acuity basic - magnifying aids
TRANSCRIPT
USER MANUAL
ACUITY BASIC

Acuity Basic 2
User Manual V1.5 3
Table of Contents
1 Introduction ................................................................................42 Installation, safety and maintenance ..................................................4 Installation ..................................................................................4 Adjust the tilt of the screen .............................................................4 Adjust the height of the screen ........................................................5 Transporting the Acuity ...................................................................5 Tips for usage ...............................................................................53 Controls - Screen ..........................................................................63.1 Display Modes ..........................................................................63.2 Zoom .....................................................................................63.3 Block auto focus .......................................................................63.4 Brightness ...............................................................................73.5 Contrast .................................................................................73.6 White balance ..........................................................................73.7 Advanced Reading Aids ...............................................................73.8 Tableau ..................................................................................83.9 Brake Handle ...........................................................................84 Controls - Remote Control ...............................................................85 Advanced Menu ............................................................................86 Switch Screen (only for Acuity Basic with switch Screen).........................107 Regulations ..................................................................................108 WEEE & RoHS Directives .................................................................109 Warranty Information .....................................................................1010 Technical specifications ..................................................................11
Acuity Basic 4
1 Introduction
Congratulations with your Acuity Basic; a desktop video magnifier of high quality that is especially user friendly with its touch sensitive input method.
Read this manual thoroughly before you start to use your Acuity Basic. Information in this manual refers to both the Acuity Basic and Acuity Basic with Switch Screen models. This manual contains instructions on how the device needs to be installed, and describes all of the functions of the Acuity Basic.
2 Installation, safety and maintenance
Package contents The package of the Acuity Basic contains the following:• Acuity Basic or Acuity Basic with Switch Screen• Power adaptor• Manual• Remote Control and Remote Control Receiver (optional accessory)• HDMI Cable (for Acuity Basic with Switch screen function only)
Installation
Never open up the device yourself; this will void your warranty. If you suspect the device is in need of service or repairs, please contact your supplier.
The Acuity Basic will be delivered to you in a pre-assembled state. All you have to do is slide the screen up to your preferred height and connect the adaptor into a wall socket outlet and switch on the device.
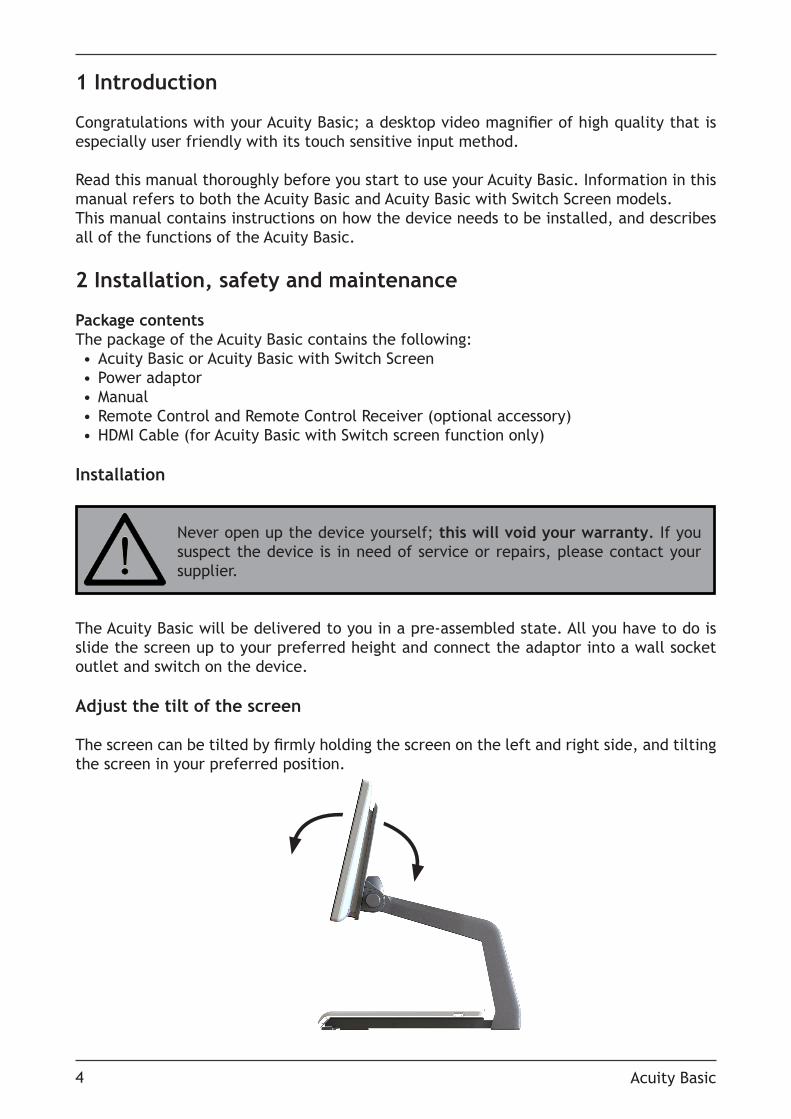
Adjust the tilt of the screen
The screen can be tilted by firmly holding the screen on the left and right side, and tilting the screen in your preferred position.
User Manual V1.5 5
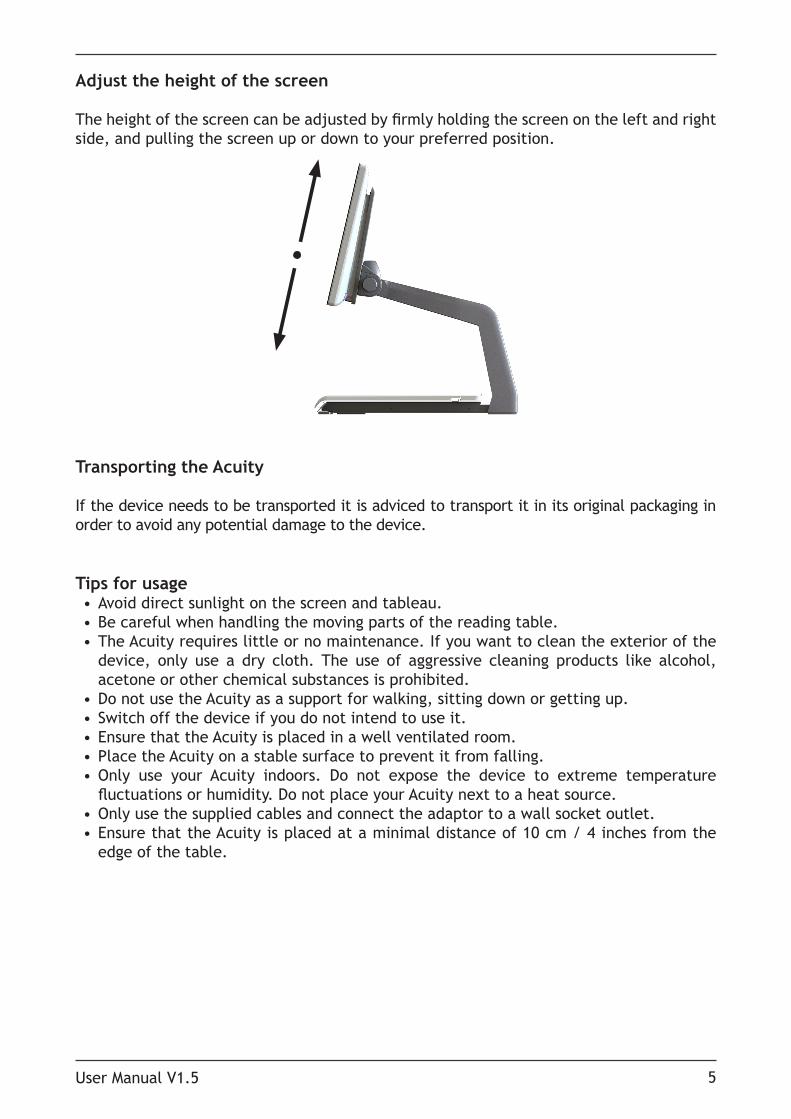
Adjust the height of the screen
The height of the screen can be adjusted by firmly holding the screen on the left and right side, and pulling the screen up or down to your preferred position.
Transporting the Acuity
If the device needs to be transported it is adviced to transport it in its original packaging in order to avoid any potential damage to the device.
Tips for usage• Avoid direct sunlight on the screen and tableau.• Be careful when handling the moving parts of the reading table. • The Acuity requires little or no maintenance. If you want to clean the exterior of the
device, only use a dry cloth. The use of aggressive cleaning products like alcohol, acetone or other chemical substances is prohibited.
• Do not use the Acuity as a support for walking, sitting down or getting up. • Switch off the device if you do not intend to use it.• Ensure that the Acuity is placed in a well ventilated room. • Place the Acuity on a stable surface to prevent it from falling. • Only use your Acuity indoors. Do not expose the device to extreme temperature
fluctuations or humidity. Do not place your Acuity next to a heat source.• Only use the supplied cables and connect the adaptor to a wall socket outlet.• Ensure that the Acuity is placed at a minimal distance of 10 cm / 4 inches from the
edge of the table.

Acuity Basic 6
3 Controls - Screen
The on/off switch of the Acuity is located at the lower right hand side on the back of the monitor. To start up or shutdown the device, hold it for 2 seconds until you hear the start up or shutdown tone.
The controls of the Acuity can be found below the screen and consist of touch sensitive pads:
3.1 Display ModesTapTap this icon to cycle through all available display modes.
Press-and-holdPress and hold the Display Mode icon to quickly switch between your last used high contrast mode and the full colour mode.
SwipeSwipe from left to right to go to the next display mode in the cycle. Swipe from right to left to go to the previous display mode in the cycle.
3.2 ZoomTap or press and hold the minus icon allows you to zoom out. Tap or press and hold the plus icon allows you to zoom in. The magnification level will be shown on screen.
3.3 Block auto focusBy tapping the magnifier icon the device will refocus on your reading material and block the auto focus on that level.Tap a zoom button to unblock the auto focus.
User Manual V1.5 7
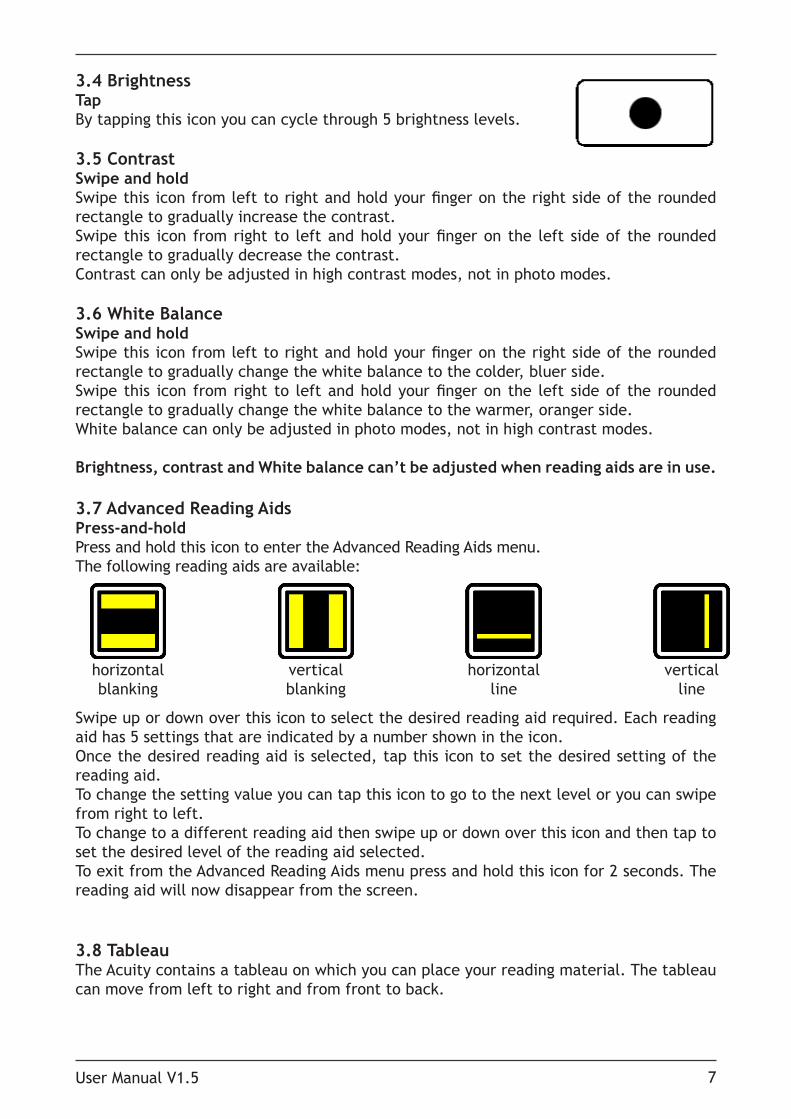
3.4 BrightnessTapBy tapping this icon you can cycle through 5 brightness levels.
3.5 ContrastSwipe and holdSwipe this icon from left to right and hold your finger on the right side of the rounded rectangle to gradually increase the contrast. Swipe this icon from right to left and hold your finger on the left side of the rounded rectangle to gradually decrease the contrast.Contrast can only be adjusted in high contrast modes, not in photo modes.
3.6 White BalanceSwipe and holdSwipe this icon from left to right and hold your finger on the right side of the rounded rectangle to gradually change the white balance to the colder, bluer side. Swipe this icon from right to left and hold your finger on the left side of the rounded rectangle to gradually change the white balance to the warmer, oranger side.White balance can only be adjusted in photo modes, not in high contrast modes.
Brightness, contrast and White balance can’t be adjusted when reading aids are in use.
3.7 Advanced Reading AidsPress-and-holdPress and hold this icon to enter the Advanced Reading Aids menu. The following reading aids are available:
horizontal blanking
vertical blanking
horizontal line
vertical line
Swipe up or down over this icon to select the desired reading aid required. Each reading aid has 5 settings that are indicated by a number shown in the icon. Once the desired reading aid is selected, tap this icon to set the desired setting of the reading aid.To change the setting value you can tap this icon to go to the next level or you can swipe from right to left.To change to a different reading aid then swipe up or down over this icon and then tap to set the desired level of the reading aid selected.To exit from the Advanced Reading Aids menu press and hold this icon for 2 seconds. The reading aid will now disappear from the screen.
3.8 TableauThe Acuity contains a tableau on which you can place your reading material. The tableau can move from left to right and from front to back.
Acuity Basic 8
3.9 Brake HandleIn front of the tableau of the Acuity you will find a single brake handle with which you can control the movement of the tableau. The handle has 4 positions:
Left = The tableau can be moved freely.Middle-left = Free movement from left to right. Front to back movement can be adjusted by 5 millimeter increments by moving the tableau.Middle-right = Free movement from left to right, front to back movement is blocked. Right = All movement of the tableau is blocked.
4 Controls - Remote Control
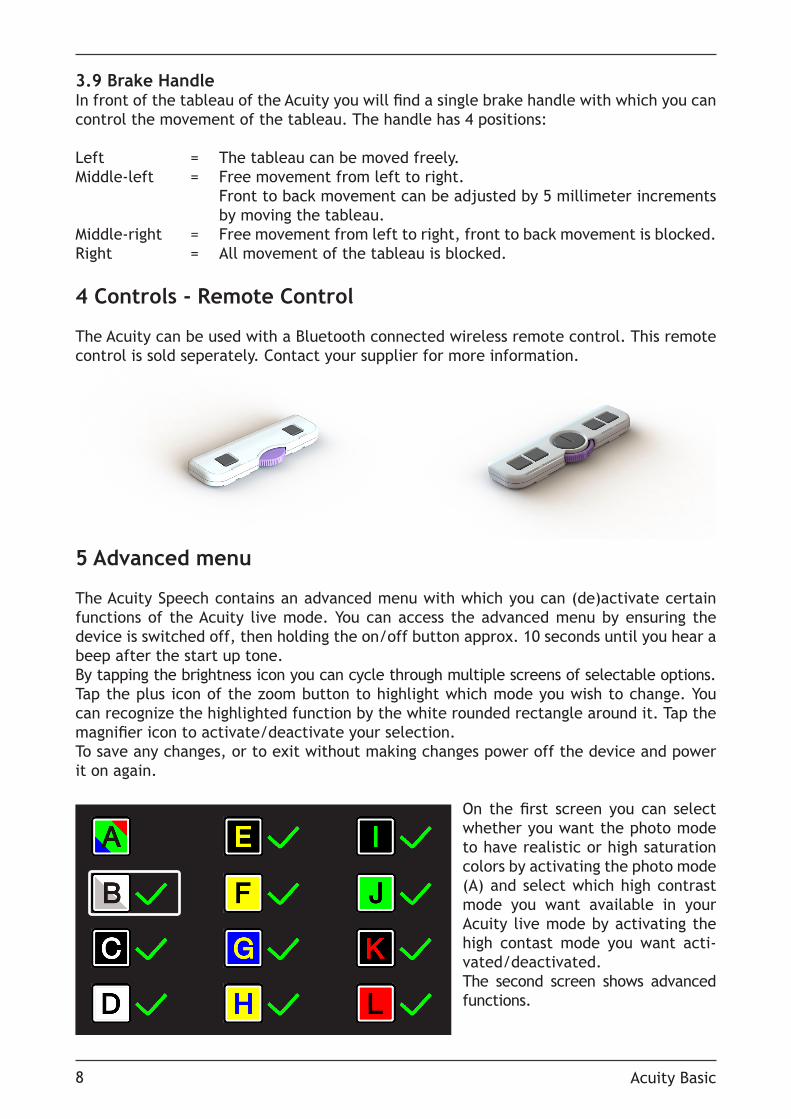
The Acuity can be used with a Bluetooth connected wireless remote control. This remote control is sold seperately. Contact your supplier for more information.
5 Advanced menu
The Acuity Speech contains an advanced menu with which you can (de)activate certain functions of the Acuity live mode. You can access the advanced menu by ensuring the device is switched off, then holding the on/off button approx. 10 seconds until you hear a beep after the start up tone. By tapping the brightness icon you can cycle through multiple screens of selectable options. Tap the plus icon of the zoom button to highlight which mode you wish to change. You can recognize the highlighted function by the white rounded rectangle around it. Tap the magnifier icon to activate/deactivate your selection.To save any changes, or to exit without making changes power off the device and power it on again.
On the first screen you can select whether you want the photo mode to have realistic or high saturation colors by activating the photo mode (A) and select which high contrast mode you want available in your Acuity live mode by activating the high contast mode you want acti-vated/deactivated.The second screen shows advanced functions.
User Manual V1.5 9
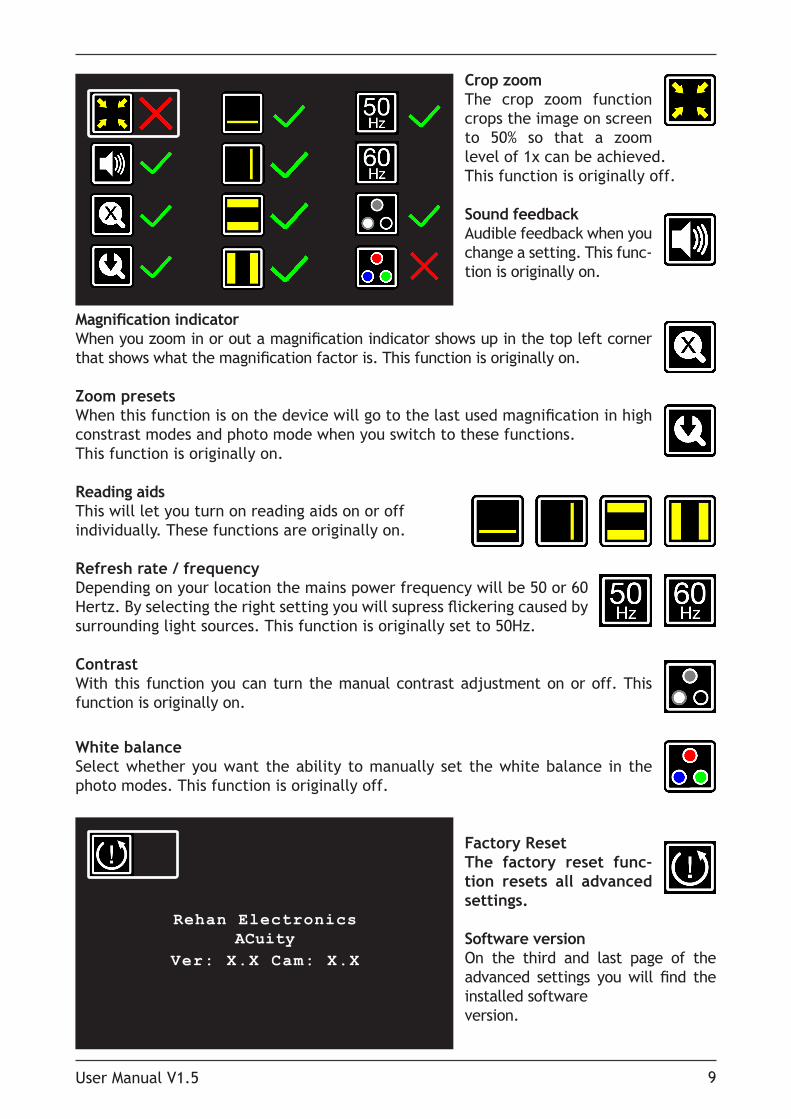
Crop zoomThe crop zoom function crops the image on screen to 50% so that a zoom level of 1x can be achieved. This function is originally off.
Sound feedbackAudible feedback when you change a setting. This func-tion is originally on.
Magnification indicatorWhen you zoom in or out a magnification indicator shows up in the top left corner that shows what the magnification factor is. This function is originally on.
Zoom presetsWhen this function is on the device will go to the last used magnification in high constrast modes and photo mode when you switch to these functions. This function is originally on.
Reading aidsThis will let you turn on reading aids on or off individually. These functions are originally on.
Refresh rate / frequency Depending on your location the mains power frequency will be 50 or 60 Hertz. By selecting the right setting you will supress flickering caused by surrounding light sources. This function is originally set to 50Hz.
ContrastWith this function you can turn the manual contrast adjustment on or off. This function is originally on.
White balance Select whether you want the ability to manually set the white balance in the photo modes. This function is originally off.
Factory ResetThe factory reset func-tion resets all advanced settings.
Software versionOn the third and last page of the advanced settings you will find the installed software version.
Rehan ElectronicsACuity
Ver: X.X Cam: X.X
Acuity Basic 10
6 Switch Screen (only for Acuity Basic with Switch Screen)
Connect the HDMI cable from one of the HDMI ports at the back of the Acuity to your computer. Press the On/Off button once to toggle between the Acuity and your computer.
7 Regulations
Products with CE marking comply with EMC Directive 2014/30/EC and the Low Voltage Directive 2014/35/EU issued by the Commission of the European Community.
Compliance with these directives implies conformity to the following standards:
Safety: EN62368-1EMC: EN55022; EN55024The device also complies to FCC part 15 Class B
8 WEEE & RoHS Directives
WEEE NoticeThe WEEE logo (shown left) on the product or its literature indicates that the product must not be disposed of or dumped with your household waste. For more information about electronic and electrical waste equipment disposal, recovery and collection points, please check your local regulations.
RoHS ComplianceThe Acuity Basic is in compliance with the Restrictions of the use of certain Hazardous Substances (RoHS)Directive.
9 Warranty Information
For all queries regarding warranty of your device, please contact your supplier for further information.
Use of the device other than described in this manual will exclude it from warranty condi-tions.
User Manual V1.5 11
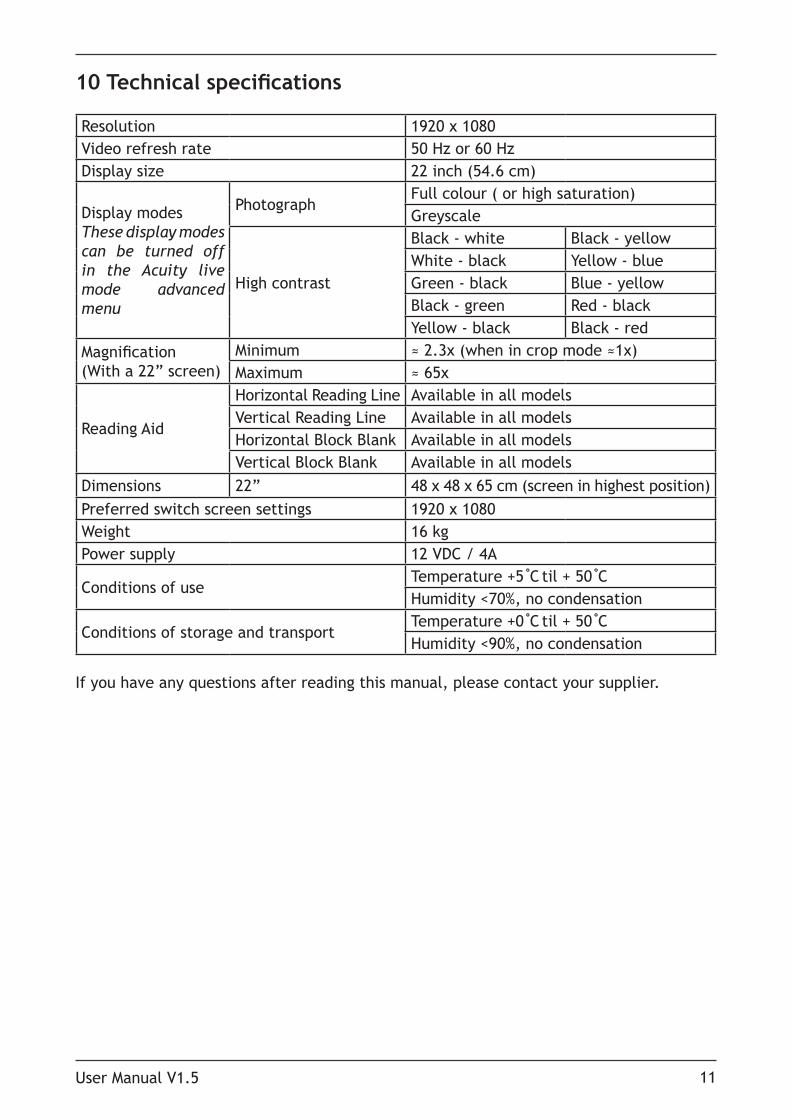
10 Technical specifications
Resolution 1920 x 1080Video refresh rate 50 Hz or 60 HzDisplay size 22 inch (54.6 cm)
Display modesThese display modes can be turned off in the Acuity live mode advanced menu
PhotographFull colour ( or high saturation)Greyscale
High contrast
Black - white Black - yellowWhite - black Yellow - blueGreen - black Blue - yellowBlack - green Red - blackYellow - black Black - red
Magnification(With a 22” screen)
Minimum ≈ 2.3x (when in crop mode ≈1x)Maximum ≈ 65x
Reading Aid
Horizontal Reading Line Available in all modelsVertical Reading Line Available in all modelsHorizontal Block Blank Available in all modelsVertical Block Blank Available in all models
Dimensions 22” 48 x 48 x 65 cm (screen in highest position)Preferred switch screen settings 1920 x 1080Weight 16 kgPower supply 12 VDC / 4A
Conditions of useTemperature +5 C̊ til + 50 C̊Humidity <70%, no condensation
Conditions of storage and transportTemperature +0 C̊ til + 50 C̊Humidity <90%, no condensation
If you have any questions after reading this manual, please contact your supplier.

REHAN ELECTRONICSAughrim Road
CarnewCounty Wicklow
Irelandwww.rehanelectronics.ie