activities guide for teachers - national space...
TRANSCRIPT

Activities Guide for Teachers
National Space Biomedical Research InstituteHouston, Texas

The National Space Biomedical Research Institute (NSBRI) is combining thebasic research capabilities of some of the nation’s leading biomedical researchcenters with operational and applied research conducted by the NationalAeronautics and Space Administration (NASA) to understand and achieve safeand effective long-term human exploration and development of space. TheNSBRI’s discoveries and research products will help to counter the effects ofweightlessness and space radiation and will contribute to the health and well-being of all mankind.
National Space Biomedical Research InstituteOne Baylor Plaza, NA-425Houston, Texas 77030-3498http://www.nsbri.org
The activities described in this book are intended for school-age children underdirect supervision of adults. The authors, Baylor College of Medicine and theNational Space Biomedical Research Institute cannot be responsible for anyaccidents or injuries that may result from conduct of the activities, from notspecifically following directions, or from ignoring cautions contained in thetext. The opinions, findings and conclusions expressed in this publication aresolely those of the authors and do not necessarily reflect the views of BaylorCollege of Medicine or the National Space Biomedical Research Institute.
Authors: Kimberly Chang, Ph.D., Nancy P. Moreno, Ph.D., and Barbara Z. Tharp, M.S.
Editor: James P. Denk, M.A.Cover Illustration: T LewisDesign and Production: Martha S. Young
AcknowledgmentsThe authors gratefully acknowledge the support of Bobby R. Alford, M.D.,Laurence R. Young, Sc.D., Ronald J. White, Ph.D., and William A. Thomson,Ph.D., as well as the contributions of the following reviewers: Cassius B.Bordelon, Jr., Ph.D., Greg Byrne, Ph.D., Paula Cutler, Maithili Daphtary,Ph.D., Michael Grusak, Ph.D., Kathy Major, Grant Schaffner, Ph.D., and CarolaWright, Ph.D. Preparation of this guide would not have been possible withoutthe invaluable assistance of the following field test teachers: Cheryl Anderson,Dorothy Arceneaux, Cathy Bucchino, Veronica Curry, Sharon Fontaine, LollieGaray, Delores Hall, Marilyn Manning, Demetria Rutherford and Kim Walker.
The National Aeronautics and Space Administration (NASA) supported thiswork through the NASA Cooperative Agreement NCC9-58 with the NationalSpace Biomedical Research Institute.
All rights reserved. No part of this book may be reproduced by any mechanical,photographic or electronic process, or in the form of an audio recording; normay it be stored in a retrieval system, transmitted, or otherwise copied forpublic or private use without prior written permission of the publisher. Black-line masters reproduced for classroom use are excepted.
© 2000 by Baylor College of Medicine
All rights reserved. Published 2000
Printed in the United States of America
ISBN: 1-888997-43-5
ii

What Can We Learn in Space About Our Bodies Here on Earth? iv
Using Cooperative Groups in the Classroom vi
1. Weighty Questions 1
2. Supporting Structures 5
3. Inner Strength 8
4. Round, Light and Hollow 12
5. The Power of Togetherness 16
6. Muscle Fibers 20
7. Gravity and Muscles 23
8. Good Stress 28
9. Building Blocks 32
10. Bones and Muscles in Space 37
Table of Contents
iiiFrom Outerspace to Innerspace / Muscles and Bones© 2000 Baylor College of Medicine

There are many reasons to study life sciences in microgravity, from obvious ones, such as ensuring
astronaut health to less obvious ones, such as improving health care on Earth. The human body is
designed to operate in Earth’s gravity field. When humans are removed
from this environment, as when they travel in space, many complex
changes take place: their bones become weaker, fluids shift toward the
upper body, body rhythms are disrupted and motion sickness may occur.
Life science research allows us to begin planning for long-term stays in
space. It also provides important new medical information to improve the
health care of people here on Earth, such as the ways we care for persons undergoing prolonged bedrest or
those with osteoporosis.
BALANCE. During their first days in space, astronauts can become dizzy and nauseous. Eventually
they get over it, but once they return to Earth, they have a hard time walking and standing upright. Finding
ways to counteract these changes could benefit millions of Americans with balance disorders.
BONES. Astronauts’ bones become weak and porous because they are not
working against the Earth’s gravity. For different reasons, many people on Earth,
particularly older women, also develop weak bones that fracture easily with little
or no trauma. This condition is known as osteoporosis (porous bone).
CANCER/RADIATION. Outside the Earth’s protective atmosphere, astronauts are exposed to many kinds
of damaging radiation that can lead to cell damage and increase astronauts’ chances of developing tumors.
Learning how to keep astronauts safe from space radiation may improve cancer treatments for people on Earth.
ivFrom Outerspace to Innerspace / Muscles and Bones
© 2000 Baylor College of Medicine

HEART & CIRCULATION. Without gravity, the amount of blood in the body is reduced. The heart grows
smaller and weaker, which makes astronauts feel dizzy and weak when they return to Earth. Heart failure and
diabetes, experienced by many people on Earth, lead to similar problems.
IMMUNE SYSTEM. Living and working in space may make it easier for astronauts to become sick or develop
diseases. Learning how the body’s disease defense systems change in space will help us to understand many
illnesses, and their effects on the human immune system, here on Earth.
MUSCLES. When muscles do not have to work against gravity, they weaken and begin
to waste away. Special exercises and other strategies to help astronauts’ muscles stay
strong in space also may help older and bedridden people, who experience similar problems on Earth.
NUTRITION & FITNESS. Research that uncovers ways to reduce space-related health problems through
diet, exercise or rehabilitation will contribute to the development of prevention and treatment programs for
osteoporosis and other bone disorders, muscle wasting diseases and many other illnesses.
SLEEP & TEAM WORK. It is hard for astronauts in space to get enough sleep because they lose the
day/night cycle of Earth and there are many distractions. Strategies to help astronauts perform without
errors and deal with stress also will benefit people who work at night or have irregular schedules.
TECHNOLOGY. Special systems and equipment, new remote medical
diagnostic tools and intelligent computer software that support life
science research—as well as the health of astronauts in space—
will improve diagnosis and care for patients on Earth.
vFrom Outerspace to Innerspace / Muscles and Bones© 2000 Baylor College of Medicine

viFrom Outerspace to Innerspace / Muscles and Bones
© 2000 Baylor College of Medicine
Cooperative learning is a systematic way forstudents to work together in groups of two to four. Itprovides an organized setting for group interactionand enables students to share ideas and to learnfrom one another. Students in such an environmentare more likely to take responsibility for their ownlearning. Cooperativegroups provide supportfor reluctant learners,model communitysettings wherecooperation isnecessary, and enablethe teacher to conducthands-on investigationswith fewer materials.
Organization is essentialfor cooperative learningto occur in a hands-onscience classroom. Materials must be managed,investigations conducted, results recorded, andclean-up directed and carried out. When a class is“doing” science, each student must have a specificrole, or chaos may result.
The Teaming Up! model* provides an efficient systemfor cooperative learning. Four “jobs” are delineated:Principal Investigator, Materials Manager, Reporter and Maintenance Director. Each job entails specificresponsibilities. Students wear job badges thatdescribe their duties. Tasks are rotated within each
group for differentactivities so that eachstudent has anopportunity to experienceall roles. Teachers evenmay want to make classcharts to coordinate job assignments withingroups. For groups with fewer than fourstudents, jobassignments can becombined.
Once a cooperative model for learning is established inthe classroom, students are able to conduct scienceactivities in an organized and effective manner. Allstudents are aware of their responsibilities and areable to contribute to successful group efforts.
Using Cooperative Groups in the Classroom
Principal Investigator
● Reads the directions
● Asks the questions
● Checks the work
Maintenance Director
● Follows the safety rules
● Directs the clean up
● Asks others to help
Reporter
● Writes down observa-
tions and results
● Explains the results
● Tells the teacher when
the group is finished
Materials Manager
● Picks up the materials
● Uses the equipment
● Returns the materials
* Jones, R.M. 1990. Teaming Up! LaPorte, Texas: ITGROUP.
Extension ActivitiesThere are many opportunities for exciting extensionactivities focusing on space travel and its effects on thehuman body. The NASA and NSBRI internet sites
provide a wealth of educational resources that may beuseful in developing such activities. For more infor-mation, go to <www.nasa.gov> and <www.nsbri.org>.

1. Weighty Questions
CCOONNCCEPTEPTSS● Gravity holds us to the Earth’s surface.● The force of gravity can be counteracted by other forces.
OOVVEERRVIEWVIEWStudents will compare and contrast the behavior of a water-filled plastic bag, both outside and inside of a container of water, to begin to understand the differences between environments with gravity andenvironments with reduced gravity.
SSCCIEIENNCCEE , HE, HE AALLTTH & MH & M AATTH SKILH SKILLL SS● Predicting● Observing● Comparing● Inferring
1
BackgroundAll organisms on our planet are adaptedto living with gravity, the force that pullsobjects toward the center of the Earth.Gravity keeps objects from floating intospace and it is the reason why “whatgoes up must come down.” It is notexclusive to the Earth. Amazingly, allobjects in the universe attract each other.The force of the attraction depends onthe distance between the two objects andtheir masses. Gravitational forces arenormally too tiny to notice, unless one ofthe objects has a lot of mass (such as aplanet or moon).
Many students have difficulty with theconcepts of mass and weight. All objectsin the universe have mass, which can beunderstood as a measurement of how difficult it is to set an object in motion orto stop it once it is moving. The mass ofan object, measured in kilograms, is constant no matter where the object is.
Weight, on the other hand, varies withthe amount of gravity and can be meas-ured in units called “newtons” (namedafter the famous physicist). On Earth,something with a mass of 1 kg weighsabout 10 newtons. On the Moon, wheregravity is less, the same object still has amass of 1 kg but weighs less than twonewtons. It is important to note, however,that in everyday language people aremuch more likely to say that “somethingweighs two kilograms.” For ease of under-standing, in this guide we use the words
“weigh” and “weight” in their everydaysense instead of their strictest scientificinterpretation.
Understanding the difference betweenmass and weight is important if you gointo space. Deep in space, something canbe virtually weightless because it is toofar away from other objects to be affectedby their gravity. An objectin orbit around Earth (orother celestial body) alsois weightless, but for a different reason. Thoughthis object is close to theEarth, it circles the planet at avelocity that overcomes the downwardpull of Earth’s gravity. In other words,orbiting bodies fall freely toward theEarth, but because they have so muchforward speed, their trajectories followthe curvature of the Earth’s surface.
This activity allows students to observeand compare the pull of gravity on watercontained within a plastic bag when thebag is standing alone and when it is sub-merged in water, at which time, the forceof gravity is counteracted by buoyancy.
Time 15 minutes for set-up; 45 minutes toconduct activity
MaterialsEach group will need:● water● snack-size plastic zip-top bag
From Outerspace to Innerspace / Muscles and Bones© 2000 Baylor College of Medicine
The amount of
gravity experienced
while in orbit is
about one-millionth
of the normal gravity
we feel at the Earth’s
surface. The gravity
experienced in space
is so weak that it is
called microgravity.
Imagine you are on
an elevator that
begins to fall freely
toward the ground.
You and the elevator
car would be moving
toward the Earth at
the same velocity,
and you would be
able to “float” within
the elevator car. You
would be weightless
compared to the car,
which is falling along
with you. This is
similar to what
astronauts experience
when they orbit the
Earth.

● food coloring● clear container with straight sides
that holds at least 1 liter of water, or a glass aquarium in a central location
● paper towels● copy of “The Shape of Things” sheet
Set-up and ManagementStudents will observe a water-filled bag.Depending on time and your students’ages, you may want to fill the bags for students. Fill each bag with as muchwater as it will hold and add a drop offood coloring. Zip the top tightly closed,while removing as much air as possible.Place the bags and other materials in acentral location.
Procedure1. Begin a class discussion of gravity by
asking questions such as, What keepsus and other objects from floating offthe Earth and into space? What happens when you throw a ball intothe air? Does it fly into outer space?How could we explore the pull of the Earth on objects near its surface? Tell students that they will be investigating gravity in action.
2. Have the Materials Manager fromeach group collect a container ofwater and a water-filled plastic snackbag, or have students fill the bags following the directions given underSet-up and Management.
3. Tell students that they will be investi-gating thebehavior of thewater bag intwo differentenvironments:resting on aflat surfaceand floating inwater. Theyshould recordtheir predic-tions and observations on a copy of “The Shape of Things.”
4. Have each group predict what willhappen to the shape of the bag whenit is placed on a hard, flat surface. Leteach group set its bag on the tableand record the bag’s appearance.Groups may choose any orientationfor their bags (on the side or with ziptop “up” works best). Students willnote that the bottom of the bag is flattened. Ask, Why do you think the bottom of the bag is flat? What wouldhappen to the water if it wasn’t in the bag? What would happen to thebag if it wasn’t filled with water?
5. Next, have the students predict what might happen when the bag isplaced in the water. They should con-sider where they think the bag will sitin the container (floating on the sur-face, at the bottom, etc.), and whatshape they think the bag might have.
6. After they have made their predictions,direct students to place the bags gently in the containers of water. Theyshould orient their bags in the sameposition that was selected for theobservations on the table.
7. After each group records its observations, ask, What happens tothe shape of the bag in the water?Students will observe that the lowersurface of the bag is not flattened inthe water. Also ask, Where does thebag rest in the water? Unless the bagscontain large air bubbles, they willfloat completely or almost completelysubmerged in an upright or sidewaysposition. Help students understandthat the bags float freely under waterbecause buoyancy counteracts thedownward pull of gravity. On thetable, however, gravity is able to pullthe water within the bag toward theEarth’s surface without the counter-action of buoyancy.
8. Conclude by leading students in a discussion of what the water in the
2 From Outerspace to Innerspace / Muscles and Bones© 2000 Baylor College of Medicine
Floaties!
An object will float
on top of a liquid if it
is less dense than the
liquid. An object
close to the same
density as the liquid
will float under the
surface. An object will
sink if it is more dense
(weighs more) than
the liquid it displaces.
A boat will float even
though its walls are
very heavy, because
the total volume of
the boat is made up
mostly of air. The
combined density of
the sides of the boat
and the air inside is
less than the density
of the water that has
been moved aside.
Something that floats
is said to be buoyant
(“buoy” = float).
4 From Outerspace to Innerspace / Muscles and Bones© 2000 Baylor College of Medicine
National Space Biomedical Research Institutehttp://www.nsbri.org
You will be investigating the shape and position of a water bag when it is in two different environments. You will need a sealed snack bag filled with colored waterand a clear, straight-sided container filled with about 1 liter of water.
What happens to the bag when it isplaced on a hard surface?
1. Predict what the bag will look like when it is placed on a table or desk. Write ordraw your prediction in the left column of the box labeled “Hard Surface.”
2. Carefully put the bag on your table or desk.How does the bag look? Write or drawyour observations in the right column.
What happens to the bag when it is placed on top of the water in the container?
3. Predict what the bag will look like when it is placed on the water. Thinkabout the shape of the bag and the placein the water where it will end up. Write ordraw your prediction in the left column ofthe box labeled “Container of Water.”
4. Carefully put the bag on the water in thecontainer. How does the bag look?Where is the bag? Write or draw yourobservations in the right column.
5. How did the water bags in the two investigations look alike? How were they different?
6. What forces were acting on the water bags in the two different investigations?
7. What do you conclude happened in each investigation?
Activity 1
Container of Water
Prediction Actual
Hard Surface
Prediction Actual

Photos. Left: Astronaut Catherine G. Coleman is assisted with suiting up for a training exercise in the deep pool ofJohnson Space Center’s Neutral Buoyancy Laboratory. The training suit that Coleman is wearing is weighted and otherwise accommodated to afford neutral buoyancy in the deep pool. Right: Underwater training is conducted inMarshall's Neutral Buoyancy Simulator in preparation for on-orbit Hubble Space Telescope operations.
bags might look like in a microgravityenvironment, such as in space. Helpthem understand that water bags inspace probably would look similar tothe bags as they floated under waterOR discuss what might happen if theytried to weigh the bags under water,using a small scale. Students shouldbe able to predict that they would beunable to weigh the floating “under-water” bag.
Extensions● Challenge students to come up with
other examples in which gravity’s pull iscounteracted. Examples include: flight ofbirds and insects, hot air balloons, kitesand airplanes, jumping into the air
(temporarily overcomes gravity), fishswimming upward, etc.
● Have students visit NASA’s web site <www.nasa.gov> to investigate how astronauts practice tasks underwater to prepare for future work in space.
● If students have not investigatedbuoyancy prior to this activity, help themunderstand concepts related to floatingand sinking by using snack bags filledwith sand, water, air and any other substances. Students should weigh eachbag, including the one with water, andpredict which bags will float and whichwill sink. Any bags that weigh more thanthe bag of water will sink. Bags thatweigh less than the bag of water will floaton the surface.
3From Outerspace to Innerspace / Muscles and Bones© 2000 Baylor College of Medicine
To practice for space walks, astronauts work under water in
a giant swimming pool at the Neutral Buoyancy Lab at
NASA. The pool, which holds enough water to fill about 60
Olympic-sized pools, is so huge that astronauts can rehearse
complicated repair and assembly tasks on life-sized sections
of the International Space Station.
For work in the pool, astronauts wear special suits that are
similar to those worn in space. Once underwater, the suits
are weighted to prevent them from sinking or rising in the
pool. This condition, which
is called “neutral buoyancy,” reduces the sensation of gravity
and simulates the feeling of working in microgravity.
Working under water on Earth, however, does not com-
pletely mimic the conditions in outer space. Even though
the astronauts float freely, the water offers resistance to
their movements. This doesn’t happen in space. In addition,
even though they feel weightless, gravity is still acting on
the astronauts under water. If they work upside down, for
example, blood still rushes to their heads.
On average, each astronaut spends eight to ten hours
practicing in the giant pool for every hour that he or she
will be expected to work in space outside the shuttle or
space station.(Photos courtesy of NASA)
Human physiology
changes as a person
goes from the Earth
to outer space. As we
move away from the
surface of the Earth,
the gravitational
pull of the Earth
decreases. The
human body is
designed to operate
in the gravitational
field of the Earth.
When the body no
longer experiences
the Earth’s
gravitational force,
complex changes
begin to occur as
the body adapts
to microgravity
conditions.

4 From Outerspace to Innerspace / Muscles and Bones© 2000 Baylor College of Medicine
National Space Biomedical Research Institutehttp://www.nsbri.org
You will be investigating the shape and position of a water bag when it is in two different environments. You will need a sealed snack bag filled with colored waterand a clear, straight-sided container filled with about 1 liter of water.
What happens to the bag when it isplaced on a hard surface?
1. Predict what the bag will look like when it is placed on a table or desk. Write ordraw your prediction in the left column of the box labeled “Hard Surface.”
2. Carefully put the bag on your table or desk.How does the bag look? Write or drawyour observations in the right column.
What happens to the bag when it is placed on top of the water in the container?
3. Predict what the bag will look like when it is placed on the water. Thinkabout the shape of the bag and the placein the water where it will end up. Write ordraw your prediction in the left column ofthe box labeled “Container of Water.”
4. Carefully put the bag on the water in thecontainer. How does the bag look?Where is the bag? Write or draw yourobservations in the right column.
5. How did the water bags in the two investigations look alike? How were they different?
6. What forces were acting on the water bags in the two different investigations?
7. What do you conclude happened in each investigation?
Activity 1
Container of Water
Prediction Actual
Hard Surface
Prediction Actual

2. Supporting Structures
CCOONNCCEPTEPTSS● Land animals and plants need support systems in order to stand and
move against forces such as Earth’s gravity.● Skeletal systems, which can be inside or outside the body, provide
support for animals.
OOVVEERRVIEWVIEWStudents will design and build an exoskeleton or an endoskeleton foran animal of their own invention.
SSCCIEIENNCCEE , HE, HE AALLTTH & MH & M AATTH SKILH SKILLL SS● Observing● Comparing● Modeling
5
BackgroundLiving things support and move theirbodies against the pull of Earth’s gravityin many different ways.Tree trunks, lobstershells, floating lily padsand snake backbones all
represent different solutions tothis problem.
An animal’s support structuredepends upon the size andshape of its body and also theenvironment in which it must live.Support structures can be inside (internal)or outside (external) of the body. External
supports (exoskeletons) usuallyconsist of hard plates or tubesthat cover most or all of the
body. Insects, spiders, clams andcrabs all have exoskeletons. Exoskeletonsprotect internal organs, prevent waterloss from the body surface and provide aprotective shield from enemies/predators.However, since they encasethe body, some kinds ofexoskeletons must be shedand remade as an animalgrows. Endoskeletons are located inside
the body. Humans, mice,frogs, snakes, birds and fishall have endoskeletons. An
endoskeleton growsalong with the body but provides incomplete protection. Endoskeletonsare living tissues that canhave several functions.
Some of these include storage of red bonemarrow where red bloodcells are made, storage offat and minerals, and regulation of calcium distributionbetween bone and other tissue.
Most skeletons have one or more rigid sections connected at joints to allowmovement. In endoskeletons, bones areconnected across joints by tough fibrousligaments. Muscles, which usually areattached to bones by tendons, makemovement possible and also help supportthe body.
Time 15 minutes for set-up; one or two sessions of 45 minutes for activity
MaterialsEach group will need:● sealable plastic bag or plastic wrap for
skin or outer covering● 10 straws● clay● scissors● 15 paper clips● two sheets of cardstock● tape● ruler● copy of “From the Outside In” student
sheet
Set-up and ManagementPlace the plastic wrap, straws, clay,paper clips, tape, rulers, cardstock andscissors in a central location.
From Outerspace to Innerspace / Muscles and Bones© 2000 Baylor College of Medicine
Human BoneFacts!
Human bones are
about half water and
half solid material.
The smallest bones
in your body are in
your ear. They are the
malleus (or hammer),
incus (or anvil), and
stapes (or stirrup).
Half of your bones
are in your hands
and feet.
Humans and giraffes
each have seven neck
bones.
Some plants and
animals (like water
lilies and jellyfish) are
adapted to float in
water and survive
without a rigid
support system.
Earthworms use
water pressure
instead of a hardened
skeleton to provide
support and strength
to their bodies.

Procedure1. Ask students to remember what
happened to the plastic bag filled withwater that they examined in ActivityOne. Ask, Did the bag have the sameshape in water as on the table?Students should be able to report thatthe bag was much flatter on the table.Follow by asking, Why don’t you and I flatten out on the floor, the way thebags did on the table? Use students’answers to guide them into a discus-sion of support structures for livingthings, particularly animals. Youmight ask questions such as, Do allanimals have some kind of support fortheir bodies? When present, what dowe call these supports? (skeletons).Are all skeletons the same? How areskeletons different? (some are internaland some are external; some consistof many parts, others do not; somegrow with the organism, others mustbe shed and replaced).
2. After students have had opportunitiesto think about the variety of supportstructures foranimal bodies,challenge themto invent ananimal usingthe “From theOutside In”sheet as a guide.Depending onyour students,you may want them to investigate dif-ferent types of animal bodies usingthe World Wide Web or the librarybefore they proceed further.
3. Each group of students will need todecide where its animal lives and howit looks (especially body shape). Oncegroups have discussed their ideas,they should decide which type of skeleton (external or internal) wouldserve their animals best. Finally, each
group should draw a design or plan forits animal. Encourage students to be creative. Show students the supplies(see materials list) that will be availablefor creating their animals OR ask stu-dents to make a list of materials tobring from home to build their animals.
4. Once the groups’ plans are completed,have the Materials Managers collectstraws, plastic bag/plastic wrap, tape,scissors, clay, paper clips, cardstockand rulers for their groups from acentral area in the classroom.
5. Have each group create its imaginaryanimal. Designate a time frame forthis work.
6. Ask groups to display their animalsand to describe how they designedtheir skeletons.
7. Draw a chart on the board with“Similarities” at the top of one column and “Differences” at the topof a second column. Ask the studentsto think about and discuss the simi-larities and differences of the variousinternal and external skeletons created by the groups.
8. Extend the discussion by drawing two more charts on the board:“Internal Skeleton—Advantages andDisadvantages,” and “ExternalSkeleton—Advantages andDisadvantages.” Work with one chartat a time and ask students to respond.
9. Conclude by asking students to sharetheir ideas about how their animalsmight move. Ask, What allows us tomove? What would we need to add toour animals so that they could move?Help students understand that, inmost cases, muscles and joints arenecessary, in addition to endo- orexoskeletons, to achieve movement ofa body.
6 From Outerspace to Innerspace / Muscles and Bones© 2000 Baylor College of Medicine
Internal SkeletonsAdvantages● Grow with organism.● Can be stronger and
thicker than exter-
nal plates or tubes.● Store or manufac-
ture other materials
inside bones. ● Can support a large-
sized body.● Store minerals, like
calcium.
Disadvantages● Provide only limited
protection of inter-
nal organs.● Do not prevent
water loss from
body.
External SkeletonsAdvantages● Serve as protection
for soft body
(except during
molting).● Prevent water loss
from body.
Disadvantages● Can make an animal
temporarily vulner-
able if old skeleton
must be shed to
accommodate
growth.● Limit animal size
because the skele-
ton has to be very
strong and heavy to
support a large
body. (The largest
animals with
exoskeletons, such
as lobsters, are
found where water
helps support their
weight.)
7From Outerspace to Innerspace / Muscles and Bones© 2000 Baylor College of Medicine
National Space Biomedical Research Institutehttp://www.nsbri.org
You will be creating a skeleton for an imaginary animal, using the following materials or materials from home.
15 paper clips 10 straws 2 pieces cardstock tapeclay ruler plastic bag or wrap scissors
1. Imagine that the plastic bag is the body of your animal. Think about the shape that your animal might have.Draw the shape in the box labeled “Shape” below.
2. Make a skeleton for your animal, using any of the materials listed above. First, you must decide whetherthe skeleton will be inside (endoskeleton) or outside (exoskeleton) the animal’s body. Next, think about howyou will support the animal’s shape by designing a skeleton. Make a plan for the skeleton in the box labeled“Skeleton” below or use the back of this sheet.
3. Now build the skeleton in or around your plastic-bag animal.
4. How does the skeleton change the animal?
5. What advantages does this skeleton give your animal?
6. What disadvantages does this skeleton give your animal?
7. How would you make your animal move?
Activity 2
Shape Skeleton

8 From Outerspace to Innerspace / Muscles and Bones© 2000 Baylor College of Medicine
3. Inner Strength
CCOONNCCEPTEPTSS● Endoskeletons are made of connected bones inside a body.● Bones provide support for the body.
OOVVEERRVIEWVIEWStudents will learn about endoskeletons by observing, comparing andcontrasting different kinds of chicken bones, and by relating theirchicken bone observations to human bones.
SSCCIEIENNCCEE , HE, HE AALLTTH & MH & M AATTH SKILH SKILLL SS● Observing● Comparing and contrasting● Inferring
BackgroundInternal skeletons, or endoskeletons,must be strong enough to support a body against the pull of gravity. Theyalso must be light and flexible enough to allow easy movement. Endoskeletonsmeet all these requirements byconnecting bones of different shapes and sizes (flat, irregular, long, short) that provide support, allow freedom ofmovement, and protect many of thebody’s most vital internal organs.
With only a few exceptions, like thetailbone in humans, each bone fulfills aparticular need. The skull protects thebrain and sense organs (eyes, nose,mouth and ears). A flexible spine enclosesand protects the spinal cord—the mainhighway for messages from the brain tothe rest of the body. The rib cagesurrounds the lungs, heart and otherinternal organs. Four limbs (arms andlegs in humans) are joined to the spinevia broad flat bones (shoulder blades andhip bones). Arms, legs and wings containsome of the longest and strongest bonesin vertebrates. More than half of the 206bones in the adult human body can befound in the limbs.
Vertebrate skeletons are comprisedprimarily of cartilage and bone. Cartilageis firm, but flexible. The skeletons ofmost embryos are made of cartilage,which gradually is replaced by a hardermaterial—bone. Bone is living tissuethat changes in response to exercise and use.
Time 20 minutes, one day ahead of time, forset-up; 45–60 minutes to conduct activity
MaterialsEach group will need:● at least one chicken bone that has
been cooked and cleaned (see Set-up) ● magnifiers● blank paper or science journals to
make drawings and record observations● copies of “Chicken Bones” and “Head-
To-Toes” student sheets
Set-up and ManagementBefore class, cook enough chicken piecesto provide one or more different bones(any sizes or shapes) to each group ofstudents. You also may have studentsbring leftover cooked chicken bones fromhome. Remove all meat from the bones(additional boiling may be necessary) andsoak the bones in a 1:10 bleach/watersolution for five minutes. Allow the bonesto dry before using them in class. Afterthe activity, save any long leg or wingbones to use again during Activity 4.Have students work in groups of 2–4.
Procedure1. Remind students of the skeletons they
constructed in Activity Two. Ask, Whatkind of skeleton do vertebrate animals(animals with backbones) have?(endoskeleton). What are someexamples of vertebrates? (fish, birds,reptiles, amphibians, mammals).
2. Distribute cleaned chicken bones.
Some animals, like
sharks, maintain a
skeleton made of
cartilage throughout
their entire lives.
Some parts of our
bodies also are made
of cartilage that never
becomes bone. Some
examples include the
outer ear, the ends of
the ribs and the nose.
Why might it be
important for these
structures to stay
flexible?
Bone To Stone
Most plant and
animal remains rot
away over time. Hard
parts, such as bones
and shells, sometimes
become buried in
sand and mud. Over
millions of years, the
shells and bones
become transformed
into stone. We call
them fossils.

3. Direct the groups toobserve the bonescarefully with and withouttheir magnifiers. Askquestions to promotecareful observations, suchas, What color are thebones? Are the bones ashard as rock? Does thesurface texture vary alongthe length of the bone?(Students may be able toobserve that the ends ofsome bones are porous,while other parts aresmooth.) Can you seesofter parts (cartilage)attached to any of thebones? (Ribs, for example,will have flexible cartilagetips.)
4. Have each student make adetailed drawing or writtendescription of a singlebone. Challenge studentsto think about where thebones they observed wouldbe found in a chicken’s body. Discusstheir observations.
5. Make a class list of the similaritiesamong the different bones observed.Follow by making a list of thedifferences.
6. Give each student a copy of the“Chicken Bones” page and havestudents identify the bones theyobserved. Ask, Were you able to predictthe location of the bones you observed?What helped you decide where thebones would be found?
7. Next, ask students to think about thehuman skeleton. Ask, Do you thinkhuman skeletons are very differentfrom chicken skeletons? Why or whynot? Make an overhead transparencyor give each student a copy of the“Head-to-Toes” page. Have students
compare the drawing of the humanskeleton to the drawing of the chickenskeleton and identify similarities anddifferences.
8. Using context clues from the poem,help students fill in the appropriatenames for the major bones of thebody. You may want to have studentsread the poem aloud or writeadditional verses.
9. Discuss the human skeleton withstudents. Have them notice that bonesare precisely arranged with bilateralsymmetry. Point out that we havepairs of bones. Ask, Why is thisstructure a good design for us tomaintain balance? Did anyone build anunsymmetrical skeleton (Activity 2)?Help students understand that thesymmetrical skeleton provides balanceand potential for mobility.
9From Outerspace to Innerspace / Muscles and Bones© 2000 Baylor College of Medicine
Bones come in
many varieties, so
they are grouped
according to shape:
long (arm and leg
bones); short (wrist
and ankle bones);
flat (ribs and bones
of the skull); and
irregular (vertebrae).
The skeletons of
many different
animals look very
similar and contain
close to the same
number of bones.
SKELETAL SYSTEM—
Answer Key for
Student Page
Living things often
are symmetrical in
one or more ways.
Many animal bodies
are composed of
two halves that are
mirror images of
each other. This is
called bilateral (two-
sided) symmetry.

10 From Outerspace to Innerspace / Muscles and Bones© 2000 Baylor College of Medicine
National Space Biomedical Research Institutehttp://www.nsbri.org
Activity 3
Approximately 3/5
actual size of
mature chicken
11From Outerspace to Innerspace / Muscles and Bones© 2000 Baylor College of Medicine
National Space Biomedical Research Institutehttp://www.nsbri.org
Activity 3
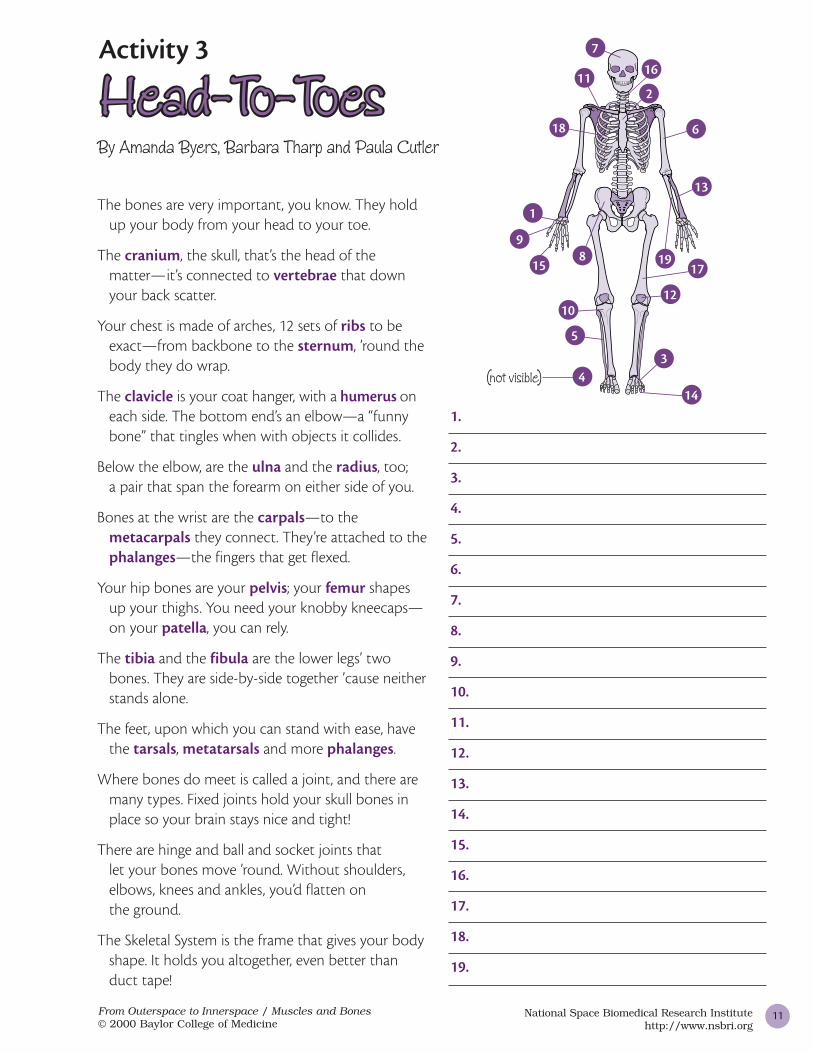
The bones are very important, you know. They hold
up your body from your head to your toe.
The cranium, the skull, that’s the head of the
matter—it’s connected to vertebrae that down
your back scatter.
Your chest is made of arches, 12 sets of ribs to be
exact—from backbone to the sternum, ’round the
body they do wrap.
The clavicle is your coat hanger, with a humerus on
each side. The bottom end’s an elbow—a “funny
bone” that tingles when with objects it collides.
Below the elbow, are the ulna and the radius, too;
a pair that span the forearm on either side of you.
Bones at the wrist are the carpals—to the
metacarpals they connect. They’re attached to the
phalanges—the fingers that get flexed.
Your hip bones are your pelvis; your femur shapes
up your thighs. You need your knobby kneecaps—
on your patella, you can rely.
The tibia and the fibula are the lower legs’ two
bones. They are side-by-side together ’cause neither
stands alone.
The feet, upon which you can stand with ease, have
the tarsals, metatarsals and more phalanges.
Where bones do meet is called a joint, and there are
many types. Fixed joints hold your skull bones in
place so your brain stays nice and tight!
There are hinge and ball and socket joints that
let your bones move ’round. Without shoulders,
elbows, knees and ankles, you’d flatten on
the ground.
The Skeletal System is the frame that gives your body
shape. It holds you altogether, even better than
duct tape!
By Amanda Byers, Barbara Tharp and Paula Cutler
1.
2.
3.
4.
5.
6.
7.
8.
9.
10.
11.
12.
13.
14.
15.
16.
17.
18.
19.

4. Round, Light and Hollow
CCOONNCCEPTEPTSS● Long bones are made of hollow tubes, which give strength with
minimal weight.
OOVVEERRVIEWVIEWStudents will investigate and compare the weight-bearing capacity ofsolid and hollow cylinders, make inferences about bone structure andobserve the interior of cleaned long bones of chickens.
SSCCIEIENNCCEE , HE, HE AALLTTH & MH & M AATTH SKILH SKILLL SS● Predicting● Observing● Comparing● Weighing● Gathering data● Recording data
12
BackgroundBones are living tissues that containblood vessels and nerve cells within astructure composed of collagen (a flexiblefibrous material) and minerals (mainlycalcium and phosphate). Without calcium(in the form of calcium salts), bone wouldbe flexible and soft, and without collagenfibers, bone would be brittle. The collagenfibers and calcium salts together makebone almost as strong as steel, but much lighter. Unlike steel, bone canrepair itself when broken with the help ofbone-forming cells (osteoblasts) and bonedigesting cells (osteoclasts). The prefix“osteo” means bone.
To provide support and still be easy tomove, bones must be both strong andlightweight. These features are mostimportant for the long bones in arms, legs and wings.
Each human long bone is composed of a shaft (diaphysis) with two flared ends
(epiphyses). The diaphysisresembles a hollow cylinder.It is made of hard compactbone that is resistant tobending. The inner cavity of the diaphysis contains yellow marrow that stores fat. The epiphysis is a thinshell of compact bone filledwith a lattice or sponge-like
structure that is surrounded by red marrow (which makes red blood cells).
Time 10 minutes for set-up; one or two sessions of 45–60 minutes for activity
MaterialsTeacher will need:● heavy-weight balance or bathroom scale● poultry scissors or small sawEach group will need:● 2 bathroom-sized paper cups● 6 –10 heavy, stackable items (bricks,
cans, reams of paper or books)● 1/3 cup dried beans● sheet of corrugated cardboard ● 1 long bone from a chicken leg or
thigh that has been cooked andcleaned (see Set-up)
● magnifiers● copy of “Weighing ‘In’” and “Hollow or
Solid?” student sheets
Set-up and ManagementIf you wish, you can use the long bonesprepared for Activity 3. Otherwise, beforeclass, cook enough chicken legs or thighsto provide one long bone to each group, orhave students bring leftover cooked chick-en bones from home. Remove all meatfrom the bones (additional boiling may benecessary) and soak them in a 1:10bleach/water solution for five minutes.Have students work in groups of 2–4.Place all materials in a central location.
Procedure1. Point to your arm or leg and ask stu-
dents to think about characteristics
From Outerspace to Innerspace / Muscles and Bones© 2000 Baylor College of Medicine
A group of special
cells constantly
breaks down and
rebuilds bones
throughout life. This
process is important
because it allows
bone to repair
damage and to
respond to changes in
its environment,
including changes in
physical activity.
Manatees and their
relatives live and feed
in water. Their rib and
leg bones lack
marrow cavities,
making their
skeletons dense and
relatively heavy.
Water, however, helps
support the weight of
their bodies.

that might be important for large armor leg bones. Stimulate their thinkingby asking questions such as, Whattype of work does my arm/leg do?Does it matter how much the bones inmy arm/leg weigh? Does it matter ifmy arm/leg bones are very strong?Based on students’ answers, make alist of desirable characteristics of long bones.
2. Tell students they will be conductingan investigation that will provideclues about the structure of longbones in humans and other verte-brates. Specifically, they will be comparing the relative abilities ofsolid and hollow cylinders to supportexternal weights. Ask, Is a hollowcylinder or a solid cylinder able to support more weight, relative to its own weight?
3. Have each group’s Materials Managerand a helper collect two paper cups,beans, cardboard and a set of weightsfrom a central location. Using the“Weighing ‘In’” sheet as a guide, havestudents compare the weights thatcan be supported by a hollow cylinder(empty cup) and a solid cylinder (cupfilled with dried beans). Each groupshould conclude its explorations by calculating the ratio of weight supported to cylinder weight for eachkind of cylinder.
4. Initiate a class discussion of students’results by asking, Which cylinder washeaviest? (solid), and Which cylinderheld the most weight? (solid). Dideither cylinder hold more weight thanyou expected? Which cylinder had a higher ratio of weight supported?(hollow). Did you expect this result?
5. Ask students to think about whichtype of cylinder (hollow or solid) mightmake a better bone. Pass out the“Hollow or Solid?” sheets. Have students record their predictions
about the structure of long bones(hollow or solid).
6. Have the Materials Managers pick upone or more chicken bones for theirgroups. Have students observe theoutsides of the bones with and with-out a magnifier, and draw an exteriorview of a bone in the space providedon their sheets.
7. Using a small saw, hammer or poultryscissors, cut or break open thebone(s) for each group. Students willobserve that the bones have hardwalls and a central space filled with asoft substance (marrow). Ask studentsto compare the structure of the boneto the hollow and solid cylinders. Ask,Which cylinder does the bone mostresemble? Help students to concludethat the relatively hollow design ofreal bones allows them to be light,but still strong enough to do theirjobs. Relate students’ conclusions tothe list of valuable characteristics ofbones made earlier.
Extensions● The thighbone (femur) is the longest
bone in the body. Its shaft is round incross section. The main shinbone (tibia)is the second longest bone in the body.Its shaft is triangular in cross section.Challenge students to investigate the relative strengths of different-shaped columns. Have students use note cardsto create columns with different shapesin cross section (round, square, triangular, etc.). Ask them to considerthe total amount of material necessaryto build each kind of column as theyreach their conclusions about relativestrength.
● To observe how calcium contributesto the hardness of bones, have studentssoak cleaned chicken bones in vinegar for about one week. Vinegar, a weakacid, will leach calcium out of thebones, which then will become weaker and softer.
13From Outerspace to Innerspace / Muscles and Bones© 2000 Baylor College of Medicine
The mineral calcium
gives bones their
hardness. People
between 11 and 24
years of age need
1,200 milligrams of
calcium (three or
more servings of
calcium-rich foods)
each day. Sources of
calcium include low-
fat dairy products,
sardines, green leafy
vegetables and nuts.
Losing Calcium?
Chalk is brittle and
snaps apart easily. A
chicken bone will not
snap in half
the same
way.
Although a
chicken
bone has calcium
salts like chalk, the
bone also has colla-
gen fibers that make
it stronger.
When we remove
calcium salts from
bone, it becomes
flexible and cannot
maintain its shape to
provide support.
Babies’ bones are very
soft and are made of
cartilage. Over time,
cartilage is broken
down and replaced
with bone.

14 From Outerspace to Innerspace / Muscles and Bones© 2000 Baylor College of Medicine
National Space Biomedical Research Institutehttp://www.nsbri.org
You will need:
2 paper cups one piece of cardboard one set of stackable weight units (cans, bricks, etc.)dried beans balance
You will use stackable weight units to investigate the support strength of hollow and solid cylinders.
1. Fill one paper cup to the top with beans. This will be your solid cylinder. The other (empty) cup will be yourhollow cylinder.
2. Use a balance to weigh each cylinder andone stackable-weight unit. Record theweights in the table on the right.
3. Predict how many units (bricks, books orcans) each cylinder will support. Record yourpredictions in the table below.
4. Place your hollow cylinder on the floor and cover it with a piece of cardboard, so that the cardboard iscentered over the cylinder. Place the weight units on top of the cardboard, one at a time. Balance theweights carefully so that your experiment does not topple over. See how many units of weight the cylinderwill hold before it is crushed. Record this number below.
5. Repeat Step 4 using the solid cylinder instead of the hollow cylinder.
6. Determine the ratio of weight supported by each cylinder. Divide the total number of weight units supportedby the cylinder, by the weight of that cylinder. Record your answers below.
7. Which cylinder was heavier?
8. Which cylinder is able to support more weight, relative to its own weight?
Activity 4
Solid cylinder (with beans) gm
Hollow cylinder gm
One stackable-weight unit gm
Hollow cylinder Solid cylinder
PREDICTION: Number of units each cylinder will support
Number of units supported by each cylinder
Total weight of units each cylinder supported
Weight of cylinder
Number of units supported ÷ Weight of cylinder

15From Outerspace to Innerspace / Muscles and Bones© 2000 Baylor College of Medicine
National Space Biomedical Research Institutehttp://www.nsbri.org
Activity 4
1. Based on what you know, do you predict that real bones are solid or hollow?
2. Give a reason for your prediction.
3. Obtain a cooked, cleaned chicken leg bone. Follow the instructions underneath the boxes below.
4. Are real bones solid or hollow?
5. What might be some advantages of this structure?
Observe and draw the outside of the bone. Have your teacher break open the bone.Draw what you see inside the broken end.

16 From Outerspace to Innerspace / Muscles and Bones© 2000 Baylor College of Medicine
5. The Power of Togetherness
CCOONNCCEPTEPTSS● Bones come together at joints.● The position of a muscle affects the amount of movement it causes a
bone to make.● Muscles work in pairs, in opposition to each other.
OOVVEERRVIEWVIEWStudents will construct a model arm and learn how muscles and boneswork together to achieve efficient movement.
SSCCIEIENNCCEE , HE, HE AALLTTH & MH & M AATTH SKILH SKILLL SS● Predicting● Observing● Drawing conclusions● Modeling● Inferring
BackgroundIn a skeleton, the places where bones or external plates (as in insects) cometogether are called joints. Joints allow ananimal’s body to flex and bend. Most animals, whether they have exoskeletonsor endoskeletons, have joints.
In vertebrate skeletons, some bones,such as those in the skull, are connectedat joints that do not allow movement.These “immovable” joints are calledsutures. Most bones, however, are connected by ligaments at “moveable”joints that permit bone movement. Of course, the moving is done by muscles, which are attached directly orby tendons to the bones.
Muscles move the parts of a joint by contracting (becoming shorter) and
pulling two bones closer together. Sinceeach muscle can pull in only one direc-tion (and not push), muscles must workin pairs. One muscle or group of musclesbends part of a joint; a different muscleor group of muscles pulls it back to itsoriginal position. Muscle placement is
very specific to optimize maneuverabilityand strength.
Our bodies can be thought of asmachines. We lift, push and pull objects,and we work continuously to maintainposture and balance against the force ofgravity. Bones, muscles, joints, ligamentsand tendons all are necessary to do thiswork. In fact, there are simple machineswithin the body’s component parts. Oneexample is the arm, which is a lever.
This activity allows students to explorehow the arm’s bones and muscles workefficiently together. Students will see thatmuscles are positioned to achieve themost movement or power with the leastpossible effort.
Time 10 minutes for set-up; 60 minutes toconduct the activity
MaterialsEach group will need:● copy of “Arm Model Instructions” and
“Arm Model Observations” sheets● 3 rulers (with holes in the center)● metal paper clip● 50 cm of string● large brad● scissors● clear tape
Set-up and ManagementDivide students into groups of 2–3. Place
UPPER ARM MUSCLES
It’s a Snap!
There are almost no
muscles in your
fingers. The muscles
that move
your fingers are in
your arms. These
muscles have very
long tendons that
attach to the bones in
your fingers. (Other
muscles are located in
the palm of your
hand.)
You can see
something similar in a
chicken foot from the
grocery store. The
long, white fibers
extending from the
end are tendons. Pull
them and you will see
the claws curl.
Brings the
forearm down
Brings the
forearm up
Hand
muscles
Tendons

materials in a central location for theMaterials Manager from each group to collect.
Procedure1. Tell students that they are going to
build and explore a model of the arm.Have Materials Managers collect therulers, string, paper clip, brad andtape for each group.
2. Tell studentsto follow thesteps on the“Arm ModelInstructions”sheet to maketheir modelarms.
3. When eachgroup has built its model arm, ask, In what ways does this modelrepresent a human arm? Discuss the similarities and differences noted bystudents between their models andtheir real arms. Point out that actual muscles pull by contracting andbecoming shorter.
4. Explain to students that they willinvestigate muscle attachment sitesusing their model arms. Have themcontinue with the instructions on the“Arm Model Observations” sheet.
5. Discuss with students their data andconclusions about muscle attachmentsites. Students will discover that
moving the string on their arm modelwill move the bottom ruler differentdistances, depending on where thestring is attached. Students also maynotice that when the string wasconnected closer to the joint, it washarder to pull. Ask students how theseconcepts might apply to the placementof the biceps muscle in the arm.Explain that each muscle in the bodyhas a precise attachment point. Muscleplacement balances the movement ofthe bone with the effort of the muscle.The points at which muscles attach tobones allow muscles to cause a largemovement with a relatively smallamount of contraction.
6. Use the “Challenge” at the bottom ofthe “Arm Model Observations” sheet tohelp students learn about howmuscles work in pairs. After studentshave completed the “Challenge,”discuss the relationships betweenpairs of muscles. For instance, thebiceps muscle bends the arm and thetriceps muscle straightens it. Ask,How do we straighten the arm afterbending it? Have students bend theirarms at the elbow and feel their bicepsmuscles contract. Ask, Can youstraighten your arm by contractingyour biceps muscle? Where is themuscle that you contract to straightenyour arm? It is the triceps muscle,located on the back of the upper arm.Have each student bend andstraighten his/her arm and feel thetriceps muscle contract and relax.
17From Outerspace to Innerspace / Muscles and Bones© 2000 Baylor College of Medicine
18 From Outerspace to Innerspace / Muscles and Bones© 2000 Baylor College of Medicine
National Space Biomedical Research Institutehttp://www.nsbri.org
To make a model arm, you will need:
2 rulers 1 paper clip 50 cm of string 1 brad clear tape
1. Hold the rulers with the smooth sides together. Fasten the rulers together by putting the brad through theend holes of both rulers. Fold the ends of the brad flat against one ruler and tape the ends of the brad inplace. Do not overlap the tape onto the second ruler. The rulers will act as an upper and a lower arm(forearm), and the brad connecting them will act as the “arm joint,” or “elbow.”
2. Open the paper clip to make a hook. Tie one end of the string to one end of the clip, which acts like a tendon to connect muscle to bone. The string will act like a muscle to move the arm model.
3. Make an “L” shape with your arm model. Place the model on the table so that one ruler lies horizontallyand the other ruler “stands” vertically. Be sure the “joint” rests off the edge of the table so the rulers canmove freely. Hook the paper clip through the farthest hole (from the “joint”) of the horizontal ruler. Threadthe other end of the string through the top hole of the vertical ruler. This is your arm model.
Activity 5
Horses have a joint
in their
knees (stifle
joint) that
allows them
to lock their
knees in
place so they can
stand for hours.
Animals, like goats
and cows, that eat
plants have a joint
that allows them to
move their jaws
side-to-side and
forward and back, in
addition to up and
down, for chewing.
JOINTS IN THE HUMAN BODY
Hip
Elbow
Knee
Foot and Ankle
Wrist and Fingers

18 From Outerspace to Innerspace / Muscles and Bones© 2000 Baylor College of Medicine
National Space Biomedical Research Institutehttp://www.nsbri.org
To make a model arm, you will need:
2 rulers 1 paper clip 50 cm of string 1 brad clear tape
1. Hold the rulers with the smooth sides together. Fasten the rulers together by putting the brad through theend holes of both rulers. Fold the ends of the brad flat against one ruler and tape the ends of the brad inplace. Do not overlap the tape onto the second ruler. The rulers will act as an upper and a lower arm(forearm), and the brad connecting them will act as the “arm joint,” or “elbow.”
2. Open the paper clip to make a hook. Tie one end of the string to one end of the clip, which acts like a tendon to connect muscle to bone. The string will act like a muscle to move the arm model.
3. Make an “L” shape with your arm model. Place the model on the table so that one ruler lies horizontallyand the other ruler “stands” vertically. Be sure the “joint” rests off the edge of the table so the rulers canmove freely. Hook the paper clip through the farthest hole (from the “joint”) of the horizontal ruler. Threadthe other end of the string through the top hole of the vertical ruler. This is your arm model.
Activity 5

19From Outerspace to Innerspace / Muscles and Bones© 2000 Baylor College of Medicine
National Space Biomedical Research Institutehttp://www.nsbri.org
You will need:
arm model ruler
You will investigate what happens when you connect the string to different places on your arm model.
1. Place your arm model on a table or desk. Slowly pull about fivecentimeters of string through the hole in the top ruler (Position 1),while holding the “elbow joint” of the rulers steady. This will raisethe tip of the bottom ruler. Measure the distance between the tipof the bottom ruler and the table. Record your measurement onthe chart below.
2. Move the paper clip to the middle hole (Position 2) of the bottom ruler. Again pull about five centimeters ofstring through the hole in the top ruler. Measure the distance between the tip of the bottom ruler and thetable. Record your measurement on the chart.
3. Move the paper clip to theclosest hole (Position 3) ofthe bottom ruler. Pull aboutfive centimeters of stringthrough the hole in the topruler. Measure the distancebetween the tip of the bottomruler and the table. Record your measurement on the chart.
4. Based on your observations, does it make a difference where the ends of a muscle are connected to abone? Why or why not?
5. Where would you expect the ends of a muscle to be attached if the objective was to achieve the mostmovement for the least amount of effort?
CHALLENGE: Figure out a way to connect another string “muscle” to your arm model that would straightenthe arm back out. Keep in mind that muscles can only pull, not push!
Activity 5
Pull string about 5 cmeach time.
Position 1
Position 2
Position 3
Ruler positionDistance ruler is raised
from table (cm)
Position 1: Farthest hole from “joint”
Position 2: Middle hole
Position 3: Closest hole to “joint”

20 From Outerspace to Innerspace / Muscles and Bones© 2000 Baylor College of Medicine
6. Muscle Fibers
CCOONNCCEPTEPTSS● Muscles are made of fibers within fibers.● The structure of muscles makes them strong.
OOVVEERRVIEWVIEWStudents will learn about the structure of muscles by comparing yarnand cooked meat.
SSCCIEIENNCCEE , HE, HE AALLTTH & MH & M AATTH SKILH SKILLL SS● Observing● Modeling● Inferring
BackgroundDespite our amazing skeletons, withoutmuscles, we would not be able to stand,balance ourselves or move. Every personhas more than 600 muscles thoughout hisor her body.
Movement happens when muscles contract and become shorter. As seen inthe previous activity, the contractionmoves the two places of muscle attach-ment closer together. These types of contractions take place countless timeseach day in the body.
Skeletal muscles (the ones responsiblefor movement of the body) are made ofbundles of progressively smaller fibers.The largest fiber bundles can be seenwith the unaided eye in a piece of muscletissue or meat. The “strings” that can be teased (pulled) apart are bundles of fibers.
Within these large bundles are numerousmuscle cells (also called fibers). Eachmuscle cell is filled with hundreds ofeven smaller strands (myofibrils). Themyofibrils contain the smallest muscleelements of all—tiny units (sarcomeres)that become shorter by sliding one set ofprotein molecules over another. Added
together, all of the minute contractionsshorten the length of the entire muscle.
This activity introduces students to thestructure of muscles by having themcompare and contrast the structure ofyarn to the structure they can observe ina cooked piece of beef stew meat or othercoarse meat.
Time 20 minutes for set-up; 45 minutes toconduct activity
MaterialsEach group will need:● 12-in. section of yarn● 4 toothpicks● plastic knife● cube of cooked beef (stringy or fibrous
cuts such as brisket, flank steak orstew meat work best); approximately1/2 pound is sufficient for an entireclass
● copies of “A Simple Yarn” student page
Set-up and ManagementCook beef brisket or stew meat inadvance for students. Each group shouldhave at least one, 1-inch cube of cookedmeat to observe. Place all materials in acentral location for students. Have students work in groups of 2–4.
Procedure1. Ask students, Have you ever seen
muscle? What does it look like? If nec-essary, remind students that “meat”is muscle tissue and that many differ-ent kinds of muscle are on display at
Human MuscleFacts!
There are 30 different
muscles in your face
that allow you to do
things like smile,
frown and raise your
eyebrows.
Muscle attached to
bone (called skeletal
muscle) is the most
abundant tissue in
the bodies of verte-
brates (animals with
backbones).
Training with weights
can double or triple a
muscle’s size. Disuse,
such as during space
travel, can shrink a
muscle by as much as
20% in just two
weeks.
As people age, their
muscle mass shrinks.
By age 50, skeletal
muscle often is
reduced by around
10%. By age 80,
almost half of a
person’s muscle mass
can be lost.
MUSCLE
STRUCTURE

Animals with
endoskeletons also
need muscles to
move wings, legs
and jaws. Even clams
and oysters have
powerful muscles
that open and close
the two halves of
their shells.
the grocery store. Follow by asking,Which characteristics of muscle helpmake it strong? Tell students that they will be investigating one aspectof this question.
2. Give each group of students a length of yarn, toothpicks and asmall cube of cooked beef brisket or stew meat.
3. Have students follow the instructionson the “A Simple Yarn” page toobserve the structure of yarn. Theyshould progressively tease apart andtest the relative strength of thestrands comprising the length of yarn.Have them usea “snap” test,in which theyhold the strandbetween bothhands andquickly pull or“snap” it, to estimate thestrength ofeach size ofstrand.
4. After students have made their yarn observations, direct their attention tothe cooked piece of meat. Have a student in each group slice the meatacross the grain using a plastic knife.Students should observe and drawthe meat cross section on their sheets.They will note that the muscle looksstringy. The strings are the large fibersof the muscle. They may see white,rubbery tendons attached to the muscle, or fat, which is a source ofenergy, along with the fibers.
5. Next, have students tease a section ofmeat into progressively smaller fibers.Have students observe the fibersusing their hand lens and draw thefibers on their student page. Havestudents explore the strength of themeat by pulling it in two different
directions (along the grain and acrossthe grain).
6. Discuss students’ observations withthe class. Ask, In what ways were theyarn and muscle sections similar? Didthe fiber-within-fiber design of theyarn make it stronger or weaker?Why? What does this imply for thestructure of muscles?
7. Conclude by discussing how musclescontract. Point out that unlike theyarn fibers, which are not verystretchy, muscle fibers can shorten.To demonstrate, have students extendtheir arms and feel the muscle(biceps) in their upper arms. Askthem to bend their arms at the elbowand notice any changes that occur intheir muscles. Help them understandthat muscles become short and fatwhen they contract. Explain that,unlike yarn, muscles are made of aseries of fibers packaged inside eachother. The largest fibers were the onesthe students were able to observe inclass. Inside each larger fiber aresmaller and smaller fibers. Finally,inside the smallest fibers are tiny fila-ments that make the whole musclechange shape. The number of fila-ments determines how big and strongthe muscle is.
Extensions● Have students compare other meats
to the one observed in class. The color ofuncooked meat (redder or whiter)depends on the kinds of fibers present.Red or “dark” muscle has more fibersthat are specialized for long-term orrepetitive activity without fatigue. Thesemuscle fibers release energy from storedfat. White muscle has more fibers specialized for very fast contractions.These fibers, however, provide power foronly a short period of time before theybecome fatigued from lack of oxygen andaccumulation of waste products. Whitemuscle uses energy from sugar.
21From Outerspace to Innerspace / Muscles and Bones© 2000 Baylor College of Medicine
From Outerspace to Innerspace / Muscles and Bones© 2000 Baylor College of Medicine
National Space Biomedical Research Institutehttp://www.nsbri.org
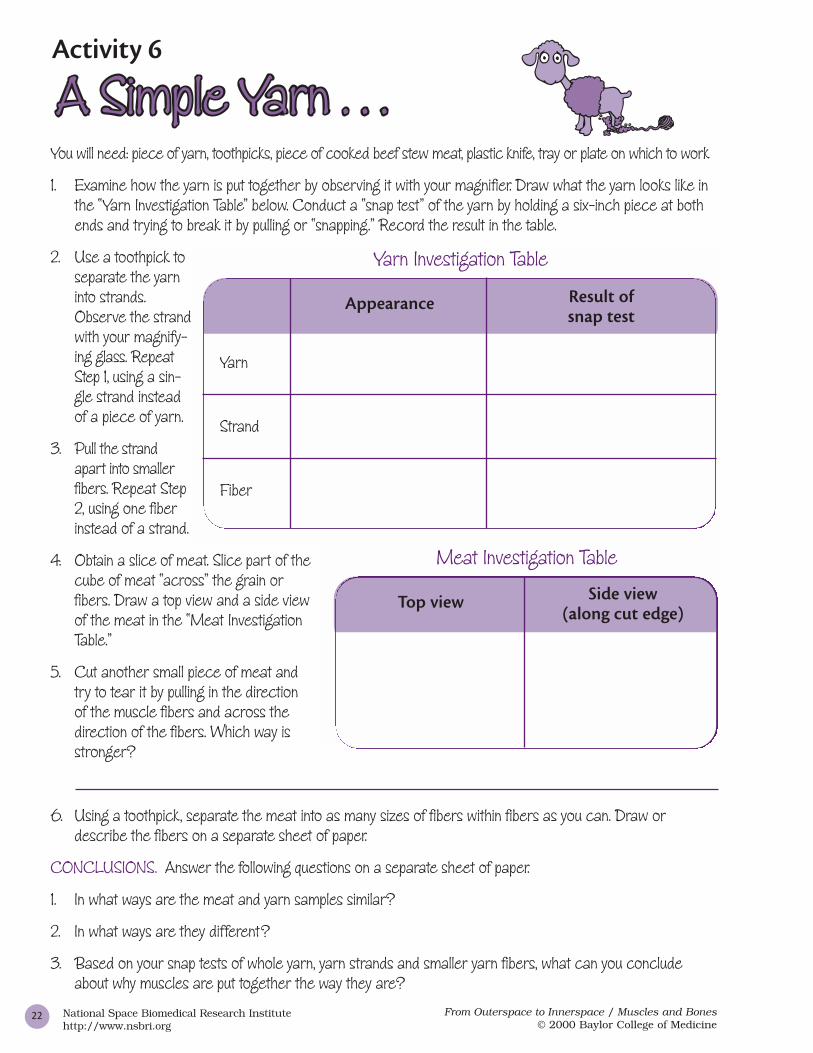
You will need: piece of yarn, toothpicks, piece of cooked beef stew meat, plastic knife, tray or plate on which to work
1. Examine how the yarn is put together by observing it with your magnifier. Draw what the yarn looks like inthe “Yarn Investigation Table” below. Conduct a “snap test” of the yarn by holding a six-inch piece at bothends and trying to break it by pulling or “snapping.” Record the result in the table.
2. Use a toothpick toseparate the yarninto strands.Observe the strandwith your magnify-ing glass. RepeatStep 1, using a sin-gle strand insteadof a piece of yarn.
3. Pull the strandapart into smallerfibers. Repeat Step2, using one fiberinstead of a strand.
4. Obtain a slice of meat. Slice part of thecube of meat “across” the grain orfibers. Draw a top view and a side viewof the meat in the “Meat InvestigationTable.”
5. Cut another small piece of meat andtry to tear it by pulling in the direction of the muscle fibers and across thedirection of the fibers. Which way isstronger?
6. Using a toothpick, separate the meat into as many sizes of fibers within fibers as you can. Draw ordescribe the fibers on a separate sheet of paper.
CONCLUSIONS. Answer the following questions on a separate sheet of paper.
1. In what ways are the meat and yarn samples similar?
2. In what ways are they different?
3. Based on your snap tests of whole yarn, yarn strands and smaller yarn fibers, what can you concludeabout why muscles are put together the way they are?
Yarn
Strand
Fiber
Yarn Investigation Table
Appearance Result ofsnap test
Activity 6
Meat Investigation Table
Top view Side view(along cut edge)
22
Safety Note
You may want
students to wear
disposable, plastic
gloves when they
handle meat samples.
From Outerspace to Innerspace / Muscles and Bones© 2000 Baylor College of Medicine
National Space Biomedical Research Institutehttp://www.nsbri.org
You will need: piece of yarn, toothpicks, piece of cooked beef stew meat, plastic knife, tray or plate on which to work
1. Examine how the yarn is put together by observing it with your magnifier. Draw what the yarn looks like inthe “Yarn Investigation Table” below. Conduct a “snap test” of the yarn by holding a six-inch piece at bothends and trying to break it by pulling or “snapping.” Record the result in the table.
2. Use a toothpick toseparate the yarninto strands.Observe the strandwith your magnify-ing glass. RepeatStep 1, using a sin-gle strand insteadof a piece of yarn.
3. Pull the strandapart into smallerfibers. Repeat Step2, using one fiberinstead of a strand.
4. Obtain a slice of meat. Slice part of thecube of meat “across” the grain orfibers. Draw a top view and a side viewof the meat in the “Meat InvestigationTable.”
5. Cut another small piece of meat andtry to tear it by pulling in the direction of the muscle fibers and across thedirection of the fibers. Which way isstronger?
6. Using a toothpick, separate the meat into as many sizes of fibers within fibers as you can. Draw ordescribe the fibers on a separate sheet of paper.
CONCLUSIONS. Answer the following questions on a separate sheet of paper.
1. In what ways are the meat and yarn samples similar?
2. In what ways are they different?
3. Based on your snap tests of whole yarn, yarn strands and smaller yarn fibers, what can you concludeabout why muscles are put together the way they are?
Yarn
Strand
Fiber
Yarn Investigation Table
Appearance Result ofsnap test
Activity 6
Meat Investigation Table
Top view Side view(along cut edge)
22

23From Outerspace to Innerspace / Muscles and Bones© 2000 Baylor College of Medicine
To keep from
toppling over, an
object’s center of
gravity must stay
above the area
outlined by the
object’s base. This is
why you will fall over
if you lean too far
forward. Once your
center of gravity is
beyond the limits of
the base defined by
your feet, you lose
your balance and
stability. This is why
people will stand
with their feet farther
apart (and thus
widen their “base”) to
keep their balance in
a moving bus or train.
7. Gravity and Muscles
CCOONNCCEPTEPTSS● Gravity pulls down on all objects on Earth, including the bodies of
organisms.● Muscles work against gravity.● Center of gravity is the point around which all the weight of an
object is equally distributed.
OOVVEERRVIEWVIEWStudents will learn about center of gravity and how the body adjusts tothe force of gravity to remain balanced.
SSCCIEIENNCCEE , HE, HE AALLTTH & MH & M AATTH SKILH SKILLL SS● Predicting● Observing● Gathering and recording data● Drawing conclusions
BackgroundGravity places a heavy load on the humanbody. Only through coordinated musclemovement is the body able to counteractthe downward pull of gravity and remainupright. Muscles in the back, legs, anklesand feet are used most. The nervoussystem tells these muscles which changesto make to help the body maintainposture and balance during movement.
To balance itself, the body makes tinyadjustments to maintain its center ofgravity over the feet. The center of gravityis an imaginary point within the body atwhich there is balance and from where theweight on all sides is equal. Fortunately,the minor muscle adjustments necessaryto maintain balance and posture are madeautomatically.
Time 10 minutes for set-up; 60 minutes toconduct activity
MaterialsPart 1Each team of 2 students will need:● copy of “Balancing Act” student sheet● meter stick● standard weight items such as heavy
coins, washers, etc.● masking tapePart 2Each group will need:● light-weight chair● copies of “Balancing You!” sheet
Set-up and ManagementPlace meter sticks, weights and maskingtape in a central location. Have studentswork in pairs.
ProcedurePart 1. Balance, Weight and Stability 1. Ask students, Do you usually fall over
when you are walking, riding a bicycleor standing on a bus? Why? Encouragestudents to think about how the bodycoordinates balance. Ask, Do you needmuscles to keep your balance? Wouldyour skeletal system alone be able tokeep you upright in a moving vehicle?Explain to students that they will beinvestigating balance and stabilityusing different amounts of weight andmeter sticks (Part One) and that theywill be learning how living things usemuscles and body position tomaintain balance (Part Two).
2. Tell each Materials Manager to collectweights, masking tape and a meterstick for her/his group.
3. Instruct one student in each group tohold the meter stick horizontally bysupporting it with one index finger ateach end. Have the student movehis/her fingers slowly toward eachother, keeping the stick balanced untilthe fingers meet. Explain that thepoint where the fingers meet is thebalance point for the stick. In otherwords, the balance point is the place

where the weight on each side is equaland the object is balanced. Have thestudents in each team record thebalance point for their meter stick.
4. Next have students tape one weighton the 30-cm mark of the meterstick. Ask students to predict wherethe new balance point will be and to record their predictions. Havethem determine the new balancepoint of the meter stick as before and record it.
5. Have students add another weight tothe one already on the meter stick andrepeat the process. They shouldrepeat the experiment one more timewith threeweights on themeter stick.
6. Directstudents’attention totheir datasheets andask, Whathappened tothe balance point of the meter stick asmore weight was added? [the balancepoint moved toward the added weight].What would have happened if you hadnot moved your finger to find a newbalance point? [meter stick would havefallen]. Help students understand
that, in order to stay balanced, theweight of each end of the meter stickhad to be equal. The only way toachieve this when more weight isadded is to move the balance point.
Part 2. Maintaining Balance1. Ask students to think about whether
maintaining their own balance is assimple as moving their fingers on the meter stick. Follow by asking themto think about whether their center ofgravity ever changes. Ask, What do youdo to keep yourself from falling whenyou trip over something? How aboutwhen you are standing in a movingtrain or bus? Tell students that theywill be exploring their own centers ofgravity in two different ways.
2. First, have students in each grouptake turns standing up from a seatedposition in a chair. They shouldrecord the results on their datasheets. Ask, How easy was it to standup? (very easy).
3. Follow by having students try again tostand up from a seated position in achair. This time, however, have themdo so without leaning their back andshoulders forward. Have them recordtheir results.
4 Next, instruct one student to standwith feet shoulder-width apart. Have
24 From Outerspace to Innerspace / Muscles and Bones© 2000 Baylor College of Medicine
NASA scientists find it crucial to have a
weightless environment for some of their
experiments. They use tall towers, long tubes,
rockets and airplanes, as well as spacecraft,
to create artificial weightless environments.
Astronaut Mary Ellen Weber, STS-101 mission
specialist, is shown onboard KC-135 during a
brief period of weightlessness afforded by
one of the parabola patterns flown
repeatedly by the NASA aircraft. Weber is
testing a device for stabilizing herself when
she operates the robotic arm aboard the Space Shuttle Atlantis. (Photo courtesy of NASA)
26 From Outerspace to Innerspace / Muscles and Bones© 2000 Baylor College of Medicine
National Space Biomedical Research Institutehttp://www.nsbri.org
Activity 7
You will need:
meter stick 3 weights (coins, washers, etc.)tape
1. Hold out your hands with only index fingers extended.
2. Have your partner lay the meter stick across your outstretched fingers.
3. Starting with you fingers at opposite ends of the meter stick, slowly move your fingers together, keepingthe meter stick balanced at all times. The point where your fingers meet is the balance point. Note thatposition on the meter stick and record it on the picture of a meter stick below.
4. Tape one weight to the meter stick at the 30-cm mark.
5. Find the balance point of the meter stick with the weight on it and record your result below.
6. Tape another weight on top of the first one at the 30-cm mark.
7. Determine the balance point and record your result.
8. Tape the third weight on top of the others at the 30-cm mark.
9. Determine the balance point of the meter stick and record your result.
10. What happened to the balance point as you added more weight?
Balance Point
2 weights 3 weights1 weightNo weights
Free Fall
Objects falling with
an acceleration equal
to that caused by
gravity alone
experience “free fall,”
or weightlessness.
The acceleration
required to achieve
free fall is 9.8 meters
per second squared
or 1 g at the Earth’s
surface. Free fall is the
lightness that you feel
on some amusement
park rides. Astro-
nauts orbiting the
Earth also experience
weightlessness for
the same reason.
Under these
conditions, many
movements can be
accomplished with
minimal effort.
However, after long
space flights,
astronauts may
demonstrate changes
in their posture upon
return to Earth. These
changes are believed
to be related to
adaptation by the
body to microgravity
conditions.

the second student place a lightweightchair 15 cm in front of the feet of thefirst student. Instruct the first studentto try to pick up the chair and torecord his/her results. Then have theother student in each group try it andrecord his/her results.
5. Tell students to move to the peripheryof the room and take turns repeatingthe process again, but this time withtheir heels, hips, back and shouldersagainst the wall and with feet flat onthe floor. Again, have them recordtheir results.
6. Discuss the students’ results. Askthem to identify the differencesbetween the two trials of each experiment. Ask, Why do youthink it wasnot possible tostand up whenyou didn'tmove yourshoulders?Why was itimpossible topick up thechair when youstood againstthe wall? Help students understandthat in both cases, their bodymovement was limited.
7. Discuss gravity again. Ask, Doesgravity affect people? Do people have acenter of gravity? The meter stickcenter of gravity changed as students
added more weight. Ask, Have youbeen able to observe whether aperson’s center of gravity changes?Have students think about where theircenters of gravity are when they aresitting in chairs and how their centersshift when they begin to stand up.Their weight shifts from their seats totheir feet; thus, their centers of gravitymust change also. Have studentsthink about where their centers ofgravity are when they lift a chair. Thechair adds extra weight to the body, sothe body must compensate for thatweight by moving the center of gravity.The body changes the center of gravityand achieves balance by moving thehips backward. This is why studentswere not able to pick up the chairswith their backs against a wall. Havestudents try these two experimentsagain, and this time have them watchtheir partners’ body movements.
Extensions● The body constantly makes adjust-
ments to compensate for the pull of gravity. Some of these adjustments arelarge, as when we pick up a chair, butmany of the adjustments are very subtle.The muscles make minor adjustmentsconstantly to maintain balance and posture. Have students work in pairs andobserve the movements made by theirpartners as they perform certain tasks.The tasks can be: moving from standingon two feet to standing on one foot, walking heel-to-toe, squatting or standing on tip toes.
25From Outerspace to Innerspace / Muscles and Bones© 2000 Baylor College of Medicine
27From Outerspace to Innerspace / Muscles and Bones© 2000 Baylor College of Medicine
National Space Biomedical Research Institutehttp://www.nsbri.org
Activity 7
You will need:
light-weight chair metric ruler
Experiment 1: From a sitting position
1. Sit in a chair and try to rise to a standing position. Switch places so your partner can try. Record yourresults below.
2. Again, sit in a chair and try to rise to a standing position, but this time, do not let your shoulders move forward. Switch places with your partner so he or she can try. Record your results below.
Experiment 2: From a standing position
3. While you are standing, have your partner place the chair 15 cm in front of you. Try to pick up the chair.Switch places so your partner can try, and then record your results.
4. Repeat Step 3, but this time, stand with your heels, hips, back and shoulders flat against a wall. Now letyour partner try it. Record your results below.
5. What happened during part B of each test?
6. Did you expect this result? Why or why not?
A. Standing up from a seated position
B. Standing up from a seated position without shoulder movement
A. While standing, pick up a chair.
B. While standing with heels, hips, back and shoulders flat against the wall, pick up a chair.
ResultsExperiment 1
ResultsExperiment 2
Muscle Control!
The brain and
nervous system
coordinate muscle
movements necessary
to maintain balance.
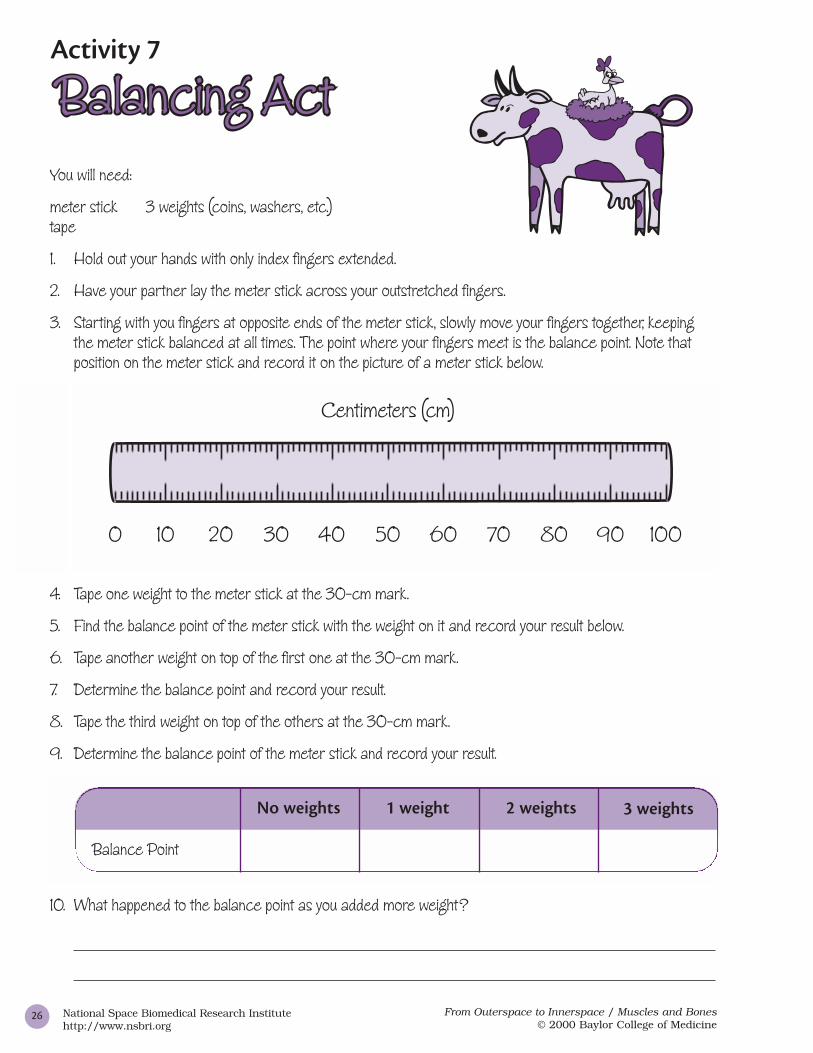
26 From Outerspace to Innerspace / Muscles and Bones© 2000 Baylor College of Medicine
National Space Biomedical Research Institutehttp://www.nsbri.org
Activity 7
You will need:
meter stick 3 weights (coins, washers, etc.)tape
1. Hold out your hands with only index fingers extended.
2. Have your partner lay the meter stick across your outstretched fingers.
3. Starting with you fingers at opposite ends of the meter stick, slowly move your fingers together, keepingthe meter stick balanced at all times. The point where your fingers meet is the balance point. Note thatposition on the meter stick and record it on the picture of a meter stick below.
4. Tape one weight to the meter stick at the 30-cm mark.
5. Find the balance point of the meter stick with the weight on it and record your result below.
6. Tape another weight on top of the first one at the 30-cm mark.
7. Determine the balance point and record your result.
8. Tape the third weight on top of the others at the 30-cm mark.
9. Determine the balance point of the meter stick and record your result.
10. What happened to the balance point as you added more weight?
Balance Point
2 weights 3 weights1 weightNo weights

27From Outerspace to Innerspace / Muscles and Bones© 2000 Baylor College of Medicine
National Space Biomedical Research Institutehttp://www.nsbri.org
Activity 7
You will need:
light-weight chair metric ruler
Experiment 1: From a sitting position
1. Sit in a chair and try to rise to a standing position. Switch places so your partner can try. Record yourresults below.
2. Again, sit in a chair and try to rise to a standing position, but this time, do not let your shoulders move forward. Switch places with your partner so he or she can try. Record your results below.
Experiment 2: From a standing position
3. While you are standing, have your partner place the chair 15 cm in front of you. Try to pick up the chair.Switch places so your partner can try, and then record your results.
4. Repeat Step 3, but this time, stand with your heels, hips, back and shoulders flat against a wall. Now letyour partner try it. Record your results below.
5. What happened during part B of each test?
6. Did you expect this result? Why or why not?
A. Standing up from a seated position
B. Standing up from a seated position without shoulder movement
A. While standing, pick up a chair.
B. While standing with heels, hips, back and shoulders flat against the wall, pick up a chair.
ResultsExperiment 1
ResultsExperiment 2

28 From Outerspace to Innerspace / Muscles and Bones© 2000 Baylor College of Medicine
8. Good Stress
CCOONNCCEPTEPTSS● Bones and muscles need exercise to be healthy.● Muscles and bones are constantly changing.● Stress tells bones and muscles how to change.
OOVVEERRVIEWVIEWStudents will learn that muscles and bones need to work to stay strong.
SSCCIEIENNCCEE , HE, HE AALLTTH & MH & M AATTH SKILH SKILLL SS● Observing● Gathering data● Drawing conclusions
BackgroundGenerally, when we think of stress, wethink of being over-worked, mentally tiredor overwhelmed by our daily lives. Whiletoo much stress can be detrimental to thebody, too little of some kinds of stress can be harmful. Activities like walking,carrying packages and mopping the floorare physical stresses. Activities like doing crossword puzzles, balancing thecheckbook and reading are mentalstresses. There also are emotionalstresses, like receiving a bad grade on atest or walking into a surprise birthdayparty. Our bodies, including muscles and bones, require some physical andmental stresses to be healthy and grow.
Physical stress is created when bones andmuscles are made to work against a force.It occurs when we pick up somethingheavy, like a 20-pound bag of cat litter.Gravity pulls down on the bag and wehave to work to overcome that force to liftthe bag. Swimming also causes stressbecause muscles and bones have to workagainst the resistance of the water tomove the body. Gravity pulls on ourbodies and our muscles and bonesconstantly work to counteract that forceand keep us balanced.
Stress from physical activity is necessaryfor bone growth and maintenance. Thebody builds bone based on its needs. Theneed for any particular bone is dictatedby the amount of stress placed on it.During the years a person’s bones aregrowing (birth to about age 25), physical
stress on bones causes builder cells towork more, which makes bones grow.Builder cells produce collagen fibers thatform the framework of bones. Theframework is then filled in with minerals,producing a strong, thick bone (seeActivity 4). Even after they stop growing,bones still need physical stress tomaintain thickness and strength.
Muscles also rebuild and grow as a resultof physical stress. Stress can lead tochange in either muscle strength ormuscle stamina (the ability to perform anactivity for a long time without becomingtired). High-intensity, short-durationexercises (or stresses), like weight lifting,cause muscles to increase in strength.Low-intensity, long-duration activities,such as running and swimming, causemuscles to increase in stamina.
Time For Part 1, 10 minutes for set-up; 20minutes for activity. For Part 2, 50minutes on Day 1, five minutes everyother day for two weeks, and 50 minuteson the final day to conduct activity.
MaterialsPart 1● overhead projector and screenEach group will need:● 2 transparent plastic knivesPart 2● clock with second hand or timerEach student will need:● spring-hinge clothespin● copy of “Stress This!” student sheet
Muscle soreness the
day after physical
activity is the result
of a temporary mild
inflammation in the
muscle. The “burn”
felt immediately after
vigorous exercise is
a result of the
accumulation of
waste (in the form of
lactic acid) in hard-
working muscle
tissue.
None of your bones
are as old as you are.
Each year, about 10%
of your bone is eaten
away and replaced by
special cells.

Set-up and ManagementPlace the materials for each session in acentral area for Materials Managers tocollect for their groups.
Part 1. Divide students into groups of2–4 and give each group two plasticknives. Set up the overhead projector.
Part 2. Give every student one clothespin and a copy of “Stress This!”
ProcedurePart 1. Stress observations 1. Introduce the topic of stress by asking
questions such as, What is stress?How can stress be a good thing? Whatare some good stresses? Explain thatthere are “good” stresses and “bad”stresses and that the body needs goodstresses, like exercise, to be healthy.
2. Tell studentsthat they aregoing toinvestigate howphysical stresscan affectbone—a hardmaterial.
3. Have studentscompare the two knives to determineif they are the same or different.
4. Instruct students to mark one knifeand bend it back and forth severaltimes without breaking it.
5. Again, have the students compare thetwo knives. Ask them if anything isdifferent between them. Request avolunteer to bring up his/her group’sknives and place them on an overheadprojector. Have students observe theknives and ask again if there isanything different between them. Thestudents will be able to observe thatvery thin opaque lines have developedonly in the knife that was bent. Often,the lines are observable even without
using an overhead projector. However,the projector will make the lines easierto see.
6. Discuss students’ observations.Explain that when they bent theknives or plastic strips, they appliedphysical stress and changed theappearance of the objects. Ask,If we wanted to break this knife, would it be easier to do so where webent it before, or at another point? Why do you think it would be easier to break where we’ve already bent it? The changes in the knives may look minor, but they are important to the objects’ structure. This conceptis true for bones, too. Gravity andmovement cause invisible stresspatterns in bones. These patterns are very small. If we could see them,they would look very unimportant, but they tell the “bone constructioncrews” where to work to make bonethicker and stronger.
Part 2. Stress and muscles 1. Explain to students that they will be
exploring the effects of stress on themuscles in their hands.
2. The first trial will test each student’sinitial muscle strength and stamina.Explain the exercise to students. Askstudents to predict how many timesthey will be able to click a clothespinwith their right (or dominant) handduring each of three, one-minutetrials, and to record their predictionson their “Stress This!” student sheets.Have each student count the actualnumber of times he/she can click aclothespin in one minute usinghis/her right (or dominant) hand, andrecord his/her results. Have studentsrest for one minute and then repeatthe trials two more times. If studentsare working in pairs, have one studentcomplete the trial while the othermeasures the time. Then havestudents switch roles. After students
29From Outerspace to Innerspace / Muscles and Bones© 2000 Baylor College of Medicine
Exercise has been
shown to be effective
in improving muscle
strength and
performance, even
in elderly persons.
Exercise also helps
maintain bone
density and may
reduce the calcium
loss from
bones (osteoporosis).
Lack of stress is bad!
Stress dictates the
amount of bone that
is built at a particular
site—depending on
need.
Muscles need stress,
too. With regular
practice, your body
will become better at
performing almost
anything because
your muscles will
change in response to
the stress caused by
the new activity. It
may be difficult to
run a mile or to do 20
push-ups at first, but
if you practice, it may
become easier after
1–2 weeks.
31From Outerspace to Innerspace / Muscles and Bones© 2000 Baylor College of Medicine
National Space Biomedical Research Institutehttp://www.nsbri.org
Activity 8
You will need:
clothespin timer, watch or clock
1. Predict the number of times you will be able to click the clothespin between your thumb and index finger inyour right (or dominant) hand for a one-minute period. Record your prediction in the table.
2. Hold the clothespin in your right (or dominant) hand between your thumb and index finger. While yourpartner is watching the timer, count the number of times you are able to click the clothespin in a one-minute period. Record the result.
3. Rest for one minute, then predict again and repeat Step 2. Rest for another minute. Repeat prediction andStep 2 again for a third trial. Be sure to hold the clothespin the same way during every time trial.
4. Switch roles with your partner and have him or her conduct the same experiment, Steps 1–3, with hisor her right (or dominant) hand and record the results.
5. After completing the trials, write a paragraph on a separate sheet describing whether any of your numbers changed from Trial 1 to Trial 3. If they did, describe what changed.
6. On the same sheet of paper, describe what happened to your muscles during this experiment.
7. Repeat steps 1–4 every other day for two weeks, for a total of seven days. Record your predictions andresults in the table below.
8. After two weeks, write another paragraph about the results of your experiments. Tell what happened and explain why you think things turned out as they did.
Number of Clicks in One Minute
Date Trial 3Trial 1 Trial 2Prediction Prediction PredictionActual Actual Actual

have completed all trials, ask, Did you feel your hand muscles burn?Were you more tired after each minuteof clicking? Why do you think thathappened?
3. Every other day for the next twoweeks, have students repeat theexercise described above. This is theconditioning period. The stressinduced by the clothespin on themuscles of the hand will cause themuscles to become stronger and gainstamina. Students should predict andreport their results each day.
4. The test of how well the stressconditioning worked comes on the lastday of the two-week period. Again, haveeach student predict how many timeshe/she will be able to click the clothes-pin during the timed periods and recordhis/her prediction. Have each studentrepeat the clicking-resting experimentagain exactly as it is described in Step 2and record the results.
5. Instruct students to write a paragraph(on a separate sheet of paper) aboutthe results of their experiment. Theyshould explain what happened andwhy they think things turned out theway they did.
6. Discuss results from the initial andfinal experiments. Students willdiscover that they were able to clickthe clothespin more times (and withless muscle soreness) in the first one-minute period after the conditioningperiod. This shows that their muscleshave grown stronger. Students alsowill discover that they are able to clickmore times in the second and thirdone-minute periods after theconditioning has taken place. Thisshows that the muscles haveincreased in stamina. Ask students,Were you able to click more times in the third trial after two weeks than at the beginning of the experiment?Why do you think that happened? How did your results compare withyour predictions?
Extensions● Have students graph their results
to produce a visual representation of changes that occurred in the three bi-daily trials over the course of twoweeks. They should create separategraphs for each one-minute period and record how the number of clothespin clicks changed over time.This will help students to understandhow their strength and enduranceincreased.
30 From Outerspace to Innerspace / Muscles and Bones© 2000 Baylor College of Medicine
Stress Fractures
Bone construction
crew workers, osteo-
blasts and osteoclasts,
repair cracks before
they get too large so
that bone strength is
maintained and
fractures are
prevented. If an area
of bone is repeatedly
stressed, the con-
struction crew may
not have sufficient
time to repair cracks,
and fractures (broken
bones) may occur.
This happens in some
athletes who suffer
breaks known as
“stress fractures.”
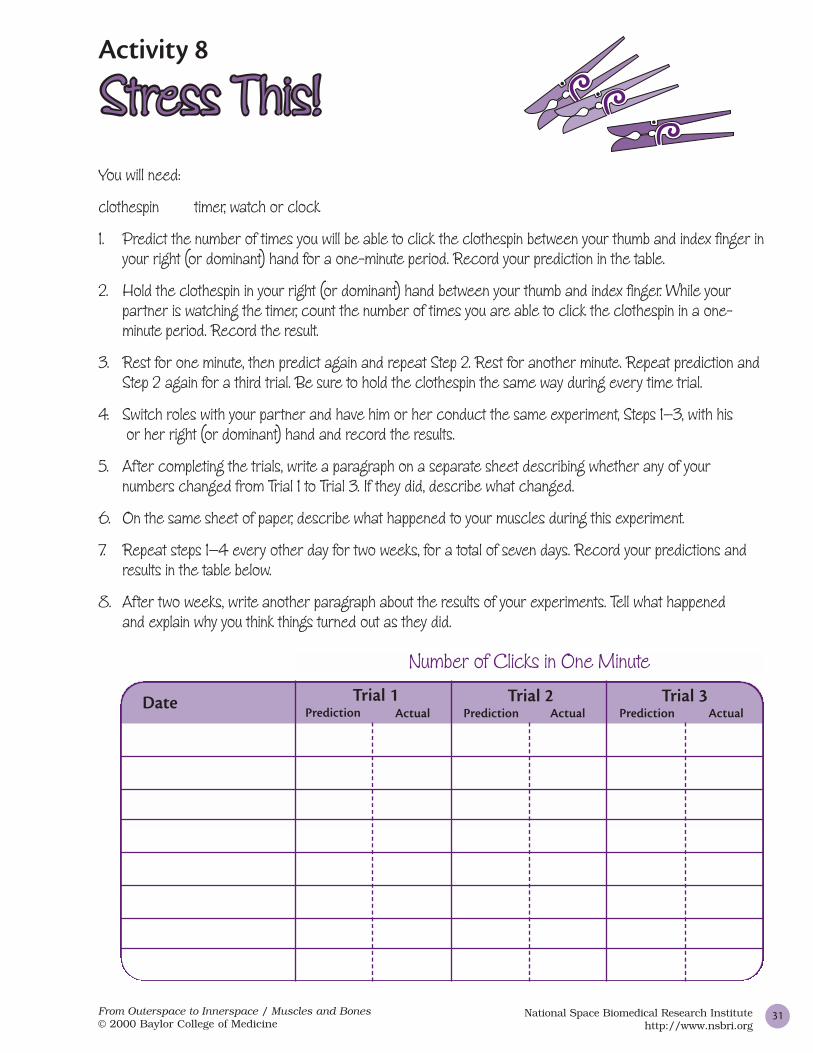
31From Outerspace to Innerspace / Muscles and Bones© 2000 Baylor College of Medicine
National Space Biomedical Research Institutehttp://www.nsbri.org
Activity 8
You will need:
clothespin timer, watch or clock
1. Predict the number of times you will be able to click the clothespin between your thumb and index finger inyour right (or dominant) hand for a one-minute period. Record your prediction in the table.
2. Hold the clothespin in your right (or dominant) hand between your thumb and index finger. While yourpartner is watching the timer, count the number of times you are able to click the clothespin in a one-minute period. Record the result.
3. Rest for one minute, then predict again and repeat Step 2. Rest for another minute. Repeat prediction andStep 2 again for a third trial. Be sure to hold the clothespin the same way during every time trial.
4. Switch roles with your partner and have him or her conduct the same experiment, Steps 1–3, with hisor her right (or dominant) hand and record the results.
5. After completing the trials, write a paragraph on a separate sheet describing whether any of your numbers changed from Trial 1 to Trial 3. If they did, describe what changed.
6. On the same sheet of paper, describe what happened to your muscles during this experiment.
7. Repeat steps 1–4 every other day for two weeks, for a total of seven days. Record your predictions andresults in the table below.
8. After two weeks, write another paragraph about the results of your experiments. Tell what happened and explain why you think things turned out as they did.
Number of Clicks in One Minute
Date Trial 3Trial 1 Trial 2Prediction Prediction PredictionActual Actual Actual

32 From Outerspace to Innerspace / Muscles and Bones© 2000 Baylor College of Medicine
9. Building Blocks
CCOONNCCEPTEPTSS● Good eating habits help maintain bone and muscle strength.● Some foods, such as complex carbohydrates, are good energy
sources.● Other foods provide building materials for bones and muscles.
OOVVEERRVIEWVIEWStudents will learn about the nutritional needs of healthy bones and muscles, and how to make good food choices, especially in terms ofgetting enough calcium.
SSCCIEIENNCCEE , HE, HE AALLTTH & MH & M AATTH SKILH SKILLL SS● Gathering information● Comparing● Charting● Drawing conclusions● Inferring
BackgroundFood provides energy to the body forgrowth, maintenance and activity. It also supplies building blocks for bones, muscles and other tissues of the body.Making the right food choices can promote and maintain good healththroughout life.
Most teenagers do not eat enough foodsthat promote bone and muscle health. To develop and maintain strong bones,their diets should include plenty of calcium-rich foods, like low-fat dairyfoods and green leafy vegetables. VitaminD, which is made in the skin when it isexposed to mild doses of sunlight, helpsthe body to absorb calcium. Vitamins A and C also are necessary for proper bone development.
Bone is remodeled throughout life. Oldbone is removed and new bone is formed.During childhood and teenage years, newbone is added faster than old bone isremoved. As a result, bones become larger and denser. Bone formation occursfaster than bone removal until about age30. After this age, breakdown of bonebegins to occur at a faster rate than boneformation. Bone loss accelerates with ageand can be particularly rapid in women inthe years around menopause. This canlead to osteoporosis, or “porous bone,” acondition in which bones are not rebuilt
as quickly as they are broken down. Theseweakened bones are more likely to frac-ture. Teenagers can help prevent osteo-porosis later in life by including enoughcalcium in their diets and by exercising.
Protein, found in meats, fish, dairy products and beans, is used by the bodyto build muscles and the scaffoldingwithin bones. In addition, protein canserve as an energy source for growth and movement. Energy also comes fromcarbohydrates (breads, pasta, vegetablesand sugars), fats and oils.
The “Nutrition Facts” label on packagedfoods can be used to make better foodchoices. This label lists the amounts ofnutrients present in grams or as a percentage of the recommended DailyValue. A food product that claims to be a“good source of calcium” must contain atleast 100 milligrams (mg) of calcium perserving. This is about one tenth of thetotal amount of calcium needed by a person each day.
Time 10 minutes for set-up; 45–60 minutes toconduct the activity
MaterialsEach student will need:● copy of “Healthy Choices” and “Foods
for Healthy Bones” sheets
Conditions in space,
where bones do not
have to work against
the force of gravity,
cause astronauts to
lose bone density and
muscle size and
strength. While this
does not affect their
performance in space,
it can make them too
weak to carry out
routine tasks when
they return to the full
force of gravity on
Earth. Counter-
measures to help
maintain bones and
muscles include
resistance exercises,
such as rowing or
using a stationary
bicycle, and
maintaining a
carefully balanced
diet.

Each group will need:● several nutrition labels from food
packages
Set-up and ManagementHave students bring in nutrition labelsfrom food packages. Put a mixture of labelsfrom different kinds of foods in plastic bagsand place them in a central location. Havestudents work in groups of 3–4.
Procedure1. Have each student make a list of
everything he or she ate during thepast 24 hours (including snacks).
2. Distribute the “Healthy Choices” page.Point out the basic food groups shown
on the page and have studentsidentify the food group category inwhich each item on their lists belongs.Some items may fall into more thanone food category. Encourage studentsto discuss these foods within theirgroups to decide where they belong.For example, a large portion oflasagna might count as one servingfrom the bread/pasta group, oneserving from the dairy group (cheese)and one serving from the meat group(ground beef or sausage).
3. Have each student make a chart andlist all of the food groups in separatecolumns. Students then should recordin the appropriate column what they
33From Outerspace to Innerspace / Muscles and Bones© 2000 Baylor College of Medicine
History of Food Labels
1906 - Federal
government begins
regulation of food
safety and quality.
1913 - Food packages
are required to state
the quality of their
contents.
1938 - Every
processed, packaged
food is required to
have a label
containing the name
and weight of the
product and a list of
ingredients.
1966 - The Fair
Packaging and
Labeling Act passes.
All products shipped
across state lines are
required to have
accurate labels.
1973 - Nutrition
labels are required on
all foods that have
one or more added
nutrients and on
foods that claim to
have a specific
nutritional property
or dietary use.
1984 - Labels are
required to include
sodium content.
1990 - All food
labels are required
to list nutritional
information,
standard serving sizes
and uniform health
claims.
From the Food and
Drug Administration
<http://vm.cfsan.fda.gov/nlea.html>
Carbohydrates, a major source of energy, are found in fruits, vegetables, grains and flour. Fiber,
starches and sugars all are carbohydrates. Most US students tend to eat too many snacks and
prepared foods that are high in sugars, instead of choosing vegetables,
breads and pasta that contain less sugar and more starches and fiber.
Fats are rich sources of energy. Cooking oils, lard, butter, margarine and
shortening are almost pure fat. Foods that contain large amounts of
fat include some red meats, dairy products, chocolate, cakes,
cookies, fried snacks (chips, crackers, etc.) and nuts. Fatty foods
should be eaten sparingly because the body will store any unused
energy as additional body fat. Fats from plants (like olive or
canola oil) or fish generally are healthier than butter, fatty
meat, lard or margarine.
Proteins are building blocks for the body. Muscles, hair,
skin and nails are mostly protein, as is the flexible collagen network within bones. Proteins
help carry out essential chemical reactions within every cell. The body can use protein as a
source of energy. Meats, fish, poultry, eggs, low-fat dairy products, beans, peas and nuts are
good sources of protein.
Vitamins are substances needed by the body in small amounts. Vitamin D, for example, helps
the intestine absorb calcium into the blood, so it can be delivered to bones. Vitamin C is
needed to make collagen, which is used in building bones and connective tissues. Eating a
variety of fruits and vegetables every day helps ensure that the body has all of the vitamins
it needs.
Minerals have a number of roles. Calcium, the most abundant mineral in the body, makes
bones hard and is important to muscles and the nervous system. Good sources of calcium are
low-fat dairy products, dark green leafy vegetables, tofu, sardines with bones and calcium-
fortified juices and cereals. Phosphorous also is important for bone health.
NUTRIENTS: SUBSTANCES IN FOOD NEEDED BY THE BODY

ate over the past 24 hours and thenumber of servings eaten for eachitem listed. Have students comparetheir totals to the recommendednumbers of servings.
4. Ask, How many of you had therecommended amounts of fruits,vegetables and dairy products? Didanyone exceed the recommendationsfor fats and sweets? How aboutbreads and pastas? Distribute the“Foods for Healthy Bones” page, whichfocuses on calcium—a nutrientimportant for strong bones. Havestudents referto their“HealthyChoices”sheets andidentify anyfoods that theyate that aresources ofcalcium. Next,have themcalculate thenumber of milligrams of calcium thatthey included in their diet over thepast 24 hours.
5. Ask students, Is there room forimprovement in your eating habits?Have the Materials Manager from eachgroup collect a bag of nutrition labels
from the materials table. Have eachgroup observe their food labels andrank the foods from best to worst interms of thenutrientsneeded forbones andmuscles(calcium,protein,Vitamins D, C,and A). Thenhave groupsshare their listswith the rest of the class.
6. Conclude by asking students tosuggest simple changes they couldmake to improve their diets. Recordtheir ideas. You may want to discussthe word “diet” with students. Eventhough it is frequently used todescribe an eating program to promoteweight-loss, “diet” also can mean theusual things that a person eats.
Extensions● Have students consult the Internet
for additional information on diet andnutrition. The Food and Drug Admin-istration <www.fda.gov>, NationalInstitutes of Health <www.nih.gov>, and the US Department of Agriculture<www.nal.usda.gov/fnic/foodcomp> are good places to start.
34 From Outerspace to Innerspace / Muscles and Bones© 2000 Baylor College of Medicine
Men as well as
women can suffer
from osteoporosis—
the development of
weak, “porous” bone.
An inadequate supply
of calcium over a
lifetime is believed to
contribute to the
development of
osteoporosis.
Approximately 6 out
of 10 teenage boys
and 8 out of 10
teenage girls do not
have enough calcium
in their diets.
35From Outerspace to Innerspace / Muscles and Bones© 2000 Baylor College of Medicine
National Space Biomedical Research Institutehttp://www.nsbri.org
Activity 9
1. List all the foods you have eaten in the past 24 hours, by meal (includingsnacks), on a separate sheet of paper.
2. Compare the foods you ate to the food groups shown in the pyramidbelow. Keep in mind that many foods combine items from two or moregroups. The number of servings shown is what you should eat every day.
3. On another sheet of paper, make a chart with each food group shown in the pyramid. List the foods youate under the appropriate food groups on the chart.
4. Compare the number of servings that you ate to the recommended amount. How did you do?
Meats and other proteinsThe protein group includes meat, chicken,
fish, nuts and beans. Pick 2–3 servingsfrom this group. One serving equals 2–3 ounces cooked meat, poultry or
fish, 1 cup cooked dried beans, 2 eggs, 4 tablespoons of peanut
butter or 2/3 cup of nuts.
Milk productsChoose 2–3 servings of milk
products (milk, yogurt, cheese, cottage cheese, pudding). One servingequals 1 cup of milk or yogurt, 1/2 cup
pudding or 2 slices of cheese.
VegetablesSelect 3–5 servings of
vegetables. One servingequals 1 cup raw, leafy
vegetables or 1/2 cupcooked vegetables
(or 1/2 cupchopped raw), or
3/4 cup ofvegetable juice.
FruitsEat 2–4 servings of fruit.
One serving equals 1 medium apple,banana or orange,1/2 cup cooked or
canned fruit or3/4 cup of
fruit juice.
Fats, oils and sweetsEat sparingly (found in candy, chocolate, fried foods, cakes,
pies, ice cream, butter and cream).
Breads, grains and cerealsHave 6–11 servings of breads, grains, rice, potatoes, cereals,
tortillas and pasta daily. One serving equals 1 slice bread, 1 tortilla, 1 cup of ready-to-eat cereal, 1/2 cup cooked cereal, rice or
macaroni, or 5–6 small crackers. Cakes, cookies, pies, french fries and chips also count as carbohydrates.
36 From Outerspace to Innerspace / Muscles and Bones© 2000 Baylor College of Medicine
National Space Biomedical Research Institutehttp://www.nsbri.org
1. Take a look at the foods list you made for the“Healthy Choices” sheet. Refer to the “Sources ofCalcium” lists above and to the right on this page andidentify any calcium-rich foods on your list. Recordthese foods on the table below—along with the number of servings you ate. (Use a separate sheet ofpaper if necessary.)
2. Find the number of milligrams (mg) of calcium perserving for each of the foods you identified andrecord it on the table below. You may need to estimatethe amount of calcium in some foods based on the ingredients of similar foods. Multiply the number ofservings by number of mg of calcium to find the total amount of calcium that you received with each food.Add the totals for each food to figure out how much calcium your body took in during the past 24 hours.
3. The recommended amount of calcium for teenagers is 1,200 milligrams per day. How does this compareto your amount?
Activity 9
SOURCES OF CALCIUM mg / serving
Dairy Foods (approx.)
Milk (1 cup) 300 mg
Cheese (2 slices) 200 mg
Cottage cheese (1 cup) 140 mg
Yogurt without fruit (1 cup) 415 mg
Yogurt with fruit (1 cup) 315 mg
Ice cream or ice milk (1 cup) 150 mg
Frozen yogurt (1 cup) 200 mg
Pudding or custard ( 1 cup) 150 mg
SOURCES OF CALCIUM mg / serving
Non-Dairy or Combination Foods (approx.)
Collard greens (1 cup) 357 mg
Sardines with bones (3 oz) 350 mg
Tofu (1/2 cup) 300 mg
Cheese pizza (1/4 of a 12 inch pizza) 250 mg
Macaroni and cheese (1 cup) 250 mg
Grilled cheese sandwich (1 sandwich) 250 mg
Lasagna (1 cup) 250 mg
Calcium-enriched orange juice (3/4 cup) 225 mg
Pancakes or waffles (2 waffles or 3 pancakes) 100 mg
Soup prepared with milk (1 cup) 150 mg
Calcium-enriched cereal (1 cup) 150 mg
Dry roasted almonds (1/4 cup) 100 mg
Chili con carne with beans (1 cup) 100 mg
Taco with cheese (1 taco) 100 mg
Cooked broccoli (1 cup) 90 mg
Tortillas (3) 80 mg
Scrambled, boiled or fried eggs (2 eggs) 80 mg
Baked beans (1/2 cup) 80 mg
Milk chocolate (1 1/2 ounce bar) 80 mg
Bread (1 slice) 40 mg
Source: <www.fda.gov>
Calcium-rich foods TotalNumber ofservings
Amount ofcalcium (mg)
Total calcium in one day

35From Outerspace to Innerspace / Muscles and Bones© 2000 Baylor College of Medicine
National Space Biomedical Research Institutehttp://www.nsbri.org
Activity 9
1. List all the foods you have eaten in the past 24 hours, by meal (includingsnacks), on a separate sheet of paper.
2. Compare the foods you ate to the food groups shown in the pyramidbelow. Keep in mind that many foods combine items from two or moregroups. The number of servings shown is what you should eat every day.
3. On another sheet of paper, make a chart with each food group shown in the pyramid. List the foods youate under the appropriate food groups on the chart.
4. Compare the number of servings that you ate to the recommended amount. How did you do?
Meats and other proteinsThe protein group includes meat, chicken,
fish, nuts and beans. Pick 2–3 servingsfrom this group. One serving equals 2–3 ounces cooked meat, poultry or
fish, 1 cup cooked dried beans, 2 eggs, 4 tablespoons of peanut
butter or 2/3 cup of nuts.
Milk productsChoose 2–3 servings of milk
products (milk, yogurt, cheese, cottage cheese, pudding). One servingequals 1 cup of milk or yogurt, 1/2 cup
pudding or 2 slices of cheese.
VegetablesSelect 3–5 servings of
vegetables. One servingequals 1 cup raw, leafy
vegetables or 1/2 cupcooked vegetables
(or 1/2 cupchopped raw), or
3/4 cup ofvegetable juice.
FruitsEat 2–4 servings of fruit.
One serving equals 1 medium apple,banana or orange,1/2 cup cooked or
canned fruit or3/4 cup of
fruit juice.
Fats, oils and sweetsEat sparingly (found in candy, chocolate, fried foods, cakes,
pies, ice cream, butter and cream).
Breads, grains and cerealsHave 6–11 servings of breads, grains, rice, potatoes, cereals,
tortillas and pasta daily. One serving equals 1 slice bread, 1 tortilla, 1 cup of ready-to-eat cereal, 1/2 cup cooked cereal, rice or
macaroni, or 5–6 small crackers. Cakes, cookies, pies, french fries and chips also count as carbohydrates.

36 From Outerspace to Innerspace / Muscles and Bones© 2000 Baylor College of Medicine
National Space Biomedical Research Institutehttp://www.nsbri.org
1. Take a look at the foods list you made for the“Healthy Choices” sheet. Refer to the “Sources ofCalcium” lists above and to the right on this page andidentify any calcium-rich foods on your list. Recordthese foods on the table below—along with the number of servings you ate. (Use a separate sheet ofpaper if necessary.)
2. Find the number of milligrams (mg) of calcium perserving for each of the foods you identified andrecord it on the table below. You may need to estimatethe amount of calcium in some foods based on the ingredients of similar foods. Multiply the number ofservings by number of mg of calcium to find the total amount of calcium that you received with each food.Add the totals for each food to figure out how much calcium your body took in during the past 24 hours.
3. The recommended amount of calcium for teenagers is 1,200 milligrams per day. How does this compareto your amount?
Activity 9
SOURCES OF CALCIUM mg / serving
Dairy Foods (approx.)
Milk (1 cup) 300 mg
Cheese (2 slices) 200 mg
Cottage cheese (1 cup) 140 mg
Yogurt without fruit (1 cup) 415 mg
Yogurt with fruit (1 cup) 315 mg
Ice cream or ice milk (1 cup) 150 mg
Frozen yogurt (1 cup) 200 mg
Pudding or custard ( 1 cup) 150 mg
SOURCES OF CALCIUM mg / serving
Non-Dairy or Combination Foods (approx.)
Collard greens (1 cup) 357 mg
Sardines with bones (3 oz) 350 mg
Tofu (1/2 cup) 300 mg
Cheese pizza (1/4 of a 12 inch pizza) 250 mg
Macaroni and cheese (1 cup) 250 mg
Grilled cheese sandwich (1 sandwich) 250 mg
Lasagna (1 cup) 250 mg
Calcium-enriched orange juice (3/4 cup) 225 mg
Pancakes or waffles (2 waffles or 3 pancakes) 100 mg
Soup prepared with milk (1 cup) 150 mg
Calcium-enriched cereal (1 cup) 150 mg
Dry roasted almonds (1/4 cup) 100 mg
Chili con carne with beans (1 cup) 100 mg
Taco with cheese (1 taco) 100 mg
Cooked broccoli (1 cup) 90 mg
Tortillas (3) 80 mg
Scrambled, boiled or fried eggs (2 eggs) 80 mg
Baked beans (1/2 cup) 80 mg
Milk chocolate (1 1/2 ounce bar) 80 mg
Bread (1 slice) 40 mg
Source: <www.fda.gov>
Calcium-rich foods TotalNumber ofservings
Amount ofcalcium (mg)
Total calcium in one day

37From Outerspace to Innerspace / Muscles and Bones© 2000 Baylor College of Medicine
10. Bones and Muscles in SpaceBackgroundOn Earth, muscles and bones are used to working against gravity tomaintain posture and balance. In space,where the effects of gravity are almostabsent, the muscles and bones ofastronauts do not have to work as hardand become weaker. Bone rebuilding fallsbehind bone dismantling, and bonesdecrease in diameter and become lessdense. The calcium removed from bonesis permanently eliminated from the bodyin urine, leading to a condition similar toosteoporosis on Earth.
Muscles in space also become smallerand weaker through a process calledatrophy. In addition, the fibers insidemuscles change because most work inspace involves short-duration, highintensity tasks.
The adaptation of muscles and bones tomicrogravity conditions does not haveserious consequences in space, whereastronauts do not need as much strengthto keep their balance and move about. Infact, the bodies of people in spaceeventually reach equilibrium, called "spacenormal," with their new environment. Thisadaptation does, however, cause problemswhen astronauts return to an environmentwith the full force of gravity because theirmuscles and bones have become too weakto function as before.
Similar problems can be observed on Earth
among people who are bedridden during along illness, who have part of their bodiesimmobilized to allow a fracture to heal orwho suffer from osteoporosis. Research todevelop measures that will counter changesin muscles and bones in space will benefitthese and many other people directly.
Time10 minutes for set-up; 30 minutes toconduct activity
MaterialsEach student will need:● copy of “Muscles & Bones in Space”
student sheet
Set-up and ManagementProvide resource materials on spacetopics.
Procedure1. Review the concepts presented in this
unit. Discuss how lack of stressaffects bones and muscles. Ask thestudents to think of environments inwhich stress on the body is reduced.(Some examples are: on the moon, onthe space shuttle or space station, orduring bed rest.)
2. Hand out the “Muscles & Bones inSpace” worksheet and have eachstudent work alone.
3. Have students share their drawingswith the rest of the class.
CCOONNCCEPTEPTSS● Lack of stress causes bones and muscles to become weak.● Astronauts must counteract the effects of lost stress on bones and
muscles.
OOVVEERRVIEWVIEWStudents will learn about the changes that occur in bones and muscleswhile people are in space and then apply their knowledge of musclesand bones to suggest preventative solutions for those changes.
SSCCIEIENNCCEE , HE, HE AALLTTH & MH & M AATTH SKILH SKILLL SS● Using resources to gather information● Applying knowledge● Drawing conclusions● Presenting conclusions with supporting information
Have you or someone
you know ever had a
broken leg or arm?
The limb probably
had to be encased in
a cast that would
keep the broken
pieces in place and
allow them to mend.
The lack of
movement causes the
muscles and bones
inside the cast to
become weaker. This
usually can be
observed once the
cast is removed—the
diameter of the newly
healed arm or leg is
noticeably smaller
than the arm
or leg that wasn’t in a
cast. Fortunately,
normal use restores
bone and muscle size
and strength within a
few weeks.
Something similar
happens to the bones
and muscles of
astronauts who live
and work in space.

38 From Outerspace to Innerspace / Muscles and Bones© 2000 Baylor College of Medicine
National Space Biomedical Research Institutehttp://www.nsbri.org
Maria and Michelle are identical twins who live together and have similar activities.They are special student astronauts with NASA. Both are participating in an experiment on muscles and bones. Tomorrow, Maria will go up in the space shuttlefor a 10-day mission. Meanwhile, Michelle will stay on Earth and maintain her normal daily routine. WhenMaria returns to Earth, scientists will compare the bones and muscles in Maria’s and Michelle’s right arms.The scientists need your help to know what to expect when the 10-day mission is over.
1. Draw an inside view of Maria’s and Michelle’s right arms—after the mission—in the spaces below. Label thebones and muscles.
2. Describe how the two arms are different.
3. The scientists do not want the changes seen in Maria’s arm to occur in the muscles and bones of astronauts on future missions. They need your help to design a diet and exercise program to prevent thesechanges. What would you suggest?
Activity 10
Maria’s Right Arm Michelle’s Right Arm