accurist watches logo model number calibre number ... watches logo model number calibre number...
TRANSCRIPT

Caseback markings
w
MB 119CAL 0T10SR927W
Accurist Watches Logo
Model Number
Calibre Number
Battery Number

How to use these instructions
This booklet contains setting instructions for the Accurist Chronograph Alarm
series of watches. Each section describes a particular calibre (also called watch
movement) which offers a unique set of functions and features. As such, it is
necessary to identify the correct calibre of your watch before proceeding to the
appropriate section (see diagram opposite).
Further information
The latest setting instructions, technical manuals and interactive instructions
are available from our web site at www.accurist.co.uk
When on the web site please refer to ‘After sales service/download manuals’
The Accurist technical helpline is also available during office hours:
+44 (0)20 7447 3941 or email [email protected]

Position A
24 Hour
Indicator
Dial
Calendar month dialStop watch dial
Timer minute dial
Mode Indicator dialBottom Right (BR)Bottom Left (BL)
Top Left (TL) Top Right (TR)
Position B
6W50 Operating Instructions
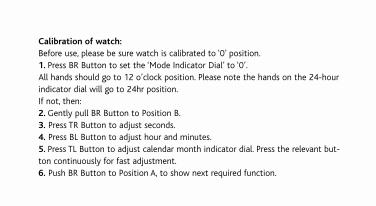
Calibration of watch:
Before use, please be sure watch is calibrated to ‘0’ position.
1. Press BR Button to set the ‘Mode Indicator Dial’ to ‘0’.
All hands should go to 12 o’clock position. Please note the hands on the 24-hour
indicator dial will go to 24hr position.
If not, then:
2. Gently pull BR Button to Position B.
3. Press TR Button to adjust seconds.
4. Press BL Button to adjust hour and minutes.
5. Press TL Button to adjust calendar month indicator dial. Press the relevant but-
ton continuously for fast adjustment.
6. Push BR Button to Position A, to show next required function.

6W50 Operating Instructions continued . . .
To set the time:
1. Press BR Button to select time ‘TME’ on Mode Indicator Dial.
2. Gently pull BR Button to Position B.
3. Press TR Button to zero second hand.
When second hand is between 30-59 seconds, the minute hand will advance to the
next full minute.
4. To adjust minutes and hours:
Press TL Button to move hands forwards (clockwise). Press BL Button to move hands
backwards (anti-clockwise).
5. To adjust the 24 hour indicator dial: Press TL or BL Button until minute and hour
hands show correct time with correct 24 hour indication.
6. Press BR Button to Position A, to show next required function.

To set calendar:
1. Press BR Button to select ‘CAL’ mode.
2. Gently pull BR Button out to Position B.
3. Press TL Button until ‘Calendar month indication dial’ shows correct month.
4. Press TR Button until seconds hand indicates correct date, along the edge of
the main dial.
5. Press BR Button to Position A, to show next required function.
Additional Feature: Instant date check (whilst in time mode ‘TME’)
1. Press TR Button for date display.
Returns to time mode automatically in 10 seconds.

6W50 Operating Instructions continued . . .
To set quick alarm: AL-1
1. Press BR Button to select ‘AL-1’ mode.
2. To adjust minutes and hours for alarm time.
Press TL Button to move hands forward (clockwise)
Press BL Button to move hands backward (anti-clockwise)
3. Alarm is now set. Press TR Button to cancel alarm.
4. Push BR Button in to Position A, to show next required function.
Additional Feature: Instant date check (whilst in time ‘TME’ function)
1. Press TL Button for daily alarm display. Returns to time mode automatically
in 10 seconds or by pressing TL or BL Buttons simultaneously.

To set daily alarm: AL-2
1. Press BR Button to select ‘AL-2’ mode.
2. Gently pull out BR Button to position B. The hands will move automatically
to the previous alarm setting.
3. To adjust minutes and hours for alarm time.
Press TL Button to move hands forward (clockwise)
Press BL Button to move hands backward (anti-clockwise)
Please ensure alarm time has been set according to the 24hr indicator dial.
4. Alarm Sound:
For Loud Alarm: Press TR Button, second hand indicates 21 seconds past hour.
For Soft Alarm: Press TR Button, second hand indicates 23 seconds past hour.
To cancel Alarm: Press TR Button, second hand indicates 19 seconds past hour.
continued...

6W50 Operating Instructions continued . . .
To set daily alarm: AL-2 continued . . .
5. Alarm is now set. It will sound every day for 15 seconds or until TR Button is
pressed.
6. Push BR Button in to Position A, to show next required function.
Chronograph measurement:
1. Press BR Button to select chronograph ‘CHR’ mode.
2. Press TR Button to start.
3. Press TR Button to stop.

Split timing:
1. Pressing BL Button allows time to be checked for 10 seconds. After which it
will automatically continue uninterrupted.
2. After stopping the timing by pressing TR Button, either:
3. Hold down TL Button to read off fractions of second on stopwatch dial recorded
in total time, or
4. Press BL Button to zero stopwatch.
To set the timer:
1. Press BR Button to select timer function ‘TMR’
2. Press TL Button to select number of minutes on timer minute dial.
3. Press TR Button to start and stop timer function.
Once TR Button is pressed, press BL Button to return to zero and
re-start the countdown instantly. Note, alarm sounds for 5 seconds.
4. Press BR Button to show next required function.

6W50 Operating Instructions continued . . .
To set local time:
1. Press BR Button to select the local time function ‘L-TM’
2. Gently pull BR button out.
3. Press TL Button to move hands forward (clockwise)
Press BL Button to move hands backward (anti-clockwise)
Note, minute hand moves in 30-minute increments only, the
second hand is not adjustable.
4. Press BR Button to show next required function.

All reset function:
1. Gently pull BR Button out.
2. Press and hold TR, TL and BL Buttons simultaneously for 3 seconds.
3. Release all buttons, confirmation ‘bleep’ will sound.
4. Push BR Button in to Position A.
5. Press BR Button to set the functional dial to ‘0’ position.
Set up watch by referring to section ‘Calibration of Watch’.

Position A
Mode Function hand
Bottom Right (BR)
Function hand
Top Right (TR)
Position B Position C
24 hour hand
AS10 Operating Instructions

To set the time:
1. Turn the crown and align the mode function hand to ‘TME’ mode.
2. Gently pull out crown to position C.
3. Turn crown either way to correct time.
Turning the crown rapidly either way (continuously clicking two or more times)
causes the hands to automatically advance rapidly. When stopping the hands,
click the crown once to the right or left. When the hands are not stopped
manually, they stop automatically after being corrected by 12 hours.
4. Push in crown to position A.
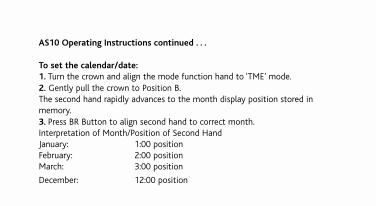
AS10 Operating Instructions continued . . .
To set the calendar/date:
1. Turn the crown and align the mode function hand to ‘TME’ mode.
2. Gently pull the crown to Position B.
The second hand rapidly advances to the month display position stored in
memory.
3. Press BR Button to align second hand to correct month.
Interpretation of Month/Position of Second Hand
January: 1:00 position
February: 2:00 position
March: 3:00 position
December: 12:00 position

4. Turn crown anti-clockwise to correct the day.
Turning the crown rapidly anti-clockwise (continuously clicking two or more
times) causes the date to automatically advance rapidly. When stopping the
date, click the crown once to the right or left. When the date is not stopped
manually, it stops automatically after being advanced by 31 days.
5. Push in crown to Position A.
Note: As a result of being equipped with an auto calendar function, it is not nec-
essary to correct the date at the end of each month. However, since the watch
uses 28 days for the month of February, it is necessary to correct the date at the
end of February, but only in leap years.

AS10 Operating Instructions continued . . .
Using the chronograph:
The chronograph is able to measure time up to a maximum of 59 minutes 59.95
seconds in 1/20th second units, after which it resets to 0 seconds.
Chronograph measurement:
1. Turn the crown and align the mode function hand to ‘CHR’ mode. The second
hand rapidly advances to the 0 position and the watch enters the chronograph
mode.
2. Press TR Button to start and stop chronograph.
A confirmation tone is heard whenever the TR button is pressed.

3. When chronograph is stopped, press and hold BR Button to display 1/20th
seconds hand.
4. Press and hold the TR Button to reset chronograph hand to the 0 position.
To reset chronograph hands:
1. Turn the crown and align the mode function hand to ‘CHR’ mode.
The second hand rapidly advances to the 0 position and the watch enters the
chronograph mode.
2. Gently pull out crown to Position B.
3. Press TR Button intermittently until the 1/20th dial is reset to the 0 position.
4. Gently pull out crown to Position C.
continued...

AS10 Operating Instructions continued . . .
To reset chronograph hands continued . . .
5. Press TR Button intermittently until the second hand is reset to the 0 position.
6. Turn crown either way to correctly position hour and minute hands to the 0 position.
Turning the crown rapidly in either direction (continuously clicking two or more times)
causes the hands to automatically advance rapidly. When stopping the hands, click the
crown once to the right or left. When the hand is not stopped manually, it stops
automatically after being corrected by 12 hours.
7. Push in crown to Position A.

Note: Pressing and holding either the TR or BR Button will cause the hands to
continue to move until the button is released.
Setting local time:
The local time function allows the time in a different time zone to be set
separately from the current time. Local time is set by performing a time
difference correction in 1 hour units based on the current time (time of the
time model/TME). The minute and second hands move in coordination with the
current time.
continued...

AS10 Operating Instructions continued . . .
Setting local time continued . . .
Time difference correction procedure:
1. Turn the crown and align the mode function hand to ‘L-T’ mode.
2. Gently pull out crown to Position C (local time setting position)
3. Turn crown either way to correct the time difference. When the crown is turned to
the right, the hour hand moves by 1 hour in the clockwise direction. When the crown
is turned to the left, the hour hand moves by 1 hour in the counter-clockwise
direction.
4. Push in crown to Position A.

Note: If the hour hand passes 12:00 AM (midnight) during correction, the date is
advanced by 1 day following completion of hand movement. If the time difference is
corrected in the counter-clockwise direction and the hour hand passes back over 12:00
AM, although the date is corrected following completion of hand movement, since the
date is corrected by 30 days in the clockwise direction, it takes about 2-3 minutes for
the date to be corrected. Pay attention to AM and PM when correcting time difference.
Using the alarm:
The alarm function uses a 24-hour clock. Once the alarm has been set, the alarm
sounds for 15 seconds when the set time is reached once a day. The time at which the
alarm sounds applies to the time (TME) mode, and cannot be set based on the local
time (L-T).
continued...
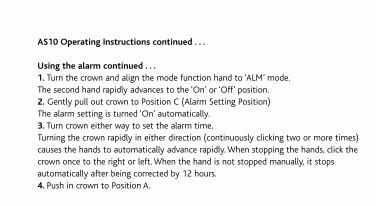
AS10 Operating Instructions continued . . .
Using the alarm continued . . .
1. Turn the crown and align the mode function hand to ‘ALM’ mode.
The second hand rapidly advances to the ‘On’ or ‘Off’ position.
2. Gently pull out crown to Position C (Alarm Setting Position)
The alarm setting is turned ‘On’ automatically.
3. Turn crown either way to set the alarm time.
Turning the crown rapidly in either direction (continuously clicking two or more times)
causes the hands to automatically advance rapidly. When stopping the hands, click the
crown once to the right or left. When the hand is not stopped manually, it stops
automatically after being corrected by 12 hours.
4. Push in crown to Position A.

Note: Please be sure to correctly set ‘AM’ and ‘PM’ by referring to the 24 hour hand.
Switching Alarm ON and OFF
The alarm is switched ON and OFF each time the TR Button is pressed when the
crown is pulled out to Position B or Position C in the alarm mode.
Alarm Tone Monitor
When the TR Button is pressed with the crown in the normal
position in the alarm mode, the alarm tone sounds for as long as the button is
pressed.
Stopping the Alarm Tone
Press either the TR or BR Button to stop the alarm tone while it is sounding.

AS10 Operating Instructions continued . . .
All Reset
1. Turn the crown and align the mode function hand to ‘CHR’ mode.
The second hand rapidly advances to the 0 position and the watch enters the
chronograph mode.
2. Gently pull the crown to position C (0-Position correction mode)
Each of the hands and date wheel move to their respective 0 positions stored in
memory and then stop.
3. Press TR and BR Buttons simultaneously and then release. Following a confirmation
tone, each of the hands perform a demonstration movement in the order of the
function hand, 24 hour hand, hour hand, minute hand and second hand to indicate
that the all-reset procedure is finished.

Note: Following the all-reset procedure, make sure to properly reset each mode
after performing 0-position correction for each hand before using the watch

Position A
Minute Chronograph hand Crown
Bottom Left (BL)
Second Chronograph hand
Alarm switch
Top Right (TR)Top Left (TL)
Position B
Position C
Hour
Chronograph
hand
3S10 Operating Instructions

To set the time:
1. Gently pull out crown to position C.
The second hand will return to the 12 o’clock position and stop automatically. If
not, then press the TR Button, each press will advance it by 1 second.
2. Turn crown either way to correct time.
3. Push in crown to position A.
4. For rapid adjustment through time zone.
Pull crown out to position C; rotate the crown quickly.
The hands will start to rotate automatically.
5. To stop hands, move crown slowly.
6. Time can be adjusted either forwards or backwards.

3S10 Operating Instructions continued . . .
To set the date:
1. Gently pull out crown to position B.
2. Turn crown clockwise to adjust date.
3. Push in crown to position A.
Chronograph measurement:
1. Press BL Button to put watch in chronograph mode.
2. Press TR Button to start and stop the chronograph.
The TR Button can be stopped and started as many times as required during the
timing of an event.

Note: After 3 minutes, the 2/100th second hand will stop at the zero position to
preserve battery life; however, the time is still being measured to 2/100th
second and when the TR Button is pressed to stop the chronograph timing. The
2/100th second hand will automatically move to show that time.
Counter measurement:
1. Press TL Button while in normal mode. The 2/100th second hand acts as a
counter, with a maximum of 50 record counts.
2. Press BL Button twice to reset the counter.

3S10 Operating Instructions continued . . .
Chronograph reset:
Please follow these instructions if your watch hands fail to return to the 12 o’clock
position when the BL Button is depressed.
1. Gently pull crown to Position C.
2. Push TR Button to advance second hand to the 12 o’clock position.
3. Press TL Button to advance 2/100th second hand to the 12 o’clock.
4. Push crown to Position A, when both hands are in the 12 o’clock position.

To set timer:
1. Press TL Button to advance the timer hand by one mark. If button is depressed the
hand rapidly advances.
2. Press TR Button to start timer, a confirmation sound will ring. When initiated the
timer hand will advance for 1 minute. When the remaining time is within
50 seconds, it switches over to 1-second advancement.
3. When the timer has terminated, a confirmation sound will ring for 10 seconds.
To set the alarm:
Alarm switch pulled out = Alarm ON
Alarm switch pushed in = Alarm OFF
continued...

3S10 Operating Instructions continued . . .
To set the alarm continued . . .
1. Gently pull out Alarm Switch.
2. Pull crown to position B. Hands will rotate to previously set alarm time.
3. For rapid adjustment, rotate the crown quickly.
Hands will start to rotate automatically.
4. To stop hands, move crown slowly. Alarm time can be adjusted forwards,
or backwards.
5. When alarm time is set, push crown into normal position A.
Hands will return to correct time.

Note: When alarm sounds push in Alarm Switch to stop alarm from sounding.
When Alarm Switch is on, the alarm will sound twice a day. (A.M. and P.M. for 20
seconds)

OS80 & OS81 Operating Instructions
Position A
Chronograph second hand dial
Chronograph minute hand
Alarm indicator hand
(model OS80)
Alarm indicator hand
Red: On (model OS81)
Bottom Right (BR)Bottom Left (BL)
Top Right (TR)
Alarm hand
Position B Position C
Chronograph
hour hand
onoff

To set the time:
1. Gently pull out crown to position C. The second hand will stop at the 0 position.
2. Turn crown either way to correct time.
3. Push in crown to position A. The second hand in the 1/20th dial begins to run.
To set the date:
1. Gently pull the crown to Position B.
2. Turn crown anti-clockwise to adjust date.
3. Push in crown to position A
Note: If the date is set between the hours of around 9:00 PM and 1:00 AM the date
may not change on the following day.

OS80 & OS81 Operating Instructions continued . . .
To set the alarm:
1. Gently pull the crown to Position B.
2. Turn the crown clockwise to set the alarm hand to the desired set time.
The alarm will sound when the hour hand aligns with the alarm hand.
3. Push in crown to position A.
Note: Pressing the BL Button to the Alarm OFF position turns the alarm off when
the alarm is sounding.
Pull out BL Button = Alarm ON.
Push in BL Button = Alarm OFF.

Chronograph measurement:
1. Press BR Button to enable the chronograph mode.
The second hand located in the 1/20th dial rapidly advances to the 0 position.
2. Press TR Button to start and stop chronograph.
A confirmation tone is heard whenever the TR Button is pressed. After 30 seconds the
Second hand on the 1/20th dial will stop at the zero position. However, the time will
continue to be measured in 1/20ths second and when TR Button is pressed to stop
the timing, the 1/20th Second hand will automatically move to show the 1/20th
time.
3. Press BR Button to reset all chronograph hands to the 0 position.

OS80 & OS81 Operating Instructions continued . . .
To reset chronograph hands:
This procedure should be performed when the chronograph second hand and
chronograph 1/20th second hand do not return to the 0 second position after
the chronograph has been reset, and including after the battery has been
replaced.
1. Gently pull out crown to Position C.
2. Press TR Button to set the chronograph second hand to the 0 position.

3. Press BR Button to set the chronograph 1/20th second hand to the 0 position.
The chronograph hands can be advanced rapidly by continuously pressing the
top or bottom right buttons.
4. Once the hands have been zeroed, reset the time and return the crown to
Position A.
5. Press BR Button to check that the chronograph hands are reset to the 0
position.

Care of your watchAvoid temperature extremes
1. Avoid leaving your watch in direct sunlight or in extremely warm conditions
for long periods of time: this will cause malfunctioning and shorten the life of
the battery.
2. Do not leave your watch for long periods of time in extremely cold places;
this may cause your watch to gain or lose time. Should it begin to gain or lose
time, place your watch on your wrist to restore its original accuracy.
Avoid wet conditions
1. Do not operate the buttons when your watch is wet, even on models marked
'Water Resistant'
2. Check case back markings and refer to the Resistance to water section below.

Avoid strong shocks
1. This watch will withstand the bumps and jars normally incurred during sports
activities.
2. Avoid dropping your watch on the ground or otherwise imparting severe
shock to it.
Avoid strong magnetic fields
1. Keep your watch away from strong magnets
2. Generally, your watch is not affected by magnetic fields from household
appliances such as television sets and stereo equipment.

Avoid harmful chemicals, solvents & gases
1. Avoid wearing your watch in the presence of strong chemicals, solvents or
gases.
2. Avoid materials such as gasoline, benzene, paint thinner, alcohol, spray
cosmetics, nail polish, nail polish remover, adhesives or paint.
Periodic inspection
1. A regular 4 to 5 years service by an authorised Accurist technician will ensure
trouble free operation.
2. Refer to the After Sales Service section on page 60 for details.

IMPORTANT
1. Keep the batteries out of reach of infants and small children. Should
accidental ingestion occur consult a doctor immediately.
2. Do not attempt to replace the battery yourself as this invalidates your
guarantee.
Keep your watch clean
Wipe off any moisture that adheres to the case, glass or band with a soft,
clean cloth.

Bracelet Adjustment
The bracelet requires a small adjustment and the model has a Z-type clasp.
1. Depress the end of the spring bar on the centre clasp with a pin.
2. Relocate the spring bar in an alternative hole.

The bracelet requires a significant adjustment or the model does not have a
Z-type clasp.
1. Use the enclosed wrist gauge to measure and mark the size of your wrist.
2. Return the completed wrist gauge with your watch
3. Follow the instructions in the After Sales Service section to return your watch
for adjustment. Your watch will be adjusted free of charge.

Resistance to water
INDICATIONS ON DIAL OR CASEBACK
LIGHT SPRAY,
DIAL CASEBACK PERSPIRATION, SWIMMING
LIGHT RAIN ETC...
BATHING, ETC...
- WATER RESISTANT OK X
WATER RESISTANT WATER RESISTANT OK OK
50M (5 ATM)
WATER RESISTANT WATER RESISTANT OK OK
100M (10 ATM)
WATER RESISTANT WATER RESISTANT OK OK
150M (15 ATM)
AND DEEPER
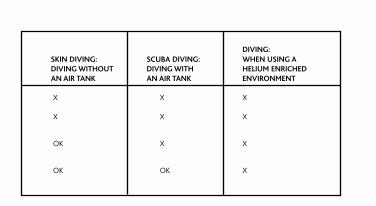
DIVING:
SKIN DIVING: SCUBA DIVING: WHEN USING A
DIVING WITHOUT DIVING WITH HELIUM ENRICHED
AN AIR TANK AN AIR TANK ENVIRONMENT
X X X
X X X
OK X X
OK OK X

Resistance to water continued . . .
IMPORTANT - NEVER PULL OUT THE CROWN WHEN THE WATCH IS WET.
• Tighten screwlock crown completely
• Water resistance is not a permenant property. We strongly
recommend you return your watch for resealing every 4 - 5
years and/or when changing batteries
• “Water resistant” may sometimes be abbreviated as “Water resist” or “WR”.
• Never pull out the crown when the watch is wet.
• Always set the crown in the normal position.