accounts receivable training guide - cyma
TRANSCRIPT

CYMAIV Accounting for Windows®
Training Guide Series
Accounts Receivable Training Guide
October 2017

CYMA Systems, Inc. 2330 West University Drive, Suite 4
Tempe, AZ 85281 (800) 292-2962
Fax: (480) 303-2969 e-mail: [email protected]
www.cyma.com
Copyright 1998-2017 CYMA Systems, Inc. All rights reserved. No part of this document may be photocopied, reproduced, or translated to another language without the prior written consent of CYMA Systems, Inc.
CYMA Systems, Inc. makes no warranty of any kind with regard to this material, including, but not limited to the implied warranties of merchantability and fitness for a particular purpose. CYMA Systems, Inc. shall not be liable for errors contained herein or for incidental consequential damages in connection with the furnishing, performance or use of this material.
Warning: This manual is protected by United States Copyright law (Title 17 United States Code). Unauthorized reproduction and/or sales may result in imprisonment for up to one year and fines of up to $10,000 (17USC 506). Copyright violators may also be subject to civil liability.
The information in this document is subject to change without notice.
PASIII, PAS+, CYMAIV, GBS and GBSII are trademarks of CYMA Systems, Inc. NetWare is a registered trademark of Novell, Inc. Some of the product names mentioned herein have been used for identification purposes only and may be trademarks of their respective companies.
Crystal Reports is a registered trademark of Business Objects.
F9 is a registered trademark of Infor Software.
Pervasive.SQL is a registered trademark of Pervasive Software, Inc.
All trademarks and names are the property of their respective holders.
Revised October 2017

iii
Table of Contents Setup Overview ....................................................................................................................................................................................... 1
Setup Checklist ....................................................................................................................................................................................... 3
Enter Customer Beginning Balances ...................................................................................................................................................... 5
Maintain Menu ........................................................................................................................................................................................ 9
Maintain Messages ............................................................................................................................................................................... 11
Maintain Tax IDs ................................................................................................................................................................................... 13
Maintain Tax Categories ....................................................................................................................................................................... 17
Maintain Volume Billing ......................................................................................................................................................................... 21
Maintain User Payment Types .............................................................................................................................................................. 25
Maintain Configuration .......................................................................................................................................................................... 27
Enter Menu ........................................................................................................................................................................................... 37
Enter Invoices ....................................................................................................................................................................................... 39
Enter Quick Invoices ............................................................................................................................................................................. 51
Enter One-Time Invoice ........................................................................................................................................................................ 57
View Customer and Product History ..................................................................................................................................................... 67
Enter Payments, Adjustments, and Transfers - Customer Payments................................................................................................... 70
Enter Payment Transfers - Customer Payments .................................................................................................................................. 75
Enter Miscellaneous Payments ............................................................................................................................................................. 79
Enter Payments - Customer Payments ................................................................................................................................................. 81
Enter Payments - Customer Payments by Line Item ............................................................................................................................ 87
Enter Payments - Invoice Adjustments ................................................................................................................................................. 89
Enter Quick Payments .......................................................................................................................................................................... 93
Enter Invoice Status Inquiry .................................................................................................................................................................. 97
Enter Invoice Status Inquiry - Inquiry Criteria Tab .............................................................................................................................. 101
Enter Invoice Status Inquiry - Selected Invoices Tab ......................................................................................................................... 103
Enter NSF Checks .............................................................................................................................................................................. 107
Enter NSF Checks: Special Conditions .............................................................................................................................................. 109
Enter Void Deposits ............................................................................................................................................................................ 111
Enter Volume Billing Invoices ............................................................................................................................................................. 113
Enter Recurring Invoices ..................................................................................................................................................................... 119
Enter/Create Recurring Invoices ......................................................................................................................................................... 127
Process Menu ..................................................................................................................................................................................... 133
Process Generate / Print Invoices ...................................................................................................................................................... 135
Process Post to AR Submenu ............................................................................................................................................................ 145
Process Post Invoices to AR ............................................................................................................................................................... 147
Process Post Payments to AR ............................................................................................................................................................ 151
Process Post Payments to AR - Post Deposit Criteria Tab ................................................................................................................ 153
Process Post Payments to AR - Post Payments to AR Tab ............................................................................................................... 155
Process Post to GL Submenu ............................................................................................................................................................. 159
Post Invoices to GL ............................................................................................................................................................................. 161
Process Post Payments to GL ............................................................................................................................................................ 165
Process Post Payments to GL - Post Deposit Criteria Tab ................................................................................................................. 169
Process Post Payments to GL - Post Payments to GL Tab ................................................................................................................ 171

Accounts Receivable Training Guide
iv
Process Post Payments to GL - Cash Basis Posting .......................................................................................................................... 173
Process Electronic Funds Transfer Recreate eFile ............................................................................................................................ 175
Process Electronic Funds Transfer Recreate eFile Deposit Criteria tab............................................................................................. 177
Process Electronic Funds Transfer Recreate eFile - Selected Deposits tab ...................................................................................... 179
Process Electronic Funds Transfer - Prenotifications ......................................................................................................................... 181
Process Auto Apply Unapplied Payments .......................................................................................................................................... 183
Period End Processes Submenu ........................................................................................................................................................ 185
Process Period End Close .................................................................................................................................................................. 187
Process Period End Close - Actions Performed Tab ......................................................................................................................... 189
AR Period End Close will do the following group box ......................................................................................................................... 190
Process Period End Close - Prerequisites Tab ................................................................................................................................... 191
Process Period End Processes - Calculate Commissions .................................................................................................................. 193
Process Period End Processes - Create Finance Charges ................................................................................................................ 195
Process Period End Processes - Create Write-Off Entries ................................................................................................................. 199
Process Period End Processes - Print Statements ............................................................................................................................. 203
Process Period End Processes - Print Tax Reports ........................................................................................................................... 207
Process Period End Processes - Print Tax Reports - Excise Tax IDs ................................................................................................ 209
Process Period End Processes - Print Tax Reports - Miscellaneous Tax IDs .................................................................................... 213
Process Period End Processes - Print Tax Reports - Sales Tax IDs .................................................................................................. 217
Process Period End Processes - Year End Closing ........................................................................................................................... 221
Report Menu ....................................................................................................................................................................................... 223
List of Accounts Receivable Reports .................................................................................................................................................. 225
CYMA Systems, Inc. Contact Information ........................................................................................................................................... 227

CYMA Accounting for Windows Training Guide – Accounts Receivable
Copyright 1999-2018 CYMA Systems Inc. 1
Setup Overview When setting up the Accounts Receivable (AR) module for a new company, you have three options, depending upon your situation:
General Import
The General Import is designed to allow data to be brought in from a wide variety of sources. These sources may store their data in many different formats but as long as the information can be output into an intermediate comma separated value (CSV) file format it can be imported using this operation. This operation can be used to populate a brand new database or it can be used to append or add information to an existing database for ongoing data such as payroll hours, etc. See General Import for complete details.
Setup Checklist
Setup a new company in the AR module by manually entering the data. Since there is specific setup information that must be entered in AR, a setup checklist is provided within the AR module. Refer to the Accounts Receivable Setup Checklist.


CYMA Accounting for Windows Training Guide – Accounts Receivable
Copyright 1999-2018 CYMA Systems Inc. 3
Setup Checklist The Accounts Receivable Setup Checklist guides you through the steps necessary to set up the Accounts Receivable (AR) module for use on a day-to-day basis.
When you access AR for the first time, or if you have not yet completed the necessary steps to set up AR, you will get a message dialog asking if you would like to view the checklist. Each of the items on the checklist should be completed in the order in which they are listed to accommodate any dependencies between operations or data. For example, if you have not yet completed the Configuration, you will not be allowed to set up tax information, Customers or product information.
Each setup step can be completed by selecting the GOTO button located to the right of each item. The Checklist provides a visual means of identifying the areas that have been completed by displaying a check mark to the left of each completed item. Once all of the items on the checklist have been completed you will no longer be prompted to use the checklist.
Accounts Receivable Setup Checklist
Accounting Periods
When the Accounting Periods button is clicked, the Maintain Accounting Periods dialog box will display. To setup Accounting periods, select Accounting Periods... on the System Manager, Maintain Menu.
See the System Manager On-Line Reference Manual for complete details on setting up Accounting Periods.
GL Accounts

CYMA Accounting for Windows Training Guide – Accounts Receivable
Copyright 1999-2018 CYMA Systems Inc. 4
When the GL Accounts button is clicked, the Maintain Chart of Accounts dialog box will display. To setup General Ledger accounts, select Chart of Accounts... on the General Ledger, Maintain Menu.
See the General Ledger On-Line Reference Manual for complete details on setting up your Chart of Accounts.
Bank Accounts
When the Maintain Banks button is clicked, the Maintain Banks dialog box will display. See Maintain Banks for complete details.
Terms Codes
When the Terms Codes button is clicked, the Maintain Terms dialog box will display. See Maintain Terms for complete details.
Configuration Defaults
When the Configuration Defaults button is clicked, the Maintain Configuration dialog box will display. See Maintain Configuration for complete details.
Tax IDs
When the Tax IDs button is clicked, the Maintain Tax IDs dialog box will display. See Maintain Tax IDs complete details.
Tax Categories
When the Tax Categories button is clicked, the Maintain Tax Categories dialog box will display. See Maintain Tax Categories for complete details.
Products
When the Products button is clicked, the Maintain Products dialog box will display. See Maintain Products for complete details.
Customer Types
When the Customer Types button is clicked, the Maintain Customer Types dialog box will display. See Maintain Customer Types for complete details.
Customers
When the Customers button is clicked, the Maintain Customers dialog box will display. See Maintain Customers for complete details.
Customer Beginning Balances
When the Customer Beginning Balances button is clicked, the Enter Customer Beginning Balances dialog box will display.
Accounts Receivable Setup Checklist Command Button
Select the Close button to exit the Accounts Receivable Setup Checklist dialog.
CYMA Accounting for Windows Training Guide – Accounts Receivable
Copyright 1999-2018 CYMA Systems Inc. 5
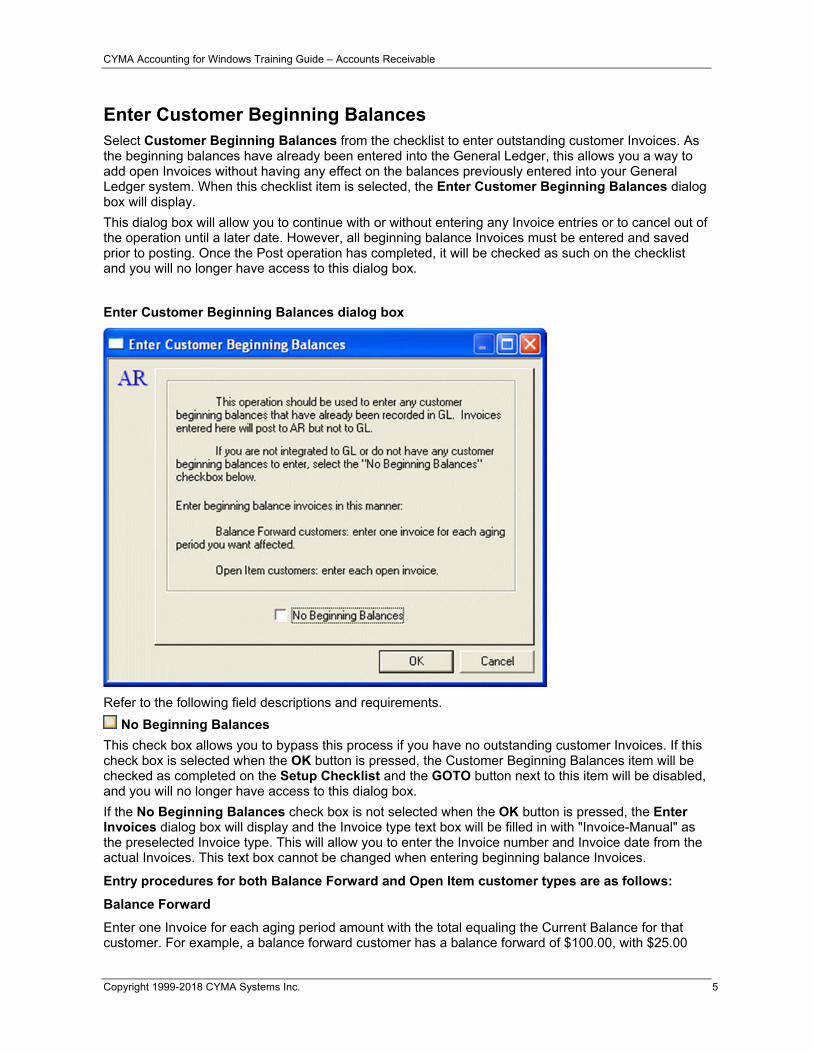
Enter Customer Beginning Balances Select Customer Beginning Balances from the checklist to enter outstanding customer Invoices. As the beginning balances have already been entered into the General Ledger, this allows you a way to add open Invoices without having any effect on the balances previously entered into your General Ledger system. When this checklist item is selected, the Enter Customer Beginning Balances dialog box will display.
This dialog box will allow you to continue with or without entering any Invoice entries or to cancel out of the operation until a later date. However, all beginning balance Invoices must be entered and saved prior to posting. Once the Post operation has completed, it will be checked as such on the checklist and you will no longer have access to this dialog box.
Enter Customer Beginning Balances dialog box
Refer to the following field descriptions and requirements.
No Beginning Balances
This check box allows you to bypass this process if you have no outstanding customer Invoices. If this check box is selected when the OK button is pressed, the Customer Beginning Balances item will be checked as completed on the Setup Checklist and the GOTO button next to this item will be disabled, and you will no longer have access to this dialog box.
If the No Beginning Balances check box is not selected when the OK button is pressed, the Enter Invoices dialog box will display and the Invoice type text box will be filled in with "Invoice-Manual" as the preselected Invoice type. This will allow you to enter the Invoice number and Invoice date from the actual Invoices. This text box cannot be changed when entering beginning balance Invoices.
Entry procedures for both Balance Forward and Open Item customer types are as follows:
Balance Forward
Enter one Invoice for each aging period amount with the total equaling the Current Balance for that customer. For example, a balance forward customer has a balance forward of $100.00, with $25.00

CYMA Accounting for Windows Training Guide – Accounts Receivable
Copyright 1999-2018 CYMA Systems Inc. 6
applicable to March, $30.00 to April and $45.00 to May. Enter one Invoice for each period to allow aging reports to reflect this information accurately. You may also enter in each Invoice in detail if you have this information available from your history records.
Open Item
Enter all open Invoices with the actual Invoice numbers and dates as they exist the Period End prior to using the Accounts Receivable module.
For more information on entering Invoices see the Enter Invoices Topic in this Training Guide.
Once all beginning balance Invoices are entered, close the Enter Invoice dialog box.
The Post Customer Beginning Balances to AR dialog box will display.
Click the Post button and you will be prompted with an option to print a proof listing.
Select Yes to print the proof listing to verify your results.
You have the option of continuing to post after reviewing the proof or canceling the post process. Cancel the post to make any necessary edits.
Once the posting process is completed, entering customer beginning balances is complete and the customer records may no longer be edited. This is a one-time operation; once complete you will not have access to the Enter Customer Beginning Balances operation.
These beginning balance Invoices will not post to the General Ledger. This protects the integrity of the beginning balances entered into the General Ledger while allowing the existing open Invoices to be added to your Accounts Receivable system.
Although this is a one-time operation it is not necessary to complete the process in one data entry session. For example, if you have a large number of beginning balance Invoices to enter, the data entry can be completed in intervals. Enter and save the beginning balance Invoices and when the Post

CYMA Accounting for Windows Training Guide – Accounts Receivable
Copyright 1999-2018 CYMA Systems Inc. 7
Customer Beginning Balances dialog box is displayed click the Cancel button. Then you can access the Customer Beginning Balances operation from the checklist again.
Enter Customer Beginning Balances Command Buttons
Click the Process button to begin entering beginning balances.
Click the Setup Printer button to redirect the report to a printer other than the default printer displayed or to change the orientation from Portrait to Landscape if necessary.
Click the Cancel button to cancel the exit the dialog box.

CYMA Accounting for Windows Training Guide – Accounts Receivable
Copyright 1999-2018 CYMA Systems Inc. 9
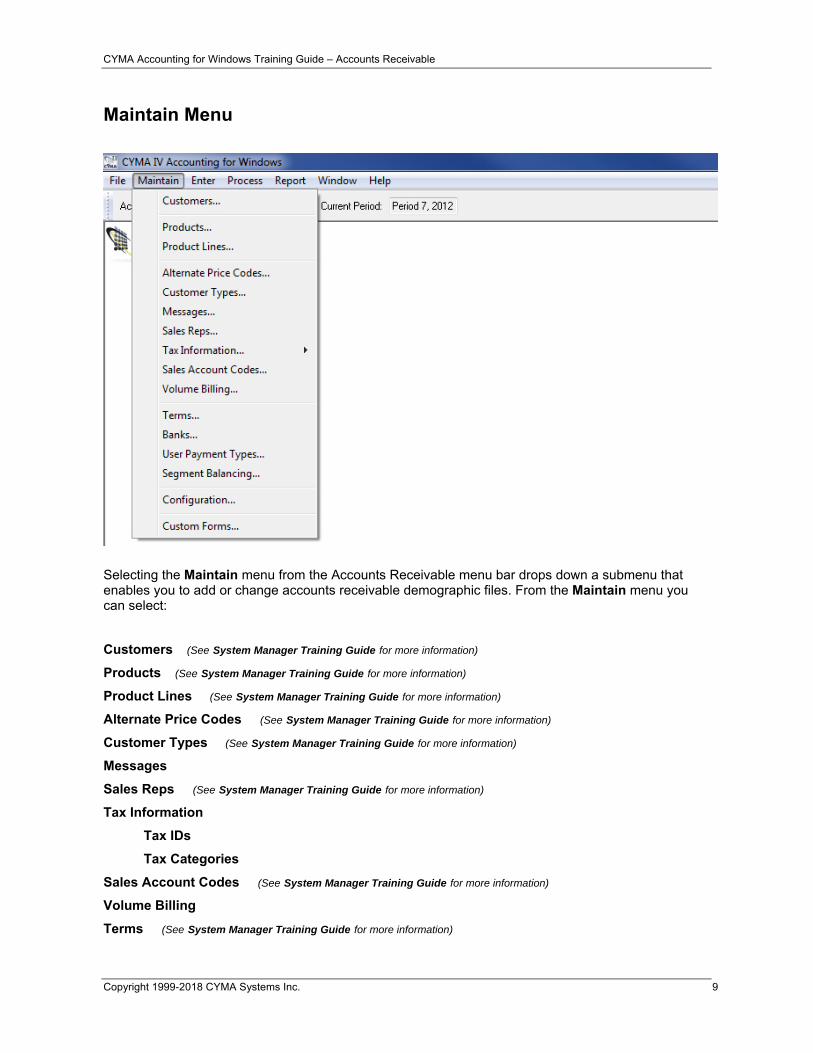
Maintain Menu
Selecting the Maintain menu from the Accounts Receivable menu bar drops down a submenu that enables you to add or change accounts receivable demographic files. From the Maintain menu you can select:
Customers (See System Manager Training Guide for more information)
Products (See System Manager Training Guide for more information)
Product Lines (See System Manager Training Guide for more information)
Alternate Price Codes (See System Manager Training Guide for more information)
Customer Types (See System Manager Training Guide for more information)
Messages
Sales Reps (See System Manager Training Guide for more information)
Tax Information
Tax IDs
Tax Categories
Sales Account Codes (See System Manager Training Guide for more information)
Volume Billing
Terms (See System Manager Training Guide for more information)

CYMA Accounting for Windows Training Guide – Accounts Receivable
Copyright 1999-2018 CYMA Systems Inc. 10
Banks (See System Manager Training Guide for more information)
User Payment Types
Segment Balancing (See System Manager Training Guide for more information)
Configuration
Custom Forms (See System Manager Training Guide for more information)
CYMA Accounting for Windows Training Guide – Accounts Receivable
Copyright 1999-2018 CYMA Systems Inc. 11
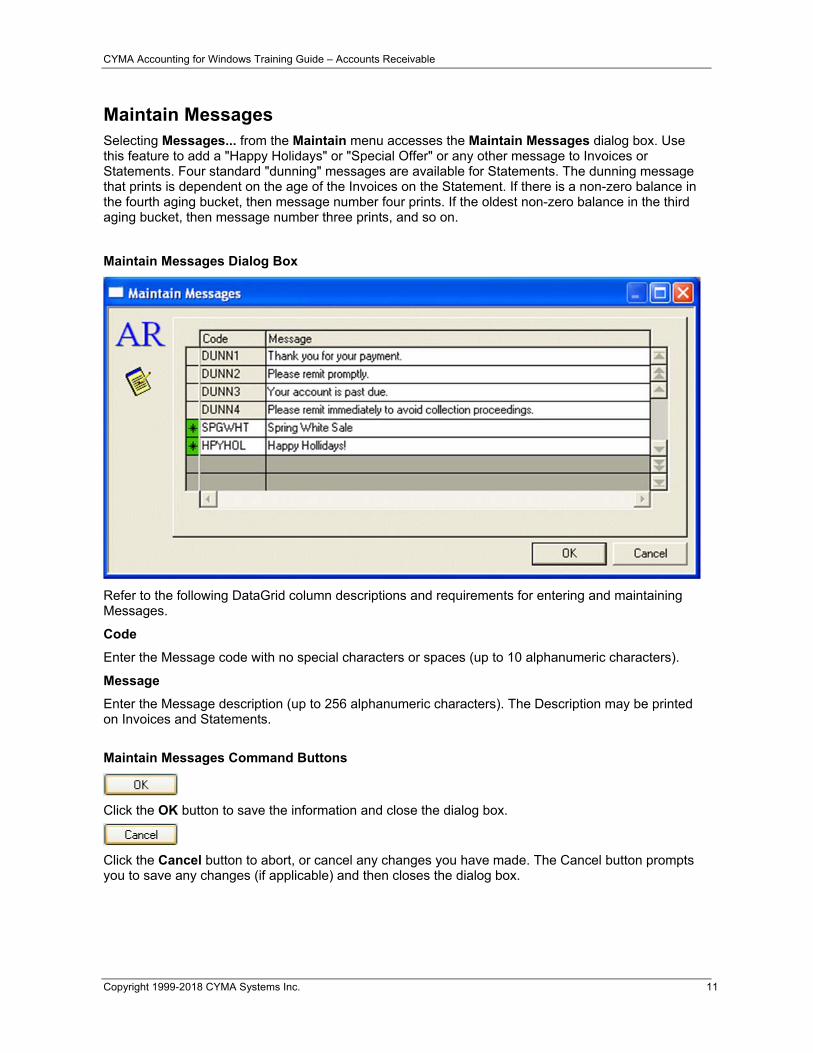
Maintain Messages Selecting Messages... from the Maintain menu accesses the Maintain Messages dialog box. Use this feature to add a "Happy Holidays" or "Special Offer" or any other message to Invoices or Statements. Four standard "dunning" messages are available for Statements. The dunning message that prints is dependent on the age of the Invoices on the Statement. If there is a non-zero balance in the fourth aging bucket, then message number four prints. If the oldest non-zero balance in the third aging bucket, then message number three prints, and so on.
Maintain Messages Dialog Box
Refer to the following DataGrid column descriptions and requirements for entering and maintaining Messages.
Code
Enter the Message code with no special characters or spaces (up to 10 alphanumeric characters).
Message
Enter the Message description (up to 256 alphanumeric characters). The Description may be printed on Invoices and Statements.
Maintain Messages Command Buttons
Click the OK button to save the information and close the dialog box.
Click the Cancel button to abort, or cancel any changes you have made. The Cancel button prompts you to save any changes (if applicable) and then closes the dialog box.


CYMA Accounting for Windows Training Guide – Accounts Receivable
Copyright 1999-2018 CYMA Systems Inc. 13
Maintain Tax IDs The Maintain Tax IDS... dialog box can be accessed by selecting Tax IDs... from the Tax Information... submenu on the Maintain menu bar. Each tax entity is assigned a unique ID. Within the record for each entity, the tax type and how the tax is calculated is defined. Tax IDs can then be assigned to Tax Categories that contain multiple Tax IDs that make up Sales, Excise and Miscellaneous Taxes. Tax IDs may be specified as taxable by a specific Tax Category (for example, a State Excise Tax that is State Sales Taxable).
Tax IDs must be included in a Tax Category in order to be used by the Accounts Receivable module.
Maintain Tax IDs dialog box
Refer to the following field descriptions and requirements.
Tax ID
To create a new record, enter an ID that represents the tax entity (up to 6 alphanumeric characters).
To edit an existing Tax ID, enter the appropriate ID, or select the ID using the Browser. Once the record is displayed in the dialog box, select the Edit button and make the desired changes. The Tax ID cannot be changed.
Desc

CYMA Accounting for Windows Training Guide – Accounts Receivable
Copyright 1999-2018 CYMA Systems Inc. 14
Enter the tax description (up to 20 alphanumeric characters). This should reflect the name of the taxing entity.
Tax ID tab
Refer to the following field descriptions and requirements.
Tax Type
Use the drop-down list to select the appropriate tax type. Available types are, County Sales, Federal Excise, Federal Misc, Municipal Misc, Municipal Sales, State Excise, State Misc, and State Sales.
Customers can be flagged as exempt from specific tax types.
Status
The Status defaults to Active. To change a Tax ID's Status to Inactive, it cannot have any current entries in the system. To delete a Tax ID, enter the appropriate ID or use the Browser, and then click the Delete button. When deleting a Tax ID, it cannot have any current or history entries in the system. If there are only history entries, you will be asked if you would like to change the Status of the Tax ID to Inactive.
Inactive Tax IDs cannot be used in Tax Categories.
Tax Rate
Enter the tax percentage rate. This field will accept values up to three places to the left of the decimal and four to the right. For example, five and three fourths percent would be entered as 5.75.
Negative values are not allowed for tax percentage rates.
Effective Date
Enter a valid calendar date on which this tax will become effective.
If a date earlier than the system date is entered the tax will not be retroactive for previously posted data.
End Date
Enter a valid calendar date on which this tax will end.
GL Accrual Acct
Enter a valid GL account, or use the Browser, to select the account for posting the tax liability for this entity to the General Ledger.
Tax Reports based on group box
Select the appropriate radio button to determine the basis on which to report this tax entity.
Sales
Selecting this radio button will produce tax reports for this tax entity based on sales invoiced rather than payments received.
Cash Receipts
Selecting this radio button will produce tax reports for this tax entity based on payments received.

CYMA Accounting for Windows Training Guide – Accounts Receivable
Copyright 1999-2018 CYMA Systems Inc. 15
Checkboxes
Taxable by Category
Select this check box if this tax is subject to another tax entity, such as a State Excise Tax (which is State Sales taxable). When you select the Taxable by Category check box you must enter a Tax Category, or use the Browser, to specify which Tax Entities this tax is subject to for calculating and reporting.
Apply to Freight
Select this check box to specify that freight charges are subject to this tax entity.
Apply to Finance Charges
Select this check box to specify that Finance Charges are subject to this tax entity.
Maintain Tax IDs Command Buttons
The Edit button allows you to make changes to the displayed Tax ID. Click the Edit button once a valid Tax ID has been entered.
The Save button validates and saves the data entered. The Save button is enabled when data on the dialog box is changed.
The New button prompts you to save any changes to the displayed Tax ID (if applicable) and then clears the dialog box. This allows you to create a new Tax ID or select another ID for viewing or editing.
The Delete button permanently removes the displayed Tax ID from the data file. This button is enabled after the Edit button has been clicked. If the Tax ID is being used in a Tax Category it cannot be deleted.
The Close button prompts you to save any changes (if applicable) and then closes the dialog box. Pressing the ESC key performs the same function.


CYMA Accounting for Windows Training Guide – Accounts Receivable
Copyright 1999-2018 CYMA Systems Inc. 17
Maintain Tax Categories The Maintain Tax Categories... dialog box can be accessed by selecting Tax Categories... from the Tax Information... submenu on the Maintain menu bar. Tax Categories are used to combine Tax IDs (or entities) into groups. This allows multiple Tax IDs to be assigned as one Tax Category to individual Customer Ship-To records as well as Product records. An unlimited number of Tax IDs can be grouped together in each Tax Category. You can create Tax IDs within the Maintain Tax Categories dialog box by clicking the New button from the Browser.
You may create different types of categories. One type could be for the customer’s ship-to locations based on the physical address. Another type could be assigned to specific product records, such as assigning excise taxes on fuels and gasoline. Product type categories could start with a (P) for easy distinction and Customer type categories could start with a (C).
For proper reporting, sales tax and excise tax id's shouldn't be included in the same Tax Category; Excise Taxes should not be assigned to Categories that will be associated with Ship To Id's, they should only be used in Tax Categories assigned to products; and Sales Tax ID's should not be included in Tax Categories that are assigned to Products.
Each Customer Ship-To record must be assigned a Tax Category. The Customer Ship-To Tax Category will be combined with any Product Tax Categories for each line item on an invoice record during data entry. The system will check for duplicate Tax IDs after combining the two Tax Categories to prevent double taxing by any Tax ID. Once the Tax ID's have been compared and duplicates eliminated, the system will compare them to the customer’s file for any tax types marked as exempt. Taxes will only be calculated for the resulting Tax IDs.
Maintain Tax Categories dialog box
Refer to the following field descriptions and requirements.
Category ID

CYMA Accounting for Windows Training Guide – Accounts Receivable
Copyright 1999-2018 CYMA Systems Inc. 18
To create a new category, enter up to six alphanumeric characters to represent the Tax Category.
To edit an existing Tax Category, enter the appropriate ID or select one from the Browser. Once a record is displayed, click the Edit button to make changes. The Category ID cannot be changed.
Desc
Enter the Tax Category description (up to 31 alphanumeric characters). This should reflect the name of the taxing entity. An excise category for fuel products could be named ’Fuel Excises’ for easy reference. Ship-To or location-specific categories could be names (such as the city and state) to distinguish these from their individual Tax IDs in the Tax ID file. Typically, a ship-to category would contain a state sales tax type, a municipal sales tax type and possibly a county sales tax type.
Tax Category tab
Status
The Status defaults to Active.
Total Tax Rate
The read only Total Tax Rate field will display the total of all the Tax IDs entered into the data grid.
DataGrid Columns and Fields
An unlimited amount of Tax ID's may be combined within a Tax Category, which is then assigned to Customer Ship-To records or Product records. Each Tax Category must have a minimum of one Tax ID assigned in order to save the record.
CYMA Accounting for Windows Training Guide – Accounts Receivable
Copyright 1999-2018 CYMA Systems Inc. 19
Tax ID's will not be used for any calculations unless they have been assigned to a Tax Category first. Individual Tax ID's may not be assigned to Product records or Customer Ship-To records.
Tax ID
In the Tax ID column enter a valid Tax ID, or use the Browser to select or create a Tax ID.
Description
The Description from the Tax ID automatically defaults and is displayed in the Description column.
Maintain Tax Categories Command Buttons
The Edit button allows you to make changes to the displayed Tax Category. Click the Edit button once a valid Tax Category has been entered.
The Save button validates and saves the data entered. The Save button is enabled when data on the dialog box is changed.
The New button prompts you to save any changes to the displayed Tax Category (if applicable) and then clears the dialog box. This allows you to create a new Tax Category or select another ID for viewing or editing.
The Delete button permanently removes the displayed Tax Category from the data file. This button is enabled after the Edit button has been clicked. If the Tax Category is being used in a customer ship-to record or product record it cannot be deleted.
The Close button prompts you to save any changes (if applicable) and then closes the dialog box. Pressing the ESC key performs the same function.


CYMA Accounting for Windows Training Guide – Accounts Receivable
Copyright 1999-2018 CYMA Systems Inc. 21
Maintain Volume Billing It is often necessary to bill a large group of customers or clients a common charge at regular intervals. Examples would include utility billings, monthly tuition, annual membership fees, or subscription fees. Rather than entering an Invoice of the same amount for each customer, the Volume Billing feature allows you to invoice a common charge to a select list of customers.
When Volume Billing... is selected from the Maintain menu, the Maintain Volume Billing dialog displays.
Maintain Volume Billing Dialog Box
Refer to the following descriptions and requirements for entering and maintaining Volume Billings.
Customer List ID
To create a new Customer List ID, enter up to 15 alphanumeric characters.
To edit an existing Customer List ID, enter the appropriate ID or select one from the Browser. Once a record is displayed, click the Edit button to make changes. The Customer List ID field cannot be changed.
Description
Enter the Customer List ID description (up to 40 alphanumeric characters).

CYMA Accounting for Windows Training Guide – Accounts Receivable
Copyright 1999-2018 CYMA Systems Inc. 22
On the Customers tab, click the select box on the DataGrid to select each customer to include in the list for invoicing (you may de-select by re-clicking a selection). Click the Save button to save your selection.
Customers Tab
Show All Customers
Click the Show All Customers option button to show all Customers.
Show Selected Customers
Click the Show Selected Customers option button to display only the Customers selected in the DataGrid for Volume Billing.
Sort by
The Sort by list box allows you to select how the entries should be sorted for printing. Sort options are by Customer ID, Name, Type ID, City, State, Sales Rep, and Terms Code.
DataGrid Columns and Fields
All columns on the DataGrid are displayed in the view-only mode.
Customer ID
The Customer ID entered in the Maintain Customers displays in view-only mode.
Name
The Customer Name entered in the Maintain Customers displays in view-only mode.
Type ID
The Customer Type ID entered in the Maintain Customers displays in view-only mode.
City
The City entered in the Maintain Customers dialog displays in view-only mode.
State
The State entered in the Maintain Customers dialog displays in view-only mode.
Sales Rep
The Sales Rep entered in the Maintain Customers dialog displays in view-only mode.
Terms Code
The Terms Code entered in the Maintain Customers dialog displays in view-only mode.
Maintain Volume Billing Command Buttons
The Edit button allows you to make changes to the displayed Customer List. Click the Edit button once a valid Customer List ID has been entered.
The Save button validates and saves the data entered. The Save button is enabled when data on the dialog box is changed.

CYMA Accounting for Windows Training Guide – Accounts Receivable
Copyright 1999-2018 CYMA Systems Inc. 23
The New button prompts you to save any changes to the displayed Customer List (if applicable) and then clears the dialog box. This allows you to create a new Customer List or select another Customer List ID for viewing or editing.
The Delete button permanently removes the displayed Customer List from the data file. This button is enabled after the Edit button has been clicked. If the Customer List has any entries in the system it cannot be deleted.
The Close button prompts you to save any changes (if applicable) and then closes the dialog box. Pressing the ESC key performs the same function.


CYMA Accounting for Windows Training Guide – Accounts Receivable
Copyright 1999-2018 CYMA Systems Inc. 25
Maintain User Payment Types When User Payment Types... is selected from the Maintain Menu the Maintain User Payment Types dialog displays. User Payment Types are used to better define what the payment was. For example, User Payment Types could be set up for VISA, Mastercard and American Express, all with a system Payment Type of Credit Card. Wire Transfer, ACH deposit could be set up with a system payment type of Cash. This allows reports to be run for each of the different User Payment Types to help reconcile bank statements.
Maintain User Payment Types dialog
Refer to the following fields and descriptions.
Data grid columns and fields
Type ID
Enter a unique value for the user defined payment Type ID.
Description
Enter a description for the user defined payment type.
Payment Type
Select from the drop down to associated a Payment Type to one of the seven system payment types. The system Payment Types define how the user defined payment type can be used throughout AR and SO. The available options are Adjustments, Cash, Credit Card, Check, Deposit, EFT and Transfer. A user defined payment type that matches each system type will be set up automatically. These payment types may not be deleted but the descriptions can be changed.
The payment types will be used as follows:
Adjustments - this payment type is only used in Enter Payments. The Adjustment type is used to adjust the balance of an Invoice. For example, the Adjustment Payment Type can be used to "write-off" an amount on the balance of a customer's account. The invoice balance will

CYMA Accounting for Windows Training Guide – Accounts Receivable
Copyright 1999-2018 CYMA Systems Inc. 26
be reduced by the amount of the adjustment in the same way it would be reduced by a payment.
Cash and Check - these payment types are used in any dialog that allows entry of payments.
Credit Card - this payment type can be used in any payment type dialogs. The Expiration Date fields will be required during entry.
Deposit - is only used as a payment type in Enter Invoices and Enter Sales Order if the customer has previously made a payment that was recorded as a Deposit with Order through the AR Enter Payment screen. After choosing Deposit as a payment type, a browser button will appear beside the Reference field. Browse and select the appropriate Deposit with Order that was recorded for this invoice/sales order.
Transfer - this payment type is only used in Enter Payments to move amounts from one invoice to another. Transfers can also be used to move payments between invoices belonging to different customers.
EFT - this payment type is used to define payments that should be included wherever the Electronic Funds Transfer (EFT) file is created. This payment type cannot be used in Enter One-Time Invoices
Status
Select a Status from the drop down list. Payment Types. Inactive Payment Types cannot be used on new invoices, sales orders or payments.
Maintain User Payment Types command buttons
Click the OK button to save any changes and close the dialog.
Click the Cancel button to close the dialog without saving any changes. If changes have been made you will be prompted to save.

CYMA Accounting for Windows Training Guide – Accounts Receivable
Copyright 1999-2018 CYMA Systems Inc. 27
Maintain Configuration Selecting Configuration... from the Maintain menu accesses the Maintain Configuration dialog box. This dialog box must be completed prior to processing any Accounts Receivable data. It must also be completed prior to Importing Accounts Receivable data from another system.
Maintain Configuration dialog box
Refer to the following field descriptions and requirements.
Company Options group box
Current Year
Select a year from the drop-down list that is already set up through System Manager, Maintain/Accounting Periods. .
Period
Select the current Accounts Receivable Period from the drop-down list. Once entered, the period will be advanced through the Period End Close process (which is the recommended procedure for advancing the period).
The Current Year and Period may be different than the General Ledger module, allowing you to continue with Accounts Receivable operations without performing the Year End Close and/or Period End Close in the General Ledger.

CYMA Accounting for Windows Training Guide – Accounts Receivable
Copyright 1999-2018 CYMA Systems Inc. 28
Aging Days
Enter the standard aging days that will determine the aging buckets for aging reports. The default is 30.
Periods before archive
Enter in the number of periods before the system will begin to move the data into a history file. The default is 3.
Apply Finance Charges group box
Finance Charges
Select this check box if you want to compound finance charges.
Freight
Select this check box if you want to calculate finance charges on freight.
Taxes
Select this check box if you want to calculate finance charges on taxes.
Check Boxes
Use Sales Rep Permissions
Check the Use Sales Rep Permissions option to control how Sales Reps interact with Enter Sales Order and Enter Invoices. If this option is checked, additional options can be set on the Maintain Sales Reps - Permission Tab to control the entry of information into the system.
Require Prerequisite Reports for Period End Close
Select this check box to have the system force users to print all of the Period End Reporting prerequisites before allowing the system to process the Period End Close.
Enable Recurring Invoices
Select this check box if you would like to use the Recurring Invoice feature. This will enable the Recurring Invoices option on the Enter menu.
Enable One-time Invoicing
Select the Enable One-time Invoicing check box if you would like to use the One-Time Invoice feature. This allows you to enter invoices without setting up a customer.
Auto Create COGS
Select this check box if you want the Accounts Receivable Post to GL process to create a second journal entry to record the "Cost Of Goods Sold" for products being sold in Accounts Receivable Enter Invoices. With this feature turned on, the AR Post process will write the normal journal entry of a debit to Accounts Receivable and a credit to the Sales GL account. The additional journal entry will be a debit to COGS and a credit to the Inventory GL account.
If the user indicates YES to this field, they can override this flag at the individual product level on the Maintain Product dialog box. If the user specifies NO at the configuration level they will not be able to override this flag at the product level.
Auto Create COGS only applies to Accounts Receivable invoices that did not originate from the Job Cost module and therefore are not associated with a job. The Job Cost module has a separate process to move job expenses from a Work in Process (WIP) GL account to a COGS GL account.

CYMA Accounting for Windows Training Guide – Accounts Receivable
Copyright 1999-2018 CYMA Systems Inc. 29
When "Auto Create COGS" is checked at the configuration level, then all NEW products will default the "Create AR Cogs Entry" flag on and use the default GL accounts on Accounts Receivable Configuration for Inventory and COGS.
Specific rules are followed to determine if / when this entry will be created depending upon which modules are installed and configured.
Show Cost on Invoice Entry
Select the Show Cost on Invoice Entry check box to add Unit Cost and Extended Cost columns to the Enter Invoice datagrid. This check box is enabled when the Auto Create COGS option is selected.
Allow Edit of Invoice After Printing
Select the Allow Edit of Invoice After Printing check box to allow the edit of an invoice after it has been printed. Any changes to the invoice are written to the audit file.
Invoice Only
Select the Invoice Only if you want only the invoice detail to be edited but not the payment information.
Invoice and Payment
Select the Invoice and Payment if you want to be able to edit both the invoice detail and the payment information.
Update IC Quantities
Check the Update IC Quantities to have invoice Accounts Receivable invoices should be used to change quantities in Inventory Control. This option is only available if Inventory Control is installed and the company's accounting basis is set to Accrual in System Manager - Maintain Company.
Invoices that update inventory will create a transaction type of "Shipment from AR" in Inventory Control. This transaction will be created when the invoice is posted to AR.
Default Invoices to Update IC
Check the Default Invoice to Update IC option if invoices should default to update quantities. Invoices can be changed to not update Inventory at the time the invoice is entered.
Use Project Tracking (Financial Management System Only)
Select the User Project Tracking option if you would like to use Project Tracking during entry of AR Invoices. By selecting this option, you will be given additional columns in the Enter Invoice and Enter Recurring Invoice grids for data entry related to Project Tracking. The additional columns are Project, Revenue Source, Category and Costing Code.
Use Grant Tracking (Not-For-Profit Only)
Select the Use Grant Tracking option if you would like to use Grant Tracking during entry of AR Invoices. By selecting this option, you will be given additional columns in the Enter Invoice and Enter Recurring Invoice grids for data entry related to Grant Tracking. The additional columns are Grant, Source, Program and Activity.
The following check boxes control how data posts to the General Ledger. These check boxes will only be enabled if the General Ledger module is installed.
Post Invoices to GL in Detail

CYMA Accounting for Windows Training Guide – Accounts Receivable
Copyright 1999-2018 CYMA Systems Inc. 30
Select this check box if you would like to post Invoice detail to the General Ledger. When posting Invoice detail to the General Ledger, one entry for each line item and one entry for each Tax ID will be created. When this check box is not selected, one entry for each General Ledger sales account, accounts receivable account, and General Ledger sales tax account will be created in the General Ledger.
For a Cash Basis company, Invoices will be posted to the General Ledger through the Post Payments to GL operation. Therefore, this option will be disabled. The Post Deposits to GL in Detail check box below will determine detail versus summary posting to GL.
When the "Use Job Costing" check box in Maintain Company is checked, the "Post Invoices to GL in Detail" option is checked and disabled. This is required in order to capture and post job details based upon the unique combination of account number, job number and job cost type.
Post Deposits to GL in Detail
Select this check box if you would like to post deposit detail to the General Ledger. When posting deposit detail to the General Ledger, one entry for each line of a check or credit card number entered will be created in the General Ledger. In cash basis companies, this will create one line for the cash account for each check or credit card, one line for each sales account, and one line for each revenue account from the Invoice that was paid.
Post Invoice to AR Upon Print
Check the Post Invoice to AR Upon Print option if you want the invoices to be posted to AR after printing the invoices. This option applies to invoice printed from Enter Invoices or invoices that are generated/printed through Process - Generate/Print Invoices.
If this option is selected,"Allow Edit of Invoice After Printing" will be greyed out.
Post Invoices Thru GL
Check the Post Invoice Thru GL option if you want the GL Journal Entries to automatically be posted in the GL module during the Post to GL - Invoices process.
Post Deposits Thru GL
Check the Post Deposits Thru GL option if you want the GL Journal Entries to automatically be posted in the GL module during the Post to GL - Payments to GL process.
Default Posting Date to Invoice Date
During Entry
Select this check box if you would like the Posting Date on the Enter Invoice dialog to change when the Invoice Date is changed in the Enter Invoice dialog. You will still be able to override the Posting Date. This check box is selected by default.
During Printing
Select this check box if you would like the Posting Date on the Invoice to be the same as the date entered when printing invoices. This check box is selected by default.
Credit Hold Treatment Group Box
The Credit Hold Treatment processing for any given client is based upon three variables: the AR Manager setting for the currently logged in user, the Credit Hold Treatment settings in AR Configuration for the document type being entered, and the Credit Hold and Overdue Invoices state in the Customer Record.

CYMA Accounting for Windows Training Guide – Accounts Receivable
Copyright 1999-2018 CYMA Systems Inc. 31
Select the appropriate treatment for each of the document types listed. These treatments will display an appropriate message to the user when entering Invoices, manual Invoices, credit memos, or manual credit memos in Enter Invoices. There are four types of treatments to choose from (see below).
If neither Credit Hold or Overdue Invoices in the customer record is checked, the Hold setting is unchanged and the check box is enabled.
All the above checks are made on Invoices being created as well as Invoices being edited.
Invoice
Select the applicable warning: Warning Only, Hold with Override, Hold Always, or Ignore.
Manual Invoice
Select the applicable warning: Warning Only, Hold with Override, Hold Always, or Ignore.
Credit Memo
Select the applicable warning: Warning Only, Hold with Override, Hold Always, or Ignore.
Manual Credit Memo
Select the applicable warning: Warning Only, Hold with Override, Hold Always, or Ignore.
Prevent Entry for Credit Hold Customers
If this check box is selected, Sales Orders or Invoices cannot be entered for any customer that is currently on Credit Hold. Credit Invoices or Sales Orders can still be entered even if this box is checked.
Credit Limit Treatment Group Box
The Credit Limit Treatment processing for any given client is based upon three variables: the AR Manager setting for the currently logged in user, the Credit Limit Treatment settings in AR Configuration for the document type being entered, and the Credit Limit state in the Customer Record.
Select the appropriate treatment for each of the document types listed. These treatments will display an appropriate message to the user when entering invoices, manual invoices, credit memos, or manual credit memos in the Enter Invoice dialog. There are four types of treatments to choose from (see below).
Invoice
Select the applicable warning: Warning Only, Hold with Override, Hold Always, or Ignore.
Manual Invoice
Select the applicable warning: Warning Only, Hold with Override, Hold Always, or Ignore.
Credit memos can be entered regardless of customers credit hold / limit status.
Types of Treatments:
Warning Only
A Warning message that reads "This customer is on credit hold" displays. The Hold check box is automatically enabled but not checked.
Hold with Override

CYMA Accounting for Windows Training Guide – Accounts Receivable
Copyright 1999-2018 CYMA Systems Inc. 32
If the user has AR Manager status, a notice titled "Customer is on Credit Hold - Can Override" displays. The notice reads "This customer is on credit hold. This Invoice will be placed on hold. The hold condition may be overridden by an Accounts Receivable manager." The Hold check box is automatically enabled and checked.
If the user does not have Accounts Receivable Manager status, a notice titled "Customer is on Credit Hold" displays, and the notice reads "This customer is on credit hold. This Invoice will be placed on hold." The Hold check box is automatically checked and disabled.
Hold Always
If Hold Always is selected, a notice titled "Customer is on Credit Hold" displays, and the notice reads "This customer is on credit hold. This Invoice will be placed on hold." The Hold check box is checked and disabled.
Ignore
If Ignore is selected, credit holds and any overdue Invoices are ignored. No message is displayed. The Hold check box is not checked and is enabled.
Default Invoice Type
Invoice Type
Select Invoice, Invoice - Manual, Credit, or Credit-Manual from the Invoice Type drop down list. This value will default on new invoices.
Default GL Accounts group box
Default General Ledger accounts are used during the Post to GL operation to post transactions associated with the account. For example, this would include entries created during the Enter Invoices and Enter Payments operations for freight, discounts and cash receipts. They are also used to post entries created from the Create Finance Charges and Create Write-Off Entries operations to the General Ledger.
The Browser is available to select each of these accounts or to create new accounts.
Changing the values in the default General Ledger Accounts will not have any affect on transactions that have been previously processed or saved!
AR
Enter a valid General Ledger account number. This account will become the default Accounts Receivable account for all new customer records created. Changing this field will not affect existing Invoices.
Finance Chg
Enter a valid General Ledger account. This account will be used when Finance Charge invoices are created during the Create Finance Charges operation. This will determine where the charges post when these invoices are posted to the General Ledger. Changing this field will not affect existing Invoices.
Freight
Enter a valid General Ledger account number. The freight amount entered on invoices will be posted to this account when the Post Invoices to GL operation is performed. A freight line item is created when an amount is entered in the Freight text box and the invoice record is saved. Changing this field will not affect existing Invoices.
Write-Offs

CYMA Accounting for Windows Training Guide – Accounts Receivable
Copyright 1999-2018 CYMA Systems Inc. 33
Enter a valid General Ledger account number. This account will be used for any write-offs that are created and posted when the Create Write-Off Entries operation is performed. The Accounts Receivable account on the invoice will be credited and this account will be the debit side of the entry. Changing this field will not affect existing Invoices.
Cash
Enter a valid General Ledger account to be used as the default cash account for posting cash receipts. Changing this field will not affect existing Invoices.
Deposit
Enter a valid General Ledger account to be used as the default account for posting payment types entered as Deposits with Orders. Changing this field will not affect existing Invoices.
Discount
Enter a valid General Ledger account. Terms discounts taken by customers for timely payment will be posted to this account when payments are posted to the General Ledger.
Inventory GL
Enter a valid General Ledger account. This account will be credited when creating a COGS journal entry in AR Post Invoices to GL. This account will be the default inventory account whenever a new Product is added in Maintain Product, but can be changed for specific products.
COGS/Expense
Enter a valid General Ledger account. This account will be debited when creating a COGS journal entry in AR Post Invoices to GL. This account will be the default COGS/expense account whenever a new Product is added in Maintain Product, but can be changed for specific products.
Default Customer Data Group Box
The selections in this group box will automatically be filled in for any new Customer records. These defaults may overwritten. This feature is designed to save time and prevent errors if most customers have the same method, terms and finance charges.
Method: Open Item Balance Forward
Select the appropriate option button to set the default method for all new customer records. Both methods retain the Invoice detail. The method chosen controls how statements print as well as controlling the default method for the Enter Customer Payments operation.
Terms Code
Enter a valid Terms Code. This Terms Code will be the default for all new customer records.
Customer Type
Enter a valid Customer Type. This Customer Type will be the default for all new customer records.
Price Code
Enter a valid Price Code. This Price Code will be the default for all new customer records.
Finance Charge

CYMA Accounting for Windows Training Guide – Accounts Receivable
Copyright 1999-2018 CYMA Systems Inc. 34
Enter up to three characters to the left of the decimal and two characters to the right for the default finance charge percentage rate for all new customer records. This can be overridden in the customer record. Enter percentages with the decimal (two and one-half percent is entered as 2.5).
Ship-To ID
Enter a value to use for the default Ship-To ID. This value will default when setting up a new customer.
Tax Category
Enter a value to use for the default Tax Category. This value will default into the default Ship-To when setting up a new customer.
Auto Pop-Up Notes
Select this check box to automatically check the Auto Pop-Up check box on all Note tabs for any new master records. This default may be overridden on new records.
Use Default Credit Limits check box
Check this box if you would like a credit limit to automatically be assigned when setting up new customers.
Default Credit Limit
Enter the amount of the default credit limit to be assigned to new customers. This value is only used if the Use Default Credit Limits check box is checked.
Default Bank ID group box
Type in a default Bank ID for each of the following payment methods, or select one using the browser.
Cash
Enter a default Bank ID for Cash, or select one using the browser.
Credit Card
Enter a default Bank ID for Credit Cards, or select one using the browser.
Check
Enter a default Bank ID for Checks, or select one using the browser.
EFT
Enter a default Bank ID for EFT processing, or select one using the browser.
Default Transaction Classification Codes
Use Transaction Classification Codes
Select this check box to enable transaction classification codes in Accounts Receivable. When selected the following datagrids will contain Transaction Classification Code columns: Enter Invoices, Enter Volume Billing Invoices and Enter Recurring Invoices.
Default Trans Class 1
Enter the default transaction classification code to be used during data entry or use the browser to select one.
Default Trans Class 2

CYMA Accounting for Windows Training Guide – Accounts Receivable
Copyright 1999-2018 CYMA Systems Inc. 35
Enter the default transaction classification code to be used during data entry or use the browser to select one.
Maintain Configuration Command Buttons
Click the OK button to save the information and close the dialog box.
Click the Cancel button to abort, or cancel any changes you have made and close the dialog box. You will be asked to confirm the cancel request.


CYMA Accounting for Windows Training Guide – Accounts Receivable
Copyright 1999-2018 CYMA Systems Inc. 37
Enter Menu
Selecting Enter from the Accounts Receivable menu bar drops down the Accounts Receivable Enter menu that enables you to enter Invoices, Payments, NSF Checks, Void Deposits, and other Accounts Receivable functions.
The following operations are available from the Accounts Receivable Enter menu:
Invoices
Quick Invoices
One-Time Invoices
Payments
Quick Payments
Invoice Status Inquiry
NSF Checks
Void Deposits
Volume Billing Invoices
Recurring Invoices


CYMA Accounting for Windows Training Guide – Accounts Receivable
Copyright 1999-2018 CYMA Systems Inc. 39
Enter Invoices When Invoices... is selected from the Enter menu the Enter Invoices dialog box is displayed. In this operation you can enter and edit Invoices as well as credit memos. When saved, each Invoice will be assigned an record number that is used to reference the record for editing and printing purposes. Once an Invoice is printed, it may no longer be edited; however, it can be voided.
Enter Invoices dialog box
Refer to the following field descriptions and requirements.
Record #
To create a new invoice record choose the New button. The record number will be assigned by the system when the record is saved, until then a "-1" will be displayed in the Record # field.
To view or edit an existing unposted record, enter the record number or use the Browser to select one. Once the record is displayed, choose the Edit button.
Type

CYMA Accounting for Windows Training Guide – Accounts Receivable
Copyright 1999-2018 CYMA Systems Inc. 40
The Type options on the drop-down list allow you to specify whether a manual Invoice needs to be recorded or a regular Invoice is to be printed. You can also specify whether this is a credit Invoice. The available types are Invoice, Invoice-Manual, Credit, Credit-Manual, and are described in detail below. Select the appropriate type from the drop-down list. The default will always be Invoice.
Invoice - Regular Invoice to be printed. After printing, the invoice type will be updated as Invoice-Printed. No Invoice Number can assigned until the Invoice record is printed. Invoice Numbers are assigned by the Print Invoices operation.
Invoice-Manual - Invoices which were prepared by hand. Manual invoices cannot be printed and duplicate invoice numbers are not permitted. Invoice Numbers can be entered with the original record, due to the fact that it has already been prepared by hand.
Credit - Regular Credit Memo to be printed. After printing the credit memo, type will be updated as Credit-Printed. Credit Memo Invoice Numbers will be assigned by the Print Invoices operation.
Credit-Manual - Credit Memo which was prepared manually. Manual credit memos cannot be printed and will not accept duplicate invoice numbers. The Credit Memo Invoice Number is entered with the original record, due to the fact that it has already been prepared by hand.
Credit memos can be entered regardless of customers credit limit status.
Invoice #
This text box is only enabled if the invoice type selected is Invoice-Manual or Credit-Manual. This will allow you to enter the actual invoice number used. This text box will be disabled for Invoice and Credit types. Invoice numbers are assigned during the Print Invoice operation for these types. Invoice numbers can contain any combination of letters, numbers and symbols such as dashes, etc. The invoice number must contain at least one digit.
Date
The Date text box is only enabled if the Invoice type selected is Invoice - Manual or Credit - Manual. This will allow you to enter the actual Invoice date. For Invoice types Invoice and Credit the Date text box will display the current accounting date. This date may be reset during the Print Invoice operation.
When an invoice originated in the Sales Order module the Invoice Date will default from the Ship Date of the Sales Order and may be overridden.
Posting Date
The Posting Date field allows you to enter Invoices from a previous month, and age them in the correct month. For example, an invoice is dated 11/25/2002 and entered with a transaction date of 12/04/2002. The Invoice will be aged based on the November invoice date, but will be posted to both Accounts Payable and General Ledger with the December transaction date.
Customer
Enter the Customer ID or use the Browser to select or create one.
When selecting a customer that has been placed on Credit Hold, one of three messages will automatically pop-up when entering a document for this customer.
If Hold with Override was chosen, it will require an entry by a User Id and Password that has been given Credit Manager authority to continue entry of the document.
If Warning Only was selected, it will display an advisory message but allow the user to continue.
An option of Hold Always will display an advisory message and prevents the document from being entered

CYMA Accounting for Windows Training Guide – Accounts Receivable
Copyright 1999-2018 CYMA Systems Inc. 41
Placing a customer on Credit Hold is done in the Maintain Customers section under the credit tab. Selection of the action for the document being entered, is found under the Maintain Configuration section.
When an invoice originated in the Sales Order module the Customer ID will default from the Sales Order and may not be overridden.
Sold To
The customers default contact name will appear in this field. The complete billing address will display by clicking the edit button next to the field. You may edit the customers address once in the Sold To window.
Location
Use the browse button to select a Location Id for the customer.
Ship To
This field will default to the first Ship-To record for the selected Customer. The Ship-To location may be edited by selecting the edit button to the right of the field. You may edit the customers address once in the Ship To window.

CYMA Accounting for Windows Training Guide – Accounts Receivable
Copyright 1999-2018 CYMA Systems Inc. 42
The e-mail address in Maintain Customers will default (if any) and may be overridden. This will be the recipient of invoices transmitted electronically through the Print Invoice process.
Tax Category
The Tax Category from the specified Ship-To record will display in this field. Use the default Tax Category or use the Browser to select or create one.
Ordered by and Phone
Use the drop-down list to select a contact person and phone from this Customer's Contact dialog box, or enter a person who does not have a contact record setup (up to 20 alphanumeric characters). These fields will automatically be filled in with the default contact information if one was selected in Maintain Customer.
PO
Type the Customers purchase order number (up to 20 alphanumeric characters).
Invoice Desc
Enter a description for this invoice. The Job Costing module will write information into this field when creating invoices.
Sales Order
Enter the appropriate Sales Order number for the document. When an invoice is created during the Sales Order Shipment Process this field will contain the actual Sales Order number in view only mode.
When an invoice originated in the Sales Order module the Sales Order number will default from the Sales Order number assigned to the actual order and may not be overridden. Note: If not using the Sales Order module this field is enabled for and no validation takes place.
Taxable
Select the Taxable check box if tax will be included on this Invoice or credit.
Checking the box effects the tax status of subsequent entries on that invoice. That is, if there is a mix of taxable and non-taxable items on the invoice, changing the status of that check box only effects the default tax status of subsequent line items.
Hold
This check box will be automatically selected if the Customer has been put on credit hold by the credit manager, or if they were automatically placed on hold through the Create Finance Charges process or Create Write-Offs process. If the customer is on hold a message will appear notifying you of the credit status. The invoice may still be entered and saved while on hold, however, it may not be printed or posted until the hold has been removed.
Users may place an invoice on hold by selecting the check box during data entry. When placed on hold by a user, the user has the ability to take the invoice off hold without assistance from the credit manager.
Update IC
Check the Update IC option if this invoice should update product quantities in inventory. This option is only available if the Update IC Quantities option is turned on in Maintain Configuration. When this box is checked the Warehouse ID and U/M columns will be displayed in the grid. This option can be turned on by default by checking the Default Invoices to Update IC option in Maintain Configuration.
Apply to

CYMA Accounting for Windows Training Guide – Accounts Receivable
Copyright 1999-2018 CYMA Systems Inc. 43
When entering a Credit type Invoice, the Browser will open and allow you to select an existing Invoice to which the Credit will apply. Only Invoices that have been posted to Accounts Receivable will be valid and available in the Browser for selection. If the Apply to text box is left blank, the Credit may be applied at a later date (after it is posted to Accounts Receivable) through the Apply Credits operation.
Terms
The Terms code will automatically default to the terms code assigned in the customer's record. Use the Browser to select or create another Terms Code.
Due Date
The due date will automatically calculate from the login date based on the terms code. The system will recalculate the due date based on the date selected during the Print Invoices operation. You can manually override the Due Date text box which will prevent the Print Invoices operation from recalculating this field.
Disc Allowed
The discount will calculate based on the terms code selected and will recalculate as line items are added.
Disc Date
The discount date will be calculated if a terms code allowing a discount is selected and at least one Product ID line item has been entered on the DataGrid. This date will be recalculated when the Invoice is printed based on the Invoice date chosen in the Print Invoice process.
Ship Via
Type the shipping instructions (up to 20 alphanumeric characters).
Ship Date
Enter the date the Customer must receive by or the date product will be shipped.
When an invoice originated in the Sales Order module the Ship Date will default from the Ship Date entered in Process Shipments and may be overridden.
Client ID
Enter a valid Client ID or select one from the browser. This field is only available if the Processing Category in Maintain Company is set to Staffing Company or Professional Employer Organization. This field will be populated if the invoice originated from Payroll - Process Staff Billing or Payroll - Process Billing and cannot be changed. If the Processing Category is set to Staffing Company, invoices entered in AR with a valid Client ID and Work Order No will update the work order totals. If the Processing Category is set to Professional Employer Organization, the invoice total will update, the Actual Invoice Amount file and payments associated with the invoice will update the Payments Received field, in Payroll - Maintain Clients - Financial Overview tab.
Work Order No
Enter a valid Work Order No or select one from the browser. This field is only available if the Processing Category in Maintain Company is set to Staffing Company. This field will be populated if the invoice originated from Payroll - Process Staff Billing and cannot be changed. Invoices entered in AR with a valid Client ID and Work Order No will update the work order totals.
Sales Rep
Accept the default Customer Sales Rep, or use the Browser to select one.

CYMA Accounting for Windows Training Guide – Accounts Receivable
Copyright 1999-2018 CYMA Systems Inc. 44
If the Use Sales Rep Permissions option was checked in Maintain Configuration, this value will default based on the user that is currently logged in. The value may or may not be changed based on permissions set on the Maintain Sales Reps - Permission Tab .
Job
Enter a valid Job or select one from the browser. This field is only available if the Use Job Costing option is checked in System Manager Maintain Company.
AR
The Customers default Accounts Receivable account will display in this field. The Browser is available to choose another Accounts Receivable account for this Invoice.
Reference 1
You may use this field to enter a reference for the current document (up to 20 alphanumeric characters)
Reference 2
You may use this field to enter a second reference for the current document (up to 20 alphanumeric characters).
Reference 3
You may use this field to enter a third reference for the current document (up to 20 alphanumeric characters).
DataGrid Columns and Fields
The data grid has User Column functionality. For more information go to the Data grid - User Column topic in the System Manager Help.
Sales Order Line #
This sales order line number is displayed in view only mode on lines that originated in the Sales Order module. This field is used to update the invoiced quantity field on the sales order line when the invoice is posted to AR.
Product ID
Enter the Product ID being sold to the customer, or use the browser to select one. When an invoice originated in the Sales Order module the Product ID will default from the Sales Order and may not be overridden.
Use the "TEXT" Product ID if you need additional description lines.
Description
The Product Description will display from the product record. This field may be overridden (up to 256 alphanumeric characters).
Warehouse ID
Enter the Warehouse ID or select one from the browser to be used for this transaction. This column is only visible if the Update IC box is checked in the header.
U/M

CYMA Accounting for Windows Training Guide – Accounts Receivable
Copyright 1999-2018 CYMA Systems Inc. 45
The U/M field will display the Purchasing Unit of Measure for the selected product. This column is only visible if the Update IC box is checked in the header.
Qty Avail
The Qty Avail column will display the quantity currently available for the selected product in the selected warehouse. This column is only visible if the Update IC box is checked in the header.
Quantity
Enter the appropriate quantity of the product. Up to four decimal places for fractional quantities are allowed. You may also specify negative quantities. When an invoice originated in the Sales Order module the Quantity will default from the Sales Order and may not be overridden.
Unit Price
The special pricing from the customer's record will display. If no special pricing is in effect for the customer, the price from the Product record will display.
If the check box on the product's record is checked to allow you to override the price, the price may be overridden. If the check box on the product's record to allow you to override the price to zero is checked, you may override the price with a zero.
Price Code
Enter a Price Code or select one from the browser. The Price Code field will increase/decrease the sales price by a percentage based on List Price, Unit Cost or Standard Cost. The Price Code will default from the Customer record if a Default Alternate Price Code has been defined.
Unit Cost
The unit cost from the product will display. This column is enabled by selecting "Show Cost On Invoices" in Accounts Receivable Maintain Configuration.
Disc Pct
Enter in a Discount Percentage in this field. The discount percentage will be deducted from the unit price and reflected in the extended price column.
Ext Price
The Extended Price for the line item will be calculated and displayed.
Ext Cost
The Extended Cost for the line item will be calculated and displayed. This column is enabled by selecting "Show Cost On Invoices" in Accounts Receivable Maintain Configuration.
Tax?
Place a check in this box if you wish to include the default tax on the product.
Tax Amount
This column will display a total that includes calculations of all Tax IDs from the Customer's Ship-To Tax Category as well as any Tax Category from the Product record.
Editing an existing Invoice will not recheck the Customer's Tax Exempt status.
Cost Code
Enter an active Cost Code or select one from the browser. This field is required if you have a job selected in the invoice header. This column will only be available if the Use Cost Codes box is checked in Job Costing Maintain Configuration.

CYMA Accounting for Windows Training Guide – Accounts Receivable
Copyright 1999-2018 CYMA Systems Inc. 46
The Cost Code field can be changed up until the invoice is posted to the General Ledger.
A warning will display if the cost code has not been budgeted for the job.
Sales Account
The Sales Account will default in this order:
1. From the Sales Order, if the invoice originated from the Sales Order module.
2. From Maintain Jobs, if a Job ID is on the line and the Use Job Level Defaulting option for “AR/Sales Orders” is selected in JC Maintain Configuration,
3. From the Product listed on the Customer Product Pricing tab, comparing the accounting date to the Begin and End date. If there are multiple lines that match the line with the lowest price will be used.
4. From the Sales Account listed in Maintain Customer.
5. From the Sales account from Maintain Products.
6. If another account is desired, enter manually or select from the browser.
Sales Code
Enter the Sales Code or select one from the browser. The GL accounts set up for this sales code will be used when creating Journal Entries.
Project Only Available in Financial Management System
Enter the Project that you would like to assign to the transaction, or use the browser to select one.
Revenue Source Only Available in Financial Management System
Enter the Revenue Source that you would like to assign to the transaction, or use the browser to select one. This value will automatically fill in if you have assigned a default to the corresponding Sales Account, but it may be changed as needed.
Category Only Available in Financial Management System
Enter the Category that you would like to assign to the transaction, or use the browser to select one. This field will only be available if you have selected the Category check box for the corresponding Project in General Ledger - Maintain Projects.
Costing Code Only Available in Financial Management System
Enter the Costing Code that you would like to assign to the transaction, or use the browser to select one. This field will only be available if you have selected the Activity check box for the corresponding Project in General Ledger - Maintain Projects.
Grant Only Available in Not-For-Profit
Enter the Grant ID that you would like to assign to the transaction, or use the browser to select one.
Source Only Available in Not-For-Profit
Enter the Source ID that you would like to assign to the transaction, or use the browser to select one. This value will automatically fill in if you have assigned a default to the corresponding Sales Account, but it may be changed as needed.

CYMA Accounting for Windows Training Guide – Accounts Receivable
Copyright 1999-2018 CYMA Systems Inc. 47
Program Only Available in Not-For-Profit
Enter the Program ID that you would like to assign to the transaction, or use the browser to select one. This field will only be available if you have selected the Program check box for the corresponding Grant ID in General Ledger - Maintain Grants.
Activity Only Available in Not-For-Profit
Enter the Activity ID that you would like to assign to the transaction, or use the browser to select one. This field will only be available if you have selected the Activity check box for the corresponding Grant ID in General Ledger - Maintain Grants.
Trans Class 1
Enter an active Trans Class 1 or select one from the browser.
Trans Class 2
Enter an active Trans Class 2 or select one from the browser.
The Trans Class fields can be changed up until the invoice is posted to the General Ledger.
Activity Date
Enter an Activity Date to associate with the invoice lines. This date is used for informational purposes only. The date will default to the date of the invoice.
Product Price Source
The Product Price Source is a view only field and will display the source of the price for the product of a selected line.
Freight
Enter the Freight amount to be charged on this invoice.
The line item created for the freight amount will use the default freight account from the Maintain Configuration dialog box.
Freight Tax
If any Tax IDs contained in any of the Tax Categories applied to the invoice were set to charge taxes on freight, the Freight Tax amount will display in this field.
Invoice Total
This field will display the Invoice Total. If the customers credit limit is exceeded, a message will appear when you try to save the record telling you the customer has exceeded the credit limit and the invoice will be placed on hold. This will also take into account any other Invoice record that has not been processed, along with the Customer's Current Balance.
Payment Group Box
This group box will be disabled while in edit mode if the invoice was generated from a shipped sales order and the related sales order had a payment entered.
Type
If payment was received on this invoice use the drop-down list to select a User Payment Type.

CYMA Accounting for Windows Training Guide – Accounts Receivable
Copyright 1999-2018 CYMA Systems Inc. 48
Date
Enter the Date of the deposit, the date must be equal to or greater than the invoice date. This date will be used to post the deposit to both Accounts Receivable and General Ledger. The system date will default and may be overridden.
Ref
If selecting a User Defined Payment Type that was associated with the system type of Check or Credit Card, enter the check number, credit card number or other reference number (up to 19 numeric characters). If selecting a User Defined Payment Type that was associated with the system type of Deposit, the Browser will become available to choose a Deposit to apply to this Invoice.
Duplicate numbers are only allowed when the User Defined Payment Type selected was associated with the system type of Credit Card.
It is not recommended that you enter the credit card number as this data is not encrypted.
Exp Date
If selecting a User Defined Payment Type that was associated with the system type of Credit Card, enter the credit card expiration date. Dates must be entered with leading zeros, such as 09/07.
Amount
Enter the Amount paid.
When the Payment Info button is clicked a dialog will display showing all the payments that have been applied to the selected invoice. The dialog will show the Deposit Number, Bank ID, Deposit Date, Check/CC No, Amount Paid and Method of Payment.
F6 Hot Key
When a line in the grid is selected and F6 is pressed on the keyboard the View Customer and Product History dialog will display.
Enter Invoices Command Buttons
Click the Copy button to copy the current invoice to a new invoice. You will be given the option to update the unit prices.
Click the Customer command button to bring up the Maintain Customer master information dialog box.
When the Print command button is selected the Print Invoice dialog is displayed. The Print Invoice dialog allows you to select a destination, set up a printer, print a test form alignment, select the number of copies to print or preview an invoice to the screen. You can also e-mail invoices from this dialog. If you select e-mail as the destination and there is a e-mail address on the invoice or the customer, when you click on Print you will get a screen asking for Email Information. In this dialog you can enter multiple To: and CC: addresses. You can change the Subject and add a message to be sent with the invoice. You also have the option for the invoice to be in PDF or RTF format. If the Post Within AR

CYMA Accounting for Windows Training Guide – Accounts Receivable
Copyright 1999-2018 CYMA Systems Inc. 49
Upon Print option is checked in Maintain Configuration, the invoice will also be posted to AR and show immediately on reports.
When an invoice is selected that has already been printed the Print button will change to Reprint and become available. This will allow the reprinting or e-mailing of existing invoices.
The Edit button allows you to make changes to the displayed invoice. Click the Edit button once a valid invoice has been entered. The following criteria is used for editing invoices:
- entered and saved invoices may be edited and/or deleted;
Caution should be used when editing invoices that originated in the Job Costing or Sales Order modules. Any changes made to an Accounts Receivable invoice that has been prepared through the Job Costing Prepare Invoice process or the Sales Order Shipment Process are not written back to the source modules (JC and SO).
- printed invoices allows limited editing, however, you may void and reenter the invoice. When an invoice is voided, all of the fields are copied to a new invoice where any type of editing is allowed;
- invoices that have been posted to AR or GL allow limited editing only.
- invoices that originated in Sales Order do not permit editing of the Customer ID; Product ID, Line Description, Quantity or Unit Price fields
- finally, if you are using the Inventory module and any "I"nventory type products are added, changed, or deleted will require a manual update to the quantity on hand by posting an Inventory Quantity Adjustment.
Click on the Save command button to save the document.
Click on the New command button to start a new document
Click on the Clear command button to clear the current document.
The Delete button permanently removes the displayed Invoice from the data file. This button is enabled after the Edit button has been clicked. Posted Invoices cannot be deleted. After the Delete button is clicked, a confirmation message is displayed before deleting the Invoice.
The Close button prompts you to save any changes (if applicable) and then closes the dialog box. Pressing the ESC key performs the same function.


CYMA Accounting for Windows Training Guide – Accounts Receivable
Copyright 1999-2018 CYMA Systems Inc. 51
Enter Quick Invoices When Quick Invoices... is selected from the Accounts Receivable Enter Menu the Enter Quick Invoices dialog box displays. In this operation you can enter invoice information and create invoices at a future date. This dialog box is only used for entry of new invoices and cannot be used to edit existing invoices.
Enter Quick Invoices dialog box
Data grid columns and fields
The data grid has User Column functionality. For more information go to the Data grid - User Column topic in the System Manager Help.
CustID
Enter or select from the browser an active Customer ID.
Ship To ID
The Ship To ID field will display the default Ship To ID set up for this customer. The value may be changed.
PO
Type the Customers purchase order number (up to 20 alphanumeric characters).
Terms Code
The Terms Code field will display the default Terms Code set up for this customer. The value may be changed.
Sales Rep
Accept the default Customer Sales Rep, or use the Browser to select one.
If the Use Sales Rep Permissions option was checked in Maintain Configuration, this value will default based on the user that is currently logged in. The value may or may not be changed based on permissions set on the Maintain Sales Reps - Permission Tab .

CYMA Accounting for Windows Training Guide – Accounts Receivable
Copyright 1999-2018 CYMA Systems Inc. 52
Inv No
Enter an Invoice Number if this invoice was created by an external process. Leave the field blank if you would like an invoice number to be assigned during Process Generate/Print Invoices.
Ref No
Enter a reference number for this line. When invoices are created, any lines with the same Customer and Ref No will be on the same invoice. This field is not required. If the field is left blank, then each line will be on a separate invoice. The Ref No will be written to the Reference 1 field in the invoice record.
Invoice Date
Enter the Invoice Date for this invoice. This date may change during the printing process.
Posting Date
Enter the Posting Date for this invoice. This date will be used when posting the transaction to the General Ledger. This date may change based on the "Default Posting Date to Invoice Date" options in Maintain Configuration.
AR Account
The Customers default Accounts Receivable account will display in this field. The Browser is available to choose another Accounts Receivable account for this Invoice.
Product ID
Enter or select from the browser an active Product ID.
Description
The product Description will default after selecting a Product ID. This can be overridden.
Quantity
Enter the Quantity sold for this product.
Unit Price
The Unit Price will default from the Product record. This can be overridden.
Price Code
Enter a Price Code or select one from the browser. The Price Code field will increase/decrease the sales price by a percentage based on List Price, Unit Cost or Standard Cost. The Price Code will default from the Customer record if a Default Alternate Price Code has been defined.
Disc Pct
Enter a Discount Percentage, if any.
Ext Price
The Extended Price will display in this field. This amount is the Quantity times the Unit Price less any discount.
Tax?
Check the Tax? field if this line item is subject to tax.
Tax Amount
The Tax Amount field will display the tax on the Extended Price based on the Tax Category ID assigned to the Default Ship To.

CYMA Accounting for Windows Training Guide – Accounts Receivable
Copyright 1999-2018 CYMA Systems Inc. 53
Line Total
The Line Total field will display the total of the Ext Price and Tax Amount.
Job
Enter an active Job or select one from the browser. The job must be the same for all lines on the same invoice. This column is only available if using Job Costing in this company.
Cost Code
Enter an active Cost Code or select one from the browser. This field is required and only available if the "Use Cost Codes" option is turned on in Job Costing Maintain Configuration.
A warning will display if the cost code has not been budgeted for the job.
Sales Account
The Sales Account will default in this order:
1. From the Sales Order, if the invoice originated from the Sales Order module.
2. From Maintain Jobs, if a Job ID is on the line and the Use Job Level Defaulting option for “AR/Sales Orders” is selected in JC Maintain Configuration,
3. From the Product listed on the Customer Product Pricing tab, comparing the accounting date to the Begin and End date. If there are multiple lines that match the line with the lowest price will be used.
4. From the Sales Account listed In Maintain Customer.
5. From the Sales account from Maintain Products.
6. If another account is desired, enter manually or select from the browser.
Sales Code
Enter the Sales Code or select one from the browser. The GL accounts set up for this sales code will be used when creating Journal Entries.
Freight
Enter the Freight amount for this line.
Frt Tax Amount
The Frt Tax Amount column will display the calculated tax on the Freight column.
Project (Financial Management System Only)
Enter the Project that you would like to assign to the transaction, or use the browser to select one.
Revenue Source (Financial Management System Only)
Enter the Revenue Source that you would like to assign to the transaction, or use the browser to select one. This value will automatically fill in if you have assigned a default to the corresponding Sales Account, but it may be changed as needed.
Category (Financial Management System Only)
Enter the Category that you would like to assign to the transaction, or use the browser to select one. This field will only be available if you have selected the Category check box for the corresponding Project in General Ledger - Maintain Projects.
Costing Code (Financial Management System Only)

CYMA Accounting for Windows Training Guide – Accounts Receivable
Copyright 1999-2018 CYMA Systems Inc. 54
Enter the Costing Code that you would like to assign to the transaction, or use the browser to select one. This field will only be available if you have selected the Activity check box for the corresponding Project in General Ledger - Maintain Projects.
Grant (Not-For-Profit Only)
Enter the Grant ID that you would like to assign to the transaction, or use the browser to select one.
Source (Not-For-Profit Only)
Enter the Source ID that you would like to assign to the transaction, or use the browser to select one. This value will automatically fill in if you have assigned a default to the corresponding Sales Account, but it may be changed as needed.
Program (Not-For-Profit Only)
Enter the Program ID that you would like to assign to the transaction, or use the browser to select one. This field will only be available if you have selected the Program check box for the corresponding Grant ID in General Ledger - Maintain Grants.
Activity (Not-For-Profit Only)
Enter the Activity ID that you would like to assign to the transaction, or use the browser to select one. This field will only be available if you have selected the Activity check box for the corresponding Grant ID in General Ledger - Maintain Grants.
Trans Class 1
Enter an active Trans Class 1 or select one from the browser.
Trans Class 2
Enter an active Trans Class 2 or select one from the browser.
Enter Quick Invoices Command Buttons
Click the Select All button to select all lines in the grid.
Click the Deselect All button to unselect all lines in the grid.
Click the Create Invoices button to create the Accounts Receivable invoices. When the invoices are created, any additional information needed is taken from the Customer record.
Click the Print button to create and print the invoices.
Click the Save button to save changes to the grid. The information in the grid can be saved and the invoices created at a later date.
Click the Delete button to delete any selected records in the grid.

CYMA Accounting for Windows Training Guide – Accounts Receivable
Copyright 1999-2018 CYMA Systems Inc. 55
Click the Close button to exit the dialog without saving any changes.


CYMA Accounting for Windows Training Guide – Accounts Receivable
Copyright 1999-2018 CYMA Systems Inc. 57
Enter One-Time Invoice When One Time Invoices... is selected from the Enter menu the Enter One Time Invoices dialog box is displayed. In this operation you can enter and edit Invoices as well as credit memos. This dialog is to enter invoices when setting up a customer is not desired. When saved, each Invoice will be assigned a record number that is used to reference the record for editing and printing purposes. Once an Invoice is printed, it may no longer be edited; however, it can be voided. Use the Custom tab to access the Custom Data Designer. This menu option can be turned on in Maintain Configuration by checking the "Enable One Time Invoices" check box.
It is not recommended to use this feature to enter multiple invoices for the same customer. If multiple invoices are needed it is much more efficient to set up a customer.
Enter One Time Invoices dialog box
Refer to the following field descriptions and requirements.
Record #
To create a new invoice record choose the New button. The record number will be assigned by the system when the record is saved, until then a "-1" will be displayed in the Record # field.

CYMA Accounting for Windows Training Guide – Accounts Receivable
Copyright 1999-2018 CYMA Systems Inc. 58
To view or edit an existing unposted record, enter the record number or use the Browser to select one. Once the record is displayed, choose the Edit button.
Type
The Type options on the drop-down list allow you to specify whether a manual Invoice needs to be recorded or a regular Invoice is to be printed. You can also specify whether this is a credit Invoice. The available types are Invoice, Invoice-Manual, Credit, Credit-Manual, and are described in detail below. Select the appropriate type from the drop-down list. The default will always be Invoice.
Invoice - Regular Invoice to be printed. After printing, the invoice type will be updated as Invoice-Printed. No Invoice Number can assigned until the Invoice record is printed. Invoice Numbers are assigned by the Print Invoices operation.
Invoice-Manual - Invoices which were prepared by hand. Manual invoices cannot be printed and duplicate invoice numbers are not permitted. Invoice Numbers can be entered with the original record, due to the fact that it has already been prepared by hand.
Credit - Regular Credit Memo to be printed. After printing the credit memo, type will be updated as Credit-Printed. Credit Memo Invoice Numbers will be assigned by the Print Invoices operation.
Credit-Manual - Credit Memo which was prepared manually. Manual credit memos cannot be printed and will not accept duplicate invoice numbers. The Credit Memo Invoice Number is entered with the original record, due to the fact that it has already been prepared by hand.
Credit memos can be entered regardless of customers credit limit status.
Invoice #
This text box is only enabled if the invoice type selected is Invoice-Manual or Credit-Manual. This will allow you to enter the actual invoice number used. This text box will be disabled for Invoice and Credit types. Invoice numbers are assigned during the Print Invoice operation for these types. Invoice numbers can contain any combination of letters, numbers and symbols such as dashes, etc. The invoice number must contain at least one digit.
Date
The Date text box is only enabled if the Invoice type selected is Invoice - Manual or Credit - Manual. This will allow you to enter the actual Invoice date. For Invoice types Invoice and Credit the Date text box will display the current accounting date. This date may be reset during the Print Invoice operation.
When an invoice originated in the Sales Order module the Invoice Date will default from the Ship Date of the Sales Order and may be overridden.
Posting Date
The Posting Date field allows you to enter Invoices from a previous month, and age them in the correct month. For example, an invoice is dated 11/25/2002 and entered with a transaction date of 12/04/2002. The Invoice will be aged based on the November invoice date, but will be posted to both Accounts Payable and General Ledger with the December transaction date.
Customer
A Customer ID of ONETIMECUST will default and the field will be grayed out. This customer is for system use only.
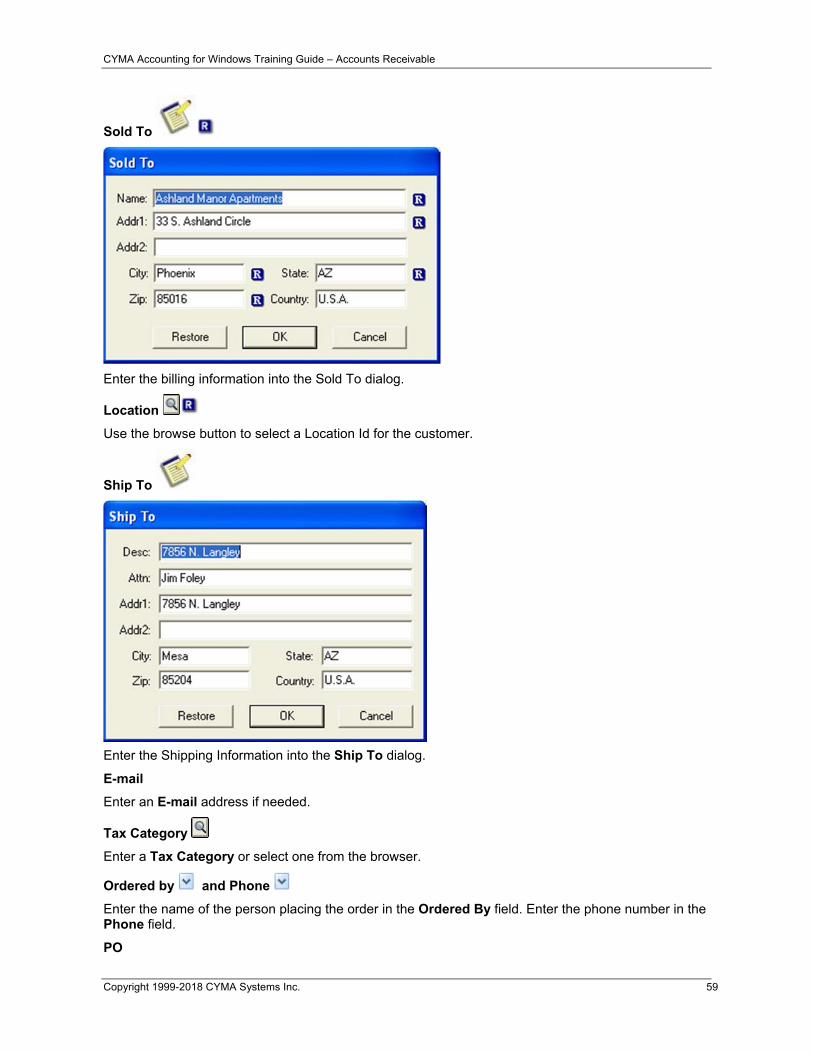
CYMA Accounting for Windows Training Guide – Accounts Receivable
Copyright 1999-2018 CYMA Systems Inc. 59
Sold To
Enter the billing information into the Sold To dialog.
Location
Use the browse button to select a Location Id for the customer.
Ship To
Enter the Shipping Information into the Ship To dialog.
Enter an E-mail address if needed.
Tax Category
Enter a Tax Category or select one from the browser.
Ordered by and Phone
Enter the name of the person placing the order in the Ordered By field. Enter the phone number in the Phone field.
PO

CYMA Accounting for Windows Training Guide – Accounts Receivable
Copyright 1999-2018 CYMA Systems Inc. 60
Enter the Customer's Purchase Order number (up to 20 alphanumeric characters).
Sales Order
Enter the appropriate Sales Order number for the document.
Taxable
Select the Taxable check box if tax will be included on this Invoice or credit.
Checking the box affects the tax status of subsequent entries on that invoice. That is, if there is a mix of taxable and non-taxable items on the invoice, changing the status of that check box only affects the default tax status of subsequent line items.
Hold
Check the Hold check box to place this invoice on hold. Invoices on Hold cannot be printed.
Update IC
Check the Update IC option if this invoice should update product quantities in inventory. This option is only available if the Update IC Quantities option is turned on in Maintain Configuration. When this box is checked the Warehouse ID and U/M columns will be displayed in the grid. If option can be turned on by default by checking the Default Invoices to Update IC option in Maintain Configuration.
Apply to
The Apply to field is not available for use with One Time Invoices and will be grayed out.
Terms
Enter a valid Terms code or select one from the browser. The Terms Code will default from Maintain Configuration.
Due Date
The Due Date will automatically calculate from the login date based on the terms code. The system will recalculate the due date based on the date selected during the Print Invoices operation. You can manually override the Due Date text box which will prevent the Print Invoices operation from recalculating this field.
Disc Allowed
The discount will calculate based on the terms code selected and will recalculate as line items are added.
Disc Date
The Discount Date will be calculated if a terms code allowing a discount is selected and at least one Product ID line item has been entered on the DataGrid. This date will be recalculated when the Invoice is printed based on the Invoice date chosen in the Print Invoice process.
Ship Via
Type the shipping instructions (up to 20 alphanumeric characters).
Ship Date
Enter the date the Customer must receive by or the date product will be shipped.
Sales Rep
Enter a valid Sales Rep or select one from the browser.

CYMA Accounting for Windows Training Guide – Accounts Receivable
Copyright 1999-2018 CYMA Systems Inc. 61
If the Use Sales Rep Permissions option was checked in Maintain Configuration, this value will default based on the user that is currently logged in. The value may or may not be changed based on permissions set on the Maintain Sales Reps - Permission Tab .
Job
Enter a valid Job or select one from the browser. This field is only available if the Use Job Costing option is checked in System Manager Maintain Company.
AR
Enter a valid General Ledger account in the AR field or select one from the browser. The Accounts Receivable account set up in Maintain Configuration will default.
Reference 1
You may use this field to enter a reference for the current document (up to 20 alphanumeric characters)
Reference 2
You may use this field to enter a second reference for the current document (up to 20 alphanumeric characters).
Reference 3
You may use this field to enter a third reference for the current document (up to 20 alphanumeric characters).
DataGrid Columns and Fields
Sales Order Line #
This sales order line number is displayed in view only mode on lines that originated in the Sales Order module. This field will always be zero.
Product ID
Enter the Product ID being sold to the customer, or use the browser to select one. When an invoice originated in the Sales Order module the Product ID will default from the Sales Order and may not be overridden.
Use the "TEXT" Product ID if you need additional description lines.
Description
The Product Description will display from the product record. This field may be overridden (up to 256 alphanumeric characters).
Warehouse ID
Enter the Warehouse ID or select one from the browser to be used for this transaction. This column is only visible if the Update IC box is checked in the header.
U/M
The U/M field will display the Purchasing Unit of Measure for the selected product. This column is only visible if the Update IC box is checked in the header.
Qty Avail

CYMA Accounting for Windows Training Guide – Accounts Receivable
Copyright 1999-2018 CYMA Systems Inc. 62
The Qty Avail column will display the quantity currently available for the selected product in the selected warehouse. This column is only visible if the Update IC box is checked in the header.
Quantity
Enter the appropriate Quantity of the product. Up to four decimal places for fractional quantities are allowed. You may also specify negative quantities.
Unit Price
The Unit Price from the Product record will display.
If the check box on the product's record is checked to allow you to override the price, the price may be overridden. If the check box on the product's record to allow you to override the price to zero is checked, you may override the price with a zero.
Price Code
Enter a Price Code or select one from the browser. The Price Code field will increase/decrease the sales price by a percentage based on List Price, Unit Cost or Standard Cost.
Unit Cost
The Unit Cost from the product will display. This column is enabled by selecting "Show Cost On Invoices" in Accounts Receivable Maintain Configuration.
Disc Pct
Enter in a Discount Percentage in this field. The discount percentage will be deducted from the unit price and reflected in the extended price column.
Ext Price
The extended price for the line item will be calculated and displayed.
Ext Cost
The extended cost for the line item will be calculated and displayed. This column is enabled by selecting "Show Cost On Invoices" in Accounts Receivable Maintain Configuration.
Tax?
Place a check in this box if you wish to include the default tax on the product.
Tax Amount
This column will display a total that includes calculations of all Tax IDs from the Tax Category as well as any Tax Category from the Product record.
Cost Code
Enter an active Cost Code or select one from the browser. This field is required if you have a job selected in the invoice header. This column will only be available if the Use Cost Codes box is checked in Job Costing Maintain Configuration.
The Cost Code field can be changed up until the invoice is posted to the General Ledger.
A warning will display if the cost code has not been budgeted for the job.
Sales Account
The Sales Account will default in this order:

CYMA Accounting for Windows Training Guide – Accounts Receivable
Copyright 1999-2018 CYMA Systems Inc. 63
1. From Maintain Jobs, if a Job ID is on the line and the Use Job Level Defaulting option for “AR/Sales Orders” is selected in JC Maintain Configuration,
2. From the Sales account from Maintain Products.
3. If another account is desired, enter manually or select from the browser.
Sales Code
Enter the Sales Code or select one from the browser. The GL accounts set up for this sales code will be used when creating Journal Entries.
Project (Financial Management System Only)
Enter the Project that you would like to assign to the transaction, or use the browser to select one.
Revenue Source (Financial Management System Only)
Enter the Revenue Source that you would like to assign to the transaction, or use the browser to select one. This value will automatically fill in if you have assigned a default to the corresponding Sales Account, but it may be changed as needed.
Category (Financial Management System Only)
Enter the Category that you would like to assign to the transaction, or use the browser to select one. This field will only be available if you have selected the Category check box for the corresponding Project in General Ledger - Maintain Projects.
Costing Code (Financial Management System Only)
Enter the Costing Code that you would like to assign to the transaction, or use the browser to select one. This field will only be available if you have selected the Activity check box for the corresponding Project in General Ledger - Maintain Projects.
Grant (Not-For-Profit Only)
Enter the Grant ID that you would like to assign to the transaction, or use the browser to select one.
Source (Not-For-Profit Only)
Enter the Source ID that you would like to assign to the transaction, or use the browser to select one. This value will automatically fill in if you have assigned a default to the corresponding Sales Account, but it may be changed as needed.
Program (Not-For-Profit Only)
Enter the Program ID that you would like to assign to the transaction, or use the browser to select one. This field will only be available if you have selected the Program check box for the corresponding Grant ID in General Ledger - Maintain Grants.
Activity (Not-For-Profit Only)
Enter the Activity ID that you would like to assign to the transaction, or use the browser to select one. This field will only be available if you have selected the Activity check box for the corresponding Grant ID in General Ledger - Maintain Grants.
Trans Class 1
Enter an active Trans Class 1 or select one from the browser.

CYMA Accounting for Windows Training Guide – Accounts Receivable
Copyright 1999-2018 CYMA Systems Inc. 64
Trans Class 2
Enter an active Trans Class 2 or select one from the browser.
The Trans Class fields can be changed up until the invoice is posted to the General Ledger.
Product Price Source
The Product Price Source is a view only field and will display the source of the price for the product of a selected line.
Freight
Enter the Freight amount to be charged on this invoice.
The line item created for the freight amount will use the default freight account from the Maintain Configuration dialog box.
Freight Tax
If any Tax IDs contained in any of the Tax Categories applied to the invoice were set to charge taxes on freight, the freight tax amount will display in this field.
Invoice Total
This field will display the invoice total.
Payment Group Box
Type
If payment was received on this invoice use the drop-down list to select the payment type. The available options are Check, Credit Card, Deposit or Cash. Check is the default pay type.
Deposit is only used as a payment type if the customer has previously made a payment that was recorded as a Deposit with Order through the AR Enter Payment screen. After choosing Deposit as a payment type, a browser button will appear beside the Reference field. Browse and select the appropriate Deposit with Order that was recorded for this invoice.
Date
Enter the date of the deposit, the date must be equal to or greater than the invoice date. This date will be used to post the deposit to both Accounts Receivable and General Ledger. The system date will default and may be overridden.
Ref
Enter the check or credit card number (up to 19 numeric characters). If Deposit was entered in the Type field, the Browser will become available to choose a Deposit to apply to this Invoice.
Duplicate numbers are only allowed when the Payment Type selected is Credit Card.
Exp Date
Enter the credit card expiration date. This field will only be enabled when the Credit Card type is selected. Dates must be entered with leading zeros, such as 09/07.
Amount
Enter the amount paid.

CYMA Accounting for Windows Training Guide – Accounts Receivable
Copyright 1999-2018 CYMA Systems Inc. 65
Enter Invoices Command Buttons
The Copy button cannot be used for One Time Invoices.
The Customer button cannot be accessed from this dialog.
When the Print command button is selected the Print Invoice dialog is displayed. The Print Invoice dialog allows you to select a destination, set up a printer, print a test form alignment, select the number of copies to print or preview an invoice to the screen. You can also e-mail invoices from this dialog. If you select e-mail as the destination and there is a e-mail address on the invoice or the customer, when you click on Print you will get a screen asking for Email Information. In this dialog you can enter multiple To: and CC: addresses. You can change the Subject and add a message to be sent with the invoice. You also have the option for the invoice to be in PDF or RTF format. If the Post to AR Upon Print option is checked in Maintain Configuration, the invoice will also be posted to AR and show immediately on reports.
The Edit button allows you to make changes to the displayed invoice. Click the Edit button once a valid One Time Invoice has been entered. The following criteria is used for editing invoices:
- entered and saved invoices may be edited and/or deleted;
- printed invoices are allowed limited editing, however, you may void and reenter the invoice. When an invoice is voided, all of the fields are copied to a new invoice where any type of editing is allowed;
- invoices that have been posted to AR or GL allow limited editing only.
Click on the Save command button to save the document.
Click on the New command button to start a new document
Click on the Clear command button to clear the current document.
The Delete button permanently removes the displayed Invoice from the data file. This button is enabled after the Edit button has been clicked. Posted Invoices cannot be deleted. After the Delete button is clicked, a confirmation message is displayed before deleting the Invoice.
The Close button prompts you to save any changes (if applicable) and then closes the dialog box. Pressing the ESC key performs the same function.


CYMA Accounting for Windows Training Guide – Accounts Receivable
Copyright 1999-2018 CYMA Systems Inc. 67
View Customer and Product History The View Customer and Product History dialog is accessed from the Enter Invoices data grid when the F6 key is pressed on the keyboard. This dialog displays the history for the selected product and customer.
View Customer and Product History
Refer to the following fields and descriptions
Customer ID
The Customer ID field displays the Customer ID of the current invoice. The customer's name displays to the right.
Product ID
The Product ID field displays the Product ID of the current Invoice. The product description displays to the right.
Show Invoices group box
Five
The Five option is the default and will display the last five invoices for the customer and product.
All
The All option will display all invoices for the customer and product.
Data grid columns and fields

CYMA Accounting for Windows Training Guide – Accounts Receivable
Copyright 1999-2018 CYMA Systems Inc. 68
The data grid has User Column functionality. For more information go to the Data grid - User Column topic in the System Manager Help.
Invoice Date
The Invoice Date field will display the date of the invoice.
Invoice No
The Invoice No field will display the order number of the invoice.
Type
The Type field will display either Invoice or Credit.
Invoice Status
The Invoice Status field will display either Entered or Printed.
Quantity
The Quantity field will display the quantity ordered for this product on the invoice.
Unit Price
The Unit Price field will display the unit price used for this product on the invoice.
Ext Price
The Ext Price field will display the value of quantity field times the unit price.
Unit Cost
The Unit Cost field will display the unit cost used for this product on the invoice.
Ext Cost
The Ext Cost field will display the value of quantity times the unit cost.
Price Code
The Price Code field will display the price code used for this product on the invoice.
Price Source
The Price Source field will display where the price came from for this product on the invoice.
Disc %
The Disc % field with display the discount percent for this product on the invoice.
Tax Amount
The Tax Amount field with display the amount of the tax for this product on the invoice.
Sales Code
The Sales Code field with display the sales code that will determine the GL accounts to use when posting the invoice.
Sales Account
The Sales Account field with display the GL Sales Account for this product on the invoice.
Project
The Project field with display the Project number for this product on the invoice. This field will only display if Project Tracking is turned on in Maintain Configuration.
Grant

CYMA Accounting for Windows Training Guide – Accounts Receivable
Copyright 1999-2018 CYMA Systems Inc. 69
The Grant field with display the Grant number for this product on the invoice. This field will only display if Grant Tracking is turned on in Maintain Configuration.
Sales Order
The Sales Order field with display the sales order number assigned to the invoice.
Job
The Job field with display the job number assigned to the invoice. This field will only display if Job Costing is turned on in System Manager - Maintain Company.
Cost Code
The Cost Code field with display the cost code assigned to the invoice. This field will only display if Use Cost Codes is turned on in Job Costing - Maintain Configuration.
Sales Rep
The Sales Rep field with display the sales rep assigned to the invoice.
Trans Class 1 and 2
The Trans Class 1 and 2 field with display the transaction classification codes assigned to the invoice. These fields will only display if Use Transaction Class Codes are turned on in Maintain Configuration.
Average Group box
Qty Ordered
The Qty Ordered field will display the average quantity ordered for all items listed in the grid.
Unit Price
The Unit Price field will display the average unit price for all items listed in the grid.
Unit Cost
The Unit Cost field will display the average unit cost for all items listed in the grid.
Gross Margin Amt
The Gross Margin Amt field will display the average gross margin amount for all items listed in the grid.
Gross Margin Pct
The Gross Margin Pct field will display the average gross margin percentage for all items listed in the grid.
View Customer and Product History command buttons
Click the View Detail button to show the Invoice for a selected line.
Click the Copy Unit Price button to copy the unit price from a selected line to the current Invoice.
Click the Close button to return to the Enter Invoices dialog.

CYMA Accounting for Windows Training Guide – Accounts Receivable
Copyright 1999-2018 CYMA Systems Inc. 70
Enter Payments, Adjustments, and Transfers - Customer Payments When Payments... is selected from the Enter menu, the Enter Payments, Adjustments, and Transfers dialog box is displayed. Customer payments as well as non-customer receipts, such as overpayment refunds, repayment of employee loans, etc., can be entered through this operation. This allows Deposits Slips to include all receipts and prevents having to go to the General Ledger to enter miscellaneous checks.
When entering a line item in the Enter Payments, Adjustments, and Transfers screen, simply pressing F6 will take you directly to the Enter Customer Payments screen.
Enter Payments dialog box
Refer to the following field descriptions and requirements.
Deposit
To enter a new deposit choose the New button. The Deposit number will be assigned by the system when the record is saved, until then the field will be disabled and display -1.
To edit an existing unposted Deposit enter the Deposit number, or use the Browser to select one. You must then select the Edit button to make any changes. Deposits that have been posted to AR will be viewable but not editable.

CYMA Accounting for Windows Training Guide – Accounts Receivable
Copyright 1999-2018 CYMA Systems Inc. 71
Date
Enter the date of this deposit. This field defaults to the current accounting date.
Bank ID
Enter the Bank ID for this deposit, or use the Browser to select or create one. The Bank Description will display in the adjacent field in the view-only mode. The last used Bank ID will automatically default.
Deposit Total
Enter the deposit total. This amount must match the amount total from the DataGrid before the Deposit can be saved or posted.
Cash Acct
The GL account from the Bank ID will display in view-only mode.
Reference
Enter a value in the Reference field to record additional information about the payments, up to 80 alphanumeric characters.
Sort Options Group Box
The Sort Options Group Box allows you to sort the data grid. These options are only available when the dialog is in read only status.
Entry Order
Select Entry Order to sort the grid in the order that the payments were entered. This is the default setting and is the setting when editing payments records.
Type
Select Type to sort the grid by the type of payment.
Reference
Select Reference to sort the grid by the reference field.
Payor Name
Select Payor Name to sort the grid by the Payor Name field.
Amount
Select Amount to sort the grid by the amount field, in ascending order.
DataGrid Columns and Fields
Refer to the following field descriptions and requirements.
Type
Enter a User Payment Type or select one from the browser.
Reference
If selecting a User Defined Payment Type that was associated with the system type of Check or Credit Card, enter the check number, credit card number or other reference number (up to 19 numeric characters).
Duplicate numbers are only allowed when the User Defined Payment Type selected was associated with the system type of Credit Card.

CYMA Accounting for Windows Training Guide – Accounts Receivable
Copyright 1999-2018 CYMA Systems Inc. 72
It is not recommended that you enter the credit card number as this data is not encrypted.
Exp. Date
If selecting a User Defined Payment Type that was associated with the system type of Credit Card, enter the credit card expiration date. Dates must be entered with leading zeros, such as 09/07.
Customer ID
Enter the Customer ID or select an existing Customer ID by using the browse button.
Payor Name
Enter the name of the business or individual that the payment was received from. The Customer Name entered in Maintain Customers defaults.
Amount
Enter the amount of the payment or adjustment.
Undistributed
This column displays the amount of the customer payment that has not yet been applied to the customer's account. In order to post the deposit, you must associate the total of the deposit amount with any unpaid invoices, or post the remaining amount on the customer's account for later use. Posting an undistributed amount on a customer's account is done on the Enter Customer Payment dialog.
When entering a line item in the Enter Payments, Adjustments, and Transfers screen, simply pressing F6 will take you directly to the Enter Customer Payments screen.
Accounts
This view only section will only be visible once a payment line is selected. It will keep track of and display the customer account's that have been accessed for entering multiple payments on that single payment line. This information is useful because it will keep track of all the customers accounts you have entered payments for in any particular payment line.
Proof Options
Detail
Select Detail to print a detail proof listing to verify your results.
Summary
Select Summary to print a summary proof listing to verify your results.
To process the payment type you have entered for a customer in the DataGrid, you must first select the line you wish to enter by clicking the Select Box on the DataGrid to the left of the record line and then select the Customer Account button.
The Enter Customer Payment dialog will display.
To process a payment type you have entered in the DataGrid to a miscellaneous account, click the Select Box on the DataGrid to the left of the record line and then hit the Miscellaneous Account button.
The Enter Miscellaneous Payment dialog will display.

CYMA Accounting for Windows Training Guide – Accounts Receivable
Copyright 1999-2018 CYMA Systems Inc. 73
Enter Payments, Adjustments, and Transfers command buttons
Click the Auto Apply to have the system automatically apply the value in the amount column to invoices and credits starting with the oldest invoice first.
If an amount has already been applied, clicking this button will clear previously applied amounts and reapply them. This option is not available if the payment line has been distributed to multiple customers.
Click the Proof button to print a proof listing. Select Print to print the proof listing to verify your results.
Click the Post button and you will be prompted to verify that you want to post this payment. After posting you will receive an option to print a proof listing. Select Print to print the proof listing to verify your results. Once the posting process is completed, the payment may no longer be edited.
This button is only enabled after the entire deposit has been fully distributed to the customer account or a miscellaneous account.
The Edit button allows you to make changes to the displayed payment. Only payments that have not been posted can be edited. Click the Edit button once a valid payment has been entered.
The Save button validates and saves the data entered. The Save button is enabled when data on the dialog box is changed.
The New button prompts you to save any changes to the displayed payment (if applicable) and then clears the dialog box. This allows you to create a payment or select another record for viewing or editing.
The Clear button prompts you to save any changes to the displayed payment (if applicable) and then clears the dialog box. This allows you to create a payment or select another record for viewing or editing.
The Delete button permanently removes the displayed payment from the data file. This button is enabled after the Edit button has been clicked. Only payments that have not been posted can be deleted.
The Close button prompts you to save any changes (if applicable) and then closes the dialog box. Pressing the ESC key performs the same function.


CYMA Accounting for Windows Training Guide – Accounts Receivable
Copyright 1999-2018 CYMA Systems Inc. 75
Enter Payment Transfers - Customer Payments When the selection box to the left of the Transfer line item ID in the DataGrid is selected, click the
button to access the Enter Payment Transfers screen.
Enter Payment Transfers dialog
Refer to the following field descriptions and requirements.
All information included in the header section of the Enter Customer Payment screen is in view-only mode.
Deposit No
The Deposit No field will display a -1 until the deposit is saved. When saved the system will automatically assign a deposit number.
Transaction
The Transaction field will display the type of transaction being entered on the customers account as defined on the Enter Payments, Adjustments, and Transfers dialog.
Customer ID
The Customer ID field displays the Customer ID you are currently entering payments for.
Payor Name
The Payor Name entered in the Enter Payments, Adjustments, and Transfers dialog displays in view-only mode.

CYMA Accounting for Windows Training Guide – Accounts Receivable
Copyright 1999-2018 CYMA Systems Inc. 76
Reference
The Reference field displays reference data entered in the DataGrid on the Enter Payments, Adjustments, and Transfers dialog box.
Customer Name
The Customer Name displays in view-only mode.
Deposit Date
The Deposit Date field displays the date of the deposit.
Check Amount
The Check Amount field displays the total that was entered in the Amount column in the Enter Payments, Adjustments, and Transfers dialog DataGrid.
Undistributed
The Undistributed field displays that portion of the payment that has not yet been distributed to the customer’s account. Only deposits that have been fully distributed can be selected for posting.
Click the Select Invoices button to select all the Invoices in the DataGrid. This will automatically apply the undistributed amount to all debit balance Invoices.
Click the Deselect Invoices button to deselect all the Invoices selected in the DataGrid.
Click the Select Credits button to select all the Credits in the DataGrid. This will automatically accumulate all credit balance Invoices up to the balance of the Invoice and apply the total to the undistributed amount.
Click the Deselect Credits button to deselect all the Credits in the DataGrid.
Click the Deselect All button to deselect all line items in the DataGrid.
Click the Line Item Detail button to apply a partial payment to specific line items on an Invoice. This button will only be enabled when an amount less than the Invoice balance is entered in the Amount column. The line must be selected by clicking the mouse in the selection box to the left of the DataGrid.
Sort By Group Box
Inv Date
Select the Inv Date option button to sort the Invoices in the DataGrid by Invoice date.
Inv No
Select the Inv No option button to sort the Invoices in the DataGrid by Invoice number.
Show Paid Invoices

CYMA Accounting for Windows Training Guide – Accounts Receivable
Copyright 1999-2018 CYMA Systems Inc. 77
Click the Show Paid Invoices check box to display all the Customers Paid Invoices in the DataGrid. Any paid Invoices will not be displayed unless this box is checked.
Post on Account
Select the Post on Account check box if you wish to post any dollar amount to the customers account, creating an unapplied payment. You must type in the dollar amount you wish to post in the Post on Account text field.
Deposit with Order
Select the Deposit with Order check box if you plan to create an unapplied payment marked as a deposit. The Deposit with Order check box becomes enabled only after selecting the Post on Account check box.
A Deposit with Order can be considered an unapplied payment that has been received for a specific invoice or order. Deposits with Order can be selected on the Enter Invoice screen as a full or partial payment for the Invoice being entered.
DataGrid Columns and Fields
Upon entering the transfer, the DataGrid will list the customer's invoice information. You may view the customers Unpaid Invoices by selecting the check box Show Paid Invoices. Only unpaid Invoices that have been posted to Accounts Receivable will be displayed on the DataGrid.
The DataGrid columns that appear grayed out are view-only mode.
Inv No
The Inv No column displays the Invoice number associated with the unpaid Invoice.
Inv Date
The Inv Date column displays the Invoice date associated with the corresponding Invoice Number.
Inv Bal
The Inv Bal column displays the unpaid Invoice balance.
Disc Avail
The Disc Avail column displays the available discount amount, based on the deposit date and the discount calculated from the terms code.
Disc Allowed
The Disc Allowed column displays the available discount amount, based on the deposit date and the discount calculated from the terms code.
Disc?
Select the Disc check box if you wish to give the selected customer a discount.
Amt Paid
Enter the Transfer amount to be applied to this Invoice. If the entire Invoice balance is not Transferred, enter the partial Transfer amount. The partial Transfer amount is deducted from the Invoice balance and the amount in the Remaining column will be recalculated.
Partial Transfers can also be applied to individual line items. Once the Transfer has been entered, highlight the Invoice line by selecting the selection list box then select the Line Item Detail button.
Remaining

CYMA Accounting for Windows Training Guide – Accounts Receivable
Copyright 1999-2018 CYMA Systems Inc. 78
The initial amount shown in this column will be the Invoice balance amount. Any unpaid amount remaining after applying a payment amount will be displayed when tabbing off of the Amt Paid column. Any Invoice that represents a credit balance will fill this cell with the color red.
Terms, Disc, and Due
This view only section will only be visible once a payment line is selected. It will keep track of and display the current line item that has been accessed for entering payment.
Enter Payment Transfers Command Buttons
Click the Customer command button to bring up the Maintain Customer master information dialog box.
The Edit button allows you to make changes to the displayed Transfer. Only Transfers that have not been posted can be edited. Click the Edit button once a valid Transfer has been entered.
The Save button validates and saves the data entered. The Save button is enabled when data on the dialog box is changed.
The Delete button permanently removes the displayed Transfer from the data file. This button is enabled after the Edit button has been clicked. Only Transfers that have not been posted can be deleted.
The Close button prompts you to save any changes (if applicable) and then closes the dialog box. Pressing the ESC key performs the same function.

CYMA Accounting for Windows Training Guide – Accounts Receivable
Copyright 1999-2018 CYMA Systems Inc. 79
Enter Miscellaneous Payments When the Enter Miscellaneous Payments button is selected, the Enter Miscellaneous Payments dialog box displays. Entering miscellaneous payments that are not customer related, such as refunds from overpayments, employee loans, etc., allows the Deposit Slip to include all checks received. This prevents having to go to the General Ledger to enter miscellaneous cash receipts. This will provide a complete audit trail for all cash receipts from within the Accounts Receivable module.
Enter Miscellaneous Payments dialog box
Refer to the following field descriptions and requirements. All information included in the header section of the Enter Miscellaneous Payments dialog box is in view-only mode.
Deposit No
The Deposit No field will display a -1 until the deposit is saved. When saved, the system will automatically assign a deposit number.
Transaction
The Transaction field will display the type of transaction being entered on the customers account as defined on the Enter Payments, Adjustments, and Transfers dialog.
Payor Name
The Payor Name will display in this view-only text box.
Reference
The Reference field displays reference data entered in the DataGrid in the Enter Payments, Adjustments, and Transfers dialog.
Check Amount
The Check Amount field displays the total that was entered in the Amount column on the Enter Payments, Adjustments, and Transfers dialog DataGrid.
Undistributed
The Undistributed field displays that portion of the payment that has not yet been applied.
DataGrid Columns and Fields

CYMA Accounting for Windows Training Guide – Accounts Receivable
Copyright 1999-2018 CYMA Systems Inc. 80
Refer to the following column descriptions and field requirements.
Description
Enter a description to describe the purpose of the cash receipt. The Description column will display the Payor Name from the Enter Payments, Adjustments, and Transfers dialog. This field may be overridden (up to 30 alphanumeric characters).
Credit Account
Enter a General Ledger account, or use the Browser to select the account to which the credit side of the entry will post when payments are posted to the General Ledger.
Account Name
The Account Name field displays the Name of the account selected in the Credit Account column.
Amount Paid
This will default to the check amount but will allow you to override if the check needs to be split among multiple General Ledger accounts.
Trans Class 1
Enter an active Transaction Classification Code 1 or select one from the browser.
Trans Class 2
Enter an active Transaction Classification Code 2 or select one from the browser.
Enter Miscellaneous Payments Command Buttons
The Save button validates and saves the data entered. The Save button is enabled when data on the dialog box is changed.
The Delete button permanently removes the displayed payment from the data file. Only payments that have not been posted can be deleted.
The Close button prompts you to save any changes (if applicable) and then closes the dialog box. Pressing the ESC key performs the same function.

CYMA Accounting for Windows Training Guide – Accounts Receivable
Copyright 1999-2018 CYMA Systems Inc. 81
Enter Payments - Customer Payments When the Enter Customer Payments button is selected, the Enter Customer Payments dialog box displays.
Payments for Balance Forward as well as Open Item customers are entered in this dialog box. Payments can be applied to customer records who have not yet been billed if you are unsure where to apply the check.
Partial payments can be applied to invoices by a flat amount or can be applied to individual line items. Invoices can be partially paid by selecting an invoice on the DataGrid and typing the Amt Paid. The system will automatically begin applying the Amt Paid to the first line item until the dollar amount is depleted. You may optionally select the Line Item Detail button after an amount less than the Remaining balance has been entered which will allow you to specify the line items you want to show as paid. This is especially useful for Cash Basis companies allowing you to control which sales accounts are affected when the partial payment is posted to the General Ledger.
Enter Customer Payments dialog box
Refer to the following field descriptions and requirements.
All information included in the header section of the Enter Customer Payment screen is view-only.
Deposit No
The Deposit No field will display a -1 until the deposit is saved. When saved, the system will automatically assign a deposit number.
Transaction
The Transaction field will display the type of transaction being entered on the customers account as defined on the Enter Payments, Adjustments, and Transfers dialog.

CYMA Accounting for Windows Training Guide – Accounts Receivable
Copyright 1999-2018 CYMA Systems Inc. 82
Customer ID
The Customer ID field displays the Customer ID you are currently entering payments for.
Payor Name
The Payor Name entered in the Enter Payments, Adjustments, and Transfers dialog will display in this view-only text box.
Reference
The Reference field displays reference data entered in the DataGrid on the Enter Payments, Adjustments, and Transfers dialog box.
Exp
The Exp field displays the credit card Expiration date entered on the Enter Payments, Adjustments, and Transfers dialog box.
Customer Name
The view-only Customer Name field displays the Customer Name.
Deposit Date
The Deposit Date field displays the date of the deposit.
Check Amount
The Check Amount field displays the total that was entered in the Amount column in the Enter Payments, Adjustments, and Transfers dialog DataGrid.
Undistributed
The Undistributed field displays that portion of the payment that has not yet been distributed to the customer’s account..
Only deposits that have been fully distributed can be selected for posting.
Click the Select Invoices button to select all the Invoices in the DataGrid. This will automatically apply the undistributed amount to all debit balance Invoices.
The system will automatically begin applying the Amt Paid to the first line item until the dollar amount is depleted.
Click the Deselect Invoices button to deselect all the Invoices selected in the DataGrid.
Click the Select Credits button to select all the Credits in the DataGrid. This will automatically accumulate all credit balance Invoices up to the balance of the Invoice and apply the total to the undistributed amount.
Any undistributed credit amount will be applied to the oldest credit first.
Click the Deselect Credits button to deselect all the Credits in the DataGrid.
Click the Deselect All button to deselect all line items in the DataGrid.

CYMA Accounting for Windows Training Guide – Accounts Receivable
Copyright 1999-2018 CYMA Systems Inc. 83
Click the Line Item Detail button to apply a partial payment to specific line items on an Invoice. This button will only be enabled when an amount less than the Invoice balance is entered in the Amount column. The line must be selected by clicking the mouse in the selection box to the left of the DataGrid.
Sort By Group Box
Inv Date
Select the Inv Date option button to sort the Invoices in the DataGrid by Invoice date.
Inv No
Select the Inv No option button to sort the Invoices in the DataGrid by Invoice number.
Sales Order
Select the Sales Order option button to sort the Invoices in the DataGrid by Sales Order.
Ship To
Select the Ship To option button to sort the Invoices in the DataGrid by Ship To.
Show Paid Invoices
Click the Show Paid Invoices check box to display all the Customers Paid Invoices in the DataGrid. Any paid Invoices will not be displayed unless this box is checked.
Post on Account
Select the Post on Account check box if you wish to post any dollar amount to the customers account, creating an unapplied payment. You must type in the dollar amount you wish to post in the Post on Account text field.
Deposit with Order
Select the Deposit with Order check box if you plan to create an unapplied payment marked as a deposit. The Deposit with Order check box becomes enabled only after selecting the Post on Account check box.
A Deposit with Order can be considered an unapplied payment that has been received for a specific invoice or order. Deposits with Order can be selected on the Enter Invoice screen as a full or partial payment for the Invoice being entered.
DataGrid Columns and Fields
Upon entering the check, credit card number, cash, or transfer amount, the DataGrid will list the customer's unpaid invoice information. You may view the customers Unpaid Invoices by selecting the check box Show Paid Invoices. Only unpaid Invoices that have been posted to Accounts Receivable will be displayed on the DataGrid.
The DataGrid columns that appear grayed out are view-only mode.
Inv No
The Inv No column displays the Invoice number associated with the unpaid Invoice.
Sales Order No

CYMA Accounting for Windows Training Guide – Accounts Receivable
Copyright 1999-2018 CYMA Systems Inc. 84
The Sales Order No column displays the Sales Order associated with the corresponding Invoice Number.
Ship-To ID
The Ship-To ID column displays the Ship To ID associated with the corresponding Invoice Number.
Inv Date
The Inv Date column displays the Invoice date associated with the corresponding Invoice Number.
Inv Bal
The Inv Bal column displays the unpaid Invoice balance.
Disc Avail
The Disc Avail column displays the available discount amount, based on the deposit date and the discount calculated from the terms code.
Disc Allowed
The Disc Allowed column displays the available discount amount, based on the deposit date and the discount calculated from the terms code.
Disc?
Select the Disc check box if you wish to give the selected customer a discount.
Amt Paid
Enter the payment amount to be applied to this Invoice. If the entire Invoice balance was not paid, enter the partial payment amount. The partial payment amount is deducted from the Invoice balance and the amount in the Remaining column will be recalculated.
Partial payments can also be applied to individual line items. Once the amount paid has been entered, highlight the Invoice line by selecting the selection list box then select the Line Item Detail button.
Remaining
The initial amount shown in this column will be the Invoice balance amount. Any unpaid amount remaining after applying a payment amount will be displayed when tabbing off of the Amt Paid column. Any Invoice that represents a credit balance will fill this cell with the color red.
Invoice Reference
A view only section will only be visible below the data grid once a payment line is selected. This section will display relative invoice information for the currently selected payment line item, the displayed information includes the terms code, discount date, due date, sales order number, purchase order number and job number.
Enter Customer Payments Command Buttons
Select the View Invoice button to view the selected invoice. This button will open an invoice dialog in view only mode. No editing is allowed.
Click the Customer command button to bring up the Maintain Customer master information dialog box.

CYMA Accounting for Windows Training Guide – Accounts Receivable
Copyright 1999-2018 CYMA Systems Inc. 85
The Edit button allows you to make changes to the displayed payment. Only payments that have not been posted can be edited. Click the Edit button once a valid payment has been entered.
The Save button validates and saves the data entered. The Save button is enabled when data on the dialog box is changed. If the batch of Payments is not fully distributed, you will receive a warning message. This helps prevent you from accidentally saving payments that are not fully distributed and therefore not posted in the AR Posting Process.
The Delete button permanently removes the displayed payment from the data file. This button is enabled after the Edit button has been clicked. Only payments that have not been posted can be deleted.
The Close button prompts you to save any changes (if applicable) and then closes the dialog box. Pressing the ESC key performs the same function.


CYMA Accounting for Windows Training Guide – Accounts Receivable
Copyright 1999-2018 CYMA Systems Inc. 87
Enter Payments - Customer Payments by Line Item When the Line Item Detail button is selected the Enter Payments by Line Item dialog box will display.
Enter Payments by Line Item dialog box
Refer to the following field descriptions and requirements. All information included in the header section of the Enter Payments by Line Item dialog box is in view-only mode.
Invoice No
The Invoice No field displays the Invoice number associated with the unpaid Invoice.
Invoice Balance
The Invoice Balance field displays the unpaid Invoice balance.
Check No
The Check No field displays the Check number entered in the in the Enter Payments, Adjustments, and Transfers dialog box.
Check Amount to Apply
The Check Amount to Apply field displays the total that was entered in the Amt Paid column on the Enter Customer Payments dialog box for this Invoice.
DataGrid Columns and Fields
All line items for the invoice selected on the Enter Customer Payments dialog box will display. Enter the Pay Amt for each line item that needs to reflect as paid. The DataGrid total of the Pay Amt column must be equal to the Check Amount before the OK button will allow you to save the record.
The DataGrid columns which appear grayed out are view-only mode for viewing data.

CYMA Accounting for Windows Training Guide – Accounts Receivable
Copyright 1999-2018 CYMA Systems Inc. 88
Product ID
The Product ID column displays the Product ID associated with this line item.
Price
The Price column displays the price for the product associated with this line item.
Quantity
The Quantity column displays in the quantity of product associated with this line item.
Ext Price
The Ext Price column displays the extended price associated with this line item.
Tax Amount
The Tax Amount column displays the total tax associated with this line item.
On partially paid line items the system automatically pro-rates the portions of the payment that apply to taxes and to the extended price.
Line Total
The Line Total column displays the total of the Ext Price and the Tax Amount.
Pay Amt
Enter the payment amount to be applied to this line item. If the entire Line Total is not being paid, enter the partial payment amount. The partial payment amount is deducted from the Line Total and the amount in the Remaining column will be recalculated.
Remaining
The initial amount shown in this column will be the Line Total amount. Any unpaid amount remaining after applying a payment amount will be displayed when tabbing off of the Pay Amt column.
Enter Payments by Line Item Command Buttons
Choose the OK button to save the line item payment and return to the Enter Customer Payments dialog box. The total Pay Amt must be equal to the Check Amount to Apply.
Choose the Cancel button to return to the Enter Customer Payments dialog box. If any data was entered the system will prompt you and ask if you would like to save the changes.

CYMA Accounting for Windows Training Guide – Accounts Receivable
Copyright 1999-2018 CYMA Systems Inc. 89
Enter Payments - Invoice Adjustments When the selection box to the left of the Adjustment line item ID in the DataGrid is selected, click the
button to access the Enter Invoice Adjustments screen.
Enter Invoice Adjustments dialog
Refer to the following field descriptions and requirements.
All information included in the header section of the Enter Customer Payment screen is in view-only mode.
Deposit No
The Deposit No field will display a -1 until the deposit is saved. When saved the system will automatically assign a deposit number.
Transaction
The Transaction field will display the type of transaction being entered on the customers account as defined on the Enter Payments, Adjustments, and Transfers dialog.
Customer ID
The Customer ID field displays the Customer ID you are currently entering payments for.
Description
The Payor Name entered in the Enter Payments, Adjustments, and Transfers dialog displays in view-only mode.
Reference

CYMA Accounting for Windows Training Guide – Accounts Receivable
Copyright 1999-2018 CYMA Systems Inc. 90
The Reference field displays reference data entered in the DataGrid on the Enter Payments, Adjustments, and Transfers dialog box.
Customer Name
The Customer Name displays in view-only mode.
Date
The Date field displays the date of the deposit.
Amount
The Amount field displays the total that was entered in the Amount column in the Enter Payments, Adjustments, and Transfers dialog DataGrid.
Undistributed
The Undistributed field displays that portion of the payment that has not yet been distributed to the customer’s account. Only deposits that have been fully distributed can be selected for posting.
DataGrid Columns and Fields
The DataGrid lists the customer's unpaid invoice information.
The DataGrid columns that appear grayed out are view-only mode.
Inv No
Use the Browser to select the Invoice you want to adjustment.
Inv Date
The Inv Date column displays the Invoice date associated with the corresponding Invoice Number.
Inv Bal
The Inv Bal column displays the unpaid Invoice balance.
Debit Account
Use the Browser to select the Debit Account for this adjustment.
Amount
Enter the adjustment amount to be applied to this Invoice. If the entire Invoice balance is not being adjusted, enter the partial adjustment amount. The partial adjustment amount is added or deducted from the Invoice balance and the amount in the Remaining column will be recalculated.
Remaining
The initial amount shown in this column will be the Invoice balance amount. Any unpaid amount remaining after applying a payment adjustment will be displayed when tabbing off of the Amt Paid column. Any Invoice that represents a credit balance will fill this cell with the color red.
Terms, Disc, and Due
This view only section will only be visible once a payment line is selected. It will keep track of and display the current line item that has been accessed for entering payment.
Enter Invoice Adjustments Command Buttons

CYMA Accounting for Windows Training Guide – Accounts Receivable
Copyright 1999-2018 CYMA Systems Inc. 91
Click the Customer button to access the Maintain Customers dialog.
The Edit button allows you to make changes to the displayed adjustment. Only adjustments that have not been posted can be edited.
The Save button validates and saves the data entered. The Save button is enabled when data on the dialog box is changed.
The Delete button permanently removes the displayed adjustment from the data file. This button is enabled after the Edit button has been clicked. Only adjustments that have not been posted can be deleted.
The Close button prompts you to save any changes (if applicable) and then closes the dialog box. Pressing the ESC key performs the same function.


CYMA Accounting for Windows Training Guide – Accounts Receivable
Copyright 1999-2018 CYMA Systems Inc. 93
Enter Quick Payments When Quick Payments... is selected from the Enter Menu the Enter Quick Payments dialog box displays. The Quick Payments dialog allows the user to enter payment information and then create deposits from those entries.
Enter Quick Payments dialog
Refer to the following fields and descriptions
Deposit group box
Bank ID
Enter the Bank ID or select one from the browser. This bank ID will be used when creating the deposit. The Bank Name displays in the field to the right of the Bank ID.
Cash Account
The Cash Account field displays the General Ledger Account that has been associated with the selected bank.
Date
Enter a Date to use when creating the deposit. The date must be within an open General Ledger year. A warning will display if a date is entered that is outside the Current Period.
Reference
Enter Reference information if desired. This field is required if a deposit is being created that contains a record where the Misc Pymt? column is set to yes and the Customer ID is blank.
Data grid columns and fields

CYMA Accounting for Windows Training Guide – Accounts Receivable
Copyright 1999-2018 CYMA Systems Inc. 94
The data grid has User Column functionality. For more information go to the Data grid - User Column topic in the System Manager Help.
Type
Enter a User Payment Type or select one from the browser.
Transfers and Adjustments cannot be entered through this dialog. Use the Enter Payments dialog for these options.
Reference
If selecting a User Defined Payment Type that was associated with the system type of Check or Credit Card, enter the check number, credit card number or other reference number (up to 19 numeric characters).
Duplicate numbers are only allowed when the User Defined Payment Type selected was associated with the system type of Credit Card.
It is not recommended that you enter the credit card number as this data is not encrypted.
Exp. Date
If selecting a User Defined Payment Type that was associated with the system type of Credit Card, enter the credit card expiration date. Dates must be entered with leading zeros, such as 09/07.
Customer ID
Enter the Customer ID or select one from the browser.
This field will be filled in automatically if an Invoice number is manually entered in the Inv No column.
Inv No
Enter the Invoice Number that needs to be paid. This browser will show invoices for the selected Customers. An invoice number can be entered manually that does not belong to the selected customer and the customer will change to one associated with the invoice entered.
Misc Payment?
The Misc Payment? column is used to denote this payment is a miscellaneous payment and not to be applied to an invoice. If this column is set to yes, the Invoice No column will be disabled for the payment line. The Credit Account column will be enabled for selection of the GL account to post the payment to.
This column cannot be set to yes if the User Payment Type selected is associated with the system payment type of EFT.
Inv Bal
The Inv Bal column will display the current balance of the selected invoice.
Disc Avail
The Disc Avail column will display the amount of any available discount based on the terms code on the invoice.
CYMA Accounting for Windows Training Guide – Accounts Receivable
Copyright 1999-2018 CYMA Systems Inc. 95
Disc Allowed
The Disc Allowed column will populate with the same value as in the Disc Avail column but may be changed to reflect the discount that will be taken for this payment.
Amount
The Amount column will populate with the difference between the Inv Bal and Disc Allowed Column. This value may be changed.
Remaining
The Remaining column will display the difference between the Inv Bal and Amount column to show the user what the balance will be on the invoice after this payment has posted.
Credit Account
The Credit Account is enabled and required for payment lines with the Misc Payment column set to Yes.
Trans Class 1
Enter an active Trans Class 1 or select one from the browser.
Trans Class 2
Enter an active Trans Class 2 or select one from the browser.
Inv Date
The Inv Date column displays the Date of the Invoice.
Terms Code
The Terms Code column displays the Terms Code of the Invoice.
Due Date
The Due Date column displays the date the invoice is due.
Disc Date
The Disc Date column displays the last date that the discount will be available.
Sales Order No
The Sales Order No displays the sales order number from the invoice.
Customer's PO
The Customer's PO displays the customer's purchase order number from the invoice.
Job
The Job column displays the Job number for the invoice
Customer Name
The Customer Name field displays the Customer Name for a selected line in the grid.
Click the Line Item Detail button to apply a partial payment to specific line items on an Invoice. This button will only be enabled when an amount less than the Invoice balance is entered in the Amount column. The line must be selected by clicking the mouse in the selection box to the left of the DataGrid.

CYMA Accounting for Windows Training Guide – Accounts Receivable
Copyright 1999-2018 CYMA Systems Inc. 96
Enter Quick Payment Command Buttons
Click the Select All button to select all lines in the grid to be included in the created deposit.
Click the Deselect All button to unselect all lines in the grid.
Click the Create Deposit button to create a deposit from the selected lines.
Only selected lines will be included in the deposit.
Click the Proof button to print a proof report of the selected lines.
Click the Save button to save the entries without creating deposits.
Click the Delete button to delete all lines in the grid. To delete individual lines, select the lines then use the Delete key on the keyboard.
Click the Close button to close the dialog without saving any changes.

CYMA Accounting for Windows Training Guide – Accounts Receivable
Copyright 1999-2018 CYMA Systems Inc. 97
Enter Invoice Status Inquiry When Invoice Status Inquiry... is selected from the Accounts Receivable Enter menu the Invoice Status Inquiry dialog box displays. The Invoice Status Inquiry dialog consists of two tabs, Inquiry Criteria and Selected Invoices, which allow you to control which invoices to include in the inquiry. Invoice status inquiries can be accessed from Accounts Payable and Accounts Receivable.
The Inquiry Criteria tab allows you to enter the selection criteria for the invoices to be selected. The Selected Invoices tab allows you to view the invoices that meet the selection criteria entered on the Inquiry Criteria tab.
Refer to the following steps to select invoices for inquiry:
Enter the invoice selection criteria on the Inquiry Criteria tab.
Click the Find Now button to list the invoices meeting the selection criteria.
Once the system has located the invoices, the Selected Invoices tab displays and lists the invoices meeting the criteria entered on the Inquiry Criteria tab. To add to your selections using different selection criteria return to the Inquiry Criteria tab, reenter the criteria, and click the Find Now button.
Invoice Status Inquiry – Inquiry Criteria Tab
Invoice Status Inquiry – Selected Invoices Tab

CYMA Accounting for Windows Training Guide – Accounts Receivable
Copyright 1999-2018 CYMA Systems Inc. 98
Invoice Status Inquiry Command Buttons
Select the Print button to print the list of invoices displayed in the grid. The report will contain only a subset of the columns displayed.
Select the Export to CSV button to export the list of invoices displayed in the grid. The export will contain information for all columns displayed.
Select the Find Now command button to locate the data matching the selection criteria. This button is only enabled when the Inquiry Criteria tab is active. When selected, the Selected Invoices tab becomes active and the DataGrid lists the invoices meeting the criteria. Switch tabs to change the selection criteria and click the Find Now button again to add invoices meeting the new selection criteria to the selections. This gives you the option to select invoices by batches meeting specific criteria.
When an Invoice is highlighted on the Selected Invoices tab, the View Payments command button becomes active. Click the View Payments command button to open a dialog that will display the payment detail for the selected invoice.

CYMA Accounting for Windows Training Guide – Accounts Receivable
Copyright 1999-2018 CYMA Systems Inc. 99
When an Invoice is highlighted on the Selected Invoices tab, the View Document command button becomes active. Click the View Document command button to open the Enter Invoice dialog and view the selected invoices itemized line item detail.
To select an Invoice, click the selection box to the left of the Invoice line on the DataGrid.
Click the Close command button to exit the Invoice Status Inquiry Dialog. Pressing the ESC key performs the same function.


CYMA Accounting for Windows Training Guide – Accounts Receivable
Copyright 1999-2018 CYMA Systems Inc. 101
Enter Invoice Status Inquiry - Inquiry Criteria Tab The Inquiry Criteria tab allows you to enter the criteria for the invoices to be selected and viewed.
Invoice Status Inquiry - Inquiry Criteria Tab dialog box
Refer to the following field descriptions and requirements.
Invoice Status Inquiry - Inquiry Criteria Tab DataGrid Columns and Fields
Use the DataGrid to enter selection criteria for selecting invoices and credit memos based on the following fields:
For more information regarding the Selection Criteria go to the Selection Criteria topic in the System Manager Help.
Field
This view-only column shows the fields available for user-defined selection criteria. The options are as follows:
Customer ID
The Customer ID option allows you to select Invoices based on the Customer ID.
Invoice No
The Invoice No option allows you to select Invoices based on the Invoice number.
AR Order Date
The AR Order Date option allows you to select Invoices based on the order date.

CYMA Accounting for Windows Training Guide – Accounts Receivable
Copyright 1999-2018 CYMA Systems Inc. 102
Record No
The Record No option allows you to select Invoices based on the Record Number.
Invoice Status
The Invoice Status option allows you to select Invoices based on the status of the Invoice.
Terms Code
The Terms Code option allows you to select Invoices based on the Terms Code.
Invoice Type
The Invoice Type option allows you to select Invoices based on the Invoice Type.
Sales Order
The Sales Order option allows you to select Invoices based on the Sales order number.
Customer PO
The Customer PO option allows you to select Invoices based on the value in the Customer PO field on the invoice.
Sales Rep
The Sales Rep option allows you to select Invoices based on the Sales Rep.
Job
The Job option allows you to select Invoices based on a specific Job number.
AR Account
The AR Account option allows you to select Invoices based on the Accounts Receivable account the Invoice is posted to.
Product ID
The Product ID option allows you to select Invoices based on a specific Product ID.
Sales Account
The Sales Account option allows you to select Invoices based on the General Ledger Sales account the Invoice is posted to.

CYMA Accounting for Windows Training Guide – Accounts Receivable
Copyright 1999-2018 CYMA Systems Inc. 103
Enter Invoice Status Inquiry - Selected Invoices Tab The Selected Invoices tab allows you to view the Invoices that meet the selection criteria entered on the Inquiry Criteria tab.
Invoice Status Inquiry - Selected Invoices Tab dialog box
Refer to the following field and column descriptions.
Invoice Status Inquiry - Selected Invoices Tab DataGrid Columns and Fields
Upon selecting the Find Now button the DataGrid lists the unpaid invoices and credit memos that meet the selection criteria entered on the Inquiry Criteria tab.
The data grid has User Column functionality. For more information go to the Data grid - User Column topic in the System Manager Help.
The DataGrid columns are in view-only mode.
Invoice No
The Invoice Number for the Invoices and Credit Memos display in the view-only Invoice No column.
Type
The type of Invoice or Credit Memo displays in the view-only Type column.
Invoice Date

CYMA Accounting for Windows Training Guide – Accounts Receivable
Copyright 1999-2018 CYMA Systems Inc. 104
The Invoice Date displays in the view-only Invoice Date column.
Post Date
The Posting Date displays in the view-only Post Date column.
Terms Code
The Terms Code displays in the view-only Terms Code column.
Due Date
The Due Date displays in the view-only Due Date column.
Invoice Status
The Invoice Status column will display either Entered, Manual, Printed or Voided based on the current status of the invoice.
Customer ID
The Customers with invoices meeting the selection criteria are listed in the view-only Customer ID column.
Ship To
The Ship To ID assigned to the invoice displays in the view-only Ship To column.
Sales Rep
The Sales Rep assigned to the invoice displays in the view-only Sales Rep column.
Tax Category
The Tax Category assigned to the invoice displays in the view-only Tax Category column.
Hold?
The Hold? column with display yes or no based on the Hold status of this invoice.
Sales Order No
The Sales Order number displays in the view-only Sales Order No column.
Customer's PO
The value entered into the PO field on the invoice displays in the view-only Customers's PO column.
Ship Via
The Ship Via assigned to the invoice displays in the view-only Ship Via column.
Job
The job number displays in the view-only Job column.
Update IC
Yes or No will display in the Update IC column to show if this Invoice will/did update Inventory Control.
Invoice Total
The total Invoice amount displays in the view-only Invoice Total column. This column also displays a total at the bottom of the grid.
Amt Paid
The total amount of payments applied to the invoice displays in the view only Amt Paid column.
Balance

CYMA Accounting for Windows Training Guide – Accounts Receivable
Copyright 1999-2018 CYMA Systems Inc. 105
The unpaid Invoice balance displays in the view-only Invoice Balance column. This column also displays a total at the bottom of the grid.
Customer Name:
When an Invoice is selected in the DataGrid, the view-only Customer Name: field displays the associated Customer Name.
To select an Invoice, click the selection box to the left of the Invoice line on the DataGrid.


CYMA Accounting for Windows Training Guide – Accounts Receivable
Copyright 1999-2018 CYMA Systems Inc. 107
Enter NSF Checks Select NSF Checks... from the Enter menu to access the Enter NSF Checks dialog box. This operation allows you to mark checks returned by the customer's bank as unpaid. This will mark the check status as NSF and reopen any invoices paid by the returned check. This will increase the customers Current Balance. The system will mark the check as not posted to the General Ledger, thereby allowing the system to select the appropriate deposit the next time payments are posted to the General Ledger. When the NSF entry is posted to the General Ledger, the check will be reversed by the new journal entry. The entry will Credit the Cash account and Debit Accounts Receivable or the appropriate Sales account if the company is on Cash Basis.
Enter NSF Checks dialog box
Refer to the following field descriptions and requirements.
Customer ID
Enter the Customer ID whose check was returned. The Customer Name will display in the text box below.
Check No
Enter the number of the returned check, or use the Browser to scan the selected Customers check records. In the view-only text boxes below, the deposit date and check amount will display.
NSF Date:
Enter the date that you want to NSF the check. This date will be used when posting the transaction to the GL. The date needs to be in an open and defined year. This date does not affect aging reports.
Deposit Date:

CYMA Accounting for Windows Training Guide – Accounts Receivable
Copyright 1999-2018 CYMA Systems Inc. 108
This is a view only field that shows the deposit date of the selected check.
Check Amount:
This is a view only field that show the check total of the selected check.
DataGrid Columns and Fields
All the Invoices paid by the check will display as a reference. The Invoices displayed will be reopened for this customer’s account.
Invoice No
The Invoice No column displays the number of the Invoice paid by this check.
Invoice Date
The Invoice Date column displays the date of the Invoice paid by this check.
Invoice Total
The Invoice Total column displays the total of the Invoice paid by this check.
Disc Amt
The Disc Amt column displays the amount of discount taken on the Invoice paid by this check.
Amt Paid
The Amt Paid column displays the amount of the Invoice paid by this check.
Balance
The Balance column displays the outstanding balance for this Invoice.
Enter NSF Checks: Special Condition
There is one special NSF condition that requires additional explanation: NSF credit card payments
Enter NSF Checks Command Buttons
Choose the Post button to post the data to Accounts Receivable once the returned check information has been entered and reviewed. A message dialog will display stating the result of posting this check as NSF, and ask you if you would like to continue with the Post. Posting NSF checks will prepare the deposit to automatically create reversing General Ledger entries, reverse payments on invoices, and update the Customer's Current Balance.
Click the Close button to close the dialog box without posting the NSF check.

CYMA Accounting for Windows Training Guide – Accounts Receivable
Copyright 1999-2018 CYMA Systems Inc. 109
Enter NSF Checks: Special Conditions Enter NSF Checks: Special Condition
There is one special NSF condition that requires additional explanation:
NSF credit card payments
Example: Enter NSF Credit Card Payments
When the credit card number is entered and there are multiple transactions associated with that card number, the Confirm NSF Check dialog box appears.
The Confirm NSF Check dialog box lists transactions associated with that card number, allowing confirmation of the NSF transaction.


CYMA Accounting for Windows Training Guide – Accounts Receivable
Copyright 1999-2018 CYMA Systems Inc. 111
Enter Void Deposits When Void Deposits... is selected from the Accounts Receivable Enter menu, the Void Deposits dialog box displays. This operation allows you to mark Deposits posted to Accounts Receivable as "Voided." Once the voided Deposit is posted to Accounts Receivable by selecting the Post button, the Customer invoices paid by the voided Deposit are reopened. Deposits must be posted to Accounts Receivable to be selected for voiding in the Void Deposits dialog.
Enter Void Deposits Dialog
Refer to the following field descriptions and requirements.
Deposit
Enter the Deposit Number to be voided or use the Browser to select the Deposit.
Void Date
Enter the Date to void the Deposit. The system date is the default.
Bank ID
When a Deposit is selected, the Bank ID and bank description the deposit was posted to displays in view-only mode.
AR Total
When a Deposit is selected, the total amount posted to Accounts Receivable displays in the view-only AR Total field.
Deposit Date

CYMA Accounting for Windows Training Guide – Accounts Receivable
Copyright 1999-2018 CYMA Systems Inc. 112
When a Deposit is selected, the date the deposit was posted to the system displays in the view-only Deposit Date field.
Cash Acct
When a Deposit is selected, the General Ledger account the deposit was posted to displays in the view-only Cash Acct field.
Void Deposits DataGrid Columns and Fields
All the invoices paid by the Deposit will be reopened for the customer’s accounts. All columns and fields on the DataGrid are in view-only mode.
Type
The User Payment Type displays in the view-only Type column.
Reference
The reference entered on the original Deposit such as the check number or credit card number for the type of payment displays in the view-only Reference column.
Exp. Date
If a credit card was used the in the original Deposit, the credit card expiration date displays in the view-only Exp. Date column.
Customer ID
The Customer ID displays in view-only mode.
Payor Name
The name of the business or individual that the payment was received from displays in the view-only Payor Name column. The customer name entered in Maintain Customers defaults.
Amount
The Amount of the Deposit displays in view-only mode.
The column total displays below the last DataGrid line.
Void Deposits Command Buttons
Click the Post command button to post the selected void deposit to the Accounts Receivable system. The Post process updates the appropriate period and year-to-date accumulators.
The Close command button prompts you to save any changes (if applicable) and then closes the dialog box. Pressing the ESC key performs the same function.

CYMA Accounting for Windows Training Guide – Accounts Receivable
Copyright 1999-2018 CYMA Systems Inc. 113
Enter Volume Billing Invoices When Volume Billing Invoices... is selected from the Enter menu, the Enter Volume Billing Invoices dialog displays. The Enter Volume Billing Invoices dialog box allows you to enter a single Invoice that will be applied to a selected group of customers defined in the Maintain Volume Billing dialog box. After creating these Invoices, they can then be posted to Accounts Receivable and the General Ledger.
Volume Billing Invoices Dialog Box
Refer to the following field descriptions and requirements.
Volume Billing ID
Enter or select a Volume Billing ID from the Browser or add a new Volume Billing ID by clicking the New button in the Browser dialog box. The view-only field to the right displays the Volume Billing Name.
Invoice Date
The current accounting date displays as the default. This date may be overridden if you want to use a different date. This date will become the new Invoice date. The Invoice due dates and discount dates will be recalculated based on this date unless the due date was manually typed when the Invoice was entered. Manually entered due dates are not recalculated by the system.
Prefix
Enter a Prefix to identify this Invoice.
Sales Order
Enter the appropriate Sales Order number for the document.

CYMA Accounting for Windows Training Guide – Accounts Receivable
Copyright 1999-2018 CYMA Systems Inc. 114
PO:
Enter a PO number for this invoice.
Taxable
Select the Taxable check box if tax will be included on this Invoice or credit.
Terms
The Terms code will automatically default to the Terms code assigned to this Volume Billing ID. Use the Browser to select a different Terms code or create a new Terms code.
Due Date
The Due Date will automatically calculate from the Invoice date based on the Terms code. You can manually override the Due Date text box which will prevent the system from recalculating this field.
Disc Date
The discount date will be calculated if a terms code allowing a discount is selected and at least one Product ID line item has been entered on the DataGrid.
Disc Allowed
The discount will calculate based on the terms code selected and will recalculate as line items are added.
Ship Via
Type the shipping instructions (up to 20 alphanumeric characters).
Ship Date
Enter the date the Customer must receive the order by or the date product will be shipped by.
Job
Type the Job description for this Invoice (up to 20 alphanumeric characters).
Sales Rep
Accept the default Customer Sales Rep, or use the Browser to select one.
If the Use Sales Rep Permissions option was checked in Maintain Configuration, this value will default based on the user that is currently logged in. The value may or may not be changed based on permissions set on the Maintain Sales Reps - Permission Tab .
Ref
You may use this field to enter a reference for the current document (up to 20 alphanumeric characters).
Ref2
You may use this field to enter a second reference for the current document (up to 20 alphanumeric characters).
Ref3
You may use this field to enter a third reference for the current document (up to 20 alphanumeric characters).
AR
The Customer’s default Accounts Receivable account will display in this field. The Browser is available to choose another Accounts Receivable account for this Invoice.
CYMA Accounting for Windows Training Guide – Accounts Receivable
Copyright 1999-2018 CYMA Systems Inc. 115
DataGrid Columns and Fields
Product ID
Enter the Product ID being sold to the Customer, or use the Browser to select one.
Use the "TEXT" Product ID if you need additional description lines.
Description
The Product Description will display from the Product record. This field may be overridden (up to 80 alphanumeric characters).
If the "TEXT" Product ID is used, in the Description field you may enter up to 80 alphanumeric characters.
Quantity
Enter the appropriate quantity of the Product. Up to four decimal places for fractional quantities are allowed. You may also specify negative quantities.
Unit Price
Any special pricing from the customer’s record will display. If no special pricing is in effect for the customer, the price from the Product record will display.
If the check box on the product's record is checked to allow you to override the price, the price may be overridden. If the check box on the product's record to allow you to override the price to zero is checked, you may override the price with a zero.
Disc Pct
Enter in a Discount Percentage in this field. The discount percentage will be deducted from the unit price and reflected in the extended price column.
Ext Price
The extended price for the line item will be calculated and displayed.
Tax?
Place a check in the check box if you wish to include the default tax on the product.
Tax Amount
The Tax Amount column will display a total that includes calculations of all Tax IDs from the Customer's Ship-To Tax Category as well as any Tax Category from the Product record.
Editing an existing Invoice will not recheck the Customer's Tax Exempt status.
Sales Account
The Sales Account column will display the sales account from the Product's record. The Browser may used to select a different sales account if desired.
If you are using the Job Costing module, you can optionally default the sales account from the job based on the setting in Maintain Jobs - Invoice tab - Use GL Sales Accounts From. To enable this option, select the "Use Job Level Defaulting - AR" check box on JC Maintain Configuration. When this check box is not selected the sales account will default from the product sales account.
Sales Code

CYMA Accounting for Windows Training Guide – Accounts Receivable
Copyright 1999-2018 CYMA Systems Inc. 116
Enter the Sales Code or select one from the browser. The GL accounts set up for this sales code will be used when creating Journal Entries.
Project (Financial Management System Only)
Enter the Project that you would like to assign to the transaction, or use the browser to select one.
Revenue Source (Financial Management System Only)
Enter the Revenue Source that you would like to assign to the transaction, or use the browser to select one. This value will automatically fill in if you have assigned a default to the corresponding Sales Account, but it may be changed as needed.
Category (Financial Management System Only)
Enter the Category that you would like to assign to the transaction, or use the browser to select one. This field will only be available if you have selected the Category check box for the corresponding Project in General Ledger - Maintain Projects.
Costing Code (Financial Management System Only)
Enter the Costing Code that you would like to assign to the transaction, or use the browser to select one. This field will only be available if you have selected the Activity check box for the corresponding Project in General Ledger - Maintain Projects.
Grant (Not-For-Profit Only)
Enter the Grant ID that you would like to assign to the transaction, or use the browser to select one.
Source (Not-For-Profit Only)
Enter the Source ID that you would like to assign to the transaction, or use the browser to select one. This value will automatically fill in if you have assigned a default to the corresponding Sales Account, but it may be changed as needed.
Program (Not-For-Profit Only)
Enter the Program ID that you would like to assign to the transaction, or use the browser to select one. This field will only be available if you have selected the Program check box for the corresponding Grant ID in General Ledger - Maintain Grants.
Activity (Not-For-Profit Only)
Enter the Activity ID that you would like to assign to the transaction, or use the browser to select one. This field will only be available if you have selected the Activity check box for the corresponding Grant ID in General Ledger - Maintain Grants.
Trans Class 1
Enter an active Trans Class 1 or select one from the browser.
Trans Class 2
Enter an active Trans Class 2 or select one from the browser.
Freight
Type the freight amount to be charged on this Invoice.

CYMA Accounting for Windows Training Guide – Accounts Receivable
Copyright 1999-2018 CYMA Systems Inc. 117
The line item created for the freight amount will use the default freight account from the Maintain Configuration dialog box.
Freight Tax
If any Tax IDs contained in any of the Tax Categories applied to the Invoice were set to charge taxes on freight, the freight tax amount will display in this field.
Invoice Total
This field will display the Invoice Total. If the customer’s credit limit is exceeded, a message will appear when you try to save the record telling you the customer has exceeded the credit limit and the Invoice will be placed on hold. This will also take into account any other Invoice record that has not been processed, along with the Customer's Current Balance.
Enter Volume Billing Invoices Command Buttons
The Edit button allows you to make changes to the displayed Volume Billing. Click the Edit button once a valid Volume Billing ID has been entered.
The Save button validates and saves the data entered. The Save button is enabled when data on the dialog box is changed.
The New button prompts you to save any changes to the displayed Volume Billing (if applicable) and then clears the dialog box. This allows you to create a new Volume Billing ID or select another Volume Billing ID for viewing or editing.
The Close button prompts you to save any changes (if applicable) and then closes the dialog box. Pressing the ESC key performs the same function.


CYMA Accounting for Windows Training Guide – Accounts Receivable
Copyright 1999-2018 CYMA Systems Inc. 119
Enter Recurring Invoices When the Enter/Edit Recurring Invoices button is selected, the Enter Recurring Invoices dialog box displays.
Enter Recurring Invoice dialog box
Refer to the following field descriptions and requirements:
Record #
The record number will be generated by the system. The field will display as a "-1" when creating new recurring invoice records. The record number will be assigned at the time of saving the record.
Type
All new records will be assigned the Invoice type "Invoice." This will force the invoices to be printed prior to posting them to Accounts Receivable or the General Ledger.
Last Processed
The last date that an Invoice was created from this recurring invoice record will be displayed here.
Frequency

CYMA Accounting for Windows Training Guide – Accounts Receivable
Copyright 1999-2018 CYMA Systems Inc. 120
The frequency code selected will tell the system which group of recurring records to use when creating actual Invoice records. Available frequency codes are: Weekly, Biweekly, Semi-Monthly, Monthly, Quarterly, Annually, Semi-Annually, and Other.
Group
The Group drop down list will display all the user defined groups you have created while entering Invoices from the Enter Recurring Invoices entry screen. If you choose a specific group, only those invoices which belong to that group, and are within the selected frequency, will have Invoices generated.
Count
Enter the number of times the system should create an Invoice for this record. If 999 is entered, invoices will be created indefinitely when the appropriate frequency is selected. Any number other than 999 will specify how many times this record will create an invoice before being marked as inactive.
Generated
The number of times this record has created an Invoice will display in this field.
Customer
Enter the Customer ID or use the Browser to select or create one.
Sold To
The customer’s default contact name will appear in the Sold To field. The complete billing address will display by clicking the edit button next to the field. While in the Sold To dialog box, you may edit the customers address.
Location
Enter the Ship-To Location ID, or use the Browser to select one. This field will default to the first ship-to record for the selected Customer.
Ship to

CYMA Accounting for Windows Training Guide – Accounts Receivable
Copyright 1999-2018 CYMA Systems Inc. 121
Enter the Ship-To Location ID, or use the Browser to select one. This field defaults to the first Ship-To record for the customer selected.
Tax Category
The Tax Category from the specified Ship-To record displays in this field. This field will be in the view-only mode and may only be changed via the Maintain/Customer, Ship-To tab page.
Ordered by
Use the Ordered by drop-down list to select a contact person from this Customer's Contact dialog box, or enter a person who does not have a contact record (up to 20 alphanumeric characters). If a default contact is set up for the Customer, that contact will populate but can be changed.
Phone
Enter a delivery phone or use the drop-down list to select one of the phone numbers from the Contact records. If a default contact is set up for the Customer, that contact phone number will populate but can be changed.
Sales Order
Enter the appropriate Sales Order number for the document.
Taxable?
The default taxable status displays from the product file. The taxable status may be overridden.
Update IC
Check the Update IC option if this invoice should update product quantities in inventory. This option is only available if the Update IC Quantities option is turned on in Maintain Configuration. When this box is checked the Warehouse ID and U/M columns will be displayed in the grid. If option can be turned on by default by checking the Default Invoices to Update IC option in Maintain Configuration.
Terms
The terms code will automatically default to the code assigned to this customer. It may be overridden if desired.
Ref
You may use this field to enter a reference for the current document (up to 20 alphanumeric characters).
Ship Via

CYMA Accounting for Windows Training Guide – Accounts Receivable
Copyright 1999-2018 CYMA Systems Inc. 122
Type the shipping instructions (up to 20 alphanumeric characters).
Ref2
You may use this field to enter a second reference for the current document (up to 20 alphanumeric characters).
PO
Type the customer’s purchase order number (up to 20 alphanumeric characters).
Job
Type the Job description for this Invoice (up to 20 alphanumeric characters).
Sales Rep
Accept the default customer Sales Rep, or use the Browser to select one.
If the Use Sales Rep Permissions option was checked in Maintain Configuration, this value will default based on the user that is currently logged in. The value may or may not be changed based on permissions set on the Maintain Sales Reps - Permission Tab .
AR Account
The Accounts Receivable account from the Customer's file displays in this field.
DataGrid Columns and Fields
Product ID
Enter a Product ID, or use the Browser to select one.
Use the "TEXT" product ID if you need additional description lines.
Description
The Product Description displays from the Product record. This field may be overridden (up to 80 alphanumeric characters).
Warehouse ID
Enter the Warehouse ID or select one from the browser to be used for this transaction. This column is only visible if the Update IC box is checked in the header.
U/M
The U/M field will display the Purchasing Unit of Measure for the selected product. This column is only visible if the Update IC box is checked in the header.
Qty Avail
The Qty Avail column will display the quantity currently available for the selected product in the selected warehouse. This column is only visible if the Update IC box is checked in the header.
Quantity
Enter the appropriate quantity of the Product. Up to four decimal places for fractional quantities are allowed.
Price
The system displays the default price based on the Customers Price file or the Product file. The system first checks the Customer's price file to see if a record exists for the Product ID on this

CYMA Accounting for Windows Training Guide – Accounts Receivable
Copyright 1999-2018 CYMA Systems Inc. 123
line item, if found it checks to see if the date range is valid. If the date range is OK, the system displays the price from the Customer's price file. If no record is found in the Customer price file, the price from the Product record displays.
If the check box on the product's record is checked to allow you to override the price, the price may be overridden. If the check box on the product's record to allow you to override the price to zero is checked, you may override the price with a zero.
Price Code
Enter a Price Code or select one from the browser. The Price Code field will increase/decrease the sales price by a percentage based on List Price, Unit Cost or Standard Cost. The Price Code will default from the Customer record if a Default Alternate Price Code has been defined.
Disc Pct
Enter in a Discount Percentage in this field. The discount percentage will be deducted from the unit price and reflected in the extended price column.
Ext Price
The price multiplied by the quantity will be calculated and displayed in this column.
Tax
Place a check in the check box if you wish to include the default tax on the product.
Tax Amount
This column will display a total that includes calculations of all Tax IDs from the Customer's Ship-To Tax Category as well as any Tax Category from the Product record.
Taxes are recalculated when Invoice records are created to insure that any rate change for Tax IDs used by the new records will be included in the new Invoice tax calculations. If the Update Taxable Flags on Products check box is selected when the Invoice record is created, the Tax Amount may change if the Taxable status of the Product IDs has been changed since the Recurring Invoice record was created.
Cost Code
Enter an active Cost Code or select one from the browser. This field is required if you have a job selected in the invoice header. This column will only be available if the Use Cost Codes box is checked in Job Costing Maintain Configuration.
A warning will display if the cost code has not been budgeted for the job.
Sales Account ID
The Sales Account will default in this order:
1. From Maintain Jobs, if a Job ID is on the line and the Use Job Level Defaulting option for “AR/Sales Orders” is selected in JC Maintain Configuration,
2. From the Product listed on the Customer Product Pricing tab, comparing the accounting date to the Begin and End date. If there are multiple lines that match the line with the lowest price will be used.
3. From the Sales Account listed in Maintain Customer.
4. From the Sales account from Maintain Products.
5. If another account is desired, enter manually or select from the browser.

CYMA Accounting for Windows Training Guide – Accounts Receivable
Copyright 1999-2018 CYMA Systems Inc. 124
Sales Code
Enter the Sales Code or select one from the browser. The GL accounts set up for this sales code will be used when creating Journal Entries.
Project (Financial Management System Only)
Enter the Project that you would like to assign to the transaction, or use the browser to select one.
Revenue Source (Financial Management System Only)
Enter the Revenue Source that you would like to assign to the transaction, or use the browser to select one. This value will automatically fill in if you have assigned a default to the corresponding Sales Account, but it may be changed as needed.
Category (Financial Management System Only)
Enter the Category that you would like to assign to the transaction, or use the browser to select one. This field will only be available if you have selected the Category check box for the corresponding Project in General Ledger - Maintain Projects.
Costing Code (Financial Management System Only)
Enter the Costing Code that you would like to assign to the transaction, or use the browser to select one. This field will only be available if you have selected the Activity check box for the corresponding Project in General Ledger - Maintain Projects.
Grant (Not-For-Profit Only)
Enter the Grant ID that you would like to assign to the transaction, or use the browser to select one.
Source (Not-For-Profit Only)
Enter the Source ID that you would like to assign to the transaction, or use the browser to select one. This value will automatically fill in if you have assigned a default to the corresponding Sales Account, but it may be changed as needed.
Program (Not-For-Profit Only)
Enter the Program ID that you would like to assign to the transaction, or use the browser to select one. This field will only be available if you have selected the Program check box for the corresponding Grant ID in General Ledger - Maintain Grants.
Activity (Not-For-Profit Only)
Enter the Activity ID that you would like to assign to the transaction, or use the browser to select one. This field will only be available if you have selected the Activity check box for the corresponding Grant ID in General Ledger - Maintain Grants.
Trans Class 1
Enter an active Trans Class 1 or select one from the browser.
Trans Class 2
Enter an active Trans Class 2 or select one from the browser.
Product Price Source

CYMA Accounting for Windows Training Guide – Accounts Receivable
Copyright 1999-2018 CYMA Systems Inc. 125
The Product Price Source is a view only field and will display the source of the price for the product of a selected line.
Freight
Enter the freight amount to be charged on this invoice.
The line item created for the freight amount will use the default GL Account for freight found in the Maintain/Configuration dialog box.
Freight Tax
If any Tax IDs contained in the Customer's Ship-To Tax Category or the Product ID Tax Categories are set to charge taxes on freight, the freight tax amount will display in this field.
Invoice Total
This field displays the invoice total. The Grand Total may change due to tax rate changes as well as the status of the Update Taxable Flags on Products and Update Prices on Products check boxes when Invoices are created.
If the Customer’s credit limit is exceeded when Invoice records are created, a message will appear advising that this customer has exceeded their credit limit and the invoice will be placed on hold. This will also take into account any other Invoice record that has not been processed along with the Customer's Current Balance.
Enter Recurring Invoices Command Buttons
The Edit button allows you to make changes to the displayed recurring Invoice. Click the Edit button once a valid Invoice has been entered.
The Save button validates and saves the data entered. The Save button is enabled when data on the dialog box is changed.
The New button prompts you to save any changes to the displayed recurring Invoice (if applicable) and then clears the dialog box. This allows you to create a new Invoice or select another Invoice for viewing or editing.
The Clear button prompts you to save any changes to the displayed payment (if applicable) and then clears the dialog box. This allows you to create a payment or select another record for viewing or editing.
The Delete button permanently removes the displayed recurring Invoice from the data file. This button is enabled after the Edit button has been clicked.
The Close button prompts you to save any changes (if applicable) and then closes the dialog box. Pressing the ESC key performs the same function.


CYMA Accounting for Windows Training Guide – Accounts Receivable
Copyright 1999-2018 CYMA Systems Inc. 127
Enter/Create Recurring Invoices When Recurring Invoices... is selected from the Enter menu, the Enter/Create Recurring Invoices dialog is displayed.
The Enter/Create Recurring Invoices process allows you to enter repetitive Invoices that are billed on a routine basis. These records can be selectively chosen to create Invoices that can then be printed from the Print Invoices operation. After printing these Invoices, they can then be posted to Accounts Receivable and the General Ledger.
Recurring Invoices allow you to specify a billing cycle from a predefined list of frequencies (Weekly, Biweekly, Semi-Monthly, Monthly, Quarterly, Semi-Annually, Annually, and Other). You may also specify how many times an Invoice should be created from each recurring record. The system will track how many times an Invoice has been created. When the specified count has been reached, the recurring Invoice record will automatically become inactive.
Recurring Invoices can also be edited as well as automatically updated for pricing changes. Recurring Invoices can be created with unlimited repeat counts.
Enter/Create Recurring Invoices Dialog

CYMA Accounting for Windows Training Guide – Accounts Receivable
Copyright 1999-2018 CYMA Systems Inc. 128
Refer to the following field descriptions and requirements.
Enter Recurring Invoices group box
Select the Enter/Edit Recurring Invoices button to enter or edit Recurring Invoice records. When this button is selected the Enter Recurring Invoices dialog box will be presented for entering new Recurring invoice records or editing existing invoices.
Create Invoices group box
Click the Create AR Invoices from Recurring File for: button to create invoices from the recurring entry file based on the selections chosen below. This will create invoices for all

CYMA Accounting for Windows Training Guide – Accounts Receivable
Copyright 1999-2018 CYMA Systems Inc. 129
Customers who have a Recurring Invoice record for the Frequency and Group selected for processing. Once the invoices are created, the view-only mode fields on the Enter Recurring Invoices dialog box will be updated. The Generated To Date field will be increased by one, and the Date Last Processed will display the current accounting date.
A Proof Listing can optionally be printed when creating the AR Invoices.
Update Taxable Flags on Products
Select this check box to create invoices using the current taxable status of the Product IDs on the line items. Leave the option unchecked if you want the line items to retain the taxable status of the line items as they currently exist in the Recurring file.
Generate Invoices with Updated Pricing
Select this check box to create invoices using the current price of Product ID's referenced on the line items. If selected, the system will first check the Customer's special pricing. If the customer has no active special price for a product, the price from the product record will be used.
Update Prices on Recurring Invoices
Select this check box to actually change the price in the recurring invoice file. For example, if the recurring invoice has a product price of $50, but the product file contains a price of $75, selecting this check box will update the product price on the recurring invoice to match the price in the product file ($75).
The Update Prices on Recurring Invoices check box is enabled when the Generate Invoices with Updated Pricing check box is selected.
Frequency
Use the drop-down list to select the Frequency code for which you would like to generate invoice records. The available options are: Weekly, Biweekly, Semi-Monthly, Monthly, Quarterly, Semi-Annually, Annually, and Other.
Group
This drop down list will display all the user defined groups you have created while entering invoices from the Enter Recurring Invoices entry screen. If you choose a specific group, only those invoices which belong to that group, and are within the selected frequency, will have invoices generated.
Manual Invoice Date
Enter the date to use when posting the Manual Recurring Invoice.
Printing group box
DataGrid Columns and Fields
Use the following selection criteria to filter the Recurring Entry Listing report.
Customer ID
Select the Customer ID option to filter the report by Customer ID.
Record No
Select the Record No option to filter the report by Record Number.
Create Date
Select the Create Date option to filter the report by Date the Invoice was created.
CYMA Accounting for Windows Training Guide – Accounts Receivable
Copyright 1999-2018 CYMA Systems Inc. 130
Terms Code
Select the Terms Code option to filter the report by Terms Code.
Frequency
Select the Frequency option to filter the report by the Frequency assigned to the invoice.
Group Code
Select the Group Code option to filter the report by the group assigned to the invoice.
Trans Class 1
Select the Trans Class 1 option to filter the report by Transaction Classification Code.
Trans Class 2
Select the Trans Class 2 option to filter the report by Transaction Classification Code.
Sort Options Group Box
The Sort Options group box allows you to select how the entries should be sorted for printing.
Customer
Select the Customer option button to sort the Recurring Invoice List by Customer ID. Customer ID is selected by default.
Frequency
Select the Frequency option button to sort the Recurring Invoice List by Frequency code.
AR Acct
Select the AR Acct option button to sort the Recurring Invoice List by the Accounts Receivable account.
Group
Select the Group option button to sort the Recurring Invoice List by the group.
Print Options Group Box
Screen
Select the Screen button to display the requested report on your screen. The report may also be sent to the Windows default printer from your screen.
Printer
Select the Printer button to redirect the report to the printer shown in the "default printer" section of the destination group of the dialog.
File
Select the File button to export the displayed report in one of several common formats.
The Setup Printer button allows you to select another printer that you have set up in Windows, change the printer's properties, and change the paper options (size, source, and orientation). The default printer displays in view-only mode.
Click the List Recurring Invoices button to print a list of the Recurring Invoice based on the above selection criteria records stored in the Recurring Entry file.

CYMA Accounting for Windows Training Guide – Accounts Receivable
Copyright 1999-2018 CYMA Systems Inc. 131
Enter/Create Recurring Invoices Command Buttons
Click the Close button to close the dialog box.


CYMA Accounting for Windows Training Guide – Accounts Receivable
Copyright 1999-2018 CYMA Systems Inc. 133
Process Menu
The Process menu contains operations for printing Invoices, posting to AR, posting to GL, applying credits, applying unapplied payments, and the period end processes.
The following operations are available from the Accounts Receivable Process menu:
Generate/Print Invoices
Post to AR
Post to GL
Electronic Funds Transfer
Recreate eFile
Prenotifications
Auto Apply Unapplied Payments
Price Change (See System Manager Training Guide for more information)
Period End Processes


CYMA Accounting for Windows Training Guide – Accounts Receivable
Copyright 1999-2018 CYMA Systems Inc. 135
Process Generate / Print Invoices When Generate/Print Invoices... is selected from the Process menu, the Generate/Print Invoices dialog is displayed. The Generate/Print Invoices process allows you to print or generate Invoices for the invoice records created through Enter Invoices , Recurring Invoices as well as the Create Finance Charges process. Options available in this process allow you to reprint invoices due to printer jams, data entry errors, etc.
Print Invoices dialog box
Refer to the following field descriptions and requirements. The DataGrid changes dynamically based on the option button selected.

CYMA Accounting for Windows Training Guide – Accounts Receivable
Copyright 1999-2018 CYMA Systems Inc. 136
Print Invoices
The Print Invoices option is selected by default for printing Invoices and credit memos.
Generate Invoices
The Generate Invoices option works exactly like Print Invoices except no invoices will print.
Beginning Invoice No
The Print Invoices operation will display the next available Invoice number. The default Invoice number may be overridden to allow for out of sequence Invoice printing.
Use Original Invoice Date
Check the Use Original Invoice Date to have the print process use the invoice date that was entered on the Enter Invoice dialog.
Invoice Date
The current accounting date displays as the default. This date may be overridden a different date is needed. This date will become the new Invoice date. The Invoice due dates and discount dates will be recalculated based on this date unless the due date was manually typed when the Invoice was entered. Manually entered due dates are not recalculated by the system.
If you are printing invoices for progress billings, be sure to enter an appropriate invoice date. For example, progress billing invoices have been entered for the months of January, February and March. Each invoice should be printed separately and dated accordingly. Alternatively, the Use Original Invoice Date option can be checked to ensure the invoice date entered in Enter Invoices will be used.
The date the invoice is posted is based on the Posting Date entered in Enter Invoices and the Default Invoice Date into Posting Date option in Maintain Configuration.
If the invoice originated from Payroll - Process Billing, the date entered at the time of billing will be used.
Print Invoices DataGrid Columns and Fields
Use the DataGrid to enter selection criteria for printing Invoices and Credits based on the following fields:
For more information regarding the Selection Criteria go to the Selection Criteria topic in the System Manager Help.
Field
The display-only Field column shows the fields available for user-defined selection criteria. The options are as follows:
Record No
The Record No option allows you to print invoices based on the record number.
AR Order Date
The Order Date option allows you to print invoices based on the order date.
Job

CYMA Accounting for Windows Training Guide – Accounts Receivable
Copyright 1999-2018 CYMA Systems Inc. 137
The Job option allows you to print invoices based on the job number.
Customer ID
The Customer ID option allows you to print invoices based on the Customer ID.
Terms Code
The Terms Code option allows you to print invoices based on the Terms Code.
AR Account
The AR Account option allows you to print invoices based on the Accounts Receivable account the Invoice is posted to.
Invoice Type
The Invoice Type option allows you to print invoices in a separate batch from Credit Invoices.
Updated By
The Updated By option allows you to print invoices based on the user that updated the Invoices.
Reprint Invoices dialog box

CYMA Accounting for Windows Training Guide – Accounts Receivable
Copyright 1999-2018 CYMA Systems Inc. 138
Reprint Invoices
Select the Reprint Invoices option button to reprint Invoices and Credits using the original Invoice number. This allows you to reprint an Invoice for a customer requesting additional copies.
Beginning Invoice No
When the Reprint Invoices option button is selected the Beginning Invoice No is disabled. The Invoice or Credit will print with its original Invoice number.
Invoice Date
When the Reprint Invoices option button is selected the Invoice Date is disabled. The Invoice or Credit will print with its original print date.
Reprint Invoices DataGrid Columns and Fields

CYMA Accounting for Windows Training Guide – Accounts Receivable
Copyright 1999-2018 CYMA Systems Inc. 139
Use the DataGrid to specify which record number(s) to reprint.
For more information regarding the Selection Criteria go to the Selection Criteria topic in the System Manager Help.
Field
The display-only Field column shows the fields available for user-defined selection criteria. The options are as follows:
Invoice No
The Invoice No option allows you to reprint a specific Invoice or Invoices within a specific range of Invoice numbers.
Record No
The Record No option allows you to print invoices based on the record number.
Invoice Date
The Invoice Date option allows you to print invoices based on the invoice date.
Job
The Job option allows you to print invoices based on the job number.
Customer ID
The Customer ID option allows you to print invoices based on the Customer ID.
Paid In Full
The Paid In Full options allows printing of invoices they have either been fully paid or invoices that still have a balance.
Reprint and assign new Invoice Numbers dialog box

CYMA Accounting for Windows Training Guide – Accounts Receivable
Copyright 1999-2018 CYMA Systems Inc. 140
Reprint and assign new Invoice Numbers
Select the Reprint and assign new Invoice Numbers option button to reprint Invoices and Credits while assigning new Invoice numbers. For instance, when pre-printed Invoices jam in the printer, this option will reprint the Invoices, assign new Invoice numbers and void the original Invoice numbers. Voided Invoice numbers may not be reused. When an Invoice or a credit has been voided, they will be assigned one of the following types; Void-Invoice or Void-Credit. This type will display on the Invoice Register for reference.
You can only Reprint and Assign new Invoice numbers to Invoices/Credits that have not been posted to AR.
Beginning Invoice No

CYMA Accounting for Windows Training Guide – Accounts Receivable
Copyright 1999-2018 CYMA Systems Inc. 141
The Reprint and assign new Invoice Numbers operation will display the next available Invoice number. The default Invoice number may be overridden to allow for out of sequence Invoice printing.
Invoice Date
When the Reprint and assign new Invoice Numbers option button is selected the Invoice Date is disabled. The Invoice or Credit will print with its original print date.
Reprint Invoices DataGrid Columns and Fields
Use the DataGrid to specify which record number(s) to reprint.
For more information regarding the Selection Criteria go to the Selection Criteria topic in the System Manager Help.
Field
The display-only Field column shows the fields available for user-defined selection criteria. The options are as follows:
Invoice No
The Invoice No option allows you to reprint a specific Invoice or Invoices within a specific range of Invoice numbers.
Record No
The Record No option allows you to print invoices based on the record number.
Invoice Date
The Invoice Date option allows you to print invoices based on the invoice date.
Job
The Job option allows you to print invoices based on the job number.
Customer ID
The Customer ID option allows you to print invoices based on the Customer ID.
Printing a Proof Listing
A proof listing may optionally be printed before printing the Invoices or Credits. The proof listing allows you to verify the Invoice data prior to printing the Invoices on pre-printed forms.
Proof Listing Group Box
Detail
The Detail option button will be selected by default. When selected, the Proof listing will print line item detail for each Invoice on the Proof Listing.
Summary
Select the Summary option button to print summary records for each Invoice on the Proof Listing.
Print Options Group Box
Screen
The Screen option button will be selected by default. When selected, the Proof Listing will be sent to your screen. It may then be sent to the Windows default printer.

CYMA Accounting for Windows Training Guide – Accounts Receivable
Copyright 1999-2018 CYMA Systems Inc. 142
Printer
Select the Printer option button to print the Proof Listing directly to the printer shown in the view-only default printer field.
File
Select the File option button to print the Proof Listing to a File in one of several common formats.
Click the Print Proof button to print the Proof Listing to the selected destination.
Invoice Options Group Box
Message ID
Select a pre-defined message from the dropdown list to include on the Invoices. Press New to bring up the Maintain Message dialog to add a new message.
Sort By
Use the Sort By drop-down list to select how you want the invoices to print. The available options are:
Order No
When Order No is selected from the drop-down list, the invoices will be printed in numerical order by record number.
Customer ID
When Customer ID is selected from the drop-down list, the invoices will be printed in alphanumeric order by Customer ID.
Name
When Name is selected from the drop-down list, the invoices will be printed in alphabetical order by Customer Name.
Zip Code
When Zip Code is selected from the drop-down list, the invoices will be printed in numerical order by zip code.
Sales Rep
When Sales Rep is selected from the drop-down list, the invoices will be printed in alphanumeric order by Sales Rep ID.
The Sort By value that you select is saved in the registry and used as the default value the next time the Print Invoices dialog is entered. If there is no registry entry the value defaults to Order No.
Print Options Group Box
Printer
Select the Printer option button to print the Invoices directly to the printer shown in the view-only default printer field. This option will be disabled if the Generate Invoices options is selected.
File

CYMA Accounting for Windows Training Guide – Accounts Receivable
Copyright 1999-2018 CYMA Systems Inc. 143
Select the File option button to print the Invoices to a File in one of several common formats. This option will be disabled if the Generate Invoices options is selected.
Select the Email option button to transmit invoices via e-mail. A primary e-mail address must be entered in Maintain Customers prior to selecting this option. This will be the recipient of invoices transmitted electronically. This option will be disabled if the Generate Invoices options is selected.
Copies
Choose the number of copies of each Invoice that will be printed. When multiple copies of a given Invoice are printed, all copies for that Invoice are printed and then the next Invoice is processed.
Invoice Form
Use the Invoice Form drop-down list to select an Invoice form template to use for printing Invoices. Invoice form templates are created and modified using the Maintain/Custom Forms option.
Click the Preview Invoices button to preview the Invoices on the screen. This allows you to verify the Invoices before printing them on your forms.
Click the Test Form Alignment button to print a test form to verify the form alignment.
Click the Setup Printer button to redirect the report to a printer other than the default printer displayed or to change the orientation from Portrait to Landscape if necessary.
Print Invoices Command Buttons
Click the Print button to begin printing the invoices. If the Post Within AR Upon Print option is checked in Maintain Configuration, the invoice will also be posted to AR and show immediately on reports.
Click the Generate button to begin generating the invoices. If the Post Within AR Upon Print option is checked in Maintain Configuration, the invoice will also be posted to AR and show immediately on reports.
Click the Reprint button to begin reprinting the invoices.
Click the Reprint-New button to begin reprinting the invoices. Invoices will be created with new invoice numbers.
Click the Close button to close the dialog box without printing the invoices.


CYMA Accounting for Windows Training Guide – Accounts Receivable
Copyright 1999-2018 CYMA Systems Inc. 145
Process Post to AR Submenu
The Post to AR submenu contains the operations for posting Invoices or payments to Accounts Receivable.
From the menu bar Process/Post to AR the following operations are available.
Post Invoices to Accounts Receivable
Post Payments to Accounts Receivable


CYMA Accounting for Windows Training Guide – Accounts Receivable
Copyright 1999-2018 CYMA Systems Inc. 147
Process Post Invoices to AR Select Invoices... from the Post to AR submenu to access the Post Invoices to AR dialog box. This will only post Invoices and Credits that have already been printed or are Invoice types, Invoice-Manual and Credit-Manual. Posting the Invoices to the Accounts Receivable system will mark the records as ready to be posted to the General Ledger and allow payments to be received from customers through the Enter Payments operation as well as the Apply Unapplied Payments operation.
The History for each customer affected by the Invoices being posted will be updated with sales, payment, and any finance charge amounts, if finance charge Invoices are being posted. This process will also update the Sales Rep period-to-date and year-to-date sales amounts.
Any invoice originating in the Job Costing Module containing a Job Number will update the "Invoiced To Date" field on the Maintain Job dialog during the Posting to Accounts Receivable routine. If the invoice being posted was marked as the "Final Invoice" in the Job Costing Prepare Invoice process, in addition to updating the Invoiced to Date field, the Job will be marked as closed and the End Date will be populated with the Final Invoice Date.
Post Invoices to AR dialog box
Refer to the following field descriptions and requirements.

CYMA Accounting for Windows Training Guide – Accounts Receivable
Copyright 1999-2018 CYMA Systems Inc. 148
Year
Select a Year from the drop down. The year will default from Maintain Configuration. If the user does not have full access to Maintain Configuration, the drop down will be disabled and the year cannot be changed.
Post Invoices in Period Range
Select the beginning date for the period in which to post the invoices to the Accounts Receivable system. Use the drop down list box to choose a different period. The beginning date for the current period defaults.
To
Select the ending date for the period in which to post the invoices to the Accounts Receivable system. Use the drop down list box to choose a different period. The ending date for the current period defaults.
Only invoices within the date range specified and the period selected will be posted! Invoice numbers with dates outside of this range will not be posted!
Print Register
This check box will be selected by default. When selected, the Invoice Register will print a list of invoices posted when the Post button is selected. The following option buttons will only be enabled if this box is selected. The option buttons allow you to decide if you want to print the register in detail, which will show all line items for the invoices or in summary, which will print one line per invoice with no line item detail.
Detail
The option button will be selected by default when enabled. When selected, the Invoice Register will show line item detail.
Summary
When this option button is selected, the Invoice Register will print one line for each Invoice posted.
Selections DataGrid group box
Use the DataGrid columns and fields to select which invoices to post. The following selection criteria are available:
For more information regarding the Selection Criteria go to the Selection Criteria topic in the System Manager Help.
Dates in Period
The Dates in Period option allows you to post Invoices for specific dates.
Customer ID
The Customer ID option allows you to post Invoices based on the Customer ID.
Invoice No
The Invoice No option allows you to post Invoices based on the Invoice number.
AR Account
The AR Account option allows you to post Invoices based on the Accounts Receivable account the Invoice is posted to.
Created By User

CYMA Accounting for Windows Training Guide – Accounts Receivable
Copyright 1999-2018 CYMA Systems Inc. 149
The Created By User option allows you to post Invoices based on a specific user. Select one of the following from the drop-down list:
Payments Recorded on The Invoices group box
This option group will control where payments recorded on Invoices will be posted to in the general ledger as well as what posting reports you would like to have printed for verification purposes.
DataGrid Columns and Fields
MOP
The MOP text box is in view-only mode as a reference to the type of payment being made.
Bank ID
The Bank ID text box displays the default Bank ID assigned to each payment type on the Maintain Configuration dialog. You may accept the default or use the browser to select a different Bank ID.
GL Account
The GL Account text box is in view-only mode as a reference to the GL Cash Account for the Bank in which the payments were deposited. This Account Number is displayed from the associated Bank record. If the default Bank ID is used, this will be the same as the Default Cash Account from the Maintain/Configuration Tab.
Acct Type
The Acct Type text box is in view-only mode as a reference to the Type of bank Account in which the payments were deposited. This is displayed from the associated Bank ID record.
Bank Name
The Bank Name text box is in view-only mode as a reference to the name of the Bank where the payments were deposited
Print Deposit Slip
The Print Deposit Slip check box allows you to print deposit slips for payments that are posted to the Accounts Receivable system through the Post Invoices to AR process.
Print Payment Register
The Print Payment Register check box allows you to print a Payment Register for payments posted to the Accounts Receivable system through the Post Invoices to AR process.
Print Destination group box
Screen
Select this option button to display the requested report on your screen. The report may also be sent to the Windows default printer from your screen.
Printer
Select this option button to redirect the report to the printer shown in the "default printer" section of the destination group of the dialog.
File
Select this option button to export the displayed report in one of several common formats.
Post Invoices to AR Command Buttons

CYMA Accounting for Windows Training Guide – Accounts Receivable
Copyright 1999-2018 CYMA Systems Inc. 150
Click the Post button to post the Invoices and credit memos to Accounts Receivable. The Invoice Register Proof Listing will print. After printing the Proof listing you are given the option to continue with posting the Invoices or canceling the Posting operation.
Posting an AR Invoice that originated in Sales Order will update the Qty Invoiced field on the Sales Order line(s).
When posting AR invoices that have an EFT payment entered a dialog box will display that will allow the entry of the path and filename for the EFT file.
Posting an AR invoice that has a valid Client ID and Work Order number will update the Work Order totals in Payroll - Maintain Work Orders.
Click the Setup Printer button to redirect the report to a printer other than the default printer displayed or to change the orientation from Portrait to Landscape if necessary.
Click the Cancel button to close the dialog box without posting Invoices or credit memos.

CYMA Accounting for Windows Training Guide – Accounts Receivable
Copyright 1999-2018 CYMA Systems Inc. 151
Process Post Payments to AR Select Payments... from the Post to AR submenu to access the Post Payments to AR dialog box. The Post Payments to AR process will update the associated Invoice records the payments are applied to, as well as mark the payments as ready to be posted to the General Ledger through Post Payments to GL operation. This operation also updates the appropriate period and year-to-date accumulators and recalculates the Current Balance Due for all affected customer records.
Applying a payment to any invoice which originated in the Job Costing Module and contains a Job Number will update the "Payments To Date" field on the Maintain Job dialog during the Post Payments to Accounts Receivable routine.
Entries in deposits that have been posted cannot be edited.
Post Payments to AR dialog box
The dialog box consists of two tabs which allow you to refine the list of deposits that need to be selected for posting;
Post Deposit Criteria
The Post Deposit Criteria tab has filters that will be applied to entered deposits that are available to post. When the Find Now button is pressed the results will be displayed on the Post Payments to AR tab.
Post Payments to AR
The Post Payments to AR tab displays the results of the filter apply on the Post Deposit Criteria tab. The deposits displayed in the grid can then be selected individual for posting.
Post Payments to AR Command Buttons
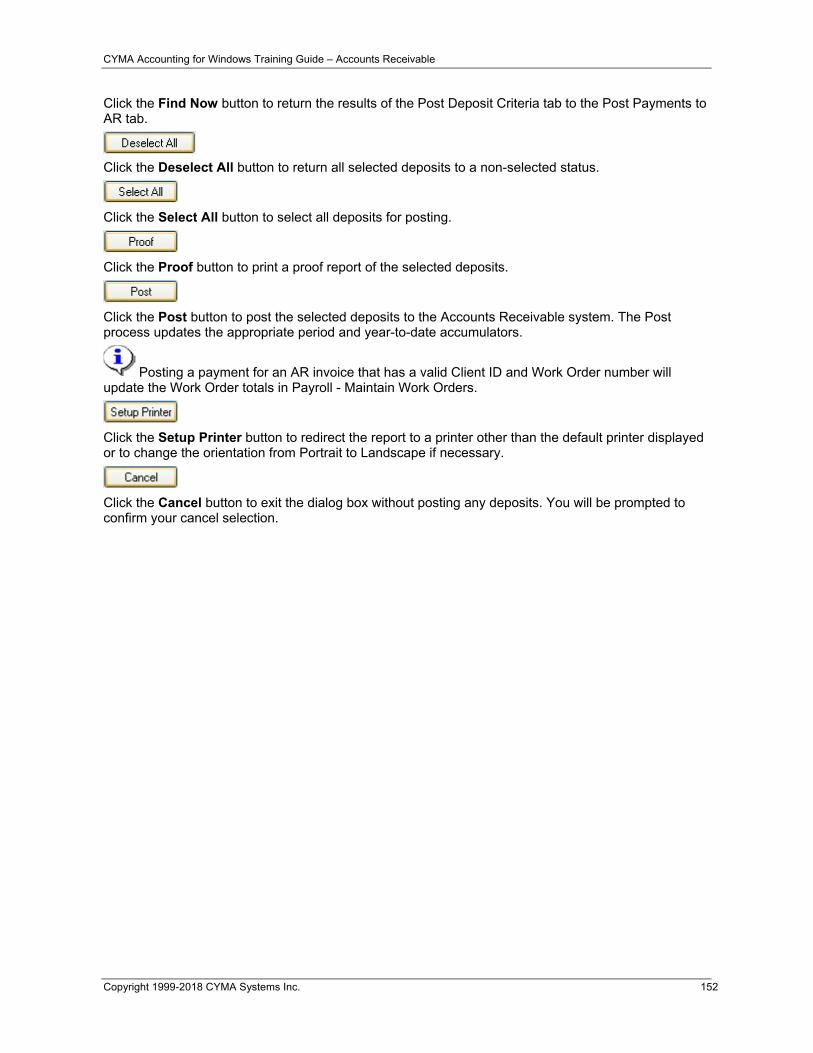
CYMA Accounting for Windows Training Guide – Accounts Receivable
Copyright 1999-2018 CYMA Systems Inc. 152
Click the Find Now button to return the results of the Post Deposit Criteria tab to the Post Payments to AR tab.
Click the Deselect All button to return all selected deposits to a non-selected status.
Click the Select All button to select all deposits for posting.
Click the Proof button to print a proof report of the selected deposits.
Click the Post button to post the selected deposits to the Accounts Receivable system. The Post process updates the appropriate period and year-to-date accumulators.
Posting a payment for an AR invoice that has a valid Client ID and Work Order number will update the Work Order totals in Payroll - Maintain Work Orders.
Click the Setup Printer button to redirect the report to a printer other than the default printer displayed or to change the orientation from Portrait to Landscape if necessary.
Click the Cancel button to exit the dialog box without posting any deposits. You will be prompted to confirm your cancel selection.

CYMA Accounting for Windows Training Guide – Accounts Receivable
Copyright 1999-2018 CYMA Systems Inc. 153
Process Post Payments to AR - Post Deposit Criteria Tab The Post Deposit Criteria tab has filters that will be applied to entered deposits that are available to post. When the Find Now button is pressed the results will be displayed on the Post Payments to AR tab.
Post Payments to AR dialog box
Refer to the following fields and descriptions:
Enter The Invoice Criteria DataGrid
Use the DataGrid to enter selection criteria for selecting deposits based on the following fields:
Field
This view-only column shows the fields available for user-defined selection criteria. The options are as follows:
Deposit No
The Deposit No option allows you to select deposits based on the deposit number.
Deposit Date
The Deposit Date option allows you to select deposits by deposit date.
Bank ID
The Bank ID option allows you to select deposits by the Bank ID.
User
The User option allows you to select deposits by the user that entered the deposit.
For more information regarding the Selection Criteria go to the Selection Criteria topic in the System Manager Help.

CYMA Accounting for Windows Training Guide – Accounts Receivable
Copyright 1999-2018 CYMA Systems Inc. 154

CYMA Accounting for Windows Training Guide – Accounts Receivable
Copyright 1999-2018 CYMA Systems Inc. 155
Process Post Payments to AR - Post Payments to AR Tab The Post Payments to AR tab displays the results of the filter apply on the Post Deposit Criteria tab. The deposits displayed in the grid can then be selected individual for posting.
Post Payments to AR dialog box
Refer to the following field descriptions and requirements:
Display Group Box
The Display Group Box allows you to select what payments to display on the DataGrid. Click the appropriate option button to display all payments or only payments selected for posting in the DataGrid.
All
Click the All option button to display all payments in the DataGrid for posting.
Selected
Click the Selected option button to display only the payments selected in the DataGrid for posting.
CYMA Accounting for Windows Training Guide – Accounts Receivable
Copyright 1999-2018 CYMA Systems Inc. 156
The default for the Display options is All payments. Once you have selected payments for posting you can click on the Selected button and confirm your choices before posting the selected payments.
Sort Order Group Box
Click the appropriate option button to determine how the payments will be sorted for viewing in the DataGrid. The default value for Sort Order is Deposit.
Deposit
Click the Deposit option button to sort the payments by Deposit ID.
User
Click the User option button to sort the payments by the user that created the deposit.
Bank
Click the Bank option button to sort the payments by Bank.
Period
Click the Period option button to sort the payments by the Period they were created in.
DataGrid Columns and Fields
Once you have selected the Display and Sort Order options and moved the pointer to the DataGrid area, the deposits will be displayed according to your selections. You can then select or deselect deposits for posting.
Within the DataGrid you can select a single row or groups of rows using standard Windows conventions. Left-click or SPACEBAR to select single rows, SHIFT+left-click to select multiple adjacent rows, and CTRL+left-click to select multiple nonadjacent rows.
Deposit No
The view-only Deposit No field displays the Deposit ID number assigned by the system.
Period
The view-only Period field displays the period the payment will post to.
Deposit Date
The view-only Deposit Date field displays the date the payment was created.
User
The view-only User field displays the User that created the payment.
Bank Name
The view-only Bank Name field displays the name of the Bank for this payment.
Total Deposit
The view-only Total Deposit field displays the total amount of the payment.
Cash Account
The view-only Cash Account field displays the cash account the payment will post to in the General Ledger.
Print Deposit Slip
The Print Deposit Slip check box allows you to print a Deposit Slip for all deposits that are posted through this process. This check box is not selected by default on entering the dialog box.

CYMA Accounting for Windows Training Guide – Accounts Receivable
Copyright 1999-2018 CYMA Systems Inc. 157
Print Payment Register
The Print Payment Register check box allows you to print a Payment Register for your records for all Deposits that are processed through the Post to AR process. This check box is selected by default on entering this dialog box.
Print Destination Group Box
Select the print destination for the deposit slip and/or payment register.
Screen
Select the Screen option button to display the requested report on your screen. The report may also be sent to the Windows default printer from your screen.
Printer
Select the Printer option button to redirect the report to the printer shown in the default printer section.
File
Select the File option button to export the displayed report in one of several common formats.
Electronic Funds Transfer group box
If a deposit is being posted that contains an EFT transaction the following fields will be enabled for entry.
Path
Enter the Path to the location in which to save the file. You may use the button to the right of the field to browse for the location.
Filename
Enter the Filename of the file to be created. A file name will default.

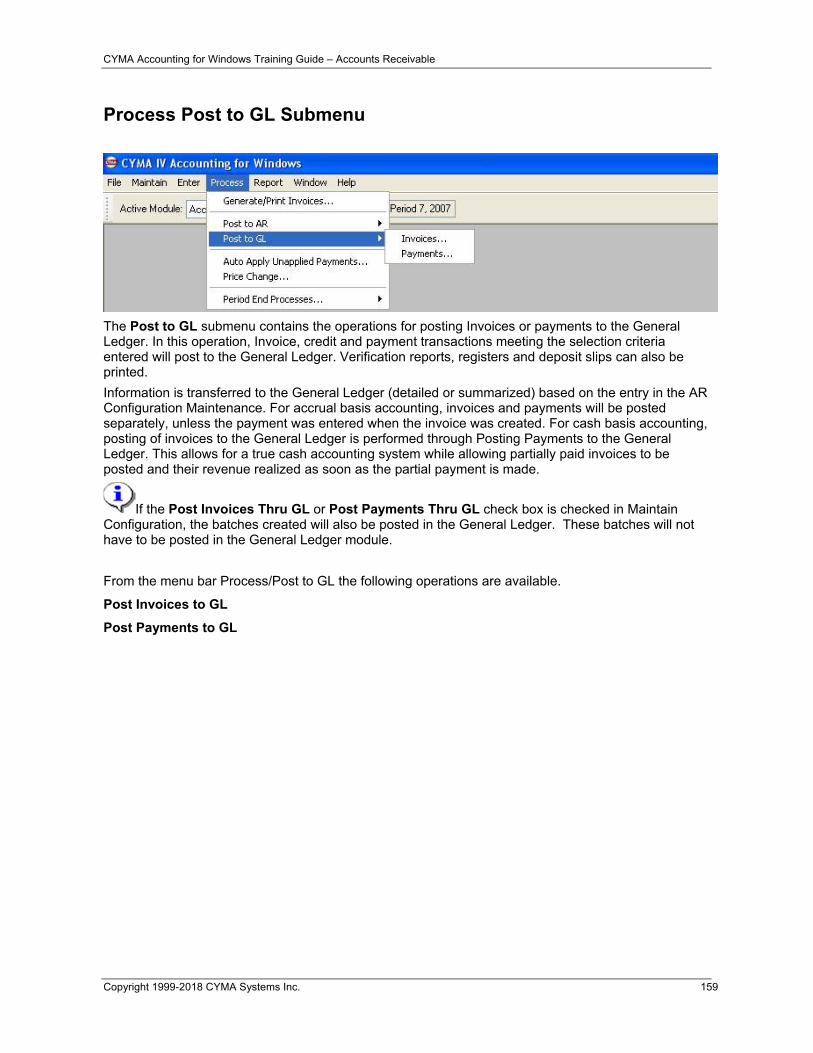
CYMA Accounting for Windows Training Guide – Accounts Receivable
Copyright 1999-2018 CYMA Systems Inc. 159
Process Post to GL Submenu
The Post to GL submenu contains the operations for posting Invoices or payments to the General Ledger. In this operation, Invoice, credit and payment transactions meeting the selection criteria entered will post to the General Ledger. Verification reports, registers and deposit slips can also be printed.
Information is transferred to the General Ledger (detailed or summarized) based on the entry in the AR Configuration Maintenance. For accrual basis accounting, invoices and payments will be posted separately, unless the payment was entered when the invoice was created. For cash basis accounting, posting of invoices to the General Ledger is performed through Posting Payments to the General Ledger. This allows for a true cash accounting system while allowing partially paid invoices to be posted and their revenue realized as soon as the partial payment is made.
If the Post Invoices Thru GL or Post Payments Thru GL check box is checked in Maintain Configuration, the batches created will also be posted in the General Ledger. These batches will not have to be posted in the General Ledger module.
From the menu bar Process/Post to GL the following operations are available.
Post Invoices to GL
Post Payments to GL


CYMA Accounting for Windows Training Guide – Accounts Receivable
Copyright 1999-2018 CYMA Systems Inc. 161
Post Invoices to GL This process can be accessed by selecting Process - Post to GL - Invoices from the menu bar. The Post Invoices to GL process will only post invoices and credit memo’s that have already been posted internally through Process - Post to AR - Invoices. Posting the invoices to the General Ledger system will mark the records as posted to GL and create an unposted AR Journal in General Ledger system. The AR Journal will show the credits and debits to the General Ledger AR Accounts and Sales/Revenue Accounts, Tax ID Accrual Accounts and Freight Accounts affected by the posted invoices.
If the Post Invoices Thru GL check box is checked in Maintain Configuration, the batch that is created will also be posted in the General Ledger. These batches will not have to be posted in the General Ledger module.
This menu option will be disabled for companies set up as Cash Basis. Cash Basis invoices will Post to the General Ledger system through the Post Payments to General Ledger process.
Post Invoices to GL dialog box
Refer to the following field descriptions and requirements.
Year
Select a Year from the drop down. The year will default from Maintain Configuration. If the user does not have full access to Maintain Configuration, the drop down will be disabled and the year cannot be changed.

CYMA Accounting for Windows Training Guide – Accounts Receivable
Copyright 1999-2018 CYMA Systems Inc. 162
Post Invoices in Period Range
Select the beginning date for the period in which to post the invoices to the General Ledger system. Use the drop down list box to choose a different period. The beginning date for the current period defaults.
To
Select the ending date for the period in which to post the invoices to the General Ledger system. Use the drop down list box to choose a different period. The ending date for the current period defaults.
Selections DataGrid group box
Use the DataGrid columns and fields to select which invoices to post. The following selection criteria are available:
For more information regarding the Selection Criteria go to the Selection Criteria topic in the System Manager Help.
Field
The display-only Field column shows the fields available for user-defined selection criteria. The options are as follows:
Dates in Period
The Dates in Period option allows you to post Invoices to GL for specific dates.
Customer ID
The Customer ID option allows you to post Invoices to GL based on the Customer ID.
Invoice No
The Invoice No option allows you to post Invoices to GL based on the Invoice number.
AR Account
The AR Account option allows you to post Invoices to GL based on the Accounts Receivable account the Invoice is posted to.
Created By User
The Created By User option allows you to post Invoices to GL based on a specific user.
Print Destination group box
Screen
Select this option button to display the Proof Listing on your screen. The report may also be sent to the Windows default printer from your screen.
File
Select this option button to export the displayed report in one of several common formats.
Printer
Select this option button to redirect the report to the printer shown in the "default printer" section of the destination group of the dialog.

CYMA Accounting for Windows Training Guide – Accounts Receivable
Copyright 1999-2018 CYMA Systems Inc. 163
When the Post button is selected, the system will first check the Maintain/Configuration to see if this company has selected to post Invoices to the General Ledger in detail. The Summary and Detail posting information is outlined below. Once the button has been selected, the system will first prepare the selected data for the Proof Listing. Once printed, the system will give you the option of continuing with the Post to GL or canceling. If you choose to continue, a batch or unposted AR Journal will be created in the General Ledger as described below:
Detail Posting If the Post Invoices to GL in Detail check box is selected, this process will create one line item in the AR Journal for each Invoice line item, as well as each Tax ID Accrual Account. In addition one line item per Invoice will be created for the AR Account associated with each invoice.
Summary Posting If the Post Invoices to GL in Detail check box is not selected, this process will create one line item in the AR Journal with a summary total for each AR Account, each Sales Account, Tax ID Accrual and one line item for all freight charges to the freight account stored on the invoices.
The AR Journal will remain unposted in the General Ledger until it is Posted from the Post/Journal Entries process in the General Ledger System.
Click the Setup Printer button to redirect the report to a printer other than the default printer displayed or to change the orientation from Portrait to Landscape if necessary.
Click the Cancel button to cancel posting.


CYMA Accounting for Windows Training Guide – Accounts Receivable
Copyright 1999-2018 CYMA Systems Inc. 165
Process Post Payments to GL Select Payments... from the Post to GL submenu to access the Post Payments to GL dialog box. The Post Payments to GL operation will mark the payments as posted to the General Ledger. The Post to GL process will create a CR Journal (Cash Receipts) in the General Ledger for all deposits selected.
If the Post Payments Thru GL check box is checked in Maintain Configuration, the batch that is created will also be posted in the General Ledger. These batches will not have to be posted in the General Ledger module.
For Cash Basis companies, this process will also post individual Invoice Line items that were paid by the deposits selected.
Post Payments to GL dialog box
The dialog box consists of two tabs which allow you to refine the list of deposits that need to be selected for posting;
Post Deposit Criteria
The Post Deposit Criteria tab has filters that will be applied to entered deposits that are available to post. When the Find Now button is pressed the results will be displayed on the Post Payments to AR tab.
Post Payments to GL
The Post Payments to GL tab displays the results of the filter apply on the Post Deposit Criteria tab. The deposits displayed in the grid can then be selected individual for posting.
Post Invoices to GL Command Buttons

CYMA Accounting for Windows Training Guide – Accounts Receivable
Copyright 1999-2018 CYMA Systems Inc. 166
Click the Find Now button to return the results of the Post Deposit Criteria tab to the Post Payments to GL tab.
Click on the Deselect All button to return all selected deposits to a non-selected status.
Click on the Select All button to select all deposits in the DataGrid for posting.
Click the Post button to post the selected deposits to the General Ledger system. The system will first check the Maintain/Configuration to see if this company has selected to post Deposits to the General Ledger in detail. The Summary and Detail posting information is outlined below. Once the button has been selected, the system will first prepare the selected data for the Proof Listing. Once printed, the system will give you the option of continuing with the Post to GL or canceling. If you choose to continue, a batch or unposted CR Journal will be created in the General Ledger.
Detail Posting If the Post Deposits to GL in Detail check box is selected, this process will create one line item in the CR Journal for each Payment line item (Payment Lines contain the Invoice Number that the Payment was applied to) as well as one line entry for each Check/Credit Card to the Cash Account.
Post Deposits to GL in Detail - Selected
When the Post Deposits to GL in Detail check box is selected on the Maintain Configuration dialog box, one line entry will be sent to the AR Journal for each of the following items for each Check or Credit Card posted:
A line entry to the Cash Acct for the Check or Credit Card, Document No will reflect Check or Credit Card No.
A line entry for each Sales Account from the line items of Invoices paid by the Check or Credit Card.
A line entry for each Tax ID from the line items of Invoices paid by the Check or Credit Card.
A line entry for each Discount Taken from the Invoices paid by the Check or Credit Card.
A line entry for each Freight amount from the Invoices paid by the Check or Credit Card.
Summary Posting If the Post Deposits to GL in Detail check box is not selected, this process will create one line item in the CR Journal with a summary total for each AR Account and one line item for each Cash Account.
Post Deposits to GL in Detail - Not Selected
When the Post Deposits to GL in Detail check box is not selected on the Maintain Configuration dialog box, posting payments to the General Ledger for a Cash Basis company will send one line item for each of the following to the AR Journal in General Ledger:
One line entry for each Cash Account for Unapplied AR Payments, if any.
One line entry for each Cash Account for Miscellaneous Cash Receipts, if any.
One line entry for each Cash Account for all dollars applied to AR Sales.
One line entry for Discounts Taken to Discount Account in AR Configuration.
One line entry for Freight amounts paid to Freight Account in AR Configuration.
One line entry for each Tax ID Accrual Account that received a cash receipt.
The CR Journal will remain unposted in the General Ledger until it is Posted from the Post/Journal Entries process in the General Ledger System.

CYMA Accounting for Windows Training Guide – Accounts Receivable
Copyright 1999-2018 CYMA Systems Inc. 167
Cash Basis Posting
Cash Basis companies will have the menu option Process/Post to Invoices GL, disabled. The Invoices will post to the General Ledger when their respective payments are posted to the GL. Cash Basis posting will not create entries in the CR Journal but use the AR Journal instead. The Post Payments to GL in Detail check box will be what the system checks and will determine how Invoices and payments are posted to the General Ledger.
Click the Setup Printer button to redirect the report to a printer other than the default printer displayed or to change the orientation from Portrait to Landscape, if necessary.
Click the Cancel button to cancel posting.


CYMA Accounting for Windows Training Guide – Accounts Receivable
Copyright 1999-2018 CYMA Systems Inc. 169
Process Post Payments to GL - Post Deposit Criteria Tab The Post Deposit Criteria tab has filters that will be applied to entered deposits that are available to post. When the Find Now button is pressed the results will be displayed on the Post Payments to GL tab.
Post Payments to GL - Post Deposit Criteria Tab
efer to the following fields and descriptions:
Enter The Invoice Criteria DataGrid
Use the DataGrid to enter selection criteria for selecting deposits based on the following fields:
Field
This view-only column shows the fields available for user-defined selection criteria. The options are as follows:
Deposit No
The Deposit No option allows you to select deposits based on the deposit number.
Deposit Date
The Deposit Date option allows you to select deposits by deposit date.
Bank ID
The Bank ID option allows you to select deposits by the Bank ID.
User
The User option allows you to select deposits by the user that entered the deposit.
For more information regarding the Selection Criteria go to the Selection Criteria topic in the System Manager Help.

CYMA Accounting for Windows Training Guide – Accounts Receivable
Copyright 1999-2018 CYMA Systems Inc. 170

CYMA Accounting for Windows Training Guide – Accounts Receivable
Copyright 1999-2018 CYMA Systems Inc. 171
Process Post Payments to GL - Post Payments to GL Tab The Post Payments to GL tab displays the results of the filter apply on the Post Deposit Criteria tab. The deposits displayed in the grid can then be selected individually for posting.
Post Payments to GL - Post Payments to GL Tab
Refer to the following field descriptions and requirements.
Display Group Box
All
Click the All option button to display all payments in the DataGrid for posting.
Selected
Click the Selected option button to display only the payments selected in the DataGrid for posting.
The default for the Display options is All payments. Once you have selected payments for posting you can click on the Selected button and confirm your choices before posting the selected payments.
Sort Order Group Box
Click the appropriate option button to determine how the payments will be sorted for viewing in the DataGrid. The default value for Sort Order is Deposit.
Deposit
Click the Deposit option button to sort the payments by Deposit ID.
User

CYMA Accounting for Windows Training Guide – Accounts Receivable
Copyright 1999-2018 CYMA Systems Inc. 172
Click the User option button to sort the payments by the user that created the deposit.
Bank
Click the Bank option button to sort the payments by Bank.
Period
Click the Period option button to sort the payments by the Period they were created in.
DataGrid Columns and Fields
Once you have selected the Display and Sort Order options and moved the pointer to the DataGrid area, the deposits will be displayed according to your selections. You can then select or deselect deposits for posting.
Within the DataGrid you can select a single row or groups of rows using standard Windows conventions. Left-click or SPACEBAR to select single rows, SHIFT+left-click to select multiple adjacent rows, and CTRL+left-click to select multiple nonadjacent rows.
Deposit No
The view-only Deposit No field displays the Deposit ID number assigned by the system.
Period
The view-only Period field displays the period the payment was posted to Accounts Receivable which will be the period it will post to in the General Ledger module.
Deposit Date
The view-only Deposit Date field displays the deposit date selected when the deposit was entered.
User
The view-only User field displays the User that entered the deposit.
Bank Name
The view-only Bank Name field displays the bank name associated with the bank ID selected when the deposit was entered.
Total Deposit
The view-only Total Deposit field displays the total amount of the deposit record.
Cash Account
The view-only Cash Account field displays the General Ledger account number for the bank.
Print Destination Group Box
Screen
Select the Screen option button to display the Proof Listing on your screen. The report may also be sent to the Windows default printer from your screen.
Printer
Select the Printer option button to redirect the report to the printer shown in the default printer view-only field.
File
Select the File option button to export the displayed report in one of several common formats.

CYMA Accounting for Windows Training Guide – Accounts Receivable
Copyright 1999-2018 CYMA Systems Inc. 173
Process Post Payments to GL - Cash Basis Posting Cash Basis companies will have the menu option Process/Post to GL/Invoices, disabled. The invoices will post to the General Ledger when their respective Payments are Posted to the General Ledger. Cash Basis posting will not create entries in the CR Journal but use the AR Journal instead. The Post Payments to GL in Detail check box will be what the system checks and will determine how Invoices and Payments are posted to the General Ledger.
Post Deposits to GL in Detail - Selected
One line entry will be sent to the AR Journal for each of the following items for each Check or Credit Card posted:
A line entry to the Cash Acct for the Check/CC, Document No will reflect Check/CC No.
A line entry for each Sales Acct from the line items of invoices paid by the Check/CC.
A line entry for each Tax ID from the line items of invoices paid by the Check/CC.
A line entry for each Discount Taken from the invoices paid by the Check/CC.
A line entry for each Freight amount from the invoices paid by the Check/CC.
Post Deposits to GL in Detail - Not Selected
When this check box is not selected in Maintain/Configuration, posting Payments to GL for a Cash Basis company will send one line item for each of the following to the AR Journal in General Ledger:
One line entry for each Cash Acct for Unapplied AR Payments, if any.
One line entry for each Cash Acct for Miscellaneous Cash Receipts, if any.
One line entry for each Cash Acct for all dollars applied to AR Sales.
One line entry for Discounts Taken to Discount Acct in AR Configuration.
One line entry for Freight amounts paid to Freight Acct in AR Configuration.
One line entry for each Tax ID Accrual Acct that received a cash receipt.


CYMA Accounting for Windows Training Guide – Accounts Receivable
Copyright 1999-2018 CYMA Systems Inc. 175
Process Electronic Funds Transfer Recreate eFile When Recreate eFile... is selected from the Electronic File Transfer submenu on the Process Menu the Recreate eFile dialog displays. This dialog is used to recreate, reverse or create a voided file.
Electronic Funds Transfer Recreate eFile dialog
Refer to the following fields and descriptions
The Recreate eFile dialog consists of two tabs.
Deposit Criteria
The Deposit Criteria tab allows filtering of the existing deposits to create a new or modified file.
Selected Deposits
The Selected Deposits tab displays the result of applying the Deposit Criteria entered.
Recreate eFile Command Buttons
Select the Find Now button to apply the Deposit Criteria and display the result on the Selected Deposits tab.
Select the Select All button to select all records displayed on the Selected Deposits tab.
Select the Deselect All button to unselect all records on the Selected Deposits tab.

CYMA Accounting for Windows Training Guide – Accounts Receivable
Copyright 1999-2018 CYMA Systems Inc. 176
Select the Print Proof button to display a proof report listing all records selected on the Selected Deposits tab.
Select the Create File button to create a file that contains only the selected records.
Select the Close button to close the dialog without creating a file.
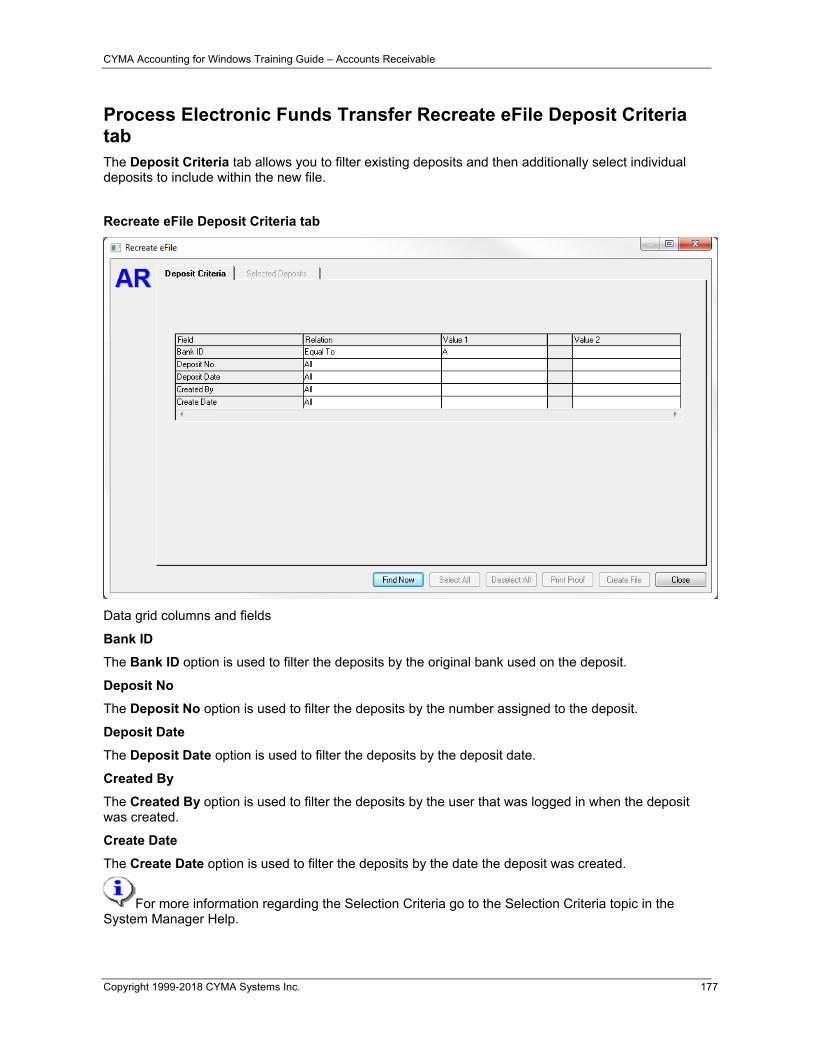
CYMA Accounting for Windows Training Guide – Accounts Receivable
Copyright 1999-2018 CYMA Systems Inc. 177
Process Electronic Funds Transfer Recreate eFile Deposit Criteria tab The Deposit Criteria tab allows you to filter existing deposits and then additionally select individual deposits to include within the new file.
Recreate eFile Deposit Criteria tab
Data grid columns and fields
Bank ID
The Bank ID option is used to filter the deposits by the original bank used on the deposit.
Deposit No
The Deposit No option is used to filter the deposits by the number assigned to the deposit.
Deposit Date
The Deposit Date option is used to filter the deposits by the deposit date.
Created By
The Created By option is used to filter the deposits by the user that was logged in when the deposit was created.
Create Date
The Create Date option is used to filter the deposits by the date the deposit was created.
For more information regarding the Selection Criteria go to the Selection Criteria topic in the System Manager Help.

CYMA Accounting for Windows Training Guide – Accounts Receivable
Copyright 1999-2018 CYMA Systems Inc. 178
.

CYMA Accounting for Windows Training Guide – Accounts Receivable
Copyright 1999-2018 CYMA Systems Inc. 179
Process Electronic Funds Transfer Recreate eFile - Selected Deposits tab The Selected Deposits tab allows you to select the deposits that should be included in the new file. The tab displays only those records that match the criteria entered on the Deposit Criteria tab.
Recreate eFile - Selected Deposits tab
Refer to the following fields and descriptions
Show All
Select the Show All option to show all records that match the criteria entered on the Deposit Criteria tab.
Show Selected
Select the Show Selected to only show records that have been highlighted in the grid.
Data grid columns and fields
Bank ID
The Bank ID column displays the Bank ID associated with the deposit.
Deposit No
The Deposit No column displays the number associated with the deposit.
Deposit Date
The Deposit Date column displays the date of the deposit.
Created By
The Created By column displays the User ID of the user that was logged in when the deposit was created.

CYMA Accounting for Windows Training Guide – Accounts Receivable
Copyright 1999-2018 CYMA Systems Inc. 180
Create Date
The Create Date column displays the date the deposit was created.
File Process Type group box
Recreate
Select the Recreate option to create a new file from the selected deposits. When this file is created any deposits or payments within a deposit that have been voided are NSF'd will not be included. This option should be used if you have voided payments/deposits but not sent the file to the bank or to create one file out of multiple deposits.
Reverse
Select the Reverse option to create a new file from the selected deposits that will reverse the debit or credit. This file should be sent if a file was mistakenly sent to the bank and all transactions need to be reversed.
NSF Payments Only
Select the NSF Payments Only option to create a file that only creates transactions for payments that were NSFd or Deposits that were Voided. This file should be sent if a file was sent and then payments/deposits voided afterwards.
Include Prenotes
Check the Include Prenotes option to include the banking information for any customers set up as Prenote. When this option is selected an entry will be made in the file with a zero dollar amount.
Prenote Date
In the Prenote Date field enter the date that needs to be assigned to the Prenote record.
File Information group box
Path
Enter the Path to the location in which to save the file. You may use the button to the right of the field to browse for the location.
Filename
Enter the Filename of the file to be created. A file name will default.

CYMA Accounting for Windows Training Guide – Accounts Receivable
Copyright 1999-2018 CYMA Systems Inc. 181
Process Electronic Funds Transfer - Prenotifications When Prenotifications... is selected from the Electronic File Transfer submenu on the Process Menu the Prenotifications dialog displays. This dialog is used to create an EFT file that only includes prenotification records.
Prenotifications dialog
Refer to the following fields and descriptions
Bank ID
Enter the Bank ID or select one from the browser of the bank that is to be the recipient of the created file.
Prenote Date
Enter the Prenote Date that will be associated with the prenotification records.
File Information group box
Path
Enter the Path to the location in which to save the file. You may use the button to the right of the field to browse for the location.
Filename
Enter the Filename of the file to be created. A file name will default.
Prenotification command buttons
Click the Print Proof button to print a proof report showing the records that have been selected for processing.

CYMA Accounting for Windows Training Guide – Accounts Receivable
Copyright 1999-2018 CYMA Systems Inc. 182
Click the Create File to create the EFT file to be sent to the bank for processing.
Click the Close button to exit the dialog without creating the file.

CYMA Accounting for Windows Training Guide – Accounts Receivable
Copyright 1999-2018 CYMA Systems Inc. 183
Process Auto Apply Unapplied Payments When Auto Apply Unapplied Payments... is selected from the Process Menu the Auto Apply Unapplied Payments dialog box is displayed. This process allows you to apply any unapplied payments to existing invoices. This process will create a deposit dated with the accounting date of the system and post it to AR.
If the program cannot apply the entire unapplied payment then no transfer is done. Credit memos are not applied, only outstanding unapplied payments and deposit with order invoices. Periods selected apply to the unapplied payments and dates of invoices. The transfer (deposit) that is created uses the current accounting date for the transfer.
Auto Apply Unapplied Payments dialog
Refer to the following fields and descriptions
Apply to Invoices in Period
Select the starting period that you would like to process the invoices.
To
Select the ending period that you would like to process the invoices.
Bank ID
Select the Bank ID that you would like to use for the created deposit.
Selections Data Grid columns and fields
For more information regarding the Selection Criteria go to the Selection Criteria topic in the System Manager Help.

CYMA Accounting for Windows Training Guide – Accounts Receivable
Copyright 1999-2018 CYMA Systems Inc. 184
Field
The display-only Field column shows the fields available for user-defined selection criteria. The options are as follows:
Customer ID
Use the Customer ID selection to select a specific customer or range of customers.
Dates in Period
Use the Dates in Period selection to select a specific date or range of dates within the selected period(s).
Deposit with Order
Use the Deposit with Order selection to select if you want to include Deposit with Order invoices in the process.
Print Deposit Slip
Check the Print Deposit Slip check box if you would like to print the Deposit Slip. This options is unchecked by default.
Print Payment Register
Check the Print Payment Register check box if you would like to print the Payment Register. This option is checked by default.
Print Destination Options
Screen
Select the Screen option to display the reports on the screen.
Printer
Select the Printer option to send the reports directly to the printer.
File
Select the File option to send the reports to a file.
Printer Description
The Printer Description field is view only and will display the name of the selected printer.
Auto Apply Unapplied Payments Command Buttons
Click the OK button to start the process.
Click the Setup Printer button to change the printer or printer options.
Click the Cancel button to close the dialog.

CYMA Accounting for Windows Training Guide – Accounts Receivable
Copyright 1999-2018 CYMA Systems Inc. 185
Period End Processes Submenu
The Period End Processes submenu contains the operations recommended to be performed at the end of each period.
The following options are available on the Period End Processes submenu:
Calculate Commissions
Create Finance Charges
Create Write-Offs Entries
Print Statements
Print Tax Reports
Period End Close


CYMA Accounting for Windows Training Guide – Accounts Receivable
Copyright 1999-2018 CYMA Systems Inc. 187
Process Period End Close Select Period End Close... from the Period End Processes submenu to access the Period End Close dialog box. This is the preferred way to increment the AR Period. The Period End Close will clear the period-to-date totals for all customers as well as the Sales Rep period-to-date sales amounts. Closing the period allows you to optionally move closed transactions to history.
Year End Close
The Year End Close process will be performed by the Period End Close function. The Period End Close process will check the System Manager module to see if the Period being closed is the last period in the fiscal year. If the system detects that it is the last period of a fiscal year, you will be given a confirmation message letting you know that both the Period and the Year will be closed. This will clear Period-to-Date totals as well as year-to-date totals and optionally move all closed transactions to the history files. Records that have gone to the history files may be accessed through the History reports but may not be processed further. For this reason, only closed transactions will be moved.
The Period End Close dialog box consists of the following tab pages.
Actions Performed
The fields on the Actions Performed tab are displayed in view-only mode. The current AR Period that is about to be closed is displayed as well as information regarding what the Period End Close will do. It allows you to select to move Invoices and payments that have been closed to the history files.
Prerequisites
The Prerequisites tab page lets you know of any processes or suggested reports that have not been completed. The Required Processing section is crucial. The system will not allow you to close a period unless the Completed? Column displays a Yes in all of the rows. Processes and Reports that have not been completed will have their entire row displayed in red as a visual reference as to what has not been completed.
Period End Close Command Buttons

CYMA Accounting for Windows Training Guide – Accounts Receivable
Copyright 1999-2018 CYMA Systems Inc. 188
When the Process button is selected, the system will first check for un-printed Invoice records in the current period. You will be allowed to print them in the next period if desired. Once this criteria has been checked, the system will display the Prerequisites tab automatically to insure that you review the processes and reports that should take place prior to closing the period.
Click the Cancel button to cancel closing the period.

CYMA Accounting for Windows Training Guide – Accounts Receivable
Copyright 1999-2018 CYMA Systems Inc. 189
Process Period End Close - Actions Performed Tab The fields on the Actions Performed tab are displayed in the view-only mode. The current AR Period that is about to be closed is displayed as well as information regarding what the Period End Process will do. It allows you to select to move invoices and payments that have been closed to the history files.
Actions Performed Tab dialog box
Refer to the following field descriptions.
Options group box
Close Period of Ending
The above fields will be filled in by the system automatically. The information will show the period number in the first text box, the year in the second text box and the last date of the Current Period in the last text box. The system will find the Current Period and Year in Maintain/Configuration. The ending date of the Current Period will be found by the system in the System Manager/Maintain/Accounting Periods. These fields may not be changed, the system will automatically increment the Period when the process is complete. This prevents you from closing a period twice.
Move Invoices and Payments to History
The Move Invoices and Payments to History check box allows you to decide if you want your closed transactions to be moved to the history files. The system uses the "Number of Periods before Archive" to calculate which items will meet the date requirements for moving to history. The date when your closed transactions will qualify to transfer to history is calculated based upon a formula. The Number of Periods before Archive is subtracted from the current period, selected for close, to make this determination. Only invoices and payments that meet the date requirements will be further evaluated for consideration to move to history.

CYMA Accounting for Windows Training Guide – Accounts Receivable
Copyright 1999-2018 CYMA Systems Inc. 190
This allows transactions with dates from previous periods that were closed in a different period to be moved as well. It also allows you to decide after a few periods have passed to begin moving transactions to history. You may no longer process transactions that have been moved to history but they may be accessed from any history report. Moving transactions to history can significantly speed up processing if you have a large number of transactions. It will also speed up reports from the current data files.
Items will NOT be moved to history if they still have associated transactions that are still open.
Note: Backup your data files before running this process!
This is a reminder to backup your data files. It is always recommended to back your files up daily, however it is a good idea to have a period end backup to retain for the year.
AR Period End Close will do the following group box This option group is informational and outlines what the process actually does.
1) Check to ensure that all posting prerequisites have been performed before continuing.
If the system detects any transactions containing a date within the Period date range, the process will display a warning allowing you to exit and post the transactions first. In addition, it will also check for Invoice records that have not been printed or posted. You will be allowed to continue if you do not want the Invoices that have not been printed posted to the Current Period.
2) Clear the period-to-date totals in the Customer and Sales Rep files.
When the process continues, it will clear the PTD amounts on the Customer History tab as well as the PTD sales on the Sales Rep tab. This allows the system to begin accumulating the totals for the new period.
3) Advance the Period
When all validation has been performed and you have selected to continue, the system will advance the period after the above totals have been cleared.

CYMA Accounting for Windows Training Guide – Accounts Receivable
Copyright 1999-2018 CYMA Systems Inc. 191
Process Period End Close - Prerequisites Tab This tab page lets you know of any processes or suggested reports that have not been completed. The Required Processing section is crucial. The system will not allow you to close a period unless the Completed? Column displays a Yes in all four of the rows. Processes and Reports that have not been completed will have their entire row displayed in red as a visual reference as to what has not been completed.
Prerequisites tab dialog box
Refer to the following prerequisites and their descriptions.
- - - - - REQUIRED PROCESSING - - - - -
The - - - - - REQUIRED PROCESSING - - - - - Validation Criteria safeguards you from posting Invoice and deposit records into an incorrect period. You may always select to post records to a closed period, however this validation procedure tries to insure that all records are posted to the correct AR Period.
Have All Invoices been posted to AR?
The system checks to see that all Invoice records that contain an Invoice Date within the Period being closed or prior have been posted internally to the Accounts Receivable System. If the system finds any unposted records it will display a No in the completed column and will not allow you to close the period until this process is performed.
Have All Deposits been posted to AR?
The system checks to see that all Deposit Payment records that contain an Invoice Date within the Period being closed or prior have been posted internally to the Accounts Receivable System. If the system finds any unposted records it will display a No in the completed column and will not allow you to close the period until this process is performed.

CYMA Accounting for Windows Training Guide – Accounts Receivable
Copyright 1999-2018 CYMA Systems Inc. 192
Have All Invoices been posted to GL?
The system checks to see that all Invoice records that contain an Invoice Date within the Period being closed or prior have been posted to the General Ledger. If the system finds any unposted records it will display a No in the completed column and will not allow you to close the period until this process is performed.
Have All Deposits been posted to GL?
The system checks to see that all Deposit Payment records that contain an Invoice Date within the Period being closed or prior have been posted to the General Ledger. If the system finds any unposted records it will display a No in the completed column and will not allow you to close the period until this process is performed.
- - - - - REQUIRED REPORTS - - - - -
The - - - - - REQUIRED REPORTS - - - - - section of the DataGrid displays the reports that need to be run prior to closing the period. If the reports haven’t been run, it may be difficult to get the data in the exact format needed from the Report Menu. If you selected the Require Prerequisite Reports for Period End Close check box in Maintain/Configuration, the system will require that the reports listed below have been run since the last Posting Process. If you did not select the above check box, the system will warn you that an above report has not been run if detected, but will allow you to close the Period when you confirm that you wish to do so. Reports that show a Completed status of Yes will also display the Date the report was last printed for your reference. The Prerequisite Reports consist of the following:
Have Tax Reports been printed?
The Tax Reports may be accessed from Process/Period End Processes/Print Tax Reports on the menu bar. Running the Tax Reports from the Period End Processes allows a sort of batch printing as well as the appropriate dates for the period being preselected by the system.
Has the Aging Report been printed?
Aging reports may always be printed at a later date, however if transactions are posted to the period after it has been closed, the report will not show the same as when run prior to closing the period. Any of the nine Aging reports will tell the system that the Aging report has been printed.
Have Statements been printed?
Statements may only be printed for the current period. Therefore it is crucial that you print them prior to closing the period. If you do not print statements, a completed status of No should not be a problem.
Has the Customer Ledger been printed?
Printing any of the Current Customer Ledgers will tell the system that the Customer Ledger has been printed. History Ledgers are not included in the checking process.
Has the Invoice Register been printed?
This will check to see that an Invoice Register has been printed after the last time Invoices were printed.
Has the Payment Register been printed?
This will check to see that a Deposit Register has been printed after the last Deposit was posted to AR.

CYMA Accounting for Windows Training Guide – Accounts Receivable
Copyright 1999-2018 CYMA Systems Inc. 193
Process Period End Processes - Calculate Commissions Select Calculate Commissions... from the Period End Processes submenu to access the Calculate Commissions dialog box. This process allows you to print the Commission Register and a summary version that may be used as vouchers for entering the commission data into the Payroll or Accounts Payable modules. You can also optionally print all Sales Reps at one time or in ranges of Sales Rep IDs. Due to the wide variety of ways that commissions are calculated, the function will be a reporting function only. This process will print the Sales Reps commission information based on if they are set up to be paid on Cash Receipts or Sales for the period. This process will print the Commission calculations based on the current period data, therefore it is imperative that this report be printed prior to performing the Period End Close process.
Calculate Commission dialog box
Refer to the following field descriptions and requirements.
Reports group box
Print Vouchers
The above check box allows you to print the Voucher version of the Commission calculation for use when entering the commissions into the Accounts Payable or Payroll modules. This check box will not be selected when the process is first displayed. The Vouchers will show one line per Sales Rep with the total Quantities sold for all products along with the total Extended price, Discounts and Payments and in the far right column, possible commissions. One line will print below this totaling each Sales Reps Quota and Actual Commission. Actual Commission will be the total of the possible commissions if the total Extended meets or exceeds the associated Sales Rep’s quota. If the quota was not met, the Actual Commissions will show zero with a total possible commissions listed directly above.
Print Commission Register

CYMA Accounting for Windows Training Guide – Accounts Receivable
Copyright 1999-2018 CYMA Systems Inc. 194
This check box will be selected by default when the process is first accessed. The option will print a detailed Commission Register. Each Invoice or Check/Credit Card will be displayed along with the Product and quantities sold or payment received on with its commission calculation. Each Sales Rep will have a totals line which displays quantity sold, extended price, total billed/payment received along with discounts and payments. The commission dollars available will display in the far right column. Each Sales Rep will have their Quota and Actual Commission printed at the end of their respective section. If the quota was reached in the Extended column, then the Actual Commission will be the total of all commissions available for that Rep. If the quota was not reached, the Actual Commission amount will be zero with the possible commission total listed above.
Options group box
All Sales Rep IDs
This option button will be selected as the default when the process is first displayed. When selected, this option button will print the Commission data for all Sales Reps set up in Maintain/Sales Reps.
Range of Sales Rep IDs
This option button will allow you to process the commissions for ranges of Sales Reps. If selected, the following text boxes will become enabled and required. Their associated Browsers will also be enabled. Enter the From and Through Sales Rep IDs or use the Browser to select these values.
From
Through
Print Destination Group Box
Screen
Select the Screen option button to display the Proof Listing on your screen. The report may also be sent to the Windows default printer from your screen.
Printer
Select the Printer option button to redirect the report to the printer shown in the default printer view-only field.
File
Select the File option button to export the displayed report in one of several common formats.
Calculate Commissions Command Buttons
Click the Setup Printer button to redirect the report to a printer other than the default printer displayed or to change the orientation from Portrait to Landscape if necessary.
When the Print button is selected, the Calculate Commissions operation will print the selected version(s) of the Commission data.
Click the Close button to close the Dialog Box.

CYMA Accounting for Windows Training Guide – Accounts Receivable
Copyright 1999-2018 CYMA Systems Inc. 195
Process Period End Processes - Create Finance Charges Select Create Finance Charges... from the Period End Processes submenu to access the Create Finance Charges dialog box. The Create Finance Charges dialog box can be accessed by selecting Process/Period End Processes/Create Finance Charges from the Menu. This process allows you to calculate finance charges for customers that are past due the number of days you specify. There are several options available when creating the finance charges. Optionally, customers with invoices that are past due can be automatically placed on credit hold by this process. Finance charges can be shown on statements only and never create any real records to post or they can create finance charge invoices that will go through the routine processing for Invoices; Post to AR and Post to GL. The fields and groups shown on the dialog box are described below:
Create Finance Charges dialog box
Refer to the following field descriptions and requirements.
Date to Apply Charges
This field is required and will be filled in by default with the current accounting date. The date entered here will show up on the Statements that are printed as well as become the Invoice date for Finance Charge invoices that are created. Also, the system will use this date to base how many days past due an Invoice is when selecting which invoice records need to have finance charges calculated.
Period
The Period view-only mode field will display the AR Period that corresponds to the Date To Apply Charges date.
GL Account
This view-only mode field will display the default GL finance charge account entered on the Maintain Configuration dialog box.

CYMA Accounting for Windows Training Guide – Accounts Receivable
Copyright 1999-2018 CYMA Systems Inc. 196
This account will be credited when Finance Charge Invoices are posted to GL. Cash Basis companies will not be able to post these invoices to GL until their respective payments are posted to the General Ledger.
Apply Finance Charges To option group
Invoices Past Due Days
This field is a required field. The number entered here is used in conjunction with the Date to Apply Charges to determine which invoices are past due.
Minimum Balance Past Due
This text box is optional. It allows you to specify a minimum past due dollar amount for invoices to be included in the finance charges created. This will work in conjunction with the Days Past Due forcing the selected invoices to be a specified number of days past due and a minimum dollar amount past due.
Minimum Finance Charge
This text box is optional. It allows you to specify a minimum finance charge to automatically be entered on created finance charge records. This will prevent Finance Charge invoices from being created for amounts such as 50 cents.
Calculate Minimum Finance Charge By group box
Invoice
The Invoice option button allows you to calculate Finance Charges on an Invoice by Invoice basis.
Customer
The Customer option button allows you to set a Customer level minimum Finance Charge that allows you to specify a minimum Finance Charge that applies to all Invoices for a Customer. For example, if a Customer has an Invoice in the amount of $100.00, and the amount entered in Minimum Finance Charge text box is $25.00, the Finance Charge for this Invoice will be $25.00.
Credit Management group box
This option group allows automatic credit management functions to be performed simultaneously as the finance charges are created. Customers may be automatically placed on Overdue Invoice Hold on the Maintain/Customer,Credit Tab through this process.
Set Overdue Invoice Hold for:
When this check box is selected, the system will use the same date and number of days past due as the Calculate Finance Charges process uses to automatically place customers on Overdue Invoice Hold.
Processing Options group box
Print on Statements Only
This option button will be selected by default when the dialog box is displayed. When selected, the process will create the finance charge records in a temporary file and will not create actual Invoice records. The process may be run more than once for different sets of Customer IDs, Customer Types and even different days past due. Each time the process is run it will calculate and store records in the temporary file, it will continue adding records. The Print Statement will be able to use the Finance Charge records stored in the temporary file but these records will never post to Accounts Receivable or General Ledger. The temporary file will be cleared when the Period End Close process is performed. This is a very useful collection aid without the added task of writing off most of the finance charges as bad or uncollectable debts.
CYMA Accounting for Windows Training Guide – Accounts Receivable
Copyright 1999-2018 CYMA Systems Inc. 197
Create Invoices for Charges
When this option button is selected, actual invoices will be created for the finance charges. Invoices will be assigned a type of Invoice-Manual and will need to be posted to the Accounts Receivable module prior to printing them on statements. The Accounts Receivable module will automatically begin numbering the Finance Charge invoices with -FC000001 and will be incremented by 1 for each new Finance Charge Invoice. This provides easy reference to Finance Charge invoices on reports or when applying payments. If left unpaid for long periods of time, the old outstanding finance charges will need to be written off as uncollectable or bad debts. The Process/Period End Processes/Create Write-Offs process will allow you to perform a write off on only finance charges if this becomes necessary.
Customer Type Options group box
The Customer Type Options group gives you the ability to create finance charges for all customer types or a specified range of customer types. Each customer was assigned a Customer Type when their customer record was created.
All Customer Types
This option button will be selected by default when the dialog box is first displayed.
Range of Types
You may select this option button if you want to limit the customer types for which the system will create finance charges. When selected, the From and Through text boxes below and their associated Browsers will be enabled.
From
This text box and its Browser will be enabled only if the Range of Customer Types option button has been selected. Enter a Customer Type ID or select one from the Browser.
Through
This text box and its Browser will be enabled only if the Range of Customer Types option button has been selected. Enter a Customer Type ID or select one from the Browser.
Terms Codes
The Terms Codes options are only available if the Create Invoices for Charges option is selected in the Processing Options group box.
From Original Invoice
Select the From Original Invoice option if the finance charge invoice should use the same Terms Code as the original invoice.
Use Customer
Select the Use Customer option if the finance charge invoice should use the same Terms Code as the customer default.
Use Specific
Select the Use Specific option to choose a terms code for the invoice. Enter or select and active terms code from the browser.
Customer ID Options group box
This option group allows you to create finance charges for All Customer IDs or a range of Customer IDs within the specified range of Customer Types.
All Customer IDs

CYMA Accounting for Windows Training Guide – Accounts Receivable
Copyright 1999-2018 CYMA Systems Inc. 198
This option button will be selected by default when the dialog box is first displayed.
Range of IDs
You may select this option button if you want to limit the Customer IDs included in the specified range of Customer Types for which the system will create finance charges. When selected, the From and Through text boxes below and their associated Browsers will be enabled.
From
This text box and its Browser will be enabled only if the Range of Customer IDs option button has been selected. Enter a Customer ID or select one from the Browser.
Through '
This text box and its Browser will be enabled only if the Range of Customer IDs option button has been selected. Enter a Customer ID or select one from the Browser.
Create Finance Charges Command Buttons
When the Create button is selected, the system will gather the Customer IDs within the range of Customer Type IDs and find any past due invoices that meet the Invoices Past Due by # of days criteria selected above. The system will then create Invoices which must be processed or records in a temporary file to allow you to print the finance charges on statements without posting them.
Click the Cancel button to exit the Finance Charges dialog box.

CYMA Accounting for Windows Training Guide – Accounts Receivable
Copyright 1999-2018 CYMA Systems Inc. 199
Process Period End Processes - Create Write-Off Entries Selecting Create Write-Off Entries... from the Period End Processes submenu accesses the Create Write-Off Entries dialog box. The Create Write-Off Entries dialog box can be accessed by selecting Process/Period End Processes/Create Write-Off Entries from the menu bar. This process allows you to create write-off entries for customer invoices that are past due a specified number of days.
There are several options available when creating the Write-Off Entries. This operation allows you to automatically find and calculate write-off entries based on criteria that you specify. You then have all invoices and their respective overdue amounts to preview and edit as necessary. This process also allows you the option of writing off finance charges, freight charges and overdue invoice amounts collectively or one type at a time. You also have the ability to specify a minimum and maximum write-off amount as well as have the system automatically place customers on credit hold if they have an amount written off by this process.
This process will decrease the invoice balance by the write off amount. It will also update the customer’s YTD Write-Off amount on the Customer Credit Tab. When the Post button is selected, entries will be created for the AR Journal in the GL Ledger with a Description of AR Write-Off Entry.
In a cash basis company the invoice balance will be decreased, but no journal entry will be created.
Create Write-Off Entries dialog box
Refer to the following field descriptions and requirements.
Write-Off Options group box

CYMA Accounting for Windows Training Guide – Accounts Receivable
Copyright 1999-2018 CYMA Systems Inc. 200
Write-Off Date
Enter the date for the write-off entries. This date will determine the period in which the entries will be posted and will also be printed on the General Ledger AR Journal.
Period
The period corresponding to the Write-Off date will display in view-only mode.
GL Account
The General Ledger Write-off account entered in Maintain/Configuration will display and can be overridden. This will be the account the system uses when writing entries to the AR Journal in the General Ledger.
Invoices Past Due days
Enter the minimum number of days an invoice must be past due to be considered for Write-Off.
Freight Charges
Select this check box to write-off uncollectable freight charges only or to automatically include freight charges with other overdue dollars to be written off.
Finance Charges
Select this check box to write-off uncollectable finance charges only or to automatically include them with other overdue dollars to be written off. This check box will not be selected when the dialog is displayed. If you chose to Print Finance Charges on Statements only when Finance Charges were created, you may not need to use this option. However, if you always create invoice records when creating finance charges, this is a very helpful tool as many times finance charges are quite hard to collect.
Overdue Amounts
Select this check box to write-off uncollectable overdue invoice amounts only or to include them with Finance Charge amounts or Freight Charges.
Minimum Write-Off
Enter the minimum overdue dollar amount an invoice should be prior to being considered for write-off.
Maximum Write-Off
Enter the maximum overdue dollar amount an invoice should be prior to being considered for write-off. This will help prevent very large invoice amounts from being written off without special consideration.
Place Write-Off Customers on Credit Hold?
This check box allows you to automatically place customers receiving write-off entries on credit hold.
Customer Type Options group box
All Customer Types
When the All Customer Types option button is selected, the system considers all customer types when performing the write-off process. This option button will be selected by default when the dialog first displays.
Range of Types

CYMA Accounting for Windows Training Guide – Accounts Receivable
Copyright 1999-2018 CYMA Systems Inc. 201
When the Range of Types option button is selected the From and Through text boxes become enabled along with their Browsers. They will also then become required fields. This option button tells the system to consider a specified range of customer types when performing the write-off process. Enter the starting Customer Type in the From text box and the ending Type in the Through text box or use the Browser to select the types.
From
Through
Customer ID Options group box
All Customer IDs
When the All Customer IDs option button is selected, the system considers all Customer IDs when performing the write-off process. This option button will be selected by default when the dialog first displays.
Range of IDs
When the Range of IDs option button is selected the From and Through text boxes will be enabled along with their Browsers. They will also then become required fields. This option button tells the system to consider a specified range of Customer IDs when performing the write-off process. Enter the starting ID in the From text box and the ending ID in the Through text box or use the Browser to select the IDs.
From
Through
DataGrid Columns and Fields
Customer Name
The Customer Name view only column will display the Customer Name for any records found matching the above criteria when the Find button is selected.
Invoice No
The Invoice No view only column will display the Invoice Number associated with the Customer Name for records found matching the above criteria.
Due Date
The Due Date view only column will display the associated Invoice’s Due Date for your reference.
Write-Off Amt
The Write-Off Amt field can be edited. It will display the remaining balance for the Invoice records found that meet the selected criteria. If no changes are made to this field, the amount displayed will be the amount of the Write-Off entry created. If the dollar amount is overridden with a zero, no Write-Off entry will be made for the associated Invoice.
Create Write-Off Entries Command Buttons
When you have completed filling in your criteria for including records, select the Find button. The system will find all invoices matching the above selected criteria and will fill the DataGrid with the information. You may edit the Amounts in the DataGrid to make any desired adjustments prior to selecting to Post the Write-Off Entries. This process may be performed more than once if a different

CYMA Accounting for Windows Training Guide – Accounts Receivable
Copyright 1999-2018 CYMA Systems Inc. 202
data set is selected each time. The system will no longer show outstanding amounts that were written off thereby preventing double entries to the General Ledger.
The Post button will update the Customer Credit Tab by adding the dollar amount written off for each customer to the YTD Write-Off amount. This process will also alter the Balance Due for any invoices. If the Place Write-Off Customers on Credit Hold check box was selected, the system will also put the same customers on credit hold as well. Unposted Journal entries will be sent to the AR Journal in the General Ledger system with the description of AR Write-Off Entry.
Click the Cancel button to cancel posting.
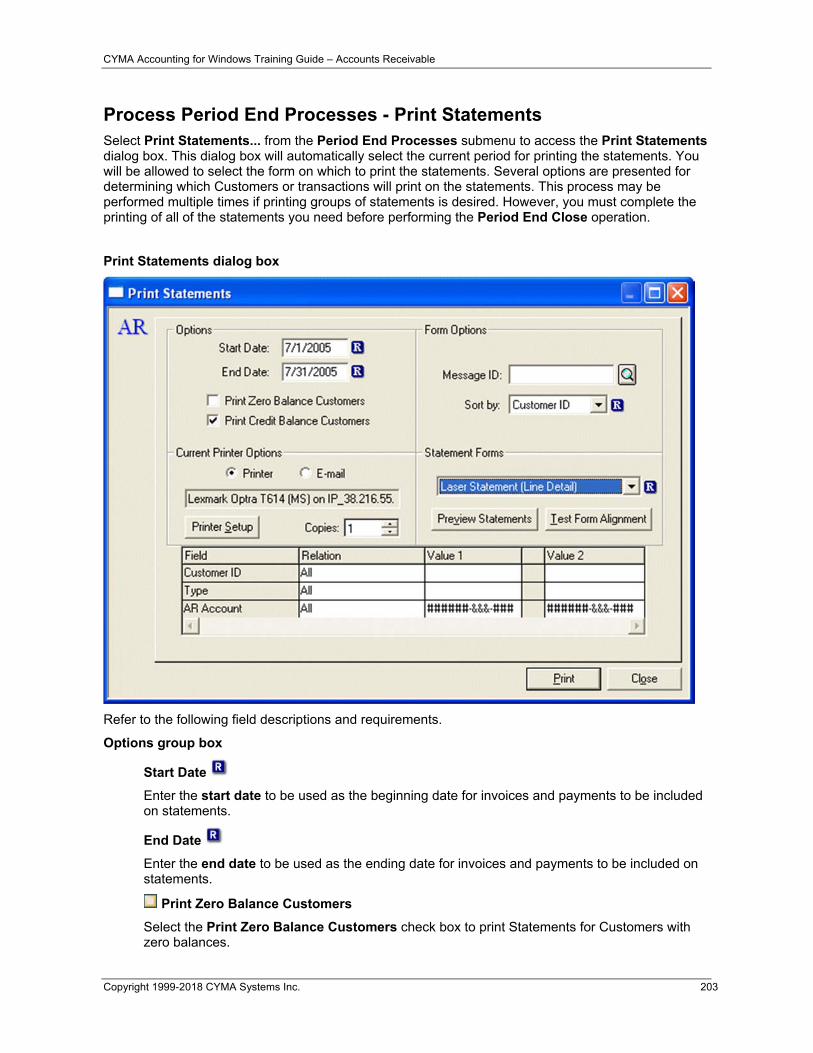
CYMA Accounting for Windows Training Guide – Accounts Receivable
Copyright 1999-2018 CYMA Systems Inc. 203
Process Period End Processes - Print Statements Select Print Statements... from the Period End Processes submenu to access the Print Statements dialog box. This dialog box will automatically select the current period for printing the statements. You will be allowed to select the form on which to print the statements. Several options are presented for determining which Customers or transactions will print on the statements. This process may be performed multiple times if printing groups of statements is desired. However, you must complete the printing of all of the statements you need before performing the Period End Close operation.
Print Statements dialog box
Refer to the following field descriptions and requirements.
Options group box
Start Date
Enter the start date to be used as the beginning date for invoices and payments to be included on statements.
End Date
Enter the end date to be used as the ending date for invoices and payments to be included on statements.
Print Zero Balance Customers
Select the Print Zero Balance Customers check box to print Statements for Customers with zero balances.

CYMA Accounting for Windows Training Guide – Accounts Receivable
Copyright 1999-2018 CYMA Systems Inc. 204
Print Credit Balance Customers
Select the Print Credit Balance Customers check box to print Statements for Customers with credit balances.
Current Printer group box
Printer
Select the Printer option button to send the statements directly to the printer shown in the view-only default printer field.
Select the Email option button to transmit statements via e-mail. A primary e-mail address must be entered in Maintain Customers prior to selecting this option. This will be the recipient of statements transmitted electronically.
The Current Printer view-only box displays the default printer.
The Printer Setup button allows you to select another printer that has been set up in Windows. Change the printer’s properties and change the paper options (size, source, and orientation).
Copies
Choose the number of copies of each Statement that will be printed. When multiple copies of Statements are printed, they are printed in sets, for example, the first complete set of statements are printed, then the first set of copies are processed, then the second set, and so on until all copies have been processed.
Form Options group box
Message ID
Select a pre-defined message from the dropdown list to include on the Statements. Press New to bring up the Maintain Message dialog to add a new message.
Sort By
Use the Sort By drop-down list to select the order in which to sort the statements. Available sorting options are Customer ID, Name, Zip Code and Sales Rep.
Statement Forms group box
Statement Forms
Use the Statement Forms drop-down list box to select the statement format. Standard statement formats are provided with the Accounts Receivable module. Use them as they are or select the Custom Forms item on the Maintain menu bar to customize the standard formats or to create your own.
Click this button to preview the statements on the screen. This allows you to verify the statement data before printing them on your form stock.
Click this button to print a test form to verify the form alignment.
DataGrid Columns and Fields
The Fields listed on the rows are available to use with the Relation column to specify all or a range of Customer IDs, Customer Types, and AR Accounts for statement printing. This allows you to print

CYMA Accounting for Windows Training Guide – Accounts Receivable
Copyright 1999-2018 CYMA Systems Inc. 205
statements by Type for specific regions, etc. Perhaps you send statements to the East Region on the 20th of the month and to the West Region on the 25th of the month.
For more information regarding the Selection Criteria go to the Selection Criteria topic in the System Manager Help.
Field
This view-only column shows the fields available for user-defined selection criteria. The options are as follows:
Customer ID
The Customer ID option allows you to print Statements based on the Customer ID.
Type
The Type option allows you to print Statements based on the Customer Type.
AR Account
The AR Account option allows you to print Statements based on the Accounts Receivable account the Invoice is posted to.
Print Statements Command Buttons
Click the Print button to begin printing statements.
Click the Close button to close the dialog box without printing statements.


CYMA Accounting for Windows Training Guide – Accounts Receivable
Copyright 1999-2018 CYMA Systems Inc. 207
Process Period End Processes - Print Tax Reports Select Print Tax Reports... from the Period End Processes submenu to access the Print Tax Reports dialog box. The tabs on this dialog box allow you to specify only the Tax IDs for which you wish to print tax reports. All tax IDs will show up on the tab page associated with the tax type specified in the Maintain/Tax Information/Tax IDs process. The Tax IDs will be displayed in a DataGrid allowing you to choose single Tax IDs for printing or contiguous and/or non-contiguous rows of Tax IDs. Contiguous rows may be selected by using the SHIFT key along with your mouse or arrow keys. Non-contiguous rows may be selected by using the CTRL key with your mouse or arrow keys.
The specific sections and data displayed on the DataGrid will be described on the following tab pages:
Sales Tax IDs
Excise Tax IDs
Miscellaneous Tax IDs
Print Tax Reports Command Buttons
Click the Setup Printer button to redirect the report to a printer other than the default printer displayed or to change the orientation from Portrait to Landscape if necessary.
Click the Print button to print the selected tax reports.
Click the Close button to close the Dialog Box.


CYMA Accounting for Windows Training Guide – Accounts Receivable
Copyright 1999-2018 CYMA Systems Inc. 209
Process Period End Processes - Print Tax Reports - Excise Tax IDs Select the Excise Tax IDs tab to print State Excise Sales Taxes and Federal Excise Sales Taxes. All Excise Sales Tax IDs display on the Excise Tax IDs tab Page.
Excise Tax IDs Tab
Refer to the following field descriptions and requirements.
Columns on the Data Grid
The columns on the Data Grid will be displayed in the view-only mode. You may select one or more rows of Sales Tax IDs to print as a group. Each Tax ID/Entity will print a report based on if the Tax is based on Cash Receipts or Sales and show the data for the current period for each tax.
Tax ID
This column will display all Tax IDs that have been set up through Maintain/Tax Information/Tax IDs.
Description
This column will display the Tax Description or Entity name set up in the Maintain Tax IDs process for each associated Tax ID listed.
Tax Rate
This column will display the Tax Rate associated with each Tax ID for easy reference.
Printed

CYMA Accounting for Windows Training Guide – Accounts Receivable
Copyright 1999-2018 CYMA Systems Inc. 210
This column will keep track of the Tax IDs that have already had the Tax Reports printed. This makes it easy to run the reports for individual or groups of Tax IDs in separate runs by providing a quick visual reminder of where you left off. This prevents having to run to the printer or waiting until the last batch has printed completely to find out which IDs have already been printed.
Dates In Period group box
This option allows you to select a specific date range within the current period.
Start Date
The default is the starting date of the current period. You may accept this value or enter a different Start Date.
End Date
The default is the ending date of the current period. You may accept this value or enter a different End Date.
Report Options group box
These radio buttons allow you to specify whether or not you want the report to print in Detail or Summary
Detail
The Detail radio button will be selected by default when the Print Tax Reports process is first accessed. Detail reports will show all Invoices and their associated taxable status along with the tax charged on each invoice.
Summary
Summary reports will show total sales or receipts, with taxable and tax exempt sales/receipts shown separately as well as the tax calculation on the Sales or Receipts.
Print Destination Group Box
Screen
Select the Screen option button to display the Proof Listing on your screen. The report may also be sent to the Windows default printer from your screen.
Printer
Select the Printer option button to redirect the report to the printer shown in the default printer view-only field.
File
Select the File option button to export the displayed report in one of several common formats.
Customer Options group box
These check boxes allow you to Print Customer Names and Addresses on the Tax Reports. The summary reports will not have the ability to do this, therefore it is necessary to insure that you choose the Detail Report Option if your Tax Entity requires this information to be printed. Neither check box will be selected when the Print Tax Reports process is first accessed.
Print Customer Name
Select the Print Customer Name check box to print Customer names on the Tax Reports.
Print Customer Address

CYMA Accounting for Windows Training Guide – Accounts Receivable
Copyright 1999-2018 CYMA Systems Inc. 211
Select the Print Customer Address check box to print Customer addresses on the Tax Reports.


CYMA Accounting for Windows Training Guide – Accounts Receivable
Copyright 1999-2018 CYMA Systems Inc. 213
Process Period End Processes - Print Tax Reports - Miscellaneous Tax IDs Select the Miscellaneous Tax IDs tab to print State Miscellaneous Sales Taxes, Federal Miscellaneous Sales Taxes and Municipal Miscellaneous Sales Taxes. All Miscellaneous Sales Tax IDs display on the Miscellaneous Tax IDs tab Page.
Miscellaneous Tax IDs Tab
Refer to the following field descriptions and requirements.
Data Grid Columns and Fields
The columns on the Data Grid will be displayed in the view-only mode. You may select one or more rows of Sales Tax IDs to print as a group. Each Tax ID/Entity will print a report based on if the Tax is based on Cash Receipts or Sales and show the data for the current period for each tax.
Tax ID
This column will display all Tax IDs that have been set up through Maintain/Tax Information/Tax IDs.
Description
This column will display the Tax Description or Entity name set up in the Maintain Tax IDs process for each associated Tax ID listed.
Tax Rate
This column will display the Tax Rate associated with each Tax ID for easy reference.
Printed

CYMA Accounting for Windows Training Guide – Accounts Receivable
Copyright 1999-2018 CYMA Systems Inc. 214
This column will keep track of the Tax IDs that have already had the Tax Reports printed. This makes it easy to run the reports for individual or groups of Tax IDs in separate runs by providing a quick visual reminder of where you left off. This prevents having to run to the printer or waiting until the last batch has printed completely to find out which IDs have already been printed.
Dates In Period group box
This option allows you to select a specific date range within the current period.
Start Date
The default is the starting date of the current period. You may accept this value or enter a different Start Date.
End Date
The default is the ending date of the current period. You may accept this value or enter a different End Date.
Report Options group box
These option buttons allow you to specify whether or not you want the report to print in Detail or Summary.
Detail
The Detail option button will be selected by default when the Print Tax Reports process is first accessed. Detail reports will show all Invoices and their associated taxable status along with the tax charged on each invoice.
Summary
Summary reports will show total sales or receipts, with taxable and tax exempt sales/receipts shown separately as well as the tax calculation on the Sales or Receipts.
Print Destination Group Box
Screen
Select the Screen option button to display the Proof Listing on your screen. The report may also be sent to the Windows default printer from your screen.
Printer
Select the Printer option button to redirect the report to the printer shown in the default printer view-only field.
File
Select the File option button to export the displayed report in one of several common formats.
Customer Options group box
These check boxes allow you to Print Customer Names and Addresses on the Tax Reports. The summary reports will not have the ability to do this, therefore it is necessary to insure that you choose the Detail Report Option if your Tax Entity requires this information to be printed. Neither check box will be selected when the Print Tax Reports process is first accessed.
Print Customer Name
Select the Print Customer Name check box to print Customer names on the Tax Reports.
Print Customer Address
Select the Print Customer Address check box to print Customer addresses on the Tax Reports.

CYMA Accounting for Windows Training Guide – Accounts Receivable
Copyright 1999-2018 CYMA Systems Inc. 215


CYMA Accounting for Windows Training Guide – Accounts Receivable
Copyright 1999-2018 CYMA Systems Inc. 217
Process Period End Processes - Print Tax Reports - Sales Tax IDs Select the Sales Tax IDs tab to print State Sales Taxes, County Sales Taxes and Municipal Sales Taxes. All Sales Tax IDs display on the Sales Tax IDs tab Page.
Sales Tax IDs Tab
Refer to the following field descriptions and requirements.
DataGrid Columns and Fields
The columns on the DataGrid will be displayed in the view-only mode. You may select one or more rows of Sales Tax IDs to print as a group. Each Tax ID/Entity will print a report based on if the Tax is based on Cash Receipts or Sales and show the data for the current period for each tax.
Tax ID
This column will display all Tax IDs that have been set up through Maintain/Tax Information/Tax IDs.
Description
This column will display the Tax Description or Entity name set up in the Maintain Tax IDs process for each associated Tax ID listed.
Tax Rate
This column will display the Tax Rate associated with each Tax ID for easy reference.
Printed

CYMA Accounting for Windows Training Guide – Accounts Receivable
Copyright 1999-2018 CYMA Systems Inc. 218
This column will keep track of the Tax IDs that have already had the Tax Reports printed. This makes it easy to run the reports for individual or groups of Tax IDs in separate runs by providing a quick visual reminder of where you left off. This prevents having to run to the printer or waiting until the last batch has printed completely to find out which IDs have already been printed.
Dates In Period group box
This option allows you to select a specific date range within the current period.
Start Date
The default is the starting date of the current period. You may accept this value or enter a different Start Date.
End Date
The default is the ending date of the current period. You may accept this value or enter a different End Date.
Report Options group box
These option buttons allow you to specify whether or not you want the report to print in Detail or Summary.
Detail
The Detail option button is selected by default when the Print Tax Reports process is first accessed. Detail reports will show all Invoices and their associated taxable status along with the tax charged on each invoice.
Summary
When the Summary button is selected, reports are printed in Summary. Summary reports will show total sales or receipts, with taxable and tax exempt sales/receipts shown separately as well as the tax calculation on the Sales or Receipts.
Print Destination Group Box
Screen
Select the Screen option button to display the Proof Listing on your screen. The report may also be sent to the Windows default printer from your screen.
Printer
Select the Printer option button to redirect the report to the printer shown in the default printer view-only field.
File
Select the File option button to export the displayed report in one of several common formats.
Customer Options group box
These check boxes allow you to Print Customer Names and Addresses on the Tax Reports. The summary reports will not have the ability to do this, therefore it is necessary to insure that you choose the Detail Report Option if your Tax Entity requires this information to be printed. Neither check box will be selected when the Print Tax Reports process is first accessed.
Print Customer Name
Select the Print Customer Name check box to print Customer names on the Tax Reports.
Print Customer Address

CYMA Accounting for Windows Training Guide – Accounts Receivable
Copyright 1999-2018 CYMA Systems Inc. 219
Select the Print Customer Address check box to print Customer addresses on the Tax Reports.


CYMA Accounting for Windows Training Guide – Accounts Receivable
Copyright 1999-2018 CYMA Systems Inc. 221
Process Period End Processes - Year End Closing When you are at the end of your fiscal year, the following notice will display.
The Accounts Receivable: Notice informs you that you are at the end of the accounting year. In addition to the end of period procedures, additional year end steps will be added.
During the year-end processing, the normal period end updating procedures described in the previous section will be performed. In addition to those steps, the year-end update will, optionally, transfer items which meet the date requirements for moving to history and clear the YTD totals for Customers and Sales Reps.
Accounts Receivable: Notice Command Button
Click the OK button to proceed to the Period End Close dialog.


CYMA Accounting for Windows Training Guide – Accounts Receivable
Copyright 1999-2018 CYMA Systems Inc. 223
Report Menu The Accounts Receivable module offers a wide range of reports. The reports are organized into categories that use the standard Windows expanding/collapsing tree structure convention.
Each category may be expanded to display all the report topics within that category by clicking your mouse on the plus symbol to the left of each category. To collapse a category click the minus symbol to the left of the category. To launch an individual report:
1. Click on the report title, which enables the Continue button and the Destination group box.
2. Select the destination for your output and click the Continue button.
3. Enter the selection criteria and click the OK button.
A report may also be launched for display by double-clicking on the report title.
Report Categories for Accounts Receivable:
Refer to the following descriptions for the report categories that are available in the Accounts Receivable module. Each offers selection criteria that allows you to print the specific data you desire.
Entry Reports
The standard entry reports provide complete listings of information regarding daily transactions, checks, Invoices, unapplied credits and payments, and write-offs.
Customer Ledgers
The standard customer ledgers allow you to view current and historical information in various formats.
Aging and Cash Expectations Reports
Information to control collection decisions and cash expectations is at your fingertips with the various standard aging and cash expectations reports.
Master File Reports
Your company data is readily accessible with the master file reports available. Print reports for specific records by entering the appropriate selection criteria.
Show group box
All Reports
Select the All Reports option to display all reports available within the module.
User Reports
Select the User Reports option to display the user reports selected within the module. For more information see the Report Menu User Reports topic in the System Manager Manual.
Report Menu Command Buttons
Click the Add User Reports button to display the Add User Reports dialog. From this dialog you can add/remove reports from the User Reports list.
The Add Custom Report button allows you to add customized or new custom designed Crystal Reports to the Report menu tree structure.

CYMA Accounting for Windows Training Guide – Accounts Receivable
Copyright 1999-2018 CYMA Systems Inc. 224
The Delete Custom Report button allows you to remove customized Crystal Reports from the Report menu tree structure. This button is only enabled when a custom report is highlighted.
Click the Continue button to output the report to the selected destination.
Click the Close button to close the dialog box.

CYMA Accounting for Windows Training Guide – Accounts Receivable
Copyright 1999-2018 CYMA Systems Inc. 225
List of Accounts Receivable Reports The following is a listing of the standard reports that are packaged with the Accounts Receivable module.
Entry Reports
Daily Transaction Reports
Daily Transaction Report (Current Invoices)
Daily Transaction Report (Current Taxes)
Daily Transaction Report (Current Payments)
Daily Transaction Report (History Invoices)
Daily Transaction Report (History Taxes)
Daily Transaction Report (History Payments)
Invoice
Unprinted Invoice Register
Invoice Register
Invoice Register (Current and History)
Invoice Register (Current by Sales Rep)
Unposted Invoice Register
Invoice Register (Invoices Updating Inventory)
Recurring Invoice Proof
Unapplied Credits
Write Off Register (Landscape)
Payment
Payment Register
Payment Register (Current and History)
Unapplied Payments
NSF Listing
Unposted Deposit Register
Deposit Slip (Current)
Analysis
Product Analysis (By Date Range)
Product Analysis (Historical By Date Range)
Customer Payment Analysis
Customer Payment Analysis (Historical)
Credit Analysis
Large Deposit Analysis
Gross Margin Report (By Product)
Gross Margin Report (Top 10 by Product)
Gross Margin Report (By Customer)
Gross Margin Report (Top 10 by Customer)
Sales by Date Range (Current with drill down)

CYMA Accounting for Windows Training Guide – Accounts Receivable
Copyright 1999-2018 CYMA Systems Inc. 226
Customer Ledgers
Summary Ledger
Detail Ledger (Landscape)
Detail Ledger (Pmts Summarized by Inv. Line)
Detail Ledger (Pmts Summarized by Inv. Line) (Landscape)
Summary Ledger (Chronological Order)
Quick Ledger Report
Customer Balance Report
Summary History Ledger
Detail History Ledger (Landscape)
Detail History Ledger (Pmts Summarized by Inv. Line)
Detail History Ledger (Pmts Summarized by Inv. Line) (Landscape)
Aging & Cash Expectations Reports
Aging Report (Customer Detail by Due Date) (Landscape)
Customer Ledger Aging by Due Date (Detail) (Landscape)
Aging Report (Customer Detail by Invoice Date) (Landscape)
Aging Report (Customer Summary by Due Date) (Landscape)
Customer Ledger Aging by Due Date (Summary) (Landscape)
Aging Report (Customer Summary by Invoice Date) (Landscape)
Aging Report (Sales Rep Detail by Due Date) (Landscape)
Aging Report (Sales Rep Detail by Invoice Date) (Landscape)
Aging Report (Company Summary by Due Date) (Landscape)
Aging Report (Company Summary by Invoice Date) (Landscape)
Cash Expectations Report (Landscape)
Master File Reports
Customer
Customer Master Report
Customer Price Report
Customer Ship To Report
Customer Contact Report
Customer Type Listing
Customer Labels (Avery 5160)
Terms Listing
Product Code Listing
Product Code Audit Report
Sales Rep Listing
Tax ID Listing
Tax Category Listing
Volume Billing Profile
Bank File Listing
Order Audit Report

CYMA Accounting for Windows Training Guide – Accounts Receivable
Copyright 1999-2018 CYMA Systems Inc. 227
CYMA Systems, Inc. Contact Information
CYMA Systems, Inc.
2330 West University Drive, Suite 4
Tempe, AZ 85281
(800) 292-2962
Fax: (480) 303-2969
email: [email protected]
www.cyma.com
When contacting CYMA Systems, Inc. for technical support, please have the following information available:
CYMAIV Account Number (if known)
Windows Version
Network Operating System (if applicable)
CYMAIV Version