about sqa robot - ready to test.€¦ · web viewsqa robot allows you to create, modify, and run...
TRANSCRIPT
For QTP Information and scripts visit: www.gcreddy.com
SQA RobotSQA SUITE PRODUCTS
SQA Suite is a team-testing environment for client/server applications. It automates test development and execution, and provides team workflow tracking and reporting.
SQA Manager
Lets you plan, manage, and analyze all aspects of your testing project. SQA Manager offers integrated, E-Mail-enabled workflow tracking and defect management combined with powerful reporting and graphics capabilities.
SQA Robot
Allows you to create, modify, and run automated tests for Windows client/server applications. SQA Robot uses specialized object-level integration with Centura, Delphi, Oracle Forms, PowerBuilder, SQLWindows, Visual Basic, and other RAD environments.
SQA LoadTest
Lets you run performance, configuration, multi-user, and distributed regression tests on multiple test stations connected by a TCP/IP, NetBIOS, or IPX/SPX network. With SQA LoadTest, you run, manage, and monitor tests from a central Master test station. SQA LoadTest combines the traditional methods of GUI testing with the ability to impose load on a Web or database server.
SQA SiteCheck
Lets you manage your Intranet or World Wide Web site. With SQA SiteCheck, you can use graphical capabilities to visualize the structure of your Web site, automate Web site testing with SQA Robot, and analyze and track Web site defects using SQA Manager. SQA SiteCheck comes with its own integrated editor, or you can use your favorite HTML editor to update and repair Web site problems.
Testing Tools – SQA Robot# 1

For QTP Information and scripts visit: www.gcreddy.com
SQA Process
A formalized methodology for automated testing of Windows client/server applications. SQA Process serves as a framework for creating a world-class quality assurance organization.
SQA Repository
The SQA Suite component for storing software testing project information about test planning, test execution, and defect tracking. All SQA products are integrated by a shared network repository.
About SQA Manager
SQA Manager is an information management tool for software development and testing professionals. SQA Manager is designed to help you track software testing information through all phases of the software development, test, and revision cycles. You can use SQA Manager to plan testing strategies, track information related to test execution, and track defects from origination through resolution.
SQA Manager has features that can be used by all members of the software development and testing team:
Testers Programmers Customer service personnel Documentation specialists Managers Even the end-users of the software.
SQA Manager allows you to manage the software quality assurance process from the beginning of product development all the way through product delivery.
About the SQA Repository
SQA Suite products access a database¾called the SQA Repository¾ that stores information specific to software testing projects you want to track. For each project defined in the SQA Repository, you can include information about:
Test plans Test procedures Test cases
Testing Tools – SQA Robot# 2
For QTP Information and scripts visit: www.gcreddy.com
Defects found during development and test stages Resolution data as problems are resolved.
Each user can enter information about his or her software development or testing tasks and results. Other users accessing the same test repository can retrieve and evaluate the information as needed. Test results can be tracked over multiple test cycles to verify the progress of software development and testing.
The SQA Repository can be stored on a network, allowing all people involved in the development and testing effort to stay up-to-date with the project status.
Overview of the SQA Repository
SQA Suite programs use the SQA Repository to store information about testing projects. For each project in the SQA Repository, you can include information about test plans, test schedules, test procedures, test cases, defects found while testing, and resolutions as problems are resolved. Test results can be tracked over multiple test cycles to verify the entire QA process.
The SQA installation creates two default SQA Repositories:
\SAMPLES\QBSREPO is the default SQA Repository for the tutorial and sample applets.
\SQAREPO is the default SQA Repository for your own test data.
Whenever you create a new SQA Repository, you can create it either with a Microsoft Access database or a Sybase SQL Anywhere database:
Microsoft Access – This can be for a single-user or shared. The database is virtually maintenance free.
Sybase SQL Anywhere – This can be a single-user version or a server-based version for enterprise-wide applications:
Single-user version – The database is virtually maintenance free. Server-based version – Data access speed is typically faster than for a
SQL Anywhere single-user database or Microsoft Access database. A SQL Anywhere server database requires database software running on a network server and a more complex maintenance effort.
Selecting an SQA Repository
To select an SQA Repository:
1. Close any SQA Suite programs that are running.
Testing Tools – SQA Robot# 3
For QTP Information and scripts visit: www.gcreddy.com
2. Do one of the following:From the Windows taskbar: Choose StartProgramsSQA SuiteSQA
Administrator.From Program Manager: Double-click the SQA Administrator icon in the SQA Suite program group.
3. If necessary, select the SQA Repository tab.The name of the currently active SQA Repository appears in the edit box. The names of the most recently active repositories appear in the list box.
4. Select a repository from the list, or choose Browse and select a repository. 5. Choose OK.
If the current SQA Repository is up-to-date, the SQA Administrator changes to the new SQA Repository. If the current SQA Repository is not up-to-date, the SQA Administrator displays a message box asking if you want to delete the temporary log file, which contains playback results.
6. If the message box appears, choose one of the following:Yes – Deletes the log file without updating the repository. Changes to another repository.No – Does not update the repository or delete the log file. Changes to another repository.Cancel – Does not update the repository or delete the log file. Does not change repositories.
NOTE: If you change repositories without deleting the log file, you risk updating the new SQA Repository with incorrect data if both repositories have projects with the same name.
NOTE: To update the repository, choose AdminUpdate SQA Repository in SQA Robot.
Creating a New SQA Repository
To create a Microsoft Access or SQL Anywhere single-user repository:
1. Close any SQA Suite programs that are running.2. Do one of the following:
From the Windows taskbar: Choose StartProgramsSQA SuiteSQA Administrator.
From Program Manager: Double-click the SQA Administrator icon in the SQA Suite program group.
3. If necessary, select the SQA Repository tab.4. Choose Create Repository. The SQA Administrator runs a setup wizard.
Testing Tools – SQA Robot# 4
For QTP Information and scripts visit: www.gcreddy.com
5. Choose Create a new SQA Repository.6. In the edit box, enter the drive and pathname for the new repository,
or choose Browse and select an existing directory. (You must have write privileges for that drive and directory.)
7. Choose Next to continue.8. Select the type of new repository to create:
Microsoft Access repository – Creates the repository with a Microsoft Access database.Sybase SQL Anywhere repository – Creates the repository with a Sybase SQL Anywhere single-user database.
9. Choose Next to continue. The setup wizard confirms the type and location of your new repository.
10. Choose Next. The setup wizard creates the new SQA Repository.
Copying an SQA Repository
To copy a Microsoft Access or SQL Anywhere single-user repository:
1. Close any SQA Suite programs that are running.2. Do one of the following:
From the Windows taskbar: Choose StartProgramsSQA SuiteSQA Administrator.From Program Manager: Double-click the SQA Administrator icon in the SQA Suite program group.
3. If necessary, select the SQA Repository tab.4. Choose Create Repository. The SQA Administrator runs a setup wizard.5. Choose one of the following:
Copy all information from an existing SQA Repository – Copies the entire contents from the existing repository. For example, you can copy all information to update or backup the repository, or to convert it from one type of database to another.Copy non-project information from an existing SQA Repository – Copies information that is not specific to a project from the existing repository. For example, you can copy data to create a new repository for testing a new release of an existing application.
6. Choose Next to continue.7. In the edit box, enter the drive and pathname for the existing source
repository, or choose Browse and select a repository. 8. Choose Next to continue.
9. In the edit box, enter the drive and pathname for the new repository, or choose Browse and select a directory. (You must have write privileges for that drive and directory.)
10. Choose Next to continue.11. Select the type of new repository to create:
Testing Tools – SQA Robot# 5
For QTP Information and scripts visit: www.gcreddy.com
Microsoft Access repository – Creates the repository with a Microsoft Access database.Sybase SQL Anywhere repository – Creates the repository with a Sybase SQL Anywhere single-user database.
12. Choose Next to continue. The setup wizard confirms the type and location of your new repository.
13. Choose Next. The setup wizard creates the new SQA Repository.
Deleting an SQA Repository
To delete a Microsoft Access or SQL Anywhere single-user repository:
1. Close any SQA Suite programs that are running. 2. Do one of the following:
From the Windows taskbar: Choose StartProgramsSQA SuiteSQA Administrator.
From Program Manager: Double-click the SQA Administrator icon in the SQA Suite program group.
3. If necessary, select the SQA Repository tab.4. Choose Delete Repository. The SQA Administrator runs a setup wizard.5. In the edit box, enter the drive and pathname for the repository you
want to delete, or choose Browse and select the repository. (You must have write privileges for that drive and directory.)
6. Choose Next to continue. The setup wizard shows the path of the repository you want to delete.
7. Choose Next to delete the SQA Repository.
Overview of SQABasic Files and Directories
You can customize SQA Robot test procedures by adding your own SQABasic procedures and functions either directly to script files or to included header and source files.
Header and source files are stored in \SQABAS32 or \SQABAS16 in the SQA Suite installation directory. If you expect to share SQABasic header and source code files with other users, you should create a common SQA directory.
Header files have .SBH extensions and contain the procedure declarations and global variables referred to in your test procedure script files.
Source code files have .SBL extensions and contain the procedure definitions you use in your script files.
· To create a new header or source file, choose File SQABasic FileNew from the SQA Robot window. SQA Robot opens a new client window for the SQABasic file.
Testing Tools – SQA Robot# 6

For QTP Information and scripts visit: www.gcreddy.com
· To open an existing header or source file, choose FileSQABasic FileOpen from the SQA Robot window.
Creating a Common SQA Directory
1. Close any SQA Suite programs that are running.2. Do one of the following:
From the Windows taskbar: Choose StartPrograms SQA SuiteSQA Administrator.From Program Manager: Double-click the SQA Administrator icon in the SQA Suite program group.
3. Select the Common SQA Directory tab.4. Choose Create Common SQA Directory. The SQA Administrator runs a
setup wizard and then displays a dialog box for specifying the location of the common directory.
5. Do one of the following:Enter the drive and pathname for the new common directory. (You must have write privileges for that drive and directory.)Choose Browse to select an existing directory. Double-click the directory you want to use and choose OK. The directory name appears in the edit box. Append the name with a backslash (\) and the name of a new subdirectory. (You must have write privileges for that drive and directory.)
6. Choose Next to continue.7. Choose Next. After the new common directory is created, its name is
inserted in the Common SQA Directory field.8. To use this common SQA directory, select the SQA Robot tab. Select
Common SQA Directory and choose OK.
NOTE: If you have SQA LoadTest installed, and you are running SQA Administrator from the SQA LoadTest Master test station, you cannot create an additional common SQA directory. Use the common SQA directory that was created during SQA LoadTest installation.
Choosing an Existing Common SQA Directory
1. Close any SQA Suite programs that are running.
2. Do one of the following:From the Windows taskbar: Choose StartProgramsSQA SuiteSQA
Administrator.From Program Manager: Double-click the SQA Administrator icon in the SQA Suite program group.
Testing Tools – SQA Robot# 7
For QTP Information and scripts visit: www.gcreddy.com
3. Select the Common SQA Directory tab.4. Choose Browse, double-click the directory you want to use, and choose OK.
The directory name appears in the Common SQA Directory edit box. 5. Select the SQA Robot tab.6. Choose Common SQA Directory.7. Choose OK to set the directory.
Copying SQABasic Files to a Local SQA Directory
To copy SQABasic header and source files from a common SQA directory to your local SQA directory:
1. Close any SQA Suite programs that are running.2. Do one of the following:
From the Windows taskbar: Choose StartProgramsSQA SuiteSQA Administrator.From Program Manager: Double-click the SQA Administrator icon in the SQA Suite program group.
3. If necessary, select the SQA Repository tab.4. Select the local SQA repository into which you want to copy the files.5. Select the Common SQA Directory tab.6. Choose Browse, double-click the directory that contains the files you
want to copy, and choose OK. The directory name appears in the Common SQA Directory edit box.
7. Choose Copy SQABasic Files To Local SQA Directory. 8. Choose Yes to copy the files.
Managing Users Overview
SQA Robot lets you register new users and change information and privileges for existing users. Only registered users are allowed to log in to SQA Suite products. For each user, you can define a password, first name, last name, company, department, title, phone, and access privileges.
NOTE: You must have administration privileges to change the user privileges of others.
ADMIN is the default user when you first log in to SQA Robot. There is no default password for the ADMIN user ID. This lets someone log in when SQA Robot is first installed. You should define an ADMIN user as part of your initial setup work. The ADMIN user always has full access privileges and cannot be deleted from the SQA Repository.
Testing Tools – SQA Robot# 8
For QTP Information and scripts visit: www.gcreddy.com
Registering New Users
You can register new users only if you have the necessary administration privileges.
1. Choose AdminUser.2. Choose New. 3. Enter the information to register the new user.4. Choose Privileges. 5. Set the privileges for the new user. 6. Choose OK.7. Choose OK.8. Enter an ID of up to 10 characters and choose OK. This becomes the
user's login ID.
Modifying Existing Users
You can modify user information only if you have the necessary administration privileges.
1. Choose AdminUser.2. Select a user from the list. 3. Choose Open or double-click the user in the list.4. Change the user information.5. Choose OK.
Deleting Existing Users
You can delete users only if you have the necessary administration privileges.
1. Choose AdminUser.2. Select one or more users in the list, or choose Select All. 3. Choose Delete. SQA Robot prompts you to confirm the deletion.4. Choose Yes or Yes to All to delete the users, choose No to retain the
indicated user, or choose Cancel to terminate the entire deletion process.
The SQA Repository categorizes test data by project. All test procedures created with SQA Robot are stored in the SQA Repository as part of the current project. SQA Robot lets you define new projects and delete existing projects from the SQA Repository.
Testing Tools – SQA Robot# 9
For QTP Information and scripts visit: www.gcreddy.com
Defining New Projects
1. Choose AdminNew Project.2. Enter the new project name of up to 40 characters.3. Enter the new project directory of up to eight alphanumeric characters
(the limit imposed on DOS filenames). This is the name of the subdirectory in the SQA Repository where project specific files, including test procedure script files and test case master and failed data files, are to be stored.
4. Choose OK.
NOTE: You must have Add/Delete Project user privileges to add new projects to the SQA Repository.
Deleting Projects
Deleting a project removes all test procedures, test cases, test logs, test schedules, and defect information for that project from the SQA Repository.
1. Make sure the project is not open and that no users are currently logged into that project. If necessary, choose FileOpen Project to open another project.
2. Choose AdminDelete Project.3. Select a project from the list. 4. Choose OK. SQA Robot prompts you that all users must be logged out
of the project you want to delete.5. Choose Yes to delete the project.
NOTE: You must have Add/Delete Project user privileges to delete projects from the SQA Repository. Also, you can delete a project only if no users are currently logged in to that project.
SQA Robot lets you register and modify information about companies that report software problems. If only internal employees provide this information, you need only register your own company.
However, if you want to use the SQA Repository to collect test information that your customers report, you should enter company records for those customers.
Testing Tools – SQA Robot# 10

For QTP Information and scripts visit: www.gcreddy.com
Registering New Companies
You can register new companies only if you have the necessary administration privileges.
1. Choose AdminCompany.2. Choose New.3. Enter the information to register the new company.4. Choose OK. The Save As dialog box appears.5. Enter an ID of up to 10 characters and choose OK.
Modifying Existing Companies
You can modify company information only if you have the necessary administration privileges.
1. Choose AdminCompany.2. Select a company from the list. 3. Choose Open or double-click the company in the list.4. Change the company information. 5. Choose OK.
Deleting Existing Companies
You can delete companies only if you have the necessary administration privileges.
1. Choose AdminCompany.2. Select one or more companies in the list, or choose Select All. 3. Choose Delete. SQA Robot prompts you to confirm the deletion. 4. Choose Yes or Yes to All to delete the companies, choose No to retain
the indicated company, or choose Cancel to terminate the entire deletion process.
Testing Tools – SQA Robot# 11
For QTP Information and scripts visit: www.gcreddy.com
About SQA Robot
SQA Robot is the leading product for automating the testing of Microsoft Windows client/server applications. SQA Robot runs on the following operating systems:
· Windows NT 3.51· Windows NT 4.0· Windows 95· Windows 3.1
You can test 16-bit applications with SQA Robot running under Windows 3.x. You can test both 16-bit and 32-bit applications with SQA Robot running under Windows NT and Windows 95.
The tests you record for a 32-bit application can be played back on the 16-bit version of the application. And the tests you record for a 16-bit application can be played back on the 32-bit version. This makes it easy to test the different versions of an application - Windows 3.1 (16-bit) and Windows NT or Windows 95 (32-bit) ¾ using the same test suite.
Moreover, you can record tests across both 16-bit and 32-bit applications in the same SQA Robot recording session ¾ a feature unique in the industry.
SQA Robot offers the following key features:
· Object-Oriented Recording technology provides the fastest, most intuitive test creation capability with the shortest learning curve.
· Object Testing technology inspects and verifies all properties of objects, including non-visible properties that cannot be tested manually.
· SQABasic delivers the full power of integrated programming for script development.
· Object-level integration with PowerBuilder, Visual Basic, Oracle Forms, Delphi Centura, and other client/server rapid application development (RAD) environments.
· Automatic synchronization and recovery from Unexpected Active Windows and General Protection Faults for reliable, unattended playback.
· Review and analysis of test results with the integrated SQA Test Log Viewer and Comparators.
· Seamless integration with the SQA Repository and all products in SQA Suite.
Testing Tools – SQA Robot# 12
For QTP Information and scripts visit: www.gcreddy.com
SQA Robot lets you start recording a test procedure in as few as two mouse clicks. While you use the application, SQA Robot automatically generates a test procedure script file in either SQABasic or Microsoft Visual Basic. After recording, SQA Robot plays back the script in a fraction of the time it would take to repeat the actions manually.
Logging in to SQA Robot
Registered users log in to SQA Robot under their own user IDs and passwords. If you have not yet registered any users or defined any projects, you can log in to SQA Robot using the default ADMIN user ID and the default project in \SQAREPO.
1. Make sure you have already selected an SQA Repository using the SQA Administrator
2. Do one of the following:From the Windows taskbar: Choose StartProgramsSQA SuiteSQA Robot.
From Program Manager: Double-click the SQA Robot icon in the SQA Suite program group.
3. Enter your own User ID if you have been registered, or accept the default ADMIN user ID.
4. Enter your own Password if you have been registered, or leave this field blank if you are using the default ADMIN user ID.
5. Select a Project Name, or accept the default project name.6. Choose OK to display the SQA Robot main window.
The SQA Robot Main Window
If SQABasic is your test procedure scripting language, the SQA Robot main window can contain three types of child windows:
· Test procedure windows – Display SQABasic test procedure scripts that you are currently recording, debugging, or editing.
· Console window – Displays compiler error messages whenever you play back, debug, or manually compile SQABasic files.
· Variables window – Displays and updates variable values while you debug SQABasic test procedures.
The SQA Robot main window also includes:
· Toolbars – contain buttons for choosing frequently used menu commands.
Testing Tools – SQA Robot# 13

For QTP Information and scripts visit: www.gcreddy.com
· Status bar – Provides useful information as you work with SQA Robot. It displays menu command help and error messages, your current operation mode (recording, playback, or debugging), the location of the text cursor (line number and column) within a test procedure window, and the current user ID.
Standard SQA Robot Toolbars
SQA Robot has four default toolbars with buttons for choosing frequently used menu commands. Active buttons are displayed in color, and inactive buttons are grayed. If you point to a toolbar button and pause, SQA Robot displays a Windows ToolTip with the command name of that button.
· Standard – Record, play back, edit, and debug test procedure scripts, insert new recorded actions into existing scripts, start other SQA Suite applications, and start online Help.
· Record – Pause, stop, view the SQA Robot main window, and display the Insert toolbar while recording.
· Insert – Insert test cases, wait states, and comments into the test procedure script while recording or editing.
· Debug – Debug and edit recorded test procedure scripts, start other SQA Suite products, and start online Help.
Test Procedure Overview
A test procedure is an SQABasic or Visual Basic script that you record with SQA Robot. When you record a test procedure, SQA Robot automatically captures user activities and stores them as a series of SQABasic commands. Test procedure script files have the same name as the test procedure ID, but with a .REC extension. Test procedure files are stored in the \Repository\Project\PROCS subdirectory.
If SQABasic is your scripting language, the test procedure script is displayed in a child window called the test procedure window. SQA Robot does not display the test procedure window if Visual Basic is your scripting language.
When you play back the test procedure, SQA Robot executes the activities you recorded.
There are two types of test procedures:
· GUI procedures. These contain the user's recorded GUI actions, such as keystrokes and mouse clicks. In regression tests, GUI procedures also contain one or more GUI test cases.
· Virtual user procedures. These contain the user's recorded HTTP requests to a Web server.
Testing Tools – SQA Robot# 14
For QTP Information and scripts visit: www.gcreddy.com
NOTE: You can only record virtual user procedures if you have Virtual User Recording installed.
GUI Procedure Script Structure
A typical GUI procedure has four major sections:
· Initialization commands· Window restoration commands (optional)· User action and test case commands· Closing commands
Initialization Commands
All SQA Robot GUI procedure scripts must begin with the following commands:
Sub Main
This defines the test procedure as a subroutine named Main. This is normally the first command in the script and should not be edited.
Dim Result As Integer
This defines the variable Result as an integer variable. SQA Robot returns the value from each test case function in the variable Result. The value for Result is local to the Main subroutine.
'Initially Recorded: 03/12/96 11:12:02'Test Procedure Name: Mortgage Prequalifier History
SQA Robot writes two comment lines (which begin with a single quotation mark) in the initialization section of each script. The first tells when the test procedure was recorded, and the second is the text entered as the name (not the ID) of the test procedure.
InitPlay
(Visual Basic only) This is a subroutine defined by SQA Robot that initializes test procedure playback. It must always be the first command in a Visual Basic script.
SetProcID "QBPRQ01"
Testing Tools – SQA Robot# 15
For QTP Information and scripts visit: www.gcreddy.com
(Visual Basic only) This is a subroutine defined by SQA Robot that identifies the ID of the test procedure. This always follows InitPlay and always precedes any user action commands in a Visual Basic script.
Window Restoration Commands
The following commands record the sizes and positions of open windows so that SQA Robot can restore the testing environment during playback. They also indicate the windows within which user actions occur.
StartSaveWindowPositionsEndSaveWindowPositions
These statements tell SQA Robot that, during playback, the intervening Window SetContext, Window MoveTo, and Window SetPosition commands are for windows restoration only. All playback timing defaults are set to zero to process these commands as quickly as possible.
If any command fails between StartSaveWindowPositions and EndSaveWindowPositions, that failure is reported to the test log as a warning, not a script command failure.
Window SetContextWindow SetPosition
The Window SetContext statement defines the context window for subsequent test cases and user actions, and Window SetPosition indicates the position, size, and status of that context window. These statements can vary, depending on the window within which user actions occur.
During recording, SQA Robot saves the positions of windows that are normal, minimized, or maximized if Auto Record Window Size is checked in the Recording Options dialog box. It does not save the positions of hidden windows. During playback, SQA Robot restores the windows to their positions when the test procedure was recorded. SQA Robot writes messages to the test log for any windows it cannot find on playback.
User Action and Test Case Commands
User action commands represent the actions you take while recording a GUI procedure. They are not test cases, but represent your actions between test cases. User actions within a window are always preceded in the script by a Window SetContext statement establishing the context window within which the actions occur.
PushButton Click, "VBName=SelectOK;VisualText=OK"
Testing Tools – SQA Robot# 16
For QTP Information and scripts visit: www.gcreddy.com
User action statements always begin with an object type (PushButton, Window, EditBox, etc.) followed by the action applied to it (Click, Resize, VScrollTo, etc.).
Result = WindowTC (CompareMenu, "VBName=Main; VisualText=Mortgage Prequalifier",
"CaseID=QBPRQ01A")
Test case and wait state functions are preceded by the Result variable. A test case function corresponds to a test case you insert into the test procedure while recording. During playback, if the test case passes, Result equals 1. If the test case fails, Result equals 0.
Closing Commands
All GUI procedure scripts must end with the following commands, which terminate the test procedure and reset SQA Robot:
EndPlay
(Visual Basic only) This is a subroutine defined by SQA Robot that terminates playback of a Visual Basic test procedure script.
End Sub
This indicates the end of the Main subroutine
Command Types
SQA Robot test procedure commands are organized into these types, based on the tasks they perform in the script:
Control Flow commands – Define the beginning and end of SQA Robot scripts, and the beginning and end of commands that save and restore windows. Control flow tasks include initialization and termination for test procedure playback.Used only in GUI procedures.Object Scripting commands – Access an application's objects and object properties from within a test procedure script. Object Scripting tasks include retrieving and setting an object's properties. Used only in GUI procedures.
Test Case commands – Compare objects captured while playing back successive builds of the application-under-test against the established baseline data. If the objects are the same, the test case passes (Result
Testing Tools – SQA Robot# 17
For QTP Information and scripts visit: www.gcreddy.com
equals 1). If the objects are different, the test case fails (Result equals 0). Used only in GUI procedures.User Action commands – Correspond to user actions on specific objects while recording. Actions include operations like choosing a menu command, scrolling a list box, clicking a button, or typing text into an edit box. Used only in GUI procedures.Utility commands – Affect the flow of test procedure playback by setting wait times, calling other test procedures, starting applications, starting and stopping timers, and playing back low-level recordings. They also control output to the test log, retrieve results from running test procedures, and set characters used in statements. Used only in GUI procedures.
If you have Virtual User Recording installed, you can use these SQABasic commands:
Datapool commands – Retrieve data from a datapool created with SQA Datapool Manager.HTTP commands – Issue HTTP requests to a Web server that is not SSL-protected.HTTP/HTTPS commands – Issue HTTP or HTTPS requests to a Web server, depending on whether the server is SSL-protected.Virtual User commands – Perform operations in virtual user procedures. For example, virtual user commands perform synchronization and timer operations for virtual users, and handle communications between the Master and Agent test stations.
Except for control flow commands, which must appear at the beginning and end of every script, the order of recorded commands depends on your recording options and user actions.
Naming Conventions Overview
SQA Robot requires you to assign an ID for each test procedure and test case (or wait state). These IDs have an eight character limit, imposed by the DOS filename restriction.
Because test procedure and test case IDs are referred to in the SQA Repository and in test procedure scripts, it is important that you establish and adhere to a naming convention. Having a meaningful naming convention helps you identify the test item's purpose.
Test Procedure IDs
Testing Tools – SQA Robot# 18

For QTP Information and scripts visit: www.gcreddy.com
A test procedure ID should indicate which application or component the test procedure tests. To achieve this, you can assign meanings to specific characters of the filename.
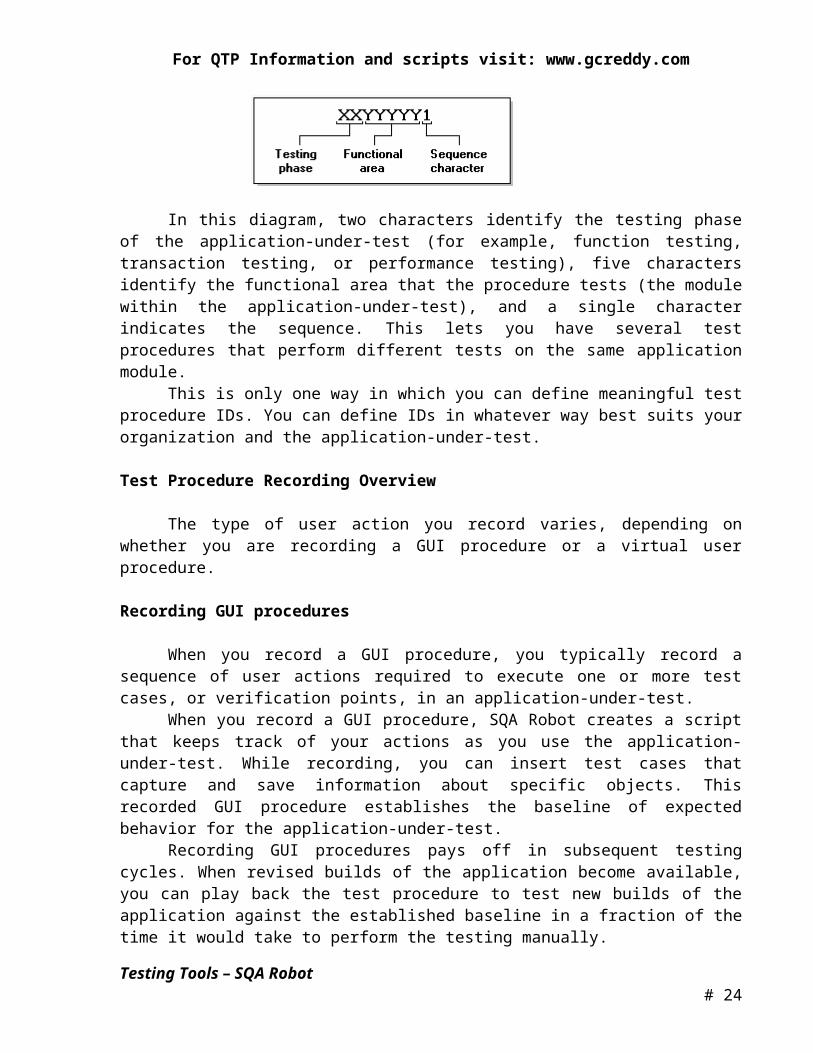
In this diagram, two characters identify the testing phase of the application-under-test (for example, function testing, transaction testing, or performance testing), five characters identify the functional area that the procedure tests (the module within the application-under-test), and a single character indicates the sequence. This lets you have several test procedures that perform different tests on the same application module.
This is only one way in which you can define meaningful test procedure IDs. You can define IDs in whatever way best suits your organization and the application-under-test.
Test Procedure Recording Overview
The type of user action you record varies, depending on whether you are recording a GUI procedure or a virtual user procedure.
Recording GUI procedures
When you record a GUI procedure, you typically record a sequence of user actions required to execute one or more test cases, or verification points, in an application-under-test.
When you record a GUI procedure, SQA Robot creates a script that keeps track of your actions as you use the application-under-test. While recording, you can insert test cases that capture and save information about specific objects. This recorded GUI procedure establishes the baseline of expected behavior for the application-under-test.
Recording GUI procedures pays off in subsequent testing cycles. When revised builds of the application become available, you can play back the test procedure to test new builds of the application against the established baseline in a fraction of the time it would take to perform the testing manually.
SQA Robot's Object-Oriented Recording technology examines objects in the application-under-test at the Windows layer during recording and playback. As a result, GUI procedure playback does not depend on absolute screen coordinates. Object-Oriented Recording insulates the GUI procedure
Testing Tools – SQA Robot# 19

For QTP Information and scripts visit: www.gcreddy.com
from minor user interface changes and simplifies GUI procedure maintenance.
Recording Virtual User Procedures
When you record a virtual user procedure, you record the HTTP requests that a client sends to a Web server.
NOTE: You can only record virtual user procedures if you have Virtual User Recording installed.
The Test Planning Process
During your test planning phase, before you begin recording, SQA Robot can help you define test procedures and test cases before you actually record them. Within your test procedure or test case definition, you can enter a file ID, name, description, and also references to any specification documents, or text files you use in designing your test procedures and test cases.
SQA Robot provides you with a small subset of the test planning functionality in SQA Manager, the SQA Suite product specifically designed for test planning, test project management, defect tracking, and test results reporting.
Steps in the Recording Workflow
The general process for recording a test procedure is:
1. When recording a GUI procedure, start your application-under-test. (Optionally, you can start the application-under-test after you start recording by choosing InsertStart Application.)
2. Set your testing environment.3. Set your recording options.4. Start recording.
By default, SQA Robot minimizes its main window so you can work with the application-under-test. If SQABasic is your scripting language, SQA Robot dynamically creates a test procedure script in the main window.If you are recording a virtual user procedure, the Record a Web Application dialog box appears. Select your browser and continue with the next step.
5. Perform actions such as inserting test cases (with GUI procedures), sending requests to the Web server (with virtual user procedures), inserting comments, inserting timer commands, and coordinating with wait states. For each recorded action, SQA Robot adds the corresponding commands to the test procedure script.
6. If necessary, switch from Object-Oriented to low-level recording mode.
Testing Tools – SQA Robot# 20
For QTP Information and scripts visit: www.gcreddy.com
7. End the recording session.
NOTE: To record a virtual user procedure, you must have Virtual User Recording installed.
Preparing to Record
Plan to use SQA Robot at the earliest stages of the application development and testing process. If any Windows GUI objects such as menus and dialog boxes exist within the initial builds of your application, SQA Robot can record the corresponding test cases.
Consider the following guidelines before you begin recording:
· Establish predictable start and end states for your test procedure. By starting and ending the recording at a common point in the application, test procedures can be played back in any order, with no test procedure being dependent on where another one ends.
· Set up your test environment. Whatever windows are open, active, or displayed when you begin recording should be open, active, or displayed when you stop recording. This applies to all applications, including Program Manager, E-mail, and so on.
SQA Robot can record the sizes and positions of all open windows when you start recording (based on the recording options settings). During playback, SQA Robot attempts to restore windows to their recorded states, and inserts a script command failure in the test log if it cannot find a recorded window.
Modular Test Procedures
Rather than define a long sequence of actions in one GUI test procedure, you should define test procedures that are short and modular. Keep your test procedures focused on a specific area of testing – for example, one dialog box or on a related set of recurring actions.
When you need more comprehensive testing, modular test procedures can easily be called from or copied into other test procedures. They can also be grouped into shell procedures, which are top level, ordered groups of test procedures.
The benefits of modular test procedures are:
· They can be called, copied, or combined into shell procedures.
Testing Tools – SQA Robot# 21

For QTP Information and scripts visit: www.gcreddy.com
· They can be easily modified or re-recorded if the developers make intentional changes to the application-under-test.
· They are easier to debug.
Recording a New Test Procedure
To start recording a new test procedure:
1. Prepare to record by setting the test environment and recording options.2. Choose FileRecord Test Procedure. 3. Fill in the dialog box.4. If the list of available test procedures is not visible, choose Show List to
display IDs and names of existing test procedures. 5. If necessary, choose Options and set your recording options.6. Choose OK to start recording.
If you select an already existing test procedure, SQA Robot displays a message asking if you want to overwrite it.
7. Choose Yes to overwrite, or choose No to define a new test procedure.8. If you are recording a virtual user procedure, the Record a Web
Application dialog box appears. Choose Browse to display your Web browser's path and file name in Command Line. Choose OK.
Hiding and Displaying SQA Robot
By default, the SQA Robot main window minimizes while recording to allow unobstructed access to the application-under-test.
To display the SQA Robot main window at any time while recording, click the Open Robot Window button on the Record toolbar.
You can also use hot keys to display or hide SQA Robot while recording:
· To bring the SQA Robot window to the foreground, press CTRL+SHIFT+F. This works whether SQA Robot is in the background or completely hidden.
· To hide the SQA Robot main window completely, press CTRL+SHIFT+H. The SQA Robot window disappears altogether but continues executing.
Hot keys work only while recording. If you are not recording, use the taskbar or ALT+TAB to bring SQA Robot to the foreground.
You can also use the Recording Options dialog box to change the While Recording options, which let you view part of the SQA Robot window while recording or send the window to the background.
Pausing and Resuming a Recording Session
Testing Tools – SQA Robot# 22
For QTP Information and scripts visit: www.gcreddy.com
While recording, if you choose a valid SQA Robot menu command or toolbar button, recording is suspended. After SQA Robot completes your selected action, recording resumes and you can continue working with the application-under-test.
To pause recording manually, choose RecordPause. SQA Robot indicates a paused state by:
· Depressing the Pause toolbar button.· Displaying "Recording Suspended" in the status bar.· Displaying a check next to the RecordPause menu command.
To resume recording, choose RecordPause again. You should always resume recording with the application-under-test in the same state it was in when you paused.
NOTE: You cannot use the Pause feature while recording a virtual user procedure.
Using Record and Insert Toolbars
By default, the SQA Robot Insert toolbar is dynamic. It is displayed when you click the Insert button on the Record toolbar, and hidden after the test case is created. To make test case buttons visible at all times while recording, you may add test case buttons to the Record toolbar or manually display the Insert toolbar.
To manually display the Insert toolbar so it is visible while recording, do one of the following:
· Check SQA Robot Insert in the toolbar popup menu.· Choose WindowToolbars and check SQA Robot Insert in the Toolbars
dialog box.
To add test case buttons to the Record toolbar:
1. Display both Record and Insert toolbars.2. Use the right mouse button to drag a test case button from the Insert
toolbar and drop it within the Record toolbar.
Alternatively, you may:
1. Display the Record toolbar.2. Choose Add Button in the toolbar popup menu.
Testing Tools – SQA Robot# 23
For QTP Information and scripts visit: www.gcreddy.com
3. Use either mouse button to drag a test case button from the Add Toolbar Button dialog box and drop it within the Record toolbar.
NOTE: If you make any unwanted changes to the Record or Insert toolbar, you can choose Reset Toolbar in the toolbar popup menu to reset the toolbar to its default configuration.
Recording Actions in a Test Procedure
While recording, you can insert any of the following into a test procedure:
· Test Cases – Capture specific conditions, states, or values during a test procedure recording and store the data as the expected baseline for the application-under-test. During playback, test cases recapture the data from the current build of the application-under-test, and compare the captured data to the baseline data.
· Wait States – Provide a way to synchronize test procedure playback with the application-under-test. During playback, your application may require additional time to complete certain tasks. Setting wait states lets you define specific conditions for which the test procedure waits before continuing with subsequent test actions.
· Timers – Let you insert start and stop timer commands to record the duration of events in a test procedure, such as database or network access. After playback, the elapsed time is displayed in the SQA Test Log Viewer.
· Synchronization Points – Let you coordinate virtual users at test runtime. To use this feature, you must have Virtual User Recording installed.
The remaining Insert menu commands let you call existing test procedures from the script being recorded, insert comments into the test procedure script or test log, or invoke an application while recording without having to go through the desktop.
Inserting Wait States
SQA Robot synchronizes automatically with the application-under-test. During playback, each script command uses a built-in retry and timeout value. For example, each script command waits up to 20 seconds (the default time) for windows and test actions to respond or become available during playback.
Your application may need more than 20 seconds. For example, an additional delay may be necessary if the application accesses a network server, printer, or other remote system. In these cases, if test procedure
Testing Tools – SQA Robot# 24

For QTP Information and scripts visit: www.gcreddy.com
playback does not wait, it can become out-of-sync with the application by sending script commands before the application is ready for them.
SQA Robot provides wait states that create additional delays or timing conditions to handle time-dependent test activities. While recording, if you notice that an activity in the application-under-test requires more time to complete than the default retry and timeout value allows, you may need to insert a wait state at that point in the test procedure.
Inserting Timers
To start a timer:
1. Click the Insert button.2. Click the Start Timer button on the Insert toolbar.3. Enter a timer ID of up to eight characters and choose OK. If you start
more than one timer, make sure you give each timer a different ID.
To stop a timer:
1. Click the Insert button.2. Click the Stop Timer button on the Insert toolbar.3. Select a timer ID from the list of timers you started and choose OK.
When you open the test log in the SQA Test Log Viewer, the elapsed time is displayed for each Stop Timer event.
Starting Applications
SQA Robot lets you start applications while recording without using the desktop. Within test procedures, you should always start applications or other executable (.EXE) programs by their full pathnames. This gives you more precise control over the test environment.
To start an application or executable program while recording:
1. Click the Insert button on the Record toolbar.2. Click the Start Application button on the Insert toolbar.3. Type the full pathname of the .EXE file to be executed, and choose
Browse to select an .EXE file. 4. Choose OK to start the application.5. Continue recording the test procedure.
During playback, SQA Robot starts the specified application when it reaches that command in the test procedure.
Testing Tools – SQA Robot# 25
For QTP Information and scripts visit: www.gcreddy.com
Calling Test Procedures
While recording, you can call previously recorded SQA Robot test procedures. This lets you avoid repetitive actions in the application-under-test by taking advantage of already existing test procedures.
To call a previously recorded test procedure while recording:
1. Click the Insert button on the Record toolbar.2. Click the Call Test Procedure button on the Insert toolbar.3. Select the test procedure, and check or uncheck the Run Now option:
· If Run Now is checked, SQA Robot adds the test procedure call to the recording test procedure and immediately plays back the called test procedure when you choose OK.
· If Run Now is not checked, SQA Robot adds the test procedure call to the recording test procedure but does not play back the called test procedure when you choose OK.
4. Choose OK to continue recording.
Inserting Comments
While recording, you can insert lines of comment text into the test procedure. Comments are helpful in documenting and editing test procedure scripts.
To insert comment text into a script while recording:
1. Click the Insert button on the Record toolbar.2. Click the Insert Comment button on the Insert toolbar.3. Type the comment in the edit box, which allows up to 60 characters
including spaces and punctuation. SQA Robot inserts the comment into the test procedure script file preceded by a single quote. For example:'This is a comment in the script.
4. Choose OK to continue recording.
Inserting a Test Log Message
Testing Tools – SQA Robot# 26

For QTP Information and scripts visit: www.gcreddy.com
To insert a message, description, and result into a test log while recording:
1. Click the Insert button on the Record toolbar.2. Click the Write to Test Log button on the Insert toolbar.3. Type the message. Optionally, type a description and select a result.
SQA Robot inserts the information into the test procedures script and then adds the information to the test log during playback.
4. Choose OK to continue recording.
Switching to Low-Level Recording
To toggle between Object-Oriented Recording and low-level recording, do one of the following:
· Press CTRL+SHIFT+R.· Click the Open Robot Window button on the Record toolbar (or press
CTRL+SHIFT+F) to bring SQA Robot to the foreground, and then choose RecordTurn Low-Level Recording On/Off.
When you switch to low-level recording mode, SQA Robot does the following:
· Records low-level actions in binary files that cannot be edited· Adds a PlayJrnl command to your test procedure script that references
the low-level file
Use the SQALow utility to examine the contents of low-level files.
Ending a Recording Session
To finish recording a test procedure, do one of the following:
· Click the Stop Recording button on the Record toolbar.· Click the Open Robot Window button on the Record toolbar (or press
CTRL+SHIFT+F) to bring SQA Robot to the foreground, and then choose RecordStop.
When you stop recording, the following SQA Robot hot keys become inactive:
· CTRL+SHIFT+F to show the SQA Robot window· CTRL+SHIFT+H to hide the SQA Robot window· CTRL+SHIFT+R to toggle between recording modes
NOTE: You should finish your recording session by returning the application-under-test to the same state it was in when recording began. For example, if you started recording from the main application window, stop recording at
Testing Tools – SQA Robot# 27

For QTP Information and scripts visit: www.gcreddy.com
the same window. This allows you to play back the test procedure without manually resetting the environment.
Test Procedure Playback Overview
When you play back a test procedure, SQA Robot repeats your recorded actions and automates the software testing process. With automation, you can test each new build of your application faster and more thoroughly than by testing it manually. This decreases testing time and increases both coverage and overall consistency.
There are two general phases of test procedure playback:
· Test development phase – Play back test procedures to verify that they work as intended, using the same build of the application-under-test that you used to record. This establishes the baseline of expected behavior for the application-under-test.
· Regression testing phase – Play back test procedures to compare the latest build of the application-under-test to the baseline established during the test development phase. Regression testing reveals any differences that may have been introduced into the application since the last build. These differences can be evaluated to determine if they are actual defects or deliberate changes.
Before playback, SQA Robot automatically compiles a test procedure if it has changed since it last ran.
Test Development Phase
The general process for the test development phase is:
1. Prepare for playback by setting the test environment and playback options.2. Play back each test procedure against the same build of the
application-under-test that was used for recording to verify that it performs as intended.
3. View the pass/fail results using the SQA Test Log Viewer. If the test procedure fails, you may need to edit, debug, or re-record the test procedure so that it runs as required. Use the appropriate SQA Comparator to determine the cause of test case failures.
4. Group individual test procedures into a comprehensive shell procedure. Play back the shell procedure to verify that the test procedures work properly. If necessary, edit, debug, or re-record the test procedures.
Testing Tools – SQA Robot# 28

For QTP Information and scripts visit: www.gcreddy.com
Regression Testing Phase
The general process for the regression testing phase is:
1. Restore the testing environment and playback options for unattended regression testing.
2. Play back the test procedure or shell procedure.3. Analyze the results using the SQA Test Log Viewer. Use the appropriate
SQA Comparator to investigate the cause of failures.4. If failed test cases or test procedures are the result of intentional
changes to the application-under-test, update the master data using the appropriate SQA Comparator.
5. If necessary, revise your test procedures to bring them up to date with new features in the application-under-test. Play back the revised test procedures against the current build and then reevaluate the results.
6. If failed test cases or test procedures are the result of actual defects in the application, generate a defect using the SQA Test Log Viewer. This defect information is used by SQA Manager to track the life cycle of all defects reported against the application-under-test.
Preparing for Playback
The state of the Windows environment as well as your application-under-test can affect test procedure playback. In general, you should verify that the playback environment is in the same state it was in when you recorded your test procedure. If there are differences between the recorded environment and the playback environment, playback problems can occur.
Before playing back a test procedure, be sure your application-under-test is in the same state it was in when you recorded your test procedure. Whatever applications and windows were open, active, or displayed when you started recording the test procedure should be open, active, or displayed when you start playback. In addition, be sure that any network settings, active databases, and system memory are in the same state as when the test procedure was recorded.
Make sure you set the appropriate preferences and playback options. You should also decide how SQA Robot is to handle unexpected active windows and recover from possible script command errors.
Playing Back a Test Procedure
Testing Tools – SQA Robot# 29

For QTP Information and scripts visit: www.gcreddy.com
1. Prepare for playback by setting the test environment and playback options. 2. Choose FilePlayback Test Procedure.3. Fill in the dialog box.
4. If necessary, choose Options and set your playback options.5. Choose OK to start playback.
Stopping Playback
Press the F11 key to stop test procedure playback.
NOTE: SQA Robot only recognizes F11 key input when playing back Object-Oriented commands. The F11 key does not stop playback during low-level actions.
Stopping SQA Repository Update
If Update SQA Repository On Completion of Playback is checked in the Playback Options dialog box, SQA Robot updates the SQA Repository after playback and displays a dialog box indicating update progress.
Choose Stop if you need to terminate SQA Repository update while in progress.
Generating and Tracking Defects
After analyzing failures, you can use the SQA Test Log Viewer to generate a defect and enter specific information about any defects found in the application-under-test. The information is stored in the SQA Repository and becomes available to SQA Manager users for tracking and reporting purposes.
You can use SQA Manager to track defects, generate reports, and keep track of development and testing status for the application-under-test.
Shell Procedure Overview
SQA Robot lets you group several test procedures into a shell procedure that plays back the test procedures in sequence. For example, you may have one test procedure that starts your application, a second that searches for and opens a particular file, a third that modifies the file, and a fourth that closes the application and returns to the starting point.
Combined into a single shell procedure, test procedures can run in unattended mode and perform comprehensive test coverage. Moreover, the results from all test procedures and test cases are stored in the same test log, which simplifies results analysis in the SQA Test Log Viewer.
Testing Tools – SQA Robot# 30
For QTP Information and scripts visit: www.gcreddy.com
For unattended testing, each test procedure should return to a common point in the application-under-test. This common point could be a main menu, a specific window or dialog box, or even Program Manager. This assures that test procedure playback remains synchronized with the application-under-test.
NOTE: You cannot add virtual user procedures to shell procedures.
Creating Shell Procedures
Before creating a shell procedure, you must already have recorded the individual test procedures you intend to include.
1. Choose FileCreate Shell Procedure.2. Enter an ID, or accept the default ID if you have checked Autonaming
On in the Preferences dialog box.3. Enter a Name and Description and choose OK.
SQA Robot displays a dialog box listing Available Test Procedures that have been recorded for the current project in the SQA Repository.
4. To add test procedures to the shell procedure, select one or more test procedures in the Available Test Procedures list and choose Add or Add All. SQA Robot appends the test procedures to the Selected Test Procedures list.
5. To remove a test procedure from the list, select it and choose Remove.6. Choose OK. SQA Robot displays a message indicating that the shell
procedure has been created.7. Choose OK again.
Playing Back Shell Procedures
1. Restore the environment and playback options as you do for test procedures.2. Choose FilePlayback Test Procedure.3. Enter the shell procedure ID, or select the shell procedure ID from the
Available Test Procedures list.4. Choose OK.
Test Case IDs
Testing Tools – SQA Robot# 31
For QTP Information and scripts visit: www.gcreddy.com
The ID you define for a test case should help you identify the application-under-test, the test procedure it is in, and the type of test case.
In this diagram, two characters identify the testing phase of the application-under-test, three characters identify the functional area or module that the procedure tests, two characters identify the test case type, and a single character indicates the sequence.
You can use either numbers, letters, or both for the sequence character, which allows up to 36 test cases (0 through 9 plus A through Z) in a test procedure. However, SQA recommends that you not create such a large test procedure. Instead of including many test cases, define test procedures that are short and modular.
Test Case Overview
SQA Robot test cases capture specified objects, data, or images from the application-under-test and save that information as the baseline of expected behavior. During playback, SQA Robot compares the saved baseline with the same object, data, or image in the new build. If a difference is detected, the test case fails. If no difference is detected, the test case passes.
From the SQA Test Log Viewer, you can use the SQA Text, Image, and Object Properties Comparators to compare and analyze the test case master and failed data files. If necessary, you can update your master data files by editing them or replacing them with data from failed data files.
Before You Create a Test Case
Before you create a test case, consider the following:
· What feature in the application do you want to test? Example: You want to verify that the Cut command places selected data in the Clipboard.
· To test the feature, what object or objects should you test? Example: The objects you should test are the Cut command on the Edit menu and the data on the Clipboard.
· What kind of test do you want to create? Example: You create test cases to verify that 1) the Cut command exists on the Edit menu, 2) the Cut command is enabled, and 3) the Clipboard contains the information cut to it.
Testing Tools – SQA Robot# 32
For QTP Information and scripts visit: www.gcreddy.com
· What type of test case do you create to accomplish the kind of object testing that you want?Example: You create a test procedure that contains two test cases ¾ an Object Data test case to verify that the Cut command exists on the Edit menu and that the state of the Cut command is enabled; a Clipboard test case to verify that the selected information is actually placed on the Clipboard.
Tasks in Creating a Test Case
You perform the following major tasks when you create a test case:
· Start to create a test case · Select the object to test· Select the data to test· Edit data (optional)· Select identification methods (optional)· Select verification methods (optional)· Test column titles or top menus (optional)
After test procedure playback, you can perform the following major tasks:
· Analyze test case data files · Delete test cases (optional)
Starting to Create a Test Case
You can insert one or more test cases while recording or editing a test procedure.
To start creating test case:
1. Record a new test procedure or edit an existing test procedure.2. Do one of the following:
Click the Insert button on the Record toolbar to display the SQA Robot Insert toolbar.Click the Open Robot Window button on the Record toolbar (or press CTRL+SHIFT+F) to bring the SQA Robot window to the foreground, and then choose InsertTest Case.
3. Click a test case type button on the Insert toolbar or choose a test case type from the InsertTest Case menu.SQA Robot suspends recording and displays the Define a ... Test Case dialog box for entering the test case ID and other information.
4. Enter a test case ID, name, description, and choose OK.
Identifying the Object to Test
Testing Tools – SQA Robot# 33
For QTP Information and scripts visit: www.gcreddy.com
After you choose a test case type, a pointing-hand appears with which you select the object to test.
When you point to an object in the application-under-test, you use one of the following methods to visually identify the object, based on settings in the Preferences dialog box:
· Invert Object Colors – Inverts screen colors as you point to an object. · Show Object Type – Displays a TestTip that describes the object type
as you point to an object. · Show Recognition Method – Displays a TestTip that describes both the
object type and the object recognition method as you point to an object.
The default method is Show Object Type. To select another method, set the Object Selection Indicator in the Preferences dialog box.
You can also check the Show Development Environment check box to display the development environment name (if known) in the TestTip
Showing the Object Type
If Show Object Type is selected in the Preferences dialog box, a pointing-hand appears with a TestTip below it that identifies each object type (for example PushButton, DataWindow, or Table Window).
If the TestTip describes an object as Unknown, you must define it before you can test it.
Showing the Object Recognition Method
If Show Recognition Method is selected in the Preferences dialog box, the pointing-hand appears with a TestTip that includes the object type and the object recognition method. The object recognition method determines what information SQA Robot uses during playback to recognize the object.
For example, SQA Robot can identify a CheckBox by one of the following recognition methods - its object name, its label, its index value, or its ID value. If the object recognition method is not the one that you want to use for a specific type of object, you can change it.
Inverting the Object Colors
If Invert Object Colors is selected in the Preferences dialog box, the pointing-hand appears after you begin to create a test case. As you move the pointing-hand over the objects in your application-under-test, the screen colors invert.
Testing Tools – SQA Robot# 34
For QTP Information and scripts visit: www.gcreddy.com
SQA Robot indicates that it will test the entire window or dialog box by inverting it. When you select a Window object, the test case type you create determines what SQA Robot tests.
Selecting the Data to Test
After capturing an object but before saving a test case, you can select the data you want to test for the Object Data test case.
The values originally captured are displayed in the data grid, a display element in every Test Case dialog box.
Use any of the following methods to select data in the columns, rows, or cells of the data grid. The selected values become the baseline that SQA Robot uses during playback to test the current build of the application.
Range - Click and drag the pointer over a range of cells; click the first cell, hold down the SHIFT key, and click the last cell in the range; hold down the SHIFT key while pressing one of the arrow keys.Non-contiguous cells - Make sure the captured values are deselected. Then press the CTRL key and click each cell. Clicking without the CTRL key cancels previous selections.Entire column - Click a column title. Entire row - Click a row number. All cells - Click the box in the upper left-hand corner of the grid.
Editing Captured Data
You can edit the data in any cell of the data grid. Editing data is useful if you want to change the baseline for a test case based on a new specification or anticipated changes to the application-under-test. By editing data before playback, you can often avoid a test case failure.
To edit captured data in the data grid:
1. Double-click the cell or select it and press ENTER. The pointer changes to a text cursor.
2. Do one of the following:· To clear the current data from the cell and enter new data, press
BACKSPACE or DELETE.· To keep the changes to the data in a cell, press ENTER.· To cancel a change and display the original data, press ESC.
3. To move the pointer to another cell to edit the text, press one of the keyboard arrow keys, or click the cell using the mouse.
Restrictions on Editing Captured Data
When you edit data in the data grid, you cannot do the following:
Testing Tools – SQA Robot# 35

For QTP Information and scripts visit: www.gcreddy.com
· Edit column, row, or menu titles unless you use the Move Column Titles to Grid or Move Top Menus to Grid option.
· Insert additional columns or rows.· Use the Numeric Range verification method, because it does not
compare the data to the values in the grid. Instead, it compares the data captured during test procedure playback according to the From and To values you specify. Editing the data in the grid has no effect.
Testing Column Titles or Top Menus
After you capture data using the Object Data or Clipboard test case, you can check Move Column Titles to Grid or Move Top Menus to Grid in the Test Case dialog box. If you check this option, the column or menu titles are moved into the data grid. Numbers replace the column or menu titles.
Use Move Column Titles to Grid or Move Top Menus to Grid to:
· Capture and test a title without its column data.· Test the title like any of the other data in the grid.· Edit a title by moving it to the grid, editing it, and moving it back to its
position as a title.
If a test case captures only column titles, SQA Robot automatically enables the Move Column Titles to Grid option. Titles are moved to the grid so that data exists in the grid for testing. This option is not available for list objects, such as ListBoxes, ComboListBoxes, and ComboBoxes.
Changing a Column Width
The column widths in the data grid default to fit the longest data string. You can adjust the widths of any of the columns in the grid.
1. Place the pointer on the vertical borderline between the column title cells. The pointer changes to a double vertical bar with arrows.
2. Click-and-drag the pointer to adjust the size.3. To hide a column completely, drag its right vertical borderline to the
left until the column disappears.
To restore column widths to the default settings, press F8.
Transposing Columns and Rows
You can change the display of information in the data grid by checking Transpose View in a Test Case dialog box. Transpose View is a display option only; it does not affect how SQA Robot captures information.
Testing Tools – SQA Robot# 36
For QTP Information and scripts visit: www.gcreddy.com
Transpose View is not available for a menu because SQA Robot treats each menu as a separate entity; rows of menu items are not recognized. For example, SQA Robot does not treat the fourth menu item in one menu and the fourth menu item in another menu as though they were in the same row.
If Transpose View is not checked (the default), the data is displayed in column and row format.
If Transpose View is checked, the columns are displayed as rows, and rows are displayed as columns.
When the view is transposed, column widths become the same size ¾ the maximum size needed. When the view is not transposed, the column widths are adjusted according to the contents of each column.
Select or deselect Transpose View before you select the specific data to test because when you transpose a grid, the current selections are lost.
Selecting Identification Methods
Identification methods, along with verification methods, specify how SQA Robot compares and tests the captured values. The identification method tells SQA Robot how to locate and retrieve selected column and row values.
If the data is displayed in a two-dimensional grid, you select two identification methods - one for columns and one for rows. If the data is displayed in a one-dimensional grid, you select only one identification method.
By Location - Tests that the locations (as well as the content) of the values selected while recording have not changed in the application during playback.By Content - Tests that the content of the values selected while recording has not changed in the application during playback, even though the values may have changed locations.By Title - Tests that values selected under specific column titles while recording have not changed in the application during playback, even though the columns may have changed locations.By Key/Value - Tests that the content of selected values and their locations within a row have not changed in the application during playback, even though the row may have changed locations. Also lets you add keys to columns to efficiently locate selected values in the columns during playback.
Test Case Reference
The following list summarizes each SQA Robot test case. Click for information about the test case and how to create it.
Testing Tools – SQA Robot# 37
For QTP Information and scripts visit: www.gcreddy.com
Alphanumeric - Tests for case-sensitive or case-insensitive text, an exact number, a number within a range; verifies that a field is blank, or allows you to run your own custom test on an alphanumeric value.Clipboard - Captures and compares alphanumeric data that has been copied to the Clipboard, for example, from spreadsheets or from data in controls that cannot be captured using any other test case. File Comparison - Compares the contents of two files. File Existence - Checks for the existence of a specified file.Module Existence - Checks for a specified software module in memory. Object Data - Captures and compares the data in objects. Object Properties - Captures and compares the properties of objects. Region Image - Captures a region of the screen. When you play back the recorded test procedure, the test case tests for differences between the captured region and the playback region. User-Defined DLL Call - Calls an independently developed DLL test routine into the current test procedure to perform a customized test case.User-Defined EXE Call - Calls an independently developed EXE test routine into the current test procedure to perform a customized test case.Web Site - Checks the content of your Web site with every revision and ensures that changes have not resulted in defects. Window Existence - Verifies that the specified window is displayed before continuing with the playback.Window Image - Captures a window for bitmap comparison during playback. When you play back the recorded test procedure, the test case compares the same window in the application-under-test to the window captured during recording.
Alphanumeric Test Case
An Alphanumeric test case lets you capture and test alphabetic or numeric values from a single or multi-line edit box or from other Windows objects that SQA Robot recognizes. These include: CheckBox, Generic, GroupBox, Label, PushButton, RadioButton, ToolBar, Window (caption). You can use the test case to verify that text has not changed, to trap spelling errors, and to ensure that numeric values are accurate. With an Alphanumeric test case, you can do the following:
While Recording
· Specify how the captured data should be compared during playback by selecting a verification method.
· Recapture the values without creating a new test case.
After Recording
From the SQA Text Comparator:
Testing Tools – SQA Robot# 38
For QTP Information and scripts visit: www.gcreddy.com
· View and/or edit the master data file for captured text (testcaseID.TXM). There is no master data file for captured numbers.
· View any failed data files: testcaseID.TXF, T02, T03 for captured text; testcaseID.NMF, N02, N03 for captured numbers.
· Replace master data with failed data.
Creating an Alphanumeric Test Case
To create an alphanumeric test case while recording or editing:
1. Begin recording or editing.2. Click the Insert button on the Record toolbar.3. Click the Alphanumeric button on the Insert toolbar.4. Enter information about the test case ID, name, and description, or
select a test case from the Available Test Cases list.5. Click OK.6. Select a verification method. The Alphanumeric test case includes two
additional verification methods used only for this test case:Apply a User-Defined DLL Test FunctionVerify That Selected Field is Blank
If you select Numeric Equivalence or Numeric Range and then select an object that is not numeric, SQA Robot indicates that the test cannot be completed. Choose Recapture to capture the correct numeric value or repeat the test case using the Case-Sensitive or Case-Insensitive verification method. Any number preceded by a character, for example a $, is an alphabetic value.
7. Choose OK to display the pointing-hand.8. Do one of the following:
· Point to the object and click the left mouse button.· Press F4 and select the object to test from the object list. The
object list includes all of the objects on the Windows desktop.9. Choose one of the following:
Accept - Accepts the captured text, writes the test command in the script, and writes the captured alphabetic data to a master data file. SQA Robot does not create a master data file for numeric values.Recapture - Displays the application-under-test so you can repeat
steps 8 - 9. Cancel - Returns to the application-under-test without capturing any test case information.
Clipboard Test Case
Testing Tools – SQA Robot# 39

For QTP Information and scripts visit: www.gcreddy.com
A Clipboard test case lets you capture text contained in objects that cannot be captured using any of the other test cases. To use the Clipboard test case, the application-under-test must supply a Copy or Cut capability so you can place the data or content of the object in the Clipboard. This test case is useful for capturing data from spreadsheet and word processing applications as well as terminal emulators. It does not allow you to test bitmaps.
With a Clipboard test case, you can do the following:
While Recording
· Choose which of the captured data you want to test by selecting columns, rows, or individual cells.
· Specify how the captured data should be compared during playback by selecting a verification method.
· Identify how you want to locate the captured data during playback by selecting an identification method.
· Edit the captured data in the data grid before saving the data.
After Recording
From the SQA Text Comparator:
· View and/or edit the master data file (testcaseID.GRM).· View any failed data files (testcaseID.GRF, G02, G03, ...).· Replace master data with failed data.
Creating a Clipboard Test Case
1. Copy the data you want to test to the Clipboard.2. Begin recording or editing.
3. Click the Insert button on the Record toolbar.4. Click the Clipboard button on the Insert toolbar.
5. Enter information about the test case ID, name, and description, or select a test case from the Available Test Cases list.
6. Choose OK.7. Complete the following steps as needed in the data grid:
· Transpose the columns and rows for viewing.· Move column titles to the grid.· Edit data.· Select the data that you want to test during playback.· Change column widths.
Testing Tools – SQA Robot# 40
For QTP Information and scripts visit: www.gcreddy.com
8. Select a verification method.9. Select an identification method. 10. Choose one of the following:
OK - Accepts the captured text, writes the test command in the script, and writes the captured data to a master data file.Cancel - Returns to the application-under-test without capturing any test case information.
File Comparison Test Case
A File Comparison test case lets you compare two specified files during playback. The comparison is based on the contents of the files and their sizes, not on the filenames or dates.
When you create the test case, you specify the drive, directory, and the filenames of the files. During playback, SQA Robot compares the files byte-for-byte.
Creating a File Comparison Test Case
1. Begin recording or editing.2. Choose InsertTest CaseFile Comparison.3. Enter information about the test case ID, name, and description, or
select a test case from the Available Test Cases list.4. Choose OK.5. Enter the drive, directory, and filenames with extensions in the
Filename fields or choose Browse and select the drive, location, and filename, and choose OK.
You can define the test case by specifying filenames before the files are created. However, they must be created before the test case is played back, or the test case will fail.
6. Choose OK to write the information directly in the script.File Existence Test Case
A File Existence test case lets you specify a file to look for during playback. When you create the test case, you specify the drive, directory, and filename for the required file. During playback, SQA Robot checks to see if the file exists in the specified location.
Creating a File Existence Test Case
1. Begin recording or editing.2. Choose InsertTest CaseFile Existence to display the Define a File
Existence Test Case dialog box.3. Enter information about the test case ID, name, and description, or
select a test case from the Available Test Cases list.
Testing Tools – SQA Robot# 41

For QTP Information and scripts visit: www.gcreddy.com
4. Choose OK.5. Enter the drive, directory, and filename with extension in the Filename
field or choose Browse and select the drive, location, and filename, and choose OK.You can define the test case by specifying filename before the file is created. However, the file must be created before the test case is played back, or the test case will fail.
6. Choose OK to write the information directly in the script.
Module Existence Test Case
A Module Existence test case lets you verify whether a specified software module exists in memory during playback. Within Microsoft Windows, modules are defined as processes or executable programs (.EXE), dynamic link libraries (.DLL or other extension), device drivers (.SYS or .DRV), or display fonts (.FON).
In a 32-bit Windows environment, each process has its own address space, or context. When you create a Module Existence test case in a 32-bit environment, you select the name of the module to be verified, and if it is part of a process, also the context name (or the process of which it is part).
In a 16-bit Windows environment, there is no context because all processes share a single address space. When you create a Module Existence test case in a 16-bit environment, you select only the name of the module to be verified.
Creating a Module Existence Test Case
1. Begin recording or editing.2. Choose InsertTest CaseModule Existence.3. Enter information about the test case.4. Choose OK to list the modules by their context name and module name.5. Select a module, or type the full pathname in the Module Filename field.
If you select a module that is part of a process (.EXE) in a 32-bit Windows environment, SQA Robot fills in the Context Filename field. You can also type the full pathname in the Context Filename field.
If you select a module that is also a process (.EXE) in a 32-bit Windows environment, there is no separate context of which it is part, and the Context Filename field is empty.
If you select a module in a 16-bit Windows environment, there is no context, and the Context Filename field is grayed.
6. Choose OK to write the information directly in the script.
Object Data Test Case
Testing Tools – SQA Robot# 42
For QTP Information and scripts visit: www.gcreddy.com
The Object Data test case lets you capture the data inside controls and components, including the following:
· PowerBuilder DataWindows, DropDownDataWindows, DropDownListBoxes, and DataStore controls
· VBX and OCX/ActiveX controls· Visual Basic Data controls· Delphi data-aware and DataSource components· Centura Table Windows· SQLWindows Table Windows· Win 32 controls: list view, tree view, header, tab, and status bar· Lists: list box, combo box, edit box· Menus
With the Object Data test case, you can do the following:
While Recording
· Select a data test, if applicable, to use on the object. · Choose which of the captured data to test by selecting columns, rows,
or individual cells.· Recapture the data without creating a new test case.· Specify how the captured data should be compared during playback by
selecting a verification method.· Identify how to locate the captured data during playback by selecting
an identification method for both column and row data.· Edit the captured data in the data grid before saving the data.
After Recording
From the SQA Text Comparator:
· View and edit the master data (testcaseID.GRM).· View any failed data files (testcaseID.GRF, G02, G03, ...).· Replace master data with failed data.
Creating an Object Data Test Case
1. Begin recording or editing.2. Click the Insert button on the Record toolbar.3. Click the Object Data button on the Insert toolbar. 4. Enter information about the test case ID, name, and description, or
select a test case from the Available Test Cases list.
Testing Tools – SQA Robot# 43

For QTP Information and scripts visit: www.gcreddy.com
5. Choose OK to display the pointing-hand.6. Do one of the following:
· Point to the object and click the left mouse button.· Press F4 and select the object to test from the object list. The object list includes all of the objects on the Windows desktop.
7. If the Object Data Tests dialog box appears, select the appropriate data test from the drop-down and choose OK.
8. Check the appropriate check boxes in the Object Data Test Case dialog box.9. Edit the data as needed by double-clicking a cell and changing the data.
For menu items, double-clicking an item displays the Edit Menu Item dialog box.10. Select the data to test.11. Select a verification method. 12. Select an identification method for columns and for rows. 13. Choose one of the following:
OK - Accepts the captured data, writes the test command in the script, and writes the captured data to a master data file.Recapture - Displays the application-under-test so you can repeat
steps 6 - 13. Cancel - Returns to the application-under-test without capturing any test case information.
Region Image Test Case
A Region Image test case lets you select a region of the screen that SQA Robot captures and saves as a bitmap. The captured region, which can overlap more than one window, is a pixel-by-pixel representation that includes colors, height, and width. For the test case to pass, it is important that the location of the region during playback is the same as it was in the baseline.
With a Region Image test case, you can do the following:
While Recording
Mask (exclude) areas that you do not want to include in the test case, for example, the time and date fields or a blinking cursor.
SQA Robot creates two files for masks in the \Repository\Project \CASES directory:
· MASKS.DAT - Lists the names and screen coordinates for all of the masks in a project.
Testing Tools – SQA Robot# 44

For QTP Information and scripts visit: www.gcreddy.com
· testcase.MKL - Lists the names of the image masks for a specific test case. You can add or delete a mask from a test case by editing the name in the testcase.MKL file.
After Recording
From the SQA Image Comparator:
· View the master data file (testcaseID.MAS).· View any failed data files (testcaseID.FAL, F02, F03, ...).· Replace master data with failed data.
Creating a Region Image Test Case Without a Mask
1. Make sure the region you want to test is visible in the application-under-test. 2. Begin recording or editing.3. Click the Insert button on the Record toolbar.4. Click the Region Image button on the Insert toolbar.5. Enter information about the test case ID, name, and description, or
select a test case from the Available Test Cases list.6. Choose OK. 7. Select No Image Mask.8. Choose OK. 9. Draw a box around the region by clicking the left mouse button once to
anchor the first corner (upper-left or lower-right). Draw the box and then click the left mouse button again to anchor the second corner. (To cancel and re-draw the box, click the right mouse button and repeat this step.)
When you anchor the second corner, SQA Robot saves the image to a .MAS file and the test case definition is complete.
Creating a Region Image Test Case with a New Mask
1. Make sure the region you want to test is visible in the application-under-test.
2. Begin recording or editing.3. Click the Insert button on the Record toolbar.4. Click the Region Image button on the Insert toolbar.5. Enter information about the test case ID, name, and description, or
select a test case from the Available Test Cases list.6. Choose OK.7. Select Create New Image Masks.
Testing Tools – SQA Robot# 45

For QTP Information and scripts visit: www.gcreddy.com
8. Choose OK. 9. Draw a box by clicking the left mouse button once to anchor the first
corner (upper-left or lower-right). Draw the box and then click the left mouse button again to anchor the second corner. (To cancel and re-draw the box, click the right mouse button and repeat this step.)The selected region appears in the upper-left corner of the desktop.
10. To mask part of the region, draw a box around the area by following the procedure in step 9.
When you anchor the second corner, the masked area turns black, and the Mask Name dialog box appears.
11. Enter a name for the mask of up to ten characters. If an image mask is unique to a particular test case, you may
want to assign it a unique name similar to the test case name.If you can use the same image mask in multiple test cases, you
may want to assign it a common name. For example, if you create an image mask to block a date or time field, you can name it MASKDATE or MASKTIME.
12. Choose one of the following:OK - Creates the mask, writes the test case in the script, creates a master data file and a testcase.MKL file, and adds the mask name to the MASKS.DAT file.Create Another - Accepts the mask name and returns to the selected region image so you can create another mask.Cancel - Cancels the last mask defined.
Creating a Region Image Test Case with an Existing Mask
You can mask an area of an image by using existing masks. Since masks are position-dependent, you need to know which area of the image the mask will cover. If you are not sure, do not use an existing mask.
1. Make sure the region you want to test is visible in the application-under-test. 2. Begin recording or editing.3. Click the Insert button on the Record toolbar.4. Click the Region Image button on the Insert toolbar.
5. Enter information about the test case ID, name, and description, or select a test case from the Available Test Cases list.
6. Choose OK.7. Select Use Existing Image Masks.8. Choose OK. 9. Draw a box around the region by clicking the left mouse button once to
anchor the first corner (upper-left or lower-right). Draw the box and
Testing Tools – SQA Robot# 46
For QTP Information and scripts visit: www.gcreddy.com
then click the left mouse button again to anchor the second corner. (To cancel and re-draw the box, click the right mouse button and repeat this step.)
The Select Existing Mask(s) dialog box appears.10. Select a mask, or press the CTRL or SHIFT key and select multiple masks.11. Choose OK. SQA Robot writes the test case in the script, creates a
master data file, and creates a testcase.MKL file.
Adding and Deleting Masks from a Region Image Test Case
You can add or delete a mask from a test case by adding or deleting the name in the testcase.MKL file.
1. From an editor such as Notepad, open the \Repository\Project\CASES\MASKS.DAT file and copy the name of the mask you want to add.
2. In the same editor, open the \Repository\Project\CASES\testcase.MKL file.3. Add the name of the mask or delete a mask name.
If you copy the name from the MASKS.DAT file, be sure to delete the coordinates that follow the name after you insert the name into the .MKL file.
4. Save the changes and close the editor.Web Site Test Case
A Web Site test case let you check the content of your Web site with every revision and ensure that changes have not resulted in any of the following defects:
· Internal links not found· External links not found· Pages with broken links· Pages that have permanently moved· Orphans
· Viruses· Pages slow to download
When you record a Web Site test case, SQA SiteCheck detects pages with potential active content (a form, ActiveX control, Java applet, JavaScript, or VBScript) and stores your interactions with this content. For example, if a page has a form, the test case lets you enter data into the form and press the Submit button.When you play back the test case, SQA SiteCheck reuses the stored input to follow the links from active pages. For example, when it reads the page with
Testing Tools – SQA Robot# 47
For QTP Information and scripts visit: www.gcreddy.com
the form, it enters the stored data and follows the link from the Submit button. SQA SiteCheck does this while tracing all the other links (even when they change), without requiring you to enter new data.
Creating a Web Site Test Case
1. Begin recording a test procedure.2. Click the Insert button on the Record toolbar.3. Click the Web Site button on the Insert toolbar.4. Enter information about the test case ID, name, and description, or
select a test case from the Available Test Cases list. Choose OK to start the Web Site Test Case wizard.
5. Select the site to test. (For information about each option, choose Help.) 6. Choose Next.7. Fill in the dialog box. (For information about each option, choose Help.)
You can control how many levels to read by checking Read Entire Site or by entering the Level number.
8. Choose Next.9. Fill in the dialog box. (For information about each option, choose Help.)
If you want to run SQA SiteCheck now to add ActiveScan entries for Web pages with active content , choose Yes. (To use the ActiveScan feature, you must have Internet Explorer 3.0 or later installed, although it does not need to be the default browser.)If you do not want to add ActiveScan entries to the test case, choose
No.10. Choose Finish.
If you chose No for ActiveScan entries, you are finished with this test case. Skip to step 13 .
If you chose Yes for ActiveScan entries, SQA SiteCheck starts and scans the site for active content. Continue with step 11.
11. If a message appears saying there is no active content, choose OK and then choose FileExit. Skip to 13.
12. If a message appears saying you will be switched to ActiveScan view, choose OK and do the following:
a) Fill in the form and submit the results, or make selections as necessary. The top pane of the SQA SiteCheck window records your entries or selections.
b) Click Next to go to the next page that contains active content. Repeat step a.
c) When finished, choose FileExit.
13. When finished recording the test procedure, click the Stop button in SQA Robot.
Testing Tools – SQA Robot# 48
For QTP Information and scripts visit: www.gcreddy.com
Creating a User-Defined EXE Call Test Case
1. Choose InsertTest CaseUser-Defined EXE Call.2. Enter information about the test case.3. Choose OK.4. Enter the path and filename (including extension) of the EXE program,
or choose Browse and select from a list of available executable files.5. Choose OK to write the information directly in the script.
Creating a User-Defined DLL Call Test Case
1. Choose InsertTest CaseUser-Defined DLL Call.2. Enter information about the test case.3. Choose OK.4. Enter the path and filename (including extension) of the DLL library
name and function, or choose Browse and select from a list of available files.
5. Choose OK to write the information directly in the script.
Calling an Alphanumeric Test Case DLL Function
Follow these guidelines to call an alphanumeric DLL function from an SQA Robot test procedure:
· While recording a test procedure, choose InsertTest CaseAlphanumeric Test Case, and select Apply a User-Defined DLL Test Function as the verification method.
The DLL file does not have to exist when you record the test procedure. Inserting the test case simply inserts a reference to the DLL name and function name into the test procedure script. However, the .DLL file and function must exist before you play back the test procedure.
· The user-defined function must be written in the C language.· The user-defined function must be exported from the DLL.· The user-defined function must have the following Microsoft Windows-
compatible function prototype:
WORD FAR PASCAL UserDefFunc (GLOBALHANDLE hTextRec, GLOBALHANDLE hTextPlay)
You can replace the name UserDefFunc with any valid function name. The global handles reference memory that is owned by the SQA Robot runtime DLL. This memory is freed by SQA Robot after the test case is finished.
Testing Tools – SQA Robot# 49
For QTP Information and scripts visit: www.gcreddy.com
· You must include the C language header file RBUDF.H in the user-defined function. RBUDF.H is in the SQA Robot installation directory (\SQA5 is the default).
· The user-defined function must return a pass/fail result using the following constants (defined in RBUDF.H):
#define RBUDF_PASS 1#define RBUDF_FAIL 0
Creating Other Test Cases
The following test cases from earlier versions of SQA Suite have been replaced by the Object Data test case. Although you can still use these test cases to test specific objects, you'll find that the Object Data test case gives you all their functionality in one easy-to-use test case.
Creating a DataWindow Test Case Creating a List Test Case Creating a Menu Test Case Creating an OCX/VBX Data Test Case Creating a Table Window Test Case
Creating a DataWindow Test Case
NOTE: This test case from earlier versions of SQA Suite has been replaced by the Object Data test case. Although you can still use this test case, you'll find that the Object Data test case gives you all its functionality in one easy-to-use test case.
1. Begin recording or editing.2. Click the Insert button on the Record toolbar.3. Click the DataWindow button on the Insert toolbar.4. Enter information about the test case ID, name, and description, or
select a test case from the Available Test Cases list.5. Choose OK to display the pointing-hand.6. Do one of the following:
· Point to the object and click the left mouse button.· Press F4 and select the object to test from the object list. The
object list includes all of the objects on the Windows desktop.
7. Complete the following steps as needed in the data grid:· Transpose the columns and rows for viewing.· Move column titles to the grid.· Edit data.· Select the data that you want to test during playback.· Change column widths.
Testing Tools – SQA Robot# 50
For QTP Information and scripts visit: www.gcreddy.com
8. Select a verification method.9. Select an identification method for columns and one for rows. 10. Choose one of the following:
OK - Accepts the captured text, writes the test command in the script, and writes the captured data to a master data file.Recapture - Displays the application-under-test so you can repeat
steps 6 - 10. Cancel - Returns to the application-under-test without capturing any test case information.
Creating a List Test Case
NOTE: This test case from earlier versions of SQA Suite has been replaced by the Object Data test case. Although you can still use this test case, you'll find that the Object Data test case gives you all its functionality in one easy-to-use test case.
1. Begin recording or editing.2. Click the Insert button on the Record toolbar.3. Click the List button on the Insert toolbar.4. Enter information about the test case ID, name, and description, or
select a test case from the Available Test Cases list.5. Choose OK to display the pointing-hand.6. Do one of the following:
· Point to the object and click the left mouse button.· Press F4 and select the object to test from the object list. The object list includes all of the objects on the Windows desktop.
7. Complete the following steps as needed in the data grid:· Transpose the columns and rows for viewing.· Edit data.· Select the data that you want to test during playback.· Change column widths.
8. Select a verification method.9. Select an identification method.
10. Choose one of the following:OK - Accepts the captured text, writes the test command in the script, and writes the captured data to a master data file.Recapture - Displays the application-under-test so you can repeat
steps 6 - 10.Cancel - Returns to the application-under-test without capturing any test case information.
Creating a Menu Test Case
Testing Tools – SQA Robot# 51
For QTP Information and scripts visit: www.gcreddy.com
NOTE: This test case from earlier versions of SQA Suite has been replaced by the Object Data test case. Although you can still use this test case, you'll find that the Object Data test case gives you all its functionality in one easy-to-use test case.
1. Begin recording or editing.2. Click the Insert button on the Record toolbar.3. Click the Menu button on the Insert toolbar.4. Enter information about the test case ID, name, and description, or
select a test case from the Available Test Cases list.5. Choose OK to display the pointing-hand.6. Do one of the following:
· Point to the menu bar. (The TestTip is Window because a menu resides on a window object.) Click the left mouse button.
· Press F4 and select the window containing the menu from the object list. The object list includes all of the objects on the Windows desktop.
7. Complete the following steps as needed in the data grid:· Move top menus to the grid.· Edit data by double-clicking the item to display the Edit Menu
dialog box. · Select the data that you want to test during playback. When you
select menus by their titles, the number of items in the selected menus is compared during playback.
· Change column widths.8. Specify whether the test case should include the menu states and
keyboard shortcut keys as part of the playback comparison: Test Menu States – If checked, SQA Robot includes the state (enabled, disabled, grayed, or checked) of the selected menu items during playback. Test Shortcut Keys – If checked, SQA Robot includes the keyboard shortcuts and accelerators for the selected menu items during playback.
9. Select a verification method.10. Select an identification method.11. Choose one of the following:
OK - Accepts the captured text, writes the test command in the script, and writes the captured data to a master data file.
Recapture - Displays the application-under-test so you can repeat steps 6 - 11.
Cancel - Returns to the application-under-test without capturing any test case information.
Creating an OCX/VBX Data Test Case
Testing Tools – SQA Robot# 52
For QTP Information and scripts visit: www.gcreddy.com
NOTE: This test case from earlier versions of SQA Suite has been replaced by the Object Data test case. Although you can still use this test case, you'll find that the Object Data test case gives you all its functionality in one easy-to-use test case.
1. Begin recording or editing.2. For a grid-style OCX/ActiveX or VBX, prepare the object by doing one of
the following: To capture selected data, select the appropriate cells. To speed up the capture of all the data, select the cells in the grid and use a Selected Data test.To capture only visible data, scroll the grid data to display the data to
test.3. Click the Insert button on the Record toolbar.4. Click the OCX/VBX Data button on the Insert toolbar.5. Enter information about the test case ID, name, and description, or
select a test case from the Available Test Cases list.6. Choose OK to display the pointing-hand.7. Do one of the following:
· Point to the object and click the left mouse button.· Press F4 and select the object to test from the object list. The
object list includes all of the objects on the Windows desktop.8. If the OCX/VBX Data Tests dialog box appears, select the object to test
from the drop-down (if there is more than one object). Select the data test from the drop-down (if there is more than one data test). Choose OK.
9. Complete the following steps as needed in the data grid:· Transpose the columns and rows for viewing.· Edit data.· Select a subset of the data to test during playback.· Change column widths.
10. Select a verification method.11. Select an identification method.12. Choose one of the following:
OK - Accepts the captured data, writes the test command in the script, and writes the captured data to a master data file.Recapture - Displays the application-under-test so you can repeat
steps 7 - 12. Cancel - Returns to the application-under-test without capturing any test case information.
Creating a Table Window Test Case
NOTE: This test case from earlier versions of SQA Suite has been replaced by the Object Data test case. Although you can still use this test case, you'll find
Testing Tools – SQA Robot# 53

For QTP Information and scripts visit: www.gcreddy.com
that the Object Data test case gives you all its functionality in one easy-to-use test case.
1. Begin recording or editing.2. Click the Insert button on the Record toolbar.3. Click the Table Window button on the Insert toolbar.4. Enter information about the test case ID, name, and description, or
select a test case from the Available Test Cases list.5. Choose OK to display the pointing-hand.6. Do one of the following:
· Point to the object and click the left mouse button.
· Press F4 and select the object to test from the object list. The object list includes all of the objects on the Windows desktop.
7. Complete the following steps as needed in the data grid:· Transpose the columns and rows for viewing.· Move column titles to the grid.· Edit data.· Select the data that you want to test during playback.· Change column widths.
8. Optionally, select the following:Use Column Object NameCapture Hidden Columns
9. Select a verification method.10. Select an identification method for columns and for rows. 11. Choose one of the following:
OK - Accepts the captured text, writes the test command in the script, and writes the captured data to a master data file.Recapture - Displays the application-under-test so you can repeat
steps 6 - 11. Cancel - Returns to the application-under-test without capturing any test case information.
Wait States Overview
SQA Robot synchronizes automatically with the application-under-test. During playback, each script command uses a built-in retry and timeout value. For example, each script command waits up to 20 seconds (the
Testing Tools – SQA Robot# 54
For QTP Information and scripts visit: www.gcreddy.com
default) for windows and test actions to respond or become available during playback.
At times, your application may need more than the 20 seconds. For example, an additional delay may be necessary if the application accesses a network server, printer, or other remote system. In these cases, if test procedure playback does not wait, it can become out-of-sync with the application by sending script commands before the application is ready for them.
SQA Robot wait states create additional delays or timing conditions to handle time-dependent test activities.
Creating a Test Case Wait State
To create a wait state for a test case during a recording session:
1. Click the Insert button on the Record toolbar to display the Insert toolbar.2. Click the Test Case Wait State button on the Insert toolbar.3. Select a test case type.4. Select a retry time.5. Select a timeout time.6. Choose OK.7. Enter information about the test case ID, name, and description, or
select a test case from the Available Test Cases list box and choose OK.
8. Create the test case.
Creating a Positive Region Wait State
When you define a Positive Region wait state, the test procedure waits until the selected region matches a region in the application-under-test. If a match occurs, playback continues; if there is no match, SQA Robot retries until there is a match or the test timeout is reached.
SQA Robot uses the default retry time (2 seconds) and the default timeout time (20 seconds). You can change the default when you are not in record mode by choosing OptionsWait States.
To create a Positive Region wait state during a recording session:
1. Make sure the region you want to capture is visible in the application-under-test. 2. Choose InsertWait StatesPositive Region.
3. Choose OK to display the crosshair cursor.4. Draw a box around the region by clicking the left mouse button once to
anchor the first corner (upper-left or lower-right). Draw the box and
Testing Tools – SQA Robot# 55
For QTP Information and scripts visit: www.gcreddy.com
then click the left mouse button again to anchor the second corner. (To cancel and re-draw the box, click the right mouse button and repeat this step.)
SQA Robot also creates a master data file that you can view in the SQA Image Comparator. No failed data file is created. Instead, SQA Robot writes information to the SQA Test Log Viewer and displays it in the Description field at the bottom of the window.
Creating a Negative Region Wait State
When you define a Negative Region wait state, a test procedure waits until a selected region does not match a region in the application-under-test. This wait state is useful when you want a test procedure to wait for an expected change in a region or when you want the test procedure to wait for a region to disappear.
SQA Robot uses the default retry time (2 seconds) and the default timeout time (20 seconds). You can change the default when you are not in record mode by choosing OptionsWait States.
To create a Negative Region wait state during a recording session:
1. Make sure the region you want to capture is visible in the application-under-test. 2. Choose InsertWait StatesNegative Region.3. Choose OK to display the crosshair cursor 4. Draw a box around the region by clicking the left mouse button once to
anchor the first corner (upper-left or lower-right). Draw the box and then click the left mouse button again to anchor the second corner. (To cancel and re-draw the box, click the right mouse button and repeat this step.)
5. Choose OK to define the wait state and to write the command in the script.
SQA Robot also creates a master data file that you can view in the SQA Image Comparator. No failed data file is created. Instead, SQA Robot writes information to the SQA Test Log Viewer and displays it in the Description field at the bottom of the window.
Creating a Delay Wait State
When you define a Delay wait state, the test procedure waits for a fixed amount of time before playback continues. This wait state is useful when you can calculate the amount of time needed for a process to finish before playback resumes.
Testing Tools – SQA Robot# 56

For QTP Information and scripts visit: www.gcreddy.com
If you are testing an application in which time estimates are not predictable (for example, a client/server application), you may want to define a wait state based on specific conditions rather than on absolute time. To do this, use one of the Test Case wait states or the Positive or Negative Region wait state.
To create a Delay wait state during a recording session:
1. Choose InsertWait StatesDelay.2. Enter a time in milliseconds, for example, 1500 milliseconds to delay
for 1.5 seconds.3. Choose OK to define the wait state and to write the command in the script.
SQA Robot does not create either a master or failed data file. If a failure occurs, SQA Robot writes information to the SQA Test Log Viewer and displays it in the Description field at the bottom of the window.
Compiling Test Procedures Overview
By default, SQA Robot detects whether a test procedure has been modified since it last ran and, if necessary, automatically compiles the test procedure when you execute it by playing back or debugging.
You can also use these File menu commands to manually compile test procedure scripts:
· Compile – Compiles the currently active SQABasic test procedure script, which must be open in the SQA Robot editor.
· Compile All – Compiles all SQABasic test procedures and source files in the current project. Test procedures do not have to be open in the SQA Robot editor. Choose this command if, for example, you have made changes to global definitions that may affect all of your SQABasic files.
· Batch Compile – Lets you manually select and compile multiple files in one operation. Batch compiling is slightly different for SQABasic and Visual Basic files.
NOTE: The Compile and Compile All commands are available only if your selected scripting language is SQABasic.
SQA Robot displays a Console window that contains compilation results and error messages with line numbers for all test procedures and source files compiled in SQABasic mode.
Testing Tools – SQA Robot# 57
For QTP Information and scripts visit: www.gcreddy.com
Batch Compiling SQABasic Files
To batch compile SQABasic test procedures and source files:
1. Choose FileBatch Compile.2. Select one or more SQABasic files in the Available list and choose Add,
or choose Add All. SQA Robot appends the files to the Selected list.SQA Robot compiles SQABasic files in the same order that they appear in the Selected list. To remove files from the list, make your selections and choose Remove or Remove All.
3. Choose OK to compile the selected files and display the results in the Console window.
Batch Compiling Visual Basic Files
To batch compile Visual Basic test procedures:
1. Choose FileBatch Compile. The Available list includes those test procedures that have not yet been compiled, as well as those test procedures that have changed since they were last compiled.
2. Select one or more test procedures in the Available list and choose Add, or choose Add All. SQA Robot appends the test procedures to the Selected list.SQA Robot compiles test procedures in the same order that they appear in the Selected list. To remove test procedures from the list, make your selections and choose Remove or Remove All.
3. Choose OK to compile the test procedures into executable .EXE files. When the compilation finishes, SQA Robot prompts you for an
acknowledgment. 4. Choose OK.
Data Test Overview
The Object Data test case supports data tests to capture the data in objects. In general, there are two types of data tests:
· Internal data tests – Predefined and delivered with SQA Robot. An internal data test uses a predefined understanding of the object to determine the data to capture. Internal data tests cannot be edited.
· User data tests – Created within your organization or delivered with SQA Robot. A user data test uses a specific property in the object in conjunction with other parameters to determine the data to capture.
Testing Tools – SQA Robot# 58

For QTP Information and scripts visit: www.gcreddy.com
SQA Robot comes with some user data tests already defined for your immediate use with the Object Data test case. You can copy and edit these tests as appropriate for your organization.
NOTE: User data tests created within your organization are stored in the SQA Repository that was in use when the data test was created. If you switch to a different repository, the user data tests are not available unless you recreate them in the new repository.
When you use the Object Data test case to test an object that has more that one data test, SQA Robot displays a list of all the object's data tests (user and internal). You can select any of the tests depending on what you want to capture and test. For example, you might have data tests defined for a grid that let you:
· Capture all the data in the grid including fixed columns and rows, even if the data is not visible on the screen.
· Capture only selected or displayed data in the grid.
Before You Create a Data Test
Before you create a data test, do the following:
· Have the documentation or online Help that came with the control. · Have a good understanding about the properties of the control and
how the properties relate.· Be familiar with the Object Data test case.
Creating a Data Test
You should create your data tests before you begin to test your application.
The tests are stored in the SQA Repository that is currently active when you create the tests. If you switch to a different repository, the data tests will not be available unless you recreate the data test in the new repository.
1. Choose OptionsObject Data Test Definition.2. Choose Select. The application-under-test appears with the pointing-hand. 3. Do one of the following:
· Point to the object with the pointing-hand and click the left mouse button.
· Press F4 and select the object from the object list. The object list includes all of the objects on the Windows desktop.
Testing Tools – SQA Robot# 59
For QTP Information and scripts visit: www.gcreddy.com
The object classification of the selected object and its user data tests appear in the dialog box. (Internal data tests do not appear in this list because they cannot be edited.)
4. Enter a name, up to 50 characters, for the new test in the Data Test Name field and choose New. 5. Select a Property to Test. This property is the one whose values you want to capture in the data test.
6. Enter the Axis Parameters that set the boundaries and context for the data test. 7. As needed, check the boxes under Additional Parameters.8. In Description, enter a description that indicates what the data test does.9. Optionally, choose Test to do the following:
· Verify the syntax of the data test before you save it. · If the syntax is correct, watch SQA Robot perform the data test
on the selected object. When the test is completed, SQA Robot displays a dialog box with the captured data.
10. Choose OK to save the test and automatically verify it.If the syntax of the expression is incorrect, the incorrect area is highlighted so you can correct it and then resave it.
Creating or Editing an Expression
You can create or change an expression that appears in the From and To fields in the Create/Edit Object Data Test dialog box. The expression is a combination of values, properties, and operators. It can also be a single value or property.
For example, the expression Rows - 1 sets the maximum boundary for capturing a property. To limit that boundary further, you can edit the expression: If Rows > 100 Then 100 Else Rows - 1.
1. Choose OptionsObject Data Test Definition.2. Choose Select. The application-under-test appears with the pointing-hand. 3. Do one of the following:
· Point to the object with the pointing-hand and click the left mouse button.
· Press F4 and select the object from the object list. The object list includes all of the objects on the Windows desktop.
4. Enter a name for a new test or select an existing test name.5. Choose New or Edit.6. Click the button to the right of the From or To field to create or edit an
expression for that field.
Testing Tools – SQA Robot# 60

For QTP Information and scripts visit: www.gcreddy.com
7. Enter the expression in the Formula edit box or do the following:
To Do this
Select a property for the expression Double-click a property in the Available Properties list. This list contains all the properties available for the property you are testing.
Select an operator for the expression Double-click an operator in the Operators list.
8. Choose Verify to check the syntax of the expression. A message appears. Choose OK. If the syntax is incorrect, the incorrect area is highlighted so you can correct it. Choose OK.
9. Choose OK to accept the expression.
Copying a Data Test
You copy a data test to backup, to edit, or to create a new test from an existing one. When you copy a data test, you can use the test only for the control for which the original data test was created.
1. Choose OptionsObject Data Test Definition.2. Do one of the following:
· Point to the object with the pointing-hand and click the left mouse button.
· Press F4 and select the object from the object list. The object list includes all of the objects on the Windows desktop.
3. Enter a name for a new test or select an existing test name.4. Choose Copy.5. Type a new name in the To field. The name can contain up to 50 characters.6. Choose OK.
Renaming a Data Test
1. Choose OptionsObject Data Test Definition.2. Do one of the following:
· Point to the object with the pointing-hand and click the left mouse button.
· Press F4 and select the object from the object list. The object list includes all of the objects on the Windows desktop.
3. Select a name from the Data Test Name list.4. Choose Rename.
Testing Tools – SQA Robot# 61

For QTP Information and scripts visit: www.gcreddy.com
5. Type a new name in the To field. The name can contain up to 50 characters.6. Choose OK.
If you rename a data test, scripts that contain the test under its original name will fail on playback unless you change the name in the scripts.Deleting a Data Test
1. Choose OptionsObject Data Test Definition.2. Do one of the following:
· Point to the object with the pointing-hand and click the left mouse button.
· Press F4 and select the object from the object list. The object list includes all of the objects on the Windows desktop.
3. Select a name from the Data Test Name list.4. Choose Delete to display a confirmation message.5. Choose Yes.
If you delete a data test, scripts that contain the test under its original name will fail on playback unless you delete the test from the scripts.
Object Recognition Methods Overview
SQA Robot uses a variety of recognition methods to identify objects in the application-under-test that are acted on during recording sessions. These recognition methods are saved as arguments in test procedure script commands so that SQA Robot can correctly identify the same objects during playback. For example, SQA Robot can identify a check box in the application-under-test by its object name, associated label or text string, index value, or ID value.
While recording, SQA Robot sorts through its list of object recognition methods to choose one that uniquely identifies each tested object. If the first recognition method in the list does not uniquely identify the object, SQA Robot tries the next recognition method, and so on, until the object is identified.
You can redefine the order in which SQA Robot chooses recognition methods for each object type. This order has an effect on both the readability and stability of test procedure script commands. When reading script files, it is easier to locate a command on a specific object if that command uses the object name or label for identification. However, if the object name or label is likely to change between builds, another recognition method may provide more stability.
You should evaluate your own development and testing environment before you change the default order of object recognition methods.
Reordering Object Recognition Methods
Testing Tools – SQA Robot# 62
For QTP Information and scripts visit: www.gcreddy.com
1. Choose OptionsObject Recognition.2. Select the object type to modify from the Object Type list box.
The fixed set of recognition methods for the selected object type appears in the Recognition Method Order list box in its last saved order.
3. Select an object recognition method in the list, and then choose Move Up or Move Down. To restore the original default order, choose Default.
4. Choose OK.
Working with Object Classes Overview
If you know in advance that the application-under-test contains a custom object or any object that is not recognized by SQA Robot, you can use the OptionsObject Mapping command to define a new custom object class name and associate that new custom class with a standard object type. SQA Robot saves this custom class/object type association and uses it to identify the custom object during playback.
Some custom object classes defined by PowerBuilder, Delphi, SQLWindows, Visual Basic, and PeopleTools applications are already associated with standard object types because of SQA Robot support for these development environments. For example, whenever SQA Robot encounters an object with the ThunderCheckBox object class name, it refers to that object with the parameters used for a standard CheckBox object. Other custom object classes are not defined.
If Define Unknown Objects as Type "Generic" is checked in the Recording Options dialog box, SQA Robot automatically associates unknown objects encountered while recording with the Generic object type.
If Define Unknown Objects as Type "Generic" is not checked and you create a test case for an object that is not a standard object type or a user-defined custom class, SQA Robot does the following:
· Temporarily suspends recording.· Highlights the unknown object on the screen.· Displays the Define Object dialog box, which includes any helpful
identifying text and class information captured from the object.
Defining Unknown Objects While Recording
1. Select from the Type list an object type to associate with the unknown object.
Testing Tools – SQA Robot# 63
For QTP Information and scripts visit: www.gcreddy.com
If possible, select a descriptive type to make your test procedure script more readable. However, if you are not sure which type to use, select Generic.
2. Choose OK to continue recording. SQA Robot stores this object mapping information in case the same object type is captured again.
Defining a New Object Class
1. Choose OptionsObject Mapping.2. Select from the Object Type list the standard object type that you want
to associate with the new object class name.SQA Robot displays the class names already available for that object type in the Object Classes list box.
3. Choose Add.4. Type a unique object class name and choose OK. 5. Choose Close.
Modifying an Object Class Name
1. Choose OptionsObject Mapping.2. Select from the Object Types list the standard object type that is
associated with the object class name.SQA Robot displays the class names already available for that object type in the Object Classes list box.
3. Select the name to modify from the Object Classes list box.4. Choose Modify.5. Type a new name for the selected class and choose OK. 6. Choose Close.
Deleting an Object Class Name
1. Choose OptionsObject Mapping.2. Select from the Object Types list the standard object type that is
associated with the object class name.SQA Robot displays the class names already available for that object type in the Object Classes list box.
3. Select the name to delete from the Object Classes list box.4. Choose Delete. SQA Robot prompts you to confirm the deletion.5. Choose OK.
Testing Tools – SQA Robot# 64

For QTP Information and scripts visit: www.gcreddy.com
6. Choose Close.
Testing Tools – SQA Robot# 65