about revenue assurance manager
TRANSCRIPT

[1] Oracle® Communications Billing and Revenue ManagementCollecting Revenue Assurance Data
Release 7.5
E16713-08
August 2016

Oracle Communications Billing and Revenue Management Collecting Revenue Assurance Data, Release 7.5
E16713-08
Copyright © 2011, 2016, Oracle and/or its affiliates. All rights reserved.
This software and related documentation are provided under a license agreement containing restrictions on use and disclosure and are protected by intellectual property laws. Except as expressly permitted in your license agreement or allowed by law, you may not use, copy, reproduce, translate, broadcast, modify, license, transmit, distribute, exhibit, perform, publish, or display any part, in any form, or by any means. Reverse engineering, disassembly, or decompilation of this software, unless required by law for interoperability, is prohibited.
The information contained herein is subject to change without notice and is not warranted to be error-free. If you find any errors, please report them to us in writing.
If this is software or related documentation that is delivered to the U.S. Government or anyone licensing it on behalf of the U.S. Government, then the following notice is applicable:
U.S. GOVERNMENT END USERS: Oracle programs, including any operating system, integrated software, any programs installed on the hardware, and/or documentation, delivered to U.S. Government end users are "commercial computer software" pursuant to the applicable Federal Acquisition Regulation and agency-specific supplemental regulations. As such, use, duplication, disclosure, modification, and adaptation of the programs, including any operating system, integrated software, any programs installed on the hardware, and/or documentation, shall be subject to license terms and license restrictions applicable to the programs. No other rights are granted to the U.S. Government.
This software or hardware is developed for general use in a variety of information management applications. It is not developed or intended for use in any inherently dangerous applications, including applications that may create a risk of personal injury. If you use this software or hardware in dangerous applications, then you shall be responsible to take all appropriate fail-safe, backup, redundancy, and other measures to ensure its safe use. Oracle Corporation and its affiliates disclaim any liability for any damages caused by use of this software or hardware in dangerous applications.
Oracle and Java are registered trademarks of Oracle and/or its affiliates. Other names may be trademarks of their respective owners.
Intel and Intel Xeon are trademarks or registered trademarks of Intel Corporation. All SPARC trademarks are used under license and are trademarks or registered trademarks of SPARC International, Inc. AMD, Opteron, the AMD logo, and the AMD Opteron logo are trademarks or registered trademarks of Advanced Micro Devices. UNIX is a registered trademark of The Open Group.
This software or hardware and documentation may provide access to or information about content, products, and services from third parties. Oracle Corporation and its affiliates are not responsible for and expressly disclaim all warranties of any kind with respect to third-party content, products, and services unless otherwise set forth in an applicable agreement between you and Oracle. Oracle Corporation and its affiliates will not be responsible for any loss, costs, or damages incurred due to your access to or use of third-party content, products, or services, except as set forth in an applicable agreement between you and Oracle.

iii
Contents
Preface ................................................................................................................................................................ vii
Audience...................................................................................................................................................... viiAccessing Oracle Communications Documentation ............................................................................ viiDocumentation Accessibility .................................................................................................................... viiDocument Revision History ..................................................................................................................... vii
1 Understanding Revenue Assurance Manager
About Revenue Assurance Manager .................................................................................................... 1-1About Collecting Revenue Assurance Data from Billing ................................................................ 1-2
How Revenue Assurance Data is Collected from Billing............................................................. 1-2About Viewing Revenue Assurance Data Collected from Billing .............................................. 1-3About Splitting Revenue Assurance Data into Detailed Categories .......................................... 1-4
Split Revenue Assurance Data .................................................................................................. 1-4Splitting Revenue Assurance Data by Type of Charge ......................................................... 1-5
About Collecting Revenue Assurance Data from Pipeline Batch Rating ..................................... 1-5About Using Event Notification to Generate Revenue Assurance Data.................................... 1-7About Control Points......................................................................................................................... 1-7About Aggregation Scenarios .......................................................................................................... 1-8About Linking Pairs of Rating, Rerating, and Written-Off Control Points ............................... 1-8About Flows........................................................................................................................................ 1-9About Using UE Loader to Load Revenue Assurance Data..................................................... 1-10About the Revenue Assurance Data Collected in Rated Event Loader .................................. 1-10About Collecting Revenue Assurance Data on Written-Off EDRs.......................................... 1-10
2 Installing Revenue Assurance Manager
System Requirements ............................................................................................................................. 2-1Software Requirements ..................................................................................................................... 2-1
Installing Revenue Assurance Manager .............................................................................................. 2-2Loading the CollectProcessAudit Trigger in Rated Event Loader.................................................. 2-3Configuring Universal Event Loader to Load Revenue Assurance Data ...................................... 2-3About Installing Revenue Assurance Center ..................................................................................... 2-4
Installing Revenue Assurance Center ............................................................................................ 2-4Starting and Using Revenue Assurance Center............................................................................. 2-4
Uninstalling Revenue Assurance Manager......................................................................................... 2-5
iv
3 Setting Up Revenue Assurance Manager for Pipeline Batch Rating
Configuring Revenue Assurance Manager ......................................................................................... 3-1Configuring Event Notification ....................................................................................................... 3-2Selecting Aggregation Scenarios...................................................................................................... 3-2
Loading Scenarios into the Pipeline Manager Database....................................................... 3-3Identifying Control Point Locations for Revenue Assurance Data ............................................ 3-3Configuring the FCT_AggreGate Module to Collect Revenue Assurance Data ...................... 3-3
Using iScripts to Derive Grouping Fields ............................................................................... 3-5Configuring SimpleSample Files ..................................................................................................... 3-5Adding Control Points to Flows ...................................................................................................... 3-6Linking Rating, Rerating, and Write-Off Control Points ............................................................ 3-7Setting Up UE Loader to Load Revenue Assurance Data into the Database ............................ 3-8
Setting Up UE Loader Templates ............................................................................................. 3-8Setting Up Batch Controller to Call UE Loader ............................................................................. 3-8
Setting Up Revenue Assurance Manager to Collect Data on Written-Off EDRs ........................ 3-9
4 Setting Up Revenue Assurance Manager for Billing
Configuring BRM Billing to Collect Revenue Assurance Data ...................................................... 4-1Enabling Billing Utilities to Generate Revenue Assurance Data ................................................ 4-1Configuring Bill Now, On-Demand Billing, and Auto-Triggered Billing to Collect Revenue Assurance Data 4-2Configuring Item Subtypes............................................................................................................... 4-3
5 Using Batch IDs in Revenue Assurance Manager
Tracking EDRs by Using Batch IDs...................................................................................................... 5-1Keeping Track of Rejected EDRs by Using Batch IDs................................................................... 5-2
Setting the Default Batch ID Behavior ................................................................................................ 5-3
6 Configuring Revenue Assurance Alerts
About Revenue Assurance Alerts ......................................................................................................... 6-1Configuring Alert Thresholds ............................................................................................................... 6-2
Defining Threshold Data and Time Periods .................................................................................. 6-2Defining Filter Conditions ................................................................................................................ 6-3Defining Field Value Ranges ............................................................................................................ 6-4Period Alert Example ........................................................................................................................ 6-4Daily Alert Example .......................................................................................................................... 6-4Weekly Alert Example....................................................................................................................... 6-5Loading Alert Details into the Database......................................................................................... 6-5
Loading Alert Details by Using load_pin_config_ra_thresholds ........................................ 6-5Configuring Email Alerts ....................................................................................................................... 6-6
Specifying Email Alert Text .............................................................................................................. 6-6Specifying Email Alert Details ......................................................................................................... 6-7
Generating Revenue Assurance Alerts ................................................................................................ 6-9

v
7 Using Revenue Assurance Aggregation Scenarios
About Aggregation Scenarios ................................................................................................................ 7-1Data Fields Collected by All Scenarios................................................................................................ 7-2Fields Used to Group Scenario Data .................................................................................................... 7-2Preconfigured Aggregation Scenario Details ..................................................................................... 7-2
8 Customizing Revenue Assurance Manager
About the Revenue Assurance Manager Opcodes ............................................................................ 8-1Using Policy Opcodes to Customize Revenue Assurance Manager .......................................... 8-2Customizing Audit Object Validation ............................................................................................ 8-2Customizing /process_audit/batchstat Object Validation.......................................................... 8-3Customizing Alert Behavior............................................................................................................. 8-3Customizing the Revenue Assurance Written-Off EDR Summaries ......................................... 8-3
Creating New Aggregation Scenarios for Revenue Assurance ....................................................... 8-4Changing the Control Point for Data on Written-Off EDRs ........................................................... 8-4Customizing Revenue Assurance Center ............................................................................................ 8-5
9 Revenue Assurance Utilities
load_ara_config_object............................................................................................................................ 9-2load_pin_config_batchstat_link ............................................................................................................ 9-3load_pin_config_controlpoint_link ...................................................................................................... 9-4load_pin_config_ra_alerts....................................................................................................................... 9-5load_pin_config_ra_flows ...................................................................................................................... 9-7load_pin_config_ra_thresholds ............................................................................................................. 9-9pin_ra_check_thresholds ..................................................................................................................... 9-11

vi

vii
Preface
This document describes Oracle Communications Billing and Revenue Management (BRM) Revenue Assurance Manager and Revenue Assurance Center. This information includes the concepts, installation, and configuration of Revenue Assurance Manager for Pipeline Batch Rating and Billing as well as related topics.
AudienceThis document is intended for personnel who are involved in revenue assurance or billing and rating.
Accessing Oracle Communications Documentation BRM documentation and additional Oracle documentation; such as Oracle Database documentation, is available from Oracle Help Center:
http://docs.oracle.com
Additional Oracle Communications documentation is available from the Oracle software delivery Web site:
https://edelivery.oracle.com
Documentation AccessibilityFor information about Oracle's commitment to accessibility, visit the Oracle Accessibility Program website at http://www.oracle.com/pls/topic/lookup?ctx=acc&id=docacc.
Access to Oracle SupportOracle customers that have purchased support have access to electronic support through My Oracle Support. For information, visit http://www.oracle.com/pls/topic/lookup?ctx=acc&id=info or visit http://www.oracle.com/pls/topic/lookup?ctx=acc&id=trs if you are hearing impaired.
Document Revision HistoryThe following table lists the revision history for this book.
Version Date Description
E16713-01 November 2011 Initial release.

viii
E16713-02 May 2012 Documentation updates for BRM 7.5 Patch Set 1.
■ Made minor formatting and text changes.
E16713-03 March 2013 Documentation updates for BRM 7.5 Patch Set 4.
■ Replaced multidatabase information with multischema information.
E16713-04 August 2013 On HP-UX IA64, BRM 7.5 is certified as of BRM 7.5 Patch Set 5.
Documentation added for HP-UX IA64.
E16713-05 February 2014 Documentation updates for BRM 7.5 Patch Set 7.
■ Made minor formatting and text changes.
E16713-06 October 2014 Documentation updates for BRM 7.5 Patch Set 10.
■ Updated the "Starting and Using Revenue Assurance Center" section.
E16713-07 January 2015 Documentation updates for BRM 7.5 Patch Set 11.
■ Made minor formatting and text changes.
E16713-08 August 2016 Documentation updates for BRM 7.5 Patch Set 16.
■ Removed references of Business Operations Center.
Version Date Description
1
Understanding Revenue Assurance Manager 1-1
1Understanding Revenue Assurance Manager
This chapter provides an overview of Oracle Communications Billing and Revenue Management (BRM) Revenue Assurance Manager.
Before using Revenue Assurance Manager, you should be familiar with BRM concepts and system architecture. See BRM Concepts for more information.
About Revenue Assurance ManagerYou use Revenue Assurance Manager to verify the end-to-end completeness, accuracy, and integrity of BRM billing and pipeline batch rating results. You can analyze revenue assurance data to find revenue leakage in your system.
You obtain revenue assurance data by auditing the results of these processes:
■ Billing: Revenue Assurance Manager provides statistics such as the number of accounts billed or invoiced, the total revenue, and the number of records that were successfully billed or failed to be billed.
See "About Collecting Revenue Assurance Data from Billing" for more information.
■ Pipeline batch rating: Revenue Assurance Manager provides statistics such as total duration and charges, retail and wholesale amounts, and total discount amounts.
See "About Collecting Revenue Assurance Data from Pipeline Batch Rating" for more information.
Revenue Assurance Manager stores the data it collects in the BRM database. There are two ways for you to view this data.
■ Revenue Assurance Manager reports: You can generate summary and detail reports from revenue assurance data for billing, and pipeline rating. You can change the report parameters to meet your business needs.
See BRM Reports for more information.
Important: Revenue Assurance Manager is an optional feature that you install separately.
Note: See "Installing Revenue Assurance Manager" for installation procedures.

About Collecting Revenue Assurance Data from Billing
1-2 BRM Collecting Revenue Assurance Data
■ Revenue Assurance Center: You can use the Revenue Assurance Center application to search for and view revenue assurance statistics generated from billing and pipeline rating. See the Revenue Assurance Center Help for detailed instructions about using the application.
See "Installing Revenue Assurance Center" for installation information.
You can also configure Revenue Assurance Manager to send alerts when revenue assurance data passes a threshold that you set. For example, you can configure an alert to be sent when the number of suspended EDRs exceeds 100,000. See "About Revenue Assurance Alerts" for more information.
About Collecting Revenue Assurance Data from BillingYou can generate revenue assurance billing data from the following BRM billing processes:
■ Regular billing
■ Bill Now
■ On-demand billing
■ Auto-triggered billing
■ Trial billing
■ Invoicing
■ Deferred actions
The revenue assurance data generated from billing consists of statistics such as the number of accounts billed, accounts that failed to be billed, the time of the billing process, and the revenue details. BRM stores the revenue assurance data collected from billing in/process_audit/billing objects.
To collect revenue assurance data for billing, you must configure BRM billing utilities to generate revenue assurance data. See "Configuring BRM Billing to Collect Revenue Assurance Data" for more information.
After revenue assurance data has been collected from billing, you can view the data by using Revenue Assurance Center or Revenue Assurance reports. See "About Viewing Revenue Assurance Data Collected from Billing" for more information.
How Revenue Assurance Data is Collected from BillingRevenue Assurance Manager collects data from control points in billing utilities. Unlike the control points in pipeline rating, billing control points are preconfigured and you cannot change them.
These are the billing utilities and the data that is collected from them:
■ pin_bill_accts: Anticipated revenue.
■ pin_collect: Revenue collected.
■ pin_inv_accts: Invoices generated, including total records processed, records that have been successfully invoiced, and failed records.
■ pin_deferred_act: The number of scheduled deferrals executed.
■ pin_cycle_fees: The amount of cycle fees generated.

About Collecting Revenue Assurance Data from Billing
Understanding Revenue Assurance Manager 1-3
Revenue assurance data for billing is stored in /process_audit/billing objects in the BRM database.
About Viewing Revenue Assurance Data Collected from BillingYou can view revenue assurance data from billing by using Revenue Assurance reports or by using Revenue Assurance Center.
Revenue Assurance reports includes both summary and detail reports for billing data. You can customize the reports. See BRM Reports for more information.
When you use Revenue Assurance Center to view revenue assurance data for billing, you can search for data based on:
■ Billing segments.
■ Accounts billed on the same accounting day of month (DOM).
■ A combination of billing segment and DOM.
You can choose to display data from all control points or from selected control points. These are the control points:
■ Revenue Anticipated
■ Revenue Collected
■ Invoice Generated
■ Scheduled Deferrals Executed
■ Cycle Fees Generated
Figure 1–1 shows a typical Revenue Assurance Center billing data screen:
Note: There are some restrictions on the types of data that can be displayed in Revenue Assurance Center:
■ Revenue assurance data collected for trial billing is viewable only in reports.
■ Revenue Assurance Center can display only split revenue assurance data.
See "About Splitting Revenue Assurance Data into Detailed Categories" for more information.
Note: A summary of the revenue assurance data collected from billing by billing segments is available from control points in pin_bill_accts only.

About Collecting Revenue Assurance Data from Billing
1-4 BRM Collecting Revenue Assurance Data
Figure 1–1 Revenue Assurance Billing Summary
About Splitting Revenue Assurance Data into Detailed CategoriesYou can split revenue assurance billing data into more detailed categories, such as amounts associated with A/R items, billable items, and suppressed bills. Splitting revenue assurance billing data allows you to more accurately pinpoint the source of revenue leakage in your system.
Split revenue assurance data is automatically generated by these billing operations:
■ Bill Now
■ On-demand billing
■ Auto-triggered billing
The following utilities offer a -split parameter that you can use to separate data for regular billing and trial billing:
■ pin_bill_accts
■ pin_trial_bill_accts
See the discussion of billing utilities in BRM Configuring and Running Billing for more information on pin_bill_accts and pin_trial_bill_accts.
You can view split revenue assurance data in Revenue Assurance Center or in Revenue Assurance reports:
■ Revenue Assurance Center automatically displays split data. It cannot display data that is not split.
■ You can configure Revenue Assurance Reports to display split or unsplit data. See "About the Split Method Parameter" in BRM Reports for more information.
Split Revenue Assurance DataSplit revenue assurance data includes the following categories:
■ A/R items: If service types are associated with these items, the amount for each service type is also generated:
Important: If you intend to collect revenue assurance data from billing, be sure to use the -split parameter to pin_bill_accts and pin_trial_bill_accts when you use these utilities.

About Collecting Revenue Assurance Data from Pipeline Batch Rating
Understanding Revenue Assurance Manager 1-5
– Adjustments: Adjustment charges
– Payments: Total number of payments received
– Payment reversals: Total payment reversals
– Disputes: Sum of disputed amounts
– Settlements: Sum of settlements
– Refunds: Total refunds
– Write off: Total number of written-off accounts
– Write-off reversals: Total number of write-off reversal accounts
■ Billable items: The billable items and their subtypes that you have configured; for example, usage charges, recurring charges, one-time charges, and discounts.
■ Miscellaneous charges: If billable items are not configured, the split revenue assurance data is stored as miscellaneous charges.
■ Connections: The number of billed connections, where a connection represents a device or phone number.
■ Bills suppressed: The number of suppressed bills, the reason for the suppression, and the anticipated revenue.
Splitting Revenue Assurance Data by Type of ChargeYou can also split revenue assurance data based on the type of charge, such as discounts, usage charges, and one-time and recurring charges. You do this by setting up custom billable items and item subtypes. If you do not configure billable item subtypes, the split revenue assurance data is stored as miscellaneous charges.
See "Configuring Item Subtypes" for more information.
About Collecting Revenue Assurance Data from Pipeline Batch RatingYou can collect revenue assurance data to analyze the effect of pipeline rating on Event Data Records (EDRs). You configure Revenue Assurance Manager to collect statistics on EDRs at various points in your pipelines, and then compare those statistics to see how a batch of EDRs changes as it is processed.
The statistics collected can include:
■ The number of EDRs in the batch
■ Retail charged amount
■ Event wholesale value
■ Discounts applied
■ Total time usage
■ Amount of data transferred
■ When a call started
■ When a call ended
Note: The bills-suppressed data is generated by regular billing, trial billing, and auto-triggered billing only.

About Collecting Revenue Assurance Data from Pipeline Batch Rating
1-6 BRM Collecting Revenue Assurance Data
Revenue assurance data is collected and aggregated at control points that you configure in pipelines. You establish control points by adding the FCT_AggreGate module at appropriate pipeline locations. You determine the data to be collected by specifying aggregation scenarios used by the module.
You can configure related control points into flows that enable you to examine data for a batch sequentially. You can also link pairs of control points to see original and current values.
FCT_AggreGate outputs aggregated data into flat files. You configure the Batch Controller to send these flat files to the Universal Event (UE) Loader as they are created. UE Loader parses the flat files and then calls opcodes to load the information into the database as /process_audit/batchstat objects.
Figure 1–2 shows how revenue assurance data is collected from EDRs in pipeline batch rating, stored in the BRM database, and viewed by using Revenue Assurance Center or Revenue Assurance Reports:
Figure 1–2 Revenue Assurance Data Collection
Collecting revenue assurance data from pipeline batch rating involves these tasks:
■ Configuring event notification to capture data on written-off EDRs and set up revenue assurance alerts.
See "About Using Event Notification to Generate Revenue Assurance Data" for more information.

About Collecting Revenue Assurance Data from Pipeline Batch Rating
Understanding Revenue Assurance Manager 1-7
■ Configuring control points in your pipelines to determine where revenue assurance data is captured.
See "About Control Points" for more information.
■ Associating an aggregation scenario with each of your control points to determine how revenue assurance data is organized. Revenue Assurance Manager includes preconfigured aggregation scenarios that group revenue assurance statistics by using different fields.
See "About Aggregation Scenarios" for more information.
■ Linking pairs of control points related to rating, rerating, and written-off EDRs. Revenue Assurance Center uses these linked pairs to establish the original and current values for a set of EDRs.
See "About Linking Pairs of Rating, Rerating, and Written-Off Control Points" for more information.
■ Defining flows, which are ordered lists of control points that Revenue Assurance Center uses to display revenue assurance data. Flows allow you to track revenue assurance data for EDR batches at various stages during pipeline processing.
See "Adding Control Points to Flows" for more information.
■ Configuring Universal Event (UE) Loader to load revenue assurance data into the database.
See "About Using UE Loader to Load Revenue Assurance Data" for more information.
■ Configuring alerts to be sent when revenue assurance data passes a threshold that you set.
See "Generating Revenue Assurance Alerts" for more information.
About Using Event Notification to Generate Revenue Assurance DataRevenue Assurance Manager uses event notification to collect data on written-off EDRs and set up revenue assurance alerts.
The following events are generated specifically to facilitate the revenue assurance event notification process:
■ /event/notification/suspense/writeoff - When suspended EDRs are written off, Suspense Manager generates this event. By default, when this event occurs, the PCM_OP_PROCESS_AUDIT_CREATE_WRITEOFF_SUMMARY opcode is called.
■ /event/notification/ra_threshold - When specified conditions for producing revenue leakage alerts occur, the load_pin_config_ra_thresholds utility generates this event. By default, when this event occurs, the PCM_OP_PROCESS_AUDIT_POL_ALERT policy opcode is called. See "load_pin_config_ra_thresholds" for more information.
See "Configuring Event Notification" for more information on configuring event notification for Revenue Assurance Manager.
About Control PointsYou establish control points in batch pipelines to determine where Revenue Assurance Manager collects data. You can configure control points in locations that enable you to compare data from different stages in the rating processes.
About Collecting Revenue Assurance Data from Pipeline Batch Rating
1-8 BRM Collecting Revenue Assurance Data
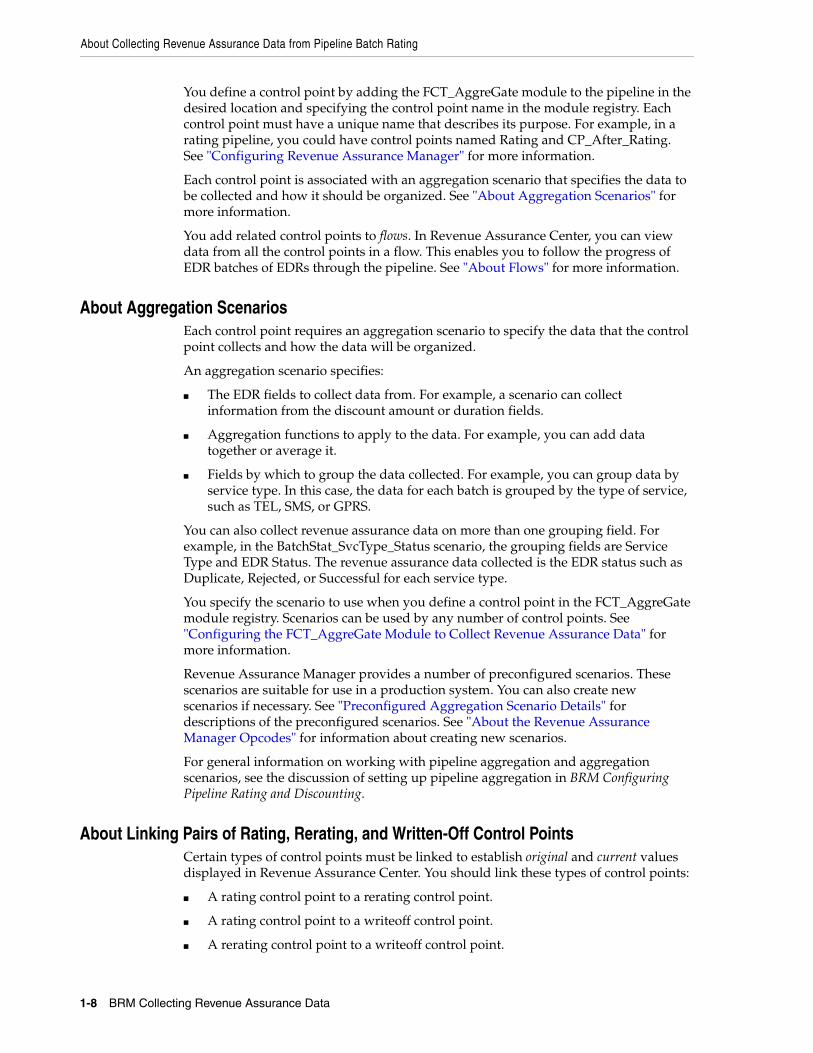
You define a control point by adding the FCT_AggreGate module to the pipeline in the desired location and specifying the control point name in the module registry. Each control point must have a unique name that describes its purpose. For example, in a rating pipeline, you could have control points named Rating and CP_After_Rating. See "Configuring Revenue Assurance Manager" for more information.
Each control point is associated with an aggregation scenario that specifies the data to be collected and how it should be organized. See "About Aggregation Scenarios" for more information.
You add related control points to flows. In Revenue Assurance Center, you can view data from all the control points in a flow. This enables you to follow the progress of EDR batches of EDRs through the pipeline. See "About Flows" for more information.
About Aggregation ScenariosEach control point requires an aggregation scenario to specify the data that the control point collects and how the data will be organized.
An aggregation scenario specifies:
■ The EDR fields to collect data from. For example, a scenario can collect information from the discount amount or duration fields.
■ Aggregation functions to apply to the data. For example, you can add data together or average it.
■ Fields by which to group the data collected. For example, you can group data by service type. In this case, the data for each batch is grouped by the type of service, such as TEL, SMS, or GPRS.
You can also collect revenue assurance data on more than one grouping field. For example, in the BatchStat_SvcType_Status scenario, the grouping fields are Service Type and EDR Status. The revenue assurance data collected is the EDR status such as Duplicate, Rejected, or Successful for each service type.
You specify the scenario to use when you define a control point in the FCT_AggreGate module registry. Scenarios can be used by any number of control points. See "Configuring the FCT_AggreGate Module to Collect Revenue Assurance Data" for more information.
Revenue Assurance Manager provides a number of preconfigured scenarios. These scenarios are suitable for use in a production system. You can also create new scenarios if necessary. See "Preconfigured Aggregation Scenario Details" for descriptions of the preconfigured scenarios. See "About the Revenue Assurance Manager Opcodes" for information about creating new scenarios.
For general information on working with pipeline aggregation and aggregation scenarios, see the discussion of setting up pipeline aggregation in BRM Configuring Pipeline Rating and Discounting.
About Linking Pairs of Rating, Rerating, and Written-Off Control PointsCertain types of control points must be linked to establish original and current values displayed in Revenue Assurance Center. You should link these types of control points:
■ A rating control point to a rerating control point.
■ A rating control point to a writeoff control point.
■ A rerating control point to a writeoff control point.
About Collecting Revenue Assurance Data from Pipeline Batch Rating
Understanding Revenue Assurance Manager 1-9
See "Linking Rating, Rerating, and Write-Off Control Points" for details on creating control point links.
When pairs of control points are linked, Revenue Assurance Center shows the linked control points in the same area. Values for the first control point are marked as original values, and the last control point as current values.
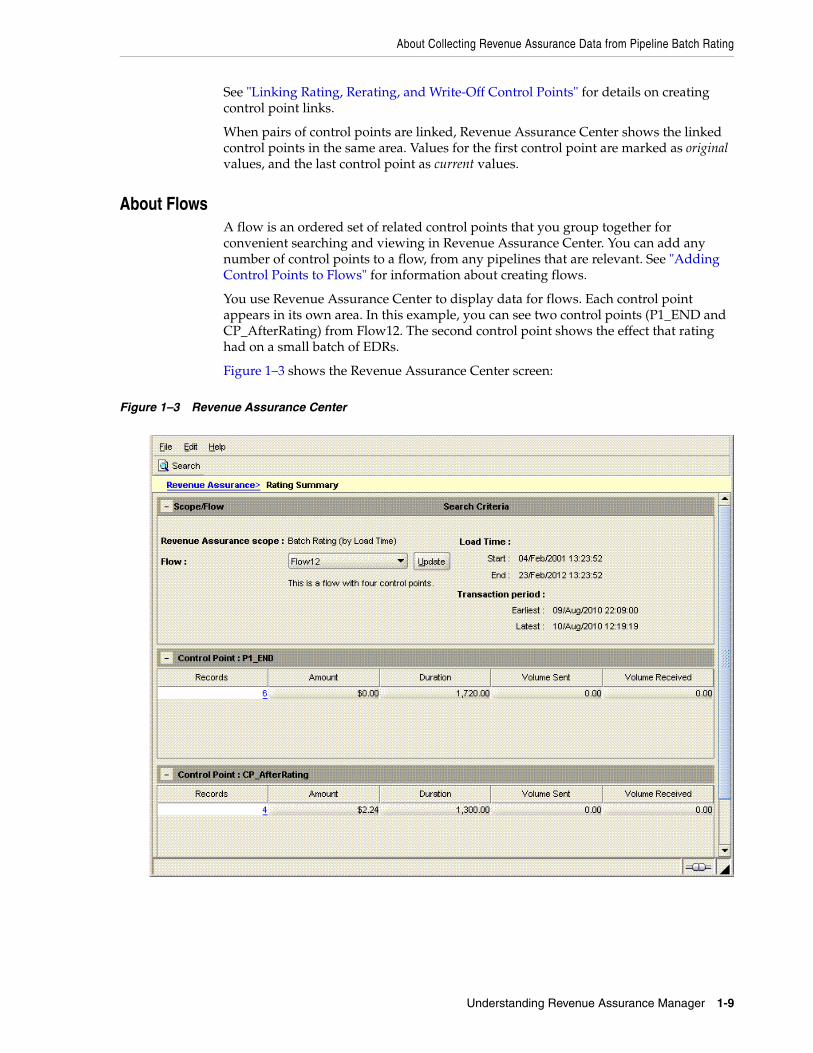
About FlowsA flow is an ordered set of related control points that you group together for convenient searching and viewing in Revenue Assurance Center. You can add any number of control points to a flow, from any pipelines that are relevant. See "Adding Control Points to Flows" for information about creating flows.
You use Revenue Assurance Center to display data for flows. Each control point appears in its own area. In this example, you can see two control points (P1_END and CP_AfterRating) from Flow12. The second control point shows the effect that rating had on a small batch of EDRs.
Figure 1–3 shows the Revenue Assurance Center screen:
Figure 1–3 Revenue Assurance Center

About Collecting Revenue Assurance Data from Pipeline Batch Rating
1-10 BRM Collecting Revenue Assurance Data
About Using UE Loader to Load Revenue Assurance DataIn order to view batch pipeline revenue assurance data, you must first load that data into /process_audit objects in the BRM database. You use Universal Event (UE) Loader to load the data.
The UE Loader loads revenue assurance data into the following /process_audit objects:
■ /process_audit/pipeline objects store information about processed EDRs.
■ /process_audit/batchstat objects store information about the revenue assurance data collected for specific scenarios.
You can configure the BRM Batch Controller to probe automatically for revenue assurance data files and then call UE Loader to load them into the database. You can also decide to load the data periodically by using cron or a similar program.
See "Setting Up UE Loader to Load Revenue Assurance Data into the Database" and "Setting Up Batch Controller to Call UE Loader" for more information.
About the Revenue Assurance Data Collected in Rated Event LoaderRevenue Assurance Manager collects data from Rated Event (RE) Loader. BRM uses RE Loader to load events that have been rated or rerated with pipeline batch rating. See the discussion of Rated Event Loader in BRM Configuring Pipeline Rating and Discounting for more information.
The revenue assurance data collected from RE Loader include:
■ Total revenue generated by the batch.
■ Total number of EDRs loaded.
You can view the RE Loader data in Revenue Assurance Center or in Revenue Assurance reports.
When the rated EDRs are loaded in RE Loader, either all the EDRs are loaded, or they all fail. There is no possibility of some records getting loaded and some records failing. In Revenue Assurance Manager, the data collected for RE Loader is not grouped by status or any other fields.
You must load the CollectProcessAuditForIREL.sql file to enable the collection of revenue assurance data from RE Loader. See "Loading the CollectProcessAudit Trigger in Rated Event Loader" for information on loading this trigger.
About Collecting Revenue Assurance Data on Written-Off EDRsYou can use Revenue Assurance Manager to view statistics about the number of EDRs that have been written off.
When an EDR is written off through Suspense Manager, an /event/notification/suspense/writeoff event is generated. You configure event notification so that Revenue Assurance Manager collects data every time such an event occurs. The data collected from a written-off EDR includes the original batch ID and the number of EDRs that were written off in that batch of EDRs.
See "Setting Up Revenue Assurance Manager to Collect Data on Written-Off EDRs" for configuration information.

2
Installing Revenue Assurance Manager 2-1
2Installing Revenue Assurance Manager
This chapter describes how to install Oracle Communications Billing and Revenue Management (BRM) Revenue Assurance Manager and Revenue Assurance Center.
Before you read this chapter, you should be familiar with BRM concepts and architecture. See:
■ BRM Concepts
■ Understanding Revenue Assurance Manager
System Requirements Revenue Assurance Manager server component is supported on the HP-UX IA64, Linux, AIX, and Solaris operating systems. For information on disk space requirements for these operating systems, see BRM Installation Guide.
Revenue Assurance Center is supported on the Windows platform and requires approximately 100 MB of disk space.
Software RequirementsBefore installing Revenue Assurance Manager, you must install:
■ Third-Party software, which includes the Perl libraries and JRE required for installing BRM components. See the instructions for installing the Third-Party software in BRM Installation Guide.
■ BRM. See BRM Installation Guide.
■ Oracle version 10g or 11g.
Before installing Revenue Assurance Center, you must install BRM. See BRM Installation Guide for install instructions.
Important: Revenue Assurance Manager and Revenue Assurance Center are optional features that you install separately.
Caution: If you are using an earlier version of Oracle, you must upgrade it before you install Revenue Assurance Manager. For information on upgrading Oracle, see your Oracle documentation.
Installing Revenue Assurance Manager
2-2 BRM Collecting Revenue Assurance Data
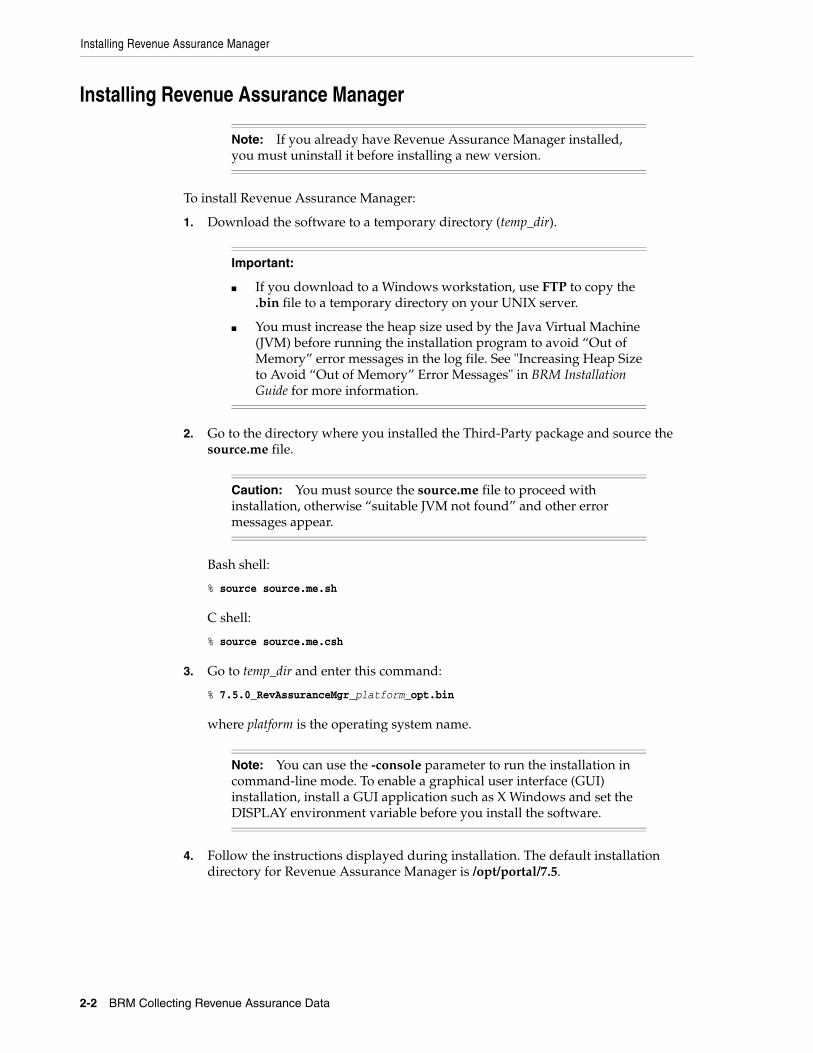
Installing Revenue Assurance Manager
To install Revenue Assurance Manager:
1. Download the software to a temporary directory (temp_dir).
2. Go to the directory where you installed the Third-Party package and source the source.me file.
Bash shell:
% source source.me.sh
C shell:
% source source.me.csh
3. Go to temp_dir and enter this command:
% 7.5.0_RevAssuranceMgr_platform_opt.bin
where platform is the operating system name.
4. Follow the instructions displayed during installation. The default installation directory for Revenue Assurance Manager is /opt/portal/7.5.
Note: If you already have Revenue Assurance Manager installed, you must uninstall it before installing a new version.
Important:
■ If you download to a Windows workstation, use FTP to copy the .bin file to a temporary directory on your UNIX server.
■ You must increase the heap size used by the Java Virtual Machine (JVM) before running the installation program to avoid “Out of Memory” error messages in the log file. See "Increasing Heap Size to Avoid “Out of Memory” Error Messages" in BRM Installation Guide for more information.
Caution: You must source the source.me file to proceed with installation, otherwise “suitable JVM not found” and other error messages appear.
Note: You can use the -console parameter to run the installation in command-line mode. To enable a graphical user interface (GUI) installation, install a GUI application such as X Windows and set the DISPLAY environment variable before you install the software.

Configuring Universal Event Loader to Load Revenue Assurance Data
Installing Revenue Assurance Manager 2-3
5. Go to the directory where you installed the Revenue Assurance Manager package and source the source.me file:
Bash shell:
% source source.me.sh
C shell:
% source source.me.csh
6. Change directory to the BRM_Home/setup directory and run the pin_setup script.
7. If your event tables are partitioned, run the partition_utils utility with the -o update parameter from the BRM_Home/apps/partition_utils directory:
% perl Bin_Home/bin/partition_utils -o update
See "Updating Partitions" and "partition_utils" in BRM System Administrator's Guide for more information.
Your Revenue Assurance Manager installation is now complete.
Loading the CollectProcessAudit Trigger in Rated Event LoaderThis section explains how to define the CollectProcessAuditForIREL trigger in Rated Event (RE) Loader. You must define this trigger in RE Loader before using Revenue Assurance Manager. CollectProcessAuditForIREL defines event ID and batch ID mapping in rated EDRs and loads them into the BRM database.
To load the trigger:
1. Go to the BRM_Home/sys/data/config directory.
2. Run the following command:
% sqlplus login/password @$ORACLE_SID @CollectProcessAuditForIREL.sql
where ORACLE_SID is the BRM database alias.
Configuring Universal Event Loader to Load Revenue Assurance DataTo configure the Universal Event (UE) Loader properties file to load revenue assurance data:
1. Open the UE Loader properties file (BRM_Home/apps/uel/Infranet.properties) in a text editor.
2. Change this setting:
infranet.uel.date_pattern = dd/MMM/yyyy:hh:mm:ss a zzzz
Note: The installation program does not prompt you for the installation directory if BRM or Revenue Assurance Manager is already installed on the machine and automatically installs the package at the BRM_Home location.
Note: The pin_setup script starts all required BRM processes.
About Installing Revenue Assurance Center
2-4 BRM Collecting Revenue Assurance Data
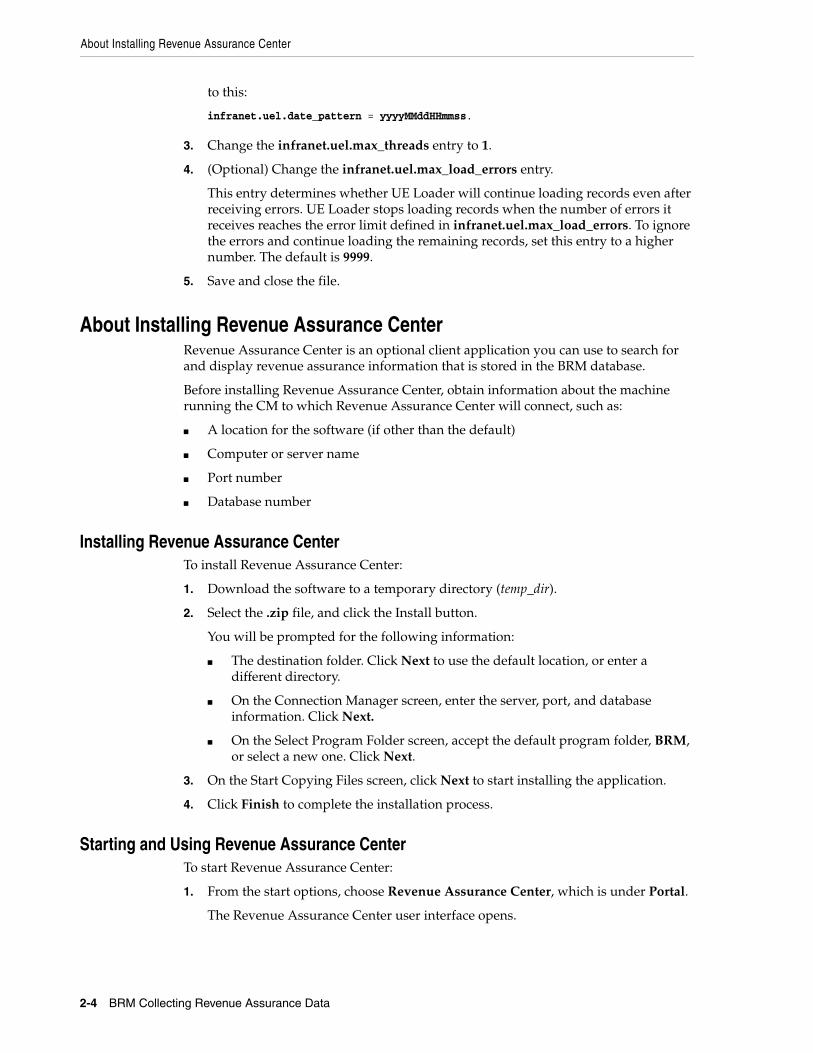
to this:
infranet.uel.date_pattern = yyyyMMddHHmmss.
3. Change the infranet.uel.max_threads entry to 1.
4. (Optional) Change the infranet.uel.max_load_errors entry.
This entry determines whether UE Loader will continue loading records even after receiving errors. UE Loader stops loading records when the number of errors it receives reaches the error limit defined in infranet.uel.max_load_errors. To ignore the errors and continue loading the remaining records, set this entry to a higher number. The default is 9999.
5. Save and close the file.
About Installing Revenue Assurance CenterRevenue Assurance Center is an optional client application you can use to search for and display revenue assurance information that is stored in the BRM database.
Before installing Revenue Assurance Center, obtain information about the machine running the CM to which Revenue Assurance Center will connect, such as:
■ A location for the software (if other than the default)
■ Computer or server name
■ Port number
■ Database number
Installing Revenue Assurance Center To install Revenue Assurance Center:
1. Download the software to a temporary directory (temp_dir).
2. Select the .zip file, and click the Install button.
You will be prompted for the following information:
■ The destination folder. Click Next to use the default location, or enter a different directory.
■ On the Connection Manager screen, enter the server, port, and database information. Click Next.
■ On the Select Program Folder screen, accept the default program folder, BRM, or select a new one. Click Next.
3. On the Start Copying Files screen, click Next to start installing the application.
4. Click Finish to complete the installation process.
Starting and Using Revenue Assurance CenterTo start Revenue Assurance Center:
1. From the start options, choose Revenue Assurance Center, which is under Portal.
The Revenue Assurance Center user interface opens.

Uninstalling Revenue Assurance Manager
Installing Revenue Assurance Manager 2-5
2. Click the Revenue Assurance Center Help button to display information on how to use Revenue Assurance Center.
See "Customizing Revenue Assurance Center" for information on how you can change features in Revenue Assurance Center.
Uninstalling Revenue Assurance ManagerTo uninstall Revenue Assurance Manager, run the BRM_Home/uninstaller/RevAssuranceMgr/uninstaller.bin.
Note: When prompted, enter the BRM login and password. Contact your system administrator to obtain the default username and password.

Uninstalling Revenue Assurance Manager
2-6 BRM Collecting Revenue Assurance Data

3
Setting Up Revenue Assurance Manager for Pipeline Batch Rating 3-1
3Setting Up Revenue Assurance Manager forPipeline Batch Rating
This chapter describes how to configure Oracle Communications Billing and Revenue Management (BRM) Revenue Assurance Manager to collect revenue assurance data from pipeline batch rating.
Before reading this chapter, you should be familiar with the following tasks and concepts:
■ About Collecting Revenue Assurance Data from Pipeline Batch Rating
■ "About pipeline rating" in BRM Configuring Pipeline Rating and Discounting
■ "Using event notification" in BRM Developer's Guide
■ The discussion of working with aggregation scenarios in the Pricing Center Help
Configuring Revenue Assurance ManagerTo set up Revenue Assurance Manager for pipeline batch rating, you need to complete the following tasks:
■ Configure event notification to notify Revenue Assurance Manager when events occur.
See "Configuring Event Notification" for more information.
■ Choose scenarios that determine how the revenue assurance data is grouped.
See "Selecting Aggregation Scenarios" for more information.
■ Identify control points for pipeline data collection.
See "Identifying Control Point Locations for Revenue Assurance Data" for more information.
■ Configure FCT_Aggregate to use your aggregation scenarios and control points.
See "Configuring the FCT_AggreGate Module to Collect Revenue Assurance Data" for more information.
■ Configure SimpleSample files to map the batchIDs of the EDRs.
See "Configuring SimpleSample Files" for more information.
■ Add related sets of control points to flows.
See "Adding Control Points to Flows" for more information.
■ Link control points for rating, rerating, and written-off EDRs.
Configuring Revenue Assurance Manager
3-2 BRM Collecting Revenue Assurance Data
See "Linking Rating, Rerating, and Write-Off Control Points" for more information.
■ Configure Universal Event (UE) Loader to load revenue assurance data into the database.
See "Setting Up UE Loader to Load Revenue Assurance Data into the Database" for more information.
■ Configure Batch Controller to call UE Loader.
See "Setting Up Batch Controller to Call UE Loader" for more information.
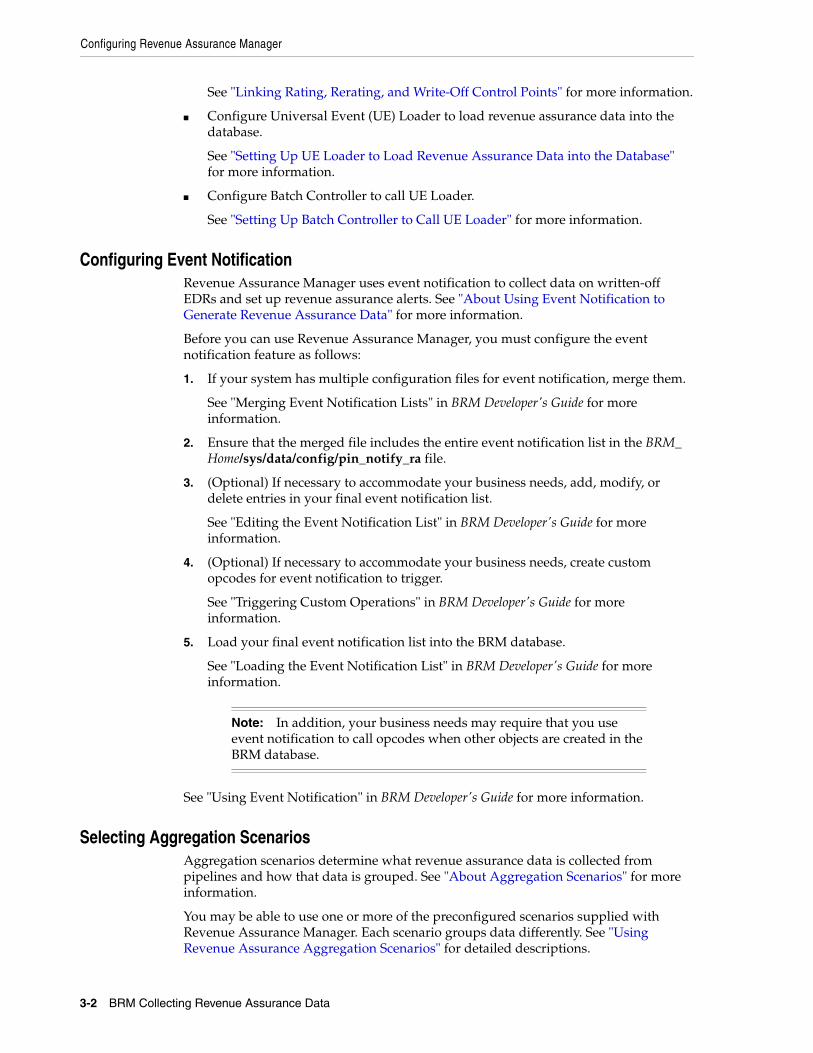
Configuring Event NotificationRevenue Assurance Manager uses event notification to collect data on written-off EDRs and set up revenue assurance alerts. See "About Using Event Notification to Generate Revenue Assurance Data" for more information.
Before you can use Revenue Assurance Manager, you must configure the event notification feature as follows:
1. If your system has multiple configuration files for event notification, merge them.
See "Merging Event Notification Lists" in BRM Developer's Guide for more information.
2. Ensure that the merged file includes the entire event notification list in the BRM_Home/sys/data/config/pin_notify_ra file.
3. (Optional) If necessary to accommodate your business needs, add, modify, or delete entries in your final event notification list.
See "Editing the Event Notification List" in BRM Developer's Guide for more information.
4. (Optional) If necessary to accommodate your business needs, create custom opcodes for event notification to trigger.
See "Triggering Custom Operations" in BRM Developer's Guide for more information.
5. Load your final event notification list into the BRM database.
See "Loading the Event Notification List" in BRM Developer's Guide for more information.
See "Using Event Notification" in BRM Developer's Guide for more information.
Selecting Aggregation ScenariosAggregation scenarios determine what revenue assurance data is collected from pipelines and how that data is grouped. See "About Aggregation Scenarios" for more information.
You may be able to use one or more of the preconfigured scenarios supplied with Revenue Assurance Manager. Each scenario groups data differently. See "Using Revenue Assurance Aggregation Scenarios" for detailed descriptions.
Note: In addition, your business needs may require that you use event notification to call opcodes when other objects are created in the BRM database.

Configuring Revenue Assurance Manager
Setting Up Revenue Assurance Manager for Pipeline Batch Rating 3-3
If none of the preconfigured aggregation scenarios satisfies your business requirements, you can create your own. For details, see "Creating New Aggregation Scenarios for Revenue Assurance" and Pricing Center Help on instructions for defining an aggregation scenario.
You must associate aggregation scenarios with control points in the registry of the FCT_Aggregate module. See "Configuring the FCT_AggreGate Module to Collect Revenue Assurance Data".
Loading Scenarios into the Pipeline Manager DatabaseYou must load aggregation scenarios into the Pipeline Manager database before you can use them. Scenarios that you create are loaded into the database by Pricing Center at the time of creation.
To load scenarios into an Oracle Pipeline Manager database, run the following command against the Pipeline Manager database from the Pipeline_Home/database/oracle/scripts directory:
% sqlplus user/password@database RevenueAssurance_Scenarios.sql
where:
■ Pipeline_Home is the directory in which you installed Pipeline Manager.
■ user is the Pipeline Manager user ID.
■ password is the Pipeline Manager user password.
■ database is the Pipeline Manager database alias.
Identifying Control Point Locations for Revenue Assurance DataYou configure control points in pipeline locations where you want to collect revenue assurance data. You associate an aggregation scenario with the control point to determine the data that is collected. See "About Control Points" for more information.
The exact locations where you place control points depend on the data you are collecting. It is often useful to insert control points before and after a critical point in the pipeline. For example, you can insert a control point before and after rating so that you can analyze the impact on EDRs.
You place a control point in a pipeline by inserting an instance of the FCT_AggreGate module at the desired point in the pipeline. You specify the control point ID and aggregation scenario in the module registry. See "Configuring the FCT_AggreGate Module to Collect Revenue Assurance Data" for more information. Each control point ID must be unique system-wide.
Configuring the FCT_AggreGate Module to Collect Revenue Assurance DataYou insert the FCT_AggreGate module at locations that you identify to collect revenue assurance data. You define a control point and associated aggregation scenario in the registry of each FCT_AggreGate module that you insert.
Note: If an aggregation scenario requires one or more iScripts, you must specify them in the Function Pool section of the pipeline registry. See "Using iScripts to Derive Grouping Fields" for more information.

Configuring Revenue Assurance Manager
3-4 BRM Collecting Revenue Assurance Data
You also configure other options in the module registry, including details about control and result files. These are standard options unrelated to revenue assurance. See "Setting Up Pipeline Aggregation" in BRM Configuring Pipeline Rating and Discounting for more information.
To configure an FCT_AggreGate module for revenue assurance:
1. Add the FCT_AggreGate module to the pipeline registry at the desired location.
2. Configure the module for revenue assurance data:
■ In the Scenarios section of the registry, create a block for the scenario by entering the scenario name. For example, enter RA_03 to use the Service Type scenario.
■ For the ControlPointId parameter, enter an ID for the control point you are defining. The control point ID must be unique and have maximum of 30 characters. For example, if you use the Service Type scenario, you might define the CP_PostRatingBatchStat_Svctype control point.
■ For the TableName registry entry, enter the name of the scenario that you defined earlier.
■ Add the registry parameter IncludeProcessingTimestamps and set it to TRUE.
■ Enter values for the standard FCT_AggreGate parameters, such as Threshold, TempDir, DoneDir, CtlDir. See "About Aggregation Scenarios" in BRM Configuring Pipeline Rating and Discounting for more information.
■ Enter a semicolon (;) for the FieldDelimiter.
■ Add the parameters IncludeErrorEDRs and IncludeInvalidDetailEDRs and set them to TRUE.
The following example shows FCT_AggreGate configured for control point CP_PostRatingBatchStat_Svctype using the Service Type aggregation scenario (RA_03):
# Aggregation--------------------------------------------------# AggreGate{ModuleName = FCT_AggreGateModule{Active = TRUEScenarioReaderDataModule = ifw.DataPool.ScenarioReaderScenarios{RA_03
Note: The value of the TableName entry is used as the name of the output files for the scenario. Using the scenario name for this entry makes it easier to associate files with the scenarios from which they were created.
Note: When configuring scenarios that do not use grouping based on the field EDRStatus, do not specify the IncludeErrorEDRs and IncludeInvalidDetailEDRs parameters.

Configuring Revenue Assurance Manager
Setting Up Revenue Assurance Manager for Pipeline Batch Rating 3-5
{TableName = RA_03Threshold = 10000TempDir = ./data/aggregateDoneDir = ./data/aggregateCtlDir = ./data/aggregateFieldDelimiter = ;ControlPointId = CP_PostRatingBatchStat_SvctypeIncludeErrorEDRs = TRUEIncludeInvalidDetailEDRs = TRUEIncludeProcessingTimestamps = TRUE
ResultFile{IncludeFormat = FALSETempSuffix = .tmpDoneSuffix = .datWriteEmptyFile = FALSE}ControlFile{IncludeFormat = FALSESuffix = .ctlDataFilePath = TRUE}}}
Using iScripts to Derive Grouping FieldsReview the description of the scenario you are using to see if it requires any iScripts. Scenarios use iScripts to derive grouping fields such as EDR Status, Revenue Stream, and Output Stream.
If required, you need to specify the iScripts in the FunctionPool section of the registry file, before the FCT_AggreGate module. See the description of FCT_IScript in BRM Configuring Pipeline Rating and Discounting for more information.
See the description of the following iScripts in BRM Configuring Pipeline Rating and Discounting for more information on where to enter these iScripts:
■ ISC_SetEDRStatus
■ ISC_SetOutputStream
■ ISC_SetRevenueStream
■ ISC_SetRevenueFigures
The following iScript must be placed at the beginning of the pipeline to ensure that the batch ID is inserted before any further processing of the mediation batches.
■ ISC_SetAndValidateBatchInfo
Configuring SimpleSample FilesConfigure the SimpleSample files to map the batchIDs of the EDRs. This is a mandatory step for Revenue Assurance Manager to work correctly.
You can find the SimpleSample files at: Pipeline_Home/opt/ifw/formatDesc/Formats/Sample.
To configure the SimpleSample files:

Configuring Revenue Assurance Manager
3-6 BRM Collecting Revenue Assurance Data
1. Open the SIMPLESAMPLE_v1.dsc file using a text editor such as Notepad.
2. Find the following line:
SERVICE AscString();
3. Add the following lines before the aforementioned line:
BATCH_ID AscString();ORIGINAL_BATCH_ID AscString();SUSPENDED_FROM_BATCH_ID AscString();EVENT_ID AscString();
4. Save and close the file.
5. Open the SIMPLESAMPLE_v1_InMap.dsc file using a text editor such as Notepad.
6. Find the following line:
"020" -> DETAIL.RECORD_TYPE;
7. Add the following lines before the aforementioned line:
BATCH_ID -> DETAIL.BATCH_ID;ORIGINAL_BATCH_ID -> DETAIL.ORIGINAL_BATCH_ID;SUSPENDED_FROM_BATCH_ID -> DETAIL.ASS_SUSPENSEEXT.SUSPENDED_FROM_BATCH_ID;EVENT_ID -> DETAIL.EVENT_ID;
8. Save and close the file.
9. Open the SIMPLESAMPLE_v1_InGrammar.dsc file using a text editor such as Notepad.
10. Find the following line:
edrInputMap( "SIMPLESAMPLE_V1.DETAIL.STD_MAPPING" );
11. Add the following lines before the aforementioned line:
edrAddDatablock( DETAIL.ASS_SUSPENSE_EXT );
12. Save and close the file.
Adding Control Points to FlowsFlows are ordered sets of related control points. You group control points into flows so that you can search for and view them conveniently in Revenue Assurance Center. When you view a flow in Revenue Assurance Center, its control points are displayed in the order in which they were defined.
You define flows in the pin_config_ra_flows file and load the flows into the database by using the load_pin_config_ra_flows utility. See "load_pin_config_ra_flows". Flows are stored as/config/ra_flows objects.
The load_pin_config_ra_flows utility overwrites existing flows. You must load a complete set of flows each time you run the utility.
To add control points into flows and load them into the database:
1. Open the BRM_Home/sys/data/config/pin_config_ra_flows file in a text editor.
This file includes instructions about the syntax to use to add control points to flows.

Configuring Revenue Assurance Manager
Setting Up Revenue Assurance Manager for Pipeline Batch Rating 3-7
2. Save and close the file.
3. Use the following command to load your control points into the database:
% load_pin_config_ra_flows pin_config_ra_flows
If you do not run the utility from the directory in which the file is located, include the complete path to the file; for example:
% load_pin_config_ra_flows BRM_Home/sys/data/config/pin_config_ra_flows
To verify that the flows were loaded, you can display the /config/ra_flows object by using the Object Browser, or use the robj command with the testnap utility. See "Reading an Object and Writing its Contents to a File" in BRM Developer's Guide for more information.
Linking Rating, Rerating, and Write-Off Control Points For Revenue Assurance Center to recognize original and current values for certain types of control points, you must link them and add the links to the BRM database. The control points that require linking include:
■ Rating to rerating.
■ Rerating to written-off.
■ Rating to written-off.
To link control points, you define the links in the pin_config_controlpoint_link file and then load them into the BRM database by using the load_pin_config_controlpoint_link utility. See "load_pin_config_controlpoint_link". Links are stored in the /config/link_controlpoint object in the BRM database. The PCM_OP_PROCESS_AUDIT_CREATE_AND_LINK opcode links /process_audit/batchstat objects based on the data in the /config/link_controlpoint object. See "About the Revenue Assurance Manager Opcodes" for more information.
To configure your control points into flows and load them into the database:
1. Open the BRM_Home/sys/data/config/pin_config_controlpoint_link file in a text editor. This file includes instructions on how to add control points into flows.
2. Save and close the file.
Tip: If you copy the pin_config_ra_flows file to the directory from which you run the load_pin_config_ra_flows utility, you do not have to specify the path or file name. The file must be named load_pin_config_ra_flows.
Caution: The load_pin_config_controlpoint_link utility overwrites existing links. You must load a complete set of links each time you run the utility.
Important: The load_pin_config_controlpoint_link utility needs a configuration (pin.conf) file in the directory from which you run the utility. See "Creating Configuration Files for BRM utilities" in BRM System Administrator's Guide for more information.

Configuring Revenue Assurance Manager
3-8 BRM Collecting Revenue Assurance Data
3. Use the following command to load your control points into the database:
% load_pin_config_controlpoint_link pin_config_controlpoint_link
If you do not run the utility from the directory in which the file is located, include the complete path to the file; for example:
% load_pin_config_controlpoint_link BRM_Home/sys/data/config/pin_config_controlpoint_link
See "load_pin_config_controlpoint_link" for more information.
To verify that the control point links were loaded, you can display the /config/controlpoint_link object by using Object Browser, or use the robj command with the testnap utility. See "Reading an Object and Writing its Contents to a File" in BRM Developer's Guide for more information.
Setting Up UE Loader to Load Revenue Assurance Data into the DatabaseUE Loader takes the revenue assurance data from the FCT_AggreGate output files and loads it into the BRM database. The following sections explain how to configure UE Loader.
Setting Up UE Loader TemplatesUE Loader requires that each aggregation scenario have a separate UE Loader event input template in XML format to map the data generated by FCT_AggreGate to the input flist for the opcodes that data. Revenue Assurance Manager provides XML templates for each of the preconfigured scenarios.
See "About Rating Events Created by External Sources" in BRM Setting Up Pricing and Rating for more information about UE Loader.
Setting Up Batch Controller to Call UE LoaderBatch Controller runs programs such as UE Loader either when a specific event occurs or automatically at timed intervals. See "Controlling Batch Operations" in BRM System Administrator's Guide for instructions on how to configure Batch Controller to run UE Loader to load revenue assurance data into the database.
Most implementations use the occurrence-driven execution feature of Batch Controller to run UE Loader whenever FCT_AggreGate creates output files with revenue assurance data.
Tip: If you copy the pin_config_controlpoint_link file to the directory from which you run the load_pin_config_controlpoint_link utility, you do not have to specify the path or file name. The file must be named pin_config_controlpoint_link.
Important: If you set up Batch Controller to load scenario data files periodically rather than by occurrence, make sure the files are loaded frequently. Revenue Assurance Center uses the time when records were loaded into the database when it searches for data in time range. For the revenue assurance data to be meaningful, it should be loaded into the database soon after creation.

Setting Up Revenue Assurance Manager to Collect Data on Written-Off EDRs
Setting Up Revenue Assurance Manager for Pipeline Batch Rating 3-9
Setting Up Revenue Assurance Manager to Collect Data on Written-Off EDRs
For written-off EDRs, Revenue Assurance Manager collects the original batch ID and the number of EDRs that were written off in the batch. See "About Collecting Revenue Assurance Data on Written-Off EDRs" for more information.
To collect revenue assurance data on written-off EDRs, do the following:
■ Enable event notification for Revenue Assurance Manager.
See "Configuring Event Notification" for more information.
■ Set a parameter in the Connection Manager pin.conf file to configure the control point ID to collect the revenue assurance data on written-off EDRs. You can change this control point ID.
See "Changing the Control Point for Data on Written-Off EDRs" for more information.

Setting Up Revenue Assurance Manager to Collect Data on Written-Off EDRs
3-10 BRM Collecting Revenue Assurance Data
4
Setting Up Revenue Assurance Manager for Billing 4-1
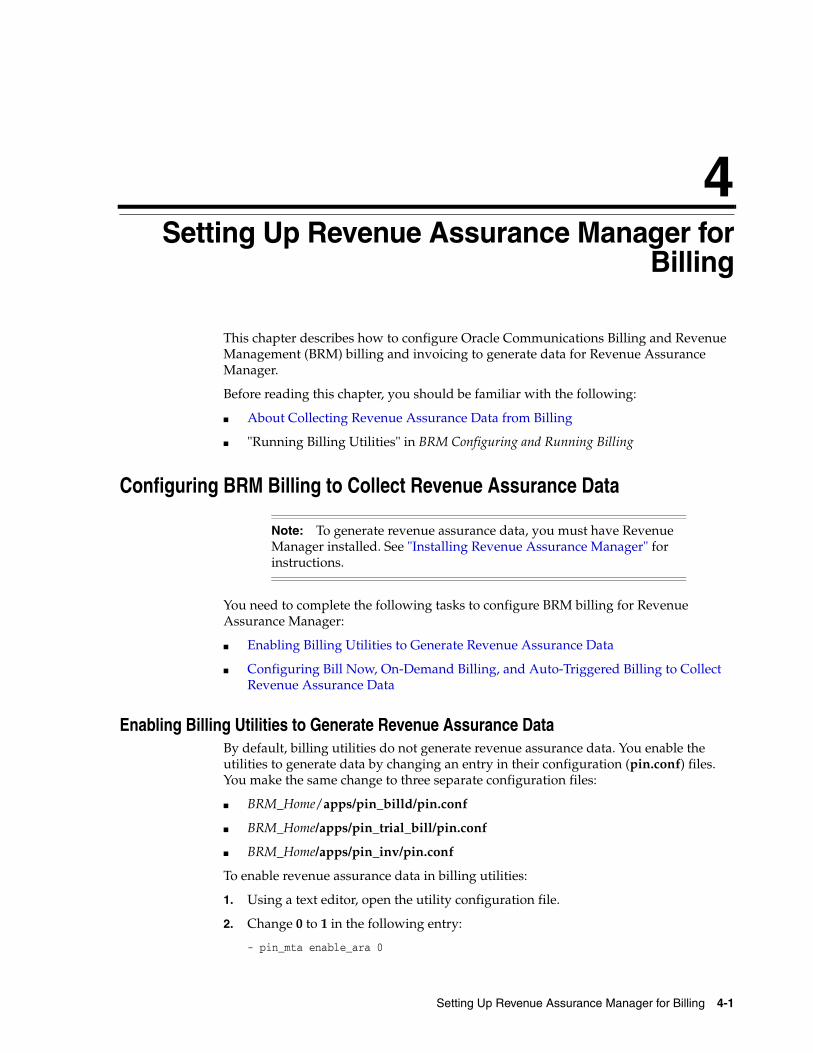
4Setting Up Revenue Assurance Manager forBilling
This chapter describes how to configure Oracle Communications Billing and Revenue Management (BRM) billing and invoicing to generate data for Revenue Assurance Manager.
Before reading this chapter, you should be familiar with the following:
■ About Collecting Revenue Assurance Data from Billing
■ "Running Billing Utilities" in BRM Configuring and Running Billing
Configuring BRM Billing to Collect Revenue Assurance Data
You need to complete the following tasks to configure BRM billing for Revenue Assurance Manager:
■ Enabling Billing Utilities to Generate Revenue Assurance Data
■ Configuring Bill Now, On-Demand Billing, and Auto-Triggered Billing to Collect Revenue Assurance Data
Enabling Billing Utilities to Generate Revenue Assurance DataBy default, billing utilities do not generate revenue assurance data. You enable the utilities to generate data by changing an entry in their configuration (pin.conf) files. You make the same change to three separate configuration files:
■ BRM_Home/apps/pin_billd/pin.conf
■ BRM_Home/apps/pin_trial_bill/pin.conf
■ BRM_Home/apps/pin_inv/pin.conf
To enable revenue assurance data in billing utilities:
1. Using a text editor, open the utility configuration file.
2. Change 0 to 1 in the following entry:
- pin_mta enable_ara 0
Note: To generate revenue assurance data, you must have Revenue Manager installed. See "Installing Revenue Assurance Manager" for instructions.

Configuring BRM Billing to Collect Revenue Assurance Data
4-2 BRM Collecting Revenue Assurance Data
A value of 1 generates revenue assurance data; 0 disables data generation.
3. Save and close the file.
4. Stop and start the Connection Manager (CM).
See the discussion of starting and stopping the BRM system in BRM System Administrator's Guide.
Configuring Bill Now, On-Demand Billing, and Auto-Triggered Billing to Collect Revenue Assurance Data
By default, collecting revenue assurance data for Bill Now, on-demand billing, and auto-triggered billing is disabled. You enable this feature by using the pin_bus_params utility to modify the EnableARA parameter in the billing instance of the /config/business_params object.
Complete these tasks to enable Bill Now, on-demand billing, and auto-triggered billing to generate revenue assurance data:
1. Run the following command to create an editable XML file from the billing instance of the /config/business_params object:
pin_bus_params -r bus_params_billing.xml
This command creates an XML file named bus_params_billing.xml.out in your working directory. (You can specify another location for this file if you want).
2. Using a text editor, open the new bus_params_billing.xml file.
3. Change disabled to enabled in this entry:
<EnableARA>disabled</EnableARA>
4. Save and close the file.
5. Go to BRM_Home/sys/data/config and load the change into the /config/business_params object by using this command:
pin_bus_params bus_params_billing.xml
6. To verify that all fields are correct, read the object with the testnap utility or Object Browser.
7. Stop and restart the Connection Manager (CM).
Caution: This file contains the instructions that BRM uses to overwrite the existing /config/business_params object. If you delete or modify other parameters in the file, you may cause unexpected behavior in the BRM A/R configuration.
Tip: To execute this command from a different directory, see "pin_bus_params" in BRM Developer's Guide.
Tip: See "Using testnap" and "Reading Objects by Using Object Browser" in BRM Developer's Guide for general instructions on using testnap and for information on how to use Object Browser.

Configuring BRM Billing to Collect Revenue Assurance Data
Setting Up Revenue Assurance Manager for Billing 4-3
For more information, see the discussion of starting and stopping the BRM system in BRM System Administrator's Guide.
8. (Multischema systems only) Run the pin_multidb script with the -R CONFIG parameter.
For more information, see "pin_multidb" in BRM System Administrator's Guide.
Configuring Item SubtypesFor bill items to work as configured in Revenue Assurance Manager, you must configure item subtypes. Item subtypes define the different types of charges for item types such as cycle arrears, cycle forward, cycle forward arrears, and so on. For example, cycle forward fee and cycle arrears fees can be categorized can be included in the recurring subtype and monthly usage in the usage subtype.
If you do not configure billable item subtypes, the split revenue assurance data is stored as miscellaneous charges.
You define item subtypes in the config_item_types file by using the sub_type property in the ItemType tag.
Before configuring item subtypes, you must first configure bill items. See "Creating Custom Bill Items" in BRM Configuring and Running Billing.
To configure item subtypes:
1. Using a text editor, open the config_item_types file in the BRM_Home/sys/data/pricing/example directory.
2. Define your new item subtypes in the ItemType tag.
Use the item subtypes recurring and remit default item subtypes as examples. You can copy and change it as necessary.
<ItemType precreate="false" type="cumulative" sub_type="recurring">/item/cycle_forward_arrear</ItemType>
3. In the Storable Class Editor, create the storable class /item/name, where name is the value in the PIN_FLD_TYPE field of /config/item_types.
4. Run the load_config_item_tags and load_config_item_types utilities to configure the item subtypes in the BRM database. See "load_config_item_tags" and "load_config_item_types" in BRM Configuring and Running Billing.
The defined subtypes are displayed in Revenue Assurance Center in the Charge Type column of the Billing Details screen, under the Revenue section, except for subtypes that are defined as discount, which are displayed in the Adjustments/Discounts section of the Billing Details screen. For more information, see the Revenue Assurance Center Help.
Important: Be sure to enter Discount for discount subtypes. Otherwise, Revenue Assurance Center will display the item’s data on the Revenue sections instead of the Adjustments/Discounts section.

Configuring BRM Billing to Collect Revenue Assurance Data
4-4 BRM Collecting Revenue Assurance Data

5
Using Batch IDs in Revenue Assurance Manager 5-1
5Using Batch IDs in Revenue AssuranceManager
This chapter describes how to use batch IDs are used in Oracle Communications Billing and Revenue Management (BRM) Revenue Assurance Manager.
Before reading this chapter, you should:
■ Follow the instructions in "Setting Up Revenue Assurance Manager for Pipeline Batch Rating" to configure Revenue Assurance Manager.
■ Follow the instructions in "About Installing Revenue Assurance Center" and "Customizing Revenue Assurance Center" to install and configure Revenue Assurance Center.
You should also be familiar with the following:
■ Understanding Revenue Assurance Manager
■ "About pipeline rating" in BRM Configuring Pipeline Rating and Discounting
Tracking EDRs by Using Batch IDsIn pipeline batch rating, each batch file received from the mediation system is assigned a batch ID, which is stored in every EDR derived from the file. Each EDR also receives a unique event ID.
During rerating and recycling, the EDR receives a new batch ID, but the original batch ID is retained in a different field. Retaining the original batch ID in the EDR makes it possible to determine the revenue impact of EDRs for each batch that is received from mediation, even if some EDRs are rerated or recycled.
Revenue Assurance Manager uses the following fields to track EDRs as they are processed by pipelines and as they are rerated or recycled:
■ DETAIL.BATCH_ID
■ DETAIL.ORIGINAL_BATCH_ID
■ DETAIL.ASS_SUSPENSE_EXT.SUSPENDED_FROM_BATCH_ID
Note: The KeepExistingBatchIds registry entry in FCT_PreSuspense module controls the way batch IDs are set. For details, see "Setting the Default Batch ID Behavior".
Tracking EDRs by Using Batch IDs
5-2 BRM Collecting Revenue Assurance Data
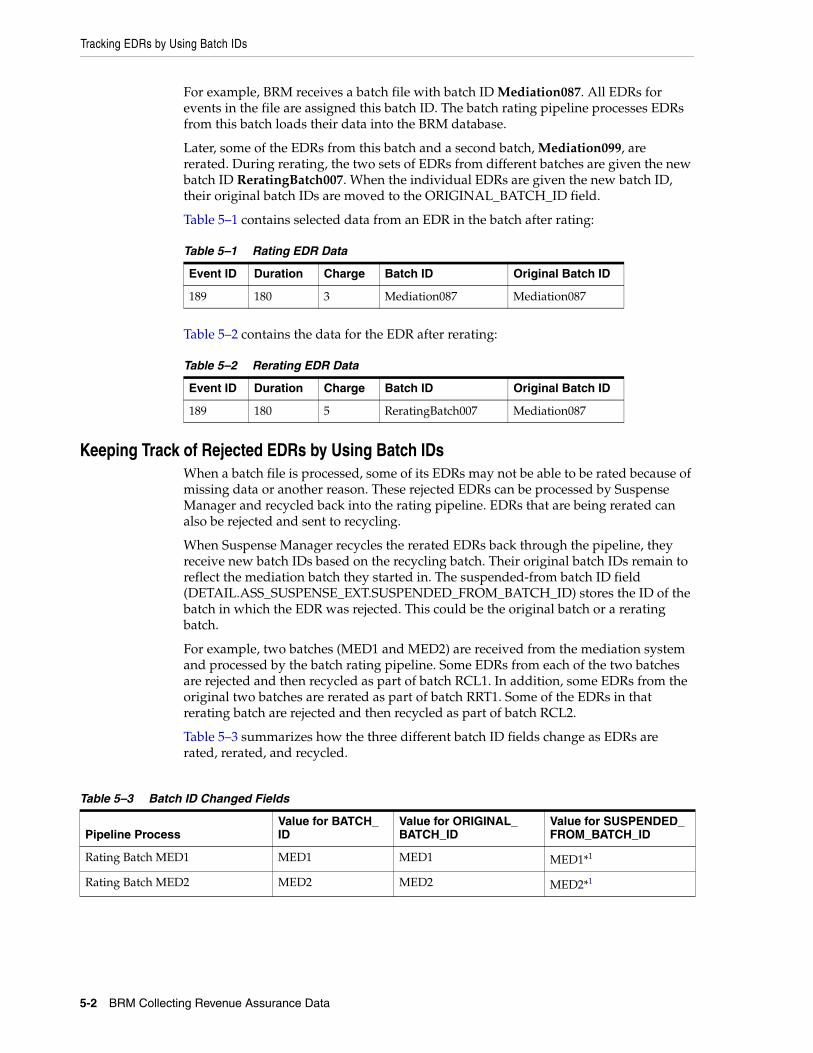
For example, BRM receives a batch file with batch ID Mediation087. All EDRs for events in the file are assigned this batch ID. The batch rating pipeline processes EDRs from this batch loads their data into the BRM database.
Later, some of the EDRs from this batch and a second batch, Mediation099, are rerated. During rerating, the two sets of EDRs from different batches are given the new batch ID ReratingBatch007. When the individual EDRs are given the new batch ID, their original batch IDs are moved to the ORIGINAL_BATCH_ID field.
Table 5–1 contains selected data from an EDR in the batch after rating:
Table 5–2 contains the data for the EDR after rerating:
Keeping Track of Rejected EDRs by Using Batch IDsWhen a batch file is processed, some of its EDRs may not be able to be rated because of missing data or another reason. These rejected EDRs can be processed by Suspense Manager and recycled back into the rating pipeline. EDRs that are being rerated can also be rejected and sent to recycling.
When Suspense Manager recycles the rerated EDRs back through the pipeline, they receive new batch IDs based on the recycling batch. Their original batch IDs remain to reflect the mediation batch they started in. The suspended-from batch ID field (DETAIL.ASS_SUSPENSE_EXT.SUSPENDED_FROM_BATCH_ID) stores the ID of the batch in which the EDR was rejected. This could be the original batch or a rerating batch.
For example, two batches (MED1 and MED2) are received from the mediation system and processed by the batch rating pipeline. Some EDRs from each of the two batches are rejected and then recycled as part of batch RCL1. In addition, some EDRs from the original two batches are rerated as part of batch RRT1. Some of the EDRs in that rerating batch are rejected and then recycled as part of batch RCL2.
Table 5–3 summarizes how the three different batch ID fields change as EDRs are rated, rerated, and recycled.
Table 5–1 Rating EDR Data
Event ID Duration Charge Batch ID Original Batch ID
189 180 3 Mediation087 Mediation087
Table 5–2 Rerating EDR Data
Event ID Duration Charge Batch ID Original Batch ID
189 180 5 ReratingBatch007 Mediation087
Table 5–3 Batch ID Changed Fields
Pipeline ProcessValue for BATCH_ID
Value for ORIGINAL_BATCH_ID
Value for SUSPENDED_FROM_BATCH_ID
Rating Batch MED1 MED1 MED1 MED1*1
Rating Batch MED2 MED2 MED2 MED2*1

Setting the Default Batch ID Behavior
Using Batch IDs in Revenue Assurance Manager 5-3
By linking the control point in the original mediation pipeline to the control point in the recycle pipeline that processed the rerated EDRs, you can determine the revenue impact for each of the mediation batches and identify the revenue leakage in your system.
Setting the Default Batch ID BehaviorThe KeepExistingBatchIds registry entry in FCT_PreSuspense module controls whether the values for batch IDs in EDR records are preserved as originally set by the input module.
■ A value of True preserves the batch ID in each detail record of the batch input file.
■ A value of False (the default) sets the batch ID of each record to the batch ID contained in the header record of the batch input file.
Recycle Batch RCL1 (containing suspended EDRs from MED1 and MED2)
RCL1 MED1/MED2 MED1/MED2
Rerating Batch RRT1 (containing EDRs from MED1 and MED2)
RRT1 MED1/MED2 RRT1*1
Recycle Batch RCL2 (containing suspended EDRs from RRT1)
RCL2 MED1/MED2 RRT1
1 The value of the suspended-from batch ID is ignored in rating and rerating. Because it is left blank, it is assigned the value of batch ID.
Table 5–3 (Cont.) Batch ID Changed Fields
Pipeline ProcessValue for BATCH_ID
Value for ORIGINAL_BATCH_ID
Value for SUSPENDED_FROM_BATCH_ID

Setting the Default Batch ID Behavior
5-4 BRM Collecting Revenue Assurance Data

6
Configuring Revenue Assurance Alerts 6-1
6Configuring Revenue Assurance Alerts
This chapter describes how to configure alerts based on revenue assurance data collected in your Oracle Communications Billing and Revenue Management (BRM) system.
Before reading this chapter, read the following documents:
■ Understanding Revenue Assurance Manager
■ Installing Revenue Assurance Manager
■ Setting Up Revenue Assurance Manager for Pipeline Batch Rating
About Revenue Assurance AlertsYou can configure Revenue Assurance Manager to send alerts when the data collected meets criteria that you specify. For example, you can configure an alert to be sent when the number of EDRs rejected in one day exceeds a value that you specify.
Configuring and using revenue assurance alerts involves:
■ Configuring alert thresholds in the pin_config_ra_thresholds file and loading them into /config/ra_thresholds objects.
See "Configuring Alert Thresholds" for more information.
■ Configuring email alerts by:
– Creating the text of the email alerts in the ra_alert_message.locale file and loading it into /strings objects. See "Specifying Email Alert Text" for more information.
– Defining email details, such as recipient information, in the pin_config_ra_alerts file and loading it into /config/ra_alerts objects. See "Specifying Email Alert Details" for more information.
■ Checking for alerts periodically by using the pin_ra_check_thresholds utility. See "pin_ra_check_thresholds".
See "Generating Revenue Assurance Alerts" for more information.
Alerts also require that event notification be configured. See "Configuring Event Notification" for more information.
You can customize the default alert behavior by changing the PCM_OP_PROCESS_AUDIT_POL_ALERT opcode. For example, you could customize the opcode to log alert information in addition to sending emails. For details, see "Customizing Alert Behavior" for more information.

Configuring Alert Thresholds
6-2 BRM Collecting Revenue Assurance Data
Configuring Alert ThresholdsYou configure alert thresholds in the pin_config_ra_thresholds file. When you configure an alert threshold, you define:
■ The data you want to check and the time period in which it will be checked.
See "Defining Threshold Data and Time Periods" for more information.
■ Optional filter criteria to narrow results.
See "Defining Filter Conditions" for more information.
■ Minimum and maximum threshold values for the data you specify.
See "Defining Field Value Ranges" for more information.
The values you specify work together to determine whether an alert is triggered. All conditions must be met for an alert to be triggered.
The pin_config_ra_thresholds file includes syntax information and examples. Consult the file for more information. Use this section to supplement the information in the file.
After your alert thresholds are defined in pin_config_ra_thresholds, you load that information into the database’s /config/ra_thresholds objects. See "Loading Alert Details into the Database" for more information.
Defining Threshold Data and Time PeriodsYou define an alert threshold’s data and time periods in a line with the following syntax:
RA_Threshold:<Threshold Name> <Obj Type> <Date Range Type> <WeekDay> <Number of Units> <Start Offset><Length of Period> <Secs/Mins/Hrs>
For example:
RA_Threshold:Rejected_EDRs_Per_Day /process_audit/batchstat/status 1 1 1 16:00:00 0 Secs
Table 6–1 describes the threshold parameters.
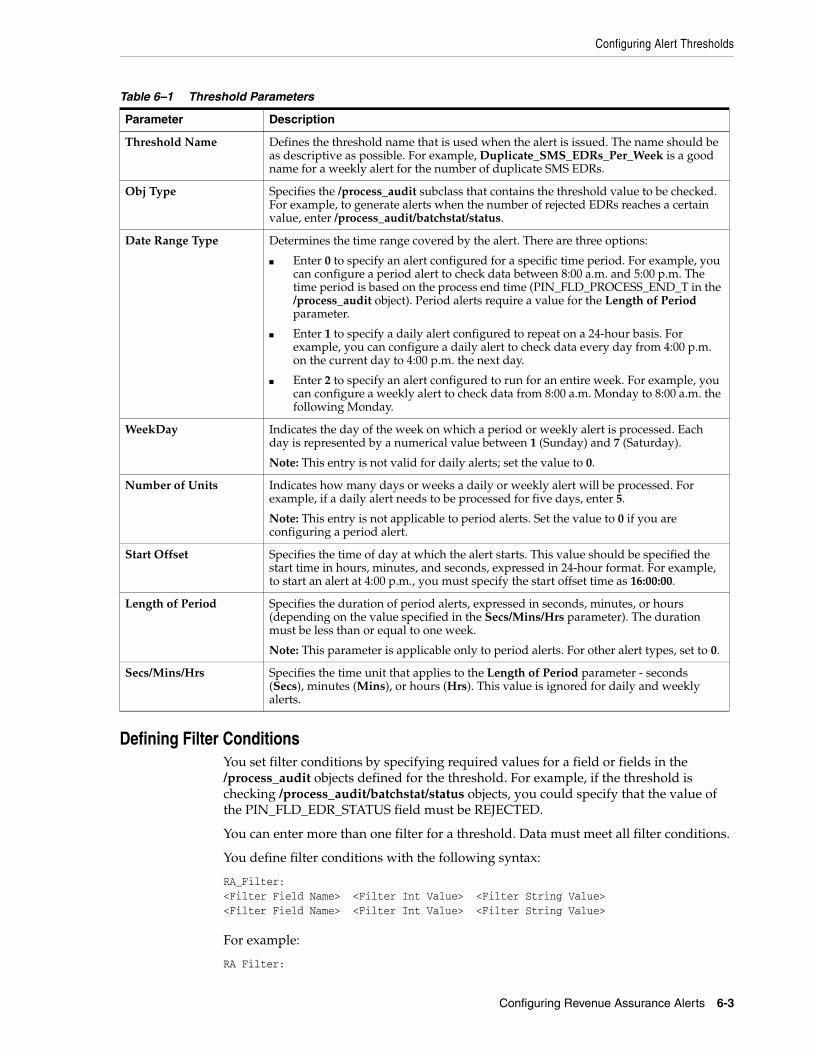
Configuring Alert Thresholds
Configuring Revenue Assurance Alerts 6-3
Defining Filter ConditionsYou set filter conditions by specifying required values for a field or fields in the /process_audit objects defined for the threshold. For example, if the threshold is checking /process_audit/batchstat/status objects, you could specify that the value of the PIN_FLD_EDR_STATUS field must be REJECTED.
You can enter more than one filter for a threshold. Data must meet all filter conditions.
You define filter conditions with the following syntax:
RA_Filter:<Filter Field Name> <Filter Int Value> <Filter String Value><Filter Field Name> <Filter Int Value> <Filter String Value>
For example:
RA Filter:
Table 6–1 Threshold Parameters
Parameter Description
Threshold Name Defines the threshold name that is used when the alert is issued. The name should be as descriptive as possible. For example, Duplicate_SMS_EDRs_Per_Week is a good name for a weekly alert for the number of duplicate SMS EDRs.
Obj Type Specifies the /process_audit subclass that contains the threshold value to be checked. For example, to generate alerts when the number of rejected EDRs reaches a certain value, enter /process_audit/batchstat/status.
Date Range Type Determines the time range covered by the alert. There are three options:
■ Enter 0 to specify an alert configured for a specific time period. For example, you can configure a period alert to check data between 8:00 a.m. and 5:00 p.m. The time period is based on the process end time (PIN_FLD_PROCESS_END_T in the /process_audit object). Period alerts require a value for the Length of Period parameter.
■ Enter 1 to specify a daily alert configured to repeat on a 24-hour basis. For example, you can configure a daily alert to check data every day from 4:00 p.m. on the current day to 4:00 p.m. the next day.
■ Enter 2 to specify an alert configured to run for an entire week. For example, you can configure a weekly alert to check data from 8:00 a.m. Monday to 8:00 a.m. the following Monday.
WeekDay Indicates the day of the week on which a period or weekly alert is processed. Each day is represented by a numerical value between 1 (Sunday) and 7 (Saturday).
Note: This entry is not valid for daily alerts; set the value to 0.
Number of Units Indicates how many days or weeks a daily or weekly alert will be processed. For example, if a daily alert needs to be processed for five days, enter 5.
Note: This entry is not applicable to period alerts. Set the value to 0 if you are configuring a period alert.
Start Offset Specifies the time of day at which the alert starts. This value should be specified the start time in hours, minutes, and seconds, expressed in 24-hour format. For example, to start an alert at 4:00 p.m., you must specify the start offset time as 16:00:00.
Length of Period Specifies the duration of period alerts, expressed in seconds, minutes, or hours (depending on the value specified in the Secs/Mins/Hrs parameter). The duration must be less than or equal to one week.
Note: This parameter is applicable only to period alerts. For other alert types, set to 0.
Secs/Mins/Hrs Specifies the time unit that applies to the Length of Period parameter - seconds (Secs), minutes (Mins), or hours (Hrs). This value is ignored for daily and weekly alerts.
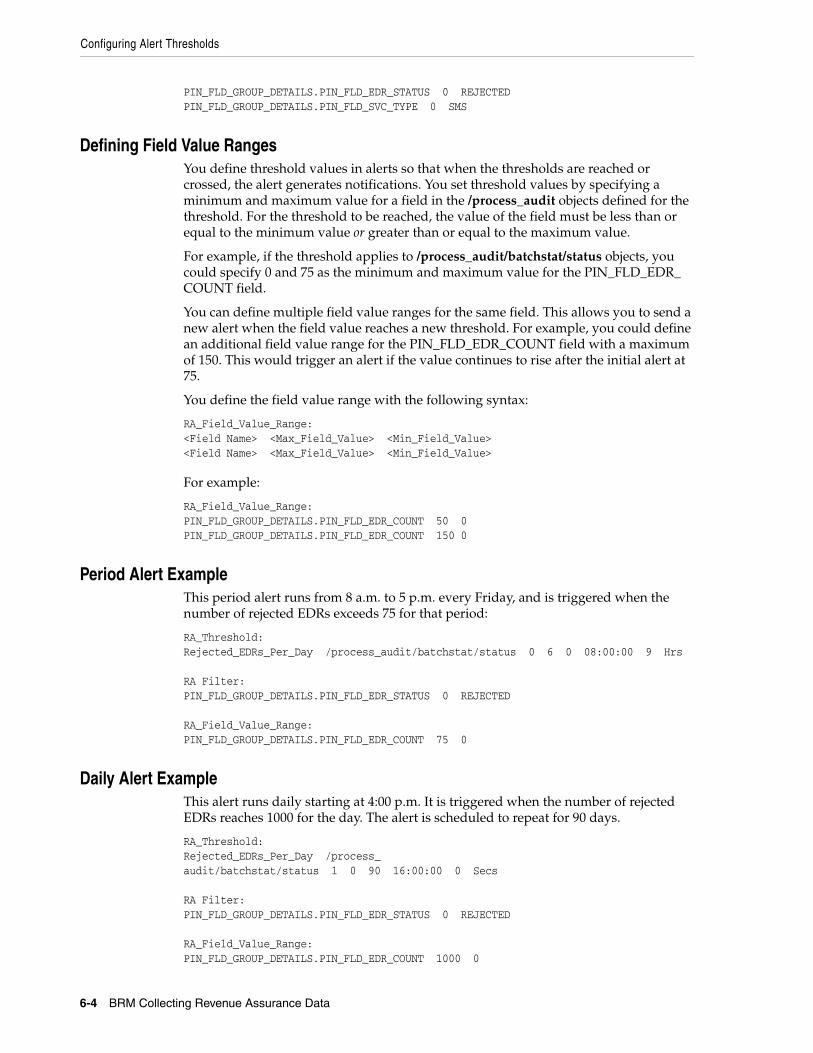
Configuring Alert Thresholds
6-4 BRM Collecting Revenue Assurance Data
PIN_FLD_GROUP_DETAILS.PIN_FLD_EDR_STATUS 0 REJECTEDPIN_FLD_GROUP_DETAILS.PIN_FLD_SVC_TYPE 0 SMS
Defining Field Value RangesYou define threshold values in alerts so that when the thresholds are reached or crossed, the alert generates notifications. You set threshold values by specifying a minimum and maximum value for a field in the /process_audit objects defined for the threshold. For the threshold to be reached, the value of the field must be less than or equal to the minimum value or greater than or equal to the maximum value.
For example, if the threshold applies to /process_audit/batchstat/status objects, you could specify 0 and 75 as the minimum and maximum value for the PIN_FLD_EDR_COUNT field.
You can define multiple field value ranges for the same field. This allows you to send a new alert when the field value reaches a new threshold. For example, you could define an additional field value range for the PIN_FLD_EDR_COUNT field with a maximum of 150. This would trigger an alert if the value continues to rise after the initial alert at 75.
You define the field value range with the following syntax:
RA_Field_Value_Range:<Field Name> <Max_Field_Value> <Min_Field_Value><Field Name> <Max_Field_Value> <Min_Field_Value>
For example:
RA_Field_Value_Range:PIN_FLD_GROUP_DETAILS.PIN_FLD_EDR_COUNT 50 0PIN_FLD_GROUP_DETAILS.PIN_FLD_EDR_COUNT 150 0
Period Alert ExampleThis period alert runs from 8 a.m. to 5 p.m. every Friday, and is triggered when the number of rejected EDRs exceeds 75 for that period:
RA_Threshold:Rejected_EDRs_Per_Day /process_audit/batchstat/status 0 6 0 08:00:00 9 Hrs
RA Filter:PIN_FLD_GROUP_DETAILS.PIN_FLD_EDR_STATUS 0 REJECTED
RA_Field_Value_Range:PIN_FLD_GROUP_DETAILS.PIN_FLD_EDR_COUNT 75 0
Daily Alert ExampleThis alert runs daily starting at 4:00 p.m. It is triggered when the number of rejected EDRs reaches 1000 for the day. The alert is scheduled to repeat for 90 days.
RA_Threshold:Rejected_EDRs_Per_Day /process_audit/batchstat/status 1 0 90 16:00:00 0 Secs
RA Filter:PIN_FLD_GROUP_DETAILS.PIN_FLD_EDR_STATUS 0 REJECTED
RA_Field_Value_Range:PIN_FLD_GROUP_DETAILS.PIN_FLD_EDR_COUNT 1000 0
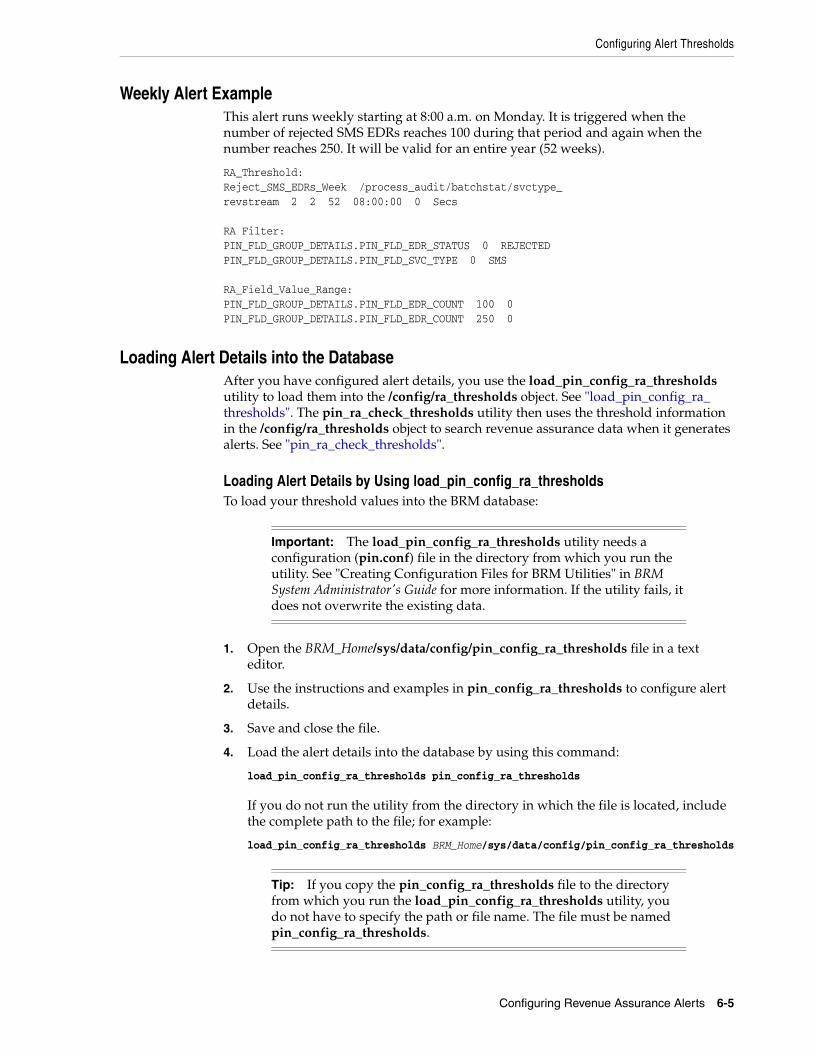
Configuring Alert Thresholds
Configuring Revenue Assurance Alerts 6-5
Weekly Alert ExampleThis alert runs weekly starting at 8:00 a.m. on Monday. It is triggered when the number of rejected SMS EDRs reaches 100 during that period and again when the number reaches 250. It will be valid for an entire year (52 weeks).
RA_Threshold:Reject_SMS_EDRs_Week /process_audit/batchstat/svctype_revstream 2 2 52 08:00:00 0 Secs
RA Filter:PIN_FLD_GROUP_DETAILS.PIN_FLD_EDR_STATUS 0 REJECTEDPIN_FLD_GROUP_DETAILS.PIN_FLD_SVC_TYPE 0 SMS
RA_Field_Value_Range:PIN_FLD_GROUP_DETAILS.PIN_FLD_EDR_COUNT 100 0PIN_FLD_GROUP_DETAILS.PIN_FLD_EDR_COUNT 250 0
Loading Alert Details into the DatabaseAfter you have configured alert details, you use the load_pin_config_ra_thresholds utility to load them into the /config/ra_thresholds object. See "load_pin_config_ra_thresholds". The pin_ra_check_thresholds utility then uses the threshold information in the /config/ra_thresholds object to search revenue assurance data when it generates alerts. See "pin_ra_check_thresholds".
Loading Alert Details by Using load_pin_config_ra_thresholdsTo load your threshold values into the BRM database:
1. Open the BRM_Home/sys/data/config/pin_config_ra_thresholds file in a text editor.
2. Use the instructions and examples in pin_config_ra_thresholds to configure alert details.
3. Save and close the file.
4. Load the alert details into the database by using this command:
load_pin_config_ra_thresholds pin_config_ra_thresholds
If you do not run the utility from the directory in which the file is located, include the complete path to the file; for example:
load_pin_config_ra_thresholds BRM_Home/sys/data/config/pin_config_ra_thresholds
Important: The load_pin_config_ra_thresholds utility needs a configuration (pin.conf) file in the directory from which you run the utility. See "Creating Configuration Files for BRM Utilities" in BRM System Administrator's Guide for more information. If the utility fails, it does not overwrite the existing data.
Tip: If you copy the pin_config_ra_thresholds file to the directory from which you run the load_pin_config_ra_thresholds utility, you do not have to specify the path or file name. The file must be named pin_config_ra_thresholds.
Configuring Email Alerts
6-6 BRM Collecting Revenue Assurance Data
See "load_pin_config_ra_thresholds" for more information.
To verify that the alert details were loaded, display the /config/ra_thresholds object by using Object Browser, or use the robj command with the testnap utility. See "Reading an Object and Writing its Contents to a File" in BRM Developer's Guide for more information.
Configuring Email AlertsConfiguring email alerts involves these tasks:
■ Specifying the text you want in alert emails and optionally localizing that text.
See "Specifying Email Alert Text" for more information.
■ Specifying email details and loading them into the database.
See "Specifying Email Alert Details" for more information.
Specifying Email Alert TextYou configure the subject and message body of email alert messages in the locale of your choice. To configure email alert messages in U.S. English, edit the BRM_Home/sys/msgs/revenueassurance/ra_alert_message.en_US file. This file includes a default subject line and message body that you can edit. The file also includes information about syntax and required elements, which follow standard rules for localized string files. See "Localizing and Customizing Strings" in BRM Developer's Guide for more information.
You can use substitution parameters in the file that are replaced with appropriate information when the alert email is sent. These are the substitution parameters you can use:
■ %ALERT_NAME: Replaced with the alert name.
■ %START_TIME: Replaced with the start time of the period for which alert was generated.
■ %END_TIME: Replaced with end time of the period for which alert was generated.
■ %OBJECT_TYPE: Replaced with object type value configured for the alert.
■ %FILTERS: replaced with the field-value pairs of the filter conditions defined for the alert.
■ %THRESHOLD_VALUES: Replaced with the field and corresponding minimum and maximum limits defined for the alert.
■ %LINE_BREAK: Replaced with new line. (Applicable to the message body only.)
The default subject line is:
Alert %ALERT_NAME has crossed defined threshold values.
The default message body defined in the file is:
The alert %ALERT_NAME has crossed defined threshold values for the period %START_TIME to %END_TIME. %LINE_BREAK The alert is configured as given below: %LINE_BREAK ObjectType = %OBJECT_TYPE %LINE_BREAK Filter = %FILTERS %LINE_BREAK Threshold Values = %THRESHOLD_VALUES"
Configuring Email Alerts
Configuring Revenue Assurance Alerts 6-7
You can define localized versions of the email alert text by creating ra_alert_message.locale files with the appropriate file name extension for the locales. See "Creating New Strings and Customizing Existing Strings" in BRM Developer's Guide for more information.
After defining the email text, you use the load_localized_strings utility to load the contents of the file into the /strings objects.
The load command syntax is as follows:
load_localized_strings ra_alert_message.localeSee "load_localized_strings" in BRM Developer's Guide for more information.
See "Loading Localized or Customized Strings" in BRM Developer's Guide for more information.
Specifying Email Alert DetailsYou specify recipients and other details about email alerts in the pin_config_ra_alerts file. You specify these details for each alert:
■ Name of the alert
■ Locale to be used for subject and email body.
The locale determines which localized version of the alert text is sent.
■ Name of the sender
■ Email addresses of recipients
You define the sender name and locale for each alert in a single line with this syntax:
RA_Alert: Alert_Name Sender_Name Locale
The Alert_Name parameter must be the name of an alert as defined in the pin_config_ra_thresholds file. The sender name is the name you want to appear in the From line of emails.
You define recipients for each alert by specifying email addresses and types in a block below the RA_Alert line. Use this syntax:
Email_addr_1 Email_Type> Email_addr_2 Email_Type> Email_addr_3 Email_Type>
The email type is optional. It determines how the email is sent to the recipient. Valid values are:
■ 1 - Email is addressed directly to the recipient.
■ 2 - The recipient receives a copy (CC).
■ 3 - The recipient receives a blind copy and does not see other recipients (BCC).
Note: When loading a localized version of this file, be sure to use the correct file extension for your locale. See "Locale Names" in BRM Developer's Guide for a list of file extensions.
Note: Each entry must begin with RA_Alert; the text is case-sensitive.

Configuring Email Alerts
6-8 BRM Collecting Revenue Assurance Data
■ 4 - Specifies that the address is to be used as the Reply To value in the alert message.
This address is not a recipient of the alert email.
The default value is 1, which is used if no type is specified.
The following example configures email notification for the Rejected_EDRs_Per_Day alert. The sender of alert emails is RA_NOTIFICATION. The primary recipient is [email protected] and [email protected] receives a copy.
RA_Alert: Rejected_EDRs_Per_Day RA_NOTIFICATION en_US
[email protected] [email protected] 2
For additional information see, the BRM_Home/sys/data/config/pin_config_ra_alerts file, which includes syntax information and examples.
After configuring alert details, you load the file into the database by using the load_pin_config_ra_alerts utility. See "load_pin_config_ra_alerts". Email alert data is stored in the /config/ra_alerts object.
To configure and load email details:
1. Open the BRM_Home/sys/data/config/pin_config_ra_alerts file in a text editor.
2. Add your email details to the file. The file includes instructions and sample data.
3. Save and close the file.
4. Load the email details into the database by using this command:
load_pin_config_ra_alerts pin_config_ra_alerts
If you do not run the utility from the directory in which the file is located, include the complete path to the file; for example:
load_pin_config_ra_alerts BRM_Home/sys/data/config/pin_config_ra_alerts
See "load_pin_config_ra_alerts" for more information.
To verify that the email details were loaded, you can display the /config/ra_alerts object by using Object Browser, or use the robj command with the testnap utility. See "Reading an Object and Writing its Contents to a File" in BRM Developer's Guide for more information.
Important: The load_pin_config_ra_alerts utility needs a configuration (pin.conf) file in the directory from which you run the utility. See "Creating Configuration Files for BRM Utilities" in BRM System Administrator's Guide for more information. If the utility fails, it does not overwrite the existing data.
Tip: If you copy the pin_config_ra_alerts file to the directory from which you run the load_pin_config_ra_alerts utility, you do not have to specify the path or file name. The file must be named pin_config_ra_alerts.

Generating Revenue Assurance Alerts
Configuring Revenue Assurance Alerts 6-9
Generating Revenue Assurance AlertsYou use the pin_ra_check_thresholds utility to check alert thresholds periodically. See "pin_ra_check_thresholds". You can run pin_ra_check_thresholds as part of a chron, chrontab, or at script, or you can run it manually.
This utility checks the /config/ra_thresholds object for the revenue assurance thresholds you have set. If it finds that a threshold has been crossed, it generates a notification event that causes the PCM_OP_PROCESS_AUDIT_POL_ALERT policy opcode to prepare and send an email. You can customize the opcode to change the default alert behavior. See "Customizing Alert Behavior" for more information.
Use this command to run the pin_ra_check_thresholds utility:
pin_ra_check_thresholds
See "pin_ra_check_thresholds" for more information.
Important: The pin_ra_check_thresholds utility needs a configuration (pin.conf) file in the directory from which you run the utility. See "Creating Configuration Files for BRM Utilities" in BRM System Administrator's Guide for more information.

Generating Revenue Assurance Alerts
6-10 BRM Collecting Revenue Assurance Data

7
Using Revenue Assurance Aggregation Scenarios 7-1
7Using Revenue Assurance AggregationScenarios
This chapter describes the aggregation scenarios provided to collect revenue assurance data from Oracle Communications Billing and Revenue Management (BRM) pipeline batch rating.
Before you read this chapter, you should be familiar with these concepts:
■ Pipeline batch rating and aggregation scenarios. See "About Pipeline Rating" in BRM Configuring Pipeline Rating and Discounting and the discussion of aggregation scenarios in the Pricing Center Help for more information.
■ How Revenue Assurance Manager uses control points and aggregation scenarios. See "About Control Points" and "About Aggregation Scenarios" for more information.
About Aggregation ScenariosAggregation scenarios specify the data that is collected by Revenue Assurance Manager from pipeline batch rating. You must specify an aggregation scenario at every control point you set up in the pipeline.
Revenue Assurance Manager includes scenarios that are suitable for use in a production system. These scenarios group revenue assurance data in different ways. See "Data Fields Collected by All Scenarios" for a list of the fields from which the scenarios collect data. See "Fields Used to Group Scenario Data" for a list of the fields by which the scenarios can group data.
For example, the EDR statistics for scenario RA_03 are grouped by service type, such as TEL, SMS, or GPRS. Data, such as event count, retail charged amount, and so on, is aggregated for each service type.
Most of the scenarios group by combinations of grouping fields. For example, scenario RA_04 groups fields by both service type (TEL, SMS, and so on) and EDR status (duplicate, rejected, written-off or successful). Data is aggregated separately for each combination; duplicate EDRs for the SMS service, for example.
If the preconfigured scenarios do not meet your business needs, you can also create your own. For details, see "Creating New Aggregation Scenarios for Revenue Assurance" and instructions for defining aggregation scenarios in Pricing Center Help.
Note: Custom scenarios require custom UEL templates and cannot be used with Revenue Assurance Center.

Data Fields Collected by All Scenarios
7-2 BRM Collecting Revenue Assurance Data
Before you can use the preconfigured scenarios, you must load them into the pipeline database. See "Loading Scenarios into the Pipeline Manager Database" for instructions.
Data Fields Collected by All ScenariosAll of the preconfigured aggregation scenarios collect statistics from the EDR fields listed in Table 7–1:
Fields Used to Group Scenario DataThe EDR data fields in Table 7–2 are available to use for grouping data.
Preconfigured Aggregation Scenario DetailsTable 7–3 provides information about the Revenue Assurance Manager preconfigured aggregation scenarios.
Table 7–1 All Scenarios Data Fields
Field Description
Event count Number of EDRs.
Retail charged amount Retail charged amount collected.
Event wholesale value Total wholesale amount charged for the EDR, if appropriate.
Discount amount Discount amount applied.
Duration Total usage time, in seconds, if appropriate (for example, for a voice call).
Volume sent Data transferred in bytes, if appropriate (for example, for a GPRS event).
Volume received Data received in bytes, if appropriate (for example, for a GPRS event).
Earliest call made The earliest call start timestamp.
Latest call made The latest call start timestamp.
Table 7–2 Grouping Data Fields
Grouping Field Description
Batch ID Batch ID of the batch being processed.
Original batch ID Mediation batch ID of the rerating or recycling EDR batches.
Suspended from batch ID The batch ID from which the EDR was suspended.
Service type Type of service, such as TEL, SMS, or GPRS.
Revenue stream Retail, Wholesale, or Roaming.
Output stream The output stream of the EDR. This is based on the service type; for example, if the service type is SMS, the output stream is SMS.
EDR status Success, Suspense, Duplicate, Discard, Rejected, or Skipped.
Suspense code Suspense reason code assigned to the EDR.

Preconfigured Aggregation Scenario Details
Using Revenue Assurance Aggregation Scenarios 7-3
Table 7–3 RA Manager Preconfigured Aggregation Scenarios
Scenario/ File Name
Collects Data for an EDR Batch Based On
Grouping Fields (Listed in the Grouping Order) Storable Class
Installation Point
iScripts Required
RA_01, Batchstatat_simple
An EDR batch. Batch ID, Original batch ID, Suspended from batch ID
/process_audit/batchstat/simple
Anywhere in a pipeline
None
RA_02, BatchStat_status
EDR Status. Batch ID, Original batch ID, Suspended from batch ID, EDR status
/process_audit/batchstat/status
Anywhere in a pipeline
ISC_SetEDRStatus
RA_03, BatchStat_SvcType
Service type. Batch ID, Original batch ID, Suspended from batch ID, Service type
/process_audit/batchstat/svctype
After FCT_ServiceCodeMap
None
RA_04, BatchStat_SvcTypeStatus
Service type and EDR status.
Using this scenario, you can find the number of records that are duplicate, rejected, or successful for each service type.
Batch ID, Original batch ID, Suspended from batch ID, Service type, EDR status
/process_audit/batchstat/svctype_status
After FCT_ServicecodeMap
ISC_SetEDRStatus
RA_05, BatchStat_RevenueStream
Revenue stream.
The revenue streams are: Retail, Wholesale, and Roaming.
Batch ID, Original batch ID, Suspended from batch ID, Revenue stream
/process_audit/batchstat/revstream
After Post Rating
ISC_SetRevenueStream
RA_06, BatchStat_Revenue Stream_Status
Revenue stream and EDR status.
Batch ID, Original batch ID, Suspended from batch ID, Revenue stream, EDR status
/process_audit/batchstat/revstream_status
After Post Rating
ISC_SetRevenueStream, ISC_SetEDRStatus
RA_07, BatchStat_RevenueStream_SvcType
Revenue stream and service type.
Batch ID, Original batch ID, Suspended from batch ID, Revenue stream, Service type
/process_audit/batchstat/revstream_svctype
After Post Rating
ISC_SetRevenueStream
RA_08, BatchStat_RevenueStream_ServiceType_Status
Revenue stream, service type, and EDR status.
Batch ID, Original batch ID, Suspended from batch ID, Revenue stream, Service type, EDR status
/process_audit/batchstat/revstream_svctype_status
After Post Rating
ISC_SetRevenueStream, ISC_SetEDRStatus
RA_09, BatchStat_SvcType_RevenueStream
Service type and the revenue stream.
Batch ID, Original batch ID, Suspended from batch ID, Revenue stream, Service type
/process_audit/batchstat/revstream_status_svctype
After Post Rating
ISC_SetRevenueStream
RA_10, BatchStat_ServiceType_RevenueStream_Status
Service type, revenue stream, and EDR status.
Batch ID, Original batch ID, Suspended from batch ID, Revenue stream, Service type, EDR status
/process_audit/batchstat/svctype_revstream_status
After Post Rating
ISC_SetRevenueStream, ISC_SetEDRStatus

Preconfigured Aggregation Scenario Details
7-4 BRM Collecting Revenue Assurance Data
RA_11, BatchStat_Outputstream
Output stream. Batch ID, Original batch ID, Suspended from batch ID, Output stream
/process_audit/batchstat/outputstream
Just before output
ISC_SetOutputStream
RA_12, BatchStat_ServiceType_RevenueStream_Outputstream
Service type, revenue stream, and output stream.
Batch ID, Original batch ID, Suspended from batch ID, Output stream, Service type, Revenue stream
/process_audit/batchstat/svctype_revstream_outputstream
Just before output
ISC_SetRevenueStream and ISC_SetOutputStream
RA_13, BatchStat_Suspense
Suspense reason code. Batch ID, Original batch ID, Suspended from batch ID, Suspense code
/process_audit/batchstat/suspense
After FCT_Suspense
None
RA_14, BatchStat_ServiceType_RevenueStream_Status_Outputstream
Service type, revenue stream, EDR status, and output stream.
Batch ID, Original batch ID, Suspended from batch ID, Service type, Revenue stream, EDR status, Output stream
/process_audit/batchstat/svctype_revstream_status_outputstream
Just before output
ISC_SetRevenueStream, ISC_SetOutputStream, and ISC_SetEDRStatus
Table 7–3 (Cont.) RA Manager Preconfigured Aggregation Scenarios
Scenario/ File Name
Collects Data for an EDR Batch Based On
Grouping Fields (Listed in the Grouping Order) Storable Class
Installation Point
iScripts Required
8
Customizing Revenue Assurance Manager 8-1
8Customizing Revenue Assurance Manager
This chapter describes how to customize Oracle Communications Billing and Revenue Management (BRM) Revenue Assurance Manager.
See "Understanding Revenue Assurance Manager" for general information about Revenue Assurance Manager and its capabilities.
To customize Revenue Assurance Manager, you should have knowledge of the Pipeline Manager system architecture, BRM system architecture, PCM opcodes, flists, storable classes, aggregation scenarios, iScripts, and iRules. For more information, see:
■ BRM Concepts
■ BRM System Administrator's Guide
■ BRM Developer's Guide
About the Revenue Assurance Manager OpcodesRevenue Assurance Manager uses these Process Audit FM standard opcodes:
■ PCM_OP_PROCESS_AUDIT_CREATE
This opcode creates audit objects for revenue assurance. It is called by PCM_OP_BILL_MAKE_BILL_NOW and PCM_OP_BILL_MAKE_BILL_ON_DEMAND and the UE Loader.
This opcode performs the following actions:
– Reads the primary database ID for storing /process_audit objects.
– Calls the PCM_OP_PROCESS_AUDIT_CREATE_AND_LINK opcode to create /process_audit/batchstat objects.
– Calls the PCM_OP_PROCESS_AUDIT_POL_CREATE policy opcode to validate data and check for duplicate objects.
– Calls PCM_OP_CREATE_OBJ to create audit objects.
■ PCM_OP_PROCESS_AUDIT_CREATE_AND_LINK
This opcode creates /process_audit/batchstat objects and links them together.
This opcode performs the following actions:
– Calls the PCM_OP_PROCESS_AUDIT_POL_CREATE_AND_LINK policy opcode to check for duplicate objects and entries.
– Calls the PCM_OP_PROCESS_AUDIT_LINK opcode to create the necessary links between /process_audit/batchstat objects.

About the Revenue Assurance Manager Opcodes
8-2 BRM Collecting Revenue Assurance Data
■ PCM_OP_PROCESS_AUDIT_LINK
This opcode links /process_audit/batchstat objects according to the configuration specified in the /config/link_controlpoint object.
■ PCM_OP_PROCESS_AUDIT_CREATE_WRITEOFF_SUMMARY
This opcode creates a summary of a write-off operation. It is triggered by a notification event generated by Suspense Manager when a suspended EDRs are written off. This opcode gets information about the written-off EDRs from the notification event, including the EDR’s suspended batch ID and its original batch ID.
■ PCM_OP_PROCESS_AUDIT_SEARCH
This opcode searches for and returns revenue assurance data from groups of /process_audit/batchstat objects.
You pass in:
– A /process_audit/batchstat object subclass type.
– A control point name.
– The detailed grouping or summary data you want.
– The type of search to perform.
The opcode returns the relevant statistics.
Using Policy Opcodes to Customize Revenue Assurance ManagerYou can use the following policy opcodes to customize Revenue Assurance Manager:
■ PCM_OP_PROCESS_AUDIT_POL_CREATE
See "Customizing Audit Object Validation" for more information.
■ PCM_OP_PROCESS_AUDIT_POL_CREATE_AND_LINK
See "Customizing /process_audit/batchstat Object Validation" for more information.
■ PCM_OP_PROCESS_AUDIT_POL_ALERT
See "Customizing Alert Behavior" for more information.
■ PCM_OP_PROCESS_AUDIT_POL_CREATE_WRITEOFF_SUMMARY
See "Customizing the Revenue Assurance Written-Off EDR Summaries" for more information.
Customizing Audit Object ValidationThe PCM_OP_PROCESS_AUDIT_POL_CREATE policy opcode checks for duplication of audit objects and validates audit data. It is called by the PCM_OP_PROCESS_AUDIT_CREATE opcode.
This policy opcode performs the following actions:
■ Checks for duplicate objects and validates data.
■ Performs validation only if there are no duplicate audit objects.
The opcode returns any validated data and duplicate records.

About the Revenue Assurance Manager Opcodes
Customizing Revenue Assurance Manager 8-3
You can customize PCM_OP_PROCESS_AUDIT_POL_CREATE by modifying the fields in the flist, modifying duplicate checks, and adding validation checks.
Customizing /process_audit/batchstat Object ValidationTo validate /process_audit/batchstat objects, use the PCM_OP_PROCESS_AUDIT_POL_CREATE_AND_LINK policy opcode.
This opcode checks for duplication of audit objects and entries. It is called by PCM_OP_PROCESS_AUDIT_CREATE_AND_LINK.
You can customize this opcode by modifying the fields in the flist, modifying duplicate checks, and adding validation checks.
This opcode sets and returns errors if there are any duplicate objects or entries, otherwise it returns the POIDs of the /process_audit/batchstat objects.
Customizing Alert BehaviorRevenue Assurance Manager uses the PCM_OP_PROCESS_AUDIT_POL_ALERT policy opcode to send email alerts when configured threshold values are crossed. See "Configuring Email Alerts" for information on configuring email alerts.
PCM_OP_PROCESS_AUDIT_POL_ALERT reads the details of the alert from the notification event and sends an alert email message using the details in the /config/ra_alerts object. These details include the recipient e-mail addresses, the locale to be used for subject, and the message body text.
PCM_OP_PROCESS_AUDIT_POL_ALERT calls the PCM_OP_DELIVERY_MAIL_SENDMSGS opcode to send email messages using dm_email.
You can customize this opcode to notify an external system or change email. For example, you may want to send alerts via text messages or collect alert information in error logs in addition to sending emails.
Customizing the Revenue Assurance Written-Off EDR SummariesAfter Suspense Manager writes off an EDR, Revenue Assurance Manager creates a summary of the EDR by calling the PCM_OP_PROCESS_AUDIT_POL_CREATE_WRITEOFF_SUMMARY policy opcode. You can change this process by adding custom code to this opcode.
By default, PCM_OP_PROCESS_AUDIT_POL_PREPARE_WRITEOFF_SUMMARY reads fields from /suspended_usage/telco object and maps them to fields in the /process_audit/batchstat/status object. Table 8–1 below shows the mapping; the new fields are grouped by Batch ID and Original batch ID:
Table 8–1 RA Manager Field Mapping
Maps these Fields in /suspended_usage/telcoTo these Fields in /process_audit/batchstat/status
PIN_FLD_BYTES_IN PIN_FLD_VOLUME_RECEIVED
PIN_FLD_BYTES_OUT PIN_FLD_BYTES_VOLUME_SEND
PIN_FLD_BYTES_CALL_DURATION PIN_FLD_BYTES_EVENT_DURATION
PIN_FLD_BYTES_EDR_COUNT PIN_FLD_BYTES_EDR_COUNT

Creating New Aggregation Scenarios for Revenue Assurance
8-4 BRM Collecting Revenue Assurance Data
PCM_OP_PROCESS_AUDIT_POL_PREPARE_WRITEOFF_SUMMARY sets and returns errors if there are any objects other than /suspended_usage/telco objects in the input flist.
You can change the behavior of PCM_OP_PROCESS_AUDIT_POL_PREPARE_WRITEOFF_SUMMARY to read and aggregate any fields of the /suspended_usage storable class and its subclasses. The opcode can then map this data to corresponding fields in the /process_audit/batchstat/status storable class.
Creating New Aggregation Scenarios for Revenue AssuranceRevenue Assurance Manager uses aggregation scenarios to group the data that it collects from the pipeline. If the aggregation scenarios provided with Revenue Assurance Manager do not meet you needs, you can create your own.
See "About Aggregation Scenarios" for more information on how Revenue Assurance Manager uses aggregation scenarios.
To create your own aggregation scenarios:
1. Create an aggregation scenario by using Pricing Center.
See the discussion of working with aggregation scenarios in Pricing Center Help.
2. Create the appropriate /process_audit/batchstat subclasses.
See "Creating Custom Fields and Storable Classes" in BRM Developer's Guide for more information.
3. Create the XML templates used by Universal Event (UE) Loader to load the aggregation data generated by the new scenario.
For more information on how to create new UE Loader templates, see Developer Center Help.
4. Modify the PCM_OP_PROCESS_AUDIT_POL_CREATE_AND_LINK policy opcode to check for duplication of records in the newly created /process_audit object.
See "Customizing /process_audit/batchstat Object Validation" for more information.
Changing the Control Point for Data on Written-Off EDRsThe control point ID to collect revenue assurance data on written-off EDRs is configured in the Connection Manager configuration file (BRM_Home/sys/cm/pin.conf). See "About Collecting Revenue Assurance Data on Written-Off EDRs" for more information.
Note: You cannot view data from custom scenarios in Revenue Assurance Center.
Note: The new subclasses created must contain an array field of type PIN_FLD_GROUP_DETAILS. The PIN_FLD_ORIGINAL_BATCHID field must also be created in the array.

Customizing Revenue Assurance Center
Customizing Revenue Assurance Manager 8-5
To change the control point ID:
1. Open the Connection Manager (CM) BRM_Home/sys/cm/pin.conf file in a text editor.
2. Change the control point ID in the writeoff_control_point_id entry.
The default control point ID is CP_SuspenseWriteOff.
3. Save and close the file.
4. Stop and restart the CM.
See the discussion of starting and stopping the BRM system in BRM System Administrator's Guide for more information.
Customizing Revenue Assurance CenterYou can use the racustom.properties file to customize some features in Revenue Assurance Center. The file is located in Revenue Assurance Center_home\RevenueAssuranceCenter\lib.
The racustom.properties file contains the following text:
# racustom.properties# Revenue Assurance Center's customizable properties file# RA Details screen default view by option is configured using the # following key. The valid value for this key should be any of 0 #or 1 or 2 or 3 or 4#Service Type = 0#BatchID = 1#Revenue Stream = 2#Output Stream = 3#Suspense Reason = 4ra.ratingdetail.default.viewby.value=0ra.reratingdetail.default.viewby.value=0ra.status.success=Successra.status.suspended=Suspensera.status.writtenoff=WRITTEN-OFFra.searchdlg.rating.servicetype.items=SMS,GSMra.searchdlg.rating.revenuestream.items=Wholesale,Retailra.searchdlg.rerating.servicetype.items=SMS,GSMra.searchdlg.rerating.revenuestream.items=Wholesale,Retailra.common.currency.symbol=$ra.common.decimal.separator=.ra.common.currentlocale=en
The file specifies:
■ The option settings from the Revenue Assurance Center Customize Table dialog box.
■ The default grouping parameter for the Revenue Assurance Center Details screen. The Details screen displays revenue assurance data organized by the default grouping parameter.
You can manually change this default configuration by changing the number value in the strings of this type:
ra.ratingdetail.default.viewby.value=0
The line above shows Service Type selected as the default. If you change 0 to 2, your default option becomes Revenue Stream.

Customizing Revenue Assurance Center
8-6 BRM Collecting Revenue Assurance Data
■ The Service type search options in the rating and rerating Search dialog box.
Add service types to these lines to add search options to the dialog box:
ra.searchdlg.rating.servicetype.items=SMS,GSMra.searchdlg.rerating.servicetype.items=SMS,GSM
■ The revenue stream options in the rating and rerating Search dialog boxes.
Add revenue streams to these lines to add search options to the dialog box:
ra.searchdlg.rating.revenuestream.items=Wholesale,Retailra.searchdlg.rerating.revenuestream.items=Wholesale,Retail
■ The default system currency. The default is US Dollars (ISO code 840); you can change this to any other currency type. To change the default currency to Euros, use the Unicode escape sequence code shown below:
ra.common.currency.symbol=\u20AC
■ The default decimal separator (.) for the default currency. If the default currency is changed from US Dollars to euros, change the decimal separator to a comma (,).
ra.common.decimal.separator=,
■ The current locale of the BRM server in which CM is running. You can change this locale if necessary. The default setting is English.
ra.common.currentlocale=en
Table 8–2 lists the additional locales that are supported:
Table 8–2 Supported Locales
Language Locale
German de
Portuguese (Brazilian) pt_BR
Japanese ja
Spanish es
French fr
Italian it
9
Revenue Assurance Utilities 9-1
9Revenue Assurance Utilities
This chapter provides reference information for Oracle Communications Billing and Revenue Management (BRM) revenue assurance utilities.
load_ara_config_object
9-2 BRM Collecting Revenue Assurance Data
load_ara_config_object
Use the load_ara_config_object utility to specify how to check for duplicate audit objects. This utility loads data into the /config/process_audit_conf object in the Oracle Communications Billing and Revenue Management (BRM) database.
9LocationBRM_Home/bin
9Syntaxload_ara_config_object pin_config_audit_conf_file
9Parameters
pin_config_audit_conf_fileThe name and location of the file that defines the /process_audit object fields used for performing duplicate checks. By default, the utility uses the BRM_Home/sys/data/config/pin_config_audit_conf file.
If you run the command in a different directory from where the pin_config_audit_conf file is located, you must include the entire path for the file.
9ResultsThe load_ara_config_object utility notifies you only if it encounters errors. Look in the default.pinlog file for errors. This file is either in the directory from which the utility was started, or in a directory specified in the utility configuration file.
Caution: The load_ara_config_object utility overwrites existing /config/process_audit_conf objects. If you are updating existing configuration data, you cannot load new configuration data only. You must load complete sets of configuration data each time you run the load_ara_config_object utility.
Important: To connect to the BRM database, the load_ara_config_object utility needs a configuration file in the directory from which you run the utility. See "Creating Configuration Files for BRM Utilities" in BRM System Administrator's Guide for more information.
Tip: The file must be named pin_config_audit_conf.

load_pin_config_batchstat_link
Revenue Assurance Utilities 9-3
load_pin_config_batchstat_link
The load_pin_config_batchstat_link utility loads linking data into the /config/link_batchstat object in the Oracle Communications Billing and Revenue Management (BRM) database.
9LocationBRM_Home/bin
9Syntaxload_pin_config_batchstat_link pin_config_batchstat_link_file
9Parameters
pin_config_batchstat_link_fileThe name and location of the file that defines the linking data objects. The default pin_config_batchstat_link file is in BRM_Home/sys/data/config/pin_config_batchstat_link.
If you load the pin_config_batchstat_link file from a different directory, you must include the entire path for the file.
9ResultsIf the utility does not notify you that it was successful, look in the default.pinlog file to find any errors. This file is either in the directory from which the utility was started or in a directory specified in the utility configuration file.
Caution: The load_pin_config_batchstat_link utility overwrites existing /config/link_batchstat objects. If you are updating existing linking data, you cannot load new linking data only. You must load complete sets of linking data each time you run the load_pin_config_batchstat_link utility.
Important: To connect to the BRM database, the load_pin_config_batchstat_link utility needs a configuration file in the directory from which you run the utility. See "Creating Configuration Files for BRM Utilities" in BRM System Administrator's Guide for more information.
Tip: If you copy the pin_config_batchstat_link file to the directory from which you run the load_pin_config_batchstat_link utility, you do not have to specify the path or file name.
load_pin_config_controlpoint_link
9-4 BRM Collecting Revenue Assurance Data
load_pin_config_controlpoint_link
The load_pin_config_controlpoint_link utility loads control point linking data into the config/link_controlpoint object in the Oracle Communications Billing and Revenue Management (BRM) database.
9LocationBRM_Home/bin
9Syntaxload_pin_config_controlpoint_link pin_config_controlpoint_link
9Parameters
pin_config_controlpoint_linkThe name and location of the file that defines the linking data objects. The default pin_config_controlpoint_link file is in BRM_Home/sys/data/config/pin_config_controlpoint_link.
If you load the pin_config_controlpoint_link file from a different directory, you must include the entire path for the file.
9ResultsIf the utility does not notify you that it was successful, look in the default.pinlog file to find any errors. This file is either in the directory from which the utility was started or in a directory specified in the utility configuration file.
Note: This utility does not support branding.
Caution: The load_pin_config_controlpoint_link utility overwrites existing /config/link_controlpoint objects. If you are updating existing linking data, you cannot load new linking data only. You must load complete sets of linking data each time you run the load_pin_config_controlpoint_link utility.
Important: To connect to the BRM database, the load_pin_config_controlpoint_link utility needs a configuration file in the directory from which you run the utility. See "Creating Configuration Files for BRM Utilities" in BRM System Administrator's Guide for more information.
Tip: If you copy the pinonfig_controlpoint_link file to the directory from which you run the load_pin_config_controlpoint_link utility, you do not have to specify the path or file name.

load_pin_config_ra_alerts
Revenue Assurance Utilities 9-5
load_pin_config_ra_alerts
Use the load_pin_config_ra_alerts utility to configure email details in the /config/ra_alerts object in the Oracle Communications Billing and Revenue Management (BRM) database. You define these email details in the pin_config_ra_alerts file in BRM_Home/sys/data/config.
See "Configuring Email Alerts" in BRM Collecting Revenue Assurance Data for more information.
9LocationBRM_Home/bin
9Syntaxload_pin_config_ra_thresholds pin_config_ra_alerts
9Parameters
pin_config_ra_alertsThe name and location of the file that contains the configured alert. The default pin_config_ra_alerts file is in BRM_Home/sys/data/config.
The pin_config_ra_alerts file contains the rules for configuring email details and includes an example. You can customize this example and configure your email details.
If you do not run the utility from the directory in which the file is located, you must include the complete path to the file, for example:
load_pin_config_ra_thresholds BRM_Home/sys/data/config/pin_config_ra_alerts
9ResultsThe load_pin_config_ra_alerts utility notifies you when it successfully creates the /config/ra_alerts object. Otherwise, look in the default.pinlog file for errors. This file is
Caution: The load_pin_config_ra_alerts utility overwrites existing /config/ra_alerts objects. If you are updating revenue assurance alerts, you cannot load new alerts only. You must load complete sets of alerts each time you run the load_pin_config_ra_alerts utility.
Important: To connect to the BRM database, the load_pin_config_ra_alerts utility needs a configuration file in the directory from which you run the utility. See "Creating Configuration Files for BRM Utilities" in BRM System Administrator's Guide for more information.
Tip: If you copy the pin_config_ra_alerts file to the directory from which you run the load_pin_config_ra_alerts utility, you do not have to specify the path or file name. The file must be named pin_config_ra_alerts.

load_pin_config_ra_alerts
9-6 BRM Collecting Revenue Assurance Data
either in the directory from which the utility was started or in a directory specified in the utility configuration file.
To verify that the alerts were loaded, display the /config/ra_alerts object by using the Object Browser, or use the robj command with the testnap utility. See "Reading an Object and Writing its Contents to a File" in BRM Developer's Guide for more information.

load_pin_config_ra_flows
Revenue Assurance Utilities 9-7
load_pin_config_ra_flows
Use the load_pin_config_ra_flows utility to load revenue assurance flows into the /config/ra_flows object in the Oracle Communications Billing and Revenue Management (BRM) database. You define the flows in the pin_config_ra_flows file in BRM_Home/sys/data/config.
See "Adding Control Points to Flows" in BRM Collecting Revenue Assurance Data for more information.
9LocationBRM_Home/bin
9Syntaxload_pin_config_ra_flows pin_config_ra_flows
9Parameters
pin_config_ra_flows The name and location of the file that contains the configured flows. The default pin_config_ra_flows file is in BRM_Home/sys/data/config.
The pin_config_ra_flows file contains the rules for configuring flows and includes an example. You can customize this example and configure flows.
If you do not run the utility from the directory in which the file is located, you must include the complete path to the file, for example:
load_pin_config_ra_flow BRM_Home/sys/data/config/pin_config_ra_flows
9ResultsThe load_pin_config_ra_flows utility notifies you when it successfully creates the /config/ra_flows object. Otherwise, look in the default.pinlog file for errors. This file is either in the directory from which the utility was started or in a directory specified in the utility configuration file.
Caution: The load_pin_config_ra_flows utility overwrites existing flows. If you are updating flows, you cannot load new flows only. You must load complete sets of flows each time you run the load_pin_config_ra_flows utility.
Important: To connect to the BRM database, the load_pin_config_ra_flows utility needs a configuration file in the directory from which you run the utility. See "Creating Configuration Files for BRM Utilities" in BRM System Administrator's Guide for more information.
Tip: If you copy the pin_config_ra_flows file to the directory from which you run the load_pin_config_ra_flows utility, you do not have to specify the path or file name. The file must be named pin_config_ra_flows.

load_pin_config_ra_flows
9-8 BRM Collecting Revenue Assurance Data
To verify that the flows were loaded, display the /config/ra_flows object by using the Object Browser, or use the robj command with the testnap utility. See "Reading an Object and Writing its Contents to a File" in BRM Developer's Guide for more information.

load_pin_config_ra_thresholds
Revenue Assurance Utilities 9-9
load_pin_config_ra_thresholds
Use the load_pin_config_ra_thresholds utility to load revenue assurance alert threshold details into the /config/ra_thresholds object in the Oracle Communications Billing and Revenue Management (BRM) database. You define these thresholds in the pin_config_ra_thresholds file in BRM_Home/sys/data/config.
See "Configuring Alert Thresholds" in BRM Collecting Revenue Assurance Data for more information.
9LocationBRM_Home/bin
9Syntaxload_pin_config_ra_thresholds pin_config_ra_thresholds
9Parameters
pin_config_ra_thresholdsThe name and location of the file that contains the configured threshold details. The default pin_config_ra_thresholds file is in BRM_Home/sys/data/config.
The pin_config_ra_thresholds file contains the rules for configuring thresholds and includes an example. You can customize this example and configure thresholds.
If you do not run the utility from the directory in which the file is located, you must include the complete path to the file, for example:
load_pin_config_ra_thresholds BRM_Home/sys/data/config/pin_config_ra_thresholds
9ResultsThe load_pin_config_ra_thresholds utility notifies you when it successfully creates the /config/ra_thresholds object. Otherwise, look in the default.pinlog file for errors. This file is either in the directory from which the utility was started, or in a directory specified in the utility configuration file.
Caution: The load_pin_config_ra_thresholds utility overwrites existing thresholds. If you are updating revenue assurance thresholds, you cannot load new thresholds only. You must load complete sets of thresholds each time you run the load_pin_config_ra_thresholds utility.
Important: To connect to the BRM database, the load_pin_config_ra_thresholds utility needs a configuration file in the directory from which you run the utility. See "Creating Configuration Files for BRM Utilities" in BRM System Administrator's Guide for more information.
Tip: If you copy the pin_config_ra_thresholds file to the directory from which you run the load_pin_config_ra_thresholds utility, you do not have to specify the path or file name. The file must be named pin_config_ra_thresholds.

load_pin_config_ra_thresholds
9-10 BRM Collecting Revenue Assurance Data
To verify that the alert thresholds were loaded, display the /config/ra_thresholds object by using the Object Browser, or use the robj command with the testnap utility.See "Reading an Object and Writing its Contents to a File" in BRM Developer's Guide for more information.

pin_ra_check_thresholds
Revenue Assurance Utilities 9-11
pin_ra_check_thresholds
Use the pin_ra_check_thresholds utility to notify you when the /config/re_thresholds object contains revenue assurance alerts. Alerts are loaded into this object if the revenue assurance thresholds you have configured are crossed.
See "Configuring Alert Thresholds" in BRM Collecting Revenue Assurance Data for more information.
9LocationBRM_Home/bin
9Syntaxpin_ra_check_thresholds
9ParametersThere are no parameters for the pin_ra_check_thresholds utility.
9ResultsThe pin_ra_check_thresholds utility returns the values listed in "Return Values" and logs other information in the revenue assurance log file. This log file is either in the directory from which this utility was started or in a directory specified in the utility configuration file.
9Return Valuespin_ra_check_thresholds returns the following:
■ 0 - on success
■ 1 - error opening the PCM connection
■ 2 - /config/thresholds object not present
■ 3 - all other errors
Important: To connect to the Oracle Communications Billing and Revenue Management (BRM) database, the pin_ra_check_thresholds utility needs a configuration file in the directory from which you run the utility. See "Creating Configuration Files for BRM Utilities" in BRM System Administrator's Guide for more information. You can change the configuration logfile and loglevel entries as needed.

pin_ra_check_thresholds
9-12 BRM Collecting Revenue Assurance Data