aar quick reference guide sureclose - arizona · pdf fileaar quick reference guide ......
TRANSCRIPT

AAR Quick Reference Guide
SureClose® Basic View for Agents


Preface
AAR Quick Reference Guide – SureClose® Basic View for Agents 1
Preface
The Arizona Association of REALTORS® Business Services team is here to assist you with
any questions that you might have regarding SureClose®. However, you should always
ask your company’s SureClose® Site Administrator first. If they don’t have the answer,
then we will be happy to help.
Business Services Team
Our team is responsible for support all the applications that Arizona Association of
REALTORS® offers to its members as a member benefit. The team members are:
Nick Catanesi – Director of Business Services
Dan Howells – Business Application Specialist
Diane Martin – Business Application Specialist
Niki Burridge – Business Application Specialist
Susan Carroll-Hamblen – Business Application Specialist
Hours
We are available Monday through Friday from 8 a.m. to 5 p.m. to answer your questions.
You can use the following methods to contact us:
Local Support Hotline: 480.304.8930
Toll Free Support Hotline: 866.833.7357
Email: [email protected]
NOTE: The Arizona Association of REALTORS® is closed on the following
holidays: New Years Day, Martin Luther King Day, President’s Day,
Memorial Day, Independence Day, Labor Day, Columbus Day,
Veteran’s Day, Thanksgiving, the Friday after Thanksgiving, and
Christmas.

Preface
2 AAR Quick Reference Guide – SureClose® Basic View for Agents
Reference Information
Our website (www.aaronline.com/tm) contains the following information:
Tutorial Videos
Handouts for you to download
Links to download the printer driver
SureClose® Process
Every office has its own process for using SureClose®, but the basic steps are just about
the same for every company:
1. An agent obtains a listing or an accepted contract.
2. The agent fills out a New File Request and forwards it to their office.
3. An office employee creates the appropriate file in SureClose®. SureClose®
automatically sends an email to the agent letting them know the file has been
created.
4. The agent uploads their documents. An email is automatically sent to the broker
letting them know there are documents to review.
5. The broker or designated reviewer logs in to the Document Review Tool and
searches for all new documents to be reviewed.
6. The broker completes a review of each new file or document, and sends emails to
the agent to let them know what is missing or needs to be fixed.
7. The office employee (or broker) reviews the file in SureClose® to delete any
unnecessary placeholders or add additional placeholders that might be needed.
They also delete any tasks that do not apply to the transaction.
8. The agent sends messages to their client through SureClose® to maintain a record
of the messages within the file and keep the file current.
9. The agent continues to upload executed documents as they receive them until the
listing expires or the transaction closes escrow.
10. The office employee completes a final check of the file when the transaction is
finished and then archives the file.

Preface
AAR Quick Reference Guide – SureClose® Basic View for Agents 3
Arizona Department of Real Estate Information
The Arizona Department of Real Estate (ADRE) requires brokers to maintain written
policies, procedures, and systems for their firms. In many cases, the brokers’ staff will
continue the same roles and responsibilities after starting with transaction management
(TM) as they did before. However, ADRE holds brokers directly responsible for who
handles real estate documents, what they do with those documents, how they are
compensated, etc. We strongly recommend that brokers using AAR TM review
their policy manuals to ensure they are within ADRE compliance. AAR will make
suggestions and recommendations regarding AAR TM/SureClose® use, however it is
ultimately the broker’s responsibility to know and follow ADRE guidelines regarding
transactions and files.
Brokers should make themselves familiar with the following Substantive Policy Statements
(http://www.azre.gov/LawBook/SubstantivePolicyStatements.aspx):
SPS 2005.04
SPS 2005.10
SPS 2010.01
Brokers should also review Commissioner’s Rule R4-28-1103
(http://www.azsos.gov/public_services/Title_04/4-28.htm).
Direct any specific questions regarding any issue regarding compliance or adherence to
ADRE guidelines to Robin King, Senior Investigator / Manager Auditing & Investigations
Division. Her email address is [email protected].
You can also call the Legal Hotline with questions. You must have a Legal Hotline personal
identification number to access the hotline. If you are a Designated Broker and do not
have a personal identification number, go to http://www.aaronline.com/documents/LH and
click on the Legal Hotline Access Process hyperlink to fill out the appropriate forms.

Preface
4 AAR Quick Reference Guide – SureClose® Basic View for Agents

Table of Contents
AAR Quick Reference Guide – SureClose® Basic View for Agents 5
Table of Contents
Chapter 1. Computer Set-Up ................................................................... 7
Modify Your Internet Explorer Options ................................................... 7
Security Tab .................................................................................................... 8
Privacy Tab ................................................................................................... 10
Download the Printer Driver ................................................................. 11
Your Branded Website .......................................................................... 13
Chapter 2. Agent View Overview ........................................................... 15
My Setup ............................................................................................... 15
My Files ................................................................................................. 16
Sections of the File Screen .................................................................... 17
Property Summary Section ............................................................................ 17
Activities Section ........................................................................................... 18
Documents Section........................................................................................ 19
File Notes Section ......................................................................................... 19
Contacts Section ........................................................................................... 20
Chapter 3. Uploading Documents .......................................................... 23
Green Arrow Icon ................................................................................. 23
SureClose® Printer Driver ...................................................................... 24
Uploading Using the Basic Tab ...................................................................... 24
Uploading Using the Advanced Tab ............................................................... 26
Splitting Documents into Separate Placeholders ........................................... 30
Using the Printer Driver on a Shared Computer............................................. 31

Table of Contents
6 AAR Quick Reference Guide – SureClose® Basic View for Agents

Computer Set-Up
AAR Quick Reference Guide – SureClose® Basic View for Agents 7
Chapter 1. Computer Set-Up
You must make some changes to your computer for SureClose® to function properly. These
changes include modifications to Internet Explorer (the preferred browser), installing a printer
driver, and adding a shortcut to your desktop or a favorite to your favorites list so you can
access SureClose® through your own branded SureClose® website. Follow the instructions in
this chapter to modify the settings on each computer you use to work in SureClose®.
Note: You can use other browsers, such as Mozilla Firefox or Google Chrome,
but your functionality within SureClose® will be limited.
Modify Your Internet Explorer Options
Use the following steps to modify your Internet Explorer options:
1. Open a session of Internet Explorer.
2. Click on the Tools menu and choose Internet Options from the menu. You see the
Internet Options window (Figure 1).
Figure 1
The Internet Options window has seven tabs. However, you only need to modify the
Security and Privacy tabs.

Computer Set-Up
8 AAR Quick Reference Guide – SureClose® Basic View for Agents
Security Tab
Make the following changes to the Security tab (Figure 2):
1. Click on Trusted sites zone and click the Sites button to see Figure 3.
Figure 2
2. Uncheck the Require server verification (https://) for all sites in this zone check box.
3. Type *.sureclose.com in the Add this website to the zone field and click the Add
button.
Figure 3
4. Click the Close button to return to the Security tab.

Computer Set-Up
AAR Quick Reference Guide – SureClose® Basic View for Agents 9
5. Click the Custom level… button in the Security level for this zone section (as shown
in Figure 4) to see Figure 5.
Figure 4
6. Select Low from the Reset custom settings drop-down menu and click the Reset…
button.
7. Click the Yes button to change the settings (Figure 5).
Figure 5
8. Click the OK button to return to the Security tab.

Computer Set-Up
10 AAR Quick Reference Guide – SureClose® Basic View for Agents
Privacy Tab
Make the following changes to the Privacy tab (Figure 6) if you have your Turn on Pop-up
Blocker check box checked:
Figure 6
1. Click the Settings button in the Pop-up Blocker section to see the Pop-up Blocker
Settings window (Figure 7).
Figure 7

Computer Set-Up
AAR Quick Reference Guide – SureClose® Basic View for Agents 11
2. Type sureclose.com in the Address of website to allow field and click the Add button.
3. Click the Close button to return to the Privacy tab.
4. Click the Apply button and then the OK button to exit from the Internet Explorer
Options window.
Download the Printer Driver
Use the following steps to install the SureClose® Printer Driver on your computer:
1. Click on the Start button in the lower left corner of your Windows screen.
2. Right click on Computer (or My Computer) to see a menu of options.
3. Click on Properties to see the System Information window for your computer.
4. Read through the properties to see if you have a 32-bit or 64-bit computer.
NOTE: If you have a computer running Windows XP, it is
automatically a 32-bit computer.
5. Close the System Information window.
6. Go to www.aaronline.com/TM and click on the Downloads section.
7. Choose the appropriate printer driver for your computer. There are two – 32-bit and
64-bit.
8. Click on the Open button to download the file. The folder that opens contains
installation instructions as well as the application file (Figure 8).
Figure 8
Computer Set-Up
12 AAR Quick Reference Guide – SureClose® Basic View for Agents
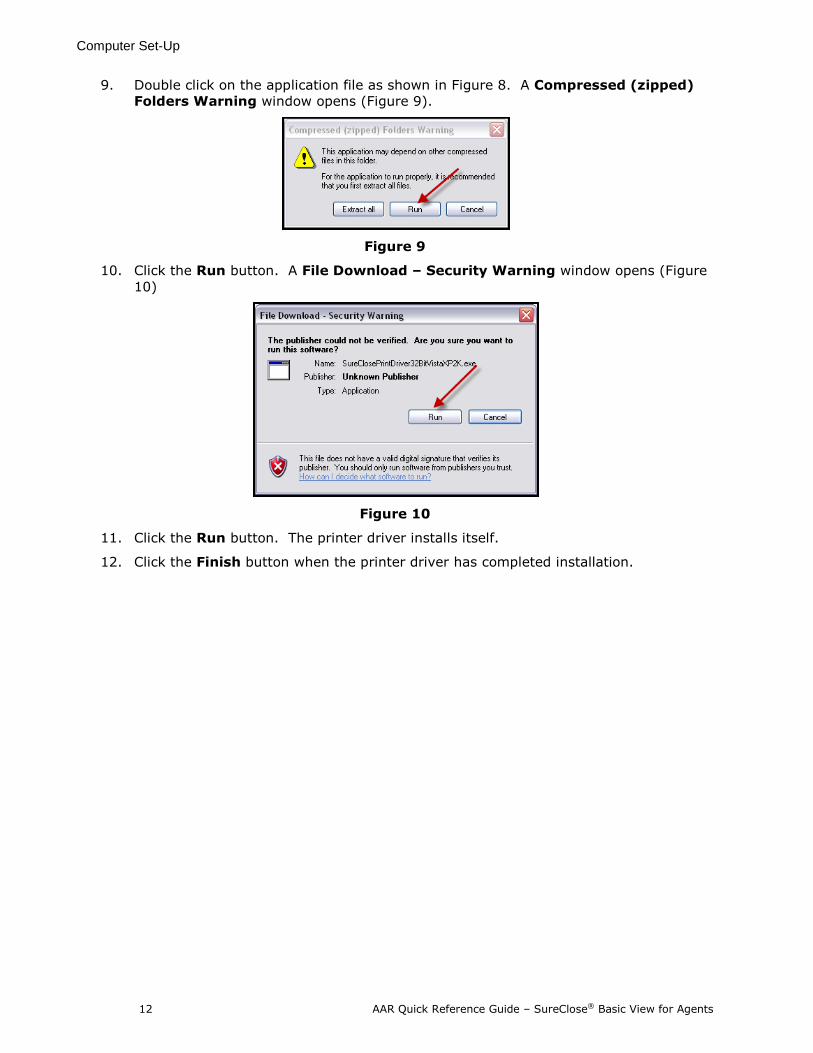
9. Double click on the application file as shown in Figure 8. A Compressed (zipped)
Folders Warning window opens (Figure 9).
Figure 9
10. Click the Run button. A File Download – Security Warning window opens (Figure
10)
Figure 10
11. Click the Run button. The printer driver installs itself.
12. Click the Finish button when the printer driver has completed installation.

Computer Set-Up
AAR Quick Reference Guide – SureClose® Basic View for Agents 13
Your Branded Website
Every real estate brokerage in Arizona using SureClose® has its own branded website that its
agents use to log in to SureClose®. Your system administrator will give you the brand code
for your company’s branded site. You will also see the link (including the brand code) in the
email message you receive with your SureClose® ID and password.
Type https://tm.sureclose.com/brands/login.asp?BrandID=xxx (where xxx is your
company’s brand code) in the address line of Internet Explorer and press Enter. You see your
company’s branded website, which is similar to Figure 11.
Figure 11
You should make this site a short cut on your desktop or add it as a favorite site in your
favorites menu, or both.

Computer Set-Up
14 AAR Quick Reference Guide – SureClose® Basic View for Agents
Agent View Overview
AAR Quick Reference Guide – SureClose® Basic View for Agents 15
Chapter 2. Agent View Overview
The agent view of SureClose® has two Menu Bar items that you will use after logging in:
My Setup
My Files
My Setup
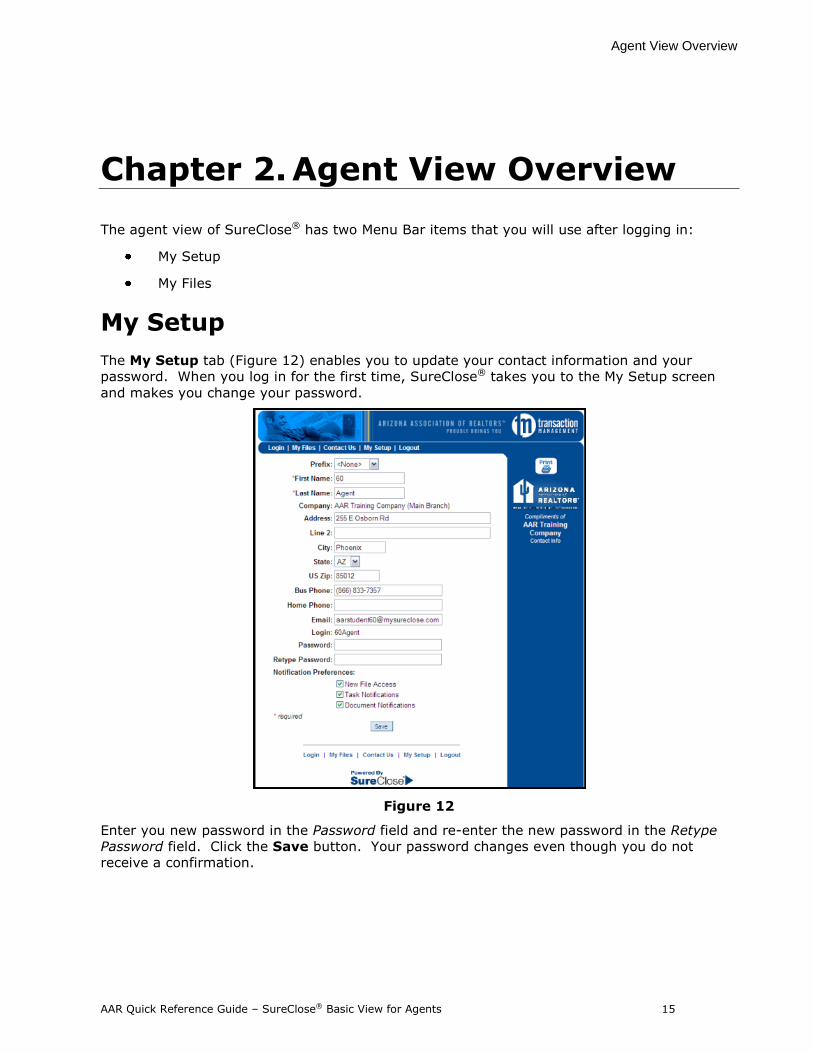
The My Setup tab (Figure 12) enables you to update your contact information and your
password. When you log in for the first time, SureClose® takes you to the My Setup screen
and makes you change your password.
Figure 12
Enter you new password in the Password field and re-enter the new password in the Retype
Password field. Click the Save button. Your password changes even though you do not
receive a confirmation.

Agent View Overview
16 AAR Quick Reference Guide – SureClose® Basic View for Agents
You also want to verify that your Notification Preferences are turned on. The Notification
Preferences are:
New File Access: A notification is sent to your email address when you are added to
a transaction file.
Task Notifications: A notification can be sent to your email address when a task is
due. Ask your SureClose® Site Administrator which of your tasks have notifications
attached.
Document Notifications: A notification can be sent to your email address when a
document is uploaded to a placeholder. Ask your SureClose® Site Administrator
which document placeholders have notifications attached.
My Files
You see a list of your active or archived files on the My Files tab (Figure 13). For your closing
files (files in escrow), the address of the property is displayed, as well as the closing date and
your company’s file number. For your listing files, the address of the property is displayed as
well as the listing date, expiration date, and the MLS number.
To view a particular file, click on the address of the property to see the details of the file.
Figure 13
To see your archived files, click on the Switch to archived files hyperlink. You see a list of
your archived Closing files followed by your archived Listing files. You can filter the list by
typing the street name in the Filter Displayed Files field.
NOTE: You only see the archived files for your current brokerage.

Agent View Overview
AAR Quick Reference Guide – SureClose® Basic View for Agents 17
Sections of the File Screen
When you click on a property address, you see the transaction file displayed on the File
screen. There are six sections to the File screen: Property Summary, Completed Activities,
Scheduled Activities, Documents, File Notes, and Contacts.
Property Summary Section
The Property Summary section (Figure 14) shows you the details of your property. Your
office enters this information when they create your file. You can quickly see the following.
Important dates associated with the file
o Listing acceptance date (listing files)
o Listing expiration date (listing files)
o File start date (listing and closing files)
o File status (listing and closing files)
o Contract acceptance date (closing files)
o Estimated closing date (closing files)
Tracking numbers
o Escrow number
o MLS number
o Title number (not used)
o File number
Legal description
Property description
Figure 14

Agent View Overview
18 AAR Quick Reference Guide – SureClose® Basic View for Agents
Activities Section
The Activities section (Figure 15) shows the activities or tasks you need to complete for your
file. It is divided into two sections: Completed Activities and Scheduled Activities.
Figure 15
Completed Activities Section
You see a list of tasks that have been completed in the Completed Activities section (Figure
16). This section lists the activity and the date and time the activity was completed.
Figure 16
Your buyers and sellers will also be able to see selected items in this section in their view of
the file if they have been invited to log in to SureClose®.
Scheduled Activities Section
You see a list of tasks you need to complete in the Scheduled Activities section and the due
date for each task.
To complete a task, click the checkbox to the left of the task (or tasks), and click the
Complete hyperlink (Figure 17).
The tasks are listed by date due. If a task does not have a due date, it appears at the top of
the list.
Figure 17

Agent View Overview
AAR Quick Reference Guide – SureClose® Basic View for Agents 19
Documents Section
You see all the document placeholders (the place where an executed document is stored)
associated with your transaction file in the Documents section (Figure 18). A green up arrow
to the left of each placeholder signifies that a document needs to be uploaded. A pair of
eyeglasses to the left of each placeholder indicates that the placeholder contains a document.
Seeing neither icon signifies that the placeholder will be filled by another party to the
transaction file (for example, your broker). Click directly on the eyeglasses icon to view a
document. See Chapter 3 for the methods to upload documents into your file.
Figure 18
File Notes Section
The File Notes section (Figure 19) is the conversation log for the transaction file. It contains
emails, records of phone calls, and other comments pertaining to the transaction. These
notes are seen by guests to the file only if your broker or office manager grants the guest
specific access to view the email or comment.
You add your own comments (notes and records of phone calls) to the file by sending yourself
or another team member an email from the Contacts section.
Figure 19

Agent View Overview
20 AAR Quick Reference Guide – SureClose® Basic View for Agents
Contacts Section
You see all the parties to the transaction in the Contacts section (Figure 20) based on the
original file request you submitted to your office. You can view the contact information for an
individual by clicking directly on the person’s name.
Figure 20
Use the following steps to send a message to one or many parties on the file:
1. Click the check box to the left of each name and click the Send Message button.
You see the New Message window (Figure 21).
Figure 21
2. Type your message in the Message field.

Agent View Overview
AAR Quick Reference Guide – SureClose® Basic View for Agents 21
3. Click the Attach documents check box if you want to attach documents to the
message. A list of the documents in the file displays under the message (Figure 22).
Figure 22
4. Click the check boxes to the left of the documents you want to add to the message
5. Click the Send Message button. Any message you send is automatically recorded in
the File Notes section (Figure 23).
Figure 23

Agent View Overview
22 AAR Quick Reference Guide – SureClose® Basic View for Agents

Uploading Documents
AAR Quick Reference Guide – SureClose® Basic View for Agents 23
Chapter 3. Uploading Documents
There are two ways to upload documents in Basic View: using the green arrow icon and using
the SureClose® printer driver. You must have the SureClose® printer driver installed on your
computer to use it.
Green Arrow Icon
The green arrow icon signifies that the document placeholder is empty and ready for a
document to be uploaded. You can use the green arrow icon if you have the individual
document saved on your computer.
Note: This option is available only in Internet Explorer.
Use the following steps to upload a document from your computer to your transaction file in
SureClose®:
1. Click the green arrow to the left of the placeholder to which you want to upload a
document. You see the Upload Document screen (Figure 24).
Figure 24
2. Click the Browse button to display a Windows Browse window.
3. Find the document you need to upload and highlight it by clicking on it.

Uploading Documents
24 AAR Quick Reference Guide – SureClose® Basic View for Agents
4. Click the Open button to start the upload process. You return to the Upload
Document screen.
5. Click the Submit button to upload the document.
SureClose® replaces the green arrow with a pair of eyeglasses to signify that a document has
filled the placeholder. You can click on the eyeglasses to view the document.
NOTE: You cannot use this option if you have multiple documents saved in
one file. You must use the SureClose® printer driver to split the
documents into their respective placeholders.
SureClose® Printer Driver
There are a number of ways to use the SureClose® printer driver depending on the processes
in place in your brokerage.
Uploading Using the Basic Tab
You can use the SureClose® printer driver to upload a New File Request form to an
administrative inbox in SureClose®. Your company might ask you to use this method when
sending a new file request to your office. Ask your System Administrator for your company’s
procedure.
Use the following steps for the Basic tab on the printer driver:
1. Open the document you need to upload and click the Print icon.
2. Select SureClose Upload from your list of printers (Figure 25).
Figure 25

Uploading Documents
AAR Quick Reference Guide – SureClose® Basic View for Agents 25
3. Click the OK button. The SureClose® Print Driver window displays (Figure 26).
Figure 26
4. Type the username for the administrative inbox in the SureClose Username field. Ask
your System Administrator for the correct user name to use.
5. Click the Save check box to save the user name in the field.
6. Click the Upload button to upload the document to the inbox. You receive a
message stating that your document has been uploaded to the inbox (Figure 27).
Figure 27

Uploading Documents
26 AAR Quick Reference Guide – SureClose® Basic View for Agents
Uploading Using the Advanced Tab
You can use the SureClose® printer driver to upload any document directly into a placeholder
in SureClose®.
Use the following steps for the Advanced tab on the printer driver:
1. Open the document you want to upload and click the Print icon.
2. Select SureClose Upload from your list of printers (Figure 28).
Figure 28

Uploading Documents
AAR Quick Reference Guide – SureClose® Basic View for Agents 27
3. Click the OK button. The SureClose® Print Driver window displays (Figure 29).
Note: Use the procedure in Splitting Documents into Separate
Placeholders on page 30 if you have multiple documents in
one file.
Figure 29
4. Select the Advanced tab on the SureClose® Print Driver window as shown in
Figure 29.
5. Type your SureClose® ID and password in the Login Details screen (Figure 30) and
click the OK button.
Figure 30
NOTE: Once you have logged in, the SureClose® print driver leaves you
logged in for two hours after your last upload.

Uploading Documents
28 AAR Quick Reference Guide – SureClose® Basic View for Agents
6. Click the Search button to display a list of your files in the Files window (Figure 31).
You can narrow the search by entering specific criteria in any of the search fields.
Figure 31
7. Highlight the file to which you want to upload the documents by clicking on the
address of the file in the Files field (Figure 32). You see the dividers for the file in the
Dividers and placeholders field.
Figure 32

Uploading Documents
AAR Quick Reference Guide – SureClose® Basic View for Agents 29
8. Expand the divider in the Dividers and placeholders field by clicking on the plus sign
to the left of the divider to see the placeholders or by double clicking on the name of
the divider (Figure 33).
Figure 33
9. Highlight the placeholder to which you want to upload the document (Figure 34).
Figure 34

Uploading Documents
30 AAR Quick Reference Guide – SureClose® Basic View for Agents
10. Click the Upload button to upload your document. You receive a message stating
that your document has been uploaded and auto-filed (Figure 35).
Figure 35
NOTE: It can take 30 seconds to a minute for a document to actually be filed
in the transaction file.
If you choose a placeholder that already contains a document, SureClose® creates a new
document placeholder directly below the original and appends the date and time of uploading
to the new placeholder (Figure 36).
Figure 36
Splitting Documents into Separate Placeholders
You can use the printer driver to split a large file that contains multiple documents into
separate placeholders in a transaction file. For example, a file contains the following
documents:
Document Page Range
Real Estate Agency Disclosure and Election 1
Residential Purchase Contract, including the cover page 2 - 11
HOA Addendum 13
Earnest Money Receipt 14
You would use the following steps to split this file into its separate placeholders:
1. Open the file.
2. Click the Printer icon to see your printer screen.
3. Choose SureClose Upload from your list of printers.
4. Select to print page 1 and click the OK button.
5. Follow the steps in Uploading Using the Advanced Tab on page 26 to upload the
document.
6. Click the printer icon to see your printer screen.

Uploading Documents
AAR Quick Reference Guide – SureClose® Basic View for Agents 31
7. Select to print pages 2 – 11 and click the OK button.
8. Follow the steps in Uploading Using the Advanced Tab on page 26 to upload the
document.
9. Click the printer icon to see your printer screen.
10. Select to print page 13 and click the OK button.
11. Follow the steps in Uploading Using the Advanced Tab on page 26 to upload the
document.
12. Click the printer icon to see your printer screen.
13. Select to print page 14 and click the OK button.
14. Follow the steps in Uploading Using the Advanced Tab on page 26 to upload the
document.
15. Close the file.
Using the Printer Driver on a Shared Computer
The SureClose® Printer Driver remembers who has been using the printer driver for the last
two hours. Use the following steps to log out the previous user and log in as yourself once
you see the Advanced tab of the printer driver:
1. Click on the Tools drop-down menu and choose the Login option (Figure 37).
Figure 37
Uploading Documents
32 AAR Quick Reference Guide – SureClose® Basic View for Agents
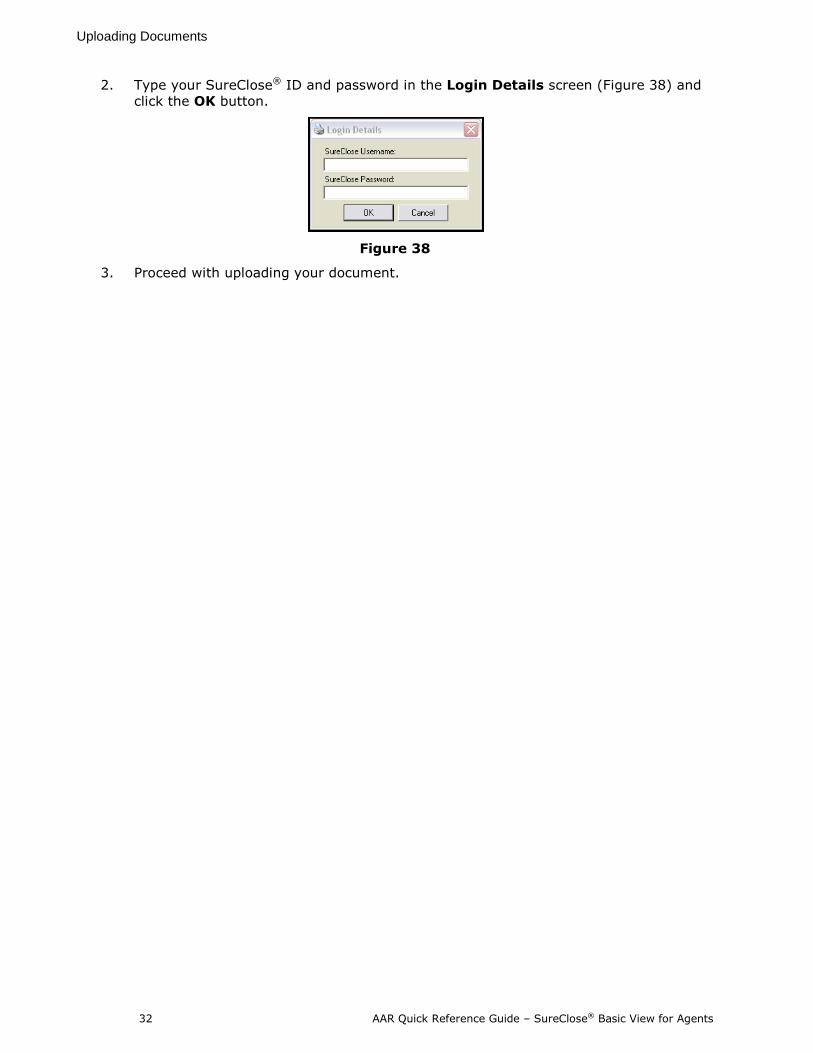
2. Type your SureClose® ID and password in the Login Details screen (Figure 38) and
click the OK button.
Figure 38
3. Proceed with uploading your document.