a+ unit five: storage
TRANSCRIPT

Storage Page 1
A+ Unit Five: Storage
Student Name
Member of Team
Team Lead
AM/PM
A+ Test Essentials 701 1.1 Categorize storage devices and backup media
o FDD o HDD
Solid state vs. magnetic o Removable storage
Tape drive Solid state (e.g. thumb drive, flash, SD cards,
USB) External CD-RW and hard drive
1.2 Explain motherboard components, types and features o PATA
IDE EIDE
o SATA, eSATA
1.9 Summarize the function and types of adapter cards o I/O
SCSI USB
3.3 Explain the process and steps to install and configure the Windows OS
o File systems FAT32 vs. NTFS
o Directory structures o Files
Extensions Attributes Permissions
3.3 Explain the process and steps to install and configure the Windows OS
o Directory structures Create folders Navigate directory structures
o Files Creation Extensions Attributes Permissions
A+ Certification Objectives Covered
Turn Over
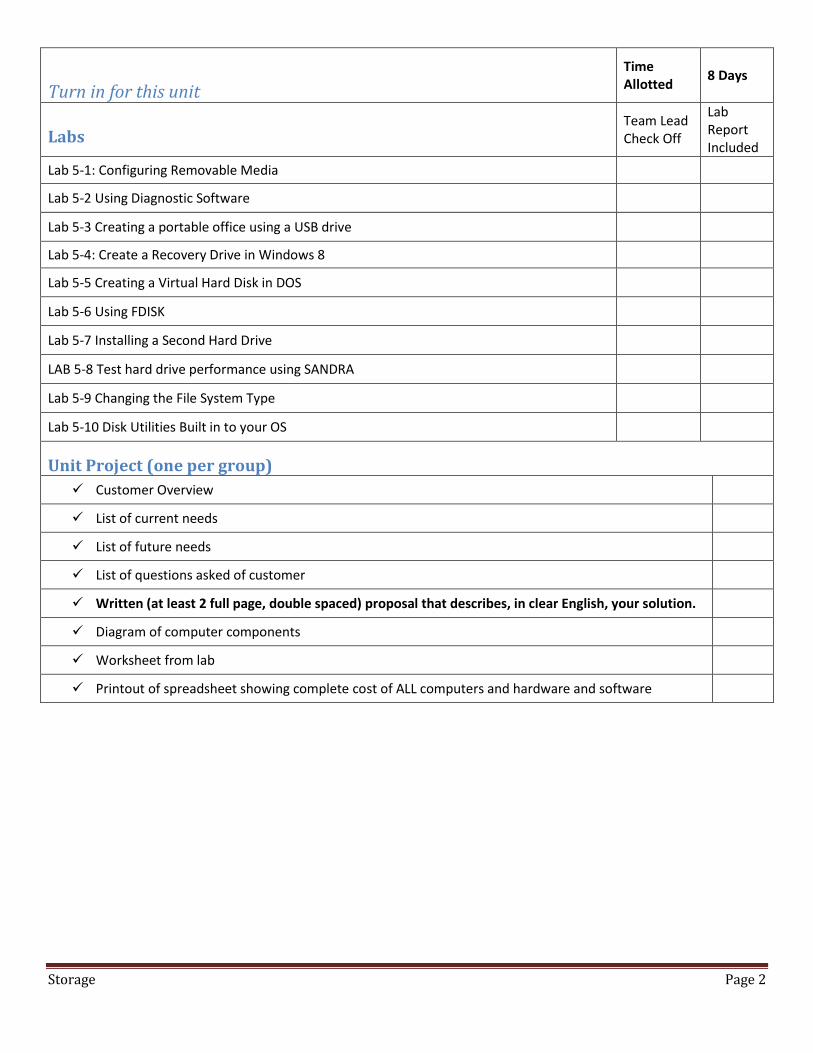
Storage Page 2
Turn in for this unit
Time Allotted
8 Days
Labs Team Lead Check Off
Lab Report Included
Lab 5-1: Configuring Removable Media
Lab 5-2 Using Diagnostic Software
Lab 5-3 Creating a portable office using a USB drive
Lab 5-4: Create a Recovery Drive in Windows 8
Lab 5-5 Creating a Virtual Hard Disk in DOS
Lab 5-6 Using FDISK
Lab 5-7 Installing a Second Hard Drive
LAB 5-8 Test hard drive performance using SANDRA
Lab 5-9 Changing the File System Type
Lab 5-10 Disk Utilities Built in to your OS
Unit Project (one per group)
Customer Overview
List of current needs
List of future needs
List of questions asked of customer
Written (at least 2 full page, double spaced) proposal that describes, in clear English, your solution.
Diagram of computer components
Worksheet from lab
Printout of spreadsheet showing complete cost of ALL computers and hardware and software

Storage Page 3
Floppy Drives
Connected to the _______________________ card or motherboard by a ribbon cable
with _______________________pins and 2 connections.
Powered by a small _______________________that connects to the power supply.
Data is written via a _______________________/_______________________head that is
housed on an _______________________arm.
The arm moves freely across the disk.*
The _______________________has one read/write head _______________________the
disk and _______________________.
The heads move _______________________across the disk as the disk spins either 300
or 360 rpm
The heads do _______________________touch the disk. If they do it causes a true crash
and the disk is toast.*
As data is written, _______________________heads on either side of the r/w head clean
up so there is no data bleed.
This ensures each track is _______________________in size.
Disk turns on a _______________________
Flash Memory
Flash memory is _______________________memory that can be electrically erased and
_______________________. It is a technology that is primarily used in memory cards.
Unlike _______________________, it is erased and programmed in blocks consisting of
multiple locations (in early flash the entire chip had to be erased at once).
Flash memory costs less than standard EEPROM and has become the
_______________________technology wherever a significant amount of non-

Storage Page 4
_______________________, solid-state storage is needed.
Flash Memory
Examples of applications include _______________________audio players, digital
cameras and _______________________phones.
Flash memory is also used in USB _______________________drives
It has also gained some popularity in the gaming market, where it is often used instead
of EEPROMs or _______________________-powered SRAM for game save data. *
How Data is Stored to a Flash Drive
Flash memory is made up of a _______________________
At each intersection are two _______________________

Storage Page 5
_______________________Gate
_______________________Gate
Connecting the two transistors is a thin layer of iron _______________________that can
pass power through (_______________________) the gates
If the two transistors are “_______________________” through a charge the value of the
cell is _______________________
If not, the value is _______________________
The floating get gets charged
Electrons travel down a “_______________________” to the control gate
The charge _______________________to the ground, like normal
But as it forces its way through the control gate, the cell
_______________________reads the charge
Above _______________________% and it stays a 1
When it drops _______________________, it goes to 0
Types of Hard Drive Interfaces
IDE and _______________________standards (AKA PATA)
Other interface standards
_______________________
_______________________1394
_______________________B
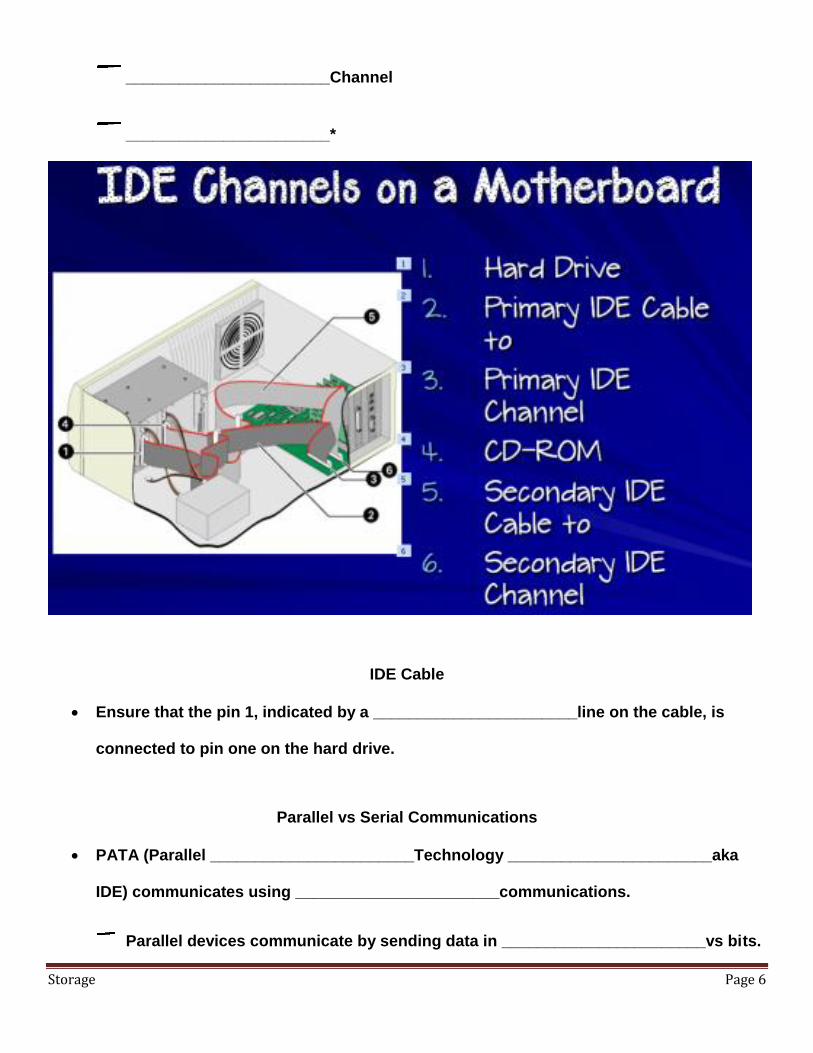
Storage Page 6
_______________________Channel
_______________________*
IDE Cable
Ensure that the pin 1, indicated by a _______________________line on the cable, is
connected to pin one on the hard drive.
Parallel vs Serial Communications
PATA (Parallel _______________________Technology _______________________aka
IDE) communicates using _______________________communications.
Parallel devices communicate by sending data in _______________________vs bits.

Storage Page 7
A parallel device can send _______________________or two bytes of data down a
bus at a time.
Both the sending and _______________________devices must
_______________________the transfer
Originally parallel communications were more _______________________
Parallel devices must take turns _______________________*
Parallel vs Serial Communications
SATA (_______________________Advanced Technology Attachment)
Serial devices communicate one _______________________at a time, however
communications are _______________________and more reliable
Can go up to _______________________ Gbps (whew)
SATA 1—1.5 Gbps
SATA 2—3 Gbps
Parallel vs Serial Communications
SATA 3—6 Gbps
SATA does advanced error checking, resulting in more reliable communications
Serial devices can communicate in tandem with other serial devices
Serial devices operate at a lower voltage
eSATA—used for external devices
eSATAp—Power over eSATA*
Storage Page 8
Vertical Drives
Traditionally, bits are arranged in a flat, _______________________manner
To increase size of the disk, the size of the bits have been _______________________,
however we’re reaching the limits at about _______________________
Laying the bits _______________________frees up a lot of real estate, allowing the bits to
be closer together and increasing the size of drives.
Also known as _______________________recording
Solid State Drives
A solid state drive is a _______________________device with a storage capacity similar to
a small hard drive. Solid state drives are used as _______________________for hard disk
drives for storing operating system, application, and data files. Some
_______________________of solid state drives:
They are faster than _______________________drives
They have no _______________________parts so they last longer
Lower power consumption than _______________________drives (good for laptops)
They are less _______________________to physical damage (from dropping) and immune
from magnetic fields
They are smaller and _______________________than hard drives
main disadvantage is _______________________--they are several times more expensive
than comparable hard drives.
Hybrid Hard Drives
a hard drive that contains a flash memory chip that stores _______________________and
applications.

Storage Page 9
_______________________can retrieve data from flash, the drive--which spins constantly
in an ordinary _______________________--can stay asleep most of the time.
Speeds up _______________________and takes out issue of hard drive being the
_______________________of the system, depending on the amount of flash memory.
Improves speed, power _______________________, and reliability of hard drives (less
wear and tear on platters).
How Hard Drives Work
Platter(s) are stacked together and spin in _______________________
Read/write heads are controlled by an _______________________and move in unison
across disk surfaces as disks rotate on a spindle
Require hard drive _______________________for _______________________*
How Data is Written
Data is written from the _______________________in towards the center.
As the heads get closer to the center they must _______________________for the
smaller sectors
_______________________: Speeds up writing of tracks on smaller sectors.
Reduced write _______________________: A reduced current is used towards the
center of the platter on the smaller sectors.*

Storage Page 10
Tape Drives
Also called _______________________linear tape or DLT drives
Store data on _______________________tapes,
Most commonly used for _______________________backups
Advantages of tape drives:
Tape Drives
store _______________________amounts of data.
relatively _______________________and small enough for long-term storage.
disadvantages:
Access is typically _______________________than reading or writing
Data must be read from tape _______________________.
SCSI Basics
SCSI = _______________________Computer _______________________Interface
Acts like a small _______________________inside of the computer
Bus can contain/be used by up to _______________________ or
_______________________devices
Bus controller can be either:
An _______________________card (host adapter)
_______________________on motherboard
Faster, more expensive, more difficult to install than similar

Storage Page 11
_______________________devices*
The SCSI Subsystem
Host adapter
Card inserted onto _______________________slot on mother board
Manages all devices on _______________________bus
Supports _______________________and external SCSI devices
Forms a single _______________________chain with devices
Device drivers
Enable OS to _______________________with a host adapter*
Termination
Prevents _______________________echo
Required at both ends. If the card is first either place a _______________________on it or
use software or a _______________________to turn it on/off*
Comparing IDE and SCSI
IDE supports only _______________________internal devices; SCSI supports both
_______________________and _______________________devices and allows you to add
more devices to a system.
SCSI devices are generally of higher quality than IDE devices and more

Storage Page 12
_______________________.*
Comparing IDE and SCSI
IDE devices require a separate _______________________for each device; SCSI requires
only _______________________for the entire chain.
Both IDE and SCSI are generally _______________________-compatible, in that most
faster hardware can work with slower devices.*
How System BIOS Helps Manage Data Transfer
Provides _______________________handler for software interrupts
Automatically _______________________/_______________________hard drive
Helps manage data transfer over I/O bus between hard drive and memory
Using _______________________mode, CPU is in charge
Using _______________________with DMA controller in charge (no CPU
involvement)
With bus mastering using DMA, hard drive _______________________controls data
transfer*
How a Hard Drive Is Logically Organized to Hold Data
Requirements to boot from hard drive and get to a command prompt:
Drive must have _______________________and _______________________markings
written on it
A _______________________system must be installed
Storage Page 13
Files needed to boot the PC must be copied to _______________________directory
of drive*
How a Hard Drive Is Logically Organized to Hold Data
Steps for preparing a hard drive to hold files (after physical installation)
_______________________-level format
_______________________hard drive
_______________________-level format*
Hard Drive Partitions and Logical Drives
Partitions
_______________________-level divisions
_______________________drives (volumes)
Further division of partitions
Have letters or name (in XP/Vista) assigned to them
Each has its own file _______________________ (eg, FAT16, FAT32, NTFS)*
When to Partition a Drive
When installing a _______________________ hard drive
If existing hard drive is giving _______________________
If you suspect a _______________________ has attacked the drive
Storage Page 14
To _______________________ hard drive clean and _______________________ new OS
To use the large drives more efficiently.*
What Happens During Formatting
OS format for each logical drive creates these file system items at beginning of each
logical drive:
OS _______________________record
_______________________
_______________________directory*
Choosing a File System
File system defines how _______________________is stored on a disk, and what
operating systems can use it.
Parts of a _______________________system
_______________________—Logical division on a hard drive
Volume
A single _______________________storage area on a hard drive.
Can be one or more _______________________, or across one or more
_______________________.
Defined by a _______________________letter

Storage Page 15
_______________________—aka “folder” is a container that can hold files, programs,
folders
_______________________—One dimensional stream of bits
FAT32 vs NTFS
When you partition your drive, you choose a file system.
_______________________—most security options
_______________________—more accessible by other Oses
Always use _______________________in a network
File systems
Fat32
Partition size: _______________________TB (but Windows can only handle 32 GB)
_______________________long file names
File size: _______________________ GB
268,435,437 _______________________files
_______________________TB largest volume size
Limited _______________________
Can be _______________________by older OSes
NTFS
_______________________TB
_______________________long file names
16 _______________________file size
4,294,967,295 _______________________files
Storage Page 16
_______________________TB largest volume size (woot)
Smaller _______________________sizes
Ability to _______________________files
Compression
Use disk _______________________
Use _______________________mount points
_______________________are WAY advanced
Managing and Troubleshooting Hard Drives
Error messages
Tools for troubleshooting and maintaining hard drive
Solving common hard drive problems
General troubleshooting guidelines
An Ounce of Prevention
Make _______________________and keep them current
Run _______________________software regularly
_______________________files; scan hard drive occasionally
Don’t _______________________around the hard drive
Don’t _______________________PC turned off for weeks/months at a time
High _______________________can be dangerous for hard drives
Be _______________________with a hard drive

Storage Page 17
Objectives
Locate CMOS screen for configuring floppy, USB devices, and changing boot order. Configure the computer to boot in various scenarios
Note: If your computer does not have a floppy, work with a partner.
1. Enter the CMOS settings on your lab computer. You can use your DELL for this since all you’re doing is disabling the floppy and you will re-enable it.
2. Locate the floppy disk controller area. 3. Disable the floppy disk controller. 4. Restart. 5. Put a floppy into the drive. 6. From the run command, type A: and hit enter. 7. What happens?
8. Why?
9. Go back in and re-enable the controller.
One purpose for disabling an FDC is to allow a kiosk computer to be available for use, but not allow users to access the
floppy drive and potentially walk away with data. The controller can be re-enabled when an administrator needs it for
some reason.
Repeat the steps above, only this time disable (from the CMOS) the USB controller. Before you hit save in your CMOS
answer the following!
1. What are the steps you took to disable the USB ports?
2. Is your keyboard or mouse USB?

Storage Page 18
3. If so, what will happen if you save and continue?
4. Yeah, that would not be cool, would it?
5. Don’t save the settings unless you LIKE reinstalling your lab system! I mean if you do, by all means knock yourself out!
Installing Data Doctor Removable Media Recovery
1. Go into the //192.168.1.71/software folder and locate labfiles. 2. Install Removable Media Recovery Tool. 3. Insert a Flash drive (borrow one if you don’t have your own). 4. Open the program. 5. What information does it give you about your media?
Physical Disk Number
Model
Media type
Cylinder
Head
SectorsPerTrack
Disk Size
6. Go into My computer and right click on your drive. Write down the file system (it’ll be FAT, FAT16, FAT32, or NTFS).
7. Go back to the program. Click on your drive and select “Standard Search” 8. Click next. 9. Read the directions. If it doesn’t like standard mode, go back to advanced. 10. Select Partition Type

Storage Page 19
11. Let it do its thing. 12. Were you able to find anything to recover? What?
13. Try this program on a floppy. Does it work?
1. Get a USB drive and clean it off. 2. Go to this website: http://www.maximumpc.com/article/features/build_ultimate_usb_toolbox 3. Create either:
a. A portable office drive that has all you need to run portal OpenOffice.org, et al on it. b. A portable media drive that allows you to play music, movies, and modify files.
4. Demonstrate that it works by using the programs installed. 5. Answer the questions below:
A. I created a portable ___________________________________ drive. B. I put the following programs on this drive.
C. How are the versions of the programs you used different from the full programs?
D. Where would a drive such as this come in handy?
Storage Page 20
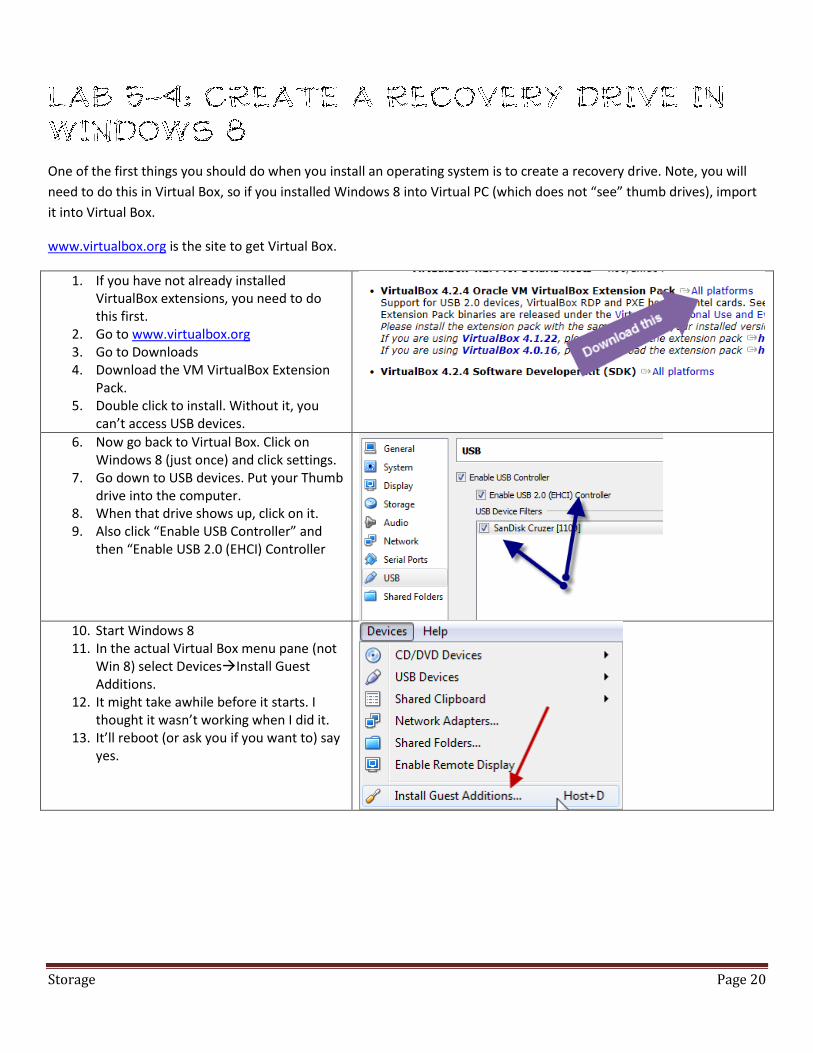
One of the first things you should do when you install an operating system is to create a recovery drive. Note, you will
need to do this in Virtual Box, so if you installed Windows 8 into Virtual PC (which does not “see” thumb drives), import
it into Virtual Box.
www.virtualbox.org is the site to get Virtual Box.
1. If you have not already installed VirtualBox extensions, you need to do this first.
2. Go to www.virtualbox.org 3. Go to Downloads 4. Download the VM VirtualBox Extension
Pack. 5. Double click to install. Without it, you
can’t access USB devices.
6. Now go back to Virtual Box. Click on Windows 8 (just once) and click settings.
7. Go down to USB devices. Put your Thumb drive into the computer.
8. When that drive shows up, click on it. 9. Also click “Enable USB Controller” and
then “Enable USB 2.0 (EHCI) Controller
10. Start Windows 8 11. In the actual Virtual Box menu pane (not
Win 8) select DevicesInstall Guest Additions.
12. It might take awhile before it starts. I thought it wasn’t working when I did it.
13. It’ll reboot (or ask you if you want to) say yes.

Storage Page 21
14. Once Windows 8 is open again, from the start page type recovery.
15. Click “settings” 16. Find where it says Create a Recovery
Drive. 17. Click that. 18. The UAC will pop up and ask you if you
want to run the Media Recovery Center. 19. Say yes.
20. It is going to ask you if you want to copy
your recovery partition. We don’t have one, but if you buy a computer with Windows 8 already installed, it will have a recovery partition. You can put that on a DVD or thumb drive and that way if your hard drive physically dies, you can still recover.
21. Put your thumb drive in. NOTE: EVERYTHING ON THAT DRIVE WILL BE DELETED.
22. Answer the following question: Do you have anything on your thumb drive that is important?
23. If the answer is YES, save that stuff to a hard drive or get another thumb drive.
24. If the answer is NO, proceed. 25. When it comes up you should see C:\ and
maybe D:\ or E:\. Choose the one that represents your Thumb Drive.
26. Click next. 27. It will warn you that everything on your
drive will be deleted. If you’re cool with that, click Create.
28. It’ll take a little bit and then it will tell you it is done.
29. To test to see if it’s done, go into My Computer (I type explorer and select files) and look in your thumb drive.
30. You should see that
Test by restarting your computer, go into BIOS and set it to boot from USB (or hit F12 and select USB). Does it boot?

Storage Page 22
1. Open Virtual PC. 2. Close DOS so that the
state is not saved. 3. Click the DOS install and
click the settings button in Virtual PC.
4. Click Hard Disk 2 (it currently says None because you only have one virtual hard disk).
5. Now click Virtual Disk Wizard
6. Click next, create a new virtual hard disk, browse to where your other DOS disk is.
7. Name this disk DOS Disk 2.VHD
8. Create a Fixed Size disk. 9. Make it 500 MB. We
don’t need a big disk. 10. Click Okay.
11. Quit DOS, turn off (not save state).
12. Click DOS 13. Click settings. 14. NOW you’re going to put
in a second hard drive (the one you just created).
Reboot into DOS.
Questions

Storage Page 23
1. What is a virtual hard disk?
2. What can you do with this disk you just created?
3. What are you going to need to do before you can use it? (Don’t do that, just tell me. The next lab has you doing stuff to it.)
4. How many hard disks can you have in a virtual machine?
5. How many network cards?
6. Pretty cool, huh?
Storage Page 24
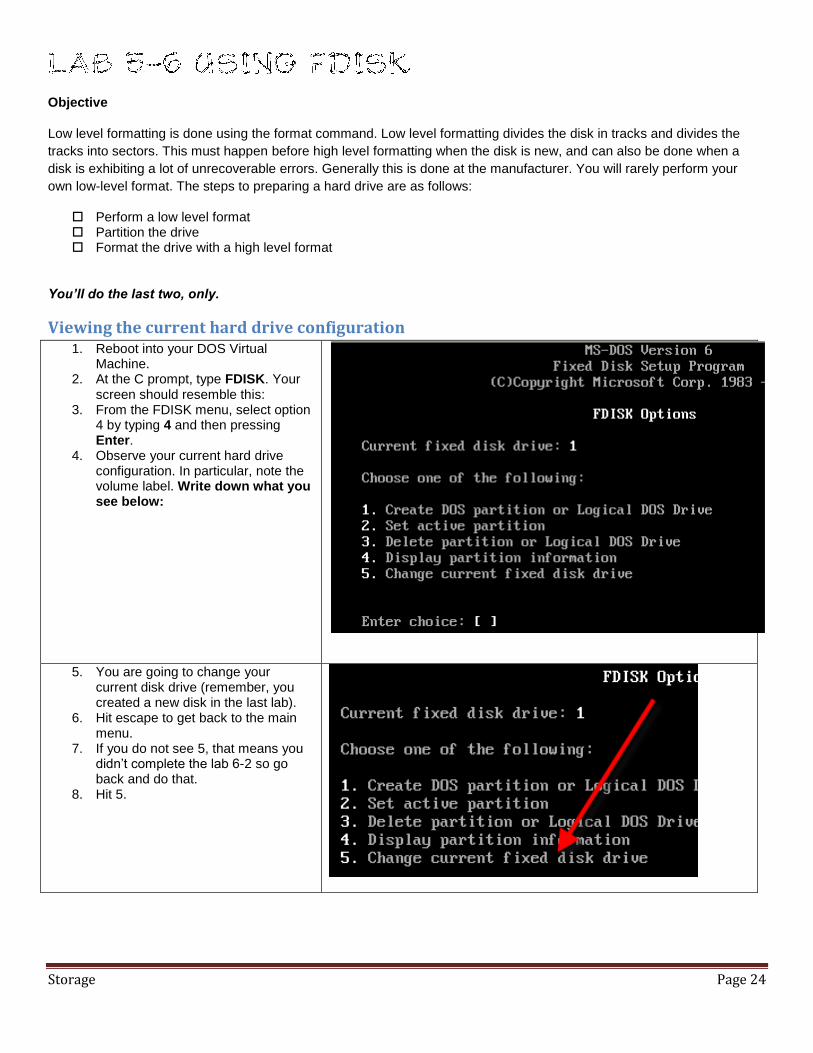
Objective
Low level formatting is done using the format command. Low level formatting divides the disk in tracks and divides the
tracks into sectors. This must happen before high level formatting when the disk is new, and can also be done when a
disk is exhibiting a lot of unrecoverable errors. Generally this is done at the manufacturer. You will rarely perform your
own low-level format. The steps to preparing a hard drive are as follows:
Perform a low level format Partition the drive Format the drive with a high level format
You’ll do the last two, only.
Viewing the current hard drive configuration 1. Reboot into your DOS Virtual
Machine. 2. At the C prompt, type FDISK. Your
screen should resemble this: 3. From the FDISK menu, select option
4 by typing 4 and then pressing Enter.
4. Observe your current hard drive configuration. In particular, note the volume label. Write down what you see below:
5. You are going to change your current disk drive (remember, you created a new disk in the last lab).
6. Hit escape to get back to the main menu.
7. If you do not see 5, that means you didn’t complete the lab 6-2 so go back and do that.
8. Hit 5.

Storage Page 25
9. You should see something like shown to the right. You haven’t done anything to your 2
nd drive yet. It’s
pristine, clean, and ready to be 10. FDISKed!
11. At the FDISK Main Menu, select option 1 and press Enter.
12. Type 1 and press Enter. 13. When the FDISK utility asks if you
want to use all the available space for the primary partition and set it as active, select No by typing N and pressing Enter.
14. When FDISK prompts you to enter the amount of drive space you want to use, type 100 and press Enter.
15. Press Esc to return to the FDISK Main Menu.
16. Hit 4 to display partition information and you should see 1 partition, set as primary DOS, 100 MB in size, which is using 20% of your drive.
Primary, extended and DOS partitions.
There are a maximum of four partitions that can be placed on any DOS or Windows 9x hard drive. These would be primary partitions. However, you can create extended partitions and put logical
partitions inside extended partitions. Confused? Good. This allows you to get around the 4 partition limit. You can have only ONE extended DOS partition, but it can be split into lots of logical partitions. Only one partition can be active. The active partition is the one that is used for booting the system. Primary—A partition that can be named active and can hold boot files. There can be up to four. If you
need four use: Extended—Used to hold logical partitions. There can be only ONE. Logical—used when you need more than four partitions. Logical partitions may ONLY be created
within the extended partition. Why? Because I said so. (No, because that’s how DOS works. No one thought they’d need more than
two partitions, four max!)
17. So let’s create an extended partition. Go back to the FDISk menu.
18. Select 1 to create a new partition. 19. Select 3 to create logical DOS drives
in the extended DOS partition. 20. D’oh! You can’t do that! You need to
create an extended partition first! 21. Select 2 to create an extended DOS
partition. Make it 300 MB. 22. It’s going to immediately tell you that
you have to create a logical drive. Why? Because you can’t do anything to an extended drive unless it has logical drives. Create THREE logical drives of 100, 100, and 99 MB each (just follow the onscreen prompts).

Storage Page 26
23. When you are done display partition information. It should look like this:
24. Go ahead and display the logical partitions. What drive letters have been assigned?
Write answer here
25. Exit out of FDISK. Because you created new partitions, you have to restart.
26. Test that your partitions are there. Type d:\ and hit enter.
27. It’s giving you an error? What is the error and why are you getting it?
Write answer here
28. You have to format it so back at the C:\ prompt type format d:
29. Format away! Whee! Formatting is fun!
30. Label it OLDWOMAN
31. What is happening as you format the drive?
Write the answer here, be specific.
32. Go into your D: drive and type dir. What do you see?
33. Why does it say “File not found?”
Write the answer here.
34. Create a text file within OLDWOMAN named fly.txt. Now do a DIR.
35. What do you see?
Write the answer here.
36. Format e: name it spider 37. Format f: name it bird 38. Format g: name cat
Take a screen shot of these partitions named (go into FDISK) and
staple it to your lab report.
Delete a Partition

Storage Page 27
39. Head into FDISK again. 40. Select 3 to delete a partition. 41. Select 2 to delete an extended
partition. 42. You get an error? What is the error
and why did you get it?
Write the answer here
43. Let’s just delete ONE logical partition.
44. Do that (figure it out) 45. You’ll have to reboot after you delete
the partition.
Setting an active partition 1. Select option 2 from the FDISK Main Menu. 2. Choose the primary partition that you created by typing 1 and pressing Enter. 3. Press Esc to return to the main menu. 4. Press Esc to exit FDISK and press any key. Your workstation will restart. 5. Note: If you already have DOS installed, the installer creates a single partition and sets it to active, so it will just
tell you that it’s already set to active.
Define the following terms:
Term Definition
Active
Partition
Partition
Extended
partition
Logical drive
FDISK
MBR
Circle True or False.
1. When a partition’s size is changed using the FDISK utility, the data contained on the partition is lost. True / False 2. The FDISK utility is used to partition and format hard drives. True / False 3. Extended partitions are always placed within logical drives. True / False
4. List three functions of the FDISK utility.
a. ____________________________ ____________________________ ____________________________ ____________________________
Storage Page 28
____________________________ ____________________________ ____________________________ _____
b. ____________________________ ____________________________ ____________________________ ____________________________ ____________________________ ____________________________ ____________________________ _____
c. ____________________________ ____________________________ ____________________________ ____________________________ ____________________________ ____________________________ ____________________________ _____
5. You are the desktop PC support technician for the Good Job Corporation. John, one of your customers, suspects that his hard drive is not partitioned to use its full capacity. Describe how you would use the FDISK utility to show John his current hard drive configuration.
6. Describe the relationship between a logical drive and an extended partition.
7. What is the difference between a physical drive and a logical drive?
Objective
You must format a hard drive to install a file system. In this lab exercise you will learn how to properly install and optimize
the FAT file system.
After completing this lab, you will be able to:
Format a partition.
Use the SCANDISK utility to optimize performance.
Use the DEFRAG utility to optimize performance.
Materials Required
Storage Page 29
Operating system: Windows of some flavor
Lab workgroup size: 2 students
You MUST do this on your LAB computer (not the classroom DELLs. We never open those.)
Lab Setup & Safety Tips
Each workstation’s hard drive should contain one unformatted primary partition that has been set as active during lab 6-1.
Be sure that the data stored on your lab workstation has been backed up before you proceed with this lab exercise.
1. Power off your lab workstation. 2. Install a second hard drive that does not have anyone else’s OS on it! You want a plain drive. Get it from me. 3. Be sure that second drive is mounting in your CMOS. 4. Show me ____________________________ ______ 5. Go into your host OS and right click on My Computer and select manage. 6. Go to Disk Management. You should see your new blank hard drive.
a. Right click on your computer b. Select “Manage” c. Click Disk Management d. You should see Disk 0 (your boot disk) and Disk 1 (as well as your CD ROM) If you do not see two disks
plus CD, shut down and make sure everything is attached. e. Right click on the disk 1 and format it. Format as a Standard Disk. f. Go into “my computer” and look to see if it is there. Show me so I can check it off on the checkoff sheet. g. Once you have done that, shut down, ground yourself and remove that hard disk and check it back into
me.
Do this next section using the VIRTUAL hard disk you created.
7. Go into DOS on your virtual PC. 8. Power on your lab workstation and allow it to boot from your DOS boot disk. 9. At the A prompt, type FORMAT driveletterofnewdrive (probably D:/ or E:/) 10. When asked to confirm before proceeding, type Y and press Enter. The format command begins to format drive
C. 11. When formatting is completed, type a volume label of DRIVE 1.
Making drive bootable You can use many different commands to make a drive bootable. Following are two examples of command sequences:
Using the SYS command
1. Power off your lab workstation. 2. Insert the boot disk into drive A. 3. Power on your lab workstation and allow it to boot from your DOS boot disk. 4. At the A prompt, type SYS A: driveletter: and press Enter.
Using the Format command
The /S switch tells DOS to add system information to the drive after it has been formatted. Use the /? option to view other
FORMAT switches.
1. Power off your lab workstation.
Storage Page 30
2. Insert the boot disk into drive A. 3. Power on your lab workstation and allow it to boot from your DOS boot disk. 4. At the A prompt, type FORMAT driveletter: /S. 5. When asked to confirm before proceeding, type Y and press Enter. 6. When formatting is completed, type a volume label of DRIVE 1.
Go into your Windows 7 and make sure you can see the virtual hard disk you created.
1. Locate the drive in My Computer. 2. Right click on the drive. 3. Click propertiesTools. 4. Under Error-Checking click “check now”. 5. This runs the Scandisk tool.
Using the DEFRAG utility 1. In your start menu find the command prompt. 2. Right click and run as administrator. Defrag requires you to have admin access. 3. At the prompt, type DEFRAG and press Enter. 4. Write down the switches that work with defrag
5. Run “analyze only”. 6. Allow DEFRAG to reorganize the hard drive (this should happen quickly if the drive was formatted recently). 7. When the defragmentation is completed, exit the DEFRAG utility AFTER having me check it off.
1. Right click on your computerManageDisk Management 2. Right click on one of the hard drives 3. Defragment 4. Show me
You will be required to do all of these things on your lab test. ALL OF THEM!
Review Questions Circle True or False.
1. Using the SCANDISK utility will delete all files less than 512 K in size. True / False 2. The DEFRAG utility places file clusters in consecutive order. True / False 3. You should run the SCANDISK utility only once every three months. True / False
4. Describe the functionality of the DEFRAG utility.

Storage Page 31
5. You are currently employed as a PC desktop support technician at My World. One of your customers, Jamie, calls to tell you that her computer is running more slowly than it did last month. List two utilities that Jamie might use to improve the performance of her computer.
6. John is currently running DEFRAG, and it is taking a long time. John called you to ask what the DEFRAG program does, and why it seems to be so slow. Over the last year John has never run the DEFRAG utility. Describe to John both the purpose of the DEFRAG utility and explain why it is taking so long to run.
Objectives
The goal of this lab is to help you use SANDRA to compare the performance of your system’s drives against
similar drives. After completing this lab, you will be able to:
➤ Use SANDRA to test your drive’s performance
➤ Use SANDRA to compare your system’s drives with similar drives

Storage Page 32
Materials Required
This lab will require the following:
➤ Windows 9x operating system
➤ SiSoft SANDRA 2011
Download and Install SANDRA
1. Go to www.sisoftware.com or the pub folder and download Sandra 2011 Lite. (Note: The Techspot server worked for me on December 6, 2010.
2. Log into your Windows XP. 3. Install SANDRA. Do not install the PDA versions.
SANDRA Lite can be used to run all sorts of tests on your hard drive. It should give you a nice indication of
how your drive is running. We’re going to use SANDRA to test our hard drives. SANDRA is actually updated
quite often, so if you use it at a tech you’d want to check for the newest version.
1. Start SANDRA. 2. Click the hardware tab. 3. Click physical drives to analyze your hard drive and fill in the information below.
Type (SCSI, ATA, SATA)
Interface
Cache size
Total sectors
Number of ECC Bytes
Bytes per sector
Capacity
Partition information
Temperature
ECC Corrected count
List four features of your drive

Storage Page 33
Space used
4. What are two performance tips the program gives you to speed up the drive?
5. Click on the Benchmarks tab and click Physical Disks. 6. How fast is your drive? ____________________________ MB/S (Megabytes per second) 7. What four drives does the program compare your drive with?
a. ____________________________ ____________________________ ____________________________ ____________________________ ______
b. ____________________________ ____________________________ ____________________________ ____________________________ ______
c. ____________________________ ____________________________ ____________________________ ____________________________ ______
d. ____________________________ ____________________________ ____________________________ ____________________________ ______
e. Which ones are faster? f. Slower?
8. What could you do with this information?
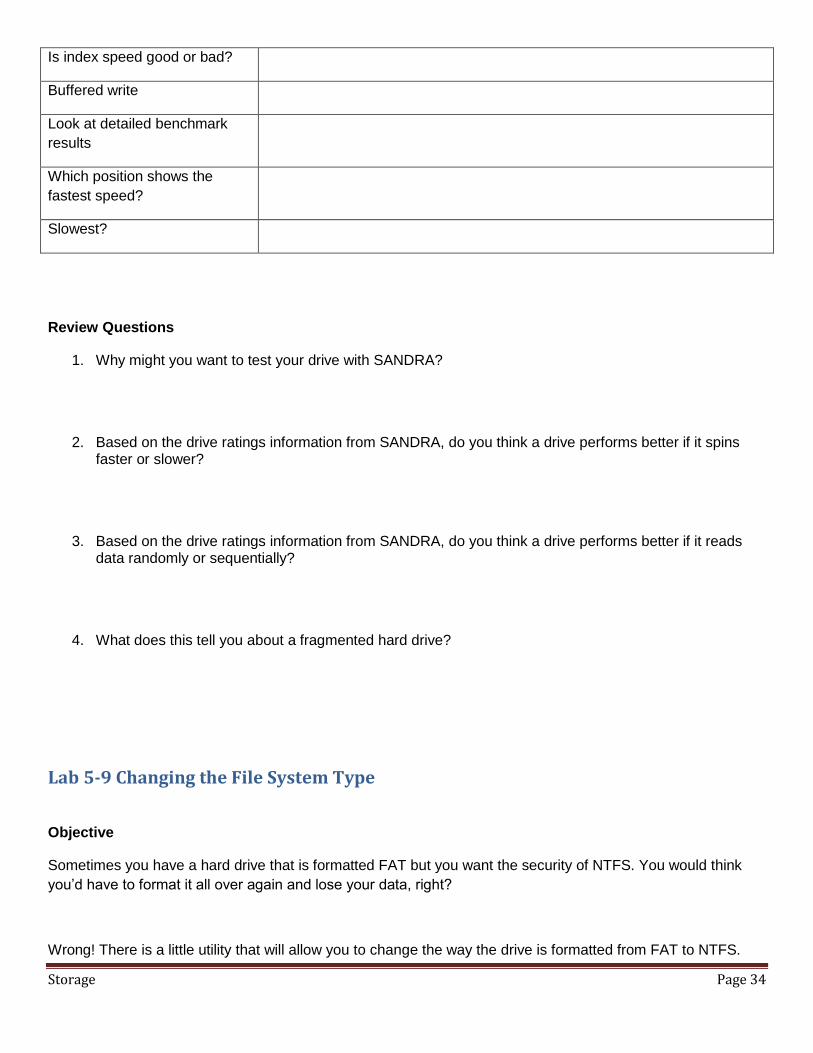
9. Scroll down to benchmark breakdown. Fill out the following information.
What was the drive index
speed?
What was the random access
time?
Storage Page 34
Is index speed good or bad?
Buffered write
Look at detailed benchmark
results
Which position shows the
fastest speed?
Slowest?
Review Questions
1. Why might you want to test your drive with SANDRA?
2. Based on the drive ratings information from SANDRA, do you think a drive performs better if it spins faster or slower?
3. Based on the drive ratings information from SANDRA, do you think a drive performs better if it reads data randomly or sequentially?
4. What does this tell you about a fragmented hard drive?
Lab 5-9 Changing the File System Type
Objective
Sometimes you have a hard drive that is formatted FAT but you want the security of NTFS. You would think
you’d have to format it all over again and lose your data, right?
Wrong! There is a little utility that will allow you to change the way the drive is formatted from FAT to NTFS.
Storage Page 35
Note: You cannot convert from NTFS to FAT because of how the vector table is stored in NTFS. Think
of it the same way you can use an old device in a newer port (say you can use a SATA 1.5 drive with a
SATA 2.0 port) but you can’t use the new stuff in the old port.
Materials Required
One small partition on your drive that is formatted in FAT
DOS boot floppy with FDISK on it
Lab Setup & Safety Tips
Each workstation’s hard drive should contain one unformatted primary partition that has been set as active during lab 6-1.
You should have completed lab 6-2 to ensure your hard drive is defragmented and has been checked for errors.
Here we go 1. Boot into Windows XP. 2. Ensure that you have one small formatted partition on your drive and that it is formatted FAT. 3. What drive letter is assigned to your small partition? (It should be probably E or F.)
4. At the command prompt type convert driveletter: /FS:NTFS a. What you’re saying is: b. Convert the drive at this letter c. From FS FAT to d. NTFS
5. Give the drive a volume label of mydrive. 6. Press enter and it will tell you if you can do this or
not. 7. If you were to install XP on a FAT32 on a single
hard drive and you converted, the conversion would take place next time you rebooted your computer. If you looked in computer management, it would still say it was FAT.
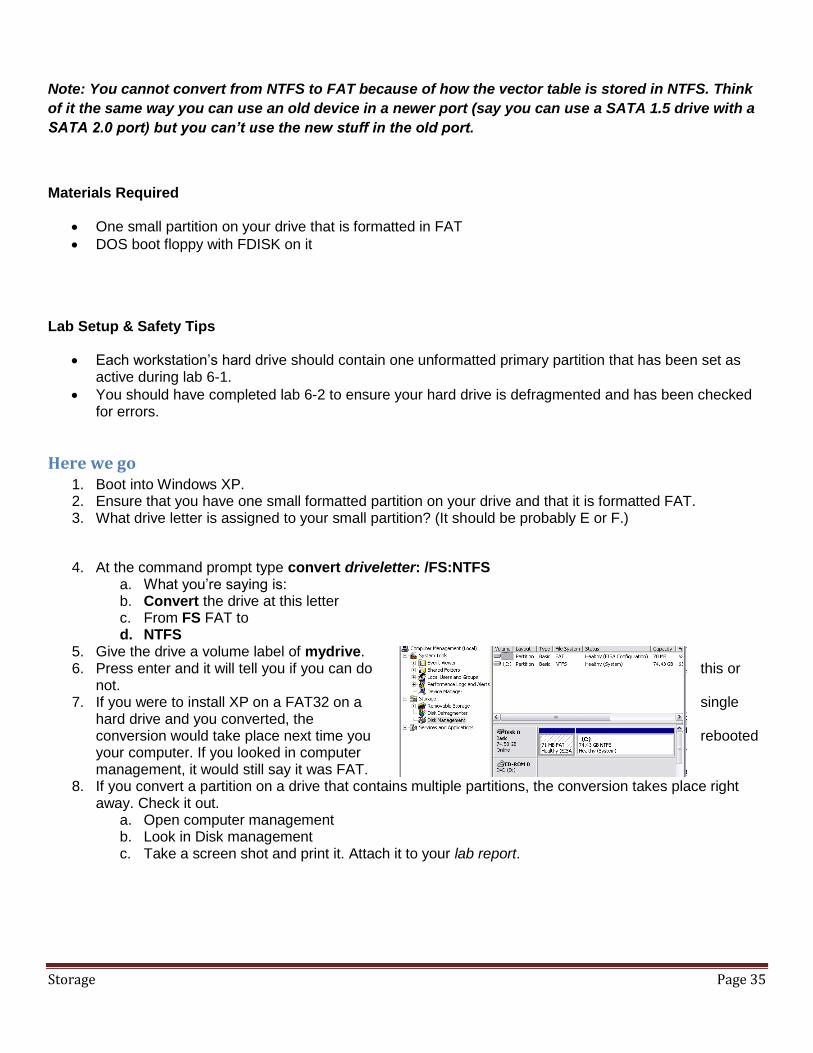
8. If you convert a partition on a drive that contains multiple partitions, the conversion takes place right away. Check it out.
a. Open computer management b. Look in Disk management c. Take a screen shot and print it. Attach it to your lab report.

Storage Page 36
Review Questions Circle True or False.
1. You can convert an NTFS partition to FAT without losing data? True or false 2. You can convert a FAT32 partition to FAT16 without losing data? True or false 3. What is the benefit of FAT16 over FAT32?
4. What is the benefit of FAT32 over NTFS?
5. What is the benefit of NTFS over FAT?
The following disk utilities are built into your operating system:
1. Chkdsk 2. Scandisk 3. Device manager 4. MSConfig.exe (not really a disk utility but helpful in troubleshooting) 5. NTBackup
Learn what each of these utilities does and describe them below.
Utility name What it does

Storage Page 37
Perform the following tasks:
1. Use Chkdsk on your lab computer’s hard drive. What is the outcome? (Describe what it found below.) 2. Use Scandisk on your lab computer’s hard drive. What is the outcome? (Describe below.) 3. Go into device manager and identify the following (do this on XP)
a. IRQ used
b. I/O Ranges used (yes, all of them)

Storage Page 38
Module: Storage
Description of Problem
A customer comes into your shop. He has a small Real Estate franchise. He would like to purchase some form of
removable storage that could be used to make things easier in his business. The files he’s using are too big for
floppies. They can use USB, but they want something more reliably secure. USB drives have been left around by
employees, and even lost. The data is too sensitive to risk that happening.
Current Needs
Fixed storage that can be used to store large files, work with both MAC and PC operating systems, will work in laptops, cameras, and video cameras.
A new server with a backup solution using RAID
Removable media that can work with different computer systems and cameras, video cameras, etc.
They will DEFINITELY need more than one type of storage to handle this.
Interviews with employees
After you have completed the jargon and list of questions you need to have answered, see me and I’ll give you the
rest of this information.
Expansion plans/Future needs
The company plans to expand. The interviews will help you understand what they need.
Your Requirements
Task One: Develop a list of terms/jargon to be defined for the customer. Define the jargon.
Task Two: Develop a list of questions that must be answered before you can begin your research.
Task Three: Develop a list of current customer needs.
Task Four: Develop a list of future customer needs.
Task Five: Research solutions to the problems and develop a solution to present to the customer.
Task Six: Keep a list of resources consulted as you go. It will be part of your portfolio.
Task Seven: Create a spreadsheet of prices to the solution.
Task Eight: Present the solution. Be sure to include pictures of the items you have chosen.
Deliverables
Customer Overview
Jargon list
Questions
Current needs
Future needs
Solution, including graphics and drawings as necessary
Resource list
Presentation of solution.

Storage Page 39
Criteria Outstanding Good Needs Work Poor 0
Customer Overview 20 17 13 8
Definitions of jargon/terms used in project 20 17 13 8 Developed a list of questions that should be
answered before beginning. 20 17 13 8
Customer current needs identified. 40 34 26 15
Customer future needs identified 40 34 26 15
Media can be read in cameras 40 34 26 15
Media can be read on all different computers 40 34 26 15
Media can be read in video camera 40 34 26 15
Backup solution 40 34 26 15
Solution is completely priced out 20 17 13 8
Media is clearly defined 40 34 26 15
Entire team participates in project 20 17 13 8
List of resources used 20 17 13 8
Project portfolio is put together and is complete 20 17 13 8 Total Points on Project
Storage Page 40
REVIEW QUESTIONS FOR REMOVABLE MEDIA MODULE
1. How many sectors per track are there on a 3 ½ “high-density floppy disk?
2. What two cables are connected to a floppy drive inside a computer?
3. What symbol is written to a disk to indicate that the track is formatted and data can be written to it?
4. What is the difference between a sector and a cluster?
5. What is another name for a cluster?
6. What is the purpose of the master boot record on a disk?
7. If a file is fragmented, describe how the entries in the FAT will look.
8. What cluster information for a file is found in the directory entry for the file?
9. Which bit in the file attribute byte tells if the file is a hidden file?
10. What is the difference between an external DOS command and an internal DOS command?
11. How can you make an exact copy of a disk if you only have one floppy drive on your computer?
12. List the steps to create an emergency startup disk using Windows 9x.
13. Why is it helpful to have EDIT.COM on the startup disk?
14. If a floppy drive is not working, why is it better to replace the drive than to repair it?
15. What might cause the error, “General failure reading drive A”?
16. How can you look at a 3 ½ -inch floppy disk and tell if it is a high-density or double-density disk?
17. What do you check if you get the error, “Write protect error writing drive A:”?

Storage Page 41
18. List the steps that you would follow to install a new floppy drive as drive B.
19. How does the computer distinguish drive A from drive B?
20. Which holds more data, a Zip drive or a Jaz drive?
21. What are the names of the three upcoming storage technologies?
22. List the description and maximum capacity of the following storage technologies.
Type Description Capacity
SDC
USB flash drive
Microdrive digital
Magnetic ZIP drive
Magnetic portable
USB drive
CompactFlash
SmartMedia
PocketZip
Micro-optical
Memory stick
Flash drives
QIC
DAT
DLT