a software stack for mobile devices
TRANSCRIPT

Programming Mobile Applications for Android Handheld Systems - Week 1
1 - Introduction
Today I am going to introduce you to the Android platform. I'll start by giving you an overview of the Android platform, and the components that make it up, and then I'll present each of these components and discuss how they help developers buildgreat mobile applications.
The Android platform is a software stack designed primarily, but not exclusively, to support mobile devices such as phones and tablets. This stack has several layers going all theway from low level operating system services, that manage the device itself, up to sample applications, things like the phone dialer, the context database,and a web browser.
Android also comes with a softwaredevelopers kit, or STK, which is used to create Android applications. And finally there are tons of documentation, tutorials, blogs, and examples that you can use to improve your own understanding of Android. I encourage you to take advantage of all these resources.
A software stack for mobile devices:
OS kernel, system libraries, application
frameworks & key apps
Android SDK for creating apps
Libraries & development tools
Lots of documentation. Start browsing
today!
See: http://developer.android.com/training

The above graphic represents the Android software stack: As you can see it's organized into several layers.At the bottom, there is a Linux kernel layer. Above that are system libraries,and the Android runtime system. Next, there's a rich application framework layer to support the development of new applications. And at the very top, Android provides some standard applications including the phone dialer, the web browser, and the contacts database.
Let's look at each of these layers in detail, starting with the Linux Kernel layer, which is the lowest layer of software in the Android platform. This layer provides the core services that any Android computing device relies on. Android's Linux kernel provides generic operating system services. For example, it provides a permissions architecture, so that you can restrict access to data and resources to only those processes that have the proper authorizations. It supports memory and process management, so that multiple processes can run simultaneously without interfering with each other. It handles low level details of file, and network IO. And it also allows device drivers to be plugged in, so that Android can communicate with a wide range of low-level hardware components that are often coupled to computing devices, e.g. memory, radios and cameras.

Android's Linux kernel also includes several Android-specific components. For example, power management services, because mobile devices often run on battery power. It provides its own memory sharing, and memory managing features, because mobile devices often have limited memory. And Android Linux kernel also includes its own interprocess communication mechanism called the binder, which allows multiple processes to share data and services in sophisticated ways. This is just a few of the Android-specific features - there are many others as well.
The next layer up includes a variety of System Libraries. These libraries are typically written in C and C++ and for that reason they are often referred to as the native libraries. And these native libraries handle a lot of the core, performance sensitive activities on your device. Things like quickly rendering web pages and updating the display. For example, Android has its own System C Library which implements the standard OS system calls, which do things like process and thread creation, mathematical computations, memory allocation, and much more. There's also the surface manager for updating the display, a media framework for playing back audio and video files, Webkit for rendering and displaying web pages, Open GL, for high performance graphics, and SQLite, for managing in memory relational databases.
System C library
Bionic libc
Surface Mgr.
Display
management
Media
Framework
Audio/ Video
Webkit
browser engine
OpenGL
Graphics engines
SQLite
Relational
database engine
This layer also includes the Android run-time, which supports writing and running Android applications. There are two components in the Android run time that we'll talk about today: the Core Java Libraries and the Dalvik Virtual Machine. Let's talk about each of those one at a time.
Android applications are typically written in the Java programming language. And, to make it easier to write applications, Android provides a number of reusable Java building blocks. For instance, the Java and Java Extensions (Java X) packages include basic software for things like common data structures, concurrency mechanisms, and file IO.

The Android packages have software that's specific to the life cycle of mobile applications. The org packages support various internet, or web operations. And the Junit packages support the unit testing of applications.
basic java classes -- java.*, javax.* app lifecycle -- android.* Internet/Web services -- org. * Unit testing -- junit.*
The second part of the Android Runtime is the Dalvik Virtual Machine (DVM), the software that actually executes Android applications. You might have assumed that since they're written in Java they would probably run on a standard Java virtual machine. But in fact, that's not the case.
What typically happens with Android is that developers first write their applications in the Java programming language. Then, a Java compiler compiles the Java source code files into multiple Java bytecode files. Next, a tool called DX transforms the Java bytecodes into a single file of a different bytecode format called DEX, in a file usually called classes.dex. Next, the DEX file is packaged with other application resources and installed on the device. And finally, when the user launches the application, the Dalvik virtual machine will then execute the classes.dex file.
The reason for doing all this is that the Dalvik virtual machine, unlike the Java virtual machine, was specifically designed to run in the resource-constrained environment typical of mobile devices. And when I say resource-constrained, what I mean is that compared to a typical desktop device, the typical mobile device is less powerful and more limited in many ways. For example, it will probably have a slower CPU, less memory, and a limited battery life.
If you're interested in finding out more about the Dalvik Virtual Machine itself, then I recommend you take a look at the video, Dalvik VM Internals, by Dan Bornstein of Google.
The next layer in the Android software stack is the Application Framework, which contains reusable software that many mobile applications are likely to need. For
example, the view system contains common graphical elements. Things like buttons and icons that many applications include in their user interfaces. Let's take a deeper look at some of these components. One application framework component is the package manager.
The Package Manager is essentially a database that keeps track of all the applications currently installed on your device. So here's the home screen of my phone. When I click on the launcher icon, the phone shows me a bunch of icons, each one representing an application package that's stored on my phone.
The Package Manager stores information about these applications. And that's useful for several reasons. For example, it allows applications to find and contact each other, so that one application can share data with another application, or so that one application can request services from another.
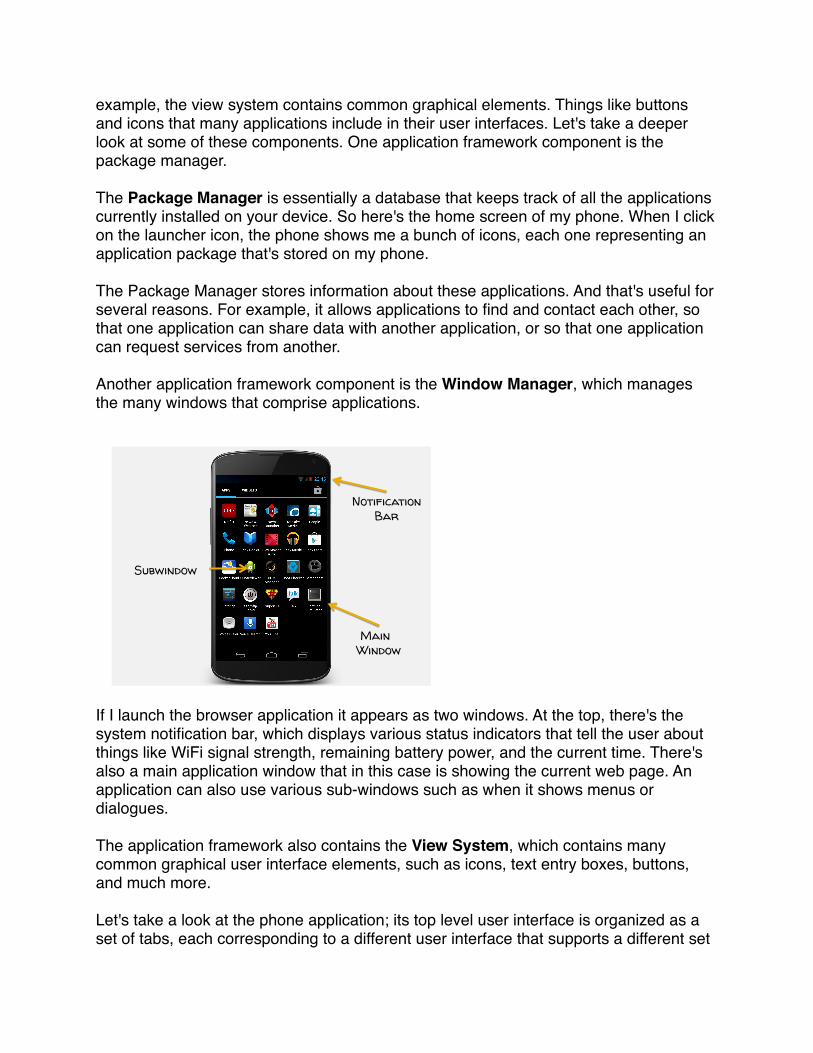
Another application framework component is the Window Manager, which manages the many windows that comprise applications.
Main Window
Notification Bar
Subwindow
If I launch the browser application it appears as two windows. At the top, there's the system notification bar, which displays various status indicators that tell the user about things like WiFi signal strength, remaining battery power, and the current time. There's also a main application window that in this case is showing the current web page. An application can also use various sub-windows such as when it shows menus or dialogues.
The application framework also contains the View System, which contains many common graphical user interface elements, such as icons, text entry boxes, buttons, and much more.
Let's take a look at the phone application; its top level user interface is organized as a set of tabs, each corresponding to a different user interface that supports a different set

of tasks. The phone tab shows me a phone dialer. The call log tab shows a list of recent incoming and outgoing calls. And the contacts tab shows a list of stored contacts.
When I select the phone tab, I'm shown a user interface that mimics a phone keypad. That keypad is made up of view system components, things like buttons and text views. The application will listen as I press these buttons, and then respond by writing the corresponding digits to a text view to show me what number I'm dialing.
The next application framework component is the Resource Manager, which manages the non-compiled resources that make up an application: strings, graphics, and user interface layout files.
To give you an example of non-compiled resources, let's go back to the phone application again. Now this tab has some English words on it. And that's fine because I speak English. But Android is available around the world. It's not limited to English speakers, and so it's important that we have an easy way to customize applications for other languages. One way that Android supports that is that it lets you define strings in multiple languages.
For example, the phone application has a string file for Italian words as well as one for English words. So if you speak Italian, then you can go into the settings application and select Italian as your default language. Now, if I go back and rerun the phone application, you'll see that Android will use the appropriate Italian words rather than the English words. And of course you can do this for as many languages as makes sense for your application.
Another application framework component is the Activity Manager. Android activities often correspond to a single user interface screen. Applications are then created by stringing together multiple activities through which the user can navigate. The Activity Manager helps to coordinate and support that kind of navigation.
Suppose I want to listen to some music. I'll click on the launcher icon to show my applications. From there, I can click on the music player icon and that will start an activity that brings up a user interface screen showing the music I have on my device, in this case sorted by artist. I can select an artist and see the albums by that artist. I can select one album by clicking on it. And this starts another activity that brings up another user interface screen showing the songs in the album I just selected.
Now if I hit the Back button, I can go back to the last activity and, for example, I can choose a different album. Now I can click on a specific song in that album and yet another activity starts up, that brings up yet another user interface screen, allowing me to play this song.
Another application framework component implements Content Providers, which are essentially databases that allow applications to store and share structured information. For example, here we see that the phone application can access stored contact
information and use it to dial a phone number. And it can do that because the contact information is stored in a content provider. And even better, content providers are designed to work across applications. So not only can the phone dialer use the contact information, but so can the MMSM, messaging application and so can various social media applications.
Let's take a look. In the phone application, I can select the Contact tab to access stored contact information. I can select one of the contacts to quickly dial that contact. Now as I said, I can do that because contact information is stored in a content provider. And again, even better, content providers are designed to work across applications. So not only can the phone dialer use the contacts but so can the MMS messaging application, and so can Twitter, Facebook, my email readers, and things like that.
The next application framework component is the Location Manager, which allows applications to receive location and movement information, such as that generated by the GPS system. And this allows applications to perform context-specific tasks, things like finding directions from the current location. Calling up the Google Maps application queries the location manager for my current location, and then shows a map of the area around that current location.
The last application framework component I'll talk about today is the Notification Manager, which allows applications to place information in the Notification Bar. For example, to let users know that certain events have occurred. For example, suppose I want to send my wife an MMS message. And let's suppose that right at this minute, she's writing an email or making a phone call or whatever. So although she probably wants to know that I've sent her an MMS message, she might not want that to disrupt her right now. Well, Android handles this with a Notification Manager. And the way that works is that there's some software running on her phone, that's always listening for incoming MMS messages. When one arrives, that software uses the Notification Manager to place an icon in her phone's notification bar. And that's shown here as a little smiley face icon.
When sheʼs ready she can pull down on the notification bar which then shows more information about the specific notification. And if she clicks on that notification the MMS application will start up and she can read and hopefully respond to my message.
The last layer of the Android software stack is the Application Layer. As I said earlier, Android comes with some built-in applications. And these include things like the Home Screen, the Phone Dialer, the Web Browser, an Email Reader, and more. And one of the things that's really nice about Android is that none of these apps is hard-coded into the system. If you have a better app, you can substitute your app for any of these standard apps.

2 - The Android Development Environment.
The Android development environment is an integrated set of tools to help you create your own Android applications. You should think of them as your workbench for creating Android applications, and like any skilled craftsperson, the more comfortable you are with your tools, the easier it's going to be to produce top quality work.
Installing the Android Developer Tools
(ADT) Bundle
Using the Eclipse IDE
Using the Android emulator
Debugging Android applications
Other tools
Supported Operating Systems:
Windows XP, Vista, or Windows 7
Mac OS X 10.5.8 or later (x86 only)
Various Linux distributions
See: http://developer.android.com/sdk

Make sure you have the Java Development Kit (JDK6) installed See:
http:// www.oracle.com/technetwork/java/javase/downloads
Now in this lesson, we'll cover several topics. First, I'll explain how you can set up your development environment including installing the Android SDK, the Eclipse integrated development environment or IDE, and the Android developer tools. Then I'll show you the Eclipse IDE in action. And we'll create a very simple Android application. After that, I'll show you some specific tools; such as, the Android emulator which allows you to run Android applications without needing a physical device. And then I'll show you how to use the eclipse debugger to help you diagnose any eventual problems that you might have in your application. And lastly, I'll show you a variety of other tools designed to help you further perfect your applications.
Before you get started make sure that you have a supported operating system. For Windows, these include Windows XP, Windows Vista, and Windows 7. For Mac you'll need Mac OS X 10, 10.5.8 or later. Running on an Intel-based CPU. Several Linux distributions will work as well. Please see the Android developers' website for more information. Now, you should also make sure that you have the Java Development Kit Version six, or the JDK6 installed. And be aware that JDK6 is not the latest version of Java, so some of you may have version seven, but that's not fully supported by Android. Check the following website for more information: http://www.oracle.com/technetwork/java/javase/downloadsload
So now we're ready to get started. So first download and install the Android Developer Tools or ADT Bundle. You can find the ADT Bundle at http://developer.android.com/sdk. Now I'll also point out that Google has recently released a new IDE, called Android Studio, which they expect will ultimately become the preferred IDE for doing Android development. However, since Android Studio is still currently in a preview or pre-

released state, I'm going to do my demonstrations for this class using Eclipse. But you're free to, to use Eclipse or to use Android Studio, as you wish.
The ADT Bundle provides you with several things. First, it has the latest Android platform including the latest libraries, reusable software, tools, and documentation. It also includes the eclipse IDE and Android specific plugins. It has additional tools that support developing, running, testing, and debugging your Android apps and it has the latest system image for the emulator so that you can run and debug your Android applications without needing to have an actual device.
Let's look at a very simple Android application called, Hello Android. And I'll be referring back to this application throughout the lesson. Now here I'm showing my phone's home screen. First, I'll click on the launch here icon. And then I'll click on the Hello Android icon to launch the application, the application starts, and displays the words, Hello world.
Now that's about as simple as it gets, but let's walk through the process of writing the Hello Android application, using the eclipse IDE. Now this is the Eclipse IDE opened to full screen. Let's start by creating a new Android application project. Now one way to do that is to go to the File menu, then New, and then select Android Application Project.
Once you do this, you'll see a series of dialogue boxes that ask you for information about this application. On the first screen enter Hello Android, all one word for the application name, and for the project name. Where it asks for the package name, I'm using course.examples.helloandroid but you could use something else if you'd like. Now go ahead and leave the other boxes alone, and hit Next.
Now for this exercise, let's just click through the next few screens. They control application characteristics that we haven't discussed yet, but we'll come back to them when time is right.
Once you arrive at the screen titled, Blank Activity, go ahead and hit the Finish button. Eclipse will generate the application's source code and layout files. And once it's finished, you will open a file called activity_main.xml. This file defines the application's user interface layout. And based on this file, Eclipse will show you whatever it can about how this application will look when it runs.
As you can see here, Hello Android will display a simple screen with the words, hello world. Let's also take a quick look at the source code for this application. Let's open up the file main activity.java. Now that opens up an editor window, showing the contents of the file.
And I won't talk too much about the source code right now, except to say that when this application runs; the on create method of this class will be called and that code will set up and display the application's user interface screen, so let's run this code to see what happens.
One way of running an application is to, click on the project in the File pane, then select Run As, and then select Android Application. Now a dialogue box pops up, asking where to run the application? In this case, I only have my phone connected, so I'll choose that. And now, we wait while the application is copied to the phone, and then run.
And there you have it. Your first Android application, running on a real device.
Now, the phone I use is the Nexus Four. Let's suppose I'd like to test this out on a different phone. Let's say the Galaxy Nexus but I don't have one of those phones. In that case rather than run out and buy a Galaxy Nexus, I can run Hello Android on an emulated Galaxy Nexus using the Android Emulator. And in order to do that, I first need to create the emulated phone instance that I'll use inside the emulator.
Now these emulated phone instances are called virtual devices. Let's go back to the clips, and set up a virtual device corresponding to a Galaxy Nexus. So now we're back in Eclipse. First, I'll go up to the tool bar, and launch the Android virtual device manager, it might be a bit hard to see here, but look for the icon, that shows an android in a box. Clicking that will display a dialogue box showing existing virtual devices and allowing you to make new ones.
Let's click on the New button which will bring up another dialogue box. Under AVD name or Android Virtual Device name you can give this virtual device any name you want. Now go to the Device pull down menu and select Galaxy Nexus, that will fill in a bunch of information for you such as the target platform to use. In this case let's use Android 4.2.2. I'm going to add some memory to the SD card just in case we may need it later. And then I'll hit okay.
You can see the virtual device you just created. Click on that and then click Start. Now go ahead and click through to the next screen. And then we'll need to wait several minutes while the virtual device boots up. I'll come back later when it's done.
Okay, we're almost there, just a few seconds more. And there's the home screen of an emulated Galaxy Nexus.
Now that the Galaxy Nexus is running, let's return to Eclipse. And this time, I'll install and run hello android on the emulated phone rather than on a physical device. So just like we did before, let's click on the project name. Select Run As, and then select Android application. A dialogue box up, box pops up, showing us connected devices. And this time, instead of selecting an actual device, select the virtual device that you just started and click okay.
Eclipse will install the application on the virtual device and then run it. And here you go, Hello Android, running on the emulator.
Today I've shown you that you can build applications like Hello Android on an actual device, inside an emulator or both. And there are pluses and minuses with each of

these approaches; for example, the benefits of using an emulator include; that the emulator is cheaper, you don't have to buy all the devices that you may want to test on. Also, unlike the phone, the emulator allows you to easily configure hardware characteristics, like the size of the sd card, the display size, whether the device has a trackball, and so on. Also, many modifications that you make or any of the modifications that you make. Are isolated to this emulated device, so you don't have to worry that your testing will mess up your phone or its data or configuration.
Now on the other hand, emulators have some downsides as well. For example, the Android Emulator is pretty slow and that can be frustrating when you're trying to rapidly experiment and tune your app and you have to wait for the emulator to start up and run and shut down. Also some features are not well supported by the emulator. For instance, there is no support for bluetooth connectivity and no support for connecting accessories to the emulator via a USB cable. Also, some software features aren't available at by default in the emulator, so certain applications won't run on it. And finally, at the end of the day, the emulator is not a device. You can't know how your application is going to look and perform on an actual device just by seeing it on an emulator.
Let's take a look at some of the advanced features that the emulator supports. For instance, you can configure the emulator to emulate the speed and latency of different cellular networks. You can configure the emulator to emulate different battery states, such as whether you're running low on battery power, or currently charging the device. You can also inject mock location coordinates to make testing of location or applications much easier.
And typically, these features help to test code that must respond to environment events. For instance, applications are often designed to do different things, depending on the battery level. Let me show you how easy this is.
Here I'm showing a terminal window. And an emulator running on a virtual device. In the terminal window, I'll use telnet to connect to the emulator. You can see port number on which the emulator's listening in that emulator's window title bar. And in this case that's 5554. So I'll type telnet local host 5554. Now I'll set the network characteristics to emulate a slower edge network. I'll type network, speed, edge.
And notice that the cellular network status icon in the notification bar has now changed. Now I'll change it back to 3G network speed. And now I'll change the battery status to reflect a phone that is running out of battery power. I'll type in power, capacity 5. And again you can see that the battery status indicator in the notification bar is changed to reflect the lower battery level.
Now I'll change the charging status to indicate that the phone is not plugged in. I'll type power status not charging. And again as you can see the battery status indicator no longer shows a lightning bolt, and has changed color to indicate that the device is almost completely out of power.
Also if I open the maps application you can see that the emulator thinks that I'm currently somewhere near Washington DC. However, I can change that by inputting a new set of location coordinates like so, geo fix 0.00 40.00 and as you can see the maps application now shows that I've been transported somewhere near a beach in sunny Spain.
The Android emulator also allows you to emulate network interactions such as receiving a phone call or a SMS message. Back in the terminal window, I'll reconnect to the emulator over telnet. And then, I'll give the emulator a command which will cause it to emulate an incoming SMS message. That command is sms send followed by the sender's phone number, 3015555555. And then the text message. In this case, this is a text message. Now, keep your eye on the emulator window to see what happens when I hit Return. And as you can see, the emulator's notification bar now contains a notification, indicating that the emulated phone just received the SMS message and we can pull down on the notification bar. And then start messaging application to get a closer look at that SMS message.
Android also allows two emulators to interact with each other. Here I'm showing two emulator instances running, in one I'll open the phone application and start to dial the number of the second. The number of the second emulator is the port number shown at the top of that emulator. In this case, 5554. Now you can see that the second emulator has received the call. And is ringing its user. So I'll pick up the incoming call in the second emulator, and as you can see, now the first emulator's interface has changed to reflect that the call is connected. Now, if one of the parties hits the Hold button, that will also be reflected in both phone applications. And once the users are done with the call, I can hang up one of the emulators and both emulators show that the call has been disconnected.
And of course that' just a few of the many things that you can do with the emulator. There are many, many other interesting features as well and if you want to know more I would recommend that you take a look at the emulator page, on an, on the Android developer's website.

Week 2 - Application FundamentalsToday, we're going to talk about the four fundamental building blocks from which all Android applications are built. These building blocks are implemented as Java classes. And the first of these building blocks is the Activity class. Now that's the main class that users see when the run an application.
Activities are designed to provide a graphical user interface, or a GUI, to the user, and this enables users to give and receive information to and from an application. The remaining three components work behind the scenes, so they don't have user interfaces. And these components include services for supporting long running or in the background operations: Broadcast Receivers that listen for and respond to events that happen on a device, and Content Providers which allow multiple applications to store and share data.
Applications are typically created from multiple collaborating components, which Android starts up and runs as necessary. And each of these components serves a different purpose in the Android ecosystem, and therefore, has it own entry point, and its own APIs. Let's take a look at each of these components one at a time. First, let's talk about the activity class.
As I said earlier, this class is designed to present a graphical user interface to the user and to capture the user's interaction through that interface. As a general rule of thumb, an activity should support a single focused thing that the user can do. A single thing, like dialing a phone number or entering contact information for a single person, and so on. Now, of course, as device screens, especially those on tablets, get larger and larger, what we mean by a single focus thing that the user can do is, of course, bound to change.
As an example of an activity, let's take a look at the Phone Dialer application. Here I'll show you the phone application running on an actual device. You'll remember from earlier lessons that the phone application can open a user interface with multiple tabs. One for a phone dialer, one for the call log, and one for a contact list. In Android 4.2, this application's source code is actually part of the Contacts application. And it's written in a file called DialTectsActivity.java in the
The DialTactsActivity class is a subclass of the Activity class. And the comments here explain that this activity is supposed to display a tab containing the phone, the phone dialer, the call log and the contacts list that I mentioned earlier.
The next component is the Service class. Unlike Activity, services run in the background. So there's no need for services to have user interfaces. Instead, services have two main purposes. One, they can perform long running operations, typically away from the main UI thread. And two, they provide a way for different processes to request operations and share data.

For an example of a service, let's take a look at the Music application. The music application has a number of different user interface screens that show, for example, your music and the songs performed by a single artist, letting you select one song by that artist, and finally letting you play that one song. If you start playing a song, however, and then decide to back up and see what other songs that artist has, or if you want to do something totally different, e.g. check your email, you probably don't want the music to stop playing.
Android handles this by using a Service to play the music. The MediaPlayback service used in the Music app is a subclass of Service, and it allows the music to keep playing, even if the user switches between different activities.
The next component is Broadcast Receiver. Broadcast Receivers listen for and respond to events - they play the role of the subscriber in the publish/subscribe pattern. In Android, events are represented by the Intent class, which we'll talk about more in later classes. Publishers create these intents and then broadcast them using a method such as the Context classʼs, SendBroadcasts. Now, once broadcasted, these intents are then routed to the broadcast receivers that have subscribed to, or registered for, those specific intents, at which point, they can respond to the event.
The messaging application is an example of an application that uses of Broadcast Receivers. Let's take a look at that application.
Imagine that somewhere out there in the world, someone decides that they want to send me an SMS message. That SMS message will be created and sent and will flow through the telephone network and eventually arrive at my phone. And when it does, Android will put a notification icon in the notification bar to let me know that an SMS message has arrived for me.
Now of course, you can't know exactly when you're going to receive such a message. So Android has some software that just sits and waits for SMS messages to arrive. And when they do, that software broadcasts an SMS_received intent. And there is another broadcast receiver that is listening for that intent and that broadcast receiver will eventually receive the intent and will then start up a service that will download and store the incoming SMS message. Now here I'll go to the MMS application and open one of its broadcast receivers. SMSreceiver.java. As you can see, the SMS receiver class is a subclass of broadcast receiver. And the comments explain that this broadcast receiver hands off the incoming SMS mesage to a service which takes care of the downloading and storage of the message.
The last component weʼll discuss is the Content Provider. A Content Provider allows applications to store and share data. Content providers uses a database-style interface but they're more than just databases. For example, content providers will handle the low-level details of inter-process communication. So that applications running in separate processes can communicate and exchange data safely and easily. The
browser application is one example of an application that uses content providers. So here I'll start the browser application.
If I click on the icon next to the address bar, the browser opens a list of bookmarks, or saved addresses, for websites that I might want to access quickly in the future. When a user adds one of these bookmarks, the browser application stores it in a content provider.
Example: The MapLocation Application
In our last class we looked at the Hello Android application. That simple application involved just a single activity. Today, however, we're going to look at a more complex application. In this case comprised of two activities. And, of course, once you know how to use two activities, adding a third, and a forth and so on, will just be more of the same.
This application is called MapLocation and one of its activities allows the user to enter a postal address. That activity also provides a button that the user can press that will start up a second activity, Google Maps, that presents a map centered on the address that the user just entered.
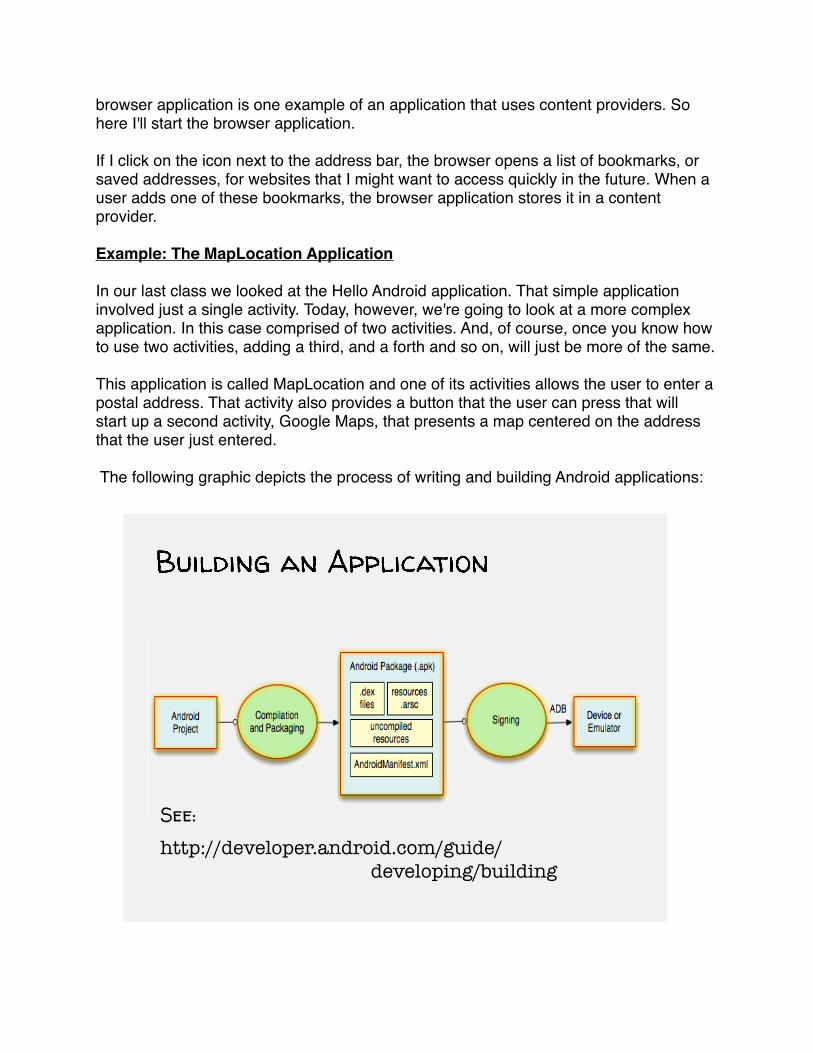
The following graphic depicts the process of writing and building Android applications:
See: http://developer.android.com/guide/�
developing/building

First, you create the source code and the non-source code resources that make up your application. Next, tools compile your source code, and prepare your resources. The output of this step is an Android package or APK which corresponds to your application's executable. Next the APK is digitally signed, to identify you as its developer and finally the APK is installed on a device or emulator and run.
As a developer, your participation in the build process will usually involve the following four steps. 1. Defining resources. See: http://developer.android.com/guide/topics/resources2. Implementing the application classes3. Packaging the application4. Installing and running the application (in particular, for testing and debugging)
Step 1 - Defining your application's resources.
As I've said before, Android applications are more than just source code. They include non-source code entities as well, things like layout files, strings, images, menus, animations and much more. And managing resources separately from the application has several benefits. One of which is that you can easily alter those resources without having to change or recompile your applications source code in any way.
One common resource type is strings. In Android there are three types of string resources:• Individual strings• Arrays of strings• Plurals.
Strings and, and arrays of strings are pretty self explanatory, let's talk about plurals.
Types: String, String Array, Plurals Typically stored in res/values/*.xml Specified in XML, e.g.,
<string name="hello">Hello World!</string> Can include formatting and styling

Plurals are string arrays that can be used to choose specific strings that are associated with certain quantities, such as one book, or two books. And the strings are typically stored in an XML file in the res/values directory of your application. The format is a, an XML string tag containing a name attribute and then containing the actual string itself. The actual string can include formatting and styling information, e.g. HTML tags.
Finally, other resource files can refer to the strings that you've defined as @string/string_name. In Java code, you can also access these strings, but this time you do it as R.string.string_name.
Let's open the strings.xml file in the res/values directory:
<?xml version="1.0" encoding="utf-8"?><resources> <string name="show_map_string">Show Map</string> <string name="location_string">Enter Location</string></resources>
This file shows two strings, show_map_string with the value, “Show Map”. And location_string, with the value, “Enter Location”.
I've also defined a another strings.xml file, this one for supporting the Italian language. And it's in the res/values-it directory. The suffic “-it” in the directory name is what tells Android that this is where the string file for the Italian language is found. If we look at that file, we'll see the same two strings, show_map_string and location_string. But this time their values are Italian words rather than English words:
<?xml version="1.0" encoding="utf-8"?><resources> <string name="show_map_string">Mostra la mappa</string> <string name="location_string">Digita l\'indirizzo</string></resources>
In the example I just showed, if your default language is Italian then location string will have the value”Digita l'indirizzo”. Otherwise, it'll have the value “Enter Location”.
Let's see that in action. Now I'm going to run Map Location twice. The phone on the left uses English as its default language. While the phone on the right uses Italian as its default language. Now as you can see, although both phones are using the same exact source code, the phone on the left, displays English strings, while the phone on the right, displays Italian strings.
Another kind of resource is a Layout File. Layout Files specify what the user interface for some part of your application will look like. And again, these files are written in XML, although some tools will allow you to create the layout visually, and then those tools will generate the XML for you. In fact Eclipse will do that.

Layout files are typically stored in the res/layout directory of your application. And you can access the layout in java as r.layout.layout_name. You can access that layout in other resource files as @layout/layout_name.
Just like string files whose use depends on your default language, Android allows you to create multiple layout files. Android can then choose from those files at run-time based on your device's configuration.
Let's look at an example, the main.xml file that is in the res/layout directory:
<?xml version="1.0" encoding="utf-8"?><RelativeLayout xmlns:android="http://schemas.android.com/apk/res/android" android:id="@+id/RelativeLayout1" android:layout_width="match_parent" android:layout_height="match_parent" android:orientation="vertical" >
<EditText android:id="@+id/location" android:layout_width="match_parent" android:layout_height="wrap_content" android:layout_alignParentLeft="true" android:hint="@string/location_string" android:inputType="textPostalAddress" />
<Button android:id="@+id/mapButton" android:layout_width="wrap_content" android:layout_height="wrap_content" android:layout_below="@+id/location" android:layout_centerHorizontal="true" android:text="@string/show_map_string" />
</RelativeLayout>
This file specifies that the layout is composed of something called the Relative layout. More on that when we talk about user interfaces.
Inside the relative layout there's another element called an EditText, that's the box that you use for entering the postal address. There's also a button, that's the button that was labeled show map.
Eclipse can also show what it thinks this will all look like, at run time. You can see that by clicking on the Graphical Layout tab under the XML file listingʼs window. Now once you're there, you can also click on the individual elements and Eclipse will show you more detailed information about their layout properties.

MapLocation also has another file, also called main.xml, but this one is in the res/layout-land directory. If MapLocation is running with a device in landscape mode this file is used instead of the one that we saw before.
<?xml version="1.0" encoding="utf-8"?><RelativeLayout xmlns:android="http://schemas.android.com/apk/res/android" android:id="@+id/RelativeLayout1" android:layout_width="match_parent" android:layout_height="match_parent" android:orientation="vertical" >
<EditText android:id="@+id/location" android:layout_width="match_parent" android:layout_height="wrap_content" android:layout_alignParentTop="true" android:layout_toLeftOf="@+id/mapButton" android:ems="10" android:hint="@string/location_string" android:inputType="textPostalAddress" > </EditText> <Button android:id="@+id/mapButton" android:layout_width="wrap_content" android:layout_height="wrap_content" android:layout_alignParentRight="true" android:layout_alignTop="@+id/location" android:text="@string/show_map_string" android:textSize="20sp" /> </RelativeLayout>
Now as you can see, this file uses the same elements, a Relative layout, an EditText and a Button. But I've changed their positioning slightly, so that the elements all appear on a single line, which I think looks better in landscape mode. And again, you can play around with Eclipse to get more details about the layout properties of each individual element.
Now I've mentioned a few times now that resources can be accessed in Java as R dot something or another. Well, to do this, Android generates a class called R from your application and you can then access the fields of this R class to get to those strings and layouts and other resources that you defined in the XML files.

At compilation time, resources are used to generate the R.java class Java code uses the R class to access resources
Let's take a look at an, at an actual R.JAVA file. As I've said, this file is generated by Android, so you shouldn't modify it.
/* AUTO-GENERATED FILE. DO NOT MODIFY. * * This class was automatically generated by the * aapt tool from the resource data it found. It * should not be modified by hand. */
package course.examples.MapLocationFromContacts;public final class R { public static final class attr { } public static final class drawable { public static final int ic_launcher=0x7f020000; } public static final class id { public static final int mapButton=0x7f050000; } public static final class layout { public static final int main=0x7f030000; } public static final class string { public static final int find_address=0x7f040000; }}

You can see that the file defines the R class, and this R class contains another class called Layout, which has a field called Main. And that actually gives you a reference or handle to the main.xml file. There's also an ID class, providing handles to the relative layout, to the button defined in the main.xml files.
If you go back and check the main.xml files now, you'll see that there are lines that say android:id, which is where these fields and IDs come from. And finally, there's a class called string which provides handles for all the strings that we've been talking about. [Editorʼs note: the last file shown above is from a slightly different app, called MapLocationFromContacts, so the classes will not exactly match those of MapLocation].
Step 2 - (in application development) Implementing your Java classes
This next step usually involves writing at least one activity. The entry point for activities is the Activity.onCreate method, which is where you will typically initialize your application. Let's look at the MapLocations appʼs onCreate method in a bit more detail:
In onCreate, you usually do the following four things:
1. Restore saved application state2. Set the content view, which tells android what to display as the activity's user
interface3. Initialize specific elements of the activity's user interface4. Attach code to those user interface elements, so that specific actions will be
performed when the users interact with these user interface elements.
Let's see how these steps are implemented in MapLocation.java source code in the application's src directory:
public class MapLocation extends Activity {
private final String TAG = "MapLocation"; @Override protected void onCreate(Bundle savedInstanceState) { // Restore any saved state super.onCreate(savedInstanceState); // Set content view setContentView(R.layout.main);
// Initialize UI elements final EditText addrText = (EditText) findViewById (R.id.location); final Button button = (Button) findViewById (R.id.mapButton);
// Link UI elements to actions in code

button.setOnClickListener(new Button.OnClickListener() { @Override public void onClick(View v) { try { String address = addrText.getText ().toString(); address = address.replace(' ', '+'); Intent geoIntent = new Intent( android.content.Intent.ACTION_VIEW, Uri.parse("geo:0,0?q=" + address)); startActivity(geoIntent); } catch (Exception e) { Log.e(TAG, e.toString()); } } }); }...
This file implements a class called MapLocation, which is a subclass of activity. As an activity it has an onCreate method where the application is initialized. The first step of onCreate is to call super.onCreate, passing savedInstantState as a parameter. This saved instance is a something of type Bundle - it's basically a data structure containing any information that Android might have saved from the last time the activity was running. We'll talk more about this next time when we dive deeper into the activity class. But for now, just be aware that onCreate has to call super.onCreate, or you'll get an error.
Next, there's a call to setContentView. In this case, passing in the reference of the layout file for this application, r.layout.main. After that, there's some code that acquires references to individual UI elements in the layout. Such as the editTextBox, which is stored in a variable called, adder text, and the button, which is stored in a variable called button. As you can see, these references are acquired by calling Activity.findViewById and passing in the id of the desired element.
And finally, there's some code that defines what to do when the user presses the show map button. This code implements the on ClickListener interface, which has an onClick method that gets called whenever the user clicks on this button. The code in the onClick method first gets any text that the user has entered in the address box. Then it processes that text to remove spaces and put it in a format that Google Maps understands. And then it starts the Google Maps application, passing in this modified address text. I'll explain what this code is doing in more detail in later lessons when we dive into the workings of the activity class and the intent class. Also, just to simplify things, I have left out any error checking or verification of the address string that was input. In production code, you're really going to want to do that.
Step 3 - Packaging the Application
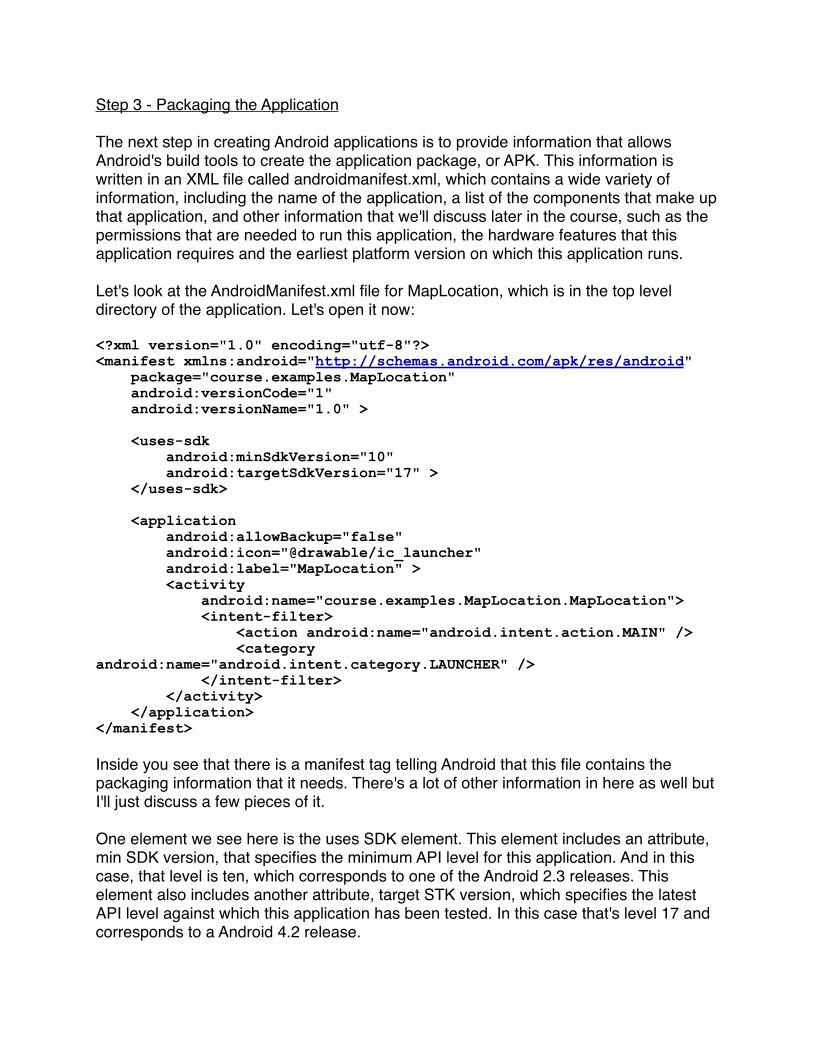
The next step in creating Android applications is to provide information that allows Android's build tools to create the application package, or APK. This information is written in an XML file called androidmanifest.xml, which contains a wide variety of information, including the name of the application, a list of the components that make up that application, and other information that we'll discuss later in the course, such as the permissions that are needed to run this application, the hardware features that this application requires and the earliest platform version on which this application runs.
Let's look at the AndroidManifest.xml file for MapLocation, which is in the top level directory of the application. Let's open it now:
<?xml version="1.0" encoding="utf-8"?><manifest xmlns:android="http://schemas.android.com/apk/res/android" package="course.examples.MapLocation" android:versionCode="1" android:versionName="1.0" >
<uses-sdk android:minSdkVersion="10" android:targetSdkVersion="17" > </uses-sdk>
<application android:allowBackup="false" android:icon="@drawable/ic_launcher" android:label="MapLocation" > <activity android:name="course.examples.MapLocation.MapLocation"> <intent-filter> <action android:name="android.intent.action.MAIN" /> <category android:name="android.intent.category.LAUNCHER" /> </intent-filter> </activity> </application></manifest>
Inside you see that there is a manifest tag telling Android that this file contains the packaging information that it needs. There's a lot of other information in here as well but I'll just discuss a few pieces of it.
One element we see here is the uses SDK element. This element includes an attribute, min SDK version, that specifies the minimum API level for this application. And in this case, that level is ten, which corresponds to one of the Android 2.3 releases. This element also includes another attribute, target STK version, which specifies the latest API level against which this application has been tested. In this case that's level 17 and corresponds to a Android 4.2 release.

There are also an application elements that specify the icon for this application and the label that's shown in the application's title bar. Inside the application element, there's an activity element, that lists the one activity, in this case MapLocation, that comprises this application.
Step 4 - Installing and running the application to test and debug it
In an earlier lesson we saw how to do this in Eclipse. You can also do this from the command line, for example, by issuing commands to the ADB tool.
That's all for application fundamentals, please join me next time when we will discuss the Activity class.

Week 2 - The Activity ClassIn our last lesson, we talked about the four fundamental components of Android applications: • Activities• Services, • Broadcast receivers• Content providers
Today we're going to take a deeper look at Activities. I'll start by presenting the Activity class itself. Next, I'll discuss Android's task backstack, which helps users easily navigate back and forth among the activities they use. After that, I'll discuss the life cycle of activities, how they're created, executed, terminated and how Android manages and communicates these life cycle phases and changes to your applications. After that I'll discuss the API's and patterns that you'll need to programmatically start activities. And finally I'll finish up with a discussion of how Android activities handle device and application configuration changes.
The Activity class
Activities are the primary class for interacting with users, providing a visual interface to the application. By convention, activities are modular, in the sense that each activity should support a unified and focused interaction between the user and the application, e.g. viewing an email message or showing a login screen. If we follow this convention, each application is reduced to a string of unitary activities through which the user navigates. Android fosters this navigation through the maintenance of tasks and a task backstack, which ensures that activities are properly suspended and resumed
In Android a task is a set of related activities, which are often part of the same application, but not always - a task can span multiple applications. Most tasks start at the home screen. When a user launches an application from the home screen a new task is normally started. And when a user hits the home button to return back to the home screen, the current task is closed.
For more details see: http://developer.android.com/guide/topics/fundamentals/tasks-and-back-stack.html
The task backstack works as follows:
• An activity is launched is pushed onto the task backstack• When the user hits the back button, or the activity terminates itself programatically or
Android has decided to kill that activity to conserve resources, the activity is destroyed and is popped off the task backstack.

Activity 3 Activity 2 Activity 1
Activity 1 Activity 2 Activity 1
Let's take a look at how this process works. The above graphic represents an activity that is running on a device and depicts the state of the task backstack. The black pointer at the bottom indicates the current snapshot.
• The application is launched and starts up Activity 1:• Activity 1 is pushed onto the top of the task backstack as the root of the current
task. • Activity 1 has a single button labeled Start Activity 2 - the user presses this button:
• Activity 1 is suspended and its state is captured so that it can be restored later if the user returns back to it.
• Activity 2 is started and pushed onto the task backstack. • Activity 2 has a single button labeled Start Activity 3 - the user presses this button:
• Activity 2 is suspended• Activity 3 is started and pushed on to the task backstack.
• The user finishes with Activity 3 and hits the back button to back to Activity 2:• Activity 3 is killed and popped it off the task backstack - Activity 2 is now at the top
of the task backstack.• Activity 2 is resumed, restoring it's state and bringing it back into view on the device.

The Activity Lifecycle
As we saw with the task backstack examples, Android activities may come and go, come back, and go away for good. The have a lifecycle. Applications are not completely in control of this lifecycle - some lifecycle changes depend on choices that the user makes, such as pressing the back button or the home button. Other lifecycle changes depend on Android itself, for example, if a device is running low on memory, Android may kill a suspended activity even though it may need to recreate the same activity later when the user navigates back to it.
Let's talk about the activity lifecycle and the particular lifecycle changes that activities undergo. For example, once an activity is started, it can be in a resumed (or running) state. When it's in this state, the activity is visible and the user can interact with it.
An activity can also be paused, for instance, when a new activity is about to pop-up in front of it. Here, the activity still may be partially visible but the user can't interact with it because of the new activity that is starting up. Prior to version 3.0, Android could terminate activities once they went into the paused state.
An activity can also be stopped, in which case it is no longer visible and Android is free to terminate it. This is important to reiterate: Android can terminate a stopped activity and will so even though it might need to recreate the same activity later when the user navigates back to it.
Resumed/Running - visible, user interacting Paused - visible, user not interacting, can be terminated* Stopped - not visible, can be terminated

Activities often need to behave differently during different parts of the life cycle. For instance, if an activity is showing an animation but then pops up a partially transparent dialogue-style activity in front of it, it might need to pause the animation while the user responds to the dialogue, and then restart the animation once that dialogue activity finishes. To support these situations, Android announces lifecycle changes by calling specially named lifecycle (or template) methods. Some of these methods are shown here:
protected void onCreate (Bundle savedInstanceState) protected void onStart() protected void onResume() protected void onPause() protected void onRestart() protected void onStop() protected void onDestroy()
• onCreate() is called when the activity is about to be created. • onStart() is called when the activity's about to become visible•••• onDestroy is called when the activity's about to be destroyed.
If you want to take some specific action when your activity changes state,then you need to override one or more of these methods in your activity.
Let's look at how these different methods interrelate with each other:
Entire Lifetime
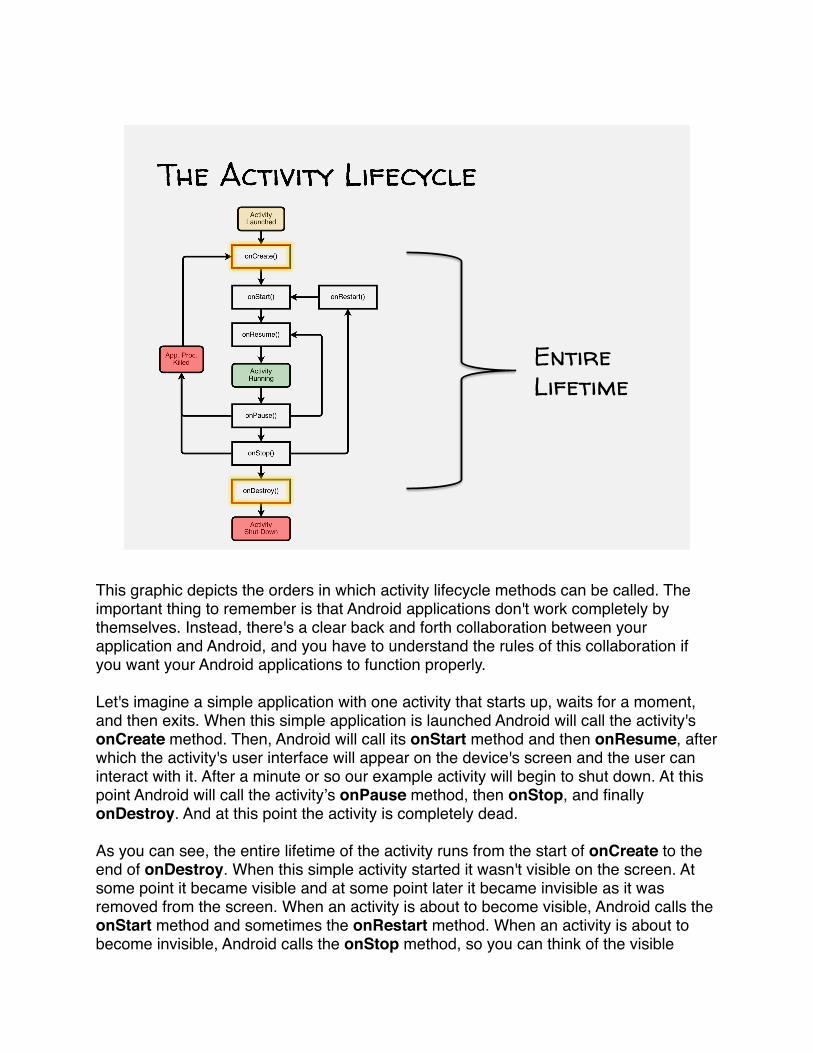
This graphic depicts the orders in which activity lifecycle methods can be called. The important thing to remember is that Android applications don't work completely by themselves. Instead, there's a clear back and forth collaboration between your application and Android, and you have to understand the rules of this collaboration if you want your Android applications to function properly.
Let's imagine a simple application with one activity that starts up, waits for a moment, and then exits. When this simple application is launched Android will call the activity's onCreate method. Then, Android will call its onStart method and then onResume, after which the activity's user interface will appear on the device's screen and the user can interact with it. After a minute or so our example activity will begin to shut down. At this point Android will call the activityʼs onPause method, then onStop, and finally onDestroy. And at this point the activity is completely dead.
As you can see, the entire lifetime of the activity runs from the start of onCreate to the end of onDestroy. When this simple activity started it wasn't visible on the screen. At some point it became visible and at some point later it became invisible as it was removed from the screen. When an activity is about to become visible, Android calls the onStart method and sometimes the onRestart method. When an activity is about to become invisible, Android calls the onStop method, so you can think of the visible

lifetime of an activity as the period between the beginning of a call to onStart and the end of a call to onStop. And finally, while an activity is visible on the screen, there are times when the user can interact with it, and there are times when the user cannot. For example, when a device goes to sleep the user cannot interact with the activity even though it is the foreground activity. So, when an activity is about to acquire user interactivity, Android calls the onResume method. And when the activity is about to lose user interactivity, Android calls the onPause method, so you can think of the visible and in foreground lifetime of an activity as the period between the start of a call to onResume and the end of a call to onPause.
Visible
Let's walk through an example of this based on the MapLocation application that we saw in earlier lessons. First, the user goes to home screen and launches the map location application. This causes the map location activity to start up. At which point Android calls Map Location's onCreate method. OnCreate initializes the activity. And then Android continues by calling onStart. And at this point Map Location is visible but not yet ready for user interaction. And right now it calls onResume. After onResume completes Map Location will soon be both visible and ready for user interaction. And at this point the user will normally enter an address in the address box. Once the address has been entered the user will normally press the show map button which will launch Google Maps. As it starts up, Google Maps will have its own initial activity, that will go through its own lifecycle, and receive its own lifecycle call backs.

Let's continue looking at the MapLocation activity. Now, because Google maps is about to come into the foreground and cover up the MapLocation activity, it will first receive a call to its onPause method. Soon after, Map Location will no longer be visible and Android will call its onStop method.
Eventually Google Maps will appear on the screen and the user will be able to interact with it. But at some point the user will be done with Google Maps and might, for example, choose return back MapLocation by hitting the back button. As Android brings MapLocation back into the foreground it will first call onRestart and then onStart. Soon after, the application will be visible again. Next, Android will call Map Locationʼs onResume method and soon the Map Location activity will be both visible and ready for user interaction.
Finally when the user eventually loses interest in application, he or she might hit the back button again, in this case to end the application. At this point, Android will again go through the process of removing Map Location from the screen. It will first call onPause, then onStop, and then this time it will call onDestroy, before completely terminating the application.
Visible & in Foreground

Let's take a deeper look at these life-cycle methods. The first method that gets called is onCreate, which is when the activity is first created. Typically, onCreate is used to initialize the activity, and will carry out the following four functions:
1. Call super.onCreate, so Android can do some of its own initialization. 2. Set the activity's ContentView, which tells Android about the activity's user interface.3. Capture and retain any references to the various views or elements of the user
interface.4. Configure the user-interface views and elements, as required.
Let's take a look at the MapLocations onCreate method In MapLocationActivity.java:
package course.examples.MapLocation;
import android.app.Activity;import android.content.Intent;import android.net.Uri;import android.os.Bundle;import android.util.Log;import android.view.View;import android.widget.Button;import android.widget.EditText;
public class MapLocation extends Activity {
private final String TAG = "MapLocation"; @Override protected void onCreate(Bundle savedInstanceState) { // Restore any saved state super.onCreate(savedInstanceState); // Set content view setContentView(R.layout.main);
// Initialize UI elements final EditText addrText = (EditText) findViewById (R.id.location); final Button button = (Button) findViewById (R.id.mapButton);
// Link UI elements to actions in code button.setOnClickListener(new Button.OnClickListener() { @Override public void onClick(View v) { try { String address = addrText.getText() .toString(); address = address.replace(' ', '+'); Intent geoIntent = new Intent( android.content.Intent.ACTION_VIEW, Uri.parse("geo:0,0?q=" + address));

startActivity(geoIntent); } catch (Exception e) { Log.e(TAG, e.toString()); } } }); }
@Override protected void onStart() { super.onStart(); Log.i(TAG, "The activity is visible and about to be started."); }
@Override protected void onRestart() { super.onRestart(); Log.i(TAG, "The activity is visible and about to be restarted."); }
@Override protected void onResume() { super.onResume(); Log.i(TAG, "The activity has focus (it is now \"resumed\")"); }
@Override protected void onPause() { super.onPause(); Log.i(TAG, "Another activity is taking focus” + “(this activity is about to be \"paused\")"); }
@Override protected void onStop() { super.onStop(); Log.i(TAG, "The activity is no longer visible” + “(it is now \"stopped\")"); }
@Override protected void onDestroy() { super.onDestroy(); Log.i(TAG, "The activity is about to be destroyed."); }}

As you can see that the MapLocation class is a subclass of Activity and overrides Activity.onCreate. Inside the onCreate method, you see the four functions, just mentioned.
First, there's a call to super.onCreate. Next, there's a call to setContentView, passing in the ID of a layout file as a parameter. Then the activity stores references to an editTextView and to a Button, which appear in the user interface. And finally, onCreate attaches a Listener to the button. Android calls this Listener code every time the user presses this button - the listener code is “listening” for presses of the button.
OnRestart is another life-cycle method that is called if the activity that has been stopped, but is about to be started again. You can use onRestart to handle any special processing that is needed when the activity has been stopped and is about to start again.
onStart is called when the activity is about to become visible. Typical usages for this method include starting when visible-only behaviors, such as requesting location sensor updates or loading and resetting persistent application states, e.g. updating the unwritten messages queue in an email reader application.
The onResume method gets called, when the activity is visible and about to start interacting with the user. And some things you do in this method, are to start foreground-only behaviors, such as starting animations or playing a background soundtrack.
The onPause method is called when your activity is about to lose focus. In this method, you can shut down foreground only-behavior, e.g. killing an animation. You should also save any persistent state that the user has edited.
The onStop method is called when the activity is no longer visible to the user. At this point it's possible that the activity may be restarted later, so some typical things to do here include caching the activity state that you'll want to restore when the activity is later restarting and onStart is called.
Remember: onStop is not always called when an activity terminates. For instance, it may not be called when Android kills the application's process, due to low memory. So, don't wait to save persistent data with this method - do it back in onPause.
The onDestroy method is called when the activity is about to be destroyed. Some typical actions to do here include releasing the activityʼs resources, e.g. shutting down private threads that were started by this activity.
Also remember: onDestroy may not be called at all. For example, when Android kills an application due to low memory on the device.

Turning back to MapLocation, observe that I've overridden most of the activity life-cycle methods, including onStart, onRestart, onResume, onPause, onStop, and onDestroy. In each of these methods I've placed a method call that logs some information about the method being called. I encourage you to run the MapLocation application yourself, and to watch the LogCat view, to see exactly what's being written. Try pressing different buttons, e.g. the back-button, the home button and other keys, to verify that the life-cycle method calls are following the graphic depiction above.
Starting Activities
Now that we've seen the activity life-cycle in action, let's take a look at how one activity can programmatically start another activity. To do so, you first create an Intent object that specifies the activity you want to start. Then, you pass this newly created intent to a methods such as startActivity, or startActivityForResult.
StartActivity will start up the desired activity, pushing the current activity out of the foreground. StartActivityForResult will also start up the desired activity, but will do so with the expectation that the started activity will provide a result back to that calling activity. In this case, the result is communicated back by a call to that activity's onActivityResult callback method. We'll come back to this in a few minutes.
For now, let's go back into Eclipse and look at how MapLocation actually starts up the GoogleMaps activity. Here I'm showing where map location has attached a listener, to the show map button:
final Button button = (Button) findViewById (R.id.mapButton);
// Link UI elements to actions in code button.setOnClickListener(new Button.OnClickListener() { @Override public void onClick(View v) { try { String address = addrText.getText().toString(); address = address.replace(' ', '+'); Intent geoIntent = new Intent( android.content.Intent.ACTION_VIEW, Uri.parse("geo:0,0?q=" + address)); startActivity(geoIntent); } catch (Exception e) { Log.e(TAG, e.toString()); } } });
Whenever the user clicks this button, the listener's onClick method will be called. That code creates an intent called geoIntent and passes it to the startActivity method. The

end result of this is that a GoogleMaps activity opens, showing a map centered on the address that the user entered.
Recall that entering an address in MapLocation was pretty slow. Now I'm going to show you a different application that, instead of asking the user to enter an address through the keyboard, allows selecting a contact from the Contacts application, using the address of that contact to center the map.
Let's take a look at this application, called MapLocationFromContacts. Now you see a button that will allow me to select an address from an existing contact. When I click on it, a new activity is started. Now, this activity is actually part of the Contacts application, which will show me my contacts and allow me to select one of them.
Here, I'll select my own name, Adam Porter. The Contacts application has no idea what I want to do with this selected contact, in particular it cannot start or show the map itself, based on this contact - it just wasn't designed to do that. What I've got happening here is that MapLocationFromContacts has asked the Contacts application to return the selected data to it by using the startActivityForResult, method rather than just the startActivity method. Once the contact is selected, MapLocationFromContacts will receive the selected data and will call GoogleMaps to it.
Let's see that in the code. I'm opening the MapLocationFromContacts applicationʼs main activity:
package course.examples.MapLocationFromContacts;
import android.app.Activity;import android.content.ContentResolver;import android.content.Intent;import android.database.Cursor;import android.net.Uri;import android.os.Bundle;import android.provider.ContactsContract;import android.util.Log;import android.view.View;import android.widget.Button;
public class MapLocationFromContactsActivity extends Activity {
private static final String DATA_MIMETYPE = ContactsContract.Data.MIMETYPE; private static final Uri DATA_CONTENT_URI = ContactsContract.Data.CONTENT_URI; private static final String DATA_CONTACT_ID = ContactsContract.Data.CONTACT_ID;
private static final String CONTACTS_ID = ContactsContract.Contacts._ID; private static final Uri CONTACTS_CONTENT_URI = ContactsContract.Contacts.CONTENT_URI;

private static final String STRUCTURED_POSTAL_CONTENT_ITEM_TYPE = ContactsContract.CommonDataKinds.StructuredPostal. CONTENT_ITEM_TYPE; private static final String STRUCTURED_POSTAL_FORMATTED_ADDRESS = ContactsContract.CommonDataKinds.StructuredPostal. FORMATTED_ADDRESS;
private static final int PICK_CONTACT_REQUEST = 0; static String TAG = "MapLocation";
@Override protected void onCreate(Bundle savedInstanceState) { super.onCreate(savedInstanceState); setContentView(R.layout.main);
final Button button = (Button) findViewById (R.id.mapButton);
button.setOnClickListener(new Button.OnClickListener() { @Override public void onClick(View v) { try { Intent intent = new Intent( Intent.ACTION_PICK, CONTACTS_CONTENT_URI); startActivityForResult(intent, PICK_CONTACT_REQUEST); } catch (Exception e) { } } }); }
...
@Override protected void onRestart() { Log.i(TAG, "The activity is about to be restarted."); super.onRestart(); } ... @Override protected void onDestroy() { super.onDestroy(); Log.i(TAG, "The activity is about to be destroyed."); }}
This is pretty similar to what we saw in map location. But you'll notice that the code in the button listener creates a slightly different intent and passes it as a parameter to startActivityForResult. We'll look at Intents in more detail in the next lesson, but you

can also see here that startActivityForResult takes a second parameter, which represents a request code. This will come in handy later when the result is returned back to the started activity.
Once the new activity is started, it is responsible for setting the result returned back to the calling activity, which it does by calling the Activity.SetResult method, passing in a result code and, optionally, some result data using another type of Intent, e.g.:
public final void setResult (int resultCode, Intent data)
The result codes include some built-in codes such as RESULT_CANCELED, which indicates that the user chose not to complete the activity normally - e.g. hitting the back button. RESULT_OK indicates that the activity completed normally. Developers can also add custom result codes after the the built-in result code, RESULT_FIRST_USER.
So, before the activity ends it must set its result, by calling setResult, which will eventually be transmitted back to the calling activity via the call to onActivityResult. Let's take another look at that code in MapLocationFromContacts:
@Override protected void onActivityResult(int requestCode, int resultCode, Intent data) { if (resultCode == Activity.RESULT_OK && requestCode == PICK_CONTACT_REQUEST) {
ContentResolver cr = getContentResolver(); Cursor cursor = cr.query(data.getData(), null, null, null, null);
if (null != cursor && cursor.moveToFirst()) { String id = cursor.getString( cursor.getColumnIndex(CONTACTS_ID)); String where = DATA_CONTACT_ID + " = ? AND " + DATA_MIMETYPE + " = ?"; String[] whereParameters = new String[] { id, STRUCTURED_POSTAL_CONTENT_ITEM_TYPE }; Cursor addrCur = cr.query(DATA_CONTENT_URI, null, where, whereParameters, null);
if (null != addrCur && addrCur.moveToFirst()) { String formattedAddress = addrCur. getString(addrCur.getColumnIndex( STRUCTURED_POSTAL_FORMATTED_ADDRESS));
if (null != formattedAddress) { formattedAddress = formattedAddress. replace(' ', '+'); Intent geoIntent = new Intent( android.content.Intent. ACTION_VIEW, Uri.parse(

"geo:0,0?q=" + formattedAddress)); startActivity(geoIntent); } } if (null != addrCur) addrCur.close(); } if (null != cursor) cursor.close(); } }
As you can see, its parameters include:• requestCode an integer passed in to startActivityForResult• resultCode an integer passed from the started activity when it called setResult• data an Intent object also passed in via setResult
The method onActivityResult usually starts off by checking the result code and request codes to determine what to do with that particular result. In this example, the next steps are to retrieve the underlying contact data and parse it to extract just the postal address of the contact. The details aren't important now, so I'll skip over them. But once the postal address has been extracted, MapLocationFromContext operates just like MapLocation did. It processes the data to a format that Google Maps expects, puts that data into an Intent object, and then calls startActivity, passing in the intent.
Handling Configuration Changes
The final topic I'll discuss today, is handling configuration changes. A device's configuration refers to device and application characteristics related to application resources, such as languages used, screen size, keyboard availability and device orientation.
These characteristics can change at run time and when they do Android will usually kill the current activity and then restart it with the appropriate resources for the changed configuration. Now since configuration changes can happen frequently during an application, the life-cycle methods code should execute quicklyt.
Consider a device orientation change, for example. If you move the device from portrait mode to landscape mode and back, the current activity is killed and restarted, twice. If your onCreate and other start-up code is slow the user will notice the delay, and the user-experience will suffer.

To improve the speed of configuration changes, Android allows you to do two things:• You can create and save an arbitrary Java object, that “caches” important state
information• You can manually handle the configuration change, avoiding the whole shutdown and
restart sequence altogether.
Let's talk about each of these.
One way to cache important data and store it in a Java object is to override the onRetainNonConfigurationInstance method, which would be called sometime between onStop and onDestroy. The object that you build and return via a onRetainNonConfiguration instance can be retrieved when the activity is recreated by calling getLastNonConfigurationInstance, which is usually done during the call to the activity's onCreate method, when you recreate the activity. Note that these methods have been deprecated in favor of other methods in the fragment class, which we haven't discussed yet, but we'll come back to it in a later lesson.
The other way to speed up reconfiguration is to avoid the whole kill and restart sequence altogether, at least for specific configuration changes. To do this, you declare the specific changes that your activity will handle in the AndroidManifest.xml file. For example, the following xml snippet indicates that my activity will manually handle changes in device orientation and screen size, and keyboard accessibility:
<activity android:name=".MyActivity“! android:configChanges="orientation|screensize|keyboardHidden”...>
When you handle some configuration changes manually then, if those configuration changes occur at run-time, your activity will receive a call to onConfigurationChanged, which receives a Configuration object as a parameter, detailing the new configuration. Your code can read this object and make whatever changes it needs.
That's all for today's discussion of the activity class. Please join me next time, when we'll discuss the Intent class in detail.

Week 3 - The Fragment ClassFragments were added to Android 3.0 to better support user interfaces for devices with large screens, such as tablets. Over the last few years, the popularity of tablets have grown incredibly so, because of their larger screens, some of the design heuristics that made sense for a smaller phone display no longer work. In particular, we can comfortably do much more on a large tablet display than we could do on a small phone display.
To put this in concrete terms, let's take a look at the application called QuoteViewer, which is comprised of two activities. The first activity shows the titles of several of Shakespeareʼs plays, allowing the user to select one title at a time. When a title is selected a second activity starts, which displays a quotation from that play.
Let's take a look. The first activity starts up and shows us the titles of three plays: Hamlet, King Lear, and Julius Caesar. Iʼll click on Hamlet. This starts the second activity, which shows me Horatio's quote as Hamlet is dying. “Now cracks a noble heart, Good-night, sweet prince; and flights of angels sing thee to thy rest.” Now I'll hit the back button to return to the titles and then click on King Lear. Again we get a quote, this time from the blinded Earl of Gloucester who says, “As flies to wanton boys, are we to the gods; they kill us for their sport.” Again, Iʼll hit the back button to return to the titles, and this time, I click on Julius Caesar, and again, the second activity starts up and we see a quote, this one where Brutus urges Cassius to go on the attack, “There is a tide in the affairs of men, which taken at the flood leads on to fortune. Omitted, all the voyage of their life is bound in shallows and in miseries.”
This interface is fine for a phone - it would be hard to do much else and still have a readable and easy-to-use interface. On a tablet, this layout is pretty lame. Let me show you.
Here is an emulated tablet. When I start the QuoteViewer application the first thing you notice is a lot of unused white space. The titles take up only a little space on the left side of the display. When I click on Hamlet, you see that the quote stretches all the way across the 10-inch tablet, but uses little of the vertical space. And besides not using the available space too well, this layout imposes a slow back-and-forth navigation style where the user has to keep moving from the title down to the back button, back to the title and so on.
Let's see a better layout that shows both the titles and the quotes at the same time. I'll start up the FragmentStaticLayout application. Initially, it brings up a user interface that looks exactly like what you saw with the QuoteViewer application. But when I click on the title, Hamlet, the user interface divides into two parts. The titles stay were they were on the left, but the quote is now shown simultaneously on the right side of the screen. If I want to see a different quote I simply select a new play tittle on the left. The

QuoteViewer application was made up of two activities, but the FragmentStaticLayout application is made up of a single activity that hosts two fragments. Fragments represent a portion of an activity's user interface. In the FragmentStaticLayout application there is one fragment on the left for the titles, and another on the right for the quotes.
Fragments are hosted by activities; one activity can host any number of fragments, and one fragment can be used across any number activities. Fragments are posted by activities, so they must be loaded into the activity and then displayed, or removed, and so on, as the activity changes its state. Consequently, the life cycle of a fragment is tied to and coordinated with the lifecycle of the activity that's hosting it.
Fragments also have some of their own lifecycle callbacks. For now, let's talk about the fragment lifecycle assuming that the fragment is statically bound to its hosting activity. We'll talk about dynamically adding and removing fragments from a hosting activity a little later.
A fragment can be in a running (or resumed) state, which is when the fragment is visible in the running activity. A fragment can also be in a paused state, which is when their hosting activity is visible, but some other activity is in the foreground and has focus. A fragment can also be in a stopped state. In this state, the fragment is not visible.
Fragment Lifecycle Callback Methods
Let's talk now about the lifecycle callback methods that a fragment can receive and when those methods might be called relative to the life cycle states of the activity that hosts the fragment. When a fragment's hosting activity is being created the fragment may receive several lifecycle method calls.
1. Fragment.onAttach( ) - when a Fragment is first attached to its host activity2. Fragment.onCreate( ) - for initializing the fragment, but unlike Activity.onCreate ( )
do not set up the user interface yet3. Fragment.onCreateView( ) - for setting up and returning a view containing the
fragment's user interface. This view is then given to the hosting activity so it can install that view in the activity's view hierarchy.
4. Fragment.onActivityCreated( ) - after the hosting activity has been created and the fragment's user interface has been installed

Containing activity has completed onCreate() and the fragment has been installed
onAttach()
onCreate()
onCreateView()
onActivityCreated()
While the fragment is attached to the hosting activity its lifecycle is dependent on the hostʼs lifecycle. For example, if the hosting activity is about to become visible it will receive a call to its Activity.onStart( ) method and a hosted fragment will also receive a call to Fragment.onStart( ) method. When the hosting activity is about to become visible and ready for user interaction Android calls the Fragment.onResume( ) method. And when the hosting activity is visible, but another activity is about to come in to the foreground, Android calls the Fragment.OnPause( ) method. When the hosting activity is no longer visible, the fragment receives a call to Fragment.onStop( ).
When the hosting activity is about to be destroyed, any fragments that it is hosting must also be shut down, and this happens in several steps:
1. Fragment.onDestroyView( ) - the fragment's user interface view, created by the call to Fragment.onCreateView( ), is detached from that activity. This is where you can release view resources.
2. Fragment.onDestroy( ) - the fragment is no longer in use. This is where you can release fragment resources.
3. Fragment.OnDetach( ) - the fragment is no longer attached its activity. This is where you might do things such as nulling out references to the hosting activity.

Fragment no longer
attached to its
activity
Typical Actions
Null out references
to Hosting Activity
onDestroyView()
onDestroy()
onDetach()
Adding Fragments to Activities
There are two general ways that fragments get added to activities:
1. Statically: Typically by putting them into the activity's layout file which is then used in a call to setContentView()
2. Programmatically: Using the FragmentManager
Once they're added, Android will make a call to onCreateView, where the fragment can use its own XML layout, similar to what activities do when they call setContentView. Or, they can programmatically build their user interfaces. Once the user interface view is built, onCreateView must return the view that's at the root of it's user interface layout, which will eventually be given to the hosting activity and added to the hosting activity's user interface.
Let's look back at the FragmentStaticLayout application and see how it defines its layout.

Recall there's a panel on the left showing the play titles and a panel on the right showing quotes and that each of these panels is implemented by a different fragment, titleFragment and quoteFragment, respectively.
This application's main activity is called QuoteViewerActivity. Let's open it and see how it handles or creates its layout:
package course.examples.Fragments.StaticLayout;
import android.app.Activity;import android.os.Bundle;import android.util.Log;import course.examples.Fragments.StaticLayout.TitlesFragment.ListSelectionListener;
public class QuoteViewerActivity extends Activity implements ListSelectionListener {
public static String[] mTitleArray; public static String[] mQuoteArray;

private QuotesFragment mDetailsFragment;
private static final String TAG = "QuoteViewerActivity";
@Override protected void onCreate(Bundle savedInstanceState) { super.onCreate(savedInstanceState); mTitleArray = getResources().getStringArray (R.array.Titles); mQuoteArray = getResources().getStringArray (R.array.Quotes); setContentView(R.layout.main); mDetailsFragment = (QuotesFragment) getFragmentManager() .findFragmentById(R.id.details); }
@Override public void onListSelection(int index) { if (mDetailsFragment.getShownIndex() != index) { mDetailsFragment.showQuoteAtIndex(index); } } @Override protected void onDestroy() { Log.i(TAG, getClass().getSimpleName() + ":entered onDestroy()"); super.onDestroy(); }
@Override protected void onPause() { Log.i(TAG, getClass().getSimpleName() + ":entered onPause()"); super.onPause(); }
@Override protected void onRestart() { Log.i(TAG, getClass().getSimpleName() + ":entered onRestart()"); super.onRestart(); }
@Override protected void onResume() { Log.i(TAG, getClass().getSimpleName() + ":entered onResume()"); super.onResume(); }
@Override
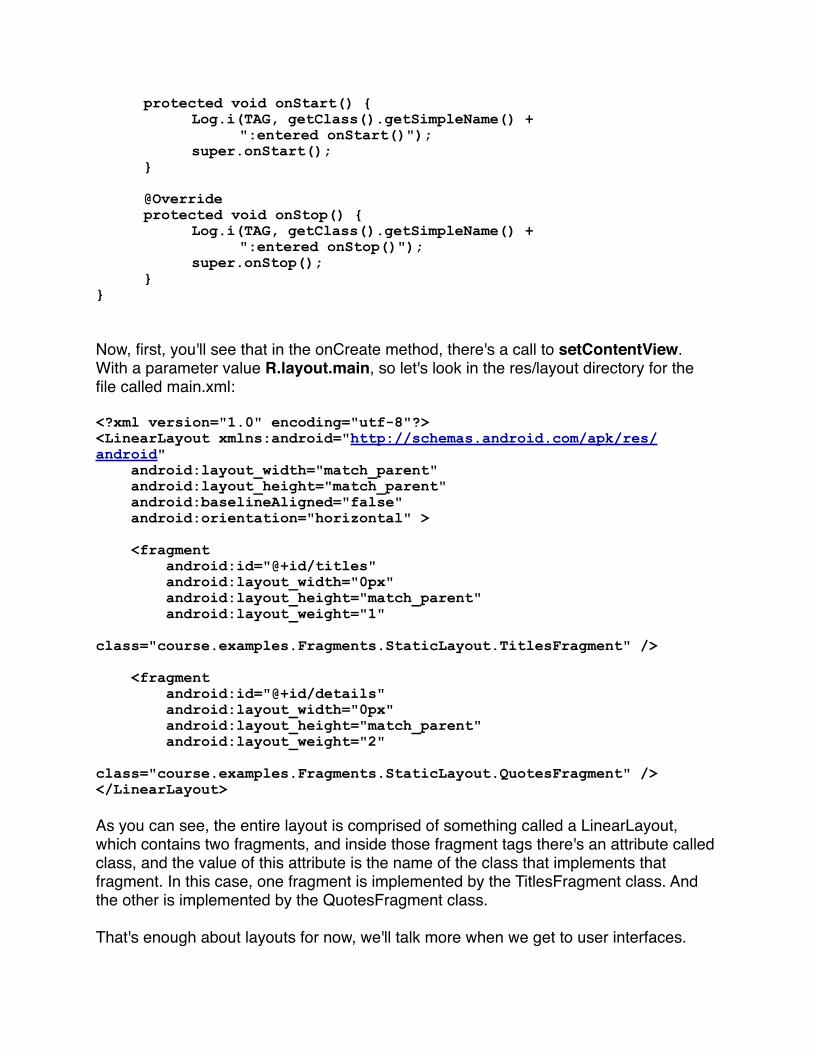
protected void onStart() { Log.i(TAG, getClass().getSimpleName() + ":entered onStart()"); super.onStart(); }
@Override protected void onStop() { Log.i(TAG, getClass().getSimpleName() + ":entered onStop()"); super.onStop(); }}
Now, first, you'll see that in the onCreate method, there's a call to setContentView. With a parameter value R.layout.main, so let's look in the res/layout directory for the file called main.xml:
<?xml version="1.0" encoding="utf-8"?><LinearLayout xmlns:android="http://schemas.android.com/apk/res/android" android:layout_width="match_parent" android:layout_height="match_parent" android:baselineAligned="false" android:orientation="horizontal" >
<fragment android:id="@+id/titles" android:layout_width="0px" android:layout_height="match_parent" android:layout_weight="1" class="course.examples.Fragments.StaticLayout.TitlesFragment" />
<fragment android:id="@+id/details" android:layout_width="0px" android:layout_height="match_parent" android:layout_weight="2" class="course.examples.Fragments.StaticLayout.QuotesFragment" /></LinearLayout>
As you can see, the entire layout is comprised of something called a LinearLayout, which contains two fragments, and inside those fragment tags there's an attribute called class, and the value of this attribute is the name of the class that implements that fragment. In this case, one fragment is implemented by the TitlesFragment class. And the other is implemented by the QuotesFragment class.
That's enough about layouts for now, we'll talk more when we get to user interfaces.

In any event, when this XML file is read, Android will understand that it needs to create these two fragments, and that it needs to install them in the QuoteViewer activity, which will start the chain of life cycle calls that we talked about earlier.
As discussed above, one of those calls will be a call to onCreateView, in which the fragment is responsible for creating its user interface layout. Let's take a look at one of those layouts, the one in QuoteFragment, class to see how it creates its user interface:
Here's the QuoteFragment class, and here is its onCreateView method:
package course.examples.Fragments.StaticLayout;
import android.app.Activity;import android.app.Fragment;import android.os.Bundle;import android.util.Log;import android.view.LayoutInflater;import android.view.View;import android.view.ViewGroup;import android.widget.TextView;
public class QuotesFragment extends Fragment {
private TextView mQuoteView = null; private int mCurrIdx = -1; private int mQuoteArrayLen;
private static final String TAG = "QuotesFragment";
public int getShownIndex() { return mCurrIdx; }
public void showQuoteAtIndex(int newIndex) { if (newIndex < 0 || newIndex >= mQuoteArrayLen) return; mCurrIdx = newIndex; mQuoteView.setText(QuoteViewerActivity.mQuoteArray [mCurrIdx]); }
@Override public void onAttach(Activity activity) { Log.i(TAG, getClass().getSimpleName() + ":entered onAttach()"); super.onAttach(activity); }
@Override public void onCreate(Bundle savedInstanceState) { Log.i(TAG, getClass().getSimpleName() +

":entered onCreate()"); super.onCreate(savedInstanceState); }
@Override public View onCreateView(LayoutInflater inflater, ViewGroup container, Bundle savedInstanceState) { return inflater.inflate(R.layout.quote_fragment, container, false); }
@Override public void onActivityCreated(Bundle savedInstanceState) { super.onActivityCreated(savedInstanceState); mQuoteView = (TextView) getActivity().findViewById (R.id.quoteView); mQuoteArrayLen = QuoteViewerActivity.mQuoteArray.length; }
@Override public void onStart() { Log.i(TAG, getClass().getSimpleName() + ":entered onStart()"); super.onStart(); }
@Override public void onResume() { Log.i(TAG, getClass().getSimpleName() + ":entered onResume()"); super.onResume(); }
@Override public void onPause() { Log.i(TAG, getClass().getSimpleName() + ":entered onPause()"); super.onPause(); }
@Override public void onStop() { Log.i(TAG, getClass().getSimpleName() + ":entered onStop()"); super.onStop(); }
@Override public void onDetach() { Log.i(TAG, getClass().getSimpleName() + ":entered onDetach()"); super.onDetach(); }

@Override public void onDestroy() { Log.i(TAG, getClass().getSimpleName() + ":entered onDestroy()"); super.onDestroy(); }
@Override public void onDestroyView() { Log.i(TAG, getClass().getSimpleName() + ":entered onDestroyView()"); super.onDestroyView(); }}
This method calls the inflate method of the LayoutInflater class, passing in a layout file as a parameter. The effect of this is pretty similar to what happens in setContentView. Specifically, an XML file is read in and converted into Java objects corresponding to some user interface views.
You can also add fragments to an activity dynamically without hard-coding the fragments into the activity's layout file. To do it while the activity is running you have to do four things:
1. Get a reference to the FragmentManager2. Begin a FragmentTransaction3. Add a fragment to the activity4. Commit the FragmentTransaction
Now to see this in action, let's take the FragmentStaticLayout application, and change it a bit so that the fragments are added programatically, rather than being added as part of as part of the QuoteViewer's layout file.
Back in the IDE I've created a new application called FragmentProgramaticLayout, which is the same as the original except for how the fragments are added to the main activity. Let's open up the QuoteViewer activity and see how it handles this layout. Now here in onCreate, there's a call to setContentView, with a parameter value R.layout.main, which is in the res/layout directory . letʼs open it:
<?xml version="1.0" encoding="utf-8"?><LinearLayout xmlns:android="http://schemas.android.com/apk/res/android" android:id="@+id/activityFrame" android:layout_width="match_parent" android:layout_height="match_parent" android:orientation="horizontal" >
<FrameLayout android:id="@+id/title_frame"

android:layout_width="0dp" android:layout_height="match_parent" android:layout_weight="1" > </FrameLayout>
<FrameLayout android:id="@+id/quote_frame" android:layout_width="0dp" android:layout_height="match_parent" android:layout_weight="2" > </FrameLayout></LinearLayout>
As you can see, the entire layout is, again, a linear layout with two sub views, but instead of being fragments they are frame layouts, which serve to set aside some space in the user interface. We'll fill that space later when we add the fragments to the main activity.
Back in the onCreate method of QuoteViewerActivity, letʼs walk through the steps of adding the fragments into the activity:
package course.examples.Fragments.ProgrammaticLayout;
import android.app.Activity;import android.app.FragmentManager;import android.app.FragmentTransaction;import android.os.Bundle;import course.examples.Fragments.ProgrammaticLayout.TitlesFragment.ListSelectionListener;
public class QuoteViewerActivity extends Activity implements ListSelectionListener {
public static String[] mTitleArray; public static String[] mQuoteArray; private final QuotesFragment mQuoteFragment = new QuotesFragment();
@Override protected void onCreate(Bundle savedInstanceState) { super.onCreate(savedInstanceState); mTitleArray = getResources().getStringArray (R.array.Titles); mQuoteArray = getResources().getStringArray (R.array.Quotes); setContentView(R.layout.main);
FragmentManager fragmentManager = getFragmentManager(); FragmentTransaction fragmentTransaction = fragmentManager

.beginTransaction(); fragmentTransaction.add(R.id.title_frame, new TitlesFragment()); fragmentTransaction.add(R.id.quote_frame, mQuoteFragment); fragmentTransaction.commit(); }
@Override public void onListSelection(int index) { if (mQuoteFragment.getShownIndex() != index) { mQuoteFragment.showQuoteAtIndex(index); } }}
Recall there are four steps: first, we get a reference to the FragmentManager, then we call its beginTansaction method, which returns a FragmentTransaction. Next, we call the add method of the FragmentTransaction, passing in an ID for the frame layout and the fragment that that view will hold, for both the title fragment and for the quote fragment. Finally, we'll call the commit method on the fragment transaction.
Let's run the code and make sure that we haven't goofed anything up. Here's the FragmentProgrammaticLayout application running on an emulated tablet - it seems to operate as promised.
Now we know how to add fragments to an activity programmatically. But in our example, it didn't really make that much difference because the layout itself was still static: there are always exactly two panels. However, one of the nice things about being able to add fragments on the fly is that you can dynamically change the user interface while the program is running. If you do this right, you can make good use of your precious screen space.
Let's take a look at a simple example that gives you a taste of a dynamic user interface. I'll launch an application called FragmentDynamicLayout, which is similar to the previous examples except sometimes it will show a single fragment and sometimes it will show multiple fragments.
I've started it up and it's showing the title fragment and nothing else. Observe that I've changed the title of Hamlet to make it a little longer. You can see that it takes up much more of the screen space than before. When I click on that title, you can see that the item fills the entire screen horizontally.
After clicking on the title, you can see the familiar quote from Hamlet - the application is now displaying two fragments. If I hit the back button, we go back to having just a single fragment.
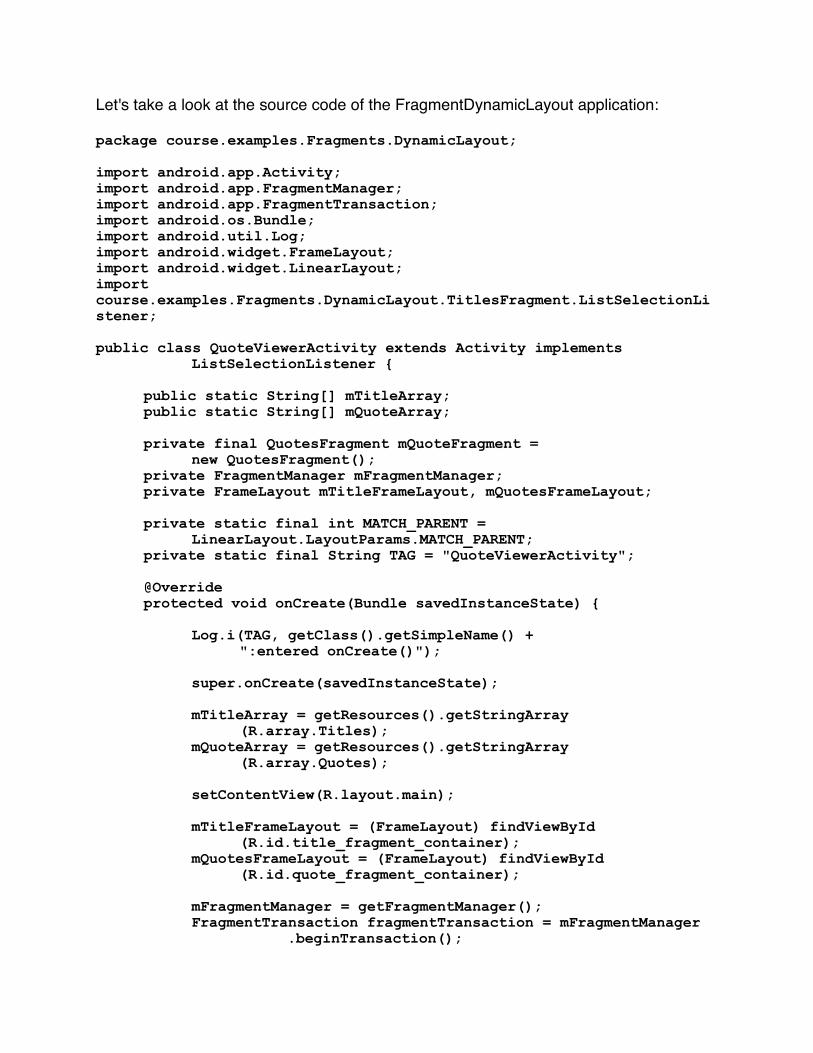
Let's take a look at the source code of the FragmentDynamicLayout application:
package course.examples.Fragments.DynamicLayout;
import android.app.Activity;import android.app.FragmentManager;import android.app.FragmentTransaction;import android.os.Bundle;import android.util.Log;import android.widget.FrameLayout;import android.widget.LinearLayout;import course.examples.Fragments.DynamicLayout.TitlesFragment.ListSelectionListener;
public class QuoteViewerActivity extends Activity implements ListSelectionListener {
public static String[] mTitleArray; public static String[] mQuoteArray;
private final QuotesFragment mQuoteFragment = new QuotesFragment(); private FragmentManager mFragmentManager; private FrameLayout mTitleFrameLayout, mQuotesFrameLayout;
private static final int MATCH_PARENT = LinearLayout.LayoutParams.MATCH_PARENT; private static final String TAG = "QuoteViewerActivity";
@Override protected void onCreate(Bundle savedInstanceState) { Log.i(TAG, getClass().getSimpleName() + ":entered onCreate()");
super.onCreate(savedInstanceState);
mTitleArray = getResources().getStringArray (R.array.Titles); mQuoteArray = getResources().getStringArray (R.array.Quotes);
setContentView(R.layout.main);
mTitleFrameLayout = (FrameLayout) findViewById (R.id.title_fragment_container); mQuotesFrameLayout = (FrameLayout) findViewById (R.id.quote_fragment_container);
mFragmentManager = getFragmentManager(); FragmentTransaction fragmentTransaction = mFragmentManager .beginTransaction();

fragmentTransaction.add(R.id.title_fragment_container, new TitlesFragment()); fragmentTransaction.commit();
mFragmentManager .addOnBackStackChangedListener( new FragmentManager.OnBackStackChangedListener() { public void onBackStackChanged() { setLayout(); } }); }
private void setLayout() { if (!mQuoteFragment.isAdded()) { mTitleFrameLayout.setLayoutParams( new LinearLayout.LayoutParams( MATCH_PARENT, MATCH_PARENT)); mQuotesFrameLayout.setLayoutParams(new LinearLayout.LayoutParams(0, MATCH_PARENT)); } else { mTitleFrameLayout.setLayoutParams( new LinearLayout.LayoutParams(0, MATCH_PARENT, 1f)); mQuotesFrameLayout.setLayoutParams( new LinearLayout.LayoutParams(0, MATCH_PARENT, 2f)); } }
@Override public void onListSelection(int index) { if (!mQuoteFragment.isAdded()) { FragmentTransaction fragmentTransaction = mFragmentManager .beginTransaction(); fragmentTransaction.add(R.id.quote_fragment_container, mQuoteFragment); fragmentTransaction.addToBackStack(null); fragmentTransaction.commit(); mFragmentManager.executePendingTransactions(); } if (mQuoteFragment.getShownIndex() != index) { mQuoteFragment.showIndex(index); } }
@Override protected void onDestroy() { Log.i(TAG, getClass().getSimpleName() + ":entered onDestroy()"); super.onDestroy(); }

@Override protected void onPause() { Log.i(TAG, getClass().getSimpleName() + ":entered onPause()"); super.onPause(); }
@Override protected void onRestart() { Log.i(TAG, getClass().getSimpleName() + ":entered onRestart()"); super.onRestart(); }
@Override protected void onResume() { Log.i(TAG, getClass().getSimpleName() + ":entered onResume()"); super.onResume(); }
@Override protected void onStart() { Log.i(TAG, getClass().getSimpleName() + ":entered onStart()"); super.onStart(); }
@Override protected void onStop() { Log.i(TAG, getClass().getSimpleName() + ":entered onStop()"); super.onStop(); }}
In the QuoteViewerActivity file we call the setContentView, passing in the main XML file, as before.
Next, we start the process of adding a fragment to this activity, except his time, we'll only add the title fragment. In fact, we never add the quote fragment unless the user clicks on a title. When the user does click on the title, the onListSelection method is called.
Look at the onListSelection method, first, we test to see if the QuoteFragment has already been added to the layout. And if it hasn't, then it is add it now, by starting another fragment transaction.
There are two new concepts here:

1. We're going to add this transaction to the task back stack so that when the user hits the back button the fragment layout will be restored its previous state, before the last fragment was added. This is because, by default, fragment changes are not tracked by the back stack.
2. I've added a call to FragmentManger.ExecutePendingTransactions, which forces the transaction to be executed immediately, rather than at some later time when the system finds it convenient to do so. This is done because otherwise it might take some time for Android to update the display.
Configuration Changes
Recall our lesson on the Activity class, where I showed how methods retainNonConfigurationInstance and getLastNonConfigurationInstance let activities handle configuration changes manually. I also mentioned that those methods were deprecated in favor of other methods in the fragment class. Let's talk about those methods now.
If you're using a Fragment and the device's configuration changes Android (by default) will kill the hosting activity and then recreate it. However, if you call the setRetainInstance method on the Fragment, passing in true as the boolean parameter, when configuration changes occur Android will destroy the Activity, but not its hosted fragments, i.e. it saves the Fragmentsʼ states and detaches them from the Activity but it does not call their onDestroy methods. Later, when the hosting activity is recreated, Android does not call the fragmentsʼ onCreate methods either.
Let's take a look at the FragmentStaticConfigLayout application example. Its function is the same as the previous examples except that I've added some code to handle configuration changes.
When the device is in landscape mode, the layout is similar to what we've seen - both fragments use a large font, size 32 sp. The Titlefragment takes about a third of the horizontal space, while the quote fragment takes the remaining two-thirds of the space. If a title is too long to fit on a single line in the title fragment its text wraps around to a second line.
However, when the device is in portrait mode the layout changes a bit: both fragments use a smaller 24 sp font and the TitleFragment takes up only a fourth of the horizontal space while the quote fragment takes up the remaining three quarters of the space. If a title is too long to fit on a single line in the TitleFragment, we replace some of the text with ellipses.
Let's see the application in action. I'll start the device in landscape mode and select one of the titles to show a quote. The TitleFragment and QuoteFragment are using

larger fonts. They're dividing up the screen in a roughly one-fourth to three-fourths ratio. And, the TitleFragment is allowing the title of Hamlet to spill over onto a second line.
When we rotate the device, Android kills and restarts the QuoteViewer activity. The title that I've previously checked is still checked, because information about which item was checked has been retained by the call to setRetainInstance(true) in both fragments.In portrait mode the layout changes: the fonts are smaller and, instead spanning two lines, the end of Hamlet title has been replaced with ellipses.
Let's go see how this works in the source code for StaticConfigLayout application:In the TitleFragment.java file, the code is mostly the same as in the previous examples, but there are at least two differences.
1. The onCreate method now has a call to setRetainInstance(true), so when configuration changes occur Android will not kill this fragment.
2. The onActivityCreated method now checks to see whether the value of mCurrentIndex is not equal -1. If it is then the user has previously selected a title and so this call to onActivityCreated, is probably because of a configuration change, in which case, we make sure that title remains checked. I made similar changes to the QuoteFragment class as well.
package course.examples.Fragments.StaticConfigLayout;
import android.app.Activity;import android.app.ListFragment;import android.os.Bundle;import android.util.Log;import android.view.LayoutInflater;import android.view.View;import android.view.ViewGroup;import android.widget.ArrayAdapter;import android.widget.ListView;
public class TitlesFragment extends ListFragment {
private static final String TAG = null; private ListSelectionListener mListener = null; private int mCurrIdx = -1;
public interface ListSelectionListener { public void onListSelection(int index); }
@Override public void onAttach(Activity activity) { super.onAttach(activity); try { mListener = (ListSelectionListener) activity; } catch (ClassCastException e) {
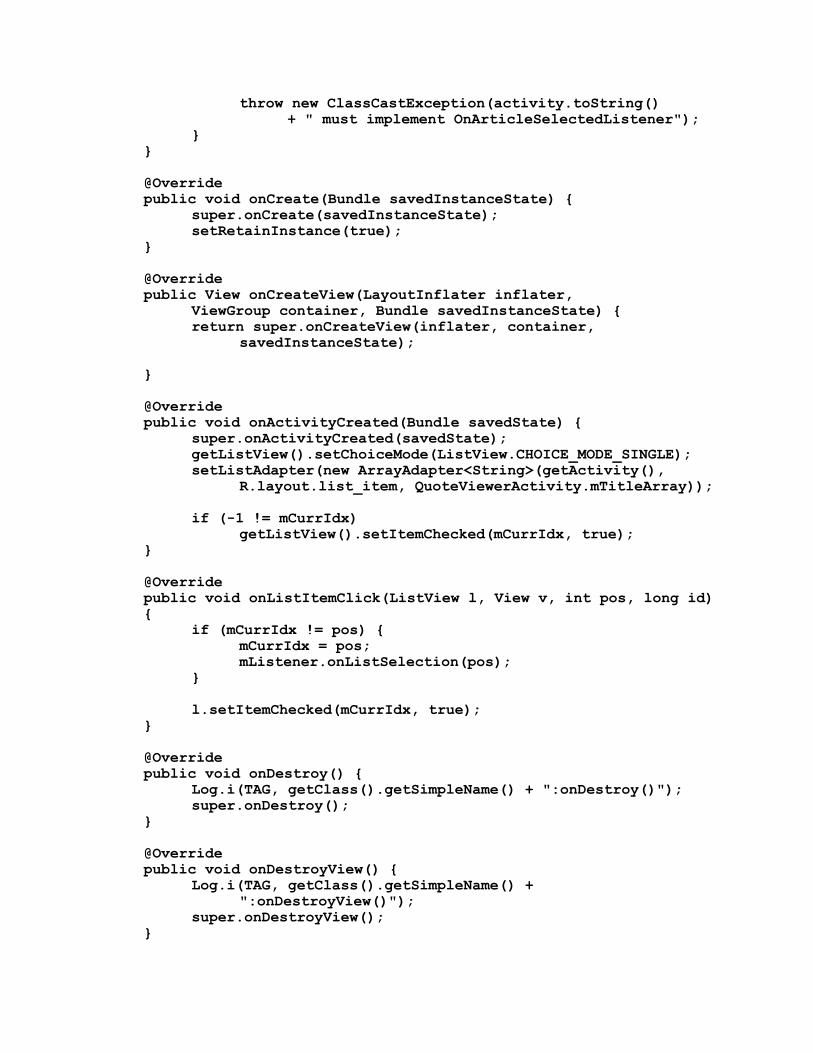
throw new ClassCastException(activity.toString() + " must implement OnArticleSelectedListener"); } }
@Override public void onCreate(Bundle savedInstanceState) { super.onCreate(savedInstanceState); setRetainInstance(true); }
@Override public View onCreateView(LayoutInflater inflater, ViewGroup container, Bundle savedInstanceState) { return super.onCreateView(inflater, container, savedInstanceState);
}
@Override public void onActivityCreated(Bundle savedState) { super.onActivityCreated(savedState); getListView().setChoiceMode(ListView.CHOICE_MODE_SINGLE); setListAdapter(new ArrayAdapter<String>(getActivity(), R.layout.list_item, QuoteViewerActivity.mTitleArray));
if (-1 != mCurrIdx) getListView().setItemChecked(mCurrIdx, true); }
@Override public void onListItemClick(ListView l, View v, int pos, long id) { if (mCurrIdx != pos) { mCurrIdx = pos; mListener.onListSelection(pos); }
l.setItemChecked(mCurrIdx, true); }
@Override public void onDestroy() { Log.i(TAG, getClass().getSimpleName() + ":onDestroy()"); super.onDestroy(); }
@Override public void onDestroyView() { Log.i(TAG, getClass().getSimpleName() + ":onDestroyView()"); super.onDestroyView(); }

@Override public void onDetach() {
Log.i(TAG, getClass().getSimpleName() + ":onDetach()"); super.onDetach(); }
@Override public void onPause() {
Log.i(TAG, getClass().getSimpleName() + ":onPause()"); super.onPause(); }
@Override public void onResume() {
Log.i(TAG, getClass().getSimpleName() + ":onResume()"); super.onResume(); }
@Override public void onStart() {
Log.i(TAG, getClass().getSimpleName() + ":onStart()"); super.onStart(); }
@Override public void onStop() {
Log.i(TAG, getClass().getSimpleName() + ":onStop()"); super.onStop(); }}
That's all for our discussion of the fragment class. Please join me next time when we'll cover Android user interfaces.

Week 3 - Intents In our last lesson, we talked about the activity class and I showed you how one activity can programmatically start another activity by first creating an intent object, and then by passing that intent to a method such as startActivity or startActivityForResult. Today we're going to take a deeper look at intents. We'll discuss how they are created and processed when starting other activities.
I'll begin by presenting the Intent class itself and how Intents are created, what fields they have and what information those fields contain. Then I'll talk about the two ways in which Android decides which activity should be stated when a method, such as startActivity, is called, i.e. explicit activation, in which an intent specifically names the activity to start, and implicit activation, where an intents describes the kind operation to be performed, but doesnʼt specifically identify an activity, after which Android finds and starts the activity that can perform that operation.
The Intent class serves two main purposes:1. Specify an operation to be performed2. Represent an event that other components are to be notified of
Today, however, we're going to focus on just the first of these, using intents to specify operations to be performed. We'll leave the second, using intents for events notification, for a later lesson when we talk about broadcast receivers.
You can think of Intents as providing a language for specifying operations to be performed, providing an easy way to say things such as, Select a contact, or Take a photo, or Dial a phone number, or Display a map. An Intent is usually constructed by an activity that needs some work to be done, and then Android uses the intent to start another activity that can perform the desired work.
Let's talk now about the kinds of information that can be specified within an intent. For example, we'll talk about intent fields including: • Action• Data• Category• Mime type• Target component• Extras• Flags
An intent's Action field is a string that represents or names the operation to be performed.

Some built-in examples of action strings include:
ACTION_DIAL – Dial a number ACTION_EDIT – Display data to editACTION_SYNC – Synchronize device data with serverACTION_MAIN – Start as initial activity of app
You can set an intent's action in several ways. You can pass an action string as a parameter to the Intent constructor. Or, you can create an empty intent, and then, call the set action method on it, passing the action string, again as a parameter:
Examples:
Intent newInt = new Intent(Intent.ACTION_DIAL);
or
Intent newInt = new Intent(); newInt.setAction(Intent.ACTION_DIAL);
Intents also have a data field which represents data that is associated with the intent. That data is formatted as a Uniform Resource Identifier, or URI. One example of intent data is a geo-schemed URI, which indicates map data. You might remember that we saw this in earlier lessons as part of those MapLocation application:
Uri.parse(“geo:0,0?q=1600+Pennsylvania +Ave+Washington+DC”)
Another example is the tel-schemed URI indicating a phone number that you want dialed. And note that the strings that represent the underlying data are first being passed through the uri.parse method which takes that string and then returns an URI object.
Uri.parse(“tel:+15555555555”)
You can set the intent's data in a variety of ways. You can pass it directly to the intent's constructor or you can create an empty intent and then use the setData method to set the data for that intent:
Intent newInt = new Intent(Intent.ACTION_DIAL," Uri.parse("tel:+15555555555"));
or
Intent newInt = new Intent(Intent.ACTION_DIAL); newInt.setData(Uri.parse("tel:+15555555555"));

Intent Category represents additional information about the kinds of components that can handle or should handle this intent. Some examples include:
CATEGORY_BROWSABLE – can be invoked by a browser to display data ref’s by a URI
CATEGORY_LAUNCHER – can be the initial activity of a task & is listed in top-level app launcher
Intents also have a Type field, which specifies the mime type of the intent's data. Some examples of mime types include:
image/*image/pngimage/jpg text/plaintext/html
If you don't specify a mime type, Android will try to infer one for you. You can set an intent's mime type by using the setType method and passing in a string that represents the desired mime type. You can also set both the data and the type together by calling the setDataAndType method:
Intent.setType(String type)orIntent.setDataAndType(Uri data, String type)
Intents also have a component field that identifies the intent's target activity. You can set this field if you know that there's exactly one activity that should always receive this intent. You can set the intent's target component using one of the intent's constructors, by passing in a context object and a class object which represents the activity that should perform the desired operation.
Intent newInt = Intent(Context packageContext, Class<?> cls);
We'll see a code example of this in a few minutes.
You can also create an empty intent and then use one of the set component, set class, or set class name methods, to set that target activity.
orIntent newInt = new Intent ();and one of: setComponent(), setClass(), or setClassName()

Intents also have an Extras field. Extras store additional information associated with the intent. Extras are effectively a map of key-value pairs, so the target activity has to know both the name and the type of any extra data that it intends to use. For example, the intent class defines an Extra called EXTRA_EMAIL, which is used to pass a list of recipients in sending email.
The code below creates an Intent with the action Intent.ACTION_SEND.
Intent newInt = new Intent(Intent.ACTION_SEND);newInt.putExtra(android.content.Intent.EXTRA_EMAIL, new String[]{ “[email protected]”, “[email protected]”," “[email protected]”, “[email protected]” });
There are several different methods for setting extras, and the specific form of these methods will depend on the type of data you want to store. For example, there is method for storing a string, one method for storing an array of floats, and so on, e.g.:putExtra(String name, String value); putExtra(String name, float[] value);
Another intent field is for Flags , which represent information about how the intent should be handled. Some built-in examples include:FLAG_ACTIVITY_NO_HISTORY - when an activity is started based on this intent it do not put in the history stack.FLAG_DEBUG_LOG_RESOLUTION - print out extra logging information when this intent is being processed.
This last flag is a great tool to use if your intents are not starting up the activities that you want them to. Hereʼs an example of setting a flag:
Intent newInt = new Intent(Intent.ACTION_SEND); newInt.setFlags(Intent.FLAG_ACTIVITY_NO_HISTORY); Now that we've seen intents, let's talk about how you use them to start activities. Recall that I mentioned you could programmatically start an activity using methods such as startActivity or startActivityFor Result:
startActivity(Intent intent,...) startActivityForResult(Intent intent, ...)

When you use one of these methods, Android has to figure out which single activity it's going to start up. There are two ways Android can do this.
Explicit Activation
The first way is to explicitly name the target activity when you create the intent, then Android can just look it up and start that activity. The second way, which is only used if you haven't explicitly set the target activity, is that Android can implicitly determine the appropriate activity based on the intent that was used and based on the properties of activities that you have installed on your device.
Let's take a look at an example application that explicitly starts another activity, called HelloWorldWithLogin, which is comprised of two activities: LoginScreen and HelloAndroid.
When this application launches, the login activity starts first, providing a TextBox for typing in a username, and another one for entering a password. There is also a Button, which is pressed after the user enters a username and password. LoginActivity will check the entered password and username and, if it accepts them, will start the HelloAndroidActivity, which displays the words “Hello Android”.
Let's see that in action. I'll launch the HelloAndroidWithLogin application. This pops up a user interface screen, allowing me to enter a username and a password.
I'll click the log in button. If log in activity accepts my username and password, then another activity starts, displaying the words, Hello Android.
Let's look at the code, starting with the LoginScreen class:
package course.examples.helloWorldWithLogin;
import java.util.Random;
import android.app.Activity;import android.content.Intent;import android.os.Bundle;import android.text.Editable;import android.view.View;import android.view.View.OnClickListener;import android.widget.Button;import android.widget.EditText;
public class LoginScreen extends Activity { @Override public void onCreate(Bundle savedInstanceState) { super.onCreate(savedInstanceState); setContentView(R.layout.loginscreen);

final EditText uname = (EditText) findViewById (R.id.username_edittext); final EditText passwd = (EditText) findViewById (R.id.password_edittext); final Button loginButton = (Button) findViewById (R.id.login_button);
loginButton.setOnClickListener(new OnClickListener() { public void onClick(View v) { if (checkPassword(uname.getText(), passwd.getText ())) { Intent helloAndroidIntent = new Intent (LoginScreen.this, HelloAndroid.class); startActivity(helloAndroidIntent); } else { uname.setText(""); passwd.setText(""); } } }); }
private boolean checkPassword(Editable uname, Editable passwd) { // Just pretending to extract text and check password return new Random().nextBoolean(); }}
Here I'm showing the listener code that's attached to the login button, where the code grabs the username and password from each EditText, and passes them to a method called checkPassword. If check password returns true, then the code will continue.
First it creates an Intent called helloAndroidIntent. And as you can see, the call to the intent constructor takes two parameters. A Context and a Class object for the activity to be started. In this case, LoginActivity.this is used as the context. A context is an interface that's used to access global application information. Since Activity is a subclass of Context, it's fine to use LoginActivity.this for this parameter. The second parameter is the Class object, in this case for the Hello Android activity. This parameter indicates the activity to be started by the call to start activity.

Implicit Activation
The second way to start an activity is by Implicit activation. In this situation, you haven't told Android which activity to start - it has to figure it out on its own by matching the Intent that passed to startActivity (or startActivityForResult) with the capabilities of other Activities that are on your device. This process is called intent resolution.
Intent resolution relies on two kinds of information. First, there's the intent that the calling activity created to describe the operation wanted. And second, individual Android activities specify intent filters which describe the kinds of operations, or intents, that they can handle. This information is usually placed in the AndroidManifest.xml file for the applications to which these activities belong.
At runtime, when the startActivity method is actually called, Android will try to match the intent with the intent filters that it knows about. However, it's only going use part of the intent information when it does this matching - specifically, it will look at the Action field, it will look at the Data, including both the URI and the Mime type, and it will look at the Category.
Let's see how an application specifies intent-filters in an AndroidManifest.XML file. Here's an xml snippet showing an activity tag that includes an intent-filter tag that, in turn, includes an action tag that identifies the action the activity can support:
<activity ...> <intent-filter ...>" ... <action android:name=”actionName" /> ... </intent-filter> ...</activity>
For example, if an activity can dial phone numbers then its intent-filter should include the standard action, Intent.ACTION_DIAL, which is one of many string constants defined in java. In an xml intent filter, use its actual value, which is the string "android.intent.action.DIAL", e.g.:
<action android:name= "android.intent.action.DIAL"/> If your activity handles a specific type of data you can add that information to its intent filter as well. For example, an activity can specify the MIME type of data it handles, it can also specify the scheme, host, and or port number of the data URIs it handles. It can further limit the format of the data URI by specifying its path, path pattern, or path prefix. And there are quite a few possibilities here. See the next page for some details:

<intent-filter …> � … <data android:mimeType="string" android:scheme="string" � android:host="string" android:port="string" android:path="string" android:pathPattern="string" android:pathPrefix="string" />� … </intent-filter> See: http://developer.android.com/guide/components/intents-filters.html
If an activity wants to publish that it can show maps for example, then it might include an intent filter like this one, which tells Android that it can handle data URIs that have a geo scheme.
<intent-filter ...> ... <data android:scheme=”geo" /> ...</intent-filter>
Similarly, activities can specify categories for the intents they handle:
<intent-filter ...> ... <category android:name="string" /> ... </intent-filter>

Let's look at an example that puts all of this together. Google Maps can handle intents, that have an action of Intent.ACTION_VIEW and that have a data field with the “geo” scheme. I had look at the AndroidManifest.XML file for the Google Maps application, and what I saw looked something like this:
<intent-filter …>� <action android:name = "android.intent.action.VIEW" />� <category android:name = "android.intent.category.DEFAULT" />� <category android:name = �
"android.intent.category.BROWSABLE”/>� <data android:scheme = "geo”/> </intent-filter>�
There was an activity with an intent filter. And that intent filter listed an action of intent.action.VIEW. And, it had data, it had a data scheme of “geo”. In fact, this is exactly what the MapLocation applications passed into the start activity:
From file MapLocation.java:
Intent geoIntent = new Intent(android.content.Intent.ACTION_VIEW, Uri.parse("geo:0,0?q=" + address));
In Google Maps, the activity also listed two categories: category.browsable, meaning that it can respond to browser links, and category.default.
N.B. In most cases activities that want to accept implicit intents must include category.default in their intent filters.

Note: to receive implicit intents an Activity should specify an IntentFilter with the category
"android.intent.category.DEFAULT” category
And finally, because more than one activity can accept a particular intent, Android will have to break the tie in some way. One way is just to ask the user which activity he or she wants to handle the intent - you may have seen that. Another is that activities can specify a priority that Android will take into account when deciding between two different activities that can handle a particular intent. Priority values should be between minus 1,000 and positive 1,000 - higher values mean higher priority.
If you are interested in knowing more about intent filters, I recommend you take a look at the adb dumpsys command. Here, I've opened up a terminal window and now, I'll issue the command:
adb shell dumpsys package > data.txt
This is going to spit out a ton of information from the package manager in the text file specified. Let's run the command and now I'll open that file in a text editor and search for the string “geo”.
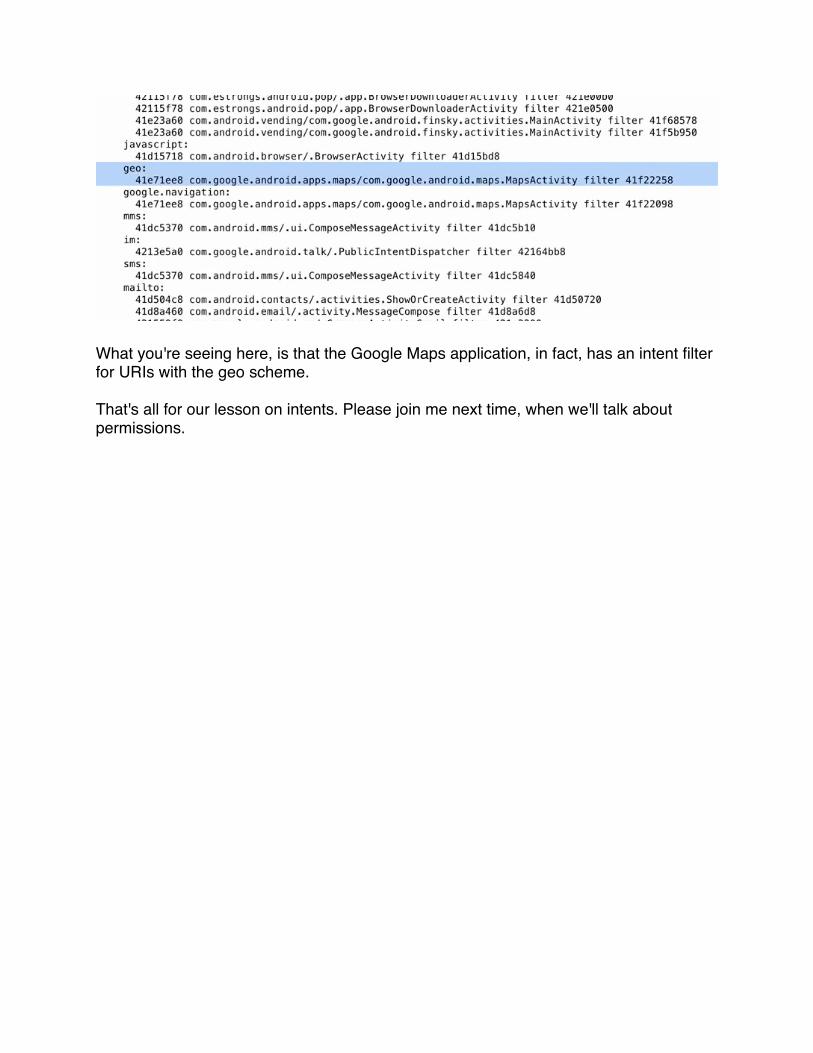
What you're seeing here, is that the Google Maps application, in fact, has an intent filter for URIs with the geo scheme.
That's all for our lesson on intents. Please join me next time, when we'll talk about permissions.

Week 3 - PermissionsIn this lesson, I'll talk about how Android applications can define and use permissions, to control access to important data, resources, and operations. First, I'll talk about Android's permissions architecture. After that, I'll explain how you can define and use application level permissions. And then, I'll finish up by talking about component specific permissions and permissions-related APIs.
Android permissions
Android uses permissions to protect resources, data and operations. Applications can also define and enforce their own permissions to limit access to their resources, to user information, e.g. access an application's database, or to o cost-sensitive APIs, e.g. which components can invoke costly operations, such as sending SMS or MMS messages, and to system resources, e.g. which components can use the device's camera
Permissions are represented as strings. Applications include these permission strings in the AndroidManifest.xml file:• to declare permissions that they use themselves• to declare permissions that they require of other components that want to use them
When an application needs to use a permission, it puts a <uses-permission> tag in its AndroidManifest.xml file. When that application is installed on a device, the user must accept the permission, otherwise errors or access failures will occur.
On the next page is a snippet of the AndroidManifest.xml file for a hypothetical application. As you can see, the application needs permission to access the device's camera, permission to open a network socket to access the internet and permission to access precise location information, coming for example from a GPS provider.
Take a look at this documentation for a list of Android's built-in permissions:http://developer.android.com/reference/android/Manifest.permission.html

<manifest … > �…�<uses-permission android:name=�
"android.permission.CAMERA”/> <uses-permission android:name=�
"android.permission.INTERNET”/> <uses-permission android:name=�
“android.permission.ACCESS_FINE_LOCATION”/> … </manifest > See: http://developer.android.com/reference/�
android/Manifest.permission.html
Recall the MapLocationFromContacts application from earlier lessons - it allows the user to select a contact from the Contacts application and then to display a map centered on that contact's postal address. Here's the application in action:
I see a button that will allow me to select a contact. When I click on it I am shown my contacts, which allows me to select one of them. Once I do that, that contact's postal address and other information is passed to Google Maps, which then displays a map, centered on the postal address.
My contact list is private information - Android doesn't allow just any application on my device to have access to it. How did MapLocationFromContacts get access to it? The application must have declared that it uses the appropriate permission. To confirm that we should look in the AndroidManifest.xml file:
<?xml version="1.0" encoding="utf-8"?><manifest xmlns:android="http://schemas.android.com/apk/res/android" package="course.examples.MapLocationFromContacts" android:versionCode="1"

android:versionName="1.0" >
<uses-permission android:name="android.permission.READ_CONTACTS" > </uses-permission>
<uses-sdk android:minSdkVersion="5" android:targetSdkVersion="17" />
<application android:allowBackup="false" android:icon="@drawable/ic_launcher" > <activity android:name="MapLocationFromContactsActivity" android:label="Map Location From Contacts" > <intent-filter> <action android:name="android.intent.action.MAIN" /> <category android:name="android.intent.category.LAUNCHER" /> </intent-filter> </activity> </application></manifest>
As you can see, there is a uses-permission tag that declares this application uses the built in READ_CONTACTS permission.
Defining & using application permissions
In addition to declaring the permissions they use, Android applications can also define and enforce their own permissions.
Suppose you've written an application that performs some privileged or dangerous operation, you might not want just any application to to be able invoke yours. Android lets you define and enforce your own application-specific permission. Other applications must be granted your permission or Android will not allow them to use your application.
Lets look at this in more detail with a simple example. Here's a simple application called PermissionExampleBoom. Weʼre going to pretend that it performs some kind of dangerous action, e.g. formatting your external memory card. Let's take a look at this application in action:
I'll launch the PermissionExampleBoom application and ... BOOM goes the dynamite. Now, since this operation is clearly dangerous, we don't want just anyone to be able to start this application, so we're going to define and enforce our own application-specific permission.

Let's open up the AndroidManifest.xml file to see how it's done.
<?xml version="1.0" encoding="utf-8"?><manifest xmlns:android="http://schemas.android.com/apk/res/android" package="course.examples.permissionexample.boom" android:versionCode="1" android:versionName="1.0" >
<uses-sdk android:minSdkVersion="10" android:targetSdkVersion="17" />
<permission android:name="course.examples.permissionexample.BOOM_PERM" android:description="@string/boom_perm_string" android:label="@string/boom_permission_label_string"> </permission>
<application android:allowBackup="true" android:icon="@drawable/ic_launcher" android:label="@string/app_name" android:permission="course.examples.permissionexample.BOOM_PERM"> <activity android:name=".BoomActivity" android:label="@string/app_name" > <intent-filter> <action android:name="android.intent.action.MAIN" /> <category android:name="android.intent.category.LAUNCHER" /> </intent-filter> <intent-filter> <action android:name="course.examples.permissionexample.boom.boom_action" />
<category android:name="android.intent.category.DEFAULT" /> </intent-filter> </activity> </application></manifest>
Here you can see a permissions tag that defines the new permission. The permission's name is "course.examples.permissionexample.BOOM_PERM"
The permission tag includes two other attributes, a label, and a description, which can be shown to the user when they are installing the application. The values for these strings are in the strings.xml file.

If we scroll down a bit, you can see that this application also includes this permission as an attribute of the application tag, because of which Android will ensure that components trying to start this application will have already been granted the BOOM_PERM permission.
The PermissionExampleBoom application requires the BOOM_PERM permission. Consequently, any other application that wants to use it will first have to acquire that permission. Let's see what happens if an application without the proper permissions tries to start PermissionExampleBoom.
I've installed an application on the device called PermissionExampleBoomUser. When I launch it a single button is presented, labeled Detonate. When I press this button, the ʻBoomUser application will start up the ʻBoom application, which requires the BOOM_PERM permission. The ʻBoomUser application does not have that permission, so Android should prevent it from starting up the ʻBoom application.
I've opened the IDE and it's showing LogCat output from the running device, so now I'll press the detonate button. As expected, the device is showing an error dialog, which says the ʻBoom application has stopped. Looking at the log output, we see that Android has thrown a security exception; ʻBoomUser, requires the BOOM_PERM permission.
Let's fix that problem. If ʻBoomUser wants to use the ʻBoom application, then must declare that it uses the boom_permission. To do that, it will put a uses permission tag in the AndroidManifest.xml file. Let's see that in the code. Here's the ʻBoomUser AndroidManifest.xml file:
<?xml version="1.0" encoding="utf-8"?><manifest xmlns:android="http://schemas.android.com/apk/res/android" package="course.examples.permissionexample.boomUser" android:versionCode="1" android:versionName="1.0" >
<uses-sdk android:minSdkVersion="10" android:targetSdkVersion="17" />
<uses-permission android:name="course.examples.permissionexample.BOOM_PERM" />
<application android:allowBackup="true" android:icon="@drawable/ic_launcher" android:label="@string/app_name" > <activity android:name=".BoomUserActivity" android:label="@string/app_name" > <intent-filter> <action android:name="android.intent.action.MAIN" />

<category android:name="android.intent.category.LAUNCHER" /> </intent-filter> </activity> </application>
</manifest>
You can see the uses-permission tag, with the name attribute, whose value is the same as the permission that's defined by permission example boom: "course.examples.permissionexample.BOOM_PERM".
I reinstalled the PermissionExampleBoomUser application on my device, having added the uses-permission tag. Launching it, there's the Detonate button again. Pressing it, Boom! goes the dynamite, as expected.
Component permissions & permissions-related APIs
So far, the permissions I've shown you have applied to the entire application. Android also allows you to set permissions for individual components, and these settings will take precedence over any application-level permissions. Let's take a look at some of these component permissions.
Activity permissions restrict which components can start the associated activity. These permissions are checked within the execution of methods such as startActivity() and startActivityForResult(), which are called when one activity starts another. If the required permission is missing, Android will throw a security exception, which is what happened with PermissionExampleBoomUser.
Service permissions restrict which components can start, or bind to, an associated service. We haven't talk about services much yet, so I'll just mention that these permissions are checked when requests are made to start, stop or connect to services using methods such as Context.startService(), Context.stopService(), or Context.bindService(). Android will throw a security exception if required permissions are missing.
Broadcast receiver permissions restrict which components can send and receive broadcasts. Again, we haven't talked about broadcast receivers very much yet, so at this point I'll just say that these permissions are checked in a variety of different ways at a variety of different times. We'll cover this the lesson on Broadcast receivers.
Content provider permissions restrict which components can read and write the data contained in a content provider. And again, we'll talk more about this in a later lesson.
That's all for this lesson on permissions. Please join me next time, when we'll discuss Fragments.
Week 4 - User InterfacesAdapterViews & Layouts Menus & ActionBar Dialogs
In this lesson, we're going to talk about the many different kinds of classes that Android gives you to help you build good looking and effective user interfaces. I'll start by introducing the view class, a basic building block for just about everything that's visible on your device's screen. I'll also discuss the various events that views can receive.
After that, I'll discuss a higher level compound view called groups, called View Groups which combine multiple views to create a particular look or behavior. I'll also discuss some specific view groups. In particular AdapterViews and Layouts.
And after that, I'll talk about menus and the action bar, which give users easy access to frequently used functions.
And last, I'll finish up with the discussion of Dialogs. Those views that popup in front of an application, to give and get information to and from the user.
So let's talk about user interfaces or UI's in general. First of all, a user interface is essentially the place and the means by which the user and the application exchange information. And in this lesson, when I talk about a UI, I'm specifically going to concentrate on the device screen, and the visual elements that users can see and touch on that screen.
Of course modern user interfaces can be much more than just that. For instance, hand held devices typically have many sensors, so user interfaces increasingly leverage many different kinds and qualities of input and output. Including audio, LED lights, radio waves and more.
Views & View Events
Android activities usually display a visual user interface to the user, so Android provides a rich set of classes from which developers can create those user interfaces. Let's talk about some of those classes starting with the view class.
The View class is a key building block for UI components. Views occupy a rectangular space on the screen and they're responsible for drawing themselves and for handling any events that are directed to them.
Android comes with a number of predefined or built-in views, including Buttons, ToggleButtons, Checkboxes, the RatingBar, and the AutoCompleteTextView.
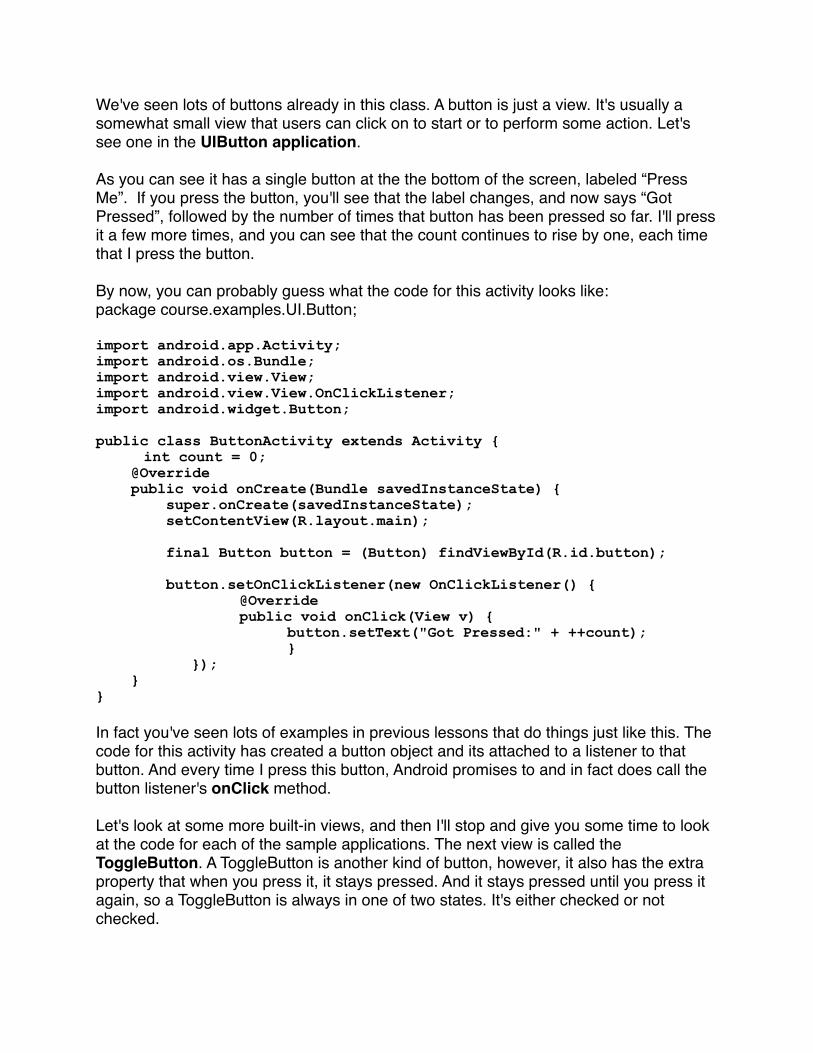
We've seen lots of buttons already in this class. A button is just a view. It's usually a somewhat small view that users can click on to start or to perform some action. Let's see one in the UIButton application.
As you can see it has a single button at the the bottom of the screen, labeled “Press Me”. If you press the button, you'll see that the label changes, and now says “Got Pressed”, followed by the number of times that button has been pressed so far. I'll press it a few more times, and you can see that the count continues to rise by one, each time that I press the button.
By now, you can probably guess what the code for this activity looks like:package course.examples.UI.Button;
import android.app.Activity;import android.os.Bundle;import android.view.View;import android.view.View.OnClickListener;import android.widget.Button;
public class ButtonActivity extends Activity { int count = 0; @Override public void onCreate(Bundle savedInstanceState) { super.onCreate(savedInstanceState); setContentView(R.layout.main); final Button button = (Button) findViewById(R.id.button); button.setOnClickListener(new OnClickListener() { @Override public void onClick(View v) { button.setText("Got Pressed:" + ++count); } }); }}
In fact you've seen lots of examples in previous lessons that do things just like this. The code for this activity has created a button object and its attached to a listener to that button. And every time I press this button, Android promises to and in fact does call the button listener's onClick method.
Let's look at some more built-in views, and then I'll stop and give you some time to look at the code for each of the sample applications. The next view is called the ToggleButton. A ToggleButton is another kind of button, however, it also has the extra property that when you press it, it stays pressed. And it stays pressed until you press it again, so a ToggleButton is always in one of two states. It's either checked or not checked.

ToggleButton's also typically display some kind of indicator to let the user know what state the button is currently in. And you've probably seen toggle buttons likes this in many applications. You hit the button and music starts playing, and it continues playing until you hit the button again.
Let's see a ToggleButton in action with the UIToggleButton application. The application shows a single unchecked ToggleButton, labeled “Start”. Under the label there's a small area. It's not lit up right now. But it will light up when the toggle button is eventually checked. The idea here is that something's going to start happening when the user presses this ToggleButton. Hitting the button, the background color changes from black to white, and the ToggleButton now says Stop. You can see there's also a small blue highlight underneath the label, which indicates that the ToggleButton is now checked. package course.examples.UI.ToggleButton;
import android.app.Activity;import android.os.Bundle;import android.view.View;import android.view.View.OnClickListener;import android.widget.LinearLayout;import android.widget.ToggleButton;
public class ToggleButtonActivity extends Activity { int count = 0;
@Override public void onCreate(Bundle savedInstanceState) { super.onCreate(savedInstanceState); setContentView(R.layout.main);
final LinearLayout bg = (LinearLayout) findViewById (R.id.linearlayout); final ToggleButton button = (ToggleButton) findViewById (R.id.togglebutton); button.setOnClickListener(new OnClickListener() { @Override public void onClick(View v) { if (button.isChecked()) { bg.setBackgroundColor(0xFFF3F3F3); } else { bg.setBackgroundColor(0xFF000000); } } }); }}
The next view I'll talk about is the Checkbox, which you've probably seen in things such as order forms where, for instance, you check all the toppings that you want on your pizza. A checkbox is actually just another kind of two-state button, just like a toggle

button. The main difference is its appearance. Checkboxes usually display some kind of area that's empty when the Checkbox is not checked, but shows a check mark or an x symbol when the check box is in the checked state.
Let's see a checkbox in action. The UI Checkbox application displays some text, and then an unchecked check box followed by the words, “I'm not checked”. Underneath, there's a button that says, “Hide CheckBox”. Clicking on the checkbox displays a check mark to show that it has now been selected, and the text following the checkbox has changed to say, “I'm checked”. In the source code, I've attached a listener to the checkbox, which changes thetext to reflect the checkbox's current state. package course.examples.UI.CheckBox;
import android.app.Activity;import android.os.Bundle;import android.view.View;import android.view.View.OnClickListener;import android.widget.Button;import android.widget.CheckBox;
public class CheckBoxActivity extends Activity { @Override public void onCreate(Bundle savedInstanceState) { super.onCreate(savedInstanceState); setContentView(R.layout.main); final CheckBox checkbox = (CheckBox) findViewById (R.id.checkbox); checkbox.setOnClickListener(new OnClickListener() { @Override public void onClick(View v) { if (checkbox.isChecked()) { checkbox.setText("I'm checked"); } else { checkbox.setText("I'm not checked"); } } }); final Button button = (Button) findViewById(R.id.button); button.setOnClickListener(new OnClickListener() { @Override public void onClick(View v) { if (checkbox.isShown()) { checkbox.setVisibility(View.INVISIBLE); button.setText("Unhide CheckBox"); } else { checkbox.setVisibility(View.VISIBLE); button.setText("Hide CheckBox"); } } }); }

}
When I click on the “Hide CheckBox” button, the listener attached to the button changes the visibility of the checkbox so that now it's invisible. When I click on the button again, the check box becomes visible again.
The next view is the RatingBar, which displays a row of stars like you might use in a application that rates restaurants or songs. The RatingBar allows users to highlight some number of stars by clicking or dragging on the RatingBar view.
package course.examples.UI.RatingsBar;
import android.app.Activity;import android.os.Bundle;import android.widget.RatingBar;import android.widget.RatingBar.OnRatingBarChangeListener;import android.widget.TextView;
public class RatingsBarActivity extends Activity { int mCount = 0; @Override public void onCreate(Bundle savedInstanceState) { super.onCreate(savedInstanceState); setContentView(R.layout.main); final TextView tv = (TextView) findViewById(R.id.textView); final RatingBar bar = (RatingBar) findViewById (R.id.ratingbar); bar.setOnRatingBarChangeListener(new OnRatingBarChangeListener () { @Override public void onRatingChanged(RatingBar ratingBar, float rating, boolean fromUser) { tv.setText("Rating:" + rating); } }); }}
Let's see an application that uses a RatingBar. I've set up the RatingBar to show a total of four stars, all unselected at the beginning. Now I'll select the first star and as you can see it highlights. Now the second star, and now the third. And now I'll drag back across the RatingBar, which essentially deselects all the stars.
The last view I'll talk about is the AutoCompleteTextView. This view is first of all a text view. That is, it's a view that displays text. And we've seen lots of those already. This text view is also editable, which means that users can type text that will go into this text view. In addition, this view will show a list of text entries and will filter that list, as you

type, so that it only shows those entries that match what you're typing. Once you've narrowed down the list, you can touch a single entry, which will then be placed into the text view.
Let's see that in the UIAutoComplete application, which shows the words Country, and then next to that there's an AutoCompleteTextView. And I've associated a long list of countries with this AutoCompleteTextView. And now I want to have the name Chile appear in this box. I could have put the list in some kind of scrolling view, but then I would need to scroll through the long list to find the country that I wanted.
package course.examples.UI.AutoComplete;
import android.app.Activity;import android.os.Bundle;import android.view.View;import android.widget.AdapterView;import android.widget.AdapterView.OnItemClickListener;import android.widget.ArrayAdapter;import android.widget.AutoCompleteTextView;import android.widget.Toast;
public class AutoCompleteActivity extends Activity {
/** Called when the activity is first created. */ @Override protected void onCreate(Bundle savedInstanceState) { super.onCreate(savedInstanceState); setContentView(R.layout.main);
AutoCompleteTextView textView = (AutoCompleteTextView) findViewById(R.id.autocomplete_country); ArrayAdapter<String> adapter = new ArrayAdapter<String> (this,R.layout.list_item, COUNTRIES); textView.setAdapter(adapter); textView.setOnItemClickListener(new OnItemClickListener() {
@Override public void onItemClick(AdapterView<?> arg0, View arg1, int arg2, long arg3) { Toast.makeText(getApplicationContext(), "The winner is:" + arg0.getAdapter().getItem(arg2), Toast.LENGTH_SHORT).show(); } }); } static final String[] COUNTRIES = new String[] { "Afghanistan", "Albania","Algeria", "American Samoa", "Andorra", "Angola", "Anguilla","Antarctica", ... [see AutoCompleteActivity.java for the whole list up to ‘z’] };}

With an AutoCompleteTextView, you can just start typing in some letters, e.g. the letter C, and now the letter H. A a drop down list has appeared, showing only those countries that start with the letters CH. So in this case, there's Chad, Chile, China, and the Christmas Islands. So I'll continue by typing the letter I. And now the list has shrunk to just Chile and China. Now I'll go ahead and type one more letter L, and now there's just the single country, Chile, left in the drop down list. I just select it and the word Chile is inserted into the AutoCompleteTextView. A little message window pops up confirming that I've chosen Chile.
These are a few of the views that Android provides. The example applications show some of the operations that are commonly used with views. And, there are also many other view operations that we didn't show. For instance, you can set a viewʼs opacity or transparency. You can set it's background, its orientation on a display, and other things.
You can also have your users interact with the keyboard by requesting or accepting the input focus which tells Android that keyboard clicks, for example, should be sent to a particular view.
View Events
Views handle events, and these events can come from various sources, such as the user touching a view on the display or using physical input devices, such as an actual keyboard, trackball or D-pad. Android itself can also be a source of events. For instance, views receive various method calls when Android needs to reposition or re-draw the views.
A common way to handle events is by attaching Listeners to individual Views. Android defines a number of different kinds of Listener interfaces and the methods defined by those interfaces get called when specific events occur on a view. For example, the view class defines an onClickListener interface that has an onClick method. This method is called whenever a view has been clicked.
The View class also defines the onLongClickListener, and that has an onLongClick method. This method is called whenever a view is pressed and held pressed for a specific period of time.
Then there is the onFocusedChangeListener, that has an onFocusChange method. This method is called when a view has received or lost focus.
The View class also defines an onKeyListener interface that has an onKey method which is called when the View is about to receive a hardware key press. There are many other events that you can listen for as well.
Let's step back for a second. Right now, we're talking about individual Views. But applications typically involve many views, all being displayed at the same time. As we

saw when we used the UIHierarchy viewer in our lesson on the Android development environment.
Applicationsʼ views are typically organized as a tree - there's an outer-most view, and it holds some number of child Views. And each of these child Views can have its own children. And so on.
When Android goes to draw all these views on the screen, it does so by walking through the View tree multiple times, each time doing something a bit different. Conceptually, on the first pass, it measures all of the views. On the second pass, it positions all the views. And on the third pass, it draws all the views. much of the time, you don't worry or care about these steps.
But, if you create your own custom view sub-classes, then you may also want to override these various view methods to ensure that your custom view is drawn the way that you want it to be. For instance, when its doing its measuring pass, Android will call onMeasure on your view and your view must calculate and then set its own dimensions.
When itʼs doing its layout pass, Android will call your views onLayout method. And this method should position itself and call onLayout on all of its childrenʼs Views. During the third pass, Android will call your views' onDraw method and this method then draws the view.
Some other methods you might want to override in your custom views include onFocusChanged, to handle when your view's focus state changes, onKeyUp or onKeyDown, to handle hardware key events, or onWindowVisibilityChanged, to handle a change in the visibility status of the window containing your view.
Set visibility: show or hide view Set Checked state Set Listeners: Code that should be executed when specific events occur Set properties: opacity, background, rotation Manage input focus: allow view to take focus, request focus

View Groups
So far we've been talking mostly about individual views. But we often want to have some kind of compound view that puts together multiple individual views.
A simple example is a Radio Group, which is a set of related CheckBoxes. For example, you might have an application that asks how old you are, and allows you to select from a set of age ranges, say, under 20, 20 to 34, 35 to 49, and over 50. And to do this, you would have a collection of TextViews for all the different age ranges, and then next to each TextView you would put a CheckBox. You would also want to make sure that only one of those check boxes is selected at a time, because the age ranges are mutually exclusive.
To support such complex views Android has a class called Viewgroup, which is an invisible view that contains other views, so you can use them to group and organize multiple views and view groups. ViewGroup is a base class for ViewContainer and Layout, which we'll discuss later on in this lesson.
Just like with simple views, Android provides a number of predefined ViewGroups, such as RadioGroup, TimePicker, DatePicker, WebView, MapView, Gallery, and Spinner.
Let's take a look at each of these starting with the RadioGroup.
A RadioGroup is a ViewGroup containing a set of mutually-exclusive check boxes or Radio Buttons, only one of the Radio Buttons can be selected at any one time. Let's take a look at the UI RadioGroup application example, which displays a TextView and a RadioGroup. The TextView is displaying the text no choice made. Because right now none of the radio buttons are selected. So now I'll select choice one and as you can see the text changes to reflect the choice that I made. Now I'll select choice two. And again you can see that choice one, was automatically unselected and choice two was now selected. And the same kind of thing happens when I select Choice three.
package course.examples.UI.RadioGroup;
import android.app.Activity;import android.os.Bundle;import android.view.View;import android.view.View.OnClickListener;import android.widget.RadioButton;import android.widget.TextView;
public class RadioGroupActivity extends Activity { /** Called when the activity is first created. */ @Override public void onCreate(Bundle savedInstanceState) { super.onCreate(savedInstanceState); setContentView(R.layout.main);

final TextView tv = (TextView) findViewById(R.id.textView);
final OnClickListener radioListener = new OnClickListener() { @Override public void onClick(View v) { RadioButton rb = (RadioButton) v; tv.setText(rb.getText() + " chosen"); } }; final RadioButton choice1 = (RadioButton) findViewById (R.id.choice1); choice1.setOnClickListener(radioListener);
final RadioButton choice2 = (RadioButton) findViewById (R.id.choice2); choice2.setOnClickListener(radioListener);
final RadioButton choice3 = (RadioButton) findViewById (R.id.choice3); choice3.setOnClickListener(radioListener);
}}
The next ViewGroup is TimePicker which allows the user to select a particular time. Again, here's my phone, I'll now start up the UITimePicker application. And the application displays a text view showing the current time. And a button labeled Change the Time. So I'll click on the button. And, up pops the time picker view group. As you can see, the time picker is composed of many different views, that together allow the User to independently set the hour, the minutes, and whether or not the time is a.m or p.m. There's also a button at the bottom to indicate that you're done. And once you click that button, the text view changes to show the time that you just selected.
package course.examples.UI.timepicker;
import java.util.Calendar;
import android.app.Activity;import android.app.Dialog;import android.app.TimePickerDialog;import android.os.Bundle;import android.view.View;import android.widget.Button;import android.widget.TextView;import android.widget.TimePicker;
public class TimePickerActivity extends Activity {
private TextView mTimeDisplay; private Button mPickTime;

private int mHour; private int mMinute;
static final int TIME_DIALOG_ID = 0;
// Callback received when the user "sets" the time in the dialog
private TimePickerDialog.OnTimeSetListener mTimeSetListener = new TimePickerDialog.OnTimeSetListener() { public void onTimeSet(TimePicker view, int hourOfDay, int minute) { mHour = hourOfDay; mMinute = minute; updateDisplay(); } };
/** Called when the activity is first created. */ @Override public void onCreate(Bundle savedInstanceState) { super.onCreate(savedInstanceState); setContentView(R.layout.main);
// capture our View elements mTimeDisplay = (TextView) findViewById(R.id.timeDisplay); mPickTime = (Button) findViewById(R.id.pickTime);
// add a click listener to the button mPickTime.setOnClickListener(new View.OnClickListener() { public void onClick(View v) { showDialog(TIME_DIALOG_ID); } });
// get the current time final Calendar c = Calendar.getInstance(); mHour = c.get(Calendar.HOUR_OF_DAY); mMinute = c.get(Calendar.MINUTE);
// display the current date updateDisplay(); }
// updates the time we display in the TextView private void updateDisplay() { mTimeDisplay.setText(new StringBuilder().append (pad(mHour)).append(":").append(pad(mMinute))); }
private static String pad(int c) { if (c >= 10) return String.valueOf(c); else return "0" + String.valueOf(c);

}
@Override protected Dialog onCreateDialog(int id) { switch (id) { case TIME_DIALOG_ID: return new TimePickerDialog(this, mTimeSetListener, mHour, mMinute, false); } return null; }}
Similar to the TimePicker, there is also a DatePicker ViewGroup. This ViewGroup allows the user to select a particular date. So now I'll start the UIDatePicker application. The application displays a text view showing the current date and a button labeled change the date. So I'll click on the button and up pops the DatePicker ViewGroup. Again, the DatePicker is composed of many different views, that together allow the user to independently set the month, the day, and the year. And there's also a button at the bottom to indicate when you're done. When you click on that button, the text view changes, to show the date that you selected with the DatePicker.
The next View group is a WebView which is a ViewGroup that displays Web pages. Here's the UI WebView application. I'll start it up. And it will download and display the familiar web page at www.google.com.
package course.examples.UI.WebView;
import android.app.Activity;import android.os.Bundle;import android.view.KeyEvent;import android.webkit.WebView;import android.webkit.WebViewClient;
public class WebViewActivity extends Activity {
WebView mWebView; /** Called when the activity is first created. */ @Override public void onCreate(Bundle savedInstanceState) { super.onCreate(savedInstanceState); setContentView(R.layout.main);
mWebView = (WebView) findViewById(R.id.webview); mWebView.setWebViewClient(new HelloWebViewClient()); mWebView.getSettings().setJavaScriptEnabled(true); mWebView.loadUrl("http://www.google.com"); }

@Override public boolean onKeyDown(int keyCode, KeyEvent event) { if ((keyCode == KeyEvent.KEYCODE_BACK) && mWebView.canGoBack ()) { mWebView.goBack(); return true; } return super.onKeyDown(keyCode, event); } private class HelloWebViewClient extends WebViewClient { @Override public boolean shouldOverrideUrlLoading(WebView view, String url) { view.loadUrl(url); return true; } } }
The next view group is a MapView, which is a ViewGroup that displays maps, and allows the user to interact with them. Let's take a look at an example application that actually uses the MapFragment class but uses it to display the underlying MapView.
I'll start up the UIGoogleMaps application which displays a map centered on some part of the America's. The map also displays two red pins. One, around Washington D.C. in the United States and another in Mexico. Let me click on the upper most red pin. When I do that pop up appears saying I'm at the Washington Monument. If I then click on the other red pin, I see another pop up. This time saying estoy Mexico. I'm in Mexico.
package course.examples.UI.WebView;
import android.app.Activity;import android.os.Bundle;import android.view.KeyEvent;import android.webkit.WebView;import android.webkit.WebViewClient;
public class WebViewActivity extends Activity {
WebView mWebView; /** Called when the activity is first created. */ @Override public void onCreate(Bundle savedInstanceState) { super.onCreate(savedInstanceState); setContentView(R.layout.main);

mWebView = (WebView) findViewById(R.id.webview); mWebView.setWebViewClient(new HelloWebViewClient()); mWebView.getSettings().setJavaScriptEnabled(true); mWebView.loadUrl("http://www.google.com"); } @Override public boolean onKeyDown(int keyCode, KeyEvent event) { if ((keyCode == KeyEvent.KEYCODE_BACK) && mWebView.canGoBack ()) { mWebView.goBack(); return true; } return super.onKeyDown(keyCode, event); } private class HelloWebViewClient extends WebViewClient { @Override public boolean shouldOverrideUrlLoading(WebView view, String url) { view.loadUrl(url); return true; } } }
Each ViewGroup shown above has a fairly clear purpose and usually works with a fixed kind of input data. The next set of ViewGroups is designed for situations where different developers may want to display different kinds of data. Consider, for instance, a ListView, which can be used to show a list of phone numbers to dial, a list of songs to play, a list of images to select as your phone's wallpaper, and so forth.
To work with all these different data types, Android provides a ViewGroup subclass called AdapterView. AdapterViews are ViewGroups whose child views and underlying data are managed not by the ViewGroup itself but by another class called an Adapter,
The Adapter is responsible for managing the data and for creating and providing the Views of that data to the Adapter View, which is responsible only for displaying the data views.
ListView is an AdapterView that displays a scrollable list of selectable items. Those items are managed by an adapter called the ListAdapter. The ListView can also optionally filter that list of items based on text input, just like what we saw with the AutoCompleteTextView.
Let me start up the UIListView application. And as you can see the data underlying this list view is a long list of colors. Red, Orange, Yellow. Et cetera. And this list also brings up a virtual or soft keyboard. And I'll use it to type in the letter o. And as I do this the

ListView will filter all of the colors that don't start with the letter o. In this case, that leaves just orange and olive. I'll now type in the letter L, which leaves just the color olive. And if I click on that word olive, you'll see that the listener I've attached to the list view will display my selection on the screen.
Let's take a look at the source code for this application in the file ListViewActivity:
package course.examples.UI.ListLayout;
import android.app.ListActivity;import android.os.Bundle;import android.view.View;import android.widget.AdapterView;import android.widget.AdapterView.OnItemClickListener;import android.widget.ArrayAdapter;import android.widget.ListView;import android.widget.TextView;import android.widget.Toast;
public class ListViewActivity extends ListActivity { @Override public void onCreate(Bundle savedInstanceState) { super.onCreate(savedInstanceState); setListAdapter(new ArrayAdapter<String>(this, R.layout.list_item, getResources().getStringArray(R.array.colors)));
ListView lv = getListView(); lv.setTextFilterEnabled(true); //Also pops up KYBD
lv.setOnItemClickListener(new OnItemClickListener() { public void onItemClick(AdapterView<?> parent, View view, int position, long id) { Toast.makeText(getApplicationContext(), ((TextView) view).getText(), Toast.LENGTH_SHORT).show(); } }); }}
And let's go to the onCreate method. Here, we're calling setListAdapter, to set the list adapter for this ListView. The actual adapter is an ArrayAdapter which implements the Adapter Interface.
The constructor for the ArrayAdapter takes a few parameters. Two that we'll focus on are the resource ID, which tells the ArrayAdapter how to create the View. The second parameter is the array of data objects.

Let's look at those data objects. They're defined as a string array resource in the res/values/strings.xml file:
<?xml version="1.0" encoding="utf-8"?><resources> <string name="app_name">UI ListView</string> <string-array name="colors"> <item>red</item> <item>orange</item> <item>yellow</item> <item>green</item> <item>blue</item> <item>indigo</item> <item>violet</item> <item> aqua </item> <item> black</item> <item>fuchsia</item> <item>gray</item> <item>grey</item> <item>lime</item> <item>maroon</item> <item>navy</item> <item>olive</item> <item>purple</item> <item>silver</item> <item>teal</item> <item>white</item> </string-array> <string name="color_prompt">Pick a Color. Any Color.</string></resources>
Here you can see the string array, it's named colors, and it contains a collection of colors, just like we saw, red, orange, yellow, and so forth.
Now let's go back to the list view activity, and get the name of the Layout file, that will be used to create views for each of these colors. That Layout resource is in res/layout/list_item.xml. Let's open that file.
<?xml version="1.0" encoding="utf-8"?><TextView xmlns:android="http://schemas.android.com/apk/res/android" android:layout_width="match_parent" android:layout_height="match_parent" android:padding="10dp" android:textSize="24sp" >
</TextView> Now as you can see, each piece of data, is going to be put in the text view, with the certain amount of padding around it, And each drawing with the certain font size.
Now, back to the ListView activity. The source code gets the ListView associated with the ListActivity, and then calls setTextFilterEnabled(true), which causes the keyboard to

popup and enable filtering when the user types. Finally, we set an OnItemClickedListener and an OnItemClicked method, which will display the color that the user clicks in the ListView.
The next AdapterView is the Spinner class. A spinner is an adapter view that provides a scrollable list of items within a drop down ListView that the user can click on to select an item. The data for a spinner is managed by a SpinnerAdapter. Let's take a look at this class in the UISpinner application example.
It brings up a text view, that says, “Pick a color, any color”. Currently red is being used as the default selection. Now suppose I want to select a different color. To do that, I'll click on the Spinner, right now it says red, and that causes the Dropdown with the list of colors to appear, so now, I'll select the yellow. The DropDown list disappears, the color yellow now appears as the selected color, and you can see the separate window showing the text, the color is yellow. And I can do it again. This time I'll pick the color violet, and you see the same behaviour occurring again.
I'll now open the SpinnerActivity.java file and go to the onCreate method:
package course.examples.UI.Spinner;
import android.app.Activity;import android.os.Bundle;import android.view.View;import android.widget.AdapterView;import android.widget.AdapterView.OnItemSelectedListener;import android.widget.ArrayAdapter;import android.widget.Spinner;import android.widget.Toast;
public class SpinnerActivity extends Activity { @Override public void onCreate(Bundle savedInstanceState) { super.onCreate(savedInstanceState);= setContentView(R.layout.main); Spinner spinner = (Spinner) findViewById(R.id.spinner); ArrayAdapter<CharSequence> adapter = ArrayAdapter.createFromResource( this, R.array.colors, R.layout.dropdown_item); spinner.setAdapter(adapter); spinner.setOnItemSelectedListener(new OnItemSelectedListener() { public void onItemSelected(AdapterView<?> parent, View view, int pos, long id) { Toast.makeText(parent.getContext(), "The color is " + parent.getItemAtPosition(pos). toString(), Toast.LENGTH_LONG).show(); }

public void onNothingSelected(AdapterView<?> parent) { } }); }}
First, there's a call to setContentView using the main.xml layout file. Let's open that file:
<?xml version="1.0" encoding="utf-8"?><LinearLayout xmlns:android="http://schemas.android.com/apk/res/android" android:layout_width="match_parent" android:layout_height="wrap_content" android:orientation="vertical" android:padding="10dip" >
<TextView android:layout_width="match_parent" android:layout_height="wrap_content" android:layout_marginTop="10dip" android:text="@string/color_prompt" android:textSize="24sp" />
<Spinner android:id="@+id/spinner" android:layout_width="match_parent" android:layout_height="wrap_content" android:textSize="24sp" />
</LinearLayout>
Here we see that the user interface has several parts. In particular, it has a Spinner element, called Spinner.
And going back to the Spinner activity, we now set up an Adapter for the Spinner. We create this Adapter, the call to ArrayAdapter's createFromResource method. The parameters to this method include the list of colors, and a Layout for each view that will appear in the Drop Down list.
Let's take a look at those resource files now. First I'll open up the strings.xml file which holds the colors array.:
Next I'll open up the Drop Down item.xml file, that has the Layout for the DropDown Views. <?xml version="1.0" encoding="utf-8"?><TextView xmlns:android="http://schemas.android.com/apk/res/android" android:layout_width="match_parent" android:layout_height="match_parent" android:textSize="24sp"

android:padding="5dp"></TextView>
And here you see that each color will appears a text to you, with the certain padding and font size.
Turning back to the Spinner activity we set the Adapter, and then set an OnItemSelected Listener, which is called when the User selects a color.
The next ViewGroup is the Gallery class, which displays a set of data with a horizontally scrolling list. Like a Spinner, the data for a gallery object is managed by a Spinner Adapter. Here, I'll start up the UIGallery application. As you can see, the data for this application, is a set of images. And I can swipe on the display, to move forward, and backward through the list of images. You'll also notice that when I select a particular image, a listener is invoked to display the index of the selected image.
The AdapterView, which is the superclass of the ListView, are generic ViewGroups that are used to display a list of data. Layouts are generic ViewGroups that are used to organize and structure other views in ViewGroups. For example, the LinearLayout holds a set of child views or ViewGroups but arranges the children in a single row, either horizontally or vertically.
Let's look at an example application called UILinearLayout. And what you see here is a set of colored boxes labeled red, green, blue, and yellow. And they're all laid out in a horizontal row. Under that, there's another set of boxes laid out vertically. And they're labeled row one, row two, row three, and row four. Let's look at the source code to see how that layout was actually created.
I'm going to go straight to the main.xml file where its layout is stored.
<?xml version="1.0" encoding="utf-8"?><LinearLayout xmlns:android="http://schemas.android.com/apk/res/android" android:layout_width="match_parent" android:layout_height="match_parent" android:orientation="vertical" >
<LinearLayout android:layout_width="match_parent" android:layout_height="0dp" android:layout_weight="1" android:orientation="horizontal" >
<TextView android:layout_width="0dp" android:layout_height="match_parent" android:layout_weight="1" android:background="#aa0000" android:gravity="center_horizontal"

android:text="red" android:textSize="24sp"/>
<TextView android:layout_width="0dp" android:layout_height="match_parent" android:layout_weight="1" android:background="#00aa00" android:gravity="center_horizontal" android:text="green" android:textSize="24sp"/>
<TextView android:layout_width="0dp" android:layout_height="match_parent" android:layout_weight="1" android:background="#0000aa" android:gravity="center_horizontal" android:text="blue" android:textSize="24sp"/>
<TextView android:layout_width="0dp" android:layout_height="match_parent" android:layout_weight="1" android:background="#aaaa00" android:gravity="center_horizontal" android:text="yellow" android:textSize="24sp"/> </LinearLayout>
<LinearLayout android:layout_width="match_parent" android:layout_height="0dp" android:layout_weight="3" android:orientation="vertical" >
<TextView android:layout_width="match_parent" android:layout_height="0dp" android:layout_weight="1" android:text="row one" android:textSize="15pt" />
<TextView android:layout_width="match_parent" android:layout_height="0dp" android:layout_weight="1" android:text="row two" android:textSize="15pt" />
<TextView android:layout_width="match_parent" android:layout_height="0dp"

android:layout_weight="1" android:text="row three" android:textSize="15pt" />
<TextView android:layout_width="match_parent" android:layout_height="0dp" android:layout_weight="1" android:text="row four" android:textSize="15pt" /> </LinearLayout></LinearLayout>
In this file, you see that the entire layout is a LinearLayout. And that LinearLayout has two children, each of which is also a LinearLayout. The outermost linear layout has a layout_width and a layout_height of match_parent, which means that it takes up all of the space of its parent, in this case, the entire application window. You can also see that its orientation is vertical. And this means that the children will be laid out one on top of the other.
If we look at the first child LinearLayout, we see that its layout_width is match_parent. So it should be as wide as the parent, the outermost LinearLayout. Its layout_height, however, is set to 0. It also has a layout_weight of 1, and we'll see how these bits of information are used in a minute. The last thing to notice is that the orientation is horizontal. So, the children of this LinearLayout will be laid out next to each other horizontally.
Now, let's go to the second child of that outermost LinearLayout. And it again is also a LinearLayout. And this element has a layout_width of match_parent and a layout_height of 0. Its layout_weight, however, is 3, whereas that first child had a layout_weight of 1. And these weights tell Android that the first child LinearLayout should get one fourth of the space, while the second child gets the remaining three fourths. The second child also has an orientation of vertical rather than horizontal. T
The next layout is a RelativeLayout. With a RelativeLayout, child views are positioned relative to each other and to their parents, rather than in a fixed order, as we saw with the LinearLayout. Here's the UIRelativeLayout example application. This application contains an EditText view and two buttons. Let's look at how we get that particular layout. Now here's the UI RelativeLayout application. Now let's open up the main.xml layout file.
<?xml version="1.0" encoding="utf-8"?><RelativeLayout xmlns:android="http://schemas.android.com/apk/res/android" android:layout_width="match_parent" android:layout_height="match_parent" >
<EditText android:id="@+id/entry"

android:layout_width="match_parent" android:layout_height="wrap_content" android:hint="Type here:" android:textSize="24sp" />
<Button android:id="@+id/ok" android:layout_width="wrap_content" android:layout_height="wrap_content" android:layout_alignParentRight="true" android:layout_below="@id/entry" android:layout_marginLeft="10dip" android:text="OK" android:textSize="24sp" />
<Button android:layout_width="wrap_content" android:layout_height="wrap_content" android:layout_alignTop="@id/ok" android:layout_toLeftOf="@id/ok" android:text="Cancel" android:textSize="24sp" /></RelativeLayout>
As you can see, we've got a RelativeLayout as the outermost ViewGroup. Inside it, there are the elements that we saw on the screen. An EditText field and two buttons. And they're labeled OK and Cancel. And if we look more closely, we can see that the OK button should be aligned to the right of the parent. That's the RelativeLayout. And below the EditText, which is designated by its ID entry. Now the Cancel button says that it should be aligned to the left of the OK button, and that its top should be aligned with the top of the OK button. So, putting all those constraints together then, Android is able to come up with the layout that you saw when we ran the application.
The next layout is a TableLayout. With a TableLayout, child views are arranged into rows and columns. Here, I'll start up the UITableLayout example application, which mimics an old text-based menu, which you see is laid out one command per row. And within each row, the different pieces of information are laid out in columns. In the IDE, we can open up the layout file. And here we can see that the layout is a TableLayout, and that within the TableLayout, there are a number of table rows. Within each table row, there's a list of views. And these views are assumed to be in numerical column order. But if necessary, you can specify a layout_column. For instance, this row has nothing in column 0, so we have to tell Android that the first row's text view should go in column 1, not in column 0. And you can also see that this TextView specifies a gravity of right, which means that the views text should be pushed to the right of the TextView.
The next layout is the GridView. GridViews arrange their children in a two dimensional, scrollable grid. So I'll start up the UIGridView example application. This application reads in a bunch of images and then automatically lays them out in a rectangular grid.

And when I click on any one of these images, another activity is started, that displays that single image. Let's look at the main.xml layout file.
<?xml version="1.0" encoding="utf-8"?><LinearLayout xmlns:android="http://schemas.android.com/apk/res/android" android:layout_width="match_parent" android:layout_height="match_parent" android:orientation="vertical" >
<GridView android:id="@+id/gridview" android:layout_width="match_parent" android:layout_height="match_parent" android:columnWidth="90dp" android:gravity="center" android:horizontalSpacing="10dp" android:numColumns="auto_fit" android:stretchMode="columnWidth" android:verticalSpacing="10dp" /></LinearLayout>
You see that there's a GridView element. In that element, I've specified some things such as the width of the columns, and the amount of spacing to leave around each image. I also specify that the GridView is free to determine the number of columns to use. Now going to the source code, I'll open up the GridLayout activity file.
package course.examples.UI.GridLayout;
import java.util.ArrayList;import java.util.Arrays;
import android.app.Activity;import android.content.Intent;import android.os.Bundle;import android.view.View;import android.widget.AdapterView;import android.widget.AdapterView.OnItemClickListener;import android.widget.GridView;
public class GridLayoutActivity extends Activity {
protected static final String EXTRA_RES_ID = "POS"; private ArrayList<Integer> mThumbIdsFlowers = new ArrayList<Integer>(Arrays.asList(R.drawable.image1, R.drawable.image2, R.drawable.image3, R.drawable.image4, R.drawable.image5, R.drawable.image6, R.drawable.image7, R.drawable.image8, R.drawable.image9, R.drawable.image10, R.drawable.image11, R.drawable.image12));
@Override
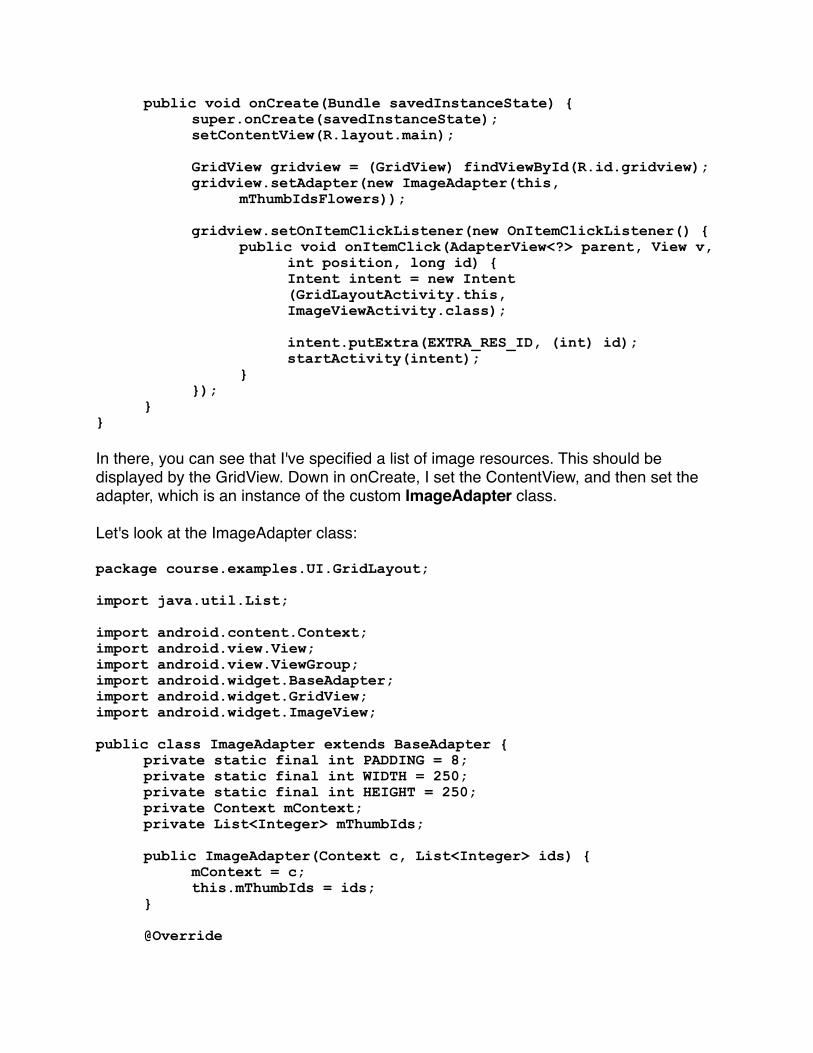
public void onCreate(Bundle savedInstanceState) { super.onCreate(savedInstanceState); setContentView(R.layout.main);
GridView gridview = (GridView) findViewById(R.id.gridview); gridview.setAdapter(new ImageAdapter(this, mThumbIdsFlowers));
gridview.setOnItemClickListener(new OnItemClickListener() { public void onItemClick(AdapterView<?> parent, View v, int position, long id) { Intent intent = new Intent (GridLayoutActivity.this, ImageViewActivity.class);
intent.putExtra(EXTRA_RES_ID, (int) id); startActivity(intent); } }); }}
In there, you can see that I've specified a list of image resources. This should be displayed by the GridView. Down in onCreate, I set the ContentView, and then set the adapter, which is an instance of the custom ImageAdapter class.
Let's look at the ImageAdapter class:
package course.examples.UI.GridLayout;
import java.util.List;
import android.content.Context;import android.view.View;import android.view.ViewGroup;import android.widget.BaseAdapter;import android.widget.GridView;import android.widget.ImageView;
public class ImageAdapter extends BaseAdapter { private static final int PADDING = 8; private static final int WIDTH = 250; private static final int HEIGHT = 250; private Context mContext; private List<Integer> mThumbIds;
public ImageAdapter(Context c, List<Integer> ids) { mContext = c; this.mThumbIds = ids; }
@Override
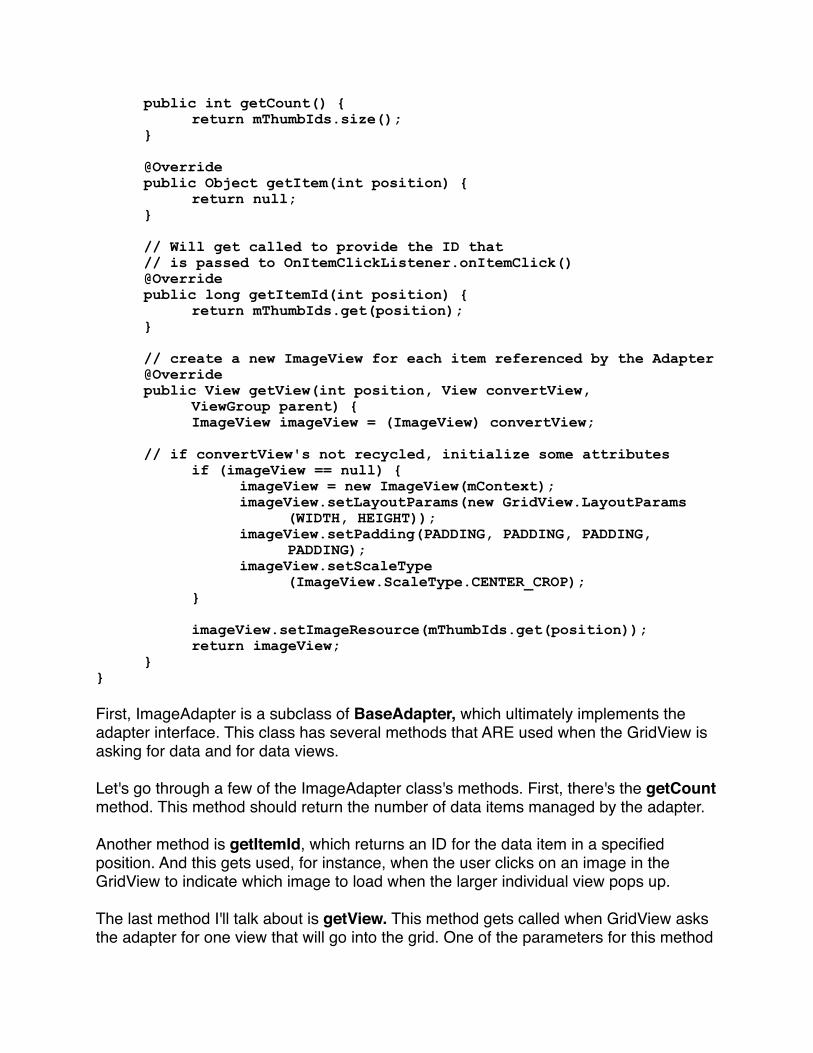
public int getCount() { return mThumbIds.size(); }
@Override public Object getItem(int position) { return null; }
// Will get called to provide the ID that // is passed to OnItemClickListener.onItemClick() @Override public long getItemId(int position) { return mThumbIds.get(position); }
// create a new ImageView for each item referenced by the Adapter @Override public View getView(int position, View convertView, ViewGroup parent) { ImageView imageView = (ImageView) convertView;
// if convertView's not recycled, initialize some attributes if (imageView == null) { imageView = new ImageView(mContext); imageView.setLayoutParams(new GridView.LayoutParams (WIDTH, HEIGHT)); imageView.setPadding(PADDING, PADDING, PADDING, PADDING); imageView.setScaleType (ImageView.ScaleType.CENTER_CROP); }
imageView.setImageResource(mThumbIds.get(position)); return imageView; }}
First, ImageAdapter is a subclass of BaseAdapter, which ultimately implements the adapter interface. This class has several methods that ARE used when the GridView is asking for data and for data views.
Let's go through a few of the ImageAdapter class's methods. First, there's the getCount method. This method should return the number of data items managed by the adapter.
Another method is getItemId, which returns an ID for the data item in a specified position. And this gets used, for instance, when the user clicks on an image in the GridView to indicate which image to load when the larger individual view pops up.
The last method I'll talk about is getView. This method gets called when GridView asks the adapter for one view that will go into the grid. One of the parameters for this method

is a view called ConvertView. This parameter will sometimes be null. If so, then you need to create a new view and configure it however you want. Other times, ConvertView will not be null - it will actually reference a view that was already returned by this method in the past.
For example, if you have a lot of views in the grid and only some of them might be visible at any one time, so GridView will only ask for the views that it's going to display. But if the user later scrolls to GridView, some of the views that were visible are going to become invisible because they scroll off the screen. So Android will try to reuse those views, and it will pass one of those new views off to the adapter to get to the GetView method. Then you'll just use the ConvertView and reset whatever fields that you need for your current data item. This is good because it saves the time needed to allocate new views, which in turn can make the scrolling look much more fluid.
The next thing I'll talk about are Menus and the ActionBar. Activities can support Menus. Menus can be presented to the user in different ways. But the basic idea is that Menus give users a quick way to access important functions. So, activities can add items to a Menu, and they can respond when the user invokes the Menu item, say by clicking on it.
The appearance of Menus has changed in Android over time, so I'll talk about basic menus first, and then later I'll talk specifically about the newer ActionBar class. There are three kinds of Android menu:
1.Options Menus: shown when a user presses the menu button. Older Android devices usually had a dedicated physical menu key. Newer ones don't.
2.Context Menus: menus that are attached to specific views and are shown only when the user presses and holds that view. Context Menus are usually used for operating on the specific data held in the view, while Option Menus and SubMenus tend to be for global operations that affect the whole application.
3.SubMenus: secondary menus that are activated only when the user touches an already visible menu item.
Let's look at some examples. Here's the Phone application. Let me show you an example of an Options Menu for this application. First, I'll scroll over to the Contacts tab, and you can see that there's an icon here at the bottom. When I click on it, a menu pops up, allowing me to do things, e.g. specify which contacts to display or import/export contacts.
Next, let's see an example of a Context Menu. I'll open the Browser application and use an Options Menu to get to the bookmarks function, which brings up a tab showing Bookmarks, History, and Saved pages. I'll select History, which shows me a list of web pages that I've visited recently. Now I'll press and hold on one of these web page history entries. As you can see, a new menu appears, supporting actions that can be applied to this one webpage link, e.g. opening it, bookmarking it, or sharing it.

Finally, let me show you an example of a SubMenu. Here I'll open the Gallery application, which shows me some photo albums stored on my device. I'll click on one and see a photo from the album. I'll click on the Menu icon, which presents a set of actions that I can perform. I'll select the Delete menu option. Now this brings up a secondary menu, which actually gets shown as a kind of dialog in this case, asking me to confirm the deletion.
In order to create the Menus, you first define the contents of the menu in an XML file in the res/menu directory. When the user later opens the menu, Android calls a particular method, such as onCreateOptionsMenu for Options Menus and their SubMenus, or onCreateContextMenu for Context Menus. In these methods, you'll use a MenuInflater to create the actual menu layout.
When the user later selects one of the menu items, Android will call a method, such as onOptionsMenuItemSelected for Options Menus and SubMenus, or onContextMenuItemSelected for Context Menus.
Let's look at a simple example with all these different kinds of menus. This application is called HelloAndroid WithMenus. I'll start it up and as you can see, there's a TextView with the words Hello Android. And if I press and hold this TextView, a Context Menu pops up and tells me to hit the menu button instead. So let's try that. Now, if you look up in the top right corner, you can see the icon that gets you to the menu items.
I'm calling that icon a menu button, but actually it's an overflow area for actions that appear on the ActionBar, which is the area at the top of the application. Let me click on that icon. This brings up a menu with three entries. Help, More help, and Still more help. If I click on these, some actions will be taken.
For the first two menu entries, I just display some texts on the screen. The last one, however, is associated with a SubMenu, which in this case just has one entry, telling me there is no more help. Let's look at how this is implemented in the source code:
package course.examples.UI.MenuExample;
import android.app.Activity;import android.os.Bundle;import android.view.ContextMenu;import android.view.ContextMenu.ContextMenuInfo;import android.view.Menu;import android.view.MenuInflater;import android.view.MenuItem;import android.view.View;import android.widget.TextView;import android.widget.Toast;
public class HelloAndroidWithMenuActivity extends Activity { public void onCreate(Bundle savedInstanceState) { super.onCreate(savedInstanceState);

setContentView(R.layout.main); TextView tv = (TextView) findViewById(R.id.text_view); registerForContextMenu(tv); }
@Override public boolean onCreateOptionsMenu(Menu menu) { MenuInflater inflater = getMenuInflater(); inflater.inflate(R.menu.top_menu, menu); return true; }
@Override public boolean onOptionsItemSelected(MenuItem item) { switch (item.getItemId()) { case R.id.help: Toast.makeText(getApplicationContext(), "you've been helped", Toast.LENGTH_SHORT).show(); return true; case R.id.more_help: Toast.makeText(getApplicationContext(), "you've been helped more", Toast.LENGTH_SHORT).show(); return true; case R.id.even_more_help: return true; default: return false; } }
@Override public void onCreateContextMenu(ContextMenu menu, View v, ContextMenuInfo menuInfo) { super.onCreateContextMenu(menu, v, menuInfo); MenuInflater inflater = getMenuInflater(); inflater.inflate(R.menu.context_menu, menu); }
@Override public boolean onContextItemSelected(MenuItem item) { switch (item.getItemId()) { case R.id.help_guide: Toast.makeText(getApplicationContext(), "ContextMenu Shown", Toast.LENGTH_SHORT).show(); return true; default: return false; } }}

First, we'll look at the onCreateOptionsMenu method, where we get the MenuInflater, and then call its inflate method passing in a reference to the menu layout, and passing in the menu in which we want to put the new layout. Now I'll open the menu file top_menu.xml:
<menu xmlns:android="http://schemas.android.com/apk/res/android" > <item android:id="@+id/help" android:icon="@drawable/ic_menu_help" android:title="@string/help"/> <item android:id="@+id/more_help" android:icon="@drawable/ic_menu_help" android:title="@string/more_help"/> <item android:id="@+id/even_more_help" android:icon="@drawable/ic_menu_help" android:title="@string/even_more_help"> <menu> <item android:id="@+id/give_up" android:title="@string/give_up"/> </menu> </item></menu>
This file contains a menu tag. And inside it, there are several item tags. In each tag, there are attributes, such as an ID, an icon to display for this item, and a title for this item. The third Menu item also includes a SubMenu, which is specified by the nested menu tag.
Back in the activity, in the last line of onCreateOptionsMenu, we'll return the value true, indicating that we want to display this Menu item now. Now when the users selects one of these Menu items, Android will call onOptionsItemSelected, passing in the selecting item. Here, we check the item's ID and then take the appropriate action for that item.
Now let's look at how the Context Menu is set up. First, when a user invokes the Context Menu for the first time, Android calls onCreateContextMenu. The code is very similar to what we saw with the Options Menu. You get the MenuInflater and you use it to inflate an XML layout file. Let's open it up.
<menu xmlns:android="http://schemas.android.com/apk/res/android" > <item android:id="@+id/help_guide" android:title="@string/guide"/></menu>
This menu just has a single item with the ID, help_guide.

In addition to what I've just shown you Menus can also support a number of more advanced features. For example, you can put related menu items into a group so you can process and manipulate them as a unit. You can also find the short cut keys to specific menu items so you can access them more quickly. And you can bind Intents to menu items. For instance, you can start a particular activity when the user clicks on a particular menu item.
I've mentioned the ActionBar a few times now. The ActionBar was added in Android 3.10 - it mimics the application bar that you often see in desktop applications. You know, the bar at the top of the application window with File, Edit, ..., Help, etc. The basic idea behind the action bar is, rather than hiding actions behind a traditional pop-up menu, give the users quick access to the actions they're likely to use.
Let's look at some uses of the action bar. Now the first example I'll give goes back to our lesson on fragments. You remember those Quote Viewer applications, well, in this application, FragmentDynamicLayoutWithActionBar, I've added some items to the action bar. These items are provided by three different classes. Some items come from the main activity, some come from the fragment that displays the titles, and some come from the fragment that displays the quotes. Let's take a look - I'll start the application.
As before, when it starts up, there's a main activity, which hosts a single fragment, the TitleFragment. Now if you look at the action bar at the top of the tablet, you see that there are two pieces of text in the upper right corner. One says Activity Action, and the other says Title Action.
That first piece of text was put there by the QuoteViewer activity. The second was put there by the TitleFragment. And if I click on these bits of text, you'll see some text pop up, telling you which object is actually carrying out the actions associated with that action bar item.
Now, if I click on one of the titles, you remember that this causes the quote fragment to be dynamically added to the layout. The quote fragment also adds some items to the action bar, dynamically. In this case there's a main action, and the second action, that gets put in the overflow area.
I'll click on the main action, and again, you can see the text saying that this action is provided by the quote fragment. If I click on the overflow icon, this causes the second item provided by the quote fragment to appear. And if I now click on that pop up, you again see an associated text pop up.
Let's look at how this is implemented in the source code. I'll first open the QuoteViewer activity file.
package course.examples.UI.FragmentActionBar;
import android.app.Activity;

import android.app.FragmentManager;import android.app.FragmentTransaction;import android.os.Bundle;import android.view.Menu;import android.view.MenuInflater;import android.view.MenuItem;import android.widget.Toast;import course.examples.UI.FragmentActionBar.TitlesFragment.ListSelectionListener;
public class QuoteViewerActivity extends Activity implements ListSelectionListener {
public static String[] TitleArray; public static String[] QuoteArray; private final TitlesFragment mTitlesFragment = new TitlesFragment (); private final QuoteFragment mDetailsFragment = new QuoteFragment ();
private FragmentManager mFragmentManager;
@Override protected void onCreate(Bundle savedInstanceState) { super.onCreate(savedInstanceState); TitleArray = getResources().getStringArray(R.array.Titles); QuoteArray = getResources().getStringArray(R.array.Quotes); setContentView(R.layout.main);
mFragmentManager = getFragmentManager(); FragmentTransaction fragmentTransaction = mFragmentManager .beginTransaction(); fragmentTransaction.add(R.id.title_fragment_container, mTitlesFragment); fragmentTransaction.commit(); }
@Override public void onListSelection(int index) { if (!mDetailsFragment.isAdded()) { FragmentTransaction fragmentTransaction = mFragmentManager.beginTransaction(); fragmentTransaction.add(R.id.quote_fragment_container, mDetailsFragment); fragmentTransaction.addToBackStack(null); fragmentTransaction.commit(); mFragmentManager.executePendingTransactions(); } if (mDetailsFragment.getShownIndex() != index) { mDetailsFragment.showIndex(index); } }

@Override public boolean onCreateOptionsMenu(Menu menu) { MenuInflater inflater = getMenuInflater(); inflater.inflate(R.menu.activity_menu, menu); return true; }
@Override public boolean onOptionsItemSelected(MenuItem item) { switch (item.getItemId()) { case R.id.activity_menu_item: Toast.makeText(getApplicationContext(), "This action provided by theQuoteViewerActivity", Toast.LENGTH_SHORT).show(); return true; default: return super.onOptionsItemSelected(item); } }}
Here, we see the onCreateOptionsMenu, and onOptionsMenuItemSelected methods, mentioned before.
Let's take a look at the menu layout in the activity_menu.XML file.
<?xml version="1.0" encoding="utf-8"?><menu xmlns:android="http://schemas.android.com/apk/res/android" >
<item android:id="@+id/activity_menu_item" android:showAsAction="ifRoom|withText" android:title="ActivityAction"> </item></menu>
This looks like what we've already seen, except one difference is the showAsAction attribute. Its value is ifRoom OR withText, which means that Android should show this item in the action bar, if there's room, but should put it in the overflow area otherwise. It also means the item should be shown as text, rather than by displaying an icon
Now, I'll open up the TitlesFragment.java file:
package course.examples.UI.FragmentActionBar;
import android.app.Activity;import android.app.ListFragment;import android.os.Bundle;import android.view.Menu;import android.view.MenuInflater;import android.view.MenuItem;

import android.view.View;import android.widget.ArrayAdapter;import android.widget.ListView;import android.widget.Toast;
public class TitlesFragment extends ListFragment { ListSelectionListener mListener = null; int mCurrIdx = -1;
public interface ListSelectionListener { public void onListSelection(int index); }
@Override public void onAttach(Activity activity) { super.onAttach(activity); try { mListener = (ListSelectionListener) activity; } catch (ClassCastException e) { throw new ClassCastException(activity.toString() " must implement OnArticleSelectedListener"); } }
@Override public void onCreate(Bundle savedInstanceState) { super.onCreate(savedInstanceState);
setHasOptionsMenu(true); setRetainInstance(true); }
@Override public void onActivityCreated(Bundle savedState) { super.onActivityCreated(savedState);
setListAdapter(new ArrayAdapter<String>(getActivity(), R.layout.list_item, QuoteViewerActivity.TitleArray)); if (mCurrIdx != -1) { setSelection(mCurrIdx); } }
@Override public void onListItemClick(ListView l, View v, int pos, long id) { mCurrIdx = pos; getListView().setItemChecked(pos, true); mListener.onListSelection(pos); }
@Override public void onCreateOptionsMenu(Menu menu, MenuInflater inflater) { inflater.inflate(R.menu.title_menu, menu);}

@Override public boolean onOptionsItemSelected(MenuItem item) { switch (item.getItemId()) { case R.id.title_menu_item: Toast.makeText(getActivity().getApplicationContext(), "This action provided by the TitlesFragment", Toast.LENGTH_SHORT).show(); return true; default: return super.onOptionsItemSelected(item); } }}
Again, there are calls to the onCreateOptionsMenu and onOptionsMenuItemSelected methods. The one difference here, is that because TitleFragment is a fragment, we also have to issue the command setHasOptionsMenu(true) in the onCreate method.
Last I'll open up the QuoteFragment.java file:
package course.examples.UI.FragmentActionBar;
import android.app.Fragment;import android.os.Bundle;import android.view.LayoutInflater;import android.view.Menu;import android.view.MenuInflater;import android.view.MenuItem;import android.view.View;import android.view.ViewGroup;import android.widget.TextView;import android.widget.Toast;
public class QuoteFragment extends Fragment {
private TextView mQuoteView = null; private int mCurrIdx = -1; private int mQuoteArrLen = 0;
public int getShownIndex() { return mCurrIdx; }
public void showIndex(int newIndex) { if (newIndex < 0 || newIndex >= mQuoteArrLen) return; mCurrIdx = newIndex; mQuoteView.setText(QuoteViewerActivity.QuoteArray [mCurrIdx]); }

@Override public View onCreateView(LayoutInflater inflater, ViewGroup container, Bundle savedInstanceState) { return inflater.inflate(R.layout.detail_fragment, container, false); }
@Override public void onCreate(Bundle savedInstanceState) { super.onCreate(savedInstanceState);
setRetainInstance(true); setHasOptionsMenu(true); }
@Override public void onActivityCreated(Bundle savedInstanceState) { super.onActivityCreated(savedInstanceState); mQuoteView = (TextView) getActivity().findViewById (R.id.quoteView); mQuoteArrLen = QuoteViewerActivity.QuoteArray.length; }
@Override public void onDetach() { super.onDetach(); mCurrIdx = -1; }
@Override public void onCreateOptionsMenu(Menu menu, MenuInflater inflater) { inflater.inflate(R.menu.quote_menu, menu); }
@Override public boolean onOptionsItemSelected(MenuItem item) { switch (item.getItemId()) { case R.id.detail_menu_item_main: Toast.makeText(getActivity().getApplicationContext(), "This action provided by the QuoteFragment", Toast.LENGTH_SHORT).show(); return true; case R.id.detail_menu_item_secondary: Toast.makeText(getActivity().getApplicationContext(), "This action is also provided by the QuoteFragment", Toast.LENGTH_SHORT).show(); default: return super.onOptionsItemSelected(item); } }
}

Again, not much new here. My quote fragment has it's menu file and quote_menu.XML Lets look at that:
<?xml version="1.0" encoding="utf-8"?><menu xmlns:android="http://schemas.android.com/apk/res/android" > <item android:id="@+id/detail_menu_item_main" android:showAsAction="ifRoom|withText" android:title="QuoteAction"> </item> <item android:id="@+id/detail_menu_item_secondary" android:showAsAction="never" android:title="SecondaryQuoteAction"> </item></menu>
This menu has two items. One has it's showAsAction attribute set to ifRoom OR withText, just like we saw before. The other one though, has its showAsAction attribute set to never, and so it will always appear in the overflow area and never in the action bar.
Another use of the ActionBar is to help provide a consistent way of switching between different views in an application. When using the ActionBar this way, the screen is divided into two sections: a tab area and a content area.
The ActionBar.Tab class allows you to associate a fragment with each tab indicator in the tab area. Now only one tab indicator can be selected at any one time. When the user selects a particular tab indicator Its fragment can be shown in the content area. If the user then selects a different tab, a different fragment can be shown in the content area.
Here's a sample application called UITabLayout that uses the ActionBar.Tab class to switch between two instances of a fragment that uses the GridView layout that we discussed earlier. I'll start the UI tab layout application:
The application displays two tab indicators, one labeled Flowers, and one labeled Animals. The Flowers tab is currently selected and, in fact, does exactly what we saw in the UI GridView application. Now I'll select the Animals tab. As you can see, the application is now displaying another GridView fragment, but this time it's showing images of dogs rather than flowers.
Let's take a look at the source code for this application. I'll open the TabLayoutActivity.java file and go to the onCreate method:
package course.examples.UI.TabLayout;

import java.util.ArrayList;import java.util.Arrays;
import android.app.ActionBar;import android.app.ActionBar.Tab;import android.app.Activity;import android.app.Fragment;import android.app.FragmentTransaction;import android.os.Bundle;
public class TabLayoutActivity extends Activity {
private static final String ANIMALS_TABSTRING = "Animals"; private static final String FLOWERS_TABSTRING = "Flowers"; protected static final String THUMBNAIL_IDS = "thumbNailIDs";
private ArrayList<Integer> mThumbIdsFlowers = new ArrayList<Integer>( Arrays.asList(R.drawable.image1, R.drawable.image2, R.drawable.image3, R.drawable.image4, R.drawable.image5, R.drawable.image6, R.drawable.image7, R.drawable.image8, R.drawable.image9, R.drawable.image10, R.drawable.image11, R.drawable.image12));
private ArrayList<Integer> mThumbIdsAnimals = new ArrayList<Integer>(Arrays.asList(R.drawable.sample_1, R.drawable.sample_2, R.drawable.sample_3, R.drawable.sample_4, R.drawable.sample_5, R.drawable.sample_6, R.drawable.sample_7, R.drawable.sample_0));
@Override public void onCreate(Bundle savedInstanceState) { super.onCreate(savedInstanceState);
setContentView(R.layout.main);
final ActionBar tabBar = getActionBar(); tabBar.setNavigationMode(ActionBar.NAVIGATION_MODE_TABS);
GridFragment flowerFrag = new GridFragment(); Bundle args = new Bundle(); args.putIntegerArrayList(THUMBNAIL_IDS, mThumbIdsFlowers); flowerFrag.setArguments(args); tabBar.addTab(tabBar.newTab().setText(FLOWERS_TABSTRING) .setTabListener(new TabListener(flowerFrag)));
GridFragment animalFrag = new GridFragment(); args = new Bundle(); args.putIntegerArrayList(THUMBNAIL_IDS, mThumbIdsAnimals); animalFrag.setArguments(args); tabBar.addTab(tabBar.newTab().setText(ANIMALS_TABSTRING) .setTabListener(new TabListener(animalFrag)));
}

public static class TabListener implements ActionBar.TabListener { private final Fragment mFragment;
public TabListener(Fragment fragment) { mFragment = fragment; }
@Override public void onTabReselected(Tab tab, FragmentTransaction ft) { }
@Override public void onTabSelected(Tab tab, FragmentTransaction ft) { if (null != mFragment) { ft.replace(R.id.fragment_container, mFragment); } }
@Override public void onTabUnselected(Tab tab, FragmentTransaction ft) { if (null != mFragment) ft.remove(mFragment); } }}
First the code gets the action bar. Then it configures the action bar to operate as a tab. Next, it creates the grid view fragment, giving it the list of images to display, in this case, that's the flower images. Finally, it creates and configures a new tab indicator, and attaches it to the action bar. Then it does essentially the same thing with the other tab.
When we added the tab, notice that we also created an instance of something called the TabListener. This is an object that will be called when the user selects or unselects individual tabs. Let me scroll down to that code.
Here's the onTabSelected method. When a tab is selected this code adds the fragment to the hosting activity.
Here's the onTabUnselected method. When a tab is unselected this code removes the current fragment From the hosting activity.
The last thing I want to discuss is the Dialog, which is an independent subwindow used by an activity for short communications with users. Some dialog classes provided by Android include the AlertDialog, the ProgressDialog, and the DatePickerDialog and TimePickerDialog.

Let's look at the the UIAlertDialog sample application that uses both the AlertDialog and the ProgressDialog. When I start it up, it displays one button, that the user can press to initiate application shutdown. If I hit that button, you see that the application pops up a dialog, an AlertDialog, that shows a message, Do you really want to exit? It then allows the user to respond, either yes or no. I'll hit no. It dismisses the AlertDialog and returns me back to the application.
Let's say time goes by and now I really do want to exit. So I'll hit the Shutdown button again, which again brings up the alert dialog. This time, however, I'll hit the yes button on the alert dialog. The alert dialog is dismissed, and a new dialog, this time a ProgressDialog, is displayed, showing a graphic spinner to let me know that the shut down process is proceeding. When the shutdown finishes the application terminates itself.
Lets see what this looks like in the source code. I'll open up the AlertDialogActivity.java file, and go to its onCreate method:
package course.examples.UI.AlertDialog;
import android.app.Activity;import android.app.AlertDialog;import android.app.Dialog;import android.app.DialogFragment;import android.app.ProgressDialog;import android.content.DialogInterface;import android.os.Bundle;import android.util.Log;import android.view.View;import android.view.View.OnClickListener;import android.widget.Button;
public class AlertDialogActivity extends Activity { private static final int ALERTTAG = 0, PROGRESSTAG = 1; protected static final String TAG = "AlertDialogActivity"; private Button mShutdownButton = null; private DialogFragment mDialog;
@Override public void onCreate(Bundle savedInstanceState) { super.onCreate(savedInstanceState); setContentView(R.layout.main);
mShutdownButton = (Button) findViewById (R.id.shutdownButton); mShutdownButton.setOnClickListener(new OnClickListener() { @Override public void onClick(View v) { showDialogFragment(ALERTTAG); } }); }

void showDialogFragment(int dialogID) { switch (dialogID) { case ALERTTAG: mDialog = AlertDialogFragment.newInstance(); mDialog.show(getFragmentManager(), "Alert"); break; case PROGRESSTAG: mDialog = ProgressDialogFragment.newInstance(); mDialog.show(getFragmentManager(), "Shutdown"); break; } }
protected void continueShutdown(boolean shouldContinue) { if (shouldContinue) { mShutdownButton.setEnabled(false); showDialogFragment(PROGRESSTAG); finishShutdown(); } else { mDialog.dismiss(); } }
private void finishShutdown() { new Thread(new Runnable() { @Override public void run() { try { // Pretend to do something before // shutting down Thread.sleep(5000); } catch (InterruptedException e) { Log.i(TAG, e.toString()); } finally { finish(); } } }).start(); }
public static class AlertDialogFragment extends DialogFragment { public static AlertDialogFragment newInstance() { return new AlertDialogFragment(); }
@Override public Dialog onCreateDialog(Bundle savedInstanceState) { return new AlertDialog.Builder(getActivity()) .setMessage("Do you really want to exit?") .setCancelable(false) .setNegativeButton("No", new DialogInterface.OnClickListener() {

public void onClick(DialogInterface dialog, int id) { ((AlertDialogActivity) getActivity()) .continueShutdown(false); } }).setPositiveButton("Yes", new DialogInterface.OnClickListener() { public void onClick( final DialogInterface dialog, int id) { ((AlertDialogActivity) getActivity()) .continueShutdown(true); } }).create(); } }
public static class ProgressDialogFragment extends DialogFragment { public static ProgressDialogFragment newInstance() { return new ProgressDialogFragment(); }
@Override public Dialog onCreateDialog(Bundle savedInstanceState) { final ProgressDialog dialog = new ProgressDialog (getActivity()); dialog.setMessage("Activity Shutting Down."); dialog.setIndeterminate(true); return dialog; } }}
As you can see, when the user presses the Shut down button, the showDialogFragment method is invoked passing in an ID for the desired dialog. The showDialogFragment method creates an instance of the alertDialogFragment and then calls the show method on it.
Lets look at that class. AlertDialogFragment is a subclass of DialogFragment and it has an onCreateDialog method. This method will be called in response to the show method being invoked, and this method creates a new alertDialog.builder instance.
The methods of a builder almost always return the current object, and this is useful because it allows you to create an object and then just keep tacking on method calls one after another to configure that object. Here you can see a call to setMessage and right after that a call to setCancelable, and then a call to setNegativeButton and so forth. Once you've set all the things that you want, you end with a call to the Create method, which effectively puts together all of the previous calls and returns the final configured object.

Once this dialog is displayed, if the user selects No, then there's a call to continueShutdown with the parameter false. If the user instead select yes then there's a call to continueShutdown with the parameter true.
Lets go to the continueShutdown method. If shouldContinue is false, we dismiss the alert dialog and everything goes on as if nothing had happened. It shouldContinue is true however, we dismiss the alert dialog, and then call showDialog, passing in the progress tag ID. This call creates a ProgressDialogFragment object and then calls the show method on it. Eventually, we end up at the onCreateDialog method, in the ProgressDialogFragment class. And here we make a new ProgressDialog, set its message to Activity Shutting Down, and then call setIndeterminate true, which allows the dialog to stay visible until its dismissed.
That's all for our discussion of Android's User Interface classes. Please join me next time, when we'll discuss, user notifications.

Week 5 - AlarmsSo far, the example applications we've studied make logical decisions and take immediate action. But if an application needs to take a delayed or multiple repeated actions it can do so by using Alarms.
I'll discuss the Android AlarmManager and the APIs it provides for setting and canceling alarms. I'll also discuss the various types of Alarms that Android supports. And finally, Iʼll discuss an example application that uses Alarms.
In a nutshell, Alarms are a mechanism for sending Intents in the future, possibly even after an application is no longer running. And, once created and registered, Alarms are retained and monitored even if the device goes to sleep. Depending on how an alarm is configured, a sleeping device can be woken up to handle the alarm, or the alarm can be retained until the next time the device wakes up. Alarms continue to be active until the device shuts down. On shutdown, all registered alarms are canceled.
Examples of alarms include:• the MMS messaging application uses them to start a service that finds undelivered
MMS messages and retries delivering them.• the Settings application makes a device discoverable over Bluetooth and sets an
alarm until the alarm goes off and makes the device not discoverable.• the Phone application keeps a cache of user information and uses alarms to
periodically update that cache.
AlarmManager APIs
To use alarms, you interact with the AlarmManager service. To get a reference to this service call the context classes GetSystemService, passing in the name of the service, in this case, Alarm_Service as a parameter. Once you have a reference to the AlarmManager, you can then use its methods to create and set alarms, e.g.:
getSystemService(Context.ALARM_SERVICE)
For instance, to set a single alarm you can use the Alarm.set method, passing three parameters, including a type, which we'll discuss shortly, a long, representing the time at which the alarm should go off and a PendingIntent, which encapsulates the operation that should occur when the Alarm finally does go off, e.g.:
One-shot alarm:"void set(int type, long triggerAtTime, PendingIntent operation)
You can use the method, setRepeating, to set an alarm that repeatedly goes off at specific intervals. This method has four parameters, the three we saw in the set method

and an additional long that specifies the amount of time between each successive time that the alarm goes off.
Repeating alarm:void setRepeating(int type, long triggerAtTime, long interval, PendingIntent operation)
Another AlarmManager method is setInexactRepeating. This method is similar to setRepeating, but this method gives Android more flexibility in deciding exactly when to fire the alarms. For instance, Android might batch up multiple alarms of this kind and fire them at the same time so as not to wake up the device too many times. And if you want to have this kind of behavior, then your time interval must be one of the following constants, which specifies intervals of 15 minutes, 30 minutes, one hour, 12 hours, and 24 hours. And if you don't use one of these constants, then the behavior of the alarms is the same thing that you would have gotten had you used setRepeating instead, e.g.:
Repeating alarm with inexact trigger criteria:
void setInexactRepeating(int type, long triggerAtTime, long interval, PendingIntent operation)
Interval options: INTERVAL_FIFTEEN_MINUTESINTERVAL_HALF_HOURINTERVAL_HOURINTERVAL_HALF_DAYINTERVAL_DAY
Alarm Types
Now each of the three methods took a parameter called type. Android provides two degrees of configurability for alarms. One is how time information is interpreted, and the other is how to respond if the device is sleeping when the alarm fires.
• Time interpretation: recall that each of the alarm setting methods took a long as a parameter, representing a time. Android can interpret this value in two different ways:
1. Real time: relative to system clock, which represents the number of milliseconds since midnight January 1, 1970.
2. Elapsed time: relative to time since last boot
• Device sleeping response: what should Android do if the alarm goes off when the the device is asleep.
1. Wake up the device now - deliver the intent. 2. Let the device continue sleeping - deliver the intent when the device wakes up.

Putting those together, there are four possibilities:
RTC_WAKEUP: Fire the alarm at the specified wall clock time. If the device is asleep, wake it now and deliver the intent.
RTC: Fire the alarm at the specified wall clock time, but if the device is asleep, deliver the intent when the device wakes up.
ELAPSED_REALTIME: Fire the alarm when the device has been up for the specified time. If the device is asleep, donʼt wake it up.
ELAPSED_REALTIME_WAKEUP: Fire the alarm when the device has been up for the specified time, and if the device is sleeping wake it up.
Pending Intents
As we discussed back in user notifications, a PendingIntent holds a regular intent and essentially serves as a permission slip, in which one component allows a second component to use the underlying intent as if it were the first component.
Three methods that can create a PendingIntent are getActivity, which returns a PendingIntent that can be used to start an activity. GetBroadcast, which returns a PendingIntent that can be used to broadcast an intent. And getService, which returns a PendingIntent that can be used to start a service.
Examples:
PendingIntent getActivity(Context context, int requestCode, Intent intent, int flags, Bundle options)
PendingIntent getBroadcast(Context context, int requestCode, Intent intent, int flags)
PendingIntent getService(Context context, int requestCode, Intent intent, int flags)

Example Application
So now that we've learned about alarms, let's take a look at an example application called AlarmCreate. This application uses alarms to gently encourage a student to stop playing video games and return to his or her studies.
The application displays a simple user interface with four buttons. One button, labeled Set Single Alarm, sets a single alarm to go off in two minutes. Another, labeled Set Repeating Alarm, sets a repeating alarm that will go off in two minutes, and then continue to go off every 15 minutes. Another button, labeled Set Inexact Repeating Alarm, sets a repeating alarm that should go off every 15 minutes starting in about two minutes. This is an inexact alarm, so Android will try to fire the alarm every 15 minutes but will exercise a lot of flexibility in when exactly those alarms go off. And finally, a button labelled Cancel Repeating Alarm, will cancel any currently active repeating or inexact repeating alarms.
Clicking the Set Single Alarm button raises the toast message indicating that the application has set a single alarm that should go off in two minutes. When it does, the

code will place raise user notification. Let's wait and see what happens. Back watching the device, the notification appears, asking if I'm playing Angry Birds again. Pulling down on the notification drawer I find a kind reminder to get back to studying. If I click on this notification the AlarmCreate application is brought back up.
Before we move forward, let's look at the source code for this application.
package course.examples.Alarms.AlarmCreate;
import android.app.Activity;import android.app.AlarmManager;import android.app.PendingIntent;import android.content.Intent;import android.os.Bundle;import android.os.SystemClock;import android.view.View;import android.view.View.OnClickListener;import android.widget.Button;import android.widget.Toast;
public class AlarmCreateActivity extends Activity {
private AlarmManager mAlarmManager; private Intent mNotificationReceiverIntent, mLoggerReceiverIntent; private PendingIntent mNotificationReceiverPendingIntent, mLoggerReceiverPendingIntent; private static final long INITIAL_ALARM_DELAY = 2 * 60 * 1000L; protected static final long JITTER = 5000L;
@Override public void onCreate(Bundle savedInstanceState) { super.onCreate(savedInstanceState);
setContentView(R.layout.main);
// Get the AlarmManager Service mAlarmManager = (AlarmManager) getSystemService (ALARM_SERVICE);
// Create PendingIntent to start the AlarmNotificationReceiver mNotificationReceiverIntent = new Intent (AlarmCreateActivity.this, AlarmNotificationReceiver.class); mNotificationReceiverPendingIntent = PendingIntent.getBroadcast( AlarmCreateActivity.this, 0, mNotificationReceiverIntent, 0);
// Create PendingIntent to start the AlarmLoggerReceiver mLoggerReceiverIntent = new Intent

(AlarmCreateActivity.this, AlarmLoggerReceiver.class); mLoggerReceiverPendingIntent = PendingIntent.getBroadcast( AlarmCreateActivity.this, 0, mLoggerReceiverIntent, 0);
// Single Alarm Button final Button singleAlarmButton = (Button) findViewById (R.id.single_alarm_button); singleAlarmButton.setOnClickListener(new OnClickListener(){ @Override public void onClick(View v) { mAlarmManager.set(AlarmManager.RTC_WAKEUP, System.currentTimeMillis() + INITIAL_ALARM_DELAY, mNotificationReceiverPendingIntent);
mAlarmManager.set(AlarmManager.RTC_WAKEUP, System.currentTimeMillis() + INITIAL_ALARM_DELAY + JITTER, mLoggerReceiverPendingIntent);
Toast.makeText(getApplicationContext(), "Single Alarm Set", Toast.LENGTH_LONG).show(); } });
// Repeating Alarm Button final Button repeatingAlarmButton = (Button) findViewById (R.id.repeating_alarm_button); repeatingAlarmButton.setOnClickListener(new OnClickListener () {
@Override public void onClick(View v) { mAlarmManager.setRepeating (AlarmManager.ELAPSED_REALTIME, SystemClock.elapsedRealtime() + INITIAL_ALARM_DELAY, AlarmManager.INTERVAL_FIFTEEN_MINUTES, mNotificationReceiverPendingIntent);
mAlarmManager.setRepeating (AlarmManager.ELAPSED_REALTIME, SystemClock.elapsedRealtime() + INITIAL_ALARM_DELAY + JITTER, AlarmManager.INTERVAL_FIFTEEN_MINUTES, mLoggerReceiverPendingIntent);
Toast.makeText(getApplicationContext(), "Repeating Alarm Set", Toast.LENGTH_LONG).show(); } });

// Inexact Repeating Alarm Button final Button inexactRepeatingAlarmButton = (Button) findViewById(R.id.inexact_repeating_alarm_button); inexactRepeatingAlarmButton.setOnClickListener(new OnClickListener() {
@Override public void onClick(View v) { mAlarmManager.setInexactRepeating( AlarmManager.ELAPSED_REALTIME, SystemClock.elapsedRealtime() + INITIAL_ALARM_DELAY, AlarmManager.INTERVAL_FIFTEEN_MINUTES, mNotificationReceiverPendingIntent);
mAlarmManager.setInexactRepeating( AlarmManager.ELAPSED_REALTIME, SystemClock.elapsedRealtime() + INITIAL_ALARM_DELAY + JITTER, AlarmManager.INTERVAL_FIFTEEN_MINUTES, mLoggerReceiverPendingIntent);
Toast.makeText(getApplicationContext(), "Inexact Repeating Alarm Set", Toast.LENGTH_LONG).show(); } });
// Cancel Repeating Alarm Button final Button cancelRepeatingAlarmButton = (Button) findViewById(R.id.cancel_repeating_alarm_button); cancelRepeatingAlarmButton.setOnClickListener(new OnClickListener() { @Override public void onClick(View v) { mAlarmManager.cancel (mNotificationReceiverPendingIntent); mAlarmManager.cancel (mLoggerReceiverPendingIntent);
Toast.makeText(getApplicationContext(), "Repeating Alarms Cancelled", Toast.LENGTH_LONG).show(); } }); }}
In the main activity, look at the onCreate method. First, the code gets a reference to the AlarmManager service. Next, the code creates an intent whose target is the AlarmNotificationReceiver class. This intent is then wrapped in a PendingIntent that will cause this intent to be broadcast. Next, the code creates a second intent,

which this time is targeted to another class called AlarmLoggerReceiver. And as before, this intent is wrapped in a PendingIntent that will ultimately cause the intent to be broadcast to that receiver.
Now, scrolling down, the code sets up the four buttons that we saw earlier. The first button, when pressed, will set up two one-shot alarms. The first alarm is scheduled to go off two minutes after the button is pressed. The second of this pair will go off about five seconds later.
The second button, when pressed, will set up a pair of repeating alarms. The first alarm is scheduled to go off in two minutes, or two minutes after the button is pressed, and then go off every 15 minutes after that. The second alarm of the pair will go off about five seconds after the first.
The third button, when pressed, will set up two inexact repeating alarms. The first alarm is scheduled to go off roughly every 15 minutes, starting two minutes after the button is pressed. And again, the second alarm is scheduled to go off about five seconds after the first. Because this is an inexact repeating alarm, Android has considerable flexibility in the exact timing of both of those alarms. In particular, Android will try to minimize the number of times it needs to wake up the device if it's sleeping, for instance, by grouping separate alarms to go off roughly at the same time.
Finally, the fourth button, when pressed, will cancel existing alarms. In particular, this is important for repeating alarms, which will continue to go off until they're cancelled or until the device shuts down.
Returning back to the running application, I'll now press the Set Repeating Alarm button, and this sets some new repeating alarms that will first go off in two minutes and then every 15 minutes after that. Let's come back when we're ready...
Okay, we're back now, and it's been about two minutes since the alarms were set. There's the notification showing that the alarm went off. The next alarm will come along in about 15 minutes. Let's take another break now, and when we come back, we'll examine the LogCat output for this application...
A bit more than 15 minutes has passed, and here's the application open in the IDE. I'll now expand the LogCat view, and I'll filter the LogCat output to just show log messages that have a tag coming from this application. I'll type tag:alarm, and that leaves just the messages that we're interested in now.
As you can see, there are four messages, two from the first time the alarms fired, and two more from when the alarms went off again after 15 minutes. And notice that the two alarms that were scheduled to go off with five seconds between them, do in fact go off with that interval of time between them. So those were repeating alarms.

Let's go back now to the application and take a look at what happens when we use the SetInexactRepeating method to set these same alarms.
I'll pull down on the notification area and use it to go back to the application. First, I'll cancel the existing alarms, and next I'll set the inexact repeating alarms. Let the application run for awhile, and then take another look at the LogCat output ...
Here we are back in the IDE, and about 20 minutes has passed since we last talked. Back to the LogCat view you can see there are four new messages, two from the first time the alarms fired and two more from the second time those alarms went off.
Some things to notice:• Even though at 11:19, we set the alarms to go off starting in two minutes, the
first set of alarms actually went off after four or five minutes. • Even though the pair of alarms were scheduled to go off with a five second
delay between them, Android has actually fired them at essentially the same time.
• Because these are inexact repeating alarms, Android was free to modify the exact alarm timings.
So that's all for our lesson on alarms. Please join me next time for a discussion of networking.

Week 5 - Broadcast ReceiversIn this lesson, we're going to talk about another fundamental Android component: the BroadcastReceiver class. I'll begin by discussing the basic workflow that you'll follow when you're using the class. Next, I'll discuss how broadcast receivers are registered with the Android system. After that, I'll talk about the different ways that events can be broadcast to those broadcast receivers. And lastly, I'll finish up with a short discussion of how broadcast receivers are notified and how they handle the broadcasts they receive.
The BroadcastReceiver is a base class for components whose purpose is to wait for certain events to occur, to receive those events, and then to react to them. Individual broadcast receivers register to receive the specific events in which they're interested.
The basic workflow is:1. Broadcast receivers register to receive specific intents, e.g.
action_send_message. 2. Some component generates an action_send_message intent and broadcasts
it to the system.3. Android delivers that intent to the broadcast receivers that registered to receive
it, e.g. action_send_message intents.4. The registered broadcast receivers get a call to their onReceive method, with
which they handle the incoming event.
BroadcastReceivers can register in two ways
Statically, in AndroidManifest.XML Dynamically, by calling a registerReceiver() method
Let's talk about each of these steps one at a time. In order to register a broadcast receiver developers have two options:

• They can register the broadcast receiver statically by putting some information in the AndroidManifest.XML file of the application to which the broadcast receiver belongs.
• Or, they can register the broadcast receiver dynamically by in invoking some methods at run time.
To register a broadcast receiver statically you add a receiver tag in your applications AndroidManifest.XML file, and then within that receiver tag you put at least one intent filter tag, which tells Android that when an intent matching this intent filter is broadcast, this broadcast receiver wants to know about it. The format for a receiver tag looks something like this: a receiver keyword followed by attributes, which may include:
• android:enabled - allows you to enable or disable a particular receiver.• android:exported - if set to true, then this receiver can receive broadcasts from
outside its application; if it's set to false, then the receiver can only receive intents that are broadcast by other components within this application.
• android:name - gives the name of the class that implements this receiver.• android:permission - defines a permission string that the sender of an intent
must have in order for this receiver to receive an intent from them.
<receiver android:enabled=["true" | "false"]
android:exported=["true" | "false"] android:icon="drawable resource" android:label="string resource" android:name="string" android:permission="string" android:process="string" > . . . </receiver>
You must also specify at least one intent filter tag, which was covered back in the lesson on intents in Week 3. Once you've created the receiver tag, you insert an intent filter tag as one of its children, and just like with intent filters that are used to start activities these intent filter tags can specify things like an action, data, and categories.

When you register a receiver statically, the information will be read and processed when the system boots up or when the application package is added if that happens while the system is running.
Let's take a look at an application that's statically registers a single broadcast receiver to receive a custom intent that I'll call the show toast intent. Here's my device. And I'll start up the Single Broadcast Static Registration application. This application displays a single button labeled “Broadcast Intent”. Pressing this button causes an intent to be broadcast and then routed to and received by a broadcast receiver, which then displays a toast message. Now I'll press the button. And there you see the toast message indicating that the receiver got the intent.
Below, I've opened up the application in the IDE. The main activity first defines an intent action string that will be used to identify this intent. Scrolling down, there's a button listener that calls the contextʼs sendBroadcast method, passing in an intent and a permission string. The intent will be matched against registered intent filters, while the permission string indicates that this intent can only be delivered to broadcast receivers that have this particular permission.
package course.examples.BroadcastReceiver.singleBroadcastStaticRegistration;

import android.app.Activity;import android.content.Intent;import android.os.Bundle;import android.view.View;import android.view.View.OnClickListener;import android.widget.Button;
public class SimpleBroadcast extends Activity {
private static final String CUSTOM_INTENT = "course.examples.BroadcastReceiver.show_toast"; @Override public void onCreate(Bundle savedInstanceState) { super.onCreate(savedInstanceState); setContentView(R.layout.main); Button button = (Button) findViewById(R.id.button); button.setOnClickListener(new OnClickListener() { @Override public void onClick(View v) { sendBroadcast(new Intent(CUSTOM_INTENT), android.Manifest.permission.VIBRATE); } }); }}
Hereʼs the code for the receiver part of this application:
package course.examples.BroadcastReceiver.singleBroadcastStaticRegistration;
import android.content.BroadcastReceiver;import android.content.Context;import android.content.Intent;import android.os.Vibrator;import android.util.Log;import android.widget.Toast;
public class Receiver extends BroadcastReceiver { private final String TAG = "Receiver";
@Override public void onReceive(Context context, Intent intent) {
Log.i(TAG, "INTENT RECEIVED"); Vibrator v = (Vibrator) context .getSystemService(Context.VIBRATOR_SERVICE); v.vibrate(500);
Toast.makeText(context, "INTENT RECEIVED by Receiver", Toast.LENGTH_LONG).show(); }}
You can also register broadcast receivers programmatically at run time. For instance, if you want your broadcast receiver to respond to intents only while your activity is in the

foreground, well then you can dynamically register and unregister them in your activities on resume and on pause methods for example.
And to do this:• First create an intent filter object and specify the intents that you want to register
for. • Create the BroadcastReceiver and register it by calling a registerReceiver
method. There are different implementations of this method:• The LocalBroadcastManager class, which is for broadcasts that are meant
only for this application and don't need to be broadcast system wide.• The Context class, which broadcasts intents system wide so they can be
received by any application on your device. • As necessary, you can call an unRegisterReceiver method to unregister these
broadcast receivers.
Let's look at the source code for the single broadcast dynamic registration application.On the surface, this appplication looks the same as the previous one. There's a “Broadcast intent” button, and when you press it an intent is broadcast, a broadcast receiver receives the intent, and then displays a toast message.
Internally however, the implementation is slightly different:
package course.examples.BroadcastReceiver.SingleBroadcastDynamicRegistration;
import android.app.Activity;import android.content.Intent;import android.content.IntentFilter;import android.os.Bundle;import android.support.v4.content.LocalBroadcastManager;import android.view.View;import android.view.View.OnClickListener;import android.widget.Button;
public class SingleBroadcast extends Activity {
private static final String CUSTOM_INTENT = "course.examples.BroadcastReceiver.show_toast"; private final IntentFilter intentFilter = new IntentFilter (CUSTOM_INTENT); private final Receiver receiver = new Receiver();
private LocalBroadcastManager mBroadcastMgr;
@Override public void onCreate(Bundle savedInstanceState) { super.onCreate(savedInstanceState);
mBroadcastMgr = LocalBroadcastManager .getInstance(getApplicationContext()); mBroadcastMgr.registerReceiver(receiver, intentFilter);
setContentView(R.layout.main);

Button button = (Button) findViewById(R.id.button); button.setOnClickListener(new OnClickListener() { @Override public void onClick(View v) { mBroadcastMgr.sendBroadcast(new Intent (CUSTOM_INTENT)); } }); }
@Override protected void onDestroy() { mBroadcastMgr.unregisterReceiver(receiver); super.onDestroy(); }}
The code begins by creating an intent action string, and then an intent filter object with the just-created action string. Next, it creates a broadcast receiver instance called receiver.
Down in the onCreate method, we get an instance of the localBroadcastManager, which, as I said, is used to broadcast and receive intents only within this application. We use the localBroadcastManager to register the receiver object for the show toast intent.
When the button is pushed, the listener calls localBroadcastManger.sendBroadcast, which sends the intent to the receiver object, which operates just as it did in the last application, creating and displaying a toast message.
So far, we have been broadcasting single intents to single receivers, but Android supports other ways that intents can be broadcast.
For example, intents can be broadcast normally or in order. Normal broadcasts are delivered to subscribed broadcast receivers in an undefined order. So if you have two broadcast receivers that should receive a single intent it's possible that both broadcast receivers could be processing the intent at the same time. Ordered broadcasts deliver the intent to multiple broadcast receivers one at a time in priority order.
Broadcasts can also be sticky or non-sticky. A sticky broadcast persists after the broadcast, so a broadcast receiver that is registered after the initial broadcast of an intent may still be able to receive it. This feature is useful, for example, to record system state changes such as changes in the battery level or charging status. In these cases it doesn't matter to the receiver when the state changed, they just want to know what the current state is.
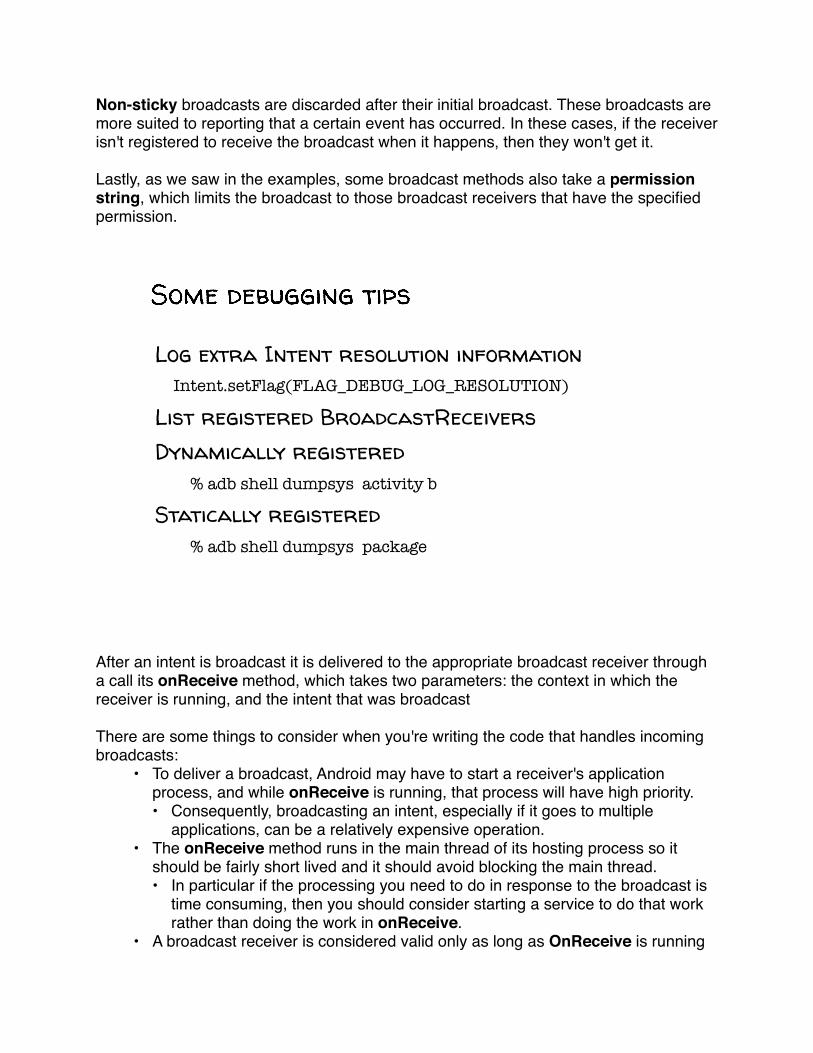
Non-sticky broadcasts are discarded after their initial broadcast. These broadcasts are more suited to reporting that a certain event has occurred. In these cases, if the receiver isn't registered to receive the broadcast when it happens, then they won't get it.
Lastly, as we saw in the examples, some broadcast methods also take a permission string, which limits the broadcast to those broadcast receivers that have the specified permission.
Log extra Intent resolution information Intent.setFlag(FLAG_DEBUG_LOG_RESOLUTION)
List registered BroadcastReceivers Dynamically registered
% adb shell dumpsys activity b
Statically registered % adb shell dumpsys package
After an intent is broadcast it is delivered to the appropriate broadcast receiver through a call its onReceive method, which takes two parameters: the context in which the receiver is running, and the intent that was broadcast
There are some things to consider when you're writing the code that handles incoming broadcasts:
• To deliver a broadcast, Android may have to start a receiver's application process, and while onReceive is running, that process will have high priority. • Consequently, broadcasting an intent, especially if it goes to multiple
applications, can be a relatively expensive operation. • The onReceive method runs in the main thread of its hosting process so it
should be fairly short lived and it should avoid blocking the main thread. • In particular if the processing you need to do in response to the broadcast is
time consuming, then you should consider starting a service to do that work rather than doing the work in onReceive.
• A broadcast receiver is considered valid only as long as OnReceive is running

• Once onReceive returns, Android may terminate the underlying broadcast receiver.
• Consequently broadcast receivers can't start up operations that will need to call back to the receiver asynchronously at a later time.
• This makes sense because there's no guarantee that the broadcast receiver will even exist when that call back occurs.
• Examples of these asynchronous callbacks include things like starting a dialogue, or starting an activity via the startActivityForResult method.
Let's look at some more examples of applications that use broadcast receivers. Here is the Compound Broadcast application. It has a button labeled “Broadcast Intent”, which when pressed will use the sendBroadcast method to broadcast a show toast intent. This time, however, there are three broadcast receivers that will receive this intent.
When the button is pressed, toast messages appear from receiver one, receiver two and receiver three. The Compound Broadcast application used sendToBroadcast, so the broadcasts were sent out normally, i.e. the order of arrival and subsequent processing were indeterminate.
If you require that broadcasts are received in a definite order, or if you want each broadcast receiver to have exclusive access to the intent while it's being processed, then you must use a sendOrderedBroadcast method and the following methods from the context class:
• Send an intent to broadcast receivers that have a specified permission in priority order, e.g.
// send Intent to BroadcastReceivers in priority ordervoid sendOrderedBroadcast (Intent intent, String receiverPermission)
• Same thing, but provide additional parameters for greater control, e.g.// send Intent to BroadcastReceivers in priority order // includes multiple parameters for greater controlvoid sendOrderedBroadcast (Intent intent, String receiverPermission, BroadcastReceiver resultReceiver, Handler scheduler, int initialCode, String initialData, Bundle initialExtras)
Let's look at the CompoundOrderedBroadcast application, which displays a button, labeled “Broadcast Intent”. When the button is pressed a show toast intent is broadcast.
There are three registered broadcast receivers, each with a different priority for receiving the broadcast.

Receiver two has the highest priority, receiver one the next highest, and receiver three has the lowest priority, so we expect the receivers to get the broadcast in the order receiver two, receiver one, receiver three.
However, I put some code in receiver one that aborts the broadcast. So in this case only receiver two and receiver one should receive the broadcast:
Pressing the broadcast intent button and a toast message appears saying that the intent was received by receiver two, followed by another saying it was received by receiver one. And apparently, receiver three is left out.
Look at the source code for this application, start with the Android manifest.xml file:
<?xml version="1.0" encoding="utf-8"?><manifest xmlns:android="http://schemas.android.com/apk/res/android" package="course.examples.BroadcastReceiver.CompoundOrderedBroadcast" android:versionCode="1" android:versionName="1.0" >
<uses-sdk android:minSdkVersion="10" android:targetSdkVersion="18" />
<uses-permission android:name="android.permission.VIBRATE" > </uses-permission>
<application android:allowBackup="false" android:icon="@drawable/icon" android:label="@string/app_name" > <activity android:name=".CompoundOrderedBroadcast" android:label="@string/app_name" > <intent-filter> <action android:name="android.intent.action.MAIN" />
<category android:name="android.intent.category.LAUNCHER" /> </intent-filter> </activity>
<receiver android:name=".Receiver2" android:exported="false" > <intent-filter android:priority="10" > <action android:name="course.examples.BroadcastReceiver.show_toast" > </action> </intent-filter> </receiver>

<receiver android:name=".Receiver3" android:exported="false" > <intent-filter android:priority="1" > <action android:name="course.examples.BroadcastReceiver.show_toast" > </action> </intent-filter> </receiver> </application>
</manifest>
As you can see, receiver two was statically registered with a priority of 10, and receiver three was registered with a priority of 1.
In the main activity, the code creates an instance of Receiver1, then creates an intentFilter for the show toast intent and then sets the priority to three.
package course.examples.BroadcastReceiver.CompoundOrderedBroadcast
import android.app.Activity;import android.content.Intent;import android.content.IntentFilter;import android.os.Bundle;import android.view.View;import android.view.View.OnClickListener;import android.widget.Button;
public class CompoundOrderedBroadcast extends Activity {
static final String CUSTOM_INTENT = "course.examples.BroadcastReceiver.show_toast";
private final Receiver1 mReceiver = new Receiver1();
@Override public void onCreate(Bundle savedInstanceState) { super.onCreate(savedInstanceState); setContentView(R.layout.main);
IntentFilter intentFilter = new IntentFilter(CUSTOM_INTENT); intentFilter.setPriority(3); registerReceiver(mReceiver, intentFilter);
Button button = (Button) findViewById(R.id.button); button.setOnClickListener(new OnClickListener() { @Override public void onClick(View v) { sendOrderedBroadcast(new Intent(CUSTOM_INTENT), android.Manifest.permission.VIBRATE); }

}); }
@Override protected void onDestroy() { unregisterReceiver(mReceiver); super.onDestroy(); }}
So any Receiver2 instance has priority ten. This Receiver1 instance has priority three, and any receiver three instance has priority one. When the broadcast intent button is pressed, the listener calls sendOrderedBroadcast, passing in a new show toast intent. This intent is first received by a receiver two instance, and then by a receiver one instance that was created in this file.
Let's open the receiver one code:
package course.examples.BroadcastReceiver.CompoundOrderedBroadcast;
import android.content.BroadcastReceiver;import android.content.Context;import android.content.Intent;import android.os.Vibrator;import android.util.Log;import android.widget.Toast;
public class Receiver1 extends BroadcastReceiver {
private final String TAG = "Receiver1";
@Override public void onReceive(Context context, Intent intent) {
Log.i(TAG, "INTENT RECEIVED");
if (isOrderedBroadcast()) { Log.i(TAG, "Calling abortBroadcast()"); abortBroadcast(); } Vibrator v = (Vibrator) context .getSystemService(Context.VIBRATOR_SERVICE); v.vibrate(500);
Toast.makeText(context, "INTENT RECEIVED by Receiver1", Toast.LENGTH_LONG).show(); }}

Here, in onReceive you see that the code checks whether this is an orderedBroadcast. If so, it calls abortBroadcast, which consumes the broadcast, and in this case, prevents it from being sent on to receiver three.
Let's also look at a slightly more complicated use of ordered broadcast. In the application Ordered Broadcast with Result Receiver, we see that a single toast message is displayed showing all the broadcast receivers that receive this intent, indicating the order in which they received it.
Starting the application and pressing its “Broadcast Intent” button gives the toast message showing that receiver two received the intent, then receiver one, then receiver three.
Let's look at the source code:
package course.examples.BroadcastReceiver.CompoundOrderedBroadcast;
import android.app.Activity;import android.content.BroadcastReceiver;import android.content.Context;import android.content.Intent;import android.content.IntentFilter;import android.os.Bundle;import android.view.View;import android.view.View.OnClickListener;import android.widget.Button;import android.widget.Toast;
public class CompoundOrderedBroadcastWithResultReceiver extends Activity {
static final String CUSTOM_INTENT = "course.examples.BroadcastReceiver.show_toast";
private final Receiver1 mReceiver1 = new Receiver1();
@Override public void onCreate(Bundle savedInstanceState) { super.onCreate(savedInstanceState);
setContentView(R.layout.main);
IntentFilter intentFilter = new IntentFilter (CUSTOM_INTENT); intentFilter.setPriority(3); registerReceiver(mReceiver1, intentFilter); Button button = (Button) findViewById(R.id.button); button.setOnClickListener(new OnClickListener() { @Override public void onClick(View v) {

sendOrderedBroadcast(new Intent(CUSTOM_INTENT), null, new BroadcastReceiver() { @Override public void onReceive(Context context, Intent intent) { Toast.makeText(context, "Final Result is " + getResultData(), Toast.LENGTH_LONG).show(); } }, null, 0, null, null); } }); }
@Override protected void onDestroy() { unregisterReceiver(mReceiver1); super.onDestroy(); }}
In the main activity, look at the listener for the Broadcast Intent button: this code uses the second form of the sendBroadcast method. One of the interesting parameters of this method is a broadcast receiver - I'll call it the result receiver that will receive the intent after all the other broadcast receivers have gotten their chance to receive it. This is useful if the initial broadcast receivers compute some result, because it will then be available to this last receiver (by calling getResultData).
Now let's take a look at one of the broadcast receiver classes to see how they compute the result that this result receiver finally displays in the toast message. Here's the receiver one class:
package course.examples.BroadcastReceiver.CompoundOrderedBroadcast;
import android.content.BroadcastReceiver;import android.content.Context;import android.content.Intent;import android.util.Log;
public class Receiver1 extends BroadcastReceiver { private final String TAG = "Receiver1";
@Override public void onReceive(Context context, Intent intent) { Log.i(TAG, "INTENT RECEIVED by Receiver1");
String tmp = getResultData() == null ? "" : getResultData(); setResultData(tmp + ":Receiver 1:");
}}
As you can see, the onReceive method calls getResultData. Then it tacks its own string onto the end of the data and saves the new string by calling setResultData. Since all the broadcast receivers do this in turn, the final result data is a single string showing which receivers received the intent, and the order in which they received it.
The last category of broadcasts I'll talk about today are the sticky broadcasts. As I said earlier, non-sticky broadcasts indicate that an event has occurred at the specific moment but once the event is over, it's over. Android disposes of the event and moves on. If a broadcast receiver wasn't registered to receive an intent when it was issued, say yesterday, then it shouldn't be told about it now, because, for example, it might think that the event just happened, which might lead to timing problems and other difficulties.
Other events however, indicate state changes that may persist. Broadcast receivers that need to know about the current device state, for example, will still want that information even if they weren't registered to be notified when that particular state changed. For example, if the battery level goes very low Android will broadcast this fact to the system. If a new application starts up and registers to hear about the battery state it should know right away if the device is in the low battery state. Because of this Android broadcasts that battery low intent as a sticky broadcast.
Sticky intents are cached by Android. Sticky broadcasts of a given intent overwrite any cached values from previous broadcasts of matching intents. When a broadcast receiver is dynamically registered, any cached intents that match its intent filter will be broadcast to it. In addition, one matching cached intent will be returned to the caller of registered receiver.
As with non-sticky broadcasts, sticky broadcasts can be sent normally, that is without a defined order, or sequentially, in priority order.
Normal sticky broadcasts can use this method.
//public abstract class Context ... // send sticky Intent to interested BroadcastReceivers void sendStickyBroadcast (Intent intent)
Ordered sticky broadcasts can use this method:// send sticky Intent to interested BroadcastReceivers in priority order // sender can provide various parameters for greater controlvoid sendStickyOrderedBroadcast (Intent intent, BroadcastReceiver resultReceiver, Handler scheduler, [cont’d next page] int initialCode, String initialData, Bundle initialExtras)

Finally, applications that want to broadcast sticky intents must have the broadcast_sticky permission.
Let's look at an example application that uses sticky broadcasts. I'll run the sticky intent application in the emulator and I've also opened a terminal window, and started a Telnet session with that emulator.
The application displays the current battery level and displays the string, “Reading may be stale”, which indicates that the battery level reading comes from a cached, sticky broadcast, not from a fresh broadcast.
If I now go to the terminal window and change the battery level, a new intent will be broadcast reflecting the updated battery level. As you can see the display is updated and the display text has changed to indicate that broadcast receiver can distinguish between fresh broadcasts and a cached one.
Let's look at the source code for this application:
package course.examples.BroadcastReceiver.StickyIntent;
import android.app.Activity;import android.content.BroadcastReceiver;import android.content.Context;import android.content.Intent;import android.content.IntentFilter;import android.os.BatteryManager;import android.os.Bundle;import android.widget.TextView;
public class StickyIntentBroadcastReceiverActivity extends Activity {
@Override public void onCreate(Bundle savedInstanceState) { super.onCreate(savedInstanceState);
setContentView(R.layout.main);
final TextView currentStateView = (TextView) findViewById (R.id.level);
registerReceiver(new BroadcastReceiver() { @Override public void onReceive(Context context, Intent intent) {
if (intent.getAction().equals (Intent.ACTION_BATTERY_CHANGED)) {
String age = "Reading taken recently"; if (isInitialStickyBroadcast()) { age = "Reading may be stale";

}
currentStateView.setText("Current Battery Level:" + String.valueOf(intent.getIntExtra( BatteryManager.EXTRA_LEVEL, -1)) System.getProperty ("line.separator") + age); } } }, new IntentFilter(Intent.ACTION_BATTERY_CHANGED)); }}
The main activity of this application calls registerReceiver and passes in a broadcastReceiver. The onReceive method of that broadcast receiver first checks to see whether it's receiving a battery_changed intent. If so, it determines whether the broadcast is new or cached, by calling isInitialStickyBroadcast. This method returns true if this intent is a cached value. After that the code sets the text to display.
So that's all for this lesson on broadcast receivers. Next time we'll talk about Threads, AsyncTasks, and Handlers.

Week 5 - NetworkingOne of the defining characteristics of modern hand held systems is that they can keep us connected and networked without tethering us to a single location. In this lesson, we'll explore the software and programming practices that you'll need to connect your applications to the network.
I'll start this lesson by discussing networking in general, focusing on connecting your applications to the internet using the Hypertext Transfer Protocol or HTTP specifically by using HTTP GET requests. Then, I'll present several classes that Android provides to support this kind of networking. Lastly, I'll discuss how your applications can process the data they receive in response to these HTTP GET requests. In particular, I'll talk about two popular data formatting languages:
• Javascript Object Notation Language, or JSON• Extensible Markup Language, or XML
I'll talk about how you parse, or make sense, of these HTTP responses when they're formatted in one of these languages.
Android Networking Classes
Early handheld devices gave us mobility. You could move from one place to another, and still perform useful computation, but their networking capabilities were primitive by today's standards. Today's devices combine powerful processors with fast network connections over WiFi and cellular networks. Handheld applications, therefore, often want to make use of these networking capabilities to access and provide data, and services.
To help you do this, Android includes a variety of networking support classes, including the Socket and URL classes, in the Java.net packages. The HttpRequest, and HttpResponse classes, in the org.apache packages, and the URI, AndroidHttpClient, and AudioStream classes, in the android.net packages.
We're going to look at several of these classes, using each to implement the same example application, one that interacts with an internet service to get information about earthquakes that have occurred in a particular geographic region, data that is returned in various formats. Initially we'll display the downloaded text as is. Later, I'll show you how to process that data to extract just the information that you want. Oh, and, and one other thing: this data includes geographic information, so it's really begging to be displayed on a map. We won't do that in this lesson, but keep it in mind because we'll come back to this when we study maps and location.

To make this application work, the code needs to create an HTTP request, send it to a server computer, retrieve the results, and display them. Android provides several classes for helping with this, including the Socket class, the HttpUrlConnection class and the AndroidHttpClient.
Example A: The Networking Sockets Application
I'll launch the Networking Sockets application on my device. Initially, the application displays a single button labeled Load Data. When I press that button, the application will issue an HTTP GET request to an external server. And that server will respond with some complex text containing the requested earthquake data. Pressing the Load Data button, you can see the requested data.
Let's look at the source code to see what it took to get that data:
package course.examples.Networking.Sockets;
import java.io.BufferedReader;import java.io.IOException;import java.io.InputStream;import java.io.InputStreamReader;import java.io.OutputStreamWriter;import java.io.PrintWriter;import java.net.Socket;import java.net.UnknownHostException;
import android.app.Activity;import android.os.AsyncTask;import android.os.Bundle;import android.util.Log;import android.view.View;import android.view.View.OnClickListener;import android.widget.Button;import android.widget.TextView;
public class NetworkingSocketsActivity extends Activity { TextView mTextView;
@Override public void onCreate(Bundle savedInstanceState) { super.onCreate(savedInstanceState); setContentView(R.layout.main); mTextView = (TextView) findViewById(R.id.textView1);
final Button loadButton = (Button) findViewById (R.id.button1); loadButton.setOnClickListener(new OnClickListener() {
@Override public void onClick(View v) {

new HttpGetTask().execute();
} }); }
private class HttpGetTask extends AsyncTask<Void, Void, String> {
private static final String HOST = "api.geonames.org";
// Get your own user name at http://www.geonames.org/login private static final String USER_NAME = "aporter"; private static final String HTTP_GET_COMMAND = "GET / earthquakesJSON? north=44.1&south=-9.9&east=-22.4&west=55.2&username=" + USER_NAME + " HTTP/1.1" + "\n" + "Host: " + HOST + "\n" + "Connection: close" + "\n\n";
private static final String TAG = "HttpGet";
@Override protected String doInBackground(Void... params) { Socket socket = null; String data = "";
try { socket = new Socket(HOST, 80); PrintWriter pw = new PrintWriter(new OutputStreamWriter( socket.getOutputStream()), true); pw.println(HTTP_GET_COMMAND);
data = readStream(socket.getInputStream());
} catch (UnknownHostException exception) { exception.printStackTrace(); } catch (IOException exception) { exception.printStackTrace(); } finally { if (null != socket) try { socket.close(); } catch (IOException e) { Log.e(TAG, "IOException"); } } return data; }

@Override protected void onPostExecute(String result) { mTextView.setText(result); }
private String readStream(InputStream in) { BufferedReader reader = null; StringBuffer data = new StringBuffer(); try { reader = new BufferedReader(new InputStreamReader (in)); String line = ""; while ((line = reader.readLine()) != null) { data.append(line); } } catch (IOException e) { Log.e(TAG, "IOException"); } finally { if (reader != null) { try { reader.close(); } catch (IOException e) { Log.e(TAG, "IOException"); } } } return data.toString(); } }}
In the main activity for this application, here is the listener for the Load Data button. When this button is pressed, the application will create, and then execute, an AsyncTask called HttpGetTask. Let's look at that class.
The HttpGetTask class first declares some variables used in creating an HTTP GET Request. When the execute method is called on the HttpGetTask, the doInBackground method is called, which begins by creating a new socket that will be connected to the host computer, api.geonames.org on the standard http port: 80.
Next, the code gets the socket's output stream and writes the HTTP_GET_COMMAND. This string is sent to the host computer, which interprets it as an HTTPGetRequest, and then responds by sending back the appropriate response data. The code continues by getting the socket's input stream and passing it to a method called readStream, which ultimately reads the response data from the socket's InputStream, and returns the response as a single string. This string is passed to the onPostExecute method which executes on the main thread and displays the response in the textView.

If we return back to the application, you'll notice that the response text includes not only the earthquake data, but also the HTTP response headers. Normally, I wouldn't want to display that text here because I mainly want to show you the earthquake data, in which case I should have parsed the response and pulled out just the data I wanted.
Also, you may have noticed I didn't write any of the error handling code that you really need to make this application robust. This suggests the trade-offs involved in using sockets. At this low level you have great flexibility, but you must handle the many details of making HTTP requests, all the error handling, and all the processing of the HTTP responses.
Example B: The Networking URL Application
The next implementation we'll look at uses the HttpUrlConnection class. This class provides a higher-level interface that handles more of the networking details than the socket class does. But as we'll see in a moment, its API is not as flexible as our last option, the Android HTTP client class. However, I must also point out that the Android team is not actively working on the Android HTTP client anymore - it's putting its efforts into improving the HttpUrlConnection class.
Let's look at the next example, the NetworkingURL application, implemented with the HttpURLConnection class. As before, this application initially displays a single button labeled Load Data. And as before, when I press on that button the application issues an HTTP GET request to an external server, and that server will respond with some complex text, containing the requested earthquake data.
Pressing the Load Data button, we can see the requested data, appearing in a textView. Notice, however, that this time, the HTTP response headers have been stripped out.
Let's look at the source code and see how this works.
package course.examples.Networking.URL;
import java.io.BufferedInputStream;import java.io.BufferedReader;import java.io.IOException;import java.io.InputStream;import java.io.InputStreamReader;import java.net.HttpURLConnection;import java.net.MalformedURLException;import java.net.URL;
import android.app.Activity;import android.os.AsyncTask;import android.os.Bundle;import android.util.Log;import android.view.View;

import android.view.View.OnClickListener;import android.widget.Button;import android.widget.TextView;
public class NetworkingURLActivity extends Activity { private TextView mTextView;
@Override public void onCreate(Bundle savedInstanceState) { super.onCreate(savedInstanceState);
setContentView(R.layout.main); mTextView = (TextView) findViewById(R.id.textView1);
final Button loadButton = (Button) findViewById (R.id.button1); loadButton.setOnClickListener(new OnClickListener() {
@Override public void onClick(View v) { new HttpGetTask().execute(); } }); }
private class HttpGetTask extends AsyncTask<Void, Void, String> {
private static final String TAG = "HttpGetTask";
// Get your own user name at http://www.geonames.org/login private static final String USER_NAME = "aporter"; private static final String URL = "http://api.geonames.orgearthquakesJSON?north=44.1&south=-9.9&east=-22.4&west=55.2&username=" + USER_NAME;
@Override protected String doInBackground(Void... params) { String data = ""; HttpURLConnection httpUrlConnection = null;
try { httpUrlConnection = (HttpURLConnection) new URL (URL) .openConnection();
InputStream in = new BufferedInputStream( httpUrlConnection.getInputStream());
data = readStream(in);
} catch (MalformedURLException exception) { Log.e(TAG, "MalformedURLException"); } catch (IOException exception) { Log.e(TAG, "IOException"); } finally {

if (null != httpUrlConnection) httpUrlConnection.disconnect(); } return data; }
@Override protected void onPostExecute(String result) { mTextView.setText(result); }
private String readStream(InputStream in) { BufferedReader reader = null; StringBuffer data = new StringBuffer(""); try { reader = new BufferedReader(new InputStreamReader(in)); String line = ""; while ((line = reader.readLine()) != null) { data.append(line); } } catch (IOException e) { Log.e(TAG, "IOException"); } finally { if (reader != null) { try { reader.close(); } catch (IOException e) { e.printStackTrace(); } } } return data.toString(); } }}
In the main activity for this application, look at the listener for the load data button. As before, when this button is pressed, the application creates and executes an AsyncTask called HttpGetTask.
Let's look at that class. When the execute method is called on HTTP GetTask, the doInBackground method is invoked. That method begins by creating a new URL object and passing a URL string for the desired service as a parameter. The code then calls the openConnection method on the URL object, which returns an httpUrlConnection. This object is then stored in a variable called HttpURLConnection.
Next, the code geta the HTTP URL connection's input stream, passing it through the readStream method. And as before, the readStream method, reads the response data from the socket's input stream, and then returns the response, as a single string. This

time however, the HTTP URL connection strips off the HTTP response headers and handles the error checking for you.
Next, this string is passed to the onPostExecute method, which displays the response in a textView.
Example C: The Networking Android Http Client Application
The third class is Android HTTP client. This class is an implementation of the Apache project's DefaultHttpClient and it allows a great deal of customization. In particular, the class breaks an HTTP transaction into a request object and into a response object. So you can create subclasses that customize the handling of requests and their responses. Now, by this point, you know what the application looks like, so let's jump straight into the code and look at the implementation:
package course.examples.Networking.AndroidHttpClient;
import java.io.IOException;
import org.apache.http.client.ClientProtocolException;import org.apache.http.client.ResponseHandler;import org.apache.http.client.methods.HttpGet;import org.apache.http.impl.client.BasicResponseHandler;
import android.app.Activity;import android.net.http.AndroidHttpClient;import android.os.AsyncTask;import android.os.Bundle;import android.view.View;import android.view.View.OnClickListener;import android.widget.Button;import android.widget.TextView;
public class NetworkingAndroidHttpClientActivity extends Activity { private TextView mTextView = null;
@Override public void onCreate(Bundle savedInstanceState) { super.onCreate(savedInstanceState); setContentView(R.layout.main);
mTextView = (TextView) findViewById(R.id.textView1);
final Button loadButton = (Button) findViewById (R.id.button1); loadButton.setOnClickListener(new OnClickListener() { @Override public void onClick(View v) { new HttpGetTask().execute(); }

}); }
private class HttpGetTask extends AsyncTask<Void, Void, String> {
private static final String TAG = "HttpGetTask";
// Get your own user name at http://www.geonames.org/login private static final String USER_NAME = "aporter";
private static final String URL = "http://api.geonames.org/earthquakesJSON?north=44.1&south=-9.9&east=-22.4&west=55.2&username=" + USER_NAME;
AndroidHttpClient mClient = AndroidHttpClient.newInstance ("");
@Override protected String doInBackground(Void... params) {
HttpGet request = new HttpGet(URL); ResponseHandler<String> responseHandler = new BasicResponseHandler();
try {
return mClient.execute(request, responseHandler);
} catch (ClientProtocolException exception) { exception.printStackTrace(); } catch (IOException exception) { exception.printStackTrace(); } return null; }
@Override protected void onPostExecute(String result) {
if (null != mClient) mClient.close();
mTextView.setText(result);
} }}
Let's go right to the HTTPGetTask class. It begins by creating a new AndroidHttpClient object by calling the classes newInstance method. When the doInBackground method is called, the code creates an HttpGet object, passing in the URL string for that request.

Next, it creates a ResponseHandler object. This object is handles the response to the HttpGet request. In this case, a response handler is of type BasicResponseHandler, which will return the response's body (we'll see a more complex response handler later in this lesson).
Finally, the request and the ResponseHandler, are passed into the execute method, which sends the request, gets the response, passing it through the ResponseHandler. And the result of all this is then passed on to onPostExecute. which displays the response in a text field.
Processing HTTP Responses
So far, our example application has requested data and then just displayed that data in a TextView. But as you saw, that data has a complex format that's really intended for machine processing and not for displaying to human beings. In fact, this is an increasingly popular way to transport data around the internet and many web services now provide data in such formats.
In particular, two formats that we'll talk about now are the JavaScript Object Notation, JSON and the Extensible Markup Language, XML. Let's talk about each of these, one at a time.
JSON format is intended to be lightweight - it resembles the data structures found in traditional programming languages. JSON data is packaged in two kinds of data structures:
1. Maps, which are sets of key and value pairs2. Ordered lists
If you want more details about JSON, have a look at: http://www.json.org/
Now, let's go back our example application that made a request to a web service for some data about earthquakes, at: http://api.geonames.org/earthquakesJSON?north=44.1&south=-9.9&east=-22.4&west=55.2&username=demo
The response that came back was formatted in JSON. Here are the data:
{"earthquakes”: [{"eqid":"c0001xgp","magnitude":8.8,"lng":142.369, " "src":"us”, "datetime":"2011-03-11 04:46:23","depth":"24.4,"lat":38.322}{"eqid":"2007hear","magnitude":8.4,"lng":101.3815," "src":"us”,"datetime":"2007-09-12 09:10:26","depth": " 30,"lat":-4.5172},...

{"eqid":"2010xkbv","magnitude":7.5,"lng":91.9379," "src":"us”,"datetime":"2010-06-12 17:26:50","depth":" 35,"lat":7.7477}] }
First, the data comprises a JSON object and that object is a map with one key-value pair. The key is earthquakes, and the value is an ordered list with several objects inside it. Each object is itself a map containing key-value pairs. For instance, there's a key called eqid and it's value is an earthquake ID. There's also a key called lng and it's value is the longitude at which the earthquake was centered. Together, all of these data pertain to one earthquake.
Let's take a look at the Networking Android HTTP Client JSON application. As before, this application initially displays a single button labeled Load Data. And as before, when I press that button, the application will issue an HTTP get request to an external server. And that server will respond, with some complex text, containing the requested earthquake data. When press the Load Data button you can see the requested data, summarized and presented in a list view.

Let's look at the source code to see how this works:
package course.examples.Networking.AndroidHttpClientJSON;
import java.io.IOException;import java.util.ArrayList;import java.util.List;import org.apache.http.HttpResponse;import org.apache.http.client.ClientProtocolException;import org.apache.http.client.ResponseHandler;import org.apache.http.client.methods.HttpGet;import org.apache.http.impl.client.BasicResponseHandler;import org.json.JSONArray;import org.json.JSONException;import org.json.JSONObject;import org.json.JSONTokener;import android.app.ListActivity;import android.net.http.AndroidHttpClient;import android.os.AsyncTask;import android.os.Bundle;import android.widget.ArrayAdapter;
public class NetworkingAndroidHttpClientJSONActivity extends ListActivity {
@Override public void onCreate(Bundle savedInstanceState) { super.onCreate(savedInstanceState); new HttpGetTask().execute(); }
private class HttpGetTask extends AsyncTask<Void, Void, List<String>> {
private static final String TAG = "HttpGetTask";
// Get your own user name at http://www.geonames.org/login private static final String USER_NAME = "aporter";
private static final String URL = "http://api.geonames.org/ earthquakesJSON? north=44.1&south=-9.9& east=-22.4&west=55.2&username=" + USER_NAME;
AndroidHttpClient mClient = AndroidHttpClient.newInstance ("");
@Override protected List<String> doInBackground(Void... params) { HttpGet request = new HttpGet(URL); JSONResponseHandler responseHandler = new JSONResponseHandler(); try {

return mClient.execute(request, responseHandler); } catch (ClientProtocolException e) { e.printStackTrace(); } catch (IOException e) { e.printStackTrace(); } return null; }
@Override protected void onPostExecute(List<String> result) { if (null != mClient) mClient.close(); setListAdapter(new ArrayAdapter<String>( NetworkingAndroidHttpClientJSONActivity.this, R.layout.list_item, result)); } }
private class JSONResponseHandler implements ResponseHandler<List<String>> {
private static final String LONGITUDE_TAG = "lng"; private static final String LATITUDE_TAG = "lat"; private static final String MAGNITUDE_TAG = "magnitude"; private static final String EARTHQUAKE_TAG = "earthquakes";
@Override public List<String> handleResponse(HttpResponse response) throws ClientProtocolException, IOException { List<String> result = new ArrayList<String>(); String JSONResponse = new BasicResponseHandler() .handleResponse(response); try {
// Get top-level JSON Object - a Map JSONObject responseObject = (JSONObject) new JSONTokener( JSONResponse).nextValue();
// Extract value of "earthquakes" key -- a List JSONArray earthquakes = responseObject .getJSONArray(EARTHQUAKE_TAG);
// Iterate over earthquakes list for (int idx = 0;idx < earthquakes.length(); idx++) {
// Get single earthquake data - a Map JSONObject earthquake = (JSONObject) earthquakes.get(idx);

// Summarize earthquake data as a string // and add it to result
result.add(MAGNITUDE_TAG + ":" + earthquake.get(MAGNITUDE_TAG)
+ "," + “LATITUDE_TAG + ":"+ earthquake.getString(LATITUDE_TAG)
+ "," + LONGITUDE_TAG + ":" + earthquake.get(LONGITUDE_TAG)); } } catch (JSONException e) { e.printStackTrace(); } return result; } }}
Here I've got the application open in the IDE. And now, I'll open up the file that does the downloading and displaying. And I'm going to skip right to the HTTPGetTask class. Here, the doInBackground method is similar to what we've seen before, but this time, it uses the JSONResponseHandler class to process the response.
Let's scroll down and take a look at that class. The key method in this class is the handleResponse method. This method begins, by passing the raw response through a BasicResponseHandler which just returns the response body without the http response headers. Next, the code uses a JSONTokener to parse the JSON response into a Java object. And then returns that top-level object, which in this case is a Map.
Next, the code extracts the value associated with the earthquake's key, which in this case is an ordered list. Then the code iterates over the earthquakes' list where for each element, it gets the data associated with a single earthquake. This data is stored in Maps.
Next, the code summarizes the various pieces of earthquake data, converting them to a single string and adding that string to a list, called result. And then finally the result is returned back to the calling method. When the doInBackground method finishes the onPostExecute method is called, passing the result as A parameter.
This method creates and sets a listAdapter for the listView, passing in the result list that was computed back in handle response.
The other data format we'll talk about is the Extensible Markup Language, XML, which is a markup language for creating XML documents. XML documents contain markup and content. The markup encodes a description of the document's storage layout and logical structure. The content is everything else.
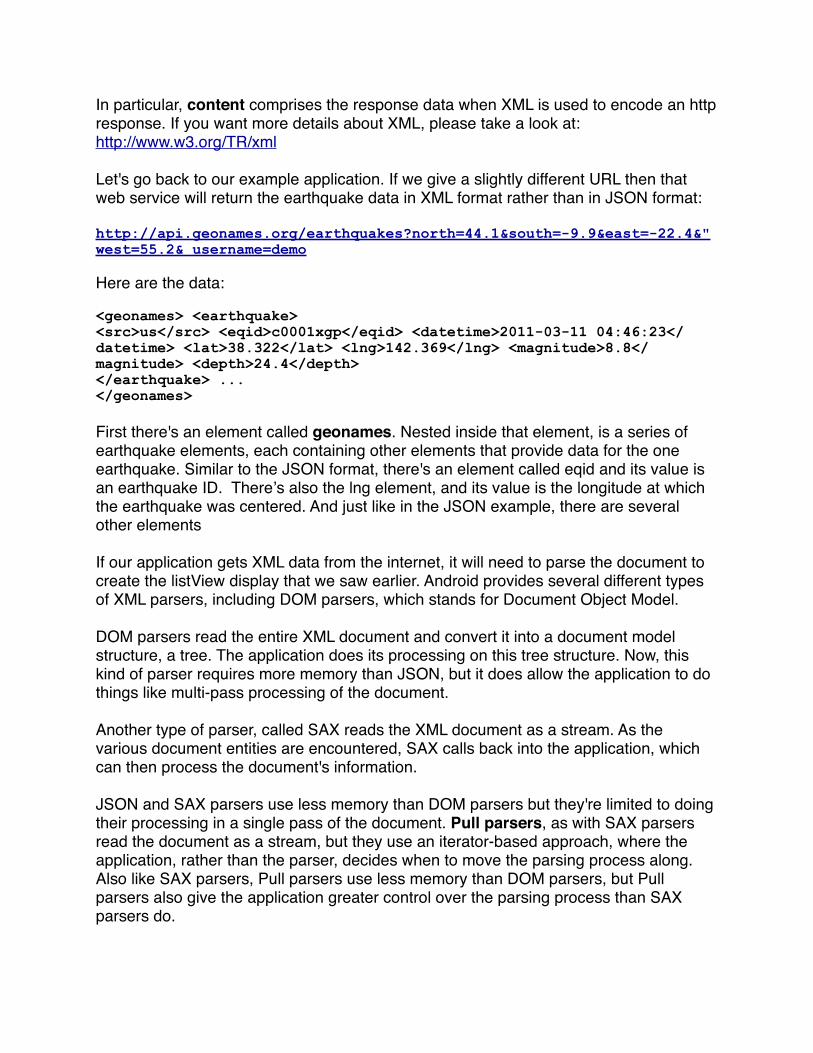
In particular, content comprises the response data when XML is used to encode an http response. If you want more details about XML, please take a look at:http://www.w3.org/TR/xml
Let's go back to our example application. If we give a slightly different URL then that web service will return the earthquake data in XML format rather than in JSON format:
http://api.geonames.org/earthquakes?north=44.1&south=-9.9&east=-22.4&" west=55.2& username=demo
Here are the data:
<geonames> <earthquake><src>us</src> <eqid>c0001xgp</eqid> <datetime>2011-03-11 04:46:23</datetime> <lat>38.322</lat> <lng>142.369</lng> <magnitude>8.8</magnitude> <depth>24.4</depth></earthquake> ...</geonames>
First there's an element called geonames. Nested inside that element, is a series of earthquake elements, each containing other elements that provide data for the one earthquake. Similar to the JSON format, there's an element called eqid and its value is an earthquake ID. Thereʼs also the lng element, and its value is the longitude at which the earthquake was centered. And just like in the JSON example, there are several other elements
If our application gets XML data from the internet, it will need to parse the document to create the listView display that we saw earlier. Android provides several different types of XML parsers, including DOM parsers, which stands for Document Object Model.
DOM parsers read the entire XML document and convert it into a document model structure, a tree. The application does its processing on this tree structure. Now, this kind of parser requires more memory than JSON, but it does allow the application to do things like multi-pass processing of the document.
Another type of parser, called SAX reads the XML document as a stream. As the various document entities are encountered, SAX calls back into the application, which can then process the document's information.
JSON and SAX parsers use less memory than DOM parsers but they're limited to doing their processing in a single pass of the document. Pull parsers, as with SAX parsers read the document as a stream, but they use an iterator-based approach, where the application, rather than the parser, decides when to move the parsing process along. Also like SAX parsers, Pull parsers use less memory than DOM parsers, but Pull parsers also give the application greater control over the parsing process than SAX parsers do.

Several types of parsers available
DOM – Converts document into a tree of
nodes
SAX – streaming with application
callbacks
Pull – Application iterates over XML
entries
The example application looks exactly the same as the one we showed for parsing JSON responses, so I won't show this application to you now, but let's look at the source code.
package course.examples.Networking.AndroidHttpClientXML;
import java.io.IOException;import java.util.List;
import org.apache.http.client.ClientProtocolException;import org.apache.http.client.methods.HttpGet;
import android.app.ListActivity;import android.net.http.AndroidHttpClient;import android.os.AsyncTask;import android.os.Bundle;import android.widget.ArrayAdapter;
public class NetworkingAndroidHttpClientXMLActivity extends ListActivity {
@Override

public void onCreate(Bundle savedInstanceState) { super.onCreate(savedInstanceState);
new HttpGetTask().execute(); }
private class HttpGetTask extends AsyncTask<Void, Void, List<String>> {
private static final String TAG = "HttpGetTask";
// Get your own user name at http://www.geonames.org/login private static final String USER_NAME = "aporter";
private static final String URL = "http://api.geonames.org/earthquakes?north=44.1&south=-9.9&east=-22.4&west=55.2&username=" + USER_NAME;
AndroidHttpClient mClient = AndroidHttpClient.newInstance("");
@Override protected List<String> doInBackground(Void... params) { HttpGet request = new HttpGet(URL); XMLResponseHandler responseHandler = new XMLResponseHandler(); try { return mClient.execute(request, responseHandler); } catch (ClientProtocolException e) { e.printStackTrace(); } catch (IOException e) { e.printStackTrace(); } return null; }
@Override protected void onPostExecute(List<String> result) { if (null != mClient) mClient.close(); setListAdapter(new ArrayAdapter<String>( NetworkingAndroidHttpClientXMLActivity.this, R.layout.list_item, result)); } }}
I'll open up the file that does the downloading and displaying, skipping to the HTTP GetTask class. The doInBackground method, similar to what we have seen before, but now it uses the XML response handler class, to process the response.
So let's open up that class and see how it works.

package course.examples.Networking.AndroidHttpClientXML;
import java.io.IOException;import java.io.InputStreamReader;import java.util.ArrayList;import java.util.List;
import org.apache.http.HttpResponse;import org.apache.http.client.ClientProtocolException;import org.apache.http.client.ResponseHandler;import org.xmlpull.v1.XmlPullParser;import org.xmlpull.v1.XmlPullParserException;import org.xmlpull.v1.XmlPullParserFactory;
class XMLResponseHandler implements ResponseHandler<List<String>> {
private static final String MAGNITUDE_TAG = "magnitude"; private static final String LONGITUDE_TAG = "lng"; private static final String LATITUDE_TAG = "lat"; private String mLat, mLng, mMag; private boolean mIsParsingLat, mIsParsingLng, mIsParsingMag; private final List<String> mResults = new ArrayList<String>();
@Override public List<String> handleResponse(HttpResponse response) throws ClientProtocolException, IOException { try {
// Create the Pull Parser XmlPullParserFactory factory = XmlPullParserFactory.newInstance(); XmlPullParser xpp = factory.newPullParser();
// Set the Parser's input to be the XML document in the HTTP Response xpp.setInput(new InputStreamReader(response.getEntity() .getContent())); // Get the first Parser event and start iterating over the XML document int eventType = xpp.getEventType();
while (eventType != XmlPullParser.END_DOCUMENT) {
if (eventType == XmlPullParser.START_TAG) { startTag(xpp.getName()); } else if (eventType == XmlPullParser.END_TAG) { endTag(xpp.getName()); } else if (eventType == XmlPullParser.TEXT) { text(xpp.getText()); } eventType = xpp.next(); }

return mResults; } catch (XmlPullParserException e) { } return null; }
public void startTag(String localName) { if (localName.equals(LATITUDE_TAG)) { mIsParsingLat = true; } else if (localName.equals(LONGITUDE_TAG)) { mIsParsingLng = true; } else if (localName.equals(MAGNITUDE_TAG)) { mIsParsingMag = true; } }
public void text(String text) { if (mIsParsingLat) { mLat = text.trim(); } else if (mIsParsingLng) { mLng = text.trim(); } else if (mIsParsingMag) { mMag = text.trim(); } }
public void endTag(String localName) { if (localName.equals(LATITUDE_TAG)) { mIsParsingLat = false; } else if (localName.equals(LONGITUDE_TAG)) { mIsParsingLng = false; } else if (localName.equals(MAGNITUDE_TAG)) { mIsParsingMag = false; } else if (localName.equals("earthquake")) { mResults.add(MAGNITUDE_TAG + ":" + mMag + "," + LATITUDE_TAG + ":" + mLat + "," + LONGITUDE_TAG + ":" + mLng); mLat = null; mLng = null; mMag = null; } }}
Now as before, the key method in this class is the handleResponse method, which begins by creating the PullParser object. Next, the code sets the parser's input to be the XML document that was returned in the body of the http response. And after that, the code gets the first parser event, and begins to iterate over the XML document. \

Inside the while loop, there are three events that this code checks for:
1. The start of an XML tag2. The end of an XML tag 3. Element content (text)
When the event is a start event, the startTag method is called, passing in the element that is being started. This method checks whether this data element is one that needs to be saved. If so, it records that by setting certain variables.
When the event is an end event, the endTag method is called, passing in the element that is being ended and again, this method identifies whether this data element is one that's being saved and if so, it records that. In addition, if this is the end of the earthquake tag, then the results string for this piece of earthquake data is added to the result list.
When the event is a text event, the textMethod is called, passing in the element's content. This method identifies which tag is currently being parsed and then saves the content for later use.
As before, after the doInBackground method finishes the onPostExecute method is called with the result passed in as the parameter. That method creates and sets a listAdapter for the listView, passing in the result list that was computed in the handleResponse method.
That's all for our lesson on networking. See you next time for a lesson on graphics and animation.