a sharepoint guide for your personal website... · web viewa sharepoint guide for your personal...
TRANSCRIPT

A SharePoint Guide for Your Personal Website
IndexWhat is the Purpose of your Site?....................................2
How to Log In....................................................................3
How to Edit and Publish a Page........................................3-4
How to Add a Picture........................................................4-5
How to Make a Link..........................................................5
How to use Headings........................................................6
How to Copy over Text from Word, email, etc.................6
How to Create a New Page...............................................6
How to Move a Link in the Navigation..............................7
How to Change Page Layouts...........................................8
How to Restore a Previous Version of your Page.............8
How to Restore a File from the Recycle Bin......................9

What is the Purpose of your Site?The purpose of most faculty websites contains three parts:
One: Detailed information on publicly showcasing research and teaching
Two: Research, Special Projects, or Service initiatives
Three: Marketing YOURSELF and reputation management
We have structured this skeleton of a site in a way that it is conducive to matching these three purposes.
Initial address of your site: https://faculty.sharepoint.illinoisstate.edu/yourulid
Here is what a default site looks like:
2

How to Log In In the footer of the page there is a link for Site Admin
Click on that and enter your ulid and passwordNote: If you are already logged in you will not need to enter ulid and password
How to Edit and Publish a Page Once you have logged in, you will see “Site Actions” at the top right-hand corner of the page. After clicking on Site Actions a list of options will appear, choose “Edit Page”.
3

Ribbon
Tabs
Several tabs and a ribbon will appear at the top of the page.
By default the “Format Text” tab will be active, which houses familiar tools on the ribbon bar such as bold, italics, bulleted lists, etc.
Different tabs appear depending on what task you are performing (for example, when editing a picture)
In the content area of the page, type in the desired text. Click on the “Save & Close” icon in the ribbon. Once you want it to go live, click on the “Publish” tab and icon. It will ask you if you want to add comments to this version of the page (such as
updated for FY16). You do not need to add anything here. Click continue. The page is now live.
How to Add a Picture Resize your image in an image editing program BEFORE you add it to the webpage. Click “Site Actions” in the top right-hand corner of the page, and choose “Edit Page” At the top of the screen choose the “insert” tab. In the ribbon, you will see a picture icon.
If you click on the icon it assumes you have already uploaded the picture before and it is already part of your site. The first time you upload a picture you will click on the little black arrow below the picture and select “From Computer”
4

Click the browse button to select your image Upload it to the images folder (or folder of choice) Click ok You can optionally add a description, title, author, etc. Click Save. At the top of your screen you now have a “Picture Tools” tab with a ribbon full of tools. Next to the alt text you will see a box to enter a description for screen readers for the sight
impaired. If the image has any text on it (such as Apply for Program X) you will want to type in the text in this box.
Play with the position and size to get the desired effect. Save & keep editing or Save & Close/Publish
How to Make a Link Click “Site Actions” in the top right-hand corner of the page, and choose “Edit Page” Go to the website you want to link to and copy the url (aka web address) Type in the text for the link
o Do not type “click here” or “more…” You want to make the link meaningful to site readers for the visually impaired. For example, instead of Click “here” to apply to program x, you would link “Apply to program x”
Select (highlight) the text you are going to make a link. Click on the black arrow below the LINK icon and select “From Address”
Paste the url into the address field Click Ok Save & keep editing or Save&Close/Publish
How to Properly use Headings You want to avoid creating your own styles for text (such as making text bold and a different
size). Instead you want to use headings. This is used by search engines, handheld devices, and accessibility tools.
5

Each page has only one Heading One. Headings should be used sequentially; you do not want to skip from a Heading One to a Heading
Six. To create a heading, highlight the text you want to be a heading In “Format Text” tab you will see a MarkUp Styles icon Select the heading style you want to use such as heading 2 or heading 3
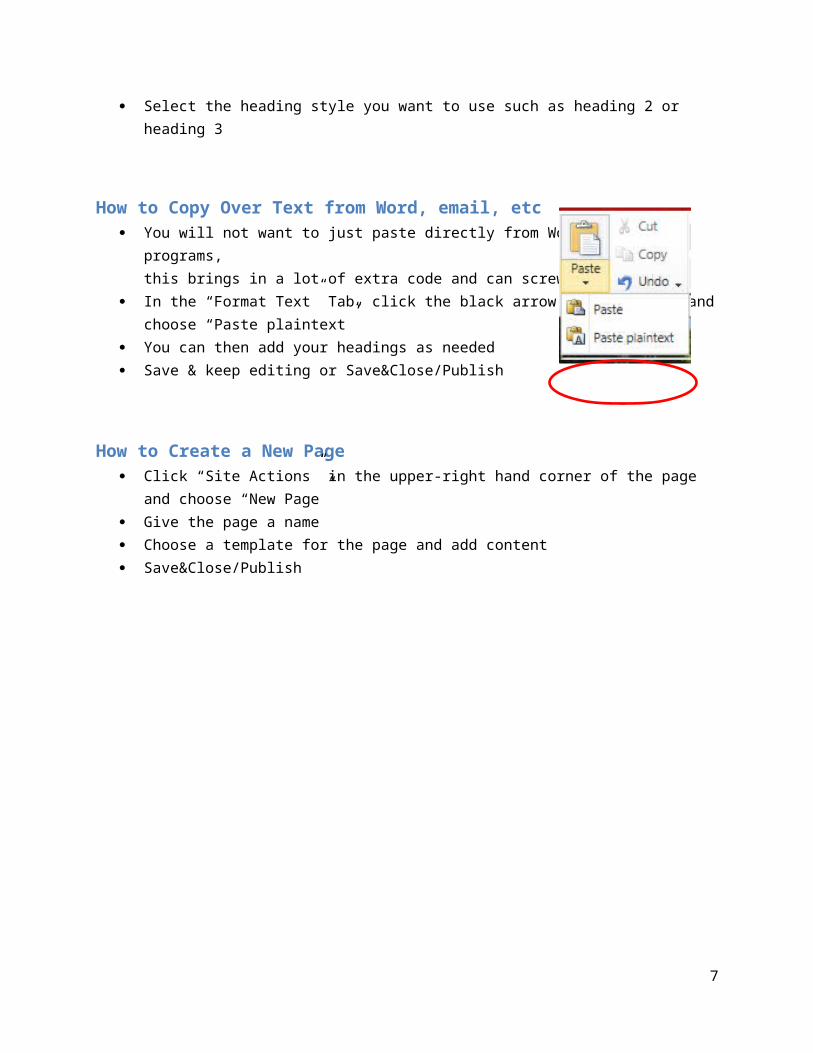
How to Copy Over Text from Word, email, etc You will not want to just paste directly from Word or other programs,
this brings in a lot of extra code and can screw up your page In the “Format Text” Tab, click the black arrow under “Paste” and
choose “Paste plaintext” You can then add your headings as needed Save & keep editing or Save&Close/Publish
How to Create a New Page Click “Site Actions” in the upper-right hand corner of the page and choose “New Page” Give the page a name Choose a template for the page and add content Save&Close/Publish
6
How to Move a Link in the Navigation Click “Site Actions” and choose “Site Settings” Under “Look and Feel” you will see “Navigation”
Scroll down to the section labeled “Navigation Editing and Sorting” Select the new page you created (or whatever page you want to move) Use the “Move Up” and “Move Down” functions to move the link in the navigation list. To hide a page from the Navigation, select the page and click “Hide”
Click Ok
7

How to Change Page Layouts Click “Site Actions” and choose “Edit Page” Copy your content to notepad in case some sections are changed that result in the
disappearance of your content Select the “Page” tab Click on the page layout tab and choose the layout you would prefer
How to Restore a Previous Version of your Page In the inevitable event that something has gone wrong after you have saved the file…maybe even after you have saved it a few times (or another editor has changed it), we have it set so that you can go back to restore a previous version.
Click “Site Actions” and choose “Edit Page” Choose the page tab and select “Page History” from the ribbon
On the left you will see a list of versions, dates, and times. Click a version to see a preview of the page. Click “Restore this Version” at the top center of the page to restore the page currently being
previewed.
8

Click Ok
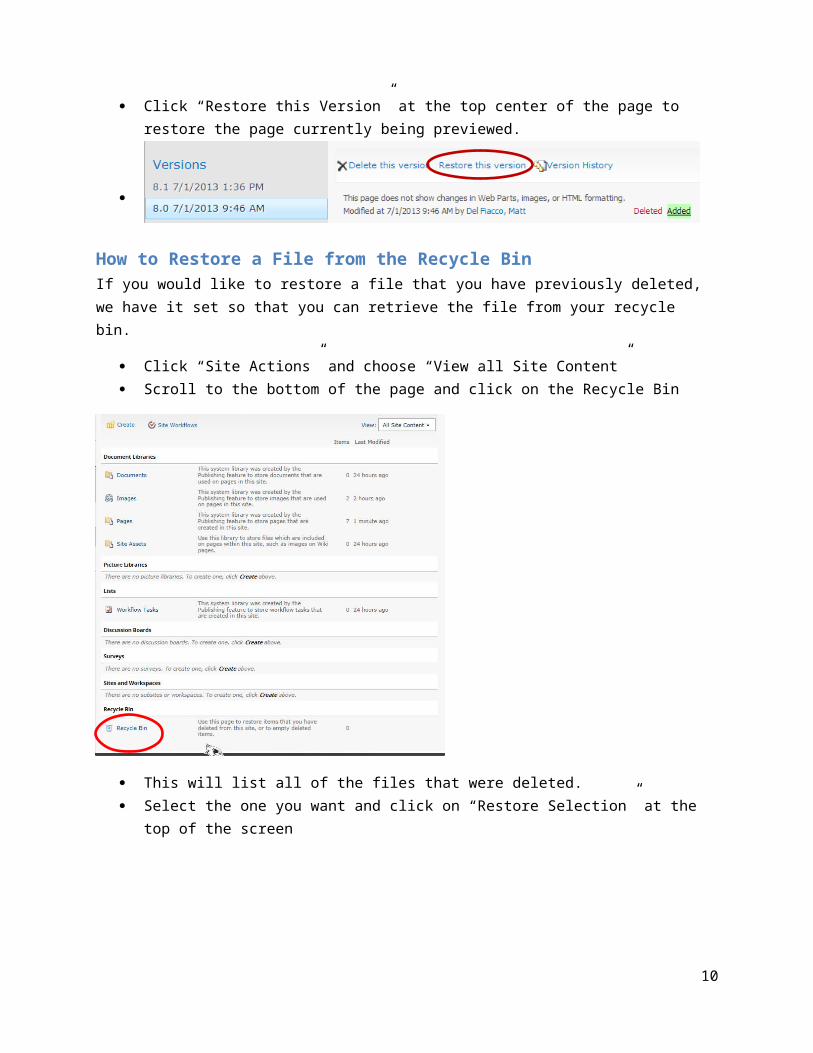
How to Restore a File from the Recycle BinIf you would like to restore a file that you have previously deleted, we have it set so that you can retrieve the file from your recycle bin.
Click “Site Actions” and choose “View all Site Content” Scroll to the bottom of the page and click on the Recycle Bin
This will list all of the files that were deleted. Select the one you want and click on “Restore Selection” at the top of the screen
9
What this introductory handout does not cover: Changing the banner image Special permissions Sub-sites Inserting video Blogs, wikis, or threaded discussions Polls Surveys Importing information from COINS or Digital Measures Site analytics Much much more…
10