a review of laser speed meters in road traffic policing
TRANSCRIPT

© P D LEE 2007, 2008 1
A Review of Laser Speed Meters in
Road Traffic Policing
Paul D. Lee, BEng
14 July 2008 (Version 1.2)

© P D LEE 2007, 2008 2
Contents
Contents ..........................................................................................................2
About the Author ..............................................................................................4
Audience and Scope........................................................................................5
Introduction ......................................................................................................6
Primary Evidence: Prior Opinion......................................................................7
Secondary Evidence: Laser Speed Meters......................................................9
Speed Measurement using Lasers ................................................................10 Basic Principles ......................................................................................10 Multiple Measurements...........................................................................12 A Special Type of Light ...........................................................................12 Which way did it go?...............................................................................12 Alignment and Sighting...........................................................................13
Introducing a Real Device: The LTI 20.20......................................................14 Device Overview.....................................................................................14 Finding the Target...................................................................................15 Locking On..............................................................................................17 Alignment and Sighting...........................................................................17 Beam Divergence ...................................................................................18 The Lastec System .................................................................................19 Problems.................................................................................................21
Misalignment..................................................................................................22 Overview.................................................................................................22 Aligned or Not Aligned? ..........................................................................23 Aligning the “Red Dot”: Parallax..............................................................24 More on Parallax.....................................................................................26 Aligning the “Red Dot”: Beam Size .........................................................27 Aligning the “Red Dot”: “Red Dot” Size ...................................................30 Aligning the “Red Dot”: Movement..........................................................30 Aligning the “Crosshairs”: Relative Sizes................................................31 Aligning the “Crosshairs”: Parallax..........................................................32 Aligning the “Crosshairs”: Movement......................................................32 Misalignment and Aim ............................................................................34 Real Examples of Misalignment/Aiming Problems..................................34 Misalignment Example 1.........................................................................35 Misalignment Example 2.........................................................................37 Misalignment Example 3.........................................................................40

© P D LEE 2007, 2008 3
Beam Spread.................................................................................................42 Overview.................................................................................................42 Real Examples of Beam Spread.............................................................45 Beam Spread Example 1........................................................................46 Beam Spread Example 2........................................................................48 Beam Spread Example 3........................................................................54
Beam Spread: Further Discoveries ................................................................59 Unexpected Errors..................................................................................59 Actual Beam Spread...............................................................................63
Reflection.......................................................................................................64 Overview.................................................................................................64 Diffuse Reflection....................................................................................64 Specular Reflection.................................................................................65 Reflection from Scotchlite™ Like Surfaces.............................................65 Reflection: An Error Mechanism .............................................................66 Real Examples of Reflection...................................................................67 Reflection Example 1..............................................................................67 Reflection Example 2..............................................................................68 Reflection Example 3..............................................................................69 Clarification of Reflection Examples .......................................................70
Slip.................................................................................................................72 Overview.................................................................................................72 Real Examples of Slip.............................................................................74 Slip Example 1........................................................................................74 Slip Example 2........................................................................................74 Slip Example 3........................................................................................75 Slip Example 4........................................................................................76 Clarification of Slip Examples .................................................................78 Slip Scenario 1........................................................................................79 Slip Scenario 2........................................................................................81
Appendix 1 – References...............................................................................83

© P D LEE 2007, 2008 4
About the Author
I graduated from Sheffield University in 1992 with a First Class Honours Degree in Software Engineering (BEng). I was awarded the Mappin Medal as the best Software Engineer/Computer Scientist at Sheffield University in that year. I currently have a total of 19 years of experience in the Engineering Industry working as a Software Engineer with a number of leading edge technology companies – in fields as diverse as Supercomputers and Virtual Reality Systems. I am currently employed by an electronics company as a Principal Engineer and is responsible for the design and implementation of a Real Time Operating System for use in Embedded Systems. As part of this work I act as a consultant both in the design of Embedded System Applications, and in new hardware design – ranging from processor cores to complete systems. My software and engineering expertise has been used globally. Since 2002, I have tested and operated numerous Laser Speed Meters, including “LTI 20.20” and “ProLaser” devices. This includes UK type approved systems, and actual UK Police enforcement systems.

© P D LEE 2007, 2008 5
Audience and Scope This report is aimed at a wide audience. As a result I have tried to avoid “techno babble” and attempted to present the material in a way that makes it easy to understand. Of necessity, this means simplifying what is essentially a technical subject. Simplification does not undermine the main aim of this report, which is to present evidence which shows that laser speed meters can get speed measurements wrong. In my opinion, this makes them unsuitable in legal proceedings, since we can never be sure that the speed presented by the speed meter system was the true speed of the targeted vehicle. The evidence shows that these devices can produce incorrect speed readings even when used in with manufacturer’s instructions and applicable guidelines, and it shows that the operator of the device may remain unaware that a given speed reading produced was incorrect. The evidence reveals flaws in the testing of these devices. In the UK, the errors shown in this report constitute Home Office Type Approval failures. None of the errors shown in this report were discovered or admitted during the type approval test process. Courts have been told that the errors shown in this report cannot happen. Clearly they can, and the Courts have been mislead, and unsound convictions have taken place. All this is of concern to me, because I feel it is not justice. Of particular concern are the errors caused by “Beam Spread” effects. These errors occur readily, even when the device has been operated correctly. Without a second means of checking the speed (such as white lines on the road), the operator and processing staff have no means to establish whether the speed reading was correct. I have therefore written this report to present the evidence that I have to illustrate my concerns. While I hope to provide explanations of how and why the devices go wrong, this is not the main aim of this report. The main aim of this report is simply to show that they can go wrong, even when operated correctly. I believe that there should be a full review of these devices, and I would like to participate fully in such a review. The latest version of this report can be obtained from the internet at the following location:
http://groups.yahoo.com/group/laserspeed/files/

© P D LEE 2007, 2008 6
Introduction Over the last few years, the UK has seen a marked increase in the use of laser technology to enforce road speed limits throughout the UK. This report provides substantial evidence which suggests that many motorists are being wrongly convicted. The reason for this is that the laser speed detection devices used by the police are unreliable - there are a number of shortfalls with the laser technique in general. I believe these devices can never be totally accurate. Often, the reading from the laser speed meter is “secondary evidence”, and is used to corroborate the “primary evidence” which is the prior opinion of the operator that the targeted vehicle is exceeding the speed limit. Since the primary evidence is the operator’s prior opinion, I will start there. In the next part of this report, I will look at “prior opinion”.

© P D LEE 2007, 2008 7
Primary Evidence: Prior Opinion Often, in speeding cases involving laser speed meters, primary evidence will be the opinion of the device operator that a given vehicle was exceeding the speed limit. This is a classic example of time overtaking the law. The idea of a witness providing “opinion” evidence that a vehicle was exceeding the speed limit probably dates back to when there were no automated speed meter devices. Cases would probably have only been brought where it was clear a vehicle was exceeding a low speed limit by a considerable margin. Today, speeds are much higher, offences are prosecuted where the limit has been exceeded by only a few miles per hour, and thousands upon thousands of cases are brought each day. Laser speed meter operators claim to provide “opinion” evidence of vehicle speeds at distances of over half a mile away. In my opinion, and in many cases, they do no such thing. I have seen complete traffic videos showing the operator reading the speed of just about every vehicle in sight. Then in Court, for those vehicles above the speed limit they say they formed a prior opinion that they were exceeding the speed limit. When challenged about the speeds recorded under the speed limit they say they were checking the accuracy of their prior opinion. How do they remember which vehicles they thought were exceeding the speed limit, and those that were not? No written records ever appear to be kept and yet it appears these operators can remember thousands of opinions every week. They appear to be able to selectively recall individual opinions months after when asked to do so in Court. I have seen a single traffic video with around 700 speed measurements in about an hour and a half. No record was made about any of the “prior opinions” formed and yet the operator was able to recall his opinions several months later in Court. The same tape shows hundreds of speeds on or below the limit. I have seen traffic videos with operators targeting vehicles before they appear from behind obstructions, the device already being trained upon the target. I do not believe that human beings can accurately assess speed from the sort of ranges at which laser speed meters are operated and it is nonsense to suggest otherwise. You only have to look head on at a vehicle, at say, 800m away to see how obvious this is. It is difficult to work out that it is moving, let alone what speed it is travelling at. In a letter to the Home Office [1], I asked: Before operating the device, operators are meant to form a prior opinion of a vehicles speed, and use the de vice to corroborate their opinion. How accurately does the Home Office believe an oper ator can estimate the speed of an oncoming vehicle at sa y 500m from the device?

© P D LEE 2007, 2008 8
The reply from the Home Office [2], stated: We have not done any measurement of the accuracy wi th which Police Officers can estimate the speed of [a] vehicle without measuring it. For automatic devices operated unattended, we require a second independen t means of measuring the speed with in 10% to provide a check that the device was working. We are confident police officers can assess the speed much better th an this. Note: Laser speed meters are not automatic devices and they are not operated unattended. They therefore do not require a second independent means of measuring the speed. Surprised (to say the least) by the Home Office claim that operators can assess speed to within 10% at distances of 500m, I asked the Home Office what research backed up this claim [3]: The Home Office claim that operators can assess spe ed to better than 10% is staggering. Does the Home Office claim that an operator can spot the difference between a car at 30mph and one at 33mph at a distance of 500m? The H ome Office has already admitted that they have not cond ucted any tests to prove this. What evidence does the Hom e Office have to back up this ridiculous claim? Pleas e could you supply copies of the documentation or res earch you are relying on as the basis to this position. The Home Office reply [4] was as follows: The response to this question stated ‘we have not d one any measurement of the accuracy with which Police Officers can estimate the speed of a vehicle withou t measuring it’. It therefore follows that the view expressed, that an officer can estimate the speed o f a vehicle to better than 10%, is not substantiated by any test results and is clearly just a view. You obviou sly have a different opinion. I do have a different opinion: Convicting people using opinion evidence without any research to show that this opinion evidence is reliable is wholly unacceptable. I believe that Police Officers are misleading the Courts en-masse on a daily basis and acting in breach of what the law allows. On 2 December 2006, I was involved in some testing of some Police laser speed meter equipment. A trained police enforcement operator was operating the equipment. Trevor Hall, secretary of the Road Policing section of ACPO was also present. They were invited to demonstrate the accuracy of their speed estimation skills. They refused. In the next section of the report I will introduce what is often secondary evidence – the reading from a laser speed meter.

© P D LEE 2007, 2008 9
Secondary Evidence: Laser Speed Meters In this section of the report, I look at what is often secondary evidence – the reading from a laser speed meter. For any device to be used in this way in a speeding case, it must be a “prescribed device”. The law enables various “classes” of device to be used in this way, and specific types of device are granted “type approval” by the Home Office. Type Approval is meant to give an assurance to the Courts that the results obtained can be relied upon to be accurate. The Home Office have granted “type approval” to a number of laser speed meters – the most common in UK usage being the “LTI 20.20” produced by LaserTech Inc. in the U.S.A. and sold in the UK by TeleTraffic UK Ltd. In my opinion, it is clear that the readings from laser speed meters cannot be relied upon, and that type approval should never have been granted. Plenty of evidence now exists showing the various errors and problems that can occur. If any of these errors had been discovered during the type approval testing, type approval would never have been granted. However, millions of motorists in the UK have now paid fines based on evidence from these devices over a number of years. The only people refusing to accept the unreliability of these devices today are the authorities and those making money from selling the devices. These people are making statements to public and Courts that are demonstrably untrue. The remainder of this report is dedicated to looking at the evidence provided by these devices, starting with an overview of how the technology works.

© P D LEE 2007, 2008 10
Speed Measurement using Lasers In this section of the report, I will provide a basic grounding in speed measurement using a laser.
Basic Principles The first point to note about laser speed measurement devices is that they do not measure speed directly – in fact they do not measure speed at all. Laser speed measurement devices measure the time taken for invisible infra-red light to travel to a given target and back again. From this measured time, the distance from the device to the target can be calculated, and from a number of consecutive measurements over a period of time, a speed can be calculated by an embedded microprocessor built into the system. The following diagrams illustrate this. The target is on the left. The laser device is on the right:
First the device sends out a brief flash (or pulse) of invisible infra-red light like this:
Some of the invisible light bounces off the target and travels back to the device, like this:

© P D LEE 2007, 2008 11
The device times how long it takes for the light to travel from the device to the target and back using a very precise clock. Since the speed of light is a known value, we can now calculate the distance from the target to the device.
If the process is repeated it produces a second distance. If the target was not moving then the second distance will be equal to the first distance. If the target was moving then the second distance will be different to the first distance. If the exact time between the two distance measurements is known, the speed at which the target was moving can be calculated. The speed is the distance travelled divided by the time it took to travel that difference in distance.
This is the basic method that a laser device uses to calculate speed.

© P D LEE 2007, 2008 12
Multiple Measurements If only two distance readings were used, inaccurate results may be produced. For example, if the laser was moved from one object to another object between the two measurements then simply using two distance readings would not give the true speed of either object. In fact neither object may be moving at all. In practice most devices take several measurements and use the entire set of measurements to calculate the speed. There is also actually no need to calculate the individual distances – the speed can be calculated directly from the time measurements using a statistical formula. This method produces better results, but it is still flawed, as I will show later on.
A Special Type of Light Devices have to be able to detect the light pulse coming back to it, and must not mistake natural, or indeed any other light for its own light – otherwise incorrect readings would result. Clearly the light must also be invisible so as not to distract motorists. Devices therefore use infra-red light of a certain wavelength, frequency and strength. Filters are used so that the devices only see their own light coming back.
Which way did it go? Most devices emit a very quick flash (known as a pulse) of light and then look for its return. Whilst devices may be able to measure the strength of the returned light (the return signal) they are unable to know where the light has been as it has travelled out and back to the device. It might have bounced back directly off an object, or it could have experienced multiple reflections before finally returning to the device. On hitting an object (or objects) the light sent out by the device will be scattered in all directions and some light will never be returned to the device. However, over a finite period of time, which depends on the paths taken, some light will be returned to the device. From this “noisy” return signal, the device must try to select the reflection that represents the intended target. Whatever method is used, the device has no idea of where the light is being reflected from, what path it has taken, the shape of any object(s) that has provided a reflection or even whether the object(s) is moving at all. As this report will demonstrate, these problems mean that these devices can never be totally reliable when measuring the speed of a vehicle. This in turn makes these devices unsuitable for speed enforcement purposes, since their readings are not reliable all the time.

© P D LEE 2007, 2008 13
Alignment and Sighting Another problem arises because the light beam is invisible. How does the operator know which object is being targeted? Put another way, how does the operator accurately target the light beam on the desired object? Most devices provide a sighting mechanism. There is a procedure, which allows the operator to align the sighting mechanism with the invisible light beam. Aligning the light beam with the sighting mechanism is vital if the operator is to target vehicles successfully. As an analogy consider a rifle and its sight. If the sight does not indicate where the bullet is going to go, then it is useless. The same is true of laser speed measuring devices. If the sighting mechanism does not show where the laser beam is going, then the device is useless. Many problems result from poorly aligned devices, and I am not convinced these devices can ever be aligned perfectly. That completes a brief overview of how laser speed meters work. I have been involved in producing a DVD [5], which illustrates these principles using real device. In the next section, I will introduce a real device.

© P D LEE 2007, 2008 14
Introducing a Real Device: The LTI 20.20 In this section of the report, I will introduce real device, called an “LTI 20.20”. The LTI 20.20 is made by Laser Technology Inc., and is in widespread use throughout the UK. The sole supplier of the device in the UK is Tele-Traffic (UK) Ltd. It should be noted that this is not the only device available today.
Device Overview Simplistically, the device is a box with a handle. The handle includes a trigger, which is squeezed by the operator to obtain a reading. At the front of the box are two apertures. One contains the infra-red light beam transmitter, the other is the return signal receiver. On the rear of the box are a number of switches to control device operation and a simple segment display, which shows the speed or distance readings obtained. The device has many variants, some (not all) are illustrated below. Only some of the variants are “type approved” for use by UK Police Forces.

© P D LEE 2007, 2008 15
Finding the Target When operated, the device sends out pulses of invisible infra-red light produced by a laser diode at a rate of 125 times per second. There is therefore one pulse of light every 8ms (milli-seconds), and each pulse lasts for about 10 to 12 ns (nano-seconds). The light has a centre wavelength of around 905 nm (nano-metres) which gives a frequency of about 3.31 x 10^14 Hz. The following diagram illustrates this:
As each pulse of light is sent out, the device starts a very accurate, high precision “clock”. The pulses of light travel outwards from the device and may be reflected back by anything that is struck. Even when travelling through air, a very small amount of light may be reflected back to the device when it strikes dust particles in the air. A much stronger signal is returned back to the device, when a solid object, such as a vehicle is struck. The device needs to be able to reject weak signals and “pick out” the intended target. Light returned to the device is focussed onto a very sensitive avalanche photo diode (APD), which produces a voltage when struck by light. The stronger the light striking the APD, the higher the voltage produced. This voltage is then amplified and compared to a reference voltage using a comparator. If the input signal voltage is less than the reference voltage, no signal is output from the comparator. If the voltage is greater than the reference voltage, a signal is output. If the reference voltage is just right, the device can effectively be made to see only significant targets.

© P D LEE 2007, 2008 16
Consider the case of an LTI 20.20 being aimed at the front registration plate of a car. The following drawing illustrates the side on view:
When it reaches the vicinity of the car, the laser beam has “spread” somewhat. This means that a portion of the laser beam may strike the road surface ahead of and behind the front of the car. As soon as the light emerges from the device, tiny amounts of light are being reflected back – from dust particles in the air. Sometime later, a slightly stronger signal will be received from reflections with the road surface ahead of the car. Next, a fairly strong signal will be received back from the car, followed by a weaker signal once more from reflections with the road surface behind where the laser struck the car. If we set the threshold voltage for the comparator “just right” we can eliminate all the signals apart from the strong signal of the car. The following diagram illustrates this, showing the output signal, the input signal to the comparator, and the output signal from the comparator:
Unfortunately, getting the threshold voltage perfect is impossible – because there are always surfaces and objects that return a signal equal or greater in strength to the signal obtained from road vehicles. This is a fundamental problem with the technique and can give rise to all manner of errors.

© P D LEE 2007, 2008 17
Locking On According to the inventor of the device, Jeremy Dunne [12], the LTI 20.20 uses the first four samples to “acquire” or “lock on” to the target. If there are multiple targets inside the laser beam providing sufficient return signals, then the LTI 20.20 always acquires the closest target. It takes the first signal returned that triggers the comparator. Once the target is acquired, the device knows the approximate speed, and it only looks for further return signals in the vicinity of where the target is expected to be. It now seeks to acquire 40 measurement samples of which the first is the last of the four acquisition samples. For each sample in the measurement set, validation checks are performed. A measurement set is only considered valid if 35 out of the 40 measurement samples pass the validation checks. From the set of 40 samples, a speed can be calculated, and a further check on the individual samples can be performed by using the calculated speed to check what the individual distances should be. Calculating and validating a speed reading from a set of “flight times” is simple. However, there is no way of proving that the set of times was accurate to start with, or that the measurements are from the intended target. As long as the set of “flight times” looks genuine and passes all the validation checks the embedded processor cannot tell it where the readings have come from. This, as I will illustrate, gives rise to numerous problems with the technique.
Alignment and Sighting On top of the box is the sighting mechanism. This is similar to a rifle sight. A “red dot” is presented inside the sighting mechanism and is intended to indicate the object being targeted. The “red dot” is only visible to the operator by looking into the sighting mechanism. It does not appear on any target objects and is not visible to drivers. It is simply an optical effect produced inside the sighting mechanism. The position of the “red dot” can be adjusted relative to the laser beam in both the horizontal and vertical directions. This allows the “red dot” to be aligned with the laser beam. On later models of the LTI 20.20 the sighting mechanism also includes a “head up” display which shows the speed reading obtained inside the sighting scope. On the rear of the device is an RS232 connector which allows the readings obtained to be sent down a data cable to other attached devices. The LTI 20.20 also has a distance measuring mode – where it displays the distance to the target when the trigger is pressed.

© P D LEE 2007, 2008 18
Beam Divergence The width (and height) of the laser beam increases further away from the device – just like light from a torch. The manufacturers specifications state that the divergence of the laser beam is about 3 milli-radians. This enables the approximate beam width (W), at any distance from the device (S) to be calculated. The formula works out as: W = S / 333.33. The following table gives some example beam widths (and heights) for a number of distances over the operating range of the device: Distance from the Device (metres) Approx. Laser Beam Width (metres) 100 0.3 200 0.6 400 1.2 500 1.5 800 2.4 1000 3.0 For example, at a distance of 400 metres from the device, the approximate beam width (and height) is 1.2 metres.

© P D LEE 2007, 2008 19
The Lastec System The data connector on the back of the LTI 20-20 allows other devices to be connected. For example, a video camera is often attached to the LTI 20.20. This is mounted on the same tripod as the LTI 20.20 and is positioned at an offset of about 10cm. This gives a tiny but insignificant parallax effect. Further equipment, called a Camera Control Unit (CCU), is provided that takes the data provided by the LTI 20.20 (via the data connector) and superimposes it on the video picture. This complete system is called a “Lastec System” and the following diagram shows how the components are linked together:
The following picture shows a Lastec system viewed from the rear. The LTI 20.20 is in the middle. To the left of the LTI 20.20 is a monitor, to the right is the CCU:

© P D LEE 2007, 2008 20
The results are recorded onto videotape that may be used as evidence to prosecute drivers. The videotape has the date and time superimposed on it, as well as the readings obtained from the LTI 20.20. A set of crosshairs also appear on the videotape. These should be set by the operator so they are aligned with the “red dot” sighting mechanism on the LTI 20.20. They should therefore show exactly where the invisible laser beam is going. The following picture shows an example of what the videotape shows:
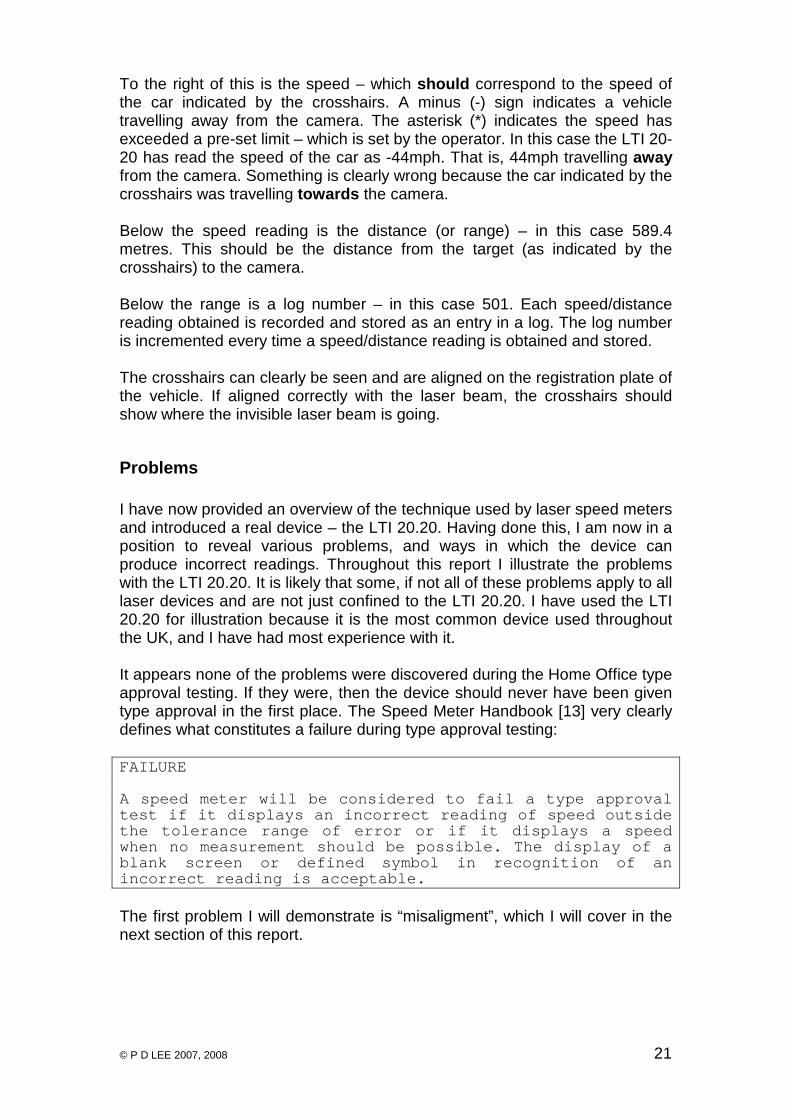
At the top of the picture, the black and white lines are an electronic encoding of the data onto the video signal. This allows data processing equipment to read the data from the videotape automatically. At the bottom of the picture is a black box with the data that has been superimposed onto the video picture. At the top left of the “box” can be seen the time “11:58:41” (eleven fifty eight and forty one seconds). Below this is the date – 7 November 2002. To the right of this is “NR15”. This is the “field” number. There are 50 fields per second. To the right again can be seen the site and police officer reference. “0477” refers to PC 477 who was operating the equipment. “1541” is the site reference.
© P D LEE 2007, 2008 21
To the right of this is the speed – which should correspond to the speed of the car indicated by the crosshairs. A minus (-) sign indicates a vehicle travelling away from the camera. The asterisk (*) indicates the speed has exceeded a pre-set limit – which is set by the operator. In this case the LTI 20-20 has read the speed of the car as -44mph. That is, 44mph travelling away from the camera. Something is clearly wrong because the car indicated by the crosshairs was travelling towards the camera. Below the speed reading is the distance (or range) – in this case 589.4 metres. This should be the distance from the target (as indicated by the crosshairs) to the camera. Below the range is a log number – in this case 501. Each speed/distance reading obtained is recorded and stored as an entry in a log. The log number is incremented every time a speed/distance reading is obtained and stored. The crosshairs can clearly be seen and are aligned on the registration plate of the vehicle. If aligned correctly with the laser beam, the crosshairs should show where the invisible laser beam is going.
Problems I have now provided an overview of the technique used by laser speed meters and introduced a real device – the LTI 20.20. Having done this, I am now in a position to reveal various problems, and ways in which the device can produce incorrect readings. Throughout this report I illustrate the problems with the LTI 20.20. It is likely that some, if not all of these problems apply to all laser devices and are not just confined to the LTI 20.20. I have used the LTI 20.20 for illustration because it is the most common device used throughout the UK, and I have had most experience with it. It appears none of the problems were discovered during the Home Office type approval testing. If they were, then the device should never have been given type approval in the first place. The Speed Meter Handbook [13] very clearly defines what constitutes a failure during type approval testing: FAILURE A speed meter will be considered to fail a type app roval test if it displays an incorrect reading of speed o utside the tolerance range of error or if it displays a sp eed when no measurement should be possible. The display of a blank screen or defined symbol in recognition of an incorrect reading is acceptable. The first problem I will demonstrate is “misaligment”, which I will cover in the next section of this report.

© P D LEE 2007, 2008 22
Misalignment In this section of this report I will look at a common problem with laser speed devices – misalignment.
Overview As stated previously laser speed meters, such as the LTI 20.20, send out an invisible laser beam to the target. On the LTI 20.20, a “red dot” sighting mechanism is used to aim the beam at the required target. The “red dot” must therefore be aligned with the laser beam if the technique is to work. If video evidence is used, then the crosshairs must be aligned to the laser beam otherwise they do not indicate the true target of the laser beam. The “red dot” is aligned with the laser beam by selecting a suitable target such as a telegraph pole. The operator should be looking for a tall, thin object, which has no other objects in the vicinity behind it. The LTI 20.20 is then switched into a mode to test the alignment. The device emits a tone, which changes in pitch with the characteristics of the return signal. This allows the operator to decide when the laser beam is being targeted at the telegraph pole. The “red dot” can be adjusted to bring it into line with the telegraph pole. This procedure must be repeated both horizontally and vertically – this can be achieved by aligning the device in one plane, before tilting the device through 90 degrees to align the device in the other plane. Once complete this procedure will result in the “red dot” being aligned with the laser beam. The procedure is critical to instrument operation, and should be carried out both before and after any enforcement session. This proves that the device was correctly aligned throughout the duration of the enforcement session. The Laser Speed Meters DVD [5] contains a section demonstrating the alignment procedure. In the case of a Lastec system, the crosshairs should also be aligned to the laser beam. Once the “red dot” and laser are in alignment, this is simply a matter of pointing the “red dot” to a fixed object and aligning the crosshairs so they point at the same place. Where video evidence is recorded, it is usually sent to a Central Ticketing Office (CTO), who decide which drivers to prosecute. They will base their decisions on the position of the crosshairs. If these crosshairs are misaligned, many motorists could face wrongful prosecution. For this reason if the crosshairs are not correctly aligned, the videotape presents unreliable evidence and should be not used to prosecute motorists. I know of at least one video tape which clearly shows the enforcement system to be very badly misaligned. As far as I am aware, all the convictions (probably numbering hundreds of motorists), still stand.

© P D LEE 2007, 2008 23
Aligned or Not Aligned? If it can be demonstrated that either crosshairs or “red dot” sighting mechanism was out of alignment during an enforcement session, then the whole enforcement session has gathered unreliable evidence. In my opinion it ought to be up to the Prosecution to prove that the device was correctly aligned. In my experience, often they are not aligned correctly and yet it is taken “as read” that the alignment was correct. In the case of the LTI 20.20, operators should use the “red dot” sighting mechanism at all times. However the “red dot” is not visible on any videotape produced - only the crosshairs are shown. This means there is no way of telling from the video if the “red-dot” was aligned with the laser beam, if the crosshairs were aligned to the laser beam, or if the operator was using the correct targeting method. If either of the alignments is not correct it may be possible to tell this by analysing the whole videotape. Looking at a clip of a single reading from a vehicle is not sufficient. It appears that both the Police and the CPS go to great lengths to avoid disclosing complete videotapes to defendants. There are only a few cases where a complete tape has been disclosed. Several cases have even been discontinued when disclosure of the complete tape has been requested. Normally the prosecution will disclose just a short clip of the defendant’s vehicle. This is not sufficient to enable the defendant to reach a conclusion as to whether the alignment of the device was correct. Both manufacturers instructions and Police guidelines make it clear that alignment is critical to device operation [8][9][10][11]. The whole area of alignment is prone to human error as can be demonstrated by numerous examples from real enforcement sessions. This is not surprising when you consider the alignment process in detail. First of all, the operator should align the “red dot” in the sighting mechanism with the laser beam. To do this the device is placed into a test or alignment mode. In this mode, the device emits a tone related to the signal being returned to the device. The stronger the reflection, the higher pitch the tone. The idea is that the operator sweeps the beam over a thin target such as a telegraph pole or lighting column, and the change of pitch will reveal when the laser crosses the target. The “red dot” can then be adjusted so that it matches the position of the laser beam. This is done twice, once for the horizontal plane, and once for the vertical plane. Next the crosshairs are aligned by moving them into the same position as shown by the “red dot” – if the “red dot” is aligned with the laser, then this will bring the crosshairs into alignment with the laser as well as the “red dot”. There are a number of problems with this.

© P D LEE 2007, 2008 24
Aligning the “Red Dot”: Parallax The first problem is parallax. Every time the operator brings his eye to the sighting mechanism, his eye will be in a slightly different position with respect to the “red dot”. This means that the line of sight from eye, via “red dot” to the target will be different. This means that the alignment is only correct for a single position of the eye relative to the “red dot”. For perfect alignment, the operator must position the eye in exactly the same place every time the device is operated. To see this effect, simply take a pen or pencil and hold it close to your eyes. The pen is your “red dot”. Use the pen to line up your sight with a target in the distance. You have now aligned your line of sight with the target. Now move your head from side to side. When you do this, your sight is no longer aligned with the target. This is parallax, as illustrated below:
Say the operator positions his eye at “eye position 2”. Using a target in the distance, the sight (“red dot”) is aligned. If the operator now positions his eye at “eye position 1” the device is no longer aligned. The target appears to the left of the sight and the sight would have to be moved to the left to bring the device into alignment for the new eye position. Similarly, If the operator positions his eye at “eye position 3” the device is no longer aligned. The target appears to the right of the sight and the sight would have to be moved to the right to bring the device into alignment for the new eye position. Put another way, when using the device after alignment, if the operator does not position his eye in the same position he used to align it, then the laser is being directed to a position different to that shown by the “red dot”.

© P D LEE 2007, 2008 25
By using “similar triangles”, a simple formula can be obtained for the error off the line of sight (E), at any distance (S) from the device (measured from the sight), given an eye position off the correct line of sight (e), at distance (s) from the device (measured from the sight):
For example, say the operator positions his eye 1mm (0.001m) to the left of the position he used when he aligned the device. Say, the distance from eye to sight when aligned was 10cm (0.1m). Say a vehicle is targeted 500m from the device. Using the formula in the above diagram, we can see the laser would be directed 5m from the intended target. The above shows the position looking down on the device. The same is also true looking side on to the device – so in the above example, if the operator’s eye was 1mm to the left, and 1mm above the correct position, the laser would be directed to a point 5m to the right and 5m below the intended target. The error is enough to hit the wrong target altogether.

© P D LEE 2007, 2008 26
More on Parallax In the above section, I have provided a very simple introduction to parallax effects. The parallax illustrated was caused by the eye moving off the optical axis of the sighting scope. There are many other ways in which parallax effects can be obtained. The distance to the target dictates where in the sighting scope the image is formed by the objective lens. If this is either in front of or behind the plane of the sighting “reticle”, then you have parallax. If the image happens to be formed in the same plane as the sighting “reticle” then there is no parallax – this only occurs with objects at a specific distance from the scope. Defects in the objective lens may also cause varying degrees of parallax. Close up to the device you will also get parallax effects caused by the fact that the sighting scope and laser beam exit point are in different positions. I have seen no evidence of any documentation describing the parallax characteristics of any laser speed meter, such as the LTI 20.20. I believe that these characteristics should be made available to the public, since they are critical to how accurately the operator can align (and aim) the device. In my opinion, this is an area for further research.
© P D LEE 2007, 2008 27
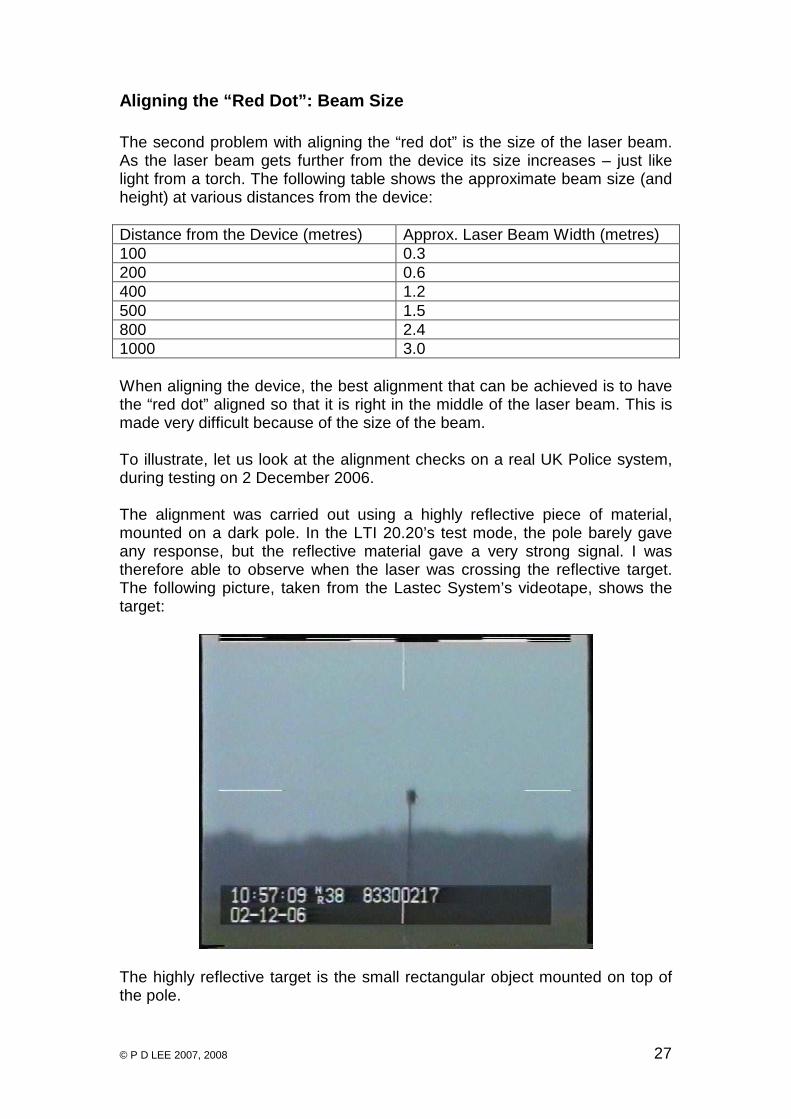
Aligning the “Red Dot”: Beam Size The second problem with aligning the “red dot” is the size of the laser beam. As the laser beam gets further from the device its size increases – just like light from a torch. The following table shows the approximate beam size (and height) at various distances from the device: Distance from the Device (metres) Approx. Laser Beam Width (metres) 100 0.3 200 0.6 400 1.2 500 1.5 800 2.4 1000 3.0 When aligning the device, the best alignment that can be achieved is to have the “red dot” aligned so that it is right in the middle of the laser beam. This is made very difficult because of the size of the beam. To illustrate, let us look at the alignment checks on a real UK Police system, during testing on 2 December 2006. The alignment was carried out using a highly reflective piece of material, mounted on a dark pole. In the LTI 20.20’s test mode, the pole barely gave any response, but the reflective material gave a very strong signal. I was therefore able to observe when the laser was crossing the reflective target. The following picture, taken from the Lastec System’s videotape, shows the target:
The highly reflective target is the small rectangular object mounted on top of the pole.

© P D LEE 2007, 2008 28
Let us now consider the horizontal alignment. The following series of diagrams illustrate a number of key positions in the horizontal alignment, looking from above:
T is the alignment target, and L is the laser beam. Positions 1 to 4 show the key stages when the laser is swept over the target from left to right. Up to position 1, none of the laser beam strikes the target. Once position 2 is reached, all of the target is being struck by the laser beam. This remains true until position 3 is reached. Finally, when position 4 is reached, none of the laser beam strikes the target. During this particular alignment test, I found that the LTI 20.20 gave an identical audible tone for every position of the laser between (approximately) positions 2 and 3. I could therefore observe that the laser beam had a significant width. It therefore follows that in attempting to align the “red dot” exactly with the laser beam, I can only ever perform the alignment to an accuracy of plus or minus the beam width minus the target width all divided by 2. For example, if I am carrying out the alignment at 200m where the beam width is 0.6m, and the reflective target has a width of 0.1m, then I can only align the “red dot” to an accuracy of +/- 0.25m. The accuracy is increased at distances further away than the alignment distance. Again the “similar triangles” formula can be used: E = Se ÷ s Where: E gives the accuracy at distance S, and e is the accuracy at the alignment distance s. For example, with the device aligned to +/- 0.25m at 200m, the accuracy at 500m is +/- 0.625m. The smallest error when aligned close up, is therefore magnified into a significant error far away.

© P D LEE 2007, 2008 29
The example I have illustrated here suggests that the best accuracy of alignment is achieved when the width of the target matches the width of the beam at the distance at which the alignment target is situated. Is this really true? I suspect it depends on the reflectivity of the alignment target. If the alignment target width is bigger than the beam width, then again the accuracy is the difference between the two widths, all divided by two. Although this is just one of a number of possible sources of alignment error, I have seen no evidence to suggest that this is taught, understood or practised by any laser speed meter operators.

© P D LEE 2007, 2008 30
Aligning the “Red Dot”: “Red Dot” Size One thing that I have noticed while carrying out alignment checks is the actual size of the “Red Dot”. Often the “red dot” totally obscures the targets. In other words, you can’t really see what you are doing. Here is a view looking through the sighting scope of an LTI 20.20. Do you think the red dot is covering none, one or two vehicles?
In this case, the “red dot” is covering two vehicles – two cars at about 375m from the device. At that distance the beam width is about 1.1m – so the beam could be solely on one vehicle, or the other, or it could be straddling both. How on earth would you know? More importantly, how do you target the laser onto one of them, whilst avoiding the other? LTI 20.20 devices are type approved for use at ranges of up to 1000m – over 2½ times the distance shown here.
Aligning the “Red Dot”: Movement Another problem with aligning the “red dot” is movement of the device – caused by things such as an unsteady hand or, in the case of an in-vehicle operated device, the movement of the vehicle housing the device. A tiny movement of the device can cause a significant movement of the position of the laser beam. At 500m a movement of 1 degree results in an error of 8.7m.

© P D LEE 2007, 2008 31
Aligning the “Crosshairs”: Relative Sizes This is an interesting problem. Here again, is that image that shows the “red dot” obscuring two vehicles at 375m.
The problem is that the video camera has a much bigger magnification – often up to 16 times. Here is an example of what a vehicle at about 375m looks like on the video screen:
It is clear from the above image that the “crosshairs” can be aligned to within perhaps 10cm at 375m. However the “red dot” obscures an area of several metres. Imagine the above car was one of the two vehicles obscured by the “red dot” as shown above. Where, in the above image would you place the “crosshairs”? It is obvious that this can’t be done accurately and yet the “crosshairs” are used to identify the offending vehicle.

© P D LEE 2007, 2008 32
Aligning the “Crosshairs”: Parallax The crosshairs are superimposed on a flat screen, and so parallax is much less of a problem when it comes to aligning the “crosshairs” with the “red dot”. However, there is still some parallax caused by the fact that the video camera and “red dot” are not in the same plane. I believe that if the alignment of “crosshairs” and “red dot” is done at a distance this should not be that much of a problem.
Aligning the “Crosshairs”: Movement Another problem with aligning the “crosshairs” is movement of the device – caused by things such as an unsteady hand or, in the case of an in-vehicle operated device, the movement of the vehicle housing the device. A tiny movement of the device can cause a significant movement of the position of the “crosshairs”. At 500m a movement of 1 degree results in an error of 8.7m. At this stage, the operator is trying to position the “crosshairs” in the same place as the “red dot”. He therefore has to continuously shift eye position whilst attempting to keep the device steady, hoping that the vehicle he is in does not move. If any movement occurs, then by the time he moves the “crosshairs” to where the “red dot” was, the “red dot” is now actually somewhere else without the operator realising. On 2 December 2006, I was involved in some testing of Police laser speed meter equipment. A trained police enforcement operator was operating the equipment. Trevor Hall, secretary of the Road Policing section of ACPO was also present. It was very noticeable that any movement of the van resulted in significant movement of the aiming point, and at times this rendered aiming the device accurately hopeless. Movement of the van was caused by people moving inside the van, and also by buffeting from the wind. The following series of images are from a real enforcement session, taken at 1/25th second intervals. They clearly show how much the crosshairs can move, and in this instance the cause appears to have been buffeting of the camera van from passing vehicles. I have extended the crosshairs, which enables the movement to be seen more easily:

© P D LEE 2007, 2008 33
Yet again “similar triangles” can be used to find out how much the beam moves (E) at a distance (S), when the beam is moves (e) at a distance (s): E = Se ÷ s We can also work out the angle the device rotated by to produce this error: Angle = arctan (e ÷ s). Say the displacement of the beam over the car above (211m) was 0.6m. Using the above formula we can see that at 500m, the beam would have moved 1.42m. The device would have moved through an angle of just 0.16 degrees to produce this error. Tiny movements produce significant errors.

© P D LEE 2007, 2008 34
Misalignment and Aim I have now described a number of problems with aligning laser speed meters accurately. All of these mechanisms produce an error in the alignment accuracy of the device, and all the errors are combined (“added up”) to produce the overall accuracy of the device. Sometimes the errors may combine to cancel each other out, and an accurately aligned device will result. On other occasions the errors may combine to produce a very badly aligned device. The problems do not end there. Having aligned the device, the operator still has to aim the device while using it. Many of the problems then apply all over again. Again these further errors can combine to give good results, or they could combine to give very bad results. In other words a major player in the overall accuracy of these devices is luck. From a legal perspective, how can the prosecution possibly show whether a device was aligned accurately? In my opinion it is clear they cannot.
Real Examples of Misalignment/Aiming Problems Having detailed many mechanisms which can render the alignment and aiming of a device inaccurate, it is reasonable to expect that I should be able to back these claims up with real life examples. Obtaining real life examples is made difficult by the Police and the CPS, but examples do exist, I will now present some of these.

© P D LEE 2007, 2008 35
Misalignment Example 1 A simple demonstration of misalignment can be achieved by deliberately misaligning the “red dot” on an LTI 20.20. In this example, the “red dot” has been misaligned. The “red dot” is then aimed at a stationary lorry, and repeated speed readings are taken. Owing to the misalignment, the laser beam is going somewhere other than where the “red dot” indicates. In this case, the laser beam is directed way to the left of the position indicated by the “red dot”:
The device gives a speed reading of 6mph, apparently for the stationary lorry. What has happened is that the laser has struck a car which has just started moving, obscured by the left hand side of the sighting scope.
The car continued to accelerate, out of sight, and the device gives a speed reading of 8mph, apparently for the lorry, which is stationary.

© P D LEE 2007, 2008 36
The car continues to accelerate, and appears in the sighting scope. The device gives a speed reading of 17mph, still with the “red dot” sighted on the stationary lorry.
Now the “red dot” is sighted on the moving car. However the device gives a speed reading of 0mph. This is because the car has now outside of the laser beam. The laser beam is striking some other stationary object, and giving the speed of that object, not the speed of the car. This simple demonstration shows the effect of a misaligned device. Speed readings for the wrong target are easily obtained. In other words the wrong speed is attributed to the vehicle targeted.

© P D LEE 2007, 2008 37
Misalignment Example 2 The image we already seen, earlier in this report, shows an example of possible misalignment:
In this image, the crosshairs are clearly aligned on the registration plate of the vehicle which is approaching the camera. The video clearly shows the operator to be tracking the car coming towards the camera. However the LTI 20.20 system has produced a speed reading of -44mph. A negative speed (a speed with a minus sign) indicates the device “thinks” its target is travelling away from the camera. Clearly something is wrong. The Lastec system has produced incorrect data. One possible explanation for this is misalignment. Instead of hitting the car the operator was aiming for, the laser beam struck one of the cars travelling in the opposite direction and produced the speed for those cars instead. In this case, the error is very apparent. The speed given is in the opposite direction to the vehicle actually targeted, and this makes it obvious that something is wrong. This is a serious error. Imagine if the vehicles in the top of the picture were travelling in the same direction as the targeted car. The operator would have been oblivious to the error, and the innocent driver of the targeted vehicle could have been wrongly prosecuted based on the speed of another car!

© P D LEE 2007, 2008 38
The Police Operator of the device that produced the above error claimed he had set the equipment up correctly. In a witness statement [7] he wrote: The equipment was checked in accordance with manufacturer’s instructions prior to checking the s peeds of any vehicles and at the conclusion of this speed check. The manufacturer’s instructions [8][9][10] include alignment check and adjustment of both “red dot” and “crosshairs” and emphasise that this is critical to instrument operation. The ACPO Code of Practise [11] also makes this clear. I asked the Home Office to comment on this image [1]. Their reply [2] was: This picture would only be generated if the camera had not been properly aligned with the laser beam at th e start of the check. So either the Police Operator used a misaligned system and lied to the Court, or these systems can produce grossly incorrect speed readings even when set up correctly. I asked Gwent Police and the IPCC to investigate this case by means of a formal complaint. Having exhausted the formal complaint process neither Gwent Police [14][15], nor the IPCC [16] could find any evidence of serious wrong doing on the part of the Operator in this case. This example enforcement session contained 677 speed readings. There are 4 speed readings which show the wrong direction, and 19 speed readings which show 0mph (stationary) when the system was targeted on a moving vehicle. Numerous other readings show alignment errors. There are probably numerous other errors, which are not obvious. The ACPO Code of Practice [11] states: If the operator has any doubt as to the validity of the reading obtained by the device in comparison to the ir personal estimation of the speed of the target vehi cle, then they will stop the check.
On this tape 220 speed readings were above the threshold speed set by the operator for prosecution. These readings would probably have resulted in penalties or even driving bans. Some of the errors shown during this enforcement session are clear and obvious, other errors are probably present but not obvious. The whole tape should have been discarded. It was not. Gwent Police resisted disclosure of this videotape. It took two Court Orders (the first of which they ignored) before the tape was finally disclosed. Now the errors on the videotape have been exposed, it might surprise you to learn that no action of any sort has been taken. As far as I am aware, all convictions and penalties have been allowed to stand.

© P D LEE 2007, 2008 39
Given that these errors can occur when apparently, according to the Police and the IPCC, the operator has done nothing seriously wrong, how can these devices be used with any credibility? The Speed Meter Handbook [13] very clearly defines what constitutes a failure during type approval testing: FAILURE A speed meter will be considered to fail a type app roval test if it displays an incorrect reading of speed o utside the tolerance range of error or if it displays a sp eed when no measurement should be possible. The display of a blank screen or defined symbol in recognition of an incorrect reading is acceptable. Had the errors in this example occurred during type approval testing, the system would never have been given type approval.

© P D LEE 2007, 2008 40
Misalignment Example 3 In this example, the operator was allegedly tracking a motorcycle. However three readings produced three totally different speeds, including one of 0mph. For these images I have extended the crosshairs:
In this first image the crosshairs are centred just to the right and slightly above the motorcyclist’s helmet.
In this second image, the crosshairs are centred to the left and above the motorcyclist’s helmet.

© P D LEE 2007, 2008 41
In this third image, the crosshairs are centred on a position just above the motorcyclist’s helmet. The results from this sequence are clearly inconsistent. In all three images the crosshairs are slightly above the helmet. Two readings, one either side of the helmet obtained speeds of -87mph, and -107mph. Yet the reading in the middle (in between the other two) produced 0mph. In all three readings the crosshairs are not aligned on any vehicle at all. The Speed Meter Handbook [13] very clearly defines what constitutes a failure during type approval testing: FAILURE A speed meter will be considered to fail a type app roval test if it displays an incorrect reading of speed o utside the tolerance range of error or if it displays a sp eed when no measurement should be possible. The display of a blank screen or defined symbol in recognition of an incorrect reading is acceptable. Had the errors in this example occurred during type approval testing, the system would never have been given type approval. I believe that the 0mph reading was caused by a combination of this misalignment, plus another effect caused by beam spread, which I will introduce in the next section of this report.

© P D LEE 2007, 2008 42
Beam Spread In this section of this report I will look at problems that are caused by the spread of the laser beam.
Overview As stated previously laser speed meters, such as the LTI 20.20, send out an invisible laser beam to the target. As this beam gets further from the device, it widens, just like light from a torch.
The laser beam from a laser speed meter spreads the further it gets from the device. In the above diagram, L represents the laser device, A represents the line of aim, and T1 represents the target that the device is being aimed at. EL and ER are the left and right edges of the laser beam respectively. In the case of the LTI 20.20, the manufacturers specifications state that the divergence of the laser beam is about 3 milli-radians. This enables the approximate beam width (W), at any distance from the device (S) to be calculated. The formula works out as: W = S / 333.33. The following table gives some example beam widths (and heights) for a number of distances over the operating range of the device: Distance from the Device (metres) Approx. Laser Beam Width (metres) 100 0.3 200 0.6 400 1.2 500 1.5 800 2.4 1000 3.0

© P D LEE 2007, 2008 43
This characteristic of the laser beam means that at distance it is possible, indeed likely, that the beam will be striking multiple objects, and not just the target being aimed for. In many instances the strength of the returned light from these other objects is of insufficient strength, and so the device effectively does not see it. Using a comparator to prevent the device from seeing signals that are below a certain threshold strength is one way of achieving this. I have already illustrated this earlier in this report, but a brief recap will not go amiss. Consider the case of an LTI 20.20 being aimed at the front registration plate of a car. The following drawing illustrates the side on view:
A portion of the laser beam may strike the road surface ahead of and behind the front of the car. If we set the threshold voltage for the comparator “just right” we can eliminate all the signals apart from the strong signal of the car. The following diagram illustrates this, showing the output signal, the input signal to the comparator, and the output signal from the comparator:
By setting the threshold level correctly, the device only sees the signal returned from the car.

© P D LEE 2007, 2008 44
The real problem occurs when more than one object capable of returning a strong enough signal is struck by the laser. Scenarios could include two vehicles in busy traffic, or a white line on the road beneath the car. Consider the following example:
In this example the laser beam has struck the intended target, T1, but it has also struck a second target T2. In this case the comparator threshold level cannot prevent the device from seeing the signal from the second target:
In this case, the second target, T2, can be eliminated if the device only operates on the first returned pulse above the threshold value. In this case, T1 is the first returned pulse about the threshold value, and so the device operates on T1 – the target that was aimed for.

© P D LEE 2007, 2008 45
Now consider the following example:
In this example the laser beam has struck the intended target, T1, but it has also struck a second target T2. In this case the comparator threshold level cannot prevent the device from seeing the signal from the second target:
In this case taking the first returned signal above the threshold results in the device operating on the wrong target – T2. The speed of T2 will be obtained, rather than the speed of T1, which was the intended target. Devices have no knowledge of which of multiple targets is the intended target. It is therefore inevitable that sooner or later, a speed will be obtained which is not the speed of the intended target, resulting in incorrect prosecution.
Real Examples of Beam Spread Having now explained the theory of how beam spread can cause incorrect readings, I will now present some real examples of such errors. Obtaining real life examples is made difficult by the Police and the CPS, but examples do exist.

© P D LEE 2007, 2008 46
Beam Spread Example 1 In this example the operator was allegedly tracking a motorcycle. However one of the readings was a speed of 0mph – even though the motorbike was moving. I have extended the crosshairs in the following images:
The speed recorded is 0mph, and the distance shown is 625.8m. It is clear the reading did not come from the motorbike. Highly reflective signs and white lines are in the vicinity. These could all possibly provide strong enough return signals if the beam hit them. A look at the speed reading taken just under 5 seconds earlier gave a speed of –87mph and a distance of 689.1m. Although taken earlier, the distance recorded is 63.3m further away:

© P D LEE 2007, 2008 47
If the speed reading of –87mph was from the motorbike, then the 0mph reading came from an object somewhere in front of the motorbike when it was recorded at –87mph. The sign in the central reservation, closest to the camera is possibly where the 0mph speed came from. Beam spread, possibly combined with some misalignment could well have caused the 0mph reading to occur, by causing the laser beam to strike the sign in the central reservation closest to the device. Of course, this is educated speculation. I really cannot tell you what happened for sure. The laser beam is invisible. The laser could have struck the white line on the road. We can be absolutely sure, that the 0mph reading was not from the intended target, which was clearly the motorbike. The Speed Meter Handbook [13] very clearly defines what constitutes a failure during type approval testing: FAILURE A speed meter will be considered to fail a type app roval test if it displays an incorrect reading of speed o utside the tolerance range of error or if it displays a sp eed when no measurement should be possible. The display of a blank screen or defined symbol in recognition of an incorrect reading is acceptable. Had the error in this example occurred during type approval testing, the system would never have been given type approval.

© P D LEE 2007, 2008 48
Beam Spread Example 2 This is a more complicated example of errors which could have been caused by beam spread. The problem with these devices is that it is extremely difficult to show whether a reading obtained is correct for the intended target. Often, if a reading is wrong, it is impossible to prove it. Sometimes, with a lot of “detective work”, it is possible to prove that a set of readings from a device are inconsistent. This example demonstrates this by presenting a number of images from a single enforcement session, and by cross referencing them, demonstrates that at least two of them are wrong. To start with a simple diagram of the area of road where the readings were taken, showing some key “landmarks”:
The key items are a 50mph speed limit sign, a lone traffic cone, and then a group of cones. All of these items are on the right hand side of the area of road being targeted. They make useful reference points. Over the next few pages, I will present a series of readings from this session. Make a note of the distances recorded in each image.

© P D LEE 2007, 2008 49
This is log 328 from the session. The crosshairs indicate the reading is from a lorry, and the reading is 22mph at a distance of 265.0m. Note that the lorry has just passed the 50mph sign, which is visible top right, and is approaching the lone cone, which is bottom left.
This is log 650 from this session. This time we have a lorry, which has just passed the 50mph sign and is approaching the lone cone. This time the speed reading is 36mph and the distance is 328.1m. Compare this image with the previous image, log 328. Both the lorries are in approximately the same position, but the distance produced by the system differs by 63.1m. Something is clearly wrong.

© P D LEE 2007, 2008 50
This is log 604 from the session. The car is approaching the lone cone, which is visible in front of the car. The group of cones are visible to the bottom left. The reading is 36mph at a distance of 266.5m. Compare this image, with the first image, log 328. The distance shown is the same as the lorry in log 328, but the car is clearly nearer the device. It is well passed the 50mph sign, which is no longer visible. Something is clearly wrong.
Another image. This is log 129. This lorry is further back than the car. The speed reading is 32mph at 330.7m. This distance reading is consistent with the reading from the car, log 604, and also with the lorry in log 650. However, this distance reading is not consistent with log 328.

© P D LEE 2007, 2008 51
This is log 468. The van is the indicated target and it is between the 50mph speed limit sign (the edge of which is just visible top right), and the lone cone. The speed reading is 30mph at a distance of 224.3m. This reading is not consistent with any of the previous images. Something is clearly wrong. If we use the pictures and the landmarks to place approximately where the vehicles are, and annotate their distances, we can see that the system has produced totally inconsistent readings.
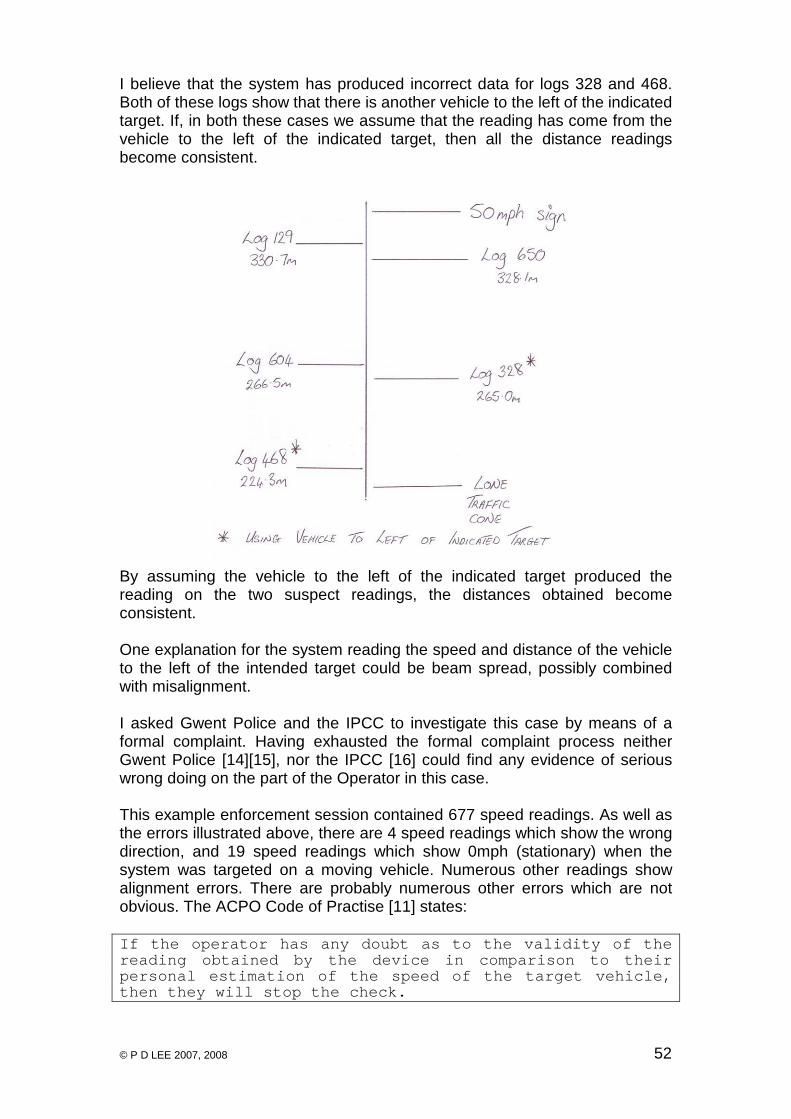
The distances should be in order. Clearly, they are not.
© P D LEE 2007, 2008 52
I believe that the system has produced incorrect data for logs 328 and 468. Both of these logs show that there is another vehicle to the left of the indicated target. If, in both these cases we assume that the reading has come from the vehicle to the left of the indicated target, then all the distance readings become consistent.
By assuming the vehicle to the left of the indicated target produced the reading on the two suspect readings, the distances obtained become consistent. One explanation for the system reading the speed and distance of the vehicle to the left of the intended target could be beam spread, possibly combined with misalignment. I asked Gwent Police and the IPCC to investigate this case by means of a formal complaint. Having exhausted the formal complaint process neither Gwent Police [14][15], nor the IPCC [16] could find any evidence of serious wrong doing on the part of the Operator in this case. This example enforcement session contained 677 speed readings. As well as the errors illustrated above, there are 4 speed readings which show the wrong direction, and 19 speed readings which show 0mph (stationary) when the system was targeted on a moving vehicle. Numerous other readings show alignment errors. There are probably numerous other errors which are not obvious. The ACPO Code of Practise [11] states: If the operator has any doubt as to the validity of the reading obtained by the device in comparison to the ir personal estimation of the speed of the target vehi cle, then they will stop the check.

© P D LEE 2007, 2008 53
On this tape 220 speed readings were above the threshold speed set by the operator for prosecution. These readings would probably have resulted in penalties or even driving bans. Some of the errors shown during this enforcement session are clear and obvious, other errors are probably present but not obvious. The whole tape should have been discarded. It was not. Gwent Police resisted disclosure of this video tape. It took two Court Orders (the first of which they ignored) before the tape was finally disclosed. Now the errors on the videotape have been exposed, it might surprise you to learn that no action of any sort has been taken. As far as I am aware, all convictions and penalties have been allowed to stand. Given that these errors can occur when apparently the operator has done nothing seriously wrong, how can these devices be used with any credibility? The Speed Meter Handbook [13] very clearly defines what constitutes a failure during type approval testing: FAILURE A speed meter will be considered to fail a type app roval test if it displays an incorrect reading of speed o utside the tolerance range of error or if it displays a sp eed when no measurement should be possible. The display of a blank screen or defined symbol in recognition of an incorrect reading is acceptable. Had the errors in this example occurred during type approval testing, the system would never have been given type approval.

© P D LEE 2007, 2008 54
Beam Spread Example 3 On 2 December 2006, I was part of a team given access to a UK Police Lastec system, which was mounted inside an enforcement van. The police operator, PC Howard Fordham, was invited to set the equipment up as per normal operational procedure. Trevor Hall, Secretary to ACPO Road Policing Enforcement Technology Committee was present to witness the tests. Once the operator was happy that he had set the equipment up correctly, we conducted a number of tests. One of the tests was to have a van pass a motorbike. We did a number of runs. Sometimes the motorbike was stationary and sometimes the motorbike was ridden at slow speed. The operator was told to take repeated speed readings of the motorbike. The idea was to produce the scenario shown in the following diagram:
Even though the operator was aiming for the motorbike, if the van was inside the laser beam, the system would give the speed of the van, not the speed of the motorbike. As expected, the system produced numerous errors, displaying the speed of the van, even though the operator had aimed at the motorbike.
The Police and ACPO were clearly surprised by the errors and immediately inspected the motorbike. They raised an objection about the perfectly legal reflector on the number plate of the motorbike. They insisted we repeated the tests without the reflector (making it illegal)! The same errors occurred when we repeated the tests.

© P D LEE 2007, 2008 55
The following images, show just a small number of the errors obtained.
A correct reading of 0mph aiming for the motorbike. The crosshairs are centred on a position just above and to the right of the motorbike. Remember that the device was aimed with the “red dot” in the sighting scope of the LTI 20.20 which does not have the accuracy nor the magnification shown in this photograph. For more information see “Aligning the “Crosshairs”: Relative Sizes” earlier in this report.
Three seconds later, with the crosshairs nearer to the motorbike than the previous reading, the system produces an incorrect reading. The speed shown is actually for the van, which was moving. The motorbike clearly was not moving. This is a classic beam spread error.

© P D LEE 2007, 2008 56
A correct reading of 0mph aiming for the motorbike. The crosshairs are centred on a position just above the motorbike.
Two seconds later, with the crosshairs pretty much in the same position, the system produces an incorrect reading. The speed shown is actually for the van, which was moving. The motorbike clearly was not moving. This is a classic beam spread error.

© P D LEE 2007, 2008 57
In this image the motorbike was being ridden at a constant slow speed. This is correct reading of –12mph aiming for the motorbike. The crosshairs are centred on the motorbike. Note the distance of 585.8m from the device.
Five seconds later, and with the crosshairs still on the motorbike, the system produces an incorrect reading. The speed shown is actually for the van, which was moving at a speed much faster than the motorbike. The distance recorded this time is 424.2m from the device - 161.6m closer than the previous reading. This is consistent with the reading coming from the van, even though the operator aimed for the motorbike, which was moving away. This is a classic beam spread error. These three examples shown demonstrate that even if the operator aims the device correctly, a speed reading for “something else” can be obtained. In the examples, the aiming point remained unchanged, but the speed recorded was from another vehicle. That other vehicle was not obstructing the camera view of the intended target, but it was obstructing the invisible laser beam. These errors occurred with a properly set up device being operated correctly by a trained operator.

© P D LEE 2007, 2008 58
Without the first reading of each pair, you would not be able to tell this had happened. In many cases on real enforcement sessions this could have happened without the operator noticing. Wrongful convictions are inevitable. For the above experiment, I also had a go at targeting the motorbike. The same errors occurred. The errors were so bad that at first I thought I was somehow aiming incorrectly. The video shows that I was aiming correctly, and in any event the same errors occurred with the trained operator using the system. However, there were some errors that were completely unexpected. These are shown later in this section, under “Unexplained Errors”. In these examples the operator was shooting straight down the road, often devices are operated across the road at an angle. This complicates the matter still further. The Speed Meter Handbook [13] very clearly defines what constitutes a failure during type approval testing: FAILURE A speed meter will be considered to fail a type app roval test if it displays an incorrect reading of speed o utside the tolerance range of error or if it displays a sp eed when no measurement should be possible. The display of a blank screen or defined symbol in recognition of an incorrect reading is acceptable. Had the errors in this example occurred during type approval testing, the system would never have been given type approval.

© P D LEE 2007, 2008 59
Beam Spread: Further Discoveries On 2 December 2006, I was part of a team given access to a UK Police Lastec system, which was mounted inside an enforcement van. As well as the predicted beam spread errors, as described in “Beam Spread Example 3” in the previous section of this report, two other discoveries were made. I will look at these discoveries in this section of the report.
Unexpected Errors Whilst conducting the beam spread tests at Elvington, a number of results were obtained which were not expected, and initially were without explanation. However, after looking at the video footage in some detail, I believe the errors are more complicated examples of the beam spread error mechanism I have described in this section of the report. To illustrate this, I will now look at one such example. The following two images were taken just 6 seconds apart, with the motorbike travelling at about 10mph and the van at about 65mph.
With the crosshairs on the motorbike, the system presents a speed of –12mph at a distance of 635.3m.

© P D LEE 2007, 2008 60
Less than 6 seconds later, and with the crosshairs still on the motorbike, the system incorrectly presents a speed of –66mph (the speed of the van). There can be no doubt that this is a gross error. In both cases the crosshairs are targeted on the motorbike, yet in one instance the speed of the motorbike is produced, and in the other instance the speed of the van is produced. I was very surprised to see these errors, and at first I wondered if I was not aiming the device correctly. However, the above error occurred with the Police Operator, PC Howard Fordham, operating the device. Analysis of the lastec video shows that the device was aimed correctly – the crosshairs were in exactly the same position on the motorbike. In the second instance, the device seems to have “ignored” the target the operator was aiming at, and presented the speed of a vehicle beyond the intended target. When aimed at the motorbike, the system produced the speed of another vehicle. If this occurred in a real enforcement session, the wrong driver would have been accused, and possibly convicted of speeding. The operator would be unaware of this effect having happened.

© P D LEE 2007, 2008 61
The Speed Meter Handbook [13] very clearly defines what constitutes a failure during type approval testing: FAILURE A speed meter will be considered to fail a type app roval test if it displays an incorrect reading of speed o utside the tolerance range of error or if it displays a sp eed when no measurement should be possible. The display of a blank screen or defined symbol in recognition of an incorrect reading is acceptable. Had the above error occurred during type approval testing, the system would never have been given type approval. So what happened to cause this error? Having studied this example in some detail, I believe that this could be a more complicated example of the beam spread error mechanism. It could well be that the device “locked on” to the wrong target long before the speed was displayed, when the van was nearer to the device than the motorbike. The video shows error codes displayed when the van was nearer to the device than the motorbike. This shows the operator was trying to obtain a speed reading at this point. The device then presented error codes continuously until a speed of –66mph was displayed. At this point the van was considerably further away than the motorbike. The device has a gating mechanism, which allows the device to ignore irrelevant reflections. It effectively “closes its eyes” to all reflections at times other than the time of the expected reflection from the acquired target. In other words, the device only looks for reflections around the time the reflection is due. It is therefore possible that when the operator first pulled the trigger, both vehicles were in the laser beam, and the device “locked on” to the closer vehicle – the van. Then, as the van overtook the motorbike, the device was unable to obtain a speed reading consistent with the speed of the target it had locked onto – because the motorbike was now closer and therefore preventing clean measurement data from the van. Once the van was far enough beyond the motorbike, the gating mechanism of the device made the motorbike invisible, and thus the device only “saw” reflections from the van, and finally obtained a speed consistent with the target it initially required. This theory could also explain another example which occurred during the testing at Elvington. This is shown overleaf.

© P D LEE 2007, 2008 62
A reading of –44mph with the crosshairs on the motorbike. The motorbike was travelling at around 10mph – the speed displayed is that of the van. The system has displayed an incorrect speed for the targeted vehicle.

© P D LEE 2007, 2008 63
Actual Beam Spread The following table, seen already, presents the manufacturer’s specification for the divergence of the laser beam, with the claimed divergence of 3 milli-radians. Distance from the Device (metres) Approx. Laser Beam Width (metres) 100 0.3 200 0.6 400 1.2 500 1.5 800 2.4 1000 3.0 However, after analysing the results of the Elvington tests, Dr. Clark concluded in his test report [17], that the divergence of the beam was more than the manufacturer’s specification. In his report, Dr. Claimed that at 200m the approximate beam with was about 0.88m – giving a divergence of about 4.4 milli-radians – more than a third over the manufacturer’s claimed divergence. The following table shows the claimed approximate beam widths, alongside approximate figures obtained by applying Dr. Clark’s measured divergence. Distance Claimed Laser Beam Width Actual Laser Beam Width 100 0.3 0.44 200 0.6 0.88 400 1.2 1.76 500 1.5 2.20 800 2.4 3.52 1000 3.0 4.40 The greater the divergence of the device, the more likely errors caused by beam spread effects become. Since the device “locks on” to targets, I believe that any “wobble” of the device will increase its “effective” divergence.

© P D LEE 2007, 2008 64
Reflection In this section of this report I will look at potential problems that are caused by the reflection of the laser beam.
Overview Just like visible light, the beam from a laser speed meter can be reflected. This gives rise to potential problems because the device has no idea what path the light arriving back has taken. Under normal circumstances, light returning back to the device has been reflected just once. In this case, the device can measure the distance to the target, and from a number of distance measurements, it can calculate a speed. The light has travelled in a straight line to the first reflection and back again. However, there is a mechanism where the device can generate a speed reading where the light has been reflected more than once. To understand the mechanism, it is first necessary to understand a few basic “categories” of reflection.
Diffuse Reflection Diffuse reflection occurs when light strikes a rough, dull surface. Here the light hits the surface and is scattered back in all directions. Some of the light may be reflected back the same way it came.
Diffuse Reflection

© P D LEE 2007, 2008 65
Specular Reflection Specular reflection occurs when light strikes a shiny, smooth surface (like a mirror). Most of the light is reflected onwards. The angle of reflection is equal to the angle of incidence – rather like a snooker ball bouncing off a side cushion. Specular reflections can occur when light strikes a surface at a low angle of incidence. Surfaces can include car panels, windows and areas of water – such as puddles, ponds and lakes.
Specular Reflection
Reflection from Scotchlite™ Like Surfaces Scotchlite™ is a special type of material which is designed to reflect most of the light back the way it came. Scotchlite™ can be found in road signs, traffic cones and car number plates.
Reflection from a Scotchlite™ like surface.

© P D LEE 2007, 2008 66
Reflection: An Error Mechanism Since the device has no idea of the path the light has taken from the device and back again, it cannot reject readings where more than one reflection has taken place. Consider the case where light from the laser device first strikes a shiny, smooth surface (specular reflection). It then travels on to a scotchlite™ surface and is reflected back the way it came. It then strikes the shiny, smooth surface again (specular reflection) and is sent back to the laser device. This is illustrated in the following diagram:
1. Light is sent out from the LTI 20-20 (top left) towards the target
(bottom). 2. The light strikes the target and is reflected onwards via a “mirror like”
specular reflection. 3. The light strikes a scotchlite™ like surface and is reflected back the
way it came. 4. The light strikes the target once more, and is once again reflected
onwards via a “mirror like” specular reflection. 5. The light finally reaches the device, which has no idea where it has
been. In this case the laser speed meter will not measure the distance to the target. Instead it will measure the distance to the scotchlite™ like surface via the (intended) target. When an (incorrect) distance is obtained in this manner, a spurious speed reading will be obtained. The speed is incorrect for the intended target, since the laser beam was reflected on to a second, incorrect target. The speed is also incorrect for the second target, because the path to the second target was not direct.

© P D LEE 2007, 2008 67
Real Examples of Reflection To prove that any reading in an enforcement session was caused by a reflection is almost impossible, since you cannot see where the laser beam is going. However it is possible to demonstrate a reflection error.
Reflection Example 1 On 2 December 2006, I was part of a team given access to a UK Police Lastec system, which was mounted inside an enforcement van. The police operator, PC Howard Fordham, was invited to set the equipment up as per normal operational procedure. Trevor Hall, Secretary to ACPO Road Policing Enforcement Technology Committee was present to witness the tests. Once the operator was happy that he had set the equipment up correctly, we conducted a number of tests. One of the tests was to have a stationary car act as a reflector onto a secondary target, and then see if a speed reading could be obtained by directing the laser at the stationary car. The following diagram shows the demonstration set up:
The LTI 20.20 was aimed at the stationary car as the van was driven past. If a speed reading was obtained from the stationary car it would show 0mph. If a speed reading was obtained via a reflection from the van it would show a non-zero speed. After a few runs, the following reading was obtained:

© P D LEE 2007, 2008 68
The car was stationary, it was the van that was moving. The reflection of the van can clearly be seen on the door panels of the car. This demonstration proves, without doubt, that it is possible to “fool” the device with a reflection. The device is unaware that multiple reflections have taken place and it produces a speed reading which is apparently for the car. This situation is more likely to occur in real enforcement sessions if the device is misaligned.
Reflection Example 2 In this example, the device was aimed the parked car, as indicated by the “red dot”. The car was clearly not moving.
The speed reading of 18mph was obtained from the black car via reflection.

© P D LEE 2007, 2008 69
Reflection Example 3 Without a driver, this car was clearly not moving.
This speed reading, of -23mph, was obtained via reflection from a motorbike.
The Speed Meter Handbook [13] very clearly defines what constitutes a failure during type approval testing: FAILURE A speed meter will be considered to fail a type app roval test if it displays an incorrect reading of speed o utside the tolerance range of error or if it displays a sp eed when no measurement should be possible. The display of a blank screen or defined symbol in recognition of an incorrect reading is acceptable.

© P D LEE 2007, 2008 70
Clarification of Reflection Examples The above reflection examples were all induced deliberately. They are not intended to show how reflection errors would occur in a real enforcement session. What they are intended to show, and what they do show very clearly, is that laser speed meters cannot detect and reject readings where reflections have taken place. Should reflection occur during an enforcement session, the device may not detect it, and an erroneous speed reading could result. Reflections may occur inadvertently due to misalignment. It is almost impossible to show that a reading taken during a real enforcement was affected by a reflection. It is clear the ticket offices do not pick up gross errors, let alone subtle errors such as those caused by reflections.

© P D LEE 2007, 2008 71

© P D LEE 2007, 2008 72
Slip In this section of the report, I will look at an effect which has become known as “slip”. I have also seen this effect referred to as “sweep”.
Overview Laser speed meters calculate speed from a series of distance measurements obtained by timing the “flight” of an infra-red pulse of light. The speed displayed is the rate of change of the measured distances. Whilst the measurement takes place, there is nothing to stop the operator moving the laser. By doing this, the operator affects the measured distances and also the measured speed. Devices “validate” the measured distances to ensure that they all look consistent. Some devices even claim to look at changes in the returned signal to detect movement of the laser. This works to a point, but since the device does not know where the light was reflected it cannot reject all panning errors. If the distances produce a constant movement and there are no big changes in returned signal, it is possible that an erroneous speed reading can be produced. This makes it possible to obtain speed readings from surfaces which are not moving at all, and it makes it possible to obtain incorrect speed readings from targets which are moving – such as vehicles. Consider a large flat object such as a wall or a road surface. These do not move, yet it is possible to obtain considerable speed readings from them. If the laser beam is moved over the object whilst a reading is taken the device will end up with a series of flight times which will all be different from each other. Providing you moved it smoothly during the measurement period (and this is not difficult) a speed reading can be obtained for an object that is not moving at all.

© P D LEE 2007, 2008 73
The following diagram illustrates this:
The diagram shows a flat surface at the bottom and an LTI 20.20 laser speed meter top left. To simplify, the diagram illustrates three distance measurements. Say that for the first reading of the laser beam is directed to the distant end of the flat surface. The result will be a large distance measurement. The laser beam is now panned along the surface towards the LTI 20.20. The second distance measurement obtained is smaller than the first reading - the light has to travel less far before reflection takes place. The third distance measured will be shorter still. From these readings the LTI 20.20 will believe that the target was moving and a speed reading will be produced – because the distance measurements obtained were continually decreasing. In fact the target was not moving at all. The laser beam was moving not the target. It was the movement of the laser beam that caused the speed reading. It is not possible for the device to eliminate such a reading as erroneous. This is because the distance measurements obtained by “slipping” the laser beam over a stationary wall in this way look like genuine distance measurements from a target moving at the same speed. The device cannot calculate absolute speed - it measures the relative speed between the laser and the target. If the laser is not held steady on the target, the true speed of the target will not be obtained. Consider the case where a device is misaligned and therefore missing the intended target. Say for example the crosshairs on the video picture have not been aligned and are being using as the targeting mechanism. The operator might believe he is tracking a moving vehicle, but in fact the laser beam could be “slipping” along a surface in front, behind or to the side of the vehicle. In this case the speed reading obtained will not be the speed of the vehicle but the speed at which the laser beam has passed over the stationary surface. This is one reason why device alignment is so critical. It also illustrates why evidence from a misaligned device should not be used to prosecute any drivers. Devices are quite capable of producing speed readings from stationary surfaces. This effect is not confined to stationary surfaces. If the laser reflection point on a vehicle changes during the measurement period, then an incorrect speed reading will be produced. In the case of an LTI 20.20, if the laser moves down the bonnet of a car during the measurement period, then the speed reading could be enough to result in incorrect conviction of the driver.
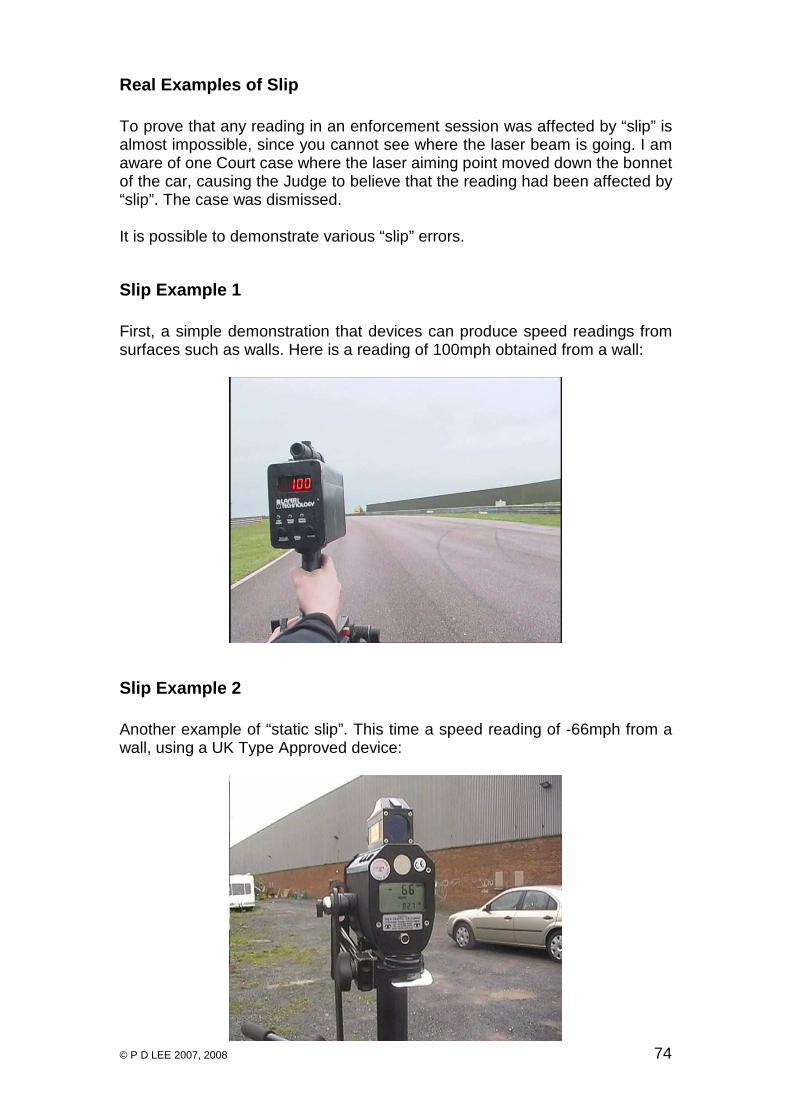
© P D LEE 2007, 2008 74
Real Examples of Slip To prove that any reading in an enforcement session was affected by “slip” is almost impossible, since you cannot see where the laser beam is going. I am aware of one Court case where the laser aiming point moved down the bonnet of the car, causing the Judge to believe that the reading had been affected by “slip”. The case was dismissed. It is possible to demonstrate various “slip” errors.
Slip Example 1 First, a simple demonstration that devices can produce speed readings from surfaces such as walls. Here is a reading of 100mph obtained from a wall:
Slip Example 2 Another example of “static slip”. This time a speed reading of -66mph from a wall, using a UK Type Approved device:

© P D LEE 2007, 2008 75
Slip Example 3 This is an example of an exaggerated speed reading produced by “slip”, albeit deliberately. The first speed reading was taken whilst I tried to keep the laser steady on the lorry, the second reading was taken whilst I deliberately “slipped” the laser beam down the side of the lorry:
This is the first reading. The device records a speed of 54mph with the view through the sighting scope showing the “red dot” aligned on the front of the lorry.
This is the second reading. The device now records a speed of 76mph with the view through the sighting scope showing the “red dot” aligned on the side of the lorry. The lorry had not accelerated by 22mph in a short distance uphill, the second reading was very wrong due to “slip”. I have demonstrated a similar errors for the BBC (Inside Out), and Dr. Michael Clark has demonstrated similar errors for ITV (Tonight).

© P D LEE 2007, 2008 76
Slip Example 4 On 2 December 2006, I was part of a team given access to a UK Police Lastec system, which was mounted inside an enforcement van. The police operator, PC Howard Fordham, was invited to set the equipment up as per normal operational procedure. Trevor Hall, Secretary to ACPO Road Policing Enforcement Technology Committee was present to witness the tests. Once the operator was happy that he had set the equipment up correctly, we conducted a number of tests. One of the tests was to prove that “slip” could happen on a UK, type approved, Police system, since the authorities had stated that “slip” would only occur on American devices. (Note that example 2, above, was on a UK type approved device).

© P D LEE 2007, 2008 77
We used a GPS device inside the vehicle to monitor the speed, and instructed the driver to drive at a steady speed of 30mph. By slipping the device, we obtained a speed of -36mph, whilst the GPS device showed the vehicle did not exceed 29mph:
Here the device produces a speed reading of –36mph. That is, 36mph travelling away from the laser speed meter.
A GPS device, inside the same vehicle, shows that it did not exceed 29mph.

© P D LEE 2007, 2008 78
Clarification of Slip Examples The above slip examples were all induced deliberately. They are not intended to show how “slip” errors would occur in a real enforcement session. What they are intended to show, and what they do show very clearly, is that laser speed meters cannot detect all panning errors. Should panning occur during an enforcement session, the device may not detect it, and an erroneous speed reading could result. They also show that where an operator tracks a vehicle with a misaligned device, such that the laser is actually striking some other surface, the devices are perfectly capable of producing a speed reading. This is not the speed of the intended target, but the speed at which the laser beam is moving over the surface. Such surfaces include walls and roads. It is almost impossible to show that a reading taken during a real enforcement was affected by slip. It is clear the ticket offices do not pick up gross errors, let alone subtle errors such as those caused by slip. I know of at least one case which was thrown out because the crosshairs showed a clear movement down the bonnet of a car whilst the speed reading was being taken. There are numerous scenarios where real slip errors could occur. A few of these are shown over the following pages.

© P D LEE 2007, 2008 79
Slip Scenario 1 This scenario simply involves movement of the laser over the target. Normally this would be unintentional on the part of the operator. To illustrate how this can happen, I will use a series of images, which we have already seen from a previous section of this report. In this example, movement of the vehicle housing the LTI 20.20 caused the laser to move. The operator could do nothing to stop this movement. It appears to have been caused by wind buffeting from passing vehicles.
In this first image, the crosshairs are aligned on the registration plate of the car. For the purpose of this example, imagine that due a small degree of misalignment, the laser is striking above the position indicated by the crosshairs – that is, at the far end of the bonnet, next to the windscreen. If we assume that at 211m the laser was 1m above the position indicated by the crosshairs, this would require the laser to be out of alignment with the crosshairs by just 0.27 degrees. Due to the movement of the housing vehicle, the aiming point changes, outside of the control of the operator:
The crosshairs are now aligned slightly below the registration plate. With the misalignment the laser would now be about half way down the bonnet.

© P D LEE 2007, 2008 80
The movement of the housing vehicle continues, and the aiming point changes still further, again, outside of the control of the operator:
The crosshairs are now centred on a position just below the car. With the misalignment the laser would now be at the front end of the bonnet. It is clearly possible that the movement could result in the laser moving from the far end of the bonnet to the front end of the bonnet during the measurement period – outside of the control of the operator. Looking correctly through the “ret dot” mechanism, which does not show this level of detail, the operator would be unaware of the movement. During the measurement period, the distances read by the laser could have advanced by the length of the bonnet during the measurement cycle. This adds the length of the bonnet to the distance the device “thinks” the car has travelled. That will result in an increased speed reading. If the car were travelling at 30mph and the bonnet was 1m in length, then the device could read up to around 37mph – enough to result in an incorrect prosecution. It is clear that movement can produce this effect. But what happens if the returned signal is right on the detection threshold. As the car approaches the reflection angle changes and so will the amount of returned signal. This could cause the detection point on the vehicle to move and could result in slip errors without the any movement of the device taking place. There is no way of proving this has happened. It is therefore not sufficient to look for movement of the crosshairs. The detection point on the vehicle could have moved because of changes in reflectivity and angle during the period in which the measurement took place. I do not have the facilities to analyse this effect.

© P D LEE 2007, 2008 81
Slip Scenario 2 This scenario occurs when the device is misaligned, and instead of remaining constant on the intended target it “slips” over a stationary surface, such as a road or a wall. To illustrate how this can happen, I will use a series of images, which we have already seen from a previous section of this report. In this example, the crosshairs are not centred on any vehicle. Instead they are moved along a series of highly reflective white lines in the road:
In this first image, the crosshairs are aligned on the white lines in the centre of the road. The horizontal crosshair bisects the middle “closed lane” sign in the central reservation.
This is an image taken about 0.4 seconds later. The crosshairs are still perfectly aligned on the white lines. The horizontal crosshair has now moved up to the top of the sign. This shows that the laser has moved further along the road.

© P D LEE 2007, 2008 82
This third image is taken 0.16 seconds after the second image, and about 0.56 seconds after the first image. It is clear the crosshairs have moved further up the road. Let us assume for the time being, that the laser was aligned with the crosshairs. If the trigger was pressed during the above movement, the laser could have tracked along the white lines and produced a speed reading. I have already shown, earlier in this section, that these devices are perfectly capable of doing that. As it turns out, the distance from the camera to the point on the road where the crosshairs are was about 700m in this instance. The movement at the device end to produce the movement of the crosshairs in the above images would be tiny – well under half of one degree – and such a movement could be caused simply by the operator pressing the trigger. Since the “red dot” obscures such detail at this range, the operator would be completely unaware of that was happening. Slip readings are the most difficult to prove. Even if the laser were visible, you still do not have any knowledge about the point where the return signal caused the detection threshold to be exceeded. I believe that readings affected by “slip” effect may be possible in real enforcement sessions. Dr. Clark claims to have a number of examples of “slip” in real enforcement sessions, but to date, the Police and CPS have prevented him from releasing them. I have not seen them.

© P D LEE 2007, 2008 83
Appendix 1 – References [1] Letter from Paul D. Lee to the Home Office, dated 1 May 2006. [2] Letter from Rob Coleman, Home Office to Paul D. Lee, dated 12 June 2006. Home Office reference T19712/6. [3] Letter from Paul D. Lee to the Home Office, dated 25 June 2006. [4] Letter from Jill Naylor, Home Office to Paul D. Lee, dated 11 October 2006, Home Office reference T19712/6. [5] DVD: Laser Speed Meters (Paul D. Lee/Dr. Michael Clark). [6] Unreliability of Laser Speed Meters – A Technical Commentary on [5] by Dr. Michael Clark, dated 23 October 2005. [7] Witness Statement of PC Porter (Gwent Police PC477) dated 18 April 2003. [8] LTI 20.20 TS/M Speedscope Operations Manual (Tele Traffic UK LTD). [9] LTI 20.20 Ultralyte 100 User Manual (Tele Traffic UK LTD). [10] LTI 20.20 Laser Speed Measurement Devices and Lastec Video System Operations Manual (Tele Traffic UK LTD). [11] Code of Practice for Operational Use of Road Policing Enforcement Technology Version 2.3, 25 November 2005 (ACPO). [12] Expert Report by F. G. Garratt and J. Dunne in the case of John Shardlow, dated 15 December 2004. [13] The Speed Meter Handbook (Fourth Edition), published by the Home Office Scientific Development Branch, publication number 15/05, by Dr. S. R. Lewis. [14] Letter from Inspector Fran Richley, Gwent Police, to Paul D. Lee, dated 25 October 2004. [15] Letter from Detective Chief Inspector C Norman, Gwent Police, to Paul D. Lee, dated 26 September 2006. [16] Letter from Kristin Vaughan, IPCC, to Paul D. Lee, dated 29 December 2006. [17] Report Concerning Tests Performed at Elvington Aerodrome on 2 December 2006, by Dr. Michael Clark, dated 6 Janaury 2007.