a musical approach to the teaching and performance of ... · a musical approach to the teaching and...
TRANSCRIPT

Central Washington UniversityScholarWorks@CWU
Electronic Theses Student Scholarship and Creative Works
1963
A Musical Approach to the Teaching andPerformance of PercussionJohn Frederick MowadCentral Washington University
Follow this and additional works at: http://digitalcommons.cwu.edu/etd
Part of the Educational Methods Commons, and the Teacher Education and ProfessionalDevelopment Commons
This Thesis is brought to you for free and open access by the Student Scholarship and Creative Works at ScholarWorks@CWU. It has been accepted forinclusion in Electronic Theses by an authorized administrator of ScholarWorks@CWU.
Recommended CitationMowad, John Frederick, "A Musical Approach to the Teaching and Performance of Percussion" (1963). Electronic Theses. Paper 332.

A MUSICAL APPROACH TO THE
TEACHING AND PERFORMANCE OF
PERCUSSION
A Thesis
Presented to
the Graduate Faculty
Central Washington State College
In Partial Fulfillment
of the Requirements for the Degree
Master of Education
by
John Frederick Moawad
August 1963

LP 577/, 3
AA C:, &' 1 ..,~....,.,
~·; : ~ • 'r-\. ! _
LU~L~ :~J '.U!~
..... 1. • ... r_~
l ...
'. '· .. ;,
...

APPROVED FOR THE GRADUATE FACULTY
________________________________
A. Christianson, CHAIRMAN
_________________________________
H. J. Eickhoff
_________________________________
R. D. Gustafson

TABLE OF CONTENTS
CHAPTER
I. THE PROBLEM • • • • • • • • • • • • • • • • • • •
II.
III.
IV•
Statement of the problem. • • • • • • • • • • •
Purpose of the study. • • • • • • • • • • • • •
Scope of the study. • • • • • • • • • • • • • •
TEACHING THE "LIKE-GRIP". • • • • • • • • • • • •
Justification of the traditional grip • • • • •
Justification for the "like-grip'1 •• • • • • •
Applying to the drums • • • • • • • • • • • • •
Achieving the grip. • • • • • • • • • • • • • •
Summary of the "like-grip". • •
Right hand illustrated. • • • •
• • • • • • • •
• • • • • • • •
Left hand illustrated • • • • • • • • • • • • •
Both sticks on the drum illustrated ••••••
THE SNARE DRUM RUDIMENTS. • • • • • • • • • • • •
Rudiments are basic to drumming • • • • • • • •
The problem of reading • • • • • • • • • • • •
THE RUDIMENTAL SYSTEM A.ND THE EDWARD B.
STRAIGHT SYSTEM DISCUSSED • • • • • • • •
A closer look at the Rudimental System.
A closer look at the Straight System. •
• • • •
• • • •
• • • •
PA.GE
1
1
1
1
3
3
3
4
5
5
6
7
8
10
10
10
12
12
13
CHAPTER
V. A RECOMMENDED APPROACH TO TEA.CHING SNARE
DRUM USING '!'HE LIKE-GRIP". • • • • • • • • • • •
Teaching the difficult roll ••••••••••
The speed of the roll. • • • • • • • • • • • •
The beginning student. • • • • • • • • • • • •
iv
PAGE
15 15 16
16
Follow-up for musical development. • • • • • • 18
Rules for Concert drumming • • • • • • • • • • 18
When to begin the percussion instruments • • • 20
VI. PRA.CTIC.AL INFORMATION ABOUT THE MOST COMMONLY
USED PERCUSSION INSTRUMENTS. • • • • • • • • • •
What is percussion tone? •••• • • • • • • •
Always strive for musical sounds • • • • • • •
The concert snare drum • • • • •
The concert bass drum. • • • • •
The timpani. • • • • • • • • • •
• • • • • • •
• • • • • • •
• • • • • • •
The chimes • • • • • • • • • • • • • • • • • •
The xylophone, marimba, and vibraphone ••••
A guide for the melodic mallet instruments ••
The crash cymbals. • • • • • • • • • • • • • •
The suspended cymbal • • • • • • • •
The hi-hat cymbals • • • • • • • • •
The gong • • • • • • • • • • • • • •
• • • • •
• • • • •
• • • • •
23
23
23
24
25 31
37
40
43
45
4?
49
49

CHAPTER
VII.
The Korean temple-blocks •• • • • • • • • • •
The tambourine. • • • • • • • • • • • • • • •
The castanets •
The triangle. •
• • • • • • • • • • • • • • •
• • • • • • • • • • • • • • •
Latin-American instruments. • • • • • • • • •
The Maracas. • • • • • • • • • • • • • • •
The Quijada De Burro (Jaw Bone) ••••••
The Guire (The Gourd) •• • • • • • • • • •
The Cencerro (Cow-Bell). • • • • • • • • •
La Cabaca (Beaded Gourd) • • • • • • • • •
The Tumbadora (Conga-Drum) • • • • • • • •
Bongos • • • • • • • • • • • • • • • • • •
Timba le s • • • • • • • • • • • • • • • • •
The Canza' • • • • • • • • • • • • • • . . The Clave s • • • • • • • • • • • • • • • •
Stage-band drums. • • • • • • • • • • • •••
• • • • • • • • • Backing a soloist • • • • •
THE MARCHING-PERCUSSION SECTION • • • • • • • •
The fast marching cadence • • • • • • • • • •
The execution of the music. • •
Cymbals in the marching band. •
Understanding the tenor drum. •
• • • • • • •
• • • • • • •
• • • • • • •
Recommended drums for marching. • • • • • • •
v
PAGE
50
51
5tt-54
56
56
57
57
57
57
57
57
58
58
58
59
60
62
64
65 66
67
69
CHAPTER
VIII. THE CONCERT PERCUSSION SECTION •• • • • • • • •
IX. THE PERCUSSION ENSEMBLE • • • • • • • • • • • •
x. THE SUMMARY • • • • • • • • • • • • • • • • • •
The Purpose. • • • • • • • • • • • • • • • •
The Scope •• • • •
Recommendations. •
BIBLIOGRAPHY • • • • • •••
• • • • • • • • • • • • •
• • • • • • • • • • • • •
• • • • • • • • • • • • •
vi
PAGE
71
73
76
76
76
77
78
CHAP!'ER I
I. THE PROBLEM
Statement 9! .:t!:m, problem. It is a commonly known
tact that a problem exists in selecting and teaching the
percussion instruments. Until now no one, to this writer's
knowledge, bas provided the instrumental music teacher
with a successful format or instruction.
J!Urpose .Qt .:tllt study. It is the purpose of this
study (1) to aid the teacher of instrumental music in de
veloping a musical approach to the teaching of snare drum
using a recommended "like-grip" for holding all sticks and
mallets; (2) to provide the teacher of instrumental music
with selected published methods and materials tor develop
ing musicianship; (3) to provide the instrumental music
teacher with teaching techniques covering selected and most
commonly used percussion instruments.
Sgope .Qt 1bi, study. The study presents teaching
techniques developed by the writer and provides the instru
mental music teacher with (1) a natural "like-grip" for
holding all sticks and mallets; (2). the values and applica
tions of Rudimental and Concert snare drumming; (3) selected
methods of instruction for attaining musical results; (4)
teaching and performance techniques covering the snare drum,

2
bass drum, timpani, melodic mallet instruments and the
traps-accessories; (5) ways of improving the percussion
ensemble, the concert-percussion section, and the march1ng
percuss1on section.
CHAPrER II
TEA.CHING THE "LIKE .. GRIP"
Justification t.21: .tb4 traditional &J:.1l2,. The
grip which has been a tradition in Rudimental drumming
seems to stem from early military drumming where the
drum was held by a drum sling causing the drum to slant
to the right. Naturally the left hand stick needed to be
held differently in order to strike the field drum prop
erly. This is the only basic reason for the unnatural left
hand grip.
One of the problems encountered in teaching the
snare drum to the beginning student is developing strength
and muscular control in the unnatural left hand grip. Too
much time is wasted on constantly correcting the left hand
and its bad habits. The more natural "like-grip" method,
that this writer advocates, will move much faster, allowing
more time for other needed technical and musical aspects ot
playing.
Justification !Q.l. .tm_ "lik8-grip." The "like-grip"
is a natural way of holding out the hand and picking up a
pencil or a stick. The "like-grip" is just that elementary.
The snare drum should be taught with both hands using the
"like-grip." This will make uniform the grip used for tim-
pan1, timbales, marimba, xylophone, vibraphone, and the
snare drum. All sticks and mallets would basically be held
the same tor all of the percussion instruments. This ef
fects a natural transfer not possible with the traditional
grip.
Sameness or sound is more easily achieved when both
sticks or mallets are dampened and gripped in the same man
ner. The muscle actions in the left and right hands, wrists
and arms will be alike. From this sameness in grip, angle,
and muscle action emanates what this writer thinks is a tar
more uniform musical sound.
The problem that may exist of producing primarily
snare drummers, should be eliminated in part by the "like
grip" approach. The percussion student can learn and
perform simultaneously on all instruments or the percussion
family rather than spending as many as five years learning
an unnatural grip for the snare drum. This is a comprehen
sive answer to the teaching or percussion instruments to
the student and its need is apparent.
ApplYing i,Q .tb§. drums• The concert snare drum should
be located waist high, held by a floor stand, in a horizon
tal position. It may be easier if the drum is slightly
tilted ~ from the player to compensate for the normal
body angle. If marching, the drum can be used with special
equipment which will place the drum in a horizontal position.
A slight tilting inwards is recommended while marching and
playing. In stage band drumming it will be round that mov
ing trom one drum to the other is considerably easier with
the 11 like-grip." Reaching a drum to the lef't when the lef't
stick is pointing to the right and other similar placement
problems are completely gone. This improved versatility is
a real benef'i t.
Achieying tm, &llll• The grip is accomplished by
holding both sticks as in the traditional right hand grip.
Be certain the stick is resting firmly in the joint of the
first finger. The thumb must be parallel w1 th. the stick,
and the stick must pivot between the thumb and first finger.
The other fingers then close loosely around the stick per
mitting it to pivot on the first finger. See illustrations
for correct lett and right positions, Figures 1 and 2.
The position of' both sticks on the snare drum should
f'orm a 30 to 3; degree angle instead of' the 90 degree angle
used with the traditional grip. See illustration tor correct
position of' the sticks on the snare drum, Figure 3, page a. Snmury .2t a "lik@-grip." When teaching the 11 like
grip" remember {l) the drum should be mounted so the playing
surface is horizontal to the player; (2) the hands grip the
sticks or mallets alike, with the covering and position of'

I
I I
I
I I
I I
I
(-~ ~ .
•• •
------ - ~-- --
Figure 1. Lett Position.
6

•• , .. ~ \ \
\ \ \ \
\ \ \ \
\
'
Ficure 2. Right Position.
7

Pigure 3. Position ot both sticks on the snare drum.
8
9
the sticks being exactly matched; (3) the muscular action or
both hands-wrists-arms must be the same; (~) practice both
hands first on bounce-rebound-roll and alternating single
stroke rolls as well; (5) practice always for unification
or sound.

CHAPTER III
THE SNARE DRUM RUDIMENTS
The basic snare drum rudiments are the result of a
project by the United States Army. A.round the year 1869
the army sent out a call for material to be used in a
training manual for field music. Gardiner A. Strube was
assigned the task of preparing in modern notation the
"jiggles" and "hen tracks" submitted by the army drummers
of that day. Thus, Strube earned for himself a sort of
immortality with his twenty-six basic military snare drum
rudiments.
Rug1;ments ~ basic .:.t.Q drumming. The twenty-six
snare drum rudiments, or first principles of snare drumming,
are now a tradition. They are an important part of a per
cussionist's training, and to neglect them would be a grave
error. Rudiments are to the percussionist what scales are
to the instrumentalist. Rudiments are used extensively in
martial music but must be used with great discretion in
concert-band or orchestra music. There is no substitute
for rudimental study in developing the flexibility and co
ordination that an excellent percussionist needs.
The problem of reading. The method of training from
snare drum rudiments alone is not as musically effective as
11
it might be. Many times drummers can play the rudiments
quite well. However once they are asked to play the writ
ten music set before them, it is quite amazing how little
they can read in relationship to the technique that they
have developed in their hands. Rudiments should be taught
as a means to an end. The rudiments are good only to the
extent that they teach the drummer how to execute the music.
The percussionist must learn to read music. The student
who does not read music will find no place in the band or
orchestra.
CHA.PI'ER IV
THE RUDIMENTAL SYSTEM
AND THE
EDWARD B. STR!IGHT SYSTEM DISCUSSED
Most of the snare drum methods are based primarily
upon the mastery of the thirteen or twenty-six standard
snare drum rudiments. An opposite approach is to be found
in the Straight System of drumming. His system is based
upon these basic disciplines: (1) Begin every measure with
the right hand. (2) Use the right hand on counts one and
two in every measure. (3) Flam with the right hand. (4)
Commence rolls with the right hand. (5) Play the same
rhythm the same way each time it occurs. The significant
point of difference in the two systems is that Straight
maintains that the same rhythm must always be played in the
same way, while the Rudimental System primarily states
to alternate.
A clo§er look il.:t the Rudimegtal System. The Rudi
mental System finds its foundation upon the Thirteen Essen
.:tial Rudiment~ as codified by the National Association of
Rudimental Drummers. Twenty-six rudiments are listed but
the N.A..R.D. requires only the execution of the first thir
teen played open-close-open for membership. These rudiments
13
are the equivalent of scales for the melodic instruments.
They form rhythmic-technical solutions for application in
the execution of the printed music. Students of rudiments
are able to apply pre-learned rhythmic patterns to music,
and they read by grouping rather than by individual notes.
This is called hand to hand drumming and places a very high
premium on ambidexterity. The basic philosophy of rudi
mental drumming would be: Learn the rudiments; learn to
read music patterns; apply the rudiments to the musical
score; alternate and play hand to hand.
A closer l.Q.QJs a,.:t ~ Straight System. The Straight
System emphasizes the use of the right or preferred hand.
All rolls are executed beginning and ending with the right
or preferred hand. Each measure begins with the right hand.
Most flams are executed with the right hand. All repeated
figures are always played with the same sticking pattern.
Ambidexterity is not basic to this system. Only three rudi
ments are used: flam, roll, and drag. The unity or sameness
of sound is the predominant feature of this snare-drumming
system. The Straight System considers only the alternating
strokes, while the Rud.imental System accounts for each note.
The Straight System provides the percussionist with a more
intensive musical background by approaching percussion
learning through logically developed reading material.

14
Several pages are devoted to a very plausible philosophy or
professional ethics. Each exercise is preceded by one page
of commentary explaining the problem and then suggesting a
solution. The following chart may be helpful for clarif i
cation of roll designation:
Straight 3 stroke roll 5 stroke roll 7 stroke roll 9 stroke roll
(a) Rudimental 5 stroke roll 9 stroke roll
13 stroke roll 17 stroke roll
This writer highly recommends 11.Ml h,esson File, and
Analvsi§ Qt 618 ~ by Mr. Straight. In most teaching
situations these books would not be good material for the
beginning student. However, for the advanced student or
snare drumming they constitute first-rate books of instruc
tion. The late Mr. Straight' s dedication, "Yours for better
drumming," certainly is true, for these two books offer the
second or third year student many enjoyable hours of snare
drum study. At the same time, they help to make the student
most musically competent.
CHAPTER V
A RECOMMENDED APPROACH TO TEACHING SNARE DRUM
USING THE "LIKE-GRIPtt
It is recommended that the concert-snare drum be the
first instrument of the percussion family to be studied.
Two schools of snare drumming exist which only too often
are not compatible with each other. This writer believes
it necessary that the student be taught both rudimental and
concert-orchestral techniques, since both schools do have
great value and will contributB to each other. However, the
concert style of snare drumming is preferred in band and
orchestra. This style of drumming best matches and blends
with the sound of an ensemble.
Teaching ..:t.b§. difficult 1:.Ql,l. The most difficult of
all executions on the snare drum is the even long or closed
roll. The student must be taught both the rudimental and
the concert rolls. The rudimental roll consists of two beats
for each stick. This is made up of a stroke (wrist) and a
tap (bounce). No matter what the tempo, the two beats should
always be audible. It is incorrect to add more beats or
bounces when the roll is closed. The concert-orchestral roll
will give the aural illusion of sustained sound, because (it
is an illusion) the ear cannot hear as fast as the sticks
bounce. This roll differs completely from the rudimental
roll in that there are more bounces of the stick, and the
individual beats are not controlled so much. The concert
roll will contain, for the most part, about three bounces
16
in each stick. Since the primary beat is the strongest, the
remaining two beats are considerably weaker because they are
all bounce. Rolling the sticks toward the center after the
primary beat will produce strength in the sticks and should
compensate the bounces. It is necessary to keep the spaces
between bounces as large as possible because the spaces be
tween, rather than the points themselves are most important.
Tile. speed Qi ~ .t.Q.ll. The speed of the roll is
determined by the tempo and the style of the music being
played. The basic factor in determining the proper roll is
tempo. All rolls can be played basically in some form or
groups of three or four pulses per beat. In other words,
all rolls are derived from the basic duple or triple pulsa
tion. If a soft sound is desired a slow speed should be
used; for intense sound a fast speed is used. The more
strokes, the more intensity of sound; the fewer strokes, the
less intensity achieved. On occasion, when an added "push"
is desired the roll should be started with both sticks at the
same time.
~ beginning student. The student is to be taught

the "like-grip" approach of holding the sticks. The stu
dent will need (1) one pair of drum sticks, 2S for average
student and 2B if the student has small hands; (2) a con
cert snare drum and stand or some practice surface that is
horizontal (not slanted to the left or right).
The student is introduced to the sticks and their
use in producing the single blow, tap, and stroke as used
in the single stroke roll and hand to hand playing. The
student will first study from Slingerland IU:Ym Method Book
Number l by Haskell Harr. This book will give the student
a concept of alternating the drum sticks, and at the same
time the student will learn to read note values. The be
ginning stages of snare drumming must be slow and thorough
if the student is to learn the proper concept of drumming.
17
After the student has learned the single stroke
material in Book HQ. l, it is imperative that Slingerland
Drum Method ~ Number ~ by Haskell Harr be introduced.
From this book the basic snare drum rudiments are studied.
The student should complete this drum method in the order in
which the rudiments and exercises are presented.
The student should be able to complete the Harr
methods in one school year with intense study and practice.
In this beginning stage the student has developed a tech
nique of playing and reading the traditional drum rudiments.

18
The ttlike-grip" has been substituted for traditional grip.
Otherwise the sound and style of the student is truly rudi-
mental.
Follow-Jm for musical c!evelopment. The student will
study from Benjamin Podemski's Standard Snare Drum :Method
which will achieve a good foundation in correct concert band
or orchestra snare drum playing. This method will direct
the player towards a truly artistic musical style of playing
the snare drum. In this stage of development the student
is to learn a set of rules contrary to the rudimental disci
pline. These rules are necessary for likeness of sound and
musical results in concert snare drumming.
GENERAL RULES E.Q.B CONCERT DRUMMING l1f ~ Alm ORCHESTRA:
I. There are only three musically essential drum rudiments: the closed roll, the single stroke roll, and the flam.
II. Always play the downbeat of every measure with the right or leading hand. Continue alternating RLRL etc., and omit the hand for which a rest has been substituted.
III. Always play the same rhythms with the same sticking. Remember, it is always best to analyze the sticking and try it several ways for the desired musical sound and best effect. The important discipline in correct concert drumming is to attain the best musical sound regardless of the sticking employed.
N. .Always play flams together, that is bring down both sticks at the same time. Remember, the real purpose of a flam in concert drumming is to provide a broad, legato effect. ~ single

stroke on the snare drum will provide a staccato effect. Playing flams with an open anticipated grace note is incorrect except in Rudimental contest playing.
When applying these four rules to concert drumming, the
student must be able to hear and learn to match the sounds
of the ensemble. Teaching from the recommended follow-up
methods will establish a solid foundation in the reading
and execution of duple and triple meter with a clean cut
and musically correct concert technique.
The following suggestions are offered for teaching
the follow-up methods to the student: (1) Cover all mat
erial slowly and thoroughly. (2) Introduce the Podemski
19
book to the student and review note values, musical terms,
and expressions beginning on page 6, making certain the stu
dent has a clear understanding of them and their use in
music. (3) Begin lessons starting on page 12 and carefully
practice the material from pages 12 - 21 through to page 21.
(4) Continue working from the Podemski book starting with
exercise No. 1 on page 22. When the student completes exer
cise No. 12 in this section of the book, then also start
teaching from Edward ~. Straight's Book NQ. 1 7 ~ I.esson
File. The student needs continued work in duple meter.
Work through The I@sson File to its end with much careful
attention to the instructions which precede each new lesson.
(5) When the student progresses to the end of exercise
No. 21 in Podemski's book, Edward~. Straight's Book !'!Q. ~'
Analysis Qt 618 Time should be introduced. This book is
needed because Podemski's book does not provide ternary
sticking. Apply Straight's sticking to the Podemski book
in ternary meter. Be certain that the exercises in all of
the books are properly sticked according to the right hand
rule and the Straight System. (6) Individual students will
progress at different rates, depending on their mental
ability and muscular dexterity. However, as in the study
20
of any other instrument, it requires a lot of perspiration
and perseverance if the student is to learn properly. The
student should complete exercise No. 47 in the Podemski book
midway through the second year of lessons. At this time,
Edward B. Straight's Book l'!Q. l, Syncopated Rhytbms should be
introduced. Keep working from all four books and complete
them only after the student has mastered each and every les
son. (8) This course of study will take about three years
of intense study. Assuming the student started private les
sons in the sixth grade of school, the course would be com
pleted sometime during the ninth grade of school. With this
background and musical discipline in playing the snare drum,
the student can now musically begin the study of the timpani
or melodic mallet instruments.
~ .:t.Q begin the percussion instruments. A very
practical percussion course of study that is recommended
by this writer consists of three years of private lessons
on the snare drum. lt the same time the student is also
21
a member of beginning and intermediate bands. In beginning
and intermediate band classes the student learns basic bass
drum and cymbal techniques. The ninth grade year is spent
on the melodic mallet instruments such as bells, vibraphone,
xylophone or marimba. During the tenth grade the student
is taught timpani. .All of the traps-accessories are taught
the student as they are called for in the music.
The completion of this course of study insures each
student a rudimental style and concert style, a knowledge
of snare drumming, and a working knowledge of the melodic
mallet instruments and timpani. Any percussion student may
continue with private lessons on any of these instruments.
It will be found that one student will want to study tim
pani, another mallets, and another snare drum. Advanced
studies can be offered these students, and they can be per
mitted to really specialize.
By using this recommended approach, all students have
developed a working musical knowledge of the instruments by
having completed a comprehensive course of instruction.
With the same care and consideration which is lavished on
other sections of the band and the orchestra, the percussion
22
section can be changed from an often sadly neglected section
to the firm foundation upon which fine musical organizations
are built.
For the advanced snare drummer, supplementary and
advanced reading material is here listed:
1. Christian, Bobby. Modern ~ Stud!es For Sight Reading. New York: Creative Music.
2. Stone, George L. Accents Awl Rebound.~· George B. Stone and Sons, Inc., 193 •
Boston:
Stone, George L. Stick Cont301. Boston: George B. Stone and Sons, Inc., 193 •
CHAPTER VI
PRACTICAL INFORMATION ABOUT
THE MOST COMMONLY USED PERCUSSION INSTRUMENTS
~ ~ percussion ~? The modern piano is prob
ably the finest percussive instrument. The hammer action
of the piano is the clue to the proper production of per
cussion tone of any 11 struck11 instrument. Regardless of
the speed and intensity with which one strikes the piano
key, the hammer strikes the metal string and "gets away."
This is the basic answer to the concept of percussion
tone. When this is applied to the other percussion instru
ments the action of the wrist and its motion are most
important. The arm and the fingers have their place in
the handling of a stick or mallet, but the wrist controls
the lightness and speed of all strokes of the stick or
mallet.
Always strive !.Ql: musical soW)ds. The percussion
instruments are naturally obtrusive. This obtrusive sowid
can be overcome by correct placement of the sticks or mal
lets on the vibrating surface. The ~ .Qf. speed with which
the stick-mallet leaves the vibrating surface is a deter
mining factor for good percussive sowid. If a very staccato
sound is desired then a quick motion is made. If the motion
is slower, a more legato sound will be obtained. The angle
24
at which an instrument is struck will produce different
sounds. The glancing circular blow will produce a smoother
tone than one which is perpendicular. The end result is a
more musical sound.
The concert snare ~· The most practical size of
snare drum is the 6t11 x 14" drum. A drum of this size is
ideal for all concert use because it has a good sound and
adequate volume with crisp tone. This writer prefers a
well-constructed, metal-shelled drum over the wooden
shelled drum. The brass drum produces a more responsive
sound. The brass shell is available plated with nickel or
chrome, but is made of brass and not of steel.
Drum heads are made from calfskin or plastic. There
are advantages to both of these heads. With calfskin heads
more minute and subtle adjustment of head tension can be
attained, resulting in more percussive color. The greatest
advantage of plastic heads is that they are not affected by
weather conditions. This writer believes that a combination
of the two with a calfskin professional batter head and a
plastic professional snare head on a good brass drum shell
will produce best overall sound and projection. With the
addition of 16 coiled wire snares and a parallel strainer
this drum will have the desired crisp and responsive sound.
Uneven tension on the drum heads will result in poor

sound and sluggish stick response. It takes just a little
more time to procure even head tension, but it can be done
systematically and is well worth the trouble. The batter
head should have the same sound throughout the outer edge
of the head near the rim. It is not possible to tighten
the snare head for the same results because the two snare
"beds" place a greater tension at those points than at
others. Most drummers agree that the batter head should
have more tension than the snare head. They further con
tend that the snare head should not have as much tension
applied as the batter head, for it must assist the snares
25
in vibrating. This writer thinks the opposite is more near
ly true. Always tighten the snare head as much as possible
without breaking it, and then adjust the snares and batter
head for a good response. A loose or even semi-loose snare
head does not give a crisp, sensitive response, so it be-
comes necessary to have the snare head very tight for good
snare drum tone. The final difference between the two heads
and their tension is determined by the style of playing and
the weight of the sticks.
~ goncert ~ ~. The player of the bass drum
should have a musical background with a finely developed
sense of timing, for he is the backbone of the ensemble. A
snare drum background is essential. The bass drum should
sound "bass", but the sound should have a nboom", not a
roar or rumble. The size this writer recommends would be
between 14tt x 3211 and 16 11 x 36 11 for a satisfactory boom.
26
If money is available, the pearl finishes add much to the
appearance and will last longer. Separate tension should be
specified with calfskin heads. The bass drum stand should
be of sturdy construction either of wood or steel. The
drum must not be allowed to slide around when struck a
hard "blow." The stand must place the drum at a height
which requires the player to reach up slightly.
The mallets at the players disposal should consist
of two double-and beaters made of lamb's wool. One beater
should be a little heavier for heavy symphonic selections.
The lighter beater should be used with marches and lighter
numbers. The player should also have a pair of large tim
pani mallets to execute long single stroke rolls on the
drum. The double-end beater is preferable because quite
often the bass drummer is required to play a roll without
time to reach for the timpani mallets. All mallets and beat-
ers should be made to meet the specification of the performer
and the size of the bass drum.
The bass drum must be tuned to produce a boom of
indefinite pitch. 1..fany percussionists prefer a dead non
obtrusive sound from the bass drum. Varied sounds can be

achieved by adding strips of paper or feathers from a
pillow to the inside of the drum. A very exciting effect
can be attained by this 11 dead 11 sound especially for mar-
27
tial music. The bass drum has many theories concerning the
actual tuning of a bass drum, such as tuning the heads in
perfect fourths or fifths. There is no specific pitch or
true pitch for the bass drum. The pitch should be deter
mined by the particular ensemble in which the drum is used.
It should sound neither too high nor too low, but such that
it will blend with the ensemble and not create an obvious
sound, revealing its presence. As the timpanist, a sensi
tive bass drummer changes the pitch of the drum to the
register in which the ensemble happens to be playing through
out a performance.
Controlling the pitch of the bass drum is accom
plished by placing the left hand on the left drum head, and
then by changing the pressure exerted on the head the tone
or pitch can be controlled. The right knee placed on the
head which is being played can be used in the same manner.
The opposite technique of playing would be true of the left
handed bass drummer. With practice and experience the
player will discover techniques of controlling pitch by the
amount of pressure applied to the drum.heads with the hand
and knee. Various pitches and tone qualities are inherent

28
in the bass drum, and with the proper position of the beater
and the striking technique employed to the head along with
the pressure exerted the bass drum becomes a very musical
instrument.
Only a certain degree of tension can be applied to
the large heads of a bass drum; for this reason the drum is
subject to sudden changes in pitch, particularly in damp
weather. Temperature and humidity changes create difficulty
in maintaining and holding a good tone. The calfskin heads
are more sensitive and produce the best musical results;
however the plastic drumheads will not be affected by the
changes in weather. The plastic head will produce some
difference in tone; therefore the player will need to adjust
and compensate when applying pressure with the hand and knee
technique.
The bass drummer should memorize the music for a
concert. With the music memorized, he can concentrate on
how he plays and will be able to listen to the rest of the
ensemble while watching the director. By listening to the
musical colors and phrase patterns of the ensemble, the bass
drummer will learn how to make the bass drum blend musically
with the rest of the ensemble. It is a requisite of bass
drumming that the player understand the inherent sluggishness
of the drum. He must learn to stay on top of the beat. On
29
occasion, when acoustics require it, the player should play
ahead or anticipate the beat slightly in order to keep the
tempo from dragging.
In maintaining a steady beat, the head of the drum
should be struck in an upward circular motion as if pluck
ing a harp and drawing the tone from within the drum. Re
member that tone and pitch are controlled with the use of
the hand and the knee. A rule to remember is that if the
bass line of a composition ascends in pitch so should the
bass drum, and if it descends so should the bass drum.
The bass drum should be struck on the upper third of
the head. The center is used for specific effects, such as
a loud "bomb" or "thud", and is struck in a downward or
parallel motion. For music in the dance style, play in the
dead center of the head and muffle the opposite head with
the left palm.
The player should be familiar with such terms as
legato or staccato. Musical terms should be applied to the
drums as they are to the brass and woodwind instruments. It
is in the soft, legato sections that the heavy wool beater
is used. The reason is that less effort is required in ob
taining a big tone because of the weight of the beater.
The staccato passages requiring speed should be performed
with the lighter of the two wool beaters because it requires
less effort in maintaining speed. For a crack or shot ef
fect, a hard felt or wooden beater should be used striking
dead center. For a "roar" strike hard near the edge with
the large wool beater.
30
The accent should be played with the intensity which
produces this effect. Most bass drummers have a tendency
to overdo the accent by striking a hard blow to the center
of the drumhead. Instead, the player should continue to
play on the upper third of the head and apply a little more
pressure to the upward stroke, thus creating the accent.
To produce a roll, whether using timpani mallets or
a double-ended bass drum beater, play close to the rim of
the drum. Here the heavier tension causes the beater or
mallets to bounce. Tilting the bass drum will change the
tone. However with timpani mallets the drum is easier to
play in the tilted position.
Suggestions for maintaining the bass drum: (1) After
every rehearsal the rods should be loosened so that all ten
sion is released from the heads. This will prevent the wood
en hoops from warping. (2) The drum should be taken apart
and cleaned at least once a year. Dust accumulates between
the hoops and heads, causing much difficulty when trying
to distribute even head tension. Using a damp cloth will
remove dust and particles. (3) The rods should be removed
31
and oiled at least six times a year, a safeguard against
rusting. (4) Applying a damp cloth to calfskin drumheads
at least three or four times a year will keep them "alive. n
By using varied beaters, mallets, different striking
spots, and tilting to various angles, other effects can be
obtained from the bass drum. Achieving the proper musical
effect at the right time will rest on the musical discre
tion of the performer and his director.
Iba. timpani. One of the most important members of
band and orchestra is the timpanist. Considering the demands
placed on his abilities, it is essential that a solid founda
tion be laid for his full development.
Perhaps too often the student timpanist in the school
band or orchestra is left to shift for himself after a brief
introduction to the instrument by his director. What the
student learns is usually from his director who has little
or no knowledge of the timpani himself. The following infor
mation is designed to broaden the knowledge of timpani for
both the teacher and the student.
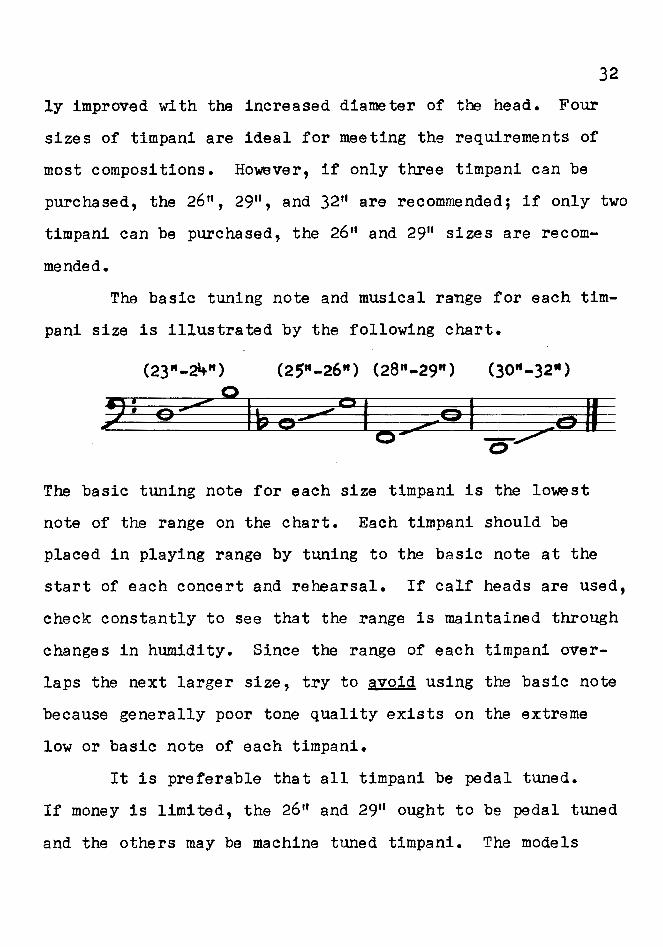
The standard sizes of timpani are 23", 25", 28 11 and
30". This writer personally prefers the larger sizes of
timpani because they will provide improved tone quality and
an expanded range for the timpanist. The sizes preferred
are the 24", 26 11 , 29u, and 3211 • The low tones will be great-
32
ly improved with the increased diameter of the head. Four
sizes of timpani are ideal for meeting the requirements of
most compositions. However, if only three timpani can be
purchased, the 26 11 , 2911 , and 32" are recommended; if only two
timpani can be purchased, the 26 11 and 2911 sizes are recom
mended.
The basic tuning note and musical range for each tim
pani size is illustrated by the following chart.
(23"-24") (2~"-26") (28"-29") (30"-32•) 0
The basic tuning note for each size timpani is the lowest
note of the range on the chart. Each timpani should be
placed in playing range by tuning to the basic note at the
start of each concert and rehearsal. If calf heads are used,
check constantly to see that the range is maintained through
changes in humidity. Since the range of each timpani over
laps the next larger size, try to §Void using the basic note
because generally poor tone quality exists on the extreme
low or basic note of each timpani.
It is preferable that all timpani be pedal tuned.
If money is limited, the 26" and 2911 ought to be pedal tuned
and the others may be machine tuned timpani. The models
33
without tuning handles obstructing mallet technique and with
a mechanical locking clutch pedal mechanism are highly re
commended as pedal timpani.
Plastic heads produce good sound, and this writer
recommends their use. Plastic heads offer many advantages
over the calfskin head: (1) easier tuning; (2) little wear
and tear; (3) lower cost; (4) not bothered by changes in
weather. It cannot be disputed that the musical tone of an
11 ideal 11 calf head is superior. The teacher never has the
opportunity to purchase or at least finds it extremely diffi
cult to get that "ideal" calfskin head. The tone, resonance,
and response of the plastic head is very satisfactory.
Even tension must exist on the timpani heads if clear
and resonant tone is to be achieved. If the timpani is the • type with tuning handles, be certain that they are even.
Even to the eye will usually be even to the sound. After
the handles are set in this fashion, they can be turned
evenly in either direction and the head will go up or down
in pitch, evenly and clearly. This is the only answer to
good clear tone in tuning. Only after the head is evenly
tuned can the pedal tuning technique be effective.
Unless the player has a good ear, uneven intonation
will result. The student-player must work for good pitch.
The timpanist must be able to hear and recognize the inter-
vals in bass clef. ~chromatic pitch pipe can be used in
the developing of the inner ear to help the student, but
the pitch pipe must not be allowed to be a "crutch. 11
In tuning of the timpani, it is always best to ap
proach the note wanted from below. For example, think the
note desired, release the pedal or handle to the fundamen
tal or basic note then tune to the desired note. This will
eliminate any chance of the head sticking and will produce
cleaner intonation. When tuning more than one drum to new
pitches it is best to tune the lowest note first, then think
up by interval to the pitch of the other drums.
Testing the pitch of the timpani head is best achiev
ed by either striking the head softly with the mallet or by
flipping the head with the second finger. The mallet method
will give a more accurate tone. One word of caution: do not
strike the head too often when tuning the drum as this may
tax the ear, and after a short period of time the ear may
not know what to listen for. Notice that the pitch sounds
one way with the ear right over the timpani head and another
way a little distance away from the head. Learn to adjust
for this difference in the dispensation of the overtones from
the timpani he ad.
The most difficult technique of tuning timpani is to
be able to adjust the heads to new tones while the ensemble

is still playing in the old key. Complete concentration
must exist or there will be pitch trouble.
35
This writer has timpani students sit on a drummer's
throne while performing on the timpani. The throne must
have a swivel top or seat which will enable the player to
turn to each respective timpani. This sitting position
proves highly effective when using all pedal timpani on fast
moving passages such as a bass line of a march.
The quality of tone produced is determined by the
musical ability of the player and his choice of mallets.
Much care should be taken in the choice of mallets. The
felt covered ball which is sewn evenly and firmly around the
core with no overlap is the best overall mallet. This will
produce a full round tone and is a good all-purpose mallet.
The large lamb's wool mallets are fine for bass drum rolls
but are inarticulate when used on the timpani. Hard, felt
mallets are used when a clean, crisp tone is desired from
the timpani. Hard felt or wood mallets produce a louder tone,
but the player must be careful the tone quality does not be
come distorted and the pitch obviated.
In performance the fine timpanist uses several pairs
of mallets in ~ composition. The player must learn to
judge the proper mallet sound required as the music warrants
it. Since no definite signs in the music tell the student-

player to change mallets, such changes are usually left to
the discretion of the director and the student.
The striking spot on the timpani is approximately
three inches from the edge of the drum closest to the player.
There is some variance, depending on the size of the drum
and the sound desired. The player must remember always to
"draw" the tone from within the drum. Play the drum in a
continuous circular motion--don't just 11 hit it."
The timpanist must use good common sense when inter
preting the music before him. He must seek out what the
composer really intended. The director that insists that
every note be played exactly as written is sadly mistaken.
The ringing sound of the timpani is very much inherent in
this instrument. Generally, the timpanist should play every
part with a ringing quality of sound. A rule to follow is
always match the sound of the ensemble and never dampen un
less a general release occurs. Another rule concerns the
dampening technique when passing between two or more timpani.
The tone to be struck last in a phrase should be the one to
ring; the preceding notes up to this one should be dampened.
If all are allowed to ring, a highly unmusical roar will re
sult.
To achieve the best possible tone from timpani, the
roll must be kept under careful control when moving from one
size drum to the other. A good timpani roll is not extremely
37
fast. The speed of the mallets vary slightly on tones of
different pitch. Low F and G tones on the larger drum re
quire a roll which is slower than the D taken on the smaller
drum.
The lower tones do not need as much force from the
mallets. Higher pitches demand a faster roll and more force
in order to keep the head in an even, constant vibration.
The timpanist must learn to make slight adjustment of speed
on almost every tone of different pitch. The only real
solution is the ear, together with considerable sensitivity
and physical finesse. The difficulties in playing timpani
are more musical than technical. A more musical approach
should be employed. This writer sincerely believes the pre
ceding comments and suggestions will serve to better achieve
that end.
Recommended Timpani Methods:
1. Goodman, Saul. Moderu :Method EQ.!: Timpani. New York: Mills Music Inc.
2. Friese, Alfred and Alexander Lepak. ~Alfred Friese Timpani Method. New York: Henry Adler, Inc.
(The books recommended for timpani will give the
student good basic reading and tuning exercises together
with ear training and technique study.)
~ chimes. Chimes are a very colorful mallet percus
sion instrument. Although chimes have frequently been used
with sacred music, they should not be limited strictly to

38
this type of literature. Chime parts are written in treble
clef. The normal range of tubular concert chimes is one and
one-half octaves, C-F, chromatic, with double rows. The
chimes are built with the natural tones in front and the
sharps raised in the back row to facilitate playing.
Concert chimes are constructed in three different
diameters, 111 , lf", and It", the most frequently used size
being the lf" chimes. The lt" diameter chimes produce sat
isfactory tonal depth, resonance, and carrying power for
most bands and orchestras.
The register of a regulation set of eighteen concert
chimes is from C in the third space of the treble clef to
F above the staff. Chimes have an overtone series which is
different from the overtone pattern of other instruments.
Generally speaking, other instruments have true harmonics,
being usually spaced in fifths, fourths, thirds, etc., above
the fundamental tone and are hardly perceptible. In chimes
the written pitch is the fourth overtone of the series,
which is the dominant tone. Instead of being heard with
true harmonics as in most other instruments, it has three
lower overtones and any number above the fundamental with
none of the overtones in any true harmonic relationship.
This is a natural characteristic of the special brass alloy
used in the construction of the chime tubes.

39
The lowest played note for chimes is written C4
(middle C on the piano keyboard) the overtone structure
causes the note to sound one octave higher. When playing
or writing for chimes this overtone structure must be
taken into consideration. Another fact about chimes which
should help to explain why they are rather difficult to
understand is the fact that A in the second space treble
clef on a set of concert chimes sounds the .l on the first
line above the staff. When listening to this sound, it
does not seem possible because of the prominence of the
three lower overtones or partials, which are very strong
and sound more than two octaves lower. This is especially
bothersome to the player with an exceptional ear when he
stands close to the instrument.
A full, resonant tone is produced when the chime is
struck sharply on the striking cap with a rawhide mallet.
The chime tube itself is never struck. The damper pedal
can be used to dampen all chimes, or the pedal can be held
open which allows each chime to be hand dampened. To dam
pen a chime, the hand should dampen the tone at the same
point at the cap where the chime was struck. One effective
technique: when chimes are equipped with a damper pedal,
passing tones of a chord are silenced with the hand and the
damper pedal is depressed when chord changes are made.
To produce the best tone, use only the rawhide mal
lets the manufacturer recommends for the chimes. These
will produce good forte sounds from the chimes. For pian
issimo effects, padding the mallet with leather or cloth,
or maybe a handkerchief, will cut down the metallic sound
of the chime. Single mallet or two-mallet technique can
be used in playing the chimes. One mallet technique is
most common as the very nature of the chime tone restricts
rapid execution.
If the hangers of a chime should break (cord holding
chime to suspension rack) do not improvise a hanger. Send
to the manufacturer for the proper hanger for the chim~ .
Chimes can be used (1) to emphasize unison opening
statements with the brass, (2) to take the place of a cymbal
crash in a march, (3) to enhance and give color to the trom
bones or counter-melody instruments in a concert march, (4)
to give more sonority to unison clarinet passages, and (5)
to be substituted for or played along with bell passages.
The xylophone, marimba, ~vibraphone. On occasion,
the xylophone, marimba, and vibraphone are three musical
instruments that are mistaken for one another. The basic
similarity being that all three have keyboards that are
played with mallets.
The xYlophone, named from two Greek words meaning
41
ttwood sound, 11 is similar to the glockenspiel, except that
the sound bars are made of resonant wood called British
Honduras Rosewood. Both the xylophone and the marimba have
wooden keyboards. The vibraphone has metal keys and belongs
to the classification known as metallaphones.
The marimba and the xylophone do have a marked dif
rerence, even though the keyboards are alike. Directly
under each key on the marimba there is a hollow chamber,
usually a metal tube, that sustains and amplifies the tone
once the key has been struck with a mallet. The function
of the chamber is that of a resonator. When the key is
struck the air inside the resonator is set in motion sympa
thetically. The marimba is struck with soft yarn mallets.
The wooden keyboard of the xylophone is struck with hard rub
ber or plastic mallets. It may have very short tubes under
some of the keys. The main difference between the xylophone
and the marimba is that each marimba key has its own resona
tor and the two instruments employ different types of mallets.
Although the vibraphone is similar to other mallet
instruments in design, there is a marked difference in the
sound. The bars or keys are made of a special aluminum alloy
instead of the British Honduras Rosewood used for the ma
rimba and xylophone keys. Vibraphones are equipped with a
damper pedal which controls the sustained sound of the
42
instrument. The roll technique used on the woodbar instru
ments produces the sustained effect. The characteristic
sound of the vibraphone is produced by electric-motor driven
pulsators turning above the resonators, and beneath the keys,
to produce the vibrating sound. When using the vibraphone
with the motor off, the pulsators should be in a vertical
position leaving the resonators open to produce a full sound.
The system used to identify the playing range of the
melodic instruments refers to the modern piano keyboard. It
begins with Al bass clef (being the first note of the key
board) and ascends chromatically up the keyboard and the
Grand Staff. For example, the octave above .A.l is called A.2.
Middle C on the piano keyboard in this system would be
called and referred to as C4 because it is the fourth C above
Al etc.,.
To compare the written score with the actual sound
range of the melodic instruments correctly, the following
information may prove helpful. ~ glockenspiel or cased
bells have thirty metal keys. The playing range is from G3
to C6. They have no resonators and are housed in a case.
They sound two octaves higher than written. Use plastic or
brass tip mallets for best tone. The marching bell~
has twenty-five metal keys. Its playing range is from A3
to A5. It has no resonators. It is constructed on a metal
lyre-shaped frame for marching with a leather strap. It
sounds two octaves higher than written. Use hard rubber,
plastic, or brass tip mallets for best tone. ~ recommended
model of ~ marimba is the four octave model which has
forty-nine rosewood keys. The playing range is from C 3 to
C7. .A.11 marimbas sound the actual written note. Use the
soft yarn-wound mallets for best blend and tone on the ma
rimba. A recommended model of the vibraphone is the three
octave model which has thirty-seven metal keys. The playing
range is from F3 to F6. .All vibraphones sound the actual
written note. For soft legato passages the soft wound-yarn
mallet is recommended. If a harder or more staccato tone is
needed, the cord-wound or leather mallets are recommended.
! recommended model of ~ xylophone is the three-and-a-half
octave model which has forty-four rosewood keys. Its play
ing range is from F4 to CS. 411 xylophones sound as written.
Hard rubber or plastic tip mallets are recommended for best
sound.
A guid~ for the melodic mallet instruments. (1) The
percussionist should possess a working knowledge of the
piano keyboard. Scales, chords, and tonalities have more
meaning to the student with a piano experience. (2) The
student having studied piano and snare drum should be intro
duced to the mallet instruments. The marimba is recommended

44
as the beginning instrument, but the xylophone, bells, or
vibraphone may be substituted. (3) The student should be
taught the scales and arpeggios. A. t this time, a "fee 111
for the instrument can be acquired along with melodic pat
terns which will aid in training the ear. (4) Single stroke
sticking patterns must be mastered; imperfect control must
not exist. (5) The student should be encouraged to pick out
familiar tunes by ear and to improve his ear and tonality
memory, as this will provide the needed skills to play jazz
on the vibraphone in stage band. (6) Correct hand position
should always be the rule. The mallets must be relaxed but
controlled. The student must play in the center of the
keys, not on the edge, except when doing more than two
mallet work. (7) Three and four-mallet work should not
begin until the student has mastered the two-mallet tech
nique. (8) In addition to solo literature available for
mallet instruments, solo literature for flute, oboe, and
violin contain excellent material which can be played on the
mallet instruments. (9) This writer believes that no stu
dent can deserve the title of percussionist in the field of
percussion without being able to show a certain amount of
facility with mallet instruments. The instrumental music
teacher must encourage and guide his percussion students to
put in an hour a day with the mallets, at least an equiva-

lent time with the snare drum and with the timpani, and to
continue piano study.
Recommended Mallet Methods:
1. Devens, George. Lesson ~For :Mall~t Instrumeqts. New York: Henry Adler Inc.
2. Kraus, Phil. Modern Mallet Method, Vol. l, 2, 3 New York: Henry Adler Inc.
3. Kraus, Phil. Vibes For Beginners. New York: Henry Adler Inc.
4. Rae, Johnny. illl Phrasing E.Q!: Mallet,s. New York: Henry Adler Inc.
5. \Echter, Julias. fill Vibes - Modern Tech.gig~ For Musicians. New York: Henry Adler Inc.
45
~ crash cymb9ls. In a pair of matched crash cym
bals one cymbal is slightly lower in ring than the other, so
that when struck a diffused crash results. The crash cym-
bals are struck together and should produce a ringing
quality. Cymbals can be the most intriguing instrument of
the percussion family. The various colors achieved by these
plates of hammered brass is spectacular, and for this reason
the smart director is very particular about selecting matched
concert crash cymbals.
The ideal percussionist needs at least three pairs of
cymbals: light, medium, and heavy, all of different diame
ters. If only one pair of cymbals can be owned, the 18-inch
medium or medium-thin is recommended. Usually a thin cymbal
will be lower in pitch than a thick one of the same diameter.

46
Since the cymbals to be used must satisfy the mood
and character of the composition, the same cymbals should
not be used to play every single piece of music. The cym
bal player must produce color and shadings that will enhance
the music. Because the music rarely states what size-weight
cymbals to use, this choice is left to the discretion of the
player and the director.
Crash cymbals often are shipped from the factory or
dealer with wooden handles fastened with a metal bolt
assembly. If the wooden handles are used, the tone of the
cymbals becomes distorted and the discs may become cracked.
However if leather handles or straps are used, the cymbals
will be less apt to crack and the discs will vibrate freely,
producing a much improved tone.
Cymbals can best be effective by keeping one cymbal
relatively stationary, while the other disc is the active
striker. Both cymbals never collide into one another for
any reason.
The following information should help define good
crash cymbal technique: (1) Always use leather or lamb's
wool straps rather than wooden handles on crash cymbals.
(2) Grasp the straps in the same manner as the "like-grip,"
hold firmly and stay close to the hole to maintain control
over the cymbal. (3) Hold the cymbals together and hold

them chest high in a tilted position so that the striking
cymbal will be on the top. (4) The stroke should be one
continuous motion. In other words the motion of prepara
tion is the separation of the discs, which should not stop
after the separation and start again for the stroke. When
the cymbals play repeated strokes, they are never placed to
gether each time; they must be played with the sensation of
drawing away the tone when contact is made. If pianissimo
playing is needed, play with just the outer edge of the cym
bals. (5) Be careful that the cymbals are never crashed
with the edges exactly corresponding. This will capture the
air and cause a suction which cups the cymbals. To avoid
this, lower the far edge of one cymbal slightly. (6) After
the cymbals have struck, the two symbals should be waved
gracefully in the air above the player's head to allow the
waves to project for greater effectiveness. (7) To produce
a glissando on the crash cymbals, slide the edge of one
cymbal against the other, with the edge of one cymbal slid
ing perpendicularly to the ridge of the other.
The suspended cymbal. The suspended cymbal is usu
ally 16 to 20 inches in diameter and relatively heavy in
weight. It is suspended from a floor holder and played with
hard felt timpani mallets or soft yarn-wound marimba mallets.
The effects attained with this instrument are limited only

48
by the players imagination.
A suspended cymbal can also be struck by a wooden stick
to produce an entirely different sound. When struck with a
wooden stick the attack should be made on its extreme edge
with a glancing blow of the stick. Many interesting effects
can be realized by playing the cymbal with the tip of the
snare drum stick near or on the center or cup. A snare drum
roll played on the cup is an entirely different effect from
a timpani roll with mallets near the outer edge.
Usually the suspended cymbal roll called for in music
is produced by the hard felt timpani mallets, playing the
single stroke timpani roll on the outer edges of the cymbal.
The best roll technique is to place the mallets on opposite
sides of the cymbal. If this is not done, the cymbal could
tilt and even fall on the floor during a performance. By
balancing the weight of the strokes on opposite sides of
the cymbal surface, this should never happen.
For more colors and effects on suspended cymbal try
(1) cymbal rolls played with nails or yarn mallets.for bril
liance; (2) coins or keys taped to the outer edge for a
sizzling effect; (3) placing a snare drum stick lightly be
neath the cymbal for a non-metallic sizzling effect; (4)
scraping the cymbal with a coin for excellent ttppp" dynamics;
(5) brushes on the cymbal; (6) choked cymbal.
49
The hi-hat cymbals. The hi-hat cymbals should be
14-inch cymbals. The bottom cymbal should be medium heavy,
and the top one medium thin for best results.
To attain a good "chick" sound from the cymbals one
of the felt washers may be shaved to an angle with a razor
blade or coarse sand paper. This will cause the cymbal to
tilt slightly so that the top and bottom cymbals will al
ways "chick" together. It is recommended that the cymbals
always be kept slightly loose so that their open tones will
11 singu after being struck.
The .KQ..ng .Ql: tam-tam. The gong should be of definite
pitch, and as deep in color as possible. The 28-inch gong
usually proves most satisfactory. 4lthough there is no
ideal size, an important fact to remember is that the gong
must be checked for best tone by striking it with the heav
ily padded lamb's wool beater before a concert or rehearsal.
The spot where the tone is most resonant is where the gong
is to be struck. The gong should be "warmed-up" before
being struck. This is accomplished by starting it vibrating
very slowly and softly by striking it lightly with the bea
ter.
The gong should be suspended by a metal hanger and
allowed to swing freely. The cord which holds the gong to
the metal hanger should be a string bass G gut string.
50
Never use "cutty-hunk" or heavy twine, since this will only
muffle the deep ringing sound. The gong is dampened by the
player's free hand and arm when necessary.
Mallets are the source of varying tone color. The
roll is made on the gong by playing the timpani roll on the
surface with heavy wool timpani mallets. Once again it
should be pointed out that the gQllg_ must ~ warmed J!n or
set in motion by the player, so that it is vibrating when
the first tone is heard. When the gong is struck without
this measure of precaution, it must set itself into vibra
tion with its first blow and the tone is consequently "cold. 11
At the same time, to prevent the gong from 11 splitting" this
gentle warming up of the instrument by touching it lightly
should make the gong outlast the director.
The Korean temple-blocks. The temple blocks are of
Oriental origin and come in various sizes and sounds. They
are made of resonant wood that has been hollowed out to
take the shape of an upturned mouth. They should be mounted
on a floor-stand, side by side according to size, left to
right, large to small, five of these blocks making up the
conventional set.
The temple-blocks are struck with two matched hard
rubber mallets. They should produce a "woody" sound which
resembles definite pitch. Temple-blocks are used to sound
and denote such things as horse hoofs, a closing door, or
the ticking of a clock.
The tambourine. Known as the Tambour ~ Basque in
French and as Tambourine in Italian, the tambourine is a
51
very musically effective percussion instrument when played
correctly. Good tambourines are relatively inexpensive and
every school should own at least one small, one medium, and
one large size. Tambourines should not be so thick as to
cramp the hand in which it is held. To perform with tambour
ines requires practice, good timing, and a measureable amount
of touch control.
The jingles are the most important sound of the tam
bourine. The best jingles available would be those of Ger
man silver. Jingles are high pitched, medium pitched, and
low pitched. The diameter of the instrument is a contribut
ing factor to the musical tone. Some tambourines have
double rows of jingles, but only the large tambourine should
be double rowed in construction.
The instrument is played primarily by tapping the
fingers or hand on the rim of the tambourine. The instru
ment is held in the left hand between the thumb and the
fingertips. The hand grasps it at the point where the little
hole is to be found. The player needs only to play the
outside rim for very soft passages. If the head itself is
52
tapped softly, a tom-tom effect rather than the sotmd of the
jingles will be heard. For very loud passages, the player
may close the hand in a fist and strike the head with the
knuckles near the rim. It should be pointed out once again
that a jingle-like quality should emanate from the instru
ment at all times. If a composer has indicated in the
score a quality much like a shot, the tambourine should be
struck with the fist right in the center of the head.
For extremely loud passages with a rather fast rhythm
the use of the knee may be necessary. Place one foot on a
chair and rest the tambourine on the leg while playing with
both hands. Such technique should be followed for all pass
ages which are too difficult for one hand technique. The
leg is placed on a chair and the tambourine is struck
against the knee for the first note and the fist for the
next note, continuing alternately. Actually, the left hand
is almost stationary while the right hand moves the tambour
ine back and forth between the left hand and the knee.
There are no musical terms widely used to indicate
how the player is to execute the various rhythms fotmd in
a composition. The tambourine can be played with the fingers,
upside down, against the knee, with the fist, on the snare
drum, and with snare drum sticks. The actual method is left
entirely to the performer and the director.

Two types of rolls are used for the tambourine.
The wrist roll, is made by turning the arm rapidly in a
twisting motion in the air. This will produce two dy-
53
namic ranges, loud and very loud. A crescendo and dimin
uendo may be attained by twisting the tambourine very
rapidly, first putting it behind your back and then bringing
it forward to your front and then returning it to the same
point of origin. The effect is that of crescendo and
diminuendo because of the positions behind and in front
of the body. The other type of roll is executed by rubbing
the right thumb on the head, near the rim, around the edge
of the diameter. Crescendos are made by added pressure of
the thumb against the head and by moving the thumb faster
as the pressure is increased. One trick is to glue a
strip of sandpaper to the rim of the instrument on its head.
Perfect results occur every time when rubbing the thumb over
the sandpaper. A guide to the use of the two rolls is that
loud rolls usually are played by twisting the tambourine,
and soft rolls are produced with the thumb.
To avoid "broadcasting" the entrance of the tambourine
before one commences playing, the instrument should rest
with the head down on a soft cloth. This will also provide
a cushion effect for the player when returning it to the
percussion table after its use.

The castanets. The technique of playing castanets
is more easily attained. With a minimum of practice the
student should become proficient in their use. The single
pair of castanets attached to a handle are the most prac
tical. However, the double pair may be needed on occasion,
especially for greater power.
The handle of the castanet is held by the thumb and
the fingers of the right hand with the castanets pointing
toward the floor. The single castanets are played against
the palm of the left hand with the fingers closing around
them to stop them at the end of the rolls and on the rests.
Another technique of playing is to use two pairs of castanets,
closely matched in pitch, with the bottom clapper of each
pair taped shut, and played against the legs. This is re
commended for fast tempos and difficult rhythms. In very
soft passages it may be that by tapping the clapper with a
triangle mallet the desired effect may be produced if the
tempo is not too fast. Practice and experiment for the
desired effects.
~ triangle. The triangle is a very easy instrument
to play but not everyone can make satisfactory musical
sounds on it. The triangle is metal shaped in the form of
its geometrical name with one corner open. If there is no
open corner, the metal will not produce its characteristic

ringing sound.
A triangle holder is a clamp attached to the music
stand. It has two holes in a projecting prong, and should
be used by the player for best results. A gut string,
preferably a violin "A." string five inches long, is placed
through the two holes making a loop. After a segment of
the string is put through the one hole and then through
55
the other producing a loop, the ends remaining above the
clamp are then to be burned with a flame until they swell
enough to make their own knot above each hole. Place the
triangle on the loop with the open end to the left of the
player. The triangle is placed within this loop and allow
ed to hang and resound freely.
The player should have a minimum of five mallets of
different sizes and weights and one pair of matched mallets.
Mallets can be purchased at any hardware store simply by
buying various steel nails or bolts. Many colors can be
achieved by changing mallets. V~llets may be arrayed in
order from nails and bolts or thic1:e bi ts of pipe to thin
strands of a metal hair pin.
Good triangles are not expensive; every school should
have at least three of them in different sizes. One five
inch, one seven-inch, and one nine-inch would prove most
satisfactory. A triangle producing a definite musical

56 sound or pitch is a poor instrument. If a definite pitch
is desired, the composer should write for bells or chimes;
but when an ambiguous sound is called for, with a bell-like
quality, the triangle is used exclusively.
In playing the triangle, the fingers are not to touch
it except to dampen or stop it from ringing. The triangle
should be struck on the bottom, with the opening being to
the left. Matched nails should be used when parts become
too technical to be played with one beater. The roll or
trill is played in the top corner with a single beater.
Latin--American instruments. There is an ever in
creasing demand made upon the percussion section in the
band or ensemble to play the Latin-A.merican rhythms with
authentic instruments. The instruments are enjoyable to
play and exciting to score for and hear. That which differ
entiates Latin-American music from North-American music is
the rhythm and not necessarily the melody or the harmony.
The intensity and drive of Latin-American rhythms can only
be learned by practicing and developing a working knowledge
of those rhythm instruments that are uniquely Latin-American.
Ten basic Latin-American instruments exist. (1) The
Maracas are a pair of medium sized dried gourds mounted on
a handle and contain dried seeds or shot. They are played
by alternately shaking each hand gracefully at the level of

57
the chin. (2) The Quijada ~Burro (Jaw-Bone) is con
structed from the jaw-bone of an ass, with the teeth fitted
so loosely that they rattle when struck. The Jaw-bone is
held in the left hand and struck with fist of the right
hand. Only simple rhythms are used, allowing the teeth to
rattle freely. This instru.rnent is most effective when ac
centuating the conga rhythm. (3) The Guiro (The Gourd) is
a dried squash shaped like a cucumber, having seeds removed,
and with ridges on the upper surface. It is played by
holding it in the left hand and scraping the notched sur
face with a stick. (4) The Cencerro (Cow-Bell) is just an
everday cow-bell with the striker removed. Hold the cow -
bell in the palm of the left hand and strike with a drum
stick. Two basic sounds are characteristic of this instru
ment. Striking the flat side produces a "tick" and striking
the open edge produces a resonant Hping. 11 (5) La Cabaca
(Beaded Gourd) is a large round gourd or coco-nut covered
with beads. It is used in the Samba. The instrument is
held in the right hand and shook while being struck with the
left hand. (6) The Tumbadora (Conga-Drum) is a large round
hollow tom-tom producing a very deep sound. It can be used
over the shoulder or resting on the floor, being played with
the palms and fingers near the rim. It is used with Rhumbas
and Congas. (7) Bongos are two high pitched drums of differ-
58
ent sizes. They can be played between the knees while
seated or played with a floor stand while standing. They
are played with the finger tips. The small drum is to the
players left and the large to his right. (8) Timbales
are larger than bongos and played with sticks. They are
mounted on a floor stand with the large drum to the play
ers left and the small drum to his right. (9) The~·
is a long metal tube with beads inside. It is used on
Sambas. It is held by each end and shaken like Maracas.
(10) The Claves are a pair of rosewood sticks quite short
in length. They are played by holding the deeper sounding
of the two on the partially closed knuckles of the left
hand and striking quickly with the right hand. Most Latin
American rhythms conform to this important instrument and
its rhythm.
If additional information is needed about some phase
of these instruments and their use, the following books
should help answer any question the reader may have about
a particular instrument.
Recommended Latin-~merican Boo~s:
1. Deutch, and Dr. Charles Colin. .H.Qlt IQ Arrange Latin Instruments. New York: New Sounds In Modern Music.
2. Deutch, and Dr. Charles Colin. .HQli 1Q ~ BongoTimbales-Congo Drum~ Mat§Cas. New York: New Sounds In Modern Music.

59 3. Rale, Phil. L_atin-A,mer!,~ Rhythms Fo;,;: The Drummer.
New York: Remick Music Corp.
4. Reed, Ted. Latin Rhythms. New York: Ted Reed.
Stage-~ drums. Many schools offer an ensemble
called stage-band. The following information should help
the director or student understand some common aspects of
stage technique. The bass drum is used to keep time (play
ing in four) or for punctuation and playing background
rhythmic patterns. The latter is commonly found in modern
jazz drumming. The player should be capable of using the
bass drum in both ways.
There is a certain way of striking the drums to get
a true drum sound. The feeling should be one of drawing
the sound out of the drum instead of forcing it into the
drum. The stroke must be resilient, not dull.
By listening carefully to what the ensemble is play
ing, the player can achieve the proper blend of drums with
the ensemble. It is amazing how few drummers give any at
tention to the combined sounds of percussion and ensemble.
The primary task is to swing the band and reinforce
accents and dynamic contrast. Again the drummer must listen
carefully. What the stage band drummer plays must fit musi
cally with what the band plays. The efforts must be unified.
Because there are so many new developments in music,
the drummer must constantly listen to and observe other

drummers and bands at every opportw1ity. The student must
be patient and willing to work hard to achieve his goals.
Backing a soloist: Soloists differ as to the kind
60
of accompaniment they prefer. Some like a busy dance style,
one which supplements the basic meter structure with many
rhythmic figures; others want "straight time 11 drumming, the
basic rhythm with very little, if any, additional rhythmic
embellishments. If the soloist plays softly, do the same!
If the soloist swings hard and loud, open up! Always at
tempt to simulate the rhythmic and tonal mode of the soloist •
. A practical drum set would be: bass drum, 22 11 x 1411 ;
snare drum, 5t" x 14"; small tom-tom, 911 x 13"; large floor
tom-tom, 16" x 1611 ; hi-hat cymbals, 14", the bottom one
medium heavy, the top one medium thin; floor cymbals, con
sisting of one 19" heavy weight ride cymbal and one 20 11
sizzle cymbal with twelve sizzles.
Before beginning a basic study of stage drumming,
the percussion student should have good control of the rudi
ments and must be able to read. The student must learn to
improvise on the drums. The student will really develop
ambidexterity and quadridexterity on the dance drums.
1.
Be st Methods:
Chapin, Jim. Advanc~d Technique~ For §h~ Modern Drummer. New York: Jim Chapin, 194 .
2. Krupa, Gene. ~Science .Q1: Drumming Books ~And I:«:Q. New York: Robbins Music Corp., 1946.
Ludwig, William F. Jr. s4gng Drumming. W.F.L. Drum Company, 19 •
Chicago:
4. Wsttling, George and Brad Spinney. Professional Drum Studies. New York: Jim Chapin, 1948.
61
CHAPTER VII
THE MARCHING-PERCUSSION SECTION
A percussion section in the marching band that is
well-coordinated and trained as a team is a beautiful thing
to hear and see. However a percussion section that lacks
precision and vitality can do more to damage the sound of
a marching band than any other section in the organization.
Too many percussion sections on the march play
poorly, unrhythmically, and without precision simply because
they are trying to play too loud. A section which plays
with rhythmic precision and uses like sticking will always
carry farther and sound bigger than a section playing ffff
but not playing with precision. Volume is never a substi
tute for precision and accuracy.
Band directors are usually extremely critical of
poor intonation in their brass and woodwind sections, and
they will go to any extreme to correct these sections. The
same must always apply to the percussion section. Drums
that are not tuned alike have a sound that is just as ob
jectionable as the sound produced when other instruments
are out of tune. Therefore it is imperative that careful
attention be given to matching the sound of each of the var
ious types of drums.
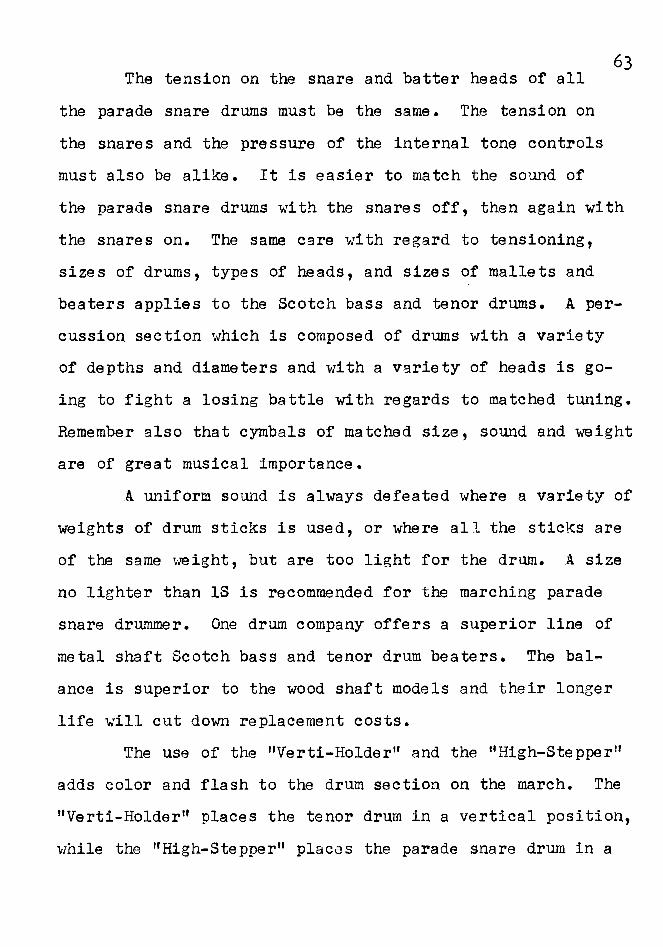
The tension on the snare and batter heads of all
the parade snare drums must be the same. The tension on
the snares and the pressure of the internal tone controls
must also be alike. It is easier to match the sound of
the parade snare drums with the snares off, then again with
the snares on. The same care with regard to tensioning,
sizes of drums, types of heads, and sizes of mallets and
beaters applies to the Scotch bass and tenor drums. A per
cussion section which is composed of drums with a variety
of depths and diameters and with a variety of heads is go
ing to fight a losing battle with regards to matched tuning.
Remember also that cymbals of matched size, sound and W'9ight
are of great musical importance.
A uniform sound is always defeated where a variety of
weights of drum sticks is used, or where all the sticks are
of the same vreight, but are too light for the drum. A size
no lighter than 18 is recommended for the marching parade
snare drummer. One drum company offers a superior line of
metal shaft Scotch bass and tenor drum beaters. The bal
ance is superior to the wood shaft models and their longer
life will cut down replacement costs.
The use of the 11Verti-Holder" and the 11 High-Stepper 11
adds color and flash to the drum section on the march. The
11Verti-Holder 11 places the tenor drum in a vertical position,
while the "High-Stepper" places the parade snare drum in a

horizontal position. With this equipment, the "like-grip"
method of holding sticks and mallets is most effective on
the march.
The use of plastic heads on all of the marching drums
is recommended for best tone quality, carrying power, and
resistance to changes caused by weather. The adv~ntage of
plastic heads in obtaining a matched tuning with separate
tension drums is far superior.
The fast lll§rching cadence. With the increased march
ing tempo and complexity of marching routines, there are
some problems for the percussion section, especially for the
snare drummer. The snare drummer is likely to find that
some of the standard drum rudiments, designed for a military
cadence of 120 beats per minute, are extremely difficult to
execute at 160 or 180 beats per minute.
If the fast cadence is used in the marching band, to
avoid unprecise drumming, it is recommended that single
stroke playing be employed most of the time. Keep the right
hand on the strong beat with the left foot and the left
hand on the weak beat with the right foot. This method of
sticking will maintain the natural body equilibrium that is
present when one swings his arms as he walks. Scotch and
tenor drummers would also play with the right hand striking
the drum as the left foot touches the ground. Drumming left

with left and right with right has a tendency to cause a
11 waddly11 manner as the drummers march.
65
~ execution of ,:t.llit music. With the percussion
equipment carefully selected and tuned and the sticking
method adopted, the next phase is playing the music. }~ny
of the percussion parts to marches and commercial football
shows do not lend themselves well to the faster tempos of
marching and playing. It becomes necessary to edit or re
write the parts to make them more musical, more playable,
and more practical.
The recommended answer is to establish certain basic
rhythm patterns to be played with specific time signatures
and specific tempo. For example, in 4/4 time with a tempo
of 168 beats per minute, the snare drum might play
each measure, altering this rhythm, of course, at the be
ginnings and endings of phrases, and at special accents or
syncopation. In the matter of syncopation, it is best to
11 punch11 the syncopated beat which will lift the selection
and give life to the overall sound of the band. In most
instances the syncopated beat will have even more vitality
if all the percussion instruments will omit the beat immedi-
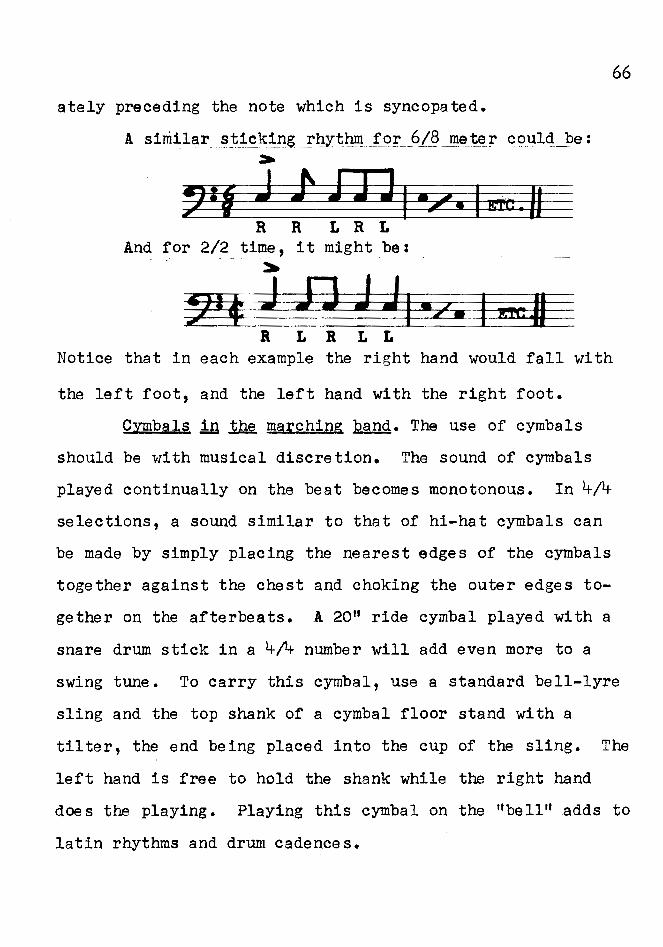
ately preceding the note which is syncopated.
A similar_ ~"tJ~k_ing__l'_~t_hn! _f_QJ:' ___ 6L? ~m~_~r could be: >
' '# J ) J J J, ....., .. I E'l'C.H R R L R L
And for 2/2 time, it might be: ~
66
!V f J IJ J J I •/. I ~ 11 R L R L L
Notice that in each example the right hand would fall with
the left foot, and the left hand with the right foot.
Cymbals 1n ~ marching band. The use of cymbals
should be with musical discretion. The sound of cymbals
played continually on the beat becomes monotonous. In 4/4
selections, a sound similar to that of hi-hat cymbals can
be made by simply placing the nearest edges of the cymbals
together against the chest and choking the outer edges to
gether on the afterbea ts. A 2011 ride cymbal played with a
snare drum stick in a 4/4 number will add even more to a
swing tune. To carry this cymbal, use a standard bell-lyre
sling and the top shank of a cymbal floor stand with a
tilter, the end being placed into the cup of the sling. The
left hand is free to hold the shank while the right hand
does the playing. Playing this cymbal on the "bell" adds to
latin rhythms and drum cadences.

67
Understanding ~ tenor drum. Too often the proper
use of the tenor drum in the marching band is misunderstood.
The tenor drum is a sound between the snare and the bass drum.
The tenor drum is an effective and colorful addition to the
marching-percussion section when used to best advantage. It
should not be used as a "prop" to give the player an excuse
to twirl the mallets, which always looks fine but adds noth
ing to the musical sound of the percussion section.
The following examples show the correct use of the
tenor drum.
Example 1. Playing simplified snare drum parts and rein
forcing the accents, while at the same time embellishing the
bass drum part.
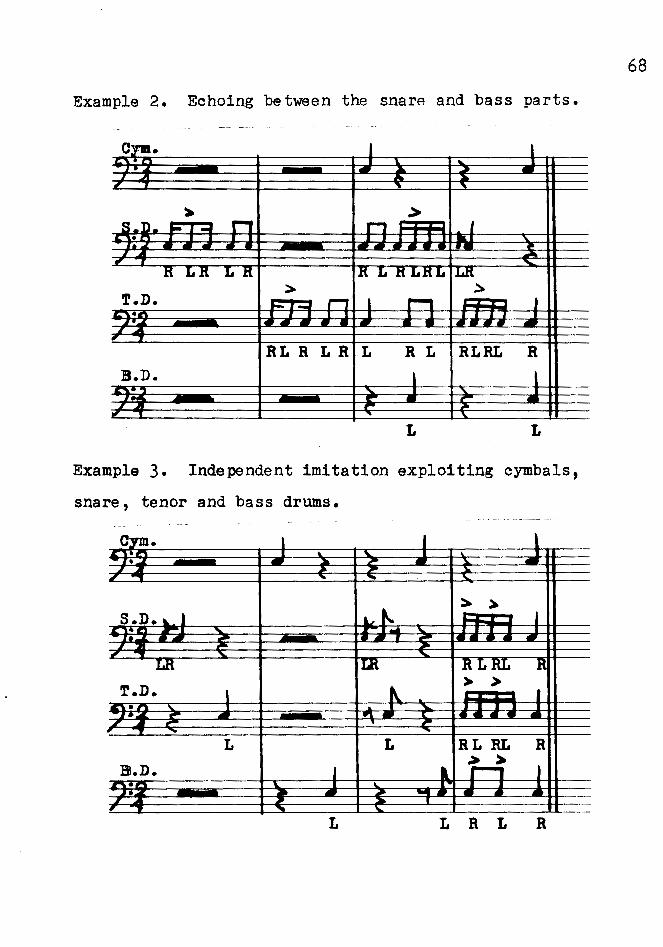
Example 2. Echoing between the snare and bass parts.
T.D.
B.D.
L L
Example 3. Independent imitation exploiting cymbals,
snare, tenor and bass drums.
L
B.D.
L L R L R
68

69
The percussion instruments offer special possibil
ities for enlivening the sounds of the marching band. A
little imagination, careful tuning, care of equipment, and
purposeful rehearsal will make the ordinary percussion
section into a spectacular combination of rhythm and motion.
Recommended drums for marchiqg. All drums should be
separate tension and mounted with plastic heads. The 11 like
grip11 is used on all of the drums in the marching band. If
the traditional grip is still being employed, recommended
drums and equipment for its use are also listed.
Recommended Drums For Marching: (Using "Like-Grip")
Parade Drum Tenor Drum Scotch Drum
10"xl411 in pearl finish with "Hi-Stepper" 10nxl5" in pearl finish with "Verti-Holder" 1011x28 11 in pearl finish
Recommended Drums For Marching: (Using "Tradi tional 11 )
Parade Drum Tenor Drum Scotch Drum
12"xl5" in pearl finish with sling and leg-rest 1211xl7" in pearl finish with sling and leg-rest lO"x30" in pearl finish
Recommeqded ~ Cadences: (Parade Drum-Scotch DrumCymbals)
1. Schinstine. Swingin ~ Cadeqces. San Antonio: Southern Music Co.
2. Schinstine-Hoey. Drum Cadeqces For All Occasions. San Antonio: Southern Music Co.
3. Wilcoxon, Charley. .2Q Street Beats. New York: Wilcoxon.
Recommeqded Cadences: (Parade-Tenor-Scotch DrumsCymbals)
1. Hoey, Fred. Tenor Drums Front. San Antonio: Southern Music Co.

2. Pratt, John s. 128 Rudimental Street Beats. Long Island: Belwin Inc.
3. Schory, Dick. Modern Marching Cadences. Chicago: Ludwig Drum Co.
70
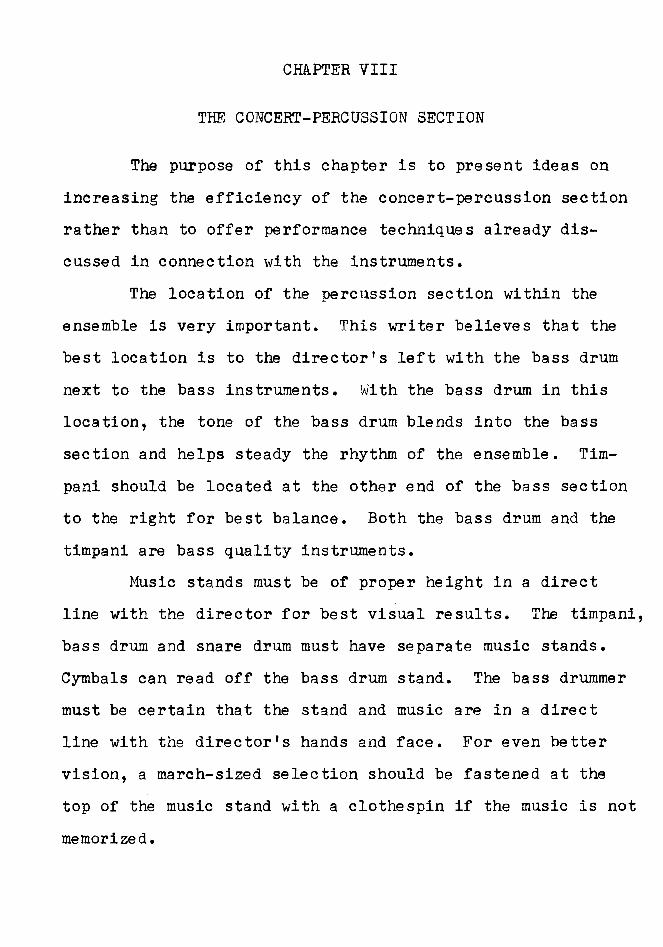
CHAPTER VIII
THE CONCERT-PERCUSSION SECTION
The purpose of this chapter is to present ideas on
increasing the efficiency of the concert-percussion section
rather than to offer performance techniques already dis
cussed in connection with the instruments.
The location of the percussion section within the
ensemble is very important. This writer believes that the
best location is to the director's left with the bass drum
next to the bass instruments. With the bass drum in this
location, the tone of the bass drum blends into the bass
section and helps steady the rhythm of the ensemble. Tim
pani should be located at the other end of the bass section
to the right for best balance. Both the bass drum and the
timpani are bass quality instruments.
Music stands must be of proper height in a direct
line with the director for best visual results. The timpani,
bass drum and snare drum must have separate music stands.
Cymbals can read off the bass drum stand. The bass drummer
must be certain that the stand and music are in a direct
line with the director's hands and face. For even better
vision, a march-sized selection should be fastened at the
top of the music stand with a clothespin if the music is not
memorized.

72
To be certain of getting the tempo, the percussion
players should get in "ready" position at a cue from the
director. When the director raises his arms they get set.
This is accomplished by placing the tips of the drum sticks
silently against the drum head at the striking spot, by
pressing the cymbals silently together, and by placing the
ball of the mallets on the keys or bars. A.s the director
makes the preliminary upbeat, percussion players move sticks
and mallets away from the ready positions in rhythm with the
director's baton motion and b3ck again to strike their in
struments as he makes the first downbeat. This procedure
helps the percussionists feel the rhythm of the attack and
better insures precision. Ready positions should be formed
for all entrances after measures of rest within a composition.
In rehearsals it is often effective to have the per
cussion players study their parts without playing as the rest
of the ensemble plays. In this way they get the '' sound 11 of
the composition and a much better musical idea of how to
make their parts blend.
The percussion section must be taught to be musically
alert and quick to sense ways in which it can be most help
ful to the ensemble. Good percussion is extremely important
to the band and orchestra.

CHAPI'ER IX
THE PERCUSSION ENSEMBLE
The percussion ensemble has as its purpose the
performance of music written for percussion instruments.
Percussion ensemble students have the opportunity to ac
quire playing experience in small groups such as duets,
trios, and quartets as well as in larger combinations, and
to become acquainted with percussion instruments and lit
erature.
School contest materials have been noticeably
influenced by percussion ensemble music. Such works have
been written in an attempt to break away from the usual
"military" type ensemble comprising bass drum, snare drum,
and cymbals. Ensembles including timp.~mi, marimba, xylo
phone, temple blocks, tambourine, claves, bells, timbales,
tom-toms, and others, in addition to the usual "military"
percussion offer players an opportunity to become acquainted
with a variety of percussion instruments.
Practical substitution of instruments will often en
able the ensemble to perform composition calling for the
instruments which a re not ordinarily at its disposal. For
instance, in a composition written for xylophone and marimba,
when only a marimba is available, both parts can be played
by two players, the player with the xylophone part using
harder mallets than the player with the marimba part.
74
As the concept of percussion usage has changed, the
performance> of the percussion "part" has become a more diff
icult and involved art. The student-player is frequently
called upon to play several different instruments during one
composition. Ensemble training has tremendous "transfer"
power in this area. Many ensemble numbers demand that the
player play two, three, or as many as seven or eight differ
ent instruments. The experience received from this type of
performance is directly applicable to band and orchestra
playing. Of equal value is the experience of playing the
different instruments called for in the various compositions.
That is, the same performer should not play the snare drum,
or the timpani, or the melodic mallet instruments on all com
positions, but must be encouraged to try a different instru
ment on a new composition.
Through ensemble participation the student learns to
depend on his own musical ability to a much greater degree
than when playing as a member of a section. The student is
always playing a ''solo" part, and he is equally as important
as any other member of the ensemble. The student will real
ize that only by playing the part correctly, as the composer
intended, can the over-all musical effect be achieved. After

playing the more demanding literature of the percussion
ensemble, the band and orchestra repertory should present
fewer musical and technical difficulties to the student.
75

The Purpose
CHAPTER X
A MUSICAL APPROACH TO THE
TEACHING AND PERFORMANCE OF
PERCUSSION
THE SUMMARY
The purpose of this study was (1) to aid the teach
er of instrumental music in developing a musical approach
to the teaching of snare drum using a recommended 11 like-grip"
for holding the snare drum sticks; (2) to provide the teacher
of instrumental music with selected published methods of in
struction which develop musicianship; (3) to provide the
instrumental music teacher with teaching techniques developed
by this writer covering selected and most commonly used per
cussion instruments.
The Scope
The study considered the following topics in the
field of percussion teaching: (1) a natural "like-grip" for
holding all sticks and mallets; (2) the values and appli
cations of Rudimental and Concert snare drumming; (3) selected
methods of instruction which best attain musical results;
(4) teaching and performance techniques covering the snare
drum, bass drum, timpani, melodic mallet instruments and the
77
traps-accessories; (5) ways of improving the percussion
ensemble, the concert-percussion section, and the marching
percussion section.
Recommendations
In the final analysis it is up to the instrumental
music teacher to guide the percussion student through those
areas of percussion knowledge and technique that will permit
the student to meet the demands made upon him by the music
encountered.
It is recommended that the instrumental music teacher
be aware of his responsibilities to the percussion students
and.to see to it that "drum lessons" eventually include
study in the four primary areas of percussion study: snare
drum, xylophone or marimba, timpani, and traps-accessories,
and, of course, musical styles.

1.
2.
l+.
6.
7.
8.
10.
11.
BIBLIOGRAPHY
Bower, Harry A. The Harry A. Bower System For I!::Ml Drums, Bells, Xylophoqe, Timpani. New York: Carl Fischer.
Buggert, Robert. Teaching Techniaues E..Q.r. The Percussions. Long Island: Belwin Inc.
Chapin, Jim. Advanced Tec~~gues For The Modern Drummer. New York: Jim Chapin, 19 •
Christian, Bobby. Modern ~ Studies For Sight Reading. New York: Creative Music.
Colby, J. B. Ch§rt Showing Origin Of Rudiments. Denver: J. Burns Colby, 1936.
Deutch and Dr. Charles Colin. How To Play Bongo-Timbales Congo Drum And Maracas. New York: New Sounds In Modern Music.
Deutch and Dr. Charles Colin. How To Arrange Latin Instruments. New York: New Sounds In Modern Music.
Devens, George. Lesson~ For Mallet Iqstruments. New York: Henry Adler Inc.
Dorn, Billy. Reading Aqd TechniC§l Studies For The Advanced Mallet Player. New York: Henry Adler Inc.~
Friese, Alfred and Alexander Lepak. ~ Alfred Friese Timpaqi Method. New York: Henry Adler, Inc.
Gardner, Carl E. The Gardner Modern Method For Th~ Instruments .Q! Percussion. New York: Carl Fischer, Inc.
12. Goodman, Saul. Modern Method For Timpaqi. New York: Mills Music Inc.
13. Harr, Haskell 'tJ. Sliqgerland Drum Method ~Number ~. Chicago: Slingerland Drum Company.
14. • Slingerland Drum Method ~ Number Two. Chicago: Slingerland Drum Company.

15. Hoey, Fred. TenQt DrYJUS Front. San .Antonio: Southern Music Co.
16. Kraus, Phil. Modern Mallet Method Book Q.m. New York: Henry Adler, Inc.
17. , Modern Mallet Method Book Two. New York: Henry Adler, Inc.
18. , Modei:n Mallet Method~ Three. New York:
19.
20.
21.
Henry Adler, Inc. ____ , Vibes For Beginners. Inc.
New York: Henry Adler ,
Krupa, Gene. The Science Of Drumming Boo~ One Aqd Two. New York: Robbins music Corp., 1 6.
Ludwig, William F. Jr. ~Drumming. w.F.L. Drum Company, 194-8.
Chicago:
22. Miller, Roy M. Practical Instrumentation For The wiqd Band. Detroit: \.'Jayne University Press.
23. Podemski, Benjamin. Podemski's Standard Snare Drum Methoq. New York: Mills Music Inc.
24. Pratt, John s. 128 Rudimental Street B~ats. Long Island: Belwin Inc.
25. Rae, Johnny. ~Phrasing For Mallets. New York: Henry Adler, Inc.
26. Rale, Phil. Latin-!merican Rhythms For The Drummer. New York: Remick Music Corp.
27. Reed, Ted. Latin Rhythms. New York: Ted Reed.
28. Salmon, James. The Percussion Section For The Concert Band. Winona: Hal Leonard Music, Inc.
29. Schinstine-Hoey. Drum Cadences For All Occasions. San Antonio: Southern Music Co.
30. Schinstine. Swingin Drum Cadences. San Antonio: Southern Music Co.

31. Schory, Dick. Modern Marching Cadences. Chicago: Ludwig Drum Co.
32. Spinney, Bradley. Encyclopaedia Of Percussion Instru~' Vol. 1 Book A· Hollywood: Percussion Club,
33. , Encyclopaedia Of Percussion Instruments And
31+.
35.
36.
Drumming, Vol. g Book ~. New York: Bradley Spinney, 1959.
Stone, George L. Stick Control. Boston: George B. Stone and Sons, Inc., 1935.
' Accents A.nd Re bo!:mdS • Boston: George B. Stone
and Sons, Inc., 1935.
Straight, Edward B. The Lesson File ~ Number QM. Chicago: Frank's Drum Shop.
37. • Analysis of 6/8 Time ~Number Two. Chicago: Frank's Drum Shop.
38. • Syncopated Rhythms Book Number Three. Chicago: Frank's Drum Shop.
39. 'Wechter, Julias. Elu Vibes-Modern Technique For Musicians. Henry Adler, Inc.
l+o. Y.ettling, George and Brad Spinney. Professional Drum Studies. New York: Capitol Songs, 1946.
l+l. Wilcoxon, Charley. .2Q. Street Beats. New York: Wilcoxon.