a manual for conducting georeferenced photo transects ... · gps photo transect manual 3.0 october...
TRANSCRIPT

GPS Photo Transect Manual 3.0 October 2009 1: 33
A Manual for Conducting Georeferenced Photo Transects Surveys to
Assess the Benthos of Coral Reef and Seagrass Habitats
1 October 2009
Version 3.0
Method developed by: C. Roelfsema and S. Phinn Centre for Remote Sensing & Spatial Information Science
School of Geography, Planning & Environmental Management University of Queensland
Brisbane, Queensland, AUSTRALIA, 4072 e-mail: [email protected]
Ph: 61-7-3365-6081 and Fax: 61-7-3365-6977
GPS Photo Transect Manual 3.0 October 2009 2: 33
Table of Contents: Summary .................................................................................................................................... 4 1 Equipment Needs ............................................................................................................... 8
1.1 Hardware ..................................................................................................................... 8 1.2 Software .................................................................................................................... 13
2 Methods Description ........................................................................................................ 14 2.1 Preparation ................................................................................................................ 14 2.2 Step by step in water ................................................................................................. 15 2.3 Data Processing Downloading .................................................................................. 17 2.4 Data Processing: Photo Analysis with CPCe ............................................................. 21
2.4.1 Photo Analysis: Detailed by assigning benthic cover type to x points in each photo. 21 2.4.2 Photo Analysis: Not detailed by assigning one benthic cover category to individual photo. ............................................................................................................... 23
2.5 Data Processing : GIS Environment .......................................................................... 24 3 Tips .................................................................................................................................. 25 4 Safety Consideration ........................................................................................................ 25
4.1 Snorkelling ................................................................................................................. 25 4.2 Diving ......................................................................................................................... 25
5 Appendix .......................................................................................................................... 26 5.1 A Example results ..................................................................................................... 26 5.2 B CPCE example class file Detail Benthic Cover Type ............................................. 27 5.3 C CPCE example class file Not Detail Benthic Category .......................................... 29 5.4 D Check List Equipment and Field Steps .................................................................. 31 5.5 E Photo Linking software .......................................................................................... 32 5.6 E Considerations for digital camera and housing ..................................................... 33
GPS Photo Transect Manual 3.0 October 2009 3: 33
List of Figures Figure 1: Drybag setup with GPS and Reel. ............................................................................. 8 Figure 2: Alternative float set up with GPS place in plastic box within a float and connected to
reel (photo: Ray Berkelmans, AIMS) .................................................................................. 8 Figure 3: Snorkeller and diver towing the GPS-drybag-float system ......................................... 8 Figure 4: Photo of slate and its data at start of transect........................................................... 15 Figure 5: Snorkeler or Diver takes photos of benthos and holds reel connected to GPS in
hand. ................................................................................................................................ 15 Figure 6: Example photo of benthos, with plump line for set distance from camera to bottom.
......................................................................................................................................... 16 Figure 7: Photo of slate and its data at end of transect............................................................ 16 Figure 8: GPS-Photo Link Start up window .............................................................................. 17 Figure 9: GPS-Photo link: GPS down load window ................................................................. 18 Figure 10: GPS-Photo Link: Time Synchronise Window .......................................................... 18 Figure 11: GPS-Photo Link: GPS - Camera time calibration ................................................... 19 Figure 12 GPS-Photo Link: Add comments to Photo window occurs. ..................................... 19 Figure 13: GPS-Photo Link: Output format window ................................................................. 20 Figure 14: Screen grab of photo analysis CPCE program. Main photo with circles in different
colours (green= label assigned, red=label not assigned yet, yellow = label currently assigned. On the right is table with point numbers and its assigned classes. On the bottom the coloured bar represents the different categories that can be assigned.......... 21
Figure 15: Screen grab of photo analysis CPCE program. Main photo is a zoom in of the point that needs a class assigned. Circles in different colours (green= label assigned, red=label not assigned yet, yellow = label currently assigned. On the right is table with point numbers and its assigned labels. On the bottom the coloured bar represents the different category that can be assigned. Program will automatically jump to next point when point is assigned. .................................................................................................... 22
Figure 16: Benthic cover per photo per transect . .................................................................... 22 Figure 17: Screen grab of photo analysis CPCE program. On the right is table with one box for
class assigned to the whole photo. On the bottom the colour bar represents the different benthic photo categories that can be assigned. ............................................................... 23
Figure 18: Example output of GPS-Photo Linked in ARCGIS .................................................. 24 Figure 19: Example output of kml file created with GPS-Photo Link for use in Google Earth. . 24

GPS Photo Transect Manual 3.0 October 2009 4: 33
Summary This manual describes the methods for gathering still photos (or video frame) of the benthos (horizontal or vertical) that have a known position in time and space. Photos can be used to quantitatively or qualitatively assess the benthos by determining: percentage horizontal projective cover (herein referred to as”% cover”); species composition (e.g. coral, algae, and seagrass) of benthic environments (e.g. sandy or rocky beaches, inter-tidal and rocky or coral reef areas), or indicators of health (e.g. coral bleaching, coral diseases). The method involves a GPS being towed by snorkeller/diver that is taking photos along a freely planned track. At set intervals, kick cycle or time estimates, horizontal projective photos or seascape photos are taken from the seabed. GPS coordinate are continuously recorded while towing the unit when swimming a transect and collecting photos. Photos are then linked with GPS coordinates using of the shelve software (e.g. GPS Photolink or other). This software enables synchronisation of camera and GPS time, after which photo position is determined through interpolation based on closest in time GPS positions. The photos can be viewed at its position in space in a GIS environment such as ARCGIS, Google Earth or other. Photos are analysed using standardized peer reviewed software Coral Point Count excel (Kohler et al., 2006). The method was initially developed to collect data intended to be used for the analysis of remotely sensed images (airborne and satellite images) of coral reef and seagrass environments. The method described can be used in the following situations:
• In-water surveys (Snorkelling, Diving or Reef walking) • Boating surveys using
o Drop (video or still) camera where GPS is in boat o Towed video where GPS is located in boat are on float above video.
The following is a brief summary, a detailed description of all equipment; software and methods are provided in the remainder of the manual. For any recommendation or further for information contact the authors. Referencing: The manual should be referenced as: Roelfsema C.M. and S.R. Phinn (2009). A Manual for Conducting Georeferenced Photo Transects Surveys to Assess the Benthos of Coral Reef and Seagrass Habitats version 3.0. Centre for Remote Sensing and Spatial Information Science, The University of Queensland, Brisbane, Australia. Peer reviewed paper describing the manual should be referenced as: Roelfsema, C.M., and S.R. Phinn (submitted). Calibration and Validation of Coral Reef Benthic Community Maps: Integration of Field Data with High Spatial Resolution Multi Spectral Satellite Imagery. Journal of Applied Remote Sensing,
GPS Photo Transect Manual 3.0 October 2009 5: 33
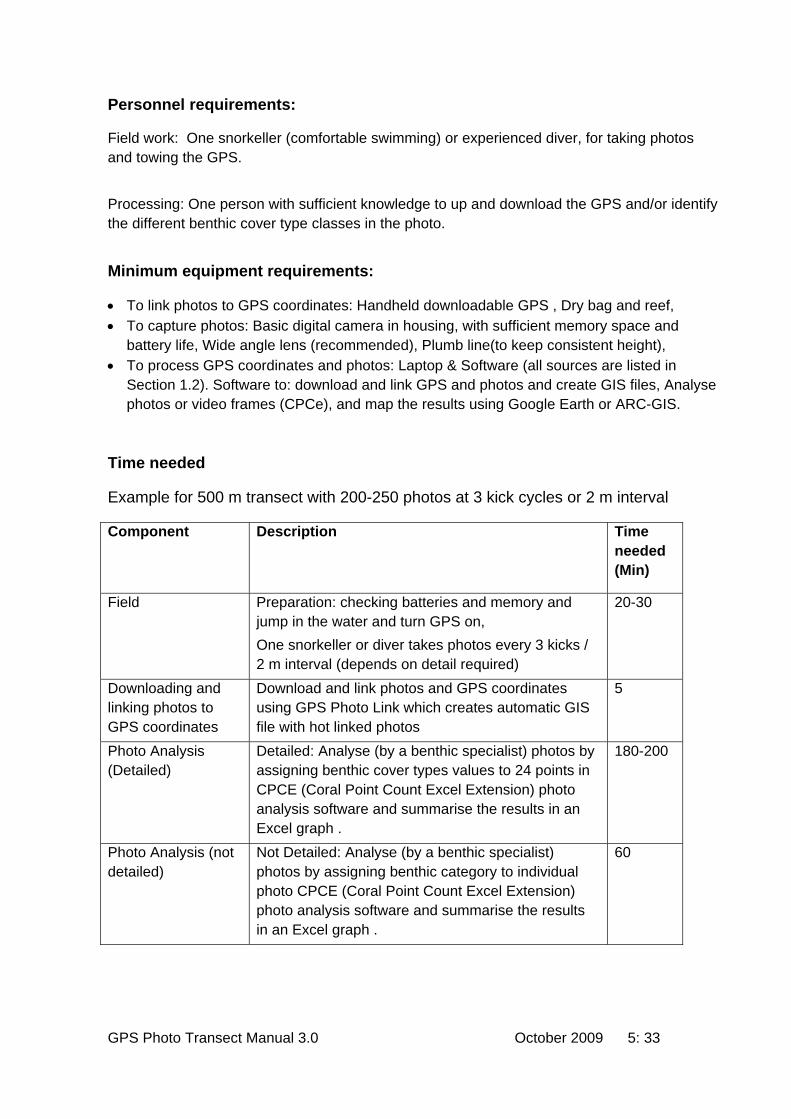
Personnel requirements:
Field work: One snorkeller (comfortable swimming) or experienced diver, for taking photos and towing the GPS. Processing: One person with sufficient knowledge to up and download the GPS and/or identify the different benthic cover type classes in the photo.
Minimum equipment requirements:
• To link photos to GPS coordinates: Handheld downloadable GPS , Dry bag and reef, • To capture photos: Basic digital camera in housing, with sufficient memory space and
battery life, Wide angle lens (recommended), Plumb line(to keep consistent height), • To process GPS coordinates and photos: Laptop & Software (all sources are listed in
Section 1.2). Software to: download and link GPS and photos and create GIS files, Analyse photos or video frames (CPCe), and map the results using Google Earth or ARC-GIS.
Time needed
Example for 500 m transect with 200-250 photos at 3 kick cycles or 2 m interval
Component Description Time needed (Min)
Field Preparation: checking batteries and memory and jump in the water and turn GPS on, One snorkeller or diver takes photos every 3 kicks / 2 m interval (depends on detail required)
20-30
Downloading and linking photos to GPS coordinates
Download and link photos and GPS coordinates using GPS Photo Link which creates automatic GIS file with hot linked photos
5
Photo Analysis (Detailed)
Detailed: Analyse (by a benthic specialist) photos by assigning benthic cover types values to 24 points in CPCE (Coral Point Count Excel Extension) photo analysis software and summarise the results in an Excel graph .
180-200
Photo Analysis (not detailed)
Not Detailed: Analyse (by a benthic specialist) photos by assigning benthic category to individual photo CPCE (Coral Point Count Excel Extension) photo analysis software and summarise the results in an Excel graph .
60

GPS Photo Transect Manual 3.0 October 2009 6: 33
Advantages of approach Photos can be:
• Viewed at its position in GIS environment (e.g. ARCGIS, Google Earth) and its derived benthic data as well, as its position is known in time and space on top of georeferenced remote sensing imagery or any spatial data set.
• Analysed when needed in the field on a laptop or in the office on the desktop. • Analysed to a suitable detail or archived and analysed in years after. • Used to provide information on various aspects of the benthos, depending on the detail
provided by the photo. • Compared to video, photos can have higher resolution and are easier to process.
Transfer of skills and level of required experience
• Transfer is easy if suitable experience is present • Field component person with any experienced fit snorkeler or diver. • Downloading and storage of GPS and camera any person with basic computer experience. • Analysis of photos by person experienced with identifying benthic cover types. • GIS processing by person with basic GIS knowledge. Equipment and software needs
• Most of the equipment is used already by most survey teams(e.g. handheld GPS, laptop, digital camera in housing) and does not need extra purchase.
• Software package described are low cost or for free, except ARCGIS • Coral Point Count Excel Extension (CPCE) is an efficient and a flexible software package
for any classification scheme or number of points to be counted on photos, which isvery well documented.
• GPS-Photolink can create automatic ARCGIS shape and Google Earth format file with geotacked photos which improves image interpretation
General
• Method is flexible can be adjusted for variety of transect length and photo intervals (e.g. 100 m length & 2 m interval or 20 m/5 m or 25 m/1 m) depending on detail needed.
• Length of transect can vary (50 m, 300 m, 1000 m or more) • No transect line need to be deployed which saves time and increase safety • Direction can be determined while in the field Disadvantages of approach • When finished, field survey photos first need to be analysed to determine benthic cover
which is a time consuming process, in comparison to in water assessment of % cover. • No 3D view of benthos, which can create difficulties identifying features. • Diver can entangle him/her self in line to surface float on GPS. • Diver towed GPS tricky in survey areas with steep slopes/walls or against currents • Not suitable for validating low spatial resolution imagery (i.e. pixels > 100m x 100m). • Cost of the software • The horizontal offset between camera and GPS needs to be ideally nil, which can be
challenging when diving. • Camera angle will deviate as not used a fixed frame • Interval between photos can vary, only transect tape can provide a consistent interval.
GPS Photo Transect Manual 3.0 October 2009 7: 33
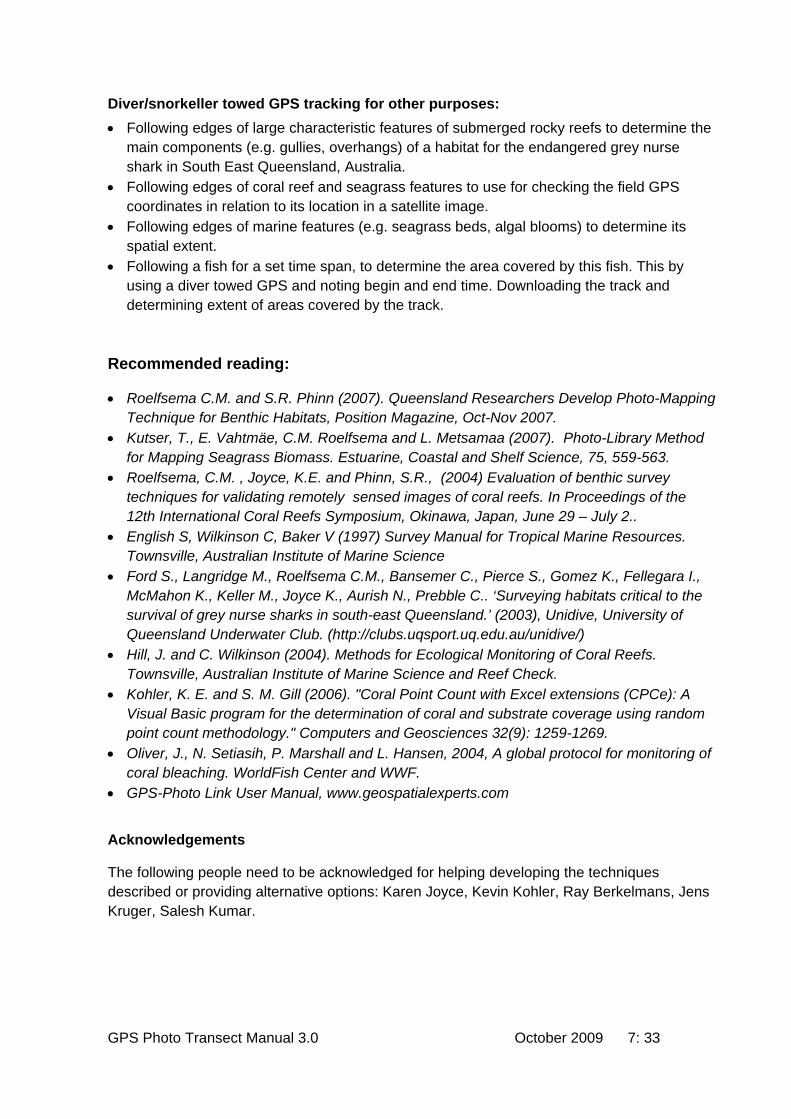
Diver/snorkeller towed GPS tracking for other purposes: • Following edges of large characteristic features of submerged rocky reefs to determine the
main components (e.g. gullies, overhangs) of a habitat for the endangered grey nurse shark in South East Queensland, Australia.
• Following edges of coral reef and seagrass features to use for checking the field GPS coordinates in relation to its location in a satellite image.
• Following edges of marine features (e.g. seagrass beds, algal blooms) to determine its spatial extent.
• Following a fish for a set time span, to determine the area covered by this fish. This by using a diver towed GPS and noting begin and end time. Downloading the track and determining extent of areas covered by the track.
Recommended reading:
• Roelfsema C.M. and S.R. Phinn (2007). Queensland Researchers Develop Photo-Mapping Technique for Benthic Habitats, Position Magazine, Oct-Nov 2007.
• Kutser, T., E. Vahtmäe, C.M. Roelfsema and L. Metsamaa (2007). Photo-Library Method for Mapping Seagrass Biomass. Estuarine, Coastal and Shelf Science, 75, 559-563.
• Roelfsema, C.M. , Joyce, K.E. and Phinn, S.R., (2004) Evaluation of benthic survey techniques for validating remotely sensed images of coral reefs. In Proceedings of the 12th International Coral Reefs Symposium, Okinawa, Japan, June 29 – July 2..
• English S, Wilkinson C, Baker V (1997) Survey Manual for Tropical Marine Resources. Townsville, Australian Institute of Marine Science
• Ford S., Langridge M., Roelfsema C.M., Bansemer C., Pierce S., Gomez K., Fellegara I., McMahon K., Keller M., Joyce K., Aurish N., Prebble C.. ‘Surveying habitats critical to the survival of grey nurse sharks in south-east Queensland.’ (2003), Unidive, University of Queensland Underwater Club. (http://clubs.uqsport.uq.edu.au/unidive/)
• Hill, J. and C. Wilkinson (2004). Methods for Ecological Monitoring of Coral Reefs. Townsville, Australian Institute of Marine Science and Reef Check.
• Kohler, K. E. and S. M. Gill (2006). "Coral Point Count with Excel extensions (CPCe): A Visual Basic program for the determination of coral and substrate coverage using random point count methodology." Computers and Geosciences 32(9): 1259-1269.
• Oliver, J., N. Setiasih, P. Marshall and L. Hansen, 2004, A global protocol for monitoring of coral bleaching. WorldFish Center and WWF.
• GPS-Photo Link User Manual, www.geospatialexperts.com Acknowledgements
The following people need to be acknowledged for helping developing the techniques described or providing alternative options: Karen Joyce, Kevin Kohler, Ray Berkelmans, Jens Kruger, Salesh Kumar.
GPS Photo Transect Manual 3.0 October 2009 8: 33
1 Equipment Needs
The equipment presented is an example that has been used by the authors of the manual; however other handheld GPS’s, that can track and download, in combination with underwater cameras, could do the job as well.
1.1 Hardware
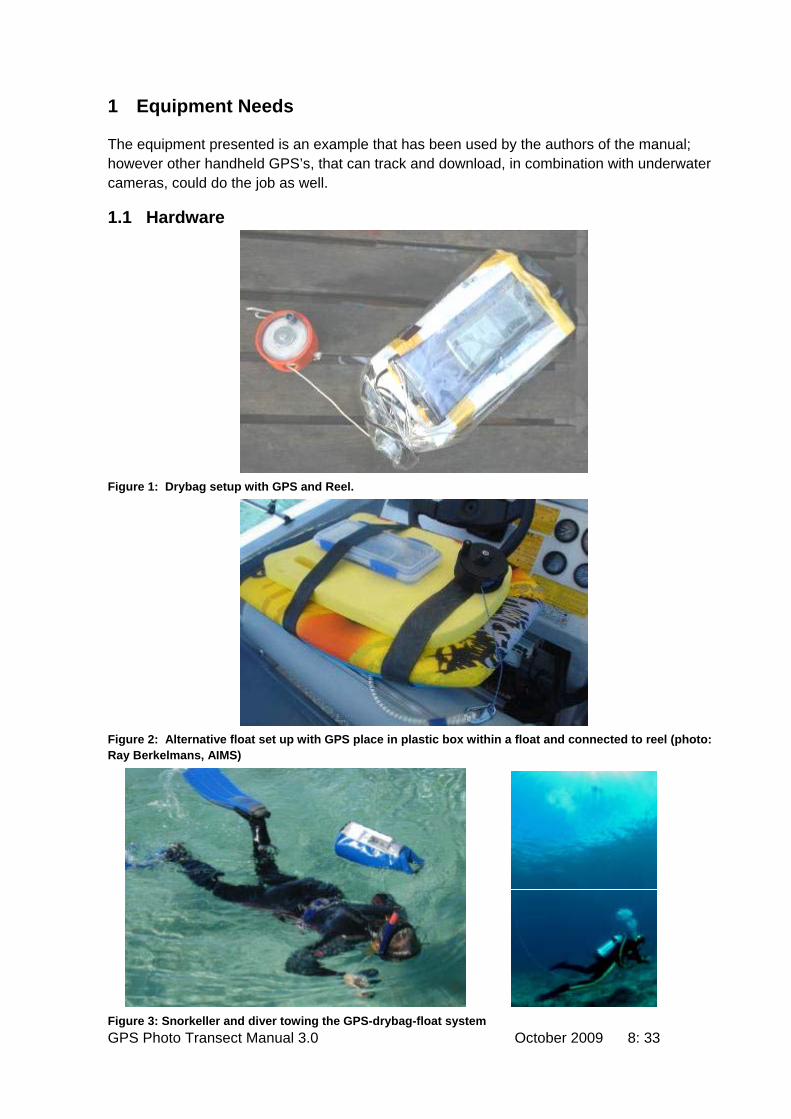
Figure 1: Drybag setup with GPS and Reel.
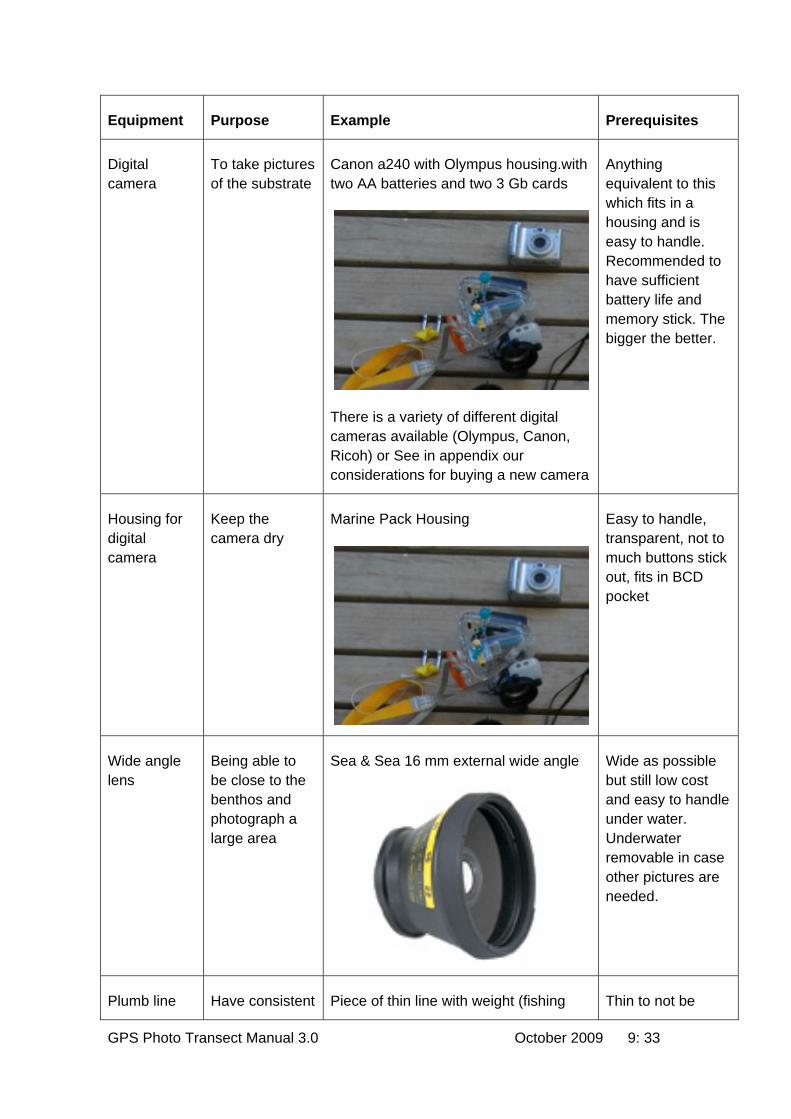
Figure 2: Alternative float set up with GPS place in plastic box within a float and connected to reel (photo: Ray Berkelmans, AIMS)
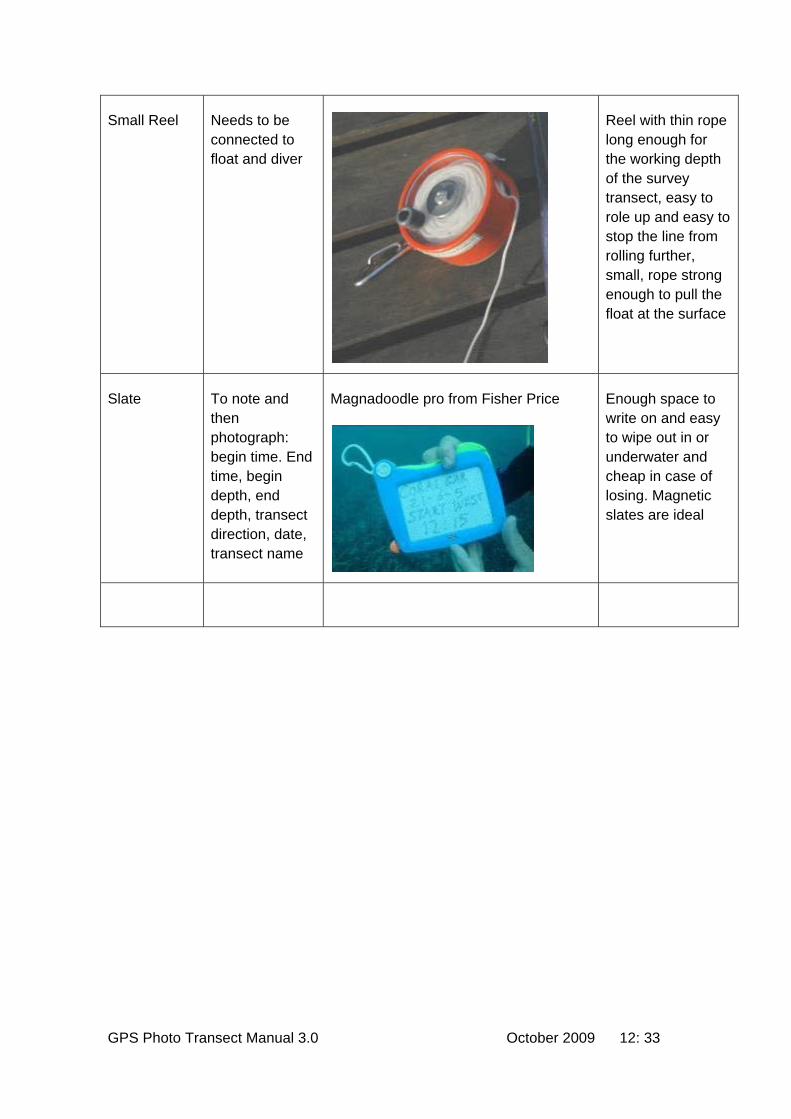
Figure 3: Snorkeller and diver towing the GPS-drybag-float system
GPS Photo Transect Manual 3.0 October 2009 9: 33
Equipment Purpose Example Prerequisites
Digital camera
To take pictures of the substrate
Canon a240 with Olympus housing.with two AA batteries and two 3 Gb cards
There is a variety of different digital cameras available (Olympus, Canon, Ricoh) or See in appendix our considerations for buying a new camera
Anything equivalent to this which fits in a housing and is easy to handle. Recommended to have sufficient battery life and memory stick. The bigger the better.
Housing for digital camera
Keep the camera dry
Marine Pack Housing
Easy to handle, transparent, not to much buttons stick out, fits in BCD pocket
Wide angle lens
Being able to be close to the benthos and photograph a large area
Sea & Sea 16 mm external wide angle
Wide as possible but still low cost and easy to handle under water. Underwater removable in case other pictures are needed.
Plumb line Have consistent Piece of thin line with weight (fishing Thin to not be

GPS Photo Transect Manual 3.0 October 2009 10: 33
distance from the camera to the bottom to ensure same area covered by photograph
led)
obvious in the picture, heavy enough to form a straight plumb line, long enough for the distance needed
Handheld GPS
Logging way points and tracking the surveyors track
Garmin 72 or 76 Map
Long battery life, 8 or more channels, up and download capability, logging tracks and waypoints, adjusting logging times (e.g. every 10 s), adjusting projections and datum
GPS drybag Keeping the GPS unit self extra dry
Aquapack
Transparent, fits GPS,
Float Needs to keep GPS unit above water surface for most of the time
Any styrofoam or other floating material that can be found
Sufficient floating device to keep GPS a t surface

GPS Photo Transect Manual 3.0 October 2009 11: 33
1 kilo Weight Needs to hold the GPS in the right position. Function as the keel of a boat
Divers weight or any other object which makes up 1 kilo (e.g. coral rubble)
Anything that is small and weights around 1 kilo
Drybag Needs to hold the GPS in small dry back, on top of float with weight.
Transparent, water proof bag, e.g. Ortlieb, 10 litres
GPS Photo Transect Manual 3.0 October 2009 12: 33
Small Reel Needs to be connected to float and diver
Reel with thin rope long enough for the working depth of the survey transect, easy to role up and easy to stop the line from rolling further, small, rope strong enough to pull the float at the surface
Slate To note and then photograph: begin time. End time, begin depth, end depth, transect direction, date, transect name
Magnadoodle pro from Fisher Price
Enough space to write on and easy to wipe out in or underwater and cheap in case of losing. Magnetic slates are ideal

GPS Photo Transect Manual 3.0 October 2009 13: 33
1.2 Software
Software Purpose EXAMPLE Prerequisites
Up/download GPS
Up load GPS coordinates for transect location and to download tracks and waypoints
FREE DNR Garmin extension
Program which downloads and uploads from Garmin GPS and turns it into shape file directly suitable for ESRI GIS software
http://www.dnr.state.mn.us/mis/ gis/tools/ arcview/ extensions/DNRGarmin/ DNRGarmin.html
Any program which can up or download the GPS and translate it into file format for any GIS package you use
Download camera
To download to cameras on to computer
Standard laptop software and USB port/camera drivers
Standard computer with USB port
Mapping GIS
To view the downloaded track on a image or map and to check its location
FREE Google Earth or ArcExplorer http://www.esri.com
Works perfect for just checking track on map or image
We mostly use ARCGIS needs licence but has more capabilities then only showing the track on a map
Standard computer and software which can present spatial data
Photo analysis
To determine any characteristics needed for the research (% cover, bottom type, species composition, sediment colour, algal cover, etc)
FREE CPCE Coral Point Count Excel Extension
This program provides an easy way to analyse photos and place results automatically in Excel spread sheet
http://www.nova.edu/ocean/cpce/
Any other program which suits to get the desired information
Download and link photos and GPS and create GIS files
Downloads GPS coordinates and Photos and link them automatically output: ARCGIS shape file or Google Earth File.
GPS-Photo Link
USB port/camera driver software
Alternative: see appendix E
Can link GPS tracks with photo and outputs a spatial data file on standard computer
GPS Photo Transect Manual 3.0 October 2009 14: 33
2 Methods Description
2.1 Preparation
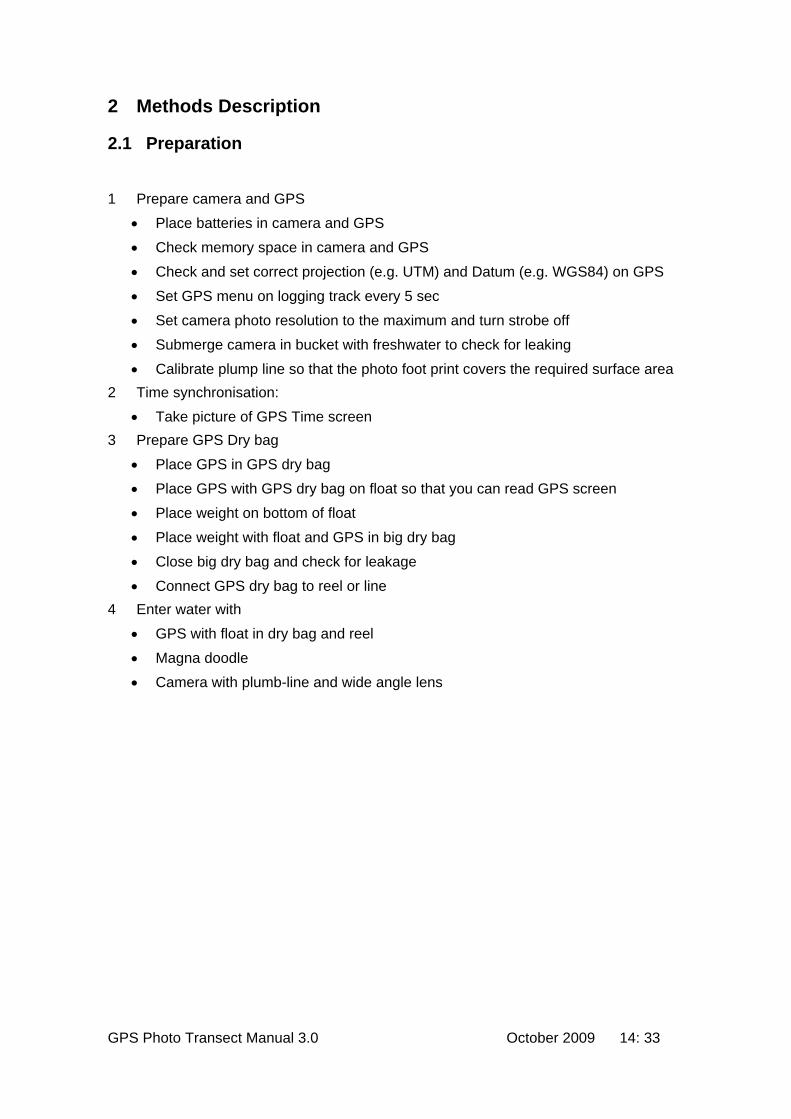
1 Prepare camera and GPS • Place batteries in camera and GPS
• Check memory space in camera and GPS
• Check and set correct projection (e.g. UTM) and Datum (e.g. WGS84) on GPS
• Set GPS menu on logging track every 5 sec
• Set camera photo resolution to the maximum and turn strobe off • Submerge camera in bucket with freshwater to check for leaking
• Calibrate plump line so that the photo foot print covers the required surface area 2 Time synchronisation:
• Take picture of GPS Time screen 3 Prepare GPS Dry bag
• Place GPS in GPS dry bag • Place GPS with GPS dry bag on float so that you can read GPS screen
• Place weight on bottom of float
• Place weight with float and GPS in big dry bag
• Close big dry bag and check for leakage
• Connect GPS dry bag to reel or line 4 Enter water with
• GPS with float in dry bag and reel
• Magna doodle • Camera with plumb-line and wide angle lens
GPS Photo Transect Manual 3.0 October 2009 15: 33
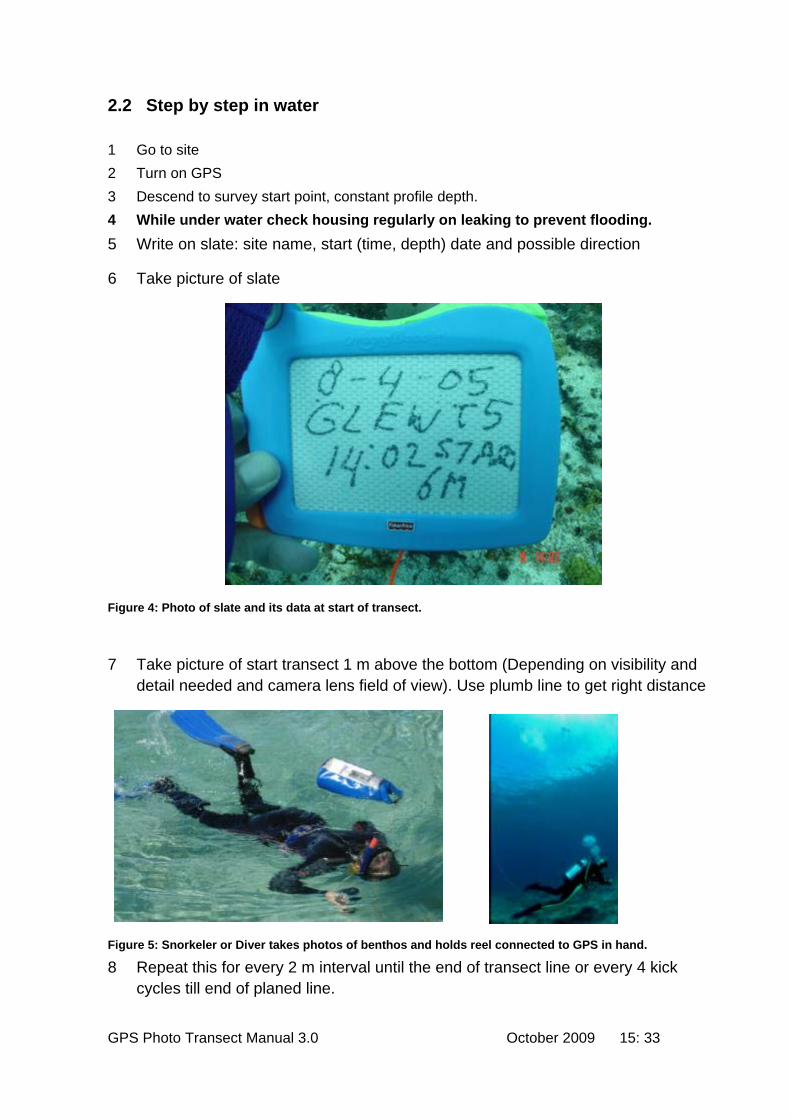
2.2 Step by step in water 1 Go to site 2 Turn on GPS 3 Descend to survey start point, constant profile depth. 4 While under water check housing regularly on leaking to prevent flooding. 5 Write on slate: site name, start (time, depth) date and possible direction
6 Take picture of slate
Figure 4: Photo of slate and its data at start of transect.
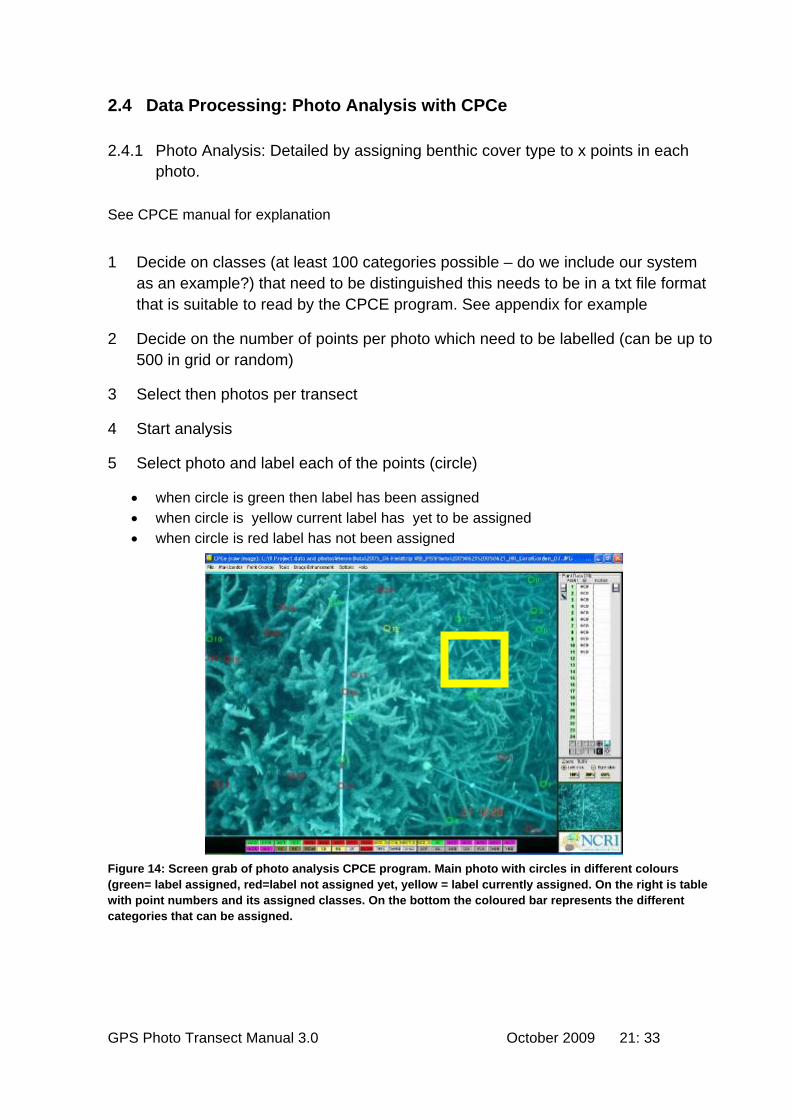
7 Take picture of start transect 1 m above the bottom (Depending on visibility and detail needed and camera lens field of view). Use plumb line to get right distance
Figure 5: Snorkeler or Diver takes photos of benthos and holds reel connected to GPS in hand.
8 Repeat this for every 2 m interval until the end of transect line or every 4 kick cycles till end of planed line.

GPS Photo Transect Manual 3.0 October 2009 16: 33
Figure 6: Example photo of benthos, with plump line for set distance from camera to bottom.
9 Write on slate: site name, end (time, depth) date, direction
10 Take picture of slate
Figure 7: Photo of slate and its data at end of transect.
11 Ascend/complete dive when finished
12 Turn GPS off (tracking is stopped then)
13 Go to next transect when needed and start again

GPS Photo Transect Manual 3.0 October 2009 17: 33
2.3 Data Processing Downloading
1 Download photos and rename photos to site_yyyymmdd_transectno_photono.jpg
2 Download GPS Track and link to photos (Detailed description in software manual).
2.1 Connect Camera and GPS to computer
2.2 Start GPS-Photo link and “Download Camera” window below appears
Figure 8: GPS-Photo Link Start up window
2.3 Determine Photo location (on camera or in directory on computer)
2.4 Determine output location of photos and thumb nail photo directory create new folder and press next
2.5 The “GPS download” window occurs

GPS Photo Transect Manual 3.0 October 2009 18: 33
Figure 9: GPS-Photo link: GPS down load window
2.6 Determine the GPS connected or select a track file and determine the datum format (the program will automatically calculated geographic and UTM coordinates) Press next
2.7 The “time synchronise” window occurs
Figure 10: GPS-Photo Link: Time Synchronise Window
2.8 Synchronise GPS time stamp to photo stamp by selecting “use photo of GPS receiver” and tick of “use GPS position only within 60 sec” select for matching “Interpolate between closest GPS points” (Closest in time) press next

GPS Photo Transect Manual 3.0 October 2009 19: 33
2.9 The “GPS time and Photo time calibration” window occurs
Figure 11: GPS-Photo Link: GPS - Camera time calibration
2.10 Look up the photo of the GPS time screen, read the time of and enter it in the GPS time box. This will automatically calculated the offset time. Press then enter
2.11 The “photo comments” window occurs where you can enter information to plot on each photo separately which is optional. Then press next
Figure 12 GPS-Photo Link: Add comments to Photo window occurs.

GPS Photo Transect Manual 3.0 October 2009 20: 33
2.12 The “output format” window occurs.
Figure 13: GPS-Photo Link: Output format window
2.13 Here you can select if you want to create a shape file with hotlinks to photo for ARCGIS or Arcview and/or a kml file for use in Google earth. You also select if you want hotlinks to a thumbnail or to the original photo.
2.14 After you pressed enter the photos will automatically linked to GPS coordinates. The program will generate several files which will be stored in the folder where the thumbnail are or original pictures are. Two shape files 1) Track file with the track and 2) picture file with per record a photo and coordinates and meta data of the photo. It also generates a kml file which has the track The following can be done to check the quality:
• all the photos taken should be linked, it the number of photos is different the number of photos linked there is something wrong with the time offset calculated.
• When plotting the photos on an image one can check if the photos are taken at the spot you expected. Our experience is that the photos are within 5 m of the actual target. The mis-registration is due to error in GPS position but also of the image position.
GPS Photo Transect Manual 3.0 October 2009 21: 33
2.4 Data Processing: Photo Analysis with CPCe
2.4.1 Photo Analysis: Detailed by assigning benthic cover type to x points in each photo.
See CPCE manual for explanation
1 Decide on classes (at least 100 categories possible – do we include our system as an example?) that need to be distinguished this needs to be in a txt file format that is suitable to read by the CPCE program. See appendix for example
2 Decide on the number of points per photo which need to be labelled (can be up to 500 in grid or random)
3 Select then photos per transect
4 Start analysis
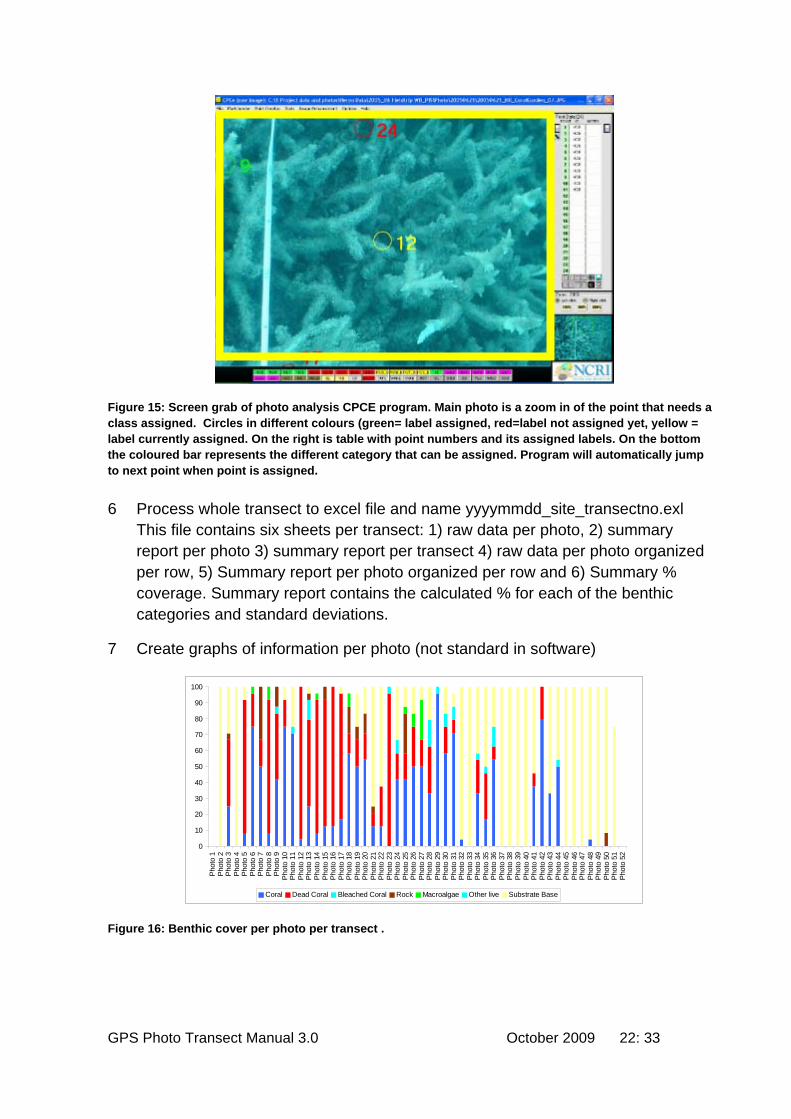
5 Select photo and label each of the points (circle)
• when circle is green then label has been assigned • when circle is yellow current label has yet to be assigned • when circle is red label has not been assigned
Figure 14: Screen grab of photo analysis CPCE program. Main photo with circles in different colours (green= label assigned, red=label not assigned yet, yellow = label currently assigned. On the right is table with point numbers and its assigned classes. On the bottom the coloured bar represents the different categories that can be assigned.
GPS Photo Transect Manual 3.0 October 2009 22: 33
Figure 15: Screen grab of photo analysis CPCE program. Main photo is a zoom in of the point that needs a class assigned. Circles in different colours (green= label assigned, red=label not assigned yet, yellow = label currently assigned. On the right is table with point numbers and its assigned labels. On the bottom the coloured bar represents the different category that can be assigned. Program will automatically jump to next point when point is assigned.
6 Process whole transect to excel file and name yyyymmdd_site_transectno.exl This file contains six sheets per transect: 1) raw data per photo, 2) summary report per photo 3) summary report per transect 4) raw data per photo organized per row, 5) Summary report per photo organized per row and 6) Summary % coverage. Summary report contains the calculated % for each of the benthic categories and standard deviations.
7 Create graphs of information per photo (not standard in software)
Figure 16: Benthic cover per photo per transect .
0
10
20
30
40
50
60
70
80
90
100
Phot
o 1
Phot
o 2
Phot
o 3
Phot
o 4
Phot
o 5
Phot
o 6
Phot
o 7
Phot
o 8
Phot
o 9
Pho
to 1
0P
hoto
11
Pho
to 1
2P
hoto
13
Pho
to 1
4P
hoto
15
Pho
to 1
6P
hoto
17
Pho
to 1
8P
hoto
19
Pho
to 2
0P
hoto
21
Pho
to 2
2P
hoto
23
Pho
to 2
4P
hoto
25
Pho
to 2
6P
hoto
27
Pho
to 2
8P
hoto
29
Pho
to 3
0P
hoto
31
Pho
to 3
2P
hoto
33
Pho
to 3
4P
hoto
35
Pho
to 3
6P
hoto
37
Pho
to 3
8P
hoto
39
Pho
to 4
0P
hoto
41
Pho
to 4
2P
hoto
43
Pho
to 4
4P
hoto
45
Pho
to 4
6P
hoto
47
Pho
to 4
8P
hoto
49
Pho
to 5
0P
hoto
51
Pho
to 5
2
Coral Dead Coral Bleached Coral Rock Macroalgae Other live Substrate Base
GPS Photo Transect Manual 3.0 October 2009 23: 33
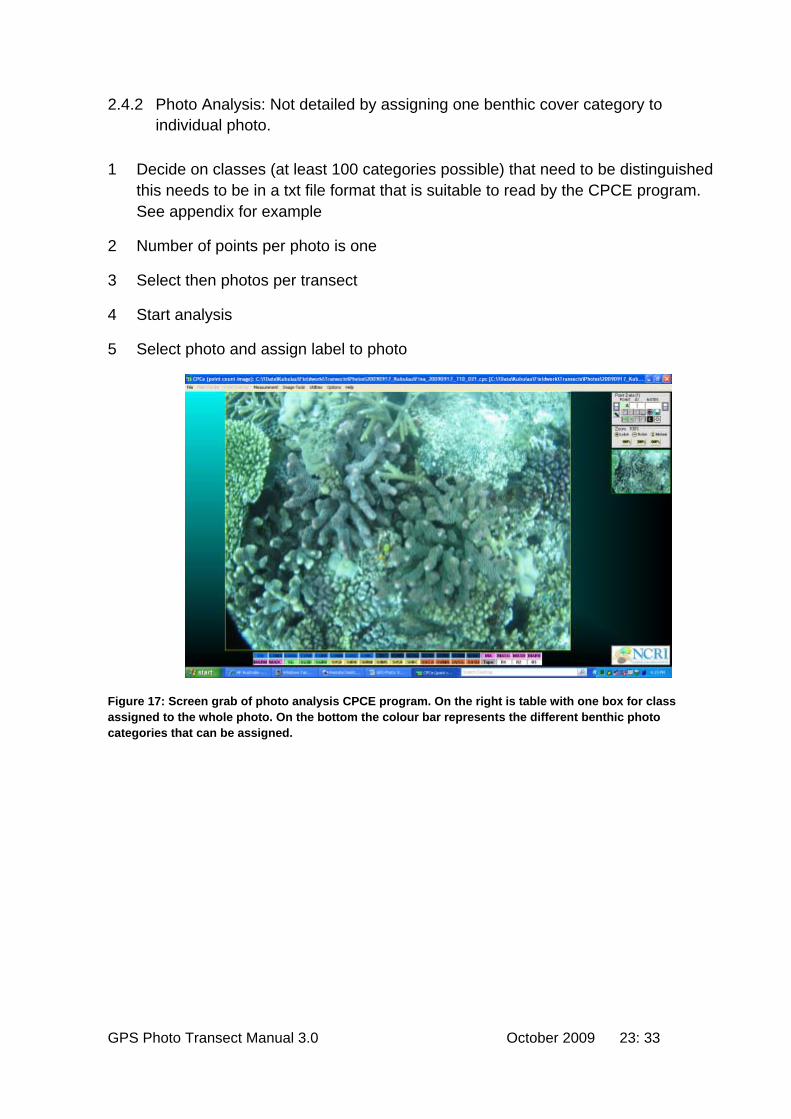
2.4.2 Photo Analysis: Not detailed by assigning one benthic cover category to individual photo.
1 Decide on classes (at least 100 categories possible) that need to be distinguished this needs to be in a txt file format that is suitable to read by the CPCE program. See appendix for example
2 Number of points per photo is one
3 Select then photos per transect
4 Start analysis
5 Select photo and assign label to photo
Figure 17: Screen grab of photo analysis CPCE program. On the right is table with one box for class assigned to the whole photo. On the bottom the colour bar represents the different benthic photo categories that can be assigned.
GPS Photo Transect Manual 3.0 October 2009 24: 33
2.5 Data Processing : GIS Environment
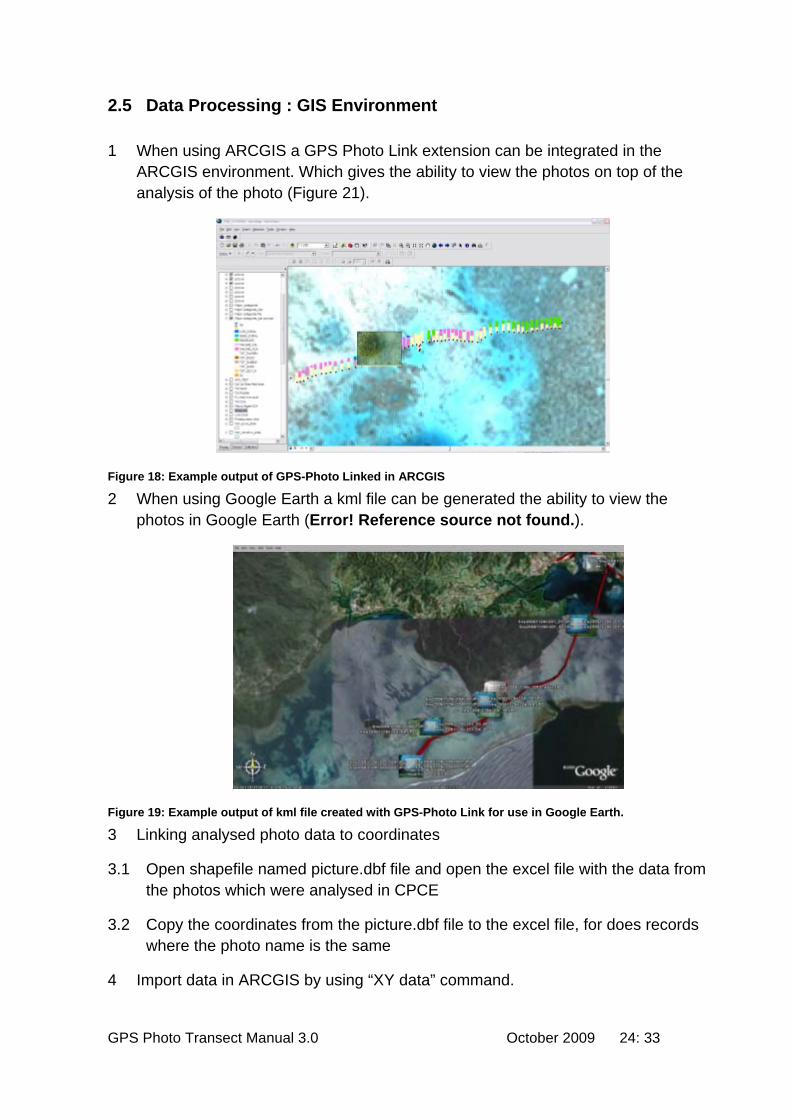
1 When using ARCGIS a GPS Photo Link extension can be integrated in the ARCGIS environment. Which gives the ability to view the photos on top of the analysis of the photo (Figure 21).
Figure 18: Example output of GPS-Photo Linked in ARCGIS
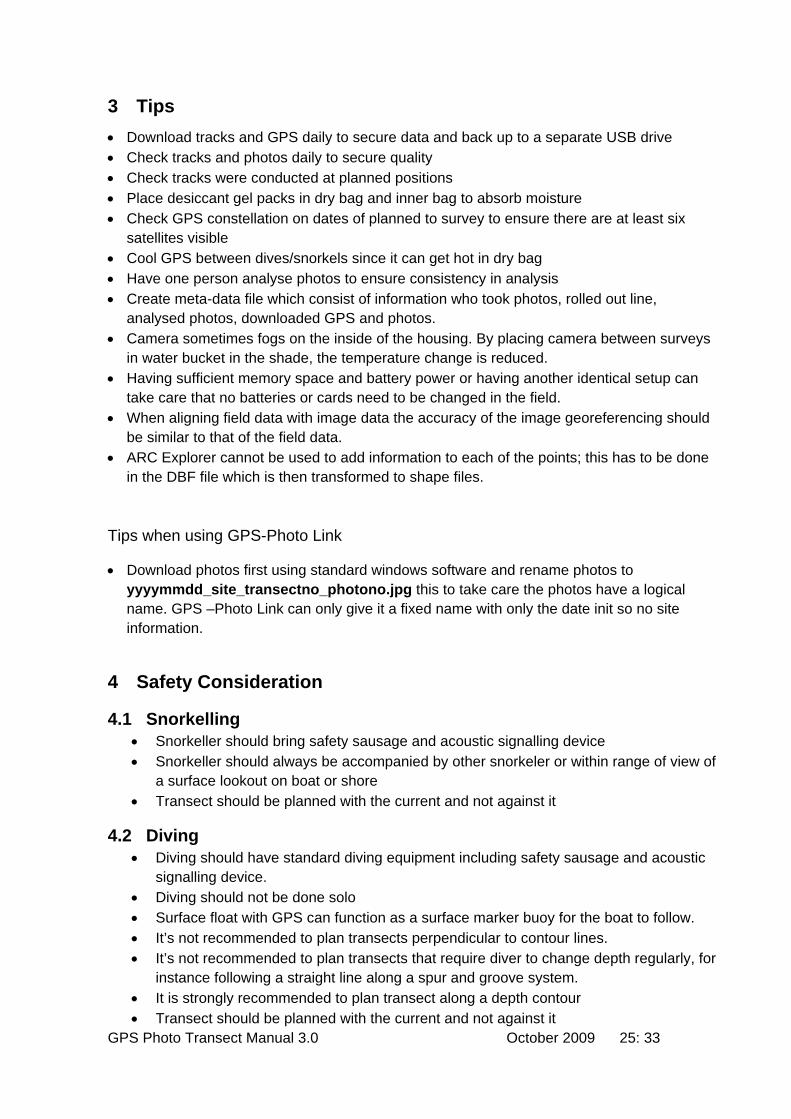
2 When using Google Earth a kml file can be generated the ability to view the photos in Google Earth (Error! Reference source not found.).
Figure 19: Example output of kml file created with GPS-Photo Link for use in Google Earth.
3 Linking analysed photo data to coordinates
3.1 Open shapefile named picture.dbf file and open the excel file with the data from the photos which were analysed in CPCE
3.2 Copy the coordinates from the picture.dbf file to the excel file, for does records where the photo name is the same
4 Import data in ARCGIS by using “XY data” command.
GPS Photo Transect Manual 3.0 October 2009 25: 33
3 Tips • Download tracks and GPS daily to secure data and back up to a separate USB drive • Check tracks and photos daily to secure quality • Check tracks were conducted at planned positions • Place desiccant gel packs in dry bag and inner bag to absorb moisture • Check GPS constellation on dates of planned to survey to ensure there are at least six
satellites visible • Cool GPS between dives/snorkels since it can get hot in dry bag • Have one person analyse photos to ensure consistency in analysis • Create meta-data file which consist of information who took photos, rolled out line,
analysed photos, downloaded GPS and photos. • Camera sometimes fogs on the inside of the housing. By placing camera between surveys
in water bucket in the shade, the temperature change is reduced. • Having sufficient memory space and battery power or having another identical setup can
take care that no batteries or cards need to be changed in the field. • When aligning field data with image data the accuracy of the image georeferencing should
be similar to that of the field data. • ARC Explorer cannot be used to add information to each of the points; this has to be done
in the DBF file which is then transformed to shape files.
Tips when using GPS-Photo Link
• Download photos first using standard windows software and rename photos to yyyymmdd_site_transectno_photono.jpg this to take care the photos have a logical name. GPS –Photo Link can only give it a fixed name with only the date init so no site information.
4 Safety Consideration
4.1 Snorkelling • Snorkeller should bring safety sausage and acoustic signalling device • Snorkeller should always be accompanied by other snorkeler or within range of view of
a surface lookout on boat or shore • Transect should be planned with the current and not against it
4.2 Diving • Diving should have standard diving equipment including safety sausage and acoustic
signalling device. • Diving should not be done solo • Surface float with GPS can function as a surface marker buoy for the boat to follow. • It’s not recommended to plan transects perpendicular to contour lines. • It’s not recommended to plan transects that require diver to change depth regularly, for
instance following a straight line along a spur and groove system. • It is strongly recommended to plan transect along a depth contour • Transect should be planned with the current and not against it
GPS Photo Transect Manual 3.0 October 2009 26: 33
5 Appendix
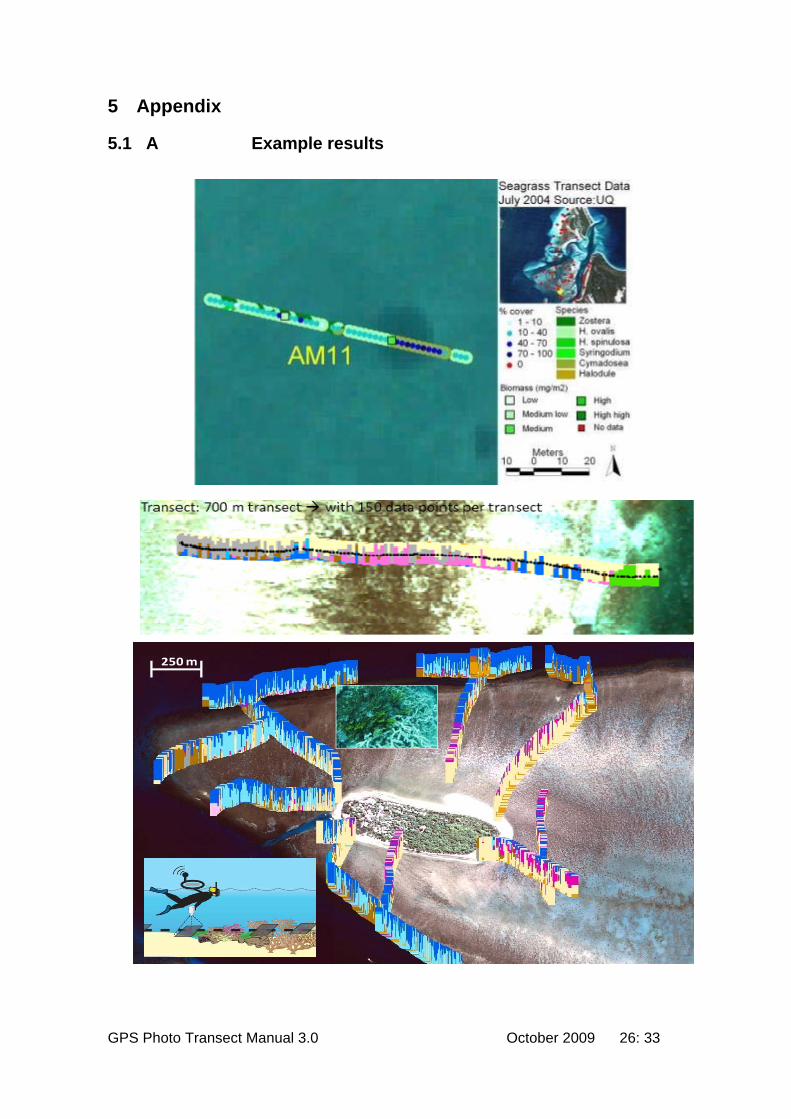
5.1 A Example results
250 m
GPS Photo Transect Manual 3.0 October 2009 27: 33
5.2 B CPCE example class file Detail Benthic Cover Type 8 "C","Coral" "DC","Dead Coral" "BC","Bleached Coral" "RC", "Rock" "MA","Macroalgae" "OL","Other live" "Su", "Substrate Base" "TWS","Tape, wand, shadow" "HCB", "Hard Coral Branching","C" "HCM", "Hard Coral Massive","C" "HCT", "Hard Coral Table","C" "HCE", "Hard Coral Encrusting","C" "DCB", "Dead Coral Branching","DC" "DCM", "Dead Coral Massive","DC" "DCT", "Dead Coral Table","DC" "DCE", "Dead Coral Encrusting","DC" "DCA", "Dead coral with algae","DC" "HCB_B", "Bleached Hard Coral Branching","BC" "HCM_B", "Bleached Hard Coral Massive","BC" "HCT_B", "Bleached Hard Coral Table","BC" "HCE_B", "Bleached Hard Coral Encrusting","BC" "SC", "Soft Coral", "C" "A-CY", "Cyanobacteria", "MA" "A-FI", "Filamentous - cladophora", "MA" "A-FO", "Foliose – Ulva dictyota", "MA" "A-CO", "Corticated - Caulerpa", "MA" "A-LT", "Leathery - Sargassum", "MA" "A-CA", "Calcareous - Halimeda", "MA" "A-E", "Crustose – red crustose", "MA" "RC cor", "Corraline on rock","RC" "RC turf", "Turf on rock","RC" "RC cl", "Rock clean","RC" "SD", "Sand","Su" "RB", "Rubble","Su" "OT", "Other","OL" "DCOR", "Diseased coral","DC" "TAPE", "Tape","TWS" "WAND", "Wand","TWS" "SHAD", "Shadow","TWS" NOTES,NOTES,NOTES

GPS Photo Transect Manual 3.0 October 2009 28: 33
"ASP", "Aspergillis","NA" "BL", "Bleached coral point","NA" "BBD", "Black Band Disease","NA" "OD", "Other disease","NA" "PLA", "Plague, Type II (White Plague, Type II)","NA" "WBD", "White Band Disease","NA" "YBD", "Yellow Blotch Disease","NA"

GPS Photo Transect Manual 3.0 October 2009 29: 33
5.3 C CPCE example class file Not Detail Benthic Category 7 "C","Coral" "SC","Soft Coral" "MA","Macro Algae" "SG","Seagrass" "SU","Non- Living Substrate" "OV","Overview" "TWS","Tape, wand, shadow" "CO","Coral Dominant","C" "COMA","Coral and Macro Algae","C" "COSG","Coral and Seagrass","C" "COSD","Coral and Sand","C" "CORU","Coral and Rubble","C" "CORM","Coral and Reef Matrix","C" "COSC","Coral and less Soft Coral","C" "CODC","Coral live and dead","C" "SC","Soft Coral Dominant","SC" "SCMA","Soft Coral and Macro Algae","SC" "SCSG","Soft Coral and Seagrass","SC" "SCSD","Soft Coral and Sand","SC" "SCRU","Soft Coral and Rubble","SC" "SCRM","Soft Coral and Reef Matrix","SC" "SCHC","Soft Coral and less Hard Coral","SC" "MA","Macro Algae Dominant","MA" "MASG","Macro Algae and Seagrass","MA" "MASD","Macro Algae and Sand","MA" "MARU","Macro Algae and Rubble","MA" "MARM","Macro Algae and Reef Matrix","MA" "MADC","Macro Algae and dead coral","MA" "SG","Seagrass Dominant","SG" "SGSD","Seagrass and Sand","SG" "SGRU","Seagrass and Rubble","SG" "SUSD","Sand Dominant","SU" "SURU","Rubble Dominant","SU" "SURM","Reef Matrix Dominant","SU" "SUMS","Mud/Silt Dominant","SU" "SUSR","Sand/Rubble Dominant","SU" "SUDC","Dead Coral Dominant","SU" "OVCO","Overview Coral Dominant","OV" "OVMA","Overview Macro Algae Dominant","OV" "OVSG","Overview Seagrass Dominant","OV" "OVSU","Overview Non Living Substrate Dominant","OV"

GPS Photo Transect Manual 3.0 October 2009 30: 33
"Tape","Tape/Slate/Out of focus/GPS","TWS" NOTES,NOTES,NOTES "R1","Rugosity 1","N" "R2","Rugosity 2","N" "R3","Rugosity 3","N"
GPS Photo Transect Manual 3.0 October 2009 31: 33
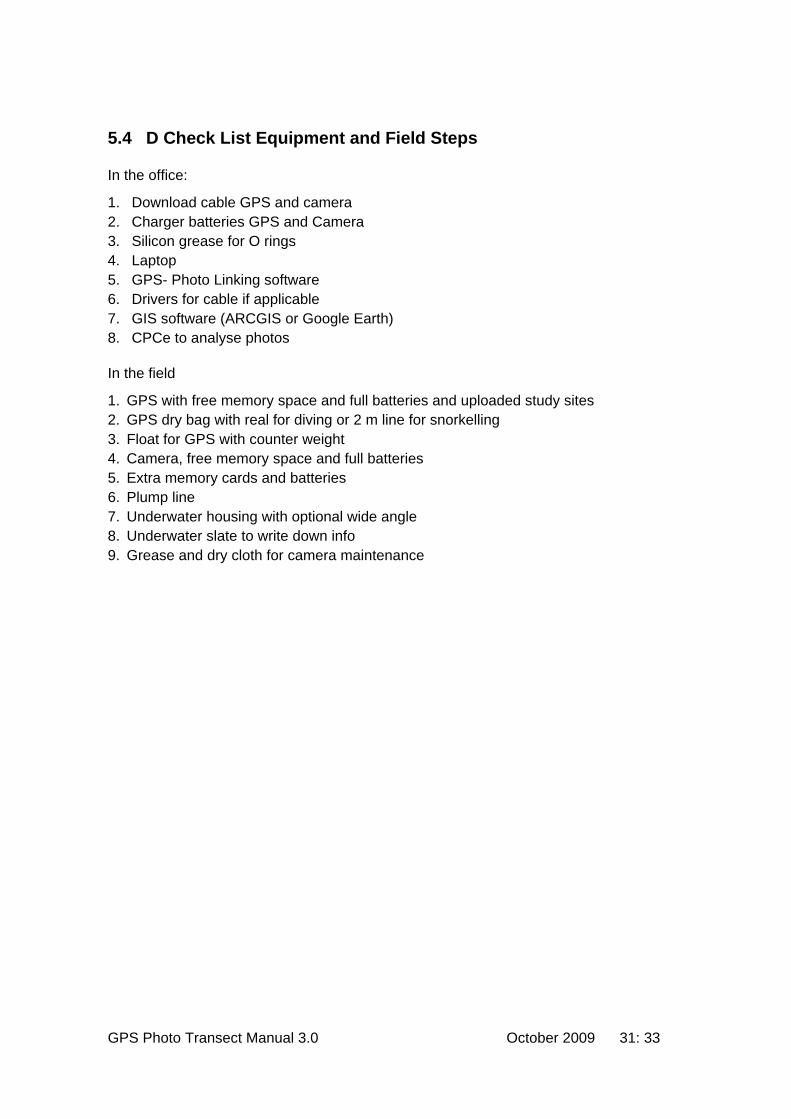
5.4 D Check List Equipment and Field Steps
In the office:
1. Download cable GPS and camera 2. Charger batteries GPS and Camera 3. Silicon grease for O rings 4. Laptop 5. GPS- Photo Linking software 6. Drivers for cable if applicable 7. GIS software (ARCGIS or Google Earth) 8. CPCe to analyse photos
In the field
1. GPS with free memory space and full batteries and uploaded study sites 2. GPS dry bag with real for diving or 2 m line for snorkelling 3. Float for GPS with counter weight 4. Camera, free memory space and full batteries 5. Extra memory cards and batteries 6. Plump line 7. Underwater housing with optional wide angle 8. Underwater slate to write down info 9. Grease and dry cloth for camera maintenance
GPS Photo Transect Manual 3.0 October 2009 32: 33
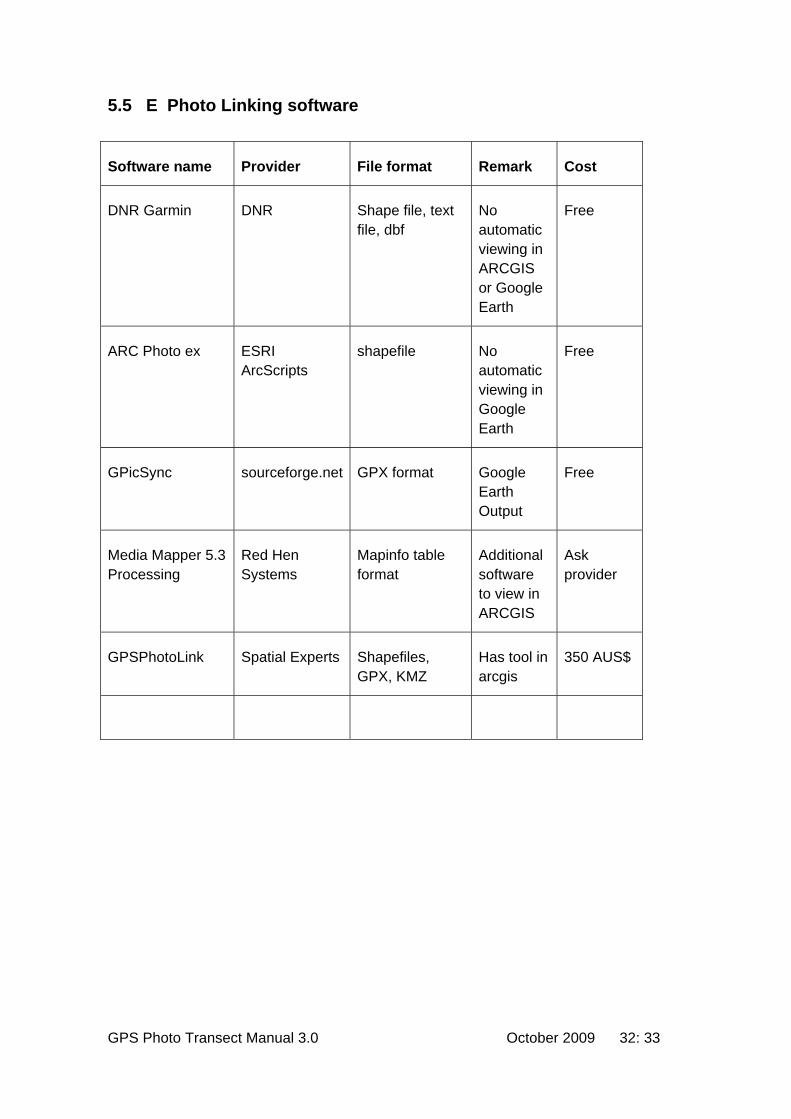
5.5 E Photo Linking software
Software name Provider File format Remark Cost
DNR Garmin DNR Shape file, text file, dbf
No automatic viewing in ARCGIS or Google Earth
Free
ARC Photo ex ESRI ArcScripts
shapefile No automatic viewing in Google Earth
Free
GPicSync sourceforge.net GPX format Google Earth Output
Free
Media Mapper 5.3 Processing
Red Hen Systems
Mapinfo table format
Additional software to view in ARCGIS
Ask provider
GPSPhotoLink Spatial Experts Shapefiles, GPX, KMZ
Has tool in arcgis
350 AUS$
GPS Photo Transect Manual 3.0 October 2009 33: 33
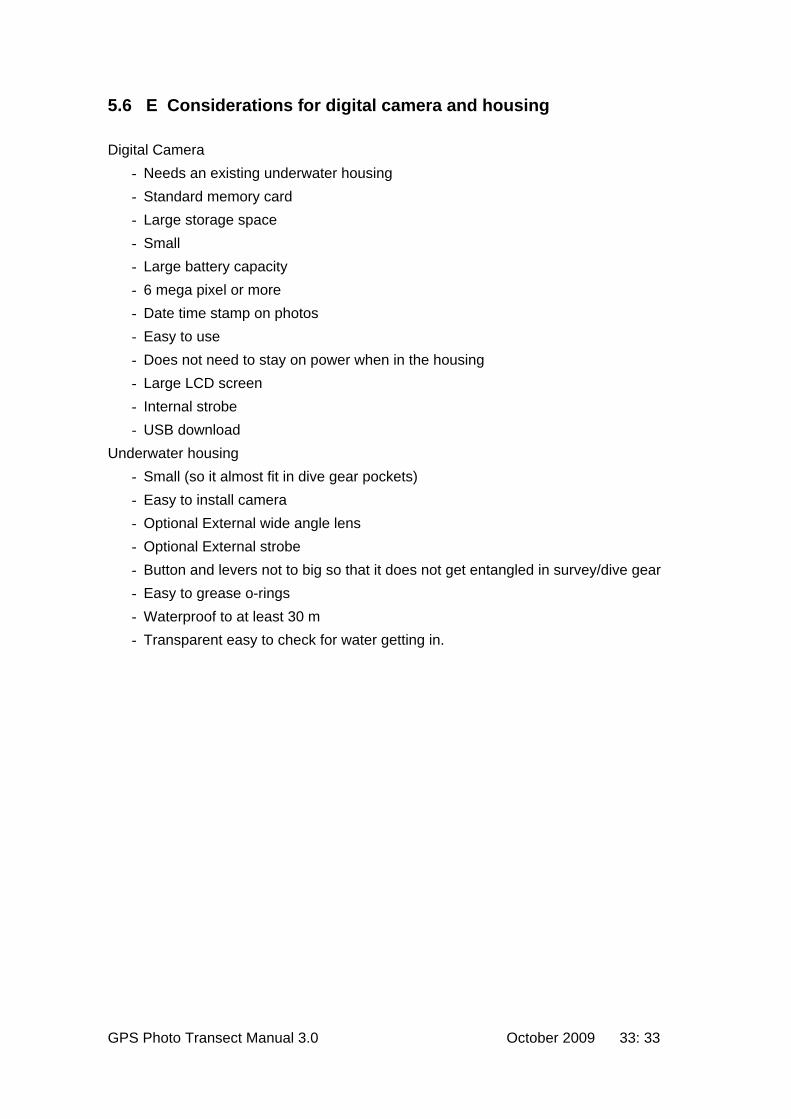
5.6 E Considerations for digital camera and housing Digital Camera
- Needs an existing underwater housing - Standard memory card - Large storage space - Small - Large battery capacity - 6 mega pixel or more - Date time stamp on photos - Easy to use - Does not need to stay on power when in the housing - Large LCD screen - Internal strobe - USB download
Underwater housing - Small (so it almost fit in dive gear pockets) - Easy to install camera - Optional External wide angle lens - Optional External strobe - Button and levers not to big so that it does not get entangled in survey/dive gear - Easy to grease o-rings - Waterproof to at least 30 m - Transparent easy to check for water getting in.