a guide to timing in aegisub - wordpress.com · a guide to timing in aegisub author: jadpraet last...
TRANSCRIPT
A Guide to Timing in Aegisub
Author: jadpraetLast Update: 27 Jun 2011
Disclaimer: This document has as a goal to teach new timers how to do their job. However, I will not claim that this is the ultimate way to do things. After all, every timer will eventually develop his or her own style. This however, is the way I would explain things to a newbie and thus it's mostly based on my way of timing and the way I learned it.
Table of Contents
1 Getting Started................................................................................................................ 11.1 What is timing?..................................................................................................... 11.2 Downloading Aegisub........................................................................................... 11.3 Loading the necessary files.................................................................................. 11.4 The options menu................................................................................................. 2
2 The Basics...................................................................................................................... 42.1 Rough timing........................................................................................................ 42.2 Fine timing........................................................................................................... 5
2.2.1 Lead-in and lead-out................................................................................ 52.2.2 Line-linking............................................................................................... 52.2.3 Keyframe snapping.................................................................................. 6
2.3 The timing post-processor................................................................................... 72.4 Checking your work............................................................................................. 9
3 Helpful Things............................................................................................................... 103.1 Hotkeys............................................................................................................... 103.2 Preparing for the post-processor......................................................................... 113.3 Timing signs........................................................................................................ 133.4 Dealing with overlapping lines............................................................................. 163.5 Missing lines........................................................................................................ 163.6 Missing keyframes............................................................................................... 17
4 Special Types of Timing................................................................................................ 174.1 Pre-timing............................................................................................................ 174.2 Alpha timing......................................................................................................... 174.3 Karaoke timing..................................................................................................... 18
4.3.1 Kanji timer................................................................................................... 20
5 Glossary of Terms......................................................................................................... 20
6 F.A.Q............................................................................................................................... 21
7 Conclusion..................................................................................................................... 21
A Appendix A..................................................................................................................... 22A.1 Timing guidelines................................................................................................. 22A.2 Tpp settings......................................................................................................... 22
i
1 Getting StartedStarting, the most important step for just about everything. If you already know all this, you can skip it though. However, at least try to skim through sections 1.3 and 1.4 since they mention a few important things.
1.1 What is timing?
Before we actually get started, I will answer this simple-sounding question. In my opinion, good timing is syncing subtitles with voices in such a way that the viewer can read them comfortably. In particular, this means that the subtitles stay long enough on screen to read, there is no subtitle flickering and there are no scene bleeds.
1.2 Downloading Aegisub
To download Aegisub, go to http://www.aegisub.org/ and scroll down to downloads. There, you can select the version you need. Of course, you should install it after downloading.
1.3 Loading the necessary files
Well, this step might actually pose some difficulties to newbies if they don't have access to a video file and a script. If you're already in a fansub group, you could ask them to provide you with a video and script for training purposes. If not, I suggest looking for a script on the internet and downloading a raw for the episode.Here's a site where you can find some scripts: http://freetl.wordpress.com/
Now, for the actual loading of the files. In most cases, you'll have a .txt or .ass file for the script. You can just right click on the file and choose “Open with > Aegisub”. Alternatively, you can open Aegisub and click “File > Open Subtitles...” and open the file.
To open the video file, click “Video > Open Video...” To open the audio, click “Audio > Open Audio from Video...” or if the audio isn't included in the video, click “Audio > Open Audio File” to load the audio separately. If you got a “timecodes.txt” included with the video, you should also click “Video > Open Timecodes File...” Finally, click “Video > Detach Video” and minimize the detached video, since we won't be needing that for now.
Your main window should now look somewhat like Image 1. You might have a green audio graph instead of the one in the image though. We'll get back to that later on.
1
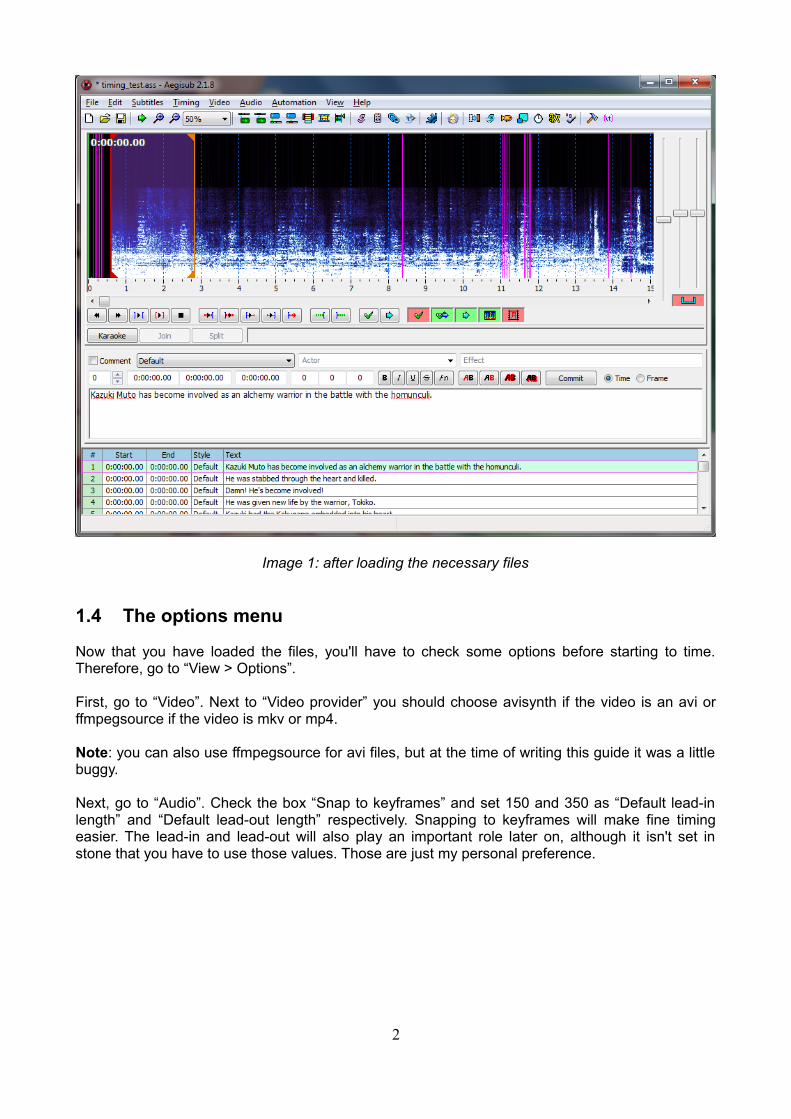
Image 1: after loading the necessary files
1.4 The options menu
Now that you have loaded the files, you'll have to check some options before starting to time. Therefore, go to “View > Options”.
First, go to “Video”. Next to “Video provider” you should choose avisynth if the video is an avi or ffmpegsource if the video is mkv or mp4.
Note: you can also use ffmpegsource for avi files, but at the time of writing this guide it was a little buggy.
Next, go to “Audio”. Check the box “Snap to keyframes” and set 150 and 350 as “Default lead-in length” and “Default lead-out length” respectively. Snapping to keyframes will make fine timing easier. The lead-in and lead-out will also play an important role later on, although it isn't set in stone that you have to use those values. Those are just my personal preference.
2

Image 2: the video menu in the options
Image 3: the audio menu in the options
3

2 The BasicsBefore saying anything else, I will stress this first:SAVE YOUR WORK AFTER EACH SECTION!
2.1 Rough timing
Rough timing (also known as sharp timing) consists of making the lines start and stop exactly at the start and end of the dialogue. To do so, you'll have to look at the audio graph and use your ears.
You can set the starting time by left-clicking in the audio graph whereas the ending time is set by right-clicking. To commit your selection, you'll have to push button 13 or press G on the keyboard. If button 16 is activated, you will then automatically jump to the next line, which is a real time saver. Also, you'll want button 15 to be turned off to prevent auto-committing.
Image 4: rough timing
The most important buttons in the image above are 3, 6, 9, 13 and 20. The short keys for these are S, Q, D and G. S plays your current selection. Q plays the last 500 ms before your selection. D plays the last 500 ms of your selection. And G commits your changes, as explained before. S, Q and D help a lot to check if you timed the line correctly. Finally, you can use the horizontal zoom slider to the left of number 20 to zoom in on the audio graph.
4

Tip: instead of pressing the scroll bar with your mouse to move forward, you can also push F on your keyboard. Thus, you should always keep your left hand near the S, Q, D, G and F keys.
Now you might be wondering why my audio graph looks different than yours. That's because I have activated button 18, which turns on the “Spectrum analyzer mode”. Personally, I find it easier to find sounds in this mode than with the green audio graph. As you can see in Image 4, it's clear where someone is saying something. With the green audio graph however, it didn't look as clear to me.
Anyway, you now know enough to do rough timing, so have fun applying it to your training file. On your first try, it will probably take a few hours, but it's very well possible to do rough timing in just as much time as the playtime of the video. So don't get discouraged if things go slowly on your first tries!
When you're finished, save your work and proceed to the next section.
2.2 Fine timing
Fine timing (or scene timing) is an essential part of the timing process. It's the part where the subtitles are made comfortable for the viewer to read. Here is where you make sure that the subtitles stay long enough on screen to read, there is no subtitle flickering and there are no scene bleeds.
Those three things can be done automatically by the post-processor, but it is essential that the timer also knows how to perform them manually, because the post-processor can sometimes screw up a bit. To practise, I would recommend doing the first 20 lines of your script manually. After that, revert back to the file you saved after rough timing and continue to section 2.3.
2.2.1 Lead-in and lead-out
This one is easy. You just have to add lead-in and lead-out to each of the lines. You can do this either by pressing button 11 and 12 and than committing the change, or just press C for lead-in and V for lead-out on the keyboard, followed by G to commit. The amount of lead-in and lead-out that is added depends on the number you filled in under options earlier.
Attention: do not forget to commit the changes after applying lead-in and lead-out!
Another important point: no line should be shorter than 500 ms! Anything shorter is completely impossible to read!
2.2.2 Line linking
After the previous step, you probably have some overlapping lines. When that's the case, you should select the two lines, then right click and choose “Make lines continuous (change end)”. This will change the ending time of the first line to match the starting time of the second line.
There is another situation where you'll want to link lines. If, after adding lead-in and lead-out, two lines are 500 ms or less apart from each other, you should extend the time of the first line to match the one of the second line. Again, this is done with “Make lines continuous (change end)”. This is to prevent what I call “subtitle flickering”. However, some timers use a smaller value than 500 ms or don't do line linking at all because they like it more that way.
5

Image 5: line-linking
2.2.3 Keyframe snapping
Have you noticed those purple lines that appear frequently in the audio graph? Those are called keyframes. Usually, they indicate that a large portion of the image on screen changes, e.g. when the video was showing the face of one character speaking, it suddenly shows the face of the other character.
If you're 300 ms or closer to a keyframe after adding the lead-in, you should extend your line to start at that keyframe. You'll see that your cursor is hovering above the keyframe if the white line turns green.If you're 500 ms or closer to a keyframe after adding the lead-out, you should extend your line to end at that keyframe.Again, the exact values timers use vary, but 300 ms and 500 ms are the ones I use.
Image 6: the green line you see when hovering above such a purple keyframe
Attention: you should always be alert when snapping to keyframes! Snapping the start of a line to a keyframe usually doesn't bring any trouble. Snapping the end of a line to a keyframe however, sometimes does! E.g. some dialogue extends 150 ms over the keyframe. You add the 350 ms as lead-out. In this case, it's still within 500 ms of the keyframe. In this case, you should try snapping it to the keyframe. If only one syllable disappears by doing this (like the “su” from “desu”) it should be all right.However, if it's more than one syllable, it's risky. In that case, you will have to use your own judgement. Is it too noticeable that the subs disappear before the dialogue? If the answer is “yes”, do not snap to the keyframe!
6

Image 7: both the start and end of the line have been snapped to a keyframe (notice how I ignore the little bit of sound after the keyframe)
This should cover the basics of fine timing. There is still one small detail, the splitting of long lines, but I usually do that when I check the video.
2.3 The timing post-processor
Did you think that you'd have to do all the fine timing manually? Well, actually, it's entirely possible, but it's more time consuming than the automatic way: the timing post-processor (tpp).
To access the tpp, click “Timing > Timing Post-Processor”. We have several options here. To make sure we have a lead-in, let's start with adding a lead-in. To do so, uncheck all the boxes except for “Add lead in” and type 150 next to it. Also, you should make sure that you have only checked the styles you want to apply it to. When you're ready, click “OK”. (see also Image 8)
Next, we're going to add the lead-out, do the line-linking and the keyframe snapping. Check all the boxes except for “Affect selection only” and “Add lead in”. As for the values, you should have 350 for lead-out, 500 as threshold and the bias meter about 4/5 to the end. This will add a 350 ms lead-in and extend it to match the starting time of the next line if it's 500 ms or closer to it.The values for keyframe snapping will depend on the video, since these values are in number of frames. We want them to be about 250 ms, 300 ms, 500 ms and 500 ms. However, some videos have a frame rate of 23.976 fps while others have one of 29.97 fps. Using some basic math, we then find the following values:
23.976 fps: 6 8 29,97 fps: 8 1012 12 15 15
Note 1: if you want to play really safe, you can add the lead in first, next add only lead out, then make the lines continuous and finally, do the keyframe snapping. This might just be paranoia, but I feel the tpp messes up less when doing this in four separate steps.
Note 2: Adding the lead in should always be done separately from the rest, because in my timing style, lead in takes precedence over lead out.
7

Image 8: adding the lead-in
Image 9: adding the rest (for a 23.976 fps video)
To see the frame rate of a video, you can install MediaInfo. (http://mediainfo.sourceforge.net/en)After installing it, you can right-click your video file and select MediaInfo. Next click “View > Tree” and look under “Video” for “Frame rate”.
Now the tpp should have applied all the necessary steps to the script. However, the tpp screws up a bit sometimes. Therefore, it's very important to check everything. This is what we'll do in the next section. Do not forget to save your file now though, and name it differently than the one you were supposed to save after rough timing!
Tip: section 3.2 will explain a simple technique you can use to prevent the tpp from screwing up too much.
8

Image 10: finding frame rate with MediaInfo
2.4 Checking your work
This is the most time consuming part of timing once you're very good at rough timing. Usually, rough timing takes between 20 to 40 minutes. Next, running the tpp takes just a minute. And finally, checking the video takes at least as long as the length of the video, sometimes even up to three times the length.
Things you might encounter when watching the video to check your work are:
– The tpp snapped the line to the wrong keyframe (this can happen a lot in heavy action scenes). You can try to avoid this problem by using the technique in section 3.2.
– Sometimes, a character screams the last syllable of a word (e.g. “nani desu kaaaaaaaaaaaaaaa?!”), making the sound last a whole second. If somewhere in that one second of screaming a keyframe is crossed, the tpp won't snap it to the keyframe. You'll have to spot that and correct it by yourself. This too can be avoided with the technique in section 3.2 though.
– Two lines might overlap when they shouldn't. This usually happens because the tpp does keyframe snapping after line-linking. This one is a little hard to avoid if you're using the tpp, so you should always check for this problem.
– You might notice missing keyframes resulting in scene bleeds or reverse bleeds (refer to section 3.6 and section 5 for that).
– A line doesn't appear long enough to be readable. Note: Sometimes, you'll even have to improvise a bit and bend the rules to make a line stay long enough on screen to be readable enough.
One last thing that you might notice when watching the video, is that some subtitles take up more than two lines on the screen. In such a case, you should break it at the appropriate place (e.g. pause in speech or scene change). Remember: subtitles should never be longer than 2 lines!
9
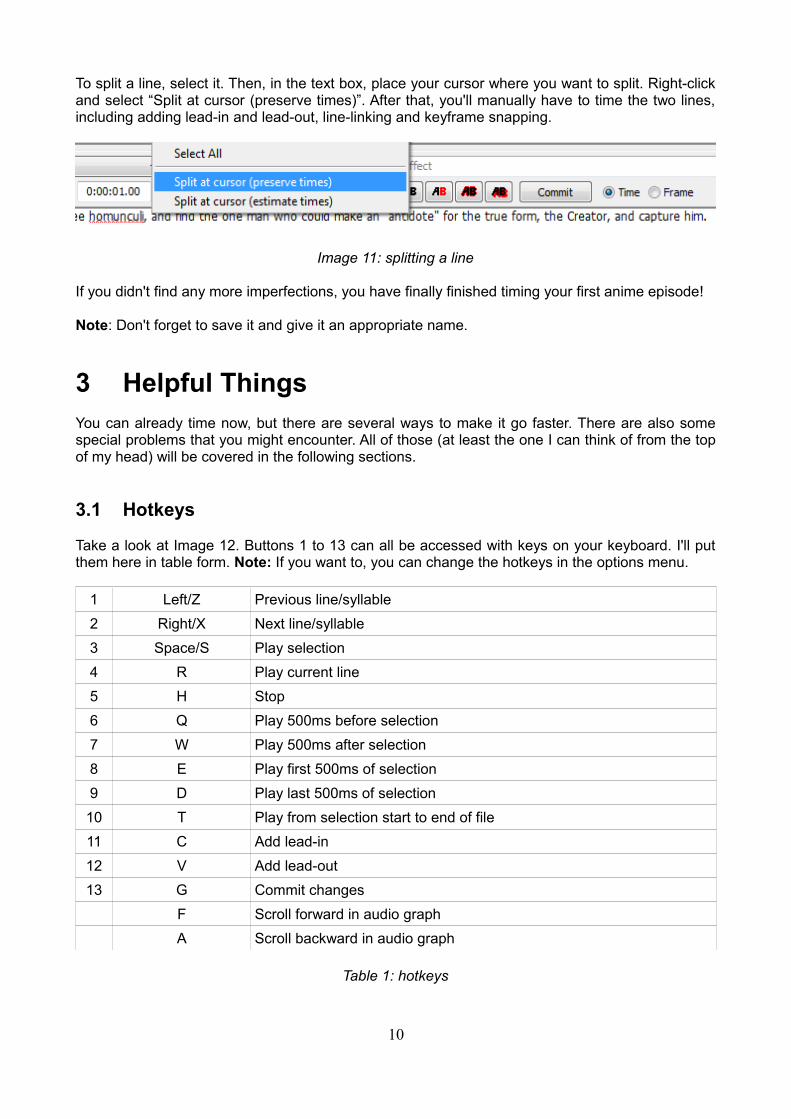
To split a line, select it. Then, in the text box, place your cursor where you want to split. Right-click and select “Split at cursor (preserve times)”. After that, you'll manually have to time the two lines, including adding lead-in and lead-out, line-linking and keyframe snapping.
Image 11: splitting a line
If you didn't find any more imperfections, you have finally finished timing your first anime episode!
Note: Don't forget to save it and give it an appropriate name.
3 Helpful ThingsYou can already time now, but there are several ways to make it go faster. There are also some special problems that you might encounter. All of those (at least the one I can think of from the top of my head) will be covered in the following sections.
3.1 Hotkeys
Take a look at Image 12. Buttons 1 to 13 can all be accessed with keys on your keyboard. I'll put them here in table form. Note: If you want to, you can change the hotkeys in the options menu.
1 Left/Z Previous line/syllable2 Right/X Next line/syllable3 Space/S Play selection4 R Play current line5 H Stop6 Q Play 500ms before selection7 W Play 500ms after selection8 E Play first 500ms of selection9 D Play last 500ms of selection10 T Play from selection start to end of file11 C Add lead-in12 V Add lead-out13 G Commit changes
F Scroll forward in audio graphA Scroll backward in audio graph
Table 1: hotkeys
10

Image 12: the buttons
Besides all of the keys mentioned in the earlier sections, you might find E and W useful too at times.
Finally, a way to go through the video is selecting an area, then press S. This will play the selected area, but you can set your start and end time for the line in the meantime with the help of the audio graph. If you use G to commit your changes and jump to the next line, the audio will keep playing as long as it hasn't gone past the end time of your selection. Using this and making quick checks with Q and D, it's possible to rough time an episode in real time.
3.2 Preparing for the post-processor
If you take a look at the images below, you'll notice that the actual sound stops just a little bit after the keyframe at 20:14.74. However, after applying the tpp, the line will be extended to the keyframe at 20:15.74. This happens because the tpp adds lead-out first and then sees that the second keyframe is closer to the end of the line.If you know that you will use the tpp, you can prevent this from happening by ending the line somewhere between half a second and 300 ms before the keyframe you want it to snap to later on. This also means that you won't have to time very precisely when you are close to a keyframe while knowing you'll apply the tpp afterwards. Sometimes, this can really save some time.
Note: depending on how much lead-out you'll add, you'll want to end the line a little closer or a little further from the keyframe. The values above are once again the ones I use.
11

Image 13: after applying tpp
Image 14: applying the technique
12

Image 15: applying the tpp after applying technique, correct result
3.3 Timing signs
In some groups, the timer is also required to time the signs to make things easier for the typesetter later on in the fansubbing process. Timing signs obviously can't be done with the audio graph alone, which means we'll finally use that video we detached a long time ago.
I time signs by timing them to the video first during the rough timing phase. This doesn't have to be perfect though. I also apply a different style to them by clicking “Subtitles > Styles Manager...” and copying my “Sign” style to the “Current script” box. Chances are that you don't have a “Sign” style in your “Storage” yet, so let's make one first.
First click “New” under “Storage”. (Image 16) Then put “Sign” under “Style name” and choose 8 for alignment. I change the alignment because it makes it easier to distinguish between signs and actual dialogue while watching the video. You don't need to change any other options, that's for the typesetter to do. So just press “OK” for now. (Image 17)
Only one last thing to do now: press “Copy to current script ->” under Storage while selecting your new “Sign” style. Now you can set the “Sign” style for the line by selecting the line and choosing the style as you can see in Image 18.
Setting the “Sign” style is important, because that way you can deselect that style in the tpp so it doesn't change the timing for it.
Note: to help the typesetter find the signs later on, I add a comment line before and after the sign. You can do this by right clicking the line and selecting “Insert (before)” and “Insert (after)”. Then, you select each of the two new lines and check the box next to “Comment”. (see also Image 19)
13
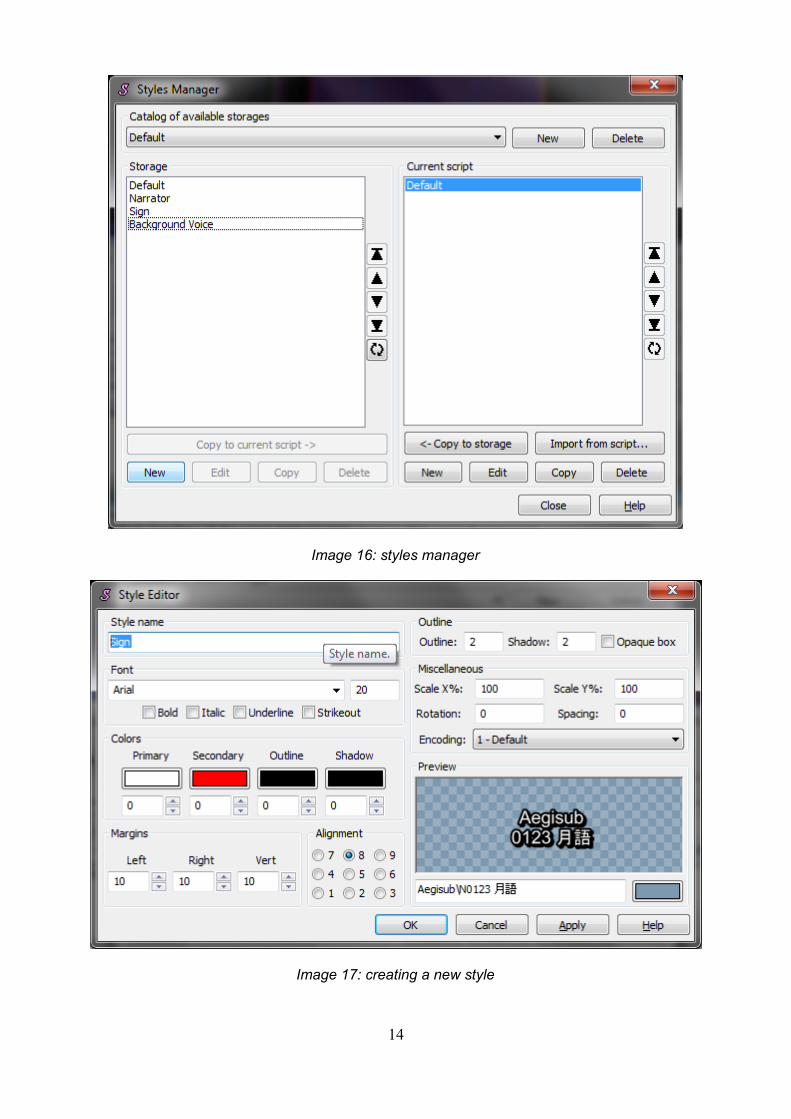
Image 16: styles manager
Image 17: creating a new style
14

Image 18: setting the “Sign” style
Now that we have set the “Sign” style, we'll still have to time it exactly. To do so, you'll need to use the video. Click on the video window after selecting the line and then use the left/right arrow keys to navigate through the frames or the SHIFT + left/right arrow keys to go to the previous or next keyframe. When you find the first frame where the sign appears, click the “Set start of selected subtitles to current video frame” button. To set the ending time for the line, find the last frame where the sign is still visible and click the “Set end of selected subtitles to current video frame” button. (see also Image 20)
To set the ending time, find the last frame where the sign is still visible and set it as the ending time in the box next to the starting time.
Note: even if it's a line that's fading in, you should set the starting or ending time to be when it as practically invisible. The typesetter should add fade-in or fade-out afterwards.
15

Image 19: making signs more noticeable for the typesetter
Image 20: two essential buttons
3.4 Dealing with overlapping lines
To deal with overlapping lines caused by several people talking at once, I usually just use the tpp as usual. However, when checking the video afterwards, I pay extra attention to potential screw-ups. When it's just one or two overlapping lines, it might turn out fine, but if two people are talking at the same time for a long period, it will be really important to check well.
To be honest, I find dealing with overlapping lines to be the only frustrating part of timing if there are too many of them. Fortunately, this doesn't occur very often in most series.
3.5 Missing lines
Sometimes it happens that the translator forgot to translate a line. If you think that is the case, you should add a line by right-clicking and using “Insert (before)” or “Insert (after)”. You should write something like “!!! MISSING LINE !!!” there and time it to the untranslated dialogue. You should also notify the translator or project leader about it.
16
3.6 Missing keyframes
This is something that you might notice when you check your work by watching the video with your timed script. If you notice a scene bleed or reverse scene bleed, pause the video and check the audio graph at that time.
The scene bleed might have been caused either because the tpp didn't snap the line to the keyframe or it might be that you are dealing with a missing keyframe which caused the line to pass over a scene change.
In the latter case, you'll have to use the same technique as for doing the precise timing of signs (see section 3.3). You'll manually have to search the time where the scene change happens and adjust the starting or ending time of the line to avoid causing a scene bleed.
4 Special Types of TimingThere are a few special types of timing besides the normal one. These will be explained in the following sections.
4.1 Pre-timing
Pre-timing consists of timing lines to a dialogue without translation so the translator can fill them in later. You should time the lines to what you think are different sentences. Usually, I pre-time using audio only and set the start and end times at the exact start and end of a spoken sentence.
Note: you'll probably have to split or join lines afterwards because you might have timed a line to just part of a sentence or two sentences. You can either do rough timing or fine timing, but if you do fine timing and have to join or split the lines afterwards, you'll have to correct them manually.
Image 21: pre-timed script
4.2 Alpha timing
Another special type of timing is alpha timing. This consists of delaying the appearance of part of the line. For example:
Hey, hey, mama?Hey, hey, mama? What are you doing?
To achieve this, you should use the “{\alpha&HFF&}” tag by placing it before the part of the line that needs to appear later. Next, duplicate the line but leave the tag out. Of course, you'll need to time the first line to the moment where only the first part of the line should appear, and the second line
17

where the whole text should appear. Also, remember to link the lines and snap to keyframes if necessary.
Image 22: alpha timing
Note: This is quite a controversial way of timing. Some people like it because they can't see ahead in the dialogue if something surprising is going to happen, while other people hate it because they have to focus more on the subs than on the screen. This kind of timing should only be used in cases like a countdown or something.
4.3 Karaoke timing
A final special kind of timing is karaoke timing. With this, I don't mean simply matching the text to each line. I mean matching each syllable to the corresponding syllable in the song to create a karaoke effect. We won't be creating actual karaoke effects in this section though, we'll only be timing them.
First, you should time the karaoke lines to match the voices exactly, like rough timing. Next, select a line and press the “Karaoke” button.
18

Image 23: after pressing the “Karaoke” button
You can now see those yellow lines in the audio graph separating each word. However, this isn't what we want just yet. Therefore, click “Split”. Now you'll be able to set split points in the bar next to “Accept Split”. Set one after each syllable and then press “Accept Split”.
Note: if there's a pause in the song after a word, you should place a split point there too and time a blank syllable!
Image 24: just before actually splitting the syllables (a pause occurred after “takaku”)
Next, you'll have to time each syllable by dragging the yellow dashed lines in the audio graph. You should put the yellow lines a little bit before the start of the syllable. You don't have to be very precise since human perception can't tell the difference between a few ms.
19

As a last step, you'll have to insert the karaoke tags. You can do so by right clicking in the box next to split and selecting “\k”. Now, you just have to do the same thing for all the other lines in the song.
Image 25: inserting the karaoke tags
4.3.1 Kanji timer
Sometimes groups also add kanji karaoke to their releases. You can time these kanji even if you don't know Japanese by using the kanji timer in Aegisub. There's a good tutorial for the kanji timer on the Aegisub site: http://docs.aegisub.org/manual/Kanji_TimerI would advice against kanji timing unless you know at least kana though. Sometimes, the kanji timer isn't completely right, and knowing hiragana and katakana can help you to catch errors.
5 Glossary of TermsHere's a quick overview of some specific terms used in this document.
Timing: synchronizing subtitles with dialogue
Rough timing: setting the start and ending times of each line to match the audio exactly, also known as sharp timing
Fine timing: adding lead-in and lead-out, line-linking and snapping to keyframes, also known as scene timing
Lead-in: extra time added before the audio to make it easier for the viewer to read the line
Lead-out: extra time added after the audio to make it easier for the viewer to read the line
Line-linking: changing the ending time of a line to match the starting time of the next line
tpp: the Timing Post-Processor in Aegisub
fps: frames per second
20
Keyframe: a frame where the image changes a lot, most of the time indicates a scene change
Scene bleed: a line whose ending time is set just slightly after a scene change
Reverse scene bleed: a line whose starting time is set just slightly before a scene change, less noticeable than normal scene bleed
Line flickering: happens when there is less than 500 ms (depending on the timer's taste) between two successive lines, prevented by linking lines
Pre-timing: timing without a script, leaving blanks for the translator to fill in
Alpha timing: timing by delaying the appearance of part of the line
Karaoke timing: timing the syllables of a song to create a karaoke effect
6 F.A.Q.Q: How do I shift times en masse?
A: Click “Timing > Shift Times...” All of the options there should speak for themselves.
7 ConclusionTiming is obviously one of the most important jobs in the fansub world. However, some call it rather tedious and boring. For some people that might be true, but I myself like this job because I like to listen to the voices of the voice actors. In the end, instead of tedious and boring, I actually find this job to be fun!
As a fellow timer, I hope that you too will end up liking this job just as much as I do. I also hope that this document will have taught you how to time. From here on, you're on your own.
Final note: Practice makes perfect!
21
Appendix AA.1 Timing guidelines
1. Generally, we start a line 150 ms before the audio starts. End one 350 ms after it ends.2. If there are lines that are close to each other, about 500 ms, you join the ending time of the
first line to the starting time of the second line (after having calculated where the starting time of the second line starts *with* the lead-in).
3. There are special occasions where you're close to what you call a "keyframe". If you're 300 ms or closer, after having added the lead-in time, start your line at that scene. If you are 500 ms or closer to a scene change, after adding the "lead out", link to the end of that scene.
4. If lines overlap because of you adding "lead out", cut on the “lead out” time, and try to always, if possible, have the "lead-in" time.
5. If lines overlap without adding lead in or lead out, just let them overlap.6. In the cases where it's more than just part of the word after keyframe, link it over the scene
and link with next line. Meaning: don't cut lines short if it's half a word or something, only if it's slightly over.
7. Make sure that very short lines are on screen long enough to read. No line should be less than about 0.5 seconds (500 ms) in duration.
8. Break long lines at the appropriate place (pause in speech or scene change). Subtitles should never be longer than 2 lines.
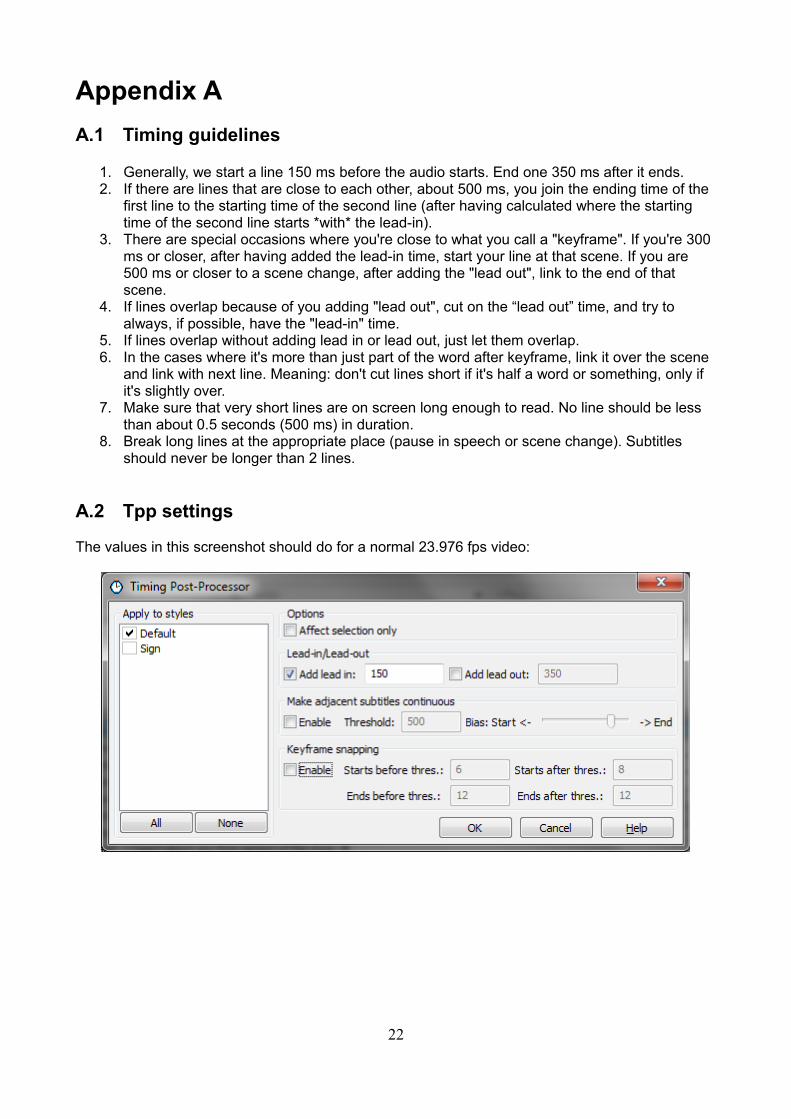
A.2 Tpp settings
The values in this screenshot should do for a normal 23.976 fps video:
22