a guide to packaging an aerosol food product horan drive fenton, mo 63026 (800) 729-8220 toll-free...
TRANSCRIPT
866 Horan Drive
Fenton, MO 63026
(800) 729-8220 toll-free
(636) 349-5333
claytoncorp.com
Page 1 of 32
A Guide to Packaging an Aerosol Food Product
By: Ric Berger
Clayton Corporation
Introduction
This paper will provide a brief history of aerosol food products then look at packaging an
aerosol food product through a series of questions. The answers to these questions along
with the provided guidance will help in:
1. Avoiding potential problems, which the formula may encounter when
packaged as an aerosol.
2. Selecting a propellant.
3. Selecting the packaging components.
4. Understand filling conditions that may affect your product.
The paper concludes with a review of regulatory requirements for packaging and aerosol
food product.

Page 2 of 32
A Brief History of Aerosol Food
After WWII, people began looking for new ways to use the aerosol package developed
during the war for dispensing bug repellant. One of these pioneers was A. S. (Bunny)
Lapin, Clayton Corporation’s founder. In 1947, Bunny Lapin introduced the patented
Reddi Wip whipped cream to the consumer and the aerosol food market was born in the
United States.
Bunny Lapin Demonstrating Reddi Wip in 1951
The next big jump in the market came after Arthur Meyerhoff, Sr. and Leon Rubin
patented PAM spray in 1957 and introduced it in 1959.
Whipped cream and oil pan sprays remain the two largest aerosol food products today.
2006 data for the USA estimated there was 454,060,010 aerosol food cans filled of which
approximately 84% were whipped cream and pan sprays1.
The next major aerosol food product introduced in the USA was processed cheese.
Nabisco introduced the product in 1966, under the name Snack Mate. Then in the late
1970’s, Pillsbury introduced a viscous decorative icing in an aerosol can.
While other aerosol food products have been attempted, few have succeeded. Most
growth and expansion has come as offshoots of the 4 above products. Whipped cream
now includes dairy and non-dairy products along with different fat contents and flavors.
The cheese product has expanded from cheddar to include cream cheese and cannoli
fillings. While, decorative icing has expanded to include a sprayable decorative coloring.
The latest product introduction occurred in 2007 when Batter Blaster introduced an
aerosol Pancake Batter. It appears the product is being received well in the market,
however this isn’t the first time for this type of product. Pancake batter was tried once
before in the 1970’s.

Page 3 of 32
Reddi Wip and PAM are registered trademarks of Con Agra Foods
1 - Information from magazine, Spray June 2007, article US aerosol production slips 1.6% by David Waterman While many aerosol food products have been tried in the past, such as malts, shakes,
peanut butter and more, until now gaining market acceptance has been hard. However,
over the past couple of years, new products have been tested with favorable consumer
results. It appears that in the consumers’ pursuit of convenient time saving food products
new possibilities for aerosol food products are gaining popularity. In 2006, the aerosol
food market in the USA grew 7.6%2. The second fastest growing market segment in
aerosols.
Now that we have reviewed a brief history of aerosol foods, lets look at packaging a
product. The first thing you to be determined is what product to package. Once you have
selected the product and understand the market, you can begin answering the following
questions and reviewing your options. Also remember that even by knowing the answers
to these questions and working with your suppliers, testing the product is a must to insure
compatibility of the product and package.
Product Formulation
While this paper does not delve in formulating a product, we begin with a couple of
questions regarding how the formula may react when packaged as an aerosol.
1. Will pressure affect the product?
Some formulations when under pressure, allow oils to separate from the
product. This condition may manifest itself as oil leaking through the valve
crimp, from the valve stem and/or an initial dispensing of oil when the valve
is first opened. It is important to set up samples for aging tests to determine if
the formulation is effected by pressure.
2. Will air in the headspace of the can affect the product?
Under normal filling conditions there will be air trapped in the can after
filling. If trapped air will affect the product, it may be necessary to flush the
can of any air prior to attaching the valve. There are a couple of ways this
may be accomplished:
a. Removing the air by vacuum.
b. Replacing the air using a nitrogen flush
These methods may not work in all situations thus; consult the supplier of the
equipment for placing and crimping the valve if air removal is required.
The answers to some of these questions may not be known until after the product has
been packaged and stability testing performed. So lets get started on packaging a product
by looking at propellants.

Page 4 of 32
2 - Information from magazine, Spray June 2007, article US aerosol production slips 1.6% by David Waterman Propellant Selection
The propellant may serve many functions including:
1. Dispensing the product.
2. Foaming the product.
3. Thinning the product.
The common propellants that may be used for food are:
1. Nitrogen.
2. CO2: Be sure to check for flavor changes when using CO2 because it may
import a bitter taste to the product.
3. Nitrous Oxide.
4. Compressed air.
5. Hydrocarbon: Hydrocarbon propellants are liquid propellants unlike the
previous listed propellants, which are gasses. Hydrocarbon propellants are a
mixture of propane and n-butane (or isobutane). The mixture can be adjusted
to provide a range of pressures at standard temperature. These propellants are
flammable.
Some questions that will help determine the proper propellant(s) for the product are:
1. Will the propellant be part of the products formulation or will the propellant
need to be kept separated from the product?
If the propellant will be part of the formulation, a standard aerosol is being
packaged. If the propellant cannot be mixed in with the product, a barrier
package will be required.
2. Will the propellant be used to foam the product?
If foaming of the product is required, in addition to the propellant dispensing
the product, the propellant will act as a blowing agent. In a barrier package
foaming product, the blowing agent is added to the formula. For this to occur
the propellant will have to be soluble in the product.
3. What dispensing rate is required?
Page 5 of 32
While many variables influence the dispensing rate, including viscosity and
valve orifice size, the dispensing rate can also change with the propellant
selected. Liquid propellants have lower working pressures than compressed
gases.
4. Is a variable dispensing rate acceptable?
When using a compressed gas as the propellant, the product will dispense
faster at the beginning than at the end of the can. Make sure the product will
function as intended at both points. If a variable dispensing rate is a problem,
then alternatives are liquid propellants and compressed gas absorbed on
activated carbon. These options will provide constant or close to constant
dispensing throughout the use of the product. There is also the option of
combining a liquid propellant and compressed gas to increase the dispensing
rate at the beginning of the can and prevent it from dispensing too slowly at
the end of the can.
5. Is flammability an issue?
If flammability is not an issue, all food approved propellants may be used. If
flammability is an issue, I know of only compressed gasses that can be used
(check with propellant suppliers to find out which propellants are approved
for food use).
6. Will the propellant import a taste to the product?
Some propellants add a taste aspect to the product. CO2 can add a bitter taste.
Can Selection
Lets begin the investigation into the packaging by asking questions that will help with
selecting the proper can. The first two questions will determine if the product is a
standard aerosol or a barrier package product.
1. Will the propellant be part of the products formulation or will the propellant
need to be kept separated from the product?
If the propellant is mixed in with the product such as in whipped cream and
pan spray, then a standard aerosol product is being filled. If the propellant and
product are kept in separate chambers within the can, such as in aerosol
cheese, then a barrier package is required.
There is an exception to this rule. Barrier packages can be used when the
product requires a propellant to foam the product be separate from the
propellant to dispense the product. An example of this is foaming gel shaving
Page 6 of 32
cream. Foaming gel shaving creams have a liquid propellant mixed in with
the gel to post foam the gel after dispensing. This mixture is then packaged in
a barrier package with a secondary propellant, in a separate compartment,
used to dispense the product.
2. What is the product’s viscosity?
If the product has a viscosity near water, it can be packaged as a standard
aerosol. If the product’s viscosity is too high and will not flow freely enough
to continuously feed the valve then a barrier package is used. A test would be
to shake the can and see if the product flows freely. Products that are
generally thicker than gels, like save cream, most likely would require a
barrier package.
Now that you have determined if the product will be packaged as a standard aerosol or
barrier package product lets begin looking at choices for the can. We will start with cans
used for standard aerosols products. There are many different styles and materials that
can be used. Choices are:
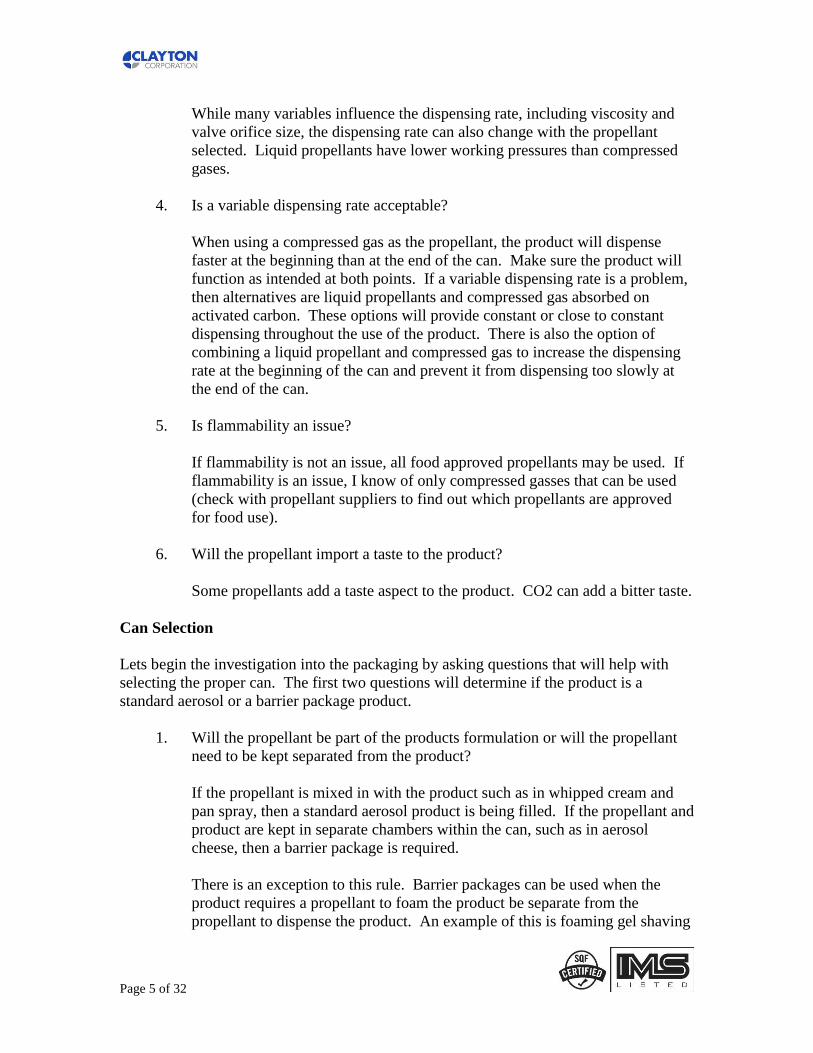
1. 3-Piece Steel (also know as tin plate) (see Figure 1): A three-piece steel can is
constructed from a body that starts as a flat sheet, then rolled and welded into a
tube. This forms a seam that runs the vertical length of the can’s body. The top
dome and bottom are then seamed onto the body of the can. The standard style
can has chimes, the point at which the top dome and bottom are seamed to the
can body, outside the diameter of the can’s body.
Figure 1: 3-Piece Steel Can
2. 3-Piece Steel, Necked –In (see Figure 2): The 3-Piece Steel, Necked-In can is
similar to the standard 3-piece can above but, the chimes are slightly smaller
in diameter then the can’s body. In this case, if an overcap is used that has the

Page 7 of 32
same diameter as the can’s body you will end up with a smooth transition
between the can and the overcap.
Figure 2: 3-Piece Steel, Necked-In Can
The welded seam on 3-Piece Steel can, which runs the length of the can’s
body, poses a potential problem for some products. The can manufacture has
ways to add protection to the seam. You should discuss your product with
them and ask them if it will affect the integrity of the seam.
3. 2-Piece Steel (see Figure 3): The can wall and top are formed from 1 piece
and the bottom is seamed onto the can. This process allows the can to be
made without a side seam.
Figure 3: 2-Piece Steel Can
4. Aluminum (see Figure 4): An aluminum can is formed from a single slug of
aluminum. The slug is impacted with high force by a ram slightly smaller in

Page 8 of 32
diameter than the cylinder the slug is in. The impact force, forces the
aluminum up between the cylinder wall and ram forming an open topped tube.
The tube then goes through other process such as washing, applying the inside
liner, printing and more before it comes to the necking stations. Through a
number of stations the top of the tube is formed into the dome shape of the
can. The valve opening and bead are also formed at this time.
The bead is important because this is where the valve will be attached.
Because of the forming process, the bead has a condition called eyelashing
(see Figure 5). Eyelashing occurs as the top of the tube is reduced in diameter
to form the dome and valve opening. As a result of the reduction in diameter
of the aluminum small wrinkles are formed. These wrinkles on the bead will
play an important part in the valve selection for your product. A valve with a
lathe cut gasket may be required to obtain a good seal between the can and
valve. There is a process called machining which removes the eyelashing.
You will need to speak with your can supplier if this is required.
Figure 4: Aluminum Can Figure 5: Bead of an Aluminum can
magnified 88X showing eyelashing
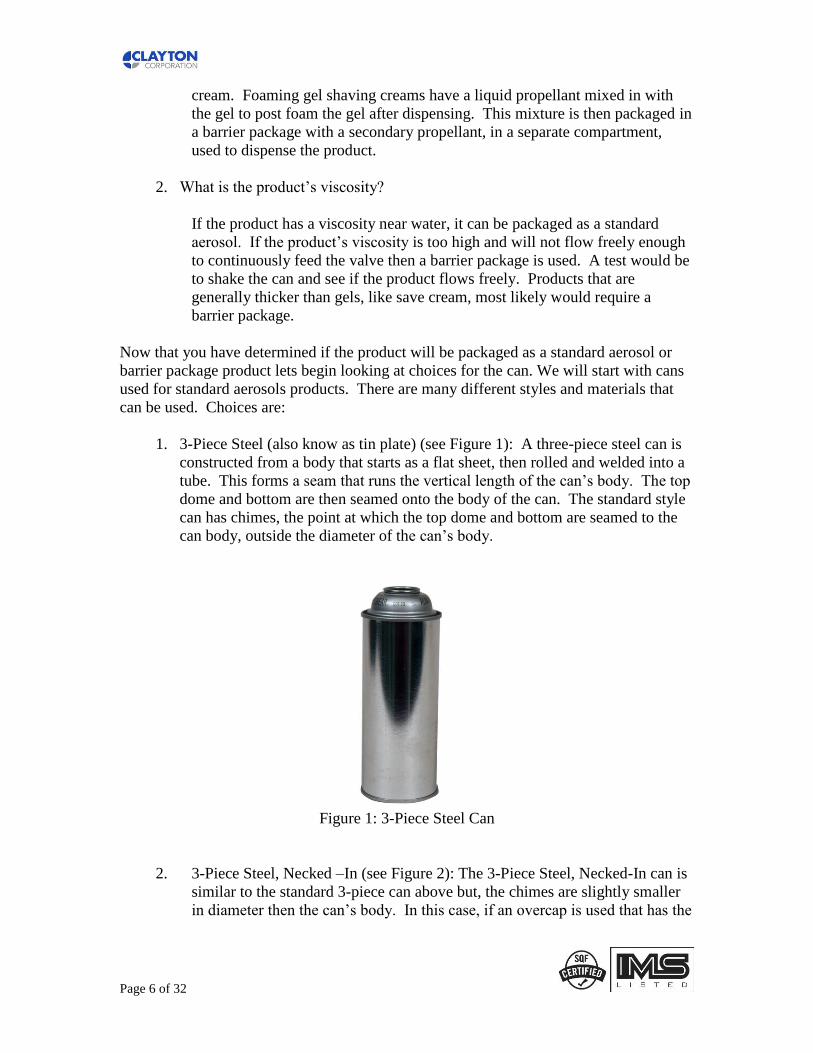
5. Stainless Steel (see Figure 6): Stainless steel cans are not common due to
their high cost. I have only seen them used for a returnable whipped cream
product where the valves were removed, the cans cleaned, sanitized and then
refilled.
Page 9 of 32
Figure 6: Stainless Steel Can
When examining barrier-packaged products there are a few different styles of barrier
packaging available. The styles available are:
1. Piston Can: Piston cans are available in both aluminum and steel. The piston
is inserted into the can as the can is manufactured. Note: A piston cannot be
used with an irregular shaped can due to the interference in the piston’s
movement or seal with the inside of the can. There are 3 basic styles of
pistons:
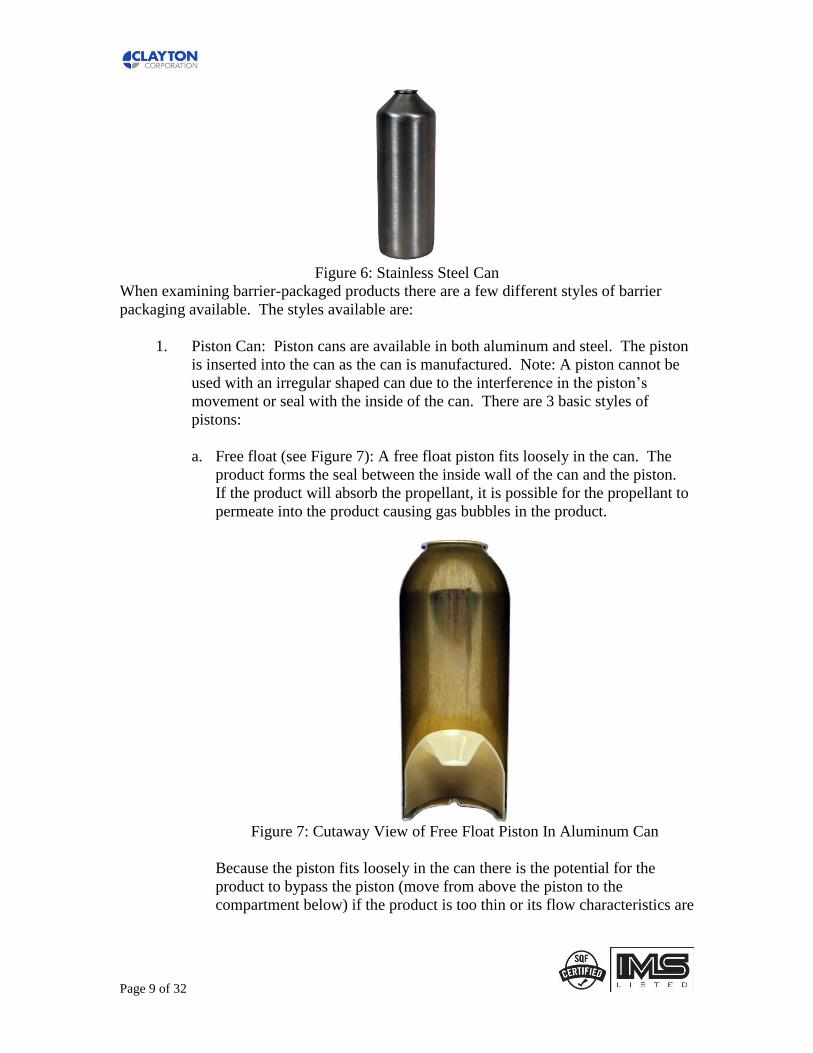
a. Free float (see Figure 7): A free float piston fits loosely in the can. The
product forms the seal between the inside wall of the can and the piston.
If the product will absorb the propellant, it is possible for the propellant to
permeate into the product causing gas bubbles in the product.
Figure 7: Cutaway View of Free Float Piston In Aluminum Can
Because the piston fits loosely in the can there is the potential for the
product to bypass the piston (move from above the piston to the
compartment below) if the product is too thin or its flow characteristics are

Page 10 of 32
thixotropic. You will need to put up samples of your product with this
style piston and check for bypass.
The materials used to manufacture free float pistons can be any of the
standard materials used for pistons including, ABS, polypropylene or
polyethylene (see information on piston materials below).
b. Compliant (see Figure 8): This style piston has a flexible wiper that
maintains a tight fit in the can. In aluminum cans, the seal between the
piston and the can wall is tight enough to prevent bypass of very thin
liquids. The side seam of a 3-piece steel can provides a leak path past the
piston so the same seal is not obtained.
Compliant pistons are made out of flexible materials such as
polypropylene and polyethylene, which allow them to flex slightly should
the piston encounter a small dent in the can.
Because of the materials used to manufacture a compliant piston,
hydrocarbon propellants are not used. Hydrocarbon propellants will
permeate through the piston and into the product.
Figure 8: Cutaway View of Compliant Piston in Aluminum Can
c. Pistons with gel barrier: These are pistons, which include a secondary
gel material either on top of the piston or sandwiched between two
halves of the piston, that prevents permeation of the propellant or
bypass of the product.
d. Piston materials.

Page 11 of 32
1. Acrylonitrile Butadiene Styrene (ABS): This material is used to
manufacture free float style pistons because it works well with
propellants. It will work with hydrocarbons, Nitrogen, 134a and
CO2, and compressed air. Because the material is ridged, it is
not used for compliant style pistons.
2. Polypropylene and Polyethylene: Because of their flexibility
these materials are used for compliant style piston. These
materials are also used for free float pistons for cost savings and
when hydrocarbon propellants are not used. These materials are
good for Nitrogen, 134a, CO2 and compressed air.
2. Bag-In-Can (see Figure 9): A Bag-In-Can, barrier system is one where the
can is fitted with a bag inside. The bag can be made of aluminum or plastic.
It is usually a combination of layers of materials to prevent permeation of the
propellant into the product. The product goes in the bag and the propellant is
injected between the bag and can wall.
Figure 9: Bag-In-Can in a 3-Piece Steel Necked-In Can
Both piston cans and bag-in-can barrier packages are gassed through the
bottom of the can. The propellant is either injected through a pre-placed valve
such as an umbrella valve or through a hole and then plugged with a piece of
rubber.
3. Bag-On-Valve (see Figure 10): On a Bag-On-Valve barrier system the bag is
attached to the valve. The bag is made in layers to keep propellant and product

Page 12 of 32
separate. The bag is rolled up into a small diameter tube that will fit through the
opening of the can. After the Bag-On-Valve is placed into the can, propellant is
added either by:
a. First crimping the valve in place and then injecting the propellant around
the valve.
b. Through a process called “under cap gassing” where the gas is injected
into the can just before the valve is crimped in place.
The product is then pressure filled into the bag through the valve.
Figure 10: Bag-On-Valve in an Aluminum Can
Now that you have an understanding of the cans and barrier packages available, the next
group of three questions will help determine the can size and style. Additional
information pertaining to other components of the package may be needed to completely
answer this list. An understanding of the market is also required.
1. Who is the target market?
The answer to this question will help determine the can size and style. If the
product is for children, the use of a smaller diameter can may be desirable to
assure that children can easily hold it during dispensing.
The answer may also help in the decision regarding the style of can chosen.
The target market may require a shaped can, necked-in can, tall thin can, or
other variation that appeals to that group. I had a customer report to me after
performing consumer testing, with a new product, they received feedback that
said the consumer didn’t believe the product being tested belonged in the

Page 13 of 32
package being used. They believed the package related to another product.
Ball Corporation put out an interesting pamphlet called “Shaping the Future,
Investigating the Meaning of Shape in Packaging”. It looks at how shapes are
perceived by consumers. It is interesting reading.
2. How much product is to be delivered?
Based on the amount of product to be delivered the can size and diameter can
be determined.
3. Should the overcap align flush with the sidewall of the can?
If the overcap is to mount flush with the sidewall of the can then use either a
Necked-In 3-Piece Steel Can (see Figure 11) or aluminum can. The
aluminum can may be designed to allow attachment of the cover at the
intersection of the sidewall and dome providing the inline look or the use of a
double shell cover where the inner shell attaches to the valve and the outer
shell has the same diameter as the can may be used.
Figure 11 – Necked-In 3-Piece Steel can with Cover
4. At what can position(s) will the product be dispensed?
When using any type of barrier package the product can be dispensed at any
can angle. Dispense a standard aerosol at any angle requires a special dip tube
style valve (this will be discussed when we look at selecting the valve).
Aerosol cans are rated for pressure. They are rated for their doming/deforming pressure
and their bursting pressure. Asking the following question will help determine which can
pressure rating is required:
Page 14 of 32
1. What will the internal can pressure be at 130 degrees F (55C)?
In the USA, the Department of Transportation (DOT) requires that an aerosol
can be tested by bringing the pressure in the can up to what it would be at 130
degrees F to assure that the can will not deform or burst. This is accomplished
by running the can through a hot water bath. When selecting the can know
what the pressure will be at 130 degrees F and select a can with a
doming/deforming pressure rated above this pressure. DOT has three can
pressure ratings:
a. Regular: rated at 140psig.
b. 2P: rated at 160psig.
c. 2Q: rated at 180psig.
Some products have exemptions from the hot water bath test requirement.
These exemptions were obtained because of the effect heat will have on the
product. Such an exemption was obtained on cans used for whipped cream.
Whipped cream cans use a pressure relief device, sometimes called a rim vent
can. Should the can reach a pressure that would cause deforming or bursting
the dome deforms opening vents and relieves the pressure so the can will not
burst.
The last question to ask in order to determine the can is:
1. What is the product’s ph?
The answer to this question along with the product’s formula will help
determine the proper lining for the can. Some of the available linings are:
a. Phenolic resins.
b. Epoxy-phenolic resins.
c. Organosol resins.
d. Polyamide imide (PAM) resins.
e. Laminated linings.
f. Polymer coated.
Each of these linings has their advantages and disadvantages. Working with
the can supplier will assure you get the proper can lining for the product.
Page 15 of 32
As a closing to this section, remember that the can supplier is an excellent source of
information on selecting the proper can to fit the product’s requirements. Providing the
answers to the questions above will help the can supplier select the proper can for the
product.
Valve Selection
Now lets take a look at selecting the valve. For the purposes of this discussion, I will
separate the aerosol valve types into two categories, Spring Valve and Toggle Valve.
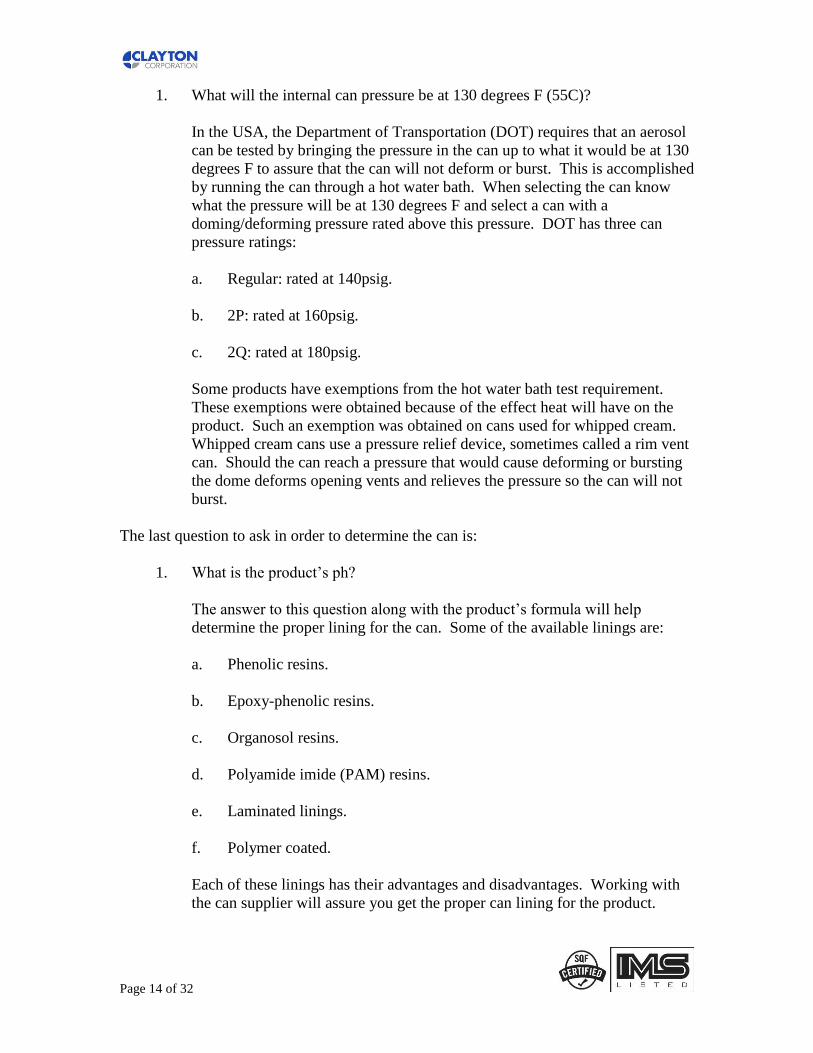
1. Spring Valve: For the purpose of clarity, a spring valve is any valve that uses
a metal spring for closing the valve (see Figure 12).
Figure 12: Spring Valve
a. Spring valves are actuated by either vertical pressure or by tilting the
stem to the side. When the actuation force is release the spring returns
the valve to the closed position
b. Spring valves are in the normally closed position until the operator
applies an actuation force.
c. The stem O.D. in this style valve is approximately .15 inch (3.8mm).
d. The stem normally has 1 or more orifices ranging from approximately
.01 inch (.33mm) to .03 inch (.91mm) in diameter. Select the orifice
size and number of orifices based on the dispensing rate desired.
e. The valve can come with or without a dip tube. With a dip tube if the
product will be dispensed in an upright position or without a dip for
turning the can upside down when dispensing. It is also possible to get
specialty valves with dip tubes that allow the product to be dispensed
both right side up and upside down.
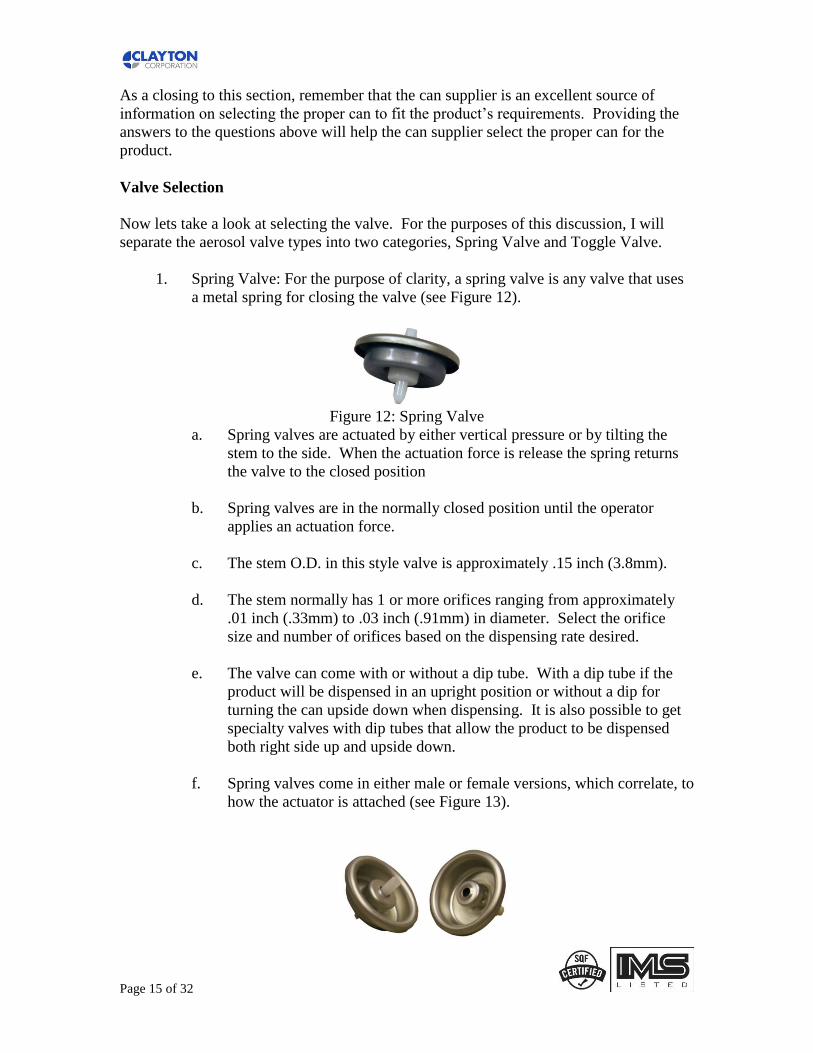
f. Spring valves come in either male or female versions, which correlate, to
how the actuator is attached (see Figure 13).
Page 16 of 32
Figure 13: Spring valves, male on left, female on right
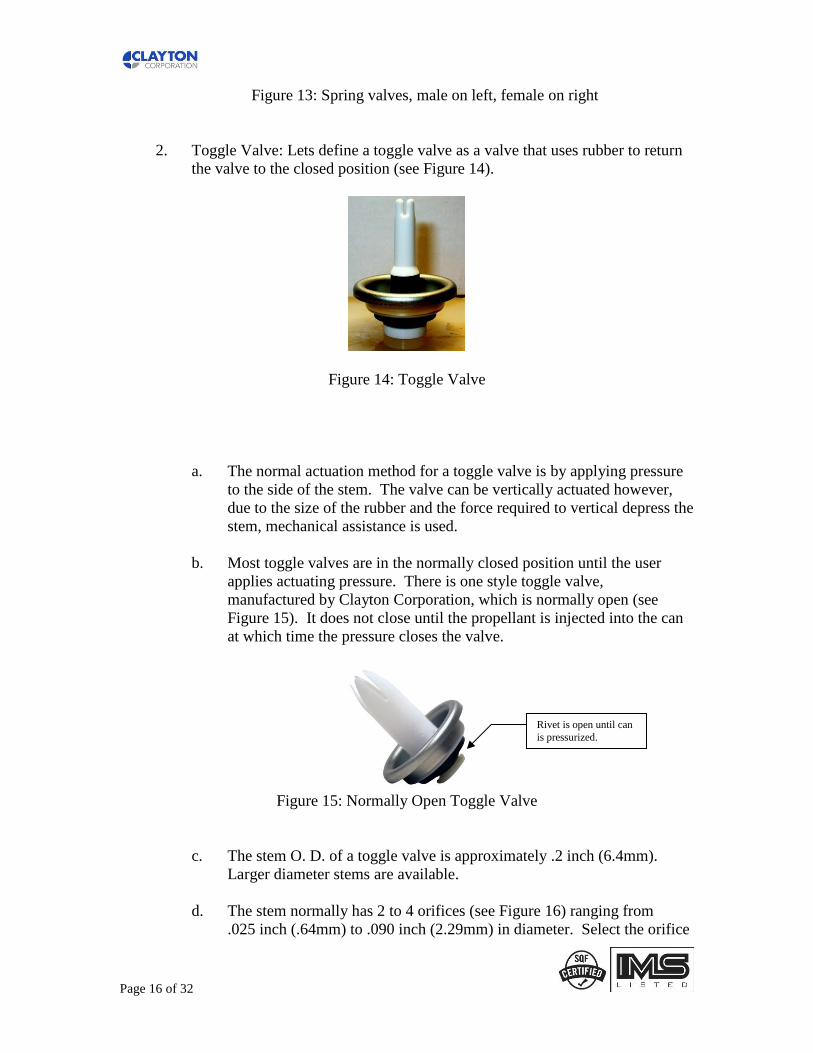
2. Toggle Valve: Lets define a toggle valve as a valve that uses rubber to return
the valve to the closed position (see Figure 14).
Figure 14: Toggle Valve
a. The normal actuation method for a toggle valve is by applying pressure
to the side of the stem. The valve can be vertically actuated however,
due to the size of the rubber and the force required to vertical depress the
stem, mechanical assistance is used.
b. Most toggle valves are in the normally closed position until the user
applies actuating pressure. There is one style toggle valve,
manufactured by Clayton Corporation, which is normally open (see
Figure 15). It does not close until the propellant is injected into the can
at which time the pressure closes the valve.
Figure 15: Normally Open Toggle Valve
c. The stem O. D. of a toggle valve is approximately .2 inch (6.4mm).
Larger diameter stems are available.
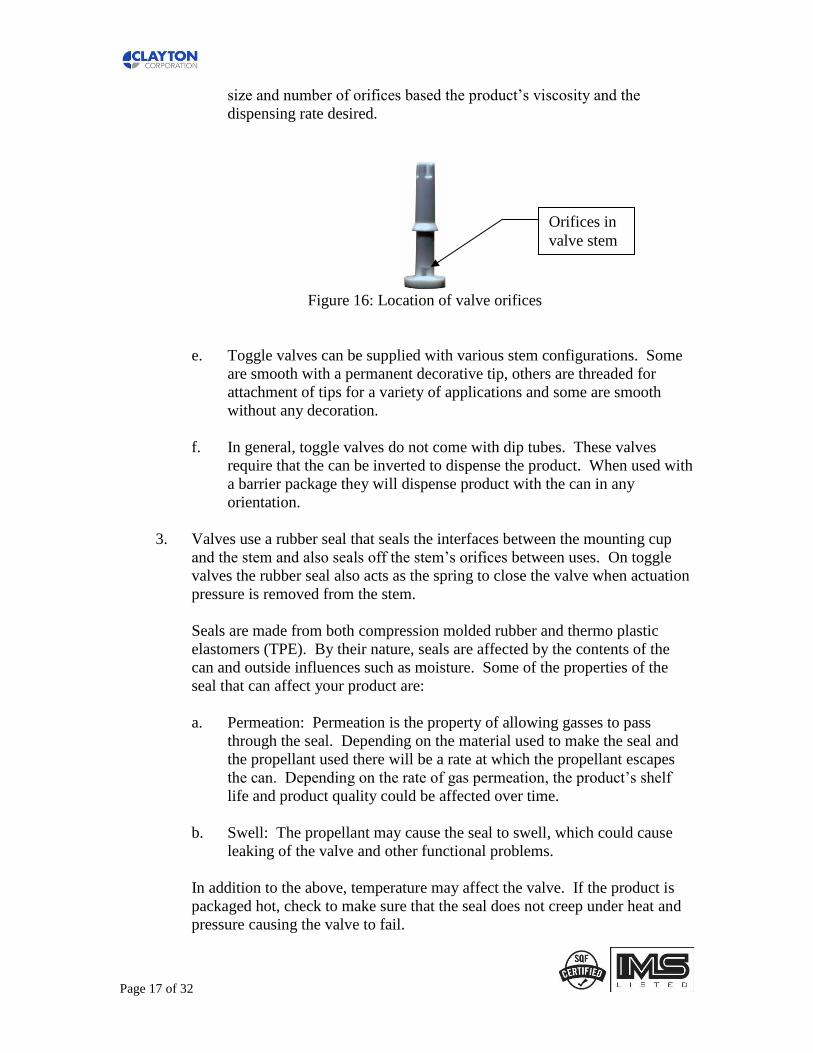
d. The stem normally has 2 to 4 orifices (see Figure 16) ranging from
.025 inch (.64mm) to .090 inch (2.29mm) in diameter. Select the orifice
Rivet is open until can
is pressurized.
Page 17 of 32
size and number of orifices based the product’s viscosity and the
dispensing rate desired.
Figure 16: Location of valve orifices
e. Toggle valves can be supplied with various stem configurations. Some
are smooth with a permanent decorative tip, others are threaded for
attachment of tips for a variety of applications and some are smooth
without any decoration.
f. In general, toggle valves do not come with dip tubes. These valves
require that the can be inverted to dispense the product. When used with
a barrier package they will dispense product with the can in any
orientation.
3. Valves use a rubber seal that seals the interfaces between the mounting cup
and the stem and also seals off the stem’s orifices between uses. On toggle
valves the rubber seal also acts as the spring to close the valve when actuation
pressure is removed from the stem.
Seals are made from both compression molded rubber and thermo plastic
elastomers (TPE). By their nature, seals are affected by the contents of the
can and outside influences such as moisture. Some of the properties of the
seal that can affect your product are:
a. Permeation: Permeation is the property of allowing gasses to pass
through the seal. Depending on the material used to make the seal and
the propellant used there will be a rate at which the propellant escapes
the can. Depending on the rate of gas permeation, the product’s shelf
life and product quality could be affected over time.
b. Swell: The propellant may cause the seal to swell, which could cause
leaking of the valve and other functional problems.
In addition to the above, temperature may affect the valve. If the product is
packaged hot, check to make sure that the seal does not creep under heat and
pressure causing the valve to fail.
Orifices in
valve stem
Page 18 of 32
4. There are different materials and material thicknesses used to make the
valve’s mounting cup. Here are a few things to understand about the
mounting cup when choosing the valve.
a. Metals and coating used on mounting cups.
1. Steel mounting cups.
a. There are two common thicknesses of metal used for mounting
cups. They are .011” (.28mm) and .015” (.38mm).
b. Normal coatings for the metal are:
1. Tin plated with two coats of epoxy on both sides of the steel.
2. Tin plated with two coats of epoxy on the outside of the
mounting cup and a .007” (.18mm) thick polypropylene
laminate on the inside.
3. It is also possible to obtain the mounting cup in some colors.
2. Aluminum mounting cups: The thickness of the cup is .016” (.41mm).
The ones that Clayton uses are double epoxy coated.
3. Stainless Steel mounting cups: These are expensive and not a standard
item.
b. Mounting cups are formed from a flat sheet of material that is larger than
the diameter of the mounting cup. When the metal is cut out and formed
into the mounting cup the cup has what are called cut edges. There are
two cut edges on a mounting cup, the outside edge and the edge in the
center where the stem comes through. No matter what style of protective
coating was applied to the flat sheet of metal, this coating does not cover
the two cut edges. These edges are bare metal. These edges run the risk
of rusting if moisture stays in contact with them.
5. There are a few different methods of sealing the interface between the valve’s
mounting cup and the can.
a. Lathe Cut Gasket (see Figure 17): This is a flat ring of rubber that fits
into the curl of the mounting cup.
b. Laminate Gasket (see Figure 17): This is a polypropylene film
laminated to the metal. It seals the valve to the can and also protects the
steel mounting cup from the package contents. If using this type of

Page 19 of 32
mounting cup with an aluminum can there may be leakage between the
valve and can due to the eyelashing effect on the can’s bead.
c. Sleeve Gasket (see Figure 17): This is a polyethylene sleeve that fits into
the curl of the mounting cup.
Figure 17: Mounting cup gasket styles. From left to right Lathe Cut, Laminate and sleeve
Now that you have some understanding about the valve, lets look at some of the
questions to ask that will help in selecting the proper valve.
1. What is the products viscosity? The products viscosity will play a major part
in the valve selected.
a. Low Viscosity non-foaming products (like pan spray) are best suited to
be dispensed through a spring valve; however, some toggle valves are
adaptable for dispensing low viscosity liquids.
b. Low Viscosity foaming products (like whipped cream) may be
dispensed through either a spring or toggle style valve.
c. Mid viscosity non-foaming and foaming products (around the viscosity
of a hair gel) may be dispensed through either a spring valve or toggle
style valve.
d. High viscosity products (like peanut butter) are best suited to be
dispensed through a toggle valve.
2. When not using a barrier package: What propellant will be used?
The propellant used will help in the selection of the rubber used for the seal.
3. What is the product ph?
The products ph can affect the mounting cup used. Based on the products ph
there may be a need to use an aluminum cup or a plastic laminate mounting
cup.
4. At what can orientation will the product be dispensed?
Page 20 of 32
a. Right side up only: Use a dip tube valve to dispense right side up unless
using a barrier package. Dip tubes are easily attached to spring valves.
While a dip tube can be attached to a toggle valve, it is not standard.
b. Upside down only: This is easily accomplished with both a toggle valve
and spray valve.
c. All directions: While the easiest way to accomplish this is with a barrier
package, there are spring valves with a special dip tube assembly that
allow dispensing in all directions. This type dip tube is not currently
available for a toggle valve. It is also possible with foaming products to
obtain upright dispensing. This is accomplished through formulation.
5. What dispensing rate is required?
The number and size of the orifices can adjust the dispensing rate the valve
will deliver.
6. What can type will be used?
The answer to this question will help determine the method for sealing the
valve and can interface. The valve’s mounting cup will either have a lathe cut
gasket, laminate film or sleeve gasket to provide the seal. Valves with lathe
cut gasket are more costly than the other methods. So where possible try a
mounting cup with laminate film or sleeve gasket to determine their
effectiveness. Possible sealing methods by can type are:
a. Steel/Tinplate: Any of the valve’s mounting cup sealing methods, i.e.
lathe cut gasket, laminate and sleeve gasket will work.
b. Aluminum: When using an aluminum can, if the bead has not been
machined, there may be problems with leakage when using a laminate or
sleeve gasket. This is a result of the eyelashing on the bead described
above. Conditions under which it may be worth try a laminate film or
sleeve gasketed mounting cup are:
a. When the products viscosity is high and there is no oil that
separates out of the product under pressure.
b. When using a Bag-In-Can. The bag fits over the bead of the can,
which helps obtain a seal.
c. If the bead has been machined.
c. Stainless Steel: Any of the valve’s mounting cup sealing methods, i.e.
lathe cut gasket, laminate and sleeve gasket will work.

Page 21 of 32
7. Will there be an attached dispensing tip?
There are many methods of connecting a dispensing tip to the valve. Some of
the toggle style valves come with a dispensing tip (see Figures 14 & 15
above). A dispensing tip will always need to be added to a spring valve.
Valves are designed to accept dispensing tips as follows:
a. Toggle valve: Threaded stem or snap on to the shoulder of the stem
b. Spring Valve: Spring valves come in male and female type. Some can
be obtained with threaded pedestal or threaded mounting cup.
As with cans, the valve supplier is an excellent source for help in selecting the proper
valve. Supplying the answers to these questions to the valve supplier will help them
select the proper valve.
Valve Actuator and Dispensing Tip Selection
Now lets investigate valve actuators and dispensing tips. Actuators come in numerous
styles. The following list provides different styles of actuators. With each style there are
numerous variations.
1. Push Button Actuator for Spring Valve: These actuators vertically
depress the valve. The come in both male and female versions.
2. Tilt Actuator for Spring Valve: These actuators are pushed to the
side to open the valve.
3. Trigger Actuator: A trigger actuator reduces the force required
to actuate the valve and provides a better line of sight than
a push button actuator.
4. Lever Actuator: A lever actuator will reduce the force required o
to actuate the valve. Clayton Corporation’s EZD System
shown in the picture also provides numerous gripping and
actuation methods for the consumer.
5. Spout Actuator: Spouts provide a different aesthetic look than
a push button style actuator because they cover most or all of
the valve.
Page 22 of 32
6. Dome Actuator: Dome actuators can act as both the valve
actuator and overcap. They also may include tamper
evidency like Clayton Corporation’s EZ Flip dome actuator
pictured here.
Dispensing tips can either be incorporated into the valve stem, the valve actuator or be a
separate attachment to the valve. The dispensing tip produces the pattern in which the
product is dispensed. Dispensing tips can provide a multitude of dispensing patterns
including:
1. Stream: This style of dispenser provides a stream of product. The tip that
accomplishes this can be built into the actuator, screwed on the valve or be
part of the valve.
2. Spray: This style of dispenser provides a circular pattern of product. The
product comes out in small droplets or a mist. The diameter of the spray and
droplet size can be varied by the tip design. This style tip is normally built
into the actuator.
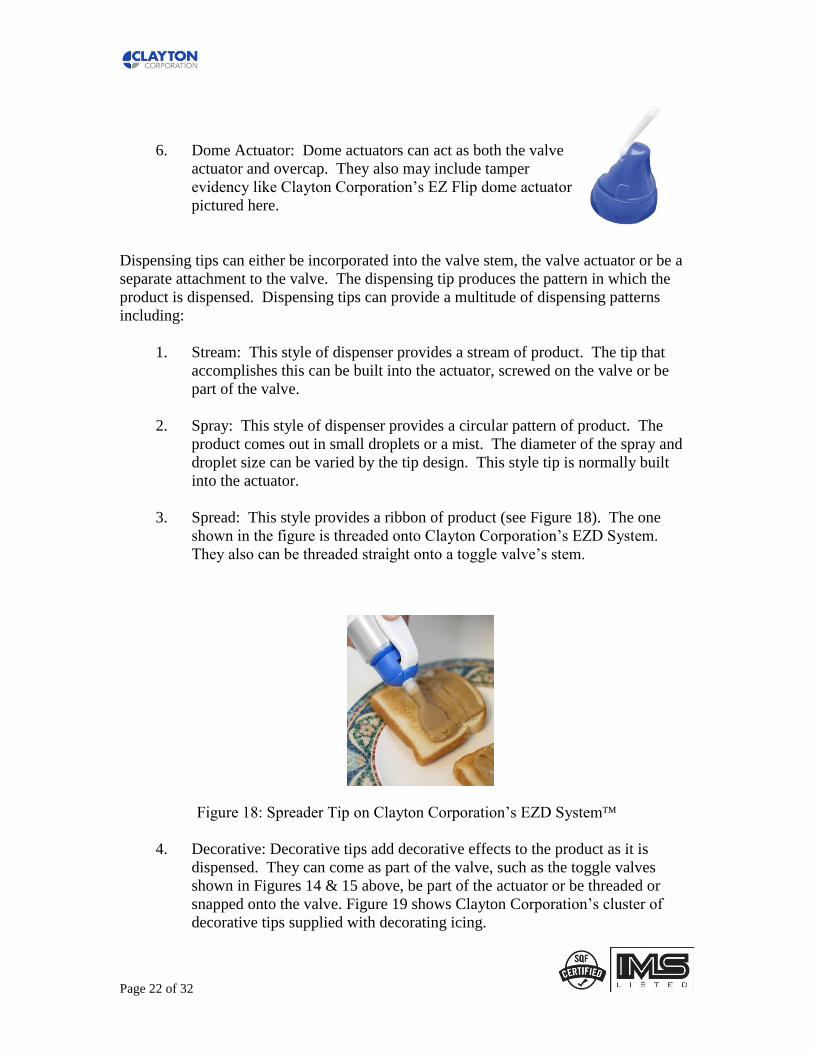
3. Spread: This style provides a ribbon of product (see Figure 18). The one
shown in the figure is threaded onto Clayton Corporation’s EZD System.
They also can be threaded straight onto a toggle valve’s stem.
Figure 18: Spreader Tip on Clayton Corporation’s EZD System
4. Decorative: Decorative tips add decorative effects to the product as it is
dispensed. They can come as part of the valve, such as the toggle valves
shown in Figures 14 & 15 above, be part of the actuator or be threaded or
snapped onto the valve. Figure 19 shows Clayton Corporation’s cluster of
decorative tips supplied with decorating icing.

Page 23 of 32
Figure 19: Clayton Corporation’s Decorative Cluster
5. Brush: A brush tip can be used to brush on a product as it is dispensed (see
Figure 20).
Figure 20: Brush Tip on Clayton Corporation’s EZD System
In addition to patterns, dispensing tips can be used to:
1. Extend the distance from the can that the product exits.
2. Change the angle at which the product is dispensed.
3. Reduce the force required to actuate the valve.
Dispensing tips may also be designed to be:
1. Cleanable.
2. Replaceable.
3. Interchangeable/multiple tips supplied.
4. Sealable between uses.

Page 24 of 32
Now lets examine questions that will help determine the actuator/dispensing tip for the
product:
1. How will the product be used?
This will help determine if the product should be dispensed in a stream, spray,
in a decoration, at an angle, and more. It will also help determine if multiple
tips must be supplied such as with the Decorative Cluster shown above.
2. Who is the target Market?
This will help determine how easy it must be to dispense the product.
a. If the market is children consider the size of their hands and their
strength.
b. If the market includes people with reduced strength or dexterity in their
hands this will need to be considered when deciding on the actuator.
3. Will the actuator need to be cleaned between uses?
If the actuator/dispensing tip requires cleaning after each use, then it must be
designed to accommodate this requirement. It could be designed to be washed
in place or removable for washing.
4. Will the actuator/dispensing tip need to be replaced after each use?
If replacing the actuator/dispensing tip after each use is required then extras
will need to be supplied or available for purchase.
5. Will the actuator/dispensing tip need to be sealed between uses to prevent
hardening or spoilage of the product?
If the product that remains in the valve stem and actuator/dispensing tip will
spoil, harden or occur other changes detrimental to the product, a sealing cap
may need to be placed over the tip.
6. Is a secondary actuator/dispensing tip required or does it come as part of the
valve?
Some toggle valves have stems that may dispense the product in an acceptable
pattern without requiring any attached actuator.
7. Will the actuator also act as the overcap or will a separate overcap be used?

Page 25 of 32
Actuator/overcap combinations are available that fill both roles.
Overcap Selection
The next category of packaging to be examined is the overcap. Overcaps come in many
shapes, colors and sizes. Lets start by grouping the choices into two categories, One-Inch
Overcap, which attaches to the valve and covers only the valve and Full Overcap, which
covers the full dome of the can.
1. One-Inch Overcap: This style overcap normally attaches to the mounting cup
of the valve. There are some overcaps of this design that attach to the actuator
where the actuator is attached to the mounting cup of the valve. In this
category of overcaps there are:
a. For our purposes I will call this first category “Pop Off” overcaps. They
are also called straight wall covers and stacker covers. These overcaps
have no mechanical means for removal. The user holds the overcap and
pulls it off. This style overcap comes in many shapes and colors but most
are straight walled with either a flat top of rounded top (see Figure 21 for
an example of this style overcap).
Figure 21: Clayton Corporation’s SW158 Overcap
b. Push Button: These overcaps have a button or lever that is pushed to
help in removal (see Figure 22)
Figure 22: Clayton Corporation’s SL508 Overcap

Page 26 of 32
c. Tamper Resistant/Evident: This style overcap provides resistance to
removal. Normally a portion of the cover is broken before removal; this
provides evidence that they have been previously removed (see Figure
23).
Figure 23: Clayton Corporation’s Tamp-R-Gard Overcap
2. Full Overcap: This category of overcaps can snap over the can chime, attach
to the valve or some aluminum cans are shaped at the intersection of the dome
and sidewall for the cover to snap on.
a. Pop Off Covers: As above, the user holds the overcap and pulls it off.
Styles in this category include:
1. Rim Snap: These overcaps snap on and cover the chime of a
standard 3-Piece Steel can (see Figure 24).
Figure 24: Clayton Corporation’s RS211 Cover on 3-Piece Steel Can
2. Rim Snap Overcap for Necked-In Steel Can: These overcaps snap
on and cover the chime of 3-Piece Necked-In can such that their
diameter and the diameter of the can are in line (see Figure 25).
Page 27 of 32
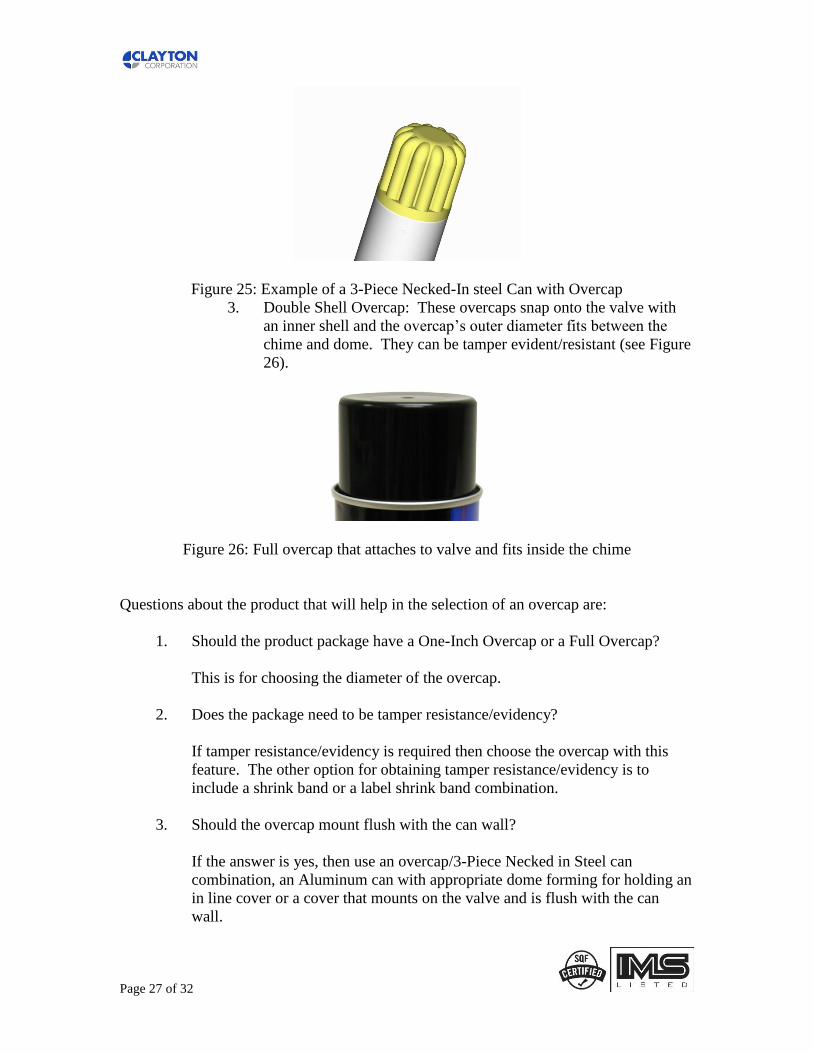
Figure 25: Example of a 3-Piece Necked-In steel Can with Overcap
3. Double Shell Overcap: These overcaps snap onto the valve with
an inner shell and the overcap’s outer diameter fits between the
chime and dome. They can be tamper evident/resistant (see Figure
26).
Figure 26: Full overcap that attaches to valve and fits inside the chime
Questions about the product that will help in the selection of an overcap are:
1. Should the product package have a One-Inch Overcap or a Full Overcap?
This is for choosing the diameter of the overcap.
2. Does the package need to be tamper resistance/evidency?
If tamper resistance/evidency is required then choose the overcap with this
feature. The other option for obtaining tamper resistance/evidency is to
include a shrink band or a label shrink band combination.
3. Should the overcap mount flush with the can wall?
If the answer is yes, then use an overcap/3-Piece Necked in Steel can
combination, an Aluminum can with appropriate dome forming for holding an
in line cover or a cover that mounts on the valve and is flush with the can
wall.

Page 28 of 32
If a flush mount is not required then the choice is open.
Can Artwork Style Selection
The last packaging component this article will review is the can’s artwork. There are two
options for applying the artwork to the can, preprinted cans and labels.
1. Preprinted can:
The artwork is printed on the can at the can manufacturer’s plant.
2. Labels:
Labels are made from a number of materials including, paper, paper film and
plastic. The label can be adhered to the can by, a pre-applied adhesive back,
glue or heat shrinking. Labels may also be coated for protection and/or to
improve appearance. Coatings consist of varnish, aqueous coating, UV
coating, EB coating.
Some labels provide only a means of putting artwork and product information
on the can while others provide secondary functions. One such secondary
function is tamper resistance. Some heat shrink labels may also be designed
to prevent the overcap from being removed until a portion of the label is
removed.
When selecting between a preprinted can and a label, ask these questions:
1. How many sku’s of the product are there?
The higher the number of sku’s the more space will be required for can
warehousing if using preprinted cans.
2. How many cans of a given sku will be produced?
There may be a volume where it becomes cost effective to use a preprinted
can. Running a large number of sku’s may result in reduced efficiencies on
the filling line due to changeover time of the labeler depending on the label
equipment being used.
3. What is the product’s expected life cycle? & How often will changes be made
to the packaging and/or artwork?
If a products life cycle is short and/or there are artwork and packaging
changes expected, labels will be cost effective due to reduced scrap cost.
4. Does the can have a specialized shaped or is it necked-in?

Page 29 of 32
This may affect the choice of using a label because of placement and
distortion issues.
5. Will the label also act to provide tamper resistance/evidence to the package?
If a tamper resistant/evident overcap is not being used, a label that provides
this feature may be the solution.
6. Under what conditions will the product be filled, stored and used?
If the product will get wet, and a label is being used, make sure the adhesive
and label are water resistant.
Can Filling and Gassing Considerations
Now that we have looked at the questions regarding formulation and packaging, lets take
a look at questions regarding can filling.
1. Do the packaging materials need to be sanitized or just clean?
a. Sanitized/Sterilized: If you product must be sanitized you have four
methods:
1. Irradiation.
2. Gas.
3. Chemical: There are a number of sanitizing solutions available.
Most are solutions of phosphoric acid, quaternary ammonium or
iodine.
4. Heat: may be supplied as a separate operation as with an oven or
provided by the product if hot packed.
Irradiation and gas sterilization would be done outside of the filling
plant. Use of chemical and heat sanitizing can be done as part of the
filling process or offline. Chemical sanitizers can be used as a wash or
dip however; this method would not be good for barrier packaging. Heat
can be used however; caution should be used to make sure the packaging
materials are not damaged. Most materials are unaffected at the
standard pasteurization temperature. However, there may be issues with
some valve materials when they are hot and under pressure.
Page 30 of 32
b. Cleaned: If the packaging materials need only be clean, they may not
need anything done to them or they may need to have a water rinse or
clean air blow off.
c. Cleaning and/or sanitizing the packaging materials may be a regulatory
requirement or be required to provide the shelf life required of the
product.
2. Will the product be filled hot?
If the answer is no this section does not apply.
If the answer is yes to this question it may affect:
a. Valve selection: Depending on the temperature of the product when
packaged, the pressure build up in the can and the time the valve is
exposed to the heat may require special materials be used for the valve.
b. Propellant selection: Determine the pressure of the propellant at the
temperature of the product and at 130 degrees F. (The 130 degree F
requirement comes from the USA Department of Transportation (DOT)
for can integrity with regards to shipping requirements. Requirements in
other countries may vary. Choose a can with doming/deforming
specifications above the higher of the two pressures.
3. Will the product be filled cold, below room temperature?
If the product is packaged cold condensation could form on the outside of the
can. If a label is used, the can may need to be dried prior to applying the
label.
If filling at room temperature you should not have a problem with
condensation.
Now lets examine the gassing process looking at questions that will need to be considered
to assure a proper functioning product.
1. What amount of the propellant is absorbed by the product?
In standard aerosols, some level of propellant will be absorbed into the
product. If the propellant is a compressed gas, gas will be absorbed into the
product over time. If the level of absorption is high enough, the pressure in
the can will drop as the gas is absorbed into the product. As a result:
a. It may be necessary to put a higher level of pressure in the can during
gassing to allow for absorption.

Page 31 of 32
b. It may be necessary to shake the can as the gas is being injected to help
speed up the absorption. This is done with whipped cream. The can is
shaken as the nitrous oxide is injected.
2. Is the product filled hot?
When using a compressed gas, make sure enough propellant is injected into
the can such that when the product cools there is enough remaining pressure
to dispense the product properly.
3. Will the product be cooled after packaging?
When using a compressed gas with a product that will be cooled after gassing,
the pressure will drop. The amount of pressure drop will depend on the
propellant being used. This will need to be taken into consideration when
determining the pressure required after immediately after gassing and
compensating for the pressure drop.
Regulatory Considerations
The last area of discussion is regulatory issues. Whilst I cannot cover all regulations in
every country I would like to stress the importance of knowing the regulations in the
country where the product will be packaged and sold. In Europe more and more
regulations are being written that cover all of the EU, however, there remain regulations
in each EU country.
The main regulatory areas to consider apply to:
1. Packaging selection: Make sure that your packaging materials are approved
for food contact. In the USA these regulations fall under the governing body
called the FDA
2. Transportation: Since the product is an aerosol there will be shipping
regulations involved. In the USA, the Department of Transportation (DOT)
regulates can selection, some product labeling requirements and carton
labeling requirements. This is one area where the regulations are pretty much
standardized around the world, however there still are some labeling
variations between countries.
3. Labeling: Labeling will have to meet a number of regulations including
information pertaining to the amount of product, hazards, nutrition and
contents.
In addition some products may by regulated by other agencies such as the IMS (Interstate
Milk Shippers in the USA). This group is an arm of the FDA that regulates milk
products.

Page 32 of 32
Conclusion
I have provided many areas for consideration when selecting the packaging for an aerosol
food product. I also touched on points relating to the formula, propellants and the filling
process. Whilst the packaging materials, available propellants and processing techniques
continue to change, the answers to the questions above will be a good reference for
working with your suppliers to select the proper packaging. In closing, the answers to
these questions and advice from suppliers only takes you to the point of having made the
best choices for your product packaging materials. It does not replace the need to test the
product and package for function, compatibility and stability.
Acknowledgements
I would like to sincerely thank the following people for their input in preparing this
paper:
Dr. Joseph Lott – VP Research and Development, Clayton Corporation
Jim McBroom – Design Engineer, Clayton Corporation
Scott Schneider – Pharmaceutical Sales & Market Development Manager, CCL
Ron Shaw – VP Sales Retired, Exal Corporation
Contact Information For Ric Berger
Please do not hesitate to contact me regarding any comments or queries regarding the
paper. I am also available to help you with your selection of Clayton Corporation
products for your aerosol food product.
Ric Berger
Clayton Corporation
866 Horan Drive
Fenton, MO 63026
USA
Phone: 1-636-717-2839
Email: [email protected]