a+ guide to managing and maintaining your pc, 7e
DESCRIPTION
A+ Guide to Managing and Maintaining your PC, 7e. Chapter 4 Form Factors, Power Supplies, and Working Inside a Computer. Objectives. Learn about different form factors used for computer cases, motherboards, and power supplies Learn how electricity is measured and about electrical components - PowerPoint PPT PresentationTRANSCRIPT

1
A+ Guide to Managing and Maintaining your PC, 7e
Chapter 4Form Factors, Power Supplies, and
Working Inside a Computer

Objectives
• Learn about different form factors used for computer cases, motherboards, and power supplies
• Learn how electricity is measured and about electrical components
• Learn how to select a power supply
• Learn how to protect yourself and your equipment against the dangers of electricity
• Learn how to work inside a computer case
• Learn how to troubleshoot electrical problems
2

Form Factors Used By Computer Cases, Motherboards, and Power
Supplies• Computer case, motherboard, power supply
– Interconnected system– Must be compatible
3
Figure 4-1 Computer power supply with connectorsCourtesy: Course Technology/Cengage Learning

Form Factors Used By Computer Cases, Motherboards, and Power
Supplies (cont’d.)• Form factor
– Specifies size, shape, and features of a device• Determined by motherboard
• Using the same form factor assures– Motherboard fits the case– Powers supply cords provide proper voltage– Motherboard and case holes align properly– Case and motherboard ports align– Wires on case match connections on motherboard– Power supply holes align with case
4
5
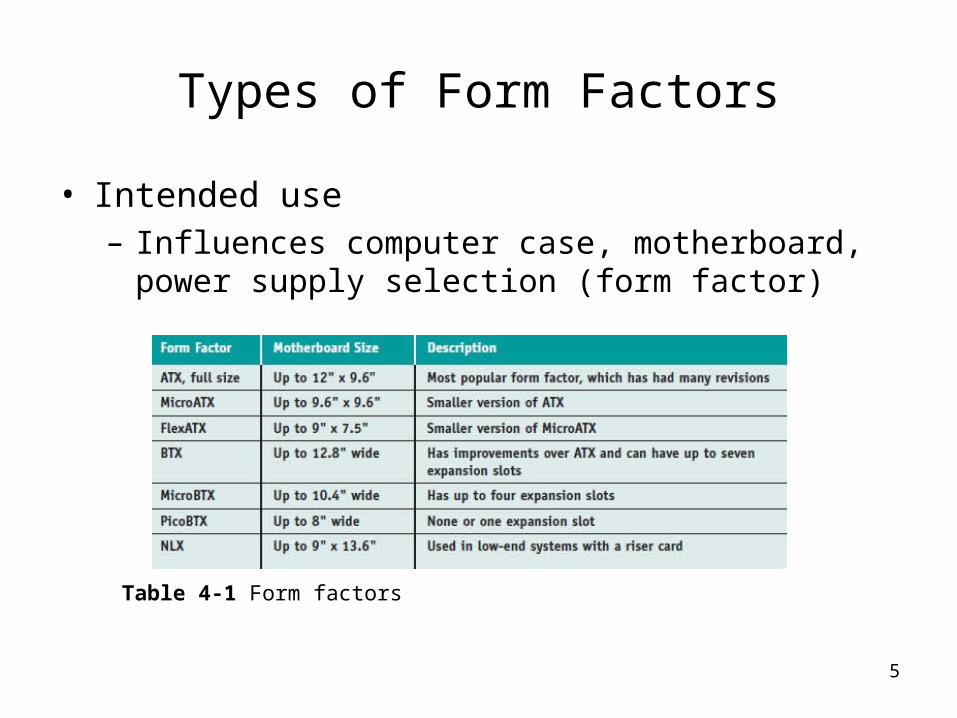
Types of Form Factors
• Intended use– Influences computer case, motherboard, power
supply selection (form factor)
Table 4-1 Form factors

Types of Form Factors (cont’d.)
• ATX form factor– Most common– Motherboard dimensions: up to 12” x 9.6”– Versions
• Original ATX form factor used P1 connector
• ATX Version 2.1 specifications added 4-pin auxiliary connector
• ATX Version 2.2 allowed for 24-pin P1 connector
• Version 2.2 provides +12 volts, +5 volts, and +3.3 volts pins
– Motherboard offers soft switch feature
6

7
Figure 4-2 The CPU on an ATX motherboard sits opposite the expansion slots and does not block the room needed for long expansion cardsCourtesy: Course Technology/Cengage Learning

Types of Form Factors (cont’d.)• ATX (Advanced Technology Extended), developed by
Inter in 1995, has several revisions
• Measures up to 12” x 9.6”
• CPU and memory slots sit beside expansion slots so they do not bump into the CPU or memory modules
• Original ATX fans blow air into the case
• Revised ATX from factor fans blow air out of the case
• Which one is better?
• Uses P1 Connector, 20 pins, provides +3.3V, +5V, +12 V and rarely some uses -5V
• For more powerful CPUs, ATX version 2.1 added 4 pin auxiliary connector for additional 12V, called ATX12V power supply
8

Types of Form Factors (cont’d.)• ATX version 2.2 allowed for a 24-pin P1 connector
• Extra 4-pin on the connector provide +12V, +5V, +3.3V
• If motherboard supports PCI Express then it has 24-pin P1 connector, called Enhanced ATX boards. (see pg. 115, fig. 4-5)
• ATX motherboard has a soft switch, or soft power feature but OS system has to support
• Mini ATX is not popular
• eATX (used in rack mounted servers) is not popular version of ATXs.
9

Types of Form Factors (cont’d.)
• MicroATX form factor– Reduces total cost of a system by reducing the
number of expansion slots– Reducing power – Smaller then the Micro ATX– Used for smaller systems such as a home theatre
system
10

Types of Form Factors (cont’d.)
• FlexATX– Variation of MicroATX with maximum flexibility– Good choice for custom systems– Cost less, fewer features– Fits MicroATX, or ATX case
11

Types of Form Factors (cont’d.)
• BTX (Balanced Technology Extended) form factor– Reduces heat with better airflow
• NLX (New Low-profile Extended) form factor– Developed to improve older and similar LPX form
factor– One expansion slot (riser card, bus riser, daughter
card can be mounted)– See pg. 119, figure 4-10– See exam tip
12

13
Figure 4-7 This MicroATX motherboard by Biostar is designed to support an AMD processorCourtesy: Course Technology/Cengage Learning
Figure 4-8 Improved airflow in a BTX case and motherboard makes it unnecessary to have a fan on top of the processorCourtesy: Course Technology/Cengage Learning

14
Types of Computer Cases
• Computer case (chassis)– Houses power supply, motherboard, cards, drives– Panel switches/lights to control/monitor PC– Ports connecting cables to motherboard
• Mounted on front, top, side, rear
– Match power supply to system electrical needs

15
Types of Computer Cases (cont’d.)
• Desktop cases– Motherboard on bottom; power supply to the rear
• Tower cases– Up to 2 feet high; can contain several drives
• Notebook cases– Used for all portables; includes desktop components
Figure 4-11 Tower and desktop casesCourtesy: Course Technology/Cengage Learning

16
Measures and Properties of Electricity
• Successful PC technicians: – Understand electricity– Know how to use electricity – Know how to measure electricity – Can protect computer equipment from electricity
• Units used to measure characteristics of electricity– Volt, amp, ohm, watt
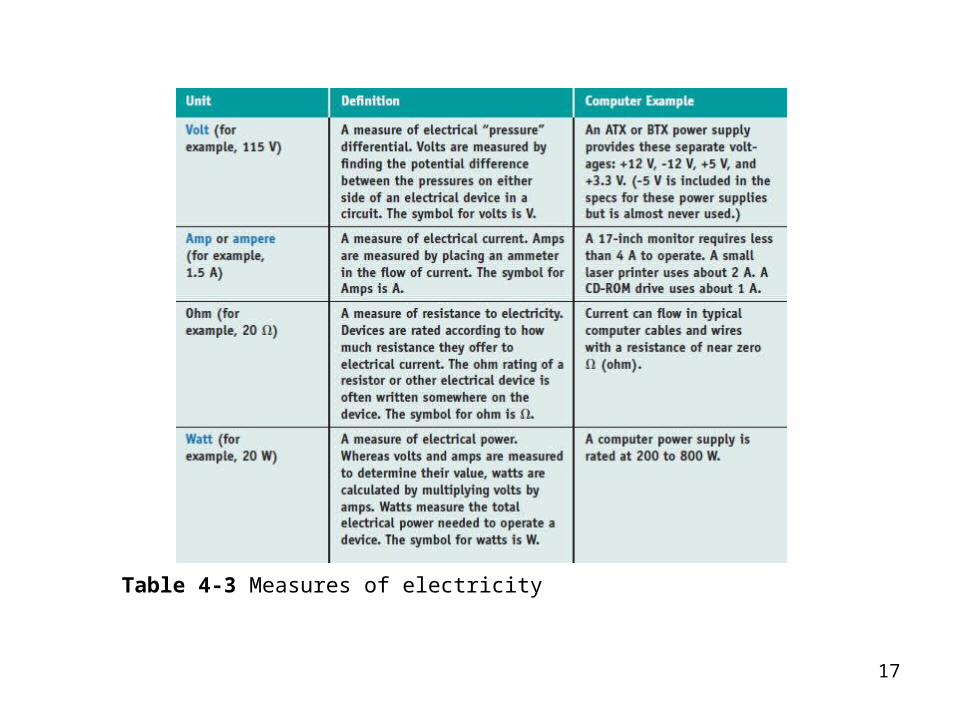
17
Table 4-3 Measures of electricity

18
AC and DC
• Alternating current (AC)– Oscillatory current driven by an alternating voltage
• Example: house current oscillates at 60 Hz
• Direct current (DC)– Single direction current driven by constant voltage
• Required by computer in small amounts, such as 5 V
• Power supply acts as a transformer and rectifier – Rectifier: converts AC to DC– Transformer: changes ratio of current to voltage

19
Figure 4-14 A transformer keeps power constant but changes the ratio of current to voltageCourtesy: Course Technology/Cengage Learning

20
Hot, Neutral, and Ground
• Completing a circuit:– AC travels from power station to house on a hot line– AC travels from panel to device using black (hot) wire– AC flows out of device circuit in a white (neutral) wire – AC returns to power station on a neutral line
• Short circuit: failure due to excess flow of electricity – Fuses protect circuits by melting wire (breaking circuit) – Grounded neutral lines pass detoured AC to earth
• Lines in three-prong plugs: hot, neutral, ground – Receptacle tester verifies outlet wiring
• See Caution on pg. 125 and Pg. 124 Note.

21
Figure 4-15 Normally, electricity flows from hot to neutral to make a closed circuit in the controlled environment of an electrical device such as a lampCourtesy: Course Technology/Cengage Learning

22
Figure 4-17 Use a receptacle tester to verify that hot, neutral, and ground are wired correctlyCourtesy: Course Technology/Cengage Learning
Figure 4-16 A polarized plug showing hot and neutral, and a three-prong plug showing hot, neutral, and groundCourtesy: Course Technology/Cengage Learning

23
Some Common Electronic Components
Figure 4-18 Symbols for some electronic components and for groundCourtesy: Course Technology/Cengage Learning

Some Common Electronic Components(cont’d.)
• Materials to make components:– Conductors: weakly resist current flow (copper)– Insulators: highly resist current flow (ceramics)– Semiconductors: allow flow if charged (silicon)
• Transistor– Switches current on (1) and off (0)– Amplifies current– Contains three layers of semiconductor material– Charge applied to center layer
• Controls switching
24

Some Common Electronic Components(cont’d.)
• Capacitor– Holds electrical charge for a period of time– Creates even flow of current in a PC
• Diode – Allows electricity to flow in one direction only– Rectifies current (convert AC to DC)
• Resistor– Controls amount of current flowing through device– Degree of resistance is measured in ohms
25

26
Figure 4-19 Capacitors on a motherboard or other circuit board often have embedded crossed lines on topCourtesy: Course Technology/Cengage Learning

27
Selecting a Power Supply
• Power supply or power supply unit (PSU)– Box inside a computer case supplying power to
motherboard and other installed devices– Both a rectifier and transformer
• Converts AC house current to DC
• Steps down voltage from 110 V or 220 V to 3.5, 5, and 12 V

28
Types and Characteristics of Power Supplies
• Important power supply feature considerations:– Form factor determines power supply size– Type and number of power cables, and connectors– Voltage selector switch– Fans– On/off switch– Wattage ratings– Warranty and overall quality

29
How to Select a Power Supply(PSU)
• Considerations– Match form factor to case, motherboard– Make sure it provides necessary connectors– Match wattage capacity to system requirements– Consider warranty, price, and additional features
• Determining wattage capacity– Consider all components inside case– Consider USB and FireWire devices
• Get power from ports connected motherboard

How to Select a Power Supply (cont’d.)
• Point to keep in mind– It may have two ratings
• Room temperature (peak rating)
• Continuous operation (actual rating)
– Video cards draw the most power– Use power supply rated 30 percent higher than
expected – Web sites have wattage calculators– Never use Dell power supply with non-Dell
motherboard• Pinout verification or pinout converter
30

31
Table 4-5 To calculate power supply rating, add up total wattage

Protect Yourself and the Equipment Against Electrical Dangers
• PC support activities present physical dangers– PC technicians must protect themselves and others– PC technicians must protect the equipment
32

33
Protect Yourself Against Electrical Shock and Burns
• Protection from electrical shock– Disconnect power
• Pull plug at AC outlet
– Protect power cord• Do not pull on cord itself
– Remove jewelry– Power supplies and CRT monitors contain capacitors
• Technician must not be grounded
• Both considered field replaceable unit (FRU)

Protect the Equipment Against Static Electricity or ESD
• Static electricity (electrostatic discharge or ESD)– Touching device causes discharge, damaging device– Particularly severe in dry and cold climates
• Protecting system from ESD– Use ground bracelet, static mat, static shielding bags,
ESD gloves– Touch computer case before touching components– Touch person when passing components– Remove jewelry, work on hard floors– Unplugged power cord before working inside case
34

35
Protect Against Electromagnetic Interference
• Caused by magnetic fields generated by current flow
• RFI (radio frequency interference)– EMI in radio frequency range affecting reception
• Crosstalk problem– Data in cables crossing EM fields gets corrupted– Control crosstalk by shielding cables, power supply
• Detect EMI using tuned-down AM radio
• Other ways to protect device:– Use line conditioners; shield cables, power supply – Move PC to a new location

Surge Protection and Battery Backup
• Storms and uneven AC flow cause power surges– Prevented by installing an AC filter
• Devices between AC outlet and computer equipment:– Power Strips– Surge suppressors– Power conditioners– Uninterruptible power supplies (UPSs)
• Use devices with UL (Underwriters Laboratory) logo– UL 1449
36
Surge Protection and Battery Backup (cont’d.)
• Surge protector– Protects equipment from sudden power changes– Absorbs and/or blocks surge
• Recommended features:– Joules rating greater than 600 joules– Protection activation time (2 nanoseconds or less)– Warranty for connected equipment and UL seal– Light indicating surge protection working– Data line protector for telephone line to modem– Let-through voltage rating and line noise filtering
37

38
Figure 4-28 Both surge suppressors alert you when protection is not working. The small surge suppressor is designed to travel with a laptopCourtesy: Course Technology/Cengage Learning

Surge Protection and Battery Backup (cont’d.)
• Line conditioners (power conditioners)– Protect against spikes or swells (voltage surges)– Raise voltage during brownouts (voltage sags)– Filter EMI/RFI interference from the electrical line
• Power conditions are measured in watts, volt-amperes (VA), kilovolt-amperes (kVA)
• Determining VA needed– Multiply amperage of each component by 120 V– Add up the VA for each component
• Provide no protection against a total blackout39

Surge Protection and Battery Backup (cont’d.)
• Uninterruptible power supply (UPS) benefits– Conditions line to account for brownouts, spikes– Provides backup power during a blackout– Provides protection against very high spikes
• Designs: standby, inline, line-interactive
• Smart (intelligent) UPS: controlled with software
• Considerations when buying– VA rating and watts– Degree of line conditioning– Warranties, guarantees, and service policies
40

How to Work Inside a Computer Case
• Skills needed to:– Replace computer parts inside the case– Build a system from scratch
• Requires tools and safety precautions
• Taking a PC apart and putting it back together– Should follow step-by-step procedures
41

PC Support Technician Tools
• Essential tools– Ground bracelet, ground mat, ground gloves– Flat-head screwdriver– Phillips-head or cross-head screwdriver– Torx screwdriver set (size T15)– Insulated tweezers– Extractor– OS recovery CD or DVD
• Many other non-essential tools exists (see pg. 145)
• Use a toolbox42

43
Figure 4-31 PC support technician toolsCourtesy: Course Technology/Cengage Learning

PC Support Technician Tools (cont’d.)
• Post Diagnostic Cards– Helps discover, report computer errors and conflicts
at power-on self test (POST)• Tests performed by startup BIOS
44
Figure 4-32 Post Code Master diagnostic card by Microsystems Developments, Inc.Courtesy: Course Technology/Cengage Learning

PC Support Technician Tools (cont’d.)
• Power Supply Tester– Measures output of each power supply connector
45
Figure 4-33 Use a power supply tester to test the output of each power connector on a power supplyCourtesy: Course Technology/Cengage Learning

PC Support Technician Tools (cont’d.)
• Multimeter– Measure several characteristics of electricity in a
variety of devices
46
Figure 4-34 This digital multimeter can be set to measure voltage, resistance, or continuityCourtesy: Course Technology/Cengage Learning

Safety Precautions
• Make notes for backtracking
• Stay organized, do not stack boards
• Do not touch board chips– With hands, magnetized screwdriver
• Do not change dual inline package (DIP) switch settings with a graphite pencil
• Protect yourself and the equipment– Never ever touch inside of a turned on computer– Consider monitor, power supply as “black boxes”– Protect against static electricity
47

Steps to Take Apart a Computer
• Tools needed– Ground bracelet, a Phillips-head screwdriver, a flat-
head screwdriver, paper, pen
• Guidelines– Back up data– Power down system, unplug it, press power button– Put computer on a table with plenty of room– Open computer case– Diagram all cable connections
48

Steps to Take Apart a Computer (cont’d.)
• Guidelines (cont’d.)– Before removing ribbon cables, look for red color or
stripe down one side of each cable– Remove cables to all drives– Remove expansion cards– Remove motherboard– Remove power supply– Remove drives
49

Steps to Put a Computer Back Together
• Reverse disassembly process
• Component installation order– Power supply, drives, motherboard, cards– Connect all data and power cables– Plug in keyboard, monitor, mouse– Turn on power– Verify PC working properly
50

Troubleshooting the Electrical System
• Electrical problems can occur before or after boot– May be consistent or inconsistent
• Possible electrical problem symptoms:– PC appears “dead”– PC sometimes halts during booting– Error codes or beeps occur during booting– Smell burnt parts or odors exists– PC powers down at unexpected times– Hear a whine coming from the power supply
• Most PC problems have simple solutions51

52
Problems with External Power
• Brownout (reduced current) may create issues– Check out other devices using same circuit– Remove other devices
• See if voltage increases
• Resolution– Install line conditioner
• Conditions voltage to the PC

53
Problems with Loose Internal Connections
• Can cause a system to appear dead or reboot itself
• Troubleshooting tasks:– ATX and BTX power supplies
• Verify power switch wire connected properly to motherboard and turned on before power comes up
– Remove case cover• Check all power connections
• Check cables linking power supply to motherboard
• Check cables linking power supply to drives
– Verify case front panel in place before power-on

Problems that Come and Go
• Intermittent symptoms indicating a post-boot problem– Computer stops, hangs, reboots for no reason– Memory errors appear intermittently– Data written incorrectly to the hard drive– Keyboard stops working at odd times– Motherboard fails or is damaged– Power supply overheats, becomes hot to the touch– Power supply fan becomes very noisy or stops
• Intermittent problems are more difficult to solve
54

Problems with an Inadequate Power Supply
• Power supply may not meet needs of new devices
• Testing for an adequate power supply– Make all devices in the system work at the same time
• Example: copy files from new drive to old drive
• Simple solution: upgrade to a higher power supply
• Calculate total wattage needed by system
55

56
Problems with a Faulty Power Supply
• Test with a power supply tester or multimeter
• Power supply with correct voltages– May still be problem source
• ATX power supply monitors motherboard voltage range– Halts motherboard if voltages inadequate
• If power supply appears “dead”, replace it

Problems with the Power Supply Fans
• Fans usually hum, whine before failing– Replace fan or entire power supply– Suspect another short if failure continues– Do not operate PC if fan not working
• Troubleshooting nonfunctional fan– Turn off power; remove all power cord connections to
all components except motherboard; turn on power– Turn off power; reconnect one card or drive at a time– Motherboard power supply problem
• Fan does not work when all devices except motherboard disconnected
57

Problems with Overheating
• Computer powers down after operating for a few minutes or a few hours
• Troubleshooting– Leave system turned off for about 30 minutes, try
again– Check computer’s internal temperature– Install additional fans
58

Power Problems with the Motherboard
• Bad contact between board component and chassis– Short can seriously damage motherboard– Check for missing or extra standoffs (spacers)
• Shorts in the circuit on motherboard– Look for damage to the bottom of the motherboard– Look for burned-out capacitors
59

Replacing the Power Supply
• Criteria for replacement power supply– Uses correct form factor– Adequately rated for power in watts– Has necessary power connectors
• Determining power supply problem– Turn off PC, open computer case, set new power
supply on top of the old one– Disconnect old power supply’s cords, plug PC devices
into the new power supply– Turn on PC, verify new power supply solves problem
60
Summary
• Form factor specifies size, shape, features of device– Motherboard, power supply, and case share the same
form factor
• Types of cases: desktop, tower, notebook
• Quantities characterizing electricity– Voltage, current, resistance, power
• Current flows from hot wires to neutral wires– Excess current escapes through grounds
61

Summary (cont’d.)
• AC supplied by power station– Transformed, rectified before flowing into PC
• Major components in a circuit board– Transistor, capacitor, diode, resistor
• Electrical threats– ESD, EMI, uneven current flow, sudden power surges
(or spikes)
62