a guide to handling and application -...
TRANSCRIPT

ADHESIVES
APPLICATION GUIDE
®
A Guide To Handlingand Application
General Overview ................................................................................................................................ 3Packaging ..................................................................................................................................... 3Substrate Preparation .................................................................................................................. 3
Types of Surface Preparation .............................................................................................. 3General Surface Preparation ............................................................................................... 4Preparation Methods for Various Substrates ...................................................................... 4
Steel ............................................................................................................................... 4Stainless Steel ............................................................................................................... 4Aluminum...................................................................................................................... 4Magnesium .................................................................................................................... 5Brass and Copper ......................................................................................................... 5Zinc ................................................................................................................................ 5Plated Metals ................................................................................................................ 5Plastics .......................................................................................................................... 5Miscellaneous Substrates ............................................................................................. 5
Selecting a Preparation Method .......................................................................................... 5Maintenance of Surface Properties ..................................................................................... 6
Applying Chemlok Solvent-based Adhesives ..................................................................................... 7Preparing the Adhesive ............................................................................................................... 7Applying the Adhesive ................................................................................................................. 7
Hand Brushing ...................................................................................................................... 7Dip Application ..................................................................................................................... 8Spray Application ................................................................................................................. 9
Spray Equipment .......................................................................................................... 9Roll Coating ........................................................................................................................ 10
Drying Processes ........................................................................................................................ 10Handling Coated Parts ............................................................................................................... 10Coated Parts Layover Stability .................................................................................................. 11Proper Storage ........................................................................................................................... 11
Applying Chemlok Aqueous Adhesives ............................................................................................ 12Differences Between Solvent-based and Aqueous Adhesive Systems.................................... 12Benefits of Aqueous Systems .................................................................................................... 12Preparing the Adhesive ............................................................................................................. 12Applying the Adhesive ............................................................................................................... 12
Spray Application ............................................................................................................... 12Spray Equipment ........................................................................................................ 13
Dip Application ................................................................................................................... 14Automatic Systems ............................................................................................................ 15Brushing .............................................................................................................................. 15Roll Coating ........................................................................................................................ 15Pad Painting ....................................................................................................................... 15
Accelerating Drying Time .......................................................................................................... 15Monitoring .................................................................................................................................. 17Storage ..................................................................................................................................... 17Coated Parts Layover Stability .................................................................................................. 17
Molding ..................................................................................................................................... 18
Post-Treatment .................................................................................................................................. 19
Troubleshooting ................................................................................................................................. 19
Safe Handling ..................................................................................................................................... 20
Lord Applications Laboratory ........................................................................................................... 20
Service and Equipment Suppliers .................................................................................................... 21
TABLE OF CONTENTS

3
It’s been more than 40 years sinceChemlok® rubber-to-metal adhesives were firstintroduced. While much has changed duringthis time, one thing remains constant: thequality of Chemlok adhesives. Today — asfrom the beginning — the Chemlok family isrecognized as the industry leader in rubber-to-metal adhesives. That’s why when manufactur-ers have a critical application that demands aproven rubber-to-metal adhesive, they look toChemlok products.
Although a premium adhesive is the basisof a quality bond, it’s only the beginning;proper application is essential for maximumresults. Whether you’re dipping or spraying,using solvent-based or aqueous Chemlokproducts, you’ll learn how to maximizeefficiency and optimize results. This guide willalso show you how to troubleshoot commonbond problems, and find names and numbersof materials and equipment suppliers.
We recommend you read this entirebooklet before using Chemlok adhesives;however, we realize that many of our custom-ers have been using our products for years,and reading this guide from cover to coverisn’t necessary. Regardless, we hope thisresource will become an indispensable part ofyour operation and a convenient, one-sourcesolution to many of your bonding questions.Just think of it as an extension of LordCorporation, and remember: When it’s critical,it’s Chemlok.
PackagingChemlok solvent-based and aqueous
adhesive systems are available in several sizesto accommodate varying production require-ments. Choose from one of these convenientpackages:• Quart containers• 1-gallon pails• 5-gallon pails• 55-gallon, phenolic-lined metal drums with
agitator paddles
Substrate PreparationOne of the most important steps to a
quality bond is substrate preparation. Toensure optimum bond performance and long-term environmental resistance, substratesmust be free of organic and inorganic contami-nants. Organic materials, which can beremoved by solvent or alkaline cleaning,
include grease, dirt and oils. Common inor-ganic pollutants are rust, scale and oxidelayers. These contaminants can be cleaned byabrasion or chemical processes, or a combina-tion of both.
Types of Surface Preparation — There area number of ways to prepare substrates foradhesive application; however, the methodscan be broadly divided into mechanical andchemical. Regardless of which method youchoose, the essentials of all good surfacepreparations include:• Removal of all surface contaminants and
decomposition products.• Prevention of recontamination.• Careful handling through all processing
steps.
Mechanical preparation involves physi-cally removing surface contamination andincreasing surface area and substrate profile.These methods include:• Blasting — Abrasive particles (sand, grit or
metal oxides) are projected against thesurface with a stream of air. Blasting isespecially effective for removing inorganiccontamination and other corrosion com-pounds found on metal. The character orquality of the treatment is affected byduration of the blast; shape and size of theblasting media; particle velocity; and thehardness, porosity and other properties ofthe substrate.
• Abrading — A wire brush or abrasive paperor pad is used to grind the surface. Caremust be taken to prevent contamination ofthe abrasive material and to remove dustand particles after use.
• Machining — Cutting tools are used to“score” surfaces. If oils are completelyremoved, machining produces an excellentbonding surface. However, any oil left on themetal surface may cause poor adhesion.
Chemical processes, on the other hand,utilize organic and inorganic chemicals todissolve, suspend or eliminate soils andsurface contaminants. Preparations include:• Vapor/solvent degreasing — The vapor
of solvent or alkaline cleaning solutionis utilized to eliminate organic contamination or oils. Because degreasing willnot remove scale or corrosion, it’s bestto use in conjunction with blasting formetal substrates.
GENERAL OVERVIEW

4
• Anodizing — Aluminum oxides are electro-lytically deposited on bonding surfaces.
• Passivation• Zinc phosphating• Alkaline cleaning• Chromate alodizing• Chemical etching• Pickling
General Surface Preparation — Whetheryou’re using Chemlok solvent-based oraqueous adhesive systems, the following three-step process is the preferred mechanicalsurface preparation technique:1. Degreasing2. Grit-blasting3. Degreasing
While the above methods produceexcellent surfaces for bonding most substrates,more elaborate chemical methods may beneeded for certain substrates or for improvedenvironmental resistance. Details on specificmethods are described under the heading forthe specific substrate.
Regardless of the system you choose,parts must remain clean when being removedfrom the cleaning tank. Water break tests(ASTM F22) should be performed regularly tocheck purification effectiveness.
Preparation Methods For Various
Substrates — Although the general prin-ciples are the same for preparing all sub-strates, some materials require specialattention. Below, we’ve outlined some ofthe nuances of preparing various surfacesfor bonding.
Steel — Grit blasting (with steel or aluminumoxide) is widely used for preparing steelsurfaces. It is especially effective for metalscovered with rust, scale, oxide layers andother corrosion compounds. Steel preparationusually involves:1. Vapor degreasing2. Grit blasting (recommended grit size ranges
from G-40 to G-70)3. Solvent degreasing or alkaline cleaning with
rust inhibitor in rinse
Chemical treatments for steel include ironphosphate or zinc phosphate conversioncoatings. Micro-crystalline, calcium-modifiedzinc phosphates are preferred for solvent-based and aqueous adhesives.
When preparing steel with chemicalmethods, a calcium-modified, microcrystallinezinc phosphate (film weight of 125 to 450 mg/ft2) is recommended. Zinc phosphate treat-ment consists of:1. Hot caustic clean2. Water rinse3. Phosphoric acid pickle4. Water rinse5. Zinc phosphate6. Water rinse7. Rust inhibiting rinse8. Hot air dry
This type of surface treatment provideson-the-shelf corrosion protection of theuncoated part as well as improved under-bondcorrosion protection.
For detailed information and names ofrepresentative suppliers, consult manufactur-ers of phosphating treatments and otherchemical treatments.
Stainless Steel — Preparing stainless steelwith mechanical methods includes:1. Blasting with sand or aluminum oxide (Steel
grit should not be used because it leavesferrous deposits that can cause galvaniccorrosion.)
2. One-hour layover maximum
Chemical treatment for the passivation ofstainless steel involves the following:1. Vapor degreasing and/or alkaline cleaning2. Immersion for 15 to 20 minutes at 120˚F to
135˚F in a solution of nitric acid (20% to25%by weight), sodium dechromate (2% to4% by weight) and water (71% to 78% byweight)
3. Cold water rinse4. 1-hour dry
Immersion times, solution concentrationsand operating temperatures may be adjustedto suit conditions and alloys.
Aluminum — The preferred mechanicalmethod for preparing aluminum is blasting.This includes:1. Blasting with sand or aluminum oxide (Steel
grit should not be used because it leavesferrous deposits that can cause galvaniccorrosion.)
2. One-hour layover maximum
Chromate alodizing of aluminum alsoproduces excellent bonds. This involves:
Special Note About Degreasers
Although chlorinated solvents
like trichloroethylene and
perchloroethylene are still used
for degreasing, many companies
have discontinued use due to
environmental and health-related
issues. As a result, many “envi-
ronmentally friendly” alterna-
tives have been developed, which
produce surfaces clean enough
for use with adhesive systems.
Popular alternatives to chlori-
nated solvent degreasers include:
• Aqueous alkaline cleaning
systems, which have been used
with solvent-based and aqueous
adhesives. (Consult the supplier
list for sources.)
• Petroleum-based solvents.
These materials can be used
alone or emulsified to form
semi-aqueous systems.
XIIIII
IVIX
XIIIII
IVIX
XIIIII
IVIX

5
1. Vapor degrease and/or aqueous aluminum2. Water rinse3. Deoxidizer4. Water rinse5. Chromate conversion treatment6. Water rinse7. Warm air dry
Consult the manufacturers of theproprietary materials used in these processesfor more information.
Aluminum surfaces may also be preparedby anodizing (electrolytic deposition ofaluminum oxide). Although both sulfuric acidanodizing and chromic acid anodizing areeffective when preparing aluminum, chromicacid anodizing should not be used whenbonding silicone rubbers. Surfaces preparedwith sulfuric acid anodizing must be unsealedand the adhesive applied within one hour.
Magnesium — Depending upon the requiredenvironmental resistance, preparation ofmagnesium surfaces varies. Blasting with sandor aluminum oxide provides a good bondingsurface, but the bond will not resist environ-mental conditions well. For best results, usechemical methods such as chrome picklingor anodizing.
Brass and Copper — In addition to blastingwith sand or aluminum oxide, brass andcopper surfaces may be treated with chemicalmethods, including ammonium persulfateetching. The steps for this procedure are:1. Vapor degrease and/or alkaline clean2. Immersion for 1 to 2 minutes in a solution of
ammonium persulfate (25% by weight) andwater (75% by weight)
3. Water rinse4. Dry
Zinc — Zinc surfaces are almost alwaysprepared mechanically. However, be carefulwhen bonding directly to zinc-plated, galva-nized or electrogalvanized surfaces. Typically,hot dip-galvanized substrates can’t be adheredto, whereas electrogalvanized surfaces doaccept bonds.
Plated Metals — Two unique problems areoften encountered when preparing andbonding plated metals:• Vigorous mechanical treatment may
penetrate and destroy the plating.• Plating-to-base adhesion may be inadequate.
Since the plating process produces aclean, bondable surface, freshly platedsurfaces often do not require additionalpreparation. Keep in mind, however, thatplating changes surface properties such asadhesion, porosity and surface stress of themetal deposit. Current density, composition ofthe plating bath (including brightener content)and temperature of the bath also affect theplated surface’s ability to be bonded.
When mechanical pretreatment is used,abrade the surface lightly. Fine grades of sandor abrasive paper will minimize penetration.The correct chemical treatment depends uponthe type of metal which is deposited during theplating process.
If the plating does not adhere tightly tothe base metal, the plating process itselfshould be investigated. Application of Chemlok205 or 207 primer (0.1 to 0.2 mil) oftenimproves adhesion to plated metals.
Plastics — Rubber can be bonded to manyrigid plastics. To prepare plastic surfaces:1. Clean with aqueous alkaline or a non-
aggressive solvent2. Lightly sand or abrade the surface (Avoid
sanding vigorously; this creates excessiveheat, which will melt the plastic, impedebonding and warp the substrate.)
Miscellaneous Substrates — The principlesoutlined in this bulletin can be adapted to thesurface preparation of almost any rigidmaterial for bonding. Again, the essentials ofproper surface preparations include:• Removal of all surface contaminants and
decomposition products• Prevention of recontamination• Careful handling through all processing steps
Also remember that high surface profilesfrom mechanical blasting generally bond betterthan those with low surface profiles.
Selecting a Preparation Method — Todetermine which preparation method bestsuits your needs, consider:• Economy — In large volumes, chemical
treatments are generally less expensive thanmechanical methods.
• Versatility — Mechanical preparationmethods may be applicable to numerousmetals, while chemical treatments may bemetal-specific.

6
• Adaptability to Existing Equipment —Existing facilities may favor either mechani-cal or chemical processing.
• Adhesion Requirements — Adhesionrequirements vary from product to product,and bond quality is affected by the particularapplication. Therefore, surface preparationwill vary accordingly.
• Environmental Resistance Requirements —Chemical conversion often provides betterenvironmental resistance than mechanicalmethods.
• Government Regulations — Waste disposalregulations may prohibit the use of chemicaltreatments in certain areas.
Maintenance of Surface Properties —
Maintaining optimum surface cleanliness isessential until adhesive application is com-plete. To accomplish this:• Apply the primer or adhesive immediately
after the surface is prepared.• Avoid exposure to dust, moisture, chemical
fumes, mold release agents and otherpossible contaminants.
• Keep solvents and cleaning solutionsfree from contamination, and replacewhen necessary.
• Ensure grits and abrasives remain clean andfree of contaminants.
• Check the purity of rinse water and “drying”air frequently, ensuring minimalcontamination.
• Prevent surface oxidation by applying a coatof primer or adhesive.
The “water break” test can be used tocheck for oil and grease removal. If a surfacecan support an unbroken film of deionizedwater for 20 seconds or more, it is consideredessentially free from grease or oil.

7
Preparing the AdhesiveTemperature — Temperature affects theviscosity of Chemlok primers and covercoats.If stored cold, allow them to return to theusual working temperature before using.For drums, this may take as long as 48 hours.
Dilution — Regardless of dilution amounts, itis important — in all cases — that the appro-priate diluent be added to the primer oradhesive while stirring. Depending upon theapplication, dilution of both the primer andcovercoat may be required. Mixing guidelinesare listed on product bulletins that come witheach Chemlok product.
Pails, Single Gallons and Smaller
Containers — Hand-stir in a “figure 8”motion with a wooden paint stick. For galloncontainers, paint shakers may also be usedwith solvent-based adhesives. Fifteen minutesis usually sufficient.
Continue mixing until all settled materialis removed from the bottom and the solu-tion has a uniform appearance. Stir frequentlyduring use.
To minimize solvent loss, replace thecontainer lid when not in use. Solvent lossreduces ingredient solubility, and increasessolids content and viscosity.
Caution: If used, electric mixers
should have spark-proof motors.
Drums — Chemlok products are available instandard 55-gallon drums as well as 55-gallonunits with built-in agitators. The standarddrum has two openings (3/4-inch and 2-inch)in the drum head, while the agitator drum hasa 2-inch side opening near the drum headouter edge. Regardless of type, all steel drumshave protective interior coatings that havebeen tested for safe storage.
Most Chemlok products are available inagitator units, which have a double-bladeagitator accessible through a bung in the centerof the drum head. (See Figure 1) Initially, asteel hand crank may be used to loosen settledmaterial. Then, the adhesive should beagitated at least three to four hours at 40 to 60rpm prior to use; eight hours is recommended.For continuous agitation, a variable speed, air-driven motor is typically used.
APPLYING CHEMLOK SOLVENT-BASED ADHESIVES
Caution: Electric motors should not be
used because of spark and fire hazard. To
prevent sparks from static electricity,
drums should be properly grounded. For
additional information on air-driven
motors, contact a manufacturer
listed at the end of this guide.
Applying the AdhesiveChemlok solvent-based adhesives may be
applied by brushing, dipping, spraying or roll-coating. General recommendations are:• Primer dry film thickness — 0.2 to 0.5 mil
(.0002 to .0005 inch)• Covercoat dry film thickness — 0.5 to 1.0 mil
(.0005 to .001 inch)• Post-vulcanization bonding — 0.8 to 1.3 mil
(.0008 to .0013 inch)
Hand Brushing — Chemlok solvent-basedadhesives are suitable for hand brushingstraight from the can. When using this method,wear cloth gloves and work in a clean environ-ment. Also make sure there are no dirty orgreasy objects within reach.
When working from small, open contain-ers, solvent evaporation may increase adhesivesolids. This is particularly true with largebrushes, which carry a substantial volume of
!
! FIGURE 1
Locking Ring
Typical55-Gallon
Drum with
AgitatorDouble-Blade Agitator
Handle & Plug
WasherPlug
Plug

8
adhesive in the brush body. This adhesivedries and, in some cases, becomes pasty.
If brush strokes become visible on paintedparts, dilute the adhesive to the originalviscosity. Brushing is easiest when theviscosity is correct.
Primers and covercoats usually dry in 30to 60 minutes at 70˚F. Higher temperaturesand/or increased air circulation will acceleratedrying time.
Dip Application — Hand-dipping Chemlokadhesives is recommended when only a smallnumber of parts need to be coated or whenfactory conditions prohibit mechanical units.To avoid excess coating, sags and drips,withdraw parts from the adhesive slowly. Alsobe sure to control the viscosity and agitate theadhesive frequently.
Mechanical Dipping — There are twoprimary mechanical dipping applications:conveyor equipment and dip tanks.
Conventional conveyor equipment isclassified as either monorail or bar conveyorsystems. The monorail system is a single-chainunit; the bar conveyor is a double-chainassembly with bars running horizontallybetween the chains. Selection of a conveyorunit depends on the size and number of partsto be dipped.
For best results, arrange the conveyor’sdipping section so parts are withdrawn at anangle rather than straight up and down. Byremoving the parts at an angle, the conveyor’sforward motion provides a gradual verticallift, which allows excess fluid to drain evenlyfrom parts.
When using dip tanks, the adhesiveshould be agitated continuously, ensuring agood top-to-bottom turnover. The constantmotion prevents skinning and sweeps airbubbles to the side. Circulating pumps orsubmerged impeller agitators are veryeffective. Because of the filler content,diaphragm pumps, if used, should be dual-diaphragm models.
Tank depth should only accommodate thelargest part to be dipped. Additional depthonly increases the volume of the tank andlessens the likelihood of adhesive turnover.Also, the tank bottom should be slanted sothat immersion depth of the parts and the tankdepth both decrease as parts move up and outat an angle.
To facilitate adhesive changing andminimize down-time, tanks should be mobile.If parts are to be partially dipped or if the con-veyor’s low point is not adjustable, provisionswill be needed for raising or lowering the tank.
A drip pan behind the dip tank is alsorecommended. If excess droplets from theparts have not hardened, they may bereturned to the tank. However, if the materialhas solidified, it should be discarded. Othersuggestions include:• Equipment made of carbon steel• Large piping to ensure low-pressure operation• Solvent-resistant packing or a mechanical
seal in all pumps• Method for agitating contents of the tank
Chemlok adhesives may be agitated orpumped continuously over indefinite periodswithout damage. However, over-mixing cancause solvent loss.
Depth of Immersion — As a general rule,avoid immersing parts deeper than absolutelynecessary. This minimizes adhesive build-up.For parts that require only partial coating,adjust the conveyor line height or immersiontank level to suit your needs.
It’s also important to clean part-hanginghooks prior to use. And when a variety ofparts will be processed by the same dippingequipment, various hook sizes may be needed.
Design of Metal Parts — To ensure success-ful dipping, a metal contour or hole should bedesigned in the part’s upper body for securingit to a conveyor hook. The part should hang sodrainage is toward a point where the adhesivetear will not interfere with the moldingprocess. Air entrapment can be avoided bychanging positions on the conveyor hook.Protruding stud heads that have been weldedor swaged into flat plates frequently trap airwhere the weld is not completely filled. If thestud is at a high stress point, the small voidcan be the first spot of bond failure. Handtouch-up of critical points may be needed toprevent solvent entrapment.
Perforated Metals — When parts with smallperforations are dipped, adhesive is fre-quently trapped in the holes, causingwebbing or sagging. You may need to “touchup” these areas with a paint brush. Withdraw-ing parts slowly from the dip tank helpsprevent these problems.

9
Precautions With Threaded Parts — Soft,rubber caps or thimbles for externallythreaded studs, or a cork for tapped holes, areoften used to protect threads from adhesivecoating. Unfortunately, these protectivedevices are not always effective. Do not dip if
it is important to the function of the part
that threads be clean.
Withdrawing Parts From the Adhesive —
Removing metal parts slowly from the adhesiveis critical to dipping success. If removed tooquickly, an excessive amount of adhesive maycling to the part. This excess adhesive drainsslowly and unevenly, forming tears, sags andfat edges. Collectively, these imperfectionsreduce aesthetics, prolong drying time and,ultimately, affect the overall molding operation.
For optimum results, remove parts slowlyand evenly. This allows uniform adhesivedrainage, helping eliminate bond defects. Avertical withdrawal rate of 3 feet per minute isusually satisfactory.
Dip/Spin Coating — Dip/spin coating maybe used on small parts, but appearances arenot as uniform as dipping. Despite reducedaesthetics, this method is satisfactory formany applications, including rubber-encapsu-lated inserts.
When dip/spin coating, place parts in adip/spin barrel, dip in the appropriate primer,then spin in the drum at a high rpm untilexcess primer is removed. Coated partscan then be dumped onto a screen or openconveyor to dry at room temperature orin warm, dry, circulating air. The sameprocedures can be used when applying theadhesive covercoat.
Spray Application — Spray application ofadhesives is particularly applicable whencoating one side or certain areas of a part.When spraying, however, it is important thatthe adhesive reach the substrate wet. If dryingoccurs before reaching the metal, adhesion willbe poor.
Hand-held guns may be used for smallruns, while conveyorized or automated unitsare effective for large production operations.To reduce overspray, electrostatic units can beemployed. And for small, intricate parts, an airbrush may be used. Regardless of size,properly adjusted equipment ensures deliveryof uniform films — without sags and tears.
During hand-spray operations, parts areoften assembled on racks that incorporatemasks wherever needed. If the applicationrequires overall coating, parts can be rotatedin front of the spray gun. Chain-on-edgeconveyors can be programmed to automati-cally rotate metals as they pass the guns.
Spray Equipment — Many manufacturersmake paint guns that are also suitable forapplying Chemlok adhesives. The preferredsystem includes:• Gun tips and air caps suited for job-specific
volume and spray pattern• Adjustable air pressure on the liquid supply
tank• Controllable atomizing air pressure on the
gun or air source• Screen (usually 100 mesh) in the liquid line• Filters and moisture traps in air lines
Removal of oil and water is critical topreventing contamination. Therefore, theentire spray system should be easy to dis-mantle and clean. If settling of dilutedadhesive in a flow-restricted areas becomes aproblem — particularly in an automatic airlessspray system where adhesive flows themajority of the time — it may be necessary toinstall plumbing which switches to a clean-outsolvent every eight hours.
When spraying Chemlok adhesives, it isalso important to continuously agitate thesupply tank. Liquid lines (preferably 3/8-inchor less diameter hoses) should be short toprovide rapid flow rate and prevent dead spotswhere settling can occur.
Electrostatic Spray Equipment — A numberof devices may be used for electrostatic sprayapplications, including electrostatic andconventional electrostatic air hand guns, andspinning disc and mini-bell electrostaticapplicators. (The controls and adjustments onelectrostatic and conventional electrostaticguns are similar except for the necessity of aremote power-pack.)
When using these applicators, a smallamount of MEK, or other polar solvent suchas diacetone alcohol or cyclohexanone, maybe needed to increase covercoat polarity.Slow-evaporating aromatic solvents may alsobe added to primers to improve the spray’swrap quality.
Do not, however, exceed 15% ketone byvolume when diluting a topcoat that will be

10
sprayed over an uncured primer. This elimi-nates the chance of re-solvating the primer.
Because of the high dilution typically usedwith primers and adhesives, both must becontinuously agitated. Also, hose and pipinglengths should be minimized, and precautionsshould be taken against adhesive settling inthe lines during extended shut-downs.
Coverage — Estimating coverage of sprayedadhesives is difficult, as the quantity useddepends largely upon the amount of overspray.In many cases, it may be as much as 50%. Withelectrostatic spraying, however, transferefficiency may be as high as 75%; thus, a muchhigher coverage rate can be expected.
Controlling Atomizing Air Pressure —
Maintaining atomizing air pressure is impor-tant to successful spray application. If thepressure is too high, adhesive droplets maydisperse and dry before reaching the metal,leaving a dry, dusty appearance. Threads ofmaterial will also be seen floating in the spraybooth. You can control the problem byreducing atomization pressure, further dilutionor by using a higher boiling solvent.
Controlling Premature Drying — Spray-coated parts dry much more quickly thandipped parts, as partial drying occurs duringatomization. To properly wet the metal, theadhesive must be fluid when it reaches thesubstrate. If multiple guns are used, ensureeach is applying a wet coat. Do not apply adry coat with the first gun then cover it with awet coat.
Roll Coating — Roll coating may be used tocoat cylindrical or flat objects. Shafts andpipes can be coated by holding them momen-tarily between two rotating felt rolls that havebeen dipped in adhesive. A mohair fabric paintroller can be used to coat large, flat surfaces.However, short nap rollers are preferred.
Reverse Roll Coating — Reverse roll coatingis used to apply Chemlok solvent-basedproducts to coil steel, coil aluminum or coilstainless. If you do not have two coating
units that can run in tandem, the primer
must be covercoated at a later time.
When reverse roll coating, pump theprimer (or adhesive) from a drum into acoating pan. A pick-up roll then transfers theadhesive to an applicator roll that the coilmetal passes over at a line speed of 100 to 150
feet per minute. Adjust the primer or adhesiveflow rate so it overflows the coating pan into aslanted trough, which then returns thematerial to the drum. This system ensuresconstant agitation.
Drying ProcessesAll Chemlok solvent-based adhesives can
be dried at room temperature (30 to 45minutes at 75˚F is sufficient). If faster drying isnecessary, use a circulating air dryer at 150˚Fto 200˚F. Be sure there is adequate aircirculation, though, because the fastest dryingoccurs when the solvent is removed and beginsdiffusing through the surface. Air may berecirculated, provided there is enough bleed-off to prevent excessive solvent build-up.
With closed systems, care must be takento prevent explosive solvent build-ups. For thisreason, conveyorized dryers with open endsand crosswise air circulation are most oftenused. Gas-fired ovens may also be used — ifthey are designed properly. It’s also importantto purge solvent vapors and unburned gasbefore restarting gas ovens.
Other effective dryers include steam coilsand infrared heat lamps. When using heatlamps, however, temperature of the substratesurface must not exceed 250˚F, and should beinterlocked to shut off if the line stops.
Handling Coated PartsAfter drying, unload coated metal parts
directly from the conveyor into tote baskets.They may be handled while warm withoutdanger of scuffing; however, be aware of anysharp points and corners.
Coated areas that will receive high levelsof stress should be protected or retouched ifdamaged. Removing adhesive from these areasmay cause premature bond failure.
Both clean metal parts and coatedmaterials should be kept free of contamination.Because fingerprints can adversely affectadhesion, gloves are highly recommended.Thin, white, cotton gloves are satisfactory, asthey show soil easily, are economical enough tobe discarded when necessary, and are thin andporous enough to be comfortable.

11
Coated Parts Layover StabilityMold as soon as possible, but store all
coated parts properly to ensure maximumlayover. Typically, this entails sealing rubber-treated metals in a plastic bag and storing thepackage in a cardboard box. These precautionsensure parts are not exposed to UV light.
Proper StorageTemperature variations encountered
during shipping and storage typically do notaffect the performance of Chemlok solvent-based primers and adhesives. However,freezing temperatures may increase viscosity,and some products may gel. All productsshould be warmed to room temperaturebefore using. Refer to product literature foradditional information.
Summer storage and shipping tempera-tures, on the other hand, may exceed safelimits for Chemlok products. Shipping andstorage temperatures of 40˚F to 90˚F arerecommended, and temperatures greater than100˚F should be avoided. Also, avoid storingChemlok products near heating units and inupper racks of non-air conditioned ware-houses. Cool and well-ventilated storage areasare ideal and should be used wheneverpossible. Special handling and storageprecautions, when necessary, will be clearlymarked on drums.

Differences Between Solvent-basedand Aqueous Adhesive Systems
Aqueous products are made from a mixtureof high molecular weight polymer emulsions,pigments and curatives in a water-basedmedium; solvent-based adhesives, on the otherhand, consist of pigments and curatives withdissolved polymers in a solvent solution.
Although the chemical make-up of Chemloksolvent-based and aqueous systems is similar,handling requirements differ.
Benefits of Aqueous SystemsThe most obvious benefit of Chemlok
aqueous adhesives is protection of theenvironment. In fact, meeting and complyingwith environmental regulations like the CleanAir Act of 1990 has been a major impetus inthe development of more environmentallysound products. Directly related to environ-mental benefits is increased workplace safety.Because solvents are not present in aqueousadhesives, workers aren’t exposed to fumes.This, in turn, eliminates potential fire hazardsassociated with flammable solvents.
Emulsions
All VOC-compliant
25% to 50% solids by weight
Dilution rarely needed
Diluents: deionized (DI) water, distilled water
Film thickness control by density measure-ment: hydrometer
Less forgiving of part contamination
Solutions/dispersions
Not VOC-compliant
18% to 28% TSC by weight
Dilution required
Diluents: MIBK, MEK, Xylene, Toluene
Film thickness control by viscositymeasurement: Zahn or Ford cup
12
Preparing the AdhesiveLike solvent-based products, most
aqueous primers and covercoats must beagitated before use to ensure consistentperformance. Use slow, controlled stirring byhand, or by motor-driven or air-powered stirpaddles at 30 rpm or less, rather than high-shear agitation; vigorous agitation causesbubbles which interfere with the adhesive’sfilm-forming characteristics. Also avoidcontaminating the adhesive during agitation.
Gallon-size or smaller containers may behand-mixed with a paint stick. Mechanicalagitation may also be used, but solid materialsshould first be loosened from the containerbottom. Chemlok aqueous adhesives
should never be mixed on a paint shaker
— even for a short period.
Mix 5-gallon pails mechanically, usingstainless steel agitator paddles. Drums areequipped with built-in, single-blade agitators,and air motors can easily be attached. Single-station drum agitators are available, as wellas multi-drum configurations. Consult thesuppliers’ list for more information on thesesystems.
Applying the AdhesiveChemlok aqueous primers and adhesives
can be applied by spraying or dipping. In somecases, brushing, roll coating or pad paintingtechniques are used; however, they are notrecommended for several reasons:• Surfactants in aqueous systems produce
foam during brush application.• The low viscosity of the products can cause
adhesive pooling. (In areas where there ispooling, the dried film will be thick and lackchip resistance.)
• Controlling dry film thickness and unifor-mity is difficult.
Whenever possible, aqueous adhesivesshould be sprayed. Film thickness and unifor-mity are more easily controlled and dry filmsare cosmetically superior. Spray applicationalso accelerates drying because the atomizationof aqueous systems increases the surface areawhere evaporation can occur.
Spray Application — When spray-applyingChemlok aqueous primers, one pass is usuallysufficient to achieve appropriate dry filmthickness. This is particularly true when theprimers are finely atomized. In most cases,conventional air guns produce the finestadhesive droplet size.
APPLYING CHEMLOK AQUEOUS ADHESIVES
SOLVENT AQUEOUSTECHNOLOGY DIFFERENCES
Do not freeze
Do not shake
Agitate at 20 to 30 rpm
No grounding straps required
Store at 30°F to 100°F (-1°C to 38°C)
Agitate at 40 to 60 rpm initially
Decrease agitation to 20 to 30 rpm
Ground drum with grounding straps
SOLVENT AQUEOUSADHESIVE HANDLING

13
For automatic systems, consider the partsize and configuration when selecting asystem. Gun position, number of guns, andwhether or not reciprocating guns are installedall affect aqueous primer and covercoatthickness. Choose a system that will provideuniform film thickness and complete coverage.
If you have stainless steel spray guns andpressure pots that were used to apply solvent-based products, you can also use them toapply aqueous systems. However, all solvent-based materials must be removed from theequipment. Lines should be flushed first withsolvent — MEK is recommended — then withwater, until water exiting the system runsclean. Never allow MEK to stand in lines
for more than a few minutes. If you plan touse solvent-based systems with the equipmentagain, reverse the process.
When using chain-on-edge equipment,you may need to make adjustments toaccommodate a preheat cycle before applyingthe primer or one-coat. However, it may bepossible to change the point where parts areloaded rather than adding new equipment tothe line. If you consider such a change, consulta Lord Technical Service Representative foradditional help.
Spray Equipment — A wide variety of sprayguns can be used to apply Chemlok aqueousadhesives. Given the lower dry film thicknessrequirements of the primers (0.2 to 0.4 mils)relative to the covercoats, you may need todilute primers 10% to 30% with deionizedwater, particularly when using HVLP (high-volume, low-pressure) equipment. Covercoatsand one-coats, however, can usually besprayed full strength.
Use gun tips ranging from 0.030 to 0.042inches for primers and 0.042 to 0.055 inchesfor adhesives. When using conventional air-atomized guns, atomization pressures range
from 20 to 50 psi, while pressures for HVLPguns typically range from 2 to 7 pounds. Forboth manual and automatic spray lines, 50mesh in-line fluid filters are recommended.
Spray equipment options include:Electrostatic Spray Units — Most Chemlokaqueous adhesive systems can be sprayed withelectrostatic spray units, and portableelectrostatic air atomizing equipment can beused to apply many Chemlok aqueoussystems. Occasionally, dilution of 10% to 30%is required to atomize materials adequatelyand maintain correct film thickness. Typicalequipment and settings are shown in Figure 2.
Air Turbine Spray Systems — Air turbinespray units are low-pressure systems designedtoreduce overspray. Advantages of turbinesystems include material savings of approxi-mately 30% to 65%, improved film build andfaster drying.
Operating in the 2 to 5 psi range, turbinesdeliver a constant, high volume head of heatedair to the gun. Once atomized, the turbineproduces an invisible cone of warm air thathelps project particles to the metal surface.(Because most of the atomized particles areheld within the cone, an even distribution isproduced within the fan range.) The warm airof the turbine also aids in drying.
The equipment shown in Figure 3 hasbeen tested by Lord Corporation and foundsatisfactory for applying Chemlok aqueousadhesives. Depending upon the product andapplication, dilution may be necessary.
Conventional Air-Atomized Units —
Conventional air-atomized systems typicallyprovide excellent, uniform dry films with allChemlok aqueous systems. (See Figure 4)However, the atomizing pressure (usually 20to 40 pounds) should be monitored closely. Iftoo much pressure is applied, the adhesive will
Equipment
Binks Model 111-391375 KV Power Pack
Binks Model 85 spray gunwith an 0.070" orifice
Binks Model 85-5668pressure pot (10 liter plasticliner)
Conditions
Set at 75 KV and 30microamps
Set at 30 psiatomization pressure
Set at 10 psi fluidpressure
FIGURE 2 ELECTROSTATICSPRAY UNITS
Equipment
Turbo Spray Model 600Turbine (7.5 hp)
#760 automatic spray gun
Fluid tip - 1-1.5 mm
Air Car - #330
Pressure Pot or 1:1 pump
Conditions
Atomization pressure1.5-3 psi at 45°C
Set at 6-10 psi
FIGURE 3 AIR TURBINE SPRAYCONDITIONS
Hand stir
Hand stir andpaint shake
Hand stir andair-driven mixer
Hand crank andair-driven mixer
Quart
1 gallon
5 gallon
55 gallon
Hand stir
Hand stir andair-driven mixer
Hand stir andair-driven mixer
Hand crank andair-driven mixer
10 to 15 min.
20 to 30 min.
45 to 60 min.
8 hours
CONTAINER SOLVENT AQUEOUS MIXING TIME
ADHESIVE PREPARATION
14
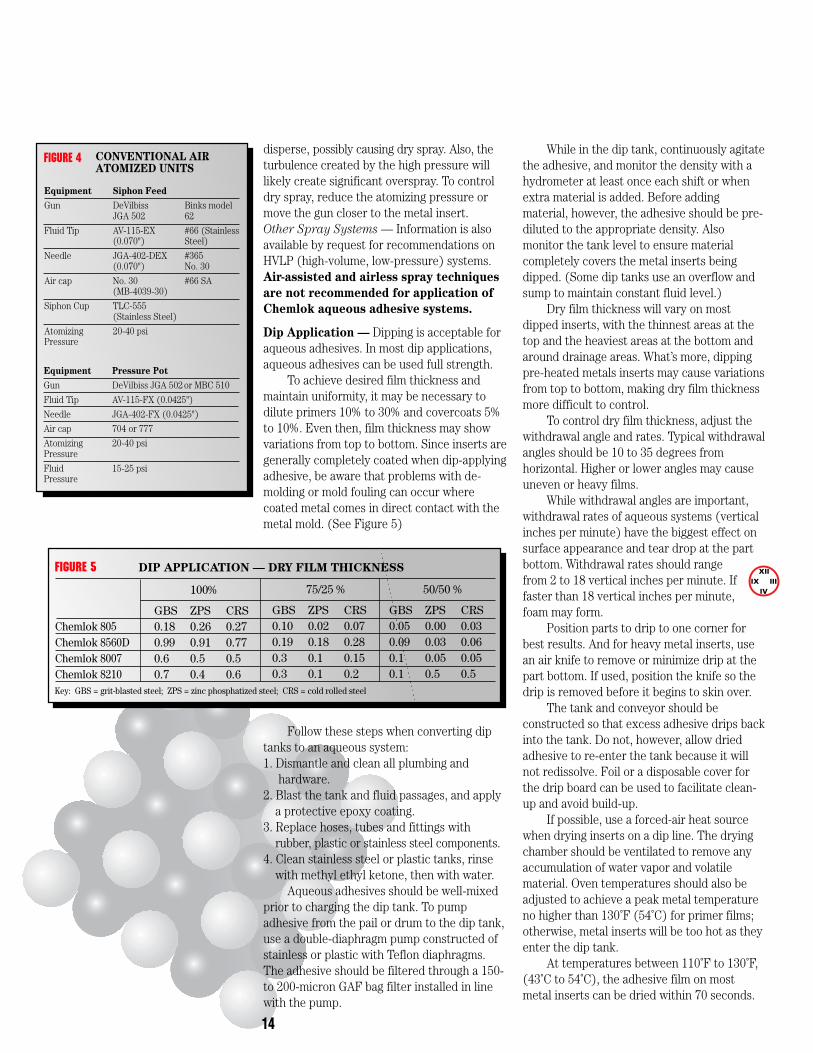
disperse, possibly causing dry spray. Also, theturbulence created by the high pressure willlikely create significant overspray. To controldry spray, reduce the atomizing pressure ormove the gun closer to the metal insert.Other Spray Systems — Information is alsoavailable by request for recommendations onHVLP (high-volume, low-pressure) systems.Air-assisted and airless spray techniques
are not recommended for application of
Chemlok aqueous adhesive systems.
Dip Application — Dipping is acceptable foraqueous adhesives. In most dip applications,aqueous adhesives can be used full strength.
To achieve desired film thickness andmaintain uniformity, it may be necessary todilute primers 10% to 30% and covercoats 5%to 10%. Even then, film thickness may showvariations from top to bottom. Since inserts aregenerally completely coated when dip-applyingadhesive, be aware that problems with de-molding or mold fouling can occur wherecoated metal comes in direct contact with themetal mold. (See Figure 5)
Follow these steps when converting diptanks to an aqueous system:1. Dismantle and clean all plumbing and
hardware.2. Blast the tank and fluid passages, and apply
a protective epoxy coating.3. Replace hoses, tubes and fittings with
rubber, plastic or stainless steel components.4. Clean stainless steel or plastic tanks, rinse
with methyl ethyl ketone, then with water.Aqueous adhesives should be well-mixed
prior to charging the dip tank. To pumpadhesive from the pail or drum to the dip tank,use a double-diaphragm pump constructed ofstainless or plastic with Teflon diaphragms.The adhesive should be filtered through a 150-to 200-micron GAF bag filter installed in linewith the pump.
While in the dip tank, continuously agitatethe adhesive, and monitor the density with ahydrometer at least once each shift or whenextra material is added. Before addingmaterial, however, the adhesive should be pre-diluted to the appropriate density. Alsomonitor the tank level to ensure materialcompletely covers the metal inserts beingdipped. (Some dip tanks use an overflow andsump to maintain constant fluid level.)
Dry film thickness will vary on mostdipped inserts, with the thinnest areas at thetop and the heaviest areas at the bottom andaround drainage areas. What’s more, dippingpre-heated metals inserts may cause variationsfrom top to bottom, making dry film thicknessmore difficult to control.
To control dry film thickness, adjust thewithdrawal angle and rates. Typical withdrawalangles should be 10 to 35 degrees fromhorizontal. Higher or lower angles may causeuneven or heavy films.
While withdrawal angles are important,withdrawal rates of aqueous systems (verticalinches per minute) have the biggest effect onsurface appearance and tear drop at the partbottom. Withdrawal rates should rangefrom 2 to 18 vertical inches per minute. Iffaster than 18 vertical inches per minute,foam may form.
Position parts to drip to one corner forbest results. And for heavy metal inserts, usean air knife to remove or minimize drip at thepart bottom. If used, position the knife so thedrip is removed before it begins to skin over.
The tank and conveyor should beconstructed so that excess adhesive drips backinto the tank. Do not, however, allow driedadhesive to re-enter the tank because it willnot redissolve. Foil or a disposable cover forthe drip board can be used to facilitate clean-up and avoid build-up.
If possible, use a forced-air heat sourcewhen drying inserts on a dip line. The dryingchamber should be ventilated to remove anyaccumulation of water vapor and volatilematerial. Oven temperatures should also beadjusted to achieve a peak metal temperatureno higher than 130˚F (54˚C) for primer films;otherwise, metal inserts will be too hot as theyenter the dip tank.
At temperatures between 110˚F to 130˚F,(43˚C to 54˚C), the adhesive film on mostmetal inserts can be dried within 70 seconds.
FIGURE 4 CONVENTIONAL AIRATOMIZED UNITS
Siphon Feed
DeVilbiss Binks modelJGA 502 62
AV-115-EX #66 (Stainless(0.070") Steel)
JGA-402-DEX #365(0.070") No. 30
No. 30 #66 SA(MB-4039-30)
TLC-555(Stainless Steel)
20-40 psi
Equipment
Gun
Fluid Tip
Needle
Air cap
Siphon Cup
AtomizingPressure
Pressure Pot
DeVilbiss JGA 502 or MBC 510
AV-115-FX (0.0425")
JGA-402-FX (0.0425")
704 or 777
20-40 psi
15-25 psi
Equipment
Gun
Fluid Tip
Needle
Air cap
AtomizingPressure
FluidPressure
XIIIII
IVIX
Chemlok 805Chemlok 8560DChemlok 8007Chemlok 8210
100%
GBS ZPS CRS0.18 0.26 0.270.99 0.91 0.770.6 0.5 0.50.7 0.4 0.6
Key: GBS = grit-blasted steel; ZPS = zinc phosphatized steel; CRS = cold rolled steel
FIGURE 5 DIP APPLICATION — DRY FILM THICKNESS
75/25 %
GBS ZPS CRS0.10 0.02 0.070.19 0.18 0.280.3 0.1 0.150.3 0.1 0.2
50/50 %
GBS ZPS CRS0.05 0.00 0.030.09 0.03 0.060.1 0.05 0.050.1 0.5 0.5

15
(See Figures 6 - 8) Drying temperatures of150˚F to 200˚F (65˚C to 93˚C) are acceptablefor one-coat products. Before removing,inserts should be cooled to at least 110˚F(43˚C) to minimize chips in the film andavoid sticking.
When not in use, the dip tank should becovered to prevent contamination and waterloss. To avoid hard settling, maintain agitationduring down times. Also completely redisperseany settled solids before reuse, and removeany inserts that have fallen into the tank.
Automatic Systems — Monorail systems areoften used for large parts that must undergomore than one process. However, output isrelatively low and the labor per piece is high.Monorail systems also require large capitalinvestments and a significant amount offloor space.
When only adhesive application isnecessary, bar conveyors may be used. Thesesystems are effective for small parts, requiringless floor space and providing more laborefficiency than monorail systems. Automaticunloading is sometimes used.
Brushing — Brush application of Chemlokaqueous adhesives is not recommended. But, ifit is necessary, use either a 100% natural fiberbristle brush or a foam brush. Apply the adhesivein one direction with short brush strokes whilekeeping the wet film uniform and free ofsurface voids. Also, avoid rebrushing the wetfilm and flooding the metal with adhesive.
Brush-apply primers full strength at a wetfilm thickness of less than 1 mil. Aqueouscovercoats should be applied at 2 to 3 mils wetfor proper dry film thickness in a single pass.Even when using aqueous covercoats at fullstrength, achieving an adequate dry filmthickness in a single application may bedifficult without experiencing runs and sags.For best recoating results, allow the first coatto dry thoroughly, then apply a second coat.(Avoid recoating if possible.)
Roll Coating — As with brushing, roll coatingChemlok aqueous adhesives is not recom-mended. However — if necessary — use shortnap rolls and a recommended defoamer; longnap and foam rolls cause surface foaming.
As with brush application, avoid recoatingand work in one direction only. Primers andcovercoats alike should be used full strength.
Defoamer recommendations are availableupon request.
Pad Painting — Due to foam formation,achieving cosmetically acceptable dry film witha foam pad applicator is difficult. If it isnecessary to apply aqueous adhesives with thistype of applicator, work in one direction andavoid recoating the wet film.
Dry film cosmetics for all application
methods described above can be improved
by preheating the metal surface to 140˚F.
Additional cautionary information:
Whatever application method is used,
make sure Chemlok aqueous adhesives do
not come in contact with mild steel sur-
faces, including gate valves on drums,
pressure pots and fluid feed lines. Only
plastic or stainless steel is acceptable.
Dried films should also be removed
regularly from equipment and paint booths.
Like dried films of solvent-based Chemlok
adhesives, the residue from Chemlok
aqueous systems is combustible. Avoid
exposing dried films to sparks,
open flames or excessive heat.
See the guide to safe handling of Chemlok
adhesives.
Accelerating Drying TimeDry time, dry film flexibility and the
dilution/viscosity relationship of aqueousadhesive systems differ from solvent-basedsystems. Because water evaporates moreslowly than solvents, aqueous adhesives mayrequire more drying time. However, adjustmentscan be made to minimize or eliminate thesedifferences.
To reduce drying time, preheat metals(120˚F to 140˚F; 49˚C to 60˚C) with an infraredheat lamp, forced air convection oven orelectric oven before applying the primer.Preheating metal inserts causes aqueousadhesives to dry from the metal surfaceoutward, preventing surface skin-over andwater entrapment.
Often, preheating eliminates the need forfurther oven drying. Larger metal inserts mayretain enough heat to make an additionalpreheat prior to covercoat application unnec-essary. However, metal inserts can be reheatedwith no adverse effect on primer performance.
!

16
FIGURE 8 Dry Times For Chemlok 8210 Dip Applied Applied to pre-heated metal or RT metal then oven dried
130 150 170OVEN TEMPERATURE (˚F)
TIME (seconds)
No Pre-heatMetal Pre-heat
190 210
200
150
100
50
0
Chemlok 8210 dries in 30-40 minutes @ 75˚FAdhesive film thickness = 0.50-0.85Cold-rolled steel, pre-heat temperature - 120˚F
FIGURE 7 Dry Times For Chemlok 8007 Dip Applied Applied to pre-heated metal or RT metal then oven dried
130 150 170OVEN TEMPERATURE (˚F)
TIME (seconds)
No Pre-heatMetal Pre-heat
190 210
200
150
100
50
0
Chemlok 8007 dries in 30-40 minutes @ 75˚FAdhesive film thickness = 0.50-0.85Cold-rolled steel, pre-heat temperature - 120˚F
FIGURE 6 Dry Times For Chemlok 8560D Dip Applied Applied to pre-heated metal or RT metal then oven dried
130 150 170OVEN TEMPERATURE (˚F)
TIME (seconds)
RT PartsPre-heat Parts
190 210
200
150
100
50
0
Chemlok 8560D dries in 30-40 minutes @ 75˚FAdhesive film thickness = 0.60-0.85Cold-rolled steel, pre-heat temperature - 120˚F
DilutionRatio*Full Strength90/1080/2070/3060/4050/50
Hydrometer
1.1501.1361.1201.1001.0861.068
#2 Zahn Cup(seconds)181615141413
#1 Zahn Cup(seconds)403432292827
Brookfield Viscosity(cps)*6035151085
*A #2 spindle @ 30 rpm was used for the full-strength, 90/10 and 80/20 dilutions; all other measurements were recorded using a #1spindle @ 30 rpm
FIGURE 11 Chemlok 8007 Initial Solids Content = 32.9%
MixRatio*Full Strength90/1080/2070/3060/4050/50
SpecificGravity1.1861.1521.1441.1211.1001.081
#2 Zahn Cup(seconds)181514141414
#3 Zahn Cup(seconds)998887
*A #2 spindle @ 30 rpm was used for the full-strength, 90/10 and 80/20 dilutions; all other measurements were obtained using a #1spindle @ 30 rpm
FIGURE 10 Chemlok 8560S Initial Solids Content = 40%
Brookfield Viscosity(cps)*301510644
MixRatio*Full Strength90/1080/2070/3060/4050/50
SpecificGravity1.2861.1941.1721.1421.1201.000
#2 Zahn Cup(seconds)301916151414
#3 Zahn Cup(seconds)13109888
*A #2 spindle @ 30 rpm was used for the full-strength, 90/10 and 80/20 dilutions; all other measurements were obtained using a #1spindle @ 30 rpm
FIGURE 9 Chemlok 8560D Initial Solids Content = 45%
Brookfield Viscosity(cps)*225853516115
DilutionRatio*Full Strength90/1080/2070/3060/4050/50
Hydrometer
1.1101.0961.0801.0661.0561.048
#2 Zahn Cup(seconds)221817151414
#1 Zahn Cup(seconds)544136323029
Brookfield Viscosity(cps)*25015090402015
*A #2 spindle @ 30 rpm was used for the full-strength, 90/10 and 80/20 dilutions; all other measurements were recorded using a #1spindle @ 30 rpm
FIGURE 12 Chemlok 8210 Initial Solids Content = 27.5%
Dilution Ratio*Full Strength90/1080/2070/3060/4050/50
35°F (2°C)
39.8211815.714.514
45°F(7°C)
38.520.717.515.414.514
55°F(13°C)
29.52016.4151413.5
* Dilution Ratio — part adhesive/part deionized water by weight; solids content of full strength adhesive = 45%
FIGURE 13 Chemlok 8560D #2 Zahn Cup Viscosity as a Function of Temperature
65°F(18°C)
27.819.715.514.61413.5
75°F(24°C)
27.319.615.314.513.813.5
100°F(38°C)
26.7191514.513.513.4
125°F (52°C)
Gelled18.8151413.513.4

17
If a metal preheat is impractical, theaqueous adhesive film may be dried eitherunder ambient conditions or by running theinserts through a drying oven (120˚F to 22˚F;49˚C to 104˚C). To accelerate drying time, raisethe oven temperature, increase air flow orincrease oven dwell time. (See Figures 6-8)Of these methods, increasing air flow ismost effective.
MonitoringDespite high non-volatile content (solids),
the viscosity of aqueous adhesive systems istypically low. Consequently, monitoringapplication parameters with conventionalmethods is difficult. For example, dilutionfrom 10% to 100% causes little change in Zahncup viscosity.
Because density is a linear relationshipbetween the non-volatile content and theamount of diluent, product density is the bestway to monitor aqueous adhesive systems andcontrol film thickness. Specific gravity can bemeasured with a hydrometer.(See Figures 9-18)
StorageAqueous adhesive systems should be
stored in dry areas at temperatures between70˚F to 80˚F (21˚C to 27˚C) at all times. Ifstored in subfreezing temperatures (32˚F; 0˚C),water crystals will form, and materials willcoagulate and eventually freeze solid.
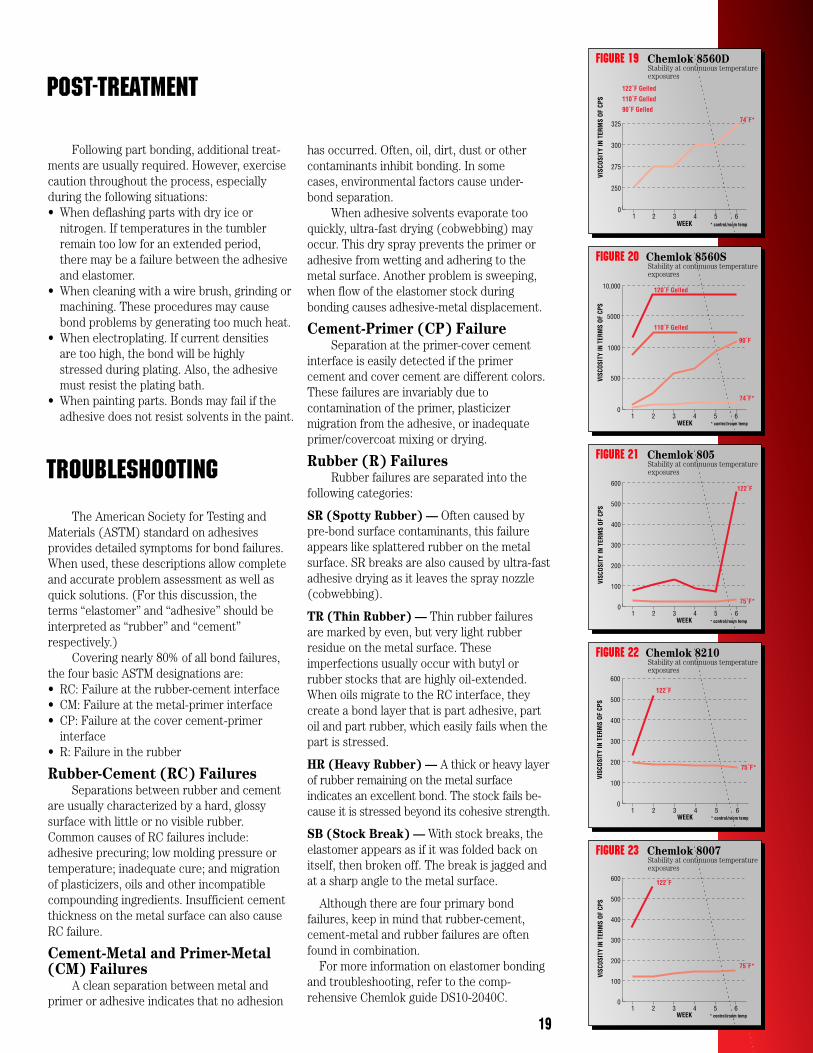
Extended exposure to temperaturesabove 100˚F (38˚C) should also be avoided,as this affects the adhesive’s inherent stability;short-term storage (less than one week) in hightemperatures, however, has little effecton viscosity or adhesive performance.(See Figures 19-23)
Coated Parts Layover StabilityParts coated with Chemlok aqueous
adhesives have shorter layovers than solvent-based systems; therefore, they should bemolded within two to three weeks aftercoating. During layover periods, protectmetal inserts from excessive heat, humidity,dust, contamination and light.
Cover parts for long-term storage• Cardboard Kraft paper
(untreated)• Plastic sheets: Do not seal plastic
bags tightly• Use clean cotton gloves to handle
parts• Keep from sunlight and UV light• Do not store parts near press areas• Avoid silicone mold release agents
COATED PARTS HANDLING
Dilution Ratio*Full Strength90/1080/2070/3060/4050/50
35°F (2°C)
18.215.914.61413.913.6
45°F(7°C)
1815.614.213.613.513.4
55°F(13°C)
17.81513.913.613.313.4
* Dilution Ratio — part adhesive/part deionized water by weight; solids content of full strength adhesive = 40%
FIGURE 14 Chemlok 8560S #2 Zahn Cup Viscosity as a Function of Temperature
65°F(18°C)
171513.913.513.313.3
75°F(24°C)
16.514.813.813.313.313.2
100°F(38°C)
15.814.513.713.313.313.2
125°F (52°C)
1514.213.313.313.313.1
Dilution Ratio*Full Strength90/1080/2070/3060/4050/50
35°F (2°C)
181615141413
45°F(7°C)
181615141413
55°F(13°C)
171615141413
*Dilution Ratio — part adhesive/part deionized water by weight; solids content of full-strength adhesive = 32.88%
FIGURE 15 Chemlok 8007 #2 Zahn Cup Viscosity as a Function of Temperature
65°F(18°C)
171615141413
75°F(24°C)
171615141413
100°F(38°C)
171615141313
125°F (52°C)
171514141312
Dilution Ratio*Full Strength90/1080/2070/3060/4050/50
35°F (2°C)
221817151414
45°F(7°C)
221817151414
55°F(13°C)
221817151414
*Dilution Ratio — part adhesive/part deionized water by weight; solids content of full-strength adhesive = 27.52%
FIGURE 16 Chemlok 8210 #2 Zahn Cup Viscosity as a Function of Temperature
65°F(18°C)
221817151414
75°F(24°C)
221817151414
100°F(38°C)
211816151313
125°F (52°C)
211716141313

18
One of the most important steps in themanufacturing process is molding. During thisphase, the adhesive-coated metals and rubberare placed in the mold cavity, and — underproper conditions of time, temperature andpressure — the bonded assembly is formed.
Controlling each step in the moldingprocess is critical to bond success. Majorvariations in any step will cause bond failures.Minor alterations — though not detrimentalindividually — can collectively result in pooror marginal adhesion and above-averagescrap rates.
For ideal bonding, maintain maximummold pressure with minimum elastomerviscosity. This pressure/viscosity ratio,typically obtained with the specified timeand temperature conditions, ensures peakwetting at the adhesive-elastomer interface.It also optimizes physical properties of theelastomer being cured.
Other considerations include:• Molding pressure. Optimum adhesionrequires adequate pressure and intimatecontact of elastomer and adhesive duringvulcanization and cure. Molds that are tootight or leaky will hinder bond quality.• Temperature. Dramatic temperaturevariations from cavity to cavity may causebond failure, lack of cure, or overcure onsome parts. Mold temperature should be
MOLDING
checked periodically — particularly withinthe individual cavities. Tempilsticks®, orselective melting-point wax pencils, areexcellent for spot-checking mold cavities.Thermocouples can also be used, but theymust be calibrated regularly.
• Mold design. When designing the mold,provisions should be made to facilitatesubstrate loading as well as removal of thevulcanized part. Also avoid mold partinglines in critical bond areas. Also avoidplacing sprue holes near adhesive-coatedmetals. Close proximity during mold fillingcan cause sweeping or wiping of theadhesive from the metal surface.
FIGURE 18 Chemlok 8007 Dry Film Thickness versus Hydrometer Reading
DilutionFull Strength90/1080/2070/3060/4050/50
Specific Gravity1.1501.1281.1141.0981.0881.068
DFT on ZPS (mils)0.310.130.110.090.060.04
DFT on GBS (mils)0.330.200.120.060.040.03
1.055 1.075 1.095 1.115 1.135 1.1550.00
0.05
0.10
0.15
0.20
0.25
0.30
DFT
(mils
)
Hydrometer Reading
0.35
ZPSGBS
FIGURE 17 Chemlok 8210 Dry Film Thickness versus Hydrometer Reading
DilutionFull Strength90/1080/2070/3060/4050/50
Specific Gravity1.1101.0931.0801.0661.0561.048
DFT on ZPS (mils)0.680.490.370.190.150.10
DFT on GBS (mils)0.780.500.400.240.160.10
1.04 1.05 1.06 1.07 1.08 1.09 1.10 1.11 1.120.00
0.10
0.20
0.30
0.40
0.50
0.60
DFT
(mils
)
Hydrometer Reading
0.70
0.80
ZPSGBS
19
Following part bonding, additional treat-ments are usually required. However, exercisecaution throughout the process, especiallyduring the following situations:• When deflashing parts with dry ice or
nitrogen. If temperatures in the tumblerremain too low for an extended period,there may be a failure between the adhesiveand elastomer.
• When cleaning with a wire brush, grinding ormachining. These procedures may causebond problems by generating too much heat.
• When electroplating. If current densitiesare too high, the bond will be highlystressed during plating. Also, the adhesivemust resist the plating bath.
• When painting parts. Bonds may fail if theadhesive does not resist solvents in the paint.
POST-TREATMENT
FIGURE 22 Chemlok 8210 Stability at continuous temperature exposures
0
100
200
300
400
500
600
1 2 3 4 5 6WEEK
122˚F
75˚F*
VISC
OSIT
Y IN
TER
MS
OF C
PS
* control/room temp
FIGURE 23 Chemlok 8007 Stability at continuous temperature exposures
0
100
200
300
400
500
600
1 2 3 4 5 6WEEK
122˚F
75˚F*
VISC
OSIT
Y IN
TER
MS
OF C
PS
* control/room temp
FIGURE 19 Chemlok 8560D Stability at continuous temperature exposures
0
250
275
300
325
1 2 3 4 5 6WEEK
122˚F Gelled
110˚F Gelled
90˚F Gelled74˚F*
VISC
OSI
TY IN
TER
MS
OF
CPS
* control/room temp
FIGURE 21 Chemlok 805 Stability at continuous temperature exposures
0
100
200
300
400
500
600
1 2 3 4 5 6WEEK
122˚F
75˚F*VI
SCOS
ITY
IN T
ERM
S OF
CPS
* control/room temp
FIGURE 20 Chemlok 8560S Stability at continuous temperature exposures
0
500
1000
5000
10,000
1 2 3 4 5 6WEEK
120˚F Gelled
110˚F Gelled
90˚F
74˚F*
VISC
OSIT
Y IN
TER
MS
OF C
PS
* control/room temp
TROUBLESHOOTING
The American Society for Testing andMaterials (ASTM) standard on adhesivesprovides detailed symptoms for bond failures.When used, these descriptions allow completeand accurate problem assessment as well asquick solutions. (For this discussion, theterms “elastomer” and “adhesive” should beinterpreted as “rubber” and “cement”respectively.)
Covering nearly 80% of all bond failures,the four basic ASTM designations are:• RC: Failure at the rubber-cement interface• CM: Failure at the metal-primer interface• CP: Failure at the cover cement-primer
interface• R: Failure in the rubber
Rubber-Cement (RC) FailuresSeparations between rubber and cement
are usually characterized by a hard, glossysurface with little or no visible rubber.Common causes of RC failures include:adhesive precuring; low molding pressure ortemperature; inadequate cure; and migrationof plasticizers, oils and other incompatiblecompounding ingredients. Insufficient cementthickness on the metal surface can also causeRC failure.
Cement-Metal and Primer-Metal(CM) Failures
A clean separation between metal andprimer or adhesive indicates that no adhesion
has occurred. Often, oil, dirt, dust or othercontaminants inhibit bonding. In somecases, environmental factors cause under-bond separation.
When adhesive solvents evaporate tooquickly, ultra-fast drying (cobwebbing) mayoccur. This dry spray prevents the primer oradhesive from wetting and adhering to themetal surface. Another problem is sweeping,when flow of the elastomer stock duringbonding causes adhesive-metal displacement.
Cement-Primer (CP) FailureSeparation at the primer-cover cement
interface is easily detected if the primercement and cover cement are different colors.These failures are invariably due tocontamination of the primer, plasticizermigration from the adhesive, or inadequateprimer/covercoat mixing or drying.
Rubber (R) FailuresRubber failures are separated into the
following categories:
SR (Spotty Rubber) — Often caused bypre-bond surface contaminants, this failureappears like splattered rubber on the metalsurface. SR breaks are also caused by ultra-fastadhesive drying as it leaves the spray nozzle(cobwebbing).
TR (Thin Rubber) — Thin rubber failuresare marked by even, but very light rubberresidue on the metal surface. Theseimperfections usually occur with butyl orrubber stocks that are highly oil-extended.When oils migrate to the RC interface, theycreate a bond layer that is part adhesive, partoil and part rubber, which easily fails when thepart is stressed.
HR (Heavy Rubber) — A thick or heavy layerof rubber remaining on the metal surfaceindicates an excellent bond. The stock fails be-cause it is stressed beyond its cohesive strength.
SB (Stock Break) — With stock breaks, theelastomer appears as if it was folded back onitself, then broken off. The break is jagged andat a sharp angle to the metal surface.
Although there are four primary bondfailures, keep in mind that rubber-cement,cement-metal and rubber failures are oftenfound in combination.
For more information on elastomer bondingand troubleshooting, refer to the comp-rehensive Chemlok guide DS10-2040C.

SAFE HANDLING LORD APPLICATIONSLABORATORY
20
Proper handling of Chemlok adhesives isessential for safe and effective application.Although many of the flammability and healthconcerns can be avoided by using Chemlokaqueous systems, we recommend theseprocedures be followed when using anyChemlok product:• Ventilate application and storage areas.• Avoid use around ignition sources.• Wear protective clothing.• Clean application and processing equipment
regularly.• Dispose of waste according to federal, state
and local regulations.• Read labels, MSDS and product bulletins
before use.
Guidelines for safe handling can be found inthe brochure “Chemlok Adhesives — A Guideto Handling and Application,” (SI 3018).
As an extension of our product develop-ment efforts, Lord Corporation has invested inan aqueous adhesives applications laboratory.By simulating customers’ applications, we canprovide detailed technical support and morethoroughly evaluate optimum applicationcharacteristics of new products. Up to 1,000pieces can be coated on the current equip-ment, which can support the following processes:
Alkaline Cleaning — Small batches (15gallons) of customer inserts can be cleanedwith high-turbulence alkaline detergents.Testing of new cleaning methods and materialsis also possible with this equipment.
Hand Spray — The application lab isequipped with various spray equipment,including conventional guns, HVLP hand sprayguns and an electrostatic hand spray gun.Batch preheating and post-heating are alsoavailable.
Chain-On-Edge — To help customersdetermine production needs, a full-size Binks1.5-pitch chain-on-edge spray line is availablefor coating parts. Parts can be preheated anddried in a 13-foot, gas-fired oven. In a 5-footspray booth, Chemlok aqueous adhesives areapplied by automatic spray guns supplied bypressure pots or fluid pumps with high- andlow-pressure recirculation.
Dip Tank — A dual-conveyorized, 19-gallondip tank with variable withdrawal angles andrates can process parts up to 12 inches longand 8 inches wide. It features stainless steelconstruction with a double-diaphragm pumpoverflow and recirculation.

Coaters of Chemlok®
AdhesivesAllied Coating95 Woodhaven LaneTroy, OH 45373Greg Flanary(937) 335-1170
BT Industries228 Buckeye Blvd.Port Clinton, OH 43452Terry White(419) 734-5520
Hitech Industrial Coatings24660 Industrial HighwayWarren, MI 48089Jerry Rzeppa(810) 759-3559
Heritage Industrial Finishing1874 Englewood AvenueAkron, OH 44321-1095Patty Clark(216) 798-9840
Ken-Koat, Inc.1605 Riverfork Drive EastHuntington, IN 46750Jim Berger(219) 356-4192
Midwest Technical Coatings101 S. Dye Mill RoadTroy, OH 45373Tom Bowers(513) 339-2409
Performance Product Painting, Inc.63 Omni CircleP.O. Box 1165Auburn, ME 04211-1165Paul LaVoie or Dave Sullivan(207) 783-4222
Sun Manufacturing107 Industrial RoadWilliamstown, KY 41097Joe Williams or Dave Mobley(608) 824-5004
Tiodize, Inc.28966 Wall StreetWixom, MI 49086Jeff Hood(810) 348-6050
Universal Coating, Inc.1167 W. Frances RoadMt. Morris, MI 48358Tim Johnson(313) 686-5934
VJS610 North Market StreetP.O. Box 846Troy, OH 45373Earnestine Smith(513) 339-8445
Metal CleaningEquipmentAmerican Metal Wash360 Euclid AvenueCanonsburg, PA 15317(412) 746-4203
Bowden Industries1004 Oster Drive NWHuntsville, AL 35816(800) 553-3637
CAE Ransohoff Company4933 Provident DriveCincinnati, OH 45246(800) 248-9274
DOW Advanced CleaningSystems Company
2020 Dow CenterMidland, MI 48674(800) 436-9227
Finishing Equipment3640 Kennebec DriveSt. Paul, MN 55122(612) 452-1860
Mirachem Corporation1045 South Edward DriveTempe, AZ 85281(800) 847-3527
Novamax Technologies12801 Newburgh RoadLiconia, MI 48150(800) 521-5770
Proceco Inc.14790 St. Augustine RoadJacksonville, FL 32258(904) 886-0200
Syntech Products Corporation520 East Woodruff AvenueToledo, OH 43624(419) 241-1215
The Mart Corporation2450 Adie RoadMaryland Heights, MO 63043(800) 543-6278
Phosphating andPlating ChemicalsMan-Gill Chemical Inc.23000 St. Clair AvenueCleveland, OH 44117(800) 627-6422
Parker-Amchem32100 Stephenson HighwayMadison Heights, MI 48071(800) 222-2600
McGean-Rohco50 Public Square #1250Cleveland, OH 44113(216) 441-4900
Texco Corporation2801 Highland AvenueCincinnati, OH 45212(513) 731-3400
Novamax Technologies12801 Newburgh RoadLivonia, MI 48150(313) 464-4555
Mixers55-Gallon Drum MixersBinks Manufacturing Co.9201 West Belmont AvenueFranklin Park, IL 60131-2887(708) 671-3000Models #31-114 and #31-134
Dedoes Industries91 Roberts RoadOssineke, MI 49766(517) 471-5413
Multi-Head Mixers
5-Gallon Pail MixersBinks Manufacturing Co.9201 West Belmont AvenueFranklin Park, IL 60131-2887(708) 671-3000“Quick-Mixer” Model #149-873
ChemineerP.O. Box 1123Dayton, OH 45401(513) 454-3200Models LTG-2X and LTD-2X
DeVilbiss Ransburg1724 Indian Wood Circle, Suite FMaumee, OH 43537(419) 891-8200Model QS-5003
IndcoP.O. Box 589New Albany IN 47150(800) 942-4383Model 815
DeVilbiss Bansburg1724 Indian Wood Circle, Suite FMaumee, OH 43537(419) 891-8200QMS Series Models
Lightnin221 Rochester StreetAvon, NY 14414(716) 226-6136Series 30 Air Drive Model
“Jiffy” Mixer Blades For
Aqueous Adhesives
IndcoP.O. Box 589New Albany, IN 47150(800) 942-4383
Spray EquipmentAccuSprayP.O. Box 391525Cleveland, OH 44139-1525(216) 439-1200
Binks Manufacturing Co.9201 West Belmont AvenueFranklin Park, IL 60131-2887(708) 671-3000
Devilbiss Ransburg1724 Indian Wood CircleMaumee, OH 43537(419) 891-8200
Graco Inc.4050 Olson Memorial HighwayMinneapolis, MN 55422(612) 623-6000
SERVICE AND EQUIPMENT SUPPLIERS
21

22
Infrared HeatersBlack Body/BBC Industries1524 Fenpark DriveFenton, MO 630264Phone: (314) 343-5600
(800) 654-4205FAX: (314) 343-3952
Fostoria Industries1200 North Main StreetFostoria, OH 44830Phone: (419) 435-9201FAX: (419) 435-0842
Glenro39 McBride AvenuePaterson, NJ 07501Phone: (314) 343-5600
(800) 654-4205FAX: (314) 343-3952
HeatrexMoisertown RoadMeadville, PA 16335Phone: (814) 724-1800
(800) 394-6589FAX: (814) 333-6580
Innovative IndustriesP. O. Drawer 41205Cleveland, OH 44141Phone: (216) 468-2601
(800) 843-7647FAX: (216) 468-2602
OAL Associates16744 West Bernardo DriveSan Diego, CA 92127Phone: (619) 451-1799FAX: (619) 451-2799
Radiation Systems455 West Main StreetWyckoff, NJ 07481Phone: (201) 891-7515FAX: (201) 891-4407
Research Inc.P. O. Drawer 24064Minneaopolis, MN 55424Phone: (612) 829-7481FAX: (612) 941-3628
Spectrum Infrared244 East 131st StreetCleveland, OH 44108Phone: (216) 451-6666FAX: (216) 451-2510
Thermation12207 Nicollet AvenueBurnsville, MN 55337Phone: (800) 959-0645FAX: (651) 905-4966
Web Systems (WSI)1354 Linden DriveBoulder, CO 80304Phone: (303) 440-4868
(800) 786-4860FAX: (303) 442-8078
Induction HeatersAmeritherm39 Main StreetScottsville, NY 14546(716) 889-9000
Radio Frequency Co.152 Dover RoadMillis, MA 12054(617) 762-4900
Ross Production Systems20780 Parker StreetFarmington Hills, MI 48336(810) 476-2882
Vacuum Tube Industries506 N. Warren AvenueBrocton, MA 02405(508) 584-4500
Dry Film Thickness(DFT) Testing Equip-ment ManufacturersManufacturers:Automation USAP.O. Box 563Westminister, MD 21158(800) 678-4370
CMI International2301 Arthur AvenueElk Grove Village, IL 60007
DeFelsko Corporation802 Proctor AvenueOgdensburg, NY 13669
Elcometer Inc.1893 Rochester Industrial DriveRochester Hills, MI 48309(800) 521-0635
DistributorsErichson Instruments, Inc.1340 East Home AvenueAkron, OH 44310(800) 626-7697FAX: (800) 942-9742
Electromatic Equipment Co.602 Oakland AvenueCedarhurst, NY 11516(800) 645-4330
Electro-Physik USA778 West Algonquin RoadArlington Heights, IL 60005(800) 927-8623
Fischer Technology, Inc.750 Marshall Phelps RoadWindsor, CT 06095(800) 243-8417
UPA Technology, Inc.InstrumentsTerminal DrivePlainview, NY 11803(516) 349-8300
Paul N. Gardner Company316 N. E. First StreetPompano Beach, FL 33060(800) 762-2478
Nutro Corporation11515 Alameda DriveStongsville, OH 44136(440) 572-3800Fax: (440) 572-5584
Turbo Spray Midwest50210 Pontiac TrailWixom, MI 48393(810) 624-9909
Nordson Corporation FinishingSystems
555 Jackson StreetAmherst, OH 44001(216) 988-9411
Paasche Airbrush Co.7440 W. Lawrence Ave.,
Dept. 99BHarwood Heights, IL 60656-3497(708) 867-9191
Fluid FiltersBinks Manufacturing Co.9201 West Belmony AvenueFranklin Park, IL 60131-2887(708) 671-30003/8" NPS (f) x 1/4" NPT (m):Part # 103-1245
50 Mesh Filter AssemblyPart #83-2089
Replacement Screens
DeVilbiss Ransburg1724 Indian Wood Circle, Suite FMaumee, OH 43537(419) 891-82003/8" NPS (f) x 3/8" NPT (m):Part #SSM-5807
Gun-Mounted AssemblyPart #SSM-5811
50 Mesh Filter Screens
Graco Inc.4050 Olson Memorial HighwayMinneapolis, MN 55422(612) 623-6000
Water DeionizersCulligan1 Culligan ParkwayNorthbrook, IL 60062(800) 451-2400
Graver Water Division2720 U. S. Highway 22Union, NJ 07083(908) 964-2400
Osomonics5949 Clearwater DriveMinnetonka, MN 55343(800) 848-1750Strippable Spray Booth Coatings
Binks Manufacturing9201 West Belmont AvenueFranklin Park, IL 60131-2887(708) 671-3000#791 Peelable Booth Coating
Chemco Manufacturing3175 MacArthur Blvd.Northbrook, IL 60062(800) 323-0431Booth Coat #27-5860

21

Chemical Products Division Worldwide
Lord Corporation (North America)2000 W. Grandview Blvd.P.O. Box 10038Erie, PA, USA 16514-00381-800-CHEMLOK
Lord Corporation (Europe) Ltd.Stretford Motorway EstateBarton Dock RoadStretford, ManchesterEngland M32 0ZH44 (161) 865-8048
Lord Industrial Ltda.Via Anhanguera, KM.63,5Distrito Industrial13.200 Jundiai, Sao PauloBrazil55 (11) 7392-7755
Lord Far East, Inc. (Japan)2F, Yoyogi Center Building57-1, Yoyogi 1-ChomeShibuya-ku, TokyoJapan 15181 (3) 3378-9011
Cautionary Information:Before using this or any other Lordproduct, refer to the product MaterialSafety Data Sheet (MSDS) and label forsafe use and handling instructions.
WORLD HEADQUARTERS
REGIONAL OPERATIONS CENTERS
INTERNATIONAL OPERATIONS
AGENTS/REPRESENTATIVES
MANUFACTURINGFACILITIES
JOINTVENTURES LICENSEES
ChemicalProducts
A Division of Lord Corporation
Chemlok and Ty-Ply are registered trademarks of Lord Techmark, Inc., a subsidiary of Lord Corporation.
Dowanol is a registered trademark of Dow Chemical and Hypalon is a registered trademark of the E. I. DuPont De Nemours Company.*Tempilstick is a registered trademark of Tempil Co.
© 1999, Lord Corporation 5M-12/99 SI-3018B