a guide to fluorescent spot testing for g6pd deficiency · 3 path • a guide to fluorescent spot...
TRANSCRIPT

A guide to fluorescent spot testing for G6PD deficiency April 2014
Contents
I. Introduction .......................................................................................................................................................................... 3
II. Purpose of this guide ............................................................................................................................................................ 3
III. Overview: FST workflow ....................................................................................................................................................... 3
IV. Blood sampling and storage ................................................................................................................................................. 4
V. Hardware and supplies required for an FST for G6PD ......................................................................................................... 4
VI. Cost of G6PD FST equipment ............................................................................................................................................... 6
VII. Illustrated instructions (Trinity Biotech kit 203-A G-6-PDH Screening Kit) ............................................................................................ 6
VIII. Buffer and reagent storage ................................................................................................................................................... 6
IX. Formulating reagents in your laboratory ............................................................................................................................ 18
X. References ............................................................................................................................................................................. 18
XI. Checklist for G6PD deficiency fluorescent spot testing ..................................................................................................... 19
Acknowledgments and publication information This material is based on research funded by the Bill & Melinda Gates Foundation, grant number OPP1034534; as well as the UK Department
for International Development (DFID), grant number 204139. The findings and conclusions contained within are those of the authors and do
not necessarily reflect positions of the Bill & Melinda Gates Foundation, or DFID.
This guide was written and edited by PATH staff Nicole LaRue, Scott Wittet, and Dr. Sampa Pal. It was reviewed by Dr. Gonzalo Domingo, PATH;
Dr. Ari Winasti Satyagraha, Eijkman Institute, Indonesia; Mrs. Woyneshet Gelaye, Regional Health Research Laboratory Center, Ethiopia; and
Dr. Daniel Bridges, AKROS Research, Zambia. Design and illustrations: Shawn Kavon. Proofreading: Jake Abrahams.
Suggested citation: PATH. A Guide to Fluorescent Spot Testing for G6PD Deficiency. Seattle: PATH; 2014.
Cover photo: PATH/Patrick McKern
PATH • A Guide to Fluorescent Spot Testing for G6PD Deficiency3
I. Introduction
Glucose-6-phosphate dehydrogenase (G6PD) deficiency is a genetic disorder, and is the most common human enzyme deficiency.1 Individuals with severe G6PD deficiency are vulnerable to serious health threats—hemolysis of red blood cells and hemolytic anemia—when exposed to certain anti-malarial drugs (compounds in the 8-aminoquinoline group, such as primaquine) or other substances, including fava beans.
The fluorescent spot test (FST) is widely used for in vitro diagnosis of G6PD deficiency using whole blood or dried blood spots. The test is affordable and produces qualitative, visual results within minutes.
Principle of the testG6PD catalyzes a reaction in the pentose phosphate pathway, a metabolic pathway that supplies reducing energy to cells such as erythrocytes by maintaining the level of the reduced form of the co-enzyme nicotinamide adenine dinucleotide phosphate (NADPH). G6PD is essential for protecting erythrocytes in the presence of oxidizing agents.
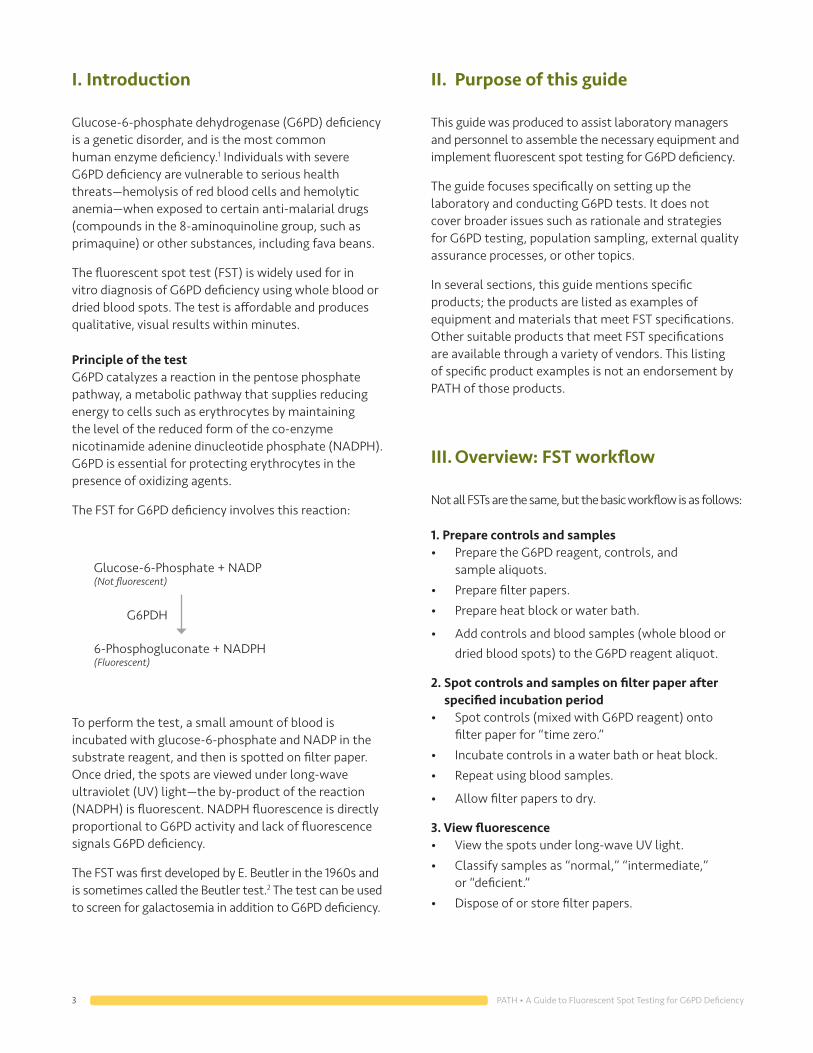
The FST for G6PD deficiency involves this reaction:
II. Purpose of this guide
This guide was produced to assist laboratory managers and personnel to assemble the necessary equipment and implement fluorescent spot testing for G6PD deficiency.
The guide focuses specifically on setting up the laboratory and conducting G6PD tests. It does not cover broader issues such as rationale and strategies for G6PD testing, population sampling, external quality assurance processes, or other topics.
In several sections, this guide mentions specific products; the products are listed as examples of equipment and materials that meet FST specifications. Other suitable products that meet FST specifications are available through a variety of vendors. This listing of specific product examples is not an endorsement by PATH of those products.
III. Overview: FST workflow
Not all FSTs are the same, but the basic workflow is as follows:
1. Prepare controls and samples• Prepare the G6PD reagent, controls, and
sample aliquots.
• Prepare filter papers.
• Prepare heat block or water bath.
• Add controls and blood samples (whole blood or dried blood spots) to the G6PD reagent aliquot.
2. Spot controls and samples on filter paper after specified incubation period• Spot controls (mixed with G6PD reagent) onto
filter paper for “time zero.”
• Incubate controls in a water bath or heat block.
• Repeat using blood samples.
• Allow filter papers to dry.
3. View fluorescence• View the spots under long-wave UV light.
• Classify samples as “normal,” “intermediate,” or “deficient.”
• Dispose of or store filter papers.
To perform the test, a small amount of blood is incubated with glucose-6-phosphate and NADP in the substrate reagent, and then is spotted on filter paper. Once dried, the spots are viewed under long-wave ultraviolet (UV) light—the by-product of the reaction (NADPH) is fluorescent. NADPH fluorescence is directly proportional to G6PD activity and lack of fluorescence signals G6PD deficiency.
The FST was first developed by E. Beutler in the 1960s and is sometimes called the Beutler test.2 The test can be used to screen for galactosemia in addition to G6PD deficiency.
6-Phosphogluconate + NADPH (Fluorescent)
Glucose-6-Phosphate + NADP (Not fluorescent)
G6PDH

PATH • A Guide to Fluorescent Spot Testing for G6PD Deficiency4
IV. Blood sampling and storage
Specimen handling• Before receiving and processing samples, ensure
that they were properly stored after collection and during shipping (if applicable).
◊ Samples must have been refrigerated between 2°C and 8°C.
◊ No clotting observed.
◊ Less than 1 week since draw date.
• Wear gloves and other appropriate personal protective equipment.
Collection• Currently all protocols recommend use of venous
blood.
• There are not sufficient data to recommend the use of capillary blood in fluorescent spot assays.
• Use of ethylenediaminetetraacetic acid (EDTA) or acid-citrate-dextrose (ACD) anticoagulants is acceptable.
Storage• Can be stored refrigerated between 2°C and 8°C for
up to 1 week with no impact on activity output.
V. Hardware and supplies required for an FST for G6PD
Note: Make certain that the test you select will work well in the ambient temperature of your laboratory.
General equipment• Single-use dropper pipet
• 1- to 2-mL disposable snap-top tubes
• 10-uL, 200-uL, and 1,000-uL pipets and tips
• Timer
• Biohazard waste containers for disposal of potential hazardous or infectious waste
• Pen
Personal protective equipment• Gloves when handling all biological and potentially
hazardous specimens
• Coat or gown
• Eye protection (i.e., goggles or glasses)
• General lab safety (i.e., wearing pants and closed-toe shoes)

PATH • A Guide to Fluorescent Spot Testing for G6PD Deficiency5
specialized equipment product examples*
Long-wave UV light 365 nm, ≥6 watts
Do not use a short-wave UV light
• Spectroline® long wave (365nm)/short wave (254nm) UV long life filter; Model ENF-260C (cost: $350).
• Cole-Parmer® rechargeable long wave 365nm UV light; Cat. No. YO-97603-00.
Water bath or heat block set to 37°C
• VWR® microprocessor water bath; Cat. No. 97025-130; Model 5L; Serial No. 2H1221341WR.
• VWR® digital 2 block heater 120V; Cat. No. 12621-088; Model No. 949302; Serial No. 100617007.
Dark box or darkened room to view fluorescence
• Spectroline® fluorescence analysis cabinet; Model CM-10.
Filter paper • Whatman No. 1 filter paper; Cat. No. 1001-150.
Reagents Note: As shown below, it is possible to buy FST reagents and buffers for G6PD deficiency, but some laboratories prefer to prepare their own reagents (as described in section IX).
G6PD substrate • Trinity Biotech G-6-PDH Screening Test Kit – Spot Test; Cat. No. 203-A.
• R&D Diagnostics G-6-PD qualitative kit (UV lamp method); Cat. No. SQMMR500 and SQMMR1250.
• See page 18 below for information on producing G6PD substrate in your laboratory.
Dilution buffer (for rehydration of G6PD substrate)
• Buffer is included in the above kits from Trinity and R&D Diagnostics.
Controls • Trinity Biotech sells each control separately: G-6-PDH control normal—Cat. No. G6888; G-6-PDH control intermediate—Cat. No. G5029; G-6-PDH control deficient—Cat. No. G5888.
• Pointe Scientific sells all three controls as a set—Cat. No. G7583-CTL-SAM.
* These specific products are listed as examples of equipment and materials that meet FST specifications. Other suitable products that meet FST specifications are available through a variety of vendors. This listing of specific product examples is not an endorsement by PATH of those products.
PATH • A Guide to Fluorescent Spot Testing for G6PD Deficiency6
VI. Cost of G6PD FST equipment
Based on prices found in catalogs for 2013, PATH estimates that the overall cost of equipment for an FST-based G6PD testing program in the United States would be approximately:
G6PD-specific supply costs (recurring):
Whatman filter paper $30 (100 sheets)
Test kit with substrates $50–150 (45 to 50 individual tests per kit)
Controls $340 (for approximately 300 control batches)
• After incubating each control and sample for 5 minutes at 37°C.
• After incubating each control and sample for an additional 5 minutes at 37°C (for a total of 10 minutes of incubation).
The spots are then viewed in a dark box under UV light and rated for G6PD deficiency based on the amount of fluorescence observed.
VIII. Buffer and reagent storage for the Trinity 203-A kit
• Before reagents and controls are rehydrated, if refrigerated between 2°C and 8°C, they are good until the expiration date on the kit.
• Trizma buffer (rehydration agent for G6PD reagent) can be stored at room temperature (18°C to 26°C) or refrigerated (2°C to 8°C) until expiration.
• Once reconstituted, G6PD reagent can be kept up to four hours at room temperature (18°C to 26°C) and for up to one week refrigerated (2°C to 8°C) or up to 2 weeks frozen (-20°C).
• G6PD controls, once reconstituted, can be kept up to one week refrigerated (2°C to 8°C) or for up to 2 weeks frozen at -20°C with three freeze-thaw cycles.
Following are the illustrated details for performing the Trinity test:
Equipment costs (non-recurring):
Long-wave UV light $300–350 Water bath or heat block $830–880 Dark box $250_______________________________________
Subtotal $1,380–1,480
PATH estimates that recurring costs range from $5.74 to $13.74 per individual tested.
Additionally, the laboratory will require general equipment as noted on page 4.
VII. Illustrated instructions for the Trinity Biotech kit 203-A G-6-PDH Screening Test Kit
There are a number of FSTs available on the market, and one or more of them may meet the needs of your program. PATH has not evaluated all available tests and cannot recommend one test over another.
As an example of the workflow for performing an FST for G6PD deficiency, a detailed illustrated procedure is shown below for Trinity Biotech Kit 203-A, as performed in the PATH laboratories.
For this test: Each control and each blood sample is spotted on filter paper three times at three different time points:
• Immediately after adding the control or sample to the reagent.

PATH • A Guide to Fluorescent Spot Testing for G6PD Deficiency7
Rehydrate the G6PD reagent
1. Add 2 mL of Trizma buffer (included in the kit) to each vial of lyophilized G6PD reagent (included in the kit) to rehydrate the G6PD substrate.
2. Swirl and invert the mixture and let it sit for 2 minutes until completely resuspended.
3. Label the top of the reagent vial with today’s date. Check the manufacturer’s recommendation for the expiration date or shelf life of the solution. Store the solution as recommended by the manufacturer.
2mlG-6-PDH
STEP 2step 2 of 17
Gather materials and heat the water bath or heat block
1. Open the Trinity kit (Cat. No. 203-A) and remove the Trizma buffer bottle and the vials of lyophilized reagent.
2. Each rehydrated reagent vial has enough volume for nine tests. Only rehydrate the number of vials necessary for the number of tests being performed.
3. Each kit contains enough supplies for 45 to 50 tests if all the reagents are used before they expire.
4. Test only blood samples that have been stored in a refrigerator for less than one week.
5. Heat the water bath or heat block to 37°C in preparation for incubation later.
2mlG-6-PDH12mlTRIZMA
CONTROL N
G-6-PDH Co
STEP 1step 1 of 17
PipetFilter paperNo. 1-150mm
Lyophilized G6PD controls
(3 types: N, I, D)
Blood sample
Dropper1.5mLEppendorf
tube
Lyophilized G6PD
reagent
Trizmabuffer
2mL trizma buffer

PATH • A Guide to Fluorescent Spot Testing for G6PD Deficiency8
1. Make aliquots by pipetting 200 uL of the suspended G6PD reagent (from step 2) into 1.5-mL Eppendorf® tubes.
2. Make one aliquot for each sample and each control. You will need three control aliquots and one aliquot for each blood sample.
3. Label the control aliquots:
STEP 4
403DIN
STEP 4step 4 of 17
Rehydrate the lyophilized controls
CONTROL D
G-6-PDH CoCONTROL I
G-6-PDH CoCONTROL N
G-6-PDH Co
STEP 3step 3 of 17
1. To rehydrate the controls, add the specified amount of deionized water to the lyophilized powder. Allow the solution to sit until all the powder has been dissolved into solution.
2. Label each vial of control solution with today’s date. Check the manufacturer’s recommendation for the expiration date or shelf life of the solution. Store the solution as recommended by the manufacturer.
Note: lyophilized control samples of G6PD-normal, -intermediate, and -deficient blood are not included in the kit and must be ordered separately.
4. Label the blood sample aliquots with your sample numbers. The image shows an aliquot labeled for blood sample number “403.”
5. You may find it efficient to make all needed aliquots at once. The aliquots can be kept at room temperature for up to four hours at 18°C to 26°C. After four hours, they should be discarded.
Prepare control and blood sample aliquots
N for the G6PD “normal” controlI for the G6PD “intermediate” controlD for the G6PD “deficient” control
500µl deionized H20
G6PDH substrate
200µl suspended reagent

PATH • A Guide to Fluorescent Spot Testing for G6PD Deficiency9
Prepare filter papers
1. Take out Whatman® No. 1 filter papers. 150-mm filter paper works well, but other sizes can be used.
2. One of the papers will be used for the three controls, the other for blood samples and a normal control (so that you can easily compare the control with the samples on the same piece of filter paper).
3. The number of spots that can fit on each filter paper is defined by desired spacing between spots and size of filter paper. One 150-mm filter paper can typically hold up to five samples (15 spots) comfortably.
Tim
e Zero
5 min 10 min
STEP 5step 5 of 17
4. Divide each filter paper into three columns and add headings—time zero, 5 minutes, and 10 minutes—above each column as shown in the illustration.
Note: An alternate approach—if you have larger filter papers—is to run all three controls (normal, intermediate, and deficient) on each filter paper along with the blood samples. This provides a more robust internal control for all samples run. In that case, you will not need a separate filter paper for the three controls. Tim
e Zero
5 min 10 min
for controls
for blood samples and normal control

PATH • A Guide to Fluorescent Spot Testing for G6PD Deficiency10
Spot “time zero” normal control onto all filter papers and label
1. Using a disposable plastic drop pipet, take up a small amount of the solution and drop a single drop onto the filter paper being used for the controls, in the “time zero” column. The spot should be approximately one-half inch in diameter.
2. Label this drop “N.”
3. Follow this procedure for the filter papers you will use for your blood samples. Only the normal control will be spotted alongside the blood samples. One aliquot of normal control should provide enough liquid to spot a total of four filter papers (twelve “N” spots).
N
0
10 min
5 min
STEP 7step 7 of 17
Add the normal control to the normal aliquot
1. Beginning with your “normal” control, use a pipette to add 10 uL of the control to the aliquot labeled “N.” Vortex briefly or “flick mix” the aliquot to ensure that it is well mixed.
NSTEP 4
STEP 6step 6 of 17
Note: Do not mix the other controls or your blood samples with reagent yet.
10µl control N
Note: The reaction between the control or blood sample and the reagent happens very rapidly. Therefore, to obtain an accurate “time zero” spot, it is important to spot mixed controls or blood samples as soon as possible after mixing.
Mix one control with reagent first (step 6), then spot it for “time zero” (step 7). Mix and spot the remaining controls (step 8). Begin incubating the control batch (step 9).
After you have finished incubating and spotting the control samples for “time zero,” “5 minutes,” and “10 minutes,” you can mix, spot, and incubate your first batch of blood samples.

PATH • A Guide to Fluorescent Spot Testing for G6PD Deficiency11
Incubate all three controls in a water bath or heath block for 5 minutes
1. Once all three “time zero” controls have been spotted on filter paper, place the control batch of aliquots in a water bath or heat block already heated to 37°C (as instructed in step 1).
2. Set a timer for 5 minutes.
N ID
0
10 min
5 min
STEP 9step 9 of 17
Add controls to the intermediate and deficient aliquots and spot them
1. Once you have spotted your “normal” control, use a pipette to add 10 uL of the control to the aliquot labeled “I.” Vortex briefly or “flick mix” the aliquot to ensure that it is well mixed.
2. Using a disposable plastic drop pipet, take up a small amount of the solution and drop a single drop onto the filter paper being used for the controls, in the “time zero” column.
3. Follow the same process with the “D” control and aliquot.
STEP 4
I D
0
10 min
5 min
STEP 8step 8 of 17
Note: Do not spot the “I” and “D” controls on the filter papers that will be used for blood samples (only the “N” control is spotted on those filter papers). Do not mix your blood samples with reagent yet.
I D
10µl control I10µl control D

PATH • A Guide to Fluorescent Spot Testing for G6PD Deficiency12
Incubate controls for 5 more minutes
1. Incubate the control aliquots again for an additional 5 minutes (for a total of 10 minutes of incubation).
N ID
0
10 min
5 min
STEP 11step 11 of 17
Spot “5 minute” controls onto filter paper and label
1. After incubating the three controls for 5 minutes, remove the control aliquots from incubation.
2. Using a disposable plastic drop pipet for each control, place a single drop onto the filter paper being used for the controls, in the “5 minutes” column.
3. Be sure to place the 5 minutes “N” control next to the time-zero “N” control for easy comparison.
4. Do the same for the “I” and “D” controls on the “control filter paper.”
5. Not shown in the illustration: Spot the 5 minutes “N” control next to the time-zero “N” control on the “sample filter papers” as well. Do not spot the “I” and “D” controls on those papers.
STEP 10step 10 of 17
0
10 min
5 min
DIN

PATH • A Guide to Fluorescent Spot Testing for G6PD Deficiency13
Repeat steps 6 through 12 with the first batch of blood samples
1. Once you have finished mixing, incubating, and spotting the controls, you can begin processing your blood samples, using the same process.
2. Gather the “sample” filter papers you have already spotted with the time zero, 5 minutes, and 10 minutes “N” controls.
STEP 13step 13 of 17
Spot “10 minute” controls onto filter paper, label, and dispose of aliquots
1. After incubating for five more minutes (for a total of 10 minutes), remove the control batch from the water bath or heat block. Using a separate, disposable plastic drop pipet for each control, place a single drop onto the filter paper being used for the controls, in the “10 minutes” column.
2. Be sure to place the “N” control next to the time-zero and 5 minutes “N” controls.
3. Do the same for the “I” and “D” controls on the “control” filter paper.
4. Not shown in the illustration: Spot the 5 minutes “N” control next to the time-zero “N” control on the “sample filter papers” as well. Do not spot the “I” and “D” controls on those papers. Dispose of the aliquots containing solution into a biohazard waste container.
STEP 12step 12 of 17
0
10 min
5 min
DIN
continued on the next page

PATH • A Guide to Fluorescent Spot Testing for G6PD Deficiency14
Add first blood sample to aliquot and spot “time zero.”
3. Add 10 uL of a whole blood sample in EDTA (or ACD or heparin) to the aliquot tube labeled with the sample number (in the image we are using “sample number 403” as an example). Mix.
Note: Only mix enough blood samples to fit on a single piece of filter paper—typically up to four samples (plus the “N” control) on 150-mm diameter paper.
4. Immediately after mixing the first blood sample, and using a separate, disposable plastic drop pipet, take up a small amount of the solution and drop a single drop onto the filter paper in the “time zero” column under the time zero “N” control.
Repeat for up to three more blood samples (not shown in the image).
Incubate samples for five minutes
5. Once the “time zero” blood samples have been spotted on filter paper, place the batch of blood sample aliquots in a water bath or heat block already heated to 37°C (as instructed in step 1).
6. Set a timer for 5 minutes.
STEP 4
0
10 min
5 min
403403
403
0
10 min
5 min
step 13 continued
10µl blood sample
continued on the next page

PATH • A Guide to Fluorescent Spot Testing for G6PD Deficiency15
Spot “5 minute” blood samples onto filter paper and label.
7. After incubating the blood samples for 5 minutes (for a total of 10 minutes), remove the blood sample aliquots from incubation.
8. Using a disposable plastic drop pipet for each blood sample, place a single drop onto the filter paper being used for the blood samples, in the “5 minutes” column under the 5 minutes “N” control.
9. Be sure to place the first “5 minute” blood sample spot next to the “time zero” blood sample spot for easy comparison.
10. Repeat this process for the remaining blood samples.
Incubate blood samples for five more minutes.
11. Once the “5 minute” blood samples have been spotted on filter paper, place the batch of blood sample aliquots in a water bath or heat block already heated to 37°C (as instructed in step 1).
12. Set a timer for 5 minutes.
Spot “10 minute” blood samples onto filter paper, label, and dispose of aliquots.
13. After incubating the blood samples for 10 minutes, remove the blood sample aliquots from incubation.
14. Using a disposable plastic drop pipet for each control, place a single drop onto the filter paper being used for the controls, in the “10 minutes” column under the 10 minutes “N” control.
15. Be sure to place the first “10 minutes” blood sample spot next to the “time zero” and “5 minute” blood sample spot for easy comparison.
16. Dispose of the aliquots containing solution into a biohazard waste container.
4030
10 min
5 min
403
403
step 13 continued

PATH • A Guide to Fluorescent Spot Testing for G6PD Deficiency16
View spots under UV light
1. View the filter papers under a long-wave UV light (365 nm) after spots have dried completely. Use a viewing box with UV tempered glass to protect your eyes. View in a dark room so that you can see the fluorescence.
STEP 15step 15 of 17
Dry filter papers
1. Allow each filter paper to dry at room temperature for 15 to 20 minutes.
STEP 14step 14 of 17
Tim
e Zero
5 min 10 min
403 403 403
N N N
Tim
e Zero
5 min 10 min
N
I
D
N
I
D
N
I
D
0
10 min
5 min
15-20 mindry time
30 min

PATH • A Guide to Fluorescent Spot Testing for G6PD Deficiency17
Dispose of or store filter papers
1. Filter paper can be disposed of after use in a biohazard waste container or stored at 2°C to 8°C in a sealed plastic bag with desiccant for up to 2 weeks.
2. If you intend to keep the filter papers, retain both the sample papers and control papers (for reference).
STEP 17step 17 of 17
Classify samples as “N,” “I,” or “D”
1. Classify each sample based on level of fluorescence:
STEP 16step 16 of 17
Tim
e Zero
5 min 10 min
N
I
D
N
I
D
N
I
D
Tim
e Zero
5 min 10 min
403 403 403
N N N
Normal (N) G6PD activity: moderate to strong fluorescence after 5 minutes, strong fluorescence after 10 minutes.
Intermediate (I) G6PD activity: weak fluorescence after 5 minutes, moderate fluorescence after 10 minutes.
Deficient (D) G6PD activity: weak or no fluorescence after both 5 and 10 minutes.
2. The bottom image shows the results for normal controls and a deficient blood sample.
3. Record the test results.
4. You may find it useful to take photos of the fluorescing filter paper in the dark box and save the photos with your records for future reference.
Normal G6PDenzyme activity
Intermediate G6PDenzyme activity
Deficient G6PDenzyme activity
Normal controls
Deficient blood sample results

PATH • A Guide to Fluorescent Spot Testing for G6PD Deficiency18
IX. Formulating reagents in your laboratory
It may be simplest to buy reagents on the market, but if you would like to create your own reagents, here are two formulas for doing so:
1. Modified Beutler formula2:
• Glucose-6-phosphate 0.1 mL of 0.01 M
• TPN (triphosphopyridine nucleotide) 0 .1 mL of 0.0075 M
• Saponin 0.2 mL of 1%
• Tris-HCL buffer, pH 7.8 0.3 mL of 0.75 M
• GSSG (oxidized glutathione) 0.1 mL of 0.008 M
• Distilled water 0.2 mL
2. Formula used by Jiang et al.3:
• Glucose-6-phosphate 1 mL of 0.01 M
• Coenzyme II 1 mL of 0.0075 M
• Glutathione, oxidized 1 mL of 0.008 M
• Digitalis 2 mL of 0.027 M
• Tris-HCL buffer, pH 7.8 3 mL of 0.75 M
• Distilled water 3 mL
X. References
1. Beutler E. Review article: G6PD Deficiency. Blood. 1994;84(11)3613–3636. http://bloodjournal.hematologylibrary.org/content/84/11/3613.long
2. Beutler E, Mitchel lM. Brief report: special modifications of the fluorescent screening method for glucose-6-phosphate dehydrogenase deficiency. Blood. 1968;32:816–818.
3. Jiang J. et al. Using the fluorescence spot test for neonatal screening of G6PD deficiency. Southeast Asian Journal of Tropical Medicine and Public Health. 2003;34 Suppl 3:140–142. Available at: http://www.tm.mahidol.ac.th/seameo/2003-34-suppl-3/southeast-2003-vol-34-supp-3-p-140.pdf.

PATH • A Guide to Fluorescent Spot Testing for G6PD Deficiency19
� Promptly transfer drop of solution to filter paper next to original spot (or time zero).
� Add 5 minutes “N” control alongside.
� Identify spot with controls or sample number and time: 5 minutes.
� Place tube in 37°C water bath for 5 minutes.
� After 5 minutes of incubation, remove tube from water bath.
� Promptly transfer drop of solution to filter paper next to other two spots.
� Identify spot with controls or sample number and time: 10 minutes. Add 10 minutes “N” control alongside.
� Allow each filter paper to dry at room temperature for 15 to 20 minutes.
� View the filter papers under a long-wave UV light (365 nm) in a dark room. (Compare filter paper with controls to that of samples to determine fluorescence levels.)
� Compare G6PD activity by visually comparing fluorescence levels with the expected visual fluorescence levels provided by Trinity Biotech.
� Record fluorescent intensity (absent, weak, moderate, or strong) of each sample at each time point and classify as deficient, intermediate, or normal.
� Store filter paper at 2°C to 8°C in a sealed plastic bag with desiccant for up to 2 weeks or Dispose of filter papers in a biohazard waste container.
XI. Checklist for G6PD deficiency fluorescent spot testing
� Prepare the reagents: Add 2 mL of Trizma buffer from the kit to each vial of lyophilized G6PD reagent (included in the kit) to rehydrate the G6PD substrate. Swirl and invert the mixture and let it sit for 2 minutes until completely resuspended.
� Heat the water bath or heat block to 37°C in preparation for incubation later.
� Prepare the controls: Add 0.5 mL water to vial of G-6-PDH control lyophilized powder. Swirl intermittently and allow the solution to sit for 5 to 10 minutes until all the powder has been dissolved into solution.
� Whole blood specimens are run using the same procedure as controls.
� Procedure: Add 200µl of G6PD substrate solution in 1- to 2-mL disposable snap-top tubes.
� Add 10 µL of controls or whole blood (with anticoagulant) to tube containing 200 µl of G6PD substrate solution and mix.
� Promptly transfer drop of solution to filter paper with a single-use dropper pipet.
� Identify spot with controls or sample number and time zero. Add 0 minutes “N” control alongside. (Note: For each sample paper a normal control will be spotted alongside blood samples. Spots should be approximately 0.5 inch in diameter.)
� Place tube in 37°C water bath for 5 minutes.
� After 5 minute incubation remove tube from water bath.