a fine balance building a hanging sculpture - engineer … · a fine balance . building a hanging...
TRANSCRIPT

A fine balance Building a hanging sculpture
Mechanical engineering Balance and forces
Unit for pupils from 9-12 years
1 This document is produced under the EC contract № 288989
This work is licensed under a Creative Commons Attribution-NonCommercial 4.0 International License
Introduction This is one of ten ENGINEER primary school units developed to support science learning within the context of a wide range of engineering design challenges. Based on the successful Boston Museum of Science Engineering is Elementary model of inquiry-based learning, each unit features a different science area and engineering field and requires only inexpensive materials in order to support pupil-led science exploration and problem-solving design. The units have been developed to appeal to a wide range of pupils and to challenge stereotypes of engineering and engineers and so enhance both boys’ and girls’ participation in science, technology and engineering. Our pedagogic approach Central to each unit is the engineering design cycle: ask, imagine, plan, create, improve. Emphasizing the cycle helps teachers to foster pupils’ questioning and creativity, and gives space for pupils to develop their problem-solving skills including testing alternative options, interpreting results and evaluating their solutions. Tasks and challenges have been designed to be as open-ended as possible, and to avoid ‘right answers’; in particular, the unit developers have aimed to avoid competition which may alienate some pupils, while retaining the motivation of wanting to solve a problem. An important goal of all of the units is to maximise opportunities for group work and to support pupils in learning to work together and communicate their ideas effectively. Students need to discuss their ideas as they explore a new problem, work out what they need to know and share their findings, design solutions, and then improvements. How the units are organised Each unit begins with Lesson 0, a general preparatory lesson which is common to all ten units. Teachers choosing to use more than one unit will want to start with this lesson the first time they use the units and begin at Lesson 1 in subsequent units. Lesson 1 introduces a story context or problem which drives what happens next: Lesson 2 focuses on what exploring the science that the pupils need to solve the problem, while in Lesson 3 they design and build their design solution. Finally, Lesson 4 is an opportunity to evaluate, present, and discuss what they have done. Each unit is, however, unique, and some units are more demanding in terms of science understanding and the length of time required for the unit varies. Likely timings and age targets are indicated in each unit overview. Units have been designed to be flexible, however – teachers can choose which activities they want to include, and there are options for differentiating activities to cater for a range of abilities. Teacher support Each unit guide has been written to provide appropriate science, technical and pedagogic support for teachers with a wide range of experience and expertise. Each lesson includes suggestions and tips for supporting inquiry-based learning, classroom organisation and preparation. Science and making activities are illustrated with photographs. Science pedagogy notes in the Appendix explain and discuss the science involved in the unit and how to support understanding of the central concepts for pupils in the age range. Worksheets which can be copied and answer keys are also provided.
2 This document is produced under the EC contract № 288989
This work is licensed under a Creative Commons Attribution-NonCommercial 4.0 International License
Index Introduction .................................................................................................................................................... 2 Overview of the unit ....................................................................................................................................... 5 Resources ........................................................................................................................................................ 6 Lesson 0 – Engineering an envelope ............................................................................................................... 9
0.1 Introduction - 10 minutes - small group and whole class discussion ..................................................... 10 0.2 Activity 1 What is an envelope? - 5 minutes, small groups ................................................................... 10 0.3 Activity 2 Matching envelopes to objects - 15 minutes - small groups and whole class discussion ....... 11 0.4 Extension work - optional - 10-30 minutes - small groups..................................................................... 11 0.5 Conclusion – 10 minutes - whole class discussion .................................................................................. 12 0.6 Learning outcomes - for optional assessment ....................................................................................... 13
Lesson 1 – What is the engineering problem? .............................................................................................. 14 1.1 Introductory activity – orientation in circle time - 15 minutes ............................................................... 15 1.2 Collecting questions – working in small groups - 10 minutes ................................................................. 15 1.3 Building a test sculpture – working in small groups – 45 minutes .......................................................... 16 1.4 Conclusion – 20 minutes ........................................................................................................................ 17
Lesson 2 – What do we need to know? ......................................................................................................... 18 2.1 Introductory activity – circle time - 10 minutes ...................................................................................... 19 2.2 Experiments – working in pairs - 45 minutes (65 minutes with the additional seesaw
experiment)............................................................................................................................................. 19 2.3 Guided discussion and lesson conclusion- 45 minutes ........................................................................... 22
Lesson 3 – Let’s build! ................................................................................................................................... 24 3.1 Introductory activity – sitting in a circle - 15 minutes ............................................................................ 25 3.2 Building a balanced hanging sculpture – Working in pairs – 60 minutes ............................................... 25 3.3 Conclusion – 30 minutes ........................................................................................................................ 26
Lesson 4 – How did we do? ........................................................................................................................... 27 4.1 Introductory activity – 10 minutes.......................................................................................................... 28 4.2 Revision of the hanging sculptures – working in pairs – 45 minutes ...................................................... 28 4.3 Writing a construction manual - working alone – 30 minutes ................................................................ 28 4.4 Final concluding - plenary – 15 minutes ................................................................................................. 29
Appendices .................................................................................................................................................... 30 Appendix 1 Engineering design cycle ............................................................................................................................. 30 Appendix 2 The story as a stimulus ............................................................................................................................... 31 Appendix 3 Background on mobiles ............................................................................................................................... 32 Worksheets and answer sheets ..................................................................................................................................... 34
Worksheet 0 Lesson 0 – Engineering?............................................................................................................. 35 Worksheet 0 Lesson 0 - Engineering? – Teacher notes .................................................................................... 36 Worksheet 1 – Lesson 1 – Picture of a hanging sculpture 1 ............................................................................ 37 Worksheet 2 – Lesson 1 – Picture of a hanging sculpture 2 ............................................................................ 38 Worksheet 3 - Lesson 1 – Picture of a hanging sculpture 3 ............................................................................ 39 Worksheet 4 - Lesson 2 - Seesaw made out of a ruler ..................................................................................... 40 Worksheet 5 - Lesson 2 - Coat hanger ............................................................................................................. 41 Worksheet 6 - Lesson 2- Broom ....................................................................................................................... 42 Worksheet 7 - Lesson 2- Playground seesaw ................................................................................................... 43 Worksheet 8 - Lesson 2 – Documentation sheet ............................................................................................. 44 Worksheet 9 – Lesson 2 – Documentation sheet Broom ................................................................................. 45 Worksheet 10 – Lesson 2 – Documentation sheet Coat hanger ...................................................................... 46 Worksheet 11 – Lesson 2 – Documentation sheet Playground seesaw ........................................................... 47 Worksheet 12 - Lesson 2 – Drawing of a building crane .................................................................................. 48
3 This document is produced under the EC contract № 288989
This work is licensed under a Creative Commons Attribution-NonCommercial 4.0 International License

Worksheet 13 - Lesson 2- The building crane .................................................................................................. 49 Worksheet 14 - Lesson 2 – Answer sheet – The building crane ....................................................................... 50 Worksheet 15 - Lesson 3 – differentiation card 1 ........................................................................................... 51 Worksheet 16 - Lesson 3 – differentiation card 2 ............................................................................................ 52 Worksheet 17 - Lesson 3 – differentiation card 3 ............................................................................................ 53 Worksheet 18 - Lesson 3 – differentiation card 4 ............................................................................................ 54 Worksheet 19 - Lesson 3 - differentiation card 5 ............................................................................................. 55 Worksheet 20 - Lesson 3 – differentiation card 6 ............................................................................................ 56 Worksheet 21 - Lesson 3 – differentiation card 7 ............................................................................................ 57 Worksheet 22 - Lesson 3 – differentiation card 8 ............................................................................................ 58
Science notes for teachers about balance and forces, and mechanical engineering ...................................................... 59 Some key science concepts involved in Lesson 2 ........................................................................................................... 59 Pupils ideas about the science of balance and forces ..................................................................................................... 62 A glossary of terms used in this unit .............................................................................................................................. 64 Partners ........................................................................................................................................................................ 65
4 This document is produced under the EC contract № 288989
This work is licensed under a Creative Commons Attribution-NonCommercial 4.0 International License

Overview of the unit Duration: 3 hours 20 minutes (plus an optional additional 20 minutes) Target group: 9 to 12 year old pupils Description: In this unit, the pupils are engaged in the fields of mechanical engineering as well as technology and professional work. They are introduced to the phenomena of equilibrium and force. An introductory story, in which an artist asks an engineer to help him in the construction of a hanging structure for a school assembly hall, introduces the pupils to the engineering challenge. The problem- and action-based challenge encourages the pupils towards independent work and an open and constructive approach. The pupils increase their skills regarding planning and construction of hanging sculptures, involving the physical phenomena of force and equilibrium. In addition, they are introduced to interdisciplinary co-operation between engineers and other professionals, in this case from a creative field.
Science curriculum: this unit relates to the science curriculum on balance and forces. It focuses on the subject fields of tools and materials, as well as buildings and technical construction. Engineering field: this unit introduces the field of mechanical engineering. Objectives: in this unit the pupils will learn: • to use the engineering design process to increase their competence in planning and constructing a design
project; • to develop an open, collaborative, constructive and questioning approach to problems and challenges; • the significance of the scientific phenomena of balance, force, gravity and counterforce in structural
design.
The lessons in this unit: A preparatory lesson aims to raise awareness of how engineering contributes to our daily lives in ways that are not always obvious. Lesson 1 introduces the engineering problem and its context, as well as the engineering design process. The pupils investigate the properties of a hanging sculpture and are confronted with the challenge of how to construct a balanced hanging sculpture with multiple tiers. They make predictions about hanging sculptures and build test sculptures in small groups. In lesson 2 the ‘ask’ element of the engineering process leads to an investigation of the physical phenomena of forces and balance. At various experimental stations the pupils study the properties of forces, balance, centre of gravity and counterforces. In order to deepen and consolidate this knowledge, these terms are applied to the function of a crane. In lesson 3, the engineering design process is applied to the challenge of this unit. The pupils' task is to build a balanced hanging sculpture. In groups of two they plan and build a hanging sculpture according to an idea of their choice. In this process the pupils are required to gather and collect all the objects they need. The main focus of lesson 4 is to reflect on the development and construction of the balanced hanging sculptures. At this time the pupils can show whether they fulfilled all given requirements when building their sculptures. They can also make improvements and share these, as well as discuss problems that occurred whilst building the hanging sculptures. The whole group can then suggest improvements. Finally, the completed hanging sculptures are put on display and the pupils record the individual steps of the construction process in their notes.
5 This document is produced under the EC contract № 288989
This work is licensed under a Creative Commons Attribution-NonCommercial 4.0 International License

Resources List of materials and quantities for 30 pupils.
Material Amount Lesson 1 Lesson 2 Lesson 3 Lesson 4 Documentation booklets (DIN A4) – loose leaf binder or blank exercise booklet
30 (the same booklets in every lesson)
30 30 30 30
Index cards (DIN A5 or 9,5x20,5 cm) ca. 60 ca. 60 Pencils 30 30 30 30 30 Non-round pencils 5 - 15 5 - 15 Ruler (length about 20 - 30 cm) 5 - 15 5 - 15 Token (diameter about 3 cm)
50 - 150 50 - 150
Coat hanger (made out of wire)
2 - 15 5 - 15
Clothes pegs 20 – 300 50 - 150 Something to hang sculptures on like a coat rail, hook, string, …
x x x x
Thread 1 roll 1 roll Broom 5 5 Playground seesaw (optional) 1 1 Photo camera (optional) 1 1 Objects to attach (collected by the pupils themselves)
x
Water level 2 2 Fixing materials for building the sculptures
o Adhesive tape 15 5 5 5 o Liquid glue 5 5 5 5
6 This document is produced under the EC contract № 288989
This work is licensed under a Creative Commons Attribution-NonCommercial 4.0 International License

o Craft wire (thickness about 0,25 cm) 10 2 5 2 o Paper clips 150 50 50 50
Tools for building the sculptures o Scissors for children 30 30 30 30 o Craft pliers with wire cutter (please
be careful: risk of injury)
10 10 10 10
o Hand drill/bradawl (please be careful: risk of injury)
5 5 5 5
Rods for building the sculptures o Skewers (length 20 cm) 150 50 50 50 o Drinking straws (length 20 cm) 150 50 50 50 o Wooden toothpicks (length 6,5 cm) 150 50 50 50 o Balsawood round or not-round
(length: 20 & 30 cm) 30 20 10
o Hardwood (beech etc.) (length 20 & 30 cm)
30 20 10
o Plastic (length: 20 & 30 cm) 30 20 10 Threads for building the sculptures (cho0se a selection)
o Raffia 2 2 2 2
7 This document is produced under the EC contract № 288989
This work is licensed under a Creative Commons Attribution-NonCommercial 4.0 International License

o Cotton yarn or cotton blend yarn 2 2 2 2 o Package string (natural fibre) / twine
(thickness about 2,0 mm) 2 2 2 2
o Sewing thread / yarn (thread size 50)
2 2 2 2
o Nylon (thickness 0,15 mm) 2 2 2 2 o Embroidery silk 2 2 2 2 o Wool 2 2 2 2
Objects for sculptures (Chose a selection) o Crystal pearls (diameter 6 – 12 mm) 250 100 100 50 o Wooden beads (diameter 6 – 12
mm) 250 100 100 50
o Balloons 60 30 20 10 o Natural materials like stones, sea
shells, chestnuts, acorns, leaves or branches
30 30
o Post cards (DIN A5 – A7) 50 20 20 10 o Screws (length 2 – 5 cm) 20 - 30 10 - 20 10 o Screw nuts (diameter 1 – 2 cm) 20 - 30 10 - 20 10 o Styrofoam balls (diameter 3 – 6 cm) 30 - 50 10 - 20 10 - 20 about 10 o Wine corks 30 - 50 10 - 20 10 - 20 about 10
Work sheets No. 1 – 3 pictures of hanging sculptures 1 of each 1 of each No. 4 – 7 Guidance for the experiments 30 of
each 30 of
each
No. 8 – 11 Documentation sheets for the experiments
30 of each
30 of each
No. 12 Picture of a building crane 1 1 No. 13 Worksheet „Building crane“ 30 30 No. 14 Answer sheet „Building crane“ 1 1 No. 15 – 22 Differentiation cards 1 of each 1 of each
8 This document is produced under the EC contract № 288989
This work is licensed under a Creative Commons Attribution-NonCommercial 4.0 International License

Lesson 0 – Engineering an envelope What is engineering? Duration: teachers can choose how long to spend on this lesson depending on how much experience pupils already have. The introduction, main activities and conclusion will take up to 40 minutes; additional extension work can add a further 10-30 minutes. Objectives, in this lesson pupils will learn that: • engineers design solutions to problems using a range of technologies; • technologies that are appropriate for a particular problem depend on the context and materials available; • made objects have been engineered to solve problems; • engineers can be men or women. Resources (for 30 pupils) � 8 ‘post-it’ notes packs � 8 sets of at least 5 different envelope types � 8 sets of at least 5 different objects
� 8 sets of packaging examples for optional extension work
� Card, paper, glue, scissors for optional extension work
Preparation • Collect together a range of different
envelopes and packages • Print copies of worksheet 1 if using • Collect pictures for introductory activity
Working method • Small groups • Whole class discussion
Context and background This lesson is the same in all units and is intended to encourage thinking about what technology is and to challenge stereotypes about engineers (particularly those associated with gender) and engineering. It aims to develop the understanding that objects in the made world are designed for a purpose and that technology in its broadest sense refers to any object, system or process that has been designed and modified to address a particular problem or need. Pupils can think about this by discussing what problem the technology of a particular artefact (in this case an envelope) is intended to solve. In this lesson, they discuss the range of technologies that are used to engineer an envelope for a particular intended purpose. The lesson is also intended to avoid value judgments of ‘ high tech’ versus ‘low tech’ and to encourage pupils to appreciate that it is appropriate technology in a particular context that is important: the range of available materials will determine the technology that the engineer appli es to solving the problem.
This document is produced under the EC contract № 288989 This work is licensed under a Creative Commons Attribution-NonCommercial 4.0 International License

0.1 Introduction - 10 minutes - small group and whole class discussion Divide the class into groups of 4 and provide a packet of ‘post-its’ for each group. Ask the groups to discuss all the things they associate with the terms ‘engineering’ and ‘technology’. Ensure that, as part of the discussion, each individual within the group puts at least one idea on a ‘post it’. Invite each group to place their ‘post its’ on to a master display sheet and briefly explain their choices to the rest of the class. Keep the whole class list for review at the end of the lesson.
Additional support for discussion This part of the lesson can be extended by providing pictures of stereotypical and unusual examples of engineering and asking pupils to group the pictures into those that they associate with engineering and those that they do not. You could use Worksheet 1 for this activity, or use the pictures there as a whole class display. Ask pupils to work in pairs to decide which of the pictures they think are related to engineering and to give their reasons why they think that some are and some are not. Each pair of pupils could share their ideas with another pair and discuss similarities and differences in ideas. You could use these ideas as a basis for a whole class discussion; encourage pupils to open up their thinking about what counts as engineering and who could be involved in it.
0.2 Activity 1 What is an envelope? - 5 minutes, small groups Organise pupils into small groups to discuss what an envelope is and what counts as an envelope. To help discussion, provide a range of examples which cover and/or protect objects or materials for particular purposes (as in the pictures).
An important part of this activity is to encourage pupils to notice that there are many interpretations of the idea of an envelope. In the pictures there are some examples that might challenge their idea of an envelope: they include a broader interpretation of what an envelope is as something that ‘houses’, ‘protects’, ‘holds in place’, ‘covers’, ‘hides’ or even ‘reveals’ a range of different objects.
This document is produced under the EC contract № 288989 This work is licensed under a Creative Commons Attribution-NonCommercial 4.0 International License

0.3 Activity 2 Matching envelopes to objects - 15 minutes - small groups and whole class discussion
Divide the class into groups of 4 and provide a range of ‘envelopes’ and objects that could go in them. Ask the pupils to select which envelopes would be most suitable for the objects and to explain why.
The objects could include: a pair of spectacles; a certificate or photograph that must not be bent; a delicate piece of jewellery; a returnable DVD; a set of confidential papers; a pair of scissors. The range of objects and envelopes can be varied according to context and what you have available.
The following questions can help guide the discussion: ─ What material is the envelope made from? ─ What fixings and fastenings are used in the envelope? ─ What range or types of objects could the envelope be used for? ─ What other materials it could be made from? Each group should report their ideas back to the class.
There is an opportunity here for the teacher to lead the discussion and talk about the various technologies used in each engineered envelope including the types of structures, fixings and fastenings used (e.g. reusable or permanent fixings; reinforcement areas; internal and external materials selected; how edges are sealed.)
This is an evaluative activity and could be related back to the engineering design process: discussion could include thinking about the process that engineers need to be involved in when making something to solve a particular problem.
0.4 Extension work - optional - 10-30 minutes - small groups 1. Present pupils with a range of envelopes and ask them to evaluate their design in terms of their fitness for purpose (see picture). Envelopes could be compared in terms of the types of fastenings and reinforcements used, and the mix of different materials used (e.g. bubble wrap, absorbency, strength- i.e. resistance to tearing). This activity could be extended to looking at different types of packaging in relation to net folds and how these are used to reduce (or eliminate) the need for adhesives in the manufacturing process. The following 3 pictures demonstrate packaging that does not use any form of adhesive; the making involves only one type of material using cuts and folds for fastenings.
11 This document is produced under the EC contract № 288989
This work is licensed under a Creative Commons Attribution-NonCommercial 4.0 International License
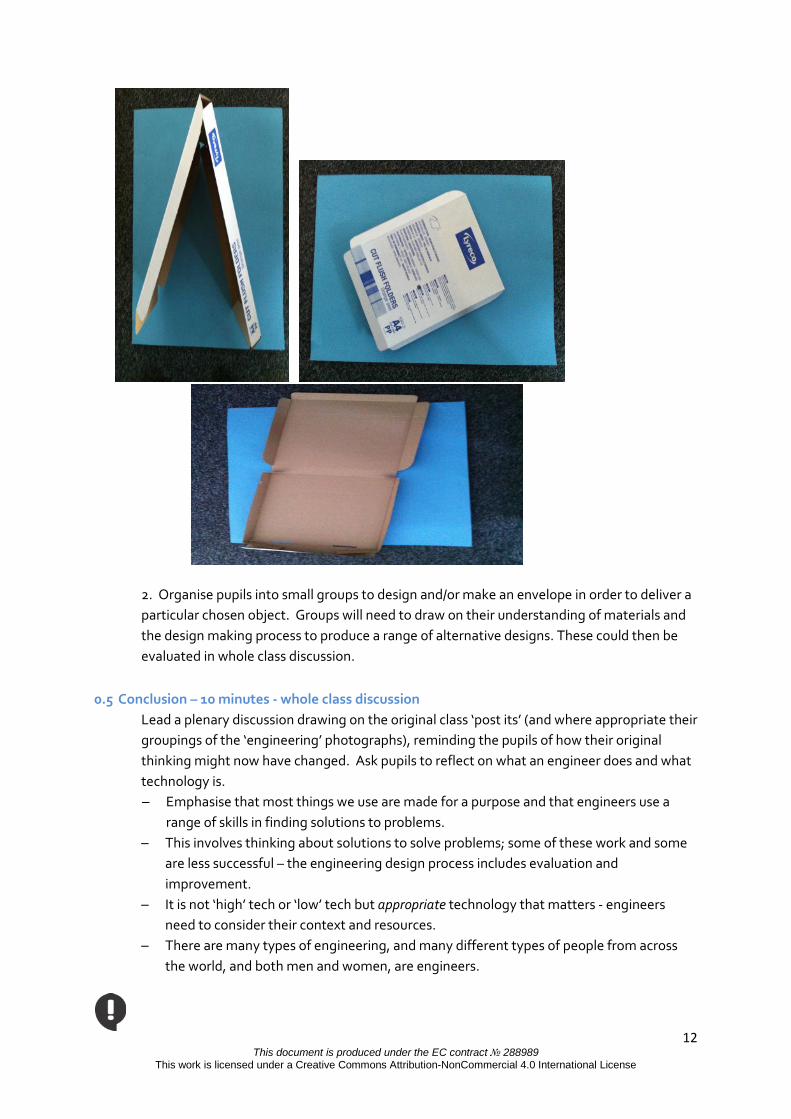
2. Organise pupils into small groups to design and/or make an envelope in order to deliver a particular chosen object. Groups will need to draw on their understanding of materials and the design making process to produce a range of alternative designs. These could then be evaluated in whole class discussion.
0.5 Conclusion – 10 minutes - whole class discussion
Lead a plenary discussion drawing on the original class ‘post its’ (and where appropriate their groupings of the ‘engineering’ photographs), reminding the pupils of how their original thinking might now have changed. Ask pupils to reflect on what an engineer does and what technology is. ─ Emphasise that most things we use are made for a purpose and that engineers use a
range of skills in finding solutions to problems. ─ This involves thinking about solutions to solve problems; some of these work and some
are less successful – the engineering design process includes evaluation and improvement.
─ It is not ‘high’ tech or ‘low’ tech but appropriate technology that matters - engineers need to consider their context and resources.
─ There are many types of engineering, and many different types of people from across the world, and both men and women, are engineers.
12 This document is produced under the EC contract № 288989
This work is licensed under a Creative Commons Attribution-NonCommercial 4.0 International License

There might be a range of equally acceptable definitions for the terms ‘engineer’ and ‘technology’; these terms are often used interchangeably, e.g. engineering could be considered as the use of technology for problem solving. In talking about the relationship between engineering, science and technology, pupils can be encouraged to think about how engineers, in the process of making objects to solve problems, use a range of technologies (including fixings and fastenings, various types of materials and different components in a range of systems) and a range of science understandings. This is an opportunity to open up discussion about how things are made and by who, and what is involved in the process of thinking about solutions to problems.
0.6 Learning outcomes - for optional assessment
At the end of this lesson pupils should be able to: ─ Recognise how a range of systems, mechanisms, structures, fixings and fastenings are
used in artefacts in different ways to provide a range of solutions to solve problems. ─ Understand that appropriate technology is often dependent on the context and
materials available. ─ Recognise that engineers use a wide range of skills in developing solutions to problems . ─ Recognise that many different types of people with different interests and skills can be
engineers.
13 This document is produced under the EC contract № 288989
This work is licensed under a Creative Commons Attribution-NonCommercial 4.0 International License

Lesson 1 – What is the engineering problem? Finding out about the challenge Duration: 90 minutes Objectives: in this lesson the pupils will learn: • to understand the nature of an engineering problem and how the unit will address such problems; • to anticipate how to build a hanging sculpture; • to be able to describe what a hanging sculpture is. Resources (for 30 pupils) � worksheets No 1 – 3 (pictures of balanced
hanging sculptures) � 60 index cards � 30 documentation booklets � 30 pencils � Somewhere to hang sculptures up � Fixing materials for building the sculptures
o 5 adhesive tape o 5 liquid glue o 2 craft wire o 50 paper clips
� Tools for building the sculptures o 30 scissors for children o 10 craft pliers with wire cutter
(please be careful: risk of injury) o 5 hand drill (please be careful:
risk of injury) � Rods for building the sculptures
o 50 skewers o 50 drinking straws o 50 wooden toothpicks
� Threads for building the sculptures (chose a
selection) o 2 raffia bundles o 2 cotton yarn or cotton blend
yarn o 2 package string o 2 sewing thread / yarn o 2 nylon o 2 embroidery silk o 2 wool
� Objects for sculptures (chose a selection) o 100 crystal pearls o 100 wooden beads o 30 balloons o 30 natural materials o 20 post cards o 30 styrofoam balls o 10-20 wine corks
Preparation • Collect the materials • Print the worksheets and copy them
Working method • Circle time / Plenary • Small groups
Context and background The’ ask’ element of the engineering design cycle introduces the pupils into the issue of hanging sculptures. The pupils are given the task of building a balanced hanging sculpture. Based on hands-on-activities the pupils develop some ideas for solving the problem.
14 This document is produced under the EC contract № 288989
This work is licensed under a Creative Commons Attribution-NonCommercial 4.0 International License
1.1 Introductory activity – orientation in circle time - 15 minutes The teacher tells the story (see appendix 2) which introduces the engineering challenge and then organises the class for Circle time by ensuring the pupils form a circle, sitting on chairs, benches, or cushions on the floor.
This has the advantage that everyone can see everyone else, and everybody is equal. The circle is especially suitable for concentrating on a topic, holding a joint discussion, or presenting objects. Selected objects can be presented in the centre of the circle. Alternatively, the teacher holds an object up or hands it to a child to pass round. The pupils learn social intercourse better in a circle: successful social coexistence requires certain rules and conventions, which can be negotiated more effectively when sitting in a circle. “During the next lessons we are going to talk about hanging sculptures because Paolo wants to build one. You are asked to build a balanced hanging sculpture in pairs“
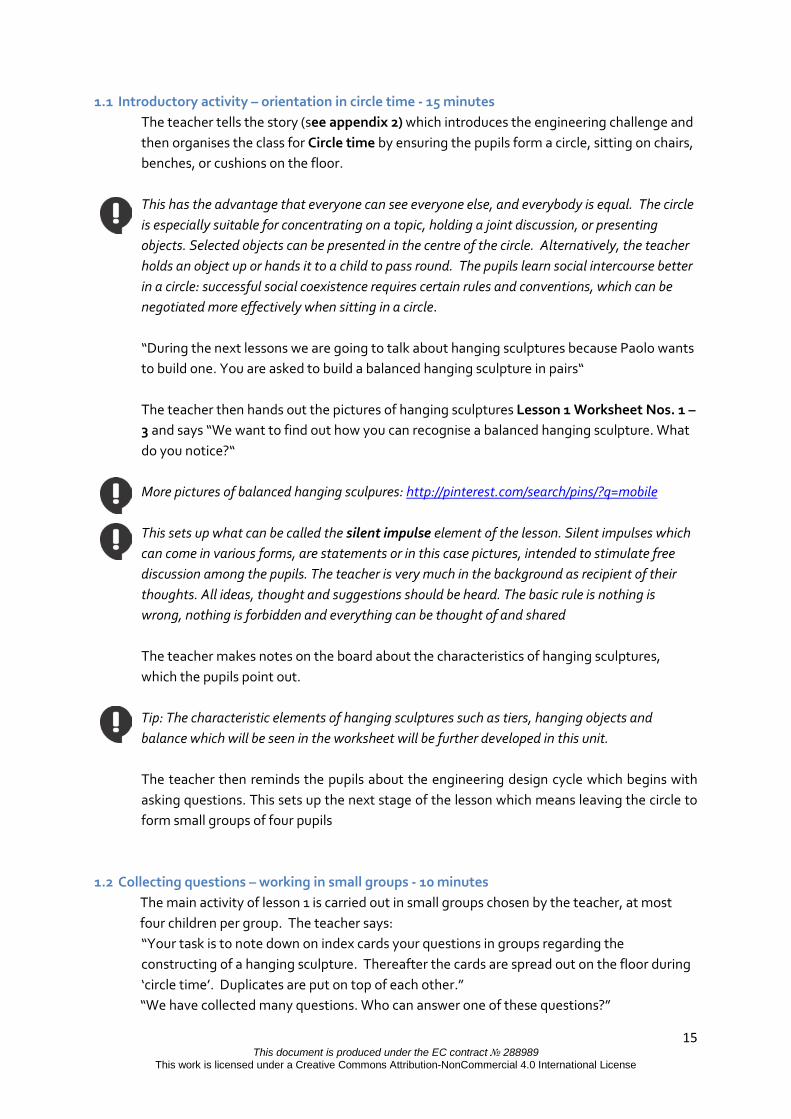
The teacher then hands out the pictures of hanging sculptures Lesson 1 Worksheet Nos. 1 – 3 and says “We want to find out how you can recognise a balanced hanging sculpture. What do you notice?“ More pictures of balanced hanging sculpures: http://pinterest.com/search/pins/?q=mobile This sets up what can be called the silent impulse element of the lesson. Silent impulses which can come in various forms, are statements or in this case pictures, intended to stimulate free discussion among the pupils. The teacher is very much in the background as recipient of their thoughts. All ideas, thought and suggestions should be heard. The basic rule is nothing is wrong, nothing is forbidden and everything can be thought of and shared
The teacher makes notes on the board about the characteristics of hanging sculptures, which the pupils point out. Tip: The characteristic elements of hanging sculptures such as tiers, hanging objects and balance which will be seen in the worksheet will be further developed in this unit. The teacher then reminds the pupils about the engineering design cycle which begins with asking questions. This sets up the next stage of the lesson which means leaving the circle to form small groups of four pupils
1.2 Collecting questions – working in small groups - 10 minutes
The main activity of lesson 1 is carried out in small groups chosen by the teacher, at most four children per group. The teacher says: “Your task is to note down on index cards your questions in groups regarding the constructing of a hanging sculpture. Thereafter the cards are spread out on the floor during ‘circle time’. Duplicates are put on top of each other.” “We have collected many questions. Who can answer one of these questions?”
15 This document is produced under the EC contract № 288989
This work is licensed under a Creative Commons Attribution-NonCommercial 4.0 International License
The teacher sticks / tapes the sorted cards to a board. The questions are discussed later, e.g. in the second or third lesson or at the end of the whole unit. The teacher keeps them in mind and discusses them when they fit thematically.
The questions can be sorted according to − construction materials − objects − method of attachment − rods − tools required − the scientific background − understanding of the basic principles
1.3 Building a test sculpture – working in small groups – 45 minutes
During the next step, the pupils can make their first attempts at constructing a hanging sculpture using some simple materials. The teacher presents the materials for building a hanging sculpture and introduces them to the idea of the document booklet in order to document their working process.
The documentation book documents the child’s individual learning path and is an important diagnostic tool for the teacher, since it shows the individual development. By working with documentation books, the children learn to present their thoughts in a way that is understandable to themselves and others, and to exchange ideas with others.
This is introduced here so that the next step can be carried out. − “You work in the next lessons with a documentation booklet. You take notes on your
ideas, approaches to a solution, inventions, reflections on what you have learned and so on. It is how Evelyn Engineer in our story would work. For this you can use a blank exercise book or loose-leaf folder.
− “Your challenge is to construct a first test sculpture: • At first you note down or sketch your ideas in your documentation booklet. • Then you test your ideas. If you have more ideas related to how to improve
your test hanging sculpture, you can modify it. • You have about 25 minutes time. • Then we examine the hanging sculptures.”
After about 25 minutes the teacher decides which groups are to present their test hanging sculpture. Possible selection criteria could be: − successful solutions − contrasting solutions − different solutions illustrating how the balance of a hanging sculptures can be optimised
16 This document is produced under the EC contract № 288989
This work is licensed under a Creative Commons Attribution-NonCommercial 4.0 International License

1.4 Conclusion – 20 minutes The teacher establishes the connection to the introductory story: whilst constructing his hanging sculpture, the artist Paolo Paintbrush encountered the problem that he was not able to balance the sculpture properly. In front of the whole class a few small groups selected by the teacher present their answers to the following questions: - Is your sculpture in equilibrium? - What problems did you encounter? - How did you solve these problems? - Where do you still need help? “You found many good solutions to build a balanced hanging sculpture by testing / trial and error. In order to construct balanced hanging sculptures like an engineer we will experiment in the next lesson with the subjects of balance, centre of gravity, forces, and counter-force.”
17 This document is produced under the EC contract № 288989
This work is licensed under a Creative Commons Attribution-NonCommercial 4.0 International License

Lesson 2 – What do we need to know? Finding out about balance and forces and mechanical engineering Duration: 100 minutes (120 with additional experiment) Objectives: in this lesson the pupils will learn: • some basic scientific concepts including force, counter-force, balance, and centre of gravity; • to relate these concepts to meeting engineering challenges; • to deploy their documentation booklet as an effective learning tool. Resources (for 30 pupils) � 30 documentation booklets � 30 pencils � 30 worksheets no. 4-7
(guidance for experiments) � 30 worksheets no. 8-11
(documentation sheets for experiments) � 1 worksheet no. 12 (picture building crane) � 30 worksheets no. 13 “Building crane” � 1 answer sheet no. 14 (“Building crane”) � 5 brooms
� 5-15 non-round pencils � 20-150 wooden token � 5-15 coat hanger (made out of wire) � 50-150 clothes pegs � thread � somewhere to hang a sculpture up like a coat
rail, hook, string, … � 1 playground seesaw (optional)
Preparation • Collect the materials • Print the worksheets and make copies • Prepare the working places for the
experiments. • Have one set of materials for the experiments
ready to talk about it • Have the picture and the answer sheet of the
building crane ready.
Working method • Circle time • Experiments • Guided discussion • Working in pairs
Context and background In lesson 2, the ‘ask’ and ‘imagine’ element carry on from lesson 1. The basics of theoretical physics are laid down here, so as to be able to continue with the ‘plan’ phase. At various stations, the pupils conduct experiments dealing with the physical concepts of balance, forces, counterforces and centre of gravity. In this process they start to comprehend the fundamental physical effects, which they need to consider when building. In the next step, the concepts developed by the pupils are extended and consolidated by applying them to the everyday object of a crane. At the end, the pupils have the theoretical background knowledge to be able to plan and construct a balanced hanging sculpture on best principles.
18 This document is produced under the EC contract № 288989
This work is licensed under a Creative Commons Attribution-NonCommercial 4.0 International License

2.1 Introductory activity – circle time - 10 minutes The teacher helps the pupils to recall their previous knowledge about hanging sculptures.
Sitting in a semicircle the pupils are reminded of the problem building a hanging sculpture. The teacher establishes the connection to the introductory story: the artist Paolo Paintbrush asks Evelyn Engineer, an engineer and mother of one of the pupils, to help him in the construction of a free hanging sculpture. In this context, various experiments are conducted in this lesson on the phenomenon of force, counter-force, equilibrium and centre of gravity. The teacher organises the class into pairs and explains the procedure: − Three experiments have been set up in the classroom. There is one more experiment
suggested depending on if the school has a playground seesaw. − Each experiment offers guidance – Lesson 2 worksheets no. 4 - 7 and documentation
sheets (worksheets no. 8 - 11) to go into the documentation booklet. The pupils use these to write up what they do in each experiment.
The teacher has three options when it comes to managing the lesson. Their choice will be determined by how used the children are to experimenting on their own: − The pupils are free to choose the order in which they do the experiments. Each pair
makes the experiments in their own time. − The experiments are carried out in a defined (cyclic) order. When the teacher gives the
word, all the groups move on one place. − The pupils remain in their places whilst conducting the experiments one after the other.
After concluding an experiment, the pupils pass on the materials of that station to the next group.
2.2 Experiments – working in pairs - 45 minutes (65 minutes with the additional seesaw experiment)
The main activity of the lesson is carrying out experiments to get to know the important physics ideas relating to the subjects of force, counter-force, balance and centre of gravity. The individual experiments are:
Seesaw made out of a ruler Material: non-round pencil, ruler, token Task: The pencil is placed, under the ruler. The ruler needs to be balanced. The tokens are placed such as to balance the ruler. Goal: To determine the balance of a moving object with different forces acting (phenomenon of balance – transferable to balanced hanging sculptures). Note: You can make the task more difficult by stacking the tokens or by taking pebble stones instead of tokens.
This document is produced under the EC contract № 288989 This work is licensed under a Creative Commons Attribution-NonCommercial 4.0 International License

Coat hanger Material: coat hanger made out of wire, clothes pegs, a piece of string, a place to hang the coat hanger Task: The hanger is suspended with a piece of thread. On both sides you need fix a different number of pegs. The coat hanger needs to be always kept in balance. Goal: To determine the balance of a moving object with different acting forces (phenomenon of a balance – transferable to balanced hanging sculptures). Broom Material: Broom Task: Both hands are stretched wide apart. The partner carefully puts the broom on the hands. The broom needs to be kept in balance. The experiment can be supported with questions by the teacher: − Can you slide both fingers into the middle of the broom? − Are you able to slide both fingers / hands at the same time? − Is it difficult to move both fingers rather than one? If yes: Which of the two fingers you
can move better? Why?
20 This document is produced under the EC contract № 288989
This work is licensed under a Creative Commons Attribution-NonCommercial 4.0 International License

− To which side does the broom tilt ? Why? − Why are the fingers not in the middle although the broom is in balance?
Goal: Determination of the centre of gravity of an non-homogeneous object. Tip: For this experiment, it is important to have an appropriate place in the room, so that no child is injured, if the broom falls down or tilted. The centre of gravity is on the broom handle just before the brush.
Note: The centre of gravity is not consistent with the centre of an object. The centre is a geometric definition. It is the point with the shortest distance from all the points of a body. The centre of gravity focuses the forces and counter-forces acting on a body. It determines the „point of balance“, where all forces are equal.
:
21 This document is produced under the EC contract № 288989
This work is licensed under a Creative Commons Attribution-NonCommercial 4.0 International License

Playground seesaw (optional) Material: Playground seesaw Task: The playground seesaw needs to be balanced with different numbers of children. Goal: Determination of balance; to note the effect of change of mass on the resulting forces. Tip: The whole class can do this experiment together. The teacher takes on the role of an observer. The teacher can prepare to reflect by paying attention to following issues: − problems /difficulties − successful experiments − successful explanations In addition, the teacher is on hand to help the pupils when necessary: − Help in reading and understanding the instructions. − Writing up the experiments on the documentation sheets. − Choosing the next experiment from those available.
2.3 Guided discussion and lesson conclusion- 45 minutes The pupils come together in a semicircle and lay the documentation sheets on the floor to avoid noise. The teacher discusses the individual experiments with the class as a whole. The teacher discusses the 3 experiments paying attention to the following questions: − What have we done in this experiment? − What did we notice? − Why did it happen? − How does this connect to building a balanced hanging sculpture? The answers are discussed and completed by the teacher repeating the relevant technical terms that each experiment illustrates or prompting the children to name them. Those are: − force − counter-force − centre of gravity − balance As a check on progress, the teacher has the documentation sheets in the individual documentation booklet.
22 This document is produced under the EC contract № 288989
This work is licensed under a Creative Commons Attribution-NonCommercial 4.0 International License

A picture of a crane (worksheet no. 12) is shown as a silent impulse. The pupils are invited to comment on it. The teacher focuses attention on the subject of the lesson. "What does the crane have to do with the experimental stations of the last lesson?"
Once again the teacher repeats the technical terms force and counter-force, balance, and centre of gravity and gives a résumé. The key teaching points are to ensure that the pupils can answer the following questions – Lesson 2 answer sheet no. 14: - Where do forces act? - What is a force? - What is a counter-force? - What is a balance? - What is a centre of gravity? The pupils can be given the crane worksheet as homework- lesson 2 worksheet no. 13. Alternatively it could be completed in the lesson. On the picture of a crane they indicate where the given terms of centre of gravity, force, counterforce and balance occur. Tip: Also other types of pillar cranes can be considered among the physics concepts and statics as well. Pictures of pillar cranes can be found on following web pages (seen on 31.7.2013): http://commons.wikimedia.org/w/index.php?search=turmdrehkran&title=Special%3ASearch http://commons.wikimedia.org/w/index.php?search=tower+crane&title=Special%3ASearch As a final step, the class can be encouraged to find further practical examples from everyday life like: − Tightrope artist – on a highly tensioned rope the tightrope artist keeps balance by
means of outspread arms or a balancing pole. On a slack line, the back-and-forth movement of the rope helps the tightrope artist to maintain balance.
− Sword – the centre of gravity of a sword is closer to the grip than the tip (similar to a broom). When forging a sword the centre of gravity is adjusted closer to, or further away from, the grip according to the desired technical requirement (i.e. precision of force).
− Front loader (tractor) – the force exerted by the lifted load is balanced by the tractor itself.
− Beam scales – the scales consist of a two-sided beam, which can pivot around its horizontal axis, to which two pans are attached. Objects in the pans exert forces which determine whether the scales are in equilibrium.
Finally, ask pupils to bring items from home for lesson 3: “We want to use our knowledge to construct a hanging sculpture. Collect various objects to hang on it, such as small stones, toys, souvenirs, objects found in nature. Your hanging sculpture can have a particular subject or motto like i.e. beach, toys, animals, forest, space, school or class outings.”
23 This document is produced under the EC contract № 288989
This work is licensed under a Creative Commons Attribution-NonCommercial 4.0 International License

Lesson 3 – Let’s build! Design your hanging sculpture Duration: 105 minutes Objectives: in this lesson the pupils will learn: • to use tools in a suitable way and develop their motor skills; • to deploy the plan/create stages of the Engineering Design Cycle effectively; • that collaboration involves high level organisational skills and a sense of purpose.
Resources (for 30 pupils) � 30 documentation booklets � 30 pencils � worksheets no. 15-22 (Differentiation cards) � photo camera (optional) � Fixing materials for building the sculptures
o 5 adhesive tape o 5 liquid glue o 5 craft wire o 50 paper clips
� Tools for building the sculptures o 30 scissors for children o 10 craft pliers with wire cutter
(please be careful: risk of injury) o 5 hand drill (please be careful:
risk of injury) � Rods for building the sculptures
o 50 skewers o 50 drinking straws o 50 wooden toothpicks o 20 balsawood rods o 20 hardwood rods o 20 plastic rods
� Threads for building the sculptures (chose a selection)
o 2 raffia bundles o 2 cotton yarn or cotton blend
yarn o 2 package string o 2 sewing thread / yarn o 2 nylon o 2 embroidery silk o 2 wool
� Objects for sculptures (chose a selection) o 100 crystal pearls o 100 wooden beads o 30 balloons o 20 post cards o 30 styrofoam balls o 10-20 screws o 10-20 screw nuts o 10-20 wine corks o objects brought by the pupils
themselves
Preparation • Collect the materials. • Print and copy the worksheets. • Prepare a possibility to hang the sculptures.
Working method • Sitting circle • Working in pairs
Context and background In lesson 3, the pupils can put what they have learned to practical use by constructing their hanging sculptures. We have now reached the ‘plan’ and ‘create’ steps in the engineering design process.
24 This document is produced under the EC contract № 288989
This work is licensed under a Creative Commons Attribution-NonCommercial 4.0 International License

3.1 Introductory activity – sitting in a circle - 15 minutes The class sits in a circle around the material. The teacher establishes the connection to the introductory story: Evelyn Engineer explained the phenomena of force, counterforce, equilibrium and centre of gravity to the artist Paolo Paintbrush. The pupils have also learned about these through their experiments. There are a few requirements the artist's hanging sculpture has to fulfil. The teacher explains these requirements. The teacher explains the minimum requirements for building a hanging sculpture: − Levels: the hanging sculpture has at least two levels. − Each level has to be balanced. The teacher also reminds the class about the engineering design cycle by asking them at what stage do they think they are now at (Answer = plan and create) They are also reminded of the importance of the scientific concepts on which their success as engineers will depend: What physical concepts do we know? − Force − Counter-force − Balance − Centre of gravity Safety advice: − Tie the knots well; the teacher should demonstrate good knot tying. − Be careful in using the tools; again a teacher demonstration will help to ensure pupils to use
them in the right way.
3.2 Building a balanced hanging sculpture – Working in pairs – 60 minutes Working in pairs, the pupils set about building their hanging sculptures. They can test their hanging sculpture and check that it fulfils the criteria. The pupils must decide on how to check whether the hanging sculpture is balanced. Tip: One way of doing this is to use horizontal lines drawn on the board or a poster to compare whether the free moving parts of the hanging sculpture are level. This could raise interesting questions about balance and forces acting on various parts of the sculpture. Instructions for the pupils: − Ask the pupils to work in pairs. − Construct a balanced hanging sculpture with the materials available. − Take note of the minimum requirements. − Hang your sculpture when you are ready. Check if every level is balanced. − After each step, sketch and write down your results in your documentation booklet. − In addition, you can improve your hanging sculpture.
This document is produced under the EC contract № 288989 This work is licensed under a Creative Commons Attribution-NonCommercial 4.0 International License
To test the hanging sculpture, the pupils hang their hanging sculpture on a hook. After each step, the (intermediate) results are sketched in the documentation book. The teams can refer to this during further modifications.
Tip: Before they start to improve their hanging sculpture, the teacher takes a photo to record the current state. Intermediate steps in the construction should also be recorded in this way.
If a pair of pupils finishes before the others, there is always the opportunity to vary the construction with the help of differentiation cards (worksheets no. 15 - 22): − Add one level − Add two levels − Add 2, 3, 4... objects − Arrange the sculpture so that the objects can be swapped but are still free to move. − Decorate the suspension − Take a level away − Try to hang a heavy and light object at the same level
3.3 Conclusion – 30 minutes
The groups present their individual ideas and solution pathways to the class. The teacher will ask pairs of pupils to present their sculptures and encourage a class conversation “Describe the process, the improvements and the result. Tell the other pupils which materials you have used. How did you build it? Were there any problems? Did you have any suggestions on how to solve these? What tools did you use? Were they easy to use?“ The teacher also ensures that the pupils use the technical terms of force, counter-force, balance and centre of gravity. The key learning point here is to encourage the pupils to think in terms of improvement. How can their sculptures be made better? Will more challenging creations involve thinking again about the underlying scientific concepts? This discussion will set up the final lesson
26 This document is produced under the EC contract № 288989
This work is licensed under a Creative Commons Attribution-NonCommercial 4.0 International License

Lesson 4 – How did we do? Is the challenge met? Duration: 100 minutes Objectives: in this lesson the pupils will learn: • to use the terms force, counter-force, balance and centre of mass in an appropriate, assured and
independent way; • to recognise that these scientific concepts are important in meeting their engineering challenge to create
a balanced hanging sculpture; • to use the engineering design process to enhance their engineering skills and improve their hanging
sculptures. Resources (for 30 pupils) � 30 documentation booklets � 30 pencils � Worksheets no. 15-22 (Differentiation cards) � Fixing materials for building a hanging
sculpture
� Tools for building the sculptures � Rods for building the sculptures � Threads for building the sculptures � Objects for building the sculptures
Preparation • Collect the materials. • Lay the sculptures in the middle of the circle. • Arrange the worksheets
Working method • Working in pairs • Sitting circle • Working alone
Context and background At this stage the pupils have learned the physical background and have built their own hanging sculpture. They now proceed to the ‘improve’ step in the engineering design process, so as to make the hanging sculpture better.
27 This document is produced under the EC contract № 288989
This work is licensed under a Creative Commons Attribution-NonCommercial 4.0 International License

4.1 Introductory activity – 10 minutes The pupils sit in a semicircle in order to review all the sculptures they created in the previous lesson. The teacher praises their work and reminds them of the suggestions put forward at the end of the previous lesson. The pupils are asked to come up with more ideas for improving the individual hanging sculptures. The minimum requirements (force, counter-force, balance, centre of gravity) are discussed, so that the pupils are encouraged to check that all requirements are properly fulfilled. The teacher should take care that the groups do not compete against one another, but rather that each design fulfils the criteria in its own way. The teacher also reminds them about the engineering design process and asks them at which stage are they now (answer = improve) The pupils have now acquired the knowledge to improve their hanging sculptures. Work instruction: “Now you know what to improve. Work in pairs on your hanging sculpture and try to implement the new ideas.”
4.2 Revision of the hanging sculptures – working in pairs – 45 minutes Each pair works on improving its hanging sculpture, following the suggestions previously put to the entire class. Optionally: The teacher again photographs the intermediate steps. The pupils record their improvements in the documentation booklet: − What did you improve? − Why? − What was the problem? − Make a coloured drawing of your improved hanging sculpture.
Pupils can be asked to think about variants indicated by differentiation cards -see Lesson 3 worksheets no. 15-22.
4.3 Writing a construction manual - working alone – 30 minutes
The teacher introduces the final activity by referring to the ways in which engineers like Evelyn Engineer in the story need to pass on their learning to others. The pupils are going to do this in the form of a construction manual. It should be addressed to other children such as - Other classes planning to do this unit - Friends, sisters and brothers - Other groups of children interested in building a hanging sculpture
28 This document is produced under the EC contract № 288989
This work is licensed under a Creative Commons Attribution-NonCommercial 4.0 International License

By writing the construction manual, the pupils reflect and describe the process they went through in constructing their hanging sculpture. They repeat the engineering design process. Optionally there can be a link to art lessons (see appendix: Background hanging sculpture).
4.4 Final concluding - plenary – 15 minutes
The teacher and children spend some time reviewing their learning and achievements in the unit. The teacher underlines the key learning points: “ you have used and applied the important terms of force, centre of gravity, equilibrium and counterforce and have recorded how you modified our sculpture“ (Selections from the construction manuals can be read out to substantiate this point) “you have worked as engineers and followed the engineering design cycle” “you have worked well in pairs and understand how important collaboration is to this kind of learning”
29 This document is produced under the EC contract № 288989
This work is licensed under a Creative Commons Attribution-NonCommercial 4.0 International License
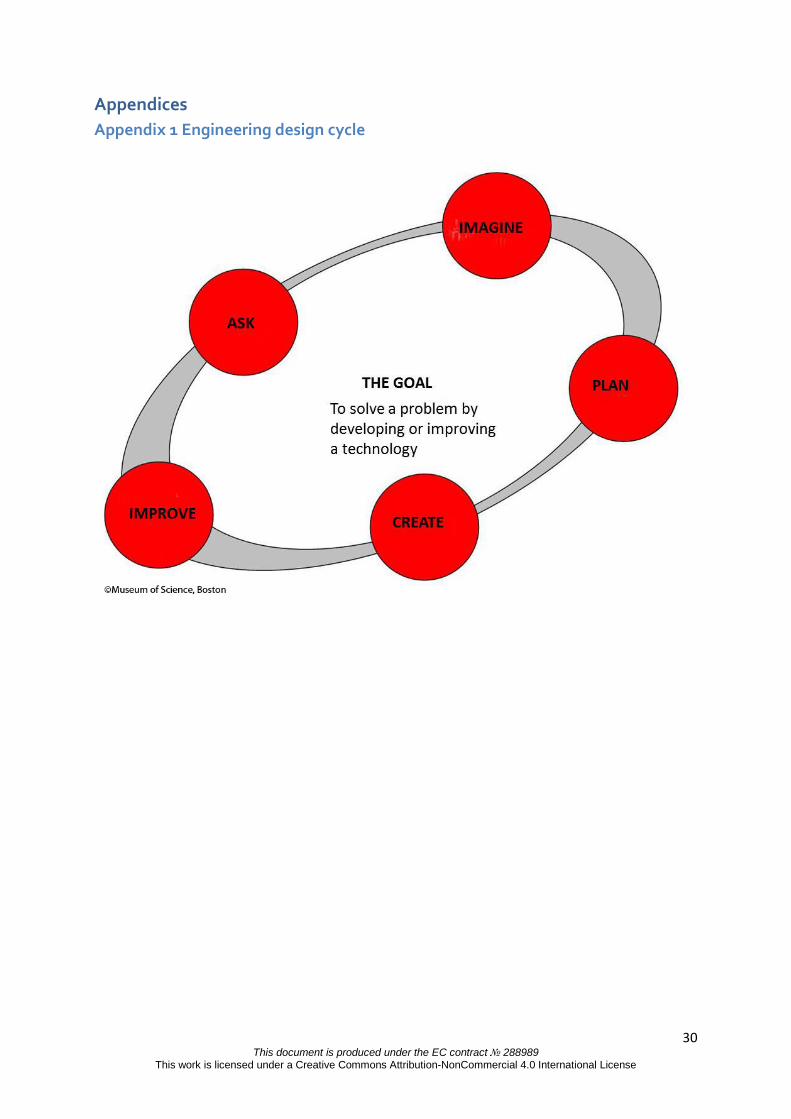
Appendices Appendix 1 Engineering design cycle
30 This document is produced under the EC contract № 288989
This work is licensed under a Creative Commons Attribution-NonCommercial 4.0 International License

Appendix 2 The story as a stimulus
The staff, governors and children have decided their school should have a thorough makeover. They want the school to be the best building in town and the local artist, Paolo Paintbrush, has been given the task of decorating the school assembly hall with a hanging structure. Various different objects should adorn the sculpture and Paolo knows these have to be in equilibrium if the sculpture is to stay up. (That’s a word we are going to be thinking about a lot in the next four lessons)
Paolo has already constructed a small model in his studio. But he is finding it difficult to balance the sculpture with all the attached objects. In the school, the pupils are already very curious about what is happening in their assembly hall. They are bombarding him with questions and are making lots of suggestions in their attempts to help him. Paolo realises that he needs the assistance of a professional. Luckily, he knows the mother of one of the pupils, an engineer called Evelyn Engineer. He asks her for help. Evelyn Engineer goes to the school and, together with Paolo and the pupils, explains the background knowledge about equilibrium in order to construct a beautiful, balanced hanging sculpture. The children then set about building models of possible sculptures for Paolo for him to decide which one to put up in their hall
31 This document is produced under the EC contract № 288989
This work is licensed under a Creative Commons Attribution-NonCommercial 4.0 International License

Appendix 3 Background on mobiles We mainly know mobiles as hanging toys. They were first created in the 1920s as works of art and became popular again in the art of the 1950s and 1960s. They belong to the genre of kinetic art. The main characteristic of hanging sculptures is that they move without any motors. The term mobile was coined by Marcel Duchamp. This is what he called his first Readymade Roue de bicyclette (1913). Later, Duchamp used the word to describe the sculptures by Alexander Calder. Marcel Duchamp (1887-1968), a Franco-American artist, began his career at fifteen years of age as an impressionist painter. His artistic style changed radically after visits to the Deutsches Museum (Munich, Germany) and the Paris Air Show (France) in 1912. He was so inspired by technology and industrial production that he broke with traditional conventions and produced the first so-called, readymades. To him the choice of an object became an inspirational act leading directly to the final work of art. With this approach he sparked large discussions in the art scene. Readymades are everyday objects, which are turned into works of art either by means of small modifications or by changing the context of the object. Alexander Calder (1898-1976) was a US American engineer, sculptor and artist. In his artistic work he tried to combine abstraction with movement. His first moving sculptures were toys made of wire and a wide variety of different materials, which he demonstrated, to friends. Influenced by the Parisian art scene, he constructed his first mobiles from 1930 onwards. Alexander Calder defined three types of mobiles:
- standing, - hanging, - wall-mounted hanging sculptures.
Kinetic Art (kinesis (Greek) = movement) is an art form, which encompasses motion as an integral part of the art. The motion is either induced by natural forces such as wind and water, or by mechanical or even computer-controlled means. The artists often incorporate scientific or technical aspects into their work. In the early 1920s, some artists started experimenting with dynamic art. In this age of rapid technological development, with increasing industrialisation and the spread of mass transportation such as cars or aircraft, the artists started transforming their static works of art. They tried to incorporate dynamic movement and use time as an element of expression. In addition, this development challenged viewers to actively engage with these new works of art in order to appreciate them fully. This pedagogical notion of active engagement, which also stemmed from the movement towards mass education, had already been implemented by Oskar von Miller in the Deutsches Museum. Founded in 1903, this museum incorporated numerous push-button experiments, the precursors to modern hands-on experiments. The first machine-driven kinetic art object is usually attributed to the Russian artist, Naum Gabo. Famous kinetic artists:
- Marcel Duchamp (Hanging sculpture) (1887-1968) - Alexander Calder (1898-1976)
32 This document is produced under the EC contract № 288989
This work is licensed under a Creative Commons Attribution-NonCommercial 4.0 International License

- George Rickey (1907-2002) - Adolf Luther (1912-1990) - Nicolas Schöffer (1912-1992) - Jean Tinguely (1925-1991) - Jörg-Tilmann Hinz (*1947)
Famous works of kinetic art:
- Roue de bicyclette (Marcel Duchamp) - Rote Reliefs (Marcel Duchamp) - Standing Wave (Naum Gabo) - Kronos 15 – Stadthaus / Bonn (Nicolas Schöffer) - Eos xk III – Israel Museum / Jerusalem (Jean Tinguely) - St. Thomas Fountain - London (Naum Gabo) - Vier Vierecke im Geviert (George Rickey) - Indian feathers (Alexander Calder) - Light-Space Modulator (Laszló Moholy-Nagy)
33 This document is produced under the EC contract № 288989
This work is licensed under a Creative Commons Attribution-NonCommercial 4.0 International License

Worksheets and answer sheets Pictures of hanging sculptures (Lesson 1)
1. Picture of a hanging sculpture 1 2. Picture of a hanging sculpture 2 3. Picture of a hanging sculpture 3
Guidance for experiments (Lesson 2)
4. Seesaw made out of a ruler 5. Coat hanger 6. Broom 7. Playground seesaw
Documentation sheets (Lesson 2)
8. Seesaw made out of a ruler 9. Coat hanger 10. Broom 11. Playground seesaw
Building crane (Lesson 2)
12. Picture building crane 13. Worksheet building crane 14. Answer sheet building crane
Differentiation cards (Lesson 3, 4)
15. Differentiation card 1 16. Differentiation card 2 17. Differentiation card 3 18. Differentiation card 4 19. Differentiation card 5 20. Differentiation card 6 21. Differentiation card 7 22. Differentiation card 8
34 This document is produced under the EC contract № 288989
This work is licensed under a Creative Commons Attribution-NonCommercial 4.0 International License

Worksheet 0 Lesson 0 – Engineering?
35 This document is produced under the EC contract № 288989
This work is licensed under a Creative Commons Attribution-NonCommercial 4.0 International License

Worksheet 0 Lesson 0 - Engineering? – Teacher notes
The pictures on the worksheet are intended to promote pupils’ discussion about what engineering is, what engineers do and who could be involved in different types of engineering.
The pictures of the spider and snail present some interesting challenges. The pupils could for example, decide that the spider is ‘engineering’ a web and this could be related to other animal ‘engineering’ examples (such as a beaver building a dam). An interesting point to make is that it is more common to think of engineering in terms of the made world. We can however, learn from studying nature and the environment. For example, the material that spiders use for making a web has been copied to make a very strong material (Kevlar) that has many useful properties. Similarly, the snail has developed a useful strategy for travelling over rough surfaces to protect its soft body from being damaged. An interesting question is whether this would be useful to solve a problem in the human world (a good example is Velcro which was developed from the burrs of burdock plant).
The toys could be considered engineering since they demonstrate the application of cams but it is interesting to ask what materials they could be made from and who actually makes them. This is likely to lead to some gender issues (many of the class may think that toys are made for children by toy designers who are male).
A similar issue might arise when pupils discuss the knitted garment and the prepared meal - pupils may think that these are only made by women, and that they are not the product of engineering.
Some of the other pictures of sculptures and works of art might be perceived as not engineering and without any real practical purpose. This will raise a question about the links between engineering and art and whether or not a made object needs to have a practical purpose for it to count as being engineering.
The pictures are meant to stimulate engagement and dialogue about engineering. This could lead to a discussion about what is involved in engineering, in which you might choose to introduce the Engineering Design Cycle.
36 This document is produced under the EC contract № 288989
This work is licensed under a Creative Commons Attribution-NonCommercial 4.0 International License
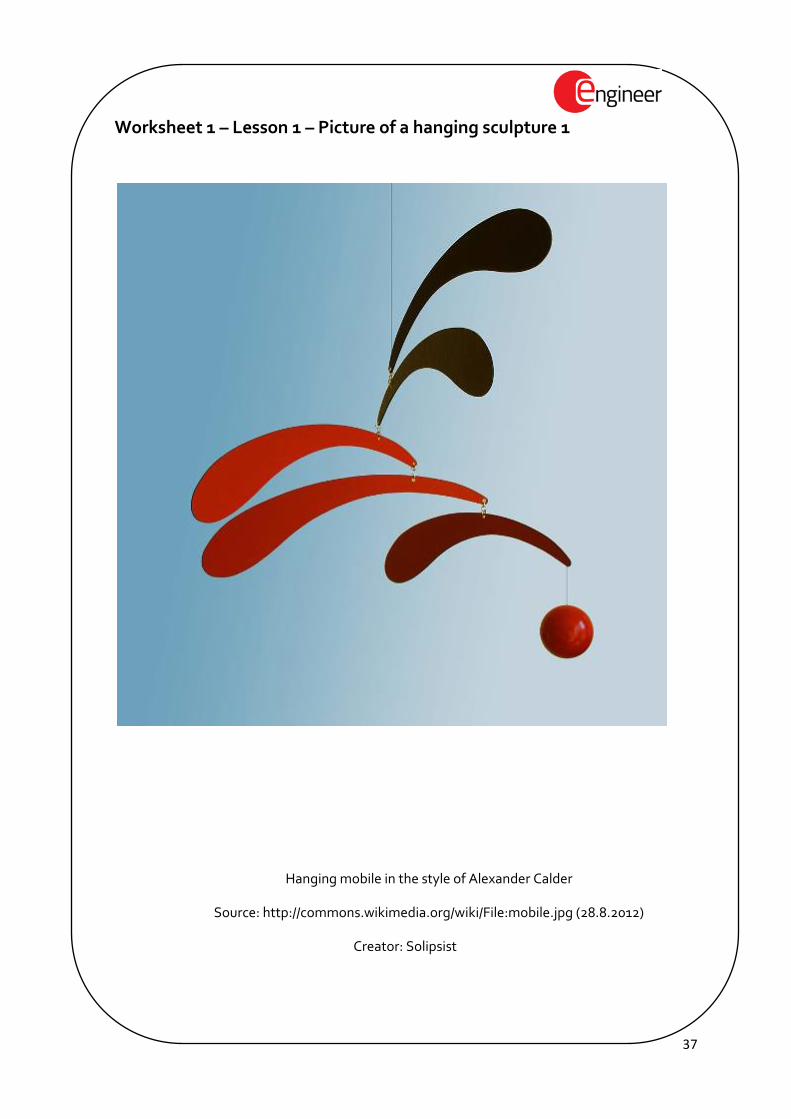
Worksheet 1 – Lesson 1 – Picture of a hanging sculpture 1
Hanging mobile in the style of Alexander Calder
Source: http://commons.wikimedia.org/wiki/File:mobile.jpg (28.8.2012)
Creator: Solipsist
37
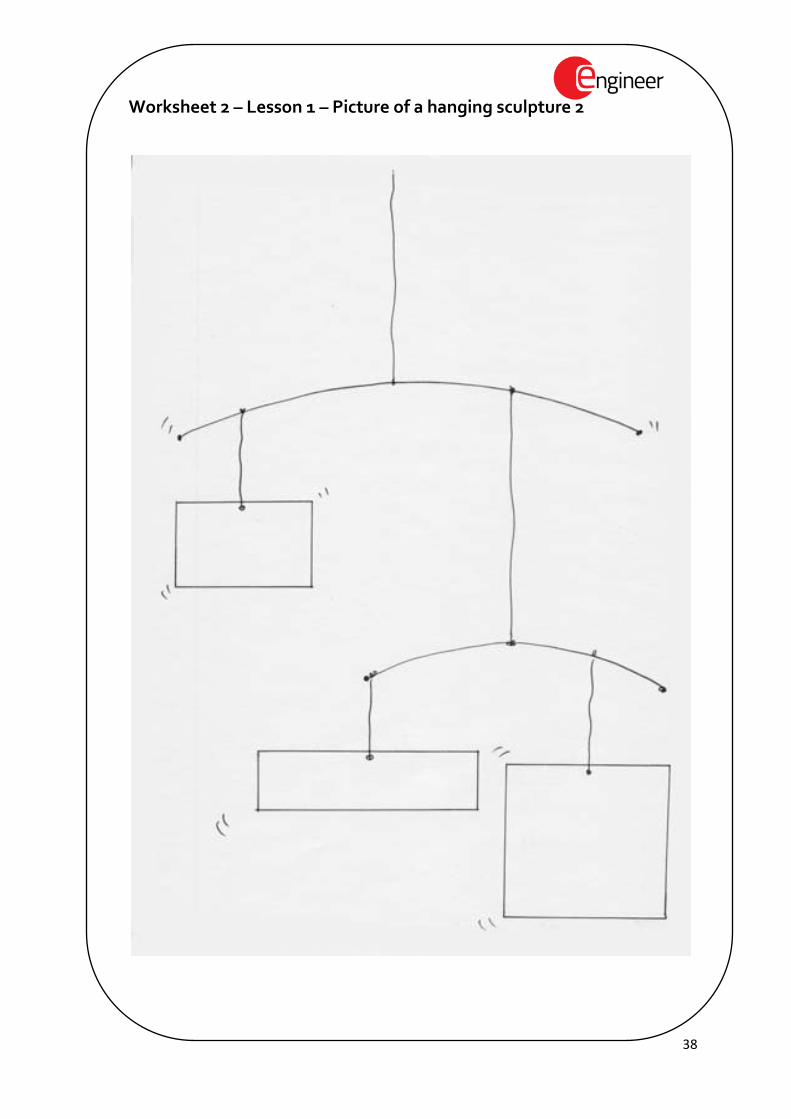
Worksheet 2 – Lesson 1 – Picture of a hanging sculpture 2
38
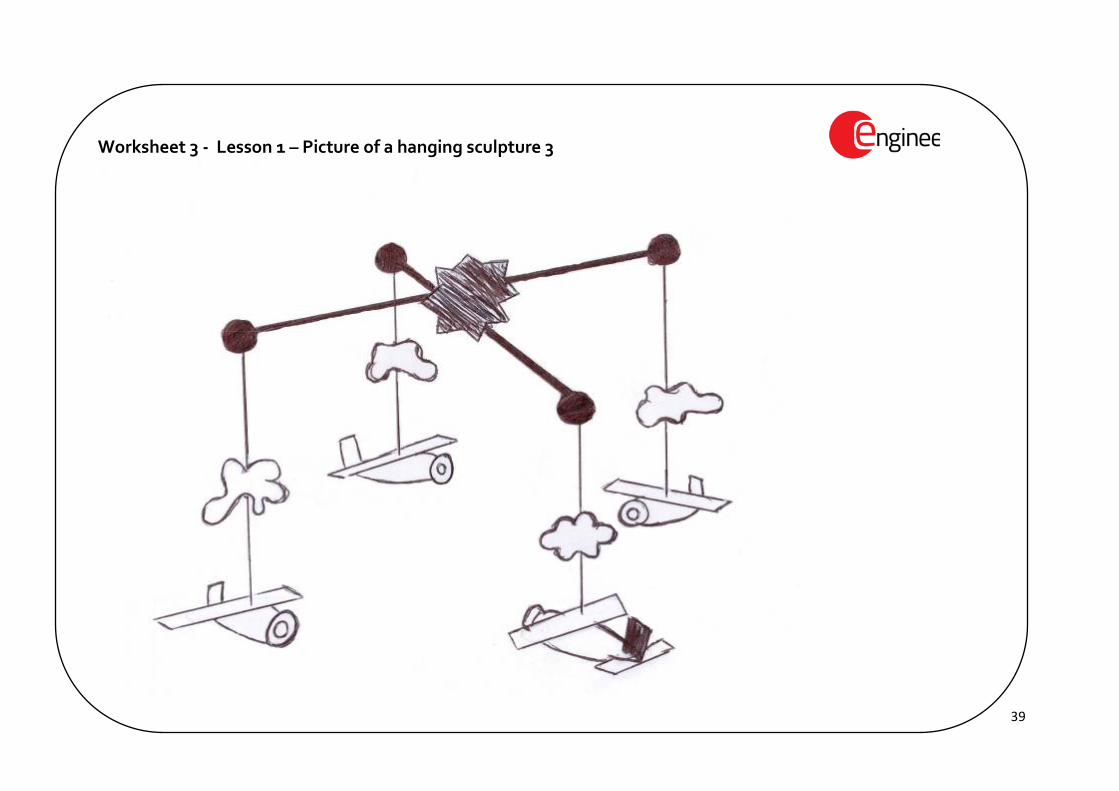
Worksheet 3 - Lesson 1 – Picture of a hanging sculpture 3
39

Worksheet 4 - Lesson 2 - Seesaw made out of a ruler Name: Date: What do you need:
- ruler
- non-round pencil
- ten token To work!
1. First read this instruction. Then write down your predictions.
2. Lay the ruler on the pencil. Balance the ruler.
3. Lay a token on each end of the ruler. Try to move the tokens until the seesaw is
balanced.
4. Can you manage to make the seesaw balance with different numbers of token?
5. Fill in the documentation sheet.
40

Worksheet 5 - Lesson 2 - Coat hanger Name: Date:
What do you need:
- coat hanger made out of wire
- piece of string
- possibility to hang something up like a hook
- 10 clothes pegs
To work!
1. First read this instruction. Then write your assumptions down.
2. Fix the coat hanger with the piece of string so that it hangs from the hook.
3. Balance the coat hanger with two clothes pegs.
4. Can you manage to balance the coat hanger with different numbers of clothes pegs?
6. Fill in the documentation sheet.
41

Worksheet 6 - Lesson 2- Broom Name: Date:
What do you need:
- broom
To work!
1. First read this instruction. Then write your assumptions down.
2. Put the broomstick over your hands. Make sure that the broomstick can move
freely over your hands. Stretch your arms out as wide as you can.
3. Now slowly move your hands together into the middle of your body.
4. Try to predict: To which side does the broom tip or move? To the side of the
brush or to the other side?
5. Fill in the documentation sheet.
42

Worksheet 7 - Lesson 2- Playground seesaw Name: Date:
What do you need:
- playground seesaw
- several children
To work!
1. First read this instruction. Then write down your predictions.
2. Balance the seesaw first with two children.
3. Follow the illustrations A to C.
4. Fill in the documentation sheet.
43

Worksheet 8 - Lesson 2 – Documentation sheet Seesaw made out of a ruler
Name: Date: Do you have an assumption how to put the token to get the seesaw balanced?
______________________________________________________________________________
______________________________________________________________________________
_____________________________________________________________________________
To work! Paint: How can you balance the seesaw? Where do you need to lay down the tokens?
Describe: How do you balance the seesaw? Where do you need to lay down the tokens?
______________________________________________________________________________
______________________________________________________________________________
_____________________________________________________________________________
Do you have an explanation?
______________________________________________________________________________
______________________________________________________________________________
_____________________________________________________________________________
44
Worksheet 9 – Lesson 2 – Documentation sheet Broom Name: Date: I predict that
______________________________________________________________________________
______________________________________________________________________________
______________________________________________________________________________
To work! Do the experiment. Write down your observations. ______________________________________________________________________________
______________________________________________________________________________
______________________________________________________________________________
______________________________________________________________________________
______________________________________________________________________________
Try to write down an explanation.
______________________________________________________________________________
______________________________________________________________________________
______________________________________________________________________________
45

Worksheet 10 – Lesson 2 – Documentation sheet Coat hanger Name: Date: Predict where you need to clip the clothes pegs on the coat hanger in order that it is balanced:
____________________________________________________________________________
____________________________________________________________________________
___________________________________________________________________________
To work! Paint: How can you balance the coat hanger? Where do you need to hang the clothes pegs?
Describe:
How can you balance the coat hanger? Where do you need to hang the clothes pegs?
____________________________________________________________________________
____________________________________________________________________________
____________________________________________________________________________
Do you have an explanation?
____________________________________________________________________________
____________________________________________________________________________
____________________________________________________________________________
46

Worksheet 11 – Lesson 2 – Documentation sheet Playground seesaw Name: Date: Can you predict how the children need to sit to balance the seesaw?
_____________________________________________________________________________
_____________________________________________________________________________
____________________________________________________________________________
To work! Paint: How can you balance the seesaw? Where do the children need to sit? Describe: How can you balance the seesaw? Where do the children need to sit? _____________________________________________________________________________
_____________________________________________________________________________
_____________________________________________________________________________
Do you have an explanation?
_____________________________________________________________________________
_____________________________________________________________________________
_____________________________________________________________________________
47

Worksheet 12 - Lesson 2 – Drawing of a building crane
48

Worksheet 13 - Lesson 2- The building crane Name: Date: You made experiments on force, counter-force, balance and centre of gravity. You can find these physical concepts in your daily life – for example in a crane. To work! 1. Look in groups of two at the drawing of the building crane. Discuss the questions.
- Can you find the centre of gravity? - Where does a force act? And where is its counter-force? What is the function of a
counter-force? - Is the crane balanced?
2. Insert the technical terms in the drawing: force/ counter-force / centre of gravity
49

force
Worksheet 14 - Lesson 2 – Answer sheet – The building crane Name: Date: You carried out experiments on force, counter-force, balance and centre of gravity. You can find these physical concepts in your daily life – for example in a crane. To work! 3. In groups of two look at the drawing of the building crane. Discuss the questions.
- Can you find the centre of gravity? - Where does a force act? And where is its counter-force? What is the function of a
counter-force? - Is the crane in balance?
4. Insert these technical terms in the drawing: force / counter-force / centre of gravity
50

Worksheet 15 - Lesson 3 – differentiation card 1
Add one level.
51

Worksheet 16 - Lesson 3 – differentiation card 2
Add two levels.
52

Worksheet 17 - Lesson 3 – differentiation card 3
Add 2, 3, 4 ... objects.
53
Worksheet 18 - Lesson 3 – differentiation card 4
Arrange that objects can be swapped but are still free to move.
54

Worksheet 19 - Lesson 3 - differentiation card 5
Slide the centre of gravity within a level.
55
Worksheet 20 - Lesson 3 – differentiation card 6
Decorate the suspension.
56

Worksheet 21 - Lesson 3 – differentiation card 7
Take a level away.
57
Worksheet 22 - Lesson 3 – differentiation card 8
Try to hang a heavy and light object at the same level.
58

Science notes for teachers about balance and forces, and mechanical engineering
Some key science concepts involved in Lesson 2 • forces act on objects • forces often come in pairs • when the forces acting on an object are balanced, the objects keeps doing what it is already doing
(which could be moving at steady speed in the same direction or remaining stationary) • turning forces • weight is a force • centre of gravity
The engineering process developed in this unit provides pupils with opportunities to imagine creative solutions to solve the engineering challenge. They are encouraged to present and discuss their approach and critically evaluate, in positive ways through making suggestions for improvement, the creations of others pupils. Balanced forces A key idea in Lesson 2 concerns that of balanced forces. Balanced forces can act on both stationary and moving objects and in each case, this idea can present particular challenges for pupils’ understanding. Pupils often find difficulty in explaining what forces are but can more easily recognise what forces do to objects. They know from experience that forces can make objects move, and that this can involve both speeding up and slowing down. They also know that forces can change the direction of a moving object and the shape of the object. In making a mobile pupils need to apply their understanding of where forces are acting on the mobile structure. Balancing a meter stick on your finger provides some insight into this. The weight of a meter stick is distributed evenly along its length. Although the pull of gravity acts along its entire length, when balanced on your finger, it feels as if all the weight acts through this single point at its centre. This enables the downward force (weight) of the stick to be balanced by the upward force of your finger at this single point. The single point through which the weight appears to act is known as the centre of gravity. It is in different places in different objects and this is further illustrated in the broom experiment in Lesson 2. For the mobile to be stable, the total forces acting on its various parts need to be balanced. Turning forces This engineering challenge requires pupils to apply their knowledge of turning forces. Any object acted upon by forces can be turned. They know for example, from early experiences that a small child can balance a heavier person on a seesaw by sitting further away from the pivot. The weight of each person on the seesaw exerts a turning force around the pivot. When the weight force of each object on either side of a pivot is the same, the turning force about the pivot is equal if they are the same distance form the centre (as in Figure 1). If you think of the forces about a pivotal point then the forces are acting in opposite directions; the left side acts anticlockwise and the right side clockwise. For the system to be balanced, these two forces must be the same. The force exerted on each side is not just a consequence of the weight. The total force on each side is a product of the weight force and the distance from the pivot (Figure 2). A change in weight or distance results in a change in equilibrium.
59 This document is produced under the EC contract № 288989
This work is licensed under a Creative Commons Attribution-NonCommercial 4.0 International License
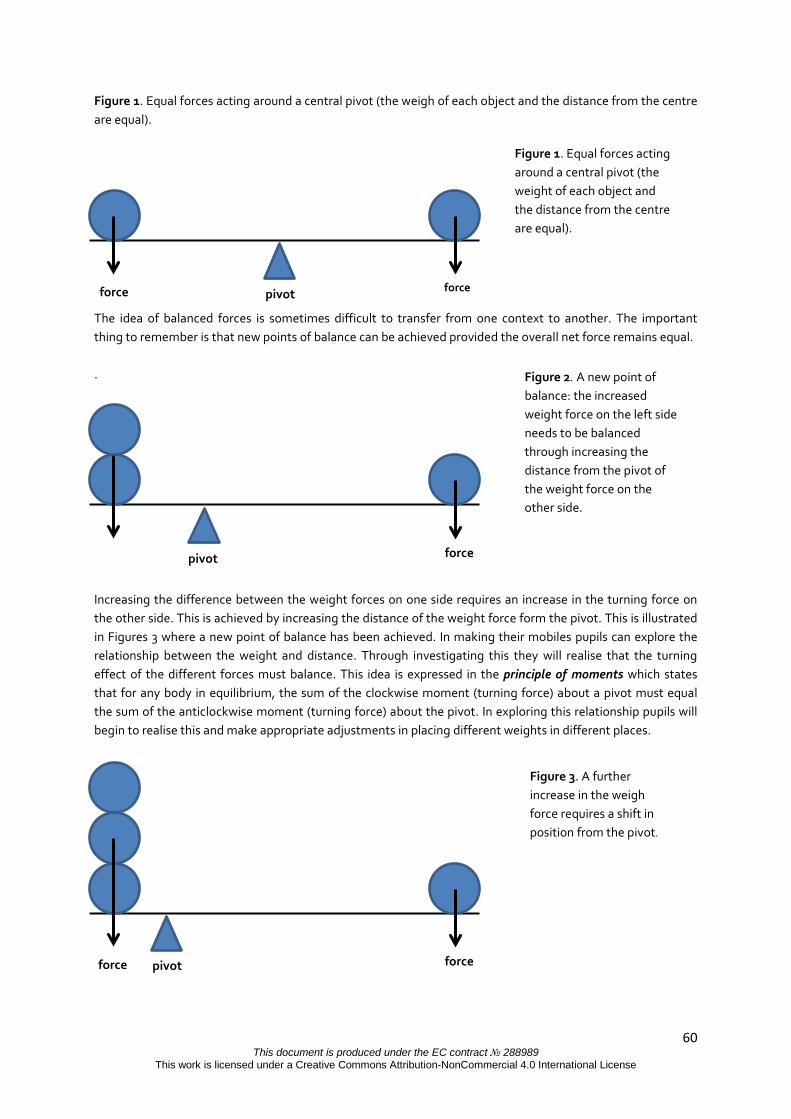
Figure 1. Equal forces acting around a central pivot (the weigh of each object and the distance from the centre are equal).
The idea of balanced forces is sometimes difficult to transfer from one context to another. The important thing to remember is that new points of balance can be achieved provided the overall net force remains equal. .
Increasing the difference between the weight forces on one side requires an increase in the turning force on the other side. This is achieved by increasing the distance of the weight force form the pivot. This is illustrated in Figures 3 where a new point of balance has been achieved. In making their mobiles pupils can explore the relationship between the weight and distance. Through investigating this they will realise that the turning effect of the different forces must balance. This idea is expressed in the principle of moments which states that for any body in equilibrium, the sum of the clockwise moment (turning force) about a pivot must equal the sum of the anticlockwise moment (turning force) about the pivot. In exploring this relationship pupils will begin to realise this and make appropriate adjustments in placing different weights in different places.
force force pivot
force pivot
force force pivot
Figure 2. A new point of balance: the increased weight force on the left side needs to be balanced through increasing the distance from the pivot of the weight force on the other side.
Figure 1. Equal forces acting around a central pivot (the weight of each object and the distance from the centre are equal).
Figure 3. A further increase in the weigh force requires a shift in position from the pivot.
60 This document is produced under the EC contract № 288989
This work is licensed under a Creative Commons Attribution-NonCommercial 4.0 International License
For all constructions in engineering, be it machinery, buildings or similar objects, forces and counter-forces must be balanced. A crane for example, tips over if it doesn´t have a counterweight that balances the weight lifted.
61 This document is produced under the EC contract № 288989
This work is licensed under a Creative Commons Attribution-NonCommercial 4.0 International License

Pupils ideas about the science of balance and forces Children's thinking about the way the natural world behaves come from their everyday experiences. They may not represent the established current scientific view but they usually contain sensible reasoning based on observation and interaction. Offering opportunities for children to challenge their thinking through activity is more likely to shift their perceptions than telling them facts. However, this presents a significant pedagogical task. It is extremely demanding for learners at all levels and ages to accommodate new ideas about a particular phenomenon, especially when it comes to implicit knowledge. Although through research we have some insight into the ideas pupils are likely to have in particular conceptual domains in science, often, pupils have difficulty in articulating their thinking so there is a need to exercise some caution in making assumptions about their reasoning. This highlights the importance of providing opportunity for children to discuss their thinking. Weight is a force Weight in science refers to a force (the gravitational attraction between an object and the earth) which is measured in Newtons. In conversation however, people using the word weight often actually mean mass. Mass is a measure of how much ‘stuff’ there is in an object and is measured in Kilograms. When Astronauts went to the Moon, for instance, their mass stayed the same as the amount of stuff in them was the same. However, their weight decreased. This is because gravity is weaker on the Moon and so the astronauts would have felt a smaller force pulling them towards the Moon’s surface. As a result they would have found it easier to jump up into the air. The difficulty of this concept must not be underestimated in teaching and it may be that pupils do not develop a full appreciation of it until later in their education. The teacher will need to use their professional judgement in deciding the appropriateness of this distinction for the pupils they are working with. It has been shown, for instance, that pupils often refer to ‘gravity’ as the reason why objects travelling in the air fall but they can hold different ideas about gravity itself (1). They often view gravity as a ’pulling down’ or ‘attractive’ force. Others may think of gravity as pushing down on things. They may link gravity with the air and may not associate gravity with weight (or heaviness) of an object. The Nuffield Primary Science Teachers’ Guide on Forces (1) provides an interesting example of a pupil’s ideas about the forces acting on a glider that shows a sophisticated idea of how ‘The downwards pull of gravity (which stops it going up) is opposed by the upwards push of air under the wings (which stops it coming down)’. However, the pupil also mentions that 'push that wears off' demonstrating that he/she believes that the initial force that started the movement through the air runs out (that is, the force gets used up by the motion of the object as opposed to acts on the object). This intuitive view is not scientifically correct. Stationary objects and moving objects present their own challenges in understanding of forces. Balanced forces: Stationary structures Children often believe that there are no forces acting on objects that are stationary and they do not recognise that forces are needed to keep the object in a stationary position. Providing tactile experiences of forces acting on objects that are not moving is helpful in challenging their thinking. Investigating balance in a range of objects and shifting their own balance to feel forces is helpful in this regard as is feeling the buoyancy force when pushing down on a balloon floating in a tank of water. The key idea here is that in order for an object to be stationary, it’s not that there are no forces acting on it, rather, it is that the forces acting on it are balanced. Therefore the forces acting on a stationary floating object are its weight pressing downwards on the water and the upthrust caused by the buoyancy force acting upwards. These are equal and balanced. We can also experience this directly in a game of tug-of-war when, despite each side exerting a force and pulling, there is no movement in either direction if the forces are equal and balanced. It is also difficult to recognise that forces in stationary structures can be transmitted within the structure itself. The reason for this is that the
62 This document is produced under the EC contract № 288989
This work is licensed under a Creative Commons Attribution-NonCommercial 4.0 International License
transmission is difficult to visualise in something that is static. Again where possible, it is important to let pupils feel or see the forces acting in stationary structures. Exploring creative ways of supporting weights in model structures (including but not limited to bridges) is a useful way of doing this. Balanced forces: moving objects Using a force to move a stationary object can lead to pupils thinking that if they apply a force to an object to get it moving, that it will keep moving until the force they have applied runs out. If they throw a ball into the air for example, they could reason that the force they have given the ball stays with it until it runs out (that is, the force gets used up by the motion of the object as opposed to acts on the object). This is eminently sensible and intuitive but at odds with scientific explanation. Forces don’t belong to objects they act on them. The forces acting on an object that is moving in a straight line and neither speeding up or slowing down are balanced. This is difficult to comprehend because it is sometimes difficult to recognise which forces are acting on the moving object and whether or not the object is travelling at the same speed, slowing down or speeding up. Where the forces acting on a moving object are not balanced, the object is either speeding up, slowing down or changing direction. It can help pupils if the teacher is able to draw on their life experience to recognise where this happens. They know, for example, that in descending a steep hill on a bicycle, it is necessary to use the breaks to constantly apply a frictional force to slow down the bicycle. This is an important idea; that to slow down a moving object, a force must be applied all the time (constantly). This also applies to an object that is speeding up; there must be force acting on it all the time. In cycling on a flat surface, for example, it is necessary to constantly apply a force to the pedals in order to keep accelerating. For an object that is free falling, the force of gravity acts on it all the time to accelerate it towards the earth. This means that the object would keep going faster and faster until it reached the ground. This does not happen because another force, air resistance, balances out the effect of gravitational pull. Investigating the journey of a free fall parachutist exemplifies this. The unit offers pupils a range of experiences to explore some of their ideas about forces in a different context. It can be used as an opportunity to extend their awareness of how engineers use their knowledge of forces to design and make simple machines to perform particular tasks. In undertaking the challenge, the pupils can extend their thinking about different ways in which forces can be transmitted, how simple machines can transform motion for particular purposes and how mechanisms can speed up or slow down movement. In most instances, through making their models, pupils will have tactile and visual experiences of where forces are acting. References (1) Nuffield Primary Science Teachers’ Guide: Forces and Movement. Ages 7-12. (1995) HarperCollins Publishers: London.
63 This document is produced under the EC contract № 288989
This work is licensed under a Creative Commons Attribution-NonCommercial 4.0 International License
A glossary of terms used in this unit Balance - equilibrium is a condition in which a structure or a system is at rest or uniform motion due to the balance of forces. Centre of gravity - is the point of a body at which the force of gravity is considered to act. Counterforce- In most cases, forces act in pairs and act in opposite directions. The opposite force is sometimes referred to as the counterforce. Force and counterforce act in opposite directions. The result of an equal force and counterforce is a balance of forces. Engineer- a person who uses his/her creativity and knowledge of materials, tools, maths and science to design objects that can solve problems, or make life easier. Engineering Design Process - the design cycle consists of five steps used by engineers in solving a problem: Ask, Imagine, Plan, Create, and Improve. Mechanical engineering – the engineering discipline concerned with designing and creating machines. Stability. -the ability of a structure or system to maintain its state when forces act on it, or to return to that state without undergoing large oscillations.
64 This document is produced under the EC contract № 288989
This work is licensed under a Creative Commons Attribution-NonCommercial 4.0 International License

Partners Bloomfield science Museum Jerusalem The National Museum of Science and Technology “Leonardo da Vinci” Science Centre NEMO Teknikens hus Techmania Science Center Experimentarium The Eugenides foundation Condervatoire National des Art et Métiers- muse des arts et métiers Science Oxford The Deutsches Museum Bonn Boston’s Museum of Science Netiv Zvulun – School Istituto Comprensivo Copernico Daltonschool Neptunus Gränsskolan School The 21st Elementary School Maglegårdsskolen The Moraitis school EE. PU. CHAPTAL Pegasus Primary School KGS Donatusschule ECSITE – European Network of Science Centres and Museums ICASE – International Council of Associations for Science Education ARTTIC Manchester Metropolitan University University of the West of England Er zijn 10 lessenseries beschikbaar in deze talen:
The units are available on www.engineer-project.eu till 2015 and on www.scientix.eu
MAGLEGÅRDSSKOLEN Gentofte Kommunes skolevæsen
65 This document is produced under the EC contract № 288989
This work is licensed under a Creative Commons Attribution-NonCommercial 4.0 International License