a beginner’s guide tobeginner... · online manual. is the most ... this philosophy is quite...
TRANSCRIPT
A Beginner’s Guide
to
by Dan Kreider
Dorico Pro version 2.2
updated 15 December 2018

2
TABLE OF CONTENTS
About ............................................................................... 3
Design and Philosophy ................................................. 5
Setup Mode ..................................................................... 8
Write Mode .................................................................. 12
Common questions about score appearance ........... 43
Engrave Mode .............................................................. 46

3
ABOUT
This brief document is intended as an overview of Dorico for new users. It’s not intended to be comprehensive, but it can hopefully serve as a concise written introduction to the basic functions of the program.
OTHER RESOURCES
There are several excellent online resources for learning Dorico and solving problems you encounter:
Google is the best place to start. “Dorico” is a fairly unique term, so entering “Dorico” followed by a word or phrase related to your question will likely return a number of helpful results.
The Online Manual is the most comprehensive resource. You can also access a list of tokens and popovers.
John Barron has written a great tutorial called “Getting started with note input in Dorico” which walks new users through the essentials of entering notes and other score elements.
Dorico’s YouTube channel is an excellent introduction to the program. The tutorial videos are professionally produced and mercifully devoid of filler material that often bloats such resources. In particular, you should start with these playlists:
1. Setup Mode 2. Write Mode 3. Engrave Mode 4. Play Mode
The Dorico forum is an active community of users, with unparalleled engagement by the development team. A word of advice to new posters: search before posting, as your question may have already been asked and answered.

4
The Dorico Facebook group is also an active community of users, and you can freely ask questions and engage with others. There are no dumb questions: just ask!
MORE CAVEATS
The intended strength of this introduction is to present a substantial amount of material in a concise format. Often, users will be unaware of a particular function, so they may not even know to search for it. Here, functions may be presented without extensive explanation, but they can be further explored through the resources listed above.
Dorico often presents multiple ways to achieve a particular result, but this introduction unashamedly picks the best way. Of course, that’s a matter of opinion, and different users will prefer different methods.
MAC USERS
For brevity’s sake, key commands are indicated for Windows OS on an English-language keyboard. Mac users should use Cmd instead of Ctrl for all pertinent key commands.
COMPARING VERSIONS
This document covers functionality in Dorico Pro. If you’re an Elements user, you don’t have access to Engrave mode or Engraving Options (as well as a few other limitations).

5
DESIGN AND PHILOSOPHY
Dorico is fundamentally different from other notation programs. Some features are similar, of course, since the process of computer-based typesetting will often involve predictable steps and functions. But learning Dorico successfully requires that users set aside their previous familiarity with other software and begin afresh.
Some general descriptions:
Default settings for notation standards
Dorico emphasizes global settings for layout, notation, and engraving. Many of the defaults can be easily changed, but Dorico does tend to say, “This is how it should be done.” This philosophy is quite different from Finale, which tends to make fewer decisions, and allows the user to choose much more from the start.
If this sounds like a bad thing, it isn’t, for two reasons:
1. You really can change all sorts of engraving conventions if you wish, and you can save your modified settings as the new defaults for all future projects. These user options represent quite an exhaustive list.
2. The world of music notation is quite broad, but many conventions are fairly well-established. Composers and arrangers who aren’t professional engravers can easily overlook important notation principles, and may end up producing scores that look quirky and amateurish, which ultimately hinders communication through the printed score.
Ultimately, Dorico’s approach is ideal: set defaults according to best practices, and allow the user to change them (and save the changes) as desired.

6
Notes can be easily manipulated
Once a note is entered, it’s quite easy to manipulate it in all sorts of ways: change duration, change rhythmic position (move it earlier or later), change pitch, duplicate it, move it to a different staff, and so on.
Notes are really like events on a piano roll editor, which results in much greater flexibility. Type in a whole note in 3/4 meter, and Dorico automatically creates a dotted half note tied to a quarter in the next bar, because the note is 4 beats in length, regardless of bar divisions. Even moving a whole note to a different staff with existing eighth-note rhythms is completely flexible, because all those notes are non-destructive.
Key commands are faster than using a mouse
Although inputting musical elements in Dorico can be achieved through mouse-based menus, nearly everything can be input through key commands. Users will benefit greatly from the speed of Dorico’s user interface if they’re willing to move away from the mouse and focus on memorizing key commands.
Different modes for different functions
Dorico is based on a strong division between different modes for different functions, which we’ll discuss later. The modes are intended to reflect a typical workflow for a project. First, you Setup the score with players and desired layouts. Next, you enter all elements of the score in Write mode. If there are layout nuances of the score you wish to change, like line breaks or the exact positioning of tempo marks, you polish the appearance in Engrave mode. In Play mode, you can focus on fine-tuning the playback as desired. And finally, Print mode outputs the printed scores.
The strength of this division by mode is that different actions are grouped according to their order of operation. For example, any action related to

7
layout, such as adding players, or creating a separate score for just the string section, takes place in Setup mode.
There’s much more that could be said about design and philosophy, but some of that will unfold as we progress. Let’s use the five modes to begin learning some of the specifics.

8
SETUP MODE
Setup mode is where you add players, flows, and layouts. You can access Setup mode by pressing Ctrl-1.
The bottom middle section is for creating flows.
Flows are independent sections of music, like a song, a movement of a larger work, or a musical example. Here are some things you can do to your flows:
• Add, delete, duplicate, rename, and re-arrange flows quite intuitively. • Choose notation options that may be different from one flow to
another, either by right-clicking, or by clicking on the gear icon. • Add a video to a flow for the purpose of scoring. Right-click to add. • Right-click to add Project Info. You can set project info for the whole
project, as well as for each flow individually, and copy information from one to another easily. The info in these fields will be used later to automatically populate tokens.
The left column is for adding and grouping players (and their instruments):

9
• Shift-P to add a solo player. Start typing an instrument name and hit enter!
o A solo player is one person. Solo players can hold multiple instruments, which you can add using the plus button beside their name, or by typing Shift-I.
• Shift-Alt-P to add a section player. Section players can use divisi. • Right-click on a player’s name to access a variety of functions:
o Rename that player o Add or remove player from all flows (helpful if you have lots of
flows!) o Choose how chord symbols are to be displayed for that player, if
applicable • Click the dropdown arrow beside a player’s name to see the
instrument(s) that player is holding.
• Click the arrow beside the instrument to: o Change the instrument. o Move the instrument to a different player. o Edit the name of the instrument. Helpful if you want to change
automatic numbering of duplicate instruments! For example: If I want three trombones on two staves, I’ll rename Trombone 1 as “Trombone 1-2” (and its abbreviation). When I do that, the second staff will automatically be labeled as just “Trombone,” since I’ve broken the automatic numbering, and I can now rename it as “Trombone 3.”

10
• Dorico generally groups instruments pretty well, but you can make different groupings if desired. Click and Shift-click to select a sequential range of players, or Ctrl-click to select players that aren’t next to one another in the list. Then at the bottom left, click on the fourth icon to group them.
• You can also add custom brackets and sub-brackets in Engrave mode, so it may not be necessary to create custom groups.
• You can also click and drag on a player to change their order in the score. Whatever order you put them in will apply for all flows. You can change the order of players for a particular layout (Layout Options--Players).
The right column is for layouts.
A layout is just a particular combination of players. By default, Dorico will create a full score layout and a part layout for each player.
Dorico automatically assigns sequential layout numbers to layouts as they are created. The layout number can be used in tokens, and it is part of the filename that is created when you export PDFs. To view the layout number (and change it), click the arrow beside the layout name to expand it.
You can easily add additional layouts as desired. You may want a layout for choir and piano, or a score with only the string section shown. At the bottom of that right column, you can see several icons. Here are the first three:

11
1. Add a Full Score layout. 2. Add a Part layout 3. Add a custom layout
The point of these different layouts is that full score vs. part layouts will automatically display certain layout designs, like size and formatting. You can change these in Layout Options, but it’s best to start with the type you want.
The gear icon is for Layout Options, which we’ll talk about later. Basically, each layout can look different in regards to spacing, formatting, page size, and other functions.
How do these three sections work together?
Don’t miss this part!
First, click on one of your players to highlight it. Then look at the bottom (flows panel) and the right column (layouts panel). The checked boxes indicate which flows and which layouts that player is a part of. Check or uncheck boxes to add or remove the player from a flow or from a layout.
If instead of clicking on the check box, you click on the larger box itself, then that box is selected. Click on a flow, and you can now see (from the checked boxes in the left and right columns) which players and layouts are a part of that flow.
Click on a layout, and you can see the checked boxed that indicate which players and which flows it contains.
12
WRITE MODE
Write mode allows you to enter musical elements in the score. Switch to Write mode by pressing Ctrl-2. For a general introduction to Write mode, you can also watch the Write Mode videos.
HOW DO I ___?
Dorico’s UI (user interface) is thoughtfully laid out and will quickly become second nature to you, but it’s crucial to acquaint yourself with the handful of important sources for making changes.
When asking the question, “How do I ___?” there are five primary places to look:
• Notation Options • Layout Options • Engraving Options • Properties panel • Context menus
Rather than comprehensively describe every function of the following five sections, this is a brief description of each. It would be best to scroll through each option yourself to see what’s possible. Throughout this document, solutions will reference these locations as needed.
Finding a desired setting in one of these five locations is generally intuitive, though not always. If you’re not finding the settings you want, do a Google search.
If you can’t find your solution in one of the first three sections, your desired change is localized rather than global. If you can’t make your change easily

13
using any of the five sections, your desired change will need to be accomplished as a workaround instead of a native function.
The principle for best practice could be summarized this way:
• Global changes are best. • Localized changes are often necessary. • Workarounds should be your last resort.
If you find yourself repeatedly using workarounds, or making localized changes, look for a global option instead.
1. ENGRAVING OPTIONS (CTRL-SHIFT-E)
Engraving Options is an extensive list of ways to change the behavior of all sorts of score elements, and its changes apply to the entire project. You can then set your options as the default for all future projects using the button at the bottom left, if you wish (this applies to all three global options menus).
2. LAYOUT OPTIONS (CTRL-SHIFT-L)
Layout Options defines the layout (appearance) of each layout—that is, scores and parts. This is where you can see the importance of defining whether layouts you created in Setup mode are parts, scores, or custom. Make sure you check to see which layout you have selected before making changes!
You can define the appearance of each layout independently: options like page size, vertical spacing, staff labels, and bar numbers.
Here are a couple settings in Layout Options that most people will need to set:
• Bar Numbers: their appearance and behavior • Note Spacing: option to extend final system full width of the frame
(justify) • Page Setup: Page size, margins, and overall size of the music and other
elements (“Space Size”). A couple suggestions: o Full orchestra scores will probably have to be Size 8, or at least 7.

14
o To keep your scores and parts from looking amateurish and difficult to read, read through the MOLA Music Preparations Guidelines. When in doubt, a good rule of thumb for orchestra parts is Size 3.
• Staves and Systems: defining staff and system name labels • Vertical Spacing: a huge time-saver for making scores look nicely
spaced. Spend a lot of time here learning how these settings affect your score layout!
3. NOTATION OPTIONS (CTRL-SHIFT-N)
Notation Options is a list of big-picture notational principles for each flow. Your flows will appear in the left column, and you can make changes on a per-flow basis (or select multiple flows to make changes to them).
4. PROPERTIES PANEL (CTRL-8)
The Properties panel is a powerful and often-overlooked way to modify elements in the score on an individual (localized) basis. The panel options will change depending on what sort of element is selected in the score:

15
Again, rather than attempt to describe all the options that might be accessed from the properties panel, here are a couple important principles to know:
• The “Common” panel to the left side is always accessible, and contains settings that can be applied to almost any element.
• The panels on the right change depending on the selection. • If you don’t see the options you want in the properties panel in Write
mode, try switching to Engrave mode. There are often additional options there.
5. CONTEXT MENUS
Context menus are similar to the properties panel in that they provide a list of options for a given location in the score. Context menus can be accessed by right-clicking in the score, or by selecting the Edit menu from the top menu bar. The Edit menu provides several additional options, such as Remove Rests, Reset (position or appearance), Propagate Properties, and the option to switch the score between concert and transposed pitch.
VIEWING and NAVIGATION
• Ctrl-Alt-1 for page view: the score as it will actually appear on the page • Ctrl-Alt-2 for galley view: the score in one long stretch. Spacing won’t
look quite right, and things might collide here or there. But this is probably the better mode for entering notes and editing them.
• Three ways to quickly zoom in and out: o Z and X o G and H o Ctrl-minus and Ctrl-=
• Ctrl-G to jump to a specific bar. • If you hold down Shift as you click and drag with the mouse, you can
drag the score around in the viewable window.
16
• When you select an element in the score, press W to toggle between the full score and the part that contains that element.
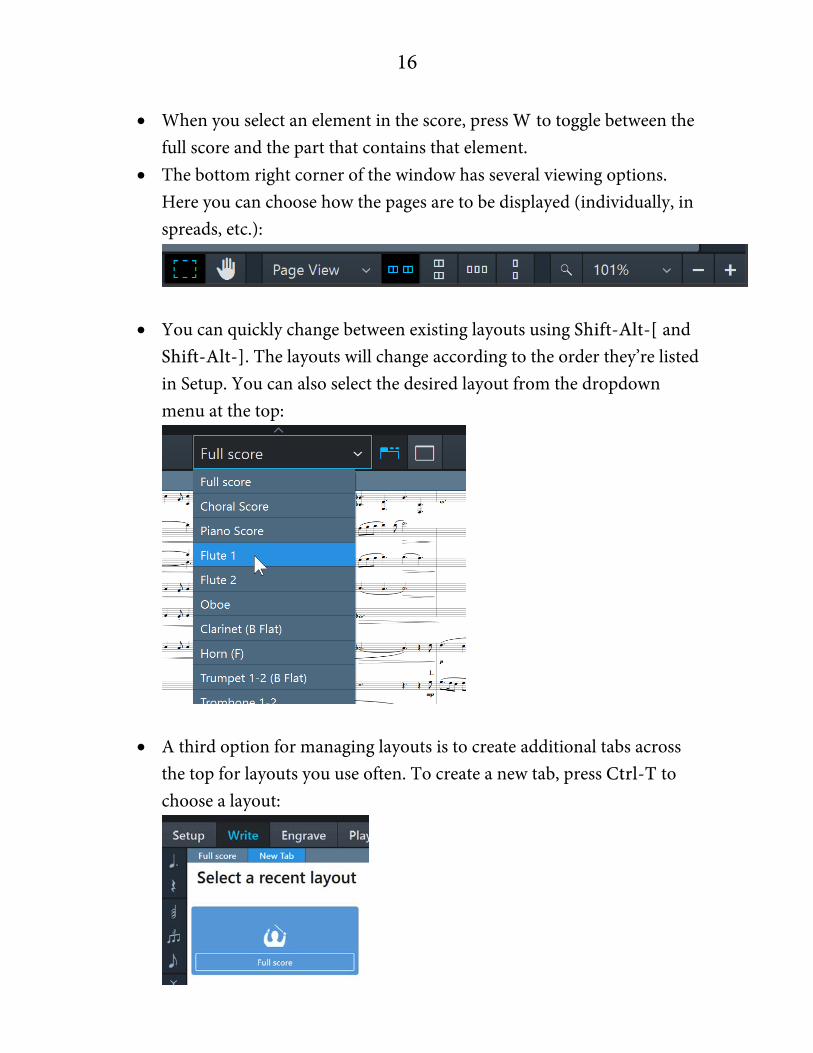
• The bottom right corner of the window has several viewing options. Here you can choose how the pages are to be displayed (individually, in spreads, etc.):
• You can quickly change between existing layouts using Shift-Alt-[ and Shift-Alt-]. The layouts will change according to the order they’re listed in Setup. You can also select the desired layout from the dropdown menu at the top:
• A third option for managing layouts is to create additional tabs across the top for layouts you use often. To create a new tab, press Ctrl-T to choose a layout:

17
• You can quickly increase the viewable screen area in several ways: o F11 to toggle fullscreen on or off. o Ctrl-7, 8, and 9 show and hide the left, bottom, and right panels
respectively. This works in Setup, Write, and Engrave modes, and partially in Play/Print.
o Ctrl-0 hides all panels. It acts as a toggle: if all panels are hidden in this way, Ctrl-7, 8, and 9 won’t work until Ctrl-0 toggled off!
o Ctrl-6 hides the top bar. o All of these sidebars can also be shown or hidden by clicking on
the small arrow on each edge:
SIGNPOSTS
Signposts are used to display items in the score that are hidden or implied, like hidden chord symbols, or hidden playing techniques, or system breaks.
You can select which signposts you want to be displayed (or hide them all) via View -- Signposts.
You can select signposts and edit their properties via the Properties panel.
BAR NUMBERS
Bar numbers can be displayed or hidden in the score on all staves. You can show or hide them via View--Bar Numbers. When displayed, these bar numbers don’t print or export. To change the behavior of printed bar numbers, go to Layout Options--Bar Numbers.

18
KEY COMMANDS
As I said before, Dorico is designed to work best with an emphasis on key commands instead of the mouse. As a result, it’s helpful to assign key commands for frequent functions, or change existing commands (but don’t get in a hurry to change Dorico’s defaults: try to adjust to them first!)
You can edit and add key commands via Preferences (Ctrl-comma). Here are some functions you may want to assign to custom key commands, with the shortcuts I’ve assigned to them (though your mileage may vary):
• Remove rests (Ctrl-Shift-R) • Propagate properties (Ctrl-Alt-R) • Shift octave up/down (numeric keypad +/-) • Increase/decrease rhythmic grid (1, 2) • Show/hide signposts (F10) • Show/hide bar numbers (F12)
SELECTION
• Arrow keys move your selection anywhere, wherever the next item is on the score: up, down, left, right. Note: This navigation behavior can sometimes be unexpected. As Dorico develops, this functionality is expected to improve.
• Ctrl-L/R arrow moves to the next or previous downbeat. • Click on the empty part of a bar to select everything in that bar. • Click on an item to select it (but arrow keys are faster!) • Shift-L/R arrow adds a selection to the left or right (or above/below).
Chord symbols aren’t included in this function. • Use Shift-click to select multiple sequential items (but arrow keys are
faster!) • Click-and-drag to create a selection box. Rarely the fastest way, but
sometimes the best option.

19
• Use Ctrl-click to select multiple items that aren’t sequential. There are some helpful nuances to this… if you’re holding down Ctrl and you click on an unintended item to add it to the selection, click on the same place to de-select it. You can also click on a whole bar or a range of bars, and Ctrl-click specific items to deselect them.
• Use Ctrl-Alt-click to toggle the selection between multiple items that are superimposed on one another, such as a signpost and a musical element. Ctrl-Alt-click will allow you to choose which item is selected.
• Ctrl-Shift-A invokes “Select More.” It expands the current selection to include all similar elements in the same bar, then (pressed again) in the same system, then in the entire flow. “Select More” is item-specific: it will expand the selection for only the current lyric type, or dynamics, or chord symbols
• To select a group of beamed notes, click on the beam. • To select a chord, click on the stem.
PLAYBACK
• Start and stop playback using Spacebar. • To play from the beginning of the flow, press Shift-Alt-Spacebar. • To play from a specific point, select a single item (a note, a rest, a
dynamic, etc) and press P. • If you have multiple items selected (for example, an entire bar), pressing
P will playback only that instrument. • You can playback only certain instruments (strings alone, for example)
from a certain point by selecting those bars and pressing P. • You can change all sort of playback settings via Playback Options (Ctrl-
Shift-P), or via Preferences (Ctrl-comma, scroll to the bottom).

20
POPOVERS
Popovers are a brilliant way to add all sorts of musical elements to the score without having to navigate to menus. Popovers are invoked in Write mode by Shift plus a letter key. You can find a list of popovers, and their possible entries, on the Dorico user manuals page.
From this point forward, popovers will be referenced as needed without much explanation.
KEYBOARD-BASED NOTE INPUT
• Start note input at a given selection by pressing Enter. Press Enter again to leave note input.
• Your rhythmic grid is an incredibly important tool. It’s visible on the bottom left corner of the screen:
Think of it like the smallest resolution that you’re working with. Change its value using Alt-[ and Alt-]. To switch between quarters, eighths, and 16th notes, you’ll need to press it twice to skip the dotted value in between!
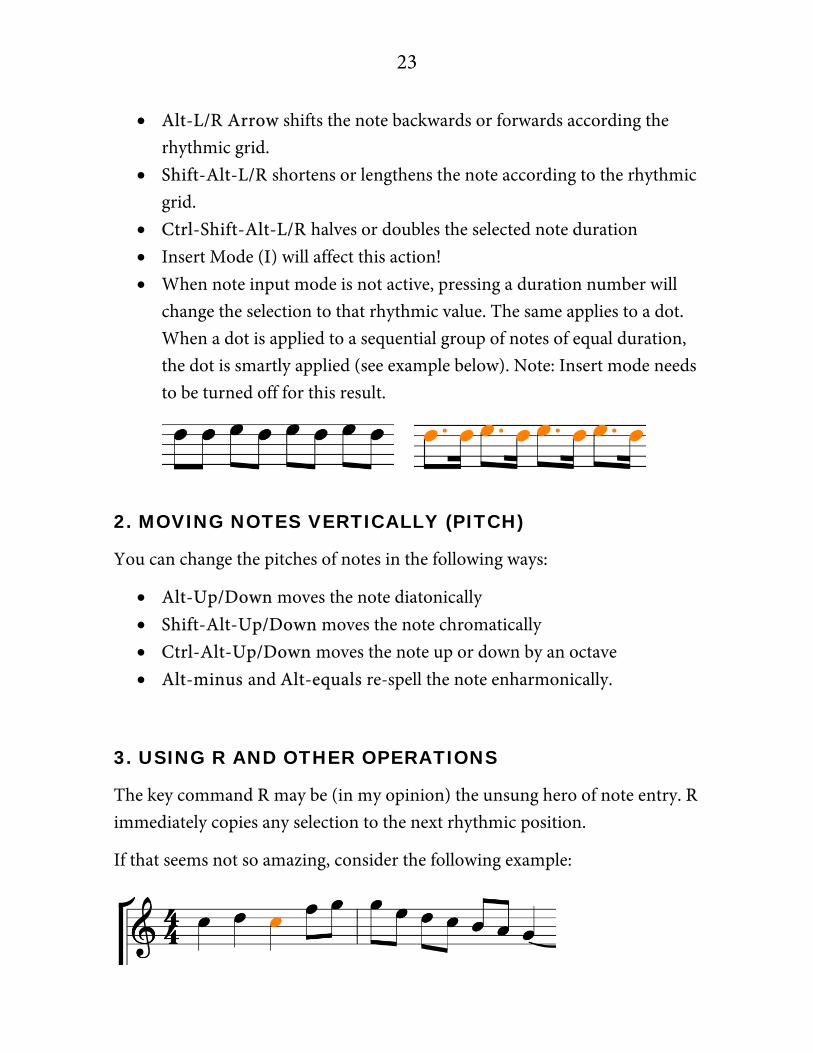
• Choose duration by pressing a number value. 6 is a quarter note. Higher numbers double duration, lower numbers halve it. Pressing a period makes the duration dotted. When you press any number key, it will remove the dot.
• Press A-G for the pitch. Dorico will automatically choose the octave closest to the previous note (even if there’s a lot of rests in between). To force a note to the higher or lower octave, press Shift-Alt- or Ctrl-Alt- before pressing the note name, though this forced direction has its

21
limits: an F that follows an E cannot be forced to the higher octave. You can quickly change the octave of the note you just entered by pressing Ctrl-Alt-Up or Ctrl-Alt-Down, which is certainly easier. (Opinion: I have a full numeric keypad and remapped these functions to the + and – buttons.)
• Enter notes with accidentals by pressing 0 for natural, minus for flat, and equals for sharp (no need if you’re entering notes diatonically). It’s sometimes easier to enter the notes diatonically, and modify them afterwards (discussed below).
• Some elements like dynamics and slurs can be entered while in note input mode, although it’s typically easier to add them separately.
• If you begin note input mode where there’s existing music, it’ll be overwritten (unless you’re in Insert Mode, see below)
• You can type comma for rest mode, but it’s easier to just press Spacebar to advance the caret by the duration you have selected. In Dorico, rests don’t have to be explicitly entered (usually). Rests will just appear wherever notes are absent.
Here’s a sample scenario: Want an empty bar except for a 16th note at the end of it? No need to enter any rests!
Make sure your rhythmic grid is set to 16th notes Ctrl-Right Arrow to go the next downbeat Left Arrow once to go back a 16th Enter a 16th note at that point and watch the remainder of the
measure populate with rests.
MIDI-BASED INPUT
Your MIDI keyboard needs to be plugged in before Dorico starts for it to be detected.

22
You can enter notes using a MIDI keyboard in two ways: “step” entry and real-time recording. Step entry works much the same as keyboard-based entry: you invoke Note Input mode, select the duration, and enter the notes or chords on the keyboard.
For MIDI recording input, select the bar in which you wish to begin and press Ctrl-R. You’ll hear a one-bar count-off, after which you begin playing. Make sure you have enough empty bars added before recording, since MIDI recording doesn’t add them automatically.
You can modify settings in Preferences--Play and Playback Options--Click.
INSERT MODE
When Insert mode is turned on (I), notes entered or deleted will shift all subsequent notes on that staff to the end of the flow.
MANIPULATING NOTES
A common mistake new users make is to delete and re-enter notes, rather than easily manipulating the notes they’ve already entered! When you’ve just entered a note, it’s selected and ready for you to change it. In this section, we’ll look at the many ways users can quickly work with existing material without needing to re-enter notes.
The following commands apply either to the note that was just entered, or to a selection of notes when note input mode is not active. While in note input mode, you can use Shift-Left Arrow to add previous notes to a selection and manipulate them without leaving note input mode.
1. MOVING NOTES HORIZONTALLY (RHYTHM)
You can change notes rhythmically in the following ways:
23
• Alt-L/R Arrow shifts the note backwards or forwards according the rhythmic grid.
• Shift-Alt-L/R shortens or lengthens the note according to the rhythmic grid.
• Ctrl-Shift-Alt-L/R halves or doubles the selected note duration • Insert Mode (I) will affect this action! • When note input mode is not active, pressing a duration number will
change the selection to that rhythmic value. The same applies to a dot. When a dot is applied to a sequential group of notes of equal duration, the dot is smartly applied (see example below). Note: Insert mode needs to be turned off for this result.
2. MOVING NOTES VERTICALLY (PITCH)
You can change the pitches of notes in the following ways:
• Alt-Up/Down moves the note diatonically • Shift-Alt-Up/Down moves the note chromatically • Ctrl-Alt-Up/Down moves the note up or down by an octave • Alt-minus and Alt-equals re-spell the note enharmonically.
3. USING R AND OTHER OPERATIONS
The key command R may be (in my opinion) the unsung hero of note entry. R immediately copies any selection to the next rhythmic position.
If that seems not so amazing, consider the following example:

24
Suppose you wish to change the C on beat 3 to two eighth notes, C and E. Don’t delete and re-enter anything. Instead:
1. Select the C on beat 3. 2. Ctrl-Alt-Shift-Left to halve the value (or press 5 to change the quarter
note to an eighth) 3. R to duplicate the new eighth-note C. 4. Alt-Up, Up to move the second C to the E.
It’s faster to do than to explain. As the key commands become second nature, you can make the change in the example above in probably less than two seconds. And there are many different scenarios—too many to give examples for!
The point is this: you should always ask yourself, “Is there a faster way to do what I want?”
Here are several other operations to know:
• N and M for cross-staff beaming (only works on a grand staff instrument)
• Alt-N and Alt-M move the selection to the staff above or below. Note: this is non-destructive and repeatable.
• You can right-click on a selection to duplicate the selection to the staff above or below. If you wish, you can assign these functions to Shift-Alt-N and Shift-Alt-M (Ctrl-comma, Key Commands, search for “duplicate”).
NOTE SIZE, MUTING, OTHER PROPERTIES
• You can change the size of selected notes via the Properties panel, as well as muting them or changing their color:

25
• If you make changes to the properties of a note, like its size or color, or if you make changes to any other properties of a score element through the Properties panel (like changing the direction of a slur, for example), you must Propagate properties for the changes to be reflected in other layouts. You can do this through the Edit menu, or by assigning a shortcut (which you should probably do, since you’ll likely use this function frequently). This propagation will apply these property changes to any other layouts that contain that element. Note: Propagate properties only applies to existing layouts. If you create a new layout after propagating a property, the properties will need to be propagated again.
CLICKING, DRAGGING, AND MOVING ELEMENTS
Generally speaking, Dorico’s philosophy discourages clicking and dragging. Users expecting a click-and-drag to work for manipulating score elements are usually quickly frustrated. It’s true that some elements can be manipulated with the mouse, though that’s not the preferred method. Here are a couple things to know:
• Just like moving notes, Alt-Left/Right Arrow moves almost anything horizontally in the score: playing techniques, dynamics, chord symbols, slurs…

26
• Alt-L/R moves some elements (like playing techniques, chord symbols, text, and lyrics) incrementally based on the rhythmic grid, regardless of whether they have a note to attach to.
• Alt-L/R moves other elements (such as slurs and dynamics) to the next available position, but Ctrl-Alt-L/R moves those same elements incrementally in the rhythmic grid.
• Clicking and dragging an element in Write mode changes its location in the score. A dragged dynamic will attach to a different note. But in Engrave mode, it merely changes its appearance, and preserves all relationships regardless of distance.
FORCE DURATION
By default, Dorico dictates how a given rhythmic value is to be notated. If you wish to notate a rhythmic value differently than Dorico displays it, you can Force Durations using O.
If you find yourself frequently using Force Durations, consider one of the following options:
1. The rhythmic groupings you’re writing may actually be incorrectly notated.
2. Check Notation Options--Note Grouping to change global behaviors.
CHORD MODE
If you want to enter multiple notes in a chord, use chord mode (Q) and enter the note names as desired. Press Q again to exit chord mode.
A few more thoughts on chord mode:
• If you prefer to think of adding notes to a chord in terms of intervals, you can also use the Intervals popover (Shift-I). Enter the interval as a number for intervals above, and a negative number for intervals below.

27
You can enter multiple numbers separated by a comma, and you can specify specific interval qualities using M, m, etc.
• If you have a melodic line and would quickly like to add a harmonic part to it in the same voice (similar to Finale’s Speedy mode), you can combine Chord mode (Q) and Lock Durations (L). You’ll still need to use the arrows to advance the cursor, but it’s pretty fast!
TUPLETS
Enter tuplet mode by pressing semicolon (;). Note: You should have your desired duration selected first, since the tuplet will be calculated based on the duration you selected. Type the ratio (3:2, or 7:4, for example) and press enter. The tuplet function is sticky, so if you are remaining in Note Input mode, you will need to type Shift-semicolon to exit it.
You can also tuplefy existing notes. Select a group of notes, either with Shift-Arrows or clicking and dragging a marquee box. Press semicolon to invoke the tuplet popover. If you had selected three notes, Dorico will assume you want 3:2, so you just need to press Enter.
You can change how tuplets are displayed and how they behave in Engraving Options--Tuplets.
TIES
Dorico treats tied notes as one event. This behavior has several implications:
• If you wish to notate, say, a dotted half note tied to a quarter in 3/4 meter, simply enter a whole note (8). Dorico will tie the note into the following bar as needed.
• For something like a whole note tied to a 16th in 4/4 time, notate a whole note, and (with your rhythmic grid set to 16ths), lengthen the duration using Shift-Alt-Right arrow.

28
• Selection involving tied notes sometimes behaves unexpectedly. In the example below, clicking in the second bar will not select the tied note it contains; you must click on the note itself, or on the originating bar:
• If you wish to apply an element to a latter note in a tie chain, as in the
example below, you would need to apply the element before tying the note.
• You can also apply the playing technique shown above while in note
input mode, at the location of the caret, which overrides the typical behavior of tied notes:
• Articulations are intelligently applied. For example, you could add both
an accent (an articulation of attack) and a staccato (and articulation of release) to a tie chain. Dorico will add the accent to the first note in the chain and add the staccato to the last note.
To tie two notes together, select them and press T. You can also press T while in note input mode to tie the note to the next note. It is possible to tie two notes together that are in different voices. Select them first using Ctrl-click.
To break a tie, press U. If you wish to change the place where the tie is broken, you can enter note input mode, navigate the caret to the desired rhythmic position, and then press U. The tied note will be broken at that position.

29
You can change how ties behave and are displayed in Engraving Options--Ties.
WORKING WITH MULTIPLE VOICES
In note input mode, Shift-V will add a new voice. Shift-Alt-V adds a new slash voice. Once you have multiple voices selected, V toggles between existing voices while in note input mode.
By default, new voices alternate between upstem and downstem. You can right-click and select Voices--Change Voice for more options.
You can also paste a selection into a new voice by right-clicking, Paste Special, Paste into voice.
Working with multiple voices may create unwanted rests. To remove them, select the rests and click Edit--Remove Rests.
For management of multiple voices, you can turn on voice colors (for display only). View--Note and Rest Colors.
You can manage how multiple voices are spaced and overlapped in Notation Options--Voices.
TEXT AND SYSTEM TEXT
You can attach text to any element in the score using Shift-X. If you want to assign system text (displayed at the top staff in the full score and on every part layout), use Shift-Alt-X.
For efficiency in workflow, you need to wrap your head around Paragraph Styles. Switch to Engrave mode, Engrave -- Paragraph Styles. This dialog is where you assign global font styles. Take some time to think through font styles and parent styles, which will save you a lot of time. If you want the text
30
tool to default to a particular paragraph style other than “Default text,” you can assign that to a key command (search Key Commands for “Create text”).
If you want to change your default text font family, you can do that via Preferences (Ctrl-comma) -- General.
From that point, set up your desired font styles in Paragraph Styles. These settings will provide you with text formatting presets when using the text tool.
DYNAMICS
Dynamics are entered using the dynamics popover, Shift-D. Most functions are fairly intuitive, though some are not. Here are some bulleted items of importance, in no particular order:
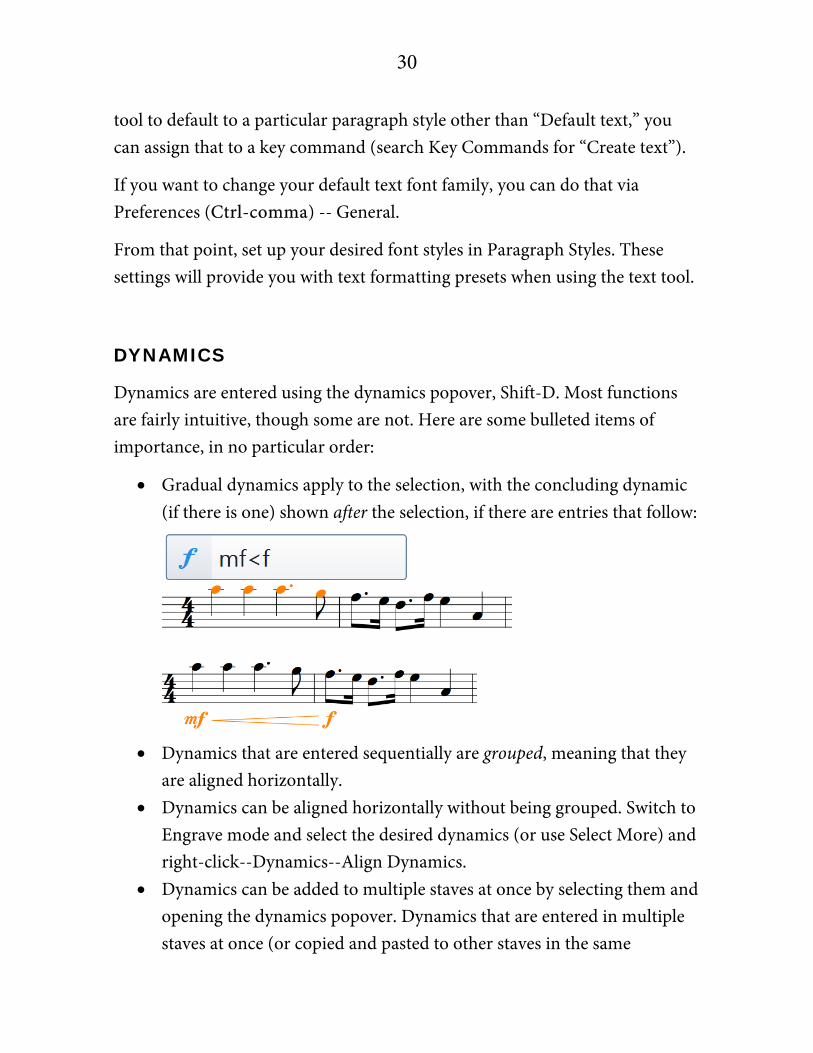
• Gradual dynamics apply to the selection, with the concluding dynamic (if there is one) shown after the selection, if there are entries that follow:
• Dynamics that are entered sequentially are grouped, meaning that they
are aligned horizontally. • Dynamics can be aligned horizontally without being grouped. Switch to
Engrave mode and select the desired dynamics (or use Select More) and right-click--Dynamics--Align Dynamics.
• Dynamics can be added to multiple staves at once by selecting them and opening the dynamics popover. Dynamics that are entered in multiple staves at once (or copied and pasted to other staves in the same
31
rhythmic position) are linked, which means changing one will change the others as well.
• Dynamics added to singers’ staves will automatically be entered above the staff.
• To change a dynamic, select it and press Enter to bring up the popover. • If you copy and paste a selection containing a dynamic into another
selection that already contains a dynamic, the new dynamic will be added to the existing one, stacked above or below it.
• You can always remove a dynamic from a group by right-click--Dynamics--Remove from group.
• For crescendo and decrescendo marks, you don’t need to invoke the popover. Make a selection and simply press Shift-comma (<) or Shift-period (>).
• For messa di voce and its inverse, you also don’t need to invoke the popover. Make a selection and press Shift-Alt-comma for <>, or Shift-Alt-period for ><.
• When a dynamic is selected, you can use Ctrl-C and Ctrl-V to easily copy and paste it to multiple staves.
• When a dynamic is selected, you can also use Alt-click to duplicate that dynamic to other locations. Be careful to choose the exact rhythmic location, as Alt-click can place a dynamic anywhere, even slightly off-center from a note! Note: Alt-click works great for all sorts of expressions and elements!
If dynamics are not displaying the way you entered them, here are some options:
• Select the dynamic and open the Properties panel (Ctrl-8) to edit properties on an individual basis.
• In the Properties panel, you can always add a prefix or suffix as a fully “manual” option. You can even hide the actual dynamic itself. This is a helpful way to enter expressions in the score using the same formatting as dynamics.

32
• For global options for how dynamics are displayed, open Engraving Options (Ctrl-Shift-E)--Dynamics. You can set global behaviors and set them as defaults.
• Unlike Finale, “expressions” are not lumped into one category. Dynamics are dynamics, tempo marks are tempo marks, and so on. Remember to use the correct popover for the category of expression you’re entering.
You can change lots of settings related to dynamics in Engraving Options--Dynamics.
ARTICULATIONS
Articulations are relatively straightforward. Memorize the key commands, which you can find here. You can change global behaviors for articulations in Engraving Options--Articulations.
Articulations can be stacked easily. Pressing the articulation key command toggles the articulation on and off.
Articulations are attached to notes and become a property of the note they modify. They can’t be moved or changed independently.
GRACE NOTES
Grace notes can be activated in note input by pressing the slash, /.
• Grace notes don’t “count” in terms of rhythmic value. • Use Alt-/ to change between slashed and un-slashed grace notes. • You can modify grace notes via the Properties panel.

33
BARS AND BARLINES
The bars and barlines popover is Shift-B. Here are some helpful items to know:
• To insert a given number of bars, click on a selection, and in the bars popover, type a number. Bars are inserted before the selection.
• To delete bars, same thing, but add a minus sign before the number. • If the selection is the start of a key change or meter change, you can
choose whether the added bars come before or after the change: o To insert the bars before the key/meter change, click on the key or
meter change to select it (or click on the barline preceding the change), and add the bars.
o To insert the bars after the key/meter change, select the first item in the bar to select it before adding the bars.
• You can use the bars popover to insert any rhythmic value. Enter a number followed by a letter (q, e, h) to represent the rhythmic value. Or you can enter 3/4 into the bars popover (Not the meter popover. Yes, it works!) to insert the equivalent of 3 quarter notes. Or you can enter one of the following to insert three quarter notes:
o 3,4 o 3-4 o 3 4 (with a space in between)
• To delete extra bars at the end of a flow, click on the first empty bar, Shift-B, and enter a high number (like -100, or whatever you like, depending on the number of bars you want to delete). You can also type “trim” into the popover to delete all remaining empty bars.
• You can add a barline anywhere. Feel free to ignore the meter. • To make a double barline, in the popover, type ||. • To change any barline back to a single (“normal”) barline, click on the
barline and delete it. • To add left or right repeat barlines, select a bar and input |: or :|. • Clicking on a single barline and deleting it removes the barline entirely.

34
• You can add a bar rest in note input. While in note input, make sure you have the correct voice selected, press Shift-B, and type rest. This is helpful if two instruments are sharing a staff but only one is playing at a given bar, and you wish to show a bar rest in the other voice.
You can make changes to the behavior of barlines in Notation Options--Barlines and Engraving Options--Barlines.
You can alter the appearance of bar numbers via Layout Options--Bar Numbers. Remember, the appearance of bar numbers usually varies from layout to layout, so it’s in Layout Options!
You can change the bar numbering sequence by clicking on a bar and selecting Bar Numbers from the context menu (right-click or Edit menu).
METER
The Meter popover is Shift-M and is quite flexible. Meters are added until the next meter indication, if one already exists. Here are just a few examples of entries and their results:
• C (common time)
• 4/4,1 (quarter note pickup)

35
• 4/4,0.25 (or just .25) (16th-note pickup)
• 3+3+2/8 (shown with rhythmic groupings)
• [3+3+2]/8 (shown as integer)
• 3/4|6/8 (composite with pipe)
To delete a previously-created pickup:
• Select the first full bar after the pickup. • Shift-M, and enter the meter again. • Select the pickup bar, Shift-B, -1.
You can also create an open meter by typing X into the popover. Remember that, while meters are displayed correctly by default, you can add or delete barlines freely, which changes the metrical groupings.
To edit a meter change, click on it in the score and hit Enter to bring up the popover.

36
You can make changes to the way time signatures are displayed in Engraving Options--Time Signatures, and you can set large time signatures in Layout Options--Time Signatures.
KEY SIGNATURES
Enter key signatures using Shift-K. A couple things to know:
• You can enter a variety of inputs in the key signatures popover: G for G major, g for G minor, or 2f, or 3s, etc.
• Changing the key preserves the enharmonic pitches. If you want to transpose the notes in a section, select everything in it and choose Write Menu--Transpose, or manually move all selected notes up or down using Alt-Up/Down Arrow.
• Changing the key applies until the next notated key signature in the score.
LYRICS
The lyrics popover is accessible via Shift-L. You can find settings for lyrics In Engraving Options--Lyrics. Here are some things to know:
• As you enter lyrics, advance the window to the next syllable by pressing spacebar (or hyphen, for multi-syllabic words). By default, melismas display extender lines. You can avoid displaying extender lines by pressing the right arrow to advance to the next syllable, rather than spacebar.
• A hard space is Alt-Shift-spacebar, and a non-breaking hyphen is alt-hyphen.
• An elision mark is displayed by typing an underscore (Shift-hyphen). • Pressing the down arrow will display sequential stanzas, and pressing
the up arrow from stanza 1 will display the chorus. The chorus is

37
hyphenated, and if there are multiple stanzas of lyrics, the chorus will be vertically centered to them.
• Pressing Alt-down arrow will add an italicized line for translation under the selected stanza.
• Lyrics operate independent from notes. They can be selected or deselected separately, and notes can be deleted while their lyrics remain.
• You can change lyric fonts in Engrave Mode--Engrave Menu--Font Styles.
• There are two ways to place lyrics above the staff: o Use Shift-Up Arrow to type them in o Select lyrics you’ve previously entered and open the Properties
panel.
CHORD SYMBOLS
Chord symbols are entered via Shift-Q. Dorico’s chord symbols options (Engraving Options--Chord Symbols) are extensive, and you should spend time here setting chords to display exactly how you prefer (and saving as default).
Scroll to the bottom of the chord symbols options to edit project settings, where you can customize chords as desired.
You can enter chord symbols manually, or with a MIDI keyboard.
Here’s how you navigate in chord symbol mode:
• Spacebar (or Shift-Spacebar) - advance to next (or previous) beat • Tab (or Shift-Tab) - advance to next (or previous) downbeat • Right arrow and Left arrow advance in smaller increments • Ctrl-Right arrow and Ctrl-Left arrow advance to next (or previous)
chord symbol

38
REHEARSAL MARKS
Rehearsal marks are added to the score in sequential order using Shift-A. A couple things to know:
Global options are accessed via Engraving Options--Rehearsal Marks. When you add a rehearsal mark, it is immediately selected and can be modified using the Properties Panel. You can add a prefix of suffix to the rehearsal mark. Selecting “Index” allows you to set the first rehearsal mark as something other than A or 1.
TEMPO
The tempo popover can be accessed with Shift-T. A couple things to know:
• You can type both text-based instructions and metronome markings into the popover, as shown here:
• For gradual tempo changes, like accel or rit, make sure to select the
entire range of bars to which the change applies. You can change the

39
appearance of the marking, either globally in Engraving Options--Tempo, or individually via the Properties Panel.
• You can specify the amount of accel or rit via the properties panel, as a percentage of the original tempo.
TEMPO EQUATIONS
Tempo equations (or metric modulations) can easily be added to the score using the Tempo popover:
Tempo equations are reflected in playback. They can include dots and double dots as well.
PLAYING TECHNIQUES
Playing techniques can be accessed via Shift-P. A couple things to know:
• Playing techniques often affect playback. • Techniques are grouped by instrument. You should memorize the
popover text for the techniques you use most. • Playing techniques can easily be hidden in the score, which is often
helpful for making playback do what you want. Hidden playing techniques will display a signpost.
• You can edit exiting playing techniques (or create new ones!) through the playing techniques editor, which you access by clicking on the
40
pencil in the techniques list on the right side. The options here are overwhelming, but the important things are:
o You can shorten the popover text for techniques you use often (I shortened downbow and upbow to D and U).
o You can assign playing techniques to playback changes through expression maps.
o You can create playing techniques as needed.
8va AND CLEFS
The ottava (8va) indication can be found in the clefs popover, Shift-C. Though this location may not be intuitive, remember that clefs give context to the vertical placement of a note by defining its register, which is essentially what the ottava does.
To change a clef, type into the popover. For treble clef, you can type either treble or g (since the treble clef is sometimes referred to as the “G clef”).
You can change the global behavior of octave lines via Engraving Options--Octave lines, or individually via the Properties panel.
ORNAMENTS
Ornaments can be added via Shift-O.
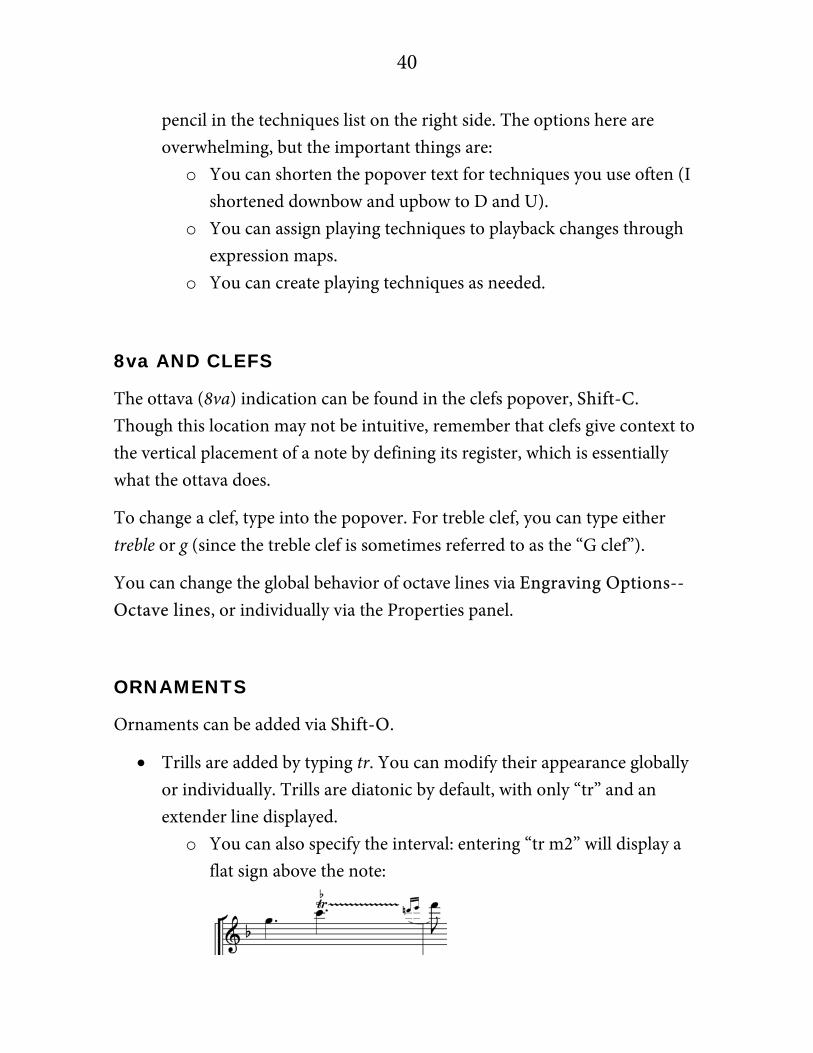
• Trills are added by typing tr. You can modify their appearance globally or individually. Trills are diatonic by default, with only “tr” and an extender line displayed.
o You can also specify the interval: entering “tr m2” will display a flat sign above the note:

41
o You can enter larger intervals, which will add an auxiliary note: entering “tr M3” yields this:
• Glissandi are added by typing gliss. You must select the starting and ending note to create a glissando.
• Tremolos are categorized in Dorico not as ornaments, but as repeated structures. See “Repeat Structures” below.
FINGERING
You can add fingering to notes using Shift-F. It’s possible to use several different formats, such as single numbers, numbers within brackets, and combinations (such as 12 or 23).
You can advance the popover to the next note in that voice by using the spacebar or arrow keys. Pressing Tab will advance to the next bar.
CUES
Add cues to instrument parts by selecting a bar or range of bars and pressing Shift-U.
Here’s what you need to know:
• Change how cues are displayed globally via Engraving Options--Cues, or individually via the Properties Panel.
• By default, cues are displayed in full score layouts in Galley View, but are hidden in the full score in Page View.
• Cues are dynamic - change a note in the reference part, and the cue will change as well.

42
• You can move cues and lengthen or shorten cues in the same way as notes: Alt-L/R and Shift-Alt-L/R. You can also grab the handles on either end and drag to lengthen or shorten a selected cue:
• When viewing a full score layout, you can click on the cue icon on the
right side (the ear icon) to open the cue dialog. Click “Update” and Dorico will highlight suggested cues in the score based on the settings you input.
REPEAT STRUCTURES
Repeat structures are added by using Shift-R. Here are a couple examples:
• To add a first and second ending, select the range of bars that encompass the first ending, Shift-R, and type “end.” To modify these endings, open the Properties panel.
• You can add elements like D.S., D.C., segno, and Coda. Simply select the location in the score and type into the popover.
• Tremolos are categorized as repeats in Dorico, not ornaments. You can add tremolos in several ways:
o Select a note or range of notes, Shift-R, and type 1, 2, 3, or 4 to specify the number of tremolo marks for single-note tremolos. You can type “0” to remove a tremolo from a note or group of notes.
o For a two-note unmeasured tremolo, select the two adjacent notes, Shift-R, and type “32.”

43
COMMON QUESTIONS ABOUT SCORE APPEARANCE
In no particular order, here are a list of common questions users may have about the appearance of their score. Some questions are answered in Engrave Mode, and will be discussed later.
Why are my staves colliding?
Your staves are probably too big for the number of staves you’re trying to fit on a page. Layout Options--Page Setup and change the rastral size.
Why are my staves still colliding?
Dorico’s algorithms for collision avoidance are quite robust. The only reason staves would collide is because they have no choice with the values they’ve been given. If staff size is sufficiently small for your project, check Layout Options--Vertical Spacing and make sure you don’t have too high of a value set for distance between staves, or “minimum X gaps with content.”
Why does my music fill the entire frame vertically, creating large gaps between systems or between staves?
Check Layout Options--Vertical Spacing, Vertical Justification. This is where you decide that when the score occupies a certain percentage of the frame vertically, Dorico should evenly expand the music vertically to fill the frame. If you don’t want this behavior ever, you can set the values to 100%, although the defaults generally produce a pleasing result.
How do I change the margins inside the music frame?
Frame margins act as a buffer to keep score elements contained visually. You can change these via Layout Options--Page Setup, Page Margins. If you set

44
these values too small, you might find some elements spill over the page margins.
I just don’t like how staves are spaced vertically. Staff X is too close to Staff Y, or Staves A and B are too far apart. Can I start dragging staves around?
No! You may need to make some small manual adjustments at the end, but that’s the exception, not the rule. Go back to Layout Options--Vertical Spacing and spend some time trying out different settings. When you find a spacing you like, you can always save it as the default for all future projects that use that layout type.
I’m seeing chord symbols on staves that shouldn’t have them. How do I hide them?
You can select the chord symbols and hide them en masse via the Properties Panel, but it’s generally better to go to Setup mode, right-click on the player, select Chord Symbols, and choose “Hide for all instruments.” You can also assign a key command for “Hide” which can be easily applied to all selected chord symbols.
Why doesn’t the final system extend the full width of the frame?
Layout Options--Note Spacing; change the value for “Only justify final system…” or uncheck it altogether to always extend the final system.

45
How do I change how staff labels are displayed?
You set full names and short names for each instrument in Setup Mode, click on instrument, Edit Names. To change whether full or short names (or nothing) are displayed in the score, go to Layout Options--Staves and Systems. For fine-grain control over staff label appearance, go to Engraving Options--Staff Labels.
How do I hide empty staves?
Layout Options--Vertical Spacing, and scroll down to “Hide Empty Staves.”

46
ENGRAVE MODE
Dorico’s defaults generally yield excellent results without the need for much manual adjustment. But at least a small amount of adjustment is needed for nearly every project. For this, there’s Engrave Mode, which you can select by pressing Ctrl-3.
There are three critical things to know about Engrave Mode:
1. Engrave Mode is non-destructive. You can’t add or delete elements, only alter their appearance. If you want to add or remove anything, switch back to Write Mode.
2. Engrave mode alters appearance, but not playback. If you drag a dynamic while in Write mode, for example, it will attach to a different rhythmic position in the score. If you drag that same dynamic in Engrave mode, it will change its visual location only, and it will remain attached to the same rhythmic location.
3. Engrave Mode functions as a deeper counterpart to Write Mode. Because the two modes have different purposes, their functionality is different. In Engrave Mode, all sorts of different options appear in the Properties panel. For example, in Engrave Mode you can select stems, not just notes. Selecting slurs in Engrave displays handles for fine-grain control. The point is that the modes are related, but definitely different. To avoid frustration, keep them separate in your thinking, or you may find yourself attempting an action in one mode that really is done in the other.
The Properties panel at the bottom functions much the same as it does in Write Mode, just with expanded functionality.

47
The Context menus (right-click or dropdown menus) are comparable as well. You’ll see many options greyed out, since they belong to Write Mode.
We’ll discuss the unique functions of Engrave Mode by separating them into the left panel (1. Graphic Editing, 2. Frames, 3. Staff Spacing, 4. Note Spacing) and the right panel (master pages).
LEFT PANEL: EDITING AND SPACING
1. GRAPHIC EDITING
Graphic editing is the default functionality when you first switch to Engrave Mode. It’s the “general” category that allows you to graphically move elements in the score, as well as formatting music frames, systems, and bracketing.
FORMATTING MUSIC FRAMES
The “Format Music Frames” section contains several simple but powerful functions that allow you to work with music frames.
“Insert Frame Break” (Ctrl-F) allows you to break the music at a selected point and start a new frame (Note: this function adds a signpost where the frame breaks).
“Lock Frame” locks a frame to preserve its existing spacing, even if more elements are added to the score.
“Make into Frame” forces a selected range to fit into a frame. Click on the first element in a frame (the first note, for example), Ctrl-click on the final note, and click “Make into Frame.”

48
Note: the behavior of “Make into Frame” takes some time to get used to. When Ctrl-clicking on the end of the selection you wish to make into a frame, there are several ways you can make the desired selection.
1. Select the last note of the final measure:
2. Select the barline that defines the end of the selection:
3. Select the note stem of the note immediately following the spot you wish
the frame to break:
In all three examples above, adding a frame break will split the frame at the barline.
Another note: Remember that “Make into Frame,” while sometimes necessary, is actually an override of Dorico’s default spacing. Instead of manually setting a frame, you may want to check Layout Options--Vertical Spacing and make adjustments to the spacing of your staves and systems. It may be that you can reduce your vertical spacing instead.

49
FORMATTING SYSTEMS
The functionality of Format Systems mirrors that of frames:
“Insert System Break” (Shift-S) begins a new system at the selection. Note: you can insert a system break anywhere: in the middle of a measure, or even in the middle of a tuplet.
“Lock System” locks a system to prevent it from being re-formatted.
“Make into System” creates a single system from a selection.
Note: just as with manual frame adjustments, manual system adjustments are also overrides of Dorico’s default spacing. If you find yourself creating system breaks or making selections into systems, you may find it easier to check your note spacing (Layout Options--Note Spacing), and alter it slightly to make the score more compact or more widely spaced.
BRACKETING
When you add players in Setup mode, Dorico automatically groups adjacent instruments using brackets and sub-brackets (and braces). This automatic bracketing is generally sufficient, but Engrave mode allows users to completely customize how staves are grouped together.
You can modify existing brackets and braces by clicking on them to select them (Engrave mode). You can delete the selected bracket or select a different bracket type from the
panel.
You can also modify the staff range for an existing bracket. Click on the top or bottom handle and use Alt-up/down arrows to change the staff selection.

50
To create a new bracket or brace, click any element in the topmost staff of the desired group, and Ctrl-click to also select any element in the bottom staff. Then select a bracket type from the left panel.
Whenever you make a change to the default staff grouping, Dorico will add a signpost above the top staff. You can return to the default grouping by selecting the signpost and deleting it.
The final option in the left Bracketing panel allows you to modify the behavior of barlines to connect or separate between staves. You can use Ctrl-click to select multiple staves and click the barline graphic to join the barlines across all selected staves. You can also click on barlines in the score and move them in the same way as brackets.
2. FRAMES
Clicking on the second panel on the far left switches to Frames. You’ll see all green, blue, and purple borders become darker, which means they can now be edited.
Frames are invisible boundary boxes that define regions in your score. There are three types:
• Music frames (blue) display the music from your flow. • Text frames (green) are free-standing text boxes that can be formatted
however you want. • Graphics frames (purple) are for importing images.
CREATING FRAMES
You can draw a new frame anywhere by selecting one of the three boxes just below the Frames toggle, and then clicking and dragging on the page to set the frame boundaries.

51
If you want the edge of a frame to align with the page margin, simply double-click outside of the page margin to begin the frame; it will be drawn on the border of the page margin. Frames cannot extend beyond the page margin.
Frame positioning is entirely manual. Frames of any kind can overlap.
Let’s start with graphics frames, which are the simplest. Select the third frames graphic at the top. Then click and drag on the page to draw out a graphic frame. The frame is now selected, and you can double-click to import a graphic. When the frame is selected, you can also access options from the Properties panel for exact size and positioning, as well as fit mode (whether to stretch or scale the image when its proportional dimensions are different than the frame).
Text frames are created the same way. Upon creating a text frame, the frame is selected; double-click or press Enter to add text. The font will be formatted based on the “default text” setting (which you can change via Engrave Mode, Engrave menu -- Paragraph Styles).
By default, the text inside a text frame is set to center vertically. You can change the vertical alignment by selecting the frame and opening the properties panel. Here you can also set a border and create left, center, and right tabs.
MUSIC FRAMES
Music frames are also created by double-click-and-drag. Their functionality, however, is more robust.
Music frames are either Master music frames or Layout music frames. Master frames are part of the page template, on the master page (which we’ll talk about later). Layout frames are individually created on a page, overriding the page template.

52
A music frame is designated as “master” or “layout” by the prefix M or L in the first dropdown. The first dropdown also allows you to select a frame chain for the given frame. A frame chain links multiple music frames together.
Let’s look at an example. First, here’s a single master music frame:

53
The frame contains the entire flow. But if I want to insert a text frame between the second and third systems, I could resize the first music frame (which would change the amount of music the frame can display), and draw another music frame to resume displaying the music:

54
When I first draw the second music frame, it will default to “LA,” which stands for “layout music frame A” (and any additional layout frames I create would be named LB, LC, etc). To link the new frame to the first frame, select “MA” from the dropdown to re-assign it to that frame chain.
This linking functionality makes it easy to create a textbook format, with text and musical examples interspersed. Text frames don’t link, though, so you need to manage those manually for now.
The other dropdowns give other options for what to display in the frame. The second selects the numerical order of the frame. The third allows you to select which flow is displayed. The fourth allows you to display only certain players:
MOVING FRAMES
You can move frames in the same way you move other items. Click on the edge of the frame to select it, then:

55
• Alt-arrow to move • Ctrl-Alt-arrow to move by a larger increment
Use the arrow keys alone to change from one selected frame to another.
Pressing Tab changes the selection from the frame to the selection handles, at which point you can use the arrows to choose which handle to change, and then use the same functionality as before (Alt-arrows and Ctrl-Alt-arrows to change the dimensions of the frames).
The point of this functionality is to limit the need for the mouse when editing frames.
You can also select a frame or frames by clicking and dragging a selection box. Only frames entirely within the box will be selected:
When frames share a common boundary, double-clicking to edit (or click-dragging to move) can sometimes select a different frame from the one you intended to select, which is why the keyboard can be more reliable for selecting and moving frame handles.

56
COPYING FRAMES
You can copy frames and their content to other pages. Select the frame to be copied, and on the right panel, right-click on the destination page (use Ctrl-click to select multiples).
FRAME CONSTRAINTS
Frame constraints lock the edge of a frame to the existing page size and margins:
You can un-anchor a frame from one or more of its sides, which will change its positioning when the page size or margins are changed. To remove the constraint from a desired side, click the lock icon to deselect it.
3. STAFF SPACING
If you spend a little time setting the vertical spacing for your layout (Layout Options--Vertical Spacing), your score should look nicely spaced. But it’s usually necessary to make a few minor manual adjustments to the staff spacing.

57
Toggle on “Staff Spacing,” and you get this:
Here are a couple things to know:
• It is much faster to use the keyboard instead of the mouse. You can do all manual staff spacing using only the keyboard. Navigate between system handles using the arrow keys, just like frames!
• The large boxes are system handles, and the small boxes are for individual staves in each system:
Tab changes the selection back and forth between these two levels.
• Just as with other elements, Alt-Up/Down moves the selected handle a small distance, and Ctrl-Alt-Up/Down moves it a larger distance.

58
• If you wish to set a particular spacing to a specific value, click on the number in the left page margin and enter a numerical value:
• When you make a change to staff spacing, you’ll see that box turn red. To remove the manual spacing change and return to the default, select the red box and press Delete.
• You can copy the specific staff spacing of a page to other pages by clicking on “Copy Staff Spacing”:
4. NOTE SPACING
Manual note spacing is rarely needed, but it’s easy to manipulate. Toggle on “Note Spacing,” and you’ll see a handle for each rhythmic position represented in the score:

59
Here are a couple things to know:
• Similar to Staff Spacing, use arrows to select different handles, Alt-L/R to move notes left or right incrementally, and Ctrl-Alt-L/R to move by a larger amount.
• Altered notes display a red box. Select the box and press Delete to remove the manual spacing.
• As indicated by the handles, you can also move barlines. • “Voice Column Index” is a helpful tool for changing the way Dorico
manages the spacing of multiple voices when they would otherwise collide. Select one of the voices, open the Properties panel, and toggle on the voice column index option:
Setting the values to 0 will force the voices to align vertically, even if their stems or noteheads collide. Setting the value to a higher number will shift the selected note to the right.
RIGHT PANEL: PAGES AND PAGE SETS
WORKING WITH PAGES
The right panel in Engrave Mode is dedicated to Pages at the top and Master Pages at the bottom—which are closely related, really.
The functionality of pages and master pages is not complex, but the concept may take a while to grasp. We’ll actually start with Master Pages, which are sometimes confusing for new users.

60
MASTER PAGES
A Master Page is a template that dictates the layout of a particular page. By default, all pages in all layouts get their design from the master pages to which they’re assigned.
There are four master page types that every new project uses:
• Default Part—First: the first page in a part layout • Default Part—Default: all subsequent pages in a part layout • Default Full Score—First: the first page in a full score layout • Default Full Score—Default: all subsequent pages in a part layout
Here’s the first principle to remember: if you want different layouts to share a common design, edit the master page, not the actual page.
For example, here’s the score:
If you wanted to adjust the title frame, you could switch on the Frames editor and start making changes.
When you did, you’d see that the page icon on the right side now has a red triangle, which indicates a page override. This means your actual page has deviated from the master page it’s using (you can remove this override by right-clicking on the page icon). This
is fine for editing an individual page, and pages may often deviate from their

61
master pages. But if you want a design change to apply to other layouts as well, edit the master page instead.
EDITING A MASTER PAGE
From the Master Pages panel, double click on the First master page icon:
Now you’re editing the master page:
Those oddly-formatted text strings are tokens. They automatically populate text fields with the correct information for each layout. You can find a complete list of tokens here. Tokens may seem strange at first, but they’re a huge time-saver!
Here are some commonly-used tokens:
• {@page@} – the layout page number

62
• {@layoutname@} – the name of the layout, like Flute 1 or Flute 2, which you can edit in the layouts panel (in Setup mode, on the right side)
• {@projecttitle@} – the name of the entire project (file name) • {@flowtitle@} – the name of that particular flow
Note: you can set the info for each flow (and for the entire project) via File--Project Info.
Here are the three steps to editing a master page:
1. When you’ve finished editing all text frames, click out of the text frame to exit it. If the cursor is still actively editing a text frame, the next step may not work correctly.
2. When you open a master page to edit it, you can see there’s a left and a right page. Sometimes you may want a slightly different layout from left to right. If you’ve been making edits to the left page and you want the master page layout to be consistent, regardless of whether it’s applied to a left or right page, copy the page layout from Left to Right:
This action will make the two master pages identical.
3. On the top right corner, click Apply and Close (it’s easy to forget this step, and then your changes won’t be applied).
Now whatever changes you’ve made will be used every time that master page is applied. The other three types of master pages are edited the same way.
You can see that, by default, part layouts use part master pages and full score layouts use full score master pages, but you can apply any master page to any layout (or even any individual page, as we’ll discuss below).

63
You can even create a new custom master page by clicking on the plus button. You can base it on an existing master page, or start from scratch.
You can also create not only custom master pages, but custom master page sets:
THE PAGES PANEL
The Pages panel shows the pages in the layout you’re currently viewing:
Here are some things you can change in the Pages panel:
• You can see that the first page is always a left-facing page. You can make the first page a right-facing page:

64
o Right-click on the page 1 icon, select “Insert Page Number Change”
o Change the first page number to 2:
The first page will now be shown as page 2, with a purple triangle to indicate a page number change. You can insert page number changes on any page. To remove these changes, right-click the page number and select “Remove Page Number Change(s).”
• You can change the master page style on any page. Right-click on a page
icon and select “Insert Master Page Change.” You can set that page to display any master page template you’ve created. You can also choose to alter only that page, or all pages thereafter. When you make a master page change, the page icon will display a green bar.
65
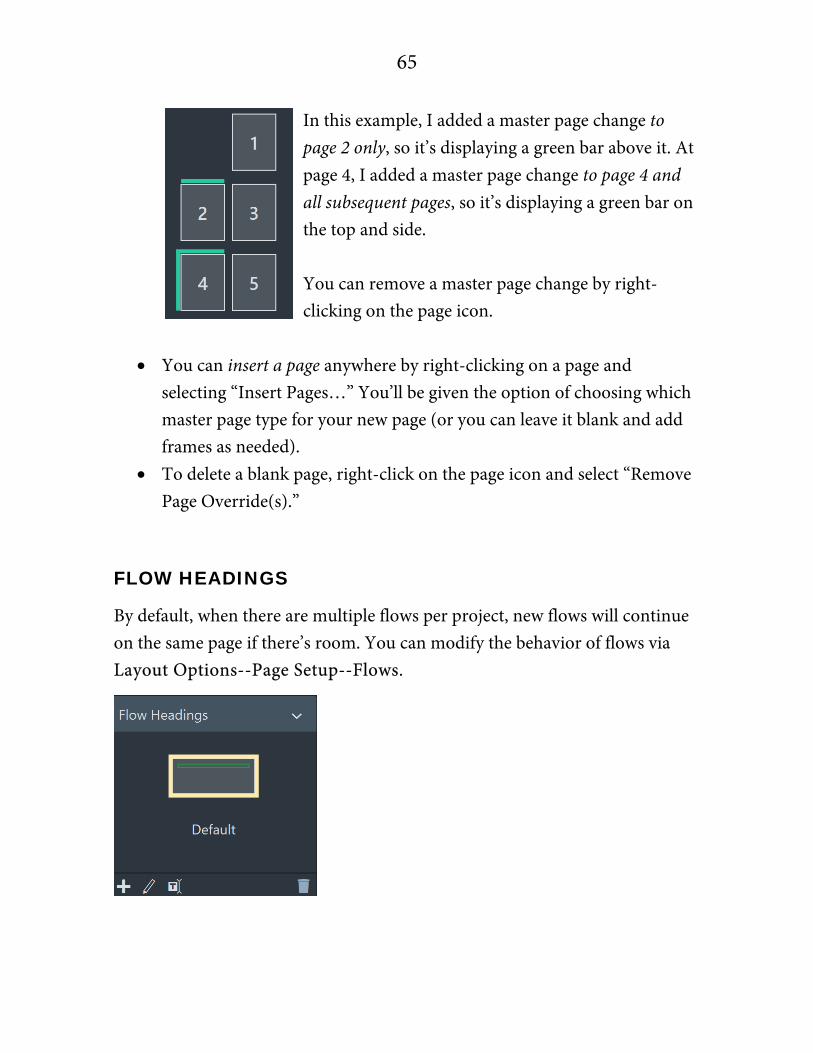
In this example, I added a master page change to page 2 only, so it’s displaying a green bar above it. At page 4, I added a master page change to page 4 and all subsequent pages, so it’s displaying a green bar on the top and side. You can remove a master page change by right-clicking on the page icon.
• You can insert a page anywhere by right-clicking on a page and
selecting “Insert Pages…” You’ll be given the option of choosing which master page type for your new page (or you can leave it blank and add frames as needed).
• To delete a blank page, right-click on the page icon and select “Remove Page Override(s).”
FLOW HEADINGS
By default, when there are multiple flows per project, new flows will continue on the same page if there’s room. You can modify the behavior of flows via Layout Options--Page Setup--Flows.

66
The “Flow Headings” master page allows you to set a template for the appearance of each new flow as it appears on the page. You can easily add new Flow Heading master pages.