a basic course in muscle energy · pdf filea basic course . in . muscle energy technique ....
TRANSCRIPT
A BASIC COURSE
IN
MUSCLE ENERGY TECHNIQUE
PRESENTED BY SARA E. SUTTON, D. O. FAAO
SPONSORED BY
OSTEOPATHIC PHYSICIANS & SURGEONS OF OREGON
AND
NORTHWEST ACADEMY
OF OSTEOPATHY
September 20-23, 2013
Downtown Portland, Oregon
Embassy Suites Hotel
Up to 20 Hours of 1-A AOA CME Credits anticipated

HISTORY OF THE MITCHELL’S MUSCLE ENERGY TECHNIQUE (MET)
The term “Muscle Energy” was given by Fred L. Mitchell, Sr. D. O. to the techniques he developed in the 1950s, first to treat mechanical problems in the pelvis. It is unclear how he named the techniques, except that the techniques involved using isometric and isotonic contractions. First Fred used the patient’s muscles to restore physiologic movement to the pelvis, which has passive joints, i.e. they are not moved by direct muscle action. He then expanded the concept to include treatment of all joints except the cranial sutures. Next he developed techniques for the spine using isometric and isotonic contractions of the patient’s muscles to treat vertebral dysfunctions. After the contraction the patient is asked to relax the contraction before the operator “takes up the slack”. Initially he recommended strong isometric contractions, but eventually evolved to using very light isometric contractions.
I first met Fred at a meeting in St. Petersburg, FL in the 1960’s, and first heard him lecture at a meeting of the Iowa Osteopathic Medical Association in Des Moines in the mid-60s. His lecture was laced with humerous stories in his southern drawl, but what impressed me the most was the method he used to diagnose and treat what we then called “osteopathic lesions”. I was particularly impressed with the changes he made in the rib cage using gentle techniques. I thought that those techniques would really be useful in my practice. Up until that time my training had been high velocity/ low amplitude (HVLA) techniques, some soft tissue techniques, and a Cranial course taught by Dr. Kimberly my third year of school. So, I spoke to Fred after his lecture and asked if he would teach me. He said, “Sure! Come on down.” Subsequently I made two or three visits to Chattanooga where the Mitchell’s hosted me in their lovely home/office for up to a week at a time. When I returned for the each visit, I hadn’t retained a lot of what he had taught me, and I am sure he was as disappointed as I was. So, I told him that this wasn’t working, so would he come to Iowa to teach some of us. He said, “Sure!”
When I was President of the American Academy of Osteopathy in 1969-70 I asked the Board if it would be willing to sponsor a tutorial given by Dr. Mitchell. The response was “Yes, as long as you do the work and it doesn’t cost us anything.” In March 1970 I hosted Fred’s first tutorial in my home/office in Fort Dodge, IA. Six of us spent five days (and most evenings) as Fred taught us about this new Muscle Energy Technique. I had room for all to stay, and my neighbor Janet Secor had finished college in January and was without a job. So, she agreed to be our cook and housekeeper. Those attending the tutorial were Devota Nowland, John Goodridge, Ed Stiles, Rolland Miller, Philip Greenman and myself. We all agreed that this was the greatest learning experience we had ever had. We were each invited to assist him in future tutorials which filled quickly as enthusiasm grew to learn MET. Muscle Energy was received enthusiastically. H taught 4 or 5 more tutorials, but unfortunately Fred died of a massive heart attack in March of 1974.
Instead of serving as Past President of the Academy in 1970, I was asked to serve as Secretary of the Academy. For five years this consumed my time and energy until a full time director was hired. I was then asked if I would chair a committee to document what was unique about what Dr. Mitchell had taught. About twelve people were appointed to the committee, all of whom had taken a tutorial. His son, Fred, Jr. was familiar with his father’s work, and was appointed along with Paul E. Kimberly, D. O. who served as our consultant. We met for three or four long weekends a year at Michigan State

University for five years. During that time we developed the curriculum for three 40 hour courses: a Basic course, as well as one for the Diaphragm and Above, and the Diaphragm and Below. Committee members became the faculty for these courses, which were often taught at osteopathic colleges in order to train their faculties. Thus, Muscle Energy is one of the models of manipulation taught in all osteopathic colleges and universities.
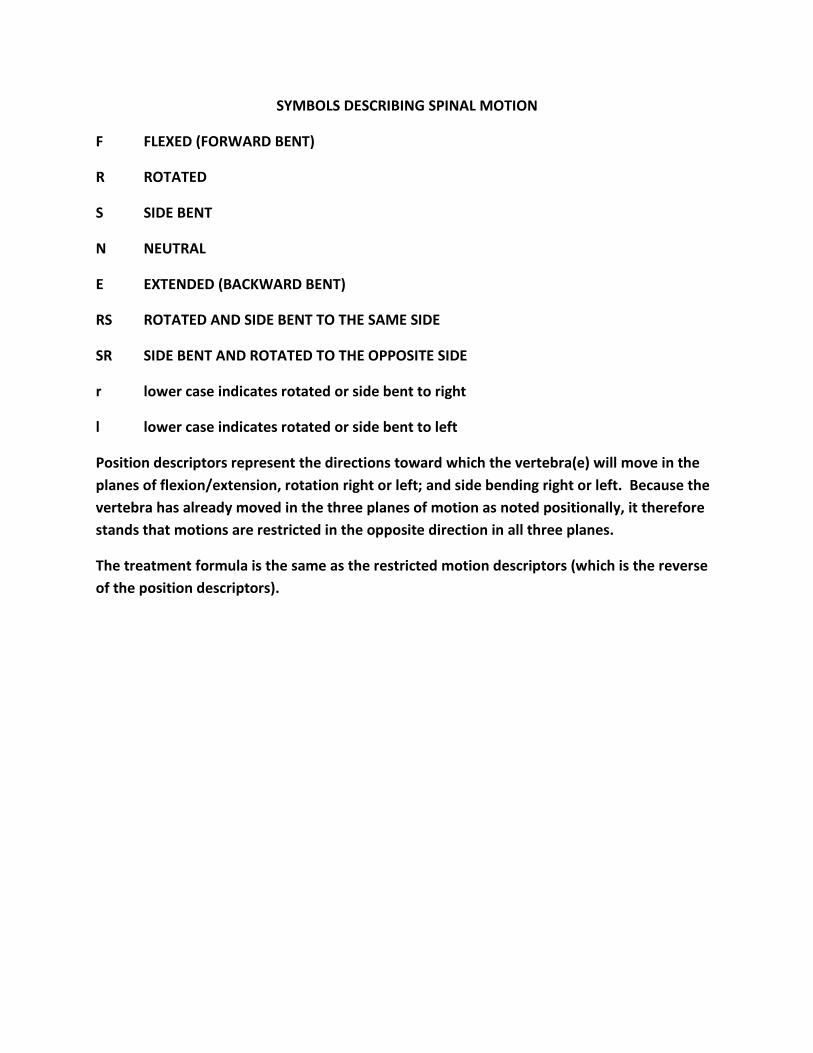
SYMBOLS DESCRIBING SPINAL MOTION
F FLEXED (FORWARD BENT)
R ROTATED
S SIDE BENT
N NEUTRAL
E EXTENDED (BACKWARD BENT)
RS ROTATED AND SIDE BENT TO THE SAME SIDE
SR SIDE BENT AND ROTATED TO THE OPPOSITE SIDE
r lower case indicates rotated or side bent to right
l lower case indicates rotated or side bent to left
Position descriptors represent the directions toward which the vertebra(e) will move in the planes of flexion/extension, rotation right or left; and side bending right or left. Because the vertebra has already moved in the three planes of motion as noted positionally, it therefore stands that motions are restricted in the opposite direction in all three planes.
The treatment formula is the same as the restricted motion descriptors (which is the reverse of the position descriptors).

ABBREVIATIONS FOR MET
Abd abduction or abductors
Add adduction or adductors
Ant anterior
ASIS anterior superior iliac spine
AC acromio-clavicular
C cervical
E extended
F flexed
Is Ilio-sacral
Inf inferior
ILA Inferior lateral angle of sacrum
IM isometric
IT isotonic
IL isolytic
(L) left
L lumbar
Lat lateral
MET Muscle Energy Treatment
ME Muscle Energy
Med medial
OF operator force
Post posterior
PSIS posterior superior iliac spine
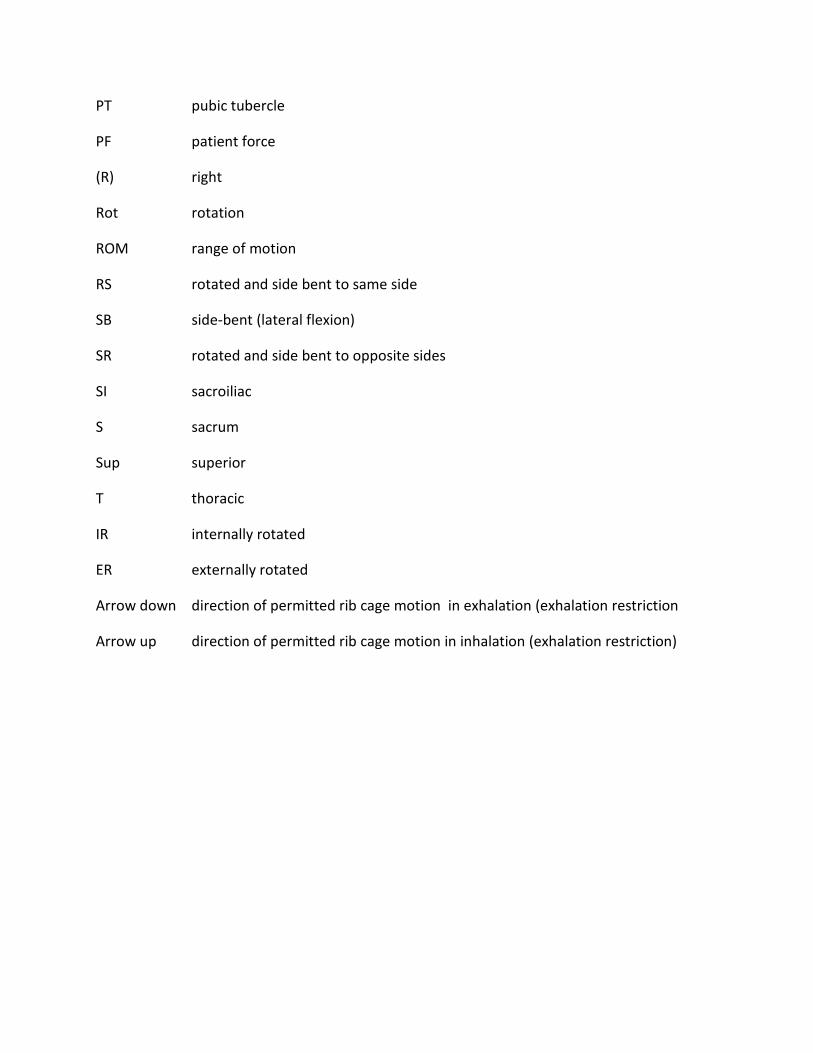
PT pubic tubercle
PF patient force
(R) right
Rot rotation
ROM range of motion
RS rotated and side bent to same side
SB side-bent (lateral flexion)
SR rotated and side bent to opposite sides
SI sacroiliac
S sacrum
Sup superior
T thoracic
IR internally rotated
ER externally rotated
Arrow down direction of permitted rib cage motion in exhalation (exhalation restriction
Arrow up direction of permitted rib cage motion in inhalation (exhalation restriction)
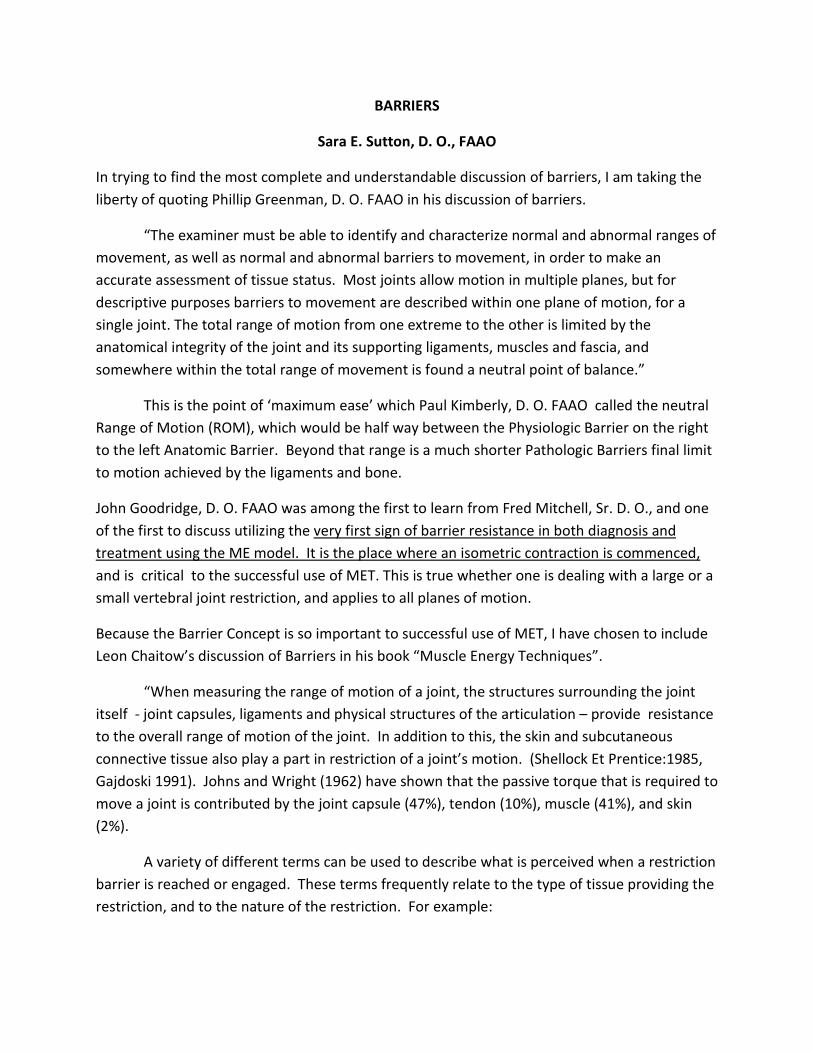
BARRIERS
Sara E. Sutton, D. O., FAAO
In trying to find the most complete and understandable discussion of barriers, I am taking the liberty of quoting Phillip Greenman, D. O. FAAO in his discussion of barriers.
“The examiner must be able to identify and characterize normal and abnormal ranges of movement, as well as normal and abnormal barriers to movement, in order to make an accurate assessment of tissue status. Most joints allow motion in multiple planes, but for descriptive purposes barriers to movement are described within one plane of motion, for a single joint. The total range of motion from one extreme to the other is limited by the anatomical integrity of the joint and its supporting ligaments, muscles and fascia, and somewhere within the total range of movement is found a neutral point of balance.”
This is the point of ‘maximum ease’ which Paul Kimberly, D. O. FAAO called the neutral Range of Motion (ROM), which would be half way between the Physiologic Barrier on the right to the left Anatomic Barrier. Beyond that range is a much shorter Pathologic Barriers final limit to motion achieved by the ligaments and bone.
John Goodridge, D. O. FAAO was among the first to learn from Fred Mitchell, Sr. D. O., and one of the first to discuss utilizing the very first sign of barrier resistance in both diagnosis and treatment using the ME model. It is the place where an isometric contraction is commenced, and is critical to the successful use of MET. This is true whether one is dealing with a large or a small vertebral joint restriction, and applies to all planes of motion.
Because the Barrier Concept is so important to successful use of MET, I have chosen to include Leon Chaitow’s discussion of Barriers in his book “Muscle Energy Techniques”.
“When measuring the range of motion of a joint, the structures surrounding the joint itself - joint capsules, ligaments and physical structures of the articulation – provide resistance to the overall range of motion of the joint. In addition to this, the skin and subcutaneous connective tissue also play a part in restriction of a joint’s motion. (Shellock Et Prentice:1985, Gajdoski 1991). Johns and Wright (1962) have shown that the passive torque that is required to move a joint is contributed by the joint capsule (47%), tendon (10%), muscle (41%), and skin (2%).
A variety of different terms can be used to describe what is perceived when a restriction barrier is reached or engaged. These terms frequently relate to the type of tissue providing the restriction, and to the nature of the restriction. For example:
Normal end of range for soft tissues is felt as a progressive build-up of tension, leading to a gradually reached barrier as all slack is removed.
If a fluid restriction (edema, congestion, swelling) causes reduction in the range of motion, the end-feel will be boggy yielding yet spongy.
If muscle physiology has changed (hypertonicity, spasm, contracture), the end point will be tight, tugging sensation.
If fibrotic tissue is responsible for a reduction in range, end-feel will be rapid and harsh but with a slight elasticity remaining.
In hypermobile individuals, or structures, the end-feel will be loose and the range greater than normal.
If bony tissue is responsible for a reduction in range (arthritis, for example), end-feel will be sudden and hard without any elasticity remaining.
Pain may also produce a restriction in range, and the end-feel resulting from sudden pain will be rapid and widespread, as surrounding tissues protect against further movement.
The barrier used in MET treatment is a ‘first sign of resistance’ barrier, to which the very first in-dication of the onset of ‘bind’ is noted.
This is the place at which further movement would produce stretching of some fibers of the muscle(s) involved. This is where MET isometric contractions, whether these involve the agonists or antagonists, commence in acute (and joint) problems.”
Paul E. Kimberly, D. O. FAAO is the first one from whom I heard the words “feather edge of the barrier”. I my experience teaching MET, as well as in experiencing the treatment, many have gone beyond the feather edge before starting the isometric or isotonic contractions.
Sara E. Sutton, D. O. FAAO
INSPECTION
SIGHTING EYE: It is important to always position yourself so that your dominant eye is over the center of the body. Failure to do so can lead to erroneous impressions of displacement or amounts of displace-ment. In order to determine which eye is dominant by following the following procedure:
NEAR POINT:
Hold the index finger of your right hand at arm length’s distance directly in front of your nose at at the level of your eyes.
Approximate the tips of the left index finger and thumb as if to form a circle.
Place this circle directly in front of the nose about elbow distance away.
Place the tip of the right index finger within the middle of the circle with both eyes open.
Close the left eye to see if the right index finger stays within the middle of the circle. If so, you are right eye dominant.
Close the right eye to see if the right index finger stays within the middle of the circle. If so, you are left eye dominant.
When examining and treating, always stand on the patient’s side which corresponds to your dominant eye, i.e. if the patient is supine, and you are right eye dominant, you stand to the right of the patient. If the patient is prone, you stay on that side of the table.
PERIPHERAL VISION:
In physical diagnosis one is often required to compare position (i.e. level of medial malleoli or anterior superior iliac spines), or to compare bilateral motion (i.e. rib cage motion).
The common error is if the examiner looks at one side, and then the other. You should look at neither side. Instead, choose a mid-point and evaluate the movement of both sides simultaneously while using your peripheral vision. If evaluating the levels of the medial malleoli, one places his thumbs under the inferior slope of the MM, then looks at the midline between the two sides, then uses his peripheral vision to determine levelness. This is effective in com-paring bilateral rib cage motion.
ERROR OF PARALAX:
When evaluating for asymmetry within a plane, the operator’s line of sight should be perpendic-ular to the plane being examined. Iliac crest heights and ASIS should be sighted in the coronal plane.

PALPATION
Palpation is the art of feeling tissues with your hands in such a manner that changes in tension and position can be readily noted and diagnosed, then treated. The development of palpation demands educating one’s proprioceptive touch in the detection, amplification and interpretation of the vascular, fascial and musculo-skeletal systems of the body.
Detection is the matter of being aware of the possible findings and practicing the techniques required to expose these possibilities.
Amplification requires localized concentration on a specific task, as well as the ability to bloc out extraneous information (like closing one’s eyes).
Interpretation is the ability to relate the information received by detection and amplification.
SENSITIVE PARTS OF THE HAND:
Pads of the fingers are most sensitive for fine tactile discrimination, e.g. tension and texture.
Dorsal surface of the hands or fingers are most sensitive for temperature.
Palmar aspects of the metacarpophalangeal joints are most sensitive to vibration
The center of the palms are most sensitive fo recognizing gross shape and sizes (stereognosis). I have found this critical in performing breast examinations, or evaluating a mass.
STRUCTURES EXAMINED BY PALPATION
All external structures, structures accessible through body orifices, bones, joints, most thrombosed or thickened veins, spermatic cord, solid abdominal viscera, and accumulation of body fluids, such as pus, blood or lymph.
QUALITIES ELICITED BY PALPATION
Texture (skin, hair, mucosa); moisture (skin and mucosa); skin temperature; masses (size, shape, consistency, motility, pulsatility); pre-
cordial cardiac thrust; crepitus (bones, joints, tendon sheaths, pleura; tenderness; thrills (heart and blood vessels); vocal fremitus; depth (light & deep palpation; tension (rigidity, spasm, contracture, fibrosis).
Structural Examination Utilizing Muscle Energy Sequence Dr. Sara Sutton
General Appearance Age, apparent age, distress, toxic appearance, body type, body habitus,
Sample documentation: John Smith is a 33 year old obese Caucasian male of endomorphic body habitus, with prominent centripetal obesity. Patient appears stated age and presents in no acute distress. Non-toxic appearing.
Gait
- Look and listen. - Have patient walk on a hard surface. - Once patient initiates walking, ask him/her to speed up slightly. This eliminates
the artifact of self-consciousness. - Observe stride. If unequal, the cause is usually a lower extremity dysfunction, or
avoidance behavior/protective movement pattern of another painful body region. - Is gait antalgic (short stance phase with fast swing phase)? Shuffling (paralytic)?
Is there observable toe drop (L5 or peroneal nerve dysfunction)? Ataxia (Upper motor neuron)? Limp?
- Is one of the legs internally or externally rotated? If so, this usually indicates a hip imbalance: Often secondary to pelvic or truncal asymmetry. Also, individuals with an anatomic short leg tend to be externally rotated on the same side.
- Is the patient pigeon toed (common in athletes) or slew-footed (indicates poor trunk, neck and head posture)?
- Is there irregularity in hip sway? If so, lumbar/pelvic joint asymmetry is suggested.
- Is arm sway symmetric in a cross pattern with gait? If not, suspect an upper extremity dysfunction or avoidance behavior/protective movement pattern of another painful body region.
With patient standing Static AP spinal curves Stand at a comfortable distance directly behind the patient, and examine the spinal curvature from top to bottom, keeping eyes at the same level of the spinal curve you are examining. Look for scoliotic curvatures. Look for creases/folds at the waist. These should be symmetrical, but can indicate the apex of a scoliotic curve if one-sided. Static lateral spinal curves Stand at a comfortable distance directly to the side of the patient. Observe any increase or decrease in the cervical lordotic, thoracic kyphotic, or lumbar lordotic curvatures. Cervical Thoracic Lumbar Increased _______ _______ ______ Decreased _______ _______ ______
Vertical Height: Symmetry of anatomic landmarks (record low side) Examine the following anatomic landmarks and note any asymmetry in vertical height, recording the low side of each asymmetric landmark. Keep eye level at the same height as the anatomic landmark being examined. Place fingers on top of both AC joints, and compare heights. For the inferior angle of the scapula, palpate along the medial border until the inferior angle is felt. If difficult to locate the scapula, passively flex the patients arm while palpating the medial border of the scapula. For the iliac crests, make sure to palpate the apex of the crest bilaterally. The PSIS may be located by palpating the iliac crests and following them down to the level of the PSIS. L R Level A-C joints ________ ________ ________ Inferior angle of scapula ________ ________ ________ Iliac Crests ________ ________ ________ PSIS ________ ________ ________ Standing Flexion test Begin by locating the PSIS bilaterally. Slide thumbs over the PSIS such that they hook the PSIS under the inferior slope. Now maintain the position as you ask the patient to keep their legs straight while bending forward as if to touch their toes. Standing flexion test positive on the side in which the PSIS moves more antero-superior than the other. Usually, this will be observed at the terminal 10-15 degrees of flexion. Positive L____R_____ at degree of flexion_____ Lumbar and Thoracic somatic dysfunction While patient is flexed during standing flexion test, walk your thumbs up the spine, segment by segment, examining for rotated vertebral segments. Transverse processes that are more posterior on one side should be noted. It is helpful to mark each segment or group of rotated vertebrae with a pen. Do not apply pressure or springing motion to the vertebral segments while in flexion, as motion is greatly restricted in flexion. The measure of vertebral rotation should be strictly based on how posterior a transverse process is relative to the other on the same vertebral segment. As the examiner moves up the thoracic spine, patient is asked to straighten up such that the level being examined remain in maximal flexion. Extended or neutral dysfunctions will be noted. Generally, three or more consecutive segments will denote a neutral dysfunction, while one or two segments involve flexed dysfunctions. Always make sure patient is able to tolerate bending forward, and remain vigilant for lightheadedness or falls: Especially in patients with risk for autonomic insufficiency or vascular compromise. ERLSL (one or two segments) ERRSR (one or two segments) NSLRR (compensatory groups) NSRRL (compensatory groups) Upper thoracic and C7 somatic dysfunctions
Once you reach the upper thoracic vertebrae, have the patient straighten up to the level being examined. While patient stands erect with head and neck flexed, examine upper 3-4 thoracic segments for vertebral rotation: Diagnose as ERS dysfunctions. Again, use static vertebral rotation as the measure of dysfunction, and do not test for motion as this will not occur in maximal flexion. Now have the patient extend his/her head and neck. While patient stands erect with head and neck extended, examine upper 3-4 thoracic segments for rotated vertebral segments: Diagnose as FRS dysfunctions. While patient stands erect, move behind patient, and while standing directly behind the patient, place the index fingers on top of the transverse processes of C7. Have the patient flex his/her neck. If asymmetry becomes prominent in flexion, diagnose an ERS somatic dysfunction: The low side is the side toward which the vertebrae has sidebent, and thus rotated. Have the patient extend the neck to diagnose FRS somatic dysfunction. The low side is the side to which the vertebrae has sidebent, and thus rotated. Note: With examination of upper thoracic and C7 somatic dysfunctions: If the patient is tall, these examinations may need to be performed seated. Now ask the patient to sit down on the table. With patient seated: Seated flexion test: Positive L____R_____ at degree of flexion_____ Locate the PSIS as described for the standing flexion test, hooking the PSIS from the inferior aspect. Note: standing flexion test positive on the side in which the PSIS moves more antero-superior than the other. The seated position removes the influence of the lower extremities. Re-check thoracic and lumbar spine: Now re-check lumbar and thoracic spine for somatic dysfunctions: note whether they increase, decrease, or disappear in the seated position. If they disappear, there is indication that the lower extremities are contributing to the spinal dysfunction. As such, the examiner moves to the lower extremities and evaluates and treats any somatic dysfunction. Then move back and re-check the thoracic and lumbar spine from the flexed, seated position. Cervical ranges of motion: In order to isolate and measure only the cervical motion, the examiner must monitor the interspinous ligament of C7-T1 for flexion and extension with his/her non-dominant
hand. At the same time, place the medial sides of the 5th fingers on the medial end of the 1st ribs posteriorly for rotation and sidebending localization of motion. Record the degrees of motion: L R Rotation _____ _____ Sidebending _____ _____ Flexion ______ Extension ______ Diagnose specific cervical somatic dysfunctions: Typical cervical vertebrae (C2-C7) always operate under Fryette’s Law II. That is, they sidebend and rotate to the same side, whether in neutral, flexion, or extension. The patient sits upright while the examiner places his/her thumb and middle finger of one hand against the articular pillars, while the other thumb and middle finger cradle the forehead of the patient. To examine for ERS dysfunctions, the examiner lets the patient’s head drop forward until motion is felt at the level being examined. The examiner then introduced right rotation-sidebending motion, followed by left rotation-sidebending motion, and compares for restrictions in motion. Slight pressure may be placed on the middle finger and thumb positioned on the articular pillars in order to produce a fulcrum for sidebending. In turn, each segment is examined for ERS dysfunctions, noting that restrictions must be converted to positional diagnoses. FRS dysfunctions are diagnosed in the same manner as ERS dysfunctions, however, this is best accomplished by returning to the neutral position each time before moving on to the next segment. For each segment, extend the cervical spine with hand placement as described above, extending each segment until approximation/closure of the facet joints is felt. This denotes the correct level of extension at which to introduce sidebending-rotation for the respective segment. A-A motion: 50% of cervical rotation occurs within this segment. To evaluate, the examiner hyperflexes the neck, and rotates the head to the right, then back to midline, and then to the left, noting the degrees of permitted motion. The examiner may visualize the degrees of rotation by using the distance between the AC joint and the SC joint as a protractor. A-A rotation L_____ R_____ O-A ROM is evaluated in the supine position (see later) Shoulder ROM
While palpating the patients shoulder, standing behind the patient with the medial aspect of the hand on the shoulder, record degrees of the following ranges of motion: R L Flexion _____ _____ Extension _____ _____ Abduction _____ _____ Adduction _____ _____ Internal rotation _____ _____ External rotation _____ _____ Note: Internal and external rotation are measured with the shoulder abducted 90 degrees, and the elbow flexed to 90 degrees. A-C Motion: A-C motion is evaluated by having the shoulder abducted 90 degrees and horizontally adducted at about 15 degrees. The examiner then introduces internal and external rotation noting the respective degrees of motion. L R Internal rotation _____ _____ External rotation _____ _____ Now ask the patient to lie down on his/her back. With patient in the supine position: Hip ROM Hip ROM is evaluated and measured by goniometer or by estimation of degrees. Not only is the total ROM in each plane of motion a concern, but also the asymmetry noted from side to side. The examiner must take care to measure the degrees of motion against restrictive barriers, not the anatomic barriers. Measurements should be taken from the center of the hip joint. Hip flexion is evaluated by straight leg raising, and the rotations are evaluated with the hip and knee each simultaneously flexed at 90 degrees. L R Flexion _____ _____ Extension _____ _____ Abduction _____ _____ Adduction _____ _____ External rotation _____ _____ Internal rotation _____ _____ Pubic Tubercles: Locate the pubic tubercles most sensitively by placing the examining hand across the pubic bone. This allows the examiner to determine the level of the cephalic margin.
Now place middle fingers on the pubic tuberclesat about ½ - ¾ inch lateral to the midline. Then roll the pads of the fingers over the edge of the tubercles looking at the caudad surface to determine whether or not the levels are equal. If they are unequal, the side of dysfunction is the side of the standing flexion test positivity. If standing flexion test was negative, correct the right side first. Note: This is the only somatic dysfunction that should be treated before proceeding to further pelvic evaluation. If there is history of trauma, or any suspicion of malignancy, fracture, or dislocation, complete physical examination should be performed, as well as appropriate x-rays ordered and read before treating pubic dysfunctions. L R Pubic tubercle high _____ _____ Pubic tubercle low _____ _____ ASIS ASIS is another sensitive area best located by placing the palm of the hand over the general area, and then immediately locating the ASIS with the pads of the thumbs, then rolling caudad to contact the inferior slopes of the ASIS. The side of dysfunction will be named for the side which had the positive standing flexion test. If the standing flexion test was negative, treat the right side first, BUT, only after all lumbar, sacral, and LE somatic dysfunctions have been treated. L R ASIS anterior-inferior _____ _____ ASIS posterior-superior _____ _____ Rib cage: The rib cage has three primary motions: 1) Bucket handle: In which there is an increase and decrease in the lateral diameter of the chest with inhalation and exhalation. This motion occurs primarily over the lower 1/3 of the rib cage. 2) Pump handle: In which there is an increase and decrease in the antero-posterior diameter of the chest with inhalation and exhalation. This is the primary motion of the upper 1/3 of the rib cage. 3) Transitional: Motion occurs in the middle third of the rib cage, in which there is almost an equal amount of pump handle and bucket handle motion. The first rib may also have either bucket handle or pump handle dysfunctions, or both. Caliper motion: evaluated with the patient prone, and relates primarily to the lower ribs. Dysfunctions are noted when there is restriction of inhalation or exhalation. It is easiest to note a positional diagnosis such as:

1st rib locked down anteriorly (Pump Handle) Ribs 8-10 locked upp laterally (Bucket Handle) Left 6th rib locked up anteriorly and lateralyl (Pump Handle and Bucket handle) Right ribs 8-10 locked up posteriorly (caliper) Sterno-clavicular joint: When the shoulders are shrugged towards the ears, the distal end of the clavicles should move cephalad and the medial end of the clavicles should move caudad in it’s articulation with the manubrium. When the shoulders are flexed to 90 degrees and the patient is asked to reach toward the ceiling, the medial end of the clavicle should move posterior in its articulation with the manubrium. The sternoclavicular joint is the sole attachment of the upper extremity to the axial skeleton, and is a strong joint. It is influenced by stresses transmitted through the upper extremities as well as stresses from the 1st rib. Therefore, dysfunctions of the upper extremities and the 1st rib should always be treated before re-evaluating and treating sterno-clavicular dysfunctions. Dysfunctions are noted by their positions: L R Medial end of clavicle superior _____ _____ Medial end of clavicle inferior _____ _____ O-A joint: The OA articulation functions under Fryette’s law I., in which the articulation rotates and sidebends in opposite directions. This occurs because of the convergence of the condyles. In order to evaluate the motion of the joint, it is less confusing just to evaluate sidebending. The patient’s neck is mildly flexed or extended to evaluate ERS or FRS, and the examiner introduces side-sheers in each direction. Compare the distance in which the chin moves from the midline right and left. If there is restriction in right sidebending, then there is restricted left rotation, and opposite. Example dysfunctions: FSLRR or FSRRL noted when examined in extension ESLRR or ESRRL noted when examined in flexion. Cranial examination: For those trained in cranial examination and treatment, this would be an appropriate time to evaluate and treat cranial dysfunction. Now ask the patient to lie on his/her stomach.
With patient prone: Hip extension and knee flexion Evaluate hip extension by stabilizing the pelvis with one hand on the opposite the side being examined while extending the contralateral hip with the other hand, just slightly above the level of the knee. Make sure to extend only within the range in which pelvic motion is not induced. Otherwise, lumbar motion will artificially overestimate the degree of hip extension. Knee flexion can be measured on both sides at the same time. With the web of your hand pressed against the patient’s shin, just above the level of the ankle, add equal and symmetrical pressure cephalad to evaluate for knee flexion. Make note of the degrees range of motion as well as asymmetry between the right and left side. Hip extension L______ R______ degrees Knee flexion L______ R______ degrees ILA of sacrum Make sure the patient’s heels are rolled out laterally and symmetrically via internal rotation of the hips: Otherwise, the ILAs will be artificially asymmetrical in the cephalad/caudad direction. Place the palm of your hand over the sacrum in a cupping motion to locate the position of the ILAs. With the medial aspect of your thumbs, slide over the ridge of the ILAs, hooking under the inferior margin. Evaluate for asymmetry of inferior positioning as well as posterior positioning. Posterior L______ R______ Inferior L______ R______ Sacral sulcus Deep L______ R______ Ischial tuberosity Inferior L______ R______ Lumbar and thoracic spine Examined in extension for flexed dysfunctions. Have the patient get up onto his/her elbows while resting chin in the palms of his/her hands. Examiner moves from the sacral sulci to the transverse processes of the L5 vertebrae. Using the tufts of the thumbs, the examiner takes up the slack of the soft tissue bilaterally. A slight springing motion is applied in the anterior direction, one side at a time. Comparison is made side to side for resistance to anterior motion. The side with the posterior transverse process is the side toward which the body of the vertebrae has rotated. Diagnose as FRS dysfunctions. Examiner moves up the lumbar and thoracic spine, segment by segment, marking each somatic dysfunction with a pen. Caliper ribs

Examiner places his/her thumbs along the medial aspect of the paraspinal musculature. The rest of the hands place laterally, covering as much of the lower posterior rib distribution as possible. Patient is asked to take a deep breath and exhale with some force. Comparison is made from side to side for locked up/locked down dysfunctions.

Sara E. Sutton, D. O., FAAO 3219 SW 39th St. Des Moines, IA 50321
STRUCTURAL EXAMINATION – Muscle Energy Model NAME ____________________________________________ AGE _________ DATE ____________________ CHART NO. _________ LOW SIDE L R LEVEL Shoulder Tip of Scapula Iliac Crest PSIS ↑ ↓ C lordosis T kyphosis L lordosis S kyphosis STANDING FLEXION TEST Pos. L _____ R _____ with _____° flexion Neg. _____ LUMBAR & THORACIC ERS DYSFUNCTIONS T 1-3 FRS DYSFUNCTIONS SEATED FLEXION TEST Pos. L _____ R _____ with _____° flexion Neg. _____ CERVICAL ROM L R Rotation ° ° Side Bending ° ° Flexion ° Extension ° CERVICAL ERS & FRS DYSFUNCTIONS A-A rotation L _____ R _____ degrees SHOULDER ROM (degrees) L R Flexion Extension Internal Rotation External Rotation Abduction Adduction PATIENT SUPINE HIP ROM (degrees) L R Flexion Internal Rotation External Rotation Abduction Adduction MEDIAL MALLEOLI Short L _____ R _____ Level _____ ASIS** COMPRESSION TEST Pos. L _____ R _____ Neg. _____ Anterior/Inferior L _____ R _____ Level _____
PATIENT SUPINE (continued) PUBIC TUBERCLES*** Inferior L _____ R _____ Superior L _____ R _____ Level _____ RIB CAGE MOTIONS Inhalation Exhalation **** & ***** Restriction Restriction L R L R Upper 1/3 PH Middle 1/3 PH & BH Lower 1/3 BH SPECIFIC RIB CAGE DYSFUNCTIONS O-A ESR & FSR DYSFUNCTIONS PATIENT PRONE HIP Extension L _____ R _____ degrees CALIPER RIB MOTIONS Inhalation restriction L _____ R _____ Exhalation restriction L _____ R _____ ILA of SACRUM Neutral Post. L _____ R _____ Inf. L _____ R _____ Extension Post. L_____ R_____ Inf. L_____ R____ SACRAL SULCUS Deep L _____ R _____ LUMBAR AND THORACIC FRS DYSFUNCTIONS OTHER EXTREMITY JOINT ROM, IF INDICATED COMMENTS: DIAGNOSES ___________________________________________ ___________________________________________ ___________________________________________ ___________________________________________ ___________________________________________ ___________________________________________ * Examination is done in prone position ** Side of dysfunction is determined by side of positive standing flexion test or positive compression test ***Side of dysfunction is determined by side of positive standing flexion test. ****B.H. = bucket handle rib motion *****P.H. = pump handle rib motion SIGNATURE _______________________________
MUSCLE ENERGY TREATMENT OF
NEUTRAL LUMBAR GROUPS
Dysfunctions of two or more vertebrae are considered to be a neutral group. According to Fryette’s principles, the vertebrae rotate one direction and side-bend to the opposite side. These are noted as NSR groups. A common group would be T-8 to L-1 side-bent left and rotated right.
To treat this group in a seated position, the patient sits upright on a low stool or table, and places his right hand behind his neck. He then places his left hand on his right elbow. The operator stands behind and slightly to the left of the patient, palpating the right T-L group with his right hand. His left hand reaches under the patient’s left arm, then over the top of his right arm. As the operator rotates the patient to the left he introduces slight right side-bending with a translatory motion to engage the barriers by slightly pulling the patient’s right arm to the left. The right side-bending isometric occurs as the patient pushes down on the operator’s left arm. The relaxation phase should be as long as the contraction phase, and the operator then engages new motion barriers. Repeat one or two times. Recheck.
Neutral groups may also be treated in a recumbent position, on either side. There are some CAUTIONS when using the recumbent techniques for lumbar or sacral techniques when patients have had hip or knee replacements. One would not want to cause a dislocation. Seated techniques are also preferred with patients who have severe arthritis of the spine or lower extremity joints.
WITH THE ROTATED SIDE UP (L1-5 Neutral Side-bent left, Rotated right)
The patient lies on his left side, keeping the spine in a neutral position. The operator stands in front of and facing the patient. The operator flexes the patient’s knees and hips to about 90 degrees, using one or both hands to accomplish this depending upon the size, flexibility and weight of the patient. He palpates the lumbars with his right hand as he flexes the hips with his left hand (or both) until he feels slight gapping of the interspinous ligaments of the lumbar interspinous ligaments. The operator places his left forearm under the patient’s legs just above the ankle so that he can lift to introduce right side-bending. The operator then asks the patient to very gently push his ankles toward the floor as the oper-ator offers an isometric counterforce. The patient is asked to relax, after which the operator engages a new side-bending barrier. Repeat once or twice. Recheck.
WITH THE ROTATED SIDE DOWN (L 1-5 Neutral Side-bent left, Rotated right)
The patient lies on his right side with the operator standing in front of him, facing the patient. The patient’s hips and knees are flexed about 90 degrees, or until the operator feels the stretching of the inter-spinous ligaments. The operator asks the patient to LET the feet drop toward the floor. The operator monitors the lumbar spine with the right hand. The operator grasps the patient’s ankles by placing the left thumb on top, the index finger between, and the third finger under the ankles. The side-bending barrier is engaged, and the operator asks the patient to gently push his ankles toward the

ceiling as the operator offers an isometric counterforce. The patient relaxes, a new side-bending barrier is engaged, and the isometric is repeated once or twice. Recheck findings.
TREATMENT OF PUBIC DYSFUNCTIONS USING
MUSCLE ENERGY TECHNIQUE
If the pubic symphysis is caudad on the right, the operator stands to the left side of the patient (patient moves close to the left edge of the table). Operator stretches his right thumb and index finger in order to place them around the patient’s right groin, then asks the patient to flex both right hip and knee so that the knee will fit under the operator’s right axilla. The operator then places his extended left fingers posterior to the right ischium with the tuberosity fitting into the palm of his hand. The operator takes uip the slack of cephalad motion, then asks the patient to very gently push his right knee caudad as the operator resists the isometric contraction. The operator takes up the slack, and repeats the contraction once or twice. The patient returns the right lower extremity to the table, and the operator rechecks findings.
CAUTION: You must make certain that the patient understands how to do a light contraction so that you are not injured. You must be able to release your hold quickly if the patient is too forceful in his hip extension effort.
If the pubic symphysis is cephalad on the left, the patient moves to the left edge of the table so that the left hip is free of the table. The operator supports the right side of the pelvis with his left hand surrounding (not on top of – sensitive!) the right ASIS. The operator’s faces the head of the table with his left thigh next to the table, and he asks the patient to let his left leg drop off the table. The operator takes up the left hip extension slack,then places his hand on the front of the patient’s left thigh. He asks the patient to gently push his thigh toward the ceiling as the operator offers resistance to a light isometric contraction. The patient is asked to relax and left his leg drop toward the floor. The patient is then asked to squeeze the operator’s left thigh with an isometric contraction; and then is asked to let the leg drop further. These two steps are repeated once or twice. Findings are rechecked.
THIS TREATMENT IS IDENTICAL FOR A POSTERIOR LEFT INNOMINATE!
Treatment of a right anterior innominate: The patient is supine, close to the left edge of the table, with the operator to the patient’s left. The set-up looks the same as a caudad pubic sheer, however the placement of the operator’s hand is posterior to the ischial tuberosity, but the operator takes up the rotation slack by rolling the right pelvis cephalad after the isometric contractions.
Another way to treat a right anterior innomate is to have the patient move to the right side of the patient as the operator stands on the right side of the table. The operator places the finger tips of his left hand along the right sacral sulcus as the he gently moves the flexed knee medially until he feels a gap in the sulcus. He then places his right shoulder against the patient’s right knee, and flexes the hip until motion is localized in the SI joint. He then asks the patient to push against his shoulder with a light contraction; relax, take up the slack, and repeat. Recheck.
THE THORACIC CAGE
The rib cage is composed of the sternum, thoracic spine, ribs and diaphragm. All of these elements are subject to somatic dysfunctions, which may alter their ability to comply with respiratory move-ment, adapt to postural and locomotion requirements of the body, as well as circulation of body fluids. Altered somato-visceral reflexes may affect innervations to pulmonary, cardiac, gastro-intestinal and endocrine function. Evaluation and treatment of all components of rib cage dys-function will add new dimensions to management of such clinical problems as chest wall pain, asthma, COPD, pneumonia, bronchitis, shoulder girdle pain, thoracic outlet syndrome, cardiac de-compensation, edema of the pelvis, upper and lower extremities, hemorrhoids, leg or vulvar varicosities, herpes zoster, and post-operative mastectomies, thoracotomies - - the list is endless.
It has always been of utmost importance in my practice to evaluate and treat rib cage dysfunctions during my patients’ pre-admission physical exams, especially if surgery is anticipated. In this way their own diaphragms should be functioning well post-operatively, thus greatly reducing the risk of post-op pneumonias.
Disruption of anatomic relationships (fracture, dislocation, subluxation or strain) may occur if these structures are subjected to physical trauma. Standard medical treatment of rib fractures and dis-locations may be augmented by careful and skillful management of associated respiratory motion restriction.
DIAGNOSIS OF RIB CAGE DYSFUNCTIONS
The first rib articulates with the manubrium via a long piece of flexible cartilage, and may be palpated near the manubrium for about two centimeters below the inferior margin of the clavicle, and at that point it passes postero-superiorly behind the clavicle. If one palpates at the lateral end of the clavicle where it approximates the head of the humerus, your finger will actually be on the second rib.
The second rib articulates at the junction of the manubrium and the body of the sternum, which is known as the sternal angle.
The heads of the second through ninth ribs each articulate between the bodies of its own vertebra and the vertebral body above (e.g. the second rib is between the bodies of T-1 and T-2). The tubercle of all ribs, except eleventh and twelfth, articulate with their own vertebral transverse processes. The first rib head articulates with the body and transverse process of the first thoracic vertebra, but does not touch the seventh cervical vertebra. Ribs ten, eleven and twelve have unifacet articulations with their own vertebral bodies.
Fred Mitchell, Sr., D. O. stressed that it was important to correct vertebral dysfunctions before treat-ing the rib cage.
EXHALATION RESTRICTIONS may also be described as “locked up”, and don’t move down as the patient exhales. The operator must locate and treat the lower-most rib or ribs which prevent exhalation.
INHALATION RESTRICTIONS are described as “locked down”, and don’t move up with inhalation.
When one is evaluating the patient’s standing posture, it is common to find the right “shoulder” (A-C) lower than the left. This is often associated with a left thoracic convexity, and commonly the left rib cage will be “locked up” and won’t exhale. Along with that pattern, one often finds that the right first rib doesn’t inhale. It is wise to examine for abduction restriction of the sterno-clavicular joints before treating the rib dysfunctions, and again after treatment. Many times St-Cl dysfunctions are secondary to rib cage dysfunctions, and will not be found after the rib dysfunction is treated.
To establish a routine for rib cage evaluation, one should stand on the side of the operators dominant eye, and spread the fingers of both hands around the lateral side of the lower 1/3 of the rib cage, with fingers at about a 45 degree angle along the shafts of the ribs. The palpation should be light, and the operator feels watches inhalation and exhalation by focusing central vision mid-line, and using lateral vision to observe any restricted motion. The lower 1/3 of the rib cage motion is primarily “bucket handle” (BH) or side-bending.
The middle 1/3 of the rib cage evaluation is accomplished by placing left and right 2nd & 3rd fingers para-sternally, and the patient inhales deeply as the operator observes both inhalation and exhalation. The middle rib cage motion is approximately equal amounts of pump handle (PH) and BH motions.
The upper 1/3 of rib cage motion is evaluated by palpating with the tips of the middle fingers where the distal clavicle and humerus approximate each other. Again, the operator observes both inhalation and exhalation. The most common pattern is that the right side doesn’t inhale if there is dysfunction.
To evaluate the 11th and 12th ribs, the patient is prone with the operator standing on the dominant eye side. These ribs are not long enough to show PH or BH motions, therefore their movement is simply described as locked up (inhaled) or locked down (ex-haled).
To evaluate caliper rib cage motion the patient is prone with the operator standing on the dominant eye side. I distinctly recall that Dr. Mitchell talked about the old ice tongs used to pick up big blocks of ice which were delivered to our homes in the days before refrigerators. His thumbs were adjacent to each other as he opened and closed the “tongs”. His hands were not on ribs 11 and 12 - - they were higher. His thumbs were placed “in the groove” next to the spinous processes of T7 to 10. He then separated his out-stretched fingers between the ribs the 7th to 10th ribs, and observed motion as the patient took a deep breath, then exhaled. He focused his central vision on the midline, and used his lateral vision to observe motion as the patient inhaled, then inhaled. Typically, the right caliper ribs are locked up - - won’t exhale. Of interest is that occasionally a lower thoracic dysfunction is stubborn to correct. At such times I have then corrected the caliper ribs, then rechecked the thoracic dysfunction - - only to find it corrected.
TREATMENT OF RIB CAGE DYSFUNCTIONS
I shall describe the dysfunctions which I commonly find them.
LEFT LOWER RIBS LOCKED UP: Patient is supine, and moves to the left so the left shoulder is about 6” lateral to the edge of the table. The operator stands to the left of the patient’s head, and the patient is asked to lift his head while flexing the thoracic spine, as the operator reaches under the patient and asks the patient to let his head rest on the operator’s right arm, next to the operator’s body. The operator palpates the lateral lower rib cage with out-stretched left hand, as the operator flexes the spine until that motion is felt in the ribs. The operator’s inner thigh (right) rests against the top of the patient’s shoulder. The patient takes in a little breath, and is asked to exhale while the operator simultaneously moves the left shoulder caudad and medially (almost a translatory motion) until a new motion barrier is palpated. Repeat one or two times. The patient is returned to mid-line and lies flat on the table. The lower rib cage motion is rechecked. I stress that the left hand’s only function is palpation - - never is any pressure placed upon the ribs.
LEFT MIDDLE RIBS LOCKED UP: The patient and operator’s positions are as in the previous task analysis, although less thoracic flexion and left lateral flexion are needed. Gentle gliding motion will take up the slack as the patient exhales. Repeat one or two times, and recheck.
UPPER RIBS LOCKED UP: The patient is supine, and the operator stands at the head of the table, and places his left hand under the upper 3 or 4 thoracic vertebrae. The operator palpates the lower-most restricted rib with his right index finger in the inter-space above the rib, and the middle finger in the next lower inter-space. He flexes the spine until he feels motion at the inter-space of the index finger, but not to the third finger. The patient takes up the side-bending slack by reaching slowly along the side of his leg until the patient reaches the side-bending barrier. Repeat one or two times. Recheck.
TREATMENT OF RIGHT CALIPER RIBS LOCKED UP: The patient is prone, and the operator stands on the left side of the patient. In order to produce a slight right T-L convexity the patient is asked to turn his head to the left, and as he is doing that the operator lifts the head and moves the head slightly to the left, then places it on the table. To create the convexity from below the operator places his left hand over the posterior right 7th to 10th ribs. He then moves one leg, then the other, toward him in order to localize the convexity to the area. The operator places heel of the left hand just lateral to T-7 to 10. The operator reaches under the area of the right ASIS (avoiding pressure directly on the ASIS), and rolls the pelvis toward him, thus engaging the rotation barrier. The patient is asked to take in a breath, then exhale completely. As the patient exhales, the operator rotates the pelvis toward him by leaning backward (not pulling with his hands), and the patient is asked to pull his right pelvis gently toward the table against a mild isometric counterforce to a count of three, then relaxes. The operator takes up the slack by engaging the new rotation barrier. He repeats the process a time or two, then rechecks findings.
The latissimus dorsi muscle is used in this isometric. It attaches to the spinous processes of the lower 5 or 6 thoracic vertebrae as well as the lumbar vertebrae and the median ridge of the sacrum and the outer tip of the iliac crest. I stress that it only takes an ounce or two of isometric counter-force. If the patient is extremely obese, it may be necessary to have an office assistant help rotate the pelvis, as well as help with the isometric contraction.
TREATMENT OF RIGHT FIRST RIB LOCKED DOWN: The patient is supine, and the operator is standing on the left side of the patient. The back of the patient’s right hand is placed on his forehead, and the operator rotates the neck @ 15 degrees to the right for the first rib dysfunction, and 20 degrees for a second rib dysfunction. Operator palpates the anterior surface of the right upper ribs, then asks the patient to inhale deeply, then try to lift the forehead (not his arm) toward the ceiling as the operator offers light isometric resistance. The patient relaxes. Repeat and recheck. Gentle isometrics are recommended.
The scalenes attach to ribs one and two, and the operator may observe their contraction with the isometrics.
Mitchell’s technique had the operator pull the patient’s right arm toward him with his right hand, and then with his left hand he reached behind the patient’s right shoulder girdle so that his flexed fingers wrapped around the right upper trapezius and supraspinatus which cover the first rib. Then he would take up the slack by pulling the first rib caudad before the isometric was performed. One day I couldn’t make myself do that on a very obese, odiferous male ! So, I just monitored the anterior surface of the right upper ribs. And it worked!!
DIAGNOSIS & TREATMENT OF FLEXED SOMATIC DYSFUNCTIONS
OF
THORACIC AND LUMBAR SPINE & SACRUM
One of the most common causes of acute low back pain is caused by the patient’s bending forward, turning to the right, and not coming back to mid-line before standing erect. The patient may complain of stiffness or acute pain as he attempts to straighten up. Thus one or more facets on right will closed, and the left facets will be locked open as the patient straightens. Accurate diagnosis can be made as the prone patient is asked to extend the lumbar and lower thoracic spine by getting up on his elbows in the “TV or Sphynx” position with palms cupping the chin, making sure the elbows are even with each other. The patient is asked to gently roll his heels out (internal rotation of the thigh) in order to relax the sacral muscles.
The level of the ILAs of the sacrum should be noted, as well as the depths of the sacral sulcii. The most common sacral dysfunction with flexed lumbar dysfunctions is a left flexed sacrum (or left shear). The left ILA wil be caudad & posterior, and the left sacral sulcus will be deeper that the right. The operator locates L-5 by placing his thumbs on the posterior surface of the PSIS, then moves his thumbs superior-medially at @ 45 degrees. The thumbs are placed horizontally over the lamina of L-5. Many times a rotated segment will be obvious, causing the operator’s thumbs to appear posterior on the side toward which the segment is rotated. However, the transverse processes may appear level, yet be restricted. Therefore, the operator needs to place a gentle rotation motion on one side until all of the “slack” is taken out of joint motion; and then introduces a gentle, short springing motion to test for restricted motion. The same is performed on the other side, and comparison is made. This re-striction is often very subtle, and may be painful to the patient. Care should be taken that the spring-ing motion is rotational, not a forced anterior motion, particularly in patients with known or suspected spondylolisthesis.
Each lumbar vertebra is examined in this fashion, as well as all of the thoracic vertebrae up to the level of @T-4, as T-1 to 3 are easily examined and treated seated.
TREATMENT OF FRS DYSFUNCTIONS: Example: FRS right
I don’t recall the time that I discovered that moving the elbow forward would help de-rotate a dys-functional segment, but I have used this in treatment ever since. The patient is in the sphinx position with elbows even, and is asked to move his right elbow forward one inch. Motion of the transverse process is re-evaluated until there is free and equal rotation each direction. It may be necessary to move the right elbow forward 2 or 3 times, or move the left one back an inch or two. ONLY when the rotation is free left and right should treatment be started by asking the patient to inhale slightly, then deeply exhale
(this will increase lordosis). As the patient exhales, the operator follow the extension with a light rotational pressure on the right transverse process. Repeat one or two times. Ask the patient to level his elbows, and recheck.
ONLY after ALL lumbar vertebrae are corrected should one recheck the sacral findings. Sometimes they will correct as the lumbars are corrected. If not, the sacrum is re-evaluated for an accurate diag-nosis.
The Thoracic FRS dysfunctions are treated in the same way, one by one. However, one uses very subtle side-bending to balance all three planes of motion. It takes just a little nudging of the rib cage to introduce side-bending. In the upper thoracics, the side-bending may be accomplished light pressure on the shoulder in an oblique axis, medial and caudad. It may be necessary to ask the patient to approximate his elbows in order to examine between the scapulae.
Always recheck findings.
TREATMENT OF A LEFT UNILATERAL FLEXED SACRUM
It is utmost importance that the sacrum is treated ONLY after all lumbar dysfunctions have been treated.
The patient is prone with the operator standing to the left of the patient. He flexes the patient’s left knee @ 90 degrees, places 2 left fingers along the superior pole of the sacral sulcus; then wraps his right arm around the patient’s left ankle in order to slightly extend the hip so it clears the table so the operator can slightly abduct the hip until motion is felt in the SI joint. He gently places the thigh on the table, then internally rotates the hip so that the foot moves laterally against the operator’s lateral left rib cage. (F. L. Mitchell, D. O. Sr only asked the patient to internally rotate the hip by turning the heel out.)
The next step is extremely important! The operator places his hypothenar eminence against the patient’s left inferior lateral angle (ILA) and tests for motion in the superior pole of the sulcus as he tests a springing motion as h varies the degrees of his extended arm. The operator needs to envision the sacrum moving up the long arm, then the short arm, of the joint. When the angle of ease is found, it is maintained as the patient is asked to take in and hold a deep breath. The operator simultaneous-ly takes up the permitted motion as the base of the sacrum moves posteriorly. (This is the extent of how FLM, Sr. treated this dysfunction.) However, I have added an isometric contraction of the pyriformis by having the patient gently squeeze my left rib cage after the sacrum has moved cephalad. The patient relaxes the contraction, and is then asked to exhale. Repeat one or two times, and recheck findings.
There are times when the sacro-coccygeal area has been traumatized, and the patient can’t tolerate any pressure to the area. In that event I have often mde changes in the position of the ILA if I only use the isometric of the pyriformis to modify this dysfrunction.

BASIC PRINCIPLES OF MUSCLE ENERGY TECHNIQUE
Muscle Energy Technique (MET) was developed by Fred L. Mitchell, Sr., D. O. This technique is classi-fied as an active technique in which the patient voluntarily uses his muscles from a precisely controlled position in a specific direction, against a distinctly executed counterforce. MET may be used to lengthen shortened or spastic muscle, to strengthen weakened muscles, to reduce localized edema, or to mobilize restricted joint motion. The function of any articulation in the body which can be moved by voluntary muscle action, directly or indirectly, can be influenced by MET. The amount of force or effort applied by the patient and the operator may vary from minimal to maximal contractions. The duration of the contraction may vary from a few to several seconds. Three types of muscle contraction may be used: isometric : the patient and operator force are equal, and may be used to lengthen short, spastic or contractured muscles; isotonic: in which the operator force is less than the patient’s force, thus may be used to tone or strengthen weakened muscles; isolytic: may be used to mobilize a contractured joint by having the operator force greater than the patient’s - - but always preceded by a few isometric con-tractions.
MET is classified as an active technique with direct positioning in which motion or restrictive barriers are engaged, but not stressed. The patient is asked to make a precise muscle effort with specific, carefully worded instructions given to the patient. The resisting counterforce provided by the operator gives cues to the patient to judge direction, intensity and duration of the contraction. Bear in mind that a great deal of force is not necessary, as we are using neurologic mechanisms to make corrections.
Two specific reflex mechanisms are utilized to accomplish our goal of treating a specific muscle:
The reciprocal inhibition reflex is the first. When an agonist muscle contracts and shortens, its antagonist must relax and lengthen so that motion can occur in the agonist muscle. The contraction of the agonist reciprocally inhibits antagonist so that smooth motion may occur. A simple example of this is that one cannot flex the elbow unless the extensors relax.
As repetitive isotonic contractions occur in the muscle, against progressive resistance, increased tone and performance of a muscle will occur. In this way a weak muscle’s tone can increase.
Afferents from both Golgi tendon receptors and gamma afferents from spindle receptors feed back to the spinal cord. Gamma efferents return to the intrafusal fibers, thus re-setting their resting length. This changes the resting length of the extrafusal fibers of the muscle. Thus, after an isometric contraction, a hypertonic muscle can be passively lengthened to a new resting length.
All of these muscle contractions influence the surrounding fascia, the connective tissue and the inter-stitial fluids, thus altering muscle physiology by reflex mechanisms. It is well to advise patients that they may experience an increase of muscle soreness or fatigue following MET, for the patient’s muscle contractions result in lactic acid, carbon dioxide and other metabolic waste products to accumulate in the tissues until metabolized and transported. thus it is important that the patient not be over-treated. They should be advised to increase their water intake after MET.
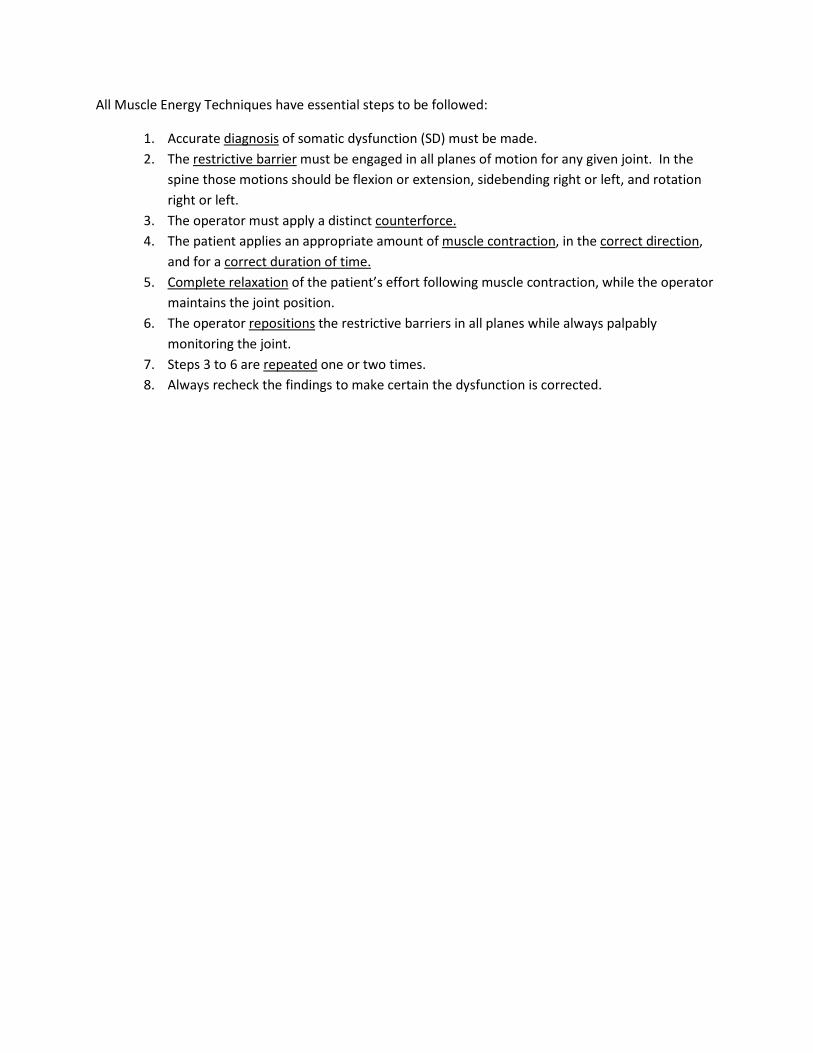
All Muscle Energy Techniques have essential steps to be followed:
1. Accurate diagnosis of somatic dysfunction (SD) must be made. 2. The restrictive barrier must be engaged in all planes of motion for any given joint. In the
spine those motions should be flexion or extension, sidebending right or left, and rotation right or left.
3. The operator must apply a distinct counterforce. 4. The patient applies an appropriate amount of muscle contraction, in the correct direction,
and for a correct duration of time. 5. Complete relaxation of the patient’s effort following muscle contraction, while the operator
maintains the joint position. 6. The operator repositions the restrictive barriers in all planes while always palpably
monitoring the joint. 7. Steps 3 to 6 are repeated one or two times. 8. Always recheck the findings to make certain the dysfunction is corrected.
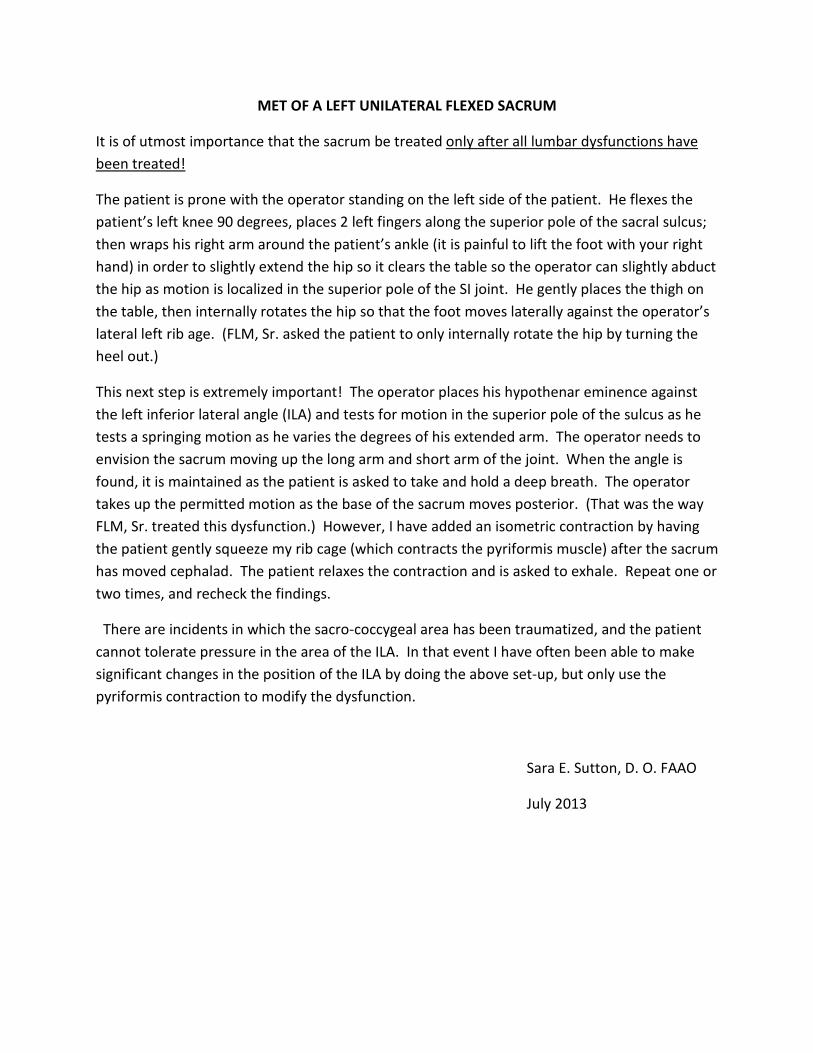
MET OF A LEFT UNILATERAL FLEXED SACRUM
It is of utmost importance that the sacrum be treated only after all lumbar dysfunctions have been treated!
The patient is prone with the operator standing on the left side of the patient. He flexes the patient’s left knee 90 degrees, places 2 left fingers along the superior pole of the sacral sulcus; then wraps his right arm around the patient’s ankle (it is painful to lift the foot with your right hand) in order to slightly extend the hip so it clears the table so the operator can slightly abduct the hip as motion is localized in the superior pole of the SI joint. He gently places the thigh on the table, then internally rotates the hip so that the foot moves laterally against the operator’s lateral left rib age. (FLM, Sr. asked the patient to only internally rotate the hip by turning the heel out.)
This next step is extremely important! The operator places his hypothenar eminence against the left inferior lateral angle (ILA) and tests for motion in the superior pole of the sulcus as he tests a springing motion as he varies the degrees of his extended arm. The operator needs to envision the sacrum moving up the long arm and short arm of the joint. When the angle is found, it is maintained as the patient is asked to take and hold a deep breath. The operator takes up the permitted motion as the base of the sacrum moves posterior. (That was the way FLM, Sr. treated this dysfunction.) However, I have added an isometric contraction by having the patient gently squeeze my rib cage (which contracts the pyriformis muscle) after the sacrum has moved cephalad. The patient relaxes the contraction and is asked to exhale. Repeat one or two times, and recheck the findings.
There are incidents in which the sacro-coccygeal area has been traumatized, and the patient cannot tolerate pressure in the area of the ILA. In that event I have often been able to make significant changes in the position of the ILA by doing the above set-up, but only use the pyriformis contraction to modify the dysfunction.
Sara E. Sutton, D. O. FAAO
July 2013
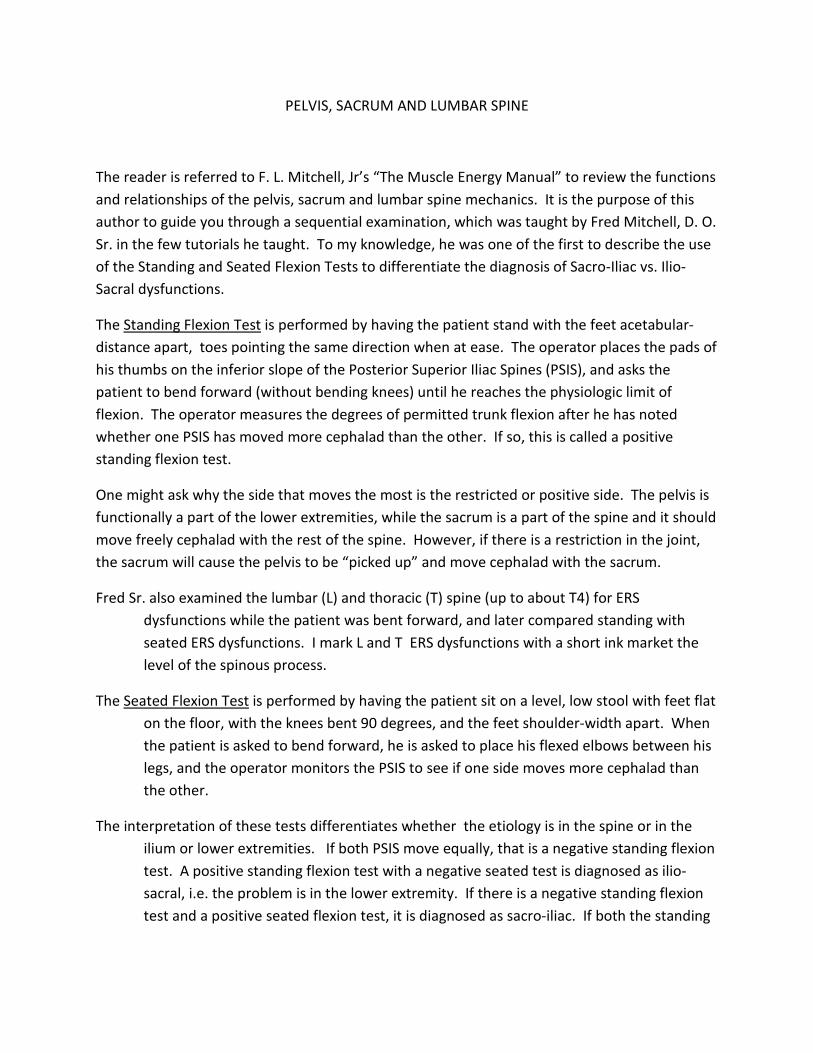
PELVIS, SACRUM AND LUMBAR SPINE
The reader is referred to F. L. Mitchell, Jr’s “The Muscle Energy Manual” to review the functions and relationships of the pelvis, sacrum and lumbar spine mechanics. It is the purpose of this author to guide you through a sequential examination, which was taught by Fred Mitchell, D. O. Sr. in the few tutorials he taught. To my knowledge, he was one of the first to describe the use of the Standing and Seated Flexion Tests to differentiate the diagnosis of Sacro-Iliac vs. Ilio-Sacral dysfunctions.
The Standing Flexion Test is performed by having the patient stand with the feet acetabular- distance apart, toes pointing the same direction when at ease. The operator places the pads of his thumbs on the inferior slope of the Posterior Superior Iliac Spines (PSIS), and asks the patient to bend forward (without bending knees) until he reaches the physiologic limit of flexion. The operator measures the degrees of permitted trunk flexion after he has noted whether one PSIS has moved more cephalad than the other. If so, this is called a positive standing flexion test.
One might ask why the side that moves the most is the restricted or positive side. The pelvis is functionally a part of the lower extremities, while the sacrum is a part of the spine and it should move freely cephalad with the rest of the spine. However, if there is a restriction in the joint, the sacrum will cause the pelvis to be “picked up” and move cephalad with the sacrum.
Fred Sr. also examined the lumbar (L) and thoracic (T) spine (up to about T4) for ERS dysfunctions while the patient was bent forward, and later compared standing with seated ERS dysfunctions. I mark L and T ERS dysfunctions with a short ink market the level of the spinous process.
The Seated Flexion Test is performed by having the patient sit on a level, low stool with feet flat on the floor, with the knees bent 90 degrees, and the feet shoulder-width apart. When the patient is asked to bend forward, he is asked to place his flexed elbows between his legs, and the operator monitors the PSIS to see if one side moves more cephalad than the other.
The interpretation of these tests differentiates whether the etiology is in the spine or in the ilium or lower extremities. If both PSIS move equally, that is a negative standing flexion test. A positive standing flexion test with a negative seated test is diagnosed as ilio-sacral, i.e. the problem is in the lower extremity. If there is a negative standing flexion test and a positive seated flexion test, it is diagnosed as sacro-iliac. If both the standing
and seated flexion tests are positive, there may be both sacro-iliac and ilio-sacral dysfunctions.
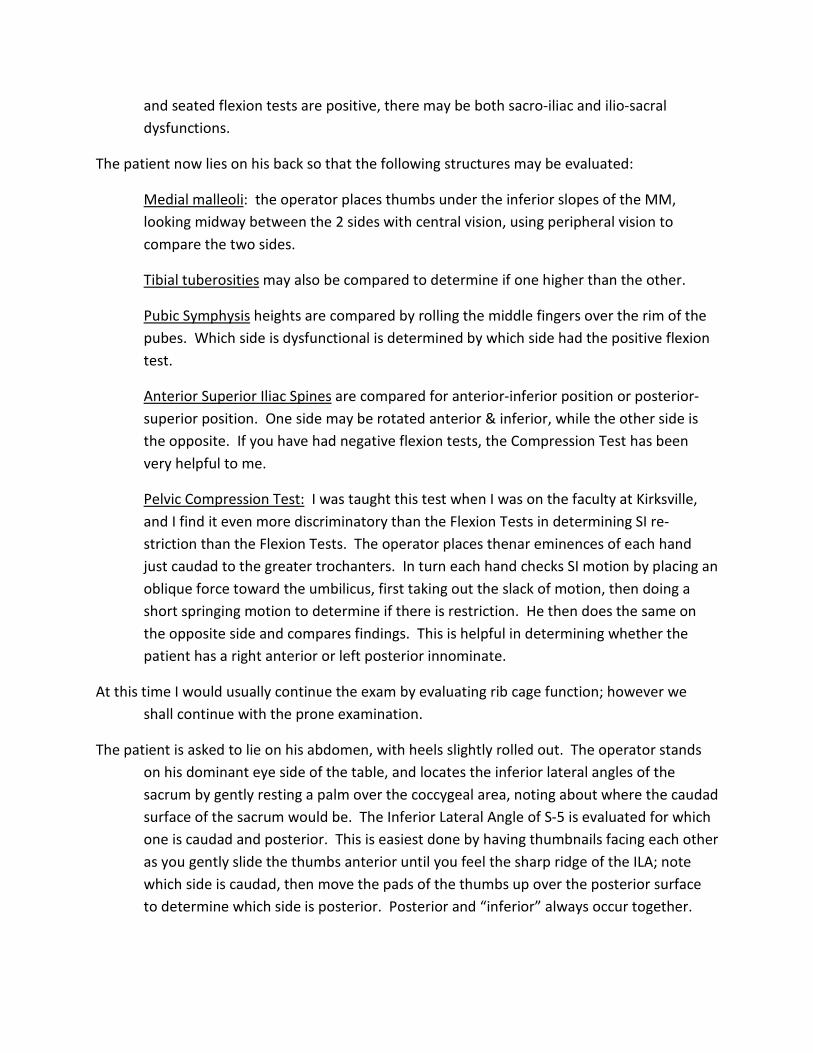
The patient now lies on his back so that the following structures may be evaluated:
Medial malleoli: the operator places thumbs under the inferior slopes of the MM, looking midway between the 2 sides with central vision, using peripheral vision to compare the two sides.
Tibial tuberosities may also be compared to determine if one higher than the other.
Pubic Symphysis heights are compared by rolling the middle fingers over the rim of the pubes. Which side is dysfunctional is determined by which side had the positive flexion test.
Anterior Superior Iliac Spines are compared for anterior-inferior position or posterior-superior position. One side may be rotated anterior & inferior, while the other side is the opposite. If you have had negative flexion tests, the Compression Test has been very helpful to me.
Pelvic Compression Test: I was taught this test when I was on the faculty at Kirksville, and I find it even more discriminatory than the Flexion Tests in determining SI re-striction than the Flexion Tests. The operator places thenar eminences of each hand just caudad to the greater trochanters. In turn each hand checks SI motion by placing an oblique force toward the umbilicus, first taking out the slack of motion, then doing a short springing motion to determine if there is restriction. He then does the same on the opposite side and compares findings. This is helpful in determining whether the patient has a right anterior or left posterior innominate.
At this time I would usually continue the exam by evaluating rib cage function; however we shall continue with the prone examination.
The patient is asked to lie on his abdomen, with heels slightly rolled out. The operator stands on his dominant eye side of the table, and locates the inferior lateral angles of the sacrum by gently resting a palm over the coccygeal area, noting about where the caudad surface of the sacrum would be. The Inferior Lateral Angle of S-5 is evaluated for which one is caudad and posterior. This is easiest done by having thumbnails facing each other as you gently slide the thumbs anterior until you feel the sharp ridge of the ILA; note which side is caudad, then move the pads of the thumbs up over the posterior surface to determine which side is posterior. Posterior and “inferior” always occur together.
The Sacral Sulcus (SS) is next evaluated for depth by placing thumbs on the posterior surface of the Posterior Superior Iliac Spine (PSIS); then the operator simply bends the DIP of the thumb to get into the SS. This judgment is a “feeler” (as Fred used to say), so close your eyes to determine which side is deepest. (You may be able to see a variation also.)
Sacral diagnoses are made from the ILA and SS findings.
If the left SS is deep, and the ILA is posterior and inferior, it is a unilateral flexed sacrum. Some call it a shear. (There will be a separate description of the treatment for a flexed sacrum.)
If the left SS is deep and the right ILA is caudad and inferior, there is a sacral torsion; and the reverse is true with opposite side findings. However, you will not know whether it is a forward or backward torsion until you have examined and treated the lumbar dysfunc-tion(s). Then the sacral findings need to be rechecked to see what the final diagnosis is. In my practice, and in that of Paul Kimberly, D. O., I rarely find that a sacral torsion remains to be treated if the sequence of treatment is treating the lumbars before re-evaluating the sacrum and making a final sacral diagnosis.
The patient is then asked to get up on elbows, with elbows under the shoulders, and level with each other. The operator now moves the tufts of his thumbs about 45 degrees medial and cephalad to be over the transverse process of L-5, snug against the spinous process. In turn he takes out the rotation slack on one side, then does a short springing; then compares with the opposite side to see which side will not rotate. The most common diagnosis for L-5 is restriction on right rotation, so the diagnosis would be FRSr. Each lumbar and thoracic vertebra is checked in the same way up to about T-4. T 1-3 can usually be examined and treated in the seated position.
Fred Mitchell, Sr. was adamant that all lumbars be treated before the sacrum was again diagnosed. Findings usually change, or disappear, after lumbars are corrected. It is only then that he thought it appropriate to treat the sacrum.
Then it is time to have the patient supine, check the position of the pelvis, and re-check the compression test after the pelvis is corrected.
There is a separate paper on the diagnosis and treatment of the Thoracic Spine.
Sara E. Sutton, D. O., FAAO
7/25/13
UPPER AND LOWER EXTREMITIES
Because of the limited time for this course, little time will be spent on diagnosing dysfunctions of the upper and lower extremities. They are important, of course. However, information is readily available regarding average ranges of motion.
One of the exceptions will be the Sterno-Clavicular (St-Cl) joints should be evaluated before and after treatment of the rib cage.
DIAGNOSIS OF LEFT STERNO-CLAVICULAR ABDUCTION RESTRICTION: This is usually diagnosed on the supine patient, though it can also be checked seated. The operator rolls his index fingers over the top of medial end of he clavicle, and notes whether the clavicle moves caudad as the patient shrugs his shoulders toward his ears. The side which doesn’t move is the dysfunctional side.
TREATMENT OF LEFT ST-CL ABDUCTION RESTRICTION: The patient is asked to move left on the table so that his shoulder will extend freely. The most critical part of the treatment is to protect the shoulder joint by having the operator place his middle finger (pointing toward the feet) in the patient’s posterior axillary fold. The operator monitors the medial clavicle with left index finger and thumb, and allows the patient to drop his left arm toward the floor. The operator squats to the left of the table enough so that the patient’s arm can push up between the operator’s approximated knees. The operator further flexes or squats until motion is localized at the clavicle, then asks the patient to push up against his knees with a gentle isometric contraction. The patient is asked to relax. The operator waits for relaxation before he squats to a new barrier, and repeats the process another time or two. Recheck findings. If you do not attain a correction, again re-check the upper rib function and make necessary corretions. Then recheck the St-Cl joints.
DIAGNOSIS OF LEFT STERNO-CLAVICULAR FLEXION RESTRICTION: The patient is supine, with the oper-ator standing at either side of the patient. The patient points his hands toward the ceiling, and the operator places his index fingertips on the front of the medical surface of the clavicle. The patient is asked to reach toward the ceiling, and the operator notes whether the clavicles move posterior equally. The side that does not recess is the joint in dysfunction.
TREATMENT OF LEFT ST-CL FLEXION RESTRICTION: The operator stands next to the left side of the table so that the patient’s left hand will rest on his right shoulder as the operator monitors on the anterior surface of the medial clavicle with his left index finger. The operator then “grows taller” by lifting his shoulder until he feels posterior motion of the clavicle. He then asks the patient to pull down gently against his shoulder, thus producing an isometric contraction. Both operator and patient relax; the operator again grows taller, and the procedure is repeated one or two times. Recheck findings.
DIAGNOSIS OF ST-CL EXTENSION RESTRICTION: This is more easily performed with the seated patient with the operator standing in front. The operator monitors the joint with index fingers on the anterior surface of the joint as the patient is asked to extend the shoulders. The side which does not move anterior is the side of dysfunction.
TREATMENT OF LEFT ST-CL EXTENDED DYSFUNCTION: The operator stand behind the patient slightly to the left of mid-line, reaches over the left upper trapezius with his right hand in order to monitor the joint. He then places his left hand on the patient’s left forearm, and extends the shoulder joint until motion is localized at the medial end of the left clavicle. He then asks the patient to pull forward with his left arm as the operator offers a gentle isometric contraction. Repeat once or twice. Recheck.
DIAGNOSIS OF ACROMIO-CLAVICULAR (A-C) DYSFUNCTION: Mitchell’s method of evaluating the A-C joints was similar to evaluating shoulder internal and external rotation. He stood behind the patient and abducted the right shoulder 90 degrees, and then placed the 90 degree flexed elbow on a horizontal plane. He then flexed the shoulder about 15 degrees before he lifted the right forearm to the external rotation barrier, noting the degrees of allowed rotation. He then returned the arm to “neutral” (horizontal), and dropped the wrist to internally rotate until the barrier was engaged. He would compare the two sides to determine if there was asymmetry of rotation. We shall use the right joint for demonstration purposes, although either or both joints might be dysfunctional.
TREATMENT OF EXTERNAL ROTATION RESTRICTION OF THE RIGHT A-C JOINT: The above neutral position of the right arm was assumed, and then the external rotation motion barrier was engaged as the operator supported the right forearm. The operator places his right fingers under the patient’s right wrist, then engages the external rotation barrier. He asks the patient to gently internally rotate the joint as the operator provides a light isometric muscle contraction. Repeat once or twice. Recheck.
TREATMENT OF INTERNAL ROTATION RESTRICTION OF THE RIGHT A-C JOINT: The same physical set-up is assumed, except the operator engages the internal rotation barrier with his fingers on top of the patient’s wrist. The direction of the isometric would be into external rotation, and the isometrics are performed.
DIAGNOSIS OF HAMSTRING MUSCLE SHORTNESS: The first clue the examiner will have to diagnose hamstring shortness will be when doing the standing flexion test. After the patient has reached the limit of trunk flexion, the operator may lay a hand against the flattened lumbar spine, and from a lateral position note how many degrees of trunk flexion are noted. If there is greater trunk flexion when doing the seated flexion test, one may be assured that short hamstrings are involved.
To evaluate asymmetry of hamstring muscle length, the patient will be supine. The operator palpates the ASIS to the side opposite to the leg being tested. The operator does a straight leg-raising until he feels resistance, but does not allow pelvic rotation with the left hand on the left ASIS. He then looks from the side as to how many degrees of hip flexion are permitted. Test the opposite side and compare findings. 90 degrees is “normal” for a young person, and the degrees reduce over the years.
TREATMENT OF SHORT RIGHT HAMSTRINGS: The patient is supine on the table, and the operator stands to the right of the patient. He asks the patient to flex both his right hip and knee to the fullest extent while leaving the left leg flat on the table. The operator wraps his left hand around the patient’s right knee so that he can feel the posterior tendons with his thumb. With his right hand he lifts the
patient’s right ankle until he feels a stretching of the posterior knee ligaments. He supports the weight of the right heel in the palm of his right hand, then extends the knee until he feels ligamentous tension. He then asks the patient to gently try to flex his knee by pushing his heel into the operator’s hand. This should be a light isometric contraction; the patient relaxes, and the operator engages the new barrier by lifting the heel to produce knee extension. The procedure is repeated once or twice. The patient straightens his knee, and places it on the table. The operator tests for the degrees of permitted hip flexion.
Because this is a difficult muscle for the patient to treat by himself, I often show a family member or two how to treat the patient twice a day at home. This is especially true when examining children. It is not unusual to find a grade school student with 50 degrees of trunk flexion.
SUPINE TREATMENT OF SHORT HAMSTRINGS HOME TREATMENT: The patient lies on the floor, and the family member asks the patient to flex the right hip and knee while maintaining this position with his two hands behind the distal thigh. The family member lifts the right heel and supports it with his cupped hands. He usually has to move close to the patient so that he is standing close to the patient’s foot. The patient is then asked to try to flex the knee by pushing into the member’s hands with a light isometric contraction, to a count of three. The patient then relaxes to a count of three, and the family member lifts the heel to engage the new knee extension barrier. Repeat another time or two.
Usually when doing isometrics, we will treat the side with the greatest restriction. With hamstrings both sides are usually involved, so both sides should be treated. As you treat the patient, you will be aware of improvement as the degrees of trunk flexion increase while doing the standing flexion test.
CERVICAL SPINE DIAGNOSIS
PRINCIPLES:
Typical cervical vertebrae (C 2-7) operate under Law 2 of Fryette’s principles, i.e. they rotate and sidebend toward the same side. C spine has no physiological neutral because of the facet structure, thus the only way to perform Type I physiological motion is to apply traction to separate the facets. Cervical joint motion is influenced by the long muscles (scalene, tapezius, longus cervicis, splenius capitis and cervicis, semi-spinalis and sterno-cleido-mastoid. They may interfere with flexion, extension or side-bending, but the rotation of the vertebra is always into the concavity; or they rotate and side-bend to the same side (-RS). In examining the spine in moderate flexion, and side-bending restriction is present on one side, the facet on the opposite side is unable to open. Conversely, examining the C spine in moderate extension, and side-bending restriction is noted on one side, it indicates that the side-bending restriction is noted on one side, it indicates that the facet on the same side will not close.
The positional descriptors would be to the side opposite to those of the restricted joints. When the isometrics are applied, they would be in the direction of the positional diagnosis.
The typical vertebrae account for approximately 50% of cervical rotation.
The atlanto-axial (C1-C2) joint accounts for the other 50% of cervical rotation, and is stabilized by the dens of C-2. To localize to this joint, the neck must be hyper-flexed, then tested for rotation right, then left. One may put a mark over the clavicle where midline of the chin rests, and then compare the distance from the sternal notch, noting approximate degrees of rotation.
The occipito-atlantal (O-A) joint rotates one direction and side-bends the opposite side (-SR) whether in neutral, slight flexion or slight flexion; and the joint is easiest tested reclining by gentle side-bending. If side-bending is restricted to the left, rotation will be restricted to the right, and vice versa.
C-7 has the most prominent spinous process as well as the longest transverse process in the C spine. It requires different treatment technique than the typical cervical vertebrae.
In evaluating gross ranges of motion (ROM), one may do what most textbooks describe, i.e. in-clude the thoracic motion that occurs. However, one is better able to reproduce findings if the motions are localized to the C spine by monitoring at the C7-T1 inter-spinous ligament for flexion and extension. With one finger over the ligament, the operator stands at the side of the patient, and flexes the neck until a slight stretch is felt on the ligament. By placing a pen from the external auditory canal and along the side of the head, one can measure the degrees the pen moves anterior. From neutral the patient extends until the operator feels a slight pinch or
shorten-ing of the ligament, records the number of degrees of extension as the neck moved posterior.
To measure side-bending, the operator stands behind the patient placing hands alongside the head with the little fingers resting on the first ribs at the level of C7-T1 articulation; then gently side-bends the head until motion is felt under the little finger to the left, then to the right. One can imagine a straight line up from C-7, and note how far that line moves left, then right.
To measure rotation, the operator stands in front of the patient and rotates gently until the physiologic barrier is felt, then may place a pen mark on the skin over the clavicle, down from the middle of the chin. Compare the degrees of permitted motion by imagining the clavicle as a protractor ranging from the acromio-clavicular (A-C) joint to the sterna notch.
I have found this method reproducible and of help in caring for patients with neck injuries, as well as in testifying on their behalf if there is litigation. If you examine without C-7 monitoring in flexion and extension, place one hand over the upper thoracic spine to note how much of the textbook ranges include thoracic motion. That can vary so much from patient to patient.
Sara E. Sutton, D. O. FAAO
July 2013
SEATED DIAGNOSIS OF TYPICAL CERVICAL VERTEBRAE
Because it is difficult to motion test individual cervical vertebrae in extension, I developed a seated method to diagnose flexed and extended dysfunctions which makes it much easier for the beginner to feel the facets open in flexion and close in extension.
To examine for Extended dysfunctions, the operator stands at the side of the patient, cradling the patient’s forehead in his open palm. The other hand forms a “U” with the extended thumb and middle finger. The tufts of those fingers are snug against the facets. As the patient relaxes and allows slight flexion to the involved joint, the operator slightly rotates to the right as he gently side-bends the opposite direction by pushing slightly to the left (right side-bending). Repeat in the opposite directions. If there is restriction to right rotation and side-bending, the diagnosis is ERS left. One continues until all of the levels have been examined. The operator then goes back up to C-2, gently extends until he feels the facets close over thumb and finger. If the facet does not close with side-bending and rotation right, the diagnosis is FRS left.
SEATED TREATMENT OF TYPICAL CERVICAL VERTEBRAE
If C-2 is ERS right, the operator’s left middle finger (I like to palpate with my left fingers, but the right fingers may be used by the operator palpating with the right hand) will have felt restricted side-bending to the left and rotation to the right. The very gentle (“one ounce”) counter-force will be against the right thumb tuft which is over the right facet. Do 2 or 3 light contractions, engaging the new barrier each time. Recheck. Check all levels from C-2 to C-6.
To check for flexed dysfunctions, the same “hand holds” are assumed, but the neck is extend-ed until the operator feels the facets close. If both facets close, there is no flexed dysfunction at that level. At the next level, if the right facet closes, and the left one won’t, the left facet is locked open as the extension barrier is engaged. If the operator’s middle finger over that facet is unable to introduce slight left side-bending, the diagnosis would be FRS right. Each segment from C-2 to C-6 is checked this way by having the finger and thumb move slightly caudad until all levels have been checked.
As the operator engages the extension barrier to the level of C-4, for example, and the operator wishes to treat the segment, he rotates the forehead slightly to the right, and pushes slightly to the left (right side-bending); the head is returned to neutral position; then he rotates the forehead left as his 3rd finger pushes slightly to the right (left side-bending). He compares side-bending restriction to determine if one side is restricted. If so, the three planes of restricted motion are engaged to begin treatment. Mitchell, Sr. usually preferred using “side-benders” for isometrics, but any or all three planes may be used for the isometric contractions. Be mindful that only a few ounces of force are needed. Always re-check the dysfunctional segment.

SEATED DIAGNOSIS AND TREATMENT OF C-1-2 (A-A)
The operator stands in front of the patient placing the palms of his hands on the patients cheeks. The patient flexes his neck to its physiologic barrier, then the operator first rotates the head to the right, then left, until the physiologic barriers are in turn engaged. The operator places a mark on the skin over the clavicle indicating the amount of rotation which occurs. The head is returned to midline, then rotated to the left to engage the physiologic barrier. The operator compares which side rotates more than the other. If to the right, the A-A is rotated right.
To treat this dysfunction, the operator stands in front of the patient and flexes the patient’s neck, places the left hand under the face to engage the left rotation barrier; and the patient is asked to gently turn his head to the right as the physician offers resistance to a light isometric contraction against his right hand on the left side of the patient’s face. After a few seconds the patient relaxes, the operator engages the new left rotation barrier by “taking up the slack” of permitted left rotation. This is repeated once or twice. It is important that the operator “take up the slack” with the underneath hand. Never force rotation with the upper hand. Recheck findings.
SEATED DIAGNOSIS OF C-7
C-7 has the longest transverse processes which may be palpated by standing behind the seated patient, placing the PIP joint against the tip of C-2 or 3, then gently moving the fingers caudad until they rest on the top of C-7 transverse processes. As the patient is asked to flex the neck the operator observes whether one side moves more caudad. If it side-bends to the left (most common), the diagnosis is ERS left. The neck is returned to neutral, and the patient is asked to extend the neck. Long hair may obscure the view, so ask your assistant to observe the motion from the front of the patient. At times the operator may palpate the motion, but that may be difficult. If the transverse process side-bends to the left, the diagnosis would be FRS left.
SEATED TREATMENT OF C-7 DYSFUNCTIONS
C-7 ERS left is the most common dysfunction at this level, so I shall describe that treatment.
The operator stands behind the patient and places the PIP joint of the right index finger on top of the T-1/first rib articulation while the right thumb palpates the C-7/T-1 inter-spinous ligament. Neck flexion is introduced until the operator feels a slight stretching of that ligament. The operator lightly places his left elbow on the patient’s left “shoulder” (upper trapezius area) to stabilize his arm as he places his left little finger on the left lateral forehead so that he can rotate the patient’s head to the right until the physiologic rotation barrier is engaged. The operator’s little finger introduces VERY MINIMAL side-bending to the barrier, then asks the patient to provide a very light isometric side-bending contraction to the left. ONLY ROTATION SLACK is taken up. This is repeated once or twice. Recheck.
C-7 FRS dysfunctions are less common, but would be diagnosed as above except that extension is introduced rather than flexion. If the transverse process tilts to the left in extension, the diagnosis would be FRS left. Treatment would be the same except it would be applied in extension.
OCCIPITO-ATLANTAL (O-A) JOINTS
The O-A do the “yes & no” nodding motions of the head. As the occiput slides slightly anterior it rotates slightly to the left, and side-bends to the right, i.e. rotation and side-bending are in opposite directions. Dysfunctions would be noted as ESlRr or FSlRr, depending whether the restricted motion was found in flexion or extension.
SEATED DIAGNOSIS OF O-A JOINTS
The examiner stands at the side of the seated patient, facing him. One hand supports the head with his extended hand on the forehead. The thumb and middle finger cradle the occiput as the hypo-thenar eminence rests on the upper back. The operator introduces slight flexion and introduces slight left side-bending of the forehead while at the same time translating the occiput to the left, then reverses the directions. If restriction was noted, the dysfunction would be diagnosed as Extended, rotated left, side-bent right, or v.v.
The same test is repeated with the neck in slight extension, and would be noted as Flexed.
O-A dysfunctions are more easily diagnosed and treated in the supine position (in my opinion!). This will be discussed as we diagnose and treat the C spine with the supine patient.

SEATED TREATMENT OF O-A DYSFUNCTIONS
The operator engages engages the feather edge of the rotation, side-bending and flexion or extension barriers, and preferably uses side-bending isometric contractions to correct the dys-functions. Always recheck your findings.
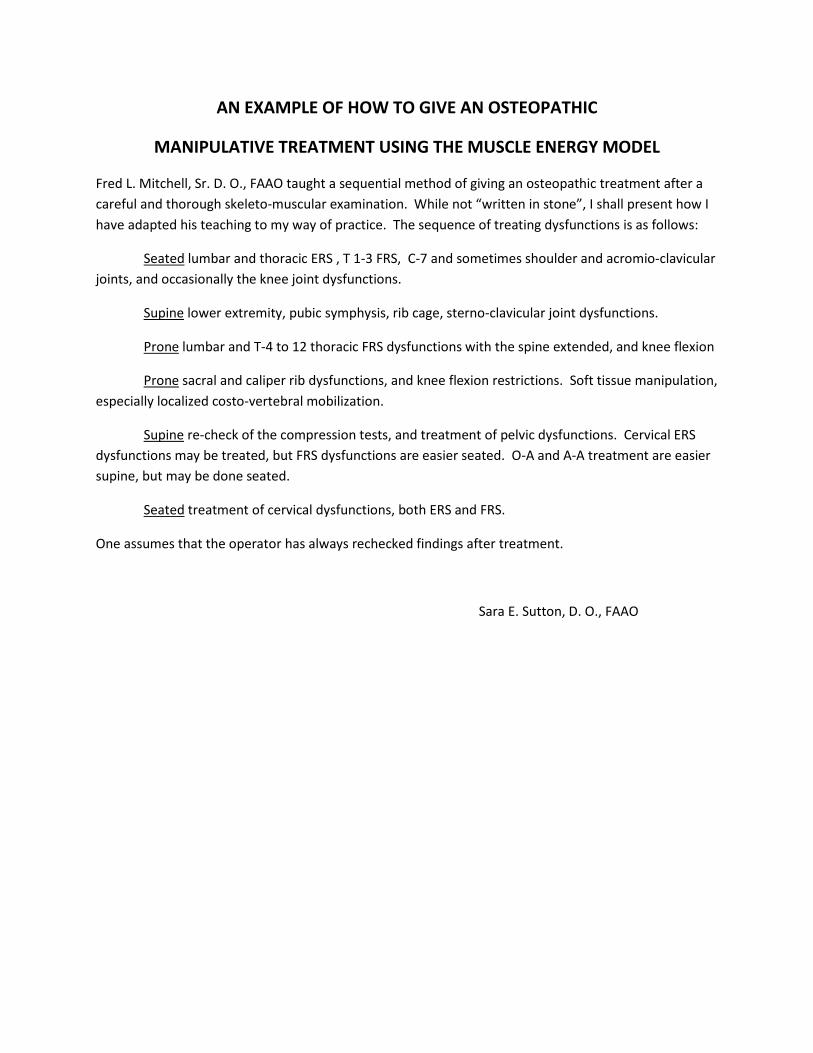
AN EXAMPLE OF HOW TO GIVE AN OSTEOPATHIC
MANIPULATIVE TREATMENT USING THE MUSCLE ENERGY MODEL
Fred L. Mitchell, Sr. D. O., FAAO taught a sequential method of giving an osteopathic treatment after a careful and thorough skeleto-muscular examination. While not “written in stone”, I shall present how I have adapted his teaching to my way of practice. The sequence of treating dysfunctions is as follows:
Seated lumbar and thoracic ERS , T 1-3 FRS, C-7 and sometimes shoulder and acromio-clavicular joints, and occasionally the knee joint dysfunctions.
Supine lower extremity, pubic symphysis, rib cage, sterno-clavicular joint dysfunctions.
Prone lumbar and T-4 to 12 thoracic FRS dysfunctions with the spine extended, and knee flexion
Prone sacral and caliper rib dysfunctions, and knee flexion restrictions. Soft tissue manipulation, especially localized costo-vertebral mobilization.
Supine re-check of the compression tests, and treatment of pelvic dysfunctions. Cervical ERS dysfunctions may be treated, but FRS dysfunctions are easier seated. O-A and A-A treatment are easier supine, but may be done seated.
Seated treatment of cervical dysfunctions, both ERS and FRS.
One assumes that the operator has always rechecked findings after treatment.
Sara E. Sutton, D. O., FAAO
EXAMINATION AND TREATMENT OF LONG RESTRICTORS
Joint Ranges of Motion (ROM) are evaluated, and permitted degrees of motion are measured and recorded, comparing ROM of right and left sides for each anatomical area examined. If asymmetry is noted it is important to determine whether it is due to shortness on the side with the least degrees, or whether it is due to weakness of the same muscle group on the opposite side. Strength testing will not be included at this time, but the student should be aware of test-ing and treatment principles.
Test for strength, the limb passively should be taken to the extreme ROM that is permitted, and then the operator resists the patient’s active maximum effort to contract in the opposite direct-ion. For example, the operator abducts the hip, and asks the patient to adduct against the operator’s isometric resistance.
To test for length, the operator passively takes the joint through its ROM until the physiologic barrier is engaged. The examiner evaluates each and records results.
If both ROM and strength asymmetry are noted, the weakness should be treated before the strength.
If strength is equal bilaterally, and the ROM is unequal, ROM imbalance is due to shortness.
If strength is unequal, ROM imbalance is due to weakness.
If ROM is equal, the muscle groups are assumed to be in balance.
TREATMENT FOR WEAKNESS
Marginal, transient weakness of a muscle group may be strengthened by using a few isotonic contractions, and may be toned as they are diagnosed by contracting the agonist muscle which causes the antagonist muscle to relax. The principle of reciprocal innervation is utilized. Rep-etition of contractions increases the strength of the stimulus to the nerve endings, and in turn increases the number of muscle fibers contracting. Weakness that does not respond to this treatment may require a plan of therapeutic exercises.
TREATMENT FOR SHORTNESS
Following a muscle contraction the excitability state of a muscle returns gradually. The stage in which a stimulus of similar intensity will not produce a contraction is called the relative refractory period. It is conjectured that muscle lengthening is permitted during that period. It is
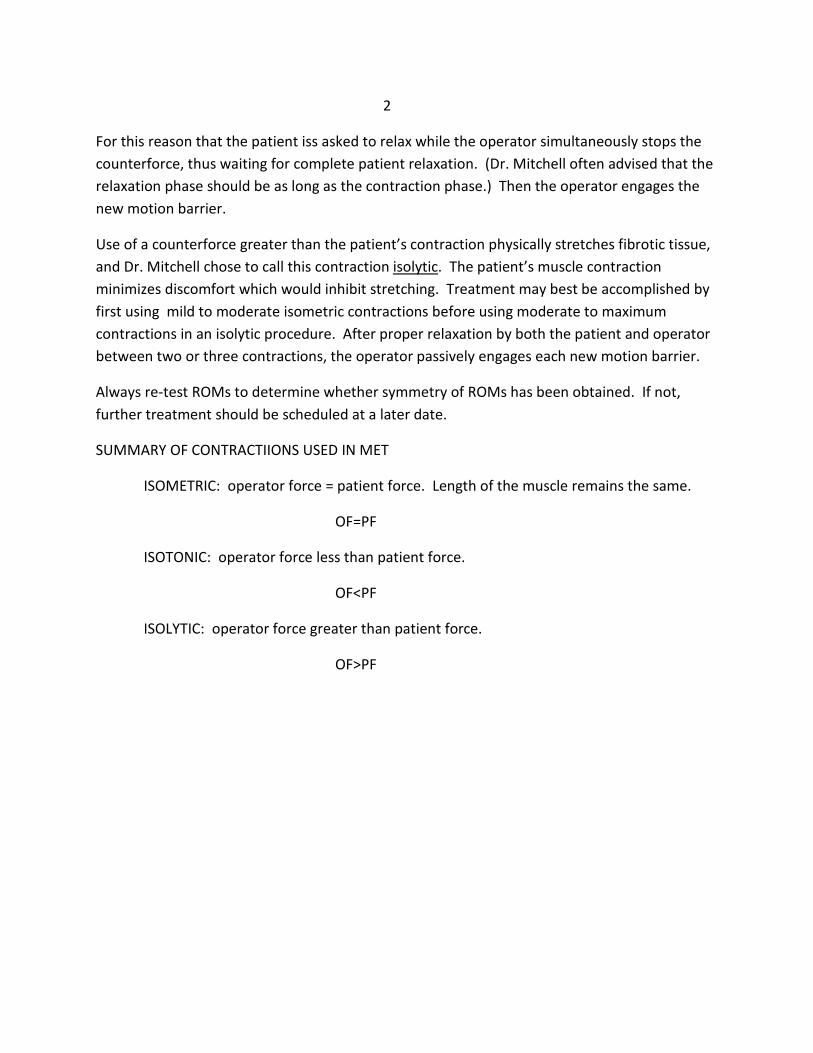
2
For this reason that the patient iss asked to relax while the operator simultaneously stops the counterforce, thus waiting for complete patient relaxation. (Dr. Mitchell often advised that the relaxation phase should be as long as the contraction phase.) Then the operator engages the new motion barrier.
Use of a counterforce greater than the patient’s contraction physically stretches fibrotic tissue, and Dr. Mitchell chose to call this contraction isolytic. The patient’s muscle contraction minimizes discomfort which would inhibit stretching. Treatment may best be accomplished by first using mild to moderate isometric contractions before using moderate to maximum contractions in an isolytic procedure. After proper relaxation by both the patient and operator between two or three contractions, the operator passively engages each new motion barrier.
Always re-test ROMs to determine whether symmetry of ROMs has been obtained. If not, further treatment should be scheduled at a later date.
SUMMARY OF CONTRACTIIONS USED IN MET
ISOMETRIC: operator force = patient force. Length of the muscle remains the same.
OF=PF
ISOTONIC: operator force less than patient force.
OF<PF
ISOLYTIC: operator force greater than patient force.
OF>PF
SYNOPSIS OF JOINT POSITION CONTROL PAPER
BY
DAVID MICHAELS, Ph. D
Published in Osteopathic Annals February 1974
Groups of muscles acting on a joint are arranged in antagonistic sets with some muscles acting in op-position to the prime movers of the joint, while other muscles act to assist or to stabilize the action. The sequence and variable amount of contraction that takes place within the group of muscles is automatic-ally provided by a joint position control system. This joint position control system regulates length and tension in the muscles acting on a joint. The orchestrating of this control is an automatic function of neural activity integrated from two sources. The nerve impulses from above carry the intentions of the brain, the state of alertness of the brain, and the body coordination efforts of the brain. These must be joined with information received from special sensory organs in the tissues of the joint and from muscles acting on the joint. This information from the periphery is used through nerve reflex arcs to ap-propriately modify the ongoing action at the joint.
In this paper the author describes the feedback mechanism that adjusts the coordinated muscular efforts about a joint. He also conveys a perspective of the total nervous system’s interaction with the body which it controls and upon which it depends for the gathering and funneling of information from inside and outside the body.
Length control refers to the length of muscle that is alterable by built-in mechanisms to give muscle the necessary efficient opportunity for accomplishing the tasks of living. Length control is governed in part by what the body wants the muscles to accomplish along with all the other muscles of the body, and by what sensations from the muscle and around the joint tell the brain and spinal cord about operating conditions in the muscle itself. A muscle that is stretched beyond its ability to contract, to do work, or even to protect itself from tearing, needs to shorten immediately. Preferably, the over-stretching should be forecast and prevented before it occurs. From another viewpoint, a muscle that is too short to allow a joint to open to a desired position, or too ong to bring a joint to a desired position when the muscle does contract, needs to have its resting length altered to correct the limiting effort of length or shortness.
The primary final controller of length in muscle is the muscle spindle. The spindle regulates muscle length by telling the spinal cord when muscle fibers are at a resting length, and by telling when the surrounding muscle fibers are being stretched so that the muscle can be ordered, through the muscle spindle nerve reflex arc, to contract and shorten itself again. The spindle is present in many locations throughout the muscle so that whenever the muscle is stretched, the spindles are stretched. The spindle is a buil-in automatic observer and alarm system that has the further capability of being reprog-rammed to set the standards of normal length at different lengths if so ordered by higher centers, or if due to persistent altered local conditions.
The name of the nerve fiber from the spinal cord to the muscle spindle, which can make the muscle spindle contract its own type of muscle fibers, is the gamma efferent nerve fiber. These fibers, along with the length detecting sensory nerves from the spindle (the gamma efferent nerve fibers), the spindle itself and the connecting (internuncial) nerves in the spinal cord, make up the feedback system of control (or servo-mechanism) called the gamma motor neuron system. One third of the motor neurons from the spinal cord to the muscles of the body are of this gamma motor type. This shows what a large role the spindle plays as it automatically observes and adjusts the length of muscles.
The muscle spindle length control mechanism is one phase of the body’s joint position control system. The other phase is tension control. This refers to the mechanism which protets the muscle from tearing by sensing over-load conditions (stretching), and which helps to regulate by inhibition of the contracting force during active muscle contraction. This mechanism, with sensory organs called Golgi end organs in the tendons of muscles, both protects against over-load and serves as a modifying effect to back up the length control mechanism discussed earlier.
When the spindle reflex length control stimulates contraction of muscles (inducing shortening), the Golgi tendon receptors send impulses that inhibit or reduce motor neuron discharges, and thereby reduce the amount of muscle contraction. This in effect allows lengthening. The two mechanisms compliment each other. Within a group fo muscles acting on a joint there will be some muscles which need to have their length changed to operate more efficiently, while other muscles will need to relax a little so that they are not over-stretched during contraction.
A final concept is that the joint position control is the result of a hierarchy of feedback control systems. These systems are built one upon another, and are integrated from spinal cord to the highest brain centers. The lowest level is the length and tension control of muscle by the spindle and tendon reflexes. Next comes the brainstem integrating areas for most of the higher centers, sending information down to the spinal cord. Above that level lie the cerebellum, the basal ganglia, the thalamus, and the sensory and motor cortices.
We can see that motor behavior depends on an integrated hierarchy of feedback control systems. We can also see that motor behavior is really what we do as human beings in our postures, our expressions, and our movements. This in turn can be seen as joint position control.