9781783559329_beaglebone_robotic_projects_sample_chapter
DESCRIPTION
Chapter No.4 Allowing the BeagleBone Black to SeeCreate complex and exciting robotic projects with the BeagleBone BlackTRANSCRIPT

BeagleBone Robotic Projects
Richard Grimmett
Chapter No. 4
"Allowing the BeagleBone Black to See"

In this package, you will find: A Biography of the author of the book
A preview chapter from the book, Chapter NO.4 "Allowing the
BeagleBone Black to See"
A synopsis of the book’s content
Information on where to buy this book
About the Author Richard Grimmett has always been fascinated by computers and electronics from his
very first programming project that used Fortran on punch cards. He has a Bachelor's and
Master's degree in Electrical Engineering and a PhD in Leadership Studies. He also has
26 years of experience in the Radar and Telecommunications industries, and even has one
of the original brick phones. He now teaches Computer Science and Electrical
Engineering at Brigham Young University - Idaho where his office is filled with many of
his robotics projects.
I would certainly like to thank my wife and family for providing me the time
and wonderful, supportive environment that encourages me to take on projects
such as this one. I would also like to thank my students; they always amaze
and inspire me with their creativity when released from the boredom of
standard educational practices.
For More Information: www.packtpub.com/beaglebone-robotic-projects/book

BeagleBone Robotic Projects We live in an amazing age. We are mostly aware of how amazing it is as we live in an
age where major changes to how we live occur well within a lifetime, sometimes within a
few years. Nowhere is this more evident than in the general area of technology, and the
specific area of computers. Not so many years ago, certainly within the lifespan of most
of the baby-boomer generation, computers were distant machines kept in the backrooms
of large corporations or universities. Access to them was tightly controlled. If you wanted
to program them, you punched your computer cards, fed them into the card reader, and
then, after an hour or so of wait, you went to receive your computer printout. This was, I
regret to reveal, part of my first experience with a computer.
These large computers were the domain of companies such as IBM, with their model 360,
Digital Equipment, with the Model PDP-7, and Hewlett -Packard, with the Model 1000.
These computers cost many thousands of dollars, and were rarely seen except by a
privileged few, who had access to climate-controlled computer rooms.
This model fit the world just wonderfully for many years, until the advent of the personal
computer. I was lucky to know someone who purchased one of the very first IBM-PCs.
It had two floppies, a monochrome monitor, and was an amazing piece of equipment.
Suddenly the world changed and the technology that had seemed so remote was now
available on the desktop. This same technological revolution in processing power also
birthed a new breed of dedicated microprocessors. These could be used for specific tasks
that had previously been the realm of analog circuitry or, in many cases, human
interaction with mechanical systems.
These processing solutions to specific applications are named embedded systems. They
take the digital calculating capability of personal computers and shrink them even further
so they can be placed in common household and industrial objects. Embedded technology
has also evolved with respect to price; fortunate, for few would be willing to pay several
thousand dollars for a door lock or temperature sensor. The initial embedded devices
were very limited in their technology, and developing applications with them became
quite a challenge. It was very common to run out of either computing horsepower or
memory. Many nights were spent by the talented few shoehorning the last features into
the last few bytes of memory.
The computer age has spawned an amazing array of technical advances in both the
hardware and soft ware areas. Companies such as Intel and AMD have created
processors with almost unfathomable computing power and more available memory
that once thought possible, and both Microsoft and Apple have provided major advances
in the area of soft ware functionality and usability. The personal computer has become a
standard tool in most households, schools, businesses, and factories.
For More Information: www.packtpub.com/beaglebone-robotic-projects/book
As the personal computer has gone, so has the embedded systems world. From what were
once four bit, special purpose processors with 2000 bytes of memory, now embedded
processors have emerged that rival the performance and capability of standard personal
computers. One has to look no further than the cell phone for an example of significant
computing capability in very small packages, and at very inexpensive prices.
This has all reached a bit of a crescendo with the introduction of small, inexpensive
systems that can not only run simple, focused applications, but have the capability of
powering almost any type of computing need we can create. At the same time these
small but powerful systems have outgrown the small, single purpose development
environments as well. They are now paired with powerful operating systems, and
provide personal computer like functionality in very small packages. The overwhelming
advance of tablets and smart phones has begun to take over the face of computing for
many applications.
These advances have also affected the embedded area as well. Small, highly capable
systems have married very inexpensive hardware with free, open source soft ware to
provide a platform for almost anyone to explore the embedded world. The Arduino, the
Raspberry Pi, and now the BeagleBone Black are all platforms that off er not only an
affordable price point, but also an open source soft ware community that provides free
capability and an easy way to interact with others to get answers to questions or exchange
ideas. With these new capabilities, as we shall see later in the book, the sky is literally
the limit.
This book will focus on just one of these processors, the BeagleBone Black. However,
much of what is written here could be applied to other choices with some limited
modifications. But this is not what you came here to learn. You came to learn how to
build some very interesting, complex, amazing robotics projects. And processors such as
the BeagleBone Black are impressive because they have the capability to not only make
this possible, but to make it accessible to those outside of academic or research
communities. In this book, we'll explore these capabilities, and build some very
impressive projects.
Just a few comments on how the book is laid out. We'll start with a very basic
introduction to the BeagleBone Black, and how to get the hardware and soft ware up
and working. Then, we'll build some basic functionality on top of the basic system,
showing you how to add sound, vision, and control.
Then we'll tackle some fairly complex capability, including GPS, audio, and some
advanced sensors. Finally, we'll wrap it up by showing you how to put an entire system
together with some tools that can make that a bit less complicated.
For More Information: www.packtpub.com/beaglebone-robotic-projects/book

In each chapter, I'll give you some very specific instructions for how to proceed. This is a
bit dangerous, and the instructions are all going to be subject to change. Hopefully you'll
understand the basics of what we are trying to accomplish, so if things don't go quite to
plan, you'll be able to figure out how to proceed. There is a lot of help out there, between
message boards and blogs, so don't be shy.
What is critical to remember is that this is not an academic exercise. Don't just read the
book, but do something with the hardware. My hope is that by the end, you'll be building
the kinds of machines that will lead us all into the 22nd century. I oft en tell my students
that their children will grow up as comfortable with robots as they are with computers.
So, let's begin!
What This Book Covers Chapter 1, Getting Started with the BeagleBone Black, will provide instructions for
initial power-up of your hardware.
Chapter 2, Programming the BeagleBone Black, will give you a brief tutorial so that you
can be successful implementing all the amazing functionality, as many of you are new to
embedded systems, Linux, Python, or perhaps even programming in general.
Chapter 3, Providing Speech Input and Output, will show you how to add speech
recognition as well as make your robot speak.
Chapter 4, Allowing the BeagleBone Black to See, will show you how to add the
capability for your robot to see.
Chapter 5, Making the Unit Mobile – Controlling Wheeled Movement, will show you
how to add wheeled movement to your robot.
Chapter 6, Making the Unit Very Mobile – Controlling Legged Movement, shows how to
build robots that have the capability to walk.
Chapter 7, Avoiding Obstacles Using Sensors, shows how to use sensors to avoid barriers
as it hardly makes sense to have mobility if your robot is going to run into obstacles.
Chapter 8, Going Truly Mobile – Remote Control of Your Robot, will show how to use
a remote device to control your robot.
Chapter 9, Using a GPS Receiver to Locate Your Robot, shows how to add a GPS device
to your robot.
Chapter 10, System Dynamics, introduces some methods for organizing all of the
capabilities so that they are available at the same ti me.
Chapter 11, By Land, Sea, and Air, introduces some interesting possibilities for
embedded projects that can fl y, sail, or swim
For More Information: www.packtpub.com/beaglebone-robotic-projects/book

4Allowing the
BeagleBone Black to See
Your projects can communicate via voice; now you are going to add vision with a webcam. You'll use this functi onality in lots of diff erent applicati ons. Fortunately, adding hardware and soft ware for vision is both easy and inexpensive.
Mission briefi ngIn this chapter, you'll add a USB webcam to your system. Having the standard USB interface on your board opens a wide range of amazing possibiliti es. On top of that, there are several amazing open-source libraries. These off er complex capabiliti es that you can use in your projects without spending months coding them.
Why is it awesome?Vision will open a set of possibiliti es for your project. These can range from simple moti on detecti on to advanced capabiliti es such as facial recogniti on, object identi fi cati on, and even object tracking. The robot can also use vision to detect its surroundings and avoid obstacles.
For More Information: www.packtpub.com/beaglebone-robotic-projects/book

Allowing the BeagleBone Black to See
86
Your objectivesIn this chapter we will cover:
Connecti ng your USB camera to your BeagleBone Black and viewing the images
Downloading and installing OpenCV, a full-featured vision library
Using the vision library to detect colored objects
Downloading the example code and colored images
You can download the example code fi les and colored images for this Packt book you have purchased from your account at http://www.packtpub.com. If you purchased this book elsewhere, you can visit http://www.packtpub.com/support and register to have the fi les e-mailed directly to you.
Mission checklistTo complete this mission, you'll need a BeagleBone Black with a LAN connecti on and a 5V power supply. You'll need to add a USB webcam. Try to fi nd a recently manufactured one. You may have an older webcam sitti ng on your project shelf, but it will probably cause problems, and the money you save will not be worth the frustrati on. I would sti ck with webcams from the major players such as Logitech or Creati ve Labs.
In most cases, you won't need to connect this device through a powered-USB hub; however, if you encounter problems, for example if the system does not recognize that your webcam is connected, realize that the lack of USB power could be the problem.
Connecting the USB camera to the BeagleBone Black and viewing the images
Our fi rst step in enabling computer vision is connecti ng the USB camera to the USB port. I have a new Logitech HD 720 camera as my example.
Prepare for lift offTo access the USB webcam, I like to use a program called guvcview. Install this by typing sudo apt-get install guvcview.
For More Information: www.packtpub.com/beaglebone-robotic-projects/book
Chapter 4
87
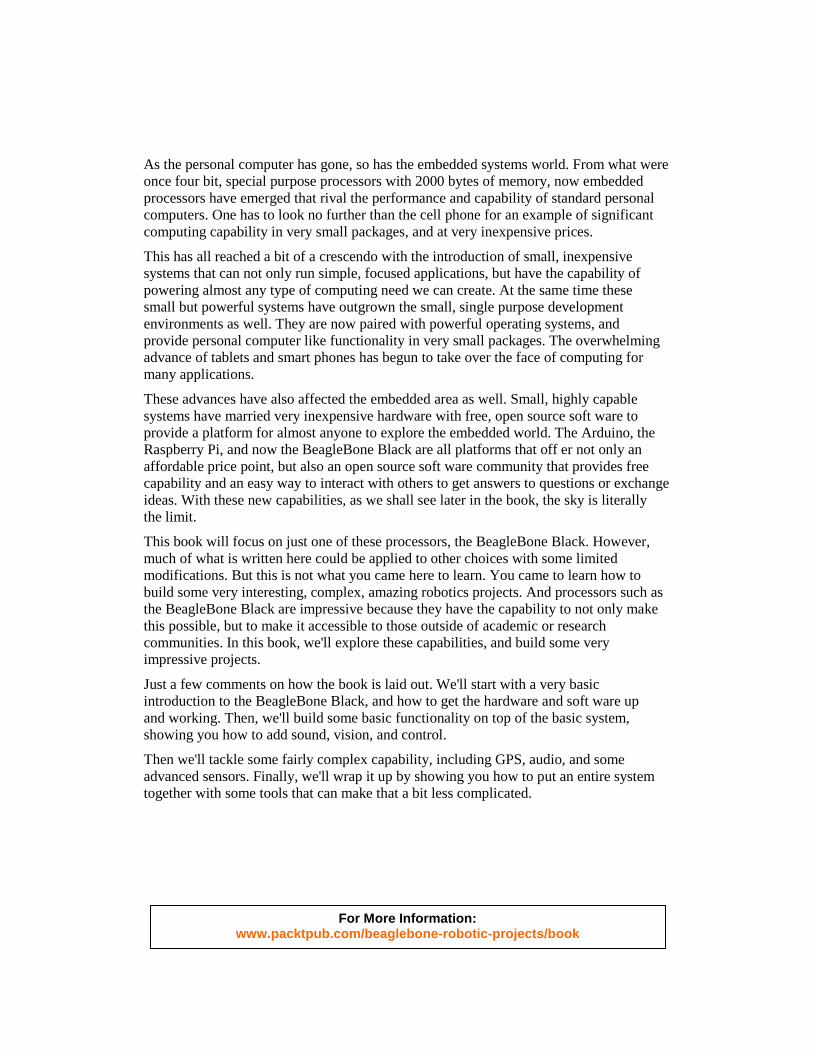
Engage thrustersConnect your USB camera and make sure your LAN cable is plugged in. Then apply power to the BeagleBone Black. Aft er the system is booted, you can check to see if the BeagleBone Black has found your USB camera. Go to the /dev directory and type ls. You should see the output as shown in the following screenshot:
Look for the video0 device, the webcam. If you see it, the system knows your camera is there.
Now let's use guvcview to see the output of the camera. Since this will need to output some graphics, you either need to use a monitor connected to the board as well as a keyboard and a mouse, or you can use vncserver. If you are going to use vncserver, make sure you start the server on the BeagleBone Black by typing vncserver via SSH. Then start up your vncviewer as described in Chapter 1, Getti ng Started with the BeagleBone Black. Open a terminal window and type sudo guvcview.
For More Information: www.packtpub.com/beaglebone-robotic-projects/book
Allowing the BeagleBone Black to See
88
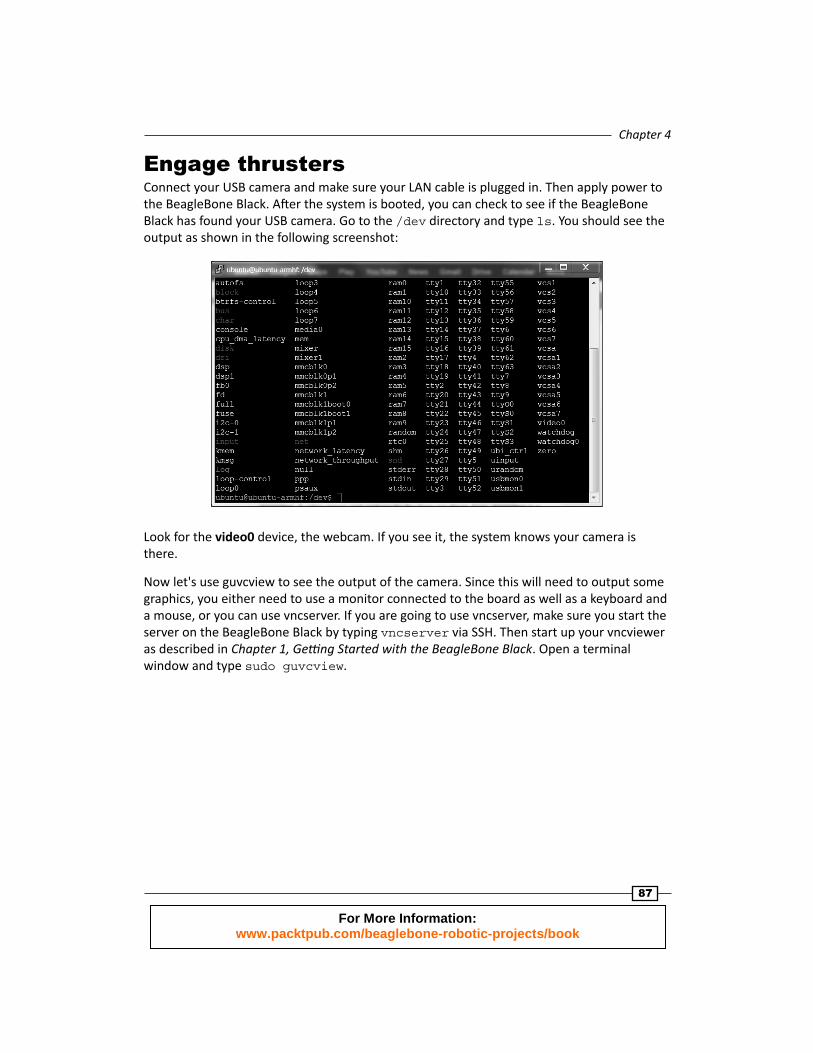
You should see the output as shown in the following screenshot:
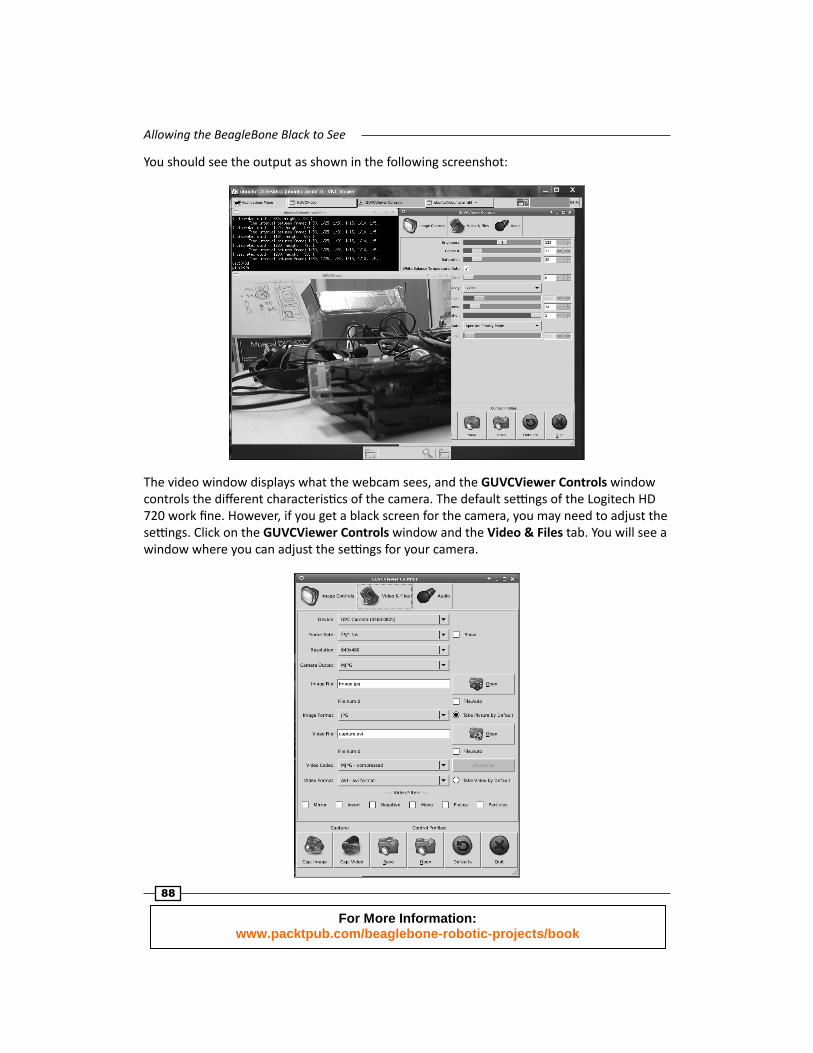
The video window displays what the webcam sees, and the GUVCViewer Controls window controls the diff erent characteristi cs of the camera. The default setti ngs of the Logitech HD 720 work fi ne. However, if you get a black screen for the camera, you may need to adjust the setti ngs. Click on the GUVCViewer Controls window and the Video & Files tab. You will see a window where you can adjust the setti ngs for your camera.
For More Information: www.packtpub.com/beaglebone-robotic-projects/book

Chapter 4
89
The most important setti ng is the Resoluti on. If you see a black screen, adjust the resoluti on down; oft en this will resolve the issue. This window will also tell you what resoluti ons are supported for your camera. Also, you can display the frame rate by checking the box at the right of the Frame Rate setti ng. Be aware, however, that if you are going through vncviewer, the refresh rate will be much slower than if you're using the BeagleBone Black and a monitor directly.
Once you have the camera up and running and a desired resoluti on set, you can go on to download and install OpenCV.
Objective complete – mini debriefi ngYour system can now "see" the outside world. Guvcview can actually capture images or video and store them as fi les, but OpenCV provides a full-featured set of image processing capabiliti es as well.
Classifi ed intelYou can connect more than one webcam to the system. Follow the same steps, but connect to cameras via a USB hub. List the devices in the /dev directory. Use guvcview to see the diff erent images. One challenge, however, is that connecti ng too many cameras can overwhelm the bandwidth of the USB port.
Downloading and installing OpenCV – a full-featured vision library
Now that you have your camera connected, you can begin to access some amazing capabiliti es that have been provided by the open source community. The most popular of these for computer vision is OpenCV.
Prepare for lift offNow you need to install OpenCV, a complete vision library that provides tools for you to use to capture, process, and save your images. Before you do this, you need to expand the parti ti on on your SD card so that you can download all the applicati ons that you need. When you wrote the Linux operati ng system to your SD card, you copied a 2 GB image; so now your card thinks it is only a 2 GB card, no matt er what size it really is. You need to reclaim this space.
For More Information: www.packtpub.com/beaglebone-robotic-projects/book

Allowing the BeagleBone Black to See
90
To do this, you'll need to issue some fairly crypti c commands, but you can use the defaults, so it will be straightf orward. First, open a terminal window. The card I am using is an 8 GB card, so if your card is of a diff erent size, you might not see the exact same numbers. Fortunately you'll be using default values throughout the process, so you won't need to know anything special about your card. To begin, type sudo su, and then enter your password. Then follow these steps:
1. Type ll /dev/mmcblk* and you should see output similar to the following screenshot:
2. Now you are going to make changes to the mmcblk0 device. Type fdisk /dev/mmcblk0.
3. Enter the p command and you should see the details of the diff erent types of storage that you currently have available, similar to the output shown in the following screenshot:
For More Information: www.packtpub.com/beaglebone-robotic-projects/book

Chapter 4
91
4. You are going to expand the second device, /dev/mmcblk0p2. To do this you are going to delete the parti ti on, then create a new parti ti on. The informati on that exists on your SD card should be preserved throughout this process, however. Enter d at the prompt, then 2, for parti ti on 2. Now enter p again and the following screenshot will be displayed:
For More Information: www.packtpub.com/beaglebone-robotic-projects/book

Allowing the BeagleBone Black to See
92
5. Now you will create a new parti ti on using defaults so that the parti ti on takes up the enti re card. At the Command prompt type an n, then p, then 2 and then hit Enter through each choice that the programs request. Your device should now reappear, similar to the following screenshot, with a diff erent size based on the size of your SD card:
6. Noti ce that the second parti ti on is now much larger than the original. Now type w to commit your changes. Now you need to reboot, so type reboot.
7. The fi nal steps will expand the fi le system. Aft er the system reboots, type sudo su and enter your password. Now type df, the command to see how much disk you have free. You should be able to see the output as shown in the following screenshot:
For More Information: www.packtpub.com/beaglebone-robotic-projects/book

Chapter 4
93
8. It is the /dev/mmcblk0p2 device that you want to resize. Type resize2fs /dev/mmcblk0p2 and then enter df; you should be able to see the output as shown in the following screenshot:
Now your device is ready to use.
Engage thrustersFirst, you'll need to download a set of libraries and OpenCV itself. There are several possible steps. I'm going to suggest the ones that I follow to install it on my systems. Once you have booted the system and opened a terminal window, type the following commands in the given order:
1. sudo apt-get install update: If you haven't done this in a while, it is a good idea to do this now before you start. You will be downloading a number of new soft ware packages, so it is good to make sure everything is up to date.
2. sudo apt-get install build-essential: You have done this in the previous chapter, but if you skipped that part, you are going to need this package.
3. sudo apt-get install libavformat-dev: This library provides a way to code and decode audio and video streams.
4. sudo apt-get install ffmpeg: This library provides a way to transcode audio and video streams.
For More Information: www.packtpub.com/beaglebone-robotic-projects/book

Allowing the BeagleBone Black to See
94
5. sudo apt-get install libcv2.3 libcvaux2.3 libhighgui2.3: These are the basic OpenCV libraries. Note the number. This will almost certainly change as new versions of OpenCV become available. If Version 2.3 does not work, either try Version 2.4 or google for the latest version of OpenCV.
6. sudo apt-get install python-opencv: This is the Python development kit for OpenCV, needed as you are going to use Python.
7. sudo apt-get install opencv-doc: This library provides the documentati on for OpenCV, just in case you need it.
8. sudo apt-get install libcv-dev: This library provides the header fi les and stati c libraries to compile OpenCV.
9. sudo apt-get install libcvaux-dev: This library provides more development tools for compiling OpenCV.
10. sudo apt-get install libhighgui-dev: This is another package that provides header fi les and stati c libraries to compile OpenCV.
11. Make sure you are in your home directory, and then type cp-r/usr/share/doc/opencv-doc/examples: This will copy all the examples to your home directory.
12. Go to the examples/c directory by typing cd ./examples/c and type sh build_all.sh and you will have a set of executable fi les that will allow you to see if the system is working.
Now you are ready to try out the OpenCV library. I prefer to use Python when programming simple tasks, so I'll show the Python examples. If you prefer the C examples, feel free to explore. In order to use the Python examples, you'll need one more library. So type sudo apt-get install python-numpy as you will need this to manipulate the matrices that OpenCV uses to hold the images.
Now that you have those, you can try one of the Python examples. Change directory to the Python examples by typing cd /home/ubuntu/examples/python. In this directory you will fi nd a number of useful examples, we'll only look at the most basic. It is called camera.py. You can try running this example; however, to do this you'll either need to have a display connected to the BeagleBone Black, or you can do this over the vncserver connecti on. Bring up a terminal window and type python camera.py. You should see output similar to the following screenshot:
For More Information: www.packtpub.com/beaglebone-robotic-projects/book

Chapter 4
95
In my case the camera window eventually turned black, but did not show the output from the camera. I found that I needed to change the resoluti on of the image to the one supported by the camera and OpenCV. To do this you edit the camera.py fi le, and add two lines as shown in the following screenshot:
For More Information: www.packtpub.com/beaglebone-robotic-projects/book

Allowing the BeagleBone Black to See
96
These two lines change the resoluti on of the captured image to 360 x 240 pixels. Now run camera.py, and you should be able to see the output similar to the following screenshot:
Objective complete – mini debriefi ngYour project can now see! You will use this capability to do a number of impressive tasks that will use this vision capability.
Classifi ed intelYou may want to play with the resoluti on to fi nd the opti mum for your applicati on. Bigger images are great—they give you more detailed view of the world—but they also take up signifi cantly more processing power. You'll play with this more as you actually ask your system to do some real image processing. Be careful if you are going to use vnc to understand your system performance as this will signifi cantly slow down the update rate. An image that is twice the size (width/height) will involve four ti mes more processing.
For More Information: www.packtpub.com/beaglebone-robotic-projects/book
Chapter 4
97
Using the vision library to detect colored objects
Now that you have access to the OpenCV library, let's see what it can do.
Prepare for lift offOpenCV and your webcam can track objects. This might be useful if you are building a system that needs to track and follow a colored ball. OpenCV makes this amazingly simple by providing some high-level libraries that can help you with this task. I'm going to do this in Python, as I fi nd it much easier to work with than C. If you feel more comfortable in C, these instructi ons should be fairly easy to translate. Also, performance will be bett er if implemented in C, so you might create the initi al capability in Python, and then fi nalize the code in C.
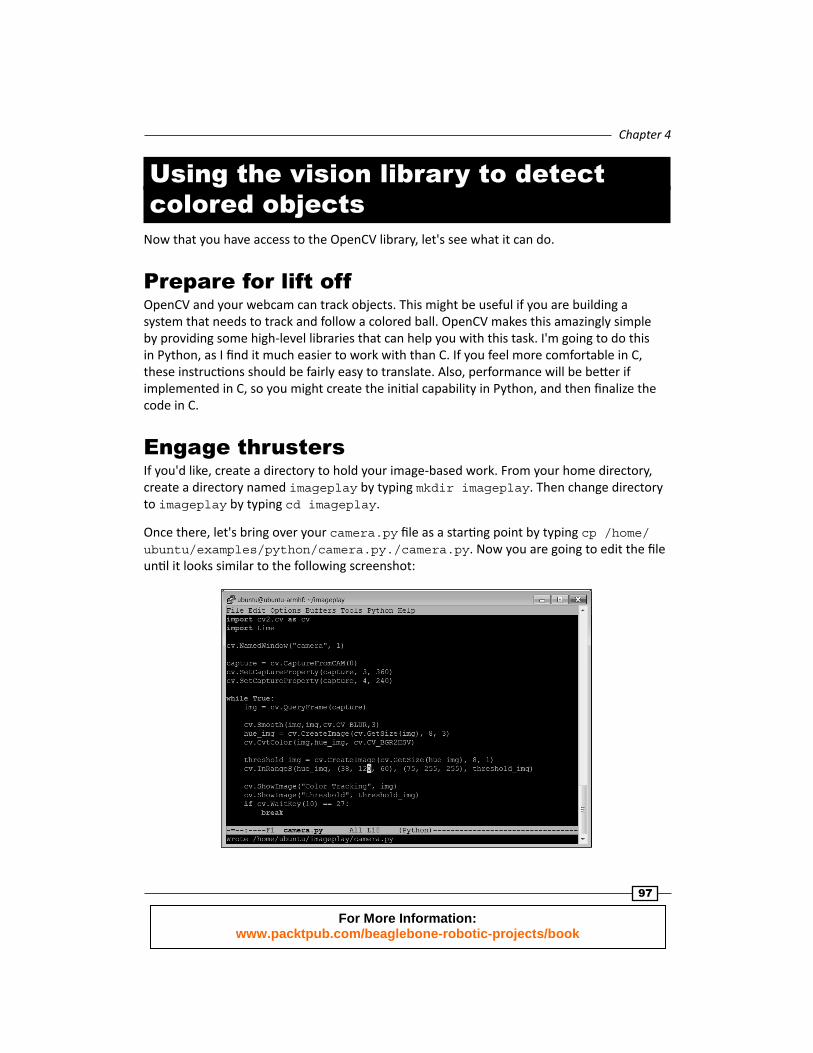
Engage thrustersIf you'd like, create a directory to hold your image-based work. From your home directory, create a directory named imageplay by typing mkdir imageplay. Then change directory to imageplay by typing cd imageplay.
Once there, let's bring over your camera.py fi le as a starti ng point by typing cp /home/ubuntu/examples/python/camera.py./camera.py. Now you are going to edit the fi le unti l it looks similar to the following screenshot:
For More Information: www.packtpub.com/beaglebone-robotic-projects/book
Allowing the BeagleBone Black to See
98
Let's look specifi cally at the changes you need to make to camera.py. The fi rst four lines you add are as follows:
#Smooth image, then convert the Hue cv.Smooth(img,img,cv.CV_BLUR,3) hue_img = cv.CreateImage(cv.GetSize(img), 8, 3) cv.CvtColor(img,hue_img, cv.CV_BGR2HSV)
We are going to use the OpenCV library to fi rst smooth the image, taking out any large deviati ons. The next two lines create a new image that stores the image in values of HSV (Hue (color), Saturati on, and Value) instead of the RGB (Red, Green, and Blue) pixel values of the original image. Converti ng to HSV focuses your processing more on the color, as opposed to the amount of light hitti ng it.
Then we add the following lines of code:
#Remove all the pixels that don't match threshold_img = cv.CreateImage(cv.GetSize(hue_img), 8, 1) cv.InRangeS(hue_img, (38,120, 60), (75, 255, 255), threshold_img)
You are going to create yet one more image, this ti me a black-and-white binary image that is black for any pixel which is not between two certain color values. The (38, 120, 60) and (75, 255, 255) parameters determine the color range. In this case I have a green ball, and I want to detect the color green.
Now run the program. You'll need to either have a display, keyboard, and mouse connected to the board or you can run it remotely using vnc. Run the program by typing sudo python camera.py. You should see a single black image, but move this window and you will expose the original image window as well. Now take your target (I used my green ball) and move it into the frame. You should see output similar to the following screenshot:
For More Information: www.packtpub.com/beaglebone-robotic-projects/book

Chapter 4
99
Noti ce the white pixels in your threshold image showing where the ball is located. You can add more OpenCV code that gives the actual locati on of the ball. You can actually draw a rectangle around the ball as an indicator in your original image fi le of the locati on of the ball. Edit the camera.py fi le to look like the following screenshot:
For More Information: www.packtpub.com/beaglebone-robotic-projects/book

Allowing the BeagleBone Black to See
100
First, add these lines:
# Find all the areas of color out there storage = cv.CreateMemStorage(0) contour = cv.FindContours(threshold_img, storage, cv.CV_RETR_CCOMP, cv.CV_C\HAIN_APPROX_SIMPLE)
These lines fi nd all the areas on your image that are within the threshold. There may be more than one; so you want to capture them all. Now you will add a while loop that will let you step through all the possible contours:
#Step through all the areas points = [] while contour:
By the way, it is important to note that if there is another larger green blob in the background, you will "fi nd" that locati on. Just to keep this simple, you'll assume your green ball to be unique. The next few lines will then get the informati on for each of your contours. Now, you want to identi fy the corners. Then you can check to see if the area is big enough to be of concern. If it is, you will add a rectangle to your original image identi fying where you think it is:
# Get the info about this area rect = cv.BoundingRect(list(contour)) contour = contour.h_next() #Check to make sure the area is big enough to be of concern size = (rect[2] * rect[3]) if size > 100: pt1 = (rect[0], rect[1]) pt2 = (rect[0] + rect[2], rect[1] + rect[3]) #Add a rectangle to the initial image cv.Rectangle(img, pt1, pt2, (38, 160, 60))
For More Information: www.packtpub.com/beaglebone-robotic-projects/book
Chapter 4
101
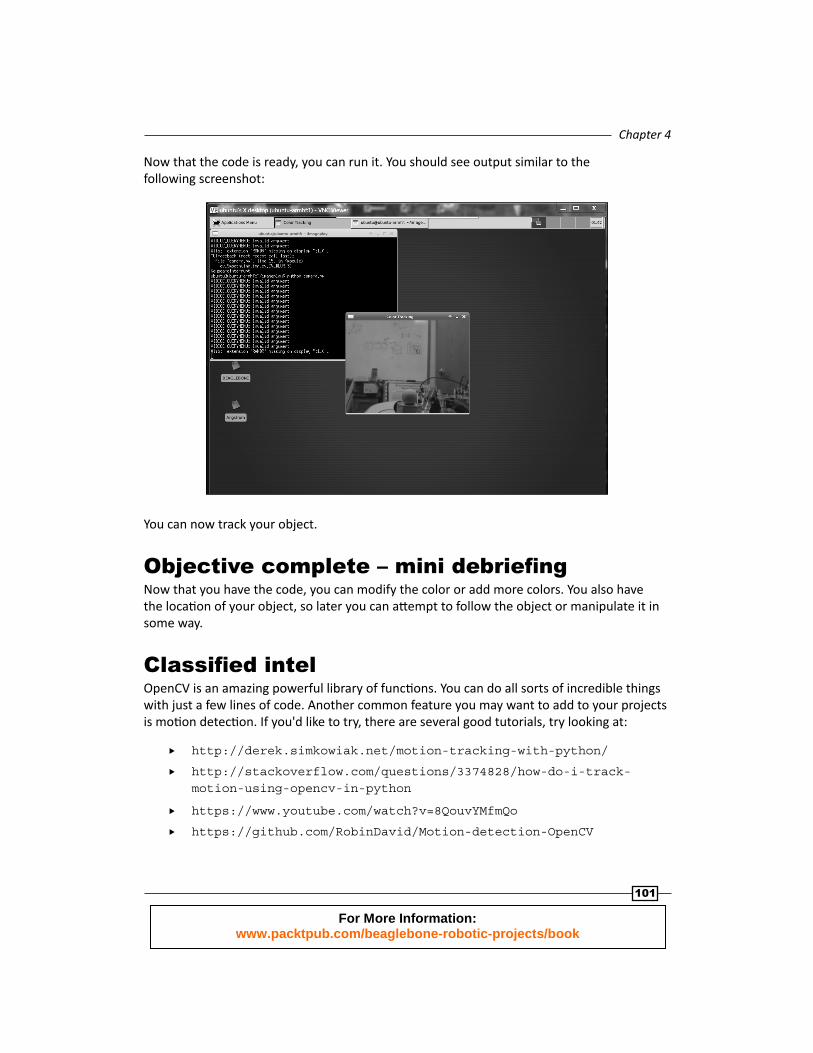
Now that the code is ready, you can run it. You should see output similar to the following screenshot:
You can now track your object.
Objective complete – mini debriefi ngNow that you have the code, you can modify the color or add more colors. You also have the locati on of your object, so later you can att empt to follow the object or manipulate it in some way.
Classifi ed intelOpenCV is an amazing powerful library of functi ons. You can do all sorts of incredible things with just a few lines of code. Another common feature you may want to add to your projects is moti on detecti on. If you'd like to try, there are several good tutorials, try looking at:
http://derek.simkowiak.net/motion-tracking-with-python/
http://stackoverflow.com/questions/3374828/how-do-i-track-motion-using-opencv-in-python
https://www.youtube.com/watch?v=8QouvYMfmQo
https://github.com/RobinDavid/Motion-detection-OpenCV
For More Information: www.packtpub.com/beaglebone-robotic-projects/book

Allowing the BeagleBone Black to See
102
Mission accomplishedYour projects can now speak and see! You can issue commands, and your projects can respond to changes in the physical environment sensed by the webcam. Next, you will add mobility using motors, servos, and in other ways.
ChallengesHaving a webcam connected to your system provides all kinds of additi onal capabiliti es. One of the absolute neatest devices out there is Kinect for the Xbox. This device provides not only video, but depth using an infrared device. There are individuals working to make Kinect work with the BeagleBone Black. Several good libraries enable Kinect on Ubuntu. If you'd like to try, buy a used Kinect and then go to http://speculatrix.tumblr.com/post/23043561344/kinect-on-the-beagleboard-and-ubuntu or http://kinepeutics.blogspot.com/2012/04/ethernet-working-installing-kinect.html and give it a try. Just a word of warning, this task is not for beginners. Later we will talk about the Robot Operati ng System, which may make it easier.
Also, you can get 3D vision with OpenCV using two cameras. There are several good places for example code, for example in the samples/cpp directory that came with OpenCV there is an example stereo_match.cpp. Also, for more code examples, you can visit http://code.google.com/p/opencvstereovision/source/checkout.
For More Information: www.packtpub.com/beaglebone-robotic-projects/book

Where to buy this book You can buy BeagleBone Robotic Projects from the Packt Publishing website:
http://www.packtpub.com/beaglebone-robotic-projects/book.
Free shipping to the US, UK, Europe and selected Asian countries. For more information, please
read our shipping policy.
Alternatively, you can buy the book from Amazon, BN.com, Computer Manuals and
most internet book retailers.
www.PacktPub.com
For More Information: www.packtpub.com/beaglebone-robotic-projects/book