9781782176480_learning_informatica_powercenter_9.x_sample_chapter
TRANSCRIPT
Free Sample

In this package, you will find: • The author biography • A preview chapter from the book, Chapter 1 "Starting the Development Phase
– Using the Designer Screen Basics" • A synopsis of the book’s content • More information on Learning Informatica PowerCenter 9.x
About the Author Rahul Malewar has been working with various data warehousing tools for the past 8 years, mainly with Informatica PowerCenter. He has worked on various versions of Informatica PowerCenter, starting from Version 8.1 to the latest 9.x. He has worked for various MNCs in India, such as UST Global, Cognizant Technology Solutions, and Principal Financial Group in Pune. He has worked on the implementation of a data warehouse involving Informatica for Fortune 500 MNCs, such as Wellpoint and Principal. He has experience of working on multiple real-time projects in a couple of MNCs and utilized these skills to write this book. He has been running his own training center named Learnwell Technocraft (www.dw-learnwell.com) since 2010, where they provide training on more than 25 data warehousing technologies over classroom, corporate, and online sessions. He has also written a blog on data warehousing concepts. At the time of writing, he has provided training to more than 1,200 candidates, ranging from freshers to professionals with 20 years of experience.
He is also the director of a software firm named Gut Lernen Technocraft Pvt. Ltd.; the company works on data warehousing and mobile-related projects. He provides free assistance on Informatica installation-related issues and other technical issues for which he can be contacted at [email protected].

Acknowledgments Without a second thought, I would like to dedicate this book to my mother for taking all the pain of my childhood and making me capable enough to write a book, which is something wonderful to happen in anybody's life. I would also like to thank my wife, Swati, for providing suggestions while writing the book. A large share of this book goes out to all my students who took Informatica training from me, which gave me the ability and motivation to write a book to help all those who I cannot reach out to personally. This also calls for a thank you note to all the reviewers of the book for pointing out the mistakes that I made while writing and providing valuable suggestions—as we say, no one is perfect.
Also, a special thanks to Packt Publishing for giving me the opportunity to write this book and for showing confidence in my writing. A big thanks to the readers of the book. I hope you will like it and make a bright career in Informatica.
I wish you all the luck for future. Keep smiling, make others smile, and make our mother earth a better place to live.

Learning Informatica PowerCenter 9.x There has to be a motive behind everything, and there is one behind this book too: to present a technology to the readers in its simplest form. The simple thought behind writing this book is to put all the essential ingredients of Informatica, starting from basic things such as downloading, extraction, and installation to working on client tools and high-level aspects, such as scheduling, migration, and so on, in simple words. There are multiple blogs available across the Internet that talk about the Informatica tool but none present end-to-end answers. We have tried to put up all the steps and processes in a systematic manner to help you start learning easily. In this book, you will get a step-by-step procedure for every aspect of the Informatica PowerCenter tool.
Informatica Corporation (Informatica), which is a multi-million dollar company incorporated in February, 1993, is an independent provider of enterprise data integration and data quality software and services. The company enables a variety of complex enterprise data integration products, which include PowerCenter, PowerExchange, enterprise data integration, data quality, master data management, business-to-business (B2B) data exchange, application information life cycle management, complex event processing, ultra messaging, and cloud data integration.
In this book, we are going to learn about the PowerCenter tool from Informatica. PowerCenter is Informatica's most widely-used tool across the globe for various data integration processes. The Informatica PowerCenter tool helps with the integration of data from almost any business system in almost any format. This flexibility of PowerCenter to handle almost any data makes it the most widely used tool in the data integration world.
While writing this book, we have kept in mind the importance of live, practical exposure of the graphical interface of the tool to the audience and so you will notice a lot of screenshots illustrating the steps to help you understand and follow the process. We have arranged the chapters in such a way that we cover all the aspects of the Informatica PowerCenter tool, and we have also made sure they flow properly in order to achieve functionality.
What This Book Covers Chapter 1, Starting the Development Phase – Using the Designer Screen Basics, talks about the basics of the Informatica PowerCenter Designer client tool. You will learn how to create/import fi les and tables as the source and target. You will also learn about the basic components of the client screen, such as the toolbar, navigator, workspace, output

panel, and status bar. By the end of this chapter, you will have a clear idea of the look and feel of the PowerCenter tool.
Chapter 2, Using the Designer Screen – Advanced, talks about the advanced topics of the Designer screen. It is an extension of Chapter 1, Starting the Development Phase – Using the Designer Screen Basics. In this chapter, we will discuss debuggers, parameters and variables, target loan plan, reusable transformations, and mapplets.
Chapter 3, Implementing SCD – Using Designer Screen Wizards, covers a single but very important aspect of data warehousing, SCD. We will see the implementation of SCD1, SCD2, and SCD3 using wizards. You should be clear with data warehousing concepts to understand this implementation.
Chapter 4, Finishing the Development – Using the Workflow Manager Screen Basics, describes the basics of the Workflow Manager screen. We will get to learn the different options present on the Workflow Manager screen. We will learn how to create session tasks and workflows. We will also see various connections, such as relations, FTP, and so on, that can be created on the Workflow Manager screen.
Chapter 5, Using the Workflow Manager Screen – Advanced, teaches you the advanced concepts of the Workflow Manager screen. This chapter describes the various tasks present on the Workflow Manager screen. We will also see how to create reusable tasks and mapplets. We will learn some very important concepts, such as scheduling, partitioning and parameter fi les, fi le list, and incremental aggregation and workflow recovery options.
Chapter 6, Monitoring Your Code – Using the Workflow Monitor Screen, describes the Workflow Manager screen of PowerCenter. This screen allows you to monitor the process we execute in Workflow Manager. We will see different logfiles, statuses, and statistics on the Monitor screen.
Chapter 7, The Lifeline of Informatica – Transformations, is meant for the most important aspect of the Informatica PowerCenter tool, transformations. We will talk about the various types of transformations in this chapter. We will implement mapping using each transformation so that you get to understand each and every transformation in detail. We will end this chapter with the classifications of transformations.
Chapter 8, The Deployment Phase – Using Repository Manager, teaches you about the fourth client screen, Repository Manager. Repository Manager is basically used for migration (deployment) purposes. We will see the various options to migrate the code from one environment to other. We will also see how to create folders on the client screen.
Chapter 9, Optimization – Performance Tuning, has the contents for the optimization of the various components of the Informatica PowerCenter tool, such as sources, targets,

mappings, sessions, and systems. Performance tuning at a high level involves two stages: finding issues called bottlenecks and resolving them.
Appendix, Installing Informatica and Using Informatica Administration Console, describes the detailed steps for the process of installation, starting from downloading the software, extracting the software, and installing the software, to configuring the software. We will also look at the administrator console of the PowerCenter tool and learn about the different services.

Starting the Development Phase – Using the Designer
Screen BasicsWith the installation phase over, we are all set to have our fi rst try on the PowerCenter Client tools. We have the following four client tools available in Informatica PowerCenter:
• PowerCenter Designer• PowerCenter Workfl ow Manager• PowerCenter Workfl ow Monitor• PowerCenter Repository Manager
Informatica PowerCenter DesignerIn this chapter, we are going to discuss the basics of the Informatica PowerCenter Designer screen. The designer screen lets you build and manage PowerCenter objects, such as sources, targets, transformations, and mappings.
To open the PowerCenter Designer screen, navigate to Start | All Programs | Informatica 9.5.1 | Client | Power Center Client | Designer.
This will open the designer screen.

Starting the Development Phase – Using the Designer Screen Basics
[ 8 ]
The Designer screen's componentsThe designer screen, as can be seen in the following screenshot, is divided into fi ve sections. Each section has its own purpose. You need to understand each component properly as we will be referring to these components regularly in the next chapters. They are as follows:
• Navigator: This is used to connect to repositories and open folders. You can copy objects and create shortcuts within the navigator. Navigator allows you to reuse the existing components.
• Workspace: This is the space where you actually do the coding. Open different tools in this window to create and edit the repository objects, such as sources, targets, mapplets, transformations, and mappings. In the designer workspace, you can see different tabs, such as Source Analyzer, Target Designer, Transformation Developer, Mapplet Designer, and Mapping Designer.
• Toolbar: This shows the various components to be used in the designer screen and other shortcuts.
• Output/control panel: This lets you view details about tasks you perform, such as saving your work or validating a mapping. You can view whether your code is valid or invalid. If invalid, the output panel shows you the reason for the error.
• Status bar: This displays the status of the current operation. The status bar shows you the status of the operation that you are trying to perform.
The preceding screen components are shown in the following screenshot:

Chapter 1
[ 9 ]
The components shown are as follows:
• Navigator (1)• Workspace (2)• Toolbar (3)• Control panel (4)• Status bar (5)
PowerCenter Designer has the following tools that allow us to work on different types of sources, different types of targets, and build mappings using different types of transformations:
• Source Analyzer: This allows you to import or create source defi nitions. You can work on various types of fi les (fl at fi les, XML, .xls, and so on) and database tables. Source Analyzer lets you modify the existing source defi nitions.
• Target Designer: This allows you to import or create target defi nitions. You can work on various types of fi les (fl at fi les, XML, .xls, and so on) and database tables. Target Designer lets you modify the existing target defi nitions.
• Transformation Developer: This allows you to create reusable transformations to use in mappings. Reusable components are important because they allow you to use the existing transformations.
• Mapplet Designer: This allows you to create a group of transformations to use in mappings. Mapplets are groups of reusable transformations that can be used in multiple mappings as reusable components.
• Mapping Designer: This allows you to create mappings that the Integration Service uses to extract, transform, and load data. Mappings contain sources, targets, and transformations linked to each other through links. You can add multiple sources, multiple targets, and multiple transformations in a mapping.
Starting the Development Phase – Using the Designer Screen Basics
[ 10 ]
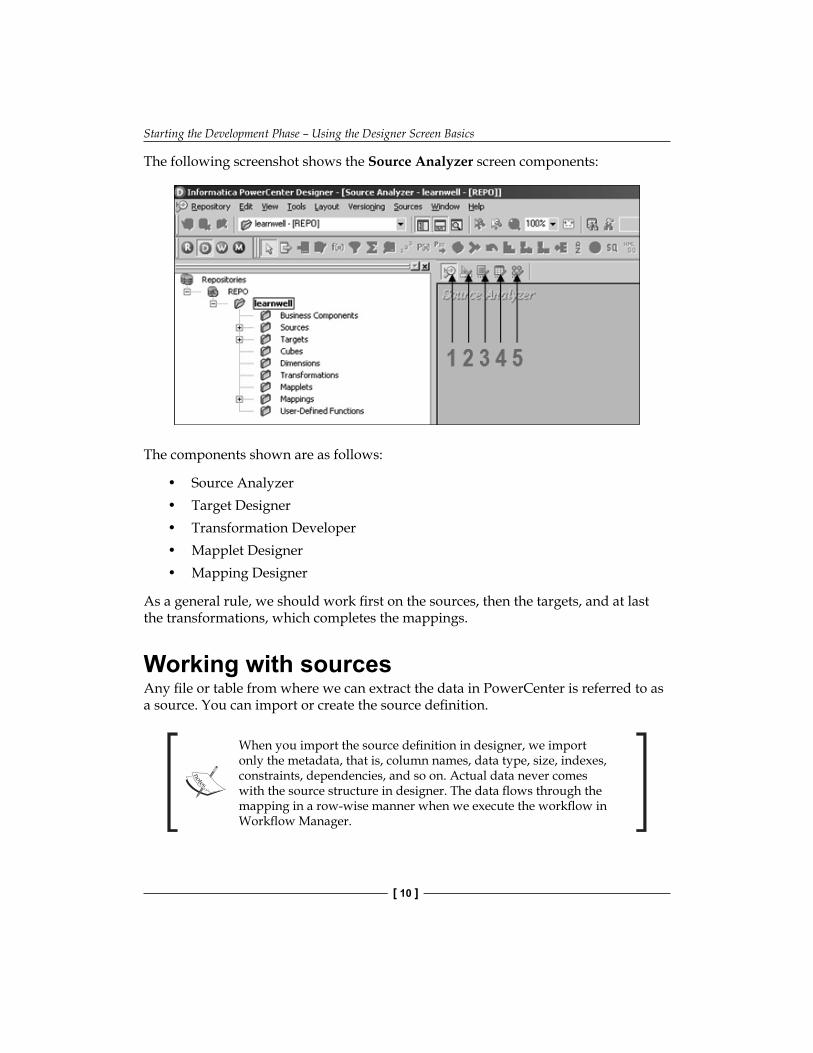
The following screenshot shows the Source Analyzer screen components:
The components shown are as follows:
• Source Analyzer• Target Designer• Transformation Developer• Mapplet Designer• Mapping Designer
As a general rule, we should work fi rst on the sources, then the targets, and at last the transformations, which completes the mappings.
Working with sourcesAny fi le or table from where we can extract the data in PowerCenter is referred to as a source. You can import or create the source defi nition.
When you import the source defi nition in designer, we import only the metadata, that is, column names, data type, size, indexes, constraints, dependencies, and so on. Actual data never comes with the source structure in designer. The data fl ows through the mapping in a row-wise manner when we execute the workfl ow in Workfl ow Manager.

Chapter 1
[ 11 ]
PowerCenter allows you to work on various types of sources, as listed below:
• Relational database: PowerCenter supports relational databases such as Oracle, Sybase, DB2, Microsoft SQL Server, SAP HANA, and Teradata
• File: Flat fi les (fi xed width and delimited fi les), COBOL fi les, XML fi les, and Excel fi les
• High-end applications: PowerCenter also supports applications such as Hyperion, PeopleSoft, TIBCO, WebSphere MQ, and so on
• Mainframe: Additional features of Mainframe such as IBM DB2 OS/390, IBM DB2 OS/400, IDMS, IDMS-X, IMS, and VSAM can be purchased
• Other: PowerCenter also supports Microsoft Access and external web services
We have seen the components that PowerCenter supports. In the next section, we will learn to import the relational database tables. Before that, a database connection needs to be added to the designer screen as mentioned in the next section.
Adding a new ODBC data sourceTo add a new database data source connection to import tables, follow this procedure:
1. In the designer screen, navigate to Tools | Source Analyzer to open the Source Analyzer tool, as indicated earlier.
2. Navigate to Sources | Import from Database.3. To add a new database connection, click on the tab shown in the
following screenshot:

Starting the Development Phase – Using the Designer Screen Basics
[ 12 ]
4. A pop up window to add a new connection will appear on the screen, as shown in the following screenshot:
We need to add a new User DSN.
5. The next screen will allow you to select the desired database from the list of databases. For our reference, we are using Oracle Database in this book. If you are using another database, select the appropriate option from the list.Select the type of database driver you wish to add and click on Finish.
Chapter 1
[ 13 ]
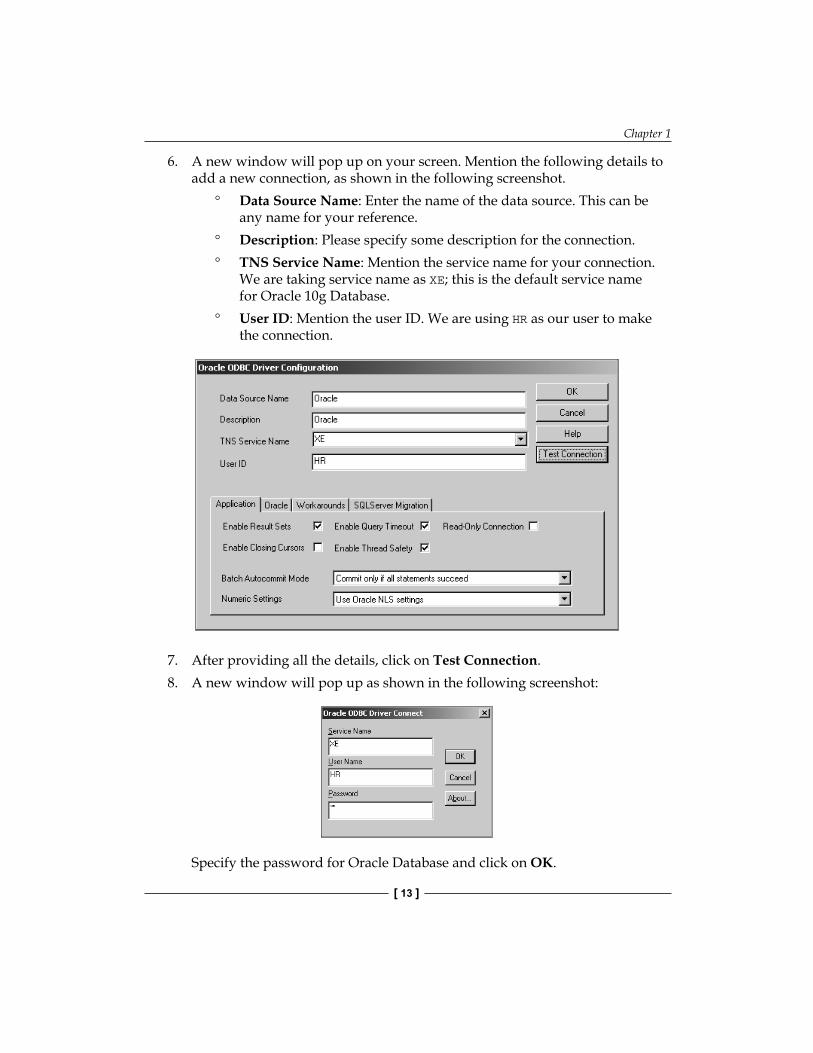
6. A new window will pop up on your screen. Mention the following details to add a new connection, as shown in the following screenshot.
Data Source Name: Enter the name of the data source. This can be any name for your reference.
Description: Please specify some description for the connection. TNS Service Name: Mention the service name for your connection.
We are taking service name as XE; this is the default service name for Oracle 10g Database.
User ID: Mention the user ID. We are using HR as our user to make the connection.
7. After providing all the details, click on Test Connection.8. A new window will pop up as shown in the following screenshot:
Specify the password for Oracle Database and click on OK.

Starting the Development Phase – Using the Designer Screen Basics
[ 14 ]
9. If all the values mentioned by you are correct, the test connection will be successful.
With this, we have added a new database connection to our repository, and we can import the tables using the new connection.
You can add different type of databases to your repository. This is just a one-time process that you need to perform before you can start using the tables.
Working with relational database tables – the Import optionWe will fi rst start working on the relational tables. You can import or create the table structure in Source Analyzer. After you add these source defi nitions to the repository, you use them in a mapping.
Perform the following steps to import the table source defi nition:
1. In the Designer screen, navigate to Tools | Source Analyzer to open the Source Analyzer tool.
2. Navigate to Sources | Import from Database:
3. From the ODBC data source fi eld, select the ODBC data source that you created to access source tables in the previous section.
4. Enter the username and password to connect to the database. Also, enter the name of the source table owner if necessary.

Chapter 1
[ 15 ]
5. Click on Connect.6. In the Select tables list, expand the database owner and the TABLES heading.7. Select the tables you wish to import and click on OK.
The structure of the selected tables will appear in the workspace as shown in the following screenshot:

Starting the Development Phase – Using the Designer Screen Basics
[ 16 ]
Working with fl at fi les – the Import optionIn the previous section, we discussed about importing the relational tables. Before we start working on importing the fl at fi les, we will discuss some important aspects about fl at fi les.
Flat fi les are of two types: delimited and fi xed width. They are explained as follows:
• In delimited fi les, the values are separated from each other by a delimiter. Any character or number can be used as delimiter, but usually for better interpretation we use special characters as delimiters. In delimited fi les, the width of each fi eld is not a mandatory option as each value gets separated from the other using a delimiter. Please see the following screenshot to understand a delimited fi le. The delimiter used in the fi le is a comma (,).
• In fi xed-width fi les, the width of each fi eld is fi xed. The values are separated from each other by the fi xed size of the column defi ned. There can be issues in reading the data if the size of each column is not maintained properly. Please see the following screenshot to understand a fi xed-width fi le.The width of each fi eld in the fi le is fi xed. See the description of each fi eld:
EMPLOYEE_ID: 4 bytes FIRST_NAME: 10 bytes LAST__NAME: 10 bytes AGE: 2 bytes JAN_SAL: 10 bytes FEB_SAL: 10 bytes LOCATION: 10 bytes DATE_OF_HIRE: 8 bytes

Chapter 1
[ 17 ]
If the size of a particular value is not equal to the size mentioned, we need to pad the value with spaces:
Working with delimited fi lesPerform the following steps to import the delimited fi les:
1. In the designer screen, navigate to Tools | Source Analyzer to open the Source Analyzer.
2. Navigate to Sources | Import from File.

Starting the Development Phase – Using the Designer Screen Basics
[ 18 ]
3. Browse the fi les you wish to import as source fi les.4. The Flat File Import Wizard screen will pop up. The Flat File Import Wizard
screen will help you specify the properties for importing the fi le in a proper format. Please complete the following steps in the wizard.
5. Select the fi le type as Delimited as shown in the following screenshot:
If the fi le contains headers as column names in the fi rst line, then we will need to start the import at row 2, as this option indicates from which row the actual data has to be imported. If the fi le doesn't contain the headers in fi rst line, we will import the data from the fi rst line only.Files may contain the column names in the fi rst line as headers. You need to verify the fi le properly before you start working on the fi le. The Import fi eld names from fi rst line option enables us to import the header names into the source defi nition. If you do not select this option, the header names will not be imported.

Chapter 1
[ 19 ]
Click on Next.
6. Select the type Delimiter to be used in the fi le. In our case, we are using comma as a delimiter. You can select the delimiter as per the fi le you are using.
7. Also, check the quotes option: No quotes, Single quotes, and Double quotes—to work with the quotes in the text values. This option enables us to import the data with single or double quotes in text values. We are using No quotes as our option since the sample fi le we are using does not have any data with quotes.

Starting the Development Phase – Using the Designer Screen Basics
[ 20 ]
8. Click on Next.9. Verify the column name, data type, and precision in the data view option.
You can edit the column names and other details in this view. Generally, you do not need to do so. This is shown in the following screenshot:
10. Click on Finish to get the source imported in the Source Analyzer, as shown in the following screenshot:

Chapter 1
[ 21 ]
Working with fi xed-width fi lesPerform the following steps to import the fi xed-width fi les:
1. In the designer screen, navigate to Tools | Source Analyzer to open the Source Analyzer.
2. Navigate to Sources | Import from File.
3. Browse the fi les you wish to use as source fi les. We are using EMP_SRC_FILE as a reference to import the fi xed-width fi le.
4. The Flat File Import Wizard screen will pop up.5. Select the fi le type Fixed Width.

Starting the Development Phase – Using the Designer Screen Basics
[ 22 ]
6. Click on Next.7. As against the delimited fi les, we will now need to set the width of each
column as per the requirement. This will help us divide the fi le in a proper column-wise manner, as shown in the following screenshot:
8. Click on Next.9. Specify the column name, data type, and precision in the data view option.
You can edit the column names and other details in this view:

Chapter 1
[ 23 ]
10. Click on Finish to get the source imported in the Source Analyzer, as shown in the following screenshot:
Working with sources – the Create optionApart from importing the fi le or table structure, we can manually create the source defi nition. When the sample source fi le or the table structure is not available, we need to manually create the source structure. When we select the Create option, we need to defi ne every detail related to the fi le or table manually, such as the name of the source, the type of the source, the column names, the column data type, the column data size, indexes, constraints, and so on. When you import the structure, the import wizard automatically imports all these details. We perform the following steps:
1. In the designer screen, navigate to Tools | Source Analyzer to open the Source Analyzer.

Starting the Development Phase – Using the Designer Screen Basics
[ 24 ]
2. Navigate to Sources | Create.
3. Mention the name of the source as per your requirements and select the type of source you wish to create from the drop-down list. For your reference, we are choosing Flat File as our source type and using SRC_STUDENT as the source fi lename. Also, select the database type for the new source to be created. This is shown in the following screenshot:
4. Click on Create and then click on Done.5. An empty source structure with the name SRC_STUDENT will appear in the
Source Analyzer as shown in the following screenshot:

Chapter 1
[ 25 ]
6. Since we are using the Create option, we need to manually specify all the details, such as the column names, data type, precision, and so on.
7. Double-click on the title bar of the SRC_STUDENT source structure to open the source defi nition. The Edit Tables dialog box appears and displays all the properties of this source defi nition. The Table tab shows the name of the table, the owner name, and the database type. You can add a comment in the Description section. The Business name fi eld is empty.

Starting the Development Phase – Using the Designer Screen Basics
[ 26 ]
8. Click on the Columns tab. The Columns tab displays the column descriptions for the source. In the Columns tab, we have options to add a new column, delete an existing column, and so on.
The options available in the Columns tab are explained as follows: Add a new column: You can click on this option to add a new
column. You can add multiple columns as per your requirement. Once you add a new column, you need to specify other details such as data type, precision, and so on for the column you added.
Delete a column: To delete a column, click on the column you wish to delete and press the Delete button.
Copy an existing column: You can copy an existing column if you wish to make a column similar to that column.
Paste the copied column: You can paste the copied column as per your requirement.
Move up or down the column: You can move up or down the column to rearrange the columns inside the source definition.

Chapter 1
[ 27 ]
We have added a few columns to the source, as shown in the following screenshot:
9. Click on the Metadata Extensions tab. Metadata extensions allow you to extend the metadata stored in the repository by associating information with individual repository objects. For example, you can store contact information, such as name or e-mail address with the sources you create. This is optional and is usually left empty.

Starting the Development Phase – Using the Designer Screen Basics
[ 28 ]
10. Click on Apply and then click on OK to close the dialog box and get the source defi nition in the Source Analyzer as shown in the following screenshot:
11. Navigate to Repository | Save or press Ctrl + S to save the changes to the repository.
Working with targetsWe have seen in the earlier section that PowerCenter can use different types of sources. Similarly, PowerCenter is capable of working with different types of targets to load data. The targets are explained as follows:
• Relational database: PowerCenter supports all the relational databases such as Oracle, Sybase, DB2, Microsoft SQL Server, SAP HANA, and Teradata
• Files: PowerCenter supports fl at fi les (fi xed-width and delimited fi les), COBOL fi les, XML fi les, and Excel fi les
• High-end applications: PowerCenter also supports applications such as Hyperion, PeopleSoft, TIBCO, WebSphere MQ, and so on
• Mainframe: Additional features of Mainframe such as IBM DB2 OS/390, IBM DB2 OS/400, IDMS, IDMS-X, IMS, and VSAM can be purchased
• Other: PowerCenter also supports Microsoft Access and external web services

Chapter 1
[ 29 ]
Working with target relational database tables – the Import optionAs we discussed about importing and creating source fi les and source tables, the same way, we need to work on target defi nitions.
The process of importing the target table is exactly the same as importing the source table; the only difference is that you need to work in Target Designer.
You can import or create the table structure in Target Designer. After you add these target defi nitions to the repository, you can use them in a mapping.
Perform the following steps to import the table target defi nition:
1. In the designer screen, navigate to Tools | Target Designer to open the Target Designer screen.
2. Navigate to Targets | Import from Database.3. From the ODBC data source button, select the ODBC data source that you
created to access the source tables. We have already added the data source while working on the sources.
4. Enter the username and password to connect to the database.5. Click on Connect.6. In the Select tables list, expand the database owner and the TABLE heading.7. Select the tables you wish to import and click on OK.
The structure of the selected tables will appear in the Target Designer screen in the workspace.
As mentioned, the process is exactly similar to importing the source in Source Analyzer. Please follow the preceding steps if you have any issues.
Working with target fl at fi les – the Import optionThe process of importing the target fi le is exactly the same as importing the source fi le; the only difference is that you need to work in Target Designer.

Starting the Development Phase – Using the Designer Screen Basics
[ 30 ]
Working with delimited fi lesPerform the following steps to import the delimited fi les:
1. In the Designer screen, navigate to Tools | Target Designer to open the Target Designer.
2. Navigate to Targets | Import from fi le.3. Browse the fi les you wish to import as source fi les.4. The Flat File Import Wizard screen will pop up.5. Select the fi le type: Delimited. Also select the appropriate option to import
the data from the row and import fi le names from the fi rst line, as we did in case of importing the source. Click on Next.
6. Select the type of delimiter used in the fi le. Also check the quotes option: No quotes, Single quotes, and Double quotes—to work with the quotes in the text values. Click on Next.
7. Verify the column name, data type, and precision in the data view option.8. Click on Finish to get the target fi le imported in the Target Designer.
Working with fi xed-width fi lesPerform the following steps to import the fi xed width fi les:
1. In the Designer screen, navigate to Tools | Target Designer to open the Target Designer.
2. Navigate to Targets | Import from fi le.3. Browse the fi les you wish to use as source fi les.4. The Flat File Import Wizard screen will pop up.5. Select the fi le type: Fixed Width. Click on Next.6. Set the width of each column as required by adding a line break.
Click on Next.7. Specify the column name, data type, and precision in the data view option.8. Click on Finish to get the target fi le imported in the Target Designer.
Chapter 1
[ 31 ]
Working with the target – the Create optionApart from importing the fi le or table structure, we can manually create the target defi nition. When the sample target fi le or the table structure is not available, we need to manually create the target structure. When we select the Create option, we need to defi ne every detail related to the fi le or table manually, such as the name of the target, type of target, column names, column data type, column data size, indexes, constraints, and so on. When you import the structure, the import wizard automatically imports all these details. We perform the following steps:
1. In the designer screen, navigate to Tools | Target Designer to open the Target Designer.
2. Navigate to Target | Create.3. Select the type of target you wish to create from the drop-down list.4. An empty target structure will appear in the Target Designer.5. Double-click on the title bar of the target defi nition for the T_EMPLOYEES
table. This will open the T_EMPLOYEES target defi nition.6. A pop-up window will display all the properties of this target defi nition. The
Table tab will show the name of the table, the owner name, and the database type. You can add a comment in the Description section. Usually, we keep the Business name section empty.
7. Click on the Columns tab. This will display the column descriptions for the target. You can add, delete, or edit the columns.
8. Click on the Metadata Extensions tab; usually, you keep this tab blank. You can store some metadata related to the target you created. Some personal details and reference details can be saved. Click on Apply and then click on OK.
9. Navigate to Repository | Save to save the changes to the repository.
Working with the target – the Copy optionPowerCenter provides a very convenient way of reusing the existing components in the repository. It provides the Drag-Drop feature, which helps when reusing the existing components.
Using the Drag-Drop feature, you can copy the existing source defi nition, created earlier, into the Target Designer to create the target defi nition with the same structure.

Starting the Development Phase – Using the Designer Screen Basics
[ 32 ]
Perform the following steps:
1. In the Designer screen, navigate to Tools | Target Designer to open the Target Designer.
2. Drag the SRC_STUDENT source defi nition from the navigator to the Target Designer workspace as shown in the following screenshot:
3. The designer screen creates a target defi nition, SRC_STUDENT, with the same column defi nitions as the SRC_STUDENT source defi nition, and the same database type.

Chapter 1
[ 33 ]
4. Double-click on the title bar of the SRC_STUDENT target defi nition to open it and edit its properties if you wish to change them.
5. Click on Rename.
6. A new pop-up window will allow you to mention a new name. Change the target defi nition name to TGT_STUDENT as shown in the following screenshot:
7. Click on OK.8. Click on the Columns tab. The target column defi nitions are the same as
the SRC_STUDENT source defi nition. You can add a new column, delete an existing column, or edit the columns as per your requirements.
9. Click on OK to save the changes and close the dialog box.10. Navigate to Repository | Save.

Starting the Development Phase – Using the Designer Screen Basics
[ 34 ]
A feel of the data inside the repository – a previewNow that you have learned to use sources and targets in PowerCenter, we will start using these sources and targets in mappings. As mentioned earlier, in the PowerCenter Designer we only deal with the metadata of sources and targets; we do have an option to preview the data of the source and target, which we imported by providing the path/connection for fi les or tables. This gives us an option to understand the data clearly before we move ahead with the next step.
Previewing the source data – fl at fi lesPerform the following steps to preview the data in the source:
1. Drag-and-drop the source from the navigator section to Source Analyzer. We are using EMP_FILE as our reference to preview data.
2. Right-click on the source defi nition and click on Preview Data.

Chapter 1
[ 35 ]
3. A new window will pop up that will ask you to provide the path where your fi le is stored. The following screenshot shows the pop-up window:
4. Click on Open to view the preview data.5. Once you are done, click on Close.
Previewing the source data – a relational tablePerform the following steps to preview the data in the relational data source:
1. Drag-and-drop the source table from the navigator section to Source Analyzer. We are using the EMPLOYEES Oracle table as our reference to preview data.
Starting the Development Phase – Using the Designer Screen Basics
[ 36 ]
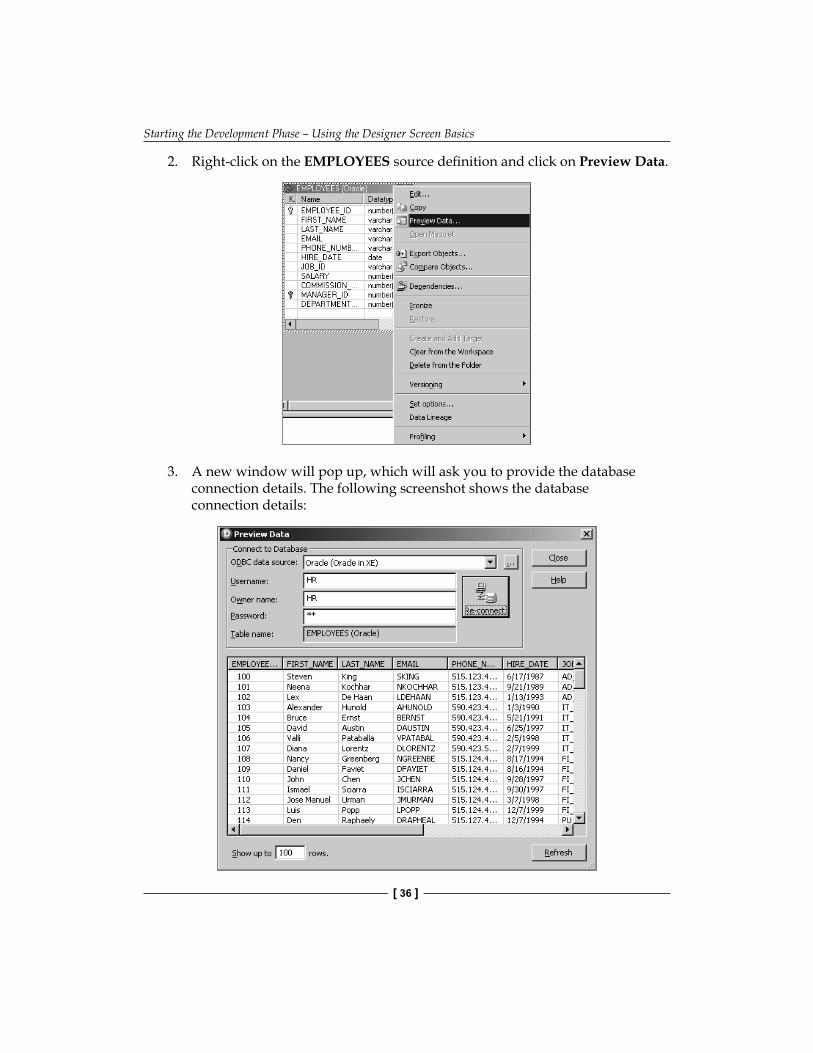
2. Right-click on the EMPLOYEES source defi nition and click on Preview Data.
3. A new window will pop up, which will ask you to provide the database connection details. The following screenshot shows the database connection details:

Chapter 1
[ 37 ]
4. Click on Connect to view the preview data.5. Once you are done, click on Close.
Creating a database tableIn the earlier section, you saw the steps to import the database table into Informatica.
Informatica PowerCenter tools allow you to create a database table from Informatica. If you have a table structure available in PowerCenter but the corresponding table is not available in the database, you will not be able to use the table for your mapping purpose as you will not be able to provide the required connections to load the data. PowerCenter provides a very effi cient and faster way to generate a database table directly, so you need not write a CREATE SQL statement to generate a table in your database.
For your reference, we will create a table named TGT_EMPLOYEES in Oracle Database. We will perform the following steps:
1. In the designer screen, navigate to Tools | Target Designer to open the Target Designer.
2. In the workspace, select the TGT_EMPLOYEES target defi nition.3. Navigate to Targets | Generate/Execute SQL.

Starting the Development Phase – Using the Designer Screen Basics
[ 38 ]
4. The Database Object Generation dialog box appears.5. In the Filename fi eld, enter the following text to generate a SQL script called
MKTABLES.SQL: C:\MKTABLES.SQL. You can provide any path. Informatica PowerCenter will generate a SQL fi le at the specifi ed location.
6. Select the ODBC data source to connect to the target database.7. Enter the necessary username and password, and then click on Connect:
8. Select the appropriate option to generate the table.

Chapter 1
[ 39 ]
9. Click on Generate and execute.10. Click on Close to exit the Database Object Generation dialog box.
With this, the TGT_EMPLOYEES table will be generated in the Oracle database.
The skeleton – a mappingIn the earlier section, you learned about all the prerequisites to create a mapping. Mapping is a structural fl ow of data from the source to target through transformations.
To understand the basic steps of creating a mapping, let's start by creating a pass-through mapping. A pass-through mapping inserts all the source rows into the target without any modifi cations.
We will use the EMPLOYEE Oracle table as source and the TGT_EMPLOYEE table as target to create a pass-through mapping.
By performing the following steps, you will create a mapping and link columns in the source EMPLOYEES table to a source qualifi er transformation:
1. Navigate to Tools | Mapping Designer and then to Mappings | Create to create a new mapping.

Starting the Development Phase – Using the Designer Screen Basics
[ 40 ]
2. In the Mapping Name dialog box, enter m_PASS_THROUGH_EMPLOYEES and click on OK.
3. Drag the EMPLOYEES source defi nition into the Mapping Designer workspace.
4. The source defi nition appears in the workspace. The Designer tool creates a source qualifi er transformation and connects it to the source defi nition. Source qualifi er is a default transformation, which comes automatically with a source. We will see the use of source qualifi er transformation in the next section.
5. Expand the Targets node in the navigator section to open the list of all target defi nitions. Drag the TGT_EMPLOYEES target defi nition into the workspace. The target defi nition appears in the Mapping Designer section.
6. The fi nal step is to connect the source qualifi er transformation to the target defi nition.
Chapter 1
[ 41 ]
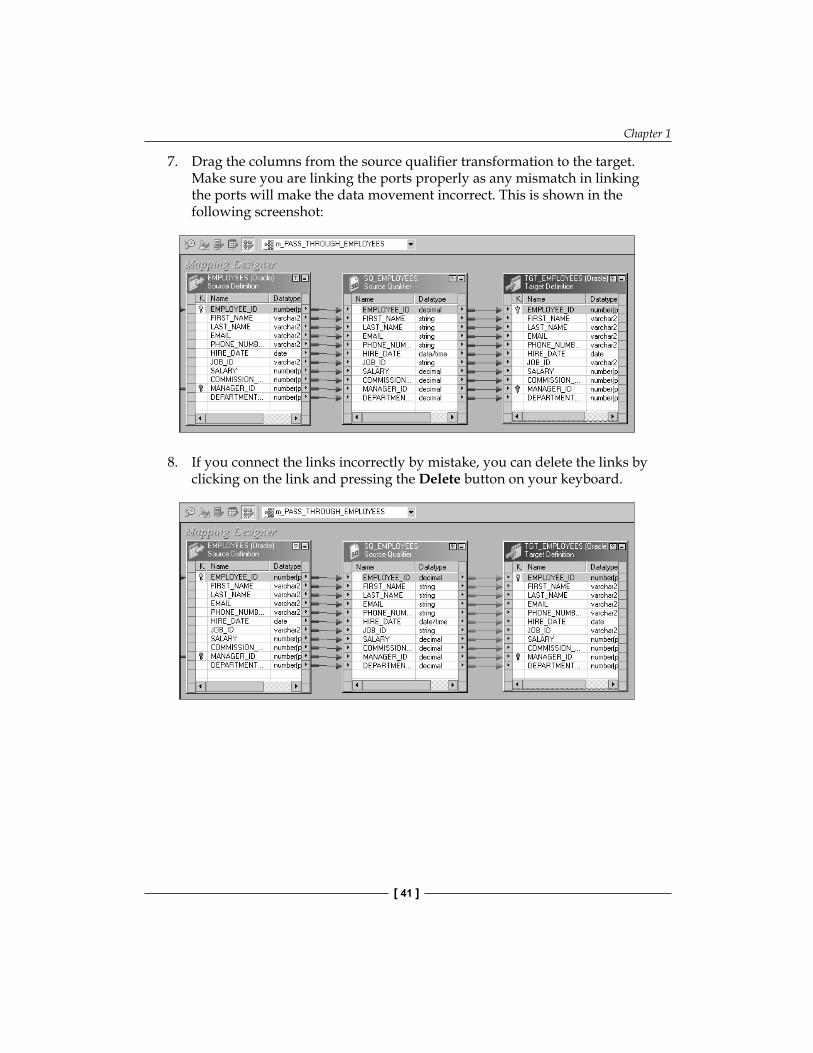
7. Drag the columns from the source qualifi er transformation to the target. Make sure you are linking the ports properly as any mismatch in linking the ports will make the data movement incorrect. This is shown in the following screenshot:
8. If you connect the links incorrectly by mistake, you can delete the links by clicking on the link and pressing the Delete button on your keyboard.

Starting the Development Phase – Using the Designer Screen Basics
[ 42 ]
9. Navigate to Repository | Save.
With this, the mapping is completed and saved in the repository. You can check the details in the Output panel.
SummaryWe started the chapter with the basic components of the PowerCenter Designer screen, that is, Source Analyzer, Target Designer, Transformation Developer, Mapplet Designer, and Mapping Designer. You then learned to work on different types of sources, which included fl at fi les (delimited fi les and fi xed-width fi les) and relational databases. Similarly, we worked on different types of targets. We also worked on the import and create functionalities of sources and targets. Later in the chapter, you saw how to preview the data. The last and most important aspect that you learned in this chapter was how to create mappings using sources and targets.
The Informatica PowerCenter Designer screen, of course, cannot be that simple. Moving ahead, in the next chapter, we will see the advanced concepts of the designer screen. There are a lot of high-level functionalities that are added in the designer window to help better and faster processing.
In the next chapter, you will see how to process the data by managing the constraints in the database. You will also see the utility to debug the mapping, which will help in fi nding any errors, and will study the concept of the reusable functionality of transformations and mapping.

Where to buy this book You can buy Learning Informatica PowerCenter 9.x from the Packt Publishing website. Alternatively, you can buy the book from Amazon, BN.com, Computer Manuals and most internet book retailers.
Click here for ordering and shipping details.
www.PacktPub.com
Stay Connected:
Get more information Learning Informatica PowerCenter 9.x