9600 english.book
TRANSCRIPT
9600 English.book Page i Thursday, September 26, 2002 12:40 PM
Operator’s Manual
Digital Pulse Oximeter
����� ��Avant 9600™
0123 English
1

9600 English.book Page ii Thursday, September 26, 2002 12:40 PM
9600 English.book Page iii Thursday, September 26, 2002 12:40 PM
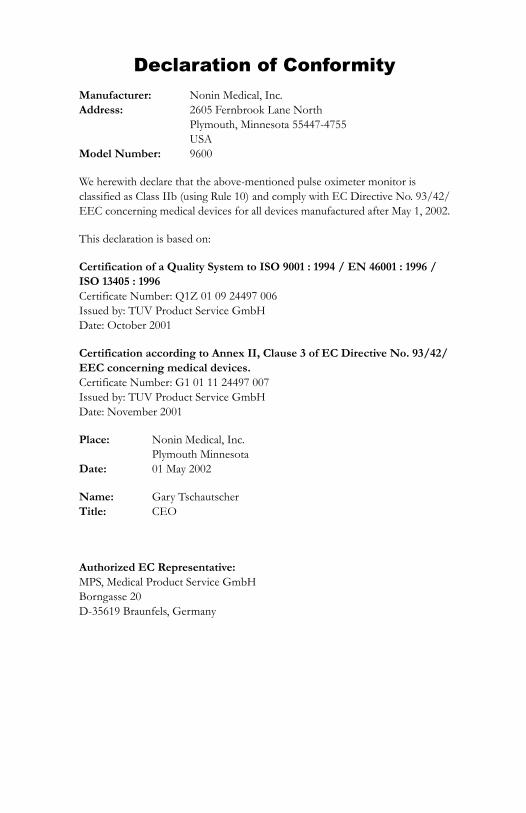
Declaration of ConformityManufacturer: Nonin Medical, Inc.Address: 2605 Fernbrook Lane North
Plymouth, Minnesota 55447-4755USA
Model Number: 9600
We herewith declare that the above-mentioned pulse oximeter monitor is classified as Class IIb (using Rule 10) and comply with EC Directive No. 93/42/EEC concerning medical devices for all devices manufactured after May 1, 2002.
This declaration is based on:
Certification of a Quality System to ISO 9001 : 1994 / EN 46001 : 1996 / ISO 13405 : 1996Certificate Number: Q1Z 01 09 24497 006Issued by: TUV Product Service GmbHDate: October 2001
Certification according to Annex II, Clause 3 of EC Directive No. 93/42/EEC concerning medical devices.Certificate Number: G1 01 11 24497 007Issued by: TUV Product Service GmbHDate: November 2001
Place: Nonin Medical, Inc.Plymouth Minnesota
Date: 01 May 2002
Name: Gary TschautscherTitle: CEO
Authorized EC Representative:MPS, Medical Product Service GmbHBorngasse 20D-35619 Braunfels, Germany

9600 English.book Page iv Thursday, September 26, 2002 12:40 PM
CAUTION! Federal law (USA) restricts this device to sale by or on the order of a physician.
CAUTION! Read this entire manual carefully before using the Avant™ 9600 Digital Pulse Oximeter.
The information in this manual has been checked carefully and is believed to be accurate. In the interest of continued product development, NONIN reserves the right to make changes and improvements to this manual and the products it describes at any time, without notice or obligation.
Nonin Medical, Inc.2605 Fernbrook Lane North
Plymouth, Minnesota 55447-4755USA
(763) 553-9968(800) 356-8874 (USA and Canada)
Fax (763) [email protected]
References to “NONIN” in this manual shall imply Nonin Medical, Inc.Nonin is a registered trademark of Nonin Medical, Inc.
© 2002 Nonin Medical, Inc.
9600 English.book Page 5 Thursday, September 26, 2002 12:40 PM
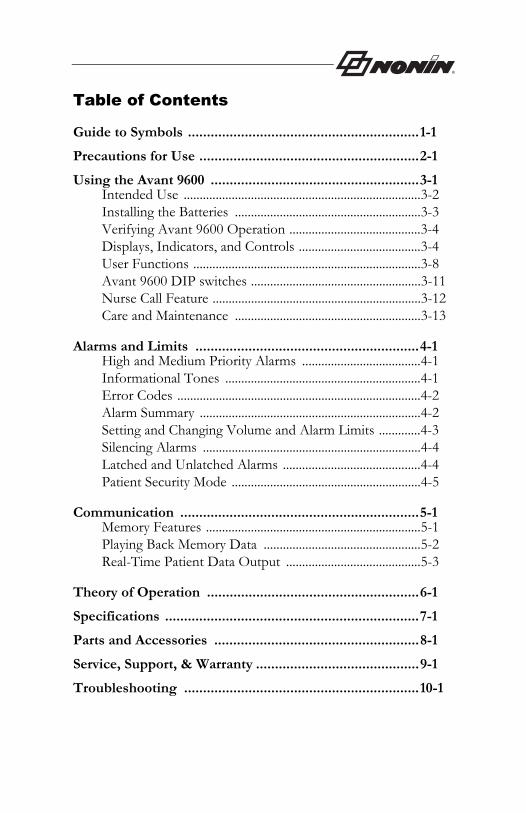
Table of Contents
Guide to Symbols .............................................................1-1Precautions for Use ..........................................................2-1Using the Avant 9600 .......................................................3-1
Intended Use ..........................................................................3-2Installing the Batteries ..........................................................3-3Verifying Avant 9600 Operation .........................................3-4Displays, Indicators, and Controls ......................................3-4User Functions .......................................................................3-8Avant 9600 DIP switches .....................................................3-11Nurse Call Feature .................................................................3-12Care and Maintenance ..........................................................3-13
Alarms and Limits ...........................................................4-1High and Medium Priority Alarms .....................................4-1Informational Tones .............................................................4-1Error Codes ............................................................................4-2Alarm Summary .....................................................................4-2Setting and Changing Volume and Alarm Limits .............4-3Silencing Alarms ....................................................................4-4Latched and Unlatched Alarms ...........................................4-4Patient Security Mode ...........................................................4-5
Communication ...............................................................5-1Memory Features ...................................................................5-1Playing Back Memory Data .................................................5-2Real-Time Patient Data Output ..........................................5-3
Theory of Operation ........................................................6-1Specifications ...................................................................7-1Parts and Accessories ......................................................8-1Service, Support, & Warranty ...........................................9-1Troubleshooting ..............................................................10-1

9600 English.book Page 6 Thursday, September 26, 2002 12:40 PM
9600 English.book Page 1 Thursday, September 26, 2002 12:40 PM
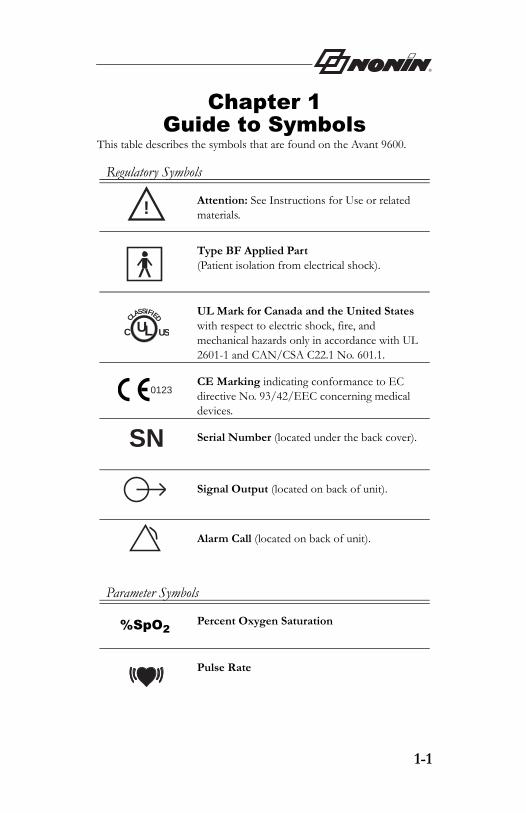
Chapter 1Guide to Symbols
This table describes the symbols that are found on the Avant 9600.
Regulatory Symbols
Attention: See Instructions for Use or related materials.
Type BF Applied Part(Patient isolation from electrical shock).
UL Mark for Canada and the United States with respect to electric shock, fire, and mechanical hazards only in accordance with UL 2601-1 and CAN/CSA C22.1 No. 601.1.
CE Marking indicating conformance to EC directive No. 93/42/EEC concerning medical devices.
Serial Number (located under the back cover).
Signal Output (located on back of unit).
Alarm Call (located on back of unit).
Parameter Symbols
%SpO2Percent Oxygen Saturation
Pulse Rate
!
CLASSIFIED
USC UL
0123
SN
1-1

Guide to Symbols
9600 English.book Page 2 Thursday, September 26, 2002 12:40 PM
Button Symbols
ON/STANDBY
Time/Date
Volume
Alarm Silence
Limits
Plus
Minus
LED Symbols
Numeric LEDs
Main Alarm
Pulse Quality
Pulse Oximeter Sensor
1-2

9600 English.book Page 3 Thursday, September 26, 2002 12:40 PM
Pulse Strength Bargraph
Upper Alarm LimitLower Alarm Limit
Alarm Silence
Time
Month
Day
Year
Pulse Volume
Alarm Volume
AC Power Adapter
Battery
1-3

Precautions for Use
9600 English.book Page 1 Thursday, September 26, 2002 12:40 PM
Chapter 2Precautions for Use
Contraindications
Warnings
Do not use the Avant 9600 in an MRI environment.
Explosion Hazard: Do not use the Avant 9600 in an explosive atmosphere or in the presence of flammable anesthetics or gases.
The Avant 9600 is intended only as an adjunct in patient assessment. It must be used in conjunction with other methods of assessing clinical signs and symptoms.
Oximeter readings of the Avant 9600 may be affected by the use of an electrosurgical unit (ESU).
Use only NONIN-manufactured pulse oximeter sensors. These sensors are manufactured to meet the accuracy specifications for NONIN pulse oximeters. Using other manufacturers’ sensors can result in improper pulse oximeter performance.
Do not use a damaged sensor.
Do not use the Avant 9600 in or around water or any other liquid when the AC power adapter is used.
As with all medical equipment, carefully route patient cables and connec-tions to reduce the possibility of entanglement or strangulation.
Use the Avant 9600 with 300PS-XX AC power adapters, where XX repre-sents the power supply designation.
The 9600’s Nurse Call feature should not be used as the primary source of alarm notification. The audible and visual alarms of the monitor, used in conjunction with clinical signs and symptoms, are the primary sources for notifying medical personnel that an alarm condition exists.
All parts and accessories connected to the serial port of the Avant 9600 must be certified according to IEC Standard EN 60950 or UL 1950 for data-processing equipment.
2-1
9600 English.book Page 2 Thursday, September 26, 2002 12:40 PM
Cautions
This equipment complies with International Standard EN 60601-1-2:2001 for elec-tromagnetic compatibility for medical electrical equipment and/or systems. This standard is designed to provide reasonable protection against harmful interference in a typical medical installation. However, because of the proliferation of radio-fre-quency transmitting equipment and other sources of electrical noise in healthcare and other environments, it is possible that high levels of such interference due to close proximity or strength of a source might disrupt the performance of this device.
If the Avant 9600 fails to respond as described, discontinue use until the situation is corrected by qualified personnel.
Cardiogreen and other intravascular dyes may affect the accuracy of SpO2 measurements.
The oximeter sensor might not work on cold extremities due to reduced circulation. Warm or rub the finger to increase circulation, or reposition the sensor.
The Avant 9600 might misinterpret motion as good pulse quality. Minimize finger motion or change the type of sensor being used (e.g., ear clip).
Some nail polish colors or artificial nails can reduce light transmission and affect SpO2 accuracy.
Before using any sensor, carefully read the Directions for Use, which contain spe-cific application times for each sensor..
Check the pulse oximeter sensor application site frequently to determine the posi-tioning of the sensor and the circulation and skin sensitivity of the patient. Patient sensitivity to sensors may vary due to medical status or skin condition.
Ear Clip or Reflectance sensors are not recommended for pediatric use. The accu-racy of the sensors has not been established for pediatric use.
Do not place liquids on top of the Avant 9600.
Do not immerse the Avant 9600 or sensors in any liquids.
Do not use caustic or abrasive cleaning agents on the unit or sensors.
Do not gas sterilize or autoclave the Avant 9600.
Batteries might leak or explode if used or disposed of improperly.
Follow local governing ordinances and recycling instructions regarding disposal or recycling of the device and device components, including batteries. Use only NONIN-approved battery packs, and remove batteries if the Avant 9600 is not used within 30 days.
When using the 300PS-UNIV battery charger, ensure that the AC cord is plugged into a grounded outlet.
2-2

Using the Avant 9600
9600 English.book Page 1 Thursday, September 26, 2002 12:40 PM
Chapter 3Using the Avant 9600
This chapter describes how to use the NONIN Avant 9600 Digital Pulse Oximeter.
Chapter ContentsPage
3.1 Intended Use ............................................................................... 3-2
3.2 Installing the Batteries ................................................................. 3-3
3.3 Verifying Avant 9600 Operation ................................................ 3-4
3.4 Displays, Indicators, and Controls ............................................... 3-4
3.5 User Functions ............................................................................ 3-8
3.6 Avant 9600 DIP switches ........................................................ 3-11
3.7 Nurse Call Feature .................................................................. 3-12
3.8 Care and Maintenance .............................................................. 3-13
3-1
9600 English.book Page 2 Thursday, September 26, 2002 12:40 PM
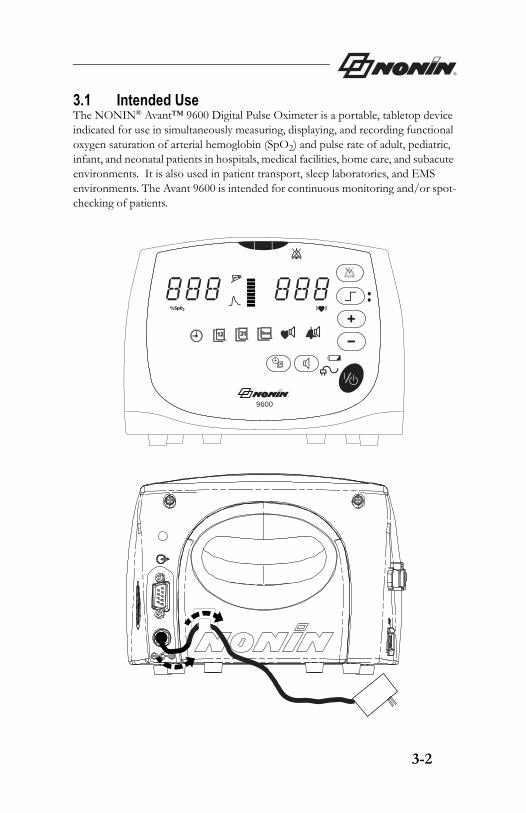
3.1 Intended UseThe NONIN® Avant™ 9600 Digital Pulse Oximeter is a portable, tabletop device indicated for use in simultaneously measuring, displaying, and recording functional oxygen saturation of arterial hemoglobin (SpO2) and pulse rate of adult, pediatric, infant, and neonatal patients in hospitals, medical facilities, home care, and subacute environments. It is also used in patient transport, sleep laboratories, and EMS environments. The Avant 9600 is intended for continuous monitoring and/or spot-checking of patients.
9600
3-2

Using the Avant 9600
9600 English.book Page 3 Thursday, September 26, 2002 12:40 PM
3.2 Installing the Batteries
NOTE: Contact NONIN to purchase or replace battery packs.NOTE: Reposition the back cover carefully, and tighten the screws
firmly—being careful not to over-tighten.
3-3

9600 English.book Page 4 Thursday, September 26, 2002 12:40 PM
3.3 Verifying Avant 9600 OperationPress the ON/STANDBY button. When the unit is first turned on, the Avant 9600 performs a brief startup (initialization) sequence. Verify that all LEDs illuminate and the unit beeps three times during the first phase of the startup sequence. If any LED is not lit (except the AC Power Adapter LED), do not use the Avant 9600. Contact NONIN Customer Support for assistance.
In order to verify that the Avant 9600 is functioning properly, it is important to monitor SpO2 and pulse rate readings. Use the following procedure to verify that the pulse oximeter sensor is functioning properly.
1. Ensure that the Avant 9600 is on, with the sensor connected.2. Apply the pulse oximeter sensor.3. Verify that a good SpO2 reading is displayed, that a pulse rate value appears,
and that the pulse strength bargraph LED is active.
3.4 Displays, Indicators, and ControlsThis section describes the Avant 9600’s displays, indicators, and controls.
Avant 9600 Parameter Displays%SpO2 DisplayNumeric light-emitting diodes (LEDs) on the upper left-hand corner of the Avant 9600 display blood oxygen saturation in percent.
Pulse Rate DisplayThe pulse rate display is located on the upper right-hand corner of the Avant 9600 and is identified by the symbol. This display shows the pulse rate in beats per minute.
Numeric LEDsNumeric LEDs display %SpO2 and pulse rate values. When setting the device, these LEDs also display values for alarm limits, volume, year, month, day, hour, and minute displays.
Under normal conditions, these LEDs display in green. For high priority (patient) alarms, the corresponding values are displayed in red, blinking fast. The values are displayed in amber when reviewing or changing limits, volumes, date, or time.
3-4
Using the Avant 9600
9600 English.book Page 5 Thursday, September 26, 2002 12:40 PM
Indicators and Icons
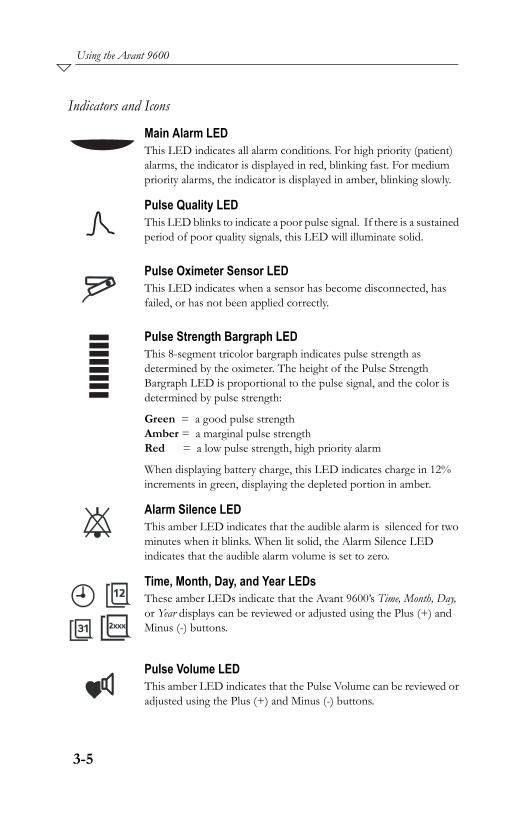
Main Alarm LEDThis LED indicates all alarm conditions. For high priority (patient) alarms, the indicator is displayed in red, blinking fast. For medium priority alarms, the indicator is displayed in amber, blinking slowly.
Pulse Quality LEDThis LED blinks to indicate a poor pulse signal. If there is a sustained period of poor quality signals, this LED will illuminate solid.
Pulse Oximeter Sensor LEDThis LED indicates when a sensor has become disconnected, has failed, or has not been applied correctly.
Pulse Strength Bargraph LEDThis 8-segment tricolor bargraph indicates pulse strength as determined by the oximeter. The height of the Pulse Strength Bargraph LED is proportional to the pulse signal, and the color is determined by pulse strength:
Green = a good pulse strengthAmber = a marginal pulse strengthRed = a low pulse strength, high priority alarm
When displaying battery charge, this LED indicates charge in 12% increments in green, displaying the depleted portion in amber.
Alarm Silence LEDThis amber LED indicates that the audible alarm is silenced for two minutes when it blinks. When lit solid, the Alarm Silence LED indicates that the audible alarm volume is set to zero.
Time, Month, Day, and Year LEDsThese amber LEDs indicate that the Avant 9600’s Time, Month, Day, or Year displays can be reviewed or adjusted using the Plus (+) and Minus (-) buttons.
Pulse Volume LEDThis amber LED indicates that the Pulse Volume can be reviewed or adjusted using the Plus (+) and Minus (-) buttons.
3-5
9600 English.book Page 6 Thursday, September 26, 2002 12:40 PM
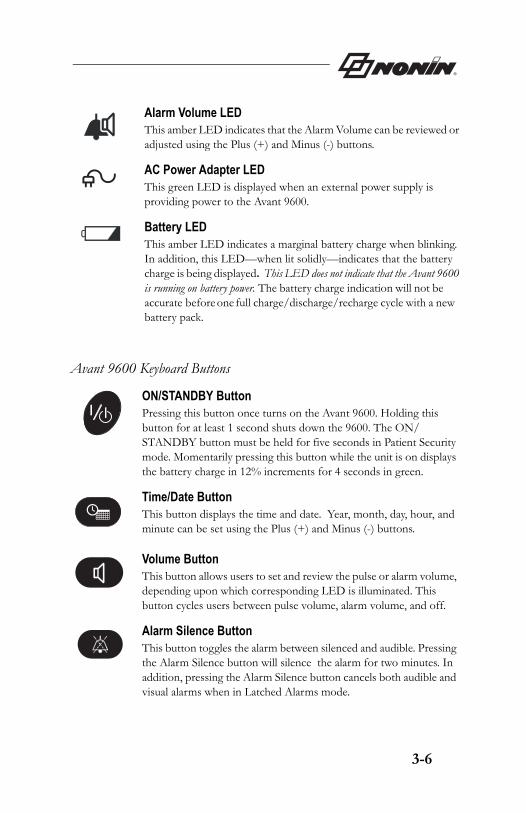
Alarm Volume LEDThis amber LED indicates that the Alarm Volume can be reviewed or adjusted using the Plus (+) and Minus (-) buttons.
AC Power Adapter LED This green LED is displayed when an external power supply is providing power to the Avant 9600.
Battery LEDThis amber LED indicates a marginal battery charge when blinking. In addition, this LED—when lit solidly—indicates that the battery charge is being displayed. This LED does not indicate that the Avant 9600 is running on battery power. The battery charge indication will not be accurate before one full charge/discharge/recharge cycle with a new battery pack.
Avant 9600 Keyboard Buttons
ON/STANDBY ButtonPressing this button once turns on the Avant 9600. Holding this button for at least 1 second shuts down the 9600. The ON/STANDBY button must be held for five seconds in Patient Security mode. Momentarily pressing this button while the unit is on displays the battery charge in 12% increments for 4 seconds in green.
Time/Date ButtonThis button displays the time and date. Year, month, day, hour, and minute can be set using the Plus (+) and Minus (-) buttons.
Volume ButtonThis button allows users to set and review the pulse or alarm volume, depending upon which corresponding LED is illuminated. This button cycles users between pulse volume, alarm volume, and off.
Alarm Silence ButtonThis button toggles the alarm between silenced and audible. Pressing the Alarm Silence button will silence the alarm for two minutes. In addition, pressing the Alarm Silence button cancels both audible and visual alarms when in Latched Alarms mode.
3-6
Using the Avant 9600
9600 English.book Page 7 Thursday, September 26, 2002 12:40 PM
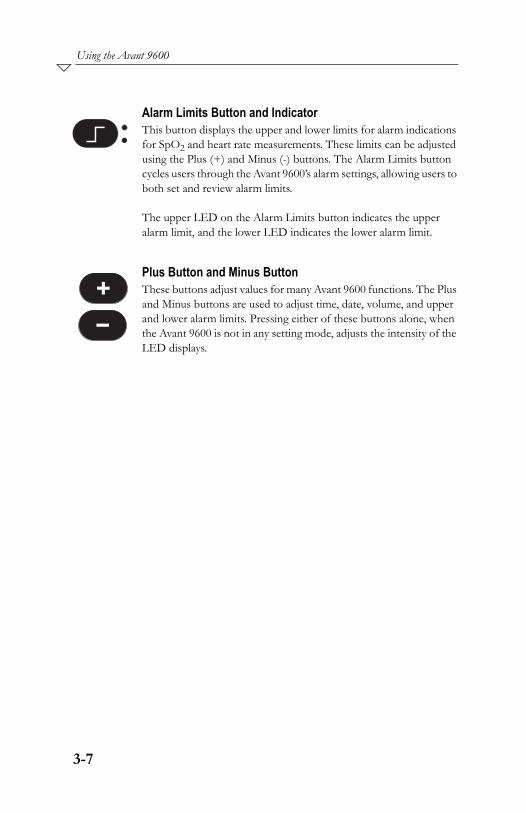
Alarm Limits Button and IndicatorThis button displays the upper and lower limits for alarm indications for SpO2 and heart rate measurements. These limits can be adjusted using the Plus (+) and Minus (-) buttons. The Alarm Limits button cycles users through the Avant 9600’s alarm settings, allowing users to both set and review alarm limits.
The upper LED on the Alarm Limits button indicates the upper alarm limit, and the lower LED indicates the lower alarm limit.
Plus Button and Minus ButtonThese buttons adjust values for many Avant 9600 functions. The Plus and Minus buttons are used to adjust time, date, volume, and upper and lower alarm limits. Pressing either of these buttons alone, when the Avant 9600 is not in any setting mode, adjusts the intensity of the LED displays.
3-7
9600 English.book Page 8 Thursday, September 26, 2002 12:40 PM
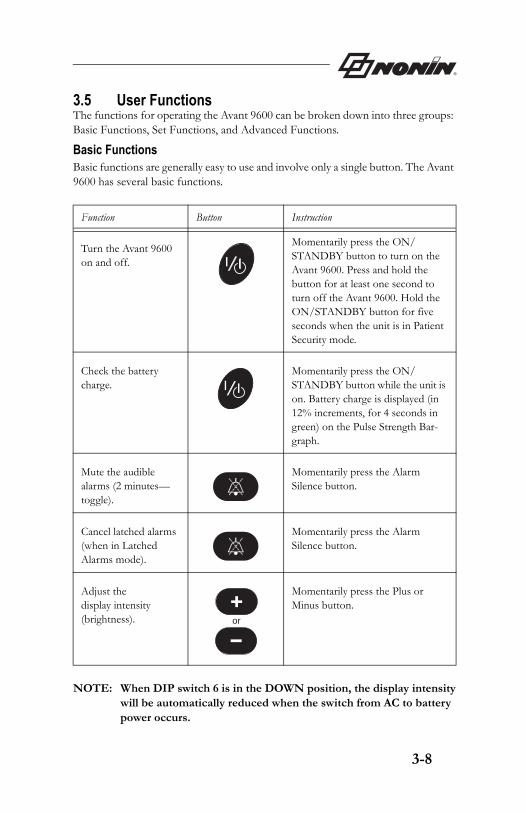
3.5 User FunctionsThe functions for operating the Avant 9600 can be broken down into three groups: Basic Functions, Set Functions, and Advanced Functions.
Basic FunctionsBasic functions are generally easy to use and involve only a single button. The Avant 9600 has several basic functions.
NOTE: When DIP switch 6 is in the DOWN position, the display intensitywill be automatically reduced when the switch from AC to batterypower occurs.
Function Button Instruction
Turn the Avant 9600 on and off.
Momentarily press the ON/STANDBY button to turn on the Avant 9600. Press and hold the button for at least one second to turn off the Avant 9600. Hold the ON/STANDBY button for five seconds when the unit is in Patient Security mode.
Check the battery charge.
Momentarily press the ON/STANDBY button while the unit is on. Battery charge is displayed (in 12% increments, for 4 seconds in green) on the Pulse Strength Bar-graph.
Mute the audible alarms (2 minutes—toggle).
Momentarily press the Alarm Silence button.
Cancel latched alarms (when in Latched Alarms mode).
Momentarily press the Alarm Silence button.
Adjust the display intensity (brightness).
Momentarily press the Plus or Minus button.
or
3-8
Using the Avant 9600
9600 English.book Page 9 Thursday, September 26, 2002 12:40 PM
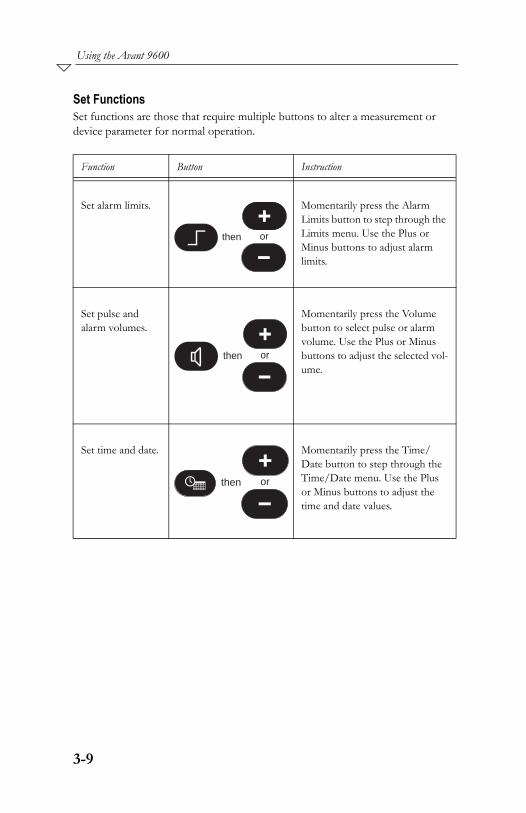
Set FunctionsSet functions are those that require multiple buttons to alter a measurement or device parameter for normal operation.
Function Button Instruction
Set alarm limits. Momentarily press the Alarm Limits button to step through the Limits menu. Use the Plus or Minus buttons to adjust alarm limits.
Set pulse and alarm volumes.
Momentarily press the Volume button to select pulse or alarm volume. Use the Plus or Minus buttons to adjust the selected vol-ume.
Set time and date. Momentarily press the Time/Date button to step through the Time/Date menu. Use the Plus or Minus buttons to adjust the time and date values.
orthen
orthen
orthen
3-9
9600 English.book Page 10 Thursday, September 26, 2002 12:40 PM
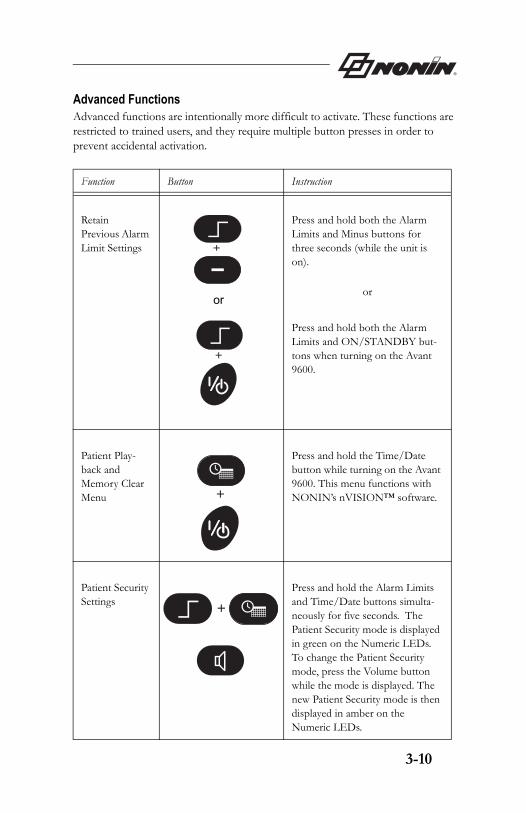
Advanced FunctionsAdvanced functions are intentionally more difficult to activate. These functions are restricted to trained users, and they require multiple button presses in order to prevent accidental activation.
Function Button Instruction
Retain Previous Alarm Limit Settings
Press and hold both the Alarm Limits and Minus buttons for three seconds (while the unit is on).
or
Press and hold both the Alarm Limits and ON/STANDBY but-tons when turning on the Avant 9600.
Patient Play-back and Memory Clear Menu
Press and hold the Time/Date button while turning on the Avant 9600. This menu functions with NONIN’s nVISION™ software.
Patient Security Settings
Press and hold the Alarm Limits and Time/Date buttons simulta-neously for five seconds. The Patient Security mode is displayed in green on the Numeric LEDs. To change the Patient Security mode, press the Volume button while the mode is displayed. The new Patient Security mode is then displayed in amber on the Numeric LEDs.
+
+
or
+
+
3-10
Using the Avant 9600
9600 English.book Page 11 Thursday, September 26, 2002 12:40 PM
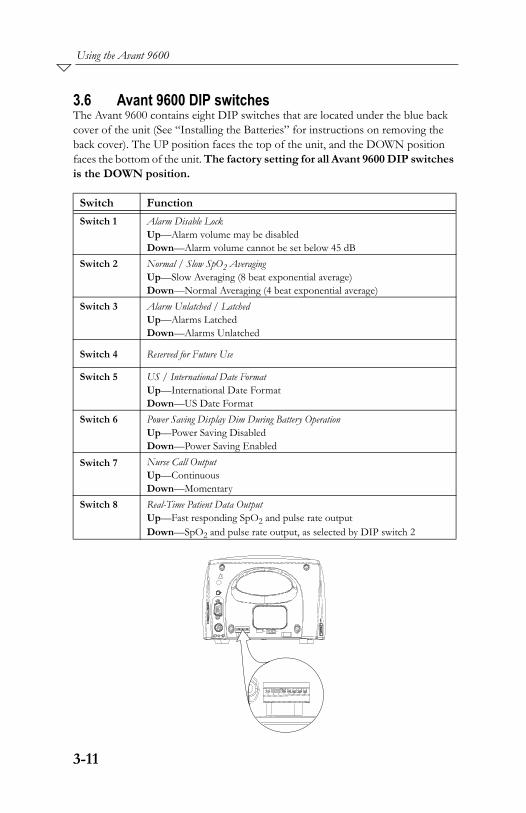
3.6 Avant 9600 DIP switchesThe Avant 9600 contains eight DIP switches that are located under the blue back cover of the unit (See “Installing the Batteries” for instructions on removing the back cover). The UP position faces the top of the unit, and the DOWN position faces the bottom of the unit. The factory setting for all Avant 9600 DIP switches is the DOWN position.
Switch FunctionSwitch 1 Alarm Disable Lock
Up—Alarm volume may be disabledDown—Alarm volume cannot be set below 45 dB
Switch 2 Normal / Slow SpO2 AveragingUp—Slow Averaging (8 beat exponential average)Down—Normal Averaging (4 beat exponential average)
Switch 3 Alarm Unlatched / LatchedUp—Alarms LatchedDown—Alarms Unlatched
Switch 4 Reserved for Future Use
Switch 5 US / International Date FormatUp—International Date FormatDown—US Date Format
Switch 6 Power Saving Display Dim During Battery OperationUp—Power Saving DisabledDown—Power Saving Enabled
Switch 7 Nurse Call OutputUp—ContinuousDown—Momentary
Switch 8 Real-Time Patient Data OutputUp—Fast responding SpO2 and pulse rate outputDown—SpO2 and pulse rate output, as selected by DIP switch 2
1 2 3 4 5 6 7 8
3-11
9600 English.book Page 12 Thursday, September 26, 2002 12:40 PM
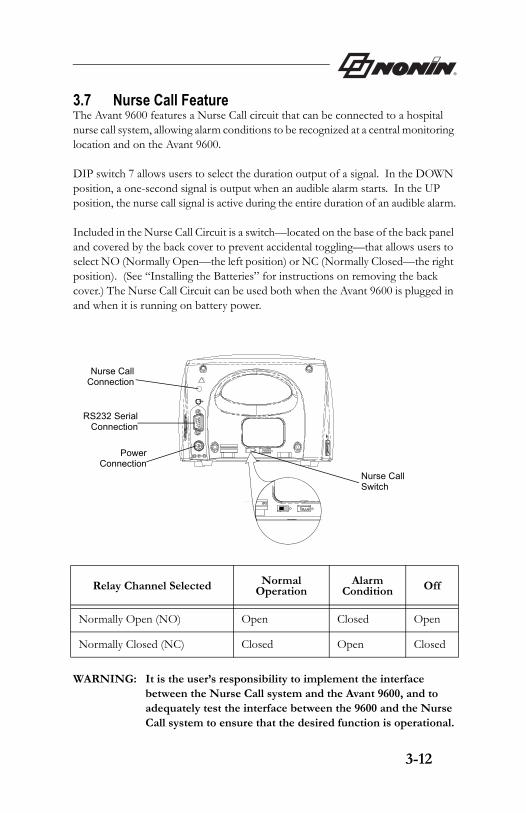
3.7 Nurse Call FeatureThe Avant 9600 features a Nurse Call circuit that can be connected to a hospital nurse call system, allowing alarm conditions to be recognized at a central monitoring location and on the Avant 9600. DIP switch 7 allows users to select the duration output of a signal. In the DOWN position, a one-second signal is output when an audible alarm starts. In the UP position, the nurse call signal is active during the entire duration of an audible alarm.
Included in the Nurse Call Circuit is a switch—located on the base of the back panel and covered by the back cover to prevent accidental toggling—that allows users to select NO (Normally Open—the left position) or NC (Normally Closed—the right position). (See “Installing the Batteries” for instructions on removing the back cover.) The Nurse Call Circuit can be used both when the Avant 9600 is plugged in and when it is running on battery power.
WARNING: It is the user’s responsibility to implement the interfacebetween the Nurse Call system and the Avant 9600, and to adequately test the interface between the 9600 and the NurseCall system to ensure that the desired function is operational.
Relay Channel Selected Normal Operation
Alarm Condition Off
Normally Open (NO) Open Closed Open
Normally Closed (NC) Closed Open Closed
Nurse CallConnection
RS232 SerialConnection
PowerConnection
Nurse Call Switch
3-12

Using the Avant 9600
9600 English.book Page 13 Thursday, September 26, 2002 12:40 PM
3.8 Care and MaintenanceThe advanced digital circuitry within the pulse oximeter of the Avant 9600 requires no calibration or periodic maintenance other than battery replacement.
Field repair of the Avant 9600 circuitry is not possible. Do not attempt to open the Avant 9600 case or repair the electronics. Opening the case will damage the Avant 9600 and void the warranty. If the Avant 9600 is not functioning properly, see “Troubleshooting.”
Cleaning the Avant 9600Clean the Avant 9600 with a soft cloth dampened with isopropyl alcohol. Do not pour or spray any liquids onto the Avant 9600, and do not allow any liquid to enter any openings in the device. Allow the unit to dry thoroughly before reusing it.
IMPORTANT! Do not immerse the Avant 9600 in liquid, and do not usecaustic or abrasive cleaning agents on the Avant 9600.
Clean the Avant 9600 separately from its associated sensors. For instructions regarding cleaning pulse oximeter sensors, refer to the appropriate pulse oximeter sensor package inserts.
3-13
9600 English.book Page 1 Thursday, September 26, 2002 12:40 PM
Chapter 4Alarms and Limits
This chapter describes alarms and limits for the Avant 9600 Digital Pulse Oximeter.
4.1 High and Medium Priority AlarmsThe Avant 9600 provides both high and medium priority audible and visual alarms.
High Priority AlarmsHigh priority alarms are those that require immediate attention to the patient. They include SpO2, pulse rate, and low perfusion alarms. On the Avant 9600, high priority alarms are indicated with rapidly blinking red LED displays when alarm limits are met or exceeded. In addition, the pulse strength bargraph LED may illuminate a red segment to indicate low perfusion.
High priority alarms are sounded as follows: “beep, beep, beep,” (short pause), “beep, beep” (10-second pause).
Medium Priority AlarmsMedium priority alarms are those that signal potential problems with the equipment or other non-life-threatening situations. On the Avant 9600, medium priority alarms are indicated with slowly blinking amber displays.
Medium priority alarms are illuminated amber on the Main Alarm LED and on the appropriate indicator(s) or numeric displays, sometimes displaying an error code to help the user identify the source of the error.
Medium priority alarms are sounded as follows: “beep, beep, beep,” (25-second pause), “beep, beep, beep.”
4.2 Informational TonesInformational tones communicate important information. They are typically single “beeps” or a series of three “beeps.” Informational tones include the startup/initialization tone and the pulse rate tone (which changes in pitch with SpO2 values).
4-1

Alarms and Limits
9600 English.book Page 2 Thursday, September 26, 2002 12:40 PM
4.3 Error CodesThe Avant 9600 includes error codes that indicate problems with the unit. To correct error conditions, perform the following steps: 1. Turn the unit off and then back on again to remove the error code.2. If the error persists, disconnect all power (AC and battery), and then
reconnect the power and turn the unit back on.3. If the error still persists, note the error code and contact Nonin Customer
Support at (800) 356-8874 (USA and Canada) or (763) 553-9968.
4.4 Alarm Summary If patient SpO2 or pulse readings are equal to or above the upper alarm limit, or if they are equal to or below the lower alarm limit, the Avant 9600 will signal an alarm.
High Priority Alarm Description
Default Adjustment Range Options
Step Value
SpO2 Upper Alarm Limit Off Off, 80 to 100 1% SpO2
SpO2 Lower Alarm Limit 80% Off, 50 to 95 1% SpO2
Pulse Upper Alarm Limit 200 BPM Off, 75 to 275 5 BPM
Pulse Lower Alarm Limit 50 BPM Off, 30 to 110 5 BPM
4-2

9600 English.book Page 3 Thursday, September 26, 2002 12:40 PM
4.5 Setting and Changing Volume and Alarm Limits IMPORTANT! Avant 9600 alarm limits reset themselves to default values
each time the unit is powered up—unless the unit is inPatient Security mode.
Reviewing, Setting, or Changing SpO2 and/or Pulse Alarm Limits1. Ensure that the Avant 9600 is on.2. Press the Alarm Limits button.
• Notice that the upper round LED is illuminated to the right of the Alarm Limits button. This indicates the upper alarm limit, while the lower LED indicates the lower alarm limit.
• Notice that the current setting appears in the %SpO2 display. • Continue to press the Alarm Limits button until the alarm limit you want
to change is displayed. • The Alarm Limits button can also be cycled to exit Set/Change mode, or
Set/Change mode will exit automatically after ten seconds with no activity.
3. Ensure that the appropriate upper or lower Alarm Limit LED is illuminated, and that the alarm limit you want to change is displayed.
4. Press the Plus (+) or Minus (-) buttons to adjust the values as desired.
Reviewing, Setting, or Changing Pulse and/or Alarm Volumes1. Ensure that the Avant 9600 is on.2. Press the Volume button once to change the alarm volume, or twice to
change the pulse volume.• After pressing the Volume button once, notice that the Alarm Volume
LED appears, and the current setting appears in the Pulse Rate display area.
• After pressing the Volume button twice, notice that the Pulse Volume LED appears, and the current setting appears in the Pulse Rate display area.
• The Volume button can also be cycled to exit Set/Change mode, or Set/Change mode will exit automatically after ten seconds with no activity.
3. Use the Plus (+) or Minus (-) buttons to adjust the alarm or pulse volumes as desired.
NOTE: Review “Silencing Alarms” for information about permanentlysilencing all alarms.
4-3
Alarms and Limits
9600 English.book Page 4 Thursday, September 26, 2002 12:40 PM
4.6 Silencing AlarmsMomentary (2-Minute) Alarm SilenceTo silence alarms for two minutes, press the Alarm Silence button.
Continuous Alarm SilenceIn order to permanently silence all alarms, DIP switch 1 must be placed in the UP position. This allows the alarm volume to be set to zero. The Alarm Silence LED will remain illuminated when the alarm volume is set to zero. Refer to “Avant 9600 DIP Switches” for more information.
4.7 Latched and Unlatched AlarmsThe Avant 9600 allows users to select Unlatched or Latched alarms. DIP switch 3, located at the bottom of the Avant 9600 behind the back cover, is used to toggle between Latched Alarms and Unlatched Alarms modes. Unlatched mode (DIP switch 3 in the DOWN position) is the default.
When the Avant 9600 is in Unlatched Alarms mode, the Main Alarm LED and the indication of the alarm source will flash, and the audible alarm will sound until the alarm condition is no longer present.
In Latched Alarms mode, the audible and visual alarms will continue to signal even after the alarm condition is no longer present. Pressing the Alarm Silence button will clear all latched alarms.
4-4
9600 English.book Page 5 Thursday, September 26, 2002 12:40 PM
4.8 Patient Security ModeThe Avant 9600 features a Patient Security mode, in which no settings can be changed and only alarm limit settings can be viewed. When Patient Security mode is enabled, users cannot change SpO2 or Pulse Rate limits—though it is still possible to view those limits. In Patient Security mode, users cannot view or set the alarm volume, pulse volume, or time and date.
When the Avant 9600 is turned on in Patient Security mode, “111 111” blinks three times in amber on the display area, and three informational tones are sounded. The upper alarm limits are then displayed, followed by the lower alarm limits.
NOTE: Patient Security mode is not disabled when the unit is turned off.
Viewing and Changing Patient Security Mode1. Press and hold both the Alarm Limits button and the Time/Date button for 5
seconds.• The state of Patient Security mode is displayed in green on the
Numeric LEDs for 3 seconds: “111 111” is displayed when Patient Security mode is enabled; “000 000” is displayed when Patient Security mode is disabled.
2. To change Patient Security mode from its current setting, press the Volume button while the mode is displayed. The new state of Patient Security mode is displayed in amber on the Numeric LEDs for 2 seconds.
NOTE: Alarm limits cannot be changed when the Avant 9600 is in Patient Security mode. Patient Security mode prevents accidental changesto critical parameters. The Avant 9600 allows users to lock andunlock alarm limits, volume settings, time settings, and timerequired to turn off the device.
4-5

C o m m u n i c a t i o n
9600 English.book Page 1 Thursday, September 26, 2002 12:40 PM
Chapter 5Communication
This chapter describes the memory playback and real-time capabilities of the Avant 9600 Digital Pulse Oximeter.
5.1 Memory FeaturesThe Avant 9600 can collect and store more than 115 hours of SpO2 and pulse rate information.
Data may be played back with data retrieval software (NONIN’s nVISION™ software is recommended). If you wish to create your own software, contact NONIN for the data format.
The memory in the Avant 9600 functions much like an “endless loop” tape. When the memory fills up, the unit begins overwriting the oldest data with the new data.
Each time the Avant 9600 is turned on, the current time/date information (if the clock is set properly) is stored in memory, starting a new recording session. Only recording sessions greater than one minute in length are stored in memory.
Patient SpO2 and pulse rate are sampled every 2 seconds. Every 4 seconds, the extreme value of the 4-second sample period is stored. Oxygen saturation values are stored in 1% increments in the range of 0 to 100%.
The stored pulse rate ranges from 18 to 300 pulses per minute. The stored values are in increments of one pulse per minute in the interval from 18 to 200 pulses per minute, and in increments of 2 pulses per minute in the interval from 201 to 300 pulses per minute.
5-1

9600 English.book Page 2 Thursday, September 26, 2002 12:40 PM
5.2 Playing Back Memory DataThe Avant 9600 has a Memory Playback feature, allowing stored data to be output through the RS232 serial connection.
1. With the unit off, connect the RS-232 connector port of the Avant 9600 to the back of your computer using a null modem cable.
2. With the Avant 9600 still off, press and hold the Time/Date button while pressing the ON/STANDBY button.
• All LEDs will illuminate briefly. PLy bac will appear in the SpO2 and Pulse Rate LED display areas. This message signals that the Avant 9600 is in Playback mode.
3. The PLy bAC message will disappear when memory playback is complete. (Memory playback may take up to 8 minutes, depending upon the amount of data.) Pressing the ON/STANDBY button will exit Playback mode.
4. A CLr no message will be displayed, and three informational tones will sound.
5. (OPTIONAL): To clear the memory:• Use the Plus or Minus buttons to select Clr YES.• Press the ON/STANDBY button.• To confirm the clearing of memory, use the Plus or Minus buttons
to select DEL YES.• Press the ON/STANDBY button again.• dnE CLr confirms that the memory is clear.
6. Press the ON/STANDBY button to return to normal operation.
5-2

C o m m u n i c a t i o n
9600 English.book Page 3 Thursday, September 26, 2002 12:40 PM
5.3 Real-Time Patient Data OutputThe Avant 9600 provides real-time data output capability via the RS232 connector port. A null modem cable may be used to connect the Avant 9600 to the receiving computer.
The information from the Avant 9600 in the real-time mode is sent in an ASCII serial format at 9600 baud with 8 data bits, 1 start bit, and 2 stop bits. Each line is terminated by CR/LF.
Upon power up, a header is sent identifying the format and the time and date. Thereafter, the data are sent once per second by the Avant 9600 in one of the following formats:
• If DIP switch 8 is in the UP position, the data will be displayed as follows:
SPO2=XXX HR=YYY F
where XXX and YYY are the fast-responding SpO2 and pulse rate values.
• If DIP switch 8 is in the DOWN position, the data will be displayed as follows:
SPO2=XXX HR=YYY
where XXX and YYY are the SpO2 and pulse rate values as selected by DIP switch 2.
5-3
6-1
Chapter 6Theory of Operation
The NONIN Avant 9600 Digital Pulse Oximeter passes red and infrared light through perfused tissue and detects the fluctuating signals caused by arterial blood pressure pulses. Well-oxygenated blood is bright red, while poorly oxygenated blood is dark red. The pulse oximeter determines functional oxygen saturation of arterial hemoglobin from this color difference by measuring the ratio of absorbed red and infrared light as the blood volume fluctuates with each heart beat. Since steady conditions (steady venous blood flow, skin thickness, bone, fingernails, etc.) do not cause fluctuations, they do not affect the saturation reading. However, if too little light gets through or the pulse is insufficient, the pulse oximeter will not be able to provide a value.
Pulse oximeters use two different colors of light and thus have the ability to determine one component of blood. The Avant 9600 is calibrated to closely approximate functional oxygen saturation values. The Avant 9600 oxygen saturation values will closely approximate co-oximeter fractional saturation values if the dysfunctional hemoglobin saturation levels are negligible.
For all practical purposes, the pulse oximeter ignores carboxyhemoglobin (carbon monoxide). Excessive levels of methemoglobin will bias the readings toward 85%.
To obtain an accurate SpO2 and pulse rate measurement, NONIN uses a number of digital filtering and decision algorithms. These algorithms separate the pulse signal from artifact, motion, and interference. The initial filtering removes most of the interference, after which each potential pulse is examined to determine if it is valid or possibly corrupted. Because the NONIN algorithms work on a pulse-by-pulse basis, the pulse oximeter can give valid readings even in the presence of arrhythmias.
As with all pulse oximeters, there exists a level of interference or motion that can degrade performance. This might be seen as slower response time, reduced accuracy, or no readings.
NOTE: The display is updated once per 1-1/2 second, and the valuedisplayed will never be more than 30 seconds old.
9600 English.book Page 1 Thursday, September 26, 2002 12:40 PM

S p e c i f i c a t i o n s
n
9600 English.book Page 1 Thursday, September 26, 2002 12:40 PM
Chapter 7Specifications
OXIMETER
Oxygen Saturation Range (%SpO2)
0% to 100%
Pulse Rate Range 18 to 300 pulses per minuteDisplays
Numeric Displays 3-digit LEDs, Tricolor (red, green, amber)Pulse Strength Bargraph LED
Tricolor LED segments
Accuracy
Blood Oxygen Saturation (%SpO2) (± 1 S.D.)a
70-100% ±2 digits for adults using FingerClip Sensor
Pulse Rate ± 3% ±1 digitMeasurement Wavelengths and Output Power
Red 660 nanometers @ 3 mw nominalInfrared 910 nanometers @ 3 mw nominal
Altitude
Operating Altitude Up to 40,000 feet SYSTEM
Temperature
Operating +32° to +122°F (+0° to +50°C)Storage/Transportation -22° to +122°F (-30° to +50°C)
Humidity
Operating 10% to 90% noncondensingStorage/Transportation 10% to 95% noncondensing
Power Requirements 7.2 volt battery pack (6 cells) or 12 VDC 1.5A AC Adapter
Battery Life
Operating minimum 12 hours of continuous operatiowith a fully charged battery pack
Storage 27 daysRecharge 4 hours
Dimensions 5.5” H x 7.25” W x 4.5” D
7-1
fall
9600 English.book Page 2 Thursday, September 26, 2002 12:40 PM
Weight 2.2 lbsMemory 115 hours minimum
Classifications per IEC 60601- 1 / CSA601.1 / UL2601-1Type of Protection Class I (when on AC power with 300PS-
UNIV battery charger)
Class II (when on AC power with 300PS-NA, 300PS-EU, or 300PS-UK battery chargers)
Internally powered (on battery power)
Degree of Protection Type BF-Applied Part
Enclosure Degree of Ingress Protection
IPX0
Mode of Operation ContinuousNurse Call
Maximum Voltage 30 V, AC or DC Maximum Load Current 20mAOutput Impedance 320 ohms typicalOutput Normally Open or Normally Closed;
switch selectableOutput Connector 0.141” miniature phone jack
a. S.D. (Standard Deviation) is a statistical measure; up to 32% of the readings mayoutside these limits.
7-2
Parts and Accessories
)
9600 English.book Page 1 Thursday, September 26, 2002 12:40 PM
Chapter 8Parts and Accessories
Model Number Description
2120B Battery Pack 9600 Manual Operator’s Manual for the Avant 9600 300PS-NA Battery Charger, North American/Japan:
Wall Mount 300PS-EU Battery Charger, Europe: Wall Mount 300PS-UK Battery Charger, United Kingdom: Wall Mount 300PS-UNIV Battery Charger, Universal Desktop with IEC320
Connector Contact your distributor or NONIN for options.
Cord Set, Charger
External Cables.
UNI-RA-0 7.25” 90-degree patient cable 8500I Patient Extension Cable (1 meter) 8500VI Patient Extension Cable (3 meters) 8604X-20 Patient Extension Cable (6 meters) 8604X-30 Patient Extension Cable (9 meters) 9600NC-6 Nurse Call Output Cable (2 meters) 9600NC-10 Nurse Call Output Cable (3 meters) 9600NC-10X Nurse Call Output Cable (3 meters—without plug UNI-RS232 RS-232 Cable
Pulse Oximeter Reusable Sensors 8000AA-1 Adult Articulated Finger Clip Sensor (1 meter) 8000AA-3 Adult Articulated Finger Clip Sensor (3 meters) 8000K2 Adult Finger Clip Sensor 8000AP-1 Pediatric Finger Clip Sensor (1 meter) 8000AP-3 Pediatric Finger Clip Sensor (3 meters) 8000J Adult Flex Sensor (1 meter) 8000J-3 Adult Flex Sensor (3 meters) 8008J Infant Flex Sensor 8001J Neonatal Flex Sensor 8000Q Ear Clip Sensor 8000R Reflectance Sensor
8-1

x
9600 English.book Page 2 Thursday, September 26, 2002 12:40 PM
For more information about NONIN parts and accessories, contact your distributor, or contact NONIN at (800) 356-8874 (USA and Canada) or (763) 553-9968. This information is also available on NONIN’s website: www.nonin.com.
Model Number Description
Pulse Oximeter Disposable Sensors 7000A Adult Finger Flexi-Form II® Sensor, 10 per box 7000P Pediatric Finger Flexi-Form II® Sensor, 10 per bo 7000I Infant Toe Flexi-Form II® Sensor, 10 per box 7000N Neonatal Foot Flexi-Form II® Sensor, 10 per box 7000D Flexi-Form II® Sensor Assortment Pack, 10 per
box
Mounting Accessories 9600 Pole Mount Pole Mount Pole Mount Clamp Pole Mount Clamp
Other Accessories nVISION™ nVISION™ software for Microsoft Windows 95/
98/2000/NT 4.0 operating systems 8000JFW Adult FlexiWrap Sensor Wrap 8008JFW Infant FlexiWrap Sensor Wrap 8001JFW Neonatal FlexiWrap Sensor Wrap 8000H Reflectance Sensor Holder System 8000S Patient Simulator
8-2

9-1
Service, Support, and Warranty
Chapter 9Service, Support, & Warranty
A return authorization number is required before returning any product to NONIN. To obtain this return authorization number, contact NONIN Customer Support: Nonin Medical, Inc.2605 Fernbrook Lane NorthPlymouth, Minnesota 55447-4755 USA
(800) 356-8874 (USA and Canada) (763) 553-9968 (outside USA and Canada)Fax (763) 553-7807 E-mail: [email protected]
WarrantyNONIN MEDICAL, INCORPORATED, (NONIN) warrants to the purchaser, for a period of one year from the date of purchase, each Avant 9600 battery pack. NONIN warrants the pulse oximetry module of the Avant 9600 for a period of three years from the date of purchase.
NONIN shall repair or replace any Avant 9600 found to be defective in accordance with this warranty, free of charge, for which NONIN has been notified by the purchaser by serial number that there is a defect, provided said notification occurs within the applicable warranty period. This warranty shall be the sole and exclusive remedy by the purchaser hereunder for any Avant 9600 delivered to the purchaser which is found to be defective in any manner, whether such remedies be in contract, tort, or by law.
This warranty excludes cost of delivery to and from NONIN. All repaired units shall be received by the purchaser at NONIN's place of business. NONIN reserves the right to charge a fee for a warranty repair request on any Avant 9600 that is found to be within specifications.
The Avant 9600 is a precision electronic instrument and must be repaired by knowledgeable and specially trained NONIN personnel only.
Accordingly, any sign or evidence of opening the Avant 9600, field service by non-NONIN personnel, tampering, or any kind of misuse or abuse of the Avant 9600, shall void the warranty in its entirety. All non-warranty work shall be done according to NONIN standard rates and charges in effect at the time of delivery to NONIN.
DISCLAIMER/EXCLUSIVITY OF WARRANTY:THE EXPRESS WARRANTIES SET FORTH IN THIS MANUAL ARE EXCLUSIVE AND NO OTHER WARRANTIES OF ANY KIND, WHETHER STATUTORY, WRITTEN, ORAL, OR IMPLIED, INCLUDING WARRANTIES OF FITNESS FOR A PARTICULAR PURPOSE OR MERCHANTABILITY, SHALL APPLY.
9600 English.book Page 1 Thursday, September 26, 2002 12:40 PM
9600 English.book Page 1 Thursday, September 26, 2002 12:40 PM
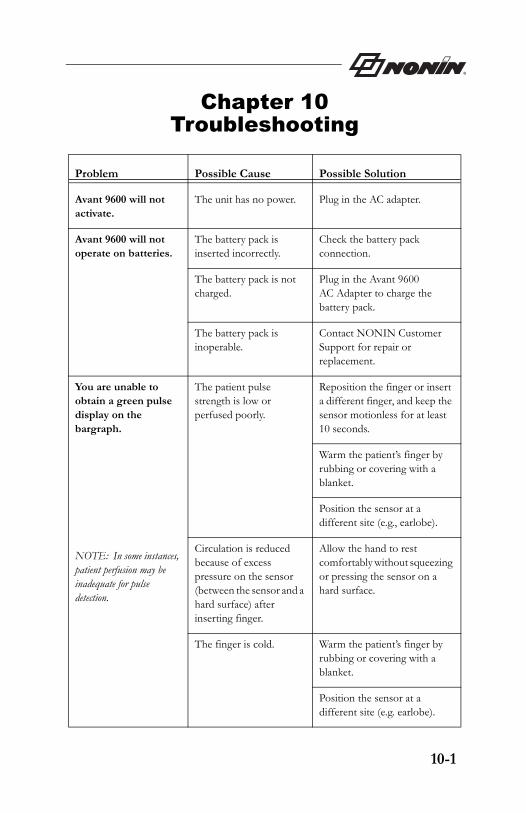
Chapter 10Troubleshooting
Problem Possible Cause Possible Solution
Avant 9600 will not activate.
The unit has no power. Plug in the AC adapter.
Avant 9600 will not operate on batteries.
The battery pack is inserted incorrectly.
Check the battery pack connection.
The battery pack is not charged.
Plug in the Avant 9600 AC Adapter to charge the battery pack.
The battery pack is inoperable.
Contact NONIN Customer Support for repair or replacement.
You are unable to obtain a green pulse display on the bargraph.
The patient pulse strength is low or perfused poorly.
Reposition the finger or insert a different finger, and keep the sensor motionless for at least 10 seconds.
Warm the patient’s finger by rubbing or covering with a blanket.
Position the sensor at a different site (e.g., earlobe).
NOTE: In some instances, patient perfusion may be inadequate for pulse detection.
Circulation is reduced because of excess pressure on the sensor (between the sensor and a hard surface) after inserting finger.
Allow the hand to rest comfortably without squeezing or pressing the sensor on a hard surface.
The finger is cold. Warm the patient’s finger by rubbing or covering with a blanket.
Position the sensor at a different site (e.g. earlobe).
10-1
Tr o u b l e s h o o t i n g
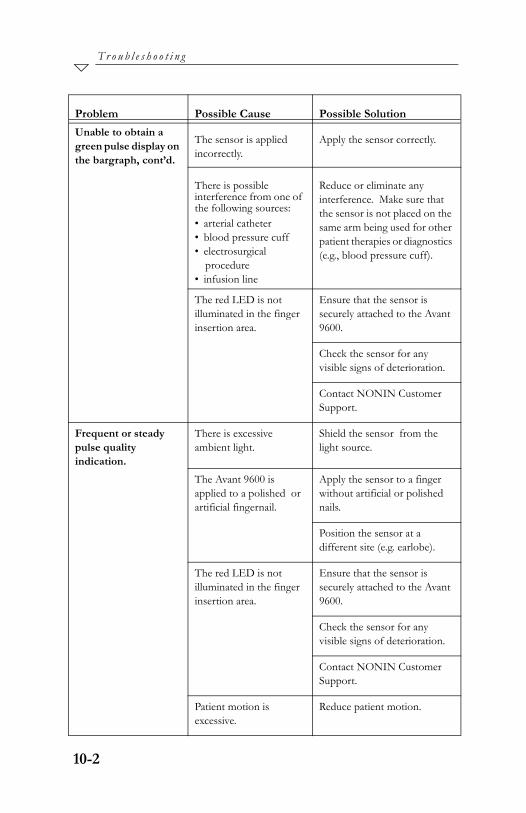
9600 English.book Page 2 Thursday, September 26, 2002 12:40 PM
Unable to obtain a green pulse display on the bargraph, cont’d.
The sensor is applied incorrectly.
Apply the sensor correctly.
There is possible interference from one of the following sources:• arterial catheter• blood pressure cuff• electrosurgical
procedure• infusion line
Reduce or eliminate any interference. Make sure that the sensor is not placed on the same arm being used for other patient therapies or diagnostics (e.g., blood pressure cuff).
The red LED is not illuminated in the finger insertion area.
Ensure that the sensor is securely attached to the Avant 9600.
Check the sensor for any visible signs of deterioration.
Contact NONIN Customer Support.
Frequent or steady pulse quality indication.
There is excessive ambient light.
Shield the sensor from the light source.
The Avant 9600 is applied to a polished or artificial fingernail.
Apply the sensor to a finger without artificial or polished nails.
Position the sensor at a different site (e.g. earlobe).
The red LED is not illuminated in the finger insertion area.
Ensure that the sensor is securely attached to the Avant 9600.
Check the sensor for any visible signs of deterioration.
Contact NONIN Customer Support.
Patient motion is excessive.
Reduce patient motion.
Problem Possible Cause Possible Solution
10-2

9600 English.book Page 3 Thursday, September 26, 2002 12:40 PM
A dash (-) appears in the %SpO2 display.
A poor signal from the finger is being detected.
Reposition the finger or insert a different finger and keep the sensor motionless for at least 10 seconds.
Position the sensor at a different site (e.g. earlobe).
The finger was removed from the sensor.
Reinsert the finger and keep the sensor motionless for at least 10 seconds.
The Avant 9600 is not functioning.
Turn the unit off, check all connections, and retry.
Contact NONIN Customer Support.
An error code appears in the display area.
The Avant 9600 encountered an error.
1. Turn the unit off and then back on again to remove the error code.
2. If the error persists, disconnect all power (AC and battery), and then reconnect the power and turn the unit back on.
3. If the error still persists, note the error code and contact NONIN Customer Support.
Problem Possible Cause Possible Solution
10-3
Tr o u b l e s h o o t i n g
9600 English.book Page 4 Thursday, September 26, 2002 12:40 PM
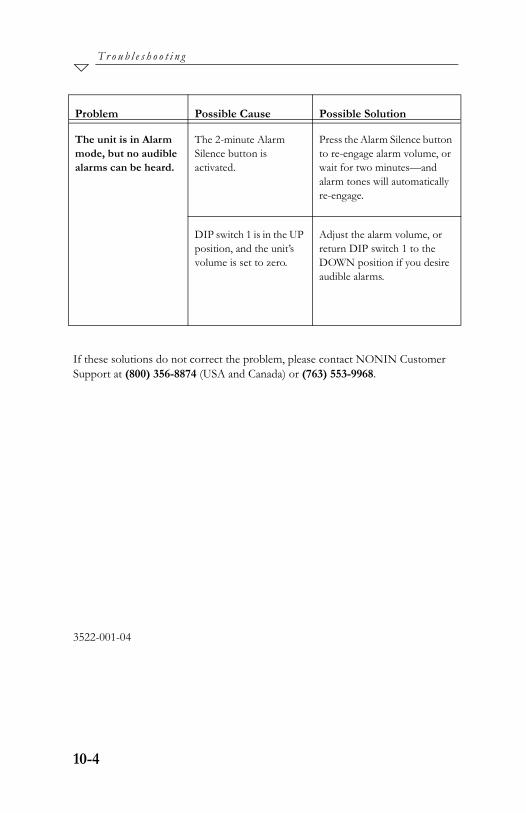
If these solutions do not correct the problem, please contact NONIN Customer Support at (800) 356-8874 (USA and Canada) or (763) 553-9968.
3522-001-04
The unit is in Alarm mode, but no audible alarms can be heard.
The 2-minute Alarm Silence button is activated.
Press the Alarm Silence button to re-engage alarm volume, or wait for two minutes—and alarm tones will automatically re-engage.
DIP switch 1 is in the UP position, and the unit’s volume is set to zero.
Adjust the alarm volume, or return DIP switch 1 to the DOWN position if you desire audible alarms.
Problem Possible Cause Possible Solution
10-4