96-well pcr cleanup manual for non-kit users the 96-well pcr cleanup kit provides a rapid method for...
TRANSCRIPT
96-well PCR Cleanup Manual for
Non-Kit Users

2
Contents
3
Introduction . . . . . . . . . . . . . . . . . . . . . . . . . . . . . . . . . .4Microplate Components Required . . . . . . . . . . . . . . . . . . .4Buffer Formulations . . . . . . . . . . . . . . . . . . . . . . . . . . . . .4Equipment Required . . . . . . . . . . . . . . . . . . . . . . . . . . . . .4
PCR Cleanup Procedure . . . . . . . . . . . . . . . . . . . . . . . .6Overview of Procedure . . . . . . . . . . . . . . . . . . . . . . . . . . .6Sample Preparation . . . . . . . . . . . . . . . . . . . . . . . . . . . . .7Vacuum Filtration Protocol . . . . . . . . . . . . . . . . . . . . . . . .7Centrifugation Protocol . . . . . . . . . . . . . . . . . . . . . . . . . . .9PCR Cleanup Automation . . . . . . . . . . . . . . . . . . . . . . . .10
Product Performance . . . . . . . . . . . . . . . . . . . . . . . . . .11
Troubleshooting . . . . . . . . . . . . . . . . . . . . . . . . . . . . . .12
Additional Accessories . . . . . . . . . . . . . . . . . . . . . . . .14
4
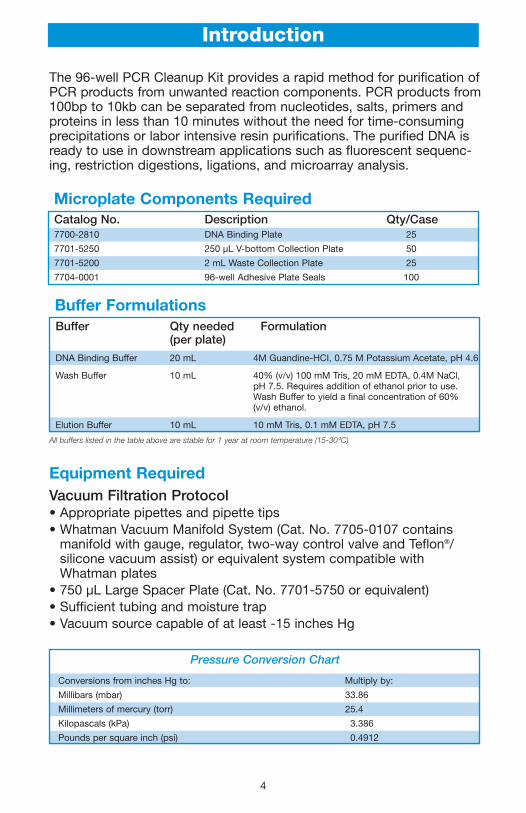
The 96-well PCR Cleanup Kit provides a rapid method for purification ofPCR products from unwanted reaction components. PCR products from100bp to 10kb can be separated from nucleotides, salts, primers andproteins in less than 10 minutes without the need for time-consumingprecipitations or labor intensive resin purifications. The purified DNA isready to use in downstream applications such as fluorescent sequenc-ing, restriction digestions, ligations, and microarray analysis.
Introduction
Equipment RequiredVacuum Filtration Protocol• Appropriate pipettes and pipette tips• Whatman Vacuum Manifold System (Cat. No. 7705-0107 contains
manifold with gauge, regulator, two-way control valve and Teflon®/silicone vacuum assist) or equivalent system compatible withWhatman plates
• 750 µL Large Spacer Plate (Cat. No. 7701-5750 or equivalent)• Sufficient tubing and moisture trap• Vacuum source capable of at least -15 inches Hg
Pressure Conversion Chart
Conversions from inches Hg to: Multiply by:
Millibars (mbar) 33.86
Millimeters of mercury (torr) 25.4
Kilopascals (kPa) 3.386
Pounds per square inch (psi) 0.4912
Catalog No. Description Qty/Case7700-2810 DNA Binding Plate 25
7701-5250 250 µL V-bottom Collection Plate 50
7701-5200 2 mL Waste Collection Plate 25
7704-0001 96-well Adhesive Plate Seals 100
Microplate Components Required
Buffer Qty needed Formulation(per plate)
DNA Binding Buffer 20 mL 4M Guandine-HCI, 0.75 M Potassium Acetate, pH 4.6
Wash Buffer 10 mL 40% (v/v) 100 mM Tris, 20 mM EDTA, 0.4M NaCl, pH 7.5. Requires addition of ethanol prior to use. Wash Buffer to yield a final concentration of 60% (v/v) ethanol.
Elution Buffer 10 mL 10 mM Tris, 0.1 mM EDTA, pH 7.5
Buffer Formulations
All buffers listed in the table above are stable for 1 year at room temperature (15-30°C)

5
Equipment Required (Continued)Centrifugation Protocol• Appropriate pipettes and pipette tips• Centrifuge capable of 1800 x g• Microplate carrier capable of accommodating 7.5 cm stack height
Precautions• This procedure involves the handling of amplification products.
Proper care must be taken to avoid cross contamination of samplesand buffers. Change gloves often. Change pipette tips after any contact with amplified material to avoid contamination of buffers or samples.
• Some of the buffers listed in this manual are potential eye/skin irritants. Proper laboratory precautions should be followed.
• This procedure is designed for research use only; not for use in diagnostic procedures.
• MSDS sheets are available upon request.• Whatman plates are designed to be disposable, single-use-only products.
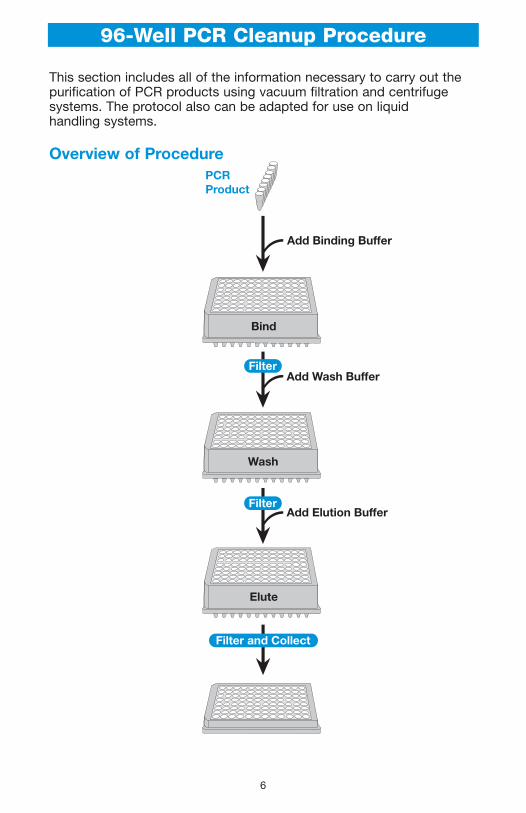
Filter
Filter
Filter and Collect
Add Wash Buffer
Add Elution Buffer
Add Binding Buffer
PCRProduct
Bind
Wash
Elute
6
96-Well PCR Cleanup Procedure
This section includes all of the information necessary to carry out the purification of PCR products using vacuum filtration and centrifuge systems. The protocol also can be adapted for use on liquid handling systems.
Overview of Procedure
7
Sample PreparationSample Volumes less than 25 µL
Add enough DNA Binding Buffer to bring the total volume to 75 µLand mix by aspiration with a pipette. For example, to a 5 µL PCRreaction, add 70 µL DNA Binding Buffer.
Sample Volumes between 25 µL and 125 µL (recommended)Add 2 volumes DNA Binding Buffer to 1 volume of the PCR sampleand mix by aspiration with a pipette.
Sample Volumes between 125 µL and 200 µLAdd 1 volume of DNA Binding Buffer to 1 volume of the PCR sample and mix by aspiration with a pipette.
Sample Volumes greater than 200 µLDivide the reaction into 2 or more tubes and follow the above criteria for sample preparation based on the new sample volume.
Note: It is not necessary to remove mineral oil from the PCR samples. If mineral oil is being used, base the above calculations on the aqueous sample volume only.
Vacuum Filtration Protocol1. Prepare vacuum manifold for DNA binding.
Attach the vacuum source to the manifold. Place the 2 mL WasteCollection Plate inside the vacuum manifold. Place the vacuummanifold collar on top of the manifold. Place the DNA Binding Plate on top of the vacuum collar, ensuring that the two plates are aligned alphanumerically (A1 to A1).
2. Apply the full volume of each prepared sample directly to the center of each well of a DNA Binding Plate.Apply vacuum between -15 and -20 inches Hg and allow the sample to be pulled through the filter media for 1 minute. Releasethe vacuum using the manifold switch and check to see that all liquid has been evacuated from each well. If fluid remains in any of the wells, repeat this step until all liquid has cleared.
Note: If all 96-wells of the plate are not being processed simulta-neously, the unused wells must be sealed with the vacuumassist or adhesive sealing tape before vacuum is applied.
8
Note: Ensure that ethanol has been added to Wash Buffer. If ethanol has not been added, refer to “Buffer Formulation”.
3. Add 400 µL Wash Buffer to each well of the DNA Binding Plate.Apply vacuum between -15 and -20 inches Hg, and allow thebuffer to be pulled through the filter media for 1 minute. Releasethe vacuum using the manifold switch, and check to see that allliquid has been evacuated from each well. If fluid remains in any of the wells, repeat this step until all liquid has cleared.
4. Apply maximum vacuum for an additional 2 minutes to drythe DNA Binding Plate.This step removes residual Wash Buffer from the DNA Binding Plate. Seal any unused wells of the DNA Binding plate before drying. Ensure that the wells in use are exposed to ambient airflowfor efficient drying. Release the vacuum using the manifold switch.Using a clean absorbent paper towel, blot the bottom of the DNABinding Plate to remove any residual Wash Buffer from the dripdirectors. The removal of ethanol present in the Wash Buffer isimportant for downstream applications.
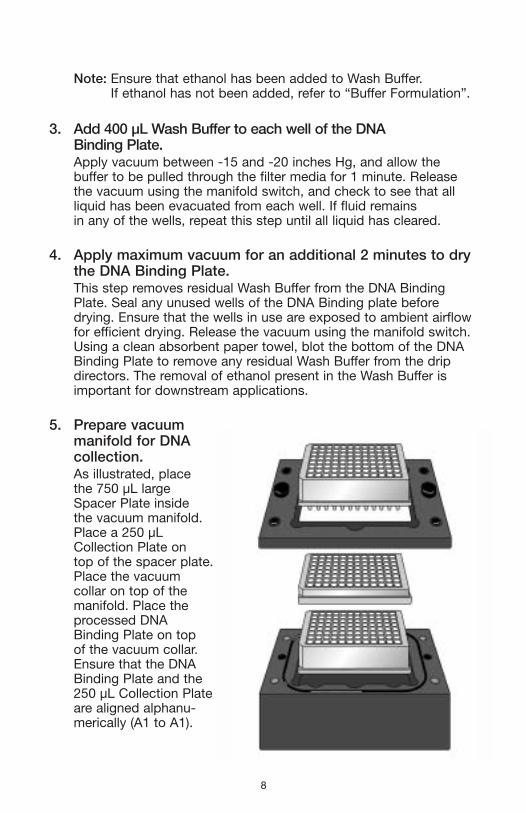
5. Prepare vacuummanifold for DNAcollection.As illustrated, place the 750 µL largeSpacer Plate inside the vacuum manifold.Place a 250 µLCollection Plate on top of the spacer plate.Place the vacuum collar on top of the manifold. Place theprocessed DNABinding Plate on top of the vacuum collar.Ensure that the DNABinding Plate and the250 µL Collection Plateare aligned alphanu-merically (A1 to A1).
9
6. Add 100 µL Elution Buffer (or nuclease-free water) to the center of each well of the DNA Binding Plate.Allow the plate to stand for 1 minute. Apply vacuum between -15 and -20 inches Hg, and allow the buffer to be pulled throughthe filter media for a minimum of 1 minute. Release the vacuumusing the manifold switch and ensure that all liquid has been evacuated from each well. If fluid remains in any of the wells repeat this step until all liquid has cleared.
Note: If more concentrated eluate is desired, the volume of elutionbuffer can be decreased to a minimum of 25 µL. However,as elution volume is decreased, some loss in volume mightbe observed due to liquid retention in the filter media.
7. Remove the 250 µL Collection Plate from the vacuum manifold.The purified PCR product is now suitable for use in downstreamapplications. For storage, cover the 250 µL Collection Plate withthe 96-well Adhesive Plate Seal.
Centrifugation ProtocolWhen using the centrifugation protocol outlined below, ensure that the centrifuge meets the criteria noted in the “Equipment Required”section. Refer to manufacturer’s manual for operating instructions.
1. Prepare plates for DNA binding.Place the 96-well DNA Binding Plate on top of the 2 mL WasteCollection Plate to form a plate stack. Ensure that the two platesare aligned alphanumerically (A1 to A1).
2. Apply the full volume of each prepared sample directly tothe center of each well of the DNA Binding Plate.Place the stacked plates in the centrifuge tray.
3. Centrifuge for 2.5 minutes at 1800 x g.The DNA is now bound to the filter media of the DNA binding plate.Remove the stacked plates from the centrifuge tray.
10
Note: Ensure that ethanol has been added to the Wash Buffer. Ifethanol has not been added, refer to “Buffer Formulation”.
4. Add 400 µL Wash Buffer to each well of the DNA binding plate.Place the stacked plates in the centrifuge tray.
5. Centrifuge for 4.5 minutes at 1800 x g.This step removes the residual Wash Buffer from the DNA BindingPlate. Remove the stacked plates from the centrifuge tray. Using aclean absorbent paper towel, blot the bottom of the DNA BindingPlate to remove any residual Wash Buffer from the drip directors.The removal of ethanol present in the Wash Buffer is important fordownstream applications.
6. Prepare plates for DNA Collection.Place the DNA Binding Plate on top of a 250 µL Collection Plate to form a plate stack, ensuring that the two plates are alignedalphanumerically (A1 to A1).
7. Add 100 µL Elution Buffer (or nuclease-free water) to thecenter of each well of the DNA Binding Plate.Allow the plates to stand for 1 minute. Place the stacked plates inthe centrifuge tray.
Note: If more concentrated eluate is desired, the volume of ElutionBuffer can be decreased accordingly. However, as elutionvolume is decreased, some loss in volume might beobserved due to liquid retention in the filter media.
8. Centrifuge for 2.5 minutes at 1800 x g.The PCR product has now been eluted into the 250 µL Collection Plate.
9. Remove the stacked plates from the centrifuge.The purified PCR product is now suitable for use in downstreamapplications. For storage, cover the Collection Plate with the 96-well Adhesive Plate Seal.
PCR Cleanup AutomationThe Whatman 96-well PCR Cleanup System is compatible with high-throughput platforms. Automated protocols for specific highthroughput systems can be obtained through Whatman technical service or by download at www.whatman.com.
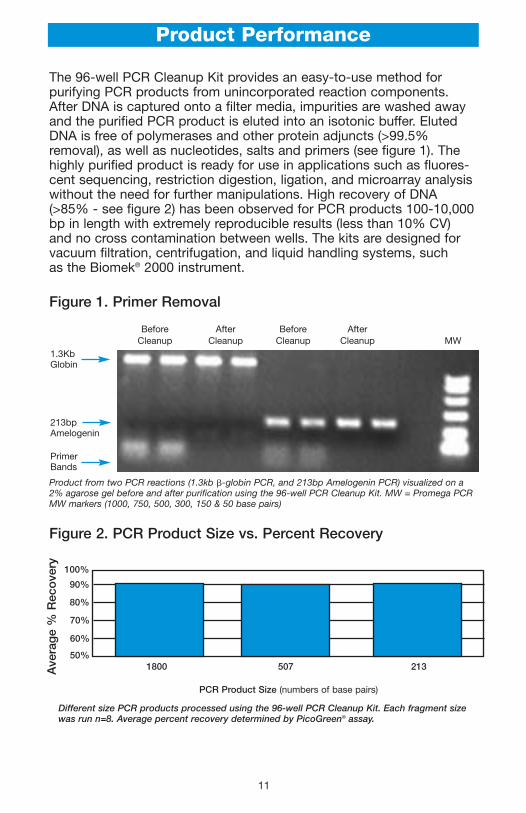
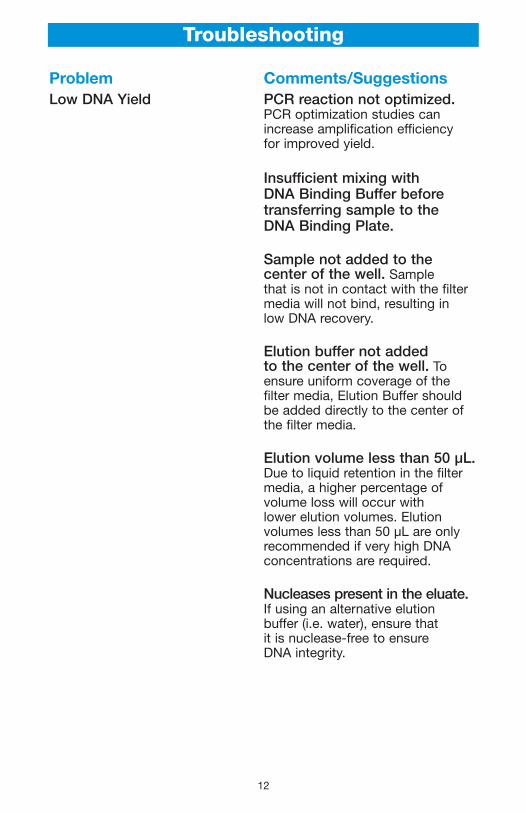
The 96-well PCR Cleanup Kit provides an easy-to-use method for purifying PCR products from unincorporated reaction components.After DNA is captured onto a filter media, impurities are washed awayand the purified PCR product is eluted into an isotonic buffer. ElutedDNA is free of polymerases and other protein adjuncts (>99.5%removal), as well as nucleotides, salts and primers (see figure 1). Thehighly purified product is ready for use in applications such as fluores-cent sequencing, restriction digestion, ligation, and microarray analysiswithout the need for further manipulations. High recovery of DNA(>85% - see figure 2) has been observed for PCR products 100-10,000bp in length with extremely reproducible results (less than 10% CV) and no cross contamination between wells. The kits are designed forvacuum filtration, centrifugation, and liquid handling systems, such as the Biomek® 2000 instrument.
Figure 1. Primer Removal
Figure 2. PCR Product Size vs. Percent Recovery
Product Performance
Product from two PCR reactions (1.3kb �-globin PCR, and 213bp Amelogenin PCR) visualized on a2% agarose gel before and after purification using the 96-well PCR Cleanup Kit. MW = Promega PCRMW markers (1000, 750, 500, 300, 150 & 50 base pairs)
Different size PCR products processed using the 96-well PCR Cleanup Kit. Each fragment sizewas run n=8. Average percent recovery determined by PicoGreen® assay.
50%
60%
70%
80%
90%
100%
1800 507 213Ave
rag
e %
Rec
ove
ry
11
PCR Product Size (numbers of base pairs)
Before After Before AfterCleanup Cleanup Cleanup Cleanup MW
1.3KbGlobin
213bpAmelogenin
PrimerBands
12
Troubleshooting
Problem Comments/SuggestionsLow DNA Yield PCR reaction not optimized.
PCR optimization studies canincrease amplification efficiency for improved yield.
Insufficient mixing with DNA Binding Buffer before transferring sample to the DNA Binding Plate.
Sample not added to the center of the well. Sample that is not in contact with the filtermedia will not bind, resulting in low DNA recovery.
Elution buffer not added to the center of the well. To ensure uniform coverage of the filter media, Elution Buffer shouldbe added directly to the center of the filter media.
Elution volume less than 50 µL.Due to liquid retention in the filtermedia, a higher percentage of volume loss will occur with lower elution volumes. Elution volumes less than 50 µL are only recommended if very high DNAconcentrations are required.
Nucleases present in the eluate.If using an alternative elution buffer (i.e. water), ensure that it is nuclease-free to ensure DNA integrity.

13
Problem Comments/SuggestionsWells Not Filtering Nonuniform airflow. If processing
less than 96 wells simultaneously,the Vacuum Assist or sealing tapemust be used on empty wells toensure proper vacuum.
Airlock due to bubble in thewell. Buffers should be added tothe center of each well to avoid airbubbles. Removal of air bubbles bysample agitation is recommended.
Insufficient vacuum. Verify thatthe vacuum manifold reaches thespecified vacuum as outlined in the protocol.
Poor DNA Performance
Ethanol in Eluate Incomplete drying. Ensure that the Wash Buffer drying process is followed carefully and completely.
High Salt in Eluate Ensure that the wash step hasbeen properly performed. Verifythat ethanol has been added toWash Buffer as outlined in“Preparation of Buffer”.
Unexpected Size PCR reaction not optimized.Fragments on Gel PCR optimization can increase
priming specificity for the desired product.
Sample cross contamination or buffer contamination. Propermolecular biology precautions must be maintained when handlingamplified products. All pipette tipsmust be changed after contactingamplification products.
14
Additional Accessories
NoticeThe information in this document is given in good faith, and is for guidance only. It is not intended tooverride or void any of Whatman’s Standard Conditions of Sale. Those Conditions remain in full andcomplete effect, and govern all relations between Whatman and the purchaser of the goods whichrelate to this document.
PCR is a patented process covered by U. S. Patents 4,683,195 and 4,683,202 and foreign equivalentsowned by Hoffman-La Roche AG. PicoGreen is a registered trademark of Molecular Probes, Inc.Biomek® is a registered trademark of Beckman Coulter, Inc.Teflon® is a registered trademark of DuPontWhatman® is a registered trademark of Whatman Inc.©Copyright, Whatman Inc., 2002 Printed in USA
Catalog No. Description Qty/Case7705-0107 Vacuum Manifold System
1 per/box(contains: Manifold with gauge,regulator, two-way control valve,and Teflon®/silicone vacuum assist)
7705-0205 Teflon/Silicone Vacuum Assist6 per/pack(replacement for vacuum assist
contained in Vacuum Manifold System)
7701-5200 2 mL Waste Collection Plate 25 per/case
7725-0118 96-well Filtrate Directors(for Biomek® 2000 processing)
25 per/case
7705-0120 Small Whatman Vacuum 1 per/packAdapter Collar for Biomek 2000
7705-0121 Medium Whatman Vacuum 1 per/packAdapter Collar for Biomek 2000

15
9 Bridewell Place, Clifton, NJ 07014www.whatman.com
The Advantages Filter ThroughSM
Part No. 69I0030019, Rev. A
Whatman
For pricing and availability, please contact:
USAWhatman Inc.9 Bridewell PlaceClifton, NJ 07014Toll Free: 800-WHATMANFax: 973-773-0168E-mail: [email protected]
Europe/Middle East/AfricaWhatman International Ltd.Whatman HouseSt. Leonard’s Road20/20 MaidstoneKent, England ME 16 OLSTel: +44 (0) 1622 676670Fax: +44 (0) 1622 677011E-mail: [email protected]
ChinaWhatman Shanghai Liaison OfficeNo. 8 Dong An Room 909Pine City HotelShanghai 200032P.R.ChinaTel: 86 21 6443 7176Fax: 86 21 6443 2568E-mail: [email protected]
JapanWhatman Japan Ltd.Daiwa Ueno Building 1F 6-10Ueno 5-chrome, Taito-kuTokyo 110-0005 JapanTel: +81 3 3832 6707Fax: +81 3 3832 6457E-mail: [email protected]
Asia PacificWhatman Asia Pacific Pte Ltd.171 Chin Swee Road#08-01 San CentreSingapore 169877Tel: + 65 6534 0138Fax: + 65 6534 2166E-mail: [email protected]
IndiaWhatman India Liaison Office503 Swastik Chambers U.B.ChowkV.N.Purav Marg, ChemburMumbai 400071IndiaTel: 91 22 529 7035Fax: 91 22 529 7036E-mail: [email protected]
www.whatman.com