948 wsh ngc 8.5x11 v1
TRANSCRIPT

EVERYONE'SRESPONSIBILITY
Guideline for PreventingMusculoskeletal InjuriesGuideline for PreventingMusculoskeletal Injuries
December 2006
948 WSH NGC_8.5x11_V1.qxd 2/2/07 11:34 AM Page 1

Guideline
for the Prevention of
Musculoskeletal Injuries
December, 2006
Workplace Safety & Health Division 200 – 401 York Avenue Winnipeg, Manitoba R3C 0P8
Workplace Safety and Health Division
Prevention of Musculoskeletal Injuries 2
Guideline for the Prevention of Musculoskeletal Injuries
Table of Contents
Introduction ..................................................................................................................... 3
Examples of musculoskeletal injuries ................................................................... 3
Assessing the risk ........................................................................................................... 4
Risk factors........................................................................................................... 4
Assessment methods ........................................................................................... 5
• Job hazard analysis.............................................................................. 5
• Physical demands description .............................................................. 6
• Ergonomic risk control factors .............................................................. 6
Control Measures ............................................................................................................ 7
Engineering controls............................................................................................. 7
Administrative controls ......................................................................................... 8
Appropriate work schedules ................................................................................. 8
Personal protective equipment ............................................................................. 9
Training and Education (on Control Measures) ............................................................. 10
Training and Education (on MSI)................................................................................... 11
Step-by-step training plan................................................................................... 12
Appendices
Appendix A - Conducting a job hazard analysis (JHA)
- Job Hazard Analysis Form
- Physical Demands Description form
Appendix B - Ergonomic Risk Factor (ERF) Checklist
Appendix C - Guide to completing the ERF checklist

Workplace Safety and Health Division
Prevention of Musculoskeletal Injuries 3
INTRODUCTION
Introduction
Musculoskeletal injuries (MSI) account for a significant number of work injuries in Manitoba. Musculoskeletal injury means an injury or disorder of the muscles, tendons, ligaments, joints, nerves, blood vessels or related soft tissue including a sprain, strain or inflammation. Since work-related MSI tends to occur when the physical demands of the action, task, movement or job exceeds the ability of the body, changes must be considered for the workstation, equipment, tools, work practices, work rate, body movements and employee training to reduce the risk of injury.
Examples of MSI
• muscle strain • tendon and/or ligament sprain • hernatiatied intervertebral disk (slipped disc) • osteo arthritis • adaptive changes to muscle length • ligament disorders • circulatory disorders (ex: varicose veins)
Workplace Safety and Health Regulation Requirements
Part 8 of Manitoba Workplace Safety and Health Regulation, M.R. 217/2006 requires employers to do a risk assessment, in consultation with the safety and health committee, or representative. If there is no committee or representative the employer must do a risk management in consultation with employees where a risk of MSI:
• is known to be present • is reasonably obvious • has been identified
• If the assessment identifies a risk to employees, measures must be taken to
implement: engineering controls (design, position of equipment) • administrative controls (safe work procedures) • appropriate work schedules, or personal protective equipment
Employers must ensure employees who may be at risk of MSI are informed of the risk as well as signs and symptoms of MSI. Employers must also ensure employees are trained in control measures to eliminate or reduce the risk of MSI.

Workplace Safety and Health Division
Prevention of Musculoskeletal Injuries 4
ASSESSING THE RISK
Introduction
When employers are aware or have been told that a work activity creates a risk of musculoskeletal injury, they must ensure the risk is assessed. This assessment must identify:
• risk factors acting on the worker (ex: forceful exertion) • areas of the body at risk of MSI (ex: lower back) • source of the risks (ex: lifting boxes)
Based on the assessment, employers must implement controls to eliminate or reduce, as much as reasonably practical, the risk of musculoskeletal injury.
Risk factors
Following is a list of MSI risk factors. To properly reduce or control the risk, it is important to recognize why these factors create a risk of injury. Any combination of the listed physical demands will increase the risk of injury.
Awkward or sustained postures: These occur when employees must adopt non-neutral postures to perform their duties. Neutral posture is a relaxed body standing upright with the arms hanging comfortably at the side. Non-neutral postures (ex: slouching, bending forward at the waist, twisting through the trunk, working with the elbows away from the body, prolonged standing on a hard surface, etc.) increase the load on the musculoskeletal system. Non-neutral postures reduce blood flow to working muscles and increase leverage (ex: the longer the crowbar, the greater the force). Consider reducing non-neutral postures by making the work environment more adjustable and bring the work closer to the centerline of the employees’ body to increase the employees’ control over body movement and reduce the risk of injury.
Forceful exertions: These occur when employees must adopt perform actions that have the potential to overload the musculoskeletal system. There is a physical limit to the amount of stress the musculoskeletal system can endure before a structural failure occurs. It is much like a metal chain lifting more than its rated capacity and one of the links fails as a result. Depending on the posture during the forceful exertion, the link which fails may be the wrist, elbow, shoulder, lower back, or any other part of the musculoskeletal system. Forceful exertions may cause failure on the gross scale (ex: a herniated or slipped disc), or the micro scale (ex: microscopic tears in the muscles, tendons, or ligaments) which may develop into a MSI. To reduce the risk of injury, consider decreasing the physical effort required to perform work.

Workplace Safety and Health Division
Prevention of Musculoskeletal Injuries 5
Repetitive motions: These occur when employees are required to perform the same sequence of actions for extended periods with little or no variation in the muscles used. Repeated movements, without significant change in work activity, may cause the musculoskeletal system of the body to suffer small injuries. With repeated exposure, these injuries may develop into a MSI. Consider rest breaks and job rotation throughout the day to reduce the risk of injury.
Vibration: This is the direct transfer of repeating movements of a machine, or tool, to the body. It is an action (ex: when a hand tool or heavy machine shakes repeatedly) causing the muscles to tighten and circulation to decrease. Consider using tools with less vibration; wrapping tools with anti-vibration wrap; using anti-vibration gloves; and ensuring machinery is maintained to reduce vibration.
Mechanical compression: This occurs when there is external pressure on the soft tissues, either at high forces and/or for prolonged periods of time (ex: leaning on a barrier, resting hands on a desk while typing, using tools that dig into the hand). When there is external pressure on the soft tissues, the blood flow and nerve function may be affected. Consider removing or modifying barriers, using tools with improved design and putting padding on hard edges or surfaces.
Assessment methods
When an assessment is performed, the risk factor(s) which may cause an injury must be identified. Consider using one or more of the following tools to identify the risks for MSI associated with the job.
Job Hazard Analysis
What: This process describes the steps required for job completion, and identifies the risks which may cause injury. Typically this analysis includes all risks which may cause any injury, including MSI. Why: Analyzing a task step-by-step allows easier identification of risks, which may be difficult to see, or describe, when the task is observed as a whole. A job hazard analysis is standard in workplace safety and health risk analysis. When: Use this tool before developing safe work procedures, or standard operating procedures for a job, especially one that has not been assessed for risks.
See Appendix A –job hazard analysis for further information.

Workplace Safety and Health Division
Prevention of Musculoskeletal Injuries 6
Physical Demands Description
What: This is a clear and complete list of the movements and other physical requirements needed to perform a job. This list describes the weights, forces, frequencies and postures employees will be exposed to during their work. Why: Effective communication of the physical demands of a task with those who may require this information is important to help identify risks. Examples may include: current employees, new employees, supervisors, human resource people, or health care professionals. Uncontrolled risks for injury may exist if the identified demands and the actual processes are different. Employees can help ensure any differences between these demands and processes are brought to the attention of the appropriate person. When: Use this tool when a complete list of the physical demands of a job, or task, is required. Start with the physical demands description of the modified or light duty jobs to better accommodate the physical capabilities of employees returning to work following an injury. This tool may also help injured employees give an effective description of their jobs to their health care provider, who in turn, may then offer effective treatment. See Appendix B – physical demands description for further information.
Ergonomic Risk Factor Checklist
What: A checklist designed to identify specific risks for musculoskeletal injury with the effect of increased exposure on the risk of injury. This checklist assigns scores to each risk factor, which are added together for an overall job score. This information is useful for prioritizing and identifying jobs, tasks and movements with increased risk of MSI. Why: This checklist can identify risks for MSI present in a specific aspect of a job, or the job as a whole. It allows employees to assign a score to each movement which can be used to identify hazardous aspects of jobs (or whole jobs) which require control measures. These scores can also serve as a benchmark for any further modifications.
When: Use this tool during the assessment of jobs suspected of containing risks for musculoskeletal injury. When any changes are made to the physical demands of the work, use this checklist to see if the changes are effective.

Workplace Safety and Health Division
Prevention of Musculoskeletal Injuries 7
CONTROL MEASURES
Introduction
“Control measures,“ when applied to musculoskeletal injuries, refer to deliberate changes to a job to reduce the employees’ risk of suffering MSI. These changes must be designed to reduce the physical demands of work to a level at, or below, the physical capabilities of the employee. Changes may be made to:
• the physical design of the work and workspace • the procedures and body movements used to perform the work • the pace at which the work is performed • to personal protective equipment
It is preferable to use a combination of these controls when considering the best method to reduce the risk of employee injury.
Engineering Controls
Since MSI occurs when the physical capabilities of the employee are exceeded, making physical changes to the work is the most effective way to reduce the risk of injury. Risk for MSI increases when the physical demands increase so, consider ways to reduce those demands. Keep in mind that the weight of body parts (ex: arms or torso) can increase the risk of injury when employees use awkward postures. Engineering controls should focus on reducing force and exposure to awkward postures. It is important to note the following:
• weight of materials, tools, and equipment handled • force required for holding, grasping, turning, flipping any materials, tools,
equipment • distances employees are required to reach, bend, lift • Postures used during work (ex: stoop-lift, squat-lift, non-neutral shoulder and
wrist joint angles) All of these forces, weights, angles, postures and distances may increase the risk of MSI through an increase in the physical demands on employees’ bodies. Successful engineering controls reduce these risks by reducing the physical demands. Increasing adjustability will allow employees to adjust the work to a comfortable position and avoid awkward or sustained postures.
Workplace Safety and Health Division
Prevention of Musculoskeletal Injuries 8
Administrative Controls
Safe work procedures fall under administrative controls. These controls decrease the risk of MSI by changing the way work is performed. It is important to remember that supervisors and employees need adequate training and time to adjust to changes in work procedure and body movements. After physical changes have been made, consider the movements and procedures employees use to perform the task. Administrative controls should be used to reduce employees’ exposure to risks when physical changes are not practical. Some awkward postures used during work, include:
o stoop-lift (bending at the waist) o twisting the trunk (especially while lifting) o elbow movement away from the body (side, front, or behind) o wrist movements (rapid, forceful, and/or extreme)
Make changes to the way work is performed from this and other control measures.
Prolonged exposure to awkward postures and repetitive movements increases the risk of MSI. Successful administrative controls result in body movements and procedures that reduce the risk of MSI.
Administrative controls include employee training on all control measures implemented to reduce the risk of MSI. For example, if a hoist or lift is introduced to the work environment, any workers who may be affected by this new equipment must be trained on the safe operation of the hoist or lift. Supervisors must receive the same training to properly demonstrate and reinforce the safe performance of work.
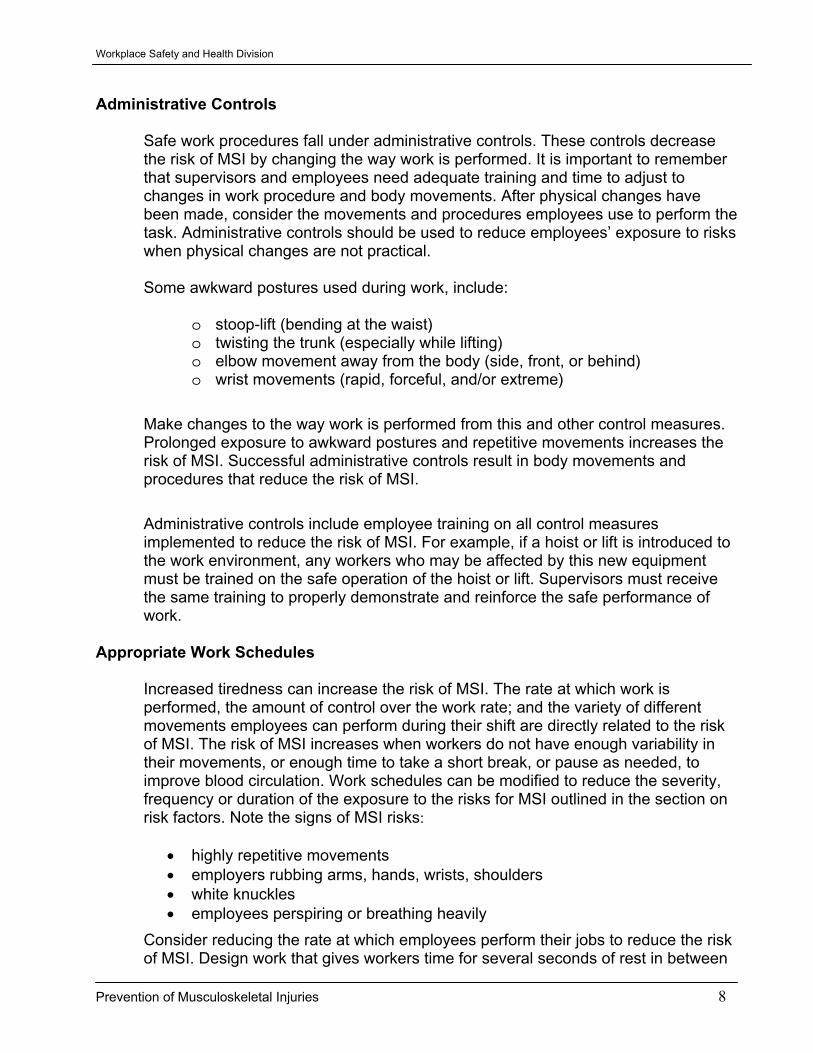
Appropriate Work Schedules
Increased tiredness can increase the risk of MSI. The rate at which work is performed, the amount of control over the work rate; and the variety of different movements employees can perform during their shift are directly related to the risk of MSI. The risk of MSI increases when workers do not have enough variability in their movements, or enough time to take a short break, or pause as needed, to improve blood circulation. Work schedules can be modified to reduce the severity, frequency or duration of the exposure to the risks for MSI outlined in the section on risk factors. Note the signs of MSI risks:
• highly repetitive movements • employers rubbing arms, hands, wrists, shoulders • white knuckles • employees perspiring or breathing heavily
Consider reducing the rate at which employees perform their jobs to reduce the risk of MSI. Design work that gives workers time for several seconds of rest in between

Workplace Safety and Health Division
Prevention of Musculoskeletal Injuries 9
and after each job, as needed. Allow employees to lower their arms and hands instead of staying in the ready position. Encourage employees in the proper use of short breaks (lasting no more than a minute or two) where they pause and rest at their workstations. Wherever practical, have employees on a job rotation schedule. Job rotation involves switching jobs or tasks with other employees during the shift. This is usually done after a break. Job rotation may be effective in reducing the risk of MSI from awkward postures, and repetitive movements, but not from forceful exertions. This rotation schedule must have employees rotating to jobs, or tasks with significantly different physical demands and movements.
Personal Protective Equipment
Since the risks for MSI are strongly related to the job, and work procedures, personal protective equipment is only practical in a few situations. When considering personal protective equipment to reduce the risk of MSI, it is important that the equipment fits properly and does not hinder work. Note that placing a glove on a hand will increase the grip force required to perform work since the finger tips will be unable to determine if the hand is slipping or not. Vibrating hand tools can be wrapped in anti-vibration tape, or employees can be provided with anti-vibration gloves to reduce the risk of MSI. Employees who kneel on floors may be exposing their knees to a risk of MSI through compression of the tissues and should have appropriate padding for the knees. Back belts have not been proven to reduce the risk of injury to the lower back and should only be used when recommended by a doctor.

Workplace Safety and Health Division
Prevention of Musculoskeletal Injuries 10
TRAINING AND EDUCATION
(on Control Measures)
Employee and Supervisor Training
When employers implement workplace controls, employees and supervisors must be trained in the changes and new or modified procedures. Employees need information and training on:
• safe performance of work • reasons for making the changes (why previous methods are no longer
suitable) Supervisors should be trained in the same way so they can reinforce the safe work procedures with workers. When considering training and education for employees and supervisors, include the following:
• injuries that have occurred, and controls implemented to prevent them • signs and symptoms of MSI that employees may experience
(Employees who know the early warning signs of MSI can get medical help sooner. Assess any job where employees report MSI.)
• All control measures implemented to reduce the risk. These include: physical changes to the design of the work and workspace safe procedures and body movements to perform the job; changes to work rate, breaks, recovery pauses, job rotation schedules and personal protective equipment provided.
Keep employees training records. To ensure accountability, ask employees and supervisors to sign an acknowledgement of the training and information received. Both new and experienced employees should receive training when controls have been implemented. Since most, but not all musculoskellal injuries develop gradually, the signs and symptoms of MSI are better able to respond effectively to early signs of MSI and get medical help sooner.

Workplace Safety and Health Division
Prevention of Musculoskeletal Injuries 11
TRAINING AND EDUCATION
(on MSI)
Employee and Supervisor Training
Since employees are the best judge of their own health and well-being, the most effective way of preventing serious MSI is to train employees in the signs and symptoms of MSI, and any risks of MSI associated with their work. Employers must identify the kind of MSI employees could suffer from performing their regular duties. This information can be gathered by:
• reviewing previous injury reports • job hazard analysis for risks of MSI • surveying employees about current or past pain or discomfort
Once MSI has been identified, the signs and symptoms of it must be included in the training given to employees, both new and experienced. Training should include what to do if employees suspect they are developing MSI, including reporting it to their supervisor and safety and health committee and getting medical help. Once an employee has reported an MSI, it is very important that an assessment is done on the particular job. Appropriate control measures must be developed and implemented to prevent further injury to employees or development of an injury by other employees who may perform the same.

Workplace Safety and Health Division
Prevention of Musculoskeletal Injuries 12
STEP-BY-STEP TRAINING PLAN Consider the following procedure when training workers and supervisors in control measures for risk of MSI: Step 1: Prepare the worker for training
• find the focus of the employee • determine their current level of knowledge of the task • position the employee so they share your physical point of view when you teach
the skill or procedure Step 2: Exhibit and explain
• show the employees each movement and procedure, step-by-step • emphasize the important points, especially when teaching biomechanics • explain clearly and entirely
Step 3: Observe and examine
• Ask the employee to demonstrate each skill back to you. Have them verbally explain what they are demonstrating.
• Observe the demonstrations and comment on the effective and ineffective things they do.
• Repeat instruction if necessary. • Have employees show they can do the job, and practise until you are certain
they know how to perform each movement and procedure effectively. Step 4: Monitor employees
• Give clear information on where to get further instruction on safe work procedures.
• Allow the employee to perform the work unassisted. • Review the employees’ understanding after a few days or a week. • Have the supervisor monitor employees daily until confident the controls have
become standard practice.

Workplace Safety and Health Division
Prevention of Musculoskeletal Injuries 13
APPENDIX A
Job Hazard Analysis
Conducting a Job Hazard Analysis (JHA)
There are three steps to conducting a job hazard analysis (JHA):
1. Break the job down into its basic steps. 2. Identify the hazards present in each step. 3. Develop controls for all hazards you have identified.
Step 1 – Breaking the Job into Steps Every task can be broken down into steps. These steps should become the basis of the safe work procedure. Identifying every step of the task is essential. Write down everything. After each step is identified, go back and combine things or eliminate unnecessary detail.
To give a clear understanding of the task, the steps must include every key step required to do the task correctly, but don’t include excess detail that will over burden the process. Limit the number of steps you actually record. If there are too many steps in the job, break it down into two jobs. Generally there should be no more than 15 steps in a job. Five steps involved in analysis by observation and discussion:
1. Select several employees willing to share their knowledge and experience. 2. Be clear about what is being done and ensure the employees understand it is
the work – not the employee -- being evaluated. 3. Watch the employees do the jobs and record the initial breakdown. 4. Discuss the breakdown with the employees for accuracy, and encourage
them to share their knowledge and experience. 5. Repeat steps 2, 3 and 4 with other employees, if appropriate and record the
basic steps again.

Prevention of Musculoskeletal Injuries
14
Com
pany Nam
e:
D
ate:
JO
B HAZAR
D AN
ALYSIS FOR
M
Job N
ame:
Facility:
Conducted B
y:
Job Steps
Hazards
Corrective A
ctions
Workplace Safety and Health Division
Prevention of Musculoskeletal Injuries 15
PHYSICAL DEMANDS DESCRIPTION (PDD) Date Analyst Department Job Title Shift
* FREQUENCY LOAD (object/tool)
PHYSICAL DEMANDS
Not
Com
pone
nt
Seld
om
Min
or
Req
uire
d
Maj
or
Max
imum
(k
g)
Usu
al
(kg)
COMMENTS
Lifting Carrying Pushing Pulling Handling Throwing
Power Grasp Gripping
Pinch Grasp Above Shoulder Below Shoulder
STR
EN
GT
H
Reaching To the Side Abduction Shoulder Flexion
Hip Abduction Flexion / Extension Radial / Ulnar Devn Wrist Pronate / Supinate Flexion Extension Side Bend
Trunk
Twist Flexion Extension Side Bend
POST
UR
ES
Neck
Twist Sitting Standing Walking Climbing Crawling Crouching Kneeling Balancing
One Foot Foot Action
Both Feet
MO
BIL
ITY
Fine Finger Movements * FREQUENCY
SELDOM = Not always performed during completion of job REQUIRED = Frequent Repetition for 25% -50% of job MINOR = Performed less than 25% of job MAJOR = Frequent Repetition for more than 50% of job
Workplace Safety and Health Division
Prevention of Musculoskeletal Injuries 16
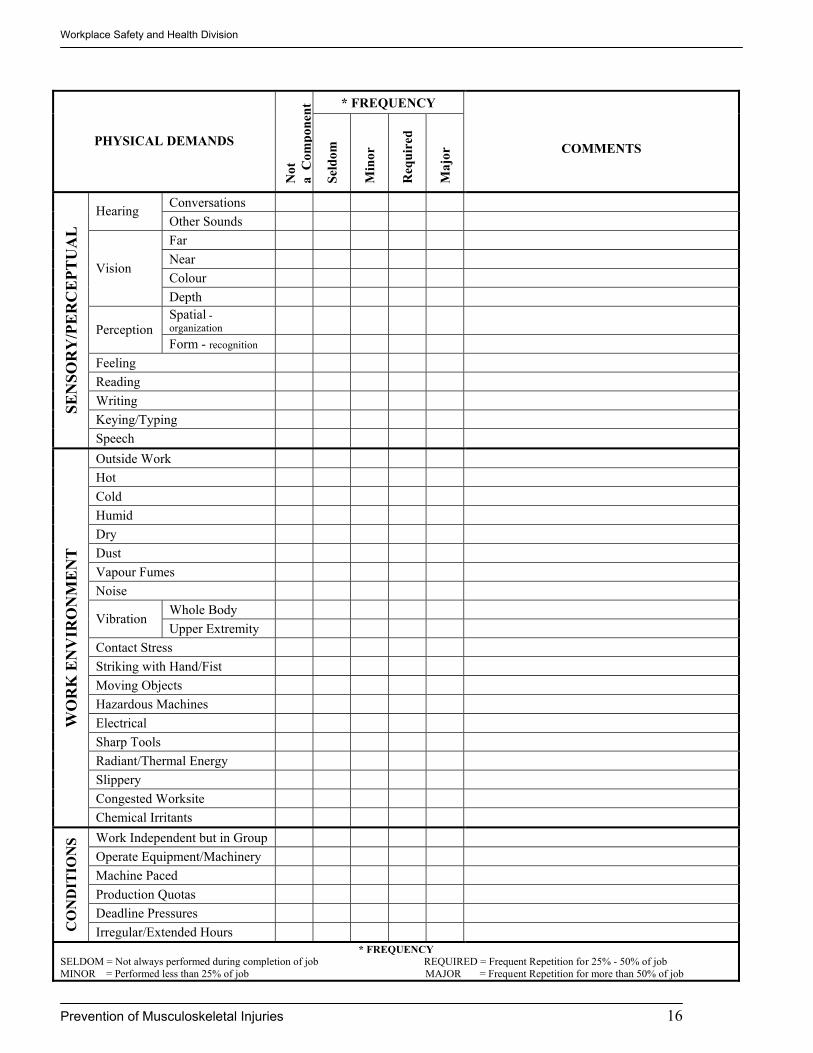
* FREQUENCY
PHYSICAL DEMANDS
Not
a
Com
pone
nt
Seld
om
Min
or
Req
uire
d
Maj
or COMMENTS
Conversations Hearing Other Sounds Far Near Colour
Vision
Depth Spatial - organization
Perception Form - recognition
Feeling Reading Writing Keying/Typing
SEN
SOR
Y/P
ER
CE
PTU
AL
Speech Outside Work Hot Cold Humid Dry Dust Vapour Fumes Noise
Whole Body Vibration
Upper Extremity Contact Stress Striking with Hand/Fist Moving Objects Hazardous Machines Electrical Sharp Tools Radiant/Thermal Energy Slippery Congested Worksite
WO
RK
EN
VIR
ON
ME
NT
Chemical Irritants Work Independent but in Group Operate Equipment/Machinery Machine Paced Production Quotas Deadline Pressures
CO
ND
ITIO
NS
Irregular/Extended Hours * FREQUENCY
SELDOM = Not always performed during completion of job REQUIRED = Frequent Repetition for 25% - 50% of job MINOR = Performed less than 25% of job MAJOR = Frequent Repetition for more than 50% of job

Workplace Safety and Health Division
Prevention of Musculoskeletal Injuries 17
APPENDIX B
ERGONOMIC RISK FACTOR CHECKLIST
UPPER EXTREMITY RISK FACTOR CHECKLIST
Date: Analyst: Job: Location:
TIME
RISK FACTOR CATEGORY
RISK FACTORS
EXPOSURE
Is the risk factor present within the job
or task?
0% to
25% of total time
25% to 50% of
time
50% to 100%
of time
If total time for job is >8 hrs, add 0.5
per hour
SCORE
1. Moderate: steady motion with regular pauses
Yes No
0
1
2
Upper Limb Movements
2. Intensive: rapid steady motion without regular pauses
Yes No
1
2
3
3. Intermittent keying
Yes No
0
0
1
Keyboard Use
4. Intensive keying
Yes No
0
1
3
5. Squeezing hard with the hand in a power grip
Yes No
0
1
3
Hand Force
(Repetitive or Static)
6. Pinch more than 2 pounds
Yes No
1
2
3
7. Neck: twist/bend (twisting neck >20o, bending neck forward >20o or back < 5o)
Yes No
0
1
2
Awkward Postures
8. Shoulder: unsupported arm or elbow above mid-torso height
Yes No
1
2
3

Workplace Safety and Health Division
Prevention of Musculoskeletal Injuries 18
TIME
RISK FACTOR
CATEGORY
RISK FACTORS
EXPOSURE
Is the risk factor present within the job
or task?
0% to
25% of job time
25% to 50% of
time
50% to 100%
of time
If job time is >8 hrs,
add 0.5 per hour
SCORE
9. Rapid forearm rotation
Yes No
0
1
2
10. Wrist: bend or deviate
Yes No
1
2
3
11. Hard/sharp objects press into skin
Yes No
0
1
2
Contact Stress
12. Using the palm of the hand or wrist as a Hammer
Yes No
1
2
3
13. Localized vibration (without dampening)
Yes No
0
1
2
Vibration
14. Whole-body vibration (without dampening)
Yes No
0
1
2
15. Lighting (poor illumination or glare)
Yes No
0
0
1
Environment
16. Adverse temperatures
Yes No
0
0
1
Control Over Work
Pace
17. One control factor present = 1 Two or more control factors present = 2
Yes No
TOTAL UPPER EXTREMITY SCORE

Workplace Safety and Health Division
Prevention of Musculoskeletal Injuries 19
BACK AND LOWER EXTREMITY RISK FACTOR CHECKLIST
Date: Analyst: Job: Location: ______________________
TIME
RISK FACTOR CATEGORY
RISK FACTORS
EXPOSURE
Is the risk factor present within the job
or task?
0% to
25% of time
25% to 50% of
time
50% to 100%
of time
If job time is >8 hrs, add 0.5 per hour
SCORE
18.Mild forward or side bending of torso more than 20o; less than 45o
Yes No
0
1
2
19.Severe forward bending of torso more than 45o
Yes No
1
2
3
20. Backward bending of torso
Yes No
0
1
2
21.Twisting of torso
Yes No
1
2
3
22.Prolonged sitting without adequate back support
Yes No
0
1
2
23.Standing stationary or inadequate foot support while seated
Yes No
0
0
1
24.Foot action (pedal), standing stationary with inadequate foot support, balancing
Yes No 0 1 2
25.Kneeling/ squatting
Yes No
1
2
3
26.Hip abduction (repetitive/ prolonged)
Yes No 0 1 2
Awkward Postures
27.Repetitive ankle extension/ flexion
Yes No
0
1
2

Workplace Safety and Health Division
Prevention of Musculoskeletal Injuries 20
TIME
RISK FACTOR
CATEGORY
RISK
FACTORS
EXPOSURE
Is the risk factor present within the job or task?
0% to
25% of time
25% to 50% of
time
50% to 100%
of time
If job time is >8 hrs, add 0.5 per hour
SCORE
28.Hard/Sharp objects press into skin
Yes No
0
1
2
Contact Stress
29.Using the knee
as a hammer or kicker
Yes No
1
2
3
Vibration
30.Whole-body
vibration (without dampening)
Yes No
0
1
2
31. Moderate load
Yes No
0
1
2
Push/Pull
32. Heavy load
Yes No
1
2
3
Control Over Work Pace
33. One control factor present = 1 Two or more control factors present = 2
Yes No
Manual Handling Checklist Score (Add scores 2 & 3 from page 3 and insert total here)
Total Back and Lower Extremity Score

Workplace Safety and Health Division
Prevention of Musculoskeletal Injuries 21
MANUAL HANDLING CHECKLIST 34(a). STEP I: NEAR LIFT MIDDLE LIFT FAR LIFT
Determine if the lift is near, middle, or far
(body to hands) - Use an average horizontal distance if a lift is made every 10 minutes or less. - Use the largest horizontal distance if more than 10 minutes pass between lifts.
34(b). STEP II: NEAR LIFT MIDDLE LIFT FAR LIFT
DANGER
ZONE
More than 51 lb.
23.13 kg 5* points
DANGER
ZONE
More than 15.88 kg (35 lb.) 6 points
DANGER
ZONE
More than 12.7 kg (28 lb.) 6 points
CAUTION
ZONE
7.71 to 23.13 kg
(17 to 51 lb.) 3 points
CAUTION
ZONE
5.44 to 15.88 kg
(12 to 35 lb.)
3 points
CAUTION
ZONE
4.54 to 12.7 kg (10 to 28 lb.)
3 points
Estimate the weight lifted in kg (pounds) - Use an average weight if a lift is made every 10 minutes or less. - Use the heaviest weight if more than 10 minutes pass between lifts. - Enter 0 in the total score if the weight is 4.54 kg (10 lb.) or less.
SAFE ZONE
Less than 7.71 kg (17 lb.) 0 points
SAFE ZONE
Less than 5.44 kg (12 lb.) 0 points
SAFE ZONE
Less than 4.54 kg (10 lb.)
0 points
*If lifts are performed more than 15 times per shift, use 6 points. Step II Score:
Factor Occasional lifts
(<1 hr/shift)
Frequent lifts (>1 hr/shift)
35. Twist torso during lift
1
1
36. Lift one-handed
1
2
37. Lift unexpected loads
1
2
38. Lift 1-5 times/minute
1
1
39. Lift > 5 times/minute
2
3
40. Lift above the shoulder
1
2
41. Lift below the knuckle
1
2
42. Carry objects 3.05 to 9.14m (10 to 30 feet)
1
2
43. Carry objects > 9.14 m (30 feet)
2
3
STEP III:
Determine the points for other risk factors - Use occasional lifts if more than 10 minutes pass between lifts - Use the more than 1 hour points if the risk factor occurs with most lifts and lifting is performed for more than 1 hour
44. Lift while seated or kneeling
1
2
Step III Score:

Workplace Safety and Health Division
Prevention of Musculoskeletal Injuries 22
APPENDIX C Guide to completing the ergonomic risk factor checklist
Introduction This section explains the content and use of the ergonomics risk factor (ERF) checklist (Appendix B). The ERF checklist is only one part of an ergonomics analysis. It works best as a preliminary tool for observing a job and defining the levels of risk factors in a job. Although it does not provide answers, it helps define what should be analyzed, and indicates the factors that may cause problems in a job. The checklist was created for an industrial manufacturing environment. It emphasizes identification of a combination of risk factors common in industry, and those that have higher risk.
It is divided into three parts:
1) risk factors for the upper extremity 2) risk factors for the back and lower extremity 3) risk factors in manual materials handling
Within each of these parts, risk factors are given scores that increase with the amount of exposure time. To use the checklist, evaluate a work task to determine which, if any, risk factors are present and the time the employee is exposed to each. Scores for each combination of risk factor exposure/time for the upper limb and lower back are added separately. They are kept separate because simultaneous exposure to risk factors for upper and lower extremities does not generally affect the same joint or anatomic region.
All components of the checklist should be completed for each job to ensure a comprehensive analysis.
STEP 1 - Familiarize Yourself with the Job Two key ways to do this are through observation and interview. Watch the employee do the job for a few minutes. Get a feel for the range of activities in a day. Talk with the employees and ask questions about their jobs. Then complete the Ergonomics Analysis Worksheet.

Workplace Safety and Health Division
Prevention of Musculoskeletal Injuries 23
Within the job description area of the checklist, describe the job on two levels: general and specific. The general will detail the goals and duties involved with this job to understand why the person is performing various tasks. The specifics will break the job down into required actions (ex: employee picks up part A from bin B and places on table C). These statements describe the general movements of the person and their sequence. The comments you make about a job should provide additional, useful information that does not fit within the structure of the checklist, and may be useful for further analysis. Within this section, note general remarks about the workstation, environment, job, or employee. Include any measurements (ex: mass, dimensions, temperature, etc.). Also include information about the anthropometrics (body shape, size and type) of the person, and how well this matches with the workstation. After the risk factor analysis (Steps 2 to 4), provide comments on any parts of the task containing risk factors (ex: a specific task that causes trouble).
The goal of an ergonomic analysis is to ensure the job fits the employee and input from the employee doing the job is a key part of the analysis. To fill out the employee interview portion of the checklist, talk with the employee and ask for any relevant information about the daily workings of the job. Questions that may provide useful information include:
Can you explain your work duties? Do you perform these duties all day, or do they change at any time? If you could improve this job in any way, what would you change? Do you feel any aches, pains, etc., that may be related to your job? What parts of your job cause problems?
STEP 2 – Determine the Risk Factors
The checklist is divided into columns and it’s best to start with the exposure column. It contains simple questions about whether or not the employee is being exposed to the various risk factors described in each row. Remember to read and understand the risk factor definitions before doing further steps.
Look at each risk factor and watch to see if the employee is exposed to this factor at any time. Once you have addressed all of the risk factors, go to Step 3. STEP 3 – Determine the Time of Exposure to the Risk Factors Step 2 shows what the employee is exposed to. The next step is to see how long the employee is exposed to each risk factor and mark it in the time column.

Workplace Safety and Health Division
Prevention of Musculoskeletal Injuries 24
The time of exposure is not how long the employee performs a job, but how long he or she is exposed to the risk factor. Example:
Joe performs a job on a production line that has a job time of 60 seconds. He does this job for eight hours per day. The job cycle involves the following body movements:
1) For 45 seconds of every cycle, Joe works with his wrist deviated.
2) For 20 seconds of every cycle, Joe’s elbow is above mid-torso level.
3) For five seconds of every cycle, Joe is bent forward greater than 45o.
Consider the job cycle represents the entire day (ex: whatever Joe does for 60 seconds, he does for eight hours).
Therefore, if Joe’s wrist is deviated for 45 seconds every cycle, Joe spends ¾ of his day or six hours with his wrist deviated. Joe has a score of three for wrist deviation.
Using the same formula, Joe spends approximately three hours per day with his elbow above mid-torso level, and less than one hour per day with his torso bent forward greater than 45o. This results in a score of two for shoulder posture and a score of one for trunk posture.
Regardless of the length of work cycle, the principal is the same for determining time of exposure.
Circle these combined scores in the appropriate column and write it down in the far right column. When both the upper limb and the back and lower extremity checklists are done, look over each to ensure that every risk factor marked “yes” in the exposure column has a score in the time column. Similarly, every risk factor marked “no” in the exposure column should have a blank time column.
STEP 4 – Evaluation of Manual Materials-handling The manual materials-handling (MMH) checklist evaluates the risk with lifting and carrying materials. It includes the location of the item being lifted; the mass of the item; how often the item is lifted; and the posture of the employee while handling the item. There are three steps:
1) Determine the horizontal distance of the load from the body. The
distance is divided into three categories: near 0 to 10 cm (0 to four inches), middle 10 to 25 cm (four to 10 inches), and far more than25 cm

Workplace Safety and Health Division
Prevention of Musculoskeletal Injuries 25
(10 inches). These ranges refer to the distance from the employee’s toes to the middle knuckle of the hand.
2) Estimate the weight of the item being lifted. If an item is lifted every 10
minutes or less, use the average weight of all the items being lifted. If more than 10 minutes pass between lifts, use the heaviest weight the person lifts.
Once the item’s weight is established, combine It with the estimate of horizontal distance to determine the score for Step II. For example: a job where a person lifts a 9.07 kg (20 lb.) load at a middle distance from the body 10 to 25 cm (four to 10 inches) would receive a score of three points. If the person does not lift any item greater than4.45 kg (10 lb.), a score of 0 would be given to this job.
3) Evaluate the other risk factors that are related to handling loads. Even if
the items being lifted are not above 4.45 kg (10 lb.) this section should still be filled out.
First, note the time of exposure: How often and how long do the MMH activities occur? If lifting is only occasional, and more than 10 minutes pass between lifts, use values from the first column ‘Occasional Lifts.’ If the risk factor occurs with most lifts, and lifting occurs for more than one hour, use the values from the second column ‘Frequent Lifts.’ Review each risk factor and determine whether or not the employee is exposed to this factor. If so, circle the score in the appropriate column and transfer it to the far right column. Add up all the scores in the right hand column and place the total in the box marked ‘Step III Score.’
The MMH checklist is really a component of the Back and Lower Extremity checklist. As such, the scores from the MMH checklist are recorded within the Back and Lower Extremity checklist, and contribute to the total score in this checklist. Once you have completed the MMH checklist, add up the scores from Steps 2 & 3and record the total in the second last row of the Back and Lower Extremity checklist.
STEP 5- Add up the Checklist Scores To find the total scores for the Upper Limb and Back and Lower Extremity checklists add the scores in the far right column for each of the checklists, and record them at the bottom of each checklist.

Workplace Safety and Health Division
Prevention of Musculoskeletal Injuries 26
STEP 6 – Opportunities for Improvement The final step is to record any actions that could improve the job. Note any recommendations after observing the employee do the job, talking with the employee, and performing the checklist analysis. It may be useful to recommend that the job be looked at in more detail before any decisions are made. The key is to record ideas while the information is fresh. Write down at least two or three ideas in the ‘Comments’ section of the Ergonomics Analysis Worksheet.

Prepared by Manitoba Labour and ImmigrationWorkplace Safety & Health Division
948 WSH NGC_8.5x11_V1.qxd 2/2/07 11:34 AM Page 2