missionarchery.com 919 river road, sparta wi 54656 · the rail slide (fig 6.1 & fig 6.3) on the...
TRANSCRIPT

MISSIONARCHERY.COM
919 River Road, Sparta WI 54656

MXB-360™ Parts Identi�cation DiagramCarefully review all of the crossbow components below so you are familiar with this information as it relates to the safety and operation of your crossbow.
MXB-360
Parts Identi�cation Page 3
Safety Rules & Instructions Pages 4-7
Cocking Instructions & Warnings Pages 8-9
MXB-320
Parts Identi�cation Page 10
Safety Rules & Instructions Pages 11-14
Cocking Instructions & Warnings Pages 15-16
Bolt/Arrow Speci�cations & Requirements Page 17
Crossbow Maintenance Page 18
Accessory Installation (Scope & Quiver) Pages 19-20
Crossbow Warranty Page 21
Personal Records Page 22
BIAS Rail™
Sling Attachment
Accessory Rail Mount
Soft Touch Forearm Soft TouchPistol Grip
CrossbowSafety
PCC Anchor™
Stock
Sling Attachment
Scope Rail
Limb BoltProtector
Limb BoltBarrelLimb Bolt Limb Cup
RiserRS Tread™
Cocking Rope
ALRS™
(Adjustable Limb Retention System)
Technology
String
Trigger
Trigger Guard
SafetyCrossbow Bolt/Arrow
Cables
Prod
X-Cam™
2 3
Index

Fig 1.2: Red = FIRE Fig 1.3: Green = SAFE
Fig 1.1: Manual Safety Mechanism
Safety location
Fig 2.1: Correct Finger Placement Fig 2.2: Correct Thumb Placement
Fig 3.1: Anti-dry �re mechanism
KEEP FINGERSBELOW STRING
WARNING!
CAUTION!
NOTICE
CAUTION!
CAUTION!
WARNING!
CAUTION!
WARNING!
WARNING!
MXB-360™ Safety Rules & Instructions Safety Rules & Instructions (Cont’d)
SAFE USE OF YOUR MISSION® CROSSBOW IS YOUR PERSONAL RESPONSIBILITY AND THE FAILURE TO FOLLOW ALL OF THESE BASIC SAFETY RULES AND INSTRUCTIONS MAY RESULT IN SEVERE PERSONAL INJURY OR DEATH TO YOU OR OTHERS.
1. Your Mission® crossbow is a precision instrument that requires speci�c tools and expertise. Accordingly, Mission® recommends that all maintenance and repair of your Mission® crossbow be performed by an Authorized Mission® Retailer. Failure to comply with this requirement may cause damage to your crossbow, in�ict serious injury, and may void your warranty.
2. While this crossbow has been factory tested, and is delivered pre-assembled to ensure your safety, this manual also provides general crossbow information including parts identi�cation, extensive loading, cocking and safety instructions.
3. NEVER expose your crossbow to extreme heat or prolonged moisture while in the cocked position.
4. AVOID storing your crossbow for extended periods of time in areas subject to extreme heat, such as the trunk of a vehicle, your attic, or in a damp garage.
5. NEVER use solvents, sprays or cleaners such as acetone or mineral spirits on or around your crossbow, as they may adversely affect the �nish, or damage components. Use a damp cloth or light gun oil for cleaning.
7. Anyone operating a crossbow under the age of 18 should always be accompanied by an adult.
8. ALWAYS BE AWARE OF YOUR TARGET AND WHAT’S BEYOND. NEVER POINT YOUR CROSSBOW TOWARD OR IN THE DIRECTION OF ANOTHER PERSON.
9. Handle every crossbow with the same respect as a �rearm. A crossbow can be dangerous and potentially fatal when mishandled.
6. Mission® dedicates itself to quality and safety. To ensure a safe and reliable shooting experience your Mission® crossbow is equipped with a standard �rearm manual safety mechanism. As with any �rearm, it is your responsibility to ensure that the safety is properly engaged when your crossbow is cocked, and remains engaged until you are ready to put your �nger on the trigger.(See Figs 1.1 - 1.3)
10. KEEP FINGERS AND THUMBS CLEAR OF THE CROSSBOW RAIL. NEVER PLACE ANY OBJECTS IN THE WAY OF THE STRING OR LIMBS TO AVOID EQUIPMENT DAMAGE OR SERIOUS PERSONAL INJURY. (See Figs 2.1 and 2.2)
11. NEVER DRY FIRE YOUR MISSION® CROSSBOW. Doing so will void your warranty, and could result in serious injury to you and/or others, as well as damage the crossbow.
Dry �ring means �ring the crossbow without a bolt/arrow loaded into the crossbow receiver. Your crossbow is equipped with a state-of-the-art Anti-Dry �re mechanism that is designed to reduce the damaging effects of an accidental dry �re. (See Fig 3.1) This device is not designed to practice-shoot your crossbow by intentionally dry �ring it. Should a dry �re occur, your crossbow must be completely inspected for damage to its components before further use.
KEEP FINGERSBELOW STRING
4 5

Fig 4.1: Example of a worn crossbow string
Fig 5.1: Correct lifting technique
Fig 6.4: Cable Orientation (viewed from below)
“R” Cam “L” Cam
“R” Cam Cable Route “L” Cam Cable Route
Safety Rules & Instructions (Cont’d) Safety Rules & Instructions (Cont’d)
12. ALWAYS use authorized crossbow bolts/arrows for shooting. Bolts/arrows must weigh a minimum of 375 grains and be designed for your Mission® crossbow.
13. NEVER point your crossbow at a target unless you intend to shoot.
14. NEVER place your �nger on the trigger until you are ready to discharge your crossbow.
15. NEVER alter your crossbow from factory speci�cations in any way. This will void your lifetime warranty and potentially cause harm to you or bystanders.
16. NEVER transport, store or do any climbing with your crossbow while it is loaded.
18. ALWAYS carefully inspect bolts/arrows and crossbow for damage or missing parts before every use.
19. ALWAYS wear a safety belt or harness when hunting from a tree stand or elevated position.
20. NEVER attempt to cock your crossbow while in your tree stand unless you are securely harnessed into your stand and you have practiced this maneuver while at ground level in your tree stand.
21. IMMEDIATELY replace any frayed or severely worn string or cables. (See Fig. 4.1)
22. ALWAYS use proper lifting techniques when manually cocking your crossbow. (See Fig 5.1)
23. NEVER work on or attempt to shoot your Mission® crossbow while on medication that may impair your judgement, physical abilities, or re�exes.
24. NEVER work on or attempt to shoot your crossbow while under the in�uence of alcohol or while consuming drugs. Doing so can result in damage to the bow or in�ict serious injury or even death.
25. ALWAYS handle crossbow bolts/arrows that are equipped with broadheads with extreme care.
Fig 6.2: “L” Cam Cable Route (View from Left side of rail slide)
Fig 6.1: “R” Cam Cable Route (View from Right side of rail slide)
The power cable coming from the right “R” cam (Blue) enters the deeper forward slot of the rail slide (Fig 6.1 & Fig 6.3) on the right of the crossbow rail and exits the deep slot at the rear of the slide on the opposite side of the crossbow rail. Conversely the “L” left cam cable (Yellow) enters the shallow forward cable slot on the left side of the crossbow rail (Fig 6.2), crossing over the other cable and exits the shallow slot at the rear of the slide on the opposing side of the crossbow rail.
27. ALWAYS check the cable orientation of your MXB-360 as it is critical to the crossbow’s performance. If your cables are not the same as pictured below, visit an authorized Mission® retailer (See Fig 6.4).
Fig 6.3: MXB-360 Rail Slide
6 7
17. ALWAYS wear safety glasses when using your crossbow.
26. ALWAYS utilize a quiver to protect yourself and your crossbow’s components from bolts/arrows tipped with sharp broadheads.
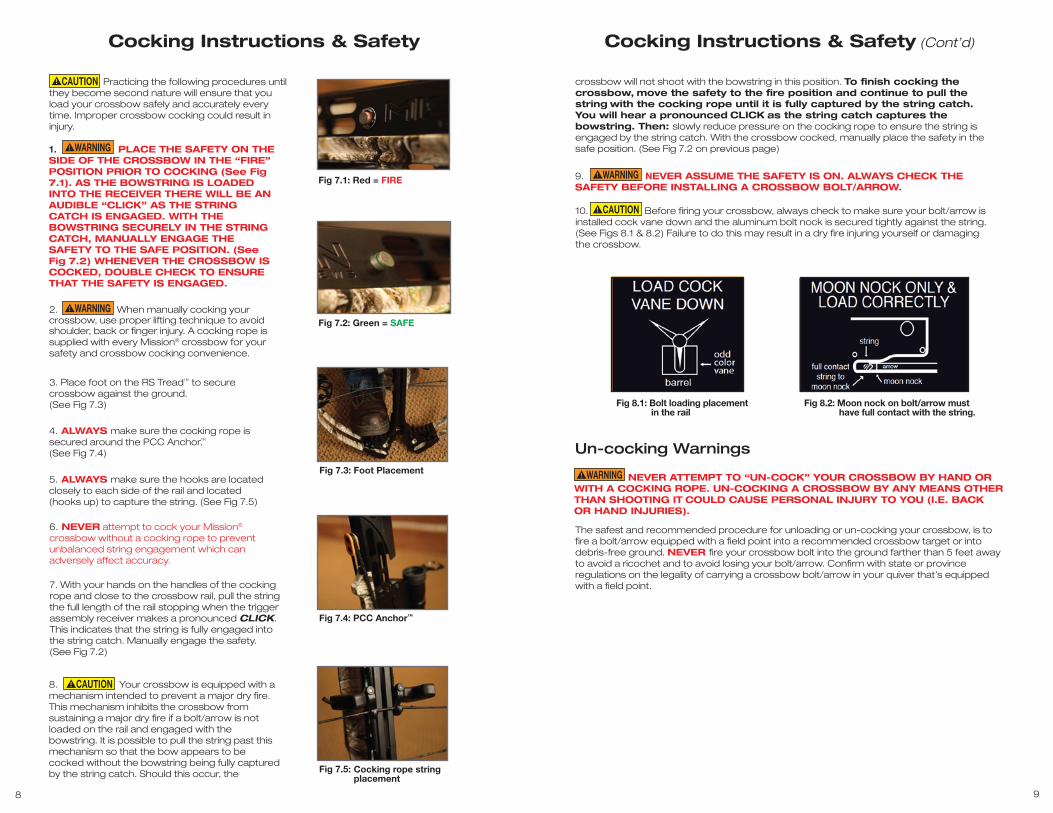
Fig 7.1: Red = FIRE
Fig 7.2: Green = SAFE
Fig 7.3: Foot Placement
Fig 7.5: Cocking rope stringplacement
Fig 7.4: PCC Anchor™
Fig 8.1: Bolt loading placement in the rail
Fig 8.2: Moon nock on bolt/arrow must have full contact with the string.
WARNING!
CAUTION!
WARNING!
WARNING!
CAUTION!
CAUTION!
WARNING!
Cocking Instructions & Safety Cocking Instructions & Safety (Cont’d)
Un-cocking Warnings
1. PLACE THE SAFETY ON THE SIDE OF THE CROSSBOW IN THE “FIRE” POSITION PRIOR TO COCKING (See Fig 7.1). AS THE BOWSTRING IS LOADED INTO THE RECEIVER THERE WILL BE AN AUDIBLE “CLICK” AS THE STRING CATCH IS ENGAGED. WITH THE BOWSTRING SECURELY IN THE STRING CATCH, MANUALLY ENGAGE THE SAFETY TO THE SAFE POSITION. (See Fig 7.2) WHENEVER THE CROSSBOW IS COCKED, DOUBLE CHECK TO ENSURE THAT THE SAFETY IS ENGAGED.
2. When manually cocking your crossbow, use proper lifting technique to avoid shoulder, back or �nger injury. A cocking rope is supplied with every Mission® crossbow for your safety and crossbow cocking convenience.
3. Place foot on the RS Tread™ to secure crossbow against the ground.(See Fig 7.3)
Practicing the following procedures until they become second nature will ensure that you load your crossbow safely and accurately every time. Improper crossbow cocking could result in injury.
4. ALWAYS make sure the cocking rope is secured around the PCC Anchor.™ (See Fig 7.4)
5. ALWAYS make sure the hooks are located closely to each side of the rail and located (hooks up) to capture the string. (See Fig 7.5)
6. NEVER attempt to cock your Mission® crossbow without a cocking rope to prevent unbalanced string engagement which can adversely affect accuracy.
crossbow will not shoot with the bowstring in this position. To �nish cocking the crossbow, move the safety to the �re position and continue to pull the string with the cocking rope until it is fully captured by the string catch. You will hear a pronounced CLICK as the string catch captures the bowstring. Then: slowly reduce pressure on the cocking rope to ensure the string is engaged by the string catch. With the crossbow cocked, manually place the safety in the safe position. (See Fig 7.2 on previous page)
9. NEVER ASSUME THE SAFETY IS ON. ALWAYS CHECK THE SAFETY BEFORE INSTALLING A CROSSBOW BOLT/ARROW.
10. Before �ring your crossbow, always check to make sure your bolt/arrow is installed cock vane down and the aluminum bolt nock is secured tightly against the string. (See Figs 8.1 & 8.2) Failure to do this may result in a dry �re injuring yourself or damaging the crossbow.
NEVER ATTEMPT TO “UN-COCK” YOUR CROSSBOW BY HAND OR WITH A COCKING ROPE. UN-COCKING A CROSSBOW BY ANY MEANS OTHER THAN SHOOTING IT COULD CAUSE PERSONAL INJURY TO YOU (I.E. BACK OR HAND INJURIES).
The safest and recommended procedure for unloading or un-cocking your crossbow, is to �re a bolt/arrow equipped with a �eld point into a recommended crossbow target or into debris-free ground. NEVER �re your crossbow bolt into the ground farther than 5 feet away to avoid a ricochet and to avoid losing your bolt/arrow. Con�rm with state or province regulations on the legality of carrying a crossbow bolt/arrow in your quiver that’s equipped with a �eld point.7. With your hands on the handles of the cocking
rope and close to the crossbow rail, pull the string the full length of the rail stopping when the trigger assembly receiver makes a pronounced CLICK. This indicates that the string is fully engaged into the string catch. Manually engage the safety. (See Fig 7.2)
8. Your crossbow is equipped with a mechanism intended to prevent a major dry �re. This mechanism inhibits the crossbow from sustaining a major dry �re if a bolt/arrow is not loaded on the rail and engaged with the bowstring. It is possible to pull the string past this mechanism so that the bow appears to be cocked without the bowstring being fully captured by the string catch. Should this occur, the
8 9

Fig 1.2: FIRE position Fig 1.3: SAFE position
Fig 1.1: Manual Safety Mechanism
Safety location
WARNING!
CAUTION!
NOTICE
CAUTION!
MXB-320™ Safety Rules & InstructionsMXB-320™ Parts Identi�cation DiagramCarefully review all of the crossbow components below so you are familiar with this information as it relates to the safety and operation of your crossbow. SAFE USE OF YOUR MISSION® CROSSBOW IS YOUR
PERSONAL RESPONSIBILITY AND THE FAILURE TO FOLLOW ALL OF THESE BASIC SAFETY RULES AND INSTRUCTIONS MAY RESULT IN SEVERE PERSONAL INJURY OR DEATH TO YOU OR OTHERS.
1. Your Mission® crossbow is a precision instrument that requires speci�c tools and expertise. Accordingly, Mission® recommends that all maintenance and repair of your Mission® crossbow be performed by an Authorized Mission® Retailer. Failure to comply with this requirement may cause damage to your crossbow, in�ict serious injury, and may void your warranty.
2. While this crossbow has been factory tested, and is delivered pre-assembled to ensure your safety, this manual also provides general crossbow information including parts identi�cation, extensive loading, cocking and safety instructions.
3. NEVER expose your crossbow to extreme heat or prolonged moisture while in the cocked position.
4. AVOID storing your crossbow for extended periods of time in areas subject to extreme heat, such as the trunk of a vehicle, your attic, or in a damp garage.
5. NEVER use solvents, sprays or cleaners such as acetone or mineral spirits on or around your crossbow, as they may adversely affect the �nish, or damage components. Use a damp cloth or light gun oil for cleaning.
6. Mission® dedicates itself to quality and safety. To ensure a safe and reliable shooting experience your Mission® MXB-320™ crossbow is equipped with an automatic safety mechanism. The safety will automatically engage when you fully cock the crossbow. As with any �rearm, it is your responsibility to ensure that the safety is properly engaged when your crossbow is cocked, and remains engaged until you are ready to put your �nger on the trigger. (See Figs 1.1 - 1.3)
Limb BoltProtector
Limb BoltBarrelLimb Bolt
RS Tread™
Cocking Rope
10 11
BIAS Rail™
Sling Attachment
Accessory Rail Mount
Soft Touch Forearm Soft TouchPistol Grip
CrossbowSafety
PCC Anchor™
Adjustable Stock
Sling Attachment
Scope Rail
ALRS™
(Adjustable Limb Retention System)
Technology
String
Safety
Trigger Guard Trigger
Crossbow Bolt/Arrow
Cables
Prod
X-Cam™
Limb Cup
Riser

Fig 2.1: Correct Finger Placement Fig 2.2: Correct Thumb Placement
Fig 3.1: Automatic Anti-dry �re mechanism
KEEP FINGERSBELOW STRING
Fig 4.1: Example of a worn crossbow string
Fig 5.1: Correct lifting technique
CAUTION!
WARNING!
CAUTION!
WARNING!
WARNING!
Safety Rules & Instructions (Cont’d) Safety Rules & Instructions (Cont’d)
7. Anyone operating a crossbow under the age of 18 should always be accompanied by an adult.
8. ALWAYS BE AWARE OF YOUR TARGET AND WHAT’S BEYOND. NEVER POINT YOUR CROSSBOW TOWARD OR IN THE DIRECTION OF ANOTHER PERSON.
9. Handle every crossbow with the same respect as a �rearm. A crossbow can be dangerous and potentially fatal when mishandled.
10. KEEP FINGERS AND THUMBS CLEAR OF THE CROSSBOW RAIL. NEVER PLACE ANY OBJECTS IN THE WAY OF THE STRING OR LIMBS TO AVOID EQUIPMENT DAMAGE OR SERIOUS PERSONAL INJURY. (See Figs 2.1 and 2.2)
11. NEVER DRY FIRE YOUR MISSION® CROSSBOW. Doing so will void your warranty, and could result in serious injury to you and/or others, as well as damage the crossbow.
Dry �ring means �ring the crossbow without a bolt/arrow loaded into the crossbow receiver. In the process of cocking the MXB 320 crossbow the Anti-Dry Fire device is activated automatically and the trigger mechanism is placed in the Safe “S” position. In this condition the crossbow cannot be �red until an arrow/ bolt is in place. Only when and arrow /bolt is in place and you are ready to shoot, should the safety be moved to the “Fire” position. Should a dry-�re occur, your crossbow must be completely inspected for damage to itscomponents before further use. (See Fig 3.1)
KEEP FINGERSBELOW STRING
12 13
12. ALWAYS use authorized crossbow bolts/arrows for shooting. Bolts/arrows must weigh a minimum of 375 grains and be designed for your Mission® crossbow.
13. NEVER point your crossbow at a target unless you intend to shoot.
14. NEVER place your �nger on the trigger until you are ready to discharge your crossbow.
15. NEVER alter your crossbow from factory speci�cations in any way. This will void your lifetime warranty and potentially cause harm to you or bystanders.
16. NEVER transport, store or do any climbing with your crossbow while it is loaded.
18. ALWAYS carefully inspect bolts/arrows and crossbow for damage or missing parts before every use.
19. ALWAYS wear a safety belt or harness when hunting from a tree stand or elevated position.
20. NEVER attempt to cock your crossbow while in your tree stand unless you are securely harnessed into your stand and you have practiced this maneuver while at ground level in your tree stand.
21. IMMEDIATELY replace any frayed or severely worn string or cables. (See Fig. 4.1)
22. ALWAYS use proper lifting techniques when manually cocking your crossbow. (See Fig 5.1)
23. NEVER work on or attempt to shoot your Mission® crossbow while on medication that may impair your judgement, physical abilities, or re�exes.
24. NEVER work on or attempt to shoot your crossbow while under the in�uence of alcohol or while consuming drugs. Doing so can result in damage to the bow or in�ict serious injury or even death.
25. ALWAYS handle crossbow bolts/arrows that are equipped with broadheads with extreme care.
17. ALWAYS wear safety glasses when using your crossbow.

Fig 7.1: FIRE position
Fig 7.2: SAFE position
Fig 7.3: Foot Placement
Fig 7.5: Cocking rope string placement
Fig 7.4: PCC Anchor™
Fig 6.4: Cable Orientation (viewed from below)
“R” Cam
“R” Cam Cable Route
“L” Cam
“L” Cam Cable Route
CAUTION!
WARNING!
WARNING!
Cocking Instructions & SafetySafety Rules & Instructions (Cont’d)
1. PLACE THE SAFETY IN THE TRIGGER HOUSING TO THE FIRE POSITION. (SEE FIG 7.1). AS THE BOWSTRING IS LOADED INTO THE RECEIVER THERE WILL BE AN AUDIBLE “CLICK” AS THE STRING CATCH IS ENGAGED WITH THE BOWSTRING SECURELY IN THE STRING CATCH. DURING THIS PROCESS THE SAFETY WILL AUTOMATICALLY ENGAGE AND BE PLACED INTO THE “SAFE” POSITION, MARKED S. ALWAYS MAKE SURE YOUR SAFETY IS ENGAGED UNTILL YOU ARE READY TO FIRE YOUR CROSSBOW. (SEE FIG 7.2)
2. When manually cocking your crossbow, use proper lifting technique to avoid shoulder, back or �nger injury. A cocking rope is supplied with every Mission® crossbow for your safety and crossbow cocking convenience.
3. Place foot on the RS Tread™ to secure crossbow against the ground. (See Fig 7.3)
Practicing the following procedures until they become second nature will ensure that you load your crossbow safely and accurately every time. Improper crossbow cocking could result in injury.
4. ALWAYS make sure the cocking rope is secured around the PCC Anchor.™ (See Fig 7.4)
5. ALWAYS make sure the hooks are located closely to each side of the rail and located (hooks up) to capture the string. (See Fig 7.5)
6. NEVER attempt to cock your Mission® crossbow without a cocking rope to prevent unbalanced string engagement which can adversely affect accuracy.
7. With your hands on the handles of the cocking rope and close to the crossbow rail, pull the string the full length of the rail stopping when the trigger assembly receiver makes a pronounced CLICK. This indicates that the string is fully engaged into the string catch and the automatic safety has been engaged. Please check to make sure the crossbow safety is engaged in the “SAFE” position.
14 15
Fig 6.2: “L” Cam Cable Route (View from Left side of rail slide)
Fig 6.1: “R” Cam Cable Route (View from Right side of rail slide)
The power cable coming from the right “R” cam (Blue) enters the deeper forward slot of the rail slide (Fig 6.1 & Fig 6.3) on the right of the crossbow rail and exits the deep slot at the rear of the slide on the opposite side of the crossbow rail. Conversely the “L” left cam cable (Yellow) enters the shallow forward cable slot on the left side of the crossbow rail (Fig 6.2), crossing over the other cable and exits the shallow slot at the rear of the slide on the opposing side of the crossbow rail.
27. ALWAYS check the cable orientation of your MXB-320 as it is critical to the crossbow’s performance. If your cables are not the same as pictured below, visit an authorized Mission® retailer (See Fig 6.4).
Fig 6.3: MXB Rail Slide
26. ALWAYS utilize a quiver to protect yourself and your crossbow’s components from bolts/arrows tipped with sharp broadheads.

Fig 8.1: Bolt loading placement in the rail
Fig 8.2: Moon nock on bolt/arrow must have full contact with the string.
WARNING!
CAUTION!
CAUTION!
WARNING!
Cocking Instructions & Safety (Cont’d)
Un-cocking Warnings
Bolt/Arrow Speci�cations & Requirements
8. NEVER ASSUME THE SAFETY IS ON. ALWAYS CHECK THE SAFETY BEFORE INSTALLING A CROSSBOW BOLT/ARROW.
9. Before �ring your crossbow, always check to make sure your bolt/arrow is installed cock vane down and the aluminum bolt nock is secured tightly against the string. (See Figs 8.1 & 8.2) Failure to do this may result in a dry �re injuring yourself or damaging the crossbow.
NEVER ATTEMPT TO “UN-COCK” YOUR CROSSBOW BY HAND OR WITH A COCKING ROPE. UN-COCKING A CROSSBOW BY ANY MEANS OTHER THAN SHOOTING IT COULD CAUSE PERSONAL INJURY TO YOU (I.E. BACK OR HAND INJURIES).
The recommended method to un-cock your crossbow is to shoot the arrow into a target or into the soft ground a few feet in front of you. If you want to switch to a different crossbow arrow/bolt prior to shooting to un-cock the crossbow use the following steps.
1) Reposition the safety to the “S” Safe location making the trigger inoperable and re-engage the Anti-Dry �re mechanism avoiding the possibility of a dry-�re.
2) Carefully replace your arrow/bolt with one more suitable to shoot into a target orinto the ground.
3) Aim at the target or soft ground a few feet in front of you, move the safety to theFire “F” position and discharge the arrow/bolt.
Fig 9.2: Minimum �etching clearanceFig 9.1: Aluminum “Half-Moon” Style nocks only
Fig 9.4: Recommended Mission® Bolts/Arrows (22”/300 grains without broadhead or �eldpoint)
Fig 9.5: Correct vane placement
Fig 9.6: Correct nock placement
7. Inspect bolts/arrows for damage after every shot. (See Fig 9.3)
1. Mission® requires using bolts/arrows with aluminum nocks that are half moon shaped. This will greatly reduce the possibility of nock failure resulting in a dry �re, which may result in damage or injury. (See Fig 9.1)
3. Total bolt/arrow weight WITH broadhead or �eld point installed must be a minimumof 375 grains.
2. The bolt/arrow must have a minimum �etching clearance of 1.35" from inside of nockto beginning of the vane. (See Fig 9.2)
4. Crossbow bolts/arrows must be 22 inches in length WITHOUT a broadhead or �eld point. (See Fig 9.4)
5. NEVER shoot a crossbow bolt/arrow without a �eld point or broadhead.
6. ALWAYS load bolts/arrows cock vane down into the slot in the rail (See Fig 9.5) with the moon nock in full contact with the string (See Fig 9.6)
8. It is recommended that �xed blade broadheads be tuned to match bolt/arrow �etching.
Mission® recommends using our customized Mission® branded bolts/arrows that are equipped with aluminum half moon nocks and meet all minimum weight and length speci�cations.
NOTICE
Fig 9.3: Arrow Inspection
16 17
1.35"

Fig 10.1: Avoiding Obstructions
Fig 11.1: Correct Scope Mounting
ScopeRail
Fig 10.2: Rail Lube Location
Fig 11.2: 4x32
Fig 11.3: 3x32 MAP
Fig 11.4: 1x32 SR
Fig 11.5: 1.5-5x32
WARNING!
CAUTION! Scope Installation
Crossbow Maintenance Accessories & Installation
6. Four different scope recital con�gurations are available as illustrated in Fig 11.2, Fig 11.3, Fig 11.4 and Fig 11.5.
Your Mission® crossbow is a precision instrument that requires speci�c tools and expertise. Accordingly, Mission® recommends that all maintenance and repair of your Mission® crossbow be performed by an Authorized Mission® retailer. 1. All the Mission® crossbow scopes are preassembled with scope mount rings and ready to
mount on the scope rail.
2. Loosen the two screws on the bottom of the scope mount rings and place at the desired spot on scope rail. (See Fig. 11.1)
3. Do not over tighten screws. A snug �t will work the best.
4. It’s recommended to check scope location with hunting cloths to simulate hunting situations.
5. After properly mounting your scope, begin sighting in your crossbow by �ring your crossbow into an authorized crossbow target and adjusting the scope accordingly.
FAILURE TO COMPLY WITH THIS REQUIREMENT MAY CAUSE DAMAGE TO YOUR CROSSBOW, INFLICT SERIOUS INJURY OR EVEN DEATH, AND MAY VOID YOUR WARRANTY.
1. Keep the trigger and anti-dry �re mechanism clear of debris. The trigger/receiver assembly is designed to operate without additional lubrication. Lubing the trigger can result in attracting dirt and grime resulting in less than optimum trigger performance.
2. To ensure the safety is operating properly, cock and load your crossbow and test the safety. Aim your crossbow at a speci�c target in a safe direction before pulling the trigger to test the safety device.
3. Protect all external metal parts of your crossbow with a light �lm of gun oil.
4. Make sure your crossbow receives a thorough drying if used in wet conditions.
5. Inspect limbs and bolt/arrows periodically to ensure there are no signs of damage, such as cracks, nicks, or slivers in the materials.
6. In the event of contacting your crossbow limb with an object during a shot, always check limbs and cams for damage. (See Fig 10.1)
7. All bearings and axles are pre-lubed and do not require additional lubrication or grease.
8. Lubricate the rail using Mission® Rail Lube every 15-20 shots to prolong the life of your string. (See FIg 10.2)
18 19

Fig 12.1: Quiver Keyhole Fig 12.2: Quiver mounted on top of the rod
Fig 12.3: Mounting bracket Fig 12.5: Quiver mounted to bracket
Fig 12.4: Mounting bracket parts
WARNING!
WARNING!
Accessories & Installation (Cont’d)
MX-3 Quiver Installation Instructions
Bohning Lynx Installation Instructions
Crossbow Warranty
1. Connect the quiver claw into the quiver keyhole on the crossbow riser. (See Fig 12.1)
2. Whether you are right or left handed will depend on which side you install the quiver claw. Note: If you are using a sling, mounting the quiver on top of the prod is recommended to avoid damaging arrows during transportation. (See Fig 12.2)
3. Place one quiver mounting post into claw, rotating the quiver until the second post snapsinto place.
1. Connect mounting bracket into the keyhole on the crossbow riser. (See Fig 12.1)
2. This is a universal mount and �ts in any position on the riser. (See Figs 12.3 and 12.4)
3. Place quiver bracket on to the adapter with the small screw. Once attached, you can place quiver on the adapter. (See Fig 12.5)
4. YOU MUST REMOVE THE QUIVER TO COCK THE CROSSBOW.
4. YOU MUST REMOVE THE QUIVER TO COCK THE CROSSBOW.
you must register online at: missionarchery.com
LIMITED LIFETIME WARRANTY. YOUR MISSION® CROSSBOW IS WARRANTED AGAINST DEFECTS IN MATERIALS AND WORKMANSHIP TO THE ORIGINAL, REGISTERED OWNER WHEN PURCHASED AT AN AUTHORIZED RETAILER, FOR THE LIFE OF THE ORIGINAL OWNER. THIS INCLUDES ALL BOW PARTS EXCEPT THE STRING, BUSS CABLE, CABLE SLIDE, TRIGGER, AND COSMETIC APPEARANCE (CHIPS, DINGS, SCRATCHES) CAUSED BY NORMAL USE AND WEAR. ALL WARRANTY CLAIMS ARE PROCESSED THROUGH AN AUTHORIZED MISSION® RETAILER. YOUR AUTHORIZED MISSION® RETAILER WILL CONTACT A MISSION® WARRANTY TECHNICIAN ON YOUR BEHALF. ANY AND ALL WARRANTIES, WRITTEN OR IMPLIED, ARE VOID WITH ANY ALTERATIONS TO THE CROSSBOW INCLUDING COSMETIC REFINISHING.
LIMITATION OF LIABILITYMATHEWS MANUFACTURING, INC. SHALL NOT BE LIABLE FOR ANY SPECIAL OR CONSEQUENTIAL DAMAGES THAT RESULT FROM THE PERFORMANCE AND USE OF THE PRODUCTS, EVEN IF MATHEWS MANUFACTURING, INC. HAS BEEN ADVISED OF THE POSSIBILITY OF SUCH DAMAGES. APPLICABLE LAW MAY NOT ALLOW THE LIMITATIONS OF EXCLUSION OF LIABILITY OR INCIDENTAL OR CONSE-QUENTIAL DAMAGES, SO THE ABOVE LIMITATION OR EXCLUSION MAY NOT APPLY TO YOU.
NOTE: Mission® reserves the right to make substitutions on warranty coverage for any reason, including but not limited to available parts and/or camo pattern. Authorized Mission® Retailers may charge for warranty work performed.* Limited Lifetime Warranty to the Original Owner.
Mission® Limited Lifetime Warranty*.
The warranty will be void if any of the following occur:
1. Failure to follow the safety and operating instructions in the owners manual;
2. Crossbow is not registered by original purchaser;
3. Crossbow is purchased from unauthorized retailer (not authorized by Mathews®
and Mission®);
4. The crossbow or any of its parts or accessories are altered from their original state;
5. Damage is caused by abuse or neglect;
6. Dry �re damage caused by using plastic non “half-moon” nocks;
7. Damage is caused by dry �ring or by using underweight bolts/arrows (lighter than recommended in the Owners Manual); or
8. The crossbow is rented or loaned for use by others.
To activate the Lifetime Warranty* on your new bow,
NOTICE
20 21

Remember, your Mission® warranty is only activated when you register your bow. Register now at: missionarchery.com
Fill out the following personal bow record for future reference:
Name
Address
City State Zip
Daytime Phone
Evening Phone
Bow Model
Serial Number
Purchased at
Purchase Date Sales Associate
Draw Length Draw Weight
Important Notes
Authorized Mission® Retailer
Located above the grip on most models
Join the Mission® Online CommunityStay Connected 24/7 at missionarchery.comShare your Mission® hunts by posting photos and stories at missionarchery.com/�eldreports, and become a fan on Facebook to get all the latest news from the Mission camp:
Mission® User Name:
Password:
Personal Records
22

MISSIONARCHERY.COM
919 River Road, Sparta WI 54656