9 the workbench - jgrasp
TRANSCRIPT

Workbench (1.8.7) 9/2/2009
9-1
9 The Workbench The jGRASP Workbench is tightly integrated with the CSD and UML windows, as well as the Debugger and Interactions. The workbench provides a useful approach for learning the fundamental concepts of classes and objects. The user can create instances of any class in the CSD window, the UML window, or the Java class libraries. When an object is created, it appears on the workbench where the user can select it and invoke any of its methods. The user can also invoke static (or class) methods directly from the class without creating an instance of the class. One of the most compelling reasons for using the workbench approach is that it allows the user to create an object and invoke each of its methods in isolation. That is, the user can invoke the methods without the need for a driver program. Some of the examples in this section were also presented in the section on Getting Started with Objects; however, more detail is included in this section.
Objectives – When you have completed this tutorial, you should be able to create objects for the workbench from classes in CSD or UML windows as well as directly from the Java libraries, invoke the methods for each of these objects, and display the dynamic states of these objects by opening object viewers for them.
The details of these objectives are captured in the hyperlinked topics listed below.
9.1 Invoking Static Methods from the CSD Window 9.2 Invoking Static Methods from the UML Window 9.3 Creating an Object for the Workbench 9.4 Invoking a Method 9.5 Invoking Methods with Parameters Which Are Objects 9.6 Invoking Methods on Object Fields 9.7 Selecting Categories of Methods to Invoke 9.8 Opening Object Viewers 9.9 Running the Debugger on Invoked Methods 9.10 Exiting the Workbench

Workbench (1.8.7) 9/2/2009
9.1 Invoking Static Methods from the CSD Window In the tutorial Getting Started, we ran the Hello program in Figure 9-1 as an application by clicking the Run button . Now let’s see how we can invoke its main method directly by using the workbench. Since main is a static method, it is associated with the Hello class rather than an instance of the Hello class; therefore, we don’t have to create an instance for the workbench. There are two ways to invoke a static method from the CSD window:
a. Click Build > Java Workbench > Invoke Static Method.
b. Click the Invoke Static Method button on the toolbar.
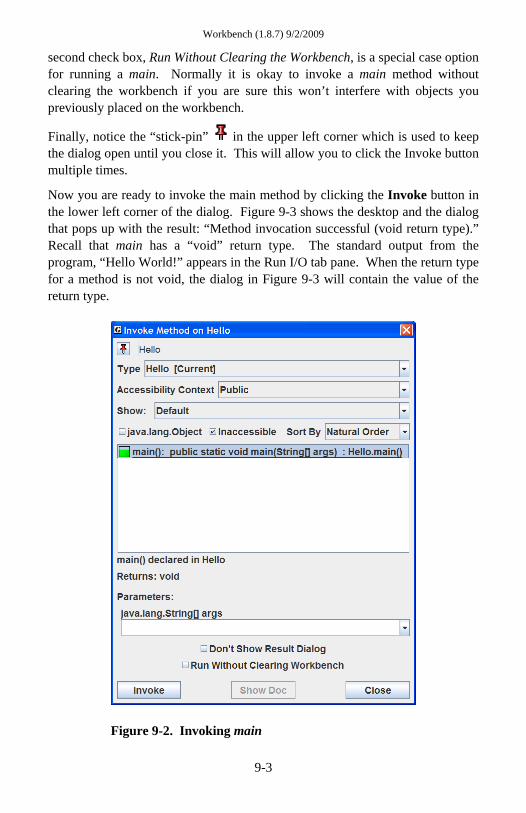
The latter is the easiest way, so click the Invoke Static Method button now. This pops up the Invoke Method dialog which lists the static method main. After selecting main, the dialog expands to show the available parameters (Figure 9-2). We can leave the java.lang.String[] args blank since our main method is not expecting command line arguments to be passed into it.
Figure 9-1. Invoking a static method from the Workbench
In Figure 9-2, notice the two check boxes below the String[] args field. The first, Don’t Show Result Dialog, will be useful when you want to repeatedly invoke a method that has a void return type or one that you do not care about. When checked ON, all result dialogs (e.g., Figure 9-3) will be suppressed. The
9-2
Workbench (1.8.7) 9/2/2009
second check box, Run Without Clearing the Workbench, is a special case option for running a main. Normally it is okay to invoke a main method without clearing the workbench if you are sure this won’t interfere with objects you previously placed on the workbench.
Finally, notice the “stick-pin” in the upper left corner which is used to keep the dialog open until you close it. This will allow you to click the Invoke button multiple times.
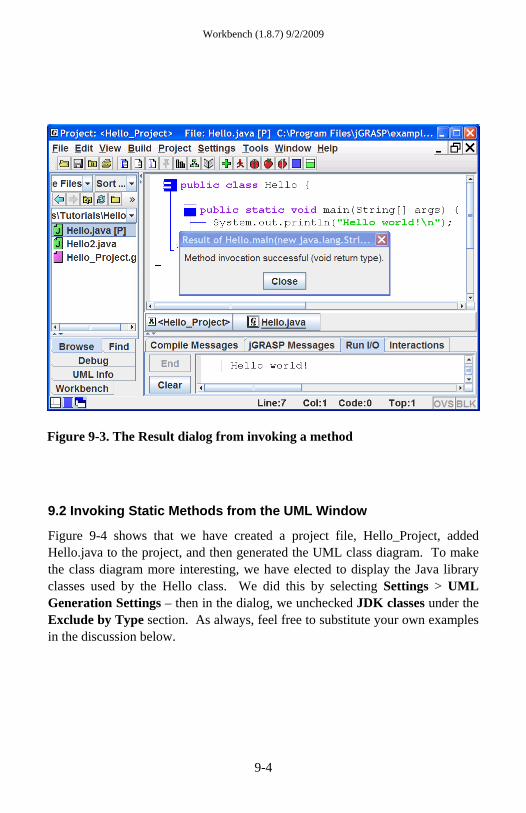
Now you are ready to invoke the main method by clicking the Invoke button in the lower left corner of the dialog. Figure 9-3 shows the desktop and the dialog that pops up with the result: “Method invocation successful (void return type).” Recall that main has a “void” return type. The standard output from the program, “Hello World!” appears in the Run I/O tab pane. When the return type for a method is not void, the dialog in Figure 9-3 will contain the value of the return type.
Figure 9-2. Invoking main
9-3
Workbench (1.8.7) 9/2/2009
Figure 9-3. The Result dialog from invoking a method
9.2 Invoking Static Methods from the UML Window
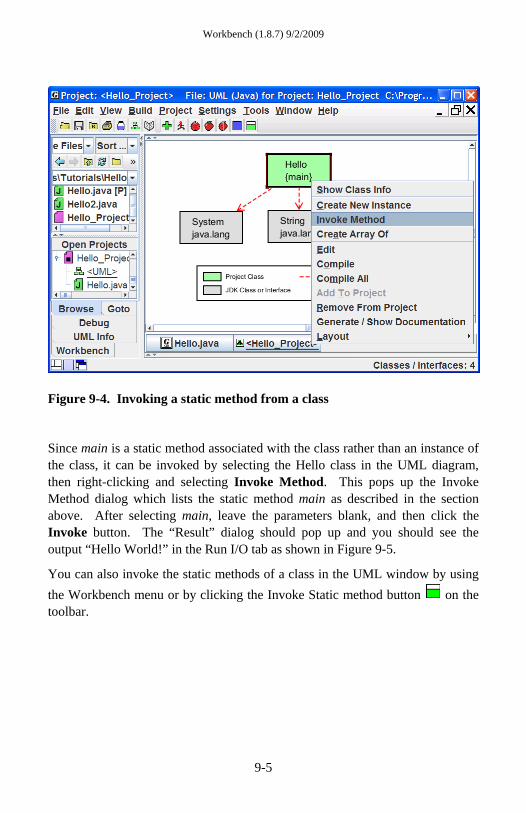
Figure 9-4 shows that we have created a project file, Hello_Project, added Hello.java to the project, and then generated the UML class diagram. To make the class diagram more interesting, we have elected to display the Java library classes used by the Hello class. We did this by selecting Settings > UML Generation Settings – then in the dialog, we unchecked JDK classes under the Exclude by Type section. As always, feel free to substitute your own examples in the discussion below.
9-4
Workbench (1.8.7) 9/2/2009
Figure 9-4. Invoking a static method from a class
Since main is a static method associated with the class rather than an instance of the class, it can be invoked by selecting the Hello class in the UML diagram, then right-clicking and selecting Invoke Method. This pops up the Invoke Method dialog which lists the static method main as described in the section above. After selecting main, leave the parameters blank, and then click the Invoke button. The “Result” dialog should pop up and you should see the output “Hello World!” in the Run I/O tab as shown in Figure 9-5.
You can also invoke the static methods of a class in the UML window by using the Workbench menu or by clicking the Invoke Static method button on the toolbar.
9-5

Workbench (1.8.7) 9/2/2009
Figure 9-5. Invoking a static method from a class
9-6

Workbench (1.8.7) 9/2/2009
9.3 Creating an Object for the Workbench
Now we move to a more interesting example which contains multiple classes. Figure 9-5 shows the PersonalLibraryProject loaded in the UML window. In this section we want to create objects and place them on the workbench. In the next section, we’ll see how to invoke the instance (or non-static) methods of the objects we’ve placed on the workbench.
We begin by right clicking on the Fiction class in the UML diagram, and then selecting Create New Instance, as shown in Figure 9-6. A list of constructors will be displayed in a dialog box.
Figure 9-6. Creating an Object for the Workbench
Note: On any CSD or UML window, you can create an instance by clicking the Create Instance button on the tool bar (or Build > Java Workbench > Create New Instance on the main menu). Using the Create Instance button from the CSD window is an easy way to create instances without the necessity of having a project or UML diagram.
9-7

Workbench (1.8.7) 9/2/2009
If a parameterless constructor is selected as shown in Figure 9-7, then clicking Create will immediately place the object on the workbench. However, if the constructor requires parameters, the dialog will expand to display the individual parameters as shown in Figure 9-8. The arguments (values of the parameters) should be filled in prior to clicking Create. Remember to enclose String arguments in double quotes.
9-8
In either case above, the user can set the name of the object being constructed or accept the default assigned by jGRASP. Also, the “stick-pin” located in the upper left of the dialog can be used to make the Create dialog “stay up” after you create an instance. This is handy for creating multiple instances of the same class. Click on the “stick-pin” (it should turn darker), then click the Create button three times and you should see three new instances appear on the workbench.
In Figure 9-9, the Workbench tab is shown after two instances (objects) of Fiction have been created. Notice that fiction_2 has been expanded so that its fields can be viewed: theAuthor, theTitle, thePages, theValue, theMainCharacter. Since the first three fields are instances of the String class, they too can be expanded. You should also note that mainCharacter is color coded green since it is the only field actually declared in Fiction. The other fields
Figure 9-8. Constructor with parameters
Figure 9-7. Selecting a constructor

Workbench (1.8.7) 9/2/2009
are color coded orange to indicate they are inherited from a parent, which in this case is Book. The placement of these fields in Book vs. Fiction was a design decision. Since not all books have a mainCharacter (e.g., a math book) but works of fiction almost certainly do, mainCharacter was defined in Fiction. Notice that Novel, a subclass (or child) of Fiction, appropriately inherits mainCharacter.
Figure 9-9. Workbench with two instances of Fiction
9.4 Invoking a Method To invoke a method for an object on the workbench, select the object, right click, and then select Invoke Method. In Figure 9-9, fiction_2 has been selected, followed by a right mouse click, and then Invoke Method has been selected. A list of user methods visible from Fiction will be displayed in a dialog box as shown in Figure 9-10. After one of the methods is selected and the parameters filled in as necessary, click Invoke. This will execute the method and display the return value (or void) in a dialog. Other output, if any, is handled in the usual way. If a method updates a field, as in the case of
9-9

Workbench (1.8.7) 9/2/2009
setMainCharacter(), the effect of the invocation is seen in the appropriate object field in the Workbench tab. The “stick-pin” located in the upper left of the dialog can be used to make the Invoke Method dialog stay up. This is useful for invoking multiple methods for the same object. For example, in a graphics program a “move” method could be clicked repeatedly to see an object move across the display.
Figure 9-10. Selecting a method
As indicated above, perhaps one of the most compelling reasons for using the workbench approach is that it allows the user to create an object and invoke each of its methods in isolation. Thus, with an instance of Fiction on the workbench, we can invoke each of its methods: setMainCharacter(), getMainCharacter(), toString(), and compareTo(). By reviewing the results of the method calls, we are essentially testing our class without a driver program.
9.5 Invoking Methods with Parameters Which Are Objects
If a method (or constructor) requires parameters that are primitive types and/or strings, these can be entered directly. However, if a parameter requires an object, then you must create an object instance for the workbench first. Then you can simply drag the object from the workbench to the parameter field in the Invoke Method dialog.
9.6 Invoking Methods on Object Fields
If you have an object in the Workbench tab, you can expand it to reveal its fields. In Figure 9-9, fiction_2 is expanded to show its fields (author, title,
9-10

Workbench (1.8.7) 9/2/2009
pages, value, and mainCharacter). Since the field mainCharacter is itself an object of the class String, any of the String methods can be invoked on it. For example, right-click on mainCharacter in fiction_2, then select Invoke Method. When the dialog pops up (Figure 9-11), you’ll see a rather lengthy list of all the methods visible to String objects. Scroll down the list and select the first toUpperCase() method, and then click Invoke. This should pop up the Result dialog with “HARRY” as the return value (Figure 9-12). This method call has no effect on the value of the field for which it was called; it simply returns the string value converted to uppercase.
Figure 9-11. Invoking a String method
Figure 9-12. Result of invoking fiction_2.mainCharacter.toUpperCase()
9-11

Workbench (1.8.7) 9/2/2009
9.7 Selecting Categories of Methods to Invoke
The Invoke Method dialog provides a list of categories of methods on a drop-down list. The “default” category list includes methods defined in the object’s class as well as those inherited from superclasses other than the Object class. This category was selected as the default so that all user defined methods could be conveniently viewed. In this section, we’ll explore the various categories of methods.
Let’s create an instance of Novel by right-clicking on Novel in the UML window and then selecting Create New Instance. On the Create dialog, choose the parameterless constructor and click Create. Now you should see novel_1 on the workbench. Right-clicking on novel_1 and then selecting the Invoke Method will open the Invoke Method dialog as shown in Figure 9-13. Notice that the first two methods are inherited (gold method symbols) and the third is defined in Novel (green method symbol). Now look back at the Invoke Method dialog for fiction_2 in Figure 9-10. The same methods are listed, but all are marked with green method symbols since those are defined in the Fiction class. One should surmise from this that both Fiction and Novel must have their own toString method.
9-12
Figure 9-13. Invoking a method for novel_1
Click pull-down list to select a category of methods.

Workbench (1.8.7) 9/2/2009
Now let’s look at another category of method on the Invoke Method dialog for novel_1. Click the drop-down list on the dialog (see info box for Figure 9-13) and select “Declared in Fiction”. Notice that the toString method in Figure 9-14 has a gray bar through its gold method symbol to indicate that it has been overridden by the toString() method defined for Novel. This means that if you select and invoke the toString method listed in Figure 9-14, the toString defined in Novel will be the one that gets called. Remember, it is the object itself that determines which method is called. In your Java program, if you wanted to call an overridden method for an object, you would need to call the method non-virtually. jGRASP provides a short cut for doing this on the workbench with the “Invoke Non-virtual” check box on the dialog. In the example in Figure 9-14, if you invoke the toString method without checking the box for Invoke Non-virtual, Novel’s toString method is called, and you get the result shown in Figure 9-15. However, if you invoke the method with the box checked, Fiction’s toString method is called, and you get the result in Figure 9-16. Notice that the only difference is that Novel’s toString method includes one more line of text (“Number of sequels: 0”) than Fiction’s toString method.
Figure 9-14 Methods declared in superclass Fiction
9-13

Workbench (1.8.7) 9/2/2009
Figure 9-15. Viewing superclasses for novel_1
Figure 9-16. Viewing superclasses for novel_1
Two other check boxes (“java.lang.Object” and “Inaccessible Methods”) are located below Show and above the method list. The first includes the methods inherited from the Object class along with the other methods in the selected category. The second can be used to display inaccessible methods such as inherited private methods.
To wrap up this section, you are invited to select among the other categories of methods that can be displayed on the Invoke Method dialog for novel_1: Default, All, Visible, Declared in java.lang.Object, Delcared in Book, Declared in Fiction, Declared in Novel, Declared in java.lang.Comparable.
9-14

Workbench (1.8.7) 9/2/2009
Notice that novel_1 inherits a large number of methods from java.lang.Object. The most inclusive category is “All” which includes all available methods. Perhaps now you see why the default category does not show all methods.
9.8 Opening Object Viewers
A separate Viewer window can be opened for any object (or field of an object) on the workbench. All objects have a basic view which is similar to the view shown in the workbench and debug tabs. However, some objects will have additional views.
The easiest way to open a viewer is to left-click on an object and drag it from the workbench to the location where you want the viewer to open. This will open a “view by name” viewer. You can also open a viewer by right-clicking on the object and selecting either View by Value or View by Name.
Figure 9-17 shows an object viewer for the title field of fiction_2 which is a String object in an instance of Novel. Formatted is the default “view” for a String object which is especially useful when viewing a String object with a large value (e.g., a page of text). In Figure 9-18, the Basic view has been selected and expanded to show the gory details of the String object. Notice that the first field is value which is a character array (char[40]) holding the actual value of the string. If we open a separate viewer on value, we have a nice Presentation view of the character array. This is the same view you get when a Presentation view for String title is opened as shown in Figure 9-19. In the Viewers for Data Structures tutorial, additional Presentation views will be discussed. You are encouraged to open separate viewers for the objects on the workbench. In addition to providing multiple views of the object, each viewer includes an Invoke Method button for the object being viewed.
Figure 9-17. Viewing a String Object
9-15

Workbench (1.8.7) 9/2/2009
Figure 9-18. Basic view of a string (expanded to see fields)
Figure 9-19. Presentation view of fiction_2.title
9-16

Workbench (1.8.7) 9/2/2009
9.9 Running the Debugger on Invoked Methods
When objects are on the workbench, the workbench is actually running the Java Virtual Machine (JVM) in debug mode. Thus, if you have a class open in a CSD window and set a breakpoint in one of its methods and then invoke the method from the workbench, the CSD window will pop to the top when the breakpoint is reached. At this time, you can single step through the program, examine fields, resume, etc. in the usual way. See the tutorial on “The Integrated Debugger” for more details.
9.10 Exiting the Workbench
The workbench is running whenever you have objects on it. If you attempt to do an operation that conflicts with workbench (e.g., recompile a class, switch projects, etc., jGRASP will prompt you with a message indicating that the workbench process is active and ask you if it is OK to end the process (Figure 9-20). When you try to exit jGRASP, you will get a similar message (Figure 9-21). These prompts are to let you know that the operation you are about to perform will clear the workbench. You can also clear or exit the workbench by right-clicking in the Workbench tab pane and selecting Clear/Exit Workbench.
Figure 9-20. Making sure it is okay to exit the Workbench
Figure 9-21. Making sure it is okay to exit
9-17

Workbench (1.8.7) 9/2/2009
9-18
Notes