80l / 2.8 cu/ft ac/dc portable fridge/freezer · screw back into place. 5. replace black plastic...
TRANSCRIPT

80L / 2.8 cu/ft
AC/DC PORTABLEFRIDGE/FREEZER
UGP-80L1 W
OWNER’S GUIDEserial number:
APR18V1

TABLE OF CONTENTS
03 Installation and operation of your Unique portable AC/DC fridge/freezer
04 Defrosting the cabinet05 UGP-80L1 W Portable fridge/freezer: features06 Power requirements06 AC power connection06 DC power connection06 Emergency overide07 Replacing the fuse09 Operation11 Error codes11 Bluetooth APP12 Connecting to a battery12 Using solar panels13 Using portable generators14 Tips and suggestions15 Technical specifications16 Troubleshooting17 Wiring diagram18 Parts diagram and list20 Appliance information 20 Notes21 Contact us21 Limited warranty

3
INSTALLATION AND OPERATION OF YOUR UNIQUE PORTABLE AC/DC
FRIDGE/FREEZER
It is important that your fridge/freezer is installed and oper-ated in accordance with the manufacturer’s instructions to guarantee the performance, efficiency and operation.
• Position the fridge/freezer in a safe and secure location, out of the reach of rain/snow and excessive wind. Prolonged exposure to heat sources or direct sunlight can affect the unit’s performance and effi-ciency.
• The normal operation of the fridge/freezer requires heat to be radi-ated away from the condensers located in the end of the cabinet. Ensure the vented areas of the cabinet are kept clear at all times to allow adequate airflow to the compressor.
• The cooling system has been designed to continue operat-ing correctly when the fridge/freezer is positioned on angles up to 35˚. It is recommended that the time the unit is ex-posed to angles over 30˚ is limited to no more than four (4) hours continuous opera-tion.
IMPORTANT: After transit where the fridge/freezer is on its side or back, ensure fridge/freezer is in a level, up-right position for 3-4 hours to allow compressor fluids to redistribute evenly before use.

4
DEFROSTING THE CABINETIf your appliance is being used primarily as a freezer, it is possible that an ice build-up on the interior may occur. This build up can af-fect the performance and efficiency of the cooling system and must be removed.
Do not use pointed tools, knives or sharp utensils, or significant force to remove the ice as this may result in damage to the unit. Turn the fridge/freezer off and empty the cabinet of food/drinks. Allow the ice to melt and then drain the water from the cabinet using the drain plugs. Use a soft, clean cloth to wipe down all surfaces and allow the fridge/freezer to dry completely.
IMPORTANT
This fridge/freezer is not intended for use by children or persons with reduced physical, sensory or mental capabilities, or lack of experience and knowledge, unless they are under supervision or instruction concerning the use of the fridge/freezer by a person responsible for their safety.
• This is not a toy. Do not allow children to play with or within the fridge/freezer.
• The fridge/freezer is suitable for outdoor and camping use and should not be exposed to rain or snow or other inclement weather.
INSTALLATION AND OPERATION OF YOUR UNIQUE PORTABLE AC/DC
FRIDGE/FREEZER continued

5
UGP-80L PORTABLE FRIDGE/FREEZER FEATURES
Protective insulated cover
DC power cord with 10 amp fuse
Battery alligator clips12V AC power cord
Interior insulated compartment lids
Internal LED light
Powder coated steel exterior
Stainless steel lid latches
Protective corners
2 x Drain plugs
Digital control
panel
1 x USB 2.1A
Sturdy side handles
3 x Storage Baskets
1 x 12V socket (40W Max)
2 x USB 2.1A
Emergency overide

6
POWER REQUIREMENTSThe Unique UGP-80L1 W portable fridge/freezers are designed to operate on AC and DC voltage inputs.
AC input Voltage is required to be 110V AC at 50 - 60 Hz
DC input Voltage is required to be 12 or 24 DC +/- 10%
AC/DC Convertor is 12V
AC POWER CONNECTIONThe Unique UGP-80L1 W portable fridge/freezers are supplied with an approved 2 pin AC power cord. It is recommended that this cord is not lengthened as this may result in a voltage drop and reduced performance.
DC POWER CONNECTION
EMERGENCY OVERIDE
The Unique UGP-80L1 W portable fridge/freezers are supplied with a vehicle DC plug (cigarette lighter plug). It is recommended that this cord is not lengthened as this may result in a voltage drop and reduced performance.
When connecting the fridge/freezer to DC, plug the power cord into the DC socket on the fridge/freezer and then plug the other end of the power cord into the DC supply.
The supplied DC power cord comes with an in-line fuse. If the red indicator light on the DC cigarette plug is not illuminated, there is either no DC voltage being supplied or the fuse is blown. See below for fuse replacement instructions. *Only use the DC power cord that is supplied with the fridge/freezer.
The emergency switch is located above the power inlet socket on the side of the unit. If the digital thermostat fails and you are un-able to set the temperature, turn this switch to Emergency override. This enables the fridge to run until you reach a service centre to replace the faulty component.
NOTE: If the switch is in the “ EMERGENCY OVERRIDE” position, the fridge/compressor will run with full cooling capacity and may freeze. This will only freeze the zone of the fridge that is currently turned on before flicking the emergency override switch.

7
REPLACING THE FUSE
1
2-3
4-5
The Unique UGP-80L1 W portable fridge/freezers are supplied with 2 additional replacement 10A fuses for the adaptor. These can be found in a plastic bag attached to the cord. If the indicator light on the DC power cord is not illuminated, it could mean that the fuse has blown. Here is how to replace the fuse:
1. Unscrew the black plastic end cap from the DC power plug.
2. Unscrew the metal threaded tip of the DC power plug to expose the cylindrical 10 amp fuse.
3. Remove blown fuse and replace with a new fuse.
4. Replace metal threaded tip of DC power plug and screw back into place.
5. Replace black plastic end cap of the DC power plug and screw into place.
Black plastic end cap
Metal threaded tip
10 A fuse
NORMAL USE
EMERGENCYOVERIDE
DC 12V / 24V12 / 24V based on input
12 / 24V base sur l’entree
IT IS NOT FOR EVERYDAY USE - ONLY FOR EMERGENCIES
If the Emergency Switch is turned on. The control panel will only show the tempera-ture and voltage, you will not be able to set the temperature or voltage.

8
IN-LINE FUSE
A 15A in-line fuse is provided with this fridge in order to protect the wiring. For 12V/24V operation, use a 15A fuse. A standard automo-bile fuse is recommended - A 15A fuse is provided with this fridge/freezer.
REPLACING THE FUSE continued
OPERATING VOLTAGE FUSE12 V / 24 V 15 A
Remove screws from the grates to access 15A fuse

9
OPERATION
COMPARTMENT CONTROL
Individual temperature controlled compartments enable a variety of fridge/freezer combinations and also allow either compartment to be shut off to save energy.
Temperature setting range: -22°C ~ +10°C, -8°F ~ 50°F
Plug in the DC or AC power cable. Use the ON/OFF power but-ton located on the electronic thermostat to power on the fridge. The LED display on the control panel will light up and the interior tem-perature will be displayed.
THERMOSTAT
Press and hold the SETTING button on the electronic thermostat for 3 seconds to adjust the temperature. To lock in the target tem-perature press SETTING button one time or leave for 5 seconds. The LCD display will indicate the current temperature inside the unit af-ter the target temperature is set. After approximately 5 minutes the displayed temperature will start to decrease.
To change the fridge between ºC and ºF. Press the Down button and UP button together.
Press and hold the SETTING button and UP button together for 3 seconds to turn off the left zone and press and hold the same but-tons for 3 seconds to turn on the left zone.
Press and hold the SETTING button and DOWN button together for 3 seconds to turn off the right zone and press and hold the same buttons for three seconds to turn on the right zone.
LEFT BIN
USB 2.1A
RIGHT BIN
RUNRUN COMPRESSOR
BATTERY PROTECTION ON/OFF COOLING SPEED
HIGH
MED
LOW
QUICK
NORM
ECO
LEFT BIN
USB 2.1A
RIGHT BIN
RUNRUN COMPRESSOR
BATTERY PROTECTION ON/OFF COOLING SPEED
HIGH
MED
LOW
QUICK
NORM
ECO
LEFT BIN
USB 2.1A
RIGHT BIN
RUNRUN COMPRESSOR
BATTERY PROTECTION ON/OFF COOLING SPEED
HIGH
MED
LOW
QUICK
NORM
ECO

10
OPERATIONBattery Protection: press and hold the voltage setting button for 3 seconds to adjust the Low, Middle , High voltage. We recommend the Middle voltage for operation.
To change the battery voltage setting press and hold the button for 3 seconds and then use the button to change between the settings. Leave the unit for 5 seconds for the voltage to adjust. The three approximate voltage settings are as follows: - (We advise to keep the setting on Medium level).
Voltage Setting
12V Battery Protection
Turn off compressor (to protect
battery)
Early warning alarm system will notify before turning off compressor
(to protect battery)
Turn on compressor
Low Level 10.3V 10.6V 11.4V
Med Level 11.1V 11.3V 12.2V
High Level 11.6V 11.9V 12.7V
Voltage Setting
24V Battery Protection
Turn off compressor (to protect
battery)
Early warning alarm system will notify before turning off compressor
(to protect battery)
Turn on compressor
Low Level 21.5V 21.8V 23.0V
Med Level 23.3V 23.6V 25.3V
High Level 24.5V 24.8V 26.2V
NOTE: The early warning alarm will sound off every 4 seconds for 30 minutes before the compressor shuts off. If an alternative power source is not found, the early warning alarm will sound off every 8 seconds for 30 mins until the unit has no more power.
CHANGING THE COOLING SPEED
Press & hold the setting button for 3 seconds and use the setting button to change between the settings. Leave the unit for 5 seconds for the cooling speed to adjust. (We advise to keep the setting on Normal level).
LEFT BIN
USB 2.1A
RIGHT BIN
RUNRUN COMPRESSOR
BATTERY PROTECTION ON/OFF COOLING SPEED
HIGH
MED
LOW
QUICK
NORM
ECO
LEFT BIN
USB 2.1A
RIGHT BIN
RUNRUN COMPRESSOR
BATTERY PROTECTION ON/OFF COOLING SPEED
HIGH
MED
LOW
QUICK
NORM
ECO
LEFT BIN
USB 2.1A
RIGHT BIN
RUNRUN COMPRESSOR
BATTERY PROTECTION ON/OFF COOLING SPEED
HIGH
MED
LOW
QUICK
NORM
ECO
LEFT BIN
USB 2.1A
RIGHT BIN
RUNRUN COMPRESSOR
BATTERY PROTECTION ON/OFF COOLING SPEED
HIGH
MED
LOW
QUICK
NORM
ECO

11
ERROR CODE
Error Code Error type can be read out on the control display
Err 7
Err 6
Thermostat failure
(If the NTC thermistor is short-circuit or has no connection).
Err 5
Thermal cut-out of electronic unit
(If the refrigeration system has been too heavily loaded, or if the ambient tempreature is high, the electronic unit will run too hot).
Err 4
Minimum motor speed error
(If the refrigeration system is too heavily loaded, the motor cannot maintain minimum speed at ap-
proximately 1,850 rpm).
Err 3
Motor start error
(The rotor is blocked or the differ-ential pressue in the refrigeration
system is too high(>5bar)).
Err 2Fan over-current cut-out
(The fan loads the electronic unit with more than 0.5A).
Err 1Battery protection cut-out
(The voltage is outside the cut-out setting).
BLUETOOTH APP
To check the Bluetooth name : Press setting button one time and see the fridge Bluetooth name.
Your Bluetooth code is located on the side of the unit under the power socket.
* To download the APP visit our website at www.UniqueOffgrid.com
LEFT BIN
USB 2.1A
RIGHT BIN
RUNRUN COMPRESSOR
BATTERY PROTECTION ON/OFF COOLING SPEED
HIGH
MED
LOW
QUICK
NORM
ECO
NORMAL USE
EMERGENCYOVERIDE
DC 12V / 24V12 / 24V based on input
12 / 24V base sur l’entree

12
USING SOLAR PANELSThe power consumption and efficiency of your Unique UGP-80L1 W portable fridge/freezer makes it ideal to be used in conjunction with solar panels to provide recharging of the DC supply. The Unique Por-table Solar Panel system (UGP-100WSPB and/or UGP-120WSP) was designed for easy use with the fridge/freezer’s DC supply. Solar panels will provide charge into the battery during the daylight hours even while the appliance is operating.
As the output from solar panels changes depending on the level of sunlight and intensity, your UGP-80L1 W portable fridge/freezer cannot be connected directly to the solar panels. The appliance must be connected to a suitable DC battery and then the solar pan-els connected to the battery.
OR OR
CONNECTING TO A BATTERYYour DC fridge/freezer can run off a single 12V or 24V power supply. When connecting to a 12V battery, ensure that the supplied connec-tion wires are used. Connect the positive wire (red) to the positive terminal on the battery and the negative wire (black) to the negative terminal on the battery. Please ensure that your deep cycle battery is fully charged and is properly connected to the Unique Portable So-lar Panel system (UGP-100WSPB and/or UGP-120WSP) or a power generator.
12V
RED BLACK NOTE: if you use 24V to power your unit ie: batteries, the cigarette socket will output 24V.
Input = Output.

13
USING PORTABLE GENERATORSIt is important that the correct generator is used with your UGP-UGP-80L1 W portable fridge/freezer. An incorrect generator may result in reduced performance or damage to your appliance which may void your appliance’s warranty.
If connecting directly to an AC generator, ensure that only a digital or inverter type generator is used. These provide a more reliable and constant 110V AC output and are specifically designed to power electronic and other power sensitive appliances.
When charging the battery using a digital or inverter type genera-tor, we recommend only using a ‘smart battery charger’ that is fully automatic, spark proof and reverse polarity protected. The battery charger is connected directly to the AC power output of the genera-tor.

14
TIPS AND SUGGESTIONS• Fresh and frozen foods should not be stored together. Frozen
surfaces can cause frost damage on fresh foods which can then lead to spoilage. It is best to put an insulating layer between these goods or to organize them into separate compartments.
• When the appliance is being set at 0˚C / 32˚F or lower, do not store glass bottles or liquids such as beer, wine, juices or soft drinks in the unit as they may freeze and shatter.
• Items such as fruit and vegetables should be stored closer to the top of the cabinet as this area is normally slightly warmer. This will reduce the risk of spoiling and ensure that delicate fresh foods are not crushed by heavier frozen items.
• To improve the efficiency of your UGP-80L1 W portable fridge/freezer it is better to have the cabinet as full as possible at all times. A full cabinet will provide lower power consumption over 24 hours than a half-empty one, as chilled and frozen food help main-tain temperature efficiency.
• Make your selection of what you wish to remove from the cabinet before you open the door. This will reduce the amount of warm air that will enter the cabinet while the door is open, and help main-tain energy and temperature efficiency.
• When located in the rear of a vehicle, it is recommended that the fridge/freezer be shaded from direct sunlight to reduce the risk of increased heat. It should also be provided with suitable ventilation to guarantee efficient power consumption and performance.
*Remember: when a vehicle is parked in the sun on a day where the ambient temperature is +30˚C/86˚F, the interior of the vehicle can reach more than +55˚C/131˚F.

15
TECHNICAL SPECIFICATIONS
MODEL UGP-80L1 W
GROSS CAPACITY 80 L / 2.8 cubic feet
ZONE Dual
RUN TEMPERATURE -22˚C/-7.6˚F to +20˚C/68˚F (in ambient temperature between +1˚C/34˚F to +43˚C/109˚F)
POWER CONSUMPTION 33 W (power consumption varies based on temp. setting)
AVERAGE RUN CURRENT 2.7 amps on 12V DC
TOTAL WATT HR DRAW 378 Wh/24 hrs (lrg. side set to +5˚C/Sm. side set to -13˚C)
TOTAL AMP HR DRAW 9.3 Ah/24 hrs (lrg. side set to +5˚C/Sm. side set to -13˚C)
REFRIGERANT R134a / 85g
INSULATION MATERIAL C5H10/C-Pentane
INSULATION THICKNESS Wall: 55mm / Lid: 50mm
WEIGHT (kg, approx.) 29 kg / 63.9 lbs
EXTERNAL DIMENSION (WxDxH)
20.9” x 31.5” x 18.5”
INTERNAL DIMENSION large chamber - 1 (LxWxD)
13.9” x 8.4” x 15.4”
INTERNAL DIMENSION large chamber - 2 (LxWxD)
13.9” x 8,4” x 6.6”
INTERNAL DIMENSION small chamber (LxWxD)
13.9” x 8.3” x 15.4”

16
TROUBLESHOOTINGPROBLEM CAUSE SOLUTION
THE COMPRESSOR DOES NOT RUN
The polarity of the positive and the negative have been reversed.
Switch off the power and check the polarity of the connections.Check your in-line fuse within the cigarette lighter plug.
The voltage is insufficient or interrupted.
Switch off power.Check connections and then fuses.
THE COMPRESSOR RUNS FOR 1-5 MINUTES AND THEN STOPS
The voltage is insufficient or interrupted.
Switch off power.Check connections and then restart.
THE COMPRESSOR RUNS BUT THE INNER COMPARTMENT DOES NOT GET COLD
The refrigeration system may be blocked.
Contact your dealer for assistance.
THE INNER LINER IS VERY COLD AND THE COMPRESSOR RUNS CONTINUOUSLY
There is a build up of ice on the inner liner.
Defrost the cabinet.
The lid is being opened and closed too frequently.
The lid should only be opened when needed.
The cabinet is being overloaded and used as a freezer.
Remove some product.
There is insufficient air flow to the condenser.
Select a well ventilated area.
THE WIRELESS REMOTE DOES NOT CONNECT TO THE FRIDGE
The voltage is insufficient or interrupted.
Switch off power. Check connections and then fuses. Restart.
The fridge is not switched on. Turn fridge on.
17
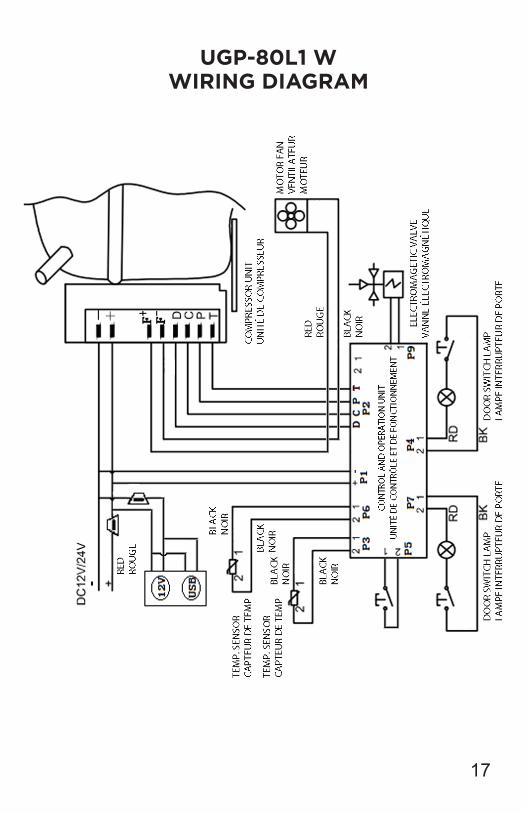
UGP-80L1 WWIRING DIAGRAM

18
UGP-80L1 WPARTS DIAGRAM AND LIST

19
PARTS DIAGRAM AND LIST continued
ITEM # PART # DESCRIPTION1 UGP-80L1 W 1 Door2 UGP-80L1 W 2 Upper Latch3 UGP-80L1 W 3 Door Handle4 UGP-80L1 W 4 M4x8 Screw5 UGP-80L1 W 5 Small lid6 UGP-80L1 W 6 Big lid7 UGP-80L1 W 7 Big Basket8 UGP-80L1 W 8 Small Basket9 UGP-80L1 W 9 M5x10 Screw
10 UGP-80L1 W 10 Fridge Handle11 UGP-80L1 W 11 Led light12 UGP-80L1 W 12 Temperature Sensing Box13 UGP-80L1 W 13 Under Latch14 UGP-80L1 W 14 M5x8 Screw15 UGP-80L1 W 15 Fridge Cabinet16 UGP-80L1 W 16 M4x10 Screw17 UGP-80L1 W 17 Cigarrate and USB Socket18 UGP-80L1 W 18 Protective Corner19 UGP-80L1 W 19 Display Control Sticker20 UGP-80L1 W 20 Display Control Panel21 UGP-80L1 W 21 Circuit Board22 UGP-80L1 W 22 Process Tube23 UGP-80L1 W 23 DC Compressor24 UGP-80L1 W 24 Compressor base25 UGP-80L1 W 25 Socket Support 26 UGP-80L1 W 26 Socket Sticker27 UGP-80L1 W 27 Socket Panel28 UGP-80L1 W 28 M4x8 Screw29 UGP-80L1 W 29 Back Cover 30 UGP-80L1 W 30 DC Socket31 UGP-80L1 W 31 Emergency Switch32 UGP-80L1 W 32 Condenser 33 UGP-80L1 W 33 Solenoid Valve34 UGP-80L1 W34 Drier filter35 UGP-80L1 W 35 Fan36 UGP-80L1 W 36 M4*30 Screw37 UGP-80L1 W 37 Hinge 38 UGP-80L1 W 38 Door Seal

20
NOTES
APPLIANCE INFORMATION(manual copy - keep with your records)
To make care and servicing of your fridge/freezer easy and efficient, please record the following information for future reference:
Model:
Serial Number:
Purchased From:
Date Purchased:

21
CONTACT US
UGP-80L1 W PORTABLE FRIDGE/FREEZER
1 YEAR LIMITED WARRANTYUnique Gas Products Ltd., warrants that this portable fridge/freezer is free from defects in material and workmanship under normal usage and service under the following terms: 1. This Warranty is made only to the first purchaser (“original purchaser”) who acquires this fridge/freezer
for his/her own use and will be honored by Unique Gas Products Ltd. and by the Seller.2. Any part of this fridge/freezer returned to the Seller or Unique Gas Products Ltd., which upon examina-
tion is determined by them to have been defective in material or workmanship, will at their option be either repaired or replaced under this warranty, within 14 days from date of return to Unique Gas Products Ltd., without charge for materials/parts.
3. The obligation to repair or replace defective parts will apply only to parts returned within one year of the date of purchase and will constitute the Sellers sole obligation under this Warranty.
The Seller will have no obligation under this warranty with respect to conditions unrelated to the material or workmanship of this fridge/freezer. Such unrelated conditions include without limitation:a) damage to any part of this fridge/freezer caused by misuse, neglect of service or any alteration thereof.b) use of this product for any purpose other than its Intended use.
This Unique fridge/freezer must be maintained regularly as outlined in the Owner’s Manual. Unique Gas Products Ltd. and the seller will not be liable for direct or indirect loss of foods caused by failure in opera-tion. In case of failure, the owner must provide proof of purchase, model, and serial number to the seller or Unique Gas Products Ltd. Please fill out warranty card within 30 days and mail back to Unique for warranty coverage.
For questions related to the operation, safety or the purchase of your fridge/freezer, please contact your dealer for more information. For general information, contact our customer service department:
• Toll-free: 1-877-427-2266 or 1-905-827-6154 (available during regular business hours, 8:30 am to 4:30 pm, EST.
• Email: [email protected]
Please visit our website for more quality off-grid products: www.uniqueoffgrid.com
Unique Gas Products Ltd., 2245 Wyecroft Road, Oakville, Ontario, Canada, L6L 5L7

© 2018 Unique Gas Products Ltd., 2245 Wyecroft Road, Oakville, Ontario, Canada, L6L 5L7
www.uniqueoffgrid.com