8 è ± â i¤sý - modern · pdf filegulko,boris f (2490) -...
TRANSCRIPT

Methods of Playing in Positions with
Part 14Endgame Series
Master the Grunfeld Structure Part 5
The Artof Analysis
Crisis Along the Big Diagonal
Carlsbad Structure Part 1
issue 14
MODERN CHESSMAGAZINE

CONTENTS33 4
12 16 19 23
71 74 77 78 79 80 83 84
49
26
38 39
38
26 30 32 35
71
49 50 51 53 54 55 57 60 62 63 64 66 68
Methods of Playing in Positions with Carlsbad Structure - Part 1 (GM Grigor Grigorov)Introduction Matelin Pavel (2587) - Debashis Das(2400) / Commenwealth 2010 (4) 12.05.2010 Onischuk,Alexander (2667) - Dominguez Perez,Leinier (2757) / FIDE World Cup (2.2) 15.08.2013 Bagirov,Rufat (2487) - Novikov,Maxim (2519) / Tula Kotov Memorial (2) 01.07.2007 Arkell,Keith C (2474) - Croad,Nicholas (2288) / BCF-chT2 0910 (4NCL) (9) 01.05.2010 Tests 1 - 5
Master the Grunfeld Structure - Part 5 (GM Mihail Marin)
The Art of Analysis (GM John van der Wiel)
Introduction, Theoretical Overview Exercise 1 - 4 / Questions & Answers
Crisis Along the Big Diagonal (GM Nikolai Ninov)
Shouldering 1 - 3 Cornering 1 - 2Cutting off 1 - 2 Restricting rook's movement Restricting bishop's movement Restricting light pieces Kuljasevic,Davorin (2591) - Weiss,C (2409) / TCh-AUT 1st Bundesliga 2013-14 (2.2) Gulko,Boris F (2490) - Kremenietsky,Anatoly M (2395) Moscow-ch 61st
Martynov,Pavel - Ivanchuk,Vassily / SochiJ-A 1986 Kapnisis,Spyridon (2412) - Marin,Mihail (2556) / EU-ch 9th Plovdiv (3) 23.04.2008 Marin,Mihail (2525) - Navrotescu,Catalin (2370) / Buzias 1991 Test 1 - 5
Endgame Series - Part 14 (GM Davorin Kuljasevic)
Bukhovsky, Anatoly / examples / Belgrade 1963 Ljubojevic,Ljubomir - Gonda,Gentaro / Skopje ol (Men) qual-B (5) 23.09.1972 Damjanovic,Mato - Langeweg,Kick / Hoogovens 28th (1) 12.01.1966 Bryn,Askild (2019) - Kuipers,Stefan (2431) / Gibraltar Masters 11th (2) 23.01.2013 Georgiev,Krum (2430) - Heydarli,Kanan Beyukkishi Og (2213) Thessaloniki op (6) 09.04.2010 Georgiev,Krum (2530) - Ipsarides,Herodotos (2110) / Limassol 10.1997 Georgiev,Krum (2461) - Van Elst,Andreas / FRA-chT2C 0506 (1.1) 16.10.2005 Filipowicz,Andrzej (2375) - Adamski,Jan (2365) / POL-chT Mikolajki (7) 1991 Leveille,Francois (2360) - Saint Amand,Paul (2225) / Montreal op (5) 1995 Tkachiev,Vladislav (2455) - Watson,William N (2550) / Lloyds Bank op 17th (7) 1993 Yordanov,Nikolay (2146) - Petkov,Vladimir (2475) / BUL-chT Sunny Beach (4) 29.09.2005 Carmaciu,Lucian (2429) - Catalin Chircu,Vadim (2200) / Cap Aurora FISCA op (8) 27.06.2014 Tests

Introduction Dear Reader,We are about to start dealing with one of the most popular and important pawn structures -Carlsbad. Among the openings out of which Carlsbad is likely to arise are Queen's Gambit, Nimzoindian Defence, Grunfeld Defence, Semi-Slav, Caro -Kann. Before I start explaining the structure in detail, I would like to givethe reader a visual example concerning the Carlsbad. A typical Carlsbadposition arises after the moves 1.d4 d5 2.c4 e6 3.Nc3 Nf6 4.cxd5 exd5 5.Bg5c6 6.e3 This is the so-called Carlsbad variation of the Queen's GambitDeclined (QGD). This variation became popular during the strong tournament which was held in Carlsbad in 1929. Since then, theoreticians introduced the name"Carlsbad structure." For more than 80 years, this structure has undergone serious developments. Nevertheless, some general positional concepts remain unchanged. In
the beginning, I would like to provide you with some basic considerations concerning the structure. The most important positional factor in the position is the absence of open files. As the reader can see, there are two semi-open files - "c" and "e". Usually, White exercises pressure along the c-file, while Black tries to make use of the e-file. When analyzing the structure from a"classical" perspective, we can say that White's long-term is to play on the kingside whereas Black should look for counter-chances on the other side of the board. At this point, I insist on the word "classical" because, in the current series of articles, we are going to see that in many positions White plays in the center and on the kingside while Black goes for active actions on the queenside. In the current article, I will focus on White's plan to play on the queenside and on Black's positional ways to fight against it. In this structure, White playing on the queenside by executing the so-called"minority attack" (three white pawns attack four black pawns). The final objective of the minority attack is to create a weak pawn on "c6". To achieve this goal, White plays b2-b4-b5 followed by bxc6. In such a case, White will put strong pressure on the weaknesses on "a7" and "c6". To avoid such scenario, Black usually meets the move b2-b4 through a7-a6. In this way, he forces White to prepare b4-b5 with a2-a4. As a result, when White finally goes for the b4-b5 break, Black will get rid of his potentially weak a-pawn by playing axb5. In this case, only the c6-pawn will be weak. Now, we are going to take a look at a game in which White managed to execute his plan flawlessly.
Methods of Playing in Positions with Carlsbad
Structure - Part 1
Modern Chess Magazine 3
www.modern-chess.com

a b c d e f g h
a b c d e f g h
8
7
6
5
4
3
2
1
8
7
6
5
4
3
2
1
8.Qc2 , the game reached the moststandard version of the Carlsbadstructure. It is important to understandthe point behind White's last move. InCarlsbad structure, it is essential to takethe b1-h7 diagonal under control byplaying Qc2 and Bd3. In this way, Whiteconnects his rooks and makes difficultfor Black to execute his typical idea toplay ...Ne4 in a suitable moment.
[ Much more popular is 8.Bd3Nevertheless, this move gives Blackan additional option. Instead of thenormal 8...0-0, he can opt for Ne4Of course, from a theoretical point ofview, White keeps a slight edge, butsometimes it makes sense to reducethe number of options for youropponent. ]
see later, Black is also ready toexchange that bishop for one of White'sknights). Since White will develop hislight-squared bishop on d3, Black's lastmove prepares the exchange via the f5-square. To achieve it, Black goes for themaneuver Nf8-e6 followed by g7-g6, Ng7,and Bf5. After the eventual exchange ofthe bishops, Black's knight will occupythe f5-square, from where it will go tothe ideal d6-square. At this point, weshould mention the d6 is the perfectsquare for Black's knight in the Carlsbadstructure. From there, the knight nowonly makes difficult for White to carryout the thematic b4-b5 advance, but atthe same time, it can occupy the e4-square at any moment. Despite it'sstrategical soundness, however, Black'splan is time-consuming. White hasenough time to realize all the desiredideas in the position. 9.Bd3 Ne610.Bh4 In some cases, the exchange ofthe dark-squared bishop for the f6-knight makes sense because it deflectsBlack's bishop from the important a3-f8diagonal. Under such circumstances,the advance b2-b4 becomes easier. Onthe other hand, giving away the pair ofbishops implies a considerablepositional risk. If Black manages to openthe position using the advance c6-c5executed in the suitable moment, thepair of bishops might tell. g6 11.0-0 0-012.Rab1 This is the best way to preparethe advance b2-b4-b5. After Whiteopens the b-file by means of b5xc6, the
Matelin Pavel 2587 2400
12.05.2010Debashis Das
Commenwealth 2010 (4)After the moves 1.d4 d5 2.c4 c6 3.Nf3
Nf6 4.Nc3 e6 5.Bg5 Nbd7 6.cxd5 exd5 7.e3 Be7
8...Nf8 This move introduces one of Black's most classical plans in Carlsbad
positions. It is evident that the c8-bishop is quite a problematic piece in this structure. That is why Black is always interested in exchanging the light-squared bishops (as we are going to
Modern Chess Magazine 4
www.modern-chess.com

more than one weakness on thequeenside. 14.a4 Bf5 15.b5It is very important that White canimmediately carry out this advance. Asthe reader already knows, before playingb4-b5, we should make sure that Blackcan not play c6-c5. It is evident that inthe particular position, the move c6-c5doesn't work. For example, in a case of15...axb5 16. axb5 c5, White can go for17.dxc5 Bxc5 18.Bxf6 Qxf6 19.Nxd5,winning a pawn. axb5 16.axb5 Bxd317.Qxd3 Nf5 18.Bxf6 Bxf6 19.bxc6bxc6
a b c d e f g h
a b c d e f g h
8
7
6
5
4
3
2
1
8
7
6
5
4
3
2
1
The moment has come to draw some conclusions concerning the strategy of both sides. Black has managed to execute the favorable exchange of the light-squared bishops, and now his knight is about to occupy the desired d6-square. Nevertheless, meanwhile, White has achieved a lot on the queenside. As a result of the typical minority attack, Black has a weak pawn on c6. Now, White will start putting pressure along
the c-file. Of course, to transform his positional advantage in something significant, White has a lot of work to do. It goes without saying that one weakness is never enough to win the game. The strong side needs two weaknesses as a minimum. Even though Black can objectively hold the position, a lot of precision is required from him. When you are the one who is pushing in such kind of positions, your primary concern should be to eliminate even the slightest hope for counterplay. That is why we should always pay attention to the resources of our opponent. How can Black further improve his position? The most obvious way to generate some activity is to play 20...Ra3 followed by Qa5 and eventually c6-c5, thus making use of the somewhat vulnerable position of the c3-knight. That is why GM Maletin went for 20.Ne2! With this precise move, White not only prevents Black from playing 20...Ra3, but at the same time he clears the c-file for the rook. It is clear that the pressure of White's major pieces will not be enough to capture the c-pawn. Somehow, White should find a way to bring his knights into the attack of the weak c6-pawn. There is a typical maneuver allowing to achieve this idea -Ne2-f4-d3-e5 (b4). Qd7 21.Rfc1 Nd6 22.Nd2! Another importantprophylactic move which shows thatMaletin always keeps an eye on theresources of his opponent. By playing21...Nd6, Black wanted to occupy theweakened c4-square. Rab8?! I think thatthis move is an inaccuracy. In general,when your opponent has long-termweaknesses, you should try to exchangeone pair of rooks. The justification of thisprinciple is quite simple. Let's take as anexample
b1-rook will be perfectly placed. Ng713.b4 a6 In the introduction, I havealready pointed out that Black shouldplay a7-a6 in response to b2-b4. In thisway, he prevents White from creating
Modern Chess Magazine 5
www.modern-chess.com

the position on the diagram. Obviously,one of the black rooks will be tied to thedefense of the c6-pawn. To create somecounterplay, Black will rely on hisremaining rook. That is why byexchanging only a pair of rooks, Whitemanages to restrict his opponent'scounterplay. On the other hand, aneventual exchange of all the rooks willfavor Black since White's remainingforces will hardly be sufficient to putsignificant pressure on the c6-pawn.Instead of exchanging a pair of rooks,Black should aim for the exchange of allminor pieces. Without minor pieces,White's pressure on c6 is almost neverenough (if there are no otherweaknesses in Black's camp).
[ Maybe Black should have activatedthe bishop by playing 22...Be7A possible line would be 23.Qc2 Ra624.Nf4 Rfa8 25.Nd3 Nb5 26.Nc5Bxc5 27.Qxc5 White's position is stilla little bit more pleasant, but Blackmanaged to activate his pieces. Asthe reader knows, if Black exchangesthe knights, he will be perfectly wellprepared for the endgame. I believethat this position is objectively equal. ]
23.Rxb8 Rxb8 24.Qc2 White startsputting pressure on the c6-pawn. Now,he intends to follow with the maneuverNe2-f4-d3. Be7 25.Nf4 Rb6 26.Nd3
a b c d e f g h
a b c d e f g h
8
7
6
5
4
3
2
1
8
7
6
5
4
3
2
1
In the future, White can considerinvading the seventh rank or attackingBlack's kingside structure using h2-h4-h5. Additionally, if White manages totransfer a knight to c5, Black will haveproblems to defend the e6-square.
[ Again, Black should have gone for anactive play through 26...Nb5Maybe he was afraid of losing a pawnafter 27.Ne5 ( Instead of 27.Ne527.g3 is a better option. White willcontinue gradually increasing thepressure against c6. With a precisedefense, however, Black can still holdthe position. ) 27...Qb7 28.Nxc6?but White's last move runs into Ba3when Black wins an exchange. ]
27.Qa4 Nb5 28.Qa8+ Kg7 29.Nb3!White activates his last passive piece.Since Black's king is weakened, the idea
f6?! Another inaccuracy. When you are in a difficult position, you should never create additional weaknesses in your camp. With his last move, Black starts weakening his kingside and the seventh rank. Also, the e6-square becomes weak.
Modern Chess Magazine 6
www.modern-chess.com

a b c d e f g h
a b c d e f g h
8
7
6
5
4
3
2
1
8
7
6
5
4
3
2
1
Kf7?! Is it possible that such a naturalmove turns out to be a mistake? Ofcourse, it is! Let's try to figure out whereis the problem. I have already pointedout that to win in a better position, weneed at least two weaknesses in theopponent's camp. This is the so-called"principle of two weaknesses." In thisposition, Black's only weakness so far isthe c6-pawn. As we see, this pawn isvery well protected. That is why Whiteshould create another weakness on theother side of the board. If the distancebetween the two weaknesses is big, thedefender will encounter problems todefend them simultaneously. Accordingto these considerations, White's targetshould be the h7-pawn. To prevent thispawn from moving to h5 (where it will notbe a weakness) White should fix it bymeans of g2-g4. In a case of ...h7-h5,White will answer with gxh5 creatinganother pawn island in Black's camp.One would argue that White's h-pawnbecomes isolated too. Nevertheless,this pawn couldn't be attacked since
White will put it on h3. After fixing theopponent's h7-pawn, White should starta combined play against Black's twoweak pawns.
[ After the abovementionedconsiderations, it becomes clear whyBlack should have played 31...h5!preventing the opponent from playingg2-g4. Later on, Black could proceedwith 32...Kf7 followed by themaneuver Na7-c8-d6. The positonremains playable. ]
32.g4! Maletin immediately seizes theopportunity. Now, he will combine hisplay against his opponent's weaknesses.Nc8 33.Ra1! It is time to invade Black'scamp. Nd6 34.Ra7 Nb5 35.Ra8 Nc336.Rc8 This is a very sound positionalmove. In general, we should always tryto tie our opponent's pieces to thedefense of some weaknesses. With hislast move, White makes the b6-rookvery passive.
[ Nevertheless, it was possible to get aslightly better version of the same ideaby playing 36.Rh8 Kg7 37.Rc8Black's king is more passive on g7than on f7. ]
36...Ne4 37.Kg2
30.Nc5 becomes very powerful. That iswhy Debashis goes for an exchange ofthe queens. Qa7 30.Qxa7 Nxa731.Nbc5
a b c d e f g h
a b c d e f g h
8
7
6
5
4
3
2
1
8
7
6
5
4
3
2
1
Modern Chess Magazine 7
www.modern-chess.com

40.Rc7+
a b c d e f g h
a b c d e f g h
8
7
6
5
4
3
2
1
8
7
6
5
4
3
2
1
Ke8! This is the most tenaciousdefense. In the endgame, theactivity is everything! ( The positionafter 40...Kg8? 41.h4! seems to behopeless for Black. White intends tofix the h7-pawn by playing h4-h5-h6.Black is too passive to survive. )41.h4 Again, White goes for hismain idea - fixing the h7-pawn. In
the endgame, it is very important tohave advanced pawns. ( In a case of 41.Rxh7? Ra5Black manages to createcounterplay. ) 41...h5! Black can notafford himself to allow the advanceh4-h5. 42.g5! Another veryinstructive move. As I have alreadypointed out, further advancedpawns are a very important asset inthe endgame. That is why Whiteprefers to fix the g6-pawn insteadof creating a weakness on h5.When the g6-pawn is lost, White'spasser will be very dangerous. ( After 42.gxh5 gxh5 43.Kg3Black obtains a sufficientcounterplay in a very instructiveway: Kd8! The most importantprinciple in the rook endgames saysthat we should activate our rook atany price. With his last move, Blackunties his rook from the defense ofthe c6-pawn. In the position arisingafter 44.Rf7 Ra5 45.Rxf6 Rxc546.Rf5 Rc3 Black's counterplayshould be enough for a draw. Stil alot of precision is required though. )
A1) Another interestingpossibility is 42...Ra4I have examined the followinginteresting line: 43.Rxc6 Rxh444.Re6+! Important intermediatemove which allows White tocollect Black's f6-pawn with acheck. Kd7 45.Rd6+ Ke746.gxf6+ Kf7 47.f4! This moveallows White to isolate the h4-rook. Now, Black should find away to deal with the dangerousc5-pawn. Rg4+ 48.Kf1!Fantastic prophylactic move. In
Ng5? This is a tactical mistake which allows White to win a pawn.
[ Black should have released thetension by playing 37...Nxc5 38.Nxc5
A) I don't think that the rookendgame arising after 38...Bxc539.dxc5 Ra6 is playable for Black.Before starting active actions,White should force Black's king intopassive position by means of
Modern Chess Magazine 8
www.modern-chess.com

order to make it, White shoulddiscover the counterplay of hisopponent. ( In a case of 48.Kf2Black is just in time to survive. h449.c6 h3 50.Rxd5 Rg2+!This is the point. Now the rookgoes behind the passed pawn.51.Kf3 Rc2 Now, White shouldpay attention to the idea 52...h3-h2. 52.Rd7+ Kxf6 53.Rh7 Rxc654.Rxh3 Rc1 We have reacheda drawn position. The activeblack rook can always botherWhite's king with annoyingchecks. Furthermore, in somepositions, Black can execute theg6-g5 advance after which theplay becomes pointless.;To the same leads 48.Kf3 Rg1!49.Rxd5 h4 50.e4 h3 51.Rd2
Kxf6 52.Rh2 Rc1 53.Rxh3 Rxc5= )
A1a) A very tricky attempt tosave the game would be
48...Rg3 49.Kf2 Rh3 50.Rxd5 Kxf6 This is the most stubborndefense. ( Worse is 50...Rh2+when White is winning after51.Kg3 Rc2 52.e4 Kxf653.Rd6+ Kf7 54.c6with e4-e5 and Kg3-h4-g5 tofollow. ) 51.c6 Rh2+ 52.Kg3Re2 53.Rd3! After this precisemove, Black runs out ofdefensive resources. Besidesprotecting the e3-pawn, therook is heading for the c3-square. In rook endgames, ourrook is best placed behind thepassed pawns. No matter ifpassed pawns belong to us orour opponent. Ke7 ( After
53...Rc2 54.Rd6+ Kf7 55.e4White is winning. His plan isthe same - e4-e5 followed byKg3-h4-g5. ) 54.Rc3 Kd855.c7+ Kc8 56.Kf3+-White is winning by using theplan we are already familiarwith.;A1b) 48...h4 49.Rxd5 h350.Rd2+- White is winningsince Black has no a reliableway to deal with the c5-pawn.Now, the reader can see thepoint behind the prophylactic48.Kf1!. Via the second rank.the white rook not onlycontrols Black's h-pawn butalso can be transferred behindthe c-pawn.;
A2) 42...fxg5 43.hxg5 Ra444.f3! Excellent move which isalso very instructive. White's g5-pawn advanced and will be avaluable passed pawn, once theg6-pawn is eliminated. That iswhy we should protect it at anyprice. Ra3 45.Rg7!Another instructive move. The g6-pawn is more important that theone on c6. ( The move 45.Rxc6would have allowed theactivation of Black's king bymeans of Kf7 Of course. Whiteis still winning. ) 45...Rc3 46.f4Rxc5 47.Rxg6 Now we have aneven number of pawns.Nevertheless, it goes withoutsaying that the quality is moreimportant than the quantity.White's passers are moreadvanced, and they are movingtowards Black's monarch,
Modern Chess Magazine 9
www.modern-chess.com
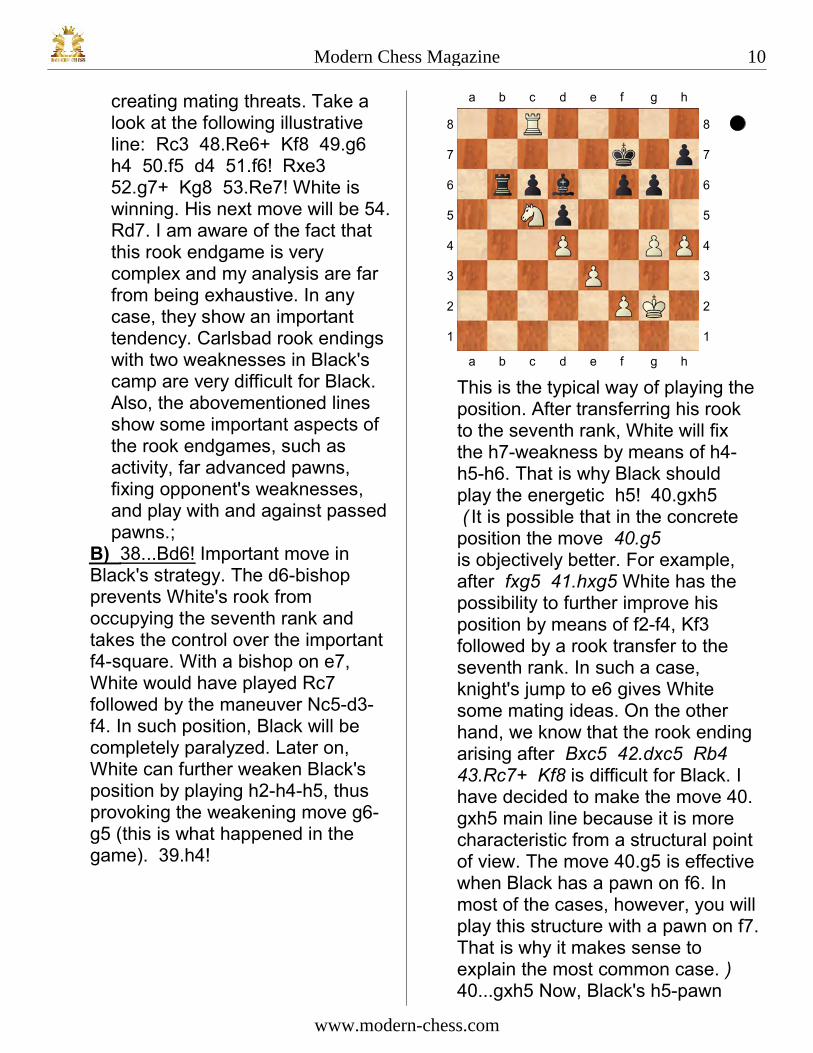
creating mating threats. Take alook at the following illustrativeline: Rc3 48.Re6+ Kf8 49.g6
h4 50.f5 d4 51.f6! Rxe352.g7+ Kg8 53.Re7! White iswinning. His next move will be 54.Rd7. I am aware of the fact thatthis rook endgame is verycomplex and my analysis are farfrom being exhaustive. In anycase, they show an importanttendency. Carlsbad rook endingswith two weaknesses in Black'scamp are very difficult for Black.Also, the abovementioned linesshow some important aspects ofthe rook endgames, such asactivity, far advanced pawns,fixing opponent's weaknesses,and play with and against passedpawns.;
B) 38...Bd6! Important move inBlack's strategy. The d6-bishopprevents White's rook fromoccupying the seventh rank andtakes the control over the importantf4-square. With a bishop on e7,White would have played Rc7followed by the maneuver Nc5-d3-f4. In such position, Black will becompletely paralyzed. Later on,White can further weaken Black'sposition by playing h2-h4-h5, thusprovoking the weakening move g6-g5 (this is what happened in thegame). 39.h4!
a b c d e f g h
a b c d e f g h
8
7
6
5
4
3
2
1
8
7
6
5
4
3
2
1
This is the typical way of playing the position. After transferring his rook to the seventh rank, White will fix the h7-weakness by means of h4-h5-h6. That is why Black should play the energetic h5! 40.gxh5 ( It is possible that in the concrete position the move 40.g5is objectively better. For example, after fxg5 41.hxg5 White has the possibility to further improve his position by means of f2-f4, Kf3 followed by a rook transfer to the seventh rank. In such a case, knight's jump to e6 gives White some mating ideas. On the other hand, we know that the rook ending arising after Bxc5 42.dxc5 Rb4 43.Rc7+ Kf8 is difficult for Black. Ihave decided to make the move 40.gxh5 main line because it is morecharacteristic from a structural pointof view. The move 40.g5 is effectivewhen Black has a pawn on f6. Inmost of the cases, however, you willplay this structure with a pawn on f7.That is why it makes sense toexplain the most common case. )40...gxh5 Now, Black's h5-pawn
Modern Chess Magazine 10
www.modern-chess.com

becomes a serious weakness.Black hopes that his bishopcontrols all the squares from whereWhite's knight could attack the h5-pawn. On the other hand, it is notalways easy to predict themaneuvers of the knight. To get anidea, we shall take a look at thefollowing line which is not forced.41.Kf3 Kg6 42.Nd3 White wants totransfer his rook to the seventhrank. Before doing that, it isimportant to prevent Black fromplaying ...Bxc5 followed by ...Rb5.Kf5 43.Rh8! Before playing Rd8,White wants to force Black's kinginto passive position. Kg6 44.Rd8Bc7 45.Rd7 Bb8 46.Nc5
a b c d e f g h
a b c d e f g h
8
7
6
5
4
3
2
1
8
7
6
5
4
3
2
1
This is something like a modelposition for the Carlsbad structure.Depending on the circumstances,White could go after one of Black'sweak pawns. In order to putpressure on the c6-pawn, Whitecould consider the maneuver Nc5-e6-d8. It seems, however, that the
idea to attack the h5-pawn is muchmore dangerous. Such an attackcan be realized by means of Nc5-e6-f8 followed by Rh7. It isimpossible for Black to be equallywell prepared for both White's plans.A classical illustration of theprinciple of two weaknesses! ]
38.Rc7?! Maletin misses a possibility towin a pawn.
[ He should have played 38.Na4! Ra639.Ndc5 Bxc5 40.Nxc5 Rb641.Rc7+ With 42.Nd7 to follow. Blackwill lose his f6-pawn. ]
38...Ne6 By exchanging a pair of knights,Black wants to reduce the tension, butWhite has a clear way of improvement.39.Nxe6 Kxe6 40.Nf4+ Kf7This move turns out to be quite passive.
[ More to the point was 40...Kd6but White retains his advantage byplaying 41.Rc8 followed by Rh8 onthe next move. It becomes apparentthat the significant distance betweenthe weaknesses makes impossibletheir effective defense. ]
41.h4 Again, this thematic advance. Ra642.h5 This is the point. White isthreatening to win a pawn with 43.hxg6hxg6 44.Nxg6. Black is forced to createnew weaknesses in his position. g5This move weakens the f5-square whichcan be easily occupied by the knight.
[ Nevertheless, it is already difficult togive Black a good advice in thisposition. For example, after 42...f543.gxf5 gxf5 Black creates two newweaknesses in his camp - e5-squareand f5-pawn (also, the weak h7-pawnis still on the board). White willfurther improve his position withnormal moves like Kf3, h5-h6 and Nf4-
Modern Chess Magazine 11
www.modern-chess.com

d3-e5. ]43.Ne2! The knight is heading for f5.Ke6 44.Ng3 h6 45.Nf5 Bf8 46.Rc8Kf7 47.Rc7+ Since Black is doomed topassivity, White can afford himself torepeat the position. Kg8 48.Kf3 Rb649.Rc8 Kf7 50.e4?! In general, whenthere are a lot of weaknesses in thecamp of your opponent, you are advisedto open the position. In this way, yourpieces will easily attack the weak points.Nevertheless, we shouldn't rush. It iscrucial to pay attention to the resourcesof your opponent.
[ Much more precise would have beento prepare the e3-e4 advance with50.Kg3 White intends to follow with f2-f3 and e3-e4. ]
50...Rb3+ 51.Ne3? This is already aserious mistake which allows Black tosave the game.
[ After 51.Kg2 dxe4 52.Rc7+ Kg853.Rxc6 White's advantage is out ofquestion. ]
51...c5! It turns out that the pin along thethird rank is very dangerous. 52.Kg2
dxe4? Black misses his chance. Now,White creates a dangerous passed pawnon the c-file.
[ After 52...cxd4 53.Nxd5 Bd6The position is equal. Black'sweakness on h6 is compensated bythe dangerous d4-pawn. ]
53.dxc5 Rc3 54.c6 Bc5 55.Nf5 Rc256.Nxh6+? Another mistake. To win apawn, Maletin allows his opponent tocentralize his king.
[ Instead, White should have improvedthe position of his own king by playing56.Kf1! Stockfish 7 gives the followingline: Rxf2+ 57.Ke1 Rc2 58.Kd1 Rc359.Kd2 Bb4 60.Rb8 Ba5 61.Ra8
e3+ 62.Nxe3 Rc5+ 63.Kd3+-White should be winning. Thiscomputer generated sequenceillustrates one fundamentalendgame principle - the activation ofthe king is more important thaneventual material gains. ]
56...Kg7? This is the last mistake in thegame. Concerned about the opponent'sh-pawn, Black misses the opportunity tocentralize his king.
[ Of course, Black should havepreferred 56...Ke6! In this position,his activity completely compensatesthe missing pawn. ]
57.Nf5+ Kh7 58.Kf1 Rxf2+ 59.Ke1Rc2 60.Rb81-0
Modern Chess Magazine 12
www.modern-chess.com