7000 watt generator - northern toolthis generator is designed to provide up to 7000 watts of...
TRANSCRIPT
READ & SAVE THESE INSTRUCTIONS
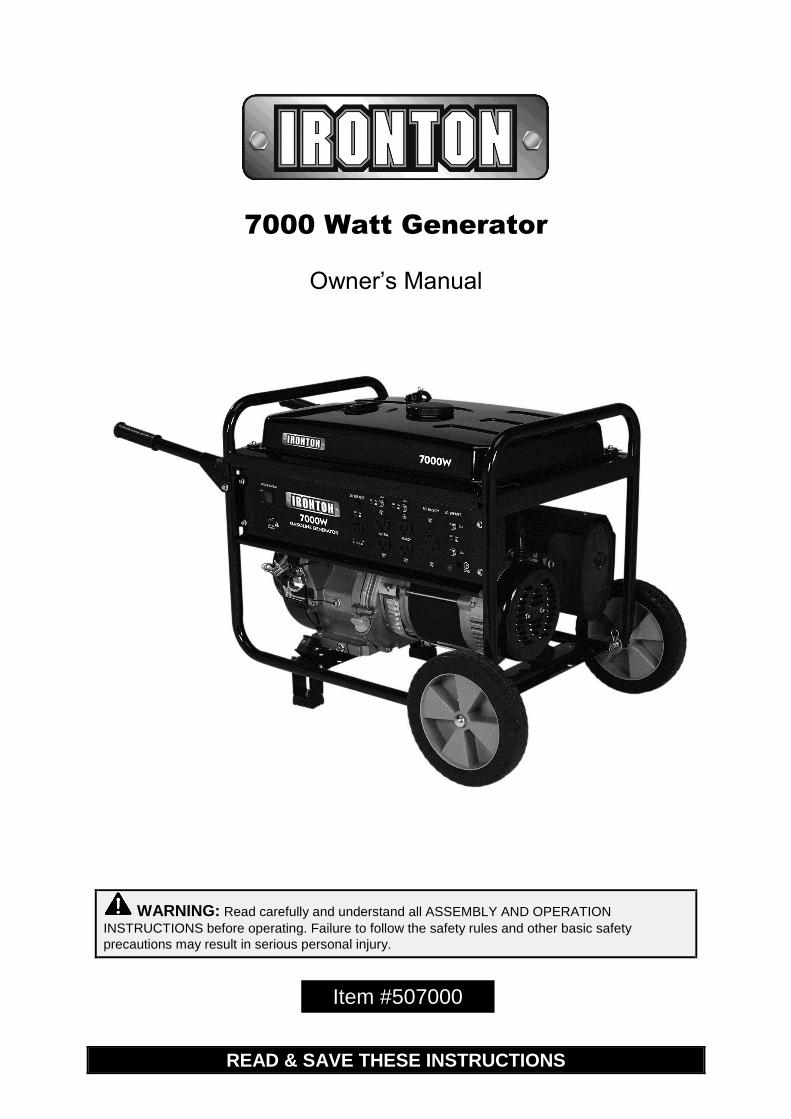
7000 Watt Generator
Owner’s Manual
WARNING: Read carefully and understand all ASSEMBLY AND OPERATION
INSTRUCTIONS before operating. Failure to follow the safety rules and other basic safety
precautions may result in serious personal injury.
Item #507000
Page 2 of 28
Thank you very much for choosing an Ironton™
product!
For future reference, please complete the owner’s record below:
Serial Number/Lot Date Code: ________________________________
Purchase Date: ____________________________________________
Save the receipt, warranty, and this manual. It is important that you read
the entire manual to become familiar with this product before you begin
using it.
This generator is designed for certain applications only. Northern Tool
and Equipment is not responsible for issues arising from modification or
improper use of this product such as an application for which it was not
designed. We strongly recommend that this product not be modified
and/or used for any application other than that for which it was designed.
For technical questions, please call 1-877-234-6869.
Page 3 of 28
Table of Contents
Intended Use .......................................................................................................................................... 4
Technical Specifications ...................................................................................................................... 4
Important Safety Information ............................................................................................................... 4
Before Each Use .................................................................................................................................... 6
Operating Instructions ........................................................................................................................ 12
Maintenance ........................................................................................................................................ 20
Parts Diagram for Engine ................................................................................................................... 22
Parts List for Engine ........................................................................................................................... 23
Parts Diagram for Generator .............................................................................................................. 24
Parts List for Generator ...................................................................................................................... 25
Replacement Parts .............................................................................................................................. 26
Limited Warranty ................................................................................................................................. 27
Page 4 of 28
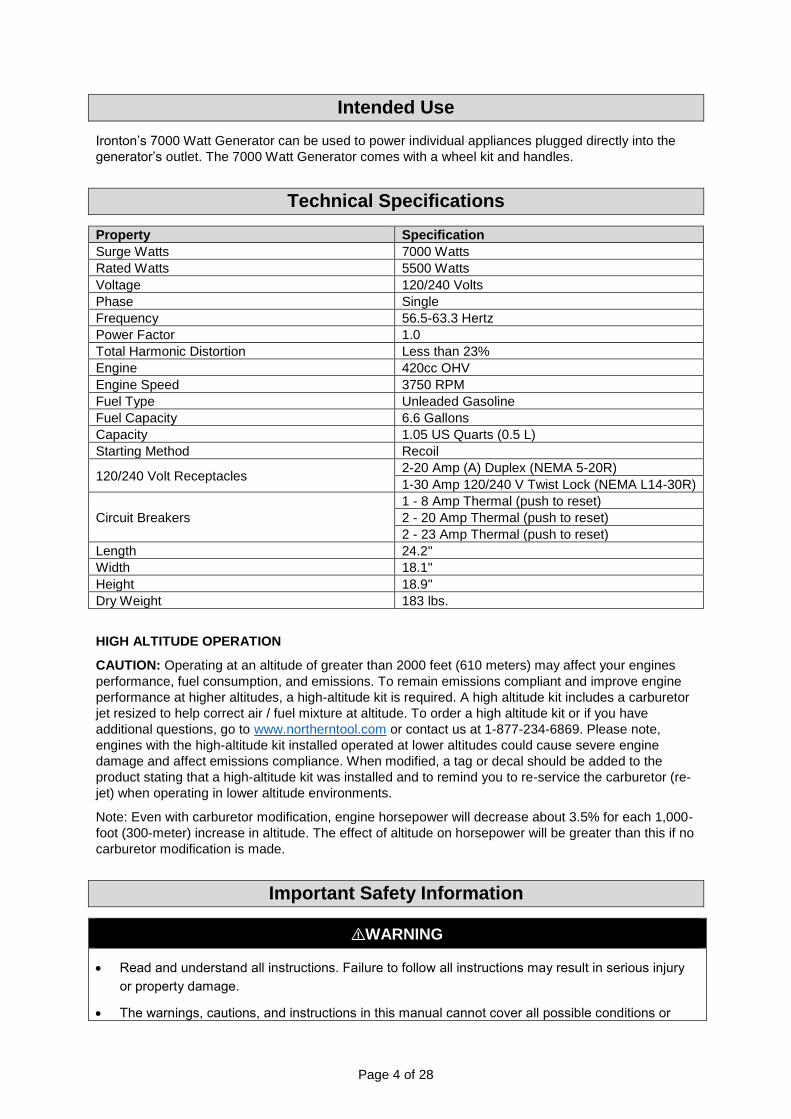
Intended Use
Ironton’s 7000 Watt Generator can be used to power individual appliances plugged directly into the
generator’s outlet. The 7000 Watt Generator comes with a wheel kit and handles.
Technical Specifications
Property Specification
Surge Watts 7000 Watts
Rated Watts 5500 Watts
Voltage 120/240 Volts
Phase Single
Frequency 56.5-63.3 Hertz
Power Factor 1.0
Total Harmonic Distortion Less than 23%
Engine 420cc OHV
Engine Speed 3750 RPM
Fuel Type Unleaded Gasoline
Fuel Capacity 6.6 Gallons
Capacity 1.05 US Quarts (0.5 L)
Starting Method Recoil
120/240 Volt Receptacles 2-20 Amp (A) Duplex (NEMA 5-20R)
1-30 Amp 120/240 V Twist Lock (NEMA L14-30R)
Circuit Breakers
1 - 8 Amp Thermal (push to reset)
2 - 20 Amp Thermal (push to reset)
2 - 23 Amp Thermal (push to reset)
Length 24.2"
Width 18.1"
Height 18.9"
Dry Weight 183 lbs.
HIGH ALTITUDE OPERATION
CAUTION: Operating at an altitude of greater than 2000 feet (610 meters) may affect your engines
performance, fuel consumption, and emissions. To remain emissions compliant and improve engine
performance at higher altitudes, a high-altitude kit is required. A high altitude kit includes a carburetor
jet resized to help correct air / fuel mixture at altitude. To order a high altitude kit or if you have
additional questions, go to www.northerntool.com or contact us at 1-877-234-6869. Please note,
engines with the high-altitude kit installed operated at lower altitudes could cause severe engine
damage and affect emissions compliance. When modified, a tag or decal should be added to the
product stating that a high-altitude kit was installed and to remind you to re-service the carburetor (re-
jet) when operating in lower altitude environments.
Note: Even with carburetor modification, engine horsepower will decrease about 3.5% for each 1,000-
foot (300-meter) increase in altitude. The effect of altitude on horsepower will be greater than this if no
carburetor modification is made.
Important Safety Information
⚠WARNING
Read and understand all instructions. Failure to follow all instructions may result in serious injury
or property damage.
The warnings, cautions, and instructions in this manual cannot cover all possible conditions or
Page 5 of 28
situations that could occur. Exercise common sense and caution when using this tool. Always be
aware of the environment and ensure that the tool is used in a safe and responsible manner.
Do not allow persons to operate or assemble the product until they have read this manual and
have developed a thorough understanding of how it works.
Do not modify this product in any way. Unauthorized modification may impair the function and/or
safety and could affect the life of the product. There are specific applications for which the product
was designed.
Use the right tool for the job. DO NOT attempt to force small equipment to do the work of larger
industrial equipment. There are certain applications for which this equipment was designed. This
product will be safer and do a better job at the capacity for which it was intended. DO NOT use
this equipment for a purpose for which it was not intended.
⚠WARNING
This product can expose you to chemicals including gasoline engine exhaust, which is known to
the State of California to cause cancer and, carbon monoxide, which is known to the State of
California to cause birth defects or other reproductive harm. For more information, go to
www.P65Warnings.ca.gov.
Handling power cords on corded products may expose you to lead, a chemical known to the state
of California to cause cancer and birth defects or other reproductive harm. Wash your hands after
handling.
⚠WARNING
WORK AREA SAFETY
Inspect the work area before each use. Keep work area clean, dry, free of clutter, and well-lit.
Cluttered, wet, or dark work areas can result in injury. Using the product in confined work areas
may put you dangerously close to cutting tools and rotating parts.
Do not use the generator where there is a risk of causing a fire or an explosion; e.g., in the
presence of flammable liquid containers, gases, or dust. The product can create sparks, which
may ignite the flammable liquids, gases, or dust.
Keep children and bystanders away from the work area while operating the generator. Do not
allow children to handle the generator.
Be aware of all power lines, electrical circuits, water pipes, and other mechanical hazards in your
work area. Some of these hazards may be hidden from your view and may cause personal injury
and/or property damage if contacted.
⚠WARNING
PERSONAL SAFETY
Stay alert, watch what you are doing, and use common sense when operating the tool. Do not use
the tool while you are tired or under the influence of drugs, alcohol, or medication. A moment of
inattention while operating the tool may result in serious personal injury.
Page 6 of 28
Wear the proper personal protective equipment when necessary. Use ANSI Z87.1 compliant safety
goggles (not safety glasses) with side shields, or when needed, a face shield. Use a dust mask in
dusty work conditions. Also use non-skid safety shoes, hardhat, gloves, dust collection systems,
and hearing protection when appropriate. This applies to all persons in the work area.
Do not overreach. Keep proper footing and balance at all times.
⚠CAUTION
GENERATOR USE AND CARE
Check for damaged parts before each use. Carefully check that the product will operate properly
and perform its intended function. Replace damaged or worn parts immediately. Never operate the
product with a damaged part.
Store the generator when it is not in use. Store it in a dry, secure place out of the reach of children.
Inspect the tool for good working condition prior to storage and before re-use.
Use only accessories that are recommended by the manufacturer for use with your product.
Accessories that may be suitable for one product may create a risk of injury when used with
another tool. Never use an accessory that has a lower operating speed or operating pressure than
the tool itself.
Do not leave the generator running unattended.
Before Each Use
There are a number of important steps required to set up your generator for initial use.
Unpacking and Inspecting Contents
Inspect the packaging immediately after receiving to be sure all parts are included. See the parts list
and exploded view.
Preparing for Power Load to Stay within Generator’s Rated Capacity
Plan your power load so that you do not exceed the generator’s rated capacity.
Setting Up as a Building Back-Up or a Portable Power Source
This generator is designed to provide up to 7000 watts of electrical power. It can supply electricity in
two ways.
Building Back-Up
The transfer switch safely connects the generator to your building's electrical system by isolating your
generator from your utility company's power lines and it connects your generator to a critical subset of
your building's circuits that are needed for emergency power needs.
⚠WARNING
Page 7 of 28
A transfer switch must be installed in order to isolate your generator from the utility power grid. If
your generator is NOT properly isolated from the utility system, serious hazards will arise:
When your generator is running, its output will back feed into the utility power line and
transformer that are normally used to provide you with power. The transformer will step up the
current to the normal line voltage. An unsuspecting utility line worker working on what he thinks
is a deactivated line could be electrocuted.
If your generator connected, running or not, when utility power is restored, your generator will be
destroyed. It could also explode or cause fire.
In addition to isolating your generator from the utility system, the transfer switch connects your
generator to a limited set of circuits in your building that have been chosen as critical to operate
during a power outage.
The generator cannot power your entire home. You must work with the installing electrician to
determine which devices/appliances you wish to power during an outage. The electrician can help you
determine which circuits and devices can be powered simultaneously without overloading the
generator.
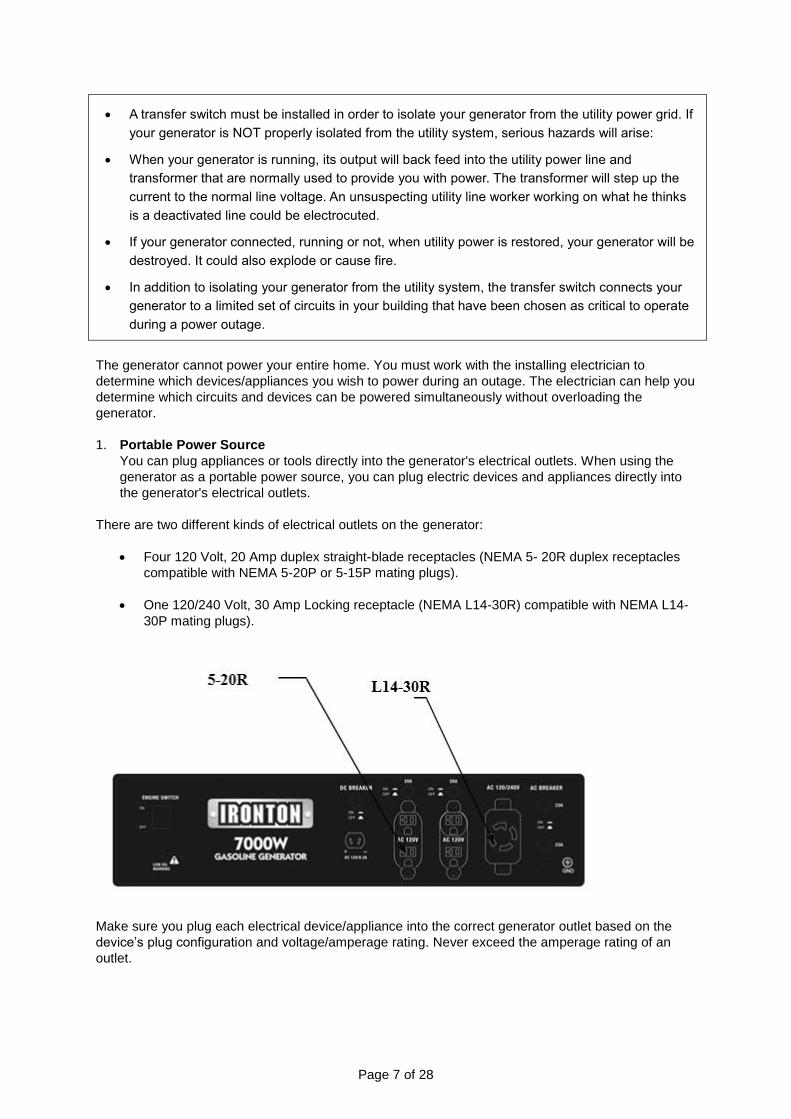
1. Portable Power Source
You can plug appliances or tools directly into the generator's electrical outlets. When using the
generator as a portable power source, you can plug electric devices and appliances directly into
the generator's electrical outlets.
There are two different kinds of electrical outlets on the generator:
Four 120 Volt, 20 Amp duplex straight-blade receptacles (NEMA 5- 20R duplex receptacles
compatible with NEMA 5-20P or 5-15P mating plugs).
One 120/240 Volt, 30 Amp Locking receptacle (NEMA L14-30R) compatible with NEMA L14-
30P mating plugs).
Make sure you plug each electrical device/appliance into the correct generator outlet based on the
device’s plug configuration and voltage/amperage rating. Never exceed the amperage rating of an
outlet.
Page 8 of 28
Note: Regardless of whether you use your generator as a back-up power source or as a portable
power source, you must not overload it. Overloading the generator may cause serious damage to the
unit and any attached electrical devices.
Extension Cords
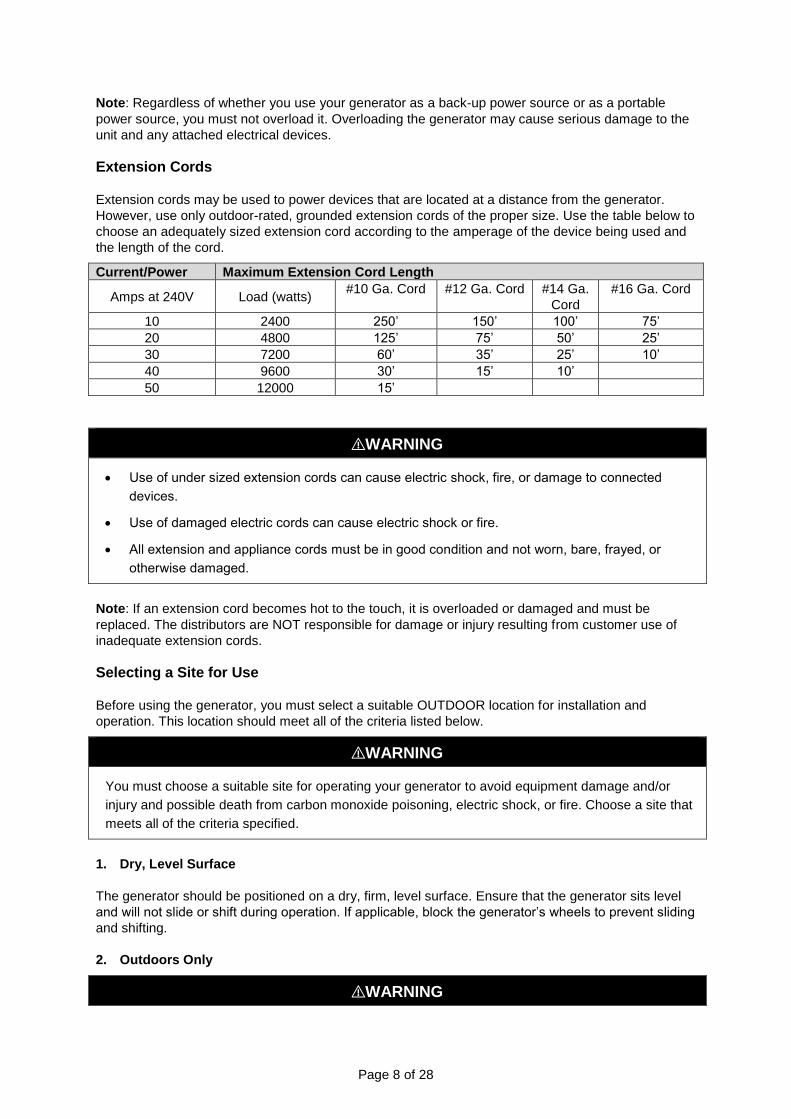
Extension cords may be used to power devices that are located at a distance from the generator.
However, use only outdoor-rated, grounded extension cords of the proper size. Use the table below to
choose an adequately sized extension cord according to the amperage of the device being used and
the length of the cord.
Current/Power Maximum Extension Cord Length
Amps at 240V Load (watts) #10 Ga. Cord #12 Ga. Cord #14 Ga.
Cord
#16 Ga. Cord
10 2400 250’ 150’ 100’ 75’
20 4800 125’ 75’ 50’ 25’
30 7200 60’ 35’ 25’ 10’
40 9600 30’ 15’ 10’
50 12000 15’
⚠WARNING
Use of under sized extension cords can cause electric shock, fire, or damage to connected
devices.
Use of damaged electric cords can cause electric shock or fire.
All extension and appliance cords must be in good condition and not worn, bare, frayed, or
otherwise damaged.
Note: If an extension cord becomes hot to the touch, it is overloaded or damaged and must be
replaced. The distributors are NOT responsible for damage or injury resulting from customer use of
inadequate extension cords.
Selecting a Site for Use
Before using the generator, you must select a suitable OUTDOOR location for installation and
operation. This location should meet all of the criteria listed below.
⚠WARNING
You must choose a suitable site for operating your generator to avoid equipment damage and/or
injury and possible death from carbon monoxide poisoning, electric shock, or fire. Choose a site that
meets all of the criteria specified.
1. Dry, Level Surface
The generator should be positioned on a dry, firm, level surface. Ensure that the generator sits level
and will not slide or shift during operation. If applicable, block the generator’s wheels to prevent sliding
and shifting.
2. Outdoors Only
⚠WARNING
Page 9 of 28
The exhaust from your generator contains carbon monoxide (CO), a poisonous gas that can kill. You
cannot smell it, see it, or taste it. Carbon monoxide exhaust is given off whether you are using
gasoline, natural gas, or propane as the fuel source to power the generator. Follow the directions
below for choosing a location to operate your generator in order to avoid carbon monoxide
poisoning.
The location you choose to operate the generator must be outdoors and away from all air intakes:
Never run the generator inside any closed or semi-enclosed spaces (even if outdoors),
including homes, garages, basements, sheds, or boxes. These spaces can trap poisonous
gases, even if you run a fan or open windows.
Place the generator so that the exhaust fumes will not be directed towards people or building
air intakes.
Ensure that working, battery-operated, or battery back-up carbon monoxide alarms are used
in any dwelling/structure that is in close proximity to the running generator.
This generator is NOT designed or approved for use in vehicles or marine applications. Never
run the generator inside RVs or other vehicles, on boats, or on pick-up truck beds.
⚠WARNING
Never attempt to attach duct-work to the muffler system to allow for installation inside an enclosure.
This could cause hot air deflection, heat build-up, and increased exhaust back-pressure, resulting in
possible exhaust leakage or damage to the generator.
3. Adequate Cooling Ventilation
The generator needs adequate, unobstructed flow of air to allow for proper cooling of engine and
generator head.
⚠WARNING
Heat build-up from inadequate ventilation can result in fire, posing a serious risk to nearby persons
Page 10 of 28
and structures.
Situate so there is adequate clearance around generator to allow for cooling airflow so that
heat does not build up.
Never place the generator immediately adjacent to a building or other structure. Allow at least
7 feet clearance.
Do not run the generator in close proximity to other heat-generating equipment, such as
another generator. The combined heat that is generated may raise air temperature in the
immediate area and there will not be adequate cooling ventilation.
Do not allow debris to accumulate and block airflow.
Do not operate with a tarp, blanket, or cover surrounding the generator.
4. No Wet Conditions
Choose a location where the generator will NOT be exposed to rain, snow, or direct sunlight.
Exposure to water can cause electric shock.
You may operate the generator under an outdoor, canopy-like structure of heat-resistant material that
is open on all sides. Make sure that all parts of canopy are at least 7 feet from exhaust, and allow for
adequate clearance above generator so that heat does not build up.
5. Hot Exhaust Clearance
The exhaust gas from your generator is extremely hot and can cause combustible materials to catch
on fire.
Make sure your generator's exhaust system is at least 7 feet from all combustible materials
and buildings/structures.
Equip the engine with a spark arrestor if the generator will be used near any ignitable forest,
brush, or grassy land. (See the "Specifications" section of this manual to determine if your
generator is already equipped.) Make sure you comply with applicable local, state, and
federal codes.
Keep a fire extinguisher rated "ABC" nearby. Keep it properly charged and be familiar with its
use.
6. Away from Dust and Dirt
Do not use the generator in extremely dusty or dirty conditions. Excessive dust and dirt can cause
premature failure of the machine.
7. Hearing Protection
Generators can produce noise levels of up to 95 dB in close proximity, which can be dangerous to
human hearing with prolonged exposure.
Hearing protection may be required for persons working within 15-20 feet of the running generator for
an extended period of time.
⚠WARNING
Never attempt to attach ductwork to the muffler system to lower noise levels. This could cause hot air

Page 11 of 28
deflection, heat build-up, and increased exhaust back-pressure, resulting in possible exhaust
leakage or damage to the generator.
Grounding the Generator
Always ensure the generator is properly grounded to prevent electrical shock. You must always
ground the generator by the following method when using the generator as a portable electrical
source:
1. Drive a ¾” or 1” copper pipe or rod into the ground close to the generator. The pipe/rod must
penetrate moist earth – the depth required will be dictated by local soil conditions. Consult with an
electrician.
2. Connect an approved ground clamp to the pipe.
3. Run a 10 gauge wire from the clamp to the generator grounding post located on the rear of the
generator head.
4. Do not connect the generator grounding post to a water pipe or a ground used by a radio system.
If a licensed electrician installs the generator with a connection to your building’s electrical circuit for
use as a back-up power system, grounding may alternatively be completed through the building’s
grounding system. Ask your electrician. If the generator is not grounded through your building’s
electrical system, follow the procedure above.
⚠WARNING
Operating the generator when it is not properly grounded can result in electrical shock.
Page 12 of 28
Operating Instructions
Once you have set up the generator for use, it is time to start the unit. The following are the
procedures necessary for safe, successful operation of your generator.
General Safety Rules for Operation
⚠WARNING
Failure to follow safety rules may result in serious injury or death to the operator or bystanders.
Before starting the generator, review the following general safety rules for operation:
Know proper use/how to stop. Be thoroughly familiar with proper use of the equipment and all
generator controls, output receptacles, and connections. Know how to stop the generator quickly if
needed.
Instruct operators. The generator owner must instruct all operators in safe generator set-up and
operation. Only trained adults should set up and operate the generator – Do not let children operate.
Intended use. Carefully read about and understand the intended use of this generator. Do not use for
other purposes, as unforeseen hazards or equipment damage may result.
Under the influence. Never operate, or let anyone else operate, the generator while under the
influence of alcohol, drugs, or medication.
Safety equipment / controls. Do not operate the generator unless all safety covers, guards, and
barriers are in place and in good working order, and all controls are properly adjusted for safe
operation.
Damaged. Do not operate the generator with damaged, missing, or broken parts.
Modifications. Do not modify the generator in any way. Modifications can create serious safety
hazards and will also void the warranty.
Engine speed. Never attempt to modify the engine speed setting. The engine speed is preset at 3600
RPM for safe and optimal performance of the generator. If speed needs adjusting, it must be done by
factory- authorized personnel.
External fuel sources. Never attempt to connect external gasoline/diesel sources in order to
increase engine run time. Larger tank at pressure or higher elevation will cause gasoline to leak from
carburetor during operation. Fire or explosion could result.
Malfunction during operation. Immediately turn off the generator if any of the following conditions
arise during operation:
Excessive change in engine speed, slow or fast
Overheating in load connecting devices
Sparking or arcs from generator
Loss of electrical output
Receptacle damage
Page 13 of 28
Engine misfire
Excessive vibration
Flame or smoke
Abnormal noise
Adjusting / repairing. Always turn off generator and remove spark plug(s) or spark plug wire(s)
before working on the generator to prevent accidental starting. Always discharge the capacitor before
working on the generator head to prevent electrical shock. (See Maintenance & Repair section of this
manual for instructions on how to do this.)
Carbon monoxide poisoning. The running engine gives off carbon monoxide, a poisonous gas that
can kill you. You CANNOT smell it, see it, or taste it. Follow all instructions for site selection and
positioning the generator, and avoid inhaling the exhaust. If you start to feel sick, dizzy, or weak while
using the generator, shut off the engine and get to fresh air RIGHT AWAY. See a doctor. You may
have carbon monoxide poisoning.
Other exhaust dangers. This product contains or emits chemicals known to the State of California to
cause cancer, birth defects or other reproductive harm. Avoid inhalation of exhaust.
Wet conditions. Do not operate the generator or handle any electrical equipment while standing in
water, while barefoot, while hands are wet or while in the rain or snow. Electric shock may result.
Ground fault circuit interrupter. Always use a ground fault circuit interrupter (GFCI) protected
extension cord (or outlet, if generator is equipped) in damp or highly electrical conductive areas and
on construction jobsites to prevent electrical shock.
Avoid contact. Avoid contact with bare wires, terminals, connections, etc., while the unit is running.
Electric shock accident. If an electric shock accident occurs, immediately shut down the source of
electrical power. If this is not possible, attempt to free the victim from the live conductor. Avoid direct
contact with victim. Use a non-conducting implement, such as a dry rope or board, to free the victim
from the live conductor. Apply first aid and get immediate medical help.
Smoking/sparks. Never smoke near the running generator, and never operate near sources of
sparks or flames.
Hot muffler. Never touch hot muffler, hot exhaust manifold, or engine cooling fins. Exhaust and
engine parts can be very hot and will burn you.
Moving parts. Keep hands, feet, and apparel away from drive belts, fans, and other moving parts.
Never remove any drive belt or fan guard while the unit is operating.
Static electricity and filling the gasoline tank. Static electricity can initiate from ungrounded
gasoline tanks or containers, from flowing gasoline, and from persons carrying a static electric charge.
Static electricity can explosively ignite gasoline vapors that are present during the fueling process,
resulting in serious bums to nearby persons. To avoid static electricity while fueling, certain steps
must be followed before and during the fueling process in order to minimize and safely dissipate static
charge build-up:
Touch a grounded metal object before starting. Always dissipate static charge from your body
before beginning the fueling process by touching a grounded metal object at a safe distance
away from fuel sources.

Page 14 of 28
Use a portable container to fill tank. Never fill the generator's gas tank directly from the fuel
pump -the generator's tank is not grounded and the high velocity flow of gasoline from a fuel
pump can cause static electric build-up. Use an approved portable container to transfer gasoline
to the generator's tank.
Fill container on the ground. Never fill the portable gas container while it is sitting inside a
vehicle, trailer, trunk, or pick-up truck bed. ALWAYS place container on the ground to be filled.
Keep nozzle in contact with container. Keep nozzle in contact with the portable container at all
times while filling. Manually control the flow of gasoline; do NOT use the nozzle's lock open
device.
Use a portable container made of metal or conductive plastic. It will dissipate charge to the
ground more readily.
Static Electricity and Fueling
Many common objects can accumulate and retain a static electric charge. Objects made of non
conductive materials (e.g., plastics) easily accumulate and retain static electric charge, as can objects
made of conductive material (e.g. metal, water) if they are not electrically grounded. The static electric
charge on an object, such as a human body or plastic fuel tank/container, can reach as high as
several thousand volts!
A static electric spark can be generated if the static electric charge stored on an object "jumps" to
another, less charged object. Such a spark can ignite invisible gasoline vapors that are present during
fueling situations.
Typical Sources of Static Electric Hazards During Fueling
The following objects can accumulate a static electric charge and cause an ignition spark in typical
fueling situations:
Ungrounded tanks/containers. Any ungrounded fuel tank or container can accumulate a static
electric charge as a result of contact with other objects or friction during transportation. This
static electrici1y can discharge as a spark to the grounded gasoline dispenser nozzle, as the
nozzle is first brought close to the tank/container at the beginning of the fueling process.
Flowing gasoline. It is important to note that gasoline accumulates static electric charge while
flowing through a hose or pipe. This charge then transfers to and accumulates in the gas tank or
container that is being filled. The total amount of charge accumulation depends on the amount
of gas pumped into the container, the speed with which it is pumped, and whether or not the
tank/container is grounded. If sufficient static electric charge accumulates in the fuel tank or
container during the fueling process, the tank/container may discharge a spark to the grounded
gasoline dispenser nozzle.
Persons. A person dispensing the gasoline can carry a static electric charge on their body,
typically resulting from contact with their car seat or electronics. The static electricity can
discharge as a spark between that person's hand and either the grounded dispenser nozzle or
the fuel tank opening.
Preparing for Operation
Position generator. Use the instructions provided under Before Each Use/Selecting a Site. Operate
outside only, on dry, level ground with adequate clearance and ventilation.
⚠WARNING
Page 15 of 28
Carbon monoxide poisoning hazard. Generators give off carbon monoxide exhaust, a poisonous
gas that can kill. You CANNOT smell it, see it, or taste it. ONLY run generator OUTDOORS and
away from air intakes. NEVER run generator inside any enclosed or semi-enclosed spaces, including
homes, garages, basements, sheds, boxes, pick-up truck beds, RVs, or boats. These spaces can
trap poisonous gases, EVEN if you run a fan or open windows. Carbon monoxide exhaust is given
off whether you are using gasoline, natural gas, or propane to power the generator.
Ground generator. Make sure the generator is grounded in accordance with instruction given in the
Before Use/Grounding the Generator section of this manual.
⚠WARNING
Electric shock hazard. Always ensure generator is properly grounded to prevent electrical shock.
Perform scheduled maintenance as needed. Make sure that any regular maintenance has been
performed as prescribed in this manual in the Maintenance & Repair section.
1. Refer to the engine owner’s manual for engine maintenance instructions.
2. Make sure battery is charged. Charge as needed according to your battery manufacturer’s
instructions.
Check /add oil. Check the oil level using the dipstick and add oil as needed. Using a funnel, add oil
up to the FULL mark on the dip stick with the recommended oil type for your engine and expected
ambient conditions. (See engine Owner’s Manual for oil type and capacity, and more detailed oil
check/fill instructions.)
⚠WARNING
Burn hazard. Never open oil port while engine is running. Hot oil can spray over face and body.
Note: The low oil shut-down feature prevents the generator from starting without sufficient oil. Engine
is shipped without oil. You must add oil before first use.
IMPORTANT: Under long, continuous-run operating conditions, be prepared to:
Check engine oil level every time you refuel the engine.
Change oil after the first 20 operating hours, and at least every 100 operating hours thereafter,
or as directed in engine owner’s manual.
Check/fill gasoline tank. Check the gasoline level in the generator’s tank. If needed, fill tank with
fresh unleaded gasoline from a portable container, after first reading the warnings and instructions
below.
⚠WARNING
Gasoline fire/explosion hazard. Gasoline is highly flammable and explosive. Heat, sparks, and
flames can ignite gasoline vapors, which can become widespread during fueling. A flash fire and/or
explosion could result and cause serious injury or death. Use extreme care when handling gasoline.
Carefully follow all the instructions in this section to avoid the following conditions which could result
Page 16 of 28
in gasoline ignition:
• Gas vapor collection inside enclosures
• Static electric sparks
• Sparks from electric wiring, batteries, or running engines
• Sources of heat (such as a hot engine or exhaust)
• Open flames, including pilot lights
1. Before starting, review the following general safety precautions for fueling:
a) Never pump gasoline directly into the generator's gas tank at a gas station - high velocity flow
from the pump could result in a static electric build-up in the generator's tank. Always use a
portable container to fill the tank. See warning box about static electric spark hazards below.
b) Fill gasoline tank OUTDOORS, never indoors.
c) Stay away from all sources of heat, sparks, and flames. Do not smoke.
2. Turn generator engine off and allow to cool for at least two minutes before removing gas cap.
Note: A running or still-hot engine is hot enough to ignite fuel.
3. Remove generator gasoline cap.
4. Add gasoline through the fill opening:
a) Follow the safety warning and instructions below for avoiding static electric sparking.
b) Do NOT overfill the gasoline tank. Allow at least 1/2 inch of empty space below the fill neck to
allow for fuel expansion.
⚠WARNING
Static electric spark hazard. A static electric spark can explosively ignite gasoline vapor, resulting
in a flash fire that could cause serious injury or death.
To avoid static electric sparking while filling the gasoline tank, the following steps must be followed to
minimize and safely dissipate static electric charge build-up before and during the fueling process:
• Always dissipate static charge from your body before beginning the fueling process by
touching a grounded metal object at a safe distance from fuel sources.
• Never fill the generator's gas tank directly from the fuel pump -the generator's tank is not
grounded and high velocity flow from the pump can cause static electricity build-up. Use an
approved portable container to transfer gas to the generator's tank.
• Never fill the portable gas container while it is sitting inside a vehicle, trailer, trunk, or pick-up
truck bed. ALWAYS place container on the ground to be filled.
• Keep nozzle in contact with portable container while filling. Manually control the flow of
gasoline; do NOT use the nozzle's lock-open device.
• A portable container made of metal or conductive plastic is preferred because it dissipates
charge to ground more readily.
Page 17 of 28
5. Clean up gasoline spills/splashed immediately.
If possible, move the generator away from spilled gasoline on the ground.
Wipe up spilled gasoline, and wait 5 minutes for excess gasoline to evaporate before starting
engine.
Gasoline soaked rags are flammable and should be disposed of properly.
If gasoline is spilled on your skin or clothes, change clothes and wash skin immediately.
6. Replace gasoline cap securely before starting engine.
7. Store extra gasoline in a cool, dry place in a UL listed, tightly sealed container.
IMPORTANT: For continuous operation, be prepared to check and refuel the engine on a regular
basis. A tank of gasoline should last about 9.5 hours under 50% load.
Inspect fuel system/check for leaks. Inspect fuel system & check for leaks BEFORE starting
generator. Do not start generator until all needed repairs have been completed.
Personal Protection. Hearing can be damaged from prolonged, close-range exposure to the type of
noise produced by this generator. The use of ear plugs or other hearing protection device is
recommended for persons working within 15-20 feet of the running generator for an extended period
of time. Loose or dangling apparel can become entangled in moving parts. Metal jewelry can conduct
electricity. Never wear jewelry or loose-fitting clothing when starting or operating the generator.
Starting the Engine
After you have completed the pre-start checklist procedures, you are ready to start the engine
1. Disconnect all loads to the generator.
2. Turn the gasoline line valve to the ON position.
3. For a cold engine, move the choke lever to the full choke position. To restart a warm engine,
move the choke lever to half choke or to the RUN position.
4. Start the engine:
a. Using electric start:
i. Turn the engine key switch to the START position and hold it there until the engine
starts.
Note: If the engine fails to start after 5 seconds, release key and wait 10 seconds before
attempting to start again. Cranking the electric starter for more than 5 seconds continuously
can overheat and damage the starter motor.
ii. Release the key when the engine starts.
b. Using recoil start -
i. Turn the engine key switch to the ON position.
ii. Pull the starter grip lightly until you feel resistance, then pull the starter cord out
briskly and rapidly.
Page 18 of 28
iii. Allow starter cord to return slowly.
5. When engine starts, move choke lever to RUN position.
6. Under long, continuous-run operating conditions, be prepared to:
a. Check and refuel the engine on a regular basis. A tank of gas should last about 9.5 hours
under 50% load.
⚠WARNING
A running engine is hot enough to ignite fuel. Never add fuel or remove gas cap if engine is running or
still hot. Let cool at least 2 minutes.
b. Check engine oil level each time you refuel.
c. Change oil after the first 20 operating hours, and at least every 100 operating hours
thereafter, as directed in the engine owner's manual.
⚠WARNING
Never open oil port while engine is running. Hot oil can spray over face and body.
Checking Generator Output
Although the speed of the engine was carefully adjusted at the factory so that the generator produces the proper voltage and frequency, output voltage should be checked periodically to ensure the generator is working properly before connecting loads to the generator.
⚠WARNING
The generator must be run at the correct speed in order to produce the proper electrical voltage and
frequency. Failure to do so could result in damage to equipment powered by the generator and
possible injury to the individual.
Output voltage should be checked with a portable voltage meter:
1. Start engine and allow to warm up for five minutes. Do not connect any loads.
2. Use voltage meter to check output voltage at the generator’s outlets/receptacles.
3. Measured voltage should be within the following ranges:
a. 120V +/- 10% at 120V receptacles.
b. 240V +/- 10% at 240V receptacles.
4. If measured voltage is not within the specified range, have generator adjusted by factory
authorized personnel. Do not attempt to adjust the engine speed yourself.
Note: There is a slight variation in voltage/speed with changing electrical loads. All engines have a
tendency to slow down when a load is applied. When electrical loads are connected to the generator,
the engine is more heavily loaded and as a result, the speed drops slightly.
This slight decrease in speed, together with the voltage drop within the generator itself, results in a
slightly lower voltage when the generator is loaded to its full capacity than when it is running with no
load. Additionally, there may be small brief surges and drops in voltage as motors connected to the
Page 19 of 28
generator cycle on or off. The slight variation has no appreciable effect in the operation of motors,
lights, and most appliances.
Connecting Electrical Loads (Portable Power Generation)
You will want to be careful when connecting loads so as not to overload the generator, especially if you are powering devices with motors that require a higher starting power load.
⚠WARNING
Do not overload generator. Make sure that combined starting and running loads do not exceed rated
capacity of generator. Overloading the generator can cause damage to the generator and attached
electrical devices, and may result in fire.
Using as a Portable Power Source. Connect electrical loads one at a time according to the following
instructions:
1. Allow engine to reach operating speed by allowing it to warm up for approximately 5 minutes
before connecting electrical devices.
2. After engine is warmed up, begin by connecting the items that require the highest wattage first.
The recommended sequence is as follows:
a. Connect items with motors such as refrigerators, freezers, air conditioners, or small hand
tools, one at a time. Let each motor stabilize before connecting the next device.
b. Connect any lights you are planning on powering.
c. Connect voltage sensitive equipment such as electronics via surge protectors. Plug
devices such as televisions, computers, and microwaves into a UL listed voltage surge
protector, then plug the surge protector into the generator.
Using as a Back-up Power Source for a Building. Each transfer switch installation will be unique.
Proper instructions for how to safely bring the generator online with the building's electrical system
should be provided by the installing electrician, who should also provide personal instruction to the
owner/operator.
Failure to follow the proper procedure as provided by the electrician could expose persons to the
hazards noted above.
Stopping
Stop the engine using the following steps:
1. Disconnect all loads to the generator.
2. Turn the engine key switch to the OFF position.
3. Turn the gasoline line shut off valve to the OFF position.
4. Remove the key from the starter to prevent accidental starting of the engine.
Storage & Exercise of Generator
When you are finished using the generator, you must:
1. Disconnect all loads to the generator.
Page 20 of 28
2. Turn the engine key switch to the OFF position.
3. Store the generator properly
4. Plan on exercising the engine regularly unless the generator is prepared for long-term storage.
Disconnect loads and turn off fuel supply. When you are finished using the generator, disconnect
all loads and turn off fuel supply:
1. Make sure all devices that were connected to the generator's outlets have been disconnected.
2. Check to be sure gasoline line shut-off valve is in OFF position.
Cool engine before storing. Let engine cool for at least five minutes before storing. A hot engine can
be a fire hazard.
Choose a storage location. Store the generator in a location that is:
Clean and dry.
Away from sources of heat, open flames, sparks, or pilot lights, even if the generator's fuel
tank is empty. Residual fuel in the tank could ignite.
Away from extreme high or low temperatures.
Note: Do not store with battery charger always connected. Batteries that are over-charged can boil
themselves dry and produce excessive amounts of hydrogen, an explosive gas.
Prevent accidental starting. Remove key from starter (for electric start engines) and secure key in a
safe location, or remove spark plug(s) in order to ensure the generator cannot be started accidentally
in a storage location or by untrained persons.
Exercise generator every 4 weeks. The generator should be run regularly. At least every four
weeks, start the engine and let it run for 10 to 15 minutes with a small load plugged in, such as a lamp
or fan. Monthly using of the generator will:
Dry out any moisture that has accumulated in the windings. If left, this moisture can cause
corrosion in the winding.
Ensure that the unit is operating properly should it be needed in an emergency.
Perform regular maintenance. Perform periodic maintenance as directed in this manual to keep the
generator in safe working condition.
Maintenance
Maintain the product by adopting a program of conscientious repair and maintenance in accordance with the following recommended procedures. It is recommended that the general condition of any tool be examined before it is used. Keep your generator in good repair. Keep handles dry, clean, and free from oil and grease. The following chart is based on a normal operation schedule.

Page 21 of 28
Follow safety rules
Read and follow these safety rules whenever you will be
servicing the generator:
Turn off generator. Always turn off generator and
remove spark plug(s) or spark plug wire(s) before working on
the engine or generator to prevent accidental starting.
Replace guards. Make sure all guards and shields are
replaced after servicing the generator.
Repair. Major service, including the installation or
replacement of parts, should be performed only by a
qualified electrical service technician.
Replacement parts. If a part needs replacement, only
use factory approved repair parts. Replacement parts that do
not meet specifications may result in a safety hazard or poor
operation of the generator and will void the warranty.
Perform engine maintenance
Perform engine maintenance as specified in the engine
owner's manual. Engine maintenance items include:
Changing oil and oil filter
Air filter check/replacement
Spark plug cleaning and replacement
Fuel filter check/replacement
Fuel tank cleaning
Check receptacles
Check receptacles before each use to make sure they are not
cracked or broken.
If a receptacle is cracked or otherwise damaged, do not use
until replaced with an authorized factory part. Using cracked or
damaged receptacles can be both dangerous to the operator
and destructive to the equipment.
Inspect fuel system/check for leaks
Inspect the fuel system and check for leaks on a regular basis.
Inspect the entire fuel system. Look for signs of leaks or
deterioration, chafed or spongy fuel hose, loose connections,
loose or missing fuel hose clamps, damaged gasoline tank, or
defective gasoline shut-off valve.
Check GFCI (if equipped)
Once a month, test the Ground Fault Circuit Interrupter (GFCI)
to protect against electrical shock due to failure of the GFCI.
(Only for those models equipped with GFCI -See the
"Specifications" section.)
Page 22 of 28
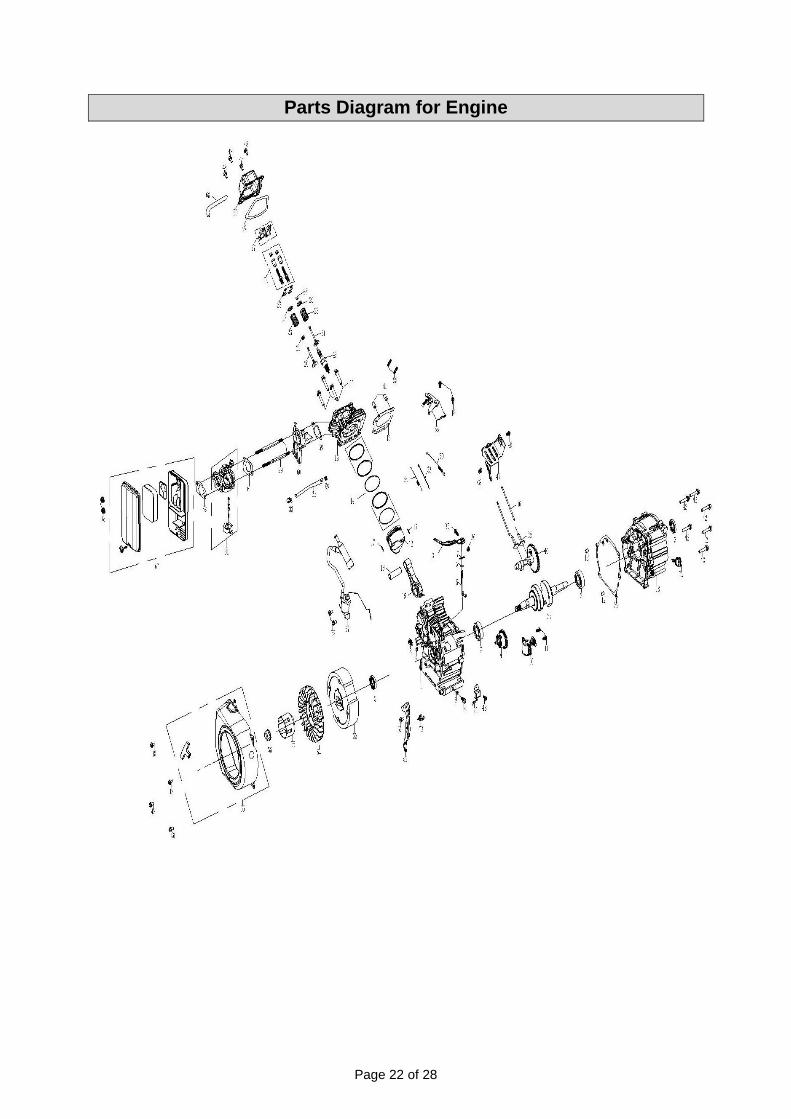
Parts Diagram for Engine
Page 23 of 28
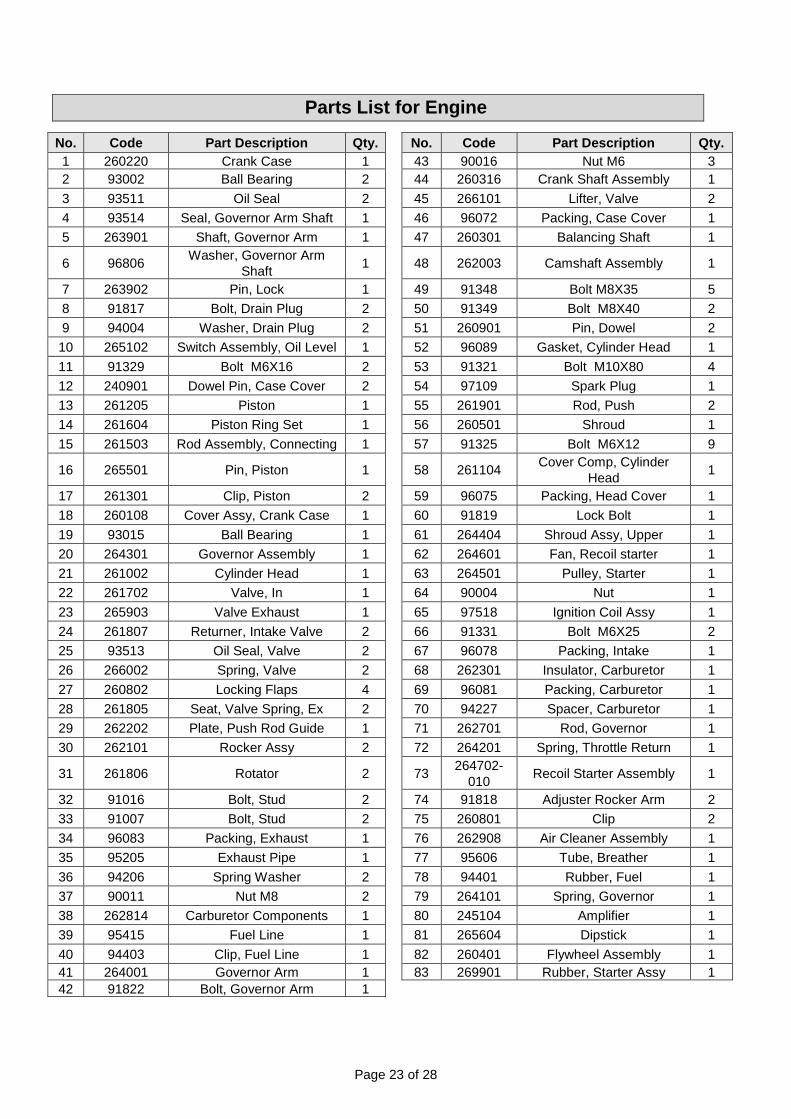
Parts List for Engine
No. Code Part Description Qty.
No. Code Part Description Qty.
1 260220 Crank Case 1
43 90016 Nut M6 3
2 93002 Ball Bearing 2
44 260316 Crank Shaft Assembly 1
3 93511 Oil Seal 2
45 266101 Lifter, Valve 2
4 93514 Seal, Governor Arm Shaft 1
46 96072 Packing, Case Cover 1
5 263901 Shaft, Governor Arm 1
47 260301 Balancing Shaft 1
6 96806 Washer, Governor Arm
Shaft 1
48 262003 Camshaft Assembly 1
7 263902 Pin, Lock 1
49 91348 Bolt M8X35 5
8 91817 Bolt, Drain Plug 2
50 91349 Bolt M8X40 2
9 94004 Washer, Drain Plug 2
51 260901 Pin, Dowel 2
10 265102 Switch Assembly, Oil Level 1
52 96089 Gasket, Cylinder Head 1
11 91329 Bolt M6X16 2
53 91321 Bolt M10X80 4
12 240901 Dowel Pin, Case Cover 2
54 97109 Spark Plug 1
13 261205 Piston 1
55 261901 Rod, Push 2
14 261604 Piston Ring Set 1
56 260501 Shroud 1
15 261503 Rod Assembly, Connecting 1
57 91325 Bolt M6X12 9
16 265501 Pin, Piston 1
58 261104 Cover Comp, Cylinder
Head 1
17 261301 Clip, Piston 2
59 96075 Packing, Head Cover 1
18 260108 Cover Assy, Crank Case 1
60 91819 Lock Bolt 1
19 93015 Ball Bearing 1
61 264404 Shroud Assy, Upper 1
20 264301 Governor Assembly 1
62 264601 Fan, Recoil starter 1
21 261002 Cylinder Head 1
63 264501 Pulley, Starter 1
22 261702 Valve, In 1
64 90004 Nut 1
23 265903 Valve Exhaust 1
65 97518 Ignition Coil Assy 1
24 261807 Returner, Intake Valve 2
66 91331 Bolt M6X25 2
25 93513 Oil Seal, Valve 2
67 96078 Packing, Intake 1
26 266002 Spring, Valve 2
68 262301 Insulator, Carburetor 1
27 260802 Locking Flaps 4
69 96081 Packing, Carburetor 1
28 261805 Seat, Valve Spring, Ex 2
70 94227 Spacer, Carburetor 1
29 262202 Plate, Push Rod Guide 1
71 262701 Rod, Governor 1
30 262101 Rocker Assy 2
72 264201 Spring, Throttle Return 1
31 261806 Rotator 2
73 264702-
010 Recoil Starter Assembly 1
32 91016 Bolt, Stud 2
74 91818 Adjuster Rocker Arm 2
33 91007 Bolt, Stud 2
75 260801 Clip 2
34 96083 Packing, Exhaust 1
76 262908 Air Cleaner Assembly 1
35 95205 Exhaust Pipe 1
77 95606 Tube, Breather 1
36 94206 Spring Washer 2
78 94401 Rubber, Fuel 1
37 90011 Nut M8 2
79 264101 Spring, Governor 1
38 262814 Carburetor Components 1
80 245104 Amplifier 1
39 95415 Fuel Line 1
81 265604 Dipstick 1
40 94403 Clip, Fuel Line 1
82 260401 Flywheel Assembly 1
41 264001 Governor Arm 1
83 269901 Rubber, Starter Assy 1
42 91822 Bolt, Governor Arm 1
Page 24 of 28
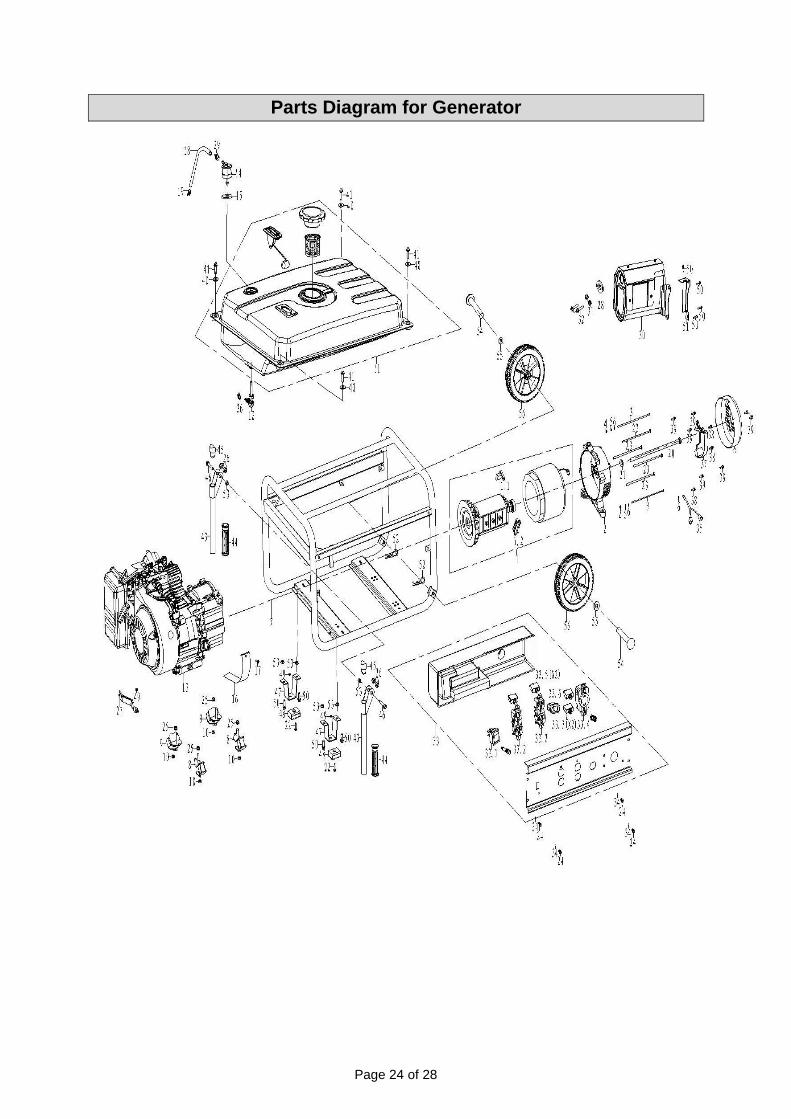
Parts Diagram for Generator
Page 25 of 28
Parts List for Generator
No. Code Part Description Qty.
No. Code Part Description Qty.
1 755514 Starting Motor
Assy 1
31 94206 Spring Washer 8 2
1.1 599019 Carbon Brush
Comp 1
32 91347 Bolt M8X30 2
1.2 599912 Grounding Post
Comp 1
33 710188 Panel Comp 1
2 532301 Motor Stand 1
33.1 6080 Switch Assy 1
3 91508 Bolt M5X204 2
33.2 6032 Double Receptacle,
America 20A/125V UL 2
4 90009 Nut M5 2
33.3 599919 Thermal Protector 20A
CSA/UL 2
5 94219 Flat Washer 5 2
33.4 6241 30A/125V/250V UL 1
6 94204 Spring Washer 5 3
33.5 6243 Thermal Protector
23A UL 2
7 770170-010 Frame 1
33.6 34204-037 12V V-Receptacle 1
8 531301 Isolator A 2
34 96120 Washer 4
9 531304 Isolator B 2
35 544603 Grounding Wire 1
10 90011 Nut M8 4
36 94403 Clip, Fuel Line 7.5 1
11 700317-010 Fuel Tank Assy 1
37 534802 Automatic Voltage
Regulator 1
12 518201 Fuel Cock 1
38 91323 Bolt M5X16 3
13 DF7000H-IR-
001E Engine Assy 1
39 91322 Bolt M5X12 7
14 265403 Manual Choke
Assy 1
40 96811 Washer, Fuel Tank 4
15 265402 Packing Washer,
One-Way Valve 1
41 91306 Bolt M6X25 4
16 539602 Guard Cover,
Crank Case 1
42 533301-010 End Cover, Generator 1
17 92034 Crossing Screw
M5X12 1
43 526601-010 Handle Assy 2
18 95327 Fuel Cock 10.5X
4.5X400 1
44 528601 Rubber, Handle 2
19 94409 Clip Fuel Line 9.5 1
45 527601 Plug, Handle 2
20 91713 Bolt
M10X1.25X255 1
46 91350 Bolt M8X45 2
21 96813 Flat Washer 1
47 525601-010 Support, Frame 2
22 91331 Bolt M6X25 2
48 531903 Vibration Isolation
Pad, Square 2
23 91610 Bolt M6X165 4
49 90016 Nut M6 3
24 91325 Bolt M6X12 4
50 91343 Bolt M8X16 8
25 90013 Nut M10 4
51 520305 Muffler Bracket 1
26 527605 Bush, Handle 4
52 548302 Cotter Pin 2
27 540601 Bracket, Air
Cleaner 1
53 90018 Nut M8 6
Page 26 of 28
No. Code Part Description Qty.
No. Code Part Description Qty.
28 96002 Gasket, Exhaust
Pipe 1
54 524602 Axle 2
29 94408 Clip, Fuel Line 10 1
55 94207 Washer 13X37X4 2
30 705511 Muffler Comp 1
56 523506 Wheel 2
Replacement Parts
For replacement parts and technical questions, please call Customer Service at 1-877-234-6869.
Not all product components are available for replacement. The illustrations provided are a
convenient reference to the location and position of parts in the assembly sequence.
When ordering parts, the following information will be required: item description, item model
number, item serial number/item lot date code, and the replacement part reference number.
The distributor reserves the rights to make design changes and improvements to product lines
and manuals without notice.
Page 27 of 28
Limited Warranty
Northern Tool and Equipment Company, Inc. ("We'' or ''Us'') warrants to the original purchaser only
(''You'' or ''Your'') that the Ironton product purchased will be free from material defects in both
materials and workmanship, normal wear and tear excepted, for a period of 90 days from date of
purchase. The foregoing warranty is valid only if the installation and use of the product is strictly in
accordance with product instructions. There are no other warranties, express or implied, including the
warranty of merchantability or fitness for a particular purpose. If the product does not comply with this
limited warranty, Your sole and exclusive remedy is that We will, at our sole option and within a
commercially reasonable time, either replace the product or product component without charge to You
or refund the purchase price (less shipping). This limited warranty is not transferable.
Limitations on the Warranty
This limited warranty does not cover: (a) normal wear and tear; (b) damage through abuse, neglect,
misuse, or as a result of any accident or in any other manner; (c) damage from misapplication,
overloading, or improper installation; (d) improper maintenance and repair; and (e) product alteration
in any manner by anyone other than Us, with the sole exception of alterations made pursuant to
product instructions and in a workmanlike manner.
Obligations of Purchaser
You must retain Your product purchase receipt to verify date of purchase and that You are the original
purchaser. To make a warranty claim, contact Us at 1-877-234-6869, identify the product by make
and model number, and follow the claim instructions that will be provided. The product and the
purchase receipt must be provided to Us in order to process Your warranty claim. Any returned
product that is replaced or refunded by Us becomes our property. You will be responsible for return
shipping costs or costs related to Your return visit to a retail store.
Remedy Limits
Product replacement or a refund of the purchase price is Your sole remedy under this limited warranty
or any other warranty related to the product. We shall not be liable for: service or labor charges or
damage to Your property incurred in removing or replacing the product; any damages, including,
without limitation, damages to tangible personal property or personal injury, related to Your improper
use, installation, or maintenance of the product or product component; or any indirect, incidental or
consequential damages of any kind for any reason.
Assumption of Risk
You acknowledge and agree that any use of the product for any purpose other than the specified
use(s) stated in the product instructions is at Your own risk.
Governing Law
This limited warranty gives You specific legal rights, and You also may have other rights which vary
from state to state. Some states do not allow limitations or exclusions on implied warranties or
incidental or consequential damages, so the above limitations may not apply to You. This limited
warranty is governed by the laws of the State of Minnesota, without regard to rules pertaining to
conflicts of law. The state courts located in Dakota County, Minnesota shall have exclusive jurisdiction
for any disputes relating to this warranty.

Page 28 of 28
Distributed by:
Northern Tool & Equipment Company, Inc.
Burnsville, Minnesota 55306
www.northerntool.com
Made in China