7000 series crafts section ii - public...
TRANSCRIPT

7000 Series Crafts Section II

CraftsEmboss Resist Card ............................................ I-3Double Embossed Card ...................................... I-3Crazy-Cool Duct Tape Projects ........................... I-4Cuff Bracelets ...................................................... I-4Chalky Finish Paints ............................................ I-5How to Make an Easy Octopus Costume ............ I-5Zen Doodling ....................................................... I-6Upcycled Treasures ............................................. I-7Easy Designs with Edger Punches...................... II-9Faux-Quilting Techniques .................................... II-10Makin’s Clay® Metallic Leaf Wreath .................... II-12Sock Kitty Water Bottle Holder Instructions ......... II-13Guests ................................................................. II-14
Table of Contents
Due to the size of this section, it has been separated into two sections in order for it to be downloaded more quickly. For instance, “Emboss Resist Card” is in Section I on page 3, whereas “Easy Designs with Edger Punches” is in Section II on page 9.
9
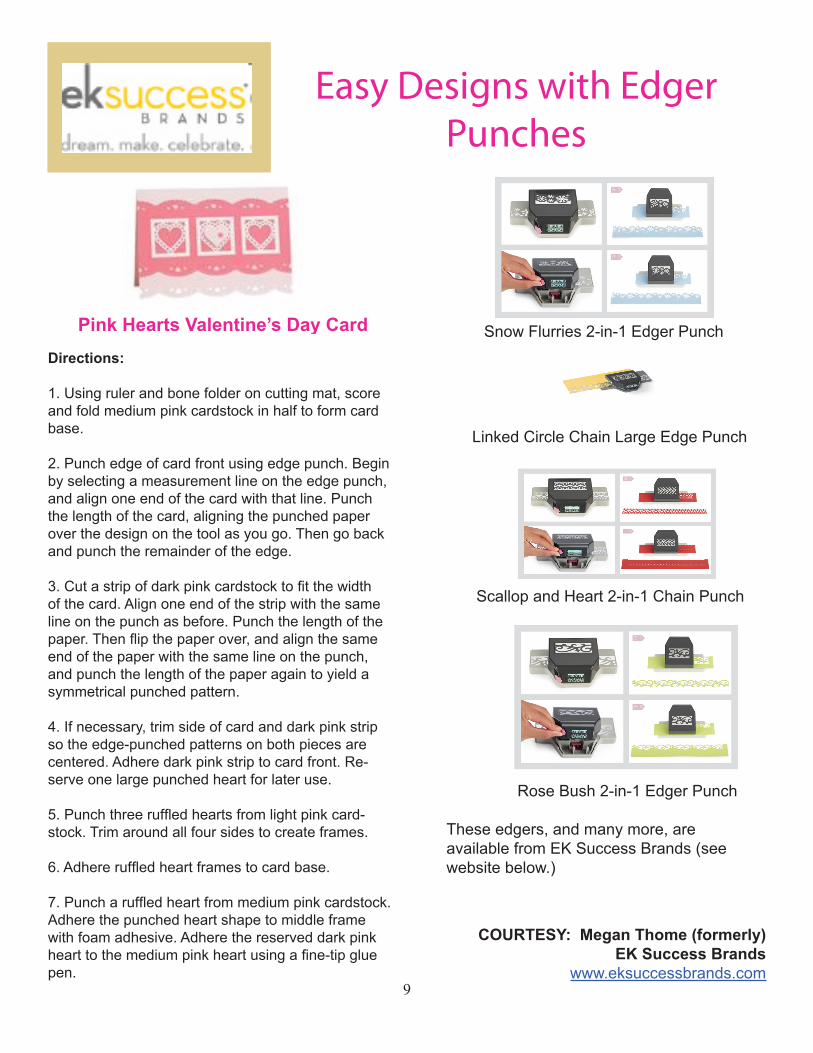
Pink Hearts Valentine’s Day CardDirections:
1. Using ruler and bone folder on cutting mat, score and fold medium pink cardstock in half to form card base.
2. Punch edge of card front using edge punch. Begin by selecting a measurement line on the edge punch, and align one end of the card with that line. Punch the length of the card, aligning the punched paper over the design on the tool as you go. Then go back and punch the remainder of the edge.
3. Cut a strip of dark pink cardstock to fit the width of the card. Align one end of the strip with the same line on the punch as before. Punch the length of the paper. Then flip the paper over, and align the same end of the paper with the same line on the punch, and punch the length of the paper again to yield a symmetrical punched pattern.
4. If necessary, trim side of card and dark pink strip so the edge-punched patterns on both pieces are centered. Adhere dark pink strip to card front. Re-serve one large punched heart for later use.
5. Punch three ruffled hearts from light pink card-stock. Trim around all four sides to create frames.
6. Adhere ruffled heart frames to card base.
7. Punch a ruffled heart from medium pink cardstock. Adhere the punched heart shape to middle frame with foam adhesive. Adhere the reserved dark pink heart to the medium pink heart using a fine-tip glue pen.
Linked Circle Chain Large Edge Punch
Snow Flurries 2-in-1 Edger Punch
Scallop and Heart 2-in-1 Chain Punch
Rose Bush 2-in-1 Edger Punch
These edgers, and many more, are available from EK Success Brands (see website below.)
Easy Designs with Edger Punches
COURTESY: Megan Thome (formerly)EK Success Brands
www.eksuccessbrands.com

What if you could create a QUILT top simply by stamping it, adding batting, a backing, quilt it and then it is done? Well I am here to show you how. I believe everyone should be abe to Stamp your ART and now you can.
I developed a new stamp line where you are able to combine different geometric stamps, place them next to each other and create beautiful quilt blocks on fab-ric, paper, wood and a variety of surfaces. This is quick and easy!
Materials:• Ann Butler’s EZ-De’s Stamps: KellyCraft, assorted• Ann Butler’s Faux Quilting Stamps: Unity Stamp Company, assorted• Ann Butler’s Colorbox Crafters Ink ™: lilac, berry, tangelo, limelight, sunshine. aquamarine• Fabric of choice • Paper of choice
Tools: • KellyCraft Get-it-Straight ™ Laser Square (optional)• Westcott Brand Extreme Edge Scissors• Acrylic blocks. sewing machine, needle, thread, baby wipes
Instructions:Please note: This technique was done on cardstock to show you the step by step process and to give you a feel for how easy it is to create block, patterns, backgrounds and more. The possibilities are endless, combining different shapes and colors. There are sev-eral photos showing finished blocks and quilted fabric blocks to get you started. The photo on the left is an actual quilt done with this technique.
First Pattern:Steps: (See below for steps 1-4)1. Place a stamp onto an acrylic block, ink it and make an impression.2. Place a second stamp for your block onto an acrylic block, ink it and make your second impression.3. Repeat the above steps to complete your block.4. If making a quilt, continue your pattern across and down, being sure to iron each block as you complete them.
Second Pattern: (See next page for steps 5-9)5. Place the stamps right onto an acrylic block to create pattern, ink it, and make an impression. Repeat until the block is complete
Third Pattern:6. Ink one square stamp at a time and then make an impression.7. Stamp the image a second time under the first im-age.8. Stamp the image onto the material a third time.9. Stamp the image a fourth time to complete the square.
Step 1 Step 2 Step 3 Step 4
10

11
Step 5 Step 6 Step 7 Step 8 Step 9
10. Continue creating the pattern on the fabric until you have an entire piece of fabric stamped to the desired size. Be sure to iron to heat set the ink.11. When this is completed, add the batting and back-ing to the stamped fabric, pinning every 4 to 6 inches. Bring to the sewing machine and stitch between the squares to quilt. Add a binding on the outer edge to fin-ish off the quilt.
Notes & Tips:• When working on fabric, always use a fabric safe ink, such as Crafter’s Ink from Clearsnap.• Try different patterns on white cardstock to see what you like.• Cut cardstock up into the geometric shapes, stamp them, then use them as puzzle pieces to create pat-terns. See what color combinations you like.• If you stamp something and do not get a good im-pression you can re-stamp easily with the clear stamps because you can see right through them. There are also a few other things you can try. You can also do
this with the Unity Red Rubber Stamps because there is no edge on the stamps so they can also be easily lined up. You can double stamp with another pattern or color creating a whole new look. You can just leave it if you are working on unbleached muslin! This gives a vintage look.• Keep baby wipes or a damp cloth near by to easily clean your stamps between impressions when chang-ing colors.• You can combine the clear and red rubber stamps together.• Using the Get-It-Straight Laser Square ™ can help you to align the stamps straight.• Prewash fabrics to remove the sizing and dry with-out fabric softener.• Make sure to remember to heat set the inks used on fabric with an iron.
COURTESY: Ann ButlerAnn Butler Designs
www.creativitystirsthesoul.com
12
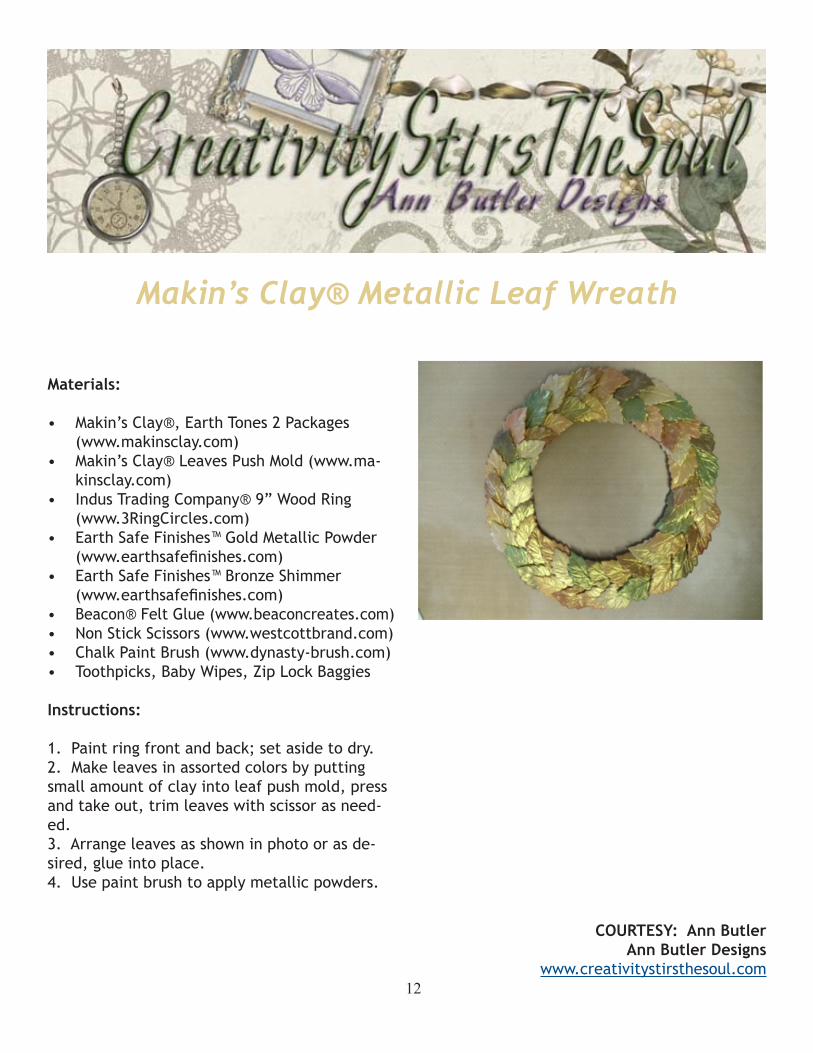
Materials:
• Makin’sClay®,EarthTones2Packages (www.makinsclay.com)• Makin’sClay®LeavesPushMold(www.ma- kinsclay.com)• IndusTradingCompany®9”WoodRing (www.3RingCircles.com)• EarthSafeFinishes™GoldMetallicPowder (www.earthsafefinishes.com)• EarthSafeFinishes™BronzeShimmer (www.earthsafefinishes.com)• Beacon®FeltGlue(www.beaconcreates.com)• NonStickScissors(www.westcottbrand.com)• ChalkPaintBrush(www.dynasty-brush.com)• Toothpicks,BabyWipes,ZipLockBaggies
Instructions:
1.Paintringfrontandback;setasidetodry.2.Makeleavesinassortedcolorsbyputtingsmallamountofclayintoleafpushmold,pressandtakeout,trimleaveswithscissorasneed-ed.3.Arrangeleavesasshowninphotoorasde-sired,glueintoplace.4.Usepaintbrushtoapplymetallicpowders.
Makin’s Clay® Metallic Leaf Wreath
COURTESY: Ann ButlerAnn Butler Designs
www.creativitystirsthesoul.com

Sock Kitty Instructions
Materials:
• 1FoxRiverredheelsock• 2oz.ofpolyesterfibrefill• ScrapsofFuchsia,SeashellPink,CaribbeanSurf (teal)XoticFeltbyNationalNonwovens• 1skeineachofblackandpinkembroideryfloss• Aleene’sFabricFusion™• Upholsterythread• Embroideryneedle• 5”,8”WestcottBrand®TitaniumSteelScissors• Ruler,pins,measuringtape,pencil,invisible marker
Instructions: 1. Turnthesockinsideout.Placeflatwithheelcenteredandfacingup.Usingthepatternpieces,drawheadcurvejustaboveredheelwhichisthemuzzle.Drawtwoearsandtailalongoppositefoldsatendofsock.2. Pinpieces.Sewalongdrawnpatternline.Carefullycutaroundpiecesleavinga1/4”border.3. Turntailandheadbodypiecesrightsideout.Cutsmallslitinfoldofeachearandturnrightsideout.4. Stuffheadpushingstuffingintoheelwhichiscat’smuzzle.Underheadstitchinacirclethroughsockandpulltighttocreateneck.Securethreadsandcut.5. Putadotofglueincenterofmuzzleaboveredmuz-zle.Usingpinkflossembroidernoseinplacewithsmallstraightstitches.Embroiderdownfromnoseandacrossmuzzletomakesmile.6. Anchorblackflossatbackofneck,bringthroughtoedgeofwhiteabovemuzzle.Makea3/4”stitchforeyetakingflossthroughtobackofneck.Pullstitchtightlytoindentslightly.Repeatforsecondeye.7. Secureflossatbackofhead.Takeflossbackthroughfrontofmuzzleononesideofnose.Makeaknot,leavea3”lengthforwhiskerandcutfloss.Repeatthisforremain-ingthreewhiskers.8. Foldrawedgesofearslitin.Withupholsterythreadstitchasmalllinealongbottomofear.Pulltogather.Se-curethread.Placeonseamlineofsockandstitchinplace.Repeatforsecondear.
9.Stufftail.Turnrawendsunderandstitcharoundopening.Pullstitchestightandsecure.Placetailalongbottomofsock.Stitchinplace.10.Foldacollarpiece11/2”by4”.Stitchwithpinkfloss.Placearoundneckandstitchinplace.Cuttwohearts,placetogetherandem-broiderinitialoraddtwocrossedstitcheswithpinkfloss.Seworgluetocatorcollar.
History of the Sock Monkey from Wikipedia
John Nelson, a Swedish immigrant to the United States, patented the sock-knitting machine in 1869, and began manufacturing work socks in Rockford, Illinois in 1890. The iconic sock monkeys made from red-heeled socks emerged at the earliest in 1932, the year the Nelson Knit-ting Company added the trademarked red heel to its product. In the early years, the red-heeled sock was mar-keted as “De-Tec-Tip.” Nelson Knitting was an innova-tor in the mass market work sock field. Nelson Knitting added the red heel “de-tec-tip” to assure its customers that they were buying “original Rockfords”. This red heel gave the monkeys their distinctive mouth. During the Great Depression, American crafters first made sock monkeys out of worn-out Rockford Red Heel Socks.
In 1958, the “scrap-craft” magazine Pack-O-Fun pub-lished “How to Make Sock Toys,” a guide to making different sock animals and dolls with red heeled socks. Frequently cited as being their most popular book ever, this pamphlet went through multiple printings and was produced in new editions up until the mid-1980s. In the late 1980s, a company called Marketing Tide of Wil-loughby Hills, Ohio sold kits with the original socks and instructions in numerous craft and sewing magazines. Their kit was featured on the ABC-TV Network Home Show in 1992, which helped to put the Sock Monkey firmly back into American Culture.
The Nelson Knitting Company was acquired in 1992 by Fox River Mills, and the original brown heather, Red Heel monkey sock is still in production by Fox River Mills. A distinctive change in the red-heeled sock design distinguishes monkeys made with Fox River Mills socks from Nelson Knitting Company socks. Fox River heels are more uniformly ovular, without the end points that gave Nelson Knitting-made sock monkeys their smiles or frowns.
In the 21st century, efforts by crafters, writers, photog-raphers, and artists to immortalize the sock monkey doll beyond soft sculptured socks has intensified in every-thing from toys to clothing. Fox River Mills now makes the original sock in several colors and there are many designs for other animals.
13
COURTESY: Debra QuartermainDebra Quartermain Designwww.debraquartermain.com

14
Shannon BielkeSha & Co292 W. Midway St.Payson, AZ [email protected]
Ann ButlerAnn Butler Designs441 Commercial Ave.Villard, MN 56385320-554-2313320-491-8882 (cell)[email protected]
Dianna EffnerExpressions, Inc.P O Box 206Jamestown, MO 65046660-849-2114800-452-2480sales@expressionsdolls.comwww.expressionsdolls.com
Elena EtcheverryFounder & ED – Charity Wings287 Industrial Street CitySan Marcos, CA [email protected]
Carina GardnerCarina Gardner, Inc.2025 Stratford Dr.Salt Lake City, UT [email protected]
Connie MoyersRoosevelt Co. Coop. Ext. ServiceP. O. Box 455Portales, NM [email protected]:/rooseveltextension.nmsu.edu
Deborah PaceAarTvark Creations8816 W. Foothill Blvd, Box 103-165 Rancho Cucamonga, CA 91730909-702-8964dpavcreations@gmail.comwww.dpavcreations.blogspot.com
Marisa PawelkoWestcott Brand Cutting ToolsP. O. Box 118Winfield, IL 60190-0118773-243-6186 marisa@modernsurrealist.comwww.modernsurrealist.comwww.westcottbrand.com
Dana Pomroy4405 Driftwood NWAlbuquerque, NM [email protected]
Debra QuartermainDebra Quartermain Design#3-221 Northumberland Street CityFredericton, NB Canada E3B3J4506-457-8153debra@debraquartermain.comwww.debraquartermain.com
Lisa RojasStampin’ Queen Creations13638 Rockledge Dr.Victorville, CA [email protected]://stampinqueencreations.blogspot.com
Clare RowleyCreative Feet LLCP O Box 26282Prescott Valley, AZ 86312928-775-3484 or [email protected]
Megan Thome EK Success Brands (formerly)11125 NW Ambassador Dr., Suite 200Kansas City, MO 64153816-389-4150www.eksuccessbrands.com
Diane TunnellIndependent Demonstrator – Stampin’ Up!2500 HammondClovis, NM [email protected]://www.stampinup.net/esuite/home/stampwithtwiladiane/
Crafts Guests