7” portable dvd player - cdn.bmstores.co.uk
TRANSCRIPT
USER MANUAL
MODEL: 334817
DVD PLAYER7” PORTABLE

Welcome1
Troubleshooting7
Technical Specifications8
Customer Support9
Your DVD Player 2.1 In The Box 2.2 Open Top View 2.3 Side View
2
Quick Setup 3.1 Power On/Off - Mains Operation 3.2 Power On/Off - In-Car Operation 3.3 Charging the Internal Battery 3.4 Standby 3.5 Adjusting the swivel display
3
Operation
Setup Menu
Useful Information
4
5
6
Getting Started 4.1 Power On and Play a DVD
Basic Operation 4.2 Basic Operation
Advanced Operation 4.3 Repeat (DVD/CD) 4.4 Multi-angle (DVD) 4.5 Audio Tracks (DVD) 4.6 Subtitles (DVD)
5.1 System Setup 5.2 General Setup 5.3 Audio Setup
6.1 Disc Handling 6.2 Disc Information 6.3 Copyright Information
2.4 Remote Control
3.6 Fitting The Remote Batteries 3.7 Connection to a TV 3.8 Connecting an External Source 3.9 In-Car Headrest Mount
4.7 Zoom (DVD/Picture disc) 4.8 Programme Playback (DVD/CD) 4.9 GOTO function (DVD/CD)
Other Operation 4.10 Numeric Keypad 4.11 Earphone Usage
5.4 Dolby (Audio Output) 5.5 Video Setup 5.6 Preferences Setup
6.4 Disc Types 6.5 Region Management Information
334817
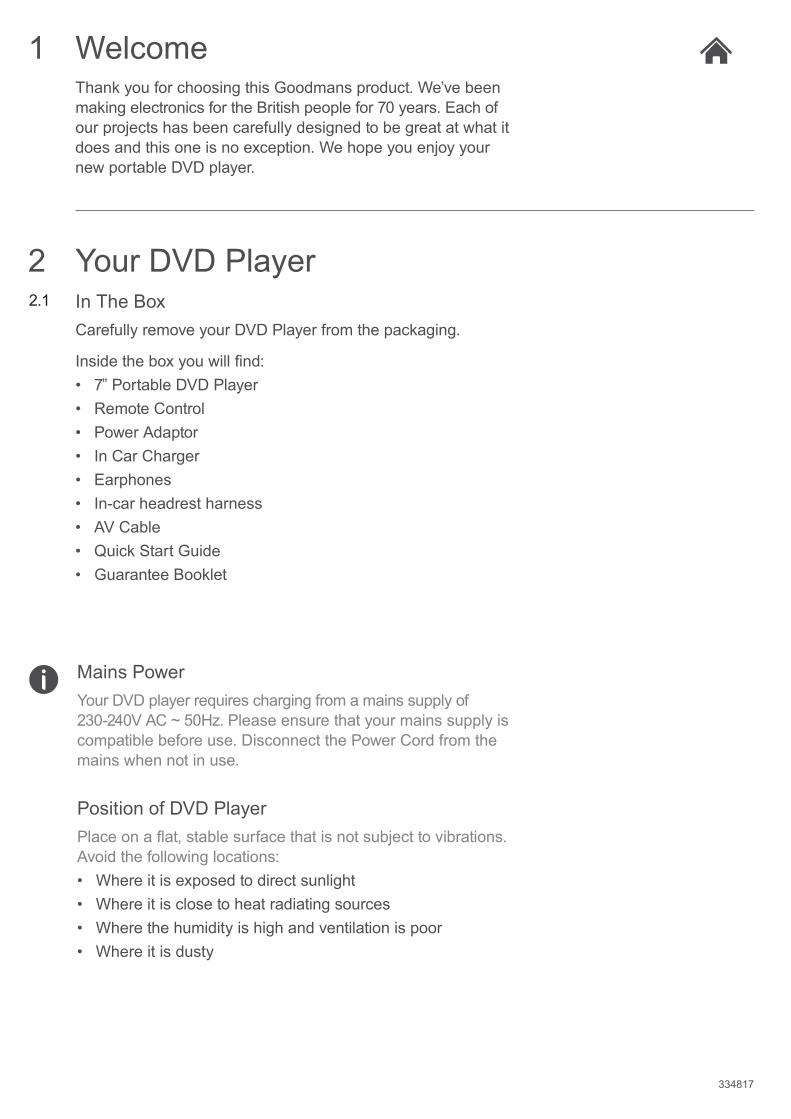
WelcomeThank you for choosing this Goodmans product. We’ve been making electronics for the British people for 70 years. Each of our projects has been carefully designed to be great at what it does and this one is no exception. We hope you enjoy your new portable DVD player.
1
Your DVD Player2In The BoxCarefully remove your DVD Player from the packaging.
Inside the box you will find:• 7” Portable DVD Player• Remote Control• Power Adaptor• In Car Charger• Earphones• In-car headrest harness• AV Cable• Quick Start Guide• Guarantee Booklet
2.1
Mains PowerYour DVD player requires charging from a mains supply of 230-240V AC ~ 50Hz. Please ensure that your mains supply is compatible before use. Disconnect the Power Cord from the mains when not in use.
Position of DVD PlayerPlace on a flat, stable surface that is not subject to vibrations. Avoid the following locations:• Where it is exposed to direct sunlight • Where it is close to heat radiating sources • Where the humidity is high and ventilation is poor • Where it is dusty

334817
Your Portable DVD Player2Open Top View2.2
A STOP button . Press to STOP playback of any media.
B PLAY/PAUSE . Press to begin playback or pause playback.
C VOL+. Press to increase volume level.
D VOL-. Press to decrease volume level.
Side View2.3
STOP
PLAY/PAUSE
VOL+
VOL-
MENU /ECO POWER
SETUP
OK
A
C
D
E
F
G
H
B
EARPHONE AV OUT AV IN OFF/ON DC IN 9-12V
I J K L M
E MENU/ECO PWER . Press to display the DVD menu (if available). Press and hold to wake unit from standby if the automatic ‘ECO’ standby has activated.
F SETUP. Press once to enter the system menu.
G NAVIGATION/OK . Navigate menus/options and selection OK button.
H OPEN/CLOSE button . Press to open or close the disc drawer.
I EARPHONE. Earphone output socket.
J AV OUT. Output socket.
K AV IN. Input socket.
L OFF/ON. Power on/off switch.
M DC IN 9-12V. Power input/charging socket.
Your DVD Player2Remote Control2.4
PROG
REPEAT
AUDIO
GOTOZOOM
ST-BY DISPLAYRETURN
SOURCE ANGLESETUP TFT
VOL- VOL+
1 2 3
4 5 6
7 8 9
0 10+
MUTE
MENUTITLE
SUBTITLE
01
12
13
14
15
02
03
04
05
06
07
08
09
10
11
21
22
23
24
25
16
17
18
19
20
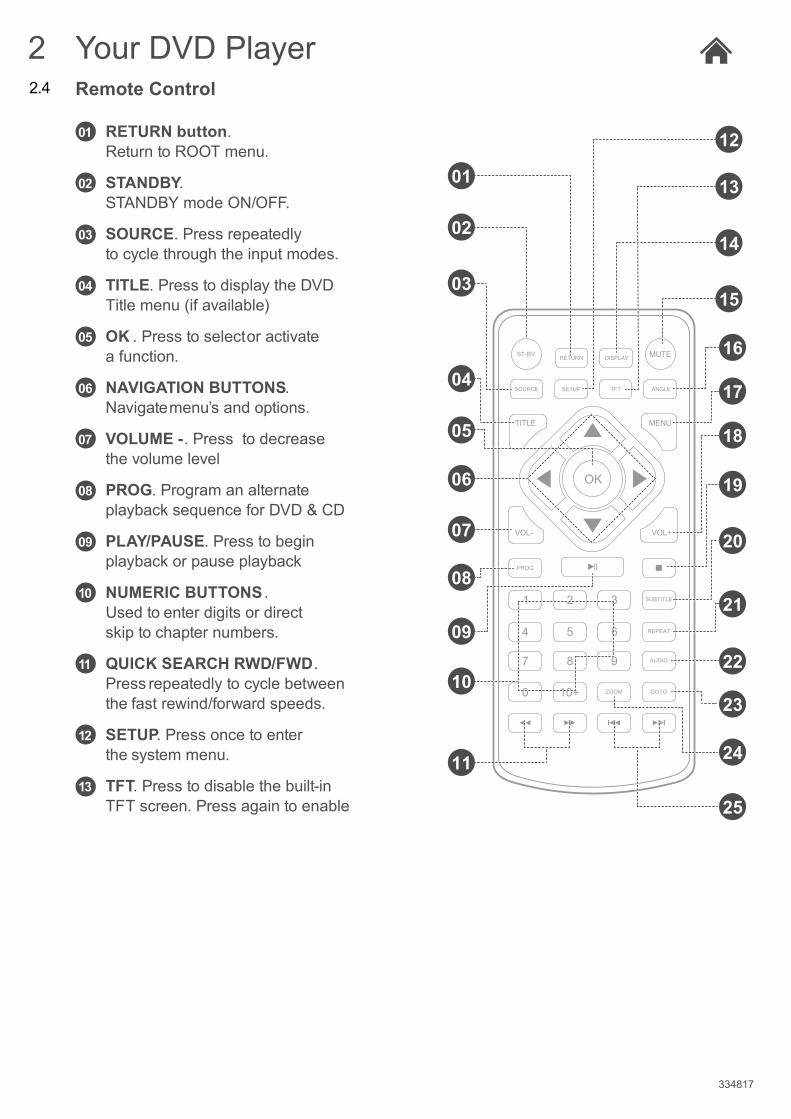
01 RETURN button. Return to ROOT menu.
02 STANDBY. STANDBY mode ON/OFF.
03 SOURCE. Press repeatedly to cycle through the input modes.
04 TITLE. Press to display the DVD Title menu (if available)
05 OK . Press to select or activate a function.
06 NAVIGATION BUTTONS. Navigate menu’s and options.
07 VOLUME -. Press to decrease the volume level
08 PROG. Program an alternate playback sequence for DVD & CD
09 PLAY/PAUSE. Press to begin playback or pause playback
10 NUMERIC BUTTONS . Used to enter digits or direct skip to chapter numbers.
11 QUICK SEARCH RWD/FWD. Press repeatedly to cycle between the fast rewind/forward speeds.
12 SETUP. Press once to enter the system menu.
13 TFT. Press to disable the built-in TFT screen. Press again to enable
OK
334817

Your DVD Player2Remote Control2.4
14 DISPLAY. Press repeatedly to cycle through available information for the current disc
15 MUTE. Press to temporarily silence audio output. Press again to resume.
16 ANGLE: Press repeatedly to cycle through any available DVD angles.
17 MENU. Press to display the DVD menu (if available)
18 VOLUME +. Press to increase the volume level
19 STOP. Press to STOP playback of any media.
20 SUBTITLE. Press repeatedly to cycle through available subtitles tracks on a DVD disc
21 REPEAT. Press repeatedly to cycle through available information for the current disc
22 AUDIO. Press repeatedly to cycle through available audio tracks
23 GOTO. Specify an exact point on a DVD or CD to jump to.
24 ZOOM . Increase the image size up to 4 x larger
25 SKIP PREV/NEXT. Press to skip DVD chapters/CD tracks PREV or NEXT.
PROG
REPEAT
AUDIO
GOTOZOOM
ST-BY DISPLAYRETURN
SOURCE ANGLESETUP TFT
VOL- VOL+
1 2 3
4 5 6
7 8 9
0 10+
MUTE
MENUTITLE
SUBTITLE
01
12
13
14
15
02
03
04
05
06
07
08
09
10
11
21
22
23
24
25
16
17
18
19
20
OK
334817
EARPHONE AV OUT AV IN OFF/ON DC IN 9-12V
EAR V IN OFF/ON DC IN 9-12V
EARPHONE AV OUT AV IN OFF/ON DC IN 9-12V
V IN OFF/ON DC IN 9-12V
334817
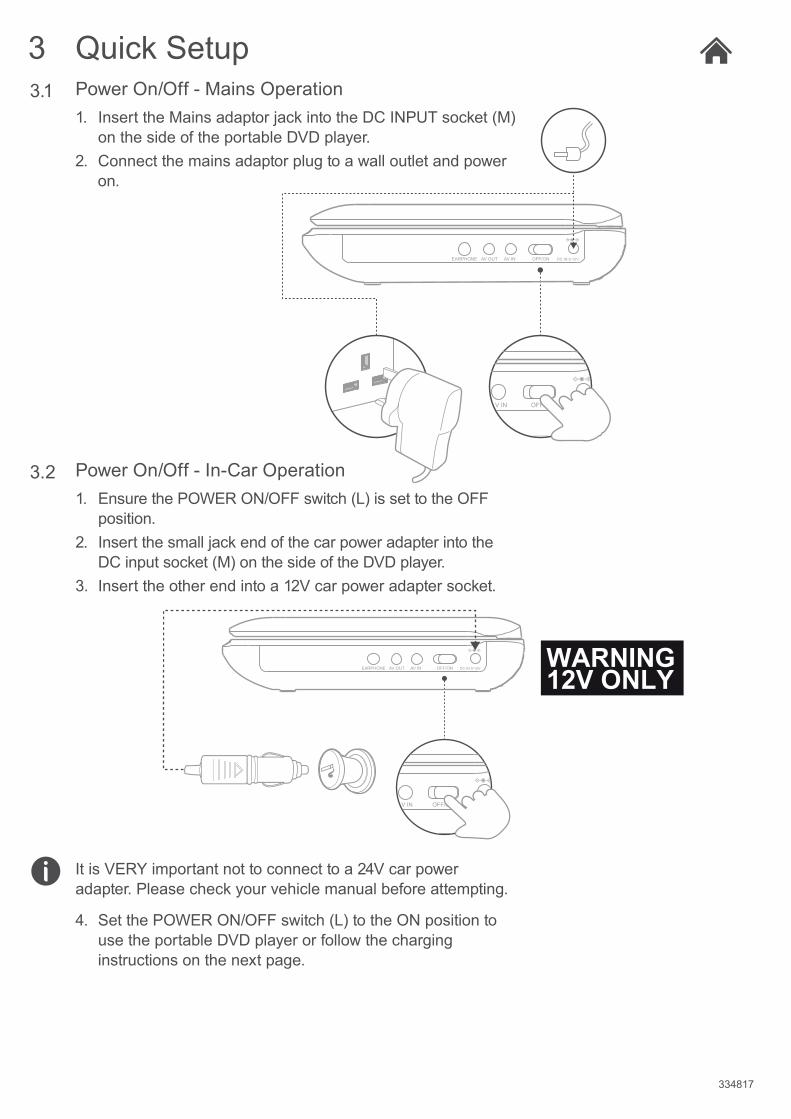
Quick Setup3Power On/Off - Mains Operation1. Insert the Mains adaptor jack into the DC INPUT socket (M)
on the side of the portable DVD player.2. Connect the mains adaptor plug to a wall outlet and power
on.
Power On/Off - In-Car Operation1. Ensure the POWER ON/OFF switch (L) is set to the OFF
position.2. Insert the small jack end of the car power adapter into the
DC input socket (M) on the side of the DVD player.3. Insert the other end into a 12V car power adapter socket.
It is VERY important not to connect to a 24V car power adapter. Please check your vehicle manual before attempting.
4. Set the POWER ON/OFF switch (L) to the ON position to use the portable DVD player or follow the charging instructions on the next page.
3.1
3.2
WARNING12V ONLY
334817
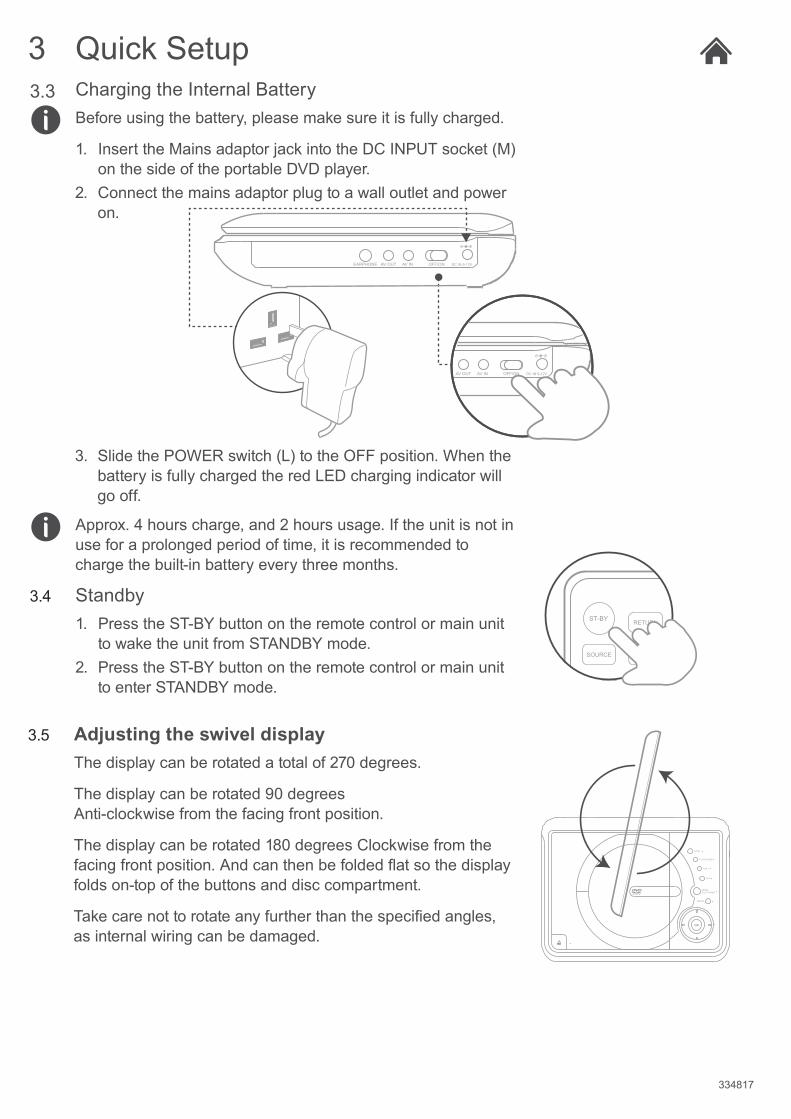
Charging the Internal BatteryBefore using the battery, please make sure it is fully charged.
1. Insert the Mains adaptor jack into the DC INPUT socket (M) on the side of the portable DVD player.
2. Connect the mains adaptor plug to a wall outlet and power on.
3. Slide the POWER switch (L) to the OFF position. When the battery is fully charged the red LED charging indicator will go off.
3.3
Approx. 4 hours charge, and 2 hours usage. If the unit is not in use for a prolonged period of time, it is recommended to charge the built-in battery every three months.
Standby1. Press the ST-BY button on the remote control or main unit
to wake the unit from STANDBY mode.2. Press the ST-BY button on the remote control or main unit
to enter STANDBY mode.
3.4
Quick Setup3
EARPHONE AV OUT AV IN OFF/ON DC IN 9-12V
EARPHONE AV OUT AV IN OFF/ON DC IN 9-12V
PROG
REPEAT
AUDIO
GOTOZOOM
ST-BY DISPLAYRETURN
SOURCE ANGLESETUP TFT
VOL- VOL+
1 2 3
4 5 6
7 8 9
0 10+
MUTE
MENUTITLE
SUBTITLE
OKAdjusting the swivel displayThe display can be rotated a total of 270 degrees.
seerged 09 detator eb nac yalpsid ehTAnti-clockwise from the facing front position.
The display can be rotated 180 degrees Clockwise from the facing front position. And can then be folded flat so the display folds on-top of the buttons and disc compartment.
Take care not to rotate any further than the specified angles, as internal wiring can be damaged.
3.5
STOP
PLAY/PAUSE
VOL+
VOL-
MENU /ECO POWER
SETUP
OK
EAR

334817
Quick Setup3Fitting the Remote Batteries1. Remove the battery cover (as shown).2. Insert 2 x AAA batteries, taking note that the polarities
match up.3. Replace the battery cover, in the same manner as you
removed it. Notes on battery usage
Do not insert battery into the remote control in the wrong direction.
.yrettab eht tiucric-trohs ro nepo ,taeh ,egrahc ton oDDo not throw battery into a fire.
If the remote control does not function correctly or if the operating range becomes reduced, replace all batteries with new ones.
Improper replacement of batteries may result in explosive hazard. It must be replaced only by batteries with the same or equivalent type.
Connection to a TVBefore attempting to connect this unit to a TV, ensure that the portable DVD player and TV are both switched off.
1. Insert the 3.5mm end of the supplied AV cable into the AV OUTPUT socket (J) on the side of the unit.
2. Connect the other ends of AV cable to a TV as shownin the diagram.
Take note to match the colours when connecting.
3. Red & white sockets carry audio and can be connected to the TV inputs or to an external amplifier.
4. The yellow cable is the video cable and must be connected to the yellow video input on your TV.
5. After tuning your TV to the correct input the playing content of the portable DVD player will appear on the TV screen. To disable the output on the TFT screen of portable DVD player press the TFT button on the remote control.
6. Press the TFT button again to enable once more.
3.6
3.7
EARPHONE AV OUT AV IN OFF/ON DC IN 9-12V

334817
Quick Setup3Connecting an External SourceConnect an external source to the portable DVD player to allow playback on the integrated display.
1. Insert the 3.5mm end of the supplied AV cable into the AV INPUT socket (K) on the side of the unit.
2. Connect the other ends of AV cable to an external source(External DVD player) .margaid eht ni nwohs sa ,
Take note to match the colours when connecting.
3. Red & white sockets carry audio and must be connected to the AUDIO OUTPUT of the external source. The yellow cable is the video cable and must be connected to the yellow video output on the external source.
4. After making the connections you must press the MODE button on the Portable DVD player to switch to the ‘AV IN’ mode.
5. Should you need to switch back to the internal DVD .niaga tinu niam eht no nottub EDOM eht sserp ,reyalp
If your video source only has a SCART output, you can purchase a SCART adaptor; and connect the three coloured
.rotpada eht no stekcos deruoloc emas eht ot skcajThen connect the adaptor to your video source.
In-Car Headrest MountFollow the below insructions to mount the portable DVD player to a car headrest.
1. Follow the instructions in section ‘3.5’ to rotate the display 180o and fold down flat onto the buttons and disc compartment.
2. Once flat, slide the portable DVD player into the headrest harness with the display facing outwards through the rectangular hole. Use the velcro tabs to secure the player.
3. Use the webbing straps to mount the harness to a headrest. Adjust the toggles to ensure the harness is secure.
3.8
3.9
EARPHONE AV OUT AV IN OFF/ON DC IN 9-12V
External DVD Player

334817
Power On and Play a DVD1. Slide the POWER switch (L) to the ON position (the Blue
power LED will illuminate).2. Press the disc compartment OPEN/CLOSE button (H) to
open the disc tray.3. Place a DVD disc onto the disc tray (label facing upwards).4. Close the disc tray and the playback starts automatically.5. When a menu screen appears on the screen, use the
navigation buttons (G or remote) to select the menu option you require, then press the OK button to start playback.
Stopping Playback (DVD/CD)1. Pressing the STOP button on the remote once during
playback will stop play at the current position.2. Pressing the PLAY/PAUSE button (B or remote) at this
point will resume playback from the position you stopped playback from.
3. If you press the STOP button on the remote twice, playback will cease and the resume option will not be available.
Play/Pause (DVD/CD)1. If you need to pause the playback at any time, press the
PLAY/PAUSE button (B or remote). 2. To resume playback press the PLAY/PAUSE button (B
or remote) again.
/ Skip chapter (DVD) or track (CD)1. Press either or buttons during playback to skip
.sdrawkcab ro daeha )DC( kcart a ro )DVD( retpahc a
This function may not work during the “Warning” section of a DVD.
Volume controls1. Use the VOLUME +/- buttons on the portable DVD player
or remote to increase or decrease the listening level.
4.1
4.2
Getting Started
Basic Operation
Operation4
AV IN OFF/ON DC IN 9-12V
VOL+
3 SUBTITLE
GOTOZOOM
VOL+
PROG
REPEAT
AUDIO
GOTOZOOM
ST-BY DISPLAYRETURN
SOURCE ANGLESETUP TFT
VOL- VOL+
1 2 3
4 5 6
7 8 9
0 10+
MUTE
MENUTITLE
SUBTITLE
OK
334817
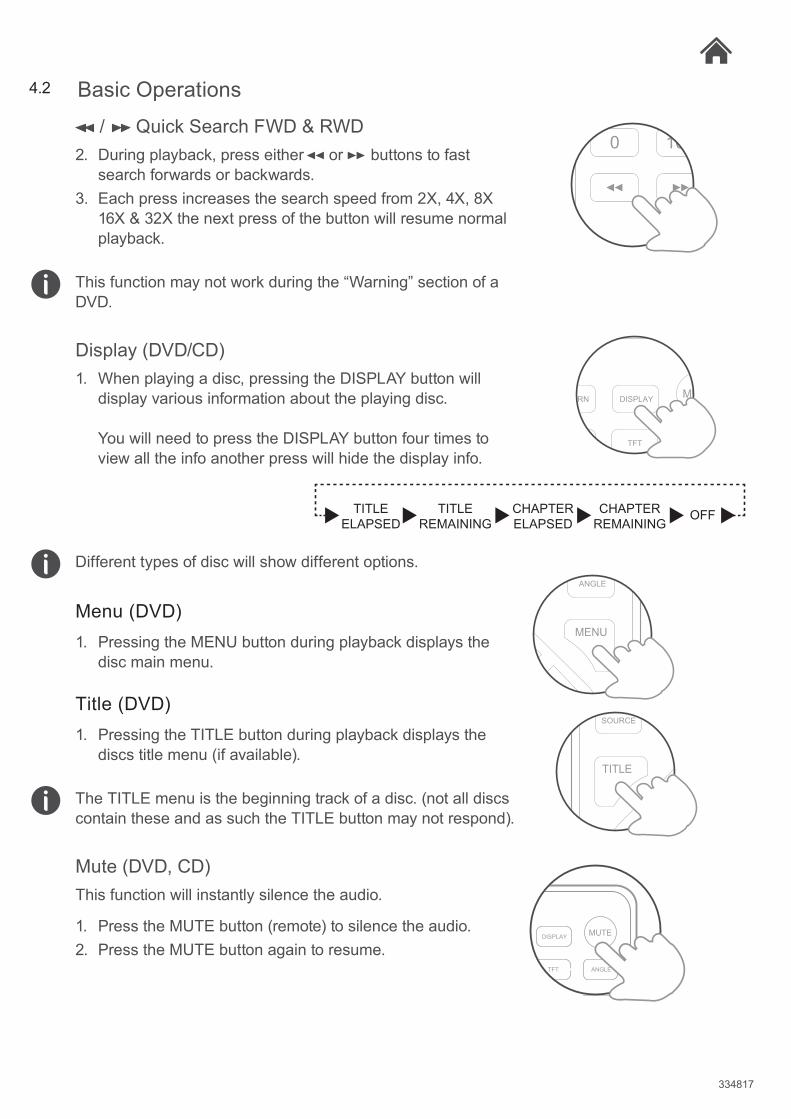
/ Quick Search FWD & RWD2. During playback, press either or buttons to fast
search forwards or backwards.3. Each press increases the search speed from 2X, 4X, 8X
16X & 32X the next press of the button will resume normal playback.
This function may not work during the “Warning” section of a DVD.
Display (DVD/CD)1. When playing a disc, pressing the DISPLAY button will
display various information about the playing disc. You will need to press the DISPLAY button four times to view all the info another press will hide the display info.
Different types of disc will show different options.
Menu (DVD)1. Pressing the MENU button during playback displays the
disc main menu.
Title (DVD)1. Pressing the TITLE button during playback displays the
discs title menu (if available).
The TITLE menu is the beginning track of a disc. (not all discs contain these and as such the TITLE button may not respond).
Mute (DVD, CD)This function will instantly silence the audio.
1. Press the MUTE button (remote) to silence the audio.2. Press the MUTE button again to resume.
TITLEELAPSED
TITLEREMAINING
CHAPTERELAPSED
CHAPTERREMAINING
OFF
Basic Operations4.2
DISPLAYRETURN
ANGLESETUP TFT
MUTE
ANGLETFT
MENU
SOURCE SETUP
TITLE
0 10+
ST-BY DISPLAYRETURN
SOURCE ANGLESETUP TFT
VOL- VOL+
MUTE
MENUTITLE
OK
334817
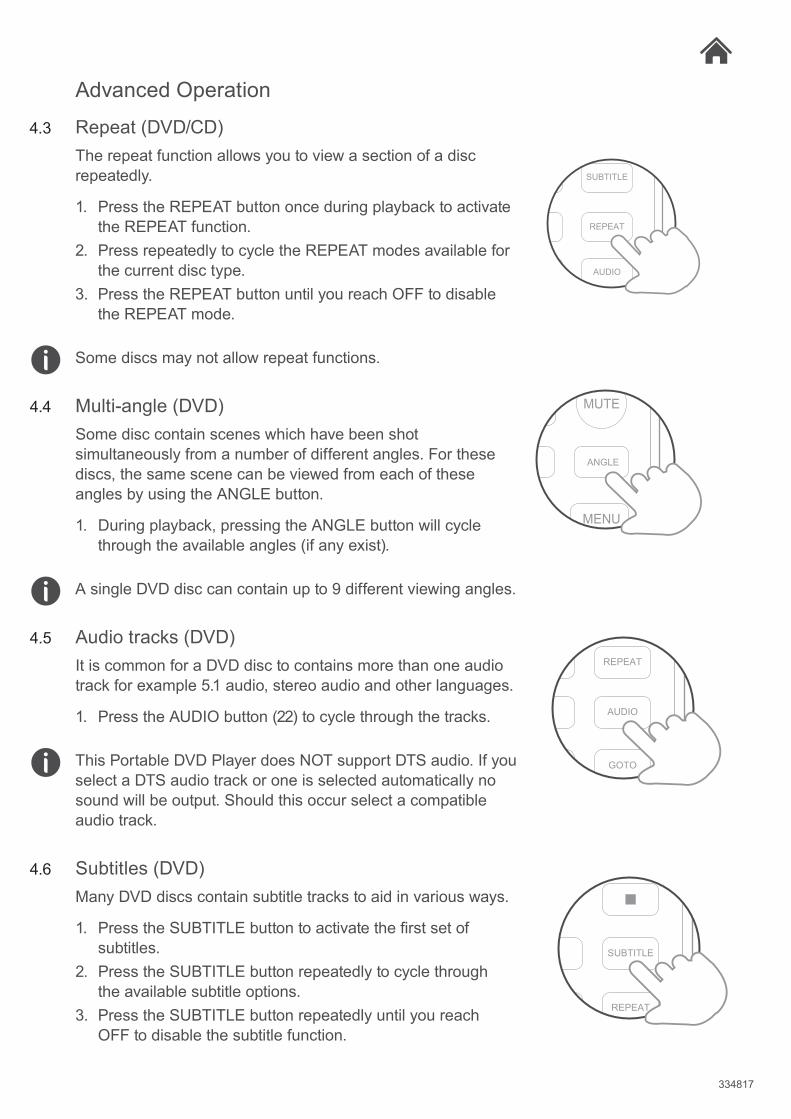
Repeat (DVD/CD)The repeat function allows you to view a section of a disc repeatedly.
1. Press the REPEAT button once during playback to activate the REPEAT function.
2. Press repeatedly to cycle the REPEAT modes available for the current disc type.
3. Press the REPEAT button until you reach OFF to disable .edom TAEPER eht
Some discs may not allow repeat functions.
Multi-angle (DVD)Some disc contain scenes which have been shot simultaneously from a number of different angles. For these discs, the same scene can be viewed from each of these angles by using the ANGLE button.
1. During playback, pressing the ANGLE button will cycle through the available angles (if any exist).
A single DVD disc can contain up to 9 different viewing angles.
Audio tracks (DVD)It is common for a DVD disc to contains more than one audio track for example 5.1 audio, stereo audio and other languages.
1. Press the AUDIO button (22) to cycle through the tracks. This Portable DVD Player does NOT support DTS audio. If you select a DTS audio track or one is selected automatically no sound will be output. Should this occur select a compatible audio track.
Subtitles (DVD)Many DVD discs contain subtitle tracks to aid in various ways.
1. Press the SUBTITLE button to activate the first set of subtitles.
2. Press the SUBTITLE button repeatedly to cycle through the available subtitle options.
3. Press the SUBTITLE button repeatedly until you reach OFF to disable the subtitle function.
4.3
4.4
4.5
4.6
Advanced Operation
REPEAT
AUDIO
3
6
9
SUBTITLE
DISPLAY
ANGLETFT
MUTE
MENU
REPEAT
AUDIO
GOTOZOOM
6
9
REPEAT
3
6
SUBTITLE

334817
Zoom (DVD/Picture disc)To zoom into the displayed image follow the below steps.
1. Press the ZOOM button to activate the zoom setting of 2X. Every subsequent press cycles through the zoom options e.g. 3X, 4X, 1/2, 1/3 & 1/4. The next press will return to the OFF setting.
2. When in ZOOM mode you can use the navigation buttons on the remote to scroll the picture up, down, left & right.
Zooming into the picture will degrade the quality of the viewed image as the pixels are being stretched.
Program playback (DVD/CD)1. Press the PROG button to begin the program function.2. Use the navigation buttons to highlight program order
number.3. Enter the TITLE/CHAPTER or TRACK number
using the numeric buttons e.g.- Title/Chapter /Track 22 would mean pressing the ‘10+’ button twice and then the ‘2’ button.
4. Repeat steps 2-3 until you have programmed all the chapters/tracks required. Should you require more Title/Chapters or Tracks than 10, navigate to the NEXT icon and press the OK button. Tracks 11-20 will now be programmable.
5. Once the programming is complete navigate to the START icon and press the OK button to begin playback of your programmed sequence.
GOTO function (DVD/CD)The GOTO function allows you to enter a specific chapter, title, audio track, subtitle track, angle and specific time codes.
1. Press the GOTO button during playback to activate the GOTO menu screen.
2. Press the GOTO button to cycle through the GOTO options.
3. Use the numeric buttons to enter the chapter, track or time you wish to skip to..
4.7
4.8
5Exit NEXT
4321
TT: /CH:TT: /CH:TT: /CH:TT: /CH:TT: /CH:
109876
TT: /CH:TT: /CH:TT: /CH:TT: /CH:TT: /CH:
4.9
Advanced Operations
AUDIO
GOTOZOOM
8 9
10+
AUDIO
GOTOZOOM
9
PROG
REPEAT
AUDIO
GOTOZOOM
ST-BY DISPLAYRETURN
SOURCE ANGLESETUP TFT
VOL- VOL+
1 2 3
4 5 6
7 8 9
0 10+
MUTE
MENUTITLE
SUBTITLE
OK

334817
Other Operations
Numeric Keypad (DVD/CD)You can use the numeric keys to control various functions on the player, for example:-
TRACK: when playing a CD disc
CHAPTER/TITLE: When playing a DVD disc.
• Input the required chapter or track number using the numeric keypad.
• Selecting chapter or track 1-9 simply press the relevant number button.
• Chapter or track 10, press the 10+ button followed by the 0 button.
• Chapter or track 22 (for example) press the 10+ button twice and then the 2 button. If the second digit is ‘0’ press the 0 button.
Earphone Usage )I( mm5.3 eht ot )deilppus( senohprae tcennoC .1
output on the side of the main unit.2. Adjust the volume in the normal manner (see Setting the
volume level, Section 4.2).
• Listen at moderate volumes to avoid hearing damage.• emulov pu nrut ton od ,gniyalp gnirud dnuos on raeh uoy fI
as the music may suddenly begin at a high volume. • Excessive sound pressure from earphones and
headphones can cause hearing loss.To avoid damaging your ears, adjust the volume to the lowest safe level before playing, and turn up to the desired level when playback has started.
4.10
4.11
EARPHONE AV OUT AV IN OFF/ON DC IN 9-12V
PROG
REPEAT
AUDIO
GOTOZOOM
ST-BY DISPLAYRETURN
SOURCE ANGLESETUP TFT
VOL- VOL+
1 2 3
4 5 6
7 8 9
0 10+
MUTE
MENUTITLE
SUBTITLE
OK

334817
The setup menu contains various preferences for functions found on the unit. To enter the Setup menu press the SETUP button.
Use the buttons to scroll; press the OK button to select.
GeneralTV display
Choose a setting between:-
• 4:3 / PS (pan and scan)• 4:3 / LB (letter box)• 16:9• Wide squeeze Angle mark
Enabling this function displays an icon for a compatible disc when multiple angles are available for selection.
OSD language
This option sets the On Screen Display language. Choose between:- • English • German• French • Spanish
Screen saver
When the unit is not in use, the DVD logo will appear as a screen saver to prevent screen burn in. Choose ON or OFF.
Last memory
When set to ON the unit will remember the last position on a disc before the unit was shut down (STANDBY).
- - General Setup Page - -
Go To General Setup Page
TV DisplayAngle markOSD LangScreen SaverLast Memory
WideOnENGOnOn
General Audio Dolby Video Preference5.2
Setup Menu5System Setup5.1
PROG
REPEAT
AUDIO
GOTOZOOM
ST-BY DISPLAYRETURN
SOURCE ANGLESETUP TFT
VOL- VOL+
1 2 3
4 5 6
7 8 9
0 10+
MUTE
MENUTITLE
SUBTITLE
OK

334817
Audio (speaker setup)Downmix
This option allows you to change the way the audio is assigned to each speaker. Choose from:-
• LT/RT - Left / Right mixed mode• STEREO - Stereo audio output
Dolby (Audio output)DUAL MONO: Only applies to discs with Dolby Digital 5.1
• STEREO: The audio frequency on the Left & Right channels will be output respectively from the Left & Right speakers.
• LEFT-MONO: The audio frequency on the Left & Right channels will be output only from the Left speaker.
• RIGHT-MONO: The audio frequency on the Left & Right channels will be output only from the Right speaker.
• MIX-MONO: The audio frequency on the Left & Right channels will be merged together and output from both Left & Right speakers.
Video > QualitySharpness
Set the video sharpness level. Select from:-
• Low• Medium• High Brightness
Set the video brightness level. Use the / buttons to increase or decrease from -16 to +16. Press the OK buttonto complete the setting.
Contrast
Set the video contrast level. Use the / buttons to increase or decrease from -16 to +16. Press the OK buttonto complete the setting.
5.3
5.4
5.5
System Setup

Password
1. Enter a new password. First you will be required to enter the current password. This will be ‘1234’ if changing for the first time.
2. Once you have entered a correct existing password you can then enter your new password and confirm. Press the OK button to save the new password.
The master override password can be used if you change the default but forget the new password. The master password is ‘1369’.
Default
Activating this option resets every setting to the factory default.
334817
PreferencesAvailable only when no disc is loaded
TV type
Set this option to whatever type of disc you are watching. PAL, MULTI (to set automatically) or NTSC.
Audio
Choose the default audio setting. This means the Portable DVD Player will automatically select this language as the audio track (if available).
Subtitle
Select the default subtitle language.
Disc menu
This option sets the default DVD menu language. Once set if the DVD you are watching contains a menu with your specified language that is used by default.
Parental
Choose between:-
• Kid Safe • PGR• G • R• PG • NC17• PG13 • Adult
When changing the parental level you will be asked to enter the password. The default password is ‘1234’.
5.6
PROG
REPEAT
AUDIO
GOTOZOOM
1 2 3
4 5 6
7 8 9
0 10+
SUBTITLE

334817
• Do not touch the playback side of the disc.• Do not attach paper or tape to disc.• Fingerprints and dust on the disc cause picture and sound
deterioration. Wipe the disc from the centre outwards with a soft cloth. Always keep the disc clean.
• If you cannot wipe off the dust with a soft cloth, wipe the disc lightly with a slightly moistened soft cloth and finish with a dry cloth.
• Do not use any type of solvent such as thinner, benzene, commercially available cleaners or antistatic spray for vinyl. It may damage the disc.
• Do not store discs in a place subject to direct sunlight or near heat source.
• Do not store discs in a place subject to moisture and dust such as a bathroom or near a humidifier.
• Store discs vertically in a case, stacking or placing object on discs outside or their case may cause warping.
• Normally, DVD discs are divided into titles, and the titles are sub-divided into chapters. Audio CD discs are divided into tracks.
• Each title, chapter, or track is assigned a number, which is called title number, chapter number or track number respectively. There may be discs that do not have these numbers.
This product incorporates copyright protection technology that is protected by U.S. patents and other intellectual property rights. Use of this copyright protection technology must be authorized by Macrovision, and is intended for home and other limited viewing uses only unless otherwise authorized by Macrovision. Reverse engineering or disassembly is prohibited.
Manufactured under license from Dolby Laboratories. Dolby and the double-D symbol are trademarks of Dolby Laboratories.
Useful Information6Disc Handling
Disc Information
Copyright Information
6.1
6.2
6.3
334817
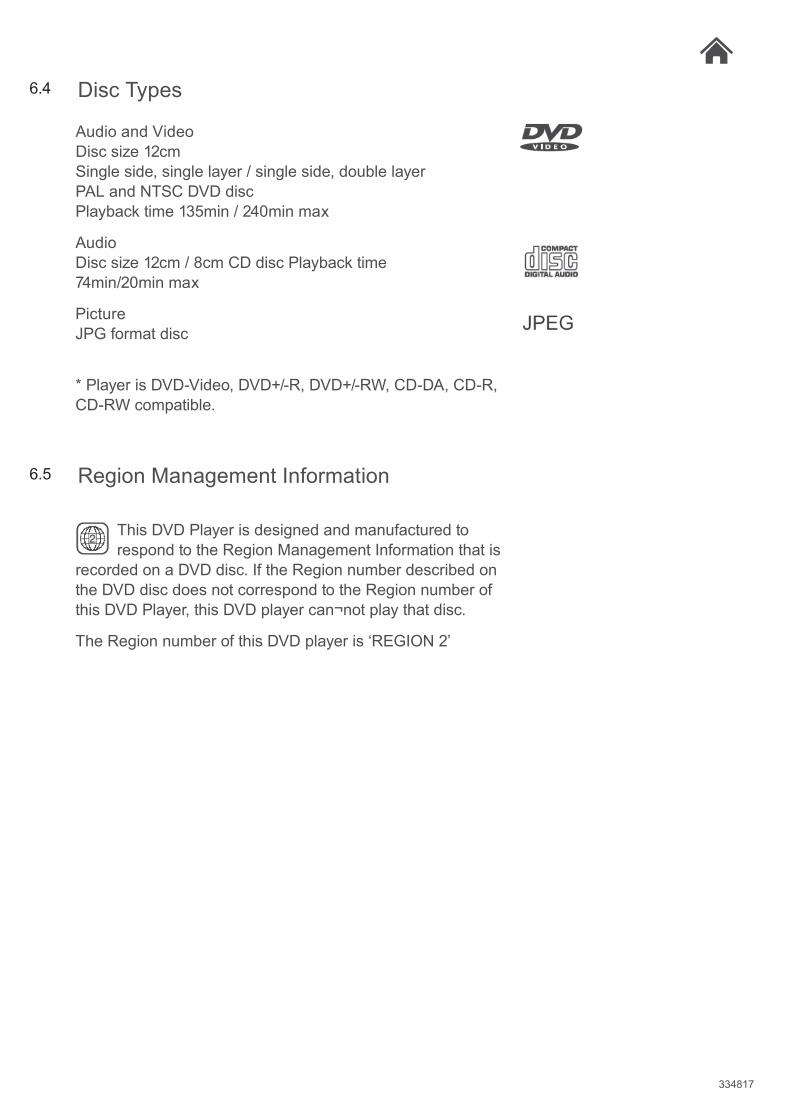
Audio and Video Disc size 12cm Single side, single layer / single side, double layer PAL and NTSC DVD disc Playback time 135min / 240min max
Audio Disc size 12cm / 8cm CD disc Playback time 74min/20min max
Picture JPG format disc
* Player is DVD-Video, DVD+/-R, DVD+/-RW, CD-DA, CD-R, CD-RW compatible.
This DVD Player is designed and manufactured to respond to the Region Management Information that is
recorded on a DVD disc. If the Region number described on the DVD disc does not correspond to the Region number of this DVD Player, this DVD player can¬not play that disc.
The Region number of this DVD player is ‘REGION 2’
Disc Types
Region Management Information
6.4
6.5
334817
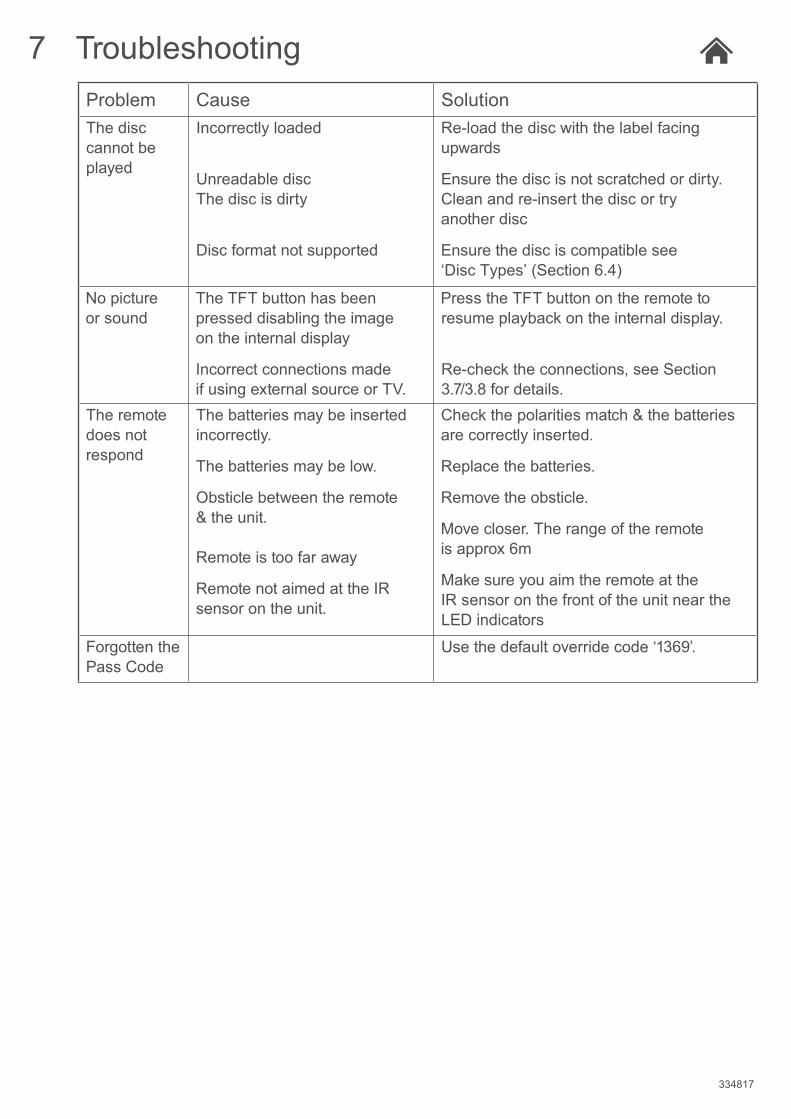
Problem Cause SolutionThe disc cannot be played
Incorrectly loaded
Unreadable disc The disc is dirty
Disc format not supported
Re-load the disc with the label facing upwards
Ensure the disc is not scratched or dirty. yrt ro csid eht tresni-er dna naelC
another disc
ees elbitapmoc si csid eht erusnE‘Disc Types’ (Section 6.4)
No picture or sound
The TFT button has been egami eht gnilbasid desserp
on the internal display
Incorrect connections made if using external source or TV.
Press the TFT button on the remote to resume playback on the internal display.
Re-check the connections, see Section 3.7/3.8 for details.
The remote does not respond
The batteries may be inserted incorrectly.
The batteries may be low.
etomer eht neewteb elcitsbO& the unit. Remote is too far away
Remote not aimed at the IR sensor on the unit.
Check the polarities match & the batteries are correctly inserted.
Replace the batteries.
Remove the obsticle.
etomer eht fo egnar ehT .resolc evoMis approx 6m
eht ta etomer eht mia uoy erus ekaMIR sensor on the front of the unit near the LED indicators
Forgotten the Pass Code
Use the default override code ‘1369’.
Troubleshooting7

334817
Model Number 334817
Power SupplyOutput - DC 9V 1000mA
Input - AC 100~240V 50/60Hz 0.3A
Input voltage DC 9-12V
Battery Lithium battery
Battery capacity 1000mAh / 7.4V
Dynamic range ≥ 85dB
Video output 1 Vp-p75 Ω unbalanced
Frequency response 20Hz~20KHz
Screen size 7" (17.8cm)
Supported Discs CD, CD-R, DVD, DVD-R, DVD+R, PICTURE CD & JPG
Remote battery 2 x AAA
Technical Specifications8
Customer Support9For all product support, please email:[email protected]
This Product is intended for use within the UK
Declaration of Conformance
:sserdda tenretni gniwollof eht ta elbaliava si ytimrofnoc fo noitaralced UE eht fo txet lluf ehThttp://www.bmstores.co.uk/technical-information

