7-1-1 integration server administrators guide
TRANSCRIPT
Title Page
webMethods Integration ServerAdministrator’s Guide
Version 7.1.1
January 2008
webMethods

This document applies to webMethods Integration Server Version 7.1.1 and to all subsequent releases.
Specifications contained herein are subject to change and these changes will be reported in subsequent release notes or new editions.
© Copyright Software AG 2008.
All rights reserved.
The name Software AG and/or all Software AG product names are either trademarks or registered trademarks of Software AG. Other company and product names mentioned herein may be trademarks of their respective owners.
Document ID: IS-AG-711-20080128
Table of Contents
About This Guide . . . . . . . . . . . . . . . . . . . . . . . . . . . . . . . . . . . . . . . . . . . . . . . . . . . . . . . . . . . . 15Document Conventions . . . . . . . . . . . . . . . . . . . . . . . . . . . . . . . . . . . . . . . . . . . . . . . . . . . . 15Additional Information . . . . . . . . . . . . . . . . . . . . . . . . . . . . . . . . . . . . . . . . . . . . . . . . . . . . . 16
1. The Role of the Administrator . . . . . . . . . . . . . . . . . . . . . . . . . . . . . . . . . . . . . . . . . . . . . 17What Does an Administrator Do? . . . . . . . . . . . . . . . . . . . . . . . . . . . . . . . . . . . . . . . . . . . . 18Typical Administrative Responsibilities . . . . . . . . . . . . . . . . . . . . . . . . . . . . . . . . . . . . . . . . 18The Integration Server Administrator . . . . . . . . . . . . . . . . . . . . . . . . . . . . . . . . . . . . . . . . . . 19Receiving Administrative Messages from the Server . . . . . . . . . . . . . . . . . . . . . . . . . . . . . 19The Administrator User . . . . . . . . . . . . . . . . . . . . . . . . . . . . . . . . . . . . . . . . . . . . . . . . . . . . 19
The Administrator’s Password . . . . . . . . . . . . . . . . . . . . . . . . . . . . . . . . . . . . . . . . . . . 19Adding Backup Administrators . . . . . . . . . . . . . . . . . . . . . . . . . . . . . . . . . . . . . . . . . . . . . . . 20
2. An Overview of the Server . . . . . . . . . . . . . . . . . . . . . . . . . . . . . . . . . . . . . . . . . . . . . . . . 21The Role of the Server . . . . . . . . . . . . . . . . . . . . . . . . . . . . . . . . . . . . . . . . . . . . . . . . . . . . . 22Architecture . . . . . . . . . . . . . . . . . . . . . . . . . . . . . . . . . . . . . . . . . . . . . . . . . . . . . . . . . . . . . 22
Services . . . . . . . . . . . . . . . . . . . . . . . . . . . . . . . . . . . . . . . . . . . . . . . . . . . . . . . . . . . . 24Retrieving Data for Services . . . . . . . . . . . . . . . . . . . . . . . . . . . . . . . . . . . . . . . . . . . . . 25
How the Server Executes Services . . . . . . . . . . . . . . . . . . . . . . . . . . . . . . . . . . . . . . . . . . . 26Security Features . . . . . . . . . . . . . . . . . . . . . . . . . . . . . . . . . . . . . . . . . . . . . . . . . . . . . . . . . 27Logging . . . . . . . . . . . . . . . . . . . . . . . . . . . . . . . . . . . . . . . . . . . . . . . . . . . . . . . . . . . . . . . . 28Caching . . . . . . . . . . . . . . . . . . . . . . . . . . . . . . . . . . . . . . . . . . . . . . . . . . . . . . . . . . . . . . . . 28
3. Starting and Stopping the Server . . . . . . . . . . . . . . . . . . . . . . . . . . . . . . . . . . . . . . . . . . . 29Starting the webMethods Integration Server . . . . . . . . . . . . . . . . . . . . . . . . . . . . . . . . . . . . 30
Starting the Server from the Command Line . . . . . . . . . . . . . . . . . . . . . . . . . . . . . . . . 31Changing Whether the Integration Server is a Windows Application or Windows Service . 33
Switching the Server from a Windows Service to a Windows Application . . . . . . . . . . 34Switching the Server from a Windows Application to a Windows Service . . . . . . . . . . 34
What Happens When You Start the Server? . . . . . . . . . . . . . . . . . . . . . . . . . . . . . . . . . . . . 36How to Tell if the Server Is Running Correctly . . . . . . . . . . . . . . . . . . . . . . . . . . . . . . . 36
Shutting Down the Integration Server . . . . . . . . . . . . . . . . . . . . . . . . . . . . . . . . . . . . . . . . . 37Viewing Active Sessions . . . . . . . . . . . . . . . . . . . . . . . . . . . . . . . . . . . . . . . . . . . . . . . . 37
Restarting the Integration Server . . . . . . . . . . . . . . . . . . . . . . . . . . . . . . . . . . . . . . . . . . . . . 38Server Recovery . . . . . . . . . . . . . . . . . . . . . . . . . . . . . . . . . . . . . . . . . . . . . . . . . . . . . . . . . 38
Integration Server Data Integrity and Recoverability Considerations . . . . . . . . . . . . . . 39Critical Integration Server Data Files . . . . . . . . . . . . . . . . . . . . . . . . . . . . . . . . . . . 40
webMethods Integration Server Administrator’s Guide Version 7.1.1 3

Table of Contents
4. Using the Integration Server Administrator . . . . . . . . . . . . . . . . . . . . . . . . . . . . . . . . . . 41What Is the Integration Server Administrator? . . . . . . . . . . . . . . . . . . . . . . . . . . . . . . . . . . . 42Starting the Integration Server Administrator . . . . . . . . . . . . . . . . . . . . . . . . . . . . . . . . . . . . 42Basic Operation . . . . . . . . . . . . . . . . . . . . . . . . . . . . . . . . . . . . . . . . . . . . . . . . . . . . . . . . . . 43
Getting Help . . . . . . . . . . . . . . . . . . . . . . . . . . . . . . . . . . . . . . . . . . . . . . . . . . . . . . . . . 43The Configuration File . . . . . . . . . . . . . . . . . . . . . . . . . . . . . . . . . . . . . . . . . . . . . . . . . . . . . 44
5. Managing Users and Groups . . . . . . . . . . . . . . . . . . . . . . . . . . . . . . . . . . . . . . . . . . . . . . 45Users and Groups . . . . . . . . . . . . . . . . . . . . . . . . . . . . . . . . . . . . . . . . . . . . . . . . . . . . . . . . 46
Purpose of Users and Groups . . . . . . . . . . . . . . . . . . . . . . . . . . . . . . . . . . . . . . . . . . . 46Defining a User Account . . . . . . . . . . . . . . . . . . . . . . . . . . . . . . . . . . . . . . . . . . . . . . . . . . . 47
Predefined User Accounts . . . . . . . . . . . . . . . . . . . . . . . . . . . . . . . . . . . . . . . . . . . . . . 48Adding User Accounts . . . . . . . . . . . . . . . . . . . . . . . . . . . . . . . . . . . . . . . . . . . . . . . . . 48Removing User Accounts . . . . . . . . . . . . . . . . . . . . . . . . . . . . . . . . . . . . . . . . . . . . . . . 49Changing Passwords and Password Requirements . . . . . . . . . . . . . . . . . . . . . . . . . . . 50
Password Requirements . . . . . . . . . . . . . . . . . . . . . . . . . . . . . . . . . . . . . . . . . . . . 50Disabling and Enabling Users . . . . . . . . . . . . . . . . . . . . . . . . . . . . . . . . . . . . . . . . . . . . . . . 52
Disabling a User . . . . . . . . . . . . . . . . . . . . . . . . . . . . . . . . . . . . . . . . . . . . . . . . . . . . . . 53Enabling a User . . . . . . . . . . . . . . . . . . . . . . . . . . . . . . . . . . . . . . . . . . . . . . . . . . . . . . 53
Defining Groups . . . . . . . . . . . . . . . . . . . . . . . . . . . . . . . . . . . . . . . . . . . . . . . . . . . . . . . . . . 54Predefined Groups . . . . . . . . . . . . . . . . . . . . . . . . . . . . . . . . . . . . . . . . . . . . . . . . . . . . 55Adding Groups . . . . . . . . . . . . . . . . . . . . . . . . . . . . . . . . . . . . . . . . . . . . . . . . . . . . . . . 56Adding Users to a Group . . . . . . . . . . . . . . . . . . . . . . . . . . . . . . . . . . . . . . . . . . . . . . . 57Removing Users from a Group . . . . . . . . . . . . . . . . . . . . . . . . . . . . . . . . . . . . . . . . . . . 58Viewing Group Membership . . . . . . . . . . . . . . . . . . . . . . . . . . . . . . . . . . . . . . . . . . . . . 59Removing Groups . . . . . . . . . . . . . . . . . . . . . . . . . . . . . . . . . . . . . . . . . . . . . . . . . . . . . 60
6. Configuring the Server . . . . . . . . . . . . . . . . . . . . . . . . . . . . . . . . . . . . . . . . . . . . . . . . . . . 61Viewing and Changing Licensing Information . . . . . . . . . . . . . . . . . . . . . . . . . . . . . . . . . . . 62
The License Key . . . . . . . . . . . . . . . . . . . . . . . . . . . . . . . . . . . . . . . . . . . . . . . . . . . . . . 62Viewing or Changing the License Key . . . . . . . . . . . . . . . . . . . . . . . . . . . . . . . . . . 62Renewal Reminders . . . . . . . . . . . . . . . . . . . . . . . . . . . . . . . . . . . . . . . . . . . . . . . 63Renewing a Key . . . . . . . . . . . . . . . . . . . . . . . . . . . . . . . . . . . . . . . . . . . . . . . . . . . 63
Licensed Sessions . . . . . . . . . . . . . . . . . . . . . . . . . . . . . . . . . . . . . . . . . . . . . . . . . . . . 63Managing the Server Thread Pool . . . . . . . . . . . . . . . . . . . . . . . . . . . . . . . . . . . . . . . . . . . . 64Setting the Session Timeout Limit . . . . . . . . . . . . . . . . . . . . . . . . . . . . . . . . . . . . . . . . . . . . 65Configuring Outbound HTTP Settings . . . . . . . . . . . . . . . . . . . . . . . . . . . . . . . . . . . . . . . . . 66
Specifying Outbound HTTP Settings . . . . . . . . . . . . . . . . . . . . . . . . . . . . . . . . . . . . . . 67Setting Up Aliases for Remote Integration Servers . . . . . . . . . . . . . . . . . . . . . . . . . . . . . . . 68
Adding an Alias . . . . . . . . . . . . . . . . . . . . . . . . . . . . . . . . . . . . . . . . . . . . . . . . . . . . . . . 69Testing the Connection to a Remote Server . . . . . . . . . . . . . . . . . . . . . . . . . . . . . . . . . 71Editing an Alias . . . . . . . . . . . . . . . . . . . . . . . . . . . . . . . . . . . . . . . . . . . . . . . . . . . . . . . 71Deleting an Alias . . . . . . . . . . . . . . . . . . . . . . . . . . . . . . . . . . . . . . . . . . . . . . . . . . . . . . 71
4 webMethods Integration Server Administrator’s Guide Version 7.1.1

Table of Contents
Setting Up Aliases for Web Services . . . . . . . . . . . . . . . . . . . . . . . . . . . . . . . . . . . . . . . . . . 72Adding an Endpoint Alias . . . . . . . . . . . . . . . . . . . . . . . . . . . . . . . . . . . . . . . . . . . . . . . 72Associate an Endpoint Alias with a Binder . . . . . . . . . . . . . . . . . . . . . . . . . . . . . . . . . . 74Editing an Endpoint Alias . . . . . . . . . . . . . . . . . . . . . . . . . . . . . . . . . . . . . . . . . . . . . . . 74Deleting an Endpoint Alias . . . . . . . . . . . . . . . . . . . . . . . . . . . . . . . . . . . . . . . . . . . . . . 75
Specifying a Third-Party Proxy Server for Outbound Requests . . . . . . . . . . . . . . . . . . . . . 75Bypassing a Proxy Server . . . . . . . . . . . . . . . . . . . . . . . . . . . . . . . . . . . . . . . . . . . . . . 77
Configuring Where the Integration Server Writes Logging, Status, and Other Information . 78Switching from the Embedded Database to an External RDBMS . . . . . . . . . . . . . . . . . . . . 79Working with Extended Configuration Settings . . . . . . . . . . . . . . . . . . . . . . . . . . . . . . . . . . 79
Configuring Integration Server to Work with Servers Running HTTP 1.0 and Above . . 80Specifying Character Encoding . . . . . . . . . . . . . . . . . . . . . . . . . . . . . . . . . . . . . . . . . . . . . . 81Using a 64-bit JVM on Solaris and HP-UX Systems . . . . . . . . . . . . . . . . . . . . . . . . . . . . . . 81Publishing Information about Integration Server Assets . . . . . . . . . . . . . . . . . . . . . . . . . . . 82
7. Configuring Ports . . . . . . . . . . . . . . . . . . . . . . . . . . . . . . . . . . . . . . . . . . . . . . . . . . . . . . . 83Overview . . . . . . . . . . . . . . . . . . . . . . . . . . . . . . . . . . . . . . . . . . . . . . . . . . . . . . . . . . . . . . . 84Considerations for Adding Ports . . . . . . . . . . . . . . . . . . . . . . . . . . . . . . . . . . . . . . . . . . . . . 85Adding an HTTP Port . . . . . . . . . . . . . . . . . . . . . . . . . . . . . . . . . . . . . . . . . . . . . . . . . . . . . . 85
Using Advanced Controls . . . . . . . . . . . . . . . . . . . . . . . . . . . . . . . . . . . . . . . . . . . . . . . 87Adding an HTTPS Port . . . . . . . . . . . . . . . . . . . . . . . . . . . . . . . . . . . . . . . . . . . . . . . . . . . . 88Adding a File Polling Port . . . . . . . . . . . . . . . . . . . . . . . . . . . . . . . . . . . . . . . . . . . . . . . . . . 93Adding an FTPS Port . . . . . . . . . . . . . . . . . . . . . . . . . . . . . . . . . . . . . . . . . . . . . . . . . . . . . . 98Adding an FTP Port . . . . . . . . . . . . . . . . . . . . . . . . . . . . . . . . . . . . . . . . . . . . . . . . . . . . . . . 101Adding an Email Port . . . . . . . . . . . . . . . . . . . . . . . . . . . . . . . . . . . . . . . . . . . . . . . . . . . . . . 103Adding an HTTP Diagnostic Port . . . . . . . . . . . . . . . . . . . . . . . . . . . . . . . . . . . . . . . . . . . . . 107Adding an HTTPS Diagnostic Port . . . . . . . . . . . . . . . . . . . . . . . . . . . . . . . . . . . . . . . . . . . 109Suspending an HTTP/HTTPS Port . . . . . . . . . . . . . . . . . . . . . . . . . . . . . . . . . . . . . . . . . . . 114Resuming an HTTP/HTTPS Port . . . . . . . . . . . . . . . . . . . . . . . . . . . . . . . . . . . . . . . . . . . . . 115Specifying an FTP/FTPS Port Range . . . . . . . . . . . . . . . . . . . . . . . . . . . . . . . . . . . . . . . . . 115Changing the Primary Port . . . . . . . . . . . . . . . . . . . . . . . . . . . . . . . . . . . . . . . . . . . . . . . . . 117Deleting a Port . . . . . . . . . . . . . . . . . . . . . . . . . . . . . . . . . . . . . . . . . . . . . . . . . . . . . . . . . . . 117Editing a Port . . . . . . . . . . . . . . . . . . . . . . . . . . . . . . . . . . . . . . . . . . . . . . . . . . . . . . . . . . . . 118Enabling/Disabling a Port . . . . . . . . . . . . . . . . . . . . . . . . . . . . . . . . . . . . . . . . . . . . . . . . . . 118Adding a Security Provider . . . . . . . . . . . . . . . . . . . . . . . . . . . . . . . . . . . . . . . . . . . . . . . . . 119
8. Configuring Document Stores . . . . . . . . . . . . . . . . . . . . . . . . . . . . . . . . . . . . . . . . . . . . . 121Overview . . . . . . . . . . . . . . . . . . . . . . . . . . . . . . . . . . . . . . . . . . . . . . . . . . . . . . . . . . . . . . . 122Configuring the Default Document Store . . . . . . . . . . . . . . . . . . . . . . . . . . . . . . . . . . . . . . . 123Configuring the Trigger Document Store . . . . . . . . . . . . . . . . . . . . . . . . . . . . . . . . . . . . . . . 124Maintaining Inbound Document History for Received Documents . . . . . . . . . . . . . . . . . . . 126Enabling Inbound Client-Side Queuing . . . . . . . . . . . . . . . . . . . . . . . . . . . . . . . . . . . . . . . . 127Configuring the Outbound Document Store . . . . . . . . . . . . . . . . . . . . . . . . . . . . . . . . . . . . . 127
Setting the Capacity of the Outbound Document Store . . . . . . . . . . . . . . . . . . . . . . . . 128
webMethods Integration Server Administrator’s Guide Version 7.1.1 5
Table of Contents
Selecting a User Account for Invoking Services Specified in Broker/Local Triggers . . . . . . 128Managing the Document History Database . . . . . . . . . . . . . . . . . . . . . . . . . . . . . . . . . . . . . 129
9. Connecting Integration Server to Broker . . . . . . . . . . . . . . . . . . . . . . . . . . . . . . . . . . . . . 131Overview . . . . . . . . . . . . . . . . . . . . . . . . . . . . . . . . . . . . . . . . . . . . . . . . . . . . . . . . . . . . . . . 132Establishing the Primary Port for Integration Server . . . . . . . . . . . . . . . . . . . . . . . . . . . . . . 132Configuring an Integration Server-to-Broker Server Connection . . . . . . . . . . . . . . . . . . . . . 132Specifying the Keep-Alive Mode for the Broker Connection . . . . . . . . . . . . . . . . . . . . . . . . 134
Setting Server Configuration Parameters for Keep-Alive Mode . . . . . . . . . . . . . . . . . . 136Normal Mode . . . . . . . . . . . . . . . . . . . . . . . . . . . . . . . . . . . . . . . . . . . . . . . . . . . . . . . . 136Listen Only Mode . . . . . . . . . . . . . . . . . . . . . . . . . . . . . . . . . . . . . . . . . . . . . . . . . . . . . 136Disabled . . . . . . . . . . . . . . . . . . . . . . . . . . . . . . . . . . . . . . . . . . . . . . . . . . . . . . . . . . . . 137
10. Managing Server Security . . . . . . . . . . . . . . . . . . . . . . . . . . . . . . . . . . . . . . . . . . . . . . . . . 139Overview of Security . . . . . . . . . . . . . . . . . . . . . . . . . . . . . . . . . . . . . . . . . . . . . . . . . . . . . . 140Setting Up Administrators . . . . . . . . . . . . . . . . . . . . . . . . . . . . . . . . . . . . . . . . . . . . . . . . . . 141Setting Up Developers . . . . . . . . . . . . . . . . . . . . . . . . . . . . . . . . . . . . . . . . . . . . . . . . . . . . . 142Enabling and Disabling Well-Known User Accounts . . . . . . . . . . . . . . . . . . . . . . . . . . . . . . 143FIPS 140-2 Compliance . . . . . . . . . . . . . . . . . . . . . . . . . . . . . . . . . . . . . . . . . . . . . . . . . . . . 143
11. Securing Communications with the Server . . . . . . . . . . . . . . . . . . . . . . . . . . . . . . . . . . . 145Overview . . . . . . . . . . . . . . . . . . . . . . . . . . . . . . . . . . . . . . . . . . . . . . . . . . . . . . . . . . . . . . . 146
Background About SSL . . . . . . . . . . . . . . . . . . . . . . . . . . . . . . . . . . . . . . . . . . . . . . . . . 146SSL and the Integration Server . . . . . . . . . . . . . . . . . . . . . . . . . . . . . . . . . . . . . . . . . . . 146
When the Integration Server Is an SSL Server . . . . . . . . . . . . . . . . . . . . . . . . . . . 146When the Integration Server Is an SSL Client . . . . . . . . . . . . . . . . . . . . . . . . . . . . 147
Presenting Multiple Client Certificates . . . . . . . . . . . . . . . . . . . . . . . . . . . . . . . . . . . . . 148Checklist for Using SSL . . . . . . . . . . . . . . . . . . . . . . . . . . . . . . . . . . . . . . . . . . . . . . . . . . . . 148Items You Need Before Configuring SSL . . . . . . . . . . . . . . . . . . . . . . . . . . . . . . . . . . . . . . . 149Obtaining the Certificate of the CA that Signed an Internet Resource’s Certificate . . . . . . . 151Configuring the Server to Use SSL . . . . . . . . . . . . . . . . . . . . . . . . . . . . . . . . . . . . . . . . . . . 151Configuring the Server to Present Multiple Client Certificates . . . . . . . . . . . . . . . . . . . . . . . 153
Checklist for Presenting Multiple Client Certificates . . . . . . . . . . . . . . . . . . . . . . . . . . . 154Obtaining Certificates . . . . . . . . . . . . . . . . . . . . . . . . . . . . . . . . . . . . . . . . . . . . . . . . . . 155Setting Up a Remote Server Alias . . . . . . . . . . . . . . . . . . . . . . . . . . . . . . . . . . . . . . . . 155Coding Your Flow Services . . . . . . . . . . . . . . . . . . . . . . . . . . . . . . . . . . . . . . . . . . . . . . 155
Controlling Server SSL Security Level by Port . . . . . . . . . . . . . . . . . . . . . . . . . . . . . . . . . . . 156
12. Controlling Access to Resources . . . . . . . . . . . . . . . . . . . . . . . . . . . . . . . . . . . . . . . . . . . 157 Overview . . . . . . . . . . . . . . . . . . . . . . . . . . . . . . . . . . . . . . . . . . . . . . . . . . . . . . . . . . . . . . . 158Controlling Access to Resources by Port . . . . . . . . . . . . . . . . . . . . . . . . . . . . . . . . . . . . . . . 158Restricting IP Addresses that Can Connect to a Port . . . . . . . . . . . . . . . . . . . . . . . . . . . . . 159
Controlling IP Access to All Ports (Globally) . . . . . . . . . . . . . . . . . . . . . . . . . . . . . . . . . 159Allow Inbound Connections from Specified Hosts (Deny all Others) . . . . . . . . . . . 160Deny Inbound Connections from Specified Hosts (Allow All Others) . . . . . . . . . . 161
6 webMethods Integration Server Administrator’s Guide Version 7.1.1
Table of Contents
Controlling IP Access to Individual Ports . . . . . . . . . . . . . . . . . . . . . . . . . . . . . . . . . . . 162Allow Inbound Requests from Specified Hosts (Deny All Others) . . . . . . . . . . . . . 162Deny Inbound Requests from Specified Hosts (Allow All Others) . . . . . . . . . . . . . 163
Restricting the Services Available from a Port . . . . . . . . . . . . . . . . . . . . . . . . . . . . . . . . . . . 164Allow Access to Specified Services (Deny All Others) . . . . . . . . . . . . . . . . . . . . . . . . . 165Deny Access to Specified Services (Allow All Others) . . . . . . . . . . . . . . . . . . . . . . . . . 166
Controlling the Use of Directives . . . . . . . . . . . . . . . . . . . . . . . . . . . . . . . . . . . . . . . . . . . . . 167Controlling Access to Resources with ACLs . . . . . . . . . . . . . . . . . . . . . . . . . . . . . . . . . . . . 168
About ACLs . . . . . . . . . . . . . . . . . . . . . . . . . . . . . . . . . . . . . . . . . . . . . . . . . . . . . . . . . 168Package Replication . . . . . . . . . . . . . . . . . . . . . . . . . . . . . . . . . . . . . . . . . . . . . . . 170Implicit and Explicit Protection . . . . . . . . . . . . . . . . . . . . . . . . . . . . . . . . . . . . . . . . 171Users that Belong to More than One Group . . . . . . . . . . . . . . . . . . . . . . . . . . . . . 171
Predefined ACLs . . . . . . . . . . . . . . . . . . . . . . . . . . . . . . . . . . . . . . . . . . . . . . . . . . . . . 172When Does the Server Perform ACL Checking? . . . . . . . . . . . . . . . . . . . . . . . . . . . . . 173 Creating ACLs . . . . . . . . . . . . . . . . . . . . . . . . . . . . . . . . . . . . . . . . . . . . . . . . . . . . . . . 173Allowing or Denying Group Access to ACLs . . . . . . . . . . . . . . . . . . . . . . . . . . . . . . . . 174Deleting ACLs . . . . . . . . . . . . . . . . . . . . . . . . . . . . . . . . . . . . . . . . . . . . . . . . . . . . . . . . 174Default Settings and Inheritance . . . . . . . . . . . . . . . . . . . . . . . . . . . . . . . . . . . . . . . . . 175
What Happens When You Change Existing ACL Assignments . . . . . . . . . . . . . . 176Assigning ACLs to Folders, Services, and Other Elements . . . . . . . . . . . . . . . . . . . . . 176Assigning ACLs to Files the Server Can Serve . . . . . . . . . . . . . . . . . . . . . . . . . . . . . . 177
Rules for Using .access Files . . . . . . . . . . . . . . . . . . . . . . . . . . . . . . . . . . . . . . . . 178Removing ACL Protection from a File . . . . . . . . . . . . . . . . . . . . . . . . . . . . . . . . . . . . . 179
13. Authenticating Clients . . . . . . . . . . . . . . . . . . . . . . . . . . . . . . . . . . . . . . . . . . . . . . . . . . . . 181Overview . . . . . . . . . . . . . . . . . . . . . . . . . . . . . . . . . . . . . . . . . . . . . . . . . . . . . . . . . . . . . . . 182Client Certificates . . . . . . . . . . . . . . . . . . . . . . . . . . . . . . . . . . . . . . . . . . . . . . . . . . . . . . . . . 182
HTTPS Ports . . . . . . . . . . . . . . . . . . . . . . . . . . . . . . . . . . . . . . . . . . . . . . . . . . . . . . . . 183FTPS Ports . . . . . . . . . . . . . . . . . . . . . . . . . . . . . . . . . . . . . . . . . . . . . . . . . . . . . . . . . . 184Checklist for Using Client Certificates . . . . . . . . . . . . . . . . . . . . . . . . . . . . . . . . . . . . . 185Items You Need Before Configuring Ports to Request Client Certificates . . . . . . . . . . 186
Importing a Client Certificate and Mapping It to a User . . . . . . . . . . . . . . . . . . . . . . . . . . . . 186Changing a Certificate Mapping . . . . . . . . . . . . . . . . . . . . . . . . . . . . . . . . . . . . . . . . . . 187
Configuring How Ports Handle Client Certificates . . . . . . . . . . . . . . . . . . . . . . . . . . . . . . . . 188Basic Authentication (User Names and Passwords) . . . . . . . . . . . . . . . . . . . . . . . . . . . . . . 188Customizing Authentication . . . . . . . . . . . . . . . . . . . . . . . . . . . . . . . . . . . . . . . . . . . . . . . . . 189
Overview of Steps . . . . . . . . . . . . . . . . . . . . . . . . . . . . . . . . . . . . . . . . . . . . . . . . . . . . 191Responding to Integrated Windows Authentication . . . . . . . . . . . . . . . . . . . . . . . . . . . . . . . 195
User Name, Password, and Domain Name . . . . . . . . . . . . . . . . . . . . . . . . . . . . . . . . . 196Activating Integrated Windows Authentication . . . . . . . . . . . . . . . . . . . . . . . . . . . . . . . 196
webMethods Integration Server Administrator’s Guide Version 7.1.1 7

Table of Contents
14. Securing Your Server with PKI Profiles . . . . . . . . . . . . . . . . . . . . . . . . . . . . . . . . . . . . . . 199Overview . . . . . . . . . . . . . . . . . . . . . . . . . . . . . . . . . . . . . . . . . . . . . . . . . . . . . . . . . . . . . . . 200
About PKI Profiles . . . . . . . . . . . . . . . . . . . . . . . . . . . . . . . . . . . . . . . . . . . . . . . . . . . . . 200PKI Profile Checking Process . . . . . . . . . . . . . . . . . . . . . . . . . . . . . . . . . . . . . . . . . . . . 201Supported Hardware and Software . . . . . . . . . . . . . . . . . . . . . . . . . . . . . . . . . . . . . . . . 201
Getting Started . . . . . . . . . . . . . . . . . . . . . . . . . . . . . . . . . . . . . . . . . . . . . . . . . . . . . . . . . . . 201Configuring PKI System Settings . . . . . . . . . . . . . . . . . . . . . . . . . . . . . . . . . . . . . . . . . . . . . 202Creating a PKI Profile . . . . . . . . . . . . . . . . . . . . . . . . . . . . . . . . . . . . . . . . . . . . . . . . . . . . . . 204Creating the PKI Profile Alias . . . . . . . . . . . . . . . . . . . . . . . . . . . . . . . . . . . . . . . . . . . . . . . . 207Connecting to and Disconnecting from the PKI System . . . . . . . . . . . . . . . . . . . . . . . . . . . 208Logging in a PKI Profile . . . . . . . . . . . . . . . . . . . . . . . . . . . . . . . . . . . . . . . . . . . . . . . . . . . . 208Deleting a PKI Profile Alias . . . . . . . . . . . . . . . . . . . . . . . . . . . . . . . . . . . . . . . . . . . . . . . . . 209Viewing and Updating Information for a PKI Profile . . . . . . . . . . . . . . . . . . . . . . . . . . . . . . . 209Viewing or Updating PKI Profile Alias Information . . . . . . . . . . . . . . . . . . . . . . . . . . . . . . . . 210Determining Whether a PKI Profile Is Logged In . . . . . . . . . . . . . . . . . . . . . . . . . . . . . . . . . 211Recovering a PKI Profile . . . . . . . . . . . . . . . . . . . . . . . . . . . . . . . . . . . . . . . . . . . . . . . . . . . 211Changing the Password for a PKI Profile . . . . . . . . . . . . . . . . . . . . . . . . . . . . . . . . . . . . . . . 213Updating Keys . . . . . . . . . . . . . . . . . . . . . . . . . . . . . . . . . . . . . . . . . . . . . . . . . . . . . . . . . . . 214Exporting a PKI Profile from the File System to an HSM Device . . . . . . . . . . . . . . . . . . . . . 215Installing an Entrust PKI Proxy . . . . . . . . . . . . . . . . . . . . . . . . . . . . . . . . . . . . . . . . . . . . . . . 216Password Rules . . . . . . . . . . . . . . . . . . . . . . . . . . . . . . . . . . . . . . . . . . . . . . . . . . . . . . . . . . 217About CRL Checking . . . . . . . . . . . . . . . . . . . . . . . . . . . . . . . . . . . . . . . . . . . . . . . . . . . . . . 217
How Often Is the CRL Downloaded? . . . . . . . . . . . . . . . . . . . . . . . . . . . . . . . . . . . . . . 218
15. Setting Up a Reverse HTTP Gateway . . . . . . . . . . . . . . . . . . . . . . . . . . . . . . . . . . . . . . . . 219Overview . . . . . . . . . . . . . . . . . . . . . . . . . . . . . . . . . . . . . . . . . . . . . . . . . . . . . . . . . . . . . . . 220How Reverse HTTP Gateway Works . . . . . . . . . . . . . . . . . . . . . . . . . . . . . . . . . . . . . . . . . . 221Advantages to Reverse HTTP Gateway vs. Traditional Third-Party Proxy Servers . . . . . . 222Clustering in the Reverse HTTP Gateway Configuration . . . . . . . . . . . . . . . . . . . . . . . . . . . 222Setting Up the Reverse HTTP Gateway Server . . . . . . . . . . . . . . . . . . . . . . . . . . . . . . . . . . 223
Setting Up the Gateway External Port . . . . . . . . . . . . . . . . . . . . . . . . . . . . . . . . . . . . . 224Setting Up the Gateway Registration Port . . . . . . . . . . . . . . . . . . . . . . . . . . . . . . . . . . 230
Connecting Your Internal Server to a Reverse HTTP Gateway Server . . . . . . . . . . . . . . . . 233Setting Up the Internal Registration Connections . . . . . . . . . . . . . . . . . . . . . . . . . . . . . 233
Performing Client Authentication on the Reverse HTTP Gateway Server . . . . . . . . . . . . . . 237Frequently Asked Questions About Reverse HTTP Gateway . . . . . . . . . . . . . . . . . . . . . . . 238
16. Outbound Passwords . . . . . . . . . . . . . . . . . . . . . . . . . . . . . . . . . . . . . . . . . . . . . . . . . . . . 241Overview . . . . . . . . . . . . . . . . . . . . . . . . . . . . . . . . . . . . . . . . . . . . . . . . . . . . . . . . . . . . . . . 242Managing Outbound Passwords . . . . . . . . . . . . . . . . . . . . . . . . . . . . . . . . . . . . . . . . . . . . . 242Changing the Master Password . . . . . . . . . . . . . . . . . . . . . . . . . . . . . . . . . . . . . . . . . . . . . . 244Changing the Expiration Interval for the Master Password . . . . . . . . . . . . . . . . . . . . . . . . . 244About the configPassman.cnf File . . . . . . . . . . . . . . . . . . . . . . . . . . . . . . . . . . . . . . . . . . . . 245
8 webMethods Integration Server Administrator’s Guide Version 7.1.1

Table of Contents
Working with Outbound Password Settings . . . . . . . . . . . . . . . . . . . . . . . . . . . . . . . . . . . . . 246Controlling Name and Location of Outbound Password File . . . . . . . . . . . . . . . . . . . . 246Controlling Encryption of Outbound Password File . . . . . . . . . . . . . . . . . . . . . . . . . . . 246
Working with Master Password Settings . . . . . . . . . . . . . . . . . . . . . . . . . . . . . . . . . . . . . . . 246Storing the Master Password in a File . . . . . . . . . . . . . . . . . . . . . . . . . . . . . . . . . . . . . 247Prompting for the Master Password at Server Initialization . . . . . . . . . . . . . . . . . . . . . 247
What To Do if You Lose or Forget Your Master Password . . . . . . . . . . . . . . . . . . . . . . . . . 248When There Are Problems with the Master Password or Outbound Passwords at Startup 248
Determining Whether You Can Restore the Passwords . . . . . . . . . . . . . . . . . . . . . . . 249Restoring the Master Password and Outbound Password Files . . . . . . . . . . . . . . . . . 250Resetting the Master Password and Outbound Passwords . . . . . . . . . . . . . . . . . . . . . 250
Email Listeners and Package Replication . . . . . . . . . . . . . . . . . . . . . . . . . . . . . . . . . . . . . . 251
17. Configuring a Central User Directory or LDAP . . . . . . . . . . . . . . . . . . . . . . . . . . . . . . . . 253Before You Begin . . . . . . . . . . . . . . . . . . . . . . . . . . . . . . . . . . . . . . . . . . . . . . . . . . . . . . . . . 254Overview of How Integration Server Works with Externally Defined Users and Groups . . . 255
How the Server Uses Externally Defined Users and Groups . . . . . . . . . . . . . . . . . . . . 255When the Server Accesses Externally Defined Information . . . . . . . . . . . . . . . . . . . . . 255How Integration Server Authenticates Externally Defined Clients . . . . . . . . . . . . . . . . 256
Configuring Central User Management . . . . . . . . . . . . . . . . . . . . . . . . . . . . . . . . . . . . . . . . 256Stopping Use of Central User Management . . . . . . . . . . . . . . . . . . . . . . . . . . . . . . . . . 259
Overview of Using LDAP . . . . . . . . . . . . . . . . . . . . . . . . . . . . . . . . . . . . . . . . . . . . . . . . . . . 260About LDAP and Caching . . . . . . . . . . . . . . . . . . . . . . . . . . . . . . . . . . . . . . . . . . . . . . . 260
Configuring the Server to Use LDAP . . . . . . . . . . . . . . . . . . . . . . . . . . . . . . . . . . . . . . . . . . 261Mapping an LDAP Users Access to ACL(s) . . . . . . . . . . . . . . . . . . . . . . . . . . . . . . . . . 267Stopping Use of an LDAP as an External Directory . . . . . . . . . . . . . . . . . . . . . . . . . . . 267
Considerations for User Accounts and Groups . . . . . . . . . . . . . . . . . . . . . . . . . . . . . . . . . . 267Granting Administrator Privileges to External Users . . . . . . . . . . . . . . . . . . . . . . . . . . . . . . 269Granting Developer Privileges to External Users . . . . . . . . . . . . . . . . . . . . . . . . . . . . . . . . 270Granting Access to Services and Files to External Users . . . . . . . . . . . . . . . . . . . . . . . . . . 271
18. Managing Packages . . . . . . . . . . . . . . . . . . . . . . . . . . . . . . . . . . . . . . . . . . . . . . . . . . . . . 273Using Packages . . . . . . . . . . . . . . . . . . . . . . . . . . . . . . . . . . . . . . . . . . . . . . . . . . . . . . . . . . 274
Predefined Packages . . . . . . . . . . . . . . . . . . . . . . . . . . . . . . . . . . . . . . . . . . . . . . . . . . 275Sample Package . . . . . . . . . . . . . . . . . . . . . . . . . . . . . . . . . . . . . . . . . . . . . . . . . . . . . 277
How the Server Stores Package Information . . . . . . . . . . . . . . . . . . . . . . . . . . . . . . . . . . . . 277Manifest File . . . . . . . . . . . . . . . . . . . . . . . . . . . . . . . . . . . . . . . . . . . . . . . . . . . . . . . . . 279
Finding Information about Your Packages . . . . . . . . . . . . . . . . . . . . . . . . . . . . . . . . . . . . . . 280Viewing the Packages that Reside on Your Server . . . . . . . . . . . . . . . . . . . . . . . . . . . 281
Filtering the List of Packages . . . . . . . . . . . . . . . . . . . . . . . . . . . . . . . . . . . . . . . . 281Determining Whether the Server Successfully Loaded the Package . . . . . . . . . . 283Determining Whether the Package Is Enabled or Disabled . . . . . . . . . . . . . . . . . 283
Displaying Information about a Package . . . . . . . . . . . . . . . . . . . . . . . . . . . . . . . . . . . 284Displaying Information about Services and Folders in a Package . . . . . . . . . . . . . . . . 287Displaying Documentation for a Package . . . . . . . . . . . . . . . . . . . . . . . . . . . . . . . . . . . 287
webMethods Integration Server Administrator’s Guide Version 7.1.1 9
Table of Contents
Working with Packages . . . . . . . . . . . . . . . . . . . . . . . . . . . . . . . . . . . . . . . . . . . . . . . . . . . . 288Creating a Package . . . . . . . . . . . . . . . . . . . . . . . . . . . . . . . . . . . . . . . . . . . . . . . . . . . . . . . 288
Activating a Package . . . . . . . . . . . . . . . . . . . . . . . . . . . . . . . . . . . . . . . . . . . . . . . . . . 289Reloading a Package . . . . . . . . . . . . . . . . . . . . . . . . . . . . . . . . . . . . . . . . . . . . . . . . . . 289Enabling a Package . . . . . . . . . . . . . . . . . . . . . . . . . . . . . . . . . . . . . . . . . . . . . . . . . . . 290Disabling a Package . . . . . . . . . . . . . . . . . . . . . . . . . . . . . . . . . . . . . . . . . . . . . . . . . . . 290Deleting a Package . . . . . . . . . . . . . . . . . . . . . . . . . . . . . . . . . . . . . . . . . . . . . . . . . . . . 291Recovering a Package . . . . . . . . . . . . . . . . . . . . . . . . . . . . . . . . . . . . . . . . . . . . . . . . . 291Archiving a Package . . . . . . . . . . . . . . . . . . . . . . . . . . . . . . . . . . . . . . . . . . . . . . . . . . . 292
Copying Packages from One Server to Another . . . . . . . . . . . . . . . . . . . . . . . . . . . . . . . . . 292Overview of Package Replication . . . . . . . . . . . . . . . . . . . . . . . . . . . . . . . . . . . . . . . . . 293Version Checking . . . . . . . . . . . . . . . . . . . . . . . . . . . . . . . . . . . . . . . . . . . . . . . . . . . . . 297
Who Can Subscribe? . . . . . . . . . . . . . . . . . . . . . . . . . . . . . . . . . . . . . . . . . . . . . . . 298Guidelines for Using Package Replication . . . . . . . . . . . . . . . . . . . . . . . . . . . . . . . 298
The Publishing Server . . . . . . . . . . . . . . . . . . . . . . . . . . . . . . . . . . . . . . . . . . . . . . . . . . 299Displaying Subscribers . . . . . . . . . . . . . . . . . . . . . . . . . . . . . . . . . . . . . . . . . . . . . 299Adding Subscribers from a Publishing Server . . . . . . . . . . . . . . . . . . . . . . . . . . . . 300Updating Subscriber Information . . . . . . . . . . . . . . . . . . . . . . . . . . . . . . . . . . . . . . 301Removing Subscribers for a Package . . . . . . . . . . . . . . . . . . . . . . . . . . . . . . . . . . 303Publishing a Package . . . . . . . . . . . . . . . . . . . . . . . . . . . . . . . . . . . . . . . . . . . . . . 303
Specifying File and Version Information for a Release or Archive . . . . . . . . . . . . . . . . 305The Subscribing Server . . . . . . . . . . . . . . . . . . . . . . . . . . . . . . . . . . . . . . . . . . . . . . . . 308
Displaying Packages That Your Server Subscribes To . . . . . . . . . . . . . . . . . . . . . 309Manually Pulling a Package . . . . . . . . . . . . . . . . . . . . . . . . . . . . . . . . . . . . . . . . . . 309Subscribing to a Package from a Subscribing Server . . . . . . . . . . . . . . . . . . . . . . 310Updating Your Subscription Information . . . . . . . . . . . . . . . . . . . . . . . . . . . . . . . . 313Canceling a Subscription . . . . . . . . . . . . . . . . . . . . . . . . . . . . . . . . . . . . . . . . . . . . 315Installing a Package Published by Another Server . . . . . . . . . . . . . . . . . . . . . . . . 316
19. Caching Service Results . . . . . . . . . . . . . . . . . . . . . . . . . . . . . . . . . . . . . . . . . . . . . . . . . . 319What Is Caching? . . . . . . . . . . . . . . . . . . . . . . . . . . . . . . . . . . . . . . . . . . . . . . . . . . . . . . . . . 320When Are Cached Results Returned? . . . . . . . . . . . . . . . . . . . . . . . . . . . . . . . . . . . . . . . . . 320Resetting the Cache . . . . . . . . . . . . . . . . . . . . . . . . . . . . . . . . . . . . . . . . . . . . . . . . . . . . . . . 322Viewing Service Statistics . . . . . . . . . . . . . . . . . . . . . . . . . . . . . . . . . . . . . . . . . . . . . . . . . . 322
20. Configuring Guaranteed Delivery . . . . . . . . . . . . . . . . . . . . . . . . . . . . . . . . . . . . . . . . . . . 323About Guaranteed Delivery . . . . . . . . . . . . . . . . . . . . . . . . . . . . . . . . . . . . . . . . . . . . . . . . . 324Configuring the Server for Guaranteed Delivery . . . . . . . . . . . . . . . . . . . . . . . . . . . . . . . . . 325
Settings Shared by Both Inbound and Outbound Transactions . . . . . . . . . . . . . . . . . . 325Settings for Inbound Transactions . . . . . . . . . . . . . . . . . . . . . . . . . . . . . . . . . . . . . . . . 325Settings for Outbound Transactions . . . . . . . . . . . . . . . . . . . . . . . . . . . . . . . . . . . . . . . 327
Administering Guaranteed Delivery . . . . . . . . . . . . . . . . . . . . . . . . . . . . . . . . . . . . . . . . . . . 328Shutting Down Guaranteed Delivery . . . . . . . . . . . . . . . . . . . . . . . . . . . . . . . . . . . . . . . 328
10 webMethods Integration Server Administrator’s Guide Version 7.1.1

Table of Contents
Reinitializing Guaranteed Delivery . . . . . . . . . . . . . . . . . . . . . . . . . . . . . . . . . . . . . . . . 329Inbound Transactions . . . . . . . . . . . . . . . . . . . . . . . . . . . . . . . . . . . . . . . . . . . . . . 329Outbound Transactions . . . . . . . . . . . . . . . . . . . . . . . . . . . . . . . . . . . . . . . . . . . . . 330
Specifying an E-Mail Address and SMTP Server for Error Messages . . . . . . . . . . . . . . . . . 330
21. Managing Services . . . . . . . . . . . . . . . . . . . . . . . . . . . . . . . . . . . . . . . . . . . . . . . . . . . . . . 331About Services . . . . . . . . . . . . . . . . . . . . . . . . . . . . . . . . . . . . . . . . . . . . . . . . . . . . . . . . . . . 332Fully-Qualified Service Names . . . . . . . . . . . . . . . . . . . . . . . . . . . . . . . . . . . . . . . . . . . . . . 332
Package Names and Service Names . . . . . . . . . . . . . . . . . . . . . . . . . . . . . . . . . . . . . . 333Finding Information about Services and Folders . . . . . . . . . . . . . . . . . . . . . . . . . . . . . . . . . 334
Listing Folders and Services . . . . . . . . . . . . . . . . . . . . . . . . . . . . . . . . . . . . . . . . . . . . 334Displaying Information about a Service . . . . . . . . . . . . . . . . . . . . . . . . . . . . . . . . . . . . 334
Working with Services . . . . . . . . . . . . . . . . . . . . . . . . . . . . . . . . . . . . . . . . . . . . . . . . . . . . . 336Manually Adding a Service to the Server . . . . . . . . . . . . . . . . . . . . . . . . . . . . . . . . . . . 336Testing Services . . . . . . . . . . . . . . . . . . . . . . . . . . . . . . . . . . . . . . . . . . . . . . . . . . . . . . 336
Running Services When Packages Are Loaded, Unloaded, or Replicated . . . . . . . . . . . . . 337What Is a Startup Service? . . . . . . . . . . . . . . . . . . . . . . . . . . . . . . . . . . . . . . . . . . . . . . 337What Is a Shutdown Service? . . . . . . . . . . . . . . . . . . . . . . . . . . . . . . . . . . . . . . . . . . . 337What Is a Replication Service? . . . . . . . . . . . . . . . . . . . . . . . . . . . . . . . . . . . . . . . . . . . 338Guidelines for Using Startup, Shutdown, and Replication Services . . . . . . . . . . . . . . . 338
Running Services in Response to Specific Events . . . . . . . . . . . . . . . . . . . . . . . . . . . . . . . 338Scheduling Services to Execute at Specified Times . . . . . . . . . . . . . . . . . . . . . . . . . . . . . . 339
Scheduling a User Task . . . . . . . . . . . . . . . . . . . . . . . . . . . . . . . . . . . . . . . . . . . . . . . . 339Using the Once Option . . . . . . . . . . . . . . . . . . . . . . . . . . . . . . . . . . . . . . . . . . . . . 340Using the Simple Repeating Option . . . . . . . . . . . . . . . . . . . . . . . . . . . . . . . . . . . 340Using the Complex Repeating Option . . . . . . . . . . . . . . . . . . . . . . . . . . . . . . . . . . 341Using the Clustering Target Node Options . . . . . . . . . . . . . . . . . . . . . . . . . . . . . . 344
Viewing Scheduled User Tasks . . . . . . . . . . . . . . . . . . . . . . . . . . . . . . . . . . . . . . . . . . 350Updating Scheduled User Tasks . . . . . . . . . . . . . . . . . . . . . . . . . . . . . . . . . . . . . . . . . 350Suspending Scheduled User Tasks . . . . . . . . . . . . . . . . . . . . . . . . . . . . . . . . . . . . . . . 351Resuming Suspended Scheduled User Tasks . . . . . . . . . . . . . . . . . . . . . . . . . . . . . . . 352Canceling Scheduled User Tasks . . . . . . . . . . . . . . . . . . . . . . . . . . . . . . . . . . . . . . . . 352Viewing the Scheduled System Tasks . . . . . . . . . . . . . . . . . . . . . . . . . . . . . . . . . . . . . 353
22. Locking Administration and Best Practices . . . . . . . . . . . . . . . . . . . . . . . . . . . . . . . . . . 355Introduction . . . . . . . . . . . . . . . . . . . . . . . . . . . . . . . . . . . . . . . . . . . . . . . . . . . . . . . . . . . . . 356Choosing Local Server Locking or VCS Integration Locking . . . . . . . . . . . . . . . . . . . . . . . . 356Disabling and Re-enabling Locking . . . . . . . . . . . . . . . . . . . . . . . . . . . . . . . . . . . . . . . . . . . 356
Before You Begin . . . . . . . . . . . . . . . . . . . . . . . . . . . . . . . . . . . . . . . . . . . . . . . . . . . . . 356Procedure . . . . . . . . . . . . . . . . . . . . . . . . . . . . . . . . . . . . . . . . . . . . . . . . . . . . . . . . . . . 357
Best Practices . . . . . . . . . . . . . . . . . . . . . . . . . . . . . . . . . . . . . . . . . . . . . . . . . . . . . . . . . . . 359Remote Server Configuration . . . . . . . . . . . . . . . . . . . . . . . . . . . . . . . . . . . . . . . . . . . . 359Server User Names . . . . . . . . . . . . . . . . . . . . . . . . . . . . . . . . . . . . . . . . . . . . . . . . . . . 359Package Replication and Publishing . . . . . . . . . . . . . . . . . . . . . . . . . . . . . . . . . . . . . . 359
webMethods Integration Server Administrator’s Guide Version 7.1.1 11

Table of Contents
Package and Folder Organization . . . . . . . . . . . . . . . . . . . . . . . . . . . . . . . . . . . . . . . . 359Source Code . . . . . . . . . . . . . . . . . . . . . . . . . . . . . . . . . . . . . . . . . . . . . . . . . . . . . . . . . 360Upgrading webMethods Integration Server . . . . . . . . . . . . . . . . . . . . . . . . . . . . . . . . . 360
23. Managing Broker/Local Triggers . . . . . . . . . . . . . . . . . . . . . . . . . . . . . . . . . . . . . . . . . . . 361Introduction . . . . . . . . . . . . . . . . . . . . . . . . . . . . . . . . . . . . . . . . . . . . . . . . . . . . . . . . . . . . . 362Managing Document Retrieval . . . . . . . . . . . . . . . . . . . . . . . . . . . . . . . . . . . . . . . . . . . . . . . 363
Increasing or Decreasing Threads for Document Retrieval . . . . . . . . . . . . . . . . . . . . . 363When to Increase or Decrease Threads for Document Retrieval . . . . . . . . . . . . . 364
Decreasing the Capacity of Trigger Document Stores . . . . . . . . . . . . . . . . . . . . . . . . . 365Suspending and Resuming Document Retrieval . . . . . . . . . . . . . . . . . . . . . . . . . . . . . 366
Suspending and Resuming Document Retrieval for all Triggers . . . . . . . . . . . . . . 367Suspending and Resuming Document Retrieval for a Specific Trigger . . . . . . . . . 369
Managing Document Processing . . . . . . . . . . . . . . . . . . . . . . . . . . . . . . . . . . . . . . . . . . . . . 371Increasing or Decreasing Threads for Document Processing . . . . . . . . . . . . . . . . . . . 371
When to Increase or Decrease Threads for Processing Documents . . . . . . . . . . . 372Decreasing Document Processing for Concurrent Triggers . . . . . . . . . . . . . . . . . . . . . 373Suspending and Resuming Document Processing . . . . . . . . . . . . . . . . . . . . . . . . . . . . 375
Suspending and Resuming Document Processing for all Triggers . . . . . . . . . . . . 375Suspending and Resuming Document Processing for Specific Triggers . . . . . . . 377
Limiting Server Threads for Broker/Local Triggers . . . . . . . . . . . . . . . . . . . . . . . . . . . . . . . 379Cluster Synchronization for Trigger Management . . . . . . . . . . . . . . . . . . . . . . . . . . . . . . . . 380
Configuring Cluster Synchronization . . . . . . . . . . . . . . . . . . . . . . . . . . . . . . . . . . . . . . . 381Cluster Synchronization at Run Time . . . . . . . . . . . . . . . . . . . . . . . . . . . . . . . . . . . . . . 381Monitoring Cluster Synchronization . . . . . . . . . . . . . . . . . . . . . . . . . . . . . . . . . . . . . . . 383
Modifying Broker/Local Trigger Properties . . . . . . . . . . . . . . . . . . . . . . . . . . . . . . . . . . . . . . 384
24. Using Integration Server to Manage XA Transactions . . . . . . . . . . . . . . . . . . . . . . . . . . 387Overview of XA Transaction Management . . . . . . . . . . . . . . . . . . . . . . . . . . . . . . . . . . . . . . 388
How the Integration Server Persists the State of a Transaction . . . . . . . . . . . . . . . . . . 388How the Integration Server Resolves Uncompleted Transactions . . . . . . . . . . . . . . . . 389About Unresolved XA Transactions . . . . . . . . . . . . . . . . . . . . . . . . . . . . . . . . . . . . . . . 390Details for an Unresolved XA Transaction . . . . . . . . . . . . . . . . . . . . . . . . . . . . . . . . . . 391
Configuring XA Options in Integration Server . . . . . . . . . . . . . . . . . . . . . . . . . . . . . . . . . . . 392Enabling or Disabling XA Transaction Recovery . . . . . . . . . . . . . . . . . . . . . . . . . . . . . 393Configuring the XA Recovery Store . . . . . . . . . . . . . . . . . . . . . . . . . . . . . . . . . . . . . . . 394Configuring XA Server Parameters . . . . . . . . . . . . . . . . . . . . . . . . . . . . . . . . . . . . . . . . 394
Manually Resolving a Transaction . . . . . . . . . . . . . . . . . . . . . . . . . . . . . . . . . . . . . . . . . . . . 395
A. Integration Server Deployment Checklist . . . . . . . . . . . . . . . . . . . . . . . . . . . . . . . . . . . . 397Introduction . . . . . . . . . . . . . . . . . . . . . . . . . . . . . . . . . . . . . . . . . . . . . . . . . . . . . . . . . . . . . 398Stage 1: Installation . . . . . . . . . . . . . . . . . . . . . . . . . . . . . . . . . . . . . . . . . . . . . . . . . . . . . . . 398Stage 2: Basic Configuration . . . . . . . . . . . . . . . . . . . . . . . . . . . . . . . . . . . . . . . . . . . . . . . . 399Stage 3: Setting Up Users, Groups, and ACLs . . . . . . . . . . . . . . . . . . . . . . . . . . . . . . . . . . 400Stage 4: Publishing Packages . . . . . . . . . . . . . . . . . . . . . . . . . . . . . . . . . . . . . . . . . . . . . . 401Stage 5: Installing Run-Time Classes . . . . . . . . . . . . . . . . . . . . . . . . . . . . . . . . . . . . . . . . . 402
12 webMethods Integration Server Administrator’s Guide Version 7.1.1
Table of Contents
Stage 6: Preparing Clients for Communication with the Server . . . . . . . . . . . . . . . . . . . . . . 402Stage 7: Setting Up Security . . . . . . . . . . . . . . . . . . . . . . . . . . . . . . . . . . . . . . . . . . . . . . . . 403Stage 8: Startup and Test . . . . . . . . . . . . . . . . . . . . . . . . . . . . . . . . . . . . . . . . . . . . . . . . . . 404Stage 9: Archive Sources . . . . . . . . . . . . . . . . . . . . . . . . . . . . . . . . . . . . . . . . . . . . . . . . . . 405
B. Server Configuration Parameters . . . . . . . . . . . . . . . . . . . . . . . . . . . . . . . . . . . . . . . . . . 407Introduction . . . . . . . . . . . . . . . . . . . . . . . . . . . . . . . . . . . . . . . . . . . . . . . . . . . . . . . . . . . . . 408watt.config. . . . . . . . . . . . . . . . . . . . . . . . . . . . . . . . . . . . . . . . . . . . . . . . . . . . . . . . . . . . . . . 408watt.core. . . . . . . . . . . . . . . . . . . . . . . . . . . . . . . . . . . . . . . . . . . . . . . . . . . . . . . . . . . . . . . . 408watt.debug. . . . . . . . . . . . . . . . . . . . . . . . . . . . . . . . . . . . . . . . . . . . . . . . . . . . . . . . . . . . . . 409watt.debug2. . . . . . . . . . . . . . . . . . . . . . . . . . . . . . . . . . . . . . . . . . . . . . . . . . . . . . . . . . . . . 410watt.net. . . . . . . . . . . . . . . . . . . . . . . . . . . . . . . . . . . . . . . . . . . . . . . . . . . . . . . . . . . . . . . . . 411watt.security. . . . . . . . . . . . . . . . . . . . . . . . . . . . . . . . . . . . . . . . . . . . . . . . . . . . . . . . . . . . . 416watt.server. . . . . . . . . . . . . . . . . . . . . . . . . . . . . . . . . . . . . . . . . . . . . . . . . . . . . . . . . . . . . . 418watt.tx. . . . . . . . . . . . . . . . . . . . . . . . . . . . . . . . . . . . . . . . . . . . . . . . . . . . . . . . . . . . . . . . . . 444watt.xslt . . . . . . . . . . . . . . . . . . . . . . . . . . . . . . . . . . . . . . . . . . . . . . . . . . . . . . . . . . . . . . . . 445
C. Diagnosing the Integration Server . . . . . . . . . . . . . . . . . . . . . . . . . . . . . . . . . . . . . . . . . . 447Introduction . . . . . . . . . . . . . . . . . . . . . . . . . . . . . . . . . . . . . . . . . . . . . . . . . . . . . . . . . . . . . 448Configuring the Diagnostic Port . . . . . . . . . . . . . . . . . . . . . . . . . . . . . . . . . . . . . . . . . . . . . . 448
Diagnostic Thread Pool Configuration . . . . . . . . . . . . . . . . . . . . . . . . . . . . . . . . . . . . . 448Diagnostic Port Access . . . . . . . . . . . . . . . . . . . . . . . . . . . . . . . . . . . . . . . . . . . . . . . . . 449
Using the Diagnostic Utility . . . . . . . . . . . . . . . . . . . . . . . . . . . . . . . . . . . . . . . . . . . . . . . . . 449Starting the Integration Server in Safe Mode . . . . . . . . . . . . . . . . . . . . . . . . . . . . . . . . . . . . 450When the Server Automatically Places You in Safe Mode . . . . . . . . . . . . . . . . . . . . . . . . . 451Generating a Thread Dump . . . . . . . . . . . . . . . . . . . . . . . . . . . . . . . . . . . . . . . . . . . . . . . . . 452
D. Wireless Communication with the Integration Server . . . . . . . . . . . . . . . . . . . . . . . . . . 453How Does the Integration Server Communicate with Wireless Devices? . . . . . . . . . . . . . . 454Using URLs for Wireless Access to the Integration Server . . . . . . . . . . . . . . . . . . . . . . . . . 456
Invoking a Service with a URL . . . . . . . . . . . . . . . . . . . . . . . . . . . . . . . . . . . . . . . . . . . 456Requesting a WML or HDML Page with a URL . . . . . . . . . . . . . . . . . . . . . . . . . . . . . . 457
WML and HDML Samples . . . . . . . . . . . . . . . . . . . . . . . . . . . . . . . . . . . . . . . . . . . . . . . . . . 459
Index . . . . . . . . . . . . . . . . . . . . . . . . . . . . . . . . . . . . . . . . . . . . . . . . . . . . . . . . . . . . . . . . . . . . . . 461
webMethods Integration Server Administrator’s Guide Version 7.1.1 13

Table of Contents
14 webMethods Integration Server Administrator’s Guide Version 7.1.1

About This Guide
This guide is for the administrator of a webMethods Integration Server. It provides an overview of how the server operates and explains common administrative tasks such as starting and stopping the server, configuring the server, setting up user accounts and security, and managing packages and services.
Document Conventions
Convention Description
Bold Identifies elements on a screen.
Italic Identifies variable information that you must supply or change based on your specific situation or environment. Identifies terms the first time they are defined in text. Also identifies service input and output variables.
Narrow font Identifies storage locations for services on the webMethods Integration Server using the convention folder.subfolder:service.
Typewriter font
Identifies characters and values that you must type exactly or messages that the system displays on the console.
UPPERCASE Identifies keyboard keys. Keys that you must press simultaneously are joined with the “+” symbol.
\ Directory paths use the “\” directory delimiter unless the subject is UNIX‐specific.
[ ] Optional keywords or values are enclosed in [ ]. Do not type the [ ] symbols in your own code.
webMethods Integration Server Administrator’s Guide Version 7.1.1 15
About This Guide
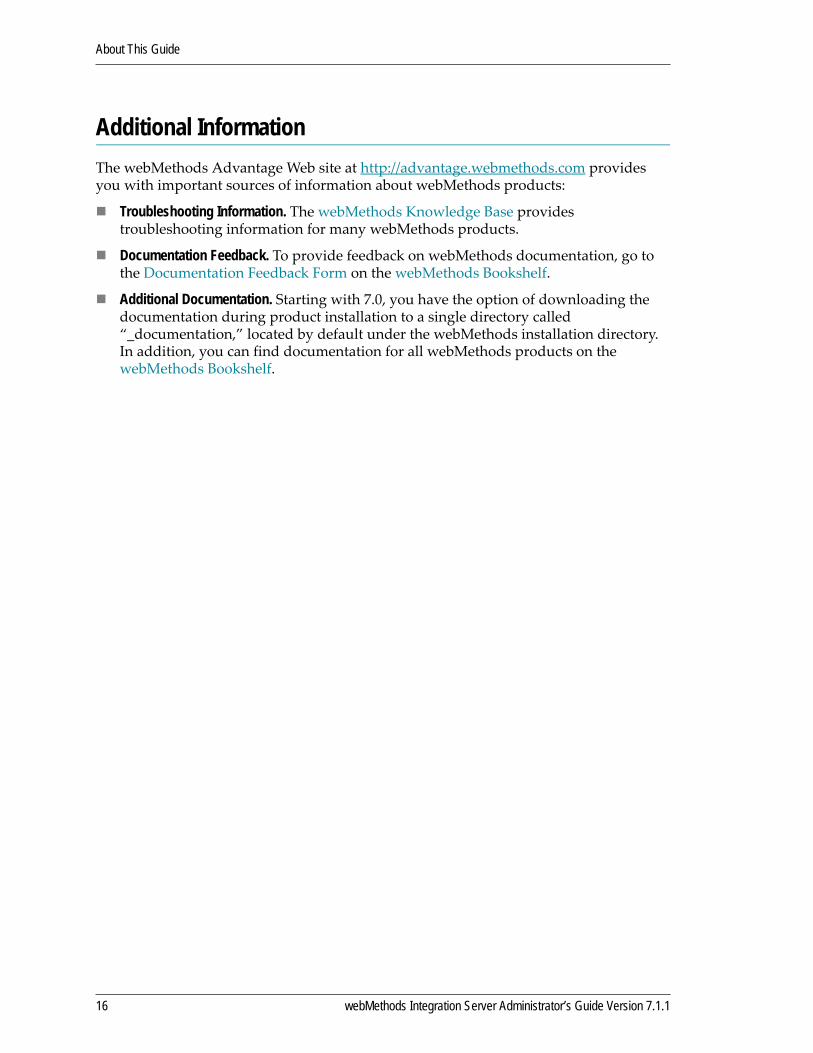
Additional InformationThe webMethods Advantage Web site at http://advantage.webmethods.com provides you with important sources of information about webMethods products:
Troubleshooting Information. The webMethods Knowledge Base provides troubleshooting information for many webMethods products.
Documentation Feedback. To provide feedback on webMethods documentation, go to the Documentation Feedback Form on the webMethods Bookshelf.
Additional Documentation. Starting with 7.0, you have the option of downloading the documentation during product installation to a single directory called “_documentation,” located by default under the webMethods installation directory. In addition, you can find documentation for all webMethods products on the webMethods Bookshelf.
16 webMethods Integration Server Administrator’s Guide Version 7.1.1

1 The Role of the Administrator
What Does an Administrator Do? . . . . . . . . . . . . . . . . . . . . . . . . . . . . . . . . . . . . . . . . . . . . . . . . . 18
Typical Administrative Responsibilities . . . . . . . . . . . . . . . . . . . . . . . . . . . . . . . . . . . . . . . . . . . . 18
The Integration Server Administrator . . . . . . . . . . . . . . . . . . . . . . . . . . . . . . . . . . . . . . . . . . . . . . 19
Receiving Administrative Messages from the Server . . . . . . . . . . . . . . . . . . . . . . . . . . . . . . . . . . 19
The Administrator User . . . . . . . . . . . . . . . . . . . . . . . . . . . . . . . . . . . . . . . . . . . . . . . . . . . . . . . . 19
Adding Backup Administrators . . . . . . . . . . . . . . . . . . . . . . . . . . . . . . . . . . . . . . . . . . . . . . . . . . . 20
webMethods Integration Server Administrator’s Guide Version 7.1.1 17
1 The Role of the Administrator
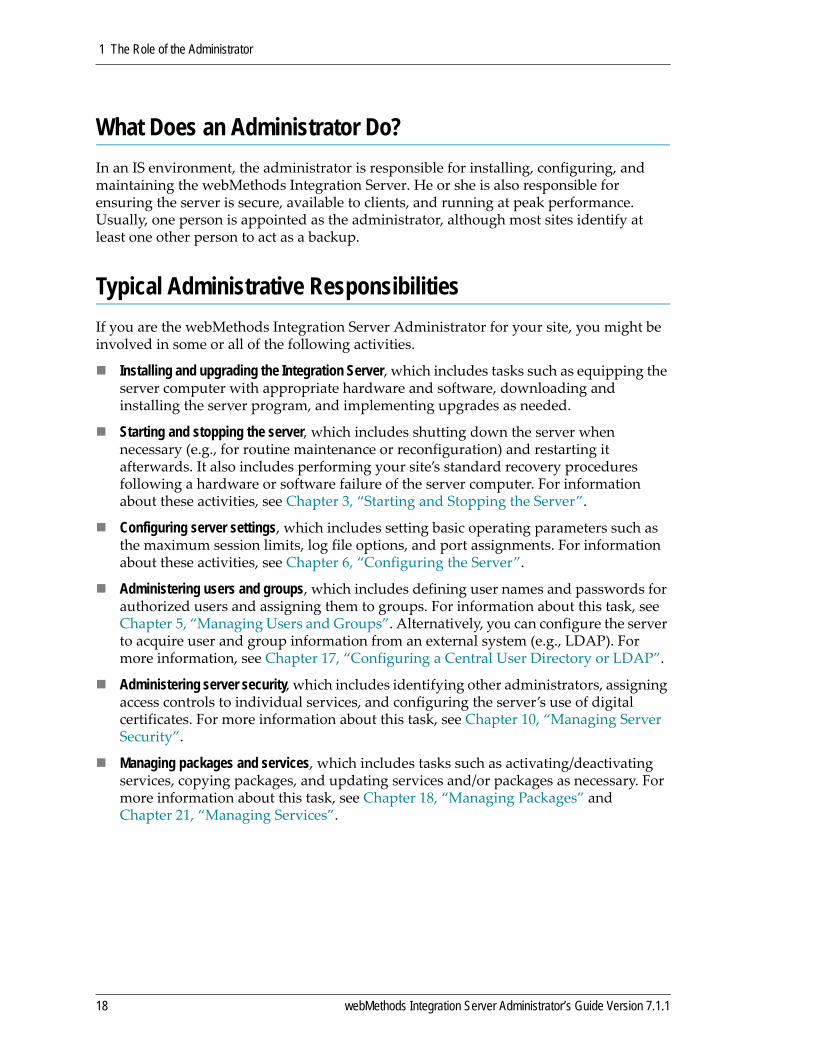
What Does an Administrator Do?In an IS environment, the administrator is responsible for installing, configuring, and maintaining the webMethods Integration Server. He or she is also responsible for ensuring the server is secure, available to clients, and running at peak performance. Usually, one person is appointed as the administrator, although most sites identify at least one other person to act as a backup.
Typical Administrative ResponsibilitiesIf you are the webMethods Integration Server Administrator for your site, you might be involved in some or all of the following activities.
Installing and upgrading the Integration Server, which includes tasks such as equipping the server computer with appropriate hardware and software, downloading and installing the server program, and implementing upgrades as needed.
Starting and stopping the server, which includes shutting down the server when necessary (e.g., for routine maintenance or reconfiguration) and restarting it afterwards. It also includes performing your site’s standard recovery procedures following a hardware or software failure of the server computer. For information about these activities, see Chapter 3, “Starting and Stopping the Server”.
Configuring server settings, which includes setting basic operating parameters such as the maximum session limits, log file options, and port assignments. For information about these activities, see Chapter 6, “Configuring the Server”.
Administering users and groups, which includes defining user names and passwords for authorized users and assigning them to groups. For information about this task, see Chapter 5, “Managing Users and Groups”. Alternatively, you can configure the server to acquire user and group information from an external system (e.g., LDAP). For more information, see Chapter 17, “Configuring a Central User Directory or LDAP”.
Administering server security, which includes identifying other administrators, assigning access controls to individual services, and configuring the server’s use of digital certificates. For more information about this task, see Chapter 10, “Managing Server Security”.
Managing packages and services, which includes tasks such as activating/deactivating services, copying packages, and updating services and/or packages as necessary. For more information about this task, see Chapter 18, “Managing Packages” and Chapter 21, “Managing Services”.
18 webMethods Integration Server Administrator’s Guide Version 7.1.1

1 The Role of the Administrator
The Integration Server AdministratorThe “Integration Server Administrator” is the utility you use to accomplish administrative tasks. You use it to monitor server activity, examine log information, add users, enable/disable services, and adjust the server’s performance features. For information about the Integration Server Administrator, see Chapter 4, “Using the Integration Server Administrator”.
Receiving Administrative Messages from the ServerThe Integration Server issues email messages for a variety of failure conditions (for example, internal errors, binding errors, and transaction manager errors). As an administrator, you are the one who should receive these messages and take appropriate action when errors occur.
To ensure that you (or an appropriate alternate) receive messages from the server, you must set the Email Notification parameters using the Integration Server Administrator as described in “Specifying an E‐Mail Address and SMTP Server for Error Messages” on page 330.
The Administrator UserEvery Integration Server is installed with a predefined user account called “Administrator.” By default, this user is the only one who can perform administrative tasks with the Integration Server Administrator.
The Administrator’s PasswordThe predefined password assigned to the Administrator user account is “manage”.
To learn how to change passwords, see “Changing Passwords and Password Requirements” on page 50.
Important! The predefined password for the Administrator account is “manage”. The predefined password for the Developer account is “isdev”. The predefined password for the Replicator account is “iscopy”.
Change all of these passwords immediately after installing the webMethods Integration Server. Otherwise, your server will be vulnerable to anyone who knows the default passwords that webMethods installs on its servers. When assigning a password, make it something that is difficult to guess. For example, make it a mixture of upper‐ and lowercase letters, numbers, and special characters. Do not use a name, a phone number, your license plate, your social security number, or other generally available information. Do not write passwords down. Do not tell anyone the password unless you are sure of that person’s identity.
webMethods Integration Server Administrator’s Guide Version 7.1.1 19
1 The Role of the Administrator
Adding Backup AdministratorsIt is a good idea to designate at least one individual as a “backup administrator,” who can administer the Integration Server when you are not available.
To add a backup administrator to your server, create a regular user account for the user (if he or she does not already have one); then add that user account to the “Administrators” group.
Only members of the “Administrators” group can use the Integration Server Administrator. For information about creating user accounts and adding them to groups, see Chapter 5, “Managing Users and Groups”.
Note: If you use an external directory for user and group information, see “Granting Administrator Privileges to External Users” on page 269 for information about adding administrators.
20 webMethods Integration Server Administrator’s Guide Version 7.1.1
2 An Overview of the Server
The Role of the Server . . . . . . . . . . . . . . . . . . . . . . . . . . . . . . . . . . . . . . . . . . . . . . . . . . . . . . . . . 22
Architecture . . . . . . . . . . . . . . . . . . . . . . . . . . . . . . . . . . . . . . . . . . . . . . . . . . . . . . . . . . . . . . . . . 22
How the Server Executes Services . . . . . . . . . . . . . . . . . . . . . . . . . . . . . . . . . . . . . . . . . . . . . . . 26
Security Features . . . . . . . . . . . . . . . . . . . . . . . . . . . . . . . . . . . . . . . . . . . . . . . . . . . . . . . . . . . . . 27
Logging . . . . . . . . . . . . . . . . . . . . . . . . . . . . . . . . . . . . . . . . . . . . . . . . . . . . . . . . . . . . . . . . . . . . 28
Caching . . . . . . . . . . . . . . . . . . . . . . . . . . . . . . . . . . . . . . . . . . . . . . . . . . . . . . . . . . . . . . . . . . . . 28
webMethods Integration Server Administrator’s Guide Version 7.1.1 21
2 An Overview of the Server
The Role of the ServerThe webMethods Integration Server hosts packages that contain services and related files. The Integration Server comes with several packages. For example, it includes packages that contain built‐in services that your developers might want to invoke from their services or client applications and services that demonstrate some of the features of the Integration Server. You can create additional packages to hold the services that your developers create. Your developers can create services that perform functions, such as, integrating your business systems with those of your partners, retrieving data from legacy systems, and accessing and updating databases.
The Integration Server provides an environment for the orderly, efficient, and secure, execution of services. It decodes client requests, identifies the requested services, invokes the services, passes data to them in the expected format, encodes the output produced by the services, and returns output to the clients.
Additionally, the server authenticates clients, verifies that they are authorized to execute the requested service, maintains audit‐trail logs, and promotes throughput using facilities such as service result caching.
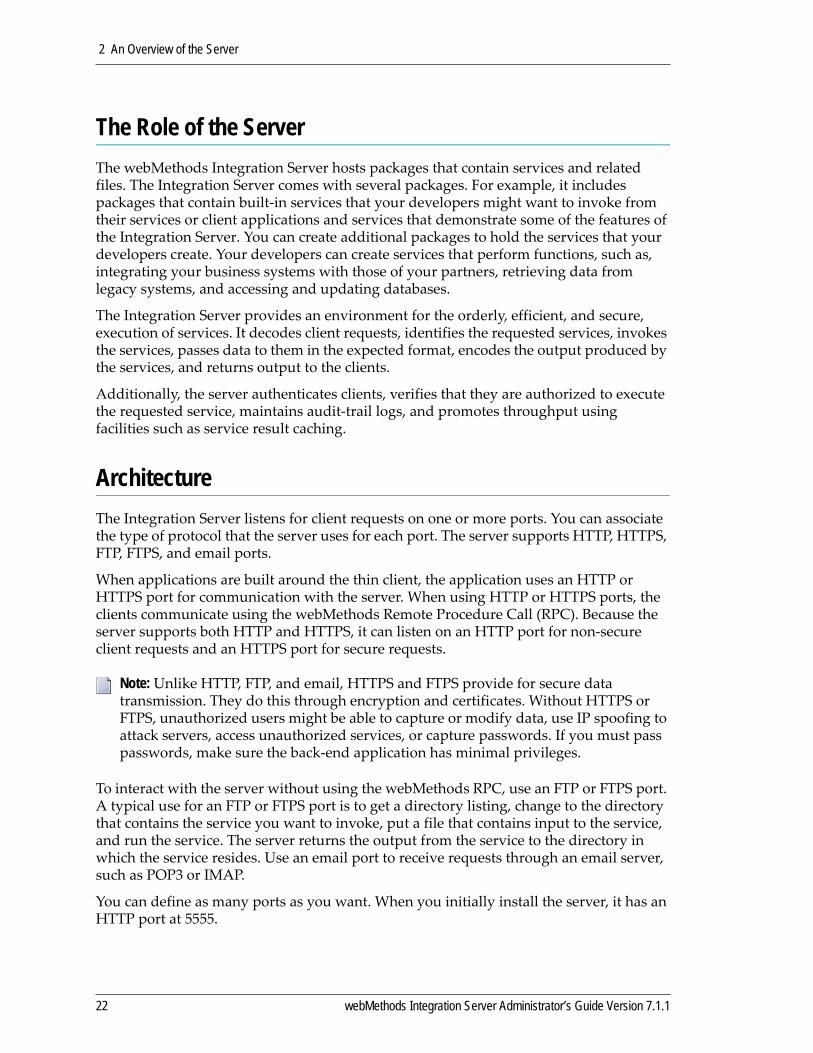
ArchitectureThe Integration Server listens for client requests on one or more ports. You can associate the type of protocol that the server uses for each port. The server supports HTTP, HTTPS, FTP, FTPS, and email ports.
When applications are built around the thin client, the application uses an HTTP or HTTPS port for communication with the server. When using HTTP or HTTPS ports, the clients communicate using the webMethods Remote Procedure Call (RPC). Because the server supports both HTTP and HTTPS, it can listen on an HTTP port for non‐secure client requests and an HTTPS port for secure requests.
To interact with the server without using the webMethods RPC, use an FTP or FTPS port. A typical use for an FTP or FTPS port is to get a directory listing, change to the directory that contains the service you want to invoke, put a file that contains input to the service, and run the service. The server returns the output from the service to the directory in which the service resides. Use an email port to receive requests through an email server, such as POP3 or IMAP.
You can define as many ports as you want. When you initially install the server, it has an HTTP port at 5555.
Note: Unlike HTTP, FTP, and email, HTTPS and FTPS provide for secure data transmission. They do this through encryption and certificates. Without HTTPS or FTPS, unauthorized users might be able to capture or modify data, use IP spoofing to attack servers, access unauthorized services, or capture passwords. If you must pass passwords, make sure the back‐end application has minimal privileges.
22 webMethods Integration Server Administrator’s Guide Version 7.1.1

2 An Overview of the Server
The Server Listens for Requests on Ports that You Specify
There may be times when you want to use the standard port numbers used by Web servers: port 80 for HTTP requests and port 443 for HTTPS requests. If your Integration Server runs on a Windows system, this is not a problem. However, if your Integration Server runs on a UNIX system, using a port number below 1024 requires that the server run as “root.” For security reasons, Software AG discourages this practice. Instead, run your Integration Server using an unprivileged user ID on a high number port (for example 1024 or above) and use the port remapping capabilities present in most firewalls to move requests to the higher numbered ports.
Note: When you install the server, it also defines a port type of webMethods/Diagnostic at 9999. The diagnostic port uses the HTTP protocol and provides you access to the Integration Server when it is unresponsive. For more information about the diagnostic port, see Appendix C, “Diagnosing the Integration Server”.
webMethods Integration Server
HTTP Port
HTTPS Port
FTPPort
HTTP requests
HTTPS requests
FTP requests
IMAP or POP3 Server
File System
FTPSPort
Email message
FTPS requests
Email Port
File PollingPort
webMethods Integration Server Administrator’s Guide Version 7.1.1 23
2 An Overview of the Server
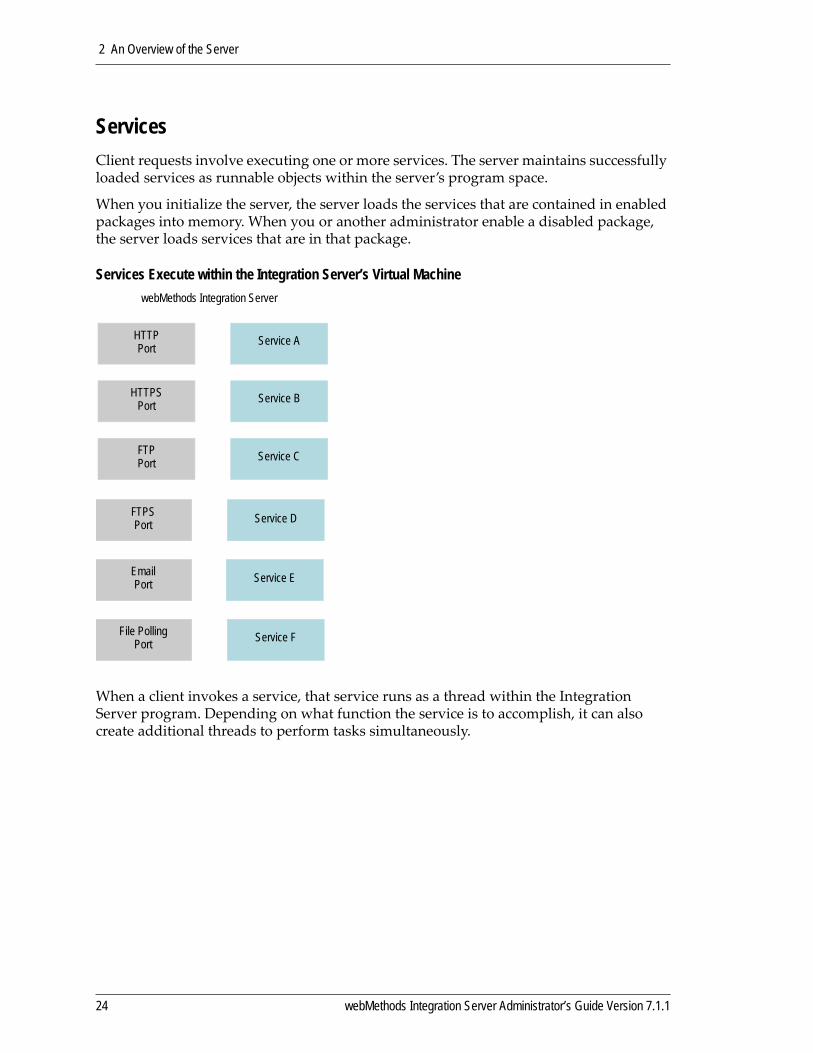
ServicesClient requests involve executing one or more services. The server maintains successfully loaded services as runnable objects within the server’s program space.
When you initialize the server, the server loads the services that are contained in enabled packages into memory. When you or another administrator enable a disabled package, the server loads services that are in that package.
Services Execute within the Integration Server’s Virtual Machine
When a client invokes a service, that service runs as a thread within the Integration Server program. Depending on what function the service is to accomplish, it can also create additional threads to perform tasks simultaneously.
Service A
webMethods Integration Server
Service B
Service C
HTTPPort
HTTPSPort
FTPPort
EmailPort
File Polling Port
Service E
Service F
FTPSPort Service D
24 webMethods Integration Server Administrator’s Guide Version 7.1.1
2 An Overview of the Server
Retrieving Data for ServicesTasks that services perform often include retrieving data from data sources. The server can retrieve data (for example, XML and HTML data) from local data sources or by issuing HTTP, HTTPS, FTP, FTPS, email, or file polling requests to resources such as Web servers and JDBC‐enabled databases.
There are a number of methods you can use to send files from a client to the Integration Server. The Integration Server provides the following automated mechanisms:
Post a file to a service via HTTP or HTTPS.
FTP a file to a service.
Submit a file to a service via a file polling port.
Email a file to a service as an attachment.
When a client submits a file to the Integration Server, the server uses the appropriate content handler to parse the contents of the file and pass them to the target service.
For all transmission methods except the file polling, the client specifies the service to be executed. For file polling, the server always executes the service associated with the file polling port.
For more information about using sending and receiving XML files, see the XML Services Developer’s Guide. For more information about sending and receiving flat files, see Flat File Schema Developer’s Guide. You can also refer to the webMethods Integration Server Built‐In Services Reference for information about services you can invoke from the service you write.
When the server accesses data from external data sources, you can optionally route either protocol (HTTP or HTTPS) through a proxy server.
Note: If you use Trading Networks, you can send some files, specifically flat files, directly to Trading Networks. For more information about how Trading Networks processes flat files, see the “Defining and Managing Flat File Document Types” chapter in webMethods Trading Networks Administrator’s Guide.
Note: If an FTP or FTPS port receives a file that does not have an extension, the Integration Server will call the default content handler.
webMethods Integration Server Administrator’s Guide Version 7.1.1 25
2 An Overview of the Server
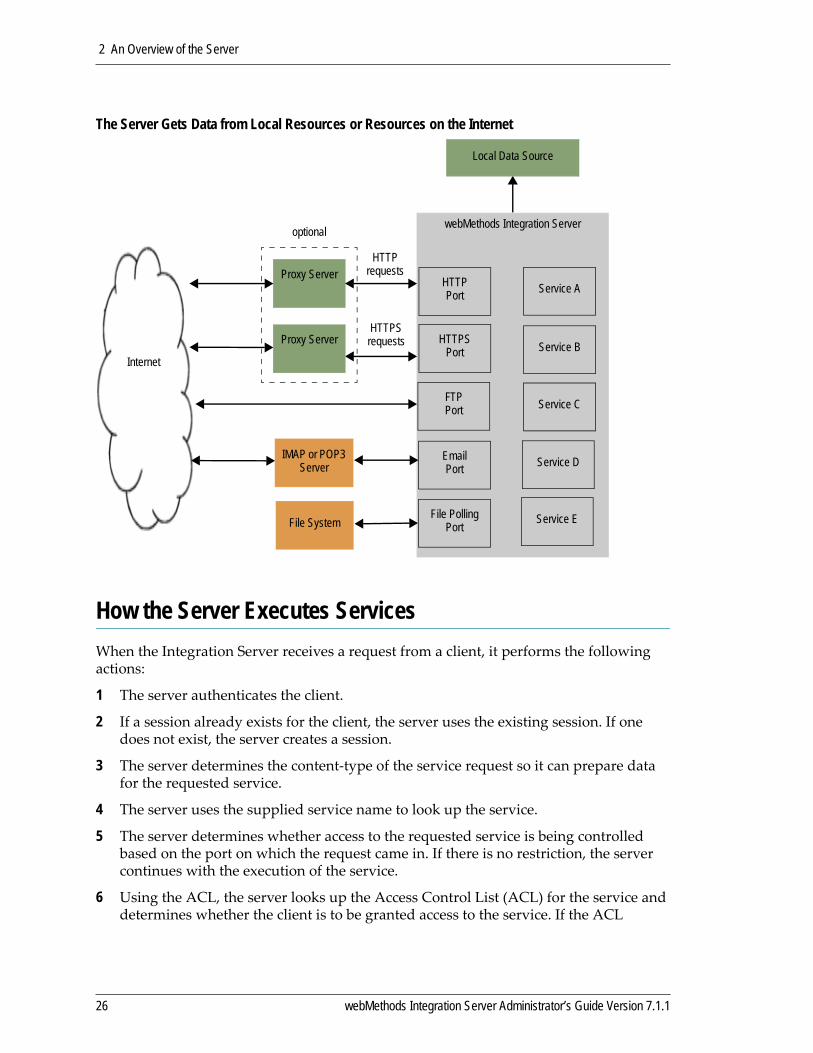
The Server Gets Data from Local Resources or Resources on the Internet
How the Server Executes ServicesWhen the Integration Server receives a request from a client, it performs the following actions:
1 The server authenticates the client.
2 If a session already exists for the client, the server uses the existing session. If one does not exist, the server creates a session.
3 The server determines the content‐type of the service request so it can prepare data for the requested service.
4 The server uses the supplied service name to look up the service.
5 The server determines whether access to the requested service is being controlled based on the port on which the request came in. If there is no restriction, the server continues with the execution of the service.
6 Using the ACL, the server looks up the Access Control List (ACL) for the service and determines whether the client is to be granted access to the service. If the ACL
Internet
webMethods Integration Server
Service B
Service C
HTTPPort
HTTP requests
HTTPS requests HTTPS
Port
FTPPort
Service A
Local Data Source
Proxy Server
Proxy Server
optional
EmailPort
File PollingPort
Service D
Service E
IMAP or POP3 Server
File System
26 webMethods Integration Server Administrator’s Guide Version 7.1.1
2 An Overview of the Server
indicates that the client is allowed to access the service, the server continues with the execution of the service.
7 If auditing is enabled, the server adds an entry to the Audit Log to mark the start of the request.
8 The server starts gathering service statistics for the service.
9 The server checks to see if the results for this service are cached. If services are cached, the server returns the cached results. If services are not cached, the server invokes the service. If the service is a flow service, which can consist of several services, it invokes each service in the flow.
10 The server ends the gathering of server statistics for the service.
11 If auditing is enabled, the server adds an entry to the Audit Log to mark the end of the request.
12 The server encodes the service results as specified by the content type.
13 The server returns the results to the client.
Security FeaturesThe Integration Server has several built‐in security mechanisms to protect services from unauthorized access, prevent unauthorized administration of the Integration Server, and to prevent data from being intercepted during transmission.
It requires clients to present valid credentials (i.e., user name and password or a client certificate) in order to connect to the server.
It controls access to individual services by user groups. This mechanism is provided through the use of Access Control Lists (ACLs) that you associate with a service. For the greatest security, associate all services with an ACL.
It allows you to control access to services based on the port on which a service request is received.
It requires clients to present valid user names (with passwords) that have Administrator privileges before allowing access to the webMethods Integration Server Administrator functions.
It hashes user passwords before storing them.
It supports encrypted conversations through Secure Sockets Layer (SSL).
It allows your Integration Server to present different client certificates to different SSL servers.
For additional information about the server’s security features, refer to Chapter 10, “Managing Server Security”.
Note: For each service in a flow, the server performs steps 6 through 11.
webMethods Integration Server Administrator’s Guide Version 7.1.1 27
2 An Overview of the Server
The security of the Integration Server depends on the security of the underlying operating system. Make sure you do the following:
Follow all vendor recommendations for tight configuration
Remove any unnecessary network services, such as telnet or mail, in case they contain security flaws.
Regularly check for and install patches from the vendor that might affect security.
See your operating system’s documentation for instructions on accomplishing these tasks.
LoggingLogging for the platform provides important data you need to monitor platform activity and correct problems. The Integration Server maintains this logging data. For complete information and instructions about working with logging data, see the webMethods Logging Guide.
CachingCaching is an optimization feature that can improve the performance of services. You activate it on a service‐by‐service basis. When you enable caching, the server saves the service invocation results in a local cache for a specified period of time. While the results are in cache, rather than re‐invoking the service, the server can quickly retrieve the service results for subsequent clients’ requests for the service.
Caching can significantly improve response time of services that retrieve information from busy data sources such as high‐traffic commercial Web servers or databases.
For additional information about using cache, see Chapter 19, “Caching Service Results”.
28 webMethods Integration Server Administrator’s Guide Version 7.1.1
3 Starting and Stopping the Server
Starting the webMethods Integration Server . . . . . . . . . . . . . . . . . . . . . . . . . . . . . . . . . . . . . . . . 30
Changing Whether the Integration Server is a Windows Application or Windows Service . . . . . 33
What Happens When You Start the Server? . . . . . . . . . . . . . . . . . . . . . . . . . . . . . . . . . . . . . . . . 36
Shutting Down the Integration Server . . . . . . . . . . . . . . . . . . . . . . . . . . . . . . . . . . . . . . . . . . . . . 37
Restarting the Integration Server . . . . . . . . . . . . . . . . . . . . . . . . . . . . . . . . . . . . . . . . . . . . . . . . . 38
Server Recovery . . . . . . . . . . . . . . . . . . . . . . . . . . . . . . . . . . . . . . . . . . . . . . . . . . . . . . . . . . . . . 38
webMethods Integration Server Administrator’s Guide Version 7.1.1 29
3 Starting and Stopping the Server
Starting the webMethods Integration ServerThe webMethods Integration Server must be running in order for clients to execute services. If you are using the server in a development environment, it must be running in order for your developers to build, update, and test services using the webMethods Developer.
1 Click Start.
2 In the Program menu point to the webMethods folder, then point to the Servers folder.
3 Click the Integration Server icon.
1 Locate the server.sh script file that you modified for your environment when you installed the server.
2 Execute this script.
To start the Integration Server on Windows
To start the Integration Server on UNIX
Note: Run this script when logged in as a non‐root user. Running the script as root might reduce the security of your system.
The server can consume more files and sockets on a UNIX system than on other systems. Therefore, if you are running the server on a UNIX system, Software AG recommends that run it with at least 102 file descriptors. You can increase the number of available file descriptors by entering the following command from the UNIX command line before starting the server:
ulimit -n number
Note: If your Integration Server has been configured to request a master password for outbound password encryption, you will be prompted for this password in a popup window or from the server console. Refer to “Managing Outbound Passwords” on page 242 for more information about this password.
30 webMethods Integration Server Administrator’s Guide Version 7.1.1
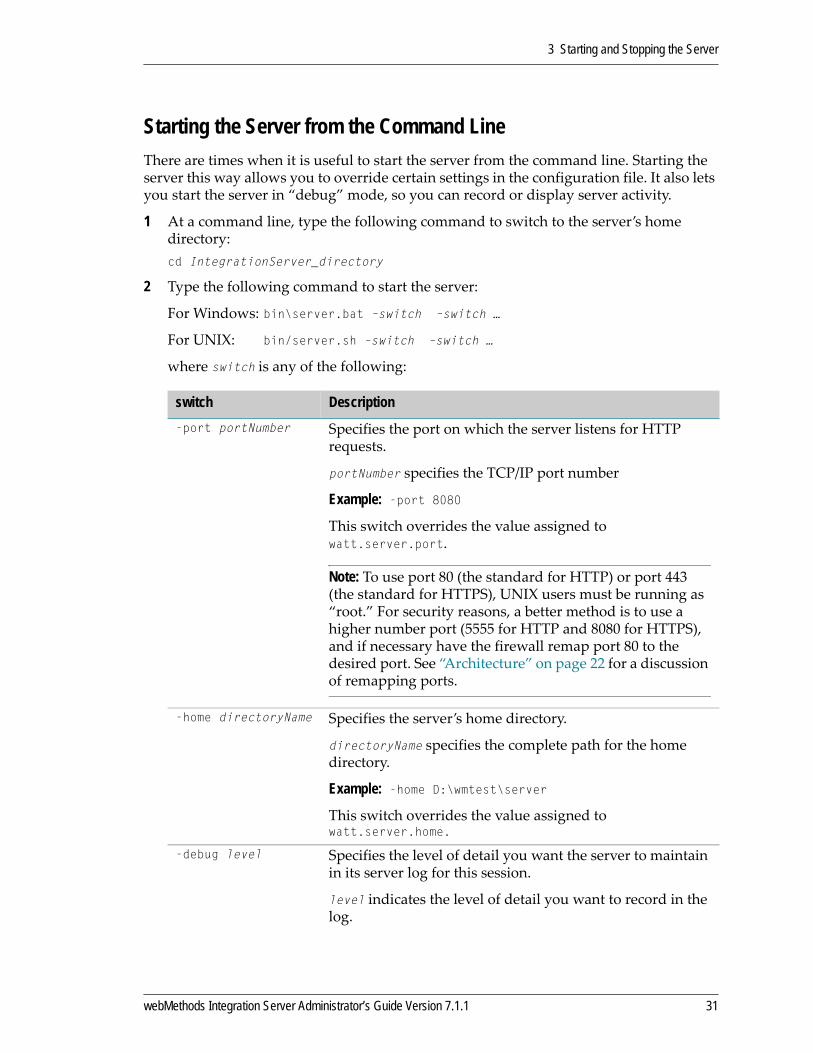
3 Starting and Stopping the Server
Starting the Server from the Command LineThere are times when it is useful to start the server from the command line. Starting the server this way allows you to override certain settings in the configuration file. It also lets you start the server in “debug” mode, so you can record or display server activity.
1 At a command line, type the following command to switch to the server’s home directory: cd IntegrationServer_directory
2 Type the following command to start the server:
For Windows: bin\server.bat –switch –switch …
For UNIX: bin/server.sh –switch –switch …
where switch is any of the following:
switch Description-port portNumber Specifies the port on which the server listens for HTTP
requests.
portNumber specifies the TCP/IP port number
Example: -port 8080
This switch overrides the value assigned to watt.server.port.
Note: To use port 80 (the standard for HTTP) or port 443 (the standard for HTTPS), UNIX users must be running as “root.” For security reasons, a better method is to use a higher number port (5555 for HTTP and 8080 for HTTPS), and if necessary have the firewall remap port 80 to the desired port. See “Architecture” on page 22 for a discussion of remapping ports.
-home directoryName Specifies the server’s home directory.
directoryName specifies the complete path for the home directory.
Example: -home D:\wmtest\server
This switch overrides the value assigned to watt.server.home.
-debug level Specifies the level of detail you want the server to maintain in its server log for this session.
level indicates the level of detail you want to record in the log.
webMethods Integration Server Administrator’s Guide Version 7.1.1 31
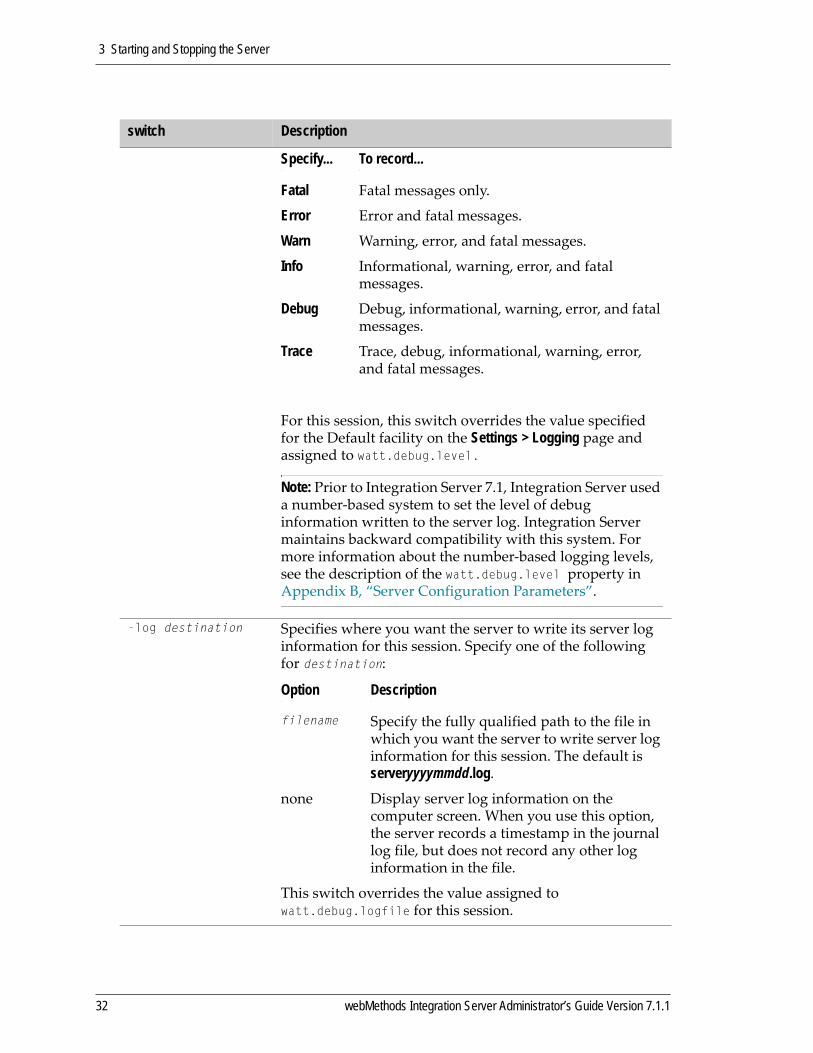
3 Starting and Stopping the Server
Specify... To record...
Fatal Fatal messages only.
Error Error and fatal messages.
Warn Warning, error, and fatal messages.
Info Informational, warning, error, and fatal messages.
Debug Debug, informational, warning, error, and fatal messages.
Trace Trace, debug, informational, warning, error, and fatal messages.
For this session, this switch overrides the value specified for the Default facility on the Settings > Logging page and assigned to watt.debug.level.
Note: Prior to Integration Server 7.1, Integration Server used a number‐based system to set the level of debug information written to the server log. Integration Server maintains backward compatibility with this system. For more information about the number‐based logging levels, see the description of the watt.debug.level property in Appendix B, “Server Configuration Parameters”.
-log destination Specifies where you want the server to write its server log information for this session. Specify one of the following for destination:
Option Description
filename Specify the fully qualified path to the file in which you want the server to write server log information for this session. The default is serveryyyymmdd.log.
none Display server log information on the computer screen. When you use this option, the server records a timestamp in the journal log file, but does not record any other log information in the file.
This switch overrides the value assigned to watt.debug.logfile for this session.
switch Description
32 webMethods Integration Server Administrator’s Guide Version 7.1.1
3 Starting and Stopping the Server
Changing Whether the Integration Server is a Windows Application or Windows ServiceThe Integration Server can run as either a Windows application or a Windows service.
Use a Windows application if you want to control when the Integration Server initializes. When the Integration Server is a Windows application, you must manually start it.
If you installed the Integration Server as a Windows service and now want it to be a Windows application, you can manually remove the Windows service for the Integration Server. After removing the Windows service, the Integration Server will still be available as a Windows application. See “Switching the Server from a Windows Service to a Windows Application” on page 34.
Use a Windows service to have the Integration Server automatically initialize when the machine on which it is installed initializes. When you use a Window service, you do not have to manually restart the Integration Server following a machine restart.
If you installed the Integration Server as a Windows application and now want it to be a Windows service, you can manually register the Integration Server service. See “Switching the Server from a Windows Application to a Windows Service” on page 34.
Note: If you want the Integration Server to prompt for the master password for outbound passwords at server initialization, do not run it as a Windows service. For more information about outbound passwords and the master password, refer to Chapter 16, “Outbound Passwords”.
webMethods Integration Server Administrator’s Guide Version 7.1.1 33
3 Starting and Stopping the Server
Switching the Server from a Windows Service to a Windows ApplicationIf Integration Server was installed as a Windows service, and you want Integration Server to run as a Windows application, you must remove the Windows service for the Integration Server.
1 If the Windows service is running, stop it. You can stop the Windows service by either using the Integration Server Administrator to shut down the Integration Server or from the Services dialog box in the Microsoft Windows Control Panel.
2 Open a command window, navigate to the Integration Server_directory\support\win32 directory and run this command:installSvc.bat unreg
Switching the Server from a Windows Application to a Windows ServiceUse the following procedure to register the Integration Server as a Windows service.
1 Edit the server.bat file to fit your environment. For example, you might change the Java minimum and maximum heap size. The server.bat script file is located in the IntegrationServer_directory\bin directory.
2 Edit the installSvc.bat file located in the IntegrationServer_directory\support\win32 directory. Using a text editor, open the installSvc.bat file and edit the following lines of code:SET SVCNAME="wmIS"SET DISPLAYNAME="webMethods Integration Server 6.5"SET DESCRIPTION="webMethods Integration Server 6.5"
To manually remove the Windows service for the Integration Server
Note: If you are running the Windows Vista operating system with the User Account Control security feature enabled, the command prompt you use to run the installSvc.bat service must be launched with full Administrator privileges. To launch the command prompt with full Administrator privileges, navigate to All Programs>Accessories, right‐click on the Command Prompt listing, and select the Run as Administrator option. If you are not logged into the operating system with Administrator privileges, you will be prompted to supply Administrator credentials.
s
Note: The user whose identity will be used to run the Integration Server as a Windows service must have Power User privileges.
To manually register the Integration Server to run as a Windows service
34 webMethods Integration Server Administrator’s Guide Version 7.1.1

3 Starting and Stopping the Server
The SVCNAME value is the name of the service and must be a unique value on your system.
The DISPLAYNAME value is used by Microsoft Windows to list the service on the Windows Services Control Panel and must uniquely identify the service.
The DESCRIPTION value describes the service.
3 Open a command window, navigate to the Integration Server_directory\support\win32 directory and run installSvc.bat to create the Integration Server service.
In the Microsoft Windows Control Panel in the Services dialog box, verify that the Integration Server created the service with the specified display name.
4 Start the service from one of the following places:
Services dialog box in the Microsoft Windows Control Panel, or
Command line using the following command:
net start <SVCNAME> In this example, you would type net start wmIS
In addition to running an Integration Server as a Windows service, you can also configure multiple Integration Servers of the same version to run as Windows services on a single Windows machine.
1 To configure an Integration Server from another installation on the same machine to run as a Windows service, refer to and repeat steps 1 through 4 in “To manually register the Integration Server to run as a Windows service” on page 34.
2 In step 2, give the service a unique service name and display name that is different from the original Windows service that you configured. To do so, go to the IntegrationServer_directory\support\Win32 directory and open the installSvc.bat file. Set the SET SVCNAME and SET DISPLAYNAME parameters to unique values. You might also want to set the SET DESCRIPTION parameter.
Note: If you are running the Windows Vista operating system with the User Account Control security feature enabled, the command prompt you use to run the installSvc.bat service must be launched with full Administrator privileges. To launch the command prompt with full Administrator privileges, navigate to All Programs>Accessories, right‐click on the Command Prompt listing, and select the Run as Administrator option. If you are not logged into the operating system with Administrator privileges, you will be prompted to supply Administrator credentials.
To configure multiple Integration Servers to run as Windows services on a Windows machine
webMethods Integration Server Administrator’s Guide Version 7.1.1 35
3 Starting and Stopping the Server
What Happens When You Start the Server?When you start the Integration Server, it performs a series of initialization steps to make itself ready for client requests. The server:
1 Establishes the operating environment by using the configuration parameters located in the configuration file (IntegrationServer_directory\config\server.cnf).
2 Initializes processes that perform internal management.
3 Loads information about all the enabled packages and their services that reside in the webMethods_directory\packages directory. If a package depends on other packages, the server loads the prerequisite packages first. The server does not load disabled packages.
4 Executes the startup services for each loaded package.
5 Initializes the guaranteed delivery engine. The server checks the job store for pending guaranteed delivery transactions. It retries the pending transactions as the guaranteed delivery configuration settings specify. For more information, refer to Chapter 20, “Configuring Guaranteed Delivery”.
6 Schedules internal system tasks.
How to Tell if the Server Is Running Correctly To determine whether your server is running, start your browser and point it to the Integration Server. (See “Starting the Integration Server Administrator” on page 42 if you need instructions for this step.)
If the server is running, you will be prompted for a name and password.
If the server is not running, your browser will issue an error message similar to the following:“Cannot open the Internet site http://localhost:5555.”“A connection with the server could not be established.”
If the Integration Server detects a problem with the master password or outbound passwords at startup, it will place you in safe mode, which is a special mode from which you can diagnose and correct problems. When the Integration Server is in safe mode, it displays the Integration Server Administrator, but the Integration Server is not connected to any external resources.
When you are placed into safe mode because of problems with the master password or outbound passwords, you will see the following message in the upper left corner of the Server Statistics screen of the Integration Server Administrator:SERVER IS RUNNING IN SAFE MODE. Master password sanity check failed -- invalid master password provided.
These problems can be caused by a corrupted master password file, a corrupted outbound password file, or by simply mis‐typing the master password when you are prompted for it. If you suspect you have mis‐typed the password, shut down the server
36 webMethods Integration Server Administrator’s Guide Version 7.1.1

3 Starting and Stopping the Server
and restart it, this time entering the correct password. If this does not correct the problem, refer to “When There Are Problems with the Master Password or Outbound Passwords at Startup” on page 248 for instructions.
Shutting Down the Integration ServerShut down the server to stop the Integration Server and all active sessions.
1 Open the Integration Server Administrator if it is not already open.
2 In the upper right corner of any Integration Server Administrator screen, click Shutdown and Restart.
3 Select whether you want the server to wait before shutting down or to shut down immediately.
Delay number minutes or until all client sessions are complete. Specify the number of minutes you want the Integration Server to wait before shutting down. It then begins monitoring user activity and automatically shuts down when all non‐administrator sessions complete or when the time you specify elapses (whichever comes first).
Perform action immediately. The server and all active sessions terminate immediately.
4 For instructions on how to view the active sessions, refer to “Viewing Active Sessions” on page 37.
5 Click Shutdown.
Viewing Active SessionsBefore you shut down or restart the server, you can view the sessions that are currently active.
1 Open the Integration Server Administrator if it is not already open.
2 In the Server menu of the Navigation panel, click Statistics.
3 Click on the current number of sessions.
To shut down the server
To view active sessions
webMethods Integration Server Administrator’s Guide Version 7.1.1 37

3 Starting and Stopping the Server
Restarting the Integration ServerRestart the server when you need to stop and reload the Integration Server. You should restart the server when:
You make certain configuration changes. Some configuration changes require the server to be restarted before they take effect. This document indicates when you are required to restart the server for configuration changes.
You want to incorporate updated services that cannot be dynamically reloaded. This typically occurs for non‐Java services.
1 Open the Integration Server Administrator if it is not already open.
2 In the upper right corner of any Integration Server Administrator screen, click Shutdown and Restart.
3 Select whether you want the server to wait before restarting or to restart immediately.
Delay number minutes or until all client sessions are complete. Specify the number of minutes you want the Integration Server to wait before restarting. It then begins monitoring user activity and automatically restarts when all non‐administrator sessions complete or when the time you specify elapses (whichever comes first).
Perform action immediately. The server and all active sessions terminate immediately. Then the server restarts.
For instructions on how to view the active sessions, refer to “Viewing Active Sessions” on page 37.
4 Click Restart.
Server RecoveryIf a hardware or software problem causes the Integration Server to fail, restart the server using the normal startup procedure. The server will attempt to perform cleanup and initialization processes to reset the operating environment.
As part of the recovery process, the server automatically:
Reloads the cache environment to its pre‐failure state.
Restores the transaction manager’s guaranteed delivery queues. See “Configuring Guaranteed Delivery” on page 323 for additional information about guaranteed delivery recovery options.
To restart the server
38 webMethods Integration Server Administrator’s Guide Version 7.1.1

3 Starting and Stopping the Server
Services that your site has created might have their own unique recovery requirements. Consult with your developers for information about these requirements.
Some circumstances might require manual intervention to restart the server. See below.
Integration Server Data Integrity and Recoverability ConsiderationsThe webMethods Integration Server utilizes a webMethods physical storage technology to persist critical operational data. This storage technology employs database‐like technology of logging and transactional management. Under normal operations these facilities maintain the integrity, consistency, and recoverability of data persisted to these files. However, even with these safeguards, abnormal server shutdown and catastrophic failures can occur, which could result in these files being left in an unrecoverable state.
Shutting down the Integration Server by any means other than the Administration User Interface may result in critical data files being left in an unrecoverable state. This will result in the inability to restart the Integration Server without manual intervention to remove or recover the damaged data files.
The mission‐critical nature of the data stored in the Integration Server’s data files requires that it be backed up periodically for disaster recovery. As in all critical data resources, the potential exists for a physical failure to leave the Integration Server data files in a corrupted state. In these situations the method of recovery is to replace these data files with the most current backup. The frequency and nature of these backups depends on the critical nature of the data being stored. Backups of these data files should be an offline process with the Integration Server in an idle or shutdown state, i.e. no disk activity.
Tip! Before restarting Integration Server, you can collect diagnostic data to troubleshoot run‐time issues. For information about using the diagnostic port and utility, see Appendix C, “Diagnosing the Integration Server”. Also refer to this chapter for information on generating thread dump to troubleshoot reasons for server slowdown or unresponsiveness.
Important! Establish site‐specific backup and restore procedures to protect these critical data files
Important! Implement site‐specific procedures to periodically backup the critical Integration Server data files. You can use any file‐system backup utility. Perform the backup process only when the Integration Server is shutdown or in a quiesce state, (no disk activity). This restriction ensures that the backup will capture these critical data files in a consistent state. Backing up an active Integration Server may result in capturing a snapshot of the data files that are in an inconsistent state and therefore unusable for recovery purposes
webMethods Integration Server Administrator’s Guide Version 7.1.1 39

3 Starting and Stopping the Server
Critical Integration Server Data FilesThere are four subdirectories in the Integration Server’s currently working directory that contain critical data files that must be backed up for recovery purposes. These subdirectories are:
./audit/data
The files in this subdirectory contain audit events, generated by the Integration Server, that have yet to be persisted in the audit database or file system. Loss of these files will result in the loss of all pending audit events. Without these files, recovery from backups may result in duplicate events being stored in the audit database or file system. Back up these two files:
AuditStore.data0000000AuditStore.log0000000
./DocumentStore
The files in this subdirectory contain the locally persisted documents being processed by the Integration Server. The loss of these files will result in the loss of any persisted documents. Back up these six files:
ISResubmitStoredata0000000ISResubmitStorelog0000000ISTransStoredata0000000ISTransStorelog0000000TriggerStoredata0000000TriggerStorelog0000000
./WmRepository4
The files in this subdirectory contain metadata for the Integration Server. The loss of these files could result in loss of configuration information and may require manual reconfiguration. Back up these two files:
FSDdata0000000FSDlog0000000
40 webMethods Integration Server Administrator’s Guide Version 7.1.1

4 Using the Integration Server Administrator
What Is the Integration Server Administrator? . . . . . . . . . . . . . . . . . . . . . . . . . . . . . . . . . . . . . . . 42
Starting the Integration Server Administrator . . . . . . . . . . . . . . . . . . . . . . . . . . . . . . . . . . . . . . . . 42
Basic Operation . . . . . . . . . . . . . . . . . . . . . . . . . . . . . . . . . . . . . . . . . . . . . . . . . . . . . . . . . . . . . . 43
The Configuration File . . . . . . . . . . . . . . . . . . . . . . . . . . . . . . . . . . . . . . . . . . . . . . . . . . . . . . . . . 44
webMethods Integration Server Administrator’s Guide Version 7.1.1 41
4 Using the Integration Server Administrator
What Is the Integration Server Administrator?The Integration Server Administrator is an HTML‐based utility you use to administer the webMethods Integration Server. It allows you to monitor server activity, manage user accounts, make performance adjustments, and set operating parameters.
You can run the Integration Server Administrator from any browser‐equipped workstation on your network. (The Integration Server Administrator is a browser‐based application that uses services to accomplish its work.)
Starting the Integration Server AdministratorTo use the Integration Server Administrator, simply open your browser and point it to the port on the host machine where the Integration Server is running.
1 Start your browser.
2 Point your browser to the host and port where the Integration Server is running.
Examples
If the server were running on the default port on the same machine where you are running the Integration Server Administrator, you would type:
http://localhost:5555
If the server were running on port 4040 on a machine called QUICKSILVER, you would type:
http://QUICKSILVER:4040
3 Log on to the server with a user name and password that has administrator privileges.
If you just installed the Integration Server, you can use the following default values:
User Name: AdministratorPassword: manage
Important! The Integration Server must be running in order to use this utility. If the server is not running, your browser will issue an error similar to the following:
“Cannot open the Internet site http://localhost:5555.”“A connection with the server could not be established.”
To start the Integration Server Administrator
Important! Use the exact combination of upper‐ and lowercase characters shown above; user names and passwords are case sensitive.
42 webMethods Integration Server Administrator’s Guide Version 7.1.1

4 Using the Integration Server Administrator
If you change the password, be sure to select one that is difficult to guess. For example, use a mixture of upper‐ and lowercase letters, numbers, and special characters. Do not use a name, phone number, social security number, license plate or other generally available information.
Basic OperationWhen you start the Integration Server Administrator, your browser displays the Statistics screen.
The Integration Server Administrator Screen
The Navigation panel on the left side of the screen displays the names of menus from which you can select a task. To start a task, click a task name in the Navigation panel. The server displays a screen that corresponds to the task you select.
Getting HelpYou can obtain information about the Integration Server Administrator by clicking the Help link in the upper right corner of any Integration Server Administrator screen. The help system displays a description of the parameters for the screen and a list of procedures you can perform from the screen. From this window, click Show Navigation Area to view the help system’s table of contents from which you can search for a specific procedure or screen description.
webMethods Integration Server Administrator’s Guide Version 7.1.1 43

4 Using the Integration Server Administrator
The Configuration FileConfiguration settings for the Integration Server are stored in the server configuration file (server.cnf). This file resides in the IntegrationServer_directory\config directory and contains parameters that determine how the server operates.
Typically, you will use the Integration Server Administrator to set parameters in the server.cnf file, but there may be times when you need to edit the file directly with a text editor.
For a list of parameters in the server.cnf file and their default values, see Appendix B, “Server Configuration Parameters”.
44 webMethods Integration Server Administrator’s Guide Version 7.1.1

5 Managing Users and Groups
Users and Groups . . . . . . . . . . . . . . . . . . . . . . . . . . . . . . . . . . . . . . . . . . . . . . . . . . . . . . . . . . . . 46
Defining a User Account . . . . . . . . . . . . . . . . . . . . . . . . . . . . . . . . . . . . . . . . . . . . . . . . . . . . . . . 47
Disabling and Enabling Users . . . . . . . . . . . . . . . . . . . . . . . . . . . . . . . . . . . . . . . . . . . . . . . . . . . 52
Defining Groups . . . . . . . . . . . . . . . . . . . . . . . . . . . . . . . . . . . . . . . . . . . . . . . . . . . . . . . . . . . . . . 54
webMethods Integration Server Administrator’s Guide Version 7.1.1 45
5 Managing Users and Groups
Users and GroupsUse the Integration Server Administrator to define user and group information to the server. The definition for a user contains the user name, password, and group membership. The definition for a group contains the group name and a list of users in the group. The server stores and maintains the information.
Alternatively, you can set up the webMethods Integration Server to access the information from an external directory if your site uses one of the following external directories for user and group information:
Central user management
Lightweight Directory Access Protocol (LDAP)
This chapter describes only how the Integration Server works when user and group information is defined internally. For information about using an external directory with the Integration Server, see Chapter 17, “Configuring a Central User Directory or LDAP”.
Purpose of Users and GroupsThe server uses user and group information to authenticate clients and determine the server resources that a client is allowed to access.
If the server is using basic authentication (user names and passwords) to authenticate a client, it uses the user names and passwords defined in user accounts to validate the credentials a client supplies.
After a client is authenticated (whether through basic authentication or client certificates), the server uses the group membership to determine if a client is authorized for the requested action, such as, using the Integration Server Administrator or invoking a service.
Access to the server’s resources is controlled at the group level. By setting up users and groups, you can control who can:
Configure and manage the server. Only users that are members of the Administrators group (administrator privilege) can access the Integration Server Administrator.
Create, modify, and delete services that reside on the server. Only users that are members of the Developers group (developer privileges) can connect to the server from the webMethods Developer.
Access services and files that reside on the server. Access to services and files is protected at the group level.
46 webMethods Integration Server Administrator’s Guide Version 7.1.1

5 Managing Users and Groups
Defining a User AccountWhen you create a user account on the Integration Server, you specify a user name, password, and group membership.
User name. A user name is a unique name that identifies a client. You can specify a user name that represents an actual person (e.g., “JDSmith” for John D. Smith), or you can specify a user name to represent applications, job functions, or organizations. For example, you might set up generically named user names such as “MktgPurchAgent,” “MktgTimeKeeper,” and so forth, to represent job functions.
Password. A password is an arbitrary string of characters that you associate with a user name. The server uses the password when authenticating a client who has submitted a valid user name. For more information about authentication, see Chapter 13, “Authenticating Clients”.
A password is meant to be a secret code shared only by the server, the server administrator, and the owner of the user account. Its purpose is to give the server added assurance that a request is coming from a legitimate user. Only administrators can assign a password to a user name and change a password for an existing account. For additional security, the server hashes passwords before storing them.
Group membership. The group membership identifies the groups to which a user belongs. Access to the server’s resources is controlled at the group level:
Only users that are members of the Administrators group can configure and manage the server using the Integration Server Administrator. For more information about controlling access to the Integration Server Administrator, see “Setting Up Administrators” on page 141.
Only users that are members of the Developers group can connect to the server from the webMethods Developer to create, modify, and delete services. For information, see “Setting Up Developers” on page 142.
The server protects access to services and files using Access Control Lists (ACLs). You set up ACLs that identify groups that are allowed or not allowed to access a resource. For more information about protecting services and files, see “Controlling Access to Resources with ACLs” on page 168.
webMethods Integration Server Administrator’s Guide Version 7.1.1 47
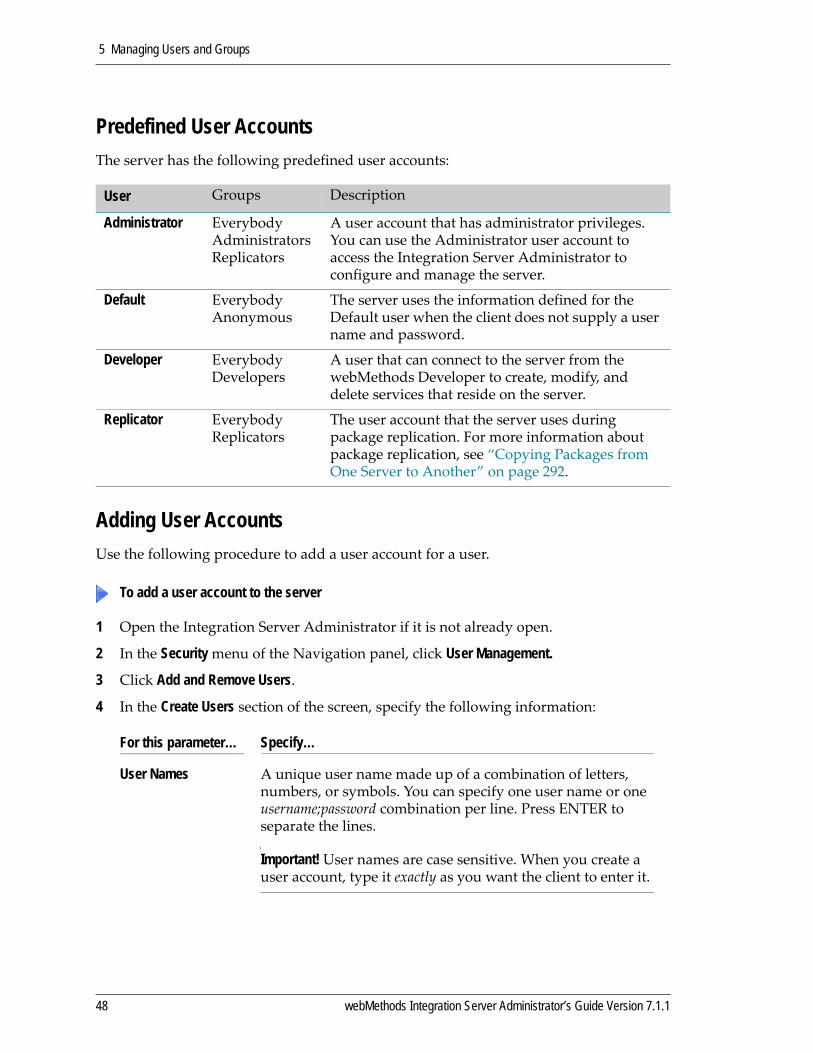
5 Managing Users and Groups
Predefined User AccountsThe server has the following predefined user accounts:
Adding User AccountsUse the following procedure to add a user account for a user.
1 Open the Integration Server Administrator if it is not already open.
2 In the Security menu of the Navigation panel, click User Management.
3 Click Add and Remove Users.
4 In the Create Users section of the screen, specify the following information:
User Groups Description
Administrator EverybodyAdministratorsReplicators
A user account that has administrator privileges. You can use the Administrator user account to access the Integration Server Administrator to configure and manage the server.
Default EverybodyAnonymous
The server uses the information defined for the Default user when the client does not supply a user name and password.
Developer EverybodyDevelopers
A user that can connect to the server from the webMethods Developer to create, modify, and delete services that reside on the server.
Replicator EverybodyReplicators
The user account that the server uses during package replication. For more information about package replication, see “Copying Packages from One Server to Another” on page 292.
To add a user account to the server
For this parameter… Specify…
User Names A unique user name made up of a combination of letters, numbers, or symbols. You can specify one user name or one username;password combination per line. Press ENTER to separate the lines.
Important! User names are case sensitive. When you create a user account, type it exactly as you want the client to enter it.
48 webMethods Integration Server Administrator’s Guide Version 7.1.1

5 Managing Users and Groups
5 Click Create Users.
Removing User AccountsUse the following procedure to delete a user account when it is no longer needed.
1 Open the Integration Server Administrator if it is not already open.
2 In the Security menu of the Navigation panel, click User Management.
3 Click Add and Remove Users.
Password A password made up of a combination of letters, numbers, or symbols. You can specify the password in the User Names field by entering username;password or you can enter the password in this field. If you do not specify a password in the User Names field, the server uses the password specified in this field for the user. If you specify multiple users without passwords in the User Names field, the server uses the password in the Password field as the password for those users.
A password is required.
Important! Passwords are case sensitive. Type these values exactly as you want the client to enter it.
Be sure to select passwords that are difficult to guess. For example, use a mixture of upper‐ and lowercase letters, numbers, and special characters. Do not use a name, phone number, social security number, license plate or other generally available information.
Re-Enter Password The same password again to make sure you typed it correctly.
Note: The server will not allow you to remove the following built‐in user accounts: Administrator, Default, Developer, and Replicator.
To delete a user account from the server
For this parameter… Specify…
webMethods Integration Server Administrator’s Guide Version 7.1.1 49
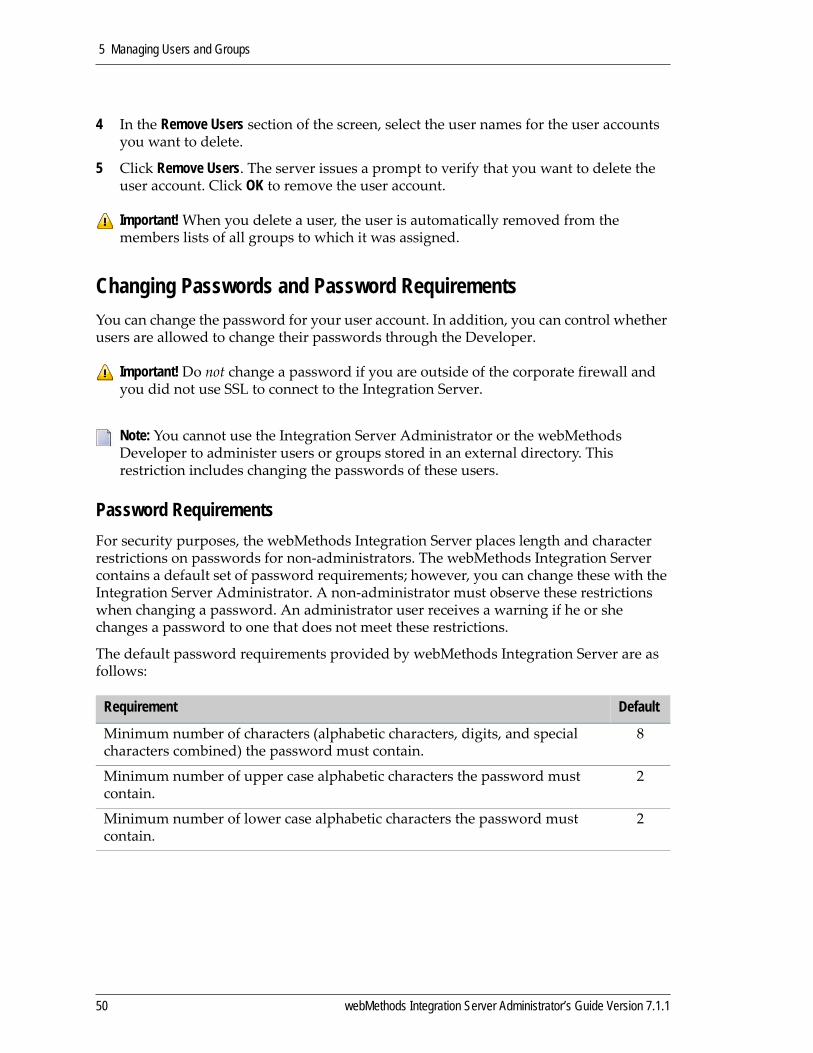
5 Managing Users and Groups
4 In the Remove Users section of the screen, select the user names for the user accounts you want to delete.
5 Click Remove Users. The server issues a prompt to verify that you want to delete the user account. Click OK to remove the user account.
Changing Passwords and Password RequirementsYou can change the password for your user account. In addition, you can control whether users are allowed to change their passwords through the Developer.
Password RequirementsFor security purposes, the webMethods Integration Server places length and character restrictions on passwords for non‐administrators. The webMethods Integration Server contains a default set of password requirements; however, you can change these with the Integration Server Administrator. A non‐administrator must observe these restrictions when changing a password. An administrator user receives a warning if he or she changes a password to one that does not meet these restrictions.
The default password requirements provided by webMethods Integration Server are as follows:
Important! When you delete a user, the user is automatically removed from the members lists of all groups to which it was assigned.
Important! Do not change a password if you are outside of the corporate firewall and you did not use SSL to connect to the Integration Server.
Note: You cannot use the Integration Server Administrator or the webMethods Developer to administer users or groups stored in an external directory. This restriction includes changing the passwords of these users.
Requirement Default
Minimum number of characters (alphabetic characters, digits, and special characters combined) the password must contain.
8
Minimum number of upper case alphabetic characters the password must contain.
2
Minimum number of lower case alphabetic characters the password must contain.
2
50 webMethods Integration Server Administrator’s Guide Version 7.1.1
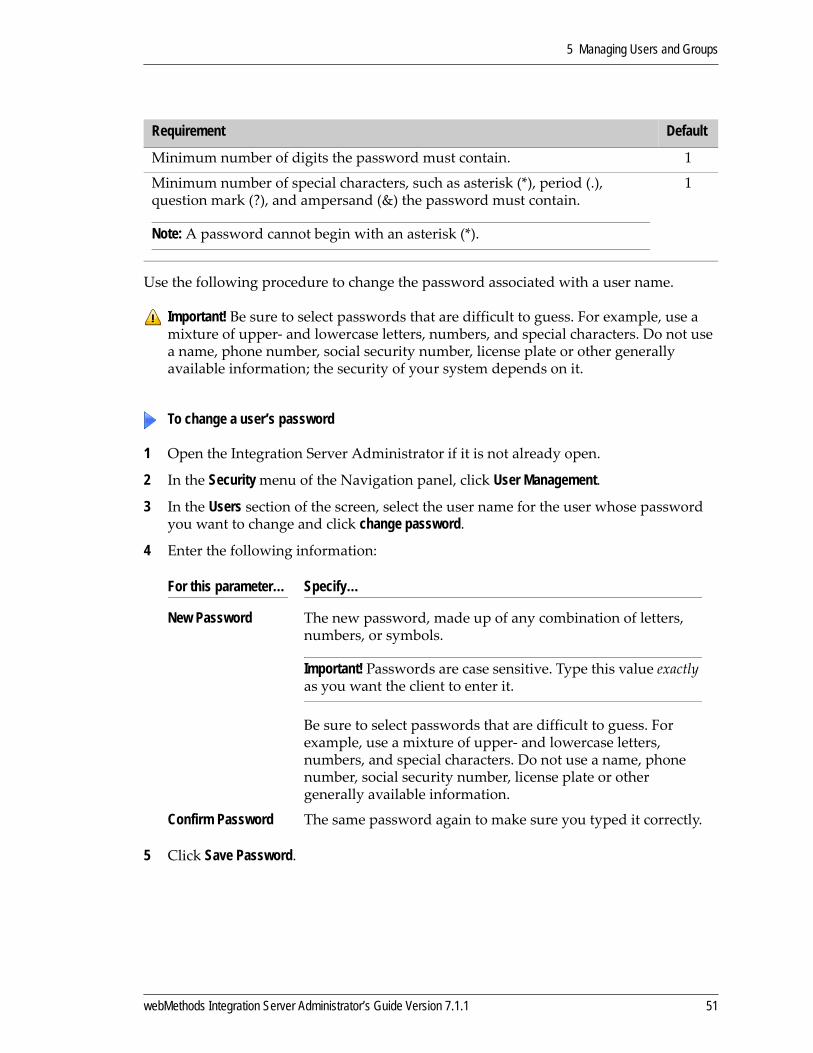
5 Managing Users and Groups
Use the following procedure to change the password associated with a user name.
1 Open the Integration Server Administrator if it is not already open.
2 In the Security menu of the Navigation panel, click User Management.
3 In the Users section of the screen, select the user name for the user whose password you want to change and click change password.
4 Enter the following information:
5 Click Save Password.
Minimum number of digits the password must contain. 1
Minimum number of special characters, such as asterisk (*), period (.), question mark (?), and ampersand (&) the password must contain.
Note: A password cannot begin with an asterisk (*).
1
Important! Be sure to select passwords that are difficult to guess. For example, use a mixture of upper‐ and lowercase letters, numbers, and special characters. Do not use a name, phone number, social security number, license plate or other generally available information; the security of your system depends on it.
To change a user’s password
For this parameter… Specify…
New Password The new password, made up of any combination of letters, numbers, or symbols.
Important! Passwords are case sensitive. Type this value exactly as you want the client to enter it.
Be sure to select passwords that are difficult to guess. For example, use a mixture of upper‐ and lowercase letters, numbers, and special characters. Do not use a name, phone number, social security number, license plate or other generally available information.
Confirm Password The same password again to make sure you typed it correctly.
Requirement Default
webMethods Integration Server Administrator’s Guide Version 7.1.1 51

5 Managing Users and Groups
1 Open the Integration Server Administrator if it is not already open.
2 In the Security menu of the Navigation panel, click User Management.
3 Click Password Restrictions.
4 Click Edit Password Restrictions.
5 Fill in information in the following fields:
Disabling and Enabling UsersThere may be times when you need to disable a user. Doing so makes password cracking attacks harder by eliminating well‐known user names. When you disable a user, login attempts with that user name will fail authentication and be rejected. For example, you might disable the user account of a developer who is on vacation, or the account of a trading partner whose trading privileges are suspended. Because the user has been disabled rather than deleted, you can later reinstate the account without changing the password or resetting permissions.
Controlling password length and character requirements for non-Administrator users
Field Description Default
Enable Password Change? Whether users are allowed to change their passwords. These users must have developer privileges.
Yes
Minimum Password Length Minimum number of characters (alphabetic characters, digits, and special characters combined) the password must contain.
8
Minimum Number of Upper Case Characters
Minimum number of upper case alphabetic characters the password must contain.
2
Minimum Number of Lower Case Characters
Minimum number of lower case alphabetic characters the password must contain.
2
Minimum Number of Digits Minimum number of digits the password must contain.
1
Minimum Number of Special Characters (neither alphabetic nor digits)
Minimum number of special characters, such as asterisk (*), period (.), question mark (?), and ampersand (&) the password must contain.
Note: A password cannot begin with an asterisk (*).
1
52 webMethods Integration Server Administrator’s Guide Version 7.1.1

5 Managing Users and Groups
For deployment, you should disable the Administrator user to prevent someone from trying to guess the password and gain access to your system. Before disabling the Administrator user, you must first create another user, for example SmithAdmin, and add it to the Administrators, Developers, and Replicators groups. Then disable the Administrator user. (Internal server functions that run as the Administrator user, such as start up and shut down services, will still be able to run as Administrator.) Then you can use the SmithAdmin user to administer your Integration Server.
Disabling a UserUse the following procedure to disable a user.
1 Open the Integration Server Administrator if it is not already open.
2 In the Security menu of the Navigation panel, click User Management.
3 Click Enable and Disable Users.
4 In the Enabled Users list select (highlight) the user or users you want to disable.
To select additional users without deselecting currently selected users, press the CTRL key while you click on the users you want to select. To deselect a user, press the CTRL key while you click the currently selected entry.
5 At the bottom of the Enabled Users area of the screen click .
The server moves the selected users to the Disabled Users area of the screen.
6 Click Save Changes.
Enabling a UserUse the following procedure to enable a user. The only time you will need to enable a user is if the system administrator explicitly disabled it.
1 Open the Integration Server Administrator if it is not already open.
2 In the Security menu of the Navigation panel, click User Management.
3 Click Enable and Disable Users.
4 In the Disabled Users list select (highlight) the user or users you want to enable.
Important! Before you disable the Administrator user, make sure you have defined another user with administrator privileges so you are not locked out of the server.
To disable a user
To enable a user
webMethods Integration Server Administrator’s Guide Version 7.1.1 53
5 Managing Users and Groups
To select additional users without deselecting currently selected users, press the CTRL key while you click on the users you want to select. To deselect a user, press the CTRL key while you click the currently selected entry.
5 At the bottom of the Disabled Users area of the screen click .The server moves the selected users to the Enabled Users area of the screen.
6 Click Save Changes.
Defining GroupsA group is a named collection of users that share privileges. The privileges can be:
Administrator privileges
Replicator privileges
Developer privileges
Privileges to invoke a service
Privileges to allow the server to serve files
Privileges to invoke a service or access files are granted and denied by Access Control Lists (ACLs) that you set up. When an administrator creates ACLs, he or she identifies groups that are allowed to access services and files and groups that are denied access to services and files.
Administrator, replicator, and developer privileges are typically granted by adding a user to the Administrators, Replicators, or Developers group, respectively. Alternatively, you can create new groups and add them to the allow lists of the Administrators, Replicators, or Developers ACLs.
Create groups that identify groups of users that will share the same privileges. When you create a group definition, you specify a group name and the members of the group.
Group name. A group name is a unique name that identifies the group. You can use any name, for example, a name that defines a department (Marketing) or job function (Programmers).
Members. List of user names that are members of the group.
54 webMethods Integration Server Administrator’s Guide Version 7.1.1
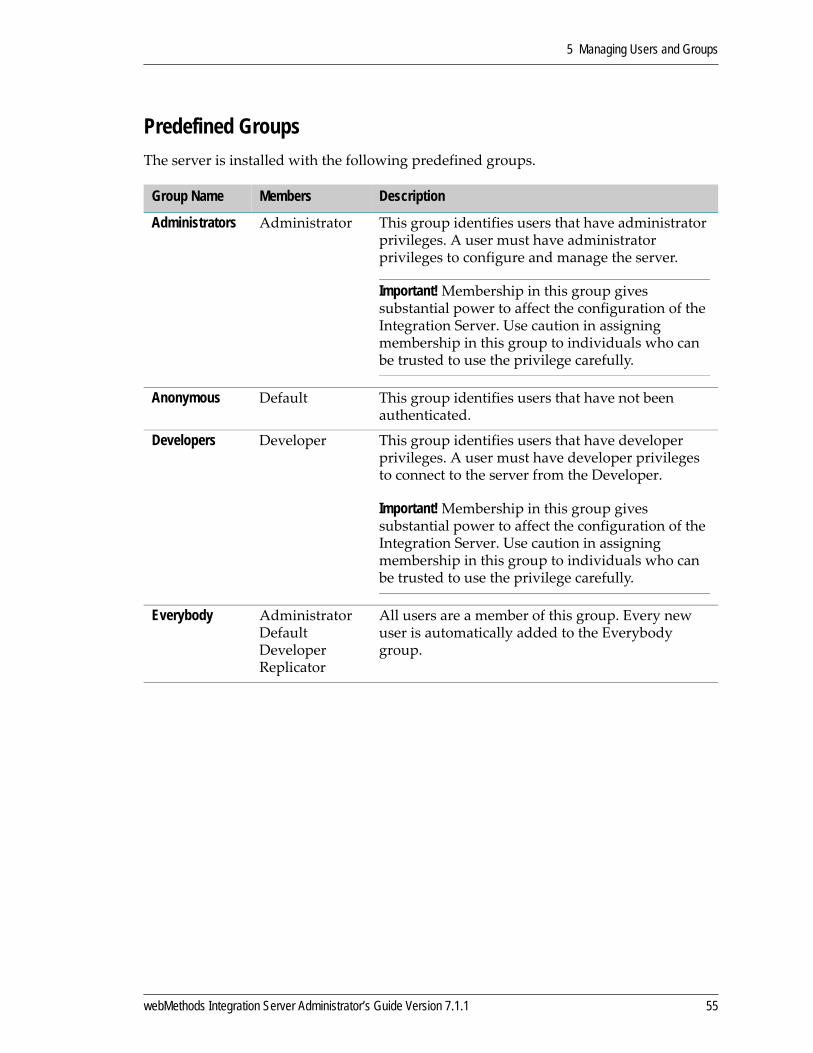
5 Managing Users and Groups
Predefined GroupsThe server is installed with the following predefined groups.
Group Name Members Description
Administrators Administrator This group identifies users that have administrator privileges. A user must have administrator privileges to configure and manage the server.
Important! Membership in this group gives substantial power to affect the configuration of the Integration Server. Use caution in assigning membership in this group to individuals who can be trusted to use the privilege carefully.
Anonymous Default This group identifies users that have not been authenticated.
Developers Developer This group identifies users that have developer privileges. A user must have developer privileges to connect to the server from the Developer.
Important! Membership in this group gives substantial power to affect the configuration of the Integration Server. Use caution in assigning membership in this group to individuals who can be trusted to use the privilege carefully.
Everybody AdministratorDefaultDeveloperReplicator
All users are a member of this group. Every new user is automatically added to the Everybody group.
webMethods Integration Server Administrator’s Guide Version 7.1.1 55

5 Managing Users and Groups
Adding GroupsUse the following procedure to add groups.
1 Open the Integration Server Administrator if it is not already open.
2 In the Security menu of the Navigation panel, click User Management
3 Click Add and Remove Groups.
4 In the Create Groups area of the screen, type a unique group name made up of a combination of letters, numbers, or symbols. You can add more than one group at a time by specifying multiple lines, one group to a line. Press ENTER to separate lines.
5 Click Create Groups.
Replicators AdministratorReplicator
This group identifies users that have replicator privileges. The Replicators group gives its members the authority to perform package replication. (By default, the server uses members of the Replicators group for package replication.)
Users do not have to be members of the Replicators group to perform package replication. As long as user is a member of a group that is assigned to the Replicators ACL, it can perform package replication.
For more information about package replication, see “Copying Packages from One Server to Another” on page 292.
Membership in this group gives substantial power to affect the configuration of the Integration Server. Use caution in assigning membership in this group to individuals who can be trusted to use the privilege carefully.
To add a new group to the server
Important! Group names are case sensitive.
Group Name Members Description
56 webMethods Integration Server Administrator’s Guide Version 7.1.1
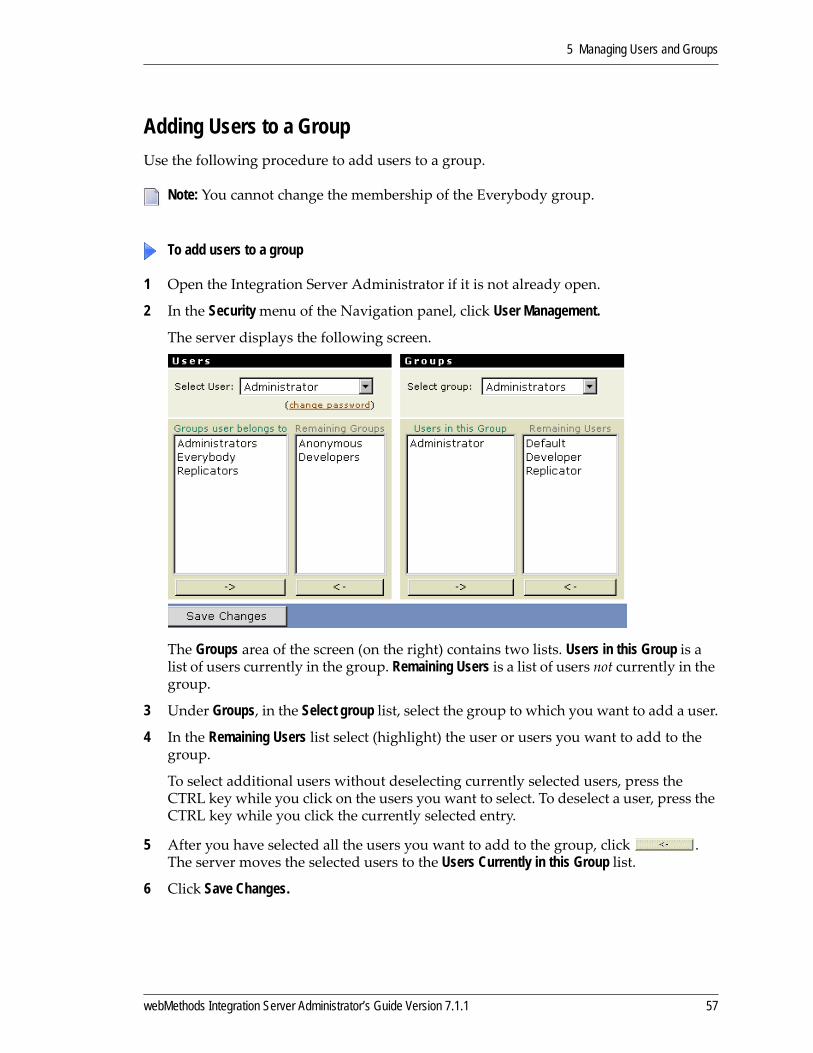
5 Managing Users and Groups
Adding Users to a GroupUse the following procedure to add users to a group.
1 Open the Integration Server Administrator if it is not already open.
2 In the Security menu of the Navigation panel, click User Management.
The server displays the following screen.
The Groups area of the screen (on the right) contains two lists. Users in this Group is a list of users currently in the group. Remaining Users is a list of users not currently in the group.
3 Under Groups, in the Select group list, select the group to which you want to add a user.
4 In the Remaining Users list select (highlight) the user or users you want to add to the group.
To select additional users without deselecting currently selected users, press the CTRL key while you click on the users you want to select. To deselect a user, press the CTRL key while you click the currently selected entry.
5 After you have selected all the users you want to add to the group, click . The server moves the selected users to the Users Currently in this Group list.
6 Click Save Changes.
Note: You cannot change the membership of the Everybody group.
To add users to a group
webMethods Integration Server Administrator’s Guide Version 7.1.1 57
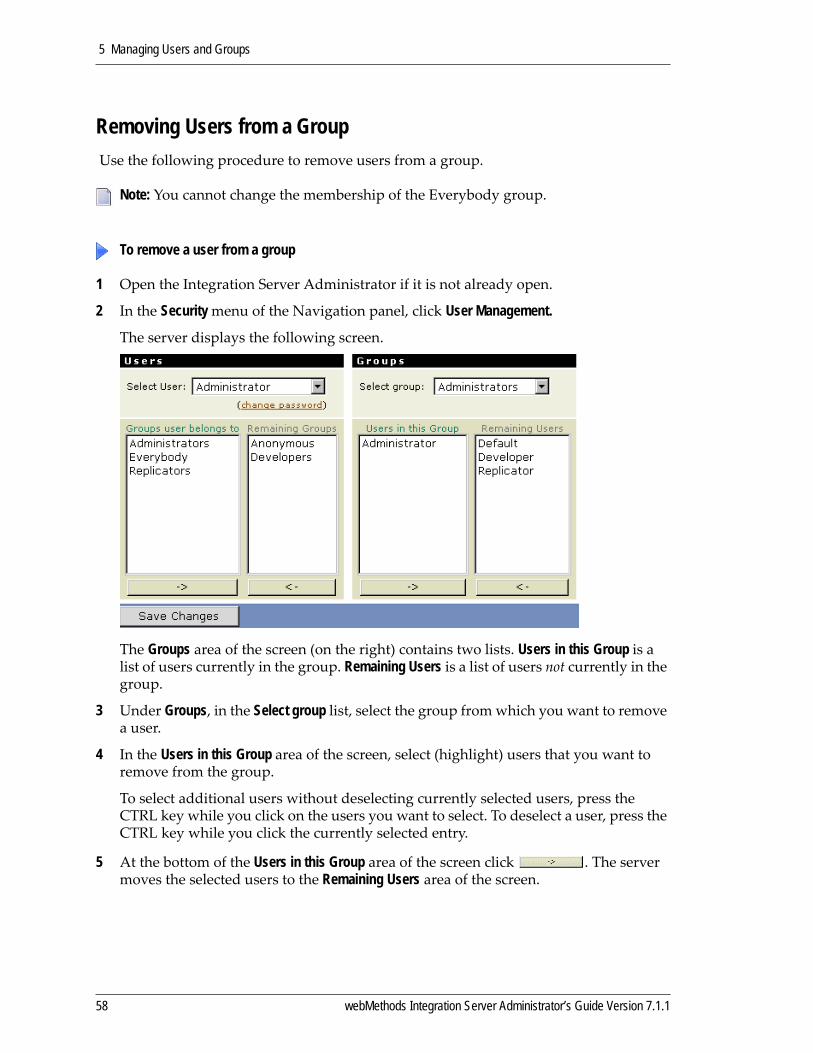
5 Managing Users and Groups
Removing Users from a Group Use the following procedure to remove users from a group.
1 Open the Integration Server Administrator if it is not already open.
2 In the Security menu of the Navigation panel, click User Management.
The server displays the following screen.
The Groups area of the screen (on the right) contains two lists. Users in this Group is a list of users currently in the group. Remaining Users is a list of users not currently in the group.
3 Under Groups, in the Select group list, select the group from which you want to remove a user.
4 In the Users in this Group area of the screen, select (highlight) users that you want to remove from the group.
To select additional users without deselecting currently selected users, press the CTRL key while you click on the users you want to select. To deselect a user, press the CTRL key while you click the currently selected entry.
5 At the bottom of the Users in this Group area of the screen click . The server moves the selected users to the Remaining Users area of the screen.
Note: You cannot change the membership of the Everybody group.
To remove a user from a group
58 webMethods Integration Server Administrator’s Guide Version 7.1.1
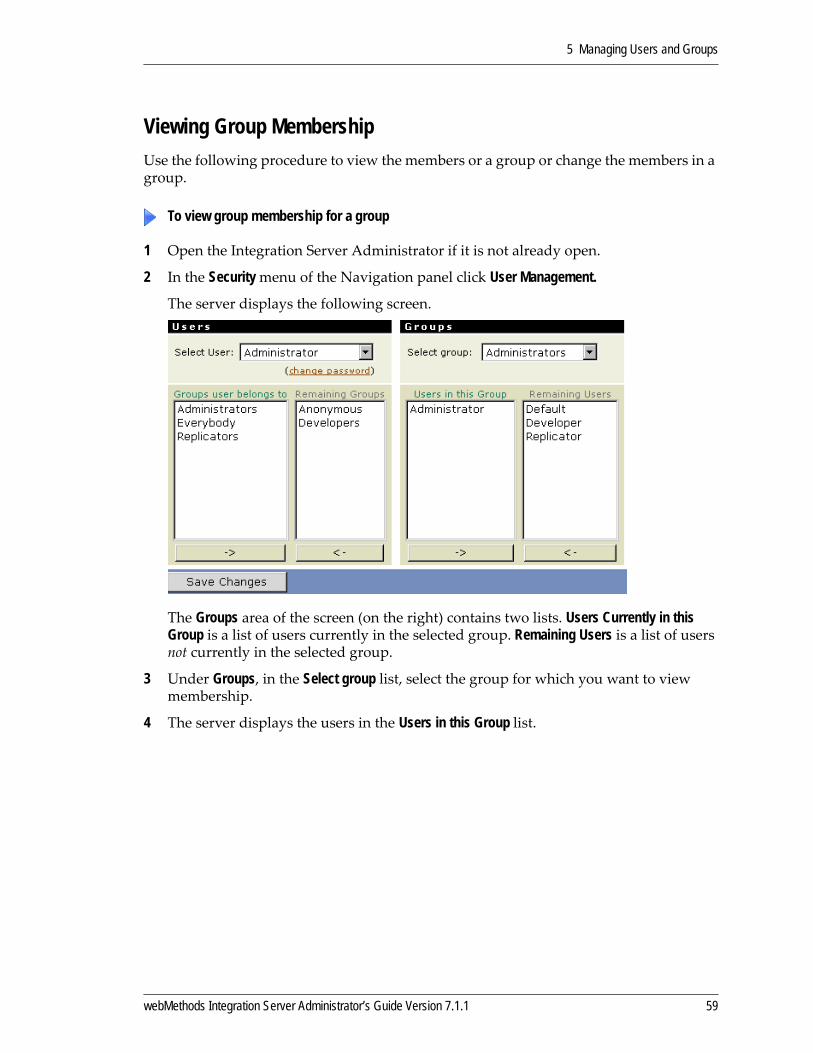
5 Managing Users and Groups
Viewing Group MembershipUse the following procedure to view the members or a group or change the members in a group.
1 Open the Integration Server Administrator if it is not already open.
2 In the Security menu of the Navigation panel click User Management.
The server displays the following screen.
The Groups area of the screen (on the right) contains two lists. Users Currently in this Group is a list of users currently in the selected group. Remaining Users is a list of users not currently in the selected group.
3 Under Groups, in the Select group list, select the group for which you want to view membership.
4 The server displays the users in the Users in this Group list.
To view group membership for a group
webMethods Integration Server Administrator’s Guide Version 7.1.1 59
5 Managing Users and Groups
Removing GroupsUse the following procedure to remove groups that you no longer need.
1 Open the Integration Server Administrator if it is not already open.
2 In the Security menu of the Navigation panel, click User Management.
3 Click Add and Remove Groups.
4 In the Remove Groups area of the screen, select the groups you want to remove.
5 Click Remove Groups.
Note: You cannot delete any of the following groups: Administrators, Developers, Replicators, Anonymous, and Everybody.
To delete a group from the server
60 webMethods Integration Server Administrator’s Guide Version 7.1.1
6 Configuring the Server
Viewing and Changing Licensing Information . . . . . . . . . . . . . . . . . . . . . . . . . . . . . . . . . . . . . . . 62
Managing the Server Thread Pool . . . . . . . . . . . . . . . . . . . . . . . . . . . . . . . . . . . . . . . . . . . . . . . . 64
Setting the Session Timeout Limit . . . . . . . . . . . . . . . . . . . . . . . . . . . . . . . . . . . . . . . . . . . . . . . . 65
Configuring Outbound HTTP Settings . . . . . . . . . . . . . . . . . . . . . . . . . . . . . . . . . . . . . . . . . . . . . 66
Setting Up Aliases for Remote Integration Servers . . . . . . . . . . . . . . . . . . . . . . . . . . . . . . . . . . . 68
Setting Up Aliases for Web Services . . . . . . . . . . . . . . . . . . . . . . . . . . . . . . . . . . . . . . . . . . . . . . 72
Specifying a Third-Party Proxy Server for Outbound Requests . . . . . . . . . . . . . . . . . . . . . . . . . . 75
Configuring Where the Integration Server Writes Logging, Status, and Other Information . . . . . 78
Switching from the Embedded Database to an External RDBMS . . . . . . . . . . . . . . . . . . . . . . . . 79
Working with Extended Configuration Settings . . . . . . . . . . . . . . . . . . . . . . . . . . . . . . . . . . . . . . 79
Specifying Character Encoding . . . . . . . . . . . . . . . . . . . . . . . . . . . . . . . . . . . . . . . . . . . . . . . . . . 81
Using a 64-bit JVM on Solaris and HP-UX Systems . . . . . . . . . . . . . . . . . . . . . . . . . . . . . . . . . . 81
Publishing Information about Integration Server Assets . . . . . . . . . . . . . . . . . . . . . . . . . . . . . . . 82
webMethods Integration Server Administrator’s Guide Version 7.1.1 61
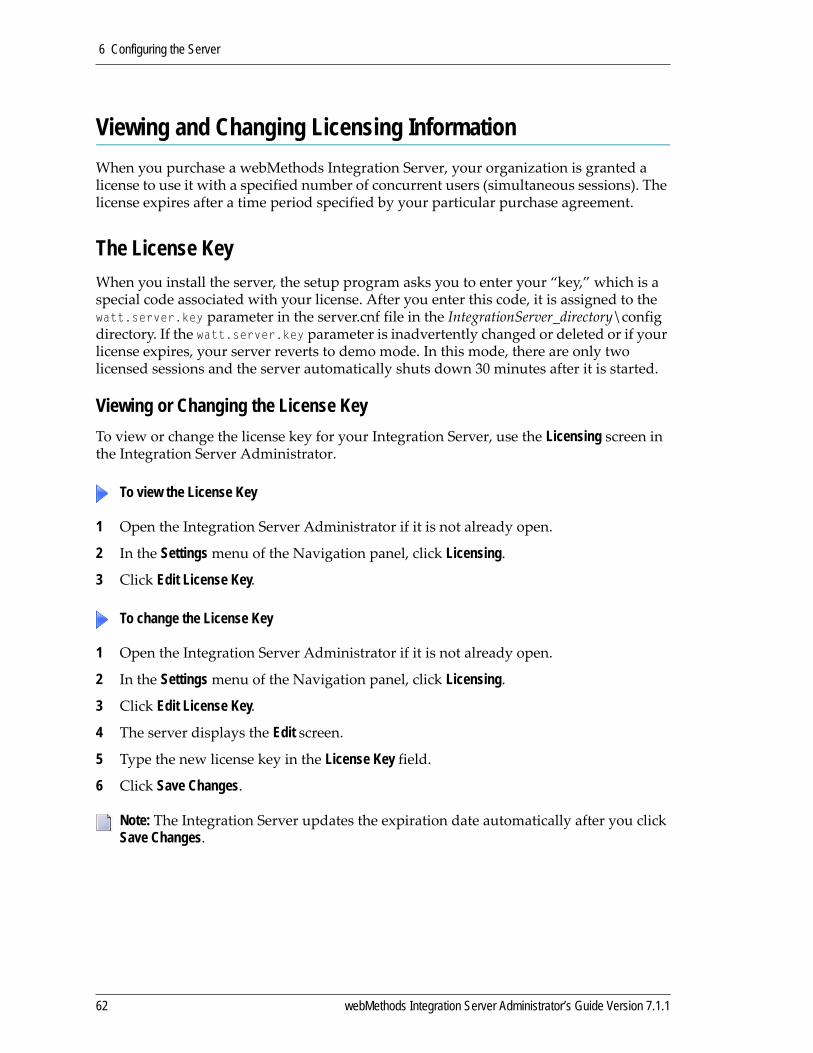
6 Configuring the Server
Viewing and Changing Licensing InformationWhen you purchase a webMethods Integration Server, your organization is granted a license to use it with a specified number of concurrent users (simultaneous sessions). The license expires after a time period specified by your particular purchase agreement.
The License KeyWhen you install the server, the setup program asks you to enter your “key,” which is a special code associated with your license. After you enter this code, it is assigned to the watt.server.key parameter in the server.cnf file in the IntegrationServer_directory\config directory. If the watt.server.key parameter is inadvertently changed or deleted or if your license expires, your server reverts to demo mode. In this mode, there are only two licensed sessions and the server automatically shuts down 30 minutes after it is started.
Viewing or Changing the License KeyTo view or change the license key for your Integration Server, use the Licensing screen in the Integration Server Administrator.
1 Open the Integration Server Administrator if it is not already open.
2 In the Settings menu of the Navigation panel, click Licensing.
3 Click Edit License Key.
1 Open the Integration Server Administrator if it is not already open.
2 In the Settings menu of the Navigation panel, click Licensing.
3 Click Edit License Key.
4 The server displays the Edit screen.
5 Type the new license key in the License Key field.
6 Click Save Changes.
To view the License Key
To change the License Key
Note: The Integration Server updates the expiration date automatically after you click Save Changes.
62 webMethods Integration Server Administrator’s Guide Version 7.1.1
6 Configuring the Server
Renewal RemindersApproximately 30 days before your license expires, the Integration Server sends an e‐mail message to the administrative‐message recipient, reminding him or her to renew the license. In addition, the server displays the following message at the top of all pages on the Integration Server Administrator:License key expires in about days days … contact webMethods for a new key.
Renewing a KeyIf you need to obtain a new key or renew your license, contact your Software AG sales representative.
Licensed SessionsYour license allows a specified number of users to have sessions in the Integration Server concurrently. The Integration Server creates a session when a developer connects to the server from the webMethods Developer or a IS client connects to the server to execute services. If a user attempts to access the server while the maximum number of sessions are in use, the server rejects the request and returns the following error to the user:Server has reached client limit.
You can view the current number of active sessions and the licensed session limit using the Statistics screen in the Integration Server Administrator. This value is permanently associated with your license key and can only be changed by obtaining a new license.
Any connection made to the server by a non‐Administrator user (that is, a user that is not part of the Administrators group) consumes a licensed session. The session exists until it times out (based on the server’s Session Timeout setting) or the requester stops the session by invoking the wm.server:disconnect service.
If a user invokes a stateless service and a session does not already exist for the user, the server creates a session. If the user is a non‐Administrator, the user consumes a licensed session. After the service completes, the server removes the session and reduces the number of licensed sessions in use.
1 Open the Integration Server Administrator if it is not already open.
2 In the Server menu of the Navigation panel, click Statistics.
The server displays the current number of active sessions in use in the Total Sessions field. The server displays the maximum number of licensed sessions your license allows in the Licensed Sessions fields.
For detailed information about the active sessions, click the number in the Total Sessions field.
To view the current number of active sessions and the licensed sessions limit
webMethods Integration Server Administrator’s Guide Version 7.1.1 63
6 Configuring the Server
Managing the Server Thread PoolTo better tune your server’s performance, you can configure the minimum and maximum number of threads. The server uses threads to execute services, retrieve documents from the Broker, and execute triggers. When the server starts, the thread pool initially contains the minimum number of threads. The server adds threads to the pool as needed until it reaches the maximum allowed. If this maximum number is reached, the server waits until processes complete and return threads to the pool before beginning more processes.
You can also set a warning level for available threads. When the percentage of available threads is equal to or less than the warning level, the server generates a journal log message to alert you to the reduced thread availability. The server generates another journal log message when the number of available threads is greater than the threshold.
1 Open the Integration Server Administrator if it is not already open.
2 In the Settings menu of the Navigation panel, click Resources.
3 Click Edit Resource Settings.
4 Under Server Thread Pool, update the server thread pool settings, as follows:
To configure the server thread pool
For this parameter… Specify…
Maximum Threads The maximum number of threads that the server maintains in the server thread pool. If this maximum number is reached, the server waits until processes complete and return threads to the pool before running more processes. The default is 75.
Minimum Threads The minimum number of threads the server maintains in the server thread pool. When the server starts, the thread pool initially contains this minimum number of threads. The server adds threads to the pool as needed until it reaches the maximum allowed, which is specified in the Maximum Threads field. The default is 10.
Available Threads Warning Threshold
Threshold at which the server starts to warn of insufficient available threads. When the percentage of available server threads equals this percentage, the server generates a Journal log message indicating the current available thread percentage and stating:
Available Thread Warning Threshold Exceeded
The default is 15%.
64 webMethods Integration Server Administrator’s Guide Version 7.1.1
6 Configuring the Server
5 Click Save Changes.
Setting the Session Timeout LimitWhen a remote client connects to the Integration Server, the server starts a session for that client. That session remains active until the client application specifically issues a disconnect instruction to the server (which forces an immediate termination) or the session “times out” due to inactivity, whichever comes first.
If a session is idle (inactive) for a long period of time, it usually means that the client is no longer active or that the connection between client and the server has been lost. The server constantly monitors for inactive sessions, and terminates sessions that are idle for more than the allowed period of time. If the server did not take steps to clear out such sessions, they would remain active indefinitely, wasting valuable server resources.
You use the Session Timeout parameter to specify the length of time you will allow an idle session to remain active (in other words, how long you want the server to wait before terminating an idle session). To set the Session Timeout parameter appropriately, you must be familiar with the clients that use your server.
If your clients are all Java programs, you can usually reduce the timeout value to 6 or 7 minutes. You may need to experiment with this setting to find the appropriate value for your site. By default, the server uses a timeout limit of 10 minutes. This is an appropriate value for most sites. However, you may have to increase this value if your clients normally have lengthy delays (greater than 10 minutes) between successive requests.
When you enter a percentage and save your changes, the server automatically calculates the number of threads and displays the number next to the specified percentage.
Tip! When the percentage of available threads falls below the warning level, you might want to decrease the number of documents the server receives and processes for Broker/local triggers. For more information, see Chapter 23, “Managing Broker/Local Triggers”.
Scheduler Thread Throttle
Percentage of server threads the scheduler function is permitted to use.
The default is 75%.
For this parameter… Specify…
webMethods Integration Server Administrator’s Guide Version 7.1.1 65

6 Configuring the Server
1 Open the Integration Server Administrator if it is not already open.
In the Settings menu of the Navigation panel, click Resources.
2 Click Edit Resource Settings.
3 In the Session Timeout field, type the number of minutes you want the server to wait before terminating an idle session.
4 Click Save Changes.
Configuring Outbound HTTP SettingsOutbound HTTP parameters control how the server presents and processes outbound HTTP and HTTPS requests (i.e., requests that the Integration Server issues on behalf of a client). The parameters control behavior such as how long the server waits for a response, how many times it retries a failed request, and so forth.
Developers can override some of the serverʹs outbound HTTP setting defaults at run time, as is described below.
User AgentThe User Agent parameter specifies the value that the server uses in the HTTP User Agent request header that it sends when requesting a Web document. The User Agent header tells a Web server what type of browser is making the request. In the case of the Integration Server, the User Agent header indicates the type of browser that the Integration Server appears to be to the Web server. Some Web servers examine this header to determine a clientʹs capabilities so they can tailor their responses accordingly.
When you install the Integration Server, the User Agent parameter is set to Mozilla/4.0 [en] (WinNT; I). You can change this value as you need; however, the value you set should satisfy the majority of services that your server executes.
Be sure your developers know the User Agent value your server uses. If their applications require a different User Agent, they can override the serverʹs default at run time by including an HTTP User Agent header with their request.
Maximum RedirectsThe Maximum Redirects parameter specifies the number of times that the Integration Server allows a request to be redirected (i.e., automatically sent to another URL by the target server. If a request exceeds the specified number of redirections, the Integration Server immediately returns an I/O exception to the client.
When you install the Integration Server, Maximum Redirects is set to 5. You will need to increase this value if the targets that you access typically redirect their requests more than this. (This may happen if the target operates in a clustered environment.)
To set the session timeout limit
66 webMethods Integration Server Administrator’s Guide Version 7.1.1
6 Configuring the Server
TimeoutThe Timeout parameter specifies the length of time the server waits for a response from a target server. If the Integration Server does not receive a response in the allotted time, it retries the request up to the number of times specified by the Retries parameter. When the allowed number of retries is exceeded, the server returns an exception.
When you install the Integration Server, the Timeout parameter is set to 3 minutes. For most sites this is a reasonable setting; however, you may need to adjust this value if you work with targets that have longer response times than this (e.g., large commercial Web sites or databases during peak periods).
RetriesThe Retries parameter specifies the number of times the server reissues a request that has timed out (i.e., one from which it did not receive a response within the time period specified by the Timeout parameter).
When you install the Integration Server, Retries is set to 0. This means that the server automatically returns an exception if it does not get a response within the allotted time. Set Retries to a value greater than 0 if you want the server to retry (reissue) timed‐out requests. The server will retry the request the number of times you specify.
Make sure that your developers know the Retries value that your server uses. If they need to use a different value, they can explicitly assign a Retries value to their service.
Specifying Outbound HTTP SettingsUse the following procedure to specify the Outbound HTTP Settings.
1 Open the Integration Server Administrator if it is not already open.
2 In the Settings menu of the Navigation panel, click Resources.
3 Click Edit Resource Settings.
4 Set the Outbound HTTP Settings as follows:
To set the Outbound HTTP Settings
For this parameter… Specify…
User Agent The string that you want the server to supply in the HTTP User Agent header if the client does not specify a value. Type the string exactly as you want it to appear in the HTTP header, including spaces, symbols, and punctuation.
Maximum Redirects An integer that indicates the number of times to allow a request to be redirected before the server returns an I/O exception to the client.
webMethods Integration Server Administrator’s Guide Version 7.1.1 67
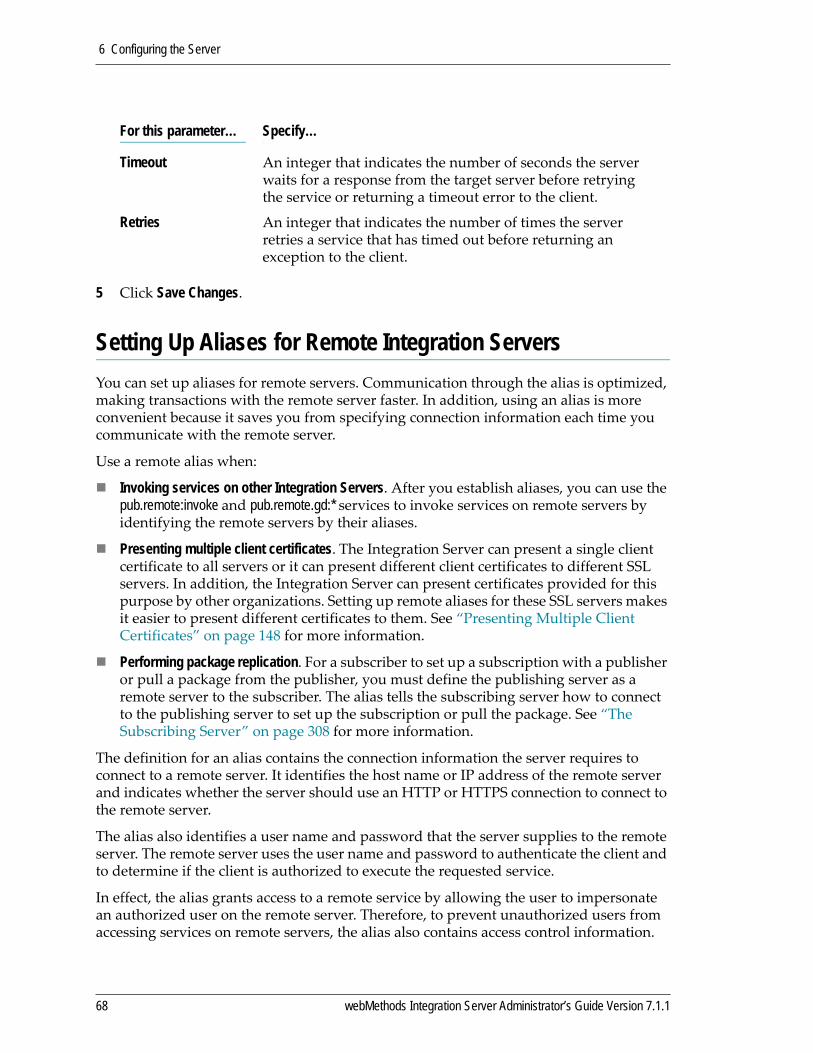
6 Configuring the Server
5 Click Save Changes.
Setting Up Aliases for Remote Integration ServersYou can set up aliases for remote servers. Communication through the alias is optimized, making transactions with the remote server faster. In addition, using an alias is more convenient because it saves you from specifying connection information each time you communicate with the remote server.
Use a remote alias when:
Invoking services on other Integration Servers. After you establish aliases, you can use the pub.remote:invoke and pub.remote.gd:* services to invoke services on remote servers by identifying the remote servers by their aliases.
Presenting multiple client certificates. The Integration Server can present a single client certificate to all servers or it can present different client certificates to different SSL servers. In addition, the Integration Server can present certificates provided for this purpose by other organizations. Setting up remote aliases for these SSL servers makes it easier to present different certificates to them. See “Presenting Multiple Client Certificates” on page 148 for more information.
Performing package replication. For a subscriber to set up a subscription with a publisher or pull a package from the publisher, you must define the publishing server as a remote server to the subscriber. The alias tells the subscribing server how to connect to the publishing server to set up the subscription or pull the package. See “The Subscribing Server” on page 308 for more information.
The definition for an alias contains the connection information the server requires to connect to a remote server. It identifies the host name or IP address of the remote server and indicates whether the server should use an HTTP or HTTPS connection to connect to the remote server.
The alias also identifies a user name and password that the server supplies to the remote server. The remote server uses the user name and password to authenticate the client and to determine if the client is authorized to execute the requested service.
In effect, the alias grants access to a remote service by allowing the user to impersonate an authorized user on the remote server. Therefore, to prevent unauthorized users from accessing services on remote servers, the alias also contains access control information.
Timeout An integer that indicates the number of seconds the server waits for a response from the target server before retrying the service or returning a timeout error to the client.
Retries An integer that indicates the number of times the server retries a service that has timed out before returning an exception to the client.
For this parameter… Specify…
68 webMethods Integration Server Administrator’s Guide Version 7.1.1
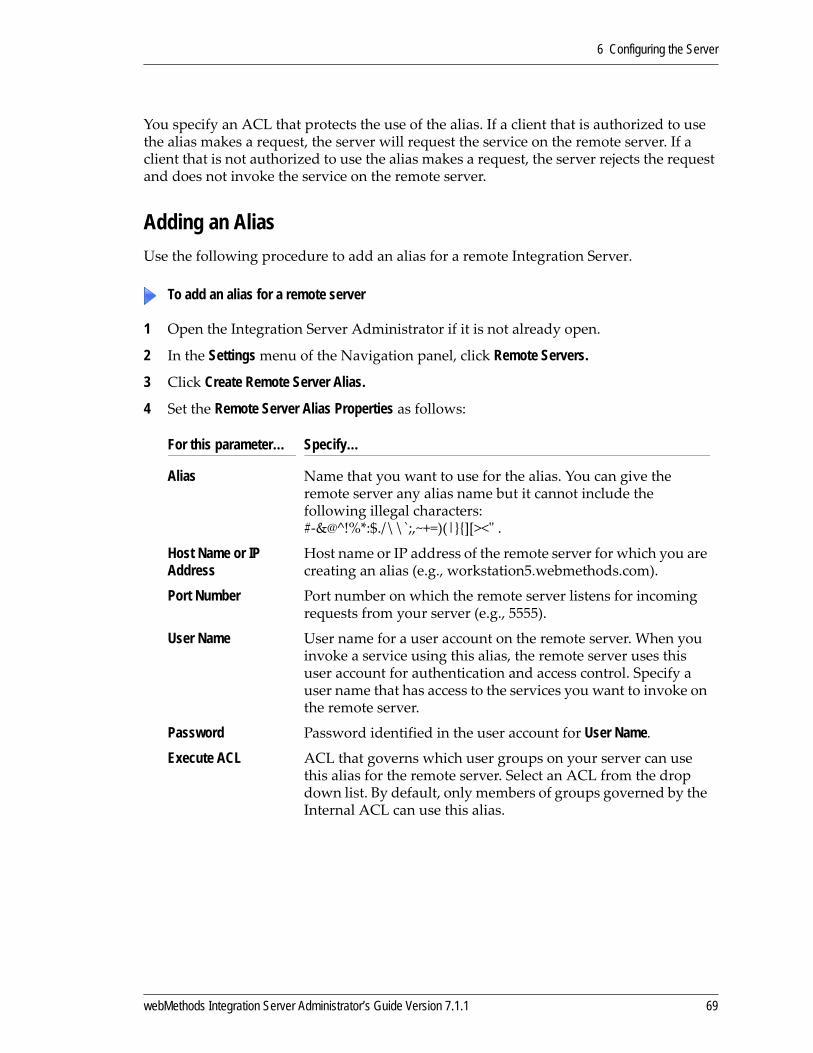
6 Configuring the Server
You specify an ACL that protects the use of the alias. If a client that is authorized to use the alias makes a request, the server will request the service on the remote server. If a client that is not authorized to use the alias makes a request, the server rejects the request and does not invoke the service on the remote server.
Adding an AliasUse the following procedure to add an alias for a remote Integration Server.
1 Open the Integration Server Administrator if it is not already open.
2 In the Settings menu of the Navigation panel, click Remote Servers.
3 Click Create Remote Server Alias.
4 Set the Remote Server Alias Properties as follows:
To add an alias for a remote server
For this parameter… Specify…
Alias Name that you want to use for the alias. You can give the remote server any alias name but it cannot include the following illegal characters:#‐&@^!%*:$./\\`;,~+=)(|}{][><ʺ .
Host Name or IP Address
Host name or IP address of the remote server for which you are creating an alias (e.g., workstation5.webmethods.com).
Port Number Port number on which the remote server listens for incoming requests from your server (e.g., 5555).
User Name User name for a user account on the remote server. When you invoke a service using this alias, the remote server uses this user account for authentication and access control. Specify a user name that has access to the services you want to invoke on the remote server.
Password Password identified in the user account for User Name.Execute ACL ACL that governs which user groups on your server can use
this alias for the remote server. Select an ACL from the drop down list. By default, only members of groups governed by the Internal ACL can use this alias.
webMethods Integration Server Administrator’s Guide Version 7.1.1 69
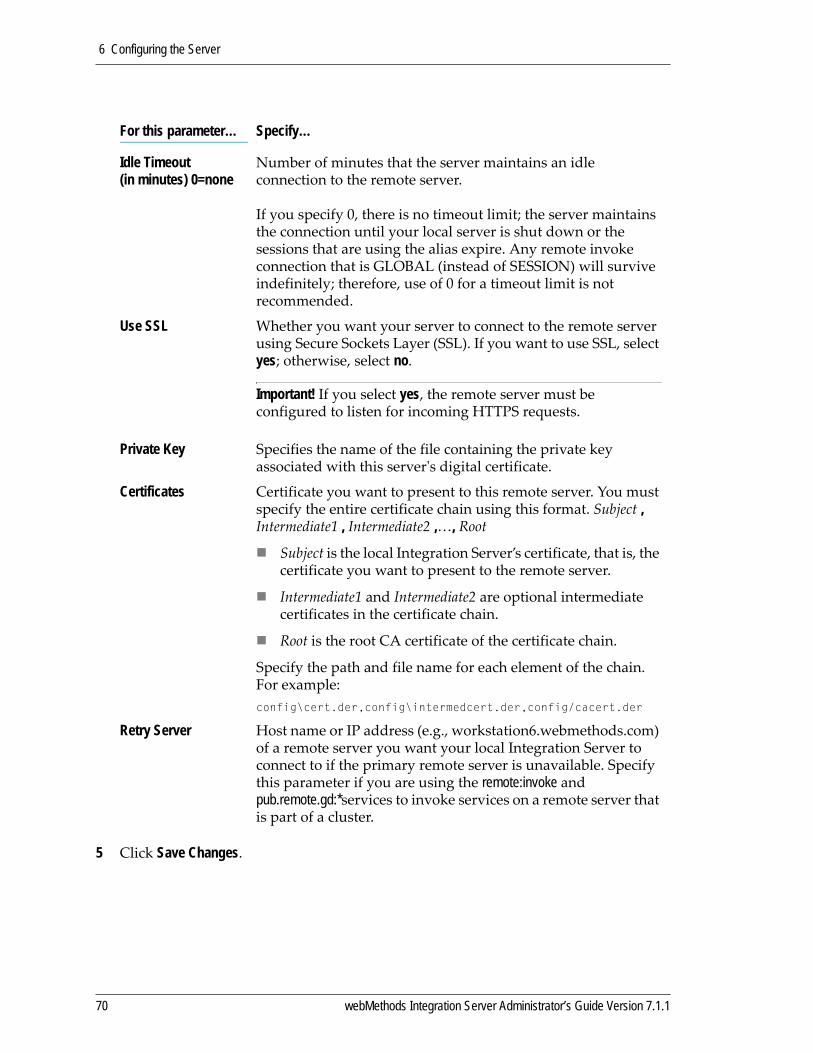
6 Configuring the Server
5 Click Save Changes.
Idle Timeout (in minutes) 0=none
Number of minutes that the server maintains an idle connection to the remote server.
If you specify 0, there is no timeout limit; the server maintains the connection until your local server is shut down or the sessions that are using the alias expire. Any remote invoke connection that is GLOBAL (instead of SESSION) will survive indefinitely; therefore, use of 0 for a timeout limit is not recommended.
Use SSL Whether you want your server to connect to the remote server using Secure Sockets Layer (SSL). If you want to use SSL, select yes; otherwise, select no.
Important! If you select yes, the remote server must be configured to listen for incoming HTTPS requests.
Private Key Specifies the name of the file containing the private key associated with this serverʹs digital certificate.
Certificates Certificate you want to present to this remote server. You must specify the entire certificate chain using this format. Subject , Intermediate1 , Intermediate2 ,…, Root
Subject is the local Integration Server’s certificate, that is, the certificate you want to present to the remote server.
Intermediate1 and Intermediate2 are optional intermediate certificates in the certificate chain.
Root is the root CA certificate of the certificate chain.
Specify the path and file name for each element of the chain. For example: config\cert.der,config\intermedcert.der,config/cacert.der
Retry Server Host name or IP address (e.g., workstation6.webmethods.com) of a remote server you want your local Integration Server to connect to if the primary remote server is unavailable. Specify this parameter if you are using the remote:invoke and pub.remote.gd:*services to invoke services on a remote server that is part of a cluster.
For this parameter… Specify…
70 webMethods Integration Server Administrator’s Guide Version 7.1.1
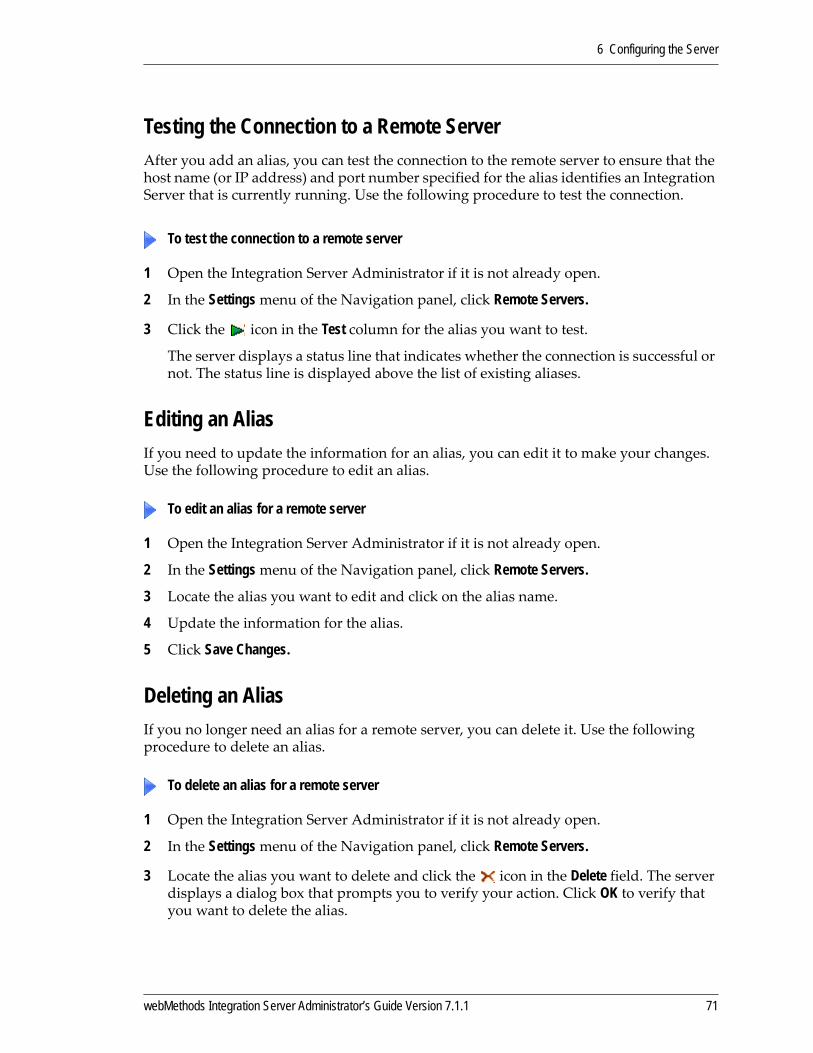
6 Configuring the Server
Testing the Connection to a Remote ServerAfter you add an alias, you can test the connection to the remote server to ensure that the host name (or IP address) and port number specified for the alias identifies an Integration Server that is currently running. Use the following procedure to test the connection.
1 Open the Integration Server Administrator if it is not already open.
2 In the Settings menu of the Navigation panel, click Remote Servers.
3 Click the icon in the Test column for the alias you want to test.
The server displays a status line that indicates whether the connection is successful or not. The status line is displayed above the list of existing aliases.
Editing an AliasIf you need to update the information for an alias, you can edit it to make your changes. Use the following procedure to edit an alias.
1 Open the Integration Server Administrator if it is not already open.
2 In the Settings menu of the Navigation panel, click Remote Servers.
3 Locate the alias you want to edit and click on the alias name.
4 Update the information for the alias.
5 Click Save Changes.
Deleting an AliasIf you no longer need an alias for a remote server, you can delete it. Use the following procedure to delete an alias.
1 Open the Integration Server Administrator if it is not already open.
2 In the Settings menu of the Navigation panel, click Remote Servers.
3 Locate the alias you want to delete and click the icon in the Delete field. The server displays a dialog box that prompts you to verify your action. Click OK to verify that you want to delete the alias.
To test the connection to a remote server
To edit an alias for a remote server
To delete an alias for a remote server
webMethods Integration Server Administrator’s Guide Version 7.1.1 71
6 Configuring the Server
Setting Up Aliases for Web ServicesThis is also known as dynamic endpoint addressing. The endpoint alias represents the network address and, optionally, any security credentials to be used with Web services.
For a consumer Web service descriptor and its associated Web service connectors, the alias information (including the addressing information and any security credentials), is used at runtime to generate a request and invoke an operation of the Web service.
For a Provider WSD, the endpoint address is used to construct the “location=” attribute of the soap:address element within the wsdl:port element when WSDL is requested for the Web service. The security credentials may be used when constructing a response to a Web service request.
An endpoint alias is usually created for one or more of the following reasons:
Security. An endpoint alias is required in order to configure WS‐Security for Web service providers and consumers.
Efficiency. Using an endpoint alias saves you from having to specify or change the server information each time you use the Web service, since the actual value of the endpoint is looked up at runtime.
When you create a provider Web service descriptor, you can specify an existing endpoint alias which will be displayed (and can be changed) from the Web service descriptor’s default binder. Developer uses a binder to collect the definitions for addresses, communication protocols, and data formats for a particular port type in one container.
You can create more binders in the Binders tab, each with different definitions and endpoint aliases. Each binder provides another option for communication by the Web service. The default binder(s) for a consumer Web service descriptor are created from the WSDL on which it is based.
The definition for an endpoint alias identifies the host name or IP address of the server. The alias also identifies an optional user name and password that the Web service descriptor can use when communicating with the server.
For information about implementing Integration Server’s WS‐Security facility, including key and certificate usage, see the WS‐Security chapters in Web Services Developer’s Guide.
Adding an Endpoint AliasUse the following procedure to add a Web service endpoint alias to Integration Server.
1 Open the Integration Server Administrator if it is not already open.
2 In the Settings menu of the Navigation panel, click Web Services.
3 Click Create Web Service Endpoint Alias.
To add an endpoint alias
72 webMethods Integration Server Administrator’s Guide Version 7.1.1

6 Configuring the Server
4 Under Web Service Endpoint Alias Properties enter the Alias name. The alias name cannot include the following illegal characters: # ‐ & @ ^ ! % * : $ . / \ \ ` ; , ~ + = ) ( | } { ] [ > < ʺ
5 Under HTTP Transport Properties, enter the Integration Server Host Name or IP Address and Port Number, as follows:
6 If you are not configuring the Web service endpoint for security, then leave the remaining settings under HTTP Transport Properties and WS-Security Properties blank and click Save Changes.
7 If you are configuring the Web service endpoint to use any of the security options listed below, first read the WS‐Security chapter in the Web Services Developer’s Guide. The Web Services Developer’s Guide includes descriptions of the remaining fields, the Transport and Message level parameters, and other important security information. You can click Save Changes now and edit the HTTP Transport Properties and WS-Security Properties later.
These security options include:
Using WS‐Security with transport‐based authentication, such as HTTPS.
A Web service that uses a security policy that:
Requires that SOAP message requests include a UsernameToken.
Requires that SOAP message responses be decrypted
Requires SOAP message requests be signed.
Requires X.509 authentication.
8 Once you create an endpoint alias for a Web service descriptor, you must associate it with binder (see below).
For this parameter… Specify…
Host Name or IP Address
Host name or IP address of the server for which you are creating an alias (e.g., workstation5.webmethods.com).
Port Number An active HTTP or HTTPS type Listener port, defined on the Integration Server specified by the Host Name or IP Address.
webMethods Integration Server Administrator’s Guide Version 7.1.1 73

6 Configuring the Server
Associate an Endpoint Alias with a BinderOnce you create a Web service endpoint alias, you can associate it one of the binders in a provider or consumer Web service descriptor.
1 Start Developer.
2 Open and lock the Web service descriptor to which you want to associate the Web service endpoint alias.
3 Double‐click the Web service descriptor and click the Binders tab.
4 Click to select the appropriate binder.
5 In the Properties panel, locate the Port alias property. Select the Web service endpoint alias that you want to associate with the Web service descriptor from the list.
6 Save the changes.
Editing an Endpoint AliasIf you need to update the information for an endpoint alias, you can edit it to make your changes. Use the following procedure to edit an alias.
1 Open the Integration Server Administrator if it is not already open.
2 In the Settings menu of the Navigation panel, click Web Services.
3 Locate the alias you want to edit and click on the alias name.
4 Click Edit Web Service Endpoint Alias.
5 Update the information for the alias.
6 Click Save Changes.
To associate an endpoint alias with a Web service descriptor
Note: When the Port alias property is modified for a consumer Web service descriptor and, the Web service descriptor is viewed as WSDL (by clicking the View WSDL button), the displayed WSDL does not reflect the change to the port alias. The original WSDL used to create the Web service descriptor is displayed. However, the new value will be used at run‐time.
To edit an endpoint alias:
74 webMethods Integration Server Administrator’s Guide Version 7.1.1

6 Configuring the Server
Deleting an Endpoint AliasIf you no longer need an endpoint alias, you can delete it. Use the following procedure to delete an alias.
1 Open the Integration Server Administrator if it is not already open.
2 In the Settings menu of the Navigation panel, click Web Services.
3 Locate the alias you want to delete and click the icon in the Delete field. The server displays a dialog box that prompts you to verify your action. Click OK to verify that you want to delete the alias.
Specifying a Third-Party Proxy Server for Outbound RequestsWhen the Integration Server executes a request against a remote server (for example a remote invoke against another Integration Server), or a Load Document service, it issues an HTTP, HTTPS, or FTP request to the specified target server. If your Integration Server sits behind a firewall and must route these requests through a third party proxy server, you must define the address of the proxy server using the Integration Server Administrator.
If you want to isolate your Integration Server behind an internal firewall, you can provide greater security by running a special Reverse HTTP Gateway Server in your DMZ and disallowing all inbound connections to your internal server. For information about setting up a Reverse HTTP Gateway Server, see Chapter 15, “Setting Up a Reverse HTTP Gateway” on page 219.
The Integration Server allows you to define three proxies: one to use for outbound HTTP requests, one to use for outbound HTTPS requests, and one to use for outbound FTP requests.
1 Open the Integration Server Administrator if it is not already open.
2 In the Settings menu of the Navigation panel, click Proxy Servers.
3 Click Edit Proxy Settings.
To delete an endpoint alias
Note: The default alias cannot be deleted, so the icon in the Delete field is disabled.
To specify a Proxy Server
webMethods Integration Server Administrator’s Guide Version 7.1.1 75
6 Configuring the Server
4 Set the Proxy (HTTP) and Secure Proxy (HTTPS) and FTP Proxy (FTP) parameters as follows. (If you use a proxy server for only one request type, complete the parameters for that type, and leave the parameters for the other types empty.)
For this parameter… Specify…
Proxy Host The name of the proxy server.
Proxy Port The port on which the proxy server listens for HTTP, HTTPS, and/or FTP requests.
Proxy User The user name the Integration Server must use when accessing this proxy server (if one is required).
Proxy Pass The password the Integration Server must use to access this proxy server (if one is required).
Proxy Type(for FTP only)
Type of FTP proxy server to connect to using the pub:client.ftp built‐in service. The proxy server always requires the FTP server name, FTP user name, and the FTP user password. The method you use to send this information to the FTP proxy server depends on the type of proxy server you have. The Integration Server supports the following proxy server types:
0. No proxy Do not use an FTP proxy server. This is the default.
1. user@host no proxy auth.Connect to the proxy server, but do not log into it. Then send the following: USER ftp_user@real_ftp_hostname PASS ftp_password
2. user@host proxy authConnect to the proxy server, and log into it with: USER proxy_user PASS proxy_password Then send the following: USER ftp_user@real_hostname PASS ftp_password
3. site commandConnect to the proxy server and log into it with: USER proxy_user PASS proxy_password Then send the following: SITE real_ftp_hostname USER ftp_user PASS ftp_password
76 webMethods Integration Server Administrator’s Guide Version 7.1.1
6 Configuring the Server
5 Click Save Changes.
Bypassing a Proxy ServerIf you are using a proxy server for outbound HTTP, HTTPS, and/or FTP, you can optionally route selected requests directly to their targets, bypassing the proxy.
To do this, you use the Integration Server Administrator to define the list of domains to which you want the Integration Server to issue requests directly.
1 Open the Integration Server Administrator if it is not already open.
2 In the Settings menu of the Navigation panel, click Proxy Servers.
3 Click Edit Proxy Settings.
4 In the Proxy Bypass field, type the fully‐qualified host and domain name of each server to which you want the Integration Server to issue requests directly. Type the host name and the domain name exactly as it will appear in the URLs that the server uses. To enter multiple names, separate each with commas.
You can use the asterisk (*) to identify several servers with similar names. The asterisk matches any number of characters. For example, if you wanted to bypass requests made to localhost, www.yahoo.com, home.microsoft.com, and all hosts whose names begin with NYC, you would type:localhost,www.yahoo.com,home.microsoft.com, NYC*.*
5 Click Save Changes.
4. open commandConnect to the proxy server and log into with: USER proxy_user PASS proxy_password Then send the following: OPEN real_ftp_hostname USER ftp_user PASS ftp _password
5. real_user@proxy_user@real_hostConnect to the proxy server and log into it, then send the following: USER ftp_user@proxy_user@real_hostname PASS ftp_password@proxy_password
To bypass a proxy server
For this parameter… Specify…
webMethods Integration Server Administrator’s Guide Version 7.1.1 77
6 Configuring the Server
Configuring Where the Integration Server Writes Logging, Status, and Other InformationThe Integration Server collects and stores information about the following areas:
Central User Management: Information about users who need access to Integration Server or webMethods Trading Networks through My webMethods interfaces.
Document History: History of documents received by triggers on the Integration Server. The server uses this information during duplicate detection to determine whether a trigger already received and processed a document. For more information about using document history data, see the Publish‐Subscribe Developer’s Guide. For information about configuring a document history database, see webMethods Installation Guide.
Internal Server Functions: Information about various Integration Server functions such as scheduled jobs, guaranteed delivery, and trigger joins. For more information about storing this information, see the webMethods Installation Guide.
Key Cross Referencing and Echo Suppression: Cross‐reference keys and process integrity status information. This information is required to synchronize updates among various applications and the databases they reference. For more information about storing cross‐reference data, see the Publish‐Subscribe Developer’s Guide.
Logging: Auditing information about service execution (audit, error, session, guaranteed delivery, and security) on the Integration Server. Also includes auditing information about processes. These include processes generated by Business Process Modeler. The webMethods Monitor uses this information to resubmit failed processes and services. For more information about storing logging data, see the webMethods Logging Guide.
Trading Networks: Database used by Trading Networks. For more information about storing Trading Networks data, see the webMethods Installation Guide.
Integration Server connects to databases that store the information mentioned above by using functional aliases and JDBC connection pools.
Note: You can enable or disable logging using server configuration parameters, and disable or enable use of a temporary logging store. For more information, see the descriptions of the watt.server.auditLog, watt.server.auditLog.error, watt.server.auditLog.gd, watt.server.auditLog.security, watt.server.auditLog.session, and watt.server.auditSync server configuration parameters in Appendix B, “Server Configuration Parameters”.
Note: Integration Server does not use functional aliases and JDBC connection pools to connect to WmDB or the JDBC Adapter.
78 webMethods Integration Server Administrator’s Guide Version 7.1.1

6 Configuring the Server
Switching from the Embedded Database to an External RDBMS If you installed your Integration Server with an embedded database, but now want to switch to an external RDBMS, follow these steps:
1 Navigate to the Security > Certificates > Client Certificates screen on the Integration Server Administrator, and make a note of the certificate mappings.
2 Create the IS Internal and Cross Reference database components and connect them to JDBC connection pools. See the webMethods Installation Guide for instructions.
3 Run the migration utility pub.scheduler:migrateTasksToJDBC to migrate your scheduled tasks from the embedded database to the external RDBMS. See the webMethods Integration Server Built‐In Services Reference for more instructions.
4 Navigate to the Security > Certificates > Client Certificates screen on the Integration Server Administrator and re‐specify your certificate mappings. Refer to “Importing a Client Certificate and Mapping It to a User” on page 186 for instructions.
Working with Extended Configuration SettingsThere may be times when you want to view special server property settings. These properties are specified in the server.cnf file, however you can view them and edit them using the Integration Server Administrator. Typically, you do not need to change these settings unless directed to by webMethods documentation or Software AG Customer Care.
1 Open the Integration Server Administrator if it is not already open.
2 In the Settings menu of the Navigation panel, click Extended.
The server displays a screen that lists configuration properties specified in the server.cnf file.
3 By default, no properties are shown. If the properties you want to view are shown, skip this step. To select properties to be displayed, click Show and Hide Keys.
Note: This service migrates scheduled tasks only; certificate mappings and run‐time data stored in the embedded database will not be migrated.
Important! Typically, you will use the Integration Server Administrator to set properties in the server.cnf file, but there may be times when you need to edit the file directly with a text editor. Before updating this file directly, be sure to shut down the Integration Server.
To view and edit extended configuration settings
webMethods Integration Server Administrator’s Guide Version 7.1.1 79

6 Configuring the Server
The server displays a list of all properties included in the server.cnf file (their values are not shown.) Select the box to the left of each property you want the server to display and click Save Changes. The server displays the Extended Settings screen again, this time with the selected properties and their values displayed.
4 To add, delete, or change a property setting, click Edit Extended Settings and type your changes.
5 Click Save Changes.
Any properties you added will automatically display a check mark in the Show and Hide Keys list and will be displayed, with their values, in the Extended Settings list.
6 Restart the server for the changes to take effect.
a In the upper right corner of any Integration Server Administrator screen, click Shutdown and Restart.
b Select whether you want the server to wait before restarting or to restart immediately.
c Click Restart.
Configuring Integration Server to Work with Servers Running HTTP 1.0 and AboveSometimes when your Integration Server connects to the partner server, the server may crash before sending back a response. If your Integration Server maintains backward compatibility with HTTP 0.9, it does not mandate a response code and consequently, it treats no response from the target server as a valid response. This is an error.
Integration Server now contains a watt property that you can set to indicate whether it maintains compatibility with another server using HTTP 0.9.
Use the following procedure to update your Integration Server to work with servers running HTTP 1.0 and above only.
1 In the Settings menu of the Navigation panel, click Extended.
2 Click Edit Extended Settings
3 Type watt.server.http.pointnineSupport=false
4 Click Save Changes.
Important! Any change you make here will be reflected in the server.cnf file.
To set Integration Server to work with servers running HTTP 1.0 and above
Note: Set watt.server.http.pointnineSupport to true if you want Integration Server to communicate with servers using HTTP 0.9 and above.
80 webMethods Integration Server Administrator’s Guide Version 7.1.1
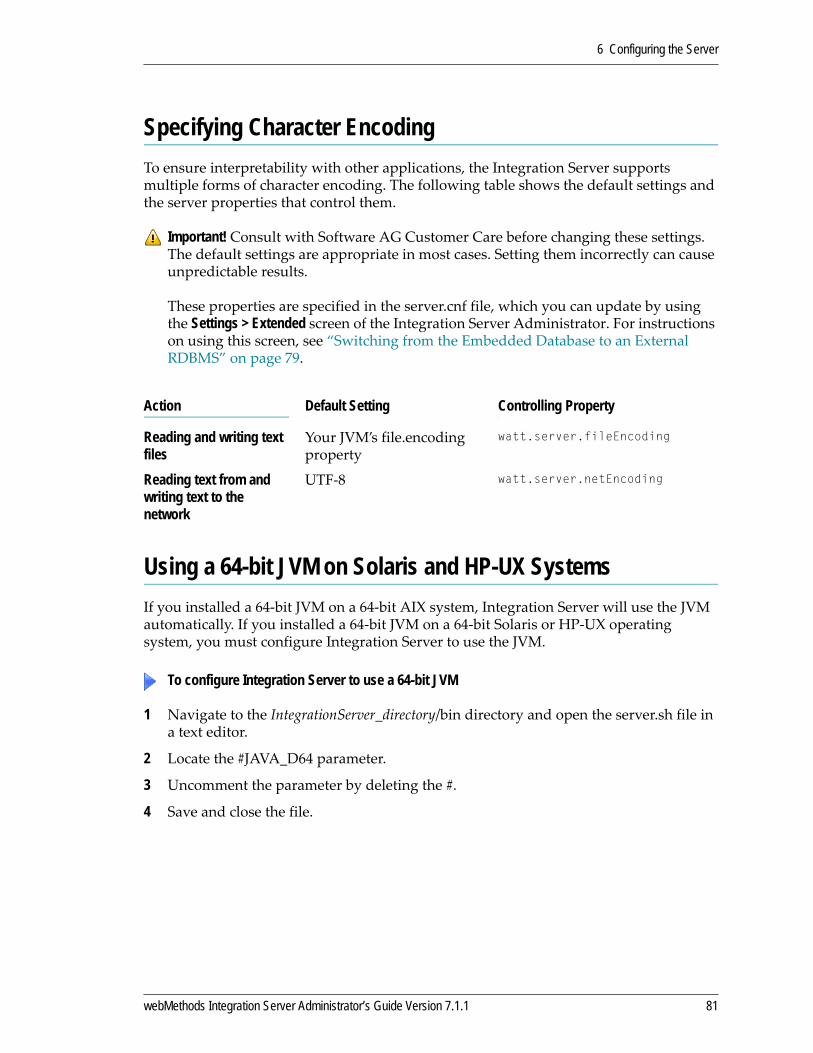
6 Configuring the Server
Specifying Character EncodingTo ensure interpretability with other applications, the Integration Server supports multiple forms of character encoding. The following table shows the default settings and the server properties that control them.
Using a 64-bit JVM on Solaris and HP-UX SystemsIf you installed a 64‐bit JVM on a 64‐bit AIX system, Integration Server will use the JVM automatically. If you installed a 64‐bit JVM on a 64‐bit Solaris or HP‐UX operating system, you must configure Integration Server to use the JVM.
1 Navigate to the IntegrationServer_directory/bin directory and open the server.sh file in a text editor.
2 Locate the #JAVA_D64 parameter.
3 Uncomment the parameter by deleting the #.
4 Save and close the file.
Important! Consult with Software AG Customer Care before changing these settings. The default settings are appropriate in most cases. Setting them incorrectly can cause unpredictable results.
These properties are specified in the server.cnf file, which you can update by using the Settings > Extended screen of the Integration Server Administrator. For instructions on using this screen, see “Switching from the Embedded Database to an External RDBMS” on page 79.
Action Default Setting Controlling Property
Reading and writing text files
Your JVM’s file.encoding property
watt.server.fileEncoding
Reading text from and writing text to the network
UTF‐8 watt.server.netEncoding
To configure Integration Server to use a 64-bit JVM
webMethods Integration Server Administrator’s Guide Version 7.1.1 81
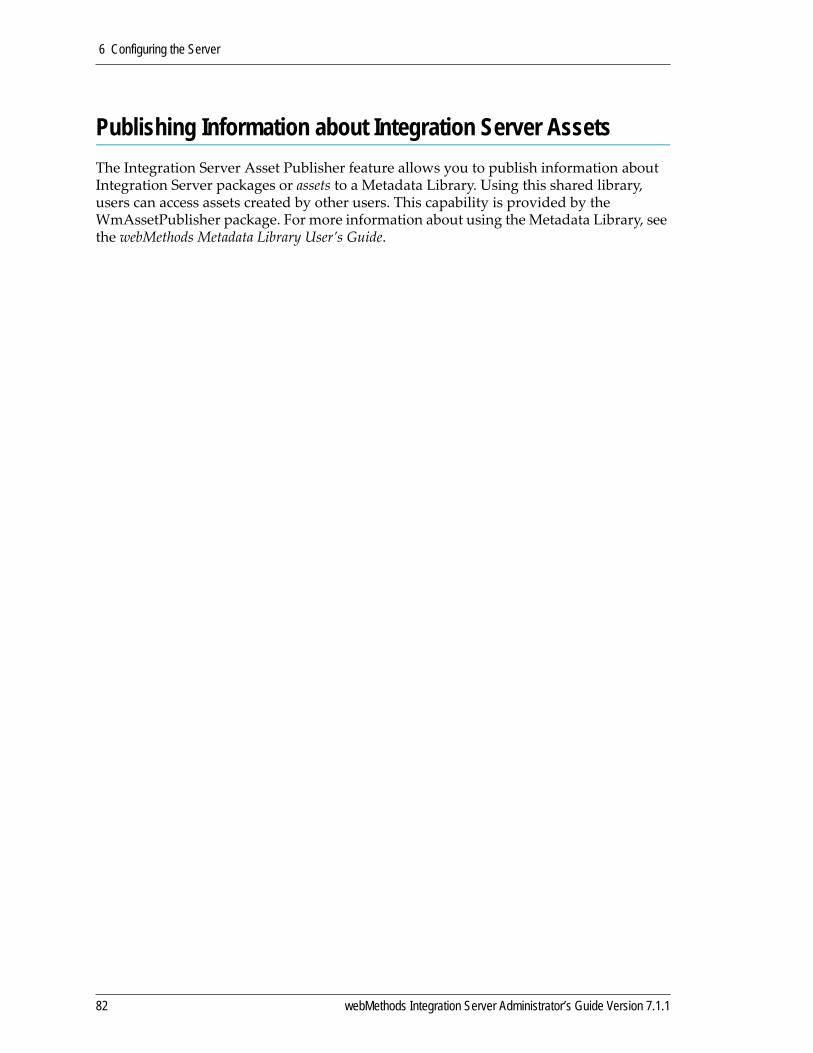
6 Configuring the Server
Publishing Information about Integration Server AssetsThe Integration Server Asset Publisher feature allows you to publish information about Integration Server packages or assets to a Metadata Library. Using this shared library, users can access assets created by other users. This capability is provided by the WmAssetPublisher package. For more information about using the Metadata Library, see the webMethods Metadata Library User’s Guide.
82 webMethods Integration Server Administrator’s Guide Version 7.1.1
7 Configuring Ports
Overview . . . . . . . . . . . . . . . . . . . . . . . . . . . . . . . . . . . . . . . . . . . . . . . . . . . . . . . . . . . . . . . . . . . 84
Considerations for Adding Ports . . . . . . . . . . . . . . . . . . . . . . . . . . . . . . . . . . . . . . . . . . . . . . . . . 85
Adding an HTTP Port . . . . . . . . . . . . . . . . . . . . . . . . . . . . . . . . . . . . . . . . . . . . . . . . . . . . . . . . . . 85
Adding an HTTPS Port . . . . . . . . . . . . . . . . . . . . . . . . . . . . . . . . . . . . . . . . . . . . . . . . . . . . . . . . . 88
Adding a File Polling Port . . . . . . . . . . . . . . . . . . . . . . . . . . . . . . . . . . . . . . . . . . . . . . . . . . . . . . . 93
Adding an FTPS Port . . . . . . . . . . . . . . . . . . . . . . . . . . . . . . . . . . . . . . . . . . . . . . . . . . . . . . . . . . 98
Adding an FTP Port . . . . . . . . . . . . . . . . . . . . . . . . . . . . . . . . . . . . . . . . . . . . . . . . . . . . . . . . . . . 101
Adding an Email Port . . . . . . . . . . . . . . . . . . . . . . . . . . . . . . . . . . . . . . . . . . . . . . . . . . . . . . . . . . 103
Adding an HTTP Diagnostic Port . . . . . . . . . . . . . . . . . . . . . . . . . . . . . . . . . . . . . . . . . . . . . . . . . 107
Adding an HTTPS Diagnostic Port . . . . . . . . . . . . . . . . . . . . . . . . . . . . . . . . . . . . . . . . . . . . . . . . 109
Suspending an HTTP/HTTPS Port . . . . . . . . . . . . . . . . . . . . . . . . . . . . . . . . . . . . . . . . . . . . . . . 114
Resuming an HTTP/HTTPS Port . . . . . . . . . . . . . . . . . . . . . . . . . . . . . . . . . . . . . . . . . . . . . . . . . 115
Specifying an FTP/FTPS Port Range . . . . . . . . . . . . . . . . . . . . . . . . . . . . . . . . . . . . . . . . . . . . . . 115
Changing the Primary Port . . . . . . . . . . . . . . . . . . . . . . . . . . . . . . . . . . . . . . . . . . . . . . . . . . . . . . 117
Deleting a Port . . . . . . . . . . . . . . . . . . . . . . . . . . . . . . . . . . . . . . . . . . . . . . . . . . . . . . . . . . . . . . . 117
Editing a Port . . . . . . . . . . . . . . . . . . . . . . . . . . . . . . . . . . . . . . . . . . . . . . . . . . . . . . . . . . . . . . . . 118
Enabling/Disabling a Port . . . . . . . . . . . . . . . . . . . . . . . . . . . . . . . . . . . . . . . . . . . . . . . . . . . . . . . 118
Adding a Security Provider . . . . . . . . . . . . . . . . . . . . . . . . . . . . . . . . . . . . . . . . . . . . . . . . . . . . . . 119
webMethods Integration Server Administrator’s Guide Version 7.1.1 83
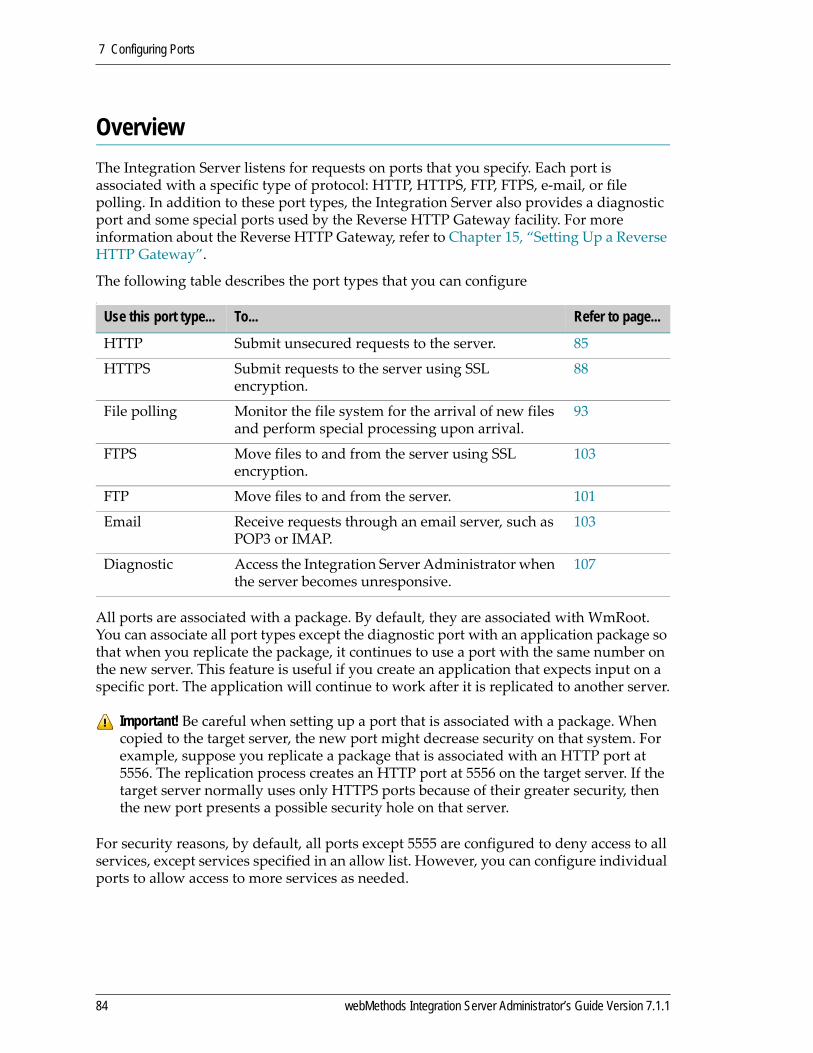
7 Configuring Ports
OverviewThe Integration Server listens for requests on ports that you specify. Each port is associated with a specific type of protocol: HTTP, HTTPS, FTP, FTPS, e‐mail, or file polling. In addition to these port types, the Integration Server also provides a diagnostic port and some special ports used by the Reverse HTTP Gateway facility. For more information about the Reverse HTTP Gateway, refer to Chapter 15, “Setting Up a Reverse HTTP Gateway”.
The following table describes the port types that you can configure.
All ports are associated with a package. By default, they are associated with WmRoot. You can associate all port types except the diagnostic port with an application package so that when you replicate the package, it continues to use a port with the same number on the new server. This feature is useful if you create an application that expects input on a specific port. The application will continue to work after it is replicated to another server.
For security reasons, by default, all ports except 5555 are configured to deny access to all services, except services specified in an allow list. However, you can configure individual ports to allow access to more services as needed.
Use this port type... To... Refer to page...
HTTP Submit unsecured requests to the server. 85
HTTPS Submit requests to the server using SSL encryption.
88
File polling Monitor the file system for the arrival of new files and perform special processing upon arrival.
93
FTPS Move files to and from the server using SSL encryption.
103
FTP Move files to and from the server. 101
Email Receive requests through an email server, such as POP3 or IMAP.
103
Diagnostic Access the Integration Server Administrator when the server becomes unresponsive.
107
Important! Be careful when setting up a port that is associated with a package. When copied to the target server, the new port might decrease security on that system. For example, suppose you replicate a package that is associated with an HTTP port at 5556. The replication process creates an HTTP port at 5556 on the target server. If the target server normally uses only HTTPS ports because of their greater security, then the new port presents a possible security hole on that server.
84 webMethods Integration Server Administrator’s Guide Version 7.1.1
7 Configuring Ports
Considerations for Adding PortsBy default, the server is pre‐configured with HTTP and diagnostic ports at 5555 and 9999, respectively. You can configure one or more additional ports. You can associate an HTTP, HTTPS, FTP, FTPS, email, or file polling protocol with the additional ports. You might add additional ports:
If you have applications that require a specific port number.
If you want to support multiple types of listening protocols.
If you want to open several ports for the same protocol.
If you want to deploy your server in a Reverse HTTP Gateway configuration, in which a Reverse HTTP Gateway Integration Server sits in your DMZ and intercepts requests before passing them to the server behind your inner firewall. For instructions on adding Reverse HTTP Gateway Ports, see Chapter 15, “Setting Up a Reverse HTTP Gateway”.
Adding an HTTP PortBy default, the Integration Server defines an HTTP port at 5555. You can add an HTTP port by completing the instructions below.
1 Open the Integration Server Administrator if it is not already open.
2 In the Security menu of the Navigation panel, click Ports.
3 Click Add Port.
4 In the Add Port area of the screen, select webMethods/HTTP.
Important! For security purposes, when you add a new port, the server defines the port to deny access to all services except those specified in an allow list. Therefore, after adding a port, you might need to perform additional steps to make more services available through the port. These steps are described in Chapter 13, “Authenticating Clients”.
Note: If your server runs on AS/400, limit the size of the port queue that is available to the TCP/IP stack. The port queue is the number of outstanding inbound connections that are queued in the TCP/IP stack. Add the following line to the server property settings: watt.server.portQueue=511For instructions about how to add server property settings, see “Switching from the Embedded Database to an External RDBMS” on page 79.
To add an HTTP port
webMethods Integration Server Administrator’s Guide Version 7.1.1 85
7 Configuring Ports
5 Click Submit. The Integration Server displays a screen requesting information about the port. Enter the following information:
For this parameter... Specify…
Port The number you want to use for the port. Select a number that is not already in use.
Package name The package associated with this port. When you enable the package, the server enables the port. When you disable the package, the server disables the port.
If you replicate this package, the Integration Server creates a port with this number and the same settings on the target server. If a port with this number already exists on the target server, its settings remain intact. This feature is useful if you create an application that expects input on a specific port. The application will continue to work after it is replicated to another server.
Bind Address (optional)
IP address to which to bind this port. Specify a bind address if your machine has multiple IP addresses and you want the port to use this specific address. If you do not specify a bind address, the server picks one for you.
Backlog How long a connection request should stay in the queue for a suspended port, before the request is rejected. The default is set to 200 milliseconds (ms), with a maximum permissible value of 65535 ms.
Keep Alive Timeout When to close the connection if the server has not received a request from the client within this timeout value (in milliseconds); or when to close the connection if the client has explicitly placed a close request with the server.
Threadpool Whether the listener will use this pool exclusively for dispatching requests. The existing Integration Server thread pool is a global thread pool. If there is a very high load on this resource, the user may have to wait for the global thread pool to process his request. However, with the private thread pool option enabled, requests coming into this port will not have to compete with other server functions for threads.
86 webMethods Integration Server Administrator’s Guide Version 7.1.1
7 Configuring Ports
6 Click Save Changes.
7 On the Ports screen, click Edit to change the Access Mode if necessary. You may Set Access Mode to Allow by Default or Reset to default access settings.
8 On the Ports screen, also check the list of ports to ensure that the status in the Enabled column is Yes. If it is not, click No to enable the port.
Using Advanced ControlsBy default, the Integration Server accepts port connections requests as soon as it receives them. This can be a problem if the port receives multiple requests simultaneously and does not have the resources to handle them. You can handle this by specifying a delay value using the Advanced Controls screen. With a delay value in place, the Integration Server will wait the specified number of milliseconds before accepting a connection request on this port. The Advanced Controls screen provides you the capability to control the rate at which the listener accepts connections, over the size of the private thread pool, if it was enable.
1 Open the Integration Server Administrator if it is not already open.
2 In the Security menu of the Navigation panel, click Ports. You will see a Port List table in the main area of the screen.
3 In the Advanced column of this table, click Edit. The Integration Server displays a screen requesting information about Listener and Private Thread Pool Controls. Note that the Diagnostic HTTP Listener State and Private Threadpool areas of the screen are already populated with predefined values.
Click Enable if you wish to set up a private thread pool for requests coming to this port. You can change or accept the default settings given below:
Threadpool Min 1 Refers to the minimum number of threads. The default is set to 1.
Threadpool Max 5 Refers to the maximum number of threads for this private thread pool. The default is set to 5.
Threadpool Priority 5 This is the Java thread priority.
Important! This setting must be used with extreme care because it will affect the server performance and throughput.
Click Disable if you do not need to use the Threadpool feature.
To use advanced controls
For this parameter... Specify…
webMethods Integration Server Administrator’s Guide Version 7.1.1 87
7 Configuring Ports
4 Enter the following information:
5 Click Apply to accept your changes. Else, click Cancel.
Adding an HTTPS PortThe HTTPS port enables the Integration Server to authenticate the client and server securely and encrypt the data exchanged. By default, the HTTPS listener uses the Integration Server certificate. However, you can configure the listener to use its own certificate, or a private key and certificate chain residing in a keystore (file‐ or SmartCard/HSM‐based).
In addition, you can configure the type of client authentication that you want the server to perform. Client authentication allows you to verify the identity of the client.
1 Open the Integration Server Administrator if it is not already open.
2 In the Security menu of the Navigation panel, click Ports.
3 Click Add Port.
For this parameter... Specify…
Listener Controls The type of controls you want to set, to manage the rate at which the listener accepts connections and other controls when the private thread pool is enabled.
Suspend. Stops the listener from accepting any more connections and subsequently dispatching any more requests.
Increase By. Increases the time that the listener will wait before accepting new client connections.
Decrease By. Decreases the time that the listener will wait before accepting new client connections.
Set To (Delay ms) Sets the delay time interval in milliseconds.
Private Thread Pool Controls
The type of thread pool control you want, in order to avoid the need for your port to compete with other server functions when the Integration Server is handling multiple connections.
Increase By. By how many threads you wish to increase the listener’s thread pool.
Decrease By. By how many threads you wish to decrease the listener’s thread pool.
Set To (Threads). At how many threads you wish to set your thread pool.
To add an HTTPS port
88 webMethods Integration Server Administrator’s Guide Version 7.1.1

7 Configuring Ports
4 In the Add Port area of the screen, select webMethods/HTTPS.
5 Click Submit. The Integration Server displays a screen requesting information about the port. Enter the following information:
6 Click Save Changes.
For this parameter... Specify…
Port The number you want to use for the port. Select a number that is not already in use.
Package name Package associated with this port. When you enable the package, the server enables the port. When you disable the package, the server disables the port.
If you replicate this package, the Integration Server creates a port with this number and the same settings on the target server. If a port with this number already exists on the target server, its settings remain intact. This feature is useful if you create an application that expects input on a specific port. The application will continue to work after it is replicated to another server.
Bind Address (optional)
IP address to which to bind this port. Specify a bind address if your machine has multiple IP addresses and you want the port to use this specific address. If you do not specify a bind address, the server picks one for you.
Backlog How long a connection request should stay in the queue for a suspended port, before the request is rejected. The default is set to 200 milliseconds (ms), with a maximum permissible value of 65535 ms.
Keep Alive Timeout When to close the connection if the server has not received a request from the client within this timeout value (in milliseconds); or when to close the connection if the client has explicitly placed a close request with the server.
Threadpool Whether the listener will use this pool exclusively for dispatching requests. The existing Integration Server thread pool is a global thread pool. If there is a very high load on this resource, the user may have to wait for the global thread pool to process his request. However, with the private thread pool option enabled, requests coming into this port will not have to compete with other server functions for threads.
webMethods Integration Server Administrator’s Guide Version 7.1.1 89
7 Configuring Ports
Click Enable if you wish to enable the private thread pool settings. You can change or accept the default settings given below:
Threadpool Min 1 Refers to the minimum number of threads. The default is set to 1.
Threadpool Max 5 Refers to the maximum number of threads for this private thread pool. The default is set to 5.
Threadpool Priority 5 This is the Java thread priority
Important! This setting must be used with extreme care because it will affect the server performance and throughput.
Click Disable if you do not need to use the Threadpool feature.Client Authentication
The type of client authentication you want the Integration Server to perform. See Chapter 13, “Authenticating Clients” for more information.
None. The server will not request client certificates. If the client presents a certificate anyway, the Integration Server processes it. If the certificate matches exactly a client certificate on file on the server, the client is logged in as the user pre‐mapped to the certificate. Otherwise, the server prompts the client for a user ID and password.
Request Client Certificates. The server will request client certificates for all requests that come in on this HTTPS port. If the client does not provide a certificate, the request proceeds anyway. If the certificate matches exactly a client certificate on file, the client is logged in as the user to which the certificate is pre‐mapped. Otherwise, the server prompts the client for a userid and password.
Require Client Certificates. The server requires client certificates for all requests that come in on this HTTPS port. For the request to succeed, the client must present a certificate that was signed by a trusted authority and that matches exactly a client certificate on file on the Integration Server. If the certificate matches a client certificate on file, the client is logged in as the user to which the certificate was pre‐mapped.
In all cases, if the certificate presented has not been signed by a trusted authority, the Integration Server does not use it.
For this parameter... Specify…
90 webMethods Integration Server Administrator’s Guide Version 7.1.1

7 Configuring Ports
Server’s Certificate Optional. Path and file name of the file that contains the Integration Serverʹs digital certificate. Specify a value here only if you want this port to present a different server certificate from the one specified on the Certificates screen.
Authority’s Certificate
Optional. Path and file name of the file that contains the certificate for the certificate authority that signed the Integration Serverʹs digital certificate.
Private Key Optional. Path and file name of the file that contains the private key of the private/public key pair associated with the Integration Serverʹs digital certificate. If you leave this field blank, the Integration Server uses the private key specified on the Certificates screen.
Trusted Authority Directory
Optional. Name of the directory (relative to the server home; or fully qualified path; or network path that contains the digital certificates of certificate authorities trusted by this server, for example config\cas. If you leave this field blank, the Integration Server uses the trusted authority directory specified on the Certificates screen. If the trusted authority field is blank on the Certificates screen as well, the server then checks the value of the watt.security.cert.wmChainVerifier.trustByDefault property. If the value is True (default), the server trusts all certificates. If the value is False, the server trusts no certificates.
---Or---KeyStore Location Optional. The location on disk where the keystore is located
(for an HSM/smart card backed keystore, a file exists on disk but does not contain the actual private key).
KeyStore Password Optional. The password with which the keystore is protected. If the private key and certificate chain are stored on an HSM device, this property must match the password with which the card was protected (for example, for nCipher as the HSM provider, this property must match the OCS (Operator Card Set) password for the card).
For this parameter... Specify…
webMethods Integration Server Administrator’s Guide Version 7.1.1 91

7 Configuring Ports
KeyStore Type Optional. The type of the keystore. Different vendors support different types of keystore; for example, the default SUN keystore implementation is of type ʺjksʺ.
Within this property, the name in parentheses is the name of the Security Provider that will provide support for the keystore type. If the desired provider is not listed in the drop‐down list, you can add it by clicking the ʺAdd new Security Providerʺ link. For more information about how to add a security provider, see “Adding a Security Provider” on page 119.
As long as a port with the given provider exists, you will not have to manually re‐register the security provider. If the last port which uses this provider is deleted and the Integration Server is restarted, you must re‐register this security provider before using it for a port.
Important! The Integration Server supports JKS and PKCS#12 keystore types only. Other keystore types may work with Integration Server but are not supported.
HSM Based Keystore
Optional. Indicates whether or not the keystore is backed by an HSM‐based keystore (a smart card device can be used as well). When the keystore is backed by such a device, the private key does not physically leave the HSM device and certain cryptographic operations must be performed on that device.
Alias Required if the KeyStore Location parameter is defined. If the KeyStore Location parameter is null, the Alias property is ignored.
Specifies the alias that points to the private key and its associated certificate chain in the keystore. Each listener points to one alias on the keystore; there can be multiple aliases in the same keystore and more than one listener can use the same alias.
Trusted Authority Directory
Optional. Specifies the name of the directory that contains the certificates of the certification authorities (CAs) that this server trusts when it uses this port; for example, config\xApps\TrustedCAs.
Note: Currently the keystore stores only the private key and its associated certificate chain, not the trusted CA certificates.
For this parameter... Specify…
92 webMethods Integration Server Administrator’s Guide Version 7.1.1
7 Configuring Ports
7 On the Ports screen, click Edit to change the Access Mode if necessary. You may Set Access Mode to Allow by Default or Reset to default access settings.
8 On the Ports screen, also check the list of ports to ensure that the status in the Enabled column is Yes. If it is not, click No to enable the port.
Adding a File Polling PortA file polling port periodically polls a monitoring directory for the arrival of files and then performs special processing on them. When it detects a new file, the server copies the file to a working directory, then runs a special file processing service against the file. The service might parse, convert, and validate the file then write it to the file system. This service, which you write, is the only service that can be invoked through this port. You can limit the files the server accepts by filtering for specific file names.
For file polling to work, you must do the following:
1 Set up the Monitoring Directory on the Integration Server. Other directories used for file polling are automatically created by the Integration Server.
2 Write a file processing service and make it available to the Integration Server. See XML Services Developer’s Guide and Flat File Schema Developer’s Guide for examples of such services.
3 Set up the file polling port on the Integration Server. Directions are provided below.
When you configure the file polling port, you specify how often to poll for files, the name and location of the processing service to use, file names to filter for, as well as other options.
1 Open the Integration Server Administrator if it is not already open.
2 In the Security menu of the Navigation panel, click Ports.
3 Click Add Port.
4 In the Add Port area of the screen, select webMethods/FilePolling.
To add a file polling port
webMethods Integration Server Administrator’s Guide Version 7.1.1 93
7 Configuring Ports
5 Click Submit. The Integration Server displays a screen requesting information about the port. Enter the following information:
For this parameter... Specify…
Package Package NamePackage associated with this port. When you enable the package, the server enables the port. When you disable the package, the server disables the port. If you are performing special file handling, specify the package that contains the services that perform that processing. If you want to process flat files from this port, select WmFlatFile, which contains built‐in services you can use to process flat files.
Note: If you replicate this package, whether to a server on the same machine or a server on a separate machine, a file polling port with the same settings is created on the target server. If a file polling port already exists on the target server, its settings remain intact. If the original and target servers reside on the same machine, they will share the same monitoring directory. If the target server resides on another machine, by default, another monitoring directory will be created on the target server’s machine.
Security Run services as userUser name you want to use to run the services assigned to the
file polling directory. Click to lookup and select a user. The user can be an internal or external user.
Polling Information Monitoring DirectoryDirectory on Integration Server that you want to monitor for files.
Working Directory (optional)Directory on the Integration Server to which the server should move files for processing after they have been identified in the Monitoring Directory. Files must meet age and file name requirements before being moved to the Working Directory. The default sub‐directory, MonitoringDirectory\..\Work, is automatically created if no directory is specified.\
Completion Directory (optional)Directory on Integration Server to which you want files moved when processing is completed in the Monitoring Directory or Working Directory. The default sub‐directory, MonitoringDirectory\..\Done, is automatically created if no directory is specified.
94 webMethods Integration Server Administrator’s Guide Version 7.1.1
7 Configuring Ports
Error Directory Optional ‐ Directory on Integration Server to which you want files moved when processing fails. The default sub‐directory, MonitoringDirectory\..\Error, is automatically created if no directory is specified.
File Name Filter (optional)The file name filter for files in the Monitoring Directory. The server only processes files that meet the filter requirements. If you do not specify this field, all files will be polled. You can specify pattern matching in this field.
File Age (optional)The minimum age (in seconds) at which a file in the Monitoring Directory can be processed. The server determines file age based on when the file was last modified on the monitoring directory. You can adjust this age as needed to make sure the server does not process a file before the entire file has been copied to the Monitoring Directory. The default is 0.
Content TypeContent type to use for the file. The server uses the content handler associated with the content type specified in this field. If no value is specified, the server performs MIME mapping based on the file extension.
Allow Recursive PollingWhether the Integration Server is to poll all sub‐directories in the Monitoring Directory. Select Yes or No.
Enable Clustering Whether the Integration Server should allow clustering in the Monitoring Directory. Select Yes or No.
Lock File Extension Defines the polling for a particular extension.
For this parameter... Specify…
webMethods Integration Server Administrator’s Guide Version 7.1.1 95
7 Configuring Ports
Message Processing Processing ServiceName of the service you want the Integration Server to execute for polled files. The server executes this service when the file has been copied to the Working directory. This service should be the only service available from this port.
Important! If you change the processing service for a file polling port, you must also change the list of services available from this port to contain just the new service. See below for more information.
File Polling IntervalHow often (in seconds) you want Integration Server to poll the Monitoring Directory for files.
Log Only When Directory Availability Changes
If you select No (the default), the listener will log a message every time the monitoring directory is unavailable.
If you select Yes, the listener will log a message in either of the following cases:
The directory was available during the last polling attempt but not available during the current attempt
The directory was not available during the last polling attempt but is available during the current attempt
Listening Directory is an NFS Mounted File SystemFor use on a UNIX system where the monitoring directory, working directory, completion directory, and/or error directory are network drives mounted on the local file system.
If you select No (the default), the listener will call the Java File.renameTo() method to move the files from the monitoring directory to the working directory, and from the working directory to the completion and/or error directory.
If you select Yes, the listener will first call the Java File.renameTo() method to move the files from the monitoring directory. If this method fails, the listener will then copy the files from the monitoring directory to the working directory and delete the files from the monitoring directory. This operation will fail if either the copy action or the delete action fails. The same behavior applies when moving files from the working directory to the completion and/or error directory.
For this parameter... Specify…
96 webMethods Integration Server Administrator’s Guide Version 7.1.1
7 Configuring Ports
6 Click Save Changes.
7 Make sure the port’s access mode is properly set and that the file processing service is the only service accessible from the port.
d In the Ports screen, click Edit in the Access Mode field for the port you just created.
e Click Set Access Mode to Deny by Default.
f Click Add Folders and Services to Allow List.
g Type the name of the processing service for this port in the text box under Enter one folder or service per line.
h Remove any other services from the allow list.
i Click Save Additions.
Cleanup ServiceOptional ‐ The name of the service that you want to use to clean up the directories specified under Polling Information.
Cleanup At StartupWhether to clean up files that are located in the Completion Directory and Error Directory when the file polling port is started.
Cleanup File AgeOptional ‐ The number of days to wait before deleting processed files from your directories. The default is 7 days.
Cleanup IntervalOptional ‐ How often (in hours) you want Integration Server to check the processed files for cleanup. The default is 24 hours
Maximum Number of Invocation ThreadsThe number of threads you want the Integration Server to use for this port. Type a number from 1‐10. The default is 10.
Note: If you change the processing service for a file polling port, remember to change the Allow List for the port as well. Follow the procedure described above to alter the allowed service list.
For this parameter... Specify…
webMethods Integration Server Administrator’s Guide Version 7.1.1 97
7 Configuring Ports
Adding an FTPS PortThe FTPS (FTP over SSL) port enables the server to authenticate the FTP client and server in a secure manner, and encrypt the control and data exchange between the FTP client and server.
By default, the FTPS port will work only with secure clients. A secure client is a client that secures the connection by issuing the AUTH command. You also can configure the FTPS listener to operate with clients that are not secure.
You can configure the FTPS port to use its own certificate or use the Integration Server certificate, or to request or require client certificates. In addition, you can configure the listener to use a private key and certificate chain residing in a keystore (file‐ or SmartCard/HSM‐based). For more information about client certificates, see Chapter 13, “Authenticating Clients”.
To add an FTPS port, complete the instructions below.
1 Open the Integration Server Administrator if it is not already open.
2 In the Security menu of the Navigation panel, click Ports.
3 Click Add Port.
4 In the Add Port area of the screen, select webMethods/FTPS.
5 Click Submit. The Integration Server displays a screen requesting information about the port. Enter the following information:
To add an FTPS port
For this parameter... Specify…
Port The number you want to use for the port. Select a number that is not already in use.
Client Authentication The type of client authentication you want the Integration Server to perform. See Chapter 13, “Authenticating Clients” for more information.
Note: FTPS clients are always prompted for a userid and password.
None. The client logs in as the user specified on the userid/password prompt.
Request Client Certificates. The server requests client certificates for all requests that come in on this FTPS port, but a certificate is not required for log in.
98 webMethods Integration Server Administrator’s Guide Version 7.1.1
7 Configuring Ports
Require Client Certificates. The server requires client certificates for all requests that come in on this FTPS port. If no certificate is provided, or if the certificate is not trusted, the Integration Server rejects the request.
By default, the Integration Server does not perform certificate mapping for FTPS ports. To use this feature, you must set the watt.net.ftpUseCertMap configuration property to true. For more information about how client authentication works for FTPS ports, see Chapter 13, “Authenticating Clients”. For more information about certificate mapping, see “Importing a Client Certificate and Mapping It to a User” on page 186.
Package name Package associated with this port. When you enable the package, the server enables the port. When you disable the package, the server disables the port.
If you replicate this package, the Integration Server creates a port with this number and the same settings on the target server. If a port with this number already exists on the target server, its settings remain intact. This feature is useful if you create an application that expects input on a specific port. The application will continue to work after it is replicated to another server.
Bind Address (optional)
IP address to which to bind this port. Specify a bind address if your machine has multiple IP addresses and you want the port to use this specific address. If you do not specify a bind address, the server picks one for you.
Secure Clients Only Select this option to prevent the FTPS listener from operating with non‐secure clients.
Server’s Certificate Optional. Path and file name of the file that contains the Integration Serverʹs digital certificate. Specify a value here only if you want this port to present a different server certificate from the one specified on the Certificates screen.
Authority’s Certificate Optional. Path and file name of the file that contains the certificate for the certificate authority that signed the Integration Serverʹs digital certificate.
Private Key Optional. Path and file name of the file that contains the private key of the private/public key pair associated with the Integration Serverʹs digital certificate. If you leave this field blank, the Integration Server uses the private key specified on the Certificates screen.
For this parameter... Specify…
webMethods Integration Server Administrator’s Guide Version 7.1.1 99
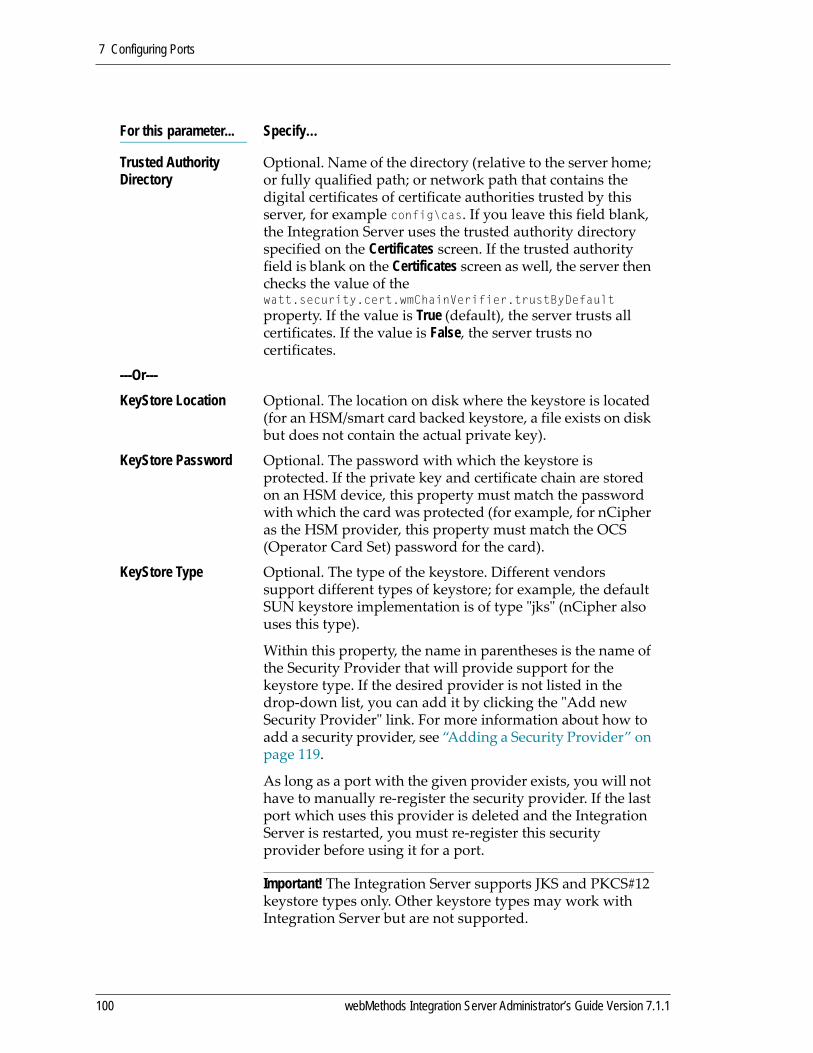
7 Configuring Ports
Trusted Authority Directory
Optional. Name of the directory (relative to the server home; or fully qualified path; or network path that contains the digital certificates of certificate authorities trusted by this server, for example config\cas. If you leave this field blank, the Integration Server uses the trusted authority directory specified on the Certificates screen. If the trusted authority field is blank on the Certificates screen as well, the server then checks the value of the watt.security.cert.wmChainVerifier.trustByDefault property. If the value is True (default), the server trusts all certificates. If the value is False, the server trusts no certificates.
---Or---KeyStore Location Optional. The location on disk where the keystore is located
(for an HSM/smart card backed keystore, a file exists on disk but does not contain the actual private key).
KeyStore Password Optional. The password with which the keystore is protected. If the private key and certificate chain are stored on an HSM device, this property must match the password with which the card was protected (for example, for nCipher as the HSM provider, this property must match the OCS (Operator Card Set) password for the card).
KeyStore Type Optional. The type of the keystore. Different vendors support different types of keystore; for example, the default SUN keystore implementation is of type ʺjksʺ (nCipher also uses this type).
Within this property, the name in parentheses is the name of the Security Provider that will provide support for the keystore type. If the desired provider is not listed in the drop‐down list, you can add it by clicking the ʺAdd new Security Providerʺ link. For more information about how to add a security provider, see “Adding a Security Provider” on page 119.
As long as a port with the given provider exists, you will not have to manually re‐register the security provider. If the last port which uses this provider is deleted and the Integration Server is restarted, you must re‐register this security provider before using it for a port.
Important! The Integration Server supports JKS and PKCS#12 keystore types only. Other keystore types may work with Integration Server but are not supported.
For this parameter... Specify…
100 webMethods Integration Server Administrator’s Guide Version 7.1.1
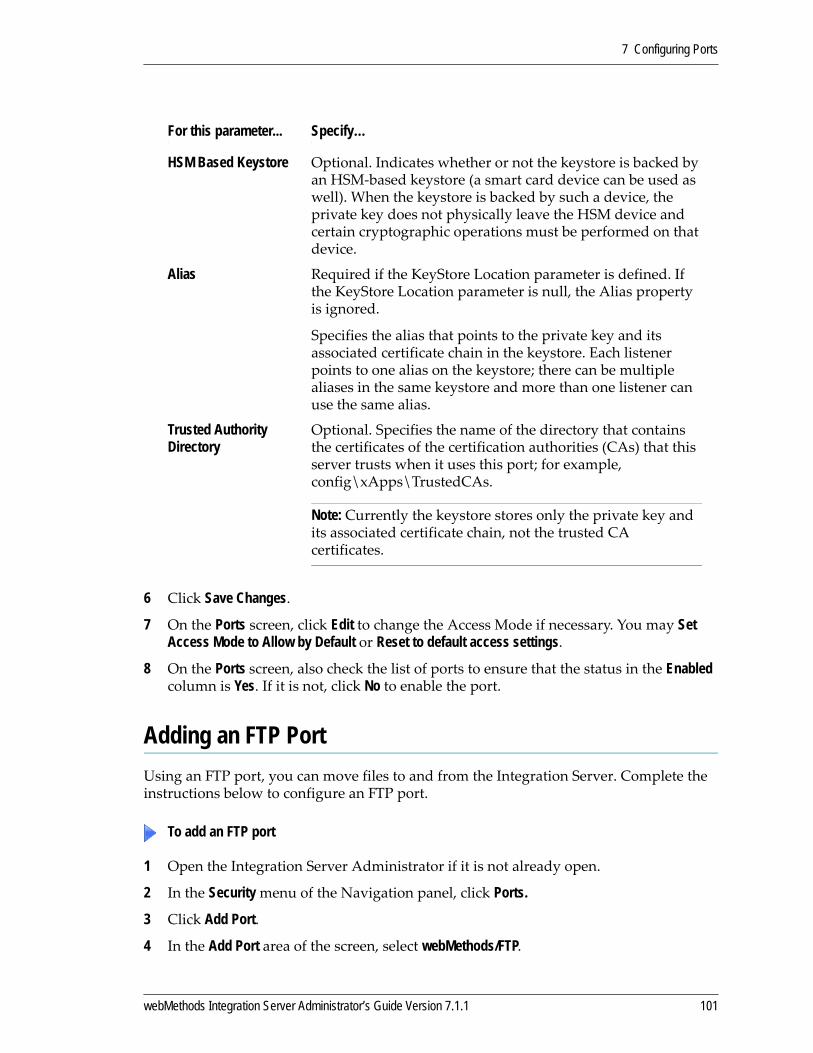
7 Configuring Ports
6 Click Save Changes.
7 On the Ports screen, click Edit to change the Access Mode if necessary. You may Set Access Mode to Allow by Default or Reset to default access settings.
8 On the Ports screen, also check the list of ports to ensure that the status in the Enabled column is Yes. If it is not, click No to enable the port.
Adding an FTP PortUsing an FTP port, you can move files to and from the Integration Server. Complete the instructions below to configure an FTP port.
1 Open the Integration Server Administrator if it is not already open.
2 In the Security menu of the Navigation panel, click Ports.
3 Click Add Port.
4 In the Add Port area of the screen, select webMethods/FTP.
HSM Based Keystore Optional. Indicates whether or not the keystore is backed by an HSM‐based keystore (a smart card device can be used as well). When the keystore is backed by such a device, the private key does not physically leave the HSM device and certain cryptographic operations must be performed on that device.
Alias Required if the KeyStore Location parameter is defined. If the KeyStore Location parameter is null, the Alias property is ignored.
Specifies the alias that points to the private key and its associated certificate chain in the keystore. Each listener points to one alias on the keystore; there can be multiple aliases in the same keystore and more than one listener can use the same alias.
Trusted Authority Directory
Optional. Specifies the name of the directory that contains the certificates of the certification authorities (CAs) that this server trusts when it uses this port; for example, config\xApps\TrustedCAs.
Note: Currently the keystore stores only the private key and its associated certificate chain, not the trusted CA certificates.
To add an FTP port
For this parameter... Specify…
webMethods Integration Server Administrator’s Guide Version 7.1.1 101
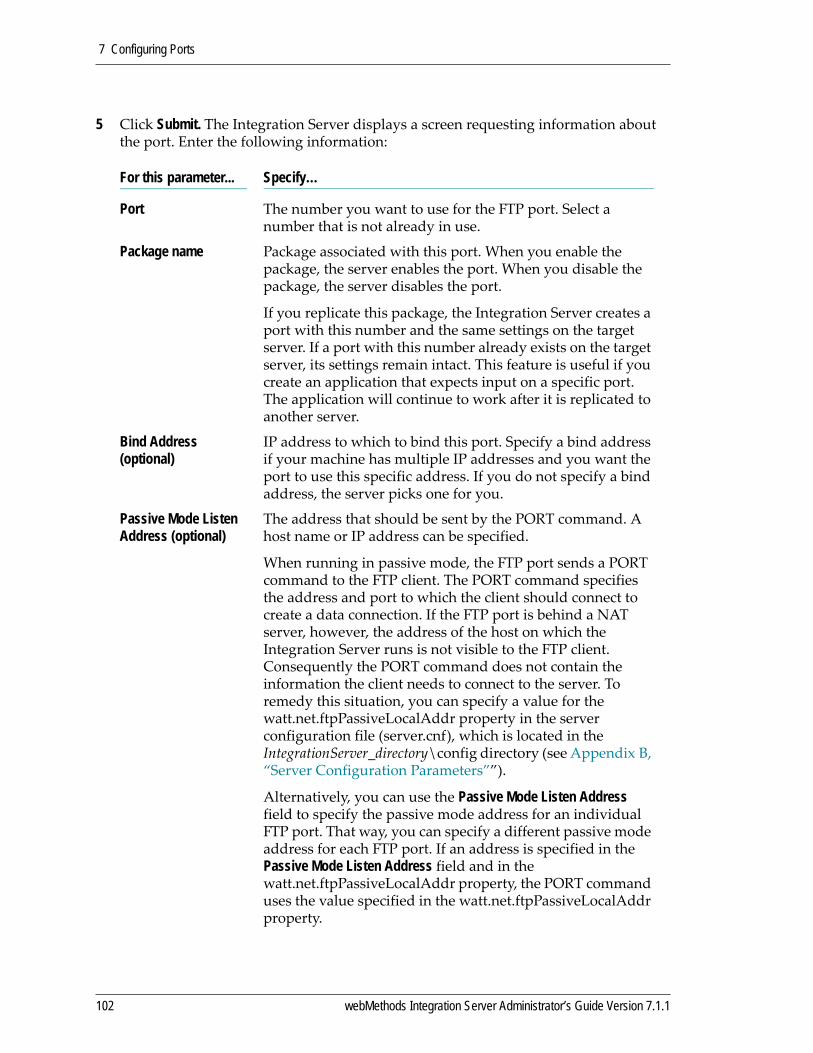
7 Configuring Ports
5 Click Submit. The Integration Server displays a screen requesting information about the port. Enter the following information:
For this parameter... Specify…
Port The number you want to use for the FTP port. Select a number that is not already in use.
Package name Package associated with this port. When you enable the package, the server enables the port. When you disable the package, the server disables the port.
If you replicate this package, the Integration Server creates a port with this number and the same settings on the target server. If a port with this number already exists on the target server, its settings remain intact. This feature is useful if you create an application that expects input on a specific port. The application will continue to work after it is replicated to another server.
Bind Address (optional)
IP address to which to bind this port. Specify a bind address if your machine has multiple IP addresses and you want the port to use this specific address. If you do not specify a bind address, the server picks one for you.
Passive Mode Listen Address (optional)
The address that should be sent by the PORT command. A host name or IP address can be specified.
When running in passive mode, the FTP port sends a PORT command to the FTP client. The PORT command specifies the address and port to which the client should connect to create a data connection. If the FTP port is behind a NAT server, however, the address of the host on which the Integration Server runs is not visible to the FTP client. Consequently the PORT command does not contain the information the client needs to connect to the server. To remedy this situation, you can specify a value for the watt.net.ftpPassiveLocalAddr property in the server configuration file (server.cnf), which is located in the IntegrationServer_directory\config directory (see Appendix B, “Server Configuration Parameters””).
Alternatively, you can use the Passive Mode Listen Address field to specify the passive mode address for an individual FTP port. That way, you can specify a different passive mode address for each FTP port. If an address is specified in the Passive Mode Listen Address field and in the watt.net.ftpPassiveLocalAddr property, the PORT command uses the value specified in the watt.net.ftpPassiveLocalAddr property.
102 webMethods Integration Server Administrator’s Guide Version 7.1.1

7 Configuring Ports
6 Click Save Changes.
7 On the Ports screen, click Edit to change the Access Mode if necessary. You may Set Access Mode to Allow by Default or Reset to default access settings.
8 On the Ports screen, also check the list of ports to ensure that the status in the Enabled column is Yes. If it is not, click No to enable the port.
Adding an Email PortBy setting up one or more email ports on your Integration Server, you can receive client requests through an email server (POP3 or IMAP). The client builds an email that contains the name of the service to run and parameters to pass to the service. The email can also contain user ID and password information.
1 Open the Integration Server Administrator if it is not already open.
2 In the Security menu of the Navigation panel, click Ports.
3 Click Add Port.
4 In the Add Port area of the screen, select webMethods/Email.
5 Click Submit. The Integration Server displays the Edit Email Client Configuration screen requesting information about the port. Enter the following information:
Note: Passing a userid and password in an email presents a possible security exposure. While the email resides on the POP3 or IMAP server, someone might be able to access this information. If you must pass a userid and password in an email, make sure the userid has minimal privileges.
To add an email port
For this parameter... Specify…
Package Name Package associated with this port. When you enable the package, the server enables the port. When you disable the package, the server disables the port.
If you replicate this package, the Integration Server creates a port with this number and the same settings on the target server. If a port with this number already exists on the target server, its settings remain intact. This feature is useful if you create an application that expects input on a specific port. The application will continue to work after it is replicated to another server.
webMethods Integration Server Administrator’s Guide Version 7.1.1 103
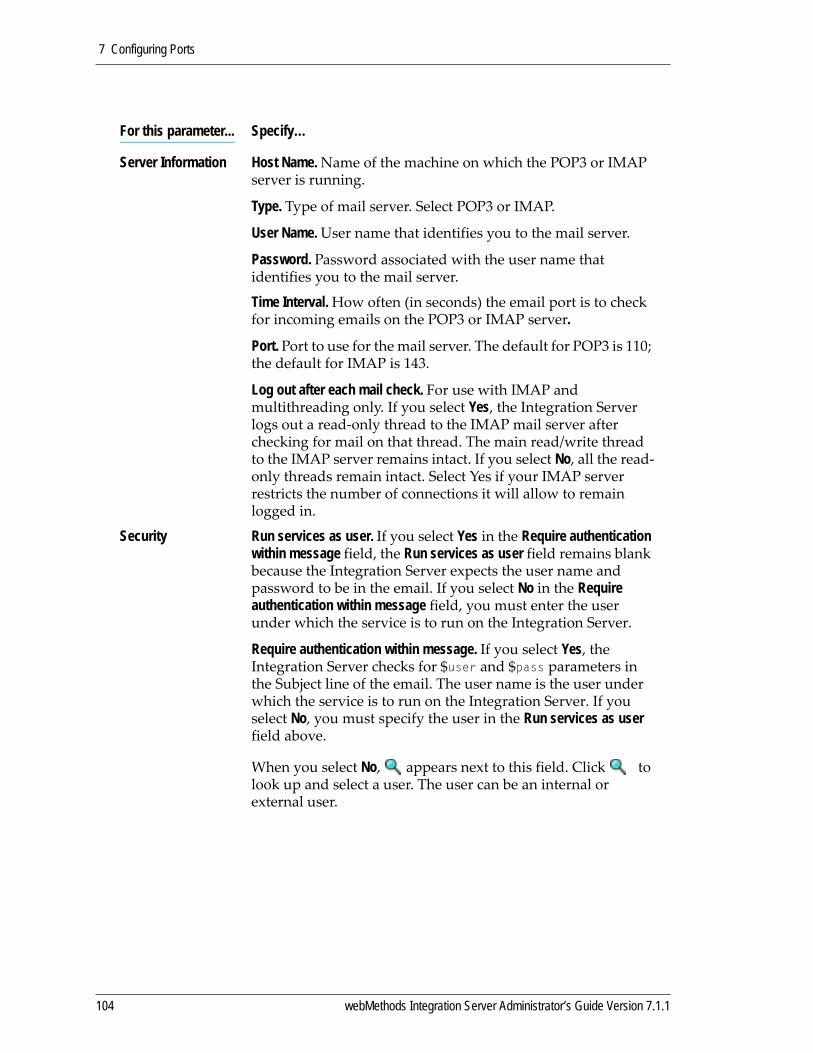
7 Configuring Ports
Server Information Host Name. Name of the machine on which the POP3 or IMAP server is running.
Type. Type of mail server. Select POP3 or IMAP.
User Name. User name that identifies you to the mail server.
Password. Password associated with the user name that identifies you to the mail server.
Time Interval. How often (in seconds) the email port is to check for incoming emails on the POP3 or IMAP server.
Port. Port to use for the mail server. The default for POP3 is 110; the default for IMAP is 143.
Log out after each mail check. For use with IMAP and multithreading only. If you select Yes, the Integration Server logs out a read‐only thread to the IMAP mail server after checking for mail on that thread. The main read/write thread to the IMAP server remains intact. If you select No, all the read‐only threads remain intact. Select Yes if your IMAP server restricts the number of connections it will allow to remain logged in.
Security Run services as user. If you select Yes in the Require authentication within message field, the Run services as user field remains blank because the Integration Server expects the user name and password to be in the email. If you select No in the Require authentication within message field, you must enter the user under which the service is to run on the Integration Server.
Require authentication within message. If you select Yes, the Integration Server checks for $user and $pass parameters in the Subject line of the email. The user name is the user under which the service is to run on the Integration Server. If you select No, you must specify the user in the Run services as user field above.
When you select No, appears next to this field. Click to look up and select a user. The user can be an internal or external user.
For this parameter... Specify…
104 webMethods Integration Server Administrator’s Guide Version 7.1.1
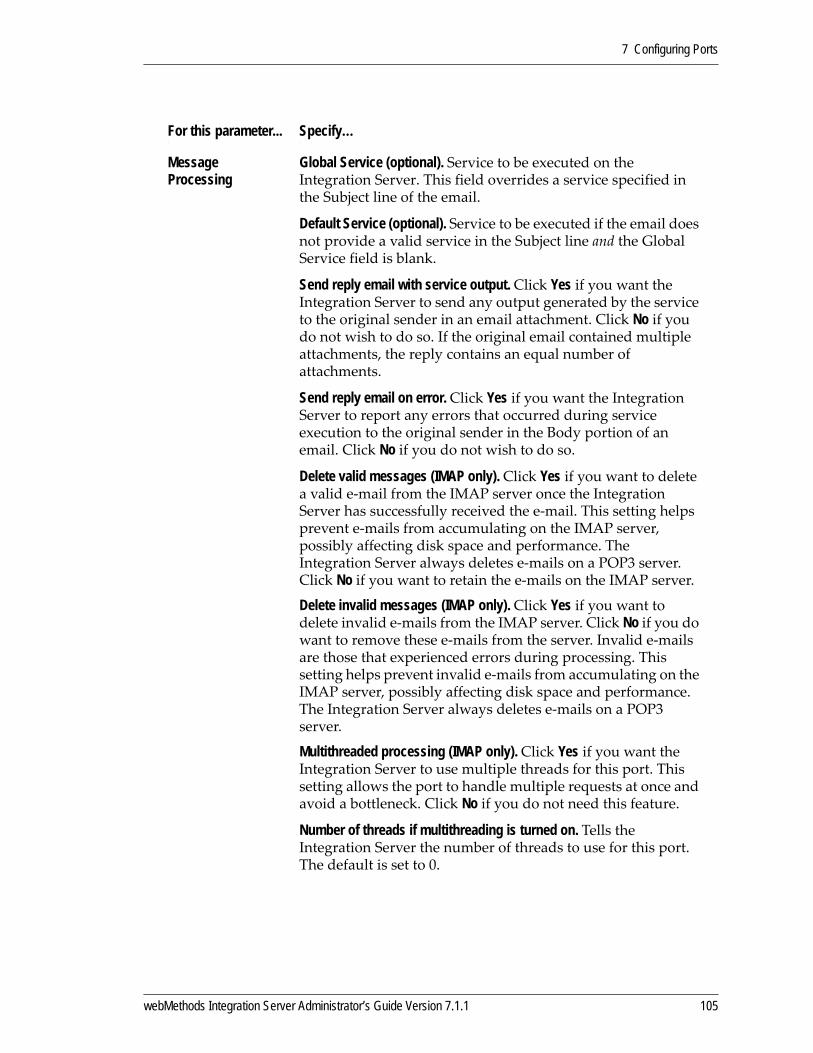
7 Configuring Ports
Message Processing
Global Service (optional). Service to be executed on the Integration Server. This field overrides a service specified in the Subject line of the email.
Default Service (optional). Service to be executed if the email does not provide a valid service in the Subject line and the Global Service field is blank.
Send reply email with service output. Click Yes if you want the Integration Server to send any output generated by the service to the original sender in an email attachment. Click No if you do not wish to do so. If the original email contained multiple attachments, the reply contains an equal number of attachments.
Send reply email on error. Click Yes if you want the Integration Server to report any errors that occurred during service execution to the original sender in the Body portion of an email. Click No if you do not wish to do so.
Delete valid messages (IMAP only). Click Yes if you want to delete a valid e‐mail from the IMAP server once the Integration Server has successfully received the e‐mail. This setting helps prevent e‐mails from accumulating on the IMAP server, possibly affecting disk space and performance. The Integration Server always deletes e‐mails on a POP3 server. Click No if you want to retain the e‐mails on the IMAP server.
Delete invalid messages (IMAP only). Click Yes if you want to delete invalid e‐mails from the IMAP server. Click No if you do want to remove these e‐mails from the server. Invalid e‐mails are those that experienced errors during processing. This setting helps prevent invalid e‐mails from accumulating on the IMAP server, possibly affecting disk space and performance. The Integration Server always deletes e‐mails on a POP3 server.
Multithreaded processing (IMAP only). Click Yes if you want the Integration Server to use multiple threads for this port. This setting allows the port to handle multiple requests at once and avoid a bottleneck. Click No if you do not need this feature.
Number of threads if multithreading is turned on. Tells the Integration Server the number of threads to use for this port. The default is set to 0.
For this parameter... Specify…
webMethods Integration Server Administrator’s Guide Version 7.1.1 105
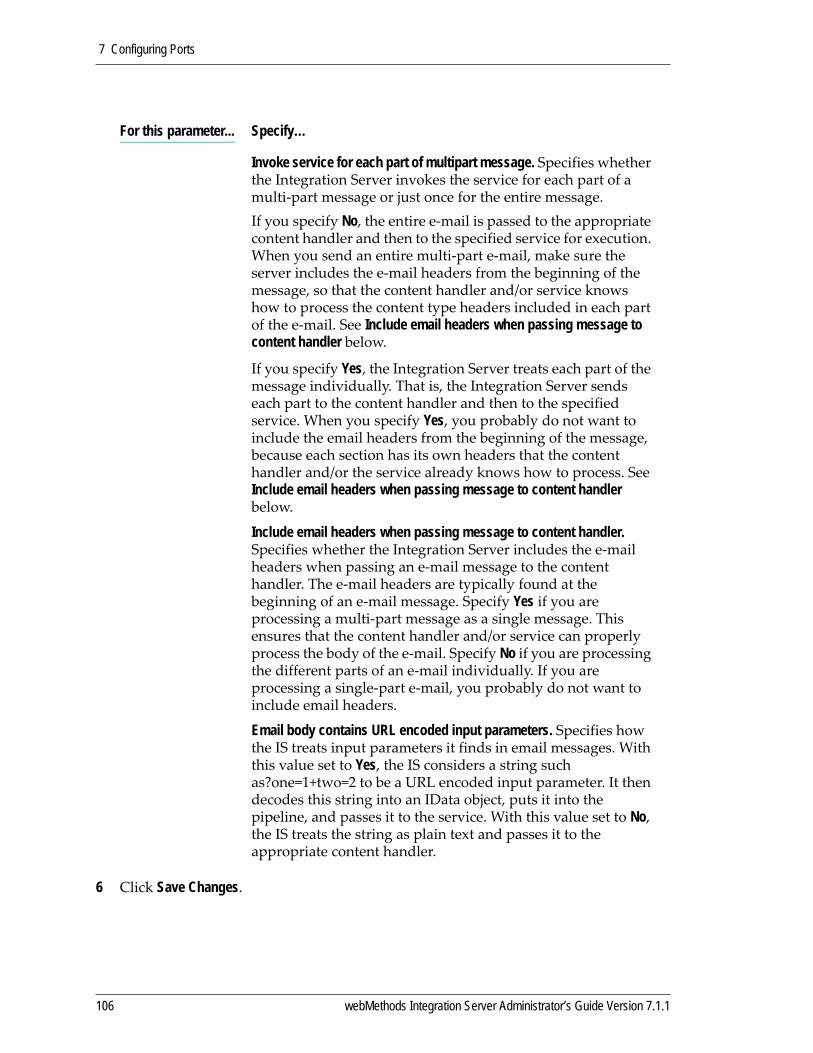
7 Configuring Ports
6 Click Save Changes.
Invoke service for each part of multipart message. Specifies whether the Integration Server invokes the service for each part of a multi‐part message or just once for the entire message.If you specify No, the entire e‐mail is passed to the appropriate content handler and then to the specified service for execution. When you send an entire multi‐part e‐mail, make sure the server includes the e‐mail headers from the beginning of the message, so that the content handler and/or service knows how to process the content type headers included in each part of the e‐mail. See Include email headers when passing message to content handler below.
If you specify Yes, the Integration Server treats each part of the message individually. That is, the Integration Server sends each part to the content handler and then to the specified service. When you specify Yes, you probably do not want to include the email headers from the beginning of the message, because each section has its own headers that the content handler and/or the service already knows how to process. See Include email headers when passing message to content handler below.
Include email headers when passing message to content handler. Specifies whether the Integration Server includes the e‐mail headers when passing an e‐mail message to the content handler. The e‐mail headers are typically found at the beginning of an e‐mail message. Specify Yes if you are processing a multi‐part message as a single message. This ensures that the content handler and/or service can properly process the body of the e‐mail. Specify No if you are processing the different parts of an e‐mail individually. If you are processing a single‐part e‐mail, you probably do not want to include email headers.
Email body contains URL encoded input parameters. Specifies how the IS treats input parameters it finds in email messages. With this value set to Yes, the IS considers a string such as?one=1+two=2 to be a URL encoded input parameter. It then decodes this string into an IData object, puts it into the pipeline, and passes it to the service. With this value set to No, the IS treats the string as plain text and passes it to the appropriate content handler.
For this parameter... Specify…
106 webMethods Integration Server Administrator’s Guide Version 7.1.1

7 Configuring Ports
7 On the Ports screen, click Edit to change the Access Mode if necessary. You may Set Access Mode to Allow by Default or Reset to default access settings.
8 On the Ports screen, also check the list of ports to ensure that the status in the Enabled column is Yes. If it is not, click No to enable the port
Adding an HTTP Diagnostic PortThe diagnostic port is a special port that uses threads from a dedicated thread pool to accept requests via HTTP. The diagnostic port uses a dedicated thread pool so that you can access the Integration Server when it becomes unresponsive.
When you install the Integration Server, it automatically creates the diagnostic port at 9999. If another port is running at 9999, the server will disable the diagnostic port when you start the Integration Server.
For more information about the diagnostic port, see Appendix C, “Diagnosing the Integration Server”.
1 Open the Integration Server Administrator if it is not already open.
2 In the Security menu of the Navigation panel, click Ports.
3 Click Add Port.
4 Under Add Port, select HTTP Diagnostic.
5 Click Submit.
Note: If you set port access restrictions, be sure the watt.net.email.validateHost server configuration property is set to true, so the Integration Server honors your IP access restrictions.
Note: Each Integration Server can have only one diagnostic port. If you want to add a new diagnostic port, you must delete the existing port first. For information about how to delete a port, see “Deleting a Port” on page 117.
To add an HTTP diagnostic port
webMethods Integration Server Administrator’s Guide Version 7.1.1 107
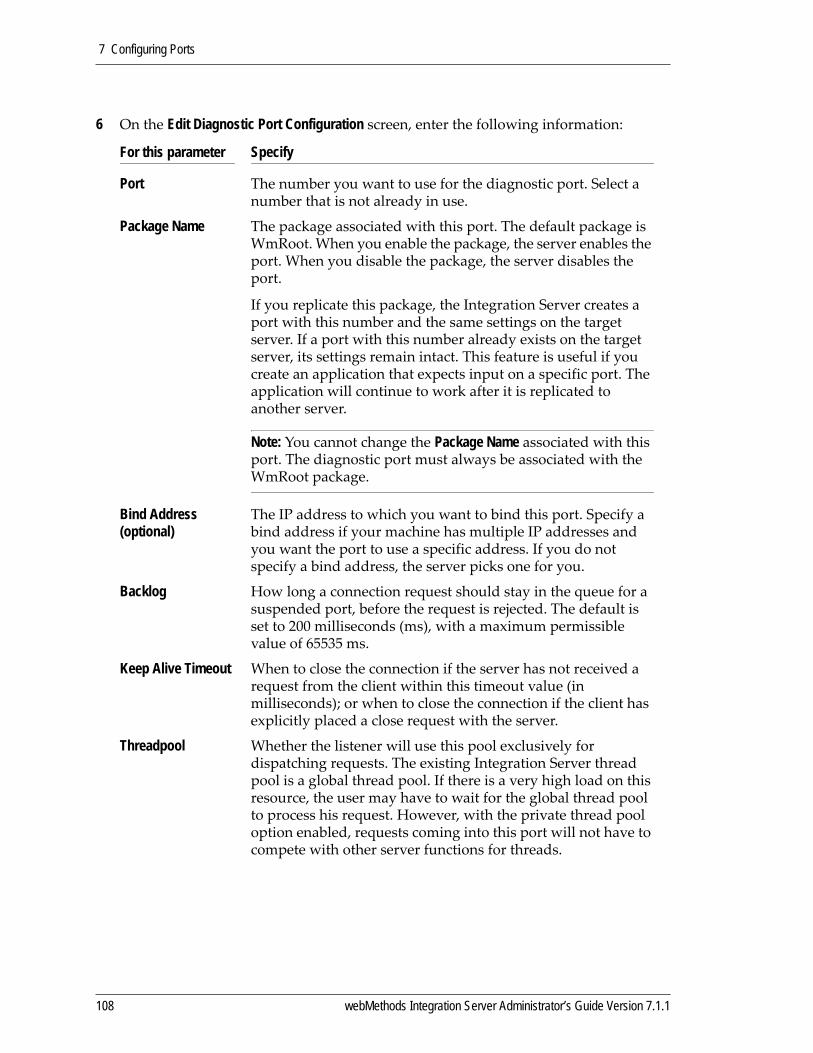
7 Configuring Ports
6 On the Edit Diagnostic Port Configuration screen, enter the following information:
For this parameter Specify
Port The number you want to use for the diagnostic port. Select a number that is not already in use.
Package Name The package associated with this port. The default package is WmRoot. When you enable the package, the server enables the port. When you disable the package, the server disables the port.
If you replicate this package, the Integration Server creates a port with this number and the same settings on the target server. If a port with this number already exists on the target server, its settings remain intact. This feature is useful if you create an application that expects input on a specific port. The application will continue to work after it is replicated to another server.
Note: You cannot change the Package Name associated with this port. The diagnostic port must always be associated with the WmRoot package.
Bind Address (optional)
The IP address to which you want to bind this port. Specify a bind address if your machine has multiple IP addresses and you want the port to use a specific address. If you do not specify a bind address, the server picks one for you.
Backlog How long a connection request should stay in the queue for a suspended port, before the request is rejected. The default is set to 200 milliseconds (ms), with a maximum permissible value of 65535 ms.
Keep Alive Timeout When to close the connection if the server has not received a request from the client within this timeout value (in milliseconds); or when to close the connection if the client has explicitly placed a close request with the server.
Threadpool Whether the listener will use this pool exclusively for dispatching requests. The existing Integration Server thread pool is a global thread pool. If there is a very high load on this resource, the user may have to wait for the global thread pool to process his request. However, with the private thread pool option enabled, requests coming into this port will not have to compete with other server functions for threads.
108 webMethods Integration Server Administrator’s Guide Version 7.1.1

7 Configuring Ports
7 Click Save Changes.
8 On the Ports screen, click Edit to change the Access Mode if necessary. You may Set Access Mode to Allow by Default or Reset to default access settings.
9 On the Ports screen, also check the list of ports to ensure that the status in the Enabled column is Yes. If it is not, click No to enable the port.
Adding an HTTPS Diagnostic PortThe diagnostic port is a special port that uses threads from a dedicated thread pool to accept requests via HTTP. The diagnostic port uses a dedicated thread pool so that you can access the Integration Server when it becomes unresponsive.
When you install the Integration Server, it automatically creates the diagnostic port at 9999. If another port is running at 9999, the server will disable the diagnostic port when you start the Integration Server.
Threadpool Click Enable if you wish to enable the private thread pool settings. You can change or accept the default settings given below:
Threadpool Min 1 Refers to the minimum number of threads. The default is set to 1.
Threadpool Max 5 Refers to the maximum number of threads for this private threadpool. The default is set to 5.
Threadpool Priority 5 This is the Java thread priority.
Important! This setting must be used with extreme care because it will affect the server performance and throughput.
Click Disable if you do not need to use the Threadpool feature.
Note: Each Integration Server can have only one diagnostic port. If you want to add a new diagnostic port, you must delete the existing port first. For information about how to delete a port, see “Deleting a Port” on page 117.
For this parameter Specify
webMethods Integration Server Administrator’s Guide Version 7.1.1 109
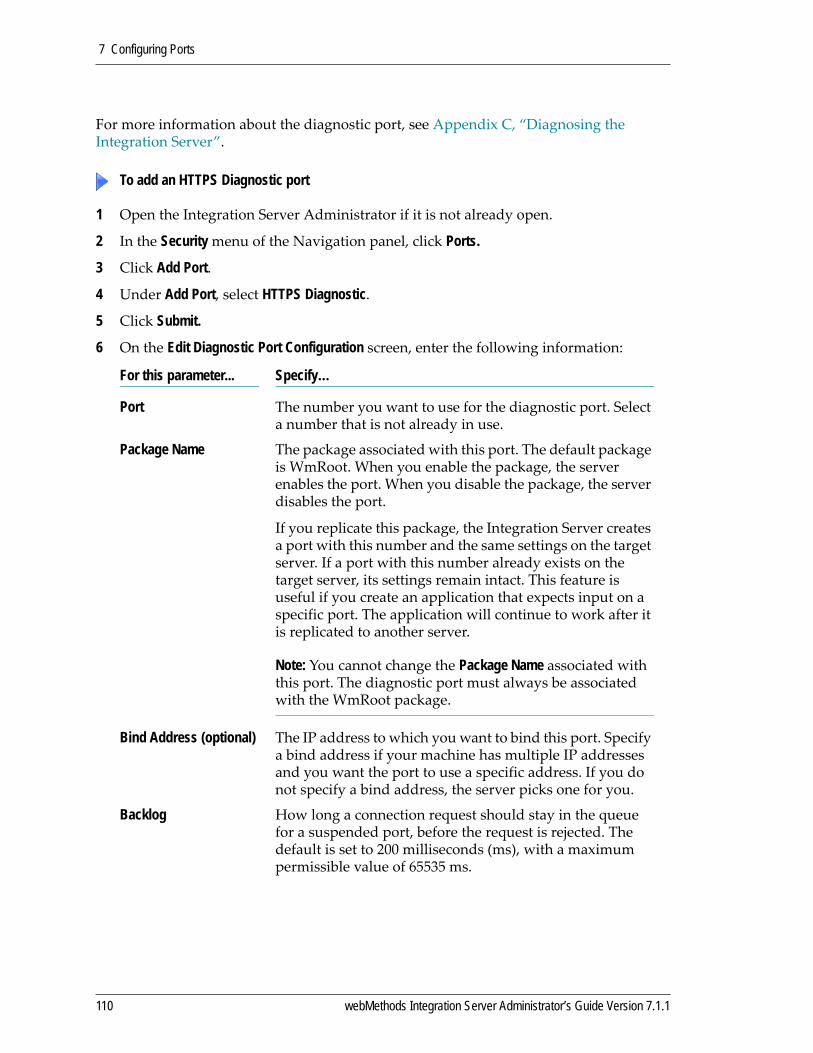
7 Configuring Ports
For more information about the diagnostic port, see Appendix C, “Diagnosing the Integration Server”.
1 Open the Integration Server Administrator if it is not already open.
2 In the Security menu of the Navigation panel, click Ports.
3 Click Add Port.
4 Under Add Port, select HTTPS Diagnostic.
5 Click Submit.
6 On the Edit Diagnostic Port Configuration screen, enter the following information:
To add an HTTPS Diagnostic port
For this parameter... Specify…
Port The number you want to use for the diagnostic port. Select a number that is not already in use.
Package Name The package associated with this port. The default package is WmRoot. When you enable the package, the server enables the port. When you disable the package, the server disables the port.
If you replicate this package, the Integration Server creates a port with this number and the same settings on the target server. If a port with this number already exists on the target server, its settings remain intact. This feature is useful if you create an application that expects input on a specific port. The application will continue to work after it is replicated to another server.
Note: You cannot change the Package Name associated with this port. The diagnostic port must always be associated with the WmRoot package.
Bind Address (optional) The IP address to which you want to bind this port. Specify a bind address if your machine has multiple IP addresses and you want the port to use a specific address. If you do not specify a bind address, the server picks one for you.
Backlog How long a connection request should stay in the queue for a suspended port, before the request is rejected. The default is set to 200 milliseconds (ms), with a maximum permissible value of 65535 ms.
110 webMethods Integration Server Administrator’s Guide Version 7.1.1
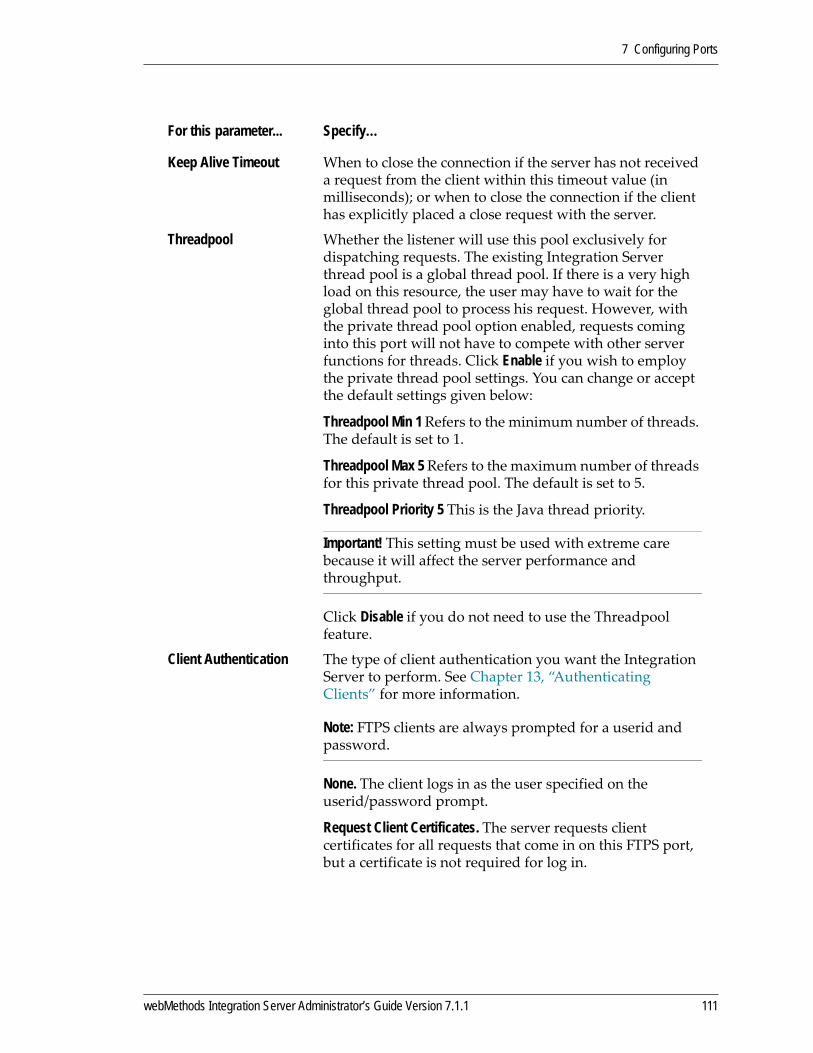
7 Configuring Ports
Keep Alive Timeout When to close the connection if the server has not received a request from the client within this timeout value (in milliseconds); or when to close the connection if the client has explicitly placed a close request with the server.
Threadpool Whether the listener will use this pool exclusively for dispatching requests. The existing Integration Server thread pool is a global thread pool. If there is a very high load on this resource, the user may have to wait for the global thread pool to process his request. However, with the private thread pool option enabled, requests coming into this port will not have to compete with other server functions for threads. Click Enable if you wish to employ the private thread pool settings. You can change or accept the default settings given below:
Threadpool Min 1 Refers to the minimum number of threads. The default is set to 1.
Threadpool Max 5 Refers to the maximum number of threads for this private thread pool. The default is set to 5.
Threadpool Priority 5 This is the Java thread priority.
Important! This setting must be used with extreme care because it will affect the server performance and throughput.
Click Disable if you do not need to use the Threadpool feature.
Client Authentication The type of client authentication you want the Integration Server to perform. See Chapter 13, “Authenticating Clients” for more information.
Note: FTPS clients are always prompted for a userid and password.
None. The client logs in as the user specified on the userid/password prompt.
Request Client Certificates. The server requests client certificates for all requests that come in on this FTPS port, but a certificate is not required for log in.
For this parameter... Specify…
webMethods Integration Server Administrator’s Guide Version 7.1.1 111
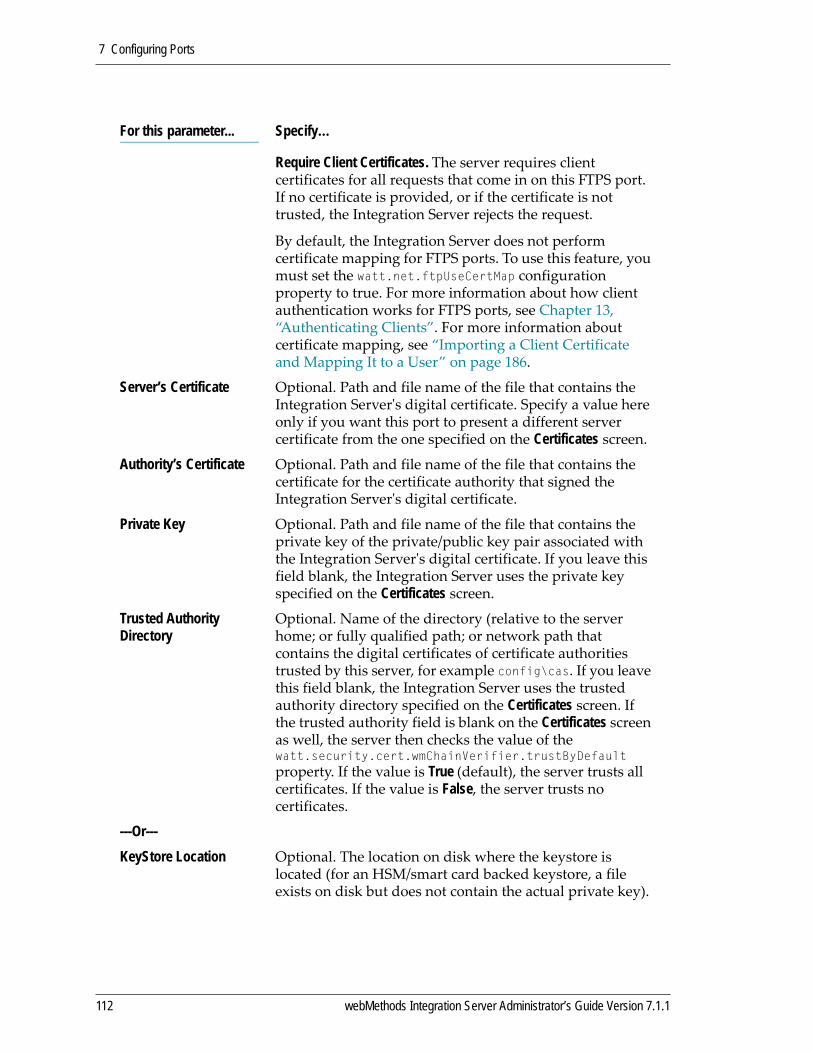
7 Configuring Ports
Require Client Certificates. The server requires client certificates for all requests that come in on this FTPS port. If no certificate is provided, or if the certificate is not trusted, the Integration Server rejects the request.
By default, the Integration Server does not perform certificate mapping for FTPS ports. To use this feature, you must set the watt.net.ftpUseCertMap configuration property to true. For more information about how client authentication works for FTPS ports, see Chapter 13, “Authenticating Clients”. For more information about certificate mapping, see “Importing a Client Certificate and Mapping It to a User” on page 186.
Server’s Certificate Optional. Path and file name of the file that contains the Integration Serverʹs digital certificate. Specify a value here only if you want this port to present a different server certificate from the one specified on the Certificates screen.
Authority’s Certificate Optional. Path and file name of the file that contains the certificate for the certificate authority that signed the Integration Serverʹs digital certificate.
Private Key Optional. Path and file name of the file that contains the private key of the private/public key pair associated with the Integration Serverʹs digital certificate. If you leave this field blank, the Integration Server uses the private key specified on the Certificates screen.
Trusted Authority Directory
Optional. Name of the directory (relative to the server home; or fully qualified path; or network path that contains the digital certificates of certificate authorities trusted by this server, for example config\cas. If you leave this field blank, the Integration Server uses the trusted authority directory specified on the Certificates screen. If the trusted authority field is blank on the Certificates screen as well, the server then checks the value of the watt.security.cert.wmChainVerifier.trustByDefault property. If the value is True (default), the server trusts all certificates. If the value is False, the server trusts no certificates.
---Or---KeyStore Location Optional. The location on disk where the keystore is
located (for an HSM/smart card backed keystore, a file exists on disk but does not contain the actual private key).
For this parameter... Specify…
112 webMethods Integration Server Administrator’s Guide Version 7.1.1

7 Configuring Ports
KeyStore Password Optional. The password with which the keystore is protected. If the private key and certificate chain are stored on an HSM device, this property must match the password with which the card was protected (for example, for nCipher as the HSM provider, this property must match the OCS (Operator Card Set) password for the card).
KeyStore Type Optional. The type of the keystore. Different vendors support different types of keystore; for example, the default SUN keystore implementation is of type ʺjksʺ (nCipher also uses this type).
Within this property, the name in parentheses is the name of the Security Provider that will provide support for the keystore type. If the desired provider is not listed in the drop‐down list, you can add it by clicking the ʺAdd new Security Providerʺ link. For more information about how to add a security provider, see “Adding a Security Provider” on page 119.
As long as a port with the given provider exists, you will not have to manually re‐register the security provider. If the last port which uses this provider is deleted and the Integration Server is restarted, you must re‐register this security provider before using it for a port.
Important! The Integration Server supports JKS and PKCS#12 keystore types only. Other keystore types may work with Integration Server but are not supported.
HSM Based Keystore Optional. Indicates whether or not the keystore is backed by an HSM‐based keystore (a smart card device can be used as well). When the keystore is backed by such a device, the private key does not physically leave the HSM device and certain cryptographic operations must be performed on that device.
Alias Required if the KeyStore Location parameter is defined. If the KeyStore Location parameter is null, the Alias property is ignored.
Specifies the alias that points to the private key and its associated certificate chain in the keystore. Each listener points to one alias on the keystore; there can be multiple aliases in the same keystore and more than one listener can use the same alias.
For this parameter... Specify…
webMethods Integration Server Administrator’s Guide Version 7.1.1 113
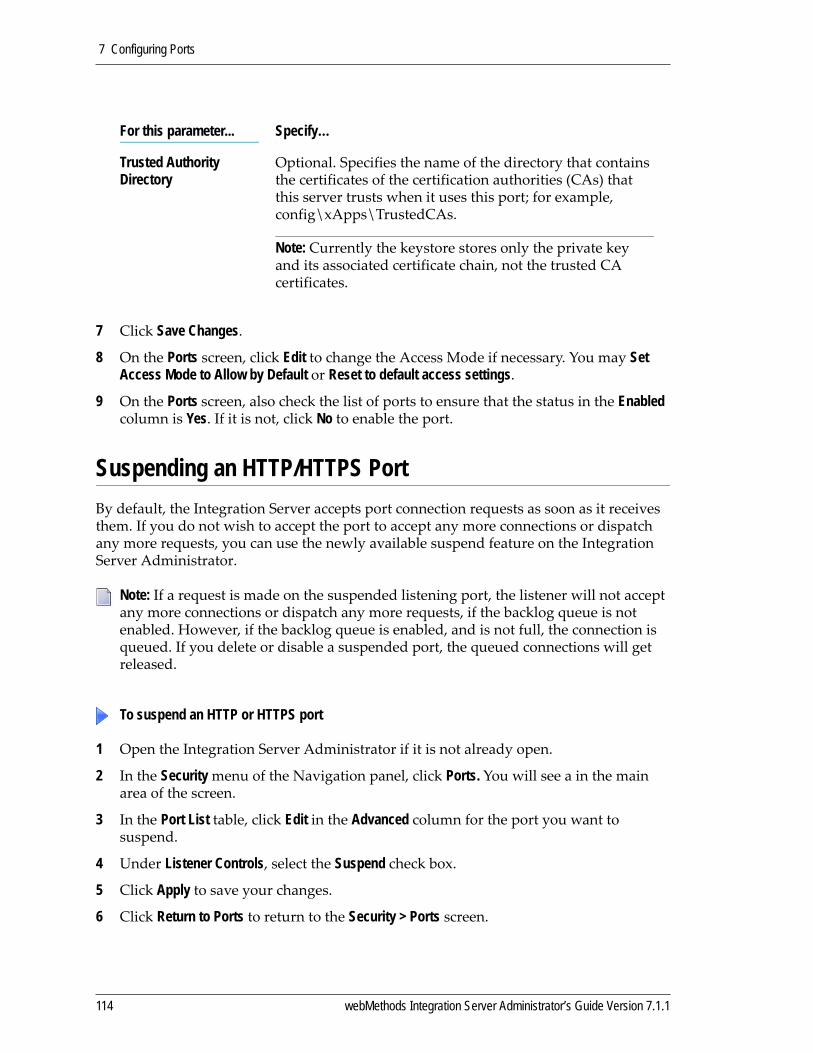
7 Configuring Ports
7 Click Save Changes.
8 On the Ports screen, click Edit to change the Access Mode if necessary. You may Set Access Mode to Allow by Default or Reset to default access settings.
9 On the Ports screen, also check the list of ports to ensure that the status in the Enabled column is Yes. If it is not, click No to enable the port.
Suspending an HTTP/HTTPS PortBy default, the Integration Server accepts port connection requests as soon as it receives them. If you do not wish to accept the port to accept any more connections or dispatch any more requests, you can use the newly available suspend feature on the Integration Server Administrator.
1 Open the Integration Server Administrator if it is not already open.
2 In the Security menu of the Navigation panel, click Ports. You will see a in the main area of the screen.
3 In the Port List table, click Edit in the Advanced column for the port you want to suspend.
4 Under Listener Controls, select the Suspend check box.
5 Click Apply to save your changes.
6 Click Return to Ports to return to the Security > Ports screen.
Trusted Authority Directory
Optional. Specifies the name of the directory that contains the certificates of the certification authorities (CAs) that this server trusts when it uses this port; for example, config\xApps\TrustedCAs.
Note: Currently the keystore stores only the private key and its associated certificate chain, not the trusted CA certificates.
Note: If a request is made on the suspended listening port, the listener will not accept any more connections or dispatch any more requests, if the backlog queue is not enabled. However, if the backlog queue is enabled, and is not full, the connection is queued. If you delete or disable a suspended port, the queued connections will get released.
To suspend an HTTP or HTTPS port
For this parameter... Specify…
114 webMethods Integration Server Administrator’s Guide Version 7.1.1
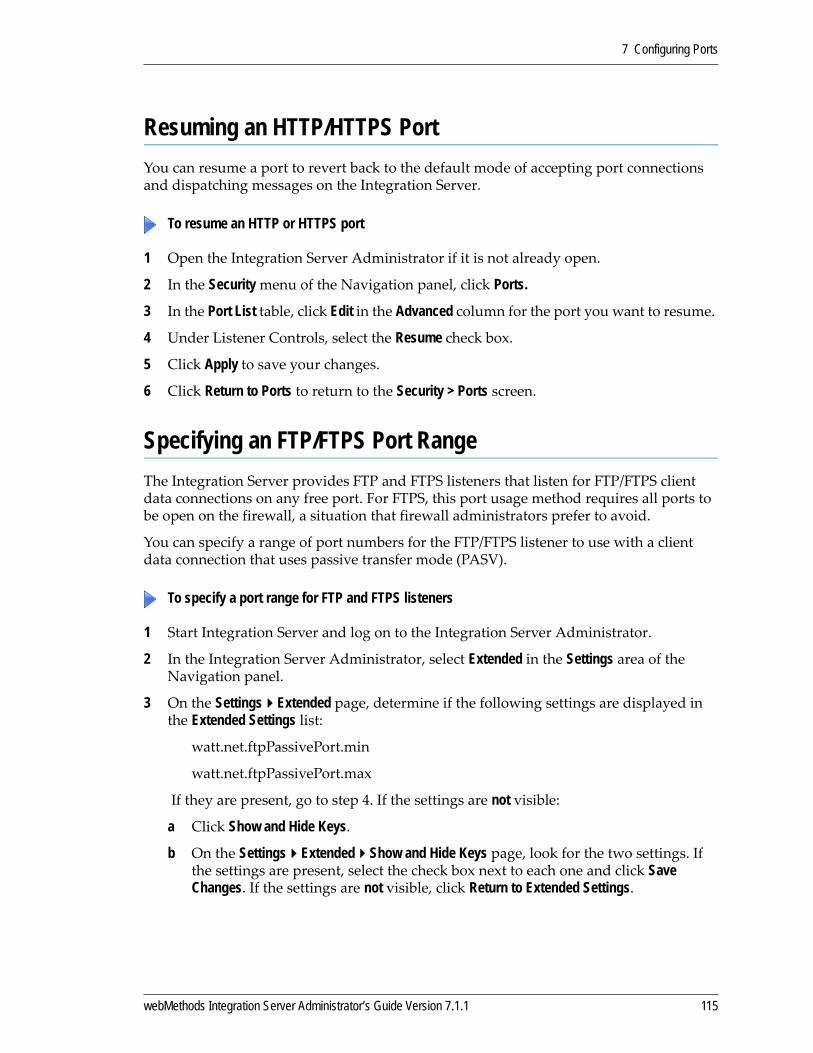
7 Configuring Ports
Resuming an HTTP/HTTPS PortYou can resume a port to revert back to the default mode of accepting port connections and dispatching messages on the Integration Server.
1 Open the Integration Server Administrator if it is not already open.
2 In the Security menu of the Navigation panel, click Ports.
3 In the Port List table, click Edit in the Advanced column for the port you want to resume.
4 Under Listener Controls, select the Resume check box.
5 Click Apply to save your changes.
6 Click Return to Ports to return to the Security > Ports screen.
Specifying an FTP/FTPS Port RangeThe Integration Server provides FTP and FTPS listeners that listen for FTP/FTPS client data connections on any free port. For FTPS, this port usage method requires all ports to be open on the firewall, a situation that firewall administrators prefer to avoid.
You can specify a range of port numbers for the FTP/FTPS listener to use with a client data connection that uses passive transfer mode (PASV).
1 Start Integration Server and log on to the Integration Server Administrator.
2 In the Integration Server Administrator, select Extended in the Settings area of the Navigation panel.
3 On the Settings Extended page, determine if the following settings are displayed in the Extended Settings list:
watt.net.ftpPassivePort.min
watt.net.ftpPassivePort.max
If they are present, go to step 4. If the settings are not visible:
a Click Show and Hide Keys.
b On the Settings Extended Show and Hide Keys page, look for the two settings. If the settings are present, select the check box next to each one and click Save Changes. If the settings are not visible, click Return to Extended Settings.
To resume an HTTP or HTTPS port
To specify a port range for FTP and FTPS listeners
webMethods Integration Server Administrator’s Guide Version 7.1.1 115
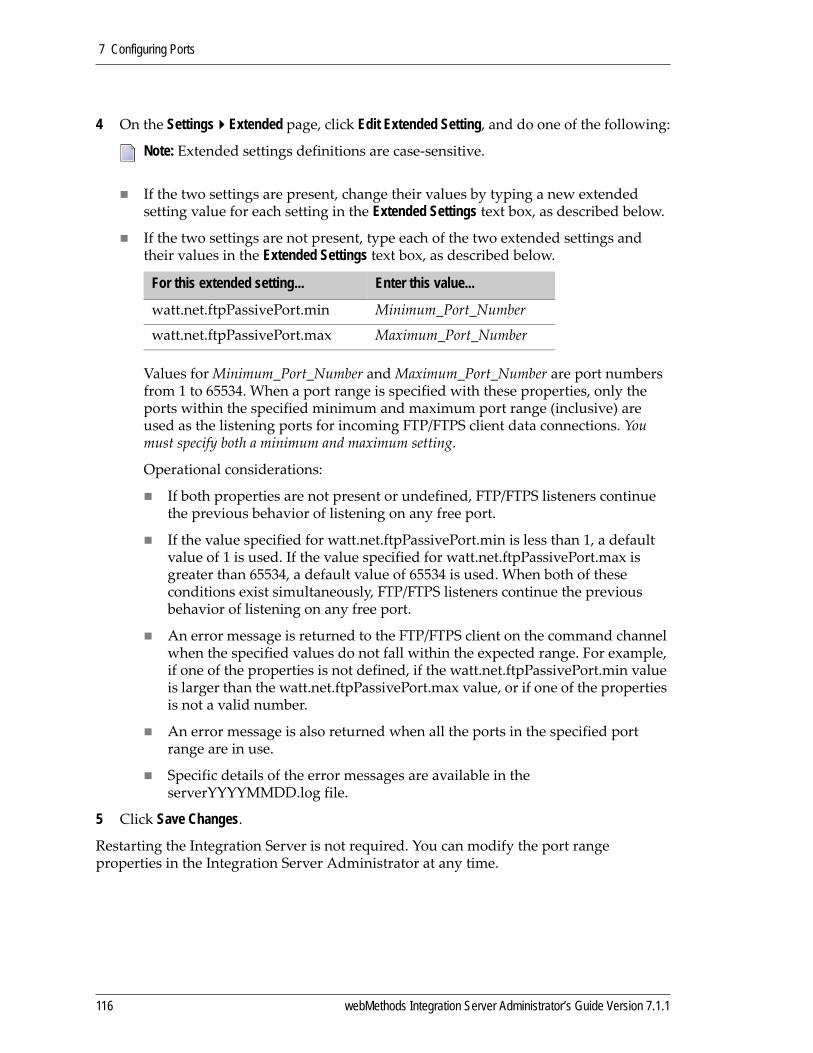
7 Configuring Ports
4 On the Settings Extended page, click Edit Extended Setting, and do one of the following:
If the two settings are present, change their values by typing a new extended setting value for each setting in the Extended Settings text box, as described below.
If the two settings are not present, type each of the two extended settings and their values in the Extended Settings text box, as described below.
Values for Minimum_Port_Number and Maximum_Port_Number are port numbers from 1 to 65534. When a port range is specified with these properties, only the ports within the specified minimum and maximum port range (inclusive) are used as the listening ports for incoming FTP/FTPS client data connections. You must specify both a minimum and maximum setting.
Operational considerations:
If both properties are not present or undefined, FTP/FTPS listeners continue the previous behavior of listening on any free port.
If the value specified for watt.net.ftpPassivePort.min is less than 1, a default value of 1 is used. If the value specified for watt.net.ftpPassivePort.max is greater than 65534, a default value of 65534 is used. When both of these conditions exist simultaneously, FTP/FTPS listeners continue the previous behavior of listening on any free port.
An error message is returned to the FTP/FTPS client on the command channel when the specified values do not fall within the expected range. For example, if one of the properties is not defined, if the watt.net.ftpPassivePort.min value is larger than the watt.net.ftpPassivePort.max value, or if one of the properties is not a valid number.
An error message is also returned when all the ports in the specified port range are in use.
Specific details of the error messages are available in the serverYYYYMMDD.log file.
5 Click Save Changes.
Restarting the Integration Server is not required. You can modify the port range properties in the Integration Server Administrator at any time.
Note: Extended settings definitions are case‐sensitive.
For this extended setting... Enter this value...
watt.net.ftpPassivePort.min Minimum_Port_Number
watt.net.ftpPassivePort.max Maximum_Port_Number
116 webMethods Integration Server Administrator’s Guide Version 7.1.1
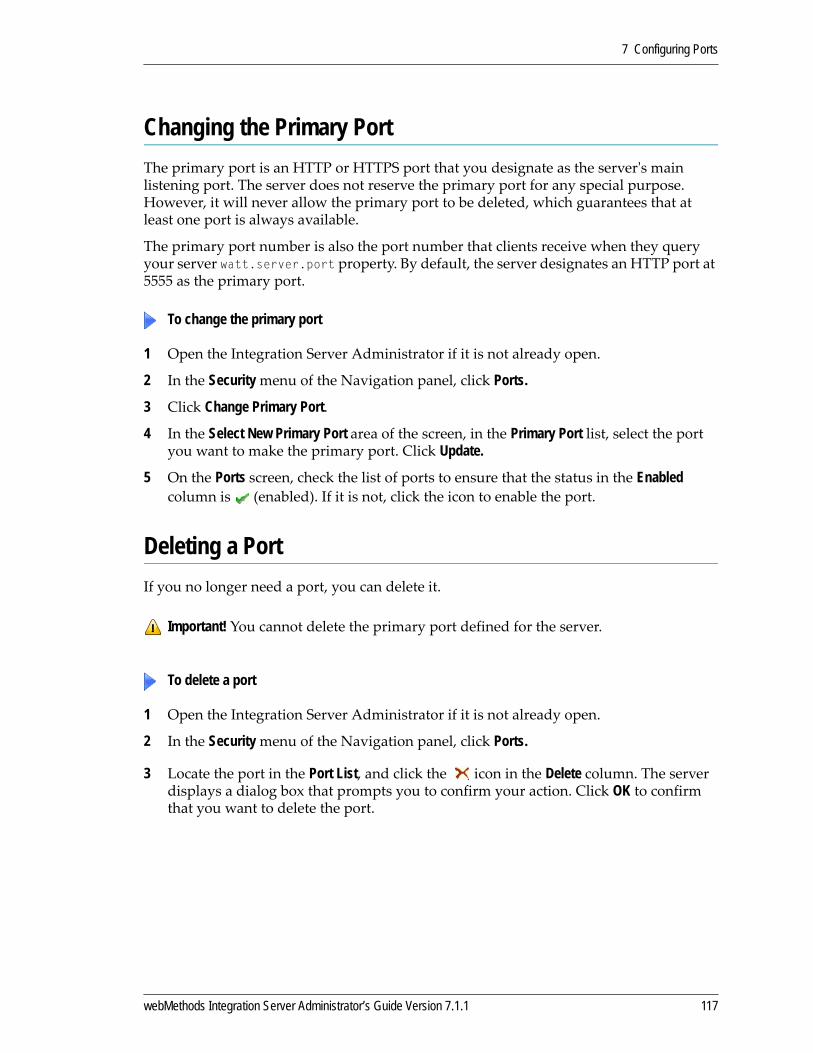
7 Configuring Ports
Changing the Primary PortThe primary port is an HTTP or HTTPS port that you designate as the serverʹs main listening port. The server does not reserve the primary port for any special purpose. However, it will never allow the primary port to be deleted, which guarantees that at least one port is always available.
The primary port number is also the port number that clients receive when they query your server watt.server.port property. By default, the server designates an HTTP port at 5555 as the primary port.
1 Open the Integration Server Administrator if it is not already open.
2 In the Security menu of the Navigation panel, click Ports.
3 Click Change Primary Port.
4 In the Select New Primary Port area of the screen, in the Primary Port list, select the port you want to make the primary port. Click Update.
5 On the Ports screen, check the list of ports to ensure that the status in the Enabled column is (enabled). If it is not, click the icon to enable the port.
Deleting a PortIf you no longer need a port, you can delete it.
1 Open the Integration Server Administrator if it is not already open.
2 In the Security menu of the Navigation panel, click Ports.
3 Locate the port in the Port List, and click the icon in the Delete column. The server displays a dialog box that prompts you to confirm your action. Click OK to confirm that you want to delete the port.
To change the primary port
Important! You cannot delete the primary port defined for the server.
To delete a port
webMethods Integration Server Administrator’s Guide Version 7.1.1 117

7 Configuring Ports
Editing a PortAfter adding a port, you can edit the port configuration. The port must be disabled before you can edit the configuration.
1 Open the Integration Server Administrator if it is not already open.
2 In the Security menu of the Navigation panel, click Ports.
3 Locate the port you want to edit and click on the port number.
4 Click Edit <port type> Port Configuration.
5 Update the information for the port.
6 Click Save Changes.
Enabling/Disabling a PortIf you want to temporarily prevent the server from accepting requests on one of its ports, you can disable that port. This action blocks incoming requests from reaching the server. When a port is disabled, clients receive an error message when they issue requests to it. Later, you can enable the port. If you shut down and restart the server, the port remains disabled until an administrator enables it. Disabling a port is a convenient way to eliminate developer access to an Integration Server once it goes into production.
Another way to enable or disable a port is to enable or disable the package associated with the port. You can associate a package with a specific port so that when you replicate the package, it continues to use a port with the same number on the new server. When a package is associated with a port, enabling the package enables the port and disabling the package disables the port.
1 Open the Integration Server Administrator if it is not already open.
2 In the Security menu of the Navigation panel, click Ports.
3 Locate the port in the Port List, and click the icon in the Enabled column to disable the port. The server displays a dialog box that prompts you to verify your action. Click OK to verify you want to disable the port.
The server replaces the icon with No to indicate that the port is now disabled.
To edit a port
Important! You must leave at least the primary port enabled.
To disable a port
118 webMethods Integration Server Administrator’s Guide Version 7.1.1
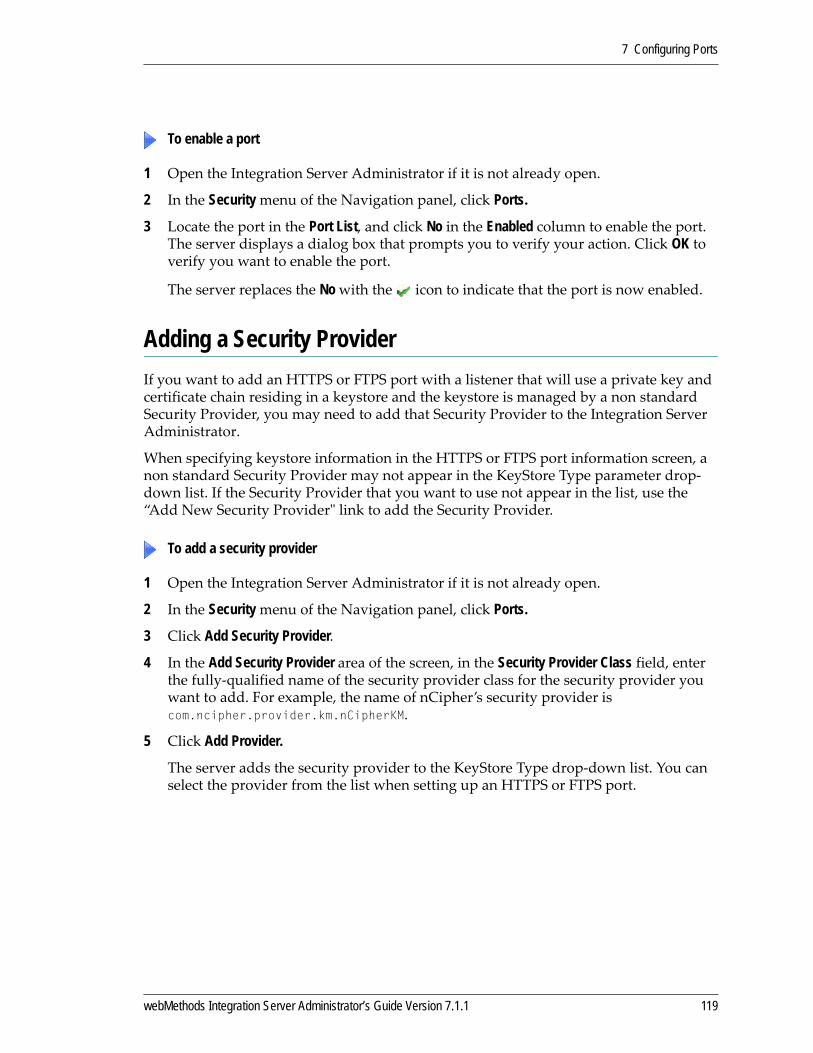
7 Configuring Ports
1 Open the Integration Server Administrator if it is not already open.
2 In the Security menu of the Navigation panel, click Ports.
3 Locate the port in the Port List, and click No in the Enabled column to enable the port. The server displays a dialog box that prompts you to verify your action. Click OK to verify you want to enable the port.
The server replaces the No with the icon to indicate that the port is now enabled.
Adding a Security ProviderIf you want to add an HTTPS or FTPS port with a listener that will use a private key and certificate chain residing in a keystore and the keystore is managed by a non standard Security Provider, you may need to add that Security Provider to the Integration Server Administrator.
When specifying keystore information in the HTTPS or FTPS port information screen, a non standard Security Provider may not appear in the KeyStore Type parameter drop‐down list. If the Security Provider that you want to use not appear in the list, use the “Add New Security Providerʺ link to add the Security Provider.
1 Open the Integration Server Administrator if it is not already open.
2 In the Security menu of the Navigation panel, click Ports.
3 Click Add Security Provider.
4 In the Add Security Provider area of the screen, in the Security Provider Class field, enter the fully‐qualified name of the security provider class for the security provider you want to add. For example, the name of nCipher’s security provider is com.ncipher.provider.km.nCipherKM.
5 Click Add Provider.
The server adds the security provider to the KeyStore Type drop‐down list. You can select the provider from the list when setting up an HTTPS or FTPS port.
To enable a port
To add a security provider
webMethods Integration Server Administrator’s Guide Version 7.1.1 119

7 Configuring Ports
120 webMethods Integration Server Administrator’s Guide Version 7.1.1
8 Configuring Document Stores
Overview . . . . . . . . . . . . . . . . . . . . . . . . . . . . . . . . . . . . . . . . . . . . . . . . . . . . . . . . . . . . . . . . . . . 122
Configuring the Default Document Store . . . . . . . . . . . . . . . . . . . . . . . . . . . . . . . . . . . . . . . . . . . 123
Configuring the Trigger Document Store . . . . . . . . . . . . . . . . . . . . . . . . . . . . . . . . . . . . . . . . . . . 124
Maintaining Inbound Document History for Received Documents . . . . . . . . . . . . . . . . . . . . . . . . 126
Enabling Inbound Client-Side Queuing . . . . . . . . . . . . . . . . . . . . . . . . . . . . . . . . . . . . . . . . . . . . 127
Configuring the Outbound Document Store . . . . . . . . . . . . . . . . . . . . . . . . . . . . . . . . . . . . . . . . . 127
Selecting a User Account for Invoking Services Specified in Broker/Local Triggers . . . . . . . . . . 128
Managing the Document History Database . . . . . . . . . . . . . . . . . . . . . . . . . . . . . . . . . . . . . . . . . 129
webMethods Integration Server Administrator’s Guide Version 7.1.1 121

8 Configuring Document Stores
OverviewThe Integration Server uses document stores to save documents to disk or to memory while the documents are in transit or waiting to be processed. Integration Server maintains three document stores for published documents.
Default document store. The default document store contains documents delivered to the client ID of the Integration Server. When the Integration Server retrieves documents delivered to its client ID, the server places the documents in the default document store. Documents remain in the default document store until the dispatcher determines which triggers subscribe to the document. The dispatcher then moves the documents to the trigger queues for the subscribing triggers.
Trigger document store. The trigger document store contains documents waiting to be processed by Broker/local triggers. The server assigns each trigger a queue in the trigger document store. A document remains in the trigger queue until the server successfully processes the document.
Outbound document store. The outbound document store contains documents waiting to be sent to the Broker. Integration Server places documents in the outbound document store when the configured Broker is not available. When the connection to the Broker is restored, the server empties the outbound document store by sending the saved documents to the Broker.
Using the Integration Server Administrator, you can configure properties for each document store. For example, you can determine the store locations and the initial store sizes. You can also determine whether the inbound document stores are stored on disk or in memory, how long document stores maintain a document history, and how quickly the server drains the outbound document store.
The following sections provide more information about configuring document stores.
Important! As part of configuring your server to publish and subscribe to documents, you might need to increase the minimum and maximum heap size. The heap size indicates how much memory is allotted for server processes. To edit the heap size, shut down the server, and open the server.bat or server.sh using a text editor. Set JAVA_MIN_MEM to the minimum heap size and set JAVA_MAX_MEM to the maximum heap size. By default, the minimum heap size is 256MB and the maximum heap is 512MB. Your capacity planning and performance analysis should indicate whether you need to set higher maximum and minimum heap size values.
122 webMethods Integration Server Administrator’s Guide Version 7.1.1
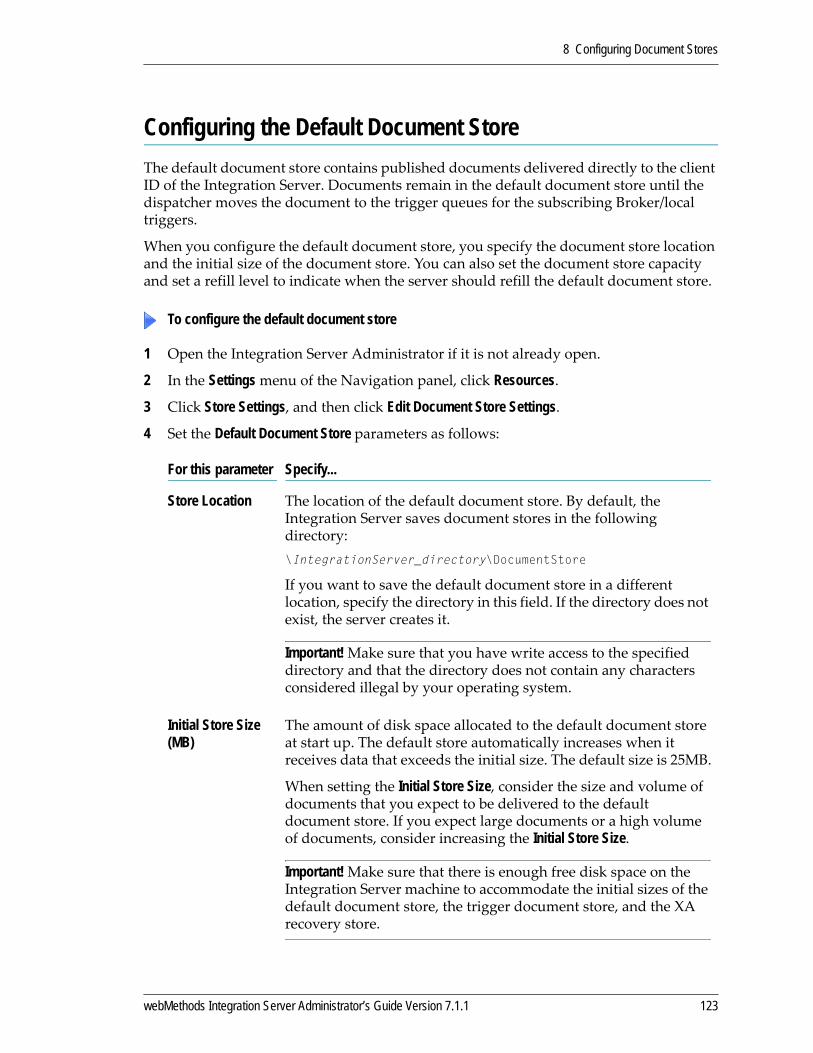
8 Configuring Document Stores
Configuring the Default Document StoreThe default document store contains published documents delivered directly to the client ID of the Integration Server. Documents remain in the default document store until the dispatcher moves the document to the trigger queues for the subscribing Broker/local triggers.
When you configure the default document store, you specify the document store location and the initial size of the document store. You can also set the document store capacity and set a refill level to indicate when the server should refill the default document store.
1 Open the Integration Server Administrator if it is not already open.
2 In the Settings menu of the Navigation panel, click Resources.
3 Click Store Settings, and then click Edit Document Store Settings.
4 Set the Default Document Store parameters as follows:
To configure the default document store
For this parameter Specify...
Store Location The location of the default document store. By default, the Integration Server saves document stores in the following directory:\IntegrationServer_directory\DocumentStore
If you want to save the default document store in a different location, specify the directory in this field. If the directory does not exist, the server creates it.
Important! Make sure that you have write access to the specified directory and that the directory does not contain any characters considered illegal by your operating system.
Initial Store Size (MB)
The amount of disk space allocated to the default document store at start up. The default store automatically increases when it receives data that exceeds the initial size. The default size is 25MB.
When setting the Initial Store Size, consider the size and volume of documents that you expect to be delivered to the default document store. If you expect large documents or a high volume of documents, consider increasing the Initial Store Size.
Important! Make sure that there is enough free disk space on the Integration Server machine to accommodate the initial sizes of the default document store, the trigger document store, and the XA recovery store.
webMethods Integration Server Administrator’s Guide Version 7.1.1 123
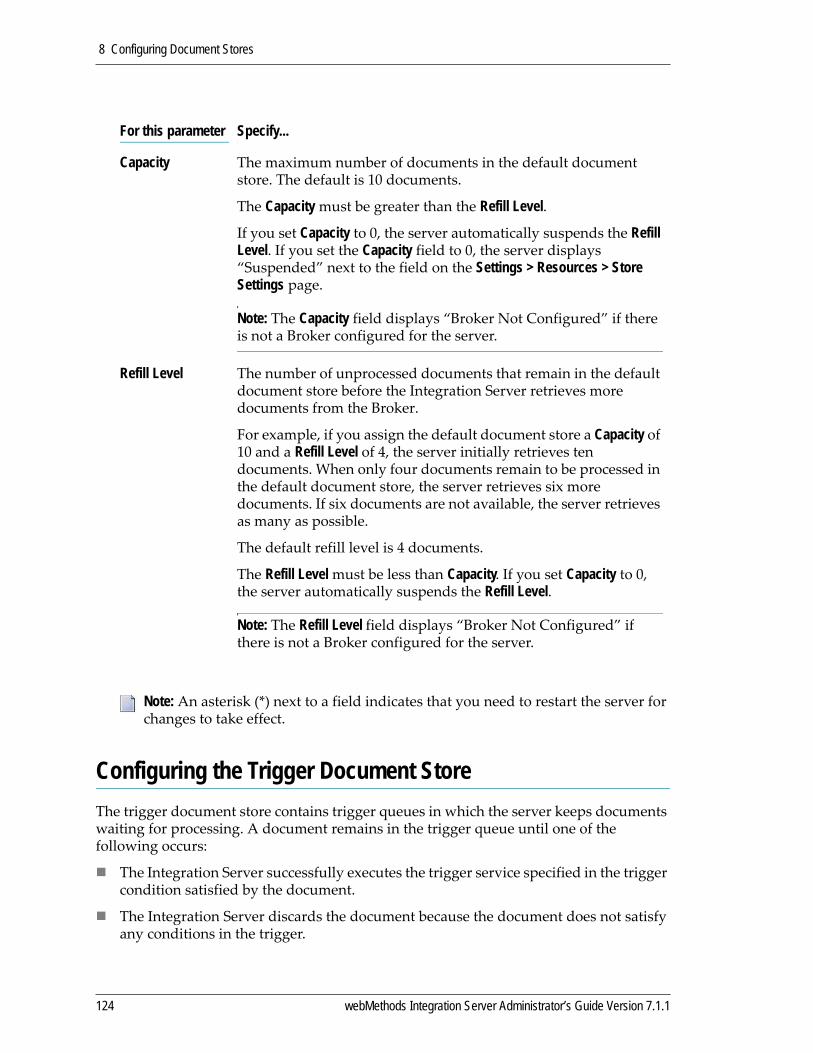
8 Configuring Document Stores
Configuring the Trigger Document StoreThe trigger document store contains trigger queues in which the server keeps documents waiting for processing. A document remains in the trigger queue until one of the following occurs:
The Integration Server successfully executes the trigger service specified in the trigger condition satisfied by the document.
The Integration Server discards the document because the document does not satisfy any conditions in the trigger.
Capacity The maximum number of documents in the default document store. The default is 10 documents.
The Capacity must be greater than the Refill Level.
If you set Capacity to 0, the server automatically suspends the Refill Level. If you set the Capacity field to 0, the server displays “Suspended” next to the field on the Settings > Resources > Store Settings page.
Note: The Capacity field displays “Broker Not Configured” if there is not a Broker configured for the server.
Refill Level The number of unprocessed documents that remain in the default document store before the Integration Server retrieves more documents from the Broker.
For example, if you assign the default document store a Capacity of 10 and a Refill Level of 4, the server initially retrieves ten documents. When only four documents remain to be processed in the default document store, the server retrieves six more documents. If six documents are not available, the server retrieves as many as possible.
The default refill level is 4 documents.
The Refill Level must be less than Capacity. If you set Capacity to 0, the server automatically suspends the Refill Level.
Note: The Refill Level field displays “Broker Not Configured” if there is not a Broker configured for the server.
Note: An asterisk (*) next to a field indicates that you need to restart the server for changes to take effect.
For this parameter Specify...
124 webMethods Integration Server Administrator’s Guide Version 7.1.1
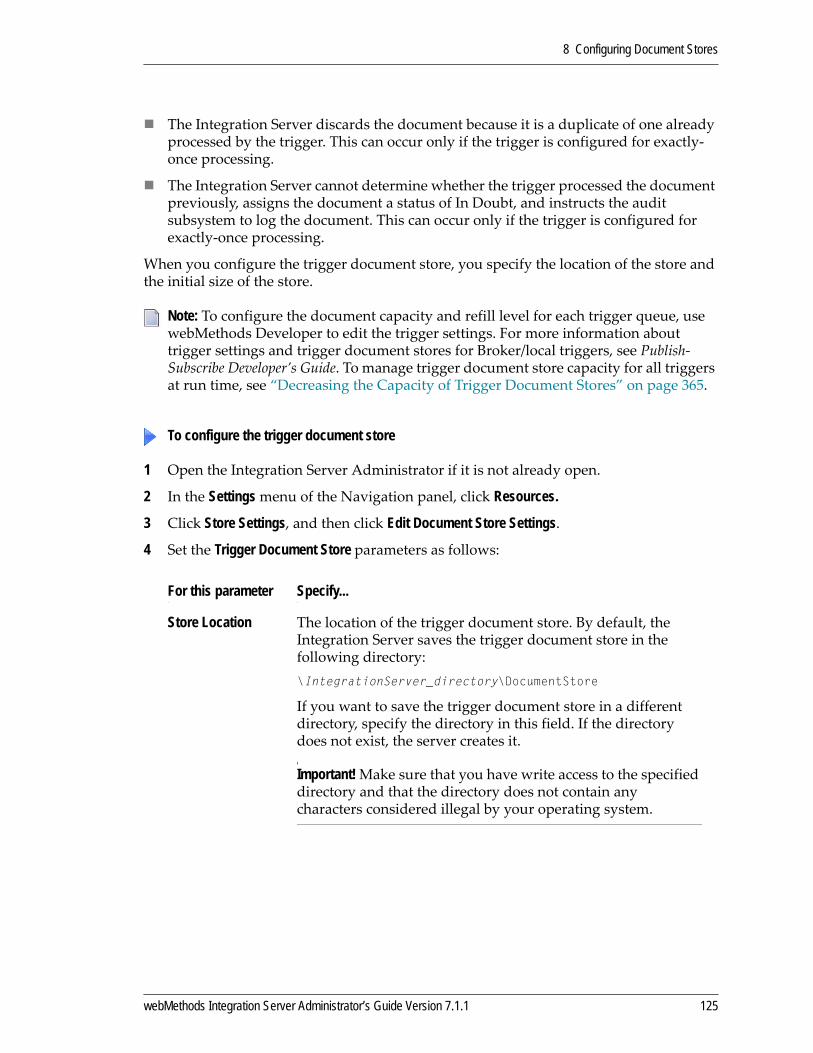
8 Configuring Document Stores
The Integration Server discards the document because it is a duplicate of one already processed by the trigger. This can occur only if the trigger is configured for exactly‐once processing.
The Integration Server cannot determine whether the trigger processed the document previously, assigns the document a status of In Doubt, and instructs the audit subsystem to log the document. This can occur only if the trigger is configured for exactly‐once processing.
When you configure the trigger document store, you specify the location of the store and the initial size of the store.
1 Open the Integration Server Administrator if it is not already open.
2 In the Settings menu of the Navigation panel, click Resources.
3 Click Store Settings, and then click Edit Document Store Settings.
4 Set the Trigger Document Store parameters as follows:
Note: To configure the document capacity and refill level for each trigger queue, use webMethods Developer to edit the trigger settings. For more information about trigger settings and trigger document stores for Broker/local triggers, see Publish‐Subscribe Developer’s Guide. To manage trigger document store capacity for all triggers at run time, see “Decreasing the Capacity of Trigger Document Stores” on page 365.
To configure the trigger document store
For this parameter Specify...
Store Location The location of the trigger document store. By default, the Integration Server saves the trigger document store in the following directory:\IntegrationServer_directory\DocumentStore
If you want to save the trigger document store in a different directory, specify the directory in this field. If the directory does not exist, the server creates it.
Important! Make sure that you have write access to the specified directory and that the directory does not contain any characters considered illegal by your operating system.
webMethods Integration Server Administrator’s Guide Version 7.1.1 125

8 Configuring Document Stores
Maintaining Inbound Document History for Received DocumentsIf the Integration Server connects to a Broker version 6.0.1, you can configure the Inbound Document History setting to maintain a history of documents received by the server. This instructs the server to perform a very basic form of duplicate detection for all triggers.
If the Integration Server connects to a Broker version 6.1 or later, you can configure duplicate detection on a per trigger basis. For information about configuring duplicate detection for Broker/local triggers using version 6.1 or later of the Integration Server, see Publish‐Subscribe Developer’s Guide.
In a cluster of Integration Servers connected to a Broker version 6.0.1, each Integration Server in the cluster maintains its own inbound document history information. That is, the inbound document history information is not shared across the cluster.
Initial Store Size (MB)
The amount of disk space allocated to the trigger document store at start up. The trigger document store automatically increases when it receives data that exceeds the initial size. The default size is 35MB.
Important! Make sure that there is enough free disk space on the Integration Server machine to accommodate the initial sizes of the default document store, the trigger document store, and the XA recovery store.
Note: An asterisk (*) next to a field indicates that you need to restart the server for changes to take effect.
Note: The Inbound Document History (minutes) field can be set only if the Integration Server connects to a Broker version 6.0.1. The field is not available if the server connects to a 6.1 or later version of the Broker. For detailed information about configuring inbound document history, see the 6.0.1 version of the webMethods Integration Server Administrator’s Guide.
For this parameter Specify...
126 webMethods Integration Server Administrator’s Guide Version 7.1.1

8 Configuring Document Stores
Enabling Inbound Client-Side QueuingIf the Integration Server connects to a 6.0.1 version of the Broker, you can use client‐side queueing. When client‐side queuing is enabled, the Integration Server stores received documents on disk and acknowledges documents to the webMethods Broker immediately after receipt and storage. When client‐side queuing is disabled, the Integration Server stores received documents in memory and acknowledges documents to the webMethods Broker after processing completes.
Configuring the Outbound Document StoreThe outbound document store contains guaranteed documents published by the server when the configured Broker is not available. After the connection to the Broker is reestablished, the server sends the documents in the outbound document store to the Broker. To maintain publication order, the server places all published documents (guaranteed and volatile) in the outbound document store before sending the documents to the Broker. The server resumes sending documents directly to the Broker after the outbound document store is empty.
You can configure how quickly the server empties the outbound document store by setting the Maximum Documents to Send per Transaction parameter on the Settings > Resources > Store Settings > Edit Document Store Settings page. By default, this parameter is set to 25 documents. To empty the outbound document store more quickly, increase the number of documents sent per transaction. Keep in mind that the amount of memory needed to send documents increases with the number of documents sent for each transaction. If you want to use less memory to empty the outbound document store and can allow the outbound document store to empty more slowly, decrease the number of documents sent for each transaction. However, it is advisable to drain the outbound document store as quickly as possible because the server performs more quickly and uses fewer resources when publishing documents directly to the Broker.
Note: Client‐side queuing is not available when the Integration Server connects to a 6.1 or later version of the Broker. For information about using client‐side queuing with a 6.0.1 version of the Broker, see the 6.0.1 version of the webMethods Integration Server Administrator’s Guide.
Note: You can configure Integration Server to throw a ServiceException when the Broker is unavailable instead of placing published documents in the outbound document store. For more information, see the watt.server.publish.useCSQ parameter on page 434.
Tip! You can use the Current Documents in Outbound Store field to monitor the number of documents in the outbound document store and how quickly the server drains the store.
webMethods Integration Server Administrator’s Guide Version 7.1.1 127

8 Configuring Document Stores
1 Open the Integration Server Administrator if it is not already open.
2 In the Settings menu of the Navigation panel, click Resources.
3 Click Store Settings, and then click Edit Document Store Settings.
4 Under Outbound Document Store, in the Maximum Documents to Send per Transaction, type the number of documents the server should send from the outbound document store to the Broker for each transaction.
If there is no configured Broker, the Integration Server Administrator displays “Broker Not Configured” next to the field name.
Setting the Capacity of the Outbound Document StoreBy default, the outbound document store can contain a maximum of 500,000 documents. After the outbound document store reaches capacity, the server “blocks” or “pauses” any threads that are executing services that publish documents. The threads remain blocked until the server begins draining the outbound document store.
The watt.server.control.maxPersist server parameter determines the capacity of the outbound document store. If you plan to bring the Broker down for an extended time period, consider editing this parameter to lower the capacity of the outbound document store. If you keep the outbound document store at the default capacity, and the Broker becomes unavailable, it is possible that storing outbound documents could exhaust memory and cause the server to fail. If the outbound document store has a lower capacity, the server will block threads instead of continuing to use memory by storing documents.
Selecting a User Account for Invoking Services Specified in Broker/Local TriggersWhen a client invokes a service via an HTTP request, the Integration Server checks the credentials and user group membership of the client against the Execute ACL assigned to the service. The Integration Server performs this check to make sure the client is allowed to invoke that service. In a publish‐and‐subscribe situation, however, the Integration Server invokes the service when it receives a document rather than as a result of a client request. Because the Integration Server does not associate user credentials with a published document, you can specify the user account for the Integration Server to use when invoking services associated with Broker/local triggers.
You can instruct the Integration Server to invoke a service using the credentials of one of the predefined user accounts (Administrator, Central, Default, Developer, Replicator). You can also specify a user account that you or another server administrator defined. When the Integration Server receives a document that satisfies a trigger condition, the Integration Server uses the credentials for the specified user account to invoke the service specified in the trigger condition.
To configure how quickly the server empties the outbound document store.
128 webMethods Integration Server Administrator’s Guide Version 7.1.1
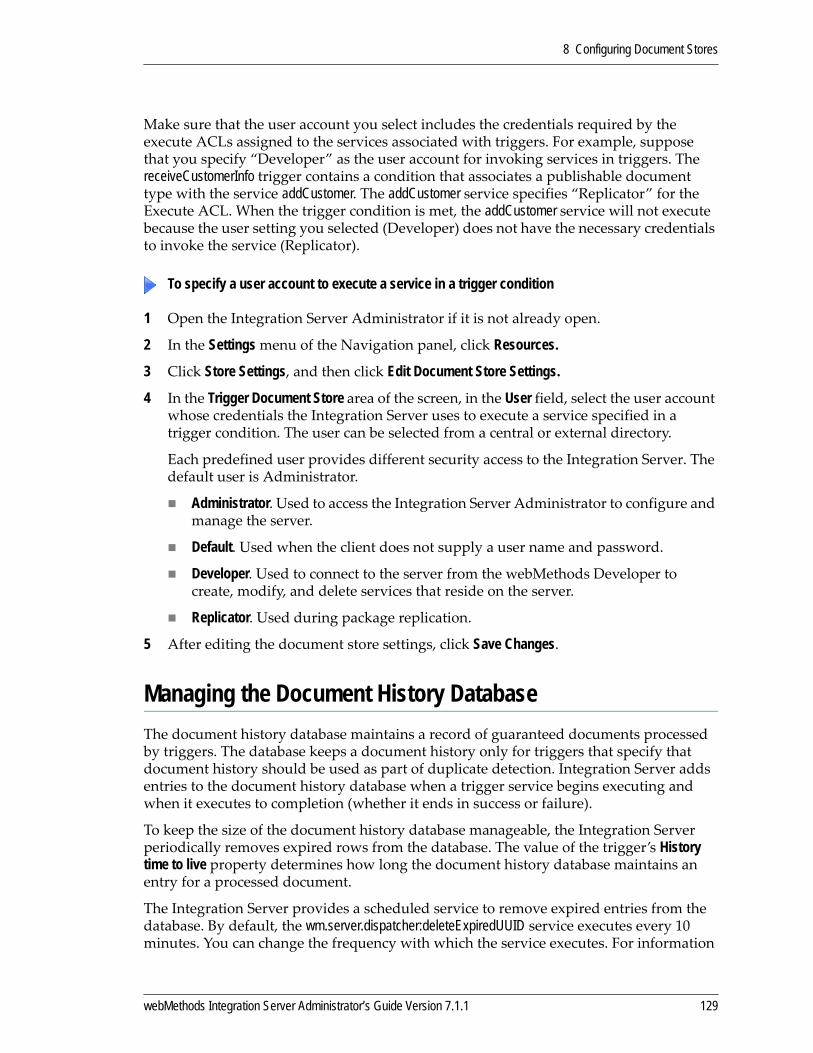
8 Configuring Document Stores
Make sure that the user account you select includes the credentials required by the execute ACLs assigned to the services associated with triggers. For example, suppose that you specify “Developer” as the user account for invoking services in triggers. The receiveCustomerInfo trigger contains a condition that associates a publishable document type with the service addCustomer. The addCustomer service specifies “Replicator” for the Execute ACL. When the trigger condition is met, the addCustomer service will not execute because the user setting you selected (Developer) does not have the necessary credentials to invoke the service (Replicator).
1 Open the Integration Server Administrator if it is not already open.
2 In the Settings menu of the Navigation panel, click Resources.
3 Click Store Settings, and then click Edit Document Store Settings.
4 In the Trigger Document Store area of the screen, in the User field, select the user account whose credentials the Integration Server uses to execute a service specified in a trigger condition. The user can be selected from a central or external directory.
Each predefined user provides different security access to the Integration Server. The default user is Administrator.
Administrator. Used to access the Integration Server Administrator to configure and manage the server.
Default. Used when the client does not supply a user name and password.
Developer. Used to connect to the server from the webMethods Developer to create, modify, and delete services that reside on the server.
Replicator. Used during package replication.
5 After editing the document store settings, click Save Changes.
Managing the Document History DatabaseThe document history database maintains a record of guaranteed documents processed by triggers. The database keeps a document history only for triggers that specify that document history should be used as part of duplicate detection. Integration Server adds entries to the document history database when a trigger service begins executing and when it executes to completion (whether it ends in success or failure).
To keep the size of the document history database manageable, the Integration Server periodically removes expired rows from the database. The value of the trigger’s History time to live property determines how long the document history database maintains an entry for a processed document.
The Integration Server provides a scheduled service to remove expired entries from the database. By default, the wm.server.dispatcher:deleteExpiredUUID service executes every 10 minutes. You can change the frequency with which the service executes. For information
To specify a user account to execute a service in a trigger condition
webMethods Integration Server Administrator’s Guide Version 7.1.1 129
8 Configuring Document Stores
about editing scheduled services, see “Scheduling Services to Execute at Specified Times” on page 339.
You can also clear all expired entries from the database at any time by clicking the Remove Expired Document History Entries link on the Settings > Resources > Exactly Once Statistics page. Using the Remove Expired Document History Entries link to clear expired entries does not affect the next scheduled execution time for the wm.server.dispatcher:deleteExpiredUUID service.
Note: The Exactly Once Statistics page also displays a history of the In Doubt or Duplicate documents received by triggers for which exactly‐once processing is configured. You can use the Clear All Duplicate or In Doubt Document Statistics link on this page to remove the currently displayed statistics.
130 webMethods Integration Server Administrator’s Guide Version 7.1.1
9 Connecting Integration Server to Broker
Overview . . . . . . . . . . . . . . . . . . . . . . . . . . . . . . . . . . . . . . . . . . . . . . . . . . . . . . . . . . . . . . . . . . . 132
Establishing the Primary Port for Integration Server . . . . . . . . . . . . . . . . . . . . . . . . . . . . . . . . . . 132
Configuring an Integration Server-to-Broker Server Connection . . . . . . . . . . . . . . . . . . . . . . . . . 132
Specifying the Keep-Alive Mode for the Broker Connection . . . . . . . . . . . . . . . . . . . . . . . . . . . . 134
webMethods Integration Server Administrator’s Guide Version 7.1.1 131
9 Connecting Integration Server to Broker
OverviewAs backbone of the webMethods product suite enterprise solution, the Broker’s role is to manage the routing of documents between applications running on different Integration Servers. For an Integration Server to join in this process, it must first be configured to connect to Broker.
Establishing the Primary Port for Integration ServerIt is important to establish the primary port for your server before connecting your server to the Broker. If you change the server’s primary port number after configuring the Broker, the Broker client for your Integration Server may become unsynchronized with your Integration Server’s configuration.
If you change the server’s primary port after connecting to the Broker, perform the following steps to resynchronize your Broker clients to the Integration Server’s new port configuration:
1 Using the Broker user interface, delete the clients that reflect the server’s originalprimary port number, for example 10.3.33.129_5555_DefaultClient.
2 Delete the dispatch.cnf file from the IntegrationServer_directory\config directory.
3 Reconfigure the server to connect to the Broker, using the procedure described in the following section.
Configuring an Integration Server-to-Broker Server ConnectionBefore configuring a connection, you need to know information about Broker such as the host name, the Broker name, and the client group to which the Integration Server will belong. In addition, you need to know whether the Integration Server will be connecting through the Broker Server’s SSL or non‐SSL port.
1 Open the Integration Server Administrator.
2 In the Settings menu of the Navigation panel, click Messaging.
3 Under Broker Configuration, click Broker Settings.
4 Click Edit Broker Settings.
To connect Integration Server to a Broker Server
132 webMethods Integration Server Administrator’s Guide Version 7.1.1

9 Connecting Integration Server to Broker
5 Click Configured and fill out the following fields, as shown below. If you are configuring an SSL connection, click Use SSL to enable the SSL parameters.
For this parameter… Specify…
Broker Host Name (DNSname:port or ipaddress:port) of the machine on which the Broker Server resides.
Broker Name Name of the Broker as defined on the Broker Server. The default name is Broker #1.
Client Group Broker client group to which this Integration Server belongs. A client group defines a single set of properties and access permissions assigned to one or more clients (here, Integration Servers) on a single Broker. If the specified client group does not exist, the Integration Server creates it on the named Broker upon establishing its initial connection.
Important! Brokers do not share can‐publish and can‐subscribe permissions across client groups. If you switch an Integration Server from one client group to another, you must restart the Integration Server and synchronize all publishable document types with the Broker. Next, you must shut down the server and use My webMethods to delete all of the Broker clients created for the server with the changed client group. Restart the server with the changed client group.
Client Prefix A string that identifies the Integration Server to the Broker. By default, the server uses its license key for the prefix. For ease of use, you may want to replace it with a friendly name.
The Broker Manager displays this prefix for each client it creates for the server. (The Broker creates multiple clients for each server that connects to it.)
If your Integration Server belongs to a cluster, make sure all servers in the cluster use the same client prefix.
Keystore The full path to this Integration Server’s keystore file. A keystore file contains the credentials (private key/signed certificate) that an entity needs for SSL authentication. If the Broker Server requires an SSL connection, then the information in this file is used to authenticate the Integration Server client to that Broker Server.
The Integration Server’s certificate file is stored on the machine on which the Integration Server resides.
Keystore Type The file type of the Integration Server’s keystore file, which can be either PKCS12 or JKS.
webMethods Integration Server Administrator’s Guide Version 7.1.1 133

9 Connecting Integration Server to Broker
6 Click Save Changes.
For more information about Broker, and configuring SSL for Broker, see the webMethods Broker Administrator’s Guide.
Specifying the Keep-Alive Mode for the Broker ConnectionAfter configuring the connection to the Broker, you can specify the keep‐alive mode that you want Integration Server to use.
The keep‐alive mode indicates whether the Broker checks for dropped connections from a client and then explicitly disconnects the client if it has dropped the connection. By disconnecting the client, the Broker makes any unacknowledged documents retrieved by that client available for redelivery to other clients.
Truststore The full path to this Integration Server client’s trust store file. A trust store file contains trusted roots for the certification authorities responsible for signing SSL certificates. For an SSL connection to be made, a valid trusted root for the SSL certificate stored in the keystore must be accessible in a trust store file.
The Integration Server’s trust store file is stored on the machine on which the Integration Server resides. Unlike the keystore file, which only stores a single set of credentials, a trust store file can contain multiple trusted roots.
Note that trust store files are not password protected.
Truststore Type The file type of the Integration Server’s trust store file, which is JKS.
Password Password required to access the SSL certificate in the Integration Server’s keystore file.
Encryption Specify whether or not to encrypt the connection between the Integration Server and the Broker.
Note: If you switch your Integration Server connection from one Broker to a Broker in another territory, you may need to synchronize your publishable document types with the new Broker. Switching your Broker connection is not recommended or supported. For more information, see “Synchronizing Publishable Document Types” in the Publish‐Subscribe Developer’s Guide.
Note: You can specify a keep‐alive mode only if Integration Server connects to a webMethods Broker version 6.1 or later.
For this parameter… Specify…
134 webMethods Integration Server Administrator’s Guide Version 7.1.1

9 Connecting Integration Server to Broker
If client state is not shared, an undetected broken connection does not pose a problem. The Broker will automatically redeliver unacknowledged events to the client when it reconnects. However, if the client state is shared and a client loses its connection to the Broker, the client cannot retrieve the unacknowledged documents after it re‐establishes the connection. (The default client for the Integration Server and all trigger clients are shared‐state clients.) This is because the same client ID is used by all the clients in a shared‐state client. The Broker cannot distinguish the reconnection of one client from the ordinary reconnections of other clients with the same client ID. The unacknowledged documents retrieved by the now disconnected client will not be made available for redelivery until the Broker receives an explicit disconnect notice (generally, when the TCP/IP connection finally times out). In some cases, this might be hours later.
To avoid a situation in which unacknowledged documents stay on the Broker for an unacceptable period of time, you can select a keep‐alive mode that will disconnect unresponsive clients and make unacknowledged documents available for redelivery.
You can configure one of the following keep‐alive modes:
Normal. The Broker sends a keep‐alive message to the Integration Server at a specified time interval (keep‐alive period) and expects a response within another specified time interval (max response time). If the Broker does not receive a response, it will retry up to the number of times specified by the retry count. If the Integration Server still does not respond to the keep‐alive message, the Broker explicitly disconnects the Integration Server. Normal is the default mode.
For example, by default, the Broker sends the Integration Server a keep‐alive message every 60 seconds. If the Integration Server does not respond within 60 seconds, the Broker sends up to three more keep‐alive messages before disconnecting the Integration Server. (The default retry count is 3.)
Listen Only. The Broker disconnects the Integration Server if there is no activity from the Integration Server over a specified time interval (keep‐alive period). In listen only mode, the Broker does not send keep‐alive messages to the Integration Server and ignores the retry count.
For example, suppose that the Broker expects activity from the Integration Server every 60 seconds. If there is no activity from the Broker after 60 seconds, the Broker disconnects the Integration Server.
Disabled. The Broker disables keep‐alive interaction with this Integration Server. The Broker does not send keep‐alive messages and does not disconnect the Integration Server because of inactivity.
Note: For more information about the Broker keep‐alive feature and about shared‐state clients, see the webMethods Broker Client Java API Reference Guide.
Note: The Broker does not communicate directly with Integration Server. The Broker Client API facilitates communication between Broker and Integration Server.
webMethods Integration Server Administrator’s Guide Version 7.1.1 135

9 Connecting Integration Server to Broker
Setting Server Configuration Parameters for Keep-Alive ModeThe keep‐alive mode is determined by the combination of values for the following set of server configuration parameters:
watt.server.brokerTransport.dur. Specifies the number of seconds of idle time that the Broker waits before sending a keep‐alive message to Integration Server. This is the keep‐alive period. The default is 60 seconds.
watt.server.brokerTransport.max. Specifies the number of seconds that the Broker waits for the Integration Server to respond to a keep‐alive message. This is the max response time. The default is 60 seconds.
watt.server.brokerTransport.ret. Specifies the number of times the Broker re‐sends keep‐alive messages before disconnecting an un‐responsive Integration Server. This is the retry count. The default is 3.
For information about setting a keep‐alive mode using these parameters, see the following sections. For more information about these parameters, see Appendix B, “Server Configuration Parameters”.
Normal ModeUse the settings in the following table to configure normal keep‐alive mode. This is the default mode.
Listen Only ModeUse the settings in the following table to configure listen only keep‐alive mode.
Set this parameter... To...
watt.server.brokerTransport.dur Any integer greater than 0 but less than 2147483647. The default is 60.
watt.server.brokerTransport.max Any integer greater than 0 but less than or equal to 2147483647. The default is 60.
watt.server.brokerTransport.ret Any integer between 1 and 2147483647. The default is 3.
Set this parameter... To...
watt.server.brokerTransport.dur 2147483647
watt.server.brokerTransport.max Any integer greater than zero but less than 2147483647
watt.server.brokerTransport.ret N/A. The retry count is ignored in listen only mode.
136 webMethods Integration Server Administrator’s Guide Version 7.1.1

9 Connecting Integration Server to Broker
Disabled Use the settings in the following table to disable keep‐alive mode.
Set this parameter... To...
watt.server.brokerTransport.dur 2147483647
watt.server.brokerTransport.max 2147483647
watt.server.brokerTransport.ret 1
webMethods Integration Server Administrator’s Guide Version 7.1.1 137

9 Connecting Integration Server to Broker
138 webMethods Integration Server Administrator’s Guide Version 7.1.1
10 Managing Server Security
Overview of Security . . . . . . . . . . . . . . . . . . . . . . . . . . . . . . . . . . . . . . . . . . . . . . . . . . . . . . . . . . 140
Setting Up Administrators . . . . . . . . . . . . . . . . . . . . . . . . . . . . . . . . . . . . . . . . . . . . . . . . . . . . . . 141
Setting Up Developers . . . . . . . . . . . . . . . . . . . . . . . . . . . . . . . . . . . . . . . . . . . . . . . . . . . . . . . . . 142
Enabling and Disabling Well-Known User Accounts . . . . . . . . . . . . . . . . . . . . . . . . . . . . . . . . . . 143
FIPS 140-2 Compliance . . . . . . . . . . . . . . . . . . . . . . . . . . . . . . . . . . . . . . . . . . . . . . . . . . . . . . . . 143
webMethods Integration Server Administrator’s Guide Version 7.1.1 139

10 Managing Server Security
Overview of SecurityTo secure access to your server and the data that resides on the server, you can:
Control who can configure and manage the server. You can restrict access to the Integration Server Administrator.
Control who can use webMethods Developer to connect to the server. You can specify who is authorized to view, create, edit, and delete the services and other elements that reside on the server.
Secure the transmission of data between IS clients and the server. You can configure a port for SSL communications.
Digitally sign documents and verify digital signatures. You can code your services to invoke a built‐in service (pub.security.pkcs7:sign) to digitally sign a document. Similarly, you can invoke another built‐in service (pub.security.pkcs7:verify) to ensure a document has not been altered since it was digitally signed. In addition, you can use PKI profiles to digitally sign and verify documents. The corresponding services here are pub.pki.pkcs7:sign and pub.pki.pkcs7:verify. Refer to Chapter 14, “Securing Your Server with PKI Profiles” to learn more about how to use PKI profiles. Refer to the webMethods Integration Server Built‐In Services Reference for more information about the built‐in services.
Control access to packages, folders, and other elements that reside on the server. You can create Access Control Lists (ACLs) that control access to individual packages, folders, and other elements such as specifications, records, and schemas. In addition, you can restrict which services are available for execution from specific ports.
Specify how you want the server to authenticate clients. This allows you to authenticate a client based on client certificates or user name/password authentication. In addition, the Integration Server also supports Integrated Windows authentication when the server acts as a Web client to access information from a server. (Microsoft Internet Information Server is an example of a server that supports the Microsoft Windows NT built‐in authentication mechanism.)
Use different certificates for different connections. This allows you to specify different certificates (and associated private keys) depending on the host with which the server is communicating.
Isolate your webMethods Integration Server behind an inner firewall. You can use the reverse invoke feature to place a Reverse HTTP Gateway Server to intercept requests from external clients before passing the requests to your internal server. See Chapter 15, “Setting Up a Reverse HTTP Gateway” for more information.
140 webMethods Integration Server Administrator’s Guide Version 7.1.1
10 Managing Server Security
Setting Up AdministratorsUse the Integration Server Administrator to configure and manage the server. Before the server allows access to the Integration Server Administrator, it ensures the user has administrator privileges.
A user has administrator privileges if he or she belongs to the Administrators group or to any other group added to the Allow List of the Administrators ACL. To determine if a user has administrator privileges, the server authenticates the user to obtain his or her user name. (For information about how the server determines the user name, see Chapter 13, “Authenticating Clients”.) After determining the user name, the server determines if the user belongs to a group that is allowed and does not belong to any group that is denied access by the Administrators ACL. If so, the server allows access to the Integration Server Administrator.
To grant administrator privileges to a user, you must assign that user to the Administrators group or to a group you have added to the Allow list of the Administrators ACL. In addition, you must make sure the user is not a member of a group that is denied access by the Administrators ACL.
1 Open the Integration Server Administrator if it is not already open.
2 In the Security menu of the Navigation panel, click User Management.
Under Local User Management, the Groups area of the screen (on the right) contains two lists. Users in this Group is a list of users currently in the selected group. Remaining Users is a list of users not currently in the selected group.
3 In the Groups area of the screen, in the Select group list, select Administrators.
4 In the Remaining Users list, select (highlight) the user or users to whom you want to grant administrator privileges.
To select additional users without deselecting currently selected users, press the CTRL key while you click on the users you want to select. To deselect a user, press the CTRL key while you click the currently selected entry.
5 After you have selected all the users you want to add to the group, click . The server moves the selected users to the Users in this Group list.
6 Click Save Changes.
Important! The user to whom you want to grant administrative privileges must already have a user account on the Integration Server. If the user does not already have a user account, create one before you perform the following steps.
To grant administrative privileges to a user
Note: Alternatively, you can create a new group such as LocalAdministrators, add that group to the Administrators ACL’s allow list, and add the user to that group.
webMethods Integration Server Administrator’s Guide Version 7.1.1 141
10 Managing Server Security
Setting Up DevelopersA developer can use webMethods Developer to view, create, modify, and delete packages, folders, services, and other elements that reside on the server. Before the server allows a connection from the Developer, it ensures that the user has developer privileges.
A user has developer privileges if he or she belongs to the Developers group or to any other group added to the Allow List of the Developers ACL. To determine if a user has developer privileges, the server authenticates the user to obtain their user name. (For information about how the server determines the user name, see Chapter 13, “Authenticating Clients”.) After determining the user name, the server determines if the user belongs to a group that is allowed and does not belong to any group that is denied access by the Developers ACL. If so, the server allows the connection between the Developer and the server to be established.
To grant developer privileges to a user, you must assign that user to the Developers group or to a group you have added to the Allow list of the Developers ACL. In addition, you must make sure the user is not a member of a group that is denied access by the Developer ACL.
1 Open the Integration Server Administrator if it is not already open.
2 In the Security menu of the Navigation panel, click User Management.
Under Local User Management, in the Groups area of the screen (on the right) contains two lists. Users in this Group is a list of users currently in the selected group. Remaining Users is a list of users not currently in the selected group.
3 In the Groups area of the screen, in the Select group list, select Developers.
4 In the Remaining Users list, select (highlight) the user or users to whom you want to grant developer privileges.
To select additional users without deselecting currently selected users, press the CTRL key while you click on the users you want to select. To deselect a user, press the CTRL key while you click the currently selected entry.
Important! List, Read, and Write ACLs are a mechanism for protecting against accidental tampering or destruction of elements. A developer making a deliberate attempt can bypass this mechanism. Do not rely on ACLs for protection in a hostile environment.
Important! The user to whom you want to grant developer privileges must already have a user account on the Integration Server. If the user does not already have a user account, create one for the user before you perform the following steps.
To grant developer privileges to a user
142 webMethods Integration Server Administrator’s Guide Version 7.1.1
10 Managing Server Security
5 After you have selected all the users you want to add to the group, click . The server moves the selected users to the Users Currently in this Group list.
6 Click Save Changes.
Enabling and Disabling Well-Known User AccountsWhen you are ready to deploy the Integration Server, it may be advisable, for security reasons, to disable the well‐known built‐in user accounts such as Administrator, Developer, and Replicator. For example, you might create a new administrator account SmithAdmin, and then disable Administrator.
See “Disabling and Enabling Users” on page 52 for more information about disabling users.
FIPS 140-2 CompliancewebMethods Integration Server Version 7.1 embeds the Entrust Authority Security Toolkit for Java 7.2, which has obtained FIPS 140–2 validation. FIPS (Federal Information Processing Standards) provides standards for information processing for use within the Federal government. The policy for Version 7.2 is available at the following:
http://csrc.nist.gov/groups/STM/cmvp/documents/140‐1/140sp/140sp802.pdf
Many government and financial organizations require that their software be FIPS 140–2 compliant, which follows the current standards and guidelines for cryptographic information processing.
Running Integration Server in FIPS 140‐2‐compliant mode ensures that it only uses FIPS compliant algorithms in the FIPS compliant modes. You can enable FIPS mode by setting the following extended setting on the Integration Server:watt.security.fips.mode=true
Refer to Appendix B, “Server Configuration Parameters” on page 407 for a detailed description of this server configuration parameter. Also, refer to “Switching from the Embedded Database to an External RDBMS” on page 79 for instructions on viewing and updating extended settings for the Integration Server.
In addition to running the server in FIPS compliant mode, you must follow the other instructions in the Entrust Cryptographic Module Security Policy. The instructions include implementing safeguards such as not allowing multiple users to access the computer and ensuring that the computer is physically protected. In particular, see section 5.4 of that document (“Operational Environment”). Depending on your
Note: Alternatively, you can create a new group such as LocalDevelopers, add that group to the Developers ACL’s allow list, and add the user to that group.
Note: Integration Server itself is not considered to be FIPS 140 certified.
webMethods Integration Server Administrator’s Guide Version 7.1.1 143

10 Managing Server Security
organizationʹs policies, you might also be required to use the same hardware, operating system, and JDK as was used in the Entrust approval.
Note: FIPS mode encryption is only applicable to HTTPS or FTPS communications and S/MIME encryption/signing. Communication between Integration Server and the Broker does not use FIPS compliant algorithms.
144 webMethods Integration Server Administrator’s Guide Version 7.1.1

11 Securing Communications with the Server
Overview . . . . . . . . . . . . . . . . . . . . . . . . . . . . . . . . . . . . . . . . . . . . . . . . . . . . . . . . . . . . . . . . . . . 146
Checklist for Using SSL . . . . . . . . . . . . . . . . . . . . . . . . . . . . . . . . . . . . . . . . . . . . . . . . . . . . . . . . 148
Items You Need Before Configuring SSL . . . . . . . . . . . . . . . . . . . . . . . . . . . . . . . . . . . . . . . . . . . 149
Obtaining the Certificate of the CA that Signed an Internet Resource’s Certificate . . . . . . . . . . . 151
Configuring the Server to Use SSL . . . . . . . . . . . . . . . . . . . . . . . . . . . . . . . . . . . . . . . . . . . . . . . 151
Configuring the Server to Present Multiple Client Certificates . . . . . . . . . . . . . . . . . . . . . . . . . . . 153
Controlling Server SSL Security Level by Port . . . . . . . . . . . . . . . . . . . . . . . . . . . . . . . . . . . . . . . 156
webMethods Integration Server Administrator’s Guide Version 7.1.1 145

11 Securing Communications with the Server
OverviewAn administrator can configure the Integration Server to use Secure Sockets Layer (SSL) to provide secure communications with the server. Use SSL to ensure that data is transmitted privately and that the content of the data is not altered during transit.
Background About SSLIn an SSL transaction, there is an SSL client and an SSL server. The SSL client initiates an SSL transaction. At the beginning of an SSL transaction, the client and server perform what is called an SSL handshake:
1 The server sends its digital certificate to the client. The client uses this certificate to authenticate the server, which assures the client that it is communicating with the organization that the certificate identifies.
2 Optionally, the server can request a client certificate from the client. The server can use the client certificate to authenticate the client.
3 The client and the server negotiate how they will securely transmit data.
SSL and the Integration ServerDepending on the situation, the Integration Server can be either a client or a server in an SSL transaction.
When the Integration Server Is an SSL ServerWhen an IS client communicates via HTTPS or FTPS with the Integration Server, the IS client is the SSL client and the Integration Server is the SSL server.
If it is configured to do so, the Integration Server will ask the client for a certificate. See Chapter 13, “Authenticating Clients” for more information about how the Integration Server authenticates clients.
Client Application
SSL Client SSL Server
HTTPS or FTPS
webMethods Integration Servers
146 webMethods Integration Server Administrator’s Guide Version 7.1.1
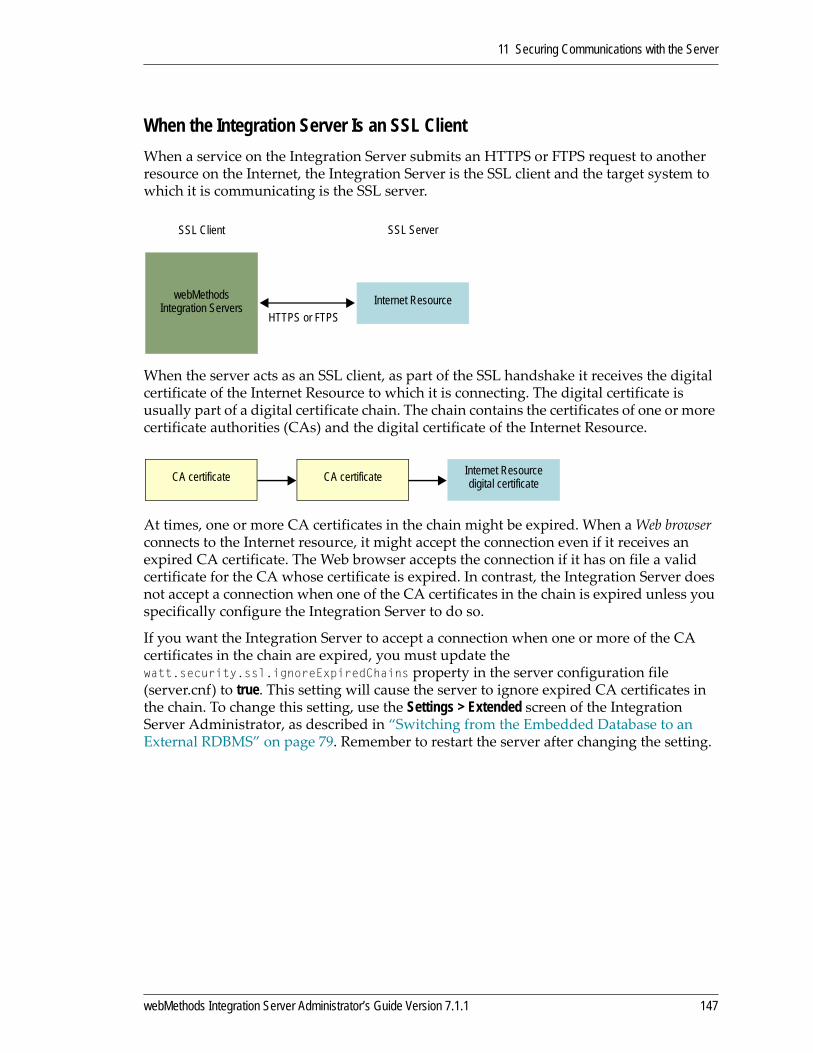
11 Securing Communications with the Server
When the Integration Server Is an SSL ClientWhen a service on the Integration Server submits an HTTPS or FTPS request to another resource on the Internet, the Integration Server is the SSL client and the target system to which it is communicating is the SSL server.
When the server acts as an SSL client, as part of the SSL handshake it receives the digital certificate of the Internet Resource to which it is connecting. The digital certificate is usually part of a digital certificate chain. The chain contains the certificates of one or more certificate authorities (CAs) and the digital certificate of the Internet Resource.
At times, one or more CA certificates in the chain might be expired. When a Web browser connects to the Internet resource, it might accept the connection even if it receives an expired CA certificate. The Web browser accepts the connection if it has on file a valid certificate for the CA whose certificate is expired. In contrast, the Integration Server does not accept a connection when one of the CA certificates in the chain is expired unless you specifically configure the Integration Server to do so.
If you want the Integration Server to accept a connection when one or more of the CA certificates in the chain are expired, you must update the watt.security.ssl.ignoreExpiredChains property in the server configuration file (server.cnf) to true. This setting will cause the server to ignore expired CA certificates in the chain. To change this setting, use the Settings > Extended screen of the Integration Server Administrator, as described in “Switching from the Embedded Database to an External RDBMS” on page 79. Remember to restart the server after changing the setting.
Internet Resource
SSL Client SSL Server
HTTPS or FTPS
webMethods Integration Servers
Internet Resource digital certificateCA certificate CA certificate
webMethods Integration Server Administrator’s Guide Version 7.1.1 147
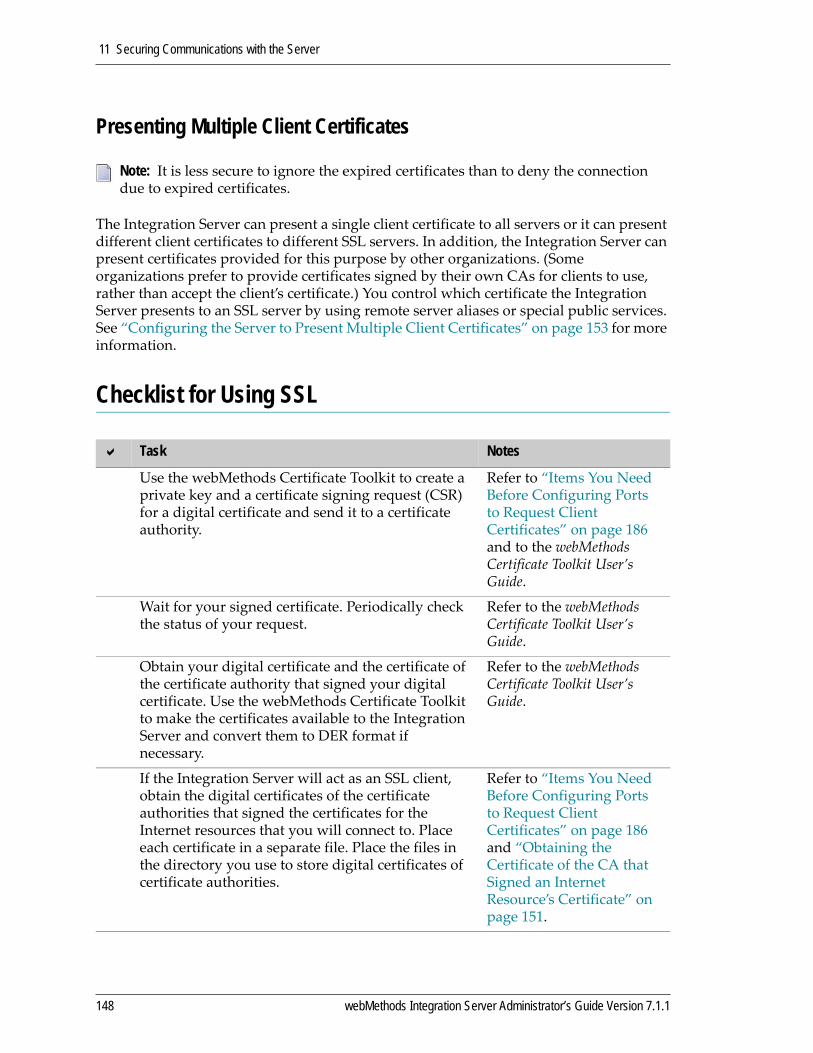
11 Securing Communications with the Server
Presenting Multiple Client Certificates
The Integration Server can present a single client certificate to all servers or it can present different client certificates to different SSL servers. In addition, the Integration Server can present certificates provided for this purpose by other organizations. (Some organizations prefer to provide certificates signed by their own CAs for clients to use, rather than accept the client’s certificate.) You control which certificate the Integration Server presents to an SSL server by using remote server aliases or special public services. See “Configuring the Server to Present Multiple Client Certificates” on page 153 for more information.
Checklist for Using SSL
Note: It is less secure to ignore the expired certificates than to deny the connection due to expired certificates.
Task Notes
Use the webMethods Certificate Toolkit to create a private key and a certificate signing request (CSR) for a digital certificate and send it to a certificate authority.
Refer to “Items You Need Before Configuring Ports to Request Client Certificates” on page 186 and to the webMethods Certificate Toolkit User’s Guide.
Wait for your signed certificate. Periodically check the status of your request.
Refer to the webMethods Certificate Toolkit User’s Guide.
Obtain your digital certificate and the certificate of the certificate authority that signed your digital certificate. Use the webMethods Certificate Toolkit to make the certificates available to the Integration Server and convert them to DER format if necessary.
Refer to the webMethods Certificate Toolkit User’s Guide.
If the Integration Server will act as an SSL client, obtain the digital certificates of the certificate authorities that signed the certificates for the Internet resources that you will connect to. Place each certificate in a separate file. Place the files in the directory you use to store digital certificates of certificate authorities.
Refer to “Items You Need Before Configuring Ports to Request Client Certificates” on page 186 and “Obtaining the Certificate of the CA that Signed an Internet Resource’s Certificate” on page 151.
148 webMethods Integration Server Administrator’s Guide Version 7.1.1

11 Securing Communications with the Server
Items You Need Before Configuring SSLBefore the Integration Server can act as an SSL server or SSL client, you must obtain items that are required for an SSL transaction. To obtain most of these items, you can use the webMethods Certificate Toolkit. For instructions on using the webMethods Certificate Toolkit, see the webMethods Certificate Toolkit User’s Guide on webMethods Advantage Web site at http://advantage.webmethods.com.
Private/Public Key. The SSL server and SSL client use public key encryption (also known as asymmetric encryption) during the SSL handshake. This type of encryption requires a key pair that is made up of a public key and a private key. The data that is encrypted with one of the keys can only be decrypted using the other key in the pair.
You use the webMethods Certificate Toolkit to create the private/public key pair. You place the private key of the key pair in a file. The toolkit uses the private key to create the public key then places the public key in the certificate signing request. The key then becomes part of the digital certificate for the Integration Server.
The party with which the Integration Server is communicating obtains the public key from the Integration Serverʹs certificate. To communicate securely, the other party can encrypt information with the public key before sending it to the Integration Server, which decrypts the information with its private key.
Refer to the webMethods Certificate Toolkit User’s Guide for instructions on creating the private key.
Configure the Integration Server to use SSL. Refer to “Configuring the Server to Use SSL” on page 151.
Add an HTTPS or FTPS port if none are defined.
If you want to allow only secure connections to the server, ensure that the primary port uses an HTTPS or FTPS port and delete all other non‐HTTPS or non‐FTPS ports. Add as many additional HTTPS or FTPS ports as you want.
Refer to “Setting Up Aliases for Remote Integration Servers” on page 68.
If you want to authenticate using client certificates but will allow clients without certificates to authenticate using passwords, configure the server to request client certificates.
If you want to authenticate using client certificates and will not allow clients to authenticate using passwords, configure the server to require client certificates.
Refer to Chapter 13, “Authenticating Clients”.
Task Notes
webMethods Integration Server Administrator’s Guide Version 7.1.1 149
11 Securing Communications with the Server
Digital Certificate for the Integration Server. A digital certificate attests to the identity of the Integration Server. You can use the webMethods Certificate Toolkit to create a Certificate Signing Request (CSR) for a digital certificate and to make the certificate available on your server.
After creating the CSR, the webMethods Certificate Toolkit takes you to the Verisign web site so that you can send your request to them. Request the certificate in DER format. If you receive a certificate in PEM format (or any format other than DER), use the webMethods Certificate Toolkit to convert it to DER format.
When the Integration Server acts as an SSL server, it uses this certificate in the SSL handshake to identify itself to the client. When the Integration Server acts as an SSL client and the SSL server requests a client certificate, the Integration Server presents this certificate as its client certificate.
The Integration Server can present its own client certificate or certificates provided by other organizations. For example, some organizations prefer to provide certificates signed by their own CAs for clients to use, rather than accept the client’s certificate. You can set up the webMethods Integration Server to present client certificates from multiple organizations. This involves obtaining the certificates and setting them up on your server, then using remote aliases or special public services to control which certificate is being presented.
Refer to the webMethods Certificate Toolkit User’s Guide for instructions on obtaining a certificate for the Integration Server. Refer to “Configuring the Server to Present Multiple Client Certificates” on page 153 for more information about sending different certificates to different SSL servers.
Certificate of the CA that signed the webMethods Integration Server’s Server certificate. The signing CA’s certificate attests to the identity of the CA that signed the digital certificate for the Integration Server. The CA should send this certificate to you when it sends you the digital certificate for the Integration Server. If it is not in DER format, you can use the webMethods Certificate Toolkit to convert it to DER format.
When the Integration Server acts as an SSL client and the SSL server requests a client certificate, the Integration Server presents this certificate along with its client certificate.
If the certificate authority does not send you its certificate, refer to the webMethods Certificate Toolkit User’s Guide for instructions on obtaining it.
Certificate of the CA that signed an Internet resource’s certificate. If your Integration Server will run services that submit HTTPS or FTPS requests to other resources on the Internet, the Integration Server will be acting as a client and will receive certificates from these resources. In order for these transactions to work, your Integration Server must have on file copies of the CA certificates of the Internet resources. For example, if your Integration Server runs a service that requests services from Molly Manufacturing, your Integration Server must have on file a copy of the certificate of the CA that signed Molly Manufacturing’s certificate. Refer to “Obtaining the Certificate of the CA that Signed an Internet Resource’s Certificate” below.
150 webMethods Integration Server Administrator’s Guide Version 7.1.1

11 Securing Communications with the Server
Obtaining the Certificate of the CA that Signed an Internet Resource’s CertificateYou may be able to obtain the certificate of the CA that signed the certificate of an Internet Resource you want to use by importing if from your browser. Browsers typically contain the digital certificates of many certificate authorities. The method you use to obtain the certificate depends on your browser. Another method is to copy the certificate from the CA’s web site.
After you obtain the CA certificate, you must copy it to the CA certificate directory. The location of this directory is specified under Trusted Certificates on the Security > Certificates screen.
The Integration Server reads this directory and loads the certificates into cache at startup. If you add a CA certificate to the directory after startup and want the Integration Server to load it into cache before the next startup, click Refresh Trusted CA Certificates Cache on the Security > Certificates screen.
Configuring the Server to Use SSLBefore you configure your Integration Server to use SSL, make sure you have read “Items You Need Before Configuring Ports to Request Client Certificates” on page 186.
The following procedure describes how to set up the Integration Server to use SSL for secure transmission of data. If you want to set up the server to request or require client certificates for authenticating clients, see Chapter 13, “Authenticating Clients”.
1 Open the Integration Server Administrator if it is not already open.
2 In the Security menu of the Navigation panel, click Certificates.
3 Click Edit Certificates Settings.
4 Set the Outbound SSL Certificate parameters as follows:
To configure the server to use SSL for secure communications
For this parameter Specify…
Server's Signed Certificate
Path and file name of the file that contains the Integration Serverʹs digital certificate.
Signing CA's Certificate
Path and file name of the file that contains the certificate for the certificate authority that signed the Integration Serverʹs digital certificate.
Server's Private Key Path and file name of the file that contains the private key of the private/public key pair associated with the Integration Serverʹs digital certificate.
webMethods Integration Server Administrator’s Guide Version 7.1.1 151

11 Securing Communications with the Server
o
e k r
t
l
y
5 In the Trusted Certificates area of the screen, in the CA Certificate Directory field, type the name of the directory (relative to the server home) that contains the digital certificates of certificate authorities trusted by this server, for example config\cas.
6 Click Save Changes.
7 Add an HTTPS or FTPS port if one does not already exist. For more information about creating ports, see Chapter 7, “Configuring Ports”. Specify HTTPS or FTPS for the type of port. Make sure no other applications are listening on the port you want to use.
For HTTPS protocol, the standard port is 443; for FTPS it is 990.
Note: The Integration Server uses the certificate information on this screen for SSL communications through a port unless you have specified different certificate information for that port. See “Setting Up Aliases for Remote Integration Servers” onpage 68 for more information about configuring ports and “Configuring the Server tPresent Multiple Client Certificates” on page 153.
Note: Most of the time you will want to specify a trusted certificates directory; however, there may be times when you want to leave it blank. For example, you might want to trust all certificate authorities on outbound requests and trust specificCAs on different ports for incoming requests. For outbound requests (a certificate thserver receives from a server that it submits a request to), if you leave this field blanor specify a directory that does not contain certificates for CAs, by default, the servetrusts all certificate authorities. The property that controls this behavior (watt.security.cert.wmChainVerifier.trustByDefault) is set to True by default. If this property is set to False and no directory or an empty directory is specified, the server will trust no certificates for outbound requests.
For inbound requests, you can specify a trusted certificates directory at the server level (on the Security Certificates screen) or at the port level (on the Edit HTTPS PorConfiguration screen or the Edit FTPS Port Configuration screen). If you omit a trusted authorities directory (or specify a directory that does not contain CA certificates) from both the server level and the port level, the server will trust no certificate authorities. If you specify a trusted authorities directory at the server leveand at the port level, the server uses the directory specified at the port level for determining trust on connections being made to that port. If you specify a trusted authorities directory at just the port level, the server uses the port‐level setting for requests being made to the port.
For S/MIME signature trust validation, if you leave this field blank or specify a directory that does not contain the certificates of trusted CAs, by default the server trusts all signatures on S/MIME messages. However, if watt.security.cert.wmChainVerifier.trustByDefault is set to False and no directoror an empty directory is specified, the server will trust no signatures on S/MIME messages.
152 webMethods Integration Server Administrator’s Guide Version 7.1.1

11 Securing Communications with the Server
Test whether your server is listening to https requests on the port you specified. Bring up your browser and type in https://localhost:port or ftp://localhost:port. If the port is working properly, you will see the logon screen for the Integration Server Administrator.
If the Integration Server Administrator does not display, check the following:
If you used the webMethods Certificate Toolkit to create this certificate, make sure the key you specified on the Convert and Save Certificates for use with webMethods Software screen is the same as the key you sent with your CSR. If the keys do not match and the correct one is the one you sent with the CSR, then go to the Convert and Save Certificates for use with webMethods Software screen and perform the conversion again, this time specifying the correct key. If the key you sent with your CSR is not the correct one, then you must resubmit the CSR, this time specifying the correct key.
Check to see if a service running on the machine is listening to the same port.
8 If you want the server to ignore expired CA certificates that it receives from an Internet resource (i.e., a Web server, another Integration Server), update the watt.security.ssl.ignoreExpiredChains property to be true. For information about this setting, see “When the Integration Server Is an SSL Client” on page 147.
9 If you want the Integration Server to cache SSL session information (e.g., client certificates), ensure the watt.security.ssl.cacheClientSessions property is set to true. If the SSL session information frequently changes for clients (e.g., changes to client certificates), set this property to false. For more information on the property, see Appendix B, “Server Configuration Parameters”.
Configuring the Server to Present Multiple Client CertificatesThe Integration Server can present a single client certificate to all SSL servers it communicates with or it can present different client certificates to different SSL servers.
The client certificates that the Integration Server presents can be its own or certificates provided by other organizations. Some organizations prefer to provide certificates signed by their own CAs for clients to use, rather than accept the client’s certificate. For example,
Note: If your Integration Server runs on a UNIX system, using a port number below 1024 requires that the server run as “root.” For security reasons, Software AG discourages this practice. Instead, run your Integration Server using an unprivilegeduser ID on a high number port (for example 1024 or above) and use the port remapping capabilities present in most firewalls to move requests to the higher numbered ports.
Note: To change server configuration settings, use the Settings > Extended screen of the Integration Server Administrator, as described in “Switching from the Embedded Database to an External RDBMS” on page 79. Remember to restart the server after changing the settings.
webMethods Integration Server Administrator’s Guide Version 7.1.1 153
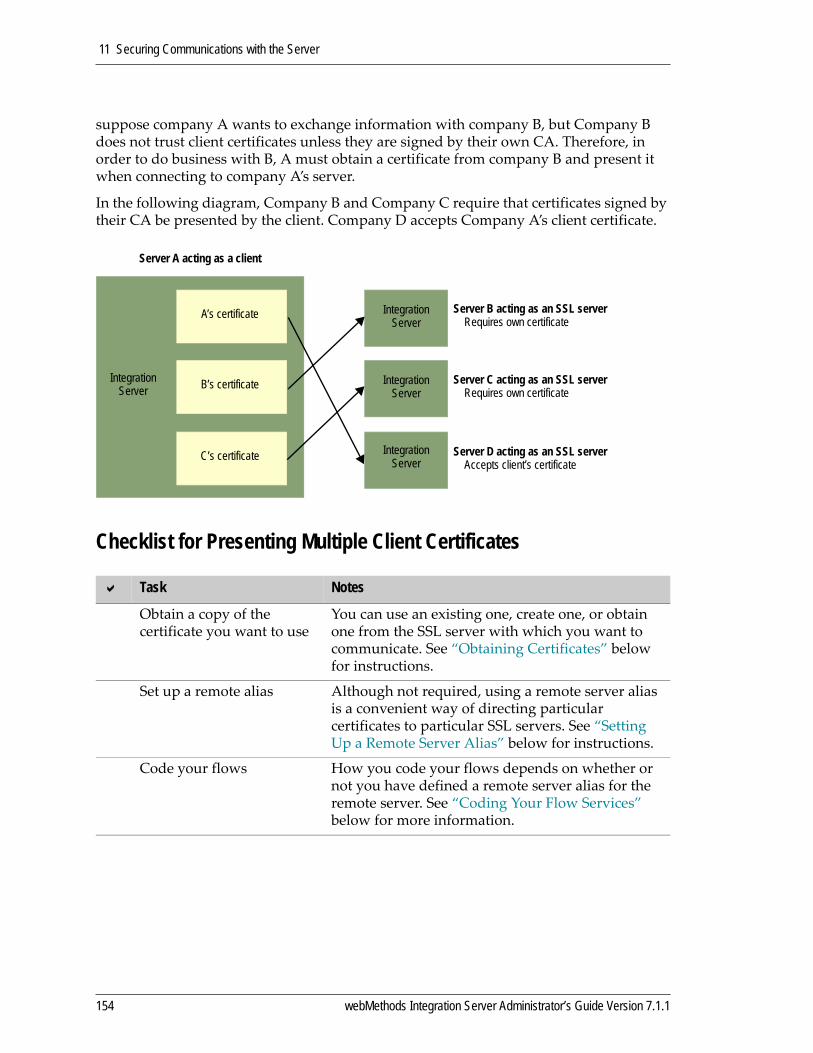
11 Securing Communications with the Server
suppose company A wants to exchange information with company B, but Company B does not trust client certificates unless they are signed by their own CA. Therefore, in order to do business with B, A must obtain a certificate from company B and present it when connecting to company A’s server.
In the following diagram, Company B and Company C require that certificates signed by their CA be presented by the client. Company D accepts Company A’s client certificate.
Checklist for Presenting Multiple Client Certificates
Task Notes
Obtain a copy of the certificate you want to use
You can use an existing one, create one, or obtain one from the SSL server with which you want to communicate. See “Obtaining Certificates” below for instructions.
Set up a remote alias Although not required, using a remote server alias is a convenient way of directing particular certificates to particular SSL servers. See “Setting Up a Remote Server Alias” below for instructions.
Code your flows How you code your flows depends on whether or not you have defined a remote server alias for the remote server. See “Coding Your Flow Services” below for more information.
Server A acting as a client
A’s certificate
B’s certificate
C’s certificate
Integration Server
Integration Server
Integration Server
Integration Server
Server B acting as an SSL server Requires own certificate
Server C acting as an SSL server Requires own certificate
Server D acting as an SSL server Accepts client’s certificate
154 webMethods Integration Server Administrator’s Guide Version 7.1.1
11 Securing Communications with the Server
Obtaining CertificatesMake the certificate you want to use available to your Integration Server. If you do not already have the certificate you want to use, you can create it using the webMethods Certificate Toolkit. Refer to the webMethods Certificate Toolkit User’s Guide for instructions on using the toolkit. If you are going to use a certificate provided by the SSL Server with which you want to communicate, obtain the certificate from that organization.
Place the certificate in a location that is easily accessible to the Integration Server. A good place is the server’s config directory. For example, you could put the client certificate to use with Company B in webMethods_directory\config\certs\companyB.
Setting Up a Remote Server AliasUsing a remote server is a convenient way of presenting different certificates to different SSL servers. Communication through the alias is optimized, making transactions with the remote server faster. In addition, using an alias is more convenient because it saves you from specifying connection information each time you communicate with the remote server.
Assign a remote server alias to the SSL server to which you want to present a special certificate. See the instructions in “Setting Up Aliases for Remote Integration Servers” on page 68. It is the alias that controls which certificate is presented to the remote server. If you do not use the alias, you must control which client certificate the Integration Server presents by using built‐in services. These services, pub.security:setKeyAndChain or pub.security:setKeyAndChainFromBytes (as well as pub.security:clearKeyAndChain or pub.security:clearKeyAndChainFromBytes), are described below and in more detail in the webMethods Integration Server Built‐In Services Reference.
Coding Your Flow ServicesHow you code your flow services depends on whether or not you have defined a remote server alias for the SSL server you want to communicate with. If you are using a remote server alias, the alias controls which certificate is presented. With a remote server alias defined, you can use the pub.remote:invoke services in your flow services to run services on the remote server.
If you have not defined a remote server alias, you must code your flow services to handle switching from one certificate to another using special public services provided by webMethods Integration Server. The pub.security:setKeyAndChain or pub.security:setKeyAndChainFromBytes service tells your Integration Server which client certificate to present. The pub.security:clearKeyAndChain or pub.security:clearKeyAndChainFromBytes service tells your Integration Server to revert back to the default certificate. All these services are documented in the webMethods Integration Server Built‐In Services Reference.
webMethods Integration Server Administrator’s Guide Version 7.1.1 155

11 Securing Communications with the Server
Controlling Server SSL Security Level by PortYou can configure your Integration Server to present different server certificates with different ports. One reason to do this is so that different ports can provide different SSL security levels. You determine the security level of a certificate during the certificate signing process. You tell the certificate authority which class of certificate you need and it creates a certificate with those attributes. Later, when you configure your ports, you specify the certificate that has the security level you want to associate with that port. See “Setting Up Aliases for Remote Integration Servers” on page 68 for instructions on configuring your ports.
156 webMethods Integration Server Administrator’s Guide Version 7.1.1
12 Controlling Access to Resources
Overview . . . . . . . . . . . . . . . . . . . . . . . . . . . . . . . . . . . . . . . . . . . . . . . . . . . . . . . . . . . . . . . . . . . 158
Controlling Access to Resources by Port . . . . . . . . . . . . . . . . . . . . . . . . . . . . . . . . . . . . . . . . . . . 158
Restricting IP Addresses that Can Connect to a Port . . . . . . . . . . . . . . . . . . . . . . . . . . . . . . . . . 159
Restricting the Services Available from a Port . . . . . . . . . . . . . . . . . . . . . . . . . . . . . . . . . . . . . . . 164
Controlling the Use of Directives . . . . . . . . . . . . . . . . . . . . . . . . . . . . . . . . . . . . . . . . . . . . . . . . . 167
Controlling Access to Resources with ACLs . . . . . . . . . . . . . . . . . . . . . . . . . . . . . . . . . . . . . . . . 168
webMethods Integration Server Administrator’s Guide Version 7.1.1 157

12 Controlling Access to Resources
OverviewWhen the server receives a client’s request to access a service, the server performs a number of checks to make sure the client is allowed to access the service. The server performs the following checks, in the order shown below. The client must pass all checks to access the service:
1 Does the port allow connections from this client’s IP address? The server checks allow/deny lists of IP addresses that are allowed to connect to the server through this port. If the IP address is allowed, the server performs the next test. Otherwise the server rejects the request.
2 Is the requested service available from this port? The server checks allow/deny lists of services that the server makes available for execution from this port. If the service is available from this port, the server performs the next test. Otherwise the server rejects the request. The server performs this test for requests to execute services. It does not perform this test for requests for list, read, or write access to services.
3 Is the requesting user allowed to access this service? The server checks the user name associated with the request against the appropriate access control list (ACL) associated with the service.
The server checks the user name against the List, Read, Write, or Execute ACL associated with the service. If the user belongs to a group that is listed in the ACL, the server accepts the request. Otherwise the server rejects the request.
You can configure these settings using the Integration Server Administrator.
To limit IP addresses that connect to a port see “Restricting IP Addresses that Can Connect to a Port” on page 159 below.
To limit the services available from a port see “Restricting the Services Available from a Port” on page 164.
To use access control lists to control which users can access an element see “Controlling Access to Resources with ACLs” on page 168.
Controlling Access to Resources by PortBy default, the Integration Server provides an HTTP port at 5555 that allows all hosts (identified by their IP addresses) to connect to it and allows access to all services through that port (unless prohibited by an ACL). Although this port is ideal for initial Integration Server installation and configuration, as well as many development environments, for deployment, you should replace this port with ports that allow connections from only specified IP addresses (those of your partners and users) and make only specified services available.
Note: By default, the Integration Server also provides a diagnostic port at 9999 that allows all hosts to connect to the server. However, users can access only the services defined with the Administrators ACL.
158 webMethods Integration Server Administrator’s Guide Version 7.1.1

12 Controlling Access to Resources
This section describes controlling access to resources at the port level. To control access using Access Control Lists, see “Controlling Access to Resources with ACLs” on page 168.
Restricting IP Addresses that Can Connect to a PortFor any given port, you can specify IP access one of two ways:
Deny by Default. Set up the port to deny requests from all hosts except for ones you explicitly allow. Use this approach if you want to deny most hosts and allow a few.
Allow by Default. Set up the port to allow requests from all hosts except for ones you explicitly deny. Use this approach if you want to allow most hosts and deny a few.
You can specify these settings globally (for all ports) or individually (for one port).
The following table shows where to find information about assigning the different types of IP access:
Controlling IP Access to All Ports (Globally)This section describes how to specify the global IP access setting for ports. The server uses this setting to determine IP access for ports that do not have a custom IP access setting. The default global setting is Allow by Default.
When you create a port, you can customize IP access for it, or you can specify that it use the global IP access setting for the server. If you use the global IP access setting and later change it, the server uses the new global setting for the port. For example, as shipped, the server uses Allow by Default as the global IP access setting (with no hosts explicitly denied). If you create a new port 6666 and do not customize IP access for it, the server uses Allow by Default for port 6666. If you later change the global IP access to Deny by Default, the server then uses Deny by Default for port 6666. If you later customize IP
Type of access Where to look for instructions
Controlling IP Access GloballyDeny by Default “Allow Inbound Connections from Specified
Hosts (Deny all Others)” on page 160
Allow by Default “Deny Inbound Connections from Specified Hosts (Allow All Others)” on page 161
Controlling IP Access of Individual PortsDeny by Default “Allow Inbound Requests from Specified Hosts
(Deny All Others)” on page 162
Allow by Default “Deny Inbound Requests from Specified Hosts (Allow All Others)” on page 163
webMethods Integration Server Administrator’s Guide Version 7.1.1 159
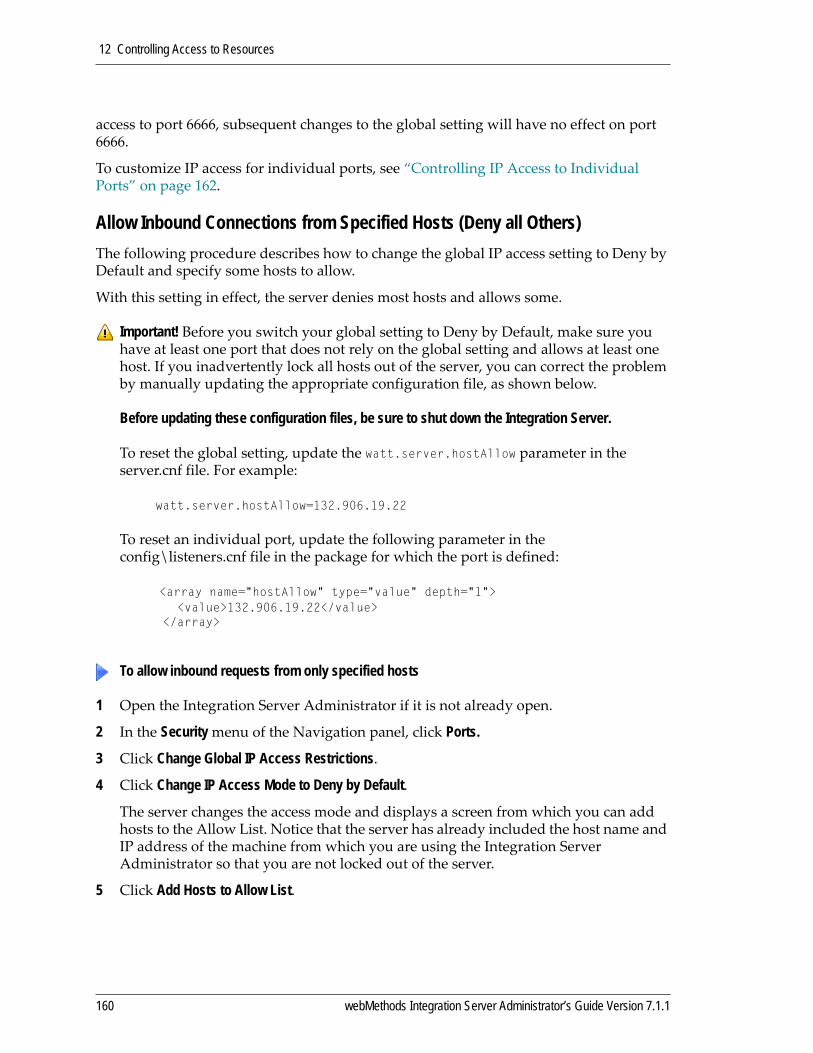
12 Controlling Access to Resources
access to port 6666, subsequent changes to the global setting will have no effect on port 6666.
To customize IP access for individual ports, see “Controlling IP Access to Individual Ports” on page 162.
Allow Inbound Connections from Specified Hosts (Deny all Others)The following procedure describes how to change the global IP access setting to Deny by Default and specify some hosts to allow.
With this setting in effect, the server denies most hosts and allows some.
1 Open the Integration Server Administrator if it is not already open.
2 In the Security menu of the Navigation panel, click Ports.
3 Click Change Global IP Access Restrictions.
4 Click Change IP Access Mode to Deny by Default.
The server changes the access mode and displays a screen from which you can add hosts to the Allow List. Notice that the server has already included the host name and IP address of the machine from which you are using the Integration Server Administrator so that you are not locked out of the server.
5 Click Add Hosts to Allow List.
Important! Before you switch your global setting to Deny by Default, make sure you have at least one port that does not rely on the global setting and allows at least one host. If you inadvertently lock all hosts out of the server, you can correct the problem by manually updating the appropriate configuration file, as shown below.
Before updating these configuration files, be sure to shut down the Integration Server.
To reset the global setting, update the watt.server.hostAllow parameter in the server.cnf file. For example:
watt.server.hostAllow=132.906.19.22
To reset an individual port, update the following parameter in the config\listeners.cnf file in the package for which the port is defined:
<array name="hostAllow" type="value" depth="1"> <value>132.906.19.22</value>
</array>
To allow inbound requests from only specified hosts
160 webMethods Integration Server Administrator’s Guide Version 7.1.1

12 Controlling Access to Resources
6 Specify the host names (e.g., workstation5.webmethods.com) or IP addresses (e.g. 132.906.19.22) of hosts from which the server is to accept inbound requests. Separate your entries with commas, for example: *.allowme.com, *.allowme2.com.
You can use the following pattern‐matching characters to identify several clients with similar host names or IP addresses.
7 Click Add Hosts.
Deny Inbound Connections from Specified Hosts (Allow All Others) The following procedure describes how to change the global IP access setting to Allow by Default and specify some hosts to deny.
With this setting in effect, the server allows most hosts and denies some.
1 Open the Integration Server Administrator if it is not already open.
2 In the Security menu of the Navigation panel, click Ports.
3 Click Change Global IP Access Restrictions.
4 Click Change IP Access Mode to Allow by Default.
The server changes the access mode and displays a screen from which you can add hosts to the Deny List.
5 Click Add Hosts to Deny List.
6 Specify the host names (e.g., workstation5.webmethods.com) or IP addresses (e.g. 132.906.19.22) of hosts from which the server is to deny inbound requests). Separate your entries with commas, for example: *.denyme.com, *.denyme2.com.
You can use the following pattern‐matching characters to identify several clients with similar host names or IP addresses.
Note: IP addresses are harder to spoof, and therefore more secure.
Char Description Example
* Matches any number of characters r*.webmethods.com
? Matches any single character workstation?.webmethods.com
To deny inbound requests from specified hosts
Note: IP addresses are harder to spoof, and therefore more secure.
webMethods Integration Server Administrator’s Guide Version 7.1.1 161
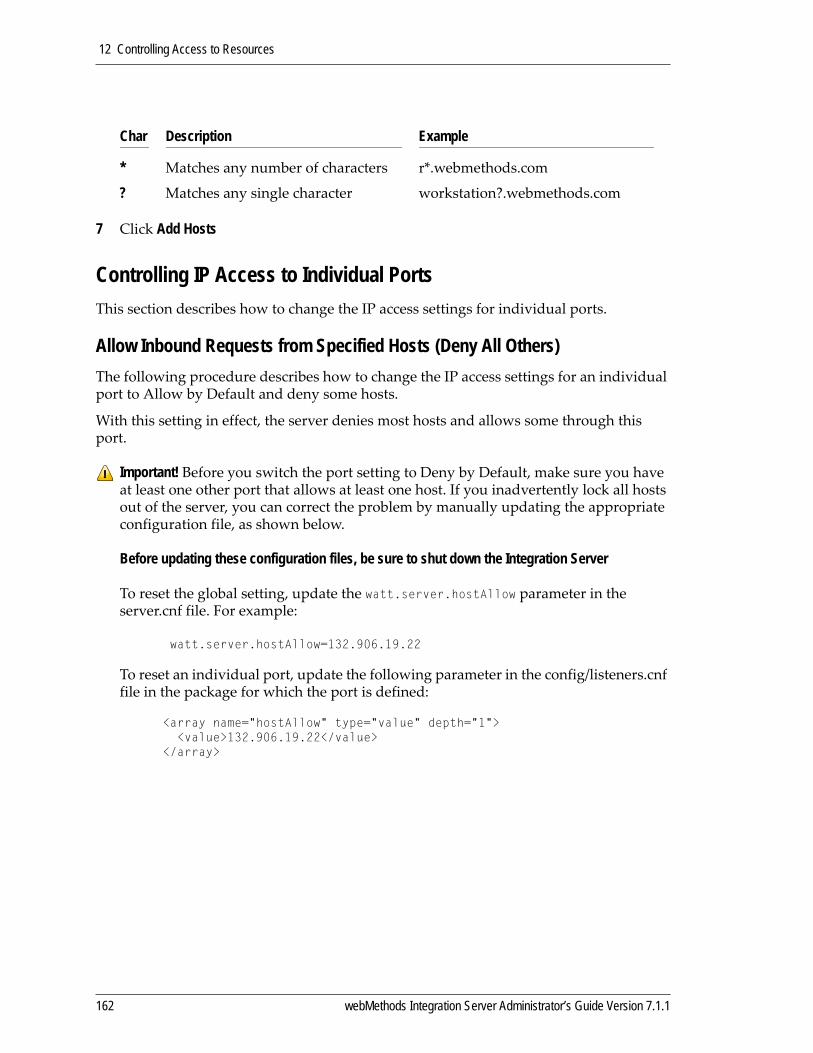
12 Controlling Access to Resources
7 Click Add Hosts
Controlling IP Access to Individual PortsThis section describes how to change the IP access settings for individual ports.
Allow Inbound Requests from Specified Hosts (Deny All Others) The following procedure describes how to change the IP access settings for an individual port to Allow by Default and deny some hosts.
With this setting in effect, the server denies most hosts and allows some through this port.
Char Description Example
* Matches any number of characters r*.webmethods.com
? Matches any single character workstation?.webmethods.com
Important! Before you switch the port setting to Deny by Default, make sure you have at least one other port that allows at least one host. If you inadvertently lock all hosts out of the server, you can correct the problem by manually updating the appropriate configuration file, as shown below.
Before updating these configuration files, be sure to shut down the Integration Server
To reset the global setting, update the watt.server.hostAllow parameter in the server.cnf file. For example:
watt.server.hostAllow=132.906.19.22
To reset an individual port, update the following parameter in the config/listeners.cnf file in the package for which the port is defined:
<array name="hostAllow" type="value" depth="1"> <value>132.906.19.22</value>
</array>
162 webMethods Integration Server Administrator’s Guide Version 7.1.1
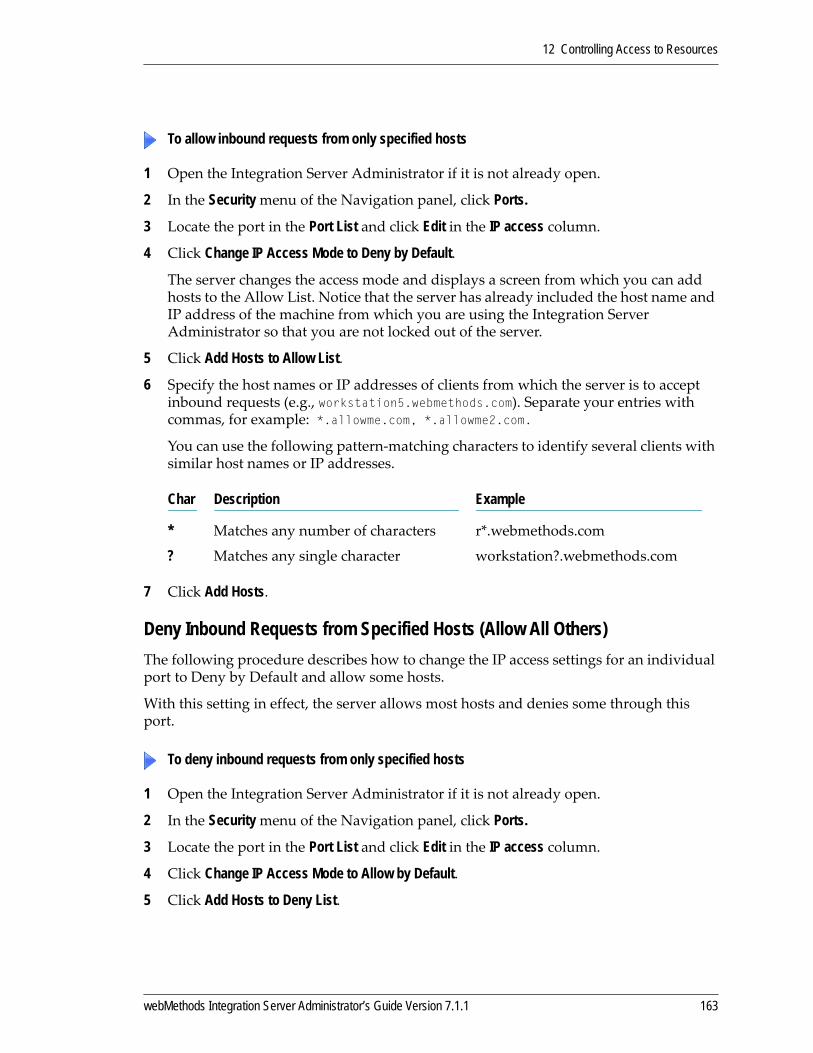
12 Controlling Access to Resources
1 Open the Integration Server Administrator if it is not already open.
2 In the Security menu of the Navigation panel, click Ports.
3 Locate the port in the Port List and click Edit in the IP access column.
4 Click Change IP Access Mode to Deny by Default.
The server changes the access mode and displays a screen from which you can add hosts to the Allow List. Notice that the server has already included the host name and IP address of the machine from which you are using the Integration Server Administrator so that you are not locked out of the server.
5 Click Add Hosts to Allow List.
6 Specify the host names or IP addresses of clients from which the server is to accept inbound requests (e.g., workstation5.webmethods.com). Separate your entries with commas, for example: *.allowme.com, *.allowme2.com.
You can use the following pattern‐matching characters to identify several clients with similar host names or IP addresses.
7 Click Add Hosts.
Deny Inbound Requests from Specified Hosts (Allow All Others)The following procedure describes how to change the IP access settings for an individual port to Deny by Default and allow some hosts.
With this setting in effect, the server allows most hosts and denies some through this port.
1 Open the Integration Server Administrator if it is not already open.
2 In the Security menu of the Navigation panel, click Ports.
3 Locate the port in the Port List and click Edit in the IP access column.
4 Click Change IP Access Mode to Allow by Default.
5 Click Add Hosts to Deny List.
To allow inbound requests from only specified hosts
Char Description Example
* Matches any number of characters r*.webmethods.com
? Matches any single character workstation?.webmethods.com
To deny inbound requests from only specified hosts
webMethods Integration Server Administrator’s Guide Version 7.1.1 163
12 Controlling Access to Resources
6 Specify the host names or IP addresses of hosts from which the server is to deny inbound requests (e.g., workstation5.webmethods.com). Separate your entries with commas, for example: *.denyme.com, *.denyme2.com.
You can use the following pattern‐matching characters to identify several clients with similar host names or IP addresses.
7 Click Add Hosts.
Restricting the Services Available from a PortBy default, the Integration Server provides an HTTP port at 5555 that allows all service requests that come in on that port access (unless prohibited by an ACL). Although this port is ideal for initial Integration Server installation and configuration, as well as many development environments, for deployment, you should replace this port with ports that limit access to services you intend to make available to your partners and users.
There are two types of port access:
Deny By Default. This is the default type for newly created ports. Use this type to deny access to all services except those you specify in a list that is associated with the port. You might use a Deny By Default port to restrict access so only the set of services that a single application uses are accessible through the port. Set the port to Deny By Default and specify the services for the application in the list associated with the port. Then, clients using the application can only access the specific services for the application. All ports, except 5555, are initially set to Deny By Default with a limited list of services available.
Allow By Default. Select this type if you intend to allow access to all services except those you explicitly deny in a list that is associated with the port.
Char Description Example
* Matches any number of characters r*.webmethods.com
? Matches any single character workstation?.webmethods.com
Note: Another way to control access to services through a port is to restrict access to clients that present particular client certificates. See Chapter 13, “Authenticating Clients” for more information.
164 webMethods Integration Server Administrator’s Guide Version 7.1.1
12 Controlling Access to Resources
Allow Access to Specified Services (Deny All Others)With this setting in effect, the server denies access to most services and allows access to some. This is the default setting.
1 Open the Integration Server Administrator if it is not already open.
2 In the Security menu in the Navigation panel, click Ports.
3 In the Access Mode column, click Edit for the port with which you want to work.
4 Click Set Access Mode to Deny by Default.
5 Click Add Folders and Services to Allow List.
6 Build a list of folders and services for the server to allow from this port.
You can build the list by entering one folder or service at a time, entering sets of folders or services, or doing a combination of the two. Typically, you will group the services you want to expose to your partners in one or more folders. It is then a simple matter of adding those folders to the list.
To enter folders or services one at a time, enter the folder or service name in the area provided on the left and click ENTER. Repeat until you have added all the folders and services you want to add.
Alternatively, you might want to allow all services associated with a specific Execute ACL. For example, to create a custom Administrator port, you can expose all services protected by the Administrators ACL.
To enter a set of services or folders associated with an ACL, use the Select an ACL list on the right of the screen to select an ACL. The server displays a list of the folders and services protected by the ACL. Initially, all these items are selected. If you do not want to add all of them to the list, deselect the ones you do not want. (Use Ctrl‐Click to deselect a selected item.) To move these entries to the list of folders and services that will be accessible through the port, click Append Selected. The server appends the selected entries to the existing list.
7 Continue the process of adding individual items and/or sets of items until you have built the list of folders and services you want to make available from this port. Then click Save Additions.
8 Click Return to Ports to return to the Security > Ports > Edit Access Mode screen.
Important! When performing the following procedure, do not log into the server through the port you want to change. The procedure involves temporarily denying access to all services through the port. If you log on through the port you want to change and then deny access to all services through it, you will be locked out of the server. Instead, log on through a different existing port or create a new port to log on through.
To allow access to specified services
webMethods Integration Server Administrator’s Guide Version 7.1.1 165
12 Controlling Access to Resources
Deny Access to Specified Services (Allow All Others)With this setting in effect, the server allows access to most services and denies access to some.
1 Open the Integration Server Administrator if it is not already open.
2 In the Security menu in the Navigation panel, click Ports.
3 Click Edit in the Access Mode column for the port with which you want to work.
4 Click Set Access Mode to Allow by Default.
5 Click Add Folders and Services to Deny List.
6 Build a list of folders and services for the server to deny from this port.
You can build the list by entering one folder or service at a time, entering sets of folders or services, or doing a combination of the two.
To enter folders or services one at a time, enter the folder or service name in the area provided on the left, and press ENTER. Repeat until you have added all the folders and services you want to add.
To enter a set of services or folders, use the pull‐down menu on the right of the screen to select an Execute ACL. The server displays a list of the folders and services protected by the ACL. Initially, all of these items are selected. If you do not want to add all of them to the list, deselect the ones you do not want. (Use Ctrl‐Click to deselect a selected item.) To move these entries to the list of folders and services that will be accessible through the port, click Append Selected. The server appends the selected entries to the existing list.
7 Continue the process of adding individual items and/or sets of items until you have built the list of folders and services you want to deny access to from this port. Then click Save Additions.
8 Click Return to Ports to return to the Security > Ports > Edit Access Mode screen.
1 Open the Integration Server Administrator if it is not already open.
2 In the Security menu in the Navigation panel, click Ports.
3 Locate the port with which you want to work in the Port List and click Edit in the Access Mode column.
4 Click Reset to Default Access Settings.
The Integration Server changes the type to Deny By Default and creates a default list of allowed services. These include the standard services required to connect to and authenticate to the server.
To deny access to specified services
To reset a port to the default
166 webMethods Integration Server Administrator’s Guide Version 7.1.1

12 Controlling Access to Resources
Controlling the Use of DirectivesA directive is a way to access or invoke resources. Integration Server supports these directives:
Users specify directives as follows:http://host:port/directive/interface/service_name
For example:http://localhost:5555/invoke/wm.server/ping
By default, all Integration Server ports except the proxy port allow all the directives listed above. The proxy port allows all directives except the web directive. However, for security reasons, organizations typically allow only those directives that are necessary to fulfill its business requirements. You might feel allow all directives on ports that are accessible only to users within your firewall, but you might want to restrict directives on ports that are exposed to users outside the firewall. For example, if you want to receive only SOAP requests on a particular port, from both internal and external users, you could allow the soap directive but no other directives on that port. To restrict the use of directives to certain ports only, you set the watt.server.allowDirective parameter (see “watt.server.allowDirective” on page 418).
By default, the invoke directive is specified on URLs as “invoke” (that is, http://host:port/invoke/folder/service_name). You can identify an alternative word for users to specify as the invoke directive. For example, you might want to allow users to specify the invoke directive as “submit” (that is, http://host:port/submit/folder/service_name). To add an alternative word for the invoke directive, you set the watt.server.invokeDirectory parameter (see “watt.server.invokeDirective” on page 429).
By default, the soap directive is specified on URLs as “soap” (that is, (http://host:port/soap). You can identify a different word for users to specify for the soap directive instead. For example, you might want users to specify the soap directive as “endpoint” (that is, http://host:port/endpoint) instead of “soap.” To specify a different word for the soap directive, you set the watt.server.SOAP.directive parameter (see “watt.server.SOAP.directive” on page 436).
Directive Used to...
invoke Run services
web Access JSP files
soap Route requests to the Integration Server SOAP handler
default Route requests to the document handler the Integration Server uses to process DSP pages
webMethods Integration Server Administrator’s Guide Version 7.1.1 167

12 Controlling Access to Resources
Controlling Access to Resources with ACLsYou can use Access Control Lists (ACLs) to control access to packages, folders, files, services and other elements that reside on the Integration Server. Specifically, you can control access to:
Services clients can invoke. You can control which groups (and therefore which users) can invoke a service. In addition to checking ACLs to determine whether a client can invoke a service, the server performs a number of port level checks. See “Controlling Access to Resources by Port” on page 158 for a description of these checks and how you can configure the server to perform them.
Special tools such as the Integration Server Administrator, the Developer, and replicator functions. These special abilities are granted by the Administrator, Developer, and Replicator ACLs that are provided with the Integration Server.
Elements that developers can see and use. You can fine tune control over which developers have access to which packages, folders, and other elements. For example, one development group might have access to create, update, and maintain one set of services, while another development group has access to a different set. ACLs can prevent one development group from accidentally updating or damaging the work of another group.
Files the server can serve. The server can serve files (for example DSP and .htm files) that reside in the pub directory for a package or a subdirectory of the pub directory. You can control access to these files by assigning ACLs to them in .access files. See “Assigning ACLs to Files the Server Can Serve” on page 177 for more information about making files available.
This section describes how to control access to resources using ACLs. To control access at the port level, see “Controlling Access to Resources by Port” on page 158.
About ACLsACLs control access to packages, folders, and other elements (such as services, document types, and specifications) at the group level. An ACL identifies groups that are allowed to access an element (Allowed Groups) and/or groups that are not allowed to access an element (Denied Groups). When identifying Allowed Groups and Denied Groups, you select from groups that you have previously defined.
There are four different kinds of access: List, Read, Write, and Execute.
List allows a user to see that an element exists. The element will be displayed on screens in the Developer and the Integration Server Administrator. List access also allows you to view an element’s metadata.
Read allows a user to view the main source of an element through the Developer and Integration Server Administrator.
168 webMethods Integration Server Administrator’s Guide Version 7.1.1

12 Controlling Access to Resources
Write allows a user to edit an element. This access also allows a user to delete or lock an element or to assign an ACL to it.
Execute allows a user to execute a service. This access also gives the user access to files the server serves, such as DSP and .htm files.
List, Read, and Write ACLs are used mostly during development time by developers, and to some extent server administrators, who need access to create, edit, and maintain services and other elements. Execute access is used extensively in production environments.
When a user tries to access an element, the server checks the appropriate ACL (List, Read, Write, or Execute) associated with the element.
You cannot assign an ACL to an element unless you are a member of that ACL. For example, if you want to allow DevTeam1 to update the OrderForm service, you must be a member of the DevTeam1 ACL. In other words, your user name must be a member of a group that is listed in the DevTeam1 ACL. Similarly, when you change an ACL assignment for an element, you must be a member of the existing ACL and a member of the ACL to which you are assigning the element.
The following table summarizes what the different access types mean for the different elements.
Type of access and allowed actions
Element List Read Write Execute
Package See that the package exists. To see what the package contains, you must have List access to the elements themselves. This access is not inherited by other elements in the package.
N/A N/A N/A
webMethods Integration Server Administrator’s Guide Version 7.1.1 169
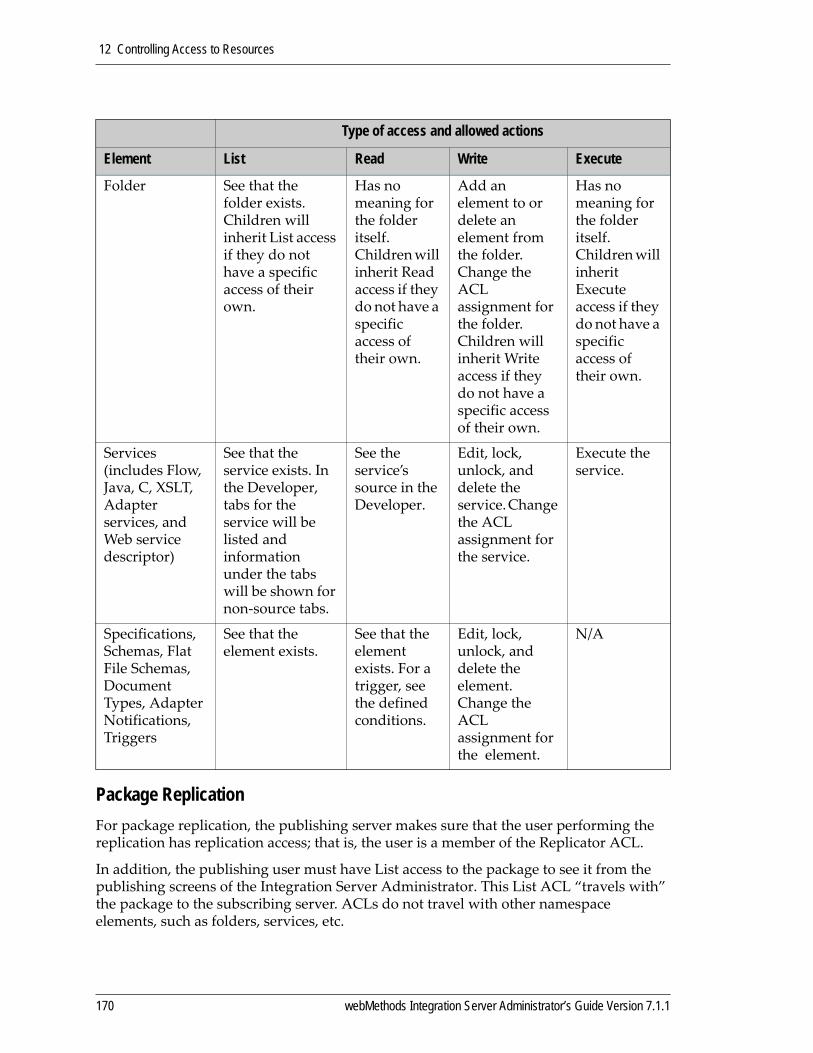
12 Controlling Access to Resources
Package ReplicationFor package replication, the publishing server makes sure that the user performing the replication has replication access; that is, the user is a member of the Replicator ACL.
In addition, the publishing user must have List access to the package to see it from the publishing screens of the Integration Server Administrator. This List ACL “travels with” the package to the subscribing server. ACLs do not travel with other namespace elements, such as folders, services, etc.
Folder See that the folder exists. Children will inherit List access if they do not have a specific access of their own.
Has no meaning for the folder itself. Children will inherit Read access if they do not have a specific access of their own.
Add an element to or delete an element from the folder. Change the ACL assignment for the folder. Children will inherit Write access if they do not have a specific access of their own.
Has no meaning for the folder itself. Children will inherit Execute access if they do not have a specific access of their own.
Services (includes Flow, Java, C, XSLT, Adapter services, and Web service descriptor)
See that the service exists. In the Developer, tabs for the service will be listed and information under the tabs will be shown for non‐source tabs.
See the service’s source in the Developer.
Edit, lock, unlock, and delete the service. Change the ACL assignment for the service.
Execute the service.
Specifications, Schemas, Flat File Schemas, Document Types, Adapter Notifications, Triggers
See that the element exists.
See that the element exists. For a trigger, see the defined conditions.
Edit, lock, unlock, and delete the element. Change the ACL assignment for the element.
N/A
Type of access and allowed actions
Element List Read Write Execute
170 webMethods Integration Server Administrator’s Guide Version 7.1.1
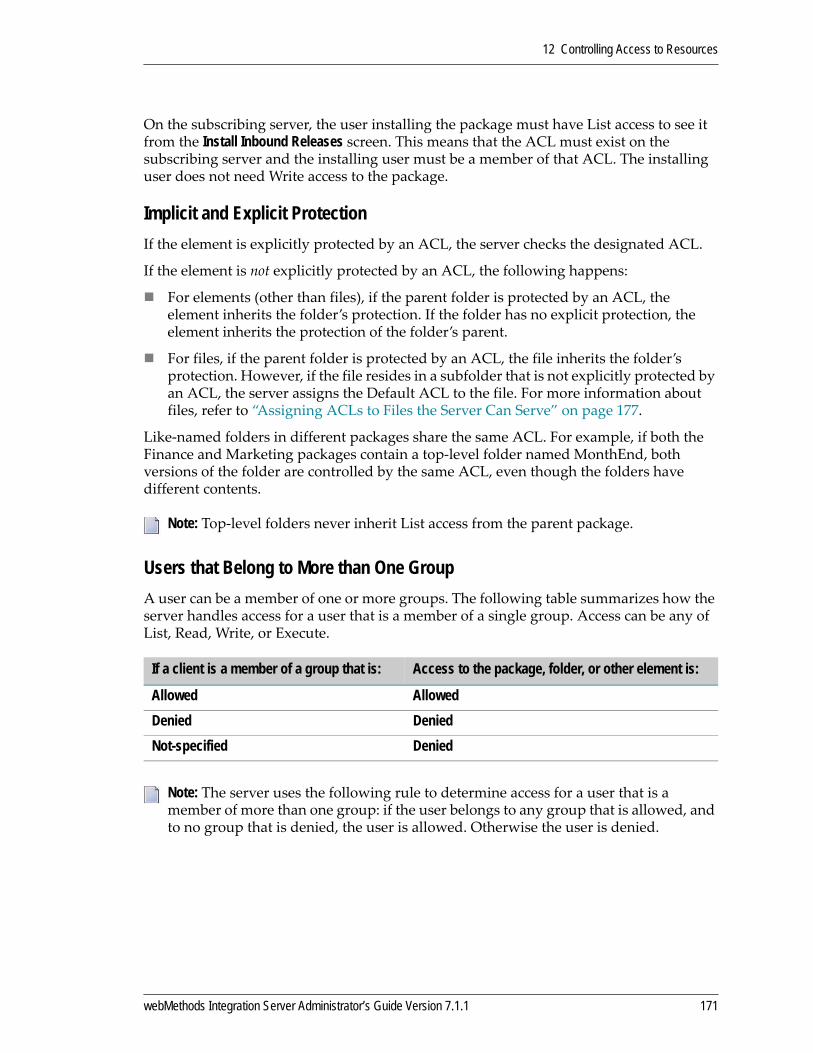
12 Controlling Access to Resources
On the subscribing server, the user installing the package must have List access to see it from the Install Inbound Releases screen. This means that the ACL must exist on the subscribing server and the installing user must be a member of that ACL. The installing user does not need Write access to the package.
Implicit and Explicit ProtectionIf the element is explicitly protected by an ACL, the server checks the designated ACL.
If the element is not explicitly protected by an ACL, the following happens:
For elements (other than files), if the parent folder is protected by an ACL, the element inherits the folder’s protection. If the folder has no explicit protection, the element inherits the protection of the folder’s parent.
For files, if the parent folder is protected by an ACL, the file inherits the folder’s protection. However, if the file resides in a subfolder that is not explicitly protected by an ACL, the server assigns the Default ACL to the file. For more information about files, refer to “Assigning ACLs to Files the Server Can Serve” on page 177.
Like‐named folders in different packages share the same ACL. For example, if both the Finance and Marketing packages contain a top‐level folder named MonthEnd, both versions of the folder are controlled by the same ACL, even though the folders have different contents.
Users that Belong to More than One GroupA user can be a member of one or more groups. The following table summarizes how the server handles access for a user that is a member of a single group. Access can be any of List, Read, Write, or Execute.
Note: Top‐level folders never inherit List access from the parent package.
If a client is a member of a group that is: Access to the package, folder, or other element is:
Allowed AllowedDenied DeniedNot-specified Denied
Note: The server uses the following rule to determine access for a user that is a member of more than one group: if the user belongs to any group that is allowed, and to no group that is denied, the user is allowed. Otherwise the user is denied.
webMethods Integration Server Administrator’s Guide Version 7.1.1 171

12 Controlling Access to Resources
The following table summarizes this approach for a user that is a member of both Group1 and Group2. Access can be any of List, Read, Write, or Execute:
Predefined ACLsThe server comes with the following predefined ACLs. You cannot delete these ACLs.
Administrators. Allows only users in the Administrators group access to a package, folder, or other element and denies all other users.
Anonymous. Provides access to unauthenticated users (those that did not specify a valid userid).
Default. Allows all authenticated users access to a package, folder, or other element. When an element is not specifically assigned an ACL or does not inherit an ACL from containing folders, the server uses the Default ACL. If the ACL assigned to an element is deleted, the server uses the Default ACL. The Default ACL authorizes authenticated users only. Unauthenticated users (those that did not specify a valid userid) are authorized by the Anonymous ACL.
Developers. Allows only users in the Developers group access to a package, folder, or other element and denies all other users.
Internal. Allows only users in the Administrators and Developers groups access to a package, folder, or other element and denies all other users. The server assigns this ACL to built‐in utility services shipped with the server, such as those in the WmRoot and WmPublic packages. You should never need to assign this ACL to an element.
Replicators. Allows the Replicator user replication privileges.
Group1’s access to the package, folder, or other element
Allowed Denied Not specified
Group2’s Access to package, folder, or other element
Allowed User Allowed User Denied User AllowedDenied User Denied User Denied User DeniedNot specified User Allowed User Denied User Denied
Note: You might see an ACL that is specific for an adapter, for example the wmPartnerUsers ACL. Refer to the documentation for the specific adapter for more information about its ACL.
172 webMethods Integration Server Administrator’s Guide Version 7.1.1
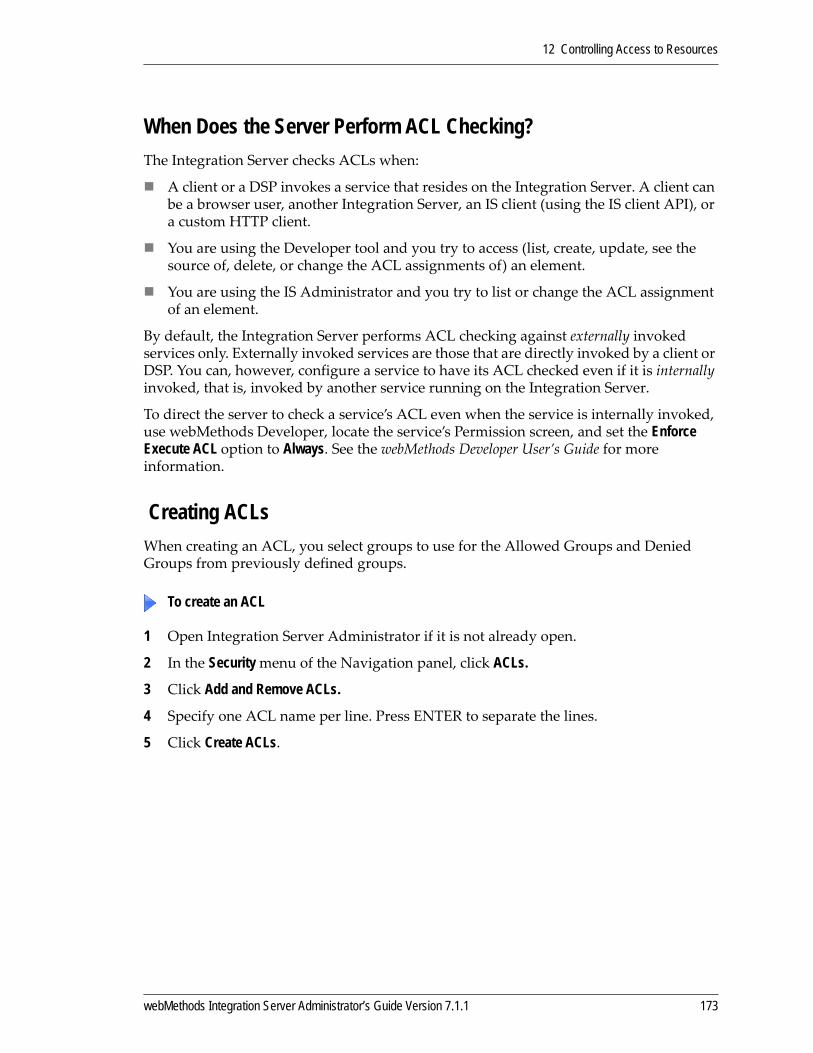
12 Controlling Access to Resources
When Does the Server Perform ACL Checking?The Integration Server checks ACLs when:
A client or a DSP invokes a service that resides on the Integration Server. A client can be a browser user, another Integration Server, an IS client (using the IS client API), or a custom HTTP client.
You are using the Developer tool and you try to access (list, create, update, see the source of, delete, or change the ACL assignments of) an element.
You are using the IS Administrator and you try to list or change the ACL assignment of an element.
By default, the Integration Server performs ACL checking against externally invoked services only. Externally invoked services are those that are directly invoked by a client or DSP. You can, however, configure a service to have its ACL checked even if it is internally invoked, that is, invoked by another service running on the Integration Server.
To direct the server to check a service’s ACL even when the service is internally invoked, use webMethods Developer, locate the service’s Permission screen, and set the Enforce Execute ACL option to Always. See the webMethods Developer User’s Guide for more information.
Creating ACLsWhen creating an ACL, you select groups to use for the Allowed Groups and Denied Groups from previously defined groups.
1 Open Integration Server Administrator if it is not already open.
2 In the Security menu of the Navigation panel, click ACLs.
3 Click Add and Remove ACLs.
4 Specify one ACL name per line. Press ENTER to separate the lines.
5 Click Create ACLs.
To create an ACL
webMethods Integration Server Administrator’s Guide Version 7.1.1 173

12 Controlling Access to Resources
Allowing or Denying Group Access to ACLsYou can edit a new or predefined ACL to allow certain groups to access this ACL and deny permissions to other groups. You can allow and deny access to internally defined groups as well as groups and roles defined externally in a central user directory or in LDAP.
1 Open the Integration Server Administrator if it is not already open.
2 In the Security menu of the Navigation panel, click ACLs. The server displays the Access Control Lists screen.
Groups in the Allowed list are explicitly allowed to access the packages, folders, services, or other elements associated with this ACL.
Groups in the Denied list are explicitly denied access to the packages, folders, services, or other elements associated with this ACL
3 In the Select ACL list under ACL Membership, select the ACL to which you want to add groups.
4 Do one of the following:
If you want to allow a group or role access to this ACL, under the Allowed list, click Add.
If you want to deny a group or role access to this ACL, under the Denied list, click Add.
5 In the dialog box that appears, in the Provider list, select the location from which you want to select a user group.
If an external user directory is not configured, the Provider list does not appear.
6 In the Role/Group Name list, do one of the following:
If you select Local, select the locally defined user group for which you want to allow or deny access to the ACL.
If you select Central or LDAP, in the Search field, enter search criteria for finding a role or group. Click Go. Select the role or group for which you want to allow or deny access to the ACL.
7 Click Save Changes.
Deleting ACLsYou can delete any ACL except the predefined ACLs: Anonymous, Administrators, Default, Developers, Internal, and Replicators. You can delete ACLs that are currently assigned to packages, folder, or other elements. When a client attempts to access an element that is assigned to a deleted ACL, the server denies access.
To allow group access to an ACL
174 webMethods Integration Server Administrator’s Guide Version 7.1.1
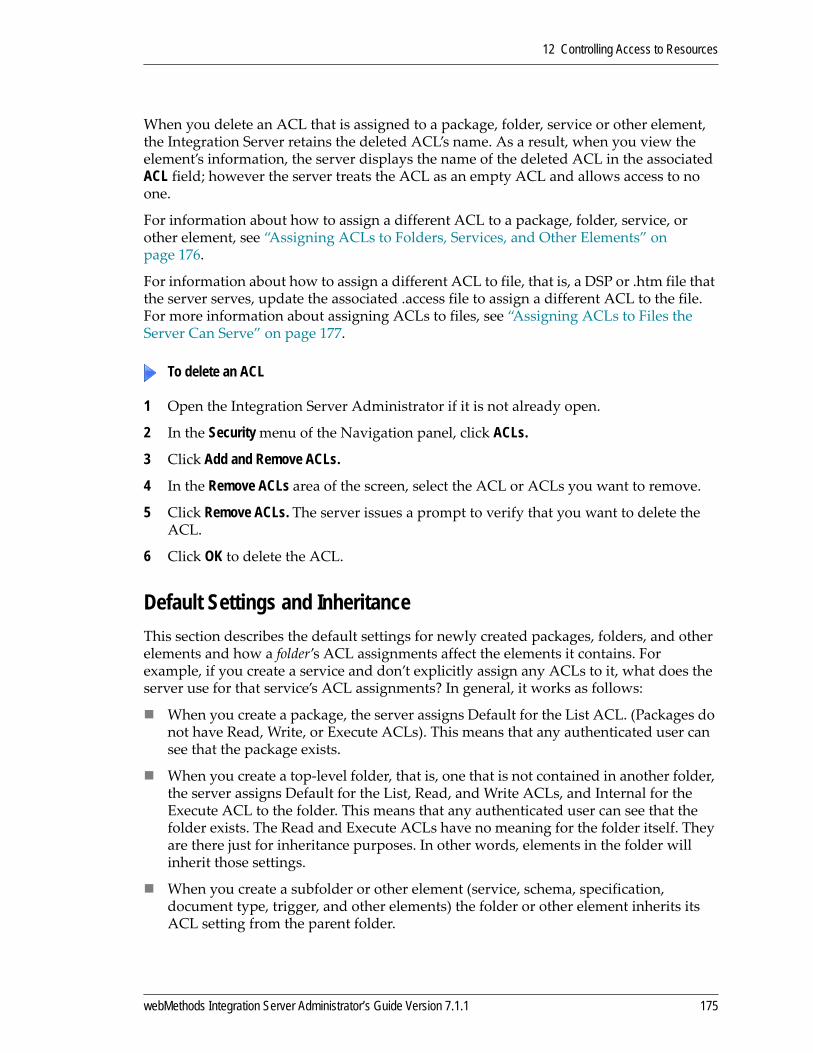
12 Controlling Access to Resources
When you delete an ACL that is assigned to a package, folder, service or other element, the Integration Server retains the deleted ACL’s name. As a result, when you view the element’s information, the server displays the name of the deleted ACL in the associated ACL field; however the server treats the ACL as an empty ACL and allows access to no one.
For information about how to assign a different ACL to a package, folder, service, or other element, see “Assigning ACLs to Folders, Services, and Other Elements” on page 176.
For information about how to assign a different ACL to file, that is, a DSP or .htm file that the server serves, update the associated .access file to assign a different ACL to the file. For more information about assigning ACLs to files, see “Assigning ACLs to Files the Server Can Serve” on page 177.
1 Open the Integration Server Administrator if it is not already open.
2 In the Security menu of the Navigation panel, click ACLs.
3 Click Add and Remove ACLs.
4 In the Remove ACLs area of the screen, select the ACL or ACLs you want to remove.
5 Click Remove ACLs. The server issues a prompt to verify that you want to delete the ACL.
6 Click OK to delete the ACL.
Default Settings and InheritanceThis section describes the default settings for newly created packages, folders, and other elements and how a folder’s ACL assignments affect the elements it contains. For example, if you create a service and don’t explicitly assign any ACLs to it, what does the server use for that service’s ACL assignments? In general, it works as follows:
When you create a package, the server assigns Default for the List ACL. (Packages do not have Read, Write, or Execute ACLs). This means that any authenticated user can see that the package exists.
When you create a top‐level folder, that is, one that is not contained in another folder, the server assigns Default for the List, Read, and Write ACLs, and Internal for the Execute ACL to the folder. This means that any authenticated user can see that the folder exists. The Read and Execute ACLs have no meaning for the folder itself. They are there just for inheritance purposes. In other words, elements in the folder will inherit those settings.
When you create a subfolder or other element (service, schema, specification, document type, trigger, and other elements) the folder or other element inherits its ACL setting from the parent folder.
To delete an ACL
webMethods Integration Server Administrator’s Guide Version 7.1.1 175
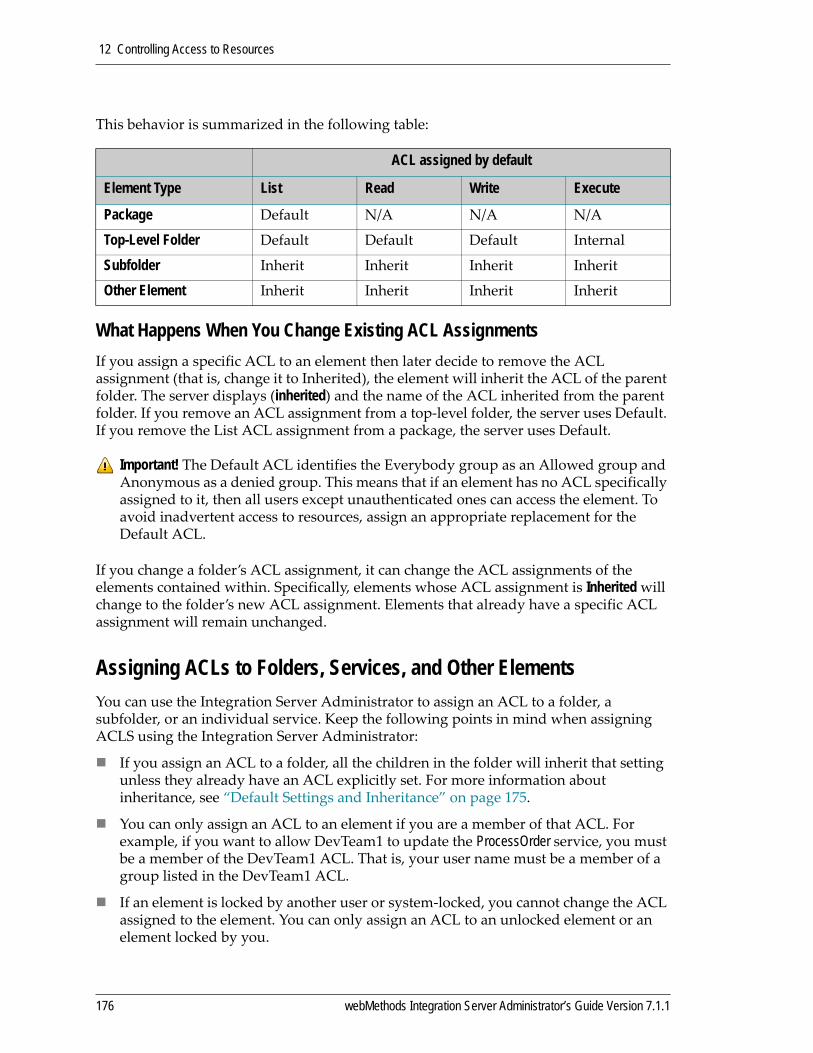
12 Controlling Access to Resources
This behavior is summarized in the following table:
What Happens When You Change Existing ACL AssignmentsIf you assign a specific ACL to an element then later decide to remove the ACL assignment (that is, change it to Inherited), the element will inherit the ACL of the parent folder. The server displays (inherited) and the name of the ACL inherited from the parent folder. If you remove an ACL assignment from a top‐level folder, the server uses Default. If you remove the List ACL assignment from a package, the server uses Default.
If you change a folder’s ACL assignment, it can change the ACL assignments of the elements contained within. Specifically, elements whose ACL assignment is Inherited will change to the folder’s new ACL assignment. Elements that already have a specific ACL assignment will remain unchanged.
Assigning ACLs to Folders, Services, and Other Elements You can use the Integration Server Administrator to assign an ACL to a folder, a subfolder, or an individual service. Keep the following points in mind when assigning ACLS using the Integration Server Administrator:
If you assign an ACL to a folder, all the children in the folder will inherit that setting unless they already have an ACL explicitly set. For more information about inheritance, see “Default Settings and Inheritance” on page 175.
You can only assign an ACL to an element if you are a member of that ACL. For example, if you want to allow DevTeam1 to update the ProcessOrder service, you must be a member of the DevTeam1 ACL. That is, your user name must be a member of a group listed in the DevTeam1 ACL.
If an element is locked by another user or system‐locked, you cannot change the ACL assigned to the element. You can only assign an ACL to an unlocked element or an element locked by you.
ACL assigned by default
Element Type List Read Write Execute
Package Default N/A N/A N/A
Top-Level Folder Default Default Default Internal
Subfolder Inherit Inherit Inherit Inherit
Other Element Inherit Inherit Inherit Inherit
Important! The Default ACL identifies the Everybody group as an Allowed group and Anonymous as a denied group. This means that if an element has no ACL specifically assigned to it, then all users except unauthenticated ones can access the element. To avoid inadvertent access to resources, assign an appropriate replacement for the Default ACL.
176 webMethods Integration Server Administrator’s Guide Version 7.1.1

12 Controlling Access to Resources
Use the following procedure to assign a new or different ACL to a folder or service.
1 Open the Integration Server Administrator if it is not already open.
2 In the Packages menu of the Navigation panel, click Management.
3 Click Browse Folders.
4 If the current screen does not list the folder or service to which you want to assign an ACL, click the name of the parent folder until the server displays a screen that lists the folder or service with which you want to work.
5 Click in the appropriate ACL field (List, Read, Write, or Execute).
The server displays the ACL Information screen. Use the pull‐down list to select the ACL you want to assign to the folder or service and click Save Changes.
1 Open the Integration Server Administrator if it is not already open.
2 In the Packages menu of the Navigation panel, click Management.
3 Click Browse Folders.
4 If the current screen does not list the folder or service to which you want to assign an ACL, click the name of the parent folder until the server displays a screen that lists the folder or service with which you want to work.
5 Click in the appropriate ACL field (List, Read, Write, or Execute).
The server displays the ACL Information screen. Select <Default> (inherited) from the pull‐down menu of ACL names and click Save Changes.
Assigning ACLs to Files the Server Can ServeThe server can serve files that reside in the pub directory for a package or a subdirectory of the pub directory. For more information about how to serve files from the Integration Server, refer to the webMethods Developer User’s Guide.
You control access to files by placing a .access file in the directory that contains files you want to protect. You can use an operating system tool of your choice to edit the .access file.
Note: Use Developer to assign ACLs to packages, specifications, document types, schemas, and triggers. For more information, see the webMethods Developer User’s Guide.
To assign an ACL to a folder or service
To remove an ACL from a folder or service
webMethods Integration Server Administrator’s Guide Version 7.1.1 177
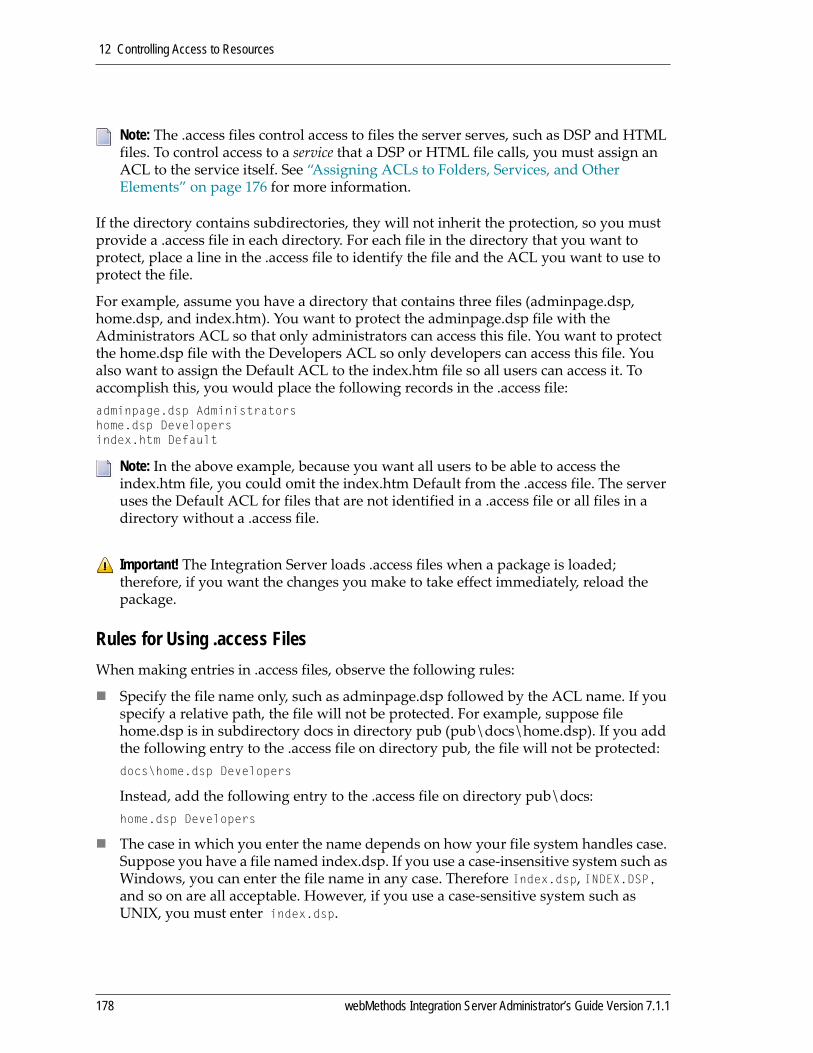
12 Controlling Access to Resources
If the directory contains subdirectories, they will not inherit the protection, so you must provide a .access file in each directory. For each file in the directory that you want to protect, place a line in the .access file to identify the file and the ACL you want to use to protect the file.
For example, assume you have a directory that contains three files (adminpage.dsp, home.dsp, and index.htm). You want to protect the adminpage.dsp file with the Administrators ACL so that only administrators can access this file. You want to protect the home.dsp file with the Developers ACL so only developers can access this file. You also want to assign the Default ACL to the index.htm file so all users can access it. To accomplish this, you would place the following records in the .access file:adminpage.dsp Administratorshome.dsp Developersindex.htm Default
Rules for Using .access FilesWhen making entries in .access files, observe the following rules:
Specify the file name only, such as adminpage.dsp followed by the ACL name. If you specify a relative path, the file will not be protected. For example, suppose file home.dsp is in subdirectory docs in directory pub (pub\docs\home.dsp). If you add the following entry to the .access file on directory pub, the file will not be protected:docs\home.dsp Developers
Instead, add the following entry to the .access file on directory pub\docs:home.dsp Developers
The case in which you enter the name depends on how your file system handles case. Suppose you have a file named index.dsp. If you use a case‐insensitive system such as Windows, you can enter the file name in any case. Therefore Index.dsp, INDEX.DSP, and so on are all acceptable. However, if you use a case‐sensitive system such as UNIX, you must enter index.dsp.
Note: The .access files control access to files the server serves, such as DSP and HTML files. To control access to a service that a DSP or HTML file calls, you must assign an ACL to the service itself. See “Assigning ACLs to Folders, Services, and Other Elements” on page 176 for more information.
Note: In the above example, because you want all users to be able to access the index.htm file, you could omit the index.htm Default from the .access file. The server uses the Default ACL for files that are not identified in a .access file or all files in a directory without a .access file.
Important! The Integration Server loads .access files when a package is loaded; therefore, if you want the changes you make to take effect immediately, reload the package.
178 webMethods Integration Server Administrator’s Guide Version 7.1.1

12 Controlling Access to Resources
Removing ACL Protection from a FileUse the following procedure to remove ACL protection from a file.
1 Shut down the server. For instructions, see “Shutting Down the Integration Server” on page 37.
2 Edit the .access file and delete the line that specifies the file whose ACL protection you want to remove.
3 Restart the server. For instructions, see “Restarting the Integration Server” on page 38.
To remove ACL protection from a file
webMethods Integration Server Administrator’s Guide Version 7.1.1 179

12 Controlling Access to Resources
180 webMethods Integration Server Administrator’s Guide Version 7.1.1
13 Authenticating Clients
Overview . . . . . . . . . . . . . . . . . . . . . . . . . . . . . . . . . . . . . . . . . . . . . . . . . . . . . . . . . . . . . . . . . . . 182
Client Certificates . . . . . . . . . . . . . . . . . . . . . . . . . . . . . . . . . . . . . . . . . . . . . . . . . . . . . . . . . . . . . 182
Importing a Client Certificate and Mapping It to a User . . . . . . . . . . . . . . . . . . . . . . . . . . . . . . . . 186
Configuring How Ports Handle Client Certificates . . . . . . . . . . . . . . . . . . . . . . . . . . . . . . . . . . . . 188
Basic Authentication (User Names and Passwords) . . . . . . . . . . . . . . . . . . . . . . . . . . . . . . . . . . 188
Customizing Authentication . . . . . . . . . . . . . . . . . . . . . . . . . . . . . . . . . . . . . . . . . . . . . . . . . . . . . 189
Responding to Integrated Windows Authentication . . . . . . . . . . . . . . . . . . . . . . . . . . . . . . . . . . . 195
webMethods Integration Server Administrator’s Guide Version 7.1.1 181
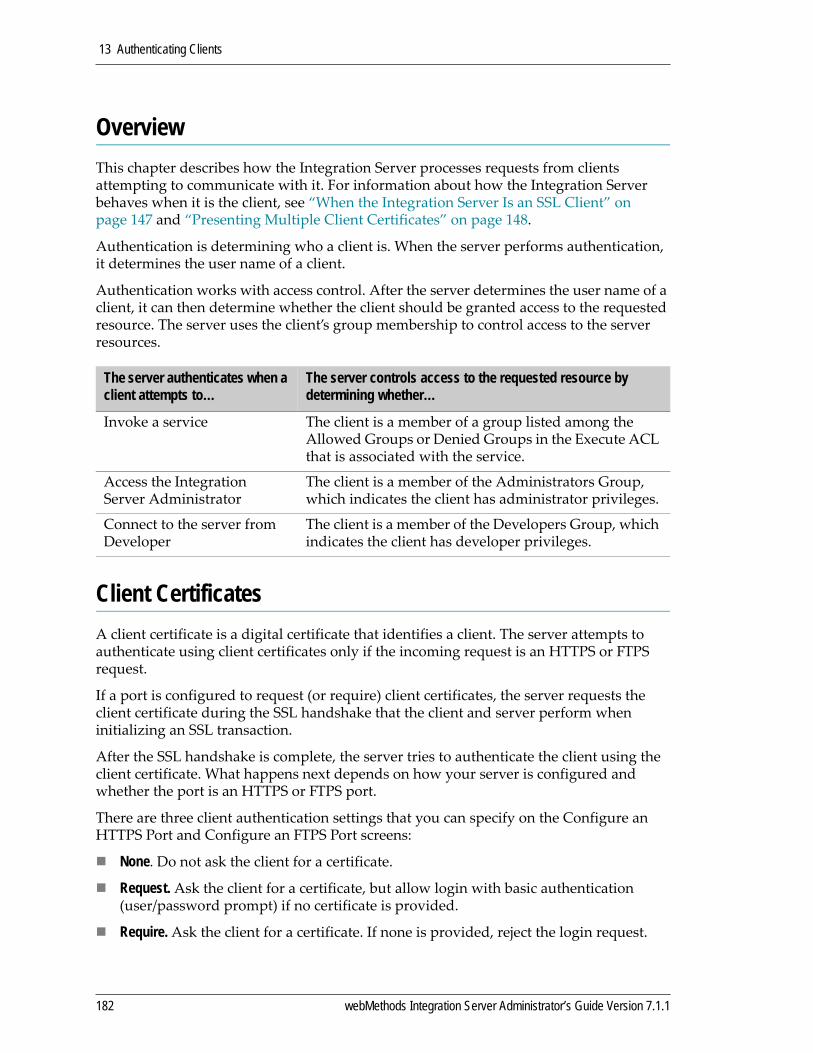
13 Authenticating Clients
OverviewThis chapter describes how the Integration Server processes requests from clients attempting to communicate with it. For information about how the Integration Server behaves when it is the client, see “When the Integration Server Is an SSL Client” on page 147 and “Presenting Multiple Client Certificates” on page 148.
Authentication is determining who a client is. When the server performs authentication, it determines the user name of a client.
Authentication works with access control. After the server determines the user name of a client, it can then determine whether the client should be granted access to the requested resource. The server uses the client’s group membership to control access to the server resources.
Client CertificatesA client certificate is a digital certificate that identifies a client. The server attempts to authenticate using client certificates only if the incoming request is an HTTPS or FTPS request.
If a port is configured to request (or require) client certificates, the server requests the client certificate during the SSL handshake that the client and server perform when initializing an SSL transaction.
After the SSL handshake is complete, the server tries to authenticate the client using the client certificate. What happens next depends on how your server is configured and whether the port is an HTTPS or FTPS port.
There are three client authentication settings that you can specify on the Configure an HTTPS Port and Configure an FTPS Port screens:
None. Do not ask the client for a certificate.
Request. Ask the client for a certificate, but allow login with basic authentication (user/password prompt) if no certificate is provided.
Require. Ask the client for a certificate. If none is provided, reject the login request.
The server authenticates when a client attempts to…
The server controls access to the requested resource by determining whether…
Invoke a service The client is a member of a group listed among the Allowed Groups or Denied Groups in the Execute ACL that is associated with the service.
Access the Integration Server Administrator
The client is a member of the Administrators Group, which indicates the client has administrator privileges.
Connect to the server from Developer
The client is a member of the Developers Group, which indicates the client has developer privileges.
182 webMethods Integration Server Administrator’s Guide Version 7.1.1
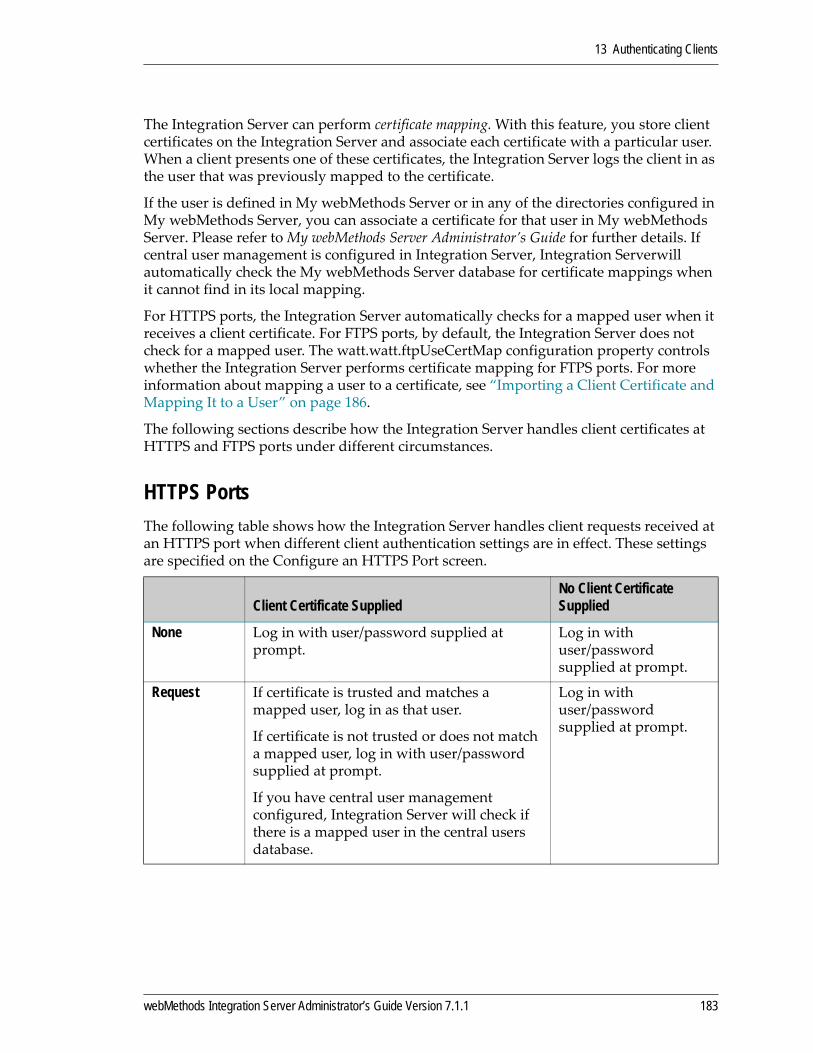
13 Authenticating Clients
The Integration Server can perform certificate mapping. With this feature, you store client certificates on the Integration Server and associate each certificate with a particular user. When a client presents one of these certificates, the Integration Server logs the client in as the user that was previously mapped to the certificate.
If the user is defined in My webMethods Server or in any of the directories configured in My webMethods Server, you can associate a certificate for that user in My webMethods Server. Please refer to My webMethods Server Administrator’s Guide for further details. If central user management is configured in Integration Server, Integration Serverwill automatically check the My webMethods Server database for certificate mappings when it cannot find in its local mapping.
For HTTPS ports, the Integration Server automatically checks for a mapped user when it receives a client certificate. For FTPS ports, by default, the Integration Server does not check for a mapped user. The watt.watt.ftpUseCertMap configuration property controls whether the Integration Server performs certificate mapping for FTPS ports. For more information about mapping a user to a certificate, see “Importing a Client Certificate and Mapping It to a User” on page 186.
The following sections describe how the Integration Server handles client certificates at HTTPS and FTPS ports under different circumstances.
HTTPS PortsThe following table shows how the Integration Server handles client requests received at an HTTPS port when different client authentication settings are in effect. These settings are specified on the Configure an HTTPS Port screen.
Client Certificate SuppliedNo Client Certificate Supplied
None Log in with user/password supplied at prompt.
Log in with user/password supplied at prompt.
Request If certificate is trusted and matches a mapped user, log in as that user.
If certificate is not trusted or does not match a mapped user, log in with user/password supplied at prompt.
If you have central user management configured, Integration Server will check if there is a mapped user in the central users database.
Log in with user/password supplied at prompt.
webMethods Integration Server Administrator’s Guide Version 7.1.1 183

13 Authenticating Clients
FTPS PortsThe following table shows how the Integration Server handles client requests received at an FTPS port when different client authentication settings are in effect.
Require If certificate is trusted and matches a mapped user, log in as that user.
If certificate is not trusted or does not match a mapped user, reject the login request.
If you have central user management configured, Integration Server will check if there is a mapped user in the central users database. If the certificate is mapped to a user in central user database, it will use that, if not reject the login request.
Reject the login request.
watt.ftpUseCertMap=true watt.ftpUseCertMap=false
Certificate No Certificate Certificate No Certificate
None Log in with user/password supplied at prompt.
Log in with user/password supplied at prompt.
Log in with user/password supplied at prompt.
Log in with user/password supplied at prompt.
Request If certificate is trusted and matches a mapped user, log in as that user.
If certificate is not trusted or does not match a mapped user, log in with user/password supplied at prompt.
Log in with user/password supplied at prompt.
Accept certificate if it is trusted, but ignore user provided in certificate. Instead, log in with user/password supplied at prompt.
Log in with user/password supplied at prompt.
Client Certificate SuppliedNo Client Certificate Supplied
184 webMethods Integration Server Administrator’s Guide Version 7.1.1

13 Authenticating Clients
Checklist for Using Client Certificates
Require If certificate is trusted and matches a mapped user, log in as that user. Ignore user/password supplied at prompt.
If certificate is not trusted or does not match mapped user, ignore user/password supplied at prompt and reject the login request.
Reject the login request.
Accept certificate if it is trusted, but ignore user provided in certificate. Instead, log in with user/password supplied at prompt.
Reject the login request.
Task Notes
Configure the server to use SSL. Refer to “Overview” on page 182.
Obtain the certificates of the Certificate Authorities that you want the server to use to validate client certificates.
Place each certificate in a separate file. Place all the files in a directory to which the Integration Server has access. For more information, see “Items You Need Before Configuring Ports to Request Client Certificates” below.
Configure the port to request client certificates.
Refer to “Configuring How Ports Handle Client Certificates” on page 188.
Import client certificates and map to specific user
Refer to “Importing a Client Certificate and Mapping It to a User” on page 186.
watt.ftpUseCertMap=true watt.ftpUseCertMap=false
Certificate No Certificate Certificate No Certificate
webMethods Integration Server Administrator’s Guide Version 7.1.1 185

13 Authenticating Clients
Items You Need Before Configuring Ports to Request Client CertificatesBefore configuring ports to request client certificates, you must configure the server to use SSL and obtain the certificates that the server uses to validate client certificates.
Configure the server to use SSL. For information about configuring the server to use SSL, see “Overview” on page 182.
CA certificates. These are the certificates that the server uses to validate client certificates. One way to obtain these certificates is to extract them from a Web browser. Most Web browsers that support SSL are shipped with the certificates of well‐known certificate authorities. If the certificates are not in DER format, use the webMethods Certificate Toolkit to convert them to DER format.
Place each certificate in a separate file. Place all the files in the same directory.
Importing a Client Certificate and Mapping It to a User You can import client certificates and keep them on file and associate each certificate with a particular user. This mapping allows you to control which user a client logs in as based on the certificate it presents. For example, a particular certificate may be used to identify the user FINANCE.
Integration Server automatically performs certificate mapping for requests received at HTTPS ports; however, for requests received at FTPS ports, Integration Server performs certificate mapping only if the watt.ftpUseCertMap configuration property is set to true. For more information about how client authentication works for an FTPS port, see “FTPS Ports” on page 184.
For ports configured to Require certificates, Integration Server will search this store of client certificates for a match. If the server finds a match, the client is automatically logged in as the user that is mapped to that certificate. If no match is found, the request fails and the client is denied access to Integration Server.
For ports configured to Request certificates, Integration Server will search the store of client certificates for a match. If the server finds a match, the client is automatically logged in as the user that is mapped to that certificate. If no match is found, Integration Server prompts the user to enter userid and password information.
If you are going to configure one or more ports to Require client certificates, you must import the client certificates you will accept and map them to the users that you want the clients to log in as.
Even if you do not configure any ports to Require client certificates, you might want to import client certificates and map them to users so that clients presenting these certificates can automatically log on as those users.
When central user management is configured, Integration Server will first check the certificate map for a user mapped to the given certificate. If no match is found,
186 webMethods Integration Server Administrator’s Guide Version 7.1.1

13 Authenticating Clients
Integration Server will then check the central users database for a user mapped to the given certificate. If it finds a user mapping, it will use that user.
1 Open the Integration Server Administrator if it is not already open.
2 In the Security menu of the Navigation panel, click Certificates.
3 Click Configure Client Certificates.
4 In the Certificate Path field, enter the path and file name of the file that contains the certificate you want to import.
5 In the User field, enter a user or click to search for and select a user.
To search for a user in the User Name dialog box, do one of the following:.
To select a local user, in the Provider list, select Local. Select the local user to which you want to map the certificate.
If an external user directory is not configured, the Provider list does not appear.
To select a user from an external directory (LDAP or a central user directory), in the Provider list, select the user directory that you want to search. In the Search field, enter the criteria that you want to user to find a user. Click Go. Select the user to which you want to map the certificate.
6 In the Usage list, select the purpose for which you wish to import this certificate.
7 Click Import Certificate.
Changing a Certificate MappingYou can change the user to which a certificate is mapped, and the purpose for which the certificate is used.
1 Open the Integration Server Administrator if it is not already open.
2 In the Security menu of the Navigation panel, click Certificates.
3 Click Configure Client Certificates.
Important! Be careful when mapping a user to particular client certificate. Make sure the user you specify does not have more authority than you want it to.
To import a client certificate
Note: Though Integration Server supports loading certificates for LDAP users, webMethods recommends using central user management and then configuring LDAP and certificates in My webMethods Server.
To change a user mapped to a certificate
webMethods Integration Server Administrator’s Guide Version 7.1.1 187
13 Authenticating Clients
4 Under Current Certificates, in the Subject CN column, click the certificate for which you want to change the mapping.
5 On the Security > Certificates > Client Certificates > Details screen, click Change Mapping.
6 In the User field, enter the user to which you want to map the certificate or click to search for and select a user.
7 In the Usage list, select the appropriate usage.
8 Click Save Changes.
Configuring How Ports Handle Client CertificatesThis section describes how to use the Integration Server Administrator to view or change how a port handles client certificates. For instructions on adding a port, see Chapter 7, “Configuring Ports”on page 83.
1 Open the Integration Server Administrator if it is not already open.
2 In the Navigation panel of the screen, on the Security menu, click Ports.
3 Locate the port whose client certificate settings you want to view or change and disable it if it is not already disabled. (To disable a port, click the icon in the Enabled column. The server replaces the icon with No to indicate that the port is now disabled.) Then click the port number.
4 Click Edit HTTPS Port Configuration or Edit FTPS Port Configuration to update the information in the fields, as necessary. For field descriptions, see “Adding an HTTPS Port” on page 88 or “Adding an FTPS Port” on page 98, respectively.
5 Click Save Changes.
6 Enable the port by clicking No in the Enabled column.
Basic Authentication (User Names and Passwords) When the server uses basic authentication, it prompts the client for a user name and password. If a user account is found for the supplied user name, the server authenticates the user name by comparing the supplied password to the password in the user account for the supplied user name. If the password is correct, the server proceeds with the request. If the password is not correct, the server rejects the request. If a user account for the supplied user name is not found, the server rejects the request.
For security reasons, the Integration Server (starting with Release 4.0) stores passwords in hashed format. Once passwords are hashed, you cannot convert them back to an unhashed format. Therefore, once you have installed and run with Release 4.0 or later of
To view or change how a port handles client certificates
188 webMethods Integration Server Administrator’s Guide Version 7.1.1
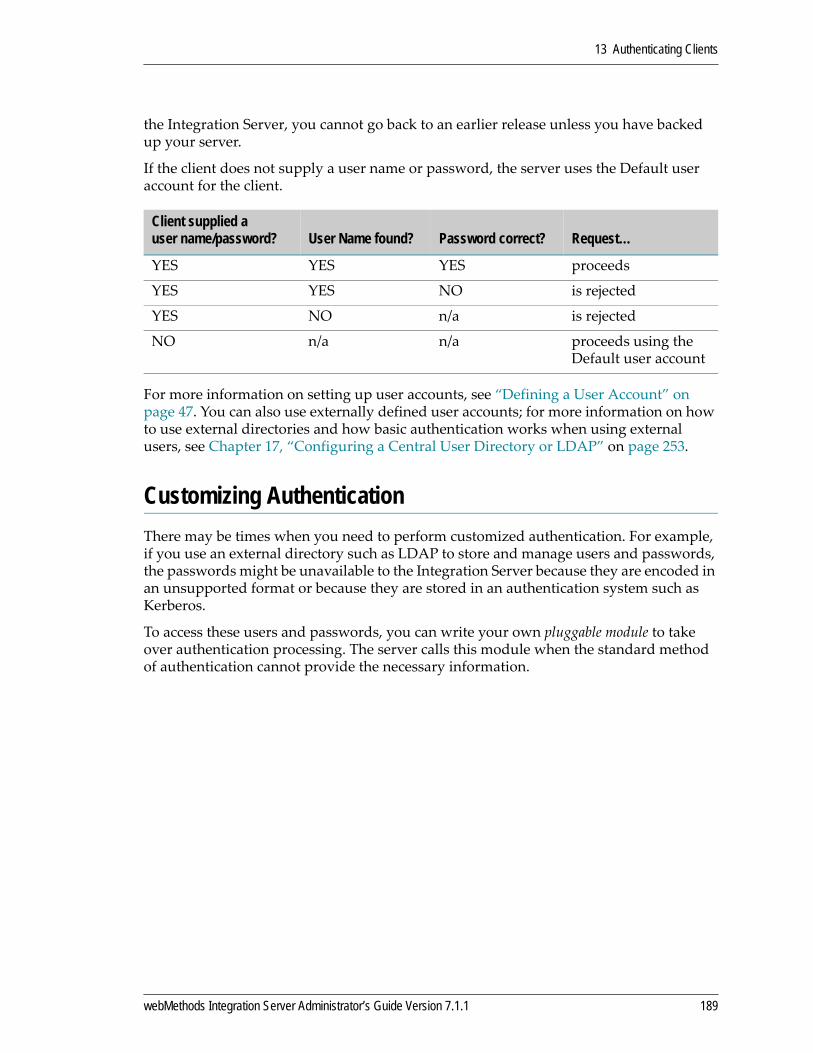
13 Authenticating Clients
the Integration Server, you cannot go back to an earlier release unless you have backed up your server.
If the client does not supply a user name or password, the server uses the Default user account for the client.
For more information on setting up user accounts, see “Defining a User Account” on page 47. You can also use externally defined user accounts; for more information on how to use external directories and how basic authentication works when using external users, see Chapter 17, “Configuring a Central User Directory or LDAP” on page 253.
Customizing AuthenticationThere may be times when you need to perform customized authentication. For example, if you use an external directory such as LDAP to store and manage users and passwords, the passwords might be unavailable to the Integration Server because they are encoded in an unsupported format or because they are stored in an authentication system such as Kerberos.
To access these users and passwords, you can write your own pluggable module to take over authentication processing. The server calls this module when the standard method of authentication cannot provide the necessary information.
Client supplied a user name/password? User Name found? Password correct? Request…
YES YES YES proceeds
YES YES NO is rejected
YES NO n/a is rejected
NO n/a n/a proceeds using the Default user account
webMethods Integration Server Administrator’s Guide Version 7.1.1 189
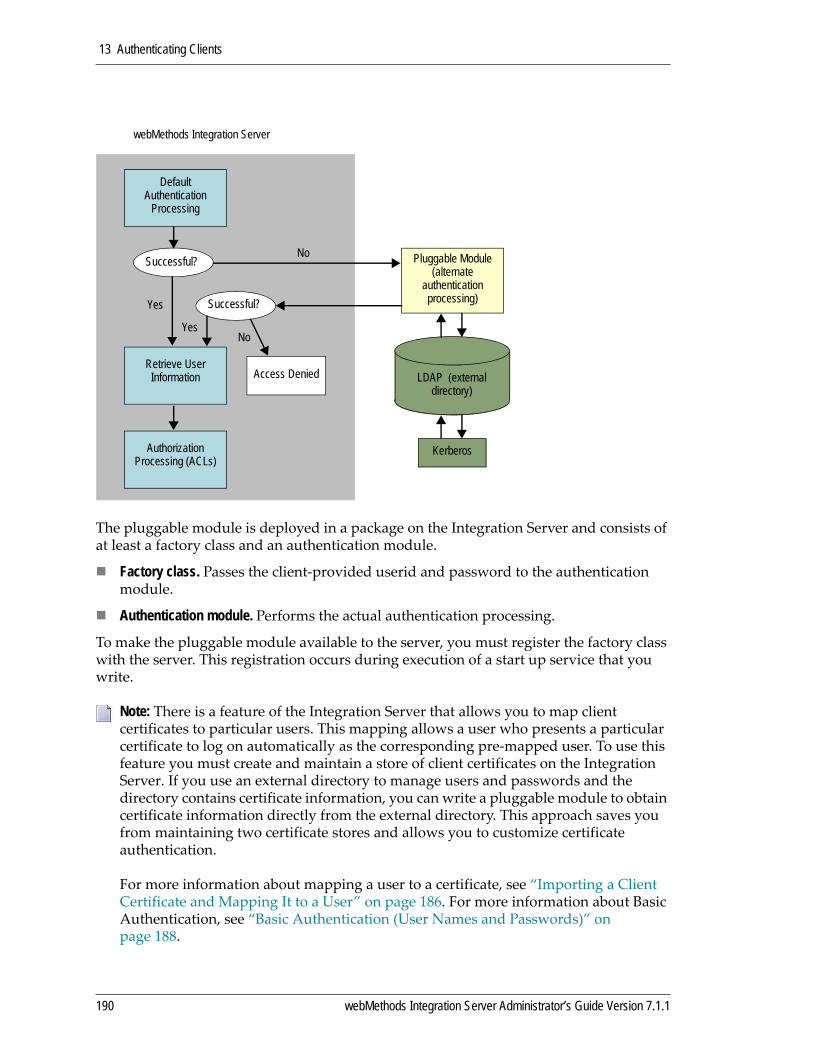
13 Authenticating Clients
The pluggable module is deployed in a package on the Integration Server and consists of at least a factory class and an authentication module.
Factory class. Passes the client‐provided userid and password to the authentication module.
Authentication module. Performs the actual authentication processing.
To make the pluggable module available to the server, you must register the factory class with the server. This registration occurs during execution of a start up service that you write.
Note: There is a feature of the Integration Server that allows you to map client certificates to particular users. This mapping allows a user who presents a particular certificate to log on automatically as the corresponding pre‐mapped user. To use this feature you must create and maintain a store of client certificates on the Integration Server. If you use an external directory to manage users and passwords and the directory contains certificate information, you can write a pluggable module to obtain certificate information directly from the external directory. This approach saves you from maintaining two certificate stores and allows you to customize certificate authentication.
For more information about mapping a user to a certificate, see “Importing a Client Certificate and Mapping It to a User” on page 186. For more information about Basic Authentication, see “Basic Authentication (User Names and Passwords)” on page 188.
webMethods Integration Server
Default Authentication
Processing
Successful?
Successful?
Retrieve User Information
Authorization Processing (ACLs)
Pluggable Module (alternate
authentication processing)
Access Denied
Kerberos
LDAP (external directory)
Yes
Yes
No
No
190 webMethods Integration Server Administrator’s Guide Version 7.1.1
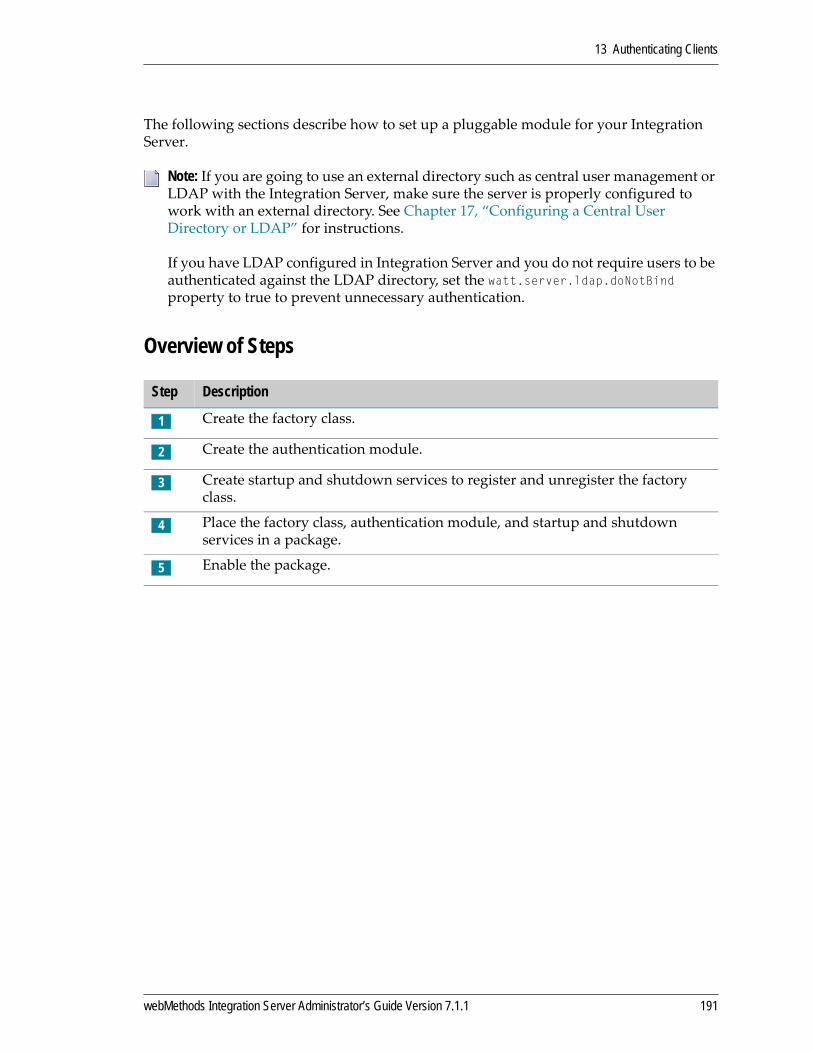
13 Authenticating Clients
The following sections describe how to set up a pluggable module for your Integration Server.
Overview of Steps
Note: If you are going to use an external directory such as central user management or LDAP with the Integration Server, make sure the server is properly configured to work with an external directory. See Chapter 17, “Configuring a Central User Directory or LDAP” for instructions.
If you have LDAP configured in Integration Server and you do not require users to be authenticated against the LDAP directory, set the watt.server.ldap.doNotBind property to true to prevent unnecessary authentication.
Step Description
1 Create the factory class.
2 Create the authentication module.
3 Create startup and shutdown services to register and unregister the factory class.
4 Place the factory class, authentication module, and startup and shutdown services in a package.
5 Enable the package.
webMethods Integration Server Administrator’s Guide Version 7.1.1 191
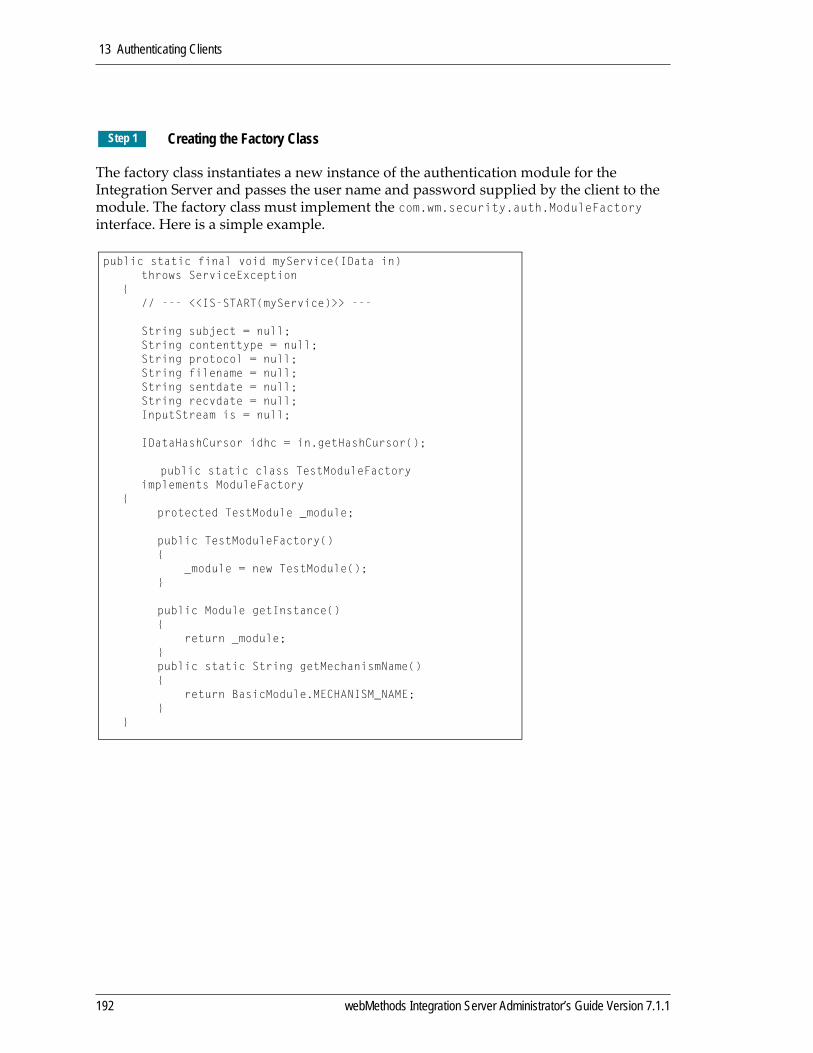
13 Authenticating Clients
The factory class instantiates a new instance of the authentication module for the Integration Server and passes the user name and password supplied by the client to the module. The factory class must implement the com.wm.security.auth.ModuleFactory interface. Here is a simple example.
Creating the Factory ClassStep 1
public static final void myService(IData in)throws ServiceException
{// --- <<IS-START(myService)>> ---
String subject = null;String contenttype = null;String protocol = null;String filename = null;String sentdate = null;String recvdate = null;InputStream is = null;
IDataHashCursor idhc = in.getHashCursor();
public static class TestModuleFactoryimplements ModuleFactory
{ protected TestModule _module;
public TestModuleFactory() { _module = new TestModule(); }
public Module getInstance() { return _module; } public static String getMechanismName() { return BasicModule.MECHANISM_NAME; }
}
192 webMethods Integration Server Administrator’s Guide Version 7.1.1
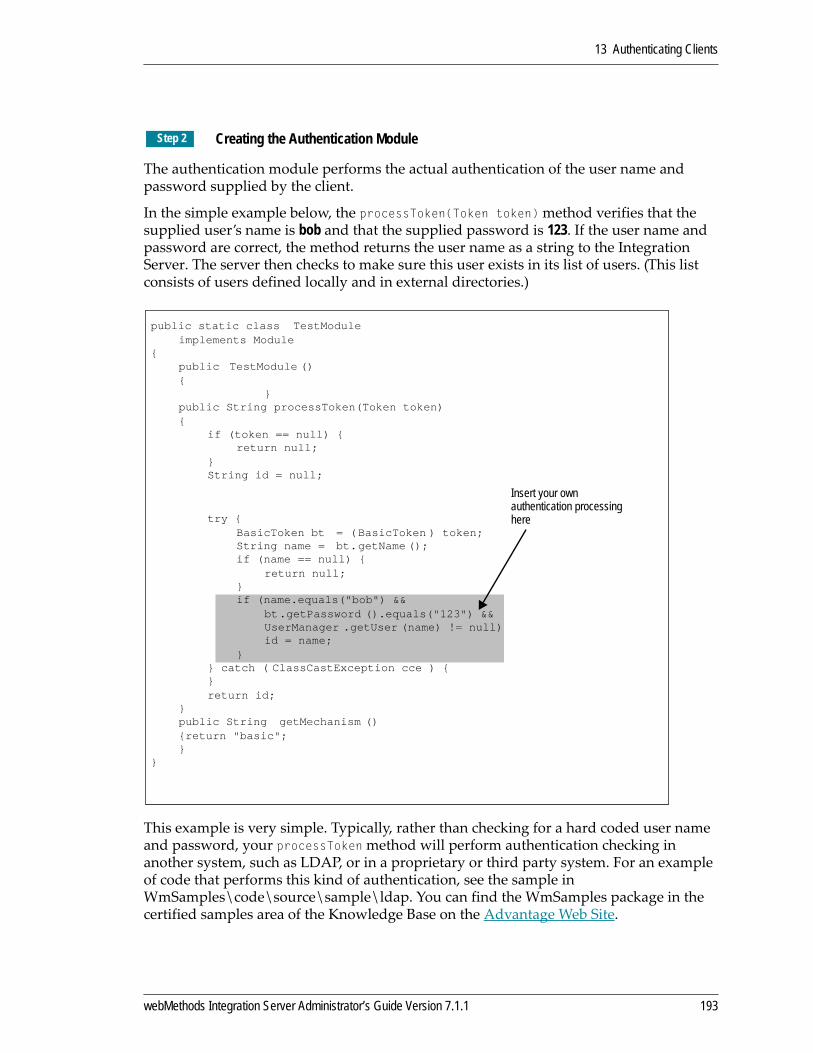
13 Authenticating Clients
The authentication module performs the actual authentication of the user name and password supplied by the client.
In the simple example below, the processToken(Token token) method verifies that the supplied user’s name is bob and that the supplied password is 123. If the user name and password are correct, the method returns the user name as a string to the Integration Server. The server then checks to make sure this user exists in its list of users. (This list consists of users defined locally and in external directories.)
This example is very simple. Typically, rather than checking for a hard coded user name and password, your processToken method will perform authentication checking in another system, such as LDAP, or in a proprietary or third party system. For an example of code that performs this kind of authentication, see the sample in WmSamples\code\source\sample\ldap. You can find the WmSamples package in the certified samples area of the Knowledge Base on the Advantage Web Site.
Creating the Authentication ModuleStep 2
public static class TestModuleimplements Module
{public TestModule () {
}public String processToken(Token token){
if (token == null) { return null;
}String id = null;
try {BasicToken bt = (BasicToken ) token;String name = bt.getName ();if (name == null) {
return null;}if (name.equals("bob") &&
bt.getPassword ().equals("123") &&UserManager .getUser (name) != null) id = name;
}} catch ( ClassCastException cce ) {}return id;
}public String getMechanism (){return "basic";}
}
Insert your own authentication processing here
webMethods Integration Server Administrator’s Guide Version 7.1.1 193
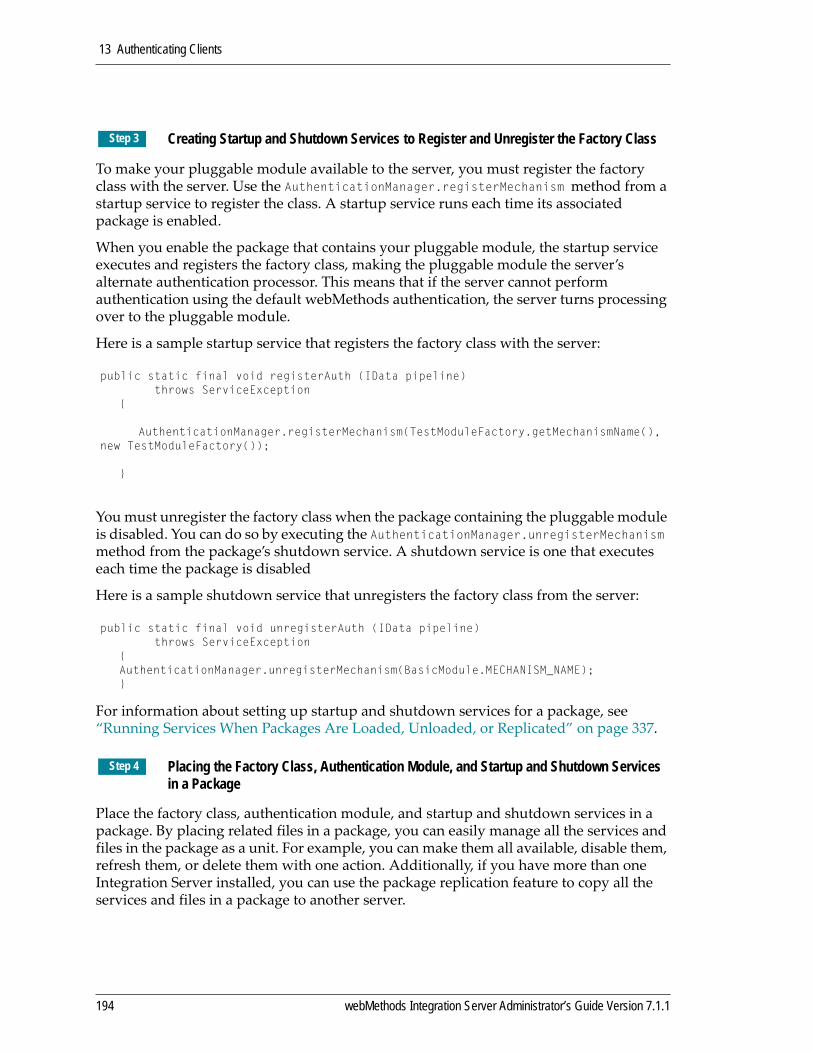
13 Authenticating Clients
To make your pluggable module available to the server, you must register the factory class with the server. Use the AuthenticationManager.registerMechanism method from a startup service to register the class. A startup service runs each time its associated package is enabled.
When you enable the package that contains your pluggable module, the startup service executes and registers the factory class, making the pluggable module the server’s alternate authentication processor. This means that if the server cannot perform authentication using the default webMethods authentication, the server turns processing over to the pluggable module.
Here is a sample startup service that registers the factory class with the server:
You must unregister the factory class when the package containing the pluggable module is disabled. You can do so by executing the AuthenticationManager.unregisterMechanism method from the package’s shutdown service. A shutdown service is one that executes each time the package is disabled
Here is a sample shutdown service that unregisters the factory class from the server:
For information about setting up startup and shutdown services for a package, see “Running Services When Packages Are Loaded, Unloaded, or Replicated” on page 337.
Place the factory class, authentication module, and startup and shutdown services in a package. By placing related files in a package, you can easily manage all the services and files in the package as a unit. For example, you can make them all available, disable them, refresh them, or delete them with one action. Additionally, if you have more than one Integration Server installed, you can use the package replication feature to copy all the services and files in a package to another server.
Creating Startup and Shutdown Services to Register and Unregister the Factory Class
Placing the Factory Class, Authentication Module, and Startup and Shutdown Services in a Package
Step 3
public static final void registerAuth (IData pipeline) throws ServiceException
{
AuthenticationManager.registerMechanism(TestModuleFactory.getMechanismName(), new TestModuleFactory());
}
public static final void unregisterAuth (IData pipeline) throws ServiceException
{AuthenticationManager.unregisterMechanism(BasicModule.MECHANISM_NAME);}
Step 4
194 webMethods Integration Server Administrator’s Guide Version 7.1.1
13 Authenticating Clients
Most likely you will want to keep files and services related to your pluggable authentication module in a separate package from other applications. This way you can disable those packages for maintenance without affecting authentication on your server.
To make your pluggable module available to the server, you must enable the package in which the module resides.
1 Open the Integration Server Administrator if it is not already open.
2 In the Packages menu of the Navigation panel, click Management.
3 Click No in the Enabled column for the package you want to enable. The server issues a prompt to verify that you want to enable the package. Click OK to enable the package. When the package is enabled, the server displays a icon and Yes in the Enabled column.
For more information about enabling a package, see “Enabling a Package” on page 290.
Responding to Integrated Windows Authentication
When the Integration Server executes services that access Web pages, the server acts as a Web client requesting information from a Web Server. That is, in these situations, the server functions much like a Web browser. In many circumstances, a Web Server authenticates a Web client.
Most Web servers use Basic Authentication and client certificates to authenticate Web clients. The Microsoft Internet Information Server (IIS) supports another type of authentication. IIS supports Microsoft Integrated Windows authentication. Integrated Windows authentication authenticates a user without requiring the transmission of actual passwords or sensitive account information across the network. For IIS to use Integrated Windows authentication to authenticate a Web client, the Web client must also support Integrated Windows authentication. The Integration Server contains support for Integrated Windows authentication.
The Integration Server supports Integrated Windows authentication on the connection from the Integration Server to a proxy. The Integration Server does not support Integrated Windows authentication on the connection from a proxy to the Internet.
Enabling the Package
Note: This section refers to the Microsoft Internet Information Server (IIS); however, the information applies to any Web server that supports Integrated Windows authentication.
Step 5
webMethods Integration Server Administrator’s Guide Version 7.1.1 195
13 Authenticating Clients
User Name, Password, and Domain NameThe goal of the Integrated Windows authentication is the same as for any authentication; that is, to determine the user name for the client and ensure that the client is who he or she claims to be.
If the Integration Server is running as an NT service, it uses the local system rights for authentication when responding to an Integrated Windows authentication. If you log on as a user, the Integration Server uses the credentials associated with that logon session when responding to an Integrated Windows authentication.
Activating Integrated Windows AuthenticationYou must activate Integrated Windows authentication before the Integration Server can participate in an Integrated Windows authentication. Once activated, the Integration Server automatically responds to Integrated Windows authentication requests.
1 Open the Integration Server Administrator if it is not already open.
2 In the Packages menu of the Navigation panel, click Management.
3 If the WmWin32 package is not already enabled, enable it by clicking No in the Enabled column for this package.
4 In the list of packages, click WmWin32.
5 Click Browse Services in WmWin32.
6 In the list of services, click wm.ntlm:reg.
7 Click Test reg. The server displays the test screen for the win32.ntlm.reg service.
8 Click Test (without inputs). The server activates Integrated Windows authentication.
Note: Integrated Windows authentication is only available when the Integration Server is running on NT.
To activate Integrated Windows authentication
Note: The WmWin32 package is deprecated as of Integration Server 7.1.
Note: If you want Integrated Windows authentication available whenever the Integration Server is running, make the win32.ntlm:reg service a startup service for the Win32 package. For instructions, see the webMethods Developer User’s Guide.
196 webMethods Integration Server Administrator’s Guide Version 7.1.1

13 Authenticating Clients
1 Open the Integration Server Administrator if it is not already open.
2 In the Packages menu of the Navigation panel, click Management.
3 In the list of packages, click WmWin32.
4 Click Browse services in WmWin32.
5 In the list of services, click wm.ntlm:unreg.
6 Click Test unreg. The server displays the test screen for the win32.ntlm.unreg service.
7 Click Test (without inputs). The server deactivates Integrated Windows authentication.
To deactivate Integrated Windows authentication
webMethods Integration Server Administrator’s Guide Version 7.1.1 197

13 Authenticating Clients
198 webMethods Integration Server Administrator’s Guide Version 7.1.1

14 Securing Your Server with PKI Profiles
Overview . . . . . . . . . . . . . . . . . . . . . . . . . . . . . . . . . . . . . . . . . . . . . . . . . . . . . . . . . . . . . . . . . . . 200
Getting Started . . . . . . . . . . . . . . . . . . . . . . . . . . . . . . . . . . . . . . . . . . . . . . . . . . . . . . . . . . . . . . . 201
Configuring PKI System Settings . . . . . . . . . . . . . . . . . . . . . . . . . . . . . . . . . . . . . . . . . . . . . . . . . 202
Creating a PKI Profile . . . . . . . . . . . . . . . . . . . . . . . . . . . . . . . . . . . . . . . . . . . . . . . . . . . . . . . . . . 204
Creating the PKI Profile Alias . . . . . . . . . . . . . . . . . . . . . . . . . . . . . . . . . . . . . . . . . . . . . . . . . . . . 207
Connecting to and Disconnecting from the PKI System . . . . . . . . . . . . . . . . . . . . . . . . . . . . . . . 208
Logging in a PKI Profile . . . . . . . . . . . . . . . . . . . . . . . . . . . . . . . . . . . . . . . . . . . . . . . . . . . . . . . . 208
Deleting a PKI Profile Alias . . . . . . . . . . . . . . . . . . . . . . . . . . . . . . . . . . . . . . . . . . . . . . . . . . . . . 209
Viewing and Updating Information for a PKI Profile . . . . . . . . . . . . . . . . . . . . . . . . . . . . . . . . . . . 209
Viewing or Updating PKI Profile Alias Information . . . . . . . . . . . . . . . . . . . . . . . . . . . . . . . . . . . . 210
Determining Whether a PKI Profile Is Logged In . . . . . . . . . . . . . . . . . . . . . . . . . . . . . . . . . . . . . 211
Recovering a PKI Profile . . . . . . . . . . . . . . . . . . . . . . . . . . . . . . . . . . . . . . . . . . . . . . . . . . . . . . . 211
Changing the Password for a PKI Profile . . . . . . . . . . . . . . . . . . . . . . . . . . . . . . . . . . . . . . . . . . . 213
Updating Keys . . . . . . . . . . . . . . . . . . . . . . . . . . . . . . . . . . . . . . . . . . . . . . . . . . . . . . . . . . . . . . . 214
Exporting a PKI Profile from the File System to an HSM Device . . . . . . . . . . . . . . . . . . . . . . . . . 215
Installing an Entrust PKI Proxy . . . . . . . . . . . . . . . . . . . . . . . . . . . . . . . . . . . . . . . . . . . . . . . . . . . 216
Password Rules . . . . . . . . . . . . . . . . . . . . . . . . . . . . . . . . . . . . . . . . . . . . . . . . . . . . . . . . . . . . . . 217
About CRL Checking . . . . . . . . . . . . . . . . . . . . . . . . . . . . . . . . . . . . . . . . . . . . . . . . . . . . . . . . . . 217
webMethods Integration Server Administrator’s Guide Version 7.1.1 199

14 Securing Your Server with PKI Profiles
OverviewPublic Key Infrastructure (PKI) allows users to exchange information securely over a network through the use of public and private keys. PKI also performs automatic key management. The Integration Server interacts with PKI through profiles.
PKI profiles provide a secure way of storing keying material needed for encrypting, decrypting, verifying, and signing documents. A PKI profile is a file that contains your private key, user certificate, digital signature, CA certificate, certificate histories, and other information. You can store PKI profiles in your file system (as .epf files), or for even greater security, on an HSM device.
An HSM device provides a secure alternate location for PKI profiles. Even if a hacker completely subverts the Integration Server and underlying operating system, they cannot get the private key out of the HSM device, but they might be able to get the key from an .epf file.
The PKI system consists of the Certificate Authority and an LDAP Directory. The Certificate Authority manages keys and security credentials. The LDAP directory stores copies of encryption certificates associated with PKI profiles, as well as policy certificates and Certificate Revocation Lists (CRLs).
If your PKI system administrator does not allow direct connections to your PKI system, you can set up a PKI proxy. The proxy sits between the client (in this case your Integration Server) and your PKI system and routes PKIXCMP messages between them. See “Installing an Entrust PKI Proxy” on page 216 for more information.
About PKI ProfilesUsing PKI profiles in combination with webMethods ACLs, you can perform cryptographic functions using the PKI profile, including encrypting, decrypting, validating, and signing documents. For example, you might have a Finance PKI profile for members of your finance department and a Sales PKI profile for members of your sales department. Each department can then use their own PKI profile for signature‐related activities.
To administer a PKI profile, a security officer must have Administrator access to the Integration Server. In addition, the security officer must know the PKI profile’s password.
To access the PKI profiles and perform cryptographic operations, your service must invoke built‐in services that are supplied by webMethods Integration Server (the pub.pki series) for this purpose. In addition, your application must run as an Integration Server user that has been granted access to the profiles through an ACL. That is, the user must be a member of the Execute ACL for the PKI profile.
For a PKI profile to be available to an application, the profile must be logged in. Depending on the circumstances, you can have one or more PKI profiles logged in at a given time. You can have multiple .epf files logged in at the same time. Depending on your HSM device you can have multiple HSM PKI profiles logged in at the same time. You can even have .epf and HSM PKI profiles logged in at the same time.
200 webMethods Integration Server Administrator’s Guide Version 7.1.1
14 Securing Your Server with PKI Profiles
PKI Profile Checking ProcessThe following describes what happens when a client sends a secure document to an application.
1 A client running outside your enterprise sends a signed and/or encrypted document to an Integration Server running inside your enterprise.
2 The Integration Server passes the document to an application.
3 Your application calls the pub.pki services (provided in the WmPKI package) to access the PKI profiles.
4 The server verifies that the user associated with the request is a member of the PKI profile’s Execute ACL.
5 The server decrypts and verifies the document using the keys and certificates in the PKI profile. The PKI profile resides either in the file system, or on an HSM device.
6 The application processes the document and sends a response back to the sending client.
Supported Hardware and SoftwareThe webMethods WmPKI package supports the following software and hardware:
Software: Entrust Authority Security Toolkit for Java 7.2
Hardware (HSM device): Any hardware device that conforms to the PKCS11 open standard, for example, nCipher HSM devices.
Getting Started The following section outlines the steps required to set up your system to use PKI profiles:
1 Install the PKI system according to vendor instructions.
2 If your PKI system administrator does not allow direct connections from clients, install a PKI proxy server, according to the vendor’s instructions. See “Installing an Entrust PKI Proxy” on page 216 for more information.
3 (Optional) Install an HSM device on the machine on which your Integration Server runs, according to the vendor’s instructions.
Important! The library must reside in your operating system path.
webMethods Integration Server Administrator’s Guide Version 7.1.1 201
14 Securing Your Server with PKI Profiles
4 Install the WMPKI package on the Integration Server (or make sure it was installed when you installed the server). Go to the Packages > Management screen on the Integration Server Administrator and look for WmPKI in the list of packages or check the IntegrationServer_directory\packages directory.
5 Configure the PKI system settings from the Integration Server. In this step you specify PKI connection settings. See “Configuring PKI System Settings” below for instructions.
6 Create PKI profiles if they were not previously created using another tool.
In this step you use the activation codes you obtained from your Registration Authority to create PKI profiles. See “Creating a PKI Profile” on page 204 for instructions.
7 Instruct your development staff to write or update applications to use the built‐in public services in your WmPKI package (the pub.pki series). These built‐in services enable your application to the access PKI profiles and perform cryptographic operations. For more information about using these services, see the webMethods Integration Server Built‐In Services Reference.
Configuring PKI System SettingsThere are a number of settings you can configure in the Integration Server for how your server connects to your PKI system:
Whether or not to connect the server to the PKI system
Location of the PKI system components
Whether the server is to perform CRL checking
Whether to connect to the PKI system directly or through a proxy
Name and location of the HSM device library
1 Open the Integration Server Administrator if it is not already open.
2 In the Adapters menu of the Navigation panel, click PKI.
3 In the PKI menu, click PKI System Properties.
To configure PKI System Settings
202 webMethods Integration Server Administrator’s Guide Version 7.1.1

14 Securing Your Server with PKI Profiles
4 Click Edit System Properties and update the following system properties as needed.
Field Contents
Connect to PKI System Whether or not the server should connect to your PKI system. The server needs to be connected to both the Certificate Authority and LDAP directory portions of your PKI system for profile creation, profile recovery, key updates, and CRL checking.
Connect Directly Select this option if you are not using the PKI proxy
Entrust Authority Host:Port #Host name (IP address) and port of the server on which the PKI authority runs, for example, 127:0.0.1:829.
LDAP Directory Host:PortHost name (IP address) and port of the LDAP directory associated with your PKI authority, for example 127:0.0.1:389.
The LDAP directory contains copies of encryption certificates associated with your PKI profiles. It also contains the policy certificate and CRLs.
Note: When the Integration Server attempts to connect to the LDAP directory, the watt.security.pki.jnditimeout property specifies how long the Integration Server waits for the connection to succeed. If the connection fails, you will need to re‐attempt your action later. For more information, see Appendix B, “Server Configuration Parameters”.
Use HTTP Proxy Select this option if you are using the PKI proxy
Entrust Authority Host Host name (IP address) of the server on which the PKI authority is running. The proxy connects to this host.
Proxy Entrust Authority URLURL of the proxy to your PKI authority.
Proxy LDAP Directory URLURL of the proxy to your PKI authority’s LDAP directory.
webMethods Integration Server Administrator’s Guide Version 7.1.1 203

14 Securing Your Server with PKI Profiles
5 Click Save Changes.
Creating a PKI ProfileIn this step you create the file that contains your keys and certificates. This file will reside in your file system as a .epf file or on your HSM device.
There are two main steps to setting up a PKI profile:
1 Create a PKI profile
This step creates your PKI profile using the activation codes supplied by your Registration Authority (RA). The server writes the file to your file system as a .epf file or to your HSM device.
2 Create an alias for the PKI profile in the Integration Server.
In this step you create an alias for the PKI profile and define ACL associations and a list of trusted certificates for it.
Enable CRL Checking Whether or not you want the Integration Server to perform a revocation check against certificates.
CRL checking is performed only for internal certificates, that is, certificates issued by your PKI system’s certificate authority
If CRL checking is enabled and the server encounters a revoked certificate, the server rejects the certificate (and the request) and issues an error message.
Note: If your server will be disconnected from the PKI system for long periods of time, disable CRL checking.
See “About CRL Checking” on page 217 for more information about this topic.
Hardware Device Library Name
This is the name of the file that contains the PKCS #11 shared library. This library (for example cknfast.dll) is supplied by your HSM vendor and allows your Integration Server to communicate with the HSM device.
Important! The library must reside in your operating system path.
Important! Your server must be connected to your PKI system when you create a PKI profile.
Field Contents
204 webMethods Integration Server Administrator’s Guide Version 7.1.1
14 Securing Your Server with PKI Profiles
These steps are described below.
1 If you are storing the PKI profile on an HSM device, make sure a preformatted token has already been inserted into a slot in the device. The token should be empty except for a label and a password. Click View Label Information to display a list of tokens (and their labels) currently inserted in the HSM device.
2 Open the Integration Server Administrator if it is not already open.
3 In the Adapters menu of the Navigation panel, click PKI.
4 In the PKI menu, click Profile Management.
5 Click Create PKI Profile.
6 Update the profile settings as follows:
Important! Before creating a PKI profile, you must have the Registration Authority create the user. When supplying information about the user, do not use multibyte characters. Multibyte characters are not supported.
Cre
To creating a PKI Profile
Field Contents
Activation Codes from Registration Authority
Reference NumberReference number provided by your registration authority.
Authorization CodeAuthorization code provided by your registration authority.
PKI Profile LocationFile System Enter information in these fields only if you want to store the
PKI profile in your file system.
File NameName of the .epf file. You can specify an absolute or relative path. If you specify just the file name, the server writes the PKI profile to the server root directory. Be sure to specify a path that is valid and accessible to the server.
PasswordPassword you want to associate with the PKI profile. This password is required when you log in a PKI profile. There may be times when the server asks you to change a password. See “Password Rules” on page 217 for more information.
Confirm PasswordEnter the same password again to make sure you typed it correctly.
webMethods Integration Server Administrator’s Guide Version 7.1.1 205
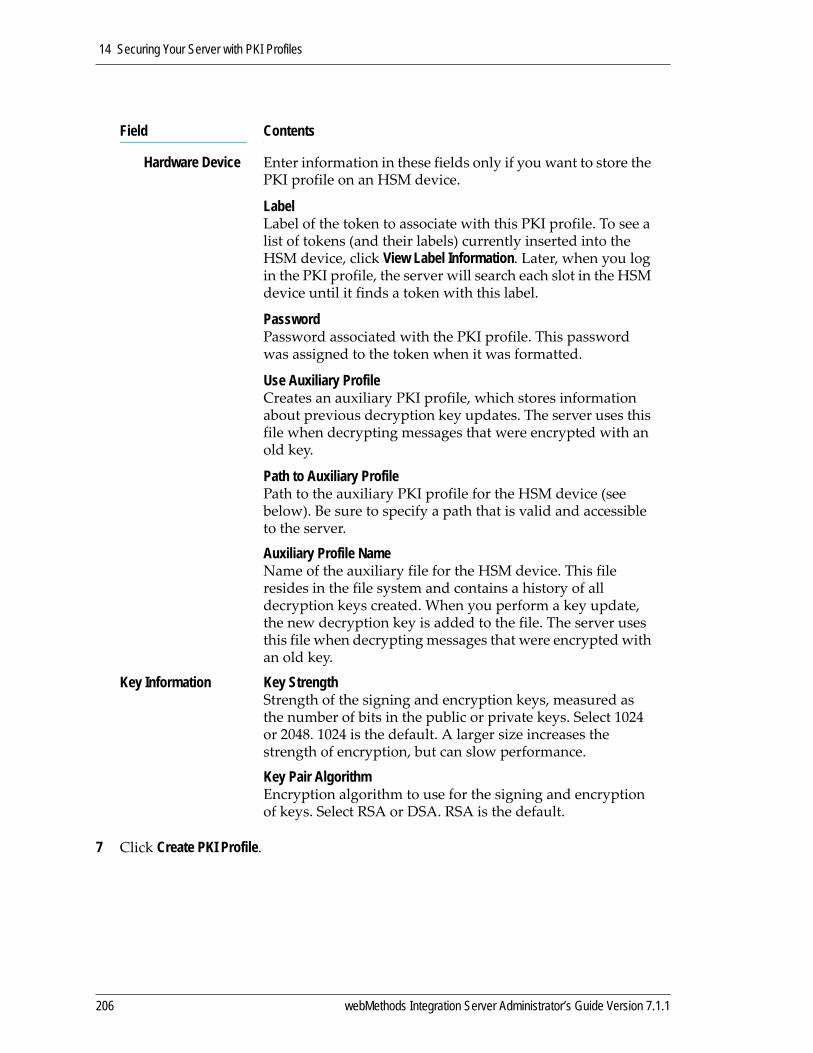
14 Securing Your Server with PKI Profiles
7 Click Create PKI Profile.
Hardware Device Enter information in these fields only if you want to store the PKI profile on an HSM device.
LabelLabel of the token to associate with this PKI profile. To see a list of tokens (and their labels) currently inserted into the HSM device, click View Label Information. Later, when you log in the PKI profile, the server will search each slot in the HSM device until it finds a token with this label.
PasswordPassword associated with the PKI profile. This password was assigned to the token when it was formatted.
Use Auxiliary ProfileCreates an auxiliary PKI profile, which stores information about previous decryption key updates. The server uses this file when decrypting messages that were encrypted with an old key.
Path to Auxiliary ProfilePath to the auxiliary PKI profile for the HSM device (see below). Be sure to specify a path that is valid and accessible to the server.
Auxiliary Profile NameName of the auxiliary file for the HSM device. This file resides in the file system and contains a history of all decryption keys created. When you perform a key update, the new decryption key is added to the file. The server uses this file when decrypting messages that were encrypted with an old key.
Key Information Key StrengthStrength of the signing and encryption keys, measured as the number of bits in the public or private keys. Select 1024 or 2048. 1024 is the default. A larger size increases the strength of encryption, but can slow performance.
Key Pair AlgorithmEncryption algorithm to use for the signing and encryption of keys. Select RSA or DSA. RSA is the default.
Field Contents
206 webMethods Integration Server Administrator’s Guide Version 7.1.1
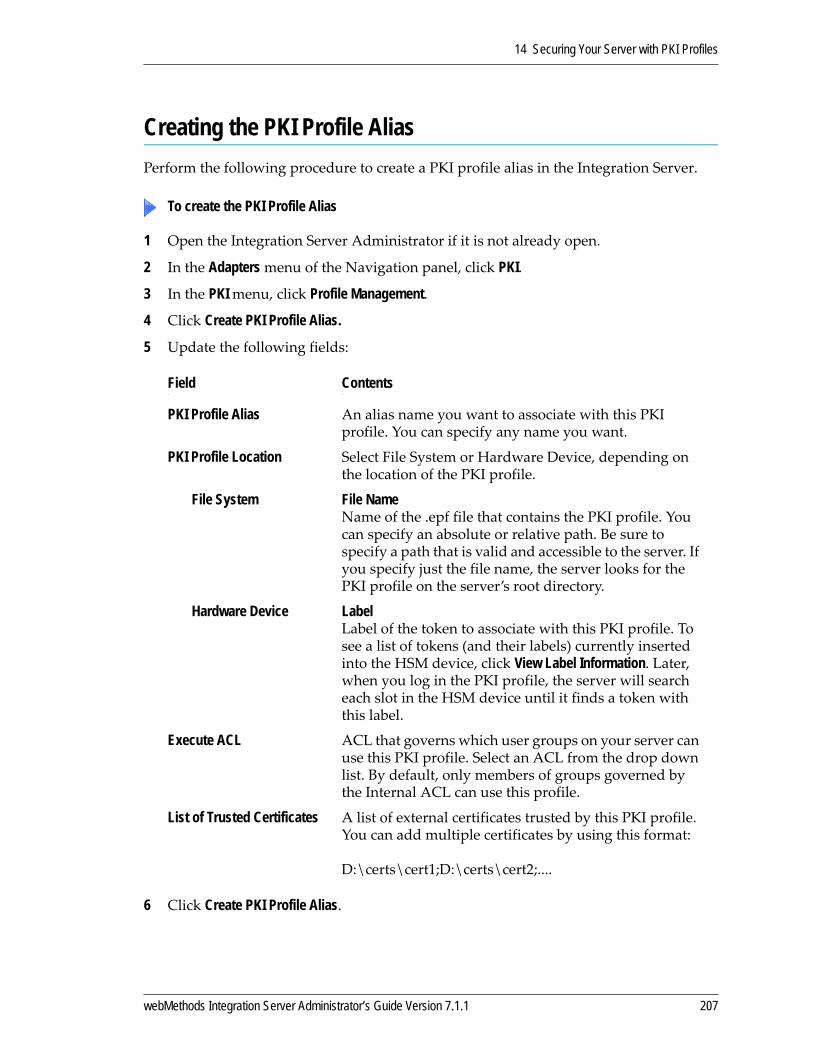
14 Securing Your Server with PKI Profiles
Creating the PKI Profile AliasPerform the following procedure to create a PKI profile alias in the Integration Server.
1 Open the Integration Server Administrator if it is not already open.
2 In the Adapters menu of the Navigation panel, click PKI.
3 In the PKI menu, click Profile Management.
4 Click Create PKI Profile Alias.
5 Update the following fields:
6 Click Create PKI Profile Alias.
To create the PKI Profile Alias
Field Contents
PKI Profile Alias An alias name you want to associate with this PKI profile. You can specify any name you want.
PKI Profile Location Select File System or Hardware Device, depending on the location of the PKI profile.
File System File NameName of the .epf file that contains the PKI profile. You can specify an absolute or relative path. Be sure to specify a path that is valid and accessible to the server. If you specify just the file name, the server looks for the PKI profile on the server’s root directory.
Hardware Device LabelLabel of the token to associate with this PKI profile. To see a list of tokens (and their labels) currently inserted into the HSM device, click View Label Information. Later, when you log in the PKI profile, the server will search each slot in the HSM device until it finds a token with this label.
Execute ACL ACL that governs which user groups on your server can use this PKI profile. Select an ACL from the drop down list. By default, only members of groups governed by the Internal ACL can use this profile.
List of Trusted Certificates A list of external certificates trusted by this PKI profile. You can add multiple certificates by using this format:
D:\certs\cert1;D:\certs\cert2;....
webMethods Integration Server Administrator’s Guide Version 7.1.1 207

14 Securing Your Server with PKI Profiles
Connecting to and Disconnecting from the PKI SystemYou can connect to and disconnect your Integration Server from the PKI system as needed. The Integration Server must be connected to the PKI system for the following tasks:
Creating a PKI profile
Recovering a PKI profile
Performing key updates
1 Open the Integration Server Administrator if it is not already open.
2 In the Adapters menu of the Navigation panel, click PKI.
3 In the PKI menu, click PKI System Properties.
4 Click Edit System Properties.
5 In the Connect to the PKI System field, click Yes to connect, or No to Disconnect.
Logging in a PKI ProfileFor a PKI profile to be available to the Integration Server (and therefore to applications that require it), the PKI profile must be logged in. For security purposes, a security officer must manually log in the PKI profile; the server does not automatically perform the login during server initialization. A PKI profile remains logged in until someone logs it out, disables or reloads the WmPKI package, or shuts down the server.
Depending on the circumstances, you can have one or more HSM‐stored PKI profiles logged in at a given time and you can have .epf and HSM‐stored PKI profiles logged in at the same time.
1 If you are logging in a PKI profile that is stored on an HSM device, make sure you insert the appropriate token into a slot on the HSM device.
2 Open the Integration Server Administrator if it is not already open.
3 In the Adapters menu of the Navigation panel, click PKI.
To connect to and disconnecting from the PKI System
Note: If the Integration Server will be disconnected from the PKI system for a long time, be sure to disable CRL checking. See “About CRL Checking” on page 217 for more information.
Logging in a PKI Profile
208 webMethods Integration Server Administrator’s Guide Version 7.1.1
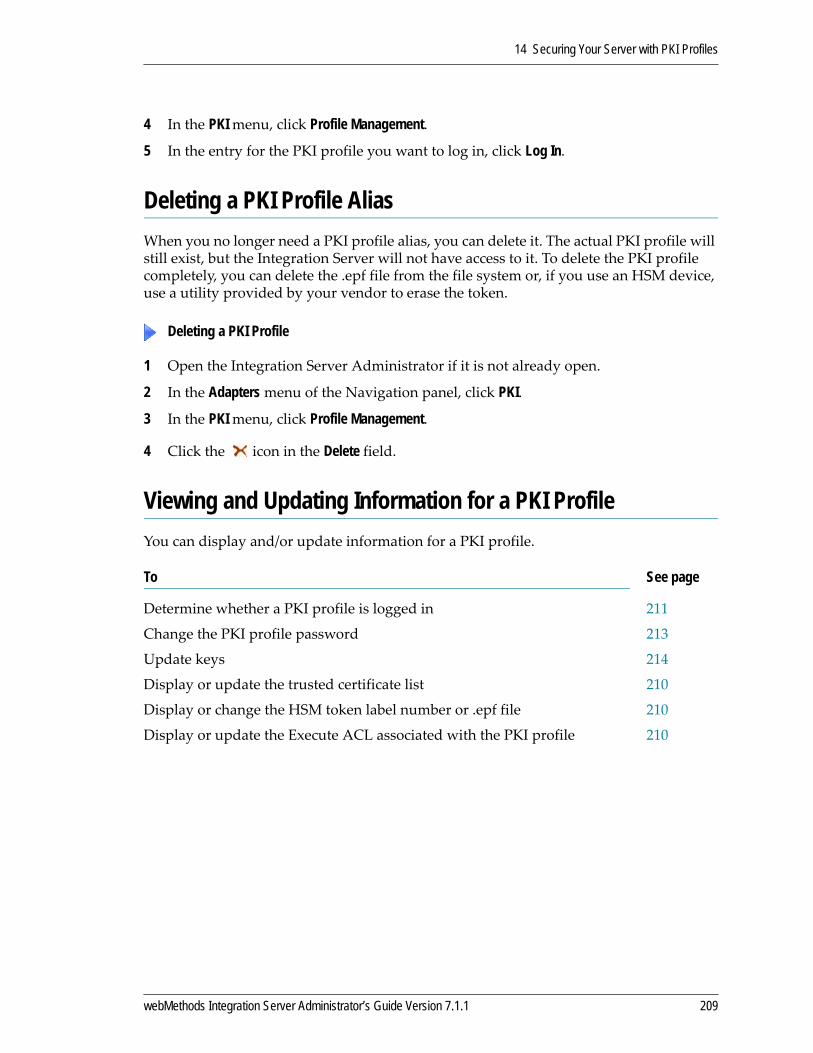
14 Securing Your Server with PKI Profiles
4 In the PKI menu, click Profile Management.
5 In the entry for the PKI profile you want to log in, click Log In.
Deleting a PKI Profile AliasWhen you no longer need a PKI profile alias, you can delete it. The actual PKI profile will still exist, but the Integration Server will not have access to it. To delete the PKI profile completely, you can delete the .epf file from the file system or, if you use an HSM device, use a utility provided by your vendor to erase the token.
1 Open the Integration Server Administrator if it is not already open.
2 In the Adapters menu of the Navigation panel, click PKI.
3 In the PKI menu, click Profile Management.
4 Click the icon in the Delete field.
Viewing and Updating Information for a PKI ProfileYou can display and/or update information for a PKI profile.
Deleting a PKI Profile
To See page
Determine whether a PKI profile is logged in 211
Change the PKI profile password 213
Update keys 214
Display or update the trusted certificate list 210
Display or change the HSM token label number or .epf file 210
Display or update the Execute ACL associated with the PKI profile 210
webMethods Integration Server Administrator’s Guide Version 7.1.1 209
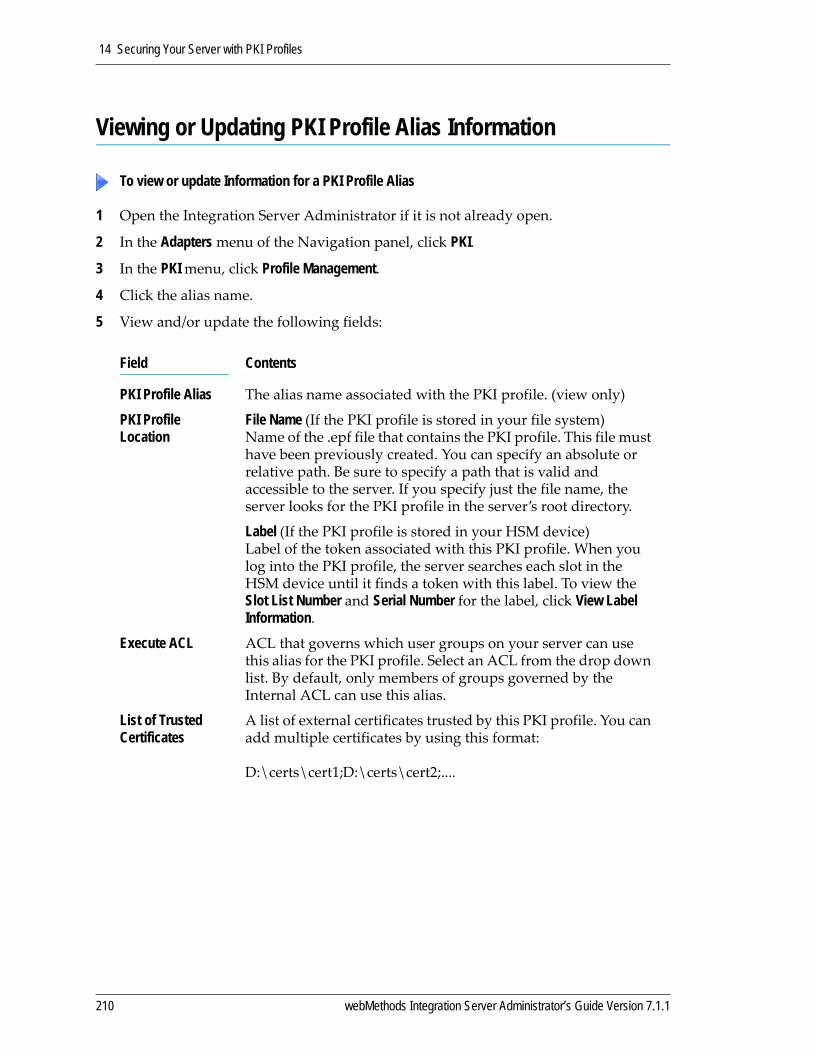
14 Securing Your Server with PKI Profiles
Viewing or Updating PKI Profile Alias Information
1 Open the Integration Server Administrator if it is not already open.
2 In the Adapters menu of the Navigation panel, click PKI.
3 In the PKI menu, click Profile Management.
4 Click the alias name.
5 View and/or update the following fields:
To view or update Information for a PKI Profile Alias
Field Contents
PKI Profile Alias The alias name associated with the PKI profile. (view only)
PKI Profile Location
File Name (If the PKI profile is stored in your file system)Name of the .epf file that contains the PKI profile. This file must have been previously created. You can specify an absolute or relative path. Be sure to specify a path that is valid and accessible to the server. If you specify just the file name, the server looks for the PKI profile in the server’s root directory.
Label (If the PKI profile is stored in your HSM device)Label of the token associated with this PKI profile. When you log into the PKI profile, the server searches each slot in the HSM device until it finds a token with this label. To view the Slot List Number and Serial Number for the label, click View Label Information.
Execute ACL ACL that governs which user groups on your server can use this alias for the PKI profile. Select an ACL from the drop down list. By default, only members of groups governed by the Internal ACL can use this alias.
List of Trusted Certificates
A list of external certificates trusted by this PKI profile. You can add multiple certificates by using this format:
D:\certs\cert1;D:\certs\cert2;....
210 webMethods Integration Server Administrator’s Guide Version 7.1.1
14 Securing Your Server with PKI Profiles
Determining Whether a PKI Profile Is Logged InA PKI profile must be logged in for you to create or recover a PKI profile or to update keys. To determine whether a PKI profile is logged in, do the following:
1 Open the Integration Server Administrator if it is not already open.
2 In the Adapters menu of the Navigation panel, click PKI.
3 In the PKI menu, click Profile Management.
4 Look at the Logged In column for the PKI profile. If it contains Yes, the profile is logged in. If it contains No, the profile is logged out.
Recovering a PKI ProfileIf a PKI profile is lost, revoked, or accidentally deleted, you can recover it using the recovery facility. Once recovered, the PKI profile has a new set of encryption and signing key pairs. The server retrieves your old decryption keys. Before you can recover a profile, you must obtain a replacement Reference Number and Authorization Code from your Registration Authority.
1 If you are recovering a PKI profile that is stored on an HSM device, make sure a preformatted token has already been inserted into a slot in the device. The token should be empty except for a label and a password. Click View Label Information to display a list of tokens (and their labels) currently inserted in the HSM device.
2 Open the Integration Server Administrator if it is not already open.
3 In the Adapters menu of the Navigation panel, click PKI.
4 In the PKI menu, click Profile Management.
5 Click Recover PKI Profile.
Important! A PKI profile is associated with a user that you had a Registration Authority create. If you used multibyte characters when supplying information for the user, you cannot recover the PKI profile. Multibyte characters are not supported.
To determine whether or not a PKI profile is logged in
Important! Your server must be connected to your PKI system when you recover a PKI profile.
To recover a PKI Profile
webMethods Integration Server Administrator’s Guide Version 7.1.1 211
14 Securing Your Server with PKI Profiles
6 Update the following fields:
Field Contents
Activation Codes from Registration Authority
Reference NumberReference number provided by your registration authority when you initiated the key recovery.
Authorization CodeAuthorization code provided by your registration authority when you initiated the key recovery.
PKI Profile Location File System
Enter information in these fields only if you want to store the PKI profile in your file system.
File NameName of the .epf file. You can specify an absolute or relative path. If you specify just the file name, the server writes the PKI profile to the server’s root directory. Be sure to specify a path that is valid and accessible to the server.
PasswordPassword you want to associate with the PKI profile.
Confirm PasswordEnter the same password again to make sure you typed it correctly.
Hardware Device
Enter information in these fields only if you want to store the PKI profile on an HSM device.
LabelLabel of the token to associate with this PKI profile. To see a list of tokens (and their labels) currently inserted into the HSM device, click View Label Information. Later, when you log in the PKI profile, the server will search each slot in the HSM device until it finds a token with this label.
PasswordPassword associated with the PKI profile. This password was assigned to the token when it was formatted.
Use Auxiliary ProfileCreates an auxiliary PKI profile, which stores information about previous decryption key updates. The server uses this file when decrypting messages that were encrypted with an old key.
212 webMethods Integration Server Administrator’s Guide Version 7.1.1

14 Securing Your Server with PKI Profiles
7 Click Recover PKI Profile.
Changing the Password for a PKI ProfilePasswords are required to log into PKI profiles. You can change the password for a PKI profile. There may be times when the server asks you to change a PKI profile password. See “Password Rules” on page 217 for more information.
1 Open the Integration Server Administrator if it is not already open.
2 In the Adapters menu of the Navigation panel, click PKI.
3 In the PKI menu, click Profile Management.
In the Change Password column in the PKI Profile Alias List, click Password in the row for the PKI profile whose password you want to change. The server prompts you to enter the new password and confirm it.
Path to Auxiliary ProfilePath to the auxiliary file for the HSM device (see below). Be sure to specify a path that is valid and accessible to the server.
Auxiliary Profile NameName of the auxiliary file for the HSM device. This file resides on the file system and contains a history of all decryption keys created. When you perform a key update, the new decryption key is added to the file. The server uses this file when decrypting messages that were encrypted with an old key.
Key Information Key StrengthStrength of the signing and encryption keys, measured as the number of bits in the key. Select 1024 or 2048. 1024 is the default. A larger size increases the strength of encryption, but can slow performance.
Key Pair AlgorithmEncryption algorithm to use for the signing and encryption of keys. Select RSA or DSA. RSA is the default.
Note: If you are using an nCipher HSM device, you cannot change the password using this method. Use the vendor utility instead
To change a password
Field Contents
webMethods Integration Server Administrator’s Guide Version 7.1.1 213
14 Securing Your Server with PKI Profiles
Updating KeysFor security purposes, keys have expiration dates. This prevents unlimited use in cases where CRLs are not being checked. When and how keys expire depends on the kind of key account you set up with your PKI authority. There are usually two kinds of accounts:
With Expiry Accounts, the key expires on a specific date and is not renewable. You might obtain an expiry key account for a contractor who works for your company for 6 months. You cannot update keys for expiry accounts.
With a Renewal Account, the key will expire, but you have the option of renewing it. The PKI authority can renew it for you automatically, or you can renew it manually. The PKI authority will attempt to automatically renew the key after a period of time, for example, 6 months. If you want to renew the key before then, you can do so from the Integration Server Administrator.
When you renew or update a key, the server obtains a new key from your PKI system and writes it to the PKI profile.
1 Open the Integration Server Administrator if it is not already open.
2 In the Adapters menu of the Navigation panel, click PKI.
3 In the PKI menu, click Profile Management.
4 In the Update Keys column in the PKI Profile List, click Update in the row for the PKI profile whose keys you want to update.
Important! The profile password can only be changed if the profile alias is logged in (i.e. if the Logged In field is set to Yes). If the profile shows Disabled in the Change Password column, go to the Logged In column and click Log In.
Important! Your server must be connected to your PKI system when you update keys.
To update keys
Important! The keys can only be updated if the profile is logged in (i.e., if the Logged In field is set to Yes. If the Logged In field is set to No, then click Log In.
214 webMethods Integration Server Administrator’s Guide Version 7.1.1

14 Securing Your Server with PKI Profiles
Exporting a PKI Profile from the File System to an HSM DeviceYou can store PKI profiles in the file system (as .epf files) or on an HSM device. If your PKI profiles are stored in the file system, but you want the greater security of an HSM device, you can export the PKI profiles to an HSM device.
Before beginning, you must have installed an HSM device (according to the manufacturer’s instructions) and connected it to the machine on which your Integration Server runs.
After you have exported the profile, you must create a new alias for it. See“Creating the PKI Profile Alias” on page 207 for instructions.
1 Make sure you have already inserted a preformatted token into a slot in the device. The token should be empty except for a label and a password. Click View Label Information to display a list of tokens (and their labels) currently inserted in the HSM device.
2 Open the Integration Server Administrator if it is not already open.
3 In the Adapters menu of the Navigation panel, click PKI.
4 In the PKI menu, click Profile Management.
5 Click Export PKI Profile from File System to Hardware Device.
6 Enter information in the following fields:
To export a PKI Profile
Field Contents
PKI Profile on File System
File NameName of the .epf file that contains the PKI profile. You can specify a relative or absolute path. Be sure to specify a path that is valid and accessible to the server. If you specify just a file name, the server looks for the file in the server root directory.
PKI Profile on Hardware Device
Label Label of the token to associate with this PKI profile. To see a list of tokens (and their labels) currently inserted into the HSM device, click View Label Information. Later, when you log in the PKI profile, the server will search each slot in the HSM device until it finds a token with this label.
Export Key HistoryWhether or not you want the PKI profile’s key history to be exported with the PKI profile. The key history will be written to the new PKI profile on the HSM device.
webMethods Integration Server Administrator’s Guide Version 7.1.1 215
14 Securing Your Server with PKI Profiles
7 Create a new alias for the profile. See“Creating the PKI Profile Alias” on page 207 for instructions.
Installing an Entrust PKI ProxyIf your PKI administrator does not allow direct connections to your PKI system, you can set up an Entrust PKI proxy. The proxy sits between the client (in this case your webMethods Integration Server) and your PKI system and routes PKIXCMP messages between them. To set up the proxy:
1 Install a web server that can host servlets.
2 On this server, install two servlets provided by Entrust.
The Manager servlet directs messages to the PKI Certificate Authority.
The Directory servlet directs messages to the LDAP directory.
3 Configure your Integration Server to point to the proxy server. See “Configuring PKI System Settings” on page 202 for instructions.
Use Auxiliary ProfileCreates an auxiliary PKI profile, which stores information about previous decryption key updates. The server uses this file when decrypting messages that were encrypted with an old key.
Path to Auxiliary ProfilePath to the auxiliary PKI profile for the HSM device (see below). Be sure to specify a path that is valid and accessible to the server.
Auxiliary Profile NameName of the auxiliary file for the HSM device. This file resides in the file system and contains a history of all decryption keys created. When you perform a key update, the new decryption key is added to the file. The server uses this file when decrypting messages that were encrypted with an old key.
Password for PKI Profile
PasswordPassword associated with the PKI profile. This password is required when you log in the PKI profile.
Field Contents
216 webMethods Integration Server Administrator’s Guide Version 7.1.1
14 Securing Your Server with PKI Profiles
Password RulesUnder some circumstances, the Integration Server might ask you to change a PKI profile’s password. This can happen if you try to log in a PKI profile when your Integration Server is not connected to the PKI system.
When the Integration Server is connected to the PKI system, the Integration Server follows the PKI system’s rules for passwords. (The PKI system’s rules are enforced when you create a password because the Integration Server must be connected to the PKI system for PKI profile creation.) When the Integration Server is not connected to the PKI system, the server uses a default set of password rules. These default rules are stored in your Integration Server.
If you log in a profile when your Integration Server is not connected to your PKI system (when the server’s default rules are in effect) and your default rules are more restrictive than the rules under which the PKI profile was created (the PKI system’s rules), the Integration Server will log in the PKI profile then ask you to change the password to one that adheres to the default rules.
Example:Your PKI‐system rules and the default rules are the same except your default rules require that a password contain a digit. The Finance PKI profile’s password does not contain a digit because one was not required during creation. You try to log in the Finance profile when the Integration Server is not connected to the PKI system. The Integration Server (running with the default rules) sees that the password does not contain a digit and asks you to change the password. After you change the password to one that adheres to the default rules, that is, contains a digit, the Integration Server allows you to log in the Finance PKI profile.
About CRL CheckingA CRL (Certificate Revocation List) is a list of certificates that have been revoked by a Certificate Authority. Revoked certificates are no longer valid. By having your server perform CRL checking, you avoid accepting a certificate that has been compromised.
The Certificate Authority maintains this list and updates it periodically. (Some certificate authorities send notifications every time they revoke a certificate.) The CRL is stored in the PKI system’s LDAP directory.
CRL checking is performed only for internal certificates, that is, certificates issued by your PKI system’s certificate authority.
By default, the server does not perform CRL checking. You can turn CRL checking on or off as needed.
webMethods Integration Server Administrator’s Guide Version 7.1.1 217

14 Securing Your Server with PKI Profiles
If CRL checking is turned on, the Integration Server performs it at the following times:
When you log in a PKI profile.
If CRL checking is enabled and the server encounters a revoked certificate, the server rejects the certificate (and the request) and issues an error message.Could not login PKI Profile Alias 'alias': The signing certificate is not valid: The certificate being validated is revoked.
During signature verification.
The server performs signature verification when it processes a signed document. If the client’s certificate was signed by your CA, the server performs a revocation check at this point.
How Often Is the CRL Downloaded?The server does not download CRLs as part of server startup. Rather, the server downloads a CRL only when it is needed. For example, the first time a user logs in a PKI profile after server startup, the server downloads the CRL associated with that PKI profile. The CRL is stored in the server’s memory. If another user logs in a PKI profile that requires the same CRL, the server uses the same copy of the CRL already in the server’s memory. The server does not refresh that copy until the CRL has been in the server’s memory for a length of time that exceeds a limit that your PKI administrator sets. The default is 24 hours. This means that a CRL in the server’s cache can become out of sync with the master CRL maintained by the certificate authority.
Note: If your server will be disconnected from the PKI system for long periods of time, disable CRL checking.
218 webMethods Integration Server Administrator’s Guide Version 7.1.1

15 Setting Up a Reverse HTTP Gateway
Overview . . . . . . . . . . . . . . . . . . . . . . . . . . . . . . . . . . . . . . . . . . . . . . . . . . . . . . . . . . . . . . . . . . . 220
How Reverse HTTP Gateway Works . . . . . . . . . . . . . . . . . . . . . . . . . . . . . . . . . . . . . . . . . . . . . . 221
Advantages to Reverse HTTP Gateway vs. Traditional Third-Party Proxy Servers . . . . . . . . . . . 222
Clustering in the Reverse HTTP Gateway Configuration . . . . . . . . . . . . . . . . . . . . . . . . . . . . . . . 222
Setting Up the Reverse HTTP Gateway Server . . . . . . . . . . . . . . . . . . . . . . . . . . . . . . . . . . . . . . 223
Connecting Your Internal Server to a Reverse HTTP Gateway Server . . . . . . . . . . . . . . . . . . . . 233
Performing Client Authentication on the Reverse HTTP Gateway Server . . . . . . . . . . . . . . . . . . 237
Frequently Asked Questions About Reverse HTTP Gateway . . . . . . . . . . . . . . . . . . . . . . . . . . . 238
webMethods Integration Server Administrator’s Guide Version 7.1.1 219
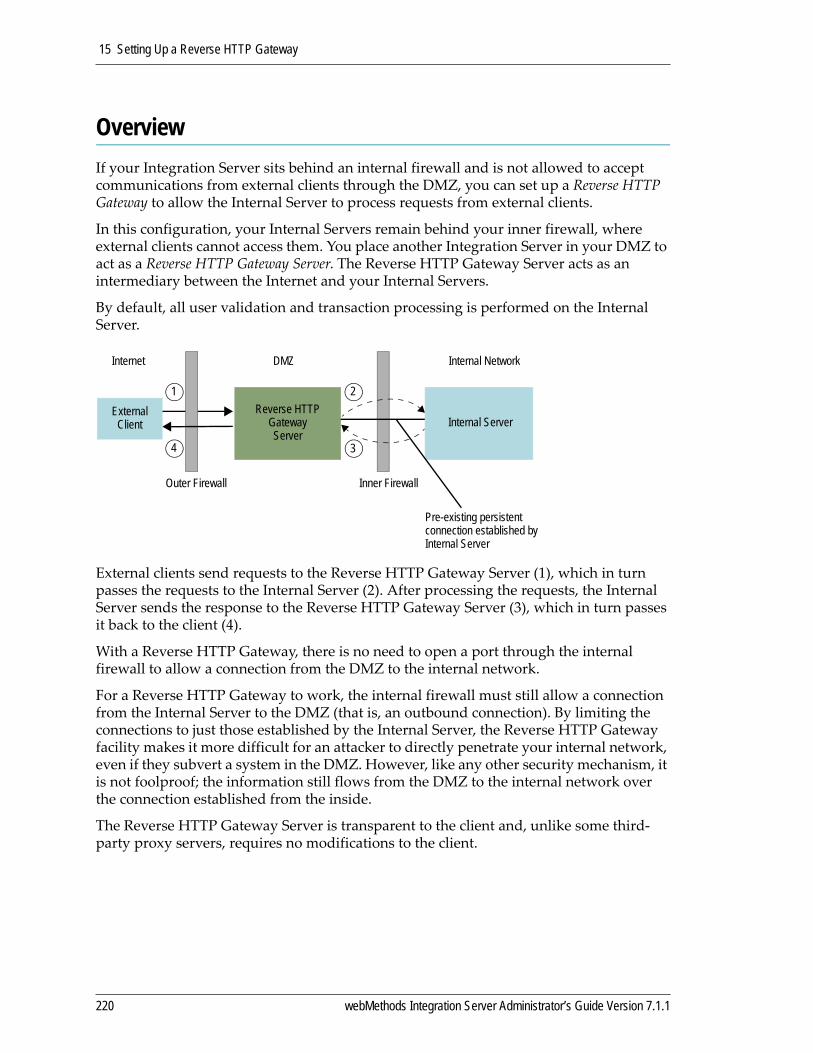
15 Setting Up a Reverse HTTP Gateway
OverviewIf your Integration Server sits behind an internal firewall and is not allowed to accept communications from external clients through the DMZ, you can set up a Reverse HTTP Gateway to allow the Internal Server to process requests from external clients.
In this configuration, your Internal Servers remain behind your inner firewall, where external clients cannot access them. You place another Integration Server in your DMZ to act as a Reverse HTTP Gateway Server. The Reverse HTTP Gateway Server acts as an intermediary between the Internet and your Internal Servers.
By default, all user validation and transaction processing is performed on the Internal Server.
External clients send requests to the Reverse HTTP Gateway Server (1), which in turn passes the requests to the Internal Server (2). After processing the requests, the Internal Server sends the response to the Reverse HTTP Gateway Server (3), which in turn passes it back to the client (4).
With a Reverse HTTP Gateway, there is no need to open a port through the internal firewall to allow a connection from the DMZ to the internal network.
For a Reverse HTTP Gateway to work, the internal firewall must still allow a connection from the Internal Server to the DMZ (that is, an outbound connection). By limiting the connections to just those established by the Internal Server, the Reverse HTTP Gateway facility makes it more difficult for an attacker to directly penetrate your internal network, even if they subvert a system in the DMZ. However, like any other security mechanism, it is not foolproof; the information still flows from the DMZ to the internal network over the connection established from the inside.
The Reverse HTTP Gateway Server is transparent to the client and, unlike some third‐party proxy servers, requires no modifications to the client.
Internet DMZ Internal Network
ExternalClient
Reverse HTTP Gateway Server
Pre-existing persistent connection established by Internal Server
Outer Firewall Inner Firewall
1 2
34
Internal Server
220 webMethods Integration Server Administrator’s Guide Version 7.1.1
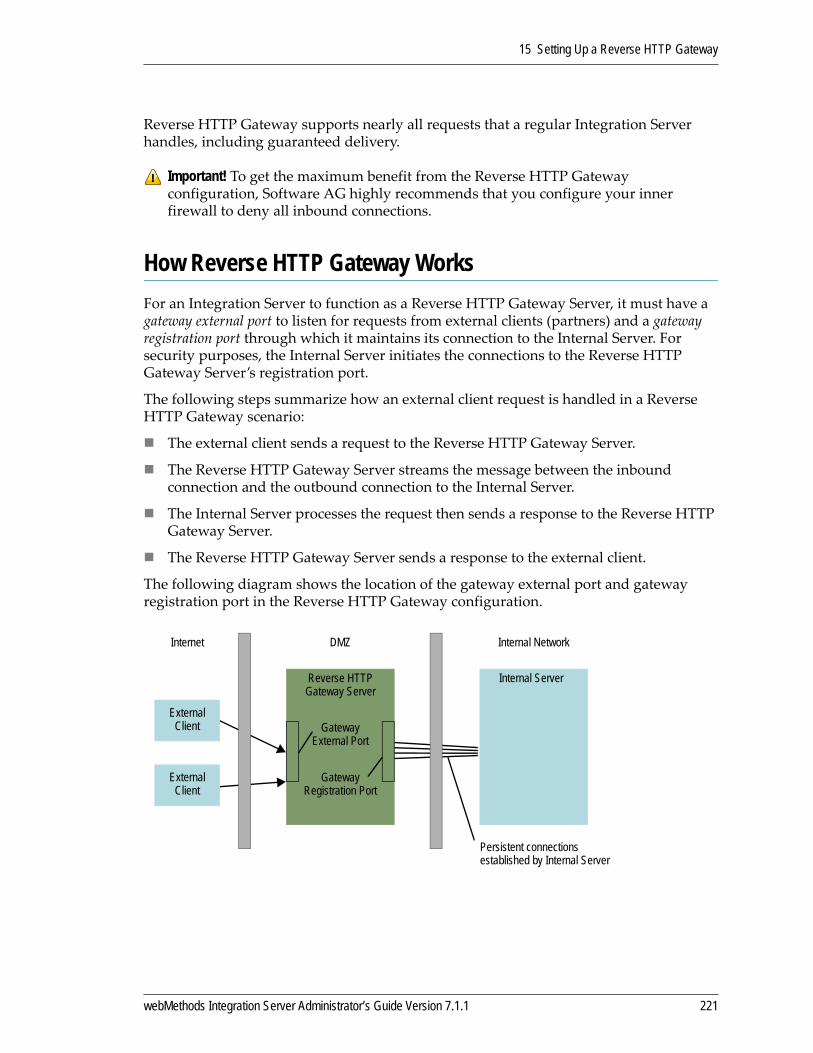
15 Setting Up a Reverse HTTP Gateway
Reverse HTTP Gateway supports nearly all requests that a regular Integration Server handles, including guaranteed delivery.
How Reverse HTTP Gateway WorksFor an Integration Server to function as a Reverse HTTP Gateway Server, it must have a gateway external port to listen for requests from external clients (partners) and a gateway registration port through which it maintains its connection to the Internal Server. For security purposes, the Internal Server initiates the connections to the Reverse HTTP Gateway Server’s registration port.
The following steps summarize how an external client request is handled in a Reverse HTTP Gateway scenario:
The external client sends a request to the Reverse HTTP Gateway Server.
The Reverse HTTP Gateway Server streams the message between the inbound connection and the outbound connection to the Internal Server.
The Internal Server processes the request then sends a response to the Reverse HTTP Gateway Server.
The Reverse HTTP Gateway Server sends a response to the external client.
The following diagram shows the location of the gateway external port and gateway registration port in the Reverse HTTP Gateway configuration.
Important! To get the maximum benefit from the Reverse HTTP Gateway configuration, Software AG highly recommends that you configure your inner firewall to deny all inbound connections.
Internet DMZ Internal Network
External Client
External Client
Persistent connections established by Internal Server
Reverse HTTP Gateway Server
Internal Server
Gateway External Port
GatewayRegistration Port
webMethods Integration Server Administrator’s Guide Version 7.1.1 221
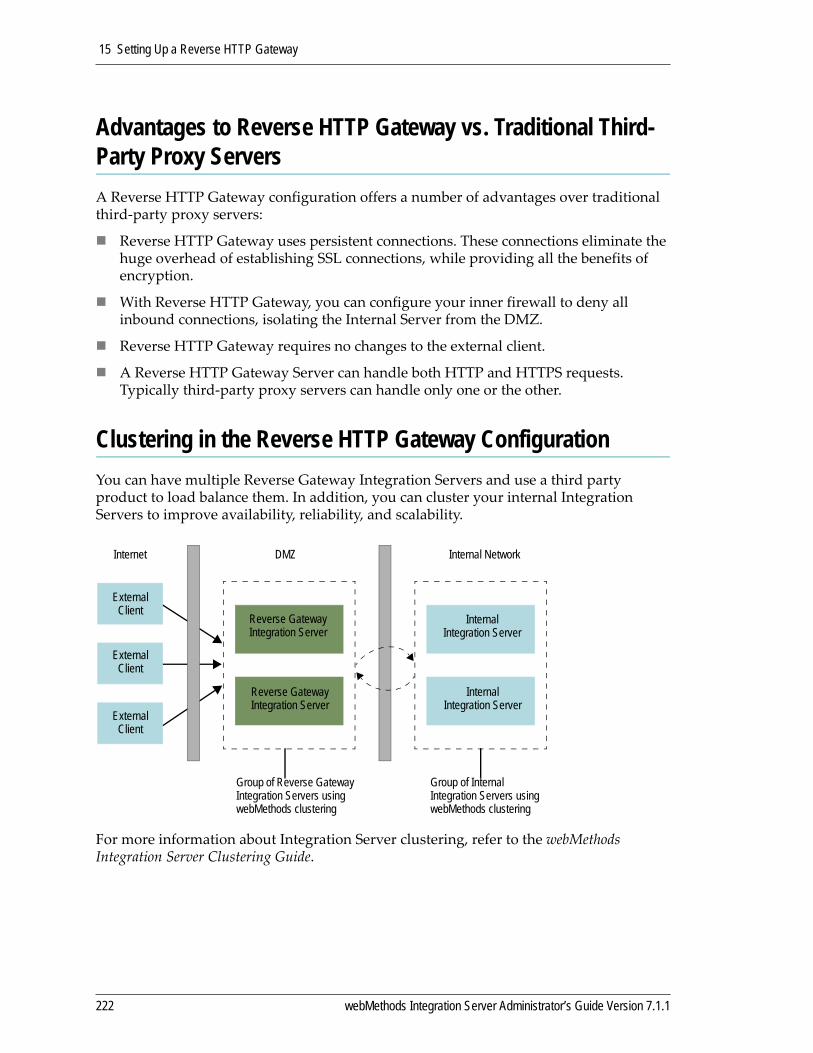
15 Setting Up a Reverse HTTP Gateway
Advantages to Reverse HTTP Gateway vs. Traditional Third-Party Proxy ServersA Reverse HTTP Gateway configuration offers a number of advantages over traditional third‐party proxy servers:
Reverse HTTP Gateway uses persistent connections. These connections eliminate the huge overhead of establishing SSL connections, while providing all the benefits of encryption.
With Reverse HTTP Gateway, you can configure your inner firewall to deny all inbound connections, isolating the Internal Server from the DMZ.
Reverse HTTP Gateway requires no changes to the external client.
A Reverse HTTP Gateway Server can handle both HTTP and HTTPS requests. Typically third‐party proxy servers can handle only one or the other.
Clustering in the Reverse HTTP Gateway ConfigurationYou can have multiple Reverse Gateway Integration Servers and use a third party product to load balance them. In addition, you can cluster your internal Integration Servers to improve availability, reliability, and scalability.
For more information about Integration Server clustering, refer to the webMethods Integration Server Clustering Guide.
Internet DMZ Internal Network
External Client
External Client
External Client
Reverse Gateway Integration Server
InternalIntegration Server
Group of Internal Integration Servers using webMethods clustering
Group of Reverse Gateway Integration Servers using webMethods clustering
Reverse Gateway Integration Server
InternalIntegration Server
222 webMethods Integration Server Administrator’s Guide Version 7.1.1
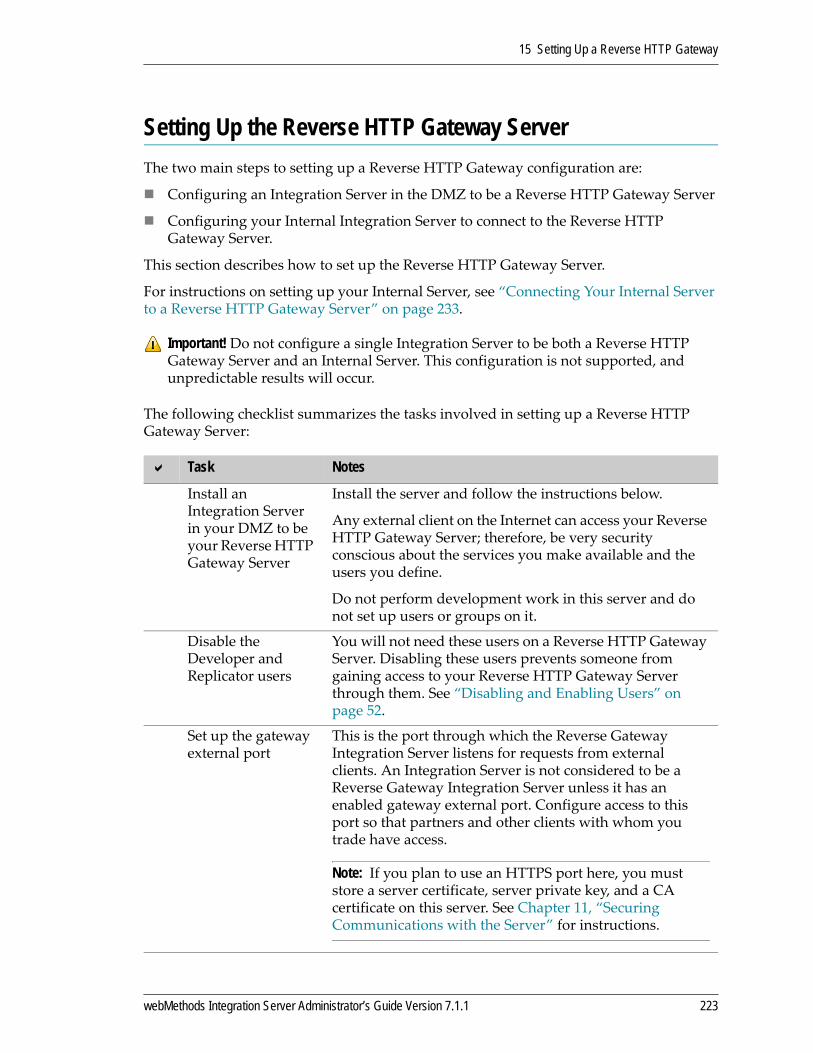
15 Setting Up a Reverse HTTP Gateway
Setting Up the Reverse HTTP Gateway ServerThe two main steps to setting up a Reverse HTTP Gateway configuration are:
Configuring an Integration Server in the DMZ to be a Reverse HTTP Gateway Server
Configuring your Internal Integration Server to connect to the Reverse HTTP Gateway Server.
This section describes how to set up the Reverse HTTP Gateway Server.
For instructions on setting up your Internal Server, see “Connecting Your Internal Server to a Reverse HTTP Gateway Server” on page 233.
The following checklist summarizes the tasks involved in setting up a Reverse HTTP Gateway Server:
Important! Do not configure a single Integration Server to be both a Reverse HTTP Gateway Server and an Internal Server. This configuration is not supported, and unpredictable results will occur.
Task Notes
Install an Integration Server in your DMZ to be your Reverse HTTP Gateway Server
Install the server and follow the instructions below.
Any external client on the Internet can access your Reverse HTTP Gateway Server; therefore, be very security conscious about the services you make available and the users you define.
Do not perform development work in this server and do not set up users or groups on it.
Disable the Developer and Replicator users
You will not need these users on a Reverse HTTP Gateway Server. Disabling these users prevents someone from gaining access to your Reverse HTTP Gateway Server through them. See “Disabling and Enabling Users” on page 52.
Set up the gateway external port
This is the port through which the Reverse Gateway Integration Server listens for requests from external clients. An Integration Server is not considered to be a Reverse Gateway Integration Server unless it has an enabled gateway external port. Configure access to this port so that partners and other clients with whom you trade have access.
Note: If you plan to use an HTTPS port here, you must store a server certificate, server private key, and a CA certificate on this server. See Chapter 11, “Securing Communications with the Server” for instructions.
webMethods Integration Server Administrator’s Guide Version 7.1.1 223
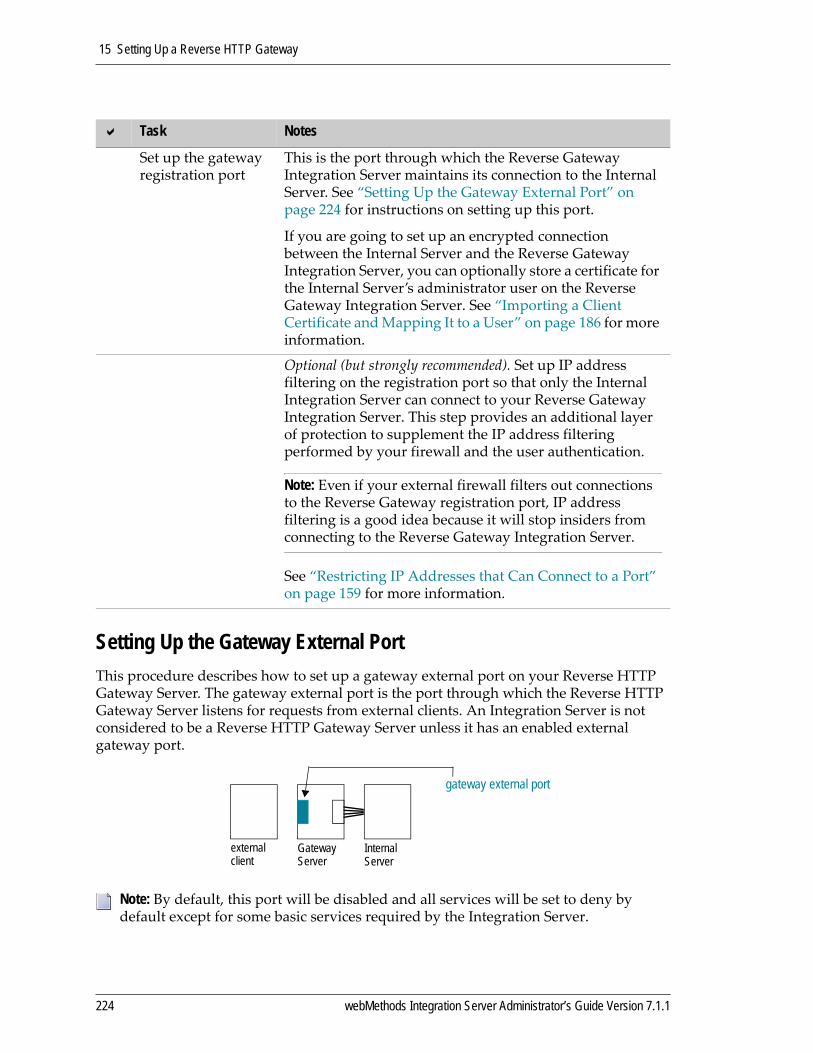
15 Setting Up a Reverse HTTP Gateway
Setting Up the Gateway External PortThis procedure describes how to set up a gateway external port on your Reverse HTTP Gateway Server. The gateway external port is the port through which the Reverse HTTP Gateway Server listens for requests from external clients. An Integration Server is not considered to be a Reverse HTTP Gateway Server unless it has an enabled external gateway port.
Set up the gateway registration port
This is the port through which the Reverse Gateway Integration Server maintains its connection to the Internal Server. See “Setting Up the Gateway External Port” on page 224 for instructions on setting up this port.
If you are going to set up an encrypted connection between the Internal Server and the Reverse Gateway Integration Server, you can optionally store a certificate for the Internal Server’s administrator user on the Reverse Gateway Integration Server. See “Importing a Client Certificate and Mapping It to a User” on page 186 for more information.
Optional (but strongly recommended). Set up IP address filtering on the registration port so that only the Internal Integration Server can connect to your Reverse Gateway Integration Server. This step provides an additional layer of protection to supplement the IP address filtering performed by your firewall and the user authentication.
Note: Even if your external firewall filters out connections to the Reverse Gateway registration port, IP address filtering is a good idea because it will stop insiders from connecting to the Reverse Gateway Integration Server.
See “Restricting IP Addresses that Can Connect to a Port” on page 159 for more information.
Note: By default, this port will be disabled and all services will be set to deny by default except for some basic services required by the Integration Server.
Task Notes
external client
Gateway Server
Internal Server
gateway external port
224 webMethods Integration Server Administrator’s Guide Version 7.1.1

15 Setting Up a Reverse HTTP Gateway
1 Open the Integration Server Administrator for the Reverse HTTP Gateway Server if it is not already open.
2 In the Navigation panel of the screen, on the Security menu, click Ports.
3 Under Add Port, select Reverse HTTP Gateway Server.
4 Click Submit.
5 On the Edit Reverse HTTP Gateway Server Configuration screen, in the Gateway External Port Port panel, enter the following information:
To set up the gateway external port
For this parameter Specify...
Protocol Select HTTP or HTTPS. If you select HTTPS, additional security and credential fields will be displayed at the bottom of the screen.
Port The number you want to use for the gateway external port. Use a number that is not already in use. This is the port that clients will connect to through your outer firewall.
Package name This field associates a package with a port. Typically you will not need to work with packages on a Reverse HTTP Gateway Server; therefore, you can leave this field with the default setting.
Bind Address (optional)
IP address to which to bind this port. Specify a bind address if your machine has multiple IP addresses and you want the port to use this specific address. If you do not specify a bind address, the server picks one for you.
Backlog How long a request will remain in the queue after the port is suspended. The default is 200 milliseconds (ms). The maximum is 65535 ms. After this time has passed, the request is rejected.
Keep Alive Timeout How long to wait before closing an idle connection to a client. The default is 20000 ms.
Threadpool If you select Disable, the server uses the common server thread pool for this port.
If you select Enable, the server creates a private thread pool for this port so that it does not need to compete with other server functions for threads. If Threadpool is enabled, the following three fields are displayed.
Threadpool Min Minimum number of threads the server maintains in this thread pool. When the Reverse Gateway Server starts, the thread pool initially contains this minimum number of threads. The server adds threads to the pool as needed until it reaches the maximum allowed. The default is 1.
webMethods Integration Server Administrator’s Guide Version 7.1.1 225
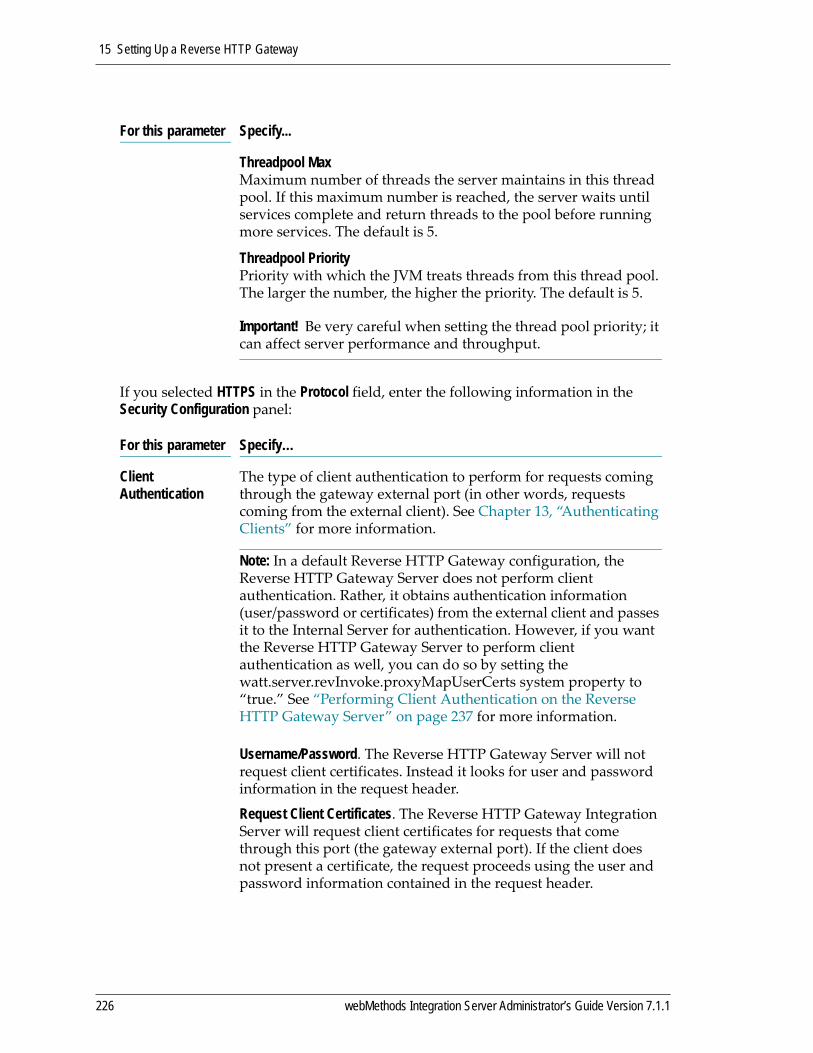
15 Setting Up a Reverse HTTP Gateway
If you selected HTTPS in the Protocol field, enter the following information in the Security Configuration panel:
Threadpool Max Maximum number of threads the server maintains in this thread pool. If this maximum number is reached, the server waits until services complete and return threads to the pool before running more services. The default is 5.
Threadpool Priority Priority with which the JVM treats threads from this thread pool. The larger the number, the higher the priority. The default is 5.
Important! Be very careful when setting the thread pool priority; it can affect server performance and throughput.
For this parameter Specify…
Client Authentication
The type of client authentication to perform for requests coming through the gateway external port (in other words, requests coming from the external client). See Chapter 13, “Authenticating Clients” for more information.
Note: In a default Reverse HTTP Gateway configuration, the Reverse HTTP Gateway Server does not perform client authentication. Rather, it obtains authentication information (user/password or certificates) from the external client and passes it to the Internal Server for authentication. However, if you want the Reverse HTTP Gateway Server to perform client authentication as well, you can do so by setting the watt.server.revInvoke.proxyMapUserCerts system property to “true.” See “Performing Client Authentication on the Reverse HTTP Gateway Server” on page 237 for more information.
Username/Password. The Reverse HTTP Gateway Server will not request client certificates. Instead it looks for user and password information in the request header.
Request Client Certificates. The Reverse HTTP Gateway Integration Server will request client certificates for requests that come through this port (the gateway external port). If the client does not present a certificate, the request proceeds using the user and password information contained in the request header.
For this parameter Specify...
226 webMethods Integration Server Administrator’s Guide Version 7.1.1
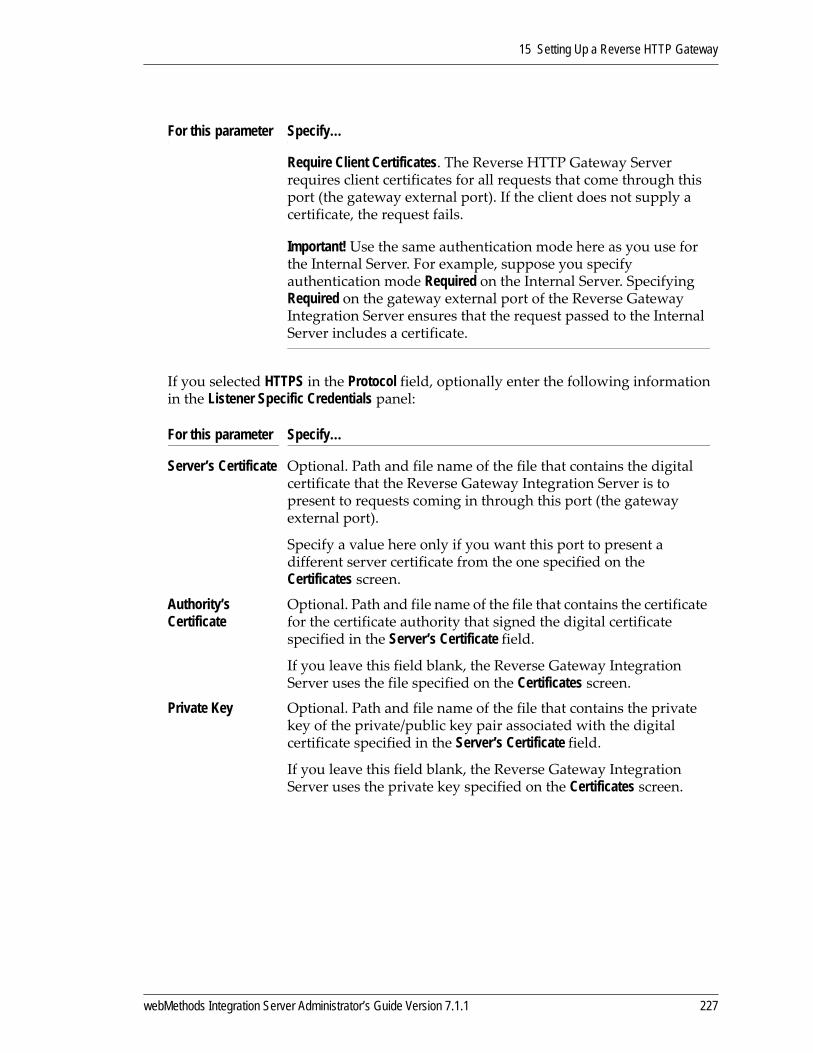
15 Setting Up a Reverse HTTP Gateway
If you selected HTTPS in the Protocol field, optionally enter the following information in the Listener Specific Credentials panel:
Require Client Certificates. The Reverse HTTP Gateway Server requires client certificates for all requests that come through this port (the gateway external port). If the client does not supply a certificate, the request fails.
Important! Use the same authentication mode here as you use for the Internal Server. For example, suppose you specify authentication mode Required on the Internal Server. Specifying Required on the gateway external port of the Reverse Gateway Integration Server ensures that the request passed to the Internal Server includes a certificate.
For this parameter Specify…
Server’s Certificate Optional. Path and file name of the file that contains the digital certificate that the Reverse Gateway Integration Server is to present to requests coming in through this port (the gateway external port).
Specify a value here only if you want this port to present a different server certificate from the one specified on the Certificates screen.
Authority’s Certificate
Optional. Path and file name of the file that contains the certificate for the certificate authority that signed the digital certificate specified in the Server’s Certificate field.
If you leave this field blank, the Reverse Gateway Integration Server uses the file specified on the Certificates screen.
Private Key Optional. Path and file name of the file that contains the private key of the private/public key pair associated with the digital certificate specified in the Server’s Certificate field.
If you leave this field blank, the Reverse Gateway Integration Server uses the private key specified on the Certificates screen.
For this parameter Specify…
webMethods Integration Server Administrator’s Guide Version 7.1.1 227
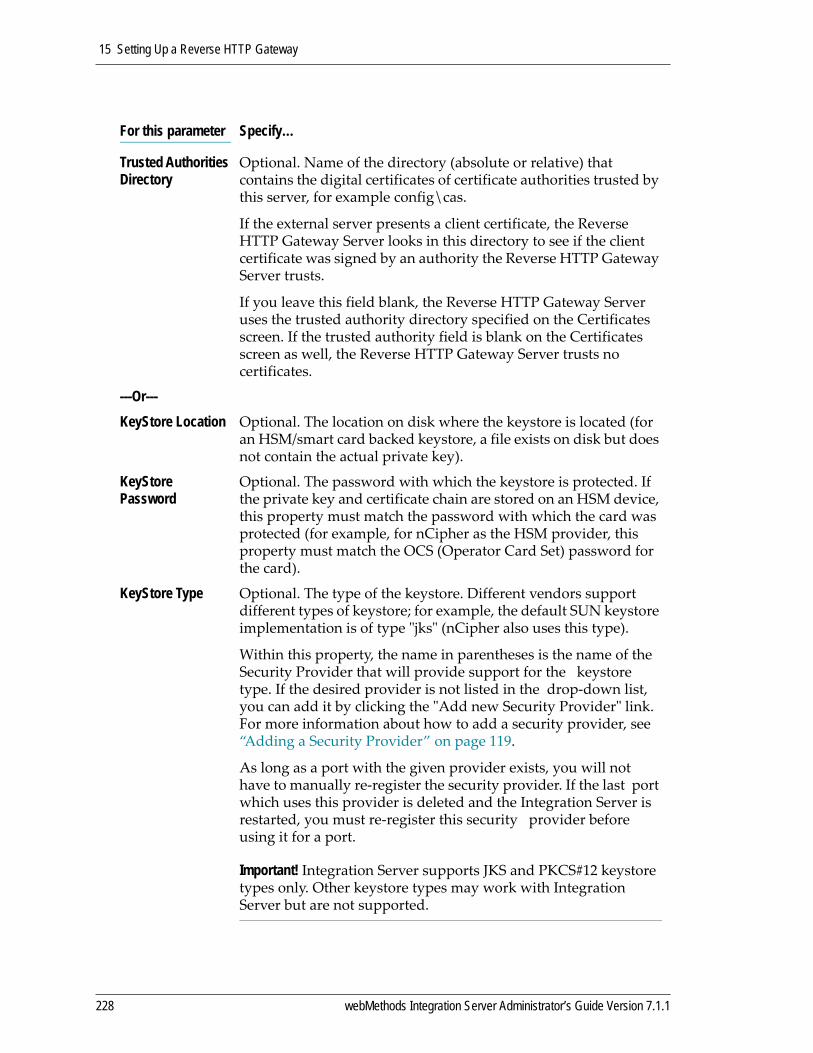
15 Setting Up a Reverse HTTP Gateway
Trusted Authorities Directory
Optional. Name of the directory (absolute or relative) that contains the digital certificates of certificate authorities trusted by this server, for example config\cas.
If the external server presents a client certificate, the Reverse HTTP Gateway Server looks in this directory to see if the client certificate was signed by an authority the Reverse HTTP Gateway Server trusts.
If you leave this field blank, the Reverse HTTP Gateway Server uses the trusted authority directory specified on the Certificates screen. If the trusted authority field is blank on the Certificates screen as well, the Reverse HTTP Gateway Server trusts no certificates.
---Or---KeyStore Location Optional. The location on disk where the keystore is located (for
an HSM/smart card backed keystore, a file exists on disk but does not contain the actual private key).
KeyStore Password
Optional. The password with which the keystore is protected. If the private key and certificate chain are stored on an HSM device, this property must match the password with which the card was protected (for example, for nCipher as the HSM provider, this property must match the OCS (Operator Card Set) password for the card).
KeyStore Type Optional. The type of the keystore. Different vendors support different types of keystore; for example, the default SUN keystore implementation is of type ʺjksʺ (nCipher also uses this type).
Within this property, the name in parentheses is the name of the Security Provider that will provide support for the keystore type. If the desired provider is not listed in the drop‐down list, you can add it by clicking the ʺAdd new Security Providerʺ link. For more information about how to add a security provider, see “Adding a Security Provider” on page 119.
As long as a port with the given provider exists, you will not have to manually re‐register the security provider. If the last port which uses this provider is deleted and the Integration Server is restarted, you must re‐register this security provider before using it for a port.
Important! Integration Server supports JKS and PKCS#12 keystore types only. Other keystore types may work with Integration Server but are not supported.
For this parameter Specify…
228 webMethods Integration Server Administrator’s Guide Version 7.1.1

15 Setting Up a Reverse HTTP Gateway
6 Click Save Changes.
7 Locate the port in the Port List, and click No in the Enabled column to enable the gateway external port. The server displays a dialog box that prompts you to verify your action. Click OK to verify you want to enable the port.
The server replaces the No with the icon to indicate that the port is now enabled.
HSM Based Keystore
Optional. Indicates whether or not the keystore is backed by an HSM‐based keystore (a smart card device can be used as well). When the keystore is backed by such a device, the private key does not physically leave the HSM device and certain cryptographic operations must be performed on that device.
Alias Required if the KeyStore Location parameter is defined. If the KeyStore Location parameter is null, the Alias property is ignored.
Specifies the alias that points to the private key and its associated certificate chain in the keystore. Each listener points to one alias on the keystore; there can be multiple aliases in the same keystore and more than one listener can use the same alias.
Trusted Authority Directory
Optional. Specifies the name of the directory that contains the certificates of the certification authorities (CAs) that this server trusts when it uses this port; for example, config\xApps\TrustedCAs.
Note: Currently the keystore stores only the private key and its associated certificate chain, not the trusted CA certificates.
For this parameter Specify…
webMethods Integration Server Administrator’s Guide Version 7.1.1 229

15 Setting Up a Reverse HTTP Gateway
Setting Up the Gateway Registration PortThis section explains how to set up the gateway registration port on a Reverse HTTP Gateway Server. The gateway registration port is the port through which the Reverse HTTP Gateway Server maintains its connection to the Internal Server.
1 Open the Integration Server Administrator for the Reverse Gateway Integration Server if it is not already open.
2 In the Security menu of the Navigation panel, click Ports.
3 Under Add Port, select Reverse HTTP Gateway Server.
4 Click Submit.
5 On the Edit Reverse HTTP Gateway Server Configuration screen, in the Gateway Registration Port panel, enter the following information:
To set up the gateway registration port
For this parameter Specify…
Protocol Select HTTP or HTTPS. If you select HTTPS, additional security and credential fields will be displayed at the bottom of the screen.
Port The number you want to use for the gateway registration port. Use a number that is not already in use.
It is best not to use a standard port such as 80 (the standard port for HTTP) or 443 (the standard port for HTTPS); since the external firewall will allow access to those ports from the outside world.
Package name This field associates a package with a port. Typically you will not need to work with packages from a Reverse Gateway Integration Server; therefore you can leave this field with the default setting.
gateway registration port
external client
Gateway Server
Internal Server
230 webMethods Integration Server Administrator’s Guide Version 7.1.1
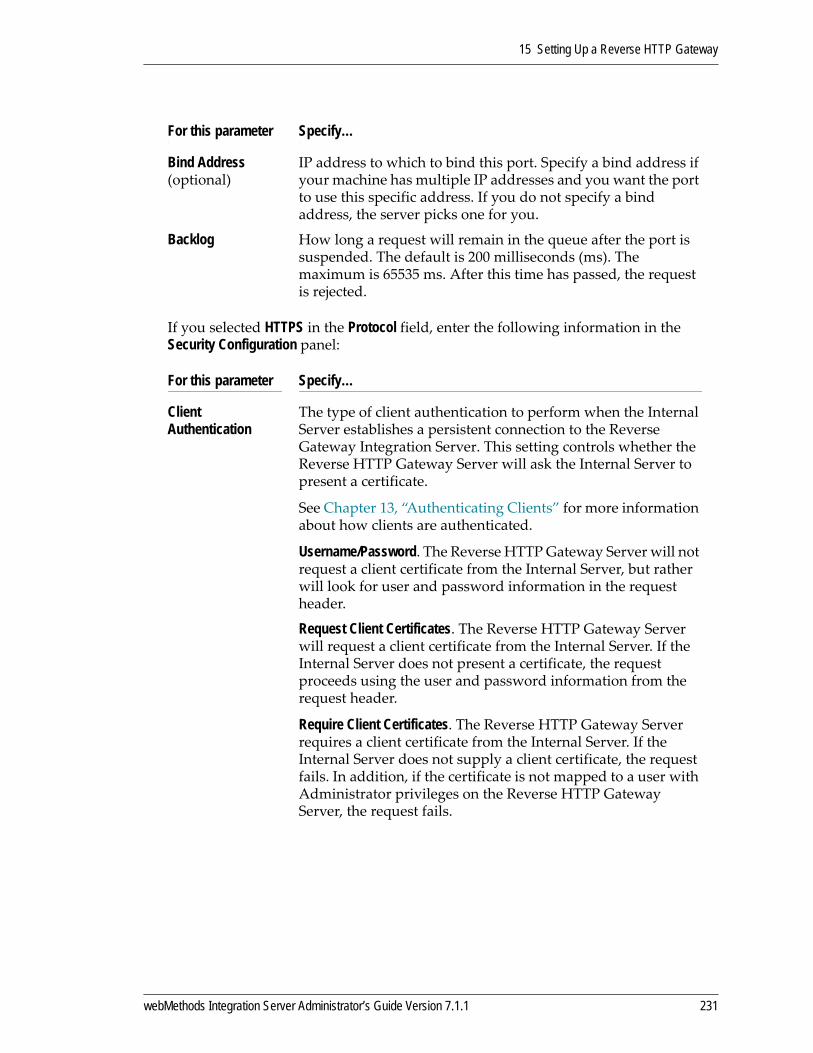
15 Setting Up a Reverse HTTP Gateway
If you selected HTTPS in the Protocol field, enter the following information in the Security Configuration panel:
Bind Address (optional)
IP address to which to bind this port. Specify a bind address if your machine has multiple IP addresses and you want the port to use this specific address. If you do not specify a bind address, the server picks one for you.
Backlog How long a request will remain in the queue after the port is suspended. The default is 200 milliseconds (ms). The maximum is 65535 ms. After this time has passed, the request is rejected.
For this parameter Specify…
Client Authentication
The type of client authentication to perform when the Internal Server establishes a persistent connection to the Reverse Gateway Integration Server. This setting controls whether the Reverse HTTP Gateway Server will ask the Internal Server to present a certificate.
See Chapter 13, “Authenticating Clients” for more information about how clients are authenticated.
Username/Password. The Reverse HTTP Gateway Server will not request a client certificate from the Internal Server, but rather will look for user and password information in the request header.
Request Client Certificates. The Reverse HTTP Gateway Server will request a client certificate from the Internal Server. If the Internal Server does not present a certificate, the request proceeds using the user and password information from the request header.
Require Client Certificates. The Reverse HTTP Gateway Server requires a client certificate from the Internal Server. If the Internal Server does not supply a client certificate, the request fails. In addition, if the certificate is not mapped to a user with Administrator privileges on the Reverse HTTP Gateway Server, the request fails.
For this parameter Specify…
webMethods Integration Server Administrator’s Guide Version 7.1.1 231
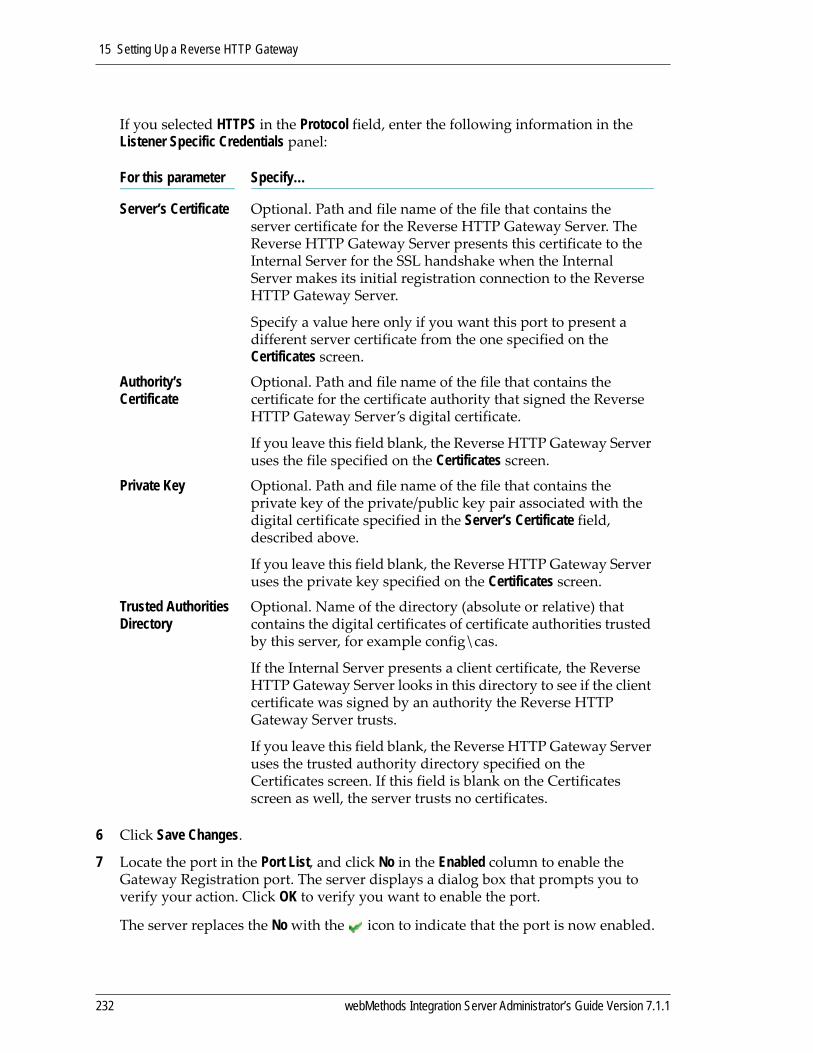
15 Setting Up a Reverse HTTP Gateway
If you selected HTTPS in the Protocol field, enter the following information in the Listener Specific Credentials panel:
6 Click Save Changes.
7 Locate the port in the Port List, and click No in the Enabled column to enable the Gateway Registration port. The server displays a dialog box that prompts you to verify your action. Click OK to verify you want to enable the port.
The server replaces the No with the icon to indicate that the port is now enabled.
For this parameter Specify…
Server’s Certificate Optional. Path and file name of the file that contains the server certificate for the Reverse HTTP Gateway Server. The Reverse HTTP Gateway Server presents this certificate to the Internal Server for the SSL handshake when the Internal Server makes its initial registration connection to the Reverse HTTP Gateway Server.
Specify a value here only if you want this port to present a different server certificate from the one specified on the Certificates screen.
Authority’s Certificate
Optional. Path and file name of the file that contains the certificate for the certificate authority that signed the Reverse HTTP Gateway Server’s digital certificate.
If you leave this field blank, the Reverse HTTP Gateway Server uses the file specified on the Certificates screen.
Private Key Optional. Path and file name of the file that contains the private key of the private/public key pair associated with the digital certificate specified in the Server’s Certificate field, described above.
If you leave this field blank, the Reverse HTTP Gateway Server uses the private key specified on the Certificates screen.
Trusted AuthoritiesDirectory
Optional. Name of the directory (absolute or relative) that contains the digital certificates of certificate authorities trusted by this server, for example config\cas.
If the Internal Server presents a client certificate, the Reverse HTTP Gateway Server looks in this directory to see if the client certificate was signed by an authority the Reverse HTTP Gateway Server trusts.
If you leave this field blank, the Reverse HTTP Gateway Server uses the trusted authority directory specified on the Certificates screen. If this field is blank on the Certificates screen as well, the server trusts no certificates.
232 webMethods Integration Server Administrator’s Guide Version 7.1.1
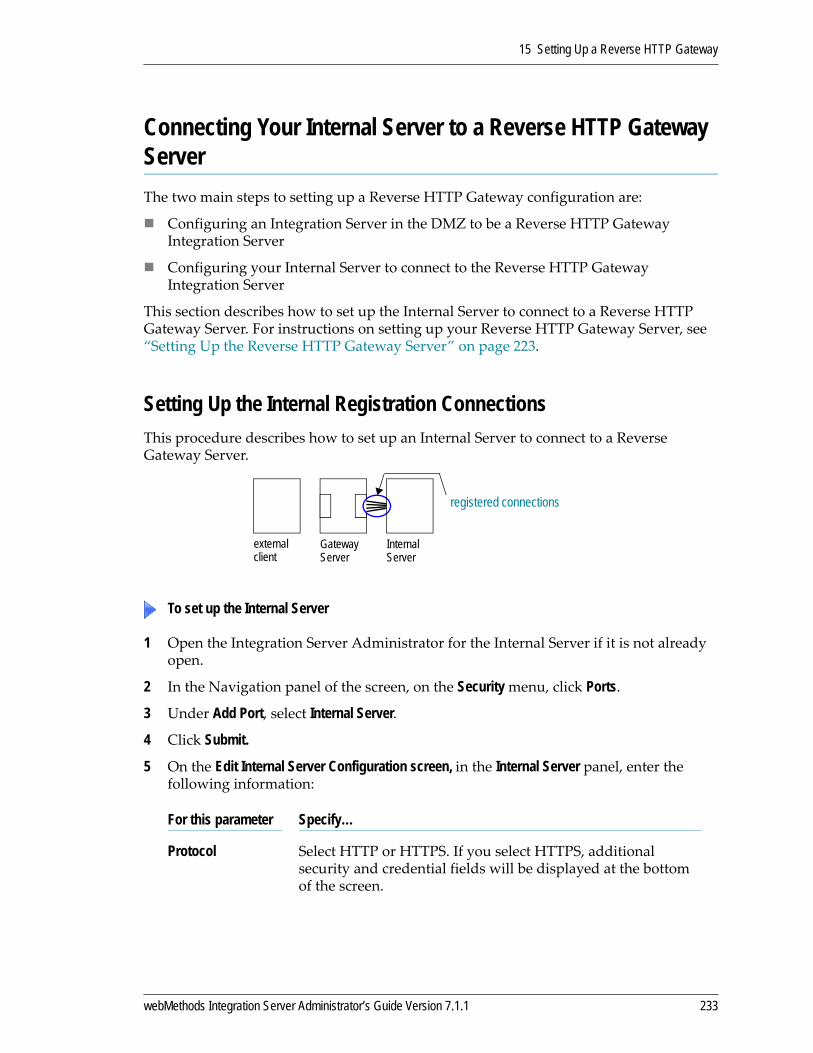
15 Setting Up a Reverse HTTP Gateway
Connecting Your Internal Server to a Reverse HTTP Gateway ServerThe two main steps to setting up a Reverse HTTP Gateway configuration are:
Configuring an Integration Server in the DMZ to be a Reverse HTTP Gateway Integration Server
Configuring your Internal Server to connect to the Reverse HTTP Gateway Integration Server
This section describes how to set up the Internal Server to connect to a Reverse HTTP Gateway Server. For instructions on setting up your Reverse HTTP Gateway Server, see “Setting Up the Reverse HTTP Gateway Server” on page 223.
Setting Up the Internal Registration ConnectionsThis procedure describes how to set up an Internal Server to connect to a Reverse Gateway Server.
1 Open the Integration Server Administrator for the Internal Server if it is not already open.
2 In the Navigation panel of the screen, on the Security menu, click Ports.
3 Under Add Port, select Internal Server.
4 Click Submit.
5 On the Edit Internal Server Configuration screen, in the Internal Server panel, enter the following information:
To set up the Internal Server
For this parameter Specify…
Protocol Select HTTP or HTTPS. If you select HTTPS, additional security and credential fields will be displayed at the bottom of the screen.
external client
Gateway Server
Internal Server
registered connections
webMethods Integration Server Administrator’s Guide Version 7.1.1 233
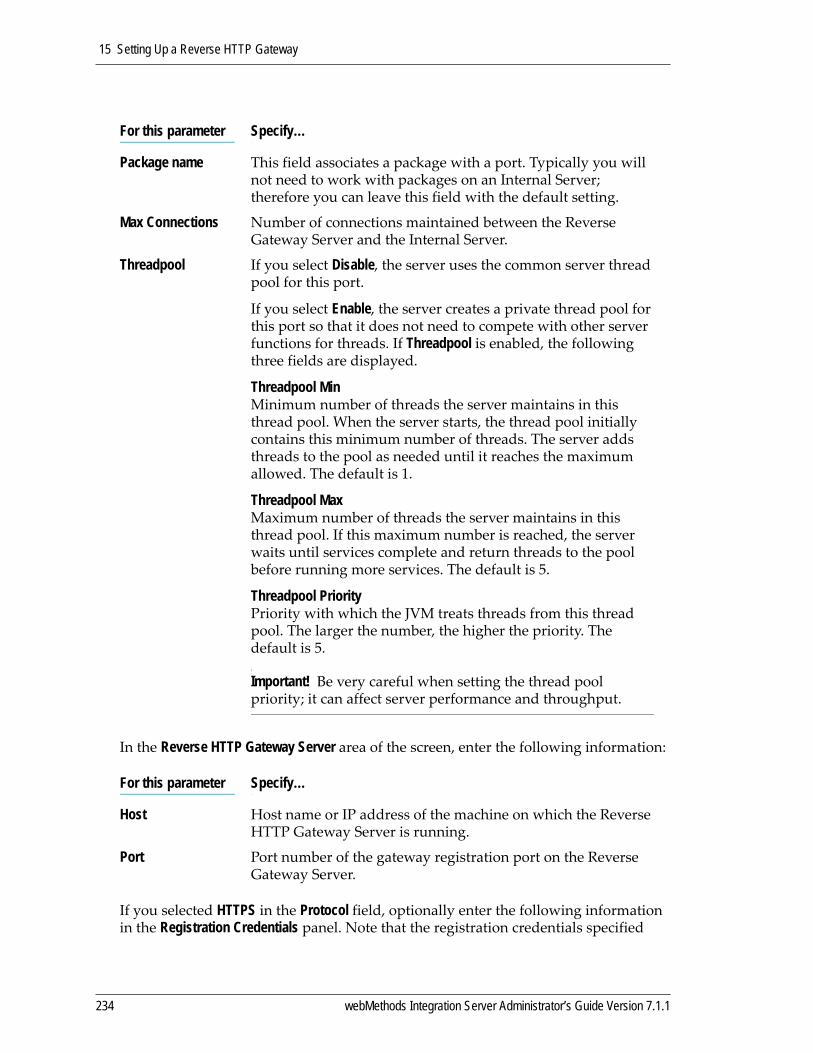
15 Setting Up a Reverse HTTP Gateway
In the Reverse HTTP Gateway Server area of the screen, enter the following information:
If you selected HTTPS in the Protocol field, optionally enter the following information in the Registration Credentials panel. Note that the registration credentials specified
Package name This field associates a package with a port. Typically you will not need to work with packages on an Internal Server; therefore you can leave this field with the default setting.
Max Connections Number of connections maintained between the Reverse Gateway Server and the Internal Server.
Threadpool If you select Disable, the server uses the common server thread pool for this port.
If you select Enable, the server creates a private thread pool for this port so that it does not need to compete with other server functions for threads. If Threadpool is enabled, the following three fields are displayed.
Threadpool Min Minimum number of threads the server maintains in this thread pool. When the server starts, the thread pool initially contains this minimum number of threads. The server adds threads to the pool as needed until it reaches the maximum allowed. The default is 1.
Threadpool Max Maximum number of threads the server maintains in this thread pool. If this maximum number is reached, the server waits until services complete and return threads to the pool before running more services. The default is 5.
Threadpool Priority Priority with which the JVM treats threads from this thread pool. The larger the number, the higher the priority. The default is 5.
Important! Be very careful when setting the thread pool priority; it can affect server performance and throughput.
For this parameter Specify…
Host Host name or IP address of the machine on which the Reverse HTTP Gateway Server is running.
Port Port number of the gateway registration port on the Reverse Gateway Server.
For this parameter Specify…
234 webMethods Integration Server Administrator’s Guide Version 7.1.1
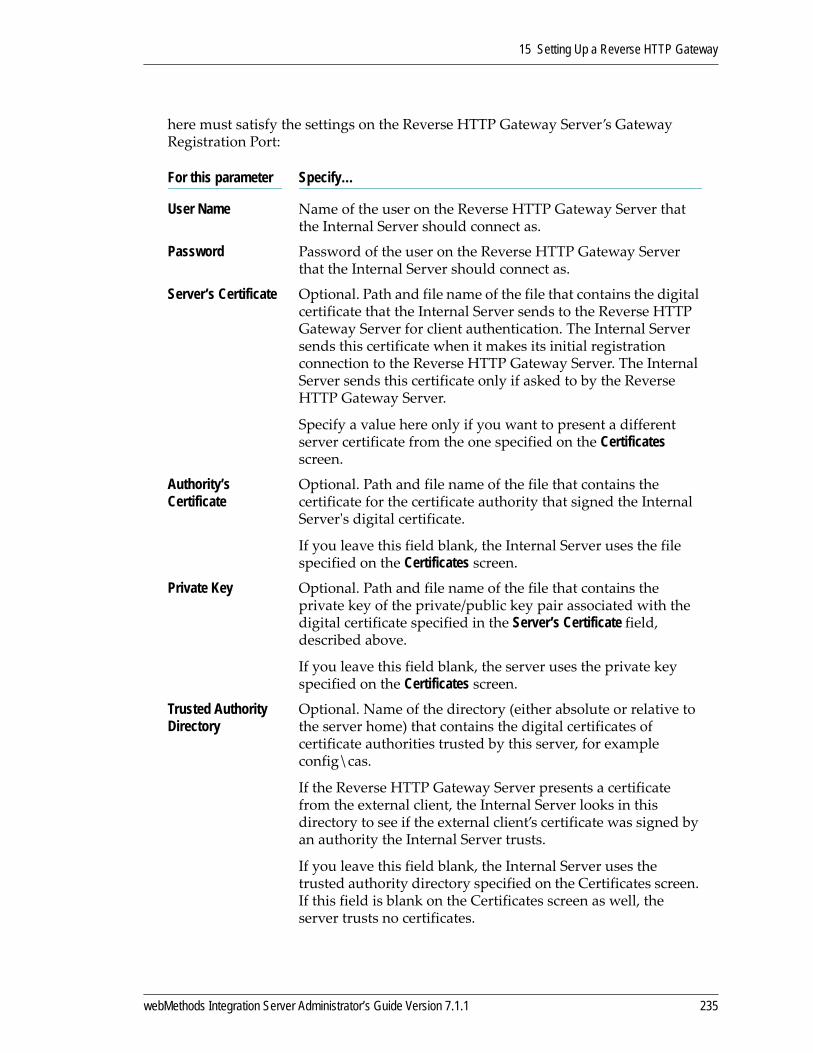
15 Setting Up a Reverse HTTP Gateway
here must satisfy the settings on the Reverse HTTP Gateway Server’s Gateway Registration Port:
For this parameter Specify…
User Name Name of the user on the Reverse HTTP Gateway Server that the Internal Server should connect as.
Password Password of the user on the Reverse HTTP Gateway Server that the Internal Server should connect as.
Server’s Certificate Optional. Path and file name of the file that contains the digital certificate that the Internal Server sends to the Reverse HTTP Gateway Server for client authentication. The Internal Server sends this certificate when it makes its initial registration connection to the Reverse HTTP Gateway Server. The Internal Server sends this certificate only if asked to by the Reverse HTTP Gateway Server.
Specify a value here only if you want to present a different server certificate from the one specified on the Certificates screen.
Authority’s Certificate
Optional. Path and file name of the file that contains the certificate for the certificate authority that signed the Internal Serverʹs digital certificate.
If you leave this field blank, the Internal Server uses the file specified on the Certificates screen.
Private Key Optional. Path and file name of the file that contains the private key of the private/public key pair associated with the digital certificate specified in the Server’s Certificate field, described above.
If you leave this field blank, the server uses the private key specified on the Certificates screen.
Trusted Authority Directory
Optional. Name of the directory (either absolute or relative to the server home) that contains the digital certificates of certificate authorities trusted by this server, for example config\cas.
If the Reverse HTTP Gateway Server presents a certificate from the external client, the Internal Server looks in this directory to see if the external client’s certificate was signed by an authority the Internal Server trusts.
If you leave this field blank, the Internal Server uses the trusted authority directory specified on the Certificates screen. If this field is blank on the Certificates screen as well, the server trusts no certificates.
webMethods Integration Server Administrator’s Guide Version 7.1.1 235
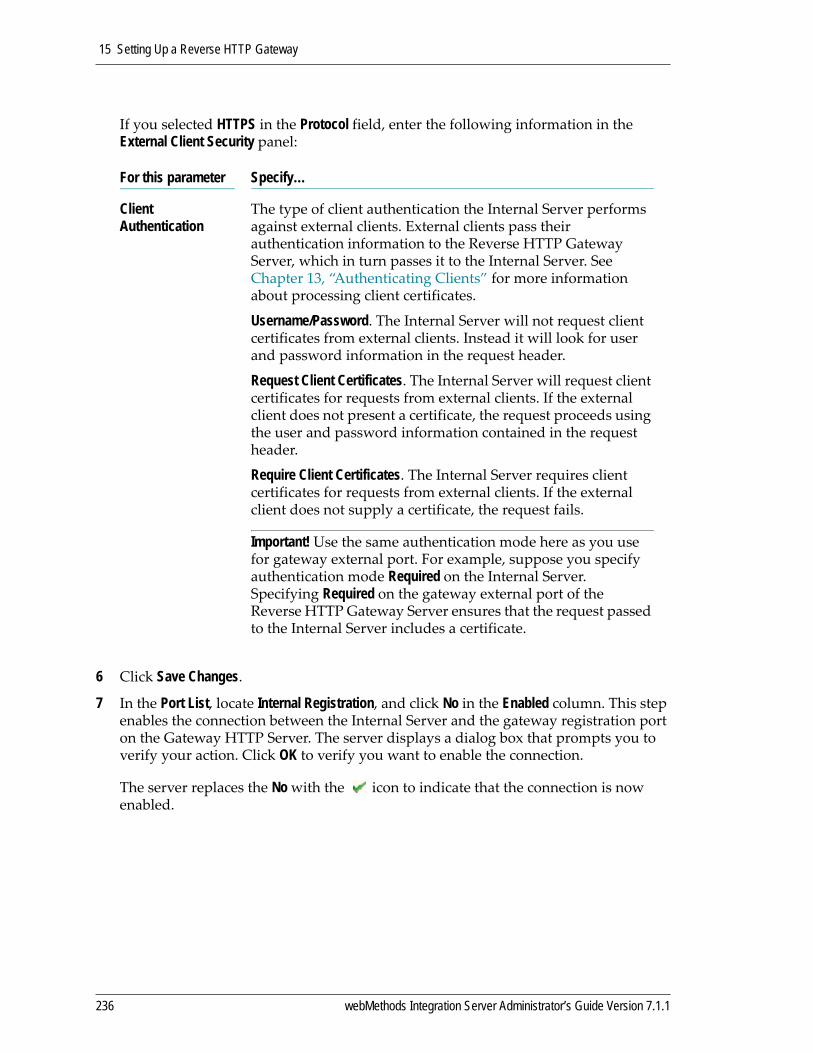
15 Setting Up a Reverse HTTP Gateway
If you selected HTTPS in the Protocol field, enter the following information in the External Client Security panel:
6 Click Save Changes.
7 In the Port List, locate Internal Registration, and click No in the Enabled column. This step enables the connection between the Internal Server and the gateway registration port on the Gateway HTTP Server. The server displays a dialog box that prompts you to verify your action. Click OK to verify you want to enable the connection.
The server replaces the No with the icon to indicate that the connection is now enabled.
For this parameter Specify…
Client Authentication
The type of client authentication the Internal Server performs against external clients. External clients pass their authentication information to the Reverse HTTP Gateway Server, which in turn passes it to the Internal Server. See Chapter 13, “Authenticating Clients” for more information about processing client certificates.
Username/Password. The Internal Server will not request client certificates from external clients. Instead it will look for user and password information in the request header.
Request Client Certificates. The Internal Server will request client certificates for requests from external clients. If the external client does not present a certificate, the request proceeds using the user and password information contained in the request header.
Require Client Certificates. The Internal Server requires client certificates for requests from external clients. If the external client does not supply a certificate, the request fails.
Important! Use the same authentication mode here as you use for gateway external port. For example, suppose you specify authentication mode Required on the Internal Server. Specifying Required on the gateway external port of the Reverse HTTP Gateway Server ensures that the request passed to the Internal Server includes a certificate.
236 webMethods Integration Server Administrator’s Guide Version 7.1.1
15 Setting Up a Reverse HTTP Gateway
Performing Client Authentication on the Reverse HTTP Gateway ServerIn a default Reverse HTTP Gateway configuration, external clients send requests to the Reverse HTTP Gateway Server, which resides in your DMZ. The Reverse HTTP Gateway Server forwards authentication information (user/password or certificates) about these clients to the Internal Server, which performs the authentication. This is the recommended configuration because certificates are safer when stored on the Internal Server, behind two firewalls.
However, if you want the Reverse HTTP Gateway Server to perform client authentication in addition to the authentication performed on the Internal Server, you can do so. To enable client authentication on the Reverse HTTP Gateway Server, make the following changes:
1 Navigate to the Settings > Extended screen and set the watt.server.revInvoke.proxyMapUserCerts system property to “true.”
2 If the Reverse HTTP Gateway Server is configured to request or require certificates, then for each external client to which you want to allow access, the Reverse HTTP Gateway Server must contain copy of the client’s public certificate mapped to a user. For more information about mapping certificates, see “Importing a Client Certificate and Mapping It to a User” on page 186.
If, instead, the Reverse HTTP Gateway Server is configured to request certificates or perform authentication using user name and password, then the Reverse HTTP Gateway Server must contain a user name for that client.
Make sure that the external client’s imported certficate or user name is the same on both the Reverse HTTP Gateway Server and the Internal Server.
3 Set the client authentication mode of the gateway external port on the Reverse HTTP Gateway Server to Require Client Certificates:
a Navigate to the Security > Ports screen.
b Find the row for the gateway external port and click the port number, then click Edit HTTP Port Configuration.
c From the Edit Reverse HTTP Gateway Server Configuration screen, in the Gateway External Port area of the screen, in the Client Authentication field, select Require Client Certificates and click Save Changes.
For more information about this port, see “Setting Up the Gateway External Port” on page 224.
webMethods Integration Server Administrator’s Guide Version 7.1.1 237

15 Setting Up a Reverse HTTP Gateway
Frequently Asked Questions About Reverse HTTP GatewayThis section provides answers to some frequently asked questions about Reverse HTTP Gateway.
1 If I define the gateway external port on the Reverse HTTP Gateway Server to use HTTPS, do I need to define my gateway registration port to be an HTTPS port too?
No. The gateway external port and the gateway registration port operate independently.
2 How many reverse connections should I register between the Reverse HTTP Gateway Server server and the Internal Server?
That depends on the expected load and the size of the transactions. A reverse connection between the Reverse HTTP Gateway Server and Internal Server is available except when a request is being written to the Internal Server or a response is being returned from the Internal Server. In other words, Reverse Gateway connection utilization is I/O bound. Therefore, if you expect large, simultaneous transactions, increase the number of registered connections accordingly.
If you have not defined a private thread pool for the internal registration port, then for best results, the sum of all connections specified in the Max Connections field for all the internal registration ports should not be exceed 10% of the number of server threads specified in Server Thread Pool Max Threads field on the Settings>Resources page. If you have defined a private thread pool for the internal registration port, then the number of connections you can specify is limited to the maximum number of threads allowed in the private thread pool.
3 Is there persistence with the Reverse HTTP Gateway Server?
No. The Reverse HTTP Gateway Server is just a network hop for the incoming request.
4 I want to authenticate the SSL credentials of external clients. Where do I set up certificates?
The following table shows where to set up certificates for the default Reverse HTTP Gateway configuration, in which the Internal Server performs client authentication. If you want to perform client authentication on the Reverse HTTP Gateway Server as well, see “Performing Client Authentication on the Reverse HTTP Gateway Server” on page 237.
238 webMethods Integration Server Administrator’s Guide Version 7.1.1
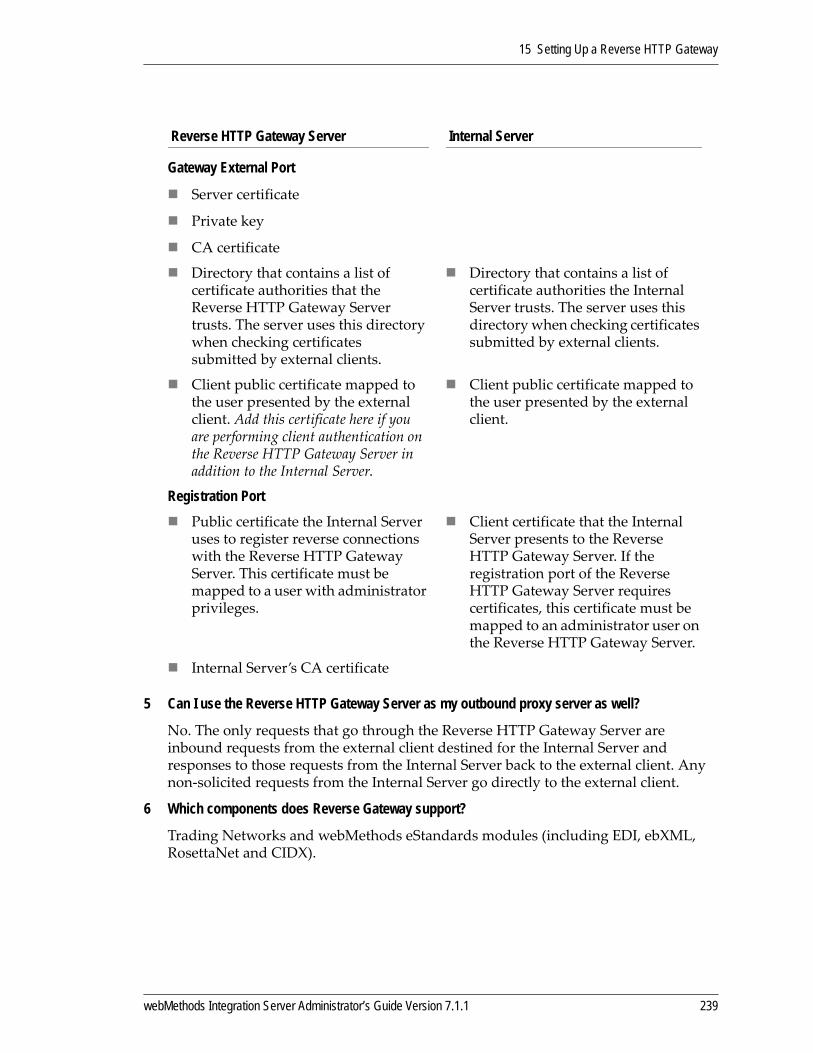
15 Setting Up a Reverse HTTP Gateway
5 Can I use the Reverse HTTP Gateway Server as my outbound proxy server as well?
No. The only requests that go through the Reverse HTTP Gateway Server are inbound requests from the external client destined for the Internal Server and responses to those requests from the Internal Server back to the external client. Any non‐solicited requests from the Internal Server go directly to the external client.
6 Which components does Reverse Gateway support?
Trading Networks and webMethods eStandards modules (including EDI, ebXML, RosettaNet and CIDX).
Reverse HTTP Gateway Server Internal Server
Gateway External Port
Server certificate
Private key
CA certificate
Directory that contains a list of certificate authorities that the Reverse HTTP Gateway Server trusts. The server uses this directory when checking certificates submitted by external clients.
Directory that contains a list of certificate authorities the Internal Server trusts. The server uses this directory when checking certificates submitted by external clients.
Client public certificate mapped to the user presented by the external client. Add this certificate here if you are performing client authentication on the Reverse HTTP Gateway Server in addition to the Internal Server.
Client public certificate mapped to the user presented by the external client.
Registration PortPublic certificate the Internal Server uses to register reverse connections with the Reverse HTTP Gateway Server. This certificate must be mapped to a user with administrator privileges.
Client certificate that the Internal Server presents to the Reverse HTTP Gateway Server. If the registration port of the Reverse HTTP Gateway Server requires certificates, this certificate must be mapped to an administrator user on the Reverse HTTP Gateway Server.
Internal Server’s CA certificate
webMethods Integration Server Administrator’s Guide Version 7.1.1 239
15 Setting Up a Reverse HTTP Gateway
7 What authentication mode should I use for the Reverse HTTP Gateway Server and the Internal Server?
Authentication mode is the method a server uses to authenticate client requests. In a default Reverse HTTP Gateway configuration, the Reverse HTTP Gateway Server receives authentication information from the external client and passes it on to the Internal Server, which performs the authentication.
Be sure to specify the same authentication mode for the Internal Server and for the gateway external port on the Reverse Gateway Server. For example, if the Internal Server’s authentication mode is Required, the gateway external port on the Reverse Gateway Server must also be Required so that the Reverse Gateway Server always passes the external client’s certificate to the Internal Server.
In contrast, the authentication mode of the gateway registration port on the Reverse Gateway Server does not need to match the authentication mode of the Internal Server or the gateway external port.
If you want to perform client authentication on the Reverse HTTP Gateway Server, see “Performing Client Authentication on the Reverse HTTP Gateway Server” on page 237.
8 Does Reverse HTTP Gateway support the FTP protocol?
No, it is limited to HTTP and HTTPS only.
9 Are the SOCK and SSLSOCK protocols supported?
No, these were proprietary protocols used in the 4.x and 6.x releases. Starting in the 7.1 release, SOCK and SSLSOCK have been replaced by HTTP and HTTPS.
10 Is it possible to run filtering services on the Reverse Gateway server?
No, filtering services were available in the 4.x and 6.x releases, but are not available in 7.x.
240 webMethods Integration Server Administrator’s Guide Version 7.1.1
16 Outbound Passwords
Overview . . . . . . . . . . . . . . . . . . . . . . . . . . . . . . . . . . . . . . . . . . . . . . . . . . . . . . . . . . . . . . . . . . . 242
Managing Outbound Passwords . . . . . . . . . . . . . . . . . . . . . . . . . . . . . . . . . . . . . . . . . . . . . . . . . 242
Changing the Master Password . . . . . . . . . . . . . . . . . . . . . . . . . . . . . . . . . . . . . . . . . . . . . . . . . . 244
Changing the Expiration Interval for the Master Password . . . . . . . . . . . . . . . . . . . . . . . . . . . . . 244
About the configPassman.cnf File . . . . . . . . . . . . . . . . . . . . . . . . . . . . . . . . . . . . . . . . . . . . . . . . 245
Working with Outbound Password Settings . . . . . . . . . . . . . . . . . . . . . . . . . . . . . . . . . . . . . . . . . 246
Working with Master Password Settings . . . . . . . . . . . . . . . . . . . . . . . . . . . . . . . . . . . . . . . . . . . 246
What To Do if You Lose or Forget Your Master Password . . . . . . . . . . . . . . . . . . . . . . . . . . . . . . 248
When There Are Problems with the Master Password or Outbound Passwords at Startup . . . . 248
Email Listeners and Package Replication . . . . . . . . . . . . . . . . . . . . . . . . . . . . . . . . . . . . . . . . . . 251
webMethods Integration Server Administrator’s Guide Version 7.1.1 241

16 Outbound Passwords
OverviewAs part of its normal operations, the Integration Server may connect to applications and subsystems such as remote Integration Servers, proxy servers, and databases. The Integration Server, acting as a client, is required to supply a password, referred to as an outbound password, to each of these systems before connecting to them. The Integration Server uses the outbound passwords to identify itself or authenticate to the other systems.
When you configure the Integration Server to connect to an application or subsystem, for example a database, you specify the password the Integration Server must send to the database server in order to connect to it. Later, when an Integration Server user makes a request that requires the database, the Integration Server sends the configured password to the database server and connects to it.
To protect these outbound passwords, the Integration Server encrypts them. By default it encrypts them using Password‐Based Encryption (PBE) technology, also known as PKCS#5. This encryption method requires the use of an encryption key or master password that you specify. The encrypted outbound passwords are stored in a file.
The master password is also encrypted, and by default, is stored in a file. However, when the password is stored in a file, there is a chance that someone could access the file and decrypt the password. Therefore, for greater security, you can configure the Integration Server to prompt for the master password at server startup instead.
As stated above, outbound passwords are used by the Integration Server to authenticate to other entities. In contrast, inbound passwords are used by users and other servers to authenticate to the Integration Server. Inbound passwords are stored as a one‐way hash. See Chapter 5, “Managing Users and Groups” for a discussion of setting up inbound passwords.
The following sections describe how to manage outbound passwords.
Managing Outbound PasswordsWhen you first install the Integration Server, it is configured to use PBE to encrypt outbound passwords, and has a master password of “manage” with an expiration interval of 90 days.
You can change the master password and its expiration interval by using the Security > Outbound Password screen of the Integration Server Administrator. You can also use the Integration Server Administrator to reset the master password and all the stored
Note: Flow services may also store and retrieve outbound passwords to access secure resources, using the pub.security.outboundPasswords services. For more information, see webMethods Integration Server Built‐In Services Reference.
Important! To protect the master password file (if you use one) and the outbound passwords file, assign them operating system Administrator access.
242 webMethods Integration Server Administrator’s Guide Version 7.1.1

16 Outbound Passwords
outbound passwords in the unlikely event the master password or outbound passwords become lost or corrupted.
To change other settings, you must edit the configPassman.cnf file. Those settings are:
Encryption method for outbound passwords
Method the Integration Server uses to obtain the master password. The Integration Server can store the master password in a file or prompt for it at server startup.
The following table lists the tasks you can perform and where to find instructions:
To change... See...
The master password. “Changing the Master Password” on page 244
The expiration interval of the master password.
“Changing the Expiration Interval for the Master Password” on page 244
The encryption method used for outbound passwords.
“Working with Outbound Password Settings” on page 246
The location of the outbound password store.
“Working with Outbound Password Settings” on page 246
The method used to obtain the master password, that is, whether the Integration Server prompts for the master password at Integration Server startup instead of storing it in a file.
“Working with Master Password Settings” on page 246
The repeat limit for the master password, that is, how soon a previously used password can be reused.
“Working with Master Password Settings” on page 246
The location of the master password store. “Working with Master Password Settings” on page 246
All outbound passwords and the master password.
“Resetting the Master Password and Outbound Passwords” on page 250
Important! As you do with other important system files, you should regularly back up the files the server uses to maintain outbound passwords. These files are:
config/txnPassStore.dat Stores encrypted outbound passwordsconfig/empw.dat Stores encrypted master password config/configPassman.cnf Specifies outbound password configuration settingsconfig/passman.cnf Non‐editable version of configPassman.cnf Always back up and restore these files together. If you change the name or location of the outbound password store or the master password store, make sure your backup procedure backs up the correct files.
webMethods Integration Server Administrator’s Guide Version 7.1.1 243
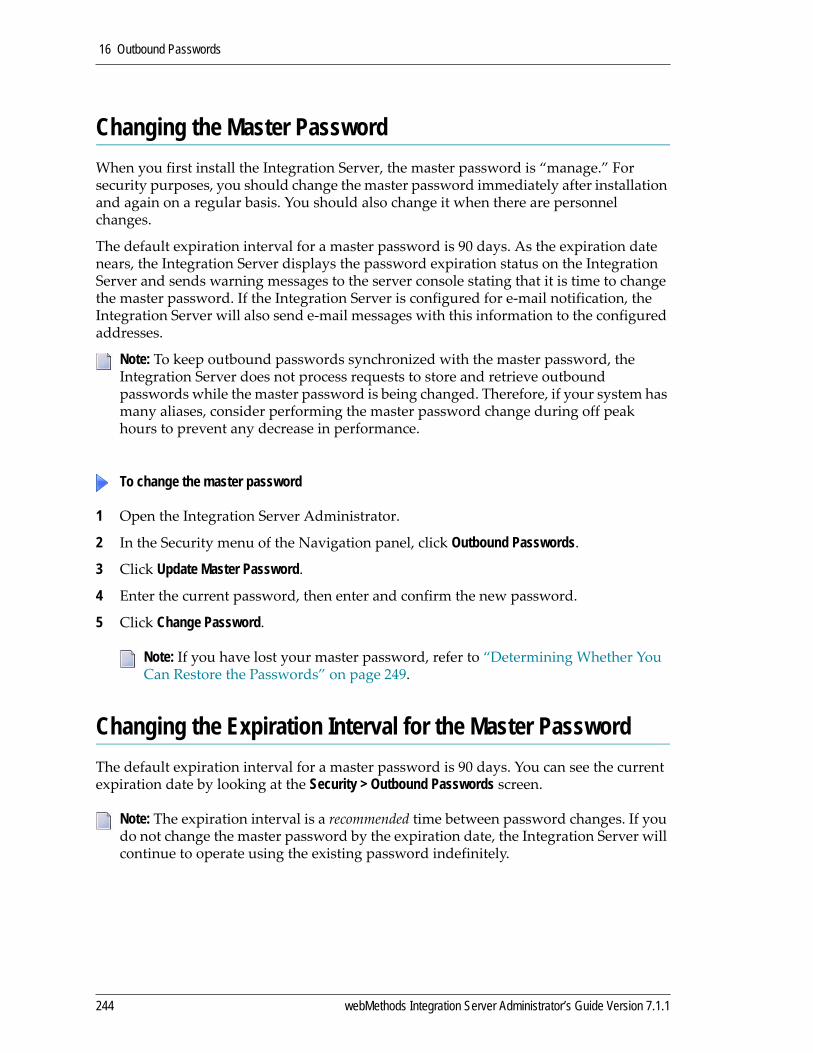
16 Outbound Passwords
Changing the Master PasswordWhen you first install the Integration Server, the master password is “manage.” For security purposes, you should change the master password immediately after installation and again on a regular basis. You should also change it when there are personnel changes.
The default expiration interval for a master password is 90 days. As the expiration date nears, the Integration Server displays the password expiration status on the Integration Server and sends warning messages to the server console stating that it is time to change the master password. If the Integration Server is configured for e‐mail notification, the Integration Server will also send e‐mail messages with this information to the configured addresses.
1 Open the Integration Server Administrator.
2 In the Security menu of the Navigation panel, click Outbound Passwords.
3 Click Update Master Password.
4 Enter the current password, then enter and confirm the new password.
5 Click Change Password.
Changing the Expiration Interval for the Master Password The default expiration interval for a master password is 90 days. You can see the current expiration date by looking at the Security > Outbound Passwords screen.
Note: To keep outbound passwords synchronized with the master password, the Integration Server does not process requests to store and retrieve outbound passwords while the master password is being changed. Therefore, if your system has many aliases, consider performing the master password change during off peak hours to prevent any decrease in performance.
To change the master password
Note: If you have lost your master password, refer to “Determining Whether You Can Restore the Passwords” on page 249.
Note: The expiration interval is a recommended time between password changes. If you do not change the master password by the expiration date, the Integration Server will continue to operate using the existing password indefinitely.
244 webMethods Integration Server Administrator’s Guide Version 7.1.1

16 Outbound Passwords
.
1 Open the Integration Server Administrator if it is not already open.
2 In the Security menu of the Navigation panel, click Outbound Passwords.
3 Click Update Expiration Interval.
4 Enter the new expiration interval in days and click Update. The maximum interval is 366 days.
About the configPassman.cnf FileThe configPassman.cnf file contains additional configuration settings for outbound password encryption that are not contained in the Integration Server Administrator. The file consists of a number of properties, some of which are commented out in the default configuration.
As shipped, the configPassman.cnf file specifies that outbound passwords will be stored in file config/txnPassStore.dat and encrypted using Password‐Based Encryption (PBE). In addition, it specifies that the master password will be stored in file config/empw.dat. Properties that can be used to specify other settings are commented out.
If you want to change these optional settings, you must edit the configPassman.cnf file. The file must always specify the following:
Encryption method for outbound passwords
Location of the file that contains the outbound passwords
Method the Integration Server uses to obtain the master password
The following sections describe the configPassman.cnf file in detail and how to change outbound password and master password settings.
To change the expiration interval for the master password
Note: Although it is not recommended, you can specify an interval of 0. With this setting, the password will not expire and no warnings will be sent to the Integration Server Administrator or the server log.
Important! The configPassman.cnf file has a companion file, passman.cnf. If you make changes to configPassman.cnf file, the Integration Server will automatically update passman.cnf to reflect these changes when you initialize the Integration Server. Never update passman.cnf directly.
webMethods Integration Server Administrator’s Guide Version 7.1.1 245
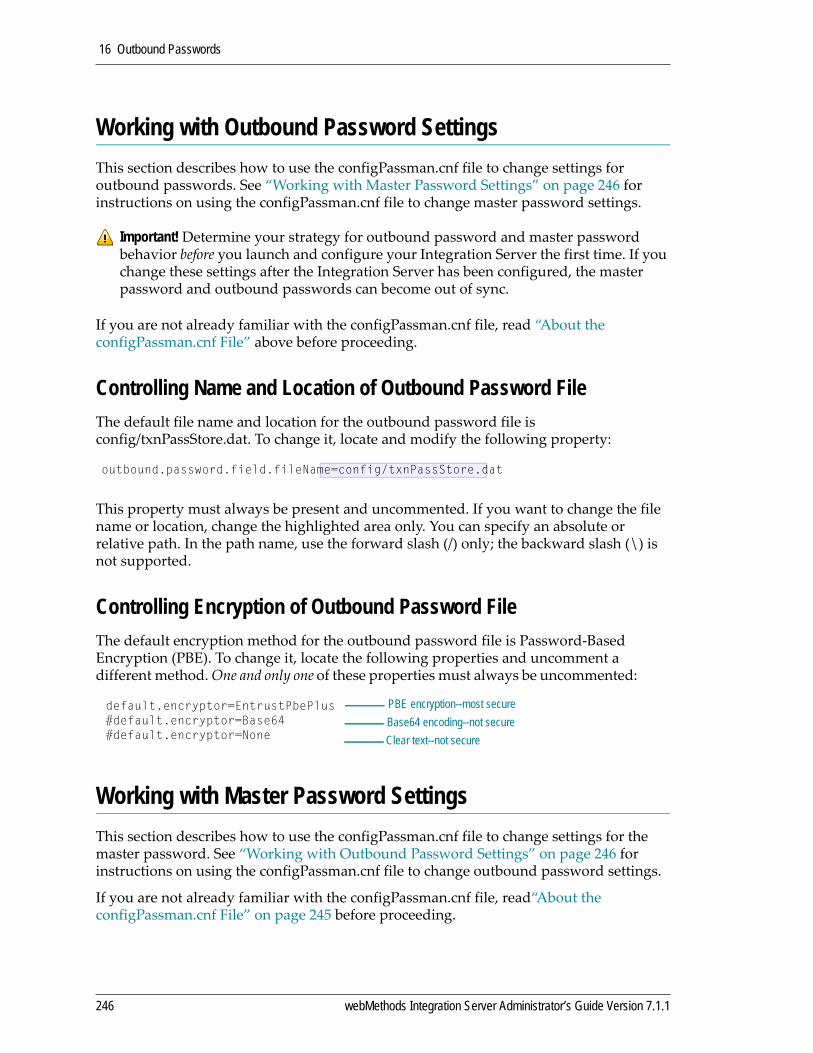
16 Outbound Passwords
Working with Outbound Password SettingsThis section describes how to use the configPassman.cnf file to change settings for outbound passwords. See “Working with Master Password Settings” on page 246 for instructions on using the configPassman.cnf file to change master password settings.
If you are not already familiar with the configPassman.cnf file, read “About the configPassman.cnf File” above before proceeding.
Controlling Name and Location of Outbound Password FileThe default file name and location for the outbound password file is config/txnPassStore.dat. To change it, locate and modify the following property:
This property must always be present and uncommented. If you want to change the file name or location, change the highlighted area only. You can specify an absolute or relative path. In the path name, use the forward slash (/) only; the backward slash (\) is not supported.
Controlling Encryption of Outbound Password File The default encryption method for the outbound password file is Password‐Based Encryption (PBE). To change it, locate the following properties and uncomment a different method. One and only one of these properties must always be uncommented:
Working with Master Password SettingsThis section describes how to use the configPassman.cnf file to change settings for the master password. See “Working with Outbound Password Settings” on page 246 for instructions on using the configPassman.cnf file to change outbound password settings.
If you are not already familiar with the configPassman.cnf file, read“About the configPassman.cnf File” on page 245 before proceeding.
Important! Determine your strategy for outbound password and master password behavior before you launch and configure your Integration Server the first time. If you change these settings after the Integration Server has been configured, the master password and outbound passwords can become out of sync.
outbound.password.field.fileName=config/txnPassStore.dat
default.encryptor=EntrustPbePlus#default.encryptor=Base64#default.encryptor=None
PBE encryption--most secureBase64 encoding--not secureClear text--not secure
246 webMethods Integration Server Administrator’s Guide Version 7.1.1
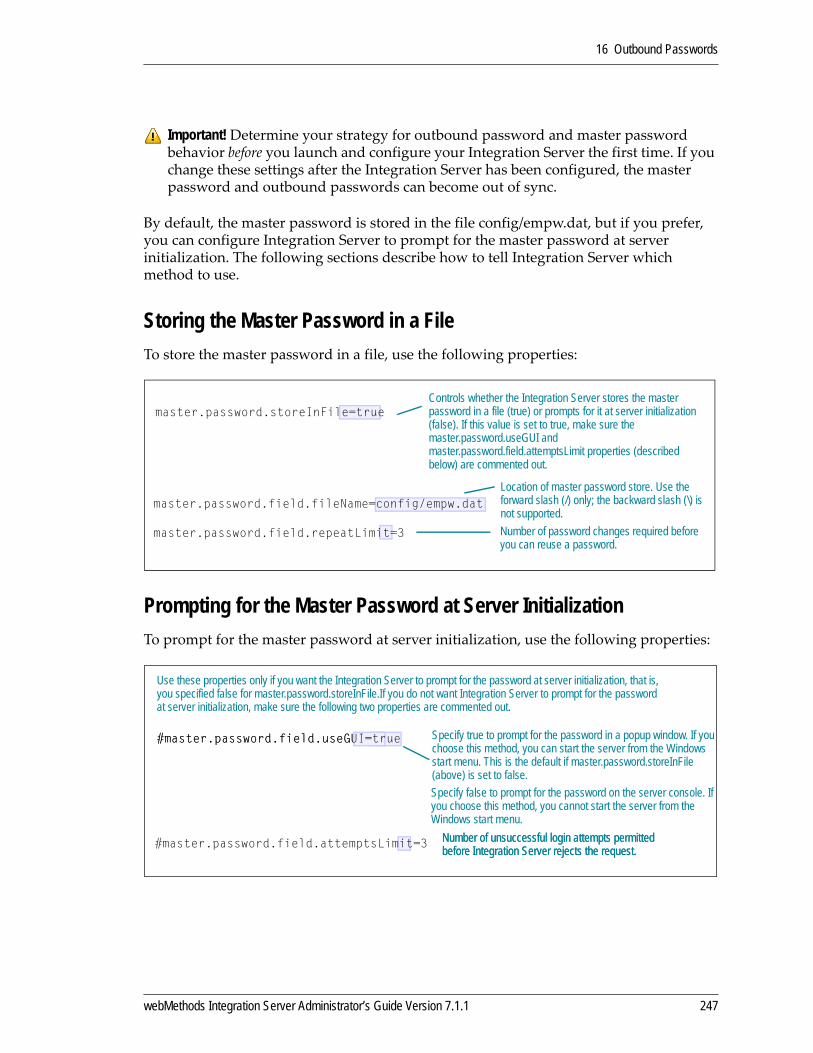
16 Outbound Passwords
By default, the master password is stored in the file config/empw.dat, but if you prefer, you can configure Integration Server to prompt for the master password at server initialization. The following sections describe how to tell Integration Server which method to use.
Storing the Master Password in a FileTo store the master password in a file, use the following properties:
Prompting for the Master Password at Server InitializationTo prompt for the master password at server initialization, use the following properties:
Important! Determine your strategy for outbound password and master password behavior before you launch and configure your Integration Server the first time. If you change these settings after the Integration Server has been configured, the master password and outbound passwords can become out of sync.
Number of password changes required before you can reuse a password.
Location of master password store. Use the forward slash (/) only; the backward slash (\) is not supported.
Controls whether the Integration Server stores the master password in a file (true) or prompts for it at server initialization (false). If this value is set to true, make sure the master.password.useGUI and master.password.field.attemptsLimit properties (described below) are commented out.
master.password.storeInFile=true
master.password.field.fileName=config/empw.dat
master.password.field.repeatLimit=3
#master.password.field.useGUI=true
Use these properties only if you want the Integration Server to prompt for the password at server initialization, that is, you specified false for master.password.storeInFile.If you do not want Integration Server to prompt for the password at server initialization, make sure the following two properties are commented out.
Specify true to prompt for the password in a popup window. If you choose this method, you can start the server from the Windows start menu. This is the default if master.password.storeInFile (above) is set to false.Specify false to prompt for the password on the server console. If you choose this method, you cannot start the server from the Windows start menu.
Number of unsuccessful login attempts permitted before Integration Server rejects the request.Number of unsuccessful login attempts permitted before Integration Server rejects the request.
#master.password.field.useGUI=true
#master.password.field.attemptsLimit=3
webMethods Integration Server Administrator’s Guide Version 7.1.1 247
16 Outbound Passwords
You cannot configure the Integration Server to prompt for the master password at server initialization if:
The Integration Server runs as a Windows service. Refer to “Changing Whether the Integration Server is a Windows Application or Windows Service” on page 33 for more information.
The Integration Server runs as a background application on UNIX.
What To Do if You Lose or Forget Your Master PasswordIf your Integration Server is configured to encrypt outbound passwords using Password‐Based Encryption (PBE), your Integration Server will have a master password, which is the key used to encrypt outbound passwords. You need to enter the master password whenever you want to change to a new encryption key. In addition, some installations are configured so that the Integration Server prompts for the master password when the Integration Server initializes; without the password, the Integration Server will start up in safe mode, which is described below.
Therefore, if you lose or forget your master password, you will need to restore it or reset it, depending on the circumstances. For more information, see “Determining Whether You Can Restore the Passwords” on page 249.
When There Are Problems with the Master Password or Outbound Passwords at StartupIf the Integration Server detects a problem with the master password or outbound passwords at startup, it will place you in safe mode, which is a special mode from which you can diagnose and correct problems.
When the Integration Server is in safe mode, it displays the Integration Server Administrator, but the Integration Server is not connected to any external resources.
When you are placed into safe mode because of problems with the master password or outbound passwords, you will see the following message in the upper left corner of the Server Statistics screen of the Integration Server Administrator:SERVER IS RUNNING IN SAFE MODE. Master password sanity check failed -- invalid master password provided.
When there is a problem with these passwords, you can correct the problem by restoring the passwords or resetting them. The method you choose depends on the problem with the passwords. There are a number of reasons the Integration Server will automatically go into safe mode.
Important! When you are in safe mode, do not configure or modify outbound passwords unless they have been reset as part of the Reset All Outbound Passwords task.
248 webMethods Integration Server Administrator’s Guide Version 7.1.1
16 Outbound Passwords
Passwords are Corrupted or Out of SyncIt is possible that the master password file, outbound password file, or both are corrupted. It is also possible that these files are out of sync with each other. The files are out of synch when the key used to encrypt the contents of the outbound password file is not the key in the master password file. In either case, refer to “Determining Whether You Can Restore the Passwords” on page 249 for instructions.
You Entered the Wrong Master Password by MistakeYou might be in safe mode because you unintentionally entered the wrong master password when prompted for it at server startup. If you think this is the case, shutdown the Integration Server and restart it, this time specifying the correct master password when prompted.
Platform Locale Has ChangedAny change to the OS locale or default encoding can render the outbound password and master password files unreadable by the Integration Server. For this reason, Software AG recommends that you do not change platform locale after the Integration Server has been installed and started.
Determining Whether You Can Restore the Passwords You can restore passwords if either of the following is true:
Your master password and outbound passwords are stored in files and you have recent backups of both and the passman.cnf file.
The Integration Server is configured to prompt for the master password, you have a recent backup of the outbound password file and the passman.cnf file, and you know the master password for that backup.
You must reset the passwords if any of the following is true:
Your master password and outbound passwords are stored in files and you do not have recent backups the master password file, the outbound password file, and the passman.cnf file.
The Integration Server is configured to prompt for the master password and you do not have recent backups of the outbound password file and the passman.cnf file.
The Integration Server is configured to prompt for the master password and you have lost or forgotten the master password.
webMethods Integration Server Administrator’s Guide Version 7.1.1 249
16 Outbound Passwords
Restoring the Master Password and Outbound Password Files Before restoring these files, make sure you have read “Determining Whether You Can Restore the Passwords” on page 249 to determine if you can restore, or if you need to reset.
1 Determine which files you need to restore.
If your master password is not stored in a file, that is, your Integration Server prompts you for a master password at server startup, then you can restore just the outbound password file and the passman.cnf file. Otherwise, you must restore the master password file, the outbound password file, and the passman.cnf file from backups.
2 Determine the name and location of the files.
The passman.cnf file is always config/passman.cnf. By default, the master password file is config/empw.dat and the outbound password file is in config/txnPassStore.dat. If you are not sure of the location of these files on your system, look at the file config/configPassman.cnf. For information about using this file, see “About the configPassman.cnf File” on page 245.
3 Shut down the Integration Server.
4 Copy the replacement files to appropriate directory.
5 Restart the Integration Server.
Resetting the Master Password and Outbound Passwords Before resetting these passwords, make sure you have read “Determining Whether You Can Restore the Passwords” on page 249 to determine if you really need to reset the passwords or if you can restore them instead.
The reset procedure clears (blanks out) the stored outbound passwords and resets the master password to “manage.” In addition, you must manually re‐enter the appropriate passwords for all application and subsystem passwords on their respective configuration screens in the Integration Server Administrator.
To restore the master password and outbound password files
Note: Always back up and restore the master password file (if you use one), the outbound password file, and the passman.cnf file together.
250 webMethods Integration Server Administrator’s Guide Version 7.1.1

16 Outbound Passwords
1 Start the Integration Server if it is not already running. If your Integration Server is configured to prompt you for a master password during server initialization, enter any value.
Integration Server takes you into safe mode, which is the Integration Server Administrator, but in a mode that is not connected to any external resources.
2 In the Security menu of the Navigation panel, click Outbound Passwords.
3 Click Update Master Password.
4 Click Reset All Outbound Passwords.
The Integration Server displays a warning screen, to be sure you want to reset the passwords.
5 Click Reset Passwords.
The Integration Server asks again if you are sure you want to reset the passwords.
6 Click OK.
This step clears the stored outbound passwords and changes the master password to “manage.”
7 From the Outbound Passwords screen, click Change Password and change the master password to something other than “manage.”
8 Restart the Integration Server.
You will see error messages as the Integration Server attempts to connect to the applications and subsystems for which the server no longer has passwords stored.
9 Go to the configuration screen for each application or subsystem and re‐enter the password required for the Integration Server to connect to that application or subsystem. Screens to check include those that define remote server aliases, cluster configuration, JDBC connection pools, e‐mail listeners, LDAP servers, proxy servers, Broker configuration, and WmDB.
Email Listeners and Package Replication When you export a package that is associated with a listener, information about that listener is sent with the package. However, in the case of an email listener, not all the listener configuration information is sent to the destination Integration Server. Specifically, the outbound password that the email listener uses to connect to the email Server is not sent. As a result, when the listener on the destination Integration Server tries to connect to the email server, the connection fails. Although the listener appears on the list of ports, it will not be enabled. You will also see error messages on the server console.
To reset stored outbound passwords and the master password
webMethods Integration Server Administrator’s Guide Version 7.1.1 251

16 Outbound Passwords
To enable the port, go to the Security > Ports > Edit Email Client Configuration Screen in the Integration Server Administrator and update the Password field to specify the password needed to connect to the email server.
If you export a package that is associated with an email listener from a 6.5 Integration Server to a pre‐6.5 Integration Server, the email listener will not be replicated at all. You must manually reconfigure the listener on the pre‐6.5 Integration Server after installing the package there.
252 webMethods Integration Server Administrator’s Guide Version 7.1.1
17 Configuring a Central User Directory or LDAP
Before You Begin . . . . . . . . . . . . . . . . . . . . . . . . . . . . . . . . . . . . . . . . . . . . . . . . . . . . . . . . . . . . . 254
Overview of How Integration Server Works with Externally Defined Users and Groups . . . . . . . 255
Configuring Central User Management . . . . . . . . . . . . . . . . . . . . . . . . . . . . . . . . . . . . . . . . . . . . 256
Overview of Using LDAP . . . . . . . . . . . . . . . . . . . . . . . . . . . . . . . . . . . . . . . . . . . . . . . . . . . . . . . 260
Configuring the Server to Use LDAP . . . . . . . . . . . . . . . . . . . . . . . . . . . . . . . . . . . . . . . . . . . . . . 261
Considerations for User Accounts and Groups . . . . . . . . . . . . . . . . . . . . . . . . . . . . . . . . . . . . . . 267
Granting Administrator Privileges to External Users . . . . . . . . . . . . . . . . . . . . . . . . . . . . . . . . . . 269
Granting Developer Privileges to External Users . . . . . . . . . . . . . . . . . . . . . . . . . . . . . . . . . . . . . 270
Granting Access to Services and Files to External Users . . . . . . . . . . . . . . . . . . . . . . . . . . . . . . 271
webMethods Integration Server Administrator’s Guide Version 7.1.1 253

17 Configuring a Central User Directory or LDAP
Before You BeginThis chapter describes how Integration Server uses an external directory to authenticate clients, rather than using internally‐defined user and group information. For information about using internally‐defined users and groups, refer to Chapter 5, “Managing Users and Groups”. You can set up the webMethods Integration Server to access information from an external directory if your site uses one of the following external directories for user and group information:
Central user management
Lightweight Directory Access Protocol (LDAP)
You can configure Integration Server for central user management by connecting Integration Server to a My webMethods Server user database. You can also configure LDAP directories and other type of directories to be used with central user management. However, you can only use one external directory at a time, a central user directory or LDAP.
Before you continue reading this chapter, you may find it helpful to first understand how Integration Server uses user and group information. Read the following sections if you have not already done so.
Chapter 5, “Managing Users and Groups”
“Setting Up Administrators” on page 141
“Setting Up Developers” on page 142
“Controlling Access to Resources with ACLs” on page 168
“Basic Authentication (User Names and Passwords)” on page 188
Important! If you are using My webMethods Server in your environment, Software AG recommends that you configure Integration Server to work with a central user management directory. If you want to use an LDAP server and you are using My webMethods Server, it is recommended that you configure LDAP using My webMethods Server. Configure Integration Server to work with LDAP server directly only when you are not using My webMethods Server.
254 webMethods Integration Server Administrator’s Guide Version 7.1.1
17 Configuring a Central User Directory or LDAP
Overview of How Integration Server Works with Externally Defined Users and GroupsThe following sections provide information about how and when Integration Server interacts with users and groups defined in a central user directory or in LDAP, specifically:
How externally defined users and groups can be used in Integration Server.
When Integration Server accesses information about externally defined users and groups.
How Integration Server authenticates users who belong to externally defined groups or roles.
How the Server Uses Externally Defined Users and GroupsThe server can use externally defined information for the same purposes it uses internally‐defined user and group information:
To authenticate clients using user names and passwords
To control who can configure and manage Integration Server
To control who can create, modify, and delete services using webMethods Developer
To control access to services and files that are available in Integration Server
Externally defined information does not replace ACLs. To control access to services and files, you still need to set up the ACLs that identify the groups that are allowed and denied access to specific services and files. However, you can assign externally defined groups to an ACL.
When you configure the server to use central user management or LDAP directory, externally defined users and groups are not displayed on the Security > User Management page. However, if an external group has been mapped to an Integration Server ACL, the group will be displayed on the Security > Access Control Lists page.
When the Server Accesses Externally Defined InformationThe server obtains externally defined information in the following circumstances:
To authenticate clients
To determine if an ACL allows or denies an action
Note: Client requests that require the server to access a central user directory or an LDAP directory may take longer to complete than those that do not.
webMethods Integration Server Administrator’s Guide Version 7.1.1 255

17 Configuring a Central User Directory or LDAP
How Integration Server Authenticates Externally Defined Clients When the server is authenticating a client using user names and passwords, it first attempts to find the user name and password internally. If it finds an internally‐defined user account for the supplied user name, the server authenticates the client using the internally‐defined information. If the supplied password is correct, the server proceeds with the request. If the supplied password is not correct, the server rejects the request.
If the server cannot find an internally‐defined user account for the supplied user name, the server accesses the external directory (either a central user directory or LDAP) to obtain user name and password information for the client. If it finds an externally defined user account, the server authenticates the client using the externally defined information. If the supplied password is correct, the server proceeds with the request. If the supplied password is not correct, the server rejects the request.
If the server cannot find either an internally or externally defined user account for the user, the server rejects the request.
If the user does not supply a user name or password, the server uses the internally‐defined Default user account.
Configuring Central User ManagementCentral user management involves using a single location to store and manage information about users of webMethods products. You can use Integration Server Administrator to grant users in a central directory access to Integration Server functionality and services. For example, you can assign a My webMethods Server role or group to an ACL.
If a user will access Integration Server or Trading Networks through My webMethods interfaces, create the users in My webMethods Server and then use Integration Server Administrator to give them access to the necessary areas. If such users are already defined in an external directory such as LDAP, you can configure My webMethods Server to work with the external directory.
Users defined in a central location, such as the My webMethods Server user directory, are sometimes referred to as central users.
Note: If the passwords are contained in an external authentication system other than Central Users or LDAP, for example Kerberos, you must create your own pluggable module to obtain this information. See “Customizing Authentication” on page 189 for information about setting up a pluggable module.
Important! Before you can configure central user management in Integration Server, My webMethods Server must already be installed and configured to use an external database. Additionally, My webMethods Server should have been restarted at least once to enable My webMethods Server clustering. My webMethods Server does not need to be running for Integration Server to access central user information.
256 webMethods Integration Server Administrator’s Guide Version 7.1.1
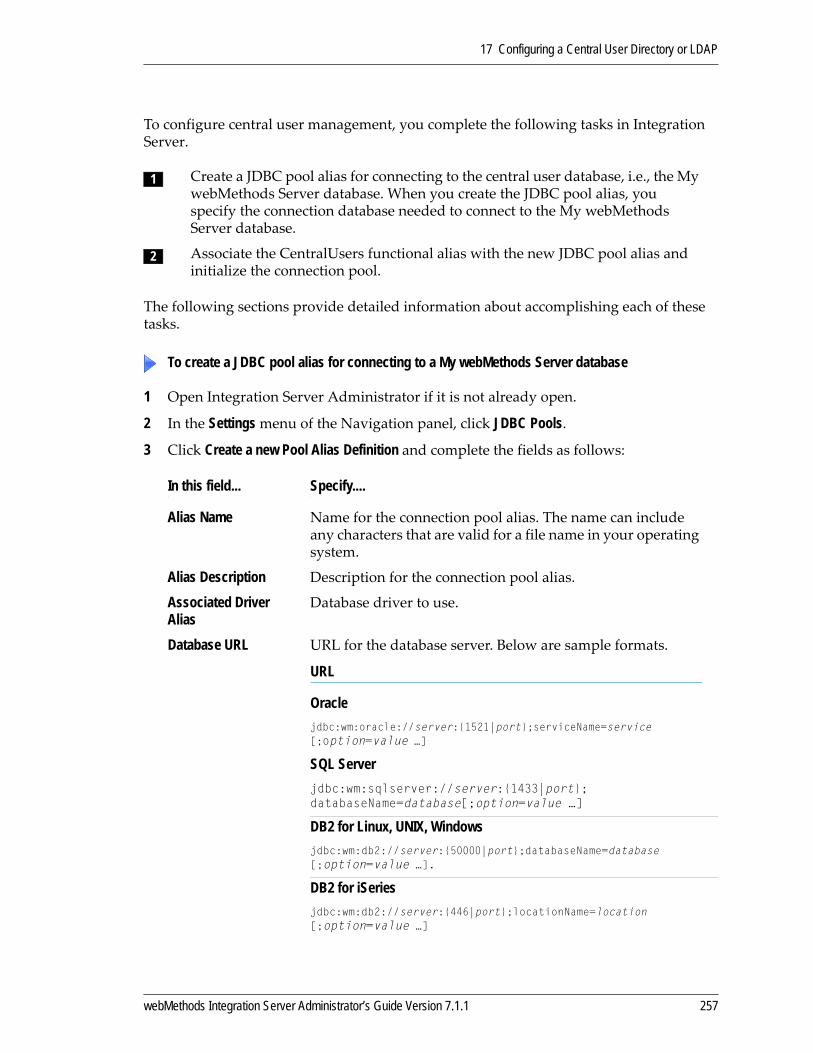
17 Configuring a Central User Directory or LDAP
To configure central user management, you complete the following tasks in Integration Server.
The following sections provide detailed information about accomplishing each of these tasks.
1 Open Integration Server Administrator if it is not already open.
2 In the Settings menu of the Navigation panel, click JDBC Pools.
3 Click Create a new Pool Alias Definition and complete the fields as follows:
1 Create a JDBC pool alias for connecting to the central user database, i.e., the My webMethods Server database. When you create the JDBC pool alias, you specify the connection database needed to connect to the My webMethods Server database.
2 Associate the CentralUsers functional alias with the new JDBC pool alias and initialize the connection pool.
To create a JDBC pool alias for connecting to a My webMethods Server database
In this field... Specify....
Alias Name Name for the connection pool alias. The name can include any characters that are valid for a file name in your operating system.
Alias Description Description for the connection pool alias.
Associated Driver Alias
Database driver to use.
Database URL URL for the database server. Below are sample formats.
URL
Oraclejdbc:wm:oracle://server:{1521|port};serviceName=service[;option=value …]
SQL Serverjdbc:wm:sqlserver://server:{1433|port};databaseName=database[;option=value …]
DB2 for Linux, UNIX, Windowsjdbc:wm:db2://server:{50000|port};databaseName=database[;option=value …].
DB2 for iSeriesjdbc:wm:db2://server:{446|port};locationName=location[;option=value …]
webMethods Integration Server Administrator’s Guide Version 7.1.1 257
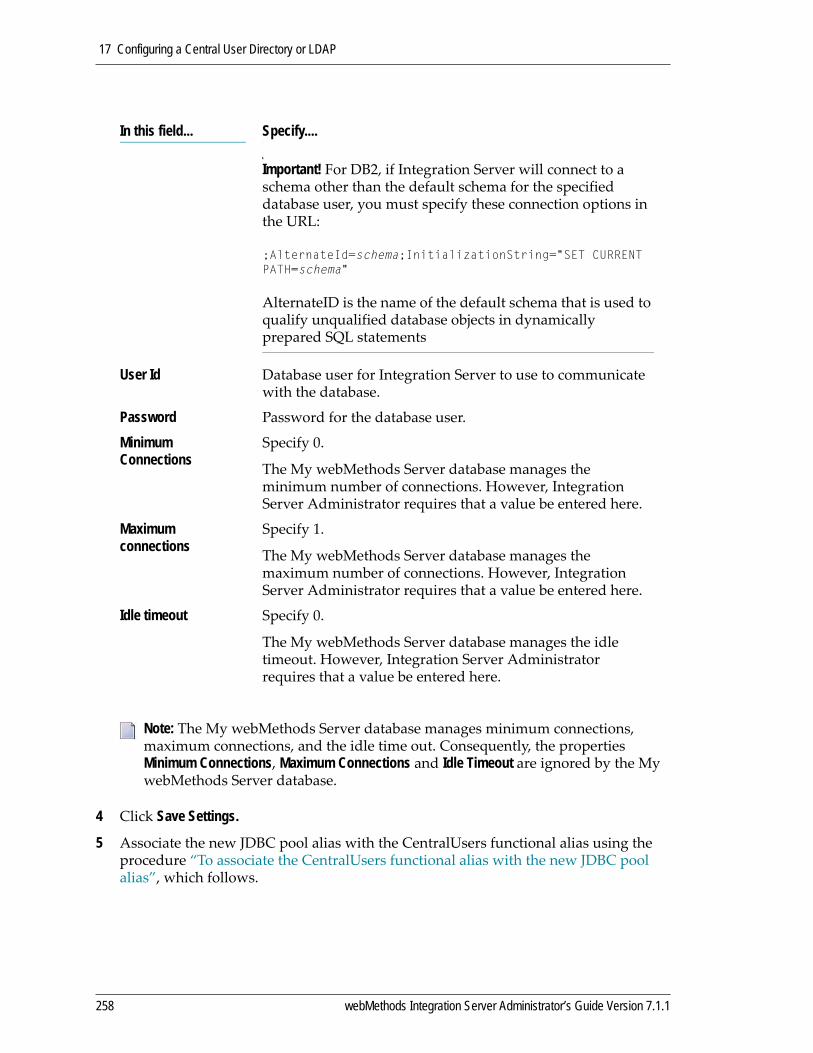
17 Configuring a Central User Directory or LDAP
4 Click Save Settings.
5 Associate the new JDBC pool alias with the CentralUsers functional alias using the procedure “To associate the CentralUsers functional alias with the new JDBC pool alias”, which follows.
Important! For DB2, if Integration Server will connect to a schema other than the default schema for the specified database user, you must specify these connection options in the URL:
;AlternateId=schema;InitializationString="SET CURRENT PATH=schema"
AlternateID is the name of the default schema that is used to qualify unqualified database objects in dynamically prepared SQL statements
User Id Database user for Integration Server to use to communicate with the database.
Password Password for the database user.
Minimum Connections
Specify 0.
The My webMethods Server database manages the minimum number of connections. However, Integration Server Administrator requires that a value be entered here.
Maximum connections
Specify 1.
The My webMethods Server database manages the maximum number of connections. However, Integration Server Administrator requires that a value be entered here.
Idle timeout Specify 0.
The My webMethods Server database manages the idle timeout. However, Integration Server Administrator requires that a value be entered here.
Note: The My webMethods Server database manages minimum connections, maximum connections, and the idle time out. Consequently, the properties Minimum Connections, Maximum Connections and Idle Timeout are ignored by the My webMethods Server database.
In this field... Specify....
258 webMethods Integration Server Administrator’s Guide Version 7.1.1

17 Configuring a Central User Directory or LDAP
1 Open Integration Server Administrator if it is not already open.
2 In the Settings menu of the Navigation panel, click JDBC Pools.
3 Under Functional Alias Definitions, in the row for the CentralUsers functional alias, click Edit in the Edit Association column. You may need to scroll to the right to see the Edit Association column.
4 In the Settings > JDBC Pools > Functional Definitions screen, in the Associated Pool Alias list, select the pool alias that you just created. Click Save Settings.
5 Under Functional Alias Definitions, in the row for the CentralUsers functional alias, click Restart in the Restart Function column. You may need to scroll to the right to see the Restart Function column. Restarting creates a fresh JDBC pool.
6 Under Functional Alias Definitions, in the row for the CentralUsers functional alias, click in the Test column. You may need to scroll to the right to see the Test column. This
verifies that Integration Server can connect to the My webMethods Server database.
7 Restart Integration Server.
Notes:
Integration Server updates the Anonymous ACL automatically to include the My webMethods Users Role from My webMethods Server.
For information about giving central groups and roles access to ACLs, see “Allowing or Denying Group Access to ACLs” on page 174.
For information about giving externally defined users, including those defined in a central user directory, administrator privileges on Integration Server, see “Granting Administrator Privileges to External Users” on page 269
For information about giving externally defined users, including those defined in a central user directory, developer privileges on Integration Server, see“Granting Developer Privileges to External Users” on page 270
For information about giving externally defined users access to a service or file, see“Granting Access to Services and Files to External Users” on page 271.
Stopping Use of Central User ManagementAt some point, you might want to stop using central user management.
1 Open Integration Server Administrator if it is not already open.
2 In the Settings menu of the Navigation panel, click JDBC Pools.
To associate the CentralUsers functional alias with the new JDBC pool alias
To stop using central user management
webMethods Integration Server Administrator’s Guide Version 7.1.1 259
17 Configuring a Central User Directory or LDAP
3 Under Functional Alias Definitions, in the row for the CentralUsers functional alias, click Edit in the Edit Association column. You may need to scroll to the right to see the Edit Association column.
4 On the Settings > JDBC Pools > Functional Definitions screen, in the Associated Pool Alias column, select None.
5 Click Save Settings. Integration Server Administrator prompts you to confirm that you want to update the functional alias. Click OK.
6 Restart Integration Server for the changes to take effect.
Overview of Using LDAPIf your site uses Lightweight Directory Access Protocol (LDAP) for user and group information, you can configure the Integration Server to obtain user and group information from the external directory. You can, however, configure Integration Server to use more than one LDAP directory at a time, allowing Integration Server to work with different LDAP directories for users in different locations or different organizations. In addition, you can maintain multiple LDAP directories so that one directory serves as a backup for another.
LDAP protocols are designed to facilitate sharing information about resources on a network. Typically, they are used to store profile information (login ID, password, etc.). You can also use them to store additional information. Integration Server uses LDAP for performing external authentication.
Using your existing LDAP information allows you to take advantage of a central repository of user and group information. System administrators can add and remove users from the central location. Users do not need to remember a separate password for webMethods applications; they can use the same user names and passwords that they use for other applications. Remember to use your LDAP tools to administer users or groups stored in an external directory.
About LDAP and CachingFor LDAP, after accessing user information, the Integration Server caches it to improve performance. If the information remains in the cache for one hour without being accessed, or if the cache space is needed for a more recent request, the Integration Server deletes the information from the cache.
If the server receives subsequent requests that require the information it has in cache, the Integration Server uses the cached information rather than accessing the external directory.
Important! If you want to use an LDAP server to store user information and you are using My webMethods Server, it is recommended that you configure LDAP using My webMethods Server. Configure Integration Server to work with LDAP server directly only when you are not using My webMethods Server.
260 webMethods Integration Server Administrator’s Guide Version 7.1.1
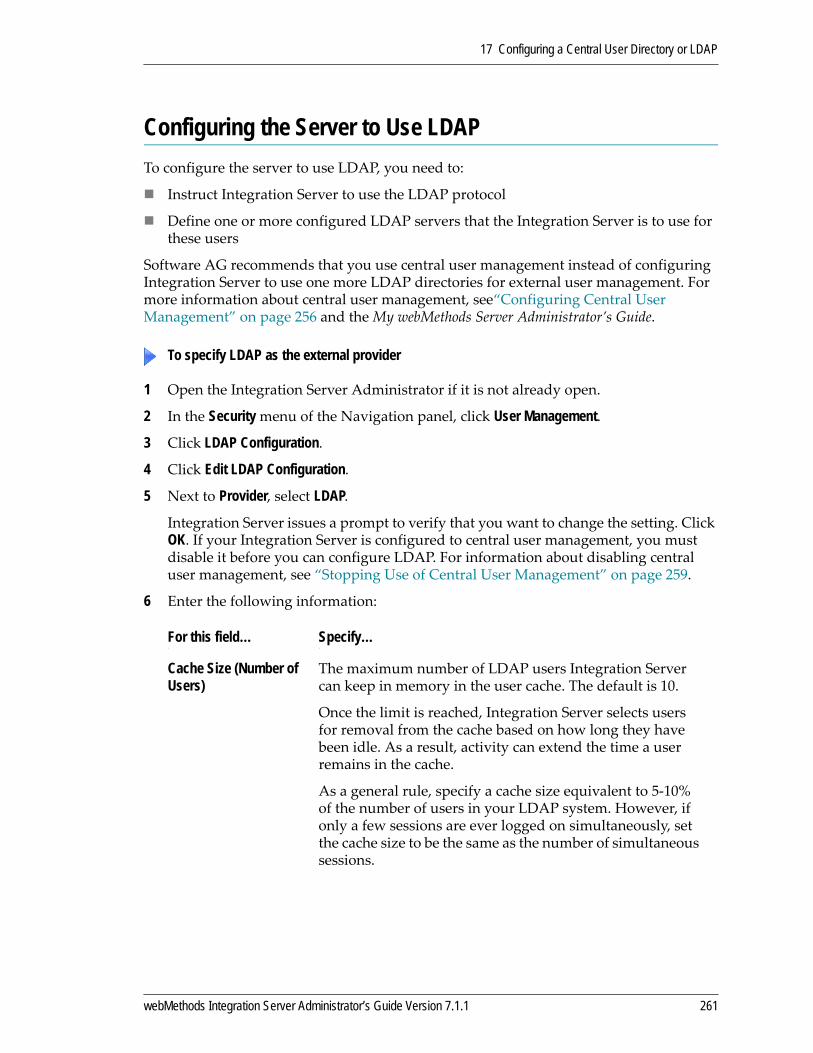
17 Configuring a Central User Directory or LDAP
Configuring the Server to Use LDAPTo configure the server to use LDAP, you need to:
Instruct Integration Server to use the LDAP protocol
Define one or more configured LDAP servers that the Integration Server is to use for these users
Software AG recommends that you use central user management instead of configuring Integration Server to use one more LDAP directories for external user management. For more information about central user management, see“Configuring Central User Management” on page 256 and the My webMethods Server Administrator’s Guide.
1 Open the Integration Server Administrator if it is not already open.
2 In the Security menu of the Navigation panel, click User Management.
3 Click LDAP Configuration.
4 Click Edit LDAP Configuration.
5 Next to Provider, select LDAP.
Integration Server issues a prompt to verify that you want to change the setting. Click OK. If your Integration Server is configured to central user management, you must disable it before you can configure LDAP. For information about disabling central user management, see “Stopping Use of Central User Management” on page 259.
6 Enter the following information:
To specify LDAP as the external provider
For this field… Specify…
Cache Size (Number of Users)
The maximum number of LDAP users Integration Server can keep in memory in the user cache. The default is 10.
Once the limit is reached, Integration Server selects users for removal from the cache based on how long they have been idle. As a result, activity can extend the time a user remains in the cache.
As a general rule, specify a cache size equivalent to 5‐10% of the number of users in your LDAP system. However, if only a few sessions are ever logged on simultaneously, set the cache size to be the same as the number of simultaneous sessions.
webMethods Integration Server Administrator’s Guide Version 7.1.1 261
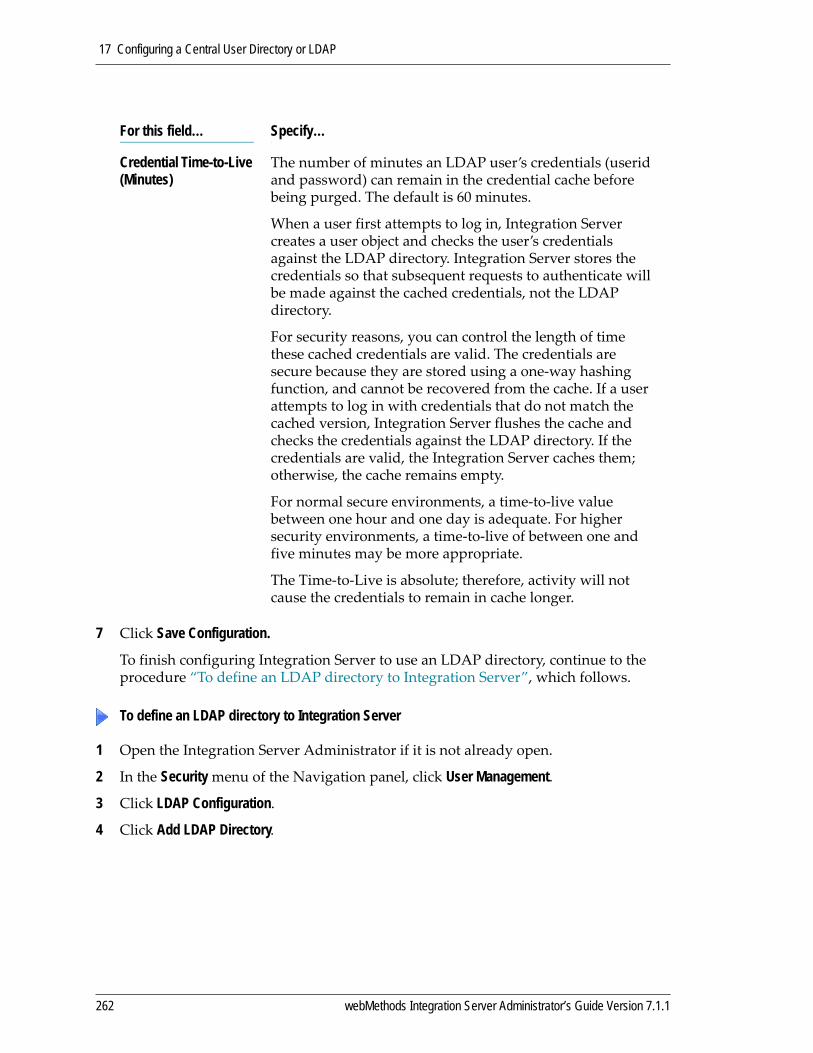
17 Configuring a Central User Directory or LDAP
7 Click Save Configuration.
To finish configuring Integration Server to use an LDAP directory, continue to the procedure “To define an LDAP directory to Integration Server”, which follows.
1 Open the Integration Server Administrator if it is not already open.
2 In the Security menu of the Navigation panel, click User Management.
3 Click LDAP Configuration.
4 Click Add LDAP Directory.
Credential Time-to-Live (Minutes)
The number of minutes an LDAP user’s credentials (userid and password) can remain in the credential cache before being purged. The default is 60 minutes.
When a user first attempts to log in, Integration Server creates a user object and checks the user’s credentials against the LDAP directory. Integration Server stores the credentials so that subsequent requests to authenticate will be made against the cached credentials, not the LDAP directory.
For security reasons, you can control the length of time these cached credentials are valid. The credentials are secure because they are stored using a one‐way hashing function, and cannot be recovered from the cache. If a user attempts to log in with credentials that do not match the cached version, Integration Server flushes the cache and checks the credentials against the LDAP directory. If the credentials are valid, the Integration Server caches them; otherwise, the cache remains empty.
For normal secure environments, a time‐to‐live value between one hour and one day is adequate. For higher security environments, a time‐to‐live of between one and five minutes may be more appropriate.
The Time‐to‐Live is absolute; therefore, activity will not cause the credentials to remain in cache longer.
To define an LDAP directory to Integration Server
For this field… Specify…
262 webMethods Integration Server Administrator’s Guide Version 7.1.1
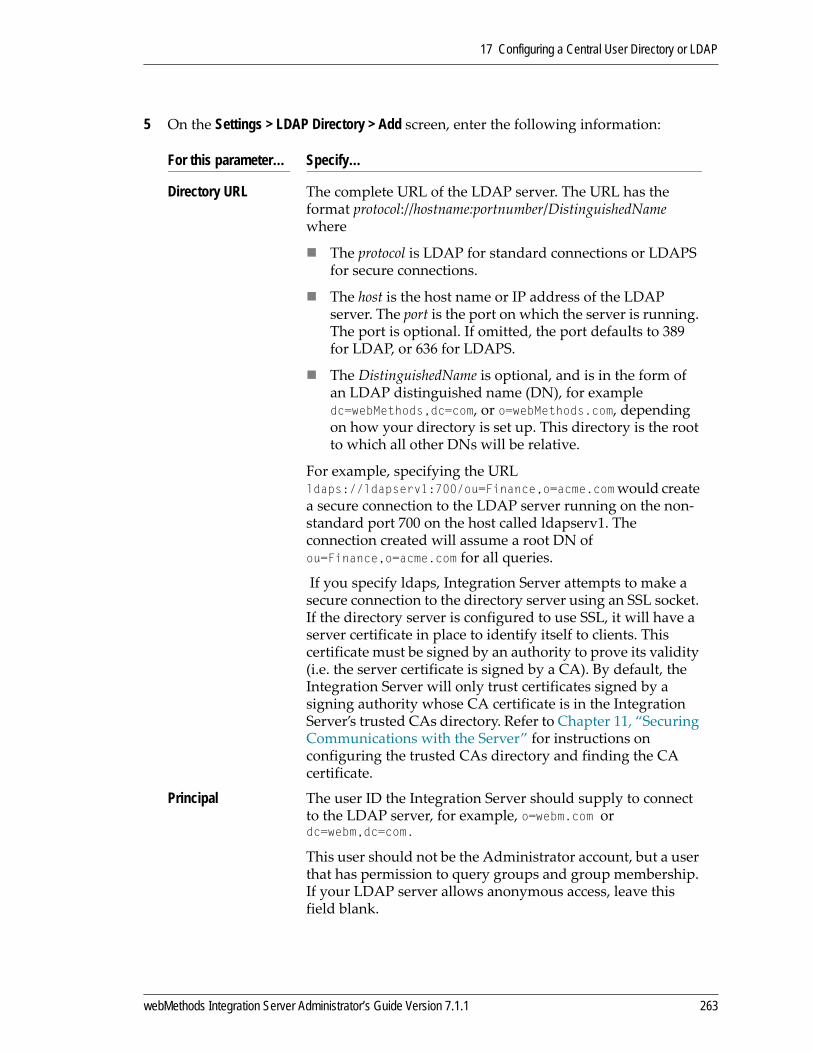
17 Configuring a Central User Directory or LDAP
5 On the Settings > LDAP Directory > Add screen, enter the following information:
For this parameter… Specify…
Directory URL The complete URL of the LDAP server. The URL has the format protocol://hostname:portnumber/DistinguishedName where
The protocol is LDAP for standard connections or LDAPS for secure connections.
The host is the host name or IP address of the LDAP server. The port is the port on which the server is running. The port is optional. If omitted, the port defaults to 389 for LDAP, or 636 for LDAPS.
The DistinguishedName is optional, and is in the form of an LDAP distinguished name (DN), for example dc=webMethods,dc=com, or o=webMethods.com, depending on how your directory is set up. This directory is the root to which all other DNs will be relative.
For example, specifying the URL ldaps://ldapserv1:700/ou=Finance,o=acme.com would create a secure connection to the LDAP server running on the non‐standard port 700 on the host called ldapserv1. The connection created will assume a root DN of ou=Finance,o=acme.com for all queries.
If you specify ldaps, Integration Server attempts to make a secure connection to the directory server using an SSL socket. If the directory server is configured to use SSL, it will have a server certificate in place to identify itself to clients. This certificate must be signed by an authority to prove its validity (i.e. the server certificate is signed by a CA). By default, the Integration Server will only trust certificates signed by a signing authority whose CA certificate is in the Integration Server’s trusted CAs directory. Refer to Chapter 11, “Securing Communications with the Server” for instructions on configuring the trusted CAs directory and finding the CA certificate.
Principal The user ID the Integration Server should supply to connect to the LDAP server, for example, o=webm.com or dc=webm,dc=com.
This user should not be the Administrator account, but a user that has permission to query groups and group membership. If your LDAP server allows anonymous access, leave this field blank.
webMethods Integration Server Administrator’s Guide Version 7.1.1 263

17 Configuring a Central User Directory or LDAP
Credentials The password the Integration Server should supply to connect to the LDAP server, that is, the Principal’s password. The Integration Server encrypts this password according to the settings specified on the Outbound Passwords screen. For more information, see Chapter 16, “Outbound Passwords”.
Connection Timeout (seconds)
The number of seconds the Integration Server will wait while trying to connect to the LDAP server. After this time has passed, the Integration Server will try the next configured LDAP server on the list. The default is 5 seconds. Increase this number if your network has latency problems. If most requests will be from batch processes, you can increase this number to be 30 seconds or more.
Minimum Connection Pool Size
The minimum number of connections allowed in the pool that the Integration Server maintains for connecting to the LDAP server. When the Integration Server starts, the connection pool initially contains this minimum number of connections. The Integration Server adds connections to the pool as needed until it reaches the maximum allowed, which is specified in the Maximum Connection Pool field. The default is 0.
Maximum Connection Pool Size
The maximum number of connections allowed in the pool that the Integration Server maintains for connecting to the LDAP server. When the Integration Server starts, the connection pool initially contains a minimum number of connections, which are specified in the Minimum Connection Pool field. The Integration Server adds connections to the pool as needed until it reaches the maximum allowed. The default is 10.
Synthesize DN Builds a distinguished name by adding a prefix and suffix to the user name.
The Synthesize DN method can be faster than the Query DN method (see below) because it does not perform a query against the LDAP directory. However, if your LDAP system does not contain all users in a single flat structure, use the Query DN method instead.
DN PrefixA string that specifies the beginning of a DN you want to pass to the LDAP server.
DN SuffixA string that specifies the end of a DN you want to pass to the LDAP server.
For this parameter… Specify…
264 webMethods Integration Server Administrator’s Guide Version 7.1.1
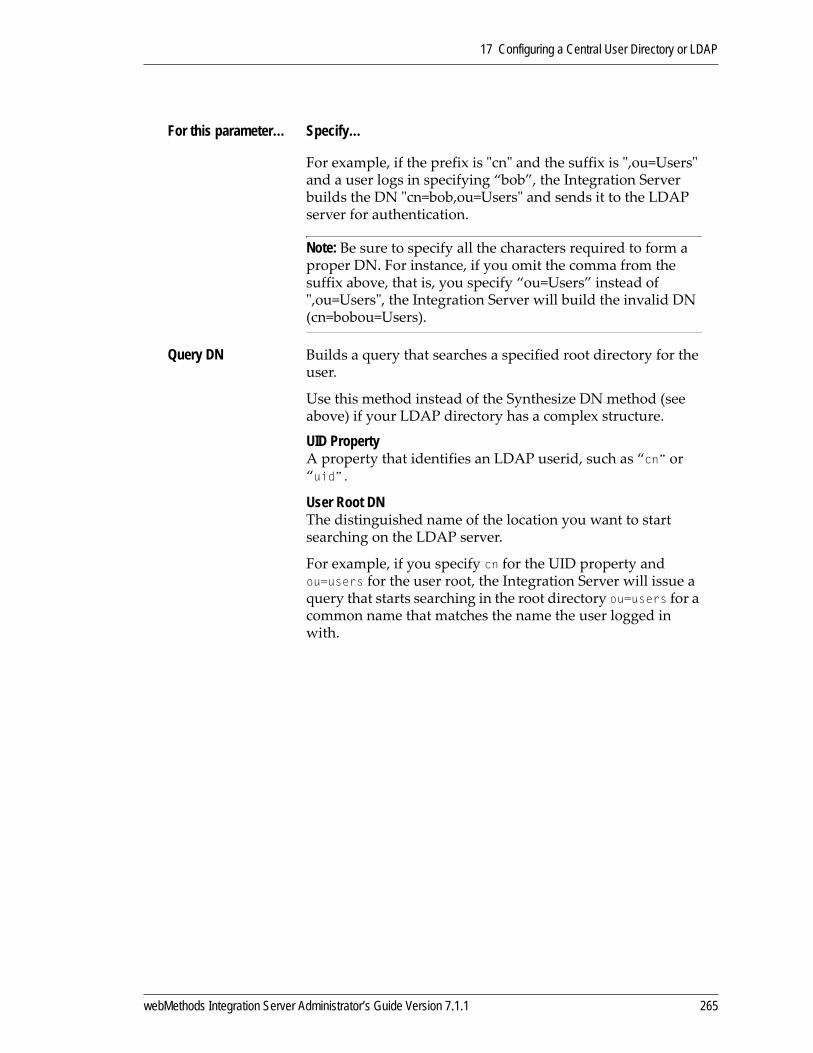
17 Configuring a Central User Directory or LDAP
For example, if the prefix is ʺcnʺ and the suffix is ʺ,ou=Usersʺ and a user logs in specifying “bob”, the Integration Server builds the DN ʺcn=bob,ou=Usersʺ and sends it to the LDAP server for authentication.
Note: Be sure to specify all the characters required to form a proper DN. For instance, if you omit the comma from the suffix above, that is, you specify “ou=Users” instead of ʺ,ou=Usersʺ, the Integration Server will build the invalid DN (cn=bobou=Users).
Query DN Builds a query that searches a specified root directory for the user.
Use this method instead of the Synthesize DN method (see above) if your LDAP directory has a complex structure.
UID PropertyA property that identifies an LDAP userid, such as “cn” or “uid”.
User Root DNThe distinguished name of the location you want to start searching on the LDAP server.
For example, if you specify cn for the UID property and ou=users for the user root, the Integration Server will issue a query that starts searching in the root directory ou=users for a common name that matches the name the user logged in with.
For this parameter… Specify…
webMethods Integration Server Administrator’s Guide Version 7.1.1 265
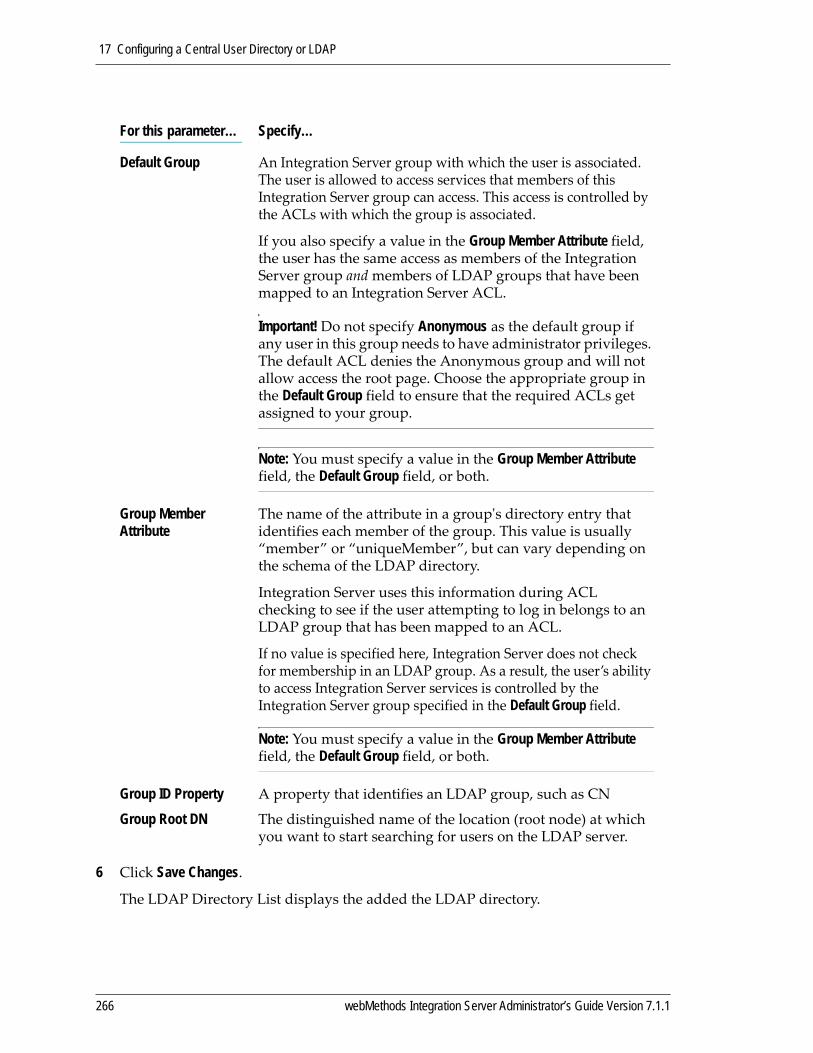
17 Configuring a Central User Directory or LDAP
6 Click Save Changes.
The LDAP Directory List displays the added the LDAP directory.
Default Group An Integration Server group with which the user is associated. The user is allowed to access services that members of this Integration Server group can access. This access is controlled by the ACLs with which the group is associated.
If you also specify a value in the Group Member Attribute field, the user has the same access as members of the Integration Server group and members of LDAP groups that have been mapped to an Integration Server ACL.
Important! Do not specify Anonymous as the default group if any user in this group needs to have administrator privileges. The default ACL denies the Anonymous group and will not allow access the root page. Choose the appropriate group in the Default Group field to ensure that the required ACLs get assigned to your group.
Note: You must specify a value in the Group Member Attribute field, the Default Group field, or both.
Group Member Attribute
The name of the attribute in a groupʹs directory entry that identifies each member of the group. This value is usually “member” or “uniqueMember”, but can vary depending on the schema of the LDAP directory.
Integration Server uses this information during ACL checking to see if the user attempting to log in belongs to an LDAP group that has been mapped to an ACL.
If no value is specified here, Integration Server does not check for membership in an LDAP group. As a result, the user’s ability to access Integration Server services is controlled by the Integration Server group specified in the Default Group field.
Note: You must specify a value in the Group Member Attribute field, the Default Group field, or both.
Group ID Property A property that identifies an LDAP group, such as CN
Group Root DN The distinguished name of the location (root node) at which you want to start searching for users on the LDAP server.
For this parameter… Specify…
266 webMethods Integration Server Administrator’s Guide Version 7.1.1
17 Configuring a Central User Directory or LDAP
7 Click Move Up/Move Down to order the directories in the list based on their priority. .
Mapping an LDAP Users Access to ACL(s)As with Integration Server groups, you can associate LDAP groups with ACLs to control access to Integration Server resources. Associating an LDAP group with an ACL is referred to as mapping. ACL mapping to LDAP groups can be done directly through the Security > ACLs page. For more information about allowing groups access to ACLs, see Chapter , “Controlling Access to Resources with ACLs”.
Stopping Use of an LDAP as an External Directory If you no longer want to use LDAP as an external directory, you can update the configuration to remove the external directory configuration settings.
1 Open the Integration Server Administrator if it is not already open.
2 In the Security menu of the Navigation panel, click User Management.
3 Click Edit LDAP Configuration.
4 Click Local in the Provider field.
5 Click Save Configuration.
6 Click OK.
7 Restart your Integration Server.
Considerations for User Accounts and GroupsThis section provides information about user accounts and groups that you should consider if you are using an external directory for user and group information.
You should keep internal and external user accounts and group names unique. It might get confusing if you have an external user account that has the same user name as an internal user account or an external group with the same group name as an internal group. If you do have identically named user names or group names, the server always uses the internally‐defined information.
To avoid confusion, it is recommended that you do not set up user accounts or groups internally if you are using an external directory. The exceptions are the predefined
Note: If you define multiple LDAP servers, Integration Server will search the LDAP directories in the order in which they are displayed on the Security > User Management > LDAP Configuration screen. If Integration Server does not find the user in the first LDAP directory, it will search in order through the list.
To stop using a LDAP as an external directory
webMethods Integration Server Administrator’s Guide Version 7.1.1 267
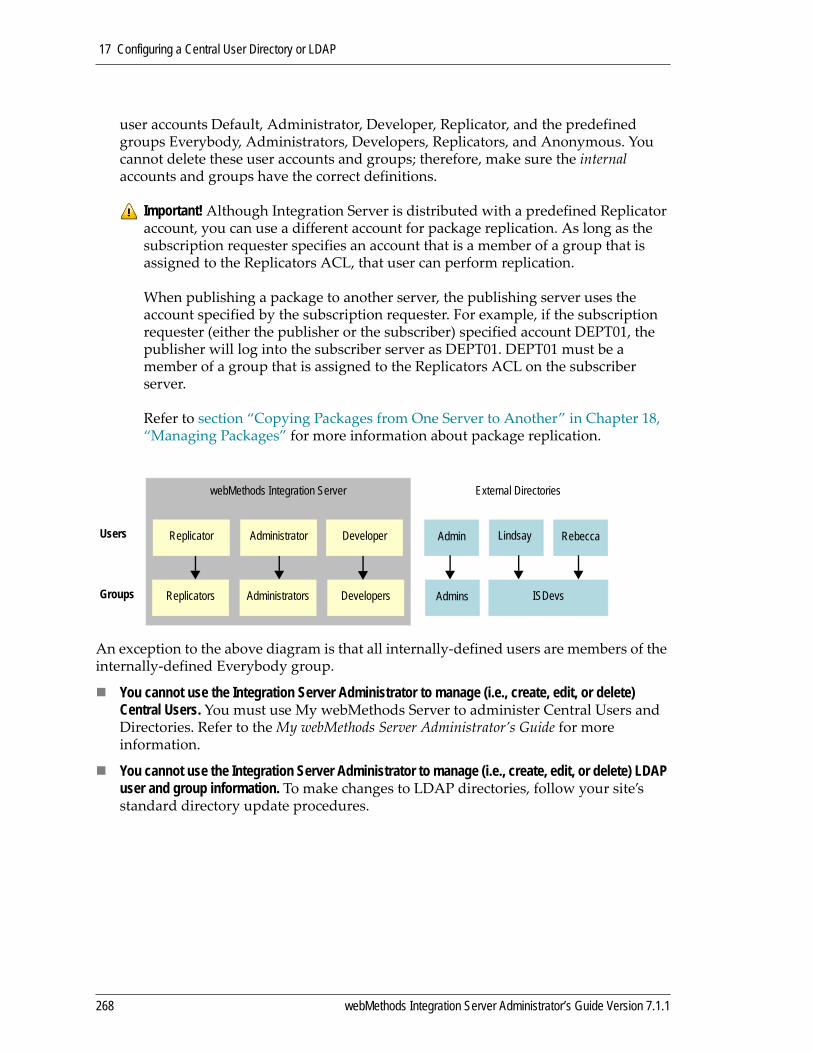
17 Configuring a Central User Directory or LDAP
user accounts Default, Administrator, Developer, Replicator, and the predefined groups Everybody, Administrators, Developers, Replicators, and Anonymous. You cannot delete these user accounts and groups; therefore, make sure the internal accounts and groups have the correct definitions.
An exception to the above diagram is that all internally‐defined users are members of the internally‐defined Everybody group.
You cannot use the Integration Server Administrator to manage (i.e., create, edit, or delete) Central Users. You must use My webMethods Server to administer Central Users and Directories. Refer to the My webMethods Server Administrator’s Guide for more information.
You cannot use the Integration Server Administrator to manage (i.e., create, edit, or delete) LDAP user and group information. To make changes to LDAP directories, follow your site’s standard directory update procedures.
Important! Although Integration Server is distributed with a predefined Replicator account, you can use a different account for package replication. As long as the subscription requester specifies an account that is a member of a group that is assigned to the Replicators ACL, that user can perform replication.
When publishing a package to another server, the publishing server uses the account specified by the subscription requester. For example, if the subscription requester (either the publisher or the subscriber) specified account DEPT01, the publisher will log into the subscriber server as DEPT01. DEPT01 must be a member of a group that is assigned to the Replicators ACL on the subscriber server.
Refer to section “Copying Packages from One Server to Another” in Chapter 18, “Managing Packages” for more information about package replication.
webMethods Integration Server External Directories
ISDevs
Users
Groups
Lindsay
Replicators Administrators Developers
Admin Rebecca
Admins
Replicator Administrator Developer
268 webMethods Integration Server Administrator’s Guide Version 7.1.1
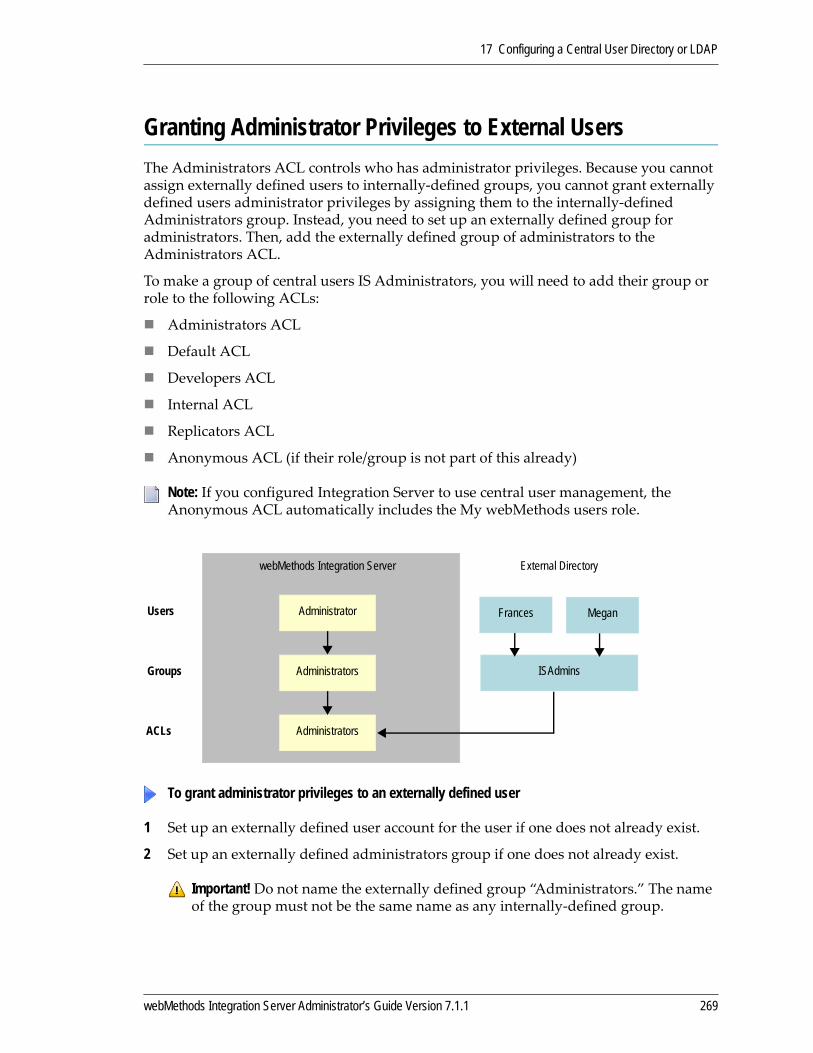
17 Configuring a Central User Directory or LDAP
Granting Administrator Privileges to External UsersThe Administrators ACL controls who has administrator privileges. Because you cannot assign externally defined users to internally‐defined groups, you cannot grant externally defined users administrator privileges by assigning them to the internally‐defined Administrators group. Instead, you need to set up an externally defined group for administrators. Then, add the externally defined group of administrators to the Administrators ACL.
To make a group of central users IS Administrators, you will need to add their group or role to the following ACLs:
Administrators ACL
Default ACL
Developers ACL
Internal ACL
Replicators ACL
Anonymous ACL (if their role/group is not part of this already)
1 Set up an externally defined user account for the user if one does not already exist.
2 Set up an externally defined administrators group if one does not already exist.
Note: If you configured Integration Server to use central user management, the Anonymous ACL automatically includes the My webMethods users role.
To grant administrator privileges to an externally defined user
Important! Do not name the externally defined group “Administrators.” The name of the group must not be the same name as any internally‐defined group.
webMethods Integration Server External Directory
ISAdmins
Users
Groups
ACLs Administrators
Administrators
Administrator Frances Megan
webMethods Integration Server Administrator’s Guide Version 7.1.1 269
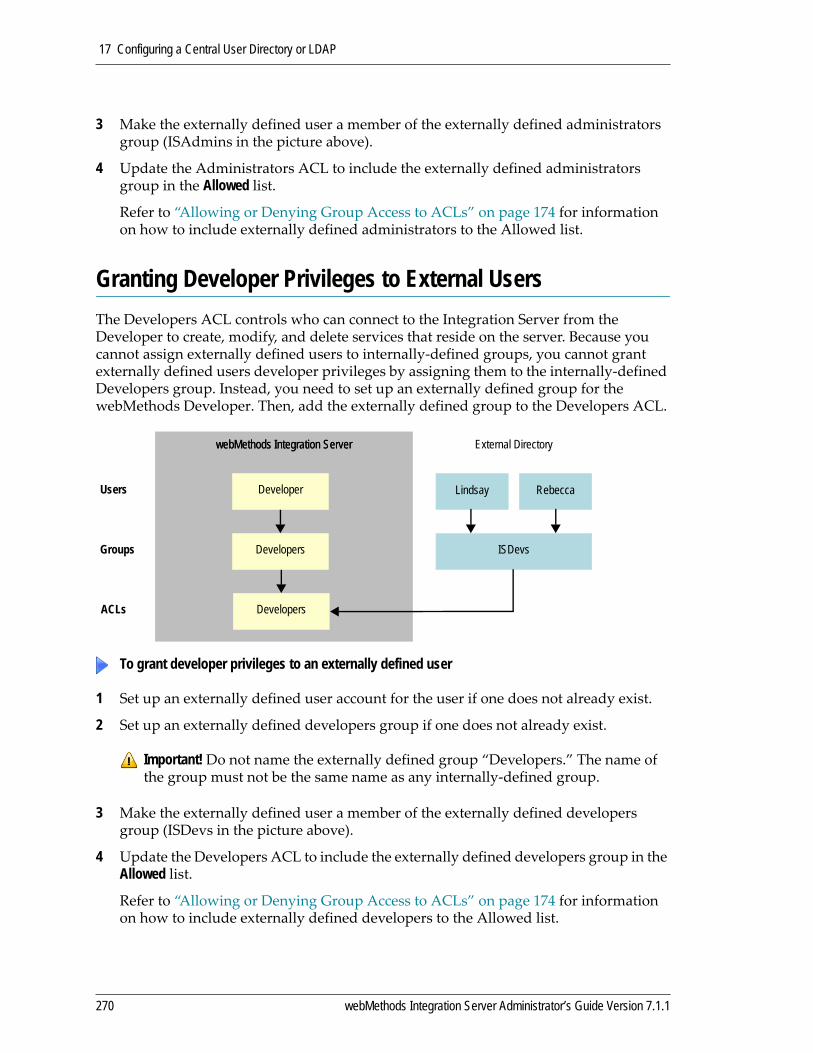
17 Configuring a Central User Directory or LDAP
3 Make the externally defined user a member of the externally defined administrators group (ISAdmins in the picture above).
4 Update the Administrators ACL to include the externally defined administrators group in the Allowed list.
Refer to “Allowing or Denying Group Access to ACLs” on page 174 for information on how to include externally defined administrators to the Allowed list.
Granting Developer Privileges to External UsersThe Developers ACL controls who can connect to the Integration Server from the Developer to create, modify, and delete services that reside on the server. Because you cannot assign externally defined users to internally‐defined groups, you cannot grant externally defined users developer privileges by assigning them to the internally‐defined Developers group. Instead, you need to set up an externally defined group for the webMethods Developer. Then, add the externally defined group to the Developers ACL.
1 Set up an externally defined user account for the user if one does not already exist.
2 Set up an externally defined developers group if one does not already exist.
3 Make the externally defined user a member of the externally defined developers group (ISDevs in the picture above).
4 Update the Developers ACL to include the externally defined developers group in the Allowed list.
Refer to “Allowing or Denying Group Access to ACLs” on page 174 for information on how to include externally defined developers to the Allowed list.
To grant developer privileges to an externally defined user
Important! Do not name the externally defined group “Developers.” The name of the group must not be the same name as any internally‐defined group.
webMethods Integration Server External Directory
Lindsay
ISDevs
Users
Groups
Rebecca
ACLs Developers
webMethods Integration Server
Developer
Developers
270 webMethods Integration Server Administrator’s Guide Version 7.1.1
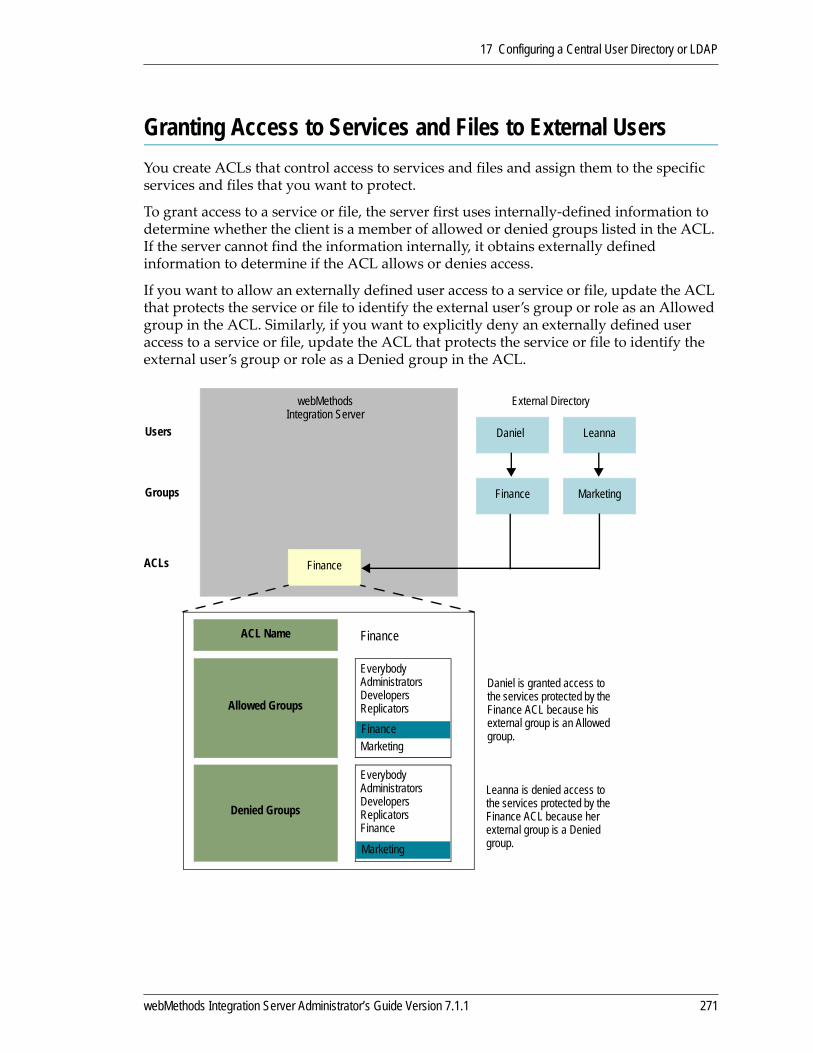
17 Configuring a Central User Directory or LDAP
Granting Access to Services and Files to External UsersYou create ACLs that control access to services and files and assign them to the specific services and files that you want to protect.
To grant access to a service or file, the server first uses internally‐defined information to determine whether the client is a member of allowed or denied groups listed in the ACL. If the server cannot find the information internally, it obtains externally defined information to determine if the ACL allows or denies access.
If you want to allow an externally defined user access to a service or file, update the ACL that protects the service or file to identify the external user’s group or role as an Allowed group in the ACL. Similarly, if you want to explicitly deny an externally defined user access to a service or file, update the ACL that protects the service or file to identify the external user’s group or role as a Denied group in the ACL.
Finance
webMethods Integration Server
External Directory
Daniel
Finance Marketing
LeannaUsers
Groups
ACLs
Finance
EverybodyAdministratorsDevelopersReplicators
MarketingFinance
EverybodyAdministratorsDevelopersReplicatorsFinance
Marketing
ACL Name
Allowed Groups
Denied Groups
Daniel is granted access to the services protected by the Finance ACL because his external group is an Allowed group.
Leanna is denied access to the services protected by the Finance ACL because her external group is a Denied group.
webMethods Integration Server Administrator’s Guide Version 7.1.1 271

17 Configuring a Central User Directory or LDAP
272 webMethods Integration Server Administrator’s Guide Version 7.1.1
18 Managing Packages
Using Packages . . . . . . . . . . . . . . . . . . . . . . . . . . . . . . . . . . . . . . . . . . . . . . . . . . . . . . . . . . . . . . 274
How the Server Stores Package Information . . . . . . . . . . . . . . . . . . . . . . . . . . . . . . . . . . . . . . . . 277
Finding Information about Your Packages . . . . . . . . . . . . . . . . . . . . . . . . . . . . . . . . . . . . . . . . . . 280
Working with Packages . . . . . . . . . . . . . . . . . . . . . . . . . . . . . . . . . . . . . . . . . . . . . . . . . . . . . . . . 288
Creating a Package . . . . . . . . . . . . . . . . . . . . . . . . . . . . . . . . . . . . . . . . . . . . . . . . . . . . . . . . . . . 288
Copying Packages from One Server to Another . . . . . . . . . . . . . . . . . . . . . . . . . . . . . . . . . . . . . 292
webMethods Integration Server Administrator’s Guide Version 7.1.1 273
18 Managing Packages
Using PackagesA package contains a set of services and related files, such as specifications, document types, and DSPs. When you add a service, specification, document type, or DSP to the webMethods Integration Server, you must add it to a package. Use a package to group services and related files.
By placing related files in a package, you can easily manage all the services and files in the package as a unit. For example, you can make them all available, disable them, refresh them, or delete them with one action. Additionally, if you have more than one Integration Server installed, you can use package management features to copy some or all services and files in a package to another server.
You can group your services using any package structure you choose, though most organizations group services into packages by function or application. For example, you might put all purchasing‐related services in a package called “PurchaseOrderMgt” and all time‐reporting services into “TimeCards.”
Access to a package and its contents is controlled through Access Control Lists (ACLs). Using ACLs, you control who can display a package from the Integration Server Administrator and Developer, who can edit the contents of a package, and who can execute services contained in the package. For more information about protecting packages, see “Controlling Access to Resources with ACLs” on page 168.
You can associate a package with a specific port so that when you replicate the package, it continues to use a port with the same number on the new server. See “Setting Up Aliases for Remote Integration Servers” on page 68 for more information about associating a package with a port.
Important! Every service on the server must belong to a package. Before you can make a service available for execution, you must load the package to which it belongs.
Important! Be careful when replicating a package that is associated with a port; the new port might decrease security on the target system. For example, suppose you replicate a package that is associated with an HTTP port at 5556. The replication process creates an HTTP port at 5556 on the target server. If the target server normally uses only HTTPS ports because of their greater security, then the new port presents a possible security hole on that server.
274 webMethods Integration Server Administrator’s Guide Version 7.1.1
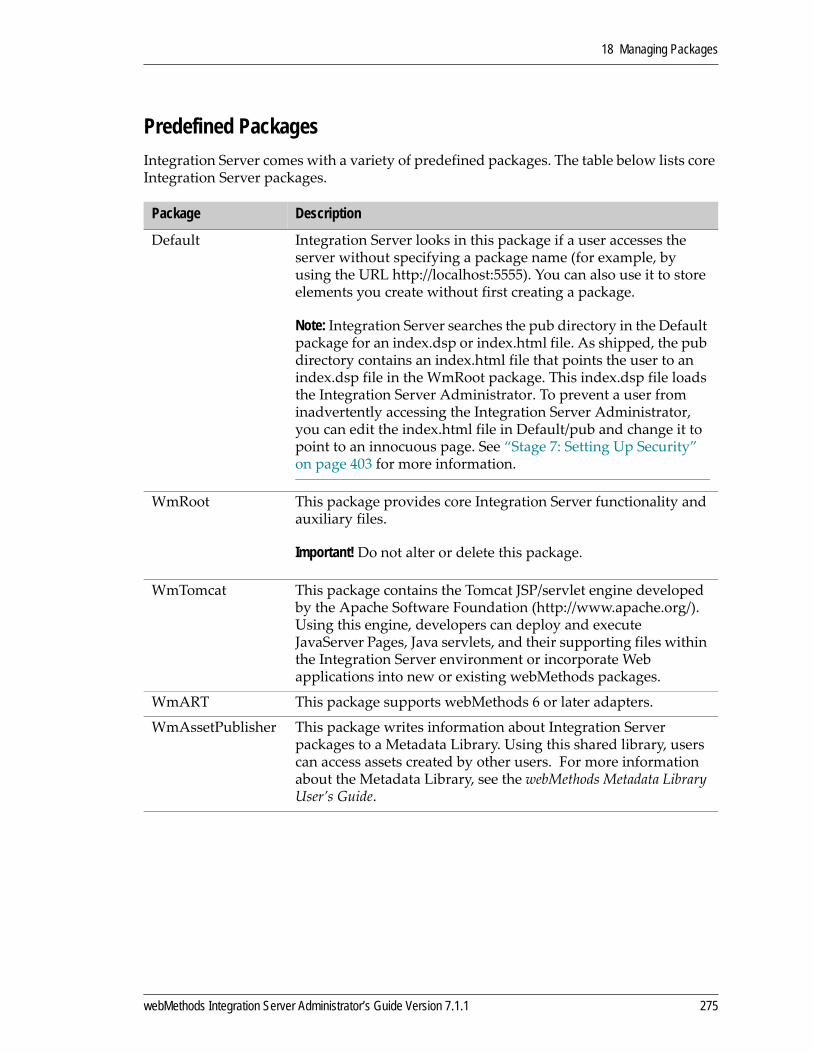
18 Managing Packages
Predefined PackagesIntegration Server comes with a variety of predefined packages. The table below lists core Integration Server packages.
Package Description
Default Integration Server looks in this package if a user accesses the server without specifying a package name (for example, by using the URL http://localhost:5555). You can also use it to store elements you create without first creating a package.
Note: Integration Server searches the pub directory in the Default package for an index.dsp or index.html file. As shipped, the pub directory contains an index.html file that points the user to an index.dsp file in the WmRoot package. This index.dsp file loads the Integration Server Administrator. To prevent a user from inadvertently accessing the Integration Server Administrator, you can edit the index.html file in Default/pub and change it to point to an innocuous page. See “Stage 7: Setting Up Security” on page 403 for more information.
WmRoot This package provides core Integration Server functionality and auxiliary files.
Important! Do not alter or delete this package.
WmTomcat This package contains the Tomcat JSP/servlet engine developed by the Apache Software Foundation (http://www.apache.org/). Using this engine, developers can deploy and execute JavaServer Pages, Java servlets, and their supporting files within the Integration Server environment or incorporate Web applications into new or existing webMethods packages.
WmART This package supports webMethods 6 or later adapters.
WmAssetPublisher This package writes information about Integration Server packages to a Metadata Library. Using this shared library, users can access assets created by other users. For more information about the Metadata Library, see the webMethods Metadata Library User’s Guide.
webMethods Integration Server Administrator’s Guide Version 7.1.1 275

18 Managing Packages
The packages in the table below provide services that enable you or other webMethods products to perform certain tasks.
This package... Contains services that...For more information...
WmARTExtDCWmISExtDCWmTNExtDC
Infrastructure Data Collector uses to discover and monitor adapters installed on Integration Server, Integration Server itself, and Trading Networks Server, respectively.
webMethods Infrastructure Data Collector Administrator’s Guide
WmAssetPublisher
Integration Server uses to extract and publish metadata about its services to webMethods Metadata Library.
webMethods Metadata Library User’s Guide
WmDesigner Support business processes modeled in webMethods Designer.
Designer online help
WmFlatFile Flow services or the File Polling processing service can call to initially accept and consume inbound flat files.
webMethods Integration Server Built‐In Services Reference
WmOptimize Support business processes monitored using webMethods Optimize.
Optimize documentation
WmPublic You can call from your client applications and services.
webMethods Integration Server Built‐In Services Reference
WmPRT Support business processes executed using the webMethods Process Engine.
webMethods Process Engine User’s Guide
WmTaskClient Support tasks developed using the webMethods Task Engine.
webMethods Task Engine User’s Guide
WmUDDI Enable you to query and publish to a UDDI v2 directory.
Note: This package is deprecated in Integration Server 7.1. You should use Developer to interact with UDDI v3 directories.
WmVCS Enable you to store Developer elements in a source control system.
webMethods Version Control System Integration Developer’s Guide
276 webMethods Integration Server Administrator’s Guide Version 7.1.1
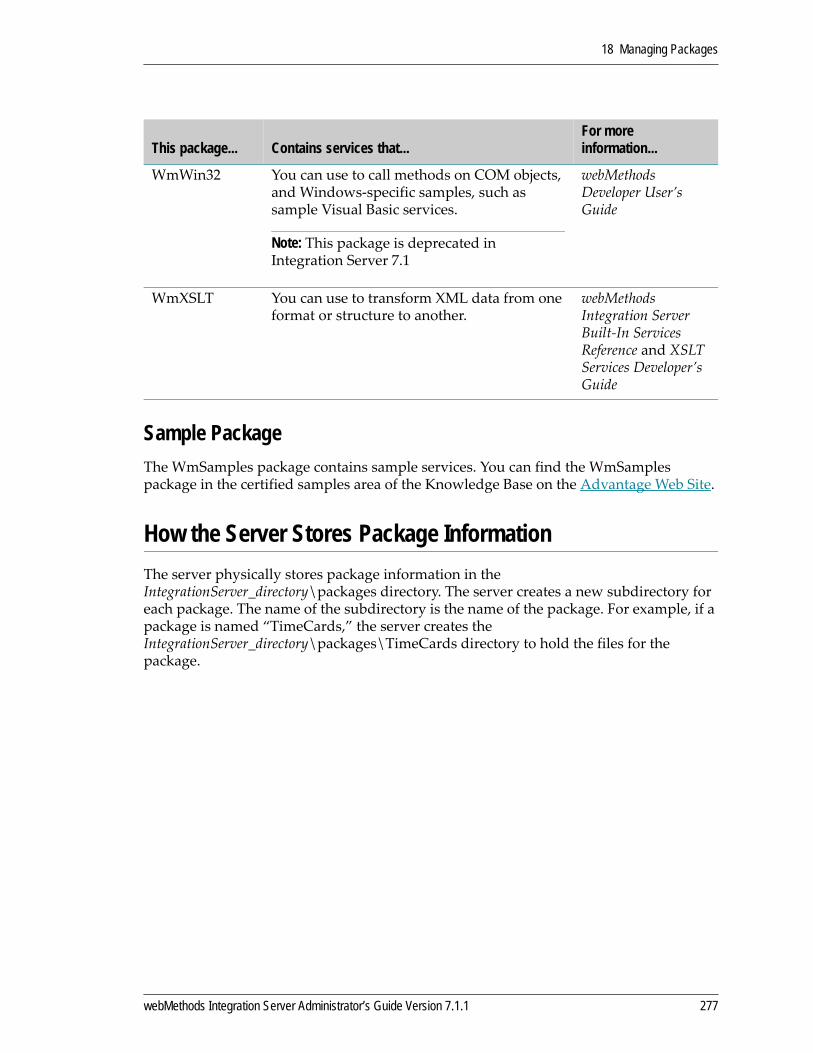
18 Managing Packages
Sample PackageThe WmSamples package contains sample services. You can find the WmSamples package in the certified samples area of the Knowledge Base on the Advantage Web Site.
How the Server Stores Package InformationThe server physically stores package information in the IntegrationServer_directory\packages directory. The server creates a new subdirectory for each package. The name of the subdirectory is the name of the package. For example, if a package is named “TimeCards,” the server creates the IntegrationServer_directory\packages\TimeCards directory to hold the files for the package.
WmWin32 You can use to call methods on COM objects, and Windows‐specific samples, such as sample Visual Basic services.
Note: This package is deprecated in Integration Server 7.1
webMethods Developer User’s Guide
WmXSLT You can use to transform XML data from one format or structure to another.
webMethods Integration Server Built‐In Services Reference and XSLT Services Developer’s Guide
This package... Contains services that...For more information...
webMethods Integration Server Administrator’s Guide Version 7.1.1 277

18 Managing Packages
When you create a new package, the server creates the following subdirectories to hold all the files associated with the package:
The code subdirectory holds the Java and C/C++ services that belong to this package. Within the code subdirectory are the classes, jars, static, source, and lib subdirectories:
The classes subdirectory is for Java classes for the Java and C/C++ services.
The jars subdirectory is for Java classes that are packaged together in jar files.
The static subdirectory is also for Java classes that are packaged together in jar files. Place the jar files in this location when you want to make them available to other packages in the Integration Server and also to packages in other Integration Server systems.
When you place jar files in the static subdirectory, then at startup the Integration Server automatically loads these files to the server classpath. Also, the jar files are available to other packages even when the immediate package is disabled.
The source subdirectory is for the source of Java services.
The libs subdirectory (not shown here) holds DLLs or specialized libraries that the Java and C/C++ services use.
Note: The Integration Server does not automatically create the static subdirectory when you create a new package. This subdirectory is user defined.
Note: The Integration Server does not automatically create the libs directory because the directory’s existence prevents you from reloading a package without restarting the server. You cannot reload a package that uses shared libraries; you must restart the server.
classes
Namespace of the package
Web documents
.........Package documentation
Resource Bundle Files
Templates
JSPs
ns
pub
resources
templates
web
Java servicescode
PackageName
doc
staticsource
jars
278 webMethods Integration Server Administrator’s Guide Version 7.1.1
18 Managing Packages
For ease of administration, place services that use shared libraries in the same package.
The ns subdirectory holds flow services, specifications, document types, schemas, triggers, adapter notifications, adapter documents, adapter services, adapter connectors, and code fragments for Java services.
The pub subdirectory holds Web documents for the package. For instructions on how to access the Web documents for a package, see “Displaying Documentation for a Package” on page 287.
The doc subdirectory holds documentation for the package.
The resources subdirectory holds resource bundles <bundle.properties>, such as application data (not user data), which is kept separate from the Integration Server application. The following items represent typical resources inside a bundle:
Icons
Window positions
Dialog box definitions
Program text
Menus
You can easily modify and update various aspects of the Integration Server without reinstalling the entire application. A Japanese language pack for the Integration Server is an example of a resource bundle that contains language and image files for the Japanese version of the server.
The templates subdirectory holds output templates that are associated with this package.
The web subdirectory holds JSPs that are associated with this package.
Manifest FileEach package has a manifest file. It contains:
Indication of whether the package is enabled or disabled. The server does not load disabled packages at server initialization and you cannot access elements that reside in disabled packages.
List of startup, shutdown, and replication services, if any, for the package. For more information about startup, shutdown, and replication services and how to identify them, see “Running Services When Packages Are Loaded, Unloaded, or Replicated” on page 337.
Package description. A brief description of the package.
Version information. Package version and build number. Also included is the JVM version under which the package was published.
webMethods Integration Server Administrator’s Guide Version 7.1.1 279
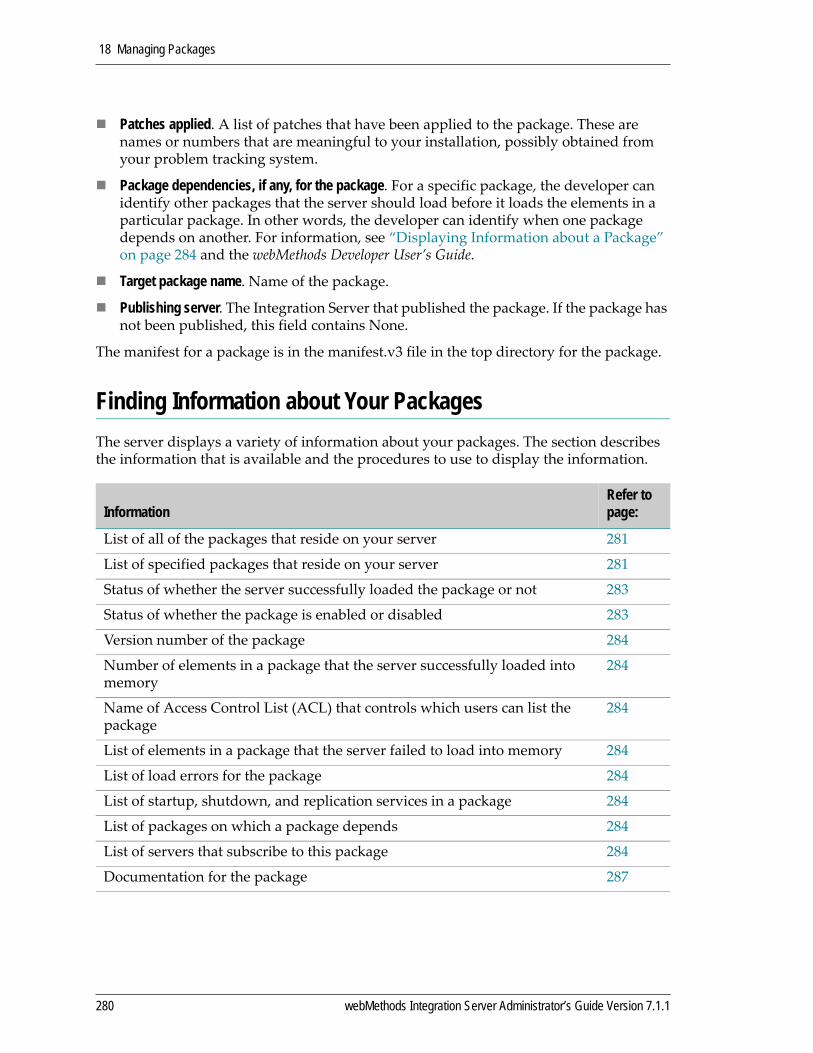
18 Managing Packages
Patches applied. A list of patches that have been applied to the package. These are names or numbers that are meaningful to your installation, possibly obtained from your problem tracking system.
Package dependencies, if any, for the package. For a specific package, the developer can identify other packages that the server should load before it loads the elements in a particular package. In other words, the developer can identify when one package depends on another. For information, see “Displaying Information about a Package” on page 284 and the webMethods Developer User’s Guide.
Target package name. Name of the package.
Publishing server. The Integration Server that published the package. If the package has not been published, this field contains None.
The manifest for a package is in the manifest.v3 file in the top directory for the package.
Finding Information about Your PackagesThe server displays a variety of information about your packages. The section describes the information that is available and the procedures to use to display the information.
InformationRefer to page:
List of all of the packages that reside on your server 281
List of specified packages that reside on your server 281
Status of whether the server successfully loaded the package or not 283
Status of whether the package is enabled or disabled 283
Version number of the package 284
Number of elements in a package that the server successfully loaded into memory
284
Name of Access Control List (ACL) that controls which users can list the package
284
List of elements in a package that the server failed to load into memory 284
List of load errors for the package 284
List of startup, shutdown, and replication services in a package 284
List of packages on which a package depends 284
List of servers that subscribe to this package 284
Documentation for the package 287
280 webMethods Integration Server Administrator’s Guide Version 7.1.1
18 Managing Packages
Viewing the Packages that Reside on Your ServerThe main package management screen of the Integration Server Administrator lists all packages that reside on your server. It also displays whether the server successfully loaded the package and whether the package is enabled.
1 Open the Integration Server Administrator if it is not already open.
2 In the Packages menu of the Navigation panel, click Management.
Filtering the List of PackagesBy default, the main package management screen lists all the packages that reside on your server. You can use the filter to limit the packages to be displayed, making the list shorter and more manageable. You can manage the Packages List in the following ways:
Filter the default list of packages by specifying a full or partial package name, and then including or excluding packages that match the specified criteria.
Narrow down a list by filtering the results again.
1 In the Packages menu of the Navigation panel, click Management. The Packages List will display all the packages on your server.
2 Click Filter Packages. The filtering options will appear above the Packages List.
Note: The server displays only packages to which you have List access.
To view the packages that reside on the server
Tip! Click Show All Packages to disable filtering and restore the default list of all packages on the server.
Filtering the Package List
Note: When Filter Packages is enabled, any changes to the Integration Server (such as new packages, etc.) will not be reflected in the Packages List. When you click Show All Packages and return to normal mode, the list will be updated.
webMethods Integration Server Administrator’s Guide Version 7.1.1 281
18 Managing Packages
3 Select some or all of the following options:
4 Click Submit. Only the packages which match the filter options will be displayed.
1 Filter the Packages List as described in the previous procedure. The packages which match the filter will be displayed.
2 Enable the Filter on result mode. This limits the search to just the currently displayed list of packages, rather than the default list of all the packages on the server.
3 Enter the new filter criteria and click Submit. Repeat as many times as necessary, being sure to enable the Filter on result mode each time.
Option Description
Filter criteria The string you want to submit to the filter. By default, packages with names that match the string are included in the results. Filter criteria can be literals or a combination of literal and wild‐card characters. The ʺ*ʺ (asterisk) and ʺ?ʺ (question mark) are the only supported wild‐card characters. Leaving the filter criteria blank includes all packages.
Important! The package names in the Filter criteria field are case‐sensitive. For example, if you enter “wma*”, the filter will ignore any packages beginning with “WmA”.
Include EnabledInclude DisabledInclude Both
Specify whether to include only packages that are enabled (those with Yes in the Enabled column of the Packages List), only those that are disabled (No is in the Enabled column), or to include both enabled and disabled packages.
Filter on result Enable this option when you have already filtered the list and you want to re‐filter the results, rather than the default list.
Exclude from result Enable this option to display the packages that do not match the Filter criteria, rather than the packages that do match.
Filtering packages from an already filtered Package List
Note: You can also enable the Exclude from result option to display the packages that do not match the Filter criteria, rather than the packages that do match.
282 webMethods Integration Server Administrator’s Guide Version 7.1.1
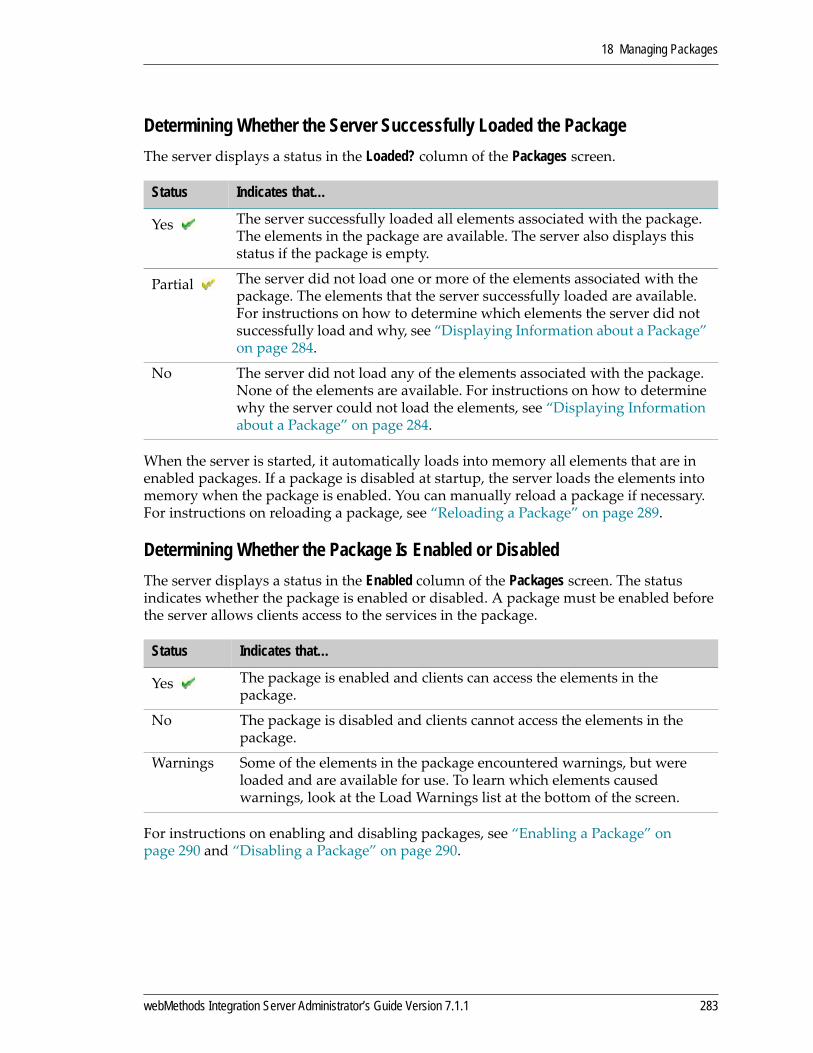
18 Managing Packages
Determining Whether the Server Successfully Loaded the Package The server displays a status in the Loaded? column of the Packages screen.
When the server is started, it automatically loads into memory all elements that are in enabled packages. If a package is disabled at startup, the server loads the elements into memory when the package is enabled. You can manually reload a package if necessary. For instructions on reloading a package, see “Reloading a Package” on page 289.
Determining Whether the Package Is Enabled or DisabledThe server displays a status in the Enabled column of the Packages screen. The status indicates whether the package is enabled or disabled. A package must be enabled before the server allows clients access to the services in the package.
For instructions on enabling and disabling packages, see “Enabling a Package” on page 290 and “Disabling a Package” on page 290.
Status Indicates that…
Yes The server successfully loaded all elements associated with the package. The elements in the package are available. The server also displays this status if the package is empty.
Partial The server did not load one or more of the elements associated with the package. The elements that the server successfully loaded are available. For instructions on how to determine which elements the server did not successfully load and why, see “Displaying Information about a Package” on page 284.
No The server did not load any of the elements associated with the package. None of the elements are available. For instructions on how to determine why the server could not load the elements, see “Displaying Information about a Package” on page 284.
Status Indicates that…
Yes The package is enabled and clients can access the elements in the package.
No The package is disabled and clients cannot access the elements in the package.
Warnings Some of the elements in the package encountered warnings, but were loaded and are available for use. To learn which elements caused warnings, look at the Load Warnings list at the bottom of the screen.
webMethods Integration Server Administrator’s Guide Version 7.1.1 283
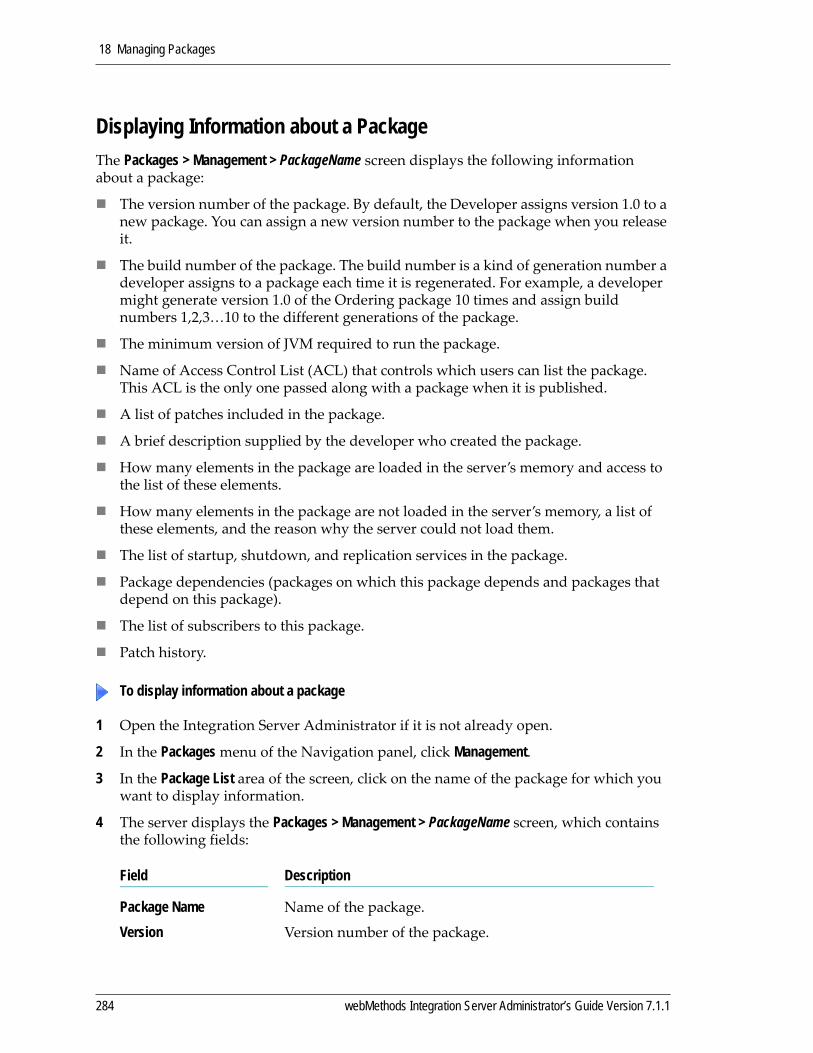
18 Managing Packages
Displaying Information about a PackageThe Packages > Management > PackageName screen displays the following information about a package:
The version number of the package. By default, the Developer assigns version 1.0 to a new package. You can assign a new version number to the package when you release it.
The build number of the package. The build number is a kind of generation number a developer assigns to a package each time it is regenerated. For example, a developer might generate version 1.0 of the Ordering package 10 times and assign build numbers 1,2,3…10 to the different generations of the package.
The minimum version of JVM required to run the package.
Name of Access Control List (ACL) that controls which users can list the package. This ACL is the only one passed along with a package when it is published.
A list of patches included in the package.
A brief description supplied by the developer who created the package.
How many elements in the package are loaded in the server’s memory and access to the list of these elements.
How many elements in the package are not loaded in the server’s memory, a list of these elements, and the reason why the server could not load them.
The list of startup, shutdown, and replication services in the package.
Package dependencies (packages on which this package depends and packages that depend on this package).
The list of subscribers to this package.
Patch history.
1 Open the Integration Server Administrator if it is not already open.
2 In the Packages menu of the Navigation panel, click Management.
3 In the Package List area of the screen, click on the name of the package for which you want to display information.
4 The server displays the Packages > Management > PackageName screen, which contains the following fields:
To display information about a package
Field Description
Package Name Name of the package.
Version Version number of the package.
284 webMethods Integration Server Administrator’s Guide Version 7.1.1
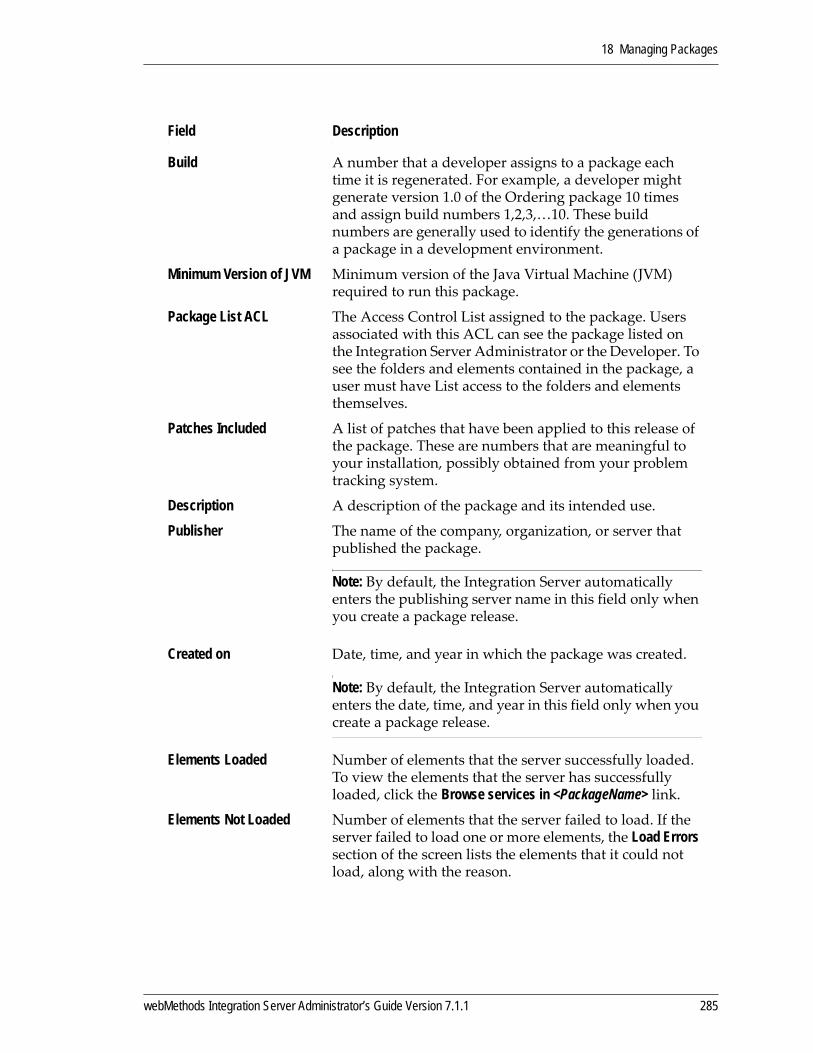
18 Managing Packages
Build A number that a developer assigns to a package each time it is regenerated. For example, a developer might generate version 1.0 of the Ordering package 10 times and assign build numbers 1,2,3,…10. These build numbers are generally used to identify the generations of a package in a development environment.
Minimum Version of JVM Minimum version of the Java Virtual Machine (JVM) required to run this package.
Package List ACL The Access Control List assigned to the package. Users associated with this ACL can see the package listed on the Integration Server Administrator or the Developer. To see the folders and elements contained in the package, a user must have List access to the folders and elements themselves.
Patches Included A list of patches that have been applied to this release of the package. These are numbers that are meaningful to your installation, possibly obtained from your problem tracking system.
Description A description of the package and its intended use.
Publisher The name of the company, organization, or server that published the package.
Note: By default, the Integration Server automatically enters the publishing server name in this field only when you create a package release.
Created on Date, time, and year in which the package was created.
Note: By default, the Integration Server automatically enters the date, time, and year in this field only when you create a package release.
Elements Loaded Number of elements that the server successfully loaded. To view the elements that the server has successfully loaded, click the Browse services in <PackageName> link.
Elements Not Loaded Number of elements that the server failed to load. If the server failed to load one or more elements, the Load Errors section of the screen lists the elements that it could not load, along with the reason.
Field Description
webMethods Integration Server Administrator’s Guide Version 7.1.1 285
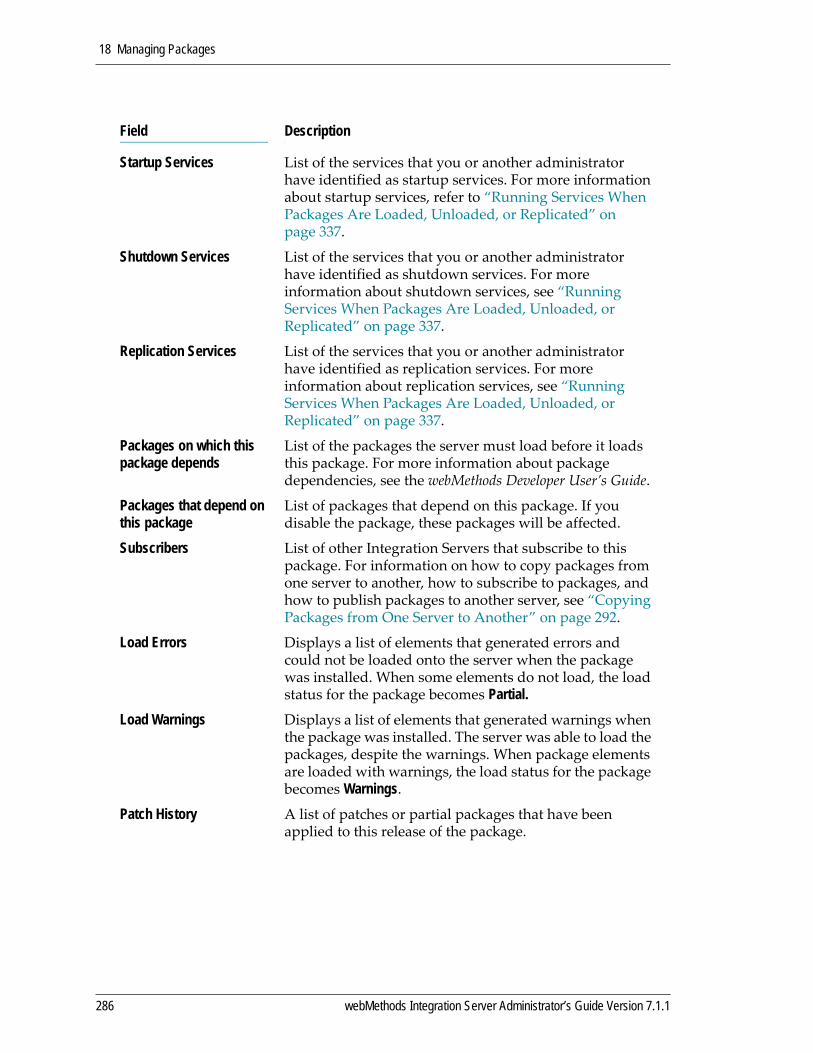
18 Managing Packages
Startup Services List of the services that you or another administrator have identified as startup services. For more information about startup services, refer to “Running Services When Packages Are Loaded, Unloaded, or Replicated” on page 337.
Shutdown Services List of the services that you or another administrator have identified as shutdown services. For more information about shutdown services, see “Running Services When Packages Are Loaded, Unloaded, or Replicated” on page 337.
Replication Services List of the services that you or another administrator have identified as replication services. For more information about replication services, see “Running Services When Packages Are Loaded, Unloaded, or Replicated” on page 337.
Packages on which this package depends
List of the packages the server must load before it loads this package. For more information about package dependencies, see the webMethods Developer User’s Guide.
Packages that depend on this package
List of packages that depend on this package. If you disable the package, these packages will be affected.
Subscribers List of other Integration Servers that subscribe to this package. For information on how to copy packages from one server to another, how to subscribe to packages, and how to publish packages to another server, see “Copying Packages from One Server to Another” on page 292.
Load Errors Displays a list of elements that generated errors and could not be loaded onto the server when the package was installed. When some elements do not load, the load status for the package becomes Partial.
Load Warnings Displays a list of elements that generated warnings when the package was installed. The server was able to load the packages, despite the warnings. When package elements are loaded with warnings, the load status for the package becomes Warnings.
Patch History A list of patches or partial packages that have been applied to this release of the package.
Field Description
286 webMethods Integration Server Administrator’s Guide Version 7.1.1

18 Managing Packages
Displaying Information about Services and Folders in a PackageYou can browse a list of services or folders in a package. See “Finding Information about Services and Folders” on page 334.
Displaying Documentation for a PackageYou can document the function of a package and its elements in Web documents that the Integration Server will serve. Place the Web documents in the pub subdirectory for a package.
Be sure to create an index.html file that holds the home page for the package and contains links to the other Web documents for the package.
1 Open the Integration Server Administrator if it is not already open.
2 In the Packages menu of the Navigation panel click Management.
3 Click the home icon for the package.
Make sure the package is enabled. (See “Determining Whether the Package Is Enabled or Disabled” on page 283 for instructions.) Enter the URL for the Web document. The URLs for the Web documents have the following format:
http://host:port/PackageName/Docname
where:
To access the home page for a package
To access any Web document for a package
host:port is the server name and port address of the Integration Server
PackageName is the name of the package in which the Web document resides. If you do not specify a package name, the server looks in the Pub directory of the Default package.
DocName is the name of the Web document. If you do not specify a document name, the server displays the index.dsp or index.html file in the Pub directory of the specified package.
webMethods Integration Server Administrator’s Guide Version 7.1.1 287
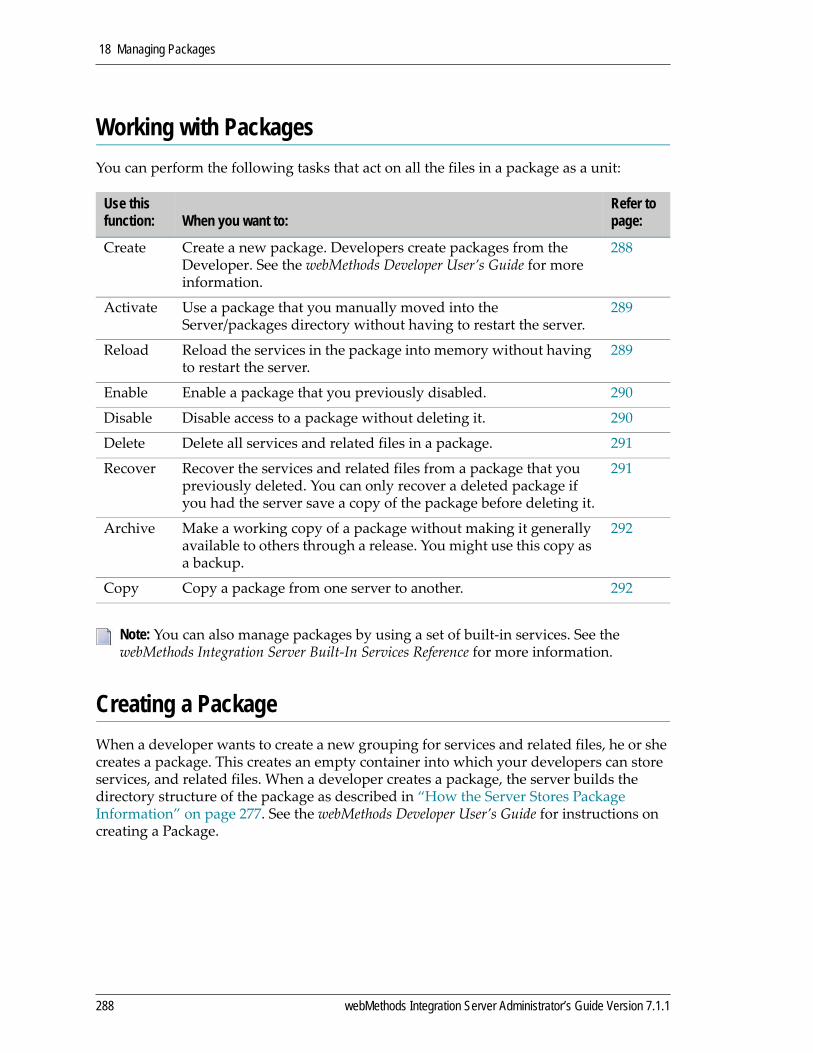
18 Managing Packages
Working with PackagesYou can perform the following tasks that act on all the files in a package as a unit:
Creating a PackageWhen a developer wants to create a new grouping for services and related files, he or she creates a package. This creates an empty container into which your developers can store services, and related files. When a developer creates a package, the server builds the directory structure of the package as described in “How the Server Stores Package Information” on page 277. See the webMethods Developer User’s Guide for instructions on creating a Package.
Use this function: When you want to:
Refer to page:
Create Create a new package. Developers create packages from the Developer. See the webMethods Developer User’s Guide for more information.
288
Activate Use a package that you manually moved into the Server/packages directory without having to restart the server.
289
Reload Reload the services in the package into memory without having to restart the server.
289
Enable Enable a package that you previously disabled. 290
Disable Disable access to a package without deleting it. 290
Delete Delete all services and related files in a package. 291
Recover Recover the services and related files from a package that you previously deleted. You can only recover a deleted package if you had the server save a copy of the package before deleting it.
291
Archive Make a working copy of a package without making it generally available to others through a release. You might use this copy as a backup.
292
Copy Copy a package from one server to another. 292
Note: You can also manage packages by using a set of built‐in services. See the webMethods Integration Server Built‐In Services Reference for more information.
288 webMethods Integration Server Administrator’s Guide Version 7.1.1
18 Managing Packages
Activating a Package There may be times when a package is installed on your server but is not active. When a package is active, it is “officially recognized” by the server and displayed in the Package List on the Package Management screen. When a package is inactive, it exists in the Packages directory, but is not officially recognized by the server.
Possible reasons for a package being inactive are:
You manually installed the package while the server was running.
Another server published the package to your server, but the package requires a version of the JVM that is higher than the version on your server. A subscribing server will not activate a package under these circumstances.
The package will not be available until either you restart the server or you activate the package.
1 Open the Integration Server Administrator if it is not already open.
2 In the Packages menu of the Navigation panel, click Management.
3 Click Activate Inactive Packages.
4 In the Inactive Packages area, select the package you want to activate from the pull‐down menu and click Activate Package.
Reloading a PackageIf the server is running when a developer changes a Java service or flow service, you must reload the package in which the service is contained for the changes to take effect. Reloading the package invokes the VM class loader to reload the package’s Java services and reloads the flow services into memory. Developers can also reload a package from the Developer.
1 Open the Integration Server Administrator if it is not already open.
2 In the Packages menu of the Navigation panel, click Management.
3 Click the reload icon in the Reload column for the package.
The icon in the Loaded? column indicates whether the server loaded the package successfully. For more information, see “Determining Whether the Server Successfully Loaded the Package” on page 283.
To activate a package
To reload a package
webMethods Integration Server Administrator’s Guide Version 7.1.1 289
18 Managing Packages
Enabling a PackageTo allow clients access to the elements in a package, you must ensure the package is enabled. Before the server can access an element in a package, the package must be enabled and the element must be loaded. By default, packages are enabled.
When you enable a disabled package, the server loads the elements in the package into memory.
1 Open the Integration Server Administrator if it is not already open.
2 In the Packages menu of the Navigation panel, click Management.
3 Click No in the Enabled column for the package you want to enable. The server issues a prompt to verify that you want to enable the package. Click OK to enable the package. When the package is enabled, the server displays a icon and Yes in the Enabled column.
Disabling a PackageWhen you want to temporarily prohibit access to the elements in a package, disable the package. When you disable a package, the server unloads all of its elements from memory.
1 Open the Integration Server Administrator if it is not already open.
2 In the Packages menu of the Navigation panel click the Management link.
3 Click the icon in the Enabled column for the package you want to disable. The server issues a prompt to verify that you want to disable the package. Click OK to disable the package. When the package is disabled, the server displays No in the Enabled column.
To enable a package
Important! Never disable the WmRoot package. The Integration Server uses the services in this package.
To disable a package
Note: The server retains the access status of a package (enabled or disabled) across server restarts. When you start the server, the server does not load elements in disabled packages.
290 webMethods Integration Server Administrator’s Guide Version 7.1.1
18 Managing Packages
Deleting a PackageWhen you no longer need the services and files in a package, you can delete the package. When you delete a package, all the elements of the package (services, specifications, document types) become unavailable.
When you delete a package, you can optionally select to save a copy of the package. If you save a copy, the server copies the package to the IntegrationServer_directory\replicate\salvage directory before deleting the package from the IntegrationServer_directory\packages directory. If needed, you can recover the package at a later time. For instructions on recovering a deleted package, see “Recovering a Package” on page 291.
1 Open the Integration Server Administrator if it is not already open.
2 In the Packages menu of the Navigation panel click Management.
3 If you want to save a copy of the package so you can recover it later if necessary, check the icon in the row that corresponds to the package you want to delete.
4 If you do not want to save a copy, click the icon in the row that corresponds to the package you want to delete.
5 Click Delete. The server displays a screen to confirm you want to delete the package. Click OK.
Recovering a PackageIf you deleted a package using the Safe delete option and you need the package again, you can recover the package.
1 Open the Integration Server Administrator if it is not already open.
2 In the Packages menu of the Navigation panel click Management.
3 Click Recover Packages.
4 In the Recover Packages area, select the package you want to recover from the pull down.
5 If you want the Integration Server to automatically activate the package when it is recovered, select the Activate Upon Recovery check box.
6 Click Recover.
Important! Never delete the WmRoot package. The Integration Server uses the services in this package.
To recover a package
webMethods Integration Server Administrator’s Guide Version 7.1.1 291
18 Managing Packages
Archiving a PackageThere may be times when you want to make a copy of a package without making it generally available. For example, you might want to back it up or send it to someone with whom you do not have a publisher/subscriber relationship.
1 Open the Integration Server Administrator if it is not already open.
2 In the Packages menu of the Navigation panel, click Management.
3 Locate the package you want to archive in the Package List, and click the icon.
4 The server displays a screen from which you specify the files you want to archive, the type of archive (full or patch), and version information. See “Specifying File and Version Information for a Release or Archive” on page 305 for instructions on specifying this information.
Copying Packages from One Server to AnotherUse package replication to copy (publish) packages from one Integration Server to another. If you have a clustered environment, this feature is useful to quickly replicate new and updated packages across all servers in the cluster. It is also a convenient way to distribute a package from one server to another anywhere on the Web.
To archive a package
Note: Using webMethods Developer, you can copy a package and its contents to another Integration Server by performing a copy or a drag‐and‐drop action. Copying packages using Developer provides a quick way to test a set of services and their supporting files, for example, in a remote environment. This method is useful in single development environments where change control is not crucial. In a production environment, however, using the package replication function is recommended.
Note: If you want to make a copy of package, for example to make a backup, without sending it to another server, see “Archiving a Package” on page 292.
292 webMethods Integration Server Administrator’s Guide Version 7.1.1

18 Managing Packages
Overview of Package ReplicationDuring replication, a single Integration Server sends (publishes) a specified package to one or more recipient servers. The server on which the package originates is referred to as the publisher, and the recipients are referred to as subscribers.
Subscribing servers receive the package in their inbound directory (IntegrationServer_directory\replicate\inbound). To activate the new package, an administrator on the subscribing server must install the package after it arrives. (This procedure is explained in “Installing a Package Published by Another Server” on page 316.)
Either a publisher or a subscriber can request a subscription. A publisher can send (push) the package and the subscriber can request (pull) the package.
Before you send a package to another server, you must create a release. When you create a release, the server creates a distribution file that contains the package and information about the package, and makes the package available to subscribers.
You can have multiple releases for a given package. For example, you might have separate releases for versions 1.0, 1.1, and 1.2 of a given package. Or, you might use different releases to separate packages for different audiences. Each release must have a unique name.
webMethods Integration Server
Publisher
Subscriber
...a publishing server copies one package...
...to one or more subscribing servers.
Subscriber
Subscriber
webMethods Integration Server
webMethods Integration Server
webMethods Integration Server
webMethods Integration Server Administrator’s Guide Version 7.1.1 293
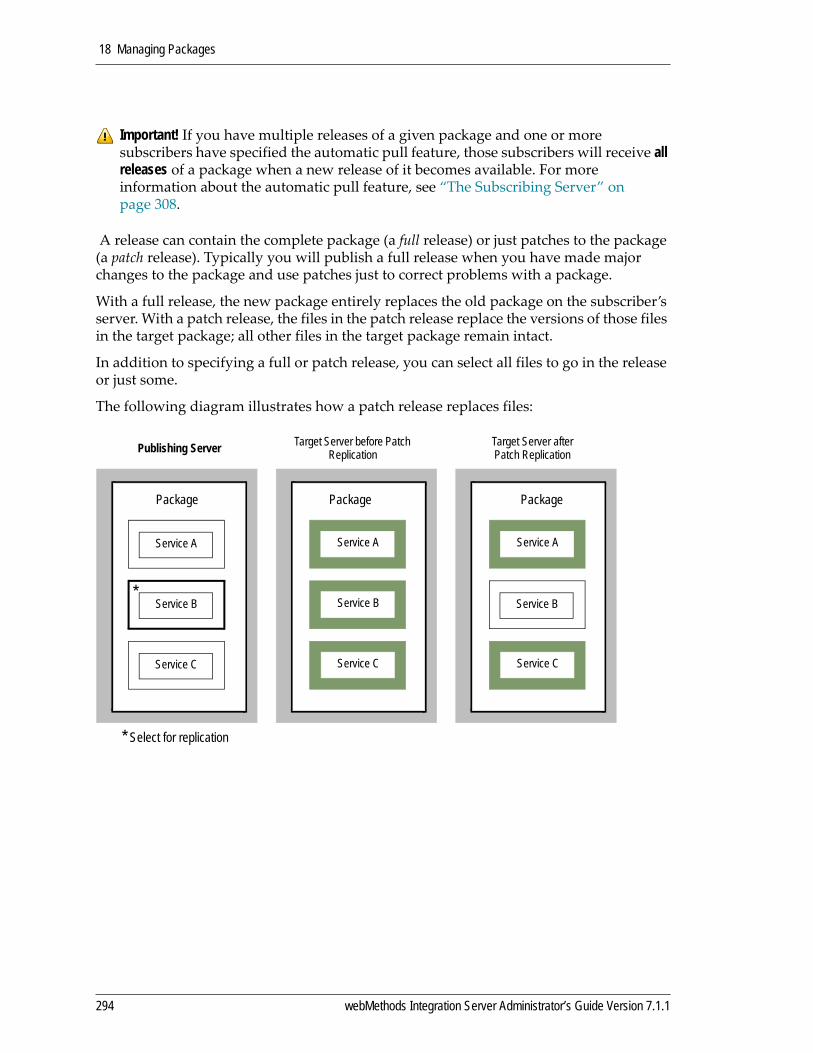
18 Managing Packages
A release can contain the complete package (a full release) or just patches to the package (a patch release). Typically you will publish a full release when you have made major changes to the package and use patches just to correct problems with a package.
With a full release, the new package entirely replaces the old package on the subscriber’s server. With a patch release, the files in the patch release replace the versions of those files in the target package; all other files in the target package remain intact.
In addition to specifying a full or patch release, you can select all files to go in the release or just some.
The following diagram illustrates how a patch release replaces files:
Important! If you have multiple releases of a given package and one or more subscribers have specified the automatic pull feature, those subscribers will receive all releases of a package when a new release of it becomes available. For more information about the automatic pull feature, see “The Subscribing Server” on page 308.
Publishing Server Target Server before Patch Replication
Target Server after Patch Replication
Package Package Package
Service C
Service A
Service B Service B
Service A
Service B
Service C
* Select for replication
*
Service A
Service C
294 webMethods Integration Server Administrator’s Guide Version 7.1.1

18 Managing Packages
The following diagram illustrates the results if you selected a single service for replication and specified a full release instead.
Most often you will select all files and specify a full release, or select some files and specify a patch release. There might be times however when you want to select just some files and specify a full release. For example, there might be files in a package, such as internal documentation files, that a developer does not want released to others. Selecting all files except the extraneous ones and specifying a full release results in a package that contains just the desired files.
There might be other times when you want to replace some files, leave others intact, and delete others. To achieve this greater level of control, you can perform a patch release and specify files to copy and files to delete. Files that you do not specify for copying or deletion remain intact. In the following example, we want to leave Service A intact, replace Service B, and delete Service C from the target package.
Publishing Server Target Server before Full Replication
Target Server after Full Replication
Package Package Package
Service C
Service A
Service B Service B
Service A
Service B
Service C
* Select for replication
*
webMethods Integration Server Administrator’s Guide Version 7.1.1 295

18 Managing Packages
The following shows what you must specify on the Specify Files for the Release screen to accomplish this task:
The Integration Server keeps track of package versions, Integration Server versions, and JVM versions so that during package installation the subscribing server can make sure the package being installed is compatible with the subscribing server’s environment. The
Publishing ServerTarget Server before Patch
ReplicationTarget Server after Patch Replication
Package Package Package
Service A
Service B Service B
Service A
Service B
* Select B for replication and C for deletion
*
Service A
Service C*
Service B
Select these files. They will replace the versions in the target package.
Click Selected Files.
Type in these files. They will be deleted from the target package.
296 webMethods Integration Server Administrator’s Guide Version 7.1.1
18 Managing Packages
type of version checking performed depends on whether the release is a full or patch release.
Version CheckingWhen the administrator on the subscribing server installs the package, the subscribing server performs some version checking:
Note: If patch releases have been applied to a package, the developer can see the patch history when viewing the package from the Developer. However, when the publisher publishes a full release of the package, the patch history is removed.
Target server verifies that…
Target JVM Version
The target server is running the same or a later version of the JVM, as specified during release creation. If this requirement is not met, the subscribing server issues a warning and installs the package but does not activate it. See “Activating a Package” on page 289 for instructions on activating a package.
Package Version For a full release For a patch release
The version of the package on the target server is earlier than or the same as the package being installed. If this requirement is not met, package installation fails.
The version of the package on the target server exactly matches the version required by the release (as specified during release creation). If this requirement is not met, package installation fails.
For example, if you create a new release and specify that it contains Version 2.0 of the wmExample package, the wmExample package on the target system must be release 2.0 or earlier.
For example, if you create a new release that contains a patch for wmExample package version 2.0, and you specify that the target package must be version 2.0, package installation will fail if the target package is not version 2.0.
This restriction prevents you from inadvertently installing an old version of a package over a newer one
This restriction gives you greater control over how and where patches are applied. This is useful because patches are typically release dependent.
webMethods Integration Server Administrator’s Guide Version 7.1.1 297
18 Managing Packages
Who Can Subscribe?Any Integration Server can subscribe to a package on another server if both servers allow it from a security perspective.
Security for package replication is accomplished a number of ways:
Userid and password. In order to send a package to a subscriber, the publisher must login to the subscriber by specifying a userid and password that exist on the subscriber.
ACLs. The userid the publisher uses to log on to the subscriber must be a member of a group that is assigned to the Replicators ACL or higher on the subscriber.
SSL. You can specify that the servers involved in package replication connect to each other using SSL.
The publisher maintains a list of subscribing servers for each package.
Subscriptions can be added by the publisher or the subscriber:
Publisher. The administrator of a publishing server can use the publisher functions to add (or remove) subscribers to any package that originates on the publishing server (i.e., one to which you do not subscribe).
Subscriber. The administrator of a remote Integration Server (the subscriber) can submit a subscription request to the publisher. When the publisher receives this request, it automatically adds that server to the subscription list for the requested package as long as authentication was successful. Subscribers can also issue cancellation requests (i.e., cancel their subscriptions) for packages to which they subscribe.
Guidelines for Using Package ReplicationKeep the following guidelines in mind when using the package replication facility:
Publishers and participating subscribers must use Integration Server Version 2.0 or later. For the for Automatic Pull feature to work, they must be running Version 4.0 or later. If you are running version 4.0 or later of the Integration Server and publish to an earlier release of the Integration Server, the subscriber cannot perform a manual or automatic pull of a package. Instead, the subscriber must wait for the publisher to send the package
Any Integration Server can publish a package.
Any Integration Server can subscribe to a package on another Integration Server.
298 webMethods Integration Server Administrator’s Guide Version 7.1.1
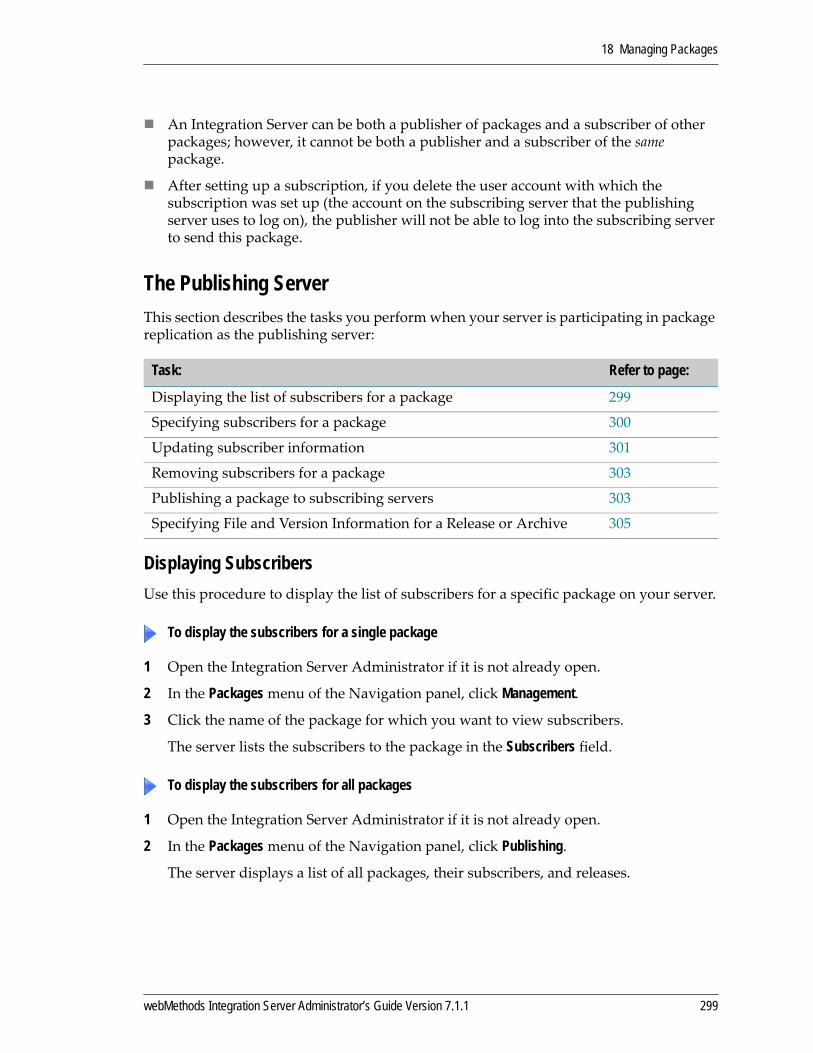
18 Managing Packages
An Integration Server can be both a publisher of packages and a subscriber of other packages; however, it cannot be both a publisher and a subscriber of the same package.
After setting up a subscription, if you delete the user account with which the subscription was set up (the account on the subscribing server that the publishing server uses to log on), the publisher will not be able to log into the subscribing server to send this package.
The Publishing ServerThis section describes the tasks you perform when your server is participating in package replication as the publishing server:
Displaying SubscribersUse this procedure to display the list of subscribers for a specific package on your server.
1 Open the Integration Server Administrator if it is not already open.
2 In the Packages menu of the Navigation panel, click Management.
3 Click the name of the package for which you want to view subscribers.
The server lists the subscribers to the package in the Subscribers field.
1 Open the Integration Server Administrator if it is not already open.
2 In the Packages menu of the Navigation panel, click Publishing.
The server displays a list of all packages, their subscribers, and releases.
Task: Refer to page:
Displaying the list of subscribers for a package 299
Specifying subscribers for a package 300
Updating subscriber information 301
Removing subscribers for a package 303
Publishing a package to subscribing servers 303
Specifying File and Version Information for a Release or Archive 305
To display the subscribers for a single package
To display the subscribers for all packages
webMethods Integration Server Administrator’s Guide Version 7.1.1 299
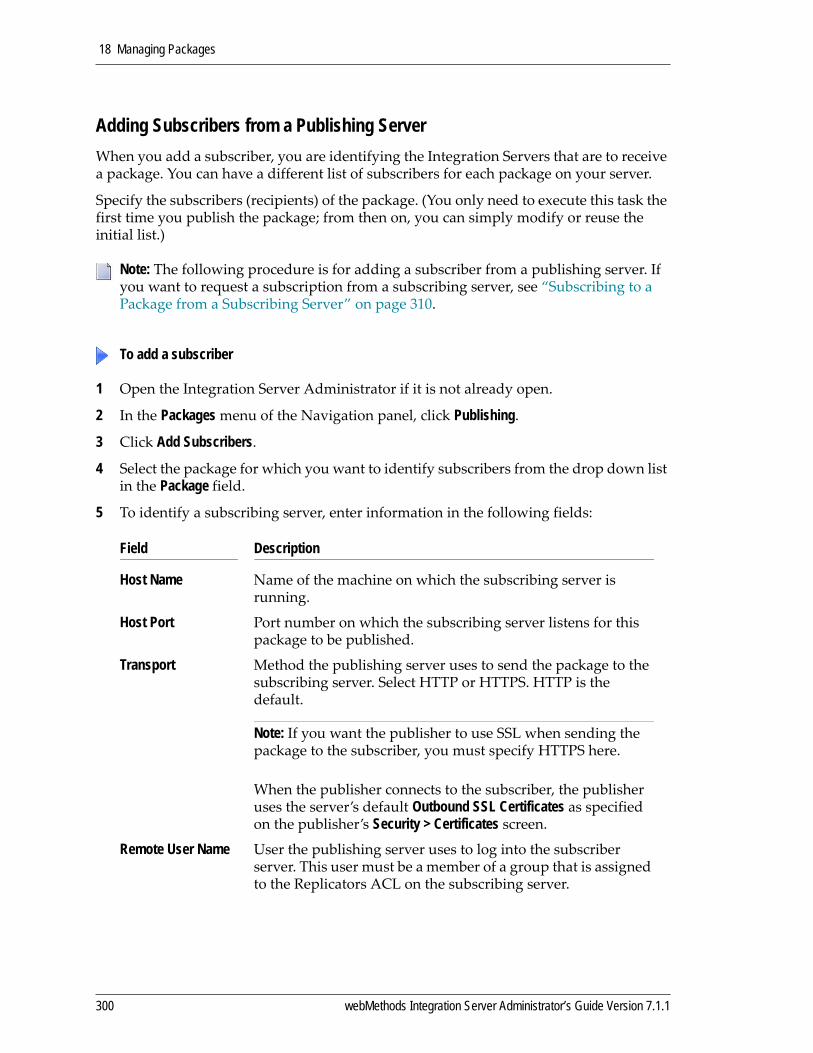
18 Managing Packages
Adding Subscribers from a Publishing ServerWhen you add a subscriber, you are identifying the Integration Servers that are to receive a package. You can have a different list of subscribers for each package on your server.
Specify the subscribers (recipients) of the package. (You only need to execute this task the first time you publish the package; from then on, you can simply modify or reuse the initial list.)
1 Open the Integration Server Administrator if it is not already open.
2 In the Packages menu of the Navigation panel, click Publishing.
3 Click Add Subscribers.
4 Select the package for which you want to identify subscribers from the drop down list in the Package field.
5 To identify a subscribing server, enter information in the following fields:
Note: The following procedure is for adding a subscriber from a publishing server. If you want to request a subscription from a subscribing server, see “Subscribing to a Package from a Subscribing Server” on page 310.
To add a subscriber
Field Description
Host Name Name of the machine on which the subscribing server is running.
Host Port Port number on which the subscribing server listens for this package to be published.
Transport Method the publishing server uses to send the package to the subscribing server. Select HTTP or HTTPS. HTTP is the default.
Note: If you want the publisher to use SSL when sending the package to the subscriber, you must specify HTTPS here.
When the publisher connects to the subscriber, the publisher uses the server’s default Outbound SSL Certificates as specified on the publisher’s Security > Certificates screen.
Remote User Name User the publishing server uses to log into the subscriber server. This user must be a member of a group that is assigned to the Replicators ACL on the subscribing server.
300 webMethods Integration Server Administrator’s Guide Version 7.1.1

18 Managing Packages
Then, click Add Subscriber. The server adds the subscriber to the list in the Subscribers field.
Repeat this step for each server you want to identify as a subscriber to the package.
Updating Subscriber Information Use this procedure to update information about a subscriber, such as the package name.
1 Open the Integration Server Administrator if it is not already open.
2 In the Packages menu of in the Navigation panel, click Publishing.
3 Click Update and Remove Subscribers.
4 Locate this subscriber in the subscriber information list and click Edit in the Update column.
5 To change subscriber information, enter information in the appropriate fields below:
Remote Password Password of the user that the publishing server uses to log into the subscribing server.
Notification Email Email address of the administrator to notify when the publishing server releases a package.
Note: To specify the automatic pull feature, you must create the subscription from the subscriber.
Note: The subscribing server must be running at the time you add the subscriber.
To update subscriber information
Field Description
Packages Packages to which the subscriber subscribes. You can change the subscription to be for another package. You can only select a package to which your server does not already subscribe because you cannot both publish and subscribe to the same package.
Host Name Name of the machine on which the subscribing server is running.
Host Port Port number on which the subscribing server listens for this package to be published. The number you specify must correspond to a port that already exists and is enabled on the subscribing server. In addition, the publishing server must have replicator access or higher.
Field Description
webMethods Integration Server Administrator’s Guide Version 7.1.1 301

18 Managing Packages
6 Then, click Submit Changes. The server adds the subscriber to the list in the Subscribers field. The server updates the information on both the subscribing and publishing servers.
Transport Method the publishing server uses to send the package to the subscribing server. Select HTTP or HTTPS. HTTP is the default. The transport type must match the type defined for the host port on the subscribing server.
Note: If you want the publisher to use SSL when sending the package to the subscriber, you must specify HTTPS here.
When the publisher connects to the subscriber, the publisher uses the server’s default Outbound SSL Certificates as specified on the publisher’s Security > Certificates screen.
Remote User Name
User the publishing server uses to log into the subscriber server. This user must be a member of a group that is assigned to the Replicators ACL on the subscribing server.
Remote Password
Password of the user that the publishing server uses to log into the subscribing server.
Notification Email
Email address of the administrator to notify when the publishing server releases a package.
Field Description
302 webMethods Integration Server Administrator’s Guide Version 7.1.1
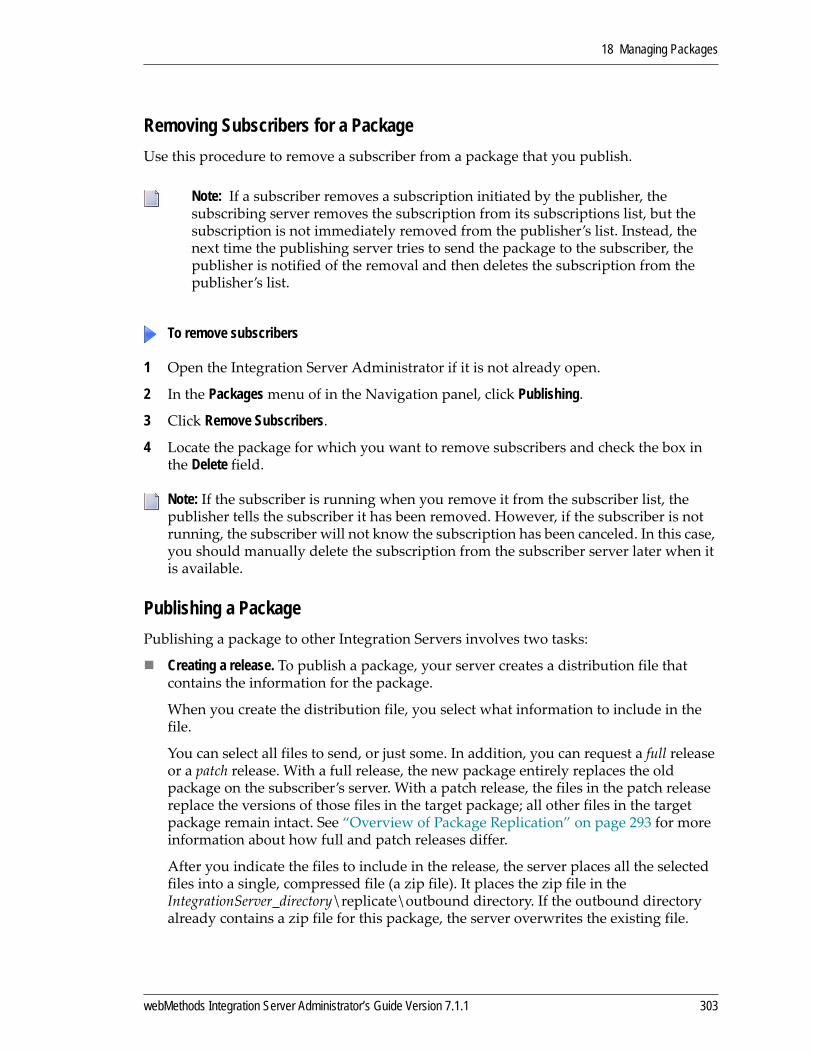
18 Managing Packages
Removing Subscribers for a PackageUse this procedure to remove a subscriber from a package that you publish.
1 Open the Integration Server Administrator if it is not already open.
2 In the Packages menu of in the Navigation panel, click Publishing.
3 Click Remove Subscribers.
4 Locate the package for which you want to remove subscribers and check the box in the Delete field.
Publishing a PackagePublishing a package to other Integration Servers involves two tasks:
Creating a release. To publish a package, your server creates a distribution file that contains the information for the package.
When you create the distribution file, you select what information to include in the file.
You can select all files to send, or just some. In addition, you can request a full release or a patch release. With a full release, the new package entirely replaces the old package on the subscriber’s server. With a patch release, the files in the patch release replace the versions of those files in the target package; all other files in the target package remain intact. See “Overview of Package Replication” on page 293 for more information about how full and patch releases differ.
After you indicate the files to include in the release, the server places all the selected files into a single, compressed file (a zip file). It places the zip file in the IntegrationServer_directory\replicate\outbound directory. If the outbound directory already contains a zip file for this package, the server overwrites the existing file.
Note: If a subscriber removes a subscription initiated by the publisher, the subscribing server removes the subscription from its subscriptions list, but the subscription is not immediately removed from the publisher’s list. Instead, the next time the publishing server tries to send the package to the subscriber, the publisher is notified of the removal and then deletes the subscription from the publisher’s list.
To remove subscribers
Note: If the subscriber is running when you remove it from the subscriber list, the publisher tells the subscriber it has been removed. However, if the subscriber is not running, the subscriber will not know the subscription has been canceled. In this case, you should manually delete the subscription from the subscriber server later when it is available.
webMethods Integration Server Administrator’s Guide Version 7.1.1 303
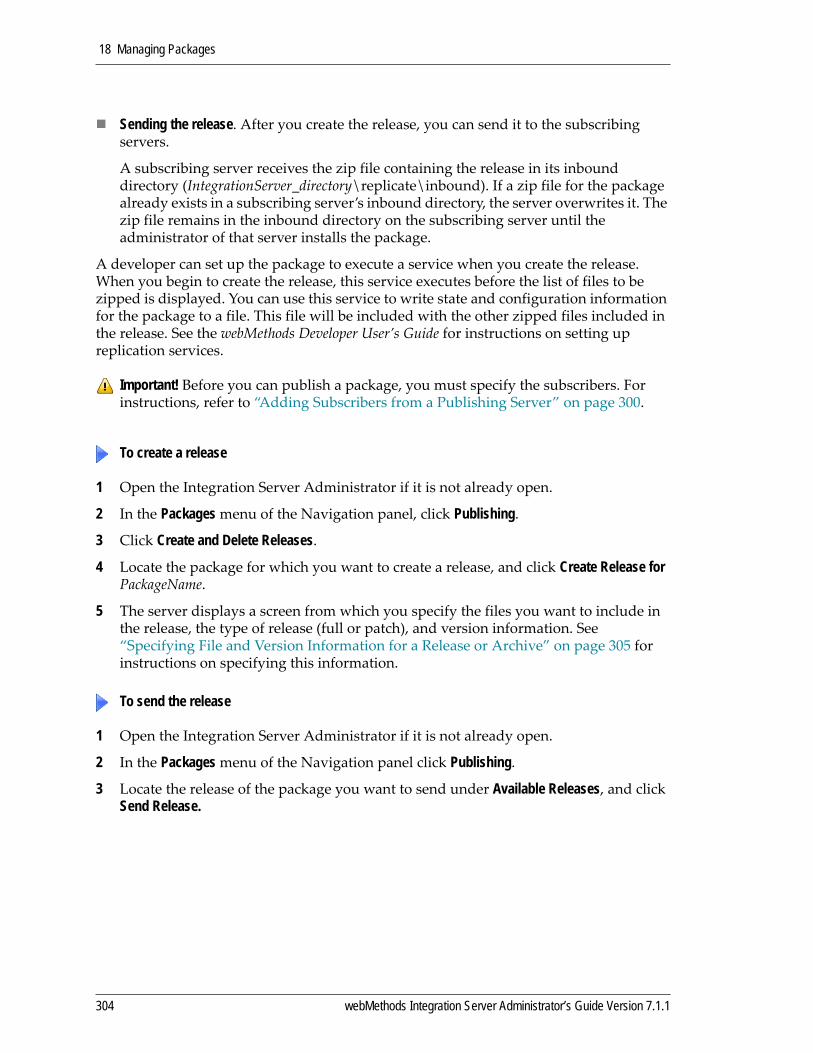
18 Managing Packages
Sending the release. After you create the release, you can send it to the subscribing servers.
A subscribing server receives the zip file containing the release in its inbound directory (IntegrationServer_directory\replicate\inbound). If a zip file for the package already exists in a subscribing server’s inbound directory, the server overwrites it. The zip file remains in the inbound directory on the subscribing server until the administrator of that server installs the package.
A developer can set up the package to execute a service when you create the release. When you begin to create the release, this service executes before the list of files to be zipped is displayed. You can use this service to write state and configuration information for the package to a file. This file will be included with the other zipped files included in the release. See the webMethods Developer User’s Guide for instructions on setting up replication services.
1 Open the Integration Server Administrator if it is not already open.
2 In the Packages menu of the Navigation panel, click Publishing.
3 Click Create and Delete Releases.
4 Locate the package for which you want to create a release, and click Create Release for PackageName.
5 The server displays a screen from which you specify the files you want to include in the release, the type of release (full or patch), and version information. See “Specifying File and Version Information for a Release or Archive” on page 305 for instructions on specifying this information.
1 Open the Integration Server Administrator if it is not already open.
2 In the Packages menu of the Navigation panel click Publishing.
3 Locate the release of the package you want to send under Available Releases, and click Send Release.
Important! Before you can publish a package, you must specify the subscribers. For instructions, refer to “Adding Subscribers from a Publishing Server” on page 300.
To create a release
To send the release
304 webMethods Integration Server Administrator’s Guide Version 7.1.1

18 Managing Packages
Specifying File and Version Information for a Release or ArchiveWhen you archive a package or create a release, the server displays a screen from which you can specify the files you want to archive or release, the type of archive or release (full or patch), and version information.
Refer to “Archiving a Package” on page 292 for detailed instructions on how to archive a package. Also, refer to “Publishing a Package” on page 303 for detailed instructions on how to create and send a release.
1 Identify the files that you want to include in the release/archive.
To specify file and version information
If you want to include: Do this:
All files In the Files to include section, select All files. Most, but not all, of the files
In the Files available in package, section, select the files you do NOT want to include in the archive or release.
In the Files to include section, select all except selected files.
If the developer added package dependencies or startup, shutdown, or replication services to the package since the last archive or release was created, be sure to include the manifest.v3 file. Otherwise these services will not be available in the resultant package. See “Running Services When Packages Are Loaded, Unloaded, or Replicated” on page 337 for more information about startup, shutdown, and replication services.
Only a few of the files
In the Files available in package section, select the files you want to include in the archive or release.
In the Files to include section, select Selected files.
If the developer added package dependencies or startup, shutdown, or replication services to the package since the last archive or release was created, be sure to include the manifest.v3 file. Otherwise these services will not be available in the resultant package. See “Running Services When Packages Are Loaded, Unloaded, or Replicated” on page 337 for more information about startup, shutdown, and replication services.
webMethods Integration Server Administrator’s Guide Version 7.1.1 305

18 Managing Packages
2 Identify files you want to delete from the target package by entering one file name per line. Separate each entry with a semicolon (;). When the subscribing server installs the package, these files will be deleted from the target package.
Files with a similar path name
In the Files to include section, select Files specified by filter and enter a valid filter, for example *.java or *.class.
or
To include all files except those with a similar name, in the Files to include section, click All except files specified by filter and enter a valid filter, for example *.bak.
If the developer added package dependencies or startup, shutdown, or replication services to the package since the last archive or release was created, be sure to include the manifest.v3 file. Otherwise these services will not be available in the resultant package. See “Running Services When Packages Are Loaded, Unloaded, or Replicated” on page 337 for more information about startup, shutdown, and replication services.
You can specify the following special character to perform pattern matching.
Char Description Example
* Matches any number of characters *.java
If you want to include: Do this:
306 webMethods Integration Server Administrator’s Guide Version 7.1.1
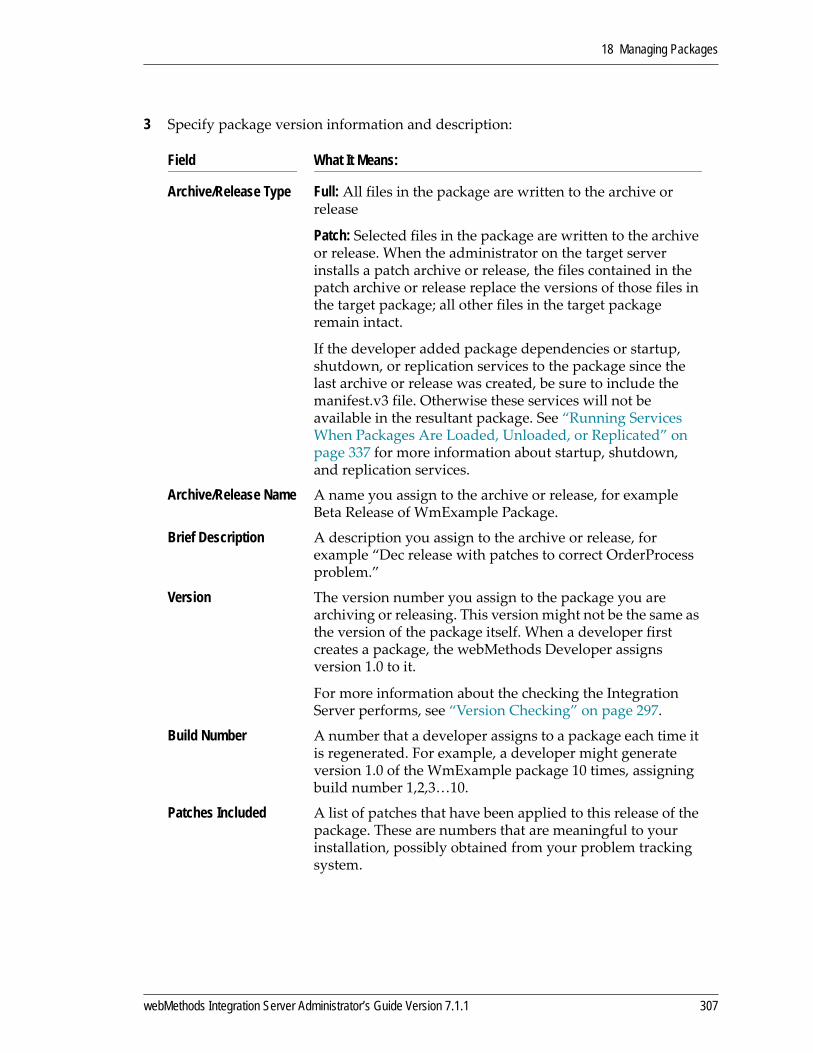
18 Managing Packages
3 Specify package version information and description:
Field What It Means:
Archive/Release Type Full: All files in the package are written to the archive or release
Patch: Selected files in the package are written to the archive or release. When the administrator on the target server installs a patch archive or release, the files contained in the patch archive or release replace the versions of those files in the target package; all other files in the target package remain intact.
If the developer added package dependencies or startup, shutdown, or replication services to the package since the last archive or release was created, be sure to include the manifest.v3 file. Otherwise these services will not be available in the resultant package. See “Running Services When Packages Are Loaded, Unloaded, or Replicated” on page 337 for more information about startup, shutdown, and replication services.
Archive/Release Name A name you assign to the archive or release, for example Beta Release of WmExample Package.
Brief Description A description you assign to the archive or release, for example “Dec release with patches to correct OrderProcess problem.”
Version The version number you assign to the package you are archiving or releasing. This version might not be the same as the version of the package itself. When a developer first creates a package, the webMethods Developer assigns version 1.0 to it.
For more information about the checking the Integration Server performs, see “Version Checking” on page 297.
Build Number A number that a developer assigns to a package each time it is regenerated. For example, a developer might generate version 1.0 of the WmExample package 10 times, assigning build number 1,2,3…10.
Patches Included A list of patches that have been applied to this release of the package. These are numbers that are meaningful to your installation, possibly obtained from your problem tracking system.
webMethods Integration Server Administrator’s Guide Version 7.1.1 307
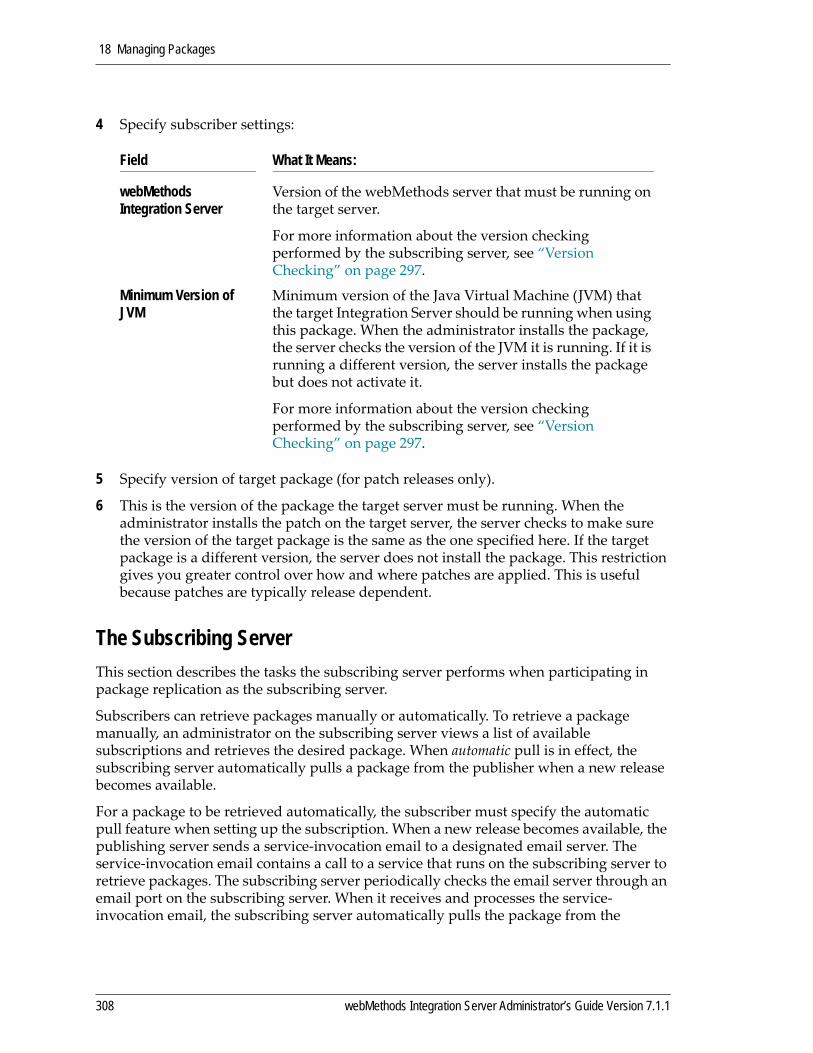
18 Managing Packages
4 Specify subscriber settings:
5 Specify version of target package (for patch releases only).
6 This is the version of the package the target server must be running. When the administrator installs the patch on the target server, the server checks to make sure the version of the target package is the same as the one specified here. If the target package is a different version, the server does not install the package. This restriction gives you greater control over how and where patches are applied. This is useful because patches are typically release dependent.
The Subscribing ServerThis section describes the tasks the subscribing server performs when participating in package replication as the subscribing server.
Subscribers can retrieve packages manually or automatically. To retrieve a package manually, an administrator on the subscribing server views a list of available subscriptions and retrieves the desired package. When automatic pull is in effect, the subscribing server automatically pulls a package from the publisher when a new release becomes available.
For a package to be retrieved automatically, the subscriber must specify the automatic pull feature when setting up the subscription. When a new release becomes available, the publishing server sends a service‐invocation email to a designated email server. The service‐invocation email contains a call to a service that runs on the subscribing server to retrieve packages. The subscribing server periodically checks the email server through an email port on the subscribing server. When it receives and processes the service‐invocation email, the subscribing server automatically pulls the package from the
Field What It Means:
webMethods Integration Server
Version of the webMethods server that must be running on the target server.
For more information about the version checking performed by the subscribing server, see “Version Checking” on page 297.
Minimum Version of JVM
Minimum version of the Java Virtual Machine (JVM) that the target Integration Server should be running when using this package. When the administrator installs the package, the server checks the version of the JVM it is running. If it is running a different version, the server installs the package but does not activate it.
For more information about the version checking performed by the subscribing server, see “Version Checking” on page 297.
308 webMethods Integration Server Administrator’s Guide Version 7.1.1

18 Managing Packages
publisher and places it in the Inbound directory. The administrator on the subscribing server can then install the package.
Displaying Packages That Your Server Subscribes ToYou can view the subscriptions your server has to packages on other servers.
1 Open the Integration Server Administrator if it is not already open.
2 In the Packages menu of the Navigation panel click Subscribing.
3 The server displays a list of your available subscriptions, organized by publisher, package, and release.
The server automatically updates this information when you (the subscriber) add, update, or remove a subscription; however, to see changes made by the publishers, you must click Update All Subscription Details.
Manually Pulling a Package You can manually pull subscriptions to the inbound directory of your server.
1 Open the Integration Server Administrator if it is not already open.
2 In the Packages menu of the Navigation panel, click Subscribing.
3 The server displays a list of your available subscriptions, organized by publisher, package, and release.
Task: Refer to page:
Displaying packages to which your server subscribes 309
Manually Pulling a Package 309
Subscribing to a package from another server 310
Updating subscription information 313
Canceling a subscription to a package on another server 315
Installing a package that was published from another server 316
To display the packages to which your server subscribes
To pull a package you have already subscribed to
webMethods Integration Server Administrator’s Guide Version 7.1.1 309
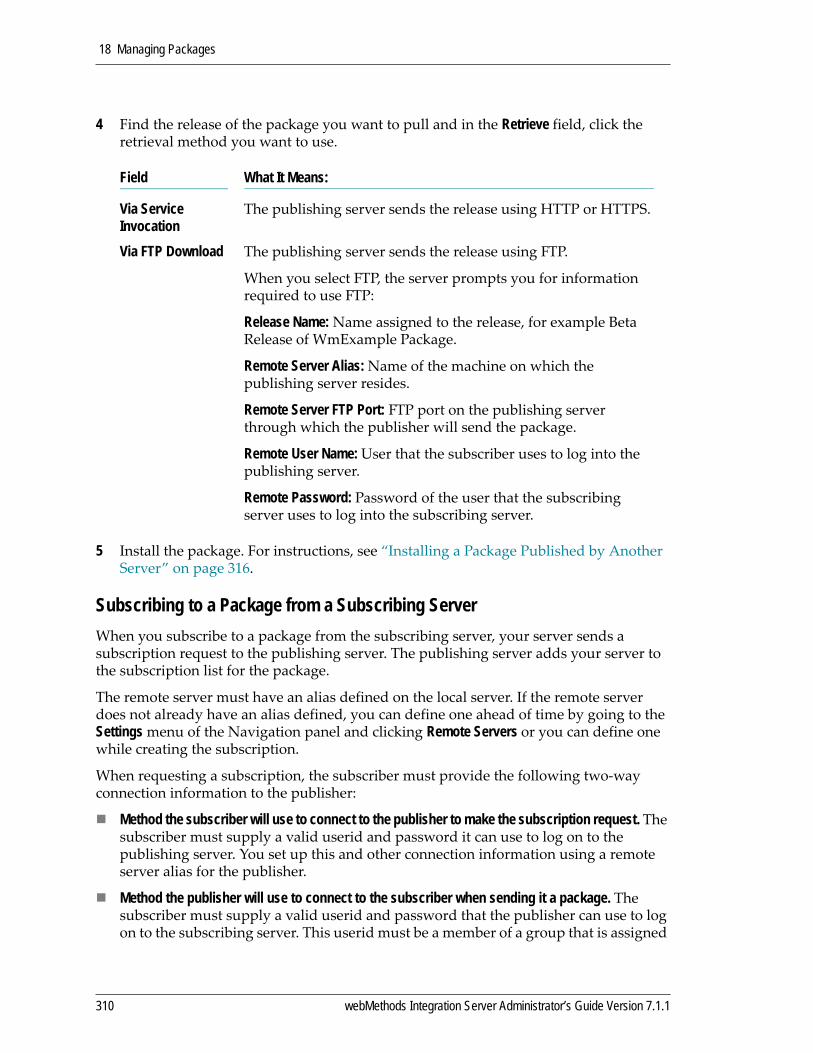
18 Managing Packages
4 Find the release of the package you want to pull and in the Retrieve field, click the retrieval method you want to use.
5 Install the package. For instructions, see “Installing a Package Published by Another Server” on page 316.
Subscribing to a Package from a Subscribing Server When you subscribe to a package from the subscribing server, your server sends a subscription request to the publishing server. The publishing server adds your server to the subscription list for the package.
The remote server must have an alias defined on the local server. If the remote server does not already have an alias defined, you can define one ahead of time by going to the Settings menu of the Navigation panel and clicking Remote Servers or you can define one while creating the subscription.
When requesting a subscription, the subscriber must provide the following two‐way connection information to the publisher:
Method the subscriber will use to connect to the publisher to make the subscription request. The subscriber must supply a valid userid and password it can use to log on to the publishing server. You set up this and other connection information using a remote server alias for the publisher.
Method the publisher will use to connect to the subscriber when sending it a package. The subscriber must supply a valid userid and password that the publisher can use to log on to the subscribing server. This userid must be a member of a group that is assigned
Field What It Means:
Via Service Invocation
The publishing server sends the release using HTTP or HTTPS.
Via FTP Download The publishing server sends the release using FTP.
When you select FTP, the server prompts you for information required to use FTP:
Release Name: Name assigned to the release, for example Beta Release of WmExample Package.
Remote Server Alias: Name of the machine on which the publishing server resides.
Remote Server FTP Port: FTP port on the publishing server through which the publisher will send the package.
Remote User Name: User that the subscriber uses to log into the publishing server.
Remote Password: Password of the user that the subscribing server uses to log into the subscribing server.
310 webMethods Integration Server Administrator’s Guide Version 7.1.1
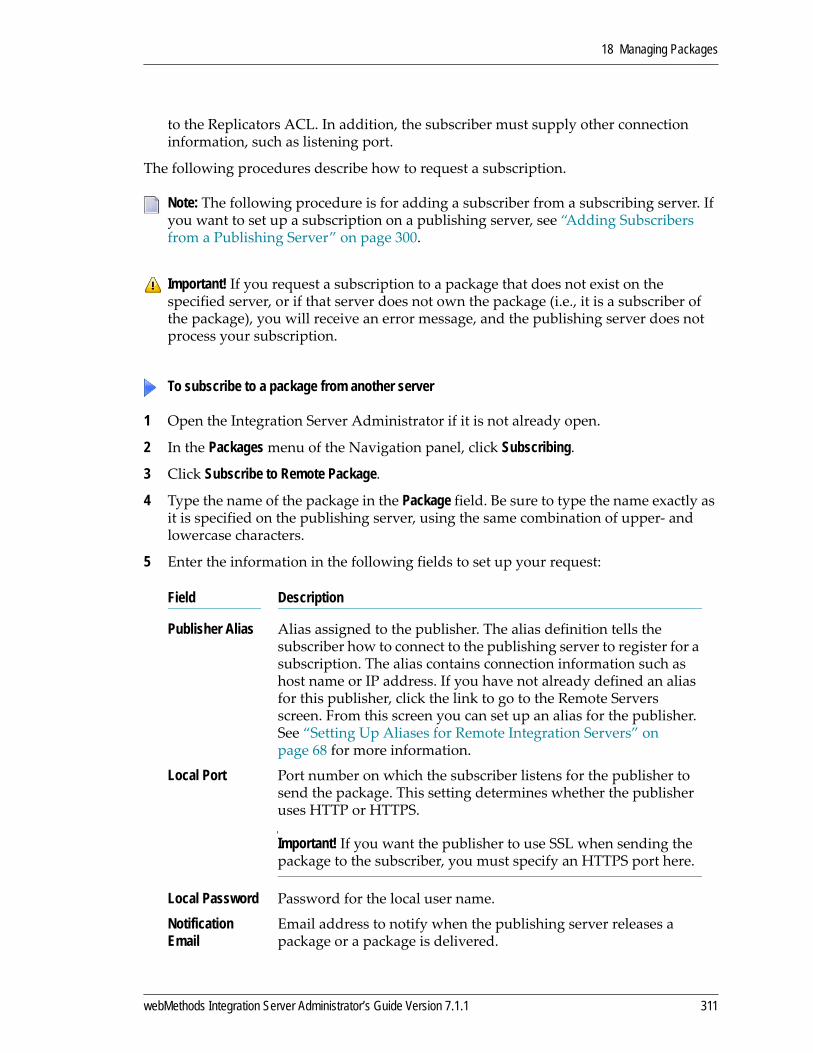
18 Managing Packages
to the Replicators ACL. In addition, the subscriber must supply other connection information, such as listening port.
The following procedures describe how to request a subscription.
1 Open the Integration Server Administrator if it is not already open.
2 In the Packages menu of the Navigation panel, click Subscribing.
3 Click Subscribe to Remote Package.
4 Type the name of the package in the Package field. Be sure to type the name exactly as it is specified on the publishing server, using the same combination of upper‐ and lowercase characters.
5 Enter the information in the following fields to set up your request:
Note: The following procedure is for adding a subscriber from a subscribing server. If you want to set up a subscription on a publishing server, see “Adding Subscribers from a Publishing Server” on page 300.
Important! If you request a subscription to a package that does not exist on the specified server, or if that server does not own the package (i.e., it is a subscriber of the package), you will receive an error message, and the publishing server does not process your subscription.
To subscribe to a package from another server
Field Description
Publisher Alias Alias assigned to the publisher. The alias definition tells the subscriber how to connect to the publishing server to register for a subscription. The alias contains connection information such as host name or IP address. If you have not already defined an alias for this publisher, click the link to go to the Remote Servers screen. From this screen you can set up an alias for the publisher. See “Setting Up Aliases for Remote Integration Servers” on page 68 for more information.
Local Port Port number on which the subscriber listens for the publisher to send the package. This setting determines whether the publisher uses HTTP or HTTPS.
Important! If you want the publisher to use SSL when sending the package to the subscriber, you must specify an HTTPS port here.
Local Password Password for the local user name.
Notification Email
Email address to notify when the publishing server releases a package or a package is delivered.
webMethods Integration Server Administrator’s Guide Version 7.1.1 311

18 Managing Packages
6 Click Start Subscription.
Automatic Pull Specifies whether the subscribing server is to automatically pull the package from the publisher when a new release becomes available.
If you select Yes, you must also specify the email address of a user on an email server to which the publishing server should send a service‐invocation email.
The subscribing server, through an email port, periodically checks this email address for a service‐invocation email. When the subscribing server processes the email, it pulls the package.
The service invocation‐email contains a call to a service that runs on the subscribing server and loads the package to the subscribing server’s Inbound directory.
For automatic pull to work, you must set up an email port to listen at the automatic pull address (described below).
For information about setting up an e‐mail port, see “Setting Up Aliases for Remote Integration Servers” on page 68.
Automatic Pull Email
Email address to which the publishing server is to send a service‐invocation email when a new release of the package becomes available.
Use a different email address for the notification and service‐invocation emails. For example, send notification emails to [email protected] and service invocation emails to [email protected].
For automatic pull to work, you must set up an email port to listen at this address.
For information about setting up an e‐mail port, see “Setting Up Aliases for Remote Integration Servers” on page 68.
Note: The publishing server must be running at the time you add the subscription.
Field Description
312 webMethods Integration Server Administrator’s Guide Version 7.1.1

18 Managing Packages
Updating Your Subscription InformationUse this procedure to update information about your subscription, such as the user name or password on the subscribing server.
1 Open the Integration Server Administrator if it is not already open.
2 In the Packages menu of in the Navigation panel, click Subscribing.
3 Click Update and Unsubscribe from Remote Package.
4 Click Edit in the Update column for the package you want to update.
5 To change subscription information, enter information in the appropriate fields below:
?
To update your subscription information
Field Description
Package Package for which you want to change subscription information.
You can change the package to another package if you do not already subscribe to or publish the new package. This restriction exists because you cannot both subscribe to and publish the same package.
Publisher Alias Alias assigned to the publisher. The alias definition tells the subscriber how to connect to the publishing server to register for a subscription. The alias contains connection information such as host name or IP address. If you have not already defined an alias for this publisher, click the link to go to the Remote Servers screen. From this screen you can set up an alias for the publisher. See “Setting Up Aliases for Remote Integration Servers” on page 68 for more information.
Local Port Port number on which the subscriber listens for the publisher to send the package. This setting determines whether the publisher uses HTTP or HTTPS.
Important! If you want the publisher to use SSL when sending the package to the subscriber, you must specify an HTTPS port here.
Note: When the publisher connects to the subscriber, the publisher uses its default certificate (specified on its Security Settings screen). Make sure the port you specify here can accept that certificate.
webMethods Integration Server Administrator’s Guide Version 7.1.1 313

18 Managing Packages
Local User Name User as which the publisher will log into the subscriber.
This user must belong to a user group that is assigned to the Replicators ACL. If you delete the user or change its association with the Replicators ACL, the publisher cannot send this package to the subscriber.
Local Password Password for the local user name.
Notification Email Email address to notify when the publishing server releases a package or a package is delivered.
Automatic Pull Specifies whether the subscribing server is to automatically pull the package from the publisher when a new release becomes available.
If you already have automatic pull configured and want to turn it off, select No. Then go to the Automatic Pull Email field and delete the email address there.
If you want to configure your server for Automatic Pull, select Yes. You must also specify the email address of a user on an email server to which the publishing server should send a service‐invocation email.
The subscribing server, through an email port, periodically checks this email address for a service‐invocation email. When the subscribing server processes the email, it pulls the package.
The service invocation‐email contains a call to a service that runs on the subscribing server and loads the package to the subscribing server’s Inbound directory.
For automatic pull to work, you must set up an email port to listen at the automatic pull address (described below).
For information about setting up an e‐mail port, see “Setting Up Aliases for Remote Integration Servers” on page 68.
Field Description
314 webMethods Integration Server Administrator’s Guide Version 7.1.1
18 Managing Packages
6 Click Submit Changes.
7 The server updates the information on both the subscribing and publishing servers.
Canceling a SubscriptionWhen you cancel a subscription, the server sends your cancellation notice to the publishing server. The publishing server removes your server from the subscription list for the specified package. If the publisher is not running when you cancel your subscription, the next time the publisher tries to send the package to your server, the publisher is informed of the cancellation and automatically deletes the subscription from its list of subscribers.
1 Open the Integration Server Administrator if it is not already open.
2 In the Packages menu of the Navigation panel, click Subscribing.
3 Click Update and Unsubscribe from Remote Package.
4 Locate the package for which you want to cancel the subscription and click the icon.
Automatic Pull Email
Email address to which the publishing server is to send a service‐invocation email when a new release of the package becomes available.
Use a different email address for the notification and service‐invocation emails. For example, send notification emails to [email protected] and service invocation emails to [email protected].
For automatic pull to work, you must set up an email port to listen at this address.
For information about setting up an e‐mail port, see “Setting Up Aliases for Remote Integration Servers” on page 68.
Note: The publishing server must be running at the time you add the subscription.
Note: If a subscriber removes a subscription initiated by the publisher, the subscribing server removes the subscription from its subscriptions list, but the subscription is not immediately removed from the publisher’s list. Instead, the next time the publishing server tries to send the package to the subscriber, the publisher is notified of the removal and then deletes the subscription from the publisher’s list.
To cancel your subscription to a package on another server
Field Description
webMethods Integration Server Administrator’s Guide Version 7.1.1 315

18 Managing Packages
Installing a Package Published by Another Server When another server publishes a package to your server, you need to install the published package.
If you install a package that has the same name as an existing package on your server, your server copies the original package to IntegrationServer_directory\replicate\salvage before it installs the new one. This lets you easily revert to the previous version if you are dissatisfied with the new package. For information about reverting to the earlier version, refer to “Recovering a Package” on page 291.
You can select whether you want the server to immediately activate the package after it installs it. If you do not select to activate the package, the server copies the package to the packages directory, but it is not available for clients to use. To make this package available for clients, you must manually activate it. For more information, refer to “Activating a Package” on page 289.
A package coming from the publisher already has a List ACL associated with it, specifically, the List ACL that was assigned to the package on the publishing server.
The installing user does not need to be a member of that ACL to install the package; however, users on the subscribing server must be members of the package’s List ACL in order to display the package on Integration Server Administrator screens.
If the package you are installing has dependencies on another package that does not exist on your server, the server will install the package but will not enable it. You will not be able to enable the installed package until the dependencies are satisfied.
If the package you are installing is associated with an email listener, the server will install the package but will not enable the listener. This is because the password required for the Integration Server to connect to the email server was not sent with other configuration information about the listener. To enable the listener, go to the Security > Ports > Edit Email Client Configuration Screen and update the Password field to specify the password needed to connect to the email server.
If you export a package that is associated with an e‐mail listener from a 6.5 Integration Server to a pre‐6.5 Integration Server, the e‐mail listener will not be replicated at all. You must manually reconfigure the listener on the pre‐6.5 Integration Server after installing the package there. For instructions on configuring the e‐mail listener, refer to “Adding an Email Port” on page 103.
Important! Be sure the server where you are installing the package has an ACL with the same name as package’s List ACL. If the List ACL does not exist, no users will be able to display the package on Integration Server Administrator screens.
Important! Make sure that packages you install come from a legitimate source, such as a replication from another server. If you are not sure, check with the developers in your organization to verify that an authorized person updated the package. Unknown packages might contain code that could damage your server.
316 webMethods Integration Server Administrator’s Guide Version 7.1.1

18 Managing Packages
1 Open the Integration Server Administrator if it is not already open.
2 In the Packages menu of the Navigation panel, click Management.
3 Click Install Inbound Releases.
4 Select the package you want to install from the Release file name drop down list.
5 If you want to make the package available immediately following installation, check the Activate upon installation checkbox in the Option field.
6 Click Install Release.
To install a package that was published from another server
webMethods Integration Server Administrator’s Guide Version 7.1.1 317

18 Managing Packages
318 webMethods Integration Server Administrator’s Guide Version 7.1.1
19 Caching Service Results
What Is Caching? . . . . . . . . . . . . . . . . . . . . . . . . . . . . . . . . . . . . . . . . . . . . . . . . . . . . . . . . . . . . . 320
When Are Cached Results Returned? . . . . . . . . . . . . . . . . . . . . . . . . . . . . . . . . . . . . . . . . . . . . . 320
Resetting the Cache . . . . . . . . . . . . . . . . . . . . . . . . . . . . . . . . . . . . . . . . . . . . . . . . . . . . . . . . . . . 322
Viewing Service Statistics . . . . . . . . . . . . . . . . . . . . . . . . . . . . . . . . . . . . . . . . . . . . . . . . . . . . . . 322
webMethods Integration Server Administrator’s Guide Version 7.1.1 319
19 Caching Service Results
What Is Caching?Caching is an optimization feature that can improve the performance of services.
You indicate the services for which you want to use caching from the webMethods Developer. When you enable caching for a service, webMethods Integration Server saves the entire contents of the pipeline after invoking the service in a local cache for the period of time that you specify. The pipeline includes the output fields explicitly defined in the cached service, as well as any output fields produced by earlier services in the flow. When the server receives subsequent requests for a service with the same set of input values, it returns the cached result to the client rather than invoking the service again.
Caching can significantly improve response time of services. For example, services that retrieve information from busy data sources such as high‐traffic commercial Web servers could benefit from caching. The server can cache the results for all types of services: flows, Java services, and C/C++ services.
The goal for caching is to strike the right balance between data concurrency and memory usage. To gauge the effectiveness of your cache, you can monitor its performance by viewing service statistics from the Integration Server Administrator and adjust your caching values accordingly.
You set the controls for caching a service from the Developer. See the webMethods Developer User’s Guide for more information on configuring a service’s use of cache.
When Are Cached Results Returned?When you enable caching for a service in the webMethods Developer, the webMethods Integration Server handles the cached results differently, depending on whether the service has input parameters. It is recommended that a cached service has input parameters.
Service with input parameters. When a cached service has input parameters, at run time the Integration Server scopes the pipeline down to only the input parameters of the service. The scoped‐down inputs are compared to the previously stored copy of inputs. If they exist and match, the cached results from the previous service invocation are used.
320 webMethods Integration Server Administrator’s Guide Version 7.1.1
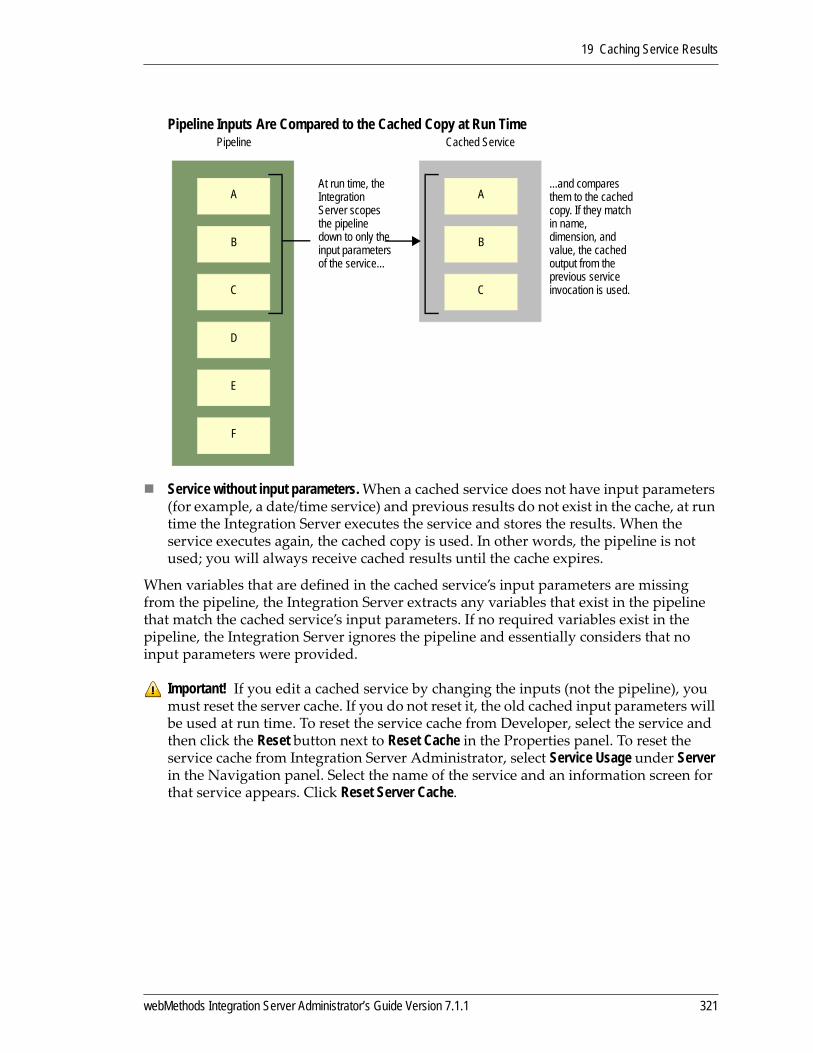
19 Caching Service Results
Pipeline Inputs Are Compared to the Cached Copy at Run Time
Service without input parameters. When a cached service does not have input parameters (for example, a date/time service) and previous results do not exist in the cache, at run time the Integration Server executes the service and stores the results. When the service executes again, the cached copy is used. In other words, the pipeline is not used; you will always receive cached results until the cache expires.
When variables that are defined in the cached service’s input parameters are missing from the pipeline, the Integration Server extracts any variables that exist in the pipeline that match the cached service’s input parameters. If no required variables exist in the pipeline, the Integration Server ignores the pipeline and essentially considers that no input parameters were provided.
Important! If you edit a cached service by changing the inputs (not the pipeline), you must reset the server cache. If you do not reset it, the old cached input parameters will be used at run time. To reset the service cache from Developer, select the service and then click the Reset button next to Reset Cache in the Properties panel. To reset the service cache from Integration Server Administrator, select Service Usage under Server in the Navigation panel. Select the name of the service and an information screen for that service appears. Click Reset Server Cache.
At run time, the Integration Server scopes the pipeline down to only the input parameters of the service...
Pipeline
A
B
C
D
E
F
...and compares them to the cached copy. If they match in name, dimension, and value, the cached output from the previous service invocation is used.
Cached Service
A
B
C
webMethods Integration Server Administrator’s Guide Version 7.1.1 321

19 Caching Service Results
Resetting the CacheYou can reset the cache for all services or you can reset the cache for a specific service. When the server resets the cache, it removes all cached service results from memory.
1 Open the Integration Server Administrator if it is not already open.
2 In the Server menu of the Navigation panel, click Service Usage.
3 Click Reset Server Cache to reset the caches of all the listed services.
1 Open the Integration Server Administrator if it is not already open.
2 In the Server menu of the Navigation panel, click Service Usage.
3 Select the name of the service for which you want to reset the cache. An information screen for that service appears.
4 Click Reset Service Cache.
Viewing Service StatisticsUse the following procedure to monitor the performance of your cache.
1 Open the Integration Server Administrator if it is not already open.
2 In the Server menu of the Navigation panel, click Service Usage.
The Service Usage screen displays the current results of your cache control settings for each cache‐controlled service.
To reset the cache for all services
To reset the cache for a specific service
To monitor the performance of your cache
Tip! Enable Show running services on top to display all the currently running services in the Integration Server together at the top of the screen. Currently running services are identified by a number in brackets at the right of the service name. The number identifies how many instances of the service, if any, are currently running.
Disable Show running services on top to restore the list to alphabetical order.
322 webMethods Integration Server Administrator’s Guide Version 7.1.1
20 Configuring Guaranteed Delivery
About Guaranteed Delivery . . . . . . . . . . . . . . . . . . . . . . . . . . . . . . . . . . . . . . . . . . . . . . . . . . . . . 324
Configuring the Server for Guaranteed Delivery . . . . . . . . . . . . . . . . . . . . . . . . . . . . . . . . . . . . . 325
Administering Guaranteed Delivery . . . . . . . . . . . . . . . . . . . . . . . . . . . . . . . . . . . . . . . . . . . . . . . 328
Specifying an E-Mail Address and SMTP Server for Error Messages . . . . . . . . . . . . . . . . . . . . . 330
webMethods Integration Server Administrator’s Guide Version 7.1.1 323
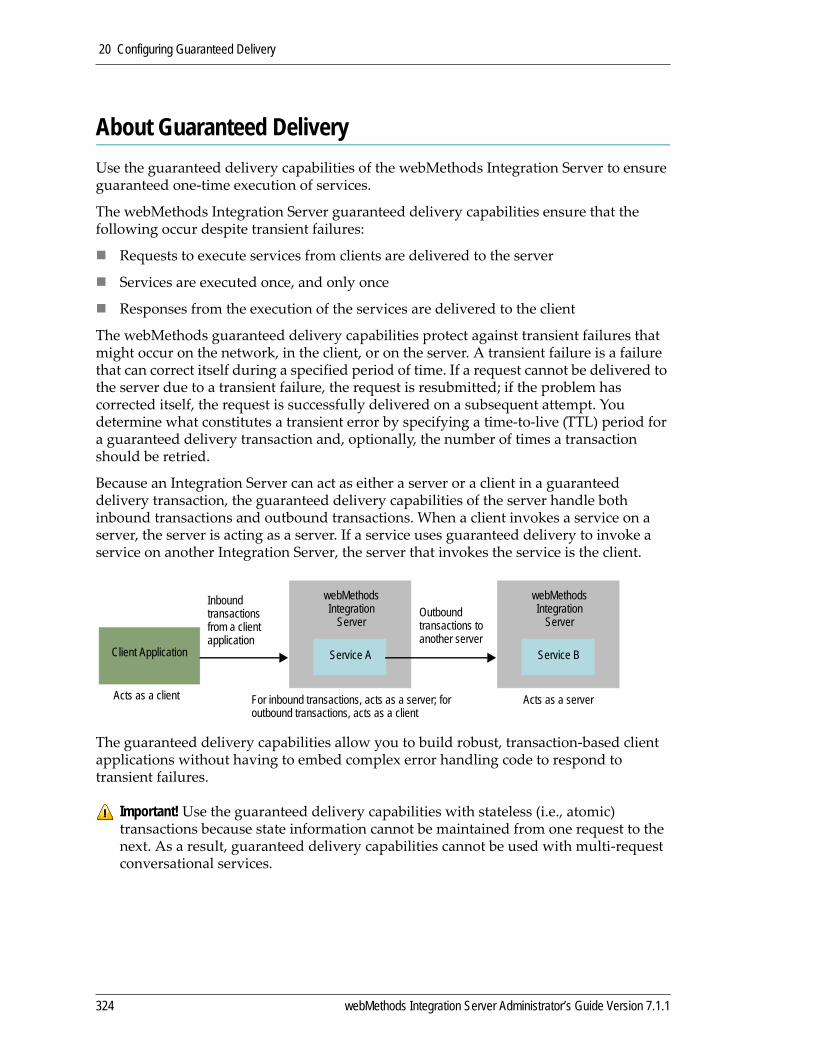
20 Configuring Guaranteed Delivery
About Guaranteed DeliveryUse the guaranteed delivery capabilities of the webMethods Integration Server to ensure guaranteed one‐time execution of services.
The webMethods Integration Server guaranteed delivery capabilities ensure that the following occur despite transient failures:
Requests to execute services from clients are delivered to the server
Services are executed once, and only once
Responses from the execution of the services are delivered to the client
The webMethods guaranteed delivery capabilities protect against transient failures that might occur on the network, in the client, or on the server. A transient failure is a failure that can correct itself during a specified period of time. If a request cannot be delivered to the server due to a transient failure, the request is resubmitted; if the problem has corrected itself, the request is successfully delivered on a subsequent attempt. You determine what constitutes a transient error by specifying a time‐to‐live (TTL) period for a guaranteed delivery transaction and, optionally, the number of times a transaction should be retried.
Because an Integration Server can act as either a server or a client in a guaranteed delivery transaction, the guaranteed delivery capabilities of the server handle both inbound transactions and outbound transactions. When a client invokes a service on a server, the server is acting as a server. If a service uses guaranteed delivery to invoke a service on another Integration Server, the server that invokes the service is the client.
The guaranteed delivery capabilities allow you to build robust, transaction‐based client applications without having to embed complex error handling code to respond to transient failures.
Important! Use the guaranteed delivery capabilities with stateless (i.e., atomic) transactions because state information cannot be maintained from one request to the next. As a result, guaranteed delivery capabilities cannot be used with multi‐request conversational services.
For inbound transactions, acts as a server; for outbound transactions, acts as a client
Client Application
Outbound transactions to another server
Service A
webMethods Integration
Server
Service B
Acts as a client Acts as a server
Inbound transactions from a client application
webMethods Integration
Server
324 webMethods Integration Server Administrator’s Guide Version 7.1.1
20 Configuring Guaranteed Delivery
Configuring the Server for Guaranteed DeliveryThis section describes configuration settings that the Integration Server uses for guaranteed delivery transactions. Most of the settings have defaults. In general, you will want to use the defaults; however, you can specify alternate settings in the server.cnf server configuration file. You can change these setting by using the Settings > Extended screen of the Integration Server Administrator as described on page “Switching from the Embedded Database to an External RDBMS” on page 79.
For Guaranteed Delivery to work, the ISInternal functional alias (specified on the Settings>JDBC Pools screen) must be configured to point to either the embedded IS Internal database or to an external RDBMS. For information about connecting Integration Server to database components, see the webMethods Installation Guide.
For information about using guaranteed delivery with server clustering, refer to the webMethods Integration Server Clustering Guide.
There are settings for both inbound and outbound guaranteed delivery transactions.
Settings Shared by Both Inbound and Outbound Transactionswatt.server.txMailUse the watt.server.txMail setting to specify the e‐mail address of an administrator to notify when guaranteed delivery capabilities are disabled due to error (for example, if the server encounters a disk full condition). An example of using this setting is [email protected].
There is no default for this setting.
watt.server.smtpServerUse the watt.server.smtpServer setting to specify the domain name (e.g., purple.webmethods.com) or IP address (e.g. 132.906.19.22) of the SMTP server you want the Integration Server to use when sending an e‐mail message about an error during guaranteed delivery. An example of using this setting is watt.server.smtpServer=132.906.19.22
There is no default for this setting.
When an administrator receives an e‐mail notification of an error, the administrator should correct the problem, then use the Integration Server Administrator to re‐initialize guaranteed delivery capabilities. For instructions on how to re‐initialize guaranteed delivery, refer to “Reinitializing Guaranteed Delivery” on page 329.
Settings for Inbound TransactionsFor inbound transactions, the server maintains a job store of transactions and the status of each. Periodically, the server sweeps the job store to remove expired transactions; that is, to remove transactions that have an elapsed time‐to‐live (TTL) period. For inbound requests, the client must specify the TTL for a transaction.
webMethods Integration Server Administrator’s Guide Version 7.1.1 325
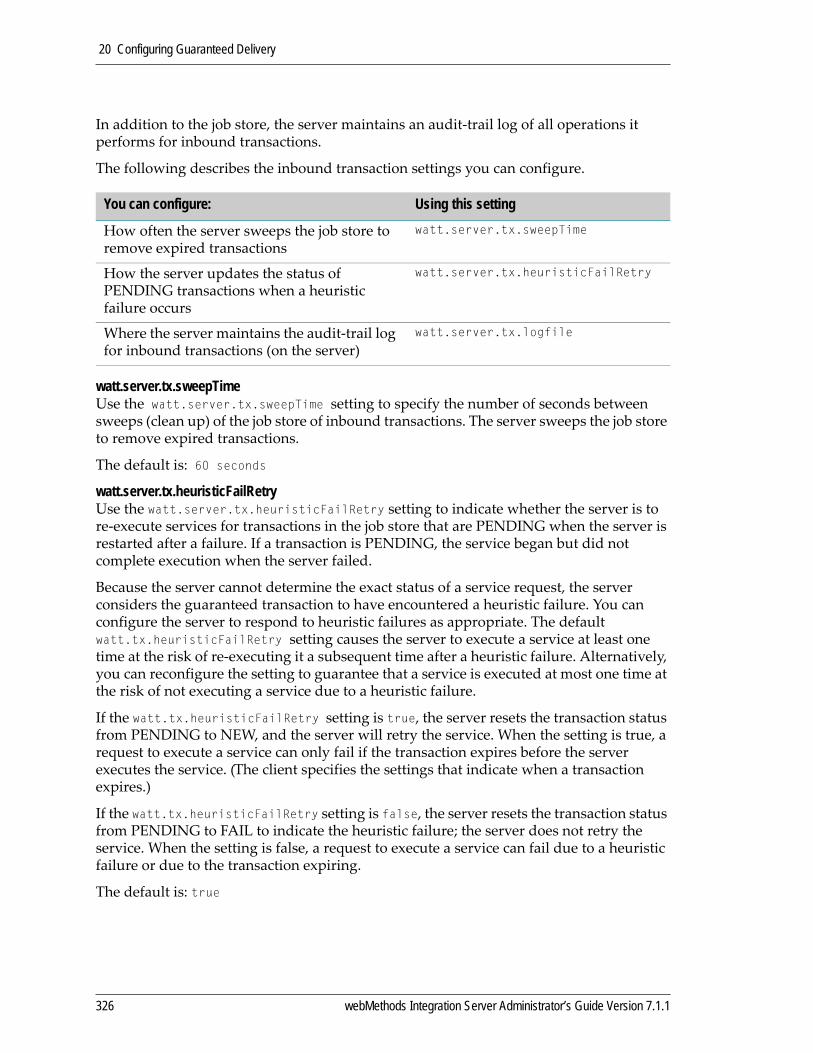
20 Configuring Guaranteed Delivery
In addition to the job store, the server maintains an audit‐trail log of all operations it performs for inbound transactions.
The following describes the inbound transaction settings you can configure.
watt.server.tx.sweepTimeUse the watt.server.tx.sweepTime setting to specify the number of seconds between sweeps (clean up) of the job store of inbound transactions. The server sweeps the job store to remove expired transactions.
The default is: 60 seconds
watt.server.tx.heuristicFailRetryUse the watt.server.tx.heuristicFailRetry setting to indicate whether the server is to re‐execute services for transactions in the job store that are PENDING when the server is restarted after a failure. If a transaction is PENDING, the service began but did not complete execution when the server failed.
Because the server cannot determine the exact status of a service request, the server considers the guaranteed transaction to have encountered a heuristic failure. You can configure the server to respond to heuristic failures as appropriate. The default watt.tx.heuristicFailRetry setting causes the server to execute a service at least one time at the risk of re‐executing it a subsequent time after a heuristic failure. Alternatively, you can reconfigure the setting to guarantee that a service is executed at most one time at the risk of not executing a service due to a heuristic failure.
If the watt.tx.heuristicFailRetry setting is true, the server resets the transaction status from PENDING to NEW, and the server will retry the service. When the setting is true, a request to execute a service can only fail if the transaction expires before the server executes the service. (The client specifies the settings that indicate when a transaction expires.)
If the watt.tx.heuristicFailRetry setting is false, the server resets the transaction status from PENDING to FAIL to indicate the heuristic failure; the server does not retry the service. When the setting is false, a request to execute a service can fail due to a heuristic failure or due to the transaction expiring.
The default is: true
You can configure: Using this setting
How often the server sweeps the job store to remove expired transactions
watt.server.tx.sweepTime
How the server updates the status of PENDING transactions when a heuristic failure occurs
watt.server.tx.heuristicFailRetry
Where the server maintains the audit‐trail log for inbound transactions (on the server)
watt.server.tx.logfile
326 webMethods Integration Server Administrator’s Guide Version 7.1.1
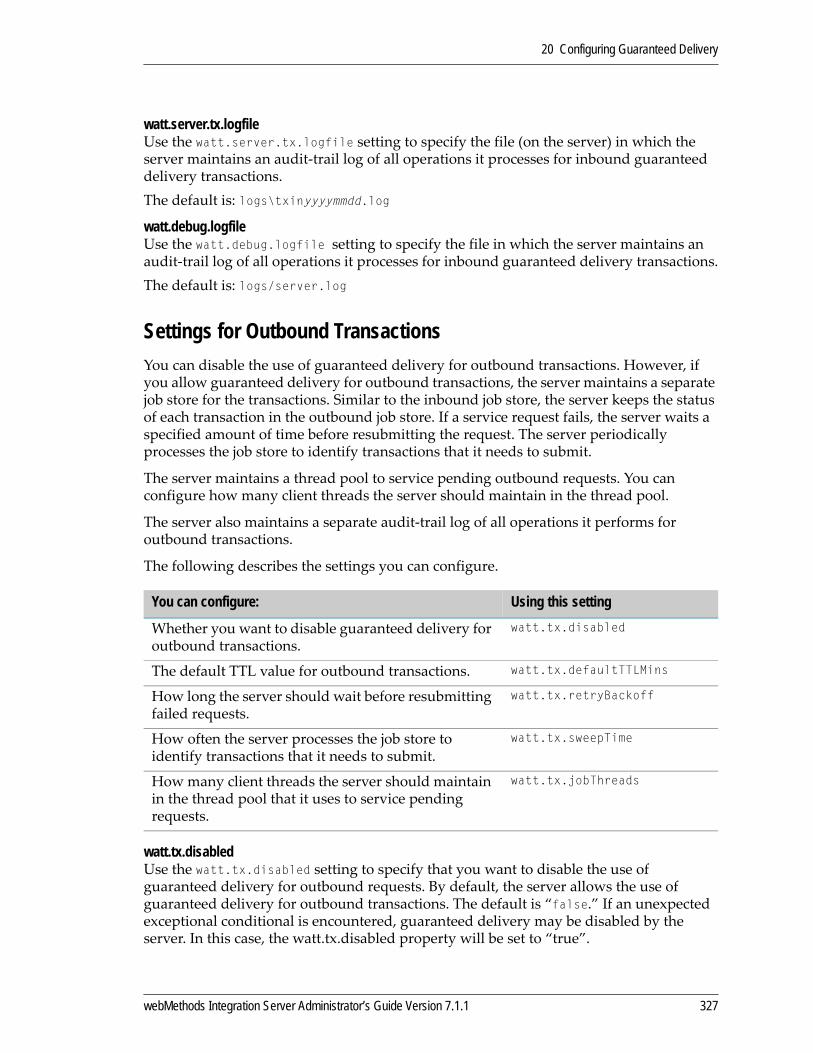
20 Configuring Guaranteed Delivery
watt.server.tx.logfile Use the watt.server.tx.logfile setting to specify the file (on the server) in which the server maintains an audit‐trail log of all operations it processes for inbound guaranteed delivery transactions.The default is: logs\txinyyyymmdd.log
watt.debug.logfile Use the watt.debug.logfile setting to specify the file in which the server maintains an audit‐trail log of all operations it processes for inbound guaranteed delivery transactions.The default is: logs/server.log
Settings for Outbound TransactionsYou can disable the use of guaranteed delivery for outbound transactions. However, if you allow guaranteed delivery for outbound transactions, the server maintains a separate job store for the transactions. Similar to the inbound job store, the server keeps the status of each transaction in the outbound job store. If a service request fails, the server waits a specified amount of time before resubmitting the request. The server periodically processes the job store to identify transactions that it needs to submit.
The server maintains a thread pool to service pending outbound requests. You can configure how many client threads the server should maintain in the thread pool.
The server also maintains a separate audit‐trail log of all operations it performs for outbound transactions.
The following describes the settings you can configure.
watt.tx.disabledUse the watt.tx.disabled setting to specify that you want to disable the use of guaranteed delivery for outbound requests. By default, the server allows the use of guaranteed delivery for outbound transactions. The default is “false.” If an unexpected exceptional conditional is encountered, guaranteed delivery may be disabled by the server. In this case, the watt.tx.disabled property will be set to “true”.
You can configure: Using this setting
Whether you want to disable guaranteed delivery for outbound transactions.
watt.tx.disabled
The default TTL value for outbound transactions. watt.tx.defaultTTLMins
How long the server should wait before resubmitting failed requests.
watt.tx.retryBackoff
How often the server processes the job store to identify transactions that it needs to submit.
watt.tx.sweepTime
How many client threads the server should maintain in the thread pool that it uses to service pending requests.
watt.tx.jobThreads
webMethods Integration Server Administrator’s Guide Version 7.1.1 327

20 Configuring Guaranteed Delivery
The default is: false
watt.tx.defaultTTLMinsUse the watt.tx.defaultTTLMins setting to specify the default time‐to‐live (TTL) value for outbound guaranteed delivery transactions. Specify the number of minutes you want the server to maintain outbound transactions in the job store when a service initiating an outbound transaction does not specify a TTL value.
The default is: 30
watt.tx.retryBackoffUse the watt.tx.retryBackoff setting to specify the number of seconds to wait after a service request failure before the Job Manager resubmits the request to execute the service to the Integration Server.
The default is: 60
watt.tx.sweepTimeUse the watt.tx.sweepTime setting to specify the number of seconds between sweeps of the job store of outbound transactions. The server sweeps the job store to identify transactions that it needs to submit.
The default is: 60
watt.tx.jobThreadsUse the watt.tx.jobThreads setting to specify the number of client threads you want to make available in a thread pool to service pending requests.
The default is: 5
Administering Guaranteed DeliveryWhen you initialize the server, it initializes guaranteed delivery capabilities. You can use the Integration Server Administrator to shut down, re‐initialize, and test guaranteed delivery.
Shutting Down Guaranteed DeliveryYou can shut down and re‐enable guaranteed delivery capabilities without having to shut down the server.
You might want to shut down guaranteed delivery to perform some administration functions, such as correcting configuration errors or starting a new audit‐trail log. (To start a new audit‐trail log, move or rename the existing log; the server automatically starts a new log if one does not already exist.)
328 webMethods Integration Server Administrator’s Guide Version 7.1.1
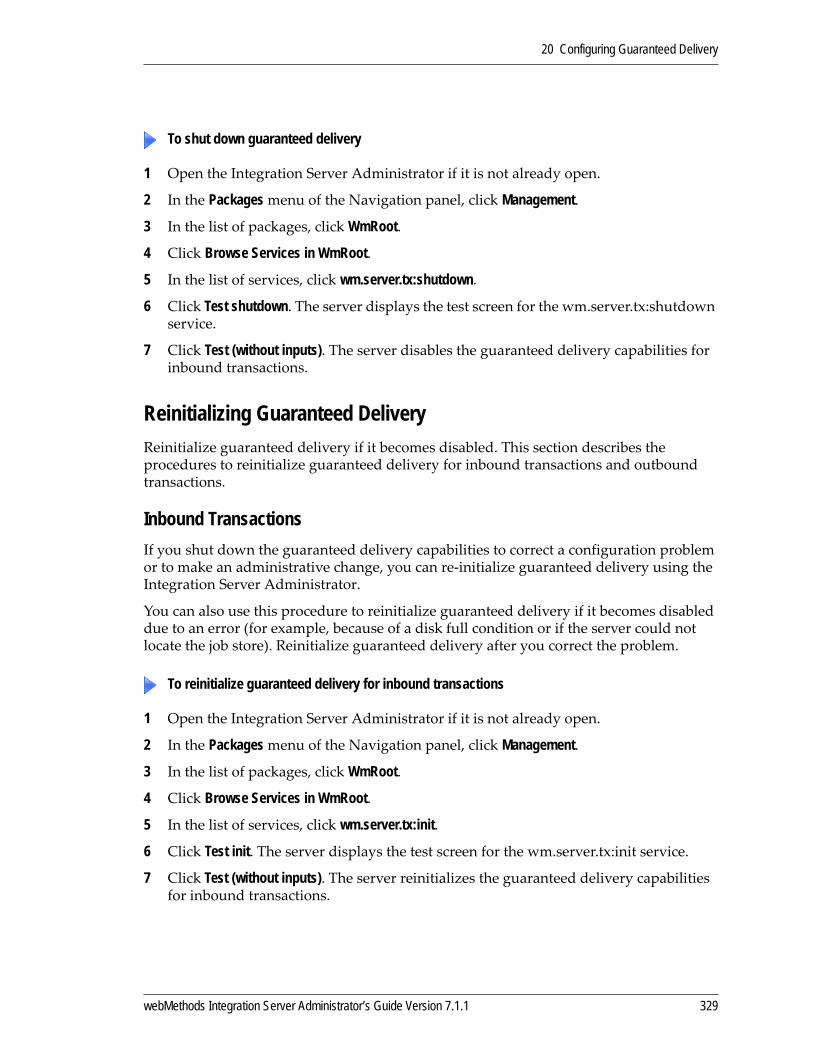
20 Configuring Guaranteed Delivery
1 Open the Integration Server Administrator if it is not already open.
2 In the Packages menu of the Navigation panel, click Management.
3 In the list of packages, click WmRoot.
4 Click Browse Services in WmRoot.
5 In the list of services, click wm.server.tx:shutdown.
6 Click Test shutdown. The server displays the test screen for the wm.server.tx:shutdown service.
7 Click Test (without inputs). The server disables the guaranteed delivery capabilities for inbound transactions.
Reinitializing Guaranteed DeliveryReinitialize guaranteed delivery if it becomes disabled. This section describes the procedures to reinitialize guaranteed delivery for inbound transactions and outbound transactions.
Inbound TransactionsIf you shut down the guaranteed delivery capabilities to correct a configuration problem or to make an administrative change, you can re‐initialize guaranteed delivery using the Integration Server Administrator.
You can also use this procedure to reinitialize guaranteed delivery if it becomes disabled due to an error (for example, because of a disk full condition or if the server could not locate the job store). Reinitialize guaranteed delivery after you correct the problem.
1 Open the Integration Server Administrator if it is not already open.
2 In the Packages menu of the Navigation panel, click Management.
3 In the list of packages, click WmRoot.
4 Click Browse Services in WmRoot.
5 In the list of services, click wm.server.tx:init.
6 Click Test init. The server displays the test screen for the wm.server.tx:init service.
7 Click Test (without inputs). The server reinitializes the guaranteed delivery capabilities for inbound transactions.
To shut down guaranteed delivery
To reinitialize guaranteed delivery for inbound transactions
webMethods Integration Server Administrator’s Guide Version 7.1.1 329
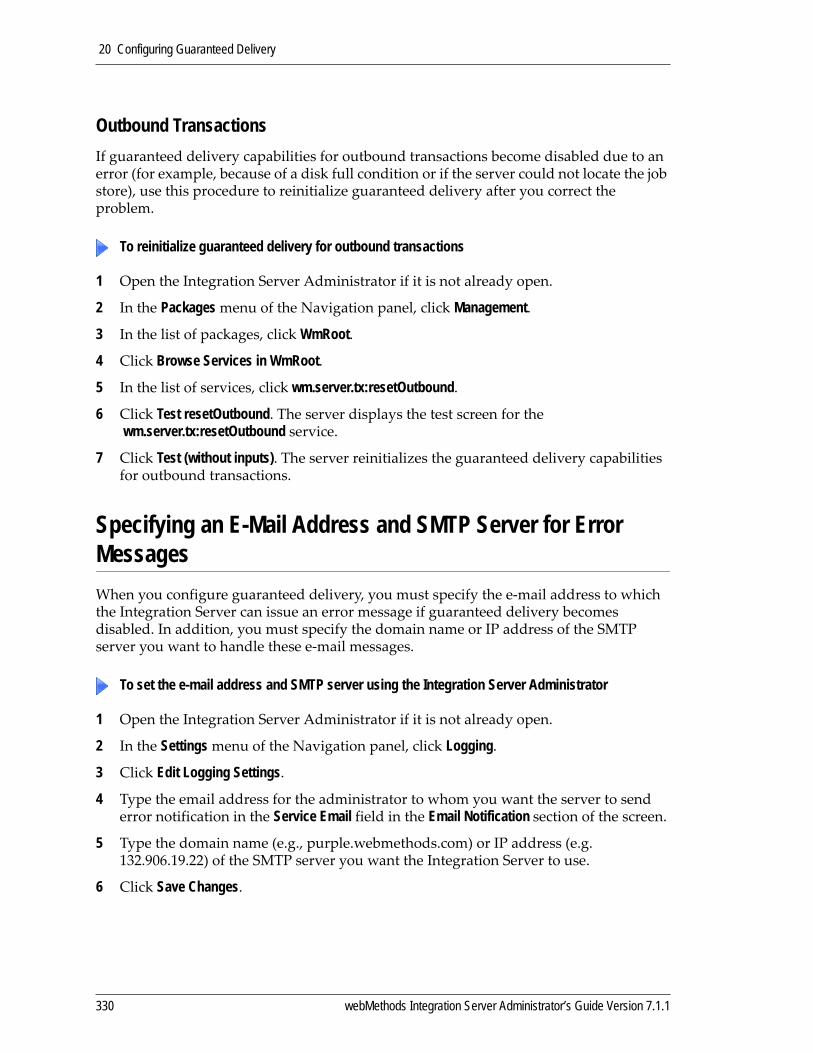
20 Configuring Guaranteed Delivery
Outbound TransactionsIf guaranteed delivery capabilities for outbound transactions become disabled due to an error (for example, because of a disk full condition or if the server could not locate the job store), use this procedure to reinitialize guaranteed delivery after you correct the problem.
1 Open the Integration Server Administrator if it is not already open.
2 In the Packages menu of the Navigation panel, click Management.
3 In the list of packages, click WmRoot.
4 Click Browse Services in WmRoot.
5 In the list of services, click wm.server.tx:resetOutbound.
6 Click Test resetOutbound. The server displays the test screen for the wm.server.tx:resetOutbound service.
7 Click Test (without inputs). The server reinitializes the guaranteed delivery capabilities for outbound transactions.
Specifying an E-Mail Address and SMTP Server for Error MessagesWhen you configure guaranteed delivery, you must specify the e‐mail address to which the Integration Server can issue an error message if guaranteed delivery becomes disabled. In addition, you must specify the domain name or IP address of the SMTP server you want to handle these e‐mail messages.
1 Open the Integration Server Administrator if it is not already open.
2 In the Settings menu of the Navigation panel, click Logging.
3 Click Edit Logging Settings.
4 Type the email address for the administrator to whom you want the server to send error notification in the Service Email field in the Email Notification section of the screen.
5 Type the domain name (e.g., purple.webmethods.com) or IP address (e.g. 132.906.19.22) of the SMTP server you want the Integration Server to use.
6 Click Save Changes.
To reinitialize guaranteed delivery for outbound transactions
To set the e-mail address and SMTP server using the Integration Server Administrator
330 webMethods Integration Server Administrator’s Guide Version 7.1.1
21 Managing Services
About Services . . . . . . . . . . . . . . . . . . . . . . . . . . . . . . . . . . . . . . . . . . . . . . . . . . . . . . . . . . . . . . . 332
Fully-Qualified Service Names . . . . . . . . . . . . . . . . . . . . . . . . . . . . . . . . . . . . . . . . . . . . . . . . . . . 332
Finding Information about Services and Folders . . . . . . . . . . . . . . . . . . . . . . . . . . . . . . . . . . . . . 334
Working with Services . . . . . . . . . . . . . . . . . . . . . . . . . . . . . . . . . . . . . . . . . . . . . . . . . . . . . . . . . 336
Running Services When Packages Are Loaded, Unloaded, or Replicated . . . . . . . . . . . . . . . . . 337
Running Services in Response to Specific Events . . . . . . . . . . . . . . . . . . . . . . . . . . . . . . . . . . . 338
Scheduling Services to Execute at Specified Times . . . . . . . . . . . . . . . . . . . . . . . . . . . . . . . . . . 339
webMethods Integration Server Administrator’s Guide Version 7.1.1 331
21 Managing Services
About ServicesA service is a server‐resident unit of functionality that clients can invoke. A service might be an entire application or used as part of a larger application. There are several types of services: flow services (including Web service connectors), adapter services, Java services, and C/C++ services.
You can create all flow services using the webMethods Developer. You can create database flow services from the Integration Server Administrator as well. You can also use the Developer to create adapter services, Java services, or use your own development environment to create Java and C/C++ services. For more information about the types of services and how to create them, refer to the webMethods Developer User’s Guide.
You can designate one or more services in a package as a startup, shutdown, or replication service. A startup service is a service that the server automatically executes when a package is loaded. A shutdown service is a service that the server automatically executes when a package is unloaded. A replication service is a service that the server automatically executes when a package is replicated.
To improve the performance of services, you can have the server cache the service results. Then, when the server receives subsequent requests for the service, it returns the cached results rather than executing the service. For more information, see Chapter 19, “Caching Service Results”.
Fully-Qualified Service NamesThe fully‐qualified service name is comprised of two parts: a folder identifier and the service name. The folder identifier consists of one or more folder names. The service name is a single name of the service.
Use a folder to group related services together. When a folder contains other folders, the nested folders are called subfolders. For example, if you have several services that involve financial information, you might create a folder named “Finance” to hold the services. Within the financial services, there might be services that are for personal finances. You might create a subfolder named “Personal” to hold those services.
Use any name for the service name. For example, if one of the financial services obtains stock quotes, you might name the service, “StockQuote.”
To specify a fully‐qualified service name, identify the folder portion, then a colon (:), then the service name:
folder:service
For example, if the “StockQuote” service is in the “Finance” folder, the fully‐qualified service name is:
Finance:StockQuote
If the folder portion identifies more than one folder, separate each folder name with a period.
332 webMethods Integration Server Administrator’s Guide Version 7.1.1
21 Managing Services
folder.subfolder1.subfolder2:service
For example, if the “HomeLoan” service is in the “Personal” folder, which is contained in the “Finance” folder, the fully‐qualified service name is:
Finance.Personal:HomeLoan
The fully‐qualified name of each service must be unique within the server. In addition, the fully‐qualified name of a service cannot be the same as the fully‐qualified name of any specification or document type that resides on the server.
Package Names and Service NamesThe relationship between the package name and the folder name can cause confusion. The name of the package to which a service belongs has no bearing on the names of the services and folders it contains. Nor does it affect how it is referenced by a client application. For example, if you move a service called “Personnel:GetDeptNames” from a package called “Admin” to a package called “EmployeeData” you will not affect client applications that reference that service; it will still be referenced by the name “Personnel:GetDepNames.”
Because the fully‐qualified name of each service must be unique within the server, you cannot have two identically named services in two different packages on the same server.
Note: The watt.server.illegalNSChars setting in the server.cnf file (which is located in the IntegrationServer_directory\config directory) defines the characters that you cannot use when naming folders and services. To view or change this setting, use the Settings>Extended screen from the Integration Server Administrator as described on page “Switching from the Embedded Database to an External RDBMS” on page 79.
webMethods Integration Server Administrator’s Guide Version 7.1.1 333
21 Managing Services
Finding Information about Services and FoldersThis section describes how to list the services (and folders) on your server and display information about a specific service.
Listing Folders and ServicesThe Folders and Services screens of the Integration Server Administrator list the services that reside on your server and the folders with which they are associated.
1 Open the Integration Server Administrator if it is not already open.
2 From the Packages menu in the Navigation panel, click Management.
3 Click Browse Folders.
4 To view the contents of a folder, click the folder name. The server displays another Folder List screen. For the selected folder, the server displays the subfolders followed by the services.
You can continue to click on folder names to view subfolders and services in selected folders.
Displaying Information about a ServiceThe Packages > Management > WmPublic > Services > service screen displays a variety of information about a selected service or specification.
1 Open the Integration Server Administrator if it is not already open.
2 From the Packages menu in the Navigation panel, click Management.
3 From the Package List, click the package whose services you want to view.
4 Click Browse Services in packagename.
To list folders and services
Note: The server will only display folders and elements to which you have List access.
To display information about a service
334 webMethods Integration Server Administrator’s Guide Version 7.1.1
21 Managing Services
5 Click the name of the service or specification for which you want to display information.
The server displays a screen that contains the following sections:
Section Description
General Info Identifies
The folder in which the service is contained and the service name.
The name of the package with which the service is associated.
The type of service: Flow, Java, or C/C++.
Whether or not the service is stateless.
Universal Name The name that will be used to qualify the name of this service. It consists of the namespace name and the local name.
By convention, a URI is generally used as the namespace name (e.g., http://www.gsx.com/gl). This assures that the universal name is globally unique.
The local name uniquely identifies the service within the collection encompassed by namespace name. Most sites use the unqualified portion of the service name as the local name
You may use any sequence of characters or digits for the namespace name and the local name.
Java-Specific Parameters
For a Java service, identifies the Java class name and method name for the service.
Access Control Identifies the ACLs assigned to the service or specification. For information about ACLs, services, and specifications, see Chapter , “Controlling Access to Resources with ACLs”.
Cache Control Identifies whether the server is to save the results of executing this service in cache. For information, see Chapter 19, “Caching Service Results”.
Data Formatting Identifies the name of a binding service that parses incoming XML for the service, the output template associated with the service (if any), and the type of the output template (HTML or XML). For information about output templates, refer to the Dynamic Server Pages and Output Templates Developer’s Guide.
webMethods Integration Server Administrator’s Guide Version 7.1.1 335
21 Managing Services
Working with ServicesYou can perform the following tasks that act on services.
Manually Adding a Service to the ServerIf you have Java or C/C++ services that were not created using the Developer, you must manually add them to the server using the jcode utility. See “Building Java Services with Your Own IDE” in the webMethods Developer User’s Guide for more information.
Testing ServicesYou can test the operation of a service. This allows you to quickly and easily verify the operation of a service and test it with special‐case input values.
1 Open the Integration Server Administrator if it is not already open.
2 From the Packages menu in the Navigation panel, click Management.
3 From the Package List, click the package whose service you want to test.
4 Click Browse Services in packagename.
5 Click on the name of the service you want to test.
6 To test the service, click Test servicename.
The server displays the Test ServiceName screen.
7 If you want to test the service with input values, fill in the required input information in the Assign Input Values section of the screen and click Test with inputs.
If you want to test the service without specifying input values, click Test (without inputs).
Note: The Developer offers a more robust environment for testing services.
To test a service
336 webMethods Integration Server Administrator’s Guide Version 7.1.1
21 Managing Services
Running Services When Packages Are Loaded, Unloaded, or ReplicatedTo have the server automatically execute a prescribed set of operations each time the server loads or unloads a package from memory or replicates a package, you can identify startup, shutdown, and replication services. This section provides an overview of startup, shutdown, and replication services.
To identify these services you must use the Developer. See the webMethods Developer User’s Guide for instructions.
What Is a Startup Service?A startup service is one that the server automatically executes when it loads a package. The server loads a package:
At server initialization (if the package is enabled)
When someone uses the Integration Server Administrator to reload a package
When someone uses the Integration Server Administrator to enable a package
Startup services are useful for generating initialization files or assessing and preparing (e.g., setting up or cleaning up) the environment before the server loads a package. However, you can use a startup service for any purpose. For example, you might want to execute a time‐consuming service at startup so that its cached result is immediately available to client applications.
What Is a Shutdown Service?A shutdown service is one that the server automatically executes when it unloads a package from memory. If a package is in memory, the server unloads the package:
At server shutdown or restart
When someone uses the Integration Server Administrator to disable the package
Before the server removes the package from memory when someone uses the Integration Server Administrator to reload a package
Shutdown services are useful for executing cleanup tasks such as closing files and purging temporary data. You could also use them to capture work‐in‐progress or state information before a package unloads.
webMethods Integration Server Administrator’s Guide Version 7.1.1 337
21 Managing Services
What Is a Replication Service?A replication service is one that the server automatically executes when it prepares to release or archive a package. The service executes when the administrator clicks the Create Release link on the Packages > Publishing > Create and Delete Releases screen or the Archive icon on the Packages > Management screen.
Replication services provide a way for a package to persist state or configuration information so that this is available when the package is activated on the remote server.
Guidelines for Using Startup, Shutdown, and Replication ServicesKeep the following guidelines in mind when using startup, shutdown, and replication services.
When you create a startup or shutdown service, you must register that service in the package with which it will be used. When you create a replication service, you can register any valid service from any loaded package on the server, including the current package itself.
Because services in a package are not made available to clients until that package’s startup services finish executing, you should avoid implementing startup services that access busy remote servers. They will delay the availability of other services in that package.
You may assign one or more startup services to a package; however, you cannot specify the order in which they will execute. If you have a series of operations that must execute in a specific order, encode the entire sequence within a single service or have a startup service invoke others.
See the webMethods Developer User’s Guide for instructions.
Running Services in Response to Specific EventsThe Event Manager runs on the server, monitoring it for events. An event is a specific action that the Event Manager recognizes and an event handler can react to. An event handler is a service a developer writes to perform an action when a specific event occurs. The Event Manager recognizes a number of different events. For example, an alarm event occurs when the webMethods Integration Server throws an exception regarding the status or health of the server. The server generates alarm events when a user cannot log on to the server, a port cannot be started, a user is denied access to a port, and so on.
Developers control the Event Manager through the Developer. The server saves information for event types and event subscriptions in the eventcfg.bin file. This file is generated the first time you start an Integration Server and is located in the following directory: IntegrationServer_directory\config. There is no need for you to work with this file directly; however, if you are clustering Integration Servers, you need to copy this file from one server to another to duplicate event subscriptions on all servers in the cluster.
338 webMethods Integration Server Administrator’s Guide Version 7.1.1
21 Managing Services
For more information about using the Event Manager, refer to the webMethods Developer User’s Guide.
Scheduling Services to Execute at Specified TimesUse the server’s scheduling function to schedule services to execute at times you specify. Services that you schedule are referred to as user tasks.
You can view a list of and update the scheduling options for scheduled user tasks. You can also cancel a scheduled user task before the server completes all scheduled executions or temporarily suspend the task’s execution. After the server completes all scheduled executions of a service, it marks the task Expired.
The server provides user tasks that you can modify. For example, the server supplies the wm.server.dispatcher:deleteExpiredUUID service if you configured a document history database for exactly‐once processing. This service removes expired entries from the document history database. Even though the server scheduled this task, you can modify how often the service runs.
In addition to the scheduled user tasks that you set up, the server schedules system tasks that it performs for normal system operation. You can view, but not update or cancel, the scheduled system tasks.
Scheduling a User TaskTo schedule a user task, you specify:
Fully-qualified service name. To indicate the service that you want the server to execute, you specify the fully‐qualified name of the service. For information about specifying service names, see “Fully‐Qualified Service Names” on page 332.
User name that you want the server to use when running the service. The server runs the service as if the user you specify is the authenticated user that invoked the service. If the service is governed by an ACL, be sure to specify a user that is allowed to invoke the service.
When and how often you want the service to run. A service can run once or repeatedly.
Run Once. The server executes the service a single time.
Repeating. The server executes the service repeatedly at an interval you specify, such as every 5 minutes.
Complex Repeating. The server executes the service repeatedly at times you specify, such as everyday at 10 a.m.
Note: You can also perform scheduling by using a set of built‐in services. See the webMethods Integration Server Built‐In Services Reference for more information.
webMethods Integration Server Administrator’s Guide Version 7.1.1 339
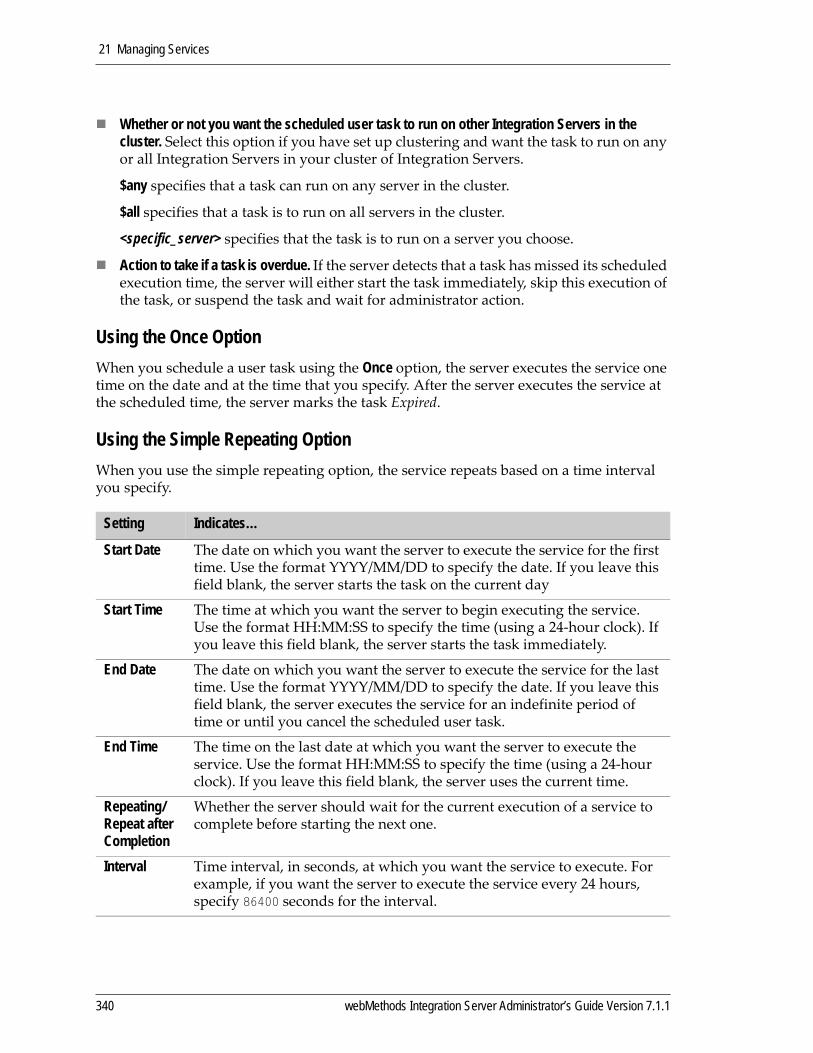
21 Managing Services
Whether or not you want the scheduled user task to run on other Integration Servers in the cluster. Select this option if you have set up clustering and want the task to run on any or all Integration Servers in your cluster of Integration Servers.
$any specifies that a task can run on any server in the cluster.
$all specifies that a task is to run on all servers in the cluster.
<specific_server> specifies that the task is to run on a server you choose.
Action to take if a task is overdue. If the server detects that a task has missed its scheduled execution time, the server will either start the task immediately, skip this execution of the task, or suspend the task and wait for administrator action.
Using the Once OptionWhen you schedule a user task using the Once option, the server executes the service one time on the date and at the time that you specify. After the server executes the service at the scheduled time, the server marks the task Expired.
Using the Simple Repeating Option When you use the simple repeating option, the service repeats based on a time interval you specify.
Setting Indicates…
Start Date The date on which you want the server to execute the service for the first time. Use the format YYYY/MM/DD to specify the date. If you leave this field blank, the server starts the task on the current day
Start Time The time at which you want the server to begin executing the service. Use the format HH:MM:SS to specify the time (using a 24‐hour clock). If you leave this field blank, the server starts the task immediately.
End Date The date on which you want the server to execute the service for the last time. Use the format YYYY/MM/DD to specify the date. If you leave this field blank, the server executes the service for an indefinite period of time or until you cancel the scheduled user task.
End Time The time on the last date at which you want the server to execute the service. Use the format HH:MM:SS to specify the time (using a 24‐hour clock). If you leave this field blank, the server uses the current time.
Repeating/Repeat after Completion
Whether the server should wait for the current execution of a service to complete before starting the next one.
Interval Time interval, in seconds, at which you want the service to execute. For example, if you want the server to execute the service every 24 hours, specify 86400 seconds for the interval.
340 webMethods Integration Server Administrator’s Guide Version 7.1.1
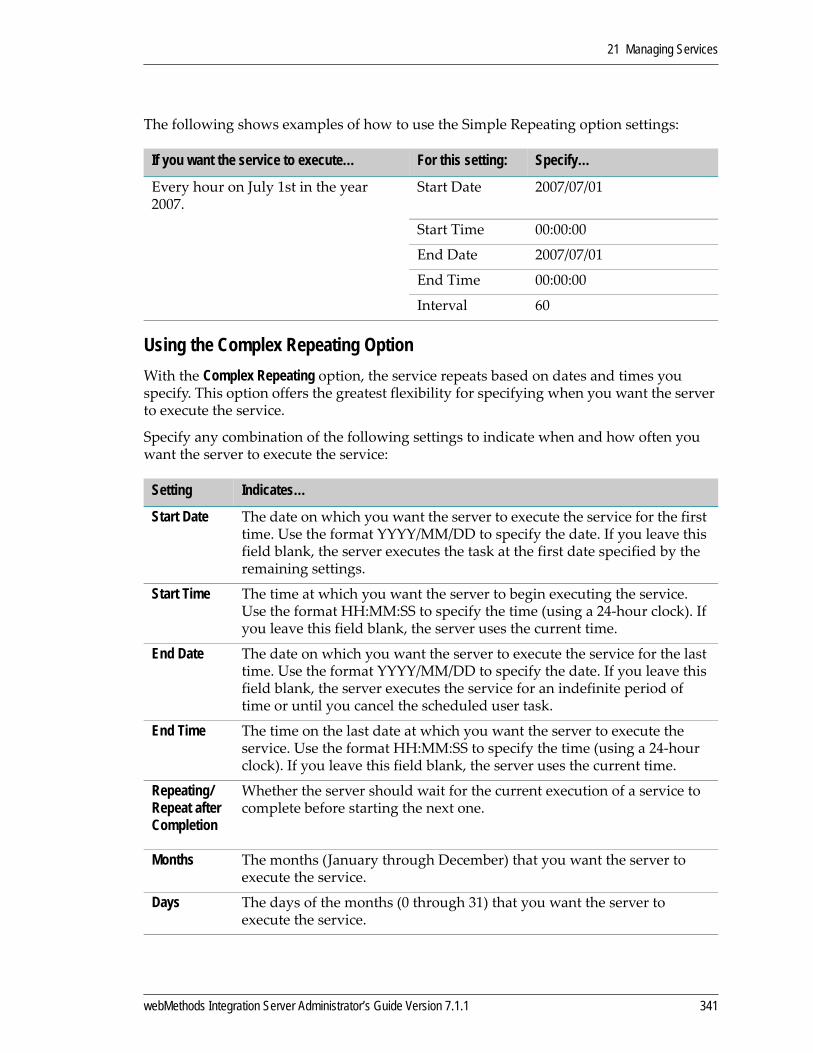
21 Managing Services
The following shows examples of how to use the Simple Repeating option settings:
Using the Complex Repeating Option With the Complex Repeating option, the service repeats based on dates and times you specify. This option offers the greatest flexibility for specifying when you want the server to execute the service.
Specify any combination of the following settings to indicate when and how often you want the server to execute the service:
If you want the service to execute… For this setting: Specify…
Every hour on July 1st in the year 2007.
Start Date 2007/07/01
Start Time 00:00:00
End Date 2007/07/01
End Time 00:00:00
Interval 60
Setting Indicates…
Start Date The date on which you want the server to execute the service for the first time. Use the format YYYY/MM/DD to specify the date. If you leave this field blank, the server executes the task at the first date specified by the remaining settings.
Start Time The time at which you want the server to begin executing the service. Use the format HH:MM:SS to specify the time (using a 24‐hour clock). If you leave this field blank, the server uses the current time.
End Date The date on which you want the server to execute the service for the last time. Use the format YYYY/MM/DD to specify the date. If you leave this field blank, the server executes the service for an indefinite period of time or until you cancel the scheduled user task.
End Time The time on the last date at which you want the server to execute the service. Use the format HH:MM:SS to specify the time (using a 24‐hour clock). If you leave this field blank, the server uses the current time.
Repeating/ Repeat after Completion
Whether the server should wait for the current execution of a service to complete before starting the next one.
Months The months (January through December) that you want the server to execute the service.
Days The days of the months (0 through 31) that you want the server to execute the service.
webMethods Integration Server Administrator’s Guide Version 7.1.1 341

21 Managing Services
The server combines all your selections to determine when to execute the service. If you do not select an item in one of the above settings, the server assumes all items for the selection. For example, if you do not specify a month, the server assumes you want the service to execute every month. If you do not select any items for any of the settings, the server assumes you want the service to execute every month, every day, all week days, every hour, and every minute; in other words, the server executes the service every minute from the time you add the task.
The following shows examples of how to use the Complex option settings:
Weekly Days The days of the week (Sunday through Saturday) that you want the server to execute the service.
Hours The hours of the days that you want the server to execute the service.
Minutes The minute of the hour that you want the server to execute the service.
If you want the service to execute… For this setting: Specify…
The 28th day of every month at midnight for the year 2007.
Start Date 2007/01/01
Start Time 00:00:00
End Date 2007/12/31
End Time 00:00:00
Months no selection
Month Days 28
Week Days no selection
Hours 0
Minutes 0
Every Monday in the months of January, February, and March at 2:30 p.m. for an indefinite period of time.
Start Date leave blank
Start Time leave blank
End Date leave blank
End Time leave blank
Months January, February, March
Month Days no selection
Week Days Monday
Hours 14
Minutes 30
Setting Indicates…
342 webMethods Integration Server Administrator’s Guide Version 7.1.1
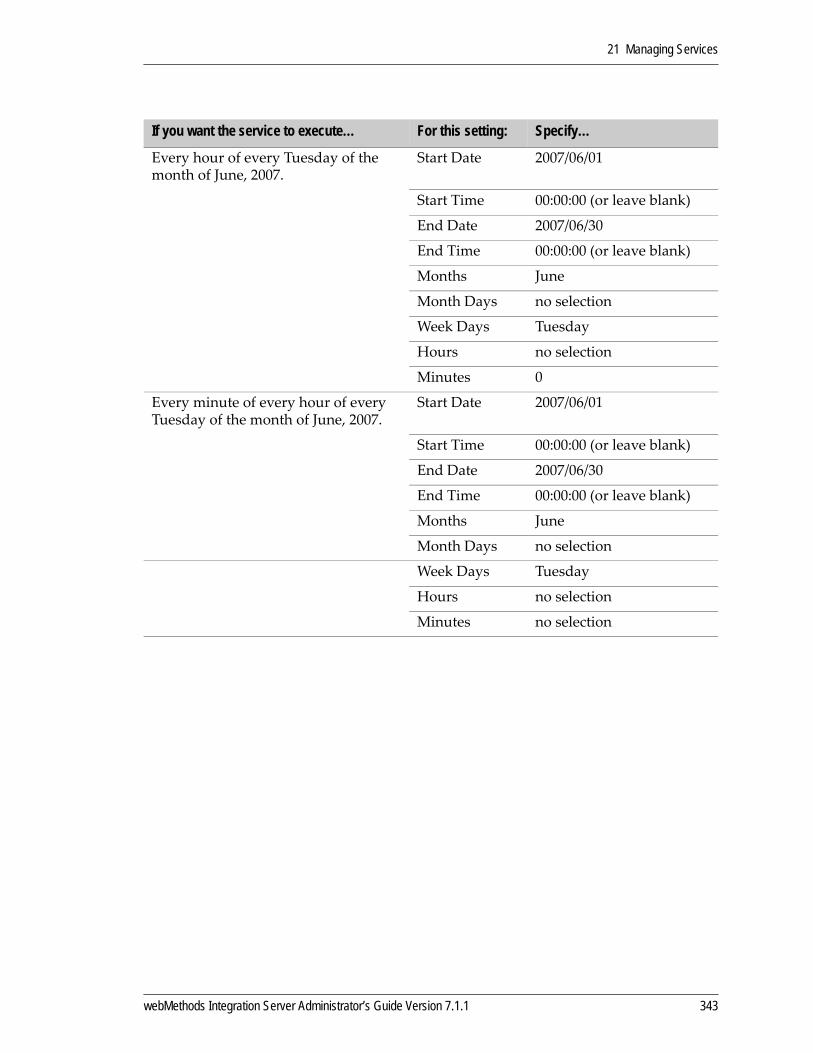
21 Managing Services
Every hour of every Tuesday of the month of June, 2007.
Start Date 2007/06/01
Start Time 00:00:00 (or leave blank)
End Date 2007/06/30
End Time 00:00:00 (or leave blank)
Months June
Month Days no selection
Week Days Tuesday
Hours no selection
Minutes 0
Every minute of every hour of every Tuesday of the month of June, 2007.
Start Date 2007/06/01
Start Time 00:00:00 (or leave blank)
End Date 2007/06/30
End Time 00:00:00 (or leave blank)
Months June
Month Days no selection
Week Days Tuesday
Hours no selection
Minutes no selection
If you want the service to execute… For this setting: Specify…
webMethods Integration Server Administrator’s Guide Version 7.1.1 343
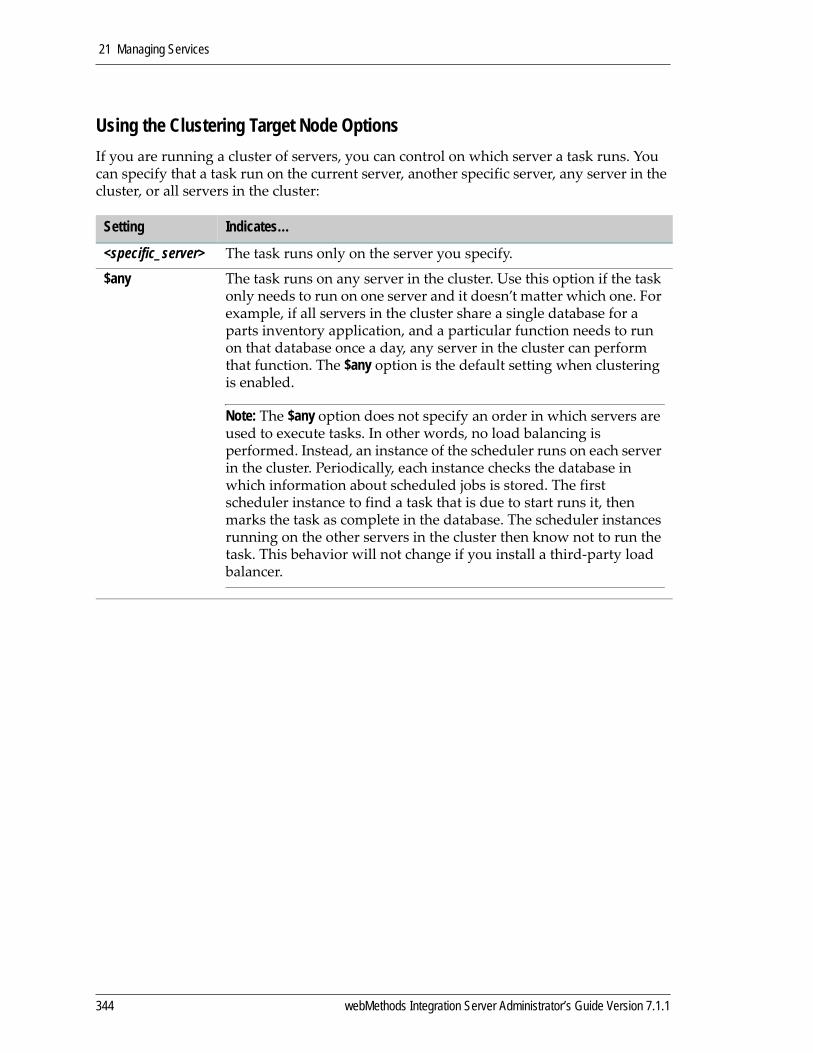
21 Managing Services
Using the Clustering Target Node OptionsIf you are running a cluster of servers, you can control on which server a task runs. You can specify that a task run on the current server, another specific server, any server in the cluster, or all servers in the cluster:
Setting Indicates…
<specific_server> The task runs only on the server you specify.
$any The task runs on any server in the cluster. Use this option if the task only needs to run on one server and it doesn’t matter which one. For example, if all servers in the cluster share a single database for a parts inventory application, and a particular function needs to run on that database once a day, any server in the cluster can perform that function. The $any option is the default setting when clustering is enabled.
Note: The $any option does not specify an order in which servers are used to execute tasks. In other words, no load balancing is performed. Instead, an instance of the scheduler runs on each server in the cluster. Periodically, each instance checks the database in which information about scheduled jobs is stored. The first scheduler instance to find a task that is due to start runs it, then marks the task as complete in the database. The scheduler instances running on the other servers in the cluster then know not to run the task. This behavior will not change if you install a third‐party load balancer.
344 webMethods Integration Server Administrator’s Guide Version 7.1.1

21 Managing Services
$all If you select $all, the task runs on all servers in the cluster. For example, suppose you run an application on each server in the cluster, and each server maintains its own database for that application. If you need to run a cleanup task against all the databases every day, then from one server you can schedule a task to run every day on all the servers in the cluster.
When you schedule a task to run on all servers in the cluster, the server divides the task into a main or parent task, and a child task for each server in the cluster. You can perform some actions (activate, suspend, delete) individually on the child tasks, but if you want to change the characteristics of a task, you must do so through the parent task.
You might see different statuses among the parent and child tasks. For example, you might have a situation where the parent status is Active, one child status is Active, and the other child status is Suspended. In general, the status of the parent task will be Active if at least one child task is active or running, Suspended if all child tasks are suspended, or Expired, if all child tasks are expired.
The following picture shows how parent and child tasks are displayed on the Server > Scheduler screen.
Setting Indicates…
ParentTaskChildTasks
In a Child task, you cannot link to the service.
In the Parent task, the target server is shown as All cluster nodes.
If you suspend, resume, or cancel a parent task, the server suspends, resumes, or cancels the associated child tasks as well.
If you schedule a task to run on any server in the cluster, the server shows the target server as Any cluster node.
If you schedule a task to run on all servers in the cluster, the server divides the task into Parent and Child tasks.
EastCoast-d5500:7100
EastCoast-d5500:7100EastCoast-d5500:7100
WestCoast-d5500:7100WestCoast-d5500:7100
Tasks in a Clustered Environment
webMethods Integration Server Administrator’s Guide Version 7.1.1 345

21 Managing Services
1 Open the Integration Server Administrator if it is not already open.
2 In the Server menu of the Navigation panel, click Scheduler.
3 Click Create a scheduled task.
4 Set the Service Information parameters as follows:
5 Select an action to perform If the Task Is Overdue.
The server periodically checks the status of scheduled tasks. If it finds a task that should have started but has not, the server runs the task immediately, unless you have specified a special action to take for late tasks. The server performs this “late action” if the task has missed its scheduled start time by a number of minutes you
To schedule the execution of a service
For this parameter Specify…
Description A description of the task.
folder.subfolder:service The fully qualified service name of the service you want the server to execute.
Run As User The user name you want the server to use when running the service. Click to search for and select your user. A user can be selected from the local or central directory.
Cluster Target Node Whether you want the task to run on other servers in the cluster:
Select $any if the task needs to run on only one server in the cluster, and it does not matter which one.
Select $all if the task needs to run on all servers in the cluster.
Select the name from the list of servers in the cluster if the task needs to run on only a specific server.
The default is the current server.
The Cluster Target Node option is not available if your server is not part of a cluster. For more information about running your server as part of a cluster, see webMethods Integration Server Clustering Guide.
For more information about the Cluster Target Node options, see “Using the Clustering Target Node Options” on page 344.
346 webMethods Integration Server Administrator’s Guide Version 7.1.1
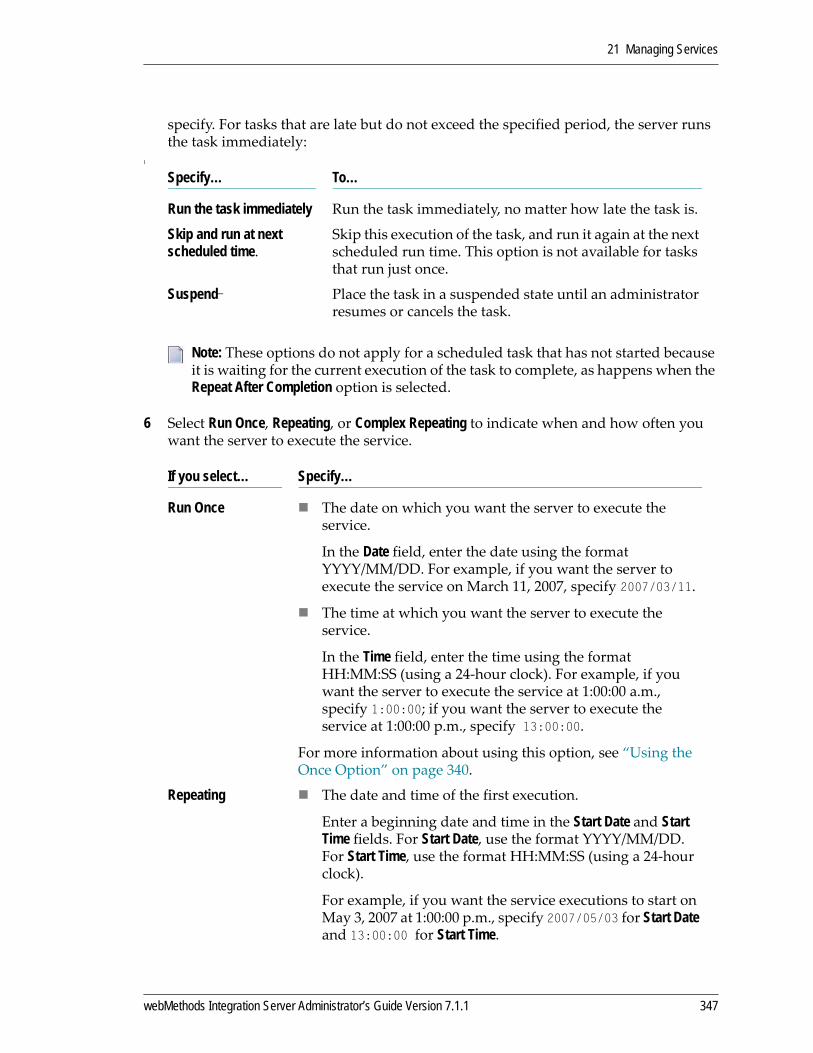
21 Managing Services
specify. For tasks that are late but do not exceed the specified period, the server runs the task immediately:
l
6 Select Run Once, Repeating, or Complex Repeating to indicate when and how often you want the server to execute the service.
Specify… To…
Run the task immediately Run the task immediately, no matter how late the task is.
Skip and run at next scheduled time.
Skip this execution of the task, and run it again at the next scheduled run time. This option is not available for tasks that run just once.
Suspend Place the task in a suspended state until an administrator resumes or cancels the task.
Note: These options do not apply for a scheduled task that has not started because it is waiting for the current execution of the task to complete, as happens when the Repeat After Completion option is selected.
If you select… Specify…
Run Once The date on which you want the server to execute the service.
In the Date field, enter the date using the format YYYY/MM/DD. For example, if you want the server to execute the service on March 11, 2007, specify 2007/03/11.
The time at which you want the server to execute the service.
In the Time field, enter the time using the format HH:MM:SS (using a 24‐hour clock). For example, if you want the server to execute the service at 1:00:00 a.m., specify 1:00:00; if you want the server to execute the service at 1:00:00 p.m., specify 13:00:00.
For more information about using this option, see “Using the Once Option” on page 340.
Repeating The date and time of the first execution.
Enter a beginning date and time in the Start Date and Start Time fields. For Start Date, use the format YYYY/MM/DD. For Start Time, use the format HH:MM:SS (using a 24‐hour clock).
For example, if you want the service executions to start on May 3, 2007 at 1:00:00 p.m., specify 2007/05/03 for Start Date and 13:00:00 for Start Time.
webMethods Integration Server Administrator’s Guide Version 7.1.1 347
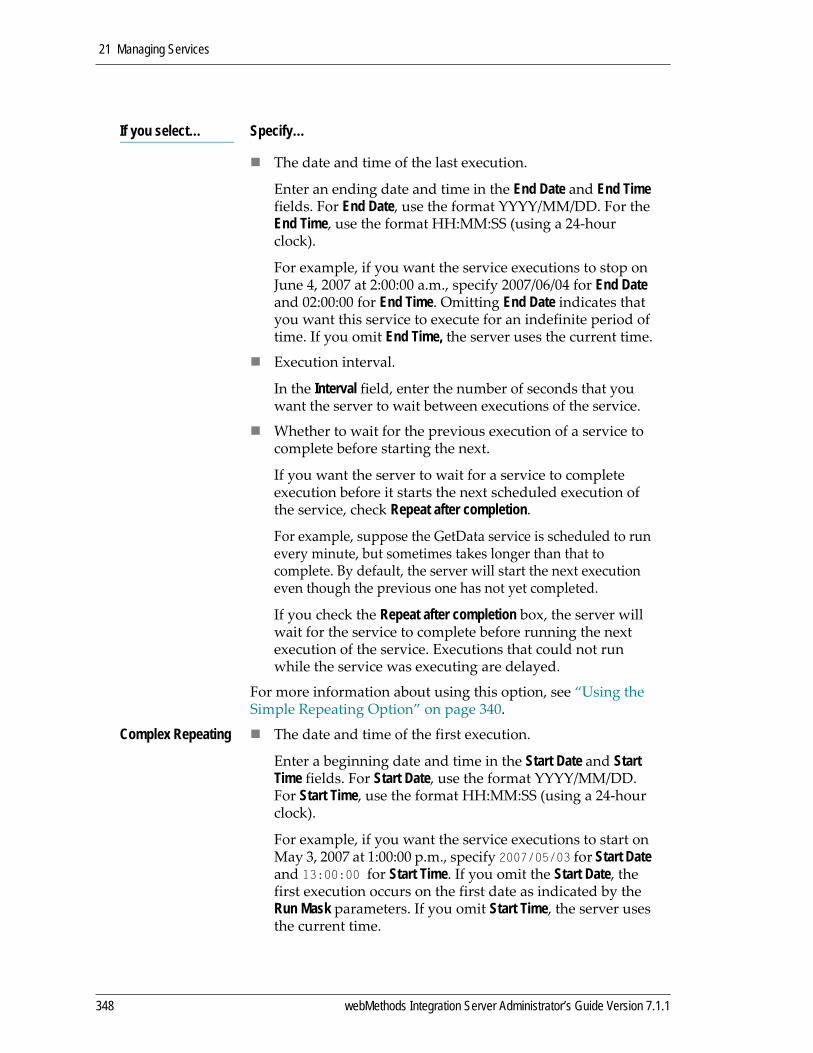
21 Managing Services
The date and time of the last execution.
Enter an ending date and time in the End Date and End Time fields. For End Date, use the format YYYY/MM/DD. For the End Time, use the format HH:MM:SS (using a 24‐hour clock).
For example, if you want the service executions to stop on June 4, 2007 at 2:00:00 a.m., specify 2007/06/04 for End Date and 02:00:00 for End Time. Omitting End Date indicates that you want this service to execute for an indefinite period of time. If you omit End Time, the server uses the current time.
Execution interval.
In the Interval field, enter the number of seconds that you want the server to wait between executions of the service.
Whether to wait for the previous execution of a service to complete before starting the next.
If you want the server to wait for a service to complete execution before it starts the next scheduled execution of the service, check Repeat after completion.
For example, suppose the GetData service is scheduled to run every minute, but sometimes takes longer than that to complete. By default, the server will start the next execution even though the previous one has not yet completed.
If you check the Repeat after completion box, the server will wait for the service to complete before running the next execution of the service. Executions that could not run while the service was executing are delayed.
For more information about using this option, see “Using the Simple Repeating Option” on page 340.
Complex Repeating The date and time of the first execution.
Enter a beginning date and time in the Start Date and Start Time fields. For Start Date, use the format YYYY/MM/DD. For Start Time, use the format HH:MM:SS (using a 24‐hour clock).
For example, if you want the service executions to start on May 3, 2007 at 1:00:00 p.m., specify 2007/05/03 for Start Date and 13:00:00 for Start Time. If you omit the Start Date, the first execution occurs on the first date as indicated by the Run Mask parameters. If you omit Start Time, the server uses the current time.
If you select… Specify…
348 webMethods Integration Server Administrator’s Guide Version 7.1.1
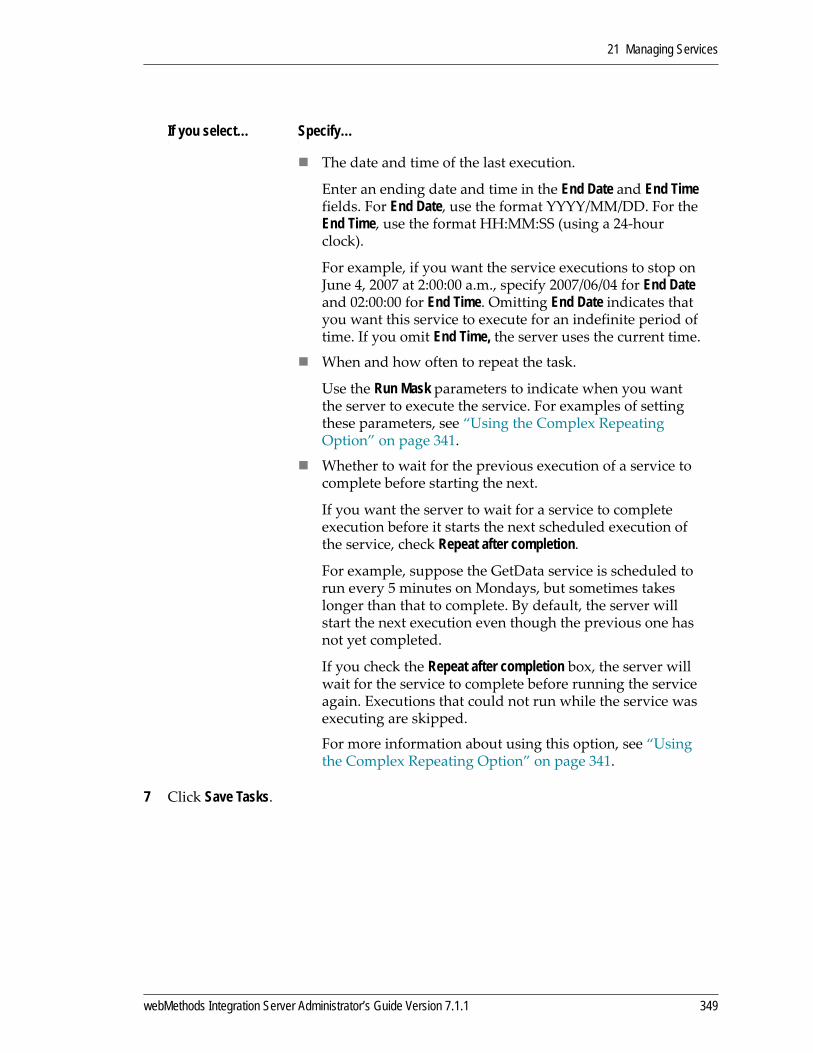
21 Managing Services
7 Click Save Tasks.
The date and time of the last execution.
Enter an ending date and time in the End Date and End Time fields. For End Date, use the format YYYY/MM/DD. For the End Time, use the format HH:MM:SS (using a 24‐hour clock).
For example, if you want the service executions to stop on June 4, 2007 at 2:00:00 a.m., specify 2007/06/04 for End Date and 02:00:00 for End Time. Omitting End Date indicates that you want this service to execute for an indefinite period of time. If you omit End Time, the server uses the current time.
When and how often to repeat the task.
Use the Run Mask parameters to indicate when you want the server to execute the service. For examples of setting these parameters, see “Using the Complex Repeating Option” on page 341.
Whether to wait for the previous execution of a service to complete before starting the next.
If you want the server to wait for a service to complete execution before it starts the next scheduled execution of the service, check Repeat after completion.
For example, suppose the GetData service is scheduled to run every 5 minutes on Mondays, but sometimes takes longer than that to complete. By default, the server will start the next execution even though the previous one has not yet completed.
If you check the Repeat after completion box, the server will wait for the service to complete before running the service again. Executions that could not run while the service was executing are skipped.
For more information about using this option, see “Using the Complex Repeating Option” on page 341.
If you select… Specify…
webMethods Integration Server Administrator’s Guide Version 7.1.1 349
21 Managing Services
Viewing Scheduled User TasksPerform the following procedure to view the user tasks you have scheduled.
If your server runs as part of a cluster of servers, all tasks will be visible from the Server > Scheduler screens of all servers in the cluster.
1 Open the Integration Server Administrator if it is not already open.
2 In the Server menu of the Navigation panel, click Scheduler.
Updating Scheduled User TasksPerform the following procedure to change the scheduling parameters for scheduled user tasks.
1 Open the Integration Server Administrator if it is not already open.
2 In the Server menu of the Navigation panel, click Scheduler.
3 Click the service name for the user task you want to update.
If your server is part of a cluster of servers and you are updating the characteristics of a task that has been scheduled to run on all servers in the cluster, you must make the changes to the parent task. The parent task is shown first in the list of entries for this task and contains All cluster nodes in the Target field. The changes you make to the parent task will automatically be carried over to the child tasks. For information about working with tasks in a clustered environment, see “Using the Clustering Target Node Options” on page 344.
4 Update the scheduling options for the selected user task. For information about the options you can specify, see “Scheduling a User Task” on page 339.
5 Click Update Tasks.
To view scheduled user tasks
To update a scheduled user task
350 webMethods Integration Server Administrator’s Guide Version 7.1.1

21 Managing Services
Suspending Scheduled User TasksPerform the following procedure to suspend all scheduled executions of a service. When you suspend a user task, it remains scheduled, but does not execute until you resume its execution. If a task expires while suspended, the server marks it Expired.
1 Open the Integration Server Administrator if it is not already open.
2 In the Server menu of the Navigation panel, click Scheduler.
3 Locate the task in the Services list, and click the icon in the Status column to suspend the task. The server displays a screen to confirm you want to suspend the task. Click OK.
The server replaces the icon with Suspended to indicate that the task is now suspended.
Note: If your server is part of a cluster and you are suspending a task that has been scheduled to run on all servers in the cluster, you can suspend the child tasks individually or you can suspend all the tasks at once by suspending the parent task. The parent task is shown first in the list of entries for this task and contains All cluster nodes in the Target field. The child tasks follow the parent task and each one shows a different target server in the Target field. For information about working with tasks in a clustered environment, see “Using the Clustering Target Node Options” on page 344.
To suspend a scheduled user task
webMethods Integration Server Administrator’s Guide Version 7.1.1 351
21 Managing Services
Resuming Suspended Scheduled User TasksPerform the following procedure to resume all scheduled executions of a task that has been suspended.
1 Open the Integration Server Administrator if it is not already open.
2 In the Server menu of the Navigation panel, click Scheduler.
3 Locate the task in the Services list, and click Suspended in the Active column to activate the task. The server displays a screen to confirm you want to resume the task. Click OK.
The server replaces Suspended with the Active icon to indicate that the task is available to execute again.
Canceling Scheduled User TasksPerform the following procedure to cancel a user task before all scheduled executions of the service are complete.
1 Open the Integration Server Administrator if it is not already open.
2 In the Server menu of the Navigation panel, click Scheduler.
Note: If your server is part of a cluster and you are resuming a task that has been scheduled to run on all servers in the cluster, you can resume the child tasks individually or you can resume all the tasks at once by resuming the parent task. The parent task is shown first in the list of entries for this task and contains All cluster nodes in the Target field. The child tasks follow the parent task and each one shows a different target server in the Target field. For information about working with tasks in a clustered environment, see “Using the Clustering Target Node Options” on page 344.
To resume execution of a suspended user task
Note: When you cancel a scheduled task, the server permanently removes it from the database that holds the job queue.
To cancel a scheduled user task
352 webMethods Integration Server Administrator’s Guide Version 7.1.1

21 Managing Services
3 Click the icon in the Remove column for the user task you want to cancel. The server issues a prompt to verify that you want to cancel the user task. Click OK.
Viewing the Scheduled System TasksThe server needs to perform system tasks periodically, such as expiring sessions. The server schedules these tasks. Perform the following procedure to view the scheduled system tasks.
1 Open the Integration Server Administrator if it is not already open.
2 In the Server menu of the Navigation panel, click Scheduler.
3 Click View system tasks.
The server displays the System Tasks screen. It lists the names of each scheduled task, the next date and time the server is to execute the task, and how often (Interval) the server is to execute the task.
Note: If your server is part of a cluster and you are canceling a task that has been scheduled to run on all servers in the cluster, you can cancel the child tasks individually or you can cancel all the tasks at once by canceling the parent task. The parent task is shown first in the list of entries for this task and contains All cluster nodes in the Target field. The child tasks follow the parent task and each one shows a different target server in the Target field. For information about working with tasks in a clustered environment, see “Using the Clustering Target Node Options” on page 344.
To view the scheduled system tasks
Note: The System Tasks screen shows the tasks for local server only; if you are running a cluster of servers, you will not see the system tasks for other servers in the cluster.
webMethods Integration Server Administrator’s Guide Version 7.1.1 353

21 Managing Services
354 webMethods Integration Server Administrator’s Guide Version 7.1.1
22 Locking Administration and Best Practices
Introduction . . . . . . . . . . . . . . . . . . . . . . . . . . . . . . . . . . . . . . . . . . . . . . . . . . . . . . . . . . . . . . . . . 356
Choosing Local Server Locking or VCS Integration Locking . . . . . . . . . . . . . . . . . . . . . . . . . . . . 356
Disabling and Re-enabling Locking . . . . . . . . . . . . . . . . . . . . . . . . . . . . . . . . . . . . . . . . . . . . . . . 356
Best Practices . . . . . . . . . . . . . . . . . . . . . . . . . . . . . . . . . . . . . . . . . . . . . . . . . . . . . . . . . . . . . . . 359
webMethods Integration Server Administrator’s Guide Version 7.1.1 355
22 Locking Administration and Best Practices
IntroductionThis chapter contains information intended for the server administrator and users who regularly replicate and publish packages as part of the production process.
Choosing Local Server Locking or VCS Integration LockingYou can configure the webMethods Integration Server to support either of the following two forms of locking:
Local locking, applied within the Integration Server file system.
Locking resulting from integration with a third‐party version control system (VCS) repository; in this case, elements are locked and unlocked as you check them out of and in to the VCS repository.
The locking administration tasks described in this chapter refer to local locking on the Integration Server. If your server environment does not make use of a version control system, configure the Integration Server for local locking as described in the following sections.
If you want to work with a third‐party version control system, see the webMethods Version Control System Integration Developer’s Guide in the webMethods_directory\_documentation directory of your webMethods installation. This guide provides information about how to implement and administer file locking with the Version Control System Integration feature.
Disabling and Re-enabling LockingThere may be times in which you do not want to implement locking on the Integration Server. If you are a server administrator, you can disable and re‐enable locking by editing the configuration parameters in IntegrationServer_directory\config\server.cnf.
Before You BeginMake sure that all users have completed development on the server and unlocked all elements.
Close all Developer sessions. After you change the extended settings in the following procedure, users will need to open a new Developer session.
356 webMethods Integration Server Administrator’s Guide Version 7.1.1
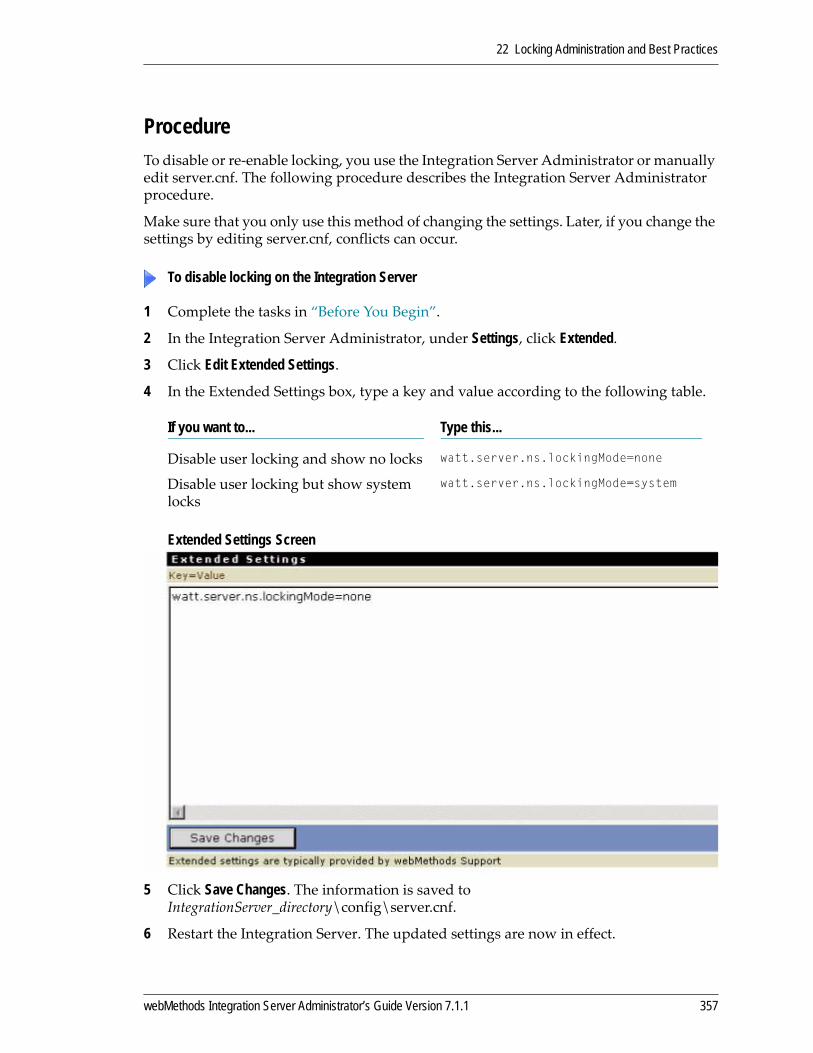
22 Locking Administration and Best Practices
ProcedureTo disable or re‐enable locking, you use the Integration Server Administrator or manually edit server.cnf. The following procedure describes the Integration Server Administrator procedure.
Make sure that you only use this method of changing the settings. Later, if you change the settings by editing server.cnf, conflicts can occur.
1 Complete the tasks in “Before You Begin”.
2 In the Integration Server Administrator, under Settings, click Extended.
3 Click Edit Extended Settings.
4 In the Extended Settings box, type a key and value according to the following table.
Extended Settings Screen
5 Click Save Changes. The information is saved to IntegrationServer_directory\config\server.cnf.
6 Restart the Integration Server. The updated settings are now in effect.
To disable locking on the Integration Server
If you want to... Type this...
Disable user locking and show no locks watt.server.ns.lockingMode=none
Disable user locking but show system locks
watt.server.ns.lockingMode=system
webMethods Integration Server Administrator’s Guide Version 7.1.1 357
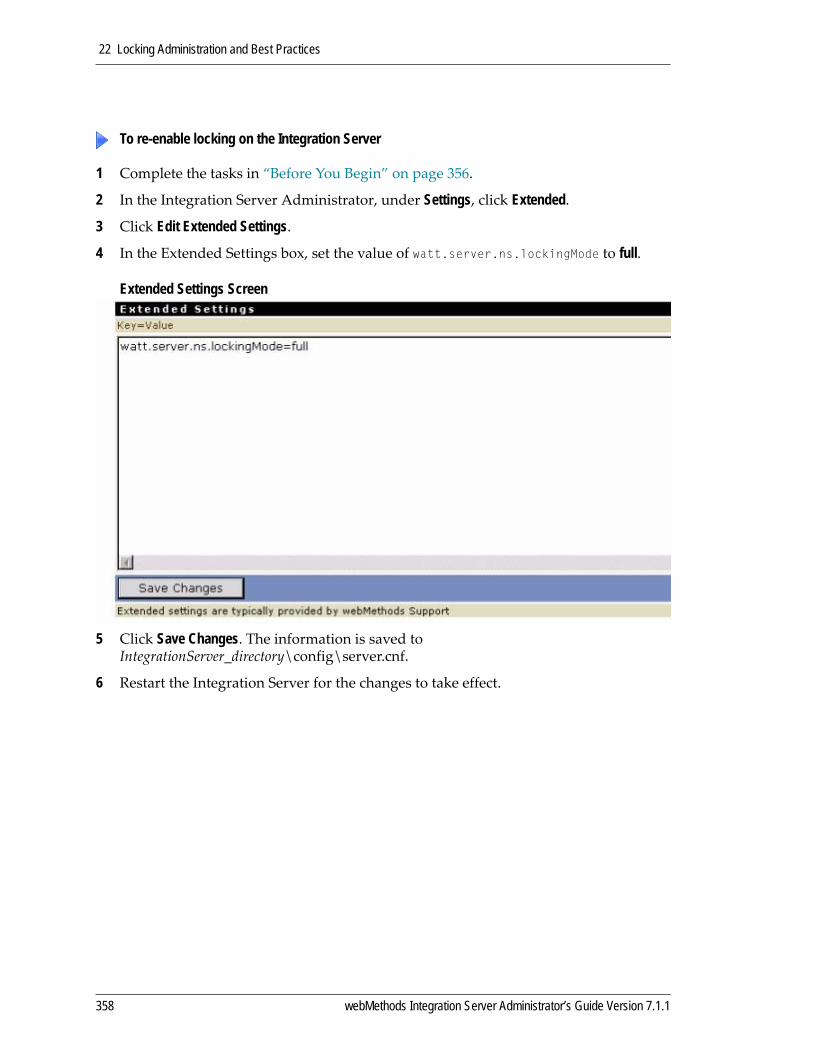
22 Locking Administration and Best Practices
1 Complete the tasks in “Before You Begin” on page 356.
2 In the Integration Server Administrator, under Settings, click Extended.
3 Click Edit Extended Settings.
4 In the Extended Settings box, set the value of watt.server.ns.lockingMode to full.
Extended Settings Screen
5 Click Save Changes. The information is saved to IntegrationServer_directory\config\server.cnf.
6 Restart the Integration Server for the changes to take effect.
To re-enable locking on the Integration Server
358 webMethods Integration Server Administrator’s Guide Version 7.1.1

22 Locking Administration and Best Practices
Best Practices
Remote Server ConfigurationIt is not recommended that you use Cooperative Development functionality in an Integration Server cluster. Locking information for elements could be inadvertently shared with another Integration Server in the cluster. Use a standalone Integration Server not a cluster, while developing to eliminate these Cooperative Development problems.
Server User NamesWhen logging on to the Integration Server, use a distinct user name. Locking is based on your user name, so it is important that each user log on to the server with a unique user name (not “Administrator” or “Developer”).
Package Replication and PublishingAlways back up your packages every day or night using package replication and publishing. Because locking information does not travel with packages (or partial packages) when they are replicated, it is recommended that you apply a version to each package according to date. Do not replace or overwrite packages; delete the old package entirely and then install the new package.
When you replicate and publish a package, the locking information is not preserved. This is expected behavior and is part of the feature’s design. You can, however, preserve system locks (read‐only file attributes).
Before you publish a package, keep in mind that user locks are not preserved.
When you salvage a deleted package, lock information is not preserved. Before you salvage or delete a package, make sure that all locks are removed from the destination package.
It is not recommended that you use system or user locking on packages that are frequently replicated and/or partially replicated. For example, when sending frequently updated packages to partners.
Package and Folder OrganizationUse a single package or folder per developer or per Java/C service.
Note: If you do replace or overwrite packages, webMethods Integration Server takes the intersection of elements in the Navigation panel. It will also move the existing package to the \replicate\salvage folder.
webMethods Integration Server Administrator’s Guide Version 7.1.1 359
22 Locking Administration and Best Practices
Source CodeIf there has been a significant change to the source code, always reload the package to reflect the latest system locks.
Upgrading webMethods Integration ServerWhen you upgrade the webMethods Integration Server to a new version, you lose all lock information. Therefore, before upgrading, make sure that all locks are removed and all changes are saved.
360 webMethods Integration Server Administrator’s Guide Version 7.1.1

23 Managing Broker/Local Triggers
Introduction . . . . . . . . . . . . . . . . . . . . . . . . . . . . . . . . . . . . . . . . . . . . . . . . . . . . . . . . . . . . . . . . . 362
Managing Document Retrieval . . . . . . . . . . . . . . . . . . . . . . . . . . . . . . . . . . . . . . . . . . . . . . . . . . . 363
Managing Document Processing . . . . . . . . . . . . . . . . . . . . . . . . . . . . . . . . . . . . . . . . . . . . . . . . . 371
Limiting Server Threads for Broker/Local Triggers . . . . . . . . . . . . . . . . . . . . . . . . . . . . . . . . . . . . 379
Cluster Synchronization for Trigger Management . . . . . . . . . . . . . . . . . . . . . . . . . . . . . . . . . . . . 380
Modifying Broker/Local Trigger Properties . . . . . . . . . . . . . . . . . . . . . . . . . . . . . . . . . . . . . . . . . . 384
webMethods Integration Server Administrator’s Guide Version 7.1.1 361

23 Managing Broker/Local Triggers
IntroductionIn a publish‐and‐subscribe solution, the retrieval and flow of documents through the Integration Server consumes resources, primarily server threads and memory. The rate at which the Integration Server can retrieve and process documents is determined by the availability of these resources. However, server resources also need to be available to perform other functions. The Integration Server Administrator provides controls for managing resources consumed by document retrieval and document processing. You can use these controls to balance the resource demands for document retrieval and processing with the server resources needed to perform other work.
Specifically, you can use the controls provided by Integration Server Administrator to:
Increase or decrease the number of server threads used to retrieve documents from the Broker.
Decrease the capacity of all trigger queues.
Suspend document retrieval for one or more triggers.
Increase or decrease the number of server threads used to process documents.
Decrease the number of threads that the Integration Server can use to process documents for concurrent triggers simultaneously.
Suspend document processing for one or more triggers.
Change the configured trigger queue capacity, refill level, or execution threads for a specific trigger.
Additionally, the Integration Server Administrator provides a cluster synchronization feature that you can use to propagate selected changes to other Integration Servers in a cluster automatically.
These controls can be useful in a production environment to free up server threads and memory to accommodate an unexpected server load (such as a sudden influx of HTTP requests) or in anticipation of a high usage time. You can also use the controls during the capacity planning stage of your project to determine the configured values for triggers and server thread usage.
The following sections contain more information about managing document retrieval and document processing using the provided controls.
362 webMethods Integration Server Administrator’s Guide Version 7.1.1
23 Managing Broker/Local Triggers
Managing Document RetrievalWithin the publish‐and‐subscribe model, document retrieval is the process in which the Integration Server uses a server thread to fetch more documents from the Broker. Document retrieval requires a server thread with which to request and retrieve documents from the Broker. Document retrieval also requires memory because the Integration Server keeps temporary copies of the documents it is retrieving in memory. The Integration Server releases the temporary copies from memory after successfully processing the document.
The Integration Server provides controls that you can use to manage the server resources used for document retrieval. Specifically, you can use the controls to:
Limit the number of server threads used for document retrieval.
Manage the rate of document retrieval and the amount of memory used during document retrieval by adjusting trigger queue capacity.
Suspend or resume document retrieval for one or more triggers.
These controls can be used during development, capacity planning, or at run time. The following sections provide more information about these controls.
Increasing or Decreasing Threads for Document RetrievalDuring production and capacity planning, you can increase or decrease the number of threads used to retrieve documents from the Broker. By default, Integration Server can use up to 100% of the server thread pool to retrieve documents. Each trigger uses a separate server thread to retrieve documents from the Broker. For example, if the maximum size of the server thread pool is 80 threads, and the server can use 100% of the server thread pool to retrieve documents, then up to 80 triggers can request more documents at one time.
You can limit the maximum number of threads used for document retrieval by specifying the percentage of the server thread pool that can be used to retrieve documents. The Integration Server uses the specified percentage to calculate the number of server threads that can be used to retrieve documents from the Broker.
For example, suppose that the maximum size of the server thread pool is 80 threads. If you specify a maximum document retrieval threads percentage of 10%, then the Integration Server can use only 8 threads to retrieve documents at one time. Because the Integration Server uses a separate thread to retrieve documents for each trigger, this means that the Integration Server can retrieve documents for only 8 triggers at one time.
Reducing the percentage of the server thread pool used for document retrieval can slow the rate of document retrieval because fewer triggers can retrieve documents
Note: You can only specify threads for document retrieval if your integration solution includes a Broker.
webMethods Integration Server Administrator’s Guide Version 7.1.1 363

23 Managing Broker/Local Triggers
simultaneously. It also ensures the availability of server threads for other tasks, such as answering HTTP requests or processing documents.
Increasing the percentage of the server thread pool available for document retrieval can increase the arrival rate of documents because it allows more triggers to retrieve documents from the Broker at one time.
For more information about setting the number of server threads for document retrieval, see “Limiting Server Threads for Broker/Local Triggers” on page 379.
When to Increase or Decrease Threads for Document RetrievalYour knowledge of your integration solution is the best tool for determining when to increase and decrease thread usage for document retrieval. For example, if you know that the Integration Server regularly receives a high number of HTTP requests during a certain time period, you might want to decrease thread usage for document retrieval right before the HTTP requests usually begin, then increase document retrieval thread usage after the frequency of HTTP requests slows down. Alternatively, if you know that the Integration Server receives a high volume of incoming documents at the same time each day, you might want to increase the number of threads available for document retrieval during that time period.
You can also determine when to increase or decrease threads for document retrieval by monitoring the number of available server threads. To assist with this, you can establish a warning threshold that instructs the Integration Server to alert you when the percentage of available threads drops below a specified level. Specifically, the Integration Server creates a journal log entry stating “Available Thread Warning Threshold Exceeded.” When you receive this message in the journal log, you can decrease threads for document retrieval to make server threads available to perform other functions. For more information about setting an available threads warning threshold, see “Switching from the Embedded Database to an External RDBMS” on page 79.
Another method of determining when to alter the number of server threads allotted for document retrieval is to monitor the current number of threads retrieving documents from the Broker. The Integration Server Administrator displays this value in the Current Threads field under Document Retrieval on the Settings > Messaging > Broker/Local Trigger Management page.
Note: Other ways to control the resources used for document retrieval are: adjusting trigger queue capacity and suspending or resuming document retrieval for triggers. For more information about adjusting trigger queue capacity, see “Decreasing the Capacity of Trigger Document Stores” on page 365. For more information about suspending (or resuming) document processing, see “Suspending and Resuming Document Retrieval” on page 366.
364 webMethods Integration Server Administrator’s Guide Version 7.1.1

23 Managing Broker/Local Triggers
Decreasing the Capacity of Trigger Document StoresYou can impact the amount of memory used for document retrieval by adjusting the capacity and refill level of all the trigger queues. The capacity determines the maximum number of documents that the trigger document store can contain. The refill level specifies the number of documents that remain in the trigger queue before the Integration Server requests more documents from the Broker.
You can use the Queue Capacity Throttle provided in the Integration Server Administrator to decrease the capacity and refill levels of all the trigger queues on the Integration Server. The Queue Capacity Throttle reduces the capacity and refill levels for all the trigger queues by the same percentage. For example, if you set the Queue Capacity Throttle to 50% of maximum, a trigger queue with a capacity of 10 and a refill level of 4 will have an adjusted capacity of 5 and an adjusted refill level of 2.
By decreasing the capacity and refill levels, you can
Reduce the amount of memory needed to retrieve documents from the Broker.
Reduced capacity and refill levels mean that the Integration Server retrieves fewer documents for a trigger at one time. Because the Integration Server retrieves fewer documents, the Integration Server uses less memory when retrieving documents.
Reduce the memory needed to store the documents while they await processing.
1 Open the Integration Server Administrator if it is not already open.
2 In the Settings menu of the Navigation panel, click Messaging.
3 Click Broker/Local Trigger Management, and then click Edit Global Trigger Controls.
4 Under Document Retrieval, in the Queue Capacity Throttle field, select the percentage of configured capacity at which you want all trigger queues to operate. The Integration Server automatically adjusts the refill levels by the same percentage.
5 If you want to apply the queue capacity throttle change to all the serves in a cluster, select the Apply Change Across Cluster check box.
This check box appears only if the current Integration Server belongs to a properly configured cluster and is configured to synchronize trigger changes across the cluster. For more information about configuring an Integration Server to synchronize trigger management changes across a cluster, see “Cluster Synchronization for Trigger Management” on page 380.
6 Click Save Changes.
Note: Decreasing the capacity might increase the frequency with which the Integration Server retrieves documents because the Integration Server might empty the trigger document store to the adjusted refill level more quickly.
To decrease the capacity and refill level of trigger queues
webMethods Integration Server Administrator’s Guide Version 7.1.1 365
23 Managing Broker/Local Triggers
Notes:
The Queue Capacity Throttle setting is maintained across server restarts and package reloads.
If the percentage by which you reduce capacity does not resolve to a whole number, the Integration Server rounds up or rounds down to the nearest whole number. However, if rounding down would reduce the value to 0, the Integration Server rounds up to 1. For example, if you set the Queue Capacity Throttle to 10% of maximum, a trigger queue with a capacity of 15 and refill level of 4 will have an adjusted capacity of 2 and an adjusted refill level of 1 (The Integration Server rounds the calculated adjusted capacity of 1.5 up to 2 and rounds the calculated adjusted refill level of 0.4 up to 1).
When you reduce the Queue Capacity Throttle and save your changes, the Integration Server does not immediately reduce the number of documents in a trigger queue. Instead, the Integration Server continues to process documents in the trigger queue until it reaches the adjusted refill level. Then, the Integration Server retrieves enough documents to fill the trigger queue to the adjusted capacity. For example, if you set Queue Capacity Throttle to 50%, a trigger queue with a capacity of 8 and a refill level of 2 will have an adjusted capacity of 4 and an adjusted refill level of 1. The Integration Server processes documents in the trigger queue until it reaches the adjusted refill level of only 1 document. Then, the Integration Server retrieves up to 3 documents to increase the number of documents in the queue to 4 (the adjusted capacity).
If you reduce the capacity to a low percentage for an extended period of time, the document might expire on the Broker. For each publishable document type, you can specify a Time to live property. This property specifies how long a document can remain on the Broker before the Broker discards it. For more information about publishable document types, see Publish‐Subscribe Developer’s Guide.
If you use the Queue Capacity Throttle as part of your capacity planning process and you determine that the configured values for trigger capacity and refill level need to change, you can use the Integration Server Administrator or webMethods Developer to set the new capacity and refill level values for each trigger. For more information about setting the capacity and refill level for a trigger, see “Modifying Broker/Local Trigger Properties” on page 384.
Suspending and Resuming Document RetrievalYou can reduce the amount of server resources that document retrieval consumes by suspending document retrieval for one or more triggers. Using the Integration Server Administrator, you can:
Suspend or resume document retrieval for all triggers.
Suspend or resume document retrieval for specific triggers.
The following sections provide more information about these options.
366 webMethods Integration Server Administrator’s Guide Version 7.1.1
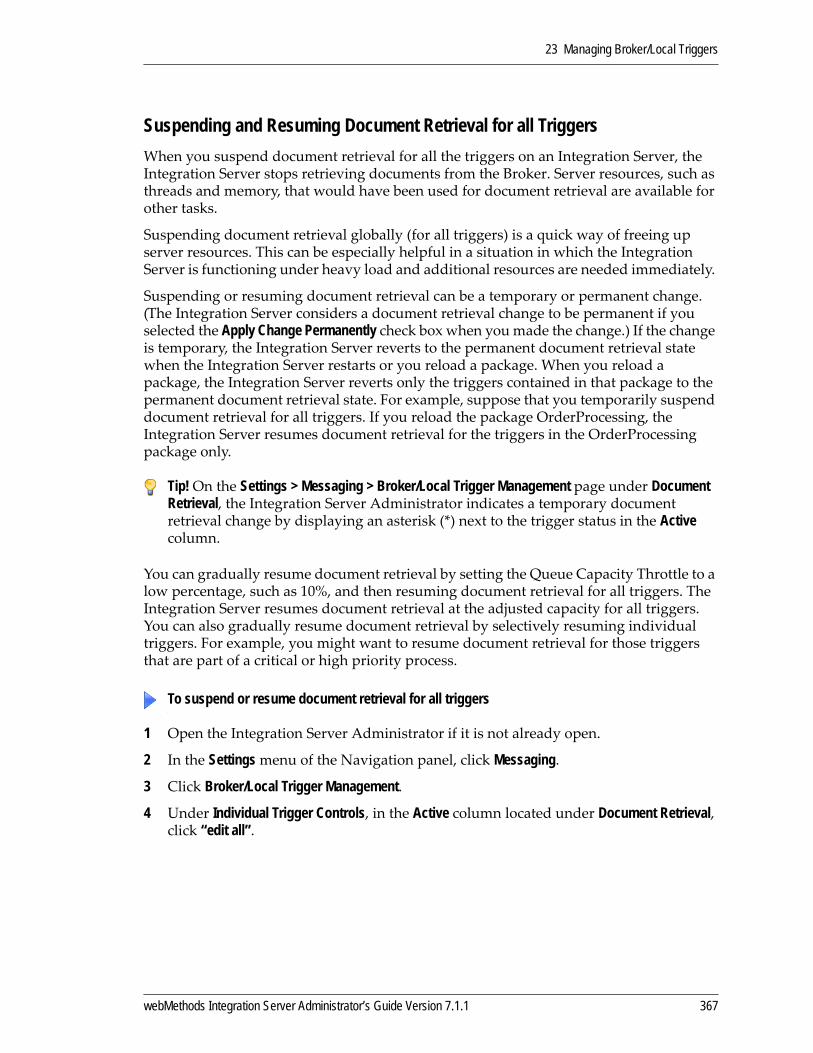
23 Managing Broker/Local Triggers
Suspending and Resuming Document Retrieval for all TriggersWhen you suspend document retrieval for all the triggers on an Integration Server, the Integration Server stops retrieving documents from the Broker. Server resources, such as threads and memory, that would have been used for document retrieval are available for other tasks.
Suspending document retrieval globally (for all triggers) is a quick way of freeing up server resources. This can be especially helpful in a situation in which the Integration Server is functioning under heavy load and additional resources are needed immediately.
Suspending or resuming document retrieval can be a temporary or permanent change. (The Integration Server considers a document retrieval change to be permanent if you selected the Apply Change Permanently check box when you made the change.) If the change is temporary, the Integration Server reverts to the permanent document retrieval state when the Integration Server restarts or you reload a package. When you reload a package, the Integration Server reverts only the triggers contained in that package to the permanent document retrieval state. For example, suppose that you temporarily suspend document retrieval for all triggers. If you reload the package OrderProcessing, the Integration Server resumes document retrieval for the triggers in the OrderProcessing package only.
You can gradually resume document retrieval by setting the Queue Capacity Throttle to a low percentage, such as 10%, and then resuming document retrieval for all triggers. The Integration Server resumes document retrieval at the adjusted capacity for all triggers. You can also gradually resume document retrieval by selectively resuming individual triggers. For example, you might want to resume document retrieval for those triggers that are part of a critical or high priority process.
1 Open the Integration Server Administrator if it is not already open.
2 In the Settings menu of the Navigation panel, click Messaging.
3 Click Broker/Local Trigger Management.
4 Under Individual Trigger Controls, in the Active column located under Document Retrieval, click “edit all”.
Tip! On the Settings > Messaging > Broker/Local Trigger Management page under Document Retrieval, the Integration Server Administrator indicates a temporary document retrieval change by displaying an asterisk (*) next to the trigger status in the Active column.
.
To suspend or resume document retrieval for all triggers
webMethods Integration Server Administrator’s Guide Version 7.1.1 367
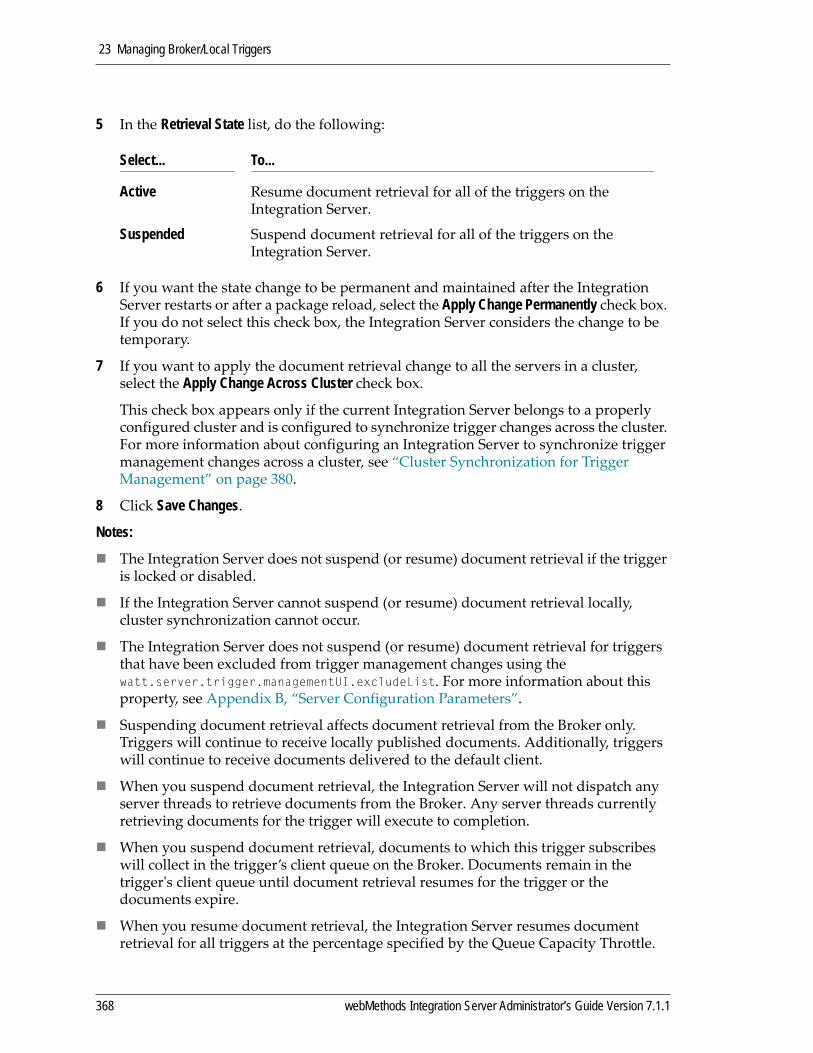
23 Managing Broker/Local Triggers
5 In the Retrieval State list, do the following:
6 If you want the state change to be permanent and maintained after the Integration Server restarts or after a package reload, select the Apply Change Permanently check box. If you do not select this check box, the Integration Server considers the change to be temporary.
7 If you want to apply the document retrieval change to all the servers in a cluster, select the Apply Change Across Cluster check box.
This check box appears only if the current Integration Server belongs to a properly configured cluster and is configured to synchronize trigger changes across the cluster. For more information about configuring an Integration Server to synchronize trigger management changes across a cluster, see “Cluster Synchronization for Trigger Management” on page 380.
8 Click Save Changes.
Notes:
The Integration Server does not suspend (or resume) document retrieval if the trigger is locked or disabled.
If the Integration Server cannot suspend (or resume) document retrieval locally, cluster synchronization cannot occur.
The Integration Server does not suspend (or resume) document retrieval for triggers that have been excluded from trigger management changes using the watt.server.trigger.managementUI.excludeList. For more information about this property, see Appendix B, “Server Configuration Parameters”.
Suspending document retrieval affects document retrieval from the Broker only. Triggers will continue to receive locally published documents. Additionally, triggers will continue to receive documents delivered to the default client.
When you suspend document retrieval, the Integration Server will not dispatch any server threads to retrieve documents from the Broker. Any server threads currently retrieving documents for the trigger will execute to completion.
When you suspend document retrieval, documents to which this trigger subscribes will collect in the trigger’s client queue on the Broker. Documents remain in the triggerʹs client queue until document retrieval resumes for the trigger or the documents expire.
When you resume document retrieval, the Integration Server resumes document retrieval for all triggers at the percentage specified by the Queue Capacity Throttle.
Select... To...
Active Resume document retrieval for all of the triggers on the Integration Server.
Suspended Suspend document retrieval for all of the triggers on the Integration Server.
368 webMethods Integration Server Administrator’s Guide Version 7.1.1

23 Managing Broker/Local Triggers
If you do not resume document retrieval before the server restarts, the trigger package reloads, or the trigger properties are modified, the Broker discards any volatile documents in that triggerʹs client queue.
Suspending and Resuming Document Retrieval for a Specific TriggerSometimes, instead of suspending or resuming document retrieval for all triggers, you might want to suspend or resume document retrieval for specific triggers. Following are some situations in which you might want to suspend or resume document retrieval for specific triggers.
When a back‐end system needs maintenance or is becoming unresponsive, you might want to suspend document retrieval for triggers that interact with the back‐end system. By suspending document retrieval, documents that would normally accumulate on the Integration Server awaiting processing remain on the Broker. This keeps memory and other server resources available for other activities. When the back‐end system becomes available, you can resume document retrieval for the associated triggers.
After suspending document retrieval for all triggers, you might resume document retrieval for specific triggers. If the server is functioning under an unusually heavy load, you might first suspend retrieval for all triggers and then gradually resume retrieval, starting with the triggers involved in key processes.
If the Integration Server suspends document retrieval for a serial trigger because the associated trigger service ends in error, you need to resume document retrieval for that trigger. For more information about configuring a serial trigger to suspend retrieval and processing automatically after an error, see the Publish‐Subscribe Developer’s Guide.
The following procedure explains how to suspend or resume document retrieval for an individual trigger.
1 Open the Integration Server Administrator if it is not already open.
2 In the Settings menu of the Navigation panel, click Messaging.
3 Click Broker/Local Trigger Management.
4 Under Individual Trigger Controls, locate the row containing the trigger for which you want to suspend document retrieval.
5 In the Active column located under Document Retrieval, click Yes or No. (The Active column displays “Yes” if document retrieval is active for the trigger; “No” if document retrieval is suspended. An asterisk (*) appears next to the status if the document retrieval state is temporary.)
To suspend or resume document retrieval for a trigger
webMethods Integration Server Administrator’s Guide Version 7.1.1 369
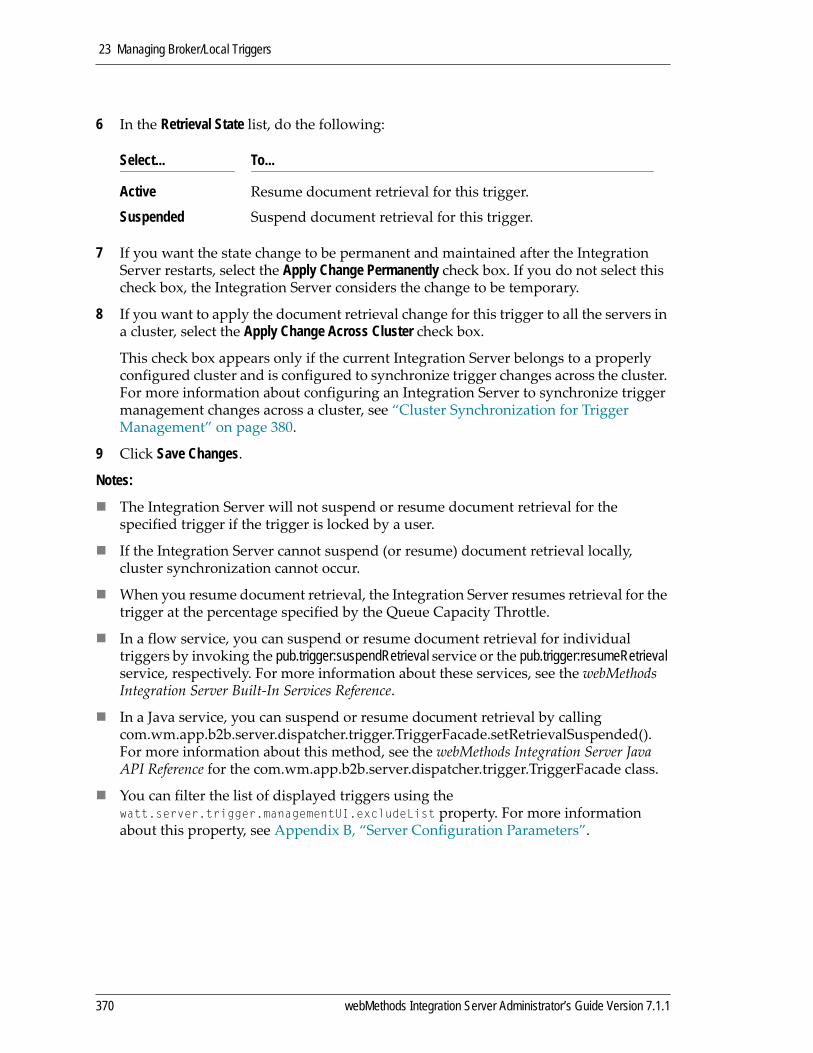
23 Managing Broker/Local Triggers
6 In the Retrieval State list, do the following:
7 If you want the state change to be permanent and maintained after the Integration Server restarts, select the Apply Change Permanently check box. If you do not select this check box, the Integration Server considers the change to be temporary.
8 If you want to apply the document retrieval change for this trigger to all the servers in a cluster, select the Apply Change Across Cluster check box.
This check box appears only if the current Integration Server belongs to a properly configured cluster and is configured to synchronize trigger changes across the cluster. For more information about configuring an Integration Server to synchronize trigger management changes across a cluster, see “Cluster Synchronization for Trigger Management” on page 380.
9 Click Save Changes.
Notes:
The Integration Server will not suspend or resume document retrieval for the specified trigger if the trigger is locked by a user.
If the Integration Server cannot suspend (or resume) document retrieval locally, cluster synchronization cannot occur.
When you resume document retrieval, the Integration Server resumes retrieval for the trigger at the percentage specified by the Queue Capacity Throttle.
In a flow service, you can suspend or resume document retrieval for individual triggers by invoking the pub.trigger:suspendRetrieval service or the pub.trigger:resumeRetrieval service, respectively. For more information about these services, see the webMethods Integration Server Built‐In Services Reference.
In a Java service, you can suspend or resume document retrieval by calling com.wm.app.b2b.server.dispatcher.trigger.TriggerFacade.setRetrievalSuspended(). For more information about this method, see the webMethods Integration Server Java API Reference for the com.wm.app.b2b.server.dispatcher.trigger.TriggerFacade class.
You can filter the list of displayed triggers using the watt.server.trigger.managementUI.excludeList property. For more information about this property, see Appendix B, “Server Configuration Parameters”.
Select... To...
Active Resume document retrieval for this trigger.
Suspended Suspend document retrieval for this trigger.
370 webMethods Integration Server Administrator’s Guide Version 7.1.1
23 Managing Broker/Local Triggers
Managing Document ProcessingWithin the publish‐and‐subscribe model, document processing is the process of evaluating documents against trigger conditions and executing the appropriate trigger services to act on those documents. Document processing requires a server thread with which to evaluate the document and execute the trigger service. It also requires memory in which to keep a copy of the document during document evaluation and trigger service execution.
The Integration Server provides various controls that you can use to manage the rate of and resource demands for document processing. Specifically, you can:
Limit the number of server threads used for document processing.
Manage the number of server threads that can be used to process documents for a trigger concurrently.
Suspend or resume document processing for one or more triggers.
These controls can be used as part of your capacity planning or used during production. The following sections provide more information about these controls.
Increasing or Decreasing Threads for Document Processing During production and capacity planning, you can increase or decrease the number of threads that can be used to process documents simultaneously. The number of threads available for document processing helps determine the rate at which the Integration Server processes documents that it receives. By default, the Integration Server can use up to 100% of the server thread pool to process documents (execute triggers). Each time the Integration Server processes a document, the server uses a server thread. For example, if the maximum size of the server thread pool is 80 threads, and the server can use 100% of the server thread pool to execute triggers, then up to 80 triggers can execute at the same time. That is, the Integration Server can process up to 80 documents simultaneously.
You can control the number of server threads available for document processing (trigger execution) by specifying the maximum percentage of the server thread pool that can be used to execute documents. The Integration Server uses the percentage to calculate the number of server threads that can be used for trigger execution (document processing). For example, suppose that the maximum size of the server thread pool is 80 threads. If you set 10% as the maximum percentage of document processing threads, then the Integration Server can use up to 8 threads to execute triggers at one time.
By reducing the number of server threads used for processing documents, you can make server threads and memory available to perform other tasks, such as executing HTTP requests and retrieving documents. Alternatively, you can increase the number of threads for document processing to allow the server to process more documents simultaneously. This can also allow the server to drain the trigger queues more quickly and request additional documents more frequently.
Document processing for serial and concurrent triggers combined cannot exceed the value determined by the maximum document processing threads percentage. If you
webMethods Integration Server Administrator’s Guide Version 7.1.1 371

23 Managing Broker/Local Triggers
reduce the percentage of document processing server threads, and concurrent triggers continue to consume the maximum execution threads possible (according to their configured settings), serial triggers must wait longer for server threads to become available. This is especially likely if the Integration Server contains concurrent triggers that execute long‐running services.
For more information about setting the number of server threads for document processing, see “Limiting Server Threads for Broker/Local Triggers” on page 379.
When to Increase or Decrease Threads for Processing Documents Your knowledge of your integration solution is the best tool for determining when to adjust thread usage for document processing (trigger execution). For example, suppose that a batch process that occurs at the same time each day results in a spike in document publishing. You might want to increase threads for document processing right before the batch process starts to make server threads available to process documents.
Alternatively, if you observe memory constraints or other resource issues, you can decrease the number of threads for document processing. Document processing consumes memory because the Integration Server keeps the document in memory while the server thread evaluates the document and executes the trigger service.
You can also determine when to modify the number of threads allowed for document processing by monitoring thread usage. You can do this by viewing the thread usage information displayed on the Server>Statistics page. However, you can also establish a warning threshold that instructs the Integration Server to alert you when the number of available threads drops below a particular level. Specifically, the Integration Server creates a journal log entry stating “Available Threads Warning Threshold Usage Exceeded.” When the Integration Server writes this journal log entry, you might want to decrease threads for document processing to allow more threads to be used for other functions. For more information about setting an available threads warning threshold, see “Switching from the Embedded Database to an External RDBMS” on page 79.
Another way to determine when to alter the number of server threads allotted for document processing is to monitor the current number of threads that are processing documents for triggers. The Integration Server Administrator displays this value in the Current Threads field located under Document Processing on the Settings > Messaging > Broker/Local Trigger Management page.
Tip! If you decrease the percentage of threads that can be used for document processing, consider decreasing the Execution Threads Throttle to prevent concurrent triggers from monopolizing available server threads.
Note: Other ways to control the resources used for document processing are: adjusting execution threads for concurrent triggers and suspending or resuming document processing for triggers. For more information about adjusting trigger queue capacity, see “Decreasing Document Processing for Concurrent Triggers” on page 373. For more information about suspending (or resuming) document processing, see “Suspending and Resuming Document Processing” on page 375.
372 webMethods Integration Server Administrator’s Guide Version 7.1.1
23 Managing Broker/Local Triggers
Decreasing Document Processing for Concurrent TriggersYou can reduce the amount of server resources consumed by document processing by decreasing the rate of processing for concurrent triggers. Specifically, you can reduce the maximum number of threads that can process documents for a concurrent trigger at one time.
The Integration Server Administrator provides an Execution Threads Throttle that you can use to reduce the execution threads for all concurrent triggers by the same percentage. For example, if you set the Execution Threads Throttle to 50% of maximum, the Integration Server reduces the maximum execution threads for all concurrent triggers by half. A concurrent trigger with a maximum execution threads value of 6, has an adjusted maximum execution threads value of 3.
By decreasing parallel processing for concurrent triggers, you can:
Free up server threads and memory to perform other functions, such as answering HTTP requests or retrieving documents.
Prevent concurrent triggers from monopolizing the threads allotted for document processing. The number of server threads that the server dispatches to process documents for serial and concurrent triggers cannot exceed the value established by the maximum execution threads percentage. If you reduce the number of threads allowed for document processing, and concurrent triggers continue to consume the maximum execution threads possible (according to their configured settings), serial triggers must wait longer for server threads to become available. This is especially likely if the Integration Server contains concurrent triggers that execute long‐running services.
1 Open the Integration Server Administrator if it is not already open.
2 In the Settings menu of the Navigation panel, click Messaging.
3 Click Broker/Local Trigger Management, and then click Edit Global Trigger Controls.
4 Under Document Processing, in the Execution Threads Throttle field, select the percentage of the configured maximum execution threads value at which you want to the server to function. The Integration Server applies this percentage to the maximum execution threads value for all concurrent triggers.
5 If you want to apply the Execution Threads Throttle change to all the servers in a cluster, select the Apply Change Across Cluster check box.
This check box appears only if the current Integration Server belongs to a properly configured cluster and is configured to synchronize trigger changes across the cluster. For more information about configuring an Integration Server to synchronize trigger management changes across a cluster, see “Cluster Synchronization for Trigger Management” on page 380.
6 Click Save Changes.
To decrease parallel execution threads for concurrent triggers
webMethods Integration Server Administrator’s Guide Version 7.1.1 373
23 Managing Broker/Local Triggers
Notes:
The Execution Threads Throttle value is maintained across server restarts and package reloads.
Serial triggers always process one document at a time. The Execution Threads Throttle property does not affect serial triggers.
If the percentage by which you reduce trigger execution threads does not resolve to a whole number, the Integration Server rounds up or rounds down to the nearest whole number. However, if rounding down would set the value to 0, the Integration Server rounds up to 1. For example, if you reduce Execution Threads Throttle to 10% of maximum, a concurrent trigger with a maximum execution threads value of 12 would have an adjusted value of 1 (the Integration Server rounds 1.2 down to 1). A concurrent trigger with a maximum execution threads value of 4 would have an adjusted value of 1 (the Integration Server rounds 0.4 up to 1).
When you reduce the Execution Threads Throttle and save your changes, the Integration Server does not terminate threads currently executing concurrent triggers to meet the adjusted maximum. The Integration Server allows server threads processing documents for concurrent triggers to execute to completion. The Integration Server waits until the number of threads executing for a concurrent trigger is less than the adjusted maximum before dispatching another server thread to process a document for that trigger.
If you suspend document processing (trigger execution) and do not suspend document retrieval, the Integration Server will fill all the trigger queues to capacity. Full trigger queues consume more memory than empty trigger queues.
You can also reduce the number of concurrent execution threads for a trigger by reducing the capacity of a trigger queue below the maximum number of concurrent execution threads for the trigger. The maximum number of dispatched threads for a trigger cannot exceed the trigger queue’s capacity. For more information about reducing trigger queue capacity, see “Decreasing the Capacity of Trigger Document Stores” on page 365.
If you use the Execution Threads Throttle as part of your capacity planning process and you determine that the configured values for Maximum execution threads need to change, you can use the Integration Server Administrator or webMethods Developer to set the new maximum execution threads values for each concurrent trigger. For more information about setting trigger properties, see “Modifying Broker/Local Trigger Properties” on page 384.
374 webMethods Integration Server Administrator’s Guide Version 7.1.1

23 Managing Broker/Local Triggers
Suspending and Resuming Document ProcessingYou can reduce the amount of server resources that document processing consumes by suspending document processing for one or more triggers. Using the Integration Server Administrator, you can:
Suspend or resume document processing for all triggers.
Suspend or resume document processing for specific triggers.
The following sections provide more information about these options.
Suspending and Resuming Document Processing for all TriggersWhen you suspend document processing for all triggers, the Integration Server stops dispatching server threads to process documents stored in trigger queues. Server resources, such as threads and memory, that might have been used for document processing will be available for other tasks. Document processing remains suspended until you specifically resume it.
Suspending document processing for all triggers is a quick way to make server resources available. This can be especially helpful in a situation in which the Integration Server is functioning under heavy load and additional resources need to be available immediately.
Suspending or resuming document processing can be a temporary or permanent change. (The Integration Server considers a document processing change to be permanent if you selected the Apply Change Permanently check box when you made the change.) If the change is temporary, the Integration Server reverts to the permanent document processing state when the Integration Server restarts or you reload a package. When you reload a package, the Integration Server reverts only the triggers contained in that package to the permanent document processing state. For example, suppose that you temporarily suspend document processing for all triggers. If you reload the package OrderProcessing, the Integration Server resumes document processing for the triggers in the OrderProcessing package only.
When you are ready to resume document processing, you might want to resume it gradually. For example, you might set the Execution Threads Throttle to a low percentage, resume document processing for all triggers, and then gradually move the Execution Threads Throttle up to 100%. Alternatively, you might selectively resume individual triggers. For example, you might want to resume document processing for those triggers that are part of a critical or high priority process.
Tip! On the Settings > Messaging > Broker/Local Trigger Management page under Document Processing, the Integration Server Administrator indicates a temporary document processing change by displaying an asterisk (*) next to the trigger status in the Active column.
webMethods Integration Server Administrator’s Guide Version 7.1.1 375
23 Managing Broker/Local Triggers
1 Open the Integration Server Administrator if it is not already open.
2 In the Settings menu of the Navigation panel, click Messaging.
3 Click Broker/Local Trigger Management.
4 Under Individual Trigger Controls, in the Active column located under Document Processing, click “edit all”.
5 In the Processing State list, do the following:
6 If you want the state change to be permanent and maintained after the Integration Server restarts, select the Apply Change Permanently check box. If you do not select this check box, the Integration Server considers the change to be temporary.
7 If you want to apply the document processing change to all the servers in a cluster, select the Apply Change Across Cluster check box.
This check box appears only if the current Integration Server belongs to a properly configured cluster and is configured to synchronize trigger changes across the cluster. For more information about configuring an Integration Server to synchronize trigger management changes across a cluster, see “Cluster Synchronization for Trigger Management” on page 380.
8 Click Save Changes.
Notes:
The Integration Server will not suspend or resume document processing for a locked or disabled trigger.
If the Integration Server cannot suspend (or resume) document processing locally, cluster synchronization cannot occur.
The Integration Server does not suspend (or resume) document processing for triggers that have been excluded from trigger management changes using the watt.server.trigger.managementUI.excludeList. For more information about this property, see Appendix B, “Server Configuration Parameters”.
Suspending or resuming document processing affects all documents in the trigger’s queue on the Integration Server, including documents retrieved from the Broker and from local publishing.
.
To suspend or resume document processing for all triggers
Select... To...
Active Resume document processing for all of the triggers on the Integration Server.
Suspended Suspend document processing for all of the triggers on the Integration Server.
376 webMethods Integration Server Administrator’s Guide Version 7.1.1

23 Managing Broker/Local Triggers
When you suspend document processing, the Integration Server will not dispatch any more server threads to process documents. Any server threads currently processing documents for triggers will execute to completion. This includes documents that are being retried.
When you suspend document processing but do not suspend document retrieval, documents will collect in trigger queues until the trigger queues are at maximum capacity or document processing resumes. If the server restarts before document processing resumes, volatile documents are discarded.
When you resume document processing the Integration Server resumes document processing at the percentage specified by the Execution Threads Throttle.
Suspending and Resuming Document Processing for Specific TriggersSometimes, instead of suspending or resuming document processing for all triggers, you might want to suspend or resume processing for a specific trigger. Following are examples of situations where you might want to suspend document processing for specific triggers.
When a back‐end system becomes unresponsive or requires maintenance, you might want to suspend document processing for triggers that interact with that back‐end system. If the back‐end system is not available because of maintenance or failure, trigger services that interact with the system would probably not execute successfully. Suspending document processing for the associated triggers allows for more effective resource utilization because you keep resources that would have been used for unsuccessful document processing available for other tasks.
After suspending document processing for all triggers, you might resume document processing for specific triggers. If the server is operating under a heavy load, you might first suspend all document processing and then gradually resume document processing, starting with the triggers involved in critical processes.
If the Integration Server suspends document processing for a serial trigger because the associated trigger service ends in error, you need to resume document processing for the trigger. For more information about configuring a serial trigger to suspend retrieval and processing automatically after an error, see the Publish‐Subscribe Developer’s Guide
1 Open the Integration Server Administrator if it is not already open.
2 In the Settings menu of the Navigation panel, click Messaging.
3 Click Broker/Local Trigger Management.
4 Under Individual Trigger Controls, locate the row containing the trigger for which you want to suspend document processing.
5 In the Active column located under Document Processing, click Yes or No. (The Active column displays “Yes” if document processing is active for the trigger; “No” if
To suspend or resume document processing for a trigger
webMethods Integration Server Administrator’s Guide Version 7.1.1 377
23 Managing Broker/Local Triggers
document processing is suspended. An asterisk (*) appears next to the status if the document processing state is temporary.)
6 In the Processing State list, do the following:
7 If you want the state change to be permanent and maintained after the Integration Server restarts, select the Apply Change Permanently check box. If you do not select this check box, the Integration Server considers the change to be temporary.
8 If you want to apply the document processing change for this trigger to all the servers in a cluster, select the Apply Change Across Cluster check box.
This check box appears only if the current Integration Server belongs to a properly configured cluster and is configured to synchronize trigger changes across the cluster. For more information about configuring an Integration Server to synchronize trigger management changes across a cluster, see “Cluster Synchronization for Trigger Management” on page 380.
9 Click Save Changes.
Notes:
The Integration Server will not suspend or resume document processing for the specified trigger if the trigger is locked by a user.
If the Integration Server cannot suspend (or resume) document processing locally, cluster synchronization cannot occur.
When you resume document processing for a concurrent trigger, the Execution Threads Throttle determines the maximum number of documents that can be processed in parallel.
In a flow service, you can suspend or resume document processing for individual triggers by invoking the pub.trigger:suspendProcessing service or the pub.trigger:resumeProcessing service, respectively. For more information about these services, see the webMethods Integration Server Built‐In Services Reference.
In a Java service, you can suspend or resume document retrieval by calling com.wm.app.b2b.server.dispatcher.trigger.TriggerFacade.setProcessingSuspended(). For more information about this method, see the webMethods Integration Server Java API Reference for the com.wm.app.b2b.server.dispatcher.trigger.TriggerFacade class.
You can filter the list of displayed triggers using the watt.server.trigger.managementUI.excludeList property. For more information about this property, see Appendix B, “Server Configuration Parameters”.
Select... To...
Active Resume document processing for this trigger.
Suspended Suspend document processing for this trigger.
378 webMethods Integration Server Administrator’s Guide Version 7.1.1
23 Managing Broker/Local Triggers
Limiting Server Threads for Broker/Local TriggersIntegration Server provides parameters that you can use to limit how many threads in the server thread pool retrieve and process documents for Broker/local triggers. You can specify what percentage of the server thread pool can be used to retrieve documents from the Broker. You can also specify the percentage of the server thread pool that can be used to process documents.
For example, suppose that the server thread pool can contain up to 80 threads. If you specify that the maximum threads for document retrieval is 50% of the server thread pool, then the Integration Server can use up to 40 threads for retrieving documents.
Limiting the number of server threads that can retrieve and process documents keeps other server threads available to perform other server functions such as responding to http requests or server administration. These parameters help to ensure that document retrieval and processing will not monopolize the entire server thread pool.
Keep the following points in mind when specifying the number of threads for retrieving and processing documents:
If you want to allow all triggers to retrieve documents simultaneously, set the maximum threads for document retrieval to a percentage that equates to the total number of triggers. That is, the number of threads set by this percentage should be equal to the total number of triggers on the Integration Server.
If you want to allow the Integration Server to process the maximum number of documents at one time, set the maximum threads for document processing to a percentage equivalent to the number of serial triggers plus the sum of maximum concurrent threads for all concurrent triggers. For example, suppose that the Integration Server contains 10 serial triggers and 10 concurrent triggers that can each execute up to 5 threads. To configure the Integration Server to dispatch enough threads to process the maximum number of documents at one time, the percentage of threads for document retrieval should be equivalent to 60 threads (10 serial triggers + 5 threads each for 10 concurrent triggers).
1 Open the Integration Server Administrator if it is not already open.
2 In the Settings menu of the Navigation panel, click Messaging.
3 Click Broker/Local Trigger Management, and then click Edit Global Trigger Controls.
Note: When the Integration Server uses a thread for document retrieval, the thread retrieves documents for one trigger from the Broker. The thread does not retrieve documents for all triggers. A thread used for document processing addresses one document in a trigger queue. (Document processing includes determining which trigger condition the document satisfies and executing the associated service.)
To set the maximum number of server threads for Broker/local triggers
webMethods Integration Server Administrator’s Guide Version 7.1.1 379

23 Managing Broker/Local Triggers
4 Under Document Retrieval, in the Maximum Threads field, type the maximum percentage of the server thread pool that can be used to retrieve documents from the Broker. You must enter a value greater than zero. The default is 100%.
If the Maximum Threads field under Document Retrieval displays “(Broker Not Configured)”, then this Integration Server is not configured to connect to a Broker.
5 Under Document Processing, in the Maximum Threads field, type the maximum percentage of the server thread pool that can be used to process documents in trigger document stores. You must enter a value greater than zero. The default is 100%.
6 Click Save Changes.
Notes:
The Integration Server uses the percentages you entered to calculate the number of threads that can be devoted to document retrieval and document processing. If the number of threads does not evaluate to a whole number the Integration Server rounds up or down to the nearest whole number.
For document retrieval, if the current number of server threads retrieving documents is greater than the new value set by the Maximum Threads percentage, the Integration Server will not dispatch more threads for document retrieval. Threads currently retrieving documents will execute to completion. The Integration Server will dispatch new threads for document retrieval only when the current number of document retrieval threads is less than the maximum allowed document retrieval threads.
For document processing, if the current number of server threads processing documents (executing triggers) is greater than the thread value determined by the Maximum Threads percentage, the Integration Server will not dispatch more threads for document processing. Threads currently processing documents will execute to completion. The Integration Server will dispatch new threads for trigger execution only when the current number of document processing threads is less than the maximum allowed document processing threads.
The current number of threads and maximum allotted threads for document retrieval and document processing are visible under the Global Trigger Controls heading on the Settings > Messaging > Broker/Local Trigger Management page.
Cluster Synchronization for Trigger ManagementIf the Integration Server is a member of a cluster, changes that you make for document retrieval, document processing, and for trigger properties can be propagated to other servers in the cluster automatically. Propagating the changes to other servers in the cluster prevents you from needing to make identical changes on all the servers manually. It can also prevent the other servers from absorbing the resource demands that would have been directed to the first server.
Note: Trigger management changes made using the pub.trigger services can also be applied across a cluster.
380 webMethods Integration Server Administrator’s Guide Version 7.1.1
23 Managing Broker/Local Triggers
Configuring Cluster SynchronizationThe Integration Server propagates trigger management changes to other members of a cluster by performing a remote invoke. For cluster synchronization to succeed, you need to complete the following tasks:
Configure the cluster. The Integration Server can propagate trigger management changes to other servers only if all the servers are members of a properly configured cluster. For more information about configuring a cluster, see the webMethods Integration Server Clustering Guide.
Set up remote server aliases for the servers in the cluster. For more information about setting up aliases for remote servers, see “Setting Up Aliases for Remote Integration Servers” on page 68.
Update the watt.server.cluster.aliasList property with a comma‐separated list of the remote server alias names. The Integration Server uses this list when executing the remote invokes that update the other cluster nodes.
When cluster synchronization property watt.server.cluster.aliasList is properly configured, the Apply Change Across Cluster check box will be visible when performing trigger management tasks.
Cluster Synchronization at Run TimeAt run time, the Integration Server uses remote invokes to update the other members of a cluster with trigger management changes. If a remote invoke to a server fails or that server is not available at the time of the remote invoke, the cluster will be out of sync. The Integration Server executing the remote invoke displays the following journal log messages to indicate the status of the cluster synchronization attempt.
Note: Integration Servers that belong to the cluster but are not in this list will not be updated during cluster synchronization.
webMethods Integration Server Administrator’s Guide Version 7.1.1 381
23 Managing Broker/Local Triggers
If synchronization... Expect this log message...
Succeeds The Integration Server Administrator displays the message:Settings changed successfully.
Succeeds for some servers, but fails for others
The Integration Server Administrator displays the message: [ISS.0085.9203] Errors occurred while updating remote aliases (x of y updates failed). See server logs for more details.
The server log displays the message for each member of the cluster that was not successfully updated:[ISS.0098.0107E] Error occurred during cluster invoke: Alias = remoteAliasName; Service = serviceName; Exception = exceptionName
You can use the Integration Server Administrator to view and change cluster synchronization status for triggers.
Fails because the local update failed
The Integration Server Administrator displays the message:[ISS.0085.9204] Local update failed: Exception providing reason for failure. (Note: The cluster synchronization will not run until all local errors are resolved.)
If the trigger management change cannot be completed on the local Integration Server, cluster synchronization cannot occur. For example, if you suspend document retrieval for all triggers and one trigger is currently locked, the Integration Server can suspend document retrieval for every trigger except the locked one. Because document retrieval could not be completed locally, the Integration Server cannot synchronize the change with the rest of the cluster.
Fails because it is not configured
The server log displays the following message:[ISS.0033.0156W] Cluster invoke did not complete successfully. Cluster Synchronization feature is not configured.
For more information about configuring cluster synchronization for triggers, see “Configuring Cluster Synchronization” on page 381.
382 webMethods Integration Server Administrator’s Guide Version 7.1.1
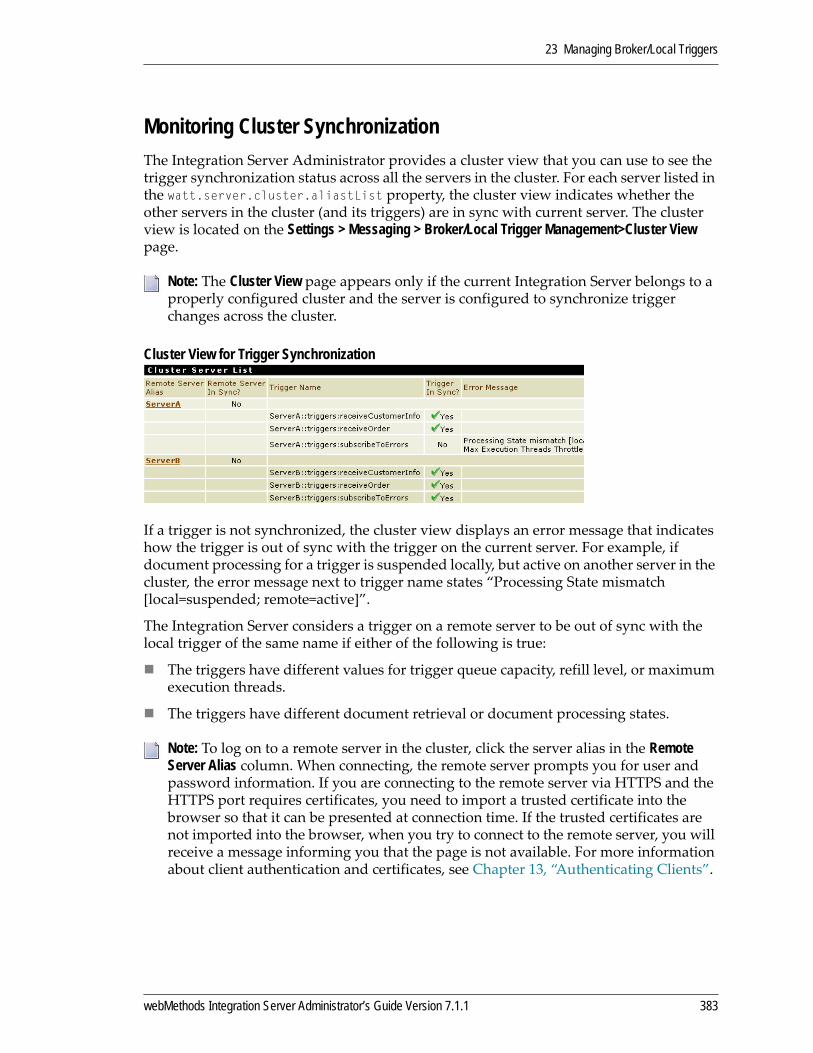
23 Managing Broker/Local Triggers
Monitoring Cluster SynchronizationThe Integration Server Administrator provides a cluster view that you can use to see the trigger synchronization status across all the servers in the cluster. For each server listed in the watt.server.cluster.aliastList property, the cluster view indicates whether the other servers in the cluster (and its triggers) are in sync with current server. The cluster view is located on the Settings > Messaging > Broker/Local Trigger Management>Cluster View page.
Cluster View for Trigger Synchronization
If a trigger is not synchronized, the cluster view displays an error message that indicates how the trigger is out of sync with the trigger on the current server. For example, if document processing for a trigger is suspended locally, but active on another server in the cluster, the error message next to trigger name states “Processing State mismatch [local=suspended; remote=active]”.
The Integration Server considers a trigger on a remote server to be out of sync with the local trigger of the same name if either of the following is true:
The triggers have different values for trigger queue capacity, refill level, or maximum execution threads.
The triggers have different document retrieval or document processing states.
Note: The Cluster View page appears only if the current Integration Server belongs to a properly configured cluster and the server is configured to synchronize trigger changes across the cluster.
Note: To log on to a remote server in the cluster, click the server alias in the Remote Server Alias column. When connecting, the remote server prompts you for user and password information. If you are connecting to the remote server via HTTPS and the HTTPS port requires certificates, you need to import a trusted certificate into the browser so that it can be presented at connection time. If the trusted certificates are not imported into the browser, when you try to connect to the remote server, you will receive a message informing you that the page is not available. For more information about client authentication and certificates, see Chapter 13, “Authenticating Clients”.
webMethods Integration Server Administrator’s Guide Version 7.1.1 383
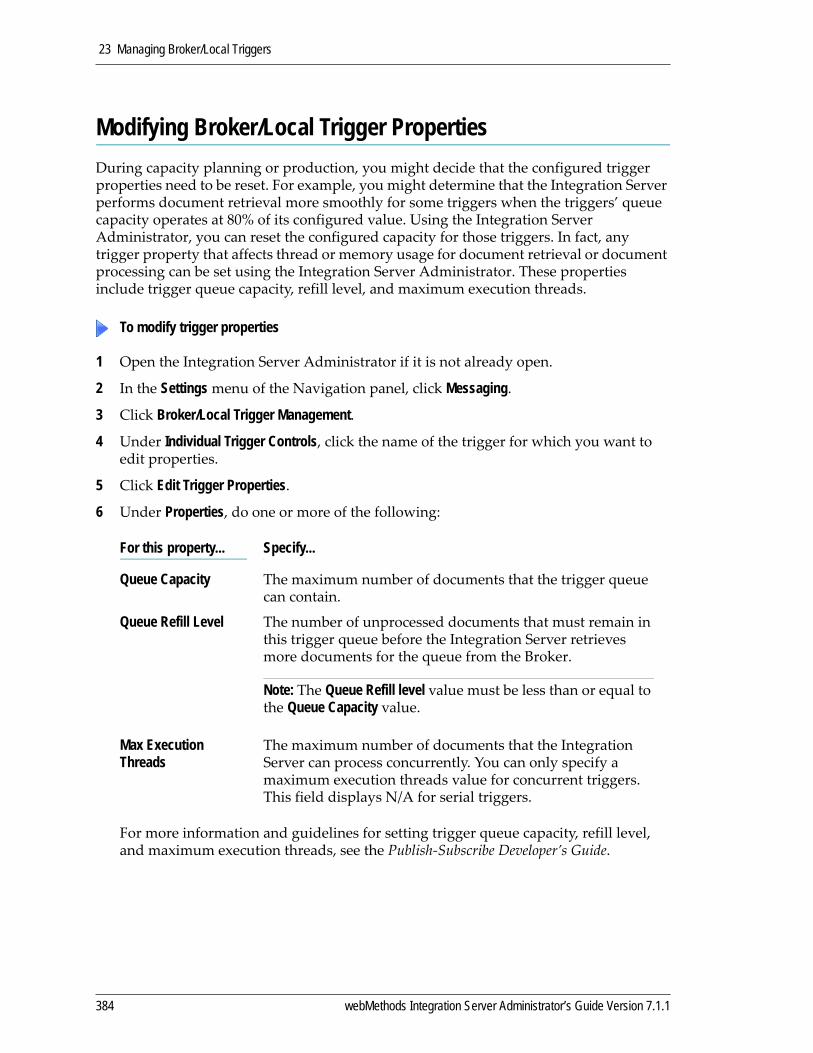
23 Managing Broker/Local Triggers
Modifying Broker/Local Trigger PropertiesDuring capacity planning or production, you might decide that the configured trigger properties need to be reset. For example, you might determine that the Integration Server performs document retrieval more smoothly for some triggers when the triggers’ queue capacity operates at 80% of its configured value. Using the Integration Server Administrator, you can reset the configured capacity for those triggers. In fact, any trigger property that affects thread or memory usage for document retrieval or document processing can be set using the Integration Server Administrator. These properties include trigger queue capacity, refill level, and maximum execution threads.
1 Open the Integration Server Administrator if it is not already open.
2 In the Settings menu of the Navigation panel, click Messaging.
3 Click Broker/Local Trigger Management.
4 Under Individual Trigger Controls, click the name of the trigger for which you want to edit properties.
5 Click Edit Trigger Properties.
6 Under Properties, do one or more of the following:
For more information and guidelines for setting trigger queue capacity, refill level, and maximum execution threads, see the Publish‐Subscribe Developer’s Guide.
To modify trigger properties
For this property... Specify...
Queue Capacity The maximum number of documents that the trigger queue can contain.
Queue Refill Level The number of unprocessed documents that must remain in this trigger queue before the Integration Server retrieves more documents for the queue from the Broker.
Note: The Queue Refill level value must be less than or equal to the Queue Capacity value.
Max Execution Threads
The maximum number of documents that the Integration Server can process concurrently. You can only specify a maximum execution threads value for concurrent triggers. This field displays N/A for serial triggers.
384 webMethods Integration Server Administrator’s Guide Version 7.1.1

23 Managing Broker/Local Triggers
7 If you want to apply the property changes for this trigger to all the servers in a cluster, select the Apply Change Across Cluster check box.
This check box appears only if the current Integration Server belongs to a properly configured cluster and is configured to synchronize trigger changes across the cluster. For more information about configuring an Integration Server to synchronize trigger management changes across a cluster, see “Cluster Synchronization for Trigger Management” on page 380.
8 Click Save Changes.
Note: You can filter the list of displayed triggers using the watt.server.trigger.managementUI.excludeList property. For more information about this property, see Appendix B, “Server Configuration Parameters”
webMethods Integration Server Administrator’s Guide Version 7.1.1 385

23 Managing Broker/Local Triggers
386 webMethods Integration Server Administrator’s Guide Version 7.1.1

24 Using Integration Server to Manage XA Transactions
Overview of XA Transaction Management . . . . . . . . . . . . . . . . . . . . . . . . . . . . . . . . . . . . . . . . . . 388
Configuring XA Options in Integration Server . . . . . . . . . . . . . . . . . . . . . . . . . . . . . . . . . . . . . . . 392
Manually Resolving a Transaction . . . . . . . . . . . . . . . . . . . . . . . . . . . . . . . . . . . . . . . . . . . . . . . . 395
webMethods Integration Server Administrator’s Guide Version 7.1.1 387
24 Using Integration Server to Manage XA Transactions
Overview of XA Transaction ManagementA transaction is a logical unit of work, composed of many different processes, that either entirely succeeds or has no effect at all.
Because the work being performed within a transaction can occur on many different platforms and can involve many different resources from different vendors, the X/Open organization developed the distributed transaction process (DTP) model and the XA interface.
The DTP model defines communication among the following:
Resources such as databases.
Resource managers such as database servers. Resource managers provide access to shared resources.
A transaction manager. The transaction manager coordinates and controls all transactions for resources through their resource managers. Integration Server contains a transaction manager sub‐system that coordinates and controls database transactions that are initiated by the webMethods JDBC Adapter or the webMethods JMS Adapter.
The XA interface describes the protocol for transaction coordination, commitment, and recovery between resource and a transaction manager. In accordance with the XA specification, Integration Server manages transactions using the transaction protocol called two‐phase commit, or 2PC.
In the first phase of 2PC, Integration Server (specifically, the transaction manager) asks the resources that are participating in a transaction whether they are prepared to commit the transaction. In the second phase, one of the following occurs:
All the resources respond that they are prepared to commit. Integration Server instructs the resources to commit the transaction.
One or more resources respond that they are not prepared to commit. Integration Server instructs all resources to roll back their preparations for committing the transaction.
How the Integration Server Persists the State of a TransactionAt the beginning of a transaction, Integration Server creates a unique transaction ID called an XID. The Integration Server stores the XID and the global state of the transaction in a persistent store called the XA recovery store. At the beginning of each subsequent action taken for the transaction, Integration Server stores the global state of the transaction and the state of each resource that is participating in the transaction in the XA recovery store. If Integration Server ends abnormally, Integration Server can retrieve the state information from the XA recovery store and try to resolve uncompleted transactions, if there are any.
388 webMethods Integration Server Administrator’s Guide Version 7.1.1
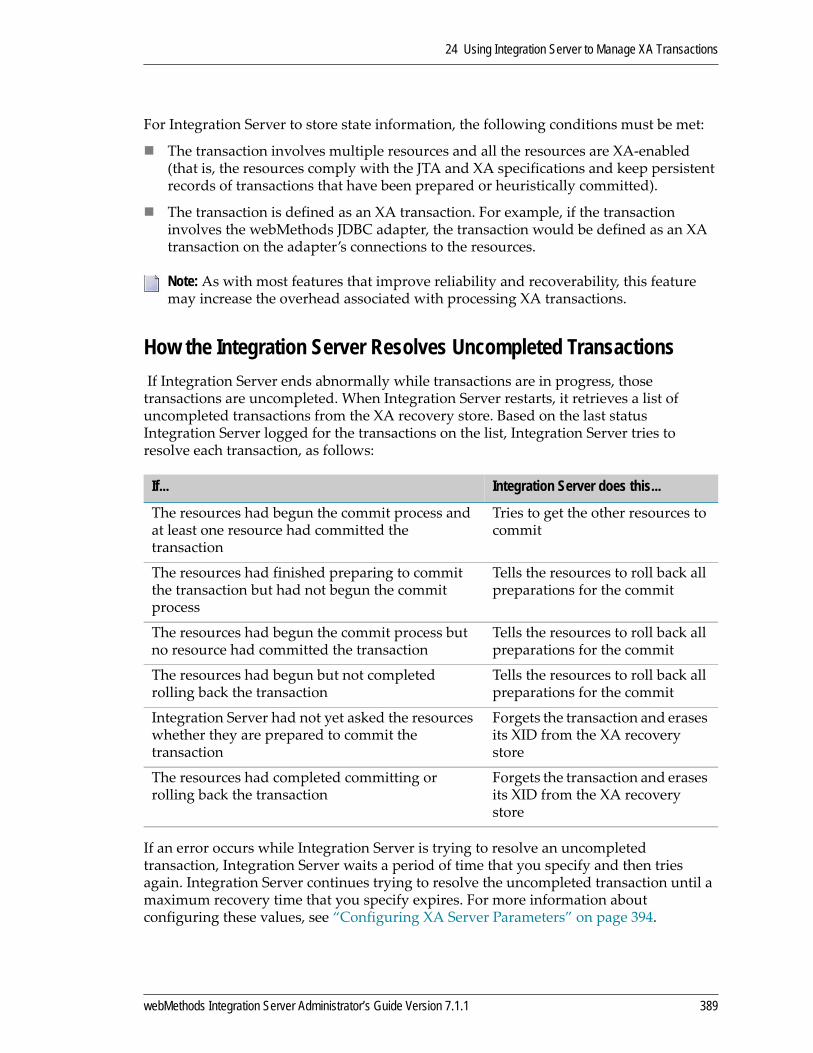
24 Using Integration Server to Manage XA Transactions
For Integration Server to store state information, the following conditions must be met:
The transaction involves multiple resources and all the resources are XA‐enabled (that is, the resources comply with the JTA and XA specifications and keep persistent records of transactions that have been prepared or heuristically committed).
The transaction is defined as an XA transaction. For example, if the transaction involves the webMethods JDBC adapter, the transaction would be defined as an XA transaction on the adapter’s connections to the resources.
How the Integration Server Resolves Uncompleted Transactions If Integration Server ends abnormally while transactions are in progress, those transactions are uncompleted. When Integration Server restarts, it retrieves a list of uncompleted transactions from the XA recovery store. Based on the last status Integration Server logged for the transactions on the list, Integration Server tries to resolve each transaction, as follows:
If an error occurs while Integration Server is trying to resolve an uncompleted transaction, Integration Server waits a period of time that you specify and then tries again. Integration Server continues trying to resolve the uncompleted transaction until a maximum recovery time that you specify expires. For more information about configuring these values, see “Configuring XA Server Parameters” on page 394.
Note: As with most features that improve reliability and recoverability, this feature may increase the overhead associated with processing XA transactions.
If... Integration Server does this...
The resources had begun the commit process and at least one resource had committed the transaction
Tries to get the other resources to commit
The resources had finished preparing to commit the transaction but had not begun the commit process
Tells the resources to roll back all preparations for the commit
The resources had begun the commit process but no resource had committed the transaction
Tells the resources to roll back all preparations for the commit
The resources had begun but not completed rolling back the transaction
Tells the resources to roll back all preparations for the commit
Integration Server had not yet asked the resources whether they are prepared to commit the transaction
Forgets the transaction and erases its XID from the XA recovery store
The resources had completed committing or rolling back the transaction
Forgets the transaction and erases its XID from the XA recovery store
webMethods Integration Server Administrator’s Guide Version 7.1.1 389
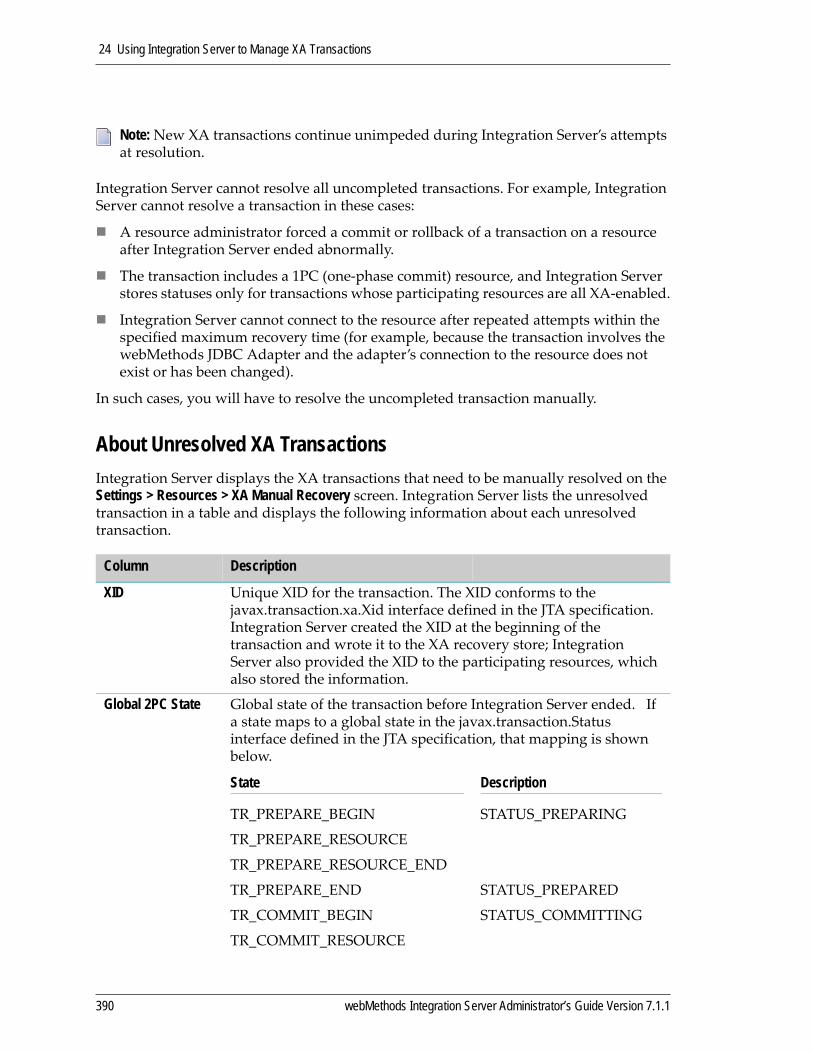
24 Using Integration Server to Manage XA Transactions
Integration Server cannot resolve all uncompleted transactions. For example, Integration Server cannot resolve a transaction in these cases:
A resource administrator forced a commit or rollback of a transaction on a resource after Integration Server ended abnormally.
The transaction includes a 1PC (one‐phase commit) resource, and Integration Server stores statuses only for transactions whose participating resources are all XA‐enabled.
Integration Server cannot connect to the resource after repeated attempts within the specified maximum recovery time (for example, because the transaction involves the webMethods JDBC Adapter and the adapter’s connection to the resource does not exist or has been changed).
In such cases, you will have to resolve the uncompleted transaction manually.
About Unresolved XA TransactionsIntegration Server displays the XA transactions that need to be manually resolved on the Settings > Resources > XA Manual Recovery screen. Integration Server lists the unresolved transaction in a table and displays the following information about each unresolved transaction.
Note: New XA transactions continue unimpeded during Integration Server’s attempts at resolution.
Column Description
XID Unique XID for the transaction. The XID conforms to the javax.transaction.xa.Xid interface defined in the JTA specification. Integration Server created the XID at the beginning of the transaction and wrote it to the XA recovery store; Integration Server also provided the XID to the participating resources, which also stored the information.
Global 2PC State Global state of the transaction before Integration Server ended. If a state maps to a global state in the javax.transaction.Status interface defined in the JTA specification, that mapping is shown below.
State Description
TR_PREPARE_BEGIN STATUS_PREPARING
TR_PREPARE_RESOURCE
TR_PREPARE_RESOURCE_END
TR_PREPARE_END STATUS_PREPARED
TR_COMMIT_BEGIN STATUS_COMMITTING
TR_COMMIT_RESOURCE
390 webMethods Integration Server Administrator’s Guide Version 7.1.1
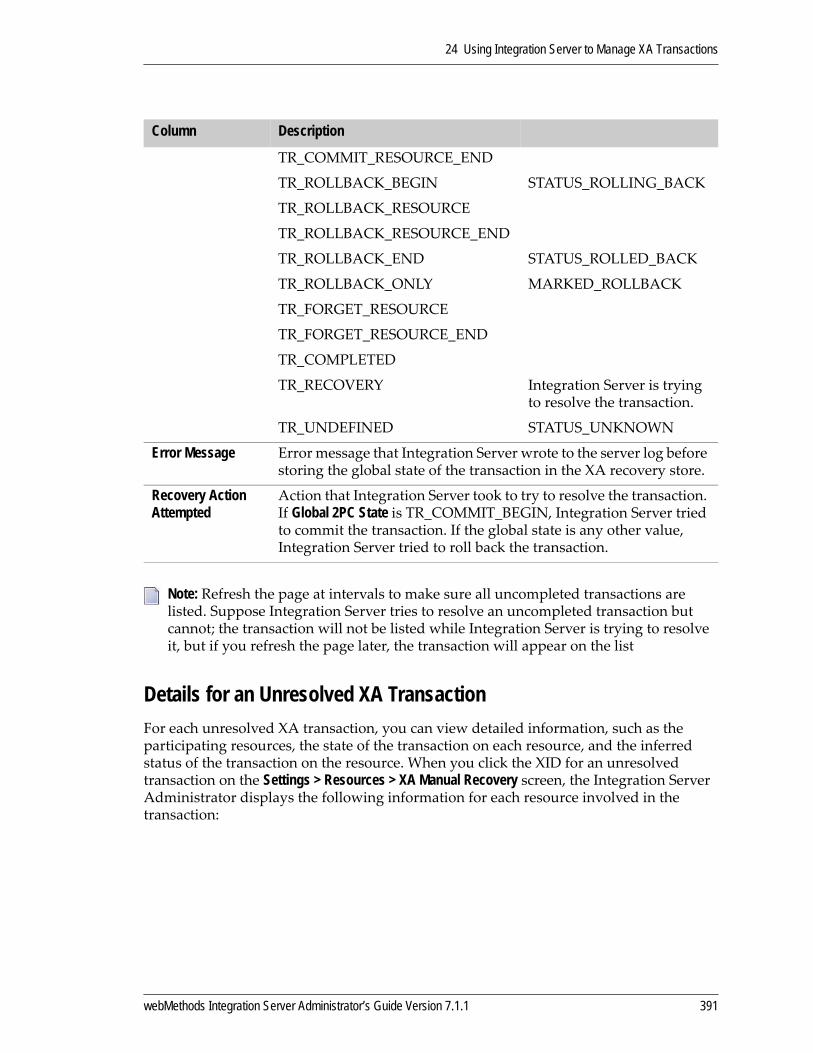
24 Using Integration Server to Manage XA Transactions
Details for an Unresolved XA TransactionFor each unresolved XA transaction, you can view detailed information, such as the participating resources, the state of the transaction on each resource, and the inferred status of the transaction on the resource. When you click the XID for an unresolved transaction on the Settings > Resources > XA Manual Recovery screen, the Integration Server Administrator displays the following information for each resource involved in the transaction:
TR_COMMIT_RESOURCE_END
TR_ROLLBACK_BEGIN STATUS_ROLLING_BACK
TR_ROLLBACK_RESOURCE
TR_ROLLBACK_RESOURCE_END
TR_ROLLBACK_END STATUS_ROLLED_BACK
TR_ROLLBACK_ONLY MARKED_ROLLBACK
TR_FORGET_RESOURCE
TR_FORGET_RESOURCE_END
TR_COMPLETED
TR_RECOVERY Integration Server is trying to resolve the transaction.
TR_UNDEFINED STATUS_UNKNOWN
Error Message Error message that Integration Server wrote to the server log before storing the global state of the transaction in the XA recovery store.
Recovery Action Attempted
Action that Integration Server took to try to resolve the transaction. If Global 2PC State is TR_COMMIT_BEGIN, Integration Server tried to commit the transaction. If the global state is any other value, Integration Server tried to roll back the transaction.
Note: Refresh the page at intervals to make sure all uncompleted transactions are listed. Suppose Integration Server tries to resolve an uncompleted transaction but cannot; the transaction will not be listed while Integration Server is trying to resolve it, but if you refresh the page later, the transaction will appear on the list
Column Description
webMethods Integration Server Administrator’s Guide Version 7.1.1 391
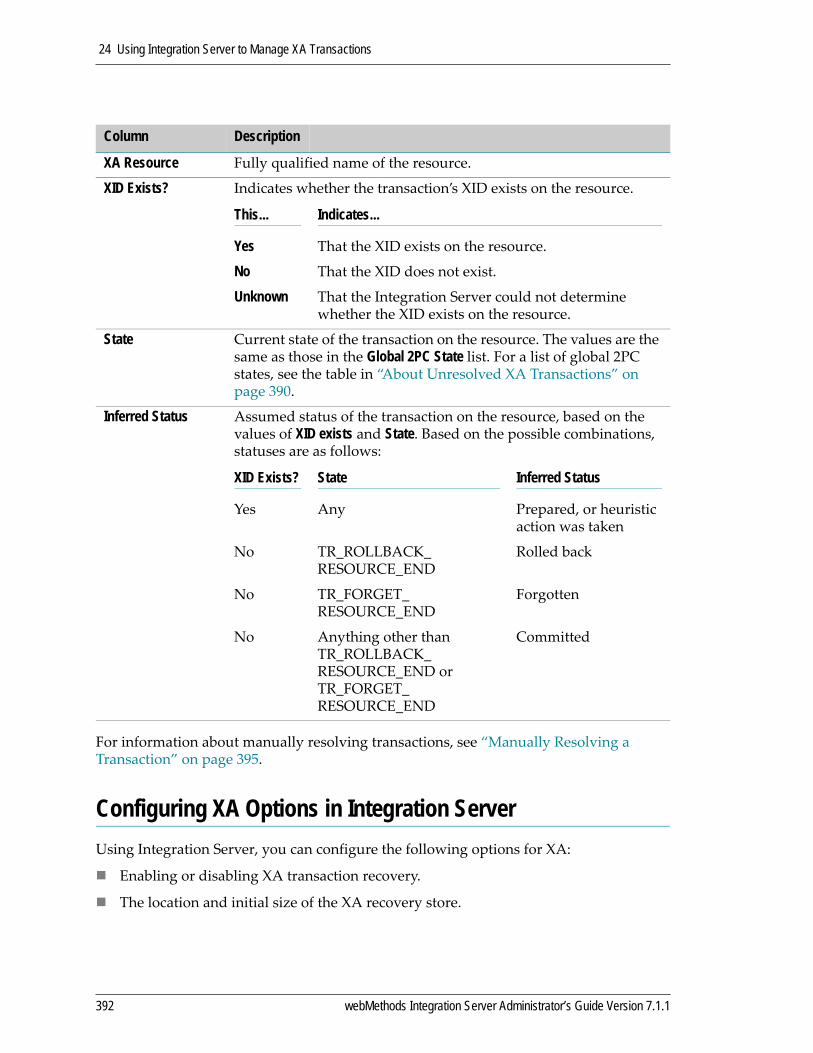
24 Using Integration Server to Manage XA Transactions
For information about manually resolving transactions, see “Manually Resolving a Transaction” on page 395.
Configuring XA Options in Integration ServerUsing Integration Server, you can configure the following options for XA:
Enabling or disabling XA transaction recovery.
The location and initial size of the XA recovery store.
Column Description
XA Resource Fully qualified name of the resource.
XID Exists? Indicates whether the transaction’s XID exists on the resource.
This... Indicates...
Yes That the XID exists on the resource.
No That the XID does not exist.
Unknown That the Integration Server could not determine whether the XID exists on the resource.
State Current state of the transaction on the resource. The values are the same as those in the Global 2PC State list. For a list of global 2PC states, see the table in “About Unresolved XA Transactions” on page 390.
Inferred Status Assumed status of the transaction on the resource, based on the values of XID exists and State. Based on the possible combinations, statuses are as follows:
XID Exists? State Inferred Status
Yes Any Prepared, or heuristic action was taken
No TR_ROLLBACK_RESOURCE_END
Rolled back
No TR_FORGET_RESOURCE_END
Forgotten
No Anything other than TR_ROLLBACK_RESOURCE_END or TR_FORGET_RESOURCE_END
Committed
392 webMethods Integration Server Administrator’s Guide Version 7.1.1
24 Using Integration Server to Manage XA Transactions
Server parameters that determine:
The length of time that Integration Server waits between attempts to resolve a transaction.
The maximum time allowed to resolve a transaction.
Whether a transaction should continue if Integration Server cannot store the status of a transaction and its participating resources in the XA recovery store (for example, because the store is corrupted).
The following sections provide more information about setting these options.
Enabling or Disabling XA Transaction RecoveryYou can enable or disable XA transaction recovery. When you disable XA transaction recovery, Integration Server does not attempt to recover incomplete transactions automatically. Additionally, you cannot use Integration Server Administrator to recover incomplete transactions manually.
If you are willing to exchange reliability and recovery of XA transactions in return for possible improved processing performance, you might want to disable XA transaction recovery. By default, Integration Server enables XA transaction recovery.
1 Open the Integration Server Administrator if it is not already open
2 In Integration Server Administrator, go to Settings > Resources and click XA Manual Recovery.
3 Do one of the following:
If XA transaction recovery is currently enabled and you want to disable it, click Disable XA Transaction Recovery. Integration Server Administrator hides the Unresolved XA Transaction table.
If XA transaction recovery is currently disabled and you want to enable it, click Enable XA Transaction Recovery. Integration Server Administrator displays the Unresolved XA Transaction table
To enable or disable XA transaction recovery
Tip! You can also use the watt.server.jca.transaction.writeRecoveryRecord server parameter to enable or disable XA transaction recovery. For more information about setting server parameters, see Appendix B, “Server Configuration Parameters”.
webMethods Integration Server Administrator’s Guide Version 7.1.1 393

24 Using Integration Server to Manage XA Transactions
Configuring the XA Recovery StoreThe XA recovery store is a persistent store that contains the XID and global sate of a transaction. You can specify the location of the XA recovery store and the initial size of the file at start up.
1 Go to Settings > Resources and click Store Settings. In the XA Recovery Store section, Integration Server Administrator shows the current settings for the location of the XA recovery store and its initial size.
2 Click Edit XA Recovery Store Settings.
3 In the Store Location field, type the relative or absolute path to the directory in the file system in which to store the XA recovery store file. The default location is:
IntegrationServer_directory\XAStore
4 In the Initial Store Size (MB) field, type the initial size for the XA recovery store file, in megabytes. The default is 10MB.
5 Click Save Changes.
When you next restart Integration Server, it will create a new XA recovery store file in the new location and start writing to it. Integration Server will also use the new initial size for the file.
Configuring XA Server ParametersIntegration Server provides the following server parameters for XA transactions and XA transaction recovery.
watt.server.transaction.recovery.sleepIntervalIf an error occurs while Integration Server is trying to resolve an uncompleted transaction, specifies the period of time Integration Server waits between resolution attempts.
watt.server.transaction.recovery.abandonTimeoutSpecifies the maximum recovery time for resolving the transaction. Integration Server continues trying to resolve the transaction until the maximum recovery time expires.
To configure the XA recovery store
Important! Make sure that you have write access to the specified directory and that the directory does not contain any characters considered illegal by your operating system.
Note: Make sure that there is enough free disk space on the Integration Server machine to accommodate the initial sizes of the default document store, the trigger document store, and the XA recovery store.
394 webMethods Integration Server Administrator’s Guide Version 7.1.1

24 Using Integration Server to Manage XA Transactions
watt.server.jca.transaction.rollbackOnWriteFailureSpecifies whether Integration Server should continue with a transaction or roll it back if Integration Server cannot store the status of a transaction and its participating resources in the XA recovery store (for example, because the store is corrupted). Setting the parameter to false involves some risk; if Integration Server ends abnormally, no statuses will have been saved to the XA recovery store, and Integration Server will not be able to resolve the uncompleted transaction or give you the chance to resolve it manually.
For more information about these and other server parameters, see Appendix B, “Server Configuration Parameters”.
Manually Resolving a TransactionIf Integration Server cannot resolve a transaction, you can try to resolve it manually. To successfully resolve a transaction manually, you must be familiar with the participating resources and must act in a way that leaves the transaction in a consistent state. For example, if only one of the participating resources committed the transaction, you can try to get the other participating resources to commit as well
When you manually resolve a transaction, resolution is not itself a transaction; that is, each participating resource and the action you perform on it does not participate in a new 2PC transaction. You must therefore make sure your actions result in a consistent state for the participating resources.
1 Open the Integration Server Administrator if it is not already open
2 In Integration Server Administrator, go to Settings > Resources and click XA Manual Recovery. Integration Server Administrator displays all of the unresolved XA transactions. For a description of the information displayed for each unresolved transaction, see “About Unresolved XA Transactions” on page 390.
3 In the XID column, click the XID for the transaction that you want to resolve. The Integration Server Administrator displays detailed information about the resources involved in the transaction. For a description of the information displayed for each participating resource, see “Details for an Unresolved XA Transaction” on page 391.
4 If you want to delete the transaction, click the Delete Transaction link. Deleting the transaction removes the transaction from the XA recovery store.
To manually resolve an XA transaction
Note: Refresh the page at intervals to make sure all uncompleted transactions are listed. Suppose Integration Server tries to resolve an uncompleted transaction but cannot; the transaction will not be listed while Integration Server is trying to resolve it, but if you refresh the page later, the transaction will appear on the list
webMethods Integration Server Administrator’s Guide Version 7.1.1 395
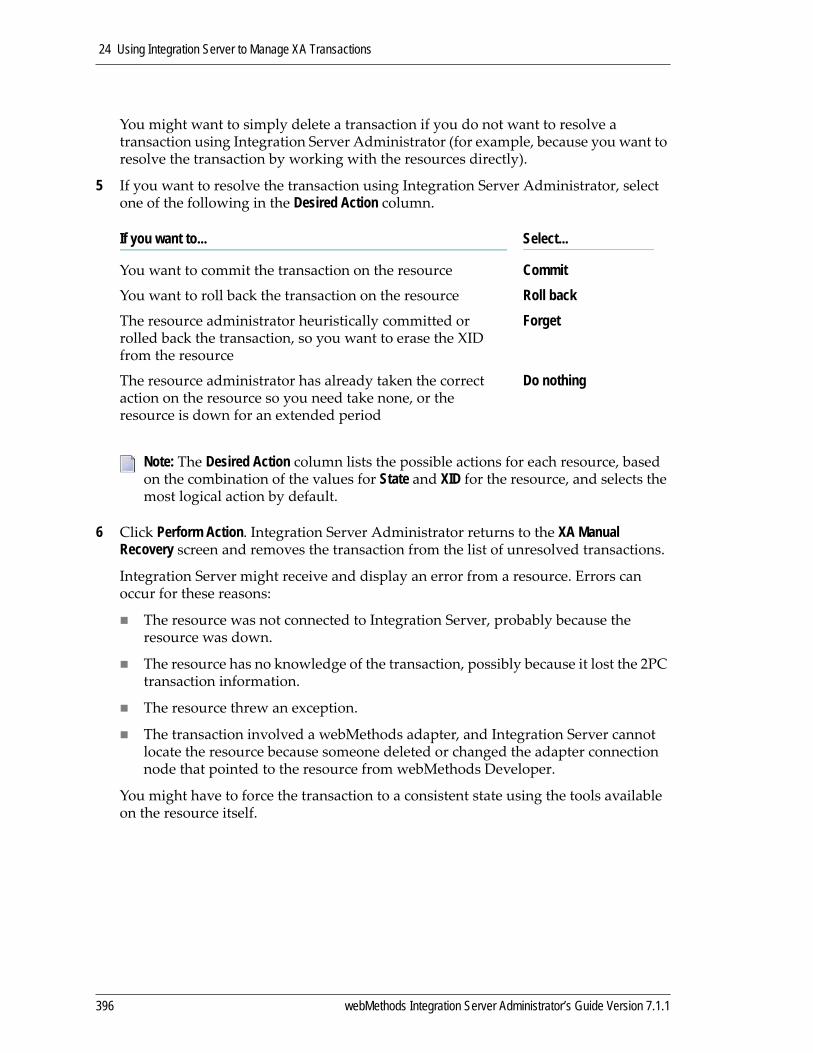
24 Using Integration Server to Manage XA Transactions
You might want to simply delete a transaction if you do not want to resolve a transaction using Integration Server Administrator (for example, because you want to resolve the transaction by working with the resources directly).
5 If you want to resolve the transaction using Integration Server Administrator, select one of the following in the Desired Action column.
6 Click Perform Action. Integration Server Administrator returns to the XA Manual Recovery screen and removes the transaction from the list of unresolved transactions.
Integration Server might receive and display an error from a resource. Errors can occur for these reasons:
The resource was not connected to Integration Server, probably because the resource was down.
The resource has no knowledge of the transaction, possibly because it lost the 2PC transaction information.
The resource threw an exception.
The transaction involved a webMethods adapter, and Integration Server cannot locate the resource because someone deleted or changed the adapter connection node that pointed to the resource from webMethods Developer.
You might have to force the transaction to a consistent state using the tools available on the resource itself.
If you want to... Select...
You want to commit the transaction on the resource CommitYou want to roll back the transaction on the resource Roll backThe resource administrator heuristically committed or rolled back the transaction, so you want to erase the XID from the resource
Forget
The resource administrator has already taken the correct action on the resource so you need take none, or the resource is down for an extended period
Do nothing
Note: The Desired Action column lists the possible actions for each resource, based on the combination of the values for State and XID for the resource, and selects the most logical action by default.
396 webMethods Integration Server Administrator’s Guide Version 7.1.1
A Integration Server Deployment Checklist
Introduction . . . . . . . . . . . . . . . . . . . . . . . . . . . . . . . . . . . . . . . . . . . . . . . . . . . . . . . . . . . . . . . . . 398
Stage 1: Installation . . . . . . . . . . . . . . . . . . . . . . . . . . . . . . . . . . . . . . . . . . . . . . . . . . . . . . . . . . . 398
Stage 2: Basic Configuration . . . . . . . . . . . . . . . . . . . . . . . . . . . . . . . . . . . . . . . . . . . . . . . . . . . . 399
Stage 3: Setting Up Users, Groups, and ACLs . . . . . . . . . . . . . . . . . . . . . . . . . . . . . . . . . . . . . . 400
Stage 4: Publishing Packages . . . . . . . . . . . . . . . . . . . . . . . . . . . . . . . . . . . . . . . . . . . . . . . . . . . 401
Stage 5: Installing Run-Time Classes . . . . . . . . . . . . . . . . . . . . . . . . . . . . . . . . . . . . . . . . . . . . . 402
Stage 6: Preparing Clients for Communication with the Server . . . . . . . . . . . . . . . . . . . . . . . . . . 402
Stage 7: Setting Up Security . . . . . . . . . . . . . . . . . . . . . . . . . . . . . . . . . . . . . . . . . . . . . . . . . . . . 403
Stage 8: Startup and Test . . . . . . . . . . . . . . . . . . . . . . . . . . . . . . . . . . . . . . . . . . . . . . . . . . . . . . . 404
Stage 9: Archive Sources . . . . . . . . . . . . . . . . . . . . . . . . . . . . . . . . . . . . . . . . . . . . . . . . . . . . . . . 405
webMethods Integration Server Administrator’s Guide Version 7.1.1 397
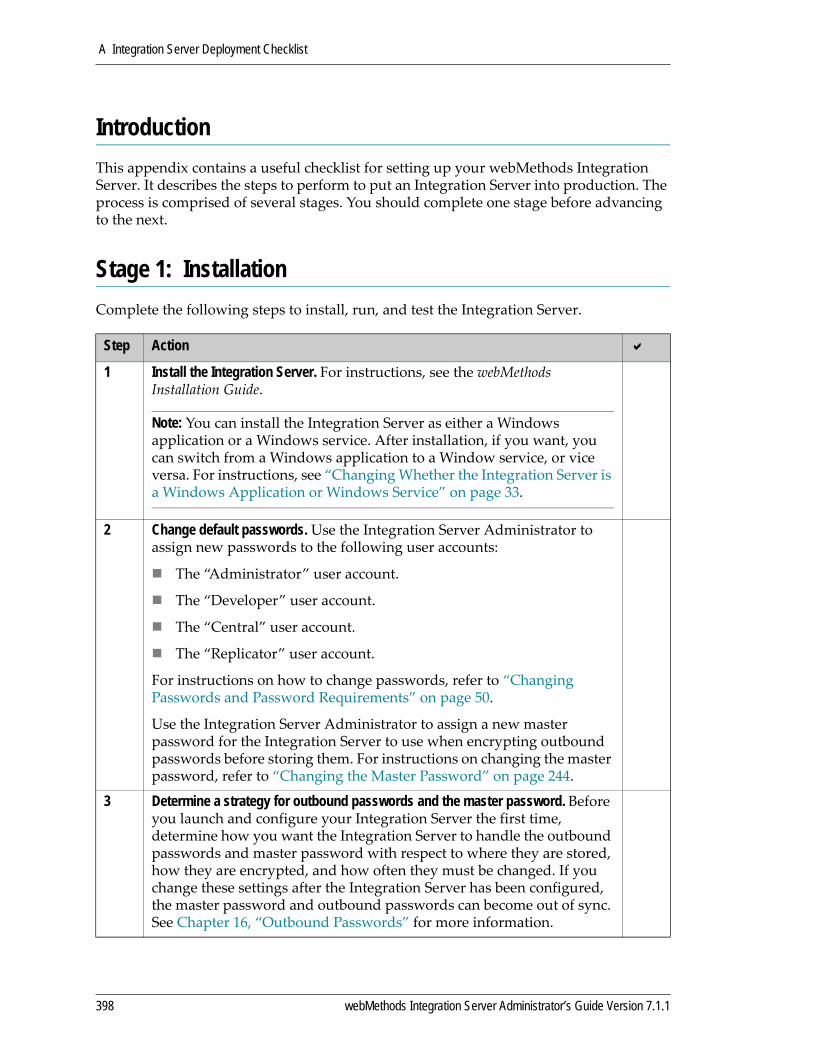
A Integration Server Deployment Checklist
IntroductionThis appendix contains a useful checklist for setting up your webMethods Integration Server. It describes the steps to perform to put an Integration Server into production. The process is comprised of several stages. You should complete one stage before advancing to the next.
Stage 1: InstallationComplete the following steps to install, run, and test the Integration Server.
Step Action
1 Install the Integration Server. For instructions, see the webMethods Installation Guide.
Note: You can install the Integration Server as either a Windows application or a Windows service. After installation, if you want, you can switch from a Windows application to a Window service, or vice versa. For instructions, see “Changing Whether the Integration Server is a Windows Application or Windows Service” on page 33.
2 Change default passwords. Use the Integration Server Administrator to assign new passwords to the following user accounts:
The “Administrator” user account.
The “Developer” user account.
The “Central” user account.
The “Replicator” user account.
For instructions on how to change passwords, refer to “Changing Passwords and Password Requirements” on page 50.
Use the Integration Server Administrator to assign a new master password for the Integration Server to use when encrypting outbound passwords before storing them. For instructions on changing the master password, refer to “Changing the Master Password” on page 244.
3 Determine a strategy for outbound passwords and the master password. Before you launch and configure your Integration Server the first time, determine how you want the Integration Server to handle the outbound passwords and master password with respect to where they are stored, how they are encrypted, and how often they must be changed. If you change these settings after the Integration Server has been configured, the master password and outbound passwords can become out of sync. See Chapter 16, “Outbound Passwords” for more information.
398 webMethods Integration Server Administrator’s Guide Version 7.1.1

A Integration Server Deployment Checklist
Stage 2: Basic ConfigurationUse the Integration Server Administrator to configure the way in which the server will send outbound requests, accept inbound requests, expire sessions, and issue error messages.
Step Action
1 Set up the ports. Use the Ports screen to specify the ports on which the server will listen for requests.
Tip! If you will receive HTTP and/or HTTPS requests on multiple ports, you may want to disable all but one port (the one you will use to interact with the Integration Server Administrator) until the server is ready for production.
For instructions on how to set up and disable ports, see “Setting Up Aliases for Remote Integration Servers” on page 68.
2 Specify the proxy servers. Use the Proxy Servers screen to specify the proxy server(s) (if any) through which this server will issue outbound requests.
Specify which URLs (if any) can bypass the proxy server.
For instructions on how to specify proxy servers and bypass lists, see “Setting Up Aliases for Remote Integration Servers” on page 68.
3 Configure session timeouts. Use the Resources screen to set the timeout value you want the server to use.
For instructions, see “Setting the Session Timeout Limit” on page 65.
4 Specify the error message recipients and an SMTP server. Use the Logging screen to specify the email address where you want the server to send error messages when an exception (a critical server error or a binding failure) occurs and the name of the SMTP server to use for this purpose.
For instructions, see “Configuring Where the Integration Server Writes Logging, Status, and Other Information” on page 78.
5 Set up logging. For instructions, see the webMethods Logging Guide.
webMethods Integration Server Administrator’s Guide Version 7.1.1 399
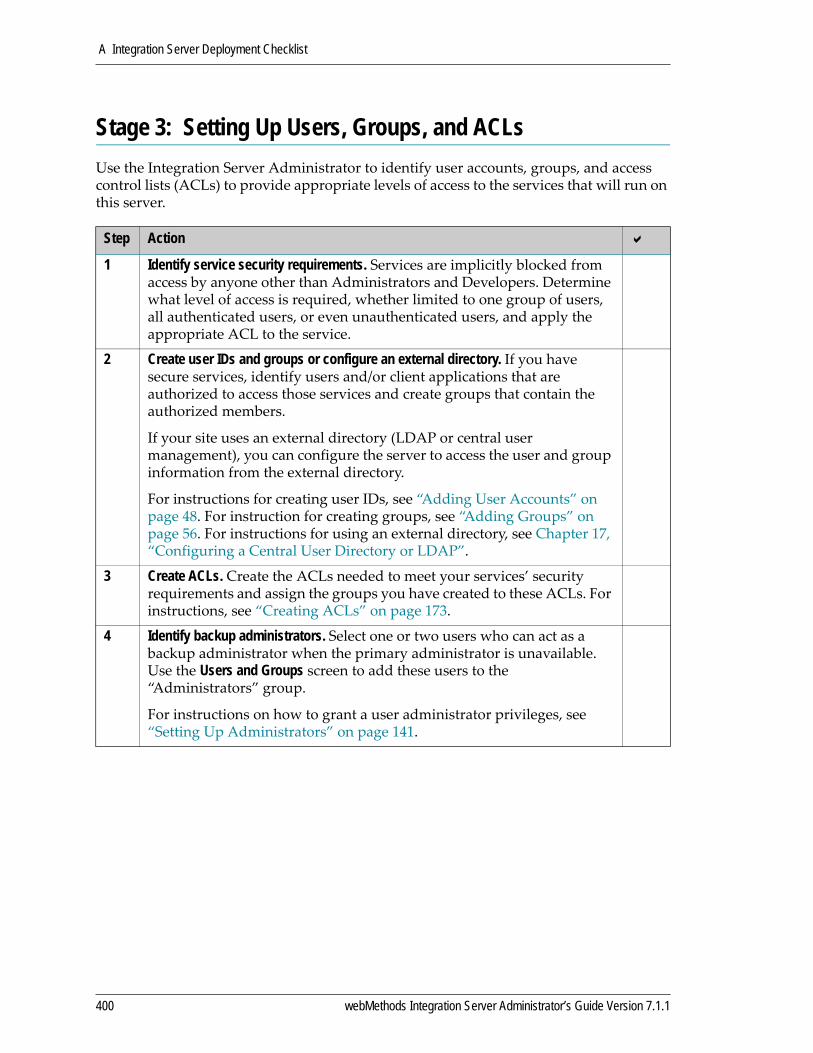
A Integration Server Deployment Checklist
Stage 3: Setting Up Users, Groups, and ACLsUse the Integration Server Administrator to identify user accounts, groups, and access control lists (ACLs) to provide appropriate levels of access to the services that will run on this server.
Step Action
1 Identify service security requirements. Services are implicitly blocked from access by anyone other than Administrators and Developers. Determine what level of access is required, whether limited to one group of users, all authenticated users, or even unauthenticated users, and apply the appropriate ACL to the service.
2 Create user IDs and groups or configure an external directory. If you have secure services, identify users and/or client applications that are authorized to access those services and create groups that contain the authorized members.
If your site uses an external directory (LDAP or central user management), you can configure the server to access the user and group information from the external directory.
For instructions for creating user IDs, see “Adding User Accounts” on page 48. For instruction for creating groups, see “Adding Groups” on page 56. For instructions for using an external directory, see Chapter 17, “Configuring a Central User Directory or LDAP”.
3 Create ACLs. Create the ACLs needed to meet your services’ security requirements and assign the groups you have created to these ACLs. For instructions, see “Creating ACLs” on page 173.
4 Identify backup administrators. Select one or two users who can act as a backup administrator when the primary administrator is unavailable. Use the Users and Groups screen to add these users to the “Administrators” group.
For instructions on how to grant a user administrator privileges, see “Setting Up Administrators” on page 141.
400 webMethods Integration Server Administrator’s Guide Version 7.1.1
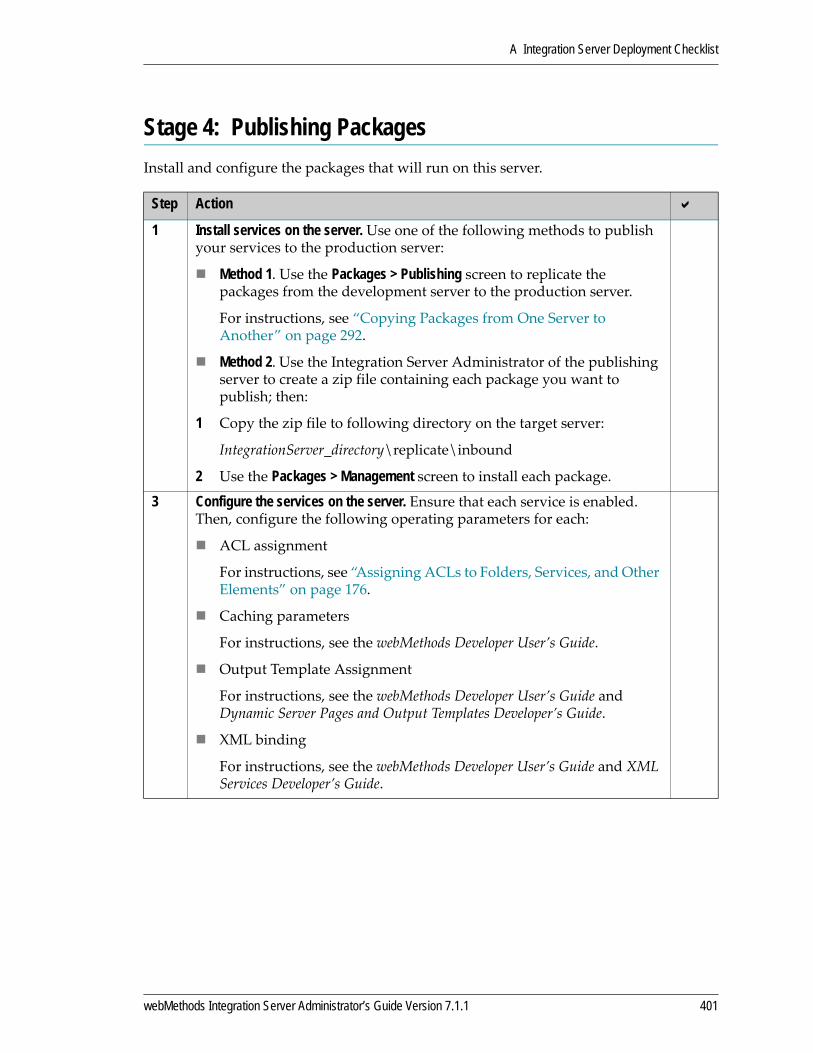
A Integration Server Deployment Checklist
Stage 4: Publishing PackagesInstall and configure the packages that will run on this server.
Step Action
1 Install services on the server. Use one of the following methods to publish your services to the production server:
Method 1. Use the Packages > Publishing screen to replicate the packages from the development server to the production server.
For instructions, see “Copying Packages from One Server to Another” on page 292.
Method 2. Use the Integration Server Administrator of the publishing server to create a zip file containing each package you want to publish; then:
1 Copy the zip file to following directory on the target server:
IntegrationServer_directory\replicate\inbound
2 Use the Packages > Management screen to install each package.3 Configure the services on the server. Ensure that each service is enabled.
Then, configure the following operating parameters for each:
ACL assignment
For instructions, see “Assigning ACLs to Folders, Services, and Other Elements” on page 176.
Caching parameters
For instructions, see the webMethods Developer User’s Guide.
Output Template Assignment
For instructions, see the webMethods Developer User’s Guide and Dynamic Server Pages and Output Templates Developer’s Guide.
XML binding
For instructions, see the webMethods Developer User’s Guide and XML Services Developer’s Guide.
webMethods Integration Server Administrator’s Guide Version 7.1.1 401
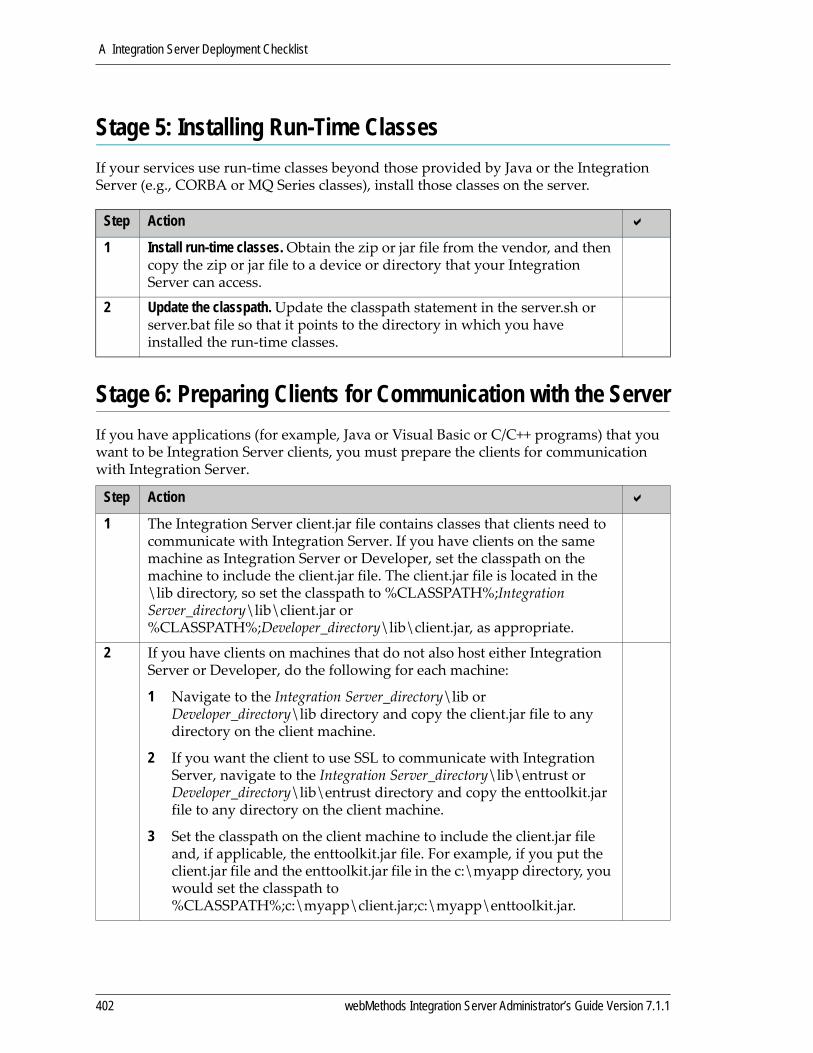
A Integration Server Deployment Checklist
Stage 5: Installing Run-Time ClassesIf your services use run‐time classes beyond those provided by Java or the Integration Server (e.g., CORBA or MQ Series classes), install those classes on the server.
Stage 6: Preparing Clients for Communication with the ServerIf you have applications (for example, Java or Visual Basic or C/C++ programs) that you want to be Integration Server clients, you must prepare the clients for communication with Integration Server.
Step Action
1 Install run-time classes. Obtain the zip or jar file from the vendor, and then copy the zip or jar file to a device or directory that your Integration Server can access.
2 Update the classpath. Update the classpath statement in the server.sh or server.bat file so that it points to the directory in which you have installed the run‐time classes.
Step Action
1 The Integration Server client.jar file contains classes that clients need to communicate with Integration Server. If you have clients on the same machine as Integration Server or Developer, set the classpath on the machine to include the client.jar file. The client.jar file is located in the \lib directory, so set the classpath to %CLASSPATH%;Integration Server_directory\lib\client.jar or %CLASSPATH%;Developer_directory\lib\client.jar, as appropriate.
2 If you have clients on machines that do not also host either Integration Server or Developer, do the following for each machine:
1 Navigate to the Integration Server_directory\lib or Developer_directory\lib directory and copy the client.jar file to any directory on the client machine.
2 If you want the client to use SSL to communicate with Integration Server, navigate to the Integration Server_directory\lib\entrust or Developer_directory\lib\entrust directory and copy the enttoolkit.jar file to any directory on the client machine.
3 Set the classpath on the client machine to include the client.jar file and, if applicable, the enttoolkit.jar file. For example, if you put the client.jar file and the enttoolkit.jar file in the c:\myapp directory, you would set the classpath to %CLASSPATH%;c:\myapp\client.jar;c:\myapp\enttoolkit.jar.
402 webMethods Integration Server Administrator’s Guide Version 7.1.1
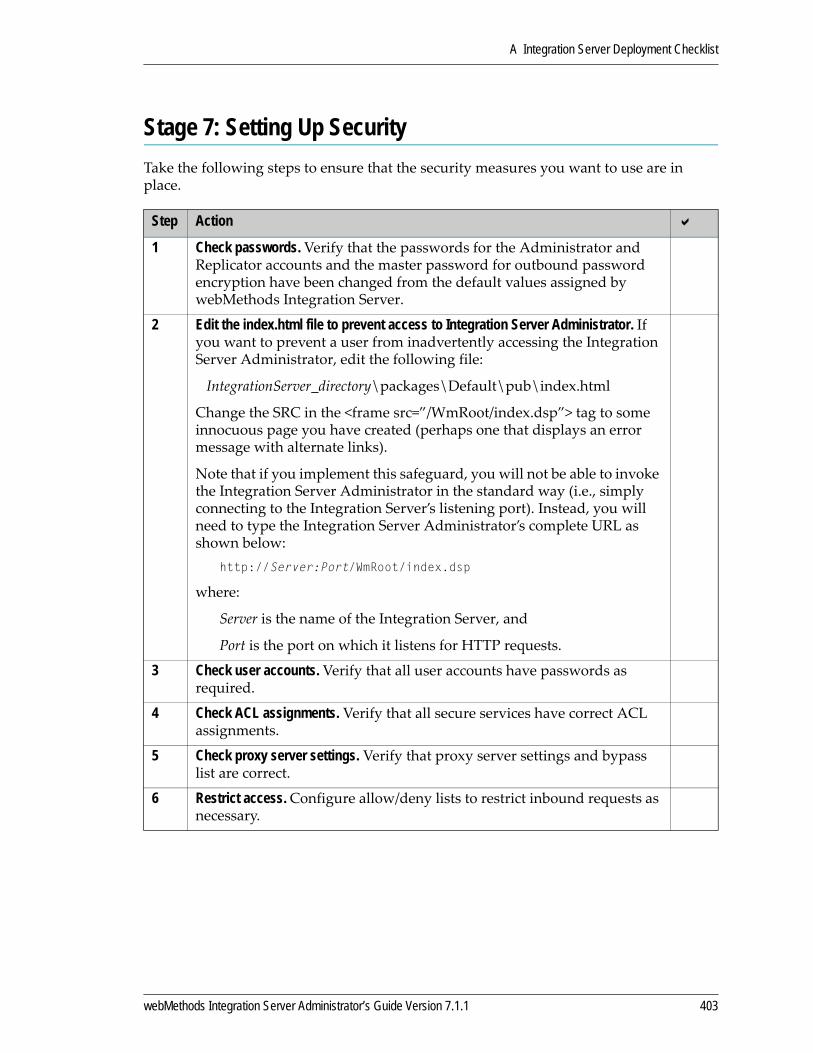
A Integration Server Deployment Checklist
Stage 7: Setting Up SecurityTake the following steps to ensure that the security measures you want to use are in place.
Step Action
1 Check passwords. Verify that the passwords for the Administrator and Replicator accounts and the master password for outbound password encryption have been changed from the default values assigned by webMethods Integration Server.
2 Edit the index.html file to prevent access to Integration Server Administrator. If you want to prevent a user from inadvertently accessing the Integration Server Administrator, edit the following file:
IntegrationServer_directory\packages\Default\pub\index.html
Change the SRC in the <frame src=”/WmRoot/index.dsp”> tag to some innocuous page you have created (perhaps one that displays an error message with alternate links).
Note that if you implement this safeguard, you will not be able to invoke the Integration Server Administrator in the standard way (i.e., simply connecting to the Integration Server’s listening port). Instead, you will need to type the Integration Server Administrator’s complete URL as shown below:
http://Server:Port/WmRoot/index.dsp
where:
Server is the name of the Integration Server, and
Port is the port on which it listens for HTTP requests.
3 Check user accounts. Verify that all user accounts have passwords as required.
4 Check ACL assignments. Verify that all secure services have correct ACL assignments.
5 Check proxy server settings. Verify that proxy server settings and bypass list are correct.
6 Restrict access. Configure allow/deny lists to restrict inbound requests as necessary.
webMethods Integration Server Administrator’s Guide Version 7.1.1 403
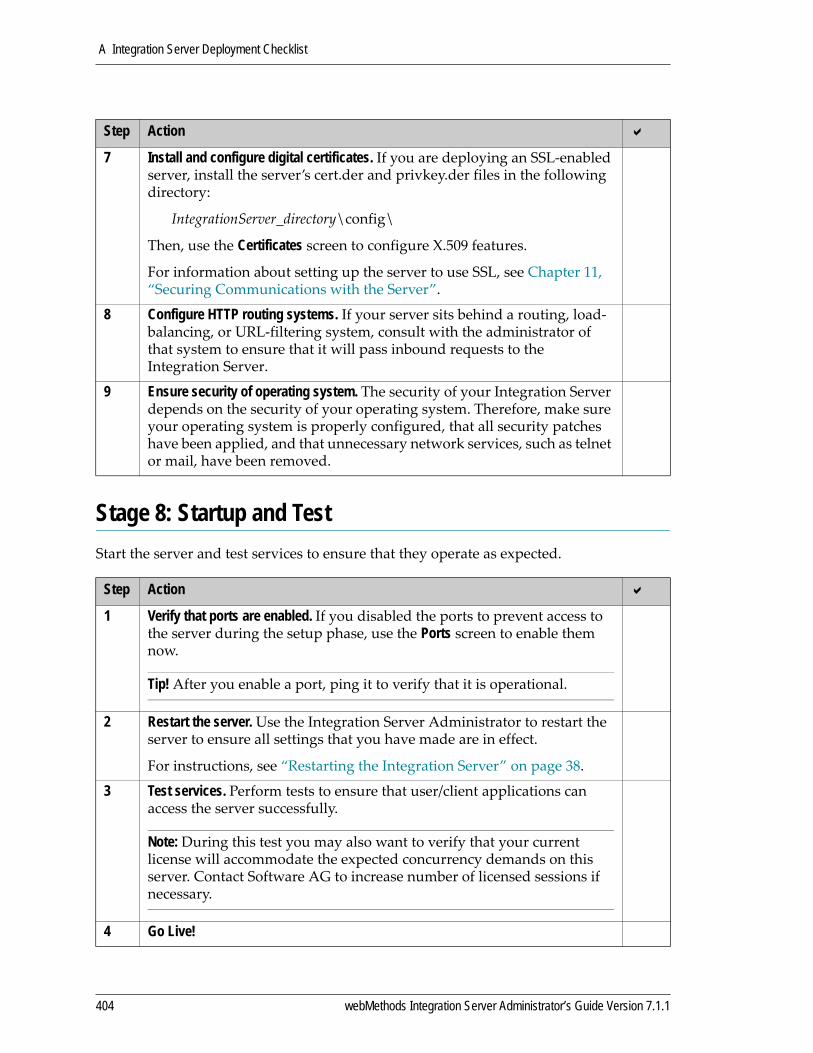
A Integration Server Deployment Checklist
Stage 8: Startup and TestStart the server and test services to ensure that they operate as expected.
7 Install and configure digital certificates. If you are deploying an SSL‐enabled server, install the server’s cert.der and privkey.der files in the following directory:
IntegrationServer_directory\config\
Then, use the Certificates screen to configure X.509 features.
For information about setting up the server to use SSL, see Chapter 11, “Securing Communications with the Server”.
8 Configure HTTP routing systems. If your server sits behind a routing, load‐balancing, or URL‐filtering system, consult with the administrator of that system to ensure that it will pass inbound requests to the Integration Server.
9 Ensure security of operating system. The security of your Integration Server depends on the security of your operating system. Therefore, make sure your operating system is properly configured, that all security patches have been applied, and that unnecessary network services, such as telnet or mail, have been removed.
Step Action
1 Verify that ports are enabled. If you disabled the ports to prevent access to the server during the setup phase, use the Ports screen to enable them now.
Tip! After you enable a port, ping it to verify that it is operational.
2 Restart the server. Use the Integration Server Administrator to restart the server to ensure all settings that you have made are in effect.
For instructions, see “Restarting the Integration Server” on page 38.
3 Test services. Perform tests to ensure that user/client applications can access the server successfully.
Note: During this test you may also want to verify that your current license will accommodate the expected concurrency demands on this server. Contact Software AG to increase number of licensed sessions if necessary.
4 Go Live!
Step Action
404 webMethods Integration Server Administrator’s Guide Version 7.1.1
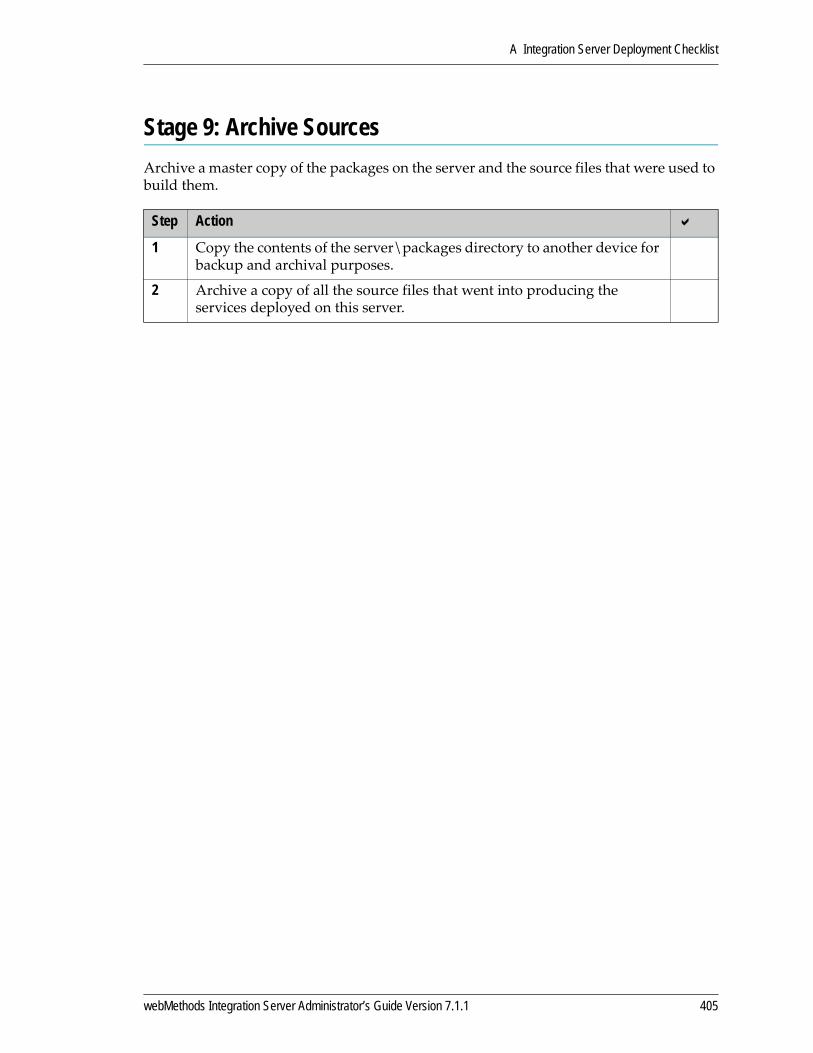
A Integration Server Deployment Checklist
Stage 9: Archive SourcesArchive a master copy of the packages on the server and the source files that were used to build them.
Step Action
1 Copy the contents of the server\packages directory to another device for backup and archival purposes.
2 Archive a copy of all the source files that went into producing the services deployed on this server.
webMethods Integration Server Administrator’s Guide Version 7.1.1 405

A Integration Server Deployment Checklist
406 webMethods Integration Server Administrator’s Guide Version 7.1.1
B Server Configuration Parameters
Introduction . . . . . . . . . . . . . . . . . . . . . . . . . . . . . . . . . . . . . . . . . . . . . . . . . . . . . . . . . . . . . . . . . 408
watt.config. . . . . . . . . . . . . . . . . . . . . . . . . . . . . . . . . . . . . . . . . . . . . . . . . . . . . . . . . . . . . . . . . . . 408
watt.core. . . . . . . . . . . . . . . . . . . . . . . . . . . . . . . . . . . . . . . . . . . . . . . . . . . . . . . . . . . . . . . . . . . . 408
watt.debug. . . . . . . . . . . . . . . . . . . . . . . . . . . . . . . . . . . . . . . . . . . . . . . . . . . . . . . . . . . . . . . . . . . 409
watt.debug2. . . . . . . . . . . . . . . . . . . . . . . . . . . . . . . . . . . . . . . . . . . . . . . . . . . . . . . . . . . . . . . . . . 410
watt.net. . . . . . . . . . . . . . . . . . . . . . . . . . . . . . . . . . . . . . . . . . . . . . . . . . . . . . . . . . . . . . . . . . . . . 411
watt.security. . . . . . . . . . . . . . . . . . . . . . . . . . . . . . . . . . . . . . . . . . . . . . . . . . . . . . . . . . . . . . . . . 416
watt.server. . . . . . . . . . . . . . . . . . . . . . . . . . . . . . . . . . . . . . . . . . . . . . . . . . . . . . . . . . . . . . . . . . . 418
watt.tx. . . . . . . . . . . . . . . . . . . . . . . . . . . . . . . . . . . . . . . . . . . . . . . . . . . . . . . . . . . . . . . . . . . . . . 444
watt.xslt . . . . . . . . . . . . . . . . . . . . . . . . . . . . . . . . . . . . . . . . . . . . . . . . . . . . . . . . . . . . . . . . . . . . 445
webMethods Integration Server Administrator’s Guide Version 7.1.1 407
B Server Configuration Parameters
IntroductionThis appendix contains a description of the parameters you can specify in the server configuration file (server.cnf), which is located in the IntegrationServer_directory\config directory. Typically you will use the Settings > Extended screen from the Integration Server Administrator to update this file, but there might be times when you need to edit the file directly using a text editor. If you edit the file directly, you should first shut down the Integration Server before updating the file. After you make the changes, restart the server.
The server uses default values for many of the parameters. If a parameter has a default, it is listed with the description of the parameter. Many of these parameters are set as you administer the webMethods Integration Server using the Integration Server Administrator.
watt.config.watt.config.systemPropertiesSpecifies the list of additional system parameters whose name does not start with watt. Each additional system property is separated by a comma. By default, the property mail.imap.partialfetch is included as an additional system property with a default value set to true.
watt.core.watt.core.schema.generateSubstitutionGroupsWhen generating an IS document type from an XML Schema definition that contains a substitution group, indicates whether the resulting document type contains an optional element for each member of a substitution group. When this property is set to false, the resulting document type contains a field that corresponds to the head element in the substitution group, but does not contain any elements for members of the substitution group. When this property is set to true, the resulting document type contains a field that corresponds to the head element and fields that correspond to each member element of the substitution group. All the fields, including the head element, are marked as optional elements. The default is false.
watt.core.validation.multiplerootSpecifies whether the pub.schema:validate service is to validate multiple roots when processing multi‐part documents. When the watt.core.validation.multipleroot property is set to true, the pub.schema:validate service checks for multiple root nodes. If multiple root nodes are found, the service flags a validation error. When the watt.core.validation.multipleroot property is set to false, the pub.schema:validate service does not perform multiple root validations. The default is true.
408 webMethods Integration Server Administrator’s Guide Version 7.1.1

B Server Configuration Parameters
watt.debug.watt.debug.layoutSpecifies the format of messages written to the server’s log file and to the Logs > Server screen. You can specify one of the following formats:
new
Messages will be in the following format:
(Component) [ComponentID.00SubComponentID.SubComponentID.MessageKey] TimeStamp MessageType MessageText
(IS.SERVER) [ISS.0025.25.6] 2007‐07‐31 10:45:27 EDT INFO: License Manager started
legacy
This format corresponds to the message format used in Integration Server prior to version 7.1. Use this format if you need to maintain backward compatibility with the previous message format. For example, you might have written code to process messages written to the server log.
When you select legacy as the message layout, messages will appear in the following format:
TimeStamp [ComponentID.00SubComponentID.MessageKeyMessageType] MessageText
2007‐07‐31 10:39:59 EDT [ISS.0025.0006I] License Manager started
This is the default.
watt.debug.levelSets level of debugging information written to the server’s log file and the Logs > Server screen. The default is Info.
Specify... To display...
Off No messages.
Fatal Fatal messages only.
Error Error and fatal messages.
Warn Warning, error, and fatal messages.
Info Informational, warning, error, and fatal messages. This is the default.
Debug Debug, informational, warning, error, and fatal messages.
Trace Trace, debug, informational, warning, error, and fatal messages.
Note: You can also set the value of the watt.debug.level property by setting the logging level for the Default facility on the Settings > Logging screen. For more information about configuring logging, see the webMethods Logging Guide.
webMethods Integration Server Administrator’s Guide Version 7.1.1 409

B Server Configuration Parameters
Prior to Integration Server 7.1, Integration Server used a number‐based system to set the level of debug information written to the server log. Integration Server maintains backward compatibility with this system. The table below describes the number‐based system.
watt.debug.logfileIf storing logging server, session, service, and error data in flat files, specifies the fully qualified path to the directory that contains the files. The default is the Integration Server_directory\logs directory. For complete information, see the webMethods Logging Guide.
watt.debug2.watt.debug2.facListSpecifies a comma‐delimited list of enabled facilities for which the server logs information. The facilities are numbered. The default is 999, which indicates the server is to log information for all facilities. Specify 1000 to prohibit the server from logging information for any service.
To view the names of facilities, use the Log Settings screen of the Integration Server Administrator to enable and disable facilities for which you want the server to log information
watt.debug2.logstringfileSpecifies the name (without the extension .txt) for the dictionary file that contains error codes and facilities. The default is lib\logstr (English Version).
Specify... To record...
0 Critical messages only.
1 Error and critical messages.
2 Warning, error, and critical messages.
3, 4 Informational, warning, error, and critical messages.
5, 6, 7 Debug, informational, warning, error, and critical messages. This is the default.
8, 9, 10 Trace, debug, informational, warning, error, and critical messages.
The server records more levels of informational messages the higher you set the number.
410 webMethods Integration Server Administrator’s Guide Version 7.1.1
B Server Configuration Parameters
watt.net.watt.net.email.validateHostControls whether the Integration Server enforces IP access restrictions for email listeners. When defining an email port, you can define IP access restrictions that specify the hosts that are allowed or denied access via the email port. Set this property to true if you want server to enforce the IP access restrictions for email listeners or false if you do not. The default is true.
watt.net.ftp.ignoreErrorsSpecifies, using a comma‐separated list, any FTP command error codes that you want the FTP client to ignore. For example, setting the property to ʺ501, 505ʺ causes the FTP client to ignore error codes 501 and 505.
watt.net.ftpClientTimeoutSpecifies the length of time, measured in seconds, an FTP session can be idle before it is removed from memory. The default is 600 seconds (10 minutes).
watt.net.ftpClientDataConnTimeoutSpecifies the number of milliseconds that an FTP service executing in active mode waits for a remote FTP server to connect to it. If the connection is not established in the specified amount of time, an exception is thrown. The default value is 30000 milliseconds (30 seconds).
watt.net.ftpConnTimeoutSpecifies the maximum number of milliseconds the FTP listener allows the connection with the client to remain inactive. The default is 15 minutes.
watt.net.ftpDataConnTimeout Specifies the maximum number of milliseconds the FTP listener waits between successive reads when performing a file upload. The default is 60000 milliseconds (60 seconds).
watt.net.ftpPassiveLocalAddr Specifies the address that should be sent by the PORT command. A host name or IP address can be specified.When running in passive mode, the FTP port sends a PORT command to the FTP client. The PORT command specifies the address and port to which the client should connect to create a data connection. If the FTP port is behind a NAT server, however, the address of the host on which the Integration Server runs is not visible to the FTP client. Consequently the PORT command does not contain the information the client needs to connect to the server. To remedy this situation, you can specify a value for the watt.net.ftpPassiveLocalAddr property. Alternatively, when you configure an FTP port (see “Adding an FTP Port” on page 101), you can use the Passive Mode Listen Address field to specify the passive mode address for
Note: You can set a different idle timeout for an individual FTP operation using the clientTimeout input parameter for the pub.client:ftp or pub.client.ftp:login services. For more information about these services, see the webMethods Integration Server Built‐In Services Reference.
webMethods Integration Server Administrator’s Guide Version 7.1.1 411

B Server Configuration Parameters
an individual FTP port. That way, you can specify a different passive mode address for each FTP port. If an address is specified in the Passive Mode Listen Address field and in the watt.net.ftpPassiveLocalAddr property, the PORT command uses the value specified in the watt.net.ftpPassiveLocalAddr property.
watt.net.ftpPassivePort.min Specifies the minimum port number of a port range for FTP/FTPS listeners to use with a client data connection that uses passive transfer mode (PASV). Must be used with watt.ftpPassivePort.max. When a port range is specified with these properties, only the ports within the specified minimum and maximum port range (inclusive) are used as the listening ports for incoming FTP/FTPS client data connections. This enables a firewall administrator to open only the specified ports.
Operational considerations:
If both properties are not present or undefined, FTP/FTPS listeners continue the previous behavior of listening on any free port.
If the value specified for watt.net.ftpPassivePort.min is less than 1, a default value of 1 is used. If the value specified for watt.net.ftpPassivePort.max is greater than 65534, a default value of 65534 is used. When both of these conditions exist simultaneously, FTP/FTPS listeners continue the previous behavior of listening on any free port.
An error message is returned to the FTP/FTPS client on the command channel when the specified values do not fall within the expected range. For example, if one of the properties is not defined, if the watt.net.ftpPassivePort.min value is larger than the watt.net.ftpPassivePort.max value, or if one of the properties is not a valid number.
An error message is also returned when all the ports in the specified port range are in use.
Specific details of the error messages are available in the serverYYYYMMDD.log file.
Restarting the Integration Server is not required after defining these settings. You can modify the port range properties in the Integration Server Administrator at any time.
watt.net.ftpPassivePort.max Specifies the maximum port number of a port range for FTP/FTPS listeners to use with a client data connection that uses passive transfer mode (PASV). Must be used with watt.ftpPassivePort.min. For usage information, see watt.ftpPassivePort.min.
watt.net.ftpSweepIntervalSpecifies the frequency, measured in seconds, at which an FTP sweeper executes. The FTP sweeper iterates through the FTP sessions in memory and removes the sessions that have exceeded their allotted idle timeout. By default, the FTP sweeper executes every 600 seconds (10 minutes).
watt.net.ftpUseCertMap Specifies whether the Integration Server will honor certificate maps for requests received by FTPS ports. When this property is set to false (the default), the Integration Server ignores the user specified on a client certificate and logs the user in with the information provided on the userid/password prompt instead.
412 webMethods Integration Server Administrator’s Guide Version 7.1.1

B Server Configuration Parameters
When this property is set to true, if the client certificate has been previously mapped to an Integration Server user, the Integration Server will log the user in as the userid specified in the client certificate. The Integration Server ignores the userid provided on the userid/password prompt. For example, suppose watt.net.ftpUseCertMap is set to false, and a certificate has been previously mapped to user Alice. When a user provides a certificate for user Alice and enters Alice’s user name and password in response to the prompt, the Integration Server will log the user in as Alice. However, if the user provides the same certificate, but provides Bob’s user name and password in response to the prompt, the Integration Server will log the user in as Bob. In other words, the Integration Server ignores the certificate map.
watt.net.httpChunkSizeSets the default chunk size when sending a HTTP request or response using Transfer‐Encoding:Chunked. The default chunk size is 8192 bytes.
watt.net.maxClientKeepaliveConnsSets the default number of client keep alive connections to retain for a given target endpoint. If not specified, five keep alive connections are retained.
watt.net.maxRedirectsSpecifies the maximum number of HTTP redirects to allow before throwing an I/O exception. The default is 5.
watt.net.proxyHostSpecifies the host that this server should use for outbound HTTP requests. There is no default.
watt.net.proxyPassSpecifies the password to use for authentication with the HTTP proxy host. There is no default.
watt.net.proxyPortSpecifies the port number on the proxy host to use for outbound HTTP requests. There is no default.
watt.net.proxySkipListSpecifies a list of domain names for which the Integration Server should not use proxy servers. The default is localhost.
Note: The None, Request Certificate, and Require Certificate client authentication settings on the FTPS Listener Configuration screen control whether the Integration Server asks for a certificate and how the Integration Server behaves when it does not receive one. The watt.net.ftpUseCertMap property controls how the Integration Server behaves when it does receive a certificate from an FTP client. For more information about client authentication at FTPS and HTTPS ports, see “Client Certificates” on page 182. For more information about certificate mapping, see “Importing a Client Certificate and Mapping It to a User” on page 186.
webMethods Integration Server Administrator’s Guide Version 7.1.1 413

B Server Configuration Parameters
watt.net.proxyUserSpecifies the user name to use for authentication with the HTTP proxy host. There is no default.
watt.net.retriesSpecifies the number of times to retry a server that times out. This can be overridden by the client. The default is 0.
watt.net.secureProxyHostSpecifies the host that this server should use for outbound HTTPS requests. There is no default.
watt.net.secureProxyPassSpecifies the password to use for authentication with the HTTPS proxy host. There is no default.
watt.net.secureProxyPortSpecifies the port number on the proxy host to use for outbound HTTPS requests. There is no default.
watt.net.secureProxyUserSpecifies the user name to use for authentication with the HTTPS proxy host. There is no default.
watt.net.ssl.client.hostnameverification When Integration Server is acting as an HTTPS client, this parameter specifies whether Integration Server should restrict outbound HTTPS connections only when a valid hostname is found in the server’s certificate.
When set to true, Integration Server verifies if the hostname is present in the server’s certificate. If this verification fails, an error is logged and the connection is aborted.
When set to false, Integration Server will bypass the hostname verification. The default is set to false.
When set to log, Integration Server logs the debug message in the server log if the hostname verification fails, but allows the connection to go through. If the hostname verification succeeds, no log is generated.
The default is false.
watt.net.ssl.client.strongcipheronlySpecifies whether the Integration Server is to restrict outbound HTTPS connections to use strong cipher suites only (128 bit session keys or higher). If you specify false (the default), when the Integration Server initiates a connection to another server, it will attempt to negotiate a strong cipher suite, and if unsuccessful will fall back to using a weak (64, 56, or 40 bit) cipher suite. If you specify true, when the Integration Server initiates a connection to another server, it will attempt to negotiate a strong cipher suite, and if unsuccessful will disconnect rather than use a weak cipher suite.
watt.net.ssl.server.clientHandshakeTimeoutSpecifies the number of milliseconds the server waits for a response from the client during an SSL handshake before timing out. The default is 20000 milliseconds.
414 webMethods Integration Server Administrator’s Guide Version 7.1.1

B Server Configuration Parameters
watt.net.ssl.server.strongcipheronlySpecifies whether the Integration Server is to restrict inbound HTTPS connections to use strong cipher suites only (128 bit session keys or higher). If you specify false (the default), when a client connects to the Integration Server, the server will attempt to negotiate a strong cipher suite, and if unsuccessful will fall back to using a weak (64, 56, or 40 bit) cipher suite. If you specify true, when a client connects to the Integration Server, the server will attempt to negotiate a strong cipher suite, and if unsuccessful will disconnect rather than use a weak cipher suite.
watt.net.timeoutSpecifies the number of seconds the server waits for an HTTP request to be fulfilled before the request times out. The default is 0.
watt.net.useCookiesAccept (true) or deny (false or null) cookies when communicating with Web servers. It is almost never a good idea to turn this off. Defaults to true.
watt.net.userAgentSpecifies the value the server uses in the HTTP User Agent request header when it requests a Web document from a Web server. The default is Mozilla/4.0 [en] (WinNT; I).
watt.net.webapp.cookies.useRelevantPath Specifies how WmTomcat can create fewer cookies to prevent the web application from logging out because of exceeding the browser cookie limit. When this property is set to true, WmTomcat returns cookies that contain the URI prefix in the pathname, and more cookies are created. By default, WmTomcat returns cookies that contain a URI prefix in the pathname. As a result, WmTomcat creates a separate cookie for each unique path. For applications that include pages across many different paths, the result can be many cookies. If the application exceeds the cookie limit of the browser that invoked it, the application is forced to log out.
But when this property is set to false (the default), WmTomcat does not include the URI prefix in the cookie, and fewer cookies are created.
For example, when watt.net.webapp.cookies.useRelevantPath is set to false, and you visit the WmTomcat sites site/a.jsp -> site/bar/b.jsp -> site/bar/baz/c.jsp, WmTomcat creates just one cookie: cookie 1) name=ssnid, path=/.
But when this property is set to true, WmTomcat creates the following cookies:cookie 1) name=ssnid, path=/site/cookie 2) name=ssnid, path=/site/bar/cookie 3) name=ssnid, path=/site/bar/baz
The default is false.
webMethods Integration Server Administrator’s Guide Version 7.1.1 415
B Server Configuration Parameters
watt.security.watt.security.caCertSpecifies the path and file name of the file containing the certificate of the Certificate Authority (CA) that issued the Integration Server’s digital certificate. The default is config\cacert.der.
watt.security.CADirSpecifies the path name of a directory (relative to the server home) that contains the digital certificates of CAs that your Integration Server trusts, for example config\cas. When you indicate that you want the server to request client certificates (watt.server.requestCerts), the server automatically presents the list of certificates in this directory to the client when it submits its own certificate. There is no default.
watt.security.cert.wmChainVerifier.trustByDefaultIn cases where no directory or a directory containing no certificates is specified for the Trusted Certificates directory, specifies whether the server is to trust:
Certificates presented by peer servers (in response to this server’s outbound request)
S/MIME signaturesSpecifies whether the server is to trust (true) or not trust (false) certificates and S/MIME signatures in this situation. The default is true. For improved security, Software AG recommends that you set this parameter to false and specify a Trusted Certificates directory.
watt.security.fips.modeSpecifies whether the server is to support FIPS (Federal Information Processing Standards). The default is false. If this parameter is set to true, the server initializes FIPS as part of server startup. If FIPS initialization fails, the error is logged to server.log and the server shuts down.
watt.security.ope.AllowInternalPasswordAccessSpecifies whether the built‐in services supporting OPE (outbound password encryption) for flow services may access the Integration Server’s internal passwords. If this parameter is set to true, the OPE services may access the internal passwords. If it is set to false, the OPE services are not allowed access to the internal passwords. By default, this parameter is set to false.Internal passwords are passwords for use by the Integration Server itself to access secure resources (e.g., remote Integration Servers, JDBC connection pools, LDAP servers, etc.). Internal passwords are managed using the Integration Server Administrator and are stored in the outbound password store. Flow services are also allowed to store passwords in the outbound password store. However, by default, passwords stored by a flow service are considered public, as opposed to internal. This distinction allows flow services to use the outbound password store as a secure mechanism for storing and retrieving passwords, but protects the Integration Server’s internal passwords.
416 webMethods Integration Server Administrator’s Guide Version 7.1.1
B Server Configuration Parameters
You can allow flow services to access internal passwords (i.e., store, retrieve, and modify) by setting watt.security.ope.AllowInternalPasswordAccess to true. However, this should be done only if you explicitly wish to have a flow service work with internal passwords. Otherwise, it is recommended you deny access to internal passwords by setting watt.security.ope.AllowInternalPasswordAccess to false.
watt.security.pki.jnditimeoutSpecifies how long (in milliseconds) the Integration Server attempts to connect to the LDAP directory when executing services in the pub.pki.smime folder. The default is 20000 milliseconds (i.e., 20 seconds).
watt.security.privateKeySpecifies the path and file name of the file that contains the private key associated with the Integration Server’s digital certificate. The default is config\privkey.der.
watt.security.ssl.cacheClientSessionsControls whether the server reuses previous SSL session information (e.g., client certificates) for connections to the same client. If you have a stable environment where repeated authentications from the same client produce the same result, set this property to true. When this property is set to true, the server caches and reuses SSL session information. If your environment is not stable (e.g., client certificates change frequently), set this property to false. Note that setting the property to false will decrease performance. The default is true.
watt.security.signedCertSpecifies the path and file name of the file containing the Integration Server’s digital certificate. The default is config\cert.der.
watt.security.ssl.ignoreExpiredChainsSpecifies whether the Integration Server ignores expired CA certificates in a certificate chain it receives from an Internet resource (i.e., a Web server, another Integration Server). To have the Integration Server ignore expired CA certificates and allow SSL connections when a certificate is expired, set the watt.security.ssl.ignoreExpiredChains setting to true. Note that this is less secure than denying connections when a certificate is expired. The default is false. For more information about this setting, see “When the Integration Server Is an SSL Server” on page 146.
watt.security.ssl.keypurposeverificationWhen Integration Server is acting as an HTTPS client, this parameter specifies whether the server should restrict outbound HTTPS connections only when a valid Extended Key Purpose field is present in the server’s certificate. The content of the Key Purpose field, id-kp-serverAuth, should be in the IETF‐mandated format, TLS WWW server authentication for the verification to pass. Refer to the section titled Extended Key Usage, in the document http://www.ietf.org/rfc/rfc3280.txt for more information regarding this format.Three values are allowed for this watt property — true, false and log.
When set to true, it will verify the presence of the key purpose field in the server’s certificate. If the key purpose verification fails, an error is logged and the connection is aborted. If the verification succeeds, no error is logged.
webMethods Integration Server Administrator’s Guide Version 7.1.1 417
B Server Configuration Parameters
When set to false, it will bypass the verification of the key purpose field. The default is false.
When set to log, it will log a debug message in the server log if the key purpose field verification fails.
The default is false.
watt.server.watt.serverThis is an internal parameter. Do not modify.
watt.server.allowDirective Restricts the use of specified directives to specified ports. For information on directives, see “Controlling the Use of Directives” on page 167). The syntax for this property is:
watt.server.allowDirective=directive1,port-string,directive2,port-string
port‐string is a comma‐delimited list of port numbers such as “5555,6666”.
Suppose you want to allow all ports to use the default directive, but you want only the ports listed below to use the other directives:
restrict use of the invoke directive to ports 5555 and 7777restrict use of the web directive to ports 6666 and 7777restrict use of the SOAP directive to port 7777
You would specify the following:watt.server.allowDirective=invoke,5555,7777,web,6666,7777,soap,7777
watt.server.auditDBSize If maintaining the temporary store on disk, specifies the space allocation, in megabytes, for the temporary store files. The default is 10. For complete information, see the webMethods Logging Guide.
watt.server.auditDir If you are maintaining the temporary store for logging data on disk, specifies the fully qualified path to the directory that contains the temporary store file. The default is the Integration Server_directory\audit directory. For complete information, see the webMethods Logging Guide.
watt.server.auditDocIdFieldSpecifies a custom document ID value to identify documents in a standard way and to provide uniform business context in the logging display. Some documents are logged by webMethods Broker through WmLogUtil to the document database, and some are logged by various components within the Integration Server, for example, if a service fails, or if the number of retries in a trigger are exceeded. As a result, when viewing the Document Monitor, some documents are logged with a numeric document ID, and some are logged with lengthy hexadecimal strings as the document ID. The custom document ID value that you specific will be used to create the document logging ID. This value is used in place of the BrokerEvent.getEventId() value (the original document ID behavior).
418 webMethods Integration Server Administrator’s Guide Version 7.1.1

B Server Configuration Parameters
The value must be in the form of a Broker unicode string, and values in excess of 128 characters will be truncated. If this extended setting is missing, the original document ID behavior applies. If this extended setting is present but undefined (null), the _env.uuid value is used if present; if no _env.uuid value is defined, the original document ID behavior applies. For more information about document logging, see the webMethods Broker Administrator’s Guide.
watt.server.auditFetchSize Specifies the number of log entries for each logging thread to pull from the temporary store and store, as a batch, in flat files or database. The default is 10. For complete information, see the webMethods Logging Guide.
watt.server.auditGuaranteed Specifies whether to maintain the temporary store for logging data on disk or in memory. The default is true (disk). For complete information, see webMethods Logging Guide.
watt.server.auditLogSpecifies whether to globally enable or disable service logging. The default is perSvc (enable customized logging on a service‐by‐service basis). For complete information, see the webMethods Logging Guide.
watt.server.auditLog.error Specifies whether to globally enable or disable error logging. The default is true (enable). For complete information, see the webMethods Logging Guide.
watt.server.auditLog.gd Specifies whether to globally enable or disable guaranteed delivery logging. The default is true (enable). For complete information, see the webMethods Logging Guide.
watt.server.auditLog.securitySpecifies whether to globally enable or disable security auditing. This property will be updated automatically when the user enables or disables security auditing onIntegration Server Administrator. The default is false. For more information about security auditing, see the webMethods Logging Guide.
watt.server.auditLog.session Specifies whether to globally enable or disable session logging. The default is true (enable). For complete information, see the webMethods Logging Guide.
watt.server.auditMaxPool Specifies the maximum number of threads to use concurrently to write logging data to the temporary store. This property also specifies the maximum number of threads to use concurrently to pull logging data from the temporary store and write it to flat files or database. The default is 10. For complete information, see the webMethods Logging Guide.
watt.server.auditMinPool Specifies the minimum number of threads to use concurrently to write logging data to the temporary store. This property also specifies the minimum number of threads to use concurrently to pull logging data from the temporary store and write it to flat files or database. The default is 1. For complete information, see the webMethods Logging Guide.
webMethods Integration Server Administrator’s Guide Version 7.1.1 419

B Server Configuration Parameters
watt.server.auditRetryCount If storing logging data in a database, specifies the maximum number of times to retry writing a log entry to the database. The default is 3. For complete information, see the webMethods Logging Guide.
watt.server.auditSync By default, the Integration Server writes audit data to transient storage before writing it to persistent storage. In some high volume, multi‐user environments, this behavior can slow performance. This property specifies how the Integration Server writes audit information. When this value is set to false (the default), the Integration Server writes audit data first to transient storage, then to persistent storage. When this value is set to true, the Integration Server writes audit data directly to persistent storage.
watt.server.auditThreshold Specifies the maximum number of log entries the temporary store can hold. The default is 100,000. For complete information, see the webMethods Logging Guide.
watt.server.broker.producer.multiclientSpecifies the number of sessions for the default client. The default client is the Broker client that the Integration Server uses to publish documents to the Broker and to retrieve documents delivered to the default client. When you set this parameter to a value greater than 1, the Integration Server creates a new multi‐session, shared state Broker client named clientPrefix_DefaultClient_MultiPub, to use for publishing documents to the Broker. Using a publishing client with multiple sessions can lead to increased performance because it allows multiple threads to publish documents concurrently. The default is 1 session.
watt.server.broker.replyConsumer.fetchSizeSpecifies the number of reply documents that the Integration Server retrieves from the Broker at one time. Increasing the reply documents the Integration Server retrieves for each call can reduce the number of calls the Integration Server makes to the Broker. The Integration Server maintains all reply documents in memory. You can reduce the amount of memory used for reply documents by decreasing the number of documents the Integration Server retrieves at one time. The default is 5 documents.
watt.server.broker.replyConsumer.multiclientSpecifies the number of sessions for the request/reply client. The request/reply client is the Broker client that the Integration Server uses to send request documents to the Broker and to retrieve reply documents from the Broker. Increasing the number of sessions for the request/reply client can lead to improved performance because it allows multiple requests and replies to be sent and retrieved concurrently. The default is 1 session.
watt.server.broker.replyConsumer.sweeperIntervalSpecifies how often (in milliseconds) the Integration Server sweeps its internal mailbox to remove expired replies to published requests. The length of the interval should balance the amount of memory consumed by expired replies with retrieving the replies for waiting requests. The Integration Server uses one background thread to age and remove expired replies and uses multiple background threads to retrieve replies for waiting requests. When the sweeper thread removes expired replies, it blocks the threads attempting to retrieve replies. When then sweeper interval is too low, the frequent execution of the sweeper thread can degrade performance because other background
420 webMethods Integration Server Administrator’s Guide Version 7.1.1
B Server Configuration Parameters
threads cannot retrieve replies as often. A sweeper interval that is too high can cause an increase in memory usage because expired replies consume memory for a longer period of time. The default is 30000 milliseconds (30 seconds).
watt.server.brokerTransport.durSpecifies the number of seconds of idle time that the Broker waits before sending a keep‐alive message to Integration Server. If Integration Server does not respond within the amount of time specified by the watt.server.brokerTransport.max property, the Broker sends another keep‐alive message to Integration Server. If Integration Server continues to be unresponsive, the Broker continues sending keep‐alive messages until it reaches the retry limit specified by the watt.server.brokerTransport.ret property. If the Integration Server still has not responded to the keep‐alive message, the Broker explicitly disconnects the Integration Server. The watt.server.brokerTransport.dur value must be an integer greater than or equal to zero but less than 2147483647. The default is 60 seconds.
For more information about using server parameters to configure the keep‐alive setting with the Broker, see “Specifying the Keep‐Alive Mode for the Broker Connection” on page 134.
watt.server.brokerTransport.maxSpecifies the number of seconds that the Broker waits for the Integration Server to respond to a keep‐alive message. This value must be an integer between 0 and 2147483647. The default is 60 seconds. For more information about using server parameters to configure the keep‐alive setting with the Broker, see “Specifying the Keep‐Alive Mode for the Broker Connection” on page 134.
watt.server.brokerTransport.retSpecifies the number of times the Broker re‐sends keep‐alive messages before disconnecting an un‐responsive Integration Server. This value must be an integer between 1 and 2147483647. The default is 3 retries.
watt.server.cache.flushMinsSpecifies how often (in minutes) the server sweeps the cache to remove expired cache entries and to prefetch cache service entries. The default is 10 minutes.
watt.server.cache.gcMinsSpecifies how often (in minutes) the server sweeps the cache to perform garbage collection. The default is 60 minutes.
watt.server.cache.isPersistentSpecifies whether you want server cache to be persistent (true) or not (false). The default is true.
Note: The Broker ignores the watt.server.brokerTransport.ret parameter if watt.server.brokerTransport.dur or watt.server.brokerTransport.max are set to 2147483647. For more information about using server parameters to configure the keep‐alive setting with the Broker, see “Specifying the Keep‐Alive Mode for the Broker Connection” on page 134.
webMethods Integration Server Administrator’s Guide Version 7.1.1 421
B Server Configuration Parameters
watt.server.clientTimeoutSpecifies the amount of time (in minutes) after which an idle user session times out. The default is 10.
watt.server.cluster.aliasListSpecifies a comma‐delimited list of aliases for remote Integration Servers in a cluster. The Integration Server uses this list when executing the remote invokes that update the other cluster nodes with trigger management changes. When this property is configured, the Settings > Messaging > Broker/Local Trigger Management > Cluster View page will be visible and the Apply Change Across Cluster check box will be available when performing trigger management tasks.
You must be using webMethods clustering to use this setting. For more information, see the webMethods Integration Server Clustering Guide.
watt.server.cluster.aware Specifies whether you want the server to participate in a cluster. The default is false.
You must be using webMethods Integration Server Clustering to use this setting. For more information, refer to the webMethods Integration Server Clustering Guide.
watt.server.cluster.cacheName Specifies the name of the cluster to join. An enterprise can have more than one cluster. This value allows the caching software to form separate caches for each cluster. Without a cluster name, all Integration Servers that are visible to one another on the network would form a single cache.
watt.server.cluster.sessTimeoutSpecifies number of minutes that the server allows inactive session objects to remain in the cluster store before removing them. The default is 60.
You must be using webMethods Integration Server Clustering to use this setting. For more information, refer to the webMethods Integration Server Clustering Guide.
watt.server.compileSpecifies the compiler command the Integration Server uses to compile Java services that are developed using the Developer. This compiler command is also used from the jcode utility. By default, the server uses javac ‐classpath {0} ‐d {1} {2}. For more information about specifying the compiler and JDK the Integration Server is to use, see the webMethods Installation Guide.
watt.server.compile.unicodeSpecifies the compiler command the Integration Server uses to compile Java services that are stored in Unicode encoding. This compiler command is also used from the jcode utility. By default, the server uses javac –encoding Unicode ‐classpath {0} ‐d {1} {2}. This setting works with the Sun JDK compiler. For more information about specifying the compiler and JDK the Integration Server is to use, see the webMethods Installation Guide.
watt. server. control. controlledDeliverToTriggers. pctMaxThresholdSpecifies the trigger queue threshold at which the Integration Server slows down the delivery rate of locally published documents. This threshold is expressed as a percentage of the trigger queue capacity. For example, if you specify 80, the Integration Server decreases the rate at which it delivers locally published documents to a trigger queue
422 webMethods Integration Server Administrator’s Guide Version 7.1.1
B Server Configuration Parameters
when that trigger queue reaches 80% capacity. Integration Server resumes delivering documents at the normal rate when the trigger queue capacity drops below the specified threshold. The default is 90.
watt.server.control.maxPersistSpecifies the capacity of the outbound document store. Integration Server places published documents in the outbound document store when the configured Broker is unavailable. When the number of documents in the outbound document store equals the capacity, the Integration Server blocks any threads executing services that publish documents. The Integration Server resumes execution of blocked threads after the Broker becomes available. The default is 500,000 documents.
watt.server.control.maxPublishOnSuccessSpecifies the maximum number of documents that the server can publish on success at one time. For example, suppose that you set the maximum to 100 documents. ServiceA publishes 10 documents on success. ServiceB publishes 90 documents on success. ServiceC publishes 5 documents on success. ServiceA and ServiceB can publish documents concurrently. However, if ServiceC begins to publish documents before ServiceA or ServiceB completes, the Integration Server throws an exception for ServiceC because the documents published by ServiceC exceed the maximum number of documents that can be published on success at one time. If ServiceD publishes 125 documents on success and the maximum is 100, ServiceD will receive an exception every time it executes. The default is 50,000 documents.
watt.server.cron.maxThreads The maximum number of threads that Integration Server maintains in the cronjob‐based scheduler thread pool. If this maximum number is reached, Integration Server waits until processes complete and return threads to the pool before running more processes. The default is 5.
watt.server.cron.minThreads The minimum number of threads that the server maintains in the cronjob‐based scheduler thread pool. When the server starts, the thread pool initially contains this minimum number of threads. The default is 2. System tasks continue to use the cronjob‐based scheduler available with older versions of Integration Server, which has its own thread pool.
watt.server.dateStampFmtSpecifies the date format to use in log files. You can use any format that is supported by the Java class java.text.SimpleDateFormat. For example, to display the date with the format 08‐12‐02 14:44:33:1235, specify dd‐MM‐yy HH:mm:ss:SSSS.
Note: The new scheduler available with Integration Server 7.1 uses threads from the server thread pool. System tasks continue to use the cronjob‐based scheduler which has its own thread pool.
Note: The new scheduler available with Integration Server 7.1 uses threads from the server thread pool. System tasks continue to use the cronjob‐based scheduler which has its own thread pool.
webMethods Integration Server Administrator’s Guide Version 7.1.1 423

B Server Configuration Parameters
watt.server.date.SuppressPatternError Specifies how the server should respond if no input is passed to the pub.date:dateTimeFormat service. When set to true, the server simply returns a null value for the value parameter. The default is for the server to throw an exception.
watt.server.db.blocktimeout
Specifies the maximum time in milliseconds the server is to block a request when waiting for a connection to a database. (The database must be defined by an alias in the WmDB package.) The default is to wait indefinitely. Specifying ‐1 also means to wait indefinitely. This property is global to all pools.
watt.server.db.connectionCache
Specifies how the server manages connections to a database. Specifying server tells the server to maintain a pool of connections for each database that is defined to the server through an alias. If a request cannot be satisfied because the pool has reached its maximum number of connections, the server blocks the request and tries again later. Specifying session tells the server to create a database connection per session. That is, when the server receives a service request that requires a database connection, it will create a new connection if one doesnʹt already exist for that session; otherwise the server will use the connection that was previously created for that session. If the attempt to create a connection for the session fails, for example because the database has no available slots for connections, the request fails. The default is session. Although enabling database connection pooling creates a pool for each database defined to your server, you can control the characteristics of each pool individually by using the Edit Alias Information screen of the Integration Server Administrator. See WmDB User’s Guide for more information about configuring the server to connect to a database.
Note: This parameter is for use with the WmDB package only. If you are using the webMethods JDBC Adapter to connect to your databases, see the documentation for that adapter instead.
This parameter applies only if you are using server pooling instead of session pooling, that is, you have specified server on the watt.server.db.connectionCache property. See the description of that parameter, below, for more information.
Note: This parameter is for use with the WmDB package only. If you are using the webMethods JDBC Adapter to connect to your databases, see the documentation for that adapter instead.
424 webMethods Integration Server Administrator’s Guide Version 7.1.1
B Server Configuration Parameters
watt.server.db.maintainminimum
Specifies how the server handles purging inactive connections that have timed out. With the parameter set to false, the server purges all of these connections. With the parameter set to true, the server purges these connections, but stops when a minimum number of connections in the pool has been reached. You specify the minimum when you define the alias. This property is global to all pools.
watt.server.db.testSQL
Specifies if a database connection from a connection pool is valid or invalid. Initially testing the database connections removes invalid connections from the connection pool and ensures that the service will always receive a valid connection.Specifying true tells the server to test the database connections in the connection pool. If the database connection is valid, then the server passes the connection to a service to process a request. If the database connection is invalid, then the server removes the connection from the connection pool.Specifying false tells the server to not test database connections in the connection pool.
watt.server.diagnostic.logperiodSpecifies how many hours of logs are returned when you run the diagnostic tool. The default is 6. When this property is set to 0, the diagnostic utility does not return any log files. It returns only the configurational and run‐time data files.
watt.server.dispatcher.comms.brokerPingSpecifies how often (in milliseconds) triggers (which are Broker clients) should ping the Broker. When there is a firewall between the Integration Server and the Broker, the firewall closes the connection between a trigger and the Broker when the connection becomes idle. To prevent connections from becoming idle, trigger Broker clients periodically ping the webMethods Broker. For example, to have the trigger Broker client ping the webMethods Broker every 30 seconds, specify the following:watt.server.dispatcher.comms.brokerPing=30000
Note: This parameter is for use with the WmDB package only. If you are using the webMethods JDBC Adapter to connect to your databases, see the documentation for that adapter instead.
This parameter applies only if you are using server pooling instead of session pooling, that is, you have specified server on the watt.server.db.connectionCache property. See the description of that parameter, above, for more information.
Note: This parameter is for use with the WmDB package only. If you are using the webMethods JDBC Adapter to connect to your databases, see the documentation for that adapter instead.
This parameter applies only if you are using server pooling instead of session pooling, that is, you have specified server on the watt.server.db.connectionCache property. Refer to the “watt.server.db.connectionCache” on page 424 for more information.
webMethods Integration Server Administrator’s Guide Version 7.1.1 425
B Server Configuration Parameters
watt.server.dispatcher.join.reaperDelaySpecifies how often (in milliseconds) that the Integration Server removes state information for completed and expired joins. The default is 1800000 milliseconds (30 minutes).
watt.server.email.from Specifies the email address the server presents as its From address when sending emails about errors. By default, the server uses Integration‐Server@localhost for the From Address, where localhost is the name of the host on which the Integration Server is running.
watt.server.errorMailSpecifies the email address of administrator to notify when the server encounters an internal fault. There is no default.
watt.server.event.audit.asyncSpecifies whether the event handlers for the audit event are invoked asynchronously or synchronously. When this parameter is set to true, Integration Server invokes the event handlers (services) that subscribe to audit events asynchronously. When this parameter is set to false, Integration Server invokes the event handlers that subscribe to audit events synchronously. The default is true.
watt.server.event.exception.asyncSpecifies whether the event handlers for the exception event are invoked asynchronously or synchronously. When this parameter is set to true, Integration Server invokes the event handlers (services) that subscribe to exception events asynchronously. When this parameter is set to false, Integration Server invokes the event handlers that subscribe to exception events synchronously. The default is true.
watt.server.event.gd.asyncSpecifies whether the event handlers for guaranteed delivery events (gdStart and gdEnd) are invoked asynchronously or synchronously. When this parameter is set to true, Integration Server invokes the event handlers (services) that subscribe to guaranteed delivery events asynchronously. When this parameter is set to false, Integration Server invokes the event handlers that subscribe to guaranteed delivery events synchronously. The default is true.
watt.sever.event.jmsDeliveryError.asyncSpecifies whether the event handlers for JMS delivery failure events are invoked asynchronously or synchronously. When this parameter is set to true, Integration Server invokes the event handlers (services) that subscribe to JMS delivery failure events asynchronously. When this parameter is set to false, Integration Server invokes the event handlers that subscribe to JMS delivery failure events asynchronously. The default is true.
426 webMethods Integration Server Administrator’s Guide Version 7.1.1

B Server Configuration Parameters
watt.server.event.jmsRetrievalError.asyncSpecifies whether the event handlers for JMS retrieval failure events are invoked asynchronously or synchronously. When this parameter is set to true, Integration Server invokes the event handlers (services) that subscribe to JMS retrieval failure events asynchronously. When this parameter is set to false, Integration Server invokes the event handlers that subscribe to JMS retrieval failure events asynchronously. The default is true.
watt.server.event.replication.asyncSpecifies whether the event handlers for replication events are invoked asynchronously or synchronously. When this parameter is set to true, Integration Server invokes the event handlers (services) that subscribe to replication events asynchronously. When this parameter is set to false, Integration Server invokes the event handlers that subscribe to the replication events synchronously. The default is true.
watt.server.event.security.asyncSpecifies whether the event handler for security events is invoked asynchronously or synchronously. When this parameter is set to true, Integration Server invokes the event handlers (services) that subscribe to security events asynchronously. When this parameter is set to false, Integration Server invokes the event handlers that subscribe to security events synchronously. The default is true.
watt.server.event.session.asyncSpecifies whether the event handlers for session events (sessionStart, sessionEnd, and sessionExpire) are invoked asynchronously or synchronously. When this parameter is set to true, Integration Server invokes the event handlers (services) that subscribe to session events asynchronously. When this parameter is set to false, Integration Server invokes the event handlers that subscribe to session events synchronously. The default is true.
watt.server.event.stat.asyncSpecifies whether the event handlers for stat (statistics) events are invoked asynchronously or synchronously. When this parameter is set to true, Integration Server invokes the event handlers (services) that subscribe to the statistics events asynchronously. When this parameter is set to false, Integration Server invokes the event handlers that subscribe to the statistics events synchronously. The default is true.
watt.server.event.tx.asyncSpecifies whether the event handlers for the transaction events (txStart and txEnd) are invoked asynchronously or synchronously. When this parameter is set to true, Integration Server invokes the event handlers (services) that subscribe to transaction events asynchronously. When this parameter is set to false, Integration Server invokes the event handlers that subscribe to transaction events synchronously. The default is true.
watt.server.fileEncoding Specifies the encoding the server is to use when reading and writing text files. This setting has no effect on files stored as Unicode. The default is your JVM’s file.encoding property.
webMethods Integration Server Administrator’s Guide Version 7.1.1 427
B Server Configuration Parameters
watt.server.ftp.listingFileAgeSpecifies the number of seconds that must elapse before a file that has been updated or created on an Integration Server functioning as an FTP server can be accessed. Files created or updated within the time specified by this parameter will not be part of the results of the FTP LIST command. The default value is 60 seconds.
watt.server.ftp.usecommandip Controls whether the pub.client:ftp service uses connection information from a NAT server when connecting to an FTP server. When the pub.client:ftp service tries to transfer data to or from an FTP server, Integration Server first connects to the FTP server at the IP address specified by the pub.client:ftp service. In response, the FTP server sends back the IP address on the FTP server to which Integration Server should connect to perform the transfer. If the FTP server sits behind a NAT server, the NAT server intercepts this address, translates it, then sends it on to Integration Server. This property controls whether Integration Server uses the address provided by the NAT server or the address already specified by the pub.client:ftp service.When this parameter is set to true, Integration Server bypasses the translated address and immediately tries the address specified by the service. If this attempt fails, Integration Server throws an exception. When this parameter is set to false, the default, Integration Server tries the address provided by the NAT server. If that attempt fails, Integration Server tries the IP address specified on the pub.client:ftp service. If both attempts fail, Integration Server throws an exception.
watt.server.hostAccessMode Specifies IP access for ports that do not have a custom IP access setting. When this parameter is set to include, the server accepts requests from all IP addresses, except those specifically denied on the Integration Server Administrator interface. When this parameter is set to exclude, the server denies requests from all IP addresses except those specifically allowed on the Integration Server Administrator interface. The default is include.
watt.server.hostAllowSpecifies the name of the host that is allowed service. There is no default.
watt.server.hostDenySpecifies the name of the host that is denied service. There is no default.
watt.server.idr.reaperIntervalSpecifies the initial interval at which the scheduled service wm.server.dispatcher:deleteExpiredUUID executes and removes expired document history entries. The default is 10 minutes.
Note: To ensure that a file has not been updated recently and can be retrieved, execute an FTP LIST command before executing an FTP RETR command.
428 webMethods Integration Server Administrator’s Guide Version 7.1.1

B Server Configuration Parameters
watt.server.illegalNSCharsSpecifies the characters that you cannot use when naming a package, folder or service. The default is ?`-#&@^!%*:$.\ /’;,~+=)(|}{][><.
watt.server.invokeDirectiveSpecifies an alternative word to use for the invoke directive in URLs that invoke services on Integration Server. By default, this parameter is set as watt.server.invokeDirectory=invoke, which means users must specify the invoke directive as invoke (http://host:port/invoke/folder/service_name). To allow users to specify the invoke directive as either invoke or an alternative word, set this parameter to the alternative word. For example, to allow users to specify the invoke directive as either invoke or submit, (http://host:port/invoke/folder/service_name or http://host:port/submit/folder/service_name), set this parameter as watt.server.invokeDirectory=submit.
watt.server.invoke.maxRetryPeriodSpecifies the total amount of waiting time (in milliseconds) that can elapse if the Integration Server makes the maximum attempts to retry a service. The default is 15,000 milliseconds (15 seconds). When configuring retries for an individual service, the value calculated by multiplying Max attempts value by the Retry interval cannot exceed the value set by this server parameter. For more information about configuring service retry, see the webMethods Developer User’s Guide.
watt.server.inetaddressSpecifies the IP address of the network interface card (NIC) on which the server is to listen for incoming requests. By default, on multiple IP machines, the Integration Server listens on all available IPs. To limit the machine to listen on a single IP, specify its address on this parameter.
watt.server.java.unicodeSpecifies whether the source code for Java services is stored in Unicode encoding. The default is false. Set this value to true if the source code contains characters that cannot be rendered in the server’s native encoding.
watt.server.jca.connectionPool.thresholdWaitingRequestWhen enabled, this property represents the percentage value that is used in addition to the configured maximum number of connections (set by the Maximum Pool Size parameter on the Connections page) for the connection pool. For example, setting the property as watt.server.jca.connectionPool.thresholdWaitingRequest=20 sets the threshold to 120% of configured maximum number of connections. If the property is not defined or if the value is less than or equal to zero, the feature remains disabled.
Note: The watt.server.idr.reaperInterval value is ignored once the wm.server.dispatcher:deleteExpiredUUID scheduled service exists. The wm.server.dispatcher:deleteExpiredUUID scheduled service exists only when a JDBC connection pool for the document history database exists and the pool contains non‐zero connections. If this service exists and you want to change the execution interval, edit the scheduled service.
webMethods Integration Server Administrator’s Guide Version 7.1.1 429

B Server Configuration Parameters
When this property is enabled, the connection pool ensures that the waiting connection requests plus the busy connections in the connection pool do not exceed the threshold limit.
watt.server.jca.transaction.recoverOnEnlistSpecifies whether the transaction manager within Integration Server invokes the XAResource.recover() service when working with XA transactions during a failover. To indicate that the Integration Server should invoke the XAResource.recover() service, set the parameter to true. Otherwise, use the default value, which is false.
watt.server.jca.transaction.rollbackOnWriteFailure If Integration Server cannot store the status of a transaction and its participating resources in the XA recovery store (for example, because the store is corrupted), specifies whether Integration Server should try to continue with the transaction anyway (false) or try to roll it back (true). Setting the parameter to false involves some risk; if Integration Server ends abnormally, no statuses will have been saved to the XA recovery store, and Integration Server will not be able to resolve the uncompleted transaction or give you the chance to resolve it manually.
watt.server.jca.transaction.writeRecoveryRecordSpecifies whether Integration Server maintains XA transaction information for use with XA transaction recovery. If Integration Server does not save XA transaction information, uncompleted XA transactions cannot be recovered using Integration Server. That is, Integration Server does not attempt to recover incomplete XA transactions automatically and you cannot use Integration Server Administrator to manually recover or resolve an incomplete transaction. Specify true to enable XA transaction recovery. Specify false to disable XA transaction recovery. The default is true.
watt.server.jdbc.defaultDriverFor use with WmDB. Specifies the name of the Java class for the driver you want to use to connect to databases when no driver name is supplied for a database alias. The default is the driver name for the Sun JVM: sun.jdbc.odbc.JdbcOdbcDriver.
watt.server.jdbc.driverListFor use with WmDB. Specifies a comma‐delimited list of JDBC drivers you want the server to load when it initializes. There is no default.
watt.server.jms.wmjms.lms.readTimeoutSpecifies the amount of time (measured in milliseconds) that Integration Server waits for the next portion of an input stream before throwing WmReadTimeoutException. The read timeout only applies after Integration Server retrieves the initial piece of the input stream. The default is 30000 milliseconds.
watt.server.keepAliveTimeoutSpecifies a length of time that the server maintains an open HTTP connection to a client after it sends an HTTP response back to the client. The default is 15000 ms (15 seconds).
Note: If you are running the Integration Server on AIX and using Oracle 9i, set this parameter to true.
430 webMethods Integration Server Administrator’s Guide Version 7.1.1
B Server Configuration Parameters
watt.server.keySpecifies the license key for the server. There is no default.
watt.server.ldap.doNotBind Specifies whether the Integration Server authenticates against the LDAP server. If your Integration Server uses a custom authentication module and you do not require users to be authenticated against the LDAP directory, set this property to true to prevent unnecessary requests to the LDAP server. The default is false.
watt.server.ldap.extendedMessages Controls whether the Integration Server displays additional information returned from the LDAP server when an authentication error occurs. This information is available only if the LDAP server provides it. Active Directory is an LDAP server that provides this additional information. The default is false.
When set to false, an error message might look like this:
2005‐03‐08 15:40:33 EST [ISS.0002.0035E] Invalid credentials connecting to ldap://10.3.33.203:389/dc=KQA,dc=webMethods,dc=com as CN=bob,OU=ISUsers,DC=KQA,DC=WEBMETHODS,DC=COM
When set to true, the same error would be displayed like this:
2005-03-08 15:40:33 EST [ISS.0002.0035E] Invalid credentials connecting to ldap://10.3.33.203:389/dc=KQA,dc=webMethods,dc=com as CN=bob,OU=ISUsers,DC=KQA,DC=WEBMETHODS,DC=COM: [LDAP: error code 49 - 80090308: LdapErr: DSID-0C09030F, comment: AcceptSecurityContext error, data 52e, vece]
For Active Directory users, the data code (data 52e above) contains the reason the authentication failed. You can convert the code to decimal and look it up on http://msdn.microsoft.com/library/en‐us/debug/base/system_error_codes.asp to determine the problem.
watt.server.ldap.extendedProps Specifies LDAP environment properties that the Integration Server will pass directly to an LDAP implementation when initializing a JNDI context. It takes this form:watt.server.ldap.extendedProps=property1=value1;property2=value2;...propertyn=valuen
For example, if you are using a specialized JNDI provider other than the default, or if your LDAP directory requires a special JNDI property to be passed into the environment when a context is created, you could set the property customProperty to customValue:watt.server.ldap.extendedProps=java.naming.customProperty=customValue
There is no default.
watt.server.ldap.memberInfoInGroups Controls where Integration Server looks for LDAP group membership information. When set to true, the default, the Integration Server looks for group membership information in the group object. When set to false, the Integration Server looks for group membership information in the user object.
webMethods Integration Server Administrator’s Guide Version 7.1.1 431
B Server Configuration Parameters
watt.server.ldap.retryCount Specifies how many times Integration Server should automatically try to reconnect to an LDAP server after a network outage or LDAP server restart. If set to 0, the default, Integration Server will prompt the LDAP user for credentials rather than retrying the connection. If set to a positive integer, Integration Server will retry the connection the number of times specified. The default is 0.
watt.server.ldap.retryWait Specifies how long Integration Server should wait before trying to reconnect to an LDAP server after a network outage or LDAP server restart. When set to 0, if there is a transient failure while communicating with LDAP, Integration Server will not try to reconnect to the LDAP server. If set to a positive integer, Integration Server will retry the connection the number of times specified in watt.server.ldap.retryCount and will wait the amount of time specified in watt.server.ldap.retryWait between retry attempts. The default is 0.
watt.server.licenses Specifies the number of licenses. The default is 1.
watt.server.log.maxEntries Specifies the default number of log entries to be displayed in the log viewing utility. The default is 35 entries (the most recent entries). For complete information, see the webMethods Logging Guide.
watt.server.log.queued Specifies whether the server is to queue log entries written by its facilities in memory, then use a background thread to write them to the server log. The default is true (queue log entries). For complete information, see the webMethods Logging Guide.
watt.server.log.refreshInterval Specifies the length of the refresh interval (in seconds) for log entries. The default is 90 seconds. For complete information, see the webMethods Logging Guide.
watt.server.oldkeySpecifies the license key that was in use prior to the current key. There is no default.
watt.server.netEncodingSpecifies the encoding the server is to use when reading and writing text to the network. This setting has no effect on text that is explicitly encoded in a particular encoding. The default is UTF‐8.
watt.server.noObjectURLSpecifies the URL to which the server redirects a request after three attempts to log on to the Integration Server Administrator have failed because the server cannot find the document the user is requesting. The default is for the server to display an HTML screen saying “No such object.”
watt.server.noAccessURLSpecifies the URL to which the server is to redirect a request after three attempts to log on to the Integration Server Administrator have failed because the user does not have access to the requested document. The default is for the server to display an HTML screen saying “Access denied.”
432 webMethods Integration Server Administrator’s Guide Version 7.1.1

B Server Configuration Parameters
watt.server.ns.backupNodesSpecifies whether services are removed completely when they are deleted. When set to true, service node.ndf files will be renamed to node.bak when they are deleted. The default is false.
watt.server.ns.dependencyManagerSpecifies whether the dependency checking features are enabled or disabled. When set to true, the dependency checking features identify elements that will be affected by moving, renaming, or deleting another element. For optimization in a production environment, you might set this parameter to false. The default for this parameter is true.
watt.server.ns.lockingModesSpecifies whether file locking is enabled on the Integration Server:
To enable use of the Version Control System Integration feature, set this value to vcs .
To enable local locking on the Integration Server set this value to full.
To disable user locking and show no locks, set this value to none.
To disable user locking but show system locks, set this value to system.
watt.server.portSpecifies the port number of the Integration Server’s primary port. The default is 5555.
watt.server.portQueueSpecifies the size of the port queue for HTTP and HTTPS ports. The port queue is the number of outstanding inbound connections that are queued in the TCP/IP stack. The default is 65534. If your server runs on AS/400, set this number to 511.
watt.server.publish.local.rejectOOSSpecifies whether Integration Server should reject locally published documents when the queue for the subscribing trigger is at maximum capacity. When this parameter is set to true, before placing a locally published document into a subscribing trigger’s queue, Integration Server first checks the trigger’s queue size. If the queue already contains the maximum number of documents allowed by the trigger’s Capacity property, Integration Server rejects the locally published document for that trigger queue only. When this parameter is set to false, Integration Server continues to place locally published documents into a subscribing trigger’s queue even when the queue is at capacity. This is the default.
Important! Document type synchronization might not work properly if you disable the dependency checking features. Do not set the watt.server.ns.dependencyManager property to false if your integration solution uses document types in the publish‐and‐subscribe model.
Note: Multiple triggers can subscribe to the same document. Integration Server places the document in any subscribing trigger queue that is not at capacity.
webMethods Integration Server Administrator’s Guide Version 7.1.1 433
B Server Configuration Parameters
watt.server.publish.useCSQSpecifies whether Integration Server uses outbound client‐side queuing if documents are published when the Broker is unavailable. Set this parameter to always to send published documents to the outbound document store when the Broker is not available. Set this parameter to never to instruct the publishing service to throw a ServiceException when the Broker is not available. The default is always.
watt.server.publish.usePipelineBrokerEventSpecifies whether Integration Server should bypass encoding that is normally performed when documents are published to the Broker. If this property is set to true, Integration Server checks the pipeline for an object called $brokerEvent. If the object is found and is of type BrokerEvent, Integration Server sends its value to the Broker and no additional encoding is performed. Set this parameter to true if Integration Server is sending native Broker events. The default is false.
For more information about publishing native Broker events, see the Publish‐Subscribe Developer’s Guide.
watt.server.publish.validateOnISSpecifies whether Integration Server validates published documents. Set this parameter to one of the following values:
Note: This parameter applies only to documents published locally using the pub.publish:publish or pub.publish.publishAndWait services.
Note: If outbound client side queuing is disabled, the publishing service needs to be written to handle ServiceExceptions that occur when the Broker is not available.
Specify... To...
always Perform document validation for all published documents. This includes instances of publishable document types for which the Validate when published property is set false.
never Disable document validation for all publishable document types. This includes instances of publishable document types for which the Validate when published property is set true.
Some reasons for disabling document validation include the following:
You want to improve performance.
You want to validate the documents manually.
You know that the system that sent Integration Server the data has already validated the data.
You prefer to have webMethods Broker, rather than Integration Server, validate the documents.
Integration Server is sending or receiving native Broker events.
434 webMethods Integration Server Administrator’s Guide Version 7.1.1

B Server Configuration Parameters
For information about handling native Broker events and specifying validation for an individual publishable document type, see the Publish‐Subscribe Developer’s Guide.
watt.server.requestCertsSpecifies whether the Integration Server requests a digital certificate from clients that connect to it through SSL. Set this parameter to true if you want the server to request certificates. Set it to false if you do not want the server to request certificates. The default is false.
watt.server.revInvoke.proxyMapUserCerts For Reverse HTTP Gateway configurations only. Specifies whether a Reverse HTTP Gateway server is to perform client authentication itself in addition to passing authentication information to the Internal Server for processing. The default is false. See “Performing Client Authentication on the Reverse HTTP Gateway Server” on page 237 for more information.
watt.server.scheduler.maxWait Maximum time in seconds Integration Server waits between queries of the task queue. The server periodically checks the queue for tasks that are scheduled to run. If there are no tasks waiting to run, the server waits the maxWait time before checking the queue again. If there are tasks waiting to run, the server checks again at the task’s schedule execution time, or after the maxWait time, whichever is earlier. For example, if the pending task is due to execute in 30 seconds and the maxWait time is 60, the server will check the queue again in 30 seconds. The default is 60. If you run a cluster of Integration Servers and schedule a task to run on all servers in the cluster, you might notice tasks starting at different times on the different servers if the servers have different settings for this property. For this reason, if you are running in a clustered environment, all the servers in your cluster should have the same settings for this property. See webMethods Integration Server Clustering Guide for more information about configuring Integration Servers in a cluster.
watt.server.scheduler.threadThrottle Percentage of Integration Server threads the scheduler process is permitted to use. The default is 75%.
watt.server.securePortSpecifies the port number of the Integration Server’s primary secured listening port. The default is 0.
watt.server.serverlogQueueSize Controls the number of entries allowed in the server log queue. This property is related to the watt.server.log.queued property, which controls whether the server is to write
perDoc Perform document validation only for instances of publishable document types for which document validation is enabled. That is, Integration Server validates published documents that are instances of publishable document types for which the Validate when published property is set true.
This is the default behavior.
Specify... To...
webMethods Integration Server Administrator’s Guide Version 7.1.1 435
B Server Configuration Parameters
entries directly to the server log, or queue them in memory first and then use a background thread to write them to the server log. If your configuration has the watt.server.log.queued property set to true and you notice that expected server log entries are not included in the log, try increasing the queue size. For more information about the server log and the server log queue, see the webMethods Logging Guide. The default queue size is 8192.
watt.server.serviceMailSpecifies the email address of an administrator to notify when a service no longer binds to a target site correctly. There is no default.
watt.server.smtpServerSpecifies the SMTP server to use for server error logging and service error email notification. There is no default.
watt.server.smtpServerPortSpecifies the number of the listening port on the SMTP server to which the Integration Server is to send server error logging and service error email notification. The default is 25.
watt.server.SOAP.defaultProtocolSpecifies the default protocol that Integration Server uses for new SOAP messages. Specify SOAP 1.1 Protocol or SOAP 1.2 Protocol. The default is SOAP 1.1 Protocol.
watt.server.SOAP.directiveSpecifies a different word to use for the SOAP directive in URLs that route requests to the Integration Server SOAP handler. By default, this parameter is set as watt.server.SOAP.directory=soap, which means users must specify the SOAP directive as soap (http://host:port/soap). To allow users to specify the SOAP directive as a different word instead, set this parameter to that word. For example, to allow users to specify the SOAP directive as endpoint, (http://host:port/endpoint), set this parameter as watt.server.SOAP.directive=endpoint.
watt.server.SOAP.MTOMThresholdSpecifies the field size, in kilobytes, that determines whether Integration Server handles base64binary encoded data in a SOAP request as a MIME attachment or whether it sends it inline in the SOAP message. If the Web service descriptor for the SOAP message enables attachments for the SOAP request, Integration Server passes as MIME attachments any base64 fields in a SOAP message that are larger than the threshold. This only applies to SOAP 1.2 messages. The default is 0.
watt.server.stats.avgTimeSpecifies the time period (in seconds) for which performance metrics are averaged. The default is 10.
watt.server.stats.logfileSpecifies the name of the file to receive statistics. The default is logs\stats.log.
watt.server.stats.pollTime Specifies the number of seconds between updates of statistics loggings. The default is 60.
436 webMethods Integration Server Administrator’s Guide Version 7.1.1

B Server Configuration Parameters
watt.server.storage.lock.maxWait Specifies the maximum number of milliseconds a pub.storage service will wait to obtain a lock.
watt.server.storage.lock.maxDuration Specifies the maximum number of milliseconds a pub.storage service will hold a lock.
watt.server.strictAccessExceptionLogging Specifies whether Integration Server will log HTTP 401 Access Denied as an error and trigger a notification. When this property is set to true, Integration Server will log HTTP 401 AccessDenied as an error and trigger notifications. When this property is set to false, Integration Server will not log HTTP 401 Access Denied as an error and will not trigger a notification. The default is false.
watt.server.sync.timeoutSpecifies the time period that a lock object exists for a given key. After calling a pub.sync:notify operation, pub.sync:wait can be called within this time period to receive a notification. The default is 60 seconds. This property affects the public services pub.sync:wait and pub.sync:notify.
watt.server.threadPoolSpecifies the maximum number of threads that the server maintains in the thread pool that it uses to run services. If this maximum number is reached, the server waits until services complete and return threads to the pool before running more services. The default is 75.
watt.server.threadPoolMinSpecifies the minimum number of threads that the server maintains in the thread pool that it uses to run services. When the server starts, the thread pool initially contains this minimum number of threads. The server adds threads to the pool as needed until it reaches the maximum allowed, which is specified by the watt.server.threadPoolMin setting. The default is 10.
watt.server.transaction.recovery.abandonTimeoutIf an error occurs while Integration Server tries to resolve an uncompleted XA transaction, specifies the maximum length of time (in minutes) during which Integration Server should make additional attempts. The default is 5 minutes.
watt.server.transaction.recovery.sleepInterval If an error occurs while Integration Server tries to resolve an uncompleted XA transaction, specifies the length of time (in seconds) that Integration Server waits between additional attempts. The default is 30 seconds.
Note: When setting the thread pool parameters (watt.server.threadPool and watt.server.threadPoolMin), be aware that each system has inherent limits to the number of threads that a user process can spawn. Check with your system administrator to determine what the current limits of your system are, and if they are insufficient, ask your system administrator to increase the limits for the Integration Server process.
webMethods Integration Server Administrator’s Guide Version 7.1.1 437

B Server Configuration Parameters
watt.server.trigger.interruptRetryOnShutdownSpecifies whether or not a request to shut down the Integration Server interrupts the retry process for a trigger service. If this parameter is set to false, the Integration Server waits for the maximum retry attempts to be made before shutting down. The Integration Server will also shut down if the trigger service executes successfully during a retry attempt. If this parameter is set to true, the Integration Server waits for the current service retry to complete. If the trigger service needs to be retried again (the service ends because of an ISRuntimeException), the Integration Server stops the retry process and shuts down. Upon restart, the transport (the Broker or, for a local publish, the transient store) redelivers the document to the trigger for processing. The default is false.
watt.server.trigger.keepAsBrokerEventSpecifies whether Integration Server should bypass decoding that is normally performed when documents are retrieved from the Broker on behalf of a trigger. If this property is set to true, Integration Server passes the value of the Broker event to the trigger service in an object called $brokerEvent and no decoding is performed. Set this parameter to true if Integration Server is receiving native Broker events. The default is false.
For more information about publishing native Broker events, see the Publish‐Subscribe Developer’s Guide.
watt.server.trigger.local.checkTTLSpecifies whether Integration Server should strictly enforce a locally published document’s time‐to‐live. When this parameter is set to true, before processing a locally published document in a trigger queue, Integration Server determines whether the document has expired. Integration Server discards the document if it has expired. The default is false.
Important! If watt.server.trigger.interruptRetryOnShutdown is set to false and a trigger is set to retry until successful, a trigger service can enter into an infinite retry situation. If the transient error condition that causes the trigger service to retry is not resolved, the Integration Server continually re‐executes the service at the specified retry interval. Because you cannot disable a trigger during trigger service execution and you cannot shut down the server during trigger service execution, an infinite retry situation can cause the Integration Server to become unresponsive to a shutdown request.
To escape an infinite retry situation, set the watt.server.trigger.interruptRetryOnShutdown to true. The change takes effect immediately.
Note: If the trigger service retry process is interrupted and the transport redelivers the document to the trigger, the transport increases the redelivery count for the document. If the trigger is configured to detect duplicates but does not use a document history database or a document resolver service to perform duplicate detection, the Integration Server considers the redelivered document to be “In Doubt” and will not process the document. For more information about duplicate detection and exactly‐once processing, see the Publish‐Subscribe Developer’s Guide.
438 webMethods Integration Server Administrator’s Guide Version 7.1.1

B Server Configuration Parameters
watt.server.trigger.managementUI.excludeListSpecifies a comma‐delimited list of triggers to exclude from the Broker/Local Trigger Management pages in the Integration Server Administrator. The Integration Server also excludes these triggers from trigger management changes that suspend or resume document retrieval or document processing for all triggers. The Integration Server does not exclude these triggers from changes to capacity, refill level, or maximum execution threads that are made using the global trigger controls (Queue Capacity Throttle and Trigger Execution Threads Throttle).
You can specify the fully qualified names of all the triggers that you want to exclude. You can also use pattern matching to exclude a group of triggers by specifying the beginning portion of the fully qualified name and following it with an asterisk (*). The Integration Server excludes all triggers that begin with the supplied pattern. For example, if you want to exclude all triggers located in the pub.prt folder, specify:
watt.server.trigger.managementUI.excludeList = pub.prt*
watt.server.trigger.monitoringIntervalSpecifies the interval, measured in seconds, at which Integration Server executes resource monitoring services for Broker/Local triggers. A resource monitoring service is a service that you create to check the availability of resources used by a Broker/Local trigger service. When it suspends a Broker/Local trigger because all retry attempts have failed, Integration Server executes the resource monitoring service to determine if all the resources are available. The default is 60 seconds.
For more information about resource monitoring services, see the Publish‐Subscribe Developer’s Guide.
watt.server.trigger.preprocess.suspendAndRetryOnErrorIndicates whether Integration Server suspends a trigger if an error occurs during the preprocessing phase of trigger execution. The preprocessing phase encompasses the time from when the trigger retrieves the document from its local queue to the time the trigger service executes. When this property is set to true, Integration Server suspends a trigger if one of the following occurs during preprocessing:
The document history database is not available when Integration Server performs duplicate detection for the trigger.
If the document history database is properly configured, Integration Server suspends the trigger and schedules a system task that executes a service that checks for the availability of the document history database. Integration Server resumes the trigger and re‐executes it when the service indicates that the document history database is available.
If the document history database is not properly configured, Integration Server suspends the trigger but does not schedule a system task to check for the database’s availability and will not resume the trigger automatically. You must manually configure the trigger after configuring the document history database properly.
webMethods Integration Server Administrator’s Guide Version 7.1.1 439
B Server Configuration Parameters
The document resolver service ends because of an ISRuntimeException. Integration Server suspends the trigger and schedules a system task to execute the trigger’s resource monitoring service (if one is specified). Integration Server resumes the trigger and retries trigger execution when the resource monitoring service indicates that the resources used by the trigger are available. If a resource monitoring service is not specified, you will need to resume the trigger manually (via the Integration Server Administrator or the pub.trigger:resumeProcessing and pub.trigger:resumeRetrieval services).
When this property is set to false, Integration Server does not suspend the trigger if a preprocessing error occurs during trigger execution. If the document history database is not available, Integration Server executes the specified document resolver service to determine the status of the document. Otherwise, Integration Server assigns the document a status of In Doubt, acknowledges the document, and uses the audit subsystem to log the document. If the document resolver service ends because of an ISRuntimeException, Integration Server assigns the document a status of In Doubt, acknowledges the document, and uses the audit subsystem to log the document.
The default is true.
For more information about building a resource monitoring service, see the Publish‐Subscribe Developer’s Guide.
watt.server.trigger.removeSubscriptionOnReloadOrReinstallSpecifies whether Integration Server deletes document type subscriptions for triggers when the package containing the trigger reloads or an update of the package is installed. If this property is set to true (the default) and a package reloads or an update of the package is installed, Integration Server deletes and then recreates any document type subscriptions for triggers in the package. (If Integration Server connects to a Broker, Integration Server deletes and recreates the subscriptions on the trigger client on the Broker.) This creates a small window of time during which the document type subscriptions do not exist. During this window, the trigger will not receive documents to which it normally subscribes.
If this property is set to false, Integration Server does not delete and then recreate document type subscriptions for triggers when the package reloads or is updated. Although Integration Server creates new document type subscriptions for triggers, Integration Server does not modify existing subscriptions. Specifically, if a trigger deleted a document type subscription, the subscription will not be removed when the package reloads or is updated. Consequently, when this property is set to false, the trigger might receive document types to which it no longer subscribes because the deleted document type subscriptions still exist on the trigger client on the Broker. When working with a 6.5.2 version of webMethods Broker, you can use My webMethods to delete the obsolete document type subscriptions from the trigger client on the Broker.The default is true.
Note: This property does not affect triggers running in a cluster of Integration Servers.
440 webMethods Integration Server Administrator’s Guide Version 7.1.1
B Server Configuration Parameters
watt.server.trigger.reuseSessionIndicates whether instances of a Broker/Local trigger use the same session on Integration Server when the document locale is the same as the default locale of Integration Server. When this property is set to true, Integration Server checks the locale of the document before processing it. If the document locale is the same as the default locale of Integration Server, or no locale is specified, the trigger uses a shared session. If the document locale is different from the default, then Integration Server creates a new session for the trigger to use to process that document. When this property is set to false, Integration Server uses a new session for each instance of a trigger. The default is false.
Reusing sessions for a JMS trigger might improve performance. However, this property does not work with all adapters.
watt.server.tspace.locationSpecifies the absolute directory path of the hard disk drive space in which the Integration Server is to temporarily store large documents rather than keep them in memory. Each file that the Integration Server stores in this directory is given the name DocResxxxxx.dat, where xxxxx is a value that can vary in length and character. Specify the absolute directory path to a directory on the same machine as the Integration Server. The default value is JVM’s temporary directory (i.e., the value of java.io.tmpdir).
Example: If you want the Integration Server to use the LargeDocTemp directory on your D drive, specify the following:
watt.server.tspace.location=D:\LargeDocTemp
watt.server.tspace.maxSpecifies the maximum number of bytes that can be stored at any one time in the hard disk drive space that you defined using the watt.server.tspace.location property. If the Integration Server attempts to write a large document to the hard disk drive space that will cause the number of bytes you specify to be exceeded, an error message is displayed on the server console, and the document is not stored. Specify a positive whole number of bytes. The default value is 52,428,800 bytes (50 MB).
Example: To set the maximum number of bytes that can be stored to 30,000,000 bytes, specify the following:
watt.server.tspace.max=30000000
Important! You must restart Integration Server after you modify the value of this property.
Tip! The size of the hard disk drive space for temporarily saving documents will vary based on the number of documents that you process concurrently and the size of the documents that you process. For example, if your typical concurrent document load is 10, you would need a hard disk drive space that is 10 to 15 times the combined size of the documents being processed concurrently.
Important! You must restart the Integration Server after you modify the value of this property.
webMethods Integration Server Administrator’s Guide Version 7.1.1 441
B Server Configuration Parameters
watt.server.timeToLiveSpecifies the minimum amount of time the TSpace will be alive. This step becomes important only when debugging flows. When debugging flows, after each step, the flow wants to clean up the TSpace. By setting a timeToLive, the TSpace wonʹt be cleaned up till after the debugging is finished.
watt.server.txMailSpecifies the email address of an administrator to notify when guaranteed delivery capabilities are disabled due to an error (for example, if the Integration Server encounters a disk full condition or if the audit‐trail log is full). There is no default.
watt.server.tx.cluster.lockBreakSecsSpecifies the number of seconds a cluster server waits before breaking a lock on a job in a cluster job store. The default is 120.
You must be using webMethods Integration Server Clustering to use this setting. For more information, refer to the webMethods Integration Server Clustering Guide.
watt.server.tx.cluster.lockTimeoutMillisSpecifies the number of milliseconds a cluster server sleeps between attempts to place an update lock on a job in a cluster job store. The default is 100.
You must be using webMethods Integration Server Clustering to use this setting. For more information, refer to the webMethods Integration Server Clustering Guide.
watt.server.tx.heuristicFailRetrySpecifies whether the Integration Server is to re‐execute services for guaranteed delivery transactions in the job store that are pending when the Integration Server is restarted after a failure. If a transaction is pending, the service began execution before the Integration Server failed.
If the setting is true, the Integration Server resets the transaction status from pending to new, and the service will be re‐executed. If the setting is false, the Integration Server resets the transaction status from pending to fail to indicate the heuristic failure, and the service will not be re‐executed. The default is true.
watt.server.tx.sweepTimeSpecifies the number of seconds between sweeps (clean up) of the job store for inbound guaranteed delivery transactions. The server sweeps the job store to remove expired transactions. The default is 60.
watt.server.userFtpRootDirSpecifies the FTP root directory that the Integration Server will create at startup. When any Integration Server user logs into the FTP Listener, the server creates that user’s FTP home directory in this root directory, for example FtpRoot/username. You can specify any directory to be the root directory, including a mapped network directory. If this property is not defined, a default directory named userFtpRoot is created in your Integration Server home directory.
442 webMethods Integration Server Administrator’s Guide Version 7.1.1
B Server Configuration Parameters
Administrators, Replicators, and non‐privileged users can perform put and get operations in the following directories:
When a user completes a put command in his or her own user directory (that is, when the STOR command is completed on the server side but before the server acknowledges the client with return code 226), an event is fired to notify interested parties by publishing a pub.client.ftp:putCompletedNotification document to the webMethods Broker. EDI packages will subscribe to this document and will retrieve the file just put onto the server.
watt.server.users.listWmOnly Specifies whether the server displays external users and groups on the IS Administrator. When this value is set to true, the IS Administrator displays native users and groups only. When the value is set to false (the default), the IS Administrator also displays users and groups from external directories defined to the server.
watt.server.wsdl.enforceSOAPMsgPartNS Specifies whether the server allows non‐namespace qualified input and output signatures to be specified as message parts for a wsdl file. When this parameter is set to true (the default), the server will throw an exception during wsdl generation if a non‐namespace qualified input or output signature is selected. When set to false, the server allows non‐namespace qualified signatures. If this parameter is set to false, set the watt.server.SOAP.enforceMsgPartNS parameter to false too so that the runtime soap services will also allow non‐namespace qualified header and body parts. For interoperability with other SOAP implementations, Software AG recommends that you run your server with this parameter enabled (the default setting). This ensures that your server will not generate wsdl files that have non‐namespace qualified message parts.
This user... Can access...
Administrator admin (in the Integration Server home directory)
The Administrator’s own user directory
The entire namespace for all packages, including WmRoot
All other user directories
Replicator The Integration Server_directory\replicate directory
Any services in the namespace that have Replicator ACL or lower
The Replicator’s own user directory
Non‐privileged user
The user’s own user directory
Any services that have an ACL at or below the level of the userʹs ACL
Note: The STOU command is not supported on the Integration Server. However, it is supported for clients. See the following built‐in services in the webMethods Integration Server Built‐In Services Reference: pub.client.ftp, pub.client.ftp:put, and pub.client.ftp:mput.
webMethods Integration Server Administrator’s Guide Version 7.1.1 443
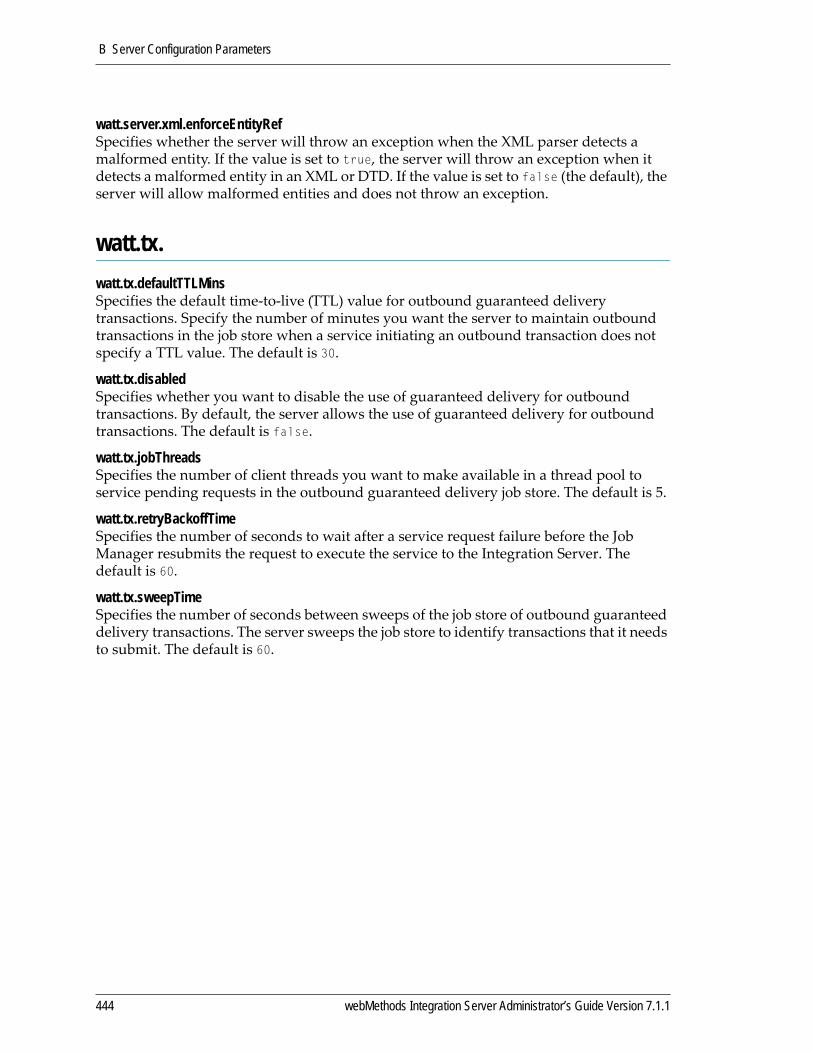
B Server Configuration Parameters
watt.server.xml.enforceEntityRefSpecifies whether the server will throw an exception when the XML parser detects a malformed entity. If the value is set to true, the server will throw an exception when it detects a malformed entity in an XML or DTD. If the value is set to false (the default), the server will allow malformed entities and does not throw an exception.
watt.tx.watt.tx.defaultTTLMinsSpecifies the default time‐to‐live (TTL) value for outbound guaranteed delivery transactions. Specify the number of minutes you want the server to maintain outbound transactions in the job store when a service initiating an outbound transaction does not specify a TTL value. The default is 30.
watt.tx.disabledSpecifies whether you want to disable the use of guaranteed delivery for outbound transactions. By default, the server allows the use of guaranteed delivery for outbound transactions. The default is false.
watt.tx.jobThreadsSpecifies the number of client threads you want to make available in a thread pool to service pending requests in the outbound guaranteed delivery job store. The default is 5.
watt.tx.retryBackoffTimeSpecifies the number of seconds to wait after a service request failure before the Job Manager resubmits the request to execute the service to the Integration Server. The default is 60.
watt.tx.sweepTimeSpecifies the number of seconds between sweeps of the job store of outbound guaranteed delivery transactions. The server sweeps the job store to identify transactions that it needs to submit. The default is 60.
444 webMethods Integration Server Administrator’s Guide Version 7.1.1
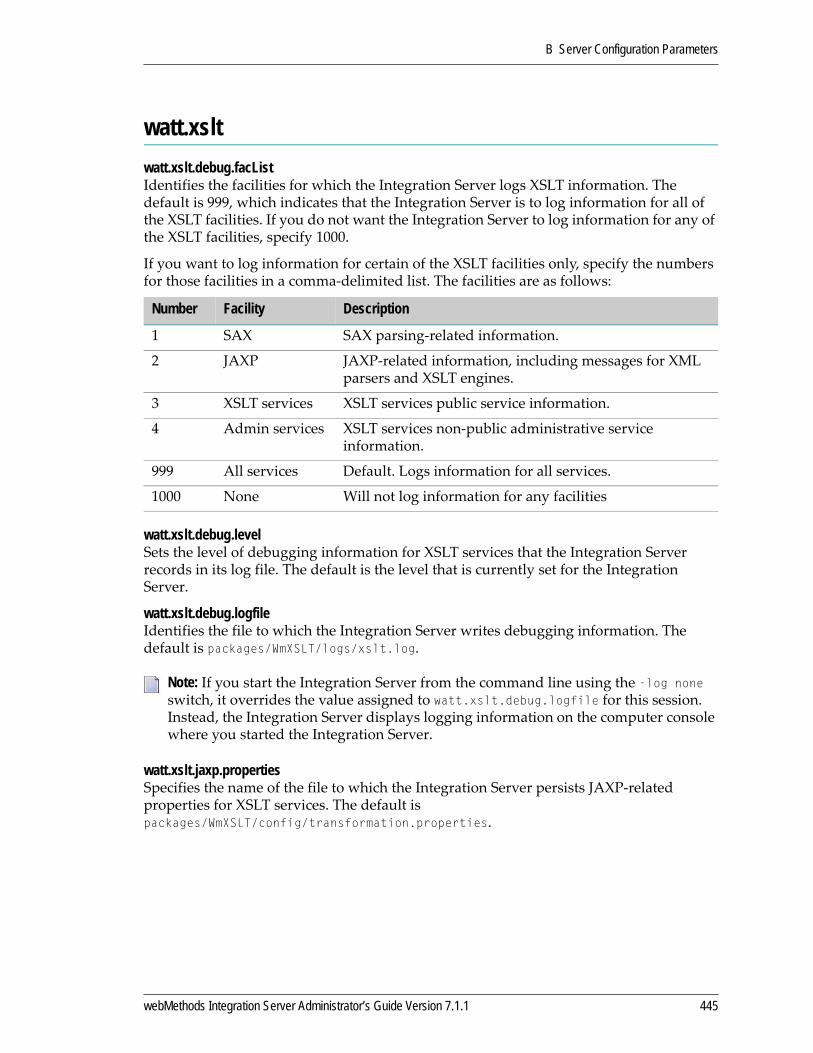
B Server Configuration Parameters
watt.xsltwatt.xslt.debug.facListIdentifies the facilities for which the Integration Server logs XSLT information. The default is 999, which indicates that the Integration Server is to log information for all of the XSLT facilities. If you do not want the Integration Server to log information for any of the XSLT facilities, specify 1000.
If you want to log information for certain of the XSLT facilities only, specify the numbers for those facilities in a comma‐delimited list. The facilities are as follows:
watt.xslt.debug.level Sets the level of debugging information for XSLT services that the Integration Server records in its log file. The default is the level that is currently set for the Integration Server.
watt.xslt.debug.logfile Identifies the file to which the Integration Server writes debugging information. The default is packages/WmXSLT/logs/xslt.log.
watt.xslt.jaxp.properties Specifies the name of the file to which the Integration Server persists JAXP‐related properties for XSLT services. The default is packages/WmXSLT/config/transformation.properties.
Number Facility Description
1 SAX SAX parsing‐related information.
2 JAXP JAXP‐related information, including messages for XML parsers and XSLT engines.
3 XSLT services XSLT services public service information.
4 Admin services XSLT services non‐public administrative service information.
999 All services Default. Logs information for all services.
1000 None Will not log information for any facilities
Note: If you start the Integration Server from the command line using the -log none switch, it overrides the value assigned to watt.xslt.debug.logfile for this session. Instead, the Integration Server displays logging information on the computer console where you started the Integration Server.
webMethods Integration Server Administrator’s Guide Version 7.1.1 445

B Server Configuration Parameters
446 webMethods Integration Server Administrator’s Guide Version 7.1.1
C Diagnosing the Integration Server
Introduction . . . . . . . . . . . . . . . . . . . . . . . . . . . . . . . . . . . . . . . . . . . . . . . . . . . . . . . . . . . . . . . . . 448
Configuring the Diagnostic Port . . . . . . . . . . . . . . . . . . . . . . . . . . . . . . . . . . . . . . . . . . . . . . . . . . 448
Using the Diagnostic Utility . . . . . . . . . . . . . . . . . . . . . . . . . . . . . . . . . . . . . . . . . . . . . . . . . . . . . 449
Starting the Integration Server in Safe Mode . . . . . . . . . . . . . . . . . . . . . . . . . . . . . . . . . . . . . . . . 450
When the Server Automatically Places You in Safe Mode . . . . . . . . . . . . . . . . . . . . . . . . . . . . . . 451
Generating a Thread Dump . . . . . . . . . . . . . . . . . . . . . . . . . . . . . . . . . . . . . . . . . . . . . . . . . . . . . 452
webMethods Integration Server Administrator’s Guide Version 7.1.1 447
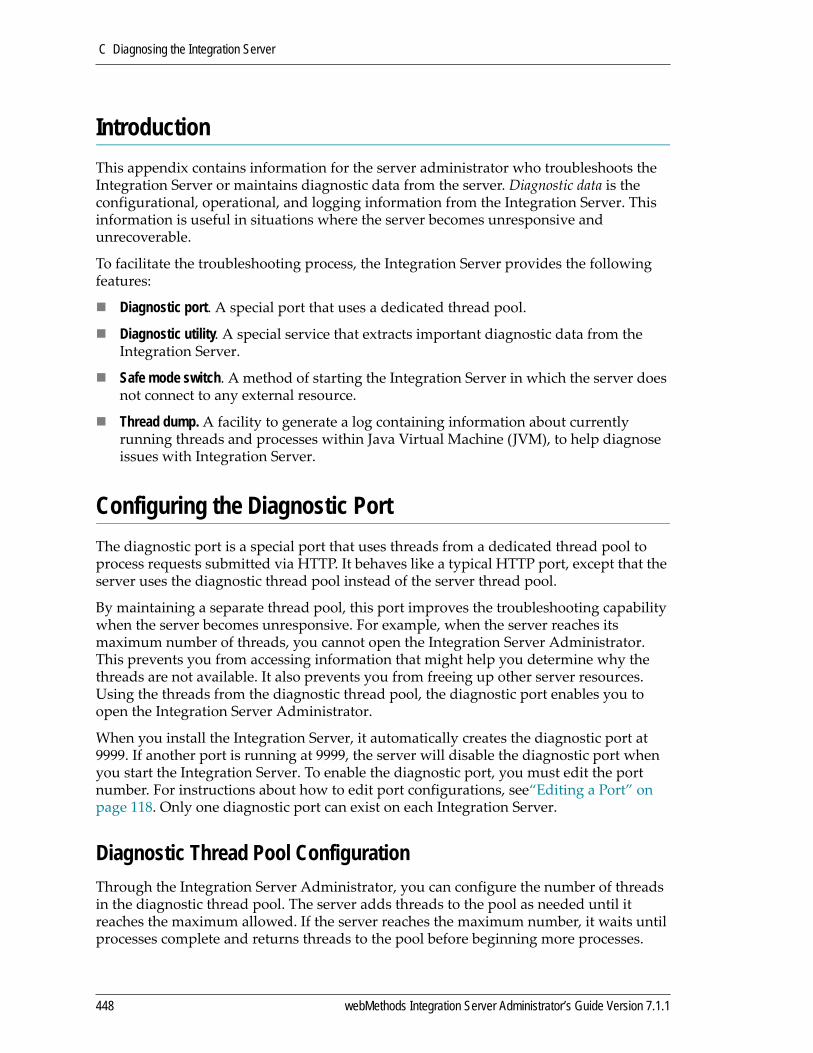
C Diagnosing the Integration Server
IntroductionThis appendix contains information for the server administrator who troubleshoots the Integration Server or maintains diagnostic data from the server. Diagnostic data is the configurational, operational, and logging information from the Integration Server. This information is useful in situations where the server becomes unresponsive and unrecoverable.
To facilitate the troubleshooting process, the Integration Server provides the following features:
Diagnostic port. A special port that uses a dedicated thread pool.
Diagnostic utility. A special service that extracts important diagnostic data from the Integration Server.
Safe mode switch. A method of starting the Integration Server in which the server does not connect to any external resource.
Thread dump. A facility to generate a log containing information about currently running threads and processes within Java Virtual Machine (JVM), to help diagnose issues with Integration Server.
Configuring the Diagnostic PortThe diagnostic port is a special port that uses threads from a dedicated thread pool to process requests submitted via HTTP. It behaves like a typical HTTP port, except that the server uses the diagnostic thread pool instead of the server thread pool.
By maintaining a separate thread pool, this port improves the troubleshooting capability when the server becomes unresponsive. For example, when the server reaches its maximum number of threads, you cannot open the Integration Server Administrator. This prevents you from accessing information that might help you determine why the threads are not available. It also prevents you from freeing up other server resources. Using the threads from the diagnostic thread pool, the diagnostic port enables you to open the Integration Server Administrator.
When you install the Integration Server, it automatically creates the diagnostic port at 9999. If another port is running at 9999, the server will disable the diagnostic port when you start the Integration Server. To enable the diagnostic port, you must edit the port number. For instructions about how to edit port configurations, see“Editing a Port” on page 118. Only one diagnostic port can exist on each Integration Server.
Diagnostic Thread Pool ConfigurationThrough the Integration Server Administrator, you can configure the number of threads in the diagnostic thread pool. The server adds threads to the pool as needed until it reaches the maximum allowed. If the server reaches the maximum number, it waits until processes complete and returns threads to the pool before beginning more processes.
448 webMethods Integration Server Administrator’s Guide Version 7.1.1
C Diagnosing the Integration Server
You can also set the thread priority for the diagnostic thread pool. The diagnostic thread priority determines the order of execution when the JVM receives requests from different threads. The larger the number, the higher the priority. When the JVM receives requests from different threads, it will run the thread with the higher priority. Therefore, by assigning a higher priority to the threads in the diagnostic thread pool, you can take advantage of the dedicated thread pool and improve access to the Integration Server Administrator.
For more information about how to configure the diagnostic thread pool, see “Switching from the Embedded Database to an External RDBMS” on page 79.
Diagnostic Port AccessOnly users in the Administrators group can access the server through the diagnostic port. You can access the Integration Server Administrator via http://<hostname>:<diagnostic port> where hostname is the machine that hosts the Integration Server and diagnostic port is the diagnostic port number. After prompting you for a username and password, the server displays the Integration Server Administrator. Because you can access the diagnostic port only through HTTP, data and passwords will be passed clear=unencrypted.
The diagnostic port allows access only to services defined with the Administrators ACL. Software AG recommends that you do not change the default access settings.
Using the Diagnostic UtilityYou use the diagnostic utility to collect configurational, operational, and logging data from the Integration Server. The diagnostic utility is an Integration Server service called wm.server.admin:getDiagnosticData. It does not take any inputs and is accessible only by members of the Administrators group. Although you run the utility via the diagnostic port to troubleshoot, it can also be used with any HTTP or HTTPS port to collect diagnostic data periodically.
The diagnostic utility creates a temporary diagnostic_data.zip file in the IntegrationServer\logs directory and writes to the .zip file as it collects information. However, if there are problems creating the .zip file, such as insufficient space in the file system, it will return a diagnostic_data.txt file. In the text file, the configurational and operational data are separated into distinct sections for easier reading. Unlike the .zip file, the text file does not contain logging data.
Note: Software AG strongly recommends that you discourage any external user access to the diagnostic port and utility. LDAP users should not access the diagnostic port.
Note: Each time you run this utility, it overwrites the diagnostic_data.zip file that is in the IntegrationServer\logs directory. If you want to keep the previous file, rename or save the file to another directory.
webMethods Integration Server Administrator’s Guide Version 7.1.1 449
C Diagnosing the Integration Server
To control the amount of logging data the diagnostic tool returns, you can specify the log period with the watt.server.diagnostic.logperiod parameter. By default, it is set to 6 hours. When this property is set to 0, the utility does not return any log files. It returns only the configuration and run‐time data files.
The logging information the utility returns depends on how you store the logs. If you save the logs to a database, the diagnostic utility will return the exact number of log entries that match the specified number of hours. If you save the logs to the file system, it will return not only the period within the specified number of hours but the entire log for that day. For instructions about how to set server configuration parameters, see “Switching from the Embedded Database to an External RDBMS” on page 79.
1 Start your Web browser.
2 Type the following url:http://<hostname>:<port>/invoke/wm.server.admin/getDiagnosticData
where <hostname> is the ip or name of the machine and <port> is the port number where the Integration Server is running.
3 Log on to the Integration Server with a username and password that has administrator privileges.
4 The server displays a dialog box that prompts you to select one of the following:
a Open the diagnostic data file.
b Save the diagnostic data file to the file system.
c Cancel and exit this operation.
If you open or save the diagnostic data file, the utility creates the file in the IntegrationServer_directory\logs directory.
Starting the Integration Server in Safe ModeIf Integration Server is having trouble starting because it or one of its packages cannot connect to an external resource, you can stop Integration Server and then start it in safe mode. When you start Integration Server in safe mode, it does not connect to any external resource. In addition, Integration Server loads only the WmRoot package; all other packages are inactive.
Note: The diagnostic utility can execute slowly due to the amount of information returned.
To run the diagnostic utility
Important! Use safe mode for diagnostic or troubleshooting purposes only. Do not run any regular Integration Server tasks or Developer while in safe mode. It will return unpredictable results.
450 webMethods Integration Server Administrator’s Guide Version 7.1.1
C Diagnosing the Integration Server
If Integration Server could not connect to a Broker or database, check the appropriate connection parameters and modify them as necessary. For instructions, see “Using a 64‐bit JVM on Solaris and HP‐UX Systems” on page 81 and the webMethods Logging Guide.
If a package such as Trading Networks Server or the webMethods SAP Adapter could not connect to an external resource, open Integration Server Administrator and go to the Packages > Management > Activate Inactive Packages page. In the Inactive Packages list, select the package and click Activate Package. Integration Server puts the package into the state it would have been in if you had started Integration Server normally. For example, if the package would have been enabled, Integration Server loads and enables it. Check and modify the connection parameters using the instructions in the appropriate guide.
1 Stop the Java process associated with the Integration Server (for example, in Windows Task Manager).
2 In the file system, navigate to the Integration Server installation directory and delete the file named LOCKFILE.
3 At the command line, navigate to the Integration Server directory and enter one of the following commands to start the server.
For information about other switches, see “Starting the Server from the Command Line” on page 31. When you open the Integration Server Administrator, it will display a message indicating that the server is running in safe mode.
When the Server Automatically Places You in Safe ModeIf the Integration Server detects a problem with the master password or outbound passwords at startup, it will automatically place you in safe mode. You will see the following message in the upper left corner of the Server Statistics screen of the Integration Server Administrator:SERVER IS RUNNING IN SAFE MODE. Master password sanity check failed -- invalid master password provided.
These problems can be caused by a corrupted master password file, a corrupted outbound password file, or by simply mis‐typing the master password when you are prompted for it. If you suspect you have mis‐typed the password, shut down the server and restart it, this time entering the correct password. If this does not correct the problem, refer to “When There Are Problems with the Master Password or Outbound Passwords at Startup” on page 248 for instructions.
To start the Integration Server in safe mode
System Command
Windows bin\server.bat ‐safeboot (other switches)
UNIX bin/server.sh ‐safeboot (other switches)
webMethods Integration Server Administrator’s Guide Version 7.1.1 451

C Diagnosing the Integration Server
Generating a Thread DumpIf you experience a drastic slow down in your server performance, or an Integration Server subsystem becomes unresponsive, you can generate a thread dump to diagnose the issue. The thread dump will diagnose thread resource contention issues which may have caused thread blocks or deadlocks, which in turn, may be the cause of unresponsiveness.
For example, if your Integration Server’s primary HTTP port stops accepting new connections, you can generate a thread dump which may tell you exactly why the primary port is stuck. To do this, you may need to access the diagnostic port which runs on a dedicated thread. If you are able to successfully log in to Integration Server Administrator, you could then generate a thread dump.
1 Start your Web browser.
2 Log on to Integration Server with a username and password that has administrator privileges. By default, Integration Server Administrator displays the Server > Statistics page.
3 Under Usage, click the Current number of System Threads.
The Server > Statistics > System Threads page is displayed. The System Threads table lists thread names and classifies them according to the following categories: Alive, Daemon, and Interrupted.
4 Click Generate JVM Thread Dump.
The Server > Statistics > System Threads > Thread Dump page is displayed with a log of results.
5 Click Return to System Threads to return to the System Threads page.
For information about server recovery when a hardware or software problem forces you to do a server restart, see Chapter 3, “Starting and Stopping the Server”.
To generate a thread dump
452 webMethods Integration Server Administrator’s Guide Version 7.1.1
D Wireless Communication with the Integration Server
How Does the Integration Server Communicate with Wireless Devices? . . . . . . . . . . . . . . . . . . 454
Using URLs for Wireless Access to the Integration Server . . . . . . . . . . . . . . . . . . . . . . . . . . . . . 456
WML and HDML Samples . . . . . . . . . . . . . . . . . . . . . . . . . . . . . . . . . . . . . . . . . . . . . . . . . . . . . . 459
webMethods Integration Server Administrator’s Guide Version 7.1.1 453

D Wireless Communication with the Integration Server
The webMethods Integration Server can receive requests from and send responses to Internet‐enabled wireless devices. A wireless device requests information from the Integration Server the using a URL. The responses sent by the server contain WML (Wireless Markup Language) content or HDML (Handheld Device Markup Language) content. Examples of wireless devices that the Integration Server can communicate with include Internet‐enabled wireless phones and Internet‐enabled personal digital assistants.
You might want to use a wireless device to communicate with the Integration Server to:
Check inventory levels at your company or at a supplier.
Place an order or check the status of an existing order.
Receive order confirmation for an order submitted with a wireless device.
Send or receive notification to alert subscribers to trade fulfillments of security price changes.
Collect statistics about your Integration Server by using event handlers that send information to wireless devices.
Request an HDML or WML page stored on the Integration Server.
You access the Integration Server from a wireless device by entering a URL in the Web browser of wireless device. The URL can invoke a service on the Integration Server or can request a WML or HDML page stored on the Integration Server.
How Does the Integration Server Communicate with Wireless Devices?The Integration Server communicates with wireless devices by means of a wireless gateway. The wireless gateway (sometimes called a WAP gateway) converts a request from a wireless device to an HTTP request. The wireless gateway also converts the HTTP response from the Integration Server to a format understood by the Web browser or micro‐browser on the wireless device.
454 webMethods Integration Server Administrator’s Guide Version 7.1.1
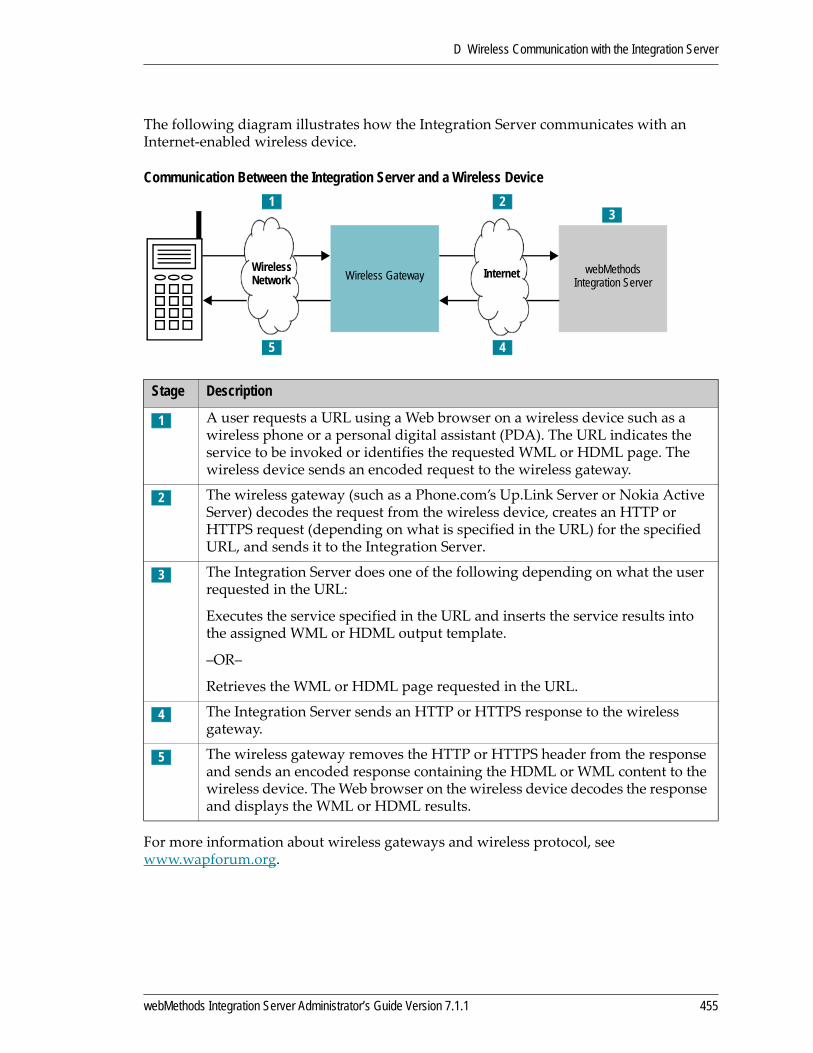
D Wireless Communication with the Integration Server
The following diagram illustrates how the Integration Server communicates with an Internet‐enabled wireless device.
Communication Between the Integration Server and a Wireless Device
For more information about wireless gateways and wireless protocol, see www.wapforum.org.
Stage Description
1 A user requests a URL using a Web browser on a wireless device such as a wireless phone or a personal digital assistant (PDA). The URL indicates the service to be invoked or identifies the requested WML or HDML page. The wireless device sends an encoded request to the wireless gateway.
2 The wireless gateway (such as a Phone.com’s Up.Link Server or Nokia Active Server) decodes the request from the wireless device, creates an HTTP or HTTPS request (depending on what is specified in the URL) for the specified URL, and sends it to the Integration Server.
3 The Integration Server does one of the following depending on what the user requested in the URL:
Executes the service specified in the URL and inserts the service results into the assigned WML or HDML output template.
–OR–
Retrieves the WML or HDML page requested in the URL.
4 The Integration Server sends an HTTP or HTTPS response to the wireless gateway.
5 The wireless gateway removes the HTTP or HTTPS header from the response and sends an encoded response containing the HDML or WML content to the wireless device. The Web browser on the wireless device decodes the response and displays the WML or HDML results.
webMethods Integration ServerWireless Gateway
WirelessNetwork Internet
13
2
45
webMethods Integration Server Administrator’s Guide Version 7.1.1 455

D Wireless Communication with the Integration Server
Using URLs for Wireless Access to the Integration ServerTo use a wireless device to access information or invoke services on the Integration Server, you need to use the device’s Web browser to enter or select a URL. The following sections explain how to invoke a service with a URL and how to request a WML or HDML page with a URL.
Invoking a Service with a URLYou can use a URL to invoke a service from an Internet‐enabled wireless device. You can request a URL by entering the URL into the Web browser directly or by selecting a link for the URL that is embedded into a HDML or WML page. In either case, the URL needs to be in the following format:
Note: Some Web browsers for wireless devices place limitations on the length of a URL that a user can enter or select. Make sure any WML or HDML pages that you create for use with wireless devices are compliant with browser requirements.
Note: To minimize the amount of user input and therefore reduce the possibilities for input errors, embed hyperlinks to URLs in the WML or HDML page.
Item Description
1 Identifies the name and port number for the Integration Server on which the service you want to invoke resides.
Important! For wireless access, the server name (localhost) must be a registered domain name; that is, the server needs to be accessible via the Internet.
Important! Many wireless gateways use port 80 as the default registered port number. If you want to use a different port number, make sure to register the server name and port number with the wireless gateway. (For security reasons, Software AG discourages using port numbers below 1024. For more information, see “Setting Up Aliases for Remote Integration Servers” on page 68.
2 Specifies the required keyword “invoke”, which tells the Integration Server that the URL identifies a service that is to be invoked.
3 Identifies the folder in which the service to invoke resides. Separate subfolders with periods. This field is case sensitive. Be sure to use the same combination of upper and lower case letters as specified in the folder name on the Integration Server.
http://local:host5555/invoke/ folderName.subFolderName/serviceName?variable=value&variable=value
1 2 3 4 5
456 webMethods Integration Server Administrator’s Guide Version 7.1.1

D Wireless Communication with the Integration Server
For more information about invoking a service with a URL, see “Building a Browser Based Client” in the webMethods Developer User’s Guide.
Requesting a WML or HDML Page with a URLYou can use an Internet‐enabled wireless device to request a WML or HDML page stored on the Integration Server. By entering a URL in the Web browser of a wireless device or by selecting a hyperlink to a URL, you can access any WML or HDML page stored in the following directory:
IntegrationServer_directory\packages\packageName\pub
Where packageName is the name of the package in which the WML or HDML file is saved.
4 Identifies the service that you want to invoke. This field is case sensitive. Be sure to use the same combination of upper and lower case letters as specified in the service name on the Integration Server. *
5 Specifies the input values for the service. Specify a question mark (?) before the input values. The question mark signals the beginning of input values. Each input value is represented as a variable=value pair. The variable portion is case sensitive. Be sure to use the same combination of upper and lower case letters as specified in your service. If your service requires more than one input value, separate each variable=value pair with an ampersand (&).
Note: Only specify this part of the URL when using the HTTP GET method.
Note: If you use the URL to invoke a service, make sure that the service applies the output to the appropriate template type (WML or HDML). For more information about creating output templates, see Dynamic Server Pages and Output Templates Developer’s Guide.
Item Description
webMethods Integration Server Administrator’s Guide Version 7.1.1 457

D Wireless Communication with the Integration Server
The URL you enter in the Web browser needs to adhere to the following format:
For example, the following URLs access the hello.wml file from the pub directory for the Wireless package:
http://localhost:5555/Wireless/pub/hello.wml
–OR–
http://localhost:5555/Wireless/hello.wml
Item Description
1 Identifies the name and port number for the Integration Server on which the file you want to request resides.
Important! For wireless access, the server name (localhost) must be a registered domain name; that is, the server needs to be accessible outside via the Internet.
Important! Many wireless gateways use port 80 as the default registered port number. If you want to use a different port number, make sure to register the server name and port number with the wireless gateway. (For security reasons, Software AG discourages using port numbers below 1024. For more information, see “Setting Up Aliases for Remote Integration Servers” on page 68.)
2 Identifies the package in which the WML or HDML file you want to request resides.
3 Specifies the pub directory. WML and HDML files that can be served to wireless devices need to reside in this directory.
Note: You do not need to specify the pub directory. Integration Server automatically looks in pub for the requested file if no directory is specified.
4 Identifies the file you want to request.
http://localhost5555/packageName/pub/fileName
1 2 3 4
458 webMethods Integration Server Administrator’s Guide Version 7.1.1
D Wireless Communication with the Integration Server
WML and HDML SamplesThe webMethods Integration Server provides sample services, WML files, HDML files, and output templates that you can use to view how wireless devices communicate with the Integration Server. These files are located in the sample.wireless folder in the WmSamples package. These samples provide examples of services that you might create to enable wireless devices to order products, view order history, obtain Integration Server statistics, and request the current date and time.
For more information about using these samples, see the following file:
WmSamples\pub\WAPDemo.htm
You can find the WmSamples package in the certified samples area of the Knowledge Base on the Advantage Web Site.
webMethods Integration Server Administrator’s Guide Version 7.1.1 459

D Wireless Communication with the Integration Server
460 webMethods Integration Server Administrator’s Guide Version 7.1.1
Index
Numerics2PC for XA transactions 38864-bit JVM, using on Solaris and HP-UX systems 81
AAccess Control Lists (ACLs)
ACL used when none assigned to service 172, 176
Administrators 172Anonymous 172assigning to services 176creating 173Default 172deleting 174description of use 168Developers 172how they work with services 175Internal 172predefined 172protecting use of remote server aliases 68removing from services 177removing protection from files 179Replicators 172updating 174
access file, using to control access to files 178accessing
any Web document for package 287home page for package 287
ACLs. See Access Control Lists (ACLs)activating packages 289activation codes, from registration authority 205adding
Access Control Lists (ACLs) 173administrators 141aliases for remote servers 69aliases for Web services 72developers 142groups 56packages 288port restrictions 165, 166ports 85services manually 336
subscribers to packages 300user accounts 48users to a group 57, 58
Administrator user account 48administrators
adding alternate administrators 20defining 141defining external users as 269email address for guaranteed delivery 325password for predefined user account 19predefined ACL, description 172predefined group, description 55predefined user account, description 19, 48receiving messages, overview 19responsibilities 18role 18SMTP server for email address for guaranteed
delivery 325Administrators ACL 172Administrators group 55aliases
functional 78PKI profile, deleting 209remote servers
deleting 71identifying 69testing connection 71updating 71
Web servicesassociating with a Binder 74deleting 75identifying 72updating 74
Allow By Defaultport IP access (custom) 162port IP access (global) 161
Anonymous ACL, description 172Anonymous group 55architecture, webMethods Integration Server 22archiving packages 292AS/400 systems, port queue size 433Asset Publisher 82
webMethods Integration Server Administrator’s Guide Version 7.1.1 461
Index
audit-trail loggingoverview 28writing log to screen 32
authenticatingbasic authentication 188client certificates 182customizing authentication with pluggable module
189description 182registering alternate authentication processor
194unregistering alternate authentication processor
194using Integrated Windows authentication 195using user names and passwords (basic) 188using user names and passwords with Integrated
Windows authentication 195when invalid password supplied 189when invalid user name supplied 189when it occurs 182when user name not supplied 189
authentication module, creating 193automatic pull facility 308auxiliary PKI profile
creating 206recovering 212when exporting a profile to an HSM device 216
available threads warning threshold 64
Bbinders
associating endpoint aliases 74blocking incoming requests to server 118Broker
bypassing decoding for trigger services 438checking for $brokerEvent objects 434client group, description of 133handling native events 434keep-alive messages
response time 421retry limit 421wait time 421
keep-alive mode 134switching Integration Server territories 134
built-in services, for pub.pki 201, 202
CC/C++ services, adding to server manually 336caching service results
overview 320resetting for all services 322resetting for single service 322viewing statistics 322
cancelingpackage subscriptions 315scheduled service execution 352
capacitydefault document store 124definition of 365outbound document store 128reducing for trigger queues 365trigger document store 125trigger queues 365
CAs. See certificate authorities (CAs)central user management
configuring 256disabling 259
certificate authorities (CAs)certificates to validate client certificates 186requesting digital certificate from 150
certificate mappingchanging user 187
Certificate Revocation List (CRL)description 217stored in LDAP directory 200when downloaded 218
certificate signing request (CSR), creating 150Certificate Toolkit 149certificates, digital
certificates required to validate client certificates 186
description of use 147obtaining certificate authority’s 150requesting for server 150trusted, for PKI profile 207using for authentication 182
changingAccess Control Lists (ACLs) 174aliases for remote servers 71aliases for Web services 74license key 62membership for groups 59passwords 50, 51
462 webMethods Integration Server Administrator’s Guide Version 7.1.1

Index
primary port 117scheduled service execution 350
checklistsconfiguring server 399deploying the server 398implementing SSL 148, 154installing server 398installing services 401security 403setting up user accounts, groups, and ACLs 400
classpath, using to prepare client to communicate with server 402
Clear All Duplicate or In Doubt Document Statistics link 130
client certificatescertificates required to validate 186description 182information required to use 186presenting multiple 154
client groups, switching 133client prefix, for webMethods Integration Server 133client.jar file, using to prepare client to communicate
with server 402clients
authenticating 182preparing to communicate with server 402
client-side queuing, described 127client-side queuing, enabling or disabling 434cluster synchronization
configuring for trigger management 381monitoring for triggers 383
Cluster View page, display of 383clustering, in a reverse invoke configuration 222code subdirectory 278command line
parameters for starting server 31starting server from 31
communications with server, securing with SSL 146configuration settings
bypass list for proxy servers 77controlling who can set 141descriptions 408guaranteed delivery 325how long to keep inactive sessions 65how to set 44LDAP 262license keys 62overriding when starting server 31
ports 84proxy servers 75server.cnf file 44
configuringadditional ports 85bypass list for proxy servers 77checklist 399controlling who can configure the server 141default document stores 123description of all settings 408guaranteed delivery 325how long to keep inactive sessions 65outbound document store 127outbound password settings 243PKI system settings 202ports 84primary port 117proxy servers 75server 61server resources 79SSL 151SSL, checklist 148SSL, checklist for presenting multiple client
certificates 154SSL, required information 149trigger document store 124user account to use 48XA recovery store 394
controlledDeliverToTriggers 422controlling
access to services and files 168access to services by port 158, 164server SSL security level by port 156who can configure the server 141who can develop services 142
conventions used in this document 15copying packages
ACL used 172group used 56how to 303publisher tasks 299requesting subscriptions to packages 310subscriber tasks 308to other servers 292user account used 48
creatingAccess Control Lists (ACLs) 173auxiliary PKI profiles 206, 212
webMethods Integration Server Administrator’s Guide Version 7.1.1 463

Index
certificate signing request (CSR) 150package release 303packages 288packages distribution files 303PKI profile aliases 207
CRL (Certificate Revocation List)description 217in LDAP directories 200when downloaded 218
CSR (certificate signing request), creating 150customizing authentication 189
Ddatabase drivers, for use with wmDB 430database storage
accessed through WmDB or JDBC adapter 78debug mode of the server 31decreasing
capacity of trigger queues 365document processing for concurrent triggers 373refill level of trigger queues 365server threads for concurrent trigger execution
373server threads for document processing 371server threads for document retrieval 363, 364trigger execution for concurrent triggers 373
decrypting documents 202decryption keys, stored in auxiliary profile 206, 212Default ACL 172default document store
capacity 124configuring 123description 122initial size 123location 123refill level 124
Default user account 48defaultProtocol, SOAP 436defining
Access Control Lists (ACLs) 173administrators 141developers 142groups 56packages 288subscribers to packages 300user accounts 47
deletingAccess Control Lists (ACLs) 174aliases for remote servers 71aliases for Web services 75groups 60packages 291ports 117subscribers to packages 303user accounts 49
Deny By Defaultaccess to services through a port 164port IP access (custom) 163port IP access (global) 160
dependency manager, enabling and disabling 433Developer
predefined user account to use 48privilege required to access server from 142user account 48
developersdefining 142defining external users as 270predefined ACL, description 172predefined group, description 55predefined user account, description 48
Developers ACL 172Developers group 55diagnostic data, description 448diagnostic port
assigning 107, 109dedicated thread pool 448description 448thread priority 449url 449
diagnostic toolurl 450watt.server.diagnostic.logperiod 450
diagnostic utilitydescription 449diagnostic_data.txt 449diagnostic_data.zip 449wm.server.admin.getDiagnosticData 449
digital certificatesSee also certificatescertificates required to validate client certificates
186client certificates for authentication 182description of use 147
464 webMethods Integration Server Administrator’s Guide Version 7.1.1

Index
obtaining certificate authority’s 150requesting 150
disabled keep-alive modeconfiguring 137description of 135
disablingguaranteed delivery for outbound requests 327packages 290ports 118users 53
displayingactive sessions 37, 63documentation for packages 287folders 334license key 62licensed session limit 63log information on screen 32membership for groups 59package information 284package subscribers 299package subscriptions 309packages 281packages residing on your server 281packages, enabled/disabled 283packages, loaded/unloaded 283scheduled service execution time 350service information 334service statistics 322services 334system task execution time 353
distribution files for packagescreating 303sending 304
DMZ, running a reverse invoke Integration Server in 220
doc subdirectory 279document history database, removing expired
entries 129, 428document processing
enforcing TTL 438increasing or decreasing threads for 372limiting threads for 379overview of managing 371rejecting locally published documents 433resuming for all triggers 375resuming for one trigger 377server threads for 371
suspending for all triggers 375suspending for one trigger 377threads, limiting 379
document retrievalincreasing or decreasing threads for 364limiting threads for 379overview of managing 363resuming for all triggers 367resuming for one trigger 369server threads for 363suspending and default client 368suspending and local publishing 368suspending for all triggers 367suspending for one trigger 369
document storesdefault
capacity 124configuring size and location 123refill level 124
outboundcapacity 128configuring size and location 127
overview 122triggers
capacity 125configuring size and location 124initial size 126location 125reducing capacity 365refill level 125
document typesremoving subscriptions on reload or reinstall 440validate when published property 434validating 434
document types, fields from substitution groups 408documentation
additional 16conventions used 15feedback 16for your packages 287
documentsenforcing TTL 438rejecting locally published 433validating on publish 434
documents, signing 202DSA encryption algorithm 206
webMethods Integration Server Administrator’s Guide Version 7.1.1 465
Index
Eemail
address for messages when guaranteed delivery fails 325, 330
ports, assigning 85SMTP server to use for messages when
guaranteed delivery fails 325, 330Enabled icon, color descriptions 283enabling
client-side queuing 127packages 290ports 119users 53
encryption algorithms 206encryption keys
expiration 214expiry accounts for 214for outbound passwords 242renewal accounts for 214updating 214
endpoint aliasesadding 72associating with a binder 74deleting 75identifying 72setting up for Web services 72updating 74
Entrust PKI proxy, installing 216epf files
creating for PKI profile 205for storing PKI profiles 200
errorssuspending triggers for 439
Event Manager 338eventcfg.bin file 338events, running services in response to 338Everybody group 55executing
replication services 338services 26services at scheduled times 339shutdown services 337startup services 337
Execution Threads Throttle property 373expired UUIDs, deleting 428expiry accounts, for encryption keys 214extended settings for VCS Integration feature 116
external directoriesaccessing users and passwords in 189considerations for user accounts and groups 267granting users access to services and files 271granting users administrator privileges 269granting users developer privileges 270how server uses 255overview 260to stop using 267uses for multiple 260
external groupsassigning administrator privileges 269assigning developer privileges 270assigning to ACLs 271how server uses 255
external user accountsassigning access to services and files 271assigning administrator privileges 269assigning developer privileges 270how server uses 255
Ffactory class, creating 192file age, for FTP LIST command 428files
controlling access to 177removing Access Control List (ACL) protection
from 179filtering packages 281firewall
configuring FTP/FTPS listerner port range 115running an internal server behind 220
flat files, sending and receiving with Trading Networks 25
flow serviceoutbound passwords 242, 416
foldersassigning Access Control List (ACLs) 176description 332listing 334
FTPaccess the directories 442port range for listener 115ports, assigning 85root directory, specifying 442
ftp client timeout 411FTP LIST command 428
466 webMethods Integration Server Administrator’s Guide Version 7.1.1
Index
FTP RETR command 428FTPS ports, adding 98full release, of a package 294functional aliases, for JDBC Connection pools 78
Ggateway. See wireless gatewaygroup name
description 54specifying for groups 54
groupsadding 56adding users to 57, 58administrator privileges 55Administrators 55Anonymous 55changing membership 59considerations when using external directories
267defining 54deleting 60developer privileges 55Developers 55externally-defined 260group name 54overview 46predefined 55privileges that can be shared 54purpose 46Replicator 56replicator privileges 56settings 54specify members of 54specify users that belong to 47viewing membership 59
guaranteed deliveryadministering 328audit-trail log for inbound transactions 327configuring 325description of 324disabling outbound transactions 327email address and SMTP server for error
notification 330email address for error notification 325handling heuristic failures 326handling restart after a failure 326inbound job store, clean up 326inbound job store, description 325
reinitializing, for inbound transactions 329reinitializing, for outbound transactions 330requests to other servers 324retry after server failure 326retry wait 328server failure 326service threads 328shutting down 328SMTP server for error notification 325specifying how long transactions active 328submitting outbound transactions 328thread pool 328
HHandheld Device Markup Language. See HDML
(Handheld Device Markup Language)HDML (Handheld Device Markup Language) 454,
457HDML pages, accessing with wireless devices 457heap size, increasing 122heuristic failures, specifying how to handle for
guaranteed delivery 326home page for packages 287hosts
allowing inbound requests 160, 163denying inbound requests 161
HSM devicesfor storing private keys 200library name 204token label 206
HTTP portsassigning 85changing to or from primary port 117
HTTP proxy serverbypass list 77configuring 75
HTTPS portsassigning 88changing to or from primary port 117
HTTPS proxy serverbypass list 77configuring 75
Iinbound client-side queuing, description of 127inbound document history, description of 126inbound vs. outbound passwords 242inner firewall, running an internal server behind 220
webMethods Integration Server Administrator’s Guide Version 7.1.1 467

Index
installingpackage published from another server 316run-time classes 402server 398services, checklist 401
Integrated Windows authenticationactivating 196deactivating 196description of 195
Integration Server. See webMethods Integration Server
Internal ACL 172interrupt trigger retry property 438IP access to ports
customizing for individual ports 162setting globally 159
IS services. See services
JJava services
adding to server manually 336specifying compiler command 422
java.transaction.Status interface for XA transactions 390
java.transaction.xa.Xid interface for XA transactions 390
JDK, specifying non-default one to use with server 422
job storefor inbound guaranteed delivery transactions 325how long outbound transactions active 328removing expired inbound transactions 326submitting outbound transactions 328
JTA specification for XA transactions 390JVM
checking version when copying a package 297using 64-bit on Solaris and HP-UX systems 81
Kkeep-alive messages
idle time 421limit 421response time 421
keep-alive modeconfiguring disabled mode 137configuring listen only mode 136configuring normal mode 136definition of 134
disabled mode 135keep alive period (duration) 421listen only mode 135maximum response property 421normal mode 135response time (max response time) 421retry limit (retryCount) 421server parameters for 136
key pair used for SSLdescription 149obtaining 149
keys, encryptionexpiration 214PKI profile 206updating 214used for outbound passwords 242
Llabel
HSM device token 206viewing slot information 210
LDAPaccessing users and passwords in 189assigning groups to ACLs 271configuration settings 262considerations for user accounts and groups 267directory for use with PKI authority 203granting users access to services and files 271granting users administrator privileges 269granting users developer privileges 270how server uses 255uses for multiple directories 260
library name, for HSM device 204license keys
changing 62description 62licensed sessions 63renewal reminders 63renewing 63viewing 62viewing licensed session limit 63viewing number of active sessions 63when session limit reached 63
listen only keep-alive modeconfiguring 136description of 135
listeners. See ports
468 webMethods Integration Server Administrator’s Guide Version 7.1.1

Index
listingactive sessions 37folders 334log information on screen 32packages residing on your server 281services 334
Loaded? icon, color descriptions 283loading packages 289local document publishing
enforcing TTL 438rejecting when trigger queue is full 433
LOCKFILE, during safe mode startup 451locking
best practices 359choosing local or VCS 356disabling and enabling 356
locking mode, setting 433locking out users 53logging
overview 28write to temporary or permanent storage 420writing log to screen 32
logging in, PKI profile 208
Mmanaging XA transactions 388manifest file, for packages 279master password (for outbound passwords)
changing 244description 242file name and location 247resetting when lost or corrupted 250
Maximum Documents to Send per Transaction property 127
maximum retry period, for services 429Maximum Threads property
for document processing 379for document retrieval 379
maxPersist parameter 128Metadata Library 82MTOM Threshold, SOAP 436
Nnaming services 332native Broker events
bypassing decoding for trigger services 438checking for $brokerEvent objects 434disabling document validation 434
NIC, specifying which one server is to listen on for incoming requests 429
normal keep-alive modeconfiguring 136description of 135
ns subdirectory 279
Ooutbound document store
capacity 128, 423configuring 127defined 122disabling use of 434emptying 127maxPersist parameter 128setting transaction limit 127
outbound passwordsdefinition 242encryption method, changing 246expiration interval, changing 244file name and location 246flow service 242, 416internal vs. public 416management 243master password, changing 244master password, description 242master password, file name and location 247name or location of master password file,
changing 247name or location of outbound passwords file,
changing 246passman.props file, definition 245resetting when master password is lost or
corrupted 250vs. inbound 242
Ppackages
ACL for package replication 172activating 289archiving 292canceling subscriptions to 315code subdirectory 278controlling access 290copying 292copying to another server 292creating 288cutting 292
webMethods Integration Server Administrator’s Guide Version 7.1.1 469

Index
deleting 291description 274directory structure 277disabling 290doc subdirectory 279documentation for 287Enabled icon color descriptions 283enabling 290filtering the list 281full vs. patch release 294home page 287information you can view 280installing published package 316List, filtering 281Loaded? icon color descriptions 283location 277making available 290manifest file 279moving 292ns subdirectory 279package replication group 56package replication guidelines 298partial release 294pasting 292predefined 275prohibiting access to 290pub subdirectory 279publishing to other servers 303recovering 291release 293reloading 289
effect on trigger subscriptions 440replicating 292, 303residing on your server 281resources subdirectory 279retrieving automatically 308retrieving manually 308safe delete 291sample services 277status, enabled/disabled 283status, loaded/unloaded 283subscribing to 310subscriptions to 309tasks you can perform 288templates subdirectory 279updating
effect on trigger subscriptions 440user account for package replication 48
viewing information about 284web subdirectory 279who can subscribe to 298
partial release, of a package 294passive FTP/FTPS listeners, port range for 115passman.props file, definition 245passwords
See also Outbound Passwordschanging 50, 51creating for PKI profile 205description 47inbound vs. outbound 242predefined Administrator user account 19requirements 50rules for PKI profiles 217specifying in user accounts 47
patch release, of a package 294PBE (Password-Based encryption), used for
outbound passwords 242persistent storage, for logging 420pipeline Broker events
bypassing decoding for trigger services 438checking for $brokerEvent objects 434disabling document validation 434
PKCS#5, encryption used for outbound passwords 242
PKI authorityLDAP directory 203url of 203
PKI profile aliasescreating 207deleting 209viewing information about 210
PKI profilesassigning passwords 205authorization code 211auxiliary 206, 212changing location of 215changing password 213creating 204, 205creating .epf file 205decription 200deleting 209deleting aliases 209determining whether logged in 211exporting 215key pair algorithm 206key strength 206
470 webMethods Integration Server Administrator’s Guide Version 7.1.1
Index
location 207password rules 217reference number 211viewing information about 210WmPKI package 201
PKI proxydescription 200installing 216
PKI systemconfiguring settings 202connecting server to 203, 208
PKIXCMP messages, routing through proxy 200pluggable module
as alternate authentication processor 189customizing authentication with 189
port queue size, lowering for AS/400 433ports
adding 85adding a security provider 119configuring 84controlling access to services through 158, 164controlling SSL security level of 156deleting 117Deny By Default access to services 164disabling 118editing 118email client configuration 103enabling 119FTP 101FTPS 98HTTP 85HTTPS 88overview 22primary, changing 117reasons to add additional 85reasons to change primary 117resetting access to 166
ports, listeningadding additional 85changing primary 117configuring 84deleting 117Deny By Default access to services 164disabling 118enabling 119overview 22port range, specifying for FTP/FTPS 115
reasons to change primary 117resetting access to 166
preprocess errors, for triggers 439preventing
access to packages 290hosts that can connect to server 161use of ports 118
private keys, storing on HSM devices 200private/public key pair used for SSL
description 149obtaining 149
privilegesadministrator, description 141administrator, granting 141administrator, granting when using external
directory 269developer, description 142developer, granting 142developer, granting when using external directory
270replicator 56shared between groups 54
profile aliases, creating 207profiles, PKI 200
auxiliary 206changing 213creating 204, 205location 207
program code conventions in this document 15protocols
email (SMTP) 84FTP 84HTTP 84HTTPS 84
proxy porton reverse invoke Integration Server, definition
221web directive 167
proxy serversbypassing 77configuring 75installing PKI 216overview 25PKI 200
pub subdirectory 279pub.pki services 201, 202
webMethods Integration Server Administrator’s Guide Version 7.1.1 471

Index
pub.trigger servicesresumeProcessing 378resumeRetrieval 370suspendProcessing 378suspendRetrieval 370
published documents, maximum published at one time 423
publishing packagescreating the distribution file 303guidelines 298how to 303identifying recipients (subscribers) 300installing published package 316removing recipients (subscribers) 303requesting subscriptions 310sending the distribution file 304sending the release 304updating subscriber information 301who can publish 298who can subscribe 298
publishing serverscreating package distribution file 303displaying subscribers 299publishing packages 303sending package release 304tasks 299who can publish 298
publishing servicesblocking 423maximum published documents 423
pulling a packageautomatically 308manually 308
QQueue Capacity Throttle, definition of 365
Rreaper interval, for document history database 428receiving administrator messages 19recovering packages 291refill level
default document store 124definition of 365reducing for trigger queues 365trigger document store 125
Registration Authorityobtaining replacement activation codes from 211supplier of certificate activation codes 204, 205
registration port, on reverse invoke Integration Server 221
reinitializingguaranteed delivery for inbound transactions 329guaranteed delivery for outbound transactions
330releases (packages)
creating 303full vs. patch 294sending 293, 304
reloading packages 289remote servers, identifying aliases 68Remove Expired Document History Entries link 129removing
Access Control Lists (ACLs) 174Access Control Lists (ACLs) from services 177expired document history entries 428groups 60packages 291ports 117scheduled execution of service 352subscribers to packages 303user accounts 49
renewal accounts, for encryption keys 214renewing license key 63replicating packages
ACL 172group 56guidelines 298how to 303overview 293publisher tasks 299Replicator user account 299Replicators ACL 299Replicators group 299requesting subscriptions to packages 310subscriber tasks 308user account 48who can subscribe 298
replication services, description 338Replicator user account 48Replicators ACL 172Replicators group 56
472 webMethods Integration Server Administrator’s Guide Version 7.1.1

Index
resettingaccess to ports 166cache for all services 322cache for single service 322
resolving uncompleted XA transactions 389resource monitoring service, execution interval 439restarting
guaranteed delivery for inbound transactions 329guaranteed delivery for outbound transactions
330reasons for restarting server 38server 38
restrictingaccess to Server Administrator 141access to server from Developer 142access to services and files 168access to services by port 158, 164hosts that can connect to server 160, 163
resuming scheduled execution of service 352retries, interrupting for shut down 438retry guaranteed delivery 326reverse invoke
overview 220when clustering 222
roleof administrator 18of webMethods Integration Server 22
round robin method, in reverse invoke configuration 221
RSA encryption algorithm 206run-time classes, installing 402
Ssafe mode
automatic 451description 450starting Integration Server in 451
schedulerserver thread allotment 65
scheduling execution of services 351canceling scheduled user task 352changing scheduled times 350description 339examples of complex scheduling options 341,
342execute one time 340how often to execute 339resuming scheduled user task 352
system tasks 339user tasks 339viewing scheduled times 350viewing when system tasks execute 353
screensemail client configuration 103
Secure Sockets Layer (SSL)background information 146certificate signing request (CSR) 150checklist to implement 148, 154client certificates 182configuring server to use 151controlling security level by port 156how server uses 146information required to implement 149information required to use client certificates 186obtaining certificate authority’s certificate 150obtaining private/public key pair 149private key pair 149requesting digital certificate 150use of certificates 147use of digital certificates 147
securitychecklist 403checklist to implement SSL 148, 154controlling access to services and files 168controlling access to services by port 158, 164controlling SSL security level by port 156controlling who can configure the server 141controlling who can develop services 142information required to implement SSL 149overview 27, 140securing server communications 146
security provideradding 119
sendingdistribution files 304releases 304
sending and receiving flat filesvia Trading Networks 25
server. See webMethods Integration ServerServer Administrator
controlling access to 141description 19, 42how to use 43picture of 43starting 42
webMethods Integration Server Administrator’s Guide Version 7.1.1 473
Index
server logmessage format 409
server resources 79server security. See securityserver thread pool
document retrieval threads 379limiting thread usage 379maximum threads 64minimum threads 64sizing 79trigger execution threads 379warning level 64
server threadsfor document processing 371for document retrieval 363for trigger execution 371
server.cnfdescription of settings 408guaranteed delivery settings 325how to set configuration settings 44location 408updating from Server Administrator 79
servicesAccess Control Lists (ACLs) usage 175ACL used when no assigned ACL 172, 176assigning Access Control Lists (ACLs) to 176caching results, overview 320caching service results, overview 28canceling scheduled user task 352changing scheduled times of execution 350controlling access to 168controlling access to by port 158, 164controlling who can access 168controlling who can develop 142deleting its Access Control List (ACL) 175denying access to external users 271execution overview 26fully-qualified names 332granting access to external users 271guaranteeing delivery of requests to server 324guaranteeing delivery of responses from services
324guidelines for using startup/shutdown/replication
338information to schedule user tasks 339invoking with URLs 456listing 334manually adding to server 336
maximum retry period 429naming 332overview 332pub.pki 201, 202removing Access Control Lists (ACLs) from 177replication 338replication services execution 338resetting cache for all services 322resetting cache for single service 322resuming scheduled user task 352retrieving data for 25running in response to specific events 338samples in WmSamples 277scheduling execution 339shutdown 337shutdown service execution 337startup 337startup service execution 337suspending scheduled user task 351tasks you can perform 336testing 336user account for invoking trigger services 128viewing information about 334viewing scheduled times of execution 350viewing service statistics 322viewing when system tasks execute 353
sessionsinactive sessions 65maximum number allowed per license 63stopping all 37timeout limit 65viewing 37
sessions, licensedlimit 63viewing active 63viewing limit 63
shared-state client, keep-alive mode 134shutdown services
description 337guidelines for use 338
shutting downguaranteed delivery 328server with restart 38webMethods Integration Server 37
sizingdefault document store 123server thread pool 79trigger document store 124
474 webMethods Integration Server Administrator’s Guide Version 7.1.1

Index
SMTP address for messages when guaranteed delivery fails 325
SMTP ports, assigning 85SMTP server, specifying for error messages
generated during guaranteed delivery processing 330
SOAP, defaultProtocol 436SOAP, MTOMThreshold 436specifications, viewing information about 334SSL. See Secure Sockets Layer (SSL)starting
command line parameters 31diagnosing problems with startup 450guaranteed delivery for inbound transactions 329guaranteed delivery for outbound transactions
330Server Administrator 42server from command line 31server on UNIX 30server on Windows 30server, overriding configuration settings 31server, process 36
startup servicesdescription 337guidelines for use 338
stoppingactive sessions 37server 37server with restart 38use of external directories 267
store locationdefault document store 123master password for outbound passwords 247outbound passwords 246trigger document store 125XA recovery store 394
subscribing serverscanceling subscriptions 315displaying 299identifying 300installing published package 316removing 303requesting subscriptions 310tasks 308updating information for 301, 313who can subscribe 298
subscribing to packagesdisplaying current subscriptions 309guidelines 298how to 310manually pulling current subscriptions 309updating subscription information 313who can subscribe 298
subscriptionscanceling 315displaying 309installing published package 316pulling 309requesting from a remote server 310
substitution groups, schema 408suspending
document processing for triggers 375, 377document retrieval for triggers 367, 369scheduled execution of service 351scheduled user task 351
sweep interval, ftp sessions 412synchronization, and dependency manager 433synchronizing, trigger management changes 380system tasks
description 339viewing scheduled execution 353
Ttemplates subdirectory 279temporary storage, for logging 420territories, switching for Integration Server 134testing
connection to remote servers 71installation of server 404services 336
thread dump, generating 452thread pool
limiting server thread usage 379scheduler 65server 79warning threshold 64
threadsfor document processing 372, 379for document retrieval 363, 379
threshold, server thread availability 64throttle controls
Execution Threads Throttle 373Queue Capacity Throttle 365
webMethods Integration Server Administrator’s Guide Version 7.1.1 475
Index
time to live (TTL), specifying for guaranteed delivery 328
timeout limits, for sessions 65token, label 206Trading Networks, sending flat files to 25transaction logs
inbound guaranteed delivery transactions 327transaction management (XA) 388trigger
removing subscriptions 440trigger document store
capacity 125configuring 124decription 122initial size 126location 125reducing capacity 365refill level 125
triggerscluster synchronization 380
configuring 381log messages for 381monitoring 383
concurrent, reducing execution threads 373deleting document type subscriptions 440document processing
concurrent trigger execution threads 373limiting threads 379overview 371rejecting when queue is full 433resuming for all triggers 375resuming for one trigger 377suspending for all triggers 375suspending for one trigger 377thread usage 371, 372
document retrievaloverview 363resuming for all triggers 367resuming for one trigger 369suspending for all triggers 367suspending for one trigger 369thread usage 363
editing properties 384interrupting retries 438monitoring interval 439queue capacity, reducung 365refill level, reducing 365resuming all document processing 375
resuming document processing 375, 377resuming document retrieval 367, 369retrying on error 439reuse sessions 441shut down requests 438specifying user account 128suspending on error 439throttle controls
Execution Threads Throttle 373Queue Capacity Throttle 365
troubleshooting information 16trusted certificates
configuring the server to use SSL 152for PKI profile 207
tspacelocation 441maximum bytes 441
TTL (time to live), specifying for guaranteed delivery 328
two-phase commit for XA transactions 388typographical conventions in this document 15
Uunauthenticated users, predefined group description
55UNIX, starting webMethods Integration Server 30updating
Access Control Lists (ACLs) 174aliases for remote servers 71aliases for Web services 74license key 62membership for groups 59subscriber information 301subscription information 313when services scheduled to execute 350
URLsaccessing the server with 456invoking services with 456using to access HDML or WML pages 457
user accountsaccount to configure and manage server 48account to use when connecting from Developer
48adding 48Administrator 19considerations when using external directories
267deleting 49
476 webMethods Integration Server Administrator’s Guide Version 7.1.1
Index
description 47externally-defined 260group membership 47overview 46password 47predefined 48purpose 46settings 47trigger service execution 128user name 47using to authenticate (basic) 188using to authenticate with Integrated Windows
authentication 195when client does not supply a user name 48
user nameexternally-defined 260specifying in user account 47using to authenticate (basic) 188using to authenticate with Integrated Windows
authentication 195user tasks
canceling scheduled execution 352changing when scheduled to execute 350examples of complex scheduling options 341,
342information to schedule services 339resuming scheduled execution 352schedule to execute one time 340suspending scheduled execution 351viewing when scheduled to execute 350
userFtpRootDir property 442users
authenticating 182disabling 52, 53enabling 52, 53locking out 52
VValidate when published property 434version control, enabling locking for 433versions, checking when a package is copied 297viewing
active sessions 37, 63documentation for packages 287folders 334license key 62licensed session limit 63membership for groups 59
package information 284package subscriptions 309packages 281packages residing on your server 281service information 334service statistics 322services 334subscribers to packages 299when services scheduled to execute 350when system tasks execute 353whether packages are enabled/disabled 283whether packages are loaded/unloaded 283
WWAP gateway. See wireless gatewaywarning threshold, server thread availabliity 64watt 427watt.core.schema.generateSubstitutionGroups 408watt.core.validation.multipleroot 408watt.debug.layout 409watt.debug.level 409watt.debug.logfile 327, 410watt.debug2.facList 410watt.debug2.logstringfile 410watt.net.email.validateHost 411watt.net.ftpClientDataConnTimeout 411watt.net.ftpClientTimeout 411watt.net.ftpConnTimeout 411watt.net.ftpPassiveLocalAddr 411watt.net.ftpPassivePort.max 115, 412watt.net.ftpPassivePort.min 115, 412watt.net.ftpSweepInterval 412watt.net.ftpUseCertMap 412watt.net.httpChunkSize 413watt.net.maxClientKeepaliveConns 413watt.net.maxRedirects 413watt.net.proxyHost 413watt.net.proxyPass 413watt.net.proxyPort 413watt.net.proxySkipList 413watt.net.proxyUser 414watt.net.retries 414watt.net.secureProxyHost 414watt.net.secureProxyPass 414watt.net.secureProxyPort 414watt.net.secureProxyUser 414watt.net.ssl.client.hostnameverification 414watt.net.ssl.client.strongcipheronly 414
webMethods Integration Server Administrator’s Guide Version 7.1.1 477
Index
watt.net.ssl.server.clientHandshakeTimeout 414watt.net.ssl.server.strongcipheronly 415watt.net.timeout 415watt.net.useCookies 415watt.net.userAgent 415watt.net.webapp.cookies.useRelevantPath 415watt.security.caCert 416watt.security.CADir 416watt.security.cert.wmChainVerifier.trustByDefault
416watt.security.fips.mode 416watt.security.ope.AllowInternalPasswordAccess
416watt.security.pki.jnditimeout 417watt.security.privateKey 417watt.security.signedCert 417watt.security.ssl.cacheClientSessions 417watt.security.ssl.ignoreExpiredChains 417watt.security.ssl.keypurposeverification 417watt.server 418watt.server.allowDirective 418watt.server.auditDBSize 418watt.server.auditDir 418watt.server.auditDocIdField 418watt.server.auditFetchSize 419watt.server.auditGuaranteed 419watt.server.auditLog 419watt.server.auditLog.error 419watt.server.auditLog.gd 419watt.server.auditLog.session 419watt.server.auditMaxPool 419watt.server.auditMinPool 419watt.server.auditRetryCount 420watt.server.auditSync 420watt.server.auditThreshold 420watt.server.broker.producer.multiclient 420watt.server.broker.replyConsumer.fetchSize 420watt.server.broker.replyConsumer.multiclient 420watt.server.broker.replyConsumer.sweeperInterval
420watt.server.brokerTransport.dur 136, 421watt.server.brokerTransport.max 136, 421watt.server.brokerTransport.ret 136, 421watt.server.cache.flushMins 421watt.server.cache.gcMins 421watt.server.cache.isPersistent 421watt.server.clientTimeout 422watt.server.cluster.aliasList 422
watt.server.cluster.aware 422watt.server.cluster.cacheName 422watt.server.cluster.SessTimeout 422watt.server.compile 422watt.server.compile.unicode 422watt.server.control.controlledDeliverToTriggers 422watt.server.control.maxPersist 128, 423watt.server.control.maxPublishOnSuccess 423watt.server.cron.maxThreads 423watt.server.cron.minThreads 423watt.server.date.suppressPatternError 424watt.server.dateStampFmt 423watt.server.db.blocktimeout 424watt.server.db.connectionCache 424watt.server.db.maintainminimum 425watt.server.db.testSQL 425watt.server.diagnostic.logperiod 425, 450watt.server.dispatcher.join.reaperDelay 426watt.server.email.from 426watt.server.errorMail 426watt.server.event.audit.async 426watt.server.event.exception.async 426watt.server.event.gd.async 426watt.server.event.jmsRetrievalError.async 427watt.server.event.replication.async 427watt.server.event.security.async 427watt.server.event.session.async 427watt.server.event.stat.async 427watt.server.event.tx.async 427watt.server.extendedMessages 431watt.server.fileEncoding 427watt.server.ftp.listingFileAge 428watt.server.ftp.usecommandip 428watt.server.hostAccessMode 428watt.server.hostAllow 428watt.server.hostDeny 428watt.server.idr.reaperInterval 428watt.server.illegalNSChars 429watt.server.inetaddress 429watt.server.invoke.maxRetryPeriod 429watt.server.java.unicode 429watt.server.jca.transaction.recoverOnEnlist 430watt.server.jca.transaction.rollbackOnWriteFailure
395, 430watt.server.jca.transaction.writeRecoveryRecord
393watt.server.jdbc.defaultDriver 430watt.server.jdbc.driverList 430
478 webMethods Integration Server Administrator’s Guide Version 7.1.1
Index
watt.server.jms.wmjms.lms.readTimeout 430watt.server.keepAliveTimeout 430watt.server.key 431watt.server.ldap.doNotBind 191, 431watt.server.ldap.extendedProps 431watt.server.ldap.memberInfoInGroups 431watt.server.ldap.retryCount 432watt.server.ldap.retryWait 432watt.server.licenses 432watt.server.log.maxEntries 432watt.server.log.queued 432watt.server.log.refreshInterval 432watt.server.noAccessURL 432watt.server.noObjectURL 432watt.server.ns.backupNode 433watt.server.ns.dependencyManager 433watt.server.ns.lockingMode 433watt.server.oldkey 432watt.server.port 433watt.server.portQueue 433watt.server.publish.local.rejectOOS 433watt.server.publish.useCSQ 434watt.server.publish.usePipelineBrokerEvent 434watt.server.publish.validateOnIS 434watt.server.requestCerts 435watt.server.revInvoke.proxyMapUserCert 435watt.server.scheduler.maxWait 435watt.server.scheduler.threadThrottle 435watt.server.securePort 435watt.server.serverlogQueueSize 435watt.server.serviceMail 436watt.server.smtpServer 325, 436watt.server.smtpServerPort 436watt.server.SOAP.defaultProtocol 436watt.server.SOAP.MTOMThreshold 436watt.server.stats.avgTime 436watt.server.stats.logfile 436watt.server.stats.pollTime 436, 437watt.server.storage.lock.maxDuration 437watt.server.strictAccessExceptionLogging 437watt.server.sync.timeout 437watt.server.threadPool 437watt.server.threadPoolMin 437watt.server.transaction.recovery.abandonTimeout
394, 437watt.server.transaction.recovery.sleepInterval 394,
437watt.server.trigger.interruptRetryOnShutdown 438
watt.server.trigger.keepAsBrokerEvent 438watt.server.trigger.local.checkTTL 438watt.server.trigger.managementUI.excludeList 439watt.server.trigger.monitoringInterval 439watt.server.trigger.preprocess.suspendAndRetryOn
Error 439watt.server.trigger.removeSubscriptionOnReloadOr
Reinstall 440watt.server.trigger.reuseSession 441watt.server.tspace.location 441watt.server.tspace.max 441watt.server.tx.cluster.lockBreakSecs 442watt.server.tx.cluster.lockTimeoutMillis 442watt.server.tx.heuristicFailRetry 326, 442watt.server.tx.logfile 327watt.server.tx.sweepTime 326, 442watt.server.txMail 325, 442watt.server.userFtpRootDir 442watt.server.users.listWmOnly 443watt.server.wsdl.enforceSOAPMsgPartNS 443watt.sever.event.jmsDeliveryError.async 426watt.tx.defaultTTLMins 328, 444watt.tx.disabled 327, 444watt.tx.jobThreads 328, 444watt.tx.retryBackoff 328watt.tx.retryBackoffTime 444watt.tx.sweepTime 328, 444watt.xslt.debug.facList 445watt.xslt.debug.level 445watt.xslt.debug.logfile 445watt.xslt.jaxp.properties 445web directive, using with proxy port 167Web services
adding endpoint aliases 72associating an endpoint alias with a binder 74endpoint aliases
deleting 75updating 74
identifying endpoint aliases 72setting up endpoint aliases 72
web subdirectory 279webMethods Integration Server
accessing with URLs 456architecture 22audit-trail logging, overview 28client authentication 182client groups, switching 133client prefix 133
webMethods Integration Server Administrator’s Guide Version 7.1.1 479
Index
configuration settings 408configuring 61debug mode 31deploying 398determining if running 36how SSL is used 146identify hosts that can connect 160, 163installing 398license keys 62overview 22preventing use of port 118process for executing services 26process when starting 36recovery after hardware or software failure 38rejecting connections from specified hosts 161requesting digital certificate 150restarting 38retrieving data for services 25role 22running as a Windows service 34security overview 27, 140setting up aliases for remote servers 68setting up aliases for Web services 72setting up multiple Integration Servers to run as
NT services 35shutting down 37starting from command line 31starting on UNIX 30territories, switching 134testing installation 404using with wireless gateways 454when to restart 38wireless devices, communicating with 454wireless devices, using with 454
Windows authentication, See Integrated Windows authentication
wireless devicescommunicating with webMethods Integration
Server 454invoking services with URLs 456requesting HDML or WML pages 457using URLs to access servers 456using with webMethods Integration Server 454
wireless gateway, role in wireless communication 454
Wireless Markup Language. See WML (Wireless Markup Language)
wm.server.admingetDiagnosticData 449
wm.server.dispatcher:deleteExpiredUUID service 129, 428
WML (Wireless Markup Language) 454, 457WML pages, accessing with wireless devices 457WmPKI package, for use with PKI profiles 201WmSamples package, description 277
XXA recovery store 388
configuring 394description 388initial size 394location 394
XA transactionsdeleting unresolved 395disabling recovery 393effect on Integration Server performance 389enabling recovery 393errors during manual recovery 396JTA specification 390management 388resolving uncompleted transactions automatically
389resolving uncompleted transactions manually 395setting action to take when status not stored 395,
430setting retry period for automatic resolution 394,
437setting time limit for automatic resolution 394, 437uncompleted transactions Integration Server
cannot resolve 390XA interface 388XIDs 390
XIDs 388, 390
Zzip files for packages
creating 303sending 304
480 webMethods Integration Server Administrator’s Guide Version 7.1.1