6wrqh - acstone.com
TRANSCRIPT

Page 1
����������������Poly Stone®

Page 2
Table of ContentsChapter One: Introduction to Poly Stone™................1
Poly Stone UsesColors (Cross Reference Charts)Custom Colors
Chapter Two: Spray Equipment and Instructions.....3
Chapter Three: Matrix..................................................11
Chapter Four: Molds ..................................................12In-moldPost MoldSeaming
Chapter Five: Gel Coat and Resins...........................14
Chapter Six: Back Coats and Back Fills.................. 15
Chapter Seven: Care and Maintenance.......................16
Chapter Eight: Trouble Shooting................................17
Appendix: Supplemental Information................. 23Catalyst ChartMaterial Safety Data SheetGlossary of TermsPoly Stone to Acrybond Color Cross Reference Chart
•••
•••
••••
4775 S. Third Avenue, Tucson, AZ 85714Tel: 520-889-1933 or 800-669-9214 Fax: 520-889-6782Web: www.acstone.com E-mail: [email protected]

Page 3
Poly Stone surfacing can dramatically enhance almost any surface with spectacular granite colors and textures. Designed for use in solid surface kitchen counter tops, bath room vanities, shower surrounds, wall panels, fiberglass products, furnishings, and many other applications, Poly Stone has almost unlimited application potential.
Using the finest raw materials under a patented process (Patent No. 5,588,599) exclusively owned by ACS International, Inc., Poly Stone granules are a polyester compound, incorporating pure alumina tri-hydtrate into the particle. Poly Stone is UV resistant and fire resistant. Poly Stone granules are virtually dust free, typically having less than 2% fines and have a specific gravity of 1.7 g/cc. Poly Stone particles may be used to cast solid surface, cast cultured granite, spray solid surface, spray cultured granite or in a variety of fiberglass applications. Poly Stone may also be used in specialty operations like Bulk Molding Compounds (BMC) or Sheet Mold Compounds (SMC). ACS makes hundreds of custom colors for a small minimum order.
Our commitment to offering high quality, innovative products that use the latest technology in the industry, results in products of unsurpassed beauty and durability. Whatever your applications, Poly Stone is certain to enhance its cosmetic appeal.
Solid Surface CastingUse Poly Stone particles to make solid surface sheets, shaped goods, or sinks. Simply combine by weight 20% Poly Stone to 80% Alumina Tri-hydrate powder to make your dry side component.
Cultured Granite CastingCultured granites can easily be made by adding Poly Stone at a ten to twenty percent by weight ratio to your calcium carbonate (marble filler) to make your dry side component. Then add polyester resin at a 70 percent filler and 30 percent resin ratio.
Solid Surface Spray ProductsSolid surface sprayable granite products can easily be manufactured by mixing Poly Stone granules with solid surface sprayable resin or gel coat.
Spray Cultured Granite ProductsPoly Stone may be wet or dry sprayed with or without a clear gel coat layer in the mold. Most manufacturers will add 25 to 30 percent Poly Stone (on a weight basis) to their clear gel coat and then wet spray into the mold. Fiberglass reinforced products such as trash cans, restaurant seating and table tops are excellent uses for Poly Stone.Poly Stone Standard Color Selection
Name Color CodeAtlantis PSLC 512Aurora PSC 402Beach PSC 403Blossom PSLC 511Burnt Amber PS 030Canyon PSLC 471Coal PS 200Cappuccino PSLS 219Dune PS 060Eclipse PSC 406Ecru PSS 314Edelweiss PS 602Emerald PS 120Europa PSLC 515Everest PSLC 462Fashion Gray PSS 310Forest PS 080Garnet PS 230Ironwood PSLC 500Kilimanjaro PSC 463Kodiak PSLC 505Kona PSLC 509Lace PSS 301Lapis PSLC 503Magma PS 601Malachite PSC 409Matterhorn PSLC 464Mesquite PSLC 502Mont Blanc PSLC 465Ocean PS 170Obsidian PSLC 508Outback PSLC 510Pebble PS 070Pecan PSLC 514Persia PSLC 504Pepper Ivory PSLC 466Ramses PSLC 506Sahara PSLC 486Sand PSS 302Shimmer PSLC 501Silkstone PSLC 513Snow PS 130Steel Gray PS 150Tan PSS 312Terracotta PSS 307Tigris PSLC 507Vanilla PSS 326Ventana PSLC 516
Poly Stone Custom ColorsCustom colors are available by special order. Please contact ACS directly at 520-889-1933 or toll free 800-669-9214.
Chapter One: Introduction to Poly StoneTM

Page 4
Poly Stone™ Coverage Ratings
Example: To spray one 60” by 60” panel and two panels that are 30” by 60”, all at 50 mils. How much Poly Stone would be needed and how much gel coat is needed?
Answer: 60 inches = 5 ft; 5 ft. x 5 ft. = 25 square feet 30 inches = 2.5 ft; 2.5 ft. x 5 ft. = 12.5 ft. square ft. x 2 panels = 25 ft2 Now go to the chart at 50 mils. 0.45 lbs per sq. ft. are needed. 0.45 lbs. x 50 ft2 (25 + 25) = 22.5 lbs. of mix, 5.63 pounds of Poly Stone, and 16.87 pounds of gel coat

Page 5
Spray equipment is available from many manufacturers. Some spray systems are designed as either a dry or a wet application type. Dry means that the Poly Stone is sprayed into a wet gel coat and then covered with more wet gel coat. The dry spray system is comparable to a stream of powder similar to a low pressure sand blaster.
Most spray operations use the wet system, which means the Poly Stone (25% by weight) and the gel coat (75% by weight) is mixed prior to spraying and applied conjunctively. ACS International does not endorse any specific equipment. Nevertheless, the spray equipment options mentioned below are based on commonly used brands and models. ACS International invites any supplier, manufacturer or fabricator that successfully uses/offers any other spray equipment, to please contact ACS to be added to this list of options.
Cup GunThe cup gun is the basic type of spray equipment available (figure 2a shows the G100-6) and is the least expensive option. Operating on the Venturi system, the cup gun functions like a hot-pot set-up, requiring the Poly Stone/gel coat mix to be catalyzed (initiated) in the cup, and then sprayed. Most cup guns use a 32 ounce cup, spraying an average of approximately 800 grams of Poly Stone/gel coat mix. This covers approximately 6.5 square feet at 25-35 mils—not counting over-spray or other losses.
A disadvantage of the cup gun is the small area that one cup will cover. Sprayers are required to have several cups in line with catalyst (initiator) aside and ready to be combined, stirred, and sprayed. The cup gun is designed ideally for start-ups, small jobs, custom shops and hobbyists. Cup guns are
manufactured by ES Manufacturing (www.esmfg.
Chapter Two: Poly Stone™ Spraying and Equipmentcom) and Poly Craft (Binks®). The cost for a cup gun is approximately USD$150.
Additional information to note when using a cup gun:A #8 or 9 tip should be usedAn air intake hole should be drilled out on the metal cap—1/16” to 1/8”
Dry Spray SystemThe basic dry spray system is a step up from the cup gun method (see figure 2b). It is recommended that a film (10-20 mils) of gel coat be sprayed onto the mold prior to spraying the dry Poly Stone mix onto the wet film of gel coat. This initial layer of gel coat achieves a finished part with a surface containing no dry spots or porosity. Once the mold is appropriately covered with Poly Stone, another film of gel coat should be sprayed on top of the dry Poly Stone to wet-out the product.
The dry spray system covers a greater square footage than the cup gun. Two application methods that are used are:
Allow the dry spray to settle into the initial gel coat film, then blow off the excessStrap dry spray nozzle onto gel coat nozzle, creating a second application which includes both dry Poly Stone and gel coat sprayed simultaneously.
Two disputable disadvantages of this system are that it tends to entrap more air and the fact that Poly Stone tends to perform better when allowed to soak in gel coat for two hours or more prior to applying. Generally, the dry system is an appropriate system for small shops that require a higher production capacity than a cup gun and that uses many colors. Dry spray systems are manufactured by ES Manufacturing (www.esmfg.com) or Magnum Industries (727-573-2955). The cost for a dry spray system is approximately USD $550.
••
1.
2.
Figure 2a: G100-6 Cup Gun. Figure 2b: DSA-150-V25C dray spray system.

Page 6
For a variety of spray systems and accessories, Troescher Company offers sales and service (contact information below). Systems offered by Troescher include a Binks 7N® with unique modifications, allowing for the ability to spray granite. The Binks 7N system is based on a liquid pressure pot tank containing the Poly Stone and gel coat mixture on one intake line going to the gun. A catalyst (initiator) tank is attached on another intake line going to the gun. The functional aspect of the Binks pot system is that components can be added or subtracted, resulting in either a simple hot pot system, to a complex air-assist system. Using a 10 gallon system that allows placing a mixed matrix 5 gallon bucket inside the pressure pot is recommended. For more information contact Craig Troescher at 513-271-5700 or [email protected].
Wet Spray SystemsLarge capacity wet spray pump systems deliver high volumes of Poly Stone mixed with gel coat and catalyst (see figure 2d). These systems are designed with either an internal static catalyst mixing system or external fans (catalyst and gel coat) mixing system.
Such systems allow for high part volume as on a production line or large custom shop. A higher skill level and understanding are necessary to operate these systems to ensure speed and quality.
In order to function properly, wet spray systems require routine cleaning and maintenance. Manufacturers for these spray systems include Venus Magnum at www.venusmagnum.com/products-b.htm, RimCraft Technologies at www.rimcraft.com (offers large chip spray systems). This level of spray equipment cost ranges from USD$4,500 to $6,500.
Figure 2c: Binks 7N spray gun.
Figure 2d: Mil gauge.
Spraying without Gel CoatUsing Poly Stone in applications without a clear gel coat is preferred by many fabricators. In such cases, proper care must be taken to ensure that a quality gel coat or resin that is designed for use as a spray solid surface be used.
For more information on spray-able resins and gel coats, see chapter five.
Supplemental EquipmentA mil gauge is an inexpensive (often times obtained from manufacturers free of charge) tool that allows for quick, easy measuring of gel coat and Poly Stone thickness (see figure 2d).

Page 7
STEP 1
STEP 2
Mold Assembly
Measure and number mold bars to ensure proper placement.
See the proceeding chapter for other examples of molds that can be used with Poly Stone.
Image to the left is an example of mold bar assembly.
•
•
•
Secure Mold
Once mold sections are in order, use double sided tape and tempered glass to set-up mold bars.
Apply mold release and make sure the glass is level and on a stable platform.
Image shown, illustrates mold on tempered glass surface.
•
•
•
External Mold Bar Taping
To secure mold form, tape corners of mold bars to avoid bar separation caused by weight of matrix.
Images to the left illustrate tape location on mold bars.
•
•
STEP 3

Page 8
Measurement
Resin: Measure by weight, pouring resin first, filler second.
Typical ratio is 25% Poly Stone, 75% Gel Coat
PLEASE NOTE: Gel coat properties (viscosity and shop temperature) or chip size may affect mix ratio.
•
•
•
STEP 4
Mixing Equipment
First image shows a very basic system of mixing equipment.
Second image shows another system for mixing resin and filler.
•
•
STEP 5
STEP 6
Poly Stone Spray Methods
First image to the left shows the beginning spray application using a cup gun.
Second image illustrates spraying Poly Stone using a different spray system (not shown in these steps).
•
•
Motor driven mixer.Hand drill mixer.

Page 9
Poly Stone Technique Tip
Use a paint brush and some of the Poly Stone mixture to completely cover the over hangs—which could have been missed during spray application.
•
Poly Stone Spray Application
Apply several spray passes, instead of one overlapping pass as done with gel coat.
Use a gel coat thickness gauge to measure depth of material (figure 2f).
For use behind gel coat 30-40 mils are recommended.
For solid surface applying, 80 mils are recommended.
•
•
•
•
Cup Gun Preparation
Hold cup gun at a 45 degree angle
Trigger air to the gun prior to angling the gun towards the mold—this avoids drips.
•
•
STEP 7
STEP 8
STEP 9

Page 10
Matrix Mix
Image to the left show the pigment mixing into matrix.
•
Back Coat Mixture
When mixing the back coat, use a pigment that matches the Poly Stone spray color.
See chapter on back coats and back fills for more information on color selection.
Cultured marble or Featherlite® may be used if the finished part does not require fabrication (see chapter six for more information on Featherlite).
If fabrication is required, Alumina tri-hydrate must be used for backfills.
•
•
•
•
Poly Stone Technique Tip
For best results, allow Poly Stone and gel coat mix to become tacky to touch before proceeding to next step (back fill pour).
•
STEP 10
STEP 11
STEP 12

Page 11
Poly Stone Technique Tip
For improved catalyst dispersal, premix catalyst into a small portion of resin.
Mix thoroughly and then add to matrix mix.
•
•
STEP 13
STEP 14
STEP 15
Catalyst to Matrix
Add premixed catalyst to pigmented matrix.
Introduce catalyst as matrix is mixing
•
•
Back Coat Mixture
Pour back fill mixture into mold immediately after catalyst is mixed thoroughly into matrix.
•
35 mils
Poly Stone
Matrix mixture
Page 12
STEP 16
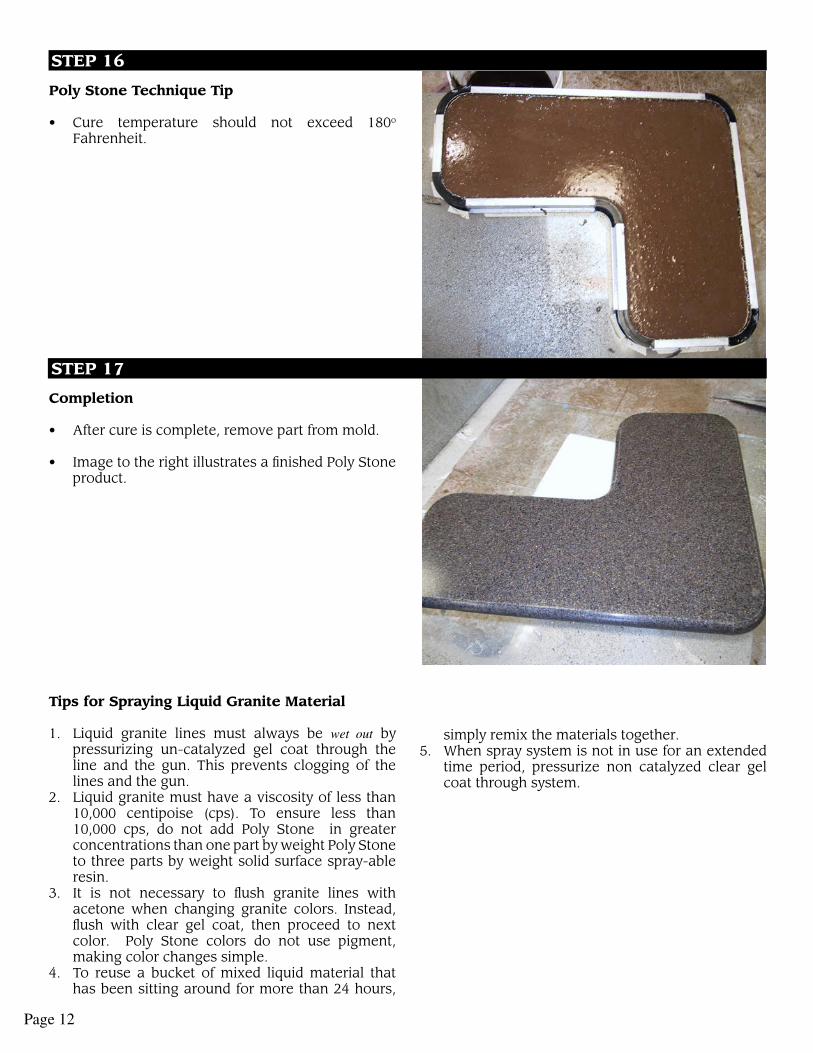
Poly Stone Technique Tip
Cure temperature should not exceed 180o Fahrenheit.
•
STEP 17
Completion
After cure is complete, remove part from mold.
Image to the right illustrates a finished Poly Stone product.
Tips for Spraying Liquid Granite Material
Liquid granite lines must always be wet out by pressurizing un-catalyzed gel coat through the line and the gun. This prevents clogging of the lines and the gun.Liquid granite must have a viscosity of less than 10,000 centipoise (cps). To ensure less than 10,000 cps, do not add Poly Stone in greater concentrations than one part by weight Poly Stone to three parts by weight solid surface spray-able resin. It is not necessary to flush granite lines with acetone when changing granite colors. Instead, flush with clear gel coat, then proceed to next color. Poly Stone colors do not use pigment, making color changes simple. To reuse a bucket of mixed liquid material that has been sitting around for more than 24 hours,
•
•
1.
2.
3.
4.
simply remix the materials together.When spray system is not in use for an extended time period, pressurize non catalyzed clear gel coat through system.
5.

Page 13
There are four types of matrix materials that may be used to back Poly Stone material.
Featherlite®
Calcium carbonateChopped fiberglassAlumina Tri-Hydrate
Each of these options offer unique benefits. ACS offers Featherlite and a variety of alumina tri-hydrates to choose from.
About FeatherliteFeatherlite is an ultra-light filler, blended with calcium carbonate, specifically designed as a means to reduce product weight. When used as a direct replacement to cultured marble, weight reduction is approximately 50%. In addition, it is an easy-use-use filler, as it comes ready to use with the addition of resin. Featherlite is a very white filler, requiring little to no titanium dioxide.
Products made with Featherlite have shown to have a better thermal shock performance than those without. Featherlite incorporates plastic micro spheres, which have an elastic property that allows the sphere to stretch and compress while subjected to stress. This elasticity will absorb stress and significantly reduce the likelihood of stress fractures and cracking. The end result is better thermal cycle with little to no stress cracks caused from hot cures in the mold.
Resin RequirementA standard marble resin is all that is needed to use with Featherlite. Resin use percentage is 50% resin by weight.
About Alumina Tri-hydrate (ATH)ACS provides several varieties of alumina tri-hydrates (ATH) to choose from including a bayer grade ATH, Onyx Pro, and OC 1500.
Bayer GradeACS supplies a bayer grade alumina tri- hydrate, with an average particle size of 22 microns and excellent air release characteristics. The standard color of this grade of bayer grade ATH is off-white.
Key Advantages Using Bayer Grade ATHLess expensive than white grades of ATHFast lead times
••••
••
ApplicationsBayer grade ATH is designed for customers who develop their own solid surface granite colors and need a proven ATH base filler material.
Resin RequirementIt is recommended to use a low viscosity solid surface resin. Resin ratio is 35 to 40% resin—depending on filler loading and chip material used.
OC 1500A white grade of ATH, OC 1500 provides excellent air release characteristics at a competitive price.
Key Advantages Using OC 1500No yellow or brown castExcellent air release propertiesMarket proven product
ApplicationsOC 1500 is ideal for solid surface applications.
Resin RequirementA low viscosity solid surface resin is recommended. Resin ratio is 35 to 40%, depending on filler loading and chip material.
Onyx ProOnyx Pro is a very clear white grade of alumina tri-hydrate with excellent gel time and low resin consumption.
Key Advantages Using Onyx ProHigh translucency and ultra-white colorNo yellow or brown castFast gel times with a LOW resin demand
ApplicationsFor use as a filler to produce cultured onyx where high translucency is desired.
Resin RequirementIt is recommended to use clear onyx resin with Onyx Pro. Resin use percentage is 28–35% to filler by weight.
•••
•••
Chapter Three: Poly Stone™ Matrix

Page 14
In-MoldIn-mold granite refers to the process of spraying the liquid granite into a mold. Then, marble or solid surface matrix is cast behind the sprayed granite product. Figure 4a is an example of spraying liquid Poly Stone into bar molds (also seen in chapter three). Figure 4b is an example of a sprayed granite mold.
Post MoldPost mold granite refers to the process of spraying the liquid granite onto a core product, that may be wood, Medium Density Fiberboard (MDF) or foam board. In post mold granite spraying, it is necessary to Poly Vinyl Acetate (PVA) spray the entire product to seal the product after completion of spraying the granite material. Sealing the product stops the inhibition of the cure caused by polyester being in contact with the air. This is most important when sanding the product. Sanding a product that is not PVA will cause sandpaper to block up and become useless.
Methods of Seaming Poly Stone PartsThe following procedure will replicate the process of seaming solid surface sheet goods as in Poly Stone products. The most important part of the seam is making sure that a perfect dry fit seam is achieved. If the seam is visible when the pieces are dry fit together, it will also be seen when the pieces are wet seamed together. Therefore, it is very important that the seam is routed cleanly after the cut.
ProcedureCut the finished product to be seamed with a sharp triple chip blade. A diamond tip granite blade is recommended.Clean edges of the cuts made with the circular saw. There will be some minor chips/cracks or chatter marks that will need to be removed in order to make a dry fit seam that is inconspicuous. This
1.
2.
is done by mirror cutting/trimming both pieces, using a high speed three horsepower router with a straight cut carbide tip router bit and using a straight edge for the exactness. The bit cut width is 1/2”, so gap the pieces to be cut uniformly about 3/8” apart. Between 1/32” to 1/16“ from each cut piece will be removed. Make sure that the alignment is correct on the pieces, so that the straight lip of the front edge of the counter does not have a slight angle.After trimming the cut, align the pieces and visually check the cut. If gaps or uneven spots are visible, re-trim pieces. When sanding, be careful not to round out the face edges of the cut, which could create unsatisfactory results.Once the seam dry fits well, for post mold applications, screw and hot melt in an 18” wooden seam block to the larger, less mobile piece to be joined. Split the dimensions so that 9 inches is on one side of the cut and 9 inches are on the other side of the cut.Use Acrybond® color matched adhesive. A color reference chart is provided. See appendix.Wipe the seam and the deck area (at least 4 inches from the seam on both pieces) with denatured alcohol, removing dust and oils that may prevent a smooth seam. Take 2” by 2“ sample blocks of solid surface samples, or other appropriate material, and hot melt them down in three to four locations along the seam. Blocks should be equally spaced, and no closer than 1/2” to the seam. Many fabricators find that taking the blocks and drilling out 1/4” holes approximately 6 to 10 per block in advance helps adhesion of the hot melt to the block and the seaming surface. Do this before hot melting the block to the deck. For another method see figure 4a.Take three or four more blocks and repeat the process by placing these blocks on the other piece, exactly opposite of the pieces which were
3.
4.
5.
6.
7.
Figure: 4bFigure: 4a

Page 15
hot melted down in step 10.Prepare clamps (either Jorgeson® or bar clamps) by having them set to the proper lengths ready to seam.Place both pieces together, and gap them approximately 1/8 of an inch. For the front piece of the counter top, be prepared to place some masking tape to prevent the adhesive from running out.Apply the Acrybond® adhesive using two parallel beads along the length of the seam.Gently tighten clamps. Tightening the closest clamp while ensuring that the top edges of the counter top are exactly level. The more level these surfaces are, the less sanding that will be required, and the higher likelihood that you’ll have two matching sides of the seamed area. A popsicle stick may be used to move back and forth across the seam to ensure the top edges are level. If readjustment is necessary, simply loosen the clamp and readjust to level the seam. Repeat this process for each clamped area. Tighten all four clamps uniformly finger tight. Caution: Overtightened clamps will cause a seam failure. Remove extra adhesive by using a one sided razor blade, sharp wood chisel, or putty knife. Then, tighten the clamps 1/16 of a turn, which will cause a little bit of adhesive to come out.For post-mold applications, screw in the underneath side that has not yet been screwed in.After the adhesive has gelled, remove clamps. Gel time is between 15 to 25 minutes.Using denatured alcohol, gently remove the blocks from the surface of the counter top. If excessive force is used part of the surface of the counter top will be pulled off. If necessary, use a sharp putty knife will help in removing the blocks.Once the adhesive is hard (dry) and ready to sand/work, use a 60 micron pad on a dual action orbital sander to create a matte finish. Less sanding will result in a better match. Finish job with a Scotchbrite® 7447 pad (purple) for a matte finish. For a satin finish, use 60 micron, then 30 micron, then use a 7448 pad (white or grey).
8.
9.
10.
11.
12.
13.
14.
15.
Deck Seam Clamp Blocks
Side View
Top ViewHeat Gun Adhesive
Deck Seam
Solid Surface
Side View of Seam Block
Seam Block
Deck Seam
45˚
(Made with Solid Surface Scrap)
(Made with Solid Surface Scrap)
Figure 4c.

Page 16
The following are product recommendations from various suppliers. ACS is not responsible for the information given within these specifications, but is offering these as an example of gel coat and resin specifications available. For questions regarding these specifications, please contact the manufacturers directly.
Manufacturing Recommended Resin(s)Cook Composites and Polymers Stypol® 040-4913, 4917, 4919, 4981Revchem Plastics, Inc. Stonetec® Product HK A-1984Silmar Technologies 93AE1958A: Silmar® 75AE-1045 Polygard Polygard® 2000 Exterior Clear Gel CoatAshland CG-SG-0010Reichold Polylight 32166-50
Chapter Five: Poly Stone™ Gel Coat & Resin

Page 17
The following is to assist in selecting the correct pigment for matrix behind Poly Stone. If you do not see a Poly Stone color referenced, this means that a natural, unpigmented backfill may be used. Custom colors will require your experimentation to determine for yourself which matrix color works best with your custom Poly Stone spray granite color. Light color pigment loading should be at 0.5%, medium color pigment loading at 1.0% and dark, bold color loadings at 1.5% to 2.0%. The following table will serve as a guideline to selection of the proper matrix color. The following color recommendations are based on BROCOM® colors. Other brands may be used.BroCom A-2245, Rhapsody Blue goes with ACS:
PS210PSS323, Starry NightPSLC512, Atlantis (dark back coat)PSLC503, Lapis
BroCom A-408, Almond goes with ACS:PSLC 608, ZionPS060, DunePS070, PebblePSC402, AuroraPSLC486, SaharaPSLC513, SilkstonePSLC510, OutbackPSS314, Ecru
BroCom A-112, Mexican Sand goes with ACS:PLSLC514, PecanPS020PS030, Burnt AmberPS040, WalnutPS050, LattePSS302, SandPSS307, TerracottaPSS312, TanPSLS219, CappuccinoPSLC464, MatterhornPSLC509, KonaPSLC504, Persia
BroCom A-2094, Designer White goes with ACS:PSLC 606, JubileePSLC 605, White SmokePS100PS130, SnowPS220PSLC462, EverestPSLC466, Pepper IvoryPSLC501, ShimmerPS602, EdelweissPSLC505, KodiakPSS326, Vanilla
BroCom A-315, Platinum goes with ACS:PS110PS140PS190PSC401, AquaPSC405, DuskPSS310, Fashion GrayPSLC 516, Ventana
BroCom A-4530, Loganberry goes with ACS:PS230, GarnetPS 604, Plum Crazy
BroCom A-311, Country Grey goes with ACS:
••••
••••••••
••••••••••••
•••••••••••
•••••••
••
PS150, Steel GrayPSLC483, PlatinumPSLC465, Mont Blanc
BroCom A-220, Heron Blue goes with ACS:PS160, BaccaratPS180PSS321, Baby Blue
BroCom A-517, Innocent Blush goes with ACS:Blossom, PSLC511PS 240PS 250PS 260PS 270PSLC 485PSS 311PSS 315PSS 301, Lace
Brocom A-117, American Brown goes with ACS:PSLC 607, CocoaPSLC506, RamsesPSLC502, MesquitePSLC 471, Canyon
BroCom A-306, Designer Black goes with ACS:PSLC508, ObsidianPSLC515, EuropaPSLC500, IronwoodPS 200PSC 442
BroCom A-217, Cerulean Blue goes with ACS:PSLC512, Atlantis (light back coat)PS 170PSS 322PSC 461
BroCom A-2662, Aspen Green goes with ACS:PSLC 507, Tigris (for light back coat)PSC 417PSC 407PS 080PSN 122
BroCom A-645, Teal goes with ACS:PSLC 507, Tigris (for dark back coat)PS 090PS 120, EmeraldPSC 409 Malachite
BroCom Red pigment goes with ACS:PS601, Magma
BroCom A-1166, Light MinkPSC403, BeachPSC406, EclipsePSC 416PSLC 485
BroCom A-116, Fawn BeigePSC463, Kilimanjaro
For the new Poly Stone colors released in 2006 that are not listed above, no pigment color was used in the back fill when creating the colors. Examples include Coriander and Tapioca. Contact our laboratory for more information on our recommended backfill colors. Ultimately, there are two reasons to pigment a backfill.
Hide thin areas from spraying.Make the granite coating less obvious (in regards to its thickness).
•••
•••
•••••••••
••••
•••••
••••
•••••
••••
•
••••
•
1.2.
Chapter Six: Poly Stone™ Back Coats & Back Fills

Page 18
One of the benefits of using Poly Stone as surfaces is the ease of care that both products provide. Each prod-uct is available in matte, satin and gloss finishes, requiring basic routine care. Simply clean each surface type regularly with soapy water. It’s that simple. Have a more difficult stain to remove? Follow the guidelines below for each surface finish and your cultured stone surface will look like new.
Matte FinishesFor difficult stains, use a mild abrasive cleaner (results shown above), or by using a mix of one part bleach to one part water. If there are minor cuts and scratches in the matte finish, use a Scotchbrite® pad (white or gray pad preferred) with a spritz of a little water upon the pad. Then, go over surface until scratches are removed. If the surface has received deeper cuts, the services of a professional are required for repair.
Satin FinishesJust as with matte finishes that couldn’t be cleaned with soap and water, satin finishes require a stronger solution. Use a cleaner such as Soft Scrub® or try a solution of one part bleach to one part water. A white Scotchbright pad may be used on satin finishes for more stubborn stains.
If you’re looking to enhance the shine of the surfaces’ satin fin-ish on your Poly Stone surface, use a nonabrasive polish such as Hope® Counter-top Polish or Protectall’s Quick Shine®.
Gloss FinishesThe benefit to a gloss finish is that it is generally more difficult to stain, however that same quality makes gloss finish more dif-ficult to remove stains from. First try using the solution of bleach and water as mentioned above and let it sit for a few minutes before scrubbing. Then, with a soft sponge, use circular motions to clean—for up to fifteen minutes. After fifteen minutes, remove the bleach and water solution with clean water. Never use abrasive cleaners or Scotchbright pads on gloss finishes.
As with most surfaces there are a few precautions that should be observed.
Do not use your counter top as a cutting board Use a pot holder or other heat/cold absorbing device for setting hot pots or frozen foods directly on your work surface Use trivets with rubber feetRun cold water in sinks made with Poly Stone before using a colanderAvoid contact with strong chemicals, such as paint thinners, oven cleaners, drain cleaners, etc. (Such items may damage the surface color/finish).
Scotchbright is a registered trademark of 3M. Quick Shine is a registered trademark of Protectall.
••
•••
Chapter Seven: Poly Stone™ Care & Maintenance

Page 19
Chapter Eight: Poly Stone™ Trouble Shooting*
Problem: Alligatoring—wrinkling of gel coat
Before Laminating ProcessCause Water.........................................................Solvent......................................................Cured over-spray......................................Raw catalyst.............................................
After/During Laminating*Cause Under cured gel coat................................
Thin gel coat.............................................
*Could also occur on second application of gel coat.
Solution Look for water contamination.Do not use solvents to reduce.Keep line wet.
Problem: Air bubble
Cause Air pockets in gel coat............................
Solution Lower air pressure in gun. Adjust resin ratio higher lengthen gel time.
Problem: Bleeding—a color that shows in another color
Color StripingCause Gel coat sagging over gel coat.................
Laminate BleedCause Monomer in laminating resin..................
Backside of gel coat cure.........................
Solution Assess sag resistance, striping gel coatImmediately spray strip coat.Over wet base coast, spray thin film of strip.
Solution Excessive monomer in resin used in laminating.
Change the gel coat.
Problem: Blisters—bubble-like defect in appearance
After Part is Pulled, Heat ExposureCause Under-cure of un-reacted catalyst...........
Oil, solvent, water.....................................Air pockets................................................
After Part in FieldCause Un-reacted catalyst...................................
Solution Catalyst over-spray, % of catalyst, mix-ing issue, leaks.Dirty air lines, material or rollers.Review rollout.
Solution Review catalyst levels, distribution, and film thickness (18 mils).
Problem appears like bubbles on the surface.
Problem that arises when one color shows on another color.
*Source: Cook Composites & Polymers Co., 2000 Application Manual. For more detailed application information contact CCP at 800-821-3590. Please note that the information has been altered as required as it applies to the application of Poly Stone.

Page 20
Problem: Dimples
Cause Granite materials....................................
Solution This is normal for spray granites. Sand finished part to remove.
Problem of dimples in gel coat surface.
Problem: Checking—mud cracking
Cause Poor integrity of the gel coat film...........
Solution Could be trapped vapor or incompatible liquid that blows through the gel coat film upon aging.Check catalyst level, asses if there is water, solvent or some other liquid in area. Chemical damage or extremes in temperature.
Problem: Chalking—gel coat oxidation
Cause Cure.........................................................
Contamination........................................Insufficient buffing..................................
Poor mold condition...............................
Solution Incomplete cure from under/over catalyzing. Check air lines, material, rollers. Also catalyst level, film thickness and water/solvent contamination.Particles from atmosphere.Wipe buffed area with solvent rag. If gloss remains, are is alright. If gloss dulls, more buffing is required.Reduce sanding/buffing requirement on parts by keeping mold in good condition.
Problem: Craters
Cause Chunks in gel coat..................................
Equipment...............................................
Solution Check for dirt in gun or filler. Material could be old and gelling—use new material. Filter the gel coat.Clean gun, could be clogged. Air setting could be too low.
Problem: Cracks
Cause Impact from laminate side.....................
Mark on mold..........................................Impact mark............................................Stress from flexing..................................
Mold mark...............................................
Solution Handling and de-molding procedures. Parts should be handled with care.Defect in mold.Handle with care.Too high gel coat thickness. Laminate too thin or under cured.De-molding or handling procedure causing problem to occur.Mold defect.
Problem appears chalk-like or deposit on surface of gel coat (premature). Gel coats can oxidize over a long period of time. Related to environmental condi-tions.
Problem appears as crescent shaped cracks either separately or in groups.
Problem appears while spraying.
Web-like cracks radiating from a center-point. Also cracks in circles.
Frontal impact occurs.Stress cracks appearing in parallel lines.
Problem: Delamination
Cause Contamination........................................
Gel coat too fully cured..........................Contamination........................................
Unbalanced laminate..............................
Solution Source could be from dust, solvent, moisture or catalyst getting onto the gel coat surface.Too high catalyst level.Solvent wiping, then waxing (around taped areas).Dry fiberglass, or dry backfill.
Problem occurring in small areas (spots)
Problem occurring in large areas.

Page 21
Problem: Dull gloss
Cause Rough mold............................................Mold buildup..........................................
Polystyrene buildup................................
Dirt or dust on mold...............................
Solvent or water.....................................
Raw catalyst............................................
Cause Rough or wet PVA..................................
Insufficiently cured gel coat or lami-nate.........................................................
Solution Polish rough spots out on mold.Wash, buff with cleaner. Often wax buildup is really polystyrene buildup—follow solution given below.Sand or scrub with brush and strong sol-vent (read precautions). DO NOT USE STYRENE!Clean mold in spray booth before gel coating. Time between cleaning and spray should be short. Use tack rag.Check for solvent or water. Drain water traps often.Only catalyzed gel coat should be sprayed into mold.Solution Review spray technique and allow for longer dry time.
Correct catalyst level in gel coat and lami-nate. Allow more time before pulling. To low of temperature (min. of 60 F.). Water, oil, or solvent contamination.
Problem: Dull spots
Cause Uneven gel coat....................................Catalyst improperly mixed into gel coat and/or laminate......................................
Trapped solvent in gel coat and/or laminate...................................................
Trapped water in gel coat and/or lami-nate.........................................................Insufficient catalyst.................................
Solution Poor breakup—use three passes.
Mix catalyst thoroughly or adjust equip-ment for good catalyst mix. Equip. surg-ing, improper catalyst settings. Gun to close to mold.
Review cleaning procedures. Check catalyst level with equipment using sol-vent reduced catalyst.
Drain lines and correct the problem.Confirm correct catalyst concentration.
Problem: Fading
Cause Poorly cured gel coat..............................
Improper cleaners or chemicals.............
Solution Check catalyst levels and film thick-ness—18 mils (+ 2 mils).Do not use strong alkaline or acidic cleaners.
Reference water spotting later in chapter.
Problem of dull or soft spots appearing in random.
Problem appearing on gel coat.When part is just pulled.
After (when) part is pulled.
Problem: Fish eyes
Cause Contamination from water, oil or sili-cone.........................................................
Dust or dirt on mold...............................Gel coat film too thin..............................Low viscosity material...........................
Solution Drain air lines. Check mold release wax. Excess and/or fresh coat of wax is worse. Check lubricating materials within the equipment.Use tack rag.Use 18(+2) mils wet, in three passes.Old material; use new stock.

Page 22
Problem: Porosity
Cause Entrapped air..........................................
Wrong catalyst........................................
No catalyst..............................................Gel coat film thickness...........................
Formulation............................................Water or solvent.....................................Pump cavitation......................................Excessive mixing....................................
Solution Wrong air pressures. Too high—fine po-rosity; too low—larger surface porosity.Get recommendation from gel coat vendor.Check catalyst supply and alignment.Applied too thick (18(+2) mils wet). Use two or three passes.Incorrect viscosity and/or resin solids. Contact vendor.ContaminationCheck pump for air leaks.Mix once per day for only 10 minutes
Visible pores.
Problem: Pre-release
Cause Incorrect catalyst....................................High catalyst level..................................Low catalyst level...................................Uneven and/or too thick film................
Gel coat cured too long.........................
Gel coat resin solids too low..................
Uneven cure...........................................Trapped solvent......................................
Mold release...........................................Clay.........................................................
Extended cure time................................Laminate curing too fast........................
Incorrect type of resin............................Laminate curing uneven........................
Solution Contact vendor for correct catalyst.Check equipment and decrease catalyst.Check equipment and increase catalyst.Check thickness, not to exceed 24 mils, wet. Film thickness should be consistentDo not leave gel coat in mold for more than 3 hours without laminating the skin coat. Laminate same day if there are variations in temperature.Contact manufacturer. Do not add sty-rene without their approval.Catalyst not dispersed correctly.Possible water, oil or solvent contamina-tion.Type and amount on the mold.Some may cause and oily residue and pre-release. Change clay, dust with fine powder or over-spray with PVA.Laminate soonerCheck for correct catalyst level. Build laminate in stages.Too high in exotherm.Low resin solids. Uneven laminate thickness. Check resin to glass ratio.
Problem occurring in the gel coat during cure, with visible surface distortion and low gloss.
Problem: Material gelled
Cause Age..........................................................Storage condition...................................
Solution Use partial container first (keep covered).Be aware of storage limitations.
Problem occurring in container.
Problem: Jagged tape lines
Cause Gel coat starting to gel...........................
Solution Use less catalyst, but not below recommended min. level. Use double sided tape process. Use good tape recommended for fine lines.
Problem: Pin holes
Cause Insufficient atomization.........................
Solution Too high gel coat delivery rate or not enough atomizing pressure.

Page 23
Problem: Resin tearing
Cause Pigment separate from resin.................Application.............................................
Solution Possible water contaminationAvoid over-spray. Incorrect spray tech-niques create excessive over spray drop-lets and flooding. Can be aggravated by long gel time and sagging. Keep a wet line and do not let over spray dry.
Also known as resin separation.
Problem: Sags and runs
Cause Too much gel coat..................................Spray technique......................................
Low viscosity..........................................
Mold wax................................................Other causes...........................................
Solution 18 (+2) mils, wet should be applied.Atomizing air is pushing and blowing the gel coat.More styrene should be volatilized. Check viscosity and thixotripic proper-ties or over agitation. Material reduced, but shouldn’t have been.Silicone content too high.Shifting the mold before it could gel.
Problem: Softness
Cause Soft gel coat...........................................
Solution Cure of gel coat in not complete. Also, check catalyst levels, film thickness and possible contaminants.
Problem resulting in the gel coat being easily marked or damaged.
Problem: Splotches
Cause Over-spray..............................................Line not maintained wet.......................Cure........................................................
Solution Over-spray should not accumulate.Spray ‘laps’ within five minutes.Film must cure as a total homogenous film instead of individually cured thin films.
After sanding and buffing, splotches appear on parts. Problem also referred to as leathery, pebbly and chicken skin.
Problem: Water spotting
Cause Exposure to a combination of excessive heat and mois-ture..................................
Improperly cured gel coat.....................Chemical treatments such as chlorine or cleaners..............................................Parts exposed to moisture too quickly after fabrication......................................
Solution Use product recommended for the application. Improper shrink wrap. Only use product applicable to gel coats.Possible under- or over-catalyzation.
Incorrect use of these chemicals.
Allow for one week ambient cure before service.
See fading for more information.

Page 24
Catalyst Chart
Catalyst Concentration Chart
Pounds ofResin1.0 lbs
2.0 lbs
3.0 lbs
4.0 lbs
5.0 lbs
6.0 lbs
7.0 lbs
8.0 lbs
9.0 lbs
10 lbs
4.5
9.1
13.6
18.2
22.7
27.2
31.8
36.3
40.9
45.4
5.7
11.4
17.0
22.7
28.4
34.0
39.7
45.4
51.1
56.8
6.8
13.6
20.4
27.2
34.0
40.9
47.7
54.5
61.3
68.1
7.9
15.9
23.8
31.8
39.7
47.7
55.6
63.6
71.5
79.4
9.1
18.2
27.2
36.3
45.4
54.5
63.6
72.6
81.7
90.8
% of Catalyst (cc)
Appendix

Page 25
MATERIAL SAFETY DATA SHEET*
Safety and Handling InformationThe following is general ingredient information for Poly Stone.
SECTION I—PRODUCT INFORMATION Chemical Name/Synonyms: Poly Stone, TexturesRTECS NO: NoneTrade Names: This MSDS pertains to all Dura Stone, Poly Stone and Textures colors.Chemical Formula: Mixture - See Section II
SECTION II—HAZARDOUS INGREDIENTS INGREDIENT CAS# WEIGHT % EXPOSURE LIMITS Aluminum Tri-hydrate 21645-51-2 50-97 15 mg/M3 (Total) (As Aluminum hydroxide) 5 mg/M3 (Resp) Titanium Dioxide 13463-67-7 < 1.0% 10 mg/M3 (Total) (Pigments) 5 mg/M3 (Resp)Filler N/A 3-20 15 mg/M3 (Total) (Filler is a proprietary, trade secret ingredient and is considered non-hazardous under OSHA 29 CFR 1910.1200)NOTE: None of the ingredients are shown to be carcinogenic
SECTION III—HEALTH INFORMATION Permissible Exposure Limits: See Section IIEye Contact: May be mildly irritating to eyesSkin Contact: Not a skin irritantInhalation: May be mildly irritating to the upper respiratory tract. This material is considered a nuisance particulate.Ingestion: No significant health problems are expected
SECTION IV—EMERGENCY FIRST AID PROCEDURES Eye Contact: Flush eyes immediately with large amounts of water for at least 10 minutes. Seek medical attention if irritation persists.Skin Contact: Wash off with water.Inhalation: Remove from area of exposure to fresh air area.Ingestion: Low toxicity; should not cause any significant health problems.
SECTION V—PHYSICAL DATA Appearance and Odor: Granular solid material, various colors. No odor.Molecular Weight: Not applicable Boiling Point: Not ApplicableMelting Point: Not Applicable Specific Gravity: Not ApplicableSolubility: Soluble in strong acids and alkalies
SECTION VI—FIRE AND EXPLOSION HAZARDS Flash Point: 680oF for filler material. Base material presents no fire or explosion hazard. Unusual Fire and Explosion Hazard: Filler material will burn with a dark smoke once ignited but will not present an explosive hazard.Special Fire Fighting Procedures: Use a self contained breathing apparatus approved by NIOSH for all fires. Use dry chemical, carbon dioxide, foam or water spray extinguishing media.
SECTION VII—PHYSICAL HAZARDS AND REACTIVITY DATA Stability: Stable. Hazardous Polymerization: Will not occurIncompatibility (Materials to avoid): Strong oxidizing agentsHazardous Decomposition Products: In a sustained fire, product components may degrade to form carbon monoxide, hydrogen cyanide, and other hazardous by products. SECTION VIII—EMPLOYEE PROTECTION Respiratory Protection: If PEL/TLV of any constituent in the mixture is exceeded, use a NIOSH approved half mask, air purifying respirator with particulate filters in atmospheres to 10X the PEL.Ventilation: Provide sufficient mechanical (general and/or local exhaust) ventilation to maintain exposures

Page 26
below the PEL/TLV(s)Other protective Equipment: Eye protection as goggles, and gloves and protective clothing (particulate impermeable) as needed to prevent irritation.
SECTION IX—ENVIRONMENTAL PROTECTION Spill and Leak Procedures: Use dry cleanup procedures; avoid dusting. Collect in containers or bags.Waste Disposal: If reuse or recycling is not possible, material may be disposed of in a sanitary landfill if codes permit. RCRA Hazardous Waste No.: Not federally regulated
SECTION X—SPECIAL PRECAUTIONS Prolonged storage and exposure to moisture will lead to eventual caking of the product. This is a detriment only to handling the material. No hazard entailed.
Some or all of the reportable chemical substances in this product are regulated by the OSHA Hazard Communication Standard, 29 CFR 1910.1200. None of the substances in this product are classified as toxic chemicals subject to reporting requirements of Section 313 of SARA Title III.
DOT Classification: Not hazardous by DOT regulations. THE INFORMATION CONTAINED HEREIN IS BASED ON THE DATA AVAILABLE AND IS BELIEVED TO BE CORRECT. HOWEVER, ACS MAKES NO WARRANTY, EXPRESSED OR IMPLIED REGARDING THE ACCURACY OF THESE DATA OR THE RESULTS TO BE OBTAINED FROM THE USE THEREOF. ACS ASSUMES NO RESPONSIBILITY FOR INJURY OR ILLNESS FROM THE USE OF THE PRODUCT DESCRIBED HEREIN.
*The above data sheet is also available separate from the spray guidelines upon request.
Poly Stone Product Description
COLOR NAMES : PS000 - PS999
WE CERTIFY THAT POLY STONE IS COMPOSED OF THE FOLLOWING INGREDIENTS:CHEMICAL COMPOSITION: CHEMICAL NAME CAS NUMBER %POLYESTER 26062-94-2 47-53
ALUMINA TRI-HYDRATE 21645-51-2 47-53

Page 27
Poly Stone to Acrybond Color Cross Reference Chart
Poly Stone Color Code Acrybond Poly Stone Color Code Acrybond
Amber PS030 Pewter 2260 Mont Blanc PSLC465 Pearl 2200Aqua PSC401 Pearl 2200 Moss PSS303 Pearl 2200Atlantis PSLC512 Pewter 2260 Obsidian PSLC508 Black 2140Aurora PSC402 Alabaster 2280 Ocean PS170 Pewter 2260Baby Blue PSS321 Pearl 2200 Outback PSLC510 Cream 2050Baccarat PS160 Pewter 2260 Peacock PSN122 Pewter 2260Beach PSC403 Natural 2190 Pecan PSLC514 Icicle A2340Black Pearl PSC442 Black 2140 Pebble PS070 Tan 2080Blossom PSLC 511 Natural 2190 Pepper Ivory PSLC466 Bisque 2220Blue Ridge PSC461 Pearl 2200 Persia PSLC504 Icicle A2340Blush PSS315 Natural 2190 Pine PS090 Pearl 2200Canyon PSLC471 Pewter 2260 Platinum PSLC483 Beige 2210Cappuccino PSLS219 Cream 2050 Pyrenees PSC407 Pearl 2200Cloud PSS210 Natural 2190 Quartz PS110 Beige 2210Coal PS200 Thunder 2270 Ramsese PSLC 506 Thunder 2270Dune PS060 Alabaster 2280 Raspberry PS260 Alabaster 2280Dusk PSC405 Bisque 2220 Rosetta PSLC485 Natural 2190Eclipse PSC406 Pearl 2200 Sahara PSLC486 Alabaster 2280Ecru PSS314 Alabaster 2280 Sand PSS302 Tan 2080Edelweiss PS602 Bisque 2220 Shimmer PSLC501 Icicle A2340Emerald PS120 Verde 2130 Silkstone PSLC513 Icicle A2340Europa PSLC515 Thunder 2270 Snow PS130 Bisque 2220Everest PLSC462 Bisque 2220 Starry Night PSS323 Thunder 2270Fashion Grey PSS310 Natural 2190 Steel Grey PS150 Pearl 2200Forrest PS080 Pearl 2200 Sunset PSC416 Pearl 2200Garnet PS230 Thunder 2270 Tan PSS312 Tan 2080Gossamer PSS311 Alabaster 2280 Tarragon PSC417 Natural 2190Ironwood PSLC500 Black 2140 Terracotta PSS307 Tan 2080Isabella PSS322 Pearl 2200 Tigris PSLC507 Pearl 2200Kilimanjaro PSC463 Natural 2190 Un-named PS250 Beige 2210Kodiak PSLC505 Bisque 2220 Un-named PS220 Bisque 2220Kona PSLC509 Tan 2080 Un-named PS210 Thunder 2270Lace PSS301 Alabaster 2280 Un-named PS180 Pearl 2200Lapis PSLC503 Pewter 2260 Vanilla PSS326 Bisque 2220Latte PS050 Beige 2210 Walnut PS040 Tan 2080Leaf PSS304 Pewter 2260 Magma PS601 Plum 2550 Malachite PSC409 Pewter 2260 Matterhorn PSLC464 Tan 2080 Mesa PS240 Natural 2190 Mesquite PSLC 502 Tan 2080 Mint PS600 Icicle A2340