69-2285-05 - truesteam installation guide -...
TRANSCRIPT

TM
69-2285-05
TrueSTEAM™
PROFESSIONAL INSTALLATION GUIDE
INCLUDED IN THIS HUMIDIFIER BOX
Remote installation requires separate purchase of the Honeywell Remote Mounting Kit (#50024917)
Tools needed to install TrueSTEAM Wire cutter/stripper
1-3/4-in. diameter hole saw
1/8-in. drill bit
Standard screwdriver
18-gauge wire (up to 5 conductor)
Torx driver T-20 and T-30
Other Requirements
TrueSTEAM flushes water at or above 140°F (60°C). Refer to local codes for proper draining practices for hot water.
Condensate pump rating of 212°F (100°C) if used.
Drip pan with water sensor shut-off required underneath TrueSTEAM if installed in or above finished space.
TrueSTEAM
Mounting bracket and hardware
Backflow preventer
Saddle valveE Water supply hoseF Drain hose (10 feet)G Duct nozzle and gasketH Owner’s manualI Service labelJ3 HumidiPRO Digital Control*J4 VisionPRO IAQ control*
* Control based on model ordered.
E
HFI
J3 J4
G
GE
TT
ING
S
TAR
TE
DM
OU
NT
ING
PL
UM
BIN
GW
IRIN
GA
PP
EN
DIC
ES
OP
ER
AT
ION
A
ND
SE
RV
ICE


TrueSTEAMTM
?
TrueSTEAM Humidification System 69-2285—05 1
GE
TT
ING
S
TAR
TE
DM
OU
NT
ING
PL
UM
BIN
GW
IRIN
GA
PP
EN
DIC
ES
OP
ER
AT
ION
A
ND
SE
RV
ICE
NEED HELP? For assistance with this product please visit http://yourhome.honeywell.com
or call Honeywell Customer Care toll-free at 1-800-468-1502.
Read and save these instructions.® U.S. Registered Trademark. Patents pending. Copyright © 2009 Honeywell International Inc. All rights reserved.
Critical Installation Information ................................2Water Quality and Hardness ...............................................2
Testing Water Quality and Interperting Results ....................2
Choosing the Filter ...............................................................2
Set the Automatic Flush Cycle Timing .................................3
Proper Sizing of a TrueSTEAM Humidifier ...........................5
TrueSTEAM Pre-Install Information .....................................7
Safety Definitions and Precautions ..........................8Safety Definitions .................................................................8
Safety Precautions ...............................................................8
Setting Homeowner Expectations ............................9
Important Installation Requirements ......................10Personal Safety .................................................................10
Mounting Location ............................................................10
Duct Nozzle ......................................................................10
Water Drainage .................................................................10
Choosing a Mounting Method .................................11Which is right for you? .......................................................11
Duct Mounting ..........................................................12STEP ONE: Select a Mounting Location ...........................12
STEP TWO: Connect the Duct Nozzle ...............................12
STEP THREE: Install Mounting Bracket to the Duct ..........13
STEP FOUR: Install TrueSTEAM onto the
Mounting Bracket ...............................................................13
Water Supply and Drain Connections ....................14STEP ONE: Connect the Cold Water Supply .....................14
STEP TWO: Tap into a Water Line .....................................14
STEP THREE: Connect TrueSTEAM to the
Cold Water Pipe .................................................................15
STEP FOUR: Connect to the Water Drain .........................15
Other Plumbing Options ..........................................16For All Options Shown: ......................................................16
Connect to TrueSTEAM .....................................................16
Remote Installation ..................................................19
Proper Hose Installation ..........................................21
Reverse Osmosis Filter ...........................................24
Parts of the RO Filter .........................................................24
Setting up the RO Filter ....................................................25
Maintaining the RO Filter ..................................................26
Before Wiring TrueSTEAM .......................................27Using the DIP Switches .....................................................27
STEP ONE: Remove the TrueSTEAM Cover .....................27
STEP TWO: Understand the DIP Switches........................27
Deciding on the Wiring Configuration ....................29STEP ONE: Make Power Monitoring Decision ...................29
STEP TWO: Make System Fan Regulation Decision .........31
STEP THREE: Make Add-On Air Proving Decision ...........33
Using the Terminals ...........................................................34
Routing the Wires ..............................................................34
Using the Correct Control Diagram ........................35
Mounting the Outdoor Sensor ................................38
Startup and Checkout ..............................................43
Routine Maintenance ...............................................44Automatic Cleaning Cycle ..................................................44
STEP ONE: Initiate a Flush Cycle .....................................44
STEP TWO: Remove the Water Tank .................................46
STEP THREE: Clean the Tank ...........................................47
STEP FOUR: Replace the Water Level Sensor .................47
Changing the Water Filter ..................................................48
Water Level Sensor Troubleshooting Steps ...........49Test Setup ..........................................................................49
Test Pins ............................................................................49
Testing for Shorts ...............................................................49
Good Water Sensor ...........................................................49
Bad Water Sensor ..............................................................49
STEP FIVE: Reinstall the Tank .........................................50
Troubleshooting .......................................................51
A: Specifications ......................................................55
B: Advanced TrueSTEAM Wiring .............................56
C: Parts List ..............................................................67

GE
TT
ING
S
TAR
TE
D
Water Quality and Hardness
Proper filtration is critical for the operation of the TrueSTEAM humidifier. Failure to address water quality will lead
to increased maintenance requirements and possible failure of the TrueSTEAM humidifier and its components.
Be sure to complete the following procedure well in advance of installation to ensure any additional costs are
documented and understood.
It is imperative to fully understand the quality and hardness of the water that will be used on each individual
TrueSTEAM humidifier. Water quality and water hardness can vary greatly from home to home, and even between
two homes on the same street. Water test kits are included with every TrueSTEAM model and are also available
for purchase separately (50044721-001). Proper use of these kits will help determine which filtration option is right
for each particular installation.
Testing Water Quality and Interperting Results• The color block will recommend the best water filtration method for the home.
• Water test strips will be green when new.
• Honeywell always recommends installing at least a polyphosphate filter.
Fill the plastic tube with water directly from theTrueSTEAM input water source.
Note: It is important to test the specific input to TrueSTEAM,as it may differ from the faucet taps in the home.
Dip the colored end of one of the test strips intothe tube’s water for 3 seconds.
Remove the test strip. Do not shake the strip.
Wait 20 seconds and then match the test strip’scolor to the closest color block on the waterhardness scale.
Note: Strip color results are no longer valid after one minute.MCR32902
1
2
4
3
RANGE 1RANGE 2
RANGE 3
WaterSoftener
RO Filter Part No.50045947
Hon
eyw
ell
Rec
omm
ends
PolyphosphateFilter Part No.
50028044
Choosing the FilterIf the water tests in range 3 then the TrueSTEAM humidifier will require the use of a whole-house water softener
for optimal performance. Failure to use softened water in this situation can potentially lead to drastically increased
maintenance requirements and premature failure of the TrueSTEAM and its components. Water hardness in
this range negatively affects all facets of a home including shower heads, faucets, laundry machines (as well as
TrueSTEAM).
In applications with softened water, use of the in-line polyphosphate filter is recommended.
Critical Installation Information
TrueSTEAM Humidification System 69-2285—052

GE
TT
ING
S
TAR
TE
D
Set the Automatic Flush Cycle Timing
• Use DIP 1 and DIP 2 to configure how often
TrueSTEAM will automatically flush the tank.
Timing for the automatic flush is based on hours of
active heating element time.
• The home’s water hardness determines how often
automatic flushing should be performed.
• The automatic flush timing can be changed any
time after installation by setting the DIP 1 and
DIP 2 positions, as shown at left. See “Automatic
Cleaning Cycle” on page 46 for a description of the
automatic flushing process.
65432
On
Off
1
654321
654321
654321
On
Off
On
Off
For water that is filtered throughthe Honeywell RO Filter System.
(30 hour flush)
For hard water withouta softener or filter.
(8 hour flush)
For water that is put through a softener before
entering TrueSTEAM. (20 hour flush)
For soft water withouta softener or filter.
(12 hour flush)
On
Off
M29614
If water hardness is in range 1:
Honeywell recommends using the
polyphosphate filter (sold separately).
Proceed to “Water Supply and Drain
Connections” on page 13.
M29602
If water hardness is in range 2:
Honeywell recommends using the RO Filtration
system (sold separately).
Note: If the RO Filtration System is not used, set the homeowner’s expectation that additional cleaning beyond once per season will be necessary.
Proceed to “Water Supply and Drain
Connections” on page 13. See “Appendix F:
Reverse Osmosis Filter” on page 23 to install
the filter.
M29661
TrueSTEAM Humidification System 69-2285—05 3

GE
TT
ING
S
TAR
TE
D While the TrueSTEAM and its available filtration options help to address the issue of water quality and hardness,
homes with extreme hard water problems should consider using a whole house water softener as the primary
filtration device. Use of a whole house water softener will help protect the humidifier from excessive maintenance
requirements as well as undue wear and tear in homes with hard water.
In applications with a water softener, it is critical for the TrueSTEAM to draw its water supply from the cold water
line after the water softener.
Note: Be sure to check all local plumbing codes before beginning installation.
M32903
Furnace
WaterHeater
Cold softened water
When using softened water, use of the in-line polyphosphate filter is recommended
WaterSoftener
Hard water source
TrueSTEAM draws water from cold water line after whole house water softener
BEST PRACTICE
Use TrueSTEAM with water that is less than 1 grain per gallon hardness. A properly functioning water softener will accomplish this.
TrueSTEAM Humidification System 69-2285—054

GE
TT
ING
S
TAR
TE
D
Proper Sizing of a TrueSTEAM Humidifier
The Air-Conditioning, Heating and Refrigeration Institute (AHRI) has set guidelines for determining humidification
capacity requirements. The recommendation is based on the cubic footage (volume) and type of home
construction – assuming typical conditions. It is important to realize many homes will have humidification
requirements that differ from the guidelines depending on how the circumstances differ from standard conditions.
Factors that impact the amount of humidity needed:
• Geographic Area
• Elevation
• Ventilation type
• Number of people living in the home
• Ceiling height (i.e. cubic volume)
• Window type (i.e. structure type)
• Insulation type (i.e. structure type)
• Equipment type
Converting square footage to cubic volume requires multiplying the square footage by the ceiling height (i.e. 2000
square foot space with 10 foot ceilings is 20,000 cubic feet). In general, the higher the ceilings, the smaller the
square footage space each TrueSTEAM model will cover since it must humidify the additional air volume.
AHRI defines structure type as follows:
• Tight construction: Well insulated with vapor retarders, tight storm doors, windows with weather stripping,
dampered fireplace, and using ½ air change per hour of air infiltration.
• Average construction: Insulated with vapor retarders, loose storm doors and windows, dampered fireplace
with 1 air change per hour of air filtration.
• Loose construction: Generally built before 1930 with little or no insulation, no storm doors, no insulated
windows, no weather stripping, no vapor retarders, undampered fireplace, and with 1-1/2 air changes per hour
of air infiltration.
It is vital to take all of these factors into account when sizing a TrueSTEAM humidifier for a particular home.
Undersizing the humidifier will not only reduce the potential to meet the a desired humidity set point, it may also
lead to extensive system fan run time or higher operating costs as the system tries to deliver to the control’s
setting. While oversizing the humidifier may lead to higher amp draw, the system run time will be less, which in
some situations may be less expensive at the bottom line.
TrueSTEAM Humidification System 69-2285—05 5

GE
TT
ING
S
TAR
TE
D
Proper Sizing of a TrueSTEAM HumidifierConverting square footage to cubic volume requires multiplying the square footage by the ceiling height
(i.e. 2000 square foot space with 10 foot ceilings is 20,000 cubic feet). In general, the higher the ceilings, the
smaller the square footage space each TrueSTEAM model will cover since it must humidify the additional air
volume.
INCLUDE ALL SQUARE FOOTAGE OF THE HOME. FINISHED AND UNFINISHED.
Example 1: 2000 sq ft home: 8 ft ceilings = 16,000 cu ft. (2000 x 8)
Example 2: 2000 sq ft home: 10 ft ceilings = 20,000 cu ft. (2000 x 10)
Example 3: 2000 sq ft home: ½ with 8 ft ceilings, ½ with 12 ft ceilings. = 20,000 cu ft. ((1000 x 8) + (1000 x 12))
INCLUDING CEILING HEIGHT, FINISHED AND UNFINISHED SPACE WILL PROVIDE A MORE ACCURATE
SIZING FOR HUMIDIFICATION.
AHRI Recommended
Humidity (Gallons Per Day)
Construction Type 8,000 CU FT 12,000 CU FT 16,000 CU FT 20,000 CU FT 24,000 CU FT 28,000 CU FT 32,000 CU FT
Tight 3.3 4.3 5.4 7.5 9.6 11.7 16
Average 7.6 9.6 11.8 16 20.3 24.4 33
Loose 11.7 14.9 18.1 24.5 30.8 37.1 50
Recommended TrueSTEAM
Model
Construction Type 8,000 CU FT 12,000 CU FT 16,000 CU FT 20,000 CU FT 24,000 CU FT 28,000 CU FT 32,000 CU FT
Tight 9 GPD 9 GPD 9 GPD 9 GPD 12 GPD 9 GPD X2 12 GPD X2
Average 9 GPD 12 GPD 9 GPD X2 9 GPD X2 12 GPD X2 12 GPD X3 12 GPD X3
Loose 12 GPD 9 GPD X2 12 GPD X2 12 GPD X3 12 GPD X3 12 GPD X4 12 GPD X4
Note:
The 6 Gallon TrueSTEAM is only recommended for small applications. This includes average to tight condos,
apartments and townhomes under 1200 sq ft.
TrueSTEAM Humidification System 69-2285—056

GE
TT
ING
S
TAR
TE
D
In the event that a service technician needs to call in to the TrueSTEAM support techline, the following information
is typically required for the Honeywell tech support specialist to accurately evaluate each situation. Failure to have
this information ready may result in resolution delays or a potentially incomplete diagnosis.
Honeywell recommends completing the below questionnaire and leaving a copy behind at the home along with the TrueSTEAM installation guide with every TrueSTEAM installation.
Honeywell TrueSTEAM techline: 800-814-9452
TrueSTEAM Pre-Install Information
Model Number of TrueSTEAM Unit
Date Code (xxxx)
Water Quality Test 1 2 3 (circle one)
Water Pressure Test (psi)
Flush Cycle Setting DIP 1 OFF ON OFF ON (cicrle one)
DIP 2 OFF ON ON OFF (cicrle one)
Duct Static Pressure Test (in.wc.)
(Maximum static pressure is 0.5 in.wc.)
Condensate Pump or Drain Pump Drain (circle one)
If Drain - PVC or Standard PVC Standard N/A (circle one)
Supply Voltage to Unit (V)
Monitoring Air Flow/System Power/
None
DIP 4 ON OFF (cicrle one)
DIP 5 ON OFF (circle one)
Control - Wireless or Wired Wireless Wired (cicrle one)
Fan Control - TrueSTEAM or Controller TrueSTEAM Controller (circle one)
Other (any additional relevant
information)
BEST PRACTICE Complete this information sheet and leave on all jobsites
TrueSTEAM Humidification System 69-2285—05 7

GE
TT
ING
S
TAR
TE
D
Safety Definitions and Precautions
Safety DefinitionsThese safety terms identify information you must read.
CAUTION: Indicates a hazardous situation which, if not avoided, could cause bodily injury
or property damage.
WARNING: Indicates a hazardous situation which, if not avoided, could result in death or serious injury.
Safety Precautions
CAUTION: Voltage Hazard.
Can cause electrical shock or equipment damage.
Disconnect HVAC equipment before beginning installation.
WARNING: Electrocution, Heavy Equipment, and Water Hazard.
Can cause death, blindness, and water damage to home, and heating element failure.
CAUTION: Steam Condensation, Fire, and Freezing Water Hazard.
Can cause failure of fan or limit control or result in water damage to home.
Make sure you read and understand the following safety hazards before installing, using, or working
with the TrueSTEAM humidifier:
• Do not direct the steam nozzle at people.
• Water inside tank can be very hot. Explain this to homeowner and emphasize the warning label
on TrueSTEAM.
• Scalding danger from draining water. When the water tank drains, the water can be hot enough to cause
injury. Make sure the homeowner understands the danger of hot water and steam.
TrueSTEAM Humidification System 69-2285—058

GE
TT
ING
S
TAR
TE
D
Make sure the homeowners know what to expect from their TrueSTEAM humidifier. Discuss the following points
with the homeowners and answer any questions they have.
• Achieving Humidity Setpoint. It may take up to a week of continuous operation to achieve the humidity
setpoint. This depends on such factors as weather, size of home, furnishings in the home, and insulation.
• Plastic or Rubber Odor. At startup, it is normal to smell a slight plastic odor in the home. If the remote hose is
used, there may be a slight rubber odor. These odors will go away within a few days.
• Ideal Humidity. 35% – 45% relative humidity in typical winter weather is considered ideal by industry experts.
Homeowners can adjust to their own comfort or until there is condensation on the windows. Lower the setpoint
if condensation appears.
• Unit Not Humidifying. If TrueSTEAM is not running but the humidity is below the setpoint, the humidity control
may have a frost protection setting. TrueSTEAM will not humidify while in a drain cycle mode.
• Setpoint Not Reached. If humidity doesn’t reach the setpoint, TrueSTEAM may be undersized for the home.
This can be due to factors such as insulation, windows, and arid climate. Also, the outdoor temperature may
be too low to maintain the humidity level. Wait for the outdoor temperature to warm closer to 20°F (-6°C). If the
desired humidity is still not reached, then a larger capacity TrueSTEAM may be needed.
• Home Ventilation. Excessive ventilation sends moist air outside and replaces it with dry air. This can make it
hard to maintain the humidity setpoint. If installing a ventilator, use a solution that retains moisture. An Energy
Recovery Ventilator (ERV) is recommended.
• Cleaning Required Light. If the Cleaning Required light is on, clean TrueSTEAM using the steps found in
the “Routine Maintenance” section on page 46, or in the Homeowner’s Operating Manual. TrueSTEAM will
continue to run normally while this light is on.
• Hard Water. The home’s water hardness determines how often TrueSTEAM must be cleaned. A water
hardness test kit is provided with your TrueSTEAM. It will help you determine the cleaning interval and filter
requirements for your TrueSTEAM.
• Energy Consumption. There may be a slight increase in overall energy consumption when operating
any humidifier. However, TrueSTEAM will make the home feel warmer. This allows the homeowner to lower
the temperature setting on the thermostat. Every degree lower on the thermostat can save up to 3% on
heating costs.Personal Safety
Setting Homeowner Expectations
TrueSTEAM Humidification System 69-2285—05 9

GE
TT
ING
S
TAR
TE
D
Personal Safety • Wear safety glasses while installing TrueSTEAM.
• Do not cut into any air conditioning or electrical line.
• Follow professional safety standards and all local regulations.
Mounting Location • Mount TrueSTEAM in a level position to avoid water damage or heating element failure.
• Install TrueSTEAM on the supply duct. Use the Remote Mounting Kit if duct mounting is not possible.
• Do not install TrueSTEAM where the ambient temperature is lower than 34°F (1.1°C) or higher
than 104°F (40°C).
• Mounting area must be strong enough to support TrueSTEAM’s weight when full of water (up to 15 lbs.).
• Choose a location that is well ventilated. Do not install TrueSTEAM in completely enclosed spaces, such as a
cabinet or unventilated closet.
• Allow at least 1 foot clearance to ventilation holes in the TrueSTEAM cover. Do not cover the holes. Covering
them can increase the temperature inside TrueSTEAM and shorten its life.
• Do not mount directly to duct board. The remote mount nozzle attachment is allowed only with a Honeywell
duct board adapter kit. See “Appendix B: Parts List” on page 59.
• If used near a pool or spa, make sure TrueSTEAM can not fall into the water or be splashed. Also, ensure
TrueSTEAM is plugged into a ground fault interrupted (GFI) outlet.
Duct Nozzle • Do not install the duct nozzle into a supply duct with static pressure exceeding 0.5 in. w.c.
• Do not install the duct nozzle through wooden sidewalls (e.g., floor joist).
• If the duct has exposed insulation on the interior, be sure the nozzle extends beyond the insulation. Clear away
excess insulation at the insertion point, or replace a section of insulated duct (approximately 6 in. x
6 in.) with rigid, non-insulated sheet metal.
• Allow at least 4 in. clearance between nozzle outlet and any interior duct to avoid water condensation.
• Mount TrueSTEAM where the nozzle outlet has a minimum 24 in. of downstream open air space.
Water Drainage • Consult local plumbing codes for drain size, material, and maximum temperature allowed.
Important Installation Requirements
Failure to comply with these requirements will result in voided warranty, improper installation, and
service callbacks.
TrueSTEAM Humidification System 69-2285—0510

MO
UN
TIN
G
Choosing a Mounting Method
Before installing TrueSTEAM in a home, you must decide which mounting method you want to use:
Which is right for you?
This manual covers duct mounting of TrueSTEAM. For Remote Mounting Instructions, see “Remote Installation”
on page 18 or “Document 69-2317” (included with Remote Mounting Kit).
TrueSTEAM Humidification System 69-2285—05 11
DUCT MOUNTING – if you can mount
TrueSTEAM onto the supply duct of
the HVAC system:
The generated steam goes directly into the
supply duct.
This is the simplest type of installation, but
it requires that a suitable mounting location
can be found on the supply duct.
Return
Supply
M29596
REMOTE MOUNTING – if a suitable
mounting location can not be found
on the supply duct:
The TrueSTEAM can be mounted up to 20
feet away from the supply duct for
select models.
A remote hose must be installed to carry
steam from TrueSTEAM to the supply duct.
You will need to use a remote mounting kit
(see “Appendix B: Parts List” on page 59).
Supply
M29597
Before proceeding:
I have decided to use: Duct Mounting Remote Mounting

MO
UN
TIN
G
Duct Mounting
Before beginning Duct Mounting:
I have confirmed local codes for proper draining practices for hot water
I have chosen an installation location that meets the requirements on page 10
Follow these steps to mount TrueSTEAM directly to the supply duct of the homeowner’s HVAC equipment.
STEP ONE: Select a Mounting LocationChoose a location that has access to a cold
water supply pipe.
Select a vertical or horizontal surface on the HVAC
supply duct, with adequate clearances, where
TrueSTEAM can be mounted.
Make sure there is a 120 VAC electrical outlet
rated for the TrueSTEAM model being installed.
Ensure the location is near a drain with a high-
temperature water rating. Consult local plumbing
codes for proper drainage. If no main floor drain
is available, see “Other Plumbing Options” on page 15.
STEP TWO: Connect the Duct Nozzle
Slide the foam gasket over the nozzle.
Make sure the o-ring gasket is properly seated
in the groove.
Insert the duct nozzle into TrueSTEAM. Twist clockwise
to ensure a tight seal.
M29598
M29599
TrueSTEAM Humidification System 69-2285—0512
TrueSTEAM Required Minimum
Model: Circuit Capacity:
HM506 7 Amps
HM509 10 Amps
HM512 12 Amps
1
4
2
3
3
2
1

MO
UN
TIN
G
Before proceeding to Plumbing:
I selected a duct mounting location
I connected the duct nozzle
I installed the mounting bracket to the duct
I installed the TrueSTEAM onto the mounting bracket
TrueSTEAM Humidification System 69-2285—05 13
STEP THREE: Install Mounting Bracket to the Duct
Position the template on the supply duct:
• Make sure the template is level and in the desired
position on the duct.
• Ensure proper clearances from A-coil.
• Make sure the duct nozzle will have proper
clearances from duct walls.
• Minimum 4-inch clearance from nozzle outlet to any
duct wall.
• Minimum 24 inches of downstream open duct air
space. (Needed to prevent water condensation.)
Drill the 1-3/4 inch hole.
Secure the mounting bracket to the duct, using four
self-drilling sheet metal screws provided.
STEP FOUR: Install TrueSTEAM onto the Mounting Bracket
Make sure the foam gasket is positioned correctly over
the nozzle.
Lift TrueSTEAM into place against the mounting
bracket. Insert the nozzle directly into the duct hole.
Check the foam gasket – it must form a tight seal in
the duct hole.
Push down to secure TrueSTEAM to the bracket arms.
Flow
4”
12”(min)
4”4”
M29600
M29601
23
1
32
1
4

PL
UM
BIN
G
STEP ONE: Connect the Cold Water Supply
Do not use hot water supply. Cold water is required
to cool boiling water to safe draining temperatures.
Insert one end of the water line into the water filter
or reverse osmosis kit. Use the 1/4-inch plastic
water line provided or a 1/4-inch copper water line.
Apply a modest pull to ensure a tight fit.
Use clamps or ties to secure the water filter in a
location that allows for removing and replacing it in
the future. Honeywell recommends changing the
water filter or RO canisters 1 & 2 annually, or as
needed based on water conditions.
Install the provided backflow preventer, as required
by code. See “Appendix F: Reverse Osmosis
Filter” if using the Reverse Osmosis Filter.
Cut the water line so it is long enough to reach
from the water filter to the supply fitting on the
bottom of the TrueSTEAM.
Insert the water line into the TrueSTEAM
supply fitting.
Note: Failure to check for a tight fit with plastic water line could result in the line coming loose in the future. Apply modest pull to ensure water line is properly
seated and secure.
STEP TWO: Tap into a Water Line• Consult local codes for proper plumbing.
• Use the saddle valve provided or a T-fitting and
manual shutoff valve to tap into a cold water
line.
• Refer to the literature included with the valve
you chose and the local plumbing codes. Use
proper technique for the valve.Saddle ValveT-fitting
Water SupplyLine
Manual ShutoffValve
M29605
Water Supply and Drain Connections
MCR32911
BEST PRACTICE Use a manual shutoff valve when tapping into a water line.
TrueSTEAM Humidification System 69-2285—0514
4 3
2
1
5

PL
UM
BIN
G
STEP THREE: Connect TrueSTEAM to the Cold Water Pipe
Connect one end of the remaining length of water
line to the backflow preventer. Apply a modest pull
to ensure a tight fit. See “Reverse Osmosis Filter” on
page 23 if using the Reverse Osmosis Filter.
Connect the other end of this line to the saddle valve
or T-fitting and manual shutoff valve.
STEP FOUR: Connect to the Water Drain• Consult and follow local plumbing codes for drain
pipe size and maximum temperature requirement.
• The ideal installation is directly to the main floor
drain using the rubber hose provided.
• If direct floor drain access is not available, see
“Other Plumbing Options” on page 15.
Connect the 1/2-inch drain hose provided to the drain
fitting on the bottom of the TrueSTEAM.
Use the hose clamp provided to secure the drain hose
to the barbed fitting.
Route the drain hose to the floor drain. The hose must
have a continuous downward slope.
Direct the hose outlet into the floor drain. Secure
the hose to reduce the risk of hot water pooling
or splashing.
MCR32901
M29607
Before proceeding to Wiring:
I have confirmed minimum required circuit capacity
I have connected the water supply using cold water
I have installed the drain connection
CAUTION: Scalding Hazard.
During operation, hot water may exit drain and can cause burns from scalding.
Make sure the hose is securely connected to the drain.
TrueSTEAM Humidification System 69-2285—05 15
2
1
3
2
1
4

PL
UM
BIN
G
Other Plumbing Options
TrueSTEAM Humidification System 69-2285—0516
3/4 IN. COPPER PIPE3/4 IN. FNPT X SWEAT
HOSECLAMPS
HOSE FROMTrueSTEAM
212°F RATED PUMP
1/2 IN. BARB X 3/4 IN. MNPT
FLEXIBLEHOSE
M28678
SEAL ALL CONNECTIONS FROMSOLENOID VALVE TO DRAIN STACK
3/4 IN. FNPT X1-1/2 IN. PVC
1-1/2 IN. (MINIMUM) PVC PIPE
3/4 IN. FNPT X 3/4 IN. CPVC
3/4 IN. CPVC PIPE
3/8-IN. TUBING RATED AT 212°F
Connect to TrueSTEAMCommon to all plumbing options.
Option 1: Plumbing to drain with condensate pump. • Use Hartell A3X-115 condensate pump or equivalent
(212°F temperature rating, > 1 GPM pump flow rate).
• Pump must be powered when TrueSTEAM is operating.
• Use a pump with a built-in overflow sensor or install the pump in a drip pan with wet switch wired to turn off TrueSTEAM.
HOSE CLAMPS ATALL CONNECTIONS
3/8-IN. TUBING RATED AT 212°F
M28713
3/4 IN. FNPT X 3/4 IN. CPVC
3/4 IN. CPVC PIPE
TO PUMP
ALTERNATIVEHOSE FROMTrueSTEAM
The following diagrams are for applications where standard draining to a floor drain is not available.Choose the
plumbing option that suits your installation. Use A, B, C, or D based on type of pipe or condensate pump. Consult
and follow local plumbing codes in addition to these instructions.
• Support rubber hose every 6 in.
• PVC must be schedule 40 or higher rating.
• All plastic pipe joints are welded.
• Drain into a P-trap that will remain wetted at all
times.
For All Options Shown:

PL
UM
BIN
G
TrueSTEAM Humidification System 69-2285—05 17
1-1/2 IN. MINIMUM TRAP (OR SIZE PER LOCAL CODE)
VENTED PERLOCAL CODE
ALL PLASTIC PIPEJOINTS ARE WELDED
M28679
3/4 IN. MNPT X SWEAT3/4 IN. FNPT X 1-1/2 IN. PVC
1-1/2 IN. PVC1-1/2 IN. (MINIMUM) PVC PIPE
3/4 IN. FNPT X 1-1/2 IN. PVC
3/4 IN. MNPT X 3/4 IN. CPVC
3/4 IN. FNPT X 1-1/2 IN. PVC
HOSE CLAMP3/8 IN. BARB X 3/4 IN. MNPT
SIZE TO FIT PUMP OUTPUT
Option 2: Plumbing to a dedicated trap.
3/4 IN. MNPT X SWEAT3/4 IN. FNPT X 1-1/2 IN. PVC
1-1/2 IN. PVC
1-1/2 IN. (MINIMUM) PVC PIPE
3/4 IN. FNPT X 1-1/2 IN. PVC
3/4 IN. MNPT X 3/4 IN. CPVC
3/4 IN. FNPT X 1-1/2 IN. PVC
HOSE CLAMP3/8 IN. BARB X 3/4 IN. MNPT
M28681
ALL PLASTIC PIPE UNDER SINK 1-1/2 IN. MINIMUM PVC
ALL CONNECTIONS FROM SOLENOID VALVE TO DRAIN TRAP ARE SEALED
SINK
COUPLING
WELD
WELD
THREADS
THREADS
WELD
WELD
WYE
1-1/2 IN. PVC
STAINLESS STEEL SLOTTED BAND COUPLING SIZED TOFIT PIPE (COPPER, PVC, CPVC)
ALTERNATIVETHIS CONFIGURATION ALLOWS FOR REMOVAL OF THE TRAP
SIZE TO FIT PUMP OUTPUT
Option 3: Plumbing to sink with a dedicated trap.

PL
UM
BIN
G
TrueSTEAM Humidification System 69-2285—0518
3/4 IN. MNPT X SWEAT
3/4 IN. FNPT X 1-1/2 IN. PVC
1-1/2 IN. PVC
1-1/2 IN. (MINIMUM)PVC PIPE
3/4 IN. FNPT X 1-1/2 IN. PVC
3/4 IN. MNPT X 3/4 IN. CPVC
3/4 IN. FNPT X 1-1/2 IN. PVC
HOSE CLAMP3/8 IN. BARB X 3/4 IN. MNPT
M28680
ALL CONNECTIONS FROM SOLENOID VALVE TO DRAIN TRAP ARE SEALED
SINK
1-1/2 IN. PVC TEE
1-1/2 IN. PVC
1-1/2 IN.PVC
COUPLINGWELD
WELD
STAINLESS STEEL SLOTTED BAND COUPLING SIZED TOFIT PIPE (COPPER, PVC, CPVC)
SIZE TO FIT PUMP OUTPUT
ALTERNATIVETHIS CONFIGURATION ALLOWS FOR REMOVAL OF THE TRAP
THREADSWELD
Option 4: Plumbing to sink trap.

AP
PE
ND
ICE
SBEST PRACTICE
If humidifier is in finished space, always install a drip pan with wet switch. Honeywell recommends Diversitech WS-1 (wiring shown here).
TrueSTEAM Humidification System 69-2285—05 19
Remote InstallationUse remote installation when no suitable duct mounting location can be found on the homeowner’s
HVAC system. For detailed instructions on remote installation, see the TrueSTEAM Remote Mount Kit Installation
Instructions (69-2317).
65432
On
Off
124V
24V
HUM
HUM
C
GT
R
RT
GF
EXT
RED
TrueSTEAMTERMINAL
BLACKGREENORANGE
Always pitch the remote Adapter Nozzle upwards
Use provided anchors if mountingto drywall or plaster
If humidifier is in finished space, always install a drip pan with wet switch. Honeywell recommends Diversitech WS-1 (wiring shown here.)
M28708

AP
PE
ND
ICE
SBEST PRACTICE
Always inspect the hose installation after at least 1 hour of steam production to confirm that there are no sags in the hose or leaks at the connection points.
TrueSTEAM Humidification System 69-2285—0520
Minimum 6 inches
Minimum 2 inches
Minimum upward pitch of 2 inches per foot.
Hose clamps at every connection.
Nozzle at upward pitch.
Always consult and follow local plumbing codes for drain pipe size and maximum temperature requirement.
Water in elbow.
Provide a 212°F rated Tee at the lowest point. Do not use plastic Tee.
If hose slopes downhill…
Downward slope can not be more than 3 feet below humidifier steam outlet.
On straight runs, use perforated angle iron. Otherwise, support hose every 12 inches using provided hooks. Clamps
Cut a slit in the insulation half way
around the hose.
Do not cut into the
rubber steam hose.
Clearance hole for hose and insulation.
Avoid sharp kinks and prevent bends.
Clamp
Minimum upward pitch of 2 inches per foot.
24 inches open air downstream.
3 inches minimum clearance from nozzle outlet to duct.
1-3/4 inch hole
On straight runs, use perforated angle iron. Otherwise, secure hose every 12 inches using provided hooks.
Seal off unconditioned space with grommet (not provided) or caulk.
Clamp
Minimum of6 inches of straight vertical rise. Always install nozzle so the
outlet is pointed up.
Do not route the steam hose through the hole in the mounting plate.
Nozzle at upward pitch.
12 inches
Insert the hose clamp into
the slit and hook it onto the
rubber hose.
M29636

AP
PE
ND
ICE
S
Note: If air handler location temperatures will drop below freezing at any time, TrueSTEAM must be mounted in a conditioned space, running a remote hose to the duct.
M24786
Living Area Remote Options
M24781
Furnace or Mechanical Room Remote
M24785
Garage Remote
M24936
Duct Mount Remote
Draining water may be hot. Ensure drain outlet not exposed.
CAUTION Hot water temperature above 140°F (60°C) can cause burns from scalding.
Proper Hose Installation
TrueSTEAM Humidification System 69-2285—05 21

AP
PE
ND
ICE
S
2 IN. PER FT
2 IN. PER FT2 IN. PER FT
2 IN. PER FT
20 FT MAX
P - TRAP
DRAIN
WITH TRAP5 FT MAX
3 F
T m
ax.
DRAIN
P - TRAP
IF NO SLOPE
10 FT MAX GENTLE BEND
OBSTRUCTION
SUPPORTED REMOTE HOSE
20 FT MAX
DRAINP - TRAPNOTE: HEIGHT OF TRAP MUST BE GREATERTHAN THE DUCT STATIC PRESSURE
DRAIN
P - TRAP
IF NO SLOPE
TYPICAL INSTALLATIONWHEN TrueSTEAM IS ABOVE
REMOTE NOZZLE
KINKED
SAG
NO SLOPE
NO SLOPE
M24915
M24915
UNDRAINEDELBOW
NOTES:• Slope hose up in direction of steam flow at 2 in. per foot;• Slope hose down in direction of steam flow at 3/4 in. per foot;• Maximum length of remote steam hose is 20 ft.• Height of P-traps must be greater than the duct static pressure. (Typical 3 in.
will suffice.)• Minimize sharp bends and elbows.• Insulating the remote hose in unconditioned spaces will sustain efficiency better
than not insulating the hose.
TrueSTEAM Humidification System 69-2285—0522

AP
PE
ND
ICE
S
TrueSTEAM Humidification System 69-2285—05 23
AVOID THESE COMMON MISTAKES
Sharp hose bends. Horizontal run does not have minimum pitch of 2 in. per ft.
Sharp hose bends. Hose not continuously supported at least every 12 in., resulting in hose sag.
Sharp hose bends. Does not have at least 6 in. vertical rise immediately out of humidifier, and nozzle is not pitched up.
Horizontal run does not have minimum pitch of 2 in. per ft. Sharp hose bends. Downward pitch does not have trap at its lowest point.
M28672
Never support the hose by attaching it to materials that could potentially sag over time
(such as PVC) or cannot support the remote hose weight.

AP
PE
ND
ICE
S
If the TrueSTEAM owner’s home has water tested in range 2 on the water test strip, the Honeywell Reverse
Osmosis (RO) Filtration System (#S0045947) should be installed in the water supply line. Failure to use the RO kit
in these situations will lead to increased maintenance requirements and possible failure of the TrueSTEAM and its
components.
The RO Filtration System consists of a base chassis, with three filter cylinders:
• Water first passes through the #1 sediment removal filter.
• Then it passes through the #2 reverse osmosis filter.
• Clean water fills the #3 clean water staging tank and the storage tank reserve.
Finally, this reserve flows into the TrueSTEAM tank when the tank runs low and the solenoid valve opens. A drain
line carries reject water from the RO Filtration System to a suitable drainage point in the home.
Parts of the RO Filter
Base Chassis
1. Sediment Removal Filter – Replace at least
once each humidification season.
2. Reverse Osmosis Filter – Replace at least
once each humidification season.
3. Clean Water Staging Tank – Not necessary
to replace, but unscrew and empty water at the end
of a humidification season.
Replace
Empty and
Reconnect
(do not replace)
Replace M29662
Reverse Osmosis Filter
TrueSTEAM Humidification System 69-2285—0524

AP
PE
ND
ICE
S
Setting up the RO Filter
See the instruction sheet packaged with the RO Filtration System for complete installation instructions.
1. Mount the base chassis to a surface capable
of holding up to 7 pounds between the home’s
cold water line and the TrueSTEAM location.
(Mounting hardware is provided.)
2. Connect the 1/4-inch white water line to the
home’s main cold water supply. Connect the
other end to the inlet port on the base chassis.
3. Connect the 1/4-inch white water line to the
outlet on the base chassis. Connect the other
end to the backflow preventer. Connect another
water line between the backflow preventer and
the TrueSTEAM supply fitting.
4. Connect the yellow water line to the outlet port
on the clean water storage tank. Connect the
other end to the yellow inlet port on the RO
Filter System.
5. Connect the red tubing to the reject water port
on the base chassis, and to a suitable drain on
the other end.
IMPORTANT: Refer to and follow local codes
for proper drain installation. Refer to additional
drain requirements in the TrueSTEAM
installation guide when coupling the RO Filter
drain with the TrueSTEAM drain.
Standpipe
Condensate
Pump
SumpLaundry
Tub
Drain points for re
ject water
Floor
Drain
Clean Water
Storage Tank
Cold Water S
upply
M32912
1/4” White TubingManual Shutoff Valve
Backflow Preventer
White Tubing
YellowTubing
Red Tubing
Drainflow Control
5
5
4
4
1
2
2
6
33
TrueSTEAM Humidification System 69-2285—05 25

AP
PE
ND
ICE
S
Maintaining the RO Filter
Honeywell recommends the following maintenance steps be performed at least once each
humidification season.
Remove filters #1, #2, and #3, in this order.
Reconnect filters in this order:
• Empty water from the #3 filter and reconnect to the
RO System. (Do not replace.)
• Connect a new #2 filter.
• Connect a new #1 filter.
M29663
TrueSTEAM Humidification System 69-2285—0526

WIR
ING
Using the DIP SwitchesThe wiring features are configured by DIP settings, which are described under the TrueSTEAM cover.
STEP ONE: Remove the TrueSTEAM Cover
Loosen the cover screw.
Slide cover out from front.
With the cover removed, you will see six DIP switches
to the left of the user interface panel. This manual
refers to DIPs 1–6 from left to right.
STEP TWO: Understand the DIP Switches
DIPS 1 and 2 are used for maintenance.
DIP 1 and DIP 2: Together, these two DIPs specify
how often the automatic flush cycle is performed. See
“Routine Maintainence” on page 46.
65432
On
Off
1
M29608
65432
On
Off
1
M29609
Before Wiring TrueSTEAM
Before wiring the TrueSTEAM:
I will read the section “Understand the DIP Switches” beginning on this page
I will read the section “Deciding on the Wiring Configuration” beginning on page 28
CAUTION: Voltage Hazard.
Be sure TrueSTEAM is not plugged in when removing the cover.
TrueSTEAM Humidification System 69-2285—05 27
1 2
3

WIR
ING
DIPS 3, 4, and 5 are used for humidifying.
DIP 3: Used to enable wireless operation.
• If DOWN (default), wireless terminal is disabled.
• If UP, wireless terminal is enabled.
DIP 4: Used to configure power monitoring.
• If DOWN (default), TrueSTEAM looks for R input
before allowing humidity.
• If UP, TrueSTEAM does not look for R Input before
allowing humidity. Power is still allowed to pass
through if R is wired. See “Make Power Monitoring
Decision” on page 28.
DIP 5: Used to configure back-up air
proving (optional).
• If DOWN (default), TrueSTEAM does not look for air
movement through an air proving device.
• If UP, TrueSTEAM looks for C connection before
allowing humidity. Wire an air proving device
between TrueSTEAM C and System C. See “Make
Add-On Air Proving Decision” on page 32.
Note: Setting DIP 5 up requires DIP 4 to be down. If DIP 4 is up, DIP 5 position will not be used.
DIP 6: Not used at this time.
65432
On
Off
1
M29610
65432
On
Off
1
M29611
65432
On
Off
1
M29612
65432
On
Off
1
M29613
TrueSTEAM Humidification System 69-2285—0528

WIR
ING
TrueSTEAM wiring is different from evaporative pad humidifier wiring. In addition to solenoid water valve actuation,
TrueSTEAM can monitor system power and regulate system fan operation.
You need to decide on the configurations you will use before wiring the TrueSTEAM, These decisions will affect
how the connections are made, how the DIP switches are set, and how TrueSTEAM operates for the homeowner.
STEP ONE: Make Power Monitoring DecisionPower Monitoring is a configuration that allows TrueSTEAM to humidify only when it has confirmation that the
HVAC system transformer has power. This helps prevent steam from entering the supply duct when the HVAC
system is not operating. There are two ways to configure power monitoring, depending on the humidity
control used:
• CONFIGURATION 1 – Using a thermostat with integrated humidity control
• CONFIGURATION 2 – Using a humidistat separate from the thermostat
Before making decisions about wiring configurations:
I understand when to use the DIP switches and how to set them for the humidity control.
CONFIGURATION 1 — using a thermostat
with an integrated humidity control such as
VisionPRO IAQ or Prestige — is ideal for
contractors who:
Want simplified wiring – TrueSTEAM only
needs to be connected to the HUM terminals
from the control.
Provide integrated system and accessory
control in the living space.
Are using VisionPRO IAQ or
Prestige thermostat.
Proceed to “Wiring Basics: Configuration 1”
illustration at top of next page.
CONFIGURATION 2 — using a humidistat
separate from the thermostat such as H6062
or TrueIAQ — is ideal for contractors who:
Use a humidity control separate from
the thermostat.
Wish to locate the humidity control on the
return duct.
Proceed to “Wiring Basics: Configuration 2”
illustration at bottom of next page.
Deciding on the Wiring Configuration
TrueSTEAM Humidification System 69-2285—05 29

WIR
ING
IMPORTANT NOTE: The images below are not complete wiring diagrams. It only depicts power monitoring and is
not meant to be a stand alone diagram. Please refer to the “Wiring the TrueSTEAM” section in the following pages
for complete wiring diagrams.
WIRING BASICS: CONFIGURATION 1
When using a thermostat with integrated
humidity control (such as VisionPRO IAQ
or Prestige):
• The thermostat is powered by the
system transformer. In this configuration,
the thermostat must have power or
TrueSTEAM will not be able to
produce steam.
• Because the thermostat knows when the
system transformer has power, set DIP 4
to UP, so that it is not looking for an R input
from the system R.
• If Thermostat is NOT POWERED by the
system transformer, it is required to monitor
the R input. Leave DIP 4 DOWN. (factory
setting)
WIRING BASICS: CONFIGURATION 2
When using a humidistat separate from the
thermostat (such as H6062 or TrueIAQ):
• TrueSTEAM generally supplies power
to the humidistat. In this configuration,
TrueSTEAM must monitor HVAC system
power to determine if humidity is allowed.
• Leave DIP 4 in the DOWN position (factory
setting), and wire the HVAC system R and
C to the TrueSTEAM R and C. TrueSTEAM
will verify power is present before allowing
steam production.
65432
On
Off
1
Thermostat withHumidity Control
HVAC SystemTrueSTEAM 1
HUMHUM
2 3
RC
M29615
65432
On
Off
1
Humidity Control
HVAC SystemTrueSTEAM
HUMHUM
RC
M29616A
TrueSTEAM Humidification System 69-2285—0530

WIR
ING
STEP TWO: Make System Fan Regulation DecisionSystem Fan Regulation is a configuration that requires TrueSTEAM to monitor the HVAC system fan and make
sure the fan is on if humidity is needed. This helps ensure that airflow will distribute humidity into the living space,
and prevents water condensation in the duct. There are two ways to configure system fan regulation, depending
on the humidity control used:
• CONFIGURATION 1 – Using a thermostat with integrated humidity control
• CONFIGURATION 2 – Using a humidistat separate from the thermostat
Which is right for you?
CONFIGURATION 1 — using a thermostat
with an integrated humidity control such as
VisionPRO IAQ or Prestige — is ideal for
contractors who:
Want integrated control of the humidifier and
HVAC system in the living space.
Want the system fan to turn on immediately
upon a call for humidity.
Proceed to “Wiring Basics: Configuration 1”
illustration at top of next page.
CONFIGURATION 2 — using a humidistat
separate from the thermostat such as H6062
or TrueIAQ — is ideal for contractors who:
Use a humidity control separate from
the thermostat.
Wish to avoid excessive air circulation in
the home. TrueSTEAM fan calls will not be
sent out of the TrueSTEAM GF terminal until
the water temperature reaches 176°F (just
before boiling).
Note: This feature can be used with VisionPRO IAQ as well. See page 35, 42.
Proceed to “Wiring Basics: Configuration 2”
illustration at bottom of next page.
TrueSTEAM Humidification System 69-2285—05 31

WIR
ING
IMPORTANT NOTE: The images below are not complete wiring diagrams. It only depicts power monitoring and is not meant to be a stand alone diagram. Please refer to the “Wiring the TrueSTEAM” section in the following pages for complete
wiring diagrams.
WIRING BASICS: CONFIGURATION 1
When using a thermostat with integrated
humidity control (such as VisionPRO IAQ
or Prestige):
• A thermostat controls the fan and
TrueSTEAM. The control will not allow
steam production unless the system fan
is on.
• Wire Thermostat G to the HVAC system G
as normal.
• Wire TrueSTEAM HUM terminals to the
system HUM terminals.
WIRING BASICS: CONFIGURATION 2
When using a humidistat separate from the
thermostat (such as H6062 or TrueIAQ):
• The external humidity control does
not monitor or control the system fan.
TrueSTEAM must confirm that the fan has
power before allowing humidity.
• Break the thermostat G to HVAC system
G connection. Wire thermostat G to
TrueSTEAM GT. Wire TrueSTEAM GF to
HVAC system G.
• Thermostat G calls will pass directly
through TrueSTEAM. If this signal is
not present, and humidity is needed,
TrueSTEAM will relay power from its RT
terminal to GF and out to HVAC system
G to ensure the fan has power for
humidity calls.
Thermostat withHumidity Control
HVAC SystemTrueSTEAM 1
HUMHUM
2 3
RC
M29617
Humidity Control
Thermostat
TrueSTEAMHVAC System
HUM
HUM
R
G
GT
GGF
M29618A
TrueSTEAM Humidification System 69-2285—0532

WIR
ING
STEP THREE: Make Add-On Air Proving DecisionIn addition to monitoring system power and fan regulation, TrueSTEAM can monitor physical air movement
through an optional add-on air proving device. If an air proving device is added, TrueSTEAM can create steam
only if the fan is moving air through the supply duct.
Honeywell HIGHLY recommends adding an Add-On Air Proving Device for ALL TrueSTEAM™ installations.
IMPORTANT NOTE: The image below is not a complete wiring diagram. It only depicts power monitoring and
is not meant to be a stand alone diagram. Please refer to the “Wiring the TrueSTEAM” section in the following
pages for complete wiring diagrams.
WIRING BASICS
• Wire TrueSTEAM R and C to HVAC system
R and C with an air proving device in-line
on C.
• Configure air proving through DIP 5 on
TrueSTEAM. Set DIP 5 up and keep
DIP 4 down.
• TrueSTEAM will look for physical air
movement through its C connection before
steam enters the duct.
65432
On
Off
1
HVAC SystemTrueSTEAM
RC
RC
M29619
TrueSTEAM Humidification System 69-2285—05 33

WIR
ING
You will need to wire TrueSTEAM using the diagram that applies to your humidity control. Remember to
include the wiring and DIP settings required for power monitoring, system fan regulation, and add-on air
proving (if used).
Using the Terminals
Wiring the TrueSTEAM
Use the terminals (found inside the cover) to
wire TrueSTEAM to the humidity control and the
HVAC system.
RedLINK Wireless Terminals
A – Hot
B – Send signal
C – Receive signal
D – Common
Note: If using wireless control, set DIPs 3 and 4 to the UP position.
Low-voltage Terminals
24V – Output voltage
HUM – Low-voltage terminals for humidity control.
C, R – Inputs from HVAC system transformer.
GT, GF – GT input is from thermostat G. GF output
goes to HVAC system G.
RT – Connects to thermostat R terminal, which is
normally switched to call for fan.
EXT – When a 24-vac fan board is not used to control
blower (hydronic or cooling-only applications), this
connection with GF provides dry-contact closure for
fan calls. EXT/GF may be wired to a low-voltage relay
control center to provide line-voltage fan control.
Route wires through the raised tabs and out the notch
at the rear of the chassis.
Make sure the wires are secure and do not interfere
with the cover assembly.
Routing the Wires
24V24VHUMHUMCGTRRTGFEXT
ABCD
M29620
TrueSTEAM Humidification System 69-2285—0534
M29621
1
2

WIR
ING
Follow the diagram for control options 1 through 14 to wire the TrueSTEAM. Refer to the installation manual
provided with the control for additional instructions if needed.
OPTION 1: Dry-contact Mechanical
Humidistat Wiring
1 Make sure that the thermostat used
isolates Y from G. All Honeywell Prestige,
VisionPRO IAQ, VisionPRO, and Focus Pro
thermostats do this.
HVAC
RECOMMENDEDAIR FLOW SWITCH (AFS)
HumidiPRO
THERMOSTAT
C
R
U
U
S
S
GYWR Rc
GYWR C
24V
24V
HUM
HUM
C
GT
R
RT
GF
EXT
M34831
TrueSTEAM
Setting
Light Auto
Next Auto
System
%
Inside
%
HUMIDITY BOOST
OUTDOOR SENSOR (OPTIONAL)
1
Using the Correct Control Diagram
CAUTION: Voltage Hazard.
Before wiring to HVAC terminals, disconnect HVAC equipment power. Make sure TrueSTEAM
is not plugged in.
65432
On
Off
1
AFS Monitor RecommendedM32913
NOTE: Advanced Wiring diagrams are shown in Appendix B beginning on page 56.
TrueSTEAM Humidification System 69-2285—05 35

WIR
ING
Installing the Humidistat
Remote Mount InstallationChoose a location in the living area.
NOTE: Select a location clear of drafts or excessive humidity. Avoid mounting near doors or windows, or in bathrooms or kitchens.
ALTERNATELOCATION
RETURN AIR
RETURN AIR
6 IN (152 MM) MINIMUM
15 IN (381 MM) MINIMUM
BEST LOCATION
RETURN AIR DUCT M34579
YESNO
NO
M34567
Warning: Product must be mounted on the RETURN
side of the duct for proper RH% sensing.
Duct-Mount Installation (recommended)
Caution: Electrical HazardCan cause electrical shock or equipment damage. Disconnect power before beginning installation.
5. Mark the duct-tube hole.
Hold the wallplate up to the desired location on the duct and make a mark inside the duct tube hole.
6. Drill the duct-tube hole.
Find your mark and drill a 1/2 in. hole in the duct. This is where the duct tube will be inserted to capture air.
M34581M34580
OR
1. Choose a location on the RETURN duct. 2. Separate wallplate from humidistat.
TrueSTEAM Humidification System 69-2285—0536

WIR
ING
Wiring the HumidistatThis humidity control is wired the same way a manual humidistat (H8908) is wired. The only difference is that you also wire in power (24 VAC) and an outdoor sensor.
M34582
M34610
RUN WIRES THROUGH THE TOP OR BOTTOM CHANNELC
RUUSS
M34865
TERMINAL DESIGNATION
C 24 VAC POWER FROM EQUIPMENTR 24 VAC POWER FROM EQUIPMENTU HUMIDIFIERU HUMIDIFIERS OUTDOOR SENSORS OUTDOOR SENSOR
NOTES: C AND R MUST BE CONSTANT 24VAC! RECOMMENDED TO WIRE TO FURNACE/AIR HANDLER CONTROL BOARD. DO NOT WIRE C AND R TO HUMIDIFIER TRANSFORMER!
C
R
U
U
S
S
24 VAC (CONSTANT)
TO HUMIDIFIER
OUTDOOR TEMPERATURESENSOR
5. Insert the duct tube.
M34671
Insert the duct tube through the wallplate before securing to the duct.
Installing the Humidistat
Duct-Mount Installation (continued)
6. Secure the wallplate.
Secure the wallplate to the duct with sheet metal screws (provided).
7. Run wires through the back plate.
Run wires through the top or bottom chan-nel on the back plate when duct-mounted. If installing like a thermostat on a wall, run the wires through the back.
TrueSTEAM Humidification System 69-2285—05 37

WIR
ING
Mounting the Outdoor Sensor (Not required if window protection isn’t needed)
Location
Mount the sensor where:• it cannot be tampered with.
• there is good air circulation.
• surface is flat.
• wire distance between sensor and humidistat is less than 200 feet.
• it can measure true outdoor ambient temperature.
Do NOT mount the sensor:• in direct sunlight.
• where snow, ice or debris can cover it.
• where hot or cold air blows on the sensor. (For example, a discharge line from an outdoor compressor unit,
vent or fan can cause inaccurate temperature readings.)
Steps to mount the sensor
1. Remove the sensor from the mounting clip.
2. Mark the area on the location selected for mounting the sensor mounting clip.
3. Mount the clip. Image on right shows typical locations for out-door sensor.
M7514A
TrueSTEAM Humidification System 69-2285—0538

WIR
ING
Wiring the Outdoor Sensor
CAUTION: Electrical Interference (Noise) Hazard. Can cause erratic system operation.
Keep wiring at least one foot away from large inductive loads such as motors, line starters,
lighting ballasts and large power distribution panels.
Use shielded cable to reduce interference when rerouting is not possible.
Be sure wires have a cable separate from the thermostat cable.
Do not route temperature sensor wiring with building power wiring, next to control contactors or
near light dimming circuits, electric motors or welding equipment.
Avoid poor wiring connections.
Avoid intermittent or missing building earth ground.
CAUTION: Electrical Shock Hazard. Can cause electrical shock or equipment damage.
Disconnect power supply before connecting wiring.
Wiring must comply with applicable codes, ordinances and regulations:
1. Wire the C7089 Outdoor Sensor to the S terminals on the humidity control. If leadwire provided with C7089 is not long enough (60 in.), run a cable to a hole at C7089 location.• Using color-coded, 18-gauge, shielded thermostat wire is
recommended. For example of general wiring of C7089, see image at
right.
• Pigtail wiring can be used.
2. Mount C7089 in its mounting clip.
3. Plug wiring hole using nonhardening caulk or putty.
1
2
2
1
USE APPROPRIATE MOUNTING MEANS FOR THE TYPE OF STRUCTURE.
PLUG WIRING HOLE WITH NON-HARDENING CAULK OR PUTTY.
C7089WIRING HOLE THROUGH STRUCTURE
M34611
CRUUSS
TrueSTEAM Humidification System 69-2285—05 39

WIR
ING
Mount Humidity Control
Align the 4 tabs on the wallplate with the slots on the back of the control, then push gently until the control snaps in place.
TABS
TABS
WALLPLATE
M34583
SLOTS ONBACK OF
HumidiPRO
CheckoutAllow C7089B Outdoor Sensor to absorb outdoor air for a minimum of twenty minutes before taking a reading.
With an accurate thermometer (±1°F [0.5°C]), measure the temperature at the sensor location, allowing time for
the thermometer to stabilize before reading.
Then verify the sensor accuracy by going into installer Test #20. This will show you the outdoor temperature.
CalibrationThe C7089 Outdoor Sensor is calibrated at the factory. However, you can offset the outdoor sensor reading using
Function 35 in Installer Setup.
You’ve just installed your Humidity Controller!This Humidity Control has been preprogrammed to the ideal settings for most homes.
If you installed this control with an outdoor sensor, the control will operate in AUTOMATIC MODE, which
automatically adjusts humidity to help prevent window condensation.
If you installed this control without an outdoor sensor, the control will operate in MANUAL MODE, giving the
homeowner simple, direct control of their humidifier (RH% Setting Only).
Advanced Installer SetupSee next page to customize feature operation.
Installer System TestIf Advanced Installer Setup is not required, skip to “Installer System Test/Checkout” on page 42.
TrueSTEAM Humidification System 69-2285—0540

WIR
ING
Honeywell has already programmed this control to work properly in most applications. However, you can adjust
the advanced settings by following the steps below.
Press p or q to change settings.
Press NEXT to advance to the next function.
Press DONE to exit and save settings.
Function NumberSetting
Displayed Description
1 System Type1 Humidifier2 Dehumidifier
4 Control Mode Automatic Mode is Default when Outdoor Sensor Detected Manual Mode is Default when NO Outdoor Sensor Detected
1 Automatic
2 Manual 5 Automatic Mode RH% (Hum) This is the humidity setpoint (RH%) the control will operate to. The homeowner does not change this and will only need to set the appropriate window protection setting.
Range: 20%-60%
Default = 35%
11 Automatic Mode Humidity Boost Increases Preset RH% (#5) when user sets window protection to 11.
0 OFF5% 5%
10% 10%
17 Automatic Mode High Temp Shut-Off Turns humidifier OFF when Outdoor Temperature is greater than selected setting.
Range: 40° - 90°
0 = OFF
Default = 65°
19 High Hum Limit
Range: 10% - 90%
Default = 60%
20 Low Hum Limit
Range: 10% - 90%
Default = 10%
21 High Dehum Limit
Range: 10% - 90%
Default = 80%
23 Low Dehum Limit
Range: 10% - 90%
Default = 40% 25 Dehumidifier Compressor Lockout 0 - 5 Minutes
Default = 0 Minutes (OFF)
30 Humidity Sensing Calibration This feature will offset the sensed indoor humidity.
Range: -9% to +9%
Default = 0 (Displays Actual RH%)
35 Outdoor Temperature Sensor Calibration This feature will offset the sensed outdoor temperature if needed.
Range: -9° to +9°
Default = 0 (Displays Actual Outdoor Temp)
To begin, press and hold the p and LIGHT buttons until
the display changes.
1 1Done Next
M29387A
Advanced Installer Setup
TrueSTEAM Humidification System 69-2285—05 41

WIR
ING
Honeywell HumidPROTM Frost Index
Installer System Test/Checkout
Outdoor Temp-10°F 0°F 10°F 20°F 30°F 40°F
Fro
st I
nd
ex
1 10 10 10 10 11 11 17 17 25 25 35 36
2 10 10 10 10 15 15 21 21 29 29 35 39
3 10 10 14 14 19 19 26 26 34 34 35 46
4 15 15 19 19 25 25 32 32 35 39 35 52
5 21 21 26 26 32 32 35 38 35 48 35 58
6 29 29 34 34 35 39 35 48 35 56 35 60
7 35 39 35 46 35 52 35 58 35 60 35 60
8* 35 56 35 60 35 60 35 60 35 60 35 60
9 35 60 35 60 35 60 35 60 35 60 35 60
10 35 60 35 60 35 60 35 60 35 60 35 60
*Black Numbers show highest humidity allowed when Default RH% (35%) is Selected.
Note: Smaller grey numbers show highest humidity allowed when Maximum RH% (60%) is selected.
Press p / q to turn system on/off.
Press NEXT to advance to next test.
Press DONE to terminate system test.
To begin, press and hold the p and q buttons until the display changes.
Function Number
Setting
Number Description
10 System Test 0 OFF
1 ON
20 View Outdoor Temperature Shows Outdoor Temperature
10 0
M29388A
Test number System status
NOTE: Most humidifiers require airflow in the system to operate. Make sure to turn on the system fan when
testing humidifier operation.
H6062 SpecificationsHumidity Ranges:
Humidify:• Default: 10% to 60%
• Total Range Available: 10% to 90%
Operating Ambient Temperature• 32° to 120°F (0° to 48.9°C)
Operating Relative Humidity• 5% to 90% (non-condensing)
TrueSTEAM Humidification System 69-2285—0542

OP
ER
AT
ION
A
ND
SE
RV
ICE
When installation is complete, plug TrueSTEAM in and turn the humidity control on. Make sure it is running
properly before turning the system over to the homeowner. Once TrueSTEAM is running, day-to-day operation is
hands-free, except for occasional cleaning. The homeowner can use the control to adjust the humidity setpoint,
adjust the frost setting (if used), or turn TrueSTEAM off as desired.
Slide the cover into place and secure with the
cover screw.
Turn on the water supply at all valves. Cold water will
flow to the TrueSTEAM but will not fill the tank until the
unit is turned on and a call for humidity is made.
Plug in the TrueSTEAM power cord.
• The Power light will turn on, indicating that
TrueSTEAM has power.
Turn the humidity control to On.
• The Humidifying light will start blinking. This means
TrueSTEAM is in Stand-by.
Press/release the Go button to prepare TrueSTEAM
for use. TrueSTEAM will automatically reset if the Go
button is not pressed after 5 minutes.
• The tank will fill with cold water and the humidifier
light will be blinking. Water flow stops automatically
when the tank is full.
• The Humidifying light will be solidly on — it will stop
blinking — when TrueSTEAM is heating water for
steam production.
Wait until TrueSTEAM produces steam, then check
the following:
• Make sure air is blowing from furnace. Typically, the
blower turns on 10 –15 minutes after the call for
humidity if TrueSTEAM is controlling the fan.
• Check all water line connections to ensure there
are no leaks before leaving the job site.
• Turn the setpoint to the desired level when testing
is complete. If humidity is not needed, set the
control to Off.
M32916
COLD and SOFTENED water should enter the TrueSTEAM
Hot WaterHeater
WaterSoftener
Startup and Checkout
TrueSTEAM Humidification System 69-2285—05 43
3
2
1
4
5

OP
ER
AT
ION
A
ND
SE
RV
ICE
TrueSTEAM automatically flushes the tank throughout the humidifying season. This lowers the water hardness
concentrated in the tank, and slows the accumulation of solid minerals.
Automatic Cleaning Cycle
• The automatic cleaning cycle takes about 45 minutes. During this time, TrueSTEAM will not produce
any steam.
• Cold water will enter the tank to lower water temperature below 140°F (60°C) before draining.
• At the end of the cycle, TrueSTEAM refills the tank with fresh water and automatically returns to
normal operation.
Manual Cleaning CycleHoneywell recommends that TrueSTEAM be manually cleaned and the water filter be changed at least
once each humidification season. The manual cleaning is necessary to remove solid mineral deposits left
behind during operation.
STEP ONE: Initiate a Flush CycleSolid material deposits in the tank are normal. The
homeowner should expect to see some buildup in the
tank and on the heating element.
• When the Cleaning Required light is on, manual
cleaning is needed. TrueSTEAM will still operate as
normal while this light is on.
• Before removing the TrueSTEAM tank, it must be
completely drained.
To begin draining the tank, press and hold the Drain
button until the Draining light blinks.
Manual Drain Procedure
Press and hold the Drain and Go buttons
simultaneously to interrupt the water cooling cycle and
immediately drain the tank.
CAUTION: Burn and Scalding Hazard. Use extreme caution when using the manual drain procedure. The water exiting the TrueSTEAM may be as hot as 212ºF. Make sure the drain outlet can handle up to 212ºF (100ºC), or wait at least 45 minutes to allow the water to cool before using this feature.
Routine Maintenance
TrueSTEAM Humidification System 69-2285—0544
M29628
2
1
OP
ER
AT
ION
A
ND
SE
RV
ICE
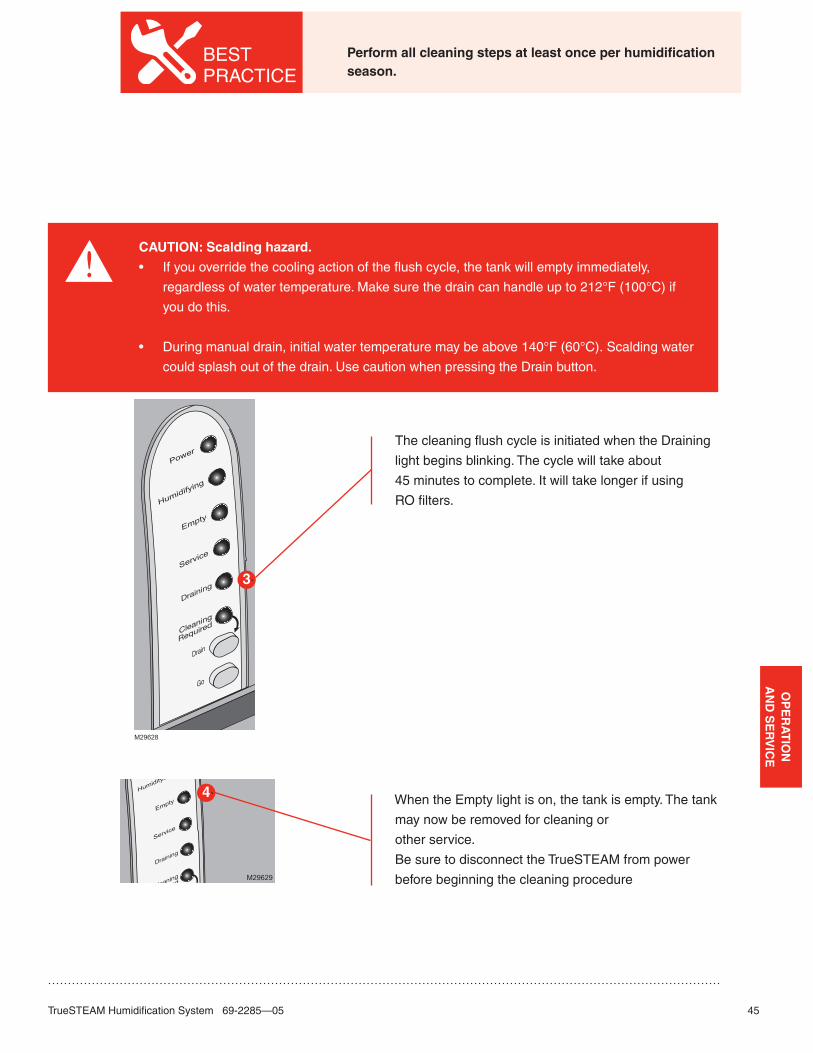
The cleaning flush cycle is initiated when the Draining
light begins blinking. The cycle will take about
45 minutes to complete. It will take longer if using
RO filters.
When the Empty light is on, the tank is empty. The tank
may now be removed for cleaning or
other service.
Be sure to disconnect the TrueSTEAM from power
before beginning the cleaning procedure
M29628
M29629
CAUTION: Scalding hazard.
• If you override the cooling action of the flush cycle, the tank will empty immediately,
regardless of water temperature. Make sure the drain can handle up to 212°F (100°C) if
you do this.
• During manual drain, initial water temperature may be above 140°F (60°C). Scalding water
could splash out of the drain. Use caution when pressing the Drain button.
BEST PRACTICE
Perform all cleaning steps at least once per humidification season.
TrueSTEAM Humidification System 69-2285—05 45
4
3

OP
ER
AT
ION
A
ND
SE
RV
ICE
STEP TWO: Remove the Water Tank
Make sure the tank is empty. The Empty light turns on
when it is.
Turn the manual shutoff valve to the “Unlock” position.
Grip the white water valve arm and slide it back to
disengage from the tank’s black spool.
Grip the tank bottom firmly. Push down the safety
release button and pull the latch forward to
release the tank.
Note: The latch remains attached to TrueSTEAM and
is not removed with the tank.
M29630
CAUTION: Scalding hazard.
Do not attempt to remove TrueSTEAM from the mounting bracket during operation or when the
tank is full of water. The heating element could be hot when tank is removed. Failure to comply
could result in severe scalding.
TrueSTEAM Humidification System 69-2285—0546
2
3
1

OP
ER
AT
ION
A
ND
SE
RV
ICE
STEP THREE: Clean the Tank
Use tap water to flush loose minerals from the tank:
• Sediment screen at tank’s bottom is removable.
• For a more thorough cleaning, soak tank in water
with CLR®, LimeAway® or white vinegar. Then
rinse clean.
• Tank is dishwasher safe.
• Do not use hydrocarbon-based cleaners.
Unplug the power cord and carefully rub minerals off of
the heating element and tank walls. Clear the sensor
compartment holes of debris, if present.
M29631
STEP FOUR: Replace the Water Level Sensor (if necessary)
WARNING: Electrocution Hazard.
TrueSTEAM must be unplugged before removing the cover. Hazardous voltage could cause
death or serious injury.
Remove TrueSTEAM cover and inspect water
level sensor. If debris buildup is present, clean with
recommended cleaning agent. If cracks or visible
discoloration is noticed, replace sensor (see below).
Remove T-30 Torx screw and lift clamp.
Remove the sensor.
Ensure sensor gaskets are seated properly and are
in good condition (no cracks). If cracks are noticed,
replace water sensor assembly (including gaskets).
Install a new sensor if excessive mineral deposits are
present, or if gaskets are in poor condition. See “Parts
List” on page 59.
M29632
3
4
2
5
1
TrueSTEAM Humidification System 69-2285—05 47
2
1

OP
ER
AT
ION
A
ND
SE
RV
ICE
Changing the Water FilterReplace the polyphosphate water filter at least once every humidification season.
Turn the water supply off at the saddle valve or T-fitting
and manual shutoff valve.
Press down on the filter collar ring and pull out the 1/4-
inch water line from each side of the filter.
Insert the 1/4-inch line into a new filter. Apply a modest
pull to ensure a tight fit.
Be sure to install the new filter correctly. The arrows on
the filter must point to TrueSTEAM in the direction of
the water flow.
Secure the new filter in place with clamps or ties to
support weight. Turn water supply on and check for
leaks.
If the optional reverse osmosis filter is used instead of
the polyphosphate filter, there are two filter cartridges
to be replaced. Replace the cartridges once every
humidification season or when the Cleaning Required
or Service light starts blinking due to water fill/drain
issues. See “Reverse Osmosis Filter” on page 23.
M29634
TrueSTEAM Humidification System 69-2285—0548
23
4
1
5

OP
ER
AT
ION
A
ND
SE
RV
ICE
Water Level Sensor Troubleshooting Steps
WARNING: Electrocution Hazard.
This test should be done when current is not present on pins. Always unplug the humidifier
before testing.
Test Setup• Remove and drain the tank. The tank must be
empty.
• Remove the connector from the water level sensor.
Test PinsTest is done in 5 pins as shown in the figure below.
Testing for Shorts• Use an OHM METER and set it to the highest
setting.
• Place the OHM METER PROBES on top of sensor
probes.
• Measure the resistance between the following
locations:
Between P1 and P3
Between P1 and P4
Between P2 and P4
Between P4 and P5
Good Water SensorThe water sensor is good if all pins show an infinite
reading.
Bad Water SensorThe water sensor is bad if any pins show Ohms
reading. This water sensor should be replaced.
TrueSTEAM Humidification System 69-2285—05 49
M32994
P1
P2
P3
WATER LEVELSENSOR
P4
P5

OP
ER
AT
ION
A
ND
SE
RV
ICE
STEP FIVE: Reinstall the Tank Before reinstalling the tank and cover, perform
these checks:
• Clear any dust from the ventilation holes
in the cover.
• Clear any debris from the water drain tube.
• Make sure the water tank gasket seal is seated
properly in the TrueSTEAM base. Make sure the
gasket is in good condition (no cracks or tears)
before attaching the tank.
Attach tank by securing the latch and plug
in TrueSTEAM.
If the control is calling for humidity, the Humidifying
light will blink at startup. TrueSTEAM waits 5 minutes
to complete the tank reconnection before acting on this
call.
Engage the white water valve to the tank’s black
spool, then turn the manual shutoff valve to the “Lock”
position and plug in the power cord.
Check that TrueSTEAM is still mounted level and is
securely in place on the mounting bracket.
Press the Go button once the tank is completely
reconnected. This will ready TrueSTEAM to act on the
control’s call for humidity (if present).
M29633
M29628
TrueSTEAM Humidification System 69-2285—0550
2
4
3
1

OP
ER
AT
ION
A
ND
SE
RV
ICE
TrueSTEAM Humidification System 69-2285—05 51
No. of Service LED Blinks
Fault Description Auto-Recoverable? Steps to Fix (Performed Only By Professional HVAC Technician)
1 Water Heater
temperature sensor is
out of range.
Yes, TrueSTEAM
will reset if fault no
longer exists in one
hour.
1. Unplug TrueSTEAM & remove cover
2. Check Water sensor connection to board. Remove and plug
back in.
3. Press the Go button.
4. If fault returns, replace TrueSTEAM
2 Water sensors failed. Yes, TrueSTEAM
will reset if fault no
longer exists in one
hour.
1. Unplug TrueSTEAM and remove cover.
2. Disconnect water level sensor wiring.
3. Ohm out water sensor
4. Readings between P1 & P3, P1 & P4, P2 & P4 and P4 & P5
should all show infinite resistance. If they do not replace the
sensor.
3 Failure to fill tank
with water.
Yes, system will
return to “Ready”
if fault no longer
exists in
three hours.
1. Ensure inlet water is on.
2. Check for voltage on the fill terminals for the solenoid valve
(should be appox. 120vac)
3. Check for leaks around the tank seal and solenoid.
4. If using an RO filter make sure the flush timer is set for 30
hours
5. If using an RO filter, follow troubleshooting information as
outlined in RO install guide.
6. If not using an RO filter, turn off water supply and replace any
in line water filter.
7. Press and hold the go button until res Service light turns off.
8. If tank still fails to fill, press the Drain button.
9. If tank fails to drain, unplug TrueSTEAM (and make sure water
in tank is cool before proceeding).
10. Follow the tank cleaning steps.
11. Ensure you have a firm grip on the tank before releasing the
tank, especially if water is present.
12. Clear any excess debris from the tank’s bottom orifice to the
solenoid.
13. Reassemble tank and plug TrueSTEAM back in. Press the
button to reset. If water still fails to fill into the tank, replace the
solenoid valve
Troubleshooting
TrueSTEAM has internal system diagnostics that monitor operation, maintenance schedules, and faults. If a
system fault is detected, TrueSTEAM will attempt to recover up to five times in a 24-hour period.
• If TrueSTEAM is unable to recover by itself within 24 hours, the red Service light blinks in a series that
indicates the fault detected.
• Refer to the table below for the fault indicated, along with the steps to fix TrueSTEAM.
• Press and hold the Go button until the Service light turns off.

OP
ER
AT
ION
A
ND
SE
RV
ICE
TrueSTEAM Humidification System 69-2285—0552
No. of Service LED Blinks
Fault Description Auto-Recoverable? Steps to Fix (Performed Only By Professional HVAC Technician)
4 Heating element
overheated.
No If this is a new install:
1. Reset the error code and power cycle the unit.
2. If the error code comes back, replace the unit.
If the unit has been in service while:
1. Troubleshoot the water sensor
2. If troubleshooting indicates a sensor issue, replace the sensor.
3. If that does not resolve the issue the entire unit will need to be
replaced.
5 Input voltage
insufficient.
Yes, system will
return to “Ready”
if fault no longer
exists in one hour.
1. Verify the electrical circuit is not overloaded.
2. Unplug and replug TrueSTEAM in to see if the fault returns.
3. If the fault returns, unplug TrueSTEAM and remove cover.
4. Ensure wiring connections are secure and attached.
5. If the fault returns, replace TrueSTEAM. (Field service is not
recommended if line voltage is lost.)
6 Water overflow
sensed.
Yes, system will
return to “Ready”
if fault no longer
exists in one hour.
Overflow error code is usually caused by one of two things:
1. Back pressure on the nozzle or remote hose.
2. Back pressure on the drain tube.
Ensure that static duct pressure is not above .5” wc.
If this is a remote install:
1. Make sure the remote hose has a minimum rise of 2” per foot.
Flat, or downhill pitches, even a sharp bend can contribute to
back pressure.
2. Ensure that remote hose rises 6” from the TrueSTEAM before it
angles to the remote mount location.
3. Ensure that the remote nozzle is not pointing in to the airflow.
Drain Tube:
1. Ensure that the has s steady downhill pitch with no flat or uphill
areas.
2. Ensure drain hose is not kinked or submerged in water at the
drain.
3. Check functionality of condensate pump, if used.
If the above does not resolve the issue:
1. Follow the tank cleaning steps listed in the manual.
2. After cleaning, if the fault returns, unplug TrueSTEAM
3. Loosen cover screw & remove cover.
4. Troubleshoot water sensor.
5. Replace sensor if infinite resistance is not shown from P1 &
P3, P1 & P4, P2 & P4 and P4 & P5
6. Press button to Reset unit.

OP
ER
AT
ION
A
ND
SE
RV
ICE
TrueSTEAM Humidification System 69-2285—05 53
No. of Service LED Blinks
Fault Description Auto-Recoverable? Steps to Fix (Performed Only By Professional HVAC Technician)
7 HVAC power
not present.
Yes, system will
return to “Ready”
if fault no longer
exists in one hour.
1. Unplug and replug TrueSTEAM in to see if power returns.
2. If power does not return, ensure HVAC equipment has power.
3. Check circuit breaker or replace fuse if circuit is tripped.
4. Unplug TrueSTEAM and remove cover. Check DIP 4 position
and verify correct wiring based on DIP 4 position. Check
install guide section on Power monitoring Information.
5. Plug in TrueSTEAM and press the Go button.
If the fault reappears, ensure the circuit being used has the rating
to support the TrueSTEAM. Unplug any additional equipment
plugged into this circuit. If fault disappears, the circuit capacity is
not properly sized to your unit.
If the fault returns, replace TrueSTEAM.
8 The weld monitor
input is active when
the heater relay is off.
No 1. Press and hold the Go button to clear the fault.
2. Initiate a humidity call.
3. If the fault returns, replace TrueSTEAM.
10 The heater relay failed
to turn on.
No 1. Check for voltage on the heater terminals/leads. There should
be 120Vac.
2. If there is not, press the Go button to clear the fault.
3. Initiate a call for humidity
4. If the fault returns, replace TrueSTEAM
12 Temperature of the
electronic circuit
board is too high.
Yes, system will
return to “Ready”
if fault no longer
exists in one hour.
1. Make sure ventilation holes in the cover are clear of
obstruction. Make sure 1 foot of clearance is maintained around
the cover’s vent holes.
2. Ensure TrueSTEAM is installed in a location with conditioned
air 34°F to 104°F (1.1°C to 40°C).
3. Turn humidistat off and allow time for electronic board to cool.
This could take up to 2 hours.
4. Turn humidistat on and press the Go button to reset.
5. Confirm humidity call starts by checking if Humidifying light
is on.
6. Allow TrueSTEAM to run. Check for steam leaks around tank
and ventilation holes.
7. If the fault returns, replace TrueSTEAM.

OP
ER
AT
ION
A
ND
SE
RV
ICE
TrueSTEAM Humidification System 69-2285—0554
No. of Service LED Blinks
Fault Description Auto-Recoverable? Steps to Fix (Performed Only By Professional HVAC Technician)
13 Tank failed to drain. No CAUTION: Water in tank may be hot (>140°F [60°C]).
1. Press the Drain button.
2. If tank fails to drain, wait for water in tank to cool.
3. Ensure tank water is cool. Once it is, follow tank cleaning steps
under “Manual Cleaning Cycle” in manual.
4. Ensure drain tube is not pinched, clogged or blocked
5. Reassemble tank, reinstall tank and press the “GO” button to
reset.
6. If tank fault persists, replace solenoid valve. (#50027997-001)
14 Heater failed to
boil water.
Yes, system will
return to “Ready”
if fault no longer
exists in one hour.
1. Follow the tank cleaning steps. “Manual Cleaning Cycle”
2. Ensure entire tank, heating element and reservoir area are
clean.
3. Reassemble & reinstall tank
4. Press GO button to reset.
5. Ensure that there is 120 Vac at heating element terminals.
6. If fault returns, replace the TrueSTEAM
15 No airflow sensed
in supply duct.
Yes, system will
return to “Ready”
if fault no longer
exists in one hour.
1. Ensure optional add-on air proving device is installed and wired
correctly.
2. Unplug TrueSTEAM, and remove cover.
3. Ensure DIP switches are set correctly. (DIP 4 down, DIP 5 up.)
4. Reconnect cover and plug in TrueSTEAM.
5. Press and hold the Go button to clear the fault.
6. If the fault persists, replace the air proving device being used.
17 Power to the wireless
adapter overloaded.
Yes, system will
return to “Ready”
if fault no longer
exists in one hour.
1. Verify wiring between TrueSTEAM and the wireless adapter.
2. Ensure DIP switches are set correctly. (DIP 3 up. Also DIP 4 up
if TrueSTEAM R and C aren’t wired.)
3. If the fault persists, replace the wireless adapter.
18 Wireless
communication
from wireless
adapter failed.
Yes, system will
return to “Ready”
after one minute.
1. Verify wiring between TrueSTEAM and the wireless adapter.
2. Verify the Prestige control is operating correctly.
3. If the fault persists, replace wireless adapter and re-enroll
connection to Prestige.
Cleaning
Required
light
is on.
Tank was slow to
drain during last
automatic flush cycle
or 12-month cleaning
interval time
has expired.
N/A Follow the tank cleaning steps. See “Manual Cleaning Cycle”
on page 46.

AP
PE
ND
ICE
S
TrueSTEAM Humidification System 69-2285—05 55
Humidifying Capacity
HM506: up to 6 gallons per day (gpd)
(23 liters per day [lpd])
HM509: up to 9 gpd (34 lpd)
HM512: up to 12 gpd (45 lpd)
Humidified Area
HM506: 4,000–14,400 cubic feet
HM509: 8,000–18,400 cubic feet
HM512: 12,000–24,000 cubic feet
Note: Higher volumes require more TrueSTEAM run time.
Weight
Empty Filled with Water
HM506: 8 lbs. 12 lbs.
HM509: 8 lbs. 15 lbs.
HM512: 9 lbs. 15 lbs.
Dimensions
11-1/4 in. W x 19 in. H x 9 in. D
Operating Temperature Range
• TrueSTEAM Humidifier: 34ºF–104ºF (1.1ºC–40ºC)
• Remote Hose/Nozzle: -50ºF–250ºF (-46ºC–121ºC)
• Operating Humidity Range: 0–95% RH, non-condensing
Drain Operation
• Automatic Flush Schedule: Configurable to 8, 12, 20, or
30 hours of operational time (heating element active)
• Automatic Flush Cycle Time: Flush cycle takes
approximately 45 minutes to empty the tank completely
• Draining Temperature Range: 34ºF–212ºF (1.1ºC–100ºC)
Electrical Ratings and Tolerances
Input Ratings
• Power Supply: 120VAC +10-15%, 60Hz
- HM506: 840W at 120VAC at full load
- HM509: 1200W at 120VAC at full load
- HM512: 1440W at 120VAC at full load
• HM506: 7A, 120VAC
• HM509: 10A, 120VAC
• HM512: 12A, 120VAC
• 15A, 120VAC interlock switch
• Thermostat/HVAC power monitor (R to C):
10mA resistive at 24VAC
• Field wiring terminals: 18–22 ga. Solid
• HVAC power/airflow monitor: 10 mA resistive at 24 VAC
Output Ratings
• Relay output contacts:
- Fan: 1.5A full load, 7.5A locked rotor at 24VAC
- Heat and backup: 15A resistive at 120VAC
• Fill Solenoid: 0.1A at 120VAC, 0.5 PF
• Drain Solenoid: 0.1A at 120VAC, 0.5PF
• Humidistat output contacts: 10mA resistive at 24VAC
• Humidistat power supply: 100mA at 24VAC
Standards and Approval Body Requirements
• Underwriters Laboratories: UL998, File no. E185662
• Federal Communications Commission: Class B
compliance, File no. YU555
• Intended to be used in accordance with the
National Electrical Code (NEC), ANSI/NFPA 70,
and the rules of the Canadian Electrical Code (CEC),
Part 1, C22.1
A: Specifications

AP
PE
ND
ICE
S
HVAC ELECTRONICHUMIDISTAT
THERMOSTAT
HUM
HUM
24V
24V
GYWR Rc
GYWR C
24V
24V
HUM
HUM
C
GT
R
RT
GF
EXT
RECOMMENDEDAIR FLOW SWITCH (AFS)
1
M24757A
HVACPOWERMASTER
TrueSTEAM - INTERNAL
Follow the diagram for control options 1 through 14 to wire the TrueSTEAM. Refer to the installation manual
provided with the control for additional instructions if needed.
OPTION 1: Dry-contact Mechanical
Humidistat Wiring
1 Make sure that the thermostat used
isolates Y from G. All Honeywell Prestige,
VisionPRO IAQ, VisionPRO, and Focus Pro
thermostats do this.
OPTION 2: TrueIAQ Wiring
1 • Make sure that the thermostat used
isolates Y from G. All Honeywell Prestige,
VisionPRO IAQ, VisionPRO, and Focus
Pro thermostats do this.
• For the TrueIAQ Installer Setup, set ISU
#25 to 3.
HVAC
RECOMMENDEDAIR FLOW SWITCH (AFS)
HumidiPRO
THERMOSTAT
C
R
U
U
S
S
GYWR Rc
GYWR C
24V
24V
HUM
HUM
C
GT
R
RT
GF
EXT
M34831
TrueSTEAM
Setting
Light Auto
Next Auto
System
%
Inside
%
HUMIDITY BOOST
OUTDOOR SENSOR (OPTIONAL)
1
CAUTION: Voltage Hazard.
Before wiring to HVAC terminals, disconnect HVAC equipment power. Make sure TrueSTEAM
is not plugged in.
65432
On
Off
1
AFS Monitor RecommendedM32913
TrueSTEAM Humidification System 69-2285—0556
B: Advanced TrueSTEAM Wiring

AP
PE
ND
ICE
S
OPTION 3: VisionPRO IAQ Wiring with Fan Delay
• Follow this diagram if you are using VisionPRO IAQ with TrueSTEAM’s fan-delay feature.
• The system fan will turn on when the water temperature reaches 176°F (80°C).
• Set installer setup #0374 to 3.
OPTION 4: VisionPRO IAQ without Fan Delay
• Follow this diagram if using VisionPRO IAQ to turn system fan on immediately with humidity call.
• Set installer setup #0374 to 1.
65432
On
Off
1
AFS Monitor RecommendedM32914
65432
On
Off
1
AFS Monitor RecommendedM32915
TH9421C
TrueSTEAM
C7089U
THM5421C
COMMUNICATIONLED
FURNACE
CONV
M33053
TH9421C
TrueSTEAM
AFS
C7089U
THM5421C
COMMUNICATIONLED
FURNACE
CONV
M33052
TrueSTEAM Humidification System 69-2285—05 57
B: Advanced TrueSTEAM Wiring

AP
PE
ND
ICE
S
OPTION 5: Prestige IAQ with fan delay
• Follow this diagram if you are using Prestige IAQ with TrueSTEAM’s fan-delay feature.
• The system fan will turn on when the water temperature reaches 176°F (80°C).
65432
On
Off
1
AFS Monitor Recommended
M32918A
24V
24V
HUM
HUM
C
GT
R
RT
GF
EXT
TrueSTEAM
THX9421R
THM5421RPrestige IAQ and TrueSTEAM with fan delay
C
W
W2
Y
R
G
AFS
Furnace
TrueSTEAM Humidification System 69-2285—0558
B: Advanced TrueSTEAM Wiring

AP
PE
ND
ICE
S
OPTION 6: Prestige IAQ or All New VisionPRO without fan delay
• Follow this diagram if you are using Prestige IAQ to turn system fan on immediately with humidity call.
65432
ON
OFF
1
M32919A
24V
24V
HUM
HUM
C
GT
R
RT
GF
EXT
TrueSTEAM
THX9421R
THM5421RPRESTIGE IAQ AND TrueSTEAM WITHOUT FAN DELAY
C
W
W2
Y
R
G
FURNACE
TrueSTEAM Humidification System 69-2285—05 59
B: Advanced TrueSTEAM Wiring

AP
PE
ND
ICE
S
OPTION 7: Wiring TrueSTEAM with zoning
OPTION 8: Wiring Prestige or All New VisionPRO with wireless TrueSTEAM
65432
ON
OFF
1
WIRELESS SETTINGS
WIRELESSTrueSTEAMHUMIDIFIER
PRESTIGE WITH WIRELESSTrueSTEAM
FURNACE
SUBBASE
THX9321RTHM4000R1000
M33054A
65432
On
Off
1
(AFS Monitor Recommended)
65432
On
Off
1
Alternative (Power Monitor Setting)M32920
Equipment 24V24V
HUM
HUM
C
GT
R
RTGF
EXT
TrueSTEAM Humidifier
HZ432
Furnace
R
C
W
Y
G
AFSHUM HUM
Humidistat
RH
RC
W1/E
W2
W3
Y1
Y2
G
O
B
DS/BK
1)
2)
TrueSTEAM Humidification System 69-2285—0560
B: Advanced TrueSTEAM Wiring

AP
PE
ND
ICE
S
OPTION 9: Prestige IAQ or All New VisionPRO controlling TrueSTEAM with zoning with fan delay
(recommended)
M33055A
THM5421RTrueSTEAMHUMIDIFIER
THX9421R
HZ432
FURNACE
AFS
65432
ON
OFF
1
AFS MONITOR RECOMMENDED
TrueSTEAM Humidification System 69-2285—05 61
B: Advanced TrueSTEAM Wiring

AP
PE
ND
ICE
S
65432
On
Off
1
(AFS Monitor Recommended)
65432
On
Off
1
Alternative (Power Monitor Setting)M32922
1) 2)
OPTION 10: TrueSTEAM wired to a dedicated fan/blower
1
1 ISU 25 must be set to 3
FAN
TrueSTEAM
TRANSFORMER
AFS
R8222
TrueIAQR C
L1(120 VOLT
HOT)
L1 L2
L2(120 VOLT
COMMON)
3 1
M33056
TrueSTEAM Humidification System 69-2285—0562
B: Advanced TrueSTEAM Wiring

AP
PE
ND
ICE
S
OPTION 11: Prestige IAQ or All New VisionPRO controlling Redlink wireless TrueSTEAM with zoning
NOTE: To get air humidity to all zones in idle mode you would need to jump the G on all zones being used and
verify that the thermostat does not have a Y/G interconnect. FocusPro, VisionPro, and Prestige models would work
for this application.
THM4000R
M32923A
WIRELESSTrueSTEAMHUMIDIFIER
THM5421R
R
C
WW2W3YY2GL
U3U3U2U2U1U1
RCRHRC
S2S2S1S1
ABCD
ABCD
24 V
24 V
HUM
HUM
C
GT
R
RT
GF
EXT
R
C
HZ432
ThermostatTh
erm
osta
tE
quip
men
t
HZ432
M1M4M6RCW1/EW2W3Y1Y2GO/BL
M1M4M6
Zone
DA
MP
ER
Zone 1
DA
MP
ER
M1M4M6
RC
W1/EW2W3Y1Y2G
O/BL
RHRC
W1/EW2W3Y1Y2GOB
DS/BK
Zon
e 4
DA
MP
ER
FURNACE
RWY
GC
THX9421R
65432
ON
OFF
1
WIRELESS SETTINGS
TrueSTEAM Humidification System 69-2285—05 63
B: Advanced TrueSTEAM Wiring

AP
PE
ND
ICE
S
OPTION 12: VisionPRO IAQ controlling 2 TrueSTEAM humidifiers
65432
On
Off
1
AFS Monitor RecommendedM32914
AFS
TrueSTEAM 1
FURNACE
M33057
COMMUNICATION LEDCOMMUNICATION
TERMINALS
24 VAC
TH9421C1004
THM5421C1008
THE YTH9421C1002 KIT INCLUDES THE TH9421C1004 VISION-PRO IAQ THERMOSTAT AND THE THM5421C1008 EQUIPMENT INTERFACE MODULE. THE YTH9421C1010 KIT INCLUDES THE TH942C1004 VISION-PRO IAQ THERMOSTAT, THM5421C1008 EQUIPMENT INTERFACE MODULE, AND C7089U1006 OUTDOOR SENSOR.
A DOUBLE-POLE RELAY SUCH AS THE R8228D1018 IS REQUIRED.
AN AIR-FLOW SWITCH IS RECOMMENDED. IF AN AIR FLOW SWITCH IS NOT USED THERE DOES NOT NEED TO BE A WIRE ATTACHED TO C ON THE TrueSTEAM AND THE #4 DIPSWITCH NEEDS TO BE SET TO “ON”.
GT IS NOT REQUIRED FOR THIS APPLICATION. SINCE THE VISIONPRO IAQ THERMOSTAT DOES NOT HAVE A Y/G INTERCONNECT, PARALLEL WIRING CAN BE DONE (AS SHOWN).
HM506, HM509, OR HM512 TrueSTEAM HUMIDIFIERS CAN BE USED.
CONFIGURE THE THERMOSTAT TO HUMIDIFY INDEPENDENT OF FAN (INSTALLER SETUP374 SET TO 3).
1
2
3
4
5
6
TrueSTEAM 2
1 6
3
21
4 4
5
CONV
HP
TrueSTEAM Humidification System 69-2285—0564
B: Advanced TrueSTEAM Wiring

AP
PE
ND
ICE
S
OPTION 13: Prestige IAQ controlling 2 TrueSTEAM humidifiers
AFS
65432
ON
OFF
1
AFS MONITOR RECOMMENDED
M33058A
TrueSTEAM 1
FURNACE
TrueSTEAM 2
A DOUBLE-POLE RELAY SUCH AS THE R8228D1018 IS REQUIRED.
AN AIR-FLOW SWITCH IS RECOMMENDED. IF AN AIR FLOW SWITCH IS NOT USED THERE DOES NOT NEED TO BE A WIRE ATTACHED TO C ON THE TrueSTEAM AND THE #4 DIPSWITCH NEEDS TO BE SET TO “ON”.
GT IS NOT REQUIRED FOR THIS APPLICATION. SINCE THE PRESTIGE IAQ THERMOSTAT DOES NOT HAVE A Y/G INTERCONNECT, PARALLEL WIRING CAN BE DONE (AS SHOWN).
HM506, HM509, OR HM512 TrueSTEAM HUMIDIFIERS CAN BE USED.
THE U1, U2, OR U3 CONTACTS CAN BE CONFIGURED TO CONTROL A HUMIDIFIER. IN THIS DIAGRAM THE 1 TERMINALS ARE USED.
CONFIGURE THE THERMOSTAT TO HUMIDIFY INDEPENDENT OF FAN (INSTALLER SETUP374 SET TO 3).
1
2
3
4
5
6
65
1 25
3 3
4
IAQDEVICE
THM5421R1005
SENSOR TYPE
TrueSTEAM Humidification System 69-2285—05 65
B: Advanced TrueSTEAM Wiring

AP
PE
ND
ICE
S
OPTION 14: TrueSTEAM humidifier wired to equipment with powered terminals with TrueSTEAM
controlling the fan
1
3
FURNACE TERMINALS
HUM W2 Y1 DHUM G COM W/W1
AIR-FLOWSWITCH
Y/Y2 R TrueSTEAM
24 V
24 V
HUM
HUM
C
GT
R
RT
GF
EXT
YOU MUST ADD A 24VAC ISOLATION RELAY BETWEEN THE TRUESTEAM HUMIDIFIER ANDTHE AIR HANDLER. AN R8222B1067 COULD BE USED.
THE 50027910-001 AIR-FLOW SWITCH (AFS) IS RECOMMENDED TO ENSURE THERE IS AIR-FLOW WHEN THE HUMIDIFIER IS RUNNING. IF THE AFS IS NOT USED, THE 4 DIPSWITCH MUST BE SET TO THE ON POSITION AT THE HUMIDIFIER (UP).
INFINITY/EVOLUTION CONFIGURATION1. IN SETUP UNDER THE INSTALL/SERVICE MENU: A. SELECT ACCESSORIES AND CHOOSE YES FOR HUMIDIFIER AND SET THE OPTION HUMIDIFY WITH FAN TO YES. B. SELECT FURNACE SETUP. UNDER THE G TERMINAL SET UP, SELECT THE FAN OPTION AND SET THE FAN SPEED TO LOW.
1
2
3
1
2
3
NOTES:
A 24VAC ISOLATION RELAY MUST BE USED BETWEEN THE FURNACE AND THE HUMIDIFIER TO ISOLATE THE TWO TRANSFORMERS. EQUIPMENT DAMAGE WILL OCCUR IF NOT USED.
THE HUMIDIFY WITH FAN OPTION MUST BE SELECTED. THIS WILL ALLOW THE SYSTEM TO CALL FOR HUMIDIFICATION WITHOUT A HEAT CALL.
THE G TERMINAL MUST BE SET TO FAN. THIS WILL ALLOW THE HUMIDIFIER TO CONTINUE TO RUN THE FAN AFTER THE HUMIDIFICATION CALL IS SATISFIED. THE TRUESTEAM HUMIDIFIER REQUIRES THE FAN TO CONTINUE TO RUN UNTIL THE WATER TEMPERATURE IN THE RESERVOIR IS COOLED TO 170 DEG TO PREVENT STEAM FROM CONDENSING IN THE DUCTWORK.
THE INFINITY SYSTEM WILL RUN ITS FAN AT LOW SPEED WHEN IT HAS A CALL FOR HUMIDIFICATION WITHOUT A HEATING CALL. THIS AIRFLOW IS 50% OF HEATING OR COOLING AIRFLOW (WHICHEVER IS GREATER). MAKE SURE AIRFLOW SATISFIES ANY MINIMUM REQUIREMENT FOR YOUR TRUESTEAM HUMIDIFIER.
FURNACE SET UP IS SHOWN. FAN COIL SET UP WILL BE SIMILAR. M33044
65432
On
Off
1
AFS Monitor Recommended
TrueSTEAM Humidification System 69-2285—0566
B: Advanced TrueSTEAM Wiring

AP
PE
ND
ICE
S
TrueSTEAM Humidification System 69-2285—05 67
Figure Part Number Part DescriptionReference
1 50024917-001 Remote Mounting Kit (with 10-foot hose)
1 50024917-002 Remote Mounting Kit (with 20-foot hose)
2 50028004-001 Cover
3 50028003-001 Duct Nozzle
4 50028001-001 Remote Nozzles
5 50020012-001 Mounting Bracket
6 50027997-001 Solenoid Valve
7 50028044-001 Polyphosphate Filter
8 50033181-001 HM512/HM509 Water Tank
8 50033182-001 HM506 Water Tank
9 50027998-001 Water Level Sensor Assembly
10 32001616-001 Saddle Valve
11 50027910-001 Differential Pressure Switch for Air Proving
12 50042822-001 Water Level Sensor Assembly
and Polyphosphate Filter
- 50043683-001 Shutoff Valve and Backflow Preventer
- S866A1007 Sail Switch for Air Proving (optional)
- THX9321R5000 Prestige HD Control
- THM4000R1000 RedLINK Wireless Adapter
- C7089R1013 RedLINK Wireless Outdoor Sensor
- YTH9421C1010 VisionPRO IAQ
- DG115EZIAQ TrueIAQ
- H8908ASPST Manual Humidistat
- 32005530-001 Ductboard Adapter Kit
- 50045947-001 RO System with Storage Tank
- 50045947-002 RO System with Storage Tank and Pump
- 50046083-001 #1 Sediment Filter
- 50046084-001 #2 RO Filter
- 50046086-001 #1 Sediment Filter and #2 RO Filter
- 50046089-001 #3 Staging Filter
- 50034043-001/U Qty. 1 Tank Sediment screen
- 50024921-002/U Qty. 1 TrueSTEAM handle
- 50032048-002/U Qty. 25 Resident Humidifier quick connect
adapter
- 50043771-001/U Qty. 25 TrueSTEAM filter for Solenoid Valve
- 32001647-001/U Qty. 25 Residential Humidifier cone screen
filter
- 50044721-001 Qty. 12 water hardness test kit
- 50051144-001 Tank gasket
C: Parts List
M29665


® U.S. Registered Trademark. © 2013 Honeywell International Inc.69-2285—05 M.S. Rev. 05-13Printed in U.S.A.
Automation and Control Solutions
Honeywell International Inc.
1985 Douglas Drive North
Golden Valley, MN 55422
http://customer.honeywell.com