69-2028 - w8735d telephone access module · telephone access module description ... the tam can...
TRANSCRIPT
69-2028
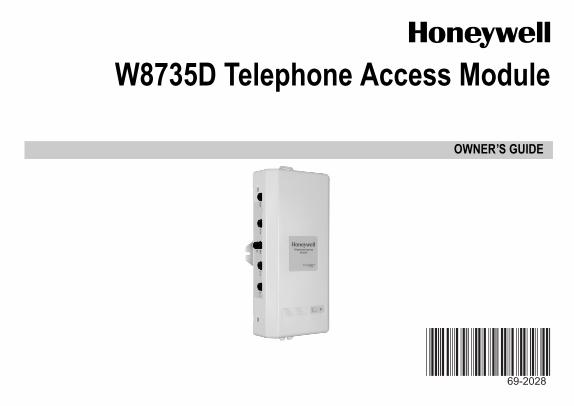
OWNER’S GUIDE
W8735D Telephone Access Module
2 69-2028
TABLE OF CONTENTSUsing This Guide ....................................................2
Features ..................................................................3
Telephone Access Module Description ................3Battery Indicator .......................................................4Battery Installation ....................................................5
Operating Your Telephone Access Module ..........6Calling Your Telephone Access Module ...................6Ending Your Call .....................................................10
Changing Your Telephone Access Module Set-tings .......................................................................10Entering the Main Menu .........................................11Thermostat Menu ...................................................12Date and Time Menu ..............................................14Pass Code Menu ....................................................14Alert Menu ..............................................................15Call and Ring Menu ................................................16Limit Menu ..............................................................23Zone Names ...........................................................31
Quick Start ............................................................34
5-Year Limited Warranty ......................................35
USING THIS GUIDEThe W8735D Telephone Access Module (TAM) is a multi-functional product. This means that it can be used in many different applications such as single- or multi-zone applications, conventional furnaces and heat pump equipment.
Use the following symbol to help you identify the features that apply to your system:
Tip symbol. Look for helpful tips throughout the guide when you see this symbol.
NOTE: Throughout this guide, the term TAM refers to the W8735D Telephone Access Module.
There is a Quick Start section at the end of this manual (see page 34) that provides brief instructions on how to connect to (call) your TAM. However, we recommend that you read and become familiar with the content of this manual.
80 9070
60
908070
60
80 9070
60
908070
60
3 69-2028
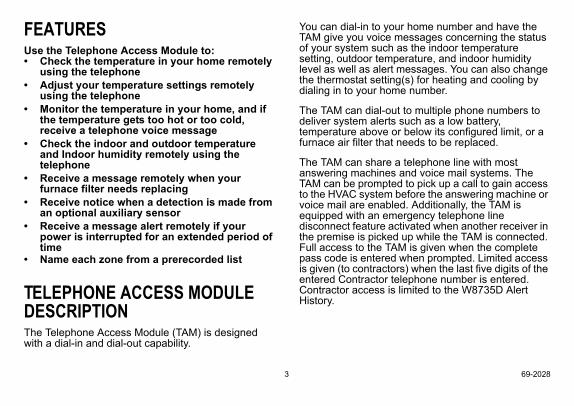
FEATURESUse the Telephone Access Module to:• Check the temperature in your home remotely
using the telephone• Adjust your temperature settings remotely
using the telephone• Monitor the temperature in your home, and if
the temperature gets too hot or too cold, receive a telephone voice message
• Check the indoor and outdoor temperature and Indoor humidity remotely using the telephone
• Receive a message remotely when your furnace filter needs replacing
• Receive notice when a detection is made from an optional auxiliary sensor
• Receive a message alert remotely if your power is interrupted for an extended period of time
• Name each zone from a prerecorded list
TELEPHONE ACCESS MODULE DESCRIPTIONThe Telephone Access Module (TAM) is designed with a dial-in and dial-out capability.
You can dial-in to your home number and have the TAM give you voice messages concerning the status of your system such as the indoor temperature setting, outdoor temperature, and indoor humidity level as well as alert messages. You can also change the thermostat setting(s) for heating and cooling by dialing in to your home number.
The TAM can dial-out to multiple phone numbers to deliver system alerts such as a low battery, temperature above or below its configured limit, or a furnace air filter that needs to be replaced.
The TAM can share a telephone line with most answering machines and voice mail systems. The TAM can be prompted to pick up a call to gain access to the HVAC system before the answering machine or voice mail are enabled. Additionally, the TAM is equipped with an emergency telephone line disconnect feature activated when another receiver in the premise is picked up while the TAM is connected. Full access to the TAM is given when the complete pass code is entered when prompted. Limited access is given (to contractors) when the last five digits of the entered Contractor telephone number is entered. Contractor access is limited to the W8735D Alert History.

4 69-2028
Battery Indicator
Fig. 1. Battery Status LED indicator.
A light emitting diode (LED) indicator on the front panel of the TAM illuminates to provide information about the status of the battery:
• Steady Green LED indicates the battery is good• Flashing Green LED indicates the battery is low• Alternating Green/Red flashing LED indicates the
battery is missing or dead
IMPORTANT:If the battery LED indicator is flashing green or green/red, replace the battery immediately (see “Battery Installation” on page 5).
Replace the battery annually and/or before leaving for an extended period of time.
BATTERYINDICATORLED
M24636
80 9070
60
908070
60
5 69-2028
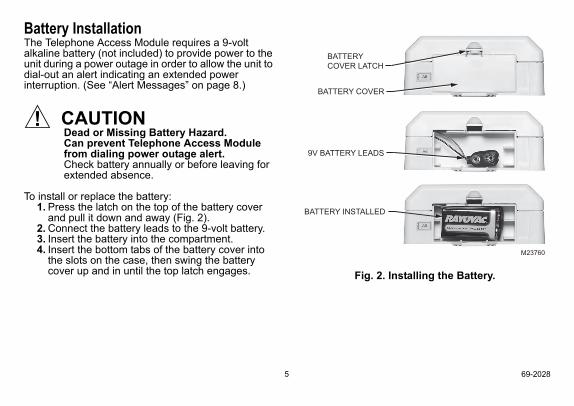
Battery InstallationThe Telephone Access Module requires a 9-volt alkaline battery (not included) to provide power to the unit during a power outage in order to allow the unit to dial-out an alert indicating an extended power interruption. (See “Alert Messages” on page 8.)
CAUTIONDead or Missing Battery Hazard. Can prevent Telephone Access Module from dialing power outage alert.Check battery annually or before leaving for extended absence.
To install or replace the battery:1. Press the latch on the top of the battery cover
and pull it down and away (Fig. 2).2. Connect the battery leads to the 9-volt battery.3. Insert the battery into the compartment.4. Insert the bottom tabs of the battery cover into
the slots on the case, then swing the battery cover up and in until the top latch engages. Fig. 2. Installing the Battery.
BATTERY COVER
BATTERY INSTALLED
9V BATTERY LEADS
BATTERY COVER LATCH
M23760
6 69-2028
OPERATING YOUR TELEPHONE ACCESS MODULEDuring the installation of your Telephone Access Module (TAM), the installer connected the unit to an available telephone jack in your home and configured the number of rings needed before the TAM answers a call.
A quick reference card (form 69-2011) is included with the TAM. Use this wallet card to help you with the menu items, alerts, and zone names.
The TAM is equipped with an emergency telephone line disconnect feature activated when another receiver in the premises is picked up while the TAM is connected.
To test the disconnect feature:While connected on a call to the TAM, flick the receiver hook a few times in order for the TAM to hang up and for you to receive a dial tone.
Calling Your Telephone Access ModuleCarefully review the Main menu (see Fig. 4 on page 11) before operating your TAM.
IMPORTANT:The TAM is designed to provide remote tele-phone access to your thermostat settings and information. To access this information or make changes, you must connect with the TAM from an outside line. If you want to access the TAM from within the home, you need to use a second phone line or call from a cellular telephone.
IMPORTANT:When interfacing with the W8735D make sure to always press firmly and fully on the telephone key. Fast or light key presses can result in missed inputs.
IMPORTANT:When dialing into the W8735D from a cellular telephone, make sure the reception is good. Faulty reception can result in missed key pad entries and eventual time-outs and hang ups.
The TAM can share the line with your telephone answering machine or voice mail.
80 9070
60
908070
60
7 69-2028
IMPORTANTSet the proper number of rings for the TAM to avoid interfering with voice mail or an answering machine.
To access the TAM when the phone line is shared set the number of rings the TAM will wait until it answers to one more than the device sharing the line:
For example, If your answering machine answers in four rings, set the TAM to answer in five rings.
1. Call the TAM and let the phone ring two times.2. Hang up.3. Call again within 30 seconds.4. The TAM picks up the second call.5. The TAM voice message asks you to respond to,
“Welcome to the telephone access center. Please enter your pass code followed by the # key.”
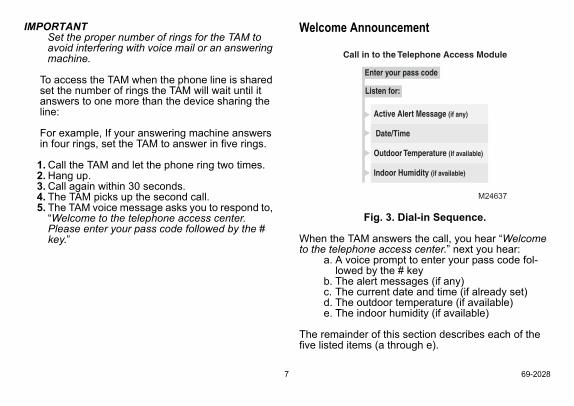
Welcome Announcement
Fig. 3. Dial-in Sequence.
When the TAM answers the call, you hear “Welcome to the telephone access center.” next you hear:
a. A voice prompt to enter your pass code fol-lowed by the # key
b. The alert messages (if any)c. The current date and time (if already set)d. The outdoor temperature (if available)e. The indoor humidity (if available)
The remainder of this section describes each of the five listed items (a through e).
Call in to the Telephone Access Module
Enter your pass code
Date/Time
Listen for:
Active Alert Message (if any)
Outdoor Temperature (if available)
Indoor Humidity (if available)
M24637

8 69-2028
Pass CodeWhen the TAM answers your call, you will be asked to respond to the voice prompt, “Please enter your pass code followed by the # key.”
This is your four-digit pass code. You can change this pass code any time by entering the Pass Code menu. See Fig. 4 on page 11.
During installation a unique pass code should have been set and the number written on the inside of the TAM cover. For complete instructions see “Pass Code Menu” on page 14.
NOTE: The TAM’s default pass code are the four dig-its - 1 2 3 4.
Alert MessagesThe TAM indicates any unacknowledged alert message immediately after you enter your pass code.
NOTE: If an alert condition still exists but has previ-ously been acknowledged, the alert is not repeated.
If there are any unacknowledged alert messages, you hear this message, “The (alert description) alert from (channel/zone) occurred on (date) at (time).”
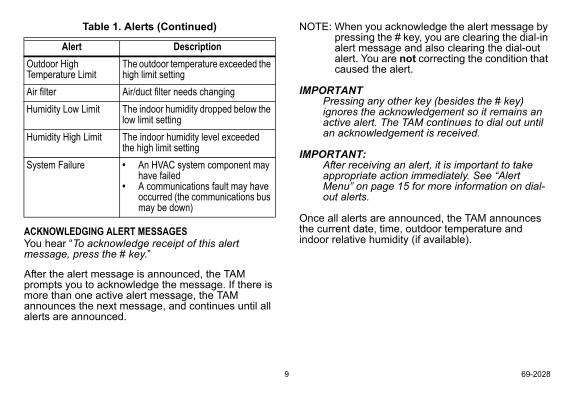
See Table 1 on the next page for a list of the alert messages and corresponding causes.
See “Acknowledging Alert Messages” on page 9 to acknowledge an alert.
For additional information, see “Changing Your Telephone Access Module Settings” on page 10.
Table 1. Alerts
Alert DescriptionPower Outage Power was out at this location for more
than 1 hourPower Restore Power has been restored at this
locationLow Battery Battery has low power or is deadAuxiliary Input Optional auxiliary input sensor has
trippedPass Code Change The pass code has been alteredLow Temperature Limit The room temperature dropped below
the low limit settingHigh Temperature Limit The room temperature exceeded the
high limit settingOutdoor Low Temperature Limit
The outdoor temperature dropped below the low limit setting
9 69-2028
ACKNOWLEDGING ALERT MESSAGESYou hear “To acknowledge receipt of this alert message, press the # key.”
After the alert message is announced, the TAM prompts you to acknowledge the message. If there is more than one active alert message, the TAM announces the next message, and continues until all alerts are announced.
NOTE: When you acknowledge the alert message by pressing the # key, you are clearing the dial-in alert message and also clearing the dial-out alert. You are not correcting the condition that caused the alert.
IMPORTANTPressing any other key (besides the # key) ignores the acknowledgement so it remains an active alert. The TAM continues to dial out until an acknowledgement is received.
IMPORTANT:After receiving an alert, it is important to take appropriate action immediately. See “Alert Menu” on page 15 for more information on dial-out alerts.
Once all alerts are announced, the TAM announces the current date, time, outdoor temperature and indoor relative humidity (if available).
Outdoor High Temperature Limit
The outdoor temperature exceeded the high limit setting
Air filter Air/duct filter needs changingHumidity Low Limit The indoor humidity dropped below the
low limit settingHumidity High Limit The indoor humidity level exceeded
the high limit settingSystem Failure • An HVAC system component may
have failed• A communications fault may have
occurred (the communications bus may be down)
Table 1. Alerts (Continued)
Alert Description
10 69-2028
Current Date and TimeYou hear “Today is (month-day-year). The time is (current time).”
Outdoor Temperature (optional)You hear “The outdoor temperature is (__) degrees.”
Indoor Humidity (optional)You hear “The relative humidity is (__) percent.”
The next announcement lists the main menu selections. (See Fig. 4 on page 11.)
The Main menu selections allow you to change the settings and operation of the Telephone Access module.
Please refer to “Changing Your Telephone Access Module Settings” on page 10 for complete information about your TAM’s settings and operation.
Ending Your CallBy pressing the # key from the Main menu, the TAM exits the call and you hear “Thank for using the telephone access center. Good bye.” before the TAM hangs up.
NOTE: Simply hanging up the phone also terminates the call after a 30 second delay.
CHANGING YOUR TELEPHONE ACCESS MODULE SETTINGSIMPORTANT:
The Telephone Access Module (TAM) is designed to allow remote telephone access to your thermostat settings and other system infor-mation. To access this information or make changes, you must connect with the Telephone Access Module from an outside line. If you want to access the Telephone Access Module locally, you must use a second telephone line or a cellu-lar telephone.
IMPORTANT:When interfacing with the TAM make sure to always press firmly and fully on the telephone key. Fast or light key presses can result in missed inputs.
IMPORTANT:When dialing into the TAM from a cellular tele-phone, make sure the reception is good. Faulty reception can result in missed key pad entries and eventual time-outs and hang ups
All changes are made using the Main menu selections.
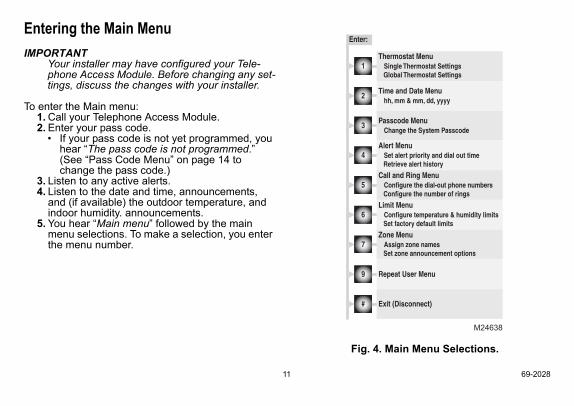
11 69-2028
Entering the Main MenuIMPORTANT
Your installer may have configured your Tele-phone Access Module. Before changing any set-tings, discuss the changes with your installer.
To enter the Main menu:1. Call your Telephone Access Module.2. Enter your pass code.
• If your pass code is not yet programmed, you hear “The pass code is not programmed.” (See “Pass Code Menu” on page 14 to change the pass code.)
3. Listen to any active alerts.4. Listen to the date and time, announcements,
and (if available) the outdoor temperature, and indoor humidity. announcements.
5. You hear “Main menu” followed by the main menu selections. To make a selection, you enter the menu number.
Fig. 4. Main Menu Selections.
Enter:
Thermostat Menu Single Thermostat Settings Global Thermostat Settings
1
Time and Date Menu hh, mm & mm, dd, yyyy
2
Passcode Menu Change the System Passcode
3
Alert Menu Set alert priority and dial out time Retrieve alert history
4
Call and Ring Menu Configure the dial-out phone numbers Configure the number of rings
5
Limit Menu Configure temperature & humidity limits Set factory default limits
6
Zone Menu Assign zone names Set zone announcement options
7
Repeat User Menu9
Exit (Disconnect)#
M24638
12 69-2028
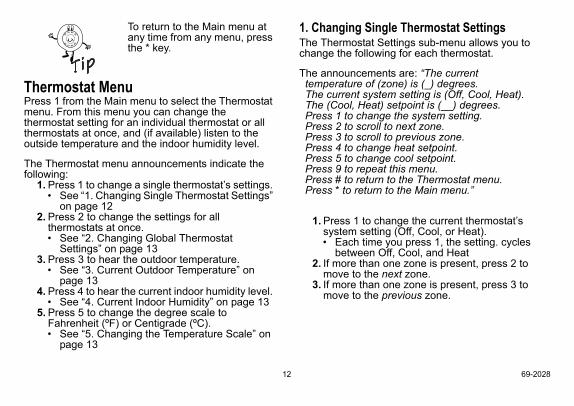
To return to the Main menu at any time from any menu, press the * key.
Thermostat MenuPress 1 from the Main menu to select the Thermostat menu. From this menu you can change the thermostat setting for an individual thermostat or all thermostats at once, and (if available) listen to the outside temperature and the indoor humidity level.
The Thermostat menu announcements indicate the following:
1. Press 1 to change a single thermostat’s settings. • See “1. Changing Single Thermostat Settings”
on page 122. Press 2 to change the settings for all
thermostats at once. • See “2. Changing Global Thermostat
Settings” on page 133. Press 3 to hear the outdoor temperature.
• See “3. Current Outdoor Temperature” on page 13
4. Press 4 to hear the current indoor humidity level. • See “4. Current Indoor Humidity” on page 13
5. Press 5 to change the degree scale to Fahrenheit (ºF) or Centigrade (ºC). • See “5. Changing the Temperature Scale” on
page 13
1. Changing Single Thermostat SettingsThe Thermostat Settings sub-menu allows you to change the following for each thermostat.
The announcements are: “The currenttemperature of (zone) is (_) degrees.The current system setting is (Off, Cool, Heat).The (Cool, Heat) setpoint is (__) degrees.Press 1 to change the system setting.Press 2 to scroll to next zone.Press 3 to scroll to previous zone.Press 4 to change heat setpoint.Press 5 to change cool setpoint.Press 9 to repeat this menu.Press # to return to the Thermostat menu.Press * to return to the Main menu.”
1. Press 1 to change the current thermostat’s system setting (Off, Cool, or Heat).• Each time you press 1, the setting. cycles
between Off, Cool, and Heat2. If more than one zone is present, press 2 to
move to the next zone.3. If more than one zone is present, press 3 to
move to the previous zone.
80 9070
60
908070
60
13 69-2028
4. Press 4 to change the Heat setpoint temperature for the current thermostat.• Enter the setpoint and press the # key.
5. Press 5 to change the Cool setpoint temperature for the current thermostat.• Enter the setpoint and press the # key.
To return to the Main menu, press the * key.
2. Changing Global Thermostat SettingsThe Global Thermostat Settings sub-menu allows you to change the system setting and setpoint for all thermostats at once.
The announcement is: “The current setting for all zones is (___), press zero to change or # to continue.”
1. Press 0 (zero) to change the current thermo-stat’s system setting (Off, Cool, or Heat).• Each time you press 0, the setting cycles
between Off, Cool, and Heat.2. Press the # key to change the setpoint tempera-
ture for the current system setting.3. Enter the setpoint and press the # key.
To return to the Main menu, press the * key.
3. Current Outdoor TemperatureIf available, this selection announces the current outdoor temperature.
Press the # key to return to the Thermostat menu, or press the * key to return to the Main menu.
4. Current Indoor HumidityIf available, this selection announces the current indoor humidity percent.
Press the # key to return to the Thermostat menu, or press the * key to return to the Main menu.
5. Changing the Temperature ScaleThe Temperature scale selection allows you to change the degree scale to Fahrenheit (ºF) or Centigrade (ºC).
The announcement is: “Press 1 to indicate all readings in degrees Fahrenheit. Press 2 to indicate all readings in degrees Centigrade.”
1. Press 1 to use degrees Fahrenheit (º F).2. Press 2 to use degrees Centigrade (º C).
To return to the Main menu, press the * key.

14 69-2028
Date and Time MenuPress 2 from the Main menu to select the Date and Time menu. From this menu, you change the current time and date for all thermostats and the TAM. Once you are at the Date and Time menu, follow the voice prompts.
Setting the Current TimeThe announcement is: “Please enter current time by entering hours and minutes followed by the # key.”
NOTE: Enter the time in HHMM format.
Example:• Keying 0 2 5 1 # on the telephone keypad sets
the time to 2:51. • Select the correct time period; 1 for AM or 2 for
PM.
Setting the Current DateAfter the time is set, the announcement is: “Please enter the today’s date by entering the month, day, and year followed by the # key.”
NOTE: Enter the date in MMDDYYYY format.
Example:• Keying 0 2 2 0 2 0 0 7 # on the telephone key pad
sets the date to February 20, 2007.
Confirming Your Time and Date ChangeOnce the time and date are entered, you hear “Based on your input, the date is (____) and the time is (___). Press the # key if this is correct or press zero to change the time and date again.”
• Press the # key to confirm and return to the Main menu.
Pass Code MenuPress 3 from the Main menu to select the Pass Code menu. From this menu you can change your pass code.
Your pass code is a four-digit number, and the installer should have set a unique pass code for you and written it inside the front cover of the TAM.
NOTE: Whenever the pass code is changed, the TAM initiates a dial-out call to inform you and/or the contractor that the pass code has changed.
80 9070
60
908070
60
15 69-2028
Changing Your Pass CodeThe announcement is: “Pass code menu. Please enter a new four-digit pass code followed by the # key.”
IMPORTANTDo not leave the pass code unchanged from the factory default setting of 1-2-3-4. Resetting the pass code to the factory default setting will prompt the TAM to always ask you to reset the pass code on every connection.
1. To change the pass code, enter a four-digit num-ber followed by the # key.• You hear “Re-enter your new four-digit pass
code followed by the # key.”2. Re-enter you pass code followed by the # key.
• If the pass codes match, you hear “Pass code changed, the new pass code is (your new pass code),” and you return to the Main menu.
• If the pass code is not entered correctly, you hear “Invalid pass code.” Follow the voice prompts and these instructions to enter a different pass code.
To leave the pass code unchanged, press the * key to go to the Main menu.
Alert MenuPress 4 from the Main menu to select the Alert menu. From this menu you can set the priority level (High, Low, or No Priority) for each alert, set the hour of the day to dial-out for the low priority alerts, and retrieve the last ten alerts stored in the TAM.• “High Priority” alerts are dialed out at the time the
alert occurs and are repeated every 30 minutes until the alert is acknowledged.
• “Low Priority” alerts are dialed out at a user set time between 12:00AM and 11:00PM and are repeated every 24 hours until the alert is acknowledged.
• “No Priority” alerts are never dialed-out.Once you are at the Alert menu —
1. Press 1 to set the priority for the announced alert.• To set the alert level, press:
9 = High5 = Low1 = No Priority# = do not change
• Repeat for each alert (See Table 2).2. Press 2 to set the hour of the day to dial-out for
the Low priority alerts.• Key in a number from 0 to 23 (12:00am to
11:00pm)3. Press 3 to listen to the last ten alerts.
To return to the Main menu, press the * key.
16 69-2028
If needed, use the “Limit Menu” on page 23 to change the values of the temperature and humidity alert limit settings.
:
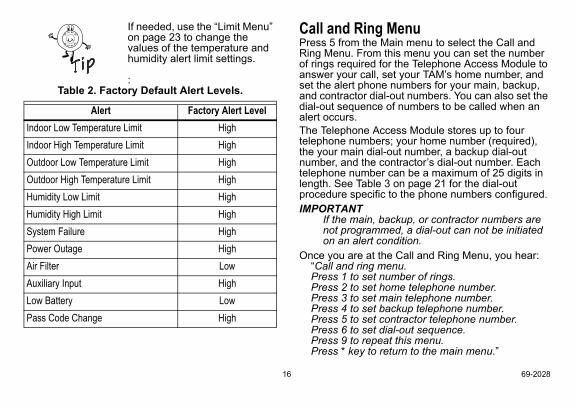
Call and Ring MenuPress 5 from the Main menu to select the Call and Ring Menu. From this menu you can set the number of rings required for the Telephone Access Module to answer your call, set your TAM’s home number, and set the alert phone numbers for your main, backup, and contractor dial-out numbers. You can also set the dial-out sequence of numbers to be called when an alert occurs.The Telephone Access Module stores up to four telephone numbers; your home number (required), the your main dial-out number, a backup dial-out number, and the contractor’s dial-out number. Each telephone number can be a maximum of 25 digits in length. See Table 3 on page 21 for the dial-out procedure specific to the phone numbers configured.IMPORTANT
If the main, backup, or contractor numbers are not programmed, a dial-out can not be initiated on an alert condition.
Once you are at the Call and Ring Menu, you hear: “Call and ring menu. Press 1 to set number of rings.Press 2 to set home telephone number.Press 3 to set main telephone number.Press 4 to set backup telephone number.Press 5 to set contractor telephone number.Press 6 to set dial-out sequence.Press 9 to repeat this menu.Press * key to return to the main menu.”
Table 2. Factory Default Alert Levels.
Alert Factory Alert LevelIndoor Low Temperature Limit HighIndoor High Temperature Limit HighOutdoor Low Temperature Limit HighOutdoor High Temperature Limit HighHumidity Low Limit HighHumidity High Limit HighSystem Failure HighPower Outage HighAir Filter LowAuxiliary Input HighLow Battery LowPass Code Change High
80 9070
60
908070
60

17 69-2028
Selecting a Call and Ring Menu ItemPress the number key for the desired action, and refer to that numbered section (1 to 6) below for more information.
1. Changing the Number of RingsThe ring setting determines how many rings the Telephone Access Module hears before answering. The factory default setting is four rings.
Set the proper number of rings for the TAM to avoid interfering with voice mail or an answering machine. See “Calling Your Telephone Access Module” on page 6 for an example.
See “Calling Your Telephone Access Module” on page 6 for information on how to determine the number of rings needed.
The announcement is: “Press a key from 2 to 9 to set the number of rings before the device will answer a call.”
1. Enter a digit from 2 to 9 for the number of rings.• You hear “Incoming calls will be answered
after (__) rings. Press the # key if this is correct or press zero to change the ring setting again.”
2. Press the # key to confirm your change or press 0 (zero) to re-enter a different number of rings.
If the Ring Setting is not entered correctly, the TAM announces that you have entered an “Invalid Setting.” Follow the voice prompts and the above instructions to enter a new Ring Setting.
2. Entering or Changing the Home Telephone NumberThe home telephone number identifies the location where the TAM is installed. This is especially useful if you have multiple TAMs installed at different residences such as your home and cabin, or if a contractor is monitoring your TAM.
The announcement is: “Current home phone number is (_____). Press # if this is correct. Press zero to change the home phone number again.”
1. Press 0 (zero) to change the number.• You hear “Please enter the home phone
number followed by the # key.”2. Enter the telephone number to which the TAM is
connected and press the # key.• You hear “You entered (_____) for the home
phone number. Press # if this is correct. Press zero to change the home phone number again.”
3. Press the # key to confirm your change.
80 9070
60
908070
60
18 69-2028
3. Entering or Changing the Main Dial-out NumberYou select a number where you can be contacted when away from home (such as office, second home, or cellular phone number).
ENTERING THE MAIN NUMBER THE FIRST TIMEIf the main number has not been entered before, you hear “Current main number is disabled. Press the # key to enable the main number or press zero to disable this number.”
1. Press # to enable the main number.• You hear “Please enter the main phone
number followed by the # key.”2. Enter the main telephone number for dial-out
alerts and press the # key.• You hear “You entered (_____) for the main
phone number. Press # if this is correct. Press zero to change the main phone number again.”
3. Press the # key to confirm your change.
CHANGING THE MAIN NUMBERThe announcement is: “Current main phone number is (_____). Press # if this is correct. Press zero to change the main phone number again.”
1. Press 0 (zero) to change the main number.• You hear “Please enter the main phone
number followed by the # key.”
2. Enter the main telephone number for dial-out alerts and press the # key.• You hear “You entered (_____) for the main
phone number. Press # if this is correct. Press zero to change the main phone number again.”
3. Press the # key to confirm your change.
4. Entering or Changing the Backup Dial-out NumberThis is an alternate (backup) contact when you cannot be reached (such as relative, friend or neighbor).
ENTERING THE BACKUP NUMBER THE FIRST TIMEIf the backup number has not been entered before, you hear “Current backup number is disabled. Press the # key to enable the backup number or press zero to disable this number.”
1. Press # to enable the backup number.• You hear “Please enter the backup phone
number followed by the # key.”2. Enter the backup telephone number for dial-out
alerts and press the # key.• You hear “You entered (_____) for the backup
phone number. Press # if this is correct. Press zero to change the backup phone number again.”
3. Press the # key to confirm your change.

19 69-2028
CHANGING THE BACKUP NUMBERThe announcement is: “Current backup phone number is (_____). Press # if this is correct. Press zero to change the backup phone number again.”
1. Press 0 (zero) to change the backup number.• You hear “Please enter the backup phone
number followed by the # key.”2. Enter the backup telephone number for dial-out
alerts and press the # key.• You hear “You entered (_____) for the backup
phone number. Press # if this is correct. Press zero to change the backup phone number again.”
3. Press the # key to confirm your change.
5. Entering or Changing the Contractor’s Dial-out NumberThis number is used for the HVAC contractor providing monitoring service at your request.
ENTERING THE CONTRACTOR NUMBER THE FIRST TIMEIf the contractor number has not been entered before, you hear “Current contractor number is disabled. Press the # key to enable the contractor number or press zero to disable this number.”
1. Press # to enable the contractor number.• You hear “Please enter the contractor phone
number followed by the # key.”
2. Enter the contractor telephone number for dial-out alerts and press the # key.• You hear “You entered (_____) for the
contractor phone number. Press # if this is correct. Press zero to change the contractor phone number again.”
3. Press the # key to confirm your change.
CHANGING THE CONTRACTOR NUMBERThe announcement is: “Current contractor phone number is (_____). Press # if this is correct. Press zero to change the contractor phone number again.”
1. Press 0 (zero) to change the contractor number.• You hear “Please enter the contractor phone
number followed by the # key.”2. Enter the contractor telephone number for dial-
out alerts and press the # key.• You hear “You entered (_____) for the
contractor phone number. Press # if this is correct. Press zero to change the contractor phone number again.”
3. Press the # key to confirm your change.
20 69-2028
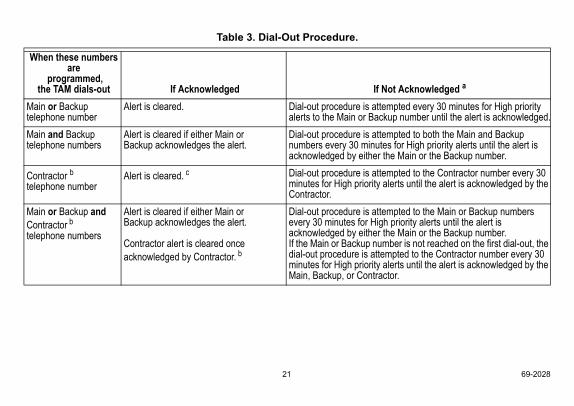
6. Setting the Dial-out SequenceThis action determines the order of the dial-out calls made when alerts occur. See Table 3 on page 21.
NOTE: If the backup and/or contractor numbers are not entered you hear “Current backup/con-tractor number is disabled.”
The announcement is: “Press 1 to have the device always call the contractor number. Press 2 to only have the device call the contractor if the other numbers cannot be reached.”
ALWAYS DIAL-OUT TO CONTRACTOR• Press 1.
The confirmation message is: “You have chosen to always have the device call the contractor number. Press # key if this is correct. Press zero to change the dial-out sequence again.”
DIAL-OUT TO CONTRACTOR ONLY IF MAIN AND BACKUP NUMBERS DO NOT ANSWER• Press 2.
The confirmation message is: “You have chosen to only have the device call the contractor if the other numbers cannot be reached. Press # key if this is correct. Press zero to change the dial-out sequence again.”
Table 3 on page 21 describes how the TAM dials-out depending on the telephone numbers and dial-out sequence that you program:
21 69-2028
Table 3. Dial-Out Procedure.
When these numbers are
programmed, the TAM dials-out If Acknowledged If Not Acknowledged a
Main or Backuptelephone number
Alert is cleared. Dial-out procedure is attempted every 30 minutes for High priority alerts to the Main or Backup number until the alert is acknowledged.
Main and Backuptelephone numbers
Alert is cleared if either Main orBackup acknowledges the alert.
Dial-out procedure is attempted to both the Main and Backup numbers every 30 minutes for High priority alerts until the alert is acknowledged by either the Main or the Backup number.
Contractor b
telephone numberAlert is cleared. c Dial-out procedure is attempted to the Contractor number every 30
minutes for High priority alerts until the alert is acknowledged by the Contractor.
Main or Backup andContractor b telephone numbers
Alert is cleared if either Main orBackup acknowledges the alert.
Contractor alert is cleared onceacknowledged by Contractor. b
Dial-out procedure is attempted to the Main or Backup numbers every 30 minutes for High priority alerts until the alert is acknowledged by either the Main or the Backup number.If the Main or Backup number is not reached on the first dial-out, the dial-out procedure is attempted to the Contractor number every 30 minutes for High priority alerts until the alert is acknowledged by the Main, Backup, or Contractor.

22 69-2028
Main and Backup and possiblyContractor b telephone numbers
Alert is cleared if either Main or Backup acknowledges the alert.If Main or Backup acknowledges the alert, the Contractor number is not dialed.Contractor alert is cleared once acknowledged by Contractor b
Dial-out procedure is attempted to the Main and Backup numbers every 30 minutes for High priority alerts until the alert is acknowledged by either the Main or the Backup number.If the Main or Backup number is not reached on the first dial-out, the dial-out procedure is attempted to the Contractor number every 30 minutes for High priority alerts until the alert is acknowledged by the Main, Backup, or Contractor.
a After the first dial-out attempt, the power outage alert does not dial-out again.b The contractor telephone number is intended for use when you have an agreement with your heating and air
conditioning contractor to monitor the alerts sent by your Telephone Access Module.c The contractor may use a special code (last five digits of the entered contractor telephone number) to access
the TAM Alert History only. Without the full access code, the contractor cannot access any other features.
Table 3. Dial-Out Procedure. (Continued)
When these numbers are
programmed, the TAM dials-out If Acknowledged If Not Acknowledged a
23 69-2028
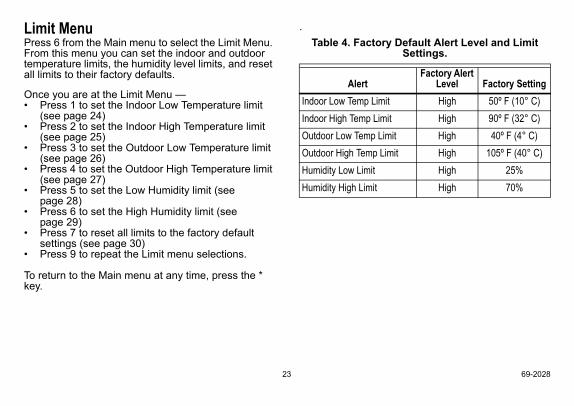
Limit MenuPress 6 from the Main menu to select the Limit Menu. From this menu you can set the indoor and outdoor temperature limits, the humidity level limits, and reset all limits to their factory defaults.
Once you are at the Limit Menu —• Press 1 to set the Indoor Low Temperature limit
(see page 24)• Press 2 to set the Indoor High Temperature limit
(see page 25)• Press 3 to set the Outdoor Low Temperature limit
(see page 26)• Press 4 to set the Outdoor High Temperature limit
(see page 27)• Press 5 to set the Low Humidity limit (see
page 28)• Press 6 to set the High Humidity limit (see
page 29)• Press 7 to reset all limits to the factory default
settings (see page 30)• Press 9 to repeat the Limit menu selections.
To return to the Main menu at any time, press the * key.
.Table 4. Factory Default Alert Level and Limit
Settings.
AlertFactory Alert
Level Factory SettingIndoor Low Temp Limit High 50º F (10° C)Indoor High Temp Limit High 90º F (32° C)Outdoor Low Temp Limit High 40º F (4° C)Outdoor High Temp Limit High 105º F (40° C)Humidity Low Limit High 25%Humidity High Limit High 70%
24 69-2028
Indoor Temperature Low Limit SettingThe Indoor Temperature Low Limit setting is used to activate an alert when the displayed temperature on the thermostat is lower than the value you set. The setting range is 40° F (4° C) to 99° F (37° C) in 1° increments. The factory default setting is 50° F (10° C).When a thermostat displays a temperature lower than your low limit setting and your dial-out alert is active, the TAM dials out.
CAUTIONProperty Loss Hazard.Do not assume your designate received and acted on the active alert.Prepare to act promptly; time may be critical.
CAUTIONProperty Loss Hazard.Do not rely only on the Telephone Access Module to identify potential problems in your home (like detecting low room temperatures that can freeze water pipes).Have someone periodically check your home while you are away.
Set the Low limit setting a few degrees below the set-back setting on your thermostat. This way you can be notified if the temperature drops below your low thermostat setting. This provides an early notice.
If your indoor low limit setting is set to the factory setting, you hear “The low limit setting is 50° F (°10 C).”If the indoor low limit setting is the value you want, press the * key to return to the Main menu.
CHANGING THE INDOOR TEMPERATURE LOW LIMIT SETTING1. You hear “To change the low limit setting, press 1.”2. Press 1.
• You hear “Enter the low limit setting followed by the # key.”
3. Enter a Low Limit Setting from 40° F (4° C) to 99° F (37° C) in 1° increments and press the # key.• You hear “Your low limit setting is (your low limit
setting).”4. If this is the low limit setting you want
programmed, press the * key to return to the Main menu.
If the indoor low limit setting is not entered correctly, you hear “Invalid setting.” Follow the instructions above to enter a new indoor low limit.
80 9070
60
908070
60
25 69-2028
Indoor Temperature High Limit SettingThe Indoor Temperature High Limit setting is used to activate an alert when the displayed temperature on the thermostat is higher than the value you set. The setting range is 40° F (4° C) to 99° F (37° C) in 1° increments. The factory default setting is 90° F (32° C).When a thermostat displays an indoor temperature higher than your high limit setting and your dial-out alert is active, the TAM dials out.
CAUTIONProperty Loss Hazard.Prepare to act promptly; time may be critical.Do not assume your designate received and acted on the active alert.
CAUTIONProperty Loss Hazard.Do not rely only on the Telephone Access Module to identify potential problems in your home (like detecting high room temperatures).Have someone periodically check your home while you are away.
If your indoor high limit setting is set to the factory setting, you hear “The high limit setting is 90° F (32° C).”
If the indoor high limit setting is the value you want, press the * key to return to the Main menu.
NOTE: The Indoor Temperature High limit setting must be greater than the Low limit setting.
CHANGING THE INDOOR TEMPERATURE HIGH LIMIT SETTING
1. You hear “To change the high limit setting, press 1.”
2. Press 1. • You hear “Enter the high limit setting followed
by the # key.”3. Enter a High Limit Setting from 40° F (4° C) to
99° F (37° C) in 1° increments and press the # key. • You hear “Your high limit setting is (your high
limit setting).”4. If this is the high limit setting you want pro-
grammed, press the * key to return to the Main menu.
If the indoor high limit setting is not entered correctly, you hear “Invalid setting.” Follow the instructions above to enter a new indoor high limit.

26 69-2028
Outdoor Temperature Low Limit SettingThe Outdoor Low Limit setting is used to activate an alert when the displayed outdoor temperature on the thermostat is lower than the value you set. The setting range is -40° F (-40° C) to 105° F (40° C) in 1° increments. The factory default setting is 40° F (4° C).When a thermostat displays a temperature lower than your low limit setting and your dial-out alert is active, the TAM dials out.NOTE: In order for this feature to be enabled, an
optional outdoor temperature sensor must be installed.
CAUTIONProperty Loss Hazard.Do not assume your designate received and acted on the active alert.Prepare to act promptly; time may be critical.
CAUTIONProperty Loss Hazard.Do not rely only on the Telephone Access Module to identify potential problems in your home (like detecting low outdoor temperatures that can freeze water pipes).Have someone periodically check your home while you are away.
If your outdoor low limit setting is set to the factory setting, you hear “The low limit setting is 40°F (4°C).”
If your outdoor low limit setting is correct, and the value you want, press the * key to return to the Main menu.
CHANGING THE OUTDOOR TEMPERATURE LOW LIMIT SETTING
1. You hear “To change the outdoor low limit set-ting, press 3.”
2. Press 3. • You hear “Enter the low limit setting followed
by the # key.”3. Enter a Low Limit Setting from -40° F (-40° C) to
105° F (40° C) in 1° increments and press the # key.• You hear “Your low limit setting is (your low
limit setting).”4. If this is the low limit setting you want pro-
grammed, press the * key to return to the Main menu.
If the outdoor low limit setting is not entered correctly, you hear “Invalid setting.” Follow the instructions above to enter a new outdoor low limit.

27 69-2028
Outdoor Temperature High Limit SettingThe Outdoor High Limit setting is used to activate an alert when the displayed outdoor temperature on the thermostat is higher than the value you set. The setting range for the High Limit Setting is -40° F (-40° C) to 105° F (40° C) in 1° increments. The factory default setting is 105° F (40° C).When a thermostat displays an outdoor temperature higher than your high limit setting and your dial-out alert is active, the TAM dials out.NOTE: In order for this feature to be enabled, an
optional outdoor temperature sensor must be installed.
CAUTIONProperty Loss Hazard.Prepare to act promptly; time may be critical.Do not assume your designate received and acted on the active alert.
CAUTIONProperty Loss Hazard.Do not rely only on the Telephone Access Module to identify potential problems in your home (like detecting high outdoor temperatures).Have someone periodically check your home while you are away.
If your outdoor high limit setting is set to the factory setting, you will hear: “The High Limit Setting is 105° F (40° C).”
If your outdoor high limit setting is correct and the value you want, press the * key to return to the Main menu.
NOTE: The Outdoor Temperature High limit setting must be greater than the Low limit setting.
CHANGING THE OUTDOOR TEMPERATURE HIGH LIMIT SETTING
1. You hear “To change the outdoor high limit set-ting, press 4.”
2. Press 4. • You hear “Enter the high limit setting followed
by the # key.”3. Enter a High Limit Setting from -40° F (-40° C) to
105° F (40° C) in 1° increments and press the # key. • You hear “Your high limit setting is (your high
limit setting).”4. If this is the high limit setting you want pro-
grammed, press the * key to return to the Main menu.
If the outdoor high limit setting is not entered correctly, you hear “Invalid setting.” Follow the instructions above to enter a new outdoor high limit.
28 69-2028
Humidity (Indoor) Low Limit SettingThe Humidity Low Limit setting is used to activate an alert when the indoor humidity is lower than the value you set. The setting range is 5 to 95 percent in 5% increments. The factory default setting is 25%.
If the indoor humidity is lower than your low limit setting and your dial-out alert is active, the TAM dials out.
NOTE: In order for this feature to be enabled, TH9421C1004 thermostats must be used.
CAUTIONProperty Loss Hazard.Do not assume your designate received and acted on the active alert.Prepare to act promptly; time may be critical.
CAUTIONProperty Loss Hazard.Do not rely only on the Telephone Access Module to identify potential problems in your home (like detecting low humidity that can damage woodwork).Have someone periodically check your home while you are away.
If your Low Limit setting is set to the factory setting, you hear “The low limit setting is 25 percent.”
If your humidity low limit setting is correct, and the value you want, press the * key to return to the Main menu.
CHANGING THE HUMIDITY LOW LIMIT SETTING1. You hear “To change the humidity low limit set-
ting, press 5.” 2. Press 5.
• You hear “Enter the low limit setting followed by the # key.”
3. Enter a low limit setting from 5 to 95% in 5% increments and press the # key.• You hear “Your low limit setting is (your low
limit setting) percent.”4. If this is the low limit setting you want pro-
grammed, press the * key to return to the Main menu.
If the humidity low limit setting is not entered correctly, you hear “Invalid setting.” Follow the instructions above to enter a new humidity low limit.

29 69-2028
Humidity (Indoor) High Limit SettingThe Humidity High Limit setting is used to activate an alert when the indoor humidity is higher than the value you set. The setting range is 5 to 95 percent in 5% increments. The factory default setting is 70%.
If the indoor humidity is higher than your high limit setting and your dial-out alert is active, the TAM dials out.
NOTE: In order for this feature to be enabled, TH9421C1004 thermostats must be used.
CAUTIONProperty Loss Hazard.Prepare to act promptly; time may be critical.Do not assume your designate received and acted on the active alert.
CAUTIONProperty Loss Hazard.Do not rely only on the Telephone Access Module to identify potential problems in your home (like detecting high humidity).Have someone periodically check your home while you are away.
If your humidity high limit setting is set to the factory setting, you hear “The high limit setting is 70 percent.”
If your humidity high limit setting is correct and the value you want, press the * key to return to the Main menu.
NOTE: The Humidity High limit setting must be greater than the Low limit setting.
CHANGING THE HUMIDITY HIGH LIMIT SETTING1. You hear “To change the humidity high limit set-
ting, press 6.” 2. Press 6.
• You hear “Enter the high limit setting followed by the # key.”
3. Enter a high limit setting from 5 to 95% in 5% increments and press the # key.• You hear “Your high limit setting is (your high
limit setting) percent.”4. If this is the high limit setting you want pro-
grammed, press the * key to return to the Main menu.
If the humidity high limit setting is not entered correctly, you hear “Invalid setting.” Follow the instructions above to enter a new humidity high limit.
30 69-2028
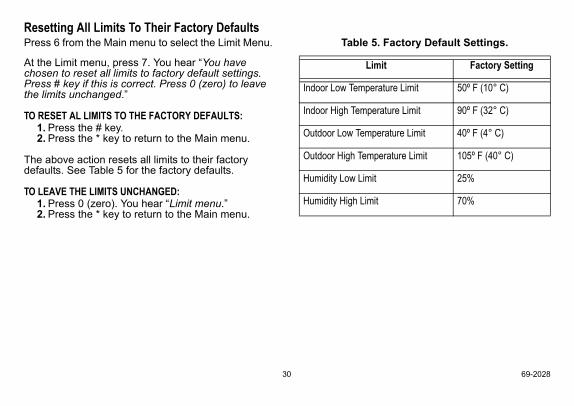
Resetting All Limits To Their Factory DefaultsPress 6 from the Main menu to select the Limit Menu.
At the Limit menu, press 7. You hear “You have chosen to reset all limits to factory default settings. Press # key if this is correct. Press 0 (zero) to leave the limits unchanged.”
TO RESET AL LIMITS TO THE FACTORY DEFAULTS:1. Press the # key.2. Press the * key to return to the Main menu.
The above action resets all limits to their factory defaults. See Table 5 for the factory defaults.
TO LEAVE THE LIMITS UNCHANGED:1. Press 0 (zero). You hear “Limit menu.”2. Press the * key to return to the Main menu.
Table 5. Factory Default Settings.
Limit Factory Setting
Indoor Low Temperature Limit 50º F (10° C)
Indoor High Temperature Limit 90º F (32° C)
Outdoor Low Temperature Limit 40º F (4° C)
Outdoor High Temperature Limit 105º F (40° C)
Humidity Low Limit 25%
Humidity High Limit 70%

31 69-2028
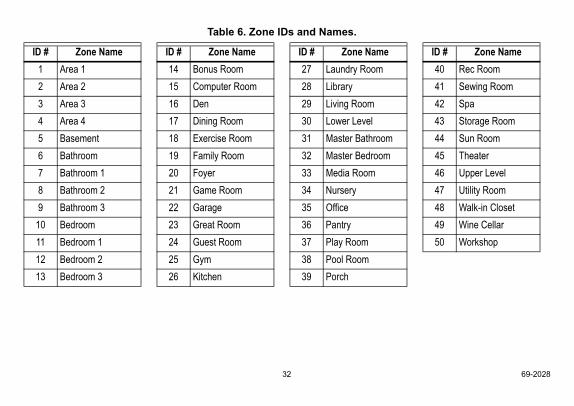
Zone NamesThe Telephone Access Module can announce the temperatures and settings of up to 50 zones by name.
From the Zone menu you can assign a zone name to each zone in your system, erase all the zone names, and set the zone announcement to state either the zone name or the zone number.
By default, each zone is announced as two numbers (a channel number followed by a zone number) such as “zone 1 0,” “zone 2 4,” or “zone 3 1.” There may be from one to four channels connected to your TAM.
Using the Zone menu, you can assign each zone a name such as “Dining Room” instead of “zone 1 4” for example. See Table 6 on page 32 for a list of the zone names.
Press 7 from the Main menu to select the Zone menu.
Once you are at the Zone Menu, you hear: “Zone menu. There are (__) zones in this system. Press 1 to assign zone names. Press 2 to erase all zone names. Press 3 to set zone announcement options. Press 9 to repeat this menu. Press * key to return to the main menu”.
Use Table 6 on the next page and the instructions following the table to assign and announce the zones for your system.
• To assign zone names, see “Assigning Zone Names” on page 33.
• To erase all the zone names, see“Erasing Zone Names” on page 33.
• To change the way the zones are announced, see “Announcing Zones by Name or Number” on page 33.
80 9070
60
908070
60
32 69-2028
Table 6. Zone IDs and Names.
ID # Zone Name ID # Zone Name ID # Zone Name ID # Zone Name1 Area 1 14 Bonus Room 27 Laundry Room 40 Rec Room2 Area 2 15 Computer Room 28 Library 41 Sewing Room3 Area 3 16 Den 29 Living Room 42 Spa4 Area 4 17 Dining Room 30 Lower Level 43 Storage Room5 Basement 18 Exercise Room 31 Master Bathroom 44 Sun Room6 Bathroom 19 Family Room 32 Master Bedroom 45 Theater7 Bathroom 1 20 Foyer 33 Media Room 46 Upper Level8 Bathroom 2 21 Game Room 34 Nursery 47 Utility Room9 Bathroom 3 22 Garage 35 Office 48 Walk-in Closet
10 Bedroom 23 Great Room 36 Pantry 49 Wine Cellar11 Bedroom 1 24 Guest Room 37 Play Room 50 Workshop12 Bedroom 2 25 Gym 38 Pool Room13 Bedroom 3 26 Kitchen 39 Porch
33 69-2028
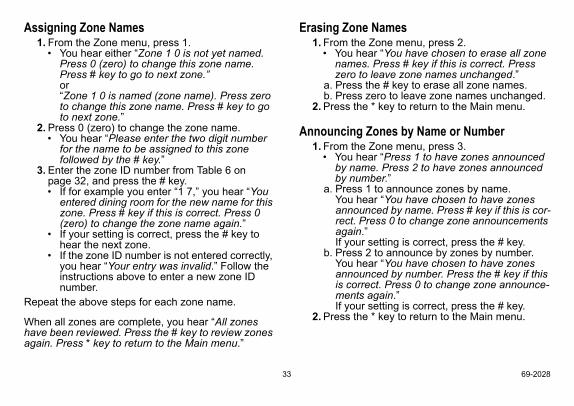
Assigning Zone Names1. From the Zone menu, press 1.
• You hear either “Zone 1 0 is not yet named. Press 0 (zero) to change this zone name. Press # key to go to next zone.”or“Zone 1 0 is named (zone name). Press zero to change this zone name. Press # key to go to next zone.”
2. Press 0 (zero) to change the zone name.• You hear “Please enter the two digit number
for the name to be assigned to this zone followed by the # key.”
3. Enter the zone ID number from Table 6 on page 32, and press the # key.• If for example you enter “1 7,” you hear “You
entered dining room for the new name for this zone. Press # key if this is correct. Press 0 (zero) to change the zone name again.”
• If your setting is correct, press the # key to hear the next zone.
• If the zone ID number is not entered correctly, you hear “Your entry was invalid.” Follow the instructions above to enter a new zone ID number.
Repeat the above steps for each zone name.
When all zones are complete, you hear “All zones have been reviewed. Press the # key to review zones again. Press * key to return to the Main menu.”
Erasing Zone Names1. From the Zone menu, press 2.
• You hear “You have chosen to erase all zone names. Press # key if this is correct. Press zero to leave zone names unchanged.”
a. Press the # key to erase all zone names.b. Press zero to leave zone names unchanged.
2. Press the * key to return to the Main menu.
Announcing Zones by Name or Number1. From the Zone menu, press 3.
• You hear “Press 1 to have zones announced by name. Press 2 to have zones announced by number.”
a. Press 1 to announce zones by name.You hear “You have chosen to have zones announced by name. Press # key if this is cor-rect. Press 0 to change zone announcements again.”If your setting is correct, press the # key.
b. Press 2 to announce by zones by number.You hear “You have chosen to have zones announced by number. Press the # key if this is correct. Press 0 to change zone announce-ments again.”If your setting is correct, press the # key.
2. Press the * key to return to the Main menu.
34 69-2028
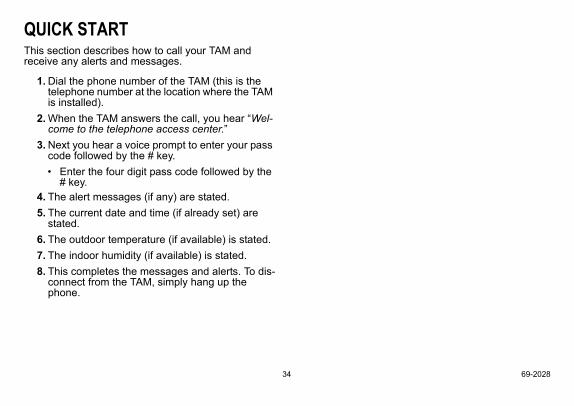
QUICK STARTThis section describes how to call your TAM and receive any alerts and messages.
1. Dial the phone number of the TAM (this is the telephone number at the location where the TAM is installed).
2. When the TAM answers the call, you hear “Wel-come to the telephone access center.”
3. Next you hear a voice prompt to enter your pass code followed by the # key. • Enter the four digit pass code followed by the
# key.4. The alert messages (if any) are stated.5. The current date and time (if already set) are
stated.6. The outdoor temperature (if available) is stated.7. The indoor humidity (if available) is stated.8. This completes the messages and alerts. To dis-
connect from the TAM, simply hang up the phone.
35 69-2028
5-YEAR LIMITED WARRANTYHoneywell warrants this product, excluding battery, to be free from defects in the workmanship or materials, under normal use and service, for a period of five (5) years from the date of purchase by the consumer. If at any time during the warranty period the product is determined to be defective or malfunc-tions, Honeywell shall repair or replace it (at Honeywell's option).If the product is defective,
(i) return it, with a bill of sale or other dated proof of pur-chase, to the place from which you purchased it; or
(ii) call Honeywell Customer Care at 1-800-468-1502. Customer Care will make the determination whether the product should be returned to the following address: Honeywell Return Goods, Dock 4 MN10-3860, 1885 Douglas Dr. N., Golden Valley, MN 55422, or whether a replacement product can be sent to you.
This warranty does not cover removal or reinstallation costs. This warranty shall not apply if it is shown by Honey-well that the defect or malfunction was caused by damage which occurred while the product was in the possession of a consumer.
Honeywell's sole responsibility shall be to repair or replace the product within the terms stated above. HONEYWELL SHALL NOT BE LIABLE FOR ANY LOSS OR DAMAGE OF ANY KIND, INCLUDING ANY INCIDENTAL OR CONSE-QUENTIAL DAMAGES RESULTING, DIRECTLY OR INDI-RECTLY, FROM ANY BREACH OF ANY WARRANTY, EXPRESS OR IMPLIED, OR ANY OTHER FAILURE OF THIS PRODUCT. Some states do not allow the exclusion or limitation of incidental or consequential damages, so this limi-tation may not apply to you.
THIS WARRANTY IS THE ONLY EXPRESS WARRANTY HONEYWELL MAKES ON THIS PRODUCT. THE DURA-TION OF ANY IMPLIED WARRANTIES, INCLUDING THE WARRANTIES OF MERCHANTABILITY AND FITNESS FOR A PARTICULAR PURPOSE, IS HEREBY LIMITED TO THE ONE-YEAR DURATION OF THIS WARRANTY. Some states do not allow limitations on how long an implied warranty lasts, so the above limitation may not apply to you.
This warranty gives you specific legal rights, and you may have other rights which vary from state to state.
If you have warranty questions, please write Honeywell Customer Relations, 1985 Douglas Dr., Golden Valley, MN 55422 or call 1-800-468-1502. In Canada, write Retail Prod-ucts ON15-02H, Honeywell Limited/Honeywell Limitée, 35 Dynamic Drive, Toronto, Ontario M1V4Z9.

Automation and Control SolutionsHoneywell International Inc. Honeywell Limited-Honeywell Limitée1985 Douglas Drive North 35 Dynamic DriveGolden Valley, MN 55422 Toronto, Ontario M1V 4Z9yourhome.honeywell.com® U.S. Registered Trademark© 2007 Honeywell International Inc.69-2028 M.S. 03-07
Printed in Mexico