6571801 kgba intego en for usa - td.sirona.comtd.sirona.com/pdf/6571801.pdf · the intraoral camera...
TRANSCRIPT

IntegoBrief operating instructions for USA
6571801 KGBA Intego EN for USA.book Seite 1 Dienstag, 10. Oktober 2017 9:27 09

2 Dentsply Sirona
Dear Customer,This brief operating instructions describes only functions that are available in the USA. You can use these document to quickly find the most important control procedures and functions of your dental treatment unit. However, the brief operating instruc-tions cannot replace the complete operating instructions, which contains many important descriptions and warnings. The complete operating instructions describes all the functions of the Intego product family, also functions that are not available in the USA.
The care and cleaning of your dental treatment unit are described thoroughly in the complete operating instructions. A quick overview of the required measures is provided in a docu-ment entitled "Care and Cleaning Plans for the dental treatment unit and the Instruments".
Your Intego Team
ContentOverview of Intego .............................................................. 3Power switch ........................................................................... 4EasyTouch user interface .................................................. 4Keys and displays on the touchscreen ....................... 5User interface of the assistant element ..................... 7Creating chair programs ................................................... 8Pneumatic foot switch ........................................................ 8C+ electronic foot control ................................................. 94-way foot control ............................................................. 103-way standard and Sprayvit E syringe ..................... 11Highspeed handpiece / air motor / other air-driven instruments ........................................... 11Electric motor ....................................................................... 12Endodontics function ........................................................ 13ApexLocator .......................................................................... 16SiroSonic L ............................................................................. 19SiroCam AF ........................................................................... 20Sivision program ................................................................. 24Configuration of the dental treatment unit (setup) 27Overview of the touchscreen dialogs ...................... 30
6571801 KGBA Intego EN for USA.book Seite 2 Dienstag, 10. Oktober 2017 9:27 09

6571801 KGBA Intego EN for USA.book Seite 3 Dienstag, 10. Oktober 2017 9:27 09
Overview of Intego
Dentist element instruments
Assistant element instruments
A Patient chair* G Assistant elementB Double-jointed head support H Cuspidor bowlC Pneumatic foot control I Water unitD C+ electronic foot control J Power switch and external
device connectionE TS dentist elementF CS dentist element
* Maximum load exerted by patient and accessories: 185 kg
Position 1 Positions 2, 3
Position 4 Position 5 Additional tray (only for TS)
Standard 3-way syringe
Turbine Turbine SiroSonic L SiroCam AF
Sprayvit E Motor BL E/ BL ISO E
Motor BL E/ BL ISO E
SiroCamAF
SiroSonic L
Position 1 Position 2 Position 3 Position 4Standard 3-way syringe
additional spray aspirator
Spray aspirator Saliva ejector
Sprayvit E
Dentsply Sirona 3

6571801 KGBA Intego EN for USA.book Seite 4 Dienstag, 10. Oktober 2017 9:27 09
Power switchThe dental treatment unit has a power switch (A) at the base of the chair. At the end of the working day, the dental treat-ment unit should be switched off to save energy and for safety reasons. This switches off the air and water supply as well as all electronic components. It then no longer consumes any energy.
EasyTouch user interface
For an overview of touch-screen programs, see the end of this quick reference guide.
A
A Touchscreen (pressure-sensitive user interface)
B Fixed keys (membrane keyboard)
4 Dentsply Sirona

6571801 KGBA Intego EN for USA.book Seite 5 Dienstag, 10. Oktober 2017 9:27 09
Keys and displays on the touchscreen
Tumbler fillingThis function is only available if cuspidor is present.
Starts or stops the tumbler filling function.
When the Tumbler filling key is pressed (> 2 s), the setting text for coupling tumbler filling to mouth rinsing position S and filling time appears.
Flushing the cuspidorStarts or stops cuspidor flushing.
When the Flushing key is pressed (> 2 s), the setting text for coupling flushing to mouth rinsing position S and flushing time appears.
Operating lightSwitches the operating light on, to the composite function, or off. The composite function is used to prevent premature curing of composite materials.
With the LEDlight, brightness is set using the no-touch sensor.
In the LEDview and LEDview Plus, the setting dialog appears when the Operating light key is pressed (> 2 s). The brightness of the light and the distance from which the no-touch sensor should react to move-ments can be adjusted.
The color temperature of the light can also be adjusted for the LEDview Plus.
Sub-dialogSome programs are divided into a main program and sub-screens.
This is indicated by a small arrow at the bottom right of the touchscreen. It points to the fixed key Sub-dialog below the touchscreen.
Chair program SMouth rinsing position (programmable) with last-position memory function
0:45:03
21
0S
S
0:45:03
21
0S
S
0:45
40
S
Dentsply Sirona 5

6571801 KGBA Intego EN for USA.book Seite 6 Dienstag, 10. Oktober 2017 9:27 09
Chair program 0Entry/exit position (programmable)
Chair programs 1 and 2(programmable)
Backrest tiltMoves the seat and backrest without any compression or stretching effects for the patient
Chair height
User profileChanges the user profile
Timer functionStarts and stops the timer.
If the Timer key is held down (>2s), the Timer function settings screen appears. Set the time and select whether you want to switch the time loop (i.e. the timer restarts automatically after the time is up) and the acoustic signal for the selected timer on or off.
Sivision programCalling of the Sivision screen for PC control
Clean keyWith instruments in place: switches the entire user interface of the dentist element to no function. The instruments of the dentist and assistant elements can no longer be activated. The Sivision monitor and the camera system are switched off. Pressing > 3 s again reactivates the dental treatment unit. This is used to make sure that no unwanted functions can be acci-dentally triggered while cleaning the surface or from interference from an external HF device
0
21
B
10:45:03
0:45:03
21
0S
0:15
Clean
A
10:45:03
21
0S
Clean
3 sec
6 Dentsply Sirona

6571801 KGBA Intego EN for USA.book Seite 7 Dienstag, 10. Oktober 2017 9:27 09
User interface of the assistant element
This functions are available if the assistent element is directly attached to the dental treatment unit. Not valid for Rear Delivery.
Chair program SMouth rinsing position (programmable) with last-position memory function
Chair program 0Entry/exit position (programmable)
Tumbler fillingon/off
Flushing the cuspidoron/off
Operating light / Composite functionRepeated pressing of the key allows the following switching positions to be set:
1. Switched on
2. Composite function
3. Switched off
Fn keyStarts and stops the timer.
S
0
Fn
Dentsply Sirona 7

6571801 KGBA Intego EN for USA.book Seite 8 Dienstag, 10. Oktober 2017 9:27 09
Creating chair programsThe four factory preset chair programs:
• Mouth rinsing position S
• Entry/exit position 0
• 1 and 2
can be individually reprogrammed for each of the two user profiles (A to B).
The Start or Instrument dialog is displayed on the touchscreen.
1. Move the patient chair to the desired treatment position.
2. Switch the operating light on or off (this will be included in the program).
3. Press and hold the desired program key (S, 0, 1 or 2) (> 2s).
An acoustic signal sounds. Your settings are now stored under the desired program key.
Note: Chair programs S and 0 can also be programmed on the assistant element side if the assistant element is attached directly to the dental treatment unit.
Pneumatic foot switchFoot pedal Drag an instrument (electric motor,
turbine/air motor, SiroSonic L) and step on the foot pedal.
The instrument is switched on with the set speed and intensity. For highspeed handpieces/air motors, the speed is controlled by the pedal action.
Spray switch Move the toggle switch. Left position: Spray off
Right position: Spray onThe spray is either switched on or off when an instrument is activated.
Chip blowerWith the chip blower, an air jet comes out of the bur.
Take an instrument and press the right button.
The chip blower remains switched on as long as the button is pressed.
21
0S
8 Dentsply Sirona

6571801 KGBA Intego EN for USA.book Seite 9 Dienstag, 10. Oktober 2017 9:27 09
C+ electronic foot controlFoot pedal All instruments are in place. Press the foot pedal. The Start dialog is shown. An instrument is removed. Press the foot pedal. The instrument is activated. If the stan-
dard foot switch function is selected, the motor and the SiroSonic L can be controlled in relation to the pedal stroke. When the intraoral camera is removed from the holder, the camera image focuses and the display switches to the still or live image.
Left button All instruments are in place. Press the left button. The chair moves to mouth rinsing posi-
tion S. An instrument is removed. Press the left button. The preset cooling medium in the sub-
dialog (spray or air) is switched on/off. If the intraoral camera is removed, the video still image is saved in Sidexis; the live image is displayed in the next quad-rant in Si Video.
Right button All instruments are in place. Press the right button. The chair moves to entry/exit position 0. An instrument is removed. Press the right button. The chip blower remains switched on as
long as the button is pressed. When the intraoral camera is removed, it is possible to toggle between single image and quad image in Si Video.
4-way foot control plate All instruments are in place. Move the 4-way foot control plate to
the left or right. Left: Chair program 1 is loaded.
Right: Chair program 2 is loaded.
S
0
S
0
S
S
0
0
S
0
Dentsply Sirona 9

6571801 KGBA Intego EN for USA.book Seite 10 Dienstag, 10. Oktober 2017 9:27 09
An electric motor or SiroSonic L is removed.
Slide the 4-way foot switch plate up or down.
Up: The speed or intensity is increased.Down: The speed or intensity is decreased.
An electric motor or SiroSonic L is removed.
Slide the 4-way foot control plate to the right.
The instrument settings saved for the favorite key, e.g. speed, intensity and activation of spray are called up.
An electric motor is removed. Slide the 4-way foot switch plate to the
left. The clockwise/counterclockwise rota-
tion of the electric motor is activated.
4-way foot controlAdjusting the chair height Slide the 4-way foot control upward or
downward.
Inclining the backrest Slide the 4-way foot control to the left
or right.
S
0
S
0
S
0
10 Dentsply Sirona
6571801 KGBA Intego EN for USA.book Seite 11 Dienstag, 10. Oktober 2017 9:27 09
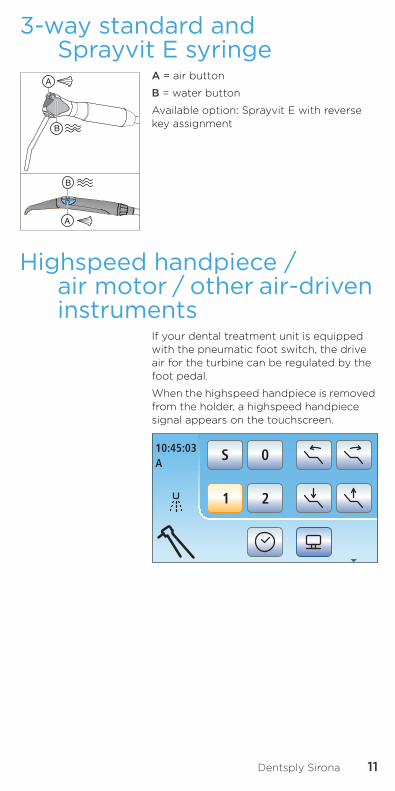
3-way standard and Sprayvit E syringe
A = air button
B = water button
Available option: Sprayvit E with reverse key assignment
Highspeed handpiece / air motor / other air-driven instruments
If your dental treatment unit is equipped with the pneumatic foot switch, the drive air for the turbine can be regulated by the foot pedal.
When the highspeed handpiece is removed from the holder, a highspeed handpiece signal appears on the touchscreen.
B
A
A
B
A
10:45:03
21
0S
Dentsply Sirona 11
6571801 KGBA Intego EN for USA.book Seite 12 Dienstag, 10. Oktober 2017 9:27 09
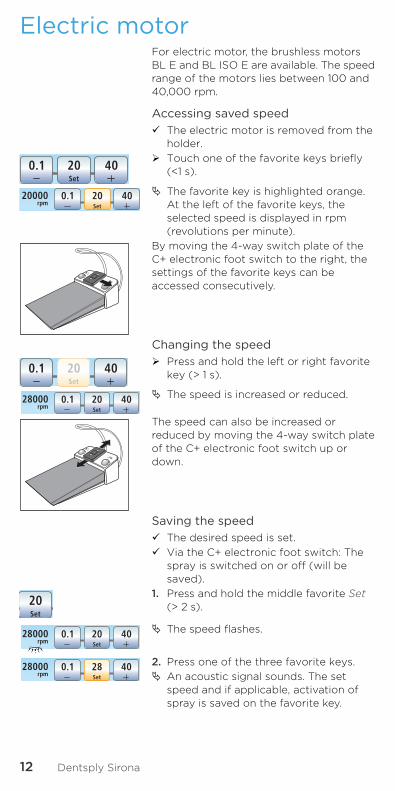
Electric motorFor electric motor, the brushless motors BL E and BL ISO E are available. The speed range of the motors lies between 100 and 40,000 rpm.
Accessing saved speed The electric motor is removed from the
holder. Touch one of the favorite keys briefly
(<1 s).
The favorite key is highlighted orange. At the left of the favorite keys, the selected speed is displayed in rpm (revolutions per minute).
By moving the 4-way switch plate of the C+ electronic foot switch to the right, the settings of the favorite keys can be accessed consecutively.
Changing the speed Press and hold the left or right favorite
key (> 1 s).
The speed is increased or reduced.
The speed can also be increased or reduced by moving the 4-way switch plate of the C+ electronic foot switch up or down.
Saving the speed The desired speed is set. Via the C+ electronic foot switch: The
spray is switched on or off (will be saved).
1. Press and hold the middle favorite Set (> 2 s).
The speed flashes.
2. Press one of the three favorite keys. An acoustic signal sounds. The set
speed and if applicable, activation of spray is saved on the favorite key.
S
0
S
0
20Set
12 Dentsply Sirona

6571801 KGBA Intego EN for USA.book Seite 13 Dienstag, 10. Oktober 2017 9:27 09
Setting the direction of rotation via the foot switchThe rotational direction of the motor can also be set via the 4-way foot control plate of the C+ electronic foot switch.
An electric motor is removed.1. Move the 4-way foot control plate to the
left. When counterclockwise rotation is
switched on, the Counterclockwise key is marked orange on the Touchscreen.
2. Move the 4-way foot control plate to the left again to reverse the rotational direction.
Endodontics functionSpeed and torque of the rotating instru-ment can be set precisely using the Endodontics function.
The basic functionality of the Endodontics function is described below. For more information, please refer to your complete Intego Operating Instructions.
Switching on the endodon-tics functionEndodontics function is assigned to the burr drive removed from the holder.
The desired electric motor for endodon-tics function is removed from the holder.
Press the Endodontics function key in the sub-dialog Motor.
The Endodontics dialog is displayed on the touchscreen.
Switching the endodontics function on/offIf the Endodontics function is switched on, when the burr drive assigned to the endodontics function is removed from the holder, the torque and/or speed of the contra-angle handpiece is displayed instead of that of the motor on the EasyPad display. To show the motor speed again when the burr drive is removed, the Endodontics function must first be switched off.
S
0
21
0Srpm300
Ncm1.00
Endo 3 Cal
Dentsply Sirona 13

6571801 KGBA Intego EN for USA.book Seite 14 Dienstag, 10. Oktober 2017 9:27 09
Press the Endodontics function key. If the key is blue, the Endodontics func-
tion is deactivated. The Motor screen opens when the burr drive is removed from its holder.
Calibrating the burr driveCalibration is required when the Endodon-tics function is started, every time the contra-angle handpiece is changed, and every time the contra-angle handpiece is lubricated. Recalibration is not necessary after changing a file.
An uncalibrated drilling instrument is shown with a blue calibration key. An orange key indicates that the drilling instru-ment has been calibrated.
The Endodontics function is switched on and a drilling instrument is dragged.
1. Attach the contra-angle handpiece that you wish to use with endodontics func-tion to the electric motor.
2. Insert a file in the contra-angle hand-piece. This ensures that the file is taken into account in the measurement.
3. Press the Cal key on the touchscreen or press the right button of the C+ elec-tronic foot control.
The key flashes. The burr drive is ready for calibration.
4. Hold down the foot pedal throughout the duration of the calibration.
The Cal key continues to flash. During calibration, increasing speeds are set on the motor. If the burr drive is calibrated, the key permanently remains high-lighted orange. Calibration is then completed.
Selecting a working stepSpeed and torque can be saved for up to six working steps. At the end of each work step, the required settings can be accessed immediately by selecting the next step.
The work steps can be selected via the forward/back keys.
Cal Cal/
S
0
0PurgeCal
S
0
Cal
Endo 3
14 Dentsply Sirona

6571801 KGBA Intego EN for USA.book Seite 15 Dienstag, 10. Oktober 2017 9:27 09
Setting the speed and torqueWith the endodontics function switched on, torque and speed of the contra-angle handpiece are indicated, but not of the motor. The control electronics of the burr drive calculate the motor control based on the contra-angle handpiece gear reduction and the torque and speed settings.
The working step with which the speed and torque are to be changed is selected.
Use the – and + keys to set the speed and torque of the contra-angle hand-piece. You can also hold down the keys for this purpose.
On the favorite keys 1, 2 and 3, torque values for the steps of the endodontic treatment can be stored and retrieved, see "Electric motor" [ 12]. The set speed remains unchanged. Speed is not saved on the favorite keys.
Switching AutoReverse ON/OFFIf the auto-reverse function is switched on, the burr drive automatically switches to counterclockwise rotation when the torque set is reached. If the foot control is pressed again, the burr drive switches back to clockwise rotation.
Touch the AutoRev key. If the key is marked orange, the Auto
Reverse function is activated.
rpm300
Ncm1.00
AutoRev
Dentsply Sirona 15

6571801 KGBA Intego EN for USA.book Seite 16 Dienstag, 10. Oktober 2017 9:27 09
ApexLocatorThe ApexLocator can be used to measure the working length of the root canal file in endodontic treatments using electrical impedance.
The ApexLocator can be used as follows:
• For measurement during treatment with the motor and the optional Endodontics function with electronic torque limitation
Distance display in the Endodontics program
• For measurement during treatment with the motor, without electronic torque limitation
Distance display in the Motor program
• For manual measurement using a file clamp
Distance display in the Start sub-screen
21
0S
Endo 3 Cal
StopMax
21
0S
rpm2700
StopMax
1.2 4020Set
Setup
San
AquaApex Dist
Auto
16 Dentsply Sirona

6571801 KGBA Intego EN for USA.book Seite 17 Dienstag, 10. Oktober 2017 9:27 09
The measured root canal depth is shown in the distance display on the touchscreen. A bar with 11 display levels shows the distance from the root canal file to the physiological apex. The root canal is divided into four colored sections in the distance display.
Gray regionThe tip of the root canal file is in the middle region of the root canal.
Blue regionThe tip of the root canal file is near the apex.
Green regionThe tip of the root canal file has reached the physiological apex.
Red regionThe tip of the root canal file has pierced the physiological apex. The instrument over-shoot is displayed.
In addition to the graphical distance display on the touchscreen, the position of the file in the root canal can also be indi-cated as an acoustic signal.
Dentsply Sirona 17

6571801 KGBA Intego EN for USA.book Seite 18 Dienstag, 10. Oktober 2017 9:27 09
Automatic motor stopYou can make a setting to determine that the motor stops automatically at a preset distance from the apex. The motor stop can be combined with the Auto-Reverse func-tion.
The sub-dialog Motor or the sub-dialog Endodontics is displayed on the touch-screen.
1. Touch the Apex stop key. If the key is highlighted orange, the
automatic motor stop is activated. The – and + keys are displayed.
2. Use the – and + keys to set the required apex distance from 1.5 to 0. If the distance is 0, the motor does not stop until it reaches the physiological apex. Please note that the distance values are not a metric length measurement!
The set distance is displayed to the left of the – and + keys. The preset motor stop position is displayed as a black triangle to the right of the distance display under the text "Stop".
For more details, please refer to your complete Intego Operating Instructions.
ApexStop
0.5Apex
18 Dentsply Sirona

6571801 KGBA Intego EN for USA.book Seite 19 Dienstag, 10. Oktober 2017 9:27 09
SiroSonic LThe SiroSonic L scaler is used to remove plaque and to rinse the prepared root canal for endodontic treatment.
Accessing intensity settings The SiroSonic TL scaler is removed. Touch one of the favorite keys briefly
(<1 s).
The favorite key is highlighted orange. The selected intensity is displayed to the left of the favorite keys.
By moving the 4-way switch plate of the C+ electronic foot switch to the right, the settings of the favorite keys can be accessed consecutively.
Changing the intensity Press and hold the left or right favorite
key (> 1 s).
The intensity is increased or reduced.
The size of the increments depends on the intensity range setting:
From 1 to 5% = 1% incrementsFrom 5 to 50% = 5% incrementsFrom 50 to 100% = 10% increments
The speed can also be increased or reduced by moving the 4-way switch plate of the C+ electronic foot switch up or down.
Saving intensity The desired intensity is set. Via the C+ electronic foot switch: The
spray is switched on or off (will be saved).
Press and hold the middle favorite Set (> 2 s).
The intensity display flashes.
Press one of the three favorite keys. An acoustic signal sounds. The intensity
set and, if applicable, activation of spray will be saved on the favorite key.
1 10050Set
50 1 10050Set
S
0
1 10050Set
20 1 10050Set
S
0
50Set
20 1 10050Set
20 1 10020Set
Dentsply Sirona 19

6571801 KGBA Intego EN for USA.book Seite 20 Dienstag, 10. Oktober 2017 9:27 09
Switching on the endodontics functionThe intensity of the endodontics function is limited for safety reasons, e.g. in order to prevent broken needles. The intensity can be adjusted from 1e to 5e.
The SiroSonic TL scaler is removed.1. Touch the Endo key.
The key is highlighted orange. The endodontics intensity (endo mode) is displayed instead of ultrasonic intensity (ultrasonic mode).
2. Use the – and + keys to set the desired endodontics intensity (1e to 5e).
By pressing the Endo key again, the user is returned to ultrasonic mode.
The intensity settings cannot be saved on the favorite keys in endo mode.
SiroCam AFThe Sivision digital video system enables the acquisition of intraoral and extraoral images. The SiroCam AF intraoral camera generates digital image data which can be transmitted via a USB 2.0 port (high-speed universal serial bus) to a connected PC and stored there. This PC can then display the images on the Sivision monitor of the dental treatment unit. The Sidexis or Si Video can be used as a PC video applica-tion.
The video images represent an outstanding possibility for improving patient communi-cation.
Focusing the SiroCam AFThe SiroCam AF intraoral camera adjusts the image focus at the touch of a button. The focus is continuously variable.
1. Direct the camera to the subject to be acquired.
2. Press the Auto focus key (B).
If the dental treatment unit is equipped with the C+ electronic foot control, it can be configured in setup that the camera image can be focused with the foot switch, see "Switching on/off the electric foot control C+ function for intraoral camera focus" [28].
Endo
3e Endo
A Lens windowB Key for automatic
focusC Connecting cable
20 Dentsply Sirona

6571801 KGBA Intego EN for USA.book Seite 21 Dienstag, 10. Oktober 2017 9:27 09
Using the camera with Si VideoUsing Si Video, up to four still images can be generated with the SiroCam AF intraoral camera. These can be displayed on the Sivision monitor either as a sequence of single images or simultaneously as a quad image. The active quadrant is marked with an orange square. The quadrants are displayed in a clockwise sequence.
The generated still images remain until the dental treatment unit or the PC is discon-nected from the power supply.
Pull out the intraoral camera. The live image is displayed on the Sivi-
sion monitor as a single image. The Sivi-sion dialog is displayed on the touchscreen.
When the intraoral camera is put in the holder, the live image disappears from the monitor. The generated still images remain displayed.
Operation of Si Video with the camera removedWith the camera removed, Si Video is controlled via the C+ electronic foot control and the Sivision program buttons.
Switching between live and still image The intraoral camera is removed from its
holder.1. Step on the foot pedal. The display switches from live to still
image.2. Press the foot pedal again. The live image is displayed again.
If the dental treatment unit is equipped with C+ electronic foot control, it can be configured in setup that the camera image can be focused with the foot switch. If this function is switched on, the foot pedal
S
0
Dentsply Sirona 21
6571801 KGBA Intego EN for USA.book Seite 22 Dienstag, 10. Oktober 2017 9:27 09
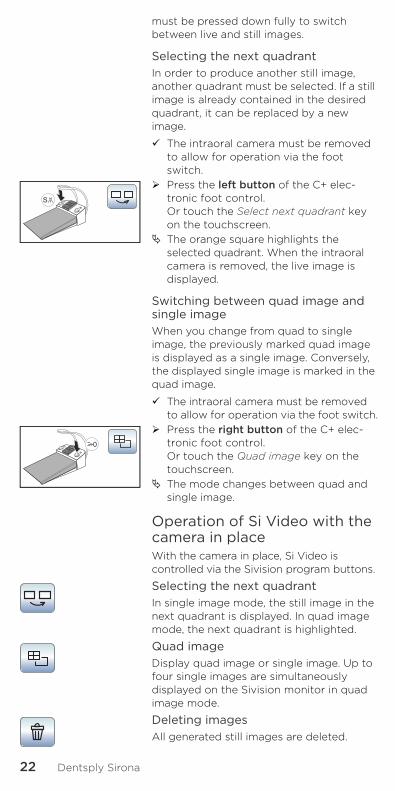
must be pressed down fully to switch between live and still images.
Selecting the next quadrantIn order to produce another still image, another quadrant must be selected. If a still image is already contained in the desired quadrant, it can be replaced by a new image.
The intraoral camera must be removed to allow for operation via the foot switch.
Press the left button of the C+ elec-tronic foot control. Or touch the Select next quadrant key on the touchscreen.
The orange square highlights the selected quadrant. When the intraoral camera is removed, the live image is displayed.
Switching between quad image and single imageWhen you change from quad to single image, the previously marked quad image is displayed as a single image. Conversely, the displayed single image is marked in the quad image.
The intraoral camera must be removed to allow for operation via the foot switch.
Press the right button of the C+ elec-tronic foot control. Or touch the Quad image key on the touchscreen.
The mode changes between quad and single image.
Operation of Si Video with the camera in placeWith the camera in place, Si Video is controlled via the Sivision program buttons.
Selecting the next quadrantIn single image mode, the still image in the next quadrant is displayed. In quad image mode, the next quadrant is highlighted.
Quad imageDisplay quad image or single image. Up to four single images are simultaneously displayed on the Sivision monitor in quad image mode.
Deleting imagesAll generated still images are deleted.
22 Dentsply Sirona

6571801 KGBA Intego EN for USA.book Seite 23 Dienstag, 10. Oktober 2017 9:27 09
Using the camera with SidexisBesides the display and processing of X-ray images, Sidexis XG or Sidexis 4 can be used additionally as a video application for the SiroCam AF intraoral camera. Sidexis displays live and still images in separate windows. Still images are stored in the patient database.
Switching intraoral camera on/off The PC is in operation and the Sivision
Connect or Siucom Plus PC application is started.
Pull out the intraoral camera. Sidexis is started and the live image
appears on the Sivision monitor. The Sivision dialog is displayed on the
touchscreen.
Generating a still image The live image is displayed on the Sivi-
sion monitor.1. Step on the foot pedal. The display switches from live to still
image.2. Press the foot pedal again. The live image is again displayed on the
Sivision monitor.
If the dental treatment unit is equipped with C+ electronic foot control, it can be configured in setup that the camera image can be focused with the foot switch. If this function is switched on, the foot pedal must be pressed down fully to switch between live and still images.
Saving an image The patient must be registered in Sidexis. The still image to be saved is displayed
on the Sivision monitor. Press the left button of the C+ elec-
tronic foot control. An acoustic signal sounds. The still
image is displayed in an additional Sidexis window and saved in the patient database.
S
0
S
0
S
Dentsply Sirona 23
6571801 KGBA Intego EN for USA.book Seite 24 Dienstag, 10. Oktober 2017 9:27 09
Sivision programThe Sivision and/or Siucom Plus PC appli-cation enables communication between the dental treatment unit and the PC. For operating from the PC, Siucom Plus the EasyTouch comfort user interface are required. Thus, the PC can also be oper-ated directly on the touchscreen and in conjunction with the intraoral camera from the C+ electric foot switch.
For details, please refer to the "Installation and Configuration of Siucom Plus / Sivision Connect" manual.
The dental treatment unit can be operated with the following PC versions:
• External PCThe dental treatment unit is connected to an external PC via an Ethernet cable. PC applications such as Sidexis, Microsoft® PowerPoint®, Windows Mediaplayer, and Si Video can also be controlled from the dental treatment unit.
• Operation without PCThe use of Sivision is not possible.
The Si Video application is used in dental treatment units with an external PC on which Sidexis is not installed. In these cases, Si Video serves as a video applica-tion for the camera.
Starting PC communication All PC applications which were started
from the dental treatment unit have been terminated.
Siucom Plus has been started, e.g. via Autostart.
1. Touch the Sivision dialog key on the touchscreen. If intraoral images are desired: Remove the intraoral camera from the holder. The Sidexis PC application or Si Video starts immediately.
The Sivision dialog is displayed on the touchscreen.
24 Dentsply Sirona

6571801 KGBA Intego EN for USA.book Seite 25 Dienstag, 10. Oktober 2017 9:27 09
2. Select the desired PC application from the left side of the touchscreen.
The File selection dialog opens for PC applications that can access files of the PC. Select the desired file by touching it.
A number of buttons which can be used to control the selected PC application then appear on the touchscreen.
The keys displayed on the touchscreen and their arrangement are preconfigured at the factory. The configuration can, however, be individually customized - see "Installation and configuration of Siucom Plus / Sivision Connect". There it can also be defined which file folder the File Selection screen should access for each PC application.
The following overview shows the keys available for configuring the Sidexis PC applications and Media player.
Dentsply Sirona 25

6571801 KGBA Intego EN for USA.book Seite 26 Dienstag, 10. Oktober 2017 9:27 09
Communication with Sidexis
Media Player
Next image Relief display filter
Tiled layout Smooth image
Cascaded layout
Sharpen image
Full frame Undo
Zoom in/out Restore orig-inal image
Rotate image 90° left/right
Close current media window
Rotate image 180°
Close all media windows
Contrast opti-mization filter
Previous/next title
Mute
Stop playback Adjust volume
Start/interrupt playback
26 Dentsply Sirona
6571801 KGBA Intego EN for USA.book Seite 27 Dienstag, 10. Oktober 2017 9:27 09
Configuration of the dental treatment unit (setup)
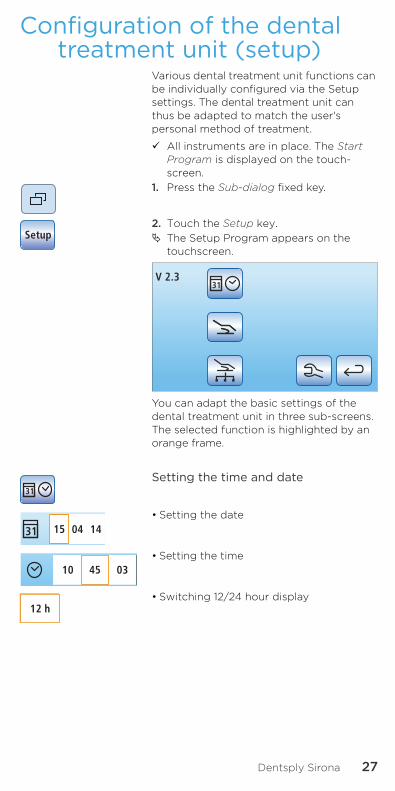
Various dental treatment unit functions can be individually configured via the Setup settings. The dental treatment unit can thus be adapted to match the user's personal method of treatment.
All instruments are in place. The Start Program is displayed on the touch-screen.
1. Press the Sub-dialog fixed key.
2. Touch the Setup key. The Setup Program appears on the
touchscreen.
You can adapt the basic settings of the dental treatment unit in three sub-screens. The selected function is highlighted by an orange frame.
Setting the time and date
• Setting the date
• Setting the time
• Switching 12/24 hour display
Setup
31
31 15 04 14
12 h
Dentsply Sirona 27

6571801 KGBA Intego EN for USA.book Seite 28 Dienstag, 10. Oktober 2017 9:27 09
Configuring control options
• Preselecting the number of user profiles
• Adjusting the touchscreen brightness
• Switching the key sound on/off
• Coupling suction to the 4-way foot switch
• Switching afterblow on/off
• Switching on/off the electric foot control C+ function for intraoral camera focus
• Key for showing/hiding white screen on Sivision monitor
• Switching the water heater on/off
Configuring the network connectionFor more information, please refer to your complete Intego Operating Instructions or the Installation Instructions.
Service domainFor service engineers only!
DHCP
Gateway192.168.0.1
Subnet (24)255.255.255.0
IP192.168.50.50
28 Dentsply Sirona

6571801 KGBA Intego EN for USA.book Seite 29 Dienstag, 10. Oktober 2017 9:27 09
Dentsply Sirona 29

6571801 KGBA Intego EN for USA.book Seite 30 Dienstag, 10. Oktober 2017 9:27 09
Overview of the touchscreen dialogs
B
10:45:03
21
0S
S
B
10:45:03
21
0S
S
0:45
A
10:45:03
21
0S
Clean
3 sec
Setup
San
AquaApex Dist
Auto
B
10:45:03
21
0S
0:15
for LEDview Plus
30 Dentsply Sirona

6571801 KGBA Intego EN for USA.book Seite 31 Dienstag, 10. Oktober 2017 9:27 09
B
10:45:03
21
0S
rpm20000 1.2 4020
Set
A
10:45:03
21
0S
Apex Dist
B
10:45:03
21
0S
50 Endo1 10050Set
B
10:45:03
21
0S
3e Endo
rpm300
Ncm1.00
Endo 3
Cal
21
0S
Endo 3 Cal
StopMax
or
Dentsply Sirona 31

Dentsply SironaSirona Dental Systems GmbH Fabrikstraße 31 64625 Bensheim Germany dentsplysirona.com
All
rig
hts
res
erve
d w
ith
res
pec
t to
tec
hn
ical
ly r
equ
ired
alt
erat
ion
s o
f an
d e
rro
rs p
oss
ibly
co
nta
ined
in t
his
tex
t.P
ub
licat
ion
No
. D3
543
.20
2.0
4.0
3.2
3O
rder
No
. 65
71 8
01
08
.20
17C
hg
. No
. 123
99
6
6571801 KGBA Intego EN for USA.book Seite 32 Dienstag, 10. Oktober 2017 9:27 09