62te
TRANSCRIPT

7/16/2019 62te
http://slidepdf.com/reader/full/62te55cf9df0550346d033afef7d 1/387
2009 AUTOMATIC TRANSMISSION
62TE - Service Information - Grand Caravan, Town & Count ry
DESCRIPTION
DESCRIPTION
Fig. 1: 62TE Transmission Courtesy of CHRYSLER LLC
The planetary gear train for the 62TE transaxle provides six forward gear ratios, including two fourth gear
ratios. One reverse gear ratio is also provided.
Underdrive (UD) Compounder Assembly
Low Clutch (LC)
Direct Clutch (DC)
1 - Underdrive Clutch (UD) 6 - Overrunning Clutch (ORC)2 - Overdrive Clutch (OD) 7 - Low Clutch (LC)
3 - Reverse Clutch (R) 8 - Direct Clutch (DC)
4 - 2/4 Clutch 9 - Planetary Gear Set
5 - L/R Clutch 10 - Remote Pinion Gear
2009 Chrysler Town & Country LX
2009 AUTOMATIC TRANSMISSION 62TE - Service Information - Grand Caravan, Town & Country
2009 Chrysler Town & Country LX
2009 AUTOMATIC TRANSMISSION 62TE - Service Information - Grand Caravan, Town & Country

7/16/2019 62te
http://slidepdf.com/reader/full/62te55cf9df0550346d033afef7d 2/387
Overrunning Clutch (ORC)
Planetary gear set
Fore-Mounted Valve Body/Solenoid/Pressure Switch Assembly
DC solenoid
LC solenoid
DC pressure switch
LC pressure switch Torque Converter Clutch (TC) and pressure control Solenoids
Line Pressure Sensor (LPS)
An additional (third) speed sensor
A "squashed," or flatter, torque converter
A flatter oil pump
A new cover for valve body access 23-way connector for the Solenoid/Pressure Switch Assembly
Redesigned transfer gears with an oil scavenger
A remote pinion gear
A 2-piece, closed differential case with structural clamshell housing.
The addition of the underdrive compounder assembly components improves low-end torque multiplication,
enhancing low-end power capability.
TRANSAXLE IDENTIFICATION
2009 Chrysler Town & Country LX
2009 AUTOMATIC TRANSMISSION 62TE - Service Information - Grand Caravan, Town & Country

7/16/2019 62te
http://slidepdf.com/reader/full/62te55cf9df0550346d033afef7d 3/387
Fig. 2: Case Stamp & Bar Code Label Location
Courtesy of CHRYSLER LLC
The 62TE transaxle is identified by a barcode label (1) that is fixed to the transaxle or the "PK" number (2).
Fig. 3: Identification Label Breakdown Courtesy of CHRYSLER LLC
The label contains a series of digits that can be translated into useful information such as transaxle part number,date of manufacture, manufacturing origin, plant shift number, build sequence number, etc. Refer to for identification label breakdown.
If the tag is not legible or missing, the "PK" number, which is stamped into the transaxle case behind thetransfer gear cover, can be referred to for identification. This number differs slightly in that it contains the entire
1 - T=TRACEABILITY
2 - SUPPLIER CODE (PK=KOKOMO)
3 - COMPONENT CODE (TK=KOKOMO TRANSMISSION)
4 - BUILD DAY (344=DEC. 9)
5 - BUILD YEAR (9=1999)
6 - LINE/SHIFT CODE (3=3RD SHIFT)7 - BUILD SEQUENCE NUMBER
8 - LAST THREE OF P/N
9 - ALPHA
10 - TRANSAXLE PART NUMBER
11 - P=PART NUMBER
2009 Chrysler Town & Country LX
2009 AUTOMATIC TRANSMISSION 62TE - Service Information - Grand Caravan, Town & Country

7/16/2019 62te
http://slidepdf.com/reader/full/62te55cf9df0550346d033afef7d 4/387

7/16/2019 62te
http://slidepdf.com/reader/full/62te55cf9df0550346d033afef7d 5/387
Fig. 4: Reverse Gear Power Flow Courtesy of CHRYSLER LLC
In Reverse, the Reverse Clutch (R) (1) is applied to provide input torque. The reverse clutch drives the front sungear. The L/R clutch (2) is applied to hold the front carrier/rear annulus assembly. The rear carrier/front annulusassembly rotates as an output member in reverse with a reduction gear ratio of 2.21:1.
Power from the main centerline transfers to the underdrive compounder annulus by way of the transfer gears
and the underdrive shaft. The Low Clutch (LC) (3) is applied to hold the underdrive compounder sun gear. Withthe sun gear held, the annulus drives the underdrive compounder carrier, and a reduction gear ratio of 1.45:1 isachieved
The main centerline ratio of 2.21:1 is multiplied by the underdrive compounder centerline ratio of 1.45:1. As aresult, the ratio through the entire gear train to the final drive in Reverse is 3.215:1.
FIRST GEAR
2009 Chrysler Town & Country LX
2009 AUTOMATIC TRANSMISSION 62TE - Service Information - Grand Caravan, Town & Country

7/16/2019 62te
http://slidepdf.com/reader/full/62te55cf9df0550346d033afef7d 6/387
Fig. 5: 1st Gear Power Flow Courtesy of CHRYSLER LLC
In First gear, the UD clutch (1) is applied to provide input torque. The UD hub is splined to the rear sun gear.When the UD clutch is applied, the UD hub and rear sun gear are driven. The L/R clutch (2) is applied to hold the front carrier/rear annulus assembly. By doing so, the rear planet gears are forced to rotate around the insideof the stationary rear annulus. The rear carrier/front annulus assembly rotates as an output member with areduction gear ratio of 2.84:1.
Power from the main centerline transfers to the underdrive compounder annulus by way of the transfer gearsand the underdrive shaft. The Overrunning Clutch (ORC) holds the underdrive sun gear. The LC (3) is alsoapplied during coast in first gear. With the sun gear held, the annulus drives the underdrive compounder carrier,and a reduction gear ratio of 1.45:1 is achieved by the underdrive compounder gear set.
The main centerline ratio of 2.84:1 is multiplied by the underdrive compounder centerline ratio of 1.45:1. As aresult, the ratio through the entire gear train to the final drive in First gear is 4.127:1.
SECOND GEAR
2009 Chrysler Town & Country LX
2009 AUTOMATIC TRANSMISSION 62TE - Service Information - Grand Caravan, Town & Country

7/16/2019 62te
http://slidepdf.com/reader/full/62te55cf9df0550346d033afef7d 7/387
Fig. 6: 2nd Gear Power Flow Courtesy of CHRYSLER LLC
In Second gear, the UD clutch (1) is applied to provide input torque. The UD hub is splined to the rear sun gear.When the UD clutch is applied, the UD hub and rear sun gear are driven. The L/R clutch (2) is applied to hold the front carrier/rear annulus assembly. By doing so, the rear planet gears are forced to rotate around the insideof the stationary rear annulus. The rear carrier/front annulus assembly rotates as an output member with areduction gear ratio of 2.84:1.
Power from the main centerline transfers to the underdrive compounder gear set annulus by way of the transfer gears and the underdrive shaft. The direct clutch (3) is applied to drive the underdrive compounder sun gear atthe same speed as the underdrive annulus. With two members driven, the underdrive compounder gear setoperates in direct, or 1:1.
The main centerline ratio of 2.84:1 is multiplied by the underdrive compounder centerline ratio of 1:1. As aresult, the ratio through the entire gear train to the final drive in Second gear is 2.84:1.
THIRD GEAR
2009 Chrysler Town & Country LX
2009 AUTOMATIC TRANSMISSION 62TE - Service Information - Grand Caravan, Town & Country

7/16/2019 62te
http://slidepdf.com/reader/full/62te55cf9df0550346d033afef7d 8/387
Fig. 7: 3rd Gear Power Flow Courtesy of CHRYSLER LLC
In Third gear, the UD clutch (1) is applied to drive the rear sun gear. The UD hub is splined to the rear sun gear.When the UD clutch is applied, the UD hub and rear sun gear are driven. The 2/4 clutch (2) is applied to hold the front sun gear. The rear carrier/front annulus rotates as an output member with a reduction gear ratio of 1.573:1.
Power from the main centerline transfers to the underdrive compounder annulus by way of the transfer gearsand the underdrive shaft. The Overrunning Clutch (ORC) holds (4) the underdrive sun gear. The LC (3) is alsoapplied during coast in first gear. With the sun gear held, the annulus drives the underdrive compounder carrier,and a reduction gear ratio of 1.45:1 is achieved by the underdrive compounder gear set.
The main centerline ratio of 1.57:1 is multiplied by the underdrive compounder centerline ratio of 1.45:1. As aresult, the ratio through the entire gear train to the final drive in Third gear is 2.28:1.
Third gear is also the default (limp-in) gear position.
FOURTH GEAR PRIME
2009 Chrysler Town & Country LX
2009 AUTOMATIC TRANSMISSION 62TE - Service Information - Grand Caravan, Town & Country

7/16/2019 62te
http://slidepdf.com/reader/full/62te55cf9df0550346d033afef7d 9/387
Fig. 8: 4th Gear Prime Power Flow Courtesy of CHRYSLER LLC
In Fourth Prime, the UD clutch (1) is applied to drive the rear sun gear. The UD hub is splined to the rear sungear. When the UD clutch is applied, the UD hub and rear sun gear are driven. The 2/4 clutch (2) is applied tohold the front sun gear. The rear carrier/front annulus rotates as an output member with a reduction gear ratio of 1.57:1.
Power from the main centerline transfers to the underdrive compounder gear set annulus by way of the transfer gears and the underdrive shaft. The direct clutch (3) is applied to drive the underdrive compounder sun gear atthe same speed as the underdrive annulus. With two members driven, the underdrive compounder gear setoperates in direct, or 1:1.
The main centerline ratio of 1.57:1 is multiplied by the underdrive compounder centerline ratio of 1:1. As aresult, the ratio through the entire gear train to the final drive in Fourth Prime is 1.573:1.
FOURTH GEAR
2009 Chrysler Town & Country LX
2009 AUTOMATIC TRANSMISSION 62TE - Service Information - Grand Caravan, Town & Country

7/16/2019 62te
http://slidepdf.com/reader/full/62te55cf9df0550346d033afef7d 10/387
Fig. 9: 4th Gear Power Flow Courtesy of CHRYSLER LLC
In Fourth gear, the UD (1) and OD clutches (2) are applied to provide input torque. The UD hub is splined tothe rear sun gear. When the UD clutch is applied, the UD hub and rear sun gear are driven. The OD hubassembly is splined to the front carrier/rear annulus assembly. When the OD clutch is applied, the OD hub and front carrier/rear annulus assembly are also driven. With the rear sun gear and the rear annulus driven at thesame speed and in the same direction, the entire front/rear planetary gear train is locked and rotating as one unit.
The rear carrier/front annulus rotates as an output member in direct, or 1:1.
Power from the main centerline transfers to the underdrive compounder annulus by way of the transfer gearsand the underdrive shaft. The Overrunning Clutch (ORC) (4) holds the underdrive sun gear. The LC (3) is alsoapplied during coast in first gear. With the sun gear held, the annulus drives the underdrive compounder carrier,and a reduction gear ratio of 1.45:1 is achieved by the underdrive compounder gear set.
The main centerline ratio of 1:1 is multiplied by the underdrive compounder centerline ratio of 1:45. As a result,
the ratio through the entire gear train to the final drive in Fourth gear is 1.45:1.
FIFTH GEAR
2009 Chrysler Town & Country LX
2009 AUTOMATIC TRANSMISSION 62TE - Service Information - Grand Caravan, Town & Country

7/16/2019 62te
http://slidepdf.com/reader/full/62te55cf9df0550346d033afef7d 11/387
Fig. 10: 5th Gear Power Flow Courtesy of CHRYSLER LLC
In Fifth gear, the UD (1) and OD clutches (2) are applied to provide input torque. The UD hub is splined to therear sun gear. When the UD clutch is applied, the UD hub and rear sun gear are driven. The OD hub assembly issplined to the front carrier/rear annulus assembly. When the OD clutch is applied, the OD hub and frontcarrier/rear annulus assembly are also driven. With the rear sun gear and the rear annulus driven at the samespeed and in the same direction, the entire planetary gear set is locked and rotating as one unit. The rear
carrier/front annulus assembly rotates as an output member in direct drive, or 1:1.
Power from the main centerline transfers to the underdrive compounder gear set annulus by way of the transfer gears and the underdrive shaft. The direct clutch (3) is applied to drive the underdrive compounder sun gear atthe same speed as the underdrive annulus. With two members driven, the underdrive compounder gear setoperates in direct, or 1:1.
The main centerline ratio of 1:1 is multiplied by the underdrive compounder centerline ratio of 1:1. As a result,
the ratio through the entire gear train to the final drive in Fifth gear is 1.00:1.
SIXTH GEAR
2009 Chrysler Town & Country LX
2009 AUTOMATIC TRANSMISSION 62TE - Service Information - Grand Caravan, Town & Country

7/16/2019 62te
http://slidepdf.com/reader/full/62te55cf9df0550346d033afef7d 12/387
Fig. 11: 6th Gear Power Flow Courtesy of CHRYSLER LLC
In Sixth gear, the OD clutch (1) is applied to drive the front carrier/rear annulus assembly. The OD hub issplined to the front carrier/rear annulus assembly. When the OD clutch is applied, the OD hub and frontcarrier/rear annulus assembly are driven. The 2/4 clutch (2) is applied to hold the front sun gear. Overdrive can be achieved using the front gear set. The rear carrier/front ring gear/annulus rotates as an output member withan overdrive gear ratio of 0.69:1.
Power from the main centerline transfers to the underdrive compounder annulus by way of the transfer gearsand the underdrive shaft. The direct clutch (3) is applied to drive the underdrive compounder sun gear at thesame speed as the underdrive annulus. With two members driven, the underdrive compounder carrier rotateswith a direct drive.
The main centerline ratio of 0.69:1 is multiplied by the underdrive compounder centerline ratio of 1:1. As aresult, the ratio through the entire gear train to the final drive in Sixth gear is 0.69:1.
DIAGNOSIS AND TESTING
TORQUE CONVERTER HOUSING FLUID LEAKAGE
2009 Chrysler Town & Country LX
2009 AUTOMATIC TRANSMISSION 62TE - Service Information - Grand Caravan, Town & Country

7/16/2019 62te
http://slidepdf.com/reader/full/62te55cf9df0550346d033afef7d 13/387
Fig. 12: Converter Housing Leak Paths Courtesy of CHRYSLER LLC
When diagnosing converter housing fluid leaks, three actions must be taken before repair:
1. Verify proper transmission fluid level.
2. Verify that the leak originates from the converter housing area and is transmission fluid.
3. Determine the true source of the leak.
Fluid leakage at or around the torque converter area may originate from an engine oil leak. The area should beexamined closely. Factory fill fluid is red and, therefore, can be distinguished from engine oil.
Some suspected converter housing fluid leaks may not be leaks at all. They may only be the result of residualfluid in the converter housing, or excess fluid spilled during factory fill, or fill after repair. Converter housingleaks have several potential sources inspect pump seal (1), pump vent (2), pump bolts (3), pump gasket (4),converter housing (5), converter (6) and a rear main seal leak (7). Through careful observation, a leak sourcecan be identified before removing the transmission for repair.
Pump seal leaks tend to move along the drive hub and onto the rear of the converter. Pump O-ring or pump body leaks follow the same path as a seal leak. Pump attaching bolt leaks are generally deposited on the insideof the converter housing and not on the converter itself. Pump seal or gasket leaks usually travel down theinside of the converter housing.
1 - PUMP SEAL
2 - PUMP VENT
3 - PUMP BOLT
4 - PUMP GASKET
5 - CONVERTER HOUSING
6 - CONVERTER
7 - REAR MAIN SEAL LEAK
2009 Chrysler Town & Country LX
2009 AUTOMATIC TRANSMISSION 62TE - Service Information - Grand Caravan, Town & Country
2009 Ch l T & C t LX

7/16/2019 62te
http://slidepdf.com/reader/full/62te55cf9df0550346d033afef7d 14/387
TORQUE CONVERTER LEAKAGE
Fig. 13: Converter Leak Points - Typical Courtesy of CHRYSLER LLC
Possible sources of torque converter leakage are:
Torque converter weld leaks at the outside diameter weld (1).
Torque converter hub weld (2).
CLUTCH AIR PRESSURE TESTS
1 - OUTSIDE DIAMETER WELD
2 - TORQUE CONVERTER HUB WELD
3 - STARTER RING GEAR
4 - LUG
2009 Chrysler Town & Country LX
2009 AUTOMATIC TRANSMISSION 62TE - Service Information - Grand Caravan, Town & Country
2009 Chrysler Town & Country LX

7/16/2019 62te
http://slidepdf.com/reader/full/62te55cf9df0550346d033afef7d 15/387
Fig. 14: Air Pressure Test Plate 9741 Courtesy of CHRYSLER LLC
Inoperative clutches can be located using a series of tests by substituting air pressure for fluid pressure using Air Pressure Test Plate 9741.
1 - OVERDRIVE CLUTCH 5 -LOW/REVERSECLUTCH
2 - REVERSE CLUTCH 6 - LOWCLUTCH
3 - UNDERDRIVE CLUTCH7 - DIRECT
CLUTCH4 -2/4 CLUTCH
2009 Chrysler Town & Country LX
2009 AUTOMATIC TRANSMISSION 62TE - Service Information - Grand Caravan, Town & Country
2009 Chrysler Town & Country LX

7/16/2019 62te
http://slidepdf.com/reader/full/62te55cf9df0550346d033afef7d 16/387
The clutches may be tested by applying air pressure to their respective passages. The valve body and oil filter must be removed and Air Pressure Test Plate 9741 installed. To make air pressure tests, proceed as follows:
Remove oil pan and valve body, Install Test Plate 9741 and tighten bolts to 6 N.m (50 in. lbs.). When testing isfinished install valve body and tighten bolts to 6 N.m (50 in. lbs.), Install the oil pan bolts and tighten to 6 N.m(50 in. lbs.) and fill transmission. See Transmission and Transfer Case/Automatic - 62TE/FLUID -
Standard Procedure.
OVERDRIVE CLUTCH
Apply air pressure to the overdrive clutch feed hole located on the test plate marked OD, listen for an audiblethud. The piston should return to its starting position when the air pressure is removed.
REVERSE CLUTCH
Apply air pressure to the reverse clutch feed hole located on the test plate marked REV, listen for an audiblethud. The piston should return to its starting position when the air pressure is removed.
2/4 CLUTCH
Apply air pressure to the feed hole located on the test plate marked 2/4 clutch. listen for an audible thud. The piston should return to its original position after the air pressure is removed.
LOW/REVERSE CLUTCH
Apply air pressure to the low/reverse clutch feed hole located on the test plate marked LR. Then, listen for anaudible thud. The piston should return to its original position after the air pressure is removed.
UNDERDRIVE CLUTCH
Because this clutch piston cannot be seen, its operation is checked by function. Air pressure is applied to thefeed hole located on the test plate marked UD. This locks the output shaft. Use a piece of rubber hose wrapped around the input shaft and a pair of clamp-on pliers to turn the input shaft. Next apply air pressure to theunderdrive clutch. The input shaft should not rotate with hand torque. Release the air pressure and confirm thatthe input shaft will rotate.
DIRECT CLUTCH
Apply air pressure to the feed hole located on the test plate marked DC, listen for an audible thud.
LOW CLUTCH
Apply air pressure to the feed hole located on the test plate marked LC, listen for an audible thud.
NOTE: The compressed air supply must be free of all dirt and moisture. Use a pressureof 30 psi.
2009 Chrysler Town & Country LX
2009 AUTOMATIC TRANSMISSION 62TE - Service Information - Grand Caravan, Town & Country

7/16/2019 62te
http://slidepdf.com/reader/full/62te55cf9df0550346d033afef7d 17/387
2009 Chrysler Town & Country LX
7/16/2019 62te
http://slidepdf.com/reader/full/62te55cf9df0550346d033afef7d 18/387
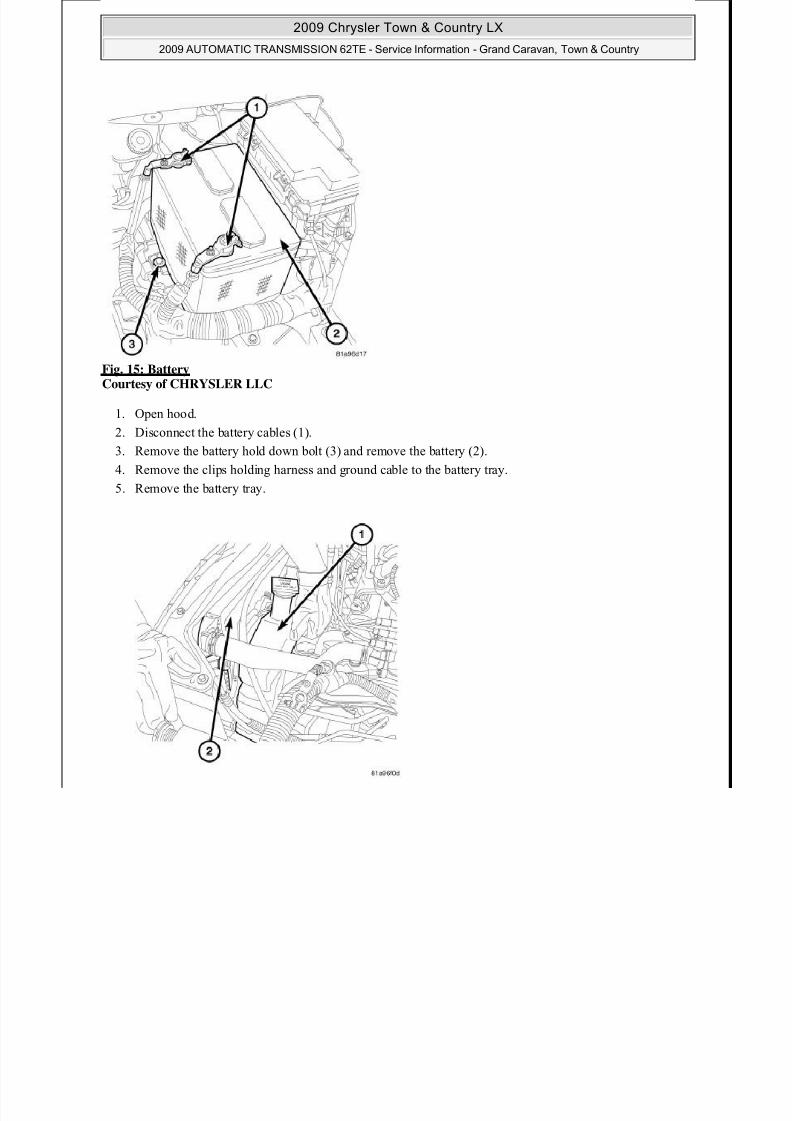
Fig. 15: Battery Courtesy of CHRYSLER LLC
1. Open hood.
2. Disconnect the battery cables (1).
3. Remove the battery hold down bolt (3) and remove the battery (2).
4. Remove the clips holding harness and ground cable to the battery tray.5. Remove the battery tray.
2009 Chrysler Town & Country LX
2009 AUTOMATIC TRANSMISSION 62TE - Service Information - Grand Caravan, Town & Country
2009 Chrysler Town & Country LX

7/16/2019 62te
http://slidepdf.com/reader/full/62te55cf9df0550346d033afef7d 19/387
Fig. 16: Overflow Bottle Courtesy of CHRYSLER LLC
6. Remove the overflow bottle (1).
Fig. 17: Cooler Lines At Transaxle Courtesy of CHRYSLER LLC
7. Disconnect oil cooler lines from transaxle using Disconnect Tool 8875A.
y y
2009 AUTOMATIC TRANSMISSION 62TE - Service Information - Grand Caravan, Town & Country
2009 Chrysler Town & Country LX

7/16/2019 62te
http://slidepdf.com/reader/full/62te55cf9df0550346d033afef7d 20/387
Fig. 18: Bolts Holding Heater LinesCourtesy of CHRYSLER LLC
8. Remove the bolts (2) holding the heater lines.
9. Unplug the input speed sensor (3).
Fig. 19: Shift Cable From/To Manual Lever
Courtesy of CHRYSLER LLC
10. Disconnect gearshift cable (1) from transaxle manual valve lever (2).
11. Disconnect gearshift cable from the bracket.
2009 AUTOMATIC TRANSMISSION 62TE - Service Information - Grand Caravan, Town & Country
2009 Chrysler Town & Country LX

7/16/2019 62te
http://slidepdf.com/reader/full/62te55cf9df0550346d033afef7d 21/387
Fig. 20: Crankshaft Position Sensor Courtesy of CHRYSLER LLC
12. Disconnect the electrical connector (2) at the crankshaft position sensor (3).
13. Remove hold down bolt (1) at the crankshaft position sensor (3).
14. Remove the crankshaft position sensor (1).
Fig. 21: Solenoid Connector At Transmission
2009 AUTOMATIC TRANSMISSION 62TE - Service Information - Grand Caravan, Town & Country
2009 Chrysler Town & Country LX

7/16/2019 62te
http://slidepdf.com/reader/full/62te55cf9df0550346d033afef7d 22/387
15. Disconnect the solenoid pack connector at the transmission.
Fig. 22: Left Transmission Mount Bolts Courtesy of CHRYSLER LLC
16. Support the transaxle with a floor jack.
17. Remove the bolts (1) at the left transmission mount (2).
2009 AUTOMATIC TRANSMISSION 62TE - Service Information - Grand Caravan, Town & Country
2009 Chrysler Town & Country LX

7/16/2019 62te
http://slidepdf.com/reader/full/62te55cf9df0550346d033afef7d 23/387
Courtesy of CHRYSLER LLC
18. Remove the transaxle upper bellhousing-to-block bolts (3).
Fig. 24: Ground Cable Courtesy of CHRYSLER LLC
19. Raise the vehicle on the hoist.20. Remove the bolt (2) holding the ground cable (3) to the transaxle.
21. Remove tie strap (1) to trans valve body pan.
22. Remove both halfshafts. Refer to Differential and Driveline/Half Shaft - Removal .
23. Remove the front and both side splash shields. Refer to Body/Exterior/SHIELD, Splash - Removal .
2009 AUTOMATIC TRANSMISSION 62TE - Service Information - Grand Caravan, Town & Country
2009 Chrysler Town & Country LX

7/16/2019 62te
http://slidepdf.com/reader/full/62te55cf9df0550346d033afef7d 24/387
Fig. 25: Rear Transaxle Mount Bracket Bolt Courtesy of CHRYSLER LLC
24. Remove rear transaxle mount bracket bolt (3).
Fig. 26: Rear Transaxle Mount Bracket Bolts Courtesy of CHRYSLER LLC
25. Remove the remaining rear transaxle mount bracket bolts (1).
2009 AUTOMATIC TRANSMISSION 62TE - Service Information - Grand Caravan, Town & Country
2009 Chrysler Town & Country LX
2009 AUTOMATIC TRANSMISSION 62TE S i I f ti G d C T & C t

7/16/2019 62te
http://slidepdf.com/reader/full/62te55cf9df0550346d033afef7d 25/387
Fig. 27: Crossmember Through Bolt Courtesy of CHRYSLER LLC
26. Support the engine and transmission with a jacks.
27. Remove the crossmember through bolt (1)
Fig. 28: Transmission Crossmember Bolts Courtesy of CHRYSLER LLC
2009 AUTOMATIC TRANSMISSION 62TE - Service Information - Grand Caravan, Town & Country
2009 Chrysler Town & Country LX
2009 AUTOMATIC TRANSMISSION 62TE Service Information Grand Caravan Town & Country

7/16/2019 62te
http://slidepdf.com/reader/full/62te55cf9df0550346d033afef7d 26/387
28. Remove the transmission crossmember bolts (1).
29. Remove the transmission crossmember (4).
Fig. 29: Left Transmission Mount Bolts Courtesy of CHRYSLER LLC
30. Lower the engine and transmission to gain access to the left transmission mount bracket bolts.
31. Remove the bolts (1) holding left transmission mount (2) to the transmission (3).
32. Remove the left transmission mount (2).
2009 AUTOMATIC TRANSMISSION 62TE - Service Information - Grand Caravan, Town & Country
2009 Chrysler Town & Country LX
2009 AUTOMATIC TRANSMISSION 62TE - Service Information - Grand Caravan Town & Country

7/16/2019 62te
http://slidepdf.com/reader/full/62te55cf9df0550346d033afef7d 27/387
Fig. 30: Front Mount Bracket Bolts Courtesy of CHRYSLER LLC
33. Remove the front mount bracket bolts (1).
34. Remove the heater line bracket bolt (3).
NOTE: The three bolts on the left side of the front bracket hold the starter inplace, ensure starter is supported.
2009 AUTOMATIC TRANSMISSION 62TE - Service Information - Grand Caravan, Town & Country
2009 Chrysler Town & Country LX
2009 AUTOMATIC TRANSMISSION 62TE - Service Information - Grand Caravan, Town & Country

7/16/2019 62te
http://slidepdf.com/reader/full/62te55cf9df0550346d033afef7d 28/387
Courtesy of CHRYSLER LLC
35. Remove the bolt (3) at transmission front mount bracket to engine.
36. Remove the front mount bracket (2).
Fig. 32: Exhaust Bracket Bolts Courtesy of CHRYSLER LLC
37. On 4.0L engines, remove bolts (3) to exhaust bracket.
38. Remove the exhaust cross under pipe (if equipped). Refer to Exhaust System/PIPE, Exhaust CrossUnder - Removal .
39. Remove bolts (2) to stand off bracket (4).40. Remove bracket (4).
NOTE: The three bolts on the left side of the front bracket hold the starter inplace, ensure starter is supported.
2009 AUTOMATIC TRANSMISSION 62TE Service Information Grand Caravan, Town & Country
2009 Chrysler Town & Country LX
2009 AUTOMATIC TRANSMISSION 62TE - Service Information - Grand Caravan, Town & Country

7/16/2019 62te
http://slidepdf.com/reader/full/62te55cf9df0550346d033afef7d 29/387
Fig. 33: Dust Shield Courtesy of CHRYSLER LLC
41. Remove torque converter dust shield bolt (3).
42. Remove torque converter dust shield (2).
Fig. 34: Torque Converter Bolts Courtesy of CHRYSLER LLC
43. Remove the torque converter-to-driveplate bolts (1). Upon removing bolts, a tight-tolerance (slotted) bolt
, y
2009 Chrysler Town & Country LX
2009 AUTOMATIC TRANSMISSION 62TE - Service Information - Grand Caravan, Town & Country

7/16/2019 62te
http://slidepdf.com/reader/full/62te55cf9df0550346d033afef7d 30/387
will be encountered. Mark this location (driveplate and converter) with paint for assembly reference.
Fig. 35: Torque Converter Bolts Courtesy of CHRYSLER LLC
44. Remove the six transaxle-to-engine lower bolts.
45. Lower transaxle from engine compartment.
NOTE: The bolts on each side of the inspection opening were removed with theexhaust bracket.
2009 Chrysler Town & Country LX
2009 AUTOMATIC TRANSMISSION 62TE - Service Information - Grand Caravan, Town & Country

7/16/2019 62te
http://slidepdf.com/reader/full/62te55cf9df0550346d033afef7d 31/387
Fig. 36: Structural Collar Bolts Courtesy of CHRYSLER LLC
46. On 3.8L engine, remove the bolts holding structural collar to the oil pan (1) and transmission (2).
Fig. 37: Torque Converter Bolts Courtesy of CHRYSLER LLC
47. Remove the torque converter-to-drive plate bolts (1). Upon removing bolts, a tight-tolerance (slotted) boltwill be encountered. Mark this location (drive plate and converter) with paint for assembly reference.
2009 Chrysler Town & Country LX
2009 AUTOMATIC TRANSMISSION 62TE - Service Information - Grand Caravan, Town & Country

7/16/2019 62te
http://slidepdf.com/reader/full/62te55cf9df0550346d033afef7d 32/387
48. Remove the two remaining lower bellhousing bolts.
49. Lower transaxle from engine compartment.
DISASSEMBLY
DISASSEMBLY
Fig. 38: Speed Sensors Courtesy of CHRYSLER LLC
1. Remove the speed sensors (1, 2 and 3).
2009 Chrysler Town & Country LX
2009 AUTOMATIC TRANSMISSION 62TE - Service Information - Grand Caravan, Town & Country

7/16/2019 62te
http://slidepdf.com/reader/full/62te55cf9df0550346d033afef7d 33/387
Fig. 39: Filter Oil Pan Courtesy of CHRYSLER LLC
2. Remove bolts (1) at the oil filter pan (2).
3. Remove the oil filter pan (2).
Fig. 40: Fluid Filter Courtesy of CHRYSLER LLC
4. Remove the bolts (1) at the oil filter (2).
2009 Chrysler Town & Country LX
2009 AUTOMATIC TRANSMISSION 62TE - Service Information - Grand Caravan, Town & Country

7/16/2019 62te
http://slidepdf.com/reader/full/62te55cf9df0550346d033afef7d 34/387
5. Remove the oil filter (2).
Fig. 41: Oil Filter Seal At Case Courtesy of CHRYSLER LLC
6. Remove the oil filter seal (1) at the case.
Fig. 42: Fasteners And Front Sound Dampener Cover Courtesy of CHRYSLER LLC
NOTE: Keep the Front Sound Dampener Cover if replacing the unit
2009 Chrysler Town & Country LX
2009 AUTOMATIC TRANSMISSION 62TE - Service Information - Grand Caravan, Town & Country

7/16/2019 62te
http://slidepdf.com/reader/full/62te55cf9df0550346d033afef7d 35/387
7. If equipped remove the fasteners (1) and the Front Sound Dampener Cover (2).
Fig. 43: Top Sound Damper Cover Courtesy of CHRYSLER LLC
8. If equipped remove the Top Sound Damper Cover (1).
Fig. 44: Valve Body Pan Courtesy of CHRYSLER LLC
NOTE: Keep the Top Sound Dampener Cover if replacing the unit
2009 Chrysler Town & Country LX
2009 AUTOMATIC TRANSMISSION 62TE - Service Information - Grand Caravan, Town & Country

7/16/2019 62te
http://slidepdf.com/reader/full/62te55cf9df0550346d033afef7d 36/387
9. Remove bolts (2) at the valve body oil pan (1).
Fig. 45: Pressure Tap Plug Courtesy of CHRYSLER LLC
10. Remove the pressure tap plug (2) at valve body pan.
11. Remove the valve body pan.
Fig. 46: Connector At Transmission Courtes of CHRYSLER LLC
2009 Chrysler Town & Country LX
2009 AUTOMATIC TRANSMISSION 62TE - Service Information - Grand Caravan, Town & Country

7/16/2019 62te
http://slidepdf.com/reader/full/62te55cf9df0550346d033afef7d 37/387
12. Remove the electrical connector (1) at the range sensor (4).
13. Remove the bolt (3) holding the detent spring.14. Remove the detent spring (2).
Fig. 47: Valve Body Bolts Courtesy of CHRYSLER LLC
15. Remove valve body bolts (1).
2009 Chrysler Town & Country LX
2009 AUTOMATIC TRANSMISSION 62TE - Service Information - Grand Caravan, Town & Country

7/16/2019 62te
http://slidepdf.com/reader/full/62te55cf9df0550346d033afef7d 38/387
Fig. 48: Oil Transfer Tubes Courtesy of CHRYSLER LLC
16. Remove valve body (1) from oil transfer tubes and manual valve (3) from rooster comb.
Fig. 49: Transfer Tube O-Rings Courtesy of CHRYSLER LLC
17. Remove oil transfer tubes (2) from the case.
2009 Chrysler Town & Country LX
2009 AUTOMATIC TRANSMISSION 62TE - Service Information - Grand Caravan, Town & Country

7/16/2019 62te
http://slidepdf.com/reader/full/62te55cf9df0550346d033afef7d 39/387
Fig. 50: Accumulators Courtesy of CHRYSLER LLC
18. Remove all six accumulators (1, 2, 3, 5, 6 and 7) from case along with the accumulator return springs.
19. Remove the 2/4 clutch oil supply seal (4) from the case.
20. Remove the manual lever, TRS and seal. See Transmission and Transfer Case/Automatic -62TE/SENSOR, Transmission Range - Removal.
Fig. 51: Measuring Input Shaft End Play Using End Play Set 8266 Courtesy of CHRYSLER LLC
21. Measure input shaft end play. Place transaxle so input shaft is vertical. Set up end play fixtures 8266A (1,2) and dial indicator (3). Input shaft end play should be within 0.13-0.64 mm (0.005-0.025 in.) Record indicator reading for reference upon reassembly.
1 - UD ACCUMULATOR 5 - LCACCUMULATOR
2 - 2/4 ACCUMULATOR 6 - DCACCUMULATOR
3 - LR ACCUMULATOR 7 - ODACCUMULATOR
4 - 2/4 CLUTCH OIL SUPPLY SEAL -
1 - END PLAY FIXTURES 8266A
2 - DIAL INDICATOR C-3339A
2009 Chrysler Town & Country LX
2009 AUTOMATIC TRANSMISSION 62TE - Service Information - Grand Caravan, Town & Country

7/16/2019 62te
http://slidepdf.com/reader/full/62te55cf9df0550346d033afef7d 40/387
Fig. 52: Front Pump 62TE Courtesy of CHRYSLER LLC
22. Remove the front pump bolts (1).
Fig. 53: Pullers C-3752 Courtesy of CHRYSLER LLC
CAUTION: Be sure input speed sensor is removed before removing oi l pump.
2009 Chrysler Town & Country LX
2009 AUTOMATIC TRANSMISSION 62TE - Service Information - Grand Caravan, Town & Country

7/16/2019 62te
http://slidepdf.com/reader/full/62te55cf9df0550346d033afef7d 41/387
23. Install slide hammers C-3752 (1) on oil pump.
Fig. 54: Oil Pump Assembly Courtesy of CHRYSLER LLC
24. Remove oil pump assembly (1).
Fig. 55: Oil Pump Gasket Courtesy of CHRYSLER LLC
2009 Chrysler Town & Country LX
2009 AUTOMATIC TRANSMISSION 62TE - Service Information - Grand Caravan, Town & Country

7/16/2019 62te
http://slidepdf.com/reader/full/62te55cf9df0550346d033afef7d 42/387
25. Remove oil pump gasket (2).
Fig. 56: Bypass Valve 62TE Courtesy of CHRYSLER LLC
26. Remove cooler bypass valve (2).
Fig. 57: Caged Needle Bearing Courtesy of CHRYSLER LLC
CAUTION: If transaxle failure has occurred, the cooler bypass valve must bereplaced. Do not re-use or attempt to clean valve.
2009 Chrysler Town & Country LX
2009 AUTOMATIC TRANSMISSION 62TE - Service Information - Grand Caravan, Town & Country

7/16/2019 62te
http://slidepdf.com/reader/full/62te55cf9df0550346d033afef7d 43/387
27. Remove number one needle bearing (1).
Fig. 58: Input Clutch Assembly Courtesy of CHRYSLER LLC
28. Remove input clutch assembly (1).
Fig. 59: No. 4 Thrust Plate Courtesy of CHRYSLER LLC
1 - #1 CAGED NEEDLE BEARING
2 - NOTE: TANGED SIDE OUT
1 - INPUT CLUTCH ASSEMBLY
2 - #4 THRUST WASHER
1 - OVERDRIVE SHAFT ASSEMBLY
2009 Chrysler Town & Country LX
2009 AUTOMATIC TRANSMISSION 62TE - Service Information - Grand Caravan, Town & Country

7/16/2019 62te
http://slidepdf.com/reader/full/62te55cf9df0550346d033afef7d 44/387
29. Remove number four thrust plate (2).
Fig. 60: Front Sun Gear Assembly Courtesy of CHRYSLER LLC
30. Remove front sun gear assembly (1) and number four thrust washer (2).
Fig. 61: Remove Front Carrier & Rear Annulus Assembly Courtesy of CHRYSLER LLC
2 - #4 THRUST PLATE (SELECT)
3 - 3 DABS OF PETROLATUM FOR RETENTION
1 - FRONT SUN GEAR ASSEMBLY
2 - #4 THRUST WASHER (FOUR TABS)
1 - #6 NEEDLE BEARING
2009 Chrysler Town & Country LX
2009 AUTOMATIC TRANSMISSION 62TE - Service Information - Grand Caravan, Town & Country

7/16/2019 62te
http://slidepdf.com/reader/full/62te55cf9df0550346d033afef7d 45/387
31. Remove front carrier/rear annulus assembly (2) and number six needle bearing (1).
Fig. 62: Rear Sun Gear Courtesy of CHRYSLER LLC
32. Remove rear sun gear (2) and number seven needle bearing (1).
2 - FRONT CARRIER AND REAR ANNULUSASSEMBLY (TWIST AND PULL OR PUSH TO REMOVE
OR INSTALL).
1 - #7 NEEDLE BEARING
2 - REAR SUN GEAR
NOTE: The number seven needle bearing (1) has three anti-reversal tabs and iscommon with the number five and number two posit ion. The orientationshould allow the bearing to seat flat against the rear sun gear (1) when puttogether.
2009 Chrysler Town & Country LX
2009 AUTOMATIC TRANSMISSION 62TE - Service Information - Grand Caravan, Town & Country

7/16/2019 62te
http://slidepdf.com/reader/full/62te55cf9df0550346d033afef7d 46/387
Fig. 63: 2/4 Clutch Retainer Snap Ring Courtesy of CHRYSLER LLC
33. Setup the Spring Compressor 5058A (1), Compress 2/4 clutch return spring (4) (just enough to removesnap ring) and remove snap ring (3).
Fig. 64: 2/4 Clutch Retainer Courtesy of CHRYSLER LLC
1 - SPRING COMPRESSING 5058A
2 - SCREWDRIVER
3 - SNAP RING
4 - 2/4 CLUTCH RETAINER
NOTE: Verify that Compressor 5058A is centered properly over the 2/4 clutchretainer before compressing. If necessary, fasten the 5058A bar to thebellhousing flange with any combination of locking pliers and bolts to
center the tool properly.
2009 Chrysler Town & Country LX
2009 AUTOMATIC TRANSMISSION 62TE - Service Information - Grand Caravan, Town & Country

7/16/2019 62te
http://slidepdf.com/reader/full/62te55cf9df0550346d033afef7d 47/387
34. Remove 2/4 clutch retainer (1).
Fig. 65: 2/4 Clutch Return Spring Courtesy of CHRYSLER LLC
35. Remove 2/4 clutch return spring (1).
Fig. 66: 2/4 Clutch Pack Courtes of CHRYSLER LLC
1 - 2/4 CLUTCH RETAINER
2 - 2/4 CLUTCH RETURN SPRING
NOTE: The 2/4 Clutch Piston has bonded seals which are not individual lyserviceable. Seal replacement requires replacement of the pistonassembly.
1 - 2/4 CLUTCH RETURN SPRING
2009 Chrysler Town & Country LX
2009 AUTOMATIC TRANSMISSION 62TE - Service Information - Grand Caravan, Town & Country

7/16/2019 62te
http://slidepdf.com/reader/full/62te55cf9df0550346d033afef7d 48/387
36. Remove 2/4 clutch pack (1, 2). Tag 2/4 clutch pack for reassembly identification.
Fig. 67: Tapered Snap Ring Courtesy of CHRYSLER LLC
37. Remove tapered snap ring (3).
1 - CLUTCH PLATE (4)
2 - CLUTCH DISC (4)
1 - LOW/REVERSE CLUTCH REACTION PLATE
2 - SCREWDRIVER
3 - LOW/REVERSE TAPERED SNAP RING (TAPERED
SIDE UP)4 - OIL PAN FACE
5 - LONG TAB
2009 Chrysler Town & Country LX
2009 AUTOMATIC TRANSMISSION 62TE - Service Information - Grand Caravan, Town & Country

7/16/2019 62te
http://slidepdf.com/reader/full/62te55cf9df0550346d033afef7d 49/387
Fig. 68: Low/Reverse Reaction PlateCourtesy of CHRYSLER LLC
38. Remove low/reverse reaction plate (1).
Fig. 69: One Low/Reverse Clutch Disc Courtesy of CHRYSLER LLC
39. Remove one low/reverse clutch disc (1).
Fig. 70: Low/Reverse Reaction Plate Snap Ring Courtesy of CHRYSLER LLC
1 - LOW/REVERSE REACTION PLATE (FLAT SIDE UP)
1 - ONE DISC FROM LOW/REVERSE CLUTCH
1 - SCREWDRIVER
2009 Chrysler Town & Country LX
2009 AUTOMATIC TRANSMISSION 62TE - Service Information - Grand Caravan, Town & Country

7/16/2019 62te
http://slidepdf.com/reader/full/62te55cf9df0550346d033afef7d 50/387
40. Remove low/reverse reaction plate snap ring (2).
Fig. 71: Low/Reverse Clutch Pack Courtesy of CHRYSLER LLC
41. Remove low/reverse clutch pack (1, 2).
2 - LOW/REVERSE REACTION PLATE FLAT SNAPRING
3 - DO NOT SCRATCH CLUTCH PLATE
1 - CLUTCH PLATES (5)
2 - CLUTCH DISCS (5)
Fig 72: Transfer Gear Cover
2009 Chrysler Town & Country LX
2009 AUTOMATIC TRANSMISSION 62TE - Service Information - Grand Caravan, Town & Country

7/16/2019 62te
http://slidepdf.com/reader/full/62te55cf9df0550346d033afef7d 51/387
Fig. 72: Transfer Gear Cover Courtesy of CHRYSLER LLC
42. Remove transfer gear cover-to-case bolts (2).
43. Remove transfer gear cover (1).
Fig. 73: Oil Scavenger Courtesy of CHRYSLER LLC
44. Remove the oil scavenger (2).
2009 Chrysler Town & Country LX
2009 AUTOMATIC TRANSMISSION 62TE - Service Information - Grand Caravan, Town & Country

7/16/2019 62te
http://slidepdf.com/reader/full/62te55cf9df0550346d033afef7d 52/387
Fig. 74: Output Nut Retaining Strap Courtesy of CHRYSLER LLC
45. Bend back the locking tabs (2) at the output transfer gear retaining strap (3).
46. Remove the bolts (1) at the output transfer gear retaining strap (3).
47. Remove the output transfer gear retaining strap (3).
Fig. 75: Holder 9739 Courtesy of CHRYSLER LLC
48 Install the Gear Holder 9739 (2) onto the output transfer gear (3)
2009 Chrysler Town & Country LX
2009 AUTOMATIC TRANSMISSION 62TE - Service Information - Grand Caravan, Town & Country

7/16/2019 62te
http://slidepdf.com/reader/full/62te55cf9df0550346d033afef7d 53/387
48. Install the Gear Holder 9739 (2) onto the output transfer gear (3).
49. Remove the output transfer gear bolt (1).
Fig. 76: Nut At Transfer Gear Courtesy of CHRYSLER LLC
50. Grind the staked tabs (1) from the transfer gear (underdrive compounder side).
51. Install the Gear Holder 9739 (1) onto the transfer gear (underdrive compounder side) and remove the nut.52. Lift the transfer gear from the underdrive compounder shaft.
2009 Chrysler Town & Country LX
2009 AUTOMATIC TRANSMISSION 62TE - Service Information - Grand Caravan, Town & Country

7/16/2019 62te
http://slidepdf.com/reader/full/62te55cf9df0550346d033afef7d 54/387
Fig. 77: Gear Puller L-4407A Courtesy of CHRYSLER LLC
53. Using Gear Puller L-4407A (1) and Thrust Button 6055 (3) remove output shaft transfer gear (2) and select shim.
Fig. 78: Output Gear Bearing Cone Courtesy of CHRYSLER LLC
1 - BEARING PULLER 5048 WITH JAWS 5048-5 AND
THRUST PAD L-4539-22 - WRENCHES
3 - OUTPUT GEAR
54. Using Bearing Puller 5048 with Jaws 5048-5 and Thrust Pad L-4539-2 (1) remove output gear bearing
2009 Chrysler Town & Country LX
2009 AUTOMATIC TRANSMISSION 62TE - Service Information - Grand Caravan, Town & Country

7/16/2019 62te
http://slidepdf.com/reader/full/62te55cf9df0550346d033afef7d 55/387
54. Using Bearing Puller 5048 with Jaws 5048 5 and Thrust Pad L 4539 2 (1) remove output gear bearingcone.
Fig. 79: Compounder Transfer Gear Bearing Courtesy of CHRYSLER LLC
55. Using Press Puller C-293-PA (1), Adaptors 9738 (3) and Press Plug 9678 remove compounder transfer gear bearing cone.
Fig. 80: Rear Carrier
Courtesy of CHRYSLER LLC
2009 Chrysler Town & Country LX
2009 AUTOMATIC TRANSMISSION 62TE - Service Information - Grand Caravan, Town & Country

7/16/2019 62te
http://slidepdf.com/reader/full/62te55cf9df0550346d033afef7d 56/387
56. Remove rear carrier assembly (1) from transaxle (2).
Fig. 81: Rear Carrier Bearing Cone Courtesy of CHRYSLER LLC
57. Remove rear carrier assembly (3) bearing cone using bearing puller 5048 with Jaws 5048-3 and thrust button 6055.
Fig. 82: Low/Reverse Spring Compressor Tool Courtesy of CHRYSLER LLC
1 - BEARING PULLER 5048 WITH JAWS 5048-3 ANDTHRUST BUTTON 6055
2 - WRENCHES
3 - REAR CARRIER ASSEMBLY
1 - SPRING COMPRESSOR DISC 6057
2009 Chrysler Town & Country LX
2009 AUTOMATIC TRANSMISSION 62TE - Service Information - Grand Caravan, Town & Country

7/16/2019 62te
http://slidepdf.com/reader/full/62te55cf9df0550346d033afef7d 57/387
58. Install spring compressor disk 6057 (1), spring compressor 5059-A (2) and forcing screw 5058A-3 (3).
Fig. 83: Spring Compressor 5059-A Courtesy of CHRYSLER LLC
59. Compress low/reverse spring using spring compressor 5059-A (4).
2 - SPRING COMPRESSOR 5059-A
3 - FORCING SCREW 5058A-3
1 - LOW/REVERSE CLUTCH RETURN SPRING
2 - SNAP RING (INSTALL AS SHOWN INILLUSTRATION)
3 - SPRING COMPRESSOR DISC 6057
4 - SPRING COMPRESSOR 5059-A
5 - FORCING SCREW 5058A-3
Fig. 84: Snap Ring Courtesy of CHRYSLER LLC
2009 Chrysler Town & Country LX
2009 AUTOMATIC TRANSMISSION 62TE - Service Information - Grand Caravan, Town & Country

7/16/2019 62te
http://slidepdf.com/reader/full/62te55cf9df0550346d033afef7d 58/387
Courtesy of CHRYSLER LLC
60. Remove snap ring (1) at low/reverse piston return spring.
Fig. 85: Low/Reverse Piston Return Spring Courtesy of CHRYSLER LLC
61. Remove low/reverse spring compressor tool and low reverse piston return spring (1).
1 - SNAP RING OPENING MUST BE BETWEEN SPRINGLEVERS (AS SHOWN IN ILLUSTRATION)
2 - SNAP RING PLIERS
3 - SPRING COMPRESSOR DISC 6057
1 - LOW/REVERSE PISTON RETURN SPRING
2 - PISTON
Fig. 86: Low/Reverse Clutch PistonCourtesy of CHRYSLER LLC
2009 Chrysler Town & Country LX
2009 AUTOMATIC TRANSMISSION 62TE - Service Information - Grand Caravan, Town & Country

7/16/2019 62te
http://slidepdf.com/reader/full/62te55cf9df0550346d033afef7d 59/387
Courtesy of CHRYSLER LLC
62. Remove low/reverse clutch piston (1).
Fig. 87: Piston Retainer Attaching Screws Courtesy of CHRYSLER LLC
63. Remove low/reverse piston retainer-to-case screws (3).
1 - LOW/REVERSE CLUTCH PISTON
2 - BONDED SEAL
3 - BONDED SEAL
NOTE: The Low/Reverse Clutch Piston has bonded seals which are notindiv idually serviceable. Seal replacement requires replacement of thepiston assembly.
1 - LOW/REVERSE CLUTCH PISTON RETAINER
2 - SCREWDRIVER
3 - TORX-LOC SCREWS
2009 Chrysler Town & Country LX
2009 AUTOMATIC TRANSMISSION 62TE - Service Information - Grand Caravan, Town & Country

7/16/2019 62te
http://slidepdf.com/reader/full/62te55cf9df0550346d033afef7d 60/387
Fig. 88: Remove/Install Piston Retainer Courtesy of CHRYSLER LLC
64. Remove low/reverse piston retainer (1).
Fig. 89: Low/Reverse Piston Retainer-To-Case Gasket Courtesy of CHRYSLER LLC
65. Remove low/reverse piston retainer-to-case gasket (2), gasket holes must line up (1).
1 - LOW/REVERSE CLUTCH PISTON RETAINER
2 - GASKET
1 - GASKET HOLES MUST LINE UP
2 - LOW/REVERSE CLUTCH PISTON RETAINER
GASKET
2009 Chrysler Town & Country LX
2009 AUTOMATIC TRANSMISSION 62TE - Service Information - Grand Caravan, Town & Country

7/16/2019 62te
http://slidepdf.com/reader/full/62te55cf9df0550346d033afef7d 61/387
Fig. 90: Inner Output Bearing Cup Courtesy of CHRYSLER LLC
66. Using a hammer and suitable drift (2), drive out inner output bearing cup (1).
Fig. 91: Outer Carrier Cup Out Courtesy of CHRYSLER LLC
67. Using bearing cup puller 6062A (1), remove outer output bearing cup (2).
2009 Chrysler Town & Country LX
2009 AUTOMATIC TRANSMISSION 62TE - Service Information - Grand Caravan, Town & Country

7/16/2019 62te
http://slidepdf.com/reader/full/62te55cf9df0550346d033afef7d 62/387
Fig. 92: Snap Ring Underdrive Compounder Courtesy of CHRYSLER LLC
68. Remove the snap ring (1) at the underdrive compounder assembly (2).
Fig. 93: Bolts At Compounder Courtesy of CHRYSLER LLC
69. Remove four bolts (1) at the compounder bearing retainer.
2009 Chrysler Town & Country LX
2009 AUTOMATIC TRANSMISSION 62TE - Service Information - Grand Caravan, Town & Country

7/16/2019 62te
http://slidepdf.com/reader/full/62te55cf9df0550346d033afef7d 63/387
Fig. 94: Tool 9908 Bearing Retainer Assembly Courtesy of CHRYSLER LLC
70. Install puller adapter 9908 (2) to the compounder bearing retainer.
Fig. 95: Slide Hammer To 9908 Courtesy of CHRYSLER LLC
71. Install Slide Hammer C-3752 (1) to puller adapter 9908 (2) and pull the underdrive compounder assemblyfrom the case.
2009 Chrysler Town & Country LX
2009 AUTOMATIC TRANSMISSION 62TE - Service Information - Grand Caravan, Town & Country

7/16/2019 62te
http://slidepdf.com/reader/full/62te55cf9df0550346d033afef7d 64/387
Fig. 96: Underdrive Compounder Assembly Courtesy of CHRYSLER LLC
72. Remove the underdrive compounder assembly (2).
Fig. 97: Bolts At Remote Pinion Cover Courtesy of CHRYSLER LLC
NOTE: Insure that the planetary gear set/output hub is removed as part of theunderdrive compounder assembly.
73. Remove the bolts (1) at the remote pinion cover (2).
2009 Chrysler Town & Country LX
2009 AUTOMATIC TRANSMISSION 62TE - Service Information - Grand Caravan, Town & Country

7/16/2019 62te
http://slidepdf.com/reader/full/62te55cf9df0550346d033afef7d 65/387
Fig. 98: Remote Pinion Cover Courtesy of CHRYSLER LLC
74. Remove the remote pinion (1) and the remote pinion cover (2) from the case.
Fig. 99: Cover At Remote Pinion Courtesy of CHRYSLER LLC
75. Remove the remote pinion cover (1) from the remote pinion (2).
2009 Chrysler Town & Country LX
2009 AUTOMATIC TRANSMISSION 62TE - Service Information - Grand Caravan, Town & Country

7/16/2019 62te
http://slidepdf.com/reader/full/62te55cf9df0550346d033afef7d 66/387
Fig. 100: Pinion Cover Cup Courtesy of CHRYSLER LLC
76. Using Remover 8913 (2) and Brace 8915 (1) remove the remote pinion cover bearing cup (3) and selective shim.
Fig. 101: Remote Pinion Small Bearing Cup Courtesy of CHRYSLER LLC
77. Using Remover 8912 and Brace 8915 (1, 2) pull remote pinion small bearing cup (3) from the case.
2009 Chrysler Town & Country LX
2009 AUTOMATIC TRANSMISSION 62TE - Service Information - Grand Caravan, Town & Country

7/16/2019 62te
http://slidepdf.com/reader/full/62te55cf9df0550346d033afef7d 67/387
Fig. 102: Differential Bearing Cover Courtesy of CHRYSLER LLC
78. Remove the differential output bearing cover bolts (1).
79. Remove differential output bearing cover (2).
Fig. 103: Differential Cover Bolts Courtes of CHRYSLER LLC
80. Remove the differential cover bolts (1).
2009 Chrysler Town & Country LX
2009 AUTOMATIC TRANSMISSION 62TE - Service Information - Grand Caravan, Town & Country

7/16/2019 62te
http://slidepdf.com/reader/full/62te55cf9df0550346d033afef7d 68/387
Fig. 104: Differential Cover Courtesy of CHRYSLER LLC
81. Remove the differential cover (1).
82. Remove the out seal (2), oil singer (3) and the small bearing cup (4).
83. Remove the large bearing cup.
Fig. 105: Differential Out And In Courtesy of CHRYSLER LLC
2009 Chrysler Town & Country LX
2009 AUTOMATIC TRANSMISSION 62TE - Service Information - Grand Caravan, Town & Country

7/16/2019 62te
http://slidepdf.com/reader/full/62te55cf9df0550346d033afef7d 69/387
84. Remove the differential.
85. Remove the manual lever and TRS. See Transmission and Transfer Case/Automatic -62TE/SENSOR, Transmission Range - Removal.
Fig. 106: Set Screw At Park Pawl Shaft
Courtesy of CHRYSLER LLC
86. Remove the set screw (1) for the park pawl shaft.
2009 Chrysler Town & Country LX
2009 AUTOMATIC TRANSMISSION 62TE - Service Information - Grand Caravan, Town & Country

7/16/2019 62te
http://slidepdf.com/reader/full/62te55cf9df0550346d033afef7d 70/387
Fig. 107: Park Pawl Tube Snap Ring 2 Courtesy of CHRYSLER LLC
87. Remove the snap ring (1) for the park guide assembly (2).
Fig. 108: Park Pawl Tube
Courtesy of CHRYSLER LLC
88. Remove the park guide assembly (1).
2009 Chrysler Town & Country LX
2009 AUTOMATIC TRANSMISSION 62TE - Service Information - Grand Caravan, Town & Country

7/16/2019 62te
http://slidepdf.com/reader/full/62te55cf9df0550346d033afef7d 71/387
Fig. 109: Park Pawl Shaft Plug Courtesy of CHRYSLER LLC
89. Remove the plug (1) to allow the park pawl shaft to be removed.
Fig. 110: Park Pawl Shaft
Courtesy of CHRYSLER LLC
90. Slide the shaft (1) out of the park pawl (3).
2009 Chrysler Town & Country LX
2009 AUTOMATIC TRANSMISSION 62TE - Service Information - Grand Caravan, Town & Country

7/16/2019 62te
http://slidepdf.com/reader/full/62te55cf9df0550346d033afef7d 72/387
Fig. 111: Park Pawl Shaft Courtesy of CHRYSLER LLC
91. Remove the park pawl shaft (1).
Fig. 112: Park Pawl
Courtesy of CHRYSLER LLC
92. Remove the park pawl (1) and the park pawl spring (2).
ASSEMBLY
ASSEMBLY
2009 Chrysler Town & Country LX
2009 AUTOMATIC TRANSMISSION 62TE - Service Information - Grand Caravan, Town & Country

7/16/2019 62te
http://slidepdf.com/reader/full/62te55cf9df0550346d033afef7d 73/387
ASSEMBLY
Fig. 113: Output Transfer Gear Cups Courtesy of CHRYSLER LLC
1. Install both output bearing cups (2) using Installer 5050A (1).
CAUTION: The cooler bypass valve must be replaced if t ransaxle failure has
occurred. Do not attempt to reuse or clean old valve.
NOTE: If transaxle is being overhauled (clutch and/or seal replacement), the TCM/PCMQuick Learn procedure must be performed. Refer to Electrical/ElectronicControl Modules/MODULE, Powertrain Control - Standard Procedure .
2009 Chrysler Town & Country LX
2009 AUTOMATIC TRANSMISSION 62TE - Service Information - Grand Caravan, Town & Country
7/16/2019 62te
http://slidepdf.com/reader/full/62te55cf9df0550346d033afef7d 74/387
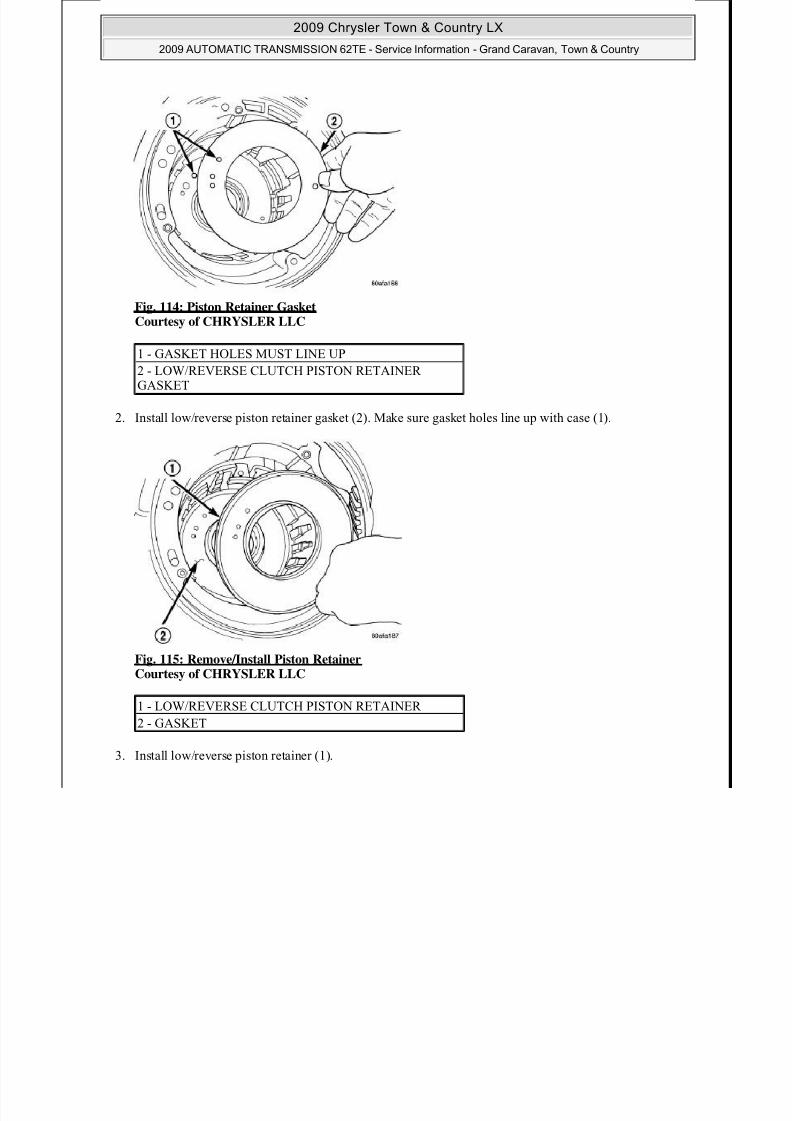
Fig. 114: Piston Retainer Gasket Courtesy of CHRYSLER LLC
2. Install low/reverse piston retainer gasket (2). Make sure gasket holes line up with case (1).
Fig. 115: Remove/Install Piston Retainer Courtesy of CHRYSLER LLC
3. Install low/reverse piston retainer (1).
1 - GASKET HOLES MUST LINE UP
2 - LOW/REVERSE CLUTCH PISTON RETAINER GASKET
1 - LOW/REVERSE CLUTCH PISTON RETAINER
2 - GASKET
2009 Chrysler Town & Country LX
2009 AUTOMATIC TRANSMISSION 62TE - Service Information - Grand Caravan, Town & Country

7/16/2019 62te
http://slidepdf.com/reader/full/62te55cf9df0550346d033afef7d 75/387
Fig. 116: Piston Retainer Attaching Screws Courtesy of CHRYSLER LLC
4. Install low/reverse piston retainer-to-case screws (3) and tighten to 5 N.m (45 in. lbs.).
Fig. 117: Low/Reverse Clutch Piston Courtesy of CHRYSLER LLC
1 - LOW/REVERSE CLUTCH PISTON RETAINER
2 - SCREWDRIVER 3 - TORX-LOC SCREWS
1 - LOW/REVERSE CLUTCH PISTON
2 - BONDED SEAL3 - BONDED SEAL
NOTE: The Low/Reverse Clutch Piston has bonded seals which are not
5 Install low/reverse clutch piston (1)
indiv idually serviceable. Seal replacement requires replacement of thepiston assembly.
2009 Chrysler Town & Country LX
2009 AUTOMATIC TRANSMISSION 62TE - Service Information - Grand Caravan, Town & Country
7/16/2019 62te
http://slidepdf.com/reader/full/62te55cf9df0550346d033afef7d 76/387
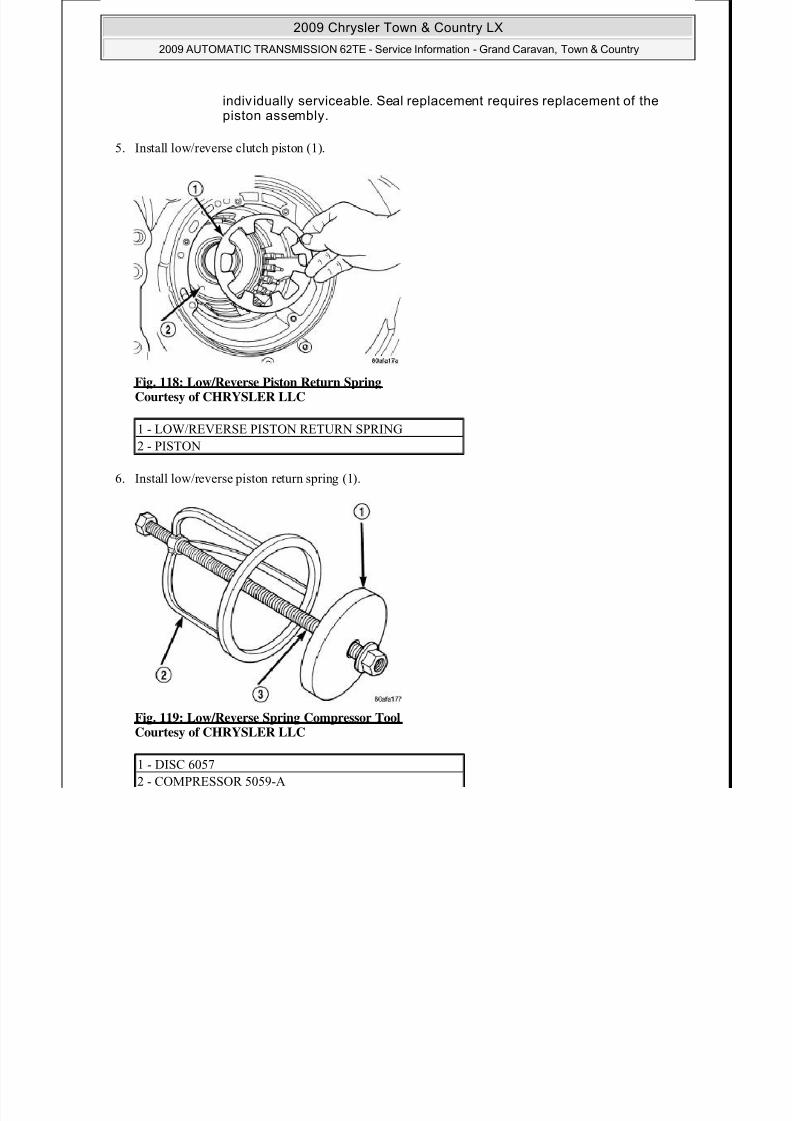
5. Install low/reverse clutch piston (1).
Fig. 118: Low/Reverse Piston Return Spring Courtesy of CHRYSLER LLC
6. Install low/reverse piston return spring (1).
Fig. 119: Low/Reverse Spring Compressor Tool Courtesy of CHRYSLER LLC
1 - LOW/REVERSE PISTON RETURN SPRING
2 - PISTON
1 - DISC 6057
2 - COMPRESSOR 5059-A
7. Install Disk 6057 (1), Compressor 5059-A (2) and Compressor Bar 5058A-3 (3).
3 - COMPRESSOR BAR 5058A-3
2009 Chrysler Town & Country LX
2009 AUTOMATIC TRANSMISSION 62TE - Service Information - Grand Caravan, Town & Country

7/16/2019 62te
http://slidepdf.com/reader/full/62te55cf9df0550346d033afef7d 77/387
( ), p ( ) p ( )
Fig. 120: Spring Compressor 5059-A
Courtesy of CHRYSLER LLC
8. Install low/reverse spring compressor into position.
Fig. 121: Snap Ring Courtesy of CHRYSLER LLC
1 - LOW/REVERSE CLUTCH RETURN SPRING
2 - SNAP RING (INSTALL AS SHOWN INILLUSTRATION)
3 - DISC 6057
4 - COMPRESSOR 5059
5 - COMPRESSOR BAR 5058-3
1 - SNAP RING OPENING MUST BE BETWEEN SPRINGLEVERS (AS SHOWN IN ILLUSTRATION)
2 - SNAP RING PLIERS
3 - DISC 6057
2009 Chrysler Town & Country LX
2009 AUTOMATIC TRANSMISSION 62TE - Service Information - Grand Caravan, Town & Country

7/16/2019 62te
http://slidepdf.com/reader/full/62te55cf9df0550346d033afef7d 78/387
9. Compress low/reverse piston and install snap ring (1).
Fig. 122: Rear Carrier Bearing Cone Courtesy of CHRYSLER LLC
10. Install rear carrier bearing cone (3) using Installer 6053 (1).
3 DISC 6057
1 - ARBOR PRESS RAM
2 - INSTALLER 6053
3 - NEW BEARING CONE
4 - REAR CARRIER ASSEMBLY
2009 Chrysler Town & Country LX
2009 AUTOMATIC TRANSMISSION 62TE - Service Information - Grand Caravan, Town & Country

7/16/2019 62te
http://slidepdf.com/reader/full/62te55cf9df0550346d033afef7d 79/387
Fig. 123: Rear Carrier Courtesy of CHRYSLER LLC
11. Install rear carrier assembly (1) to transaxle case.
Fig. 124: Output Gear Bearing Cone Courtesy of CHRYSLER LLC
12. Install out ut ear bearin cone usin Installer 6758 3 .
1 - ARBOR PRESS RAM
2 - HANDLE C-4171
3 - INSTALLER 5052
4 - OUTPUT GEAR
2009 Chrysler Town & Country LX
2009 AUTOMATIC TRANSMISSION 62TE - Service Information - Grand Caravan, Town & Country

7/16/2019 62te
http://slidepdf.com/reader/full/62te55cf9df0550346d033afef7d 80/387
Fig. 125: Checking Output Gear Bearings End Play Courtesy of CHRYSLER LLC
13. OUTPUT GEAR BEARING ADJUSTMENT:
a. With output gear removed, install a 4.50 mm (0.177 in.) gauging shim on the rear carrier assemblyhub, using grease to hold the shim in place.
b. Using Holder 6259, install output gear, bearing assembly and bolt. Tighten to 271 N.m (200 ft.lbs.).
c. Measure bearing end play. Attach Gear Checking Plate L-4432 (1) to the gear.
d. Push and pull the gear while rotating back and forth to ensure seating of bearing rollers.
e. Using a dial indicator mounted to the transaxle case, measure output gear end play.
f. Refer to the OUTPUT GEAR BEARING SHIM chart for the required shim to obtain proper bearing setting.
g. Use Holder 6259 to remove the output gear retaining bolt and washer. To remove the output gear,use Gear Puller L-4407A.
h. Remove the gauging shim and install the proper shim determined by the OUTPUT GEAR BEARING SHIM chart. Use grease to hold the shim in place.
OUTPUT GEAR BEARING SHIM
1 - GEAR CHECKING PLATE L-4432
2 - DIAL INDICATOR 3 - SPECIAL SCREWS 6260
4 - OUTPUT GEAR
End Play Shim Needed Part Number
0.05 mm (0.002in.)
4.42 mm (0.174 in.) 4412830AB
0.08 mm (0.003in.)
4.38 mm (0.172 in.) 4412829AB

7/16/2019 62te
http://slidepdf.com/reader/full/62te55cf9df0550346d033afef7d 81/387
0.66 mm (0.026in.)
3.82 mm (0.150 in.) 4412815AB
0.69 mm (0.027in.) 3.78 mm (0.149 in.) 4412814AB
0 1 (0 028
2009 Chrysler Town & Country LX
2009 AUTOMATIC TRANSMISSION 62TE - Service Information - Grand Caravan, Town & Country

7/16/2019 62te
http://slidepdf.com/reader/full/62te55cf9df0550346d033afef7d 82/387
14. Install the output transfer gear (3) and bearing assembly using Installer 6261 (2).
0.71 mm (0.028in.)
3.74 mm (0.147 in.) 4412813AB
0.74 mm (0.029in.)
3.74 mm (0.147 in.) 4412813AB
0.76 mm (0.030in.)
3.70 mm (0.146 in.) 4412812AB
0.79 mm (0.031in.)
3.66 mm (0.144 in.) 4412811AB
0.81 mm (0.032in.)
3.66 mm (0.144 in.) 4412811AB
0.84 mm (0.033in.)
3.62 mm (0.143 in.) 4412810AB
0.86 mm (0.034in.)
3.62 mm (0.143 in.) 4412810AB
0.89 mm (0.035in.)
3.58 mm (0.141 in.) 4412809AB
0.91 mm (0.036in.)
3.54 mm (0.139 in.) 4412808AB
0.94 mm (0.037in.)
3.54 mm (0.139 in.) 4412808AB
0.97 mm (0.038
in.)3.50 mm (0.138 in.) 4412807AB
2009 Chrysler Town & Country LX
2009 AUTOMATIC TRANSMISSION 62TE - Service Information - Grand Caravan, Town & Country

7/16/2019 62te
http://slidepdf.com/reader/full/62te55cf9df0550346d033afef7d 83/387
Fig. 126: Torque Output Transfer Gear Nut Courtesy of CHRYSLER LLC
15. Install NEW output transfer gear retaining bolt and washer.
16. Install Holder 9739 (1) onto the output transfer gear (2).
17. Tighten output transfer gear retaining bolt to 271 N.m (200 ft. lbs.).
Fig. 127: Turning Torque Output Gear Courtesy of CHRYSLER LLC
18. Using an inch pound torque wrench, check output shaft turning torque. Output shaft turning torqueshould be within 3-8 in. lbs. If the turning torque is too high, install a 0.04 mm (0.0016 in.) thicker shim.If the turning torque is too low, install a 0.04 mm (0.0016 in.) thinner shim. Repeat until the proper
turning torque of 3-8 in. lbs. is obtained.
2009 Chrysler Town & Country LX
2009 AUTOMATIC TRANSMISSION 62TE - Service Information - Grand Caravan, Town & Country

7/16/2019 62te
http://slidepdf.com/reader/full/62te55cf9df0550346d033afef7d 84/387
Fig. 128: Low/Reverse Clutch Pack Courtesy of CHRYSLER LLC
19. Install low/reverse clutch pack (1, 2). Leave uppermost disc out until snap ring is installed.
Fig. 129: Low/Reverse Reaction Plate Snap Ring
Courtesy of CHRYSLER LLC
1 - CLUTCH PLATES (5)
2 - CLUTCH DISCS (5)
1 - SCREWDRIVER
20 Install low/reverse reaction plate flat snap ring (2) insure you do not scratch clutch plate (3)
2 - LOW/REVERSE REACTION PLATE FLAT SNAPRING
3 - DO NOT SCRATCH CLUTCH PLATE
2009 Chrysler Town & Country LX
2009 AUTOMATIC TRANSMISSION 62TE - Service Information - Grand Caravan, Town & Country

7/16/2019 62te
http://slidepdf.com/reader/full/62te55cf9df0550346d033afef7d 85/387
20. Install low/reverse reaction plate flat snap ring (2), insure you do not scratch clutch plate (3).
Fig. 130: Low/Reverse Clutch Disc Courtesy of CHRYSLER LLC
21. Install remaining low/reverse clutch disc (1).
Fig. 131: Low/Reverse Reaction Plate
Courtesy of CHRYSLER LLC
1 - ONE DISC FROM LOW/REVERSE CLUTCH
1 - LOW/REVERSE REACTION PLATE (FLAT SIDE UP)
22. Install low/reverse reaction plate with flat side up (1).
2009 Chrysler Town & Country LX
2009 AUTOMATIC TRANSMISSION 62TE - Service Information - Grand Caravan, Town & Country

7/16/2019 62te
http://slidepdf.com/reader/full/62te55cf9df0550346d033afef7d 86/387
Fig. 132: Tapered Snap Ring Instructions Courtesy of CHRYSLER LLC
23. Use as a reference while installing tapered snap ring.
Fig. 133: Snap Ring Installed Courtesy of CHRYSLER LLC
1 - SCREWDRIVER
2 - TAPERED SNAP RING (INSTALL AS SHOWN IN
24. Install tapered snap ring (with tapered side up) (2).
ILLUSTRATION)
2009 Chrysler Town & Country LX
2009 AUTOMATIC TRANSMISSION 62TE - Service Information - Grand Caravan, Town & Country

7/16/2019 62te
http://slidepdf.com/reader/full/62te55cf9df0550346d033afef7d 87/387
Fig. 134: Check Low/Reverse Clutch Clearance Courtesy of CHRYSLER LLC
25. Set up dial indicator (1) to measure low/reverse clutch clearance. Press down on clutch pack with finger and zero dial indicator. Low/Reverse clutch pack clearance is 0.89-1.47 mm (0.035-0.058 in.) . Set upindicator and record measurement in four places. Take average of readings and select the proper low/reverse reaction plate to achieve specifications.
LOW/REVERSE REACTION PLATE
26. Install 2/4 clutch pack (1, 2).
1 - DIAL INDICATOR
2 - DIAL INDICATOR TIP TOOL 6268
3 - HOOK TOOL
PART NUMBER THICKNESS
4799846AA 5.88 mm (0.232 in.)
4799847AA 6.14 mm (0.242 in.)4799848AA 6.40 mm (0.252 in.)
4799849AA 6.66 mm (0.262 in.)
4799855AA 6.92 mm (0.273 in.)
2009 Chrysler Town & Country LX
2009 AUTOMATIC TRANSMISSION 62TE - Service Information - Grand Caravan, Town & Country

7/16/2019 62te
http://slidepdf.com/reader/full/62te55cf9df0550346d033afef7d 88/387
Fig. 135: Proper Orientation Of 2/4 Clutch Retainer & Spring Courtesy of CHRYSLER LLC
27. Orient 2/4 clutch return spring to retainer (3).
Fig. 136: 2/4 Clutch Retainer
Courtesy of CHRYSLER LLC
1 - NOTE POSITION
2 - RETURN SPRING
3 - 2/4 CLUTCH RETAINER
NOTE: The 2/4 Clutch Piston has bonded seals which are not individual lyserviceable. Seal replacement requires replacement of the pistonassembly.
1 - 2/4 CLUTCH RETAINER
28. Install 2/4 clutch retainer to transaxle (1, 2).
2 - 2/4 CLUTCH RETURN SPRING
2009 Chrysler Town & Country LX
2009 AUTOMATIC TRANSMISSION 62TE - Service Information - Grand Caravan, Town & Country

7/16/2019 62te
http://slidepdf.com/reader/full/62te55cf9df0550346d033afef7d 89/387
Fig. 137: 2/4 Clutch Retainer Snap Ring Courtesy of CHRYSLER LLC
29. Using Compressing Tool 5058A (1), compress 2/4 clutch return spring just enough to install snap ring(3).
30. Install snap ring.
Fig. 138: Check 2/4 Clutch Clearance
1 - COMPRESSING TOOL 5058A
2 - SCREWDRIVER
3 - SNAP RING
4 - 2/4 CLUTCH RETAINER
Courtesy of CHRYSLER LLC
1 - DIAL INDICATOR
2 - HOOK TOOL
3 - DIAL INDICATOR TIP 6268
2009 Chrysler Town & Country LX
2009 AUTOMATIC TRANSMISSION 62TE - Service Information - Grand Caravan, Town & Country

7/16/2019 62te
http://slidepdf.com/reader/full/62te55cf9df0550346d033afef7d 90/387
31. Set up dial indicator (1) and measure 2/4 clutch clearance. Press down on clutch pack with finger and zero dial indicator. 2/4 clutch pack clearance is 0.76-2.64 mm (0.030-0.104 in.). Set up indicator and record measurement in four places. Take average of readings. If clearance is outside this range, the clutchis assembled improperly. There is no adjustment for 2/4 clutch clearance.
Fig. 139: Number 7 Bearing
Courtesy of CHRYSLER LLC
1 - #7 NEEDLE BEARING
2 - REAR SUN GEAR
NOTE: The number seven needle (1) bearing has three anti-reversal tabs and iscommon with the number five position. The orientation should allow the
bearing to seat flat against the rear sun gear. A small amount of petrolatum can be used to hold the bearing to the rear sun gear (2).
2009 Chrysler Town & Country LX
2009 AUTOMATIC TRANSMISSION 62TE - Service Information - Grand Caravan, Town & Country

7/16/2019 62te
http://slidepdf.com/reader/full/62te55cf9df0550346d033afef7d 91/387
Fig. 140: Rear Sun Gear & #7 Needle Bearing Courtesy of CHRYSLER LLC
32. Install rear sun gear (2) and number seven needle bearing (1).
Fig. 141: Front Carrier & Rear Annulus Assembly Courtesy of CHRYSLER LLC
33. Install front carrier/rear annulus assembly (2) and number six needle bearing (1).
1 - #7 NEEDLE BEARING
2 - REAR SUN GEAR
1 - #6 NEEDLE BEARING
2 - FRONT CARRIER AND REAR ANNULUSASSEMBLY (TWIST AND PULL OR PUSH TO REMOVEOR INSTALL).
2009 Chrysler Town & Country LX
2009 AUTOMATIC TRANSMISSION 62TE - Service Information - Grand Caravan, Town & Country

7/16/2019 62te
http://slidepdf.com/reader/full/62te55cf9df0550346d033afef7d 92/387
Fig. 142: Front Sun Gear Assembly Courtesy of CHRYSLER LLC
34. Install front sun gear assembly (1) and number four thrust washer (2).
Fig. 143: Select Thinnest No. 4 Thrust Plate Courtesy of CHRYSLER LLC
35. Select the thinnest number four thrust plate thickness (2) and install to input clutch assembly. Use petrolatum to retain (3).
1 - FRONT SUN GEAR ASSEMBLY
2 - #4 THRUST WASHER (FOUR TABS)
1 - OVERDRIVE SHAFT ASSEMBLY
2 - #4 THRUST PLATE (SELECT)
3 - 3 DABS OF PETROLATUM FOR RETENTION
2009 Chrysler Town & Country LX
2009 AUTOMATIC TRANSMISSION 62TE - Service Information - Grand Caravan, Town & Country

7/16/2019 62te
http://slidepdf.com/reader/full/62te55cf9df0550346d033afef7d 93/387
Fig. 144: 62TE View Through Input Speed Sensor Hole
Courtesy of CHRYSLER LLC
36. Install input clutch assembly into position and verify that it is completely seated by viewing through inputspeed sensor hole (3). If view through input speed sensor hole is not as shown in illustration, the inputclutch assembly (2) is not seated properly.
Fig. 145: Oil Pump O-Ring Courtesy of CHRYSLER LLC
37. Remove oil pump O-ring (2). Be sure to reinstall oil pump O-ring after selecting the proper number
1 - OIL PUMP ASSEMBLY2 - O-RING
four thrust plate.
38. Install pump and gasket to transmission. Install and torque bolts.
2009 Chrysler Town & Country LX
2009 AUTOMATIC TRANSMISSION 62TE - Service Information - Grand Caravan, Town & Country

7/16/2019 62te
http://slidepdf.com/reader/full/62te55cf9df0550346d033afef7d 94/387
Fig. 146: Measure Input Shaft End Play Using End Play Set 8266A Courtesy of CHRYSLER LLC
39. Set up input shaft for measurement with Indicator Set C-3339A (3) and End Play Set 8266A (1, 2).
40. Measure the input shaft end play with the transaxle in the vertical position. Input shaft end play must bewithin 0.13-0.64 mm (0.005 to 0.025 in.) For example, if end play reading is 0.055 in. select number four Thrust Plate which is 0.071-0.074 in. thick. This should provide an input shaft end play reading of 0.020 in. which is within specifications.
41. Refer to NO. 4 THRUST PLATE TABLE to select the proper number four thrust plate.
NO. 4 THRUST PLATE TABLE
1 - END PLAY SOCKET SET 8266A
2 - DIAL INDICATOR C-3339A
-
PART NUMBER THICKNESS
4431665AB 1.60 mm (0.063 in.)
3836237AB 1.73 mm (0.068 in.)
4431666AB 1.80 mm (0.071 in.)
3836238AB 1.96 mm (0.077 in.)4431667AB 2.03 mm (0.080 in.)
3836239AB 2.16 mm (0.085 in.)
4431668AB 2.24 mm (0.088 in.)
3836240AB 2.39 mm (0.094 in.)
4431669AB 2.46 mm (0.097 in.)
3836241AB 2.62 mm (0.103 in.)
4446670AB 2.67 mm (0.105 in.)
4446671AB 2.90 mm (0.114 in.)
2009 Chrysler Town & Country LX
2009 AUTOMATIC TRANSMISSION 62TE - Service Information - Grand Caravan, Town & Country

7/16/2019 62te
http://slidepdf.com/reader/full/62te55cf9df0550346d033afef7d 95/387
42. Install input clutch assembly (1).
Fig. 147: Caged Needle Bearing Courtesy of CHRYSLER LLC
43. Install number one caged needle bearing (1) note: tanged side out (2).
1 - #1 CAGED NEEDLE BEARING
2 - NOTE: TANGED SIDE OUT
CAUTION: The cooler bypass valve must be replaced if t ransaxle failure hasoccurred. Do not attempt to reuse or clean old valve.
2009 Chrysler Town & Country LX
2009 AUTOMATIC TRANSMISSION 62TE - Service Information - Grand Caravan, Town & Country

7/16/2019 62te
http://slidepdf.com/reader/full/62te55cf9df0550346d033afef7d 96/387
Fig. 148: Bypass Valve 62TE
Courtesy of CHRYSLER LLC
44. Install cooler bypass valve (1) with O-ring end towards rear of case.
Fig. 149: Oil Pump Gasket
Courtesy of CHRYSLER LLC
45. Install oil pump gasket (1).
2009 Chrysler Town & Country LX2009 AUTOMATIC TRANSMISSION 62TE - Service Information - Grand Caravan, Town & Country

7/16/2019 62te
http://slidepdf.com/reader/full/62te55cf9df0550346d033afef7d 97/387
Fig. 150: Front Pump 62TE
Courtesy of CHRYSLER LLC
46. Install oil pump (2).
47. Install oil pump-to-case bolts (1) and tighten 30 N.m (265 in. lbs.).
Fig. 151: Output Gear Stirrup Courtesy of CHRYSLER LLC
48. Install output gear stirrup (1) with serrated side out.
1 - STIRRUP
2 - OUTPUT GEAR RETAINING BOLT
2009 Chrysler Town & Country LX2009 AUTOMATIC TRANSMISSION 62TE - Service Information - Grand Caravan, Town & Country

7/16/2019 62te
http://slidepdf.com/reader/full/62te55cf9df0550346d033afef7d 98/387
Fig. 152: Strap Bolts Courtesy of CHRYSLER LLC
49. Install retaining strap (1).
50. Install strap bolts (3) but do not tighten at this time.
Fig. 153: Turn Stirrup Clockwise Against Bolt Flats Courtesy of CHRYSLER LLC
51. Rotate stirrup (2) clockwise against flats of retaining bolt.
1 - RETAINING STRAP
2 - STIRRUP
3 - RETAINING STRAP BOLTS
1 - RETAINING STRAP
2 - STIRRUP
2009 Chrysler Town & Country LX2009 AUTOMATIC TRANSMISSION 62TE - Service Information - Grand Caravan, Town & Country

7/16/2019 62te
http://slidepdf.com/reader/full/62te55cf9df0550346d033afef7d 99/387
Fig. 154: Torque Stirrup Strap Bolts Courtesy of CHRYSLER LLC
52. Tighten stirrup strap bolts to 23 N.m (200 in. lbs.).
Fig. 155: Bend Tabs On Strap Up Against Flats Of Bolts Courtesy of CHRYSLER LLC
53. Bend tabs (1) on strap up against flats of bolts.
1 - RETAINING STRAP
2 - STIRRUP
1 - RETAINING STRAP TABS
2 - RETAINING STRAP
3 - STIRRUP
2009 Chrysler Town & Country LX2009 AUTOMATIC TRANSMISSION 62TE - Service Information - Grand Caravan, Town & Country

7/16/2019 62te
http://slidepdf.com/reader/full/62te55cf9df0550346d033afef7d 100/387
Fig. 156: Differential Out And In
Courtesy of CHRYSLER LLC
54. Install the differential, bearing cups, shim, seals and oil slinger into case.
Fig. 157: Differential Cover
Courtesy of CHRYSLER LLC
55. Install the differential cover.
2009 Chrysler Town & Country LX2009 AUTOMATIC TRANSMISSION 62TE - Service Information - Grand Caravan, Town & Country

7/16/2019 62te
http://slidepdf.com/reader/full/62te55cf9df0550346d033afef7d 101/387
Fig. 158: Differential Cover Bolts
Courtesy of CHRYSLER LLC
56. Install the differential cover bolts (1) and tighten to 61 N.m (45 ft. lbs.).
Fig. 159: Differential Output Bearing Cover Bolts
Courtesy of CHRYSLER LLC
57. Install the differential output bearing cover (2).
58. Install the differential output bearing cover bolts (1) and tighten to 12 N.m (105 in. lbs.).
2009 Chrysler Town & Country LX2009 AUTOMATIC TRANSMISSION 62TE - Service Information - Grand Caravan, Town & Country

7/16/2019 62te
http://slidepdf.com/reader/full/62te55cf9df0550346d033afef7d 102/387
Fig. 160: Differential Turning Torque
Courtesy of CHRYSLER LLC
59. Using the Turning Torque Tool 9735 (1) and an inch pound torque wrench (2) check the differentialturning torque, it should be 10 to 22 in-lbs (drag). If turning torque is more than 22 in-lbs (drag) decreaseshim size behind the end cover and recheck. If turning torque is less than 10 in-lbs (drag) increase shimsize.
60. After proper turning torque is achieved for the differential remove the differential from the case and setaside keeping the correct shim with the differential.
NOTE: Remote pinion gear must NOT be installed while checking turning torque.
2009 Chrysler Town & Country LX2009 AUTOMATIC TRANSMISSION 62TE - Service Information - Grand Caravan, Town & Country

7/16/2019 62te
http://slidepdf.com/reader/full/62te55cf9df0550346d033afef7d 103/387
Fig. 161: Cover At Remote Pinion
Courtesy of CHRYSLER LLC
61. Install the remote pinion bearing cup in the case (small cup) using Installer 9730 and Handle C-4171.
62. Install the remote pinion bearing cup in the cover using Installer 9729 and Handle C-4171.
63. Install the remote pinion (2) into the transaxle case.
Fig. 162: Remote Pinion Cover Courtesy of CHRYSLER LLC
64. Install the remote pinion cover (2) into transaxle case.
2009 Chrysler Town & Country LX2009 AUTOMATIC TRANSMISSION 62TE - Service Information - Grand Caravan, Town & Country

7/16/2019 62te
http://slidepdf.com/reader/full/62te55cf9df0550346d033afef7d 104/387
Fig. 163: Bolts At Remote Pinion Cover Courtesy of CHRYSLER LLC
65. Install the bolts (1) at the remote pinion cover (2) and tighten to 12 N.m (105 in. lbs.).
Fig. 164: Pinion Turning Torque Courtesy of CHRYSLER LLC
66. Check turning torque using Differential Bearing Torque Tool C-4995A (2) and an inch pound torquewrench (1). Turning torque for the remote pinion gear should be 2 to 8 in-lbs (drag). If more than 8 in-lbs(drag) decrease shim size under the remote pinion bearing cover cup. If turning torque is less than 2 in-lbs(drag) increase the shim size under the remote pinion bearing cover cup.
NOTE: Differential assembly must not be installed when checking for pinion dragtorque.
2009 Chrysler Town & Country LX2009 AUTOMATIC TRANSMISSION 62TE - Service Information - Grand Caravan, Town & Country

7/16/2019 62te
http://slidepdf.com/reader/full/62te55cf9df0550346d033afef7d 105/387
Fig. 165: Tool 9908 Bearing Retainer Assembly Courtesy of CHRYSLER LLC
67. Install Holder 9908 (2) onto the compounder bearing retainer to help in installation.
68. Install the compounder bearing retainer into the transaxle case.
2009 Chrysler Town & Country LX2009 AUTOMATIC TRANSMISSION 62TE - Service Information - Grand Caravan, Town & Country

7/16/2019 62te
http://slidepdf.com/reader/full/62te55cf9df0550346d033afef7d 106/387
Fig. 166: Bolts At Compounder
Courtesy of CHRYSLER LLC
69. Remove Holder 9908 from the compounder bearing retainer.
70. Install all the bolts at the compounder bearing retainer and tighten to 12 N.m (105 in. lbs.).
Fig. 167: Snap Ring Underdrive Compounder Courtesy of CHRYSLER LLC
71. Install snap ring (1) at top of the compounder bearing retainer.
2009 Chrysler Town & Country LX2009 AUTOMATIC TRANSMISSION 62TE - Service Information - Grand Caravan, Town & Country

7/16/2019 62te
http://slidepdf.com/reader/full/62te55cf9df0550346d033afef7d 107/387
Fig. 168: End Play Tool 9951
Courtesy of CHRYSLER LLC
72. Remove plug at case (3).73. Install compounder End Play Tool 9951 (2) through the hole in the front case.
74. Install Dial Indicator C-3339A (1) onto End Play Tool 9951.
75. Use moderate downward pressure on End Play Tool 9951 and zero Dial Indicator C-3339A.
76. Use moderate upward pressure on End Play Tool 9951 and take reading from Dial Indicator C-3339A.
77. Remove End Play Tool 9951 and zero Dial Indicator C-3339A.
78. Adjust shim thickness in the underdrive unit to 0.010 to 0.020.
79. Install the correct (select) helical shim and assemble the underdrive compounder. See Transmission andTransfer Case/Automatic - 62TE/ASSEMBLY, Underdrive Compounder - Assembly and retest.
80. Using Mopar lock and seal adhesive install plug back into case and tighten to 24 N.m (18 ft. lbs.).
NOTE: Insure End Play Tool 9951 is not binding in support plate that is bolted tothe case.
NOTE: Always use original shim to determine end play.
2009 Chrysler Town & Country LX2009 AUTOMATIC TRANSMISSION 62TE - Service Information - Grand Caravan, Town & Country

7/16/2019 62te
http://slidepdf.com/reader/full/62te55cf9df0550346d033afef7d 108/387
Fig. 169: Output Gear Bearing Cone Courtesy of CHRYSLER LLC
81. Install the transfer gear (underdrive compounder side) cone using Installer 6756 (3).
Fig. 170: Holder 9739 Courtesy of CHRYSLER LLC
82. Install Holder 9739 1 onto the transfer ear underdrive com ounder side 2 .
1 - ARBOR PRESS RAM
2 - HANDLE C-4171
3 - INSTALLER 50524 - OUTPUT GEAR
83. Install a new transfer gear (underdrive compounder side) nut and tighten to 271 N.m (200 ft. lbs.).
84. Use Staking Tool 9721 and stake the new nut.
2009 Chrysler Town & Country LX2009 AUTOMATIC TRANSMISSION 62TE - Service Information - Grand Caravan, Town & Country

7/16/2019 62te
http://slidepdf.com/reader/full/62te55cf9df0550346d033afef7d 109/387
Fig. 171: Differential Out & In Courtesy of CHRYSLER LLC
85. Install the differential, bearing cups, shim and oil slinger into case.
Fig. 172: Differential Cover Courtes of CHRYSLER LLC
86. Use a bead of MOPAR® ATF RTV (MS-GF41).
87. Install the differential cover.
2009 Chrysler Town & Country LX2009 AUTOMATIC TRANSMISSION 62TE - Service Information - Grand Caravan, Town & Country

7/16/2019 62te
http://slidepdf.com/reader/full/62te55cf9df0550346d033afef7d 110/387
Fig. 173: Differential Cover Bolts Courtesy of CHRYSLER LLC
88. Install the differential cover bolts (1) and tighten to 61 N.m (45 ft. lbs.).
Fig. 174: Differential Output Bearing Cover Courtes of CHRYSLER LLC
89. Use a bead of MOPAR® ATF RTV (MS-GF41).
90. Install the differential output bearing cover (2) and tighten bolts to 12 N.m (105 in. lbs.).
91. Install differential oil seals into the case using installer MD998334-01.
2009 Chrysler Town & Country LX2009 AUTOMATIC TRANSMISSION 62TE - Service Information - Grand Caravan, Town & Country

7/16/2019 62te
http://slidepdf.com/reader/full/62te55cf9df0550346d033afef7d 111/387
Fig. 175: Oil Scavenger Courtesy of CHRYSLER LLC
92. Install the oil scavenger (2).
Fig. 176: Transfer Gear Cover Courtesy of CHRYSLER LLC
93. Install the transfer gear cover (1), use a bead of MOPAR® ATF RTV (MS-GF41).
94. Install transfer gear cover-to-case bolts (2) and tighten to 12 N.m (105 in. lbs.).
2009 Chrysler Town & Country LX2009 AUTOMATIC TRANSMISSION 62TE - Service Information - Grand Caravan, Town & Country

7/16/2019 62te
http://slidepdf.com/reader/full/62te55cf9df0550346d033afef7d 112/387
Fig. 177: Park Pawl Tube Courtesy of CHRYSLER LLC
95. Install the park pawl tube (1) into case (2) making sure guide pin aligns with hole in case.
2009 Chrysler Town & Country LX2009 AUTOMATIC TRANSMISSION 62TE - Service Information - Grand Caravan, Town & Country

7/16/2019 62te
http://slidepdf.com/reader/full/62te55cf9df0550346d033afef7d 113/387
Fig. 178: Park Pawl Tube Snap Ring
Courtesy of CHRYSLER LLC
96. Install the snap ring (1) for the park pawl tube.
Fig. 179: Park Pawl Courtesy of CHRYSLER LLC
97. Install the park pawl (1) and the park pawl spring (2).
2009 Chrysler Town & Country LX2009 AUTOMATIC TRANSMISSION 62TE - Service Information - Grand Caravan, Town & Country

7/16/2019 62te
http://slidepdf.com/reader/full/62te55cf9df0550346d033afef7d 114/387
Fig. 180: Park Pawl Shaft
Courtesy of CHRYSLER LLC
98. Install the park pawl shaft (1).
Fig. 181: Park Pawl Shaft Plug Courtesy of CHRYSLER LLC
99. Install the park pawl shaft and park pawl pipe plug tighten to 27 N.m (20 ft. lbs.).
2009 Chrysler Town & Country LX2009 AUTOMATIC TRANSMISSION 62TE - Service Information - Grand Caravan, Town & Country

7/16/2019 62te
http://slidepdf.com/reader/full/62te55cf9df0550346d033afef7d 115/387
Fig. 182: Set Screw At Park Pawl Shaft
Courtesy of CHRYSLER LLC
100. Install the set screw (1) for the park pawl shaft and tighten to 1 N.m (10 in. lbs.).
101. Install the manual lever, TRS and seal. See Transmission and Transfer Case/Automatic -62TE/SENSOR, Transmission Range - Installation.
Fig. 183: Accumulators Courtesy of CHRYSLER LLC
102 Install all six accumulators (1 2 3 5 6 and 7) into case along with the accumulator return springs
1 - UD ACCUMULATOR 5 - LCACCUMULATOR
2 - 2/4 ACCUMULATOR 6 - DC
ACCUMULATOR 3 - LR ACCUMULATOR
7 - ODACCUMULATOR
4 - 2/4 CLUTCH OIL SUPPLY SEAL -
2009 Chrysler Town & Country LX2009 AUTOMATIC TRANSMISSION 62TE - Service Information - Grand Caravan, Town & Country

7/16/2019 62te
http://slidepdf.com/reader/full/62te55cf9df0550346d033afef7d 116/387
102. Install all six accumulators (1, 2, 3, 5, 6 and 7) into case along with the accumulator return springs.
103. Install a new 2/4 clutch oil supply seal (4) into the case.
Fig. 184: Transfer Tube O-Rings Courtesy of CHRYSLER LLC
104. Install the oil transfer tubes (2) into the case/compounder.
NOTE: Instal l t ransmission oi l on the oil transfer tubes O-rings.
2009 Chrysler Town & Country LX2009 AUTOMATIC TRANSMISSION 62TE - Service Information - Grand Caravan, Town & Country

7/16/2019 62te
http://slidepdf.com/reader/full/62te55cf9df0550346d033afef7d 117/387
Fig. 185: Oil Transfer Tubes
Courtesy of CHRYSLER LLC
105. Install valve body (1) onto the oil transfer tubes and manual valve (3) at the rooster comb.
Fig. 186: Valve Body Bolts Courtesy of CHRYSLER LLC
106. Install the valve body bolts (1) and tighten to 7 N.m (50 in. lbs.).
2009 Chrysler Town & Country LX2009 AUTOMATIC TRANSMISSION 62TE - Service Information - Grand Caravan, Town & Country

7/16/2019 62te
http://slidepdf.com/reader/full/62te55cf9df0550346d033afef7d 118/387
Fig. 187: Connector At Transmission
Courtesy of CHRYSLER LLC
107. Install the detent spring (2).
108. Install the bolt (3) holding the detent spring and tighten to 7 N.m (50 in. lbs.).
109. Install the electrical connector (1) at the range sensor (4).
Fig. 188: Valve Body Pan Courtesy of CHRYSLER LLC
110. Install the valve body oil pan, use a bead of MOPAR® ATF RTV (MS-GF41).
111. Install the valve body oil pan bolts and tighten to 6 N.m (53 in. lbs.).
2009 Chrysler Town & Country LX2009 AUTOMATIC TRANSMISSION 62TE - Service Information - Grand Caravan, Town & Country

7/16/2019 62te
http://slidepdf.com/reader/full/62te55cf9df0550346d033afef7d 119/387
Fig. 189: Pressure Tap Plug Courtesy of CHRYSLER LLC
112. Install the pressure tap plug (2) at valve body pan and tighten to 9 N.m (45 in. lbs.).
Fig. 190: Oil Filter Seal At Case Courtes of CHRYSLER LLC
113. Install the fluid filter seal (1) at the case.
2009 Chrysler Town & Country LX
2009 AUTOMATIC TRANSMISSION 62TE - Service Information - Grand Caravan, Town & Country

7/16/2019 62te
http://slidepdf.com/reader/full/62te55cf9df0550346d033afef7d 120/387
Fig. 191: Fluid Filter Courtesy of CHRYSLER LLC
114. Install the fluid filter (2).
115. Install the fluid filter mounting nuts and tighten to 5 N.m (40 in. lbs.).
Fig. 192: Filter Oil Pan Courtes of CHRYSLER LLC
116. Install the fluid filter oil pan, use a bead of MOPAR® ATF RTV (MS-GF41).
117. Install the fluid filter oil pan bolts and tighten to 6 N.m (53 in. lbs.).
2009 Chrysler Town & Country LX
2009 AUTOMATIC TRANSMISSION 62TE - Service Information - Grand Caravan, Town & Country

7/16/2019 62te
http://slidepdf.com/reader/full/62te55cf9df0550346d033afef7d 121/387
Fig. 193: Fasteners And Front Sound Dampener Cover Courtesy of CHRYSLER LLC
118. If equipped install the Front Sound Dampener Cover (2) and the fasteners (1).
Fig. 194: Speed Sensors
Courtesy of CHRYSLER LLC
119. Install the speed sensors (1, 2 and 3) and tighten bolts to 12 N.m (105 in. lbs.).
2009 Chrysler Town & Country LX
2009 AUTOMATIC TRANSMISSION 62TE - Service Information - Grand Caravan, Town & Country

7/16/2019 62te
http://slidepdf.com/reader/full/62te55cf9df0550346d033afef7d 122/387
Fig. 195: Top Sound Dampener Cover Courtesy of CHRYSLER LLC
120. If equipped, install the Top Sound Dampener Cover (1).
INSTALLATION
INSTALLATION
Fig. 196: Torque Converter Bolts Courtesy of CHRYSLER LLC
1. Install transaxle into osition.
2. On 4.0L engines, install the transaxle-to-engine two outer lower bolts and torque to 60 N.m (44 ft. lbs.).3. Install torque converter-to-driveplate bolts (1) and tighten to 88 N.m (65 ft. lbs.).
NOTE: The two transaxle-to-engine bolts next to the inspection cover wil l have aexhaust bracket under them.
2009 Chrysler Town & Country LX
2009 AUTOMATIC TRANSMISSION 62TE - Service Information - Grand Caravan, Town & Country

7/16/2019 62te
http://slidepdf.com/reader/full/62te55cf9df0550346d033afef7d 123/387
Fig. 197: Dust Shield Courtesy of CHRYSLER LLC
4. Install torque converter dust shield and bolt tighten to 10 N.m (88 in. lbs.).
2009 Chrysler Town & Country LX
2009 AUTOMATIC TRANSMISSION 62TE - Service Information - Grand Caravan, Town & Country

7/16/2019 62te
http://slidepdf.com/reader/full/62te55cf9df0550346d033afef7d 124/387
Fig. 198: Exhaust Bracket Bolts
Courtesy of CHRYSLER LLC
5. Install bolts (2) to stand off bracket (4) and tighten to 95 N.m (70 ft. lbs.).
6. Install the remaining transaxle-to-engine lower bolts and torque to 60 N.m (44 ft. lbs.).
7. Install the cross under exhaust pipe (If equipped). Refer to Exhaust System/PIPE, Exhaust Crossunder- Installation .
8. Install bolts (3) to exhaust bracket.
Fig. 199: Torque Converter Bolts Courtesy of CHRYSLER LLC
9. On 3.8L engines Install transaxle into position
10. Install the two lower transaxle-to-engine bolts and torque to 60 N.m (44 ft. lbs.).
11. Install torque converter-to-driveplate bolts (1) and tighten to 88 N.m (65 ft. lbs.).
2009 Chrysler Town & Country LX
2009 AUTOMATIC TRANSMISSION 62TE - Service Information - Grand Caravan, Town & Country

7/16/2019 62te
http://slidepdf.com/reader/full/62te55cf9df0550346d033afef7d 125/387
Fig. 200: Structural Collar Courtesy of CHRYSLER LLC
12. Install the bolts holding structural collar to the oil pan (1) and transmission (2) tighten to 75 N.m (55 ft.lbs.). Refer to Engine/Engine Block/COVER, Structural Dust - Installation .
2009 Chrysler Town & Country LX
2009 AUTOMATIC TRANSMISSION 62TE - Service Information - Grand Caravan, Town & Country
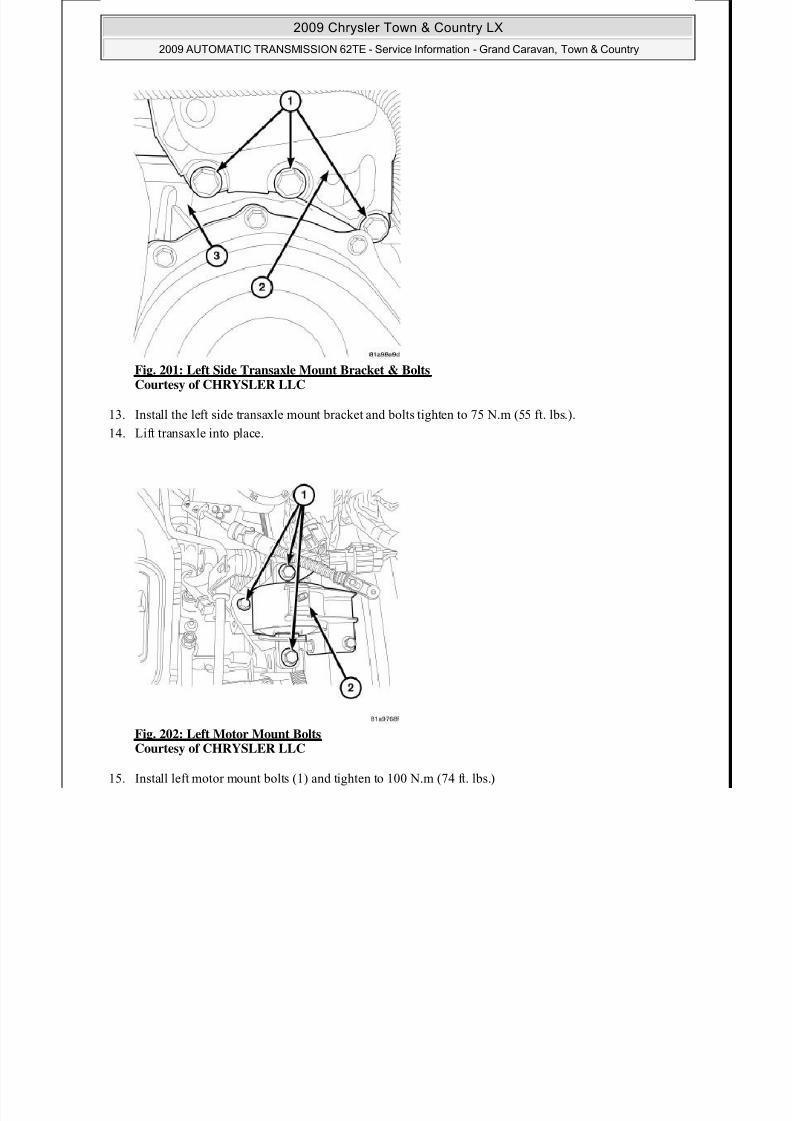
7/16/2019 62te
http://slidepdf.com/reader/full/62te55cf9df0550346d033afef7d 126/387
Fig. 201: Left Side Transaxle Mount Bracket & Bolts
Courtesy of CHRYSLER LLC
13. Install the left side transaxle mount bracket and bolts tighten to 75 N.m (55 ft. lbs.).
14. Lift transaxle into place.
Fig. 202: Left Motor Mount Bolts Courtesy of CHRYSLER LLC
15. Install left motor mount bolts (1) and tighten to 100 N.m (74 ft. lbs.)
2009 Chrysler Town & Country LX
2009 AUTOMATIC TRANSMISSION 62TE - Service Information - Grand Caravan, Town & Country

7/16/2019 62te
http://slidepdf.com/reader/full/62te55cf9df0550346d033afef7d 127/387
Fig. 203: Rear Mount & Bolts
Courtesy of CHRYSLER LLC
16. Install the rear mount and bolts, tighten to 100 N.m (74 ft. lbs.).
Fig. 204: Front Mount Bracket Bolts Courtesy of CHRYSLER LLC
17. Install the starter motor along with the front mount bracket.
18. Install the front mount bracket bolts (1) and tighten to 100 N.m (74 ft. lbs.).
2009 Chrysler Town & Country LX
2009 AUTOMATIC TRANSMISSION 62TE - Service Information - Grand Caravan, Town & Country

7/16/2019 62te
http://slidepdf.com/reader/full/62te55cf9df0550346d033afef7d 128/387
Fig. 205: Transmission Crossmember
Courtesy of CHRYSLER LLC
19. Install the transmission crossmember and tighten to 50 N.m (37 ft. lbs.).
Fig. 206: Crossmember Through Bolt Courtesy of CHRYSLER LLC
20. Install front mount through bolt and tighten to 50 N.m (37 ft. lbs.)
21. the front and both side splash shields (if equipped). Refer to Body/Exterior/SHIELD, Splash -Installation
2009 Chrysler Town & Country LX
2009 AUTOMATIC TRANSMISSION 62TE - Service Information - Grand Caravan, Town & Country

7/16/2019 62te
http://slidepdf.com/reader/full/62te55cf9df0550346d033afef7d 129/387
Fig. 207: Ground Cable Courtesy of CHRYSLER LLC
22. Install the ground cable bolt and tighten to 54 N.m (40 ft. lbs.).
23. Install halfshaft assemblies. Refer to Differential and Driveline/Half Shaft - Installation .
Fi . 208: Left Side Mount Bolts
Courtesy of CHRYSLER LLC
24. Lower the vehicle.
25. Install the left side mount bolts along with the heater tube bracket and tighten to 100 N.m (74 ft. lbs.).
2009 Chrysler Town & Country LX
2009 AUTOMATIC TRANSMISSION 62TE - Service Information - Grand Caravan, Town & Country

7/16/2019 62te
http://slidepdf.com/reader/full/62te55cf9df0550346d033afef7d 130/387
Fig. 209: Output Speed Sensors Courtesy of CHRYSLER LLC
26. Connect input speed sensor connector.
27. Connect both output speed sensor connectors (1, 2).
2009 Chrysler Town & Country LX
2009 AUTOMATIC TRANSMISSION 62TE - Service Information - Grand Caravan, Town & Country

7/16/2019 62te
http://slidepdf.com/reader/full/62te55cf9df0550346d033afef7d 131/387
Fig. 210: Solenoid Connector At Transmission Courtesy of CHRYSLER LLC
28. Connect solenoid/pressure switch assembly connector (2).
Fig. 211: Upper Transmission Bolts
Courtesy of CHRYSLER LLC
29. Install the transaxle-to-engine upper bolts and tighten to 95 N.m (70 ft. lbs.).
2009 Chrysler Town & Country LX
2009 AUTOMATIC TRANSMISSION 62TE - Service Information - Grand Caravan, Town & Country

7/16/2019 62te
http://slidepdf.com/reader/full/62te55cf9df0550346d033afef7d 132/387
Fig. 212: Crankshaft Position Sensor Courtesy of CHRYSLER LLC
30. Install and connect crankshaft position sensor (1) and tighten to 12 N.m (105 in. lbs.).
Fig. 213: Cooler Lines At Transaxle
Courtesy of CHRYSLER LLC
31. Connect oil cooler lines to transaxle. An audible 'click' should be heard. Verify connection by pulling
outward.
2009 Chrysler Town & Country LX
2009 AUTOMATIC TRANSMISSION 62TE - Service Information - Grand Caravan, Town & Country

7/16/2019 62te
http://slidepdf.com/reader/full/62te55cf9df0550346d033afef7d 133/387
Fig. 214: Shift Cable From/To Manual Lever Courtesy of CHRYSLER LLC
32. Connect gearshift cable to the bracket.
33. Connect gearshift cable to transaxle manual valve lever. Verify adjustment.
Fig. 215: Battery Courtesy of CHRYSLER LLC
34. Install the battery tray.
35. Install the tie straps holding harness and ground cable to the battery tray.
36. Install the battery (2) and battery hold down bolt (3).
37. Connect battery cables.
38. Fill transaxle. See Transmission and Transfer Case/Automatic - 62TE/FLUID - StandardProcedure.
SCHEMATICS AND DIAGRAMS
SCHEMATICS AND DIAGRAMS
2009 Chrysler Town & Country LX
2009 AUTOMATIC TRANSMISSION 62TE - Service Information - Grand Caravan, Town & Country

7/16/2019 62te
http://slidepdf.com/reader/full/62te55cf9df0550346d033afef7d 134/387
Fig. 216: Drive First Courtesy of CHRYSLER LLC
2009 Chrysler Town & Country LX
2009 AUTOMATIC TRANSMISSION 62TE - Service Information - Grand Caravan, Town & Country

7/16/2019 62te
http://slidepdf.com/reader/full/62te55cf9df0550346d033afef7d 135/387
Fig. 217: Drive First Coast Courtesy of CHRYSLER LLC
2009 Chrysler Town & Country LX
2009 AUTOMATIC TRANSMISSION 62TE - Service Information - Grand Caravan, Town & Country

7/16/2019 62te
http://slidepdf.com/reader/full/62te55cf9df0550346d033afef7d 136/387
Fig. 218: Drive First EMCC Courtesy of CHRYSLER LLC
2009 Chrysler Town & Country LX
2009 AUTOMATIC TRANSMISSION 62TE - Service Information - Grand Caravan, Town & Country

7/16/2019 62te
http://slidepdf.com/reader/full/62te55cf9df0550346d033afef7d 137/387
Fig. 219: Drive Second Courtesy of CHRYSLER LLC
2009 Chrysler Town & Country LX
2009 AUTOMATIC TRANSMISSION 62TE - Service Information - Grand Caravan, Town & Country

7/16/2019 62te
http://slidepdf.com/reader/full/62te55cf9df0550346d033afef7d 138/387
Fig. 220: Drive Second EMCC Courtesy of CHRYSLER LLC
2009 Chrysler Town & Country LX
2009 AUTOMATIC TRANSMISSION 62TE - Service Information - Grand Caravan, Town & Country

7/16/2019 62te
http://slidepdf.com/reader/full/62te55cf9df0550346d033afef7d 139/387
Fig. 221: Drive Third Courtesy of CHRYSLER LLC
2009 Chrysler Town & Country LX
2009 AUTOMATIC TRANSMISSION 62TE - Service Information - Grand Caravan, Town & Country

7/16/2019 62te
http://slidepdf.com/reader/full/62te55cf9df0550346d033afef7d 140/387
Fig. 222: Drive Third EMCC Courtesy of CHRYSLER LLC
2009 Chrysler Town & Country LX
2009 AUTOMATIC TRANSMISSION 62TE - Service Information - Grand Caravan, Town & Country

7/16/2019 62te
http://slidepdf.com/reader/full/62te55cf9df0550346d033afef7d 141/387
Fig. 223: Drive Third Coast Courtesy of CHRYSLER LLC
2009 Chrysler Town & Country LX
2009 AUTOMATIC TRANSMISSION 62TE - Service Information - Grand Caravan, Town & Country

7/16/2019 62te
http://slidepdf.com/reader/full/62te55cf9df0550346d033afef7d 142/387
Fig. 224: Drive Fourth Courtesy of CHRYSLER LLC
2009 Chrysler Town & Country LX
2009 AUTOMATIC TRANSMISSION 62TE - Service Information - Grand Caravan, Town & Country

7/16/2019 62te
http://slidepdf.com/reader/full/62te55cf9df0550346d033afef7d 143/387
Fig. 225: Drive Fourth EMCC Courtesy of CHRYSLER LLC
2009 Chrysler Town & Country LX
2009 AUTOMATIC TRANSMISSION 62TE - Service Information - Grand Caravan, Town & Country

7/16/2019 62te
http://slidepdf.com/reader/full/62te55cf9df0550346d033afef7d 144/387
Fig. 226: Fourth Coast Courtesy of CHRYSLER LLC
2009 Chrysler Town & Country LX
2009 AUTOMATIC TRANSMISSION 62TE - Service Information - Grand Caravan, Town & Country

7/16/2019 62te
http://slidepdf.com/reader/full/62te55cf9df0550346d033afef7d 145/387
Fig. 227: Drive Fifth Courtesy of CHRYSLER LLC
2009 Chrysler Town & Country LX
2009 AUTOMATIC TRANSMISSION 62TE - Service Information - Grand Caravan, Town & Country

7/16/2019 62te
http://slidepdf.com/reader/full/62te55cf9df0550346d033afef7d 146/387
Fig. 228: Drive Fifth EMCC Courtesy of CHRYSLER LLC
2009 Chrysler Town & Country LX
2009 AUTOMATIC TRANSMISSION 62TE - Service Information - Grand Caravan, Town & Country

7/16/2019 62te
http://slidepdf.com/reader/full/62te55cf9df0550346d033afef7d 147/387
Fig. 229: Drive Sixth Courtesy of CHRYSLER LLC
2009 Chrysler Town & Country LX
2009 AUTOMATIC TRANSMISSION 62TE - Service Information - Grand Caravan, Town & Country

7/16/2019 62te
http://slidepdf.com/reader/full/62te55cf9df0550346d033afef7d 148/387
Fig. 230: Drive Sixth EMCC Courtesy of CHRYSLER LLC
2009 Chrysler Town & Country LX
2009 AUTOMATIC TRANSMISSION 62TE - Service Information - Grand Caravan, Town & Country

7/16/2019 62te
http://slidepdf.com/reader/full/62te55cf9df0550346d033afef7d 149/387
Fig. 231: Park Neutral Courtesy of CHRYSLER LLC
2009 Chrysler Town & Country LX
2009 AUTOMATIC TRANSMISSION 62TE - Service Information - Grand Caravan, Town & Country

7/16/2019 62te
http://slidepdf.com/reader/full/62te55cf9df0550346d033afef7d 150/387
Fig. 232: Reverse Courtesy of CHRYSLER LLC
SPECIFICATIONS
SPECIFICATIONS
SPECIFICATIONS
DESCRIPTION SPECIFICATION
Output Shaft Gear Drag Torque 3 to 8 in. lbs.
Low/Reverse Clutch Pack Clearance 0.89 - 1.47 mm (0.035 -0.058 in.)
Reverse Clutch (Select Snap Ring) 0.76 - 1.245 mm (0.030 - 0.049 in.)Overdrive Clutch (No Selection) 0.491 - 2.345 mm (0.019 - .092 in.)
Underdrive Clutch (Select Pressure Plate) 0.91 - 1.47 mm (0.036 - 0.058 in.)
2/4 Clutch Clearance 0.76 - 2.64 mm (0.030 - 0.104 in.)
Input Shaft End Play 0.005 to 0.025 inch
Final Drive Remote Pinion Drag Torque 2 to 8 in-lbs (drag)
Differential Turning Torque 10 to 20 in-lbs (drag)
Low Clutch Clearance 0.48 - 0.76 mm (.019 - .030 in.)Direct Clutch Pack Clearance 0.95 - 1.41 (0.037 - 0.056 in)

7/16/2019 62te
http://slidepdf.com/reader/full/62te55cf9df0550346d033afef7d 151/387

7/16/2019 62te
http://slidepdf.com/reader/full/62te55cf9df0550346d033afef7d 152/387
Fig. 233: Splitter, Bearing/Gear - 1130 Courtesy of CHRYSLER LLC
2009 Chrysler Town & Country LX
2009 AUTOMATIC TRANSMISSION 62TE - Service Information - Grand Caravan, Town & Country

7/16/2019 62te
http://slidepdf.com/reader/full/62te55cf9df0550346d033afef7d 153/387
Fig. 234: Puller, Press - C-293-PA Courtesy of CHRYSLER LLC
Fig. 235: Slide Hammer, Universal - C-637 Courtesy of CHRYSLER LLC
Fig. 236: Gauge, Pressure - C-3292A Courtesy of CHRYSLER LLC
Fig. 237: Set, Dial Indicator - C-3339A Courtesy of CHRYSLER LLC
2009 Chrysler Town & Country LX
2009 AUTOMATIC TRANSMISSION 62TE - Service Information - Grand Caravan, Town & Country

7/16/2019 62te
http://slidepdf.com/reader/full/62te55cf9df0550346d033afef7d 154/387
Fig. 238: Slide Hammers - C-3752 Courtesy of CHRYSLER LLC
Fig. 239: Remover, Pump Seal - C-3981B Courtesy of CHRYSLER LLC
Fig. 240: Driver Handle, Universal - C-4171 Courtesy of CHRYSLER LLC
Fig. 241: Installer, Seal - C-4193A Courtesy of CHRYSLER LLC
2009 Chrysler Town & Country LX
2009 AUTOMATIC TRANSMISSION 62TE - Service Information - Grand Caravan, Town & Country

7/16/2019 62te
http://slidepdf.com/reader/full/62te55cf9df0550346d033afef7d 155/387
Fig. 242: Installer, Bearing - C-4213 Courtesy of CHRYSLER LLC
Fig. 243: Trak-Lok Axle Tool - C-4487 Courtesy of CHRYSLER LLC
Fig. 244: Tool, Differential Bearing Torque - C-4995A Courtesy of CHRYSLER LLC
Fig. 245: Adapter, Plug - C-4996 Courtesy of CHRYSLER LLC
2009 Chrysler Town & Country LX
2009 AUTOMATIC TRANSMISSION 62TE - Service Information - Grand Caravan, Town & Country

7/16/2019 62te
http://slidepdf.com/reader/full/62te55cf9df0550346d033afef7d 156/387
Fig. 246: Remover, Bearing/Gear - L-4406 Courtesy of CHRYSLER LLC
Fig. 247: Puller, Gear - L-4407A Courtesy of CHRYSLER LLC
Fig. 248: Installer, Bearing - L-4410
Courtesy of CHRYSLER LLC
Fig. 249: Fixture - L-4432 Courtesy of CHRYSLER LLC
2009 Chrysler Town & Country LX
2009 AUTOMATIC TRANSMISSION 62TE - Service Information - Grand Caravan, Town & Country

7/16/2019 62te
http://slidepdf.com/reader/full/62te55cf9df0550346d033afef7d 157/387
Fig. 250: Tool, Torque Measuring - L-4436-A Courtesy of CHRYSLER LLC
Fig. 251: Remover, Cup - L-4518 Courtesy of CHRYSLER LLC
Fig. 252: Installer, Seal/Cup - L-4520
Courtesy of CHRYSLER LLC
Fig. 253: Pad, Thrust - L-4539-2 Courtesy of CHRYSLER LLC
2009 Chrysler Town & Country LX
2009 AUTOMATIC TRANSMISSION 62TE - Service Information - Grand Caravan, Town & Country

7/16/2019 62te
http://slidepdf.com/reader/full/62te55cf9df0550346d033afef7d 158/387
Fig. 254: Adapter, Pressure - L-4559-2 Courtesy of CHRYSLER LLC
Fig. 255: Splitter, Bearing - P-334 Courtesy of CHRYSLER LLC
Fig. 256: Puller, Bearing - 5048
Courtesy of CHRYSLER LLC
Fig. 257: Installer, Bearing Cup - 5050A Courtesy of CHRYSLER LLC
2009 Chrysler Town & Country LX
2009 AUTOMATIC TRANSMISSION 62TE - Service Information - Grand Caravan, Town & Country
7/16/2019 62te
http://slidepdf.com/reader/full/62te55cf9df0550346d033afef7d 159/387
Fig. 258: Installer, Bearing - 5052 Courtesy of CHRYSLER LLC
Fig. 259: Compressor, Spring - 5058A Courtesy of CHRYSLER LLC
Fig. 260: Compressor, Spring - 5059-A
Courtesy of CHRYSLER LLC
Fig. 261: Installer, Seal - 5067 Courtesy of CHRYSLER LLC
2009 Chrysler Town & Country LX
2009 AUTOMATIC TRANSMISSION 62TE - Service Information - Grand Caravan, Town & Country
7/16/2019 62te
http://slidepdf.com/reader/full/62te55cf9df0550346d033afef7d 160/387
Fig. 262: Plier, Snap Ring - 6051A Courtesy of CHRYSLER LLC
Fig. 263: Installer, Bearing/Seal - 6052 Courtesy of CHRYSLER LLC
Fig. 264: Installer, Bearing - 6053
Courtesy of CHRYSLER LLC
Fig. 265: Thrust Button - 6055 Courtesy of CHRYSLER LLC
2009 Chrysler Town & Country LX
2009 AUTOMATIC TRANSMISSION 62TE - Service Information - Grand Caravan, Town & Country

7/16/2019 62te
http://slidepdf.com/reader/full/62te55cf9df0550346d033afef7d 161/387
Fig. 266: Disc, Spring Compressor - 6057 Courtesy of CHRYSLER LLC
Fig. 267: Installer, Cup - 6061 Courtesy of CHRYSLER LLC
Fig. 268: Puller, Bearing Cup - 6062A
Courtesy of CHRYSLER LLC
Fig. 269: Special Bolts - 6260 Courtesy of CHRYSLER LLC
2009 Chrysler Town & Country LX
2009 AUTOMATIC TRANSMISSION 62TE - Service Information - Grand Caravan, Town & Country

7/16/2019 62te
http://slidepdf.com/reader/full/62te55cf9df0550346d033afef7d 162/387
Fig. 270: Installer, Gear - 6261 Courtesy of CHRYSLER LLC
Fig. 271: Tip, Dial Indicator - 6268 Courtesy of CHRYSLER LLC
Fig. 272: Remover/Installer - 6301
Courtesy of CHRYSLER LLC
Fig. 273: Remover/Installer - 6302 Courtesy of CHRYSLER LLC
2009 Chrysler Town & Country LX
2009 AUTOMATIC TRANSMISSION 62TE - Service Information - Grand Caravan, Town & Country

7/16/2019 62te
http://slidepdf.com/reader/full/62te55cf9df0550346d033afef7d 163/387
Fig. 274: Installer, Bearing/Seal - 6536-A Courtesy of CHRYSLER LLC
Fig. 275: Receiver, Ball Joint - 6756 Courtesy of CHRYSLER LLC
Fig. 276: Installer, Seal - 6888 Courtesy of CHRYSLER LLC
Fig. 277: Remover, Seal - 7794-A Courtesy of CHRYSLER LLC
2009 Chrysler Town & Country LX
2009 AUTOMATIC TRANSMISSION 62TE - Service Information - Grand Caravan, Town & Country

7/16/2019 62te
http://slidepdf.com/reader/full/62te55cf9df0550346d033afef7d 164/387
Fig. 278: Fixtures, End Play - 8266A
Courtesy of CHRYSLER LLC
Fig. 279: Fixture, Pressure Test - 8391 Courtesy of CHRYSLER LLC
Fig. 280: Compressor, Spring - 8250
Courtesy of CHRYSLER LLC
Fig. 281: Remover, Bearing - 8356
Courtesy of CHRYSLER LLC
2009 Chrysler Town & Country LX
2009 AUTOMATIC TRANSMISSION 62TE - Service Information - Grand Caravan, Town & Country

7/16/2019 62te
http://slidepdf.com/reader/full/62te55cf9df0550346d033afef7d 165/387
Fig. 282: Disconnect, Trans Cooler Line - 8875A Courtesy of CHRYSLER LLC
Fig. 283: Remover, Bearing - 8912 Courtesy of CHRYSLER LLC
Fig. 284: Remover, Bearing Cup - 8913
Courtesy of CHRYSLER LLC
2009 Chrysler Town & Country LX
2009 AUTOMATIC TRANSMISSION 62TE - Service Information - Grand Caravan, Town & Country

7/16/2019 62te
http://slidepdf.com/reader/full/62te55cf9df0550346d033afef7d 166/387
Fig. 285: Brace - 8915 Courtesy of CHRYSLER LLC
Fig. 286: Dipstick - 9336 Courtesy of CHRYSLER LLC
Fig. 287: Adapters 9613 Courtesy of CHRYSLER LLC
2009 Chrysler Town & Country LX
2009 AUTOMATIC TRANSMISSION 62TE - Service Information - Grand Caravan, Town & Country

7/16/2019 62te
http://slidepdf.com/reader/full/62te55cf9df0550346d033afef7d 167/387
Fig. 288: Plug - 9678 Courtesy of CHRYSLER LLC
Fig. 289: Staking Tool - 9721 Courtesy of CHRYSLER LLC
Fig. 290: Installer, Bearing - 9723 Courtesy of CHRYSLER LLC
2009 Chrysler Town & Country LX
2009 AUTOMATIC TRANSMISSION 62TE - Service Information - Grand Caravan, Town & Country

7/16/2019 62te
http://slidepdf.com/reader/full/62te55cf9df0550346d033afef7d 168/387
Fig. 291: Compressor, Spring - 9725 Courtesy of CHRYSLER LLC
Fig. 292: Installer, Piston - 9727 Courtesy of CHRYSLER LLC
Fig. 293: Blocks, Adapter - 9738 Courtesy of CHRYSLER LLC
2009 Chrysler Town & Country LX
2009 AUTOMATIC TRANSMISSION 62TE - Service Information - Grand Caravan, Town & Country

7/16/2019 62te
http://slidepdf.com/reader/full/62te55cf9df0550346d033afef7d 169/387
Fig. 294: Holder, Gear - 9739 Courtesy of CHRYSLER LLC
Fig. 295: Air Pressure Testing Plate - 9741 Courtesy of CHRYSLER LLC
Fig. 296: Adapter, Puller - 9908 Courtesy of CHRYSLER LLC
2009 Chrysler Town & Country LX
2009 AUTOMATIC TRANSMISSION 62TE - Service Information - Grand Caravan, Town & Country

7/16/2019 62te
http://slidepdf.com/reader/full/62te55cf9df0550346d033afef7d 170/387
Fig. 297: Installer, Bearing - MD 998911 Courtesy of CHRYSLER LLC
Fig. 298: Installer, Seal - MD 998334 Courtesy of CHRYSLER LLC
Fig. 299: Tool, Compounder Shim - 9951 Courtesy of CHRYSLER LLC
ACCUMULATOR
DESCRIPTION
DESCRIPTION
2009 Chrysler Town & Country LX
2009 AUTOMATIC TRANSMISSION 62TE - Service Information - Grand Caravan, Town & Country

7/16/2019 62te
http://slidepdf.com/reader/full/62te55cf9df0550346d033afef7d 171/387
Fig. 300: Accumulators Courtesy of CHRYSLER LLC
1 - UD ACCUMULATOR 5 - LCACCUMULATOR
2 - 2/4 ACCUMULATOR 6 - DCACCUMULATOR
3 - LR ACCUMULATOR 7 - OD
ACCUMULATOR 4 - 2/4 CLUTCH OIL SUPPLY SEAL -
The 62TE has six accumulators and are all located in the case under the valve body.
OPERATION
OPERATION
The function of an accumulator is to cushion the application of a frictional clutch element. When pressurized fluid is applied to a clutch circuit, the application force is dampened by fluid collecting in the respectiveaccumulator chamber against the piston and spring(s). The intended result is a smooth, firm clutch application.
REMOVAL
REMOVAL
2009 Chrysler Town & Country LX
2009 AUTOMATIC TRANSMISSION 62TE - Service Information - Grand Caravan, Town & Country

7/16/2019 62te
http://slidepdf.com/reader/full/62te55cf9df0550346d033afef7d 172/387
Fig. 301: Accumulators Courtesy of CHRYSLER LLC
1. Remove the valve body. See Transmission and Transfer Case/Automatic - 62TE/VALVE BODY -Removal.
2. Remove the accumulator as needed.
1 - UD ACCUMULATOR 5 - LC
ACCUMULATOR 2 - 2/4 ACCUMULATOR 6 - DC
ACCUMULATOR
3 - LR ACCUMULATOR 7 - ODACCUMULATOR
4 - 2/4 CLUTCH OIL SUPPLY SEAL -
INSTALLATION
INSTALLATION
2009 Chrysler Town & Country LX
2009 AUTOMATIC TRANSMISSION 62TE - Service Information - Grand Caravan, Town & Country

7/16/2019 62te
http://slidepdf.com/reader/full/62te55cf9df0550346d033afef7d 173/387
Fig. 302: Accumulators Courtesy of CHRYSLER LLC
1. Install the accumulator as needed.
2. Install the valve body. See Transmission and Transfer Case/Automatic - 62TE/VALVE BODY -
Installation.
ASSEMBLY, INPUT CLUTCH
DISASSEMBLY
DISASSEMBLY
1 - UD ACCUMULATOR 5 - LCACCUMULATOR
2 - 2/4 ACCUMULATOR 6 - DC
ACCUMULATOR
3 - LR ACCUMULATOR 7 - ODACCUMULATOR
4 - 2/4 CLUTCH OIL SUPPLY SEAL -
Fig. 303: Tapping Reaction Plate Courtesy of CHRYSLER LLC
2009 Chrysler Town & Country LX
2009 AUTOMATIC TRANSMISSION 62TE - Service Information - Grand Caravan, Town & Country

7/16/2019 62te
http://slidepdf.com/reader/full/62te55cf9df0550346d033afef7d 174/387
1. Mount input clutch assembly (3) to Input Clutch Pressure Fixture Tool 8391.
2. Tap down reverse clutch reaction plate (4) to release pressure from snap ring (2).
Fig. 304: Reverse Clutch Snap Ring Courtesy of CHRYSLER LLC
1 - #4 THRUST PLATE (SELECT)
2 - TAP DOWN REVERSE CLUTCH REACTION PLATE TO REMOVE OR INSTALL SNAP RING
3 - INPUT SHAFT CLUTCHES RETAINER ASSEMBLY
4 - REVERSE CLUTCH REACTION PLATE
1 - REACTION PLATE
2 - SCREWDRIVER 3 - REVERSE CLUTCH SNAP RING (SELECT)
3. Remove reverse clutch snap ring (3).
Fig. 305: Pry Reverse Clutch Reaction Plate
2009 Chrysler Town & Country LX
2009 AUTOMATIC TRANSMISSION 62TE - Service Information - Grand Caravan, Town & Country

7/16/2019 62te
http://slidepdf.com/reader/full/62te55cf9df0550346d033afef7d 175/387
g yCourtesy of CHRYSLER LLC
4. Pry up and remove reverse clutch reaction plate (1).
Fig. 306: Reverse Clutch Assembly
Courtesy of CHRYSLER LLC
1 - REVERSE CLUTCH REACTION PLATE
2 - SCREWDRIVER 3 - SCREWDRIVER
5. Remove reverse clutch pack (3, 4). Tag components for assembly identification.
1 - SNAP RING
2 - REACTION PLATE
3 - CLUTCH DISC (2)
4 - CLUTCH PLATE (1)
5 - INPUT CLUTCH ASSEMBLY
2009 Chrysler Town & Country LX
2009 AUTOMATIC TRANSMISSION 62TE - Service Information - Grand Caravan, Town & Country

7/16/2019 62te
http://slidepdf.com/reader/full/62te55cf9df0550346d033afef7d 176/387
Fig. 307: Overdrive Clutch Assembly Courtesy of CHRYSLER LLC
6. Remove the OD/Reverse pressure plate snap ring (1).
7. Remove OD/Reverse pressure plate (2).
8. Remove OD/Reverse pressure plate wave snap ring (3).
9. Remove OD clutch pack (4, 5). Tag components for assembly identification.
1 - SNAP RING
2 - OD/REVERSE PRESSURE PLATE
3 - SNAP RING (WAVE)
4 - CLUTCH DISC (4)
5 - CLUTCH STEEL (3)
6 - INPUT CLUTCH ASSEMBLY
2009 Chrysler Town & Country LX
2009 AUTOMATIC TRANSMISSION 62TE - Service Information - Grand Caravan, Town & Country
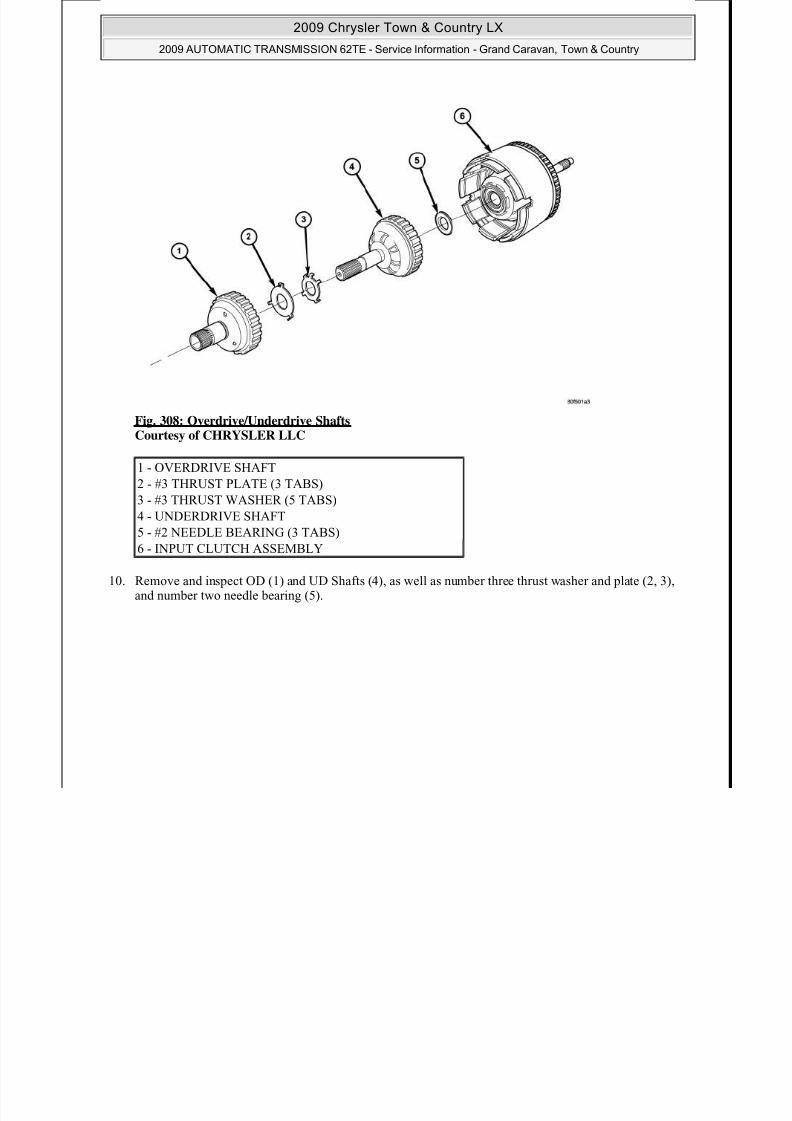
7/16/2019 62te
http://slidepdf.com/reader/full/62te55cf9df0550346d033afef7d 177/387
Fig. 308: Overdrive/Underdrive Shafts Courtesy of CHRYSLER LLC
10. Remove and inspect OD (1) and UD Shafts (4), as well as number three thrust washer and plate (2, 3),and number two needle bearing (5).
1 - OVERDRIVE SHAFT
2 - #3 THRUST PLATE (3 TABS)
3 - #3 THRUST WASHER (5 TABS)
4 - UNDERDRIVE SHAFT5 - #2 NEEDLE BEARING (3 TABS)
6 - INPUT CLUTCH ASSEMBLY
2009 Chrysler Town & Country LX
2009 AUTOMATIC TRANSMISSION 62TE - Service Information - Grand Caravan, Town & Country

7/16/2019 62te
http://slidepdf.com/reader/full/62te55cf9df0550346d033afef7d 178/387
Fig. 309: Underdrive Clutch Assembly Courtesy of CHRYSLER LLC
11. Remove the OD/UD reaction plate tapered snap ring (1), clutch plate (5), and first clutch disc (3).
12. Remove the UD clutch flat snap ring (4) and rest of the input clutch assembly (6). Tag clutch pack forassembly identification.
1 - SNAP RING (TAPERED)
2 - OD/UD REACTION PLATE3 - CLUTCH DISC
4 - SNAP RING (FLAT)
5 - CLUTCH PLATE
6 - INPUT CLUTCH ASSEMBLY
Fig. 310: UD Spring Retainer Snap Ring Courtesy of CHRYSLER LLC
1 SNAP RING PLIERS
2009 Chrysler Town & Country LX
2009 AUTOMATIC TRANSMISSION 62TE - Service Information - Grand Caravan, Town & Country

7/16/2019 62te
http://slidepdf.com/reader/full/62te55cf9df0550346d033afef7d 179/387
13. Using Compressor 5059-A (4) and an arbor press (2), compress UD clutch piston/spring enough toremove snap ring (3).
1 - SNAP RING PLIERS
2 - ARBOR PRESS RAM
3 - SNAP RING
4 - COMPRESSOR 5059-A
CAUTION: Compress return spring just enough to remove or install snap ring.
2009 Chrysler Town & Country LX
2009 AUTOMATIC TRANSMISSION 62TE - Service Information - Grand Caravan, Town & Country

7/16/2019 62te
http://slidepdf.com/reader/full/62te55cf9df0550346d033afef7d 180/387
Fig. 311: Underdrive Clutch Piston, Spring & Retainer Courtesy of CHRYSLER LLC
14. Refer to the illustration as necessary when performing the following steps
15. Remove spring retainer (2), spring (3) and UD clutch piston (4).
1 - SNAP RING
2 - SPRING RETAINER
3 - SPRING
4 - UD CLUTCH PISTON
5 - SEAL, OUTER
6 - SEAL, INNER
7 - INPUT CLUTCH ASSEMBLY
Fig. 312: Input Hub Tapered Snap Ring Courtesy of CHRYSLER LLC
1 - INPUT SHAFT
2009 Chrysler Town & Country LX
2009 AUTOMATIC TRANSMISSION 62TE - Service Information - Grand Caravan, Town & Country

7/16/2019 62te
http://slidepdf.com/reader/full/62te55cf9df0550346d033afef7d 181/387
16. Remove input hub tapered snap ring (2).
Fig. 313: Tap On Input Hub Courtesy of CHRYSLER LLC
17. Tap on input hub with soft faced hammer (2) and separate input hub from OD/Reverse piston and clutch
1 INPUT SHAFT
2 - INPUT HUB SNAP RING (TAPERED SIDE UP WITHTABS IN CAVITY)
3 - SNAP RING PLIERS
1 - INPUT SHAFT AND HUB ASSEMBLY
2 - SOFT FACED HAMMER
retainer.
Fig. 314: Pull Retainer From Piston Courtesy of CHRYSLER LLC
2009 Chrysler Town & Country LX
2009 AUTOMATIC TRANSMISSION 62TE - Service Information - Grand Caravan, Town & Country

7/16/2019 62te
http://slidepdf.com/reader/full/62te55cf9df0550346d033afef7d 182/387
18. Separate clutch retainer (2) from OD/Reverse piston (1).
Fig. 315: Snap Ring Courtesy of CHRYSLER LLC
1 - OVERDRIVE/REVERSE PISTON
2 - INPUT CLUTCHES RETAINER
1 - ARBOR PRESS RAM (COMPRESS RETURN SPRINGJUST ENOUGH TO REMOVE OR INSTALL SNAP RING)
2 - SCREWDRIVER
3 - SNAP RING
4 - Disk 6057
19. Using Disk 6057 (4) and an arbor press (1), compress return OD/Reverse piston return spring just enough
to remove snap ring (3).
5 - OD/REVERSE PISTON
6 - RETURN SPRING
2009 Chrysler Town & Country LX
2009 AUTOMATIC TRANSMISSION 62TE - Service Information - Grand Caravan, Town & Country

7/16/2019 62te
http://slidepdf.com/reader/full/62te55cf9df0550346d033afef7d 183/387
Fig. 316: Input Shaft To Input Clutch Hub Snap Ring Courtesy of CHRYSLER LLC
20. Remove input shaft to input clutch hub snap ring (3).
1 - INPUT SHAFT
2 - SHARP-POINTED TOOL
3 - SNAP RING
4 - O-RINGS
5 - SEALS
Fig. 317: Input Shaft Courtesy of CHRYSLER LLC
21. Using a suitably sized socket (2) and an arbor press (1), remove input shaft (5) from input shaft hub (7).
1 - ARBOR PRESS RAM
2 - SOCKET
3 - SEAL
4 - O-RINGS
5 - INPUT SHAFT
6 - SEAL
7 - INPUT SHAFT HUB ASSEMBLY
2009 Chrysler Town & Country LX
2009 AUTOMATIC TRANSMISSION 62TE - Service Information - Grand Caravan, Town & Country

7/16/2019 62te
http://slidepdf.com/reader/full/62te55cf9df0550346d033afef7d 184/387
Fig. 318: Input Clutch Hub, Retainer & OD/Reverse Piston Courtesy of CHRYSLER LLC
1 - SNAP RING (INPUT SHAFT)
2 - SNAP RING3 - CLUTCH RETAINER
22. Refer to the illustration as necessary when performing the above steps
ASSEMBLY
ASSEMBLY
4 - SEAL, OUTER
5 - SEAL, INNER
6 - OD/REVERSE PISTON
7 - SEAL, INPUT SHAFT
8 - SHAFT, INPUT9 - HUB
10 - SEAL
11 - SNAP RING
12 - BELLEVILLE SPRING
2009 Chrysler Town & Country LX
2009 AUTOMATIC TRANSMISSION 62TE - Service Information - Grand Caravan, Town & Country

7/16/2019 62te
http://slidepdf.com/reader/full/62te55cf9df0550346d033afef7d 185/387
Fig. 319: Input Shaft Courtesy of CHRYSLER LLC
Use petrolatum on all seals to ease assembly of components.
1. Using an arbor press (2), install input shaft (1) to input shaft hub (3).
1 - INPUT SHAFT
2 - ARBOR PRESS
3 - INPUT SHAFT HUB ASSEMBLY
Fig. 320: Input Shaft Snap Ring Courtesy of CHRYSLER LLC
1 - INPUT SHAFT
2 SCREWDRIVER (DO NOT SCRATCH BEARING
2009 Chrysler Town & Country LX
2009 AUTOMATIC TRANSMISSION 62TE - Service Information - Grand Caravan, Town & Country

7/16/2019 62te
http://slidepdf.com/reader/full/62te55cf9df0550346d033afef7d 186/387
2. Install input shaft snap ring (3).
Fig. 321: Return Spring & Snap Ring Courtesy of CHRYSLER LLC
2 - SCREWDRIVER (DO NOT SCRATCH BEARINGSURFACE)
3 - SNAP RING
4 - O-RINGS
5 - SEALS
1 - OD/REVERSE PISTON
2 - RETURN SPRING
3. Place OD/Reverse piston (1) return spring (2) and snap ring (3) into position.
3 - SNAP RING
4 - O-RING
2009 Chrysler Town & Country LX
2009 AUTOMATIC TRANSMISSION 62TE - Service Information - Grand Caravan, Town & Country

7/16/2019 62te
http://slidepdf.com/reader/full/62te55cf9df0550346d033afef7d 187/387
Fig. 322: Snap Ring
Courtesy of CHRYSLER LLC
4. Using an arbor press (1) and Disk 6057 (4), install OD/Reverse piston (5), return spring (6) and snap ring(3).
1 - ARBOR PRESS RAM (COMPRESS RETURN SPRINGJUST ENOUGH TO REMOVE OR INSTALL SNAP RING)
2 - SCREWDRIVER
3 - SNAP RING
4 - Disk 6057
5 - OD/REVERSE PISTON
6 - RETURN SPRING
Fig. 323: OD/Reverse Piston Courtesy of CHRYSLER LLC
1 - PUSH DOWN TO INSTALL OVERDRIVE/REVERSEPISTON
2009 Chrysler Town & Country LX
2009 AUTOMATIC TRANSMISSION 62TE - Service Information - Grand Caravan, Town & Country

7/16/2019 62te
http://slidepdf.com/reader/full/62te55cf9df0550346d033afef7d 188/387
5. Install the OD/Reverse piston assembly (1) to the input clutch retainer (2).
Fig. 324: Input Shaft Hub Assembly Courtesy of CHRYSLER LLC
6. Install the input hub/shaft assembly. (rotate to align splines) (1) to the OD/Reverse piston/clutch retainer assembly (2).
PISTON
2 - INPUT CLUTCHES RETAINER
1 - PUSH DOWN TO INSTALL INPUT SHAFT HUBASSEMBLY (ROTATE TO ALIGN SPLINES)
2 - OD/REV. PISTON
2009 Chrysler Town & Country LX
2009 AUTOMATIC TRANSMISSION 62TE - Service Information - Grand Caravan, Town & Country

7/16/2019 62te
http://slidepdf.com/reader/full/62te55cf9df0550346d033afef7d 189/387
Fig. 325: Input Clutch Hub, Retainer & OD/Reverse Piston Courtesy of CHRYSLER LLC
7. Refer to the illustration as necessary when performing the following steps.
1 - SNAP RING (INPUT SHAFT)
2 - SNAP RING
3 - CLUTCH RETAINER
4 - SEAL, OUTER
5 - SEAL, INNER
6 - OD/REVERSE PISTON
7 - SEAL, INPUT SHAFT
8 - SHAFT, INPUT9 - HUB
10 - SEAL
11 - SNAP RING
12 - BELLEVILLE SPRING
Fig. 326: Input Hub Tapered Snap Ring Courtesy of CHRYSLER LLC
1 - INPUT SHAFT
2 - INPUT HUB SNAP RING (TAPERED SIDE UP WITH
2009 Chrysler Town & Country LX
2009 AUTOMATIC TRANSMISSION 62TE - Service Information - Grand Caravan, Town & Country

7/16/2019 62te
http://slidepdf.com/reader/full/62te55cf9df0550346d033afef7d 190/387
8. Install input hub tapered snap ring (tapered side up with tabs in cavity) (2).
Fig. 327: Underdrive Clutch Piston Courtesy of CHRYSLER LLC
9. Install UD clutch piston (1).
(TABS IN CAVITY)
3 - SNAP RING PLIERS
1 - PISTON
Fig. 328: Seal Compressor Special Tool 5067 Courtesy of CHRYSLER LLC
1 - PISTON RETURN SPRING
2 - INSTALLER 5067
2009 Chrysler Town & Country LX
2009 AUTOMATIC TRANSMISSION 62TE - Service Information - Grand Caravan, Town & Country

7/16/2019 62te
http://slidepdf.com/reader/full/62te55cf9df0550346d033afef7d 191/387
10. Install UD piston return spring (1) and Installer 5067 (2).
Fig. 329: Underdrive Clutch Piston, Spring & Retainer Courtes of CHRYSLER LLC
3 - INPUT SHAFT CLUTCHES RETAINER ASSEMBLY
11. Refer to the illustration as necessary when performing the following steps.
1 - SNAP RING
2 - SPRING RETAINER
3 - SPRING
4 - UD CLUTCH PISTON
5 - SEAL, OUTER
6 - SEAL, INNER
7 - INPUT CLUTCH ASSEMBLY
2009 Chrysler Town & Country LX
2009 AUTOMATIC TRANSMISSION 62TE - Service Information - Grand Caravan, Town & Country

7/16/2019 62te
http://slidepdf.com/reader/full/62te55cf9df0550346d033afef7d 192/387
Fig. 330: UD Return Spring & Retainer Courtesy of CHRYSLER LLC
12. Place the UD spring retainer (1) and snap ring (2) into position.
1 - UNDERDRIVE SPRING RETAINER
2 - SNAP RING
3 - SEAL
4 - PISTON RETURN SPRING
Fig. 331: Install UD Spring Retainer & Snap Ring Courtesy of CHRYSLER LLC
1 - ARBOR PRESS RAM
2 - SNAP RING PLIERS
2009 Chrysler Town & Country LX
2009 AUTOMATIC TRANSMISSION 62TE - Service Information - Grand Caravan, Town & Country

7/16/2019 62te
http://slidepdf.com/reader/full/62te55cf9df0550346d033afef7d 193/387
13. Using Compressor 5059-A (6) and an arbor press (1), Install the UD spring retainer and snap ring (3).Compress just enough to install snap ring (3).
Fig. 332: Underdrive Clutch Pack
3 - SNAP RING
4 - OD/REVERSE PISTON5 - INSTALLER 5067
6 - COMPRESSOR 5059-A
CAUTION: Compress return spring just enough to install snap ring.
Courtesy of CHRYSLER LLC
14. Install the UD clutch pack (1, 3). Leave out upper disc (2), until snap ring is installed.
1 - CLUTCH PLATE
2 - ONE UD CLUTCH DISC
3 - CLUTCH DISC
2009 Chrysler Town & Country LX
2009 AUTOMATIC TRANSMISSION 62TE - Service Information - Grand Caravan, Town & Country

7/16/2019 62te
http://slidepdf.com/reader/full/62te55cf9df0550346d033afef7d 194/387
Fig. 333: UD Clutch Flat Snap Ring Courtesy of CHRYSLER LLC
15. Install the UD clutch flat snap ring (1).
Fig. 334: UD Clutch Flat Snap Ring
1 - UNDERDRIVE CLUTCH REACTION PLATE FLATSNAP RING
2 - SCREWDRIVER
Courtesy of CHRYSLER LLC
16. Install the last UD clutch disc (1).
1 - ONE UNDERDRIVE CLUTCH DISC
2009 Chrysler Town & Country LX
2009 AUTOMATIC TRANSMISSION 62TE - Service Information - Grand Caravan, Town & Country

7/16/2019 62te
http://slidepdf.com/reader/full/62te55cf9df0550346d033afef7d 195/387
Fig. 335: OD/UD Reaction Plate Courtesy of CHRYSLER LLC
17. Place the OD/UD clutch reaction plate (1) and snap ring into position. The OD/UD clutches reaction platehas a step on both sides. Install the OD/UD clutches reaction plate tapered step side up.
Fig. 336: Tapered Snap Ring
Courtesy of CHRYSLER LLC
1 - OD/UD CLUTCH REACTION PLATE (TAPEREDSTEP SIDE UP)
18. Install the snap ring (1) using a screwdriver (2).
1 - OVERDRIVE/UNDERDRIVE CLUTCHES REACTIONPLATE TAPERED SNAP RING
2 - SCREWDRIVER (DO NOT SCRATCH REACTIONPLATE)
NOTE: Snap ring ends must be located within one f inger of the input clutch hub.Be sure that snap ring is fully seated, by pushing with screwdriver, intosnap ring groove all the way around.
NOTE: Do not reuse tapered snap ring.
2009 Chrysler Town & Country LX
2009 AUTOMATIC TRANSMISSION 62TE - Service Information - Grand Caravan, Town & Country

7/16/2019 62te
http://slidepdf.com/reader/full/62te55cf9df0550346d033afef7d 196/387
Fig. 337: Underdrive Clutch Assembly Courtesy of CHRYSLER LLC
1 - SNAP RING (TAPERED)
2 - OD/UD REACTION PLATE
3 - CLUTCH DISC
4 - SNAP RING (FLAT)5 - CLUTCH PLATE
19. Refer to the illustration as necessary when performing the following steps.
Fig. 338: Seating Tapered Snap Courtesy of CHRYSLER LLC
6 - INPUT CLUTCH ASSEMBLY
2009 Chrysler Town & Country LX
2009 AUTOMATIC TRANSMISSION 62TE - Service Information - Grand Caravan, Town & Country

7/16/2019 62te
http://slidepdf.com/reader/full/62te55cf9df0550346d033afef7d 197/387
Courtesy of CHRYSLER LLC
20. Seat tapered snap ring (1) to ensure proper installation.
1 - OVERDRIVE/UNDERDRIVE CLUTCHES REACTIONPLATE TAPERED SNAP RING
2 - SCREWDRIVER
NOTE: Do not reuse tapered snap ring.
Fig 339: Input Clutch Assembly On Pressure Fixture Tool 8391
2009 Chrysler Town & Country LX
2009 AUTOMATIC TRANSMISSION 62TE - Service Information - Grand Caravan, Town & Country

7/16/2019 62te
http://slidepdf.com/reader/full/62te55cf9df0550346d033afef7d 198/387
Fig. 339: Input Clutch Assembly On Pressure Fixture Tool 8391 Courtesy of CHRYSLER LLC
21. Install input clutch assembly (1) to the Input Clutch Pressure Fixture 8391 (2).
1 - INPUT CLUTCH ASSEMBLY
2 - INPUT CLUTCH PRESSURE FIXTURE 8391
Fig. 340: Set Up Dial Indicator To Measure UD Clutch ClearanceCourtesy of CHRYSLER LLC
22. Set up dial indicator (1) on the UD clutch pack (2).
1 - DIAL INDICATOR
2 - UNDERDRIVE CLUTCH
2009 Chrysler Town & Country LX
2009 AUTOMATIC TRANSMISSION 62TE - Service Information - Grand Caravan, Town & Country

7/16/2019 62te
http://slidepdf.com/reader/full/62te55cf9df0550346d033afef7d 199/387
Fig. 341: Press Down On UD Clutch Pack & Zero Dial Indicator
Courtesy of CHRYSLER LLC
23. Using moderate pressure, press down and hold (near indicator) the UD clutch pack (2) with screwdriver or suitable tool and zero dial the indicator. When releasing pressure on clutch pack, indicator reading
should advance (0.005-0.010 in.).
24. Apply 30 psi (206 kPa) to the underdrive hose on Input Clutch Pressure Fixture 8391 and measure UDclutch clearance. Measure and record UD clutch pack measurement in four places, 90° apart.
25. Take average of four measurements and compare with UD clutch pack (2) clearance specification.Underdrive clutch pack clearance must be 0.91-1.47 mm (0.036 - 0.058 in.).
1 - DIAL INDICATOR
2 - UNDERDRIVE CLUTCH
CAUTION: Do not apply more than 30 psi (206 kPa) to the underdrive clutchpack.
26. If necessary, select the proper reaction plate to achieve specifications:
UNDERDRIVE REACTION PLATE THICKNESS
4659939AB 5.837-5.937 mm (0.230-0.234 in.)
4659940AB 6.147-6.248 mm (0.242-0.246 in.)
4659941AB 6.457-6.557 mm (0.254-0.258 in.)
2009 Chrysler Town & Country LX
2009 AUTOMATIC TRANSMISSION 62TE - Service Information - Grand Caravan, Town & Country
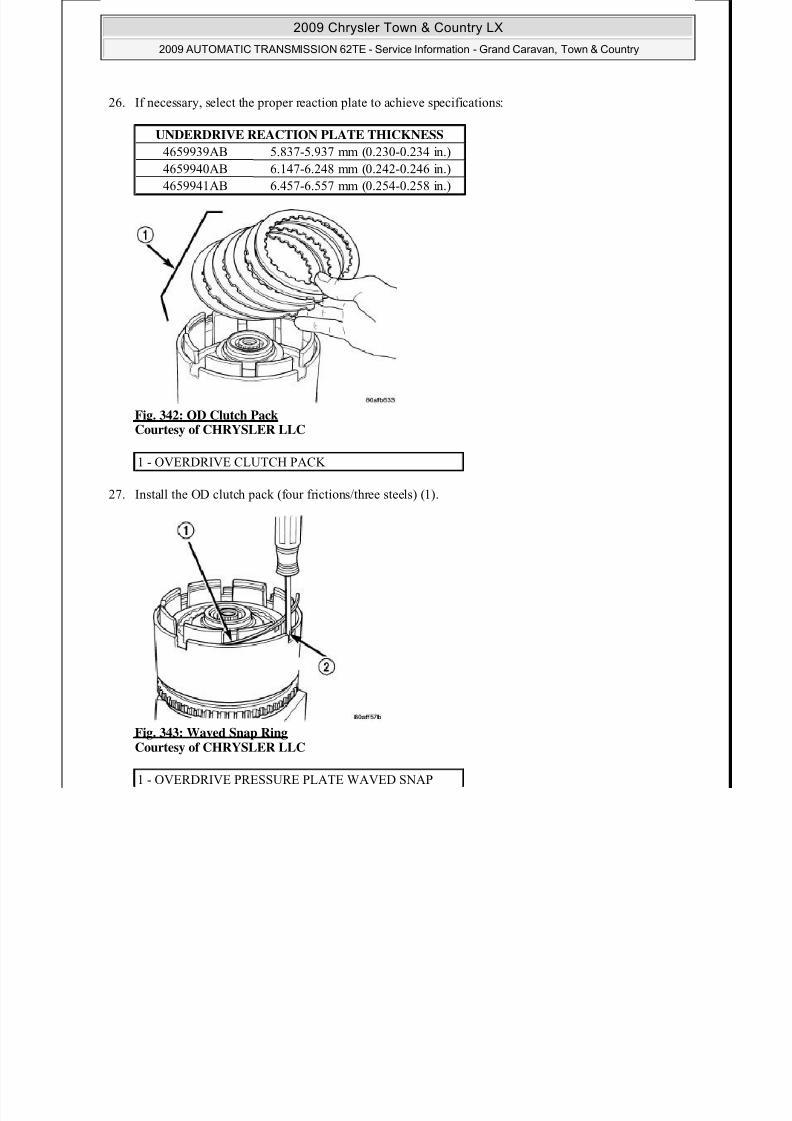
7/16/2019 62te
http://slidepdf.com/reader/full/62te55cf9df0550346d033afef7d 200/387
Fig. 342: OD Clutch Pack Courtesy of CHRYSLER LLC
27. Install the OD clutch pack (four frictions/three steels) (1).
Fig. 343: Waved Snap Ring Courtesy of CHRYSLER LLC
1 - OVERDRIVE CLUTCH PACK
1 - OVERDRIVE PRESSURE PLATE WAVED SNAP
28. Install OD pressure plate waved snap ring (1).
Fig. 344: OD/Reverse Reaction Plate Courtesy of CHRYSLER LLC
RING
2 - SCREWDRIVER
2009 Chrysler Town & Country LX
2009 AUTOMATIC TRANSMISSION 62TE - Service Information - Grand Caravan, Town & Country

7/16/2019 62te
http://slidepdf.com/reader/full/62te55cf9df0550346d033afef7d 201/387
29. Install the OD/Reverse pressure plate (1) with large step down (towards OD clutch pack) (2).
1 - OVERDRIVE/REVERSE PRESSURE PLATE
2 - (STEP SIDE DOWN)
2009 Chrysler Town & Country LX
2009 AUTOMATIC TRANSMISSION 62TE - Service Information - Grand Caravan, Town & Country
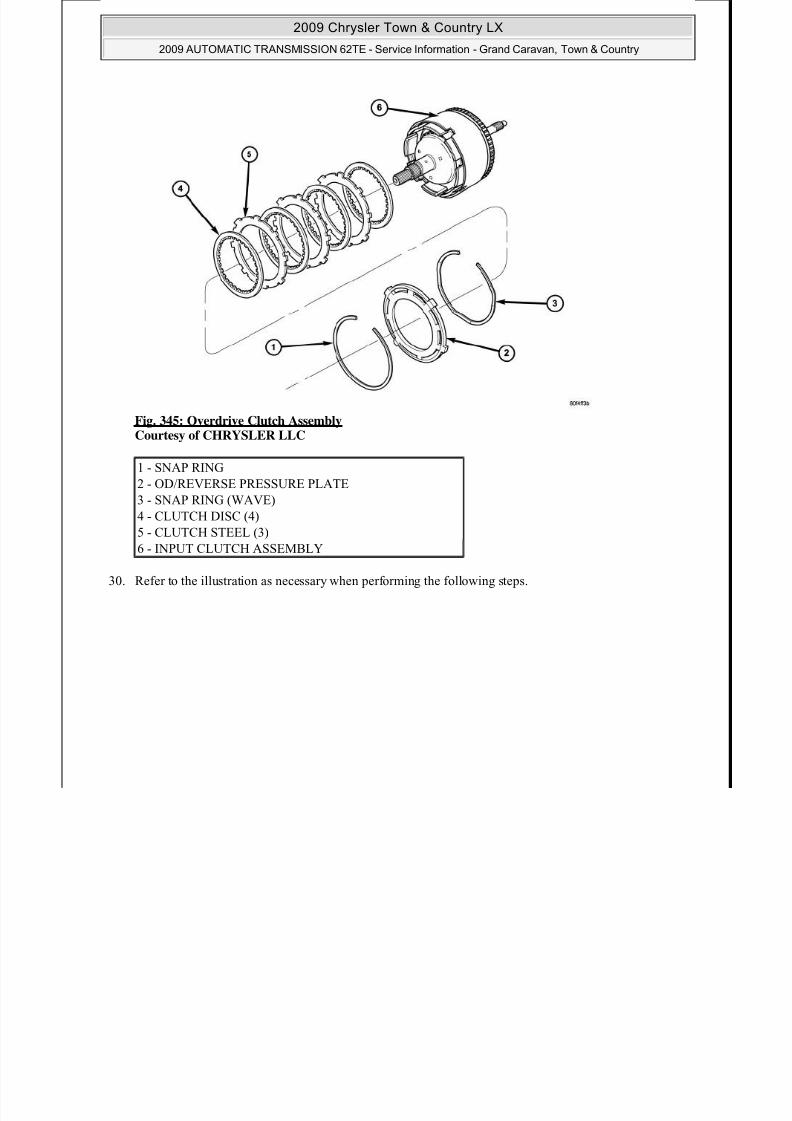
7/16/2019 62te
http://slidepdf.com/reader/full/62te55cf9df0550346d033afef7d 202/387
Fig. 345: Overdrive Clutch Assembly Courtesy of CHRYSLER LLC
30. Refer to the illustration as necessary when performing the following steps.
1 - SNAP RING
2 - OD/REVERSE PRESSURE PLATE
3 - SNAP RING (WAVE)
4 - CLUTCH DISC (4)
5 - CLUTCH STEEL (3)6 - INPUT CLUTCH ASSEMBLY
Fig. 346: Flat Snap Ring Courtesy of CHRYSLER LLC
1 - ARBOR PRESS RAM
2 - COMPRESSOR 5059-A
3 - FLAT SNAP RING
2009 Chrysler Town & Country LX
2009 AUTOMATIC TRANSMISSION 62TE - Service Information - Grand Caravan, Town & Country

7/16/2019 62te
http://slidepdf.com/reader/full/62te55cf9df0550346d033afef7d 203/387
31. Install OD pressure plate flat snap ring (3).
Fig. 347: Measure OD Clutch Pack Clearance Courtesy of CHRYSLER LLC
1 - DIAL INDICATOR
32. Measure OD clutch pack clearance. Set up dial indicator (1) on top of the OD/Reverse pressure plate.
33. Zero dial indicator and apply 30 psi (206 kPa) air pressure to the overdrive clutch hose on Tool 8391.Measure and record OD clutch pack measurement in four (4) places, 90° apart.
34. Take average of four measurements and compare with OD clutch pack clearance specification. Theoverdrive (OD) clutch pack clearance is 0.491 - 2.345 mm (0.019 - 0.092 in.).
If not within specifications, the clutch is not assembled properly. There is no adjustment for the ODclutch clearance.
35. Install reverse clutch pack (two frictions/one steel) (1, 2).
2 - OD/REVERSE REACTION PLATE
2009 Chrysler Town & Country LX
2009 AUTOMATIC TRANSMISSION 62TE - Service Information - Grand Caravan, Town & Country

7/16/2019 62te
http://slidepdf.com/reader/full/62te55cf9df0550346d033afef7d 204/387
Fig. 348: Reverse Clutch Reaction Plate Courtesy of CHRYSLER LLC
36. Install reverse clutch reaction plate with the flat side down towards reverse clutch.
1 - REVERSE CLUTCH REACTION PLATE (FLAT SIDEDOWN)
Fig. 349: Reverse Clutch Assembly Courtesy of CHRYSLER LLC
1 - SNAP RING
2009 Chrysler Town & Country LX
2009 AUTOMATIC TRANSMISSION 62TE - Service Information - Grand Caravan, Town & Country

7/16/2019 62te
http://slidepdf.com/reader/full/62te55cf9df0550346d033afef7d 205/387
37. Refer to the illustration as necessary when performing the following steps.
Fig. 350: Reverse Clutch Snap Ring Courtesy of CHRYSLER LLC
1 - SNAP RING
2 - REACTION PLATE
3 - CLUTCH DISC (2)
4 - CLUTCH PLATE (1)
5 - INPUT CLUTCH ASSEMBLY
1 - REVERSE CLUTCH SNAP RING SELECT
38. Tap reaction plate (3) down to allow installation of the reverse clutch snap ring (1). Install reverse clutchsnap ring (1).
Fig. 351: Pry Up Reverse Reaction Plate
2 - SCREWDRIVER
3 - REVERSE CLUTCH REACTION PLATE
2009 Chrysler Town & Country LX
2009 AUTOMATIC TRANSMISSION 62TE - Service Information - Grand Caravan, Town & Country

7/16/2019 62te
http://slidepdf.com/reader/full/62te55cf9df0550346d033afef7d 206/387
Fig. 351: Pry Up Reverse Reaction Plate Courtesy of CHRYSLER LLC
39. Pry up reverse reaction plate (4) to seat against snap ring (2).
1 - SCREWDRIVER
2 - SNAP RING
3 - SCREWDRIVER
4 - MUST RAISE REVERSE REACTION PLATE TORAISE SNAP RING
Fig. 352: Measure Reverse Clutch Pack Clearance Courtesy of CHRYSLER LLC
2009 Chrysler Town & Country LX
2009 AUTOMATIC TRANSMISSION 62TE - Service Information - Grand Caravan, Town & Country

7/16/2019 62te
http://slidepdf.com/reader/full/62te55cf9df0550346d033afef7d 207/387
y
40. Set up a dial indicator (1) on the reverse clutch pack (2).
1 - DIAL INDICATOR
2 - REVERSE CLUTCH
Fig. 353: Press Down On Reverse Clutch & Zero Indicator Courtesy of CHRYSLER LLC
2009 Chrysler Town & Country LX
2009 AUTOMATIC TRANSMISSION 62TE - Service Information - Grand Caravan, Town & Country

7/16/2019 62te
http://slidepdf.com/reader/full/62te55cf9df0550346d033afef7d 208/387
41. Using moderate pressure, press down and hold (near indicator) reverse clutch disc (2) with screwdriver or suitable tool and zero dial indicator (1). When releasing pressure, indicator should advance (0.005-0.010in.) as clutch pack relaxes.
42. Apply 30 psi (206 kPa) air pressure to the reverse clutch hose on Input Clutch Pressure Fixture 8391.Measure and record reverse clutch pack measurement in four places, 90° apart.
43. Take average of four measurements and compare with reverse clutch pack clearance specification. Thereverse clutch pack clearance is 0.76 - 1.245 mm (0.030 - 0.049 in.). Select the proper reverse clutchsnap ring to achieve specifications:
44. To complete the assembly, reverse clutch and overdrive clutch must be removed.
45. Install the number two needle bearing (1).
1 - DIAL INDICATOR
2 - REVERSE CLUTCH
REVERSE CLUTCH SNAP RING THICKNESS
4377195 1.53-1.58 mm (0.060-0.062 in.)4412871 1.77-1.83 mm (0.070-0.072 in.)
4412872 2.02-2.07 mm (0.080-0.082 in.)
4412873 2.27-2.32 mm (0.090-0.091 in.)
Fig. 354: Underdrive Shaft Assembly Courtesy of CHRYSLER LLC
46. Install the underdrive shaft assembly (1).
1 - UNDERDRIVE SHAFT ASSEMBLY
2 - #2 NEEDLE BEARING
2009 Chrysler Town & Country LX
2009 AUTOMATIC TRANSMISSION 62TE - Service Information - Grand Caravan, Town & Country

7/16/2019 62te
http://slidepdf.com/reader/full/62te55cf9df0550346d033afef7d 209/387
Fig. 355: No. 3 Thrust Washer Courtesy of CHRYSLER LLC
47. Install the number three thrust washer (1) to the underdrive shaft assembly (2). Be sure five tabs areseated properly.
1 - #3 THRUST WASHER (NOTE 5 TABS)
2 - UNDERDRIVE SHAFT ASSEMBLY
Fig. 356: No. 3 Thrust Plate Courtesy of CHRYSLER LLC
ll h b h h l ( ) ( b ) h b f h d i h f bl ( )
1 - OVERDRIVE SHAFT ASSEMBLY
2 - DABS OF PETROLATUM (FOR RETENTION)
3 - #3 THRUST PLATE (NOTE 3 TABS)
2009 Chrysler Town & Country LX
2009 AUTOMATIC TRANSMISSION 62TE - Service Information - Grand Caravan, Town & Country

7/16/2019 62te
http://slidepdf.com/reader/full/62te55cf9df0550346d033afef7d 210/387
48. Install the number three thrust plate (3) (note 3 tabs) to the bottom of the overdrive shaft assembly (1).Retain with petrolatum or transmission assembly gel (2).
Fig. 357: Overdrive/Underdrive Shafts
Courtesy of CHRYSLER LLC
49. Refer to the illustration as necessary when performing the following steps.
1 - OVERDRIVE SHAFT
2 - #3 THRUST PLATE (3 TABS)
3 - #3 THRUST WASHER (5 TABS)
4 - UNDERDRIVE SHAFT5 - #2 NEEDLE BEARING (3 TABS)
6 - INPUT CLUTCH ASSEMBLY
2009 Chrysler Town & Country LX
2009 AUTOMATIC TRANSMISSION 62TE - Service Information - Grand Caravan, Town & Country

7/16/2019 62te
http://slidepdf.com/reader/full/62te55cf9df0550346d033afef7d 211/387
Fig. 358: Overdrive Shaft Assembly Courtesy of CHRYSLER LLC
50. Install the overdrive shaft assembly (1).
51. Reinstall overdrive and reverse clutch as shown in illustration. Rechecking these clutch clearances isnot necessary.
ASSEMBLY, TRANSMISSION SOLENOID AND PRESSURE SWITCH
REMOVAL
REMOVAL
1. Remove valve body. See Transmission and Transfer Case/Automatic - 62TE/VALVE BODY -Removal.
1 - OVERDRIVE SHAFT ASSEMBLY
2 - #3 THRUST PLATE3 - #3 THRUST WASHER
Fig. 359: Bolts At Clamp Plate Courtesy of CHRYSLER LLC
2 Remove the clamp plate bolts and clamp plate
2009 Chrysler Town & Country LX
2009 AUTOMATIC TRANSMISSION 62TE - Service Information - Grand Caravan, Town & Country

7/16/2019 62te
http://slidepdf.com/reader/full/62te55cf9df0550346d033afef7d 212/387
2. Remove the clamp plate bolts and clamp plate.
Fig. 360: Solenoid Pack Electrical Connect Courtesy of CHRYSLER LLC
3. Remove the electrical connectors to the pressure control solenoid and line pressure sensors.
4. Remove the solenoid/pressure switch assembly.
INSTALLATION
INSTALLATION
2009 Chrysler Town & Country LX
2009 AUTOMATIC TRANSMISSION 62TE - Service Information - Grand Caravan, Town & Country
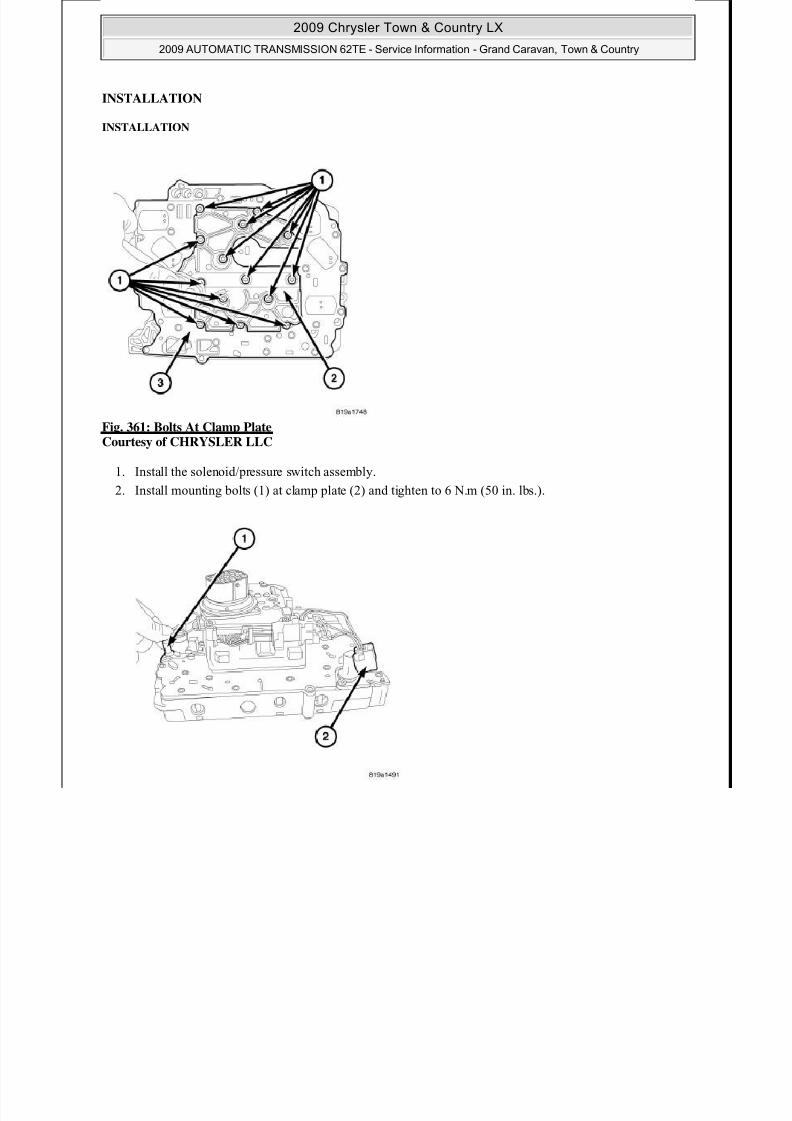
7/16/2019 62te
http://slidepdf.com/reader/full/62te55cf9df0550346d033afef7d 213/387
Fig. 361: Bolts At Clamp Plate Courtesy of CHRYSLER LLC
1. Install the solenoid/pressure switch assembly.
2. Install mounting bolts (1) at clamp plate (2) and tighten to 6 N.m (50 in. lbs.).
Fig. 362: Solenoid Pack Electrical ConnectCourtesy of CHRYSLER LLC
3. Connect the electrical connectors (1, 2) to the pressure control solenoid and line pressure sensors.
4. Install valve body. See Transmission and Transfer Case/Automatic - 62TE/VALVE BODY -
Installation.
ASSEMBLY, UNDERDRIVE COMPOUNDER
DESCRIPTION
DESCRIPTION
The underdrive compounder assembly replaces the 41TE transfer shaft. The transaxle case is modified toaccommodate the additional components. The main components of the underdrive compounder assembly arethe low clutch (LC), direct clutch (DC), overrunning clutch (ORC), simple planetary gear set and bearingretainer transfer/underdrive shaft.
DISASSEMBLY
DISASSEMBLY
2009 Chrysler Town & Country LX
2009 AUTOMATIC TRANSMISSION 62TE - Service Information - Grand Caravan, Town & Country

7/16/2019 62te
http://slidepdf.com/reader/full/62te55cf9df0550346d033afef7d 214/387
Fig. 363: Planetary Gear Set - Output Hub Courtesy of CHRYSLER LLC
1. Remove the planetary gear set/output hub (1).
Fig. 364: Helical Shim Courtesy of CHRYSLER LLC
2. Remove the helical shim (1).
2009 Chrysler Town & Country LX
2009 AUTOMATIC TRANSMISSION 62TE - Service Information - Grand Caravan, Town & Country

7/16/2019 62te
http://slidepdf.com/reader/full/62te55cf9df0550346d033afef7d 215/387
2. Remove the helical shim (1).
Fig. 365: Planetary Gear Set Courtesy of CHRYSLER LLC
3. Remove the snap ring (4) holding the planetary carrier.4. Remove the planetary carrier (5).
5. Remove the snap ring (6) holding the annulus gear.
6. Remove the needle bearing (7) on the front side of the annulus gear.
7. Remove the annulus gear (8).
8. Remove the needle bearing (9) on the back side of the annulus gear/on the front side of the output hub.
9. Inspect the needle bearing in the output hub for any damage.
1 - NEEDLE BEARING 5 -PLANETARYCARRIER
9 - #2 NEEDLEBEARING
2 - SUN GEAR 6 - #2 SNAPRING
10 - NEEDLE
BEARING
3 - HELICAL SHIM (SELECT)7 - #1 NEEDLEBEARING
11 -OUTPUTHUB
4 - #1 SNAP RING 8 -ANNULUSGEAR
-
2009 Chrysler Town & Country LX
2009 AUTOMATIC TRANSMISSION 62TE - Service Information - Grand Caravan, Town & Country

7/16/2019 62te
http://slidepdf.com/reader/full/62te55cf9df0550346d033afef7d 216/387
p g p y g
Fig. 366: Clip At Transfer Shaft-Out Courtesy of CHRYSLER LLC
10. Using two small picks, remove retaining clip from transfer/underdrive shaft
Fig. 367: Clip At Transfer Shaft Courtesy of CHRYSLER LLC
NOTE: A new retaining c lip wil l be used during assembly.
2009 Chrysler Town & Country LX
2009 AUTOMATIC TRANSMISSION 62TE - Service Information - Grand Caravan, Town & Country
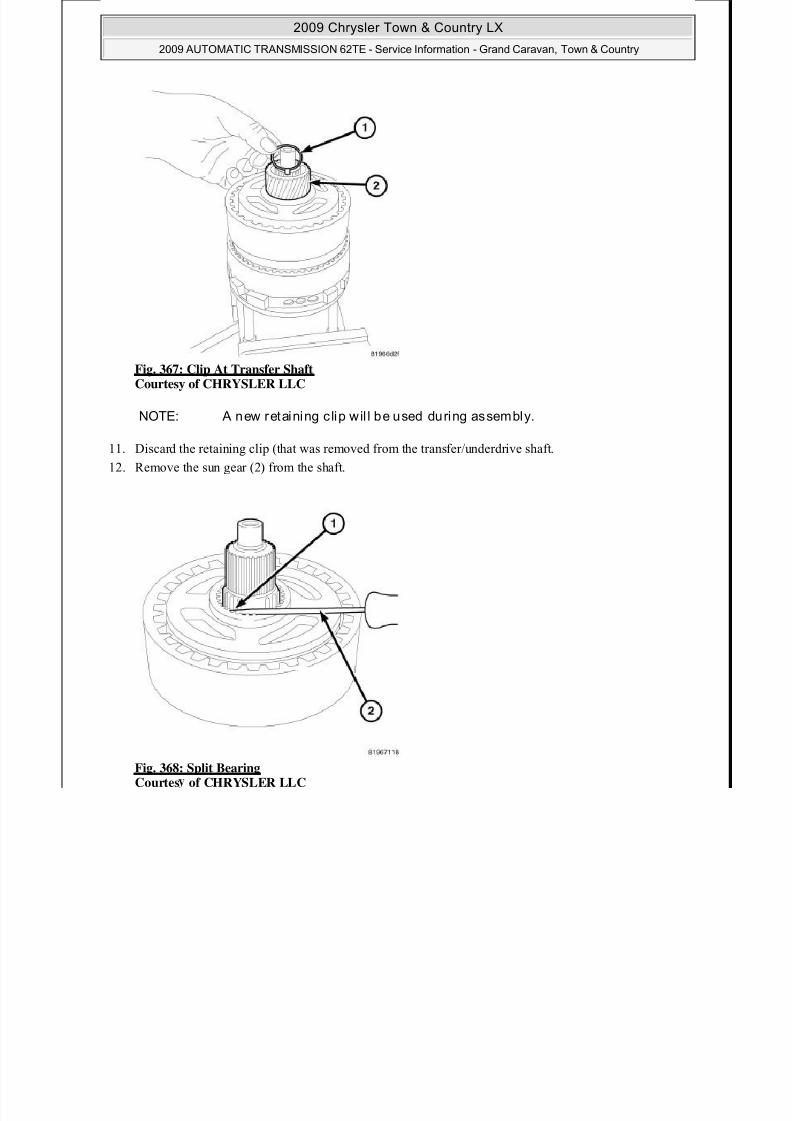
7/16/2019 62te
http://slidepdf.com/reader/full/62te55cf9df0550346d033afef7d 217/387
11. Discard the retaining clip (that was removed from the transfer/underdrive shaft.
12. Remove the sun gear (2) from the shaft.
Fig. 368: Split Bearing Courtes of CHRYSLER LLC
g p g y
13. Remove the split bearing (1) using a small pick (2).
Fig. 369: Direct Clutch
Courtesy of CHRYSLER LLC
2009 Chrysler Town & Country LX
2009 AUTOMATIC TRANSMISSION 62TE - Service Information - Grand Caravan, Town & Country

7/16/2019 62te
http://slidepdf.com/reader/full/62te55cf9df0550346d033afef7d 218/387
14. Remove the direct clutch (1) from the low clutch.
2009 Chrysler Town & Country LX
2009 AUTOMATIC TRANSMISSION 62TE - Service Information - Grand Caravan, Town & Country

7/16/2019 62te
http://slidepdf.com/reader/full/62te55cf9df0550346d033afef7d 219/387
Fig. 370: Exploded View Of Direct Clutch Courtesy of CHRYSLER LLC
15. Remove the internal snap ring (1).
16. Remove the selectable reaction plate (12).
17. Remove the number one thrust bearing (11).
18. Remove the hub (10).
19. Remove the number two thrust bearing (9).
1 - INTERNAL SNAP RING 5 -RETURN
COILSPRING
9 - #2 THRUST
BEARING
2 - FRICTION (INNER SPLINE)6 -RETAINER
10 - HUB
3 - FRICTION (OUTER SPLINE) 7 - PISTON11 - # 1THRUSTBEARING
4 - RETAINER SNAP RING 8 -
BALANCEPISTON
12 - REACTION
PLATE(SELECTABLE)
20. Remove the inner and outer spline frictions (2, 3).
Fig. 371: Direct Clutch Compressed
Courtesy of CHRYSLER LLC
2009 Chrysler Town & Country LX
2009 AUTOMATIC TRANSMISSION 62TE - Service Information - Grand Caravan, Town & Country

7/16/2019 62te
http://slidepdf.com/reader/full/62te55cf9df0550346d033afef7d 220/387
21. Install Compressor 8250 (2) over the direct clutch balance piston (3) and place onto a press (1).
22. Compress spring to remove the snap ring (4) at the direct clutch balance piston.
2009 Chrysler Town & Country LX
2009 AUTOMATIC TRANSMISSION 62TE - Service Information - Grand Caravan, Town & Country

7/16/2019 62te
http://slidepdf.com/reader/full/62te55cf9df0550346d033afef7d 221/387
Fig. 372: Exploded View Of Direct Clutch Courtesy of CHRYSLER LLC
23. Remove the direct clutch balance piston (8).
24. Remove the return coil spring (5).
25. Remove the direct clutch piston (7) from the retainer (6).
1 - INTERNAL SNAP RING 5 -RETURN
COILSPRING
9 - #2 THRUST
BEARING
2 - FRICTION (INNER SPLINE)6 -RETAINER
10 - HUB
3 - FRICTION (OUTER SPLINE) 7 - PISTON11 - #1THRUSTBEARING
4 - RETAINER SNAP RING 8 -
BALANCEPISTON
12 - REACTION
PLATE(SELECTABLE)
Fig. 373: Needle Bearing Courtesy of CHRYSLER LLC
26. Remove the needle bearing (1) from the transfer shaft.
2009 Chrysler Town & Country LX
2009 AUTOMATIC TRANSMISSION 62TE - Service Information - Grand Caravan, Town & Country

7/16/2019 62te
http://slidepdf.com/reader/full/62te55cf9df0550346d033afef7d 222/387
Fig. 374: Overrunning Clutch Courtesy of CHRYSLER LLC
27. Remove the overrunning clutch from the low clutch (1).
Fig. 375: Tool 9908 Courtesy of CHRYSLER LLC
28. Remove the Bearing Retainer Assembly Remover 9908 (1) from the low clutch (2).
2009 Chrysler Town & Country LX
2009 AUTOMATIC TRANSMISSION 62TE - Service Information - Grand Caravan, Town & Country
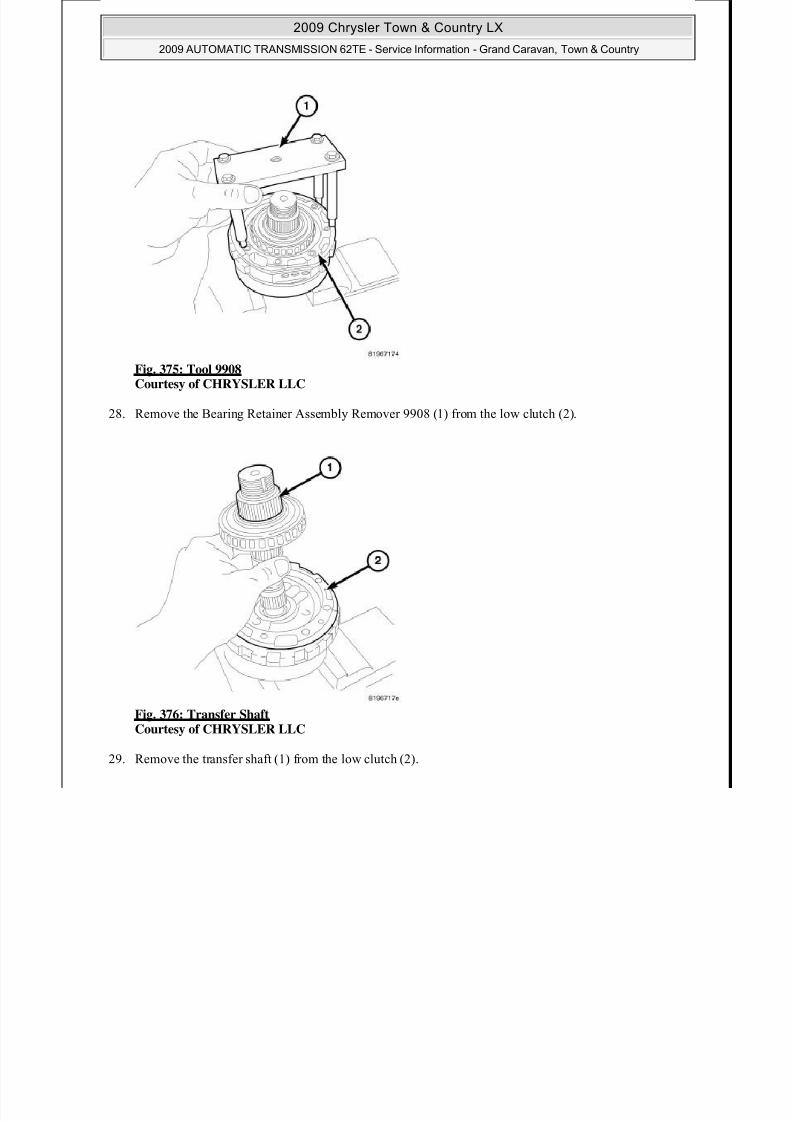
7/16/2019 62te
http://slidepdf.com/reader/full/62te55cf9df0550346d033afef7d 223/387
Fig. 376: Transfer Shaft Courtesy of CHRYSLER LLC
29. Remove the transfer shaft (1) from the low clutch (2).
Fig. 377: Bearing Splitter 1130 Courtesy of CHRYSLER LLC
30. Using Bearing Splitter 1130 (2) and a press (3) remove the underdrive compounder bearing.
2009 Chrysler Town & Country LX
2009 AUTOMATIC TRANSMISSION 62TE - Service Information - Grand Caravan, Town & Country

7/16/2019 62te
http://slidepdf.com/reader/full/62te55cf9df0550346d033afef7d 224/387
Fig. 378: Exploded View Of Low ClutchCourtesy of CHRYSLER LLC
31. Remove the snap ring (10).
32. Remove the reaction plate (3)
33. Remove the friction disc's (4) and the separator plates (5).
1 - SNAP RING (SELECTABLE) 6 -RETURNSPRING
2 - CLUTCH HUB 7 -RETAINER
3 - REACTION PLATE 8 - SEALS
4 - FRICTION DISC 9 - PISTON
5 - SEPARATOR PLATE10 - SNAPRING
2009 Chrysler Town & Country LX
2009 AUTOMATIC TRANSMISSION 62TE - Service Information - Grand Caravan, Town & Country

7/16/2019 62te
http://slidepdf.com/reader/full/62te55cf9df0550346d033afef7d 225/387
Fig. 379: Low Clutch Compressed
Courtesy of CHRYSLER LLC
34. Install compressor 9725 (1) on return spring (3) and slightly compress.
35. Remove the snap ring (4) from low clutch retainer (2).
Fig. 380: Low Clutch Return Spring Courtesy of CHRYSLER LLC
36. Release pressure on press, remove compressor 9725 and the return spring (1).
2009 Chrysler Town & Country LX
2009 AUTOMATIC TRANSMISSION 62TE - Service Information - Grand Caravan, Town & Country

7/16/2019 62te
http://slidepdf.com/reader/full/62te55cf9df0550346d033afef7d 226/387
Fig. 381: Low Clutch Piston Courtesy of CHRYSLER LLC
37. Remove the low clutch piston (1) from low clutch retainer. Low air pressure may be applied to low clutch
retainer port (3) to move piston out of the bore.
Fig. 382: Seal Rings Courtesy of CHRYSLER LLC
38. Remove the seal rings (1) from the low clutch retainer (2).
ASSEMBLY
2009 Chrysler Town & Country LX
2009 AUTOMATIC TRANSMISSION 62TE - Service Information - Grand Caravan, Town & Country

7/16/2019 62te
http://slidepdf.com/reader/full/62te55cf9df0550346d033afef7d 227/387
ASSEMBLY
Fig. 383: Seal Rings
Courtesy of CHRYSLER LLC
1. Install new seal rings (1) on the low clutch retainer (2).
CAUTION: Lube seal lips with ATF during installation, Use a twist ing mot ion duringinstallation to prevent seal lips from rolling over.
CAUTION: Do not over stretch. Can cause breakage.
2009 Chrysler Town & Country LX
2009 AUTOMATIC TRANSMISSION 62TE - Service Information - Grand Caravan, Town & Country

7/16/2019 62te
http://slidepdf.com/reader/full/62te55cf9df0550346d033afef7d 228/387
Fig. 384: Low Clutch Piston Courtesy of CHRYSLER LLC
2. Install the low clutch piston (1) into low clutch retainer.
Fig. 385: Low Clutch Return Spring Courtesy of CHRYSLER LLC
3. Install the low clutch return spring (1) over the low clutch retainer (2).
2009 Chrysler Town & Country LX
2009 AUTOMATIC TRANSMISSION 62TE - Service Information - Grand Caravan, Town & Country

7/16/2019 62te
http://slidepdf.com/reader/full/62te55cf9df0550346d033afef7d 229/387
Fig. 386: Low Clutch Compressed Courtesy of CHRYSLER LLC
4. Install compressor 9725 (1) on return spring (3) and slightly compress.
5. Install the snap ring (4) onto low clutch retainer (2).
6. Release pressure on press, remove Compressor 9725.
2009 Chrysler Town & Country LX
2009 AUTOMATIC TRANSMISSION 62TE - Service Information - Grand Caravan, Town & Country

7/16/2019 62te
http://slidepdf.com/reader/full/62te55cf9df0550346d033afef7d 230/387
Fig. 387: Exploded View Of Low Clutch Courtesy of CHRYSLER LLC
7. Install the friction disc's (4) and the separator plates (5).
8. Install the reaction plate (3).
9. Install the snap ring (10).
1 - SNAP RING (SELECTABLE) 6 -RETURNSPRING
2 - CLUTCH HUB 7 -RETAINER
3 - REACTION PLATE 8 - SEALS
4 - FRICTION DISC 9 - PISTON
5 - SEPARATOR PLATE10 - SNAPRING
Fig. 388: Low Clutch Measurement Courtesy of CHRYSLER LLC
10 U i Di l I di d i h l l h l h l h ld b 0 48
2009 Chrysler Town & Country LX
2009 AUTOMATIC TRANSMISSION 62TE - Service Information - Grand Caravan, Town & Country

7/16/2019 62te
http://slidepdf.com/reader/full/62te55cf9df0550346d033afef7d 231/387
10. Using a Dial Indicator and air pressure measure the low clutch clearance, the clearance should be 0.48 -0.76 mm (0.019 - 0.030 in.). Install desired selectable snap ring to achieve correct clearance.
Fig. 389: Underdrive Compounder Bearing
Courtesy of CHRYSLER LLC
11. Using Installer 6756 (2) and a Press (1), install the underdrive compounder bearing (3) to transfer shaft.
Fig. 390: Transfer Shaft Courtesy of CHRYSLER LLC
2009 Chrysler Town & Country LX
2009 AUTOMATIC TRANSMISSION 62TE - Service Information - Grand Caravan, Town & Country

7/16/2019 62te
http://slidepdf.com/reader/full/62te55cf9df0550346d033afef7d 232/387
12. Install new seal rings on the transfer shaft.
13. Install the transfer shaft (1) onto the low clutch (2).
Fig. 391: Selectable Shim & Transfer GearCourtesy of CHRYSLER LLC
14. Install the selectable shim (3), transfer gear (2) and the transfer gear nut.
NOTE: The selectable shim wil l determine turning torque.
2009 Chrysler Town & Country LX
2009 AUTOMATIC TRANSMISSION 62TE - Service Information - Grand Caravan, Town & Country

7/16/2019 62te
http://slidepdf.com/reader/full/62te55cf9df0550346d033afef7d 233/387
Fig. 392: Torque Transfer Gear Nut Courtesy of CHRYSLER LLC
15. Using Holder 9739 (1) tighten transfer gear nut to 271 N.m (200 ft. lbs.).
Fig. 393: LC Turning Torque Courtesy of CHRYSLER LLC
16. Check turning torque using an inch pound torque wrench. Turning torque should be between 8.0 to 18.0in-lbs (drag), If more than 18.0 in-lbs (drag) choose a larger shim and recheck turning torque. If less than8.0 in-lbs (drag) choose a smaller shim and recheck turning torque.
17 Remove transfer gear nut and gear
2009 Chrysler Town & Country LX
2009 AUTOMATIC TRANSMISSION 62TE - Service Information - Grand Caravan, Town & Country

7/16/2019 62te
http://slidepdf.com/reader/full/62te55cf9df0550346d033afef7d 234/387
17. Remove transfer gear nut and gear.
Fig. 394: Tool 9908
Courtesy of CHRYSLER LLC
18. Install the Bearing Retainer Assembly Remover 9908 (1) onto the low clutch (2).
Fig. 395: Overrunning Clutch
Courtesy of CHRYSLER LLC
19. Install the overrunning clutch (1) into the low clutch (2).
2009 Chrysler Town & Country LX
2009 AUTOMATIC TRANSMISSION 62TE - Service Information - Grand Caravan, Town & Country

7/16/2019 62te
http://slidepdf.com/reader/full/62te55cf9df0550346d033afef7d 235/387
Fig. 396: Needle Bearing Courtesy of CHRYSLER LLC
20. Install the needle bearing (1) onto the transfer shaft.
2009 Chrysler Town & Country LX
2009 AUTOMATIC TRANSMISSION 62TE - Service Information - Grand Caravan, Town & Country

7/16/2019 62te
http://slidepdf.com/reader/full/62te55cf9df0550346d033afef7d 236/387
Fig. 397: Exploded View Of Direct Clutch Courtesy of CHRYSLER LLC
21. Install the direct clutch retainer (8) onto the retainer (7).
22. Install the return coil spring (5) onto the balance piston (8).
23. Install the direct clutch piston (7) into the balance piston (8) using the Direct Clutch Piston Guide 9727.
1 - INTERNAL SNAP RING 5 -RETURNCOILSPRING
9 - #2 THRUSTBEARING
2 - FRICTION (INNER SPLINE)6 -RETAINER
10 - HUB
3 - FRICTION (OUTER SPLINE) 7 - PISTON11 - #1THRUST
BEARING4 - RETAINER SNAP RING 8 -
BALANCEPISTON
12 - REACTIONPLATE(SELECTABLE)
Fig. 398: Direct Clutch Compressed Courtesy of CHRYSLER LLC
24. Install compressor 8250 (2) over the direct clutch balance piston (3) and place onto a press (1).
25. Compress spring to install the snap ring (4) at the direct clutch balance piston.
26. Install the inner and outer spline frictions (2, 3).
27 Install the n mber t o thr st bearing (9)
2009 Chrysler Town & Country LX
2009 AUTOMATIC TRANSMISSION 62TE - Service Information - Grand Caravan, Town & Country

7/16/2019 62te
http://slidepdf.com/reader/full/62te55cf9df0550346d033afef7d 237/387
27. Install the number two thrust bearing (9).
28. Install the hub (10).
29. Install the number one thrust bearing (11).
30. Install the selectable reaction plate (12).
31. Install the internal snap ring (1).
Fig. 399: Direct Clutch Courtesy of CHRYSLER LLC
32. Install the direct clutch (1) onto the low clutch.
2009 Chrysler Town & Country LX
2009 AUTOMATIC TRANSMISSION 62TE - Service Information - Grand Caravan, Town & Country

7/16/2019 62te
http://slidepdf.com/reader/full/62te55cf9df0550346d033afef7d 238/387
Fig. 400: Split Bearing Courtesy of CHRYSLER LLC
33. Install the split bearing (1) using a small pick (2).
Fig. 401: Direct Clutch Measurement Courtesy of CHRYSLER LLC
34. Using a Dial Indicator and air pressure measure the direct clutch clearance, the clearance should be 0.95 -1 41 (0 037 0 056 i ) I t ll d i d l t bl ti l t t hi t l
2009 Chrysler Town & Country LX
2009 AUTOMATIC TRANSMISSION 62TE - Service Information - Grand Caravan, Town & Country

7/16/2019 62te
http://slidepdf.com/reader/full/62te55cf9df0550346d033afef7d 239/387
1.41 (0.037 - 0.056 in). Install desired selectable reaction plate to achieve correct clearance.
Fig. 402: Clip At Transfer Shaft
Courtesy of CHRYSLER LLC
35. Install the sun gear (2) onto the shaft.
36. Install the new retaining clip onto the transfer/underdrive shaft.
2009 Chrysler Town & Country LX
2009 AUTOMATIC TRANSMISSION 62TE - Service Information - Grand Caravan, Town & Country

7/16/2019 62te
http://slidepdf.com/reader/full/62te55cf9df0550346d033afef7d 240/387
Fig. 403: Planetary Gear Set Courtesy of CHRYSLER LLC
37. Inspect the needle bearing in the output hub for any damage.
38. Install the thrust washer (9) on the back side of the annulus gear/on the front side of the output hub.
39. Install the annulus gear (8).
1 - NEEDLE BEARING 5 -PLANETARYCARRIER
9 - #2 NEEDLEBEARING
2 - SUN GEAR 6 - #2 SNAPRING
10 - NEEDLEBEARING
3 - HELICAL SHIM (SELECT)7 - #1 NEEDLEBEARING
11 -OUTPUTHUB
4 - #1 SNAP RING 8 -ANNULUSGEAR
-
40. Install the thrust washer (7) on the front side of the annulus gear.
41. Install the snap ring (6) that holds the annulus gear.
42. Install the planetary carrier (5).
43. Install the snap ring (4) holding the planetary carrier.
Fig. 404: Helical Shim Courtesy of CHRYSLER LLC
2009 Chrysler Town & Country LX
2009 AUTOMATIC TRANSMISSION 62TE - Service Information - Grand Caravan, Town & Country

7/16/2019 62te
http://slidepdf.com/reader/full/62te55cf9df0550346d033afef7d 241/387
Courtesy of CHRYSLER LLC
44. Install the helical shim (1).
Fig. 405: Planetary Gear Set - Output Hub Courtesy of CHRYSLER LLC
45. Install the planetary gear set/output hub (1) onto the direct clutch.
CABLE, SHIFT
REMOVAL
2009 Chrysler Town & Country LX
2009 AUTOMATIC TRANSMISSION 62TE - Service Information - Grand Caravan, Town & Country

7/16/2019 62te
http://slidepdf.com/reader/full/62te55cf9df0550346d033afef7d 242/387
REMOVAL
REMOVAL
Fig. 406: Knee Blocker Courtesy of CHRYSLER LLC
1. Remove the battery. Refer to Electrical - Engine Systems/Battery System/BATTERY - Removal .
2. Remove the battery tray. Refer to Electrical - Engine Systems/Battery System/TRAY, Battery -Removal .
3. Remove the knee blocker (2). Refer to Body/Instrument Panel/KNEEBLOCKER - Removal .
2009 Chrysler Town & Country LX
2009 AUTOMATIC TRANSMISSION 62TE - Service Information - Grand Caravan, Town & Country

7/16/2019 62te
http://slidepdf.com/reader/full/62te55cf9df0550346d033afef7d 243/387
Fig. 407: Gearshift Cable
Courtesy of CHRYSLER LLC
4. Press the lock tab (2) on the gearshift cable (1) and pull the cable out of the shifter.
Fig. 408: Shift Cable From/To Manual Lever Courtesy of CHRYSLER LLC
NOTE: Make sure the lock tab on the gearshift cable is pressed before pull ing thecable from the shifter housing.
2009 Chrysler Town & Country LX
2009 AUTOMATIC TRANSMISSION 62TE - Service Information - Grand Caravan, Town & Country

7/16/2019 62te
http://slidepdf.com/reader/full/62te55cf9df0550346d033afef7d 244/387
5. Disconnect the gearshift cable (1) from the transaxle manual valve lever (2).
6. Disconnect the gearshift cable from the bracket.
Fig. 409: Cable At Bulkhead Courtesy of CHRYSLER LLC
7. Disengage the grommet for the gearshift cable (2) from the bulkhead (1).
8. Pull the gearshift cable through the bulkhead into the passenger compartment.
INSTALLATION
2009 Chrysler Town & Country LX
2009 AUTOMATIC TRANSMISSION 62TE - Service Information - Grand Caravan, Town & Country

7/16/2019 62te
http://slidepdf.com/reader/full/62te55cf9df0550346d033afef7d 245/387
INSTALLATION
Fig. 410: Cable At Bulkhead Courtesy of CHRYSLER LLC
1. Install the gearshift cable (2) through the bulkhead (1) from the passenger compartment.
2. Seat the rubber grommet onto the bulkhead. Make sure the grommet is fully engage to the bulkhead.
NOTE: Make sure the rubber grommet in the bulkhead is fully seated to prevent water leaking into the passenger compartment.
2009 Chrysler Town & Country LX
2009 AUTOMATIC TRANSMISSION 62TE - Service Information - Grand Caravan, Town & Country

7/16/2019 62te
http://slidepdf.com/reader/full/62te55cf9df0550346d033afef7d 246/387
Fig. 411: Shift Cable From/To Manual Lever Courtesy of CHRYSLER LLC
3. Connect the gearshift cable (1) to the bracket.
4. Connect the gearshift cable to the transaxle manual valve lever (2).
Fig. 412: Gearshift Cable Courtesy of CHRYSLER LLC
5. Install the gearshift cable (1) to the shifter. Make sure the lock tab (2) on the gearshift cable is fullyseated.
NOTE: Make sure the lock tab on the gearshift cable is fully seated after thegearshif t cable is installed to the shifter housing.
2009 Chrysler Town & Country LX
2009 AUTOMATIC TRANSMISSION 62TE - Service Information - Grand Caravan, Town & Country

7/16/2019 62te
http://slidepdf.com/reader/full/62te55cf9df0550346d033afef7d 247/387
6. Install the knee blocker (2). Refer to Body/Instrument Panel/KNEEBLOCKER - Removal .
7. Install the battery tray. Refer to Electrical - Engine Systems/Battery System/TRAY, Battery -Installation .
8. Install the battery. Refer to Electrical - Engine Systems/Battery System/BATTERY - Installation .
ADJUSTMENTS
ADJUSTMENTS
ADJUSTMENT
1. Park the vehicle on level ground and set the parking brake.
2. Place the gearshift lever in gated park (P) and remove ignition key.
3. Loosen the cable adjustment screw at the transaxle manual valve lever.
4. Pull the gearshift lever fully forward to the park detent position.
5. Release the park brake, then rock the vehicle to assure it is in park. Reset the park brake.
6. Tighten the cable adjustment screw to 8 N.m (70 in. lbs.). Gearshift cable should now be properlyadjusted.
7. Verify adjustment by using the verification procedure.
VERIFICATION
1. Place gearshift lever in gated park (P).
2. Attempt to move vehicle by rocking back and forth on level ground. If vehicle does not move, attempt to
start engine. If engine starts, the park position is correct.
3. Set parking brake.
4. Turn key to on/run and depress brake pedal. Place gearshift lever in neutral (N).
5. Attempt to start engine. If engine starts in both neutral (N) or park (P), gearshift cable is adjusted properly. No adjustment is required.
6. If engine does not start in either park (P) or neutral (N), perform adjustment procedure.
DRIVE, FINAL
DESCRIPTION
DESCRIPTION
2009 Chrysler Town & Country LX
2009 AUTOMATIC TRANSMISSION 62TE - Service Information - Grand Caravan, Town & Country

7/16/2019 62te
http://slidepdf.com/reader/full/62te55cf9df0550346d033afef7d 248/387
Fig. 413: Final Drive Assembly Courtesy of CHRYSLER LLC
The 62TE's final drive system is driven by the underdrive compounder's output hub/carrier assembly. The finaldrive consists of the remote pinion gear, a ring gear, and a conventional differential assembly. A 23-tooth piniongear in mesh with a 79-tooth ring gear results in a final drive ratio of 3.43:1.
Fig. 414: Remote Pinion Courtesy of CHRYSLER LLC
1 - REMOTE PINION GEAR 4 -BEARINGRETAINER
2 - BEARING ROLLER (CONE) 5 -BEARINGRACE(CUP)
2009 Chrysler Town & Country LX
2009 AUTOMATIC TRANSMISSION 62TE - Service Information - Grand Caravan, Town & Country

7/16/2019 62te
http://slidepdf.com/reader/full/62te55cf9df0550346d033afef7d 249/387
The 23-tooth remote pinion is a helical gear driven by the output hub/carrier assembly. It is supported by a bearing retainer and two tapered roller bearings, which centers the gear on its axis. The bearing preload isadjusted with a selectable shim, located between the outer bearing race and the bearing retainer. The preload measurement and adjustment must be made with the differential assembly removed.
(CUP)
3 - SELECTABLE SHIM -
Fig. 415: Differential Assembly Courtesy of CHRYSLER LLC
1 - BEARING RETAINER 4 -BEARINGROLLER (CONE)
2 - SELECTABLE SHIM 5 - RINGGEAR
6 SIDE
2009 Chrysler Town & Country LX
2009 AUTOMATIC TRANSMISSION 62TE - Service Information - Grand Caravan, Town & Country

7/16/2019 62te
http://slidepdf.com/reader/full/62te55cf9df0550346d033afef7d 250/387
The differential assembly is supported by two tapered roller bearings and contained in a structural "clamshell"housing. It is a conventional, open type (non-locking) and is contained in a two-piece, closed case. Differential bearing preload is set with a selectable shim, with the pinion gear removed. The preload for the internal/spider gears is set with shims, as well. The 224 mm (8.82 in.) ring gear is bolted to the differential case.
OPERATION
OPERATION
The 62TE's final drive system is driven by the underdrive compounder's output hub/carrier assembly. The finaldrive consists of the remote pinion gear, a ring gear, and a conventional differential assembly. A 23-tooth piniongear in mesh with a 79-tooth ring gear results in a final drive ratio of 3.43:1.
DISASSEMBLY
DISASSEMBLY
3 - BEARING ROLLER (CUP)6 - SIDEGEAR
Fig. 416: Pinion Side Bearing Cone Courtesy of CHRYSLER LLC
1. Use Puller Set C-293-PA (1), Adaptors 9613 (2) and press plug 9678 remove the pinion side bearing cone
(3).
2009 Chrysler Town & Country LX
2009 AUTOMATIC TRANSMISSION 62TE - Service Information - Grand Caravan, Town & Country

7/16/2019 62te
http://slidepdf.com/reader/full/62te55cf9df0550346d033afef7d 251/387
Fig. 417: Ring Gear Side Bearing Cone Courtesy of CHRYSLER LLC
2. Install Puller Set C-293-PA (1), C-293-42 Adaptors (3), and Press Plug 9678 to remove the ring gear side
bearing cone.
Fig. 418: Ring Gear-To-Case Bolts Courtesy of CHRYSLER LLC
1 - DIFFERENTIAL CASE2 - PINION SHAFT RETAINER
3 - RING GEAR
4 - RING GEAR-TO-CASE BOLT
2009 Chrysler Town & Country LX
2009 AUTOMATIC TRANSMISSION 62TE - Service Information - Grand Caravan, Town & Country

7/16/2019 62te
http://slidepdf.com/reader/full/62te55cf9df0550346d033afef7d 252/387
3. Remove ring gear-to-differential case bolts (4) and floating pinion shaft retainers (2).
Fig. 419: Ring Gear Courtesy of CHRYSLER LLC
4. Separate ring gear (2) from differential case (1).
1 - DIFFERENTIAL CASE
2 - RING GEAR
2009 Chrysler Town & Country LX
2009 AUTOMATIC TRANSMISSION 62TE - Service Information - Grand Caravan, Town & Country

7/16/2019 62te
http://slidepdf.com/reader/full/62te55cf9df0550346d033afef7d 253/387
Fig. 420: Separating Differential Case Cover With Screwdrivers
Courtesy of CHRYSLER LLC
5. Separate differential cover (1) from case (2) using suitable screwdrivers at position.
Fig. 421: Differential Support Courtesy of CHRYSLER LLC
1 - DIFFERENTIAL SUPPORT
2 - DIFFERENTIAL CASE
3 - SCREWDRIVER
4 - RELIEF (2 @ 180° APART)
2009 Chrysler Town & Country LX
2009 AUTOMATIC TRANSMISSION 62TE - Service Information - Grand Caravan, Town & Country

7/16/2019 62te
http://slidepdf.com/reader/full/62te55cf9df0550346d033afef7d 254/387
6. Lift support (1) from case (2).
1 - DIFFERENTIAL SUPPORT
2 - DIFFERENTIAL CASE
Fig. 422: Side Gear Thrust Washer Courtesy of CHRYSLER LLC
7. Remove side gear thrust washer (1).
1 - SIDE GEAR THRUST WASHER
2009 Chrysler Town & Country LX
2009 AUTOMATIC TRANSMISSION 62TE - Service Information - Grand Caravan, Town & Country
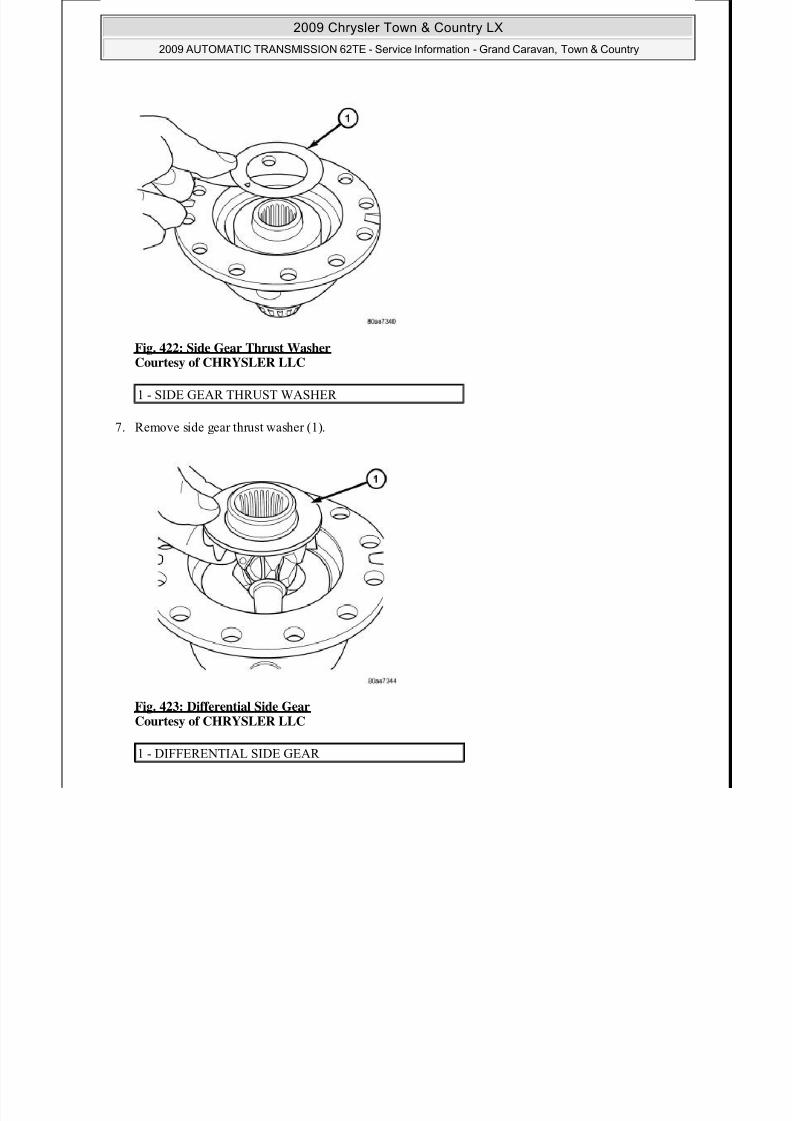
7/16/2019 62te
http://slidepdf.com/reader/full/62te55cf9df0550346d033afef7d 255/387
Fig. 423: Differential Side Gear Courtesy of CHRYSLER LLC
1 - DIFFERENTIAL SIDE GEAR
8. Remove side gear (1).
Fig. 424: Pinion Shaft Courtesy of CHRYSLER LLC
9. Remove pinion shaft (1).
1 - PINION SHAFT
2009 Chrysler Town & Country LX
2009 AUTOMATIC TRANSMISSION 62TE - Service Information - Grand Caravan, Town & Country

7/16/2019 62te
http://slidepdf.com/reader/full/62te55cf9df0550346d033afef7d 256/387
Fig. 425: Pinion Gear & Washer Courtesy of CHRYSLER LLC
10. Remove pinion gears (1) and tabbed washers (2).
Fig. 426: Differential Side Gear Courtesy of CHRYSLER LLC
1 - PINION GEAR
2 - TABBED WASHER
3 - LOCATING TAB
4 - NOTCH
1 DIFFERENTIAL SIDE GEAR
2009 Chrysler Town & Country LX
2009 AUTOMATIC TRANSMISSION 62TE - Service Information - Grand Caravan, Town & Country

7/16/2019 62te
http://slidepdf.com/reader/full/62te55cf9df0550346d033afef7d 257/387
11. Remove differential side gear (1).
1 - DIFFERENTIAL SIDE GEAR
Fig. 427: Thrust Washer Courtesy of CHRYSLER LLC
12. Remove side gear thrust washer (1).13. Inspect all components for excessive wear.
1 - THRUST WASHER
2009 Chrysler Town & Country LX
2009 AUTOMATIC TRANSMISSION 62TE - Service Information - Grand Caravan, Town & Country

7/16/2019 62te
http://slidepdf.com/reader/full/62te55cf9df0550346d033afef7d 258/387
Fig. 428: Small Pinion Bearing Courtesy of CHRYSLER LLC
14. Using Remover 8356 (1) and a 12 mm hex head bolt as a press plug remove the small pinion bearing.
Fig. 429: Large Pinion Bearing Courtesy of CHRYSLER LLC
15. Using puller C-293-PA (1), C-293-47 Adaptors (2) and Press Plug C4487-1 to remove the large pinion bearing.
ASSEMBLY
2009 Chrysler Town & Country LX
2009 AUTOMATIC TRANSMISSION 62TE - Service Information - Grand Caravan, Town & Country

7/16/2019 62te
http://slidepdf.com/reader/full/62te55cf9df0550346d033afef7d 259/387
ASSEMBLY
Fig. 430: Thrust Washer Courtesy of CHRYSLER LLC
1. Install side gear thrust washer (1) to differential case.
1 - THRUST WASHER
NOTE: The differential is serviced as an assembly. Differential service is l imited to
bearing cups and cones. Any other differential component failure must beremedied by differential assembly and transfer shaft replacement.
2009 Chrysler Town & Country LX
2009 AUTOMATIC TRANSMISSION 62TE - Service Information - Grand Caravan, Town & Country

7/16/2019 62te
http://slidepdf.com/reader/full/62te55cf9df0550346d033afef7d 260/387
Fig. 431: Differential Side Gear Courtesy of CHRYSLER LLC
2. Install side gear (1) to differential case.
1 - DIFFERENTIAL SIDE GEAR
Fig. 432: Pinion Gear And Washer Courtesy of CHRYSLER LLC
3. Install both pinion gears (1) and washers (2) to case, while orientating washer tabs to notch in case.
1 - PINION GEAR
2 - TABBED WASHER
3 - LOCATING TAB4 - NOTCH
2009 Chrysler Town & Country LX
2009 AUTOMATIC TRANSMISSION 62TE - Service Information - Grand Caravan, Town & Country

7/16/2019 62te
http://slidepdf.com/reader/full/62te55cf9df0550346d033afef7d 261/387
Fig. 433: Pinion Shaft Courtesy of CHRYSLER LLC
4. Install pinion shaft (1).
Fig. 434: Differential Side Gear
Courtesy of CHRYSLER LLC
5. Install side gear (1) to case.
1 - PINION SHAFT
1 - DIFFERENTIAL SIDE GEAR
2009 Chrysler Town & Country LX
2009 AUTOMATIC TRANSMISSION 62TE - Service Information - Grand Caravan, Town & Country

7/16/2019 62te
http://slidepdf.com/reader/full/62te55cf9df0550346d033afef7d 262/387
Fig. 435: Side Gear Thrust Washer
Courtesy of CHRYSLER LLC
6. Install side gear thrust washer (1) to case.
Fig. 436: Differential Support Courtesy of CHRYSLER LLC
1 - SIDE GEAR THRUST WASHER
1 - DIFFERENTIAL SUPPORT
2 - DIFFERENTIAL CASE
2009 Chrysler Town & Country LX
2009 AUTOMATIC TRANSMISSION 62TE - Service Information - Grand Caravan, Town & Country

7/16/2019 62te
http://slidepdf.com/reader/full/62te55cf9df0550346d033afef7d 263/387
7. Install differential support (1) into position, while aligning through-holes.
Fig. 437: Ring Gear Courtesy of CHRYSLER LLC
8. Install differential ring gear (2) to case (1).
1 - DIFFERENTIAL CASE
2 - RING GEAR
2009 Chrysler Town & Country LX
2009 AUTOMATIC TRANSMISSION 62TE - Service Information - Grand Caravan, Town & Country

7/16/2019 62te
http://slidepdf.com/reader/full/62te55cf9df0550346d033afef7d 264/387
Fig. 438: Ring Gear-To-Case Bolts
Courtesy of CHRYSLER LLC
9. Install ring gear-to-case bolts, with pinion shaft retainers, and tighten bolts (4) to 95 N.m (70 ft. lbs.).
10. Check differential side gear turning torque using Differential Bearing Torque Tool C-4995-1. Turningtorque should be no more than 10 to 20 in-lbs (drag). If drag exceeds 20 in-lbs decrease shim size, if thedrag is less than 10 in-lbs (drag) increase shim size.
1 - DIFFERENTIAL CASE
2 - PINION SHAFT RETAINER
3 - RING GEAR
4 - RING GEAR-TO-CASE BOLT
NOTE: New bolts must be used.
2009 Chrysler Town & Country LX
2009 AUTOMATIC TRANSMISSION 62TE - Service Information - Grand Caravan, Town & Country

7/16/2019 62te
http://slidepdf.com/reader/full/62te55cf9df0550346d033afef7d 265/387
Fig. 439: Differential Pinion Side Bearing Courtesy of CHRYSLER LLC
11. Using Installer 6888 (1) and a press (2), install differential bearing (3) to pinion side of the differentialhousing.
Fig. 440: Ring Gear Side Bearing Courtesy of CHRYSLER LLC
12. Using Installer C-4213 (2) and a press (1), install differential bearing (3) to ring gear side of the
differential.
2009 Chrysler Town & Country LX
2009 AUTOMATIC TRANSMISSION 62TE - Service Information - Grand Caravan, Town & Country

7/16/2019 62te
http://slidepdf.com/reader/full/62te55cf9df0550346d033afef7d 266/387
Fig. 441: Large Side Pinion Bearing Courtesy of CHRYSLER LLC
13. Using Installer MD998911 (1) and a press, install the large pinion bearing to the pinion shaft.
Fig. 442: Small Side Pinion Bearing Courtesy of CHRYSLER LLC
14. Using Installer 9723 (1) and a press, install the small pinion bearing to the pinion shaft.
FLUID
STANDARD PROCEDURE
FLUID LEVEL AND CONDITION CHECK
2009 Chrysler Town & Country LX
2009 AUTOMATIC TRANSMISSION 62TE - Service Information - Grand Caravan, Town & Country

7/16/2019 62te
http://slidepdf.com/reader/full/62te55cf9df0550346d033afef7d 267/387
FLUID LEVEL CHECK USING THE SCAN TOOL
2009 Chrysler Town & Country LX
2009 AUTOMATIC TRANSMISSION 62TE - Service Information - Grand Caravan, Town & Country

7/16/2019 62te
http://slidepdf.com/reader/full/62te55cf9df0550346d033afef7d 268/387
Fig. 443: Fluid Level To Temperature Chart Courtesy of CHRYSLER LLC
1. Verify that the vehicle is parked on a level surface.
2. Remove the dipstick tube cap.
3. Actuate the service brake. Start engine and let it run at idle speed in selector lever position "P".
4. Shift through the transmission modes several times with the vehicle stationary and the engine idling.
WARNING: There is a risk of accident from vehicle starting off by itself whenengine is running. There is a risk of injury f rom contusions andburns i f you insert your hands into the engine when it is started or when it is running. Secure vehicle to prevent it from moving off byitself. Wear properly fastened and close-fitting work clothes. Do nottouch hot or rotating parts.
5. Warm up the transmission, wait at least 2 minutes and check the oil level with the engine running. Push
the Oil Dipstick 9336A into transmission fill tube until the dipstick tip contacts the oil pan and pull outagain, read off oil level, repeat if necessary.
6. Check transmission oil temperature using the appropriate scan tool.
7. The transmission Oil Dipstick 9336A has indicator marks every 10 mm. Determine the height of the oillevel on the dipstick and using the height, the Transmission Fluid Temperature (TFT) as viewed with thescan too, and the Transmission Fluid Graph, determine if the transmission oil level is correct.
8. Add or remove oil as necessary and recheck the oil level.
9. Once the oil level is correct, install the dipstick tube cap.
FLUID CONDITION
Along with fluid level, it is important to check the condition of the fluid. When the fluid smells burned, and is
contaminated with metal or friction material particles, a complete transaxle recondition is probably required. Besure to examine the fluid on the dipstick closely. If there is any doubt about its condition, drain out a sample for a double check.
MOPAR® ATF+4 (Automatic Transmission Fluid) when new is red in color. The ATF is dyed red so it can beidentified from other fluids used in the vehicle such as engine oil or antifreeze. The red color is not permanentand is not an indicator of fluid condition. As the vehicle is driven, the ATF will begin to look darker in color and may eventually become brown This is normal ATF+4 also has a unique odor that may change with age
NOTE: When inserting dipstick special tool 9336A, excess insertion force maycause the dipstick to slip past the stop on the bracket in the transmissionoil pan. An approximate distance that the dipstick should be inserted intothe fi ll tube is 424 mm (16.69 in.).
NOTE: The dipst ick wil l protrude from the f il l tube when instal led.
2009 Chrysler Town & Country LX
2009 AUTOMATIC TRANSMISSION 62TE - Service Information - Grand Caravan, Town & Country

7/16/2019 62te
http://slidepdf.com/reader/full/62te55cf9df0550346d033afef7d 269/387
and may eventually become brown. This is normal. ATF+4 also has a unique odor that may change with age.
Consequently, odor and color cannot be used to indicate the fluid condition or the need for a fluid change.
After the fluid has been checked, seat the dipstick fully to seal out water and dirt.
FLUID AND FILTER SERVICE
FLUID/FILTER SERVICE (RECOMMENDED)
NOTE: Refer to the maintenance schedules in VEHICLE QUICK REFERENCE , or thevehicle owner's manual, for the recommended maintenance (fluid/filter change)intervals for this transaxle.
NOTE: Only fluids of the type labeled MOPAR® ATF+4 should be used. A fil ter changeshould be made at the time of the transmission oil change. The magnet (on theinside of the oil pan) should also be cleaned with a clean, dry cloth.
1. Raise vehicle on a hoist. Refer to VEHICLE QUICK REFERENCE for proper procedures. Place adrain container with a large opening, under transaxle oil pan.
2. Loosen pan bolts and tap the pan at one corner to break it loose allowing fluid to drain, then remove the
oil pan.3. Remove nuts at the oil filter.
4. Install a new filter and nuts, tighten to 5 N.m (40 in. lbs.).
5. Install the fluid filter oil pan, use a bead of MOPAR® ATF RTV (MS-GF41).
6. Clean the oil pan and magnet. Reinstall pan using new MOPAR® Silicone Adhesive sealant. Tighten oil pan bolts to 6 N.m (50 in. lbs.).
7. Pour four Quarts of MOPAR® ATF+4 through the dipstick opening.
8. Start engine and allow to idle for at least one minute. Then, with parking and service brakes applied,move selector lever momentarily to each position, ending in the park or neutral position.
9. Check the transaxle fluid level and add an appropriate amount to bring the transaxle fluid level to 3 mm(1/8 in.) below the lowest mark on the dipstick.
10. Recheck the fluid level after the transaxle has reached normal operating temperature 82°C (180°F). Refer to Fluid Level and Condition Check for the proper fluid fill procedure. See Transmission and TransferCase/Automatic - 62TE/FLUID - Standard Procedure.
11. To prevent dirt from entering transaxle, make certain that dipstick is fully seated into the dipstick opening.
GEARTRAIN, PLANETARY
DESCRIPTION
NOTE: If the transaxle is disassembled for any reason, the fluid and fi lter should bechanged.
2009 Chrysler Town & Country LX
2009 AUTOMATIC TRANSMISSION 62TE - Service Information - Grand Caravan, Town & Country

7/16/2019 62te
http://slidepdf.com/reader/full/62te55cf9df0550346d033afef7d 270/387
DESCRIPTION
Fi 444 Pl t G T i
Courtesy of CHRYSLER LLC
The planetary gear train is located between the input clutch assembly and the rear of the transaxle case. The planetary gear train consists of two sun gears (1,5), two planetary carriers, two annulus (ring) gears (4,6), and one output shaft.
OPERATION
OPERATION
The planetary geartrain utilizes two planetary gear sets that connect the transmission input shaft to the outputshaft. Input and holding clutches drive or lock different planetary members to change output ratio or direction.
HOLDING CLUTCHES
DESCRIPTION
DESCRIPTION
1 - FRONT SUN GEAR ASSEMBLY
2 - #6 THRUST BEARING
3 - #7 THRUST BEARING
4 - REAR CARRIER/FRONT ANNULUS ASSEMBLY
5 - REAR SUN GEAR 6 - FRONT CARRIER/REAR ANNULUS ASSEMBLY
2009 Chrysler Town & Country LX
2009 AUTOMATIC TRANSMISSION 62TE - Service Information - Grand Caravan, Town & Country

7/16/2019 62te
http://slidepdf.com/reader/full/62te55cf9df0550346d033afef7d 271/387
Fig. 445: 2/4 & Low/Reverse Clutches Courtesy of CHRYSLER LLC
1 - FRONT PLANET CARRIER/REAR ANNULUS
2 - 2/4 CLUTCH
3 - L/R CLUTCH
4 - REAR PLANET CARRIER/FRONT ANNULUS
2009 Chrysler Town & Country LX
2009 AUTOMATIC TRANSMISSION 62TE - Service Information - Grand Caravan, Town & Country

7/16/2019 62te
http://slidepdf.com/reader/full/62te55cf9df0550346d033afef7d 272/387
Two hydraulically applied multi-disc clutches are used to hold planetary geartrain components (1, 4) stationarywhile the input clutches drive others. The 2/4 (2) and Low/Reverse (3) clutches are considered holding clutchesand are contained at the rear of the transaxle case.
OPERATION
OPERATION
2/4 CLUTCH
The 2/4 clutch is hydraulically applied in second and fourth gears by pressurized fluid against the 2/4 clutch piston. When the 2/4 clutch is applied, the front sun gear assembly is held or grounded to the transaxle case.
LOW/REVERSE CLUTCH
5 - REAR SUN GEAR 6 - FRONT SUN GEAR ASSEMBLY
The Low/Reverse clutch is hydraulically applied in park, reverse, neutral, and first gears by pressurized fluid against the Low/Reverse clutch piston. When the Low/Reverse clutch is applied, the front planet carrier/rear annulus assembly is held or grounded to the transaxle case.
KNOB, GEARSHIFT
REMOVAL
REMOVAL
Fig. 446: Shift Knob Courtesy of CHRYSLER LLC
2009 Chrysler Town & Country LX
2009 AUTOMATIC TRANSMISSION 62TE - Service Information - Grand Caravan, Town & Country

7/16/2019 62te
http://slidepdf.com/reader/full/62te55cf9df0550346d033afef7d 273/387
y
1. Loosen the set screw (3) on the shift knob (2).
2. Hold in the shift knob button (1).
3. Pull up on the shift knob (2) while holding the shift knob button (1) in.
INSTALLATION
INSTALLATION
Fig. 447: Shift Knob Courtesy of CHRYSLER LLC
1. While holding the shift knob button (1) in install the shift knob (1) onto the shift mechanism shaft (4).
2. Tighten the set screw (3).
PUMP, TRANSMISSION OIL
DESCRIPTION
DESCRIPTION
2009 Chrysler Town & Country LX
2009 AUTOMATIC TRANSMISSION 62TE - Service Information - Grand Caravan, Town & Country

7/16/2019 62te
http://slidepdf.com/reader/full/62te55cf9df0550346d033afef7d 274/387
Fig. 448: Oil Pump Assembly Courtesy of CHRYSLER LLC
The oil pump is located in the pump housing inside the bell housing of the transaxle case. The oil pump consistsof an inner and outer gear, a housing, and a cover that also serves as the reaction shaft support.
OPERATION
OPERATION
As the torque converter rotates, the converter hub rotates the inner and outer gears. As the gears rotate, theclearance between the gear teeth increases in the crescent area, and creates a suction at the inlet side of the pump. This suction draws fluid through the pump inlet from the oil pan. As the clearance between the gear teethin the crescent area decreases, it forces pressurized fluid into the pump outlet and to the valve body.
DISASSEMBLY
DISASSEMBLY
1 - PUMP BODY
2 - OUTER GEAR
3 - INNER GEAR
4 - REACTION SHAFT SUPPORT5 - SEAL RINGS (4)
6 - REACTION SHAFT
7 - CRESCENT
2009 Chrysler Town & Country LX
2009 AUTOMATIC TRANSMISSION 62TE - Service Information - Grand Caravan, Town & Country

7/16/2019 62te
http://slidepdf.com/reader/full/62te55cf9df0550346d033afef7d 275/387
Fig. 449: Reaction Support-to-Pump Body Bolts Courtesy of CHRYSLER LLC
When disassembling the transaxle it is necessary to inspect the oil pump for wear and damage.
1. Remove the six reaction shaft support-to-pump body bolts (1).
Fig. 450: Reaction Shaft Support Courtesy of CHRYSLER LLC
1 - BOLT (6)
2 - PUMP BODY
3 - REACTION SHAFT SUPPORT
1 - PUMP BODY
2 - PUMP GEARS
2009 Chrysler Town & Country LX
2009 AUTOMATIC TRANSMISSION 62TE - Service Information - Grand Caravan, Town & Country

7/16/2019 62te
http://slidepdf.com/reader/full/62te55cf9df0550346d033afef7d 276/387
2. Remove reaction shaft support (3) from pump body (1).
3 - REACTION SHAFT SUPPORT
Fig. 451: Oil Pump Assembly Courtesy of CHRYSLER LLC
3. Remove the pump gears (2, 3) and check for wear and damage on pump body (1) and gears.
1 - PUMP BODY
2 - OUTER GEAR
3 - INNER GEAR
4 - REACTION SHAFT SUPPORT
5 - SEAL RINGS (4)
6 - REACTION SHAFT
7 - CRESCENT
2009 Chrysler Town & Country LX
2009 AUTOMATIC TRANSMISSION 62TE - Service Information - Grand Caravan, Town & Country

7/16/2019 62te
http://slidepdf.com/reader/full/62te55cf9df0550346d033afef7d 277/387
Fig. 452: Measuring Outer Gear-To-PocketCourtesy of CHRYSLER LLC
4. Re-install the gears (2) and check clearances.
5. Measure the clearance between the outer gear and the pump pocket (1). Clearance should be 0.089 - 0.202mm (0.0035 - 0.0079 in.).
Fig. 453: Measuring Outer Gear-To-Crescent Courtesy of CHRYSLER LLC
1 - FEELER GAUGE
2 - OUTER GEAR
3 - PUMP BODY
2009 Chrysler Town & Country LX
2009 AUTOMATIC TRANSMISSION 62TE - Service Information - Grand Caravan, Town & Country

7/16/2019 62te
http://slidepdf.com/reader/full/62te55cf9df0550346d033afef7d 278/387
6. Measure clearance between outer gear (2) and crescent (3). Clearance should be 0.060 - 0.298 mm
(0.0023 - 0.0117 in.).
1 - FEELER GAUGE
2 - OUTER GEAR
3 - CRESCENT
4 - INNER GEAR
Fig. 454: Measuring Inner Gear-to-Crescent Courtesy of CHRYSLER LLC
7. Measure clearance between inner gear (4) and crescent (3). Clearance should be 0.093 - 0.385 mm(0.0036 - 0.0151 in.).
8. Position an appropriate piece of Plastigage across both pump gears.
9. Align the Plastigage to a flat area on the reaction shaft support housing.
10. Install the reaction shaft to the pump housing. Tighten the bolts to 27 N.m (20 ft. lbs.).
1 - FEELER GAUGE
2 - OUTER GEAR
3 - CRESCENT
4 - INNER GEAR
2009 Chrysler Town & Country LX
2009 AUTOMATIC TRANSMISSION 62TE - Service Information - Grand Caravan, Town & Country

7/16/2019 62te
http://slidepdf.com/reader/full/62te55cf9df0550346d033afef7d 279/387
g g ( )
11. Remove bolts and carefully separate the housings. Measure the Plastigage following the instructionssupplied.
12. Clearance between both gear end faces and the reaction shaft support should be 0.020 - 0.046 mm (0.0008- 0.0018 in.).
ASSEMBLY
ASSEMBLY
Fig. 455: Oil Pump Assembly Courtesy of CHRYSLER LLC
1. Assemble oil pump.
1 - PUMP BODY
2 - OUTER GEAR
3 - INNER GEAR
4 - REACTION SHAFT SUPPORT
5 - SEAL RINGS (4)
6 - REACTION SHAFT
7 - CRESCENT
2009 Chrysler Town & Country LX
2009 AUTOMATIC TRANSMISSION 62TE - Service Information - Grand Caravan, Town & Country

7/16/2019 62te
http://slidepdf.com/reader/full/62te55cf9df0550346d033afef7d 280/387
Fig. 456: Reaction Support-To-Pump Body BoltsCourtesy of CHRYSLER LLC
2. Install and tighten reaction shaft support-to-oil pump housing bolts (1) to 28 N.m (20 ft. lbs.).
SENSOR, PRESSURE CONTROL
REMOVAL
REMOVAL
1 - BOLT (6)
2 - PUMP BODY
3 - REACTION SHAFT SUPPORT
2009 Chrysler Town & Country LX
2009 AUTOMATIC TRANSMISSION 62TE - Service Information - Grand Caravan, Town & Country

7/16/2019 62te
http://slidepdf.com/reader/full/62te55cf9df0550346d033afef7d 281/387
Fig. 457: Relay At Core Support Courtesy of CHRYSLER LLC
1. Remove the engine cover.
2. Remove the battery and battery tray. Refer to Electrical - Engine Systems/Battery System/BATTERY -Removal .
3. Remove the relay (1) at the core support.
Fig. 458: Upper Radiator Hose Courtesy of CHRYSLER LLC
4. Drain the radiator. Refer to Cooling - Standard Procedure .
5. Remove clamps (1) at the upper radiator hose (2).6. Remove the upper radiator hose. Refer to Cooling - Standard Procedure .
2009 Chrysler Town & Country LX
2009 AUTOMATIC TRANSMISSION 62TE - Service Information - Grand Caravan, Town & Country

7/16/2019 62te
http://slidepdf.com/reader/full/62te55cf9df0550346d033afef7d 282/387
Fig. 459: Power Steering Lines Courtesy of CHRYSLER LLC
7. Remove the bolts (1) holding the power steering lines (2).
Fig. 460: Shift Cable From/To Manual Lever Courtesy of CHRYSLER LLC
8. Remove shift cable (1) from manual lever (2).
2009 Chrysler Town & Country LX
2009 AUTOMATIC TRANSMISSION 62TE - Service Information - Grand Caravan, Town & Country

7/16/2019 62te
http://slidepdf.com/reader/full/62te55cf9df0550346d033afef7d 283/387
Fig. 461: Fasteners And Front Sound Dampener Cover Courtesy of CHRYSLER LLC
NOTE: Keep the Top Sound Dampener Cover if replacing the unit
9. Remove the fasteners (1) and the Front Sound Damper Cover (2).
Fig. 462: Valve Body Oil Pan Courtesy of CHRYSLER LLC
10. Remove the top valve body oil pan (1) bolts.
2009 Chrysler Town & Country LX
2009 AUTOMATIC TRANSMISSION 62TE - Service Information - Grand Caravan, Town & Country

7/16/2019 62te
http://slidepdf.com/reader/full/62te55cf9df0550346d033afef7d 284/387
Fig. 463: Solenoid Connector At Transmission Courtesy of CHRYSLER LLC
11. Remove the solenoid pack connector (2) at valve body oil pan (1).
Fig. 464: Wheel Opening Splash Shield Courtesy of CHRYSLER LLC
12. Raise the vehicle on a hoist.
13. Remove the front left side inner wheel splash screws from front side of wheel opening (1) and fold shield (2) back.
14. Turn the wheel (3) fully to the left.
2009 Chrysler Town & Country LX
2009 AUTOMATIC TRANSMISSION 62TE - Service Information - Grand Caravan, Town & Country

7/16/2019 62te
http://slidepdf.com/reader/full/62te55cf9df0550346d033afef7d 285/387
Fig. 465: Ground Cable Courtesy of CHRYSLER LLC
15. Remove the bolt (2) at the ground cable (3).
16. Remove the clip (1) at the valve body pan.
17. Move cable away from the valve body pan.
Fig. 466: Pressure Tap Plug Courtesy of CHRYSLER LLC
18. Remove the pressure tap plug (2) at valve body oil pan.
19. Remove the lower valve body oil pan bolts (1) and drain transmission fluid.
20. Remove the valve body oil pan.
2009 Chrysler Town & Country LX
2009 AUTOMATIC TRANSMISSION 62TE - Service Information - Grand Caravan, Town & Country

7/16/2019 62te
http://slidepdf.com/reader/full/62te55cf9df0550346d033afef7d 286/387
20. Remove the valve body oil pan.
Fig. 467: Bolts At Line Pressure Sensor Courtesy of CHRYSLER LLC
21. Remove the bolts (1) at the line pressure sensor.
22. Remove the line pressure sensor from the valve body.
INSTALLATION
INSTALLATION
2009 Chrysler Town & Country LX
2009 AUTOMATIC TRANSMISSION 62TE - Service Information - Grand Caravan, Town & Country
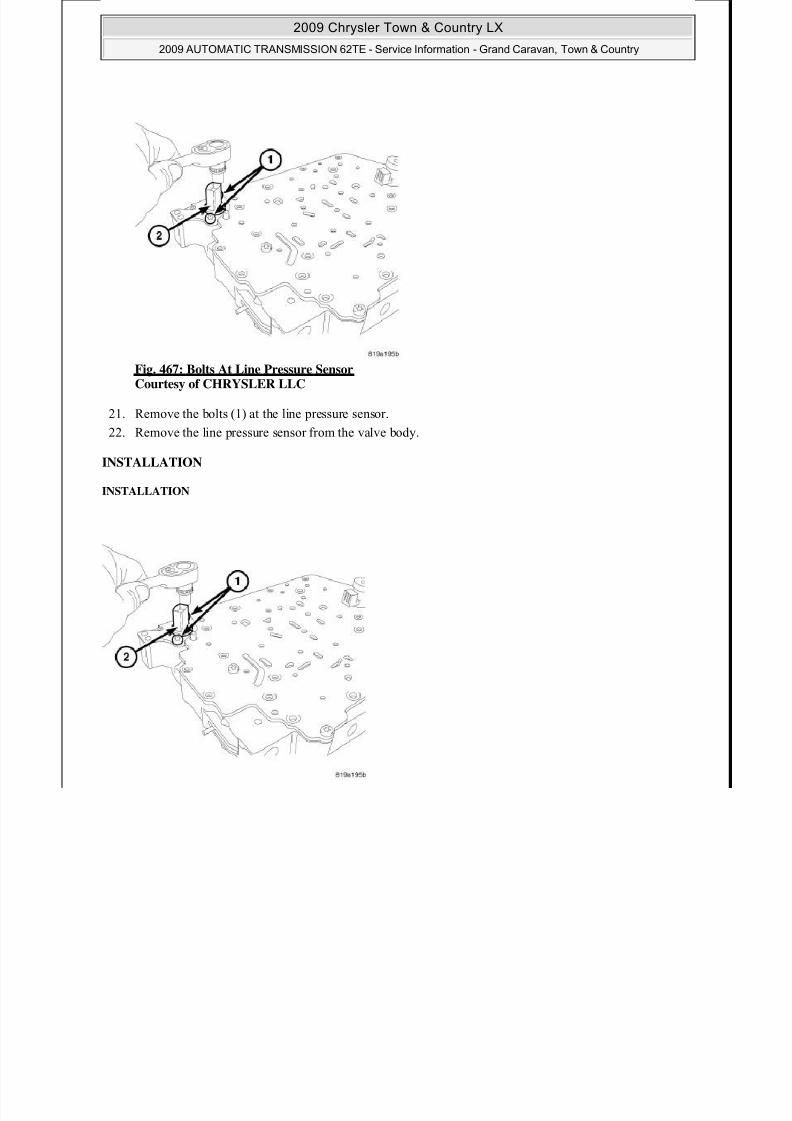
7/16/2019 62te
http://slidepdf.com/reader/full/62te55cf9df0550346d033afef7d 287/387
Fig. 468: Bolts At Line Pressure Sensor Courtesy of CHRYSLER LLC
1. Install the line pressure sensor on to the valve body.
2. Install the bolts (1) to the line pressure sensor and tighten to 6 N.m (50 in. lbs.).
Fig. 469: Valve Body Oil Pan Courtesy of CHRYSLER LLC
3. Install the valve body oil pan, use a bead of MOPAR® ATF RTV (MS-GF41).
4. Install the upper valve body oil pan bolts and tighten to 6 N.m (50 in. lbs.).
5. Install the pressure tap at valve body oil pan and tighten to 6 N.m (50 in. lbs.).
6. Lower the vehicle on a hoist.
2009 Chrysler Town & Country LX
2009 AUTOMATIC TRANSMISSION 62TE - Service Information - Grand Caravan, Town & Country

7/16/2019 62te
http://slidepdf.com/reader/full/62te55cf9df0550346d033afef7d 288/387
Fig. 470: Solenoid Connector At Transmission Courtesy of CHRYSLER LLC
7. Install the solenoid pack connector (2) at valve body oil pan.
8. Raise the vehicle on the hoist.
2009 Chrysler Town & Country LX
2009 AUTOMATIC TRANSMISSION 62TE - Service Information - Grand Caravan, Town & Country

7/16/2019 62te
http://slidepdf.com/reader/full/62te55cf9df0550346d033afef7d 289/387
Fig. 471: Valve Body Oil Pan Courtesy of CHRYSLER LLC
9. Install the lower valve body oil pan bolts and tighten to 6 N.m (50 in. lbs.).
Fig. 472: Ground Cable Courtesy of CHRYSLER LLC
10. Install the bolt at the ground cable and tighten to 10 N.m (90 in. lbs.).
11. Install the clip to the valve body oil pan
2009 Chrysler Town & Country LX
2009 AUTOMATIC TRANSMISSION 62TE - Service Information - Grand Caravan, Town & Country

7/16/2019 62te
http://slidepdf.com/reader/full/62te55cf9df0550346d033afef7d 290/387
Fig. 473: Fasteners And Front Sound Dampener Cover Courtesy of CHRYSLER LLC
12. Install the Front Sound Damper Cover (2) and install the fasteners (1).
Fig. 474: Wheel Opening Splash Shield Courtesy of CHRYSLER LLC
13. Move left side inner wheel splash shield (2) into place.
14. Install the left side inner wheel splash shield screws (1).15. Lower the vehicle.
2009 Chrysler Town & Country LX
2009 AUTOMATIC TRANSMISSION 62TE - Service Information - Grand Caravan, Town & Country

7/16/2019 62te
http://slidepdf.com/reader/full/62te55cf9df0550346d033afef7d 291/387
Fig. 475: Power Steering Lines Courtesy of CHRYSLER LLC
16. Install the bolts (1) holding the power steering lines (2) and tighten to 10 N.m (90 in. lbs.).
Fig. 476: Shift Cable From/To Manual Lever Courtesy of CHRYSLER LLC
17. Install shift cable (1) to manual lever (2).
2009 Chrysler Town & Country LX
2009 AUTOMATIC TRANSMISSION 62TE - Service Information - Grand Caravan, Town & Country

7/16/2019 62te
http://slidepdf.com/reader/full/62te55cf9df0550346d033afef7d 292/387
Fig. 477: Upper Radiator Hose Courtesy of CHRYSLER LLC
18. Install upper radiator hose (2) and clamps (1).
19. Fill the cooling system. Refer to Cooling - Standard Procedure .
Fig. 478: Relay At Core Support
Courtesy of CHRYSLER LLC
20. Install the relay (1) at the core support.
21. Install the battery and battery tray. Refer to Electrical - Engine Systems/Battery System/BATTERY -Installation .
22. Install the battery cables.
23. Fill transmission and road test. See Transmission and Transfer Case/Automatic - 62TE/FLUID -
Standard Procedure.
SENSOR SPEED TRANSMISSION OUTPUT
2009 Chrysler Town & Country LX
2009 AUTOMATIC TRANSMISSION 62TE - Service Information - Grand Caravan, Town & Country

7/16/2019 62te
http://slidepdf.com/reader/full/62te55cf9df0550346d033afef7d 293/387
SENSOR, SPEED, TRANSMISSION OUTPUT
DESCRIPTION
DESCRIPTION
Fig. 479: Speed Sensors Courtesy of CHRYSLER LLC
The Output Speed Sensor (2) is a two-wire magnetic pickup device that generates AC signals as rotation occurs.
2009 Chrysler Town & Country LX
2009 AUTOMATIC TRANSMISSION 62TE - Service Information - Grand Caravan, Town & Country

7/16/2019 62te
http://slidepdf.com/reader/full/62te55cf9df0550346d033afef7d 294/387
Fig. 480: Speed Sensor O-Ring Courtesy of CHRYSLER LLC
The Output Speed Sensor (1) is bolted to the transaxle case and uses a O-ring (2) to seal it to the transaxle case.
OPERATION
OPERATION
Fig. 481: Speed Sensors
Courtesy of CHRYSLER LLC
The output speed sensor (2) is located at the rear of the case. It reads the rotation of the underdrive compounder output carrier.
REMOVAL
REMOVAL
2009 Chrysler Town & Country LX
2009 AUTOMATIC TRANSMISSION 62TE - Service Information - Grand Caravan, Town & Country

7/16/2019 62te
http://slidepdf.com/reader/full/62te55cf9df0550346d033afef7d 295/387
Fig. 482: Speed Sensors Courtesy of CHRYSLER LLC
1. Unplug the electrical connector at the output speed sensor (2).
2009 Chrysler Town & Country LX
2009 AUTOMATIC TRANSMISSION 62TE - Service Information - Grand Caravan, Town & Country

7/16/2019 62te
http://slidepdf.com/reader/full/62te55cf9df0550346d033afef7d 296/387
Fig. 483: Speed Sensor O-Ring Courtesy of CHRYSLER LLC
2. Remove the bolt at output speed sensor (1).
3. Pull up on output speed sensor to remove.
INSTALLATION
INSTALLATION
Fig. 484: Speed Sensor O-Ring
Courtesy of CHRYSLER LLC
1. Install a new O-ring (2).
2009 Chrysler Town & Country LX
2009 AUTOMATIC TRANSMISSION 62TE - Service Information - Grand Caravan, Town & Country

7/16/2019 62te
http://slidepdf.com/reader/full/62te55cf9df0550346d033afef7d 297/387
Fig. 485: Speed Sensors
Courtesy of CHRYSLER LLC
2. Install output speed sensor (2) into case.
Fig. 486: Speed Sensor O-Ring
Courtesy of CHRYSLER LLC
3. Install bolt at output speed sensor and tighten to 12 N.m (105 in. lbs.).
4. Engage electrical connector.
SENSOR, SPEED, INPUT
DESCRIPTION
DESCRIPTION
2009 Chrysler Town & Country LX
2009 AUTOMATIC TRANSMISSION 62TE - Service Information - Grand Caravan, Town & Country

7/16/2019 62te
http://slidepdf.com/reader/full/62te55cf9df0550346d033afef7d 298/387
Fig. 487: Speed Sensors Courtesy of CHRYSLER LLC
The Input Speed Sensor (1) is a two-wire magnetic pickup device that generates AC signals as rotation occurs.
2009 Chrysler Town & Country LX
2009 AUTOMATIC TRANSMISSION 62TE - Service Information - Grand Caravan, Town & Country

7/16/2019 62te
http://slidepdf.com/reader/full/62te55cf9df0550346d033afef7d 299/387
Fig. 488: Speed Sensor O-Ring Courtesy of CHRYSLER LLC
NOTE: Always use a new O-ring
The Input Speed Sensor is bolted (1) to the transaxle case and uses a O-ring (2) to seal it to the transaxle case.
OPERATION
OPERATION
Fig. 489: Speed Sensors Courtesy of CHRYSLER LLC
The input speed sensor (1) is located at the top of the case, and read turbine speed from the input clutch hub.
REMOVAL
REMOVAL
2009 Chrysler Town & Country LX
2009 AUTOMATIC TRANSMISSION 62TE - Service Information - Grand Caravan, Town & Country

7/16/2019 62te
http://slidepdf.com/reader/full/62te55cf9df0550346d033afef7d 300/387
Fig. 490: Speed Sensors Courtesy of CHRYSLER LLC
1. Unplug the electrical connector at the input speed sensor (1).
2009 Chrysler Town & Country LX
2009 AUTOMATIC TRANSMISSION 62TE - Service Information - Grand Caravan, Town & Country

7/16/2019 62te
http://slidepdf.com/reader/full/62te55cf9df0550346d033afef7d 301/387
Fig. 491: Speed Sensor O-Ring Courtesy of CHRYSLER LLC
2. Remove the bolt at input speed sensor.
3. Pull up on input speed sensor (1) to remove.
INSTALLATION
INSTALLATION
Fig. 492: Speed Sensor O-Ring
Courtesy of CHRYSLER LLC
1. Install a new O-ring (2).
2009 Chrysler Town & Country LX
2009 AUTOMATIC TRANSMISSION 62TE - Service Information - Grand Caravan, Town & Country

7/16/2019 62te
http://slidepdf.com/reader/full/62te55cf9df0550346d033afef7d 302/387
Fig. 493: Speed Sensors
Courtesy of CHRYSLER LLC
2. Install input speed sensor (1) into case.
Fig. 494: Speed Sensor O-Ring
Courtesy of CHRYSLER LLC
3. Install bolt at input speed sensor and tighten to 12 N.m (105 in. lbs.).
4. Engage electrical connector.
SENSOR, SPEED, TRANSFER SHAFT
DESCRIPTION
DESCRIPTION
2009 Chrysler Town & Country LX
2009 AUTOMATIC TRANSMISSION 62TE - Service Information - Grand Caravan, Town & Country

7/16/2019 62te
http://slidepdf.com/reader/full/62te55cf9df0550346d033afef7d 303/387
Fig. 495: Speed Sensors Courtesy of CHRYSLER LLC
The Transfer Shaft Speed Sensor (3) is a two-wire magnetic pickup device that generates AC signals as rotationoccurs.
2009 Chrysler Town & Country LX
2009 AUTOMATIC TRANSMISSION 62TE - Service Information - Grand Caravan, Town & Country

7/16/2019 62te
http://slidepdf.com/reader/full/62te55cf9df0550346d033afef7d 304/387
Fig. 496: Speed Sensor O-Ring Courtesy of CHRYSLER LLC
The Transfer Shaft Speed Sensor (1) is bolted to the transaxle case and uses a O-ring (2) to seal it to the
transaxle case.
OPERATION
OPERATION
Fig. 497: Speed Sensors Courtesy of CHRYSLER LLC
The transfer shaft speed sensor (3) is located at the rear of the case (backside). It reads rotation of the frontannulus/rear carrier assembly.
REMOVAL
REMOVAL
2009 Chrysler Town & Country LX
2009 AUTOMATIC TRANSMISSION 62TE - Service Information - Grand Caravan, Town & Country

7/16/2019 62te
http://slidepdf.com/reader/full/62te55cf9df0550346d033afef7d 305/387
Fig. 498: Speed Sensors Courtesy of CHRYSLER LLC
1. Unplug the electrical connector at the transfer shaft sensor (3).
2009 Chrysler Town & Country LX
2009 AUTOMATIC TRANSMISSION 62TE - Service Information - Grand Caravan, Town & Country

7/16/2019 62te
http://slidepdf.com/reader/full/62te55cf9df0550346d033afef7d 306/387
Fig. 499: Speed Sensor O-Ring Courtesy of CHRYSLER LLC
2. Remove the bolt at transfer shaft sensor (1).
3. Pull up on transfer shaft sensor to remove.
INSTALLATION
INSTALLATION
Fig. 500: Speed Sensor O-Ring
Courtesy of CHRYSLER LLC
1. Install a new O-ring (2). on the transfer shaft speed sensor (1).
2009 Chrysler Town & Country LX
2009 AUTOMATIC TRANSMISSION 62TE - Service Information - Grand Caravan, Town & Country

7/16/2019 62te
http://slidepdf.com/reader/full/62te55cf9df0550346d033afef7d 307/387
Fig. 501: Speed Sensors
Courtesy of CHRYSLER LLC
2. Install transfer shaft speed sensor (3) into case.
Fig. 502: Speed Sensor O-Ring
Courtesy of CHRYSLER LLC
3. Install bolt at transfer shaft speed sensor (1) and tighten to 12 N.m (105 in. lbs.).
4. Reconnect the electrical connector.
SENSOR, TRANSMISSION RANGE
REMOVAL
REMOVAL
2009 Chrysler Town & Country LX
2009 AUTOMATIC TRANSMISSION 62TE - Service Information - Grand Caravan, Town & Country

7/16/2019 62te
http://slidepdf.com/reader/full/62te55cf9df0550346d033afef7d 308/387
Fig. 503: TRS/Rooster Comb Courtesy of CHRYSLER LLC
1. Remove the valve body. See Transmission and Transfer Case/Automatic - 62TE/VALVE BODY -Removal
2. Remove the park rod assembly (2) from the TRS/rooster comb (1).
2009 Chrysler Town & Country LX
2009 AUTOMATIC TRANSMISSION 62TE - Service Information - Grand Caravan, Town & Country

7/16/2019 62te
http://slidepdf.com/reader/full/62te55cf9df0550346d033afef7d 309/387
Fig. 504: Manual Lever Set Screw Courtesy of CHRYSLER LLC
3. Remove the set screw (1) with a Allen wrench (3) at manual lever (2).
Fig. 505: Roll Pin At Manual Lever Courtesy of CHRYSLER LLC
4. Remove the roll pin (3) at the TRS/rooster comb (1) using a pin punch (2).
2009 Chrysler Town & Country LX
2009 AUTOMATIC TRANSMISSION 62TE - Service Information - Grand Caravan, Town & Country

7/16/2019 62te
http://slidepdf.com/reader/full/62te55cf9df0550346d033afef7d 310/387
Fig. 506: Manual Lever Courtesy of CHRYSLER LLC
5. Remove the manual lever (2) from case and inspect the bushing (3).
Fig. 507: TRS 62TE Courtesy of CHRYSLER LLC
6. Remove the TRS/rooster (1, 2) comb from the case.
2009 Chrysler Town & Country LX
2009 AUTOMATIC TRANSMISSION 62TE - Service Information - Grand Caravan, Town & Country

7/16/2019 62te
http://slidepdf.com/reader/full/62te55cf9df0550346d033afef7d 311/387
Fig. 508: Manual Lever Case Seal Courtesy of CHRYSLER LLC
7. Remove the manual lever seal (2).
INSTALLATION
INSTALLATION
Fig. 509: Manual Lever Seal Courtesy of CHRYSLER LLC
1. Install a new manual lever oil seal (2) using socket (3).
2009 Chrysler Town & Country LX
2009 AUTOMATIC TRANSMISSION 62TE - Service Information - Grand Caravan, Town & Country

7/16/2019 62te
http://slidepdf.com/reader/full/62te55cf9df0550346d033afef7d 312/387
Fig. 510: Manual Lever Courtesy of CHRYSLER LLC
2. Install the manual lever in the case up to the point of the TRS.
2009 Chrysler Town & Country LX
2009 AUTOMATIC TRANSMISSION 62TE - Service Information - Grand Caravan, Town & Country

7/16/2019 62te
http://slidepdf.com/reader/full/62te55cf9df0550346d033afef7d 313/387
Fig. 511: TRS 62TE Courtesy of CHRYSLER LLC
3. Install the TRS/rooster comb onto the manual lever and fully install the manual lever into the case.
Fig. 512: Roll Pin At Manual Lever Courtesy of CHRYSLER LLC
4. Install the roll pin (3) to the TRS/rooster comb (1) using a pin punch (2).
2009 Chrysler Town & Country LX
2009 AUTOMATIC TRANSMISSION 62TE - Service Information - Grand Caravan, Town & Country

7/16/2019 62te
http://slidepdf.com/reader/full/62te55cf9df0550346d033afef7d 314/387
Fig. 513: Manual Lever Set Screw Courtesy of CHRYSLER LLC
5. Install the set screw (1) at manual lever (2) and tighten to 1 N.m (10 in. lbs.).
Fig. 514: TRS/Rooster Comb Courtesy of CHRYSLER LLC
6. Install the park rod assembly (2) to the TRS/rooster comb (1) and place the park rod assembly into theguide assembly.
7. Place the park pawl pin into the park pawl tube.8. Install the electrical connector.
9. Install the valve body. See Transmission and Transfer Case/Automatic - 62TE/VALVE BODY -Installation.
SHIFTER, TRANSMISSION
REMOVAL
INSTRUMENT PANEL
2009 Chrysler Town & Country LX
2009 AUTOMATIC TRANSMISSION 62TE - Service Information - Grand Caravan, Town & Country

7/16/2019 62te
http://slidepdf.com/reader/full/62te55cf9df0550346d033afef7d 315/387
Fig. 515: Defroster Cover Courtesy of CHRYSLER LLC
1. Disconnect the negative battery cable.
2. Using a trim stick remove the defroster cover (1).
2009 Chrysler Town & Country LX
2009 AUTOMATIC TRANSMISSION 62TE - Service Information - Grand Caravan, Town & Country

7/16/2019 62te
http://slidepdf.com/reader/full/62te55cf9df0550346d033afef7d 316/387
Fig. 516: Screws At Center Stack Cover Courtesy of CHRYSLER LLC
3. Remove the screws (1) at the center stack cover (2).
Fig. 517: Center Stack Cover Courtesy of CHRYSLER LLC
4. Remove the center stack cover (1).
2009 Chrysler Town & Country LX
2009 AUTOMATIC TRANSMISSION 62TE - Service Information - Grand Caravan, Town & Country

7/16/2019 62te
http://slidepdf.com/reader/full/62te55cf9df0550346d033afef7d 317/387
Fig. 518: Pull Cover Back Courtesy of CHRYSLER LLC
5. Pull center stack (1) back.
Fig. 519: Ignition Switch Bezel Courtesy of CHRYSLER LLC
6. Remove the ignition switch bezel (1) from I/P cover (2).
2009 Chrysler Town & Country LX
2009 AUTOMATIC TRANSMISSION 62TE - Service Information - Grand Caravan, Town & Country

7/16/2019 62te
http://slidepdf.com/reader/full/62te55cf9df0550346d033afef7d 318/387
Fig. 520: Knee Blocker Courtesy of CHRYSLER LLC
7. Remove the knee blocker (2).
Fig. 521: Center Stack Lower Cover Courtesy of CHRYSLER LLC
8. Remove the I/P cover (3) (if equipped).
2009 Chrysler Town & Country LX
2009 AUTOMATIC TRANSMISSION 62TE - Service Information - Grand Caravan, Town & Country

7/16/2019 62te
http://slidepdf.com/reader/full/62te55cf9df0550346d033afef7d 319/387
Fig. 522: WIN & Shifter Electrical Connectors Courtesy of CHRYSLER LLC
9. Remove the cluster bezel.
10. Remove the shift knob.
11. Unplug the electrical connectors (3, 4) at the WIN (1) and the shifter (2).
Fig. 523: Screws At WIN Courtesy of CHRYSLER LLC
12. Remove the screws (1) at the WIN (2).13. Remove the WIN to gain access to the lower shifter bolts.
2009 Chrysler Town & Country LX
2009 AUTOMATIC TRANSMISSION 62TE - Service Information - Grand Caravan, Town & Country

7/16/2019 62te
http://slidepdf.com/reader/full/62te55cf9df0550346d033afef7d 320/387
Fig. 524: Cable At Shifter Courtes of CHRYSLER LLC
14. Remove the shift cable (1, 2) at the shifter.
Fig. 525: Shifter Mounting Bolt Tightening Sequence Courtesy of CHRYSLER LLC
15. Remove the shifter mounting bolts 1 thru 4.
16. Remove the shifter.
FLOOR
NOTE: Ensure the lock tab at the shifter housing (2) is depressed before pull ingthe cable from the shifter housing.
2009 Chrysler Town & Country LX
2009 AUTOMATIC TRANSMISSION 62TE - Service Information - Grand Caravan, Town & Country

7/16/2019 62te
http://slidepdf.com/reader/full/62te55cf9df0550346d033afef7d 321/387
Fig. 526: RHD Console Courtesy of CHRYSLER LLC
1. Remove the center console.
2009 Chrysler Town & Country LX
2009 AUTOMATIC TRANSMISSION 62TE - Service Information - Grand Caravan, Town & Country

7/16/2019 62te
http://slidepdf.com/reader/full/62te55cf9df0550346d033afef7d 322/387
Fig. 527: Shifter RHD Electrical Connector Courtesy of CHRYSLER LLC
2. Remove the electrical connectors (1, 2 and 4) at the shifter.
3. Remove the shifter knob (1) by pulling up.
4. Remove the select gate (5).
Fig. 528: Shifter Gate Cable Courtesy of CHRYSLER LLC
5. Using a screw driver (1) remove the cable from the shifter gate (2).
2009 Chrysler Town & Country LX
2009 AUTOMATIC TRANSMISSION 62TE - Service Information - Grand Caravan, Town & Country

7/16/2019 62te
http://slidepdf.com/reader/full/62te55cf9df0550346d033afef7d 323/387
Fig. 529: Shifter Bracket Cable Courtesy of CHRYSLER LLC
6. Remove the cable from the shifter bracket (3, 4).
2009 Chrysler Town & Country LX
2009 AUTOMATIC TRANSMISSION 62TE - Service Information - Grand Caravan, Town & Country

7/16/2019 62te
http://slidepdf.com/reader/full/62te55cf9df0550346d033afef7d 324/387
Fig. 530: Shifter Nuts Courtesy of CHRYSLER LLC
7. Remove the nuts (1) at the shifter (2).
8. Remove the shifter (2).
INSTALLATION
INSTRUMENT PANEL
Fig. 531: Shifter Mounting Bolt Tightening Sequence Courtesy of CHRYSLER LLC
1. Install the shifter mounting bolts and tighten to 20 N.m (15 ft. lbs.) in the proper sequence as indicated inFig. 531.
2009 Chrysler Town & Country LX
2009 AUTOMATIC TRANSMISSION 62TE - Service Information - Grand Caravan, Town & Country

7/16/2019 62te
http://slidepdf.com/reader/full/62te55cf9df0550346d033afef7d 325/387
Fig. 532: Shifter Cable Courtesy of CHRYSLER LLC
2. Install the shift cable (1, 2) at the shifter.
NOTE: Ensure the lock tab is in the lock position after the cable is installed ontothe shifter housing (2).
2009 Chrysler Town & Country LX
2009 AUTOMATIC TRANSMISSION 62TE - Service Information - Grand Caravan, Town & Country

7/16/2019 62te
http://slidepdf.com/reader/full/62te55cf9df0550346d033afef7d 326/387
Fig. 533: Screws At WIN Courtesy of CHRYSLER LLC
3. Install the WIN (2) and install the mounting screws (1).
Fig. 534: WIN & Shifter Electrical Connectors Courtesy of CHRYSLER LLC
4. Connect the electrical connectors (3, 4) at the WIN (1) and the shifter (2).
2009 Chrysler Town & Country LX
2009 AUTOMATIC TRANSMISSION 62TE - Service Information - Grand Caravan, Town & Country

7/16/2019 62te
http://slidepdf.com/reader/full/62te55cf9df0550346d033afef7d 327/387
Fig. 535: Center Stack Lower Cover Courtesy of CHRYSLER LLC
5. Install the I/P cover (3).
Fig. 536: Knee Blocker Courtesy of CHRYSLER LLC
6. Install the knee blocker (2).
2009 Chrysler Town & Country LX
2009 AUTOMATIC TRANSMISSION 62TE - Service Information - Grand Caravan, Town & Country

7/16/2019 62te
http://slidepdf.com/reader/full/62te55cf9df0550346d033afef7d 328/387
Fig. 537: Ignition Switch Bezel Courtesy of CHRYSLER LLC
7. Install the shift knob.
8. Install the ignition switch bezel (1) to I/P cover (2).
Fig. 538: Pull Cover Back Courtesy of CHRYSLER LLC
9. Install center stack cover (1) back into position.
2009 Chrysler Town & Country LX
2009 AUTOMATIC TRANSMISSION 62TE - Service Information - Grand Caravan, Town & Country

7/16/2019 62te
http://slidepdf.com/reader/full/62te55cf9df0550346d033afef7d 329/387
Fig. 539: Center Stack Cover Courtes of CHRYSLER LLC
10. Install the center stack top cover (1) back.
11. Install the cluster bezel.
Fig. 540: Screws At Center Stack Cover Courtesy of CHRYSLER LLC
12. Install the screws (1) at the center stack cover (2).
2009 Chrysler Town & Country LX
2009 AUTOMATIC TRANSMISSION 62TE - Service Information - Grand Caravan, Town & Country

7/16/2019 62te
http://slidepdf.com/reader/full/62te55cf9df0550346d033afef7d 330/387
Fig. 541: Defroster Cover Courtes of CHRYSLER LLC
13. Install the defroster cover (1).
14. Connect the battery cable.
FLOOR
Fig. 542: Shifter Nuts Courtesy of CHRYSLER LLC
1. Install the shifter (2) onto the stud plate (3).
2. Install nuts (1) onto studs and tighten to 8 N.m (71 in. lbs.).
2009 Chrysler Town & Country LX
2009 AUTOMATIC TRANSMISSION 62TE - Service Information - Grand Caravan, Town & Country

7/16/2019 62te
http://slidepdf.com/reader/full/62te55cf9df0550346d033afef7d 331/387
Fig. 543: Shifter Bracket Cable Courtesy of CHRYSLER LLC
3. Install the cable at the shifter (2, 3).
2009 Chrysler Town & Country LX
2009 AUTOMATIC TRANSMISSION 62TE - Service Information - Grand Caravan, Town & Country

7/16/2019 62te
http://slidepdf.com/reader/full/62te55cf9df0550346d033afef7d 332/387
Fig. 544: Shifter Gate Cable Courtesy of CHRYSLER LLC
4. Install the select gate (5).
5. Install the shifter knob (1).
6. Install the electrical connectors (1, 2 and 4) at the shifter.
Fig. 545: RHD Console Courtesy of CHRYSLER LLC
7. Install the center console (1).
SOLENOID, PRESSURE CONTROL
REMOVAL
REMOVAL
2009 Chrysler Town & Country LX
2009 AUTOMATIC TRANSMISSION 62TE - Service Information - Grand Caravan, Town & Country

7/16/2019 62te
http://slidepdf.com/reader/full/62te55cf9df0550346d033afef7d 333/387
Fig. 546: Relay At Core Support Courtesy of CHRYSLER LLC
1. Remove the engine cover.
2. Remove the battery and battery tray. Refer to Electrical - Engine Systems/Battery System/BATTERY -
Removal .3. Remove the relay (1) at the core support.
2009 Chrysler Town & Country LX
2009 AUTOMATIC TRANSMISSION 62TE - Service Information - Grand Caravan, Town & Country

7/16/2019 62te
http://slidepdf.com/reader/full/62te55cf9df0550346d033afef7d 334/387
Fig. 547: Upper Radiator Hose Courtesy of CHRYSLER LLC
4. Drain the radiator. Refer to Cooling - Standard Procedure .
5. Remove clamps (1) at the upper radiator hose (2).
6. Remove the upper radiator hose. Refer to Cooling - Standard Procedure .
Fig. 548: Power Steering Lines
Courtesy of CHRYSLER LLC
7. Remove the bolts (1) holding the power steering lines (2).
2009 Chrysler Town & Country LX
2009 AUTOMATIC TRANSMISSION 62TE - Service Information - Grand Caravan, Town & Country

7/16/2019 62te
http://slidepdf.com/reader/full/62te55cf9df0550346d033afef7d 335/387
Fig. 549: Shift Cable From/To Manual LeverCourtesy of CHRYSLER LLC
8. Remove the shift cable (1) from the manual lever (2).
Fig. 550: Fasteners And Front Sound Dampener Cover Courtesy of CHRYSLER LLC
9. Remove the fasteners (1) and the Front Sound Dampener Cover (2).10. Remove shift cable (1) from manual lever (2).
2009 Chrysler Town & Country LX
2009 AUTOMATIC TRANSMISSION 62TE - Service Information - Grand Caravan, Town & Country

7/16/2019 62te
http://slidepdf.com/reader/full/62te55cf9df0550346d033afef7d 336/387
Fig. 551: Valve Body Oil Pan Courtesy of CHRYSLER LLC
11. Remove the top valve body oil pan (1) bolts.
Fig. 552: Solenoid Connector At Transmission Courtesy of CHRYSLER LLC
12. Remove the solenoid pack connector (2) at valve body oil pan (1).
2009 Chrysler Town & Country LX
2009 AUTOMATIC TRANSMISSION 62TE - Service Information - Grand Caravan, Town & Country

7/16/2019 62te
http://slidepdf.com/reader/full/62te55cf9df0550346d033afef7d 337/387
Fig. 553: Wheel Opening Splash Shield Courtesy of CHRYSLER LLC
13. Raise the vehicle on a hoist.
14. Remove the front left side inner wheel splash screws from front side of wheel opening (1) and fold shield (2) back.
15. Turn the wheel (3) fully to the left.
Fig. 554: Ground Cable Courtesy of CHRYSLER LLC
16. Remove the bolt (2) at the ground cable (3).
17. Remove the clip (1) at the valve body pan.
18. Move cable away from the valve body pan.
2009 Chrysler Town & Country LX
2009 AUTOMATIC TRANSMISSION 62TE - Service Information - Grand Caravan, Town & Country

7/16/2019 62te
http://slidepdf.com/reader/full/62te55cf9df0550346d033afef7d 338/387
Fig. 555: Pressure Tap Plug Courtesy of CHRYSLER LLC
19. Remove the pressure tap plug (2) at valve body oil pan.
20. Remove the lower valve body oil pan bolts (1) and drain transmission fluid.
21. Remove the valve body oil pan.
2009 Chrysler Town & Country LX
2009 AUTOMATIC TRANSMISSION 62TE - Service Information - Grand Caravan, Town & Country

7/16/2019 62te
http://slidepdf.com/reader/full/62te55cf9df0550346d033afef7d 339/387
Fig. 556: Bolt At VFS 62TE Courtesy of CHRYSLER LLC
22. Remove the bolt (1) at the pressure control solenoid.
23. Remove the pressure control sensor from the valve body.
INSTALLATION
INSTALLATION
Fig. 557: Bolt At VFS 62TE Courtesy of CHRYSLER LLC
1. Install the pressure control solenoid on to the valve body.
2. Install the bolts (1) to the pressure control solenoid and tighten to 6 N.m (40 in. lbs.).
2009 Chrysler Town & Country LX
2009 AUTOMATIC TRANSMISSION 62TE - Service Information - Grand Caravan, Town & Country

7/16/2019 62te
http://slidepdf.com/reader/full/62te55cf9df0550346d033afef7d 340/387
Fig. 558: Valve Body Oil Pan Courtesy of CHRYSLER LLC
3. Install the valve body oil pan, use a bead of MOPAR® ATF RTV (MS-GF41).
4. Install the upper valve body oil pan bolts and tighten to 6 N.m (50 in. lbs.).
5. Install the pressure tap at valve body oil pan and tighten to 6 N.m (50 in. lbs.).6. Lower the vehicle.
2009 Chrysler Town & Country LX
2009 AUTOMATIC TRANSMISSION 62TE - Service Information - Grand Caravan, Town & Country

7/16/2019 62te
http://slidepdf.com/reader/full/62te55cf9df0550346d033afef7d 341/387
Fig. 559: Solenoid Connector At Transmission
7. Install the solenoid pack connector (2) at valve body oil pan.
8. Raise and support the vehicle.
Fig. 560: Valve Body Oil Pan Courtesy of CHRYSLER LLC
9. Install the lower valve body oil pan bolts and tighten to 6 N.m (50 in. lbs.).
2009 Chrysler Town & Country LX
2009 AUTOMATIC TRANSMISSION 62TE - Service Information - Grand Caravan, Town & Country

7/16/2019 62te
http://slidepdf.com/reader/full/62te55cf9df0550346d033afef7d 342/387
Fig. 561: Ground Cable Courtes of CHRYSLER LLC
10. Install the bolt at the ground cable and tighten to 10 N.m (90 in. lbs.).
11. Install the clip to the valve body oil pan.
Fig. 562: Fasteners & Front Sound Dampener Cover Courtesy of CHRYSLER LLC
12. Install the Front Sound Dampener Cover (2) and fasteners (1).
2009 Chrysler Town & Country LX
2009 AUTOMATIC TRANSMISSION 62TE - Service Information - Grand Caravan, Town & Country

7/16/2019 62te
http://slidepdf.com/reader/full/62te55cf9df0550346d033afef7d 343/387
Fig. 563: Wheel Opening Splash Shield Courtesy of CHRYSLER LLC
13. Move left side inner wheel splash shield (2) into place.
14. Install the left side inner wheel splash shield screws (1).15. Lower the vehicle.
Fig. 564: Power Steering Lines Courtesy of CHRYSLER LLC
16. Install the bolts (1) holding the power steering lines (2) and tighten to 10 N.m (90 in. lbs.).
2009 Chrysler Town & Country LX
2009 AUTOMATIC TRANSMISSION 62TE - Service Information - Grand Caravan, Town & Country

7/16/2019 62te
http://slidepdf.com/reader/full/62te55cf9df0550346d033afef7d 344/387
Fig. 565: Shift Cable From/To Manual Lever Courtes of CHRYSLER LLC
17. Install shift cable (1) to manual lever (2).
Fig. 566: Upper Radiator Hose Courtesy of CHRYSLER LLC
18. Install upper radiator hose (2) and clamps (1).19. Fill the cooling system. Refer to Cooling - Standard Procedure .
2009 Chrysler Town & Country LX
2009 AUTOMATIC TRANSMISSION 62TE - Service Information - Grand Caravan, Town & Country

7/16/2019 62te
http://slidepdf.com/reader/full/62te55cf9df0550346d033afef7d 345/387
Fig. 567: Relay At Core Support Courtes of CHRYSLER LLC
20. Install the relay (1) at the core support.21. Install the battery and battery tray. Refer to Electrical - Engine Systems/Battery System/BATTERY -
Installation .
22. Install the battery cables.
23. Fill transmission and road test. See Transmission and Transfer Case/Automatic - 62TE/FLUID -Standard Procedure.
SWITCH, AUTOSTICK
DESCRIPTION
DESCRIPTION
Autostick is a driver-interactive transmission feature that offers manual gear shifting capability to provide youwith more control. Autostick allows you to maximize engine braking, eliminate undersirable upshifts and
downshifts, and improve overall vehicle performance. This system can also provide you with more controlduring passing, city driving, cold slippery conditions, mountain driving, trailer towing, and many other situations.
OPERATION
OPERATION
Autostick is a driver interactive transaxle feature that offers manual gear shifting capability. When the shifter ismoved into the Autostick position, the transaxle remains in whatever gear it was using before Autostick wasactivated. Moving the shifter to the left (towards the driver) causes a downshift and moving to the right(towards the passenger) causes an upshift. The instrument cluster will illuminate the selected gear. The vehiclecan be launched in 1st, 2nd, or 3rd gear while in the Autostick mode. The speed control is operable in 3rd and 4th gear Autostick mode. Speed control will be deactivated if the transaxle is shifted to 2nd gear. Shifting intoOD position cancels the Autostick mode, and the transaxle resumes the OD shift schedule.
SYSTEM, SHIFT INTERLOCK
DESCRIPTION
DESCRIPTION
2009 Chrysler Town & Country LX
2009 AUTOMATIC TRANSMISSION 62TE - Service Information - Grand Caravan, Town & Country

7/16/2019 62te
http://slidepdf.com/reader/full/62te55cf9df0550346d033afef7d 346/387
Fig. 568: Ignition Key/Switch Positions Courtesy of CHRYSLER LLC
The Brake Transmission Shifter/Ignition Interlock (BTSI) is a solenoid operated system that prevents thetransmission gear shifter from being moved out of PARK without a driver in place.
OPERATION
OPERATION
1 - LOCK
2 - ACC
3 - ON
4 - START
2009 Chrysler Town & Country LX
2009 AUTOMATIC TRANSMISSION 62TE - Service Information - Grand Caravan, Town & Country

7/16/2019 62te
http://slidepdf.com/reader/full/62te55cf9df0550346d033afef7d 347/387
Fig. 569: Ignition Key/Switch Positions Courtesy of CHRYSLER LLC
The Brake Transmission Shifter/Ignition Interlock (BTSI) is engaged whenever the ignition switch is in theLOCK or ACC position. An additional electrically activated feature will prevent shifting out of the PARK position unless the brake pedal is depressed at least one-half inch. When the key is in the ON position and the brake pedal is depressed, the shifter is unlocked and will move into any position.
1 - LOCK
2 - ACC
3 - ON
4 - START
2009 Chrysler Town & Country LX
2009 AUTOMATIC TRANSMISSION 62TE - Service Information - Grand Caravan, Town & Country
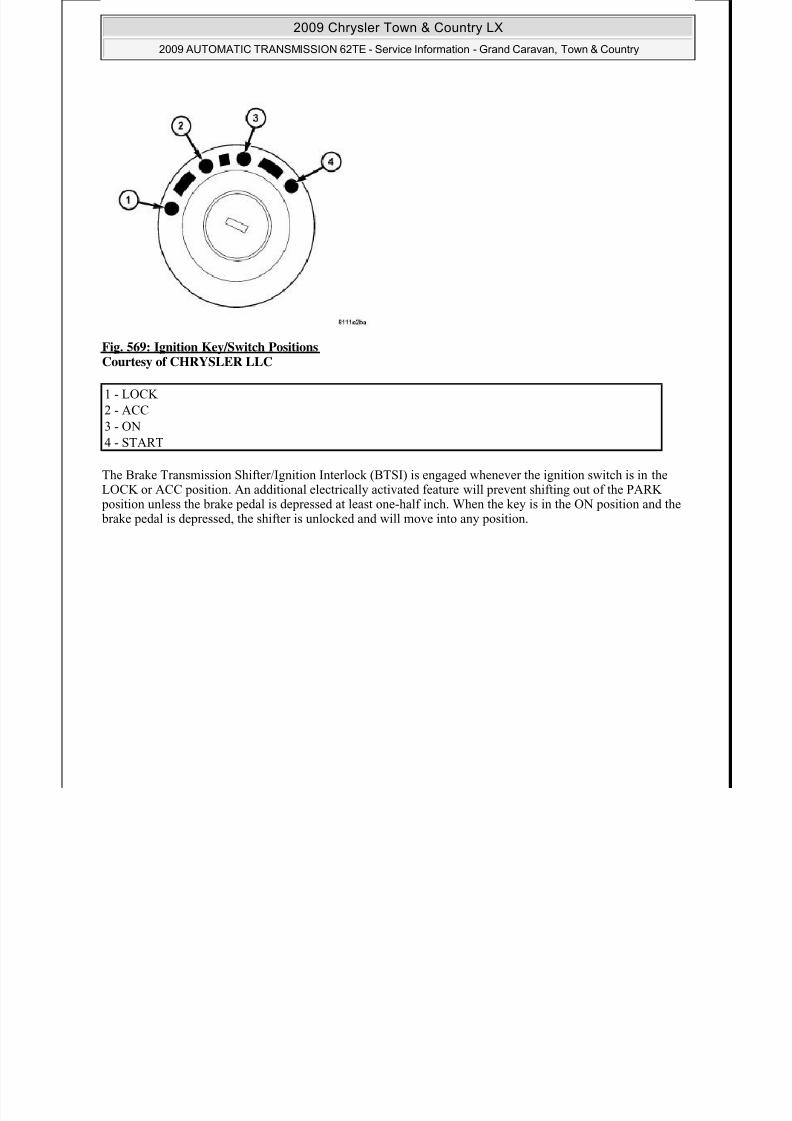
7/16/2019 62te
http://slidepdf.com/reader/full/62te55cf9df0550346d033afef7d 348/387
Fig. 570: Shift Interlock Courtesy of CHRYSLER LLC
When service brake pedal is not depressed the solenoid rotating arm (2) is free to rotate. The shifter gate pin (1)hits the blocking arm (3) and is prevented from moving from park.
When service brake is applied the rotating arm (2) is prevented from rotating by magnetic force within thesolenoid. The shifter gate pin (1) pushes the rotating arm (2) and blocker arm (3) allowing the shifter to moveout of park.
DIAGNOSIS AND TESTING
SHIFT INTERLOCK SYSTEM
2009 Chrysler Town & Country LX
2009 AUTOMATIC TRANSMISSION 62TE - Service Information - Grand Caravan, Town & Country

7/16/2019 62te
http://slidepdf.com/reader/full/62te55cf9df0550346d033afef7d 349/387
Fig. 571: Ignition Key/Switch Positions Courtesy of CHRYSLER LLC
The following chart describes the normal operation of the Brake Transmission Shift Interlock (BTSI) system. If the "expected response" differs from the vehicle's response, then system repair is necessary.
Refer to the following chart that expected shifter response, depending on ignition key/switch and brake pedal positions.
If the shifter cannot be moved out of the PARK position, refer to SHIFTER LOCKED IN PLACE below. If the shift lever can be shifted out of PARK without the brake pedal depressed, refer to CIRCUIT TEST chart.
SHIFTER LOCKED IN PLACE
1. Gain access to the brake transmission shift interlock (BTSI) solenoid. The solenoid is part of the shifter assembly.
2. Disconnect the wire connector from the rear of the BTSI solenoid.
3 I t th i iti k d t it t th ON iti
1 - LOCK
2 - ACC
3 - ON
4 - START
2009 Chrysler Town & Country LX
2009 AUTOMATIC TRANSMISSION 62TE - Service Information - Grand Caravan, Town & Country

7/16/2019 62te
http://slidepdf.com/reader/full/62te55cf9df0550346d033afef7d 350/387
3. Insert the ignition key and turn it to the ON position.4. With the brakes applied, try moving the shifter out of the PARK position.
If the lever now moves freely in and out of PARK, perform the CIRCUIT TEST.
If the shift lever now moves freely in and out of the park position, the BTSI solenoid is faulty and the shifter must be replaced. If the shift lever still does not move from the park position, the problem is in the shift lever
assembly.
If the above test pass and the shifter can still be moved freely in and out of PARK without the brake pedaldepressed, replace shifter assembly.
TORQUE CONVERTER
DESCRIPTION
DESCRIPTION
ACTION EXPECTED RESPONSE
1. Turn key to the "ACC" position and depress brake pedal.
1. Shifter CAN be shifted out of park.
2. Turn key to the "ON" position, with footoff of brake pedal.
2. Shifter CANNOT be shifted out of park.
3. Turn key to the "ON" position and depressthe brake pedal.
3. Shifter CAN be shifted out of park.
4. Leave shifter in any gear and try to returnkey to the "LOCK" position.
4. Key cannot be returned to the "LOCK" position.
5. Return shifter to "PARK" and try to
remove the key.
5. Key can be removed (after returning to "LOCK"
position).6. With the key removed, try to shift out of "PARK".
6. Shifter cannot be shifted out of "PARK".
Insert the key into the ignition cylinder and leave it at "LOCK." Try to move thetransmission out of "Park".
Shifter cannot be shifted out of "PARK".
NOTE: Any failure to meet these expected responses requires system repair.
2009 Chrysler Town & Country LX
2009 AUTOMATIC TRANSMISSION 62TE - Service Information - Grand Caravan, Town & Country

7/16/2019 62te
http://slidepdf.com/reader/full/62te55cf9df0550346d033afef7d 351/387
Fig. 572: Torque Converter Assembly Courtesy of CHRYSLER LLC
The torque converter is a hydraulic device that couples the engine crankshaft to the transmission. The torqueconverter consists of an outer shell with an internal turbine (1), a stator (4), an over-running clutch, an impeller (2) and an electronically applied converter clutch (5). The converter clutch provides reduced engine speed and greater fuel economy when engaged. Clutch engagement also provides reduced transmission fluid temperatures.The converter clutch engages in third gear. The torque converter hub (3) drives the transmission oil (fluid) pump.
The torque converter is a sealed welded unit that is not repairable and is serviced as an assembly
1 - TURBINE
2 - IMPELLER
3 - HUB
4 - STATOR
5 - CONVERTER CLUTCH DISC
6 - DRIVE PLATE
2009 Chrysler Town & Country LX
2009 AUTOMATIC TRANSMISSION 62TE - Service Information - Grand Caravan, Town & Country

7/16/2019 62te
http://slidepdf.com/reader/full/62te55cf9df0550346d033afef7d 352/387
The torque converter is a sealed, welded unit that is not repairable and is serviced as an assembly.
IMPELLER
Fig. 573: Impeller Courtesy of CHRYSLER LLC
The impeller (3) is an integral part of the converter housing. The impeller consists of curved blades placed radially along the inside of the housing on the transmission side of the converter. As the converter housing isrotated by the engine (4,5), so is the impeller, because they are one and the same and are the driving member of
the system.
TURBINE
1 - ENGINE FLEXPLATE 4 - ENGINE ROTATION
2 - OIL FLOW FROM IMPELLER SECTIONINTO TURBINE SECTION
5 - ENGINE ROTATION
3 - IMPELLER VANES AND COVER AREINTEGRAL
2009 Chrysler Town & Country LX
2009 AUTOMATIC TRANSMISSION 62TE - Service Information - Grand Caravan, Town & Country

7/16/2019 62te
http://slidepdf.com/reader/full/62te55cf9df0550346d033afef7d 353/387
Fig. 574: Turbine Courtesy of CHRYSLER LLC
The turbine (1) is the output, or driven, member of the converter. The turbine is mounted within the housingopposite the impeller, but is not attached to the housing. The input shaft (3) is inserted through the center of theimpeller and splined into the turbine. The design of the turbine is similar to the impeller, except the blades of the turbine are curved in the opposite direction.
STATOR
1 - TURBINE VANE2 - ENGINE ROTATION
3 - INPUT SHAFT
4 - PORTION OF TORQUE CONVERTER COVER
5 - ENGINE ROTATION
6 - OIL FLOW WITHIN TURBINE SECTION
2009 Chrysler Town & Country LX
2009 AUTOMATIC TRANSMISSION 62TE - Service Information - Grand Caravan, Town & Country

7/16/2019 62te
http://slidepdf.com/reader/full/62te55cf9df0550346d033afef7d 354/387
Fig. 575: Stator Location Courtesy of CHRYSLER LLC
The stator assembly (1) is mounted on a stationary shaft which is an integral part of the oil pump. The stator islocated between the impeller (2) and turbine (4) within the torque converter case. The stator contains an over-running clutch, which allows the stator to rotate only in a clockwise direction. When the stator is locked againstthe over-running clutch, the torque multiplication feature of the torque converter is operational.
TORQUE CONVERTER CLUTCH (TCC)
1 - STATOR
2 - IMPELLER
3 - FLUID FLOW
4 - TURBINE
2009 Chrysler Town & Country LX
2009 AUTOMATIC TRANSMISSION 62TE - Service Information - Grand Caravan, Town & Country

7/16/2019 62te
http://slidepdf.com/reader/full/62te55cf9df0550346d033afef7d 355/387
Fig. 576: Torque Converter Clutch (TCC) Courtesy of CHRYSLER LLC
The TCC was installed to improve the efficiency of the torque converter that is lost to the slippage of the fluid coupling. Although the fluid coupling provides smooth, shock-free power transfer, it is natural for all fluid couplings to slip. If the impeller (3) and turbine (5) were mechanically locked together, a zero slippagecondition could be obtained. A hydraulic piston (6) was added to the turbine (5), and a friction material (7) wasadded to the inside of the front cover (1) to provide this mechanical lock-up.
OPERATION
OPERATION
1 - IMPELLER FRONT COVER
2 - THRUST WASHER ASSEMBLY
3 - IMPELLER
4 - STATOR
5 - TURBINE6 - PISTON
7 - FRICTION DISC
2009 Chrysler Town & Country LX
2009 AUTOMATIC TRANSMISSION 62TE - Service Information - Grand Caravan, Town & Country

7/16/2019 62te
http://slidepdf.com/reader/full/62te55cf9df0550346d033afef7d 356/387
Fig. 577: Torque Converter Fluid Operation Courtesy of CHRYSLER LLC
The converter impeller (driving member), which is integral to the converter housing and bolted to the enginedrive plate, rotates at engine speed. The converter turbine (driven member), which reacts from fluid pressuregenerated by the impeller, rotates and turns the transmission input shaft.
TURBINE
As the fluid that was put into motion by the impeller blades strikes the blades of the turbine, some of the energyand rotational force is transferred into the turbine and the input shaft. This causes both of them (turbine and
input shaft) to rotate in a clockwise direction following the impeller. As the fluid is leaving the trailing edges of the turbine's blades, it continues in a "hindering" direction back toward the impeller. If the fluid is not redirected before it strikes the impeller, it will strike the impeller in such a direction that it would tend to slow it down.
STATOR
1 - APPLY PRESSURE 3 - RELEASE PRESSURE
2 - THE PISTON MOVES SLIGHTLYFORWARD
4 - THE PISTON MOVES SLIGHTLYREARWARD
2009 Chrysler Town & Country LX
2009 AUTOMATIC TRANSMISSION 62TE - Service Information - Grand Caravan, Town & Country

7/16/2019 62te
http://slidepdf.com/reader/full/62te55cf9df0550346d033afef7d 357/387
Fig. 578: Stator Operation Courtesy of CHRYSLER LLC
Torque multiplication is achieved by locking the stator's over-running clutch to its shaft. Under stall conditions
(the turbine is stationary), the oil leaving the turbine blades strikes the face of the stator blades and tries to rotatethem in a counterclockwise direction. When this happens the over-running clutch of the stator locks and holdsthe stator from rotating. With the stator locked, the oil strikes the stator blades and is redirected into a "helping"direction before it enters the impeller. This circulation of oil from impeller to turbine, turbine to stator, and stator to impeller, can produce a maximum torque multiplication of about 2.4:1. As the turbine begins to matchthe speed of the impeller, the fluid that was hitting the stator in such as way as to cause it to lock-up is no longer doing so. In this condition of operation, the stator begins to free wheel and the converter acts as a fluid coupling.
TORQUE CONVERTER CLUTCH (TCC)
In a standard torque converter, the impeller and turbine are rotating at about the same speed and the stator isfreewheeling, providing no torque multiplication. By applying the turbine's piston to the front cover's frictionmaterial, a total converter engagement can be obtained. The result of this engagement is a direct 1:1 mechanicallink between the engine and the transmission.
The engagement and disengagement of the TCC are automatic and controlled by the Powertrain ControlModule (PCM). The engagement cannot be activated in the lower gears because it eliminates the torque
1 - DIRECTION STATOR WILL FREE WHEEL DUE TO OIL PUSHING ON BACKSIDE OFVANES
2 - FRONT OF ENGINE
3 - INCREASED ANGLE AS OIL STRIKES VANES
4 - DIRECTION STATOR IS LOCKED UP DUE TO OIL PUSHING AGAINST STATOR VANES
2009 Chrysler Town & Country LX
2009 AUTOMATIC TRANSMISSION 62TE - Service Information - Grand Caravan, Town & Country

7/16/2019 62te
http://slidepdf.com/reader/full/62te55cf9df0550346d033afef7d 358/387
( ) g g g qmultiplication effect of the torque converter necessary for acceleration. Inputs that determine clutch engagementare: coolant temperature, vehicle speed and throttle position. The torque converter clutch is engaged by theclutch solenoid on the valve body. The clutch will engage at approximately 56 km/h (35 mph) with lightthrottle, after the shift to third gear.
REMOVAL
REMOVAL
1. Remove transmission and torque converter from vehicle. See Transmission and TransferCase/Automatic - 62TE - Removal.
2. Place a suitable drain pan under the converter housing end of the transmission.
3. Pull the torque converter forward until the center hub clears the oil pump seal.
4. Separate the torque converter from the transmission.
INSTALLATION
INSTALLATION
Fig. 579: Checking Torque Converter Seating Courtesy of CHRYSLER LLC
CAUTION: Verify that transmission is secure on the lift ing device or worksurface, the center of gravity of the transmission wi ll shif t when thetorque converter is removed creating an unstable condition.
The torque converter is a heavy unit. Use caution when separatingthe torque converter from the transmission.
2009 Chrysler Town & Country LX
2009 AUTOMATIC TRANSMISSION 62TE - Service Information - Grand Caravan, Town & Country

7/16/2019 62te
http://slidepdf.com/reader/full/62te55cf9df0550346d033afef7d 359/387
1 - SCALE
2 - STRAIGHTEDGE
1. Lubricate converter hub and oil pump seal lip with transmission fluid.
2. Place torque converter in position on transmission.
3. Align torque converter to oil pump seal opening.
4. Insert torque converter hub into oil pump.
5. While pushing torque converter inward, rotate converter until converter is fully seated in the oil pumpgears.
6. Check converter seating with a scale (1) and straightedge (2). Surface of converter lugs should be 1/2 in.to rear of straightedge when converter is fully seated.
7. If necessary, temporarily secure converter with C-clamp attached to the converter housing.
8. Install the transmission in the vehicle. See Transmission and Transfer Case/Automatic - 62TE -Installation.
9. Fill the transmission with the recommended fluid. See Transmission and Transfer Case/Automatic -62TE/FLUID - Standard Procedure.
VALVE BODY
OPERATION
OPERATION
REGULATOR VALVE
The regulator valve controls hydraulic pressure in the transaxle. It receives unregulated pressure from the pump,which works against spring tension to maintain oil at specific pressures. A system of sleeves and ports allowsthe regulator valve to work at one of three predetermined pressure levels. Regulated oil pressure is also referred to as "line pressure."
SOLENOID SWITCH VALVE
The solenoid switch valve controls line pressure from the LR/CC solenoid. In one position, it allows thelow/reverse clutch to be pressurized In the other it directs line pressure to the converter control and converter
NOTE: Check converter hub and drive notches for sharp edges, burrs, scratches, or nicks. Polish the hub and notches with 320/400 grit paper or crocus cloth if necessary. The hub must be smooth to avoid damaging the pump seal atinstallation.
CAUTION: Do not damage oil pump seal or bushing while inserting torqueconverter into the front of the transmission.
2009 Chrysler Town & Country LX
2009 AUTOMATIC TRANSMISSION 62TE - Service Information - Grand Caravan, Town & Country

7/16/2019 62te
http://slidepdf.com/reader/full/62te55cf9df0550346d033afef7d 360/387
low/reverse clutch to be pressurized. In the other, it directs line pressure to the converter control and converter clutch valves.
MANUAL VALVE
The manual valve is operated by the mechanical shift linkage. Its primary responsibility is to send line pressureto the appropriate hydraulic circuits and solenoids. The valve has three operating ranges or positions.
CONVERTER CLUTCH SWITCH VALVE
The main responsibility of the converter clutch switch valve is to control hydraulic pressure applied to the front(off) side of the converter clutch piston. Line pressure from the regulator valve is fed to the torque converter regulator valve, where it passes through the valve, and is slightly regulated. The pressure is then directed to theconverter clutch switch valve and to the front side of the converter clutch piston. This pressure pushes the piston
back and disengages the converter clutch.
CONVERTER CLUTCH CONTROL VALVE
The converter clutch control valve controls the back (on) side of the torque converter clutch. When thePCM/TCM energizes or modulates the LR/CC solenoid to apply the converter clutch piston, both the converter clutch control valve and the converter control valve move, allowing pressure to be applied to the back side of the clutch.
T/C REGULATOR VALVE
The torque converter regulator valve slightly regulates the flow of fluid to the torque converter.
LOW/REVERSE SWITCH VALVE
The low/reverse clutch is applied from different sources, depending on whether low (1st) gear or reverse is
selected. The low/reverse switch valve alternates positions depending on from which direction fluid pressure isapplied. By design, when the valve is shifted by fluid pressure from one channel, the opposing channel is blocked. The switch valve alienates the possibility of a sticking ball check, thus providing consistent applicationof the low/reverse clutch under all operating conditions.
REMOVAL
REMOVAL
2009 Chrysler Town & Country LX
2009 AUTOMATIC TRANSMISSION 62TE - Service Information - Grand Caravan, Town & Country

7/16/2019 62te
http://slidepdf.com/reader/full/62te55cf9df0550346d033afef7d 361/387
Fig. 580: Shift Cable From/To Manual Lever Courtesy of CHRYSLER LLC
1. Remove the engine cover.
2. Remove the negative battery.
3. Drain the radiator. Refer to Cooling - Standard Procedure .
4. Remove clamps at the lower radiator hose.
5. Remove the lower radiator hose.
6. Remove shift cable (1) from manual lever (2).
2009 Chrysler Town & Country LX
2009 AUTOMATIC TRANSMISSION 62TE - Service Information - Grand Caravan, Town & Country

7/16/2019 62te
http://slidepdf.com/reader/full/62te55cf9df0550346d033afef7d 362/387
Fig. 581: Fasteners And Front Sound Dampener Cover Courtes of CHRYSLER LLC
7. Remove the fasteners (1) and the Front Sound Damper Cover (2).
Fig. 582: Valve Body Pan Courtesy of CHRYSLER LLC
8. Remove the top valve body oil pan (1) bolts.
2009 Chrysler Town & Country LX
2009 AUTOMATIC TRANSMISSION 62TE - Service Information - Grand Caravan, Town & Country

7/16/2019 62te
http://slidepdf.com/reader/full/62te55cf9df0550346d033afef7d 363/387
Fig. 583: Solenoid Connector At Transmission Courtesy of CHRYSLER LLC
9. Remove the solenoid pack connector (2) at valve body oil pan (1).10. Raise the vehicle on a hoist.
11. Remove the front left side inner wheel splash screws from front side of wheel opening.
12. Turn the wheel fully to the left.
Fig. 584: Pressure Tap Plug Courtesy of CHRYSLER LLC
13. Remove the pressure tap plug (2) at valve body oil pan.
14. Remove the lower valve body oil pan bolts (1) and drain transmission fluid.
15. Remove the valve body oil pan.
2009 Chrysler Town & Country LX
2009 AUTOMATIC TRANSMISSION 62TE - Service Information - Grand Caravan, Town & Country

7/16/2019 62te
http://slidepdf.com/reader/full/62te55cf9df0550346d033afef7d 364/387
Fig. 585: Connector At Transmission Courtesy of CHRYSLER LLC
16. Remove the electrical connector (1) at the valve body (2).
Fig. 586: Detent Spring
2009 Chrysler Town & Country LX
2009 AUTOMATIC TRANSMISSION 62TE - Service Information - Grand Caravan, Town & Country

7/16/2019 62te
http://slidepdf.com/reader/full/62te55cf9df0550346d033afef7d 365/387
Courtesy of CHRYSLER LLC
17. Remove screw at detente arm (2).
18. Remove detente arm (1).
Fig. 587: Valve Body Bolts Courtesy of CHRYSLER LLC
19. Remove the twenty one valve body to case bolts (1).
Fig. 588: Oil Transfer Tubes C t f CHRYSLER LLC
2009 Chrysler Town & Country LX
2009 AUTOMATIC TRANSMISSION 62TE - Service Information - Grand Caravan, Town & Country

7/16/2019 62te
http://slidepdf.com/reader/full/62te55cf9df0550346d033afef7d 366/387
Courtesy of CHRYSLER LLC
20. Insure the manual lever is fully forward to keep the manual valve pin (3) from binding.
21. Pull the valve body away from the underdrive compounder assembly oil transfer tubes (2) and lift up on
valve body to clear the manual valve pin past the slot in the rooster comb.
DISASSEMBLY
DISASSEMBLY
Fig. 589: Solenoid Pack Electrical Connect Courtesy of CHRYSLER LLC
1. Unplug the electrical connectors (1, 2) at the valve body.
2009 Chrysler Town & Country LX
2009 AUTOMATIC TRANSMISSION 62TE - Service Information - Grand Caravan, Town & Country

7/16/2019 62te
http://slidepdf.com/reader/full/62te55cf9df0550346d033afef7d 367/387
Fig. 590: Bolts At Clamp Plate
Courtesy of CHRYSLER LLC
2. Remove the bolts (1) at the transfer plate (2) and remove the transfer plate.
Fig. 591: Solenoid Pack At Valve Body
Courtesy of CHRYSLER LLC
3. Turn valve body over and remove the solenoid module (1) from the valve body (2).
2009 Chrysler Town & Country LX
2009 AUTOMATIC TRANSMISSION 62TE - Service Information - Grand Caravan, Town & Country

7/16/2019 62te
http://slidepdf.com/reader/full/62te55cf9df0550346d033afef7d 368/387
Fig. 592: Bolts At Line Pressure Sensor
Courtesy of CHRYSLER LLC
4. Remove the bolts (1) at the line pressure sensor (2).
5. Remove the line pressure sensor from the valve body.
Fig. 593: Bolt At VFS 62TE Courtesy of CHRYSLER LLC
6. Remove the bolt (1) at the pressure control solenoid (2).
2009 Chrysler Town & Country LX
2009 AUTOMATIC TRANSMISSION 62TE - Service Information - Grand Caravan, Town & Country

7/16/2019 62te
http://slidepdf.com/reader/full/62te55cf9df0550346d033afef7d 369/387
Fig. 594: Bolts At Transfer Plate Courtesy of CHRYSLER LLC
7. Remove the bolts (1) at the clamping plate (2).
Fig. 595: Transfer Plate Courtesy of CHRYSLER LLC
2009 Chrysler Town & Country LX
2009 AUTOMATIC TRANSMISSION 62TE - Service Information - Grand Caravan, Town & Country

7/16/2019 62te
http://slidepdf.com/reader/full/62te55cf9df0550346d033afef7d 370/387
y
8. Remove the clamping plate (1).
Fig. 596: Outer Separator Plate Courtesy of CHRYSLER LLC
9. Remove the valve body cover (1).
Fig. 597: Inner Separator Plate Courtesy of CHRYSLER LLC
2009 Chrysler Town & Country LX
2009 AUTOMATIC TRANSMISSION 62TE - Service Information - Grand Caravan, Town & Country

7/16/2019 62te
http://slidepdf.com/reader/full/62te55cf9df0550346d033afef7d 371/387
y
10. Remove the valve body inner gasket and plate (1) from the valve body.
Fig. 598: Tapered Bore And Check Balls
Courtesy of CHRYSLER LLC
11. Remove the check balls (2) if equipped.
NOTE: The valve body contains some check balls that are pressed into a taperedbore (1). These check balls are not removable
2009 Chrysler Town & Country LX
2009 AUTOMATIC TRANSMISSION 62TE - Service Information - Grand Caravan, Town & Country

7/16/2019 62te
http://slidepdf.com/reader/full/62te55cf9df0550346d033afef7d 372/387
Fig. 599: Exploded View Of Valve Body Courtesy of CHRYSLER LLC
1 - CONVERTER CLUTCH SWITCH VALVE 6 - MANUALVALVE
2 - L/R SWITCH VALVE 7 -PRESSUREREGULATOR
VALVE
3 - SOLENOID SWITCH VALVE
8 - TORQUECONVERTER REGULATOR VALVE
4 - DC SWITCH VALVE
9 -CONVERTER CLUTCH
CONTROLVALVE
5 - LC SWITCH VALVE -
2009 Chrysler Town & Country LX
2009 AUTOMATIC TRANSMISSION 62TE - Service Information - Grand Caravan, Town & Country

7/16/2019 62te
http://slidepdf.com/reader/full/62te55cf9df0550346d033afef7d 373/387
NOTE: Use exploded view above for disassembly.
12. Remove valves from valve body.
ASSEMBLY
ASSEMBLY
Fig. 600: Exploded View Of Valve Body Courtesy of CHRYSLER LLC
NOTE: Tag al l valve/spring assemblies for reassembly identi ficat ion.
1 - CONVERTER CLUTCH SWITCH VALVE 6 - MANUALVALVE
2 - L/R SWITCH VALVE 7 -PRESSUREREGULATOR
VALVE
3 - SOLENOID SWITCH VALVE
8 - TORQUECONVERTER REGULATOR
2009 Chrysler Town & Country LX
2009 AUTOMATIC TRANSMISSION 62TE - Service Information - Grand Caravan, Town & Country

7/16/2019 62te
http://slidepdf.com/reader/full/62te55cf9df0550346d033afef7d 374/387
REGULATOR VALVE
9 -
1. Install the valves into valve body.
Fig. 601: Tapered Bore And Check Balls Courtesy of CHRYSLER LLC
2. Install the check balls (2) if equipped.
4 - DC SWITCH VALVE
CONVERTER CLUTCHCONTROLVALVE
5 - LC SWITCH VALVE -
NOTE: Use exploded v iew in i llustrat ion for assembly.
NOTE: The valve body contains some check balls that are pressed into a taperedbore (1). These check balls are not removable
2009 Chrysler Town & Country LX
2009 AUTOMATIC TRANSMISSION 62TE - Service Information - Grand Caravan, Town & Country

7/16/2019 62te
http://slidepdf.com/reader/full/62te55cf9df0550346d033afef7d 375/387
Fig. 602: Inner Separator Plate Courtesy of CHRYSLER LLC
3. Install the inner separator plate (1).
Fig. 603: Outer Separator Plate Courtesy of CHRYSLER LLC
2009 Chrysler Town & Country LX
2009 AUTOMATIC TRANSMISSION 62TE - Service Information - Grand Caravan, Town & Country

7/16/2019 62te
http://slidepdf.com/reader/full/62te55cf9df0550346d033afef7d 376/387
4. Install the outer separator plate (1).
Fig. 604: Transfer Plate Courtesy of CHRYSLER LLC
5. Install the transfer plate (1).
Fig. 605: Bolts At Transfer Plate Courtesy of CHRYSLER LLC
2009 Chrysler Town & Country LX
2009 AUTOMATIC TRANSMISSION 62TE - Service Information - Grand Caravan, Town & Country

7/16/2019 62te
http://slidepdf.com/reader/full/62te55cf9df0550346d033afef7d 377/387
6. Install the bolts (1) at the transfer plate (2) and tighten to 6 N.m (50 in. lbs.).
Fig. 606: Bolt At VFS 62TE Courtesy of CHRYSLER LLC
7. Install the pressure control solenoid on to the valve body.
8. Install the bolt (1) at the pressure control solenoid (2) and tighten to 6 N.m (50 in. lbs.).
Fig. 607: Bolts At Line Pressure Sensor Courtesy of CHRYSLER LLC
2009 Chrysler Town & Country LX
2009 AUTOMATIC TRANSMISSION 62TE - Service Information - Grand Caravan, Town & Country

7/16/2019 62te
http://slidepdf.com/reader/full/62te55cf9df0550346d033afef7d 378/387
Courtesy of CHRYSLER LLC
9. Install the pressure control sensor onto the valve body.
10. Install the bolts (1) to the pressure control sensor and tighten to 6 N.m (50 in. lbs.).
Fig. 608: Solenoid Pack At Valve Body Courtesy of CHRYSLER LLC
11. Install the solenoid pack (1) onto the valve body (2).
Fig. 609: Bolts At Clamp Plate
2009 Chrysler Town & Country LX
2009 AUTOMATIC TRANSMISSION 62TE - Service Information - Grand Caravan, Town & Country

7/16/2019 62te
http://slidepdf.com/reader/full/62te55cf9df0550346d033afef7d 379/387
Fig. 609: Bolts At Clamp Plate Courtesy of CHRYSLER LLC
12. Turn valve body over and install the clamp plate (2) onto the valve body.
13. Install the clamp plate bolts and tighten to 6 N.m (50 in. lbs.).
Fig. 610: Solenoid Pack Electrical Connect Courtesy of CHRYSLER LLC
14. Plug in the electrical connectors pressure control solenoid and pressure control sensors.
INSTALLATION
INSTALLATION
2009 Chrysler Town & Country LX
2009 AUTOMATIC TRANSMISSION 62TE - Service Information - Grand Caravan, Town & Country

7/16/2019 62te
http://slidepdf.com/reader/full/62te55cf9df0550346d033afef7d 380/387
Fig. 611: 2/4 Clutch Oil Supply Seal Courtesy of CHRYSLER LLC
1. Raise the vehicle on the hoist.
2. Install a NEW 2/4 clutch oil seal (1).
Fig. 612: Transfer Tube O-Rings Courtesy of CHRYSLER LLC
2009 Chrysler Town & Country LX
2009 AUTOMATIC TRANSMISSION 62TE - Service Information - Grand Caravan, Town & Country
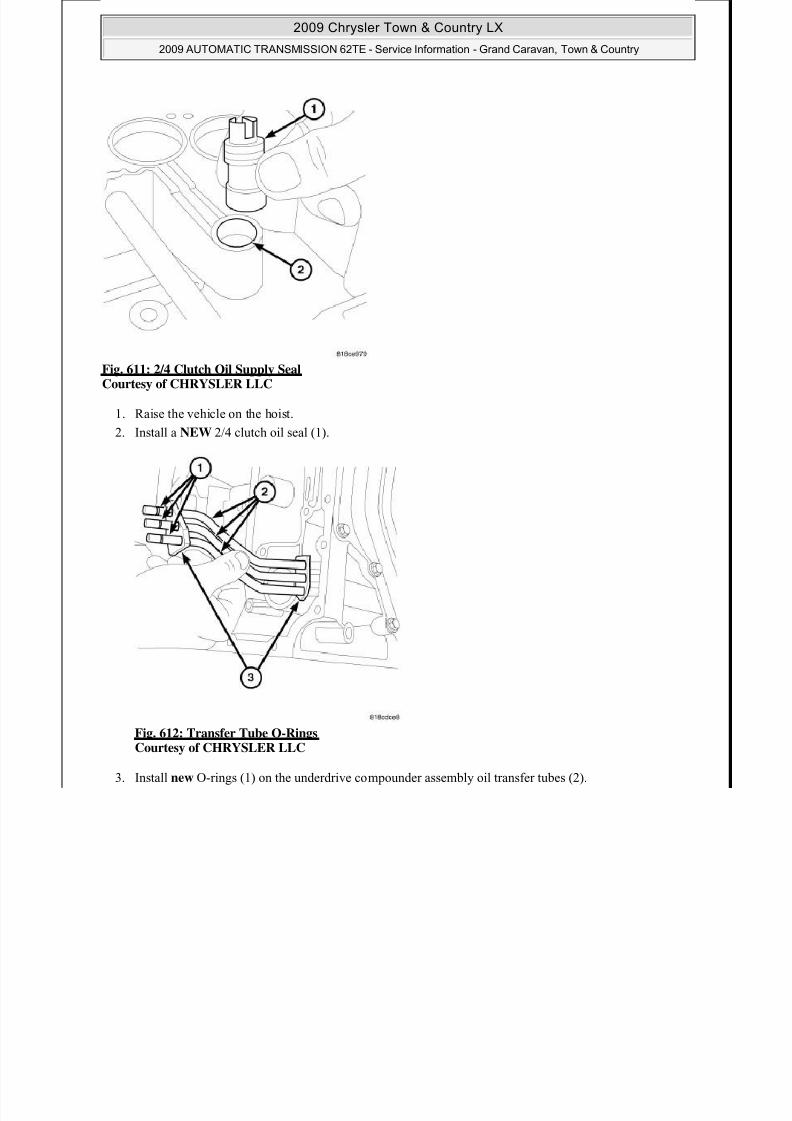
7/16/2019 62te
http://slidepdf.com/reader/full/62te55cf9df0550346d033afef7d 381/387
3. Install new O-rings (1) on the underdrive compounder assembly oil transfer tubes (2).
Fig. 613: Oil Transfer Tubes Courtesy of CHRYSLER LLC
4. Insure the manual lever is fully forward to keep the manual valve pin (3) from binding.
5. Set the manual valve pin (3) into the slot in the rooster comb.
6. Set the valve body into the underdrive compounder assembly oil transfer tubes (2) and press the valve
body into place.
2009 Chrysler Town & Country LX
2009 AUTOMATIC TRANSMISSION 62TE - Service Information - Grand Caravan, Town & Country

7/16/2019 62te
http://slidepdf.com/reader/full/62te55cf9df0550346d033afef7d 382/387
Fig. 614: Valve Body Bolts Courtesy of CHRYSLER LLC
7. Install the twenty one valve body to case bolts and tighten to 6 N.m (50 in. lbs.).
Fig. 615: Detent Spring Courtesy of CHRYSLER LLC
8. Install the detente arm (1) onto the pin at the valve body.
9. Install the screw (3) at the detente arm and tighten to 6 N.m (50 in. lbs.).
2009 Chrysler Town & Country LX
2009 AUTOMATIC TRANSMISSION 62TE - Service Information - Grand Caravan, Town & Country

7/16/2019 62te
http://slidepdf.com/reader/full/62te55cf9df0550346d033afef7d 383/387
Fig. 616: Connector At Transmission Courtes of CHRYSLER LLC
10. Install the electrical connector (1) at the valve body.
11. Lower the hoist.
Fig. 617: Valve Body Oil Pan Courtesy of CHRYSLER LLC
12. Install the valve body oil pan, use a bead of MOPAR® ATF RTV (MS-GF41).13. Install the upper valve body oil pan bolts and tighten to 6 N.m (50 in. lbs.).
14. Install the pressure tap at valve body oil pan and tighten to 6 N.m (50 in. lbs.).
15. Lower the vehicle on a hoist.
2009 Chrysler Town & Country LX
2009 AUTOMATIC TRANSMISSION 62TE - Service Information - Grand Caravan, Town & Country

7/16/2019 62te
http://slidepdf.com/reader/full/62te55cf9df0550346d033afef7d 384/387
Fig. 618: Solenoid Connector At Transmission Courtesy of CHRYSLER LLC
16. Install the solenoid pack connector (2) at valve body oil pan.
17. Raise the vehicle on the hoist.
Fig. 619: Valve Body Oil Pan Courtesy of CHRYSLER LLC
2009 Chrysler Town & Country LX
2009 AUTOMATIC TRANSMISSION 62TE - Service Information - Grand Caravan, Town & Country

7/16/2019 62te
http://slidepdf.com/reader/full/62te55cf9df0550346d033afef7d 385/387
18. Install the lower valve body oil pan bolts and tighten to 6 N.m (50 in. lbs.).
2009 Chrysler Town & Country LX
2009 AUTOMATIC TRANSMISSION 62TE - Service Information - Grand Caravan, Town & Country

7/16/2019 62te
http://slidepdf.com/reader/full/62te55cf9df0550346d033afef7d 386/387
2009 Chrysler Town & Country LX
2009 AUTOMATIC TRANSMISSION 62TE - Service Information - Grand Caravan, Town & Country

7/16/2019 62te
http://slidepdf.com/reader/full/62te55cf9df0550346d033afef7d 387/387