617: take the mobility and networking journey with...
TRANSCRIPT

617: Take the Mobility and Networking Journey With Us
Hands-on Lab Exercise Guide This session is offered as both an instructor led training and a self-paced online lab. Make money selling Field Services Stop by the Education and Consulting booths in the Solutions Expo to find out how! We're here to help.

| 1 |
Contents Contents .................................................................................................................................... 1
Overview .................................................................................................................................... 2
Scenario..................................................................................................................................... 5
Exercise 1 .................................................................................................................................. 6
Install XenMobile Device Manager Server .................................................................................. 6
Exercise 2 .................................................................................................................................23
XenMobile Device Manager Getting Started .............................................................................23
Exercise 3 .................................................................................................................................32
Configure Policies on XenMobile Device Manager ....................................................................32
Exercise 4 .................................................................................................................................35
Creating a Deployment Package ...............................................................................................35
Exercise 5 .................................................................................................................................40
Initial/Basic Configuration of XenMobile App Controller .............................................................40
Exercise 6 .................................................................................................................................50
Creating User Roles, and Assigning Applications ......................................................................50
Exercise 7 .................................................................................................................................66
Integrating XenMobile Device Manager with XenMobile App Controller ....................................66
Exercise 8 .................................................................................................................................69
XenMobile Integration with XenApp ..........................................................................................69
Exercise 9 .................................................................................................................................75
Configure NetScaler Gateway for Enterprise Store ...................................................................75
Exercise 10 ...............................................................................................................................86
Device Enrollment .....................................................................................................................86
Exercise 1: Configure NetScaler SSL Offload for Device Manager 95
Exercise 2: WorxWeb - Push Bookmarks and Hide Actions .................................................... 125

| 2 |
Overview Hands-on Training Module Objective This training will provide hands-on experience with the following:
• Installation and configuration XenMobile MDM 8.7
• Initial/Basic configuration of XenMobile App Controller 2.10
• Integrating XenMobile MDM with NetScaler Gateway and App Controller
Prerequisites • Basic understanding of Web/SaaS/Mobile apps. • Familiarity with navigating the NetScaler Configuration Utility. • Basic understanding of http/https communication. • Basic understanding of networking concepts (IE: IP addressing and communication)
Audience Citrix Partners, Customers, Sales Engineers, Consultants, Technical Support
Lab Environment Details The lab environment for the exercises to come contains the following:
• External access to common services (HTTP, SSL, SMTP, RDP, SSH, DNS) to simulate a real production environment customized
• Pre-configured Exchange, XenDesktop, XenApp, and StoreFront servers.
The Student Desktop is accessed remotely using Citrix Receiver running on your laptop. All windows applications such as XenCenter, (the XenServer GUI management tool), are accessed from the Student Desktop.

| 3 |
Lab Guide Conventions This symbol indicates particular attention must be paid to this step
Special note to offer advice or background information
reboot Text the student enters or an item they select is printed like this
VMDemo Filename mentioned in text or lines added to files during editing
Start Bold text indicates reference to a button or object
Focuses attention on a particular part of the screen (R:255 G:20 B:147)
Shows where to click or select an item on a screen shot (R:255 G:102 B:0)

| 4 |
List of Virtual Machines Used VM Name IP Address Description / OS
AD.training.lab 192.168.10.11 Windows Server 2008 R2. Domain controller for training.lab, DNS, DHCP services, and license server.
AppC
192.168.10.20
App Controller v2.10. You will perform the initial/basic setup of App Controller and configure Web Apps.
DDC 192.168.10.80 XenDesktop 7 virtual machine.
Exchange 192.168.10.15 Windows Server 2008 R2 with Exchange 2010 installed
NS NSIP=192.168.10.50 VIP=192.168.10.100
NS/AGEE 10.1. You will perform steps to integrate AGEE with Citrix StoreFront and App Controller
XDWin7Lab01 192.168.10.150 Master_Win7 192.168.10.149 Win7Client 192.168.10.201 Windows 7 Professional virtual machine XDM 192.168.10.30 XenMobile MDM v.8.6 on Windows Server 2012
SF 192.168.10.40 Windows 2012 Server with StoreFront Services installed.
SZC 192.168.10.41 Storage Zone Controller on W2K8 R2 64-bit w/SP1
Required Lab Credentials The credentials required to connect to the environment and complete the lab exercises.
VM Name Username Password Description
Win7Client administrator Citrix123 Domain admin NS1 nsroot nsroot NetScaler admin AD.training.lab administrator Citrix123 Domain admin

| 5 |
Scenario You have been hired as a consultant to design and deploy a XenMobile Enterprise Edition for MobileTeX, Inc. The solution must provide management of devices along with access to internal applications and data resources from any mobile device. Your task is to use the guidelines outlined below to implement a solution that meets the business needs.
Guidelines:
• Mobile Applications:
o Citrix Receiver and GoToMeeting should be deployed automatically.
o Only enrolled devices should be able to access resources.
• Data:
o Company data should be available to employees internally and externally. This data is publicly available and should only be accessed using read-only methods.
• FileShare:
o The MobileTeX file servers contains access to user folders and therefore should only be accessible to full-time employees. Employees should only access their personal folders.
• Secure Browsing:
o End users should be able to browse internal sites securely.
• Secure Email:
o End users should be able to access email securely.

| 6 |
Exercise 1 Install XenMobile Device Manager Server Overview In this exercise, you will learn how to install XenMobile Device Manager Server.
Step by step guidance Estimated time to complete this lab: 25 minutes.
Step Action 1. Log on to the XDM virtual machine with the following credentials:
Username: training\Administrator
Password: Citrix123
2. Open Windows Explorer and browse to \\AD\Software\XenMobile Device Manager.
If a Remote Desktop Connection message appears, click Don’t ask me again for connections to this computer and then click Yes.

| 7 |
Step Action 3. Run the XenMobile Device Manager-8.7.exe installer.
4. Click OK.
5. Click Next.

| 8 |
Step Action 6. Click I Agree.
7. Click Next.

| 9 |
Step Action 8. Keep the default destination folder.
Click Install.
9. The PostgreSQL installer is displayed.
Click Next three times.

| 10 |
Step Action 10. Enter the following credentials in the PostgreSQL Service configuration window:
Account password: Citrix123
Verify password: Citrix123
Click Next.
Click Yes to allow the installer to create an account for you.
Click No when you are prompted to replace the password with a random password.

| 11 |
Step Action 11. Enter the following credentials in the PostgreSQL Initialize database cluster window:
Password: Citrix123
Password (again): Citrix123
Click Next four times to use the default options.
Then click Finish when the installation is completed.
12. Click the … button corresponding to the License file field.
Navigate to \\AD\Software\XenMobile License\

| 12 |
Step Action 13. Select the license.crt file and click Open.
14. Click Next.

| 13 |
Step Action 15. Enter the following credentials in the Configure database connection window:
User name: postgres
Password: Citrix123
Click Check the connection.
16. On the Confirmation screen click Create > OK
Click Next.
This will create the ZDM database in PostgreSQL.

| 14 |
Step Action 17. Leave the Crystal Reports field blank and Click Next.
18. This is where you can choose if you will be enrolling iOS devices.
Accept the default options to enroll the device and click Next.

| 15 |
Step Action 19. Click Next.
20. Click Next to define the https connector for certificate-based authentication.

| 16 |
Step Action 21. Click Next to define the https connector for not authenticating with certificates.
22. In this step we’ll be setting the keystore password for the certificates in this deployment.
Enter the following parameters:
Keystore password: Citrix123
Confirm keystore password: Citrix123
Click Next.
Repeat this step for the next two screens.

| 17 |
Step Action 23.
Enter the following parameters:
Keystore password: Citrix123
Confirm keystore password: Citrix123
IP address or FQDN: IP2 FQDN
The IP2 FQDN can be found on the Student Portal in your browser.
Example: 50-22-43-109.mycitrixtraining.net
Click Next.
Important step. Understand before proceeding.

| 18 |
Step Action 24. Click the … button corresponding to the Certificate file path field.
25. Browse to \\AD\Software\Certificates.
Select APNS.pfx
Click Open.

| 19 |
Step Action 26. Enter the Private key password: Citrix123.
Click Next.
27. The Minimum Port and Maximum Port will auto-fill.
Click Next.

| 20 |
Step Action 28. Enter the following parameters:
User name: administrator
Password: Citrix123
Confirm password: Citrix123
Click Check the user name
Click OK (in the message that the Administrator account doesn’t exist.)
Click Next.
29. Click Finish.

| 21 |
Step Action 30. Wait until the configuration is completed.
Click Close once the configuration is finished.
31. Wait for the installation to complete.
Click Next.

| 22 |
Step Action 32. The installation is now completed.
Click Next and Finish.
Exercise Summary In this exercise, we installed XenMobile Device Manager. During the installation we configured the database, added the license, the APNS certificate and configured the public FQDN.
| 23 |
Exercise 2 XenMobile Device Manager Getting Started Overview In this exercise we will go through the Device Manager getting started wizard, in order to create base deployment packages, integrate with Active Directory and assign the base packages to domain users.
Step by step guidance Estimated time to complete this lab: 10 minutes.
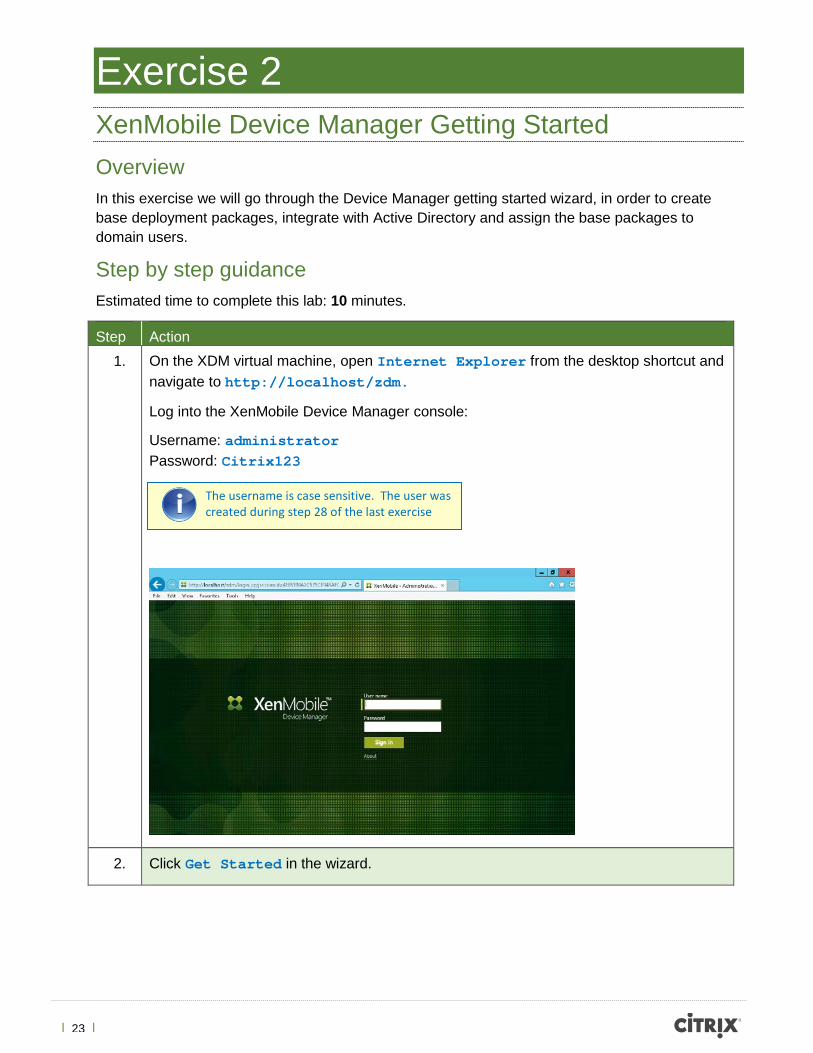
Step Action 1. On the XDM virtual machine, open Internet Explorer from the desktop shortcut and
navigate to http://localhost/zdm.
Log into the XenMobile Device Manager console:
Username: administrator Password: Citrix123
2. Click Get Started in the wizard.
The username is case sensitive. The user was created during step 28 of the last exercise

| 24 |
Step Action 3. Select the checkbox in front of “Yes, we use XenMobile App Controller…” and
click Next.
4. On the Build Package screen, the wizard will create your base package for Android and iOS devices dialog. Click Next.
| 25 |
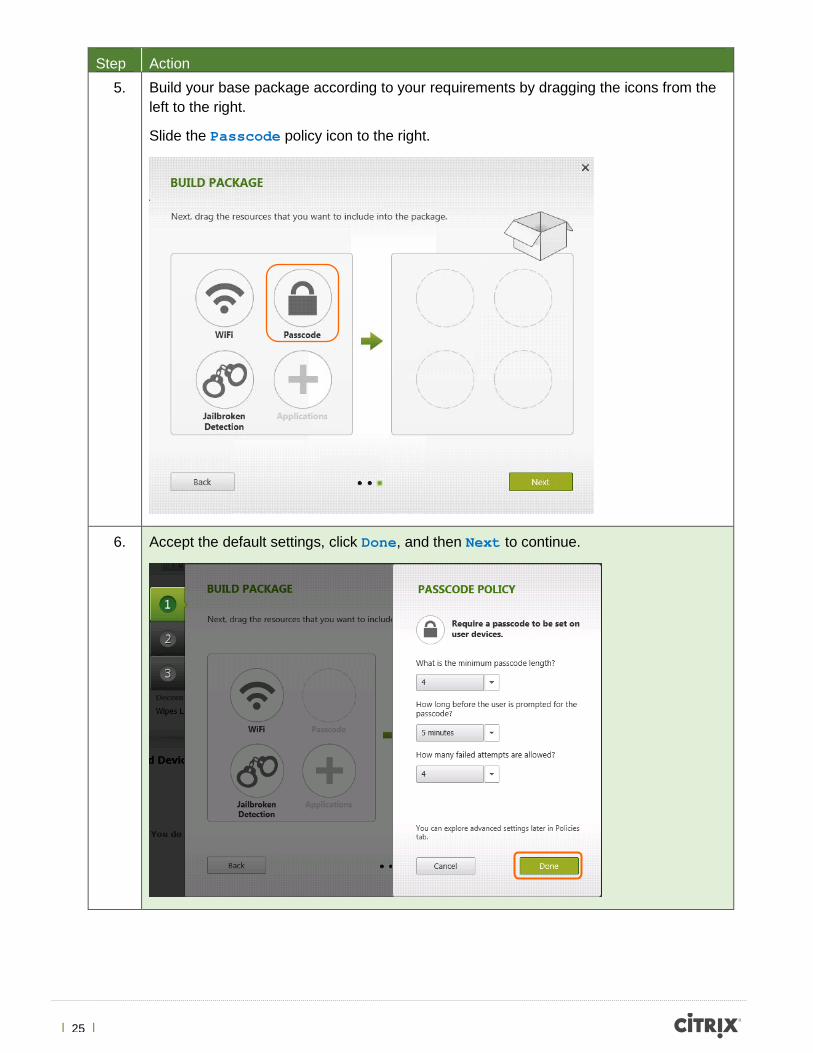
Step Action 5. Build your base package according to your requirements by dragging the icons from the
left to the right.
Slide the Passcode policy icon to the right.
6. Accept the default settings, click Done, and then Next to continue.

| 26 |
Step Action 7. In the Active Directory dialog, click Yes, enroll with corporate credentials to
configure your Active Directory User directory.
8. Click Next to accept the default LDAP as the directory type

| 27 |
Step Action 9. Enter the following data for the parameters:
Primary Host [:Port:]: 192.168.10.11
Root context: dc=training,dc=lab
Search user: [email protected]
Password: Citrix123
Domain alias: training.lab
XenMobile lockout limit: 5
Global Catalog TCP port: 3268
User Search By: sAMAccountName (The default is userPrincipalName. Change to sAMAccountName)
Click Yes on the Warning, and then click Check.
A best practice is to use a service account for the Base DN. However, for this lab environment and exercise, we are using the administrator account.

| 28 |
Step Action 10. An informational message stating that the binding was successful is displayed.
Click OK. Then click Next.
11. Keep the preconfigured LDAP attributes.
Click Next.

| 29 |
Step Action 12. Click New group.
Select Administrators from the LDAP groups category drop-down.
Select Administrator from the Roles category drop-down.
13. Click New group again.
Type Sales in the text box and select the Sales group from the dropdown.
Accept the default role of User in the Roles category drop-down.
14. Repeat Step 13 to add the Engineering and Executives groups. Configure both with the User role.

| 30 |
Step Action 15. Click Next and then Finish.
16. Optionally, you can test the enrollment at this point. Click Next.
Since you have no devices enrolled, click Skip.
17. Close the Startup Wizard by clicking Go To Device Manager.

| 31 |
Step Action 18. In the upper right corner, click Options.
19. Select the LDAP Configuration node in the left panel.
Notice that Microsoft Active Directory is Enabled and configured as Default.
Click Close.
Exercise Summary The Getting Started wizard takes you through configuring a base package for both iOS and Android devices. These packages can be configured with a few basic settings. You also configured the LDAP settings for the XenMobile Device Manager.

| 32 |
Exercise 3 Configure Policies on XenMobile Device Manager Overview XenMobile Device Manager empowers enterprise organizations to apply device configurations, settings, and security parameters to multiple devices. In this exercise, you will configure policies on XenMobile Device Manager to push to mobile devices.
Step by step guidance Estimated time to complete this lab: 10 minutes.
Step iOS Android 1. In the XenMobile Device Manager Console click the Policies tab.
2. If you are using an iOS device,
Expand iOS in the left panel.
Select Configurations.
If you are using an Android device,
Expand Android in the left panel.
Select Configurations.
3. Click New Configuration > Profiles and Settings and select Credentials.
Click New Configurations > General and select Credentials.

| 33 |
Step iOS Android 4. Under the General tab, configure the
following settings:
Identifier: Root Certificate
Display name: Root Certificate
Organization: Citrix Support
Description: Deploy Root certificate
Configure the following settings:
Credential name: Root Certificate
Description: Deploy Root Certificate
Credential type: Certificate (Leave as the default)
The credential file path:
\\AD\Software\Certificates\Root.cer (Click Browse and navigate to this path)
Click Add.
5. Select the Credential tab and configure the following settings:
Credential type: Certificate (Leave as the default)
Credential name: Root Certificate
The credential file path: Click Browse and navigate to \\AD\Software\Certificates\Root.cer
Click Create.
The Root Certificate configuration is now displayed.

| 34 |
Step iOS Android 6. The Root Certificate configuration is now
displayed.
Exercise Summary You have now configured a certificate policy for both iOS and Android devices. The certificate is necessary to enable trust between WorxMail and Exchange. Now you are ready to create deployment packages. Policies must be added to packages and deployed to mobile users.

| 35 |
Exercise 4 Creating a Deployment Package Overview The device policies created in the previous step will now be combined into targeted deployment packages. Administrators can now manage multiple devices and users simultaneously with device configuration policies and deployment packages. In this exercise, you will create a deployment package to deploy to iOS and Android devices.
Step by step guidance Estimated time to complete this lab: 10 minutes.
Step iOS Android 1. Click the Deployment tab.
2. Right click iOS Base Package.
Click Delete.
Click Yes.
Right click the Android Base Package.
Click Delete.
Click Yes.

| 36 |
Step iOS Android 3. Click New package in the upper left corner.
Then click New iOS package.
Click New Package in the upper left corner.
Then click New Android package.
4. Type iOS Training Package as the package name.
Click Next.
Type Android Training Package as the package name.
Click Next.

| 37 |
Step iOS Android 5. Expand Active Directory>training.lab.
Select Administrators, Engineering, Executives, and Sales.
Click Next.
Expand Active Directory>training.lab.
Select Administrators, Engineering, Executives, Sales.
Click Next.
6. Expand Configurations, select Passcode Policy and Root Certificate.
Click
Then click Next.
Expand MDM Policies, select Passcode Policy and Root Certificate.
Click
Then click Next.

| 38 |
Step iOS Android 7. Accept the default parameters.
Click Next.
Accept the default parameters
Click Next.
8. Click Next.
Click Next.
9. Review the Package summary.
Click Finish.
Review the Package summary.
Click Finish.

| 39 |
Step iOS Android 10. Click Deploy on the upper left.
Click Yes to confirm.
Click Deploy on the upper left.
Click Yes to confirm.
Exercise Summary You have created deployment packages for both iOS and Android devices. Now you are ready to integrate XenMobile Device Manager with NetScaler Gateway.

| 40 |
Exercise 5 Initial/Basic Configuration of XenMobile App Controller Overview XenMobile App Controller is a Linux appliance that provides IT admins the ability to manage applications. In this exercise you will configure the network settings on the App Controller. These settings include IP address, subnet mask, and default gateway. You will also perform the basic configuration which consists of changing the administrator password, configuring the Active Directory settings, and configuring the DNS and NTP servers.
Step by step guidance Estimated time to complete this lab: 15 minutes.
Step Action 1. Within XenCenter start the AppC virtual machine and select the Console tab.
Log on with the following credentials:
Username: admin
Password: password
2. The Main Menu is displayed.
Enter 0 to perform Express Setup.

| 41 |
Step Action 3. Enter 1 to configure the IP Address, Subnet Mask.
Configure App Controller with the following settings:
IP Address: 192.168.10.20
Subnet Mask: 255.255.255.0 (Press Enter to accept the default /24 mask)
4. Enter 2 to configure the Default Gateway.
Configure the Default Gateway as 192.168.10.1.
| 42 |
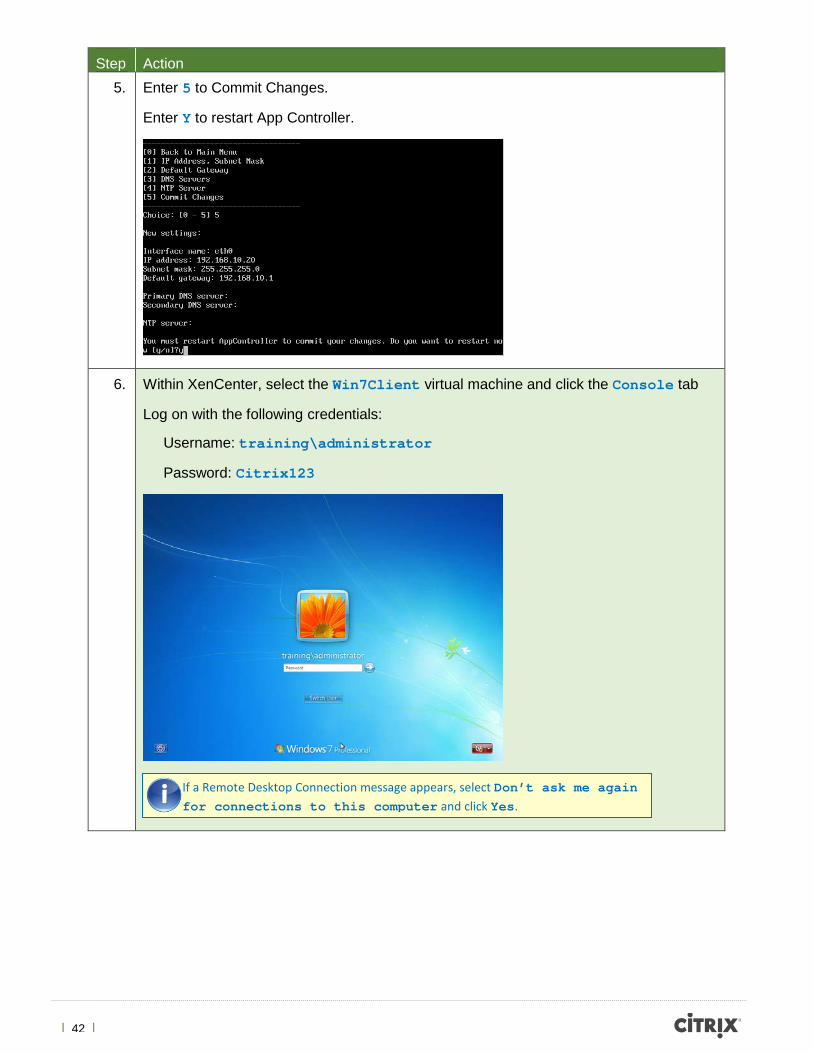
Step Action 5. Enter 5 to Commit Changes.
Enter Y to restart App Controller.
6. Within XenCenter, select the Win7Client virtual machine and click the Console tab
Log on with the following credentials:
Username: training\administrator
Password: Citrix123
If a Remote Desktop Connection message appears, select Don’t ask me again for connections to this computer and click Yes.

| 43 |
Step Action 7. Open an IE browser. Navigate to https://192.168.10.20:4443 to access the Web
Admin Console. Click Continue to this website (not recommended).
Log on with the following credentials:
Username: administrator
Password: password
8. You will be prompted to change the Administrator password.
Enter the following passwords:
Current password: password
New password: Citrix123
Confirm password: Citrix123
Click Next.
You are taken to the /ControlPoint/ site. You can type the full path if you would like. However, the URL is case sensitive.

| 44 |
Step Action 9. Enter the following parameter for the System settings:
Hostname: ac.training.lab
Accept the remaining default configuration and click Next.
10. Enter the following settings for the Active Directory configuration:
Server: 192.168.10.11 (This is the IP address of your Domain Controller.)
Domain name: training.lab
Service account: [email protected]
Password: Citrix123
Confirm password: Citrix123
Click Next.

| 45 |
Step Action 11. Enter the following settings for the NTP and DNS configurations:
NTP server: 192.168.10.11 (A general best practice is to use the DC as time server.)
Time Zone: US/Pacific (Leave the default time zone)
DNS suffixes: training.lab
Primary IP address: 192.168.10.11
Click Next.

| 46 |
Step Action 12. Enter the following Workflow Email Settings:
Email Server: 192.168.10.70 (This is the IP address of your mail server)
Port: 25
Email: [email protected] (This is the sending account for workflow approvals. This will enable workflow application requests and the manager authorization process.)
Click Next.
13. A summary of all your defined settings will be displayed. Click Save.
If the service account does not have the first name, last name, and email address configured in Active Directory, saving this configuration will fail.

| 47 |
Step Action 14. When the Confirm pop-up is displayed, click Yes to continue.
The App Controller logs off when settings are saved and users/groups are retrieved from Active Directory.
15. Log on to the App Controller again with the following credentials:
Username: administrator
Password: Citrix123
16. Click the Settings tab in the upper-right corner.
17. Select the Certificates node from the left menu.
18. Click Import and then select Server (.pfx) from the Import drop-down menu.

| 48 |
Step Action 19. Click Browse, navigate to \\AD\Software\Certificates and click Open. Select the
Training_Wildcard.pfx certificate and click Open.
20. Enter Citrix123 in the Password and Confirm Password fields.
Click OK.
The root certificate is added also.
21. Select the newly imported *.training.lab certificate and click the Make Active button on the right.
Click Yes in the Make Active window popup.
22. Log on to App Controller again with the administrator credentials.
Without the root certificate of the NetScaler Gateway installed on the App Controller, the callback URL will be needed.
Note: You will be logged out of the App Controller when this is done.

| 49 |
Step Action 23.
Navigate to Settings > Certificates again.
Click Import > Trusted (.pem)
24. Navigate to \\AD\Software\Certificates\ and click Open.
Select the MCTIntermediate.cer certificate.
Click Open.
25. All certificates should appear in the console. Verify this is the case:
Exercise Summary In this exercise, you have performed the initial and basic configuration of the App Controller. This consists of configuring the IP address, hostname, DNS and NTP servers, and uploading certificates. Now you are ready to create roles and add applications to the App Controller.
The intermediate certificate is needed for the enhanced trust between NS and AppC.

| 50 |
Exercise 6 Creating User Roles, and Assigning Applications Overview In this exercise you will create roles within the App Controller. You will then map Active Directory groups to those roles and assign applications to the respective roles.
Step by step guidance Estimated time to complete this lab: 20 minutes.
Step iOS Android 1. Click the Roles tab in the top menu.
2. On the bottom left corner of the screen, click Add role.
3. In the Add Role window, enter the following setting:
Role name: Sales
Click Next.

| 51 |
Step iOS Android 4. Use the Domain\group search box on the left side to search for
Training.lab\Sales. Move the Sales group from the Groups list to Members list using the single-right arrow button.
Click Save.
5. Repeat Steps 2 - 4 to create a role named Engineering and add the Training\Engineering group from Available groups list to Role members list.
6. Click the Apps & Docs tab.

| 52 |
Step iOS Android 7. Click the All categories drop-down and then click the “+” above the All categories
node.
Enter the following settings:
Name: Sales Apps
Description: Applications only available to those in the Sales department
Click Save.
Repeat Step 7 above to create three more categories named Office Apps, Engineering Apps, and Web Links with a description of your choice.
8. Click the Web & SaaS node in the left panel and then click the large green plus sign.

| 53 |
Step iOS Android 9. Type Salesforce in the search bar.
Click Add next to Salesforce.
10. From the Category drop-down menu select Sales Apps.
From the Assigned role drop down menu select Sales and deselect All Users.
Click Next.

| 54 |
Step iOS Android 11. Click Next.
12. Click Save.
13. Repeat step 9-12 to add Evernote to the Store.
Select Office Apps from the Category drop-down menu.
Keep the default Assigned role AllUsers.
14. Repeat Steps 9-12 to add Bugzilla to the Store.
Enter http://bugzilla.org in the URL field.
Select Engineering Apps from the Category drop-down menu.
Select Engineering from the Assigned role drop-down menu and de-select AllUsers.

| 55 |
Step iOS Android 15. Click iOS Apps in the left hand panel.
Click the large green “+” icon.
Click Android Apps in the left hand panel.
Click the large green “+” icon.
16. Click Browse…
Navigate to \\AD\Software\XenMobile MDX Apps\iOS and select the WorxMail-Release-1.5.mdx file.
Click Open.
Click Next.
Click Browse…
Navigate to \\AD\Software\XenMobile MDX Apps\Android and select the CitrixEmail-1.5.mdx file.
Click Open.
Click Next.
| 56 |
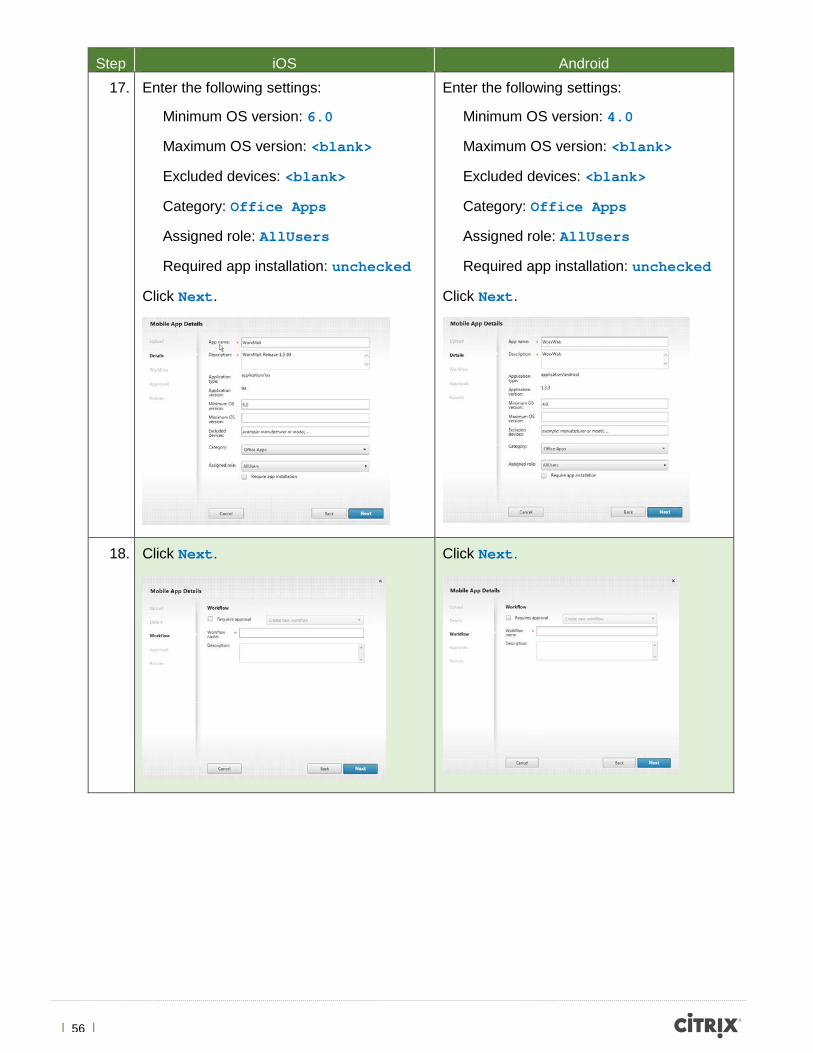
Step iOS Android 17. Enter the following settings:
Minimum OS version: 6.0
Maximum OS version: <blank>
Excluded devices: <blank>
Category: Office Apps
Assigned role: AllUsers
Required app installation: unchecked
Click Next.
Enter the following settings:
Minimum OS version: 4.0
Maximum OS version: <blank>
Excluded devices: <blank>
Category: Office Apps
Assigned role: AllUsers
Required app installation: unchecked
Click Next.
18. Click Next.
Click Next.
| 57 |
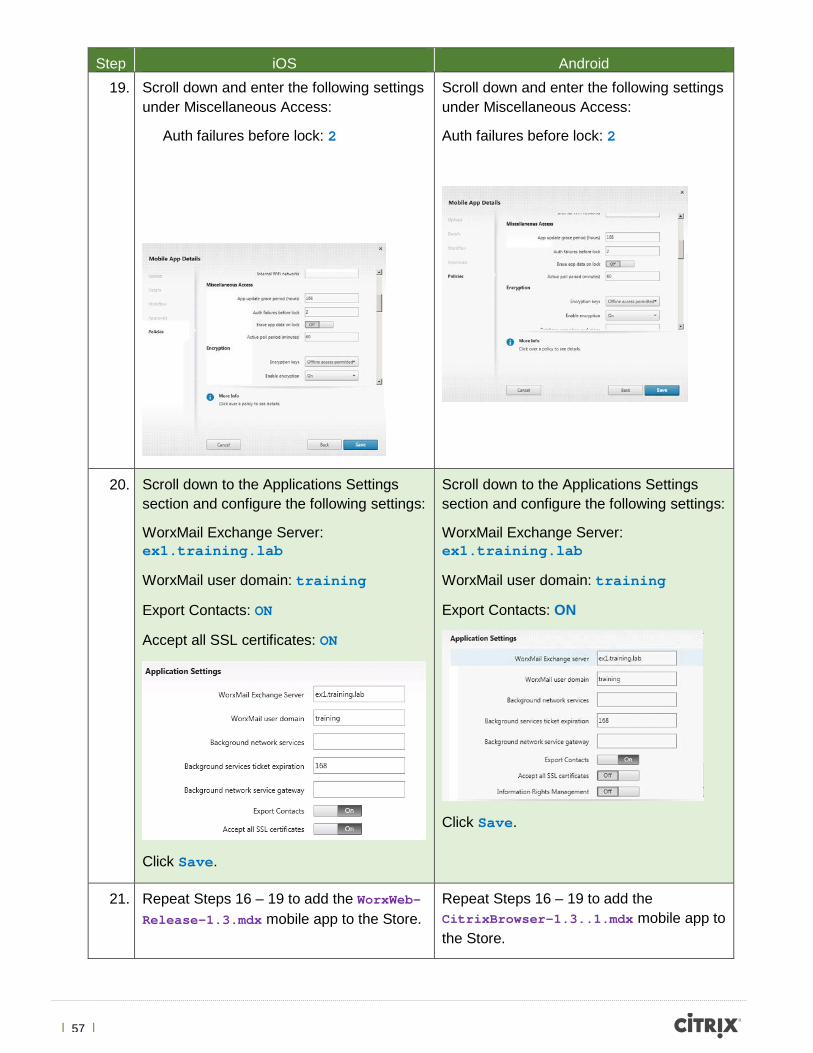
Step iOS Android 19. Scroll down and enter the following settings
under Miscellaneous Access:
Auth failures before lock: 2
Scroll down and enter the following settings under Miscellaneous Access:
Auth failures before lock: 2
20. Scroll down to the Applications Settings section and configure the following settings:
WorxMail Exchange Server: ex1.training.lab
WorxMail user domain: training
Export Contacts: ON
Accept all SSL certificates: ON
Click Save.
Scroll down to the Applications Settings section and configure the following settings:
WorxMail Exchange Server: ex1.training.lab
WorxMail user domain: training
Export Contacts: ON
Click Save.
21. Repeat Steps 16 – 19 to add the WorxWeb-Release-1.3.mdx mobile app to the Store.
Repeat Steps 16 – 19 to add the CitrixBrowser-1.3..1.mdx mobile app to the Store.

| 58 |
Step iOS Android 22. Configure the following settings in the
Application Settings section:
Preloaded bookmarks: “Citrix”,Edocs,http://support.citrix.com/proddocs
Home page URL: http://www.citrix.com
Browser user interface: Read-only address bar
Click Save.
Configure the following settings in the Application Settings section:
Preloaded bookmarks: “Citrix”,Edocs,http://support.citrix.com/proddocs
Home page URL: http://www.citrix.com
Browser user interface: Read-only address bar
Click Save.
23. Select the Apps & Docs tab. Then click the Public App Stores node.
Select the Settings tab. Then click the Store Credentials node.

| 59 |
Step iOS Android 24. Click the big green “+”.
Click Edit.
25. Configure the following settings:
App Name: Citrix Receiver
Description: Citrix Receiver
URL: https://itunes.apple.com/us/app/citrix-receiver/id363501921
Type: iOS
Category: Default
Assigned Role: AllUsers
Require app installation: Enabled
Click Save.
Enter your Google Play credentials. If you do not have a Google Play account, enter the following credentials:
Username: [email protected]
Password: Citrix123
Device id: 3182AC0AA13AB38C
Click Save.

| 60 |
Step iOS Android 26. Click the green “+” again and configure the
following settings:
App Name: GoToMeeting
Description: GoToMeeting
URL: https://itunes.apple.com/us/app/gotomeeting/id424104128
Type: iOS
Category: Default
Assigned Role: AllUsers
Require app installation: Enabled
Click Save.
Select the Apps & Docs tab. Then click the Public App Stores node.
Click the big green “+”

| 61 |
Step iOS Android 27. Citrix Receiver and GoToMeeting
are displayed.
Configure the following settings:
App Name: Citrix Receiver
Description: Citrix Receiver
URL: https://play.google.com/store/apps/details?id=com.citrix.Receiver
Type: Android (The default is iOS. Click the square next to iOS to change to Android)
Category: Default
Assigned Role: AllUsers
Require app installation: Enabled
Click Save.

| 62 |
Step iOS Android 28. Continue to Step 30. Click the green “+” again and configure the
following settings:
App Name: GoToMeeting
Description: GoToMeeting
URL: https://play.google.com/store/apps/details?id=com.citrixonline.android.gotomeeting
Type: Android (The default is iOS. Click the square next to iOS to change to Android)
Category: Default
Assigned Role: AllUsers
Require app installation: Enabled
Click Save.

| 63 |
Step iOS Android 29. Citrix Receiver and GoToMeeting
are displayed.
30. Select the Web Link node in the left panel.
31. Click the large green “+” on the right.

| 64 |
Step iOS Android 32. Enter the following settings:
App Name: Citrix
URL: http://www.citrix.com
Category: Web Links
Assigned role: AllUsers
App is hosted in internal network: unchecked
Click Save.
33. In order to make sure everything is working as required, open a new tab in your browser and navigate to https://ac.training.lab.
Log in with the following credentials:
Username: sales1
Password: Citrix123
34. Click Add Apps.
35. Click Web Links to add the Citrix web link to the list and then launch it.
36. The Citrix.com site should launch successfully. Close the browser tab.
You need to allow pop-ups when using Google Chrome browser.

| 65 |
Exercise Summary In this exercise, you added applications to the App Controller. You have also created roles, mapped AD groups to those roles, and assigned applications to those roles. This allows an administrator to easily assign applications to users based on their role.

| 66 |
Exercise 7 Integrating XenMobile Device Manager with XenMobile App Controller Overview XenMobile Device Manager can be integrated with the App Controller so applications that are published on App Controller are enumerated in WorxHome and Citrix Receiver.
Step by step guidance Estimated time to complete this lab: 20 minutes.
Step Action 1. Log on to the Device Manager at http://192.168.10.30/zdm with the following
credentials:
Username: administrator
Password: Citrix123
2. Click Options in the upper-right corner.

| 67 |
Step Action 3. In the left panel select the App Controller node. Check Enable App Controller
and enter the following information:
Host Name: 192.168.10.20
Shared Key: Citrix123
Click Close, and click Yes to save the modifications.
4. Open a new tab in your browser and navigate to https://ac.training.lab:4443.
Log on with the following credentials:
Username: administrator
Password: Citrix123
Make note of the shared key you enter here. The same key has to be entered on the App Controller. If you click “Check Connection” here, it will fail because the shared key has not been setup on the App Controller.
Click Log Others Off, if you are presented with the option.

| 68 |
Step Action 5. Click the Settings >XenMobile MDM node.
Click Edit.
6. Enter the following settings:
Host: 192.168.10.30
Port: 80
Shared Key: Citrix123
Click Test Connection.
7. After successful connection, click Close, and then click Save.
Exercise Summary You have configured the IP address of App Controller on the Device Manager and vice versa. You have also entered the shared key on both components. This allows the two components to be seamlessly integrated and trust communication from one another.
Note: Verify the settings for XDM were saved. If not, re-enter the information and save again.

| 69 |
Exercise 8 XenMobile Integration with XenApp Overview StoreFront provides access to published Windows Applications and Desktops. In this exercise, you will install and configure StoreFront to provide access to published resources in the XenApp farm.
Step by step guidance Estimated time to complete this lab: 25 minutes.
Step Action 1. Select the SF virtual machine and click the Console tab.
2. Log on with the following credentials:
Username: training\administrator
Password: Citrix123
3. Open Windows Explorer and navigate to C:\Program Files\Citrix\Receiver StoreFront\Management and launch the CitrixStoreFrontConsole.
4. When the Citrix StoreFront console opens, click Server Group and select Change Base URL.
Enter https://sf.training.lab in the Base URL textbox.
Click OK.
If a Remote Desktop Connection message appears, click Don’t ask me again for connections to this computer and then click Yes.

| 70 |
Step Action 5. Select Stores. Click Enable Remote Access. When the window opens, select the
Full VPN tunnel radio button from the Remote access section.
Then click Add from just below the NetScaler Gateway appliances section.

| 71 |
Step Action 6. In the Add Gateway Server window, configure the following settings:
Display name: NG
NetScaler Gateway URL: https://IP1 FQDN
Your IP1 FQDN is available on the ILT portal page
Example: https://50-22-43-107.mycitrixtraining.net
Version: 10.0 (Build 69.4) or later
Logon type: Domain
Callback URL: https://IP1 FQDN
Your IP1 FQDN is available on the ILT portal page
Example: https://173-192-94-3.mycitrixtraining.net
Click Next.

| 72 |
Step Action 7. In the Secure Ticket Authority section, click Add.
8. Type http://192.168.10.80 in the STA URL field and click OK.
9. Click Create and then OK.

| 73 |
Step Action 10. Select the Win7Client virtual machine in XenCenter.
11. Switch to the tab in Internet Explorer containing the App Controller Management Console.
Select the Apps & Docs tab and click the Windows Apps node.
12. Click Edit and enter the following settings:
Host: sf.training.lab
Port: 443
Relative Path: /Citrix/Store/PNAgent/config.xml
Allow Secure Access: Checked
Click Save.
13. Select the Settings tab and then click the Deployment node.

| 74 |
Step Action 14. Click Edit.
Configure Authentication from NetScaler Gateway: Yes (Default is No, change to Yes)
Click the green “+”.
15. Configure the following NetScaler Gateway settings:
Display Name: NG
External URL: https://IP1 FQDN
Your IP1 FQDN is available on the ILT portal page
Example: https://75-126-118-243.mycitrixtraining.net
Logon type: Domain only
16. Scroll to the bottom of the screen and click Save.
Exercise Summary In this exercise, you configured StoreFront services store on a Windows 2012 server. You also configured the App Controller with the StoreFront information so that HDX applications can be enumerated on the end user’s device.
Callback is not required because the NetScaler and App Controller trust one another. This is because the root certificates are installed on both NetScaler and App Controller

| 75 |
Exercise 9 Configure NetScaler Gateway for Enterprise Store Overview In this exercise you will use the Quick Start wizard to configure NetScaler Gateway for an Enterprise Store. The wizard will create the virtual server along with the necessary policies and profiles to connect to the enterprise store on the App Controller.
Step by step guidance Estimated time to complete this lab: 25 minutes.
Step Action 1. Select the Win7Client virtual machine in XenCenter.
2. In IE, navigate to http://192.168.10.50 and log on with the following credentials:
Username: nsroot
Password: nsroot
3. In the NetScaler Gateway Configuration Utility, navigate to NetScaler Gateway > Configure NetScaler for Enterprise Store.

| 76 |
Step Action 4. Click Get Started.
5. Configure the following settings:
Name: NG-VIP
IP Address*: 192.168.10.100
Click Continue.
6. From the Certificate drop-down, select the wildcard.mycitrixtraining.net certificate.
Click Continue.

| 77 |
Step Action 7. Select Configure New.
Enter the following settings:
IP Address: 192.168.10.11
Base DN: dc=training,dc=lab
Administrator Base DN*: [email protected]
Server Logon Name Attribute: sAMAccountName
Password: Citrix123
Confirm Password: Citrix123
Click Continue.
A best practice is to use a service account for the Base DN. However, for this lab environment and exercise, we are using the administrator account.

| 78 |
Step Action 8. Enter ac.training.lab as the App Controller FQDN.
Click Done.
9. NG-VIP is displayed as a Configured NetScaler Gateway Appliance on the top-right portion of the screen.
10. Close this window to return to the Configuration Utility.

| 79 |
Step Action 11. Navigate to NetScaler Gateway > Virtual Servers and double-click the NG-VIP
virtual server.
12. Select the Policies tab. Notice that all session policies have been created by the wizard.
13. Select the PL_OS_192.168.10.100 policy and click the blue hyperlink next to Request Profile at the bottom of the screen.
First time access to NetScaler Configuration Utility, do not update Java.

| 80 |
Step Action 14. Select the Published Applications tab and configure the following settings:
Web Interface address: Unchecked (The field should be blank)
Single Sign-on Domain: Checked and then enter training in this field.
15. Select the Client Experience tab and configure the following settings:
Split Tunnel: On
Clientless Access: On
Clientless Access URL Encoding: Clear
Single Sign-on to Web Applications: Checked
16. Click OK to close the session profile.

| 81 |
Step Action 17. Select the Published Applications tab.
18. Under the Secure Ticket Authority section, click Add.
19. Enter the following Secure Ticket Authority and click Create.
http://192.168.10.80
20. Click OK to close the virtual server properties window.
Double-click the NG-VIP virtual server to open it again.
21. Select the Published Applications tab again. The STA server shows as UP.
22. Select the Policies tab.

| 82 |
Step Action 23. Select the Clientless tab below the Intranet Applications tab.
Note: The clientless policies have been created by the wizard.
Click OK to close the virtual server properties window.
24. Navigate to NetScaler Gateway > Global Settings.
Click Configure Domains for Clientless Access.
| 83 |
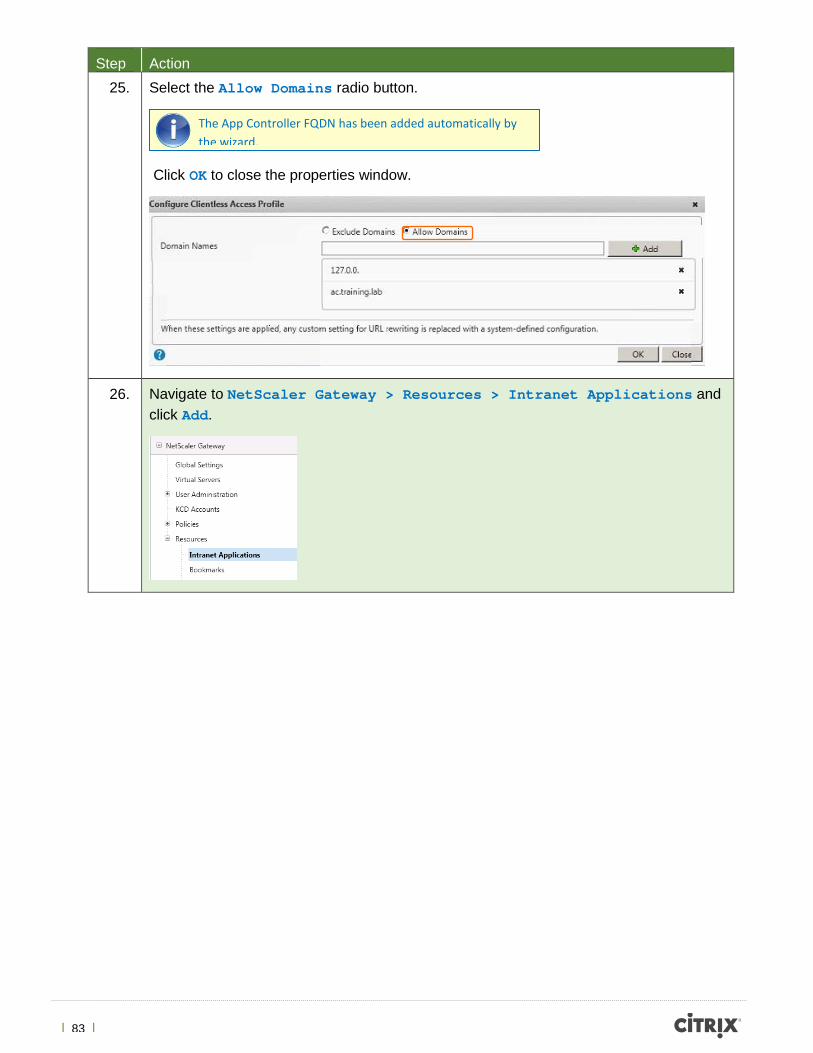
Step Action 25. Select the Allow Domains radio button.
Click OK to close the properties window.
26. Navigate to NetScaler Gateway > Resources > Intranet Applications and click Add.
The App Controller FQDN has been added automatically by the wizard.

| 84 |
Step Action 27. Enter the following Intranet Application settings:
Name: Mobility
Mode: Transparent
Protocol: TCP (Accept the default)
Destination Type: IP Address and Netmask (Accept the default)
IP Address*: 192.168.10.0
Netmask: 255.255.255.0
Click Create and then Close.
28. Navigate to NetScaler Gateway > Virtual Servers and double-click the NG-VIP virtual server.
29. Click the Intranet Applications tab.

| 85 |
Step Action 30. Select the Mobility intranet application and click Add >.
Click OK to close the virtual server properties.
Exercise Summary In this exercise, you used the wizard to configure NetScaler Gateway to connect to an enterprise store. The wizard created the virtual server as well as the authentication and session policies. The wizard is designed to simplify configuration for the administrator so that manual configuration of the policies is avoided.
A best practice is to save the running configuration after making changes. This prevents loss of configuration in the event the NetScaler is rebooted.

| 86 |
Exercise 10 Device Enrollment Overview In order for XenMobile Device Manager to manage mobile devices, the WorxHome client must be installed and configured on the endpoint device. In this exercise, you will install WorxHome and configure the Device Manager IP address that the device should connect to.
Step by step guidance Estimated time to complete this lab: 10 minutes.
Step iOS Android 1. Open the Apple App Store on your iOS
device.
Search for WorxHome.
Tap on the cloud icon to install.
Open the GooglePlay Store on your Android device.
Search for WorxHome.
Download and install WorxHome.
2. Launch the WorxHome application. An App Permissions window pops up.
Tap Accept.
After installation is complete, launch the WorxHome application.
If your device is enrolled with another MDM solution, the enrollment will fail. To continue, you must un-enroll from your existing MDM solution.

| 87 |
Step iOS Android 3. You are prompted for credentials.
Enter the IP2 FQDN
Your IP2 FQDN is available from the portal page.
Example: 75-126-118-244.mycitrixtraining.net
Tap Next.
You are prompted for credentials.
Enter the IP2 FQDN
Your IP2 FQDN is available from the portal page.
Example: 75-126-118-244.mycitrixtraining.net
Tap Next.
4. Tap Yes to Enroll your device.
Enter the user credentials.
Username: sales1
Password: Citrix123
Tap Sign On.
You are asked to enroll your device.
Tap Yes.

| 88 |
Step iOS Android 5. If you receive a message that the device
can’t verify the server’s identity.
Click Continue.
You are prompted to activate the Device Administrator.
Tap Activate.
6. An Enroll Your iPhone message shows for a second and disappears. You are then prompted to install the company profile.
Tap Install twice.
Enter the user credentials.
Username: sales1
Password: Citrix123
Tap Sign On.

| 89 |
Step iOS Android 7. Tap Done after the profile is installed.
Click OK to install the certificate.
If you receive an Invalid Server Certificate message, click Accept.
8. You are prompted to install the Device Profile.
Tap Install.
Then tap Install Now.
If you do not have screen lock configured, you are prompted to configure your screen lock settings.
Specify a 4 digit PIN.

| 90 |
Step iOS Android 9. You are prompted to install the Mobile
Device Management profile.
Tap Install.
Tap Done after the profile has been installed.
Once the enrollment is complete, you are authenticated and the Worx Store appears.
10. You are prompted to allow WorxHome to use your current location. Tap OK.
This is done in Settings >Security > Unknown Sources.
Some Android devices require you to allow installation of apps from unknown sources before WorxWeb and WorxMail can be installed.

| 91 |
Step iOS Android 11. Once the enrollment is completed, you are
authenticated and the Worx Store appears.
You are taken to the Google Play store to install Citrix Receiver.
Tap Install > Accept.
12. If not installed, you are prompted to install Receiver.
Tap Install.
Click the back arrow. You are prompted to install GoToMeeting.
Tap Install > Accept.
Note: Order of application installs may vary.
Note: Order of application installs may vary.

| 92 |
Step iOS Android 13. If not installed, you are prompted to install
GoToMeeting.
Tap Install.
You are prompted to install WorxWeb.
Tap Install. Then tap Done.
.
14. You are prompted to install WorxWeb.
Tap Install.
Worx Store is displayed along with Citrix Receiver, GoToMeeting, and WorxWeb.
Tap Worx Store.

| 93 |
Step iOS Android 15. If the device does not have a passcode
configured, you are prompted to configure a passcode.
Note: If you have a passcode configured, proceed to Step 19.
Tap Continue.
End of Exercise.
16. Enter your 4-digit passcode.
Tap Continue.
17. Re-enter the 4-digit passcode.
Tap Save.
18. All applications are installed and displayed on your springboard.

| 94 |
Exercise Summary In this exercise, you enrolled your iOS or Android device with the Device Manager. Only after the device is successfully enrolled can it be managed by policies on the Device Manager server.

| 95 |
Exercise 1: Configure NetScaler SSL Offload for Device Manager Overview In this exercise we are going to patch the XenMobile Device Manager Server, remove the existing SSL Bridge configuration and configure SSL Offload on the NetScaler.
Step by step guidance Estimated time to complete this lab: 45 minutes.
Step Action 1. Log on to the XDM VM in XenCenter with the following credentials if you are logged off:
Username: training\Administrator
Passoword: Citrix123
2. Open Windows Explorer and browse to \\ad\software\SSL Offload Patch.
Optional Exercises

| 96 |
Step Action 3. Right-click the a_patch_860-9998 file and click Copy.
4. Now, paste the file to the following location:
C:\Program Files (x86)\Citrix\XenMobile Device Manager\tomcat\webapps\zdm\WEB-INF\lib
5. Click Server Manager in the toolbar of the XDM VM.

| 97 |
Step Action 6. In Server Manager, click Tools.
7. Click Services.
8. Scroll down umtill you see the XenMobile Device Manager service, right-click it and then click Restart to restart the service.

| 98 |
Step Action 9. Now that we’ve patched the XenMobile Device Manager server let’s configure SSL Offload on
the NetScaler.
Log on to Win7Client VM in XenCenter with the following credentials if you are logged off:
Username: training\Administrator
Password: Citrix123
10. Open Internet Explorer and navigate to 192.168.10.50 in order to get to the NetScaler web console.

| 99 |
Step Action 11. Log on to the console with the following credentials:
Username: nsroot
Password: nsroot
12. First we are going to configure the service that will send traffic from the NetScaler to the XDM server. (If we had more than one XDM server you’d create a service for each XDM server)
On the left, under Traffic Management scroll down, expand SSL Offload and click Services.

| 100 |
Step Action 13. Click Add.
(It may take 20-30 seconds for the applet to load initially)
14. Enter the following information:
Service Name: svc_xdm_ssl_offload
Server: 192.168.10.30 (This is the IP address of your XDM1 server)
Protocol: HTTP
Port: 80
Monitor: TCP
Click Create and then Close.

| 101 |
Step Action 15. Now we need to add two SSL based virtual servers listening on 443 and 8443 for client
connections. Then we need to bind these vServers to the service we created in previous steps.
Navigate to SSL Offload > Virtual Servers.
16. Now click Add.
17. Enter the following information:
Service Name: lb_vserver_XDM_443
IP Address: 192.168.10.101
Protocol: SSL
Port: 443

| 102 |
Step Action 18. Under the Services tab, check the box in the Active column for the
svc_xdm_ssl_offload service.
19. Click the SSL Settings tab.

| 103 |
Step Action 20. Select the “wildcard.mycitrixtraining.net” certificate from the pane on the left and click
Add.
21. Now click SSL Parameters.
| 104 |
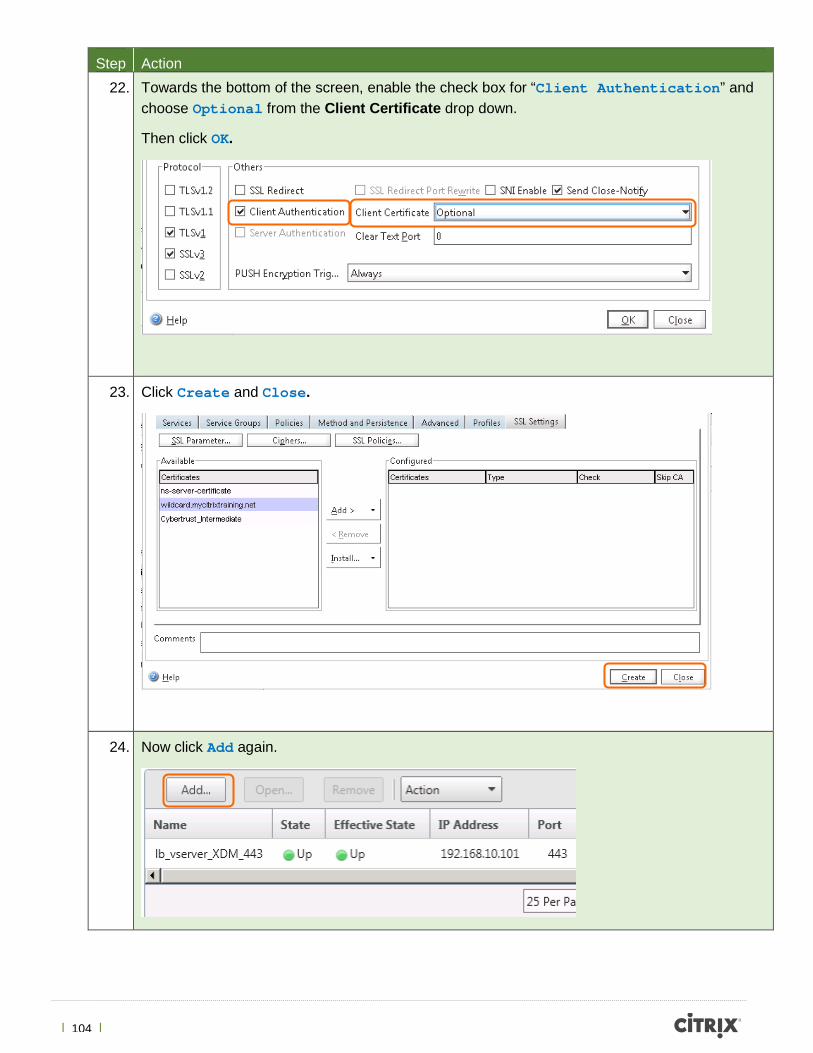
Step Action 22. Towards the bottom of the screen, enable the check box for “Client Authentication” and
choose Optional from the Client Certificate drop down.
Then click OK.
23. Click Create and Close.
24. Now click Add again.

| 105 |
Step Action 25. Enter the following information:
Service Name: lb_vserver_XDM_8443
IP Address: 192.168.10.101
Protocol: SSL
Port: 8443
26. Under the Services tab check the box in the Active column for the svc_xdm_ssl_offload service.

| 106 |
Step Action 27. Click the SSL Settings tab.
28. Click the SSL Parameters button. Ensure that Client Authentication is unchecked.
Click OK.

| 107 |
Step Action 29. Select the “wildcard.mycitrixtraining.net” certificate from the pane on the left and click
Add.
Then click Create and Close.
30. You should see both services now and the current status should be Up.
31.
Open a tab in Windows Explorer and browse to the following path:
\\xdm\C$\Program Files (x86)\Citrix\XenMobile Device Manager\tomcat\conf
We require certificates from the XDM server to be added to NetScaler. These certificates can be retrieved from the cacerts.pem certificate file on the XDM server. The PEM file contains two certificates: Device CA and Root CA. We need to split the PEM file into two separate files.

| 108 |
Step Action 32. Copy the cacerts.pem file to the desktop of the Win7Client VM.
33. Right-click cacerts.pem on the Win7Client and select Open.
Select Select a program from a list of installed programs and then double-click Notepad.
| 109 |
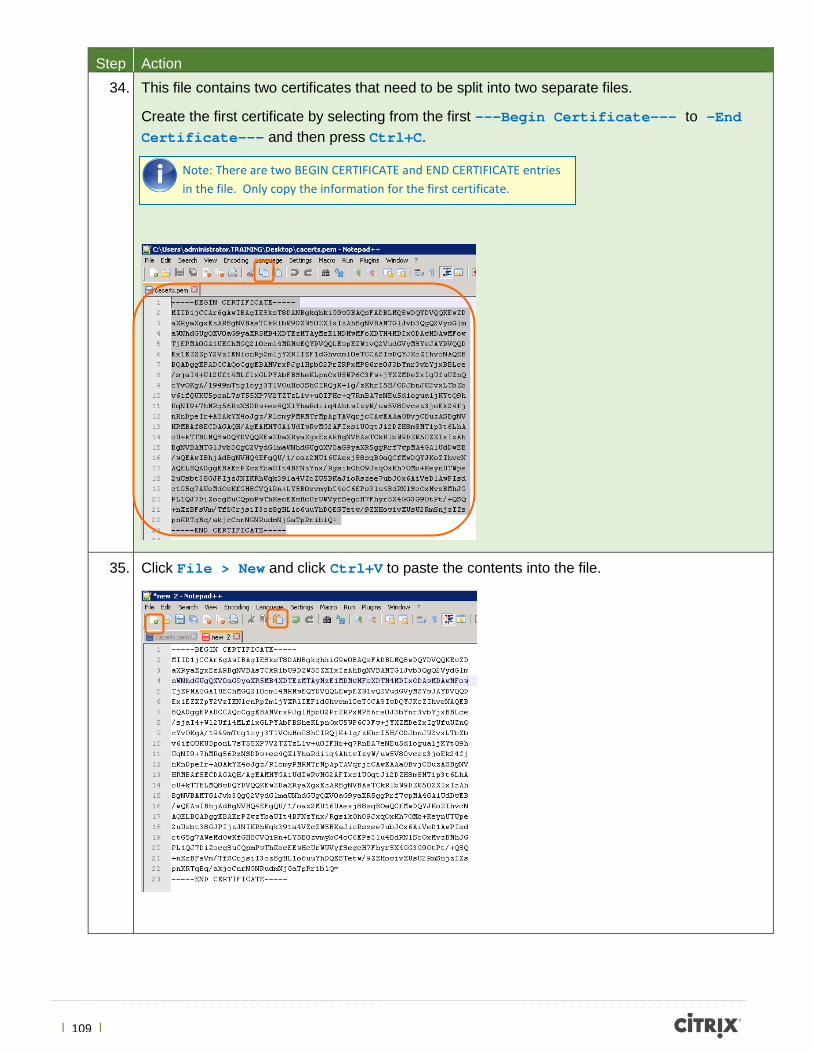
Step Action 34. This file contains two certificates that need to be split into two separate files.
Create the first certificate by selecting from the first ---Begin Certificate--- to –End Certificate--- and then press Ctrl+C.
35. Click File > New and click Ctrl+V to paste the contents into the file.
Note: There are two BEGIN CERTIFICATE and END CERTIFICATE entries in the file. Only copy the information for the first certificate.

| 110 |
Step Action 36. Click File > Save. Select All Files in the Save as type field and then save the file to
the Desktop as XDM Device CA.cer. Close Notepad.
37. Double-click the cacerts.pem file on the Desktop of the Win7Client.

| 111 |
Step Action 38. Select the second certificate by selecting from the second ---Begin Certificate--- to –
End Certificate--- section and then press Ctrl+C.
39. Click File > New to create a new file and then press Ctrl+V to paste the contents into the file.

| 112 |
Step Action 40. Click File > Save. Select All Files in the Save as type field and then save the file to
the Desktop as XDM Root CA.cer.
Close Notepad.
41. Now let’s install these certs on the NetScaler.
In Internet Explorer, you should still be logged into the NetScaler console. If the session timed out, log on again using the nsroot and nsroot credentials.
On the left side expand Traffic Management > SSL and click Certificates.

| 113 |
Step Action 42. Now in the center pane click Install…
43. Enter the following information.
Certificate-Key Pair Name: XDM Root CA.
44. To the right of the Certificate File Name field, click the down arrow to the right of the Browse button and select Local.

| 114 |
Step Action 45. Select Desktop > XDM Root CA.cer and click Open.
46. Click Create.

| 115 |
Step Action 47. Now in the same window change the Certificate-Key Pair Name to:
XDM Device CA
48. Now, click Browse, select XDM Device CA.cer and click Open.

| 116 |
Step Action 49. Click Create and Close.
50. You should now see that the XDM Root CA and XDM Device CA are installed.
Click XDM Device CA.

| 117 |
Step Action 51. Click Action and select Link…
52. Verify that the CA Certificate Name selected is XDM Root CA and click OK.
53. We also need to create an SSL Action and Policy.
On the left expand SSL and click Policies.

| 118 |
Step Action 54. Under the Policies tab click Add.
55. Enter the following information:
Name:XDM Client Policy
Expression: CLIENT.SSL.CLIENT_CERT.EXISTS
Then click the + to the right of the Action field.

| 119 |
Step Action 56. Enter the following information:
Name: XDM Action
Client Certificate: ENABLED
Certificate Tag: NSClientCert
Click Create.

| 120 |
Step Action 57. On the Create SSL Policy screen, click Create and Close.
58. Now we must bind the certificates and the new SSL Policy to the lb_vserver_XDM_443 Virtual Server for SSL Offload.
On the left expand SSL Offload and click Virtual Servers.
.

| 121 |
Step Action 59. Double click lb_vserver_XDM_443 to open it.
60. Click the SSL Settings tab.

| 122 |
Step Action 61. Select XDM Root CA and click the drop-down for the Add button and select as CA >.
Select XDM Device CA.
Click the drop-down on the Add button and select as CA >.
62. Now click the SSL Policies button.

| 123 |
Step Action 63. On the bottom left of this window click Insert Policy.
64. From the available policies select the XDM Client Policy.
Click OK.
65. Click Ok.
If the policy does not appear, log off of the web console and log back on to refresh the UI.

| 124 |
Step Action 66. Click the floppy disk icon in the upper-right corner to save the configuration we just
created. Click Yes to save the configuration.
67. To test the SSL Offload, re-enroll your device to the XenMobile Device Manager.
Exercise Summary In this exercise all the necessary steps were taken to patch the Device Manager server, create the Root CA and Device CA certificates from the Device Manager server, disable SSL Bridge, and configure SSL offload on the NetScaler.
| 125 |
Exercise 2: WorxWeb - Push Bookmarks and Hide Actions Overview In this exercise, you will see how App Controller policies can be utilized to push pre-configured bookmarks, and prevent/hide actions in the WorxWeb application.
Step by step guidance Estimated time to complete this lab: 5 minutes.
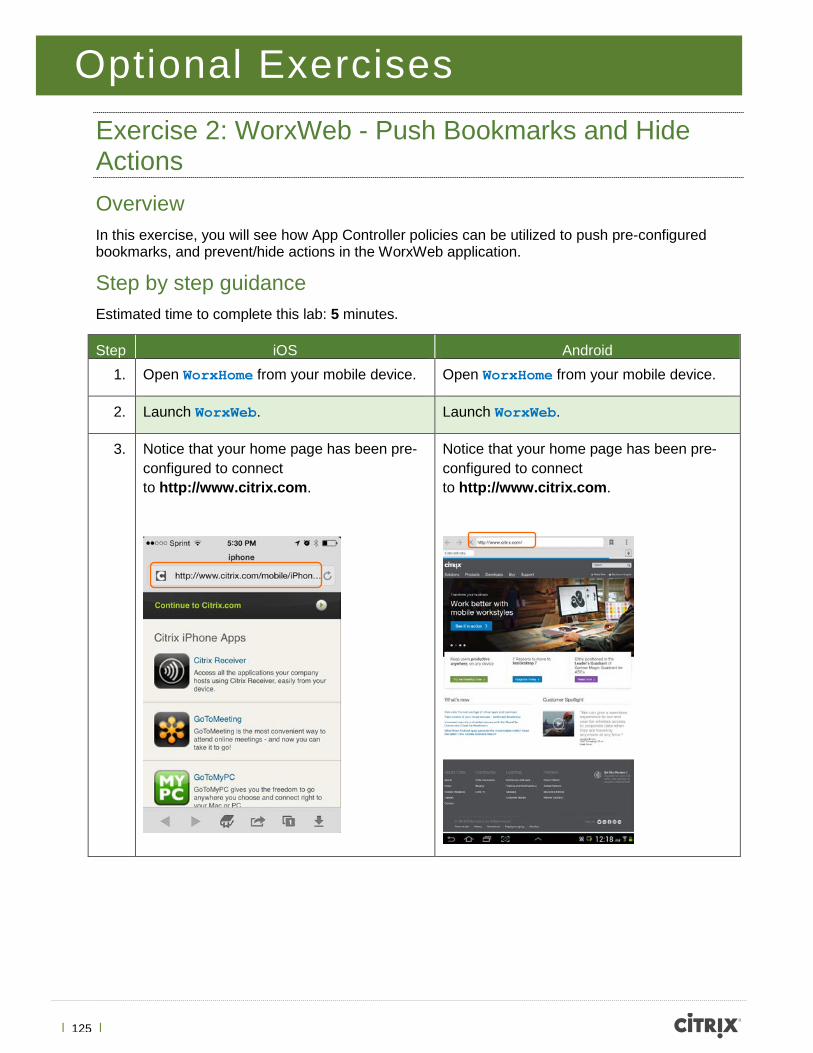
Step iOS Android 1. Open WorxHome from your mobile device. Open WorxHome from your mobile device.
2. Launch WorxWeb. Launch WorxWeb.
3. Notice that your home page has been pre-configured to connect to http://www.citrix.com.
Notice that your home page has been pre-configured to connect to http://www.citrix.com.
Optional Exercises

| 126 |
Step iOS Android 4. Tap in the address bar and try to browse to
another web site.
Tap in the address bar and try to browse to another web site.
5. Tap the book icon located on the bottom-left part of the screen.
Tap the book icon located on the top-right corner of the screen.
6. Notice that you see the bookmarks added from configuring WorxWeb.
Notice that you see the Citrix folder. This was added when configuring WorxWeb.
7. Tap the Citrix folder and launch the Edocs bookmark.
Tap the Citrix folder and launch the Edocs bookmark.
8. You are taken to the Citrix Edocs site.
You are taken to the Citrix Edocs site.
You can’t edit the address because this was configured as Read-Only in the WorxWeb application.
You can’t edit the address because this was configured as Read-Only in the WorxWeb application.

| 127 |
Exercise Summary You have successfully pushed a pre-configured homepage along with bookmarks to your endpoint device. You have also experienced the hide actions now available in the WorxMail policies.
Please complete this survey
We value your feedback! Please take a moment to let us know about your training experience by completing the brief Learning Lab Survey

| 128 |
Revision: Change Description Updated By Date
1.0 Original version Curtis Kegler May 2014
About Citrix Citrix (NASDAQ:CTXS) is a cloud company that enables mobile workstyles—empowering people to work and collaborate from anywhere, securely accessing apps and data on any of the latest devices, as easily as they would in their own office. Citrix solutions help IT and service providers build clouds, leveraging virtualization and networking technologies to deliver high-performance, elastic and cost-effective cloud services. With market-leading cloud solutions for mobility, desktop virtualization, networking, cloud platforms, collaboration and data sharing, Citrix helps organizations of all sizes achieve the speed and agility necessary to succeed in a mobile and dynamic world. Citrix products are in use at more than 330,000 organizations and by over 100 million users globally. Annual revenue in 2012 was $2.59 billion. Learn more at www.citrix.com.http://www.citrix.com