6 holiday sewing ideas: celebrate a diy 4 - · pdf file06.02.2012 · th6 holiday...
TRANSCRIPT
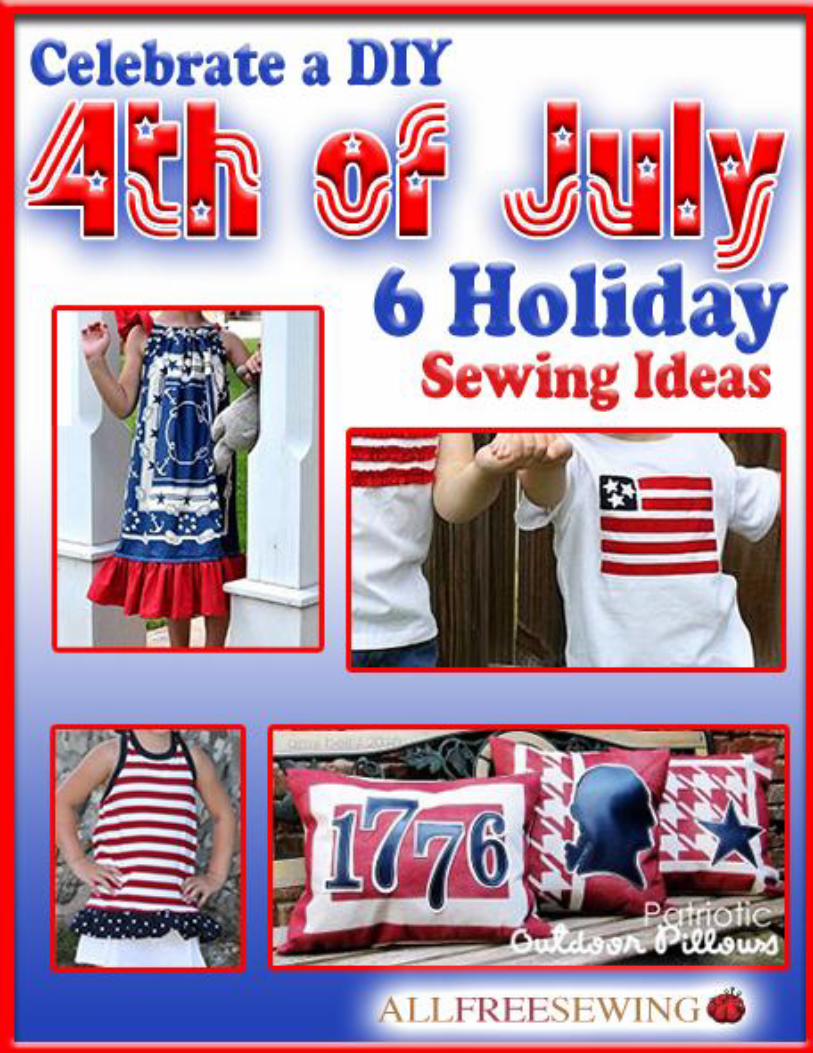
6 Holiday Sewing Ideas: Celebrate a DIY 4th of July
Copyright 2011 by Prime Publishing LLC
All rights reserved. No part of this book may be reproduced or transmitted in any form or by any means,
electronic or mechanical, including photocopying, recording, or by any information storage or retrieval
system, without written permission from the publisher, except in the case of brief quotations embodied
in critical articles and reviews.
Trademarks are property of their respective holders. When used, trademarks are for the benefit of the
trademark owner only.
Published by Prime Publishing LLC, 3400 Dundee Road, Northbrook, IL 60062 – www.primecp.com
Free Sewing Projects
Free Crochet Projects Free Knitting Projects Free Craft Projects
6 Holiday Sewing Ideas: Celebrate a DIY 4th of July
Find thousands of free sewing patterns, tips, tutorials and more at www.AllFreeSewing.com. 3
Letter from the Editors
Hi Sewers,
Holiday specific projects are some of the most fun to sew. When 4th of July rolls around it’s time to kick-
back and relax with family and friends. Dress up the kids in red, white and blue and prepare for the
party by making festive decorations. We’ve put together this eBook with patriotic ideas for you to try.
You can celebrate a fun and inexpensive 4th of July with these DIY holiday sewing projects!
Happy Sewing!
You can find more kids sewing patterns, sewing tips, and decorating ideas at www.AllFreeSewing.com.
Our eBooks, like all our sewing projects, are absolutely FREE to members of our sewing community.
Please feel free to share with family and friends and ask them to sign up at our website for our
free e-mail newsletter.
Happy Sewing,
The Editors of AllFreeSewing
www.AllFreeSewing.com
6 Holiday Sewing Ideas: Celebrate a DIY 4th of July
Find thousands of free sewing patterns, tips, tutorials and more at www.AllFreeSewing.com. 4
6 Holiday Sewing Ideas: Celebrate a DIY 4th of July Table of Contents
Stars and Stripes Tote .................................... 5
Patriotic Pillowcase Dresses ......................... 11
4th of July Outdoor Pillows .......................... 15
4th of July Halter .......................................... 20
4th of July Shirts .......................................... 21
All Americana Stars Pillow Tutorial .............. 24
6 Holiday Sewing Ideas: Celebrate a DIY 4th of July
Find thousands of free sewing patterns, tips, tutorials and more at www.AllFreeSewing.com. 5
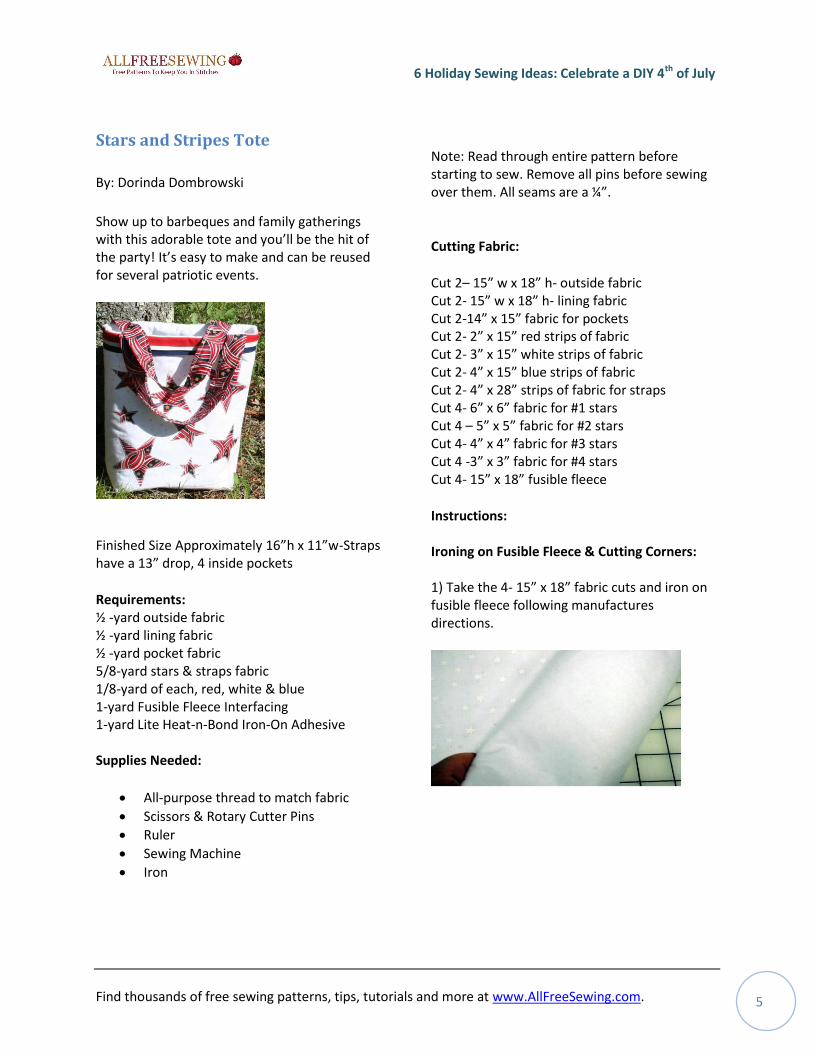
Stars and Stripes Tote
By: Dorinda Dombrowski
Show up to barbeques and family gatherings with this adorable tote and you’ll be the hit of the party! It’s easy to make and can be reused for several patriotic events.
Finished Size Approximately 16”h x 11”w-Straps have a 13” drop, 4 inside pockets
Requirements: ½ -yard outside fabric ½ -yard lining fabric ½ -yard pocket fabric 5/8-yard stars & straps fabric 1/8-yard of each, red, white & blue 1-yard Fusible Fleece Interfacing 1-yard Lite Heat-n-Bond Iron-On Adhesive Supplies Needed:
All-purpose thread to match fabric
Scissors & Rotary Cutter Pins
Ruler
Sewing Machine
Iron
Note: Read through entire pattern before starting to sew. Remove all pins before sewing over them. All seams are a ¼”.
Cutting Fabric:
Cut 2– 15” w x 18” h- outside fabric Cut 2- 15” w x 18” h- lining fabric Cut 2-14” x 15” fabric for pockets Cut 2- 2” x 15” red strips of fabric Cut 2- 3” x 15” white strips of fabric Cut 2- 4” x 15” blue strips of fabric Cut 2- 4” x 28” strips of fabric for straps Cut 4- 6” x 6” fabric for #1 stars Cut 4 – 5” x 5” fabric for #2 stars Cut 4- 4” x 4” fabric for #3 stars Cut 4 -3” x 3” fabric for #4 stars Cut 4- 15” x 18” fusible fleece
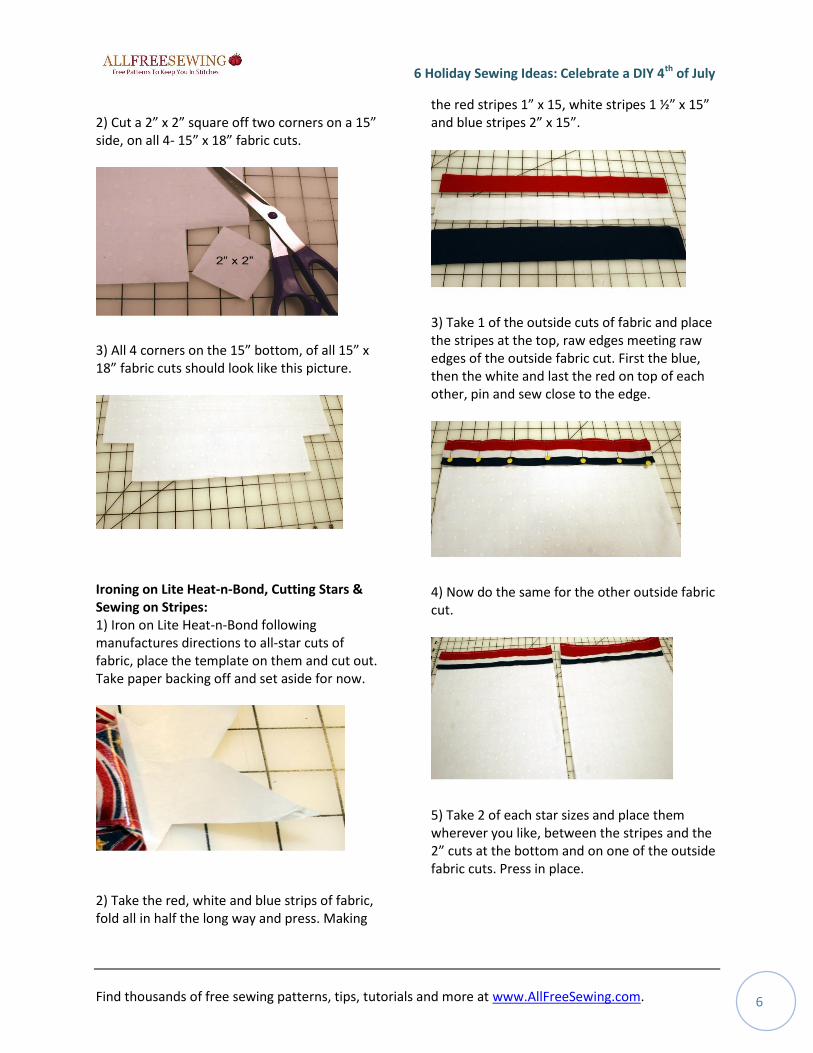
Instructions: Ironing on Fusible Fleece & Cutting Corners: 1) Take the 4- 15” x 18” fabric cuts and iron on fusible fleece following manufactures directions.
6 Holiday Sewing Ideas: Celebrate a DIY 4th of July
Find thousands of free sewing patterns, tips, tutorials and more at www.AllFreeSewing.com. 6
2) Cut a 2” x 2” square off two corners on a 15” side, on all 4- 15” x 18” fabric cuts.
3) All 4 corners on the 15” bottom, of all 15” x 18” fabric cuts should look like this picture.
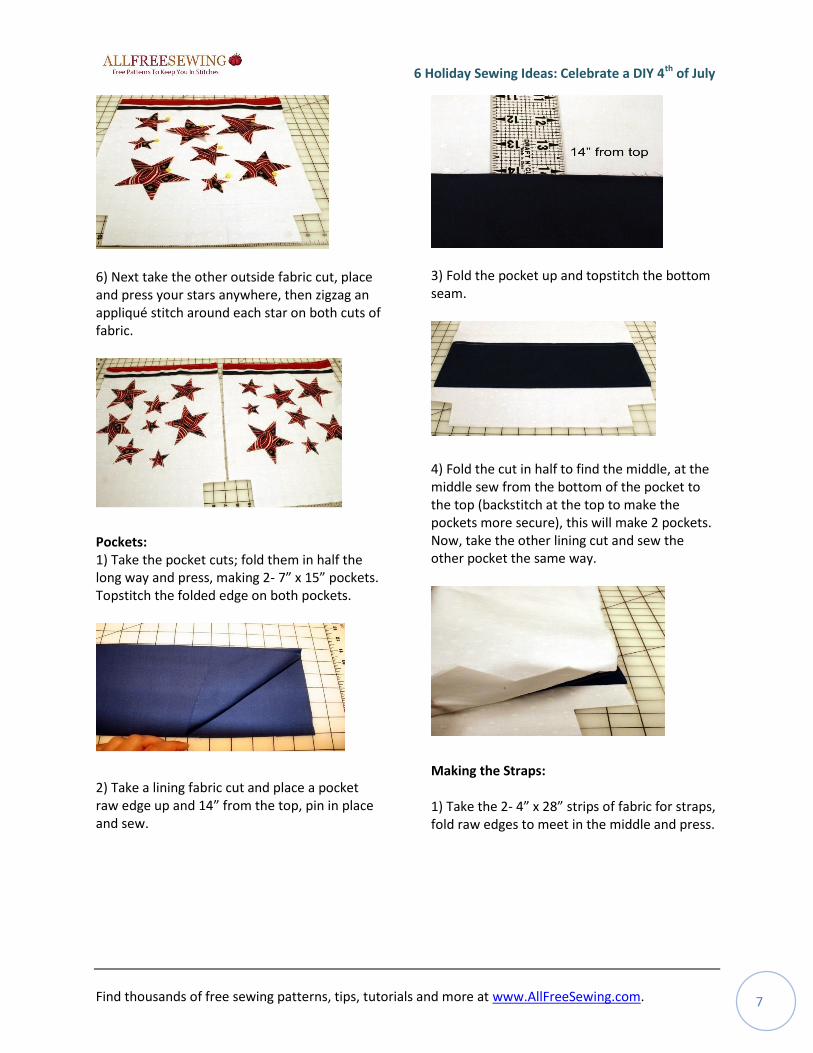
Ironing on Lite Heat-n-Bond, Cutting Stars & Sewing on Stripes: 1) Iron on Lite Heat-n-Bond following manufactures directions to all-star cuts of fabric, place the template on them and cut out. Take paper backing off and set aside for now.
2) Take the red, white and blue strips of fabric, fold all in half the long way and press. Making
the red stripes 1” x 15, white stripes 1 ½” x 15” and blue stripes 2” x 15”.
3) Take 1 of the outside cuts of fabric and place the stripes at the top, raw edges meeting raw edges of the outside fabric cut. First the blue, then the white and last the red on top of each other, pin and sew close to the edge.
4) Now do the same for the other outside fabric cut.
5) Take 2 of each star sizes and place them wherever you like, between the stripes and the 2” cuts at the bottom and on one of the outside fabric cuts. Press in place.
6 Holiday Sewing Ideas: Celebrate a DIY 4th of July
Find thousands of free sewing patterns, tips, tutorials and more at www.AllFreeSewing.com. 7
6) Next take the other outside fabric cut, place and press your stars anywhere, then zigzag an appliqué stitch around each star on both cuts of fabric.
Pockets: 1) Take the pocket cuts; fold them in half the long way and press, making 2- 7” x 15” pockets. Topstitch the folded edge on both pockets.
2) Take a lining fabric cut and place a pocket raw edge up and 14” from the top, pin in place and sew.
3) Fold the pocket up and topstitch the bottom seam.
4) Fold the cut in half to find the middle, at the middle sew from the bottom of the pocket to the top (backstitch at the top to make the pockets more secure), this will make 2 pockets. Now, take the other lining cut and sew the other pocket the same way.
Making the Straps: 1) Take the 2- 4” x 28” strips of fabric for straps, fold raw edges to meet in the middle and press.
6 Holiday Sewing Ideas: Celebrate a DIY 4th of July
Find thousands of free sewing patterns, tips, tutorials and more at www.AllFreeSewing.com. 8
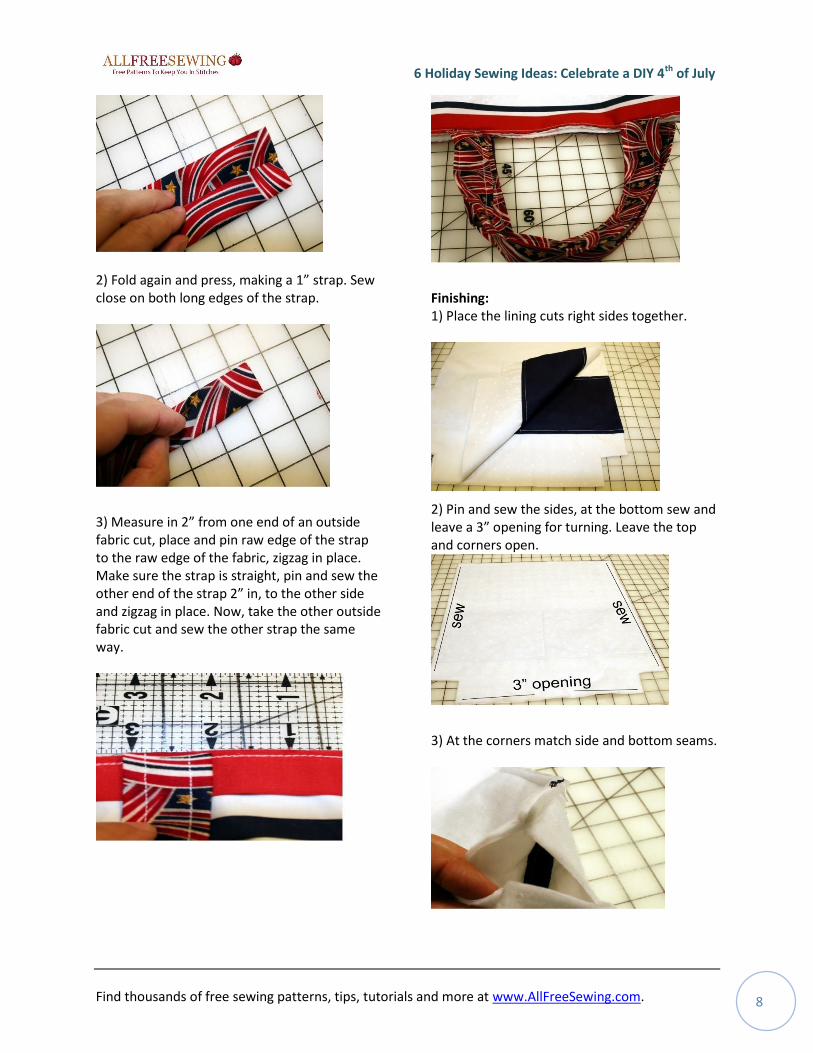
2) Fold again and press, making a 1” strap. Sew close on both long edges of the strap.
3) Measure in 2” from one end of an outside fabric cut, place and pin raw edge of the strap to the raw edge of the fabric, zigzag in place. Make sure the strap is straight, pin and sew the other end of the strap 2” in, to the other side and zigzag in place. Now, take the other outside fabric cut and sew the other strap the same way.
Finishing: 1) Place the lining cuts right sides together.
2) Pin and sew the sides, at the bottom sew and leave a 3” opening for turning. Leave the top and corners open.
3) At the corners match side and bottom seams.
6 Holiday Sewing Ideas: Celebrate a DIY 4th of July
Find thousands of free sewing patterns, tips, tutorials and more at www.AllFreeSewing.com. 9
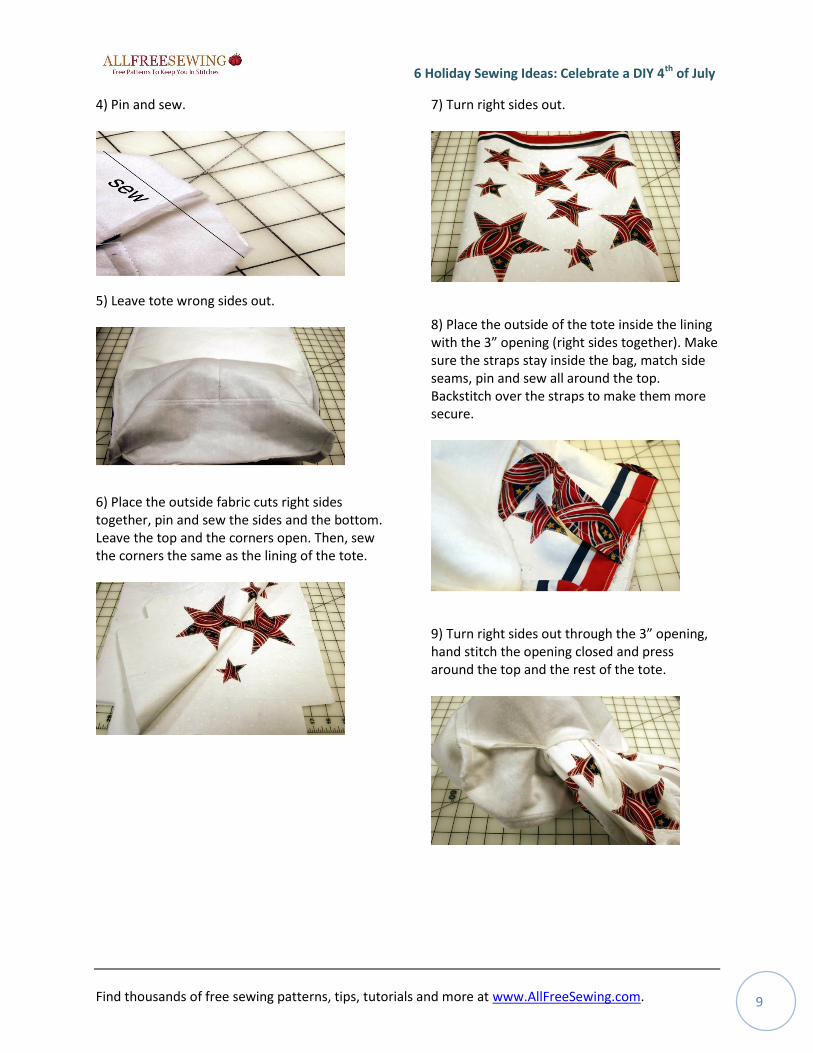
4) Pin and sew.
5) Leave tote wrong sides out.
6) Place the outside fabric cuts right sides together, pin and sew the sides and the bottom. Leave the top and the corners open. Then, sew the corners the same as the lining of the tote.
7) Turn right sides out.
8) Place the outside of the tote inside the lining with the 3” opening (right sides together). Make sure the straps stay inside the bag, match side seams, pin and sew all around the top. Backstitch over the straps to make them more secure.
9) Turn right sides out through the 3” opening, hand stitch the opening closed and press around the top and the rest of the tote.
6 Holiday Sewing Ideas: Celebrate a DIY 4th of July
Find thousands of free sewing patterns, tips, tutorials and more at www.AllFreeSewing.com. 10
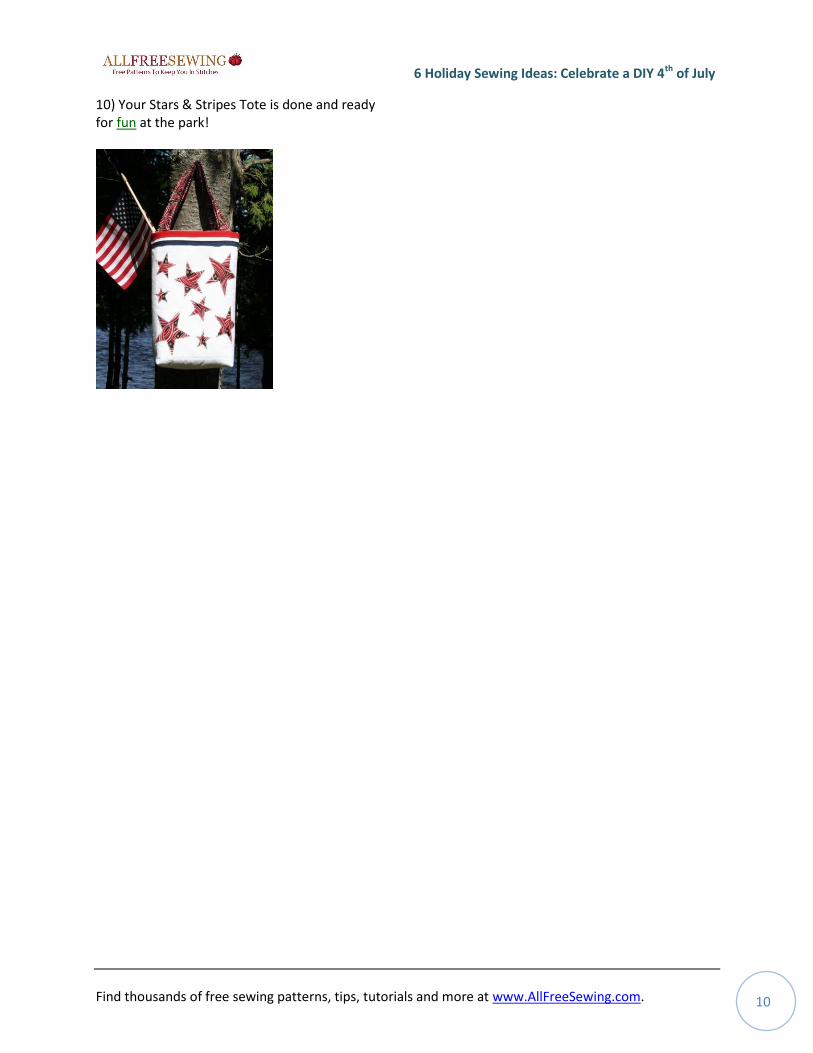
10) Your Stars & Stripes Tote is done and ready for fun at the park!
6 Holiday Sewing Ideas: Celebrate a DIY 4th of July
Find thousands of free sewing patterns, tips, tutorials and more at www.AllFreeSewing.com. 11
Patriotic Pillowcase Dresses
By: Aesthetic Nest
Use our holiday craft ideas to make your own
clothes! These patriotic pillowcase dresses are
quick and easy, and they're perfect to wear to a
4th of July barbecue.
Here's the tutorial for making these dresses in a
size 4 and a size 2, with and without ruffle.
Supplies for one dress:
1 Bar Harbor Scarf panel 1 package seam binding in off white or
oyster 1/2 yard red cotton fabric for ruffle and
tie (54" wide or wider) Off white/oyster thread and red thread
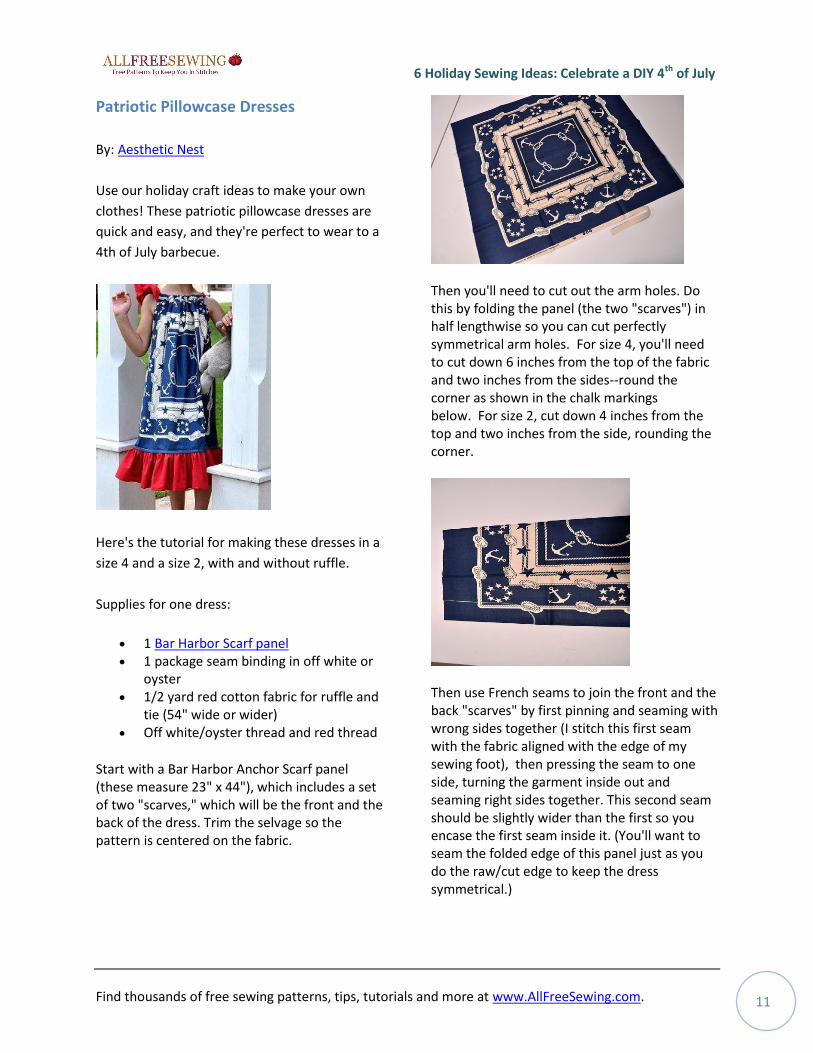
Start with a Bar Harbor Anchor Scarf panel (these measure 23" x 44"), which includes a set of two "scarves," which will be the front and the back of the dress. Trim the selvage so the pattern is centered on the fabric.
Then you'll need to cut out the arm holes. Do this by folding the panel (the two "scarves") in half lengthwise so you can cut perfectly symmetrical arm holes. For size 4, you'll need to cut down 6 inches from the top of the fabric and two inches from the sides--round the corner as shown in the chalk markings below. For size 2, cut down 4 inches from the top and two inches from the side, rounding the corner.
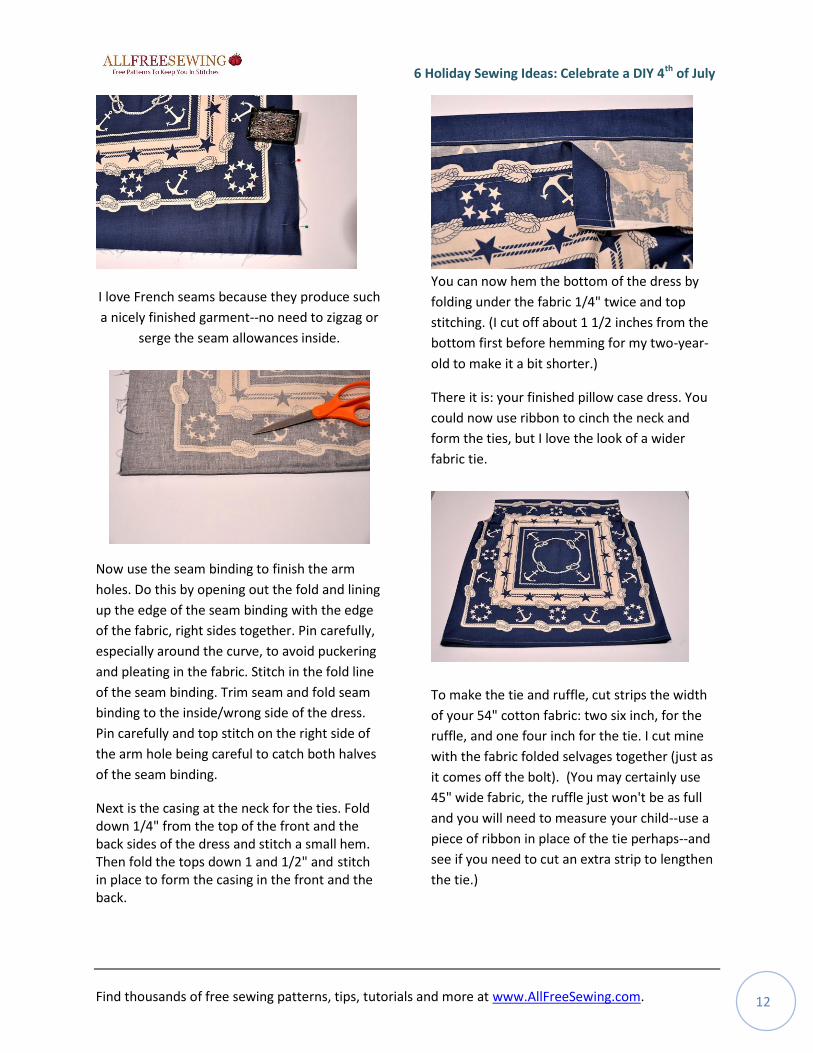
Then use French seams to join the front and the back "scarves" by first pinning and seaming with wrong sides together (I stitch this first seam with the fabric aligned with the edge of my sewing foot), then pressing the seam to one side, turning the garment inside out and seaming right sides together. This second seam should be slightly wider than the first so you encase the first seam inside it. (You'll want to seam the folded edge of this panel just as you do the raw/cut edge to keep the dress symmetrical.)
6 Holiday Sewing Ideas: Celebrate a DIY 4th of July
Find thousands of free sewing patterns, tips, tutorials and more at www.AllFreeSewing.com. 12
I love French seams because they produce such
a nicely finished garment--no need to zigzag or
serge the seam allowances inside.
Now use the seam binding to finish the arm
holes. Do this by opening out the fold and lining
up the edge of the seam binding with the edge
of the fabric, right sides together. Pin carefully,
especially around the curve, to avoid puckering
and pleating in the fabric. Stitch in the fold line
of the seam binding. Trim seam and fold seam
binding to the inside/wrong side of the dress.
Pin carefully and top stitch on the right side of
the arm hole being careful to catch both halves
of the seam binding.
Next is the casing at the neck for the ties. Fold down 1/4" from the top of the front and the back sides of the dress and stitch a small hem. Then fold the tops down 1 and 1/2" and stitch in place to form the casing in the front and the back.
You can now hem the bottom of the dress by
folding under the fabric 1/4" twice and top
stitching. (I cut off about 1 1/2 inches from the
bottom first before hemming for my two-year-
old to make it a bit shorter.)
There it is: your finished pillow case dress. You
could now use ribbon to cinch the neck and
form the ties, but I love the look of a wider
fabric tie.
To make the tie and ruffle, cut strips the width
of your 54" cotton fabric: two six inch, for the
ruffle, and one four inch for the tie. I cut mine
with the fabric folded selvages together (just as
it comes off the bolt). (You may certainly use
45" wide fabric, the ruffle just won't be as full
and you will need to measure your child--use a
piece of ribbon in place of the tie perhaps--and
see if you need to cut an extra strip to lengthen
the tie.)
6 Holiday Sewing Ideas: Celebrate a DIY 4th of July
Find thousands of free sewing patterns, tips, tutorials and more at www.AllFreeSewing.com. 13
Hem the edges of the tie by folding under twice,
as narrowly as possible--I'm always aiming for
1/4" or less. To save time, I fold under twice and
stitch as I go, which is what my mom taught me,
but you could certainly fold once, pin and stitch
and then do it again. Finish the ends similarly.
You can miter the corners if you would like. The
tie is now ready to thread through the casing. I
found using a large safety pin as a guide was
helpful.
To make the ruffle, sew the two 6-inch strips of fabric right sides together on the short ends to form a ring. Press and finish the seams with a zigzag stitch or serger. Now hem the bottom edge by folding under 1/4" twice and top stitching (similar to the finishing of the tie). Then finish the top edge with a zigzag stitch or serger. You're ready for the gathering.
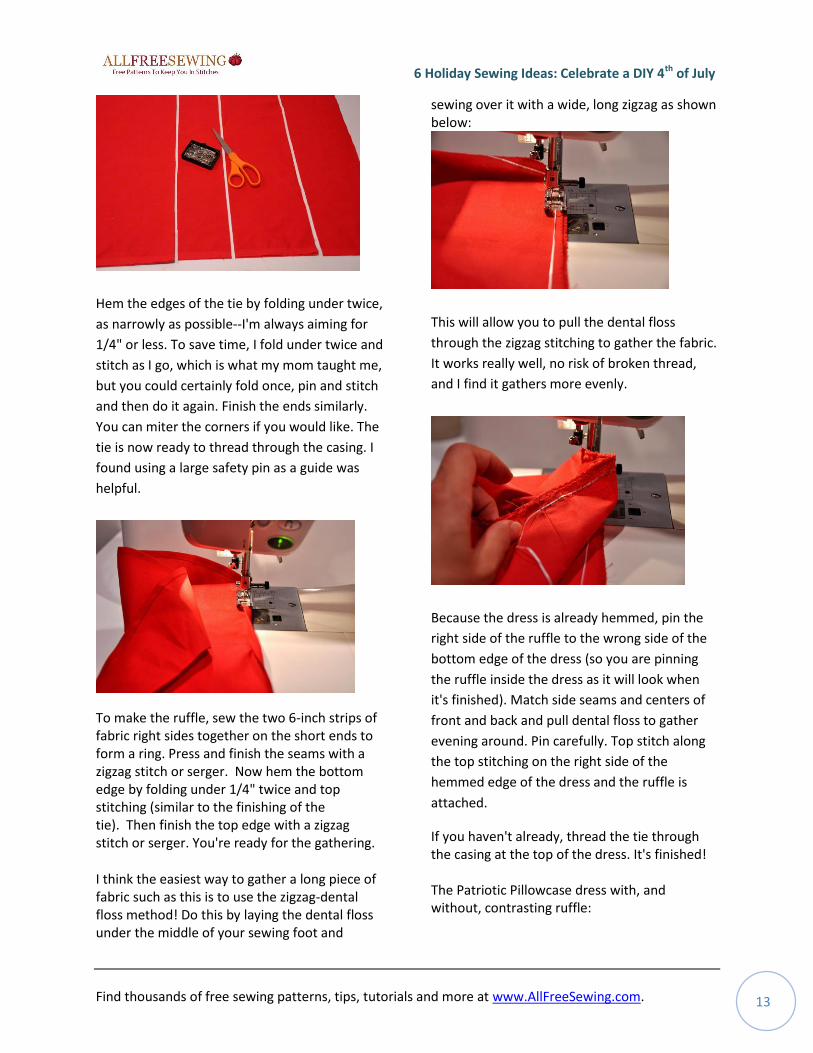
I think the easiest way to gather a long piece of fabric such as this is to use the zigzag-dental floss method! Do this by laying the dental floss under the middle of your sewing foot and
sewing over it with a wide, long zigzag as shown below:
This will allow you to pull the dental floss
through the zigzag stitching to gather the fabric.
It works really well, no risk of broken thread,
and I find it gathers more evenly.
Because the dress is already hemmed, pin the
right side of the ruffle to the wrong side of the
bottom edge of the dress (so you are pinning
the ruffle inside the dress as it will look when
it's finished). Match side seams and centers of
front and back and pull dental floss to gather
evening around. Pin carefully. Top stitch along
the top stitching on the right side of the
hemmed edge of the dress and the ruffle is
attached.
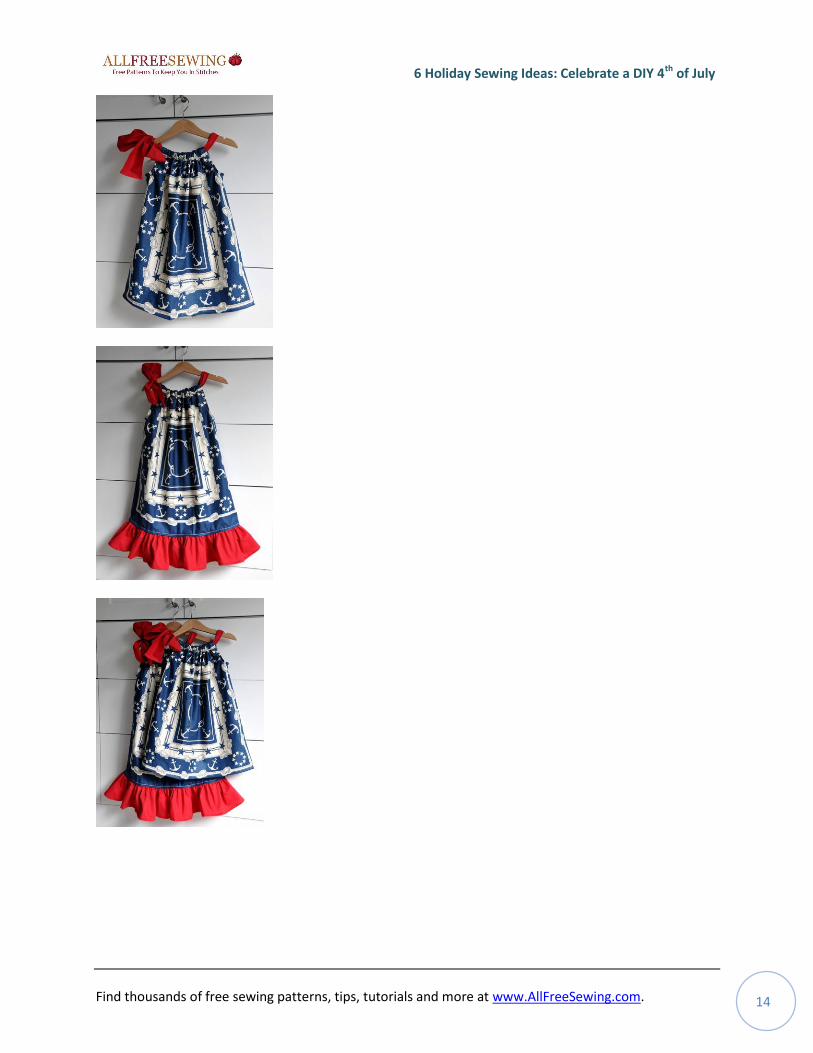
If you haven't already, thread the tie through the casing at the top of the dress. It's finished! The Patriotic Pillowcase dress with, and without, contrasting ruffle:
6 Holiday Sewing Ideas: Celebrate a DIY 4th of July
Find thousands of free sewing patterns, tips, tutorials and more at www.AllFreeSewing.com. 14
6 Holiday Sewing Ideas: Celebrate a DIY 4th of July
Find thousands of free sewing patterns, tips, tutorials and more at www.AllFreeSewing.com. 15
4th of July Outdoor Pillows
By: Amy for Positively Splendid
Make these 4th of July outdoor pillows to
decorate for your 4th of July festivities and
honor our founding fathers. This holiday craft
idea will show you just how easy it is to make
throw pillows.
To make a set of pillows, you will need:
3 pillow forms (I used 2 squares and 1
rectangle)
1 5' x 5' canvas drop cloth with leak-
proof backing
Freezer paper
Rotary cutter and mat
Cricut and Sure Cuts A Lot software
(optional, but recommended)
Iron
Red spray paint
Navy and white marine vinyl
White upholstery thread
Sewing machine needle for leather
Wash-Away Wonder Tape
Jeans sewing machine needle
All-purpose thread
Standard sewing notions: measuring
tape, shears, pins, etc.
To start, measure your pillow forms, length and width. Now, add 1 to each of these measurements, and cut out a piece according to those values. Example: My rectangular pillow is 15 inches long and 20 inches wide, so I need to cut a piece that is 16" x 21". Now you will need to cut two pieces for the back that has the same width as the piece you just cut, but are only 2/3 (.67) as long. Example: For the pillow above, I will multiply 16 (my length) x .67, which gives me 10.72. Rounding this value up to the nearest inch gives me 11. Thus, my two back pieces will each be 11" x 21". I know math can be daunting, but bear with me. You can do it! 1) Open your drop cloth and spread it out on a large work surface. Take note of each of the hemmed edges.
2) Cut your pieces according to the dimensions specified above.

6 Holiday Sewing Ideas: Celebrate a DIY 4th of July
Find thousands of free sewing patterns, tips, tutorials and more at www.AllFreeSewing.com. 16
3) Important: Cut your pillow back pieces so one of the long edges of each falls on one of the hemmed edges of your cloth. This will save you time later when you don’t have to hem them yourself!
4) Now grab your freezer paper and rotary cutter. For the star pillow, cut 1-inch strips that are the length of your pillow. Use your SCAL software and your Cricut to cut out houndstooth pieces. (Or, alternatively, trace and cut them out by hand.)
5) For this pillow, I used four 1-inch strips and 9 houndstooth pieces. Arrange them as shown. Once you are happy with your design, carefully iron them into place.
6 Holiday Sewing Ideas: Celebrate a DIY 4th of July
Find thousands of free sewing patterns, tips, tutorials and more at www.AllFreeSewing.com. 17
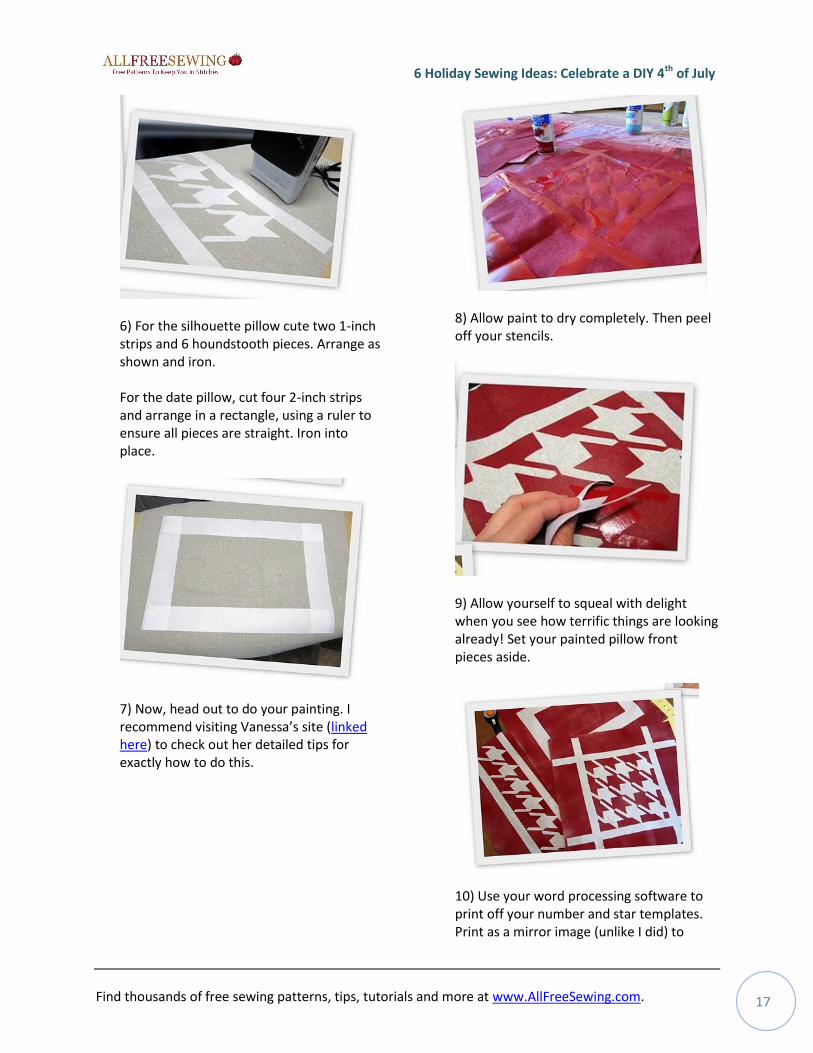
6) For the silhouette pillow cute two 1-inch strips and 6 houndstooth pieces. Arrange as shown and iron. For the date pillow, cut four 2-inch strips and arrange in a rectangle, using a ruler to ensure all pieces are straight. Iron into place.
7) Now, head out to do your painting. I recommend visiting Vanessa’s site (linked here) to check out her detailed tips for exactly how to do this.
8) Allow paint to dry completely. Then peel off your stencils.
9) Allow yourself to squeal with delight when you see how terrific things are looking already! Set your painted pillow front pieces aside.
10) Use your word processing software to print off your number and star templates. Print as a mirror image (unlike I did) to
6 Holiday Sewing Ideas: Celebrate a DIY 4th of July
Find thousands of free sewing patterns, tips, tutorials and more at www.AllFreeSewing.com. 18
ensure your shape is oriented correctly when you trace onto the back of your vinyl.
11) Trace your templates onto the back of your vinyl. (I used the navy vinyl for my main design and the white for the background.) Cut out your pieces.
12) Layer your main pieces onto your background pieces, adhering with Wonder Tape as you go.
13) Use your upholstery thread and leather needle to carefully stitch the top and
bottom layers together as shown.
14) Use Wonder Tape to secure your layered pieces to your painted pillow front. Stitch into place. You are done embellishing! All that’s left now is to assemble your pillow.
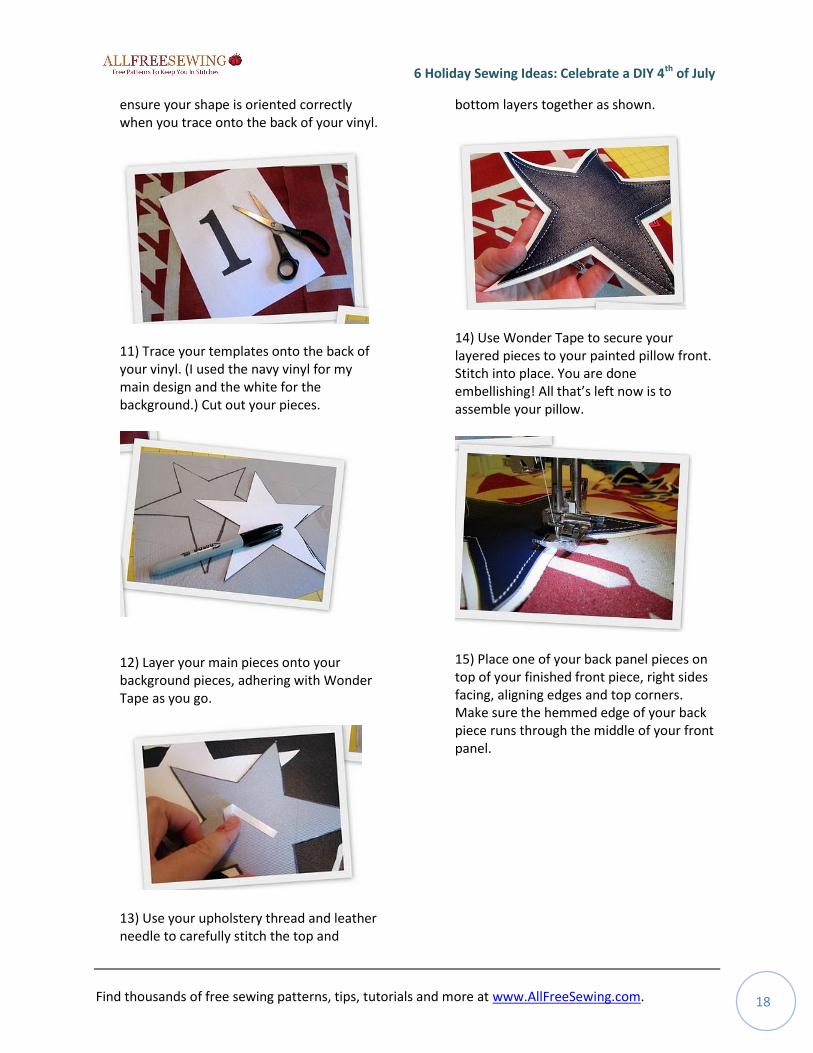
15) Place one of your back panel pieces on top of your finished front piece, right sides facing, aligning edges and top corners. Make sure the hemmed edge of your back piece runs through the middle of your front panel.
6 Holiday Sewing Ideas: Celebrate a DIY 4th of July
Find thousands of free sewing patterns, tips, tutorials and more at www.AllFreeSewing.com. 19
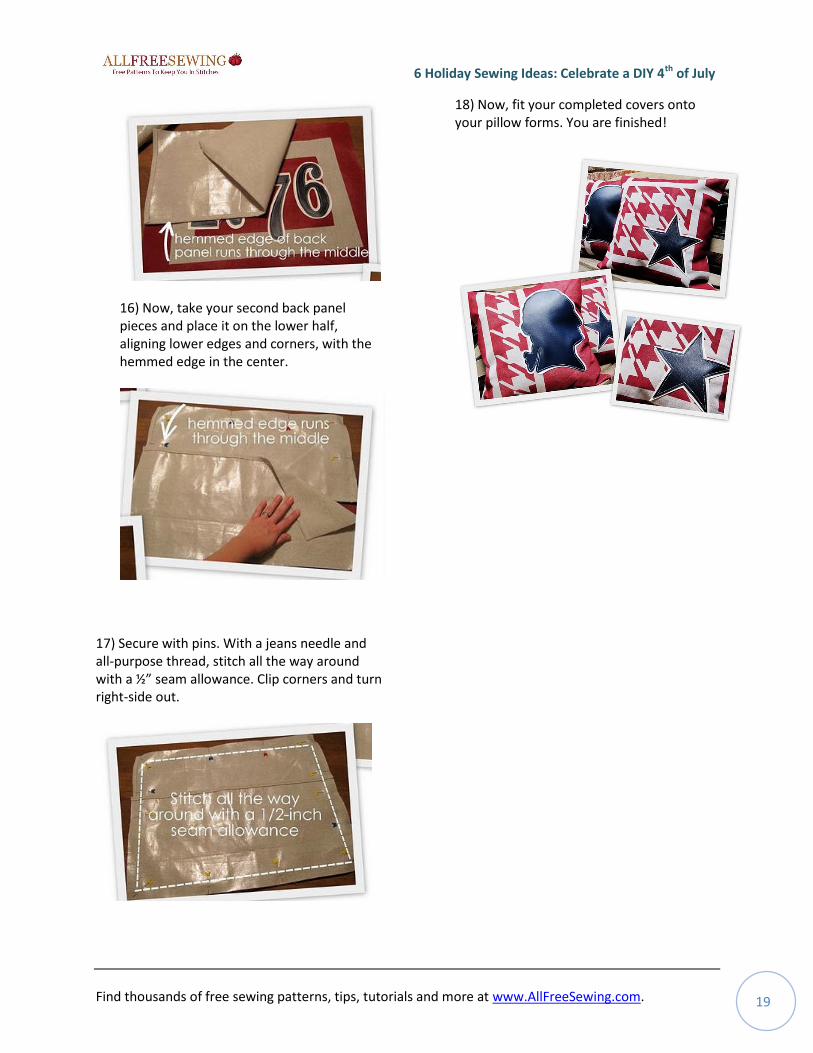
16) Now, take your second back panel pieces and place it on the lower half, aligning lower edges and corners, with the hemmed edge in the center.
17) Secure with pins. With a jeans needle and all-purpose thread, stitch all the way around with a ½” seam allowance. Clip corners and turn right-side out.
18) Now, fit your completed covers onto your pillow forms. You are finished!
6 Holiday Sewing Ideas: Celebrate a DIY 4th of July
Find thousands of free sewing patterns, tips, tutorials and more at www.AllFreeSewing.com. 20
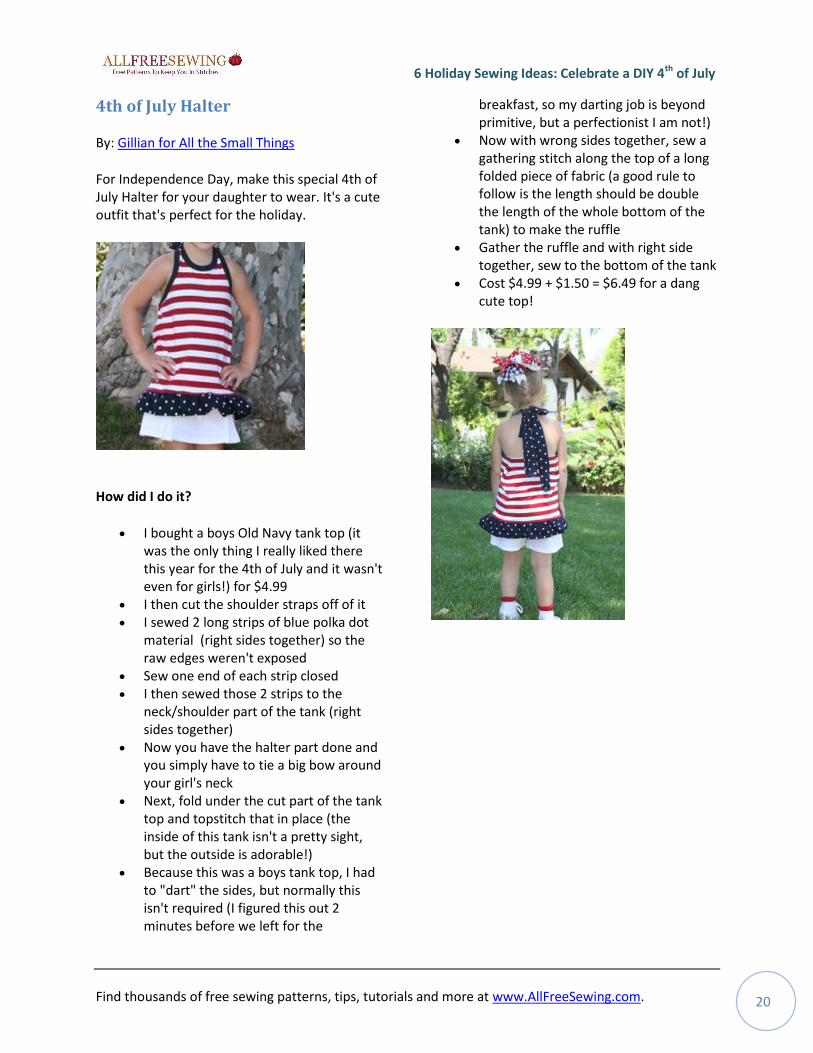
4th of July Halter By: Gillian for All the Small Things
For Independence Day, make this special 4th of July Halter for your daughter to wear. It's a cute outfit that's perfect for the holiday.
How did I do it?
I bought a boys Old Navy tank top (it was the only thing I really liked there this year for the 4th of July and it wasn't even for girls!) for $4.99
I then cut the shoulder straps off of it I sewed 2 long strips of blue polka dot
material (right sides together) so the raw edges weren't exposed
Sew one end of each strip closed I then sewed those 2 strips to the
neck/shoulder part of the tank (right sides together)
Now you have the halter part done and you simply have to tie a big bow around your girl's neck
Next, fold under the cut part of the tank top and topstitch that in place (the inside of this tank isn't a pretty sight, but the outside is adorable!)
Because this was a boys tank top, I had to "dart" the sides, but normally this isn't required (I figured this out 2 minutes before we left for the
breakfast, so my darting job is beyond primitive, but a perfectionist I am not!)
Now with wrong sides together, sew a gathering stitch along the top of a long folded piece of fabric (a good rule to follow is the length should be double the length of the whole bottom of the tank) to make the ruffle
Gather the ruffle and with right side together, sew to the bottom of the tank
Cost $4.99 + $1.50 = $6.49 for a dang cute top!
6 Holiday Sewing Ideas: Celebrate a DIY 4th of July
Find thousands of free sewing patterns, tips, tutorials and more at www.AllFreeSewing.com. 21
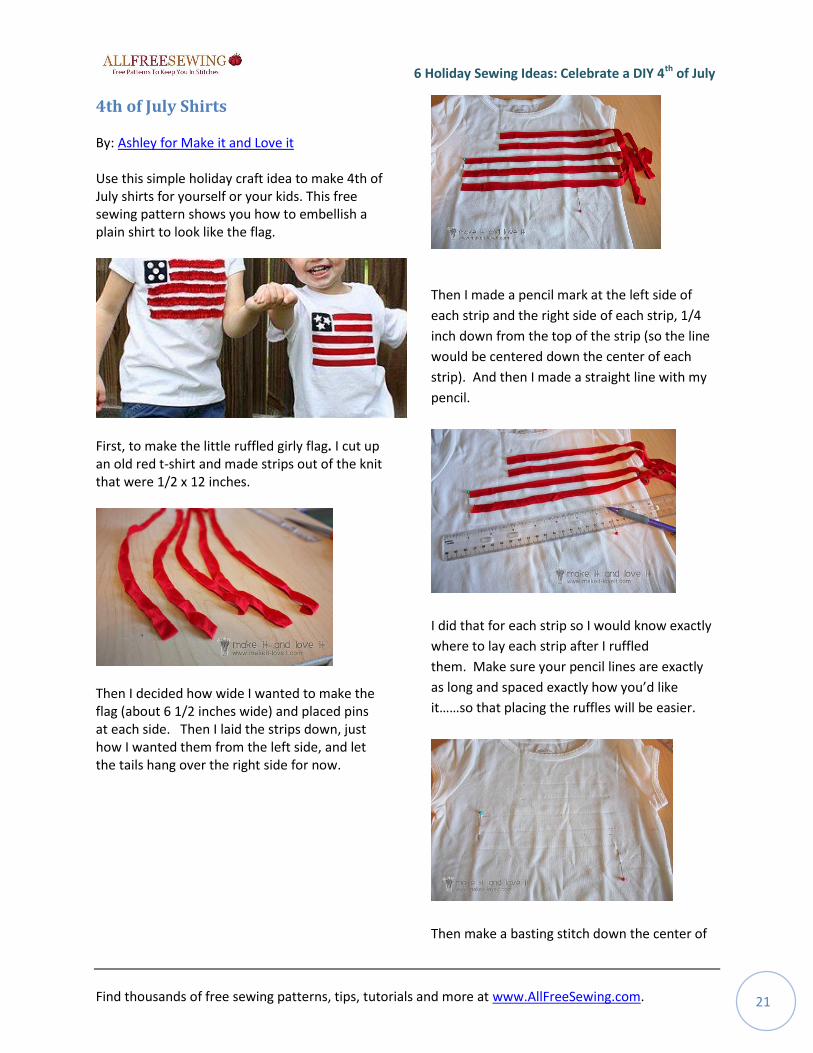
4th of July Shirts By: Ashley for Make it and Love it Use this simple holiday craft idea to make 4th of July shirts for yourself or your kids. This free sewing pattern shows you how to embellish a plain shirt to look like the flag.
First, to make the little ruffled girly flag. I cut up an old red t-shirt and made strips out of the knit that were 1/2 x 12 inches.
Then I decided how wide I wanted to make the flag (about 6 1/2 inches wide) and placed pins at each side. Then I laid the strips down, just how I wanted them from the left side, and let the tails hang over the right side for now.
Then I made a pencil mark at the left side of
each strip and the right side of each strip, 1/4
inch down from the top of the strip (so the line
would be centered down the center of each
strip). And then I made a straight line with my
pencil.
I did that for each strip so I would know exactly
where to lay each strip after I ruffled
them. Make sure your pencil lines are exactly
as long and spaced exactly how you’d like
it……so that placing the ruffles will be easier.
Then make a basting stitch down the center of
6 Holiday Sewing Ideas: Celebrate a DIY 4th of July
Find thousands of free sewing patterns, tips, tutorials and more at www.AllFreeSewing.com. 22
each 13 inch strips and gather them so that
they are only 6 1/2 inches wide (because that’s
how wide my flag is). Pin each ruffle in place,
directly over top each pencil mark. (And I
ended up trimming about 2 inches off the ends
of the top two ruffles because they were more
ruffly from being gathered more to fit a smaller
space. Make sense? If not, just ignore.)
Then sew each ruffle in place.
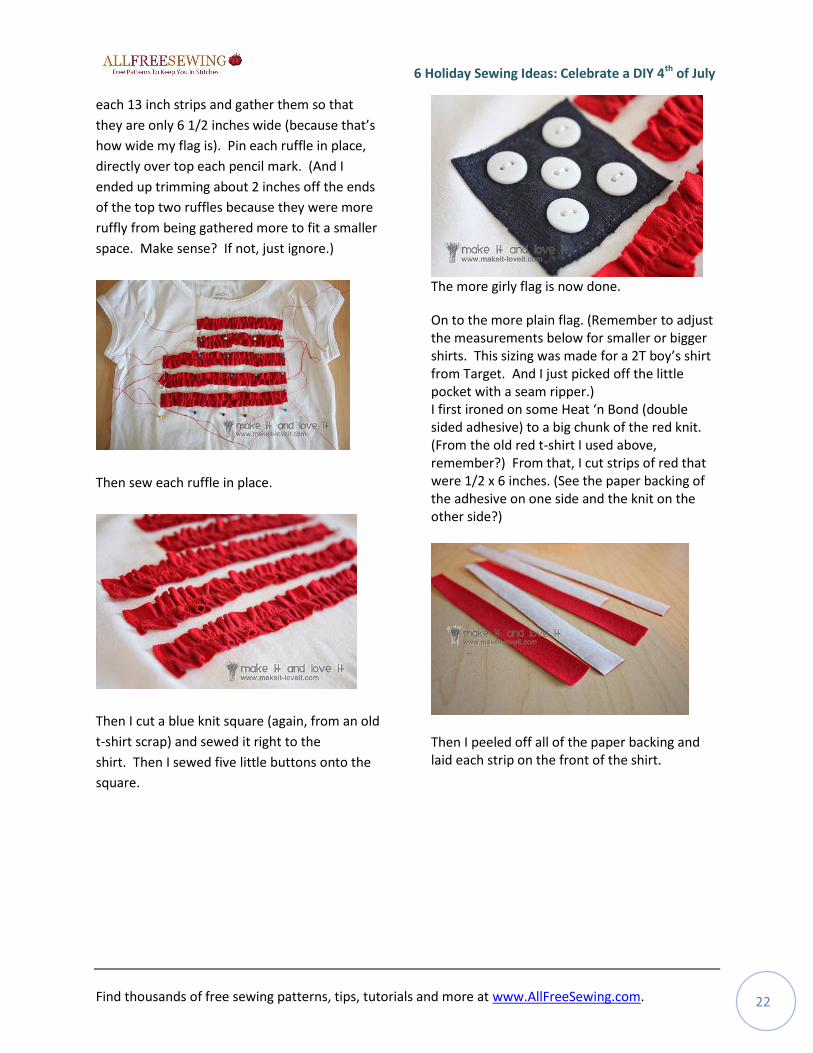
Then I cut a blue knit square (again, from an old
t-shirt scrap) and sewed it right to the
shirt. Then I sewed five little buttons onto the
square.
The more girly flag is now done.
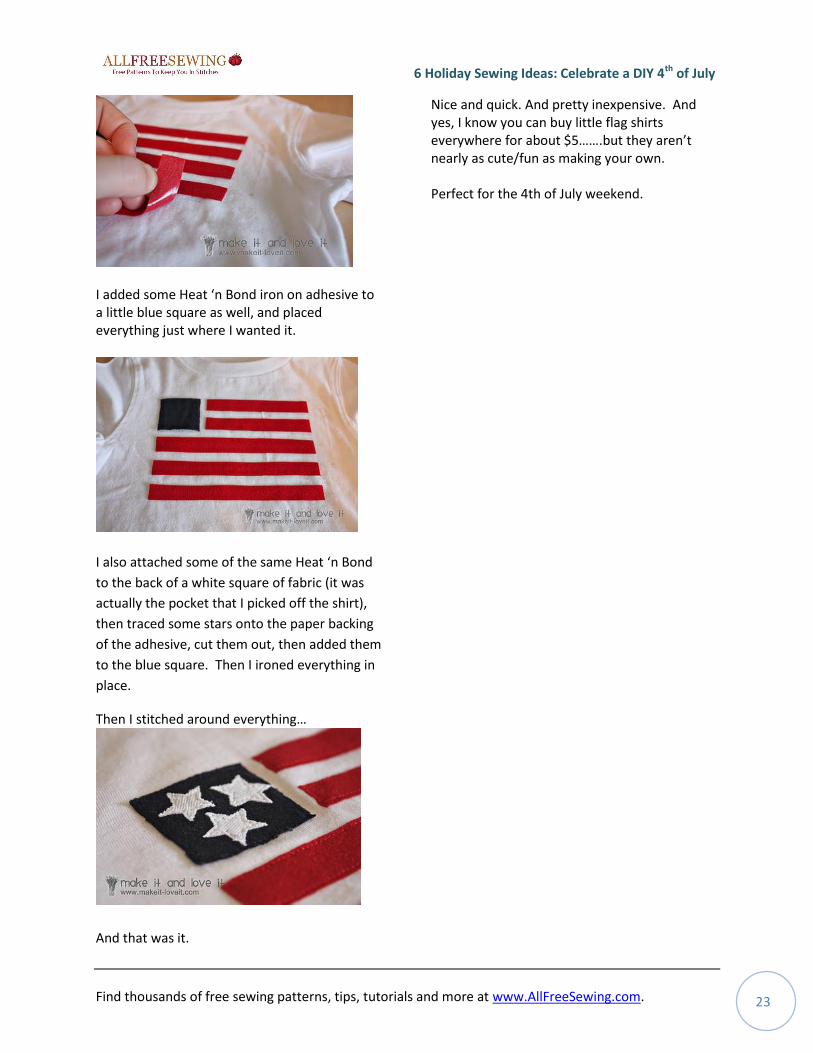
On to the more plain flag. (Remember to adjust the measurements below for smaller or bigger shirts. This sizing was made for a 2T boy’s shirt from Target. And I just picked off the little pocket with a seam ripper.) I first ironed on some Heat ‘n Bond (double sided adhesive) to a big chunk of the red knit. (From the old red t-shirt I used above, remember?) From that, I cut strips of red that were 1/2 x 6 inches. (See the paper backing of the adhesive on one side and the knit on the other side?)
Then I peeled off all of the paper backing and laid each strip on the front of the shirt.
6 Holiday Sewing Ideas: Celebrate a DIY 4th of July
Find thousands of free sewing patterns, tips, tutorials and more at www.AllFreeSewing.com. 23
I added some Heat ‘n Bond iron on adhesive to a little blue square as well, and placed everything just where I wanted it.
I also attached some of the same Heat ‘n Bond
to the back of a white square of fabric (it was
actually the pocket that I picked off the shirt),
then traced some stars onto the paper backing
of the adhesive, cut them out, then added them
to the blue square. Then I ironed everything in
place.
Then I stitched around everything…
And that was it.
Nice and quick. And pretty inexpensive. And yes, I know you can buy little flag shirts everywhere for about $5…….but they aren’t nearly as cute/fun as making your own. Perfect for the 4th of July weekend.
6 Holiday Sewing Ideas: Celebrate a DIY 4th of July
Find thousands of free sewing patterns, tips, tutorials and more at www.AllFreeSewing.com. 24
All Americana Stars Pillow Tutorial
By: Angel for Fleece Fun
Feeling patriotic? Want to make something
decorative for the American holidays? Let the
All Americana Stars Pillow Tutorial and video
show you how to make a pillow with the
ragging technique.
For the Pillow:
Printed and assembled pdf pattern 1/4 yard of five different fabrics (cotton
and flannel work best) 1/3 to 2/3 yard of fabric for backing,
center star and side pieces (again cotton or flannel)
stuffing (batting for fill) button (optional) needle and thread Washer and dryer for ragging
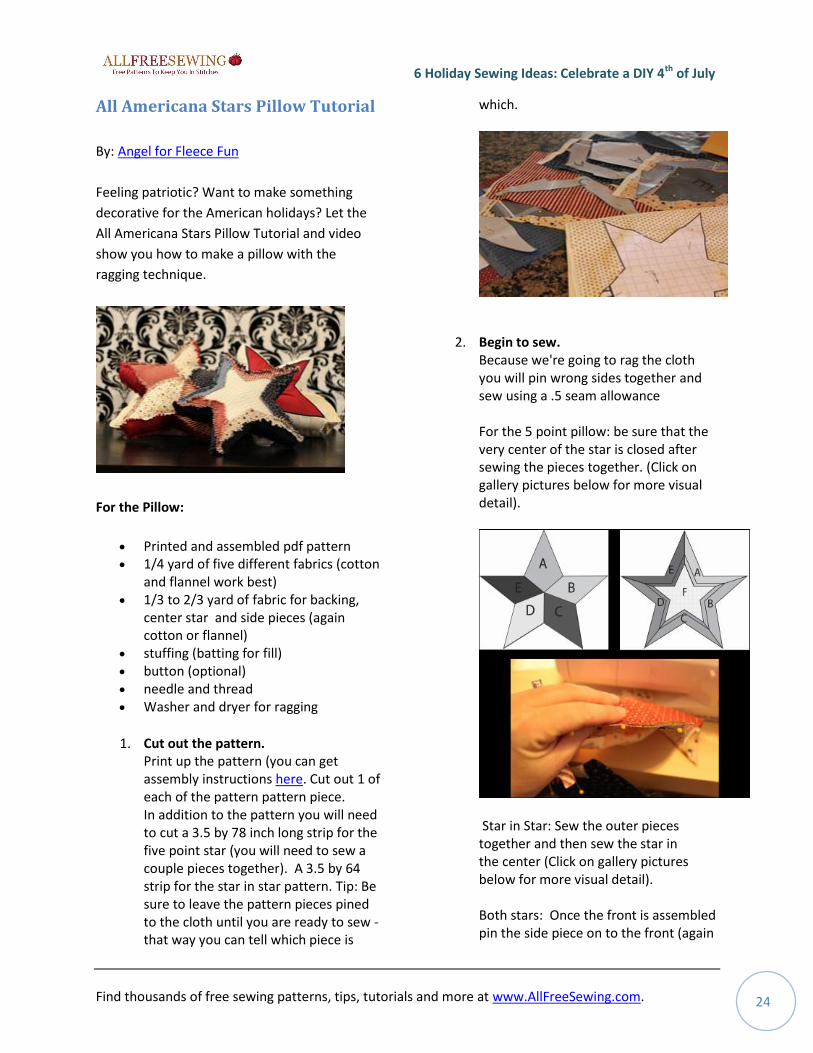
1. Cut out the pattern. Print up the pattern (you can get assembly instructions here. Cut out 1 of each of the pattern pattern piece. In addition to the pattern you will need to cut a 3.5 by 78 inch long strip for the five point star (you will need to sew a couple pieces together). A 3.5 by 64 strip for the star in star pattern. Tip: Be sure to leave the pattern pieces pined to the cloth until you are ready to sew - that way you can tell which piece is
which.
2. Begin to sew.
Because we're going to rag the cloth you will pin wrong sides together and sew using a .5 seam allowance For the 5 point pillow: be sure that the very center of the star is closed after sewing the pieces together. (Click on gallery pictures below for more visual detail).
Star in Star: Sew the outer pieces together and then sew the star in the center (Click on gallery pictures below for more visual detail). Both stars: Once the front is assembled pin the side piece on to the front (again
6 Holiday Sewing Ideas: Celebrate a DIY 4th of July
Find thousands of free sewing patterns, tips, tutorials and more at www.AllFreeSewing.com. 25
wrong sides together). Then sew around the star. Tip: while you can sew one continuous line around the star - I recommend sewing from point to point rather than trying to turn at the top of each point. So basically you will sew 5 lines
instead on long continuous one.
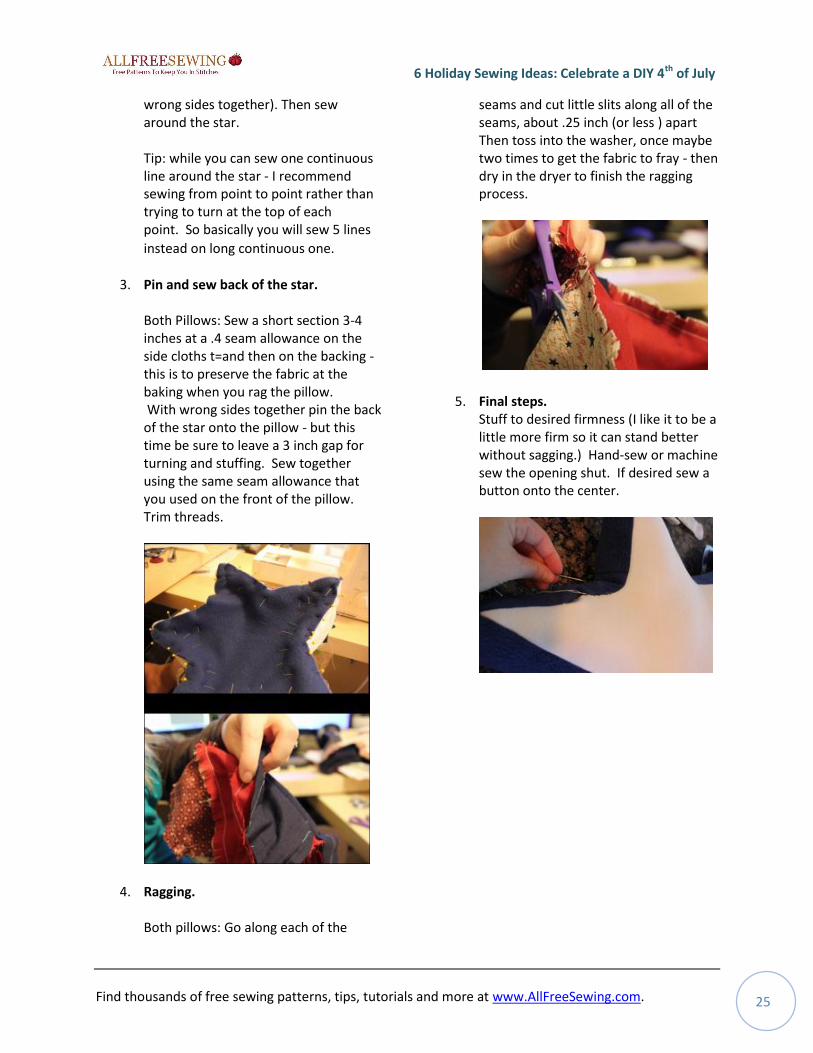
3. Pin and sew back of the star.
Both Pillows: Sew a short section 3-4 inches at a .4 seam allowance on the side cloths t=and then on the backing - this is to preserve the fabric at the baking when you rag the pillow. With wrong sides together pin the back of the star onto the pillow - but this time be sure to leave a 3 inch gap for turning and stuffing. Sew together using the same seam allowance that you used on the front of the pillow. Trim threads.
4. Ragging. Both pillows: Go along each of the
seams and cut little slits along all of the seams, about .25 inch (or less ) apart Then toss into the washer, once maybe two times to get the fabric to fray - then dry in the dryer to finish the ragging process.
5. Final steps. Stuff to desired firmness (I like it to be a little more firm so it can stand better without sagging.) Hand-sew or machine sew the opening shut. If desired sew a button onto the center.
6 Holiday Sewing Ideas: Celebrate a DIY 4th of July
Find thousands of free sewing patterns, tips, tutorials and more at www.AllFreeSewing.com. 26
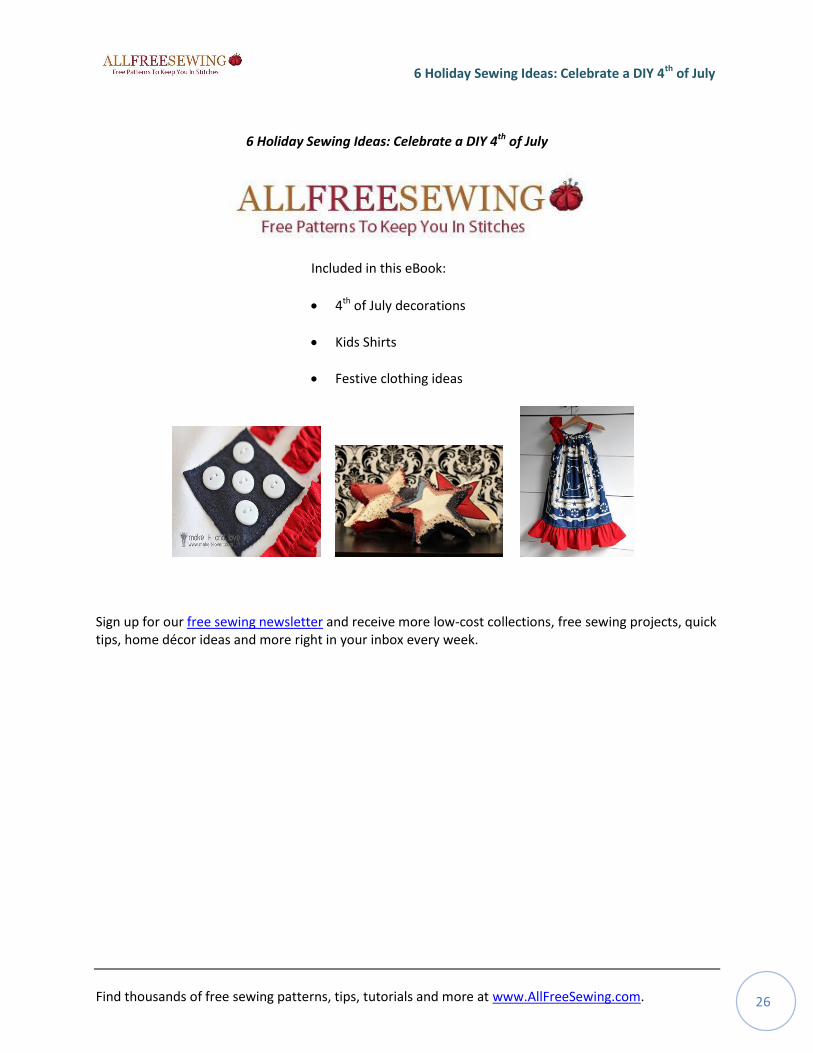
6 Holiday Sewing Ideas: Celebrate a DIY 4th of July
Included in this eBook:
4th of July decorations
Kids Shirts
Festive clothing ideas
Sign up for our free sewing newsletter and receive more low-cost collections, free sewing projects, quick tips, home décor ideas and more right in your inbox every week.