5959 tt del man e 1- 12 - classicreload.com
TRANSCRIPT
GAME MANUAL
The Ridge, Chipping Sodbury, Bristol BS17 6BN, UKTel: 01454 893900
Game Design and Program Copyright © 1995 Chris SawyerDocumentation, Packaging and Logo Copyright © 1995 MicroProse Ltd
This manual, accompanying documentation and disks are copyrighted. The owner of this product isentitled to use this product for his or her personal use. Except for back-up copies of the disks for personaluse and the quoting of brief passages for the purposes of reviews, no one may transfer, copy, back-up,give or sell any part of the manual or the information on the disks, or transmit in any form or by anymeans, electronic, mechanical, photocopying, recording or otherwise without the prior permission of thepublisher. Any person or persons reproducing any part of this program, in any media, for any reason,shall be guilty of copyright violation and shall be subject to civil liability at the discretion of the copyrightholder.
Made in the UK
MP190239MANR
5959 TT Del man E 1- 12 30/4/99 9:00 am Page 1

3Contents
SECTION 3: TUTORIALS . . . . . . . . . . . . . . .25
BEFORE WE BEGIN . . . . . . . . . . . . . . . . . . . . . . .26
TUTORIAL ONE: A Road Network . . . . . . . . . . . .26
Manager’s Name . . . . . . . . . . . . . . . . . . . . . . . . . . . . . . . .27Manager’s Face, Company Name and Colour . . . . . . .27Choosing a Place to Begin . . . . . . . . . . . . . . . . . . . . . . . .30Beginning Construction . . . . . . . . . . . . . . . . . . . . . . . . . .32Placing Road Depots . . . . . . . . . . . . . . . . . . . . . . . . . . . .32Positioning Bus Stations and Loading Bays . . . . . . . . .33Buying Road Vehicles . . . . . . . . . . . . . . . . . . . . . . . . . . .33Selling Road Vehicles . . . . . . . . . . . . . . . . . . . . . . . . . . . .34Assigning Routes to Road Vehicles . . . . . . . . . . . . . . . .35Saving your Game . . . . . . . . . . . . . . . . . . . . . . . . . . . . . . .37
TUTORIAL TWO: A Rail/Road Network . . . . . . .38
The Main Game Options Screen . . . . . . . . . . . . . . . . . .38Building a Railway Station . . . . . . . . . . . . . . . . . . . . . . .39Buying Trains . . . . . . . . . . . . . . . . . . . . . . . . . . . . . . . . . .41
SECTION 4: WORLDS . . . . . . . . . . . . . . . . . .45
Creating Your Own Scenario with the World Editor .47Generating a Scenario . . . . . . . . . . . . . . . . . . . . . . . . . . .47Changing the Starting Date of the Scenario . . . . . . . . .47Generating Land . . . . . . . . . . . . . . . . . . . . . . . . . . . . . . . .48Generating Towns . . . . . . . . . . . . . . . . . . . . . . . . . . . . . .49Generating Industries . . . . . . . . . . . . . . . . . . . . . . . . . . . .50Generating Roads . . . . . . . . . . . . . . . . . . . . . . . . . . . . . . .51Planting Trees . . . . . . . . . . . . . . . . . . . . . . . . . . . . . . . . . .52Adding Signs . . . . . . . . . . . . . . . . . . . . . . . . . . . . . . . . . . .52Saving a Scenario to Disk . . . . . . . . . . . . . . . . . . . . . . . .53Loading a Saved Scenario from Disk . . . . . . . . . . . . . . .53Leaving the Scenario Editor . . . . . . . . . . . . . . . . . . . . . .53Playing the Saved Scenario . . . . . . . . . . . . . . . . . . . . . . .53Playing a Pre-set Scenario . . . . . . . . . . . . . . . . . . . . . . . .54Create Scenario Quick Reference Guide . . . . . . . . . . .54
CONTENTSCREDITS . . . . . . . . . . . . . . . . . . . . . . . . . . . . . . . . .5
INTRODUCTION . . . . . . . . . . . . . . . . . . . . . . . . . . .6
BACKGROUND/THE GAME . . . . . . . . . . . . . . . . . .8
Sorting the Materials . . . . . . . . . . . . . . . . . . . . . . . . . . . . .9Installation/Loading . . . . . . . . . . . . . . . . . . . . . . . . . . . . .10
HOW TO USE THIS MANUAL . . . . . . . . . . . . . . . .11
SECTION 1: THE ROLLING DEMOS . . . .13
BEFORE WE BEGIN . . . . . . . . . . . . . . . . . . . . . . .14
ROLLING DEMOS . . . . . . . . . . . . . . . . . . . . . . . . .15
Rolling Demo 1 . . . . . . . . . . . . . . . . . . . . . . . . . . . . . . . . .15Rolling Demo 2 . . . . . . . . . . . . . . . . . . . . . . . . . . . . . . . . .16Rolling Demo 3 . . . . . . . . . . . . . . . . . . . . . . . . . . . . . . . . .16Rolling Demo 4 . . . . . . . . . . . . . . . . . . . . . . . . . . . . . . . . .16Rolling Demo 5 . . . . . . . . . . . . . . . . . . . . . . . . . . . . . . . . .16
SECTION 2: GAME CONTROLS . . . . . . . .17
THE MOUSE . . . . . . . . . . . . . . . . . . . . . . . . . . . . .18
THE WINDOWS . . . . . . . . . . . . . . . . . . . . . . . . . . .19
Moving Windows . . . . . . . . . . . . . . . . . . . . . . . . . . . . . . .20Closing Windows . . . . . . . . . . . . . . . . . . . . . . . . . . . . . . .20The Slider Bar . . . . . . . . . . . . . . . . . . . . . . . . . . . . . . . . . .21Scrolling around the World . . . . . . . . . . . . . . . . . . . . . . .21The Map Window . . . . . . . . . . . . . . . . . . . . . . . . . . . . . . .22Zooming In and Out . . . . . . . . . . . . . . . . . . . . . . . . . . . . .23Short Cut Keys . . . . . . . . . . . . . . . . . . . . . . . . . . . . . . . . .23
2 Contents
5959 TT Del man E 1- 12 30/4/99 9:00 am Page 2

5Credits
CREDITSGame Design and Programming Chris Sawyer
Graphics and Animation Simon Foster
Original Music John Broomhall
Sound Design and Programming Andrew Parton
Quality Assurance Andrew LuckettDaniel LutonPhil McDonnellJason SampsonDarren KirbyDon WitcombeCraig Lear
Manual Author Rik Haslam
Managing Editor Alkis Alkiviades
Packaging Sarah Warburton
Manual Design & Layout Sarah Kerr
Producer Mike Rudderham
Brand Manager Adrian Turner
Publishers Rob DaviesPete Moreland
SECTION 5: THE REFERENCE GUIDE . .59
MAIN MENU OPTIONS . . . . . . . . . . . . . . . . . . . . .60
New Game . . . . . . . . . . . . . . . . . . . . . . . . . . . . . . . . . . . . .61Load Game . . . . . . . . . . . . . . . . . . . . . . . . . . . . . . . . . . . .62Create a Scenario . . . . . . . . . . . . . . . . . . . . . . . . . . . . . . .62Play Scenario . . . . . . . . . . . . . . . . . . . . . . . . . . . . . . . . . . .63One Player/Two Player (Link & Network Play) . . . . . .64Modem Link Play . . . . . . . . . . . . . . . . . . . . . . . . . . . . . . .66Game Options . . . . . . . . . . . . . . . . . . . . . . . . . . . . . . . . . .67Difficulty . . . . . . . . . . . . . . . . . . . . . . . . . . . . . . . . . . . . . .68Tutorial/Demonstration . . . . . . . . . . . . . . . . . . . . . . . . . .69Quit to DOS . . . . . . . . . . . . . . . . . . . . . . . . . . . . . . . . . . .69
THE 3D WORLD . . . . . . . . . . . . . . . . . . . . . . . . . .70
The Icons . . . . . . . . . . . . . . . . . . . . . . . . . . . . . . . . . . . . . .70Windows . . . . . . . . . . . . . . . . . . . . . . . . . . . . . . . . . . . . . . .87Buildings . . . . . . . . . . . . . . . . . . . . . . . . . . . . . . . . . . . . . .88
SECTION 6: ADVANCED FEATURES . . .93
GAME-PLAYING NOTES . . . . . . . . . . . . . . . . . . .94
SECTION 7: HINTS & TIPS . . . . . . . . . . . .103
SECTION 8: TECHNICAL ASSISTANCE . .109
Virus . . . . . . . . . . . . . . . . . . . . . . . . . . . . . . . . . . . . . . . . .110Software Fault . . . . . . . . . . . . . . . . . . . . . . . . . . . . . . . . .110MicroProse Customer Services . . . . . . . . . . . . . . . . . . .111MicroProse On-line Services . . . . . . . . . . . . . . . . . . . . .112
4 Contents
5959 TT Del man E 1- 12 30/4/99 9:00 am Page 4

7Introduction
Transport Tycoon Deluxe sets new standards in the simulationof real world environments. You’ll find that the computercontrolled competitors really do give you more than a run foryour money. Don’t expect an easy ride, these silicon tycoonsare ruthless. They’ll shut down a service in a second if it’sproving inefficient and they are always on the look out forlucrative transportation opportunities. You will have to use allyour business acumen to keep ahead of the pack. If you can’ttake the pace, don’t worry, you can easily adjust a wide rangeof settings, and if your computer controlled rivals leave youstanding you can always stage a take-over bid.
Another area we felt absolutely vital to the success ofTransport Tycoon Deluxe was the inclusion of networkcapability. Now you can try to defeat your friends andcolleagues over a network. Be careful though, you could endup spending your work day laying tracks and delivering goodsaround the world of Transport Tycoon Deluxe.
The developers of Transport Tycoon Deluxe have gone togreat lengths to create a game of the highest possiblestandards. We sincerely hope you enjoy the game to theabsolute maximum. Good luck!
INTRODUCTION Transport Tycoon began life as a vague desire to create anentertaining transport game, in as real a simulated world aspossible.
The game was rapturously received by game-players, thesoftware industry and the computer game press. However,those who create games often know of the shortcuts they areforced to take due to development deadlines, publishingschedules and other unavoidable constraints. No game isperfect, but to create a perfect game is the holy grail of allprogrammers and designers. Transport Tycoon Deluxerepresents an enormous leap towards that goal.
It was never our desire to just make an updated version ofTransport Tycoon. What we wanted, was to create a newgame based upon the successful elements of the first. Wewanted to keep the intuitive gameplay and realism, that madeTransport Tycoon so playable, while radically improving thegame itself. The following are some of the elements that makeTransport Tycoon Deluxe a worthy successor to the originalgame.
• 3 new gameplay environments with different climates, environments, topography and industries
• World editor - create unlimited custom made scenarios• Heliports• Maglev trains and track• Buy/Sell Shares and take-over rival companies• Network play• More stations and vehicles• Improved communication of information• Customise vehicle names/town names/station names• Re-fit aircraft and ships to carry different cargo types
6 Introduction
5959 TT Del man E 1- 12 30/4/99 9:00 am Page 6

9Sorting the Materials
SORTING THE MATERIALSYour Transport Tycoon Deluxe package contains this Manualand a Compact Disc.
Required Equipment
Computer
IBM PC 486, Pentium or a 100% compatible computer.
The computer must have a CD-ROM drive and a hard disk.
Transport Tycoon Deluxe requires a 25 MHz or higherprocessor and at least 4 Mb RAM and 4Mb of hard disk spaceto install and 200KB for each saved game
Controls
To play Transport Tycoon Deluxe you require a Microsoftcompatible Mouse and a Microsoft Mouse Driver (version 8.2or higher recommended).
Display
Transport Tycoon requires a colour monitor with a SVGAgraphics system. If you are using a compatible graphicscard/monitor, it must be 100% compatible with SVGAsystems capable of 640x480 in 256 colours. SVGA graphiccard must be 100% VESA compatible, or must have a 100%compatible software VESA driver.
DOS
You must have Microsoft MS-DOS version 5.0 or higher.
BACKGROUND/THE GAMEIt’s 1950, you’ve been loaned £100,000 and you’ve got 100years to prove yourself a Transport Tycoon.
Transport Tycoon Deluxe presents you with a choice of fourvast game worlds (each of which will randomly generate alimitless number of gameplay scenario’s) made up ofnumerous small towns and raw material resources. If you’dprefer, you can even create your own game scenarios usingthe world editor.
As a budding tycoon you’ve been loaned a large amount ofmoney and you’ve got to prove yourself; to set the wheels inmotion to become the wealthiest tycoon in the world.
Matched against a batch of ruthless rivals, you’ll have to actquickly; to build the key routes that will rake in the cash.Build stations, airports, docks and a linking road, rail, air andship network that will move passengers, mail or goods to themost lucrative destination. As the years roll by you’ll have thechance to buy more advanced and faster vehicles and vessels;if you can afford them!
You’ll build stations, docks airports and make money byconnecting areas requiring transport services. You’ll constructcomplex road - rail -air - sea networks and experience cut-throat rivalry as you try to grab your piece of the action.You’ll deal with characteristic town councils that expressindividual and varying attitudes, and cope with disasters suchas mine collapses, bus, lorry and aircraft malfunctions.
You can even takeover other companies and fund industrieswhich will bring increased profits for your transportation network.
This is your chance to set the wheels in motion, to become thebest, to be THE TRANSPORT TYCOON.
8 Background/The Game
5959 TT Del man E 1- 12 30/4/99 9:00 am Page 8

11How to Use This Manual
HOW TO USE THIS MANUALThis manual is split into 8 main sections:
Section 1: The Rolling Demos
These are on-screen tutorials to visually guide you quicklythrough Transport Tycoon Deluxe. This section of the manualbriefly details what is happening on the screen. Werecommend you watch all the demo’s before going any furtherwith the game.
Section 2: Game Controls
Explains how to move around the world of Transport TycoonDeluxe, how to open and close game “windows”, and how tomake game selections.
Section 3: The Gameplay Tutorials
Designed to get you playing Transport Tycoon Deluxe asquickly as possible. You are recommended to follow eachtutorial carefully before you start to play the game on your own.
Section 4: Worlds
Descriptions of the different worlds you can choose to play inand a guide to using the world editor to create your owncustom made playing environments.
Section 5: The Reference Guide
Is intended for the player who is familiar with the basics ofTransport Tycoon Deluxe and needs to learn more aboutparticular game features.
INSTALLATION/LOADING
Installation
An installation program is included on the Transport TycoonDeluxe CD.
Insert the CD into your CD drive and designate that drive(usually by typing “D: {Return}).
When the new prompt appears, type “INSTALL {Return}”.
Please follow the on-screen text which appears.
The default (pre-set) installation routine places TransportTycoon Deluxe in a directory named C:\MPS\TTDLX.
Loading Instructions
Switch on your machine and wait until the C:\> prompt appears.
Insert the Transport Tycoon Deluxe CD into the CD drive.
Type “CD MPS\TTDLX {Return}” and then type “TYCOON{Return}” to run the game.
Note: If you have installed Transport Tycoon Deluxe toanother directory, you must type “CD {name of yourdirectory} {Return}”, and then type “TYCOON {Return}”.
To play Transport Tycoon Deluxe in Windows™ '95 followthe normal procedure for non Windows™ '95 software.
Sound
Transport Tycoon Deluxe supports Sound Blaster and 100%compatibles; Sound Blaster AWE 32, Gravis Ultrasound, ProAudio Spectrum, Sound Canvas, Roland LAPC -1/MT-32,General Midi sound cards.
10 Installation/Loading
5959 TT Del man E 1- 12 30/4/99 9:00 am Page 10
Section 6: Advanced Features
Should help the player utilise some of the more complexfeatures of Transport Tycoon Deluxe.
Section 7: Hints and Tips
This section will help you at all levels of play.
Section 8: Technical Assistance &Customer Service
12 How to Use This Manual
5959 TT Del man E 1- 12 30/4/99 9:00 am Page 12

13
SECTION 1:
The Rolling Demos
5959 TT Del man E 13-16 30/4/99 8:57 am Page 13
15Section 1: The Rolling DemoÕs
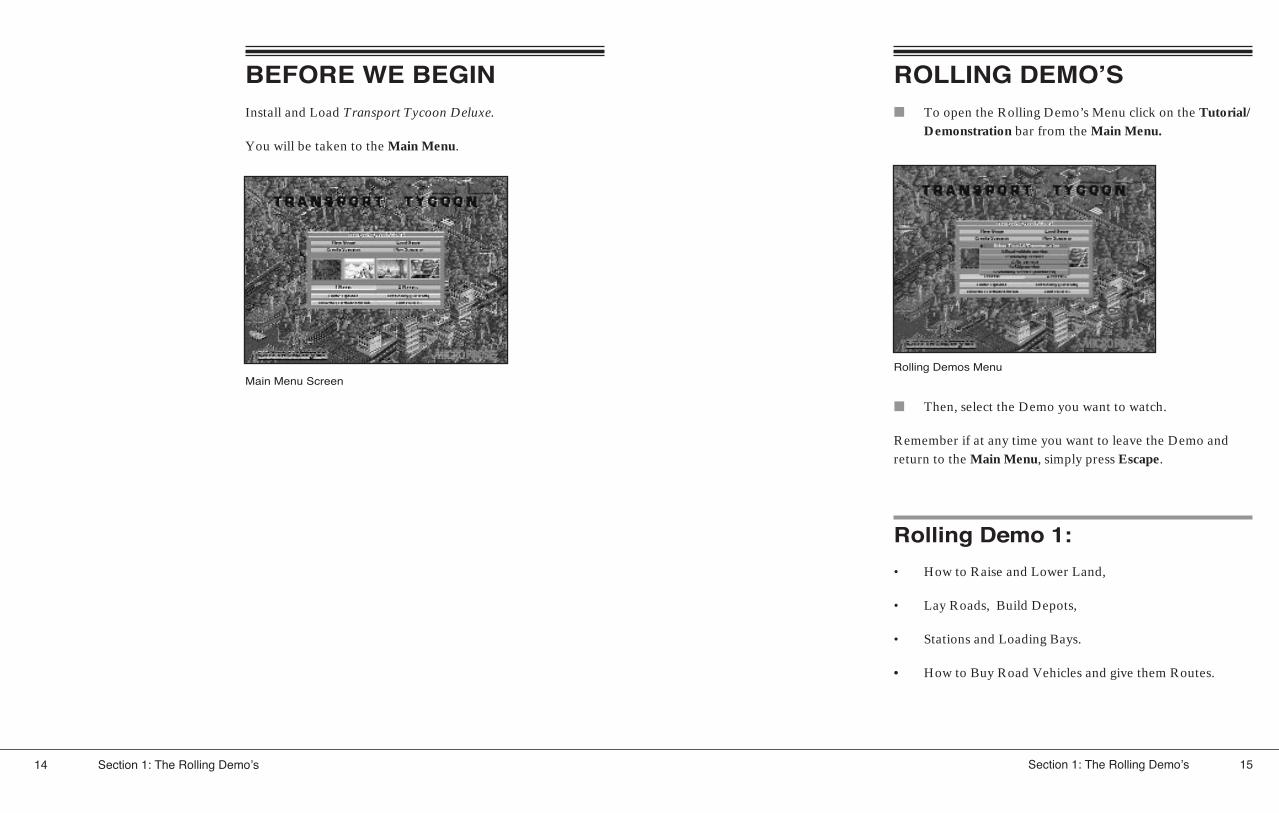
ROLLING DEMOÕS■ To open the Rolling Demo’s Menu click on the Tutorial/
Demonstration bar from the Main Menu.
■ Then, select the Demo you want to watch.
Remember if at any time you want to leave the Demo andreturn to the Main Menu, simply press Escape.
Rolling Demo 1:
• How to Raise and Lower Land,
• Lay Roads, Build Depots,
• Stations and Loading Bays.
• How to Buy Road Vehicles and give them Routes.
BEFORE WE BEGINInstall and Load Transport Tycoon Deluxe.
You will be taken to the Main Menu.
14 Section 1: The Rolling DemoÕs
Main Menu ScreenRolling Demos Menu
5959 TT Del man E 13-16 30/4/99 8:57 am Page 14

Rolling Demo 2:
• How to lay Railway Track(orientation), Dig Tunnels andBuild Bridges.
• Building Railway Buildings and Assigning Orders to Trains.
Rolling Demo 3:
• Airport construction. How to Purchase an Aircraft and give it its Orders.
Rolling Demo 4:
• Positioning Sea Ports, Building Docks, and Assigning Orders to Ships.
Rolling Demo 5:
• Advanced Railway Building.
16 Section 1: The Rolling DemoÕs
5959 TT Del man E 13-16 30/4/99 8:57 am Page 16

17
SECTION 2:
Game Controls
5959 TT Del man E 17-24 30/4/99 8:56 am Page 17

19Section 2: Game Controls
THE ÒWINDOWSÓTransport Tycoon Deluxe’s gameplay centres around a systemof Icons and “Windows”. To select options, you use the mouseto click, and click and hold the “Windows” and Icons.
Although all of the “Windows” look completely different theyall work in much the same way and have common features.
In the top left of a “Window” there is a small ‘X’.
Clicking the LMB on the ‘X’ will close the “Window”.
Most of the “Windows” contain several Icons. When clickedthese either show different pieces of information or openanother “Window”. Hold down the RMB over any part of a“Window”/ Icon for a brief description of what it does.
If you try to open a “Window” that is already open, a whiteline will flash around the outside of the “Window” to let youknow that you can’t open the “Window” twice.
THE MOUSEYou will require a Mouse to play Transport Tycoon Deluxe.
Throughout the manual you will encounter these instructions:
■ “Clicking the mouse button”.
Unless otherwise stated this refers to the Left Mouse Button(LMB).
■ Point and Click :-
Place the mouse cursor over the icon you wish to use and clickthe LMB once.
■ Click and Hold:-
Some of the twenty six icons at the top of the screen have achoice of several functions. Click and hold the LMB on theseicons to display all of the options. Keep the button held downand drag the highlight bar to the option you want. Release thebutton to select the now highlighted option.
■ Point and Drag :-
For example, to move a “Window” around the screen, placethe mouse cursor over the “Window” Drag Bar at the top ofthe “Window”, press and hold down the LMB, then move thecursor/ “Window” where you want on the screen and releasethe LMB. It will remain open in the new position.
■ Help :-
If you don’t know what an icon does, click and hold the rightmouse button (RMB) over it and you will be given a briefdescription.
18 Section 2: Game Controls
Map Window
5959 TT Del man E 17-24 30/4/99 8:56 am Page 18

21Section 2: Game Controls
The Slider Bar
Some of the “Windows” cannot fit in all of their information,so to prevent the “Windows” from getting too big there is aSlider Bar on the right hand side of the “Window” to allowyou to scroll up and down. Simply click/hold the slide bar andscroll it up and down or click on the up/down arrows on theslider bar itself.
Scrolling around the World
Probably the most common function in Transport TycoonDeluxe is moving around the 3-D world. To do this simplyplace the cursor somewhere in the main game (3-D) view andhold down the right mouse button (RMB). Keep the buttonheld down and move the mouse in the direction that you wantto go. The screen will scroll in that direction. When you havemoved far enough, release the button.
Moving ÒWindowsÓ
You will need to move entire “Windows” around the screenquite frequently.
■ To do this, click and hold the “Window” Title Bar (atthe top of all “Windows”). With the LMB still helddown, drag the “Window” to the position on the screenyou want to move it to.
■ Release the LMB and the “Window” will remain in thenew position.
Closing ÒWindowsÓ
Eventually, you will have to close “Windows” to preventclogging up of the main 3-D world screen.
■ Simply click the LMB on the ‘X’ in the top left of any“Window” to close it.
20 Section 2: Game Controls
5959 TT Del man E 17-24 30/4/99 8:56 am Page 20
23Section 2: Game Controls
Zooming In and Out
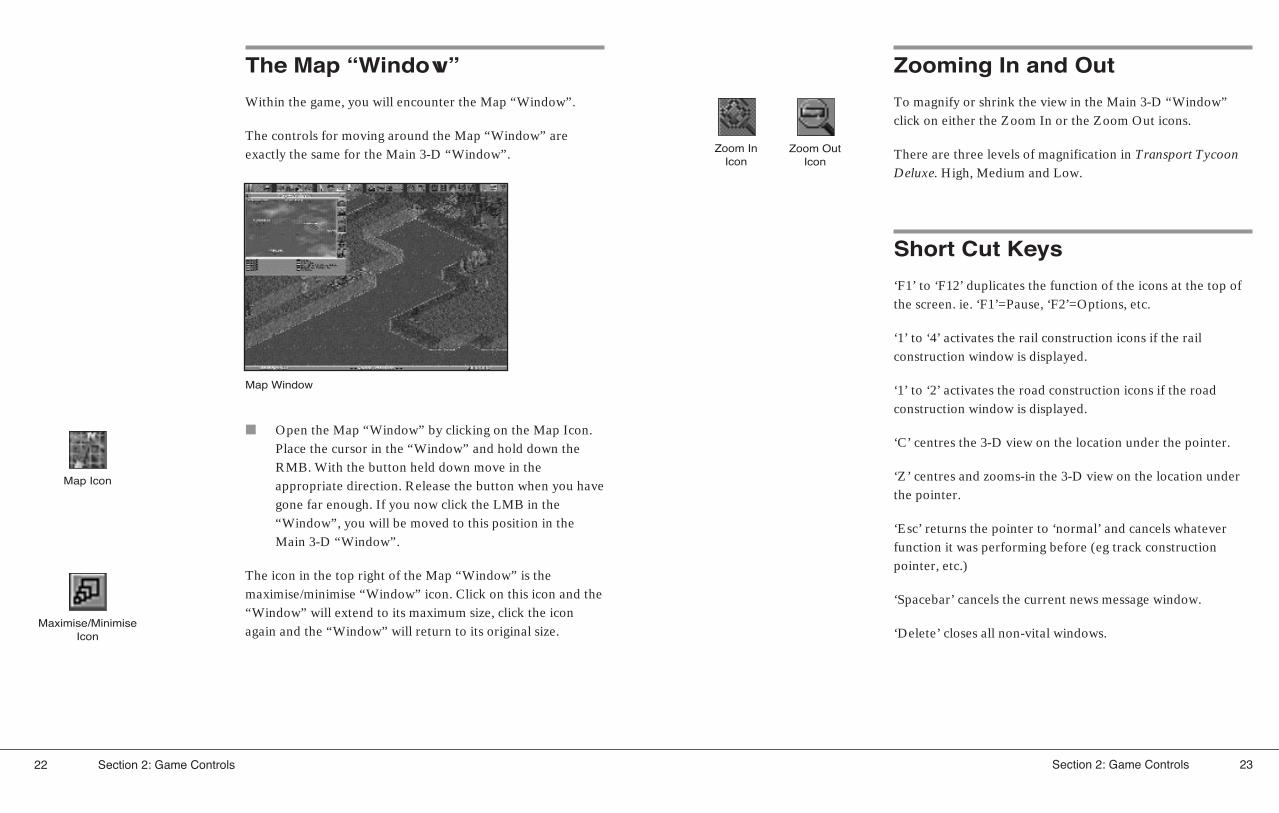
To magnify or shrink the view in the Main 3-D “Window”click on either the Zoom In or the Zoom Out icons.
There are three levels of magnification in Transport TycoonDeluxe. High, Medium and Low.
Short Cut Keys
‘F1’ to ‘F12’ duplicates the function of the icons at the top ofthe screen. ie. ‘F1’=Pause, ‘F2’=Options, etc.
‘1’ to ‘4’ activates the rail construction icons if the railconstruction window is displayed.
‘1’ to ‘2’ activates the road construction icons if the roadconstruction window is displayed.
‘C’ centres the 3-D view on the location under the pointer.
‘Z’ centres and zooms-in the 3-D view on the location underthe pointer.
‘Esc’ returns the pointer to ‘normal’ and cancels whateverfunction it was performing before (eg track constructionpointer, etc.)
‘Spacebar’ cancels the current news message window.
‘Delete’ closes all non-vital windows.
The Map ÒWindowÓ
Within the game, you will encounter the Map “Window”.
The controls for moving around the Map “Window” areexactly the same for the Main 3-D “Window”.
■ Open the Map “Window” by clicking on the Map Icon.Place the cursor in the “Window” and hold down theRMB. With the button held down move in theappropriate direction. Release the button when you havegone far enough. If you now click the LMB in the“Window”, you will be moved to this position in theMain 3-D “Window”.
The icon in the top right of the Map “Window” is themaximise/minimise “Window” icon. Click on this icon and the“Window” will extend to its maximum size, click the iconagain and the “Window” will return to its original size.
22 Section 2: Game Controls
Map Icon
Zoom In Icon
Zoom OutIcon
Maximise/MinimiseIcon
Map Window
5959 TT Del man E 17-24 30/4/99 8:56 am Page 22

24 Section 2: Game Controls
5959 TT Del man E 17-24 30/4/99 8:56 am Page 24

25
SECTION 3:
Tutorials
5959 TT Del man E 25-44 30/4/99 8:55 am Page 25

27Section 3: Tutorials
On beginning a new game you will be shown a picture of yourmanager and be prompted to type your name in theManager’s Name “Window”.
ManagerÕs Name
Type in your name and press <RETURN>, or click on ‘OK’.The “Window” will disappear and your name will appearunder your Manager’s face. If you make a mistake, click onthe Manager’s Name Bar (third bar from the left, at thebottom of the “Window”) and the Manager’s Name“Window” will re-open. Correct the mistake and press<RETURN>.
ManagerÕs Face, CompanyName and Colour
From the Manager’s “Window” you can also change the faceof your manager, the name of your company and the colourscheme for your vehicles.
Your manager’s face is set at random, but you can change it.
■ To change it, click on the New Face button (bottom leftof the “Window”), this will open the Face Selection“Window”.
BEFORE WE BEGINFor extra information on particular game features, see theReference Guide section on page 59 of this manual.
TUTORIAL ONE
A Road Network
This tutorial will guide you through Transport TycoonDeluxe’s basic controls and get you up and running with asmall road network.
Remember: If you get stuck and don’t know how to dosomething, hold down the RMB over most icons and“Windows” in the game for a brief description of what they do,or refer to the Reference Guide in this manual.
■ Load the game as described in the TechnicalSupplement.
■ Select New Game from the Main Menu. The Gameselection window will appear, allowing you theopportunity to select from scenarios and saved gamesstored on CD, and a ‘randomly generated game’. For thepurposes of this tutorial click on ‘randomly generatedgame’. You will be placed in the centre of the 3-DIsometric World.
The map has randomly placed factories, forests, mills andmines; more will appear as the game progresses and thecompetition heats up.
26 Section 3: Tutorials
5959 TT Del man E 25-44 30/4/99 8:55 am Page 26

29Section 3: Tutorials
To scroll through the available colours, click the up or downarrows on the slider bar (right side of the “Window”), or dragthe slider bar up and down. Now select your new colour byclicking on the appropriate vehicle colour (clicking on a buswill automatically close the Colour Scheme “Window”.).
When you have finished close any open “Windows” byclicking on the cross in the top left corner. Now you are readyto begin.
You now have the choice of Male, Female or New Face.Select either Male or Female and click on New Face until youfind the face you want, then click on OK.
Company Name
Your company name will default to your Manager’s namefollowed by the word: ‘Transport’.
■ To change it click on the Company name button (bottomright of the “Window”), delete the name by using theBackspace Key, type in a new one and press<RETURN>/ or click on ‘OK’.
Company Colour
Your company’s colour selection is random.
■ To change it, click the Colour Scheme Button (secondbar from the left, bottom of the “Window”), this willopen the Colour Scheme “Window”.
28 Section 3: Tutorials
Face Selection Window Colour Scheme Window
Main Screen
5959 TT Del man E 25-44 30/4/99 8:55 am Page 28

31Section 3: Tutorials
Generally the greater the population of the town the better.Try to find a town with a population of at least 300;information is accessed by clicking on the place name barfound near the centre of the town. This will open the TownsInformation “Window”.
You can also rename a town from this information“Window”. To make these tutorials easier to understand werecommend that you rename your choice for this tutorial‘TOWN ONE’.
■ Click on the rename bar at the bottom of the “Window”.
■ Delete the old name and rename it Town One.
■ Click on OK or press <RETURN>.
Choosing a place to begin
Click on the Map icon and open up the world map.
Place the cursor over the Map “Window” and hold down theRight Hand Mouse Button (RMB). Now, while keeping theRMB held down, move the mouse to scan the map quickly fora site to begin your transport operations.
For this tutorial, find a town that already has a substantialroad network. Towns show up in the Map “Window” asbrown areas with black lines (the roads) marked on them.
When you’ve found a good location:
■ Click inside the Map “Window” with the LMB and youwill move straight there in the 3-D world (your positionis shown on the Map “Window” by the four yellowmarkers).
30 Section 3: Tutorials
Map Icon
Map Window
Town Information Window
5959 TT Del man E 25-44 30/4/99 8:55 am Page 30

33Section 3: Tutorials
Positioning Bus Stations andLoading Bays
You will now need some Stations/ Depots for your roadvehicles to call at. They should be placed in highly populatedareas of towns or near industrial sites such as power plants, oilrefineries and mills which are linked to a town. Now build atleast two Bus stations or Loading Bays to begin with so thatthe vehicles have sites to travel between. This will enable yourcompany to make money on each trip. Don’t forget to selectthe correct orientation.
Remember: If you click on ‘Show Catchment Area HighlightOn’ and drag the cursor over the main 3-D view, the proposedLoading Bay or Station position will be represented by theWhite hollow box, the Catchment Area by the hollow Bluesquares.
Bus Stations only deal with passengers and Loading Bays withall Goods including Mail. You can see the status of anyLoading Bay or Station (i.e. what is waiting, what it acceptsand its ratings) by clicking on it from the 3-D world.
Buying Road Vehicles
■ Click on the Depot you have built. (Depot “Window”will appear).
■ Click the New Vehicles Button (bottom left of the“Window”) and a list of all the available road vehicleswill appear.
You can scroll through the list of vehicles by clicking the up ordown arrows on the scroll bar on the right of the “Window”.
Beginning Construction
■ Close all open “Windows” (by clicking on the X in topleft corner).
■ Open the Road Construction “Window” by clicking theRoad Construction Icon in the Construction Group.
Placing Road Depots
Find a central position in the town and place a Vehicle Depotfacing one of the roads.
■ Click on the Depot icon and again on the point whereyou want to build. As long as the Depot is built on clear,level ground on the square next to and facing a road itwill join the road automatically. Be careful to ensure thatyou select the correct depot orientation, otherwisevehicles will be unable to enter or leave it.
You are now able to buy road vehicles. Ensure that the depotentrance connects to a road, otherwise vehicles will be unableto leave or enter the depot.
32 Section 3: Tutorials
Road ConstructionIcon
Bus Station Icon
Loading Bay Icon
Depot Icon
Construction Window
5959 TT Del man E 25-44 30/4/99 8:55 am Page 32

35Section 3: Tutorials
Assigning Routes to RoadVehicles
Now assign the vehicle its route.
■ Click on the vehicle, (MPS Regal Bus in this case) andthe Vehicle’s Information “Window” will open.
■ Click the Vehicles Order icon to open its Orders“Window”.
■ Click on GoTo. The cursor will change to the Go Toicon and a hollow white box will show which square onthe 3-D world you are selecting.
■ Move the Square over one of the Bus Stations you havejust built and click the LMB again. The Station namewill now appear in the Orders “Window”.
■ Repeat this operation for the second Station and yourBus will now have its first route.
■ Highlight the MPS Regal Bus (click on the name of avehicle to highlight it).
■ Click on Build Vehicle and it will instantly appear inyour Depot.
Remember: clicking on ANY construction or build icon willcost you money. This is shown by the total cost rising fromwhere the money was spent.
■ Now, close down the Vehicles “Window”
Selling Road Vehicles
■ From the Depot “Window” click on and drag the vehicleover the Dustbin Icon. The vehicle will disappearimmediately and the amount of money made from thesale will rise from the Depot in the 3-D view.
If vehicle is on route, it must first be returned to the depot(click on Depot Icon when viewing vehicle). The vehicle canonly be sold if it is stationary in the Depot.
34 Section 3: Tutorials
New Vehicle Window
Orders Window
Orders Icon
5959 TT Del man E 25-44 30/4/99 8:55 am Page 34

37Section 3: Tutorials
Saving your game.
■ Click on the Disk Icon. (one click will select Save Gamefrom the icons menu), this will open the Save Game“Window”.
Your Saved Game will be automatically named (bottom ofthe “Window”) with your company’s name and the gamedate. To alter the Save Game name, simply delete the default,type in the new name and click on SAVE .
■ Click on the Disk Icon and select ‘Abandon Game’.
Now work through Tutorial 2 using what you have alreadybuilt in Tutorial 1.
■ Close down the Orders “Window” and click on theVehicle Action Bar at the bottom of the Vehicle“Window” (with the red flag and the word ‘Stopped’ onit). Once selected the flag will turn green and the Buswill begin its designated journey.
This is the most basic transport service you could begin with,but a good start for a profitable road network. Expand yourservice to link with other towns. Build Depots and BusStations, start goods, mail and other routes around the townin exactly the same way.
Remember to check what Loading Bays will ‘accept’ beforebuilding any vehicles otherwise you will waste a lot of moneyon unwanted transport.
■ Click on the Loading Bay in the 3-D view to show whatit will accept and what is waiting to be picked up.
36 Section 3: Tutorials
Loading Bay WindowSave Game Window
Disk Icon
5959 TT Del man E 25-44 30/4/99 8:55 am Page 36

39Section 3: Tutorials
■ Simply select your tutorial 1 Game by clicking on thename it was saved under.
You will now be back at the position you finished at in theprevious tutorial .
In this Second Tutorial you will link two towns via apassenger railway.
Using the Map “Window”, choose the town nearest to theone you used for Tutorial One (TOWN ONE) and centre onit by clicking on the town (the brown areas) in the map“Window”
Rename this New Town ÒTown TwoÓ
■ Click on the Town name, this will open the Towninformation “Window”.
■ Click on the rename bar (bottom of the “Window”),delete the old name and rename it Town Two.
■ Close all “Windows”
Building a Railway Station
■ Click on the Rail Construction icon. This will open theRail Construction “Window”.
TUTORIAL TWO
A Rail/Road Network
This Tutorial follows on from Tutorial 1. It will guide youthrough building a basic rail service and linking it to a roadnetwork.
The combinations of linking rail to other transport servicesare unlimited. As you play, more and more combinations willreveal themselves to you, making your network an everchanging concern. This example will just get you started.
Remember: You have other Tycoons battling for all the assetson the map, so you will have to work fast to get to the top andstay there.
The Main Game Options screen
■ Click on Load Game, this will open the Load Game“Window”
38 Section 3: Tutorials
Load Game Window
Rail ConstructionIcon
5959 TT Del man E 25-44 30/4/99 8:55 am Page 38

41Section 3: Tutorials
Now fill the gap with track
■ Using the track construction icons, link the two stationstogether.
Always use the pieces of track that give you the quickest andcheapest route.
■ To lay track, simply click on the Track icon you want touse, then click in the 3-D on the square you want tobuild on.
Remember: You may have to Raise or Lower areas of land.Messages will appear warning you when you can’t build. Youmay even have to dynamite certain areas.
When the two stations are linked by the track you next mustbuild a Train Depot so you can buy and house a train.
■ Choose a level place by the track to build on and click onthe Build Depot icon.
Choose the correct orientation of the Depot and place it nextto the track by clicking on the appropriate square.
All you have to do now is buy the train and assign it with aroute.
Buying Trains
Buying a train is very similar to buying a road vehicle.
■ Click on the Train Depot you have just built.
Choose a site in Town Two to place your first station(preferably as close to Town One as possible).
■ Click on the Build Station Icon.
Decide on the orientation of the station and click on theappropriate icon.
■ Place the Station in the 3-D by clicking on your chosensite. If the land is not level, you will have to raise orlower it using the icons.
Move back to Town One, either by scrolling the 3-D or usingthe Map “Window” again.
■ Build a second station on the side of the town closest toyour first station. You may again need to raise or lowerland.
40 Section 3: Tutorials
Rail Construction Window
Build Station Icon
Station Orientation Icons
Raise and Lower Icons
Track Construction Icons
Build Depot Icon
5959 TT Del man E 25-44 30/4/99 8:55 am Page 40

43Section 3: Tutorials
All you should have open on the screen is the new Trains“Window”.
To give a train orders follow the same procedure as for roadvehicles.
■ Click on the Order icon (fifth down on the right handside of the “Window”). This will open the Trains Orders“Window”.
■ Click on the GoTo Bar (at the bottom of the Train’sOrders “Window”) and then on the station that youwant the train to call at first.
The hollow white square will show you what you are selectingin the 3-D.
■ Click on the GoTo Bar again and then on the secondstation. The order will appear in the Orders “Window”.
■ Close the Orders “Window”.
■ To set the Train going, click on the Action Bar (along thebottom of the “Window”). The text on the bar will changefrom “Stopped” to “Heading For” and will show thename of the station you ordered the train to call at first.
The train will then emerge from the depot and begin its route.
Now, save your game
Remember: Do NOT save two games as the same name, thenewer of the two will overwrite the old and you will not be ableto recover the older game.
■ Then, in the Depot “Window” click on the NewVehicles Bar (bottom left of the “Window”).
This will open the New Rail Vehicles “Window”
Using the scroll bar on the right hand side of the “Window”you can scroll through the available Rail Vehicles.
For this Tutorial highlight the Kirby Paul Tank (SteamEngine) by clicking on its name, then on the Build VehicleBar at the bottom of the “Window”.
The new engine will appear in your Train Depot and theTrains “Window” will also have opened.
Now, build two Passenger Carriages in the same way.
■ Highlight a Passenger Carriage by clicking its name,then click on the Build Vehicle Bar twice.
Now close down the Train Depot and New Vehicles“Windows” by clicking on the ‘X’ in the top left corner ofeach “Window”.
Assigning Orders to Trains
42 Section 3: Tutorials
Rail Vehicle Window
5959 TT Del man E 25-44 30/4/99 8:55 am Page 42

44 Section 3: Tutorials
5959 TT Del man E 25-44 30/4/99 8:55 am Page 44

45
SECTION 4:
Worlds
5959 TT Del man E 45-58 30/4/99 8:54 am Page 45

47Section 4: Worlds
Creating Your Own ScenarioWith The World Editor
If you select a world or climate on the Main Menu and thenclick on Create a Scenario you will be taken into the worldeditor.
The World Editor allows you to build and edit your ownworld from scratch. You create the terrain, lakes, mountains,towns and industries.
Generating a Scenario
When you select Create Scenario the screen will show acompletely blank 3-D game world (initially all sea), with iconsacross the top of the screen to allow generation of thelandscape, towns and industries.
Changing the Starting Date ofthe Scenario
The current starting date for the scenario is shown at the topof the screen, located between the Disk and Map icons. Tomake the game start later than the date shown, click on theUp Arrow. The starting date can be set to any year between1950 and 1975. Similarly, you can use the Down Arrow tomake the game time start earlier.
WORLDSFour different worlds, or climates, are available to play inTransport Tycoon Deluxe. They are Temperate, Sub-Arctic,Sub-Tropical and Toyland.
Each of these climates has its own properties. The Temperateclimate is largely rich grass land with large grain fields andwooded areas.
The Sub-Arctic climate is a North-American style landscape,with tall mountains covered in snow, and forested areas.Towns in snowy areas require a supply of food before they arelikely to expand.
The Sub-Tropical climate is a South-American stylelandscape, with rainforest areas and desert areas. Deserttowns require a supply of water and food before they arelikely to expand. Rainforest areas are very expensive to clear,but can be cleared for profit by funding a lumber mill.
The Toyland ‘climate’ is a colourful mix of toy-like styles;vehicles with faces; toy like buildings; wacky industries andtowns with silly names.
In each climate, or world, you will find different industrieswhich suit that particular zone. Tactics which produce profitin one world might not have the same result in another.
46 Section 4: Worlds
Start Date Icon
5959 TT Del man E 45-58 30/4/99 8:54 am Page 46

49Section 4: Worlds
Generating towns
■ Click on the Town icon at the top of the screen todisplay the Town Generation window.
Select the size of town required from the sizes available.
■ Click on New Town.
■ Click on an area of flat land where you wish to constructa town.
Alternatively, click on Random Town to construct a town ofthe given size (small, medium or large) in a random locationin the game world.
Once a town is created, you can click on the town name todisplay the Town Information window.
As well as allowing you to rename the town, this window hasan expand bar, which allows you to expand the town to anydesired size, and a Delete bar, which can be used to removethe town (and any associated roads and industries) from thegame world completely.
Generating Land
■ Click on the Land Icon at the top of the screen to displaythe Land Generation window.
Use the Raise-land and Lower-land icons to raise and lowerareas of land. The white dots, in the centre of the window,show the size of land area which will be raised or lowered inone click of the left mouse button (LMB). Use the Up andDown Arrows to increase or decrease this area.
Rock, Lighthouse and Transmitter Icons can be used toposition rocky areas, lighthouses and transmitters on thelandscape.
Random Land: By clicking on the Random Land bar, you willgenerate a random landscape over the entire map area. Youcan use the landscape settings in the Difficulty Level windowto select the Terrain type and Quantity of Sea generated.
Reset Land: Clicking on Reset Land will completely reset thelandscape back to sea only.
48 Section 4: Worlds
Land IconTown Icon
Land Generation Window Town Generation Window
5959 TT Del man E 45-58 30/4/99 8:54 am Page 48

51Section 4: Worlds
Generating Roads
■ Click on the Roads icon at the top of the screen todisplay the Road Construction window.
As in the game itself, use the Road, Bridge and TunnelConstruction icons to construct additional roads for towns.
Generating Industries
■ Click on the Industries icon at the top of the screen todisplay the Industry Generation window.
Select the required industry type from the list by clicking withthe LMB, and then click on a clear, flat area of land on whichto build the industry.
Remember: that, before an industry can be set-up, at least onetown must be built.
No more than one of each type of industry may be built neareach town.
Most industries only require an area of flat land, however aBank can ONLY be built in a town with a population greaterthan 1200, and an Oil Rig requires a large area of sea allaround it, and can ONLY be built near the edge of the gameworld.
50 Section 4: Worlds
Industry Icon Road Icon
Industry Window Road Window
5959 TT Del man E 45-58 30/4/99 8:54 am Page 50

53Section 4: Worlds
Saving a Scenario to Disk
■ Click on the Disk Icon at the top of the screen to savethe scenario to disk. Type in a recognisable name foryour saved Scenario.
Loading a Saved Scenario fromDisk
■ Click on the Disk icon at the top of the screen, drag thehighlight bar down to Load Scenario and release the LMB.
Leaving the Scenario Editor
■ Click on the Disk icon at the top of the screen, drag thehighlight bar down to Abandon Editor and let go.(Remember to save the scenario you have been creating,if you want to play it, or continue editing it, later.)
Playing the Saved Scenario
Before starting to play a scenario, set the Difficulty Level asrequired (to set the number of competitors, etc.).
Select Play Scenario from the Game Options Screen to start anew game based on a scenario you have created and saved toyour hard disk. Select the required scenario from the LoadScenario “Window” to start playing.
Planting Trees
■ Click on the Trees icon at the top of the screen to displaythe Trees window.
Select the required tree type from those available and click onthe 3-D display to plant trees. Or, click on the Random Treesbar to plant trees randomly over the entire game world.
Adding Signs
Use the Sign icon at the top of the screen to position yourown customised signs, or markers, on the 3-D display. Oncethe sign is positioned, use the keyboard to change the text onthe sign.
To delete a sign, click on the sign in the 3-D display, then usethe Delete Key to delete the text, then click on OK.
52 Section 4: Worlds
Tree IconDisk Icon
Sign Icon
Trees Window
5959 TT Del man E 45-58 30/4/99 8:54 am Page 52

55Section 4: Worlds
1. Pause Game
Select to Pause the game time. You will still be able to scrollaround the 3-D world.
2. Game Options Toolbar
a. Game Options:a1 Currency Typea2 Road Vehicles - left-hand/right-hand drivea3 Autosave - off/every 3, 6 or 12 monthsa4 Vehicle design names - default/customa5 Distance - miles/kilometresa6 Town names - language type
b. Difficulty Settingsc. Town Namesd. Station Namese. Signsf. Full Animationg. Full Detailh. Transparent Buildings
3. Load/Save Options
Select to:
Save Scenario: Name, Save or Delete your completedScenario
Load Scenario: Highlight and select named Scenario
Abandon Editor: Return to Create Scenario front screen
Playing a pre-set scenario
The Transport Tycoon Deluxe CD contains a number of savedgames and scenarios that you may play. To access thesesimply select New Game from the Main Menu.
A menu will appear allowing you to select from a ‘randomlygenerated game’ (displayed in yellow text), a selection ofsaved games (displayed in blue text), or a selection ofscenarios (displayed in green text). Highlight the option yourequire and click on it using the LMB.
Create Scenario QuickReference Guide
54 Section 4: Worlds
Pause Icon
Game Options Icon
Disk Icon
PauseIcon
DiskIcon
Start Date Icon
MapIcon
ZoomIn Icon
ZoomOut Icon
GenerateRoadIcon
TreePlanting
Icon
SignsIcon
JazzJukebox
Icon
ExtraOptions
Icon
TownGeneration
Icon
LandGeneration
Icon
IndustryGeneration
Icon
Game OptionsIcon
5959 TT Del man E 45-58 30/4/99 8:54 am Page 54

57Section 4: Worlds
9. Industry Generation
Select the type of Industry required from the list. Industrymust be built on a clear, flat area of land.
10. Road Construction
The same as the original game. Your chance to create roadlinks before any costs are incurred.
11. Tree Planting
A choice of 12 tree types.
Or, the chance to plant trees randomly over the entire gameworld.
12. Signs
Position a sign where you want it. Edit sign box will appearwhen clicked (LMB) to allow text input.
13. Jazz Jukebox
The Sound/Music Control panel
14. Query Land Block
Position the land block query where you want it. A windowwill appear telling you who owns the land and how much itwould cost to clear.
4. Start Date Set
The starting date can be set for any year between 1950 and1975 by using the Up/Down Arrows.
5. Map Icon
World Map: A complete World Map of your newly createdscenario.
Town Directory: A complete directory of all the towns youhave created - in alphabetical order. Select (click-on name) tocentre town on screen.
6. Zoom-In/Zoom-Out
Zoom through the three levels of magnification, available inTransport Tycoon Deluxe, by clicking on the appropriate Plus+ or Minus - symbols.
7. Land Generation
These are the basic building blocks for generating your newworld scenario:
• Raise or Lower Land (up to 8 levels)• Dynamite Land or Buildings• Add Rocky Outcrops/Lighthouses/Transmitters/
Desert (sub-tropical only).• Generate Random land• Reset Land (back to sea level)
8. Town Generation
This allows you to create towns (New or Random) of a chosensize (Small, Medium or Large).
56 Section 4: Worlds
Date Icon
Map Icon
Industry GenerationIcon
Road ConstructionIcon
Land GenerationIcon
Town GenerationIcon
5959 TT Del man E 45-58 30/4/99 8:54 am Page 56

58 Section 4: Worlds
5959 TT Del man E 45-58 30/4/99 8:54 am Page 58

59
SECTION 5:
The Reference Guide
5959 TT Del man E 59-92 30/4/99 8:52 am Page 59

61Section 5: The Reference Guide
New Game
From the Game Options screen select one of the four‘Gameplay Climates’ (Temperate, Sub-Arctic, Sub-Tropicalor Toyland) by clicking on your choice with the LMB, thenClick on New Game.
The New Game Options window will appear. Click on‘randomly generated game’.
You will now begin a New Game
You will be placed straight in to the 3-D Main Game Screenwith a new randomly generated map.
Remember: From the New Game Options window you havethe opportunity to play any of the saved games and scenario’s,which have been stored on the Transport Tycoon Deluxe CD.
MAIN MENU OPTIONS
The Game Options screen appears when you load TransportTycoon Deluxe, allowing you to select either :-
• New Game• Load Game• Create a Scenario• Play Scenario• One Player/Two Player
(Accesses Link Play & Network Play)• Game Options• Difficulty• Tutorials/Demo• Quit to DOS
60 Section 5: The Reference Guide
Main Game Options Screen
Beginning of Game Screen
5959 TT Del man E 59-92 30/4/99 8:52 am Page 60

63Section 5: The Reference Guide
The World Editor allows you to generate your own scenario.You can create your own landscape, towns and industries.Once you have completed your scenario, save it and return tothe Main Game Options Menu.
Play Scenario
Selecting this option will bring up the Load Scenario Window.Simply click on the scenario which you wish to load and youwill be taken into the 3-D Main Game Screen with yourchosen scenario.
Load Game
If you select Load Game from the Game Options Screen, itwill open the Load Game “Window”.
The names of your saved games in the Transport TycoonDeluxe directory are displayed in a “Window”. To select oneof those listed, simply click on the name of the game you wantto continue.
Create a Scenario
If you select Create a Scenario from the Game OptionsScreen, it will open the World Editor Screen. You can chooseto design a scenario in any of the four gameplay climates;Temperate, Sub-Arctic, Sub-Tropical and Toyland. Simplyclick on the climate of your choice before selecting Create aScenario.
62 Section 5: The Reference Guide
Load Game Window
Word Editor Screen
5959 TT Del man E 59-92 30/4/99 8:52 am Page 62

65Section 5: The Reference Guide
■ To begin a linked game make sure the Serial Cable isconnected to both machines and both machines have amouse connected.
■ Load Transport Tycoon Deluxe as normal on bothmachines as far as the Main Menu.
■ Click on the Two Players Bar from the Main Menu onboth machines.
This will open the 2 Player Link Setup “Window”.
This “Window” contains all the options you need to link thegame.
Choose which COM port (1, 2, 3 or 4), the machines are usingfor the serial cable. The COM ports do not have to be thesame for both machines but the selection must be correct orthe link connection will not work.
One player should select ‘Serial cable (sender)’ and the othershould select ‘Serial cable (receiver)’.
When all selections have been made on both machines clickthe Attempt Connection bar.
The game will now load and play in exactly the same way as a oneplayer game, except that one of your competing Tycoons willbe human.
One Player/Two Player (Link & Network Play)
Transport Tycoon Deluxe can be played as a one player gameor the game can be linked and played competitively betweentwo players on two separate PC’s via a serial link. The gamecan also be played, by two players, over a network. Forinformation on Network Play please consult the ReadMe filestored on your Transport Tycoon Deluxe CD.
The second human player takes the place of one computer-controlled tycoon, but there will still be computer-controlledcompanies in linked mode.
To play a linked game, you will require a null-modem serialcable to link one computers’ unused Serial Port to an unusedSerial Port on the other computer.
Remember:The game, usually, requires a Mouse to run, whichwill take up one of your Serial Ports.
64 Section 5: The Reference Guide
Main Options Screen showing 2 Player Link Window
5959 TT Del man E 59-92 30/4/99 8:52 am Page 64

67Section 5: The Reference Guide
Game Options
Clicking on the Game Options Bar opens the Game Options“Window”.
Please refer to the Game Options Icon section (see page 70)for a detailed description of the Game Options.
Modem Link Play
Two Players can also compete against one another via amodem link.
Each player must have an original copy of Transport TycoonDeluxe installed on their computers.
If a saved scenario is to be played, both players must have thesame saved scenario on their machines.
Once in the 2 Player Link Set-up “Window” set one machineto ‘modem (send)’ and the other to ‘modem (receive)’.
Set the COM port for the modem on both machines (COM1,COM2, COM3 or COM4).
On the machine set to ‘send’, use the ‘Change Dial Number’bar to enter the phone number to be dialled, and then select‘Attempt Connection’ on both machines.
Only ONE player is allowed to select the Difficulty Levelsand Game Options.
Pressing any key while attempting to connect will instantlycancel the attempt.
While playing a Two-player game, you are advised to save thegame in progress regularly, for if the connection is lost thegame in progress may also be lost.
66 Section 5: The Reference Guide
Game Options Window
5959 TT Del man E 59-92 30/4/99 8:52 am Page 66

69Section 5: The Reference Guide
Tutorial/Demonstration
When you select the Tutorial/Demonstration button from theGame Options Screen, the Demonstration Menu will open.
You have Five on-screen Tutorials to choose from.
1. Road Vehicle Service2. Railway Service3. Air Service4. Ship Service5. Advanced Railway Service
You’re advised to watch them all in order. They will help youquickly learn many of the options available in TransportTycoon Deluxe.
Quit to DOS
This option will end Transport Tycoon Deluxe and return youto DOS.
Difficulty
From the Difficulty Level “Window” you have the choice ofthree default levels, Hard, Medium and Easy. Or, you cancreate a personalised level of play using the Custom button.
68 Section 5: The Reference Guide
Difficulty Level Window
The Demonstration Menu
5959 TT Del man E 59-92 30/4/99 8:52 am Page 68

71Section 5: The Reference Guide
Disk icon : This icon gives you the choice of Saving yourgame, Abandoning a game or Quitting Transport TycoonDeluxe altogether.
Save Game: To save your game click on the icon and the SaveGame “Window” will open. You can either keep the default namefor the save, or delete the default and rename it. When you areready to save, click on Save Bar (bottom right of the “Window”).
As you play you will build up more and more save games. Toremove an old save game, click on the Name of the save file inthe Save Game “Window” and then click on Delete (bottomright of the “Window”), the old save will be removed from thelist and from your hard-drive.
Abandoning Game: To Abandon a game but, not leaveTransport Tycoon Deluxe altogether, click and hold the Diskicon down. Drag the highlight bar down the menu toAbandon Game and release the LMB. You will be asked ifyou are sure you want to abandon the game.
Quit to DOS: To Quit to DOS click and hold the Disk icondown, drag the highlight bar down to Quit to DOS and releasethe LMB. You will be asked if you are sure you want to Quit.
The Finance/Information Group
The Map icon :- Click the Map icon and the World Map“Window” will immediately appear on screen.
The World Map “Window” allows quick access to any pointin the 3-D, simply by clicking anywhere in the “Window”.Moving around the Map “Window” is the same as for themain 3-D view screen. Click and hold the RMB, then movethe mouse in the direction you want to scroll. When you havemoved far enough, release the RMB, and click the LMB onthe area you want to move to in the main 3-D view.
THE 3-D WORLD
The Icons
Selecting New Game from the Main Menu will place you inthe 3-D World. In the bottom right of the screen is the presentdate and the total amount of money you can spend. You begina game with £100,000 (which is borrowed!).
Across the top of the screen are twenty six icons. Remember,holding down the Right Mouse Button (RMB) over any iconsin the game displays what features they control.
From left to right these icons are:
The Game Controls Group
The Pause icon : Pauses the game. The game will freeze in timeallowing you to consult the manual or scroll around the map.
Game Options icon : This icon allows you to adjust gameoptions, difficulty settings and select the following, from thepull down menu;
Town names displayedStation names displayedSigns displayedFull animationFull detailTransparent buildings
Clicking on the Game Options icon will allow you to adjust theAutosave feature. This feature saves the game at regularintervals. You can set the Autosave to save the game every 3, 6 or12 months. If you wish you can turn the Autosave completely off.
70 Section 5: The Reference Guide
Pause Icon
Game Options Icon
Disk Icon
Map Icon
5959 TT Del man E 59-92 30/4/99 8:52 am Page 70

73Section 5: The Reference Guide
This will open the Stations “Window”, clicking on a Stationname from the list that appears will take you to that Stationsposition in the 3-D world.
Next to the Station names are small symbols representingwhat kind of station it is e.g. a plane for an airport.
The Company Finances icon: displays any company’s financialinformation, and is very useful for keeping an eye on theopposition.
Click and hold the Budget icon, this will show the list of allthe Tycoons. Drag down the highlight bar over whichTycoon’s budget you want to view and release the LMB.
Your Company Budget information is always at the Top ofthe list. You can get to your personal “Window” quickly bysimply clicking the Budget icon once.
From within the Budget “Window” you can also Borrow andRepay money. You are allowed to borrow £300,000 in £10,000portions. The maximum loan can be increased to a maximumof £500,000 by amending the difficulty settings. As the yearspass, the maximum loan size increases with inflation.
The Company Information Icon: clicking on this icon allowsyou to view information about the total number of vehiclesyou own, Change your Manager’s Face, Name, CompanyName and Colour, as well as view rival Tycoon’s vehicles, andBuild or View your company HQ. The HQ increases in size inproportion to the success of the company.
To see the other Tycoons company information, click andhold down the Company Information Icon, drag the highlightbar down to the company you want to see and release theLMB.
Down the right hand side of the Map “Window” are sevenicons which alter the information that the Map “Window” willgive you:
Show Land Contours on the map.
Show Vehicles on the map.
Show Industries on the map.
Show Transport Routes on the map.
Show Vegetation on the map.
Show Land Owners on map
Toggles Town Names on and off.
The Town Directory “Window” gives quick access to anytown in the world. Click on the name of a town to move to itsposition in the main 3-D view screen. The number shownafter each town name is the town population.
The Subsidies “Window” lists the present subsidies on offerfrom any of the Town Councils and also the Services thathave already been subsidised.
Subsidies are offers made by Town Councils to enticeTransport Companies to provide a service that they want.
These Subsidised Routes can be very profitable and areworthwhile if you want a quick return on your money.
The Stations icon: this icon allows you to view all of your ownor rivals stations including airports and docks.
Click and hold the Stations Icon down, drag the highlight bardown to the company’s name that you want to view andrelease the LMB. If you want to see your own stations justclick on the Stations icon.
72 Section 5: The Reference Guide
Land Contours Vehicles
Industries TransportRoutes
Vegetation Land Owners
Town Names Town Directory
Subsidies Icon
Stations Icon
Company FinancesIcon
CompanyInformation Icon
5959 TT Del man E 59-92 30/4/99 8:52 am Page 72

75Section 5: The Reference Guide
Changing Company Colour
■ Click on the Colour Scheme bar (second from thebottom left of the “Window”).
This will open the New Colour Scheme “Window”.
■ Use the Up and Down arrows on the Scroll bar to see allthe available colours.
■ Click the LMB on the Coloured Vehicle you want.
This will change all your Vehicles and Station Names to thenew colour.
The Graphs
The Graphs icon: This icon allows you to view six differentgraphs to give you an accurate overview on how you are doingagainst the rival Tycoons.
The Operating Profit GraphThe Income Graph The Delivered Cargo GraphThe Performance History GraphThe Company Value GraphThe Cargo Payments Rate
The first five Graph “Windows” have a Key icon in the topright corner. Clicking on this icon will open up a Key“Window” which shows what the data in the graphrepresents.
Changing Your Managers Face
■ Open your Company Information “Window” and clickon the New Face bar (bottom left of the “Window”).
This will open the Face Selection “Window”
■ Choose either Male or Female gender for your manager.
■ Click on New Face until the face you want to keep appears.
Then click on OK.
Changing Managers Names
■ Click on the Manager Name bar (third from the left atthe bottom of the Company Information “Window”.
This will open the Managers Name “Window”.
■ Delete the old name using the BackSpace Key, type inyour new name and click on OK, or press <RETURN>.
The Managers Name “Window” will close automatically whenyou click on OK.
Changing Company Name
■ Click on the Company Name Bar (bottom right of theCompany Information “Window”).
This will open the Company Name “Window”.
■ Delete the old Company Name using the BackSpaceKey, type in the new name and click on OK, or press<RETURN>.
74 Section 5: The Reference Guide
Graphs Icon
5959 TT Del man E 59-92 30/4/99 8:52 am Page 74

77Section 5: The Reference Guide
running down the right of the vehicle information window.For a description of what actions these icons perform click onthem using the RMB.
From a vehicle’s “Window” you can increase or reduce theservicing intervals of the vehicle by clicking on the ‘show roadvehicle details’ icon and adjusting the service interval usingthe up and down icons. Remember the smaller the intervalsthe bigger the increase in reliability.
The Construction Group
The next four icons open related Construction “Windows”.These “Windows” contain more icons, some for generalconstruction and some specific to that mode of transport.
General Construction icons :- The Dynamiter, Raise / LowerLand and Purchase Land Block Icons are present in all of theconstruction “Windows”.
The Dynamiter is used to demolish anything on a square of landi.e. trees or buildings. The Dynamiter does not lower the land, itsimply clears anything from the square. The cost is determined bythe size of the object you want to demolish and its importance.
League Table
Clicking on this icon will display a league table of all thetransport companies.
Fund New Industry
Clicking on this icon will display a list of industries which youare able to fund. Select the industry you wish to fund and thenposition it in the 3-D world. The list of industries will differdepending upon which climate you are playing in.
The Transport Group
The Transport icons: The next four icons have similarfunctions but for each of the four different modes oftransport: Rail, Road, Sea and Air.
These icons allow you to view all of your own, or your rivalstrains, planes, road vehicles and boats. Also, to see theirpresent position in the 3-D by clicking on them from the list ofvehicles displayed.
At the bottom left of the Transport “Windows” there are NewVehicles buttons. To use these buttons you must already havea Depot built for the type of vehicle you want to build. If youdecide to build a new vehicle you can re-name it by clickingon rename, deleting the current name, typing in a new nameand clicking on OK.
The vehicle will be built in the Depot that was the first Depotyou built for that type of transport.
Clicking on one of the vehicles will open it’s “Window” givingyou access to all of that vehicle’s information (Age, RunningCosts, Annual Profit and Servicing / Reliability Information)and allowing you to issue quick instructions using the icons
76 Section 5: The Reference Guide
League Table Icon
Fund New IndustryIcon
Dynamiter Icon
Transport Icons
Vehicle Information Window
Vehicle Stats Window
5959 TT Del man E 59-92 30/4/99 8:52 am Page 76

79Section 5: The Reference Guide
To build a Bridge to cross a valley or waterway:
■ Click on the Bridge Icon (the cursor will change to abridge).
■ Click and Hold the LMB on the square you want thebridge to start from (this square must be sloped and thevalley cannot be deeper than one square).
■ Still holding the LMB down, drag the cursor from thefirst square to the square that you want the Bridge toend (this end square must be sloping in the oppositedirection to the first).
Once the route for the Bridge is highlighted by the whitesquares and appears correct, release the LMB.
The white boxes will disappear and the Select Road Bridge“Window” will open.
Choose from the “Window” which style of bridge you want.Using the slide bar if required.
All Bridges have a maximum speed limit that any vehiclecrossing cannot not exceed. The more expensive the Bridge,the faster that vehicles can pass over them. You will have todecide which bridge is suitable each time you come to build anew one.
The Tunnel icon allows you to excavate through any size hillor mountain so long as both ends are suitable for building, i.e.sloping in the correct direction. When this icon is selected theroute for the proposed tunnel will be highlighted in the 3-Dby linked white hollow squares.
■ Click on the Tunnel Icon and place the cursor over theproposed Tunnel entrance.
The Raise and Lower Icons allow you to change the level ofland up or down.
■ Click on one of the two icons, place the cursor over thecorner of land you want to raise or lower and click theLMB.
Purchase Land Block: Allows you to purchase a block of landfor future use. Other competitors will not be able to build onany blocks of land you purchase. You can sell blocks of landby bulldozing them.
■ Click on the icon and position the cursor box over theland block you wish to purchase, then click on it usingthe LMB.
The Toggle Build/Remove on/off icons, Bridge icons andTunnel icons are only available in the Rail and RoadConstruction “Windows”.
The Toggle Build/Remove on/off is used to erase half asquare of road, one piece of railway track or signals withoutdamaging anything else on or around that square.
■ Select the item you wish to erase, (a piece of track forinstance), from the Construction “Window”.
■ Click on Toggle Build/Remove on/off icon.
■ Click on the object in the 3-D you want to remove.(There is a hollow red square to show which object youare going to remove in the 3-D).
The Bridge Icon is used to enable a Rail or Road network tospan a piece of land without the need for levelling or raisingit. Bridges are used to cross shallow valleys (these can be anylength but only one square deep), waterways and previouslybuilt Roads and Railways.
78 Section 5: The Reference Guide
Raise and Lower Icons
Purchase LandBlock Icon
Bridge Icon Tunnel Icon
Vertical rack Icon
Toggle Build/Remove on/off Icon
5959 TT Del man E 59-92 30/4/99 8:52 am Page 78

81Section 5: The Reference Guide
All you need to do is build a passing place on the main lineand put signals on both tracks just inside both entrances to thepassing places.
A single-direction signal will allow trains to pass in only onedirection, enabling much more efficient double-track railwaysto be constructed. To build single-direction signals, click withthe signal pointer a 2nd or 3rd time on the position where thesignal is required.
The Road Construction icon: Clicking here opens up theRoad Construction “Window”, containing the two RoadOrientation Icons which build sections of road half a square ata time.
■ To build a section of road, select the icon for thedirection of road you want built.
■ Click in the centre of one of the sides of a square, thiswill build a section of road in half of the square.
■ Click in the other half of the square to completely fill itwith road.
For long straight roads select the correct road orientationicon, click and hold on the road’s starting point in the 3-D.Drag the cursor to the road’s finishing point and release theLMB, the whole ‘straight’ will be built at once, so long as youcan afford it.
To build a road around a corner in one square:
■ Place one piece of road with one of the orientation iconsin the square.
■ Select the other road construction icon and placeanother piece of road in the same square.
■ If the route shown by the white hollow squares is correctclick the LMB again and the Tunnel will constructed.
■ If the route is not correct or the white squares do notshow a route at all, you will need to level some landbefore you can build the Tunnel.
Specific Construction icons
This opens up the Rail Construction “Window”, whichcontains the Track Orientation Icons, allowing you to buildtrack in any direction.
The Train Depot and Station Icons, both when clicked requireyou to select the Orientation of the building.
The Station Icon also requires you to select the Station Size,Number of Tracks and Catchment Area Highlight.
Station size greatly influences how efficiently your trains canbe unloaded. The number of tracks limits how many trainscan be unloaded at one time, so busier stations will need morethan one track.
Remember: you can often demolish an old station and replaceit with a larger one. The Catchment Area Highlight shows thearea which the station serves.
The Signals Icon is needed when railway networks begin toget more complicated, especially when more than one train isusing the same segment of track.
When your railway network gets busier, you may find thatyou cannot afford to build a parallel track next to a previouslybuilt one; even though there is demand for another service onthat route. The answer is to have two trains on the same trackcontrolled by signals. It is important that you use signals toavoid potential collisions.
80 Section 5: The Reference Guide
Track Orientation Icon
Station and Depot Icon
Rail ConstructionIcon
Signals Icon
Road Orientation Icons
Road ConstructionIcon
5959 TT Del man E 59-92 30/4/99 8:52 am Page 80

83Section 5: The Reference Guide
Two hollow white boxes highlight the area in the 3-D that youare selecting. One of the two boxes must be placed on theshore and one of the boxes over the water. When the boxesare in the correct position, click the mouse button again tobuild.
Click on the Dock name to see what it will ‘accept’. If yourship is unsuitable to carry the cargo type that the dock‘accepts’ you can return to the Ship Depot to refit the ship.Simply click on the ship icon, click on the return to dock iconthen click on refit and select the type of cargo that you wishthe ship to carry. The Dock Construction “Window” also hasa “Place BUOY” icon. You can position a buoy anywhere inthe water and then order a ship to go to that point; either tomoor there or as part of a transport route (to keep narrowstretches of water uncongested).
The Airport Construction Icon: Clicking on this icon opensthe Airport Construction “Window” containing the BuildAirport icon. You will have a Large or Small Airport, and aHeliport, to choose from, depending on how much money youhave available and the stage of the game.
Remember: To start an airline service you will have to buildtwo airports and buy an aircraft. Airports also have to be builton a large area of level land so this form of transport can bevery expensive initially.
You can change the type of cargo that an aircraft carries byclicking on the aircraft icon, then clicking on the return tohanger icon. Wait for the aircraft to return to the hanger thenclick on the refit icon and select the type of cargo that youwould like the aircraft to carry.
The (Road Vehicle) Depot, Bus Station and Lorry LoadingBay icons
When clicked, you will have to choose the Orientation ofthese buildings similar to the Train Depot icon.
Make sure you select the correct orientation or the vehicleswill not be able to leave or enter any of the Buildings.
The Road Vehicle Depot must face a road.
Decide on a site to build the depot and choose the correctorientation facing the road.
The Dock Construction icon: Clicking this icon opens up theDock Construction “Window”.
This “Window” contains the Build Ship Depot and the BuildDock icons. Depots are used to build and service ships.
Docks are required for loading and unloading all goods andpassengers.
To build a Dock, click on the icon and place the cursor overthe area you want to build.
82 Section 5: The Reference Guide
Depot, Bus Station and Loading Bay Icons
Dock ConstructionIcon
Airport ConstructionIcon
Build Airport Icon
Dock Construction Window
5959 TT Del man E 59-92 30/4/99 8:52 am Page 82

85Section 5: The Reference Guide
New Style: Clicking the New Style icon will set the JazzJukebox to play only this style of track.
Ezy Street: Clicking the Ezy Street icon will set the JazzJukebox to play an alternative style of track.
Custom 1 & 2: These two Custom icons allow you to selectyour favourite Jazz Tracks of either style and play them in anyorder you wish.
Programming the Custom Buttons: Click on the Programicon. The Music Program Selection “Window” will appear. Inthe left of the “window” are listed all of the Jazz Tracks inTransport Tycoon Deluxe. In the right of the “window” is thepresent order in which the tracks are selected to play.
The top four icons in the centre of the “Window”, ALL, OLDSTYLE, NEW STYLE and EZY STREET, when clicked,respond exactly the same as clicking the same named iconsfrom the Jazz Jukebox. They list the permanent playlist foreach style.
The next two icons Custom 1 and Custom 2, when clicked,allow you to select your favourite tracks and create your ownpersonal playlists.
■ Simply click the track you want to select from the leftside of the screen.
The chosen track will appear in the Playlist on the right sideof the “Window”.
When you have finished your selections you can save theplaylist by clicking on the Save icon.
To replace an old playlist simply click the Clear icon andselect your new tracks.
The Place Tree/Sign icon: Holding down this Icon highlightstwo options: Plant Trees and Place Signs.
If you highlight Plant Trees, the tree window will appear,allowing you to select the tree type you wish to plant. Selectthe tree type that you wish to plant. Position the cursorhighlight where you wish to plant the tree and click the LMB.
If you highlight Place Signs, the Cursor Icon will changeappropriately to a signpost. Place the cursor over the positionyou want to label and click the LMB. You will then beprompted to type in a name for the sign. Click on OK and thenew sign will appear in the 3-D. In 2-player mode this iconincludes a Send Message option which allows players to sendmessages to one another.
To delete a sign simply click on the sign in the 3-D, delete alltext from the “window” and press <return>. To change a sign,alter the text and press <return>.
Show Sound/Music Window Icon: Click on this icon to openthe Jazz Jukebox “Window”.
From the Jazz Jukebox you can control music volume, changethe music and program a custom made music sequence.
To change the volume click and drag the ‘sliders’ to set musicand sound effects volume.
At the bottom of the Jukebox “Window” are five icons forselecting the order and style of Jazz Tracks that play duringthe game.
All: Clicking the All icon will play all the Tracks from bothstyles.
Old Style: Clicking the Old Style icon will set the JazzJukebox to play only this style of track.
84 Section 5: The Reference Guide
Tree Icon
Show Sound MusicWindow Icon
5959 TT Del man E 59-92 30/4/99 8:52 am Page 84

87Section 5: The Reference Guide
ÒWindowsÓ
Information “Windows”: Update “Windows” will appearthrough out the game, giving you information on newdevelopments, constructions and new services. These willkeep you well informed on transport systems progress andoffer ideas for possible new services.
Information Bar: Summarised messages are shown in thecentre of the information bar at the bottom of the screen.Click this area to view the complete message.
When you are happy with your selections close the Selection“Window”.
Other Icons on the Jazz Jukebox:Skip Backwards: Jumps back one track in the present playlist.Skip Forwards: Jumps forward one track in the present playlist.Stop: Stops the music playing without affecting the sound effects.Play: Starts playing the next track in the playlist.Shuffle: Clicking the Shuffle icon randomises the order of thepresent playlist.
Show Message Icon: Clicking on and holding down this iconhighlights two options: Last Message/News Reports andMessage Settings.
Last Message/News Report: Dragging the highlight bar downover the Last Message/News Report and releasing the LMBwill re-open the last information “Window” that was on thescreen.
Message Settings: Highlighting Message Settings andreleasing the LMB will open the Message Option “Window”.This “Window” contains ten separate switches so you canchoose to receive your messages in summary or in full detail.
Query Land Block: Dragging the highlight bar down to QueryLand Block and releasing the LMB changes the cursor to aQuestion Mark. Click on any square in the 3-D (a whitehollow box highlights which square you are about to query)and an information box will appear with all the informationabout that square. For instance, what type of land it is, howmuch it would cost to clear and who it is owned by.
Other options available from this icon are:Screenshot - allows you to create a .pcx file of the current screen.Giant Screenshot - allows you to create a .pcx file 9 screens large.About Transport Tycoon Deluxe - Information on the game.
86 Section 5: The Reference Guide
Show Message Icon
Query Land BlockIcon
Information Window
5959 TT Del man E 59-92 30/4/99 8:52 am Page 86

89Section 5: The Reference Guide
Sub-Arctic Climate
Coal Mine: Coal Mines do not require anything and producecoal (required by Power Stations).
Power Station: Power Stations require coal for fuel.
Oil Wells: Oil wells do not require anything and produce oil(required by Oil Refineries).
Oil Refinery: Oil Refineries require oil and produce goods.
Forest: Forests do not require anything and produce wood(required by Paper Mills)
Paper Mill: Paper Mills require wood and produce paper(required by Printing Works)
Printing Works: Printing Works require paper and producegoods.
Farm: Farms do not require anything and produce wheat andlivestock (required by food processing plants).
Food Processing Plant: Food Processing Plants require wheatand livestock, and produce food.
Gold Mine: Gold Mines do not require anything and producegold (required by banks).
Bank: Banks require gold.
Goods and Food can be taken to large towns.
Buildings
Temperate Climate
Coal Mine : Coal Mines only produce coal (required by PowerStations). They don’t ‘require’ anything.
Power Stations: Power stations require coal for fuel.
Forest: Forests require nothing to grow and produce wood(required by Sawmills).
Sawmill: Sawmills require wood from forests and produceGoods.
Oil Refinery: Oil refineries require oil from land based drillsand in later years from sea-based oil rigs. They produce onlygoods to be taken to large towns.
Farm: Farms do not require anything but produce Livestockand Grain (required by factories).
Factory: Factories require Livestock, Grain and Steel, andproduce goods to be taken to large towns
Oil Rig: Oil Rigs do not require anything but produce oil(required by Oil Refineries).
Iron Ore Mine: Iron Ore Mines do not require anything andproduce iron ore (required by Steel Mills).
Steel Mill: Steel Mills require iron ore from mines andproduce steel (required by Factories).
Goods and food can be taken to large towns.
88 Section 5: The Reference Guide
Coal Mine Power Station
Coal Mine Power Station
OIl Wells Oil Refinery
Forest Paper Mill
PrintingWorlds
Farm
Food ProcessingPlant
Gold Mine
Bank
Forest Sawmill
OIl Refinery Farm
Factory OIl Rig
Iron Ore Mine Steel Mill
5959 TT Del man E 59-92 30/4/99 8:52 am Page 88

91Section 5: The Reference Guide
Toyland ÔClimateÕ
Sugar Mines: Sugar Mines produce sugar (required by sweetfactories).
Toy Factory: Toy factories require plastic and batteries andproduce toys.
Sweet Factory: Sweet factories require toffee, candyfloss andsugar, and produce sweets.
Cola Wells: Cola Wells do not require anything and producecola (required by fizzy drink factories).
Candyfloss Forest: Candyfloss forests produce candyfloss(required by sweet factories).
Bubble Generator: Bubble generators produce bubbles(required by fizzy drink factories).
Toffee Quarry: Toffee Quarries do not require anything andproduce toffee (required by sweet factories).
Battery Farm: Battery Farms do not require anything andproduce batteries (required by toy factories).
Plastic Fountains: Plastic Fountains do not require anythingand produce plastic (required by toy factories).
Fizzy Drink Factory: Fizzy Drink Factories require cola andbubbles, and produce fizzy drinks.
Toy Shop: Toy Shops require toys.
Sweets and fizzy drinks can be taken to large towns.
Sub-Tropical Climate
Rubber Plantation: Rubber Plantations do not requireanything and produce rubber (required by factories).
Factory: Factories require rubber, copper ore and wood, andproduces goods.
Oil Wells: Oil Wells do not require anything and produce oil(required by Oil Refineries).
Lumber Mill: Lumber Mills do not require anything andproduce wood (required by factories).
Copper Ore Mine: Copper Ore Mines do not require anythingand produce copper ore (required by factories).
Water Supply: Water Supplies produce water (required bywater tanks).
Water Tank: Water Tanks require water.
Farm: Farms do not require anything and produce maize(required by food processing plants).
Fruit Plantation: Fruit Plantations do not require anythingand produce fruit (required by food processing plants).
Food Processing Plants: Food Processing Plants require fruitand maize, and produce food.
Diamond Mine: Diamond Mines do not require anything andproduce diamonds.
Bank: Banks require diamonds.
Goods and food can be taken to large towns.
90 Section 5: The Reference Guide
RubberPlantation
Factory
OIl Wells Lumber Mill
Copper OreMine
Water Supply
Water Tank Farm
FruitPlantation
FoodProcessing Plant
Diamond Mine Bank
Sugar Mines Toy Factory
Sweet Factory Cola Wells
CandyflossForest
BubbleGenerator
Toffee Quarry Battery Farm
PlasticFountains
Fizzy DrinkFactory
Toy Shop
5959 TT Del man E 59-92 30/4/99 8:52 am Page 90

Buildings Common To All Climates
Railway Depot: Railway Depots are used to build and serviceall Railway Engines and Carriages.
Railway Station: Railway Stations can be used for passengers,mail and all goods. You will need the appropriate carriages totransport them.
Road Depot: Road Depots are used to build and service allRoad Vehicles.
Bus Station: Bus Stations can be used for passengers. Youcannot order any vehicle other than a bus to call at a busstation.
Loading Bay: Loading Bays can be used for Mail and Goodsbut not Passengers.
Ship Dock: Docks can be used for any goods and passengers.
Ship Depot: Ship Depots are used for building and servicingall Ships and Ferries.
Airport (Small/Large) & Heliport: Airports and heliports canbe used for any goods or passengers.
92 Section 5: The Reference Guide
5959 TT Del man E 59-92 30/4/99 8:52 am Page 92

93
SECTION 6:
Advanced Features
5959 TT Del man E 93-102 30/4/99 8:50 am Page 93

95Section 6: Advanced Features
Train and road vehicle servicing
When trains and road vehicles are due for servicing, they headfor the nearest servicing Depot. It is a good idea to buildTrain Depots at the end of most railway lines and to buildRoad Vehicle Depots in every town you run a service to.
Cargo production and distribution fromIndustries
Clicking on any industry in the 3-D view opens up a windowshowing what the industry produces.
Two figures are given for each cargo type under the heading‘Production last month’. The first is the amount of cargo thatwas actually produced. The second (in brackets) is thepercentage actually sent to stations.
The industry tries to match its actual production to thetransport services available, producing less if the serviceratings are poor, or no services are available.
Passengers and Mail in towns
In a similar way to the industries, the Town Informationwindow shows both the actual number of passengers and mailthat went to stations (hoping to travel), and the potentialmaximum number of passengers and mail that would travel ifthere were nearby stations with ratings of 100%.
GAME-PLAYING NOTES
Using Railway Signals
The Basics: As in the real thing, the principle of the railwaysignalling system is to prevent trains from colliding bypreventing more than one train from entering any one sectionof railway track. Each signal tells the train if the section oftrack ahead is clear (green signal), or occupied (red signal).
The train will always stop and wait at a red signal; preventingit from colliding with a train in the next section.
Passing Loops: To run several trains on a single-track railwayline effectively, ‘double-track’ passing loops need to be built atregular intervals along the line, allowing trains to pass eachother safely. Each passing loop should have signals on bothtracks AND at both ends, with enough length between thesignals on the double-track for your longest possible train to fit.
Parallel Tracks: Running more than two trains on a singletrack railway with passing loops is not advisable. For three ormore trains, build parallel tracks between the stations and addjunctions and single-direction signals about every ten squares.On one track the signals should face in one direction and onthe other track they should face in the opposite direction. Thisallows many trains to run efficiently on just two parallel tracks.
Single direction signals can be built to allow trains to pass inonly one direction, enabling much more efficient double-trackrailways to be constructed. To build single-direction signals,click with the signal pointer a 2nd or 3rd time on the positionwhere the signal is required. You will know that you havesuccessfully planted a single-direction signal because only 1signal will appear on the track.
94 Section 6: Advanced Features
5959 TT Del man E 93-102 30/4/99 8:50 am Page 94
97Section 6: Advanced Features
before the station will accept goods (the cumulative value forgoods within the catchment area must be 1 or greater).
Ordering Vehicles & Vessels
There are FIVE action bars at the bottom of the VehicleOrders “Window”: SKIP, DELETE, GO TO, FULL LOADand UNLOAD. The train orders “Window” has a sixth:NON-STOP. These action bars allow you to give your trainsmore detailed orders.
Cargo and passenger distribution tostations
When cargo is produced by an industry, or passengers want totravel, only stations within four squares of their industry ortown building are considered. If only one station exists withina four-square distance from the industry or building, then apercentage of the cargo or passengers will go to the stationand wait for an appropriate transport service (the percentagebeing the current cargo rating at that station). If two or morestations exist within the four-square distance, then the cargoor passengers are distributed according to the cargo ratings ateach station, with more going to the highest rating station.
The station rating is affected by the frequency of services andis higher if there are vehicles calling regularly at a station. Therating will rise if the vehicles calling at the station are newerand faster.
However, the rating of a station will fall if goods or passengersare left waiting at a station for long periods of time.
Cargo accepted by stations
Each station has a catchment area four squares around it in alldirections, and will accept any cargo which any of the squaresin its catchment area accepts.
To find out what is accepted by a square, use the ‘Query landblock’ function (the ‘?’ icon) to get information about the square.
The information window shows what cargo is accepted - if thefigure is a fraction in brackets, then this means that more thanone of that type of building is required within the catchmentarea before the cargo is accepted by that station. For example,some buildings ‘accept’ 2/8ths goods, which means that atleast four of these buildings must exist in the catchment area
96 Section 6: Advanced Features
Vehicle Window
Orders Window
5959 TT Del man E 93-102 30/4/99 8:50 am Page 96

99Section 6: Advanced Features
This Order is very useful if you are transporting goods longdistances and on more than one transport route. For example,you could use a train to deliver oil from an oil rig to a stationthat did not accept oil. You could then instruct another train togo to that station and load the oil, which it would then take toanother destination that did accept the cargo.
Estimated Cost
Shift Key: Holding ‘Shift’ down when performing any buildingaction will show the estimated cost of that action, withoutperforming it and actually spending money.
Local Authority Window
By clicking on any town name, you will have access to theTown Information window. Selecting the ‘Local Authority’action bar will give you access to the ‘Advertising Campaign’option, the ‘Fund Road Reconstruction’ option, and will alsoshow you the current rating of all competitors. The actionsavailable to you will vary according to your cash available, itMAY include Fund Road Construction.
You can choose from Small, Medium or Large Advertisingcampaigns. Campaign costs, details and ‘Do It’ action bar allappear within the window. An Advertising campaign willattract passengers and goods to your stations in the townwhere you conducted the campaign.
To reconstruct a town's roads, click on Fund RoadReconstruction and then click on Do It. You will pay a largesum to the local authority to dig up all their roads. This optioncan be used to cause considerable disruption to road traffic.This can be useful if, for example, you are running a railservice in a town and are competing with bus/lorry services.Road reconstruction will result in traffic jams and detourswhich will make the ratings, for road vehicle stations, dropdramatically, giving your rail service a competitive advantage.
SKIP: Clicking on SKIP will miss out the next station on thevehicle’s route. The ‘Next Stop’ Arrow (left of the stationnames in the ‘Window”) will move to indicate the station thetrain is heading for next.
DELETE: To Delete an order from the Orders “Window” i.e. aStation for a vehicle to call at, you must highlight the stationname in the “Window” (the name will change colour to WHITEto show that it has been selected) then simply click the Deletebar and the station name will disappear from the “Window”.
NON-STOP: The Non-Stop Bar is only found in the TrainOrders “Window”.
To make a train travel directly to a station without stopping,highlight the station name that you want the train to go todirectly, and click the Non-Stop Bar. The action will appearafter the selected station in the Orders “Window”.
GO TO: The Go To Bar is used to designate stations forvehicles to call at.
Click the Go To Bar, then click on the station you want thevehicle to call at in the 3-D view.
The orders will appear in the Orders “Window” as you selectthem.
FULL LOAD: The Full Load Bar is used to order a vehicle towait at a station until it is fully laden.
Highlight the Station name and then click the Full Load Bar.
UNLOAD: The Unload Bar is used to order a vehicle tounload its cargo at a station even if the station does not acceptthe goods it is carrying.
Highlight the Station name and then click on the Unload bar.
98 Section 6: Advanced Features
5959 TT Del man E 93-102 30/4/99 8:50 am Page 98

101Section 6: Advanced Features
station rating, as there will be more services arriving atthe combined station.
■ Keep an eye on the profitability of all your services - usethe Vehicle List windows to check profits, and closedown services not making much money.
■ Compete directly with computer opponents who try torun services from cargo producers that you are using.Run a very frequent and fast service, always waiting forfull loads. This should keep your station ratings aboveyour opponent’s, which will mean he/she will get lesscargo to transport, eventually causing him/her to closedown the service because of lack of profit.
If you still find that the station limit has been reached at acritical point in the game (i.e. when you’re trying to build thestation at the other end of a line that took you 6 months toconstruct), just wait for a while and try again - the computeropponents are constantly assessing their services, and willclose down any service which is not profitable. There’s a goodchance that a station entry will become free after waiting justa few minutes.
Buy/Sell Company Shares
Holding the LMB, click on the company information screenand select one of the competing companies.
When the company information window appears you will seetwo options allowing you to buy and sell shares.
You can buy or sell 25% of a companies shares at a time. Ifyou buy all of a companies shares you will take that companyover and will own all its vehicles and stations and debts.
Other options will appear on the authority “window” only ifyou have enough cash. They are;
‘Build Statue of Company Owner’ - This option erects astatue in the town, and improves the ratings of all yourstations in the town.
‘Fund New Buildings’ - This option builds additional shops,offices and other buildings in the town.
‘Buy Exclusive Transport Rights’ - This option gives youexclusive transport rights to the town for 1 year. This meansthat, during this period, all passengers and goods will be sentto your stations.
Station maximum limit
Transport Tycoon Deluxe can handle a maximum of 250stations. (A ‘station’ can be a railway station, a bus station, alorry loading bay, an airport, a dock, or combinations of eachof these linked into a station with a single name.) Thislimitation is rarely a problem, but the following hints will helpto avoid being hampered by this:-
■ Don’t just concentrate on building short transportservices between close industries or towns - once a fewservices have been set up and the money starts toaccumulate, start building longer services betweendistant industries and towns. An efficient servicebetween distant towns or industries with several trainswill be more profitable than several services betweencloser towns or industries (and will use fewer stations).
■ If you are building different types of transport services inthe same area, try to link the stations (e.g. a bus stationadjoining a railway station) - only one station ‘slot’ isthen used. This also makes it easier to maintain a higher
100 Section 6: Advanced Features
5959 TT Del man E 93-102 30/4/99 8:50 am Page 100

Screenshot Functions
‘Ctrl-S’ will save a .PCX screenshot of the current screen.
‘Ctrl-G’ will save a giant .PCX screenshot of the land area(equivalent to 9 screens).
These functions can also be accessed from the Query LandBlock icon.
Closing Down Warning Windows
Clicking the RMB will close down red warning messages.
Running Transport Tycoon Deluxe fromWindowsª/Windowsª '95
If you are running the game in Windows or Windows ‘95 youwill need to disable all screen savers prior to running thegame.
If you are in Windows '95 then run Transport Tycoon Deluxein an exclusive DOS session and do not attempt to multi-task/swap out of the game.
102 Section 6: Advanced Features
5959 TT Del man E 93-102 30/4/99 8:50 am Page 102

103
SECTION 7:
Hints & Tips
5959 TT Del man E 103-108 30/4/99 8:59 am Page 103

105Section 7: Hints & Tips
If you do decide to take a vehicle for the first year,they are likely to have a higher rate of breakingdown. However if you take a vehicle exclusively butdon’t buy any, you will not be offered furtherprototype vehicles in the future.
10 Keep checking the graphs to see how you areprogressing in relation to your competitors.
11 Placing trees around a station will attract morepassengers to it. Very useful if you have a rivalsstation very close to one of yours. The trees willincrease your rating with the local authority (usefulwhen you need to increase this rating to getpermission to demolish buildings in a town).
12 Build stations with two tracks if you can afford it,this will save time later if the route picks up and youwant to have another train on the same route.
13 Rename towns that you have a network in so thatyou can easily find it from the Town or Stations“Window”.
14 When building any type of station, clicking on theCatchment Area On Icon will show you in the Main3-D view how much of the surrounding area theStation will provide its service to.
15 Using passing places on a single track will allow youto run more than one train along it. You must placesignals at both ends of the passing place on themain-line track to prevent crashes.
1 Don’t borrow too much money to begin with, theinterest payments could bankrupt your company.
2 Position your stations carefully. It is no use placing astation in the middle of nowhere. This will justwaste valuable money. Rather construct stationsclose to industries and towns.
3 Use the Map “Window” to find industrial andagricultural areas, it is a lot faster than scrollingaround the main 3-D view.
4 The further you transport any commodity the moremoney you will make on each trip. The journey will,however, take a longer time.
5 Keep a close eye on all of your vehicles. As theystart to get old, they will begin to cost you moremoney than they are earning through breakdownsand the traffic jams they will cause.
6 It is possible to land the faster aircraft at the smallerAirports, however the risk of a crash is much higher.
7 Pressing the PAUSE icon stops everything in thegame world but still allows you to scroll around theMain View of the World and the Map “Window”.
8 Subsidies offered by the Local Councils carryfinancial rewards for whoever completes the requestfirst. These can help when first starting a business.
9 New vehicles are offered to you exclusively for theirfirst year of production. Not taking on a prototypevehicle will see the offer passed on to one of yourcompetitors.
104 Section 7: Hints & Tips
5959 TT Del man E 103-108 30/4/99 8:59 am Page 104

107Section 7: Hints & Tips
17 Multiple track stations quicken loading andunloading times because you can unload more thanone train at a time. The length of time taken isshortened again if you join all the tracks to allavailable platforms.
In doing this make sure that there are signals justoutside all the stations on all the tracks. Also formaximum efficiency make sure that a train can getinto any available station from any track.
16 To construct double-track railways, build each ofthe parallel tracks separately, and only connectthem to each other at each end, before the finalstations. On one line, construct signals facing in onedirection at regular intervals along the line, and onthe other line, construct signals facing in theopposite direction at regular intervals. A largenumber of trains can be run efficiently on a railwayconstructed in this way.
106 Section 7: Hints & Tips
Passing Place
Multiple Track Station
Parallel Track with single direction signals
5959 TT Del man E 103-108 30/4/99 8:59 am Page 106

108 Section 7: Hints & Tips
5959 TT Del man E 103-108 30/4/99 8:59 am Page 108

109
SECTION 8:
Technical Assistance
5959 TT Del man E 109-112 30/4/99 8:58 am Page 109
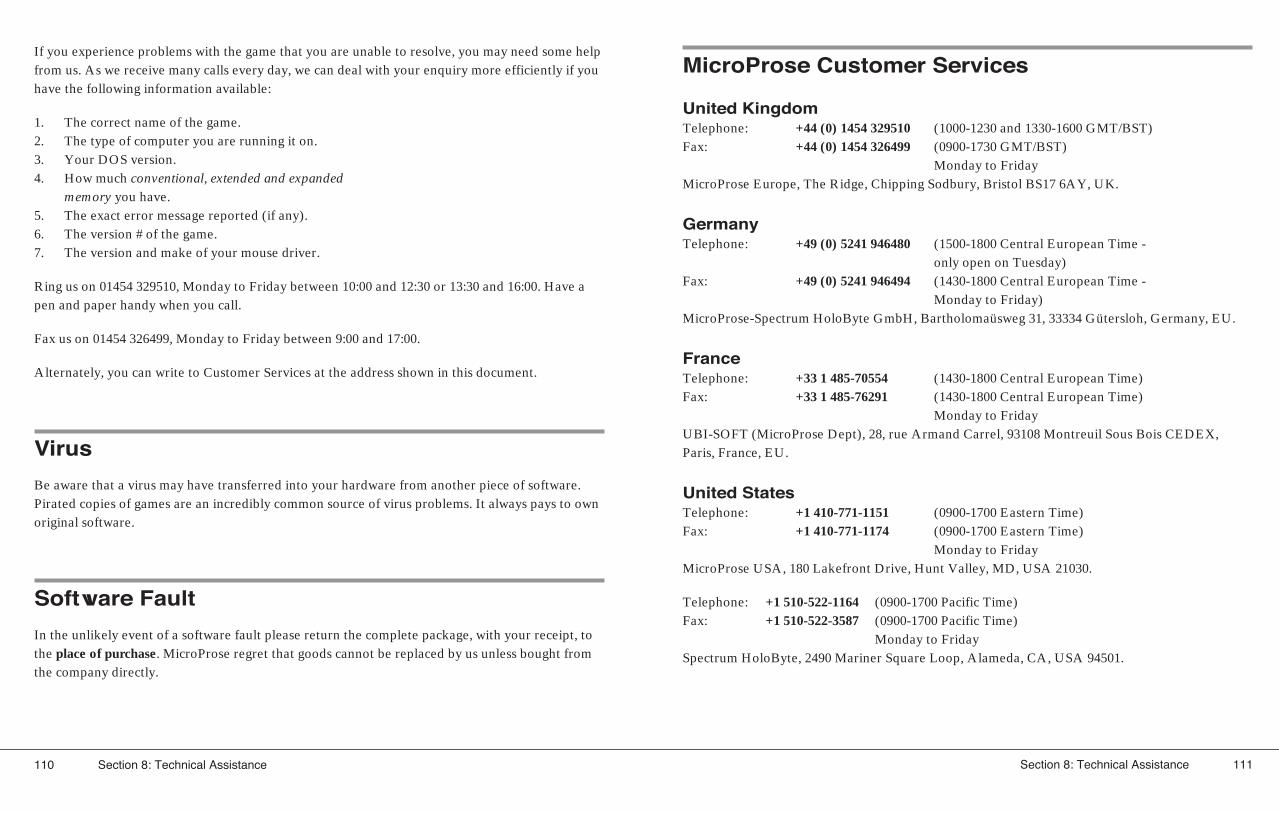
111Section 8: Technical Assistance
MicroProse Customer Services
United KingdomTelephone: +44 (0) 1454 329510 (1000-1230 and 1330-1600 GMT/BST)Fax: +44 (0) 1454 326499 (0900-1730 GMT/BST)
Monday to FridayMicroProse Europe, The Ridge, Chipping Sodbury, Bristol BS17 6AY, UK.
GermanyTelephone: +49 (0) 5241 946480 (1500-1800 Central European Time -
only open on Tuesday)Fax: +49 (0) 5241 946494 (1430-1800 Central European Time -
Monday to Friday)MicroProse-Spectrum HoloByte GmbH, Bartholomaüsweg 31, 33334 Gütersloh, Germany, EU.
FranceTelephone: +33 1 485-70554 (1430-1800 Central European Time)Fax: +33 1 485-76291 (1430-1800 Central European Time)
Monday to FridayUBI-SOFT (MicroProse Dept), 28, rue Armand Carrel, 93108 Montreuil Sous Bois CEDEX,Paris, France, EU.
United StatesTelephone: +1 410-771-1151 (0900-1700 Eastern Time)Fax: +1 410-771-1174 (0900-1700 Eastern Time)
Monday to FridayMicroProse USA, 180 Lakefront Drive, Hunt Valley, MD, USA 21030.
Telephone: +1 510-522-1164 (0900-1700 Pacific Time)Fax: +1 510-522-3587 (0900-1700 Pacific Time)
Monday to FridaySpectrum HoloByte, 2490 Mariner Square Loop, Alameda, CA, USA 94501.
If you experience problems with the game that you are unable to resolve, you may need some helpfrom us. As we receive many calls every day, we can deal with your enquiry more efficiently if youhave the following information available:
1. The correct name of the game.2. The type of computer you are running it on.3. Your DOS version.4. How much conventional, extended and expanded
memory you have.5. The exact error message reported (if any).6. The version # of the game.7. The version and make of your mouse driver.
Ring us on 01454 329510, Monday to Friday between 10:00 and 12:30 or 13:30 and 16:00. Have apen and paper handy when you call.
Fax us on 01454 326499, Monday to Friday between 9:00 and 17:00.
Alternately, you can write to Customer Services at the address shown in this document.
Virus
Be aware that a virus may have transferred into your hardware from another piece of software.Pirated copies of games are an incredibly common source of virus problems. It always pays to ownoriginal software.
Software Fault
In the unlikely event of a software fault please return the complete package, with your receipt, tothe place of purchase. MicroProse regret that goods cannot be replaced by us unless bought fromthe company directly.
110 Section 8: Technical Assistance
5959 TT Del man E 109-112 30/4/99 8:58 am Page 110

MicroProse On-Line ServicesBulletin BoardsMicroProse UK +44 (0) 1454 327083 (14,400 baud)
+44 (0) 1454 327084 (14,400 baud)MicroProse Germany +49 (0) 5241 946484 (28,800 baud)MicroProse USA +1 410-785-1841 (28,800 baud)Spectrum HoloByte +1 510-522-8909 (14,400 baud)
CompuserveMicroProse Europe Mailbox 71333,314MicroProse Germany Mailbox 74777,3326MicroProse USA Mailbox 76004,2223Spectrum HoloByte Mailbox 76004,2144MicroProse and Spectrum HoloByte also have Public Forums and Library areas for comments,questions and files. We can be found in Game Publishers Forum “B” (GO GAMBPUB)
Delphi-InternetMicroProse Europe operates a complete forum for our users where patches, updates, demos andproduct information may be downloaded. This area may be found on UK Delphi.MicroProse USA forum US-DELPHI, GAME SIGMicroProse Europe forum UK-DELPHI, FEATURED
FORUMS, MICROPROSEMicroProse USA Mailbox MICROPROSE3MicroProse Europe Mailbox MPS_EUROPE
FidonetMicroProse Conference Node 1: 2617/107
GenieScorpia RT, Keyword: “Scorpia”MicroProse USA address MICROPROSEMicroProse Europe address MPS.UK
InternetE-Mail MicroProse Europe [email protected]
MicroProse Germany [email protected] USA [email protected] HoloByte [email protected]
FTP: The MicroProse FTP site features a complete library of the latest updates, demos andproduct information.Site address: ftp.microprose.comWorld-Wide-Web: Entry to our WWW home pages can be achieved by accessinghttp://www.microprose.com from your Web Browser software.
112 Section 8: Technical Assistance
5959 TT Del man E 109-112 30/4/99 8:58 am Page 112