:5 :0 :1 :2 t
TRANSCRIPT

modified 08/12/20
t 3:52.5
3:55.0
3:57.5
4:00.0
4:02.5
4:05.0
4:07.5
4:10.0
4:12.5
4:15.0
4:17.5
4:20.0
Km/h
0
25
50
75
100
125
150
175
200
225
rpm
0
2500
5000
7500
10000
12500
1 2 3
1:42.60
Start

WinARace page 2 / 20
Content 1 INTRODUCTION TO WINARACE ................................................................................................... 3 2 WINARACE AND ITS FUNCTIONS ................................................................................................ 4
2.1 MAIN MENU ............................................................................................................................................ 4 2.1.1 Settings menu .................................................................................................................................... 4 2.1.2 Modules menu ................................................................................................................................... 4 2.1.3 View menu ......................................................................................................................................... 5 2.1.4 Help menu ......................................................................................................................................... 5
2.2 EVENT SECTION ...................................................................................................................................... 5 2.3 LOGGER SECTION ................................................................................................................................... 6 2.4 MEASUREMENTS SECTION ...................................................................................................................... 6 2.5 ANALYSIS SECTION ................................................................................................................................ 6
3 DETAILED INFORMATION ON WINARACE FUNCTIONS ........................................................... 7 3.1 SYSTEM SETTINGS .................................................................................................................................. 7 3.2 TOOLBAR ............................................................................................................................................... 7 3.3 HOW TO CREATE AN EVENT .................................................................................................................... 9 3.4 GENERAL DATA STRUCTURE OF MEASUREMENT DATA ........................................................................... 9 3.5 MEASUREMENT NOMENCLATURE (MASTER NAMES) ............................................................................. 10 3.6 EVENT SELECTING – THE 2D EVENT EXPLORER .................................................................................... 10
3.6.1 Analysis overview window............................................................................................................... 11 3.6.2 Check and change the current measurement formulas – the formula editor ................................... 12 3.6.3 Deleting measurements from the current Event .............................................................................. 12 3.6.4 Renaming measurements ................................................................................................................. 12 3.6.5 Starting the program CalcTool with selected 2D measurements .................................................... 13
3.7 FILE EXPLORER ..................................................................................................................................... 13 3.8 ACCESS TO THE PROTOCOL FUNCTION .................................................................................................. 14
4 NEW FOLDER STRUCTURE SINCE 2014 ................................................................................... 15 5 ANALYSING CHANNEL OVERVIEW ........................................................................................... 16 6 SHORTCUT LIST ........................................................................................................................... 20
Symbols used in the text
These paragraphs contain tips and practical advice for working with the 2D software
In the paragraphs highlighted with this symbol, you will find additional information and it is
very important that you follow the instructions given.
Documentation reference
➢ A user manual reference number is provided so the user can seek further assistance

WinARace page 3 / 20
1 Introduction to WinARace
The program WinARace is the front-end tool of 2D. From here you can start other software modules,
like WinIt (communication tool), SpecView (data administration) or the analysis tool 2D Analyzer. It
organizes the folder structure of your data with events and master names.
In WinARace you are able to:
• Define and change the current Event
• Select the start measurement for the analysis tool
• Start the 2D Analyzer
• Select the master name
• Start a download
• Start WinIt
• Set the software language
• Select the user level
• Set some important communication settings (same window as in WinIt – main menu item
“Settings” ⇒ “Options”)
• Activate/deactivate the protocol function
• Configure the 2D Toolbar
• Get version information of the various software modules

WinARace page 4 / 20
2 WinARace and its functions
You can split up the starting window of WinARace into five sections (refer to the next figure)
1) Main menu
2) Event section
Event/measurement administration
3) Logger section
Logger communication
4) Measurement naming
5) Analysis section
Measurement selection & analysis
2.1 Main menu
The main menu consists of four submenus:
• Settings
• Modules
• View
• Help
2.1.1 Settings menu
➢ Language: here you can select the language you want to use in
your software; German, English, French, Italian, Spanish or
Japanese1
➢ Folders – Protocol: opens a window where you can check the
folder structure and the protocol function of the software
➢ System: opens a window where you can change some system-
settings, please refer to section 3.1
➢ Exit: closes the program
2.1.2 Modules menu
➢ 2D USB Stick Handler: starts the program
2D Stick Handler to manually download
recorded data from a connected 2D/USB
stick2
➢ Prepare USB stick for usage in a 2D USB
Stick Logger: prepares a USB stick; such a
prepared USB stick is called a 2D stick2
➢ Logger communication: starts the program
WinIt
➢ Analysis: starts the program 2D Analyzer
➢ Spec Sheet: starts the program SpecView
and shows the selected measurement´s data
1 Please keep in mind that you need a Windows with Japanese language to show the characters correctly. 2 Please refer to section 3.1 if this function is not available, there it is described on how to activate it.

WinARace page 5 / 20
2.1.3 View menu
➢ Toolbar: here you can decide whether you want to see the toolbar
or not and you can modify your toolbar; for further information refer
to section 3.2
➢ Show statusbar: shows or hides the status bar
➢ Show main menu: shows or hides the main menu
➢ Show window frame: shows or hides the window frame
You have always access to the main menu of WinARace: right-mouse click on the
WinARace window opens the main menu.
2.1.4 Help menu
➢ View tutorial videos on 2D homepage: opens the 2D
homepage where you can see the tutorial videos
➢ Licence level overview: opens the 2D homepage with an
overview of the license levels and their functions
➢ Shortcut keys: opens a table with shortcut keys and their
meaning
➢ Licence: opens the software license dialogue; there you
can enter the license key
➢ Search for software updates: searches online for
software updates
➢ Automatic search for software updates: settings for
automatic software updates
➢ Update by file: In some companies connection to the
internet for update is not possible due to security settings.
In this case it is possible to get an update file from 2D and
import it with this function.
➢ Remotedesktop for 2D: Support tool to give the 2D
support the possibility to remotely connect to your computer
– you will be requested by the 2D support to start it.
➢ Send support information over FTP: sends an
information file to 2D with license and firmware update
notifications
➢ Show version information: your software version and
license
2.2 Event section
An event is the directory where your measurement´s data is stored. It helps you to organize your data.
Normally you create an event for each race weekend (or other kind of event you´re attending). It can be
named as you want, for example the circuit or name of the event. Please refer to sections 3.3 and 3.4
for further information.
In the Event section you can create a new event or change the current event in two different ways.
To create a new event click on <Create event>.

WinARace page 6 / 20
The first way to change the event is to select a directory directly from the drop-down list. There you can
choose from the last eleven directories used. The second way is to load a directory from the event
explorer. To start the event explorer click on < … >. Select a new directory in the tree view on the left
and confirm the directory with <OK> - afterwards the directory is displayed in the history list.
For further information on how to create an event, the versatile functions of the event explorer and the
data structure in general please refer to section 3.
2.3 Logger section
By clicking on the button <Communication (F2)> the program WinIt starts. In WinIt you can change the
setting of your logger and other system parts. For further information please refer to the WinIt manual3.
As this logger is a BMW defined system many parameters are fixed and not changeable.
2.4 Measurements section
In the Measurements section you select the data´s master name and download the recorded data
directly from a connected logger.
The master name is part of the data file name. It helps you to identify more easily the session (free
practice, qualifying, race, test,…). The drop-down list contains up to 9 different (last used) master
names. You can simply select one of them or enter a new one (depending on your license level). For
further information on master names and the nomenclature of the data please refer to section 3.5.
2.5 Analysis section
In the Analysis section you have three different options to select a measurement you want to start with
in the analysis tool 2D Analyzer.
1. You can select a measurement from the drop-down list. It is a history list of the eleven last used
measurements of the current event.
2. Select the newest measurement of the event with the button <Newest>.
3. By click the button < … > you can select a measurement of the current event in the file explorer.
To start the 2D Analyzer click on <Analysis (F3)>.
For further information please refer to the Analyzer manual4.
3 The manual can be downloaded from: 2d-datarecording.com/en/support/downloads/manuals ⇒ WinIt 4 The manual can be downloaded from: 2d-datarecording.com/en/support/downloads/manuals ⇒ Analyzer

WinARace page 7 / 20
3 Detailed information on WinARace functions
3.1 System Settings
You get to the System Settings via WinARace, Settings ⇒ System.
Here you can enable/disable the use of the different ways to handle the loggers. “Communicating 2D
Loggers” means any logger you connect directly to your PC (via USB, TCP/IP, etc.). In addition you are
able to select what should be done if such a logger is connected: do nothing, start a download or start
WinIt.
If you enable “Use 2D USB Stick Logger”, you activate all software modules you need to handle the
USB sticks with – to prepare them for recording or to download recorded data. In the dropdown-list you
can select when the data should be downloaded if a stick with recorded data is detected: not
automatically (you need to start the download manually), always or only if WinARace is running.
In the next dropdown-list you can modify the settings for the raw data.
At the bottom you have additional options on what should be done if data is downloaded.
Confirm your changes with <Ok>.
3.2 Toolbar
The Toolbar enables quick access to other programs or documents. At the beginning there are often
several programs and documents already linked in:
There are two ways to modify your toolbar:
1. Add default programs via the toolbar menu – View, Toolbar ⇒ <… Link XXX>

WinARace page 8 / 20
2. Right-mouse click on your toolbar
− If you choose <Edit/Delete> you can modify or delete some of the toolbar entries.
− If you choose <Add> you can easily add another entry: Select the program/document you want
to add, an icon (.bmp or .ico-format) and confirm with <Save>.
Typical icons used in the toolbar are:
Starts SpecView
Opens a window to enter information on the selected measurement. It will modify the
corresponding SpecSheet.
Opens a window to enter information on the weather condition
Starts a SpecSheet search
Opens a window with the race track of the selected event
Opens the permanent SpecSheet
Starts the program WFormel
For working with the TRSS
Opens a linked PDF file

WinARace page 9 / 20
3.3 How to create an event
To create an Event click on <Create new event> in WinARace. It opens the following window:
1. Select on the right-hand side if it is a closed circuit or not (marked in red)
2. Select a racetrack if it is a closed circuit (marked in blue)
There are two different circuit tabs:
1. The tab “Circuits“: Includes a list of pre-defined tracks delivered with the 2D race
software.
2. The tab “MyCircuits”: Contains track maps which have been created by the user
via the analysis tool 2D Analyzer.
If a track is not listed, select <Click here if circuit is not in list> and a basic circuit will be
selected (Base.ren).
3. Enter a name in the field “Eventname” (marked in green)
4. Confirm your event with <OK>
3.4 General data structure of measurement data
All measurement data are stored in the RaceData folder (e.g. C:\RaceData). In this folder you can find
your events. Every single event contains information about the particular racetrack and the
measurement data.
Data directory
Event directories
Measurement (*.MES directory)
WinARace page 10 / 20
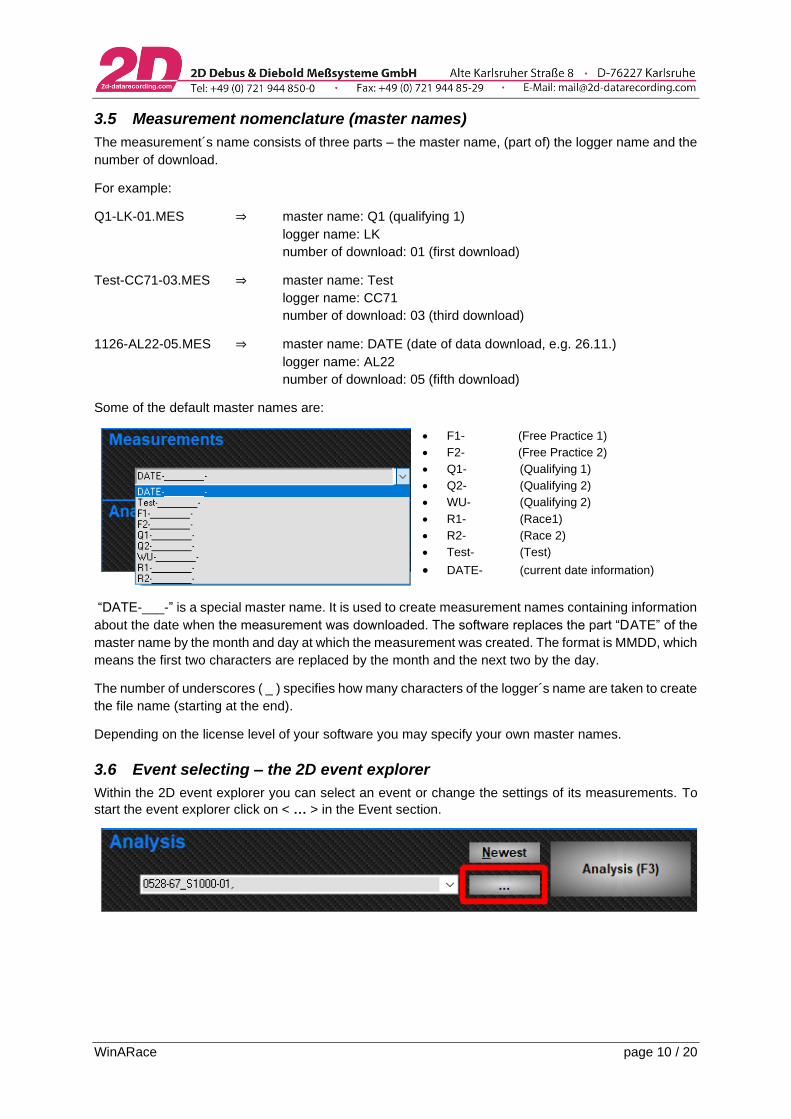
3.5 Measurement nomenclature (master names)
The measurement´s name consists of three parts – the master name, (part of) the logger name and the
number of download.
For example:
Q1-LK-01.MES ⇒ master name: Q1 (qualifying 1)
logger name: LK
number of download: 01 (first download)
Test-CC71-03.MES ⇒ master name: Test
logger name: CC71
number of download: 03 (third download)
1126-AL22-05.MES ⇒ master name: DATE (date of data download, e.g. 26.11.)
logger name: AL22
number of download: 05 (fifth download)
Some of the default master names are:
• F1- (Free Practice 1)
• F2- (Free Practice 2)
• Q1- (Qualifying 1)
• Q2- (Qualifying 2)
• WU- (Qualifying 2)
• R1- (Race1)
• R2- (Race 2)
• Test- (Test)
• DATE- (current date information)
“DATE-___-” is a special master name. It is used to create measurement names containing information
about the date when the measurement was downloaded. The software replaces the part “DATE” of the
master name by the month and day at which the measurement was created. The format is MMDD, which
means the first two characters are replaced by the month and the next two by the day.
The number of underscores ( _ ) specifies how many characters of the logger´s name are taken to create
the file name (starting at the end).
Depending on the license level of your software you may specify your own master names.
3.6 Event selecting – the 2D event explorer
Within the 2D event explorer you can select an event or change the settings of its measurements. To
start the event explorer click on < … > in the Event section.

WinARace page 11 / 20
The event explorer offers various options:
At the top of the event explorer you´ll find:
• File:
⇒ Copy selected measurement(s)
⇒ Delete measurement(s)
⇒ Rename measurement(s)
⇒ Run cal file
⇒ Execute programs from the 2D Toolbar
• History
As icons at the top:
• Refresh tree and view list
• Show/hide directory tree
• Show analysis overview window
• Deletes selected measurement(s)
• Rename selected measurement(s)
• Start CalcTool and use cal file from event folder
• Search and replace channel names into 2D measurements
• Start Analyzer with selected measurement(s)
• Start SpecViewer with selected measurement(s)
• Start formula editor with selected measurement(s)
• Starts program DTS with selected measurement(s)
• Linked programs from the 2D Toolbar
On the left side you´ll find the directory tree, in the middle there are the measurements listed of the
selected event and on the right side you can have a look at the SpecSheet of the selected measurement.
At the bottom there are buttons to confirm your selection (<OK>), start the 2D Analyzer or Formula
program and cancel the selection. Below that there is the overview window.
3.6.1 Analysis overview window
You can select the shown channel by right-mouse-click on the analysis overview window.
WinARace page 12 / 20
3.6.2 Check and change the current measurement formulas – the formula editor
The 2D formula editor is a special part of WinIt. With this editor you can comfortably check and change
the current formulas of each 2D measurement. The formula editor grabs special files which belong to
each 2D measurement.
Within the 2D event explorer you can select the measurements you want to modify and start the formula
editor. The editor displays all formula files (of each selected measurement) in the left tree view. You can
recognize the several channels (different sensors) of the measurements.
Confirm your changes with <Apply>.
3.6.3 Deleting measurements from the current Event
Within the 2D event explorer you can select the measurements you want to delete and click the
corresponding button in the toolbar (or right-mouse-click and select “Delete measurement(s)”). You will
get the following window:
There you can decide between the options to delete the complete measurement or only the downloaded
raw data. Confirm your decision with <Ok>.
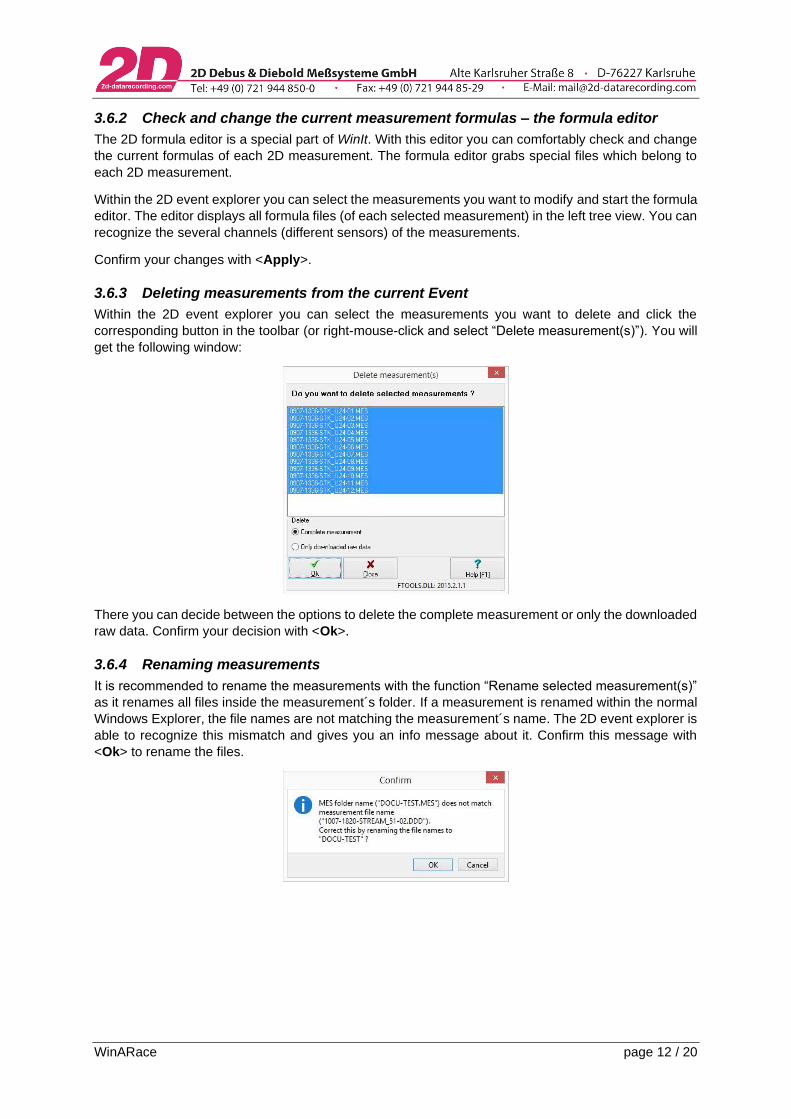
3.6.4 Renaming measurements
It is recommended to rename the measurements with the function “Rename selected measurement(s)”
as it renames all files inside the measurement´s folder. If a measurement is renamed within the normal
Windows Explorer, the file names are not matching the measurement´s name. The 2D event explorer is
able to recognize this mismatch and gives you an info message about it. Confirm this message with
<Ok> to rename the files.

WinARace page 13 / 20
3.6.5 Starting the program CalcTool with selected 2D measurements
If you want to start the program CalcTool via the event explorer, you will get four different options to run
cal-files:
1. Start the program CalcTool with selected measurements and using any cal-file (by selection)
from the data root.
2. Start the program CalcTool with selected measurements and using any cal-file (by selection)
from the current event folder.
3. Start the program CalcTool with selected measurements and using any cal-file (by selection)
from the software folder. This folder corresponds with the sub-directory called “Cal” located in
your current Race-version.
4. Start the program CalcTool with selected measurements and using any coded cal-file (by
selection) from the software´s “Cal” folder.
Afterwards you´ll get a list with the different cal-files available. In option 1, 2 and 3 you´ll be asked if you
want to edit or run the cal-file. Option 4 directly runs the cal-file, as coded cal-files can´t be modified by
the user.
3.7 File explorer
The file explorer gives you an overview of all measurement data of the current event. On the left-hand
side you see all measurement directories and on the right-hand side there is the SpecSheet of the
currently selected measurements. At the bottom is an overview window (QuickView). By clicking on it
you can select the shown channel.
To search for specific measurements you can enter a part of its name in the wildcard-field.

WinARace page 14 / 20
3.8 Access to the protocol function
The protocol function is very important for 2D as manufacturer to detect software problems and fix
software errors.
If you activate the protocol function you will get a separate protocol file for each software module you
selected. The protocol files are named after the software module. For example if you activate the
protocol function for the program Analyzer, the corresponding protocol files are Analyzer.txt,
Analyzer1.txt, Analyzer2.txt in your systems protocol folder5. These files are in standard text format and
the most recent protocol file is the one without a number.
To view or modify the protocol settings select “Settings”, “Folders – Protocol” in WinARace.
You can define how many protocol files should be saved for each program and turn the function on or
off. Confirm your changes with <Ok>.
5 The protocol folder is located within the application data, for example C:\ProgramData\Race2015\Protocol

WinARace page 15 / 20
4 New folder structure since 2014
With the new 2014 software version of WinARace there are some changes in the folder structure. The
new software is split up in different folders (race application files, application data and user data).
For locating these folders start WinARace and select Settings
⇒ Folders – Protocol.
At the bottom of the form you can see different buttons, which
will open the corresponding Windows Explorer:
Race application files:
64 bit Windows: C:\Program files (x86)\Race20XX.Y
32 bit Windows: C:\Program files\Race20XX.Y
This folder contains the 2D executable programs and core files like language or help.
Application data:
Windows 7/8/10: C:\ProgramData\Race20XX.Y
Windows XP: C:\Documents and Settings\All Users\Application Data\Race20XX.Y
This folder contains all the internal data files like .ini, license, protocol, chassis, system, circuit.
User data:
Windows 7/8/10: C:\Users\Public\Documents\Race20XX.Y
Windows XP: C:\Documents and Settings\All Users\Documents\Race20XX.Y
This folder contains all the user specific public files like cal-files, math-files, channel settings, templates,
etc.

WinARace page 16 / 20
5 Analysing channel overview
Name Sensor Info
Re_dtc_tot Drehmomentreduktion aus ASC/DTC + Weitere Torque reduction final
Re_dtc_spn Drehmomentreduktion aus ASC/DRC Torque reduction ASC/DRC
Whl_Trq_DTC ASC/DTC berechnetes Antriebsmoment Hinterrad Calculated ASC/DTC torque rearwheel
Re_DTC_PreCtrl Relative Drehmomentreduktion ASC ASC/DTC Vorsteuerung Relative torque reduction by ASC/DTC
V_Rear Hinterradgeschwindigkeit Speed rearwheel
Speed Vorderradgeschwindigkeit Speed Bike
V_Front Reale Vorderradgeschwindigkeit Speed frontwheel
ST_Wheely Abhebeerkennung Vorderrad Status wheely
Bank_dtc Schraeglage Bankangle
Throttle Drosselklappenwinkel Throttle opening
Grip_pos Gasgriffwinkel Rider demand opening
RPM Drehzahl Motor RPM engine
ABS_Stat ABS Ein / Aus / Regeleingriff ABS on / off / active
Gear Gang Gear
T_Mot Temperatur Motor Engine temperature
Brake_Press_F Bremsdruck Rad Vorne Brake pressure front
Brake_Press_R Bremsdruck Rad Hinten Brake pressure rear
DDC_sensor_fr_status Status Federwegsensor Vorne verbaut Front suspension sensor mounted
DDC_error_status Status DDC Status DDC
DDC_displacement_fr Hoehenstand Vorne Suspension position front
DDC_displacement_rr Hoehenstand Hinten Suspension position rear
Drv_Mod Fahrmodus Drive mode
T_Air Ansauglufttemperatur Intake air temperature
ACC_Y Querbeschleunigung Lateral acceleration
YAWRATE Gierrate Yawrate
ACC_X Laengsbeschleunigung longitudinal acceleration
ROLLRATE Rollrate Rollrate
ACC_Z Vertikalbeschleunigung vertical acceleration
PITCHRATE Nickrate Pitchrate

WinARace page 17 / 20
RacePro1_WhlCtr Einstellung RACPRO1 DDC Setup RACEPRO1 DDC
RacePro1_TrackCtrl Einstellung RACPRO1 Traktionskontrolle Setup RACEPRO1 Traction control
RacePro1_Engbrk Einstellung RACPRO1 Motorschleppmoment Setup RACEPRO1 Engine brake
RacePro1_Engine Einstellung RACPRO1 Motor Setup RACEPRO1 engine
RacePro1_ABS Einstellung RACPRO1 ABS Setup RACEPRO1 ABS
RacePro2_WhlCtr Einstellung RACPRO2 DDC Setup RACEPRO2 DDC
RacePro2_TrackCtrl Einstellung RACPRO2 Traktionskontrolle Setup RACEPRO2 Traction control
RacePro2_Engbrk Einstellung RACPRO2 Motorschleppmoment Setup RACEPRO2 Engine brake
RacePro2_Engine Einstellung RACPRO2 Motor Setup RACEPRO2 engine
RacePro2_ABS Einstellung RACPRO2 ABS Setup RACEPRO2 ABS
RacePro3_WhlCtr Einstellung RACPRO3 DDC Setup RACEPRO3 DDC
RacePro3_TrackCtrl Einstellung RACPRO3 Traktionskontrolle Setup RACEPRO3 Traction control
RacePro3_Engbrk Einstellung RACPRO3 Motorschleppmoment Setup RACEPRO3 Engine brake
RacePro3_Engine Einstellung RACPRO3 Motor Setup RACEPRO3 engine
RacePro3_ABS Einstellung RACPRO3 ABS Setup RACEPRO3 ABS
V_Sat GPS Geschwindigkeit GPS speed
ValidSat Sichtbare Satelliten Visible satellites
SSHH Sekunden.Hundertstel Seconds:Hundredth
Course Fahrrichtung Driving direction
Lat_dez Längengrad in dezimal degree Position in dezimal degree
Lon_dez Breitengrad in dezimal degree Position in dezimal degree
Altitude Absoluthöhe über NN m above sea level
MMDD Monat. Tag Month:Day
HHMM Stunde . Minute Hour:Minute
V_KL_30 Spannung Klemme 30 Power
vUSB Spannung am USB Port Power USB
Longitude Längengrad Position in dezimal degree
Latitude Breitengrad Position in dezimal degree
GPSValid GPS Daten verwendbar GPS data valid

WinARace page 18 / 20
Calculated channels
V_GPS GPS Geschwindigkeit korrigiert GPS speed filtered
GPS_Yaw Gierrate aus GPS Yaw rate from GPS
A_Lon_GPS Längsbeschleinigung aus GPS Longitudinal acceleration from GPS
A_Lat_GPS Querbeschleunigung aus GPS Lateral acceleration from GPS
Banking_GPS Schräglage aus GPS Bankangle from GPS
SOD_raw Zeitkanal time channel
Time2D Zeitkanal time channel
SOD_Jump_pos Zeitkanal time channel
SOD_Jump_neg Zeitkanal time channel
SOD_UPD_Index Zeitkanal time channel
SOD_Extrapol Zeitkanal time channel
SOD_Valid Zeitkanal gültig time channel valid
SOD Zeitkanal Sekunden seit 00:00 time channel seconds since 00:00
Susp_fr_2D Federweg Front Suspension travel front
Susp_rr_2D Federweg Rear Suspension travel rear
Drive_Modus Fahrmodus Klartext Drivemode as text
Speed Korrigierte Geschwindigkeit Fahrzeug Speed bike
Slip Schlupf zwischen Vorder- und Hinteradgeschwindigkeit Slip calculated by V_Front And V_rear
s_Lap Laufende Rundenlänge Running Distance per Lap
s_Run Gesamtweg der Messung Run Distance
Bank_abs Schräglage absolut Bankangle no direction
UpShift_cnt_Lap Hochschalten aktuelle Runde Upshift actual lap
DownShift_cnt Herunterschalten seit Start Messung Downshift since start
DownShift_cnt_Lap Herunterschalten aktuelle Runde Downshift actual lap
GearChangeRPM Drehzahl beim Schalten Gearchange RPM

WinARace page 19 / 20
These channels only valid results with mounted suspension sensors !
( Channels are compatible for compare with older models )
Susp_fr_hi_2d Federweg Front gefiltert Front Suspension Position filtered hi source
Susp_fr_2d
Susp_rr_hi_2d Federweg Rear gefiltert Rear Suspension Position filtered hi source
Susp_rr_2d
Susp_fr_lo_2d Federweg Front mit 3 Hz gefiltert für Mittelwertlage Fahrzeug Front "Bike" Position filtered 3 Hz
Susp_rr_lo_2d Federweg Rear mit 3 Hz gefiltert für Mittelwertlage Fahrzeug Rear "Bike" Postion filtered 3 Hz
Susp_speed_fr_2d Ein- / Ausfedergeschwindigkeit Front Front Suspension Movement Speed
Susp_speed_rr_2d Ein- / Ausfedergeschwindigkeit Rear Rear Suspension Movement Speed
These channels only available with DDC suspension control !
DDC_Rebd_Rear Einstellung Zugstufe Hinterrads Rear damping setup rebound
DDC_Comp_Rear Einstellung Druckstufe Hinterrads Rear damping setup compression
DDC_Rebd_Front Einstellung Zugstufe Vorderrads Front damping setup rebound
DDC_Comp_Front Einstellung Druckstufe Vorderrads Front damping setup compression

WinARace page 20 / 20
6 Shortcut list
Shortcut Action
<F1> Shows context sensitive help module
<F2> Starts the WinIt (Read all devices selected in the options)
<CTRL> + <F2> Starts the WinIt (Read all recording devices)
<Alt> + <F2> Starts the WinIt (Read all dashboards)
<Shift> + <F2> Starts the WinIt (Read all CAN slaves)
<F3> Starts the 2D Analyzer
<Alt> + <E> Starts the 2D Event Explorer tool
<Alt> + <I> Starts the program SpecView
<Alt> + <Q> Opens a window to view and modify the active measurement´s comment
<Alt> + <W> Opens a window to modify the weather info
<Alt> + <X> Terminates WinARace
<Alt> + <F4> Terminates WinARace
<CTRL> + <Alt> + <A> Opens a windows explorer in folder for Race application files
<CTRL> + <Alt> + <D> Opens a windows explorer in folder for application data
<CTRL> + <Alt> + <U> Opens a windows explorer in folder for user data
<CTRL> + <Alt> + <E> Opens a windows explorer in folder for the active measurement