4honline users guide - oregon state...
TRANSCRIPT
4HOnline Users Guide
For County Managers
February 6, 2015

Table of Contents Introduction .................................................................................................................................................. 2
4HOnline Structure ................................................................................................................................... 3
4HOnline Infrastructure and Security Measures ...................................................................................... 4
Processes and Help Sheets for County Managers ......................................... Error! Bookmark not defined.
County Manager Account Introduction and Overview ............................................................................. 7
How to Add a New Family and Youth Member – County ....................................................................... 15
How to Add a New Family and Adult – County ....................................................................................... 19
How to Add a New Family and Contact – County ................................................................................... 23
How to Add Animals – County ................................................................... Error! Bookmark not defined.
How to Add an Activity ........................................................................................................................... 25
How to Add an Award ............................................................................................................................. 25
How to Add a Group ............................................................................................................................... 26
How to Add a School ............................................................................................................................... 26
How to Add Several Members to a Group, Award or Activity at One Time ........................................... 27
How to Confirm a Member Enrollment .................................................................................................. 28
How to Delete a Member Account and Family Profile ........................................................................... 29
How to Enroll a Member in a Second 4-H County ..................................... Error! Bookmark not defined.
How to Enter a Group Enrollment .......................................................................................................... 30
How to Enter a Group Enrollment from an Existing Group .................................................................... 33
How to Flag Members or Families .......................................................................................................... 34
How to Give Leaders Club Access ........................................................................................................... 35
How to Move a Family/Member to a Different County.......................................................................... 39
How to Move a Member to a Different Family ....................................................................................... 40
How to Print Mailing Labels .................................................................................................................... 41
How to Process Duplicate Member Records .......................................................................................... 42
How to Reactivate an Archived Member ................................................................................................ 45
How to Register Members for State Events ............................................... Error! Bookmark not defined.
How to Set County Options..................................................................................................................... 46
Project Selection Deadline, Family Access Options, Invoice Addresses ............................................. 46
How to Set Up Project Aliases ................................................................................................................. 47

2 | P a g e
How to Set Up Project Leader Accounts ................................................................................................. 48
How to Switch a Contact to an Adult ...................................................................................................... 50
How to Switch a Member’s Club with Projects ....................................................................................... 51
How to Upload Newsletters and Announcements ................................................................................. 53
How to Update Club Information ........................................................................................................... 54
How to Update Family Contact Information - County ............................................................................ 55
Reports for Managers ................................................................................................................................. 56
How to Run a Standard or Shared Report .............................................................................................. 57
How to Memorize a Report .................................................................................................................... 58
How to Create a Custom Report ............................................................................................................. 59
How to Run a Report in the Queue ......................................................................................................... 62
How to Run a Group of Reports .............................................................................................................. 63
How to Run Member Reports ................................................................................................................. 64
4HOnline Quick Resources .......................................................................................................................... 83
4HOnline Trouble Shooting Guide .......................................................................................................... 84
FAQ .......................................................................................................................................................... 85
4-H Delivery Mode Descriptions ............................................................................................................. 88
Links to 4HOnline Training Videos and Resources ..................................... Error! Bookmark not defined.
Glossary of 4HOnline Terms ................................................................................................................... 90
Index........................................................................................................... Error! Bookmark not defined.
Introduction 4HOnline is an online member enrollment and event management software owned by RegistrationMax
LLC., and used in ____states across the United States. ____________ 4-H introduced 4HOnline member
and adult volunteer enrollment in __________. Since that time, the State 4-H Office has introduced
Event Registration and Animals/Livestock and has opened the program to 4-H members, families and
club leaders.
4HOnline is highly customizable for each state and thus is always improving. Please use the following
manual as a guide to using 4HOnline in __________. Subsequent editions will include updated
information as new portions of the program are developed and released.

3 | P a g e
4HOnline Structure In order to understand how the program works, it is necessary to understand the structure upon which
it is built. 4Honline is built on a hierarchical structure. Each level has access to the information in the
levels below it. The structure is as follows:
State Administrator Account (program set-up)
State Account
County Account
Club Account (some counties may not use this level)
Family Account
Member Profile (must log in to a family account to access the member profile)
The 4HOnline Users Guide focuses on how to use the program at the District, County, Club and Family
levels.

4 | P a g e
4HOnline Infrastructure and Security Measures
Hardware:
Texas 1 Datacenter 2 – Sonicwall firewalls in failover configuration 1 – DELL Powerconnect 6248 gigabit switch - primary 1 – DELL Powerconnect 5524 gigabit switch - secondary 1 – DELL R820 32-core SQL Server 2008 R2 database server (256 GB RAM) 1 – DELL R720xd 6-core SQL Server 2008 R2 file server (9TB – Expandable to 18TB) 1 – DELL R420 12-core IIS 8 web server 1 – DELL R320 6-core IIS 8 web server 1 - Buffalo Terastation backup server
ADC Datacenter 2 - Sonicwall firewalls in failover configuration 1 – DELL Powerconnect 6248 gigabit switch - primary 1 – DELL Powerconnect 5524 gigabit switch - secondary 1 – DELL R720xd 16-core SQL Server 2008 R2 database server (64 GB RAM) 1 – DELL R720xd 6-core SQL Server 2008 R2 file server (8TB – Expandable to 16TB) 1 – DELL R420 12-core IIS 8 web server 1 – DELL R320 6-core IIS 8 web server1 - Buffalo Terastation backup server
Logical Network Map:
This is a logical representation of the traffic flow of the network. A physical wiring diagram would look different.

5 | P a g e
High Availability:
By utilizing two datacenters we are able to reliably plan for an emergency datacenter fail-over if need be. The configuration includes a dedicated secure fiber interlink between our cabinets at each datacenter. This fiber connection allows us to take advantage of the hardware in both datacenters simultaneously. In case of a lost connectivity at one datacenter, all Internet traffic will redirect to the available datacenter and connect to the unavailable datacenter’s servers via our dedicated fiber connection. In the case that all connectivity is lost at one datacenter (including the fiber connection) the secondary datacenter has the capacity to take over the network load. All database data is replicated to both datacenters.
Firewall Security:
All traffic flowing through the firewall is subjected to a full packet inspection; this allows us to run IPS (Intrusion Prevention), IDS (Intrusion Detection) and anti-virus/anti-bot scanners on all requests. In addition, only traffic generating from the US or Canada is even allowed to get to point of packet inspection, all other traffic is dropped immediately.
VPN Security:
We use a VPN tunnel to connect to our servers for maintenance and development. VPN stands for “Virtual Private Network”, it creates a virtual encryption tunnel through which all traffic flows. This completely blinds anyone not authenticated from seeing the information that is inside the VPN tunnel. We use AES-256 encryption, which is currently the most secure encryption method available. It is said that it would require several billion years with modern computing hardware to crack an AES-256 cypher.
Website Security:
All web traffic to and from our web servers runs through SSL encryption. This encrypts all data and prevents anyone other than the users’ browser and our web servers from knowing the information that is being requested and sent.
Webserver Security:
We maintain the web servers with the latest security patches and updates. We also run anti-virus software on the webservers themselves in addition to the anti-virus on the firewall as an extra measure. All webservers run their own local firewalls that only allow necessary traffic in. Only two users are allowed to login (via VPN) to the servers themselves, narrowing the possibility of a brute force password attack.
Database Server Security:
We maintain the database servers with the latest security patches and updates. While public internet traffic should never touch the database servers, we run anti-virus software on the database servers as an extra measure. All database servers run their own local firewalls that only allow necessary traffic in. Only two users are allowed to login (via VPN) to the servers themselves, narrowing the possibility of a brute force password attack.

6 | P a g e
Database Security:
Access to the databases is only allowed from authenticated users who are coming to the server through the VPN tunnel. Each developer maintains their own username and password and the applications also have separate logins to the database. We use fine-grained permissions and do not allow developers access to the data that they don’t need. We maintain logs of all logins.
Data Security:
All sensitive data is encrypted in the database using an AES-256 encryption algorithm. All passwords are “one-way hashed”, meaning the hash itself cannot be decrypted to show a password. This is why we have to reset passwords and we cannot tell you what the existing password is. The database logs are backed up every 20 minutes throughout the day with full backups being performed every night. We currently maintain 20 minutes steps of backups going back 2 weeks, full backups for 6 months. In addition to the database server and backup server, the data is also archived to a disaster proof external drive.
Physical Security:
Our servers are located at Data Foundry datacenters in Austin, Texas. Access to the cabinet requires passing through 4 stages of biometric authentication in addition to a personal ID check in order to get the key to the cabinet itself. More information is available at http://www.datafoundry.com/data-centers/
4HOnline takes the security of your data very seriously. We understand the sensitivity of the data that we manage and do everything we can insure that the information is kept safe for your peace of mind as well as ours.

7 | P a g e
County Manager Account Introduction and Overview
When the State 4-H Office sets up a county manager account, the county manager receives an email message with a temporary password. Go to ne.4honline.com to log in. Select “I have a profile.” Enter the email address and the temporary password. Select “County” as the Role and click “Login.”
The Home page in a county account shows a brief snapshot of recent activity in the program. This includes notifications of any members who have recently moved to the county, links to state and county newsletters, pending enrollments and registrations, payments due and an enrollment snapshot. To return to the home page at any time, click “Home” at the top right of the page.
The county account contains six navigation tabs (as of the User Guide publication date). Tabs include: Enrollment, Events, Animals, Connect, Finances and Data. More tabs, including Statistics and Training are available, but are not yet in use in __________ and thus do not appear in user accounts.
The Enrollment tab contains information pertaining to the county account and all member enrollment information. Icons under the Enrollment tab include: Search, My Account, Managers, Options, Confirm Members, Schools, Clubs, Project Aliases, Activities, Awards, Groups, Group Enrollment, Payments and Reports.

8 | P a g e
The Search icon under the Enrollment tab returns a second set of tabs. The Members/Volunteers tab is a searchable list of all members/volunteers in the county. Click “Login” to access the family view of the member/volunteer account.
The Families tab is a searchable list of all Family accounts in the county. Click “Login” to access the family view of the account.
As the county manger logs in and out of member accounts, the system updates the “Recent Profiles” pane with direct links to recently-visited profiles.
Click the “Projects” tab to execute a search of who is enrolled in a specific project area. In order to make note of project completion for the current 4-H year, mark the check box next to the member name and click “Project Completion.” Select a member to manage the member’s project list.

9 | P a g e
The county manager may add or delete projects or update the years in projects from this page.
Click the “Activities” tab to view a list of members enrolled in specific activities, to add members to activities or to remove members from activities.
Click the “Awards” tab to view a list of members who have received specific awards, to add members to awards, or to remove members from awards.
Click the “Groups” tab to view members enrolled in various state or county groups, to add members to groups or to remove members from groups. NOTE: At this time, ______________ does not utilize the “Training” tab.
10 | P a g e
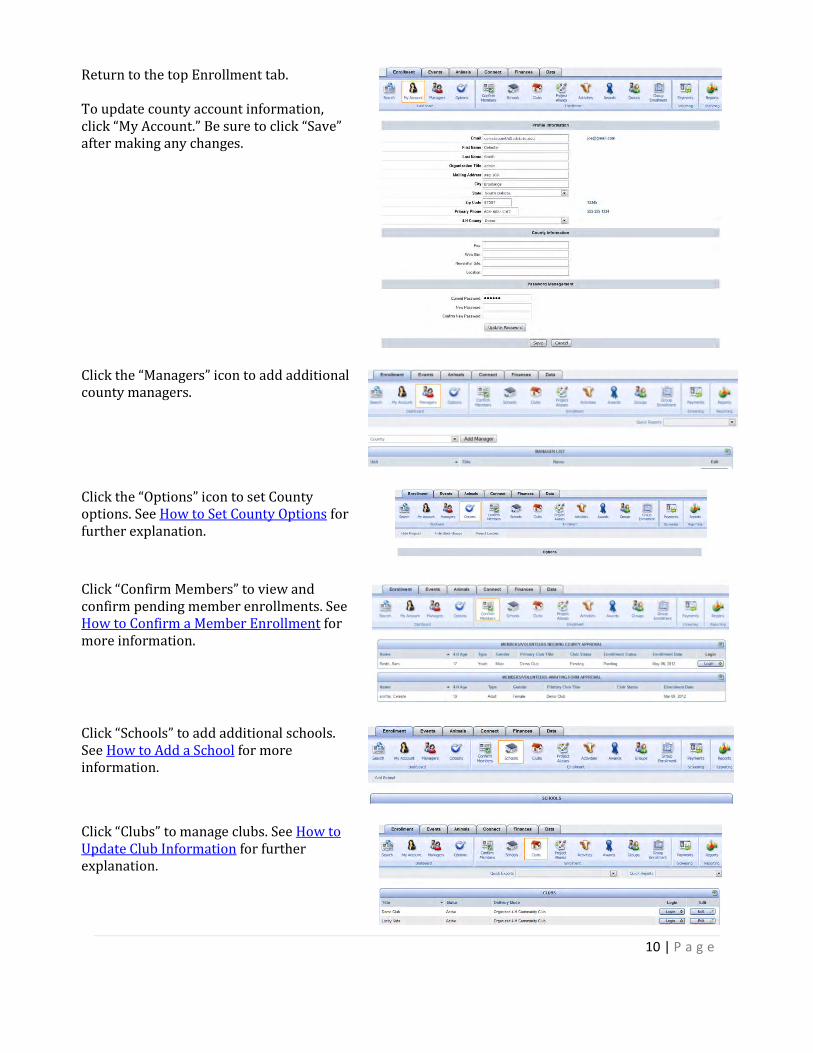
Return to the top Enrollment tab. To update county account information, click “My Account.” Be sure to click “Save” after making any changes.
Click the “Managers” icon to add additional county managers.
Click the “Options” icon to set County options. See How to Set County Options for further explanation.
Click “Confirm Members” to view and confirm pending member enrollments. See How to Confirm a Member Enrollment for more information.
Click “Schools” to add additional schools. See How to Add a School for more information.
Click “Clubs” to manage clubs. See How to Update Club Information for further explanation.

11 | P a g e
Click “Project Aliases” to manage the county project alias list. See How to Set Up Project Aliases for more instructions.
Click “Activities” to manage the activity list. See How to Add an Activity for more information.
Click “Awards” to manage the awards list. See How to Add an Award for more information.
Click “Groups” to manage the groups list. See How to Add a Group for more information.
Click “Group Enrollment” to add a new Group Enrollment or update an existing Group Enrollment. See How to Enter a Group Enrollment for more information.
Click “Payments” to track screening payments. More training on this feature will come soon.

12 | P a g e
Click “Reports” to access Enrollment Reports. View the Reports for Managers section for more information about how to create and run reports.
The Events tab contains eight icons related to event management. The “Search” icon allows the user to search member event registrations.
Click “Confirm Registrations” to confirm event registrations. See How to Confirm Event Registrations for more information.
Click the “Events” icon to manage existing events or to add new events. See How to Set Up a County Event with Registration for detailed instructions regarding how to add a new event.
At this time__________ does not use the County/Club Checks feature extensively. More training will follow.

13 | P a g e
Click “Calendar” to manage County event calendars. See How to Set Up a County Event with Registration (steps 1 – 6) for more details. More training on Calendars will follow at a later time.
Click “Locations” to add and manage event locations.
Click “Views” to manage calendar views. More training will follow at a later time.
Click “Reports” to create and run reports for Events.
Click the “Animals” tab to view members who have specific types of animals or to add or remove animals in member accounts. See How to Add Animals - County for further instructions.

14 | P a g e
Communication options within 4HOnline are found under the “Connect” tab. At this point, _____________only utilizes the “Newsletters” function. See How to Upload Newsletters and Announcements for more information.
Due to _____________ University regulations, at this point _____________ only utilizes the “Transfers” icon under the Finance tab. For further instructions see How to Submit a County Transfer.
Use the Data tab to identify any potential Enrollment or Event issues or to change a Member’s Role or Club. See How to Switch a Member’s Club with Projects for more information.

15 | P a g e
How to Add a New Family and Youth Member – County
1. Click on the “Enrollment” tab. 2. To add a youth member to an
existing family, login to the family account and continue from step 13.
3. To add new family, click “Add Family.”
4. Enter the Family Information. 5. The Family Email and Family Phone
are not required, but are highly recommended.
6. Click “Add Family.”
7. Verify that the family is not already in the system. Check “Confirm Add New Family.”
8. Click “Add Family.”
9. Enter the Profile Information. 10. Click “Continue.”

16 | P a g e
11. Select the type of member to add. Youth: Traditional full-year 4-H youth member Youth (Short-Term Member): Youth who do not participate in a traditional 4-H club, but may participate in a group for a portion of the year such as Shooting Sports. These youth are not counted on the ES237 unless included in a Group Enrollment.
12. Enter the member’s Personal Information.
13. Information in Bold is required. All other information is optional.
14. Click “Continue” to save changes and advance to the Additional Information page.
15. Using the member’s paper form, enter that the document was received, when it was received, and if consent was given for each section. Keep the paper form on file at the County 4-H Office.
16. Click “Continue.”
17. Enter the member’s health information and click “Continue.”
18. If a Health Form does not appear, return to the Personal Information page and check the youth’s birthdate. The Health Form will only appear for members ages 5 – 18 as of January 1 of the current program year. A missing Health Form signifies an entry error in the birthdate.
19. Click “Continue.”

17 | P a g e
20. In order to enroll in ______________ 4-H, a member must enroll in at least one Club.
Independent members should enroll in the County’s “Independent” Club.
Cloverbuds may enroll in a local 4-H Club, but must also enroll in the Cloverbuds Group found under the Groups tab.
21. Select the desired Club. 22. Click “Add Club.” 23. The Club appears in the “Club List.” 24. If the member chooses to enroll in
more than one club, be sure to select which Club is considered the Primary Club.
25. Click “Continue.”
26. In order to enroll in ________________ 4-H, each the youth member must select at least one project.
Cloverbuds may only enroll in the “Cloverbuds” project.
27. Click “Add Project.” 28. Click “Continue.” 29. Groups are optional. Add any
desired groups. Cloverbuds should enroll in the
Cloverbuds group. 30. Click “Submit Enrollment.”

18 | P a g e
31. Review the member’s information to be sure it is complete and correct.
32. Click “Accept Member.”
33. The new member now appears on the “Member List.”
34. To enroll another family member, select the member type and repeat steps 11 – 33.
35. If the second member’s Parent Information is the same as the first member’s information, select “Copy parent information from another the youth record” to auto-fill these portions of the form.
19 | P a g e
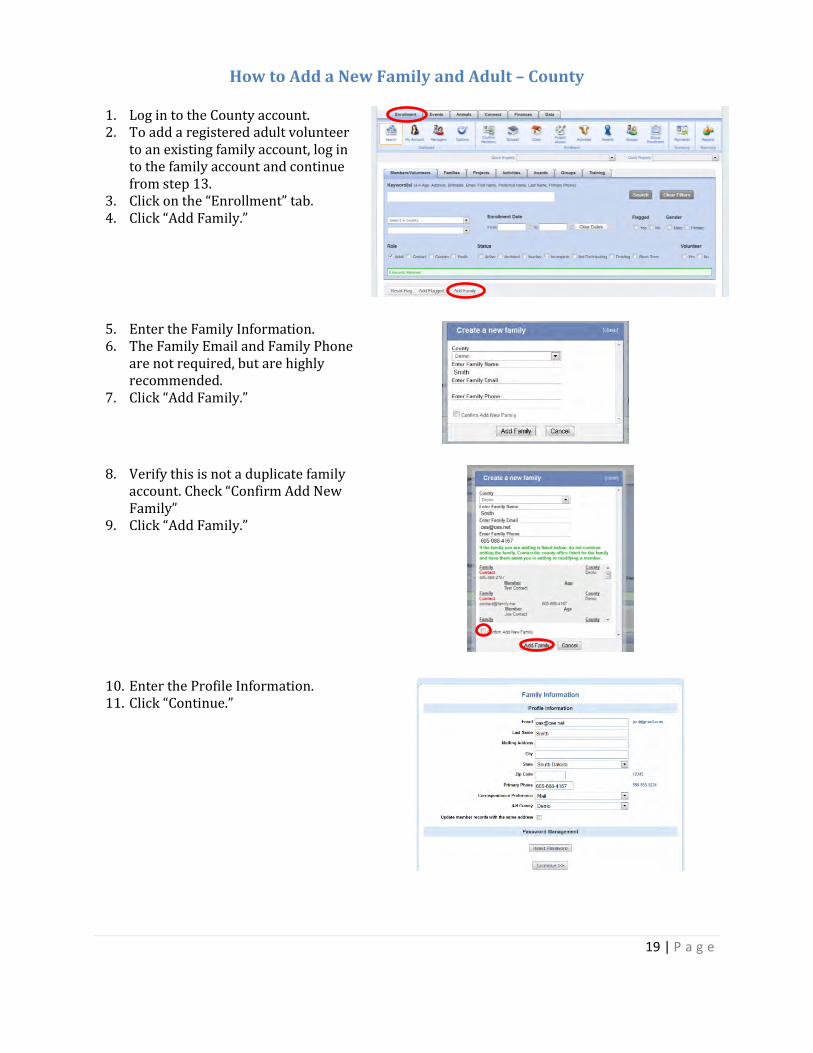
How to Add a New Family and Adult – County
1. Log in to the County account. 2. To add a registered adult volunteer
to an existing family account, log in to the family account and continue from step 13.
3. Click on the “Enrollment” tab. 4. Click “Add Family.”
5. Enter the Family Information. 6. The Family Email and Family Phone
are not required, but are highly recommended.
7. Click “Add Family.”
8. Verify this is not a duplicate family account. Check “Confirm Add New Family”
9. Click “Add Family.”
10. Enter the Profile Information. 11. Click “Continue.”

20 | P a g e
12. Select the type of member to add. Adult: Registered Adult Volunteer Contact: Any other adult who may be affiliated with 4-H but is NOT a registered volunteer (examples: committee/board members, sponsors, judges).
13. Click “Add Member.”
14. Enter the member’s Personal Information.
15. Information in Bold is required. All other information is optional.
16. Be sure to mark “Yes” for “Are you a volunteer?”
17. Click “Continue.”
18. Using the member’s paper form, enter that the document was received, when it was received, and if consent was given for each section.
NOTE: Each of the agreements is on the Volunteer Work Agreement (aka. Volunteer Enrollment Form), but is in a different order than is listed on the Additional Information page. If the volunteer has signed the Volunteer Work Agreement, he or she has agreed to each of the agreements listed. 19. Click “Continue.”
20. Complete the Volunteer Screening form.
21. If a Volunteer Screening form does not appear, return to the Personal Information page and check the “Are you a Volunteer?” field.
22. Click “Continue.”

21 | P a g e
23. If the volunteer is a Club leader or volunteers for a particular Club, select the Club and Volunteer Type.
24. Click “Add Club.” 25. Click “Continue.” 26. If the Volunteer is not involved in
specific projects, activities or groups, click “Submit Enrollment.”
27. If the Volunteer helps with a particular project area, select the project and volunteer type.
28. Click “Add Project.” 29. Click “Continue.” 30. If the Volunteer is not involved in
specific activities or groups, click “Submit Enrollment.”
31. If the Volunteer is involved with a specific Activity, select the activity and volunteer type.
32. Click “Add Activity.” 33. Click “Continue.” 34. If the Volunteer does not
participate in a specific Group, click “Submit Enrollment.”
35. Click the “Groups” tab. 36. If the Volunteer is part of a specific
Group, select the group and volunteer type.
37. Click “Add Group” 38. Click “Submit Enrollment”

22 | P a g e
39. The Adult will appear on the Member List as “Pending.”
40. Send the paper Volunteer Work Agreement with the cost recovery fee to the State 4-H Office.
41. The State 4-H Office will forward the form to Human Resources who will contact HireRight to run a background check.
42. After the State 4-H Office receives notification of a cleared background check, the State will approve the volunteer.
43. After the State 4-H Office approves the volunteer, the County needs to give final approval.
44. Click the “Enrollment” tab. 45. Click “Confirm Members” 46. Click “Login” next to the member.
47. Click on the “County Review” page. 48. Review the volunteer’s information. 49. If everything is correct and
complete, click “Accept Member” at the bottom of the page.
50. The Volunteer enrollment status is now “Active.”
51. If the background check results return any restrictions, the restrictions are noted next to the form on the Member List.

23 | P a g e
How to Add a New Family and Contact – County
1. Log in to a County account. 2. Click on the “Enrollment” tab. 3. If the Contact’s family is not already
in 4HOnline, click “Add Family.” If this in additional family member in an existing family, log in to the family account and skip to step 12.
4. Enter the Family Information. 5. The Family Email and Family Phone
are not required, but are highly recommended.
6. Click “Add Family.”
7. Verify that the family is not already in the system. Check “Confirm Add New Family”
8. Click “Add Family.”
9. Enter the Profile Information. 10. Click “Continue.”
11. Select “Contact” as the member type.
12. Click “Add Member.”

24 | P a g e
13. Enter the Contact’s Personal Information.
14. Information in Bold is required. All other information is optional.
15. Click “Continue.”
16. If the Contact participates in a group, select the group and click “Add Group.”
17. Click “Continue.” 18. The Contact appears on the
Member List for the family.
25 | P a g e
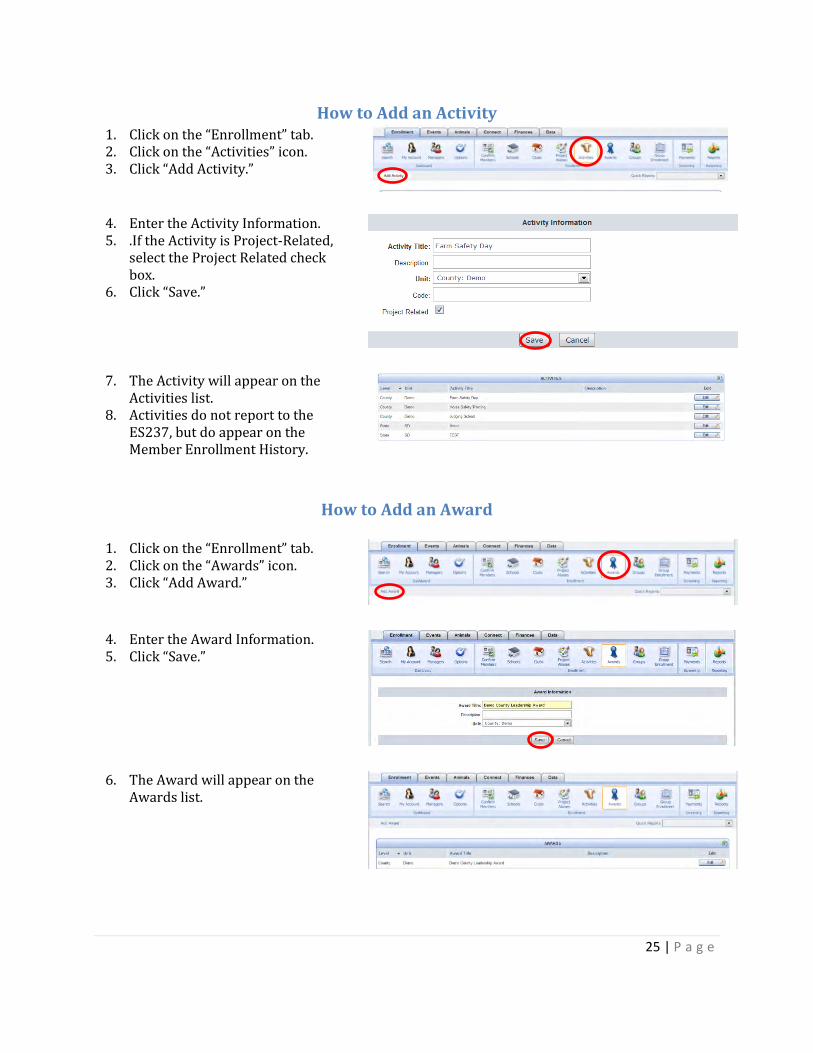
How to Add an Activity 1. Click on the “Enrollment” tab. 2. Click on the “Activities” icon. 3. Click “Add Activity.”
4. Enter the Activity Information. 5. .If the Activity is Project-Related,
select the Project Related check box.
6. Click “Save.”
7. The Activity will appear on the Activities list.
8. Activities do not report to the ES237, but do appear on the Member Enrollment History.
How to Add an Award
1. Click on the “Enrollment” tab. 2. Click on the “Awards” icon. 3. Click “Add Award.”
4. Enter the Award Information. 5. Click “Save.”
6. The Award will appear on the Awards list.

26 | P a g e
How to Add a Group 1. Click on the “Enrollment” tab. 2. Click on the “Groups” icon. 3. Click “Add Group.”
4. Enter the Group Information. 5. Choose whether to share the group
with managers or members. 6. If the “Share this group with
Members” box is checked, members will be able to add the group to their own accounts.
7. Click “Save.” 8. Groups do not count on the ES237
unless a Group Enrollment is created from the Group. See “How to Enter a Group Enrollment for an Existing Group.”
9. The group will appear on the Groups list.
How to Add a School 1. Click on the “Enrollment” tab. 2. Click on the “Schools” icon. 3. Click “Add School.”
4. Enter the School Information. 5. Click “Save.” 6. The school will appear on the list of
schools.
27 | P a g e
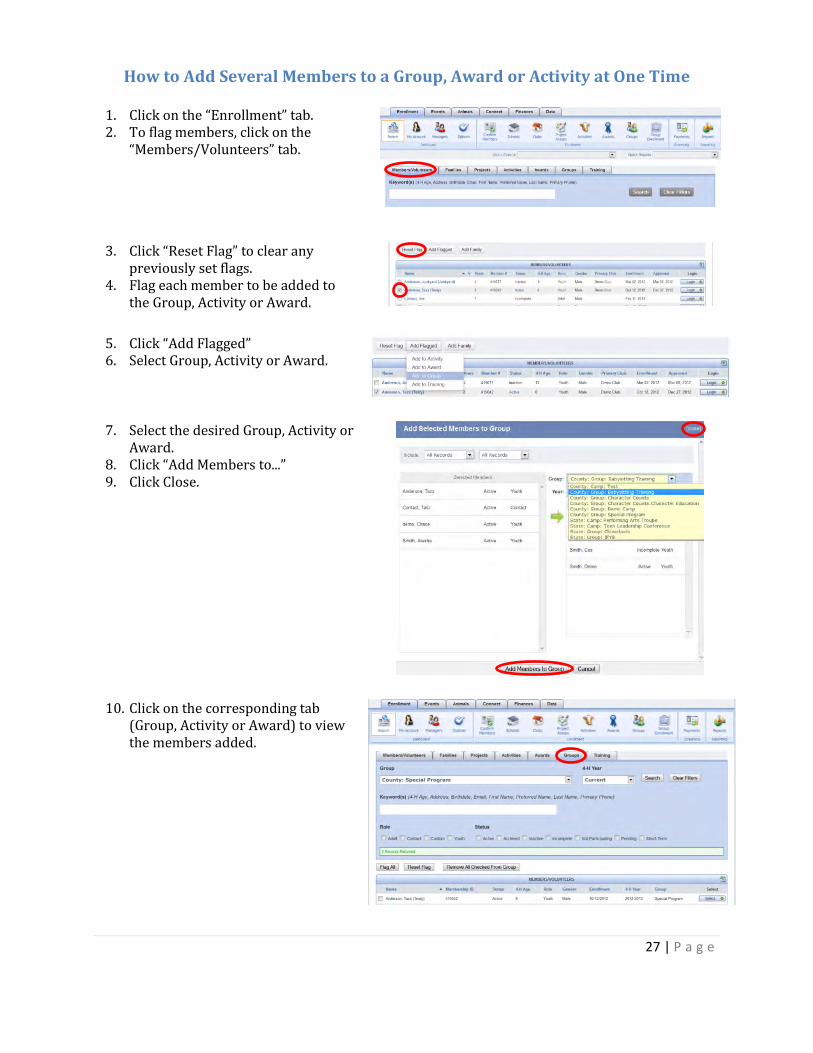
How to Add Several Members to a Group, Award or Activity at One Time
1. Click on the “Enrollment” tab. 2. To flag members, click on the
“Members/Volunteers” tab.
3. Click “Reset Flag” to clear any previously set flags.
4. Flag each member to be added to the Group, Activity or Award.
5. Click “Add Flagged” 6. Select Group, Activity or Award.
7. Select the desired Group, Activity or Award.
8. Click “Add Members to...” 9. Click Close.
10. Click on the corresponding tab (Group, Activity or Award) to view the members added.

28 | P a g e
How to Confirm a Member Enrollment 1. Log in to a County account. 2. From the “Home” page, click on the
“___ Enrollments Pending” box.
OR from the Enrollment tab, click “Confirm Members.”
3. Click “Login” next to the member to confirm enrollment. NOTE: Members/Volunteers listed as “Awaiting Form Approval” must be approved at the State level before they can be approved at the County level.
4. Click on the “County Review” page.
5. Review the member’s information to be sure it is complete and correct.
6. Pay close attention to signatures (initials are not acceptable) and health information.
7. If everything looks good, click “Accept Member.”
8. If there are changes needed, click “Send Back to Member” and contact the family regarding the changes needed to accept the enrollment.
9. Only click “Delete Member” if this is a duplicate member profile.

29 | P a g e
How to Delete a Member Account and Family Profile NOTE: ONLY delete member accounts that are duplicates.
NEVER delete any accounts that are not duplicates. Some accounts cannot be deleted because they have already been counted on an ES237, have registered for an event or have paid a fee.
1. Click on the “Enrollment” tab. 2. Log in to the duplicate member’s
family account.
3. From the “Member List” page, click “Edit” next to the member to delete.
4. Click “DeActivate Member” at the bottom of the Personal Profile page.
5. Click “OK”
6. Repeat Step 3.
7. Scroll to the bottom of the Personal
Profile page and click “Delete Member.” NOTE: If the member was Active at any point, the only option may be to Archive.
8. Repeat Steps 3 – 7 to delete each duplicate member from the family.
9. Once all of the members have been deleted, click “Edit Family.”
10. Click “Delete Family.” NOTE: The “Delete Family” button will only appear if there are no members in the family.
11. If the members were archived, click “Archive Family.”
12. Click “OK.”

30 | P a g e
How to Enter a Group Enrollment Counties use the Group Enrollment feature in 4HOnline to report any programs or activities in which they impacted non-4-H the youth. This information is automatically added to the current year’s ES237 report.
1. Login to a County account. 2. Click on the “Group Enrollment”
icon under the Enrollment tab.
3. Click “Add Group Enrollment”.
4. Required Fields are in bold. 5. Be sure that the start/end dates are
both within the program year. 6. Enter the program/event
information.
7. If the Club/Group that participated in the program is not available in the drop-down list, click “Create Group”.
8. Enter the Group Information. 9. Click “Add Group”. 10. The Group information will
automatically fill in after the user select “Add Group”.
11. Select the project area that
corresponds with the program. 12. Click on “Add Project”. 13. Click “Continue”.
31 | P a g e
14. Enter participant information.
NOTE: Duplicates are 4-H Members.
15. Enter the appropriate Racial, Residence, and Grade information.
16. Click “Continue”.
17. Enter the information for NEW Adult and Youth Volunteers.
18. Direct Volunteers are those who have direct contact with the youth.
19. Indirect Volunteers are those who may have helped with paperwork, set-up or tear-down, but had no direct contact with youth.
20. Enter the number of Volunteers who received training for the program/event.
21. When form is complete, check “Submit Form” and click “Save Form”.
22. “Group Enrollments” may be edited at any time until September 30 of the current program year.
23. All Group Enrollments count on the ES237 even if the “Submit Form” check box is not checked.
24. All of the County’s “Group
Enrollments” will appear in the list of “Group Enrollment Forms under the “Group Enrollment” icon.

32 | P a g e
25. To export a list of “Group Enrollment” information to an Excel file click on the drop-down menu under “Quick Exports”.
26. Select the “Current Year”. 27. The report will pop up as an Excel
file. Be sure pop-up blockers are turned off.

33 | P a g e
How to Enter a Group Enrollment from an Existing Group 1. Click on the “Enrollment” tab. 2. Click on the “Groups” tab.
3. Select the Group for which to create a Group Enrollment.
4. Click “Search” 5. Flag the members to include in the
Group Enrollment, or click “Flag All” to include all members.
6. Click “Create Group Enrollment.”
7. Enter the Group information. 8. Click “Add Group Enrollment.”
9. A Group Enrollment with this information will appear in the list of Group Enrollments under the Group Enrollments icon.
10. Edit the Group Enrollment to add additional information regarding participants who were not 4-H members.
11. The 4-H members included on the Group Enrollment will count on the ES237 projects area as well as the total number of duplicates.

34 | P a g e
How to Flag Members or Families
1. Click on the “Enrollment” tab. 2. Click on the “Members/Volunteers”
tab to flag individual members. Click on the “Families” tab to flag Families.
3. Mark the checkbox next to each member or family name to flag the member or family.

35 | P a g e
How to Give Leaders Club Access 1. Counties may only give Club access to
registered volunteers. These are volunteers who have completed the Volunteer Work Agreement and have been approved by the State 4-H Office.
2. After the State 4-H Office approves the volunteer, the County office must “Accept” the volunteer’s enrollment.
3. If the volunteer is already Active, go to step 25.
4. Click on “Confirm Members.” 5. Click “Login” next to the Volunteer’s name.
6. Click on “County Review”.
7. In order to have Club access, “Adult
Volunteer” must be answered “Yes”. 8. If “Adult Volunteer” is “No”, go to Step 12 to
correct it.
9. A Club and Volunteer Type must be entered
under “Club List”. 10. If the Club or Volunteer Type is blank, go to
Step 15 to correct it. 11. If all of the information is correct, click
“Accept Member.” Proceed to Step 23.
12. To correct the “Adult Volunteer” field, click on the “Personal Information” page.
13. Scroll down to the “Volunteer Section”.
Choose “Yes” 14. Scroll down to the bottom of the page and
click “Continue” to save the changes.
15. To correct the Club enrollment and
Volunteer Type, click on the “Participation” page.

36 | P a g e
16. If both the Club and the Volunteer Type are missing, select a Club from the drop-down menu.
17. Select a Volunteer Type from the second drop-down menu.
18. Click “Add Club”.
19. If only the Volunteer Type is missing, click
the “Edit” button next to the Club in the “Club List”
20. Select the appropriate Volunteer Type and
click “Update”.
21. Once the Club and Volunteer Type are filled
in, click “Continue” to save the changes. 22. Click Review Enrollment to return to the
County Review page. Scroll to the bottom of the page and click “Accept Member”.

37 | P a g e
23. Upon County acceptance, the volunteer enrollment status should read “Active” and there should be a green checkmark next to the Volunteer Screening.
24. Click “Return to County Account.”
25. From the County screen, click on the “Clubs”
icon. 26. Click “Edit” next to the Club to give a leader
Club access.
27. Be sure all Club information is up-to-date.
IMPORTANT: There MUST be something in the “Contact” field.
28. Enter as much information about the Club as possible. This is very important as we need the Club’s contact information for reports.
29. Scroll down to the bottom to the
“Volunteers” list. 30. Check the level of access to give each leader
(nothing checked = no Club access). “Allow Login” simply allows the leader to login, confirm
members*, view member records and run reports** for
members in their Club. The leader may not edit current
member information or add members.
*NOTE: If a leader confirms a member, the County still
must “Accept” the member. The County will ALWAYS
know when a new member is added to the system or when
a current member re-enrolls.
**NOTE: Club leaders may run “Standard” Reports as well
as any “Shared” reports for which the County or State has
chosen to “Share with Clubs.”

38 | P a g e
“Allow Member Management” allows leaders to confirm
members, add and edit member records and run reports.
NOTE: “Allow Login” must also be checked to give
“Member Management” access.
31. Optional: Update the Club password. 32. Click “Save.” 33. Contact the leaders granted Club access. Give
them the Club password and the “How to Login to a Club Account” Help Sheet.
HOW TO LOGIN TO A CLUB ACCOUNT – Instructions for Leaders
(separate Help Sheet available for distribution)
1. Login to a family account.
2. If granted “Club Access”, the “Club Leader Login” will appear.
3. Select the appropriate “Profile” and “Club”.
4. Enter the Club password received from the County office.
5. Click “Login to Club.” 6. Contact the County Office for more
information regarding the level of access granted and any Help Sheets needed.
“Login Only” Club
Account Search Screen
“Member Management” Club Account Search Screen

39 | P a g e
How to Move a Family/Member to a Different County
1. Log in to a County account. 2. Click on the “Enrollment” tab. 3. Log in to the family account from
the Members/Volunteers for Families search screen.
4. Click “Edit Family.”
5. Select the Family’s new County. 6. Check “Update member records
with the same address.” 7. Click “Continue. 8. The member’s new county will
receive a message that the family has moved to their county.

40 | P a g e
How to Move a Member to a Different Family
1. Click on the “Enrollment” tab. 2. Log in to the member’s family
account from the Member/Volunteers or Families search screen.
3. From the “Member List” page, click “Edit” next to the member to move to a different family.
4. From the Manager Control Panel, select the family to which the member should move.
5. Click “Change Family.” 6. Check “Login to New Family” to
view the new family as soon as the record is moved.
7. Click “OK”
8. The member record will now appear in the new family.

41 | P a g e
How to Print Mailing Labels There are several ways to print mailing labels in 4HOnline. Here are the steps for the simplest way to print them.
1. Click on the “Reports” icon. 2. Click on “Standard” on the left side
3. Select either Member or Family Labels from the list of Standard Reports. Family Labels: One label per family. Member Labels: One label per member.
4. Click “Run Report.”
5. To print the labels, click the “Save” button.
6. After the PDF opens, click on the Print button. Be sure to set the Page Scaling at “None”.
7. Print the labels!
8. To print labels for only one Club, select the Club from the drop-down list at the top of the reports list. Follow steps 3 – 7.

42 | P a g e
How to Process Duplicate Member Records
1. To find existing duplicate member, from a County account, click the Reports icon under the Enrollment tab.
2. Select the “Member – Potential Duplicates” Report
3. If no report pops-up, the program has not found any potential duplicates.
4. To find a pending duplicate record, click “Confirm Members.”
5. Login to the Member Account.
6. Click on “County Review.”
7. If the new member record is possibly a duplicate of an existing member record, the information will appear in two columns. NOTE: It is very important that each member only have one record. Our goal is to delete the new record and keep and update the old record in order to maintain an accurate member history.
The County has two options at this point: a. Process the member’s reenrollment from the county side using a printed version of the member’s information
in their new account. For this option, follow steps 8 – 30. or
b. Ask the family to redo the re-enrollment using the existing account. For this option, follow steps 14 – 26.
8. Click “Return to the County account”
9. From the “Enrollment” tab, “Members/Volunteers” search screen, log in to the pending member’s account.
43 | P a g e
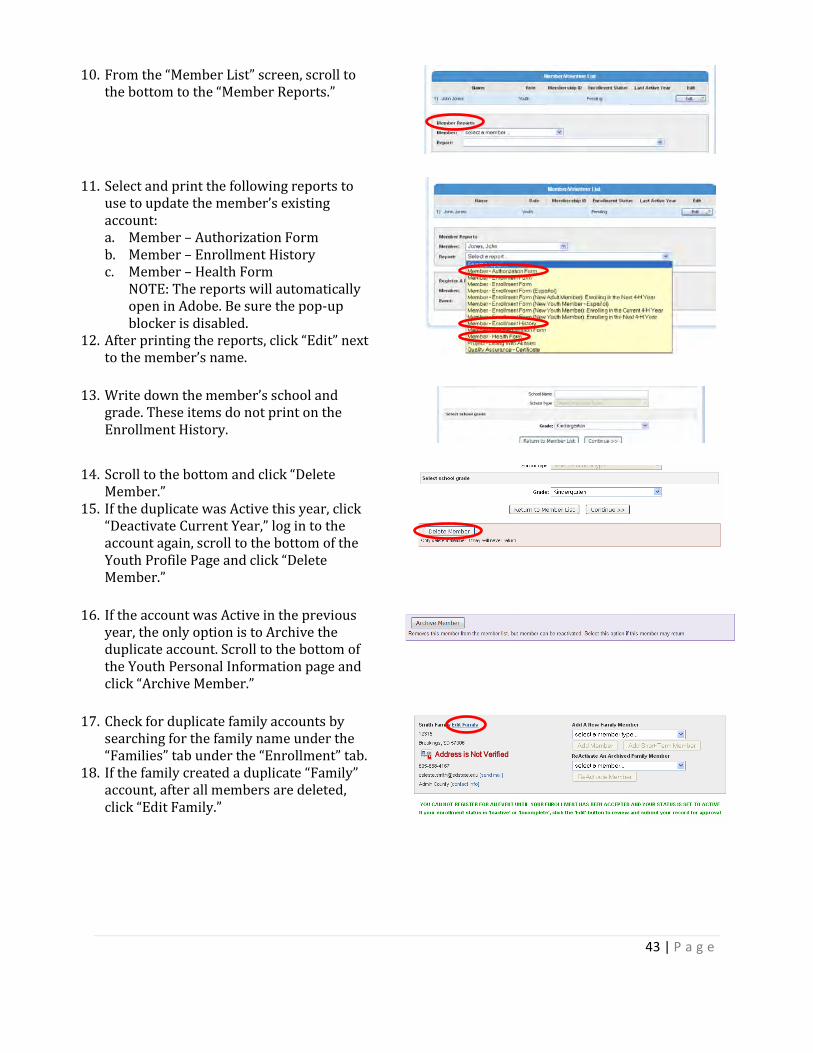
10. From the “Member List” screen, scroll to the bottom to the “Member Reports.”
11. Select and print the following reports to use to update the member’s existing account: a. Member – Authorization Form b. Member – Enrollment History c. Member – Health Form
NOTE: The reports will automatically open in Adobe. Be sure the pop-up blocker is disabled.
12. After printing the reports, click “Edit” next to the member’s name.
13. Write down the member’s school and grade. These items do not print on the Enrollment History.
14. Scroll to the bottom and click “Delete Member.”
15. If the duplicate was Active this year, click “Deactivate Current Year,” log in to the account again, scroll to the bottom of the Youth Profile Page and click “Delete Member.”
16. If the account was Active in the previous year, the only option is to Archive the duplicate account. Scroll to the bottom of the Youth Personal Information page and click “Archive Member.”
17. Check for duplicate family accounts by searching for the family name under the “Families” tab under the “Enrollment” tab.
18. If the family created a duplicate “Family” account, after all members are deleted, click “Edit Family.”
44 | P a g e
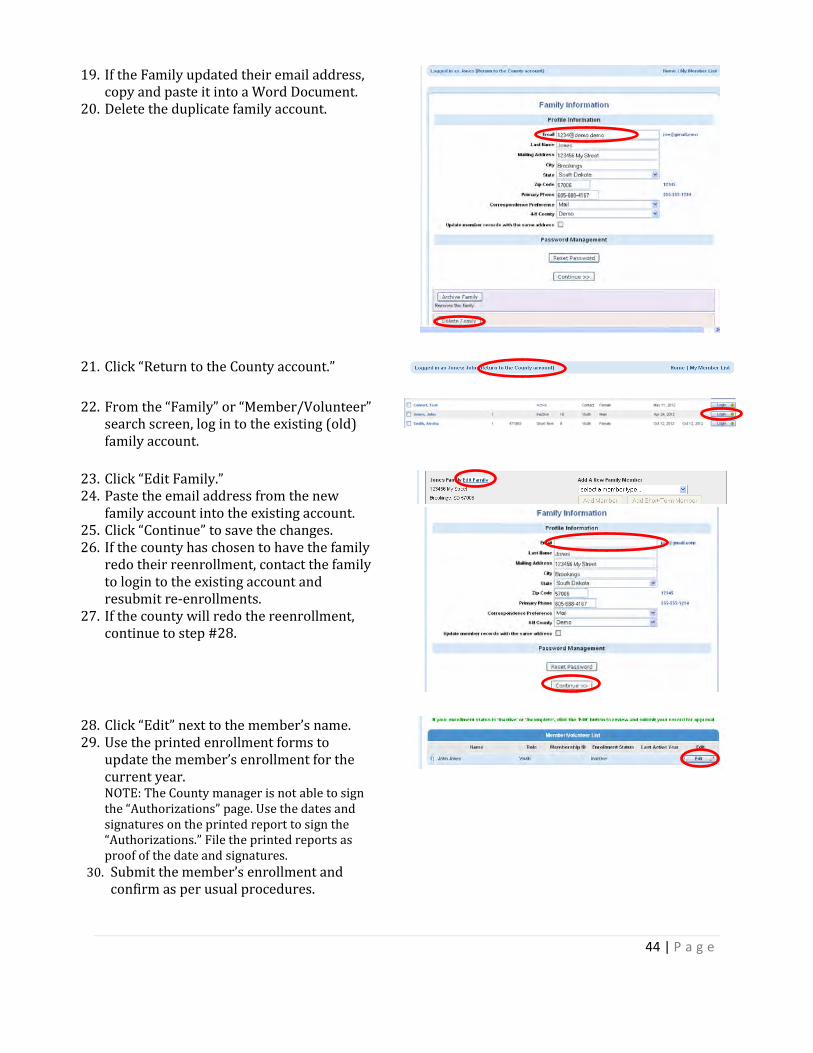
19. If the Family updated their email address, copy and paste it into a Word Document.
20. Delete the duplicate family account.
21. Click “Return to the County account.”
22. From the “Family” or “Member/Volunteer” search screen, log in to the existing (old) family account.
23. Click “Edit Family.” 24. Paste the email address from the new
family account into the existing account. 25. Click “Continue” to save the changes. 26. If the county has chosen to have the family
redo their reenrollment, contact the family to login to the existing account and resubmit re-enrollments.
27. If the county will redo the reenrollment, continue to step #28.
28. Click “Edit” next to the member’s name. 29. Use the printed enrollment forms to
update the member’s enrollment for the current year. NOTE: The County manager is not able to sign the “Authorizations” page. Use the dates and signatures on the printed report to sign the “Authorizations.” File the printed reports as proof of the date and signatures.
30. Submit the member’s enrollment and confirm as per usual procedures.

45 | P a g e
How to Reactivate an Archived Member
1. From a County account, click on the “Enrollment” tab.
2. Log in to the Archived member’s family account from the Members/Volunteers or Families tab.
3. From the “Member List” page, select the Archived family member’s name under “ReActivate An Archived Family Member.”
4. Click “ReActivate Member”
5. The member will now appear on the Member List as Inactive.
6. Click “Edit” to re-enroll the member for the current year.

46 | P a g e
How to Set County Options Project Selection Deadline, Family Access Options, Invoice Addresses
1. Click on the “Enrollment” tab. 2. Click “Options.”
3. At this point, _____________ does not charge an Animal/Livestock fee. If at some point a fee is instituted, Counties will have the option to enter the County 4-H Office information for the invoice instructions.
4. Counties may change the family access settings here.
NOTE: The County may select “Do Not Allow New Families to Create Their Record” to prevent existing families from creating duplicate accounts. However, this would require new families to submit paper enrollment forms.
5. Set the last day for a member to edit projects here. Projects will lock at 11:59 p.m. CT on this date.
6. At this point____________ does not charge an enrollment fee. If at some point a fee is instituted, Counties may enter the County 4-H Office information for the invoice instructions.
7. Enter the County 4-H Office address and invoice instructions for any County event set up in 4HOnline.
8. “Miles from State Fairgrounds” is used to determine checkout times at the fair (calculate mileage from the County 4-H office).
9. At this point, we do not use the Fair Registration Form Text field.
10. Be sure to click “Save” to save any changes in County Options.

47 | P a g e
How to Set Up Project Aliases Project Aliases are a way to customize the State Project List for county use. These are especially helpful for Cloverbud projects. A county can add aliases for any state project.
1. Log in to a County Account.
2. From the “Enrollment” tab, click on “Project Aliases”.
3. Click “Add Project Aliases”
4. Type the Alias Title. 5. Select the corresponding State
Project from the drop-down menu. 6. Click “Save”
7. The Project with its Alias will appear in the list of Project Aliases.
8. When a member adds a project, the project aliases appear in their list of projects under the “Participation” tab in their account.

48 | P a g e
How to Set Up Project Leader Accounts Give Project Leaders access to contact information for members enrolled in a specific project in the leader’s Club or County.
1. Log in to a County Account. 2. From the Enrollment tab, click on
Options.
3. Click “Project Leaders.”
4. Check “Allow Login” to give the leader access to contact information for members in the leader’s club who are enrolled in that project area.
5. Check “County Wide” to give the leader access to contact information for all members in the leader’s county who are enrolled in that project area.
6. Share the “How to Login to a Project Leader Account” Help Sheet and the project password with the Project Leader.
NOTE: Project passwords are maintained at the State level. Contact the State 4HOnline Administrator if a new password is needed.
7. If a Project Leader does not appear
on the list mentioned above. Click “Search.”
8. Login to the Project Leader’s profile.
9. Click “Edit” next to the Project Leader’s name.
10. Click on the Participation page.
11. Click on the Projects tab. 12. Select the Club. 13. Select the Project. 14. Select “Project Leader” as the
Volunteer Type. 15. Click “Add Project.” 16. Click “Continue.” 17. Return to the County Account and
begin at Step 2.

49 | P a g e
How to Submit a County Transfer
County payment process for Event Registrations and Volunteer Screenings 1. Log in to a county account. 2. Event Checks Due on the Home
page indicates registration payments are due.
3. When the County check is ready to send to the State 4-H Office, (usually after all of the county’s members have registered), click on the “Event Checks Due” button.
4. Select which event for which to submit payment. Click “Create.”
5. Select the youth invoices to include in the county transfer. NOTE: A member receives and pays an “Invoice” whereas a county receives and pays a “Transfer.
6. Click “Save.”
7. Check the “Transfer” information. 8. The State 4-H Office will enter the
Process date upon receipt of the county check.
9. If everything is correct, click “Submit.”
10. Submitted transfers cannot be deleted. If a refund is needed, contact the State 4-H Office to void the transfer.
11. After submitting the transfer, a Quick Reports drop-down appears. Print the “Financial – Transfer” and send it with county check to the State 4-H Office.
12. Click “Exit” to return to the Transfer List.
13. Click the “Finance” tab then click the Transfer icon to view the transfer status for all county transfers. The State 4-H Office will update the processed and paid information upon receipt of the county check.

50 | P a g e
How to Switch a Contact to an Adult
1. Log in to a County or District
account. 2. Click on the “Enrollment” tab. 3. Log in to the Contact’s family
account.
4. From the “Member List” page, click “Edit” next to the member to switch to an Adult.
5. Scroll to the bottom of the Personal Information page.
6. Click “Change Contact to Adult.”
7. Click “OK”
8. Use the paper Volunteer Work Agreement to complete the enrollment information, or contact the individual to log in to the family account to complete and submit the Adult Volunteer enrollment.
51 | P a g e
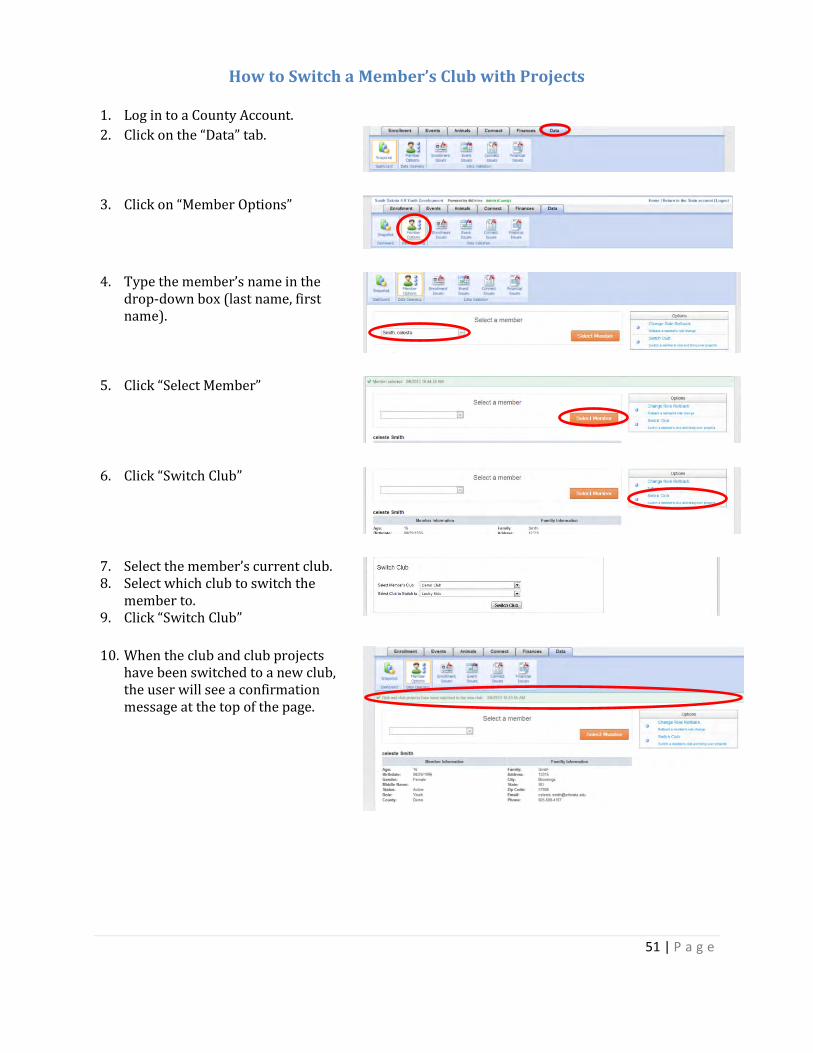
How to Switch a Member’s Club with Projects
1. Log in to a County Account.
2. Click on the “Data” tab.
3. Click on “Member Options”
4. Type the member’s name in the drop-down box (last name, first name).
5. Click “Select Member”
6. Click “Switch Club”
7. Select the member’s current club. 8. Select which club to switch the
member to. 9. Click “Switch Club”
10. When the club and club projects have been switched to a new club, the user will see a confirmation message at the top of the page.

52 | P a g e
How to Switch a Short-Term Member to a Youth Member
1. Click on the “Enrollment” tab. 2. Log in to the Short-Term member’s
family account.
3. From the “Member List” page, click “Edit” next to the Short-Term member to switch to a youth.
4. Scroll to the bottom of the Personal Information page.
5. Click “Change Short-Term Youth to Youth.”
6. Click “OK”
7. Use the paper Enrollment Form to complete the enrollment information, or contact the family to log in to the family account to complete the enrollment process.

53 | P a g e
How to Upload Newsletters and Announcements 1. Login to a County or District
account. 2. Click on the “Connect” tab.
3. Click on the “Newsletters” icon. 4. Select “Add Newsletter.”
5. Enter the Newsletter Title.
6. Enter the upload date. 7. Select “Share with Members”
and/or “Share with Managers”
8. Click on “Browse” to select the
appropriate file to upload. NOTE: The file must be in a .pdf format.
9. Click “Save.”
10. Once the newsletter is uploaded, it will appear in the list of newsletters.
11. Click “Edit” to delete any outdated newsletters and remove them from the family and manager home pages.
12. Newsletters and Announcements will appear on the Family home page for families in the County.

54 | P a g e
How to Update Club Information Contact the State 4-H Office to add a new Club or close an existing Club.
1. Login to a County account. 2. Click on the “Enrollment” tab. 3. Click on the “Clubs” icon. 4. Click “Edit” next to the desired Club.
5. Update the Club information.
6. Click “Save.”
55 | P a g e
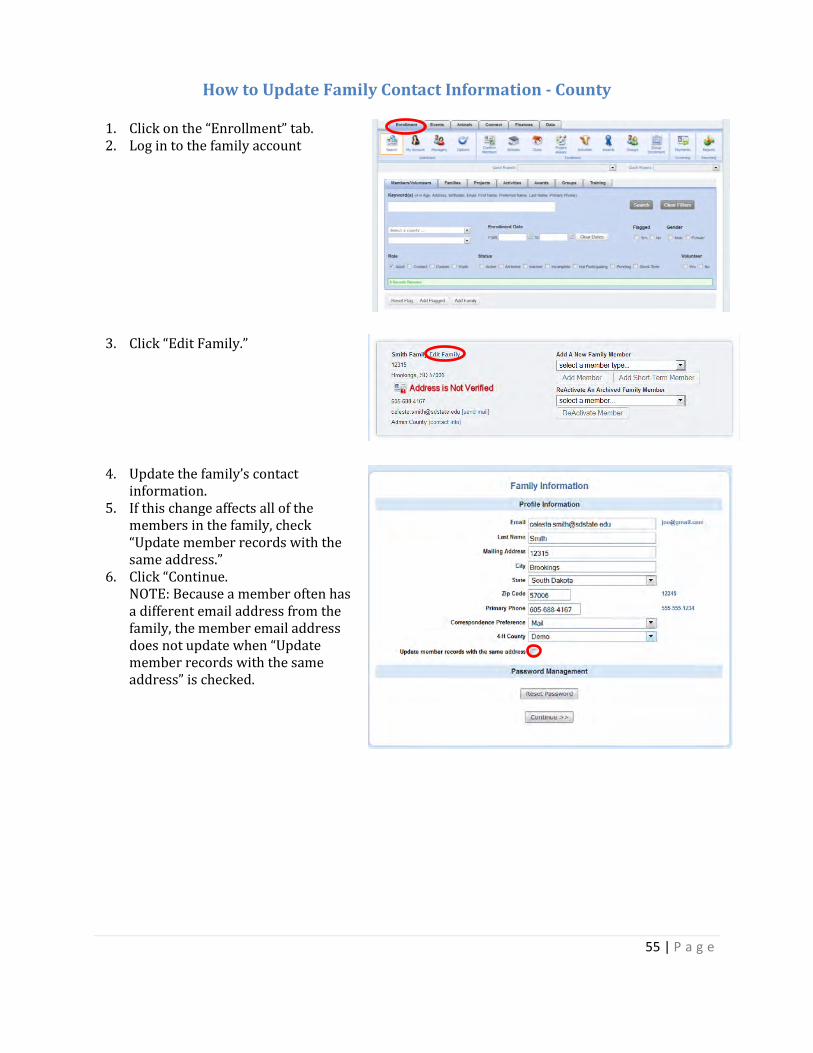
How to Update Family Contact Information - County
1. Click on the “Enrollment” tab. 2. Log in to the family account
3. Click “Edit Family.”
4. Update the family’s contact information.
5. If this change affects all of the members in the family, check “Update member records with the same address.”
6. Click “Continue. NOTE: Because a member often has a different email address from the family, the member email address does not update when “Update member records with the same address” is checked.

56 | P a g e
Reports for Managers Reports are a very useful tool in 4HOnline. A user may include any information contained in a member’s
profile or on an event registration form on a report.
Standard Reports: Reports created and designed by 4HOnline
Shared Reports: Reports created in a higher level account (for example: State level) and shared
with other managers.
Memorized Reports: Standard or Shared reports with additional filters.
Custom Reports: Reports created by the user.
Quick Exports: Reports created and designed by 4HOnline that export directly to Excel.
Quick Reports: Reports created and designed by 4HOnline that export directly to a PDF.
As a general rule, when choosing a report to run, first look for a Standard or Quick Report that contains
the necessary information. If a Standard Report has the necessary information, but includes too much
information, memorize the report to filter the information for a certain members. If there is not a
Standard report available, check the list of Shared reports to see if another manager has already created
a report with the needed information. If there is not a Shared Report listed with the necessary
information, create a Custom Report.
Once reports are created, they remain in the user’s reports list to run at any time. Reports are real-time
and contain the most up-to-date information in the system at the time the user runs the report.
Therefore, it is highly recommended to run the report each time the information is requested rather
than saving the report to the computer and just printing it each time.
Family and Member mailing labels are automatically created with each Custom Report.

57 | P a g e
How to Run a Standard or Shared Report
1. Click on the desired tab. 2. Click the “Reports” icon. 3. Select “Standard” or “Shared”
4. Select the desired report. 5. Click “Run Report.”
6. The report will open as a PDF document.
7. Click the save button to print the report.
STANDARD REPORT OPTIONS Select the desired report and right-click on
the title to see additional options for the
selected report.
To run a report for only a specific club or
for previous years, select the desired
information from the drop-down boxes
before running the report.

58 | P a g e
How to Memorize a Report Memorized Reports are Standard or Shared reports to which a user applies additional filters in order to view more specific data. 1. Click on the desired tab. 2. Click the “Reports” icon. 3. Select “Standard” or “Shared”
4. Select the desired report. 5. Click “Memorize Report” or right-
click on the selected report and click “Memorize.”
6. Enter the Memorized Report title. 7. Check “Share Club” if this report is
intended for Club Leader use as well.
8. Click “Copy”
9. Select the desired additional filters. 10. Scroll to the bottom of the page and
click “Save.”
11. Click “View Report”
12. The new Memorized Report will now appear on the user’s “Memorized” Reports list.

59 | P a g e
How to Create a Custom Report 1. Click on the “Reports” icon.
2. Select “Custom.”
3. Click “Create Report.”
4. Enter the Title and Description of the report. Click “Share Club” to make the report accessible to Club Leaders.
5. Select the desired fields to include in the report.
6. Click on the title, and then click the “Double Arrow” button to move it to the report.
7. Each tab contains additional available fields to include on a report.
8. Fields listed from top to bottom in the reports box appear in the report from left to right. To move the item to a different position in the report, select the field and click move up or move down.
9. After all desired fields are listed on the report, scroll down to the bottom of the screen and click “Save.”

60 | P a g e
10. Click on “Standard Filters.” 11. This optional screen allows filters
to be applied to the report in order to include only results that meet the specified criteria. Examples include: members enrolled in certain project area, members of a particular age, grade, gender, enrollment status, etc.
12. If there are members or families flagged (see How to Flag Members or Families) the user may apply a member or family flagged filter.
13. If no filters are selected, the report will include ALL members in the county.
14. Scroll down to the bottom and click “Save.”
15. The “Data & Format Options”
screen provides additional options for filters and report design.
16. In addition to Custom Filters, the user may choose to group the report by Family or Member. Page breaks print one page per family or member.
17. Select a grouping to group the report by one of the fields on the report. Select Count Records, to view how many records are in each group.
18. Select a field from which to sort the report under Sorting.
19. Apply any calculations as needed. 20. If needed, choose to switch the page
layout to landscape 21. Scroll down to the bottom and click
“Save”.
22. Select “Grid View” to preview the
report or export it to Excel
61 | P a g e
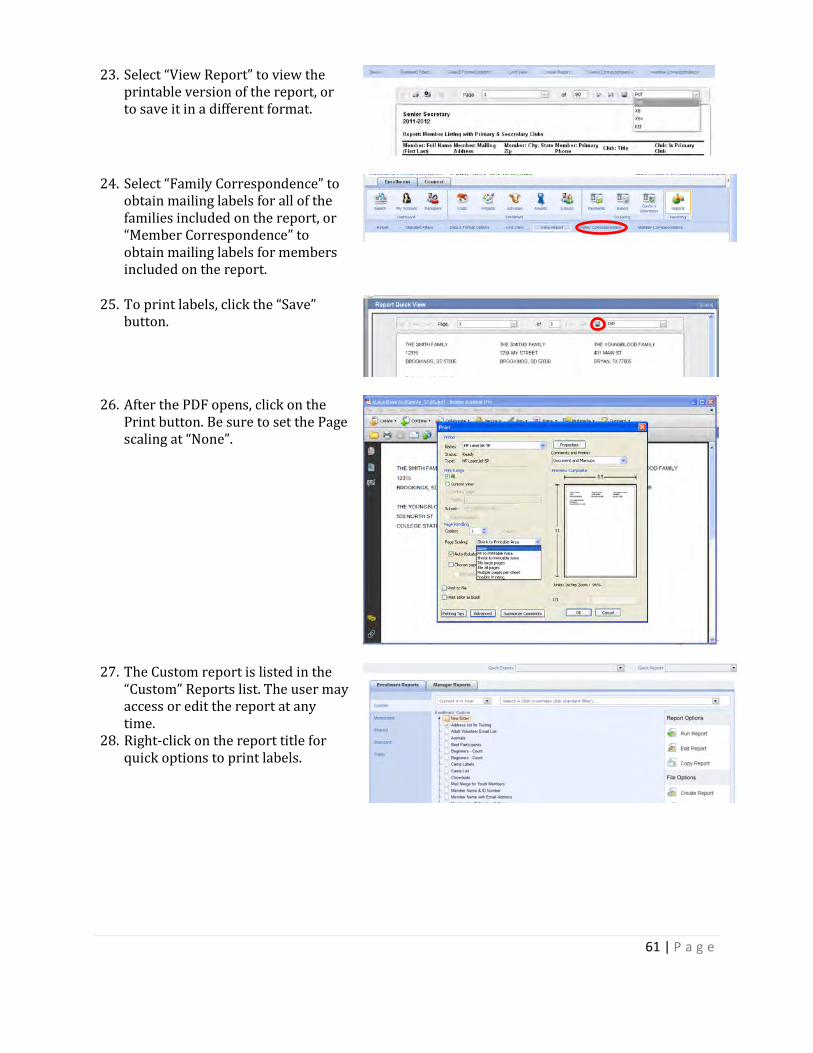
23. Select “View Report” to view the printable version of the report, or to save it in a different format.
24. Select “Family Correspondence” to obtain mailing labels for all of the families included on the report, or “Member Correspondence” to obtain mailing labels for members included on the report.
25. To print labels, click the “Save”
button.
26. After the PDF opens, click on the Print button. Be sure to set the Page scaling at “None”.
27. The Custom report is listed in the “Custom” Reports list. The user may access or edit the report at any time.
28. Right-click on the report title for quick options to print labels.
62 | P a g e
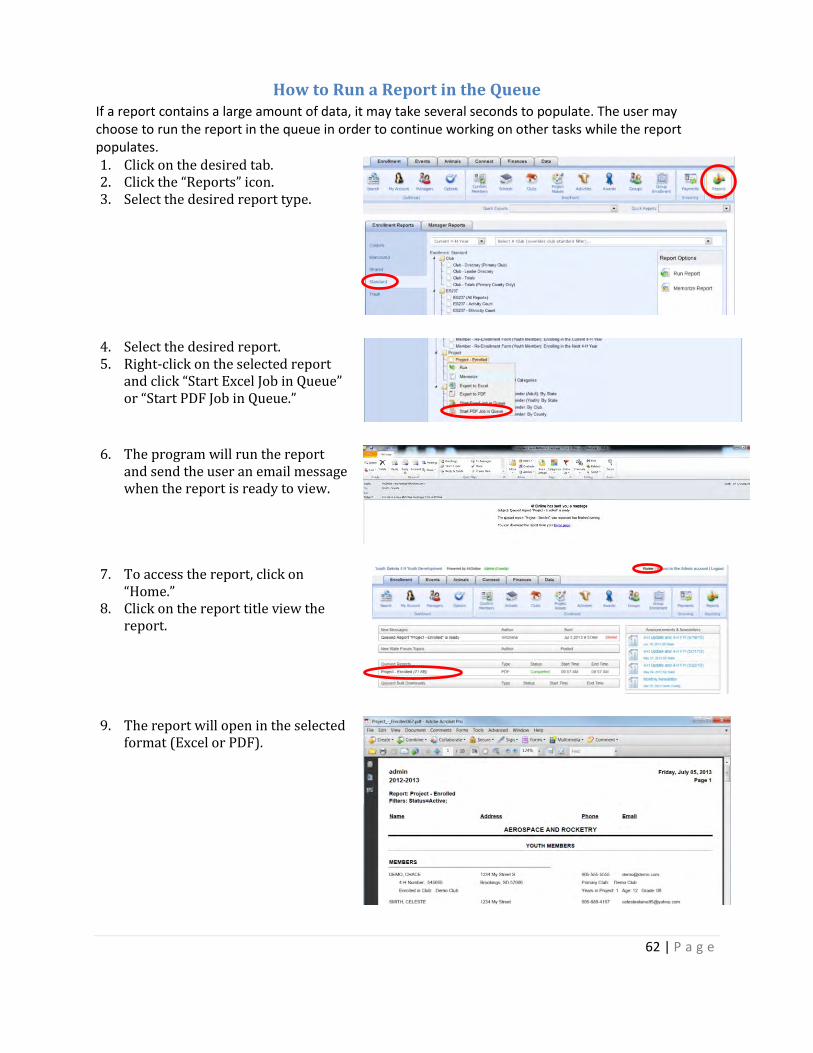
How to Run a Report in the Queue If a report contains a large amount of data, it may take several seconds to populate. The user may choose to run the report in the queue in order to continue working on other tasks while the report populates. 1. Click on the desired tab. 2. Click the “Reports” icon. 3. Select the desired report type.
4. Select the desired report. 5. Right-click on the selected report
and click “Start Excel Job in Queue” or “Start PDF Job in Queue.”
6. The program will run the report and send the user an email message when the report is ready to view.
7. To access the report, click on “Home.”
8. Click on the report title view the report.
9. The report will open in the selected format (Excel or PDF).

63 | P a g e
How to Run a Group of Reports Often, especially for events, it is beneficial to run all reports located in a specific folder at once. 1. Click on the desired tab. 2. Click the “Reports” icon. 3. Select the desired report type.
4. Click on the folder containing the desired report.
5. Right-click on the folder and select “Export to Excel” or “Start Excel Job in Queue.”
6. Each report in the selected folder appears in a separate Excel worksheet in the workbook.

64 | P a g e
How to Run Member Reports 1. Login to a family account. 2. Scroll down to the “Member
Reports” box on the “Member List” page.
3. Select the Member’s name and the desired report. The report pops-up in a .pdf document. NOTE: The internet pop-up blocker must be set to allow pop-ups from 4HOnline.
Member Report Descriptions and Samples
Member - Authorization Form: Printable
version of the Authorization agreements
signed at the time of enrollment (includes
Code of Conduct, Media Release, Release
and Waiver of Liability, etc).
Member – Re-Enrollment Form Next 4-H
Year: Pre-filled re-enrollment form for the
next 4-H year.

65 | P a g e
Member – Re-Enrollment Form Next 4-H
Year: Pre-filled re-enrollment form for the
current 4-H year.
Member – Enrollment Form (Español):
Member re-enrollment form for the current
4-H Year in Spanish.
Member – Enrollment Form (New Adult
Member): A basic enrollment form for New
Adult members. This form does NOT
include fields for the Volunteer Work
Agreement. All new adult volunteers must
also submit a Volunteer Work Agreement.
66 | P a g e
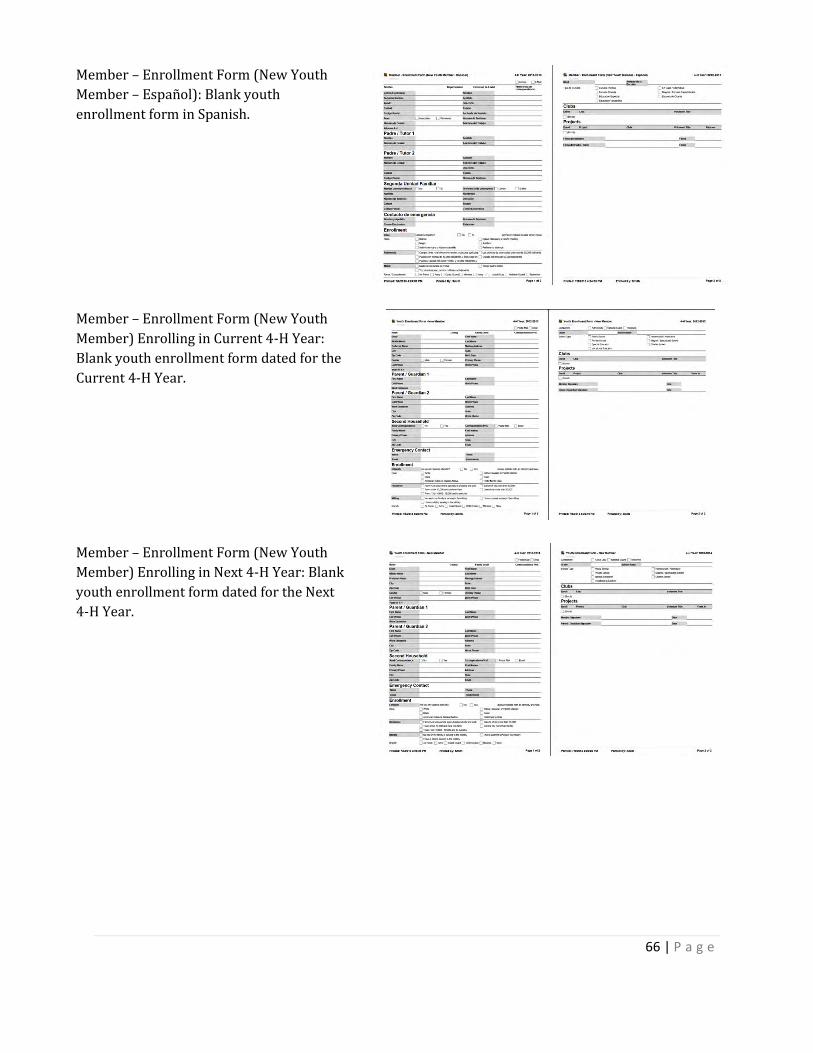
Member – Enrollment Form (New Youth
Member – Español): Blank youth
enrollment form in Spanish.
Member – Enrollment Form (New Youth
Member) Enrolling in Current 4-H Year:
Blank youth enrollment form dated for the
Current 4-H Year.
Member – Enrollment Form (New Youth
Member) Enrolling in Next 4-H Year: Blank
youth enrollment form dated for the Next
4-H Year.

67 | P a g e
Member Enrollment History: A Report of
the current enrollment information as well
as the Clubs, Projects, Activities, Awards
and Groups on the member’s record from
each year the member has enrolled through
4HOnline.
Member – Fair Registration Form: A quick
reference to make notes of desired fair
entries that includes the member’s current
projects.
Member – Health Form: Includes all Health
Information entered on the Health Form in
the member’s enrollment.
Project – Listing With Aliases: Complete list
of available 4-H projects as well as county
project aliases.

68 | P a g e
How to Add a New Youth Enrollment 1. Open a web browser and type in:
______________________ (Please note, adding the www. prefix will return an error message). TIP: Any browser should work well with 4HOnline, but Firefox or Chrome work best.
2. If another immediate family member is
already enrolled in _________________ 4-H, log in to the family account and skip to Step 10.
3. If no immediate family members are enrolled in ____________ 4-H, choose “I need to setup a profile.”
4. Enter the desired login information. 5. Click “Create Login.” 6. If a message appears stating that the account
already exists, contact the County 4-H Office to obtain login information.
7. Enter the Family Information. 8. Click “Continue” to save the information.
9. Members in 4HOnline are categorized by
Family. Add youth and adult family members who would like to enroll in 4-H. NOTE: Only add Adults who would like to enroll as Volunteers. Parents who are not volunteers should not enroll as adults.
To view the County 4-H Office contact information, click the “Contact Info” link.
10. Under “Add a New Family Member,” select “Youth” and click “Add Member.”
69 | P a g e
11. Enter the member’s Personal Information. 12. Information in Bold is required. All other
information is optional. 13. Click “Continue.”
14. Read the Additional Information carefully. 15. Mark the check box and/or sign each section.
Please remember, by typing your name in these sections, you agree to allow the ___________ 4-H Program to use your typed name as your legal electronic signature.
16. Click “Continue.”
17. Complete the Health form. 18. If a Health Form does not appear, return to
the Personal Information page and check the youth’s birthdate. The Health Form will only appear for members ages 5 – 18 as of January 1 of the current program year.
19. Click “Continue.”
20. In order to enroll in _________ 4-H, a member
must be enrolled in at least one Club. 21. Independent members should enroll in the
“Independent” Club in the County. 22. Cloverbuds may enroll in their local 4-H
Club, but must also enroll in the Cloverbuds Group found under the Groups tab.
23. Select the desired Club. 24. Click “Add Club.” 25. The Club will appear in your “Club List.” 26. The member may enroll in as many clubs as
they would like. 27. Be sure to select which Club will be the
Primary Club. 28. When you have finished adding Clubs, click
“Continue.”
29. In order to enroll in ___________ 4-H, each youth member must select a project.
30. Cloverbuds may only enroll in the “Cloverbuds” project.
31. Click “Add Project.” 32. Youth may enroll in up to 50 projects. 33. Click “Continue.” 34. Groups are optional. Cloverbuds should
enroll in the Cloverbuds group. 35. Click “Submit Enrollment.” 36. The member status will be Pending until the
County Office approves the enrollment.

70 | P a g e
How to Add a New Adult Volunteer Enrollment For adult volunteers who have not enrolled in _______________ 4-H before.
37. Open a web browser and type in:
______________ (Please note, adding the www. prefix will return an error message). TIP: Any browser should work well with 4HOnline, but Firefox or Chrome work best.
38. If another immediate family member is
already enrolled in ______________ 4-H, log in to the family account and skip to Step 10.
39. If no immediate family members are enrolled in ______________ 4-H, choose “I need to setup a profile.”
40. Enter the desired login information. 41. Click “Create Login.” 42. If a message appears stating that the account
already exists, contact the County 4-H Office to obtain login information.
43. Enter the Family Information. 44. Click “Continue” to save the information.
45. Members in 4HOnline are categorized by
Family. Add youth and adult family members who would like to enroll in 4-H. NOTE: Only add Adults who would like to enroll as Volunteers. Parents who are not volunteers should not enroll as adults.
To view the County 4-H Office contact information, click the “Contact Info” link.

71 | P a g e
46. Under “Add a New Family Member,” select “Adult” and click “Add Member.”
47. Enter the Adult’s Personal Information. 48. Information in Bold is required. All other
information is optional. NOTE: In order to receive text messages, enter a cell phone number and select a cell phone provider.
49. Answer “Yes” to “Are you a Volunteer?” 50. Click “Continue.”
51. Read the Additional Information carefully. 52. Mark the check box and/or sign each section.
Please remember, by typing your name in these sections, you agree to allow the ___________________ 4-H Program to use your typed name as your legal electronic signature.
53. Click “Continue.”
54. Complete the Volunteer Screening form and
click “Continue.” 55. If the Volunteer Screening page does not
appear, return to the Personal Information page and be “Yes” is selected for “Are you a Volunteer?”
56. Click “Continue.”
57. Clubs, Projects and Groups are optional for
Adult Volunteers. 58. Club Leaders should select and add a Club
and Volunteer Type. Project Leaders should select and add a Project area and Volunteer Type.
59. If all information is complete and correct, click “Submit Enrollment.”

72 | P a g e
60. The Enrollment Status is Pending. 61. The County 4-H Office and the State 4-H
Office will receive notification of the pending enrollment.

73 | P a g e
How to Login to an Existing Family Account
1. Enter the email address on file and select “I forgot my password” if this is the first time logging in. NOTE: If a new password is not needed, login, click “Continue to Family” and skip to step 10.
2. Select “Family” as the role. 3. Click “Send My Password.” Do not
close the internet window.
4. Check the email account on file for a message from 4HOnline with a temporary password.
5. From the 4HOnline login page, select “I have a profile.”
6. Copy and Paste the temporary password from the email message to the login page.
7. Click “Login.”
8. Follow the prompt to create a new password.
9. Click “Continue” to go to the family Member List.
10. The Member List lists all youth members and registered adult volunteers in the family who were enrolled in the ____________ 4-H program for the previous program year.
11. Click “Edit” next to a member name to view or edit the member’s information.
12. To update the entire family’s contact information, see How to Update Family Contact Information.
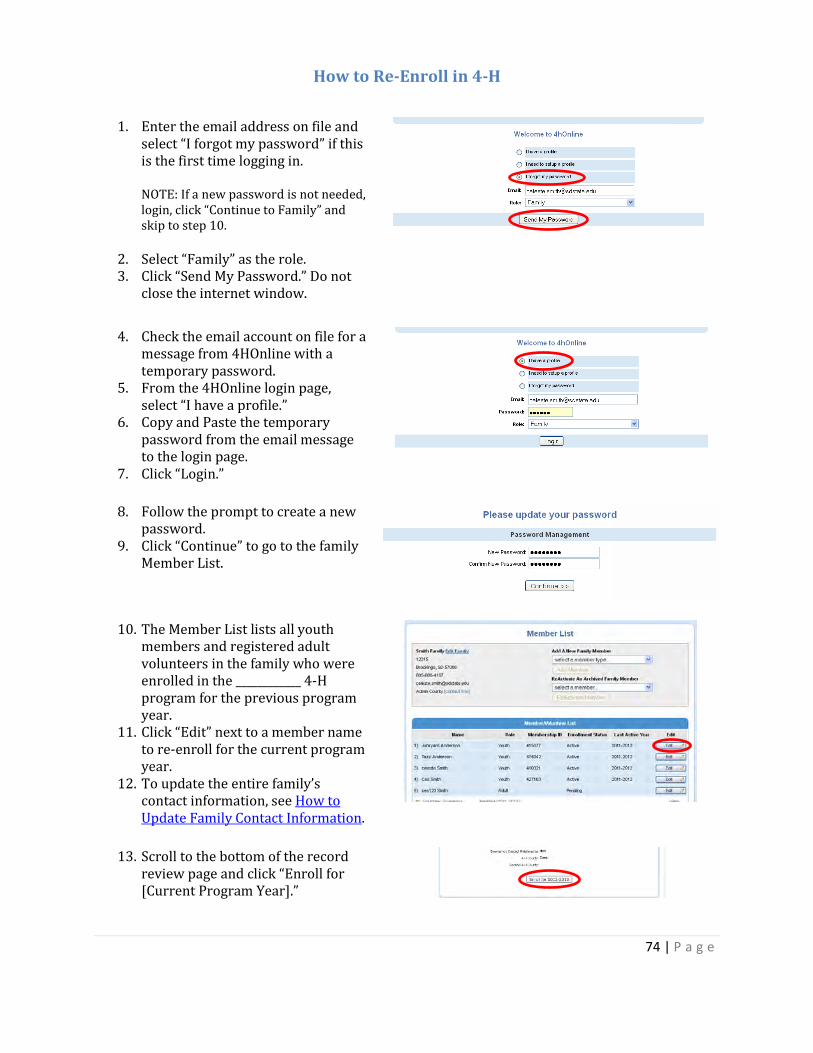
74 | P a g e
How to Re-Enroll in 4-H
1. Enter the email address on file and select “I forgot my password” if this is the first time logging in. NOTE: If a new password is not needed, login, click “Continue to Family” and skip to step 10.
2. Select “Family” as the role. 3. Click “Send My Password.” Do not
close the internet window.
4. Check the email account on file for a message from 4HOnline with a temporary password.
5. From the 4HOnline login page, select “I have a profile.”
6. Copy and Paste the temporary password from the email message to the login page.
7. Click “Login.”
8. Follow the prompt to create a new password.
9. Click “Continue” to go to the family Member List.
10. The Member List lists all youth members and registered adult volunteers in the family who were enrolled in the ____________ 4-H program for the previous program year.
11. Click “Edit” next to a member name to re-enroll for the current program year.
12. To update the entire family’s contact information, see How to Update Family Contact Information.
13. Scroll to the bottom of the record
review page and click “Enroll for [Current Program Year].”

75 | P a g e
14. Update any personal information. 15. Click “Continue” at the bottom of
the page to save changes. 16. Contact the County 4-H Office to
make any changes to the Name, Birthdate or Years in 4-H.
17. Read the Additional Information text, check the appropriate check box and enter the electronic signature.
18. Click “Continue” to save changes and access the member Health Form.
19. It is very important that each
member’s Health Form is complete and accurate. Enter the member’s Health information and click “Continue.”
20. Review and edit the member’s
clubs, projects and groups. NOTE: Cloverbuds may enroll in a local 4-H Club, but must also enroll in the Cloverbuds Group found under the Groups tab.
21. Click “Continue.”
22. When all information is correct and
complete, click “Submit Enrollment.”
23. The County office will receive notification of the pending enrollment.
24. The user will receive email notification when the County has reviewed and accepted the enrollment.
76 | P a g e
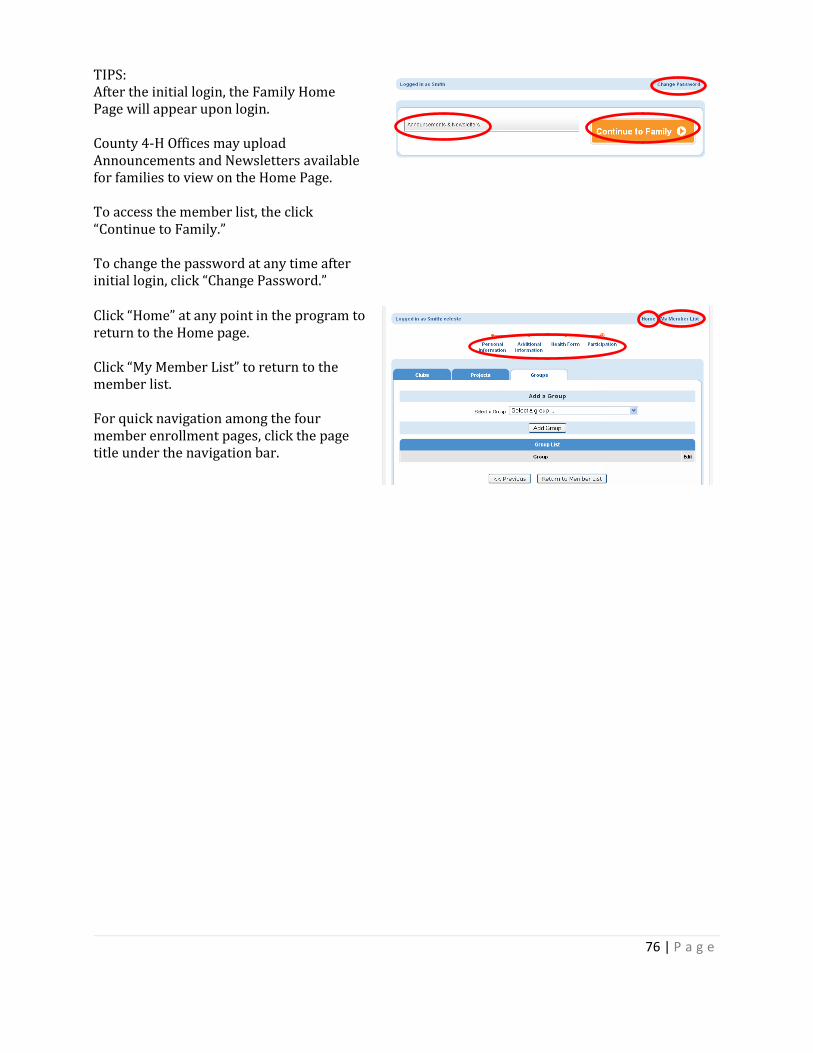
TIPS: After the initial login, the Family Home Page will appear upon login. County 4-H Offices may upload Announcements and Newsletters available for families to view on the Home Page. To access the member list, the click “Continue to Family.” To change the password at any time after initial login, click “Change Password.”
Click “Home” at any point in the program to return to the Home page. Click “My Member List” to return to the member list. For quick navigation among the four member enrollment pages, click the page title under the navigation bar.

77 | P a g e
How to Update Family Contact Information
1. Log in to a Family account. 2. Click “Continue to Family.”
3. From the “Member List,” click “Edit Family.”
4. Update the family’s contact information.
5. If this change affects all of the members in the family, check “Update member records with the same address.”
6. Click “Continue. NOTE: Because a member often has a different email address from the family, the member email address does not update when “Update member records with the same address” is checked.
7. Contact the County office to change the 4-H County.
78 | P a g e
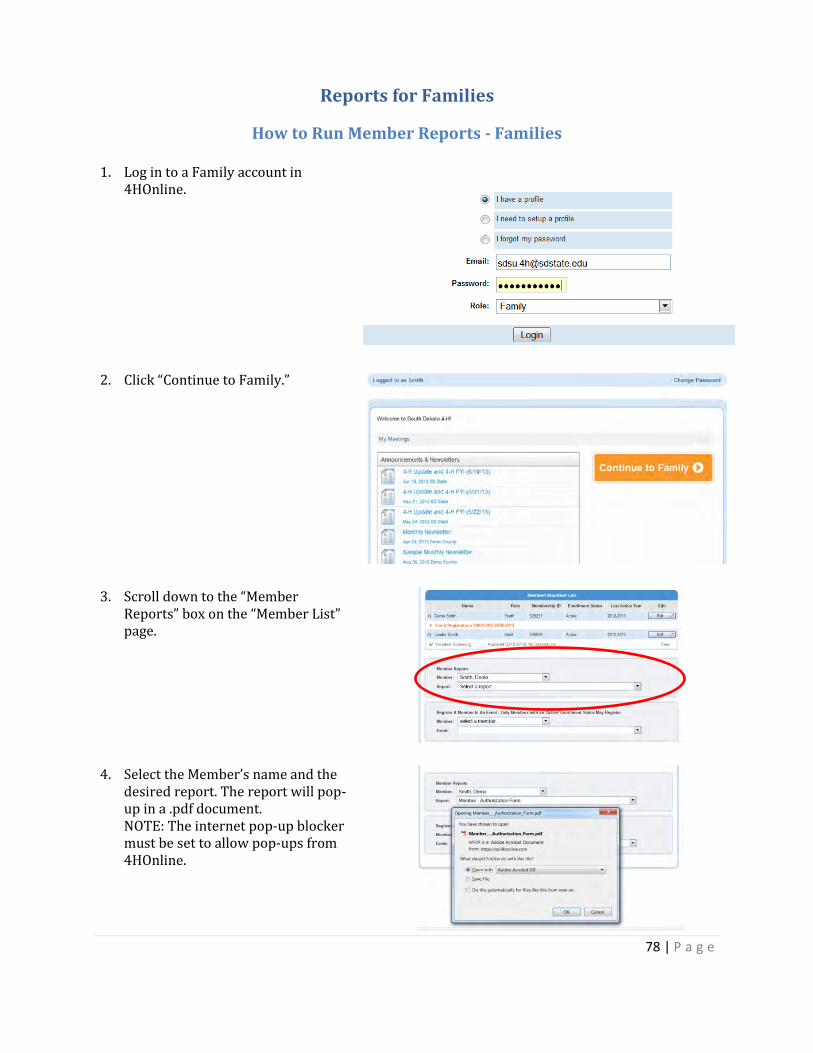
Reports for Families
How to Run Member Reports - Families 1. Log in to a Family account in
4HOnline.
2. Click “Continue to Family.”
3. Scroll down to the “Member Reports” box on the “Member List” page.
4. Select the Member’s name and the desired report. The report will pop-up in a .pdf document. NOTE: The internet pop-up blocker must be set to allow pop-ups from 4HOnline.

79 | P a g e
Member Report Descriptions and Samples
Member - Authorization Form: Printable
version of the Authorization agreements
signed at the time of enrollment (includes
Code of Conduct, Media Release, Release
and Waiver of Liability, etc.).
Member – Re-Enrollment Form Next 4-H
Year: Pre-filled re-enrollment form for the
next 4-H year.
Member – Re-Enrollment Form Current
4-H Year: Pre-filled re-enrollment form for
the current 4-H year.

80 | P a g e
Member – Enrollment Form (Español):
Member re-enrollment form for the current
4-H Year in Spanish.
Member – Enrollment Form (New Adult
Member): A basic enrollment form for New
Adult members. This form does NOT
include fields for the Volunteer Work
Agreement. All new adult volunteers must
also submit a Volunteer Work Agreement.
Member – Enrollment Form (New Youth
Member – Español): Blank youth
enrollment form in Spanish.

81 | P a g e
Member – Enrollment Form (New Youth
Member) Enrolling in Current 4-H Year:
Blank youth enrollment form dated for the
Current 4-H Year.
Member – Enrollment Form (New Youth
Member) Enrolling in Next 4-H Year: Blank
youth enrollment form dated for the Next
4-H Year.
Member Enrollment History: A Report of
the current enrollment information as well
as the Clubs, Projects, Activities, Awards
and Groups on the member’s record from
each year the member has enrolled through
4HOnline.

82 | P a g e
Member – Fair Registration Form: A quick
reference to make note of desired fair
entries that includes the member’s current
projects.
Member – Health Form: Includes all Health
Information entered on the Health Form in
the member’s enrollment.
Project – Listing With Aliases: Complete list
of available 4-H projects as well as county
project aliases.

83 | P a g e
4HOnline Quick Resources
Contents 4HOnline Trouble Shooting Guide ..............................................................................................................
FAQ ..............................................................................................................................................................
4-H Delivery Mode Descriptions .................................................................................................................
Glossary of 4HOnline Terms .......................................................................................................................

84 | P a g e
4HOnline Trouble Shooting Guide Here is a quick guide to common issues with simple fixes in 4HOnline.
Problem: The Clubs for a different County or no Clubs come up when I try to enter my member’s Clubs. Solution: Check the member’s County of enrollment. The user may have accidentally selected the wrong County. If the user’s County is not selected, the user’s Clubs will not appear. Problem: The Member Health Form does not come up for my member. Solution: Check the member’s birthdate. Health forms are set to appear for members ages 5 – 18 as of January 1. If the youth member turned 5 after January 1, he or she is not eligible to enroll in 4-H or Cloverbuds. Problem: My member or family list does not show all of my members/families. Solution: Check the youth/member “Search” box. Click “Clear Filters” and then click “Search.” All of the member records should now appear. Problem: I started entering a member and was not able to complete his/her enrollment. I cannot find the incomplete record. Solution: Look for the family under the “Families” tab. When the family account appears, click on “Login” to complete the member enrollment. Problem: I have a Cloverbud who is 8 years old. I cannot find the Cloverbuds project for this member. Solution: If the member turned 8 prior to January 1, he or she is no longer eligible for Cloverbuds and must enroll as a beginner 4-H member. Problem: One of my Families does not show up in the Family list, but the members in the family show up on the Members list. Solution: Log in to one of the family member accounts. From the “Member List”, click “Edit Family”. Check the 4-H County that the family is enrolled in. The County may have been entered incorrectly. This is also a solution if a member does not show up on the list of members and his/her family does show up on the list of Families. Login to the Family and then edit the member. Check the member’s 4-H County. Problem: A member’s primary county has marked my county as the member’s Second 4-H County, but I cannot see their record. Solution: Chances are the user’s filters are set on the member/volunteer search screen to only return members who are in the user’s county. Click “Clear Filters” and search for the member again. Problem: One of my member’s is moving to a different County. How can I transfer their record? Solution: Log in to the member’s family, click “Edit Family” and change the 4-H County to the new County. Click “Continue” to save the change. The new county will receive a message that a family has moved to their county.

85 | P a g e
FAQ
General Questions What should I do if I cannot find my password? Contact the State 4-H Office for a new temporary password or use the “I forgot my password” option on the login page. I am in charge of more than one County. How do I manage 4HOnline for all of my Counties? If the user’s Counties operate separate 4-H programs, 4HOnline sets up a “District” account for the user to access all of the Counties under that user’s jurisdiction from one place. The user will be able to run reports for each County individually as well as for the entire “District.” If the user’s Counties operate one combined 4-H program from one County office, they are combined as one County in 4HOnline.
Member Enrollments: Who should I list as an emergency contact on the youth enrollment? Does it have to be someone other than a parent? The emergency contact should match the original paper enrollment form. It is preferable that the emergency contact is not a parent already listed on the form. How do I enroll independent members? Each County should have an “Independent” Club. Simply enroll a member in that Club. The delivery mode for Independent Clubs is set to “4-H Individual Study/Mentoring/Family Learning Program.” If the County account does not have an Independent Club listed, contact the State 4-H Office to create one. How do I enroll Cloverbuds? Cloverbuds should enroll in the local club in which they participate. They should also enroll in the “Cloverbuds” Group under the Groups tab. The ONLY project Cloverbuds are allowed to enroll in is the “Cloverbuds” project. How do I count Cloverbuds “Years in 4-H”? Cloverbuds are not technically 4-H Members. Once they become a beginner 4-H member, the County manager should change their years in 4-H back to 1. What “grade level” do I use for Cloverbuds who are in pre-school? In order to keep the youth/member reports accurate, please enter that they are “not in school.” What do I do if a youth member’s Health Information is incomplete? If possible, contact the family for correct and complete health information. If the family does not have an insurance policy number and/or does not know a date for the last Tetanus shot, enter “unknown/not provided” in the field. If the user enter that it was “not provided,” the user will know that this is not something the user missed when the user entered the information. Some type of text entry is required in this field in order to submit the enrollment. Can a member be enrolled in more than one Club in our County?

86 | P a g e
Yes — members may enroll in as many Clubs in a County as they would like. Does a member have to enroll in a project? Yes — each 4-H member must be enrolled in at least one Club and one project. I do not see Self-Determined in the project list, how do I add a Self-Determined project? We were not able to add Self-Determined as a project area because it does not correspond with a National Category (which in turn corresponds with an ES237 Category). It is best to ask the member for a description of the project and find the project area that best matches the description. In most cases, it will relate to an existing project area. If there are questions regarding where to put a specific Self-Determined project, contact the State 4-H Office. Some of my families do not have email addresses. What do I do? An email address is not required when a County enters a member enrollment. It is only a required field if the family is entering the enrollment. Please leave this field blank. DO NOT enter a “fake” email address as it may turn out that it belongs to someone.
Clubs Some of my Clubs are no longer active. How do I remove them from my list of Clubs? Contact the State 4-H Office with the Club’s name and whether the Club’s status should be “Closed” or “Inactive.” “Closed” means that the Club is no longer in existence and will more than likely never reopen. If a Club is closed temporarily, possibly due to low membership, it is considered “Inactive.”
A new club started in our county. How do I add it to the Clubs list? Be sure the Club has completed the Charter requirements. Send the new Club Charter Application packet to the State 4-H Office. Contact the State 4-H Office with the Club name and delivery mode. The State 4-H Office will add the Club to the County account.
Schools: There are schools on my school list that should not be there. How do I take them off? Click on the Schools button from the Enrollment tab. This will bring up a list of schools in the County. Find the school to delete. Click on the “Edit” button next to the school and select “Delete”. How do I add home schools? When the user enters the member enrollment for a home schooled student, select the radio button for “If you are unable to locate your school…” Enter the family’s last name and then the word Homeschool as the School Name (e.g., Smith Homeschool). Select Homeschool/Alternative as the School Type.
4HOnline Capabilities: How does this system work in places where there is no Internet access such as our County fairgrounds?

87 | P a g e
4HOnline is a web-based system; this means the user must have internet access to log in to the site. The State 4-H Office has internet air cards available for check-out for 4-H events at which internet access is necessary.
Tips: When the user enters a “Search” term in the search screen, only the records matching the search credentials appear in the results. Please note: the “Search” box does not clear after the user navigates away from the page or logs off. When the user goes back to the search screen in an active session or logs in to a new session, the results of the last search will remain on the search screen. It is good idea to always clear the “Search” box after the desired information is found.

88 | P a g e
4-H Delivery Mode Descriptions Organized 4-H Clubs (Community, In-School, After-school and Military): A 4-H Club is an organized group
of the youth, led by an adult, with a planned program that is carried on throughout all or most of the
year. 4-H clubs may meet in any location and typically have elected officers and a set of rules approved
by the membership to govern the club, or for very young groups, other developmentally appropriate
structures and operating processes. Includes the following:
Community clubs typically meet in the evenings or on weekends and offer self-chosen multiple
learning experiences and activities.
In-school clubs meet during school hours, but have officers and planned activities beyond school
enrichment.
4-H after-school clubs are organized within after-school programs administered by Cooperative
Extension staff or other organizations (i.e. other the youth development organizations, housing
authorities, faith-based groups. They set the above definition of a 4-H Club and the the userng
people and adult staff identify themselves as 4-H members and volunteers. They may have
officers and elements of a club structure.
Military 4-H clubs are organized by the Armed Forces, often on military installations, and
principally for military dependents.
Special-Interest and Short-Term Programs: Groups of the youth meeting for a specific learning
experience that involves direct teaching by extension staff or trained volunteers, including teachers.
Program is not part of school curriculum and not restricted to members of 4-H clubs. Multiple-day
meetings, for example on college campuses, should be reported as short-term programs. The direct
audience contact hours should be at least six for enrollment to be reported.
Overnight Camping Programs: The youth taking part in an Extension-planned educational experience of
group living in the out-of-doors. Overnight camping includes being away from home at least one night
(resident, primitive, or travel camping) and is not restricted to members of organized 4-H clubs.
Day Camping Programs: The youth taking part in an Extension-planned educational experience of group
living in the out-of-doors. Day camping consists of multiple-day programs, with the youth returning
home each evening.
School Enrichment Programs: Groups of the youth receiving a sequence of learning experiences in
cooperation with school officials during school hours to support the school curriculum. Involves direct
teaching by extension staff or trained volunteers, including teachers.
Individual Learning/Mentoring/Family Learning Programs: Planned learning that occurs independently
of a formal group setting, such as a club, as an individual, paired, or family learning effort. Self directed,
usually with limited adult involvement except for parents (or mentor). Examples include self-study,
home study courses, advanced placement courses, mentoring or shadowing with an "expert," whole
families learning together.

89 | P a g e
School-Aged Child Care Education: After-School educational programs offered to the youth outside of
school hours, usually in a school or other community center. The after-school program must be
supported by Extension by training the after-school staff, infusing 4-H curricula into the program, and/or
other significant support such as conducting needs assessments, evaluations, and/or resource
development. The primary purpose of the program is to provide care, developmental and educational
experiences for children and the youth while parents are working or unavailable. As general guidance,
facilities or settings should operate approximately 3 days per week and two hours per day (e.g. six hours
per week) for about five months of the academic year or three days per week for six hours per day (e.g.
18 hours per week) and/or for at least eight weeks in the summer. The children and the youth in these
programs should be enrolled as 4-H members in the county program, have the benefits of all 4-H
programs and activities, and identify themselves as 4-H members. (4-H clubs in after-school settings
should be reported under Organized 4-H After School Clubs.)
TV/Video/Web Programs: The youth offered learning experiences through Extension via broadcast or
closed circuit television, including satellite transmission, or videotape replays of such series. May also
include instruction delivered by internet.
Source: http://www.ext.colostate.edu/ye/forms/definitions.pdf
90 | P a g e
Glossary of 4HOnline Terms 4-H Age: A member’s age calculated as of midnight on January 1 of the current program year instead of by his or her actual birthdate.
Active: The status of a member who has completed all of the steps required for enrollment
Activity: Any activity in which a member participates that should be part of the enrollment record. Information regarding activities is not reported on the ES237
Adult: A registered adult volunteer
Archived: A member who was active at one time, but is not participating this year
Authorizations: Legal agreements (usually on an enrollment or registration form) that require a parent or member signature
Beginner: A 4-H member who is 8, 9, or 10 years old
Browser: the program utilized to access the internet (Explorer, Firefox, Chrome)
Cloverbud: A 4-H participant who is 5, 6 or 7 years old
Club Leader: An adult volunteer responsible for a local 4-H club
Contact: A non-4-H member associated with 4-H in some way. Contacts can include board members, committee members, donors, etc.
Continue: Saves the information on the current screen and moves to the next screen. Often synonymous with “Save”
Custom Report: A report created by the manager. After its creation, a custom report is available to view and/or print at any time
Deadline: 11:59 p.m. CT on the date of the deadline
Delete and Block: Delete a member’s event registration and block them from ever registering for the event
Delivery Mode: a classification for the various types of 4-H Clubs or areas of involvement
Duplicate: A member or family profile that has been created in 4HOnline more than once
ES237: The Federal report required from each state used to report 4-H activities to the Cooperative Extension Service (CES) personnel at the Department of Agriculture (USDA) in Washington, D.C. This data is reported on form 237 and is designated ES-237
Family Correspondence: Mailing labels created for each family represented on a given report
Filter: A way to break large sets of data into smaller sets
Flag: The check box located next to the member name on the Member/Volunteer screen under the enrollment tab

91 | P a g e
Group Enrollment: A brief report of a 4-H or SDSU Extension activity that indicates the race, ethnicity and gender of the participants. Used for ES237 and Civil Rights reporting requirements
Group: Any group of people that the user would like to keep track of together. These could be camps, classes, committees, etc. Information regarding groups can be used to create a group enrollment in order to be reported on the ES237
Help Sheet: a quick reference that describes how to perform a specific task in 4HOnline
InActive: A member who was active at one time, but has not re-enrolled for the current program year
Incomplete: Member has started the enrollment/registration process, but has not submitted it to the County for approval
Invoice: an invoice printed at the family level and sent with a payment to the County 4-H Office
Junior: A 4-H member who is 11, 12 or 13 years old
Login-Only: a level of access granted to a Club Leader in which the leader may only view member enrollment information, but may not edit the information
Manager: A State or County employee using 4HOnline as a state or county administrator
Member Correspondence: Mailing labels created for each member represented on a given report
Member ID: An ID number unique to each member enrolled through 4HOnline in _________
Member List: The page in a family account that lists all of the family members registered in 4HOnline
Member Management: a level of access granted to a club leader in which the leader may edit existing member enrollment records, add new member enrollment records and/or register members for events
Membership ID: An ID number unique to each member enrolled through 4HOnline in the United States; often used for livestock backtags.
Memorized Report: A Standard, Custom or Shared report with additional filters
National Category: Categories to which each project area corresponds
Pending: Members have submitted their enrollment information, but need to be confirmed at the County and/or State level
Primary Club: a club in which a member participates most often
Project Alias: A project name used in a County that differs from the name used at the State level
Project Completion Deadline: The last day on which a member may add or change the projects in which he or she is enrolled. The State 4-H project selection deadline is May 31 of the current program year for anyone wishing to participate in summer State 4-H contests
Project Leader: An adult volunteer responsible for certain project area vs. a specific club
Project: a specific area of study or concentration for the 4-H program year

92 | P a g e
Queue: The ability to run a report in the background of the computer allowing the user to continue working on other tasks while the program compiles the report; often useful for reports that will return large amounts of data
Quick Export: A standard report that will pop up as an excel file when the user clicks the title of the report in the drop-down list at the top of the screen. Be sure pop-up blockers are turned off to run Quick Exports
Quick Report: A standard report that will pop up as a .pdf file when the user clicks on the title of the report in the drop-down list at the top right of the screen. Be sure pop-up blockers are turned off to run Quick Reports.
Records Returned: the number of member records found as a result of a search
Re-enrollment: when an existing member enrolls for the next program year
Roll-over: the end of one program year and the beginning of the next. In 4HOnline this means that all active members become inactive and all grade levels, years in 4-H and years in projects advance one year. For Nebraska, this happens at 11:59 p.m. CT on September 30
Screening Payment: The volunteer enrollment fee
Second 4-H County: a county, outside the member’s home county, in which the member participates; often in a single project area
Secondary Club: a club in which a member participates, often in a single project area
Senior: A 4-H member who is 14, 15, 16, 17, 18 or 19 years old
Shared Report: A custom report created by a higher-level manager and shared with accounts in lower levels
Standard Report: A report created by 4HOnline available to run and/or print at any time
Transfer: an invoice printed at the county level and mailed with a payment to the State 4-H Office
Upload Field: a form field often used on registration forms in which the registrant is asked to upload a document or picture
Verification: A check box that indicates all of the information about an animal is correct and complete
Volunteer Screening: An additional page of required information for registered volunteers that correlates with the Volunteer Work Agreement
Youth (Short-Term): A youth member who only participates in a 4-H group, not a 4-H Club, for a portion of the year. Often Shooting Sports members may be short-term. Unless a group enrollment is created from the group in which a short-term member is enrolled, short-term members do not count on the ES237
Youth: A youth 4-H member (ages 5 – 19)