4dsvn5ppmboe*ttvf5sbdljoh - track+ · figure 1-2: genji user interface structure • perspectives...
TRANSCRIPT

Release 5.1
Genji User ManualScrum Tool and Issue Tracking


Genji User Manual
Scrum Tool and Issue Tracking

Steinbeis GmbH & Co. KGTask Management SolutionsEugen-Ruoff-Str. 30D-71404 KorbGermany
Tel.: +49 7151 994 89-60Fax: +49 7151 994 89-61Support: [email protected]
No part of this publicationmay be reproduced, stored in a retrieval system or transmitted in any form or by anymeans, electronic, mechan-ical, photocopying, recoding, scanning or otherwise except as permitted under Sections 107 or 108 of the 1976 United States CopyrightAct, without the prior written permission of the Publisher.
Genji and the Genji logo are trademarks of Steinbeis GmbH & Co. KG, and may be registered in certain jurisdictions. The absence of atrademark from this list does not constitute awaiver of Steinbeis’s intellectual property rights concerning the trademark. All other company,brand and product names may be trademarks or registered trademarks of their respective holders. Steinbeis disclaims any responsibilityfor specifying which marks are owned by which companies or which organizations.
Copyright © 2001-2016 Steinbeis GmbH & Co. KG, All rights reserved
September 2016
If you have any comments or suggestions regarding this document, please send them by e-mail to [email protected].

Contents
List of Figures................................................................................................................................................... ix
List of Tables..................................................................................................................................................... xi
1 Getting started.......................................................................................................................................... 131.1 What is Genji?..........................................................................................................................................................................................................141.2 First steps with Genji.......................................................................................................................................................................................... 151.3 Application interface overview.................................................................................................................................................................... 15
2 Scrum............................................................................................................................................................ 172.1 Scrum overview......................................................................................................................................................................................................182.2 Working with the cockpit................................................................................................................................................................................182.3 Managing people..................................................................................................................................................................................................19
2.3.1 Managing regular users....................................................................................................................................................................192.3.2 Managing groups.................................................................................................................................................................................24
2.4 Managing Scrum teams................................................................................................................................................................................... 252.5 Managing Scrum projects...............................................................................................................................................................................26
2.5.1 Creating a new workspace............................................................................................................................................................ 262.5.2 Deleting a workspace........................................................................................................................................................................292.5.3 Copying a workspace setup..........................................................................................................................................................292.5.4 The workspace status........................................................................................................................................................................ 30
2.6 Managing releases................................................................................................................................................................................................312.6.1 Adding a release................................................................................................................................................................................... 312.6.2 Deleting a release................................................................................................................................................................................ 322.6.3 The release status.................................................................................................................................................................................33
2.7 Working with backlogs......................................................................................................................................................................................352.8 Working with sprints...........................................................................................................................................................................................352.9 Using the task board.......................................................................................................................................................................................... 352.10 Monitoring your project with burndown charts........................................................................................................................... 36
3 Administration: Managing Spaces..................................................................................................... 393.1 Configuration basics............................................................................................................................................................................................40
3.1.1 Workspace types...................................................................................................................................................................................403.1.2 Configuration inheritance...............................................................................................................................................................40
3.2 Managing spaces.................................................................................................................................................................................................. 413.2.1 Creating a new workspace............................................................................................................................................................ 413.2.2 Deleting a workspace........................................................................................................................................................................443.2.3 Copying a workspace setup..........................................................................................................................................................443.2.4 The workspace status........................................................................................................................................................................ 45
3.3 Assigning roles to team members............................................................................................................................................................ 463.4 Managing releases (phases)...........................................................................................................................................................................47
3.4.1 Adding a release................................................................................................................................................................................... 473.4.2 Deleting a release................................................................................................................................................................................ 483.4.3 The release status.................................................................................................................................................................................50
3.5 Managing workspace specific lists............................................................................................................................................................ 513.6 Default automail assignments......................................................................................................................................................................533.7 Configuring workspace-specific cockpits..............................................................................................................................................543.8 Version control........................................................................................................................................................................................................55
5

3.8.1 Subversion version control............................................................................................................................................................ 553.8.2 Git version control............................................................................................................................................................................... 573.8.3 CVS version control.............................................................................................................................................................................58
4 Administration: Managing People..................................................................................................... 614.1 Managing regular users.................................................................................................................................................................................... 624.2 Managing clients................................................................................................................................................................................................... 67
Handling of client users............................................................................................................................................................................. 67Adding clients by e-mail submission................................................................................................................................................ 67Assigning roles to client users............................................................................................................................................................... 67Limited client user permissions.............................................................................................................................................................67Different access point..................................................................................................................................................................................67
4.3 Managing groups..................................................................................................................................................................................................67
5 Administration: Managing templates...............................................................................................695.1 Managing report templates...........................................................................................................................................................................70
5.1.1 Using a report template.................................................................................................................................................................. 705.1.2 Report template repositories........................................................................................................................................................715.1.3 Downloading a report template................................................................................................................................................ 715.1.4 Uploading a report template....................................................................................................................................................... 725.1.5 Removing report templates.......................................................................................................................................................... 72
5.2 Task board card templates............................................................................................................................................................................. 735.3 Managing filters......................................................................................................................................................................................................73
5.3.1 Defining a filter...................................................................................................................................................................................... 735.3.2 Deleting a filter...................................................................................................................................................................................... 745.3.3 Creating a permanent link............................................................................................................................................................. 755.3.4 Creating a link for Maven................................................................................................................................................................76
6 Customizing Genji....................................................................................................................................796.1 Customization overview...................................................................................................................................................................................806.2 Configuration scenarios.................................................................................................................................................................................... 806.3 Roles and permissions....................................................................................................................................................................................... 82
6.3.1 Adding and editing roles................................................................................................................................................................ 826.3.2 Deleting roles..........................................................................................................................................................................................846.3.3 Restricting access to item types.................................................................................................................................................856.3.4 Restricting access to item fields................................................................................................................................................. 86
6.4 Customizing automail........................................................................................................................................................................................876.4.1 Triggers and conditions................................................................................................................................................................... 876.4.2 Automail triggers..................................................................................................................................................................................886.4.3 Automail conditions........................................................................................................................................................................... 906.4.4 Assigning automail configurations........................................................................................................................................... 916.4.5 Automail for unregistered submitters.................................................................................................................................... 92
6.5 Customizing the User Interface...................................................................................................................................................................926.6 Item properties....................................................................................................................................................................................................... 93
6.6.1 Item properties overview................................................................................................................................................................936.6.2 Item property types............................................................................................................................................................................956.6.3 Managing custom properties....................................................................................................................................................102
6.7 Customizing forms............................................................................................................................................................................................ 1056.7.1 Custom forms, actions, and fields...........................................................................................................................................1056.7.2 Managing custom Forms............................................................................................................................................................. 107
6.8 Custom selection lists......................................................................................................................................................................................1106.8.1 Custom lists overview.....................................................................................................................................................................1106.8.2 Managing lists for system properties................................................................................................................................... 1116.8.3 Managing lists for custom properties.................................................................................................................................. 119
6.9 System object states........................................................................................................................................................................................ 128
6

6.9.1 Managing workspace states.......................................................................................................................................................1286.9.2 Managing release states................................................................................................................................................................1296.9.3 Managing account states.............................................................................................................................................................129
6.10 Managing workspace types......................................................................................................................................................................1306.11 Replacing logos................................................................................................................................................................................................ 134
7 Administering the server.................................................................................................................... 1357.1 Concepts and tasks for system administrators............................................................................................................................... 1367.2 Server configuration......................................................................................................................................................................................... 136
7.2.1 System information and license data...................................................................................................................................1367.2.2 Outgoing e-mail connection..................................................................................................................................................... 1377.2.3 Incoming e-mail connection......................................................................................................................................................1397.2.4 Full text search configuration....................................................................................................................................................1417.2.5 LDAP and SSO configuration.....................................................................................................................................................1427.2.6 Various configuration items........................................................................................................................................................146
7.3 Cluster operation................................................................................................................................................................................................1487.4 Configuring login page text....................................................................................................................................................................... 1507.5 Observing and managing server state.................................................................................................................................................1507.6 Broadcasting e-mails to Genji users.......................................................................................................................................................1517.7 Configuring diagnostic messages...........................................................................................................................................................1517.8 Data backup...........................................................................................................................................................................................................1527.9 Restoring data from backup....................................................................................................................................................................... 1537.10 Switching database systems....................................................................................................................................................................1547.11 Non-western character sets......................................................................................................................................................................1547.12 Using SSL and TLS encryption on e-mail and LDAP connections................................................................................... 1547.13 Configuring Genji with Jenkins..............................................................................................................................................................1557.14 Configuring Apache Tomcat....................................................................................................................................................................1597.15 Using the TC command line client......................................................................................................................................................160
7

8

List of Figures
Figure 1-1: Genji usage overview....................................................................................................................................................................................14
Figure 1-2: Genji user interface structure...................................................................................................................................................................16
Figure 2-1: A sample cockpit..............................................................................................................................................................................................19
Figure 2-2: Enabling the Gantt view............................................................................................................................................................................. 22
Figure 2-3: Assigning users to Scrum teams........................................................................................................................................................... 26
Figure 2-4: Creating a new workspace........................................................................................................................................................................27
Figure 2-5: Configuring workspace default settings...........................................................................................................................................28
Figure 2-6: Configuring workspace e-mail settings.............................................................................................................................................28
Figure 3-1: Configuration inheritance...........................................................................................................................................................................40
Figure 3-2: Creating a new workspace........................................................................................................................................................................42
Figure 3-3: Configuring workspace default settings...........................................................................................................................................43
Figure 3-4: Configuring workspace e-mail settings.............................................................................................................................................43
Figure 3-5: Assigning roles to people in a workspace...................................................................................................................................... 47
Figure 3-6: Filtering people during role assignment..........................................................................................................................................47
Figure 4-1: Enabling the Gantt view............................................................................................................................................................................. 64
Figure 6-1: Automail triggers and automail conditions....................................................................................................................................88
ix

x

List of Tables
Table 2-1: LDAP synchronizer parameters.................................................................................................................................................................23
Table 4-1: LDAP synchronizer parameters.................................................................................................................................................................66
Table 6-1: General permissions.........................................................................................................................................................................................82
Table 6-2: RACI selection.......................................................................................................................................................................................................83
Table 6-3: Pre-defined user levels................................................................................................................................................................................... 92
Table 6-4: Default item types..........................................................................................................................................................................................117
Table 6-5: Suggestions for additional item types.............................................................................................................................................. 117
Table 6-6: List XML file format........................................................................................................................................................................................125
Table 6-7: Workspace states.............................................................................................................................................................................................128
Table 6-8: Release or phase states...............................................................................................................................................................................129
Table 7-1: LDAP synchronizer parameters..............................................................................................................................................................144
xi

xii

1Getting startedTopics:
• What is Genji?• First steps with Genji• Application interface overview
13

Getting started
1.1 What is Genji?
Genji is a powerful web-based issue tracker and Scrum tool for teams. Genji supports large numbers of projects,tasks, and users. Genji is highly configurable. To use Genji you just need a standard web browser.
Genji is used for
• bug and issue tracking in software and hardware development• Scrum tool and Kanban board• mile stone tracking
Compared to managing tasks with spread sheets, Genji will give you the following benefits:
• Web-based, so all information is consistent and up-to-date. No mailing of files or corrupting a copy of the tasklist on a file server by unauthorized access.
• Fully hierarchical, permits you to handle thousands of projects with thousands of tasks with thousands of people• Powerful role-based access control, you only make visible to others what they are supposed to see• Highly configurable, it will exactly fit your terminology and needs• Full tracking of all activities, all changes are recorded
Compared to using a standard issue tracker or bug tracker, Genji will give you the following benefits:
• Fully hierarchical, permits you to handle thousands of projects with thousands of tasks with thousands of people• Support for agile methods like Scrum and Kanban• Powerful role-based access control down to single properties. You only make visible to others what they are
supposed to see• Highly configurable via the user interface.• Full tracking of all activities, all changes are recorded
Genji implements proven project management methods and build upon methods used for personal productivitymanagement. Genji can be configured to a wide extend, and it therefore takes a little time to understand how toadapt it to a particular application scenario.
Figure 1-1: Genji usage overview
14

1.2 First steps with Genji
1.2 First steps with Genji
Unless a server is provided to you, you need to install Genji on your own personal computer or on another computer.Use the Windows installer for an easy installation. To start working with Genji you need to set up users andworkspaces.
Installation
To install Genji on Unix based operating systems or with a MySQL, Oracle, MS SSQL Server, or DB2 database, followthe „Genji Installation Guide“.
You can install the Genji server on any computer system supporting Java 7 or up. It runs on all Windows operatingsystems, Linux, Mac OS/X, Solaris, and others.
What you should know
Before you start you should be aware of some basics. In Genji you manage “items” in “workspaces” or “projects”.
Items belong to an item type like “task”, “action item”, “ticket” or whatever you like to define. The item type isassociated with a configuration, for example an input mask or a workflow.
Similar to items, workspaces belong to a workspace type, like “Help desk”, “Software development”, “Systemengineering”, “Facility management”, or whatever you define. Workspace types carry with them a lot of configurationsettings, like workflows, item types, and statuses. While you can configure single workspaces, it is much more efficientto configure workspace types and assign that type to a workspace.
For a person to be able to work with the system, the following prerequisites must be fulfilled:
• The person must have an user account with the system• There must be at least one workspace• The person must have been assigned a role in at least one workspace
With “roles” you control access to workspaces. Roles are associated with permissions, like the permission to createitems in a workspace or to read other peoples items.
Since Genji is very versatile and configurable, users are assigned a “user level”. The user level permits to control whichuser interface elements a user sees. This way menu items or screens not required by a user can be removed for him.
Genji supports many different use cases. To adapt the user interface to each use case, Genji offers “perspectives”. Aperspective is a screen that supports one ore more use cases, like Scrum, Wiki, administration, meeting management,requirements management, and so on.
1.3 Application interface overview
Once you have logged in you are taken to the last screen shown to you. The following figure illustrates the standarduser interface layout.
In your case you may see more or fewer elements, depending on your role and user level.
15

Getting started
Figure 1-2: Genji user interface structure
• Perspectives menu (A): Depending on your use case, here you select the proper “perspective”, like “Scrum”,“Meeting Management”, Project Management, or “Administration”. Which perspectives you see depends onyour license and system role.
• Main navigation toolbar (B): Here you find the main navigational elements, which can be different for eachperspective.
• Submenu toolbar (C): Some views offer their own specific toolbar, like creating projects, or saving aconfiguration.
• Full text search box (D): The full text search box permits you to access items by typing keywords here. You canuse more complex expressions to limit the search to certain item attributes, do a fuzzy search, and more. Thefull text search also covers attachments.
• Personal prole link (E): Here you may set your personal preferences like user interface language, frequency ofreminder e-mails, avatar, etc.
16

2ScrumTopics:
• Scrum overview• Working with the cockpit• Managing people• Managing Scrum teams• Managing Scrum projects• Managing releases• Working with backlogs• Working with sprints• Using the task board• Monitoring your project with
burndown charts
17

Scrum
2.1 Scrum overview
The Scrum perspective provides a number of views that enable you to work according to the Scrum method.
Project centric view
While in most places Genji will provide you with a user-centric view across all your projects, the Scrum view requiresyou to select one project to work in. All views pertain to that project.
The Scrum workflow
The main menu resembles your typical Scrum workflow:
1. You create a project2. You assign people to the project team3. You a product backlog4. You collect user stories or epics in the backlog5. You define sprints and assign user stories to the sprints, splitting them up into tasks6. Team members pick up the tasks and work on them.7. You monitor work progress using burndown chart
Genji provides for each of these steps a dedicated view.
2.2 Working with the cockpit
Genji provides special overview pages, called the „cockpit“ or dashboard. Based on the metaphor of cockpit in a caror plane, this "digital" version of a cockpit provides you with the input necessary to "drive" your business.
The cockpit contains „tiles“ such as red/green/yellow lights, alerts, drill-downs, summaries, graphics such as barcharts, pie charts, bullet graphs, spark lines and gauges. You can custom configure the set of views you want tohave in your cockpit.
There are two kinds of cockpits:
• A general cockpit, accessible via the “Cockpit” menu entry. This is handy to give you an overview across allprojects that you are involved in, our the load situation of your team across a number of projects.
• Project and release specific cockpits, accessible via the “Browse projects” menu entry. This is helpful to get aquick overview over a specific project or even release within a project, such as open items, requirements, releasenotes, etc.
18

2.3 Managing people
Figure 2-1: A sample cockpit
The Genji cockpit is made up of tabs, panels, and tiles. Tiles can be placed on panels, and panels are placed on tabs.There is no limit on the number of tabs and panels you can configure.
The cockpit layout can be configured by each user interactively and individually, using Genji drag and droptechnology.
The set of views delivered with Genji can be augmented by custom views using the Genji cockpit API.
2.3 Managing people
With proper access rights you can add, modify, and delete users from the system.
2.3.1 Managing regular usersGenji can be configured such that users can create an account themselves. However, some supervisory activity isrequired to grant users permission to view or enter any data to spaces, to assign them to organizational units, andto activate or deactivate their accounts.
Access to spaces can be granted to users by the system administrator or system manager for all spaces. A spaceadministrator can grant access to the spaces he manages.
Adding users
As s system administrator or system manager you can add users to the Genji system. To add a user, go to theAdministration > Users and groups > Users... menu entry.
The most important parameter is the user name. It must be unique, and it is recommended to use the same nameas for other accounts in your organization, like the Windows user name. In particular, if a directory server (WindowsActive Directory Server or LDAP server) is to be used, the user name you enter here must be the same as that usedon the directory server.
19

Scrum
The second important parameter is the users e-mail. The initial password is communicated to the new user via e-mail, so make sure the e-mail is correct.
If the user has forgotten his e-mail, he has to ask the system administrator to look it up.
If you as the system administrator have forgotten your password, and your e-mail address, or the e-mail connectiondoes not work, the only way to reset the password is to directly write an encrypted known password into thedatabase. There is an explanation on the user forum in the FAQ section on how to do this.
Modifying user parameters
As a system administrator or system manager you can modify user parameters to assist the user in the configurationprocess, or when adding a user to the system. A detailed explanation of all parameters can be found in the user tasksection, since these are the same parameters the user can change.
Only the system administrator can assign users to organizational units, assign them an employee identificationnumber, and configure their session timeout. These fields are read only for regular users.
Deactivating users
As a system administrator or system manager you deactivate users, for example if they have left the companyor moved to another location. Deactivating users means they are still in the database, and their entire history ispreserved. It is possible to activate them again any time. Deactivated users are shown in the user list grayed out orwith an asterisk behind their name.
Deactivated users cannot access the system anymore. In case they try they get an error message telling them tocontact the system administrator. Deactivated users do not count towards the number of user licenses included inthe license key.
Assigning user levels
As a system administrator or system manager you can assign user to levels. The user level determines whichfunctionality is available to that user.
You can define as many user levels as you like. For each user level you can configure what user interface elements willbe visible (see Customizing the User Interface). There are some fixed predefined levels which are treated differentlyby the system.
User level Description
"Client" user "Client" users are managed in a different section thanregular users. They have a simplified menu with reducedfunctionality, for example they cannot create their ownfilters, and see only their own entries in the item history.
Typically you would mark users with a client user licenseif they use the system only occasionally, for example ina help desk environment.
"Full" user "Full" users can use the full system functionalityexcluding the administrative functions like creatingspaces or managing users.
System administrator System administrators have full access to the system,including the permission to add and delete spaces andusers.
Users with system administrator rights are marked witha “!” at the end of their name.
20

2.3 Managing people
User level Description
System manager System managers have full access to the system,including the permission to add and delete spaces andusers.
In contrast to a system administrator however, theycannot modify the server configuration, like settingindex or attachment directories, or enabling anddisabling LDAP and web services.
Simple A configurable level for users that prefer basicfunctionality and a simple user interface. The differenceto an easy user is that the simple level has no restrictionsregarding reading other peoples items or filtering.
Intermediate A configurable level for intermediate users that don'twant to use the entire system functionality and havethus some user interface elements removed.
Advanced A configurable level for users that want to use most ofthe system functionality.
Removing users permanently
As a system administrator or system manager, you can remove users from the database permanently. This isparticular useful if test users had been added, or mistakes were made when creating the user name. Otherwise, thisis a rather grave operation since it affects all items this user has ever worked on.
Since Genji is a tracking system, it will not delete any users activities from the system. When permanently deletinga user from the system, a replacement user has to be named. This replacement user will be entered in all placeswhere the now to be deleted user has been registered in previously. The replacement user will thus inherit the entirehistory of the user that is about to be removed.
To delete a user from the system use the delete action button for this user on the left side of the user list screen.
Viewing a users role assignments
Select a user in the list and click on the Role assignments button in the toolbar. You will get a list with projects andthe roles this user has been assigned for these projects.
Assigning a cockpit to users
As a system administrator or system manager, you can assign one of the cockpit templates to a set of users. Selectthe users with the check boxes, then click on the Assign cockpit button in the toolbar. Select the desired cockpittemplate and click OK.
Assigning special licenses to users
As a system administrator or system manager, you can assign special licenses to selected users, for example for ALMor Gantt functionality. To assign these licenses mark the checkbox for that user in the respective column on the right.You will only see columns if you have a license for that functionality.
21

Scrum
Figure 2-2: Enabling the Gantt view
Synchronizing Genji with an LDAP directory
You can synchronize your Genji list of users with your LDAP directory. Entries found in the LDAP directory but notin Genji are created in Genji. Entries found in Genji but not in your LDAP directory can be automatically deactivatedin Genji (set parameter deactivateUnknown=true).
You can configure Genji to perform the synchronization automatically on a regular basis, or initiate thesynchronization manually from the user administration interface.
By default, automatic synchronization is disabled. To enable it you need to modify some entries in file webapps/track/WEB-INF/quartz-jobs.xml.
The relevant sections looks like this:
<?xml version="1.0" encoding="UTF-8"?><job> <name>LdapSynchronizerJob</name> <group>DefaultJobGroup</group> <description> Synchronizes a Genji user database with an LDAP directory </description> <!-- description not more than 120 characters!!! --> <job-class> com.aurel.track.dbase.jobs.LdapSynchronizerJob </job-class> <job-data-map> <entry> <!-- Enable synchronization with LDAP --> <key>enabled</key> <value>false</value> </entry> <entry> <!-- Enable user synchronization with LDAP --> <key>enabledUserSync</key> <value>true</value> </entry> <entry> <!-- Enable group and group users synchronization with LDAP --> <key>enabledGroupSync</key> <value>true</value> </entry> <entry> <!-- BaseDN for group synchronization --> <key>baseDnGroup</key> <value>dc=itk-engineering,dc=de</value> </entry> <entry> <!-- Deactivate users unknown in LDAP --> <key>deactivateUnknown</key>
22

2.3 Managing people
<value>true</value> </entry> <entry> <!-- LDAP filter expression for users--> <key>ldapFilter</key> <value>*</value> </entry> <entry> <!-- LDAP filter expression for groups--> <key>ldapFilterGroups</key> <value>(objectClass=groupOfNames)</value> </entry> <entry> <key>firstName</key> <value>gn</value> </entry> <entry> <key>lastName</key> <value>sn</value> </entry> <entry> <key>email</key> <value>mail</value> </entry> <entry> <key>phone</key> <value>phone</value> </entry> <entry> <key>groupName</key> <value>cn</value> </entry> </job-data-map></job>
You enable all automatic synchronization by setting key „enabled“ to „true“. You may have to modify the mapping ofLDAP properties to Genjiproperties. The Genji properties are the keys and must not be modified. The LDAP propertiesare the values and you may have to change them to the values you use in your directory.
Table 2-1: LDAP synchronizer parameters
Property in quartz-jobs.xml Description
enabled True if users and groups shall be regularlysynchronized with your LDAP directory.If False, properties "enabledUserSync" and"enabledGroupSync" have no effect.
enabledUserSync True if users shall be regularly synchronized with yourLDAP directory
enabledGroupSync True if groups and the users assigned to them shallbe regularly synchronized with your LDAP directory
baseDnGroup The LDAP base DN under which your groups aredefined. Search is based on the "member" propertyof the groups.
deactivateUnknown True if users not found during the synchronizationprocess shall be deactivated. The "admin" and"guest" users are exempted.
23

Scrum
Property in quartz-jobs.xml Description
ldapFilter The LDAP filter expression for user synchronization.Can be any valid LDAP filter term like"(&(objectClass=inetOrgPerson)(ou=Trackplus))"
ldapFilterGroups The LDAP filter expression for group synchronization.Can be any valid LDAP filter term like"(&(objectClass=group)(ou=Groups))"
firstName The LDAP property name for users first name
lastName The LDAP property name for users last name
email The LDAP property name for users email
phone The LDAP property name for users phone number
groupName The LDAP property name for the group name
After you have modified this file save it and restart the Tomcat server.
Bulk setting user properties
You can set some user properties for all users using a special link. Here is an example:
http://localhost:8080/track/setUserProperty.action?field=homePage&value=cockpit
The fields with their possible values are listed below.
Field Value Description
homePage cockpit | itemNavigator
layoutEnabled true | false
alwaysSaveAttachment true | false
hoursPerWorkday in hours, e.g., 8.0
autoloadTime in seconds
maxAssignedItems 1...1000
prefEmailType html | plain
sessionTimeout in minutes
2.3.2 Managing groupsGenji can be configured such that users can create an account themselves. However, some supervisory activity isrequired to grant users permission to view or enter any data to spaces, to assign them to organizational units, andto activate or deactivate their accounts.
Access to spaces can be granted to users by the system administrator or system manager for all spaces. A spaceadministrator can grant access to the spaces he manages. This section deals with managing groups, that is creating,modifying, deactivating and deleting groups, and assigning users to them.
Adding groups
The system administrator can add users to the Genji system. This is particularly useful if self-registration is not enabled.To add a user, go to the Administration > Users and groups > Groups... menu entry.
24

2.4 Managing Scrum teams
Then click on the Add group button in the toolbar. Enter a group name and save.
Tip: By marking the check boxes you give members of that group a special property. Each user in thatgroup can handle items of other members of that group as if they themselves were the author, responsibleor manager. Thus, they could access items even then if their role would not permit them to access them.This is useful when you deal with another organization and you want them to be able to see only theirown items, but not yours.
Note: By marking the check box “Automatically join new users to this group” users that have registeredthemselves or which have been registered by a system administrator will automatically be part of thatgroup and inherit all rights from that group.
You can now add users to the group. Select the group and then drag users from the right column “Available” tothe left column “Assigned”.
Tip: You can set filters on the columns to limit the amount of users yo see at a time.
Attention: The user will inherit all access rights of the groups he is a member of!
If you need to remove a user from a group drag him back to the “Available” column.
Note: The users you have removed from the group will loose all access rights they previously had inheritedfrom that group.
Removing groups
Groups can be removed just like users. If a group is associated with any items, a replacement group or user has tobe named when removing that group.
2.4 Managing Scrum teams
Before anybody can do anything in a workspace or project they have to be assigned at least one role in thatworkspace. With each role comes a set of permissions, like being allowed to change items, to create new item, orto modify specific item properties.
1. Select Manage teams in the main toolbar.
25

Scrum
Figure 2-3: Assigning users to Scrum teams
2. Select a role to which you want to assign users in your project. Drag and drop the users from the very rightcolumn to the column left of it. To remove an assignment drag and drop users from the "Assigned" list to the"Available" list. You can use filters to limit the users you see by a right mouse click on the label bar.
You have now put users on your project team.
2.5 Managing Scrum projects
You can create, edit, and delete any number of projects. Projects are referred to as “workspaces” in other parts ofthe system, so we will use that term in this section.
2.5.1 Creating a new workspaceAll manageable items belong to exactly one workspace. System administrators and managers can create new toplevel workspaces. Space administrators can create sub-spaces.
You must be logged in as system administrator or system manager if you want to create a top level workspace. Youcan create sub-spaces for workspaces where you have space administrator rights.
1. Switch to the Administration perspective. In the top toolbar select Workspaces. Alternatively click on the“Workspaces” bar in the left navigation area.
2. Click on the „Add workspace“ button in the toolbar.
26

2.5 Managing Scrum projects
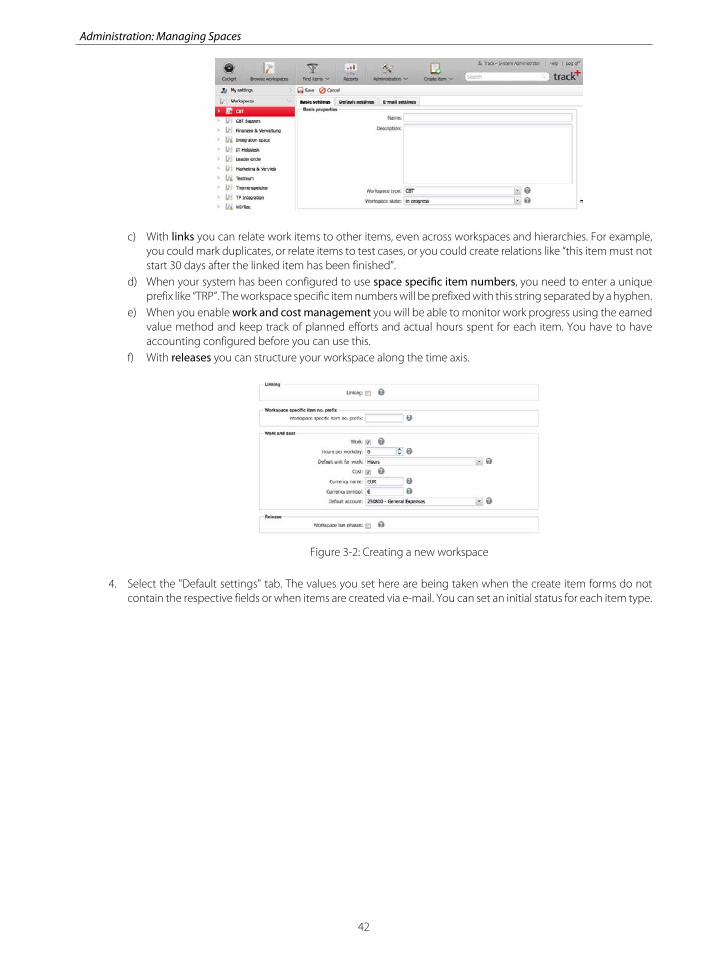
3. A new screen appears in the right. Fill out the forms on the various tabs. Use the context help if you are uncertainabout the meaning of an entry.
a) Select the workspace type. The workspace type determines large parts of your new workspacesconfiguration. Usually a system administrator has configured this when the system was adapted to yourorganization.
b) A workspace has a status which determines its visibility to regular users and what can be done within thatworkspace. For more information have a look at The workspace status.
c) With links you can relate work items to other items, even across workspaces and hierarchies. For example,you could mark duplicates, or relate items to test cases, or you could create relations like “this item must notstart 30 days after the linked item has been finished”.
d) When your system has been configured to use space specic item numbers, you need to enter a uniqueprefix like “TRP”. The workspace specific item numbers will be prefixed with this string separated by a hyphen.
e) When you enable work and cost management you will be able to monitor work progress using the earnedvalue method and keep track of planned efforts and actual hours spent for each item. You have to haveaccounting configured before you can use this.
f) With releases you can structure your workspace along the time axis.
Figure 2-4: Creating a new workspace
4. Select the "Default settings" tab. The values you set here are being taken when the create item forms do notcontain the respective fields or when items are created via e-mail. You can set an initial status for each item type.
27

Scrum
Figure 2-5: Configuring workspace default settings
5. If you want to offer a specific e-mail for creating items via e-mail, select the "E-mail settings"tab and mark the topmost check box. With this you could have an e-mail address like "[email protected]" to channel all customer request to the right support space. You need tohave these e-mail accounts on your e-mail-server first.
Important: Don’t use the same e-mail account for more than one workspace. Also, do not use thesystem wide e-mail inbox account at the same time for a project specific e-mail inbox account. Thiscould result in erroneous behavior.
Notice: You have to set up the e-mail account you are using here on your mail server.
Notice: You can globally configure that you want to accept e-mails from people whose e-mail addressis not in the Genji database, or that you do not. Furthermore, you can globally restrict the domainsfrom which you accept e-mails. This permits you to minimize spam to your projects, even if you havepublished your e-mail as a support e-mail on the internet.
Figure 2-6: Configuring workspace e-mail settings
6. Click on the „Save“ button in the toolbar.
Your workspace is now configured to create and manage items. There are many more parameters you can set likeaccounting, version control, releases, forms, fields, etc.
28

2.5 Managing Scrum projects
From here on the space administrators can completely control this workspace; there is no need to involve a systemadministrator or system manager any more.
2.5.2 Deleting a workspaceYou can delete an entire workspace, including all subspaces and items. This is the only way to permanently removeinformation from the database.
You must have system administrator or system manager privileges.
Warning: You should consider setting the space state to „archived“ rather then deleting a space. This willmake the workspace disappear on practically all lists and selection boxes, but will keep everything in thedatabase. It is also reversible. Deleting a workspace is irreversible, everything is removed from the database!
1. Switch to the Administration perspective. In the top toolbar select Workspaces. Alternatively click on the“Workspaces” bar in the left navigation area.
2. Use either the context menu in the left navigation area or select the workspace in the left navigation area andclick the "Delete" button.
3. A warning appears, unless the workspace does not have any items associated, i.e. it had just been created andnever been used. When you confirm, a second warning appears. When you confirm again, the workspace withall subspaces and items will be deleted.
The workspaces with all its associated items and properties has been deleted from the database. There is nothing left.
There will be an entry in the server log of this delete operation, stating the date and the user who performed it.
2.5.3 Copying a workspace setupWhen creating a new workspace it can be quite helpful to copy its configuration like users and roles, version control,accounting, lists, queries, custom forms, custom properties and so on from an existing workspace.
You must be logged in as workspace administrator, system administrator or system manager.
29

Scrum
1. Switch to the Administration perspective. In the top toolbar select Workspaces. Alternatively click on the“Workspaces” bar in the left navigation area.
2. Select a workspace and click on the "Copy" button in the toolbar.
3. Select the configuration entities you would like to copy and click on the "Copy" button.
You have now created a new workspace based on the configuration settings of an existing workspace. The twoworkspaces are not related to each other in any way.
2.5.4 The workspace statusAs time goes by there will be a growing number of workspaces in the Genji database. You can permanently deleteworkspaces, but it is usually better to modify workspace visibility via the workspace status
Workspaces have a status which determines its visibility.
When delivered, Genji offers three workspace statuses as shown in the table below.
Status name Description
in progress These workspaces are open to the entire functionalitythe system offers. Items can be created and changedwith no restrictions.
on hold These workspaces will not accept new items and willnot permit to modify existing items. However, all existinginformation remains visible, as well as the workspacesthemselves.
archived These workspaces will not accept new items and willnot permit to modify existing items. Furthermore they
30

2.6 Managing releases
Status name Description
are effectively hidden with all their information. Iteminformation is inaccessible.
You can change the names and the semantics of these statuses via Administration > Customize > System statuses....You can also add new statuses there.
Each status has a „type flag“ which determines the availability of a workspace. The values and logic for each typeflag is described in the following table.
Type ag name Description
active Workspaces with this status type flag are open to theentire functionality the system offers. Items can becreated and changed with no restrictions.
inactive Workspaces with this status type flag will not acceptnew items and will not permit to modify existing items.However, all existing information remains visible, as wellas the workspaces themselves.
closed Workspaces with this status type flag will not acceptnew items and will not permit to modify existing items.Furthermore they are effectively hidden with all theirinformation. Item information is inaccessible.
Warning: Changing the workspace status may make the workspace inaccessible.
2.6 Managing releases
Releases are optional in the Scrum workflow. In Genji you can define releases which in turn contain sprints and arelease backlog.
2.6.1 Adding a releaseThis section describes how to add a release or sub-phase.
You must be logged in as space administrator, system manager or system administrator.
1. Switch to the Administration perspective. In the top toolbar select Workspaces. Alternatively click on the“Workspaces” bar in the left navigation area.
2. Select a workspace in the leftmost navigation area.
3. Select the „releases“ node in the second navigation area from the left. This node will only appear if the workspacetype this workspace belongs to has releases enabled.
31

Scrum
4. Click on the „Add release“ button in the toolbar. If there are already releases available you can add sub-phases(sprints, iterations, etc.) by selecting the parent release and then clicking on the „Add child release“ or "Addsprint" button in the toolbar.
5. Fill out the form that appears.
a) The release status determines visibility of this release in places where you can select a release. Refer to Therelease status for more detailed information on release statuses.
b) The release due date has just an informative character.c) You can select the release as the default release for "Release noticed" and "Release scheduled". The defaults
are taken when you do not explicitly select a release when creating an item, or the release does not appearon the input form.
6. Click on the “Save” button.
7. Optionally, sort the release by dragging and dropping it in the list on the right.
You have created a new release in the selected workspace. The new release will be available in selection boxes foritems and filters.
2.6.2 Deleting a releaseYou can delete releases and sub-phases. If there are items assigned to a release to be deleted, you will be asked fora replacement release which will then be assigned to these items instead.
You must be logged in as space administrator, system manager or system administrator.
Warning: The delete operation for a release is not reversible!
1. Switch to the Administration perspective. In the top toolbar select Workspaces. Alternatively click on the“Workspaces” bar in the left navigation area.
32

2.6 Managing releases
2. Select a workspace in the leftmost navigation area.
3. Select the „Assign roles“ node in the second navigation area from the left.
4. Select the „releases“ node in the second navigation area from the left. This node will only appear if the workspacetype this workspace belongs to has releases enabled.
5. Select the release to be deleted either in the right list area or in the third navigation area. Click on the „Deleterelease“ button in the toolbar or use the context menu.
6. You will be asked to confirm the delete operation. If the release contains items you will be asked to pick areplacement release.
7. Click on the „Delete“ button to confirm the deletion of this release.
The release you have deleted has been replaced with the release you have selected as a replacement release.
2.6.3 The release statusSimilar to items and workspaces, releases and phases have a status. Via the release status you control the accessibilityand visibility of a release.
33
Scrum
You can create any number of phases for a workspace. Phases have a status, just as entire workspaces do. The phasestatus determines accessibility of a phase.
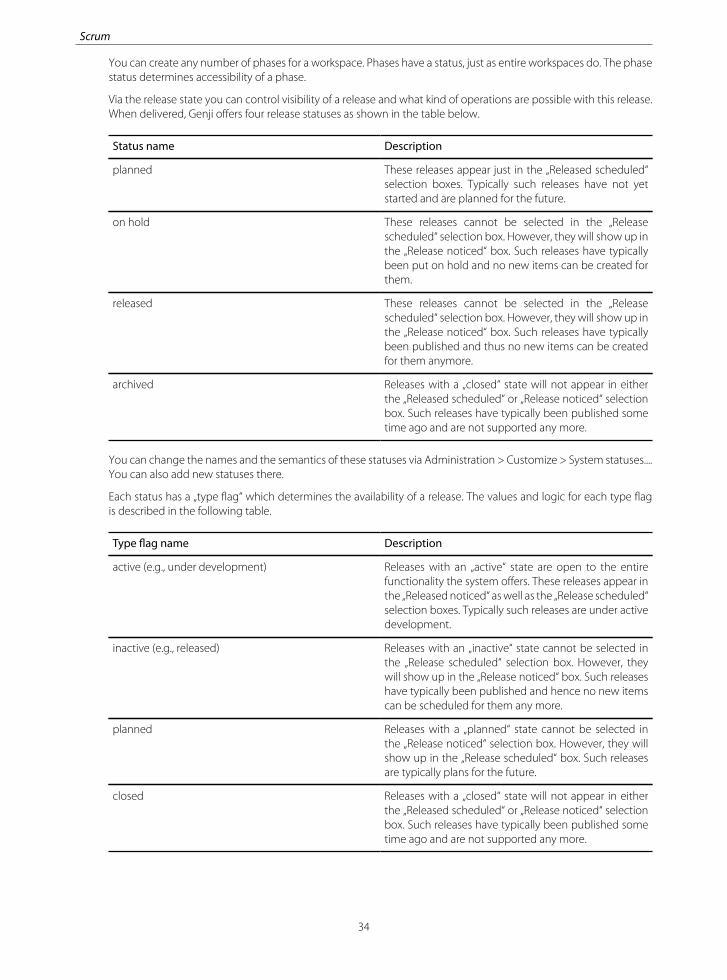
Via the release state you can control visibility of a release and what kind of operations are possible with this release.When delivered, Genji offers four release statuses as shown in the table below.
Status name Description
planned These releases appear just in the „Released scheduled“selection boxes. Typically such releases have not yetstarted and are planned for the future.
on hold These releases cannot be selected in the „Releasescheduled“ selection box. However, they will show up inthe „Release noticed“ box. Such releases have typicallybeen put on hold and no new items can be created forthem.
released These releases cannot be selected in the „Releasescheduled“ selection box. However, they will show up inthe „Release noticed“ box. Such releases have typicallybeen published and thus no new items can be createdfor them anymore.
archived Releases with a „closed“ state will not appear in eitherthe „Released scheduled“ or „Release noticed“ selectionbox. Such releases have typically been published sometime ago and are not supported any more.
You can change the names and the semantics of these statuses via Administration > Customize > System statuses....You can also add new statuses there.
Each status has a „type flag“ which determines the availability of a release. The values and logic for each type flagis described in the following table.
Type ag name Description
active (e.g., under development) Releases with an „active“ state are open to the entirefunctionality the system offers. These releases appear inthe „Released noticed“ as well as the „Release scheduled“selection boxes. Typically such releases are under activedevelopment.
inactive (e.g., released) Releases with an „inactive“ state cannot be selected inthe „Release scheduled“ selection box. However, theywill show up in the „Release noticed“ box. Such releaseshave typically been published and hence no new itemscan be scheduled for them any more.
planned Releases with a „planned“ state cannot be selected inthe „Release noticed“ selection box. However, they willshow up in the „Release scheduled“ box. Such releasesare typically plans for the future.
closed Releases with a „closed“ state will not appear in eitherthe „Released scheduled“ or „Release noticed“ selectionbox. Such releases have typically been published sometime ago and are not supported any more.
34

2.7 Working with backlogs
Warning: Changing the release status may make releases inaccessible.
2.7 Working with backlogs
Backlogs serve as container for user stories and epics, the Scrum equivalent of requirements. You can have productbacklogs and release backlogs.
Backlog item navigator general behavior
The backlog item navigator works just as the standard item navigator. For more information see The item navigator.
Backlog item navigator flat view
The flat view permits you to group and sort items on almost any item attribute. Beyond that, the flat view exhibitsthe general behaviour as described for the item navigator grid based view modes.
Backlog item navigator hierarchical view
The hierarchical view permits you to define the order of items on each structural level. It does not support groupingand does not display long text fields. Beyond that, the hierarchical view exhibits the general behaviour as describedfor the item navigator grid based view modes.
2.8 Working with sprints
In the sprint view you can move items from the backlogs to a specific sprint.
This view is mostly self-explanatory. but we will provide more detailed information in the near future.
2.9 Using the task board
The task board presents items in an intuitive way. Using drag-and-drop you can change responsible persons, status,priority, and more.
You can configure the card layout by right click on a card, then “Configure card layout”.
The color of the bar at the left side of each card is controlled by the style field of the filter used to select the items.
You can define the column type via the “Settings” button at the top right.
You can move items between columns or drag them to a new sprint, release or backlog.
You can limit the number of items you can place into each column via the little wheel at the top left of each columnheader.
35

Scrum
2.10 Monitoring your project with burndown charts
In Scrum you monitor work progress using burndown charts.
Burndown charts refer to products, releases, or sprints. To configure a burndown chart select the desired phase(release or sprint).
Note: Make sure that your release or sprint has a start date and an end date defined. This will define theperiod for the chart!
Select the reporting interval and define which states are considered as “done”.
For the y-axis you can select the item count or any numeric custom field like story points, or the effort (amount ofwork).
36

2.10 Monitoring your project with burndown charts
37


3Administration: ManagingSpacesTopics:
• Configuration basics• Managing spaces• Assigning roles to team
members• Managing releases (phases)• Managing workspace specific
lists• Default automail assignments• Configuring workspace-
specific cockpits• Version control
39

Administration: Managing Spaces
3.1 Conguration basics
When you deal with a lot of projects or spaces, and different kinds of projects like electronic development, softwaredevelopment, mechanical engineering, or controlling, configuration can become complicated. To handle large,diverse configuration scenarios, Track offers space types and configuration inheritance. Using these two featuresyou can create diverse and flexible configuration scenarios with little effort.
3.1.1 Workspace typesYou can centralize the configuration of spaces via „workspace types“.
Workspaces inherit their configuration like workflows, forms and properties from their workspace type. You can thuschange the configuration of all workspaces of one workspace type in a single place, which would not be possibleif you had merely copied a workspace. You can still overwrite most configuration settings at the workspace level,giving you a maximum in flexibility.
The following configuration items can be set at the workspace type level:
• Type of space, for example Scrum, helpdesk• Does this space have phases? For many applications phases are not required.• The item types available for items in this space• Workflows associated with items in this space• Custom properties for items in this space• Custom forms for items in this space• The states available for items in this space• The priorities available for items in this space• The severities available for items in this space
3.1.2 Configuration inheritanceConfigurations can be set at various levels: globally, item type specific, workspace type specific, and workspacespecific.
To keep a maximum of flexibility while minimizing the amount of work required for simple use cases, Genji employsa hierarchical inheritance system for configuration. Particularly for larger installations, this enhances consistency andminimizes the time required for creating and maintaining configurations.
Figure 3-1: Configuration inheritance
The following configuration entities can be configured according to this scheme:
• Custom properties
40

3.2 Managing spaces
• Custom forms• Workflows
At the global level, the configuration entities can be either configured the same for all item types, or specifically forsome item types. The same holds true for the space type level and the project type level.
You can overwrite any higher level configuration at a lower level. For example, if you have modified a customproperty at the space type level for item type „task“, you can configure this property differently for a specific projectand item type „task“.
The higher up in the hierarchy you configure entities, the less work you have maintaining the configuration.
3.2 Managing spaces
Genji organizes all items in workspaces or spaces for short. Spaces are administered by users that have spaceadministrator privileges for their spaces. This chapter describes tasks and concepts typical for project or spaceadministrators.
3.2.1 Creating a new workspaceAll manageable items belong to exactly one workspace. System administrators and managers can create new toplevel workspaces. Space administrators can create sub-spaces.
You must be logged in as system administrator or system manager if you want to create a top level workspace. Youcan create sub-spaces for workspaces where you have space administrator rights.
1. Switch to the Administration perspective. In the top toolbar select Workspaces. Alternatively click on the“Workspaces” bar in the left navigation area.
2. Click on the „Add workspace“ button in the toolbar.
3. A new screen appears in the right. Fill out the forms on the various tabs. Use the context help if you are uncertainabout the meaning of an entry.
a) Select the workspace type. The workspace type determines large parts of your new workspacesconfiguration. Usually a system administrator has configured this when the system was adapted to yourorganization.
b) A workspace has a status which determines its visibility to regular users and what can be done within thatworkspace. For more information have a look at The workspace status.
41
Administration: Managing Spaces
c) With links you can relate work items to other items, even across workspaces and hierarchies. For example,you could mark duplicates, or relate items to test cases, or you could create relations like “this item must notstart 30 days after the linked item has been finished”.
d) When your system has been configured to use space specic item numbers, you need to enter a uniqueprefix like “TRP”. The workspace specific item numbers will be prefixed with this string separated by a hyphen.
e) When you enable work and cost management you will be able to monitor work progress using the earnedvalue method and keep track of planned efforts and actual hours spent for each item. You have to haveaccounting configured before you can use this.
f) With releases you can structure your workspace along the time axis.
Figure 3-2: Creating a new workspace
4. Select the "Default settings" tab. The values you set here are being taken when the create item forms do notcontain the respective fields or when items are created via e-mail. You can set an initial status for each item type.
42

3.2 Managing spaces
Figure 3-3: Configuring workspace default settings
5. If you want to offer a specific e-mail for creating items via e-mail, select the "E-mail settings"tab and mark the topmost check box. With this you could have an e-mail address like "[email protected]" to channel all customer request to the right support space. You need tohave these e-mail accounts on your e-mail-server first.
Important: Don’t use the same e-mail account for more than one workspace. Also, do not use thesystem wide e-mail inbox account at the same time for a project specific e-mail inbox account. Thiscould result in erroneous behavior.
Notice: You have to set up the e-mail account you are using here on your mail server.
Notice: You can globally configure that you want to accept e-mails from people whose e-mail addressis not in the Genji database, or that you do not. Furthermore, you can globally restrict the domainsfrom which you accept e-mails. This permits you to minimize spam to your projects, even if you havepublished your e-mail as a support e-mail on the internet.
Figure 3-4: Configuring workspace e-mail settings
6. Click on the „Save“ button in the toolbar.
Your workspace is now configured to create and manage items. There are many more parameters you can set likeaccounting, version control, releases, forms, fields, etc.
43

Administration: Managing Spaces
From here on the space administrators can completely control this workspace; there is no need to involve a systemadministrator or system manager any more.
3.2.2 Deleting a workspaceYou can delete an entire workspace, including all subspaces and items. This is the only way to permanently removeinformation from the database.
You must have system administrator or system manager privileges.
Warning: You should consider setting the space state to „archived“ rather then deleting a space. This willmake the workspace disappear on practically all lists and selection boxes, but will keep everything in thedatabase. It is also reversible. Deleting a workspace is irreversible, everything is removed from the database!
1. Switch to the Administration perspective. In the top toolbar select Workspaces. Alternatively click on the“Workspaces” bar in the left navigation area.
2. Use either the context menu in the left navigation area or select the workspace in the left navigation area andclick the "Delete" button.
3. A warning appears, unless the workspace does not have any items associated, i.e. it had just been created andnever been used. When you confirm, a second warning appears. When you confirm again, the workspace withall subspaces and items will be deleted.
The workspaces with all its associated items and properties has been deleted from the database. There is nothing left.
There will be an entry in the server log of this delete operation, stating the date and the user who performed it.
3.2.3 Copying a workspace setupWhen creating a new workspace it can be quite helpful to copy its configuration like users and roles, version control,accounting, lists, queries, custom forms, custom properties and so on from an existing workspace.
You must be logged in as workspace administrator, system administrator or system manager.
44

3.2 Managing spaces
1. Switch to the Administration perspective. In the top toolbar select Workspaces. Alternatively click on the“Workspaces” bar in the left navigation area.
2. Select a workspace and click on the "Copy" button in the toolbar.
3. Select the configuration entities you would like to copy and click on the "Copy" button.
You have now created a new workspace based on the configuration settings of an existing workspace. The twoworkspaces are not related to each other in any way.
3.2.4 The workspace statusAs time goes by there will be a growing number of workspaces in the Genji database. You can permanently deleteworkspaces, but it is usually better to modify workspace visibility via the workspace status
Workspaces have a status which determines its visibility.
When delivered, Genji offers three workspace statuses as shown in the table below.
Status name Description
in progress These workspaces are open to the entire functionalitythe system offers. Items can be created and changedwith no restrictions.
on hold These workspaces will not accept new items and willnot permit to modify existing items. However, all existinginformation remains visible, as well as the workspacesthemselves.
archived These workspaces will not accept new items and willnot permit to modify existing items. Furthermore they
45
Administration: Managing Spaces
Status name Description
are effectively hidden with all their information. Iteminformation is inaccessible.
You can change the names and the semantics of these statuses via Administration > Customize > System statuses....You can also add new statuses there.
Each status has a „type flag“ which determines the availability of a workspace. The values and logic for each typeflag is described in the following table.
Type ag name Description
active Workspaces with this status type flag are open to theentire functionality the system offers. Items can becreated and changed with no restrictions.
inactive Workspaces with this status type flag will not acceptnew items and will not permit to modify existing items.However, all existing information remains visible, as wellas the workspaces themselves.
closed Workspaces with this status type flag will not acceptnew items and will not permit to modify existing items.Furthermore they are effectively hidden with all theirinformation. Item information is inaccessible.
Warning: Changing the workspace status may make the workspace inaccessible.
3.3 Assigning roles to team members
Before anybody can do anything in a workspace or project they have to be assigned at least one role in thatworkspace. With each role comes a set of permissions, like being allowed to change items, to create new item, orto modify specific item properties.
You must be logged in as space administrator, space manager or system administrator.
Tip: We recommend to assign roles to user groups rather than individual users. Thereby users inherit theirgroups permissions, making it much easier to manage your projects.
1. Switch to the Administration perspective. In the top toolbar select Workspaces. Alternatively click on the“Workspaces” bar in the left navigation area.
2. Select a workspace in the leftmost navigation area.
3. Select the „Assign roles“ node in the second navigation area from the left.
46

3.4 Managing releases (phases)
Figure 3-5: Assigning roles to people in a workspace
4. Select a role to which you want to assign users in your workspace. Drag and drop the users from the very rightcolumn to the column left of it. To remove an assignment drag and drop users from the "Assigned" list to the"Available" list. You can use filters to limit the users you see by a right mouse click on the label bar.
Figure 3-6: Filtering people during role assignment
Tip: You can assign more than one role to a single user. The access rights of all roles add up.
You have now given users permission in your workspace.
3.4 Managing releases (phases)
Genji organizes all items in workspaces. You can structure workspaces along the time line in phases, for example tomanage releases, iterations or sprints. Phases can be structured hierarchically just like items. For example, you couldhave a release with a number of iterations or sprints as sub-phases.
3.4.1 Adding a releaseThis section describes how to add a release or sub-phase.
You must be logged in as space administrator, system manager or system administrator.
1. Switch to the Administration perspective. In the top toolbar select Workspaces. Alternatively click on the“Workspaces” bar in the left navigation area.
47

Administration: Managing Spaces
2. Select a workspace in the leftmost navigation area.
3. Select the „releases“ node in the second navigation area from the left. This node will only appear if the workspacetype this workspace belongs to has releases enabled.
4. Click on the „Add release“ button in the toolbar. If there are already releases available you can add sub-phases(sprints, iterations, etc.) by selecting the parent release and then clicking on the „Add child release“ or "Addsprint" button in the toolbar.
5. Fill out the form that appears.
a) The release status determines visibility of this release in places where you can select a release. Refer to Therelease status for more detailed information on release statuses.
b) The release due date has just an informative character.c) You can select the release as the default release for "Release noticed" and "Release scheduled". The defaults
are taken when you do not explicitly select a release when creating an item, or the release does not appearon the input form.
6. Click on the “Save” button.
7. Optionally, sort the release by dragging and dropping it in the list on the right.
You have created a new release in the selected workspace. The new release will be available in selection boxes foritems and filters.
3.4.2 Deleting a releaseYou can delete releases and sub-phases. If there are items assigned to a release to be deleted, you will be asked fora replacement release which will then be assigned to these items instead.
You must be logged in as space administrator, system manager or system administrator.
48

3.4 Managing releases (phases)
Warning: The delete operation for a release is not reversible!
1. Switch to the Administration perspective. In the top toolbar select Workspaces. Alternatively click on the“Workspaces” bar in the left navigation area.
2. Select a workspace in the leftmost navigation area.
3. Select the „Assign roles“ node in the second navigation area from the left.
4. Select the „releases“ node in the second navigation area from the left. This node will only appear if the workspacetype this workspace belongs to has releases enabled.
5. Select the release to be deleted either in the right list area or in the third navigation area. Click on the „Deleterelease“ button in the toolbar or use the context menu.
6. You will be asked to confirm the delete operation. If the release contains items you will be asked to pick areplacement release.
7. Click on the „Delete“ button to confirm the deletion of this release.
The release you have deleted has been replaced with the release you have selected as a replacement release.
49

Administration: Managing Spaces
3.4.3 The release statusSimilar to items and workspaces, releases and phases have a status. Via the release status you control the accessibilityand visibility of a release.
You can create any number of phases for a workspace. Phases have a status, just as entire workspaces do. The phasestatus determines accessibility of a phase.
Via the release state you can control visibility of a release and what kind of operations are possible with this release.When delivered, Genji offers four release statuses as shown in the table below.
Status name Description
planned These releases appear just in the „Released scheduled“selection boxes. Typically such releases have not yetstarted and are planned for the future.
on hold These releases cannot be selected in the „Releasescheduled“ selection box. However, they will show up inthe „Release noticed“ box. Such releases have typicallybeen put on hold and no new items can be created forthem.
released These releases cannot be selected in the „Releasescheduled“ selection box. However, they will show up inthe „Release noticed“ box. Such releases have typicallybeen published and thus no new items can be createdfor them anymore.
archived Releases with a „closed“ state will not appear in eitherthe „Released scheduled“ or „Release noticed“ selectionbox. Such releases have typically been published sometime ago and are not supported any more.
You can change the names and the semantics of these statuses via Administration > Customize > System statuses....You can also add new statuses there.
Each status has a „type flag“ which determines the availability of a release. The values and logic for each type flagis described in the following table.
Type ag name Description
active (e.g., under development) Releases with an „active“ state are open to the entirefunctionality the system offers. These releases appear inthe „Released noticed“ as well as the „Release scheduled“selection boxes. Typically such releases are under activedevelopment.
inactive (e.g., released) Releases with an „inactive“ state cannot be selected inthe „Release scheduled“ selection box. However, theywill show up in the „Release noticed“ box. Such releaseshave typically been published and hence no new itemscan be scheduled for them any more.
planned Releases with a „planned“ state cannot be selected inthe „Release noticed“ selection box. However, they willshow up in the „Release scheduled“ box. Such releasesare typically plans for the future.
closed Releases with a „closed“ state will not appear in eitherthe „Released scheduled“ or „Release noticed“ selection
50

3.5 Managing workspace specic lists
Type ag name Description
box. Such releases have typically been published sometime ago and are not supported any more.
Warning: Changing the release status may make releases inaccessible.
3.5 Managing workspace specic lists
In Genji you can configure any number of custom lists. You can make these lists available to all workspaces, or justto a specific workspace. Items that contain a custom list property will have one of the preconfigured values of thelists you define. For example, you could have lists with operating systems, drawing numbers, serial numbers, orcustomers. You could have a list with system components, or just tag items with the location where you need totake care of them.
You must be logged in as space administrator, system manager or system administrator.
1. Switch to the Administration perspective. In the top toolbar select Workspaces. Alternatively click on the“Workspaces” bar in the left navigation area.
2. Select a workspace in the leftmost navigation area.
3. In the second navigation area click on the node labeled “Lists”.
4. In the second navigation column, click on "Global lists" if you want to edit a list accessible to all workspaces,or select a workspace with the list you want to edit. Then click on the “Edit” button in the toolbar or use thecontext menu.
51

Administration: Managing Spaces
5. Give a name to the new list or modify the existing one. Optionally add a brief description for book keepingpurposes.
6. Select the node to which you want to add list entries or edit an existing entry. Use the context menu to addor edit an entry.
7. Name the new entry or edit the name of an existing entry and optionally give it some style information. Thestyles can be used to control item appearance in the item navigator. Then click on the “Save” button.
You can assign an icon (16 x 16 px, GIF or PNG format) to each entry. You can furthermore assign a CSS style toeach entry, which will be used to format items in the item navigator. For example, you could use various shadesof red as background color to illustrate the urgency of an item. You can drag entries in the list on the right toanother position. The entries will be offered at the user interface in the same order as shown in the grid here.
8. For a simple list, you can just add entries underneath the top list node. To create a cascaded list, select a secondlist level node and repeat the procedure from 5.
52

3.6 Default automail assignments
You have now created or modified a workspace specific list.
3.6 Default automail assignments
For occasional users, the configuration of automail settings may require too much knowledge and time. It is thereforepossible that a space administrator, system manager or system administrator configures automail settings for aworkspace, or all workspaces for all users that do not overwrite these settings with their own.
You must be logged in as space administrator, system manager or system administrator.
1. Switch to the Administration perspective. In the top toolbar select Workspaces. Alternatively click on the“Workspaces” bar in the left navigation area.
2. Select a workspace in the leftmost navigation area.
3. Select a workspace in the left navigation area and select “Automail assignments” in the second navigation area.Select again “Automail assignments” in the third navigation area.
4. Click on the “Add” button in the toolbar.
5. Select an automail condition and an automail trigger.
6. Save the change by clicking on the „Save“ action icon in the toolbar.
All system users that do not have their own automail settings configured will automatically use the new automailsettings.
53

Administration: Managing Spaces
3.7 Conguring workspace-specic cockpits
Genji supports to basic perspectives: a user perspective and a workspace perspective. The user is interested inall items that concern him, possibly across a number of workspaces. A workspace or project administrator ismore interested in items that are contained in his workspace or project. To facilitate cooperation you can provideworkspace-specific cockpits to your team members. This helps to ensure that everybody has the same view on aworkspace in discussions.
You must be logged in as space administrator, system manager or system administrator.
When you click on "Browse workspace" in the top toolbar you can select a workspace in the left navigation area.Then you will see a cockpit which is specific to this workspace. You can furthermore have release-specific cockpitswithin each workspace, that is a common cockpit for all releases within that workspace.
The general procedure of managing these cockpits is equivalent to managing your personal cockpit.
1. Switch to the Administration perspective. In the top toolbar select Workspaces. Alternatively click on the“Workspaces” bar in the left navigation area.
2. Select a workspace in the leftmost navigation area.
3. In the second navigation area select "Cockpit".
4. To configure a workspace-specific cockpit click on the button "Configure cockpit for workspace" in the toolbar.To configure a release-specific or phase-specific cockpit click on the button "Configure cockpit for phases" inthe toolbar.
54

3.8 Version control
5. Now you can configure the cockpit just like your own. The only difference is that automatically a filter is appliedto all cockpit tiles that limits the items shown to this workspace and phases.
3.8 Version control
With Genji you can link files in a version control repository like Subversion, GIT or CVS to items.
Genji scans the repository log files on a regular basis for references to items and automatically creates links for theitems. Initially, the scan takes place every 10 minutes. The scan time is measured, and the delay between the scansis set to two times the scan time. For example, if the scan time for all repositories is 20 minutes, the repositories willbe scanned once each hour.
The parameters for the initial scan time and the delay factor can be set in file TRACKPLUS_HOME/quartz-jobs.xml.
3.8.1 Subversion version controlGenji can integrate with your source code version control system, for example CVS, Subversion, or Perforce. Toestablish links, add item numbers to your version control system submits like „#<item no.>, e.g. „#4711“. This sectiondescribes for Subversion (SVN) how to proceed.
You must know how to connect to your version control system. Typically you already have used that informationwhen you set up your version control client software.
You must be logged in as space administrator, system manager or system administrator.
1. Switch to the Administration perspective. In the top toolbar select Workspaces. Alternatively click on the“Workspaces” bar in the left navigation area.
2. Select a workspace in the leftmost navigation area.
3. In the second navigation column click on “Version control”.
Attention: The version control node will only be available of the space type for this space supportsthis feature.
55

Administration: Managing Spaces
4. Select one of the supported version control systems, in this case Subversion. The list may vary. Additional systemscan be supported via plug-ins.
5. Select a version control web viewer, if you have any installed. Genji directly supports viewVC, WebSVN, andSventon. With a version control web viewer you will be able to go from an item directly to associated changesets or files.
6. Enter the correct links for your version control web viewer. In particular, replace the „SERVER“ variable with yourserver URL.
7. Fill in the connection information (here shown for SVN connected via the svn+ssh connection method).
8. There may be additional connection information required. In the case of the svn+ssh connection method we canchoose to use a public/private key pair. In this case, copy the private key (in OpenSSH format) into the providedarea. If the key is protected via a pass phrase, enter it into the pass phrase field.
Attention: You need to copy the entire private key file in OpenSSH format there. It does not suffice tocopy the key itself, as you may be used from the authorized_keys file.
9. Test your connection. The save the configuration by clicking on the „Save“ button in the toolbar.
Your space is now directly linked to your version control system. When editing item there will be a tab showing allfiles including their meta information that are related to this item. Please not that it may take some time before any
56

3.8 Version control
commits to the Subversion repository show up in Genji, since Genji needs to scan the repository on a regular basisto retrieve this information. The time this takes depends on the size and number of your Subversion repositories.
3.8.2 Git version controlGenji can integrate with your source code version control system, for example CVS, Subversion, or Perforce. Toestablish links, add item numbers to your version control system submits like „#<item no.>, e.g. „#4711“. This sectiondescribes how to proceed for Git.
You must know how to connect to your version control system. Typically you already have used that informationwhen you set up your version control client software.
For Git, you need to create a clone of your master repository in a place where the Genji application server can accessit. Log in on your Genji server (on the console, not on the web interface) and clone the repository :
ssh yourLoginName@yourGitServersNamegit clone ssh://yourLoginName@yourGitServersName/pathToGitRepository /path/To/Your/Server/Clone/Dir
It would suffice to create a bare clone with just the administrative information:
ssh yourLoginName@yourGitServersNamegit clone --bare ssh://yourLoginName@yourGitServersName/pathToGitRepository /path/To/Your/Server/Clone/Dir
Now log in on the Genji web interface.
You must be logged in as space administrator, system manager or system administrator.
1. Switch to the Administration perspective. In the top toolbar select Workspaces. Alternatively click on the“Workspaces” bar in the left navigation area.
2. Select a workspace in the leftmost navigation area.
3. In the second navigation column click on “Version control”.
Attention: The version control node will only be available of the space type for this space supportsthis feature.
57

Administration: Managing Spaces
4. Enable version control by setting the check box. Select one of the supported version control systems, in thiscase Git. The list may vary. Additional system can be supported via plug-ins.
5. Select a version control web viewer, if you have any installed. Genjidirectly supports Git Viewer. With a versioncontrol web viewer you will be able to go from item directly to associated change sets or files.
6. Enter the correct links for your version control web viewer. In particular, replace the „SERVER“ variable with yourserver URL.
7. Enter the path to the repository as seen from the Genjiserver. You cannot directly use a remote repository.
8. Fill in the authentication information (here shown for Git authenticated via a public/private key pair). In this case,copy the private key (in OpenSSH format) into the provided area. If the key is protected via a pass phrase, enterit into the pass phrase field.
Attention: You need to copy the entire private key file in OpenSSH format there. It does not suffice tocopy the key itself, as you may be used from the authorized_keys file.
9. Save the configuration by clicking on the „Save“ button in the toolbar.
Your space is now directly linked to your version control system. When editing item there will be a tab showing allfiles including their meta information that are related to this item. Please not that it may take some time before anycommits to the Git repository show up in Genji since Genjineeds to scan the repository on a regular basis to retrievethis information. The time this takes depends on the size and number of your Git repositories.
3.8.3 CVS version controlGenji can integrate with your source code version control system, for example CVS, Subversion, or Perforce. Toestablish links, add item numbers to your version control system submits like „#<item no.>, e.g. „#4711“. This sectiondescribes how to proceed for CVS.
58

3.8 Version control
You must know how to connect to your version control system. Typically you already have used that informationwhen you set up your version control client software.
You must be logged in as space administrator, system manager or system administrator.
1. Switch to the Administration perspective. In the top toolbar select Workspaces. Alternatively click on the“Workspaces” bar in the left navigation area.
2. Select a workspace in the leftmost navigation area.
3. In the second navigation column click on “Version control”.
Attention: The version control node will only be available of the space type for this space supportsthis feature.
4. Select one of the supported version control systems, in this case Subversion. The list may vary. Additional systemscan be supported via plug-ins.
5. Select a version control web viewer, if you have any installed. Genji directly supports viewVC. With a versioncontrol web viewer you will be able to go from an item directly to associated change sets or files.
6. Enter the correct links for your version control web viewer. In particular, replace the „SERVER“ variable with yourserver URL.
7. Fill in the connection information (here shown for CVS connected via the svn+ssh connection method).
8. There may be additional connection information required. In the case of the svn+ssh connection method we canchoose to use a public/private key pair. In this case, copy the private key (in OpenSSH format) into the providedarea. If the key is protected via a pass phrase, enter it into the pass phrase field.
59

Administration: Managing Spaces
Attention: You need to copy the entire private key file in OpenSSH format there. It does not suffice tocopy the key itself, as you may be used from the authorized_keys file.
9. Test your connection. The save the configuration by clicking on the „Save“ button in the toolbar.
Your space is now directly linked to your version control system. When editing item there will be a tab showing allfiles including their meta information that are related to this item. Please not that it may take some time before anycommits to the Subversion repository show up in Genji, since Genjineeds to scan the repository on a regular basisto retrieve this information. The time this takes depends on the size and number of your version control repositories.
60

4Administration: ManagingPeopleTopics:
• Managing regular users• Managing clients• Managing groups
61

Administration: Managing People
4.1 Managing regular users
Genji can be configured such that users can create an account themselves. However, some supervisory activity isrequired to grant users permission to view or enter any data to spaces, to assign them to organizational units, andto activate or deactivate their accounts.
Access to spaces can be granted to users by the system administrator or system manager for all spaces. A spaceadministrator can grant access to the spaces he manages.
Adding users
As s system administrator or system manager you can add users to the Genji system. To add a user, go to theAdministration > Users and groups > Users... menu entry.
The most important parameter is the user name. It must be unique, and it is recommended to use the same nameas for other accounts in your organization, like the Windows user name. In particular, if a directory server (WindowsActive Directory Server or LDAP server) is to be used, the user name you enter here must be the same as that usedon the directory server.
The second important parameter is the users e-mail. The initial password is communicated to the new user via e-mail, so make sure the e-mail is correct.
If the user has forgotten his e-mail, he has to ask the system administrator to look it up.
If you as the system administrator have forgotten your password, and your e-mail address, or the e-mail connectiondoes not work, the only way to reset the password is to directly write an encrypted known password into thedatabase. There is an explanation on the user forum in the FAQ section on how to do this.
Modifying user parameters
As a system administrator or system manager you can modify user parameters to assist the user in the configurationprocess, or when adding a user to the system. A detailed explanation of all parameters can be found in the user tasksection, since these are the same parameters the user can change.
Only the system administrator can assign users to organizational units, assign them an employee identificationnumber, and configure their session timeout. These fields are read only for regular users.
Deactivating users
As a system administrator or system manager you deactivate users, for example if they have left the companyor moved to another location. Deactivating users means they are still in the database, and their entire history ispreserved. It is possible to activate them again any time. Deactivated users are shown in the user list grayed out orwith an asterisk behind their name.
Deactivated users cannot access the system anymore. In case they try they get an error message telling them tocontact the system administrator. Deactivated users do not count towards the number of user licenses included inthe license key.
Assigning user levels
As a system administrator or system manager you can assign user to levels. The user level determines whichfunctionality is available to that user.
You can define as many user levels as you like. For each user level you can configure what user interface elements willbe visible (see Customizing the User Interface). There are some fixed predefined levels which are treated differentlyby the system.
62

4.1 Managing regular users
User level Description
"Client" user "Client" users are managed in a different section thanregular users. They have a simplified menu with reducedfunctionality, for example they cannot create their ownfilters, and see only their own entries in the item history.
Typically you would mark users with a client user licenseif they use the system only occasionally, for example ina help desk environment.
"Full" user "Full" users can use the full system functionalityexcluding the administrative functions like creatingspaces or managing users.
System administrator System administrators have full access to the system,including the permission to add and delete spaces andusers.
Users with system administrator rights are marked witha “!” at the end of their name.
System manager System managers have full access to the system,including the permission to add and delete spaces andusers.
In contrast to a system administrator however, theycannot modify the server configuration, like settingindex or attachment directories, or enabling anddisabling LDAP and web services.
Simple A configurable level for users that prefer basicfunctionality and a simple user interface. The differenceto an easy user is that the simple level has no restrictionsregarding reading other peoples items or filtering.
Intermediate A configurable level for intermediate users that don'twant to use the entire system functionality and havethus some user interface elements removed.
Advanced A configurable level for users that want to use most ofthe system functionality.
Removing users permanently
As a system administrator or system manager, you can remove users from the database permanently. This isparticular useful if test users had been added, or mistakes were made when creating the user name. Otherwise, thisis a rather grave operation since it affects all items this user has ever worked on.
Since Genji is a tracking system, it will not delete any users activities from the system. When permanently deletinga user from the system, a replacement user has to be named. This replacement user will be entered in all placeswhere the now to be deleted user has been registered in previously. The replacement user will thus inherit the entirehistory of the user that is about to be removed.
To delete a user from the system use the delete action button for this user on the left side of the user list screen.
63

Administration: Managing People
Viewing a users role assignments
Select a user in the list and click on the Role assignments button in the toolbar. You will get a list with projects andthe roles this user has been assigned for these projects.
Assigning a cockpit to users
As a system administrator or system manager, you can assign one of the cockpit templates to a set of users. Selectthe users with the check boxes, then click on the Assign cockpit button in the toolbar. Select the desired cockpittemplate and click OK.
Assigning special licenses to users
As a system administrator or system manager, you can assign special licenses to selected users, for example for ALMor Gantt functionality. To assign these licenses mark the checkbox for that user in the respective column on the right.You will only see columns if you have a license for that functionality.
Figure 4-1: Enabling the Gantt view
Synchronizing Genji with an LDAP directory
You can synchronize your Genji list of users with your LDAP directory. Entries found in the LDAP directory but notin Genji are created in Genji. Entries found in Genji but not in your LDAP directory can be automatically deactivatedin Genji (set parameter deactivateUnknown=true).
You can configure Genji to perform the synchronization automatically on a regular basis, or initiate thesynchronization manually from the user administration interface.
By default, automatic synchronization is disabled. To enable it you need to modify some entries in file webapps/track/WEB-INF/quartz-jobs.xml.
The relevant sections looks like this:
<?xml version="1.0" encoding="UTF-8"?><job> <name>LdapSynchronizerJob</name> <group>DefaultJobGroup</group> <description> Synchronizes a Genji user database with an LDAP directory </description> <!-- description not more than 120 characters!!! --> <job-class> com.aurel.track.dbase.jobs.LdapSynchronizerJob </job-class> <job-data-map> <entry> <!-- Enable synchronization with LDAP --> <key>enabled</key> <value>false</value> </entry>
64
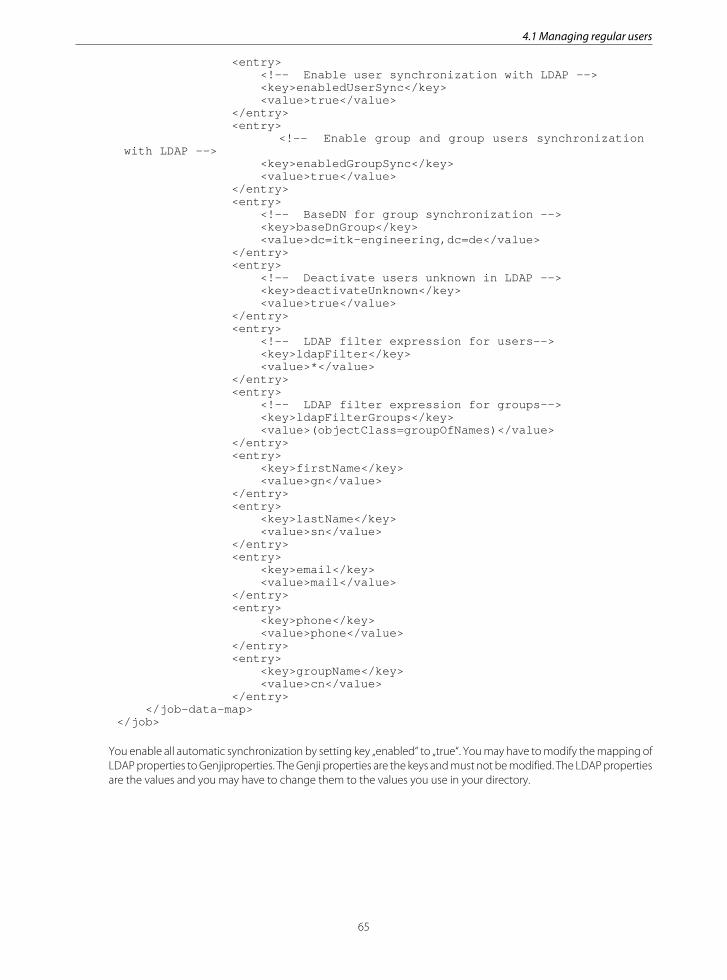
4.1 Managing regular users
<entry> <!-- Enable user synchronization with LDAP --> <key>enabledUserSync</key> <value>true</value> </entry> <entry> <!-- Enable group and group users synchronization with LDAP --> <key>enabledGroupSync</key> <value>true</value> </entry> <entry> <!-- BaseDN for group synchronization --> <key>baseDnGroup</key> <value>dc=itk-engineering,dc=de</value> </entry> <entry> <!-- Deactivate users unknown in LDAP --> <key>deactivateUnknown</key> <value>true</value> </entry> <entry> <!-- LDAP filter expression for users--> <key>ldapFilter</key> <value>*</value> </entry> <entry> <!-- LDAP filter expression for groups--> <key>ldapFilterGroups</key> <value>(objectClass=groupOfNames)</value> </entry> <entry> <key>firstName</key> <value>gn</value> </entry> <entry> <key>lastName</key> <value>sn</value> </entry> <entry> <key>email</key> <value>mail</value> </entry> <entry> <key>phone</key> <value>phone</value> </entry> <entry> <key>groupName</key> <value>cn</value> </entry> </job-data-map></job>
You enable all automatic synchronization by setting key „enabled“ to „true“. You may have to modify the mapping ofLDAP properties to Genjiproperties. The Genji properties are the keys and must not be modified. The LDAP propertiesare the values and you may have to change them to the values you use in your directory.
65

Administration: Managing People
Table 4-1: LDAP synchronizer parameters
Property in quartz-jobs.xml Description
enabled True if users and groups shall be regularlysynchronized with your LDAP directory.If False, properties "enabledUserSync" and"enabledGroupSync" have no effect.
enabledUserSync True if users shall be regularly synchronized with yourLDAP directory
enabledGroupSync True if groups and the users assigned to them shallbe regularly synchronized with your LDAP directory
baseDnGroup The LDAP base DN under which your groups aredefined. Search is based on the "member" propertyof the groups.
deactivateUnknown True if users not found during the synchronizationprocess shall be deactivated. The "admin" and"guest" users are exempted.
ldapFilter The LDAP filter expression for user synchronization.Can be any valid LDAP filter term like"(&(objectClass=inetOrgPerson)(ou=Trackplus))"
ldapFilterGroups The LDAP filter expression for group synchronization.Can be any valid LDAP filter term like"(&(objectClass=group)(ou=Groups))"
firstName The LDAP property name for users first name
lastName The LDAP property name for users last name
email The LDAP property name for users email
phone The LDAP property name for users phone number
groupName The LDAP property name for the group name
After you have modified this file save it and restart the Tomcat server.
Bulk setting user properties
You can set some user properties for all users using a special link. Here is an example:
http://localhost:8080/track/setUserProperty.action?field=homePage&value=cockpit
The fields with their possible values are listed below.
Field Value Description
homePage cockpit | itemNavigator
layoutEnabled true | false
alwaysSaveAttachment true | false
hoursPerWorkday in hours, e.g., 8.0
autoloadTime in seconds
maxAssignedItems 1...1000
66
4.2 Managing clients
Field Value Description
prefEmailType html | plain
sessionTimeout in minutes
4.2 Managing clients
Genji can be configured such that external or client users can create an account themselves and automatically join agroup. Some supervisory activity is required to grant clients specific permission to view or enter any data to spaces,to assign them to organizational units, and groups and to activate or deactivate their accounts. Handling of clientusers is the same as for regular
Handling of client users
Handling of client users is equivalent to that of regular users (see Managing regular users) with the differences notedbelow. To manage client users go to the Administration > Users and groups > Clients... menu entry.
Adding clients by e-mail submission
You can allow people to create items by e-mail. In this case a new client user can automatically be created if thee-mail comes from an authorized domain. The system tries to guess the first and last name. The automated e-mailresponse contains a link to the newly created item and a link where he can register, even if self registration is notenabled.
Assigning roles to client users
Client users cannot be assigned a role directly. Instead they have to belong to a group and inherit their permissionsfrom that group.
Limited client user permissions
Client users can only
• View a fixed list of their open and closed items• Create new items• Comment on their own open items• Close their own items
Different access point
Client users access the system via a different access point (URL).
4.3 Managing groups
Genji can be configured such that users can create an account themselves. However, some supervisory activity isrequired to grant users permission to view or enter any data to spaces, to assign them to organizational units, andto activate or deactivate their accounts.
Access to spaces can be granted to users by the system administrator or system manager for all spaces. A spaceadministrator can grant access to the spaces he manages. This section deals with managing groups, that is creating,modifying, deactivating and deleting groups, and assigning users to them.
67

Administration: Managing People
Adding groups
The system administrator can add users to the Genji system. This is particularly useful if self-registration is not enabled.To add a user, go to the Administration > Users and groups > Groups... menu entry.
Then click on the Add group button in the toolbar. Enter a group name and save.
Tip: By marking the check boxes you give members of that group a special property. Each user in thatgroup can handle items of other members of that group as if they themselves were the author, responsibleor manager. Thus, they could access items even then if their role would not permit them to access them.This is useful when you deal with another organization and you want them to be able to see only theirown items, but not yours.
Note: By marking the check box “Automatically join new users to this group” users that have registeredthemselves or which have been registered by a system administrator will automatically be part of thatgroup and inherit all rights from that group.
You can now add users to the group. Select the group and then drag users from the right column “Available” tothe left column “Assigned”.
Tip: You can set filters on the columns to limit the amount of users yo see at a time.
Attention: The user will inherit all access rights of the groups he is a member of!
If you need to remove a user from a group drag him back to the “Available” column.
Note: The users you have removed from the group will loose all access rights they previously had inheritedfrom that group.
Removing groups
Groups can be removed just like users. If a group is associated with any items, a replacement group or user has tobe named when removing that group.
68

5Administration: ManagingtemplatesTopics:
• Managing report templates• Task board card templates• Managing filters
69

Administration: Managing templates
5.1 Managing report templates
Reports are based on data sources and report templates. The data source determines the set of items you will getin a report. The report template defines the layout and visual appearance of the item data.
Sometimes it is desirable to display a list of items in a different way, for example in PDF format, with complete history,or as a graphical summary.
Genji has a powerful template based reporting engine that can prepare pixel perfect results from lists of items. Genjicomes with an interactive report design software, called JasperReports Studio. With this software you can defineyour own report templates any way you like. These templates can be tested on your computer, and once you aresatisfied with the result uploaded to the server.
The report template engine even permits you to pre-process data using XSLT style sheets. The style sheets are partof the template and will be executed on the server prior to executing the formatting part of the report template.This permits great flexibility on processing and presenting items.
5.1.1 Using a report templateYou create a report by using a report template. A report template can have its own filter configuration or may usethe filtered set of items from the item navigator.
Report templates take a list of items and format them in the way defined in the template. Most examples that comewith Genji are templates for PDF output. There are reports with and without history, grouping, localization, and evencharts.
There are two ways to access reports: via the Actions button in the item navigator or via the Reports toolbar button.In the first case, if the report template permits, you will not be asked for which items you want to create a report for.In the second case you will always be asked for filter criteria to be used for the report. In the following we assumethe second approach.
1. Select Reports from the main toolbar.
2. Open one of the folders on the left. On the right you should get a list with report templates in that folder. Whenyou hover over the report template name on the right you will see a preview of the report.
3. Select the desired report template and click on the “Create report” button in the toolbar.
70

5.1 Managing report templates
4. Depending on the report template selected you now have to specify a filter. You create the report by clickingon button “Create report”. When you click on the “XML datasource” button you can download an XML filerepresenting sample data for this type of report template. This XML file you can use as test data when you modifythe report template locally on your computer.
5.1.2 Report template repositoriesReports are organized in report template repositories.
Genji provides three types of repositories to keep report templates in:
1. A private report template repository for each user2. A project specific report template repository3. A system wide report template repository
Each user may upload personal report templates to his private report template repository. Other users will not beable to see these templates.
Project administrators may upload templates for use in projects they are responsible for. Users that have a role inthese projects will be able to see these report templates.
The system administrator can upload templates that can be seen by all users.
5.1.3 Downloading a report templateReports are based on data sources and report templates. The data source determines the set of items you will getin a report. The report template defines the layout and visual appearance of the item data.
You can download a report template for modification or to create a new, derived template. On your computer youcan design a template and test it with XML data from Genji. Once you are satisfied with the result you can uploadthe template to the server.
71

Administration: Managing templates
To download a report template from the server to your client computer, select it in the list and click on the„Download“ button in the toolbar. Alternatively use the context menu.
5.1.4 Uploading a report templateYou can upload report templates to the server from your local computer.
You can upload your personal report templates to the server. Depending on your role in the system you may onlyupload report templates to your private template repository, to a project repository, or for system wide use.
To upload a report template click on “Upload report” in the toolbar. In the window that opens select the ZIP filecontaining the report template. If you have modified an existing template and you want to replace it by yournew version, mark the check box “overwrite existing”. Otherwise a new template will be created. Then click on the“Upload” button.
The ZIP file structure is flat. The JasperReports template file must be at the top level of the ZIP file, there must be nofolder. The same goes for the other files, in particular the description and properties files.
5.1.5 Removing report templatesReports are based on data sources and report templates. The data source determines the set of items you will getin a report. The report template defines the layout and visual appearance of the item data.
You can delete your own templates by selecting them in the list and clicking on the „Delete“ button in the toolbar.As a system manager or administrator you can remove any template.
72

5.2 Task board card templates
5.2 Task board card templates
In Genji you can define the layout of task board cards as templates and use these templates in the task board view.
To add or edit task board card templates go to Administration > Templates > Agile card templates.
You can add, edit, and delete card layouts in the same way you define input mask or card layouts in the view itself.
5.3 Managing lters
You can define any number of filters and reuse them for selection a set of items. You can modify these filters anytimelater on and publish them so that others can use them. You can create parametrized filters that predefine mostconditions and ask for one or more parameters when they are being used. You can associate a view type like “Gantt”or “Task board” with a filter.
5.3.1 Defining a filter
1. Select menu Item navigator > Manage lters.
2. In the toolbar area, first select a folder, then click on “Add filter.”
73

Administration: Managing templates
3. In the window that appears define your filter.
4. Give this filter a suitable name.
5. Mark the check box "Subscribe" (A) if you want to add this filter into your „Find items“ menu.
6. You can select a style field (B) which determines the background and foreground colors in the grid based views,and the left color bar in the task board, based in the fields value.
7. You can associate a view type with this filter. Together with the saved layout this permits you to pre-define acomplete view including column layout, grouping, sorting, etc.
8. You can define more complex criteria in the lower part of this configurator. Which fields appear directly here isdetermined by the “Appear in filter” attribute of the item properties customization.
9. Save the filter.
5.3.2 Deleting a filterYou can delete filters if you are the owner or you have administrator rights.
1. Select menu Item navigator > Manage lters.
2. Select a filter by first opening a folder and then clicking on the desired filter in the right list area.
3. Click on the “Delete” icon in the toolbar area or use the context menu to delete the selected filter.
74
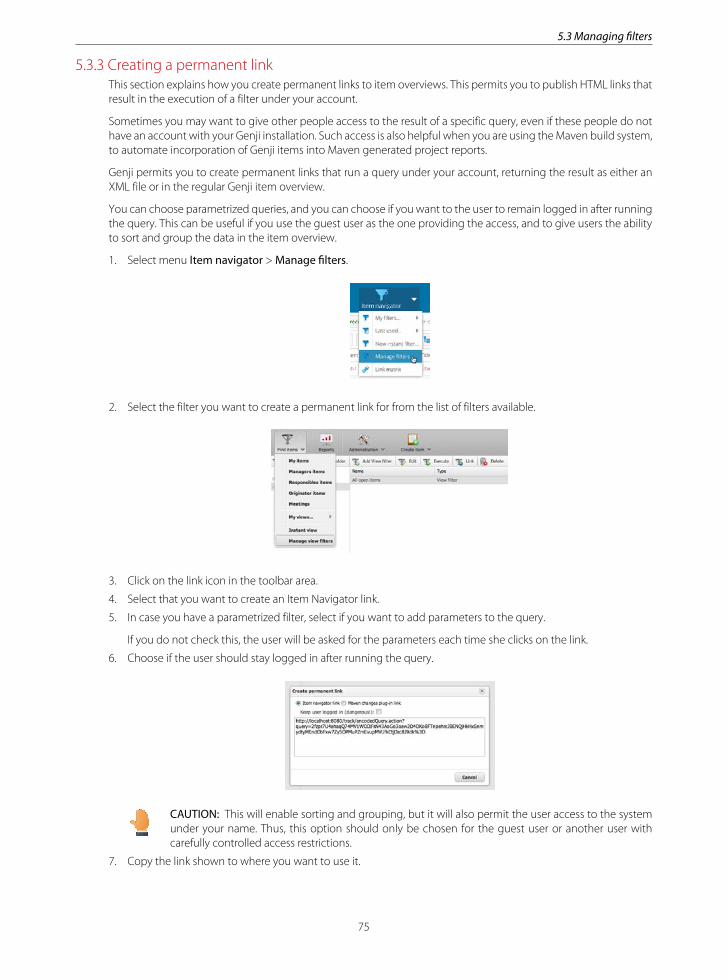
5.3 Managing lters
5.3.3 Creating a permanent linkThis section explains how you create permanent links to item overviews. This permits you to publish HTML links thatresult in the execution of a filter under your account.
Sometimes you may want to give other people access to the result of a specific query, even if these people do nothave an account with your Genji installation. Such access is also helpful when you are using the Maven build system,to automate incorporation of Genji items into Maven generated project reports.
Genji permits you to create permanent links that run a query under your account, returning the result as either anXML file or in the regular Genji item overview.
You can choose parametrized queries, and you can choose if you want to the user to remain logged in after runningthe query. This can be useful if you use the guest user as the one providing the access, and to give users the abilityto sort and group the data in the item overview.
1. Select menu Item navigator > Manage lters.
2. Select the filter you want to create a permanent link for from the list of filters available.
3. Click on the link icon in the toolbar area.
4. Select that you want to create an Item Navigator link.
5. In case you have a parametrized filter, select if you want to add parameters to the query.
If you do not check this, the user will be asked for the parameters each time she clicks on the link.
6. Choose if the user should stay logged in after running the query.
CAUTION: This will enable sorting and grouping, but it will also permit the user access to the systemunder your name. Thus, this option should only be chosen for the guest user or another user withcarefully controlled access restrictions.
7. Copy the link shown to where you want to use it.
75

Administration: Managing templates
5.3.4 Creating a link for Maven
Maven is a widely used build project management system that can automatically generate project documentation.Maven can incorporate information from other system and relate them to Maven builds or releases.
To incorporate information from Genji into Maven, you need the Genji Maven changes plug-in and install it intoyour Maven installation. Then you can create a Maven changes link and copy it into the proper place in your Mavenpom file.
The two main tags you have to change are the mapping of item types to Maven action types, and the query URL.
<build> <plugins> <plugin> <groupId>org.apache.maven.plugins</groupId> <artifactId>maven-compiler-plugin</artifactId> <configuration> <source>1.5</source> <target>1.5</target> </configuration> </plugin> <plugin> <groupId>com.trackplus.mvn.plugin</groupId> <artifactId>trackplusChanges</artifactId> <version>1.0-SNAPSHOT</version> <configuration> <query>http://gandalf:8080/track/xml/report?query=nKsW4DXl5WsX...%3D</query> <!--default action type--> <defaultType>fix</defaultType> <!-- mapping between Genji item type --> <!-- and Maven action type --> <issueTypesMap> <Task>fix</Task> <ProblemReport>fix</ProblemReport> <Requirements>add</Requirements> </issueTypesMap> </configuration> <executions> <execution> <phase>compile</phase> <goals> <goal>changes-generate</goal> </goals> </execution> </executions> </plugin> </plugins></build>
1. Select menu Item navigator > Manage lters.
2. Select the filter you want to create a permanent link for from the list of filters available.
76

5.3 Managing lters
3. Click on the link icon in the toolbar area.
4. Select that you want to create a Maven link.
5. In case you have a parametrized filter, select that you want to add parameters to the query. Anything else doesn'tmake sense for a Maven link.
6. Choose that the user should not stay logged in after running the query. Anything else doesn't make sense fora Maven link.
7. Copy the link shown to where you want to use it.
77


6Customizing GenjiTopics:
• Customization overview• Configuration scenarios• Roles and permissions• Customizing automail• Customizing the User
Interface• Item properties• Customizing forms• Custom selection lists• System object states• Managing workspace types• Replacing logos
79

Customizing Genji
6.1 Customization overview
Genji can be customized and adapted to your processes to a large extend. This includes roles, item types, workflows,item fields, action forms, and much more.
As shipped, the Genji configuration may suite already many requirements, in particular for the development ofsoftware based system. This section describes and discusses the various options when configuring Genji to adaptto your processes.
One of the most important parts of running projects with a group of people is to define who is supposed to dowhat, how things should be done, and how things should be named. This can be either communicated ad hoc, asa particular situation requires, or it can be defined as a company or project policy.
We recommend to write up the most important aspects, for example as part of a project handbook or configurationmanagement manual. In many cases it also suffices to implement policies in the Genji system; however, thesemantics of names may not always be self explanatory and should be described where project team memberscan find it.
It would be nice if there was the one and only right process. Unfortunately there is not. We therefore can just givesome examples, and outline the general procedures, hoping that this might be helpful enough to get you started.If you have no idea, using the Genji default configuration should be a pretty good start. You can always change theprocess later on, if you feel that the default process model of Genji does not suit your needs.
If you cannot get started on this, Genji provides process consulting on various levels through its consultant network.For example, we would discuss your needs and project environment, and would supply a project manual, aconfiguration manual, and a Genji configuration exactly matching your requirements.
6.2 Conguration scenarios
This section gives examples of configuration scenarios, pertaining to roles and permissions, item types, andworkflows.
Customers and developers
A common scenario is to grant customers access to the system but in a way that they only see their own entries.Developers should be able to see all entries, including internally generated tasks. There are three ways to accomplishthis setup in Genji:
1. Customers are assigned to role „Extern“. This way they can only see their own items. A disadvantage may bethat entries from this customers are not grouped. If there are several people associated with this customer, eachcan only see his own entries, but not those of his peers from the same company. If each customer is granted acollective account, this usually poses no problem though.
2. If there is only a limited amount of customers, a list is created for each customer. Only people associated withthis customer and developers are granted access to this list. Customers may now have extended rights to thislist, and all people associated with this customer may see all tasks in this list.
3. A separate project is created for each customer. Internal developers can access all projects, while customerscan only access their specific project. This permits to use the finer classification of different lists even with manydifferent customers.
Each solution has its distinct advantages, and it depends on the number of customers and how one likes to interfacethe system with the customer which solution is preferable.
80

6.2 Conguration scenarios
Anonymous access
To permit anonymous access to the system create an account „anonymous“ or use the predefined „guest“ accountwith no password or a public password and grant this user all access rights desired. Public passwords may forexample published on the login page.
Personal To Do list
It is possible to configure Genji such that you have your personal to do list that is not visible to others. There arethree ways how to achieve this. One solution is to define a new project, e.g. named „Personal“, and assign each userthe „Extern“ role. This permits you to create, modify and close items that only you can see.
The second approach is to define a new item type „personal items“ and define via access restriction on the accesspermission page that only role „Extern“ can access this list.
The third approach is to use the privacy flag on items you want to hide. You can set this flag when creating items, orlater on when you modify your own items. It is not possible to set the privacy flag on items you have not originated.
Small development teams, lean, informal
Here is an example for a lean configuration. This works very well for small teams, in open cultures with less formalapproaches.
The following item types are used:
• tasks• mile stones
You may delete all other item types.
You can use the default priorities and severities.
The following states are being used:
• opened• suspended• closed• processing
There should be no workflows configured; thus it is possible to go from any state to any other state. All teammembers shall have role „responsible“.This will give you a solid yet open process which is very efficient for smallteams.
Large development teams, lean, formal
Here is an example for a lean but more formal configuration. This works very well for larger teams where it maybe necessary to restrict state changes to certain people, e.g. that only a tester can close an item, or that marketingshould not see bugs only known to the developers.
The following item types are used:
• tasks• problem reports• request for enhancements• mile stones
You may delete all other item types.
You can use the default priorities and severities.
The following states are being used:
• opened
81

Customizing Genji
• analyzed• assigned• suspended• testing• closed• processing
Item type access should be constrained to the specific roles; for example marketing shall only be able to see milestones and requests for enhancements, developers should be able to see everything.
There should be reasonably open workflows configured. In general, any state transition shall be possible with a fewexceptions. You should ask yourself not „who should be able to carry out this transition?“ but rather „is there anyreason that not anybody could carry out this transition?“. This will lead to a more practical workflow than if you justgo ahead and consider the „good“ case, not taking into account the many exceptions that might happen in thecourse of a project.
6.3 Roles and permissions
Genji manages what users can do with items and workspaces via „roles“. You can assign roles for a workspace tousers and thereby give them certain permissions. For example, you would permit them to view other peoples items,or see certain item properties but not others, or see only items of a specific item type.
You can define any number of roles and name them as you like. For each role you can configure permissions.
6.3.1 Adding and editing rolesAs system administrator, you can add any number of roles to your installation. This section describes how to do that.
You must be logged in as system manager or system administrator.
You have four different areas you need to address when defining roles:
1. General permissions, as described below2. RACI selection list assignments, as described below3. Defining access to item types, see Restricting access to item types for more information4. Hide fields or make them read only, see Restricting access to item fields for more information
Table 6-1: General permissions
Permission Description
read any You may read or view all items in this project, not just your own. If this flagis not set, you will only be able to read an item if you are
• the original author• the current manager• the current responsible• on the consulted or informed list
of this item.
82

6.3 Roles and permissions
Permission Description
modify any You may modify all items in this project, not just your own. If this flag isnot set you will only be able to modify an item if you are
• the current manager• the current responsible• on the consulted list
of this item. This will automatically enforce that you can read this item.
create item You may create items in this project.
close any You may close any item that you are authorized to modify. This flag doesnot imply any modification authorization, it just is superimposed uponpossible modification permissions.
close if resp. You may only close an item if you are the current responsible of thisitem. This flag does not imply any modification authorization, it is justsuperimposed upon possible modification permissions.
close if manager or author You may only close an item if you are the current manager or theoriginal author of this item. This flag does not imply any modificationauthorization, it is just superimposed upon possible modificationpermissions.
workspace admin You may act as a workspace administrator or manager. You can assignusers to your project, and set all project parameters. You may archive anddelete items, or get them back out of the archive or reactivate them. Youmay change other users comments, and modify their expense entries.You cannot create a project, this has to be done by users with systemadministrator privileges, e.g., the system administrator („admin“ user).
Table 6-2: RACI selection
Selection list Description
manager This is not exactly a permission flag. It indicates that your name appearsin the selection list of managers when modifying or creating items.
responsible This is not exactly a permission flag. It indicates that your name appearsin the selection list of responsibles when modifying or creating items.
consulted This is not exactly a permission flag. It indicates that your name appearsin the selection list of consulted“ when modifying or creating items.
informed This is not exactly a permission flag. It indicates that your name appearsin the selection list of informed when modifying or creating items.
1. Switch to the Administration perspective. In the top toolbar select Customize > User roles. Alternatively clickon the “Customize”/“User roles” bar in the left navigation area.
83

Customizing Genji
2. Click on "Add" in the toolbar, or double click on a role to edit it. Fill out the form that appears. For explanationson each check box see the context description above.
Attention: When you rename an entry the change may not be reflected at the user interface!This happens when you have specific localizations for the selection entries, which is the case for allpredefined entries. In this case the localized values will be shown and not the label you define here.
3. When you are done, click on the „Save“ button in the toolbar area.
You have created a new role with associated permissions. You or any space administrator can now assign users inthis role to workspaces.
6.3.2 Deleting rolesAs system administrator, you can delete roles.
You must be logged in as system manager or system administrator.
1. Switch to the Administration perspective. In the top toolbar select Customize > User roles. Alternatively clickon the “Customize”/“User roles” bar in the left navigation area.
2. Select a role by clicking on it and the click on the "Delete" button in either the toolbar or the context menu.
84

6.3 Roles and permissions
You have deleted the selected role. All permission to users via this role have been revoked.
Attention: When you remove the only role of a user for a workspace, this workspace will become invisibleand inaccessible to that user.
6.3.3 Restricting access to item typesYou can restrict access to a set of item types for each role. By default, a role can access all item types.
You must be logged in as system manager or system administrator.
You can define a role such that it will permit only to see certain item types. This can be useful if you want to haveother parties participate in your process, but you want to keep some of your items visible only to people of yourown organization.
1. Switch to the Administration perspective. In the top toolbar select Customize > User roles. Alternatively clickon the “Customize”/“User roles” bar in the left navigation area.
2. Select a role by clicking on it and then click on “Item type assignment” in the toolbar. By dragging item typesfrom one column to the other you can make item types available or restrict access to them. If you have no itemtypes in the very right column, all item types will be available to that role.
85

Customizing Genji
3. When you are done, click on the „Done“ button in the lower right corner of the configuration pop-up window.
You have now restricted access to some item types for users carrying this role in a workspace.
6.3.4 Restricting access to item fieldsYou can hide fields from users and make fields read-only. By default all fields are shown and all fields are writableexcept for those where it doesn't make sense to change them.
You must be logged in as system manager or system administrator.
You can define a role such that it will permit only to see certain item types. This can be useful if you want to haveother parties participate in your process, but you want to keep some of your items visible only to people of yourown organization.
1. Switch to the Administration perspective. In the top toolbar select Customize > User roles. Alternatively clickon the “Customize”/“User roles” bar in the left navigation area.
2. Select a role by clicking on it and then click on “Field restrictions” in the toolbar. Select the fields you want tohide and the fields you want to make read-only.
86

6.4 Customizing automail
3. When you are done, click on the „Save“ button in the lower right corner of the configuration pop-up window.
You have now restricted access to some item fields for users carrying this role in a workspace.
6.4 Customizing automail
Genji can inform users of item activity. The conditions under which such information occurs can be largelycustomized via automail triggers and automail conditions.
There are two classes of automail:
• information due to item activity• information due to items being due or overdue (reminder e-mails)
In your user profile you can configure the conditions and frequency for reminder e-mails. In your user profile youcan also decide to switch off e-mail notifications entirely.
This section discusses the principles and functionality for automail due to item activities, like creating items, addingcomments, and so on.
A complete automail configuration consists of three steps:
1. Defining automail triggers2. Defining automail conditions3. Assigning automail trigger and conditions to projects
6.4.1 Triggers and conditionsYou can receive e-mail notifications from the Genji system when items you have an interest in are created, changed,or due. You can control under what circumstances you receive such information by means of automail triggers andautomail conditions.
Sending an e-mail upon creation or modification of an item is a two stage process, as shown in the figure below.
87

Customizing Genji
Figure 6-1: Automail triggers and automail conditions
First, based on a configurable trigger an e-mail notification is triggered. Next, the item causing the trigger event isexamined by the automail condition. Only if the item meets the condition, an e-mail is actually sent.
In the example above, only when the state or the responsible person or the end date changes, an e-mail is triggered.But only if the new priority of the item, that is the priority after the item has been changed, is "high" and "Susan Doe"is either the new or the old responsible, an e-mail is actually being sent.
With automail triggers, you can define for each action type (create, edit, change cost and budget relatedinformation), for each RACI and item role (manager, responsible, author, consulted, informed, watchers), and foreach item property whether a message is triggered or not.
Important: Automail triggers cannot be used to exclude others from notification e-mails. Any user canoverwrite for himself the space or system wide settings. Automail triggers define how YOU will be informed,or others that also use the same trigger.
As a standard user you don’t have to define your own trigger settings. In this case the space or system defaults willpertain to you. If you want to define your own trigger, start with copying an existing one.
With automail conditions you can define complex filter criteria based on new and previous item property values.For example, you only want to be notified if an item was reopened or when it was closed.
You can define your own conditions, or use existing conditions, and you can assign your personal conditionspecifically for each space. If you do not do this, the settings provided by the space or system administrator prevail.
All properties can be selected with either their „new“ or their „old“ value. „New“ means the property value that wasthe result of the action causing the automail trigger, and old means the value the property carried before the action.
This makes it possible to define conditions that check for transitions, for example state transitions from anywhere toclosed, or responsible transitions from yourself to anybody else.
6.4.2 Automail triggersVia automail triggers you can define what events or actions „fire“ a message to you in a specific role. If the messagepasses your automail conditions, you will receive the message. There are two types of actions that can trigger amessage: create actions and edit actions. You can define automail triggers separately for both types of actions.
You must be logged in as system manager or system administrator.
1. Switch to the Administration perspective. In the top toolbar select Customize > Automail. Alternatively click onthe “Customize”/“Automail” bar in the left navigation area.
88
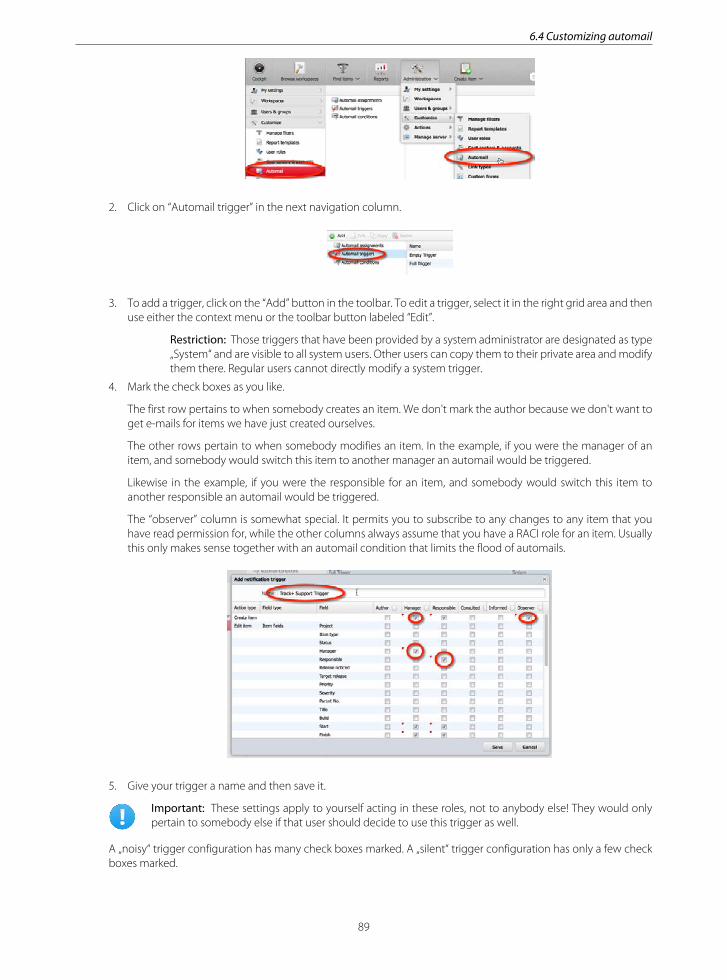
6.4 Customizing automail
2. Click on “Automail trigger” in the next navigation column.
3. To add a trigger, click on the “Add” button in the toolbar. To edit a trigger, select it in the right grid area and thenuse either the context menu or the toolbar button labeled “Edit”.
Restriction: Those triggers that have been provided by a system administrator are designated as type„System“ and are visible to all system users. Other users can copy them to their private area and modifythem there. Regular users cannot directly modify a system trigger.
4. Mark the check boxes as you like.
The first row pertains to when somebody creates an item. We don't mark the author because we don't want toget e-mails for items we have just created ourselves.
The other rows pertain to when somebody modifies an item. In the example, if you were the manager of anitem, and somebody would switch this item to another manager an automail would be triggered.
Likewise in the example, if you were the responsible for an item, and somebody would switch this item toanother responsible an automail would be triggered.
The “observer” column is somewhat special. It permits you to subscribe to any changes to any item that youhave read permission for, while the other columns always assume that you have a RACI role for an item. Usuallythis only makes sense together with an automail condition that limits the flood of automails.
5. Give your trigger a name and then save it.
Important: These settings apply to yourself acting in these roles, not to anybody else! They would onlypertain to somebody else if that user should decide to use this trigger as well.
A „noisy“ trigger configuration has many check boxes marked. A „silent“ trigger configuration has only a few checkboxes marked.
89

Customizing Genji
6.4.3 Automail conditionsYou can further filter automails generated from triggers by assigning automail conditions. With these filters you cancontrol down to each item property what kind of messages you will get from your Genji system when items arecreated or modified.
You must be logged in as system manager or system administrator.
When items are created or changed, depending on the automail trigger settings a message is prepared for this itemto be sent to you. With automail conditions you can investigate the item belonging to this message, and dependingon the result of the evaluation, the message is passed on to you as an e-mail, or it is stopped and discarded.
Automail conditions are logical expressions that relate to item properties. If the condition evaluates to true, an e-mail is sent to you. With automail conditions you can take a look at all item properties, and not only their new valuebut also their value prior to the change. This permits you to filter on absolute values as well as on value transitions.
Each automail condition can be named, and can be stored in a repository. The system administrator can placeconditions into the public repository so that all users can access and use them. A space administrator can copyconditions to a space repository, so it becomes available to all users that have a role in any of the spaces the spaceadministrator manages.
You can copy a public automail condition into your private repository and modify it there to your liking. You canmodify and delete your own conditions, and you can create new conditions.
1. Switch to the Administration perspective. In the top toolbar select Customize > Automail. Alternatively click onthe “Customize”/“Automail” bar in the left navigation area.
2. Click on “Automail condition” in the next navigation column.
3. Select the folder where you want to create or modify a condition in. For example, click on “Workspaces > ITHelpdesk” to create or modify a condition specifically for that workspace. To add a condition, click on the “Add”button in the toolbar. To edit a condition, select it in the right grid area and then use either the context menuor the toolbar button labeled “Edit”.
Restriction: You can only modify conditions that you "own", i.e., you have created. Only the systemmanager or system administrator can edit and delete filters he does not own.
4. Enter a name for the condition and click on the “Add” button. Define your filter.
90

6.4 Customizing automail
The selection box with “new” and “old” refers to the item property value before and after the triggering change.This permits you to filter on transitions. In the example we filter on the state transition from any state except for“closed” to “closed”. Thus if changes were made in state “closed” we would not receive an e-mail.
Important: “Current user” always means “me” as seen from the user that utilizes an automail condition.
5. Save your condition.
You have created or modified an automail condition. You can now use it together with an automail trigger to controlthe kind of messages that you will get from the Genjisystem.
6.4.4 Assigning automail configurationsTo control the e-mail messages you get from the system you assign a combination of an automail trigger and anautomail condition to a workspace or all other workspaces not explicitly mentioned.
You must be logged in as system manager or system administrator.
1. Switch to the Administration perspective. In the top toolbar select Customize > Automail. Alternatively click onthe “Customize”/“Automail” bar in the left navigation area.
2. Click on “Automail assignment” in the next navigation column. You can
91

Customizing Genji
3. To add an automail assignment, click on the “Add” button in the toolbar. To edit an automail assignment, selectit in the right grid area and then use either the context menu or the toolbar button labeled “Edit”.
4. Select a workspace, an automail trigger and an automail condition.
Tip: There is a special entry for “all other workspaces”. This assignment is taken for all workspaces thatdo not have their own assignment.
5. Save the assignment.
You now have a complete automail configuration which controls the kind of messages you get from the system.
6.4.5 Automail for unregistered submittersAutomail is also available for unregistered submitters of items, i.e. such submitters that do not have an account withthe Genjisystem.
Genji can be enabled to accept items via e-mail from submitters that do not have an account in the Genjisystem.Such submitters can nonetheless also be informed about the state of their items.
Such submitters will be treated as if they were the author of the items. The notification scheme and automail triggersare taken from the „guest“ account. Thus, notifications to unregistered submitters are handled as if the „guest“ userhad created them, except that the submitters e-mail is being used for notifications and not the guest users e-mail.
6.5 Customizing the User Interface
To simplify the user interface you can define user levels. For each user level you define which user interface elements(menu elements, navigation areas, etc.) are available. As an administrator you can assign each user a ceiling userlevel. The user can select his preferred level from any level equal to or below the ceiling user level.
For a user beginning to work with Genji not all functionality might be required. To reduce user interface complexityyou assign users to a user level with reduced functionality.
Switch to the Administration perspective. In the top toolbar select Customize > User Levels. You will see a matrixwith user levels and associated interface elements. The check box permits you to disable or enable a user interfaceelement.
There are some pre-defined user levels as shown below.
Table 6-3: Pre-dened user levels
Name Description
"Client" user Reduced functionality; can only create items and seehis own items. No reports, no project specific cockpit,now access to workflows.
92

6.6 Item properties
Name Description
Full user Complete functionality except for systemmanagement and administration functions.
System manager Complete functionality except for serverconfiguration options.
System administrator Complete functionality.
Custom user levels overwrite the “full user”. Thus, if a custom user level is removed, settings are taken from the “fulluser” settings. You assign the ceiling user levels in the user administration section of the application. (see Managingregular users).
6.6 Item properties
Items have properties. There are several system properties predefined which you can modify, for example changetheir label or set default values. Beyond these pre-defined properties you can define custom properties. There area number of property types like text properties, numeric properties, selections, and date properties provided withGenji. It is possible to extend the number of property types using the Genji plug-in architecture.
6.6.1 Item properties overviewGenji has built in system properties, and you can add any number of custom properties.
Properties and fields
In Genji we distinguish between properties and fields. Properties belong to items, and fields belong to forms orinput masks. On a form there is a field for an item property. However, items can have properties that are not visibleon a form.
Note: If you want to use an property, you have to place it on an input form so that it can be accessed (seeCustomizing forms).
All properties are global, but their properties like label, tool tip, and selection list can be overwritten
• for each item type• for each workspace type and item type• for each workspace and item type
Property properties are „inherited“ down the hierarchy: system, item type, workspace type, and workspace. Aworkspace manager may define or overwrite custom properties only at the workspace level. For more informationhave a look at Configuration inheritance.
This approach fosters reuse of existing custom property definitions across many workspaces, makes it easy to changeconfigurations globally while preserving full flexibility down to each workspace.
The figure below shows at the top the global configuration. When defining system and custom properties at thislevel, all workspaces and item types will automatically inherit this configuration, unless they overwrite it locally.
The item type specific configuration permits to define system and custom properties differently for each item type.If things are configured here, in all workspaces for these item types this configuration will be visible.
93

Customizing Genji
The next figure shows configuration at a workspace type level. Here you can define for each workspace type anditem type system and custom properties.
All workspaces of this workspace type will automatically inherit this configuration.
The figure below shows a configuration at a workspace level. Here you can define for each workspace and item typesystem and custom properties.
System properties
System properties are the properties that are built into Genji. Many of the system properties have some logicassociated with them, like the author property, the manager property, the responsible property, the item typeproperty, and so on. For an overview on all system properties have a look at System properties.
These properties always exist, even though they may not appear at the user interface. You can overwrite thelabels and tool tips of these properties at each of the levels mentioned above, thus permitting you some limitedcustomization.
Custom properties
As a system or workspace administrator you can define new properties. An property has an property type, like textor date. If you want to define properties offering a selection list, you first have to create the selection list before youdefine the property.
Custom properties do not automatically appear at the user interface. You have to explicitly place them on at leastone custom form before they become visible to users.
Deprecated and required properties
All properties can be marked as deprecated or required.
94

6.6 Item properties
Deprecated properties cannot be selected anymore from the property selection list when managing input forms.They are still in the database, but they cannot be used anymore when designing new forms.
If an property is marked as required, users have to enter information for this property when an item is created. If theydo not enter information, an error message is displayed. The „required“ property pertains only to creating items.
CAUTION: It is possible to create problematic configurations that prevent the user from creating new items.If an property is marked as required, but does not appear on the associated input mask for this workspaceand item type, the user will not be able to create an item.
Property names
Each property has a name. This name is used in the full text search index. When an property name is changed, thischange is always global, even for properties that have been derived, or have been overwritten at the workspace,workspace type, or item type level.
Label and tool tip
Each property has a label and a tool tip property. The label property is the one shown at the user interface as thelabel for this property. The tool tip property will be displayed as a tool tip when hovering over the property.
6.6.2 Item property typesItems have properties like a title or the date they were last modified. This section describes the types of itemproperties that are available in Genji. New item property types can be added as plug-ins, without modification ofthe core software.
Short text
Short text properties can contain short (one line, up to 50 characters) text.
You can define a default text that appears when creating an item, and you can define the minimum and maximumlength of the property.
95

Customizing Genji
When you place this property on an input form, it will look like shown below.
Long text for descriptions
Long text properties can contain longer descriptions, up to many thousands of characters. Long texts display as atext area for convenient editing.
You can define a default text that appears when creating an item, and you can define the minimum and maximumlength of the property.
When you place this property on an input form, it will look like shown below.
Rich text label
Rich text label permits you to show rich text, for example a warning. If the form contains nothing but a rich textlabel, you will not be able to save it.
When you place this property on an input form, it will look like shown below.
Date
Date properties contain dates. At the user interface, the date is formatted according to the users preferred locale.Date properties come with a number of options.
Default value
You can set the field to contain default values when the user creates a new item.
• The field is empty• The field contains the current date• The field contains a constant date• The field contains a date related to another date field plus a number of days
Dening constraints
96

6.6 Item properties
You can set restrictions on the date values a user can enter.
• The earliest date can be set to be either “now” or some fixed date• The latest date can be set to be either “now” or some fixed date
Hierarchical behavior
When used in an item hierarchy specific date fields come with a default behavior as described below.
• System fields “Start date” and “End date” of parent items are calculated from the start and end dates of theirdescendants (bottom-up). The calculated values cannot be modified.
• System fields “Target start date” and “Target end date” of parent items are checked against the target start datesand target end dates of their descendents. Any conflicts are indicated but not corrected or prohibited.
• Conflicts between target start dates and start dates (bottom-up) and target end and end dates (bottom-up) areindicated but not prohibited.
You can overwrite this behavior as follows
• Setting the hierarchical behavior to “Compute bottom-up” enforces that the date field value of parent itemsis calculated from the date field value of their descendants (bottom-up). This is the standard behavior for thesystem fields “Start date” and “End date”.
• Setting the hierarchical behavior to “Validate divergence” enforces that the date field value of parent items iscompared with the date field value of their descendants. Any violation is marked but not prohibited. This is thestandard behavior for the system fields “Target start date” and “Target end date”.
At the user interface a date property would appear as shown below.
Integer
Integer properties can contain integer numbers, negative or positive.
You can define a default value, a minimum and maximum value. The minimum value needs to be less than themaximum value, if any is defined. Furthermore, the default value needs to be larger or equal to the minimum andless than or equal to the maximum value.
At the user interface this property appears as shown below.
97

Customizing Genji
Double
Double properties can contain floating point numbers, negative or positive.
You can define a default value, a minimum and maximum value. The minimum value needs to be less than themaximum value, if any is defined. Furthermore, the default value needs to be larger or equal to the minimum andless than or equal to the maximum value.
At the user interface this property appears as shown below.
Check box
Check box properties can be marked or unmarked.
You define a default value, either marked or unmarked.
When you place this property on an input form, it will look like shown below.
Simple select
Simple select lists permit to select a single item from a given list. The default value is configured as part of the list,not as part of the property.
Note: You must have defined already a simple list before you start defining a item property of this type.Otherwise you may not be able to complete the definition of an property of this type.
98

6.6 Item properties
When you place this property on a form, it will look like shown below.
Extensible simple select
The extensible simple select lists permit to select a single item from a given list. Additionally, it permits regular usersto add new list entries directly in the edit or create new item mask.
Note: You must have defined already a simple list before you start defining a item property of this type.Otherwise you may not be able to complete the definition of an property of this type.
When you place this property on a form, it will look like shown below.
Multiple select
Multiple select lists permit to select one or more items from a given list. The default value is configured as part ofthe list, not as part of the property.
Note: You must have defined already a simple list before you start defining a item property of this type.Otherwise you may not be able to complete the definition of an property of this type.
When you place this property on a form, it will look like shown below.
Cascading select parent-child
Cascading select list of type parent-child permit to select from a list of parent items, and when a parent item hasbeen selected the list of selectable child items changes as well. For example, the parent list could be products, andthe child list could be components.
99

Customizing Genji
Note: You must have defined already a list of this type before you start defining a custom property of thistype. Otherwise you may not be able to complete the definition of an property of this type.
In our example, we have a short list of customers, Bosch and Siemens. The children are divisions of Bosch andSiemens. For Bosch, we have divisions Benzin and Diesel, for Siemens we have divisions telecommunication andmedical. All this information is contained in the list named „Customers“.
When placed on the screen, this selection would look like shown below.
When the selection in the left box is changed, the selection in the right box changes as well. Another example wouldbe a selection for an operating system: Windows, Linux, Solaris on the left, and the version (98, ME, XP, Vista, Redhat,Debian, SuSE) on the right.
Note: Even though the selection appears as two properties, this will be a single property in the database.To search for this in TQLPlus you would search for „Customer:Bosch#Benzin“. The property name is shownas part of the tool tip, in case your label is different from the property name.
Cascading select parent-children
Cascading select list of type parent-children associate two lists of child items with a single entry in the parent itemlist. The first child has no dependence on the second child.
For example, if the parent item list would contain car models, the first child list could contain engine sizes availablefor this model, and the second child list could contain colours available for this model. Different models might beoffered with different engine sizes and colors.
Note: You must have defined already a list of this type before you start defining a item property of thistype. Otherwise you may not be able to complete the definition of an property of this type.
In our example we have defined a generic list Parent-Children, with three parent, Parent-1, Parent-2, and Parent-3.Each parent item has two lists with a number of child items associated with it. For example, Parent-1 has in its firstchild list Child-1:1, Child-1:2 and in its second child list Child-1:L1, Child-1:L2, Child-1:L3. The names can of coursebe anything.
At the user interface this would look like shown below. When the parent selection is changed, the two children listschange along.
100

6.6 Item properties
Cascading select parent-child-grandchild
Cascading select list of type parent-child-grandchild creates a hierarchy of dependencies. The child list is unique foreach parent. The grandchild list is unique for each child. This can be thought of as a tree with a nesting level of two.
For example, if the parent item list would contain car manufacturers, the child list could contain models for each carmanufacturer, and the second list could contain engine sizes for each model of that manufacturer.
The engine size that could be selected would depend on the specific model of that manufacturer.
Note: You must have defined already a list of this type before you start defining a item property of thistype. Otherwise you may not be able to complete the definition of an property of this type.
In our example we have defined a parent list with three parent entries. For each parent we have defined threechildren. For each child we have defined a number of grandchildren.
At the user interface this property type would look like shown below. When you change the parent selection, boththe child and grandchild selection changes automatically.
When you change the child selection, the grandchild selection changes automatically.
User picker (general)
The user picker is an property where you can select an entry from a list of users. Which users appear in this list youcan define by roles a user has in that project, or by the organizational unit the user belongs to.
You can assign automail settings to the selected user based on the predefined automail roles. You can disableautomail for the selected user, or treat him like he was the author, manager, or responsible of the item. You can alsotreat him like he was on the consulted or observed list.
101

Customizing Genji
User picker (on behalf of)
The user picker (on behalf of) is treated in the system like the author of an item. This permits you to create an itemon behalf of somebody else, and this other person will see this item and can treat it as if he was the orginal author.Which users you can select you can define by roles a user has in the workspace the current item belongs to, or bythe organizational unit the user belongs to.
The automail settings are the same as for the author.
Workspace picker
The workspace picker permits to relate a workspace to an item other than the workspace this item is a part of.
6.6.3 Managing custom propertiesThis section describes how to add, overwrite, modify, and delete custom properties.
Overwriting propertiesYou can create variations of properties at the workspace level, workspace type level, or item type level. By overwritingproperties you can modify any of the property properties except for its type. You can for example change the label,selection lists, tool tip, or the "is required" property.
You must be logged in as system manager or system administrator.
1. Switch to the Administration perspective. In the top toolbar select Customize > Item properties. Alternativelyclick on the “Customize”/“Item properties” bar in the left navigation area.
2. A new screen appears, consisting of a tree structure on the left and a context sensitive edit area on the right. Thetree structure depends on whether your are logged in as system administrator or project administrator. Click onthe leaf node and select the custom property you want to overwrite.
102

6.6 Item properties
In the example shown here we will overwrite property „Access level“ specific for item type „Task“. Before the valueis overwritten, it is inherited from the global configuration. This is shown by the light grey color of the labels.
3. In the right area, we click on the „Derive“ button in the toolbar. You shouldn't change the property name sincethis could break report templates that use it. Property name changes are always global!
4. Change the label and tool tip.
5. Click on the „Save“ button in the toolbar. In the tree area the property has changed from a light color to a strongcolor, indicating that this is a derived property.
You have created a derived property and overwritten the global property for item types "Task" with the derivedversion. All forms for tasks will have the new label instead of the original one. The property itself is still the sameglobal property, though.
Note: You can revert this operation and return back to the global setting by right clicking on the derivedproperty in the tree area, and then selecting „Reset“.
103

Customizing Genji
Modifying propertiesYou can modify properties globally. For system properties, you can only change the name, label, and tool tip. Forcustom properties, you can change anything except for the property type.
You must be logged in as system manager or system administrator.
1. Switch to the Administration perspective. In the top toolbar select Customize > Item properties. Alternativelyclick on the “Customize”/“Item properties” bar in the left navigation area.
2. A new screen appears, consisting of a tree structure on the left and a context dependent edit area on the right.The tree structure depends on whether your are logged in as system administrator or project administrator. Inthe tree click on the property you want to modify.
In the example shown we will change the label and behaviour of system property "EndDate" on a global level.
3. Change the label and tool tip of the system property to "Due date". Set the default end date behaviour to usingthe create date plus seven days. Thus, when you create an item, the end date will be filled with the date of thesame day next week.
104

6.7 Customizing forms
4. Click on the „Save“ button in the toolbar area. On all forms you will see the new label, unless you have overwrittenit at a lower level or you have localized it explicitly.
You have renamed a system property. It will appear on all input forms with the new label and tool tip.
Attention: When you change the tool tip or label, you may not see the change reflected at the userinterface. This happens when you have explicitly localized the label with the locale editor. The localizationoverwrites the changes you make here.
6.7 Customizing forms
You can layout and design your own input masks, specific for each action type, like create, edit, add comment, and soon. You can assign forms you have created globally, or for each item type, project type, or even project. For example,you can have a very simple form for items of type „mile stone“, and a complex mask for items of type „problem report“.
This section describes
• basic concepts of forms, fields, and actions• how to assign forms to actions• how to create, modify, and delete forms
6.7.1 Custom forms, actions, and fieldsIn Genji you can define any number of forms that are used for creating items, editing items, changing item state,adding comments to items, and moving items to new projects or item types.
Forms contain system properties and custom properties, and forms are associated with the actions mentionedabove, like creating items. These associations can be configured
• globally• item type specific• project type and item type specific• project and item type specific
This approach supports configuration efficiency while preserving flexibility.
105

Customizing Genji
Each form consists of
• tabs• panels• properties
The procedure to create and use a new form is
1. Create the new form, using the interactive form designer2. Assign this form to the desired action, either globally or at a more specific level.
You can modify forms any time.
Tabs
Each form consists of at least one tab. Tabs contain panels, and panels contain properties. The figure here shows aform with three tabs. The first tab can be designed any way you like. The other two tabs have been automaticallyadded to this form because the respective feature (watch lists and accounting) have been enabled for this project.These tabs are predefined by the system, they cannot be modified interactively.
There is only a practical limit on the number of custom tabs you can add to your form. You can specify the tab labelto whatever you like.
Panels
Tabs contain panels. All properties are placed on panels. A panel is made up of rows and columns. A panel organizesthe space for properties in a grid.
106

6.7 Customizing forms
Grid positions not used are specifically marked in the form designer, and are left empty in the rendered form.
There is only a practical limit on the number of panels you can use. You can move panels any time using drag anddrop techniques.
Actions
In Genji, forms are associated with actions. For example, you may want to keep the form to create an item assimple as possible, while editing an item should reveal all item properties available. Adding a comment should onlyinvolve a comment description field, and nothing else. Changing a state oftentimes coincides with a change in theresponsible person, so this action would require a comment field, the state field, and the responsible field.
Genjicurrently knows of the following actions:
• Create item• Edit or modify item• move item to new project or item type• add comment to item• change item state• add child item to existing item
To each of these action a specific form can be assigned.
6.7.2 Managing custom FormsThis section describes how to create, assign, modify, and delete custom forms.
Assigning custom forms to actionsThis section describes how to associate a custom form with an item action.
You must be logged in as system manager or system administrator.
1. Switch to the Administration perspective. In the top toolbar selectCustomize > Forms.
107
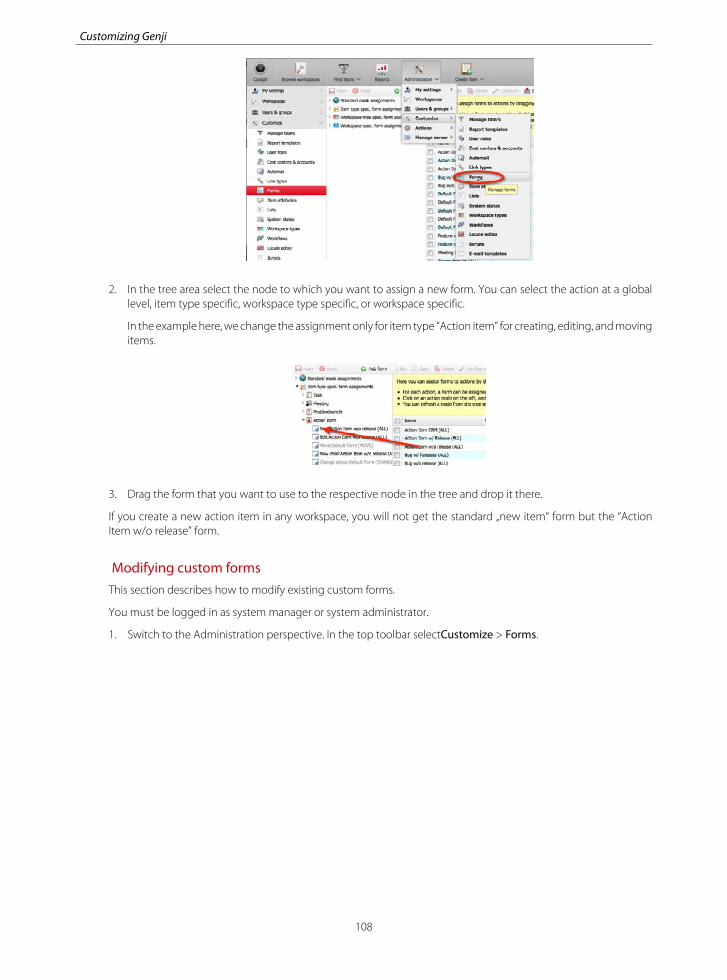
Customizing Genji
2. In the tree area select the node to which you want to assign a new form. You can select the action at a globallevel, item type specific, workspace type specific, or workspace specific.
In the example here, we change the assignment only for item type “Action item” for creating, editing, and movingitems.
3. Drag the form that you want to use to the respective node in the tree and drop it there.
If you create a new action item in any workspace, you will not get the standard „new item“ form but the “ActionItem w/o release” form.
Modifying custom formsThis section describes how to modify existing custom forms.
You must be logged in as system manager or system administrator.
1. Switch to the Administration perspective. In the top toolbar selectCustomize > Forms.
108

6.7 Customizing forms
2. A new screen appears. Click on the „Edit“ icon in the Action column on the left for the form you want to edit.
3. The interactive form designer appears.
4. Delete a field from a panel. Select the field with a left click. Open the context sensitive menu with a right mouseclick.
5. In the context sensitive menu click on „Delete“. Confirm the operation in the dialog that comes up.
6. The field has now been deleted from the form and the space is available for another field.
7. Move a field to a new position by drag and drop.
In this example move the Manager field to the Author field and drop it there.
8. The Author field position is now taken by the Manager field position and vice versa.
109

Customizing Genji
9. Add a new tab by clicking on the „New Tab“ button in the toolbar.
10. Click on the new tab to select it. In the Properties window change the tab label.
11. Add a panel to the new tab and change the number of rows and columns to 2. For this select the panel, andchange the rows and columns parameters in the Properties window dialog.
12. Add two custom fields, a multiple select and two regular fields. The multiple select requires more vertical space,so set its row span to 2. For this select the field by clicking on it in the panel area, then go to the Propertieswindow and change the row span parameter.
13. When you are done, click on the „Back“ button in the toolbar area.
You have modified the custom form. Whenever the associated action is called the new form will be used.
6.8 Custom selection lists
Some item properties require a selection of predefined values. For example, you may have a list of customers, oryou want to support a number of operating systems. Genjipermits you to define your own selection lists which canthen be used for custom or system properties.
6.8.1 Custom lists overviewYou can define selection lists in Genji which you then can use in item selection properties. You can assign customlists to item properties either globally, workspace type specific, or workspace specific.
Lists for built-in system properties
Genji has a number of built-in system properties that draw their value from a list of options. These properties havesome logic associated with them, for example in the notification and workflow engines.
110

6.8 Custom selection lists
The following system properties have simple selection lists associated with them:
• item state• priority• severity• item type
The logic is associated with „flags“ or a numeric value that you assign to your list entries. The entry name is of noimportance to the application logic.
These lists are always globally (system wide) available. You can limit the set of visible selection values from your listto a subset for each item type and workspace type. For example, you could have item states „open“ and „closed“ foritem type mile stone, and more states for item type „problem report“. For more information have a look at sectionManaging workspace types.
Lists for custom properties
You can define any number of custom lists. Custom lists do not have any specific application logic associated withthem. You can make custom lists available globally or just to a specific workspace. Genji offers three types of customlists:
• simple select• multiple select• cascaded select
The last type, the cascaded select can be rather complex. Genji comes with implementations for a parent-child list,a parent and two children list, and a parent-child-grandchild list.
Custom lists are assigned to custom properties of the same type. You can assign different lists to the same customproperty in different workspaces. For example, you may have a list of customers defined as a custom property. Inone workspace you may assign a different customer list to this property than in another one.
Workspace specific lists
All custom lists can be made available globally or workspace specific. Previous versions of Genji had two fixedworkspace specific lists:
• project subsystems or components• project classes
These two lists have been moved to custom properties and workspace specific lists.
6.8.2 Managing lists for system propertiesThere are four item properties built into the system that offer you a selection of property values from which you canselect one or more. These are item type, item status, priority, and severity.
Managing item statesYou can add, delete, and modify the list of available item states. For each item type, workspace type or workspaceyou can select which item states will be actually available at the user interface.
You must be logged in as system manager or system administrator.
Item states define the position of an item in the workflow. Item state names can be assigned as you like. Theapplication logic associated with item states is tied to their "type flag". There are four types of flags as described inthe following table.
111

Customizing Genji
Type ag Description
0, active „open“ states such as „opened“, „analyzed“, „implemented“, etc. The task isnot done, further action is required.
1, closed „closed“ states such as „closed“ or „suspended“. The task is done, no furtheraction necessary, or it is postponed.
2, inactive „ready for final testing or closing“ states.
1. Switch to the Administration perspective. In the top toolbar select Customize > Lists. Alternatively click on the“Customize”/“Lists” bar in the left navigation area.
2. In the second navigation column, click on "Global lists" and then on "Item state". You can now add states, deletestates, or modify them.
You can assign an icon (16 x 16 px, GIF or PNG format) to each entry. You can furthermore assign a CSS style toeach entry, which will be used to format items in the item navigator. For example, you could use various shadesof red as background color to illustrate the urgency of an item. You can drag entries in the list on the right toanother position. The entries will be offered at the user interface in the same order as shown in the grid here.
Attention: When you rename an entry the change may not be reflected at the user interface!This happens when you have specific localizations for the selection entries, which is the case for allpredefined entries. In this case the localized values will be shown and not the label you define here.
Example workowsThis section presents some examples for useful workflows. The examples are based on the standard Genji state spaceand role definitions.
Action item list
The action item list is the most general in the Genji system. It was designed and developed to help facilitatecommunication within groups as small as members of a project or as large as members of an entire organization.In today's world, action items levied against members of an organization are created from several different sourcesthrough various avenues (either by email, voice mail, in meetings, or by word of mouth) resulting in actions notbeing completed because either the action was forgotten, misplaced, or miscommunicated.
112

6.8 Custom selection lists
The intent of the action item list is to:
• centralize and organize all action items for a particular organization or project• make the system available through the Internet, and notify individuals via email when an action is assigned to
them or is nearing or has surpassed the due date• allow for a concise and up to date overview on a projects state
Not all states the Genji system has to offer are helpful when dealing with action items. The figure below shows thestate subset that could be used for action items.
An action item is created and initially set to state „opened“. Action items should always carry a due date and a personto which they are assigned. This is unavoidable in the Genji system.
Once work on an action item has started the state is set to „processing“ by the current responsible. This permits otherpeople to see that something is actually happening regarding this item. The item can be closed by the responsibleor a manager once all tasks associated with this action have been completed.
Milestone tracking
In a well managed project, there will be lots of binary milestones, those that are either passed or not passed. It isan often observed project sickness that milestones are not defined in a binary fashion. You will hear people comingup with terms like „conditionally passed“, „90% done“, „almost there“ and so on. If you hear such phrases you knowyou are in trouble.
It is in the nature of a milestone that you have either passed it or not. It may take some effort to define projectmilestones, but it pays well. The best milestones are connected to assessable, 100% complete results. For example,a good milestone would be „customer requirements reviewed with customer and frozen“. A bad example wouldbe „customer requirements 50% finished“.
A milestone has to have a due date associated with it. It can be either „opened“ or „closed“. The state transition from„opened“ to „closed“ marks the passing of the milestone.
It is quite common that the milestone passing dates, as envisioned in the first project plan, have to be moved. Ina badly managed project such movements become visible only at the milestone due date, or worse, at the nextquality gate. With Genji it is no problem to move a due date, but the change is recorded and you can watch howa milestone slips. Looking at the database, you can draw reports of milestone slippage in your project, telling youquite clearly where you stand.
Risk Management
Planning a project and then executing the plan is based on estimates. Unless you have a magic crystal ball you aremaking assumptions that could or could not be true. One definition for an estimate calls it a prediction that is equallylikely to be above or below the actual result. Estimate uncertainty occurs because an estimate is a probabilisticassessment of a future condition.
The many events that could lead to your estimate being too optimistic I call risks. There could be a risk that you won'tbe able to meet the schedule, or the budget, or the expected quality level. You may not be able to get the rightpeople at the required time. A supplier you are counting on falls short to deliver on his contract. You may dependon weather conditions, and they turn out to not being in your favor. It's up to your imagination what could happen.
113

Customizing Genji
Managing a project to a good extent means managing risks. It is very helpful to always have a list with the ten mostprevalent risks in your project. You should have a strategy available on how to react if any of these risks materializes.The Genji system helps you to manage a list of risks. There may be more than just ten risks. Enter all you know,and assign them to the different priority and severity levels. This permits to draw reports with those risks that aremost likely to occur, or that have the greatest impact. Use the priority to describe the probability of occurrence, andthe severity to describe the possible impact. The most critical risks are those that have the highest probability ofoccurrence and the largest impact.
There are only two states for a risk: it is either „opened“ or „closed“. Status „closed“ means the probability of this riskoccurring in the future is zero. Reasons to close a risk could be that there is no future for your project, because ithas been closed, or that the risk already occurred, or that you absolutely can rule out that the risk could ever comeup again.
Item lists
In the software business this is also called the „bug list“. Unlike milestones and action items, items are usually notplanned, but they will occur. For large projects, and particularly in software projects, from the beginning to the endthere will be many items. From our experience, for an embedded system with about 100.000 non commented linesof code you may have to handle about 2500 items before you can ship your system. Since it is close to impossibleto control such an amount of items without any tool support, bug tracking systems have been on the market forquite some time.
The Genji system is well suited to act as an item or bug tracker. Compared to other systems it supports well largeorganizations with many projects, due to its technology and access control features. Except for access control theGenji system imposes very few restrictions on its users. This leads to fast adoption and intense usage even withoutorganizational policy enforcement.
The life of an item starts with state „opened“. Anybody with appropriate permission in a specific project can createa new item. There is a default person assigned as manager of an item who is responsible to evaluate and possiblyassign it to somebody for further investigation or resolution.
If there is a time gap between the decision to further pursue this item and the time it can be assigned to somebodyfor resolution it is possible to mark an item as „analyzed“. If the analysis shows that resolution of an item should bedeferred to some later time the item can be set to „suspended“. From this state it can always be reopened, or directlybe assigned to some person for further processing.
To permit management some insight when an item is actually being worked upon by the person responsible forit, state „processing“ is available. This state marks the period during which resolution of an item is pursued. Whilemost other states describe the end of a period, this state describes the process. The end of this period is markedby state „implemented“, which means that resolution has been completed, but no integration and tests have beencarried out.
The integrators and testers can use state „integrated“, „assessing“, and „closed“. If the integration and assessmentprocess reveals no further problems with the implemented item resolution, the item can be closed. In any othercase, the item is being set back to „assigned“.
114

6.8 Custom selection lists
As with state „processing“, state „assessing“ defines a process rather than the end of a process. This again is to enablemanagement visibility when the assessment process, which could take some time, has actually been started.
Managing prioritiesPriority (urgency) means how soon an item should be taken care of. You can add, delete, and modify the list ofavailable priorities. For each item type, workspace type or workspace you can select which priorities will be actuallyavailable at the user interface.
You must be logged in as system manager or system administrator.
The warning level is used by the automail notification engine. In your user profile you can set the level beyond whichyou want to be notified of changes to items.
1. Switch to the Administration perspective. In the top toolbar select Customize > Lists. Alternatively click on the“Customize”/“Lists” bar in the left navigation area.
2. In the second navigation column, click on "Global lists" and then on "Priority". You can now add priorities, deletepriorities, or modify them.
You can assign an icon (16 x 16 px, GIF or PNG format) to each entry. You can furthermore assign a CSS style toeach entry, which will be used to format items in the item navigator. For example, you could use various shadesof red as background color to illustrate the urgency of an item. You can drag entries in the list on the right toanother position. The entries will be offered at the user interface in the same order as shown in the grid here.
Attention: When you rename an entry the change may not be reflected at the user interface!This happens when you have specific localizations for the selection entries, which is the case for allpredefined entries. In this case the localized values will be shown and not the label you define here.
Managing severitiesSeverity or criticality defines, how expensive it would be if this item would not be taken care of. You can add, delete,and modify the list of available severities. For each item type, workspace type or workspace you can select whichseverities will be actually available at the user interface.
You must be logged in as system manager or system administrator.
The warning level is used by the automail notification engine. In your user profile you can set the level beyond whichyou want to be notified of changes to items.
115

Customizing Genji
1. Switch to the Administration perspective. In the top toolbar select Customize > Lists. Alternatively click on the“Customize”/“Lists” bar in the left navigation area.
2. In the second navigation column, click on "Global lists" and then on "Priority". You can now add severity, deleteseverities, or modify them.
You can assign an icon (16 x 16 px, GIF or PNG format) to each entry. You can furthermore assign a CSS style toeach entry, which will be used to format items in the item navigator. For example, you could use various shadesof red as background color to illustrate the urgency of an item. You can drag entries in the list on the right toanother position. The entries will be offered at the user interface in the same order as shown in the grid here.
Attention: When you rename an entry the change may not be reflected at the user interface!This happens when you have specific localizations for the selection entries, which is the case for allpredefined entries. In this case the localized values will be shown and not the label you define here.
Managing item typesYou can distinguish your items by item type like customer requests, mile stones, action items, tasks, and so on. Youcan add, delete, and modify the list of available item types. For each workspace type or workspace you can selectwhich item types will be actually available at the user interface.
You must be logged in as system manager or system administrator.
For a small organization, running small projects, or for use as a simple bug tracking system it would suffice toconfigure just one item type. It is up to you to decide if you for example would benefit from distinguishing betweena problem report and a bug. If you think you don’t, you don’t have to bother setting up different item types.
On the other hand, you may want to use Genji to improve your process. In this case it may make a differencewhether you have a lot of problem reports, or if you have a lot of bugs. A problem report could come from baddocumentation, insufficient user training, or a badly designed user interface. A bug is if your developers did notimplement the specification correctly. So you may have to improve different areas of your process, depending onwhether there is a one to one relation between bugs and problem reports, or there many more problem reportsthan bugs.
Genji comes with a set of default item types as shown in the table below. You can safely delete those you do notneed, or rename them to something more appropriate to your requirements. This you can do even later on. If youthen delete item types, items of this type will then be mapped to one of those types you keep.
116

6.8 Custom selection lists
Table 6-4: Default item types
Item type Description
Problem report Somebody has a problem with something, rather unspecified. May be aknow how problem, a user interface problem, or a bug.
Task In a well managed project there exists a work breakdown structure withmany tasks or work packages. It is very tedious for a project managerto keep track of the state of such task. Using this list and having each$RESPONSIBLE take care of the state of her work package the projectmanager can without a lot of effort obtain the actual state of his projectand look for instance for late packages.
Meeting In a well managed project there exists a work breakdown structure withmany work packages. It is very tedious for a project manager to keeptrack of the state of such work packages. Using this list and having each$RESPONSIBLE take care of the state of her work package the projectmanager can without a lot of effort obtain the actual state of his projectand look for instance for late packages.
Requirement A list with requirements. This permits for requirement engineering andtracing. Since attachments can be added to each item, you can add figures,source code, or other documents to a requirement.
Action item There may be use for a rather unspecific list of action items at the projectmanagement level.
Document A document is used for the Wiki. It is essentially a single Wiki page and canbe exported to a Word document based on a template.
Document section A document section is a child part of a document. It can be exported intoa Word document as a paragraph. Document sections can contain otherdocument sections.
Document folder Documents can be organized in folders.s
Table 6-5: Suggestions for additional item types
Item type Description
Implementation error There was some problem found in the implementation, i.e. therequirements are correct, but the implementation is not.
Milestone Keeping a list with important milestones could be the shortcut version ofkeeping a list with work packages.
Risk Project management without a current list of relevant risks is not reallycomplete.
Release notes Once a requirement has been implemented, or a bug has been fixed, youcan copy it from the bug list to the release notes list. Once a release isassembled, you can extract a report filtering for the release notes list. Thisway you can make sure you have all changes included in your releasenotes.
117
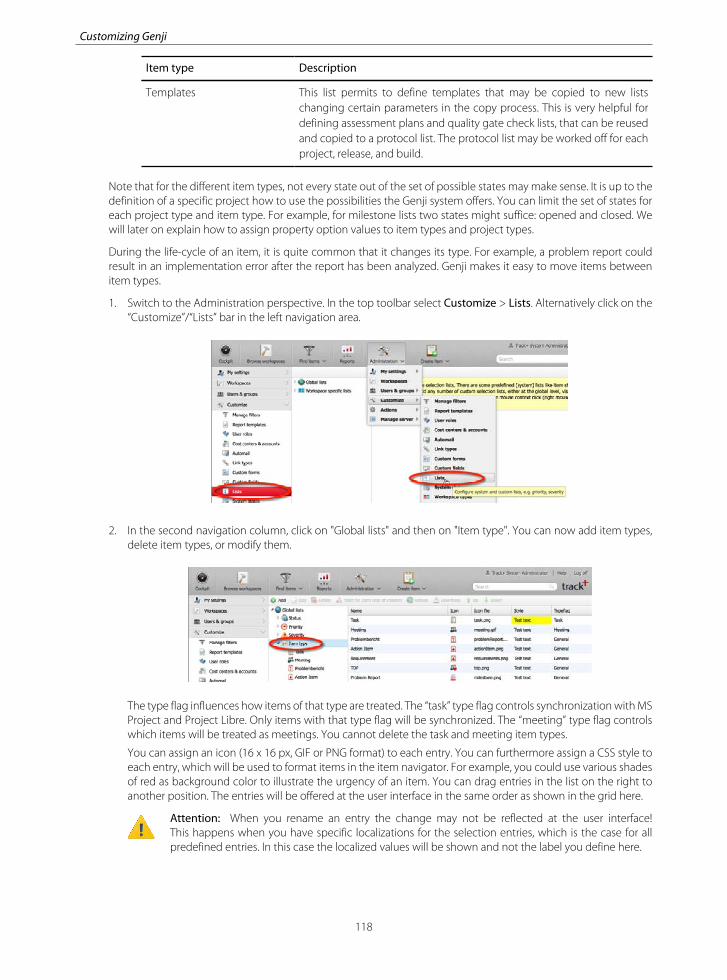
Customizing Genji
Item type Description
Templates This list permits to define templates that may be copied to new listschanging certain parameters in the copy process. This is very helpful fordefining assessment plans and quality gate check lists, that can be reusedand copied to a protocol list. The protocol list may be worked off for eachproject, release, and build.
Note that for the different item types, not every state out of the set of possible states may make sense. It is up to thedefinition of a specific project how to use the possibilities the Genji system offers. You can limit the set of states foreach project type and item type. For example, for milestone lists two states might suffice: opened and closed. Wewill later on explain how to assign property option values to item types and project types.
During the life-cycle of an item, it is quite common that it changes its type. For example, a problem report couldresult in an implementation error after the report has been analyzed. Genji makes it easy to move items betweenitem types.
1. Switch to the Administration perspective. In the top toolbar select Customize > Lists. Alternatively click on the“Customize”/“Lists” bar in the left navigation area.
2. In the second navigation column, click on "Global lists" and then on "Item type". You can now add item types,delete item types, or modify them.
The type flag influences how items of that type are treated. The “task” type flag controls synchronization with MSProject and Project Libre. Only items with that type flag will be synchronized. The “meeting” type flag controlswhich items will be treated as meetings. You cannot delete the task and meeting item types.
You can assign an icon (16 x 16 px, GIF or PNG format) to each entry. You can furthermore assign a CSS style toeach entry, which will be used to format items in the item navigator. For example, you could use various shadesof red as background color to illustrate the urgency of an item. You can drag entries in the list on the right toanother position. The entries will be offered at the user interface in the same order as shown in the grid here.
Attention: When you rename an entry the change may not be reflected at the user interface!This happens when you have specific localizations for the selection entries, which is the case for allpredefined entries. In this case the localized values will be shown and not the label you define here.
118

6.8 Custom selection lists
6.8.3 Managing lists for custom propertiesYou can define any number of selection lists which you can use for custom properties of the proper type. You canstore these lists either in a global scope, visible to anybody, or in a workspace scope, visible only to users that canaccess that workspace.
Adding a custom listYou can add custom lists which you can then assign to custom properties of the proper property type.
You must be logged in as system manager or system administrator.
1. Switch to the Administration perspective. In the top toolbar select Customize > Lists. Alternatively click on the“Customize”/“Lists” bar in the left navigation area.
2. In the second navigation column, click on "Global lists" if you want to add a list accessible to all workspaces,or select a workspace to which you want to add that list. Then click on the “Add” button in the toolbar or usethe context menu.
3. Give a name to the new list or modify the existing one. Optionally add a brief description for book keepingpurposes.
4. Select the node to which you want to add list entries or edit an existing entry. Use the context menu to addor edit an entry.
119

Customizing Genji
5. Name the new entry or edit the name of an existing entry and optionally give it some style information. Thestyles can be used to control item appearance in the item navigator. Then click on the “Save” button.
You can assign an icon (16 x 16 px, GIF or PNG format) to each entry. You can furthermore assign a CSS style toeach entry, which will be used to format items in the item navigator. For example, you could use various shadesof red as background color to illustrate the urgency of an item. You can drag entries in the list on the right toanother position. The entries will be offered at the user interface in the same order as shown in the grid here.
6. For a simple list, you can just add entries underneath the top list node. To create a cascaded list, select a secondlist level node and repeat the procedure from 5.
You have now configured a custom list of the selected type. You can assign this list to custom properties for thesame type. This assignment can be global, item type specific, workspace type and item type specific, or workspaceand item type specific.
Editing a custom listYou can edit existing custom lists, for example to modify or add entries.
You must be logged in as system manager or system administrator.
1. Switch to the Administration perspective. In the top toolbar select Customize > Lists. Alternatively click on the“Customize”/“Lists” bar in the left navigation area.
120

6.8 Custom selection lists
2. In the second navigation column, click on "Global lists" if you want to edit a list accessible to all workspaces,or select a workspace with the list you want to edit. Then click on the “Edit” button in the toolbar or use thecontext menu.
3. Give a name to the new list or modify the existing one. Optionally add a brief description for book keepingpurposes.
4. Select the node to which you want to add list entries or edit an existing entry. Use the context menu to addor edit an entry.
5. Name the new entry or edit the name of an existing entry and optionally give it some style information. Thestyles can be used to control item appearance in the item navigator. Then click on the “Save” button.
121

Customizing Genji
You can assign an icon (16 x 16 px, GIF or PNG format) to each entry. You can furthermore assign a CSS style toeach entry, which will be used to format items in the item navigator. For example, you could use various shadesof red as background color to illustrate the urgency of an item. You can drag entries in the list on the right toanother position. The entries will be offered at the user interface in the same order as shown in the grid here.
6. For a simple list, you can just add entries underneath the top list node. To create a cascaded list, select a secondlist level node and repeat the procedure from 5.
You have now edited a custom list of the selected type. You can assign this list to custom properties for the sametype. This assignment can be global, item type specific, workspace type and item type specific, or workspace anditem type specific.
Deleting a custom listYou can delete custom lists so that they cannot be used anymore. Items that used these lists will keep their historydata.
You must be logged in as system manager or system administrator.
Notice: Deleting a custom list will preserve the history; the list is only marked as deleted and will not beavailable anymore for new custom properties.
1. Switch to the Administration perspective. In the top toolbar select Customize > Lists. Alternatively click on the“Customize”/“Lists” bar in the left navigation area.
122

6.8 Custom selection lists
2. In the second navigation column, click on "Global lists" if you want to delete a list that was accessible to allworkspaces, or select a workspace from which you want to remove list. Then click on the “Delete” button in thetoolbar or use the context menu.
Your custom list has been removed from the system for selection for new custom properties. All items that had areference to this custom list will still have all information available.
Importing and exporting custom listsYou can export custom lists into XML files, and you can import custom lists from XML files. There are some rules thatgovern the import process when importing lists that already exist.
XML format
The following listing shows an XML export for a cascaded option list with two main options (“EMEA” and “Americas”).
<?xml version='1.0' encoding='UTF-8'?><ns2:trackplusExchange xmlns:ns2="http://www.trackplus.com/exporter/" version="4.0.0"> <entityExchange entityId="1002" type="TListBean"> <entityAttribute name="name"><![CDATA[Customer List]]></entityAttribute> <entityAttribute name="repositoryType"><![CDATA[2]]></entityAttribute> <entityAttribute name="objectID"><![CDATA[1002]]></entityAttribute> <entityAttribute name="description"><![CDATA[A list with customers]]></entityAttribute> <entityAttribute name="listType"><![CDATA[3]]></entityAttribute> <entityAttribute name="owner"><![CDATA[1]]></entityAttribute> <entityAttribute name="deleted"><![CDATA[N]]></entityAttribute> <subEntityRelation parentAttributeName="list" type="TOptionBean"> <trackEntity entityId="1004" type="TOptionBean"> <entityAttribute name="label"><![CDATA[Americas]]></entityAttribute> <entityAttribute name="CSSSTyle"><![CDATA[]]></entityAttribute> <entityAttribute name="symbol"/> <entityAttribute name="objectID"><![CDATA[1004]]></entityAttribute>
123

Customizing Genji
<entityAttribute name="isDefault"><![CDATA[N]]></entityAttribute> <entityAttribute name="sortOrder"><![CDATA[2]]></entityAttribute> <entityAttribute name="list"><![CDATA[1002]]></entityAttribute> <entityAttribute name="deleted"><![CDATA[N]]></entityAttribute> </trackEntity> <trackEntity entityId="1009" type="TOptionBean"> <entityAttribute name="label"><![CDATA[EMEA]]></entityAttribute> <entityAttribute name="CSSSTyle"><![CDATA[]]></entityAttribute> <entityAttribute name="symbol"/> <entityAttribute name="objectID"><![CDATA[1009]]></entityAttribute> <entityAttribute name="isDefault"><![CDATA[N]]></entityAttribute> <entityAttribute name="sortOrder"><![CDATA[3]]></entityAttribute> <entityAttribute name="list"><![CDATA[1002]]></entityAttribute> <entityAttribute name="deleted"><![CDATA[N]]></entityAttribute> </trackEntity> </subEntityRelation> <subEntityRelation parentAttributeName="parentList" type="TListBean"> <trackEntity entityId="1003" type="TListBean"> <entityAttribute name="parentList"><![CDATA[1002]]></entityAttribute> <entityAttribute name="objectID"><![CDATA[1003]]></entityAttribute> <entityAttribute name="listType"><![CDATA[4]]></entityAttribute> <entityAttribute name="name"><![CDATA[Configure child 1]]></entityAttribute> <entityAttribute name="deleted"><![CDATA[N]]></entityAttribute> <entityAttribute name="childNumber"><![CDATA[1]]></entityAttribute> <subEntityRelation parentAttributeName="list" type="TOptionBean"> <trackEntity entityId="1007" type="TOptionBean"> <entityAttribute name="label"><![CDATA[GE]]></entityAttribute> <entityAttribute name="CSSSTyle"><![CDATA[]]></entityAttribute> <entityAttribute name="symbol"/> <entityAttribute name="objectID"><![CDATA[1007]]></entityAttribute> <entityAttribute name="isDefault"><![CDATA[N]]></entityAttribute> <entityAttribute name="parentOption"><![CDATA[1004]]></entityAttribute> <entityAttribute name="sortOrder"><![CDATA[1]]></entityAttribute> <entityAttribute name="list"><![CDATA[1003]]></entityAttribute> <entityAttribute name="deleted"><![CDATA[N]]></entityAttribute> <referredDependency dependencyId="1004" dependencyEntityType="TOptionBean" attributeName="parentOption"/> </trackEntity> <trackEntity entityId="1008" type="TOptionBean"> <entityAttribute name="label"><![CDATA[Honeywell]]></entityAttribute> <entityAttribute name="CSSSTyle"><![CDATA[]]></entityAttribute>
124

6.8 Custom selection lists
<entityAttribute name="symbol"/> <entityAttribute name="objectID"><![CDATA[1008]]></entityAttribute> <entityAttribute name="isDefault"><![CDATA[N]]></entityAttribute> <entityAttribute name="parentOption"><![CDATA[1004]]></entityAttribute> <entityAttribute name="sortOrder"><![CDATA[2]]></entityAttribute> <entityAttribute name="list"><![CDATA[1003]]></entityAttribute> <entityAttribute name="deleted"><![CDATA[N]]></entityAttribute> <referredDependency dependencyId="1004" dependencyEntityType="TOptionBean" attributeName="parentOption"/> </trackEntity> </subEntityRelation> </trackEntity> </subEntityRelation> </entityExchange></ns2:trackplusExchange>
The following table describes the various entity properties of the XML file.
Table 6-6: List XML le format
Property Description
entityId Just a number; you can put any number here, it is notbeing used by the import process.
type TListBean for the list, and TOptionBean for an entryin that list.
repositoryType "0"=private, "1"=space, "2"=public repository.
objectID A number. For a list (TListBean) it is not being usedby the import process. For an option (TOptionBean)it is taken as an identifier in case you want to modifyany other properties of that option by an import.
listType "1" for a simple, one level list of options.
name The name of the list. The name is visible in theadministration user interface.
owner The primary key of the owner of that list from tableTPERSON. "1" is the "admin" user.
deleted "Y" or "N"; marks this entry as obsolete and youcannot select this option anymore. It will still show initems where it had been used.
CSSStyle An optional CSS style applied to a row in the itemnavigator if an item has an property with this optionset.
symbol An optional symbol that can be shown in the itemnavigator.
isDefault Marks this option as the default.
125

Customizing Genji
Property Description
sortOrder Determines the order in which the optionsare presented in the selection user interfacecomponents.
label The label for the option as the end user will see it.Please note that you can localize the option labelswith the localization editor later on.
list The objectID of the list this option belongs to. It is notbeing used in the import process.
The following listing shows a minimized example for a list definition that can be imported into Genji.
<?xml version='1.0' encoding='UTF-8'?><ns2:trackplusExchange xmlns:ns2="http://www.trackplus.com/exporter/" version="4.0.0"> <entityExchange entityId="1008" type="TListBean"> <entityAttribute name="repositoryType">2</entityAttribute> <entityAttribute name="objectID">1008</entityAttribute> <entityAttribute name="listType">1</entityAttribute> <entityAttribute name="name">Simple global list</entityAttribute> <entityAttribute name="owner">1</entityAttribute> <entityAttribute name="deleted">N</entityAttribute> <subEntityRelation parentAttributeName="list" type="TOptionBean"> <trackEntity entityId="1023" type="TOptionBean"> <entityAttribute name="label">Entry A slg</entityAttribute> <entityAttribute name="list">1008</entityAttribute> </trackEntity> <trackEntity entityId="1024" type="TOptionBean"> <entityAttribute name="label">Entry BN slg</entityAttribute> <entityAttribute name="list">1008</entityAttribute> </trackEntity> </subEntityRelation> </entityExchange></ns2:trackplusExchange>
Import rules
A list is considered to already exist in the database when all of the following properties match:
• The name of the list• The repository type• The list type• The project if any• The parent list identifier, if any
An option is to be considered to already exist when all of the following properties match:
• The label• The list it belongs to• The parent option in case of cascaded lists
If you change the lists name, a new list will be created when you import it.
When you change the label of an option, and keep the list name the same, a new option will be added to the list.
If you mark the option "Clear children" any child of the list that is not in the XML file is removed from the originallist during the import process.
126

6.8 Custom selection lists
If you mark the option "Overwrite existing" properties not used for identification will be overwritten during theimport process. Thus, you can modify descriptions, symbols, and CSS, but you cannot change the name or label ofa list or option.
Importing custom listsYou can import custom lists from an XML file that you might have got from another Genji instance or createdmanually.
You must be logged in as system manager or system administrator.
1. Switch to the Administration perspective. In the top toolbar select Customize > Lists. Alternatively click on the“Customize”/“Lists” bar in the left navigation area.
2. Select either “Global lists” or “Workspace specific lists”, depending on whether you want to import the new listinto the global workspace or make it workspace specific.
3. Select the list definition XML file.
“Overwrite existing” means that if the list already exists in the database it will be overwritten with the new one.For rules how the system identifies the list see Importing and exporting custom lists.
“Clear children” means that the resulting list in the database will have exactly the same structure as the one in theXML file. Otherwise, new child entries could be added to the list in the database and existing ones would be kept.
4. Click on the “Upload” button to import the list definition into the system database.
You have now imported a list from an XML file into the system database.
127

Customizing Genji
6.9 System object states
Spaces, releases, and accounts just like items have a state. The state determines whether regular users can see oruse such objects or items linked to them. This way you can release, archive or delete spaces, releases, and accounts,keeping them in the database but hiding them from regular users or for a particular purpose (like creating new itemsfor an archived release).
6.9.1 Managing workspace statesEach workspace has a state which determines its visibility and controls what can be done with items belonging to it.
You must be logged in as system manager or system administrator.
There are three workspace state values in Genji. Each state has a „state flag“ which determines the availability of aworkspace. There are three values a state flag can assume, as shown in the following table.
Table 6-7: Workspace states
State State ag Description
inprogress
active This is the standard workspace state. You can create and modify items as you like.
on hold inactive The workspace will not permit you to create and modify items. all existinginformation remains visible, as well as the workspace itself.
archived closed The workspace will not accept new items and will not permit to modify existingitems. Furthermore the workspace is invisible with all its information. Items areinaccessible.
1. Switch to the Administration perspective. In the top toolbar select Customize > System states. Alternativelyclick on the “Customize”/“System state” bar in the left navigation area.
2. Select "Workspace state". Click on the "Add" button to add a new state. Select a state in the grid and click on"Edit" button to modify a state. Click on the "Delete" button to delete a state.
128

6.9 System object states
6.9.2 Managing release statesEach release has a state which determines its visibility and controls what can be done with items belonging to it.
You must be logged in as system manager or system administrator.
There are four release state values in Genji. Each state has a „type flag“ which determines the availability of a release.There are four values a type flag can assume, as shown in the following table.
Table 6-8: Release or phase states
Status Status ag Description
unscheduled unscheduled Releases with an „unscheduled“ type flag cannot be selected in either the„Release scheduled“ nor the „Release noticed“ box.
in progress active Releases with an „active“ type flag are open to the entire functionality thesystem offers. These releases appear in the „Released Noticed“ as well as the„Release scheduled“ selection boxes.
on hold inactive Releases with an „inactive“ type flag cannot be selected in the „Releasescheduled“ selection box. However, they will show up as normal in the„Release noticed“ box.
released inactive Releases with an „inactive“ type flag cannot be selected in the „Releasescheduled“ selection box. However, they will show up as normal in the„Release noticed“ box.
archived closed Releases with a „closed“ type flag will not appear in either the „Releasedscheduled“ or „Release noticed“ selection box.
1. Switch to the Administration perspective. In the top toolbar select Customize > System states. Alternativelyclick on the “Customize”/“System state” bar in the left navigation area.
2. Select "Release state". Click on the "Add" button to add a new state. Select a state in the grid and click on "Edit"button to modify a state. Click on the "Delete" button to delete a state.
6.9.3 Managing account statesVia the account state you can control if an account can be used to book work or expenses on it.
129

Customizing Genji
You must be logged in as system manager or system administrator.
When delivered, Genji offers two account states:
• open• closed
Accounts that have been closed cannot be used to book new expenses on. However, all expenses booked on itremain visible.
1. Switch to the Administration perspective. In the top toolbar select Customize > System states. Alternativelyclick on the “Customize”/“System state” bar in the left navigation area.
2. Select "Account state" and click on the "Add" button to add a new state. Select a state in the grid and click on"Edit" to modify a state or on "Delete" to delete a state.
6.10 Managing workspace types
Workspace types help you minimize the effort of configuring a large number of workspaces or projects. Workspacesinherit their configuration from their associated workspace type. By configuring a workspace type you configure allworkspaces that you have associated with that type.
With workspace types you can provide different configurations for different types of spaces or projects. For example,if you are in embedded systems development, or develop electromechanical systems, you may have a workspacetype for the electronics part, for the mechanical part, and for the software. For the mechanical part you don't needreleases, for the electronic circuit boards you may have three editions, and for the software you need a lot of releases,a product backlog, sprints, and so on.
For a workspace type you can configure the following entities:
• if it can have phases and releases• if it supports accounting and progress monitoring• which item types are available• which states are available• which priorities are available• which severities are available• which child workspace types are available• custom properties
130

6.10 Managing workspace types
• custom forms• workflow assignments
To edit, create or delete workspace types go to Administration > Customize > Workspace types.
Add a workspace type by clicking on "Add" in the small toolbar. Edit a workspace type by selecting it in the secondnavigation column from the left. The workspace type flag mostly affects terminology, like "sprint" instead of "phase",etc.
You can enter a default for the hours of work per working day. This value is taken if no other value is set in theworkspaces themselves.
Once you are done with editing, save the changes using the „Save“ button in the small toolbar area.
Assigning available item types
You can assign which of all defined item types will be available for spaces of the selected workspace type. Dragthose that you want from the right column to the left column. If you don't drag any there, all will be available.
131

Customizing Genji
Assigning available states
You can assign which of all defined states will be available for spaces of the selected workspace type. This you definefor each item type. For example, an item of type "mile stone" might require only the states "open" and "passed",while a problem report might require many more states.
Drag those states that you want from the right column to the left column. If you don't drag any there, all will beavailable.
Assigning available priorities
You can assign which of all defined priorities will be available for spaces of the selected workspace type. This youdefine for each item type. Drag those that you want from the right column to the left column. If you don't drag anythere, all will be available.
Assigning available severities
You can assign which of all defined severities will be available for spaces of the selected workspace type. This youdefine for each item type. Drag those that you want from the right column to the left column. If you don't drag anythere, all will be available.
132

6.10 Managing workspace types
Assigning child workspace types
You can assign which workspace types are available for a subspace or child workspace for the selected parentworkspace type. For example, you can define that for a workspace of type "Helpdesk" you can only create childworkspaces of the same type. Drag the workspace types you want to make available from the right column to theleft column. If you don't drag any there, all will be available.
Defining and assigning custom properties
You can define custom properties specifically for each workspace type. You could overwrite property properties atthis level, for example because you need to call items "issues" in some projects, and "bugs" in another project. Theprocedure of defining and assigning custom properties is described in Managing custom properties.
133

Customizing Genji
Defining and assigning custom forms
You can define and assign custom forms specifically for the selected workspace type. How this is done is describedin Managing custom Forms.
Assigning workflows
You can assign workflows to item types in the selected workspace type. How this is done is described in Managingworkflows.
6.11 Replacing logos
The license conditions permit you to replace the Genji logo by your own company logo as long as the modifiedversion of Genji is not distributed outside the company to which this logo belongs.
For example, it is possible to replace the Genji logo with the Bosch logo as long as this modified version of Genji isused inside Bosch. It is not permitted to place for example a Sagem logo onto Genji and have Bosch use this modifiedversion inside Bosch.To replace the Genji logo with your companies logo you have to replace the following files:
• <TRACKPLUS_HOME>/logos/trackLogo.png (68x28) for the web interface top right logo• <TRACKPLUS_HOME>/logos/trackLogo-inverted.png (68x28) for the web interface top right logo
and dark skins where the standard logo would not have enough contrast• <TRACKPLUS_HOME>/logos/mailLogo.png (98x40) for mail templates• <TRACKPLUS_HOME>/logos/reportLogo.png (254x105) for report templates
134

7Administering the serverTopics:
• Concepts and tasks for systemadministrators
• Server configuration• Cluster operation• Configuring login page text• Observing and managing
server state• Broadcasting e-mails to Genji
users• Configuring diagnostic
messages• Data backup• Restoring data from backup• Switching database systems• Non-western character sets• Using SSL and TLS encryption
on e-mail and LDAPconnections
• Configuring Genji with Jenkins• Configuring Apache Tomcat• Using the TC command line
client
135

Administering the server
7.1 Concepts and tasks for system administrators
Some operations like connecting a Genji server to an e-mail server, providing disk space, or performing databasebackups and restores are reserved to Genji system administrators.
System administration tasks can be categorized as listed below.
• Server configuration, usually done once after system installation.• Setting login page text. This may be an ongoing activity to advice users of downtimes or other important
information.• Sending broadcast e-mails to notify users of changes or planned down times.• Monitoring the system state and analyzing the system log.• Configuring logging. Required only in case of system problems for debugging purposes.• Performing database backups.• Restoring a database.
7.2 Server conguration
There are a number of parameters that need to be configured before Genji can run in a meaningful way.
This section describes
• how to configure licensing• how to configure the e-mail interface• how to configure LDAP and single sign on (SSO)• how to set up full text search• how to setup various other settings like web services, project specific item number handling, directories for
storing attachments and backups, etc.
7.2.1 System information and license dataGenji controls licensing via a license key. The license key is bound to your servers IP address.The server informationand license tab displays information on the servers software version, database schema version, and IP addresses.
To access the server information and licensing page, Switch to the Administration perspective. In the top toolbarselect Server administration > Server conguration..
A screen with a number of tabs appears, as shown below.
136

7.2 Server conguration
Here you can enter the license key. Just cut and paste it from the file you have received into the text area. Hit the„Save“ button in the small toolbar. The number of users and the expiration date of the license key shows in the areabelow the text box.
The licensing subsystem supports a number of features. The number of licenses for each feature are shown in thebottom part of this tab. The “guest” user should not be deleted, it doesn't count towards your licenses. You canrename the “admin” user to yourself or any other user, it is a regularly usable account.
Important: When requesting a license key, make sure you supply one of the IP numbers shown on this tab.Do not use the localhost IP number 127.0.0.1 or 0:0:0:0:0:0:0. Make sure you are supplying the right Genjiversion number, as shown on the top of this tab area.
7.2.2 Outgoing e-mail connectionGenji can send e-mails to notify users of events within Genji. To this end Genji acts like any standard e-mail clientlike Outlook or Thunderbird and needs to know how to connect to an SMTP server.
Genji SMTP user
The Genji system can send e-mails to its users. For all system generated e-mails, like reminder e-mails, or passworde-mails, Genji uses as "send from" its own e-mail address.
For user triggered e-mails like changing an item you can decide whether that users e-mail should be used as thesender address or the Genji system address. You need to use the Genji system address if you want responses tothese e-mails being added as comments to items.
If you do not want to enable item submission via e-mail, this e-mail address does not necessarily have to have a reale-mail inbox associated with it, it can be a „virtual“ e-mail address. You would not see any messages sent to thataddress in the Genji system anyway.
If you want to use the item submission via e-mail feature, there has to be an e-mail inbox associated with that e-mail address.
137

Administering the server
All e-mails sent directly from the Genji system will have as their „from“ address the Genji system e-mail address,and as the „from“ name the server name. For example, such an e-mail would appear as coming from „Your server“<[email protected]>.
SMTP server name
To send e-mails, Genji needs to have access to an SMTP e-mail server. This e-mail server can be located on the samemachine as Genji, or can be placed anywhere as long as it can be directly reached. For example, it is well possibleto use an SMTP server on the internet.
Typically, you would enter the same parameters here that you are using inside your regular e-mail client software.You should not use the same account, as this may lead to access contention depending on the authenticationscheme you are using.
SMTP encrypted connections
You can use an encrypted connection between your Genji server and your SMTP e-mail server. You can selectbetween "SSL", "TLS", and "TLS if available".
For encrypted connections you first have to import a certificate from your SMTP server into your Genji server localkeystore. How this is done is described under "Using SSL and TLS encryption on e-mail and LDAP connections".
SMTP authentication mode
Genji offers four ways you can authenticate against an SMTP Server:
1. no authentication at all2. with a special user name and password for the SMTP server3. using the same user name and password as for the incoming mailbox server4. by first connecting to the incoming mailbox server
SMTP user name and password
Many SMTP servers require user authentication before permitting to send anything. Some company intranet SMTPservers may have been configured to be used without authentication. In case you authenticate with a user/passwordcombination on your SMTP server, you enter the user name and your password here.
Click the "Clear" button to clear the password. Not entering a password will take the old one.
CAUTION: Some SMTP servers do not like it if the „From“ address does not match the SMTP user name. Inthis case you are forced to check box „Use Genji „From“ address“.
Mail encoding
Genji can send e-mails in a variety of encodings. Here you set the encoding such that it matches your users preferredencoding. In the meantime, many clients support unicode (UTF encoding). This encoding works with any language.The setting here is typically the same as in your e-mail clients setting. For Western languages, "ISO-8859-1" usuallyworks fine.
138
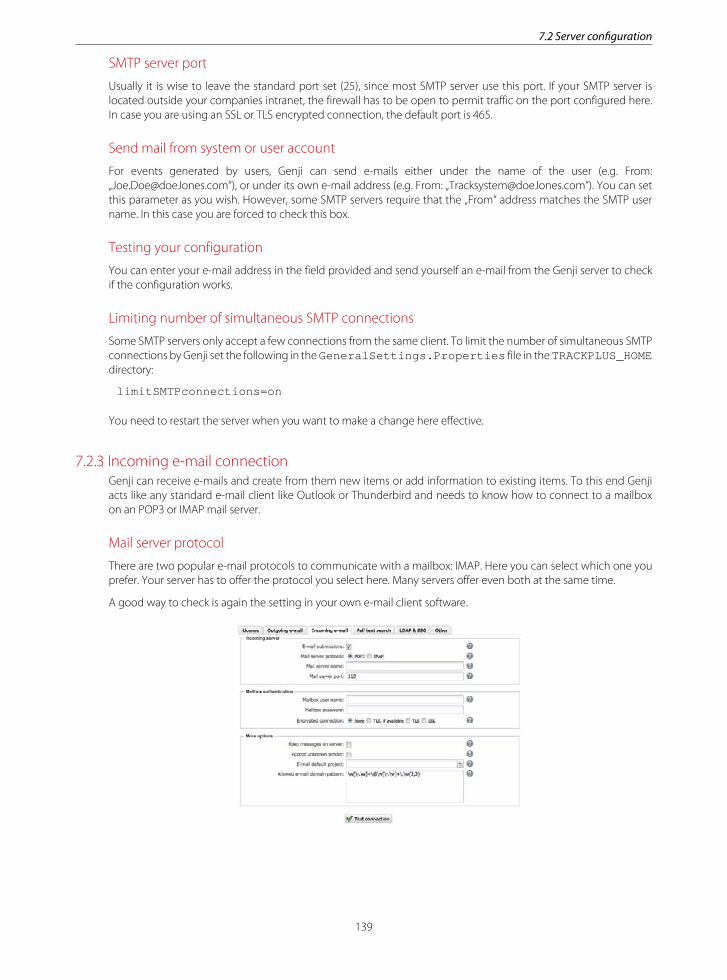
7.2 Server conguration
SMTP server port
Usually it is wise to leave the standard port set (25), since most SMTP server use this port. If your SMTP server islocated outside your companies intranet, the firewall has to be open to permit traffic on the port configured here.In case you are using an SSL or TLS encrypted connection, the default port is 465.
Send mail from system or user account
For events generated by users, Genji can send e-mails either under the name of the user (e.g. From:„[email protected]“), or under its own e-mail address (e.g. From: „[email protected]“). You can setthis parameter as you wish. However, some SMTP servers require that the „From“ address matches the SMTP username. In this case you are forced to check this box.
Testing your configuration
You can enter your e-mail address in the field provided and send yourself an e-mail from the Genji server to checkif the configuration works.
Limiting number of simultaneous SMTP connections
Some SMTP servers only accept a few connections from the same client. To limit the number of simultaneous SMTPconnections by Genji set the following in the GeneralSettings.Properties file in the TRACKPLUS_HOMEdirectory:
limitSMTPconnections=on
You need to restart the server when you want to make a change here effective.
7.2.3 Incoming e-mail connectionGenji can receive e-mails and create from them new items or add information to existing items. To this end Genjiacts like any standard e-mail client like Outlook or Thunderbird and needs to know how to connect to a mailboxon an POP3 or IMAP mail server.
Mail server protocol
There are two popular e-mail protocols to communicate with a mailbox: IMAP. Here you can select which one youprefer. Your server has to offer the protocol you select here. Many servers offer even both at the same time.
A good way to check is again the setting in your own e-mail client software.
139

Administering the server
Mail server name and port
Mailboxes are managed by mail servers. Here you enter the name of the mail server where the Genji system mailboxresides. You can leave this empty if you do not plan to use the item submission by e-mail feature, and do not requireauthentication by first reading a mailbox before sending anything.
Typically, you should leave the default port set (110 for POP3 or 143 for IMAP, and 995 for POP3 via SSL/TLS and993 for IMAP via SSL/TLS).
Mailbox user name and password
All mailbox servers require you to authenticate yourself before retrieving any e-mails. Here you enter the user nameand password associated with the Genji system e-mail inbox. Be careful if you try to reuse an existing, private account:you might loose e-mails since they would be read by the Genji system, and it is possible that contention occurs ifyou are trying to access the mailbox from two different sessions (like from your private e-mail client and throughthe Genji system).
It is therefore recommended to establish an extra e-mail account for the Genji system, unless this field is kept empty.
In case item e-mail submissions are enabled, this mailbox is regularly scanned for new e-mails. The e-mails are read,and items are created from each e-mail. The e-mail subject is mapped to the item title, the e-mail body is mappedto the item description, and any attachments are added to the item as item attachments.
Encrypted connections
You can use an encrypted connection between your Genji server and your POP3 or IMAP e-mail server. You canselect between SSL, TLS, and TLS if available.
For encrypted connections to work you first have to import a certificate from your e-mail server into your Genji serverlocal keystore. How this is done is described under "Using SSL and TLS encryption on e-mail and LDAP connections".
E-mail submissions
Genji can be configured to accept item submissions and additions to existing items via e-mail. This can be quiteuseful if customers shall not get access to the Genji database itself, but they should channel their requests via e-mails to a specific account.
You can enable or disable e-mail submissions to the Genji system selecting the radio buttons provided on theconfiguration screen. You can also decide if you want to accept e-mail submissions from users that are not registeredwith the system, or you want to limit acceptance to users that are known in Genji.
Genji regularly scans the POP3 input box of the Genji e-mail account provided in the upper part of the configurationscreen for new messages and either creates new items in the default project you have to configure here, or addssubmissions as comments to existing items if the subject line starts with a number and that number correspondsto an existing item.
Keep messages on server
Check this if you want to keep messages on your mail server even though your Genji server has read them. This canbe useful if you access the same mailbox also with an interactive client like Thunderbird or Outlook.
Accept unknown sender
Check this box if you want to permit unknown senders to submit items to the Genji system via e-mail. The e-mailsenders address is still checked for compliance with the allowed domain patterns, but it is not required any morethat the senders e-mail address is registered with some user within the Genji system.
Be careful when you expose Genji to the internet, leaving the wildcard domain pattern at the same time, which isthe default. This could result in spamming your Genji installation.
140

7.2 Server conguration
E-mail default project
When e-mail item submission has been enabled, there has to be a project the incoming items can be assigned to.This could be some kind of „catch all“ project, from where the items are regularly transferred to their final points ofdestination. Typically, one or two people monitor this catch all project, and take action when items come in.
Each project can have their own e-mail inbox configured, if it likes to do so. In this case the global e-mail inboxmight be obsolete.
Allowed domain pattern
To prevent users from unverified domains (e.g. hotmail.com, gmx.com) to register, a Perl5 regular expression can bedefined so that only e-mail domains matching that expression are allowed to register. You most likely will have tochange the example default on the site configuration page.
Example pattern:
[^@ \t]@bosch\.com
This example permits just users from domain „bosch.com“ to register. Some more examples:
[^@ \t]@t-online\.de|[^@ \t]@computer\.org
matches all users from domains t-online.de and computer.org. The pattern
\w[-.\w]+\@[-.\w]+\.\w{2,3}
matches all e-mail domains with no restrictions.
7.2.4 Full text search configurationGenji can index the text of item properties and some types of attachments, like PDF, OpenOffice, WinWord, Excel,PowerPoint, HTML, RTF, and XML. The following section describes how to configure full text search in Genji.
Enable full text search
You can enable or disable full text search. Full text search requires some storage space on disk particularly if a lot oflarge attachments need to be indexed. The computational burden of indexing may be large if a complete re-indexis forced during system start-up.
We recommend to turn full text search on since it assists in retrieving items.
Index attachments
Here you can enable or disable to also the indexing of attachments. Disabling this is useful if you have limited diskspace available, or you want to reduce the computational burden of the server.
We recommend to leave the indexing of attachments enabled.
Index on start-up
When this box is checked, a complete index is performed from scratch during system start-up. This can take sometime (minutes to hours), depending on the number of items and attachments in the database. During the indexingprocedure full text search will not work.
It is recommended to not do an automatic reindex on each server start-up. It usually does suffice to do a reindexevery half year or so. It is best to disable access to the system during the reindex process.
Lucene analyzer
Genji uses the Lucene full text indexing and query engine. When building the index, it is usually useful to keep outwords that nobody usually looks for and that occur often. For example, in the English language words like „a“, „the“,
141

Administering the server
„does“, „do“, and so on would consume a lot of indexing space while not giving any useful results when queryingfor them.
For this purpose there are different analyzers available that focus indexing on those text parts that are really useful.However, this depends on the language of the text being indexed.
Here you can select the analyzer that suits best your requirements. The standard analyzer is not as efficient as alanguage specific analyzer, but it should work in all cases. If you have texts and attachments in different languagesyou may be best of with the standard analyzer, or the analyzer of the language most texts are set in.
7.2.5 LDAP and SSO configurationIf you want to use always the same password on your Genji account as on your other computers, you can connectGenji to a directory server (LDAP server, Active Directory). If you have several applications all running on the sameserver, you can provide a single login to that server and have Genji use the authentication of that login process.
LDAP configuration
Genji can be configured to use a directory server based on LDAP to authenticate users during login. This simplifiesthe handling of login names and passwords for Genji users.
To allow users to use LDAP-authentication you have to activate the LDAP-settings in the site configuration page.The LDAP server URL is of the form
ldap://ldapserver/ou=Main,o=People
and the LDAP login property of the form
uid
If searching in LDAP can be done with anonymous bind, keep the LDAP-bind DN field and LDAP-bind passwordfield empty. Otherwise provide the distinguished name (DN) used for searching and the password for the DN.
LDAP-authentication is disabled by default. When LDAP-authentication is enabled for your Genji installation, everyuser can choose to use it or not by setting the appropriate switch in his personal profile. If you set the option„Force central password“, users will not be able to choose a specific Genji password but must rather use their centralWindows/Unix password.
142

7.2 Server conguration
Force central password
When you mark this box a regular user cannot choose any more between using the central password and the localpassword with Genji. Only a system manager or administrator can enable local passwords for a user.
Synchronizing Genji with an LDAP directory
You can synchronize your Genji list of users with your LDAP directory. Entries found in the LDAP directory but notin Genji are created in Genji. Entries found in Genji but not in your LDAP directory can be automatically deactivatedin Genji (set parameter deactivateUnknown=true).
You can configure Genji to perform the synchronization automatically on a regular basis, or initiate thesynchronization manually from the user administration interface.
By default, automatic synchronization is disabled. To enable it you need to modify some entries in file webapps/track/WEB-INF/quartz-jobs.xml.
The relevant sections looks like this:
<?xml version="1.0" encoding="UTF-8"?><job> <name>LdapSynchronizerJob</name> <group>DefaultJobGroup</group> <description> Synchronizes a Genji user database with an LDAP directory </description> <!-- description not more than 120 characters!!! --> <job-class> com.aurel.track.dbase.jobs.LdapSynchronizerJob </job-class> <job-data-map> <entry> <!-- Enable synchronization with LDAP --> <key>enabled</key> <value>false</value> </entry> <entry> <!-- Enable user synchronization with LDAP --> <key>enabledUserSync</key> <value>true</value> </entry> <entry> <!-- Enable group and group users synchronization with LDAP --> <key>enabledGroupSync</key> <value>true</value> </entry> <entry> <!-- BaseDN for group synchronization -->
143

Administering the server
<key>baseDnGroup</key> <value>dc=itk-engineering,dc=de</value> </entry> <entry> <!-- Deactivate users unknown in LDAP --> <key>deactivateUnknown</key> <value>true</value> </entry> <entry> <!-- LDAP filter expression for users--> <key>ldapFilter</key> <value>*</value> </entry> <entry> <!-- LDAP filter expression for groups--> <key>ldapFilterGroups</key> <value>(objectClass=groupOfNames)</value> </entry> <entry> <key>firstName</key> <value>gn</value> </entry> <entry> <key>lastName</key> <value>sn</value> </entry> <entry> <key>email</key> <value>mail</value> </entry> <entry> <key>phone</key> <value>phone</value> </entry> <entry> <key>groupName</key> <value>cn</value> </entry> </job-data-map></job>
You enable all automatic synchronization by setting key „enabled“ to „true“. You may have to modify the mapping ofLDAP properties to Genjiproperties. The Genji properties are the keys and must not be modified. The LDAP propertiesare the values and you may have to change them to the values you use in your directory.
Table 7-1: LDAP synchronizer parameters
Property in quartz-jobs.xml Description
enabled True if users and groups shall be regularlysynchronized with your LDAP directory.If False, properties "enabledUserSync" and"enabledGroupSync" have no effect.
enabledUserSync True if users shall be regularly synchronized with yourLDAP directory
enabledGroupSync True if groups and the users assigned to them shallbe regularly synchronized with your LDAP directory
baseDnGroup The LDAP base DN under which your groups aredefined. Search is based on the "member" propertyof the groups.
144

7.2 Server conguration
Property in quartz-jobs.xml Description
deactivateUnknown True if users not found during the synchronizationprocess shall be deactivated. The "admin" and"guest" users are exempted.
ldapFilter The LDAP filter expression for user synchronization.Can be any valid LDAP filter term like"(&(objectClass=inetOrgPerson)(ou=Trackplus))"
ldapFilterGroups The LDAP filter expression for group synchronization.Can be any valid LDAP filter term like"(&(objectClass=group)(ou=Groups))"
firstName The LDAP property name for users first name
lastName The LDAP property name for users last name
email The LDAP property name for users email
phone The LDAP property name for users phone number
groupName The LDAP property name for the group name
After you have modified this file save it and restart the Tomcat server.
Providing your own LDAP synchronizer
There are many ways to set up an LDAP server. If you want to synchronize groups and roles you can provide yourown code to replace the standard Genji LDAP synchronizer. See Managing scripts for an example custom LDAPsynchronizer.
LDAP via SSL
Genji also supports the secure ldaps protocol. To use ldaps you have to deploy the ldaps keystore file under thename „trackplus.ks“ in the attachment root directory, subdirectory „keystore“ as described in "Using SSLand TLS encryption on e-mail and LDAP connections". The LDAP server needs to be configured for LDAPS as well.
As an example, for the Apache Directory Server there is a good description how to enable LDAPS under http://directory.apache.org/apacheds/1.5/33-how-to-enable-ssl.html.
For a Windows server, we had to modify the ApacheDS configuration file as follows:
<!-- SSL properties --> <property name="enableLdaps" value="true" /> <property name="ldapsPort" value="10636" /> <property name="ldapsCertificateFile" value="C:\jdk1.5.0\bin\zanzibar.ks" /> <property name="ldapsCertificatePassword" value="secret" /> <bean id="configuration" class="org.apache.directory.server.\ configuration.MutableServerStartupConfiguration">
and
<property name="workingDirectory" value="example.com" /> <!-- SSL properties --> <property name="enableLdaps" value="true" /> <property name="ldapsPort" value="10636" /> <property name="ldapsCertificateFile" value="C:\jdk1.6.0\bin\zanzibar.ks" /> <property name="ldapsCertificatePassword" value="secret" />
145

Administering the server
Container based authentication
If you run several applications on the same web server, you might prefer to log in once for all applications on thatserver rather than authenticating yourself for each application separately. The web server or „container“ becomesresponsible for authentication („container based authentication“), and you only need to sign on once („single signon“).
When you enable Genji for container based authentication, Genji will try to retrieve the user name and authenticationtoken from the server. If this attempt is successful and the user is known to Genji, the user will be directly grantedaccess to the application.
If the user is unknown to Genji, the regular login page is displayed and Genji authentication has to be used.
The standard configuration file web.xml that comes with Genji contains a commented section that configures aTomcat web container realm for container based authentication.
7.2.6 Various configuration itemsOn this tab you can configure directories, URLs, web services, backups, handling of item numbers, auto-login forguests, and more.
Directories and URLs
Genji stores a number of items on disk rather than in its database. You should set the following directory entries toan absolute path and you must make sure that they can be written to by the user that runs the application server(e.g., tomcat7 on an Ubuntu/Debian system with Tomcat 7):
Name Description
TRACKPLUS_HOME At this location Genji stores among other thingsattachments and report templates. Make sure there issufficient disk space available and that this is an absolutepath.
Backup directory Genji can create regularly backups of its database and allother data. Such backups are stored in this directory.
Full text search index Genji keeps the indices for full text search on the filesystem, in specially formatted files and directories. Theindices can grow quite large. Here you should providesufficient disk space to keep the indices on. Also keepin mind that with each search and each save of an itemthis index is touched. We therefore recommend to havea high bandwidth connection between the Genji serverand the machine managing the index disk space to keepboth on the same machine.
Force Genji server URL
Genji has been designed to operate in a proxy environment, that is it works well even when its address from theoutside is different from the internal address.
Usually, Genji extracts its base URL from the first access to the system after server startup.
CAUTION: If you access the system using „localhost“, which you may be tempted to do as a systemadministrator, Genji will use „localhost“ as its base address until the next application restart. This will causeproblems when other people iare accessing the system from some other computer. You thus shouldalways access the system using its real address, as seen from the outside.
The automatic base URL detection works fine if there are no proxy servers between the application server and theuser clients. If there is a proxy server hiding the application server, the correct server URL has to be configured.
146

7.2 Server conguration
The application name must not be included, Genji will find that out itself. Example for the Genji server URL:
http://gandalf
This will work for an installation where the Genji application can be reached under
http://gandalf/track
or
http://gandalf/track-dev
or any other application name you might have chosen. In non-proxied environments, you can leave this field empty,which will enable the automatic detection feature for the server URL.
Configuring self registration
It is possible to permit users to register themselves. This can decrease the burden on the system administrator.Registration is always limited to certain e-mail domain patterns, as configured under „Allowed e-mail pattern“ in theincoming e-mail configuration section.
Even if users register themselves, the system administrator is the only one that can assign employee numbers anddepartments to accounts.
Project administrators have to grant users access to their projects, otherwise users will not be able to access anyproject data.
Automatic guest login
When turned on, access to any system URL automatically logs the guest user into the system. This is convenient ifyou want to make queries publicly accessible without requiring users to have an account.
Workspace specific item number
For each item Genji generates a unique and global identification number like 4789 or 6789. If you turn on the projectspecific item numbering, Genji will generate instead item numbers composed of a project specific prefix and aproject specific integer, like TRA-1, TRA-2, and so on.
Summary items behavior
This activates automated computation of start date, end date, and planned value for summary items from their childitems values. If not set parent or summary items can have dates and planned values independent of their children,which in most cases is probably not what you want.
Activate top-down support
This enables support for top-down planning of budgets and dates. The top-down values are compared with thebottom-up values and conflicts are marked. For example, if the budget was 100 Euro, and the planned value enteredby the responsible was 130 Euro, this item would be marked being in a conflict state.
Configuring site as demo site
This is a switch to make installation of a demo site easy. In a demo site it is not possible to save changes to the guestuser account. Usually this should be disabled.
Alert of new software version
This displays a message in the state line when there is a newer program version available than the one you arerunning. The message is only shown to system administrators.
147

Administering the server
Web service activation
You can activate the web service interface which is being used by external software like Eclipse Mylyn andHudson/Jenkins. The address under which you can reach the web service is the URL of your instance amended byservices/TrackplusService. Example:
https://www.trackplus.net/services/TrackplusService
Automated data backup
This turns on regular automated data backups. You can configure the number and frequency of backups on thedata backup configuration page (see Data Backup).
7.3 Cluster operation
Genji can be operated in a clustered environment, i.e. one Genji instance can run on a number of servers. This sectiongives examples of possible configurations and explains how Genji behaves in a clustered environment.
Cluster configurations
For web applications, there are two forms of clusters: high-availability (HA) clusters, and load-balancing clusters.
With a high-availability clusters you can improve the availability of the Genji service, for example to ensure 24/7operation. A HA cluster operates by having redundant nodes, which are then used to provide service when systemcomponents fail. The most common size for an HA cluster is two nodes, which is the minimum requirement toprovide redundancy. By using redundancy, HA cluster implementations eliminate single points of failure.
The figure below shows a simple HA cluster with two application servers and a database server. The database serveris not redundant, but it would be possible to use one of the application servers as a redundant database server. Therouter which switches between application server 1 and application server 2 is not shown here.
The purpose of a load-balancing clusters is to distribute a workload evenly over multiple back end nodes. Typicallythe cluster will be configured with multiple redundant load-balancing front ends. Since each element in a load-balancing cluster has to offer full service, it can be thought of as an active/active HA cluster, where all availableservers process requests.
The following figure shows a rather large configuration with a load balancer, five application servers, two databaseservers, and two file servers.
148

7.3 Cluster operation
All application servers operate on a single database, which is served in a redundant fashion via two database servers.The attachments and full text search indices are kept on a single file server, which also has a backup. The backup forthe file server is left to the operating system, there is no support for this within Genji.
The database management system needs to take care of the synchronisation between the original database serverand the backup database server.
All communication between different Genji application servers of a cluster is handled via the database. There is noneed to open any special ports for communication between the application servers, or any need for using patchedJava virtual machines.
Note: There is basically no configuration required within Genji to support operation in a clusteredenvironment. If you connect several Genji instances to the same database, Genji will automatically go intocluster operation mode. You do need an appropriate license key though, which includes all applicationservers you connect to that database.
Many other configurations are possible. For example, one of the application servers can be at the same time the fileserver. Or the database server and file server can be put on the same hardware. Genji itself does not care about allthis, as long as you ensure that you have exactly one access point (JDBC URL) for the database, and exactly one filepath to the attachment and index directories for all Genji instances of that cluster.
Start-up behaviour
When a Genji instance is started it registers itself as a node in the database. Then it checks the database for othernodes. If there are nodes in the database which have not updated their record during a certain timeout period(default is 5 minutes, can be set in file WEB-INF/quartz-jobs.xml), that entry is cleared from the table.
Thereafter Genji tries to set itself as the master node, unless there is already another node marked as master node.If this is the only node, the operation succeeds right away. Otherwise is may take as much as the time out perioduntil a new master node is completely established.
The master node is responsible for
1. updating the full text search index2. getting e-mails from an e-mail server, when submission of items by e-mail is enabled.
In all other aspects, the master node acts like a regular node.
Master node goes down
In case the master node goes down, the full text search facility is temporarily not updated. However, no activitiesrequiring update of the full text search index get lost, they are stored in the database.
Furthermore, obtaining e-mails from the e-mail server is temporarily disabled. Again, no submission will get lost asthey are stored on the e-mail server.
After at most a timeout period (default is 5 minutes, set in WEB-INF/quartz-jobs.xml) negotiation betweenthe remaining nodes will begin for who will become the replacement for the original master node. The outcomeis random. The new master node will begin to update the full text search index and start retrieving e-mails fromthe e-mail server.
Thus, the drop out of a master node will result in slightly decreased performance, and a lag of about 5 minutes inupdating the full text search index.
Regular node goes down
In case a regular node goes down there will be some decrease in performance. The other nodes will need lessthan the timeout period (default is 5 minutes, set in WEB-INF/quartz-jobs.xml) to realize that a node hasdropped out. However, this does not have any further consequences.
149

Administering the server
Forced switch of master node
Usually all application nodes will negotiate among themselves who is going to become the master node. Theoutcome is random.
It is however possible to force one of the nodes to become the master node. This requires to tell the current masternode to seize its master node related operations, like updating the full text search index, and giving way to the newmaster node. This process may take up to the timeout period (5 minutes by default), before the new node can takeup its responsibility as the new master node.
7.4 Conguring login page text
The login page of the Genji system provides an area where messages to existing or prospective users of the systemcan be placed, like downtime schedules, or registration policies. The message can be provided in several languagesat the same time. This section describes how to edit this text.
Switch to the Administration perspective. In the top toolbar select Server administration > Login page text.
The screen that appears has a selection list for the locale, a title or teaser, and a text area.
Select the locale for which you want to edit or create the login page text. You can use any HTML tags here.
The locale displayed to the user will depend on the users preferred language setting in his browser, since this isbefore login and Genji does not recognize the user yet.
7.5 Observing and managing server state
Sometimes it is necessary to prevent users from accessing the system, for example if a new version is to be deployed,or other maintenance tasks have been scheduled. Server accessibility may also be effected by the number of usersregistered, because of license restrictions.
There is a state page available which permits to disable new server logins, and which gives an overview over thenumber of users currently logged on, the number of active and deactivated users, the total number of projects anditems.
Switch to the Administration perspective. In the top toolbar select Server administration > Server status.
150

7.6 Broadcasting e-mails to Genji users
The top left section of the state page displays the actual Genji release number, the IP addresses of the server as seenfrom the Genji application, and the maximum number of active users as defined by the license.
Below you find a list with the users currently logged in, and a list of nodes in case of a cluster configuration.
At the bottom of the left part there is information on the database connected, and the delay between the Genjiserver and the database server.
On the top right you find information on the memory configuration and consumption of your Genji installation, andthe Java version being used.
The bottom right area permits to temporarily disable access to the Genji system for all users but the systemadministrator. If the system is disabled, you can provide an explanatory message on the login screen.
The application access lock is automatically removed when restarting the Genji application on the server, or whenrebooting the server. Otherwise, the system administrator can remove the access lock.
7.6 Broadcasting e-mails to Genji users
The system administrator can send broadcast e-mails to all or some Genji system users.
To send a broadcast e-mail, go to Switch to the Administration perspective. In the top toolbar select Serveradministration > Broadcast e-mail..
On the screen that appears you can select users from the list of available users by selecting departments, andselecting or deselecting single users.
Add an e-mail subject and text. Then send the e-mail by clicking on the „Send e-mail“ button in the toolbar area.
7.7 Conguring diagnostic messages
Genji can be operated with many applications servers, database systems, and operating systems. Furthermore, Genjican be configured in numerous ways. Should there be any problems in such configurations, it is very helpful for thesupport team to get diagnostic messages.
151

Administering the server
Usually, during normal operation the number of diagnostic messages saved by the system should be minimal, inorder to keep good performance and reduce disk space consumption.
However, sometimes it may be necessary to increase the number of diagnostic messages for certain modules to trackdown a problem. In this case, the „logging level“ is being increased for such modules. This causes more messagesto be written to the log files by such modules.
There are six logging levels or verbosity levels defined. The lowest verbosity level is „FATAL“, the highest „ALL“. Thestandard configuration is to set all modules to the „WARN“ level, and set modules to be inspected closer to „DEBUG“level.
1. Switch to the Administration perspective. In the top toolbar select Server administration > Loggingconguration.The screen that appears is a plain list with all Genji modules.
2. Type a filter expression into the filter box to reduce the list. If you want to change a logging level for a specificmodule, look for the line with the module name and change the level using the selection box behind the modulename.
7.8 Data backup
A system administrator can backup all data from the database and optionally all attachments into a ZIP archive file.Furthermore it is possible to create such backups automatically on a regular basis. The backup data can be used torestore the database and all attachments at a later point in time.
Note: For production environments with more than 25 users or more than 20.000 items we recommendedto use native database and file system backup tools rather than the internal backup facility described here.
Manual backup
Switch to the Administration perspective. In the top toolbar select Server administration > Data backup.
You will see a list of backups that are already available. The default naming scheme is <YYYY_MM_DD_HH_MM>.However, you can choose any name you wish.
152

7.9 Restoring data from backup
The backup process can take some time. You can select if you want to be informed by e-mail when the backup isfinished.
You can also choose if you want to include the attachments in the backup process, or rather limit the backup tothe data in the database. Selecting to include the attachments has the advantage that the attachment meta datain the database and the attachments stay consistent. You could also decide to backup the attachments using yourregular operating system backup features.
Note: You may not be able to execute a backup when at that same moment an automated backup isrunning. You will have to wait until the automated backup process is finished before you can execute yourmanual backup. By default, the automated backup is running from Monday to Friday, at 23:15 each night(server time).
Note: The backup data is placed into the directory you have configured for attachments, in a subdirectorythere called „dbBackup“.
Automated backup
You can enable your system to create backups regularly by itself. To enable automated backups activate thecorresponding check box. You can then choose at what weekdays and at what time on each weekday you wantto create a backup.
7.9 Restoring data from backup
A system administrator can restore data from a backup file to recover from a crash, port data to a new system, orgo back to previous date.
Switch to the Administration perspective. In the top toolbar select Server administration > Data restore.
On the screen that appears select the file from which you want to restore data. Then you need to enter:
1. A JDBC driver class. When you open the screen you see the same driver class your current Genji instance isusing. For a standard backup into the same type of database system this selection is fine. If you want to moveto another database system, you would have to enter the driver class for your new target database system here.
2. A JDBC URL. Here the JDBC URL of your current Genji database instance is already entered, but with a renameddatabase name.
Important: You need to create a new empty database and enter its name here before you can proceedwith the backup. It is not possible to use the same database the current Genji instance is running on.
3. A JDBC user name and password, as you have configured when you created the database.4. Do not restore the database schema when you switch database systems. Mark the check box appropriately.5. Check if you also want to restore attachments if any are included in the backup file.6. The directory where you want to restore the attachments to. It is not possible and advisable to restore to the
same directory as your current attachments are in, you should define a new directory here.
153

Administering the server
Thereafter you can start the restore process. Once the process is done you need to switch over to the restoreddatabase, and need to configure the path to the new attachment directory.
To have your Genji installation point to the new (restored) database you need to change the JDBC URL, user nameand password in file WEB-INF/Torque.properties. Then you need to restart your server.
To adapt your attachment directory go to Switch to the Administration perspective. In the top toolbar select Serveradministration > Server conguration > tab “Other”.
7.10 Switching database systems
It is possible to switch the Genji database from one database system to another one. For example, this may happenwhen you started out using the Genji Windows installer that comes with the Firebird RDBMS, and later on want tomove to an RDBMS officially supported by your company.
To move from one database system to another one, follow these steps.
1. Create a backup of your current Genji database (see Data backup).2. Create the new empty target database.3. Follow the procedure for restoring data from a backup file (see Restoring data from backup). Make sure you set
the switch called "Do not include database schema" to unchecked.
This will create a new database for the target system which should contain all information of the source database.
CAUTION: There may be some losses during the data conversion process due to database mappingdifferences. For example, some database systems have limits on text field sizes, in which case a truncationcould result. You should therefore check the conversion result carefully.
7.11 Non-western character sets
Internally Genji uses Unicode and UTF-8 for page encryption. We recommend that you use UTF-8 or UTF-16 for youre-mail templates and database connection.
The configuration of the database character encoding depends on the database system being used. If possible setit to UTF-8 or UTF-16.
7.12 Using SSL and TLS encryption on e-mail and LDAP connections
You can use encrypted connections between Genji and your e-mail server to prevent passwords from beingtransmitted clear text across your network.
Note: In case you use a certificate issued by a Certificate Authority like Verisign, Thawte, Geotrust orComodo you do not have to do anything here, it should just work.
In case you use a self-signed certificate or a certificate from a Certificate Authority not known by your system you haveto install the certificate identifying your e-mail server in your local Genji keystore. You need to proceed as follows:
1. Obtain a certificate from your e-mail server. How to do this depends on your server. You can ask your provider togive you this certificate. The certificate is usually bound to a certain internet address, like your.domain.com.
2. Import the certificate into your local keystore using the “keytool” utility that comes with any Java installation:mkdir <TRACKPLUS_HOME>/keystore
keytool -keystore <TRACKPLUS_HOME>/keystore /<your.domain.com>.ks
154

7.13 Conguring Genji with Jenkins
-import -file theServersCertificate.cer
The keystore file must be in directory TRACKPLUS_HOME/keystore. See “Various configuration items” for howto configure TRACKPLUS_HOME. The keystore file itself has to have the ending ks and the basename shouldcorrespond to the e-mail server hostname. The certificate file you got from your provider in the above example istheServersCertificate.cer.
If you experience problems with the approach above or your want to use TLS encrypted connections rather thanSSL you need to import self generated certificates into the Java keystore directly. Change to the bin directory of theJava runtime environment being used by your application server (e.g. Tomcat) and import the certificate as follows(here for a Windows system):
cd $JAVA_HOME\bin
keytool -import -alias <alias> -file theServersCertificate.crt -keystore ..\lib\security\cacerts
You will be prompted for a password. If it hasn't been changed from the default, it is "changeit".
7.13 Conguring Genji with Jenkins
You can configure Genji to work together with the Jenkins or Jenkins continuous integration server. This sectiondescribes how the procedure of setting Genji and Jenkins up properly.
Overview
Jenkins or Jenkins are web based tools to automate continuous build processes in software development projects.Continuous build processes are particularly beneficial when you have automated unit or system tests that you canrun with each build. These tests ensure that you do not regress in functionality or software quality while you arefixing defects or implementing new features.
Using a special Jenkins plug-in, you can integrate Jenkins with Genji. For Jenkins builds, you will be able to see inJenkins which Genji items were addressed with a particular build. In Genji, you will see for each item which Jenkinsbuild addressed that particular item, and which files were affected. You get links in Jenkins and in Genji which willtake you to the respective other application.
There are many ways to set up Jenkins. To integrate Jenkins with Genji tightly consider the following hints:
• Use the same user names and passwords on Genji and Jenkins. To make this easy configure both systems to usean LDAP server (see LDAP and SSO configuration).
• Install the Genji “portals” plug-in at TRACKPLUS_HOME and add the URL of your Jenkins server to thetrackplus-plugins.xml file there. This will permit you to switch directly between Genji and Jenkins fromthe Genji main menu.
Step 1: Configure Genji
On your Genji server enable the web service interface. To do this, log in as system administrator (“admin”). Switchto the Administration perspective. In the top toolbar select Server administration > Server conguration > tab“Other”.
155

Administering the server
Step 2: Install Jenkins Plug-In
To enable Jenkins to interact with Genji you need to install a plug-in for Jenkins. The plug-in consists of a single file“trackplus.hpi” which you need to copy into the plug-in folder in your Jenkins installation, as shown in the figurebelow. The Jenkins plug-in folder is located under <Servlet container path>/webapps/Jenkins/WEB-INF, or whereverelse you had installed Jenkins previously. You need to restart Jenkins after copying the file.
Step 3: Configure the Genji Jenkins Connector
You need to establish a connection between Genji and Jenkins. To this purpose you add one ore more Genjiconnectors to your Jenkins installation. From the Jenkins main page, select the “Manage Jenkins” link.
156

7.13 Conguring Genji with Jenkins
Download the Genji Jenkins plug-in from the Genji web site and install it in Jenkins.
On the “Manage Jenkins” page select “Configure System”.
157

Administering the server
There is a section labeled “Genji”. Here you can enter the URL for your Genji server, and a user name and passwordwhich is being used to add comments to Genji items affected by a Jenkins build. You should leave the item prefixwith “#”, since this is the value being used by the Genji Subversion integration.
In Jenkins, you can set up a number of Genji connectors, for example to different Genji servers, or with differentuser names.
Step 4: Configure the Jenkins Job
In the last step, you will have to instruct Jenkins which Genji connection to use for a specific job. Click on the linkfor that job from the Jenkins main page.
In the menu on the left, click the “Configure” link. Select the proper Genji connection and save.
158

7.14 Conguring Apache Tomcat
Use It!
The connection between Jenkins builds and Genji items is created via Genji item numbers found in Subversioncommit comments, preceded with a hash mark, like “3009”.
When in the Jenkins build you click on the item number, the browser will take you to that Genji item.
The link in the Genji item comment will take you to the related Jenkins build.
7.14 Conguring Apache Tomcat
When exposing your Genji installation to the internet it is usually best to work with an Apache HTTP server or IISserver as a front end to Genji. When you support other applications not running on the same Tomcat server as Genji,but via the same Apache HTTP server, you can still use single sign on without having to install a big SSO solution.
Genji requires more memory than the default installations of Apache Tomcat provide. On Linux systems, thesesettings can be modified as follows in file /etc/default/tomcat7 or /etc/default/tomcat8:
JAVA_OPTS="-Djava.awt.headless=true -DJENKINS_HOME=/home/jenkins \\
159

Administering the server
-DTRACKPLUS_HOME="/home/trackplus" -DLATEX_HOME="/usr/bin" \\ -XX:PermSize=384M -XX:MaxPermSize=550M -Xms512M -Xmx1624M \\ -XX:+UseConcMarkSweepGC"
On Windows system you can add these parameters in the Tomcat manager application.
To operate Genji on a Tomcat server behind an Apache web server, you need to consider the following configurationitems.
1. Locate your Apache web server configuration file (httpd.conf is the standard name). Let us call the directorywhere it is located APACHE_DIR/conf.
2. Add the following line at the end of the file:Include <APACHE_DIR>/conf/track.conf
3. Make sure that the following modules are loaded somewhere in your Apache web server configuration:LoadModule proxy_module modules/mod_proxy.soLoadModule proxy_http_module modules/mod_proxy_http.soLoadModule proxy_ajp_module modules/mod_proxy_ajp.so
4. Create or modify file <APACHE_DIR>/conf/track.conf. For basic authentication it should look like this:<Location ~ "/(track|websvn|crm|otherApps)"> AuthName "Steinbeis GmbH & Co. KG Login" AuthType Basic AuthUserFile <APACHE_DIR>/conf/.htpasswd AuthGroupFile /dev/null require valid-user</Location>
ProxyPreserveHost OnProxyPass /track ajp://localhost:9008/trackProxyPassReverse /track ajp://localhost:9008/track
In a real environment you would use something like LDAP authentication or SSPI here, which would permitauthentication via your Windows PC login without further password requests. We use basic authentication hereonly because it is simple to set up and permits you to test your installation quickly.
5. To create the basic authentication password file open a command shell and type:htpasswd -c <APACHE_DIR>/conf/.htpasswd firstUserLoginNamehtpasswd <APACHE_DIR>/conf/.htpasswd secondUserLoginName
and so on.6. Make sure you have container based authentication turned on in Genji (see LDAP and SSO).7. Locate the Tomcat server configuration file server.xml, usually at <TOMCAT_DIR>/conf. Make sure you have
an entry like this:<!-- Define an AJP 1.3 Connector on port 9008 --><Connector port="9008" protocol="AJP/1.3" tomcatAuthentication="false" redirectPort="8443"/>
This should enable your Genji to run with SSO behind an Apache web server.
CAUTION: This is not a complete description for setting up a secured production environment. In particular,you should disable the standard access port (80 or 8080) in server.xml, and you should force SSLencrypted connections from your Apache web server to the browsers for the /track location.
7.15 Using the TC command line client
You can perform many administrative tasks like adding and changing users, groups, workspaces, and roleassignments using the Genji command line client from a Groovy console.
160

7.15 Using the TC command line client
Installing Groovy
You can download Groovy from groovy.codehaus.org/Download. Follow the instructions to install Groovy on yourpersonal computer.
Installing the Genji libraries
You can download the TC package from www.trackplus.com/en/download.html. Install the files in this packageto Your home directory/.groovy/lib. This directory probably already exists when you have Groovyinstalled.
Running TC in a Groovy console or shell
Execute <Groovy install directory>/bin/groovyconsole or <Groovy installdirectory>/bin/groovysh. Make sure on your Genji server the web-service is enabled (see Variousconfiguration items). Then in the Groovy console type
import com.trackplus.*;TC.login("admin","tissi","http://localhost:8080/track");TC.help();
replacing “localhost:8080/track” with your servers URL and the user name and password with your user name andpassword.
If you want to get a JSON string with all users and print it to the console (assuming you have administrator rights) type
String users = TC.getAllUsers();System.out.println(users);
Some more methods to get you started are listed below. See the TC API reference available via TC.help() forup to date information.
Modifier and Type Method and Description
static java.lang.String addGroup(java.lang.StringgroupName)
Creates a new group with the given name
static void addPersonsToGroup(java.lang.StringgroupID, java.lang.String[]personIDs)
Adds a number of persons identified by their objectids to the group with the given id.
static java.lang.String addProject(java.lang.StringprojectName)
Creates a new project or workspace and saves it tothe database.
static void addRoleAssignment(WSRoleAssignmentEditBeanroleAssignmentEditBean)
Adds a role assignment (a users role in a workspace).
static void deleteGroup(java.lang.StringgroupID)
Deletes the group with the given object identifier.
161

Administering the server
static void deleteGroupWithReplacement(java.lang.StringgroupID, java.lang.StringreplacementID)
Replaces all references to the group with objectidentifier groupID with the replacement and thendeletes the group with groupID.
static void deletePerson(java.lang.StringpersonID)
Delete a user from the database based on its objectid.
static void deletePersonWithReplacement(java.lang.StringpersonID, java.lang.StringreplacementID)
Delete a user from the database based on its objectid.
static void deleteProject(java.lang.IntegerprojectID)
Deletes a project or workspace based on its objectidentifier.
static void deleteProject(java.lang.StringprojectID)
Deletes a project or workspace based on its objectidentifier.
static java.lang.String getAllGroups()
Gets a JSON string with all user groups.
static WSGroupBean[] getAllGroupsBeans()
Gets an array of all user group beans.
static WSLabelValueBean[] getAllRoles()
Gets all user roles with their names and objectidentifiers.
static java.lang.String getAllUsers()
Gets a JSON string with all users registered in thesystems database.
static WSPersonBean[] getAllUsersBeans()
Gets an array with all users registered in the systemsdatabase.
static java.lang.String getAssignmentRolesByProject(java.lang.StringprojectID)
Gets a JSON string list with roles assignments (whichuser has which roles) for a project or workspace.
162

7.15 Using the TC command line client
static WSRoleAssignmentBean[] getAssignmentRolesByProjectBeans(java.lang.StringprojectID)
Gets a list with roles assignments (which user haswhich roles) for a project or workspace.
static java.lang.String getGroupEdit(java.lang.StringgroupID)
Gets a group bean you can modify and save back.
static WSGroupEditBean getGroupEditBean(java.lang.StringgroupID)
Gets a group bean you can modify and save back.
static java.lang.String getPersonEdit(java.lang.IntegerpersonID)
Gets a JSON string of a user based on his integerobject id.
static java.lang.String getPersonEdit(java.lang.StringpersonID)
Gets a JSON string of a user based on his object id.
static java.lang.String getPersonEditByLoginName(java.lang.StringloginName)
Gets a JSON string of a user based on his login name.
static WSPersonEditBean getPersonEditBean(java.lang.StringpersonID)
Gets a bean of a user based on his object id.
static WSPersonEditBean getPersonEditBeanByLoginName(java.lang.StringloginName)
Gets a bean of a user based on his user name.
static java.lang.String getPersonsForGroup(java.lang.StringgroupID)
Returns a JSON string of person beans that aremembers of the given group.
static WSPersonBean[] getPersonsForGroupBeans(java.lang.StringgroupID)
Returns a list of person beans that are members ofthe given group.
static java.lang.String getProjectEdit(java.lang.IntegerprojectID)
Gets a project bean in a JSON string that can beedited and saved back to the database.
163

Administering the server
static java.lang.String getProjectEdit(java.lang.StringprojectID)
Gets a project bean in a JSON string that can beedited and saved back to the database.
static java.lang.String getProjectEditByName(java.lang.StringprojectName)
Gets a project bean in a JSON string that can beedited and saved back to the database.
static WSProjectEditBean getProjectEditBean(java.lang.IntegerprojectID)
Gets a project bean that can be edited and savedback to the database.
static WSProjectEditBean getProjectEditBean(java.lang.StringprojectID)
Gets a project bean that can be edited and savedback to the database.
static WSProjectEditBean getProjectEditBeanByName(java.lang.StringprojectName)
Gets a project bean that can be edited and savedback to the database.
static WSTreeNode[] getProjectsAsTree()
Gets a tree structure of project label/value beans (seeWSLabelValueBean). .
protected static void TCLFacadeException e)
Simple Handler for TCLFacadeException
static void help()
Opens a browser with the help for this class.
static java.lang.String login()
This method is just for error handling.
static java.lang.String login(java.lang.String dummy)
This method is just for error handling.
static java.lang.String login(java.lang.String dummy,java.lang.String dummy2)
This method is just for error handling.
static TCLFacade login(java.lang.String user,java.lang.String passwd,java.lang.String url)
Logs you in to the Genji web service.
164

7.15 Using the TC command line client
static void main(java.lang.String[] args)
The main function just prints some help on how touse this class.
static void printAllProjects()
Prints all projects to the console.
static void printAllRoles()
Prints a list with all roles defined in the system to theconsole.
static void removePersonsFromGroup(java.lang.StringgroupID, java.lang.String[]personIDs)
Removes a number of persons identified by theirobject ids from the group with the given id.
static void removeRoleAssignment(WSRoleAssignmentEditBeanroleAssignmentEditBean)
Removes a specific role assignment.
static java.lang.String savePersonEdit(java.lang.StringpersonJSON)
Save a user to the database.
Protecting the webservice connection with SSL
In case you use a self-signed certificate or a certificate from a Certificate Authority not known by your system youhave to install the certificate identifying your server in your local computers Java Genji keystore. You need to proceedas follows:
1. Obtain the public certificate from your Genji server. You can use your browser and go to the login page using thehttps protocol. In most browsers you can download the certificate by right-clicking on the little trust symbolin the URL line, looking for the certificcate details and then exporting the certificate to your local file system.
2. Import the certificate into your local Java keystore using the “keytool” utility that comes with any Java installation:
keytool -keystore <your home dir>/.keystore /<your.domain.com>.ks -import -file theServersCertificate.pem -alias "Key1"
You will be asked for a password to protect the keystore if this is the first entry. When you use the TC command lineclient you can activate the key as follows:
import com.trackplus.*;System.setProperty("javax.net.ssl.trustStore", "<your home dir>/.keystore/<your.domain.com>.ks");System.setProperty("javax.net.ssl.trustStorePassword", "<yourKeystorePasswd>");
TC.login("<user>","<password>","https://yourserver.tld/track");TC.help();
165

Administering the server
In case you can't get a connection you need to run the LoginSample example and add the following line at thebeginning of the main method:
System.setProperty("javax.net.debug","ssl");
166
Index
A
access control 82access right
assign 46account
state 130action item tracking 14actions 105add
custom list 119iteration 31, 47phase 31, 47release 31, 47sprint 31, 47
add role 82address
server url 146agile board 35agile board card template 73agile development 18Apache Tomcat 159Apache web server 159assign
access rights 46custom form 107form 107
assign automail 91assign role 46automail
unregistered submitter 92automail assignment
workspace default 53automail condition 87, 90automail trigger 87, 88
B
backlog 35base address 146bug tracking 14, 14burndown 36
C
cascaded select 110cascading select 99, 100, 101certificate
SSL 154TLS 154
chartburndown chart 36
class 51
classes 110cockpit 18cockpit template
workspace specific 54colorize
field value based 73condition for automail 90configuration inheritance 40copy
workspace 29, 44create
workspace 26, 41criticality 115custom form
assign 107modify 108overview 105
custom listimport 127
custom lists 51custom property 93customize
task board card template 73workspace type 130
CVS 58
D
dashboard 18define filter 73delete
custom list 122iteration 32, 48phase 32, 48release 32, 48sprint 32, 48workspace 29, 44
delete filter 74deprecated property 93
E
e-mail connection 154e-mail submission
automail 92edit
custom list 120edit role 82encryption 154
167

F
filterdefine 73delete 74
filter style field 73filter subscription 73form
action 105assign 107modify 108overview 105
G
Ganttenable license 21, 64
Git 57guest account 92
H
hide fields 86
I
importcustom list 127
input maskassign 107modify 108
issue management 14issue tracking 14item 15item properties
short text 95item property
cascading select 99, 100, 101check box 98date 96double 98integer 97multiple select 99simple select 98, 99user picker 101, 102workspace picker 102
item property type 95item select 99item state 111item type
restrict access 85iteration
add 31, 47delete 32, 48
J
Jenkins integration 155
K
Kanban board 35keystore 154
L
LDAP connection 154link
permanent 75list
custom 110selection 110
listsworkspace specific 51
localhost 146
M
managereport template 70, 70, 71, 71, 72, 72
manage item types 116mile stone tracking 14, 14modify
custom form 108form 108
multiple select 110
O
option 110overview 14overwrite 102
P
panels 18parameter
filter 19people
management 19permanent link 75permission 15, 82perspective 15phase
add 31, 47delete 32, 48status 33, 50status type flag 33, 50
priority 115product backlog 35product owner 25
168

projectScrum 26
propertydeprecated 93derive 102overwrite 102required 93
property access 86property type 95
Q
querylink to 75
R
read-only fields 86release
add 31, 47delete 32, 48Scrum 31state flag 33, 50, 129status 33, 50
release backlog 31, 35report
template 70, 70, 71, 71, 72, 72required property 93reset
overwritten property 103restrict item type 85result
link to 75revert
property overwrite 103role
add 82assign 46edit 82restrict item types 85restrict property access 86
S
screenassign 107modify 108
Scrumburndown chart 36overview 18product backlog 35project 26release 31release backlog 35sprint view 35task board 35
Scrum team 25Scrum tool 14Scum master 25select
cascaded 110custom property 98, 99multiple 110simple 110
selection 110selection list 119, 120, 122severity 115short text 95simple select 98, 99, 110Single Sign On 159sprint
add 31, 47delete 32, 48
sprint view 35SSL 154, 165SSL certificate 154SSO 159SSPI 159state
account 130for item 111
state flagrelease 129workspace 128
statusphase 33, 50release 33, 50workspace 30, 45
status type flagphase 33, 50release 33, 50workspace 30, 45
sub-phase 47subscribe
filter 73subsystem 51, 110Subversion 55SVN 55system property 93
T
tabs 18tags 110task board
left bar color 73task board card template 73task management 14team
Scrum 25team member
Scrum 25
169
templateagile board card 73report 70, 70, 71, 71, 72, 72task board card 73
tiles 18TLS 154, 154Tomcat 159TRACKPLUS_HOME 146trigger 88type flag
for item state 111
U
unregistered submitterautomail 92
urgency 115user
assign role 46management 19
user level 15user picker 101, 102
V
version controlCVS 58Git 57Subversion 55SVN 55
W
webserviceSSL 165
workspaceautomail assignments 53cockpit template 54copy 29, 44create 26, 41delete 29, 44lists 51state flag 30, 45, 128status 30, 45
workspace picker 102workspace type
restrict child workspace types 130restrict item types 130restrict priorities 130restrict severities 130restrict statuses 130
workspace types 40
170