49er mast users manual49er.org/wp-content/uploads/2013/06/6-march-49erv2.pdf · from wearing or...
TRANSCRIPT

COMPOSITE SPARS & RIGGING | COMPONENTS | GLOBAL SERVICE
49er Mast Users Manual

Southern Spars 49er Mast Users Manual© Southern Spars 2009

Table of Contents 1 Care
Introduction . . . . . . . . . . . . . . . . . . . . . 1
Care . . . . . . . . . . . . . . . . . . . . . . . . . 2
Washdown . . . . . . . . . . . . . . . . . . . . 2
Paint Scratches . . . . . . . . . . . . . . . . . . 2
Travel . . . . . . . . . . . . . . . . . . . . . . 2
Rig Inspections . . . . . . . . . . . . . . . . . . 2
2 Use
Quick Guide . . . . . . . . . . . . . . . . . . . . . 3
Setup Tips . . . . . . . . . . . . . . . . . . . . . . 4
Useful Tools. . . . . . . . . . . . . . . . . . . . . . 4
Halyard Threading . . . . . . . . . . . . . . . . . 4
Joining the Mast . . . . . . . . . . . . . . . . . 4
Attaching Trapeze Lines . . . . . . . . . . . . . . 5
Attaching Stays . . . . . . . . . . . . . . . . . . 5
Tuning Guide . . . . . . . . . . . . . . . . . . . 6
3 Dealer Information
Dealers . . . . . . . . . . . . . . . . . . . . . . . 7
Mast Parts . . . . . . . . . . . . . . . . . . . . . . 8
Mast Fitout . . . . . . . . . . . . . . . . . . . . . . 9
Warranty . . . . . . . . . . . . . . . . . . . . . . 10
About Southern Spars . . . . . . . . . . . . . . . . 10

49er | 1
IntroductionSouthern Spars is the licensed supplier of the 49er rig. Th e three piece male moulded mast is made from 100% standard modulus carbon and is available through licensed 49er dealers.
In carbonising the 49er rig, the goal was to develop a rig that could be easily and accurately reproduced with an empahasis on the details that aff ect performance.
Th e focus was on how to achieve cosistency of: bend, weight and CG. ‘Bend’ is determined by the tube stiff ness, spreader angle and spreader stiff ness, while weight and CG are controlled through strict quality control of materials.
It was also important to ensure the rig retained its ability to perform through the full wind range while targeting an ideal crew weight of 155-160kg.
Before building the fi rst prototype rig, many hours were spent running fi nite element studies of the mast-sail combination to ensure the rig performed properly throughout the full wind range.
Th eoretical rig setup (dock tune) was established and the boat was run through a range of conditions using the software to simulate real sailing loads to output the deformed sailing shapes of the mast and sail. Th e mast stiff ness and sail design was changed many times and fi ne tuned using the software before it was made and sent sailing. Independent on-the-water testing was conducted by Julian Bethwaite and his team, using the fi rst prototype rig in conditions ranging from 5-30 knots along with a range of crew weights.
Th e rig has been developed as a 3 piece mast. Th e longest section is less than 4m so it is able to be easily freighted around the world. Both sets of spreaders are identical and interchangeable. Th e spreaders slide over the tube joining spigots between the mast tubes and are separate parts. Th is allows simple assembly and ensures that the spreaders can be easily transported separately and protected from damage.
Southern Spars have developed a unique system where the spreaders automatically line up when the mast sections are fi tted together.
Th e main and spinnaker halyard sheaves are incorporated into the masthead fi tting.
Purchase systems for the Main and Jib halyards are now attached to the mast base to give more travel and easier access for adjustment. Th e main halyard has a 2:1 purchase at the head, plus a 2:1 adjustment at the base.
For more information about Southern Spars, visit the website @ www.southernspars.com
49erclass

49er | 2
CareWashdownEnsure the spar is washed down after each sail and all salt has been removed. Th is will help prevent corrosion of parts.
Th e mast should be thoroughly washed down once a month, inside and out, to keep it in top condition.
Paint ScratchesPaint scratches should be touched up to avoid bare carbon being exposed to the elements.
Southern Spars uses a two-pot polyurethane (gloss). Any polyurethane paint system can be used to touch up over this.
TravelWhen shipping your mast, or travelling by road, it is important to package it well using the Southern Spars covers.
Ensure that rigging is removed to prevent the stays from wearing or banging against the mast.
It is recommended a full inspection is performed when re-rigging the mast.
Rig InspectionsNew Stays will stretch slightly after sailing; therefore it is important to re-inspect your tuning each day for the fi rst 2-3 sessions after sailing with the new rigging.
Tape any clevis pins or sharp edges to prevent tearing of the gennaker.
Weekly Inspections
All halyards, taping etc should be checked on a weekly basis
Monthly Inspections
Check to see that all sheaves are free turning and well lubricated
Check for wear on stays and spreaders
Bi-annual Inspection & Re-rigging Inspection
Check all fi ttings for wear
Check mast for cracking
Check spreaders for wear
•
•
•
•
•
•

3 | 49er Mast Users Manual
Setup Quick GuideFit spreaders to midsection. Slide top
spreader over join at top of midsection. Slide
bottom spreader over bottom join.
Fit main halyard and gennaker halyard going
either side of upper bolt
Fit jib halyard
Join mast sections together
Thread halyards through mast base
Attach mastbase
Align spreaders with mast base and ensure
sail track is aligned. Tightly fasten screws.
Fit upper stays to bolt and run through top
spreader
Fit shrouds (just below top spreader), and run
through bottom spreader
Fit forestay and lowers
Tie trapeze lines through both ends of Dynex
loop
1.
2.
3.
4.
5.
6.
7.
8.
9.
10.
11.

49er | 4
Setup TipsUseful Tools when Assembling the Mast
Spanner for M5 nuts
3mm Allen Key
Electrical tape
5m of 4mm wire as a threading guide wire
•
•
•
•
Now run the main and gennaker halyards through the midsection, again pulling each halyard tight once they have gone through. Check that the halyards are not twisted.
Th read the halyards through the bottom section and out the mastbase. It is best to do this with the mastbase not attached to the mast. Th e gennaker halyard exits out of the front of the mastbase.
Th e main and jib halyards exit through the back sheaves in the mastbase. Before re-attaching the mastbase do a fi nal check that the halyards are not twisted and are running freely.
Th read the jib halyard through the Harken HK 302 exit block at the top of the midsection. Th en thread the jib halyard through the midsection and tape into place.
Halyard Threading
Th e main halyard is 3mm dynex rope with a 4mm Spectra tail.
Remove the sheaves in the head fi tting and tie the end of the halyard to the lower clevis pin on the back of the head fi tting. Remove the upper stay bolt. Th e main halyard is a 2 to 1 system and goes through the shackle that attaches to the head of the mainsail.
Once you thread the main halyard (behind upper bolt) and gennaker halyard (infront of upper bolt) through the tip section pull tight and tape into place. At this point look up inside the tip section to check the halyards aren’t twisted.

5 | 49er Mast Users Manual
Attaching Stays
Please note: Th e T bars on rigging need to be “long neck” T Bar hooks, otherwise you will not fi t these in the mast correctly.
Fit one end of one of the uppers (stays with eyes on both ends) onto the uppers bolt making sure there is a washer on each side between the mast and upper stays. Th en bolt through mast, ensuring the gennaker halyard is in front of the pin and the main halyard is behind the pin. Fit the second upper stay and tighten uppers bolt. Remove the clevis pins and retainer stay plates from the outer ends of the top spreaders. Place stay into hook, then refi t stay retainer back into spreader with the hook opening facing forwards.
Next fi t the shrouds by inserting the T-bar end of the stay in the mast. Th is should be inserted just beneath the top spreader. Remove the clevis pins and retainer stay plates from the outer ends of the bottom spreaders. Place stay into hook, then refi t stay retainer back into spreader with the hook opening facing forwards.
Fit the forestay to the mast by inserting the forestay on the front of the mast just above the top spreader. Fit the lowers in the bottom section.
Before putting the rig up, perform a fi nal check, confi rm that all fi ttings are attached correctly, nuts are tightened, and that all clevis pins and sharp pieces are taped.
NOTE: Under Class rules, the mast sections and spreaders must be able to come apart for measurement purposes.
Attaching Trapeze Lines
When attaching the trapeze lines to the Dynex loops at the top spreader, make sure both trapeze lines go through both loops.
Do not attach one trapeze line to one loop, then the other trapeze line to the other loop – both trapeze lines need to be through both loops.
To join the mast together, slide the top spreader (spreader with Dynex loop on) over the join at the top of the midsection. Fit locating screw. Slide bottom spreader over join at the bottom of the midsection. Fit locating screws.
Now align the spreaders with the mastbase, making sure that the sail track is aligned. Once aligned, tightly fasten locating screws.
When attaching the spreaders and joining the mast sections make sure that the joins butt up against each other. Th e angled cuts are done at exactly 22.5%.
If you are to fi t a replacement to your rig and it doesn’t accurately align, lightly sand the join of the mast and use a small rats tail fi le in the fastening hole so the screw doesn’t pull the mast out of alignment.
Joining the Mast
Th e top join has two locating screws and the bottom join has three screws. Th ese screws should be done up tightly with the curved washers underneath, located correctly on the mast.
49er | 6
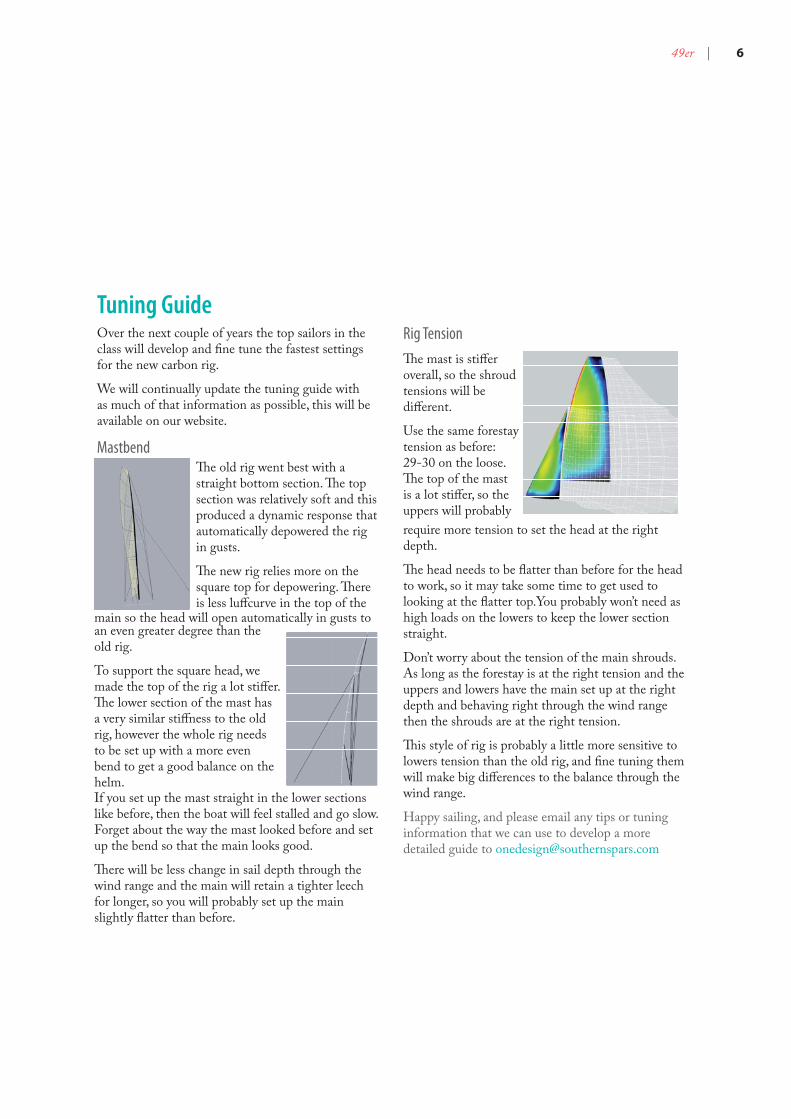
require more tension to set the head at the right depth.
Th e head needs to be fl atter than before for the head to work, so it may take some time to get used to looking at the fl atter top.You probably won’t need as high loads on the lowers to keep the lower section straight.
Don’t worry about the tension of the main shrouds. As long as the forestay is at the right tension and the uppers and lowers have the main set up at the right depth and behaving right through the wind range then the shrouds are at the right tension.
Th is style of rig is probably a little more sensitive to lowers tension than the old rig, and fi ne tuning them will make big diff erences to the balance through the wind range.
Happy sailing, and please email any tips or tuning information that we can use to develop a more detailed guide to [email protected]
Tuning GuideOver the next couple of years the top sailors in the class will develop and fi ne tune the fastest settings for the new carbon rig.
We will continually update the tuning guide with as much of that information as possible, this will be available on our website.
MastbendTh e old rig went best with a straight bottom section. Th e top section was relatively soft and this produced a dynamic response that automatically depowered the rig in gusts.
Th e new rig relies more on the square top for depowering. Th ere is less luff curve in the top of the
an even greater degree than the old rig.
To support the square head, we made the top of the rig a lot stiff er. Th e lower section of the mast has a very similar stiff ness to the old rig, however the whole rig needs to be set up with a more even bend to get a good balance on the helm.
main so the head will open automatically in gusts to
If you set up the mast straight in the lower sections like before, then the boat will feel stalled and go slow. Forget about the way the mast looked before and set up the bend so that the main looks good.
Th ere will be less change in sail depth through the wind range and the main will retain a tighter leech for longer, so you will probably set up the main slightly fl atter than before.
Th e mast is stiff er overall, so the shroud tensions will be diff erent.
Use the same forestay tension as before: 29-30 on the loose.Th e top of the mast is a lot stiff er, so the uppers will probably
Rig Tension

7 | 49er Mast Users Manual
Dealers49er masts, rigging, spare parts and covers are available from the following suppliers:
Argentina Martin Bulloch MarineSan FernandoP: +54 11 4745 8428
Martin [email protected]
AustraliaBethwaite Design Woollahra Sailing ClubVickery Ave, Rose BayNSW 2029 Australia P: +61 2 9371 6338
Clynton [email protected]
Southern EuropeNautivela srlvia Gardone 8, MilanoItalyP: +39 02 55212116F: +39 02 55212116
Paolo [email protected]
JapanPerformance Sailcraft Japan3 13 31, Ayase shi Kamitsuchitana Minami Kanagawa Ken, 252 JapanP: +81 467 76 1051F: +81 467 76 1052
Takao [email protected]
New ZealandMackay Boats Ltd24 Manga RdSilverdale, AucklandNew ZealandP: +64 9 426 4306
Dave [email protected]
EuropeOvington Boats LtdTannners BankNorth ShieldsTyne & Wear, NE30 1JHGreat BritainP: +44 (0) 77 19 59 49 49
Chris [email protected]
USALaser Performance North America300 Highpoint AvePortsmouth RI 02871USAP: +1 401 683 0400
Devin [email protected]

49er | 8
Complete Mast Mast sections and spreaders excluding rigging
Wire Rigging Set
Halyard Set Main and jib halyards with tails; spinnaker halyard
Tiller Extension Standard Including urethane universal
Tiller Extension Extra Light Including urethane universal
Rigging BagIncluding urethane universal
Mast Cover Rig MastIncluding urethane universal
Mast Cover TravellingIncluding urethane universal
Top Section Complete with masthead and all fi ttings
Middle Section Complete with all fi ttings
Bottom Section Complete with mastbase and all fi ttings
Spreaders (ea) Excluding stay retainers and pins
Stay Retainer Ring Spreader end retainer ring
Mastbase Complete with sheaves
Gooseneck/Vang BracketGooseneck bracket, Vang bracket without pin
Gooseneck Pin Complete with vang attachment ring
49er Mast Parts
590-0460
590-0480
500-0062
590-0473
590-0461
590-0462
590-0463
590-0482
590-0474
590-0465
590-0464
590-0484
590-0485
590-0486
Below is a list of 49er parts supplied by Southern Spars and available through 49er dealers.
550-0200Dyform forestay, lowers; shrouds & uppers; excludes stay adjusters
500-0063
49er Spare Mast Parts


49er | 10
WarrantySouthern Spars will remedy faulty workmanship provided that any claim by the Customer for remedy of workmanship was notifi ed to Southern Spars in writing within 12 months of the delivery date of the mast.
Southern Spars will, if requested to do so, use reasonable endeavours to assign to the Customer the benefi t of guarantees and warranties given to Southern Spars by third party suppliers or manufacturers.
Th e warranties above do not extend to and Southern Spars shall not in any event be liable for any failure or damage arising from fair wear and tear.
Any claim shall be made directly to the Dealer from whom the rig was purchased.
About Southern SparsSouthern Spars has established its place as a world leader in the design, construction, installation and servicing of carbon fi bre masts, booms, composite components and rigging. Its rigs power a wide range of yachts, from one-design class yachts to grand prix racing yachts, cruising yachts and superyachts.
Innovation, quality and an insatiable desire to produce what the customer requires runs through the company’s culture. Th ese qualities have contributed to producing product for numerous race victories, including the Volvo Ocean Race, Vendee Globe, America’s Cup, Sydney-Hobart, plus supplying rigs to some of the hottest one-design classes such as Melges 24’s, Melgs 32’s and Farr 40’s. Th e same design expertise, manufacturing methods, materials and components utilised on these racing rigs are applied to every rig built by Southern.
In recent years, Southern Spars has expanded into rig service and manufacturing composite rigging. Th e specialist rig service business Rig Pro, has service centres worldwide. Th e Composite Rigging division, based in RI, USA manufactures custom lightweight rigging products, including Southern Spars carbon EC6+ rigging used on dinghys through to superyachts.
Southern Spars has centres in the USA, France, South Africa, and headquarters in Auckland, New Zealand. It is supported by the North Marine Group and shares the resources of that group of companies.
For more information: www.southernspars.com

Southern Spars |[email protected] | www.southernspars.com
COMPOSITE SPARS & RIGGING | COMPONENTS | GLOBAL SERVICE