4-h food & nutrition
TRANSCRIPT

Utah State University is an affirmative action/equal opportunity institution.
www.Utah4-H.org
4-H Food & Nutrition

Utah State University is committed to providing an environment free from harassment and other forms of illegal discrimination based on race, color, religion, sex, national origin, age (40 and older), disability, and veteran’s status. USU’s policy also prohibits discrimination on the basis of sexual orientation in employment and academic related practices and decisions. Utah State University employees and students cannot, because of race, color, religion, sex, national origin, age, disability, or veteran’s status, refuse to hire; discharge; promote; demote; terminate; discriminate in compensation; or discriminate regarding terms, privileges, or conditions of employment, against any person otherwise qualified. Employees and students also cannot discriminate in the classroom, residence halls, or in on/off campus, USU-sponsored events and activities. This publication is issued in furtherance of Cooperative Extension work, acts of May 8 and June 30, 1914, in cooperation with the U.S. Department of Agriculture, Noelle E. Cockett, Vice President for Extension and Agriculture, Utah State University.
4-H Fun with Foods is an update of Food & Nutrition Have Fun with Foods Phase 1 by Georgia Lauritzen, USU Extension
County Extension AgentsDarlene Christensen, County Extension Agent
Susan Haws, County Extension AgentNaomi Weeks, County Extension AgentDebra Proctor, County Extension AgentRonda Olsen, County Extension Agent
State 4-H OfficeLauralee Lyons, State 4-H OfficeMonica Schruhl, State 4-H Office
Utah State University Cooperative Extension, 2010
Special thanks to Deb Jones, Alaska 4-H Program Leader
Dennis Hinkamp for taking the measuring photographs in Lesson 1 and to Katie Camp for appearing in the photos.
Introduction ......................................................................................................ii
Lesson 1: Getting Ready to Cook! ....................................................................1-1
Lesson 2: A Slice of Nutrition ...........................................................................2-1
Lesson 3: Cookies: Drop & Bar ........................................................................3-1
Lesson 4: Beverages .........................................................................................4-1
Lesson 5: Microwave Munchies .......................................................................5-1
Lesson 6: Cookies: Molded, Refrigerator & Rolled ..........................................6-1
Lesson 7: Sandwiches ......................................................................................7-1
Lesson 8: Plan a Party! .....................................................................................8-1
Lesson 9: Smart Shopping! ...............................................................................9-1
Lesson 10: Have a Party ...................................................................................10-1
Appendix: Utah State University Extension Office Information........................A-1
i

IntroductionWelcome to an exciting year in 4-H Foods! You are starting on a new adventure! Your projects in foods can be exciting and rewarding as you learn about different types of foods and how to prepare them for your club and your family.
A few recipes are included in this manual. Try them and then look for new and different suggestions in magazines, recipe books, and other places. Be adventurous; try new foods and combinations so that you can add variety to the list of foods you like best.
After each club meeting, prepare some of the foods at home. This will give you an opportunity to learn more and to help prepare food for your family. Remember – practice makes perfect, and it allows you to make each recipe special.
Activities for this Project � Prepare and serve food at home and at club meetings � Do experiments to learn the science behind cooking � Visit a grocery store to learn about the cost and variety of foods, and how to become a smart shopper � Improve quality - judge the quality of foods you prepare � Teach others - give a demonstration � Expand knowledge - learn the food pyramid and how it contributes to good health � Learn safe practices in food preparation � Make your club outstanding - participate in some of the following:
√ County Contests and State Contests √ County Fair Exhibits √ Community Service Projects √ County and Community 4-H Events
This list will help to remind you of the things you can do. Keep a record of the work you do at home and at club meetings. If you start now, you will soon have a complete record. Record what you have done at the end of each lesson and transfer the information to your 4-H portfolio. You may do much more than is required for completion of this unit. Write these things in your portfolio book also. Contact your local Extension office for information on portfolios or go to www.Utah4H.org. Refer to the appendix of this manual to find where your local Extension office is located.
Fun with Foods Level 1ii

County Contests and State ContestsConsider demonstrating your new cooking skills in a county contest or at the state level.
County Fair ExhibitsThere are several areas where you can enter:
� Cookies � Brownies � Invented Snack � Veggie Creature � Table Setting � Beginning Recipe Collection � Food Safety Poster
Community Service Projects � Volunteer at a Food Bank � Prepare food for neighbor in need � Participate in a Food Drive � Can you think of others?
County and Community 4-H EventsContact your local USU County Extension office for more information on other events. Please see Appendix A for the list of County contact information.
iii Fun with Foods Level 1

Nutrition Background InformationThere are more than 100 trillion cells in your body. Each of these has its own life pretty much just like yours. Cells take in food, grow, reproduce, and they eventually die. Different groups of cells make up different parts of your body—like your bones and your skin and your muscles and your blood. Each cell has a job to do. All of these cells need nutrients to do their work. These nutrients come from the food you eat.
There are many different kinds of nutrients. All of them are important in helping your body grow, repair cells, and generally stay healthy.
Luckily we don’t have to try to remember the names of all of these nutrients. That’s because nutrition experts have put all of them into the MyPyramid basic food groups:
� Grains like breads, cereal, rice and pasta � Vegetables � Fruits � Milk, yogurt, and cheese � Meat, poultry, fish, beans, eggs, and nuts � Fats, oils and sugars
If nutrients come from food, how do you know how much comes from which foods? No single food can possibly provide all the nutrients your body needs. Eating for good nutrition is like putting together a jigsaw puzzle. Each basic food has different things you need. You have to put many different pieces together to get the whole nutrition picture. That doesn’t mean you should eat a lot, it just means that you should eat a variety. For additional information and individual guidelines, see www.MyPyramid.gov.
Physical Activity
Don’t forget that a good diet alone will not insure good health. Physical activity also plays a major role in a good healthy body and proper utilization of the food which you eat. Everyone can benefit from exercise. Some of the benefits of exercise include having a healthier heart, controlling weight, toning up muscles, and sleeping better. All of these things contribute to a healthier mental outlook.
Water: For LifeCan you think of foods that contain a lot of water? You probably guessed tomatoes, oranges, and watermelon. But do you know that bread is more than one-third water? Meat is more than half water. And of course, milk and juice are nearly all water—plus natural flavoring and nutrients. Water is in every one of your cells and your body is 60-70% water. Although foods contain a lot of water, drinking 6 to 8 glasses of water a day is recommended.
iv Fun with Foods Level 1

1-1Fun with Foods Level 1
Lesson 1
Getting Ready to Cook!
There are a number of exciting things you will need to learn as you get ready to cook! Some of the basic rules are included in this lesson. Read and discuss these with other members of your club. Then, refer back to this lesson as you go along and you will form good work habits as you learn to “have fun with food.”
Make a Clean StartBe clean and neat, and use clean food and equipment. You will need to be careful when you handle, cook and store food to keep harmful bacteria away from it.
Guidelines: √ Make sure hands are dry before handling electric equipment. √ Tie your hair back so that it does not get into the food, and roll up your sleeves. √ Wear a clean, washable apron. √ Keep the work areas clean. Work areas are the tops of the counters, table tops, the sink and the stove.
Make sure they are clean to begin with and that you keep them clean while working. Have a trash can close by.
√ Use clean equipment and keep it clean. For instance, if you drop a spoon, make sure it is washed before it is used again. When you are through with equipment, be sure that it is put away.
√ Learn to use a tasting spoon. Use the stirring spoon to put a taste of food into the tasting spoon. Keep the stirring spoon out of your mouth. Stir heating ingredients with a wooden spoon. Never leave a utensil resting in the pot, instead use a small dish or spoon tray on the stove to hold your stirring spoon. This will keep the stove top clean.
Hand Washing √ Hand washing is an important part of working with
food. Always wash hands with soap and warm water before preparing food.
√ Wash hands for 20 seconds (try singing the ABC song twice.) For more information and ideas on fun educations activities on hand washing, visit
www.soaperhero.org. √ Contact your local Cooperative Extension office
and ask if you can borrow the Hand-i-wash hand washing education system. Each office has a system that uses black light and special lotion to show what germs look like.

1-2Fun with Foods Level 1
t or tsp................................... teaspoonT or Tbsp................................ tablespooonc ............................................ cuppt .......................................... pintqt .......................................... quart
oz .......................................... ouncelb ........................................... pounddoz ........................................ dozenmin ....................................... minutehr .......................................... hour
Clean Up the Easy WayIf you clean up as you work, the final clean-up will be a breeze! While you are keeping your work surfaces clean, you are cleaning up as you go. Soak or rinse each piece of equipment as soon as you finish with it.
It’s easy to clean-up! Just remember these easy steps:If using a dishwasher:
√ Use a rubber scraper, brush or other utensil or brush to clean away bits and particles of food before loading the dishwasher.
If washing dishes by hand: √ Use a rubber scraper or other utensil or brush to clean away bits and particles of food. √ Rather than letting the water flow while cleaning up, fill the sink with a few inches of hot water. √ Squeeze a bit of dish washing liquid into the dish cloth. √ Start with the cleanest items and move your way up to the dirtiest. For dishes which have baked on
or dried food, run some water over them and set them aside or allow them to soak before washing. √ Rinse the washed items well. If you have two sinks, use one to stack the washed items in
preparation for the rinse. √ Allow items to dry in a dish drainer or on a clean towel. If you need to store dishes quickly, then dry
them with a clean towel. √ Don’t forget to rinse out the sink so you leave it clean as well.
Read and Understand the RecipeRead the recipe carefully and completely. This means not only reading the list of ingredients and equipment and making sure you have everything you need, but be sure that you understand all of the directions before you start. If you don’t understand, ask your leader, or another adult. This may seem like a slow process at first, but it is the way to develop efficient work habits.
Assemble Your Equipment and SuppliesGather all of the ingredients and equipment you need for the recipe. Then prepare all of the foods that need special handling, such as chop the onions, squeeze the lemon, chop the meat, etc.
Watch and Time Your Cooking Watch the clock or set a timer when food is cooking or baking.
Abbreviations and MeasurementsMany recipes use abbreviations for common terms like teaspoon, tablespoon or cup. Knowing these abbreviations can make following a recipe much easier!

1-3Fun with Foods Level 1
Measuring Tips
3 teaspoons = 1 tablespoon4 tablespoons = 1/4 cup5 1/3 tablespoons = 1/3 cup8 tablespoons = 1/2 cup16 tablespoons = 1 cup2 tablespoons = 1 fluid ounce
16 ounces = 1 pound1 cup = 8 fluid ounces2 cups = 1 pint2 pints = 1 quart4 quarts = 1 gallon1 liter = 1.06 quarts
Measuring EquipmentYou have to follow a recipe carefully to prepare food you’ll enjoy making and serving. Measuring is very important to the success of a recipe. There are special utensils to use to help measure ingredients. It’s easy to measure correctly if you use standard tools. Never substitute a dry measuring cup for a liquid measuring cup. It is easy to spill fluids when a dry measuring cup is filled to the top.
Dry Measuring CupsThese cups usually come in a set of four and include a ¼ cup, ⅓ cup, ½ cup, and a 1 cup. Some sets include additional sizes.
Liquid Measuring CupsLiquid measuring cups have a pour spout and a space above the last measuring line so liquids don’t spill during measuring and pouring.
Measuring SpoonsThese are used for measuring small amounts of both liquid and dry ingredients. It’s convenient to have two sets to eliminate the need to rewash them in the middle of food preparation.

1-4Fun with Foods Level 1
SugarSpoon sugar into a dry measuring cup, higher than the top of the cup. Use the straight edge of a knife or a metal spatula to level off the top.
Activity 1: Learn to Measure Accurately
Goal: Learn how to measure correctly. Recipes can be found on page 1-8. Before making the recipes, try breaking into groups to learn different measuring techniques. Following the guidelines below, make 1-2-3 Snack Attack, Peanut Butter Balls, and/or Utterly Delicious Smoothie.
Materials Needed: √ Dry measuring cups √ Liquid measuring cups √ Measuring spoons √ Dry ingredients √ Liquid ingredients √ Solid ingredients

1-5Fun with Foods Level 1
Brown SugarBreak up any clumps by squeezing or rolling the bag. Spoon into a dry measuring cup. Pack it down firmly with the back of a spoon so it keeps the shape of the cup when turned over. Level with the straight edge of a spatula or knife.
FlourMeasuring flour incorrectly is a common mistake in cooking. To correctly measure flour: Use a spoon to stir flour. Then gently spoon flour out of its container into a dry measuring cup. Continue until the cup is overflowing, being careful not to pack it down. Level off with the straight edge of a knife.
Try this experiment on measuring flourPacking the flour into the cup actually gives you more flour than you need. Try this – scoop flour in the measuring cup directly from the bag or container, then spoon that flour into another cup the proper way and see the difference in the amount measured. The difference between a packed cup and a correctly measured cup of flour is approximately 2 tablespoons!

1-6Fun with Foods Level 1
LiquidsPlace the liquid measuring cup on a flat counter or table. Fill to the mark for the amount of liquid needed. When doing this, the cook’s eye should be level with the mark. Use measuring spoons to measure less than ¼ cup. Remove thick liquids like molasses, corn syrup, and oil with a rubber spatula.
Margarine or ButterCut using measurement marks on the wrapper as a guide. Spreadable butter or trans-fat free margarine usually have air and water added. This alters the recipe. For best results in baking, use margarine, butter or stick spreads containing at least 70% vegetable oil (this will be indicated on the label).
Liquid Extracts and JuicesPour the amount needed into the appropriate measuring spoon. Never measure over the mixing bowl or pan. Hold it over a small cup or other container to catch any spills.
ShorteningTake small amounts of shortening with a rubber spatula and pack firmly into a dry measuring cup. Level off with the straight edge of a knife or metal spatula. Clean cup out by removing shortening with a rubber spatula.

1-7Fun with Foods Level 1
Baking Powder/Baking Soda/Cornstarch/CocoaStir with a spoon to break up any lumps, then fill measuring spoon. Level it off. If there is a foil half cover on your baking powder can, you can level off the spoon by rubbing the spoon under this foil rather than using a spatula or other straight edge.
SaltPour salt into a small glass bowl and dip into it to measure. You may not get the right amount if you pour it into your spoon. Level off with the straight edge of a knife.
Recipes to Practice Measuring
1-2-3 Snack Attack Mix Yield: 4 servings
Ingredients:
1. Put all ingredients in a covered container. 2. Gently shake until well-coated.
1 cup oyster crackers 1 cup tiny twist pretzels 1 teaspoon dry Ranch dressing mix
1 tablespoon oil1 cup small square cheese crackers (reduced fat - optional)

1-8Fun with Foods Level 1
Peanut Butter Balls Yield: 3 dozen Ingredients: ¼ cup peanut butter ¼ cup honey ½ cup dry milk, nonfat ½ cup quick oatsDirections:1. Mix honey and peanut butter. 2. Gradually add dry milk and quick oats and mix well. 3. Chill for easier handling4. Form into small balls. Chill until firm.5. Refrigerate leftovers within 2 hours.Note: Honey should not be given to children younger than one year of age.
Udderly Delicious Smoothie
Food Safety Tip: Keep dairy products cold! Yield: 1 serving
Ingredients:½ cup of softened vanilla ice cream or frozen yogurt¼ cup 100% fruit juice (grape, orange, apple)
Utensils:Measuring cups Small drinking cup(s) Sandwich size zipper bag(s) Scissors
To Make:1. Place ice cream and juice inside a zipper bag.2. Zip up bag forcing air out as you go. (Make sure it’s zipped.)3. Gently knead the bag to blend the mixture together until it is
somewhat melted, but not all the way. To Eat:1. Hold the bag by the zipper, with one corner over your cup.2. With the other hand, snip off a tiny piece of the corner.3. Allow the mixture to flow into your cup. (You may need to help your
cow out by gently squeezing the bag until all the milkshake mixture is in your cup.)

1-9Fun with Foods Level 1
Activity 2: Demonstrate How to Measure
Goal: Demonstrate to others what was learned about measuring.
Materials Needed: √ Take turns giving a short demonstration on how to measure a certain ingredient. √ Why not give the demonstration to your family when you get home?
Directions:1. Measure dry ingredients with measuring cups2. Measure liquid ingredients with measuring cups3. Measure dry ingredients with measuring spoons4. Measure liquid ingredients with measuring spoons5. Measure solid ingredients
What have you learned? √ Why is it important to measure dry ingredients different than wet ingredients? √ What happened that you didn’t expect would happen?
Recipe Sources √ Utah Food $ense Program √ Wyoming Cent$ible Nutrition Program
References and Resources √ How to Measure Ingredients for Recipes. Alabama Extension Services:
http://www.aces.edu/pubs/docs/E/EFNEP-0113/

1-10Fun with Foods Level 1
LESSON 1: FOR THE RECORDGetting Ready to Cook!
MEETING
Date ______________________
Foods I prepared or helped prepare ___________________________________________________
________________________________________________________________________________
________________________________________________________________________________
I demonstrated ___________________________________________________________________
________________________________________________________________________________
________________________________________________________________________________
This lesson taught me the following skills ______________________________________________
________________________________________________________________________________
________________________________________________________________________________
Some of the activities I tried _________________________________________________________
________________________________________________________________________________
________________________________________________________________________________
Type of Food Prepared# Times
PreparedTo Whom
ServedHours Spent
# Served Cost

2-1Fun with Foods Level 1
Lesson 2
A Slice of Nutrition
In this lesson, you will explore the MyPyramid guidelines and learn basic nutrition. MyPyramid for Kids reminds you to be physically active every day and to make healthy food choices. In addition to learning about nutrition, you will learn how to safely cut fruits and vegetables and how to make dip.
Every Color Every DayCheck out MyPyramid on page 2-3. The colors orange, green, red, yellow, blue, and purple represent the five different food groups plus oils. Remember to eat foods from all food groups every day.
Eat Right1. Make half of your grains whole. Choose whole-grain foods more often, such as whole-wheat bread,
oatmeal, brown rice, and lowfat popcorn.2. Vary your veggies. Go dark green and orange with your vegetables - eat spinach, broccoli, carrots, and
sweet potatoes.3. Focus on fruits. Eat fruits at meals and at snack time too. Choose fresh, frozen, canned, or dried, and go
easy on the fruit juice.4. Get your calcium-rich foods. To build strong bones serve lowfat and fat-free milk and other milk
products several times a day.5. Go lean with protein. Eat lean or lowfat meat, chicken, turkey, and fish. Also, change your tune with
more dry beans and peas. Add chick peas, nuts, or seeds to a salad; pinto beans to a burrito; or kidney beans to soup.
6. Change your oil. We all need healthy oils. Get yours from fish, nuts, and liquid oils such as corn, soybean, canola, and olive oil.
7. Don’t sugarcoat it. Choose foods and beverages that do not have sugar and caloric sweeteners as one of the first ingredients. Added sugars contribute calories with few, if any, nutrients.
Be Physically Active Every DayThe person climbing the stairs on MyPyramid reminds you to do something active every day, like running, walking the dog, playing, swimming, biking, or climbing the stairs.
Some Tips1. Set a good example. Be active and get your family to join you. Have fun together. Go for a walk, tumble
in the leaves, or play catch.2. Take the President’s Challenge as a family. Track your individual physical activities together and earn

2-2Fun with Foods Level 1
awards for active lifestyles at www.presidentschallenge.org.3. Establish a routine. Set aside time each day as activity time - walk, jog, skate, cycle, or swim. Adults
need at least 30 minutes of physical activity most days of the week; children 60 minutes every day or most days.
4. Have an activity party. Make the next birthday party centered on physical activity. Try backyard Olympics, or relay races. Have a bowling or skating party.
5. Set up a home gym. Use household items, such as canned foods, as weights. Stairs can substitute for stair machines.
6. Move it! Instead of sitting through TV commercials, get up and move. When you talk on the phone, lift weights or walk around. Remember to limit TV watching and computer time.
7. Give activity gifts. Give gifts that encourage physical activity - active games or sporting equipment.
Take One Step at a TimeYou do not need to change overnight what you eat and how you exercise. Just start with one new, good thing, and add a new item every day.
Portion SizeKeep portions to a healthy size. Do not overeat foods high in sugar and fat. Follow recommendations of MyPyramid.
Activity 1: Learn about MyPyramid
Goal:Be physically active every day and make healthy food choices by using MyPyramid as a guide.
Materials Needed: √ MyPyramid, page 2-3 √ MyPyramid Worksheet, page 2-4
Directions:1. Talk about MyPyramid chart and how many servings youth should have a day.2. Have each youth fill out the MyPyramid worksheet.


2-4Fun with Foods Level 1
Sour
ce:
ww
w.m
ypyr
amid
.gov
Nam
e:M
yPyra
mid
Work
sheet
Ch
eck
how
you d
id y
este
rday
an
d s
et a
goal
to a
im f
or
tom
orr
ow
Gra
ins
Veg
etab
les
Fruit
s
Mil
k
Mea
t an
d
Bea
ns
Phys
ical
A
ctiv
ity
Mak
e at
lea
st h
alf yo
ur g
rain
s w
hol
e gr
ains.
Col
or y
our
pla
te w
ith
all ki
nds
of g
reat
tas
ting
vegg
ies.
Mak
e m
ost
choi
ces
frui
t,
not
juic
e.
Choo
se fat
-fre
e or
low
fat
mos
t of
ten
.
Choo
se lea
n m
eat
and
chic
ken o
r tu
rkey
. Var
y yo
ur
choi
ces—
mor
e fis
h, b
eans,
pea
s, n
uts,
and s
eeds.
Bui
ld m
ore
phys
ical
act
ivity
into
you
r dai
ly r
outine
at
hom
e an
d s
choo
l.
6 o
un
ce e
quiv
ale
nts
(1
oun
ce e
qui
vale
nt
is a
bou
t 1 s
lice
bre
ad,
1 c
up d
ry c
erea
l, or
½ c
up c
ooke
d r
ice,
pas
ta, o
r ce
real
)
2½
cup
s
(Choo
se fro
m d
ark
gree
n, o
range
, sta
rchy,
dry
bea
ns
and p
eas,
or
other
veg
gies
).
1½
cup
s
3 c
up
s
(1 c
up y
ogur
t or
1½
oun
ces
chee
se =
1 c
up
milk
)
5 o
un
ce e
quiv
ale
nts
(1
oun
ce e
qui
vale
nt
is 1
oun
ce m
eat,
chic
ken o
r tu
rkey
, or
fish, 1
egg
, 1 T
. pea
nut
but
ter,
½ o
unce
nut
s, o
r ¼
cup
dry
bea
ns)
At
leas
t 6
0 m
inute
s of
mod
erat
e to
vi
goro
us a
ctiv
ity
a day
or
mos
t day
s.
How
did
you
do
yest
erday
?
Gre
at
S
o-So
Not
So
Gre
at
My
food
goa
l fo
r to
mor
row
is:
__
____
____
____
____
____
____
____
____
____
____
____
____
____
____
____
____
My
activi
ty g
oal fo
r to
mor
row
is:
___
____
____
____
____
____
____
____
____
____
____
____
____
____
____
____
_
* So
me
food
s don
’t fi
t in
to a
ny
grou
p. T
hes
e “e
xtra
s” m
ay b
e m
ainly
fat
or
suga
r—lim
it y
our
inta
ke o
f th
ese.
ounc
e eq
uiva
lent
s
ounc
e eq
uiva
lent
s
cups
min
utes
cups
cups
Bre
akfa
st:
Lunch
:
Snac
k:
Din
ner
:
Phys
ical
act
ivity:
Wri
te I
n Y
our
Ch
oic
es
Fro
m Y
est
erd
ayFo
od
an
dA
ctiv
ity
Tip
Goal
(Base
d O
n a
18
00
Calo
rie P
att
ern
)Li
st E
ach
Food
Ch
oic
eIn
Its
Food
Gro
up
*E
stim
ate
Your
Tota
l
RE
PR
Od
uC
IB
LE
T
EA
Mn
uT
RI
TI
On
.u
sd
A.
GO
v

2-5Fun with Foods Level 1
Activity 2: Create a Fruit & Veggie Creature
Goal: Learn the importance of washing your hands before preparing food. Learn how to safely cut fruits and vegetables.
Materials Needed: √ Healthy fruits and vegetables such as celery stalks with
leaves, baby carrots, radishes, apples, bananas, pears and raisins/craisins.
√ Nuts, seeds, cream cheese, cheese spread, peanut butter, whole cloves
√ Toothpicks, paper plates, paper towels, plastic knives, paring knives.
Directions:1. Wash hands with warm soap and water. Dry hands.2. Using fruits and vegetables, create your own creature. Be sure to follow
safe practices when using a knife.3. Think about a name for your creature and a story behind who it is. 4. If you have time, make dip to serve with your creature.5. Introduce your creature to the group and enjoy eating it up.
Using Knives � Always use a cutting board when using knives. This will protect counter tops and other surfaces
from being damaged. � When using a knife, use your dominant hand and hold the knife firmly. Use a rocking motion to cut
food, rather than a straight up and down motion. Start by putting the tip down and pushing the knife forward across the food until you reach the back of the knife. The knife should not leave the surface you are working on.
� Your other hand should be used to hold the food in place and to guide the knife. Make sure that you curl your fingers inward and tuck your thumb underneath. Move your hand along as the knife cuts the food.
� Go slowly and carefully. You will speed up with practice. � Be sure to watch what you are doing at all times.

2-6Fun with Foods Level 1
Activity 3: Unusual Fruits and Veggies Taste Test
Goal: Try unusual or unfamiliar fruits and veggies.
Materials Needed: √ Fruits and Veggies that children may
not be familiar with (some examples are mango, kiwi, jicama, star fruit).
Directions: 1. Wash and cut the fruits and veggies.2. Prepare a separate plate for each fruit and veggie.3. Try each one.4. See if you can guess what you are tasting. 5. Talk about if you liked the fruit or veggie. 6. If time permits, make ranch or fruit dip to serve
with fruit and veggies.
Preparation TipLight colored fruit such as bananas and apples will darken when cut.
To avoid darkening, place them in 1 cup water plus 1 teaspoon lemon, orange or pineapple juice for a minute or two.
CAUTION!
Safety Tip: KnivesKnives are easy and fun to use. However, we can never forget how dangerous knives can be. If not used correctly, knives can cause serious injury to you or others around you.
√ Always angle the blade away from you. Any little slips will take the blade away from you instead of directly at you and your fingertips.
√ NEVER “dump” knives into the dish water. Many accidents occur from knives being placed in soapy water where they can’t be seen. Dry them thoroughly right away. Hand-wash your knives separately, take them out and dry them right away. Ensure the blade faces away from the palm of your hand as you do this.
√ Whether cutting, washing or drying, always hold a knife by its handle! Keep the handle clean and dry to prevent it from slipping.
√ Never try to catch a falling knife. Let it land on the floor and then pick it up. Wash the knife and dry it thoroughly before using it again.

2-7Fun with Foods Level 1
Nutritional Tidbit √ Fruits and vegetables give you many of the nutrients that you need:
vitamins, minerals, dietary fiber, water, and healthful phytochemicals. Some are sources of vitamin A, while others are rich in vitamin C, folate, or potassium.
√ Almost all fruits and vegetables are naturally low in fat and calories and none have cholesterol.
√ All of these healthful characteristics may protect you from getting chronic diseases, such as heart disease, stroke, and some types of cancer.
Ranch Dip Yield: 16 servings (2 Tablespoons each)
Ingredients:
Directions:1. In medium size bowl combine all ingredients.2. Pour into a serving bowl and serve with a platter of veggies.
1 16 ounce container sour cream (low-fat or fat free sour cream)1 tablespoon white vinegar2 tablespoons minced, fresh parsley
2 tablespoons minced, fresh dill½ teaspoon garlic powdersalt and pepper to taste2 tablespoons grated onion (optional)

2-8Fun with Foods Level 1
What have you learned? √ How will you use what was learned? Share ideas for preparing fruits and vegetables at home and what
you may do based on what was learned. √ What is one change you will make in your eating habits? √ What is one thing you learned about knife safety that you didn’t know before?
Recipe Sources √ Kentucky 4-H after-school √ http://allrecipes.com
References and Resources: √ MyPyramid.gov (for kids in particular: http://mypyramid.gov/kids/index.html) √ Cooking with Your Kids, Stir up some fun while teaching your kids science, math, culture and healthy
eating habits. Find more kid-friendly recipes here: http://www.fruitsandveggiesmorematters.org/?page_id=12
√ Tracker & Shopping Planner, a fun way to keep track of the fruits and veggies you eat: http://www.fruitsandveggiesmorematters.org/?page_id=79
√ How much is a Cup? These coloring sheets can help youth visualize cup equivalents: http://www.fruitsandveggiesmorematters.org/?page_id=81
√ Have a Question About Getting Kids Involved, ask the Experts! http://www.fruitsandveggiesmorematters.org/?page_id=18
Fruit Dip Yield: 8 servings (2 tablespoons per serving)
Ingredients:8 ounces yogurt, lowfat vanilla 1 tablespoon lime juice2 tablespoons 100% orange ½ tablespoon brown sugarjuice frozen concentrate, thawed
Directions:1. In a small bowl, combine yogurt, orange juice concentrate, lime juice and brown sugar.2. Mix well.

2-9Fun with Foods Level 1
LESSON 2: FOR THE RECORDA Slice of Nutrition
MEETING
Date ______________________
Foods I prepared or helped prepare ___________________________________________________
________________________________________________________________________________
________________________________________________________________________________
I demonstrated ___________________________________________________________________
________________________________________________________________________________
________________________________________________________________________________
This lesson taught me the following skills ______________________________________________
________________________________________________________________________________
________________________________________________________________________________
Some of the activities I tried _________________________________________________________
________________________________________________________________________________
________________________________________________________________________________
Type of Food Prepared# Times
PreparedTo Whom
ServedHours Spent
# Served Cost

3-1Fun with Foods Level 1
Making cookies can be fun. There are different types of cookies classified as either soft or stiff dough. In this lesson we will make drop and bar cookies, while practicing our skills of: measuring accurately, creaming, mixing ingredients, and properly using the oven.
Before you Start: √ Read the whole recipe. √ Assemble your ingredients. √ Measure accurately - never guess. √ Check oven racks and place them in position before you
turn on the oven. If baking one cookie sheet at a time, place the rack so the pan will be in the center of the oven to allow even air circulation. Use a broad spatula or pancake turner to lift the cookies from the cookie sheet onto the wire rack to cool.
√ Wash your hands (refer to Lesson 1, for more information, or soaperhero.org.)
Lesson 3
Cookies: Drop & Bar
What Counts as a Serving?The actual serving size of a cookie is 2 inches by 2 inches. Keep this in mind when you are making cookies.
2 inches
2 inches
Drop Cookies - are made from soft cookie dough in which the ingredients are mixed and dropped from two spoons or cookie scoop onto a baking sheet and baked.
Bar Cookies - ingredients are mixed, spread in a pan, baked, cooled, then cut.
3-2Fun with Foods Level 1
CAUTION!
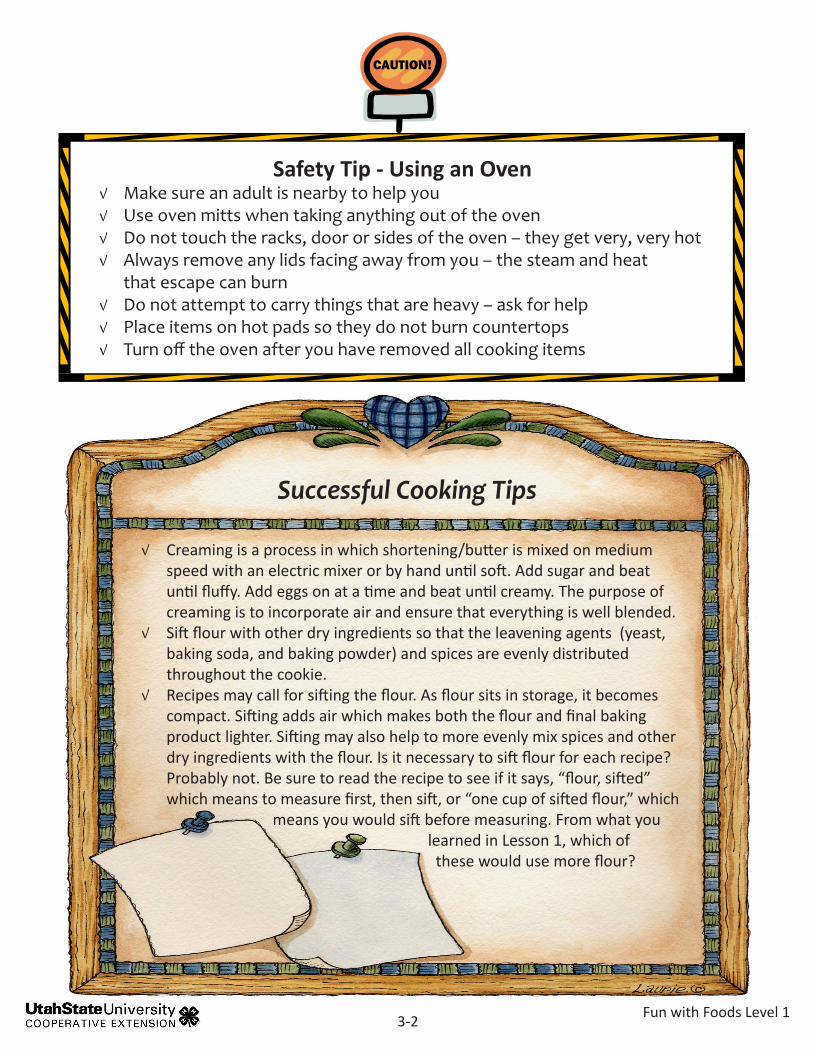
Safety Tip - Using an Oven √ Make sure an adult is nearby to help you √ Use oven mitts when taking anything out of the oven √ Do not touch the racks, door or sides of the oven – they get very, very hot √ Always remove any lids facing away from you – the steam and heat
that escape can burn √ Do not attempt to carry things that are heavy – ask for help √ Place items on hot pads so they do not burn countertops √ Turn off the oven after you have removed all cooking items
√ Creaming is a process in which shortening/butter is mixed on medium speed with an electric mixer or by hand until soft. Add sugar and beat until fluffy. Add eggs on at a time and beat until creamy. The purpose of creaming is to incorporate air and ensure that everything is well blended.
√ Sift flour with other dry ingredients so that the leavening agents (yeast, baking soda, and baking powder) and spices are evenly distributed throughout the cookie.
√ Recipes may call for sifting the flour. As flour sits in storage, it becomes compact. Sifting adds air which makes both the flour and final baking product lighter. Sifting may also help to more evenly mix spices and other dry ingredients with the flour. Is it necessary to sift flour for each recipe? Probably not. Be sure to read the recipe to see if it says, “flour, sifted” which means to measure first, then sift, or “one cup of sifted flour,” which means you would sift before measuring. From what you learned in Lesson 1, which of these would use more flour?
Successful Cooking Tips

3-3Fun with Foods Level 1
DROP COOKIES
Activity 1: Making Drop Cookies
Goal: Learn how to properly mix and bake drop cookies. Materials Needed:
√ Measuring cups and spoons, mixing bowl, electric mixer, baking sheet, spatula/pancake turner, teaspoons/cookie scoop, hot pad, wire cooling rack, oven, and ingredients as listed in recipe.
Directions: 1. Follow recipe to mix ingredients together. Remember to read the directions - do not just put ingredients
in a bowl.2. Drop cookies correctly, by pushing the dough from a spoon using either another spoon or spatula. The
dough is dropped by rounded or heaping teaspoonfuls onto the baking sheet. You may also select to use a cookie scoop which will create uniform sized cookies. If the baking pan is warm, the cookie dough may spread too much. Allow 3 inches between each cookie.
Applesauce Cookies
Yield: 3 dozen Ingredients:½ cup trans-fat free shortening ½ teaspoon cinnamon1 cup sugar ½ teaspoon cloves2 eggs ½ teaspoon nutmeg1 cup applesauce ½ teaspoon salt1 teaspoon baking soda 1 cup chopped nuts1 cup raisins 2 cups flour (sifted) Directions:
1. Preheat oven to 375⁰F.2. Cream sugar and shortening. Add eggs one at a time. 3. Stir baking soda into applesauce. Add to creamed mixture,
then mix. 4. Sift dry ingredients together.5. Add dry ingredients to mixture. Stir together using a spoon.
Stirring by hand rather than using an electric mixer will assure that you do not over beat.
6. Add nuts.7. Drop by teaspoon or scoop on ungreased cookie sheet. 8. Bake 10 to 15 minutes.

3-4Fun with Foods Level 1
Oatmeal Cranberry Cookies
Yield: 3 dozen Ingredients:½ cup butter or margarine, softened ¾ cup sugar 1 egg 1 teaspoon vanilla 1 cup flour ½ teaspoon baking powder ¼ teaspoon salt ⅛ teaspoon baking soda 1 cup quick oats ½ cup raisins ½ cup chopped fresh cranberries ½ tablespoon orange zest or frozen cranberries 6 ounces vanilla chips Directions:
1. Preheat oven to 375⁰F.2. Cream butter and sugar. Add egg and vanilla, beat well. 3. Mix flour, baking powder, salt, and baking soda. Add to creamed
mixture. 4. Stir in remaining ingredients. 5. Drop by rounded teaspoons, 2 inches apart, on greased sheet. 6. Bake for 10 minutes, or until edges start to brown lightly. 7. Cool on wire racks.
Judge your Drop Cookies:The crust should be thick and tender. The texture should be soft and moist. To prevent drop cookies from spreading too much, chill the dough. Learn to judge your product. When this cookie is baked, it should have a mound shape.
GOOD QUALITIESOutside Appearance:
Fairly uniform mound shape
Color - delicately brown exteriorInside appearance and texture: soft & tender
POOR QUALITIES LIKELY CAUSED BYIrregular size Improper dropping of dough
Dark crust edges Over baking (baking sheet too large for oven)
Too dry-hard Over baking
Doughy Under bakingExcessive Spreading Dough too warm
Dropped on hot baking sheetIncorrect oven temperature

3-5Fun with Foods Level 1
Sauce Pan Brownies
Yield: 16 bars
Ingredients:1 cup sugar 2 eggs, beaten¼ cup vegetable oil 2 (1 ounce) squares unsweetened½ cup sifted flour chocolate or 4 tablespoons 2 tablespoons of butter of cocoa melted with margarine.1 teaspoon vanilla ½ cup chopped nuts
Directions:1. Preheat oven to 350⁰F.2. Melt chocolate in saucepan or microwave. Cool. Transfer to large
mixing bowl using a rubber scraper. Notice how much cleaner a rubber spatula works rather than using a spoon.
3. Add sugar, oil, beaten eggs, and vanilla. Beat until smooth.4. Add flour. Beat until smooth.5. Stir in nuts.6. Spread in greased 8 x 8 inch pan. Bake about 30 minutes. 7. Cool. Cut into bars.
BAR COOKIES
Activity 2: Making Bar Cookies
Goal: Learn how to properly mix and bake bar cookies. Materials Needed:
√ Measuring cups and spoons, mixing bowl, rubber scraper, electric beater/mixer, cake pan hot pad, oven, and ingredients as listed in recipe.
Directions: √ Follow directions closely in selected recipe to
make bar cookies.
Baking Tips
√ Melt chocolate over medium-low heat or in microwave, stirring often to prevent burning.

3-6Fun with Foods Level 1
Smart & Yummy Cookies Yield: 3-4 dozen
Ingredients:¾ cup packed brown sugar ½ cup sugar2 egg whites, lightly beaten 2 tablespoons vegetable oil2 tablespoons fat-free milk 2 teaspoons vanilla1 ½ cups flour 1 teaspoon baking soda1 teaspoon ground cinnamon ½ teaspoon salt (optional)3 cups oats (old fashioned or 1 8-ounce container vanilla or quick, uncooked) plain low-fat yogurt1 cup diced dried mixed fruit, raisins, or dried cranberries
Directions:1. In a large bowl, combine the sugars, yogurt, egg whites, oil, milk
and vanilla. Mix well. 2. In a medium bowl, combine flour, baking soda, cinnamon, and
salt; mix well.3. Add yogurt mixture; mix well. Then stir in oats and fruit.4. Spread dough onto bottom of ungreased 9x13 inch pan and bake
in a preheated 350o oven for 28-32 minutes or until lightly brown. 5. Cool completely on wire rack. 6. Cut into bars and store in a covered container.
Judge your Bar Cookies:Uniform in size with smooth cut edges. Crust tender, texture of bars moist and rich. How do your cookies rate?
GOOD QUALITIESOutside Appearance:
A uniform, well cut shapeInside appearance and texture: Thin, delicate crustReasonably uniform texture
Rich, moist, and tender
POOR QUALITIES LIKELY CAUSED BYCrumbles when cut Cutting bars when too warm
Dry, crumbly Over baking
Hard crusty top Over mixing
Doughy Underbaking

3-7Fun with Foods Level 1
Activity 3: Fat & Sugar DiscoveryNOTE: This may be a good activity to do while the cookies are baking.
Goal: Explore how much fat and sugar are in common treats.
Materials Needed: √ Commercial candy, muffins, cakes or other treats with nutrition information listed on label √ Sugar √ Shortening √ Teaspoon size measuring spoon √ Plastic placemat, plate or cutting board
CAUTION!
Safety Tip: Raw Eggs & Uncooked Cookie DoughDo not eat uncooked cookie dough. Foods containing raw eggs, such as homemade cookie dough, homemade ice cream, cake batter, homemade mayonnaise, or eggnog carry Salmonella risks. Salmonella may lead to food poisoning. Use care when handling raw eggs. So why can you eat cookie dough ice cream, and commercial cookie dough? Pasteurized eggs are used in these products, which makes the raw dough safe.
Directions: 1. Locate nutrition information on the treat label.2. Be sure to notice the serving size and measure out the correct amount of sugar and fat for the amount of treat that is usually eaten at one time!3. Measure out 1 teaspoon of sugar for every 4 grams of sugar listed on the label, forming a pile next to the treat (16 grams = 4 teaspoons sugar).4. Measure out 1 teaspoon of shortening for every 4 grams of fat listed on the label, forming a pile next to the treat.5. How much fat and sugar are in each treat? Discuss.6. Repeat with other treats and compare fat and sugar content, if desired.
3-8Fun with Foods Level 1
Nutritional Tidbit – Saturated FatsAlthough it’s healthy to limit intake of saturated fats such as butter and shortening, they do have a place in baking.
Fat is a major source of energy for the body and is important for proper growth, development, and maintenance of good health. As a food ingredient, fat provides taste, consistency, and stability and helps us feel full. Margarine (a hydrogenated or trans fat) was developed to increase the shelf life of foods. Hydrogenation is the process of taking an oil (soybean, canola, olive oil) and altering its chemical structure to make it more solid at room temperature. This alteration is good for storage life of the food product, but the portion sizes of these products should be kept to the MyPyramid guidelines to help keep your heart and cardiovascular system healthy.
Spreadable butter or trans fat free margarine are good alternatives to regular butter or margarine, in moderation. These products usually have air and water added which will alter your recipe. For best results in baking, use margarine, butter or stick spreads containing at least 70% vegetable oil (this will be indicated on the label).
What have you learned? √ What did you learn? √ Next time you go to the grocery store, check out how many grams of fat are in different types of
cookies, or other foods you enjoy. See if any of them surprise you. √ What happened that you didn’t expect would happen? If you had it to do over again, what would you
do differently? √ Based on your analysis, how could you do even better next time? √ How will you use what was learned? Share ideas for preparing foods at home and what you may do
based on what was learned.
Recipe Sources √ 4-H Fun with Foods by Georgia Lauritzen, USU Extension √ Summit County, Utah State University Extension office
References and Resources: √ Cooking Basics: Baking Cookies √ University of Missouri Extension
https://muextension.missouri.edu/stcharles/celebratenl/2009/nov/cookies.pdf

3-9Fun with Foods Level 1
LESSON 3: FOR THE RECORDCookies: Drop & Bar
MEETING
Date ______________________
Foods I prepared or helped prepare ___________________________________________________
________________________________________________________________________________
________________________________________________________________________________
I demonstrated ___________________________________________________________________
________________________________________________________________________________
________________________________________________________________________________
This lesson taught me the following skills ______________________________________________
________________________________________________________________________________
________________________________________________________________________________
Some of the activities I tried _________________________________________________________
________________________________________________________________________________
________________________________________________________________________________
Type of Food Prepared# Times
PreparedTo Whom
ServedHours Spent
# Served Cost
4-1Fun with Foods Level 1
Nothing is better than a hot drink on a cold day, or a blended drink on a hot day. Learning to use the stove top and blender safely are important in order to prepare these yummy drinks.
Activity 1: Heating Milk & Making Hot Chocolate
Goal: Compare methods for heating milk Learn how to heat milk without scorching
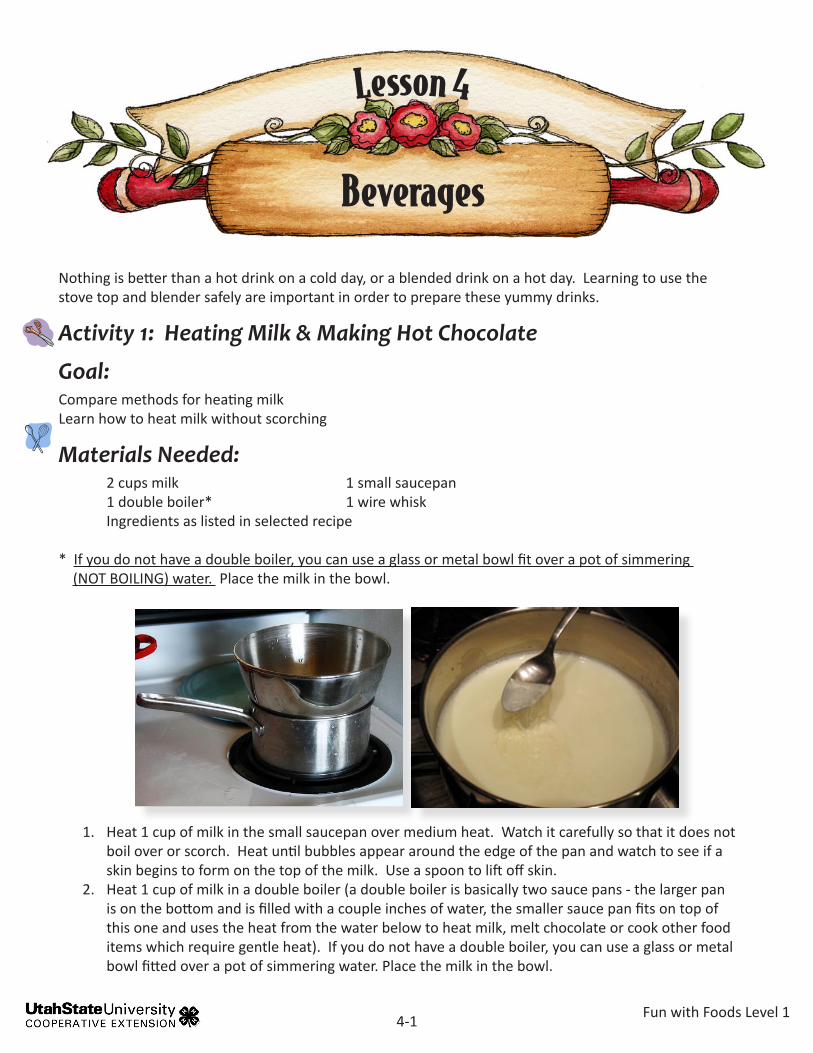
Materials Needed: 2 cups milk 1 small saucepan 1 double boiler* 1 wire whisk Ingredients as listed in selected recipe * If you do not have a double boiler, you can use a glass or metal bowl fit over a pot of simmering (NOT BOILING) water. Place the milk in the bowl.
Lesson 4
Beverages
1. Heat 1 cup of milk in the small saucepan over medium heat. Watch it carefully so that it does not boil over or scorch. Heat until bubbles appear around the edge of the pan and watch to see if a skin begins to form on the top of the milk. Use a spoon to lift off skin.
2. Heat 1 cup of milk in a double boiler (a double boiler is basically two sauce pans - the larger pan is on the bottom and is filled with a couple inches of water, the smaller sauce pan fits on top of this one and uses the heat from the water below to heat milk, melt chocolate or cook other food items which require gentle heat). If you do not have a double boiler, you can use a glass or metal bowl fitted over a pot of simmering water. Place the milk in the bowl.

4-2Fun with Foods Level 1
Answer these Questions: √ What caused the milk heated over direct heat to be covered with a skin? √ What prevented the formation of skin on the milk heated in a double boiler?
Explanation: Milk contains vitamins, minerals, protein, and if using whole milk, fat. Heat makes protein coagulate or clump together. High heat may cause scorching or burning of protein. High heat causes the protein to toughen. The skin that forms on top of the milk and the material you see sticking to the sides and bottom of the pan is protein that has changed due to heat. This will scorch very easily when heated directly over the burner.
Lower heat in the double boiler prevents scorching. Stirring will help to prevent the settling of protein on the bottom and side of the pan. Whipping with a beater makes bubbles on the milk and keeps skin from forming.
Activity 2: Hot Chocolate
Goal: Learn how to make homemade hot chocolate.
Materials Needed: Double boiler* Wooden spoon Measuring spoons Measuring cups Egg beater Ingredients as listed in recipe
* If you do not have a double boiler, you can use a glass or metal bowl fit over a pot of simmering (NOT BOILING) water. Place the milk in the bowl.
CAUTION!
Safety TipPlace all pans so that handles are away from the edge of the stovetop. Protruding handles can be accidently knocked or tipped off the stove, causing serious injuries.
3. As milk warms up, beat with a rotary beater or wisk to form a foam. Heat the milk until you are sure it is hot.
4. Compare the appearance of the two pans of milk.5. Pour the milk from the two pans, and see if you can tell a difference in heating milk by the
two methods.6. After comparing the milk, use it to make homemade hot chocolate in Activity 2.

4-3Fun with Foods Level 1
Activity 3: Powdered Hot Chocolate Mix Goal: Learn how to make homemade powdered hot chocolate.
Materials Needed: Mixing bowl Large spoon Measuring cups Measuring spoons Air-tight container Ingredients as listed in recipe
Homemade Hot Chocolate
Yield: 2 servings Ingredients:1 tablespoon cocoa 3 tablespoons sugar 2 cups milk Directions:1. Blend cocoa and sugar in bowl.2. Warm milk with a double boiler if you have one. Or, use a glass or
metal bowl fit over a pot that has simmering water in it. Put the milk in the bowl. (See activity 1).
3. Add cocoa mixture to warm milk and blend well. 4. Use beater just before serving.
Yield: 30-40 servings Ingredients:3 cups powdered sugar 1 large box (4.6 ounces) instant 2 cups instant chocolate milk mix chocolate pudding mix (such as Nesquick) 1 ½ cups non-fat instant dry milk Directions:1. Combine all ingredients. Stir thoroughly.2. Store in air-tight container.
To Serve: Add 2 heaping teaspoons of hot chocolate mix to 8 ounces of hot water, stir and serve.
Powdered Hot Chocolate Mix

4-4Fun with Foods Level 1
CAUTION!
Safety Tip: Using Blenders √ Make sure your hands are completely dry while using the blender. Never turn
the blender on or off with wet hands. Also never use wet hands to plug or unplug a blender.
√ Make sure the lid is on tight before starting the blender. Turn off the blender before removing the lid.
√ Make sure the base of the blender is tightly secured before adding ingredients. √ Do not put spoons or other utensils in the blender while blender is on. √ Unplug the blender when you are not using it.
Activity 4: Using a Blender
Goal: Learn how to properly and safely use a blender.
Materials Needed:Measuring cups Measuring spoonsBlender Ingredients as listed in selected recipe
Select from one of the following three recipes, or try them all! You can make milk drinks from fresh milk, evaporated milk (canned), or from non-fat dry milk (powdered).

4-5Fun with Foods Level 1
Dreamy Orange Smoothie
Yield: 4 Servings Ingredients:1- 6 ounce can frozen orange juice 1 ½ cans (9 ounces) water 1 ½ cans (9 ounce) milk (using the ¼ cup sugar orange juice can to measure) 6 ice cubes or 1 cup crushed ice1 teaspoon vanilla
Directions:1. Crush ice in blender. 2. Add all ingredients. Blend well. 3. Pour into glasses. Enjoy!
Banana Delight Shake
Yield: 4 Servings Ingredients:1 banana cut into small pieces 1 carton (8 ounce) fruit flavored yogurt1 ½ cups milk ¼ cup sugar1 teaspoon vanilla 6 ice cubes or 1 cup crushed ice
Directions:1. Mix all ingredients in blender until ice is crushed and drink is thick. 2. Pour into glasses. Enjoy!

4-6Fun with Foods Level 1
Nutrition Fact
Other than making a fun green smoothie, why add spinach? Spinach is known as a “power” food. Keep an open mind about it. Eating spinach will help you meet your daily requirements for calcium, iron, folate and vitamin A.
What have you learned? √ How will you use what was learned? √ What happened that you didn’t expect would happen? √ If you had it to do over again, what would you do differently? √ How do you prevent skin from forming on milk? √ What are some things you learned today that you can
demonstrate to others?
Recipe Sources √ Tooele County Extension office √ Wasatch County Extension office √ http://allrecipes.com √ 4-H Fun with Foods by Georgia Lauritzen
References and Resources: √ Healthy Drinks/Healthy Kids √ eXtension √ http://www.extension.org/pages/Healthy_Drinks
Swamp Cooler
Yield: 4 Servings
Ingredients:1 cup of fresh spinach, loosely packed ¾ cup milk½ cup fat free vanilla yogurt 1 banana½ cup frozen berries
Directions:1. Place spinach in blender first.2. Add yogurt, milk, banana and frozen berries. 3. Blend until smooth.4. Pour into two 8 ounce glasses. Enjoy!

4-7Fun with Foods Level 1
LESSON 4: FOR THE RECORDBeverages
MEETING
Date ______________________
Foods I prepared or helped prepare ___________________________________________________
________________________________________________________________________________
________________________________________________________________________________
I demonstrated ___________________________________________________________________
________________________________________________________________________________
________________________________________________________________________________
This lesson taught me the following skills ______________________________________________
________________________________________________________________________________
________________________________________________________________________________
Some of the activities I tried _________________________________________________________
________________________________________________________________________________
________________________________________________________________________________
Type of Food Prepared# Times
PreparedTo Whom
ServedHours Spent
# Served Cost

5-1Fun with Foods Level 1
Lesson 5
Microwave Munchies
Microwaves cook by causing water molecules to rub against each other. This constant rubbing or friction creates heat inside the food. This makes food heat very quickly while at the same time not heating the air around the food. Microwaves vary by how many watts they have, the higher the number of watts the quicker the food will cook. Because microwaves vary, cooking times on recipes may need to be adjusted depending on your microwave.
Activity 1: Testing dishes for microwave safety Goal: Learn what kinds of dishes are microwave safe.
Materials Needed: Glass dish Plastic dish 1 or 2 other kinds of dishes (non-metal) Glass measuring cup Water
Directions:1. Place the empty dish to be tested inside the microwave. Remember do NOT test any container that
is metal or has metal trim. A spark and fire can result. NEVER put metal in the microwave.2. Measure 1 cup of water in the glass measuring cup.3. Place cup in microwave next to the dish (or inside the dish if it is large).4. Microwave on high for 1 minute.5. Carefully test the temperature of the dish and water. If the dish is cool and the water is warm the
dish is microwave safe. 6. If the dish is hot and the water is cool do not use the dish for microwave cooking.7. Repeat steps with the next dish.
What have you learned? √ What containers seemed to work best in the microwave? √ Were any dishes labeled microwave-safe? Where was this information located? √ What would happen if you cooked in containers that were not microwave safe?

5-2Fun with Foods Level 1
CAUTION!
Safety Tip √ Never run the microwave empty or if the door is not completely closed. √ Use only microwave-safe cookware. √ Some plastics may melt in the microwave - be sure they are microwave safe
before using. √ Never use aluminum foil or any containers with metal. √ Have pot holder handy to remove hot containers. √ Be careful when removing coverings. Steam is very hot and can burn! √ Using a microwave safe cover that is vented to allow some of the steam to
escape can create moist heat that will help kill harmful bacteria especially in cooking meat or poultry.
√ Using a vented cover over the food can also help food cook evenly and keep the inside of the microwave clean.
√ If a spill occurs, be sure to wipe it up immediately.

5-3Fun with Foods Level 1
Mini Microwave Pizzas
Yield: 6 servings Ingredients:1 large can refrigerated biscuits Toppings: pepperoni, 16 ounce (small) jar spaghetti sauce peppers, mushrooms small package reduced-fat mozerella cheese Directions:1. Flatten biscuit dough on a microwave-safe plate. 2. Spread spaghetti sauce evenly on the flattened biscuit. 3. Sprinkle biscuit with cheese and additional toppings of choice. 4. Microwave for 50 seconds (microwave times may vary slightly)
until cheese is melted and inside of biscuit is no longer doughy.
Activity 2: Making Mini Pizzas
Goal: Learn how long it takes to microwave, to melt cheese and cook dough.
Materials Needed: Microwave Microwave safe plate Ingredients as listed in recipe

5-4Fun with Foods Level 1
Activity 3: Microwave VeggiesSteaming vegetables in the microwave keeps more vitamins in the food and is often faster than other cooking methods.
Goal: Learn how easy it is to microwave veggies for a quick, nutritious meal.
Materials Needed: Microwave Microwave safe plate and cover Ingredients as listed in selected recipe Serving spoon
Baked Potato with Broccoli Yield: 1 serving Ingredients: 1 medium potato ½ cup broccoli ¼ cup grated cheese (fresh or frozen) Additional toppings optional Directions:1. Wash and dry the potato. Poke holes in the potato to vent steam
(alternate method: make a deep ‘X’ cut into the long side with a knife). 2. Wrap the potato in a paper towel on a plate and put it into the
microwave. When using a 1200 Watt microwave, set the timer to 3:00 for a very small potato; 4:30 minutes for a medium-sized potato; and 6:00 minutes for a large potato. Huge potatoes require 7 to 8 minutes.
3. The microwave should stop before the potato is soft enough for eating and while it is still slightly firm deep inside.
4. Let the potato stand for five minutes. This allows the inside of the potato to finish cooking with the hot steam that is trapped inside; this helps it to become fluffy inside without over-drying the outer portion. Wrapping it in aluminum foil after taking it out of the microwave will speed this up.
5. While the potato is resting, steam the broccoli. Place fresh or frozen broccoli in a microwave safe container, add a tablespoon of water.
6. Cover with microwave safe cover with a small vent, and cook for 3-4 minutes or until the desired tenderness. Most frozen veggie packages include microwave cooking directions.
7. Cut potato in half. Top with steamed broccoli and cheese. The heat from the potato and broccoli will melt the cheese.
8. You can also add your choice of butter; parsley; green onions or chives; sour cream; cheese; crispy bacon, etc.

5-5Fun with Foods Level 1
Zapped Apple Yield: 1 serving
Ingredients: 1 medium apple cinnamon 1 teaspoon maple light or fat-free or caramel syrup whipped creamDirections:1. Wash, slice and core apple. 2. Arrange in a bowl. 3. Sprinkle apple with cinnamon, and then drizzle with syrup. 4. Microwave apple on high for 1-1 ½ minutes; add a spoonful of
whipped cream on top before serving.
Activity 4: Zapped Apple
Goal: Learn how to bake apples in the microwave.
Materials Needed: Microwave Microwave safe bowl Ingredients as listed in selected recipe Serving spoon
CAUTION!
Safety Tip √ To core an apple with an apple corer: Place the apple on a
cutting board. Press the apple corer into the center of the apple (surrounding the core) until you reach the cutting board. Twist the corer and pull it up toward you to remove the core.
√ To core an apple with a knife and a vegetable peeler: Cut the apple in half with a sharp knife, and pry out the core with a vegetable peeler.

5-6Fun with Foods Level 1
What have you learned? √ What was different about cooking in the microwave compared to a regular oven? √ What happened that you didn’t expect would happen? √ What are some of the benefits and limitations when cooking with a microwave? √ What would you tell someone else that was considering cooking in a microwave? √ What are other ways that you would like to try using the microwave?
Recipe Sources √ Utah 4-H √ Weber County Extension √ 4-H Fun with Foods by Georgia Lauritzen
References and Resources: √ Microwave Science at National 4-H video:
http://www.youtube.com/watch?v=t0Mv7F9p8O8 √ Microwave Cooking √ Arizona Cooperative Extension:
http://ag.arizona.edu/pubs/health/az1081.pdf

5-7Fun with Foods Level 1
LESSON 5: FOR THE RECORDMicrowave Munchies
MEETING
Date ______________________
Foods I prepared or helped prepare ___________________________________________________
________________________________________________________________________________
________________________________________________________________________________
I demonstrated ___________________________________________________________________
________________________________________________________________________________
________________________________________________________________________________
This lesson taught me the following skills ______________________________________________
________________________________________________________________________________
________________________________________________________________________________
Some of the activities I tried _________________________________________________________
________________________________________________________________________________
________________________________________________________________________________
Type of Food Prepared# Times
PreparedTo Whom
ServedHours Spent
# Served Cost

6-1Fun with Foods Level 1
Lesson 6
Cookies: Molded, Refrigerator & Rolled
In Lesson 4, you learned how to make drop and bar cookies. Now it’s time to learn how to make molded, refrigerated and rolled cookies. These cookies take more time to make, but are still fun and easy.
Need to Know:Before you start:
√ Read the whole recipe. √ Assemble your ingredients. √ Measure accurately—never guess. √ Check oven racks and place them in position before you turn on the oven. If baking one cookie sheet at
a time, place the rack so the pan will be in the center of the oven to allow even air circulation. √ Use a broad spatula or pancake turner to lift the cookies from the cookie sheet onto the wire rack
to cool.
Molded Cookies - are made from stiff cookie dough in which the ingredients are mixed and molded into shapes with your hands or with a cookie press. The cookie is placed on a baking sheet and baked.
Refrigerator Cookies - are a stiff dough that needs to be refrigerated before baking. These cookies should be very thin and very crispy - just mix, shape into a roll, refrigerate, slice, place on a baking sheet and bake.
Rolled Cookies - are made from stiff dough that is mixed, sometimes chilled, rolled out, cut into fun shapes with cookie cutter and bake.
6-2Fun with Foods Level 1
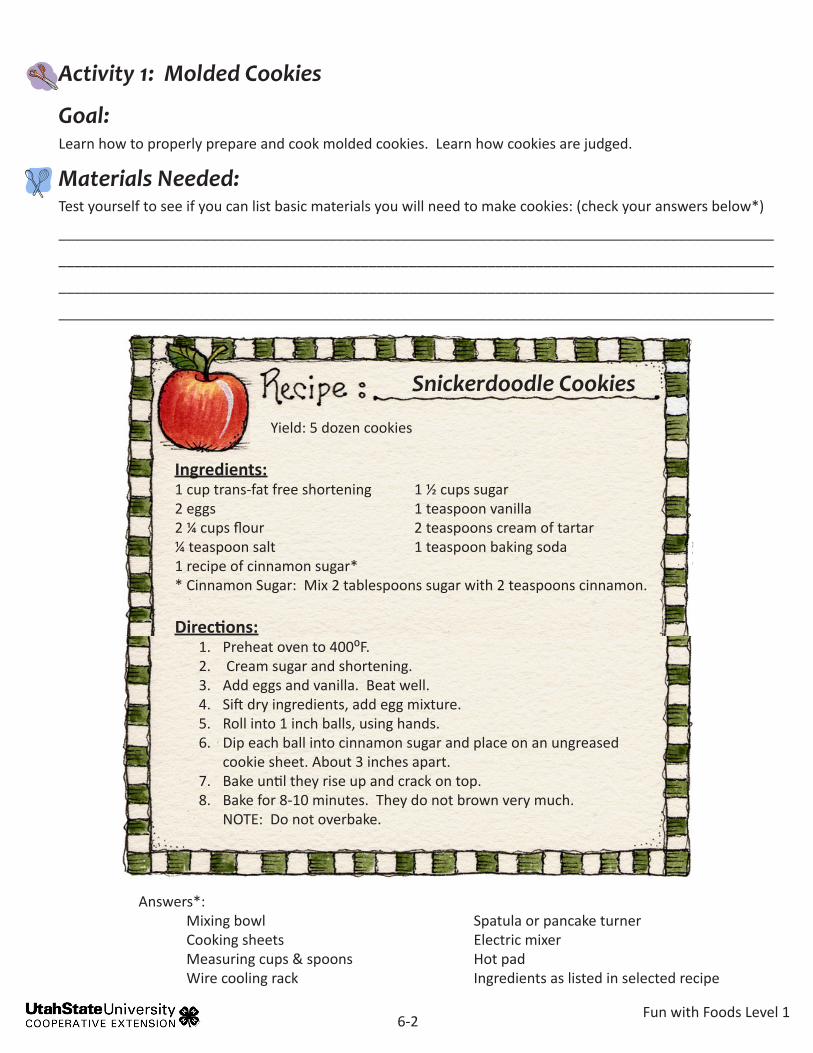
Activity 1: Molded Cookies
Goal: Learn how to properly prepare and cook molded cookies. Learn how cookies are judged.
Materials Needed:Test yourself to see if you can list basic materials you will need to make cookies: (check your answers below*)
__________________________________________________________________________________________
__________________________________________________________________________________________
__________________________________________________________________________________________
__________________________________________________________________________________________
Snickerdoodle Cookies
Yield: 5 dozen cookies Ingredients:1 cup trans-fat free shortening 1 ½ cups sugar2 eggs 1 teaspoon vanilla2 ¼ cups flour 2 teaspoons cream of tartar ¼ teaspoon salt 1 teaspoon baking soda1 recipe of cinnamon sugar** Cinnamon Sugar: Mix 2 tablespoons sugar with 2 teaspoons cinnamon.
Directions:1. Preheat oven to 400⁰F.2. Cream sugar and shortening.3. Add eggs and vanilla. Beat well.4. Sift dry ingredients, add egg mixture.5. Roll into 1 inch balls, using hands.6. Dip each ball into cinnamon sugar and place on an ungreased
cookie sheet. About 3 inches apart.7. Bake until they rise up and crack on top. 8. Bake for 8-10 minutes. They do not brown very much. NOTE: Do not overbake.
Answers*: Mixing bowl Spatula or pancake turner Cooking sheets Electric mixer Measuring cups & spoons Hot pad Wire cooling rack Ingredients as listed in selected recipe

6-3Fun with Foods Level 1
Peanut Butter Cookies
Yield: 5 dozen cookies Ingredients:1 cup brown sugar 1 cup white sugar1 cup trans-fat free shortening ¾ to 1 cup peanut butter 2 eggs 3 cups flour1 teaspoon baking soda ¼ teaspoon salt1 teaspoon vanilla
Directions:1. Preheat oven to 375⁰F.2. Mix sugars, cream shortening and peanut butter with sugars. Add
the eggs one at a time; mix thoroughly.3. Sift dry ingredients together and add wet ingredients. Add vanilla,
then mix.4. Shape into balls the size of a large walnut and press out with a
fork. Dip the fork into dry sugar to prevent sticking. Place on an ungreased cookie sheet.
5. Bake for 8-10 minutes until very lightly browned.
Judge your Molded Cookies:Uniform in size with smooth cut edges. How do your cookies rate?
GOOD QUALITIESOutside Appearance:
Uniform - well shapedColor - delicately brownedInside Appearance and Texture: Crisp - tenderEating Quality
Pleasing - well balanced
POOR QUALITIES LIKELY CAUSED BYMisshaped Poor molding
Too brown Over baking

6-4Fun with Foods Level 1
Ying Yang Cookies
Yield: 6 ½ dozen, 2 ½ inch cookies. Ingredients:1 cup trans-fat free shortening ½ cup white sugar2 eggs ½ cup brown sugar2 ¾ cup flour ½ teaspoon baking soda½ teaspoon salt 2 teaspoons vanilla½ cup nuts, chopped ½ cup chopped dates or raisins
Directions:1. Preheat oven to 400⁰F.2. Mix shortening, eggs and sugar until well blended.3. Sift the dry ingredients together and add to the first mixture.4. Add vanilla, nuts and dates or raisins and mix together thoroughly.5. Mold with hands into a long, smooth roll 2 to 2 ½ inches
in diameter.6. Wrap waxed paper around the roll and chill several hours or
overnight.7. Cut in thin slices (⅛ inches thick) with a sharp knife. 8. Place on an ungreased baking sheet and bake for 6-8 minutes.
Variations:• Chocolate Refrigerator Cookies - Add 2 squares (3 oz) unsweetened
chocolate, melted, to the egg mixture just before adding the flour mixture. Decrease vanilla to 1 teaspoon.
• Chocolate & Vanilla - Make two rolls of dough of contrasting colors; one plain and one chocolate. After chilling, cut rolls in half lengthwise. Press together the cut surfaces of two colors. Wrap and re-chill, then slice and bake.
Activity 2: Refrigerator Cookies
Goal: Learn how to properly prepare and cook refrigerator cookies.
Materials Needed:Test yourself to see if you can list basic materials you will need to make cookies: (check your answers below*)
__________________________________________________________________________________________
__________________________________________________________________________________________
__________________________________________________________________________________________
__________________________________________________________________________________________

6-5Fun with Foods Level 1
Answers*: Mixing bowl Spatula or pancake turner Cooking sheets Electric mixer Measuring cups & spoons Hot pad Wire cooling rack Fork Wax paper Knife Cutting board Ingredients as listed in selected recipe
Baking Tips √ Wrap and return unused dough to the
refrigerator to keep it stiff and easy to handle. This dough can be stored in the refrigerator for up to a week before it is used or frozen for even later use. Make sure it is in an air tight container.

6-6Fun with Foods Level 1
Quick Raisin Filled Cookies
Yield: 4 dozen
Filling: 2 cups ground raisins 1 cup water ¾ cup sugar 1 tablespoon flour 1 cup chopped nuts, optional 1 teaspoon vanilla
Combine all ingredients and boil until blended and thickened, stirring constantly. Cool.
Dough: 2 cups granulated sugar 1 cup brown sugar, well packed4 eggs 2 tablespoons milk2 teaspoons vanilla 2 teaspoons soda1 teaspoon salt 7 cups flour2 cups trans-fat free shortening (½ of the shortening may be replaced with butter or margarine)Directions:
1. Cream sugars and shortening; add eggs and beat until fluffy. 2. Sift dry ingredients and add alternately with liquid. 3. Shape into two rolls. Wrap in plastic and freeze for 2 hours or more.4. Preheat oven to 350⁰F.5. When firm, slice ⅛ to ¼ inch thick. Arrange slices on ungreased
sheet. Place 1 teaspoon raisin mixture on each slice. Cover with second slice.
6. The top slice will bake down over the bottom and seal itself. Bake for 15 minutes or until lightly browned.
Judge your Refrigerated Cookies:Uniform in size with smooth cut edges. How do your cookies rate?
GOOD QUALITIESOutside Appearance:
Uniform - well shapedColor - delicately brownedInside Appearance and Texture: Crisp - tenderEating Quality
Pleasing - well balanced
POOR QUALITIES LIKELY CAUSED BYMisshaped Poor molding
Too brown Over baking

6-7Fun with Foods Level 1
Gingerbread Cookies
Yield: 2 dozen Ingredients:3 cups flour 2 teaspoons ground ginger 1 teaspoon ground cinnamon 1 teaspoon baking soda ¼ teaspoon ground nutmeg ¼ teaspoon salt ¾ cup butter, softened ¾ cup firmly packed brown sugar ½ cup molasses 1 egg
Directions:1. Mix flour, ginger, cinnamon, baking soda, nutmeg and salt in large
bowl. Beat butter and brown sugar in large bowl with electric mixer on medium speed until light and fluffy. Add molasses and egg; beat well. Gradually beat in flour mixture on low speed until well mixed. Press dough into a thick flat disk. Wrap in plastic wrap. Refrigerate 4 hours or overnight.
2. Preheat oven to 350 degrees F. Roll out dough to 1/4-inch thickness on lightly floured work surface. Cut into gingerbread men shapes with 5-inch cookie cutter. Place 1 inch apart on ungreased baking sheets.
3. Bake 8 to 10 minutes or until edges of cookies are set and just begin to brown. Cool on baking sheets 1 to 2 minutes. Remove to wire racks; cool completely. Decorate cooled cookies as desired. Store cookies in airtight container up to 5 days.
Activity 3: Rolled Cookies
Goal: Learn how to properly prepare and cook rolled cookies.
Materials Needed:Test yourself to see if you can list basic materials you will need to make cookies: (check your answers below*)
__________________________________________________________________________________________
__________________________________________________________________________________________
__________________________________________________________________________________________
__________________________________________________________________________________________

6-8Fun with Foods Level 1
Sour Cream Sugar Cookies Yield: Depending on size of cut-outs, makes approximately 2 dozen cookies
Ingredients:½ cup sour cream 1 teaspoon baking soda1 cup butter- softened 1 ½ cups sugar1 egg ½ teaspoon salt3 ½ - 4 cups flour ½ teaspoon baking powder1 teaspoon vanilla
Directions:1. Stir baking soda into sour cream and set aside. 2. Cream together butter and sugar. Add egg, vanilla and salt,
then add sour cream mixture. 3. Add baking powder and flour 1 cup at a time. Use enough flour
so dough will be able to be rolled. (You may not use all the flour). 4. Chill at least 1 hour. Roll dough about ¼ inch thick, then cut
out with cookie cutters. 5. Preheat oven to 375⁰F.6. Bake until golden brown, approximately 10 minutes. Adjust time for
smaller or larger cookies.
Answers*: Mixing bowl Spatula or pancake turner Cooking sheets Electric mixer Measuring cups & spoons Wire cooling rack Ingredients as listed in selected recipe

6-9Fun with Foods Level 1
What have you learned? √ Compare the Peanut Butter Cookie recipe from this lesson with the Smart & Yummy Cookie recipe
from Lesson 3. What differences do you see in the ingredients? Did you notice any difference in the taste of the cookies? Any other observations?
√ What did you learn? √ What happened that you didn’t expect would happen? √ If you had it to do over again, what would you do differently? √ Based on your analysis, how could you do even better next time? √ Share some of your favorite family recipes and what makes them so good. √ How can you make some of these recipes more nutritious?
Recipe Sources √ Utah 4-H √ Wasatch County Extension √ Summit County Extension √ Betty Crocker √ http://allrecipes.com
References and Resources: √ References and Resources √ Cooking Basics: Baking Cookies √ Missouri Cooperative Extension:
https://muextension.missouri.edu/stcharles/celebratenl/2009/nov/cookies.pdf
Judge your Rolled Cookies:Uniform in size with smooth cut edges. How do your cookies rate?
GOOD QUALITIESOutside Appearance:
Uniform - well shapedColor - delicately brownedInside Appearance and Texture: Crisp - tenderEating Quality
Pleasing - well balanced
POOR QUALITIES LIKELY CAUSED BYMisshaped Poor rolling
Too brown Over baking

6-10Fun with Foods Level 1
LESSON 6: FOR THE RECORDCookies: Molded, Refrigerator & Rolled
MEETING
Date ______________________
Foods I prepared or helped prepare ___________________________________________________
________________________________________________________________________________
________________________________________________________________________________
I demonstrated ___________________________________________________________________
________________________________________________________________________________
________________________________________________________________________________
This lesson taught me the following skills ______________________________________________
________________________________________________________________________________
________________________________________________________________________________
Some of the activities I tried _________________________________________________________
________________________________________________________________________________
________________________________________________________________________________
Type of Food Prepared# Times
PreparedTo Whom
ServedHours Spent
# Served Cost

7-1Fun with Foods Level 1
Lesson 7
Sandwiches
Sandwiches are a quick and easy way to enjoy a meal. Bread is the starting point for a great sandwich – think about the type of bread and the type of filling you want to use. Then get creative with building a tasty meal. If peanut butter and jelly is a favorite and there are no allergy concerns, experiment with different breads or even use a pita pocket or whole wheat tortilla instead of bread.
Activity 1: Make a Healthy Grilled Sandwich
Goal: Grilled cheese is usually a popular choice. The traditional way of making grilled cheese uses butter or margarine. Let’s try a quick, easy, and healthier grilled cheese sandwich, with the following recipes.
Materials Needed:Toaster Microwave OvenKnife PlatesCutting Board Ingredients as listed in selected recipeFrying Pan Spatula
Yummy Grilled Sandwiches
Yield: 1 sandwich Ingredients: 2 slices of whole grain bread 1 slice of low fat cheese butter cooking sprayDirections:
1. Spray a slice of bread with butter-spray. Lay buttered side into a heated fry pan or on a grill.
2. Then add a slice of cheese and then a slice of bread.3. Grill for 1 minute or until golden brown.4. Lift the sandwich with a spatula. Re-spray the pan with butter spray.5. Flip the sandwich to cook on the uncooked side and grill for another
minute or until golden brown.

7-2Fun with Foods Level 1
Healthy Grilled Cheese Sandwich
Yield: 1 serving Ingredients:
Directions:1. Slice cheese if using a block or simply unwrap the slices.2. Toast bread in the toaster and place on plate.3. Arrange cheese on one slice of the toasted bread and cover with
the second slice of bread, then microwave the sandwich for 20-30 seconds depending on how quickly your microwave cooks.
4. Remove sandwich carefully. Caution: the cheese could be very hot! Allow to cool before eating. Enjoy!
bread (choose between white, whole wheat or other bread)
2 slices cheese (cheddar, swiss or other cheese)
Monte Cristo Grilled Sandwich
Yield: 1 sandwich Ingredients:2 slices of whole grain bread 1 egg2 tablespoons of milk a dash of cinnamon1 teaspoon of mustard 2 thin slices of deli ham2 thin slices of turkey 2 slices of cheese1 tablespoon of cranberry A sandwich grill or a small fry pansauce or strawberry jelly powdered sugar or maple syrup (optional)Directions:
1. Heat the grill or fry pan on low. As it warms up, beat together the egg, milk and cinnamon with a whisk.
2. Spread the mustard on one slice of the bread. Dip the other side of the bread slice into the egg mixture and place on the grill.
3. Layer the meat and cheese on the bread. Spread the jelly or cranberry sauce on the other slice of bread, and dip the other side of the bread into the egg mixture.
4. Place the second slice of bread on top, jelly facing the meat.5. Grill each side for 1 minute, more or less, depending on how crispy
you like your sandwich.6. Slice the sandwich in half, sprinkle with powdered sugar, and serve
with maple syrup (if desired).

7-3Fun with Foods Level 1
“Mexi” Turkey Rolls
Yield: 8 rolls Ingredients:½ cup rinsed drained canned black beans1 large vine-ripened tomato, seeded and chopped4 teaspoons fresh lime juice½ teaspoon chili powder½ ripe avocado2 tablespoons low-fat plain yogurtFour 10-inch whole-wheat tortillas½ pound thinly sliced roast turkey breast1 cup packed fresh coriander sprigs, washed well, spun dry, and chopped coarse
Directions:1. In a bowl stir together black beans, tomato, 2 teaspoons lime
juice, chili powder, and salt to taste.2. In a food processor puree avocado, yogurt, remaining 2 teaspoons
lime juice, and salt to taste. (Alternatively, with a fork mash avocado mixture until smooth.)
3. Spread avocado mixture evenly on tortillas and arrange turkey across each tortilla just below middle.
4. Top turkey with salsa and coriander and tightly roll tortillas, leaving ends open. Cut tortillas in half, diagonally.
Activity 2: Wrapped Sandwiches
Goal: Learn how to make sandwiches with bread alternatives.
Materials Needed:Toaster Knife Plates Cutting Board Ingredients as listed in selected recipe

7-4Fun with Foods Level 1
Silly “Sushi” Bites
Yield: 2 servings Ingredients:4 slices wheat bread ¼ cup smooth peanut butter¼ cup honey ¼ cup strawberries, finely diced2 tablespoons nuts, finely chopped (sunflower seeds, almonds or walnuts)
Directions:1. Trim crusts from bread. Gently press bread or flatten with a
rolling pin. 2. Spread each slice with 2 tablespoons peanut butter and 2
tablespoons honey. 3. Sprinkle each slice with 1 tablespoon nuts and 2 tablespoons
strawberries. 4. Top with other flattened bread slices and press together. 5. Cut each sandwich in half. Firmly roll each slice and serve.
Activity 3: Filled Sandwiches
Goal: Learn how to make sandwiches with bread alternatives.
Materials Needed:Toaster KnifePlates Cutting BoardIngredients as listed in selected recipe

7-5Fun with Foods Level 1
Pita Pockets Yield: 2 servings Ingredients:2 whole wheat pita breads 6 pitted dates, chopped8 tablespoons chunky or 8 teaspoons honey smooth old-fashioned 2 ripe bananas, peeled, sliced peanut butter
Directions:1. Lightly toast pita breads; cut each in half crosswise. 2. Open pita pockets. Spread 2 tablespoons peanut butter on 1 side
of the inside of each pita pocket. 3. Sprinkle chopped dates over peanut butter, dividing equally. 4. Drizzle honey over. Divide banana slices among pita pockets; close
sandwiches, pressing slightly to adhere.
CAUTION!
Safety Tip √ Why is it important to refrigerate your sandwiches? The
cold temperature in the refrigerator prevents the growth and development of bacteria that cause spoilage. It is especially important to keep meat, fish and poultry foods cold, since bacteria thrive and grow in such foods at room temperature.

7-6Fun with Foods Level 1
Look for More Ideas!Sandwich fillings are seldom made from written recipes, but rather from the imagination and whatever is on hand. Vary the type of bread used. Try French bread slices, whole wheat, and rye or sourdough bread. You will find other ideas in recipe books or magazines. Prepare some of them for your family for supper or lunch. Ask them to help you decide which ones. When you plan sandwiches, think of how you can complete the meal by having food from the five groups listed at the front of your book to make your meal complete.
What have you learned? √ Discuss any additions that kids may enjoy on the sandwich such as tomatoes, mushrooms, cucumbers. √ Think about your favorite sandwiches and talk about the things you like and why. √ What happened that you didn’t expect would happen? √ If you had it to do over again, what would you do differently?
Recipe Sources √ Summit County Extension √ http://www.recipezaar.com √ http://www.bukisa.com/articles/95280_how-to-make-a-yummy-reduced-fat-grilled-cheese-sandwich √ http://recipes.sparkpeople.com/recipe-detail.asp?recipe=162068 √ http://www.ehow.com/how_4803507_healthy-monte-cristo-sandwich.html
References and Resources: √ Cooking Basics: Baking Cookies √ Missouri Cooperative Extension
https://muextension.missouri.edu/stcharles/celebratenl/2009/nov/cookies.pdf

7-7Fun with Foods Level 1
LESSON 7: FOR THE RECORDSandwiches
MEETING
Date ______________________
Foods I prepared or helped prepare ___________________________________________________
________________________________________________________________________________
________________________________________________________________________________
I demonstrated ___________________________________________________________________
________________________________________________________________________________
________________________________________________________________________________
This lesson taught me the following skills ______________________________________________
________________________________________________________________________________
________________________________________________________________________________
Some of the activities I tried _________________________________________________________
________________________________________________________________________________
________________________________________________________________________________
Type of Food Prepared# Times
PreparedTo Whom
ServedHours Spent
# Served Cost

8-1Fun with Foods Level 1
Lesson 8
Plan a Party!
Hosting a party for parents or guests will give you an opportunity to show others what you have learned. You know how to measure ingredients, read a recipe, follow safety guidelines, and keep a clean kitchen. Now it is time to organize a party and practice the skills you have gained.
Type of Party and ThemeDecide what kind of a party or entertainment you want and select a theme. Determine the reason you are having the party. Your theme could be casual or formal. The theme you select will help you determine the decorations and types of foods that you will serve.
√ Keep your party simple. This is better than trying to do too much and having it poorly done. √ Choosing foods you have learned to prepare in your project will help you
determine your theme.
Guest InvitationsAn invitation should provide information as to the type of party, date, time of arrival, where, and what is to be worn.
√ Determine guest list and prepare invitations. √ The invitation can be given orally or written. However, a
printed invitation will be the most effective and allow the guest to refer to important information.
√ The invitations can tell the guest if the party will be a full meal or a snack, if a program will be presented, and how long the party will last.
Menu PlanningA good party does not just happen. It requires careful planning with foods that are tasty, healthy, and attractive. Your menu should be based on a few simple guidelines.
√ Select nutritious foods. Use MyPyramid to help choose foods from each food group. √ Plan for color contrast to provide an interesting and appetizing appearance of the food on the plate. √ Select a good balance between strong and mild flavored foods. √ Select a variety of textures - some chewy, some soft, and some crisp. √ There should be a balance between hot and cold foods. √ To reduce cost, select seasonal foods. √ A menu card can be placed at each place setting to let the guests know what is being served. A 3”X 5”
recipe card works well.

8-2Fun with Foods Level 1
Work PlanBalancing work assignments among club members will help make the party a success and enjoyable for you and your guests.
√ After you have determined your menu, assign each club member —or team of two— a dish to prepare. Figure out the time your dish will take for preparation.
√ In addition to dish preparation, make a list of other required jobs and assign them among club members. Other jobs may include: table setting, hostess, entertainment— such as demonstrations and clean up.
Table Setting and MannersA pleasant table setting makes the meal more enjoyable and appealing. Be sure that flatware, dinnerware, and glassware are clean and spotless.
Setting the TableSelect a tablecloth or place mats to coordinate the dishes and food as well as the type and theme of the meal you are serving. These items need to be simple so they do not compete with the food for attention.
Choose napkins to match with your table covering. Fold the napkin in a square or rectangle, with an open corner at the lower right making it easy to open and pull across the lap. The napkin is normally placed to the left of the fork.
CenterpieceThe centerpiece should enhance the table setting, but not block the view of the guests. A centerpiece can be very simple. A low-growing plant, cut flowers, or a bowl of fruit may be good choices. Centerpieces that appear unsanitary are not appropriate when serving food. The centerpiece is a place to show your creativity and will enhance the meal being served.
Tableware Placement √ The space required to set the table for each guest is called the cover. √ Center the plate on the cover one inch in from the edge of the table. √ Determine what pieces of flatware will be needed to eat the foods on your menu. √ Lay the dinner knife to the right of the plate with the blade turned in toward the plate to prevent
injury or accident. √ Spoons are placed at the right of the knife with the bowls facing up. √ Place the forks at the left of the plate with the tines up. √ The water glass is placed directly above the point of the knife. If a cup and saucer are used for hot
chocolate, they are placed to the right of the spoon, with the handle to the right. √ Cookies may be served on a small plate. Dessert stemware or bowls, used for food such as ice cream,
need to be placed on an appropriate sized plate.

8-3Fun with Foods Level 1
Table MannersTable manners are important. Practice the rules for good table manners every time you eat. Good manners go with you everywhere, so make them a habit. When good table manners become automatic you will feel more relaxed and comfortable, and the conversation and food will be enjoyed much more.
√ Sit up straight at the table. Keep your feet on the floor, not on the rungs of the chair. √ Never reach in front of someone else to get food. √ Never talk about unpleasant things at the table. √ Never criticize the food or someone else’s table manners. √ Never talk or take a drink when your mouth is full of food. √ Learn to say “please” and “thank you.” √ Wait until all persons are seated and are ready to eat before you start. √ Elbows should not be placed on the table, but kept close to the side.
Activity 1: Menu Planning
Goal: Plan a menu for a party and create a menu card for each place setting. Make a shopping list of what you will need to purchase for the party. A shopping list has been provided for your use on page 8-5.
This is a general format to follow when planning a luncheon menu. If you do not have foods in each category then leave it off the menu.
Protein Food
Vegetable/Fruit
Salad
Bread
Dessert
Beverage

8-4Fun with Foods Level 1
Sample Menu:
Menu for your Meal:
“Mexi” Turkey Wrap
Fruit Tray Fruit Dip
Saucepan Brownie
Water
Dreamy Orange Smoothie

8-5Fun with Foods Level 1
Canned &Packaged Goods
Staples Fruits &Vegetables
Non-food Items
Dairy Foods* Meats & Poultry* Frozen Foods* Breads & Cereals
*These foods should be purchased last to protect safety and quality.
Utah State University is an affirmative action/equal opportunity institution.
UtahStateUniversityExtensionGroceryListGroceryListGroceryListGroceryListGroceryListGroceryList
UtahStateUniversityExtension
extension.usu.edu

8-6Fun with Foods Level 1
Activity 2: Work Plan
Goal: Create a work plan and determine the amount of time needed to complete assigned jobs. Plan for some of the 4-H members to give a demonstration to family and friends about something that was learned in the project. Planning an icebreaker for the beginning of the party is also a good idea. An example of a fun game is to pin the name of a famous chef on the back of each person and ask questions to try to find out who they are.
√ Start time for food preparation √ Start time for decorating and setting table √ Time guests will arrive √ Time food will be served √ Clean-up time

8-7Fun with Foods Level 1
Dish: Dish:Name: Name:
Time Required to Prepare Dish: Time Required to Prepare Dish:
Preparation Start Time: Preparation Start Time:
Dish: Dish:Name: Name:
Time Required to Prepare Dish: Time Required to Prepare Dish:
Preparation Start Time: Preparation Start Time:
Dish: Table Setting:Name: Name:
Time Required to Prepare Dish: Time Required:
Preparation Start Time: Start Time:
Host/Hostess: Table Decorations:Name: Name:
Time Required: Time Required:
Start Time: Preparation Start Time:
Clean-Up: Entertainment:Name: Name:
Time Required: Time Required:
Preparation Start Time: Preparation Start Time:
Demonstrations: Demonstrations:
Name(s): Name(s):
Time Required: Time Required:
Preparation Start Time: Preparation Start Time:

8-8Fun with Foods Level 1
Jobs to be done ahead of time: Who will do them:
Jobs to be done on day of party: Who will do them:
Other ideas or notes:

8-9Fun with Foods Level 1
Activity 3: Table Setting
Goal: Look at the menu and determine the appropriate pieces needed to set the table for the party.
Draw a picture of your place setting on the placemat below.
What have you learned? √ What new ideas or thoughts came up as you planned? √ Why do you think it may be important to spend time planning? √ What do you think your party could be like if you didn’t plan? √ What are other situations where you think planning would be very important? √ What would you tell someone else who is about to attempt to plan a party?
References and Resources � Memmott, M. P., (2001). Table Manners That Matter. [Electronic publication]. FN 505, Utah State
University Extension. Available from the Utah State University website: http://extension.usu.edu/files/publications/publication/FN_505.pdf
� Bunnell, J., Haws, S., Christensen, D., Jones, D., Proctor, D., Hermansen, J., Olsen, R., Weeks, N. and Wong, S. S. (2008). Chef Extraordinaire, [Electronic publication]. http://utah4h.org/files/uploads/ Events%20and%20Registration/State%20Contests/Chef%20Extraordinaire%20Sept2008.pdf

8-10Fun with Foods Level 1
LESSON 8: FOR THE RECORDPlan a Party!
MEETING
Date ______________________
Foods I prepared or helped prepare ___________________________________________________
________________________________________________________________________________
________________________________________________________________________________
I demonstrated ___________________________________________________________________
________________________________________________________________________________
________________________________________________________________________________
This lesson taught me the following skills ______________________________________________
________________________________________________________________________________
________________________________________________________________________________
Some of the activities I tried _________________________________________________________
________________________________________________________________________________
________________________________________________________________________________
Type of Food Prepared# Times
PreparedTo Whom
ServedHours Spent
# Served Cost

9-1Fun with Foods Level 1
Smart Shopping
With this lesson you will compare different products to get just what you want — unit pricing, labels, different types of flour, fruits and vegetables in season. This lesson will take you on a tour to learn some things to look for when becoming a good shopper. If your club is not too large, you may all go together with your leader to the grocery store. If your club is large, you may need to divide up and go in smaller groups. Shopping can be a real adventure. It is fun to compare different items so that you get just what you want. This is also a good time to purchase the supplies for your party.
Supermarkets are designed to encourage shoppers to spend a lot of time and money. (This is why basic foods such as milk and fresh fruits & vegetables can often be found on opposite sides of the store or in the back.) To prevent spending a lot of time and money, take a shopping list and stick to it!
The Shopping OrderTo keep food fresh, shop in the following order:
1. Non-perishables 2. Fresh fruits & vegetables3. Dairy products4. Meat & eggs5. Frozen foods
Non-perishables √ Non-perishables include canned, bottled, or boxed foods which are stored at room temperature
at the grocery store. √ Notice the packaging of these foods in terms of marketing, food safety, & environmental friendliness.
Often you have to pay more for a “prettier package.”
Cereals √ When buying cereal look at the price per ounce. √ Select products made with whole grains. √ Nutritionally, the best choice contains less than or equal to 2 grams of fat, 10 grams of sugar, and 300
milligrams of sodium. It also contains greater than or equal to 2 grams of fiber. √ Kids’ cereals usually do not meet the “best choice” criteria. Supermarkets usually place these cereals
on lower shelves where kids will see them and ask for them.

9-2Fun with Foods Level 1
Canned Foods √ Do not buy cans that bulge, show signs of rust, or are past their expiration. (If you dent a can, open it
and put it in another container in the refrigerator, and use this in the next 2-3 days to avoid illness). √ Canned Vegetables: Choose vegetables with 2 grams of fat or less per serving and 400 milligrams or
less of sodium. √ Canned Fruits: Choose fruits canned in water, juice, or extra light syrup. √ Juices: Select 100% juices to get more nutrients.
Fresh Fruits and Vegetables √ Buy fresh fruits and vegetables in season to
save money. √ Citrus Fruits: Pick the heaviest ones as they
are the juiciest! √ Apples: Nutrition varies very little
among different varieties, so pick the variety you like best or whatever is the cheapest. Make sure apples you select are firm to the touch & reasonably bruise free!
√ Berries: Pick only an amount you will be able to eat quickly because berries have a short storage life.
√ Cucumbers: Select the greenest cucumbers that are firm.
√ Lettuce: Pick heads with a fresh appearance that are free from burned or rusty
looking tips. √ Carrots: Whole carrots may be cheaper
than baby carrots. However, if you are more likely to eat baby carrots before they go bad, then buy baby carrots! (With all fruits & vegetables, only buy what you will eat!)
Dairy Products √ Dairy products include milk, cheese and yogurt. Because dairy products provide 75% of the calcium in
diets it is a valued component of a healthy diet. Milk, cheese and yogurt come in a variety of fat content and you can choose skim/non-fat to full fat depending on your health needs.
Butter and Margarine √ Spreadable butter or trans-fat free margarine usually have air and water added. This alters their use in
the recipe. For best results in baking, use margarine, butter or stick spreads containing at least 70% vegetable oil (this will be indicated on the label).
√ It is advisable to limit intake of foods containing saturated or trans fat, as part of a healthy diet.
Fruit & Veggie Tip
√ During parts of the year different fruits and vegetables are in-season.
√ Does this change your party planning? How can you make adjustments?

9-3Fun with Foods Level 1
Meat
√ Put raw meat, fish, & poultry in a plastic bag before putting it in the grocery cart so juices don’t drip on other food.
√ If you have adequate freezer space, stock up on meat when it’s on sale! √ The “Nutrition Facts” for meat are available upon request. √ Safe handling instructions for meat can be found on packages of raw meat. Look for this information.
Eggs √ Before buying eggs open the carton to make sure the eggs are not cracked. √ When buying eggs keep in mind how much refrigerator space you have & how many you will use before
the expiration date (shell eggs can be stored for at least 4 weeks in the refrigerator).
Activity 1: Go Shopping!As a group, go to the local supermarket. You will be purchasing supplies for the upcoming party, as well as learning about shopping with the Supermarket Tour Activity. Don’t forget to bring the shopping list you made in Lesson 8.
Goal: Learn how to comparison shop for food. Use this knowledge to assist you in purchasing items for the party.
You will be purchasing supplies for the upcoming party, as well as learning about shopping with the Supermarket Tour Activity. Clipboards may be handy for recording on these worksheets at the store. Things to remember throughout this experience:
1. Look at the packaging2. Look at the price per ounce3. Look at the label

9-4Fun with Foods Level 1
Scalloped (packaged recipe)
Package Size: _____________________
Cost: ___________________________
Unit Price: _______________________
Carton Name Brand Orange Juice
Package Size: _____________________
Cost: ___________________________
Unit Price: _______________________
Fresh
Package Size: _____________________
Cost: ___________________________
Unit Price: _______________________
Instant
Package Size: _____________________
Cost: ___________________________
Unit Price: _______________________
Carton Store Brand Orange Juice
Package Size: _____________________
Cost: ___________________________
Unit Price: _______________________
Frozen
Package Size: _____________________
Cost: ___________________________
Unit Price: _______________________
Frozen Concentrate Store Brand
Package Size: _____________________
Cost: ___________________________
Unit Price: _______________________
2. Compare prices of different types of packaging of orange juice. Sometimes there is an additional markup for the cost of convenience.
Frozen Concentrate Name Brand
Package Size: _____________________
Cost: ___________________________
Unit Price: _______________________
The Cost of Convenience1. Compare prices of different types of packaging in potatoes. Sometimes there is an additional markup
for the cost of convenience.
Consider these questions: How many guests will be attending?
Does this include your 4-H Leader?
What is your menu?(see next page)
When and where will the party be held?

9-5Fun with Foods Level 1
Fresh Produce
1. Calculate the total cost of three oranges by multiplying how much the oranges weigh by the cost per pound.
_________________________ x _________________________ = ___________________ (Weight of 3 oranges) x (Cost per pound) = Total cost
2. Compare the cost per pound of a head of Lettuce and salad mix. Head Lettuce Salad Mix
Package Size or Package size or
Weight:________________________ Weight:______________________
Cost: _________________________ Cost:________________________
Cost/Pound: ___________________ Cost/Pound: __________________
3. Compare the cost of baby carrots and whole carrots in different package sizes.
Baby Carrots Whole Carrots
Package Size or Package size or
Weight:_______________________ Weight:______________________
Cost: _________________________ Cost:________________________
Cost/Pound: ___________________ Cost/Pound: __________________
*Record the information for fresh potatoes under the Cost of Convenience section
Canned Foods1. Compare prices of a name brand & a store brand canned product.
Store Brand Name Brand
Can Size:______________________ Can Size: _____________________
Price: ________________________ Price:________________________
Unit Price: ____________________ Unit Price: ___________________
2. Compare the “Nutrition Facts” labels on three different canned vegetables.
Vegetable #1: _________________ Vegetable #2: ________________
Grams of Fat: _________________ Grams of Fat: ________________
Grams of Sodium: ______________ Grams of Sodium: _____________
Vegetable #3: _________________
Grams of Fat: _________________
Grams of Sodium: ______________

9-6Fun with Foods Level 1
Cereals
1. Compare prices of name brand & store brand cereals. Pay attention to package size. A bigger package size may or may not give you a price break!
Name Brand Store Brand
Package Size: _________________ Package Size: _________________
Price: _______________________ Price: _______________________
Unit Price: ___________________ Unit Price: ___________________
Package Size: _________________ Package Size: _________________
Price: _______________________ Price: _______________________
Unit Price: ___________________ Unit Price: ___________________
2. Look at the “Nutrition Facts” label of three different cereals. (Make at least one of them a kids’ cereal). A nutritional best choice has less than or equal to 2 grams of fat, 10 grams of sugar, & 300 milligrams of sodium. It also has greater than or equal to 2 grams of fiber.
Cereal #1: ____________________ Cereal #2: ____________________
Serving Size: __________________ Serving Size: __________________
Grams of Fat: _________________ Grams of Fat:__________________
Grams of Sugar: _______________ Grams of Sugar: _______________
Grams of Sodium: _____________ Grams of Sodium:______________
Grams of Fiber: _______________ Grams of Fiber: ________________
Cereal #3: ____________________
Serving Size: __________________
Grams of Fat: _________________
Grams of Sugar: _______________
Grams of Sodium: _____________
Grams of Fiber: _______________

9-7Fun with Foods Level 1
Shopping Tip √ You have probably noticed all the
different brand names of food there are to choose from when you are in the grocery store.
√ There are brand named items that are heavily advertised on TV and with coupons, and there are store name items that are almost identical but often times cost much less.
√ By testing the products you may find that you can’t tell the difference – except in your wallet!
Activity 2: Exploring Grocery Store Foods
Goal: Explore differences in price, taste, and overall value of brand name and store name foods.
Directions:1. Obtain brand name and store name of the same
food product to be tested. Some ideas for items to test could be graham crackers, applesauce, popcorn, cereal, or soda (consider using at least one product you will be using at your party). Be sure to note the cost of the item.
2. Calculate the cost per ounce by taking the price of the product and dividing it by the number of ounces the package has listed on the label. Now you have a basis to compare different
sized packages.3. Have an adult or friend put the products to be
tested in an unmarked bowl or plate (but have them keep track of which is which).
4. Compare the different products for how they taste and look. Can you tell a difference?
5. Have the adult or friend reveal which product is the name-brand and which is the store brand.
6. Based on the cost difference and your evaluation of their look and taste, which is the better value?

9-8Fun with Foods Level 1
What have you learned? √ What new ideas or thoughts came up as you shopped? √ Why do you think it may be important to spend time planning for your shopping trip? √ What do you think your shopping trip would be like if you didn’t plan? √ What are other situations where you think planning would be very important? √ What was the biggest challenge? √ How would you prevent or make it work better next time?
References and Resources √ Utah State University, Food Sense; Christina Sperry, Kristine Saunders, Georgia Lauritzen

9-9Fun with Foods Level 1
LESSON 9: FOR THE RECORDSmart Shopping
MEETING
Date ______________________
Foods I shopped for _______________________________________________________________
________________________________________________________________________________
________________________________________________________________________________
I demonstrated ___________________________________________________________________
________________________________________________________________________________
________________________________________________________________________________
This lesson taught me the following skills ______________________________________________
________________________________________________________________________________
________________________________________________________________________________
Some of the activities I tried ________________________________________________________
________________________________________________________________________________
________________________________________________________________________________
Type of Food Prepared This Week
# Times Prepared
To Whom Served
Hours Spent
# Served Cost

10-1Fun with Foods Level 1
Have a Party!
Goal: A party for parents or guests will give you an opportunity to show others what you have learned. You have learned to organize ingredients for your recipes, and you have developed the skill of knowing what equipment is necessary to prepare your items. Now it’s time to have a party and demonstrate the skills that you have learned!
Party Day Prep: √ Prepare the food and environment. √ Remember that the presentation of your refreshments is as important as the taste. √ Atmosphere and mood are created by the decorations and music. All of these things help to create
an environment.
Have a Party: √ Greet your guests to make them feel welcome. √ Have an icebreaker or game √ Example: Pin a name of a famous chef or cook to the back of each person. Then they ask
questions of the other people to try to find out who they are. √ Serve the food you have prepared using your etiquette skills. √ Demonstrate some of the cooking skills learned this year. √ Thank your the guests for coming. √ Clean up.
What have you learned? √ Were you prepared for the party? √ How did the party go? Were the guests comfortable? Did they enjoy the activities? √ Was the food served graciously? Did it taste good? √ Did you feel that the party was a success? √ Would you want to do this again? If yes, what new ideas do you have for next time?
References and Resources √ Wasatch County Extension √ Uintah County Extension

10-2Fun with Foods Level 1
LESSON 10: FOR THE RECORDHave a Party!
MEETING
Date ______________________
Foods I prepared or helped prepare ___________________________________________________
________________________________________________________________________________
________________________________________________________________________________
I demonstrated ___________________________________________________________________
________________________________________________________________________________
________________________________________________________________________________
This lesson taught me the following skills ______________________________________________
________________________________________________________________________________
________________________________________________________________________________
Some of the activities I tried ________________________________________________________
________________________________________________________________________________
________________________________________________________________________________
Type of Food Prepared# Times
PreparedTo Whom
ServedHours Spent
# Served Cost

A-1Fun with Foods Level 1
Appendix 1
County Extension Offices
Beaver County105 E. Center St. P.O. Box 466, CourthouseBeaver, UT 84713435-438-6450http://extension.usu.edu/beaver Box Elder County (Brigham City)195 West 1100 SouthBrigham City, UT 84302435-797-1784http://extension.usu.edu/boxelder
Box Elder County (Tremonton)400 North 1000 WestP.O. Box 206Tremonton, UT 84337-0206435-257-5447http://extension.usu.edu/boxelder Cache County179 N. Main St. Suite 111Logan, UT 84321435-752-6263http://extension.usu.edu/cache
Carbon County120 E. Main St. CourthousePrice, UT 84501435-636-3233http://extension.usu.edu/carbon Davis County28 E. State Street P.O. Box 618Farmington, UT 84025801-451-3412http://extension.usu.edu/davis
Duchesne County50 E. 100 S. P.O. Box 978Duchesne, UT 84021435-738-1140http://extension.usu.edu/duchesne
Emery County75 E. Main St. P.O. Box 847, Courthouse, Room 113Castle Dale, UT 84513435-381-2381http://extension.usu.edu/emery
Garfield County55 S. Main St. P.O. Box 77, CourthousePanguitch, UT 84759435-676-1113http://extension.usu.edu/garfield Grand County125 W. 200 S.Moab, UT 84532435-259-7558http://extension.usu.edu/grand
Iron County585 N. Main St. #5, P.O. Box 69Cedar City, UT 84721435-586-8132http://extension.usu.edu/iron Juab CountyJuab County Center160 N. Main St.Nephi, UT 84648435-623-3450http://extension.usu.edu/juab

A-2Fun with Foods Level 1
Kane County180 W. 300 N.Kanab, UT 84741435-644-4901http://extension.usu.edu/kane Millard County (Delta)83 S. Manzanita Ave.Delta, UT 84624435-864-1480http://extension.usu.edu/millard
Millard County (Fillmore)50 S. Main St.Fillmore, UT 84631-0568435-743-5412http://extension.usu.edu/millard Morgan County48 W Young St. P.O. Box 720Morgan, UT 84050-0720801-829-3472http://extension.usu.edu/morgan
Piute CountyCourthouse550 N. Main St. P.O. Box 39Junction, UT 84740435-577-2901http://extension.usu.edu/piute
Rich County20 S. Main P.O. Box 8Randolph, UT 84064435-793-2435http://extension.usu.edu/rich Salt Lake County2001 S. State Street S-1200Salt Lake City, 84190-2350801-468-3170http://extension.usu.edu/saltlake
San Juan CountyCourthouse117 S. Main St. P.O. Box 549Monticello, UT 84535435-587-3239http://extension.usu.edu/sanjuan Sanpete County325 W. 100 N. St.Ephraim, UT 84627435-283-7597http://extension.usu.edu/sanpete
Sevier County250 N. MainRichfield, UT 84701435-893-0470http://extension.usu.edu/sevier Summit County45 E. 100 N. P.O. Box 127Coalville, UT 84017-0127435-336-3217http://extension.usu.edu/summit
Tooele County151 N Main StTooele, UT 84074-2141435-277-2400http://extension.usu.edu/tooele
Uintah County152 E. 100 N.Vernal, UT 84078435-781-5452http://extension.usu.edu/uintah Utah County100 E. Center St. Rm. L600 (L400 for 4-H)Provo, UT 84606801-851-8460http://extension.usu.edu/utah

A-3Fun with Foods Level 1
Wasatch County55 S. 500 E.Heber City, UT 84032435-657-3235http://extension.usu.edu/wasatch
Washington County44 N. 100 E.St. George, UT 84770435-634-5706http://extension.usu.edu/washington Wayne CountyCourthouse18 S. Main St. Box 160Loa, UT 84747435-836-1312http://extension.usu.edu/wayne
Weber County1181 N. Fairgrounds DriveOgden, UT 84404801-399-8200http://extension.usu.edu/weber