4-1-1 first checklist for troubleshootingdiagramasde.com/diagramas/otros2/troubleshooting...
TRANSCRIPT

Troubleshooting
Samsung Electronics 4-1
4. Troubleshooting4-1 Troubleshooting
4-1-1 FirstChecklistforTroubleshooting
1. Power LED: Check that the LED works when the power cord is connected to a 110V wall outlet.
2. LED Indicators: See table 4-1-2 Basic Troubleshooting: LED Diagnosis on the Front Panel.
3. In case of a power failure or abnormal screen, check the following items. ① Check that the power cord is correctly connected to a 110V wall outlet. ② Check that the Master Switch has been pressed. ③ Ch eck that the transmitter is turned on. ④ Check that transmitter device selection is set to TV. ⑤ Check that the signal cable is properly connected. ⑥ Check that channel setting has been set.

Troubleshooting
4-2 Samsung Electronics
4-1-2 CheckpointsbyErrorMode
1. TroubleshootingSummaryProblem Solution
The power does not turn on. Check if the power cord is properly connected.Air broadcasting does not work. Check if the antenna is properly installed.Cable broadcasting does not work. Subscribe to a local cable broadcasting firm and get support.
Satellite broadcasting does not work. Install a satellite antenna (Parabola) and connect it to the TV.
2. Menu&RemoteControlProblem Solution
The remote control does not work.
■ PresstheSelectDevicebuttontoselecttheTVorexternaldevice.■ Replacethebatteryoftheremotecontrolwithanewone.■ Insertthebatterymakingsurethepolarity(+,-)iscorrect.■ Checkiftheangleorthedistanceissufficient,orifthereisany
interference between the product and the remote control.■ Makesuretheuserhaspressedthecorrectbutton.■ ToavoiddirectsunlighttothereceivingpaneloftheTV,removeany
indoor lighting or change the location of the TV.■ CheckifthepowerswitchatthebackleftoftheTVisturnedon..
Cannot change the channel with the remote control.■ PresstheSelectDevicebuttontoselecttheTV.■ Changethechannelusingtheremotecontrolofthecableorsatellite
receiver.
Cannot select an A/V channel.Press the TV/AV button and check if the AV item is grayed out. When the AV item is grayed out, you cannot select an A/V channel. Check if the connector is properly connected.
Cannot select a menu. Check if the menu is grayed out. If a menu is grayed out, it cannot be selected.
Troubleshooting
Samsung Electronics 4-3
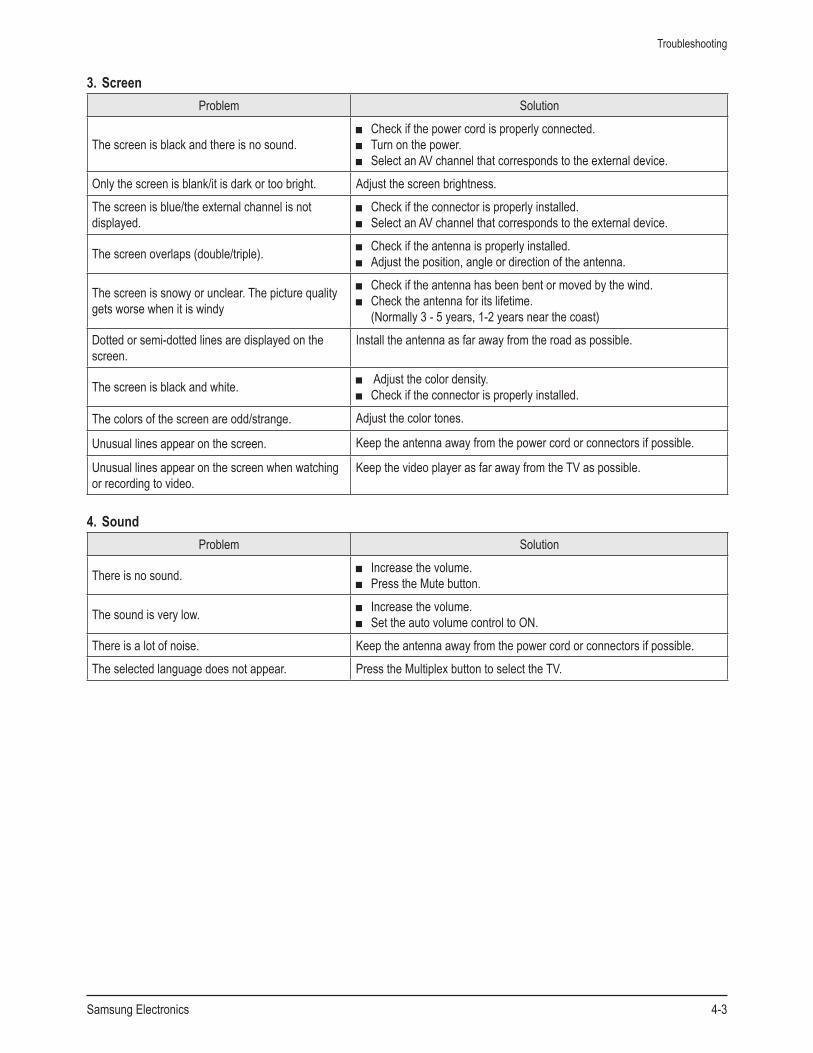
3. ScreenProblem Solution
The screen is black and there is no sound.■ Checkifthepowercordisproperlyconnected.■ Turnonthepower.■ SelectanAVchannelthatcorrespondstotheexternaldevice.
Only the screen is blank/it is dark or too bright. Adjust the screen brightness.Thescreenisblue/theexternalchannelisnotdisplayed.
■ Checkiftheconnectorisproperlyinstalled.■ SelectanAVchannelthatcorrespondstotheexternaldevice.
The screen overlaps (double/triple). ■ Checkiftheantennaisproperlyinstalled.■ Adjusttheposition,angleordirectionoftheantenna.
The screen is snowy or unclear. The picture quality gets worse when it is windy
■ Checkiftheantennahasbeenbentormovedbythewind.■ Checktheantennaforitslifetime.
(Normally 3 - 5 years, 1-2 years near the coast)Dotted or semi-dotted lines are displayed on the screen.
Install the antenna as far away from the road as possible.
The screen is black and white. ■ Adjustthecolordensity.■ Checkiftheconnectorisproperlyinstalled.
The colors of the screen are odd/strange. Adjust the color tones.
Unusual lines appear on the screen. Keep the antenna away from the power cord or connectors if possible.
Unusual lines appear on the screen when watching or recording to video.
Keep the video player as far away from the TV as possible.
4. SoundProblem Solution
There is no sound. ■ Increasethevolume.■ PresstheMutebutton.
The sound is very low. ■ Increasethevolume.■ SettheautovolumecontroltoON.
There is a lot of noise. Keep the antenna away from the power cord or connectors if possible.The selected language does not appear. PresstheMultiplexbuttontoselecttheTV.

Troubleshooting
4-4 Samsung Electronics
5. ChannelProblem Solution
There are no channels available.■ Checkiftheantennaisproperlyinstalled.■ PresstheAutoChannelbuttontostorechannels.■ Contactyourlocalbroadcastingservicestation.
Some channels are not available.
■ Adjusttheposition,angleordirectionoftheantenna.■ ActivatetheReceptionSensitivityBoostfeature.■ Contactyourlocalbroadcastingservicestation.■ UsethenumberkeystoselectaspecificchannelandpressStore/Clear
to memorize it.Only the UHF (14-69) channels are not available. Check if the antenna is able to receive UHF signals.
6. OthersProblem Solution
The TV makes a noise as if something is dropping inside.
ThisnoisemayoccurwhentheplasticmaterialinsidetheTVexpandsorcontracts according to the seasonal temperature or humidity. This is like the noise from a furniture/cabinet/sink unit, and there is no need for concern.
Troubleshooting
Samsung Electronics 4-5
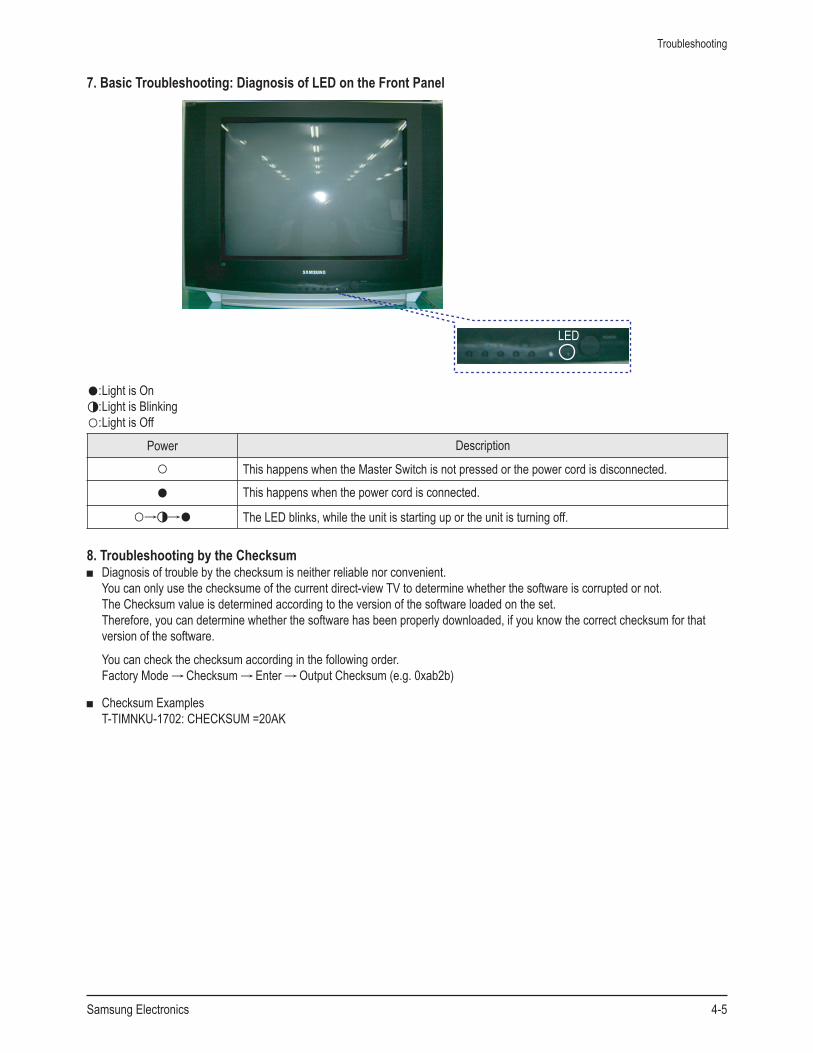
7.BasicTroubleshooting:DiagnosisofLEDontheFrontPanel
LED
●: Light is On◑: Light is Blinking○: Light is Off
Power Description○ This happens when the Master Switch is not pressed or the power cord is disconnected.
● This happens when the power cord is connected.
○→◑→● The LED blinks, while the unit is starting up or the unit is turning off.
8.TroubleshootingbytheChecksum■ Diagnosisoftroublebythechecksumisneitherreliablenorconvenient.
You can only use the checksume of the current direct-view TV to determine whether the software is corrupted or not. The Checksum value is determined according to the version of the software loaded on the set. Therefore, you can determine whether the software has been properly downloaded, if you know the correct checksum for that version of the software.
You can check the checksum according in the following order. Factory Mode → Checksum → Enter →OutputChecksum(e.g.0xab2b)
■ ChecksumExamples T-TIMNKU-1702: CHECKSUM =20AK

Troubleshooting
4-6 Samsung Electronics
9.FlowChartforMalfunction
Is there something onthe Screen.
Yes Does the OSD menu on thescreen work?
Yes
No
VCTiICReplace.Yes
Is the power cord or themaster switch out of order?
Yes
Yes
Check that the cables ard properly connected to Main
Board.
No
Connect the cableNo
Is the cable from the
MainBoardththeCRTAss’yproperly innected?
IsCRThigivoltagebeen measured?
Does the TV work?
SOUND IC
MICOM 1 CHIP IC
TUNER
COMPONENT JACK
OUTPUT INPUT JACK
FBT
OUTPUT TRQ401
DY-JACK
VERTICALIC
EWDRIVER
BRIDGEDIODE
MAINTRANS
SMPS-TR

Troubleshooting
Samsung Electronics 4-7
4-1-3 TroubleshootingProceduresbyASS’Y
1 NOPower- Power part of the Main Board Check.
Is the power cord or the master switch out of order?
Complete
Yes
Yes
YesCheck the FUSE “F801A” Check the “D801S” #1 Check the IC801S #1
W6750F
No Picture & No Sound
Change “F801A” Change “D801S” Change “IC801S”
Check the others partYes Yes
No No
SOUND IC
FD801A
D809A
F801A
SMPS-TR
BRIDGEDIODE

Troubleshooting
4-8 Samsung Electronics
2. NoSound- when the power is normal
Checkthe+14Vline
Complete
YesCheck F801S (FD802S) Check D809A Change IC602
No sound (1st power OK)
Check IC201 Pin#84,85Yes Yes
No
Change FD801S (FD802S) Change D809A
No
No
SOUND IC
FD801A
D809AMICOM 1 CHIP IC
Troubleshooting
Samsung Electronics 4-9
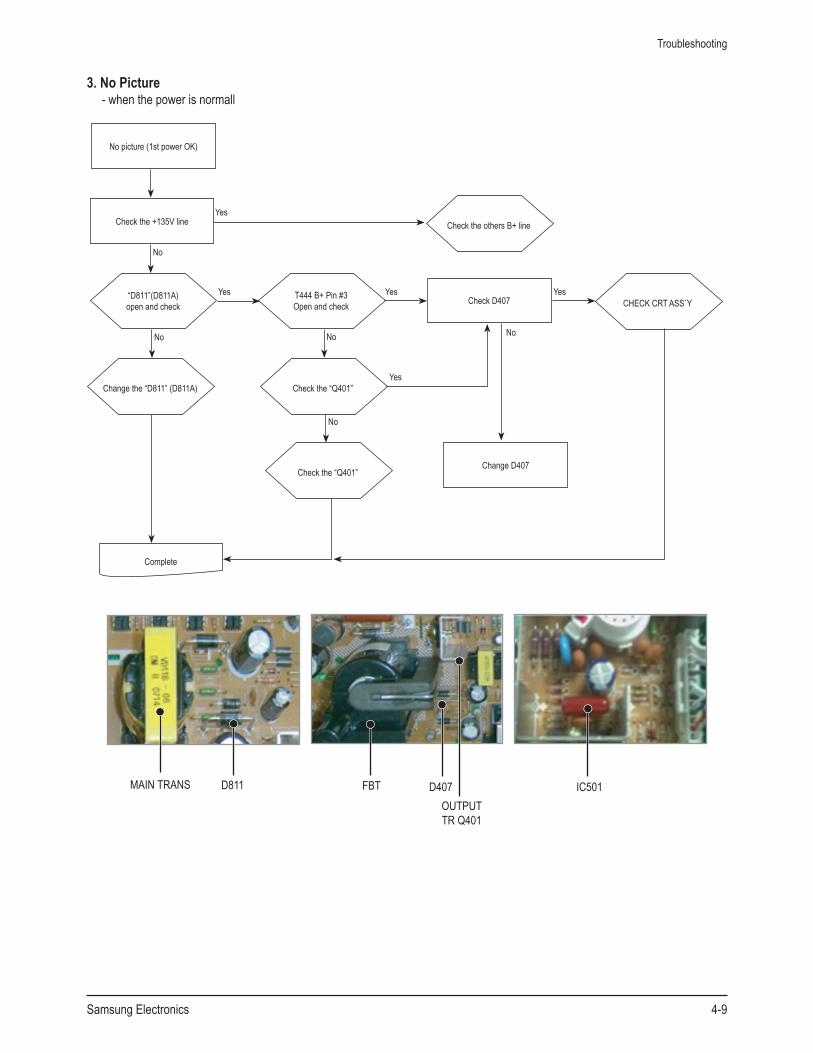
3.NoPicture- when the power is normall
Checkthe+135Vline
Complete
Yes“D811”(D811A) open and check
T444B+Pin#3 Open and check CHECKCRTASS`Y
No picture (1st power OK)
Check D407Yes Yes
No
Change the “D811” (D811A) Checkthe“Q401”
No
No
ChecktheothersB+lineYes
Checkthe“Q401”Change D407
No
No
Yes
MAINTRANS D811 FBT D407OUTPUT TRQ401
IC501

Troubleshooting
4-10 Samsung Electronics
4-1-4 TroubleshootingbyBlocks
1.Tuner Diagnosis IfthereisnosignalmeasuredeventhoughtheRFsignalreceivedbytheexternalantennaisinputtotheMainBoardTuner.
- Supplied Power: 5V, 9V, 33V- RFTroubleCheck:CheckCVBSoutput- AUDIO Trouble Check: Check SiF Signal output
5V 33V IF
TP05
TP06
Troubleshooting
Samsung Electronics 4-11
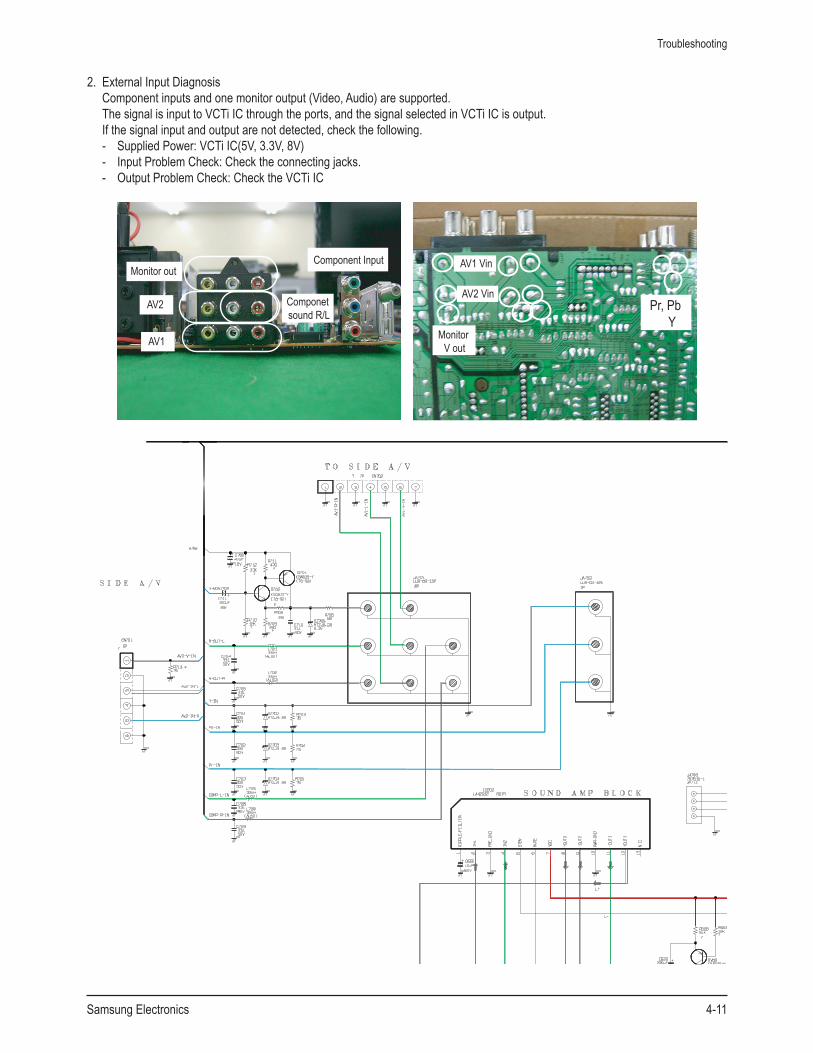
2.ExternalInputDiagnosisComponent inputs and one monitor output (Video, Audio) are supported.The signal is input to VCTi IC through the ports, and the signal selected in VCTi IC is output.If the signal input and output are not detected, check the following.- Supplied Power: VCTi IC(5V, 3.3V, 8V)- Input Problem Check: Check the connecting jacks.- Output Problem Check: Check the VCTi IC
Monitor out
AV2
AV1
Componet sound R/L
Component Input AV1 Vin
AV2 Vin
Monitor V out
Pr, Pb Y

Troubleshooting
4-12 Samsung Electronics
3. VCT49X3F Diagnosis IF+MICOM+VIDEO+MSP+Switching
TP05
TP06

Troubleshooting
Samsung Electronics 4-13
4. LA42032 Diagnosis- Supplied Power: 14V- InputProblemCheck:L/R- OutputProblemCheck:L+,L-,R+,R

Troubleshooting
4-14 Samsung Electronics
4-2 Adjustment
4-2-1 ServiceInstruction1.GeneralAdjustment:
In general, a color TV can provide ideal visual quality by adjusting the basic settings such as the vertical size, horizontal size,focus, etc.Display a black and white picture on the screen to check if the picture is clearly displayed.Iftherearesome‘spotted’pointsonthescreenwhendisplayingablackandwhitepicture,degaussthescreenusingthedegauss coil. If the spotted points remain, re-adjust the purity and the convergence.Thiscompletesthebasicperformanceexamination.
Troubleshooting
Samsung Electronics 4-15
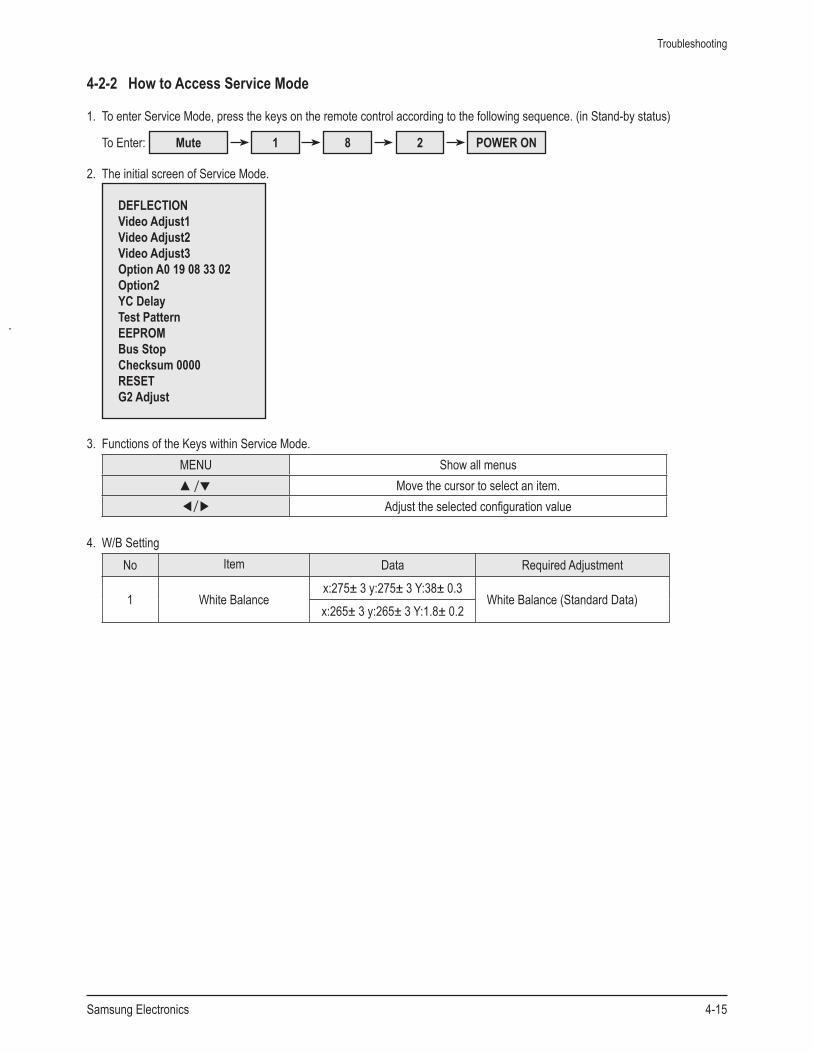
4-2-2 HowtoAccessServiceMode
1. To enter Service Mode, press the keys on the remote control according to the following sequence. (in Stand-by status)
To Enter: Mute 1 POWERON8 2
2. The initial screen of Service Mode.
DEFLECTIONVideoAdjust1VideoAdjust2VideoAdjust3OptionA019083302Option2YCDelayTestPatternEEPROMBusStopChecksum0000RESETG2Adjust
3. Functions of the Keys within Service Mode.MENU Show all menus▲/▼ Move the cursor to select an item.◀/▶ Adjust the selected configuration value
4. W/B SettingNo Item Data RequiredAdjustment
1 White Balancex:275±3y:275±3Y:38±0.3
White Balance (Standard Data)x:265±3y:265±3Y:1.8±0.2

Troubleshooting
4-16 Samsung Electronics
4-2-3 FactoryData
1. Option1
No Item Data1 System CL2 ACS Off3 AV Jack 2RCA+DVD4 Tilt Off5 Vchip Off6 Caption On7 PIP Off8 LNA Off9 Auto On Off
10 StandBy LED On11 Philippines(AV MULTI) Off12 Osd Language English13 FMRadio Off14 Antenna Disp Off15 Hi-Deviation Off
16 Plug & Play On17 DNIe Jr Off18 Volume Curve Small19 ColorMatrix Japan20 PWM/Parabola Parabola
2. Option2
No Item Data21 Hotel mode Off22 Child Lock Off23 Air/Cable On Off24 MaxBeamCheck On25 Ser data sum Off26 Zoom Option On
♦Theunderlinedareitemsappliedduringtheserviceadjustment.Noneoftheothersshouldbeadjusted.

Troubleshooting
Samsung Electronics 4-17
1 V Amp
2 V Shift
3 H EW
4 H Shift
5 V Linearity
6 Upper Linearity
7 Lower Linearity
8 V SC
9 H Parabola
10 Upper Corner
11 Lower Corner
12 H Trapezium
13 BOW
14 Angle
15 V Position
16 CXA Left Blk
17 CXA Right Blk

Troubleshooting
4-18 Samsung Electronics
3. Deflection(NT 60Hz)
No Item Data Min Max Initial value1 V Amp ADJ -128 127 29 2 V Shift ADJ -128 127 -24 3 H EW ADJ -128 127 31 4 H Shift ADJ 32 180 103 5 V Linearity ADJ -128 127 3 6 V SC FIX -128 127 28 7 H Parabola ADJ -128 127 55 8 Upper Corner ADJ -128 127 -17 9 Lower Corner ADJ -128 127 -31
10 Upper Corner6 FIX -128 127 13 11 Lower Corner6 FIX -128 127 17 12 H Trapezium ADJ -128 127 10 13 Bow ADJ -128 127 0 14 Angle FIX -128 127 0 15 EHT Time FIX 0 255 1 16 EHT Threshold FIX 0 255 10 17 EHT Vertical FIX -128 127 0 18 EHT Horizontal FIX -128 127 9 19 EHT Vertical2 FIX -128 127 -1 20 EHT Horizontal2 FIX -128 127 5

Troubleshooting
Samsung Electronics 4-19
4. Deflection(PAL 50Hz)
No Item Data Min Max Initialvalue1 V Amp ADJ -128 127 42 V Shift ADJ -128 127 -63 H EW ADJ -128 127 04 H Shift ADJ 32 180 -165 V Linearity ADJ -128 127 06 V SC FIX -128 127 07 H Parabola ADJ -128 127 38 Upper Corner ADJ -128 127 -89 Lower Corner ADJ -128 127 -5
10 Upper Corner6 ADJ -128 127 411 Lower Corner6 ADJ -128 127 212 H Trapezium ADJ -128 127 -513 Bow FIX -128 127 014 Angle FIX -128 127 0 15 EHT Time FIX 0 255 2016 EHT Threshold FIX 0 255 517 EHT Vertical FIX -128 127 0 18 EHT Horizontal FIX -128 127 019 EHT Vertical2 FIX -128 127 -7 20 EHT Horizontal2 FIX -128 127 221 PALVERPOS FIX 0 127 1822 PALVERWIDTH FIX 0 127 127

Troubleshooting
4-20 Samsung Electronics
5. Video Adjust1
No Item Data Min Max Initialvalue1 RCutoff ADJ 0 255 1272 GCutoff FIX 0 255 1273 B Cutoff ADJ 0 255 1274 RDrive ADJ 0 255 1275 GDrive FIX 0 255 1276 B Drive ADJ 0 255 1277 Sub Bright ADJ 0 100 458 Sub Contrast ADJ 0 63 379 Sub Color FIX 0 23 7
10 Sub Tint FIX 0 100 5711 AKB Option FIX 0 1 112 BCL Threshold FIX -128 127 913 BCLGain FIX 0 255 20014 BCL Time FIX 0 255 25515 Sub Sharpness FIX 0 15 716 Pilot Low FIX 10 127 517 Pilot High FIX 10 127 1318 V-Mute(x100ms) FIX 0 15 319 BCL TCUP FIX 0 65 50

Troubleshooting
Samsung Electronics 4-21
6. Video Adjust2
No Item Data Min Max Initialvalue1 VSU FIX 0 15 22 Melody Volume FIX 0 20 53 HB Start FIX 0 255 1404 HB Stop FIX 0 255 1305 RFAGC FIX 0 15 46 VMGain FIX 0 63 07 VM Delay FIX 0 15 78 V Peaking FIX 0 15 69 BLE Tilt FIX 0 15 4
10 BLEGain FIX 0 3 111 BLE Mode FIX 0 3 212 BLE Break FIX 0 7 513 CTIGain FIX 0 15 114 CTI Coring FIX 0 15 615 LTIGain FIX 0 15 516 D-EHT Time FIX 0 255 517 DCTRatio FIX 0 255 8518 VSP COMB FIX 0 3 3
Troubleshooting
4-22 Samsung Electronics
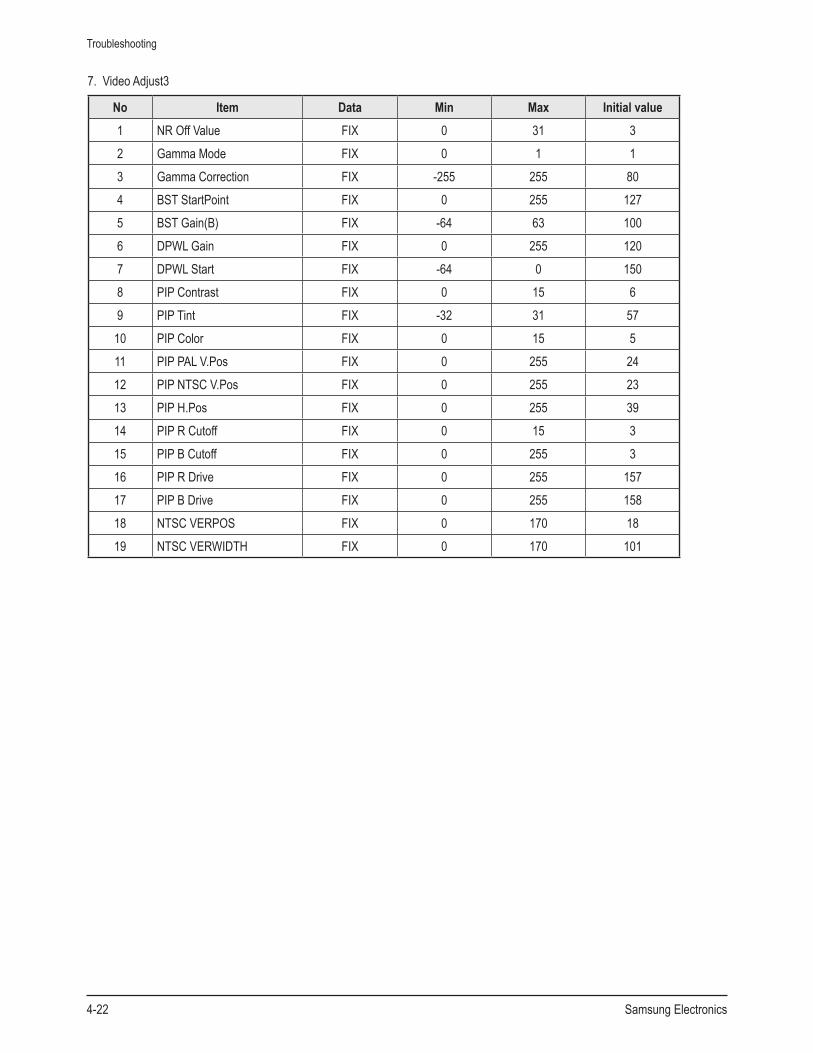
7. Video Adjust3
No Item Data Min Max Initialvalue1 NROffValue FIX 0 31 32 GammaMode FIX 0 1 13 GammaCorrection FIX -255 255 804 BST StartPoint FIX 0 255 1275 BSTGain(B) FIX -64 63 1006 DPWLGain FIX 0 255 1207 DPWL Start FIX -64 0 1508 PIP Contrast FIX 0 15 69 PIP Tint FIX -32 31 57
10 PIP Color FIX 0 15 511 PIP PAL V.Pos FIX 0 255 2412 PIP NTSC V.Pos FIX 0 255 2313 PIP H.Pos FIX 0 255 3914 PIPRCutoff FIX 0 15 315 PIP B Cutoff FIX 0 255 316 PIPRDrive FIX 0 255 15717 PIP B Drive FIX 0 255 15818 NTSCVERPOS FIX 0 170 1819 NTSCVERWIDTH FIX 0 170 101
Troubleshooting
Samsung Electronics 4-23
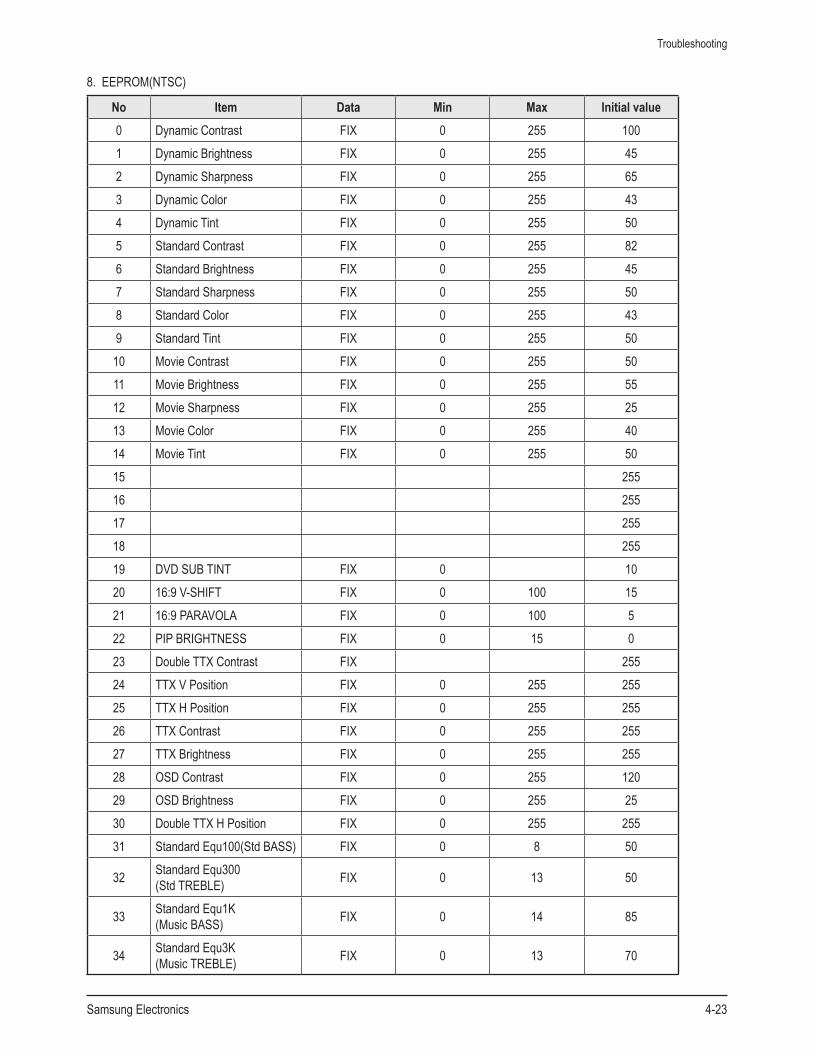
8. EEPROM(NTSC)
No Item Data Min Max Initialvalue0 Dynamic Contrast FIX 0 255 1001 Dynamic Brightness FIX 0 255 452 Dynamic Sharpness FIX 0 255 653 Dynamic Color FIX 0 255 434 Dynamic Tint FIX 0 255 505 Standard Contrast FIX 0 255 826 Standard Brightness FIX 0 255 457 Standard Sharpness FIX 0 255 508 Standard Color FIX 0 255 439 Standard Tint FIX 0 255 50
10 Movie Contrast FIX 0 255 5011 Movie Brightness FIX 0 255 5512 Movie Sharpness FIX 0 255 2513 Movie Color FIX 0 255 4014 Movie Tint FIX 0 255 5015 25516 25517 25518 25519 DVD SUB TINT FIX 0 1020 16:9 V-SHIFT FIX 0 100 1521 16:9PARAVOLA FIX 0 100 522 PIPBRIGHTNESS FIX 0 15 023 Double TTX Contrast FIX 25524 TTX V Position FIX 0 255 25525 TTX H Position FIX 0 255 25526 TTX Contrast FIX 0 255 25527 TTX Brightness FIX 0 255 25528 OSD Contrast FIX 0 255 12029 OSD Brightness FIX 0 255 2530 Double TTX H Position FIX 0 255 25531 Standard Equ100(Std BASS) FIX 0 8 50
32 Standard Equ300 (StdTREBLE) FIX 0 13 50
33 Standard Equ1K (Music BASS) FIX 0 14 85
34 Standard Equ3K (MusicTREBLE) FIX 0 13 70

Troubleshooting
4-24 Samsung Electronics
No Item Data Min Max Initialvalue35 Standard 10K(Movie BASS) FIX 0 12 95
36 Music Equ100 (MovieTREBLE) FIX 0 18 50
37 Music Equ300 (Speech BASS) FIX 0 14 40
38 Music Equ1K (SpeechTREBLE) FIX 0 11 50
39 Music Equ3K FIX 0 14 25540 Music 10K FIX 0 18 25541 Movie Equ100 FIX 0 22 25542 Movie Equ300 FIX 0 15 25543 Movie Equ1K FIX 0 11 25544 Movie Equ3K FIX 0 12 25545 Movie 10K FIX 0 13 25546 Speech Equ100 FIX 0 6 25547 Speech Equ300 FIX 0 11 25548 Speech Equ1K FIX 0 14 25549 Speech Equ3K FIX 0 13 25550 Speech 10K FIX 0 11 25551 Brightness(RGB/DVD) FIX 0 255 652 Contrast(RGB/DVD) FIX 0 63 4253 USaturation(RGB/DVD) FIX 0 63 4454 Vsaturation(RGB/DVD) FIX 0 63 4355 V/FBL Delay FIX 0 255 8556 CrCb Delay FIX 0 255 8457 d/w h-position FIX 0 255 25558 d/w -blanking 1 FIX 0 255 25559 d/w -blanking 2 FIX 0 255 25560 PIPGCUTOFF FIX 0 255 461 PIPGDRIVE FIX 0 255 17062 OSD/PIPBRIGHTBALANCE FIX 0 31 3163 PIPBRIGHTOFFSET FIX 0 255 8664 MDB_STRENGTH FIX 0 127 6865 MDB_HARMONIC FIX 0 127 3766 MDB_HP FIX 0 30 967 MDB_LP FIX 0 30 1168 MDB_LIM FIX 0 255 8769 MDB_CUTOFF FIX 0 40 25570 EHT POSITION 1 FIX 0 255 5

Troubleshooting
Samsung Electronics 4-25
No Item Data Min Max Initialvalue71 EHT POSITION 2 FIX 0 255 249
72 3.4CH SLLTHD (TV-NO NOISE) FIX 0 3 0
73 CH SLLTHD (TV-NO NOISE) FIX 0 3 074 LNA Operating Point FIX 0 255 16675 SLLTHDV(TV NO NOISE) FIX 0 6 076 LNA Default FIX 0 1 077 LNA SWITCH FIX 0 1 078 LMIXOFS FIX 0 13 1379 H-OUTDEL FIX 0 255 7280 CR-PInitial FIX 0 255 481 CR-IInitial FIX 0 255 582 DRX_CR_AMP_TH FIX 0 255 10
83 OverModulationReturnCounter FIX 0 255 100
84 VCRModeCounter FIX 0 255 5
85 VID_AMP_HEAD_BS (In the modulation) FIX 0 255 40
86 CR_P(IntheOverModulation) FIX 0 255 4
87 THRSEL(pictureshakingwhen weak signal) FIX 0 255 2
88 SLLTHDVP FIX 0 255 189 EEP_BC_MIN_LIMIT FIX 0 255 150
Troubleshooting
4-26 Samsung Electronics
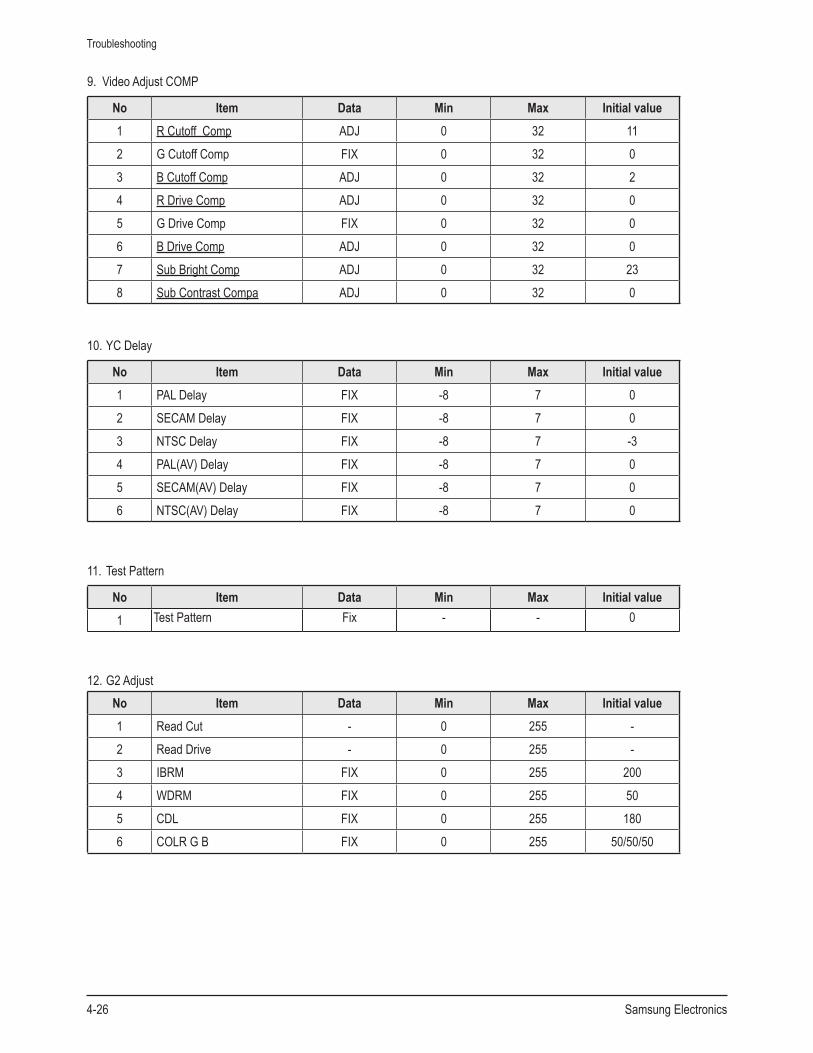
9. Video Adjust COMP
No Item Data Min Max Initialvalue1 RCutoffComp ADJ 0 32 112 GCutoffComp FIX 0 32 03 B Cutoff Comp ADJ 0 32 24 RDriveComp ADJ 0 32 05 GDriveComp FIX 0 32 06 B Drive Comp ADJ 0 32 07 Sub Bright Comp ADJ 0 32 238 Sub Contrast Compa ADJ 0 32 0
10. YC Delay
No Item Data Min Max Initialvalue1 PAL Delay FIX -8 7 02 SECAM Delay FIX -8 7 03 NTSC Delay FIX -8 7 -34 PAL(AV) Delay FIX -8 7 05 SECAM(AV) Delay FIX -8 7 06 NTSC(AV) Delay FIX -8 7 0
11. Test Pattern
No Item Data Min Max Initialvalue1 Test Pattern Fix - - 0
12.G2AdjustNo Item Data Min Max Initialvalue1 ReadCut - 0 255 -2 ReadDrive - 0 255 -3 IBRM FIX 0 255 200 4 WDRM FIX 0 255 50 5 CDL FIX 0 255 180 6 COLRGB FIX 0 255 50/50/50

Troubleshooting
Samsung Electronics 4-27
4-2-4 ServiceAdjustment
1.AdjustingthePictureSize Since the K16C chassis includes a deflection adjustment of the Factory Data, adjustments must be performed according to the following procedures when replacing the Main Board.
1. Display the Lion pattern. 2. Press “PowerOff→Mute→1→8→2→PowerOn” using the remote control and enter Factory Mode.
3. Enter Deflection Mode.4. Adjust the V-AMP, V-SHIFT, H-EW and H-SHIFT items so that the width becomes 5 and the height becomes 4.

Troubleshooting
4-28 Samsung Electronics
2.AdjustingthePictureStraightLines
1. Display the Cross Hatch pattern.
2. Adjust settings other than V-AMP, V-SHIFT, H-EW and H-SHIFT so that straight lines are displayed without curves.
3. Adjust BOW and the Angle settings so that the center line becomes a straight line.
1 V Amp
2 V Shift
3 H EW
4 H Shift
5 V Linearity
6 Upper Linearity
7 Lower Linearity
8 V SC
9 H Parabola
10 Upper Corner
11 Lower Corner
12 H Trapezium
13 BOW
14 Angle
15 V Position
16 CXA Left Blk
17 CXA Right Blk
1 V Amp
2 V Shift
3 H EW
4 H Shift
5 V Linearity
6 Upper Linearity
7 Lower Linearity
8 V SC
9 H Parabola
10 Upper Corner
11 Lower Corner
12 H Trapezium
13 BOW
14 Angle
15 V Position
16 CXA Left Blk
17 CXA Right Blk
5. Adjust the Upper Corner and the Low Corner settings so thatthe end of the lines become straight.
1 V Amp
2 V Shift
3 H EW
4 H Shift
5 V Linearity
6 Upper Linearity
7 Lower Linearity
8 V SC
9 H Parabola
10 Upper Corner
11 Lower Corner
12 H Trapezium
13 BOW
14 Angle
15 V Position
16 CXA Left Blk
17 CXA Right Blk
1 V Amp
2 V Shift
3 H EW
4 H Shift
5 V Linearity
6 Upper Linearity
7 Lower Linearity
8 V SC
9 H Parabola
10 Upper Corner
11 Lower Corner
12 H Trapezium
13 BOW
14 Angle
15 V Position
16 CXA Left Blk
17 CXA Right Blk
4. Adjust the H-Parabola and H-Trapezium settings so thatthe left and right lines become straight.
1 V Amp
2 V Shift
3 H EW
4 H Shift
5 V Linearity
6 Upper Linearity
7 Lower Linearity
8 V SC
9 H Parabola
10 Upper Corner
11 Lower Corner
12 H Trapezium
13 BOW
14 Angle
15 V Position
16 CXA Left Blk
17 CXA Right Blk
’
1 V Amp
2 V Shift
3 H EW
4 H Shift
5 V Linearity
6 Upper Linearity
7 Lower Linearity
8 V SC
9 H Parabola
10 Upper Corner
11 Lower Corner
12 H Trapezium
13 BOW
14 Angle
15 V Position
16 CXA Left Blk
17 CXA Right Blk
6. Adjust the V-Linearity and V-SC settings so that the intervals of the horizontal lines become uniform
.
1 V Amp
2 V Shift
3 H EW
4 H Shift
5 V Linearity
6 Upper Linearity
7 Lower Linearity
8 V SC
9 H Parabola
10 Upper Corner
11 Lower Corner
12 H Trapezium
13 BOW
14 Angle
15 V Position
16 CXA Left Blk
17 CXA Right Blk
1 V Amp
2 V Shift
3 H EW
4 H Shift
5 V Linearity
6 Upper Linearity
7 Lower Linearity
8 V SC
9 H Parabola
10 Upper Corner
11 Lower Corner
12 H Trapezium
13 BOW
14 Angle
15 V Position
16 CXA Left Blk
17 CXA Right Blk
7. When the adjustments are complete, display the Lion pattern and check that the picture size has not been changed. If there is no change, finish the adjustments.
Troubleshooting
Samsung Electronics 4-29
4-2-5Replacements&CalibrationNo Item Data Remark1 Main B/D Adjust Tilt, Adjust Screen, Adjust Focus, Adjust Factory Data, Adjust W/B Toshiba Mode2 Power B/D Adjust Screen, Adjust Focus Toshiba Mode3 CRTAssy - -
4 FBT Adjust Screen, Adjust Focus Toshiba Mode5 SUB - -
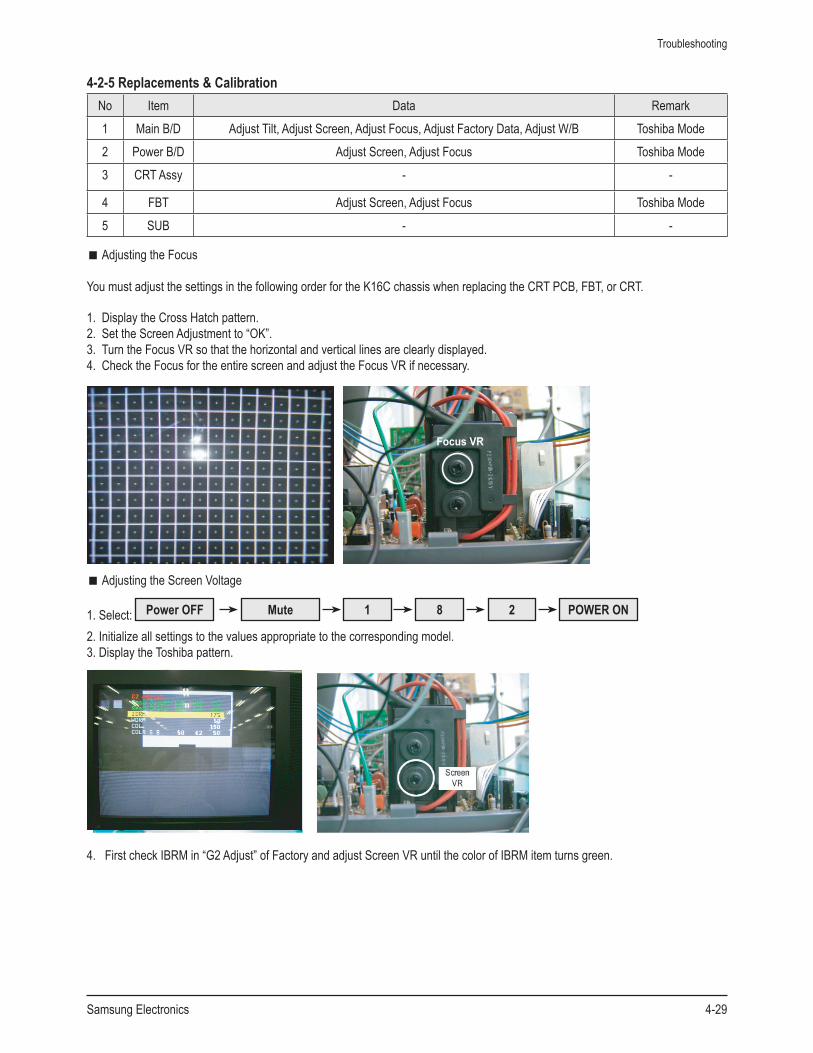
■ Adjusting the Focus
YoumustadjustthesettingsinthefollowingorderfortheK16CchassiswhenreplacingtheCRTPCB,FBT,orCRT.
1. Display the Cross Hatch pattern.2. Set the Screen Adjustment to “OK”.3. TurntheFocusVRsothatthehorizontalandverticallinesareclearlydisplayed.4.ChecktheFocusfortheentirescreenandadjusttheFocusVRifnecessary.
Focus VR
■ Adjusting the Screen Voltage
1. Select: Mute 1 POWERON8 2PowerOFF
2. Initialize all settings to the values appropriate to the corresponding model.3. Display the Toshiba pattern.
4. FirstcheckIBRMin“G2Adjust”ofFactoryandadjustScreenVRuntilthecolorofIBRMitemturnsgreen.
Troubleshooting
4-30 Samsung Electronics
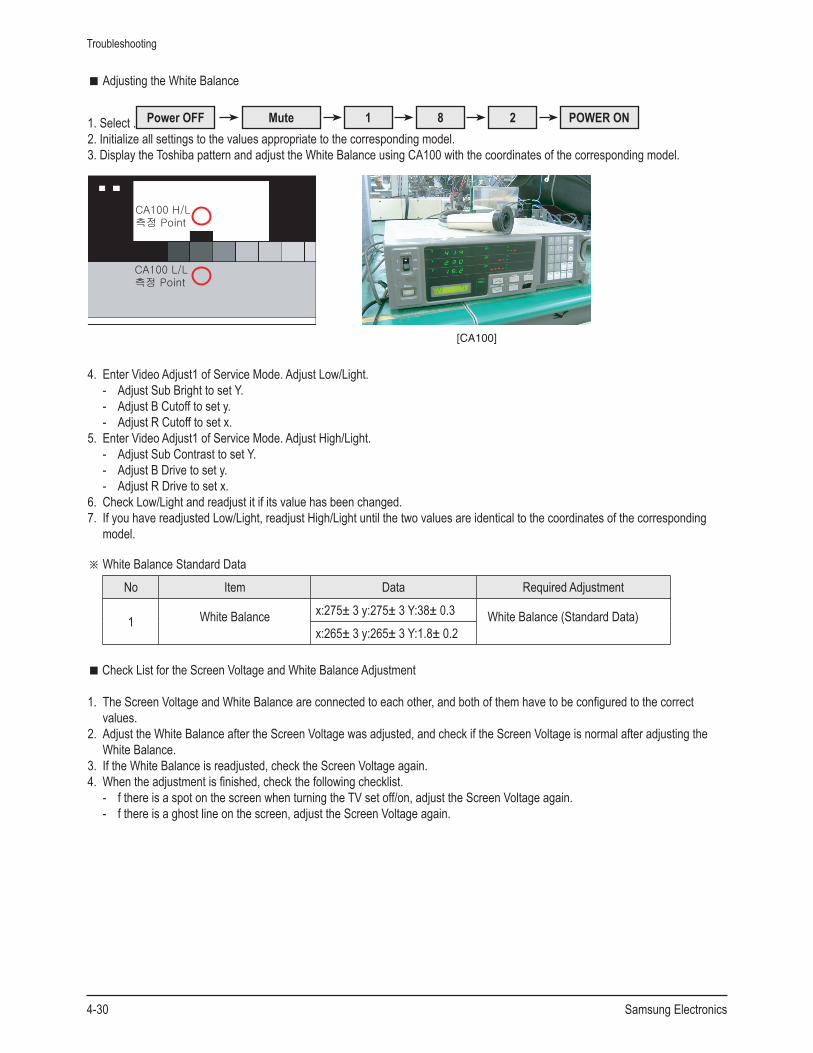
■ Adjusting the White Balance
1. Select . Mute 1 POWERON8 2PowerOFF2. Initialize all settings to the values appropriate to the corresponding model.3. Display the Toshiba pattern and adjust the White Balance using CA100 with the coordinates of the corresponding model.
[CA100]
4. Enter Video Adjust1 of Service Mode. Adjust Low/Light.- Adjust Sub Bright to set Y.- Adjust B Cutoff to set y.- AdjustRCutofftosetx.
5. Enter Video Adjust1 of Service Mode. Adjust High/Light.- Adjust Sub Contrast to set Y.- Adjust B Drive to set y.- AdjustRDrivetosetx.
6. Check Low/Light and readjust it if its value has been changed.7. If you have readjusted Low/Light, readjust High/Light until the two values are identical to the coordinates of the corresponding
model.
※ White Balance Standard Data No Item Data RequiredAdjustment
1 White Balance x:275±3y:275±3Y:38±0.3 White Balance (Standard Data)x:265±3y:265±3Y:1.8±0.2
■ Check List for the Screen Voltage and White Balance Adjustment
1. The Screen Voltage and White Balance are connected to each other, and both of them have to be configured to the correct values.
2. Adjust the White Balance after the Screen Voltage was adjusted, and check if the Screen Voltage is normal after adjusting the White Balance.
3. If the White Balance is readjusted, check the Screen Voltage again.4. When the adjustment is finished, check the following checklist.
- f there is a spot on the screen when turning the TV set off/on, adjust the Screen Voltage again.- f there is a ghost line on the screen, adjust the Screen Voltage again.
MEMO
Samsung Electronics 4-31