3rd quarter 2013 - hometech publishing · ii abbreviations the following abbreviations are used in...
TRANSCRIPT

MD 02Summer / Fall3rd Quarter
MD0233
HomeTechHandymanCost EstimatorDollars and Cents MaterialsAnd Labor Costs for HomeRepairs and Alterations
2013The data contained in this manual has been
researched for the following area:
MARYLAND 2Baltimore and Surrounding Areas
Copyright © 2013 by Hometech Publishing.Printed in the United States of America. All rights reserved. This book, or parts thereof, may not be reproduced in any form without permission from the publisher.
HomeTech Publishing10534 York Road, Suite 101Hunt Valley, Maryland 21030Phone: 800-240-8210 Fax: 410-630-7302 HomeTechPublishing.com

ii
ABBREVIATIONSTHE FOLLOWING ABBREVIATIONS ARE USED IN THIS MANUAL:
LF Per linear foot (per running foot)
SF Per square foot of area
EA Total cost for all the materials and labor items
included in the specifications
MIN Minimum total cost for item specified.
“Repair floor level brick hearth, up to 10
bricks.” The costs shown are the total
minimum cost for repairing up to 10 bricks.
ADD Additional bricks over 10 bricks, add the costs
shown for each additional brick to the costs for
10 bricks. The result is the total cost for all the
bricks to be repaired.

iii
Contents
1. Plans, Permits, Engineering 2
2. Tear-out and Demolition 4
3. Excavating and Grading 28
4. Concrete 34
5. Masonry 42
6. Floor Framing 54
7. Wall Framing 58
8. Roof Framing 60
9. Roof Covering 64
10. Exterior Trim, Porch, Deck 68
11. Siding 98
12. Exterior Doors and Door Trim 104
13. Windows and Window Trim 138
14. Plumbing 144
15. Heating and Cooling 182
16. Electrical 186
17. Insulation 202
18. Interior Wall Covering 208
19. Ceiling Covering 214
20. Interior Doors, Millwork and Trim 218
21. Cabinets and Appliances 242
22. Specialties 248
23. Floor Covering 260
24. Painting 266
25. Clean-up and Hauling 294
INDEX 296

iv
Preface To TheThis estimating manual has been prepared for the use ofhandyman contractors, estimators, insurance adjustersand other professionals who need up-to-date costinformation on which to base their home repair, homeimprovement and alteration estimates.
Job costs include laying out the work, sweeping up andpiling debris outside the building, but does not includeremoval of debris from premises unless it is specified.
A gross profit is included in the sales price for all items,which is obtained by marking up the materials costs 25%and the labor costs 125%.
This markup will produce a minimum gross profit equal to125% of the labor cost and when expensive materials areused, it will be equal to considerably more than 125% ofthe labor cost.
Materials CostsThe materials costs in this volume are based on currentcosts in local areas throughout the U.S. and Canada andinclude applicable state, provincial and federal salestaxes.
The cost of materials includes everything that goes intothe job. For example, drywall material would include theboard, drywall nails, corner beads, tape, joint compound,and even sandpaper. A normal waste factor is includedfor all cost items.
The materials costs shown do not include time spent inpicking up and delivering materials to the job. The timespent in obtaining materials should be included in thelabor cost estimate when presenting the work proposal tothe customer.
Labor CostsThe labor costs shown in this book include:
Hourly WagesWorkers’ Compensation InsuranceSocial Security Taxes or CCP (Canada)MedicareUnemployment TaxMinor Daily CleanupCoffee BreaksSetup and Layout Time
Also included are the normal inefficiencies of thehandyman business: time spent in discussions withcustomers on the job, placing and protecting deliveredmaterials, dust and security protection, difficult access tothe work, difficulty in matching materials, waiting forcustomer selections, etc.
Paid holidays, vacation and medical benefits are notincluded in the labor costs. If your employees receivethese fringe benefits, you should calculate what these areas an hourly figure for 2,000 hours per year and add thatto the labor costs shown in the manual.
Overhead ItemsOverhead items must be paid for out of the gross profit,which is included in the amount shown in the “PRICE”column.
Whether the handyman company is a one-man operationor has 20 trucks on the road, it is bound to have overheadexpenses. These overhead expenses enable thehandyman company to provide its customers withproducts, professional services, research and installationnecessary to keep their homes well maintained.
Overhead items include the following:Office SalariesSupervisionTrainingTruck ExpenseTelephoneAdvertising and MarketingOffice RentalOffice SuppliesLegal FeesAccountant Fees CommissionsBonusesLeased Office EquipmentTools and EquipmentInterest on LoansBad DebtsInsurance and Bonds
Judgment FactorsHandyman work is difficult to estimate. Care should betaken to determine whether structural defects exist insideclosed floors, walls and ceilings before contracting for thework.
The costs in the HomeTech Handyman Cost Estimatorare based on sunny days with reasonable access to thework. There are more hidden problems resulting inadditional costs than normally occur in new homeconstruction or remodeling. The costs do, however,reflect some of the difficulties and surprises encounteredin handyman projects and are realistic.

v
Handyman Cost EstimatorMinimum Charge
A contractor should establish a minimum amount tocharge his customers for labor on any work performed.This is sometimes referred to as a “trip charge.” It is a onetime minimum charge and will not be repeated even ifseveral different jobs are completed over several days atthe customer’s home.
A minimum amount that some contractors charge theircustomers may be the equivalent of 2 hours labor costplus 125% markup. If 2 hours labor for one worker coststhe company $50, the minimum charge to the customerincluding the 125% markup would be $112.50.
Markup of Materials and Labor CostsIn this manual, we are assuming a markup on thematerials costs of 25% and a markup of 125% on thelabor.
It is difficult to run a successful handyman business unlessyou mark up your costs in this way to pay for the work andthe overhead and provide you with a net profit on eachjob. It is up to each contractor to determine the markup heneeds to be successful.
The Job Price EstimateFor the purposes of the examples we are showing here,we are assuming that your company marks up materialscosts 25% and labor costs 125% to obtain an adequategross profit.
If the contractor estimates from the manual that the costfor the proposed work will be $5 for materials and $25 forlabor, a total of $30, he will charge the customer $6.25 formaterials ($5.00 plus 25% = $6.25) and $112.50 for labor(the minimum charge of two hours @ $25 per hour plus125% = $112.50) a total of $118.75 which rounds out to$119.
If the contractor estimates from the manual that the costfor the proposed work will be $50 for materials and $250for labor, a total of $300, he will charge the customer$62.50 for materials ($50 plus 25% = $62.50) and $562.50for labor ($250 plus 125% = $562.50) a total of $625.
The contractor will earn a gross profit on the job of $325,which is 52% of the total price, and the gross profit is130% of the total labor cost.
If the costs for the proposed work are $976 for materialsand $106 for labor, a total of $1082, he will give thecustomer a price estimate of $1,458. $976 plus 25%markup = $1,220 and $106 plus 125% markup = $238.50,a total of $1458
The contractor will earn a gross profit on this job of $376,which is 26% of the price, and the gross profit is 355% ofthe total labor cost.
In these two examples the labor hours far exceed the twohour minimum and the minimum charge is easily includedin the selling price for the job.
Setup and Preparation TimeMany of the items in this manual show costs for up to aminimum sized quantity and additional costs for workexceeding that quantity. This provides the contractor withcompensation for time spent setting up the job, includingdust and security protection and bringing in tools,equipment and materials. Sometimes the setting up timewill exceed the time spent in actually performing the workitself.
Materials Pick-up and CarryIt may be necessary to make a special trip to purchaseand carry materials to the job site. This trip should beincluded as a labor cost in the estimate. On page 3 weshow this item in the specifications and have set a costequal to one hour per trip. In some cases, multiplepurchases may have to be made on one trip and thecontractor must judge how much labor time to estimate asa job cost.
Building CostsEvery effort is made to provide up-to-date, accurate costinformation. Building costs throughout the United Statesand Canada are monitored, but cost changes can occurfrequently and are not always consistent with generaleconomic conditions in an area.
No warranty or guarantee is made as to thecorrectness or sufficiency of the informationcontained in this manual. The editors and publisherassume no responsibility or liability in connectionwith its use.
The editors wish to thank all who have generouslyassisted in the preparation of this volume. Constructivecriticism that will assist us in the preparation of futureeditions will be welcomed.
Please write, telephone or e-mail us if you wish to suggesthandyman items for us to include in future editions. It isour aim to make this estimating system of maximum valueto our subscribers and to make it as comprehensive as ispractical.
Hometech Publishing Teamwww.hometechpublishing.com

vi
How to Use the Cost EstimatorGeneral Information
This manual is the best estimating guide available in thehandyman industry, but in order to use it properly, youmust check it against the realities of your operation andadjust the figures as needed.
For example, if the manual shows that drywall costs$1.50 per square foot and your experience tells you itcosts you $1.60 per square foot, you should change thefigure in the manual to $1.60 to reflect the reality.
Unit cost estimating allows you to estimate standardwork very quickly and accurately. But that is only about90% of a good, detailed bid. You need to apply ajudgment analysis to any estimate to reflect specialconditions. That analysis should include the following:
Project Analysis: If there are some unusualcharacteristics to the job, such as difficult matching ofmaterials, increase the job costs.
Job Conditions: Difficult conditions such as pooraccess, little or no storage, high risk of theft, etc., shouldbe reflected in increased job costs.
Customer Analysis: Some customers will beunusually demanding and can cost you all the profit on ajob unless you recognize them for what they are andincrease your estimate to allow you to satisfy them andstill make a profit.
Company Capability: Certain kinds of work may beeasier or harder than usual for your workers; yourestimate should be adjusted to reflect that. If you willneed to hire more people or pay overtime in order to doa particular job, your increased costs should bereflected in your estimate.
The 25 CategoriesThe manual is broken down into 25 categories as listedin the Contents.
These categories are organized into the order that a jobis built, from Plans and Permits on through to Clean-Upand Hauling. Many contractors use these 25 categoriesas a checklist to be sure they have not forgottenanything.
Page Set-upHere is an example of how an individual item is set up: look at any page in the manual. In theSPECIFICATIONS section is a clear description of whatis included in the item.
The unit of measure “SF” stands for square feet. Otheritems may be “LF” for linear feet, “MIN” for minimumcost for item or items listed, and “EA” for each item. There are columns for Materials Cost, Labor Cost, TotalCost and the Selling Price.
The labor figures in the manual are based on actuallabor for thousands of jobs, translated into unit costamounts. They provide an accurate guide, but sincedifferent companies have different labor efficiencies, youshould habitually compare your actual labor costs onjobs with the costs in the manual.
Total PriceThe selling price is obtained by marking up the materialcosts 25% for a 20% gross profit based on the sellingprice. The labor costs are marked up 125% for a55-1/2% gross profit based on the selling price. Werecommend these markups over cost as the minimumneeded to succeed in handyman contracting.
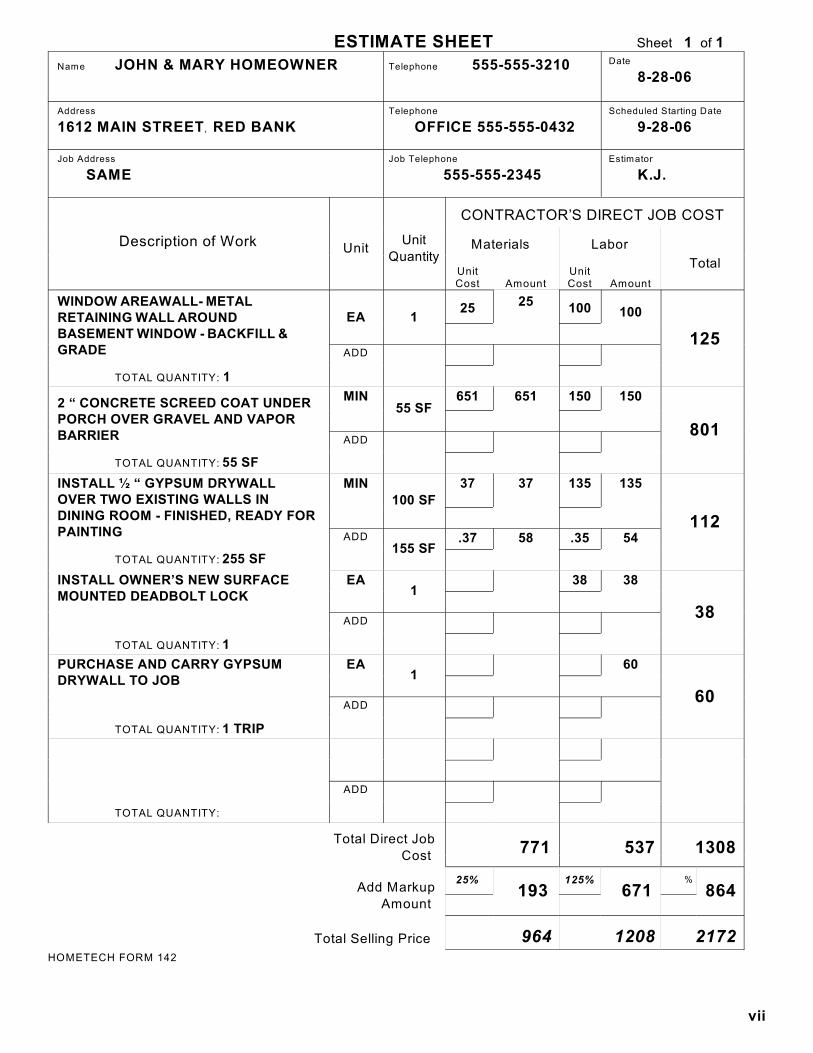
Sample EstimatesIn the first sample estimate, costs are shown for up to aminimum sized quantity of work with additional costs tobe added to the minimum for work exceeding thatquantity.
Where the Unit is “MIN”, the materials and labor costsshown are for up to the total number of pieces, linearfeet, or square feet stated.
If there is a larger quantity than the minimum, that willappear on the next line with instructions (ADD) to add itto the other amount to obtain the complete cost for theitem.
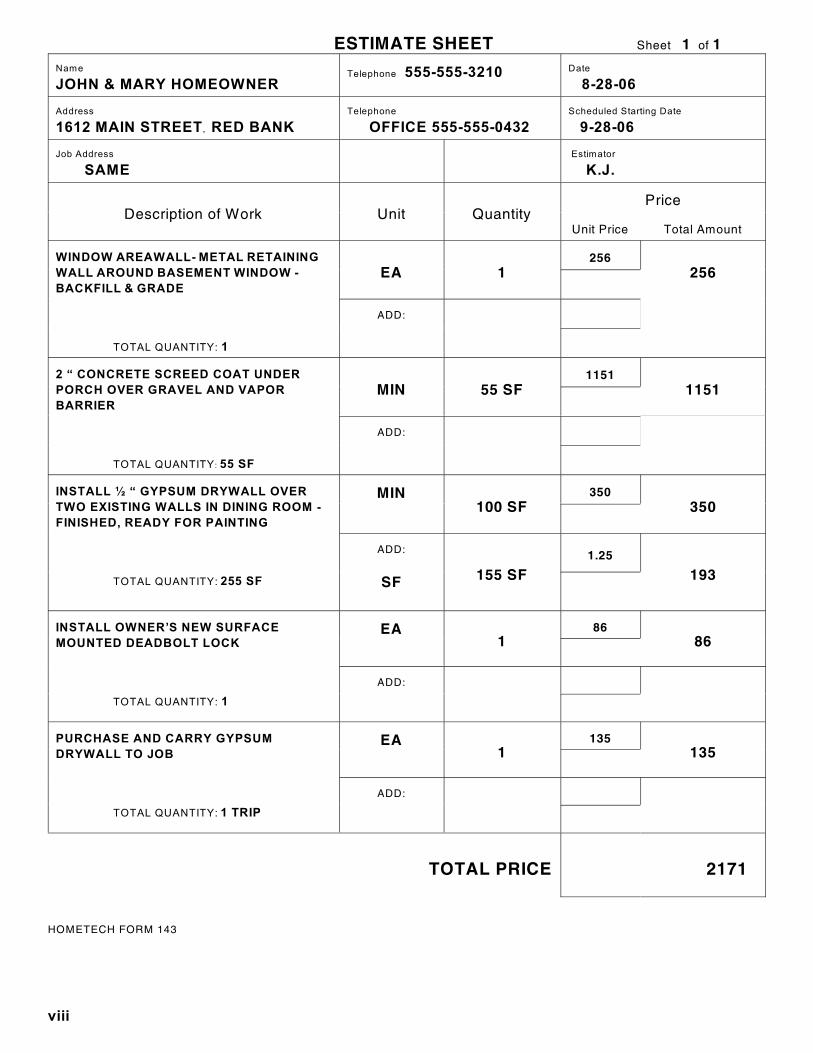
In the second sample estimate on page viii, theestimator is working with a price estimate sheet onwhich the direct job costs are omitted and only thecustomer’s prices are shown.
vii
ESTIMATE SHEET Sheet 1 of 1
Name JOHN & MARY HOMEOWNER Telephone 555-555-3210 Date
8-28-06
Address
1612 MAIN STREET, RED BANK Telephone
OFFICE 555-555-0432Scheduled Starting Date
9-28-06
Job Address
SAME Job Telephone
555-555-2345Estimator
K.J.
Description of Work UnitUnit
Quantity
CONTRACTOR’S DIRECT JOB COST
Materials Labor
TotalUnitCost Amount
UnitCost Amount
WINDOW AREAWALL- METALRETAINING WALL AROUNDBASEMENT WINDOW - BACKFILL &GRADE
TOTAL QUANTITY: 1
EA 125
25100 100
125ADD
2 “ CONCRETE SCREED COAT UNDERPORCH OVER GRAVEL AND VAPORBARRIER
TOTAL QUANTITY: 55 SF
MIN55 SF
651 651 150 150
801ADD
INSTALL ½ “ GYPSUM DRYWALLOVER TWO EXISTING WALLS INDINING ROOM - FINISHED, READY FORPAINTING
TOTAL QUANTITY: 255 SF
MIN
100 SF
37 37 135 135
112ADD
155 SF.37 58 .35 54
INSTALL OWNER’S NEW SURFACEMOUNTED DEADBOLT LOCK
TOTAL QUANTITY: 1
EA1
38 38
38ADD
PURCHASE AND CARRY GYPSUMDRYWALL TO JOB
TOTAL QUANTITY: 1 TRIP
EA1
60
60ADD
TOTAL QUANTITY:
ADD
Total Direct Job
Cost 771 537 1308
Add Markup
Amount
25%193
125%671
%
864
Total Selling Price 964 1208 2172 HOMETECH FORM 142
viii
ESTIMATE SHEET Sheet 1 of 1
Name
JOHN & MARY HOMEOWNERTelephone 555-555-3210 Date
8-28-06
Address
1612 MAIN STREET, RED BANKTelephone
OFFICE 555-555-0432Scheduled Starting Date
9-28-06
Job Address
SAME Estimator
K.J.
Description of Work Unit QuantityPrice
Unit Price Total Amount
WINDOW AREAWALL- METAL RETAINING
WALL AROUND BASEMENT WINDOW -
BACKFILL & GRADE
TOTAL QUANTITY: 1
EA 1256
256
ADD:
2 “ CONCRETE SCREED COAT UNDER
PORCH OVER GRAVEL AND VAPOR
BARRIER
TOTAL QUANTITY : 55 SF
MIN 55 SF1151
1151
ADD:
INSTALL ½ “ GYPSUM DRYWALL OVER
TWO EXISTING WALLS IN DINING ROOM -
FINISHED, READY FOR PAINTING
TOTAL QUANTITY: 255 SF
MIN100 SF
350350
ADD:
SF 155 SF1.25
193
INSTALL OWNER’S NEW SURFACE
MOUNTED DEADBOLT LOCK
TOTAL QUANTITY: 1
EA1
8686
ADD:
PURCHASE AND CARRY GYPSUM
DRYWALL TO JOB
TOTAL QUANTITY: 1 TRIP
EA1
135135
ADD:
TOTAL PRICE 2171
HOMETECH FORM 143

1
HomeTechHandyman
Cost Estimator

2 H1MD0220001CH0133
1. PLANS AND PERMITS
SPECIFICATIONS UNIT
CONTRACTOR’S
DIRECT JOB COSTPRICE
DATABASEITEMNO.MATLS LABOR TOTAL
REMODELING,RENOVATIONAND ALTERA-TION WORKPLANS
In addition to building permit fee. Costis based on total amount of direct jobcost # Includes on-site survey and
measurements by designer # Includes conferences with and
approval of plans by Owner
Basic cost for plans MIN --- --- --- --- 01.000
Each $1,000 of direct job cost ADD EA --- --- --- --- 01.001
BUILDINGPERMIT FEE(AVERAGEAMOUNT FORU.S. ANDCANADA)
Building permit fee, based on totaldirect cost of job
Basic building permit fee MIN --- --- --- --- 01.003
Each $1,000 of direct job cost ADD EA --- --- --- --- 01.004

H1MD0220001CH0133 3
1. ENGINEERING AND MISCELLANEOUS
SPECIFICATIONS UNIT
CONTRACTOR’S
DIRECT JOB COSTPRICE
DATABASEITEMNO.MATLS LABOR TOTAL
PERCOLATIONTESTING
Testing for percolation by engineerfor condition of septic tank anddrainage field
EA --- --- --- --- 01.010
RADON Test for presence of radon in home # Place canister in home # Pick up after 48 hours # Report results
EA --- --- --- --- 01.015
LEAD IN PAINT Collect samples from house and testfor presence of lead in paint
1.00 5-6 room house EA --- --- --- --- 01.021
7-8 room house EA --- --- --- --- 01.022
9-10 room house EA --- --- --- --- 01.023
ASBESTOS Collect samples of insulation, floortile, pipe wrap, etc., and test forpresence of asbestos in house
EA --- --- --- --- 01.025
MATERIALSPICK-UP
Purchase materials and carry to jobsite
EA = Each trip
EA — 23.50 23.50 52.88

4 H1MD0220001CH0133
2. CONCRETE DEMOLITION
SPECIFICATIONS UNIT
CONTRACTOR’S
DIRECT JOB COST PRICE
DATABASEITEMNO.MATLS LABOR TOTAL
SIDEWALK Break up brick or concrete sidewalk
with electric breaker hammer, no
equipment rental included
Up to 10 SF MIN --- --- --- --- 02.001
Additional area over 10 SF ADD SF --- --- --- --- 02.002
Break up brick or flagstone sidewalkset in sand or crushed stone, by hand
SF --- --- --- --- 02.003
Break up flagstone set in mortar, withelectric breaker hammer, noequipment rental included
SF --- --- --- --- 02.004
CONCRETE
SLAB
Break up existing slab in basement
with electric breaker hammer and
haul rubble outside to grade, no
equipment rental included
2" thick, up to 50 SF MIN --- --- --- --- 02.011
Additional area over 50 SF ADD SF --- --- --- --- 02.012
4" thick, up to 50 SF MIN --- --- --- --- 02.013
Additional area over 50 SF ADD SF --- --- --- --- 02.014
6" thick, up to 50 SF MIN --- --- --- --- 02.015
Additional area over 50 SF ADD SF --- --- --- --- 02.016
Break up existing slab outside on
grade with electric breaker hammer,
6" thick, no equipment rental
included
No reinforcement, up to 50 SF MIN --- --- --- --- 02.021
Additional area over 50 SF ADD SF --- --- --- --- 02.022
Reinforced, up to 50 SF MIN --- --- --- --- 02.023
Additional area over 50 SF ADD SF --- --- --- --- 02.024
CONCRETE
SAWING
Cut concrete with gas concrete saw,
per inch deep, no equipment rental
included
Concrete slab w/mesh LF --- --- --- --- 02.030
Concrete wall, no reinforcement LF --- --- --- --- 02.031
Reinforced concrete wall LF --- --- --- --- 02.032
Brick wall LF --- --- --- --- 02.033
Block wall LF --- --- --- --- 02.034

H1MD0220001CH0133 5
2. BRICK, BLOCK AND STONE DEMOLITION
SPECIFICATIONS UNIT
CONTRACTOR’S
DIRECT JOB COST PRICE
DATABASEITEMNO.MATLS LABOR TOTAL
BLOCK WALL Remove block wall by hand, noreinforcement
1.00
4", up to 50 SF MIN --- --- --- --- 02.040
Additional area over 50 SF ADD SF --- --- --- --- 02.041
8", up to 50 SF MIN --- --- --- --- 02.042
Additional area over 50 SF ADD SF --- --- --- --- 02.043
12", up to 50 SF MIN --- --- --- --- 02.044
Additional area over 50 SF ADD SF --- --- --- --- 02.045
BRICK WALL Remove brick wall by hand
4" veneer, up to 50 SF MIN --- --- --- --- 02.051
Additional area over 50 SF ADD SF --- --- --- --- 02.052
8" solid, up to 50 SF MIN --- --- --- --- 02.053
Additional area over 50 SF ADD SF --- --- --- --- 02.054
12" solid, up to 50 SF MIN --- --- --- --- 02.055
Additional area over 50 SF ADD SF --- --- --- --- 02.056
Remove brick wall with heavy dutyelectric hammer
4" veneer, up to 50 SF MIN --- --- --- --- 02.060
Additional area over 50 SF ADD SF --- --- --- --- 02.061
8" solid, up to 50 SF MIN --- --- --- --- 02.062
Additional area over 50 SF ADD SF --- --- --- --- 02.063
12" solid, up to 50 SF MIN --- --- --- --- 02.064
Additional area over 50 SF ADD SF --- --- --- --- 02.065
BRICK ANDBLOCK
Remove brick and block wall withheavy duty electric hammer
8" thick wall, up to 50 SF MIN --- --- --- --- 02.070
Additional area over 50 SF ADD SF --- --- --- --- 02.071
12" thick wall, up to 50 SF MIN --- --- --- --- 02.072
Additional area over 50 SF ADD SF --- --- --- --- 02.073
STONE WALL Remove 12" x 16" stones with heavyduty electric hammer
Stone wall, up to 50 SF MIN --- --- --- --- 02.075
Additional area over 50 SF ADD SF --- --- --- --- 02.076

6 H1MD0220001CH0133
2. OPEN CONCRETE WALL FOR DOOR OR WINDOW INSTALLATION
SPECIFICATIONS UNIT
CONTRACTOR’S
DIRECT JOB COST PRICE
DATA
BASE
ITEM
NO.MATLS LABOR TOTAL
The costs shown below are formaking an opening ready for door orwindow installation and for patchingthe walls inside and out afterinstallation.
Add the costs of the selected doors,windows, door entrances andaccessories to the preparation andpatching costs shown here
BREAKTHROUGHCONCRETEWALL
Break through concrete wall to preparefor door or window installation # Break opening in concrete wall with
pneumatic tool # Install wood header, steel lintel or
beam over new opening as requiredto support walls, joists or raftersabove
# Frame in for door or windowinstallation with 2" x 4" or 2" x 6"lumber
# Patch concrete walls inside andoutside after door or windowinstallation
# No removal or re-location of electricoutlets and fixtures, ductwork orplumbing pipes is included in costsshown
8" thick wall, no reinforcement
Up to 3'-0" LF wide opening MIN --- --- --- --- 02.100
Additional LF over 3'-0" LF ADD
8" thick wall, reinforced
LF --- --- --- --- 02.101
Up to 3'-0" LF wide opening MIN --- --- --- --- 02.102
Additional LF over 3'-0" LF ADD
12" thick wall, no reinforcement
LF --- --- --- --- 02.103
Up to 3'-0" LF wide opening MIN --- --- --- --- 02.105
Additional LF over 3'-0" LF ADD
12" thick wall, reinforced
LF --- --- --- --- 02.106
Up to 3'-0" LF wide opening MIN --- --- --- --- 02.107
Additional LF over 3'-0" LF ADD LF --- --- --- --- 02.108

H1MD0220001CH0133 7
2. OPEN EXTERIOR WALL FOR DOOR OR WINDOW INSTALLATION
SPECIFICATIONS UNIT
CONTRACTOR’S
DIRECT JOB COST PRICE
DATABASEITEMNO.MATLS LABOR TOTAL
The costs shown below are for makingan opening ready for door or windowinstallation and for patching the wallsinside and out after installation.
Add the costs of the selected doors,windows, door entrances andaccessories to the preparation andpatching costs shown here
1.00
OPENEXTERIORWALL
# Erect shoring, security and dustprotection wall enclosing work area
# Break through brick veneer, brick andblock or framed wall with plaster orgypsum drywall inside
# Clean and store bricks or siding andinterior trim for re-use
# Install wood header, lintel or beamover new opening as required tosupport walls, joists or rafters above
# Frame in for door or windowinstallation with 2" x 4" or 2" x 6"lumber
# Patch exterior to match existing asclosely as possible
# Patch interior wall after door orwindow installation, includingpatching in the saved base mouldingwhere required
# No floor patching included # No painting touch-up included
Framed wall with siding
Up to 3'-0" wide opening MIN --- --- --- --- 02.110
Additional LF width over 3'-0" LF ADD
Brick veneer wall
LF --- --- --- --- 02.111
Up to 3'-0" wide opening MIN --- --- --- --- 02.112
Additional LF width over 3'-0" LF ADD
Brick and block wall
LF --- --- --- --- 02.113
Up to 3'-0" wide opening MIN --- --- --- --- 02.114
Additional LF width over 3'-0" LF ADD LF --- --- --- --- 02.115
RE-LOCATEELECTRICALOUTLET
Re-locate existing electrical outlet, switchor fixture to either side of future opening,no floor patching included
EA --- --- --- --- 02.120
RE-LOCATEDUCTWORK
Re-locate existing ductwork to either sideof future opening, no floor patchingincluded
EA --- --- --- --- 02.121
RE-LOCATERADIATOR
Re-locate existing radiator to either side offuture opening, no floor patching included
EA --- --- --- --- 02.122

8 H1MD0220001CH0133
2. REMOVE DOOR FROM WALL FOR WINDOW INSTALLATION
SPECIFICATIONS UNIT
CONTRACTOR’S
DIRECT JOB COST PRICE
DATABASEITEMNO.MATLS LABOR TOTAL
The costs shown below are forremoving a door, making the openingready for window installation and forpatching the walls inside and out afterwindow installation.
Add the costs of the selectedwindows and accessories to thepreparation and patching costsshown here
1.00
REMOVE DOOR FROM WALL
Remove existing door from brick veneer,brick and block or framed wall andprepare opening for installation ofwindow no wider than the door # Erect security and dust protection
wall enclosing work area # Remove door and trim from wall # Frame in for window installation with
2" x 4" or 2" x 6" lumber, 1/2"plywood sheathing and insulation
# Patch the interior walls after windowinstallation with drywall, taped andfinished
# Install base and shoe moulding tomatch existing as closely aspossible
# Tooth in brick or siding at sides ofnew window opening
# Not included is brickwork or sidingunder new window
# No painting touch-up included
Framed wall with siding
Up to 3'-0" wide opening MIN --- --- --- --- 02.130
Additional LF width over 3'-0" LF ADD
Brick veneer wall
LF --- --- --- --- 02.131
Up to 3'-0" wide opening MIN --- --- --- --- 02.132
Additional LF width over 3'-0" LF ADD
Brick and block wall
LF --- --- --- --- 02.133
Up to 3'-0" wide opening MIN --- --- --- --- 02.134
Additional LF width over 3'-0" LF ADD LF --- --- --- --- 02.135
ADDITIONALBRICKWORK
Install brickwork under new window tomatch existing as closely as possible,including toothing in to existing bricks
SF --- --- --- --- 02.137
ADDITIONALSIDING
Install siding under new window to matchexisting as closely as possible, includingtoothing in to existing siding
SF --- --- --- --- 02.138

H1MD0220001CH0133 9
2. REMOVE DOOR AND ENLARGE OPENING FOR WINDOW
SPECIFICATIONS UNIT
CONTRACTOR’S
DIRECT JOB COSTPRICE
DATABASEITEMNO.MATLS LABOR TOTAL
The costs shown below are for removing adoor, making the opening ready for windowinstallation and for patching the walls insideand out after window installation.
Add the costs of the selected windows andaccessories to the preparation and patchingcosts shown here
1.00
REMOVEDOOR ANDENLARGEOPENING FORWINDOWINSTALLATION
Remove existing door from brick veneer,brick and block or framed wall andprepare opening for installation of window wider than the door # Erect shoring, security and dust
protection wall enclosing work area # Remove door from wall # Remove wall from side of door and
below to required width # Remove existing header and install
new wood header, steel lintel or beamto support walls or roof above
# Frame in for window installation with2" x 4" or 2" x 6" lumber, 1/2"plywood sheathing and insulation
# Patch the interior walls after windowinstallation with drywall, taped andfinished
# Install base and shoe moulding tomatch existing as closely as possible
# Tooth in brick or siding at sides ofnew window opening and above newsteel lintel
# Not included is brickwork or sidingunder new window
# No painting touch-up included
Framed wall with siding
Up to 3'-0" wide opening MIN --- --- --- --- 02.140
Additional LF opening over 3'-0" LF ADD
Brick veneer wall
LF --- --- --- --- 02.141
Up to 3'-0" wide opening MIN --- --- --- --- 02.142
Additional LF opening over 3'-0" LF ADD
Brick and block wall
LF --- --- --- --- 02.143
Up to 3'-0" wide opening MIN --- --- --- --- 02.144
Additional LF opening over 3'-0" LF ADD LF --- --- --- --- 02.145
ADDITIONALBRICKWORK
Install brickwork under new window tomatch existing as closely as possible,including toothing in to existing bricks
SF --- --- --- --- 02.147
ADDITIONALSIDING
Install siding under new window to matchexisting as closely as possible, includingtoothing in to existing siding
SF --- --- --- --- 02.148

10 H1MD0220001CH0133
2. REMOVE WINDOW FROM WALL FOR DOOR INSTALLATION
SPECIFICATIONS UNIT
CONTRACTOR’S
DIRECT JOB COST PRICE
DATABASEITEMNO.MATLS LABOR TOTAL
The costs shown below are forremoving a window or windows,making the opening ready for doorinstallation and for patching thewalls inside and out after doorinstallation.
Add the costs of the selected doors,entrances and accessories to thepreparation and patching costsshown here
REMOVE WINDOW(S)FROM WALL
Remove existing window(s) from brickveneer, brick and block or framed walland prepare opening for installation ofdoor no wider than the window # Erect security and dust protection
wall enclosing work area # Remove window(s) from wall # Open wall below window(s), clean
and store bricks or siding andbase mouldings for re-use
# Frame in for door installation with2" x 4" or 2" x 6" lumber, 1/2" ply-wood sheathing and insulation
# Patch the interior walls after doorinstallation, including installation ofthe saved base mouldings
# Tooth in bricks or siding at sides ofnew door opening
# No painting touch-up included
Framed wall with siding
Up to 3'-0" wide opening MIN --- --- --- --- 02.150
Additional LF width over 3'-0" LF ADD
Brick veneer wall
LF --- --- --- --- 02.151
Up to 3'-0" wide opening MIN --- --- --- --- 02.152
Additional LF width over 3'-0" LF ADD
Brick and block wall
LF --- --- --- --- 02.153
Up to 3'-0" wide opening MIN --- --- --- --- 02.154
Additional LF width over 3'-0" LF ADD LF --- --- --- --- 02.155
RE-LOCATEELECTRICALOUTLET
Re-locate exiting electrical outlet,switch or fixture to either side of futuredoorway, no floor patching included
EA --- --- --- --- 02.157
RE-LOCATEDUCTWORK
Re-locate existing ductwork to eitherside of future doorway, no floorpatching included
EA --- --- --- --- 02.158
RE-LOCATERADIATOR
Re-locate existing radiator to eitherside of future doorway, no floorpatching included
EA --- --- --- --- 02.159

H1MD0220001CH0133 11
2. REMOVE WINDOW AND ENLARGE OPENING FOR DOOR
SPECIFICATIONS UNIT
CONTRACTOR’S
DIRECT JOB COST PRICE
DATABASEITEMNO.MATLS LABOR TOTAL
The costs shown below are for removinga window, making the opening ready fordoor installation and for patching thewalls inside and out after doorinstallation.
Add the costs of the selected doors andaccessories to the preparation andpatching costs shown here
REMOVE WINDOWFROM WALL
Remove existing window from brick veneer,brick and block or framed wall and prepareopening for installation of door wider thanthe window # Erect shoring, security and dust
protection wall enclosing work area # Remove window from wall # Remove wall from side of window and
below to required width # Remove existing header and install
new wood header, steel lintel or beamas required to support walls, joists orrafters above
# Frame in for door installation with 2" x4" or 2" x 6" lumber, 1/2" ply- woodsheathing and insulation
# Patch the interior walls after doorinstallation with drywall taped andfinished
# Tooth in bricks or siding at sides ofnew door opening and above newlintel, header or beam
# No floor patching included # No painting touch-up included
Framed wall with sidingUp to 3'-0" wide opening
MIN --- --- --- --- 02.160
Additional LF width over 3'-0" LF ADD LF --- --- --- --- 02.161
Brick veneer wallUp to 3'-0" wide opening
MIN --- --- --- --- 02.162
Additional LF width over 3'-0" LF ADD LF --- --- --- --- 02.163
Brick and block wallUp to 3'-0" wide opening
MIN --- --- --- --- 02.164
Additional LF width over 3'-0" LF ADD LF --- --- --- --- 02.165
RE-LOCATEELECTRICALOUTLET
Re-locate exiting electrical outlet, switch orfixture to either side of future doorway, nofloor patching included
EA --- --- --- --- 02.167
RE-LOCATEDUCTWORK
Re-locate existing ductwork to either side offuture doorway, no floor patching included
EA --- --- --- --- 02.168
RE-LOCATERADIATOR
Re-locate existing radiator to either side offuture doorway, no floor patching included
EA --- --- --- --- 02.169

12 H1MD0220001CH0133
2. EXTERIOR SIDING AND TRIM TEAROUT
SPECIFICATION UNIT
CONTRACTOR’S
DIRECT JOB COST PRICE
DATA
BASE
ITEM
NO.MATLS LABOR TOTAL
WOOD SIDING Remove wood siding from exterior wall 1.00
Drop or beveled siding, up to 50 SF MIN --- --- --- --- 02.200
Additional siding over 50 SF ADD SF --- --- --- --- 02.201
Plywood siding, up to 50 SF MIN --- --- --- --- 02.202
Additional siding over 50 SF ADD SF --- --- --- --- 02.203
Board and batten siding, up to 50 SF MIN --- --- --- --- 02.204
Additional siding over 50 SF ADD SF --- --- --- --- 02.205
CEDARSHINGLES
Remove cedar shingles from exteriorwall
Up to 50 SF MIN --- --- --- --- 02.210
Additional shingles over 50 SF ADD SF --- --- --- --- 02.211
ALUMINUMOR VINYLSIDING
Remove aluminum or vinyl siding fromexterior wall
Up to 50 SF MIN --- --- --- --- 02.215
Additional siding over 50 SF ADD SF --- --- --- --- 02.216
STUCCO Remove stucco and wood lath fromexterior wall
Up to 50 SF MIN --- --- --- --- 02.220
Additional area over 50 SF ADD SF --- --- --- --- 02.221
Remove stucco and metal lath fromexterior wall
Up to 50 SF MIN --- --- --- --- 02.223
Additional area over 50 SF ADD SF --- --- --- --- 02.224
EXTERIORTRIM
Remove fascia board or soffit frombuilding
6", up to 10 LF MN --- --- --- --- 02.230
Additional LF over 10 LF ADD SF --- --- --- --- 02.231
12", up to 10 LF MN --- --- --- --- 02.232
Additional LF over 10 LF ADD SF --- --- --- --- 02.233
18", up to 10 LF MN --- --- --- --- 02.234
Additional LF over 10 LF ADD SF --- --- --- --- 02.235
24", up to 10 LF MN --- --- --- --- 02.236
Additional LF over 10 LF ADD SF --- --- --- --- 02.237

H1MD0220001CH0133 13
2. GUTTER AND DOWNSPOUT TEAROUT
SPECIFICATIONS UNIT
CONTRACTOR’S
DIRECT JOB COSTPRICE
DATABASEITEMNO.MATLS LABOR TOTAL
GUTTER Remove edge hung aluminum, copperor galvanized gutter from building
1.00
Up to 10 LF MIN --- --- --- --- 02.241
Additional LF over 10 LF ADD LF --- --- --- --- 02.242
Remove edge hung wood gutter frombuilding
Up to 10 LF MIN --- --- --- --- 02.244
Additional LF over 10 LF ADD LF --- --- --- --- 02.245
DOWNSPOUT Remove downspout from building
Up to 10 LF MIN --- --- --- --- 02.246
Additional LF over 10 LF ADD LF --- --- --- --- 02.247

14 H1MD0220001CH0133
2. PORCH AND DECK TEAROUT
SPECIFICATIONS UNIT
CONTRACTOR’S
DIRECT JOB COSTPRICE
DATABASEITEMNO.MATLS LABOR TOTAL
WOODPORCH
Remove wood porch up to 240 SF, nopatching or repairs included
1.00
Ground level EA --- --- --- --- 02.250
Second storyEA = Each porch
EA --- --- --- --- 02.251
METALPLATFORMAND STEPS
Remove existing metal platform andsteps from one story building
Porch and up to 5 steps MIN --- --- --- --- 02.255
Additional steps over 5 steps ADD EA --- --- --- --- 02.256
PORCHSCREENING
Remove porch screening andintermediate posts, install temporarysupports for roof structure
Up to 100 SF MIN --- --- --- --- 02.260
Additional SF over 100 SF ADDSF = Screen wall area
SF --- --- --- --- 02.261
PORCHFLOORING
Remove tongue and groove porchflooring
Up to 50 SF MIN --- --- --- --- 02.265
Additional SF over 50 SF ADD SF --- --- --- --- 02.266
PORCHCEILING
Remove wood tongue and groove porchceiling, including wall mouldings
Up to 50 SF MIN --- --- --- --- 02.267
Additional SF over 50 SF ADD SF --- --- --- --- 02.268
Remove 4' x 8', 1/4" to 1/2" plywoodporch ceiling with or without battens andwall mouldings
Up to 50 SF MIN --- --- --- --- 02.269
Additional SF over 50 SF ADD SF --- --- --- --- 02.270
PORCH ANDDECKRAILING
Remove wood railing and spindles, notincluding posts
EA = Each rail section (between posts)
EA --- --- --- --- 02.280
DECK Remove wood deck sukrface andframing
Up to 50 SF MIN --- --- --- --- 02.285
Additional SF over 50 SF ADD SF --- --- --- --- 02.286
Remove wood deck surface only inpreparation for replacing
Up to 50 SF MIN --- --- --- --- 02.287
Additional SF over 50 SF ADD SF --- --- --- --- 02.288

H1MD0220001CH0133 15
2. FENCING TEAROUT
SPECIFICATIONS UNIT
CONTRACTOR’S
DIRECT JOB COSTPRICE
DATABASEITEMNO.MATLS LABOR TOTAL
CHAIN LINKFENCE
Remove chain link fence, includingposts set in concrete, leaving concretein ground
1.00
Up to 10 LF of fencing MIN --- --- --- --- 02.290
Additional LF over 10 LF ADD LF --- --- --- --- 02.291
WOOD FENCE Remove 6'-0" high, 1" x 4" or 1" x 6"privacy or stockade fence, with postsnot set in concrete
Up to 10 LF of fencing MIN --- --- --- --- 02.295
Additional LF over 10 LF ADD LF --- --- --- --- 02.296
Remove 6'-0" high, 1" x 4" or 1" x 6"privacy or stockade fence, with postsset in concrete, leaving concrete inground
Up to 10 LF of fencing MIN --- --- --- --- 02.298
Additional LF over 10 LF ADD LF --- --- --- --- 02.299

16 H1MD0220001CH0133
2. REMOVE NON-BEARING WALL AND MAKE FLUSH OPENING
SPECIFICATIONS UNIT
CONTRACTOR’S
DIRECT JOB COST PRICE
DATABASEITEMNO.MATLS LABOR TOTAL
REMOVE
WALL AND
MAKE FLUSH
OPENING
Break through and remove non-bearing interior wall making flushceiling and walls # Erect dust protection wall
enclosing work area # Remove base and ceiling
mouldings, clean and store for re-use
# Break through existing studs andwall covering from wall-to-wall andflush with ceiling and removedebris to outside
# Patch areas on walls and ceilingwith 1/2" gypsum drywall wherewall was removed, taped, finishedand sanded
# Close in floor with plywood wherewall was removed, ready forfinished flooring
# Install stored base and ceilingmouldings on new work asrequired
1.00
Up to 6'-0" LF wide finished opening MIN --- --- --- --- 02.300
Each additional LF opening more than6'-0" LF ADD LF --- --- --- --- 02.301
HARDWOODFLOORING
Install hardwood flooring where wallwas removed, sanded and finished, notoothing in
Up to 6'-0" LF wide finished opening MIN --- --- --- --- 02.305
Each additional LF opening more than6'-0" LF ADD LF --- --- --- --- 02.306
Install toothed in hardwood flooringwhere wall was removed, add toabove hardwood flooring cost
EA = Each toothed in joint@2 1/4 inwidth ADD EA --- --- --- --- 02.316
VINYLFLOORING
Install vinyl tile where wall wasremoved, laid in adhesive
Up to 6'-0" LF wide finished opening MIN --- --- --- --- 02.308
Each additional LF opening more than6'-0" LF ADD LF --- --- --- --- 02.309

H1MD0220001CH0133 17
2. REMOVE NON-BEARING WALL AND MAKE FINISHED OPENING
SPECIFICATIONS UNIT
CONTRACTOR’S
DIRECT JOB COST PRICE
DATABASEITEMNO.MATLS LABOR TOTAL
REMOVEWALL ANDMAKEFINISHEDOPENING
Break through and remove non-loadbearing interior wall leaving existingwall on each side of opening and asmuch as 18 inches below ceiling # Erect dust protection wall
enclosing work area # Remove base and ceiling
mouldings, clean and store for re-use
# Break through existing studs andwall covering for desired openingsize and remove debris to outside
# Install dimension lumber headeras required supported by jackseach side of new opening
# Finish header and sides with 1/2"drywall, taped finished andsanded
# Install stored base and ceilingmouldings on new work asrequired
1.00
Up to 6'-0" wide finished opening MIN --- --- --- --- 02.310
Each additional LF opening more than6'-0" LF ADD LF --- --- --- --- 02.311
CASEDOPENING
Finish new opening with jambs and 2sides of door casing over drywall
Up to 6'-0" wide finished opening MIN --- --- --- --- 02.312
Each additional LF opening more than6'-0" LF ADD LF --- --- --- --- 02.313
HARDWOODFLOORING
Install hardwood flooring where wallwas removed, sanded and finished, notoothing in
Up to 6'-0" wide finished opening MIN --- --- --- --- 02.314
Each additional LF opening more than6'-0" LF ADD LF --- --- --- --- 02.315
Install toothed in hardwood flooringwhere wall was removed, add toabove hardwood flooring costs
ADD EA --- --- --- --- 02.316
EA = Each toothed in joint@2 1/4 inwidth
VINYLFLOORING
Install vinyl tile where wall wasremoved, laid in adhesive
Up to 6'-0" wide finished opening MIN --- --- --- --- 02.318
Each additional LF opening more than6'-0" LF ADD LF --- --- --- --- 02.319

18 H1MD0220001CH0133
2. REMOVE BEARING WALL AND MAKE FLUSH OPENING
SPECIFICATIONS UNIT
CONTRACTOR’S
DIRECT JOB COST PRICE
DATABASEITEMNO.MATLS LABOR TOTAL
REMOVEBEARINGWALL ANDMAKE FLUSHOPENING
Break through and remove load-bearinginterior wall making flush ceiling andwalls # Erect dust protection wall enclosing
work area # Remove base and ceiling
mouldings, clean and store for re-use
# Shore ceiling each side of newopening before breaking through
# Break through existing studs anddrywall or plaster wall covering fromwall-to-wall and flush with ceilingand remove debris to outside
# Cut joists above new opening andhead off with dimension lumber,laminated veneer lumber or W8 x 17steel beam over new opening flushwith bottom of joists above,supported by jacks in each sidewall
# Patch areas on walls and ceilingwith 1/2" gypsum drywall where wallwas removed, taped, finished andsanded
# Close in floor with plywood wherewall was removed, ready forfinished flooring
# Install stored base and ceilingmouldings on new work as required
1.00
Up to 6'-0" LF wide finished opening MIN --- --- --- --- 02.320
Each additional LF opening more than6'-0" LF ADD LF --- --- --- --- 02.321
HARDWOODFLOORING
Install hardwood flooring where wallwas removed, sanded and finished, notoothing in
Up to 6'-0" LF wide flush opening MIN --- --- --- --- 02.325
Each additional LF opening more than6'-0" LF ADD LF --- --- --- --- 02.326
Install toothed in hardwood flooringwhere wall was removed, add to abovehardwood flooring costs ADD
EA = Each toothed in joint@2 1/4 inwidth
EA --- --- --- --- 02.316
VINYLFLOORING
Install vinyl tile where wall wasremoved, laid in adhesive
Up to 6'-0" LF wide flush opening MIN --- --- --- --- 02.328
Each additional LF opening more than6'-0" LF ADD LF --- --- --- --- 02.329

H1MD0220001CH0133 19
2. REMOVE BEARING WALL AND MAKE FINISHED OPENING
SPECIFICATIONS UNIT
CONTRACTOR’S
DIRECT JOB COSTPRICE
DATABASEITEMNO.MATLS LABOR TOTAL
REMOVE
WALL AND
MAKE
FINISHED
OPENING
Break through and remove load-bearinginterior wall leaving existing wall on eachside of opening and as much as 24 inchesbelow ceiling # Erect dust protection wall enclosing
work area # Remove base and ceiling mould- ings,
clean and store for re-use # Shore ceiling each side of existing wall
opening before breaking through # Break through existing studs and wall
covering for desired opening size andremove debris to outside
# Install dimension lumber, laminatedveneer lumber or W8 x 17 steel beamover new opening supported by jackseach side
# Finish off header and sides with 1/2"drywall, taped, finished and sanded
# Close in floor with plywood where wallwas removed, ready for finishedflooring
# Install stored base and ceilingmouldings on new work as required
1.00
Up to 6'-0" LF wide finished opening MIN --- --- --- --- 02.330
Each additional LF opening more than6'-0" LF ADD LF --- --- --- --- 02.331
CASEDOPENING
Finish new opening with jambs and 2 sidesof door casing over drywall
Up to 6'-0" LF wide finished opening MIN --- --- --- --- 02.312
Each additional LF opening more than6'-0" LF ADD LF --- --- --- --- 02.313
HARDWOODFLOORING
Install hardwood flooring where wall wasremoved, snded and finished, no toothing in
Up to 6'-0" LF wide finished opening MIN --- --- --- --- 02.335
Each additional LF opening more than6'-0" LF ADD LF --- --- --- --- 02.336
Toothed in hardwood flooring where wallwas removed
ADD
EA = Each toothed in joint@2 1/4 in width
EA --- --- --- --- 02.316
VINYLFLOORING
Install vinyl tile where wall was removed,laid in adhesive
Up to 6'-0" LF wide finished opening MIN --- --- --- --- 02.338
Each additional LF opening more than6'-0" LF ADD LF --- --- --- --- 02.339

20 H1MD0220001CH0133
2. INTERIOR WALL TEAROUT
SPECIFICATIONS UNIT
CONTRACTOR’S
DIRECT JOB COST PRICE
DATABASEITEMNO.MATLS LABOR TOTAL
REMOVENON-BEARINGSTUDWALL
Remove metal or wood non-bearingstudwall, finished both sides with drywallor plaster
1.00
Up to 6 LF MIN --- --- --- --- 02.350
Additional LF over 6 LF ADD LF --- --- --- --- 02.351
REMOVELOAD-BEARINGSTUDWALL
Remove metal or wood load-bearingstudwall, finished both sides withdrywall or plaster, and install dimensionlumber wood header over, supported byjacks on each side
Up to 6 LF MIN --- --- --- --- 02.352
Additional LF over 6 LF ADD LF --- --- --- --- 02.353
Remove metal or wood load-bearingstudwall, finished both sides with drywallor plaster, and install W8 x 17 steelbeam or three 1-3/4" x 11-7/8"laminated veneer lumber beam over, supported by jacks on each side
Up to 6 LF MIN --- --- --- --- 02.354
Additional LF over 6 LF ADD LF --- --- --- --- 02.355

H1MD0220001CH0133 21
2. INTERIOR WALL COVERING TEAROUT
SPECIFICATIONS UNIT
CONTRACTOR’S
DIRECT JOB COST PRICE
DATABASEITEMNO.MATLS LABOR TOTAL
REMOVEWALLCOVERING
Remove wall covering from studwall 1.00
Gypsum drywall, up to 30 SF MIN --- --- --- --- 02.360
Additional SF over 30 SF ADD SF --- --- --- --- 02.361
Gypsum lath and plaster, up to 30 SF MIN --- --- --- --- 02.362
Additional SF over 30 SF ADD SF --- --- --- --- 02.363
Metal lath and plaster, up to 30 SF MIN --- --- --- --- 02.364
Additional SF over 30 SF ADD SF --- --- --- --- 02.365
Wood lath and plaster, up to 30 SF MIN --- --- --- --- 02.366
Additional SF over 30 SF ADD SF --- --- --- --- 02.367
Plywood paneling, up to 30 SF MIN --- --- --- --- 02.368
Additional SF over 30 SF ADD SF --- --- --- --- 02.369
Solid wood paneling, up to 30 SF MIN --- --- --- --- 02.370
Additional SF over 30 SF ADD SF --- --- --- --- 02.371
Ceramic tile in thinset, up to 15 SF MIN --- --- --- --- 02.372
Additional SF over 15 SF ADD SF --- --- --- --- 02.373
Ceramic tile in mud, up to 15 SF MIN --- --- --- --- 02.374
Additional SF over 15 SF ADD SF --- --- --- --- 02.375
Remove plaster from masonry wall
Up to 30 SF MIN --- --- --- --- 02.377
Additional SF over 30 SF ADD SF --- --- --- --- 02.378

22 H1MD0220001CH0133
2. FLOORING TEAROUT
SPECIFICATIONS UNIT
CONTRACTOR’S
DIRECT JOB COST PRICE
DATABASEITEMNO.MATLS LABOR TOTAL
HARDWOODFLOORING
Remove nailed hardwood flooring,2-1/4" x 25/32"
1.00
Up to 10 SF MIN --- --- --- --- 02.400
Additional SF over 10 SF ADD SF --- --- --- --- 02.401
Remove hardwood flooring in mastic
Up to 10 SF MIN --- --- --- --- 02.402
Additional SF over 10 SF ADD SF --- --- --- --- 02.403
Remove wood flooring and sleepersfrom concrete slab
Up to 50 SF MIN --- --- --- --- 02.404
Additional SF over 50 SF ADD SF --- --- --- --- 02.405
BRICK FLOOR Remove brick flooring from wood base
Up to 10 SF MIN --- --- --- --- 02.410
Additional SF over 10 SF ADD SF --- --- --- --- 02.411
Remove brick flooring from concretebase
Up to 10 SF MIN --- --- --- --- 02.415
Additional SF over 10 SF ADD SF --- --- --- --- 02.416
CERAMIC TILEFLOOR
Remove ceramic tile floor laid in thinset mortar
Up to 10 SF MIN --- --- --- --- 02.420
Additional SF over 10 SF ADD SF --- --- --- --- 02.421
Remove ceramic tile floor laid in mud
Up to 10 SF MIN --- --- --- --- 02.422
Additional SF over 10 SF ADD SF --- --- --- --- 02.423
SUBFLOOR Remove wood board subfloor,
1" x 6" or 1" x 8"
Up to 50 SF MIN --- --- --- --- 02.431
Additional SF over 50 SF ADD SF --- --- --- --- 02.432
Remove plywood subfloor, nailed only
Up to 50 SF MIN --- --- --- --- 02.433
Additional SF over 50 SF ADD SF --- --- --- --- 02.434
Remove plywood subfloor, nailed
and glued
Up to 50 SF MIN --- --- --- --- 02.435
Additional SF over 50 SF ADD SF --- --- --- --- 02.436
H1MD0220001CH0133 23
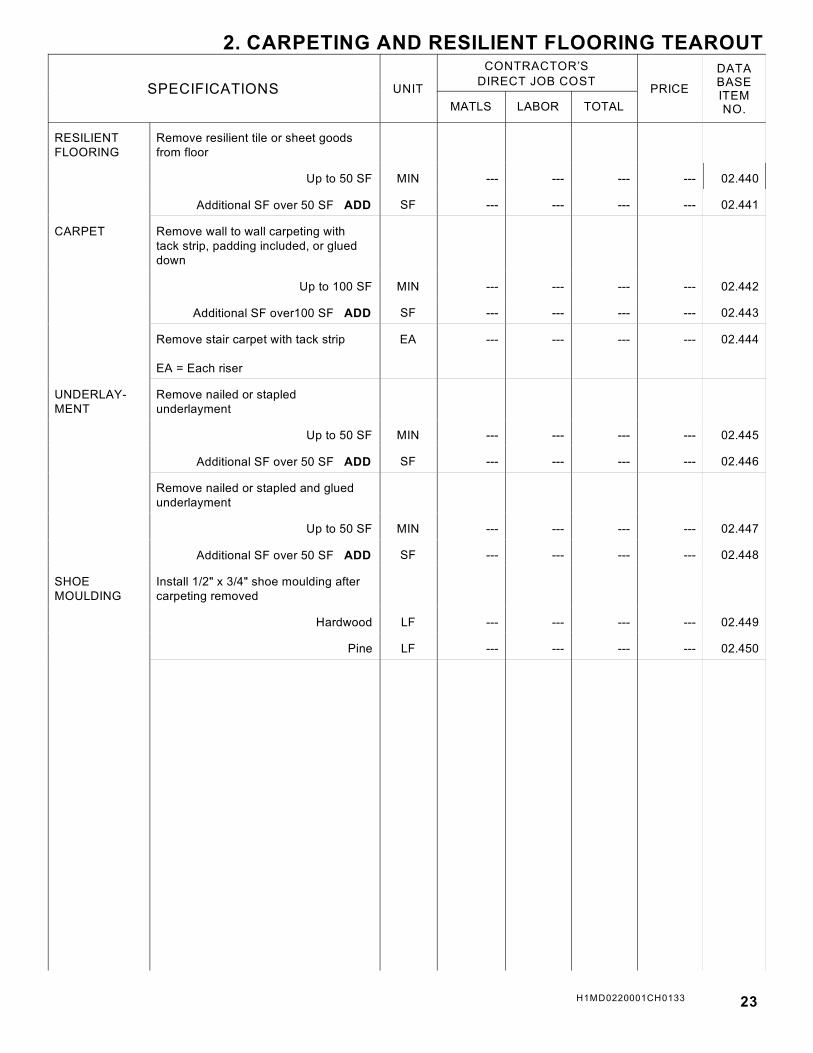
2. CARPETING AND RESILIENT FLOORING TEAROUT
SPECIFICATIONS UNIT
CONTRACTOR’S
DIRECT JOB COST PRICE
DATABASEITEMNO.MATLS LABOR TOTAL
RESILIENTFLOORING
Remove resilient tile or sheet goodsfrom floor
1.00
Up to 50 SF MIN --- --- --- --- 02.440
Additional SF over 50 SF ADD SF --- --- --- --- 02.441
CARPET Remove wall to wall carpeting withtack strip, padding included, or glueddown
Up to 100 SF MIN --- --- --- --- 02.442
Additional SF over100 SF ADD SF --- --- --- --- 02.443
Remove stair carpet with tack strip
EA = Each riser
EA --- --- --- --- 02.444
UNDERLAY-MENT
Remove nailed or stapledunderlayment
Up to 50 SF MIN --- --- --- --- 02.445
Additional SF over 50 SF ADD SF --- --- --- --- 02.446
Remove nailed or stapled and gluedunderlayment
Up to 50 SF MIN --- --- --- --- 02.447
Additional SF over 50 SF ADD SF --- --- --- --- 02.448
SHOEMOULDING
Install 1/2" x 3/4" shoe moulding aftercarpeting removed
Hardwood LF --- --- --- --- 02.449
Pine LF --- --- --- --- 02.450

24 H1MD0220001CH0133
2. DOOR AND WINDOW REMOVAL
SPECIFICATIONS UNIT
CONTRACTOR’S
DIRECT JOB COST PRICE
DATABASEITEMNO.MATLS LABOR TOTAL
ENTRANCEDOOR
Remove entrance door, frame, interiorand exterior trim and threshold from wall,3'-0" x 6'-8"
EA --- --- --- --- 02.500
1.00 Remove wood or aluminum gliding glassdoor unit, including frame, interior andexterior trim, one fixed panel and oneoperating panel and screen
EA --- --- --- --- 02.501
GARAGEDOOR
Remove overhead garage door
9' x 7' EA --- --- --- --- 02.502
16' x 7' EA --- --- --- --- 02.503
INTERIORDOOR
Remove door, frame and trim frominterior wall
Single door EA --- --- --- --- 02.510
Double door EA --- --- --- --- 02.511
WINDOW Remove wod or aluminum window fromframe wall, including trim
UP to 15 SF window MIN --- --- --- --- 02.520
Additional window area over 15 SF ADD SF --- --- --- --- 02.521
Remove steel casement window fromframe wall, including trim
Up to 15 SF window MIN --- --- --- --- 02.522
Additional window area over 15 SF ADD SF --- --- --- --- 02.523
Remove wood or aluminum window frommasonry wall, including trim
Up to 15 SF window MIN --- --- --- --- 02.524
Additional window area over 15 SF ADD SF --- --- --- --- 02.525
Remove steel casement window frommasonry wall, including trim
Up to 15 SF window MIN --- --- --- --- 02.526
Additional window area over 15 SF ADD SF --- --- --- --- 02.527
SILICONCAULKEDWINDOW
Remove window caulked with silicon
ADD EA --- --- --- --- 02.528

H1MD0220001CH0133 25
2. CEILING AND INSULATION REMOVAL
SPECIFICATIONS UNIT
CONTRACTOR’S
DIRECT JOB COST PRICE
DATABASEITEMNO.MATLS LABOR TOTAL
CEILINGCOVERING
Remove ceiling covering from ceilingjoists
1.00
Plaster and gypsum lath, up to 20 SF MIN --- --- --- --- 02.460
Additional SF over 20 SF ADD SF --- --- --- --- 02.461
Plaster and wood lath, up to 20 SF MIN --- --- --- --- 02.462
Additional SF over 20 SF ADD SF --- --- --- --- 02.463
Plaster and metal lath, up to 20 SF MIN --- --- --- --- 02.464
Additional SF over 20 SF ADD SF --- --- --- --- 02.465
Gypsum drywall, up to 20 SF MIN --- --- --- --- 02.466
Additional SF over 20 SF ADD SF --- --- --- --- 02.467
Remove wood tongue and grooveceiling
Up to 20 SF MIN --- --- --- --- 02.468
Additional SF over 20 SF ADD SF --- --- --- --- 02.469
CEILING TILE 12" x 12" composition tile
Glued SF --- --- --- --- 02.470
Stapled SF --- --- --- --- 02.471
Remove 24" x 24" or 24" x 48" dropceiling tile from grid system
EA = Each tile
EA --- --- --- --- 02.472
Remove complete metal grid system,including wall angles and ceiling tiles
Up to 30 SF MIN --- --- --- --- 02.475
Additional SF over 30 SF ADD SF --- --- --- --- 02.476
INSULATION Remove insulation from open wall,ceiling, rafter or joists
Loose insulation, up to 50 SF MIN --- --- --- --- 02.480
Additional SF over 50 SF ADD SF --- --- --- --- 02.481
Batt insulation, up to 50 SF MIN --- --- --- --- 02.482
Additional SF over 50 SF ADD SF --- --- --- --- 02.483

26 H1MD0220001CH0133
2. CABINET AND TRIM TEAROUT
SPECIFICATIONS UNIT
CONTRACTOR’S
DIRECT JOB COST PRICE
DATABASEITEMNO.MATLS LABOR TOTAL
COUNTERTOP Remove countertop from base cabinet,
not including disconnects
1.00
Up to 4 LF MIN --- --- --- --- 02.600
Additional LF over 4 LF ADD LF --- --- --- --- 02.601
KITCHEN
CABINETS
Remove wood or steel kitchen cabinets,
base, wall or island
EA = Each cabinet
EA --- --- --- --- 02.610
BASE
MOULDING
Remove base and shoe moulding to
scrap
Up to 20 LF MIN --- --- --- --- 02.620
Additional LF over 20 LF ADD LF --- --- --- --- 02.621
Remove base and shoe moulding,
clean and store for re-use
Up to 20 LF MIN --- --- --- --- 02.622
Additional LF over 20 LF ADD LF --- --- --- --- 02.623
CHAIR RAIL Remove chair rail or ceiling moulding to
scrap
One or two piece, up to 12 LF MIN --- --- --- --- 02.625
Additional LF over 12 LF ADD LF --- --- --- --- 02.626
Three piece, up to 12 LF MIN --- --- --- --- 02.627
Additional LF over 12 LF ADD LF --- --- --- --- 02.628
Remove chair rail or ceiling moulding,
clean and store for re-use
One or two piece, up to 12 LF MIN --- --- --- --- 02.629
Additional LF over 12 LF ADD LF --- --- --- --- 02.630
Three piece, up to 12 LF MIN --- --- --- --- 02.631
Additional LF over 12 LF ADD LF --- --- --- --- 02.632
CASING Remove casing to scrap
Up to 20 LF MIN --- --- --- --- 02.635
Additional LF over 20 LF ADD LF --- --- --- --- 02.636
Remove casing, clean and store for re-
use
Up to 20 LF MIN --- --- --- --- 02.637
Additional LF over 20 LF ADD LF --- --- --- --- 02.638

H1MD0220001CH0133 27
2. STAIRS TEAROUT
SPECIFICATIONS UNIT
CONTRACTOR’S
DIRECT JOB COST PRICE
DATABASEITEMNO.MATLS LABOR TOTAL
STAIRS Remove set of stairs to scrap, nopatching
1.00
Folding stairway EA --- --- --- --- 02.650
Basement stairs EA --- --- --- --- 02.651
Attic stairs EA --- --- --- --- 02.652
Remove set of main stairs to scrap,including newels, rails and balusters,no patching
EA --- --- --- --- 02.655
Remove individual handrail or staircomponents to scrap
Baluster EA --- --- --- --- 02.656
Newel post EA --- --- --- --- 02.657
Trim bracket EA --- --- --- --- 02.658
Rosette EA --- --- --- --- 02.659
Tread EA --- --- --- --- 02.660
Riser EA --- --- --- --- 02.661
Return nosing EA --- --- --- --- 02.662
Landing nosing EA --- --- --- --- 02.663
HANDRAIL Remove complete handrail to scrap,including newels and balusters
Up to 4 LF MIN --- --- --- --- 02.670
Additional LF over 4 LF LF --- --- --- --- 02.671
Remove handrail section to scrap
Up to 4 LF MIN --- --- --- --- 02.672
Additional LF over 4 LF LF --- --- --- --- 02.673
Remove handrail section, clean andstore for re-use
Up to 4 LF MIN --- --- --- --- 02.674
Additional LF over 4 LF LF --- --- --- --- 02.675
Remove individual handrail or staircomponents, clean and store for re-use
Volute, turnout, easing or gooseneck EA --- --- --- --- 02.676
Baluster EA --- --- --- --- 02.677
Newel post EA --- --- --- --- 02.678
Trim bracket EA --- --- --- --- 02.679
Rosette EA --- --- --- --- 02.680

28 H1MD0220001CH0133
3. AREAWALLS AND AREAWAYS
SPECIFICATIONS UNIT
CONTRACTOR’S
DIRECT JOB COST PRICE
DATABASEITEMNO.MATLS LABOR TOTAL
WINDOWAREAWALL
Install metal retaining wall aroundbasement window # Excavate below window and
install 24" x 37" galvanizedcorrugated wall around windowattached to foundation wall
# Place 6" of sand with gravel or loose brick over inside galvanizedcorrugated wall
# Backfill outside the areawall with grade of a minimum of 1 inch per foot away from the house for a distance of 5 feet
EA --- --- --- --- 03.000
BASEMENTAREAWAY
Remove obstruction from basementareaway drain
1.00
No difficulty EA --- --- --- --- 03.001
Some difficulty EA --- --- --- --- 03.002
Difficult EA --- --- --- --- 03.003
Replace drain grill/strainer 3/8" round EA --- --- --- --- 03.004
Repair parging on areaway masonrywalls
Up to 6 SF MIN --- --- --- --- 03.005
Additional SF over 6 SF ADD SF --- --- --- --- 03.006
Repair and patch concrete steps inareaway
No difficulty EA --- --- --- --- 03.010
Some difficulty EA --- --- --- --- 03.011
Difficult
EA = Each step
EA --- --- --- --- 03.012

H1MD0220001CH0133 29
3. SURFACE WATER CONTROL
SPECIFICATIONS UNIT
CONTRACTOR’S
DIRECT JOB COSTPRICE
DATABASEITEMNO.MATLS LABOR TOTAL
SURFACEWATERCONTROL
Grade around house foundation wall tocreate positive grade away fromfoundation and provide adequatedrainage # 40 lb. bag/1.5 cu.ft., @ $1.00 # Fill in the area around the
foundation wall with topsoil so thatgrade is 1 inch per foot for adistance of 6 feet away from thewall
# Compact the topsoil and seed theground
1.00
Up to 36 SF graded MIN --- --- --- --- 03.100
Additional grading over 36 SF ADD SF --- --- --- --- 03.101
SOD Place sod over topsoil instead ofseeding, sod @ $2.50 SF, picked up
Up to 36 SF graded MIN --- --- --- --- 03.105
Additional sod over 10 LF ADD SF --- --- --- --- 03.106
SPLASHBLOCK
Install splash block at base ofdownspout to provide drainage awayfrom house and control erosion
EA --- --- --- --- 03.110
EXTENDDOWNSPOUT
Extend downspout 4 to 6 feet away fromfoundation to provide drainage andcontrol erosion
EA --- --- --- --- 03.111
Install 4" plastic corrugated drain tile todownspout, bury in ground and extendto daylight or drywell to provide gooddrainage and control erosion, excess fillto remain on site
Up to 10 LF of buried pipe MIN --- --- --- --- 03.112
Additional buried pipe over 10 LF ADD LF --- --- --- --- 03.113
YARDDRAINAGE
Install 4" drain tile in gravel buried undergrade to provide drainage in yard andextend to daylight or drywell, excess fillto remain on site
Up to 10 LF of buried pipe MIN --- --- --- --- 03.115
Additional buried pipe over 10 LF ADD LF --- --- --- --- 03.116
DRYWELL Construct drywell to receive drainagefrom sump pump or drain tile in yard # Dig out 48" x 48" hole a minimum of
60" below grade # Line hole with poly filter cloth # Fill hole with 1-1/2" aggregate # Cover with vapor barrier # Backfill # Excess fill to remain on site
EA = Total job
EA --- --- --- --- 03.120

30 H1MD0220001CH0133
3. FRENCH DRAIN
SPECIFICATIONS UNIT
CONTRACTOR’S
DIRECT JOB COSTPRICE
DATABASEITEMNO.MATLS LABOR TOTAL
FRENCHDRAIN
Install french drain in existing basement floor
# Break basement concrete floor alonginside of footings
# Install polyethylene sump at somepoint along broken concrete area
# 4" plastic pipe along inside of footingswith 1/8" slope emptying into sump
# Backfill with stone # Patch concrete floor to match existing
floor
1.00
Up to 30 LF of plastic pipe MIN --- --- --- --- 03.150
Additional plastic pipe over 30 LF ADD LF --- --- --- --- 03.151

H1MD0220001CH0133 31
3. SUMP PUMP
SPECIFICATIONS UNIT
CONTRACTOR’S
DIRECT JOB COSTPRICE
DATABASEITEMNO.MATLS LABOR TOTAL
SUMP PUMP Install 1/3 HP sump pump in existingsump in basement floor and dischargewater from sump to storm sewer,daylight or drywell
EA --- --- --- --- 03.200
DISCHARGEWATER TOSTORMSEWER
Discharge water from sump to stormsewer connection within basement
1.00
Up to 15 LF MIN --- --- --- --- 03.205
Additional LF over 15 LF ADD LF --- --- --- --- 03.206
LF = Distance from sump pump to storm sewer connection
DISCHARGEDRAINAGE TODAYLIGHT ORDRYWELL
Discharge water from sump to daylightthrough 1-1/2" pipe through wall andunderground
# Connect pipe to sump pump # Drill hole through basement wall
above grade and run pipe up the wall, through the hole in the wall and down the outside wall into theground
# Dig trench in ground and run pipe in trench with a minimum slope of 1/8" per lineal foot down todaylight or drywell
# Backfill trench
Up to 10 LF of buried pipe MIN --- --- --- --- 03.207
Additional buried pipe over 15 LF ADD LF --- --- --- --- 03.208
LF = Length of trench
DRYWELL Construct drywell to receive drainagefrom sump # Dig out 48" x 48" hole, a minimum
of 60" below the level of the pipe from the sump
# Line hole with poly filter cloth # Fill hole with 1-1/2" aggregate # Cover with vapor barrier # Backfill
EA = Total job
EA 210.00 370.00 580.00 1,095.00

32 H1MD0220001CH0133
3. FLOWER BED BORDER
SPECIFICATIONS UNIT
CONTRACTOR’S
DIRECT JOB COST PRICE
DATABASEITEMNO.MATLS LABOR TOTAL
FLOWER BEDBORDER
Install border for flower bed withtreated wood landscaping ties, allexcess fill to remain on site
1.00
Two 4" x 4" ties up to 16 LF long MIN --- --- --- --- 03.250
Additional length of ties over 16 LF ADD LF --- --- --- --- 03.251
Three 4" x 4" ties up to 16 LF long MIN --- --- --- --- 03.252
Additional length of ties over 16 LF ADD LF --- --- --- --- 03.253
Two 6" x 6" ties up to 16 LF long MIN --- --- --- --- 03.254
Additional length of ties over 16 LF ADD LF --- --- --- --- 03.255
Three 6" x 6" ties up to 16 LF long MIN --- --- --- --- 03.256
Additional length of ties over 16 LF ADD
LF = Perimeter of border
LF --- --- --- --- 03.257

H1MD0220001CH0133 33
3. TIEWALL (WOOD RETAINING WALL)
SPECIFICATIONS UNIT
CONTRACTOR’S
DIRECT JOB COST PRICE
DATABASEITEMNO.MATLS LABOR TOTAL
TIEWALL Build wood retaining wall (tiewall) with6" x 6" pressure treated timbers # Remove sod for 18" behind wall # Excavate top 12" or more if
necessary below grade so thatface of tiewall will be againstundisturbed earth
# Build wall with tiebacks every 3rd
course, 6'-0" OC fastened todeadman timbers located thesame distance behind wall asheight of wall
# Place minimum of 12" crushedstone behind wall to within 6" oftop of grade
# Place rigid perforated 4" plasticpipe behind wall at bottomdraining to one or two outlets atend(s) of wall
# Backfill behind top of wall, seedand straw
1.00
5 ties high up to 15 LF long MIN --- --- --- --- 03.300
Additional length of ties over 15 LF ADD LF --- --- --- --- 03.301
8 ties high up to 15 LF long MIN --- --- --- --- 03.302
Additional length of ties over 15 LF ADD LF --- --- --- --- 03.303
11 ties high up to 15 LF long MIN --- --- --- --- 03.304
Additional length of ties over 15 LF ADD LF --- --- --- --- 03.305

34 H1MD0220001CH0133
4. CONCRETE PAD
SPECIFICATIONS UNIT
CONTRACTOR’S
DIRECT JOB COSTPRICE
DATABASEITEMNO.MATLS LABOR TOTAL
CONCRETEPAD
Small 4"-5" thick concrete pad ongrade # Dig out and level ground # Spread vapor barrier over ground # Build forms with 2" x 4" or 2" x 6"
lumber # Mix 60 lb bags of concrete ready-
mix with water # Place 6 x 6 #10 woven wire mesh
and pour concrete, floated andtroweled
# Remove forms and shapeconcrete edges
2' x 4' pad EA --- --- --- --- 04.000
3' x 4' pad EA --- --- --- --- 04.001
4' x 4' pad EA --- --- --- --- 04.002
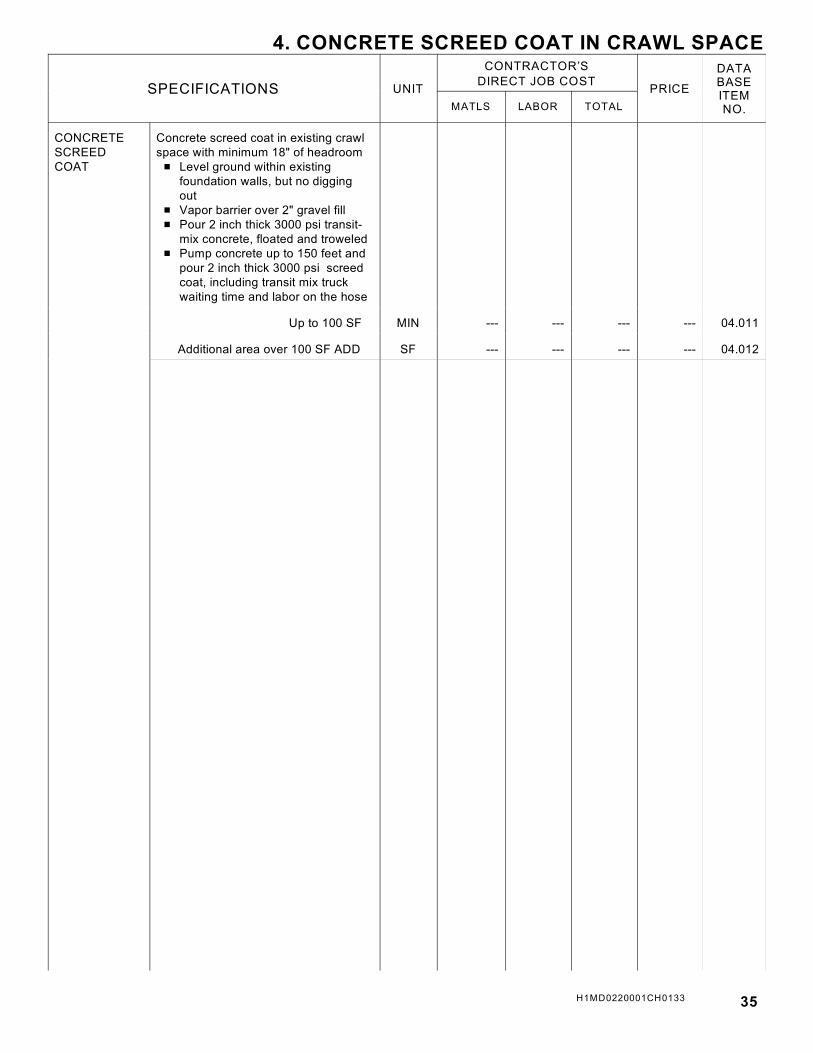
H1MD0220001CH0133 35
4. CONCRETE SCREED COAT IN CRAWL SPACE
SPECIFICATIONS UNIT
CONTRACTOR’S
DIRECT JOB COSTPRICE
DATABASEITEMNO.MATLS LABOR TOTAL
CONCRETESCREEDCOAT
Concrete screed coat in existing crawlspace with minimum 18" of headroom # Level ground within existing
foundation walls, but no diggingout
# Vapor barrier over 2" gravel fill # Pour 2 inch thick 3000 psi transit-
mix concrete, floated and troweled # Pump concrete up to 150 feet and
pour 2 inch thick 3000 psi screedcoat, including transit mix truckwaiting time and labor on the hose
Up to 100 SF MIN --- --- --- --- 04.011
Additional area over 100 SF ADD SF --- --- --- --- 04.012

36 H1MD0220001CH0133
4. REPLACE CONCRETE SIDEWALK
SPECIFICATIONS UNIT
CONTRACTOR’S
DIRECT JOB COSTPRICE
DATABASEITEMNO.MATLS LABOR TOTAL
REPLACESIDEWALKSLAB
Replace damaged sidewalk slab # Break up and remove damaged
sidewalk with electric breakerhammer or sledge hammer
# Remove grass and dirt next tosidewalk slab
# Set 2" x 4" forms on each side ofsidewalk to appropriate finishedheight
# Place vapor barrier and 6" x 6" No.10 wire mesh reinforcement informed area
# Mix bagged ready-to-use concretemix and place into formed area
# Level concrete with 2 x screedboard and float the surface
# As concrete sets, smooth surfacewith steel trowel, make controljoints with groover and edgeperimeter to match existingsidewalk
# Stiff broom to match existingtexture
# Remove forms and rake site clean # Damp spray concrete regularly
and keep covered for one week toensure a durable sidewalk
Up to 10 SF MIN --- --- --- --- 04.100
Additional area over 10 SF ADD SF --- --- --- --- 04.101

H1MD0220001CH0133 37
4. ASPHALT OR BLACKTOP DRIVEWAY
SPECIFICATIONS UNIT
CONTRACTOR’S
DIRECT JOB COSTPRICE
DATABASEITEMNO.MATLS LABOR TOTAL
ASPHALT
REPAIR
Repair crack in asphalt or blacktopsurface with asphalt crack filler in atube
Up to 10 LF MIN --- --- --- --- 04.200
Over 10 LF ADD LF --- --- --- --- 04.201
Repair hole in asphalt or blacktopsurface with cold-mix asphalt,3" deep
Up to 2 SF MIN --- --- --- --- 04.202
Over 2 SF ADD SF --- --- --- --- 04.203
SEALBLACKTOPDRIVEWAY
# Clean thoroughly the surface ofdriveway
# Apply and seal blacktop drivewayusing a coal tar sealer anddriveway sealer brush, one coat
Up to 300 SF MIN --- --- --- --- 04.205
Additional area over 300 SF ADD SF --- --- --- --- 04.206
CLEANBLACKTOPDRIVEWAY
Clean blacktop driveway withhousehold cleaner, broom and waterhose
Up to 300 SF MIN --- --- --- --- 04.210
Additional area over 300 SF ADD SF --- --- --- --- 04.211

38 H1MD0220001CH0133
4. CONCRETE WALL AND FLOOR PATCHING
SPECIFICATIONS UNIT
CONTRACTOR’S
DIRECT JOB COSTPRICE
DATABASEITEMNO.MATLS LABOR TOTAL
PATCHINGSMALLCRACK
Patch a small crack (less than 1/8" wide)in concrete floor or wall # Remove debris from crack, clean out
with air hose or vacuum cleaner # Fill crack with polyurethane caulking # Smooth caulking
Crack up to 8 LF long MIN --- --- --- --- 04.300
Additional length of crack over 8 LF ADD LF --- --- --- --- 04.301
PATCHINGLARGECRACK
Patch a large crack (over 1/8" wide) inconcrete floor or wall # Deepen crack to at least 1/2 inch and
undercut sides # Remove debris from crack, clean out
with air hose or vacuum cleaner # Fill the crack with ready-mix vinyl
concrete patch and smooth thesurface
# Use stiff broom prior to concretesetting up to match surroundingconcrete texture and keep damp for atleast one day
Crack up to 4 LF long MIN --- --- --- --- 04.302
Additional length of crack over 4 LF ADD LF --- --- --- --- 04.303
PATCHINGHOLE INCONCRETEFLOOR
Patch hole in concrete with sand mixconcrete and bonding agent # Remove debris from hole and
damaged concrete surrounding hole toa depth of at least 2 inches
# Clean out hole with air hose orvacuum cleaner
# Mix small amount of sand mix withliquid acrylic fortifier and brush on tothe sides and bottom of the hole
# Mix sand mix with acrylic fortifier andfill hole
# Level the patched hole with wood ormagnesium float
# Prior to patch setting up, smooth withsteel trowel or stiff brush to matcharea surrounding patch
3" square x 2" deep EA --- --- --- --- 04.305
6" square x 2" deep EA --- --- --- --- 04.306
12" square x 2" deep
EA = Each hole
EA --- --- --- --- 04.307

H1MD0220001CH0133 39
4. CONCRETE STEP PATCHING
SPECIFICATIONS UNIT
CONTRACTOR’S
DIRECT JOB COSTPRICE
DATABASEITEMNO.MATLS LABOR TOTAL
PATCHCONCRETETREAD
Patch crumbling concrete tread edgeup to 48 inches long # Clean out damaged area and
undercut sides and edges # Drill holes in damaged area and
drive cut nails in holes to secureconcrete patch
# Place 1 x form board againstdamaged step riser and bracesecurely
# Apply brush coat of liquid acrylicfortifier to all surfaces acceptingpatch
# Mix fiber-reinforced concrete withliquid acrylic fortifier and place informed area
# Smooth top surface with trowel toappropriate height and edge newpatch to match existing
# Remove form board and finisharea of riser to match existing
# Keep patched area damp forminimum of 24 hours
EA = Each patch up to 48" long EA --- --- --- --- 04.320

40 H1MD0220001CH0133
4. STABILIZE SETTLED EXTERIOR SLAB
SPECIFICATIONS UNIT
CONTRACTOR’S
DIRECT JOB COSTPRICE
DATABASEITEMNO.MATLS LABOR TOTAL
STABILIZESETTLEDEXTERIORSLABAGAINSTCONCRETEWALL
To prevent additional settlement of anexterior slab next to concrete housefoundation wall, install rebar into slab # Inside basement, drill through
concrete house foundation wall intoslab 12" OC for insertion of 1/2 inchdiameter and 24" long steel bars
# Hammer and grout #4 (1/2") steelbars through holes into concrete slabcountersunk 1/2"
# Patch wall
1.00
Up to 3 drilled holes MIN --- --- --- --- 04.400
Additional drilled holes more than 3 ADD EA --- --- --- --- 04.401
STABILIZESETTLEDEXTERIORSLABAGAINSTBLOCK WALL
To prevent additional settlement of anexterior slab next to a concrete blockfoundation wall, install rebar into slab # Break through and open up interior
of foundation wall above whereexterior slab butts against it on theoutside
# Drill through block wall into exteriorslab 12" OC and hammer #4 (1/2") x24" steel bar through hole intoconcrete slab
# Place steel wood in block cell cavitybelow drilled hole and steel bar
# Grout below and around steel barwithin block cell cavity and smoothgrout even with interior block wallsurface
Up to 3 drilled holes MIN --- --- --- --- 04.405
Additional drilled holes more than 3 ADD EA --- --- --- --- 04.406

H1MD0220001CH0133 41
4. MUDJACKING
SPECIFICATIONS UNIT
CONTRACTOR’S
DIRECT JOB COST PRICE
DATABASEITEMNO.MATLS LABOR TOTAL
MUDJACKING Raise existing settled concretewalkway or slab by filling void underwith pumped concrete grout # Drill holes in concrete slab # Pump concrete grout under
pressure through holes, fillingvoids under slab and compactingthe earth below
# When slab is raised as much as 8inches to original level, patchdrilled holes with mortar mix
Up to 100 SF MIN --- --- --- --- 04.420
Additional area over 100 SF ADD SF --- --- --- --- 04.421

42 H1MD0220001CH0133
5. BRICK REPOINTING AND CLEANING
SPECIFICATIONS UNIT
CONTRACTOR’S
DIRECT JOB COST PRICE
DATABASEITEMNO.MATLS LABOR TOTAL
REPOINTBRICKS
Repair mortar joints in brick wall # Cut out damaged mortar joints to a
depth of at least 1/2" # Clean joints with wire brush and
dampen # Pack ready-mix mortar in joints with
trowel and finish joints with trowel tomatch existing mortar joints
# Remove excess mortar # Keep mortar damp for several days
after finishing # All horizontal and vertical mortar
joints
1.00
Soft mortar joints, Up to 10 SF MIN --- --- --- --- 05.000
Additional mortar joints over 10 SF ADD SF --- --- --- --- 05.001
Hard mortar joints, up to 10 SF MIN --- --- --- --- 05.005
Additional mortar joints over 10 SF ADD SF --- --- --- --- 05.006
CLEANBRICKS
Clean and wash smooth face brick withmuriatic acid and water
Clean and wash up to 25 SF MIN --- --- --- --- 05.010
Additional SF over 25 SF ADD SF --- --- --- --- 05.011
Clean and wash rough textured face brickwith muriatic acid and water
Clean and wash up to 25 SF MIN --- --- --- --- 05.012
Additional SF over 25 SF ADD SF --- --- --- --- 05.013

H1MD0220001CH0133 43
5. REPLACE DAMAGED BRICK
SPECIFICATIONS UNIT
CONTRACTOR’S
DIRECT JOB COST PRICE
DATABASEITEMNO.MATLS LABOR TOTAL
REPLACE
DAMAGED
BRICK
Remove and replace damaged brick
# Rake mortar out of joints of
damaged brick
# Remove damaged brick with
chisel and clean the space
# Dampen the entire surface of the
space and lay a thick coat of
mortar on all surfaces
# Slide the replacement brick into
the slot approximately 1/2" above
the top of the brick below
# Tap it into the slot flush with the
surrounding bricks
# Apply additional mortar as
required and finish joints with
trowel
1.00
Replace 1 brick MIN --- --- --- --- 05.020
Replace additional bricks
EA = Each brick
EA --- --- --- --- 05.021

44 H1MD0220001CH0133
5. WALKWAY AND PATIO REPAIRS AND REPLACEMENT
SPECIFICATIONS UNIT
CONTRACTOR’S
DIRECT JOB COST PRICE
DATABASEITEMNO.MATLS LABOR TOTAL
REPLACEFLAGSTONE
Replace damaged 2" thick flagstone inwalkway or patio on ground in sand withstone dust joints
1.00
Up to 3 SF MIN --- --- --- --- 05.100
Additional SF over 3 SF ADD SF --- --- --- --- 05.101
Replace damaged 1-1/2" thickflagstone in walkway or patio set inconcrete bed with concrete joints
Up to 3 SF MIN --- --- --- --- 05.102
Additional SF over 3 SF ADD SF --- --- --- --- 05.103
REPLACEBRICK
Replace damaged brick in walkway orpatio on ground in sand
Up to 10 bricks MIN --- --- --- --- 05.110
Additional bricks over 10 bricks ADD SF --- --- --- --- 05.111
Replace damaged brick in walkway orpatio set in concrete bed with concretejoints
Up to 10 bricks MIN --- --- --- --- 05.112
Additional bricks over 10 bricks ADD SF --- --- --- --- 05.113
RESETFLAGSTONE
Remove and reset existing 2" thickflagstone in walkway or patio on groundin sand
Up to 3 SF MIN --- --- --- --- 05.120
Additional SF over 3 SF ADD SF --- --- --- --- 05.121
RESET BRICK Remove and reset existing brick inwalkway or patio on ground in sand
Up to 10 bricks MIN --- --- --- --- 05.125
Additional brick over 10 bricks ADD EA --- --- --- --- 05.126

H1MD0220001CH0133 45
5. STUCCO REPAIRS
SPECIFICATIONS UNIT
CONTRACTOR’S
DIRECT JOB COST PRICE
DATABASEITEMNO.MATLS LABOR TOTAL
PATCH CRACKEDSTUCCO
Remove damaged stucco and patch withstucco patching compound # Undercut edges of crack # Brush away debris in crack and
dampen # Fill crack with stucco compound,
packing it tightly # Finish surface texture to match
surrounding stucco
1.00
Up to 5 LF of cracks MIN --- --- --- --- 05.200
Additional length over 5 LF ADD LF --- --- --- --- 05.201
PATCH SMALLHOLE INSTUCCO
Remove damaged stucco and patch holewith stucco patching compound # Undercut edges of hole # Brush away debris in hole # Staple in a new piece of wire mesh if
required # Dampen hole area # Fill hole with stucco compound,
packing it tightly # Finish surface texture to match
surrounding stucco
EA = Each hole
EA --- --- --- --- 05.205
REPAIRLARGE HOLEIN STUCCOWITH THIN-COAT
Remove damaged stucco from large(over 6" wide) hole and patch # Undercut edges of hole # Brush away debris in hole # Staple in a new piece of wire mesh # Fill hole with fiberglass-reinforced
cement plaster mixed with sand andwater
# Apply synthetic stucco finish afterminimum of 24 hours to matchsurrounding stucco texture
EA = Each hole
EA --- --- --- --- 05.206
REPAIRLARGE HOLEIN STUCCOWITH THREECOATS
Remove damaged stucco from large(over 6" wide) hole and patch with threecoats stucco # Undercut edges of hole # Brush away debris in hole # Staple in a new piece of wire mesh # Apply coat of portland cement mixed
with sand, lime and water to within1/4" of surface
# Apply second coat of stucco to within1/8" of surface
# Apply third coat flush with surface # Smooth and texture it to match the
surrounding area
EA = Each hole
EA 6.50 60.00 66.50 143.13

46 H1MD0220001CH0133
5. LOW MASONRY RETAINING WALL
SPECIFICATIONS UNIT
CONTRACTOR’S
DIRECT JOB COSTPRICE
DATABASEITEMNO.MATLS LABOR TOTAL
WALLFOOTING
Build new continuous concrete footing forlow retaining wall # Remove sod from area above new
footing excavation # Excavate so that footing will be
poured against undisturbed face ofthe footing trench
# Pour concrete footing with three #5(5/8") steel bars in footing and #5(5/8") steel bars 24" OC runningvertically from footing to near top ofnew wall
# Excess fill to remain on site
Bottom of footing 24" below grade
1.00
12" H x 24" W footing up to 10 LF MIN --- --- --- --- 05.300
Additional LF more than 10 LF ADD LF --- --- --- --- 05.301
12" H x 36" W footing up to 10 LF MIN --- --- --- --- 05.302
Additional LF more than 10 LF ADD
Bottom of footing 36" below grade
LF --- --- --- --- 05.303
12" H x 24" W footing up to 10 LF MIN --- --- --- --- 05.304
Additional LF more than 10 LF ADD LF --- --- --- --- 05.305
12" H x 36" W footing up to 10 LF MIN --- --- --- --- 05.306
Additional LF more than 10 LF ADD
Bottom of footing 48" below grade
LF --- --- --- --- 05.307
12" H x 24" W footing up to 10 LF MIN --- --- --- --- 05.308
Additional LF more than 10 LF ADD LF --- --- --- --- 05.309
12" H x 36" W footing up to 10 LF MIN --- --- --- --- 05.310
Additional LF more than 10 LF ADD LF --- --- --- --- 05.311
LOWRETAININGWALL
Build new low masonry retaining wall # Build new 8" x 8" x 16" block retaining
wall on existing concrete footing withgrouted rebar
# Install weepholes in wall 6'-0" OC andgrout in 4" plastic pipe
# Install 4" perforated drain pipe alongtop of footing sloping to out-lets atends of wall or to weepholes
# Line excavation with filter cloth orgeotextile fabric
# Cover footing behind wall with stone towithin 6" of top of wall
# Cover crushed stone with filter clothor geotextile fabric
Up to 27 SF of wall MIN --- --- --- --- 05.320
Additional SF wall over 27 SF ADD
SF = One face of wall
SF --- --- --- --- 05.321

H1MD0220001CH0133 47
5. WEEPHOLE IN EXISTING RETAINING WALL
SPECIFICATIONS UNIT
CONTRACTOR’S
DIRECT JOB COST PRICE
DATABASEITEMNO.MATLS LABOR TOTAL
CUTWEEPHOLE INRETAININGWALL
Cut weephole in existing solid block orbrick and block retaining wall # Remove sod and dig 12"-30" square
hole behind wall down to level ofbottom of new weephole
# Line excavation with filtercloth orgeotextile fabric
# Cut new 4" x 4" weephole in wall andgrout in 4" PVC pipe 5 ft.OC
# Install crushed stone extending up towithin 6" of top of grade
# Cover crushed stone with filtercloth orgeotextile fabric
# Backfill and replace sod # Excess fill remains on site
Height of GradeAbove Weephole
1.00
24" EA --- --- --- --- 05.330
36" EA --- --- --- --- 05.331
48" EA --- --- --- --- 05.332
60"
EA = Each weephole
EA --- --- --- --- 05.333
DRAINTILEBEHINDEXISTINGRETAININGWALL
Dig down and install weephole anddraintile along back of existing retainingwall # Remove sod along back of retaining
wall and dig hole 12" to 30" widealong back of wall the length of thewall to the top of the footing
# Line excavation with filtercloth orgeotextile fabric
# Cut 4" x 4" weephole in wall and groutin 4" PVC pipe, 5 ft. OC
# Install perforated PVC pipe along thebottom of the excavation connected toand draining to new 4" weephole
# Cover drainpipe with crushed stoneextending up to within 6" of top ofgrade
# Cover crushed stone with filtercloth orgeotextile fabric
# Backfill and replace sod # Excess fill remains on site
Height of Grade Above Footing
24" EA --- --- --- --- 05.340
36" EA --- --- --- --- 05.341
48" EA --- --- --- --- 05.342
60"
LF = Length of new drainpipe
EA --- --- --- --- 05.343

48 H1MD0220001CH0133
5. REPLACE LOW RETAINING WALL
SPECIFICATIONS UNIT
CONTRACTOR’SDIRECT JOB COST
PRICE
DATABASEITEMNO.MATLS LABOR TOTAL
REPLACE LOWRETAININGWALL
Replace existing low retaining wall, topof wall not over 36" above grade # Remove sod for 24" behind
existing retaining wall # Break up and remove existing
retaining wall # Remove by hand all dirt covering
existing footing # Drill holes in top of existing footing
and install #5 (5/8") x 24" steelbars 24" OC
# Build new 8" x 8" x 16" blockretaining wall on footing withgrouted rebar
# Install weepholes in wall 6'-0" OCand grout in 4" clay tile or plasticpipe
# Install perforated drain pipe alongtop of footing sloping to outlets atend(s) of wall or to weepholes
# Line excavation with filtercloth orgeotextile fabric
# Cover footing behind wall withcrushed stone to within 6" of topof wall
# Cover crushed stone withfiltercloth or geotextile fabric,backfill and replace sod
1.00
Up to 27 SF of wall MIN --- --- --- --- 05.350
Additional SF of wall over 27 SF ADD SF --- --- --- --- 05.351
SF = One face of retaining wall
BRICKVENEER ONRETAININGWALL
Install common brick veneer facing onabove retaining wall
Up to 27 SF of wall MIN --- --- --- --- 05.360
Additional SF of wall over 27 SF ADD SF --- --- --- --- 05.361
SF = One face of retaining wall
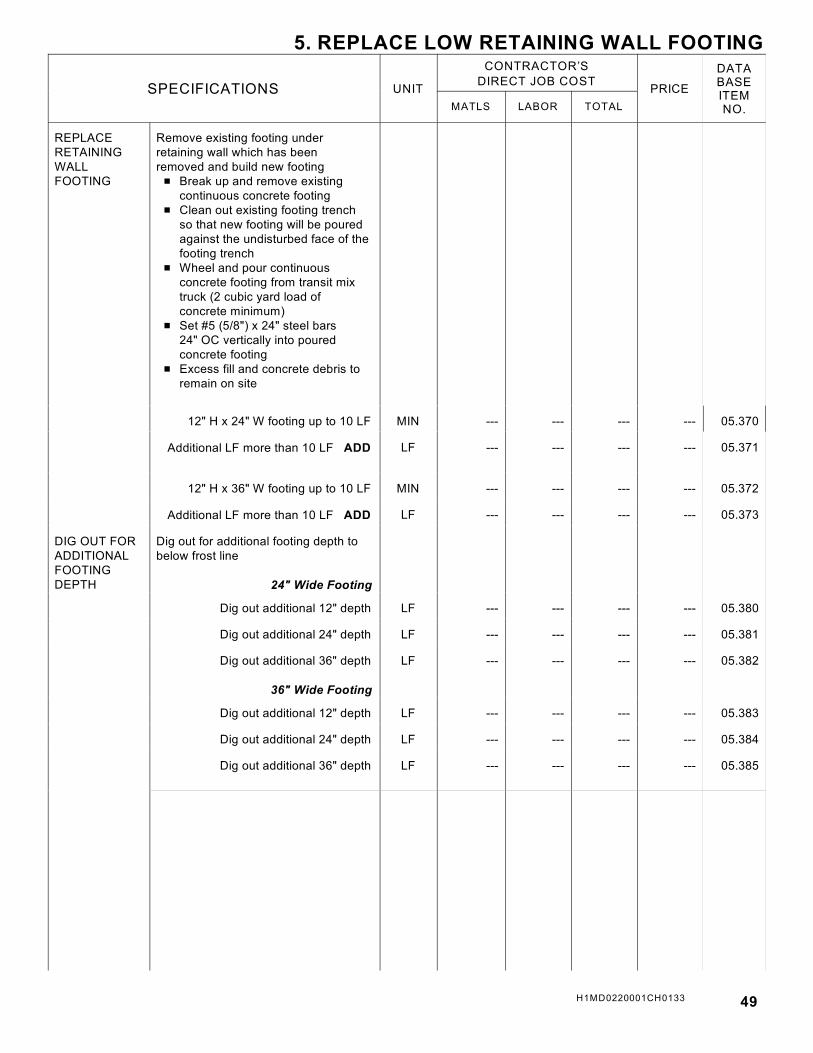
H1MD0220001CH0133 49
5. REPLACE LOW RETAINING WALL FOOTING
SPECIFICATIONS UNIT
CONTRACTOR’S
DIRECT JOB COST PRICE
DATABASEITEMNO.MATLS LABOR TOTAL
REPLACERETAININGWALLFOOTING
Remove existing footing underretaining wall which has beenremoved and build new footing # Break up and remove existing
continuous concrete footing # Clean out existing footing trench
so that new footing will be pouredagainst the undisturbed face of thefooting trench
# Wheel and pour continuousconcrete footing from transit mixtruck (2 cubic yard load ofconcrete minimum)
# Set #5 (5/8") x 24" steel bars 24" OC vertically into pouredconcrete footing
# Excess fill and concrete debris toremain on site
1.00
12" H x 24" W footing up to 10 LF MIN --- --- --- --- 05.370
Additional LF more than 10 LF ADD LF --- --- --- --- 05.371
12" H x 36" W footing up to 10 LF MIN --- --- --- --- 05.372
Additional LF more than 10 LF ADD LF --- --- --- --- 05.373
DIG OUT FOR ADDITIONALFOOTINGDEPTH
Dig out for additional footing depth tobelow frost line
24" Wide Footing
Dig out additional 12" depth LF --- --- --- --- 05.380
Dig out additional 24" depth LF --- --- --- --- 05.381
Dig out additional 36" depth
36" Wide Footing
LF --- --- --- --- 05.382
Dig out additional 12" depth LF --- --- --- --- 05.383
Dig out additional 24" depth LF --- --- --- --- 05.384
Dig out additional 36" depth LF --- --- --- --- 05.385

50 H1MD0220001CH0133
5. CHIMNEY REPAIR
SPECIFICATIONS UNIT
CONTRACTOR’S
DIRECT JOB COST PRICE
DATABASEITEMNO.MATLS LABOR TOTAL
REPLACECEMENTCHIMNEYSHELF
Remove existing cement chimneyshelf # Build wooden 2" x 4" form around
perimeter at top of masonrychimney allowing 1 inch overhandfor shelf
# Apply polyethylene material at topof bricks and wrapped aroundeach flue to prevent bonding withshelf
# Mix and place 3" mortar mix withPortland cement, sand and peagravel sloping from shelf edge upto flue with wire meshreinforcement
# Remove forms after mortar hasset
# 24" x 30" chimney
1.00
Top of Chimney Above Grade 20 LF MIN --- --- --- --- 05.400
Additional LF Above grade ADD LF --- --- --- --- 05.401
CHIMNEYFLUE RAINCAP
Install stainless steel flue cap toexisting flue, up to 30 ft. above grade
Flue size
8-1/2" x 8-1/2" EA --- --- --- --- 05.405
8-1/2" x 13" EA --- --- --- --- 05.406
12" x 12" EA --- --- --- --- 05.407
13" x 13" EA --- --- --- --- 05.408
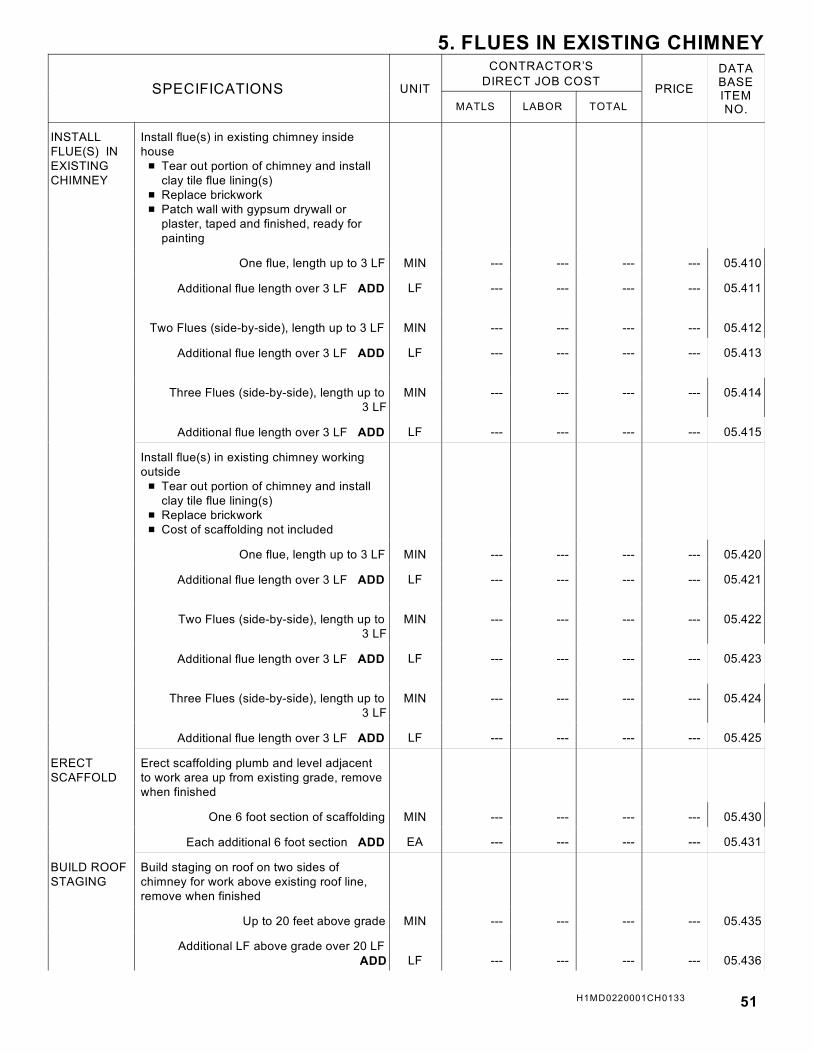
H1MD0220001CH0133 51
5. FLUES IN EXISTING CHIMNEY
SPECIFICATIONS UNIT
CONTRACTOR’S
DIRECT JOB COST PRICE
DATABASEITEMNO.MATLS LABOR TOTAL
INSTALLFLUE(S) INEXISTINGCHIMNEY
Install flue(s) in existing chimney insidehouse # Tear out portion of chimney and install
clay tile flue lining(s) # Replace brickwork # Patch wall with gypsum drywall or
plaster, taped and finished, ready forpainting
1.00
One flue, length up to 3 LF MIN --- --- --- --- 05.410
Additional flue length over 3 LF ADD LF --- --- --- --- 05.411
Two Flues (side-by-side), length up to 3 LF MIN --- --- --- --- 05.412
Additional flue length over 3 LF ADD LF --- --- --- --- 05.413
Three Flues (side-by-side), length up to3 LF
MIN --- --- --- --- 05.414
Additional flue length over 3 LF ADD LF --- --- --- --- 05.415
Install flue(s) in existing chimney workingoutside # Tear out portion of chimney and install
clay tile flue lining(s) # Replace brickwork # Cost of scaffolding not included
One flue, length up to 3 LF MIN --- --- --- --- 05.420
Additional flue length over 3 LF ADD LF --- --- --- --- 05.421
Two Flues (side-by-side), length up to3 LF
MIN --- --- --- --- 05.422
Additional flue length over 3 LF ADD LF --- --- --- --- 05.423
Three Flues (side-by-side), length up to3 LF
MIN --- --- --- --- 05.424
Additional flue length over 3 LF ADD LF --- --- --- --- 05.425
ERECTSCAFFOLD
Erect scaffolding plumb and level adjacentto work area up from existing grade, removewhen finished
One 6 foot section of scaffolding MIN --- --- --- --- 05.430
Each additional 6 foot section ADD EA --- --- --- --- 05.431
BUILD ROOFSTAGING
Build staging on roof on two sides ofchimney for work above existing roof line,remove when finished
Up to 20 feet above grade MIN --- --- --- --- 05.435
Additional LF above grade over 20 LFADD LF --- --- --- --- 05.436

52 H1MD0220001CH0133
5. FIREPLACE AND CHIMNEY REPAIR
SPECIFICATIONS UNIT
CONTRACTOR’S
DIRECT JOB COSTPRICE
DATABASEITEMNO.MATLS LABOR TOTAL
REPLACELINTEL
Replace lintel in existing fireplace # Cut away brickwork and remove
existing lintel # Install new 48" lintel # Replace brickwork
No difficulty EA --- --- --- --- 05.450
Some difficulty EA --- --- --- --- 05.451
Difficult EA --- --- --- --- 05.452
Very difficult EA --- --- --- --- 05.453
INSTALLDAMPER
Install damper in existing fireplace # Remove portion of chimney
above fireplace # Install damper # Replace brickwork
No difficulty EA --- --- --- --- 05.455
Some difficulty EA --- --- --- --- 05.456
Difficult EA --- --- --- --- 05.457
Very difficult EA --- --- --- --- 05.458
ALTERFIREPLACEFOR USE
Alter bricked up fireplace for use # Break through brick to fireplace # Clean out and repair for use with
existing damper
No difficulty EA --- --- --- --- 05.460
Some difficulty EA --- --- --- --- 05.461
Difficult EA --- --- --- --- 05.462
Very difficult EA --- --- --- --- 05.463

H1MD0220001CH0133 53
5. FRONT HEARTH REPAIRS
SPECIFICATIONS UNIT
CONTRACTOR’S
DIRECT JOB COSTPRICE
DATABASEITEMNO.MATLS LABOR TOTAL
BRICK FRONTHEARTH,FLOOR LEVEL
Repair floor level brick hearth
Up to 10 bricks MIN --- --- --- --- 05.470
Additional bricks over 10 bricks ADD EA --- --- --- --- 05.471
RAISEDBRICKHEARTH
Repair floor level brick hearth
Up to 10 bricks MIN --- --- --- --- 05.472
Additional bricks over 10 bricks ADD EA --- --- --- --- 05.473
Repair raised hearth brick riser
Up to 10 bricks MIN --- --- --- --- 05.474
Additional bricks over 10 bricks ADD EA --- --- --- --- 05.475
Replace raised hearth top and riser
Up to 10 bricks MIN --- --- --- --- 05.476
Additional bricks over 10 bricks ADD EA --- --- --- --- 05.477
FLAGSTONEFRONTHEARTH,FLOOR LEVEL
Repair floor level flagstone hearth
Up to 3 SF MIN --- --- --- --- 05.480
Additional SF over 3 SF ADD SF --- --- --- --- 05.481
RAISEDFLAGSTONEHEARTH
Repair top of raised flagstone hearth
Up to 3 SF MIN --- --- --- --- 05.482
Additional SF over 3 SF ADD SF --- --- --- --- 05.483
Repair raised hearth flagstone riser
Up to 3 SF MIN --- --- --- --- 05.484
Additional SF over 3 SF ADD SF --- --- --- --- 05.485
Replace raised hearth top and riser
Up to 3 SF MIN --- --- --- --- 05.487
Additional SF over 3 SF ADD SF --- --- --- --- 05.488

54 H1MD0220001CH0133
6. REPLACE MUDSILL
SPECIFICATIONS UNIT
CONTRACTOR’S
DIRECT JOB COSTPRICE
DATA
BASE
ITEM
NO.MATLS LABOR TOTAL
REPLACEMUDSILL,PLATFORMFRAMING
Replace defective mudsill in basementor crawl space with minimum of 18"headroom, platform framing # Jack up and shore floor joists
supported by existing mudsill # Remove existing mudsill from
attachment to joists above # Remove mudsill # Install new mudsill and nail to
existing joists. Notch mudsill toreceive anchor bolts and attach toanchor bolts with nuts andwashers
# No siding removal or repair
1.00
Full Basement LF --- --- --- --- 06.000
Crawl Space
LF = Mudsill
LF --- --- --- --- 06.001
REPLACEMUDSILL,BALLOONFRAMING
Replace defective mudsill in basementor crawl space with minimum of 18"headroom, balloon framing # Jack up and shore floor joists and
studs supported by existingmudsill
# Remove existing mudsill fromattachment to joists and studs above
# Remove mudsill # Install new mudsill and nail to
existing joists and studs. Notchmudsill to receive anchor boltsand attach to anchor bolts withnuts and washers
# No siding removal or repair
Full Basement LF --- --- --- --- 06.005
Crawl Space
LF = Mudsill
LF --- --- --- --- 06.006

H1MD0220001CH0133 55
6. REPLACE WOOD BEAM
SPECIFICATIONS UNIT
CONTRACTOR’S
DIRECT JOB COSTPRICE
DATA
BASE
ITEM
NO.MATLS LABOR TOTAL
REPLACEWOOD BEAM
Shore floor above, tear out existingdefective wood beam, install newbeam on existing posts or columns and remove shoring
New Beam
1.00
8" #13 steel I-beam LF --- --- --- --- 06.010
8" #17 steel I-beam LF --- --- --- --- 06.011
Two 2" x 8" wood beam LF --- --- --- --- 06.012
Three 2" x 8" wood beam LF --- --- --- --- 06.013
Two 2" x 10" wood beam LF --- --- --- --- 06.014
Three 2" x 10" wood beam LF --- --- --- --- 06.015
Two 2" x 12" wood beam LF --- --- --- --- 06.016
Three 2" x 12" wood beam LF --- --- --- --- 06.017
5-1/2" x 12" glued laminated woodbeam
LF --- --- --- --- 06.018
Two 1-3/4" x 9-1/4" laminatedveneer wood beam
LF --- --- --- --- 06.019
Three 1-3/4" x 9-1/4" laminatedveneer wood beam
LF --- --- --- --- 06.020
Two 1-3/4" x 11-7/8" laminatedveneer wood beam
LF --- --- --- --- 06.021
Three 1-3/4" x 11-7/8" laminatedveneer wood beam
LF --- --- --- --- 06.022
Wood flitch plate, 1/2" x 9" plywoodbetween two 2" x 10"
LF = Length of beam
LF --- --- --- --- 06.023
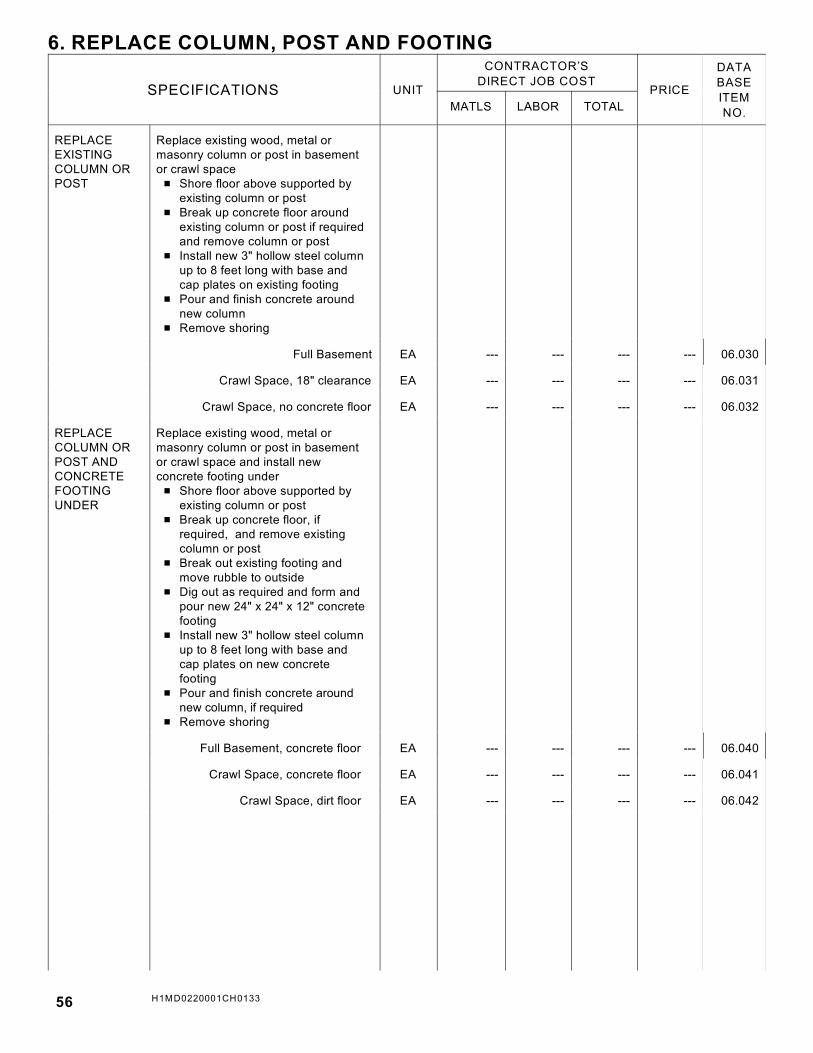
56 H1MD0220001CH0133
6. REPLACE COLUMN, POST AND FOOTING
SPECIFICATIONS UNIT
CONTRACTOR’S
DIRECT JOB COSTPRICE
DATA
BASE
ITEM
NO.MATLS LABOR TOTAL
REPLACEEXISTINGCOLUMN ORPOST
Replace existing wood, metal ormasonry column or post in basementor crawl space # Shore floor above supported by
existing column or post # Break up concrete floor around
existing column or post if required and remove column or post
# Install new 3" hollow steel columnup to 8 feet long with base andcap plates on existing footing
# Pour and finish concrete aroundnew column
# Remove shoring
1.00
Full Basement EA --- --- --- --- 06.030
Crawl Space, 18" clearance EA --- --- --- --- 06.031
Crawl Space, no concrete floor EA --- --- --- --- 06.032
REPLACE COLUMN ORPOST ANDCONCRETEFOOTINGUNDER
Replace existing wood, metal ormasonry column or post in basementor crawl space and install newconcrete footing under # Shore floor above supported by
existing column or post # Break up concrete floor, if
required, and remove existingcolumn or post
# Break out existing footing andmove rubble to outside
# Dig out as required and form andpour new 24" x 24" x 12" concretefooting
# Install new 3" hollow steel columnup to 8 feet long with base andcap plates on new concretefooting
# Pour and finish concrete aroundnew column, if required
# Remove shoring
Full Basement, concrete floor EA --- --- --- --- 06.040
Crawl Space, concrete floor EA --- --- --- --- 06.041
Crawl Space, dirt floor EA --- --- --- --- 06.042

H1MD0220001CH0133 57
6. DOUBLE UP JOISTS (SISTERING)
SPECIFICATIONS UNIT
CONTRACTOR’S
DIRECT JOB COSTPRICE
DATA
BASE
ITEM
NO.MATLS LABOR TOTAL
DOUBLE UPJOISTS(SISTERING)
Double up existing joists with newjoists spiked to existing joists openfrom below
1.00
2" x 6" LF --- --- --- --- 06.050
2" x 8" LF --- --- --- --- 06.051
2" x 10" LF --- --- --- --- 06.052
2" x 12"
LF = New sistering joist
LF --- --- --- --- 06.053

58 H1MD0220001CH0133
7. STUDWALL FRAMING
SPECIFICATIONS UNIT
CONTRACTOR’S
DIRECT JOB COSTPRICE
DATA
BASE
ITEM
NO.MATLS LABOR TOTAL
KNEEWALL Install kneewall in existing attic tosupport rafters or for future room wall
1.00
2" x 4" x 4'-0" LF --- --- --- --- 07.000
2" x 6" x 4'-0" LF --- --- --- --- 07.001
2" x 4" x 6'-0" LF --- --- --- --- 07.002
2" x 6" x 6'-0"
LF = Length of kneewall
LF --- --- --- --- 07.003
CLOSETFRAMING
Frame out closet in corner of existingroom with doorway up to 6 feet wide
2" x 4" x 8'-0" high LF --- --- --- --- 07.010
2" x 6" x 8'-0" high LF --- --- --- --- 07.011
2" x 4" x 10'-0" high LF --- --- --- --- 07.012
2" x 6" x 10'-0" high
LF = Length of partitions,Including doorway
LF --- --- --- --- 07.013
BENCH SEATDUCTENCLOSURE
Enclose existing attic ductwork withbench seat # Nail ledger to existing wall above
ductwork not over 24" above floor # Build 2" x 4" kneewall even with
top of ledger and outside theductwork
# Install 5/8" plywood cap at the topof kneewall and ledger, leavingfront and top ready for finishing
LF = Length of bench seat
LF --- --- --- --- 07.020

H1MD0220001CH0133 59
7. REPAIR DAMAGED WALL
SPECIFICATIONS UNIT
CONTRACTOR’S
DIRECT JOB COSTPRICE
DATA
BASE
ITEM
NO.MATLS LABOR TOTAL
REPAIRDAMAGEDWALLFRAMINGFROM INSIDE
Repair water or termite damaged wallframing from inside the building # Remove base moulding from
damaged area of wall and save # Remove wallboard from damaged
area # Shore ceiling over damaged area # Remove sole plate and install new
sole plate # Spike new 2" x 4" studs to
existing studs # Remove shoring # Install new wallboard, taped and
finished ready for painting # Install saved base moulding
1.00
Repair damaged area up to 36 SF MIN --- --- --- --- 07.050
Additional area over 36 SF ADD SF --- --- --- --- 07.051
REPAIRDAMAGEDWALLFRAMINGFROMOUTSIDE
Repair water or termite damaged wallframing from outside the building # Remove siding from damaged
area and save # Remove sheathing from damaged
area # Shore ceiling inside the building
over damaged area # Remove sole plate and install new
sole plate # Spike new 2" x 4" studs to
existing studs # Remove shoring # Install new sheathing and the
saved siding
Repair damaged framing up to 36 SF MIN --- --- --- --- 07.055
Additional area over 36 SF ADD SF --- --- --- --- 07.056
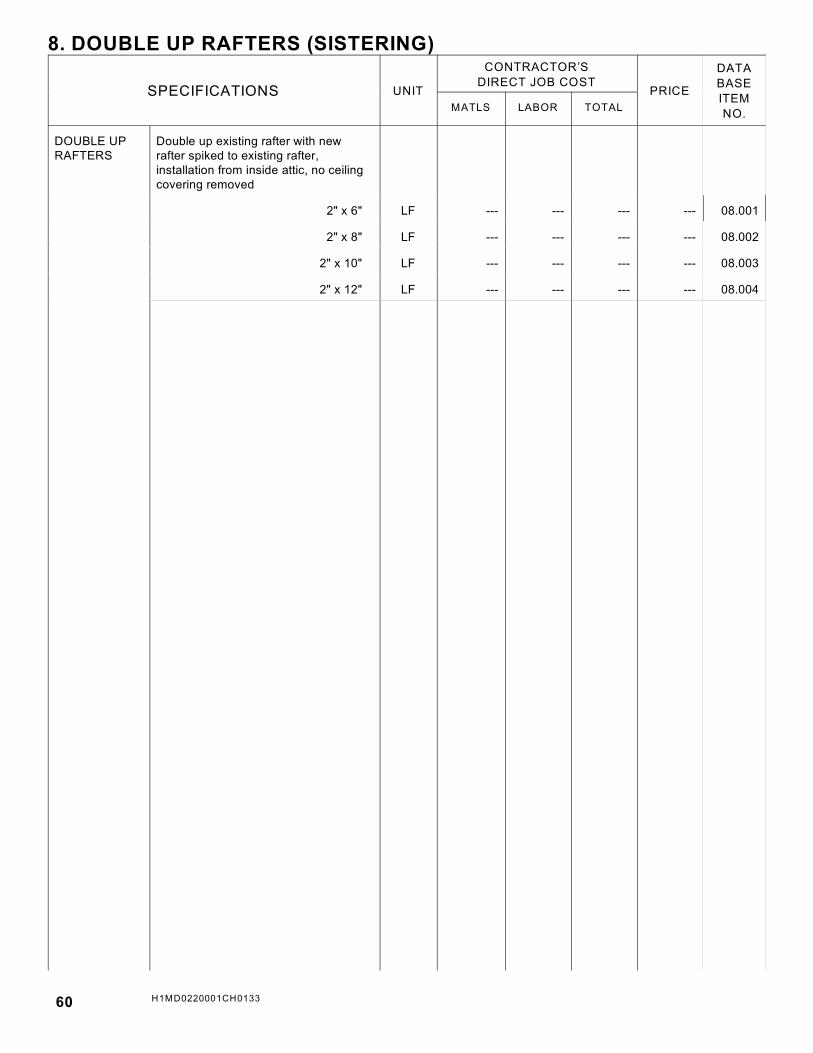
60 H1MD0220001CH0133
8. DOUBLE UP RAFTERS (SISTERING)
SPECIFICATIONS UNIT
CONTRACTOR’S
DIRECT JOB COSTPRICE
DATA
BASE
ITEM
NO.MATLS LABOR TOTAL
DOUBLE UPRAFTERS
Double up existing rafter with newrafter spiked to existing rafter,installation from inside attic, no ceilingcovering removed
1.00
2" x 6" LF --- --- --- --- 08.001
2" x 8" LF --- --- --- --- 08.002
2" x 10" LF --- --- --- --- 08.003
2" x 12" LF --- --- --- --- 08.004

H1MD0220001CH0133 61
8. REPLACE RIDGEBOARD
SPECIFICATIONS UNIT
CONTRACTOR’S
DIRECT JOB COST PRICE
DATABASEITEMNO.MATLS LABOR TOTAL
REPLACEEXISTINGRIDGEBOARD
Replace section of existingridgeboard, no ceiling or wall coveringremoved # Build temporary 2" x 4" kneewall
to support rafters on both sides ofthe section of existing ridgeboardto be replaced
# Cut nails fastening the rafters toboth sides of the existingridgeboard
# Cut out section between rafters ofridgeboard to be replaced andremove it
# Slide new section of ridgeboard inplace of the section of ridgeboardwhich was removed
# When new ridgeboard section is inplace with the rafters fitting snuglyagainst it, toenail the rafters intonew ridgeboard section
# Scab on same size pieces ofdimension lumber to connect newsection of ridgeboard with existingridgeboard or with another sectionof ridgeboard to be replaced
# Remove the temporary kneewall
1.00
Replace ridgeboard up to 8 ft. long MIN --- --- --- --- 08.010
Additional LF ridgeboard over 8 ft. ADD
LF = Additional length of newridgeboard section
LF --- --- --- --- 08.011

62 H1MD0220001CH0133
8. STRUCTURAL RIDGE BEAM
SPECIFICATIONS UNIT
CONTRACTOR’S
DIRECT JOB COSTPRICE
DATA
BASE
ITEM
NO.MATLS LABOR TOTAL
STRUCTURALRIDGE BEAM
Structural ridge beam installed belowexisting ridgeboard, no ceiling or wallcovering removed # Seat cut and plumb cut existing
rafters so new structural ridgebeam will fit neatly under theexisting ridgeboard as well assupport the rafters
# Install posts and/or headers andjacks at each end as required tosupport new structural ridge beam
# Install structural ridge beam underexisting ridgeboard on newsupports at each end
Structural Ridge Beam
1.00
(3) 2" x 10" up to 15 ft. MIN --- --- --- --- 08.020
Additional length over 15 ft. ADD LF --- --- --- --- 08.021
(3) 2" x 12" up to 15 ft. MIN --- --- --- --- 08.022
Additional length over 15 ft. ADD LF --- --- --- --- 08.023
(3) 1-3/4" x 9-1/4" LVL up to 15 ft. MIN --- --- --- --- 08.024
Additional length over 15 ft. ADD LF --- --- --- --- 08.025
(3) 1-3/4" x 11-7/8" LVL up to 15 ft. MIN --- --- --- --- 08.026
Additional length over 15 ft. ADD LF --- --- --- --- 08.027
ADDITIONALSUPPORT
Additional intermediate support forstructural ridge beam as required
4" x 4", 6'-0" high EA --- --- --- --- 08.030
4" x 4", 12' -0" high EA --- --- --- --- 08.031
6" x 6", 6'-0" high EA --- --- --- --- 08.032
6" x 6", 12'-0" high
EA = Each 4" x 4" or 6" x 6"
EA --- --- --- --- 08.033

H1MD0220001CH0133 63
8. ATTIC ALTERATIONS
SPECIFICATIONS UNIT
CONTRACTOR’S
DIRECT JOB COSTPRICE
DATA
BASE
ITEM
NO.MATLS LABOR TOTAL
DOUBLE UPCEILINGJOISTS
Double up existing ceiling joist (atticfloor framing) with new ceiling joistspiked to existing ceiling joist,installation from inside attic withexisting ceiling covering belowundisturbed
1.00
2" x 4" up to 12 feet long EA --- --- --- --- 08.100
2" x 6" up to 12 feet long EA --- --- --- --- 08.101
2" x 8" up to 16 feet long EA --- --- --- --- 08.102
2" x 10" up to 16 feet long EA --- --- --- --- 08.103
EA = Each ceiling joist
REPLACECOLLAR TIES
Replace existing collar tie in atticattached to opposing rafters # Install new collar tie # Remove existing collar tie # No ceiling covering removed
2" x 4" up to 12 feet long EA --- --- --- --- 08.110
2" x 6" up to 12 feet long EA --- --- --- --- 08.111
EA = Each new collar tie
ATTICSUBFLOORING
Install subflooring in attic with #2 3/4"SPF or 1/2" plywood across existingceiling joists (attic floor framing)
3/4" SPF SF --- --- --- --- 08.120
1/2" plywood SF --- --- --- --- 08.121
SF = Subflooring
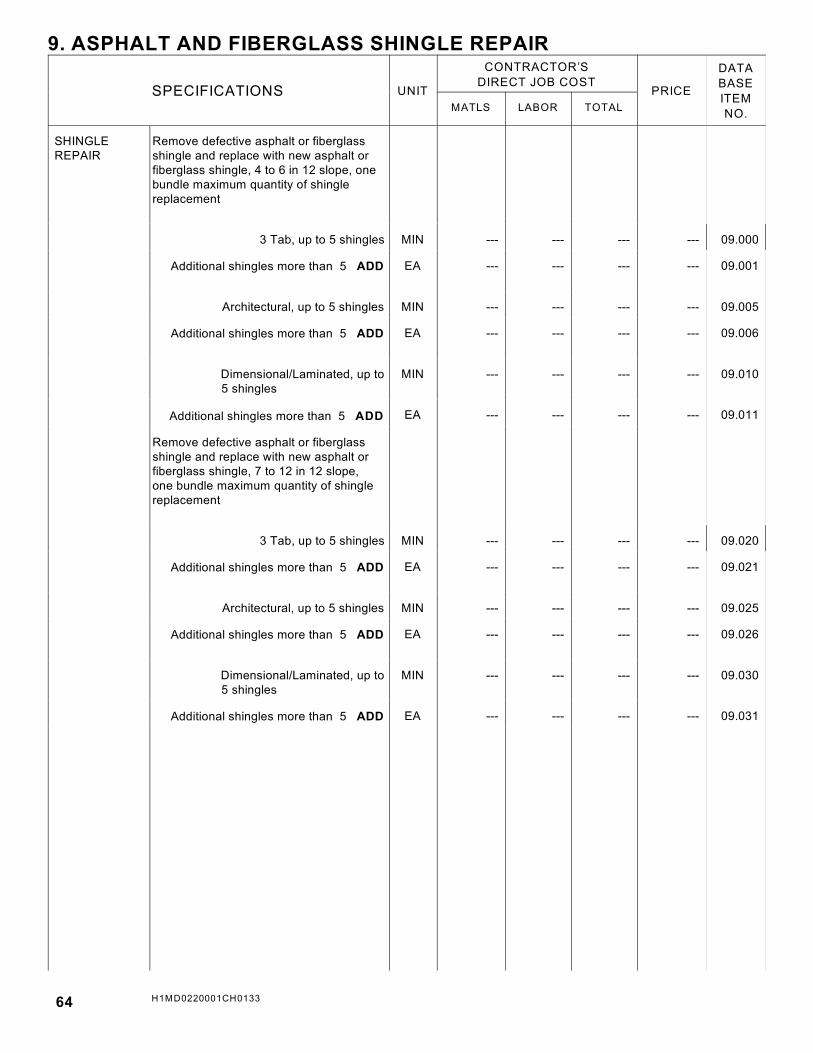
64 H1MD0220001CH0133
9. ASPHALT AND FIBERGLASS SHINGLE REPAIR
SPECIFICATIONS UNIT
CONTRACTOR’S
DIRECT JOB COSTPRICE
DATA
BASE
ITEM
NO.MATLS LABOR TOTAL
SHINGLEREPAIR
Remove defective asphalt or fiberglassshingle and replace with new asphalt orfiberglass shingle, 4 to 6 in 12 slope, onebundle maximum quantity of shinglereplacement
1.00
3 Tab, up to 5 shingles MIN --- --- --- --- 09.000
Additional shingles more than 5 ADD EA --- --- --- --- 09.001
Architectural, up to 5 shingles MIN --- --- --- --- 09.005
Additional shingles more than 5 ADD EA --- --- --- --- 09.006
Dimensional/Laminated, up to5 shingles
MIN --- --- --- --- 09.010
Additional shingles more than 5 ADD EA --- --- --- --- 09.011
Remove defective asphalt or fiberglassshingle and replace with new asphalt orfiberglass shingle, 7 to 12 in 12 slope, one bundle maximum quantity of shinglereplacement
3 Tab, up to 5 shingles MIN --- --- --- --- 09.020
Additional shingles more than 5 ADD EA --- --- --- --- 09.021
Architectural, up to 5 shingles MIN --- --- --- --- 09.025
Additional shingles more than 5 ADD EA --- --- --- --- 09.026
Dimensional/Laminated, up to5 shingles
MIN --- --- --- --- 09.030
Additional shingles more than 5 ADD EA --- --- --- --- 09.031
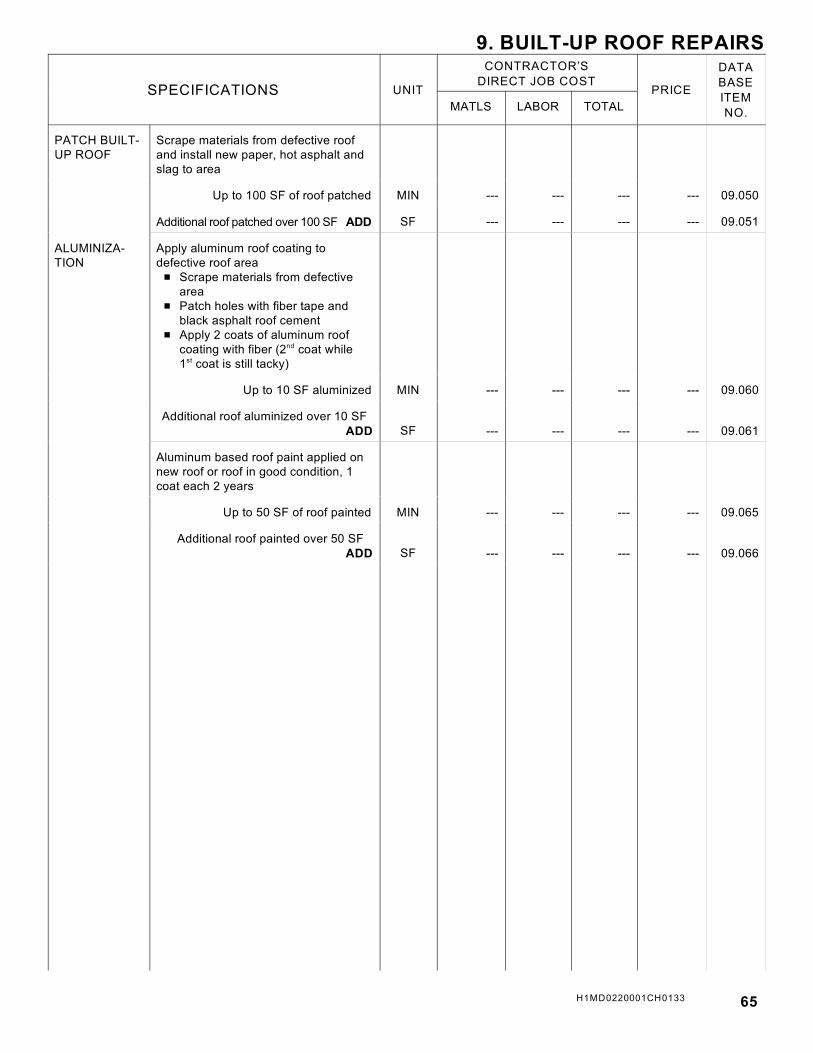
H1MD0220001CH0133 65
9. BUILT-UP ROOF REPAIRS
SPECIFICATIONS UNIT
CONTRACTOR’S
DIRECT JOB COSTPRICE
DATA
BASE
ITEM
NO.MATLS LABOR TOTAL
PATCH BUILT-UP ROOF
Scrape materials from defective roofand install new paper, hot asphalt andslag to area
1.00
Up to 100 SF of roof patched MIN --- --- --- --- 09.050
Additional roof patched over 100 SF ADD SF --- --- --- --- 09.051
ALUMINIZA-TION
Apply aluminum roof coating todefective roof area # Scrape materials from defective
area # Patch holes with fiber tape and
black asphalt roof cement # Apply 2 coats of aluminum roof
coating with fiber (2 coat whilend
1 coat is still tacky)st
Up to 10 SF aluminized MIN --- --- --- --- 09.060
Additional roof aluminized over 10 SF ADD SF --- --- --- --- 09.061
Aluminum based roof paint applied onnew roof or roof in good condition, 1coat each 2 years
Up to 50 SF of roof painted MIN --- --- --- --- 09.065
Additional roof painted over 50 SF ADD SF --- --- --- --- 09.066

66 H1MD0220001CH0133
9. REPAIR WOOD SHINGLES AND SHAKES
SPECIFICATIONS UNIT
CONTRACTOR’S
DIRECT JOB COSTPRICE
DATA
BASE
ITEM
NO.MATLS LABOR TOTAL
REPAIRWOODSHINGLES
Repair wood shingle leak by nailingdown, installing sheet metal patch underor cementing crack
1.00
Slope 4 to 6 in 12, up to 5 shingles MIN --- --- --- --- 09.070
Additional shingles more than 5 ADD EA --- --- --- --- 09.071
Slope 7 to 12 in 12, up to 5 shingles MIN --- --- --- --- 09.072
Additional shingles more than 5 ADD EA --- --- --- --- 09.073
Repair wood shingle leak by replacingdefective pieces with new ones
Slope 4 to 6 in 12, up to 5 shingles MIN --- --- --- --- 09.075
Additional shingles more than 5 ADD EA --- --- --- --- 09.076
Slope 7 to 12 in 12, up to 5 shingles MIN --- --- --- --- 09.077
Additional shingles more than 5 ADD EA --- --- --- --- 09.078
REPAIRWOODSHAKES
Repair wood shake leak by nailingdown, installing sheet metal patch underor cementing crack
Slope 4 to 6 in 12, up to 5 shakes MIN --- --- --- --- 09.080
Additional shakes more than 5 ADD EA --- --- --- --- 09.081
Slope 7 to 12 in 12, up to 5 shakes MIN --- --- --- --- 09.082
Additional shakes more than 5 ADD EA --- --- --- --- 09.083
Repair wood shake leak by replacingdefective pieces with new ones
Slope 4 to 6 in 12, up to 5 shakes MIN --- --- --- --- 09.085
Additional shakes more than 5 ADD EA --- --- --- --- 09.086
Slope 7 to 12 in 12, up to 5 shakes MIN --- --- --- --- 09.087
Additional shakes more than 5 ADD EA --- --- --- --- 09.088

H1MD0220001CH0133 67
9. SLATE ROOF REPAIR AND REPLACEMENT
SPECIFICATIONS UNIT
CONTRACTOR’S
DIRECT JOB COSTPRICE
DATA
BASE
ITEM
NO.MATLS LABOR TOTAL
REPAIRCRACKEDSLATE
Repair cracked or loose slate by fillingcrack or reattaching with asphaltroofing cement or sealer
1.00
Slope 4 to 6 in 12, up to 5 slates MIN --- --- --- --- 09.100
Additional slates more than 5 ADD EA --- --- --- --- 09.101
Slope 7 to 12 in 12, up to 5 slates MIN --- --- --- --- 09.102
Additional slates more than 5 ADD EA --- --- --- --- 09.103
CEMENTRIDGE
Cement slate ridge
Up to 10 LF of ridge cemented MIN --- --- --- --- 09.110
Additional LF of ridge over 10 LF ADD LF --- --- --- --- 09.111
REPLACESLATE
Repair slate roof leak by replacingdefective slate # Cut nails holding defective slate # Remove the slate # Cut a 5 or 6 inch wide strip of
copper long enough to insert atleast 6 inches under the slatesabove and extend beyond thebottom end of the new slate to beinstalled
# Nail copper strip into place andcover nailheads and old nail holeswith roofing cement
# Coat the underside of thereplacement slate with asphaltcement, slip it under the slatecourse above and bend thecopper strip around the bottomend to hold it in place
Up to 5 slates MIN --- --- --- --- 09.120
Additional slates over 5 ADD EA --- --- --- --- 09.121

68 H1MD0220001CH0133
9. ROOFING TILE REPAIR AND REPLACEMENT
SPECIFICATIONS UNIT
CONTRACTOR’S
DIRECT JOB COST PRICE
DATABASEITEMNO.MATLS LABOR TOTAL
REPAIRCRACKEDFLAT TILE
Repair cracked flat tile by insertingaluminum or copper flashing under tile # Cut piece of aluminum or copper
flashing wide enough to extend 1inch under the adjoining tiles, longenough to extend 1 inch under thetiles above and 1/4" below crackedtile
# Cut nails holding the cracked tile inplace
# Drill two new holes in cracked tile # Slip the flashing under the cracked
tile with 1/2" extending below thebottom of the tile and bend it up tosupport the tile in place
# Renail tile using new drilled holes # Cover the old nailholes and the new
nailheads with roofing cement
1.00
Up to 3 tiles repaired MIN --- --- --- --- 09.151
Additional tiles repaired over 3 ADD EA --- --- --- --- 09.152
REPLACEROOFINGTILES
Replace damaged or defective flat orcurved tile with new tile # Cut nails and remove damaged or
defective tile # Repair felt paper under removed tile
with patch and roofing cement # Slide new tile into place and drill two
holes through the overlaying tile andthe replacement tile
# Nail the tiles to the deck and coverthe nailheads with roofing cement
# Each tile @ $5.00 each
Up to 3 tiles repaired MIN --- --- --- --- 09.160
Additional tiles repaired over 3 ADD EA --- --- --- --- 09.161
REPAIRCRACKEDSPANISH ORMISSION TILE
Repair cracked spanish or mission tileby applying plastic sealer to the crack
Up to 3 tiles repaired MIN --- --- --- --- 09.170
Additional tiles repaired over 3 ADD EA --- --- --- --- 09.171
CEMENTRIDGE
Cement clay or concrete tile ridge andseal around chimney and vents
Up to 10 LF sealed MIN --- --- --- --- 09.175
Additional sealed area over 10 LF ADD LF --- --- --- --- 09.176

H1MD0220001CH0133 69
9. METAL ROOF REPAIR
SPECIFICATIONS UNIT
CONTRACTOR’S
DIRECT JOB COST PRICE
DATABASEITEMNO.MATLS LABOR TOTAL
REPAIRLEAKS
Tar over existing metal roof fortemporary repair of leaks
1.00
Up to 5 SF of repaired area MIN --- --- --- --- 09.201
Additional repaired area over 5 SF ADD SF --- --- --- --- 09.202
ALUMINIZA-TION
Apply aluminum roof coating todefective roof area # Scrape materials from defective
area # Patch holes with fiber tape and
black asphalt roof cement # Apply 2 coats of aluminum roof
coating with fiber (2 coat while 1nd st
coat is still tacky)
Up to 10 SF aluminized MIN --- --- --- --- 09.250
Additional area over 10 SF ADD SF --- --- --- --- 09.251

70 H1MD0220001CH0133
9. REMOVE AND RE-INSTALL GUTTERS
SPECIFICATIONS UNIT
CONTRACTOR’S
DIRECT JOB COST PRICE
DATABASEITEMNO.MATLS LABOR TOTAL
REMOVE ANDRE-INSTALLGUTTERS ONONE STORYBUILDING
Remove existing gutter system and re-install in same location on one storybuilding
1.00
Vinyl OG, up to 10 LF MIN --- --- --- --- 09.300
Additional LF over 10 LF ADD LF --- --- --- --- 09.301
Aluminum OG, up to 10 LF MIN --- --- --- --- 09.302
Additional LF over 10 LF ADD LF --- --- --- --- 09.303
Aluminum Seamless OG, up to 10 LF MIN --- --- --- --- 09.304
Additional LF over 10 LF ADD LF --- --- --- --- 09.305
Galvanized Steel OG, up to 10 LF MIN --- --- --- --- 09.306
Additional LF over 10 LF ADD LF --- --- --- --- 09.307
Copper Half Round, up to 10 LF MIN --- --- --- --- 09.308
Additional LF over 10 LF ADD LF --- --- --- --- 09.309
REMOVE ANDRE-INSTALLGUTTERS ONTWO STORYBUILDING
Remove existing gutter system and re-install in same location on two storybuilding
Vinyl OG, up to 10 LF MIN --- --- --- --- 09.310
Additional LF over 10 LF ADD LF --- --- --- --- 09.311
Aluminum OG, up to 10 LF MIN --- --- --- --- 09.312
Additional LF over 10 LF ADD LF --- --- --- --- 09.313
Aluminum Seamless OG, up to 10 LF MIN --- --- --- --- 09.314
Additional LF over 10 LF ADD LF --- --- --- --- 09.315
Galvanized Steel OG, up to 10 LF MIN --- --- --- --- 09.316
Additional LF over 10 LF ADD LF --- --- --- --- 09.317
Copper Half Round, up to 10 LF MIN --- --- --- --- 09.318
Additional LF over 10 LF ADD LF --- --- --- --- 09.319

H1MD0220001CH0133 71
9. REMOVE AND RE-INSTALL GUTTERS
SPECIFICATIONS UNIT
CONTRACTOR’S
DIRECT JOB COST PRICE
DATABASEITEMNO.MATLS LABOR TOTAL
REMOVE ANDRE-INSTALLGUTTERS ONTHREESTORYBUILDING
Remove existing gutter system and re-install in same location on three storybuilding
1.00
Vinyl OG, up to 10 LF MIN --- --- --- --- 09.320
Additional LF over 10 LF ADD LF --- --- --- --- 09.321
Aluminum OG, up to 10 LF MIN --- --- --- --- 09.322
Additional LF over 10 LF ADD LF --- --- --- --- 09.323
Aluminum Seamless OG, up to 10 LF MIN --- --- --- --- 09.324
Additional LF over 10 LF ADD LF --- --- --- --- 09.325
Galvanized Steel OG, up to 10 LF MIN --- --- --- --- 09.326
Additional LF over 10 LF ADD LF --- --- --- --- 09.327
Copper Half Round, up to 10 LF MIN --- --- --- --- 09.328
Additional LF over 10 LF ADD LF --- --- --- --- 09.329
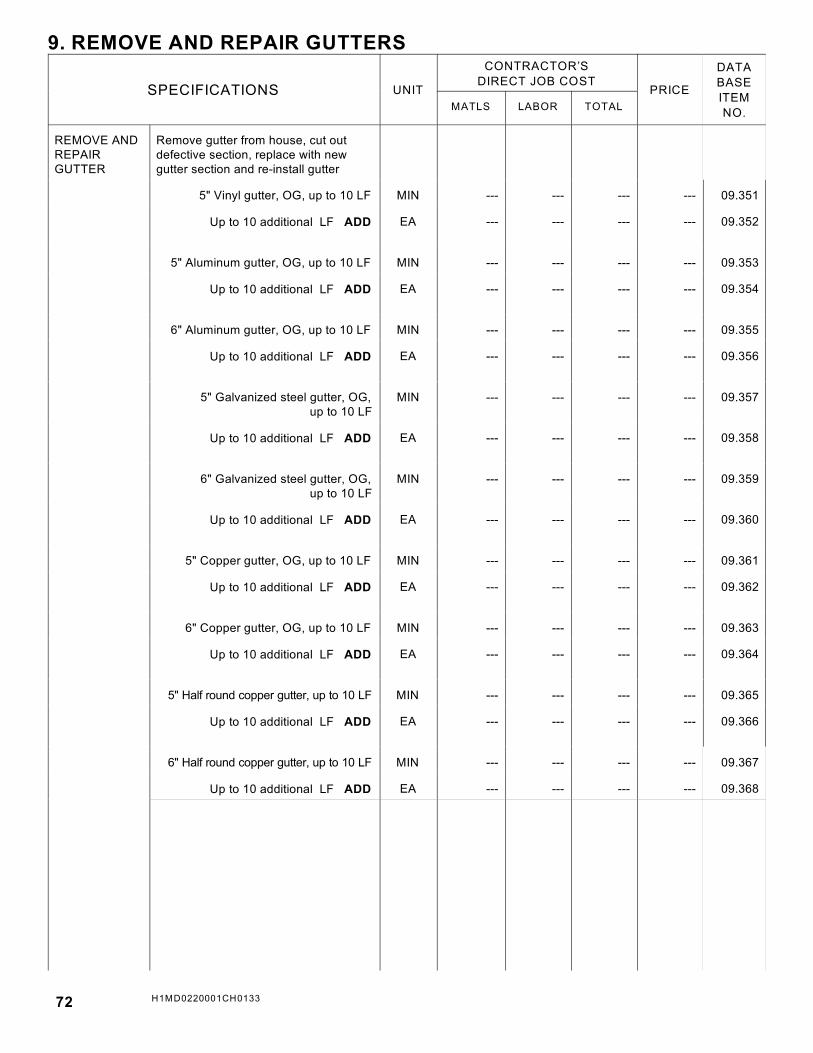
72 H1MD0220001CH0133
9. REMOVE AND REPAIR GUTTERS
SPECIFICATIONS UNIT
CONTRACTOR’S
DIRECT JOB COSTPRICE
DATA
BASE
ITEM
NO.MATLS LABOR TOTAL
REMOVE ANDREPAIRGUTTER
Remove gutter from house, cut outdefective section, replace with newgutter section and re-install gutter
1.00
5" Vinyl gutter, OG, up to 10 LF MIN --- --- --- --- 09.351
Up to 10 additional LF ADD EA --- --- --- --- 09.352
5" Aluminum gutter, OG, up to 10 LF MIN --- --- --- --- 09.353
Up to 10 additional LF ADD EA --- --- --- --- 09.354
6" Aluminum gutter, OG, up to 10 LF MIN --- --- --- --- 09.355
Up to 10 additional LF ADD EA --- --- --- --- 09.356
5" Galvanized steel gutter, OG,up to 10 LF
MIN --- --- --- --- 09.357
Up to 10 additional LF ADD EA --- --- --- --- 09.358
6" Galvanized steel gutter, OG, up to 10 LF
MIN --- --- --- --- 09.359
Up to 10 additional LF ADD EA --- --- --- --- 09.360
5" Copper gutter, OG, up to 10 LF MIN --- --- --- --- 09.361
Up to 10 additional LF ADD EA --- --- --- --- 09.362
6" Copper gutter, OG, up to 10 LF MIN --- --- --- --- 09.363
Up to 10 additional LF ADD EA --- --- --- --- 09.364
5" Half round copper gutter, up to 10 LF MIN --- --- --- --- 09.365
Up to 10 additional LF ADD EA --- --- --- --- 09.366
6" Half round copper gutter, up to 10 LF MIN --- --- --- --- 09.367
Up to 10 additional LF ADD EA --- --- --- --- 09.368

H1MD0220001CH0133 73
9. REPAIR GUTTERS
SPECIFICATIONS UNIT
CONTRACTOR’S
DIRECT JOB COSTPRICE
DATA
BASE
ITEM
NO.MATLS LABOR TOTAL
REPAIRGUTTER INPLACE
Repair existing gutter in place with anyof the following items:
1.00
Dove tail hook EA --- --- --- --- 09.670
Bronze hanger EA --- --- --- --- 09.671
Spike and ferrule EA --- --- --- --- 09.672
Aluminum wrap-around hanger EA --- --- --- --- 09.673
Hexhead screw hidden hanger EA --- --- --- --- 09.674
Aluminum strap hanger EA --- --- --- --- 09.675
Copper strap hanger EA --- --- --- --- 09.676
Vinyl end cap EA --- --- --- --- 09.677
Aluminum end cap EA --- --- --- --- 09.678
Galvanized end cap EA --- --- --- --- 09.679
Copper end cap EA --- --- --- --- 09.680
5" Vinyl 90E miter EA --- --- --- --- 09.681
5" Aluminum 90E miter EA --- --- --- --- 09.682
6" Aluminum 90E miter EA --- --- --- --- 09.683
5" Galvanized 90E miter EA --- --- --- --- 09.684
6" Galvanized 90E miter EA --- --- --- --- 09.685
5" Half round Copper 90E miter EA --- --- --- --- 09.686
6" Half round Copper 90E miter EA --- --- --- --- 09.687
5" OG Copper 90E miter EA --- --- --- --- 09.688
6" OG Copper 90E miter EA --- --- --- --- 09.689
5"Vinyl joiner EA --- --- --- --- 09.690
5" Aluminum slip joint EA --- --- --- --- 09.691
5" Galvanized slip joint EA --- --- --- --- 09.692
5"Copper slip joint EA --- --- --- --- 09.693

74 H1MD0220001CH0133
9. REMOVE AND REPLACE DOWNSPOUTS
SPECIFICATIONS UNIT
CONTRACTOR’S
DIRECT JOB COSTPRICE
DATA
BASE
ITEM
NO.MATLS LABOR TOTAL
REMOVE ANDREPLACEDOWNSPOUT
Remove existing downspout andreplace with new downspout section
1.00
2" x 3" Aluminum downspout, up to 10 LF MIN --- --- --- --- 09.700
Up to 10 additional LF ADD EA --- --- --- --- 09.701
3" x 4" Aluminum downspout, up to LF MIN --- --- --- --- 09.702
Up to 10 additional LF ADD EA --- --- --- --- 09.703
2" x 3" Galvanized downspout, up to 10 LF MIN --- --- --- --- 09.704
Up to 10 additional LF ADD EA --- --- --- --- 09.705
3" x 4" Galvanized downspout, up to 10 LF MIN --- --- --- --- 09.706
Up to 10 additional LF ADD EA --- --- --- --- 09.707
2" X 3" Copper downspout, up to 10 LF MIN --- --- --- --- 09.708
Up to 10 additional LF ADD EA --- --- --- --- 09.709
3" x 4" Copper downspout, up to 10 LF MIN --- --- --- --- 09.710
Up to 10 additional LF ADD EA --- --- --- --- 09.711
3" Round copper downspout, up to 10 LF MIN --- --- --- --- 09.712
Up to 10 additional LF ADD EA --- --- --- --- 09.713
4" Round copper downspout, up to 10 LF MIN --- --- --- --- 09.714
Up to 10 additional LF ADD EA --- --- --- --- 09.715
2" x 3" Vinyl downspout, up to 10 LF MIN --- --- --- --- 09.716
Up to 10 additional LF ADD EA --- --- --- --- 09.717

H1MD0220001CH0133 75
9. REPAIR DOWNSPOUTS
SPECIFICATIONS UNIT
CONTRACTOR’S
DIRECT JOB COST PRICE
DATABASEITEMNO.MATLS LABOR TOTAL
REPAIRDOWNSPOUTIN PLACE
Repair existing downspout in placewith any of the following items:
1.00
Traditional back clip EA --- --- --- --- 09.750
Galvanized or aluminum strap EA --- --- --- --- 09.751
Copper strap EA --- --- --- --- 09.752
3" Bronze spike EA --- --- --- --- 09.753
4" Bronze spike EA --- --- --- --- 09.754
Vinyl drop outlet EA --- --- --- --- 09.755
2" x 3" Aluminum drop outlet EA --- --- --- --- 09.756
3" x 4" Aluminum drop outlet EA --- --- --- --- 09.757
2" x 3" Galvanized drop outlet EA --- --- --- --- 09.758
3" x 4" Galvanized drop outlet EA --- --- --- --- 09.759
2" x 3" Copper drop outlet EA --- --- --- --- 09.760
3" x 4" Copper drop outlet EA --- --- --- --- 09.761
2" x 3" Aluminum elbow EA --- --- --- --- 09.762
3" x 4" Aluminum elbow EA --- --- --- --- 09.763
2" x 3" Galvanized elbow EA --- --- --- --- 09.764
3" x 4" Galvanized elbow EA --- --- --- --- 09.765
3" Round copper elbow EA --- --- --- --- 09.766
4" Round copper elbow EA --- --- --- --- 09.767
2" x 3" Copper elbow EA --- --- --- --- 09.768
3" x 4" Copper elbow EA --- --- --- --- 09.769
2" x 3" Vinyl elbow EA --- --- --- --- 09.770

76 H1MD0220001CH0133
9. REPLACE ALUMINUM VALLEY FLASHING
SPECIFICATIONS UNIT
CONTRACTOR’S
DIRECT JOB COSTPRICE
DATA
BASE
ITEM
NO.MATLS LABOR TOTAL
REPLACEVALLEYFLASHINGSECTION
Replace valley flashing section withaluminum flashing # Remove existing roofing which
extends over the valley flashing 4"above and 4" below the damagedflashing area
# Cut patch of flashing materialwhich will extend 4" above and 4"below the damaged flashing area
# Cut out existing flashing areaenough to insert new flashingpiece under top cut in existingflashing
# Apply roof cement on top side oftop area of new flashing piece andon the bottom side along the sidesat the bottom
# Insert new flashing piece underthe existing flashing where it wascut out above the damaged areaand on top of the existing flashingbelow the cut
# Nail the flashing pieces togethernear the edge of the flashing at itsfour corners
# Reinstall the roofing materialswhich were removed
4 to 6 in 12 slope
1.00
With asphalt/fiberglass shingles, up to 8 LF
MIN --- --- --- --- 09.800
Additional flashing over 8 LF ADD LF --- --- --- --- 09.801
With wood shingles or shakes, up to 8 LF MIN --- --- --- --- 09.802
Additional flashing over 8 LF ADD LF --- --- --- --- 09.803
With slate or clay tile, up to 8 LF MIN --- --- --- --- 09.804
Additional flashing over 8 LF ADD
7 to 12 in 12 slope
LF --- --- --- --- 09.805
With asphalt/fiberglass shingles, up to 8 LF
MIN --- --- --- --- 09.810
Additional flashing over 8 LF ADD LF --- --- --- --- 09.811
With wood shingles or shakes, up to 8 LF MIN --- --- --- --- 09.812
Additional flashing over 8 LF ADD LF --- --- --- --- 09.813
With slate or clay tile, up to 8 LF MIN --- --- --- --- 09.814
Additional flashing over 8 L ADD LF --- --- --- --- 09.815

H1MD0220001CH0133 77
9. REPLACE COPPER VALLEY FLASHING
SPECIFICATIONS UNIT
CONTRACTOR’S
DIRECT JOB COSTPRICE
DATA
BASE
ITEM
NO.MATLS LABOR TOTAL
REPLACEVALLEYFLASHINGSECTION
Replace valley flashing section withcopper flashing # Remove existing roofing which
extends over the valley flashing 4"above and 4" below the damagedflashing area
# Cut patch of flashing materialwhich will extend 4" above and 4"below the damaged flashing area
# Cut out existing flashing areaenough to insert new flashingpiece under top cut in existingflashing
# Apply roof cement on top side oftop area of new flashing piece andon the bottom side along the sidesat the bottom
# Insert new flashing piece underthe existing flashing where it wascut out above the damaged areaand on top of the existing flashingbelow the cut
# Nail the flashing pieces togethernear the edge of the flashing at itsfour corners
# Reinstall the roofing materialswhich were removed
4 to 6 in 12 slope
1.00
With asphalt/fiberglass shingles,up to 8 LF
MIN --- --- --- --- 09.820
Additional flashing over 8 LF ADD LF --- --- --- --- 09.821
With wood shingles or shakes, up to 8 LF MIN --- --- --- --- 09.822
Additional flashing over 8 LF ADD LF --- --- --- --- 09.823
With slate or clay tile, up to 8 LF MIN --- --- --- --- 09.824
Additional flashing over 8 LF ADD
7 to 12 in 12 slope
LF --- --- --- --- 09.825
With asphalt/fiberglass shingles, up to 8 LF
MIN --- --- --- --- 09.830
Additional flashing over 8 LF ADD LF --- --- --- --- 09.831
With wood shingles or shakes, up to 8 LF MIN --- --- --- --- 09.832
Additional flashing over 8 LF ADD LF --- --- --- --- 09.833
With slate or clay tile, up to 8 LF MIN --- --- --- --- 09.834
Additional flashing over 8 LF ADD LF --- --- --- --- 09.835

78 H1MD0220001CH0133
9. SKYLIGHT COPPER FLASHING REPAIR
SPECIFICATIONS UNIT
CONTRACTOR’SDIRECT JOB COST
PRICE
DATABASEITEMNO.MATLS LABOR TOTAL
REPAIR
SKYLIGHT
FLASHING
Repair leaking skylight
# Remove counter flashing
# Remove 12" of roofing material
and step flashing from all four
sides of skylight
# Observe any damage to skylight
unit or surrounding roof area that
may require additional repair or
replacement not included here
# Reinstall the roofing materials
which were removed and install
new step flashing up and around
skylight curb
# Re-install skylight counter flashing
# Apply neoprene flashing cement
to appropriate areas
# Each skylight approximately
24" x 36"
4 to 6 in 12 slope
1.00
With asphalt/fiberglass shingles,1 skylight
MIN --- --- --- --- 09.841
Flash additional skylight ADD EA --- --- --- --- 09.842
With wood shingles or shakes,1 skylight
MIN --- --- --- --- 09.843
Flash additional skylight ADD EA --- --- --- --- 09.844
With slate or clay tile, 1 skylight MIN --- --- --- --- 09.845
Flash additional skylight ADD
7 to 12 in 12 slope
EA --- --- --- --- 09.846
With asphalt/fiberglass shingles,1 skylight
MIN --- --- --- --- 09.850
Flash additional skylight ADD EA --- --- --- --- 09.851
With wood shingles or shakes,1 skylight
MIN --- --- --- --- 09.852
Flash additional skylight ADD EA --- --- --- --- 09.853
With slate or clay tile, 1 skylight MIN --- --- --- --- 09.854
Flash additional skylight ADD EA --- --- --- --- 09.855

H1MD0220001CH0133 79
9. SKYLIGHT ALUMINUM FLASHING REPAIR
SPECIFICATIONS UNIT
CONTRACTOR’SDIRECT JOB COST
PRICE
DATABASEITEMNO.MATLS LABOR TOTAL
REPAIR
SKYLIGHT
FLASHING
Repair leaking skylight
# Remove counter flashing
# Remove 12" of roofing material
and step flashing from all four
sides of skylight
# Observe any damage to skylight
unit or surrounding roof area that
may require additional repair or
replacement not included here
# Reinstall the roofing materials
which were removed and install
new step flashing up and around
skylight curb
# Re-install skylight counter flashing
# Apply neoprene flashing cement
to appropriate areas
# Each skylight approximately
24" x 36"
4 to 6 in 12 slope
1.00
With asphalt/fiberglass shingles,
1 skylight
MIN --- --- --- --- 09.860
Flash additional skylight ADD EA --- --- --- --- 09.861
With wood shingles or shakes,
1 skylight
MIN --- --- --- --- 09.862
Flash additional skylight ADD EA --- --- --- --- 09.863
With slate or clay tile, 1 skylight MIN --- --- --- --- 09.864
Flash additional skylight ADD
7 to 12 in 12 slope
EA --- --- --- --- 09.865
With asphalt/fiberglass shingles,
1 skylight
MIN --- --- --- --- 09.870
Flash additional skylight ADD EA --- --- --- --- 09.871
With wood shingles or shakes,
1 skylight
MIN --- --- --- --- 09.872
Flash additional skylight ADD EA --- --- --- --- 09.873
With slate or clay tile, 1 skylight MIN --- --- --- --- 09.874
Flash additional skylight ADD EA --- --- --- --- 09.875

80 H1MD0220001CH0133
9. FLASHING REPAIRS
SPECIFICATIONS UNIT
CONTRACTOR’SDIRECT JOB COST
PRICE
DATABASEITEMNO.MATLS LABOR TOTAL
FLASHINGREPAIRS
Scrape away loose mortar on chimneyflashing and reseal
1.00
Up to 5 LF of chimney flashing MIN --- --- --- --- 09.880
Additional flashing over 5 LF ADD LF --- --- --- --- 09.881
Repair small holes in flashing withasphalt cement
Up to 5 holes repaired MIN --- --- --- --- 09.882
Additional holes repaired over 5 ADD EA --- --- --- --- 09.883
Repair rust spots # Clean out rust spots with solvent
and wire brush # Cover spots with asphalt cement
Up to 2 spots repaired MIN --- --- --- --- 09.884
Additional spots repaired over 2 ADD EA --- --- --- --- 09.885
PATCHVALLEYFLASHING
Patch valley flashing with flashingmaterial and roofing cement # Sand metal flashing enough to
brighten it # Cut a patch of flashing material
that will extend 2" beyonddamaged area of flashing
# Apply 1/8" coating of roofingcement to damage area and presspatch to the cement
# Apply a top coat of roofing cementover and beyond patch
1 patch MIN --- --- --- --- 09.886
Each additional patch more than 1 ADD EA --- --- --- --- 09.887

H1MD0220001CH0133 81
9. VENT PIPE COLLAR
SPECIFICATIONS UNIT
CONTRACTOR’SDIRECT JOB COST
PRICE
DATABASEITEMNO.MATLS LABOR TOTAL
REPLACEVENT PIPECOLLAR
Replace vent pipe collar on roof withnew galvanized steel shoe and rubberboot collar
Roofing Materials
1.00
Asphalt/fiberglass shingles EA --- --- --- --- 09.895
Wood shingles or shakes EA --- --- --- --- 09.896
Slate or clay tile EA --- --- --- --- 09.897

82 H1MD0220001CH0133
9. ROOF VALLEY CLEANING
SPECIFICATIONS UNIT
CONTRACTOR’SDIRECT JOB COST
PRICE
DATABASEITEMNO.MATLS LABOR TOTAL
ROOF VALLEYCLEANING
Remove debris from roof valley totrash receptacle while standing on aladder or a roof
1.00
One story building, up to 20 LFcleaned MIN --- --- --- --- 09.900
Additional LF cleaned over 20 LF ADD LF --- --- --- --- 09.901
Two story building, up to 20 LFcleaned MIN --- --- --- --- 09.902
Additional LF cleaned over 20 LF ADD LF --- --- --- --- 09.903
Three story building, up to 20 LFcleaned MIN --- --- --- --- 09.904
Additional LF cleaned over 20 LF ADD LF --- --- --- --- 09.905

H1MD0220001CH0133 83
9. GUTTER CLEANING
SPECIFICATIONS UNIT
CONTRACTOR’SDIRECT JOB COST
PRICE
DATABASEITEMNO.MATLS LABOR TOTAL
GUTTERCLEANINGFROM ALADDER
Remove debris from gutter to trashreceptacle while standing on a ladder
1.00
One story building, up to 30 LF ofcleaning
MIN --- --- --- --- 09.910
Additional cleaning over 30 LF ADD LF --- --- --- --- 09.911
Two story building, up to 30 LF ofcleaning
MIN --- --- --- --- 09.912
Additional cleaning over 30 LF ADD LF --- --- --- --- 09.913
Three story building, up to 30 LFof cleaning
MIN --- --- --- --- 09.914
Additional cleaning over 30 LF ADD LF --- --- --- --- 09.915
GUTTERCLEANINGFROM ROOF
Remove debris from gutter to trashreceptacle while standing on a roof
One story building, up to 30 LF ofcleaning
MIN --- --- --- --- 09.920
Additional cleaning over 30 LF ADD LF --- --- --- --- 09.921
Two story building, up to 30 LF ofcleaning
MIN --- --- --- --- 09.922
Additional cleaning over 30 LF ADD LF --- --- --- --- 09.923
Three story building, up to 30 LFof cleaning
MIN --- --- --- --- 09.924
Additional cleaning over 30 LF ADD LF --- --- --- --- 09.925

84 H1MD0220001CH0133
9. DE-ICING CORD
SPECIFICATIONS UNIT
CONTRACTOR’SDIRECT JOB COST
PRICE
DATABASEITEMNO.MATLS LABOR TOTAL
DE-ICINGCORD
Install 120 V de-icing cord on existingroof eave, gutter and downspout # Plug into existing electrical
receptacle and run cord up to roofeave next to gutter and secure it
# Run cord down into gutter and upto eave 24" along the eave fromstart
# Run cord in zig-zag fashion alongeave and into gutter and downthrough bottom of downspout
1.00
Up to 30 LF of gutter and/or downspout MIN --- --- --- --- 09.950
Additional gutter/downspout over 30 LFADD
LF = Total length of gutter and/ordownspout
LF --- --- --- --- 09.951

H1MD0220001CH0133 85
9. ICE DAM BARRIER
SPECIFICATIONS UNIT
CONTRACTOR’SDIRECT JOB COST
PRICE
DATABASEITEMNO.MATLS LABOR TOTAL
ICE DAMBARRIER
Install ice dam barrier on existing roof # Erect staging below eaves # Remove 48" of existing roofing
material measuring from the eavestoward the ridge and save in goodcondition
# Clean roof deck surface of dust anddebris particles
# Cut desired length of ice and watershield underlayment, removepolyfilm backing and apply to cleanroof deck
# Reinstall roofing material whichwas removed
Existing Roofing Materials
1.00
Asphalt/Fiberglass shingles, up to 36 SF MIN --- --- --- --- 09.960
Additional roofing over 36 SF ADD SF --- --- --- --- 09.961
Wood shingles or shakes, up to 36 SF MIN --- --- --- --- 09.962
Additional roofing over 36 SF ADD SF --- --- --- --- 09.963
Slate or concrete or clay tile, up to 36 SF MIN --- --- --- --- 09.964
Additional roofing over 36 SF ADD
SF = SF of ice shield underlaymentapplied
SF --- --- --- --- 09.965
Before reinstallation of roofingmaterials, replace materials damagedwhen removed from roof
Asphalt/Figerglass shingles @ $36/SQ,up to 33 SF
MIN --- --- --- --- 09.971
Additional roofing over 33 SF ADD SF --- --- --- --- 09.972
Wood shingles or shakes @ $200/SQ,up to 25 SF
MIN --- --- --- --- 09.973
Additional roofing over 25 SF ADD SF --- --- --- --- 09.974
Slate or clay tile @ $500/SQ, up to 10 SF MIN --- --- --- --- 09.975
Additional roofing over 10 SF ADD SF --- --- --- --- 09.976
Concrete tile @ $170/SQ, up to 10 SF MIN --- --- --- --- 09.977
Additional roofing over 10 SF ADD SF --- --- --- --- 09.978

86 H1MD0220001CH0133
10. WOOD DECK POST
SPECIFICATIONS UNIT
CONTRACTOR’S
DIRECT JOB COSTPRICE
DATA
BASE
ITEM
NO.MATLS LABOR TOTAL
INSTALL POST
ANCHOR
Install post anchor at base of existingpost # Shore deck floor supported by post # Cut bottom of post as required for
post anchor clearance # Drill holes in pier, set galvanized
wood post anchor and fasten post # Remove shoring
1 post anchor MIN --- --- --- --- 10.001
Additional post anchors over 1 ADD EA --- --- --- --- 10.002
REPLACEWOOD POST
Replace damaged wood deck post # Shore deck floor supported by
existing post # Remove existing post # Install new solid wood post up to 8
feet in height # Remove shoring
One 4" x 4" P.T. fir or pine post MIN --- --- --- --- 10.005
Additional P.T. fir or pine post ADD EA --- --- --- --- 10.006
One 6" x 6" P.T. fir or pine post MIN --- --- --- --- 10.007
Additional P.T. fir or pine post ADD EA --- --- --- --- 10.008
One 4" x 4" Const.Gr.redwood post MIN --- --- --- --- 10.009
Additional redwood post ADD EA --- --- --- --- 10.010
One 6" x 6" Const.Gr.redwood post MIN --- --- --- --- 10.011
Additional redwood post ADD EA --- --- --- --- 10.012
One 4" x 4" Western red cedar post MIN --- --- --- --- 10.013
Additional red cedar post ADD EA --- --- --- --- 10.014
One 6" x 6" Western red cedar post MIN --- --- --- --- 10.015
Additional red cedar post ADD EA --- --- --- --- 10.016

H1MD0220001CH0133 87
10. REPAIR DECK FRAMING
SPECIFICATIONS UNIT
CONTRACTOR’S
DIRECT JOB COST PRICE
DATABASEITEMNO.MATLS LABOR TOTAL
SISTER DECKJOISTS
Repair springy deck by sistering joist # Cut pressure treated lumber the
same dimensions as existing joist tofit on same supports
# Hold new joist against existing joistand nail together with pairs of 10dgalvanized common nails 24" OC
1.00
Sister up to two 2" x 10" x 12'-0" joists MIN --- --- --- --- 10.050
Additional joists sistered over 2 ADD EA --- --- --- --- 10.051
DIAGONALBRACING
To correct swaying deck, install diagonalbracing on existing deck posts # Cutting angle on 2" x 6", nail it to the
top of one post or beam with 10dgalvanized common nails and nailthe bottom to an adjacent post
# Cut bottom of diagonal bracing flushwith the side of the post
# If one diagonal brace does notcorrect the swaying, continue nailingon diagonal bracing until the defectis corrected
Up to 2 diagonal braces MIN --- --- --- --- 10.055
Additional diagonal braces over 2 ADD EA --- --- --- --- 10.056
LOOSE DECKON FRAMEDWALL
Drive lag screws into band board of woodframed house to correct fastening failure # Drill pilot holes in ledger and drive
1/2" x 5" hex head galvanized lagscrews, high and low, 16" OCthrough ledger and into band boardof house
Up to 4 lag screws MIN --- --- --- --- 10.060
Additional lag screws over 4 ADD EA --- --- --- --- 10.061
LOOSE DECKON MASONRYWALL
Embed anchors or bolts in block or brickand block wall to correct fastening failure # Drill pilot holes in ledger and embed
epoxy anchors or gravity toggle boltsthrough the brick and block wall,high and low, 16" OC
Up to 4 anchors or bolts MIN --- --- --- --- 10.065
Additional anchors or bolts over 4 ADD EA --- --- --- --- 10.066
LOOSE DECKONCONCRETEWALL
Embed expansion anchors in concretewall to correct fastening failure # Drill pilot holes in ledger and embed
expansion anchors in concrete wall,high and low, 16" OC
Up to 4 anchors MIN --- --- --- --- 10.075
Additional anchors over 4 ADD EA --- --- --- --- 10.076

88 H1MD0220001CH0133
10. REPLACE PORCH POST OR COLUMN
SPECIFICATIONS UNIT
CONTRACTOR’S
DIRECT JOB COST PRICE
DATABASEITEMNO.MATLS LABOR TOTAL
REPLACEPORCH POSTOR COLUMN
Replace damaged porch post orcolumn # Install temporary jack support and
remove old post and attachedrailings
# Install new post or column # Re-install railings and attach to
new posts # New post or column up to 8 feet
high
1.00
Built-up post, 4" x 4" fir, pine orspruce, with #2 pine or fir covering
EA --- --- --- --- 10.100
Built-up post, 4" x 4" fir, pine orspruce, with STK cedar covering
EA --- --- --- --- 10.101
4" x 4" post, #2 pine or fir EA --- --- --- --- 10.102
4" x 4" post, STK cedar EA --- --- --- --- 10.103
Turned colonial post, 4" x 4" EA --- --- --- --- 10.104
Turned colonial post, 5" x 5" EA --- --- --- --- 10.105
8" fir hollow round colonial porticocolumn
EA --- --- --- --- 10.106
10" fir hollow round colonial porticocolumn
EA --- --- --- --- 10.107
12" fir hollow round colonial porticocolumn
EA --- --- --- --- 10.108
8" aluminum round colonial porticocolumn
EA --- --- --- --- 10.109
10" aluminum round colonial porticocolumn
EA --- --- --- --- 10.110
12" aluminum round colonial porticocolumn
EA --- --- --- --- 10.111

H1MD0220001CH0133 89
10. PORCH REPAIRS
SPECIFICATIONS UNIT
CONTRACTOR’S
DIRECT JOB COST PRICE
DATABASEITEMNO.MATLS LABOR TOTAL
REPLACEPORCHFLOORING
Replace existing porch flooring # Remove existing porch flooring # Install new 3/4" T & G fir or pine
porch flooring
1.00
UP to 50 SF of flooring MIN --- --- --- --- 10.150
Additional flooring over 50 SF ADD SF --- --- --- --- 10.151
PORCHFLOORINGTOOTH-IN
Pine or fir porch flooring toothed in toexisting flooring
ADD
EA = Each toothed in joint
EA --- --- --- --- 10.155
REPLACE
PORCH
HEADER
Replace existing porch header # Shore structure over header # Remove existing header # Install new header built from 2" x
10" fir or pine covered with #2pine or fir soffit and 2 fascias
# Attach to column below andstructure above
# Remove shoring
Up to 4 LF of header MIN --- --- --- --- 1 0.160
Additional header over 4 LF ADD LF --- --- --- --- 10.161
REPLACEWOODPORCHRAILING
Replace existing wood porch railing # Remove existing railing # Install new wood railing with
2" x 4" top rail, 2" x 4" bottom railand 1-1/4" x 1-1/4" balusters
Up to 8 LF of railing MIN --- --- --- --- 10.170
Additional railing over 8 LF ADD LF --- --- --- --- 10.171
REPLACELATTICE
Replace wooden lattice sections,including removing existing sectionsand installing new sections, latticemouldings and dividers
Treated pine 2' x 8' EA --- --- --- --- 10.180
4' x 8' EA --- --- --- --- 10.181
Heavy-duty treated pine 2' x 8' EA --- --- --- --- 10.182
4' x 8' EA --- --- --- --- 10.183
Cedar 2' x 8' EA --- --- --- --- 10.184
4' x 8' EA --- --- --- --- 10.185
Heavy-duty cedar 2' x 8' EA --- --- --- --- 10.186
4' x 8' EA --- --- --- --- 10.187
Plastic 2' x 8' EA --- --- --- --- 10.188
4' x 8' EA --- --- --- --- 10.189

90 H1MD0220001CH0133
10. REPLACE WOOD FASCIA
SPECIFICATIONS UNIT
CONTRACTOR’S
DIRECT JOB COST PRICE
DATABASEITEMNO.MATLS LABOR TOTAL
#2 PINE,SPRUCE, FIRFASCIA
Replace existing fascia on one storybuilding with new #2 pine, spruce or firfascia
1.00
Up to 10 LF 1" x 6" fascia MIN --- --- --- --- 10.200
Additional fascia over 10 LF ADD LF --- --- --- --- 10.201
Up to 10 LF 1" x 8" fascia MIN --- --- --- --- 10.202
Additional fascia over 10 LF ADD LF --- --- --- --- 10.203
Up to 10 LF 1" x 10" fascia MIN --- --- --- --- 10.204
Additional fascia over 10 LF ADD LF --- --- --- --- 10.205
Up to 10 LF 1" x 12" fascia MIN --- --- --- --- 10.206
Additional fascia over 10 LF ADD LF --- --- --- --- 10.207
D SELECTCEDAR FASCIA
Replace existing fascia on one storybuilding with new D Select cedarfascia
Up to 10 LF 1" x 6" fascia MIN --- --- --- --- 10.210
Additional fascia over 10 LF ADD LF --- --- --- --- 10.211
Up to 10 LF 1" x 8" fascia MIN --- --- --- --- 10.212
Additional fascia over 10 LF ADD LF --- --- --- --- 10.213
Replace existing fascia on one storybuilding with new STK cedar fascia
Up to 10 LF 1" x 6" fascia MIN --- --- --- --- 10.220
Additional fascia over 10 LF ADD LF --- --- --- --- 10.221
Up to 10 LF 1" x 8" fascia MIN --- --- --- --- 10.222
Additional fascia over 10 LF ADD LF --- --- --- --- 10.223
TWO ORTHREE STORYBUILDING
Replace fascia on two story building,add to one story labor costs shownabove
UP to 10 LF of fascia MIN --- --- --- --- 10.230
Additional fascia over 10 LF ADD LF --- --- --- --- 10.231
Replace fascia on three story building,add to one story labor costs shownabove
UP to 10 LF of fascia MIN --- --- --- --- 10.235
Additional fascia over 10 LF ADD LF --- --- --- --- 10.236

H1MD0220001CH0133 91
10. REPLACE WOOD RAKE
SPECIFICATIONS UNIT
CONTRACTOR’S
DIRECT JOB COST PRICE
DATABASEITEMNO.MATLS LABOR TOTAL
#2 PINE,
SPRUCE, FIR
RAKE
Replace existing rake on one storybuilding with new #2 pine, spruce or firrake
1.00
Up to 10 LF 1" x 4" rake MIN --- --- --- --- 10.250
Additional rake over 10 LF ADD LF --- --- --- --- 10.251
Up to 10 LF 1" x 6" rake MIN --- --- --- --- 10.252
Additional rake over 10 LF ADD LF --- --- --- --- 10.253
Up to 10 LF 1" x 8" rake MIN --- --- --- --- 10.254
Additional rake over 10 LF ADD LF --- --- --- --- 10.255
Up to 10 LF 2" x 4" rake MIN --- --- --- --- 10.256
Additional rake over 10 LF ADD LF --- --- --- --- 10.257
Up to 10 LF 2" x 6" rake MIN --- --- --- --- 10.258
Additional rake over 10 LF ADD LF --- --- --- --- 10.259
Up to 10 LF 2" x 8" rake MIN --- --- --- --- 10.260
Additional rake over 10 LF ADD LF --- --- --- --- 10.261
D SELECTCEDAR RAKE
Replace existing rake on one storybuilding with new D Select cedar rake
Up to 10 LF 1" x 4" rake MIN --- --- --- --- 10.270
Additional rake over 10 LF ADD LF --- --- --- --- 10.271
Up to 10 LF 1" x 6" rake MIN --- --- --- --- 10.272
Additional rake over 10 LF ADD LF --- --- --- --- 10.273
Up to 10 LF 1" x 8" rake MIN --- --- --- --- 10.274
Additional rake over 10 LF ADD LF --- --- --- --- 10.275
SKT CEDARRAKE
Replace existing rake on one storybuilding with new SKT cedar rake
Up to 10 LF 2" x 4" rake MIN --- --- --- --- 10.280
Additional rake over 10 LF ADD LF --- --- --- --- 10.281
Up to 10 LF 2" x 6" rake MIN --- --- --- --- 10.282
Additional rake over 10 LF ADD LF --- --- --- --- 10.283
Up to 10 LF 2 x 8" rake MIN --- --- --- --- 10.284
Additional rake over 10 LF ADD LF --- --- --- --- 10.285
TWO ORTHREE STORYBUILDING
Replace existing rake on two storybuilding with new SKT cedar rake, add toone story labor costs
Up to 10 LF of rake ADD MIN --- --- --- --- 10.290
Additional rake over 10 LF ADD LF --- --- --- --- 10.291
Replace existing rake on three storybuilding add to one story labor costs
Up to 10 LF of rake ADD MIN --- --- --- --- 10.295
Additional rake over 10 LF ADD LF --- --- --- --- 10.296

92 H1MD0220001CH0133
10. REPLACE WOOD SOFFIT
SPECIFICATIONS UNIT
CONTRACTOR’S
DIRECT JOB COST PRICE
DATABASEITEMNO.MATLS LABOR TOTAL
REPLACESOFFIT ONONE STORYBUILDING
Remove existing soffit on one storybuilding and replace with #2 pine,spruce, fir or plywood soffit # Remove existing wood soffit
beyond point where defective soffitis to be replaced
# Cut off defective section fromremoved soffit
# Install new soffit and remainder ofexisting soffit
#2 spruce, pine or firUp to 10 LF 1" x 6" soffit MIN --- --- --- --- 10.300
Additional soffit over 10 LF ADD LF --- --- --- --- 10.301
Up to 10 LF 1" x 8" soffit MIN --- --- --- --- 10.302
Additional soffit over 10 LF ADD LF --- --- --- --- 10.303
Up to 10 LF 1" x 10" soffit MIN --- --- --- --- 10.304
Additional soffit over 10 LF ADD LF --- --- --- --- 10.305
Up to 10 LF 1" x 12" soffit MIN --- --- --- --- 10.306
Additional soffit over 10 LF ADD LF --- --- --- --- 10.307
3/8" AC Exterior Grade Fir PlywoodUp to 10 LF 12" soffit
MIN --- --- --- --- 10.310
Additional soffit over 10 LF ADD LF --- --- --- --- 10.311
Up to 10 LF 16" soffit MIN --- --- --- --- 10.312
Additional soffit over 10 LF ADD LF --- --- --- --- 10.313
Up to 10 LF 24" soffit MIN --- --- --- --- 10.314
Additional soffit over 10 LF ADD LF --- --- --- --- 10.315
3/8" AC Exterior Grade Cedar PlywoodUp to 10 LF 12" soffit MIN --- --- --- --- 10.320
Additional soffit over 10 LF ADD LF --- --- --- --- 10.321
Up to 10 LF 16" soffit MIN --- --- --- --- 10.322
Additional soffit over 10 LF ADD LF --- --- --- --- 10.323
Up to 10 LF 24" soffit MIN --- --- --- --- 10.451
Additional soffit over 10 LF ADD LF --- --- --- --- 10.452
TWO ORTHREE STORYBUILDING
Replace soffit on two story building,add to one story labor costs above
Up to 10 LF of soffit MIN --- --- --- --- 10.455
Additional soffit over 10 LF ADD LF --- --- --- --- 10.456
Replace soffit on three story building,add to one story labor costs above
Up to 10 LF of soffit MIN --- --- --- --- 10.457
Additional soffit over 10 LF ADD LF --- --- --- --- 10.458

H1MD0220001CH0133 93
10. COVER WOOD SOFFIT WITH ALUMINUM OR VINYL
SPECIFICATIONS UNIT
CONTRACTOR’S
DIRECT JOB COST PRICE
DATA
BASE
ITEM
NO.MATLS LABOR TOTAL
ALUMINUMSOFFITPANEL
Cover existing wood soffit on one storybuilding and replace with newaluminum soffit panels, including “F” or“J” channel and blocking for panelattachment
1.00
Up to 10 LF 12" soffit panel MIN --- --- --- --- 10.440
Additional soffit panel over 10 LF ADD LF --- --- --- --- 10.441
Up to 10 LF 18" soffit panel MIN --- --- --- --- 10.442
Additional soffit panel over 10 LF ADD LF --- --- --- --- 10.443
Up to 10 LF 24" soffit panel MIN --- --- --- --- 10.444
Additional soffit panel over 10 LF ADD LF --- --- --- --- 10.445
VINYL SOFFITPANEL
Cover existing wood soffit on one storybuilding and replace with new vinylsoffit panels, including “F” or “J”channel and blocking for panelattachment
Up to 10 LF 12" soffit panel MIN --- --- --- --- 10.447
Additional soffit panel over 10 LF ADD LF --- --- --- --- 10.448
Up to 10 LF 18" soffit panel MIN --- --- --- --- 10.449
Additional soffit panel over 10 LF ADD LF --- --- --- --- 10.450
Up to 10 LF 24" soffit panel MIN --- --- --- --- 10.451
Additional soffit panel over 10 LF ADD LF --- --- --- --- 10.452
TWO ORTHREE STORYBUILDING
Cover soffit on two story building, add to one story labor costs shownabove
Up to 10 LF of soffit panel MIN --- --- --- --- 10.455
Additional soffit over 10 LF ADD LF --- --- --- --- 10.456
Cover soffit on three story building, add to one story labor costs shownabove
Up to 10 LF of soffit panel MIN --- --- --- --- 10.457
Additional soffit over 10 LF ADD LF --- --- --- --- 10.458

94 H1MD0220001CH0133
10. REPLACE WOOD SOFFIT WITH ALUMINUM OR VINYL
SPECIFICATIONS UNIT
CONTRACTOR’S
DIRECT JOB COST PRICE
DATA
BASE
ITEM
NO.MATLS LABOR TOTAL
ALUMINUMSOFFITPANEL
Remove existing wood soffit on onestory building and replace with newaluminum soffit panels, including “F” or“J” channel and blocking for panelattachment
1.00
Up to 10 LF 12" soffit panel MIN --- --- --- --- 10.460
Additional soffit panel over 10 LF ADD LF --- --- --- --- 10.461
Up to 10 LF 18" soffit panel MIN --- --- --- --- 10.462
Additional soffit panel over 10 LF ADD LF --- --- --- --- 10.463
Up to 10 LF 24" soffit panel MIN --- --- --- --- 10.464
Additional soffit panel over 10 LF ADD LF --- --- --- --- 10.465
VINYL SOFFITPANEL
Remove existing wood soffit on onestory building and replace with newvinyl soffit panels, including “F” or “J”channel and blocking for panelattachment
Up to 10 LF 12" soffit panel MIN --- --- --- --- 10.464
Additional soffit panel over 10 LF ADD LF --- --- --- --- 10.465
Up to 10 LF 18" soffit panel MIN --- --- --- --- 10.469
Additional soffit panel over 10 LF ADD LF --- --- --- --- 10.470
Up to 10 LF 24" soffit panel MIN --- --- --- --- 10.471
Additional soffit panel over 10 LF ADD LF --- --- --- --- 10.472
TWO ORTHREE STORYBUILDING
Replace soffit on two story building,
add to one story labor costs shownabove
Up to 10 LF of soffit panel MIN --- --- --- --- 10.475
Additional soffit over 10 LF ADD LF --- --- --- --- 10.476
Replace soffit on three story building,
add to one story labor costs shownabove
Up to 10 LF of soffit panel MIN --- --- --- --- 10.477
Additional soffit over 10 LF ADD LF --- --- --- --- 10.478

H1MD0220001CH0133 95
10. REPLACE ALUMINUM OR VINYL SOFFIT
SPECIFICATIONS UNIT
CONTRACTOR’S
DIRECT JOB COST PRICE
DATABASEITEMNO.MATLS LABOR TOTAL
ALUMINUMSOFFIT PANEL
Remove existing aluminum or vinyl soffiton one story building and replace withnew aluminum soffit panels
1.00
Up to 10 LF 12" soffit panel MIN --- --- --- --- 10.481
Additional soffit panel over 10 LF ADD LF --- --- --- --- 10.482
Up to 10 LF 18" soffit panel MIN --- --- --- --- 10.483
Additional soffit panel over 10 LF ADD LF --- --- --- --- 10.484
Up to 10 LF 24" soffit panel MIN --- --- --- --- 10.485
Additional soffit panel over 10 LF ADD LF --- --- --- --- 10.486
VINYL SOFFITPANEL
Remove existing aluminum or vinyl soffiton one story building and replace withnew vinyl soffit panels
Up to 10 LF 12" soffit panel MIN --- --- --- --- 10.490
Additional soffit panel over 10 LF ADD LF --- --- --- --- 10.491
Up to 10 LF 18" soffit panel MIN --- --- --- --- 10.492
Additional soffit panel over 10 LF ADD LF --- --- --- --- 10.493
Up to 10 LF 24" soffit panel MIN --- --- --- --- 10.494
Additional soffit panel over 10 LF ADD LF --- --- --- --- 10.495
TWO ORTHREE STORYBUILDING
Replace soffit on two story building, addto one story labor costs shown above
Up to 10 LF of soffit panel MIN --- --- --- --- 10.496
Additional soffit over 10 LF ADD LF --- --- --- --- 10.497
Replace soffit on three story building,add to one story labor costs shownabove
Up to 10 LF of soffit panel MIN --- --- --- --- 10.498
Additional soffit over 10 LF ADD LF --- --- --- --- 10.499
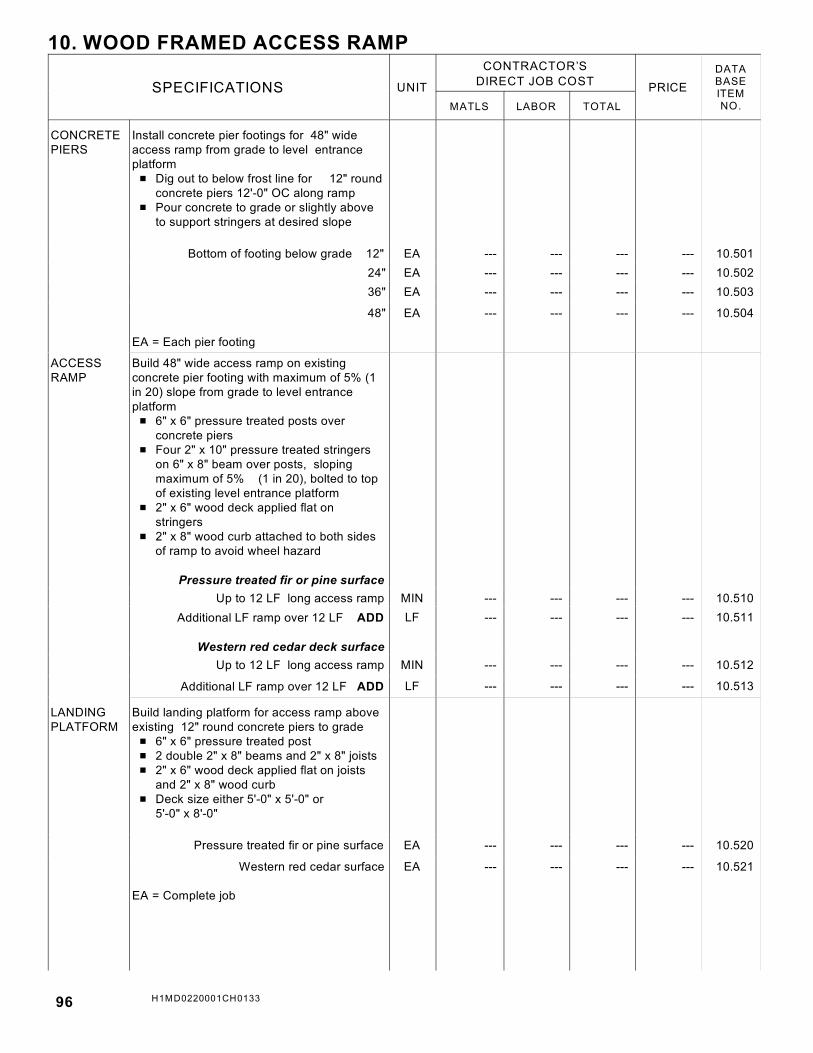
96 H1MD0220001CH0133
10. WOOD FRAMED ACCESS RAMP
SPECIFICATIONS UNIT
CONTRACTOR’S
DIRECT JOB COST PRICE
DATABASEITEMNO.MATLS LABOR TOTAL
CONCRETEPIERS
Install concrete pier footings for 48" wideaccess ramp from grade to level entranceplatform # Dig out to below frost line for 12" round
concrete piers 12'-0" OC along ramp # Pour concrete to grade or slightly above
to support stringers at desired slope
1.00
Bottom of footing below grade 12" EA --- --- --- --- 10.501
24" EA --- --- --- --- 10.502
36" EA --- --- --- --- 10.503
48"
EA = Each pier footing
EA --- --- --- --- 10.504
ACCESSRAMP
Build 48" wide access ramp on existingconcrete pier footing with maximum of 5% (1in 20) slope from grade to level entranceplatform # 6" x 6" pressure treated posts over
concrete piers # Four 2" x 10" pressure treated stringers
on 6" x 8" beam over posts, slopingmaximum of 5% (1 in 20), bolted to topof existing level entrance platform
# 2" x 6" wood deck applied flat onstringers
# 2" x 8" wood curb attached to both sidesof ramp to avoid wheel hazard
Pressure treated fir or pine surface
Up to 12 LF long access ramp MIN --- --- --- --- 10.510
Additional LF ramp over 12 LF ADD
Western red cedar deck surface
LF --- --- --- --- 10.511
Up to 12 LF long access ramp MIN --- --- --- --- 10.512
Additional LF ramp over 12 LF ADD LF --- --- --- --- 10.513
LANDINGPLATFORM
Build landing platform for access ramp aboveexisting 12" round concrete piers to grade # 6" x 6" pressure treated post # 2 double 2" x 8" beams and 2" x 8" joists # 2" x 6" wood deck applied flat on joists
and 2" x 8" wood curb # Deck size either 5'-0" x 5'-0" or
5'-0" x 8'-0"
Pressure treated fir or pine surface EA --- --- --- --- 10.520
Western red cedar surface
EA = Complete job
EA --- --- --- --- 10.521

H1MD0220001CH0133 97
10. ACCESS RAMP HANDRAILS
SPECIFICATIONS UNIT
CONTRACTOR’S
DIRECT JOB COST PRICE
DATABASEITEMNO.MATLS LABOR TOTAL
IRON RAILING 1-rail 1-1/4" galvanized pipe railing on1 side of ramp 34" above surface onround pipe posts set on surface notover 60" OC and extending 12"beyond top and bottom of ramp
LF = Length of railing
LF --- --- --- --- 10.530
1.00 2-rail 1-1/4" galvanized pipe railing on1 side of ramp 34" above surface onround pipe posts set on surface withbottom rail 12" from ramp surface andextending 12" beyond top and bottomof ramp
LF = Length of railing
LF --- --- --- --- 10.531
1-rail 1-1/2" pipe railing on existingbuilding next to ramp set with 1-1/2"space between wall and railing,
top of railing 34" above ramp surfaceand extending 12" beyond top andbottom of ramp
LF - Length of railing
LF --- --- --- --- 10.532
WOOD RAMPRAILING
Wood ramp railing 34" above ramp
# 4" x 4" end and intermediateposts, 48" OC
# 2" x 6" or 5/4" x 6" cap laid flat # 2" x 4" top and bottom rails set
upright between posts # 2" x 2" pickets fastened to outside
of rails 5" OC
Pressure treated fir or pine LF --- --- --- --- 10.535
Western red cedar
LF = Length of railing
LF --- --- --- --- 10.536

98 H1MD0220001CH0133
11. REPLACE DAMAGED CLAPBOARD SIDING
SPECIFICATIONS UNIT
CONTRACTOR’S
DIRECT JOB COST PRICE
DATA
BASE
ITEM
NO.MATLS LABOR TOTAL
REPLACECLAPBOARDSIDING
Replace damaged clapboard siding withnew siding board # Mark each end of damaged siding
board at center of wall stud wherethe board will be cut out
# Drive wedge under damaged boardoutside each marked end to keep itraised above the board below
# Cut the board with a backsaw alongthe cutting lines and finish the cutswith a chisel
# Remove the damaged board, cut outwith a hacksaw any nails in boardabove the removed board which willinterfere with the replacement boardand repair the building paper under iftorn
# Cut replacement board to requiredlength and drive it into position
# Face nail the replacement board,countersink the nails and putty thenailholes
Cedar (A & Btr)
1.00
Up to 10 LF of 1/2" x 4" siding board MIN --- --- --- --- 11.000
Additional siding board over 10 LF ADD LF --- --- --- --- 11.001
Up to 10 LF of 1/2" x 6" siding board MIN --- --- --- --- 11.002
Additional siding board over 10 LF ADD LF --- --- --- --- 11.003
Up to 10 LF of 1/2" x 8" siding board MIN --- --- --- --- 11.004
Additional siding board over 10 LF ADD LF --- --- --- --- 11.005
Up to 10 LF of 3/4" x 8" siding board MIN --- --- --- --- 11.006
Additional siding board over 10 LF ADD LF --- --- --- --- 11.007
Up to 10 LF of 3/4" x 10" siding board MIN --- --- --- --- 11.008
Additional siding board over 10 LF ADD
Redwood (Clear)
LF --- --- --- --- 11.009
Up to 10 LF of 1/2" x 4" siding board MIN --- --- --- --- 11.010
Additional siding board over 10 LF ADD LF --- --- --- --- 11.011
Up to 10 LF of 1/2" x 6" siding board MIN --- --- --- --- 110.12
Additional siding board over 10 LF ADD LF --- --- --- --- 11.013
Up to 10 LF of 1/2" x 8" siding board MIN --- --- --- --- 11.014
Additional siding board over 10 LF ADD LF --- --- --- --- 11.015
Up to 10 LF of 3/4" x 8" siding board MIN --- --- --- --- 11.016
Additional siding board over 10 LF ADD LF --- --- --- --- 11.017
Up to 10 LF of 3/4" x 10" siding board MIN --- --- --- --- 11.018
Additional siding board over 10 LF ADD LF --- --- --- --- 11.019

H1MD0220001CH0133 99
11. REPLACE WOOD CORNER BOARD
SPECIFICATIONS UNIT
CONTRACTOR’S
DIRECT JOB COSTPRICE
DATABASEITEMNO.MATLS LABOR TOTAL
REPLACEWOODCORNERBOARD
Replace damaged wood corner boardwith new corner board # Cut caulking where siding butts
against one side of corner board # Remove nails securing damaged
corner board to building # Pry damaged corner board loose
from intact corner board # Measure and cut new corner board # Install new side of corner board and
nail it to building and to intact cornerboard
# Re-caulk where siding meetsreplaced piece
# No painting or staining
1.00
Fir or Pine (Clear)
Up to 10 LF of 1" x 4" corner board MIN --- --- --- --- 11.050
Additional corner board over 10 LF ADD LF --- --- --- --- 11.051
Up to 10 LF of 1" x 6" corner board MIN --- --- --- --- 11.052
Additional corner board over 10 LF ADD LF --- --- --- --- 11.053
Up to 10 LF of 5/4" x 4" corner board MIN --- --- --- --- 11.054
Additional corner board over 10 LF ADD LF --- --- --- --- 11.055
Up to 10 LF of 5/4" x 6" corner board MIN --- --- --- --- 11.056
Additional corner board over 10 LF ADD LF --- --- --- --- 11.057
Cedar (A & Btr)
Up to 10 LF of 1" x 4" corner board MIN --- --- --- --- 11.060
Additional corner board over 10 LF ADD LF --- --- --- --- 11.061
Up to 10 LF of 1" x 6" corner board MIN --- --- --- --- 11.062
Additional corner board over 10 LF ADD LF --- --- --- --- 11.063
Up to 10 LF of 5/4" x 4" corner board MIN --- --- --- --- 11.064
Additional corner board over 10 LF ADD LF --- --- --- --- 11.065
Up to 10 LF of 5/4" x 6" corner board MIN --- --- --- --- 11.066
Additional corner board over 10 LF ADD LF --- --- --- --- 11.067
Redwood (Clear)
Up to 10 LF of 1" x 4" corner board MIN --- --- --- --- 11.070
Additional corner board over 10 LF ADD LF --- --- --- --- 11.071
Up to 10 LF of 1" x 6" corner board MIN --- --- --- --- 11.072
Additional corner board over 10 LF ADD LF --- --- --- --- 11.073
Up to 10 LF of 5/4" x 4" corner board MIN --- --- --- --- 11.074
Additional corner board over 10 LF ADD LF --- --- --- --- 11.075
Up to 10 LF of 5/4" x 6" corner board MIN --- --- --- --- 11.076Additional corner board over 10 LF ADD LF --- --- --- --- 11.077

100 H1MD0220001CH0133
11. REPLACE T & G SIDING
SPECIFICATIONS UNIT
CONTRACTOR’S
DIRECT JOB COST PRICE
DATABASEITEMNO.MATLS LABOR TOTAL
REPLACETONGUE ANDGROOVESIDING
Replace damaged tongue and groovesiding section with new tongue andgroove board # Mark each end of damaged siding
board at center of wall stud, cut withelectric saw and finish the cuts with achisel
# Make horizontal cut in center ofdamaged board and finish the cutwith a chisel
# Remove the damaged section ofboard and repair the building paperunder if torn
# Remove nails which fasteneddamaged section of siding boardbeing replaced
# Cut replacement board to length ofremoved section and cut off thebackside of the groove at the bottomof the board
# Slide the board into place, face nailthe board, countersink the nails andputty the nailholes
Fir or PineUp to 10 LF of 1" x 4" siding board MIN --- --- --- --- 11.100
Additional siding board over 10 LF ADD LF --- --- --- --- 11.101
Up to 10 LF of 1" x 6" siding board MIN --- --- --- --- 11.102Additional siding board over 10 LF ADD LF --- --- --- --- 11.103
Up to 10 LF of 1" x 8" siding board MIN --- --- --- --- 11.104Additional siding board over 10 LF ADD LF --- --- --- --- 11.105
Up to 10 LF of 1" x 10" siding board MIN --- --- --- --- 11.106Additional siding board over 10 LF ADD LF --- --- --- --- 11.107
Cedar (A & Btr)Up to 10 LF of 1" x 4" siding MIN --- --- --- --- 11.110
Additional siding board over 10 LF ADD LF --- --- --- --- 11.111
Up to 10 LF of 1" x 6" siding MIN --- --- --- --- 11.112Additional siding board over 10 LF ADD LF --- --- --- --- 11.113
Up to 10 LF of 1" x 8" siding MIN --- --- --- --- 11.114Additional siding board over 10 LF ADD LF --- --- --- --- 11.115
Up to 10 LF of 1" x 10" siding MIN --- --- --- --- 11.116Additional siding board over 10 LF ADD LF --- --- --- --- 11.117
Redwood (Clear)Up to 10 LF of 1" x 4" siding MIN --- --- --- --- 11.120
Additional siding board over 10 LF ADD LF --- --- --- --- 11.121
Up to 10 LF of 1" x 6" siding MIN --- --- --- --- 11.122Additional siding board over 10 LF ADD LF --- --- --- --- 11.123
Up to 10 LF of 1" x 8" siding MIN --- --- --- --- 11.124Additional siding board over 10 LF ADD LF --- --- --- --- 11.125
Up to 10 LF of 1" x 10" siding MIN --- --- --- --- 11.126Additional siding board over 10 LF ADD LF --- --- --- --- 11.127

H1MD0220001CH0133 101
11. REPLACE ALUMINUM OR VINYL SIDING PANEL
SPECIFICATIONS UNIT
CONTRACTOR’S
DIRECT JOB COST PRICE
DATABASEITEMNO.MATLS LABOR TOTAL
REPLACEALUMINUMSIDING PANEL
Replace damaged aluminum sidingpanel with new aluminum panel # Cut horizontally through the center
of the damaged panel with a utilityknife
# Make a vertical cut at each end ofthe damaged panel and removethe bottom section below thehorizontal cut
# Cut new panel to replace thedamaged panel 2 inches longerthan the damaged panel
# Cut off the nailing strip of thereplacement panel
# Apply roofing cement along thecenter of the remaining top half ofthe damaged panel
# Tuck the new panel under the locklip of the panel below and slide itup under the lock lip of the panelabove, overlapping the siding oneach side by 1 inch
# Press firmly on the replacementpanel to cement it to the remainingtop half of the damaged panel
Up to 10 LF of siding panel MIN --- --- --- --- 11.152
Additional siding panel over 10 LF ADD LF --- --- --- --- 11.153
REPLACEVINYL SIDINGPANEL
Replace damaged vinyl siding panelwith new vinyl panel # Using a zipper tool, unlock the
panel above the damaged panel,lift it away from the wall andremove the nails securing thedamaged panel to the wall
# Make vertical cut with tin snips ateach end of the damaged paneland remove it
# Cut the replacement panel 2inches longer than the removeddamaged section
# Slide the replacement panel intoplace overlapping the panels oneach side 1 inch and nail it to thesheathing through the nailingflange
# Snap the bottom edge of the panelabove into the top edge of thereplacement panel with the zippertool
Up to 10 LF of siding panel MIN --- --- --- --- 11.160
Additional siding panel over 10 LF ADD LF --- --- --- --- 11.161

102 H1MD0220001CH0133
11. REPLACE WATER TABLE
SPECIFICATIONS UNIT
CONTRACTOR’S
DIRECT JOB COSTPRICE
DATABASEITEMNO.MATLS LABOR TOTAL
REPLACETWO-PIECEWATERTABLE
Replace water table drip cap mouldingand water table board # Mark each end of damaged water
table cap and board # Drive wedge from below under
both water table board and cap # Cut the water table board and cap
along the cutting marks and finishthe cutting with a chisel
# Remove the damaged board andcap and remove any remainingnails
# Cut replacement board and cap torequired length and install dripmoulding and water table boardbelow
# Nail, countersink and puttyreplacement water table cap andboard
# Drip cap moulding 3/4" x 1-5/8"
1.00
Fir or Pine (Paint grade)
Up to 10 LF 1" x 4" water table MIN --- --- --- --- 11.171
Additional water table over 10 LF ADD LF --- --- --- --- 11.172
Up to 10 LF 1" x 6" water table MIN --- --- --- --- 11.173
Additional water table over 10 LF ADD LF --- --- --- --- 11.174
Cedar (A & Btr)
Up to 10 LF 1" x 4" water table MIN --- --- --- --- 11.180
Additional water table over 10 LF ADD LF --- --- --- --- 11.181
Up to 10 LF 1" x 6" water table MIN --- --- --- --- 11.182
Additional water table over 10 LF ADD LF --- --- --- --- 11.183
Redwood (Clear)
Up to 10 LF 1" x 4" water table MIN --- --- --- --- 11.190
Additional water table over 10 LF ADD LF --- --- --- --- 11.191
Up to 10 LF 1" x 6" water table MIN --- --- --- --- 11.192
Additional water table over 10 LF ADD LF --- --- --- --- 11.193

H1MD0220001CH0133 103
11. REPLACE EXTERIOR CASING
SPECIFICATIONS UNIT
CONTRACTOR’S
DIRECT JOB COST PRICE
DATABASEITEMNO.MATLS LABOR TOTAL
REPLACEEXTERIORDOOR ORWINDOWCASING ORBRICK MOULD
Replace damaged wood casing fromone side of a door or window # Cut caulking where siding butts
against one side of door or windowcasing or brick mould
# Remove nails securing damagedcasing or brick mould and pry itloose from door or window
# Remove all remaining nails,caulking or paint
# Measure, cut and fit new casing orbrick mould side and nail it to dooror window
# Caulk where siding and door orwindow meet the replaced piece ofcasing or brick mould
# No painting or staining
1.00
Brick mould
Up to 7 LF 1-1/4" x 2" brick mould MIN --- --- --- --- 11.200Additional brick mould over 7 LF ADD LF --- --- --- --- 11.201
Fir or Pine Casing (Clear)
Up to 7 LF 1" x 4" casing MIN --- --- --- --- 11.210
Additional casing over 7 LF ADD LF --- --- --- --- 11.211
Up to 7 LF 1" x 6" casing MIN --- --- --- --- 11.212
Additional casing over 7 LF ADD LF --- --- --- --- 11.213
Up to 7 LF 5/4" x 4" casing MIN --- --- --- --- 11.214
Additional casing over 7 LF ADD LF --- --- --- --- 11.215
Up to 7 LF 5/4" x 6" casing MIN --- --- --- --- 11.216
Additional casing over 7 LF ADD LF --- --- --- --- 11.217
Cedar Casing (A & Btr)
Up to 7 LF 1" x 4" casing MIN --- --- --- --- 11.220
Additional casing over 7 LF ADD LF --- --- --- --- 11.221
Up to 7 LF 1" x 6" casing MIN --- --- --- --- 11.222
Additional casing over 7 LF ADD LF --- --- --- --- 11.223
Up to 7 LF 5/4" x 4" casing MIN --- --- --- --- 11.224
Additional casing over 7 LF ADD LF --- --- --- --- 11.225
Up to 7 LF 5/4" x 6" casing MIN --- --- --- --- 11.226
Additional casing over 7 LF ADD LF --- --- --- --- 11.227
Redwood Casing (Clear)
Up to 7 LF 1" x 4" casing MIN --- --- --- --- 11.230
Additional casing over 7 LF ADD LF --- --- --- --- 11.231
Up to 7 LF 1" x 6" casing MIN --- --- --- --- 11.232
Additional casing over 7 LF ADD LF --- --- --- --- 11.233
Up to 7 LF 5/4" x 4" casing MIN --- --- --- --- 11.234
Additional casing over 7 LF ADD LF --- --- --- --- 11.235
Up to 7 LF 5/4" x 6" casing MIN --- --- --- --- 11.236Additional casing over 7 LF ADD LF --- --- --- --- 11.237

104 H1MD0220001CH0133
12. WOOD ENTRANCE DOORS, FIELD HUNG
SPECIFICATIONS UNIT
CONTRACTOR’S
DIRECT JOB COSTPRICE
DATA
BASE
ITEM
NO.MATLS LABOR TOTAL
All door frames, brick mouldings, stops and casings shown on these pages forentrance doors are fingerjoint unless otherwise stated.For door trim details and accessories different from the specifications shown here,turn to the appropriate following pages and add.
ENTRANCEDOORS,WOOD
# 1-3/4" thick # 1-5/16" x 2" exterior brick moulding
and wood frame # 1-1/2 pair 4" x 4" butts # Entrance lock @ $25 # Deadbolt lock @ $20 # Oak or aluminum sill and
weatherstripping # 2-1/4" Interior casings
Flush Birch
Particle core 2-8 x 6-8 EA --- --- --- --- 12.0013-0 x 6-8 EA --- --- --- --- 12.0023-0 x 7-0 EA --- --- --- --- 12.003
Lumber core 2-8 x 6-8 EA --- --- --- --- 12.0043-0 x 6-8 EA --- --- --- --- 12.0053-0 x 7-0 EA --- --- --- --- 12.006
Colonial 6 PanelFir 3-0 x 6-8 EA --- --- --- --- 12.007
3-0 x 7-0 EA --- --- --- --- 12.008
Pine 3-0 x 6-8 EA --- --- --- --- 12.0093-0 x 7-0 EA --- --- --- --- 12.010
Oak 3-0 x 6-8 EA --- --- --- --- 12.0113-0 x 7-0 EA --- --- --- --- 12.012
DOUBLEDOORS
# 1-3/4" thick # 1-5/16" x 2" exterior brick moulding
and wood frame # 3 pair 4" x 4" butts # Entrance lock @ $25 # 1 pair matching dummyknobs
@ $25 # Deadbolt lock @ $20 # 2 mortise bolts # T-astragel # Oak or aluminum sill and
weatherstripping # 2-1/4" interior casings # Two 3-0 x 6-8 doors per opening
Birch particle core EA --- --- --- --- 12.015Birch lumber core EA --- --- --- --- 12.016
Fir 6 panel EA --- --- --- --- 12.017Pine 6 panel EA --- --- --- --- 12.018Oak 6 panel EA --- --- --- --- 12.019
SIDE ORREAR DOOR
Fir 3-panel 4-light door with same trimand accessories as single doors above,2-8 x 6-8 or 3-0 x 6-8
EA --- --- --- --- 12.020

H1MD0220001CH0133 105
12. PRE-HUNG WOOD ENTRANCE DOORS
SPECIFICATIONS UNIT
CONTRACTOR’S
DIRECT JOB COST PRICE
DATABASEITEMNO.MATLS LABOR TOTAL
ENTRANCEDOORS,WOOD
# 1-3/4" thick # 1-5/16" x 2" exterior brick moulding
and wood frame # 1-1/2" pair 4" x 4" butts # Entrance lock @ $25 # Deadbolt lock @ $20 # Oak or aluminum sill and
weatherstripping
1.00 Flush Birch
Particle core 2-8 x 6-8 EA --- --- --- --- 12.030
3-0 x 6-8 EA --- --- --- --- 12.031
3-0 x 7-0 EA --- --- --- --- 12.032
Colonial 6 Panel
Fir 3-0 x 6-8 EA --- --- --- --- 12.033
3-0 x 7-0 EA --- --- --- --- 12.034
Pine 3-0 x 6-8 EA --- --- --- --- 12.035
3-0 x 7-0 EA --- --- --- --- 12.036
Oak 3-0 x 6-8 EA --- --- --- --- 12.037
3-0 x 7-0 EA --- --- --- --- 12.038
3 Panel 4 Lights
Fir 2-8 x 6-8 EA --- --- --- --- 12.039
3-0 x 6-8 EA --- --- --- --- 12.040
DOUBLEDOORS
Install doors in framed out opening # 1-3/4" thick # 1-5/16" x 2" exterior brick moulding
and wood frame # 3 pair 4" x 4" butts # Entrance lock @ $25 # Deadbolt lock @ $20 # Oak or aluminum sill and
weatherstripping # T-astragel # 2 mortise bolts
Flush Birch
Particle core 6-0 x 6-8 EA --- --- --- --- 12.042
6-0 x 7-0 EA --- --- --- --- 12.043
Colonial 6 Panel
Fir 6-0 x 6-8 EA --- --- --- --- 12.044
6-0 x 7-0 EA --- --- --- --- 12.045
Pine 6-0 x 6-8 EA --- --- --- --- 12.046
6-0 x 7-0 EA --- --- --- --- 12.047
Oak 6-0 x 6-8 EA --- --- --- --- 12.048
6-0 x 6-8 EA --- --- --- --- 12.049

106 H1MD0220001CH0133
12. PRE-HUNG METAL ENTRANCE DOORS
SPECIFICATIONS UNIT
CONTRACTOR’S
DIRECT JOB COST PRICE
DATABASEITEMNO.MATLS LABOR TOTAL
ENTRANCEDOORS,METAL
# Foam core, steel clad, 1-3/4" thick # Exterior wood frame # 1-5/16" x 2" exterior brick moulding # 1-1/2 pair 4" x 4" butts # Aluminum sill, magnetic
weatherstripping # 2-1/4" interior casings # Entrance lock @ $25 # Single cylinder deadbolt @ $20
1.00 Flush 2-8 x 6-8 EA --- --- --- --- 12.050
3-0 x 6-8 EA --- --- --- --- 12.051
6 panel 2-8 x 6-8 EA --- --- --- --- 12.052
3-0 x 6-8 EA --- --- --- --- 12.053
2 lights, 4 panel with insulated glass
2-8 x 6-8 EA --- --- --- --- 12.054
3-0 x 6-8 EA --- --- --- --- 12.055
1 light, 2 panel with insulated glass
2-8 x 6-8 EA --- --- --- --- 12.056
3-0 x 6-8 EA --- --- --- --- 12.057
Fan light, 4 panel with insulated glass
2-8 x 6-8 EA --- --- --- --- 12.058
3-0 x 6-8 EA --- --- --- --- 12.059
FIRECODE # 90 minute steel door and frameassembly
# “B” label rating # 6 panel
2-8 x 6-8 EA --- --- --- --- 12.060
3-0 x 6-8 EA --- --- --- --- 12.061

H1MD0220001CH0133 107
12. FRENCH AND DUTCH DOORS, FIELD HUNG
SPECIFICATIONS UNIT
CONTRACTOR’S
DIRECT JOB COST PRICE
DATABASEITEMNO.MATLS LABOR TOTAL
FRENCHDOORS
# 1-3/4" thick fir, insulated glass # 1-5/16" x 2" exterior brick moulding
and wood frame # 1-1/2 pair 4" x 4" butts # Entrance lock @ $25 # Deadbolt lock @ $20 # Oak or aluminum sill and
weatherstripping # 2-1/4" interior casings # 15 light grille
1.00 2-6 x 6-8 EA --- --- --- --- 12.070
2-8 x 6-8 EA --- --- --- --- 12.071
3-0 x 6-8 EA --- --- --- --- 12.072
DOUBLEFRENCHDOORS
# 1-3/4" thick fir, insulated glass # 1-5/16" x 2" exterior brick moulding
and wood frame # 3 pair 4" x 4" butts # Entrance lock @ $25 # 1 pair matching dummy knobs
@ $25 # Deadbolt lock @ $20 # 2 mortise bolts # T-astragal # Oak or aluminum sill and
weatherstripping # 2-1/4" interior casings # 15 light grilles
5-0 x 6-8 EA --- --- --- --- 12.080
5-4 x 6-8 EA --- --- --- --- 12.081
6-0 x 6-8 EA --- --- --- --- 12.082
DUTCHDOORS
# Fir # 1-5/16" x 2" exterior brick moulding
and wood frame # 2 pair 4" x 4" butts # Entrance lock @ $25 # Deadbolt lock @ $20 # Dutch door quadrant # Oak or aluminum sill and
weatherstripping # 2-1/4" interior casings # 9 light grille
2 Panel
2-8 x 6-8 EA --- --- --- --- 12.090
3-0 x 6-8 EA --- --- --- --- 12.091
Crossbuck Style
2-8 x 6-8 EA --- --- --- --- 12.092
3-0 x 6-8 EA --- --- --- --- 12.093

108 H1MD0220001CH0133
12. REPLACEMENT DOOR SLAB WITH NEW HARDWARE
SPECIFICATIONS UNIT
CONTRACTOR’S
DIRECT JOB COST PRICE
DATABASEITEMNO.MATLS LABOR TOTAL
REPLACEDOOR SLABWITH NEWHARDWARE
Remove existing door slab and replacewith new door slab using new hardware # 3 hinges @ $30 total # Standard bore lockset @ $25 # Standard bore deadbolt @ $20
1.00 Flush Birch
Particle core 2-8 x 6-8 EA --- --- --- --- 12.100
3-0 x 6-8 EA --- --- --- --- 12.101
3-0 x 7-0 EA --- --- --- --- 12.102
Lumber core 2-8 x 6-8 EA --- --- --- --- 12.103
3-0 x 6-8 EA --- --- --- --- 12.104
3-0 x 7-0 EA --- --- --- --- 12.105
Colonial 6 Panel
Fir 2-8 x 6-8 EA --- --- --- --- 12.110
3-0 x 6-8 EA --- --- --- --- 12.111
3-0 x 7-0 EA --- --- --- --- 12.112
Pine 2-8 x 6-8 EA --- --- --- --- 12.113
3-0 x 6-8 EA --- --- --- --- 12.114
3-0 x 7-0 EA --- --- --- --- 12.115
Oak 2-8 x 6-8 EA --- --- --- --- 12.116
3-0 x 6-8 EA --- --- --- --- 12.117
3-0 x 7-0 EA --- --- --- --- 12.118
3 Panel 4 lights
Fir 2-8 x 6-8 EA --- --- --- --- 12.120
3-0 x 6-8 EA --- --- --- --- 12.121
French 15 lights
Fir 2-6 x 6-8 EA --- --- --- --- 12.125
2-8 x 6-8 EA --- --- --- --- 12.126
3-0 x 6-8 EA --- --- --- --- 12.127
MORTISELOCKSET
Install new mortise lockset in place ofstandard bore lockset and deadbolt, addto above materials and labor costs
ADD EA --- --- --- --- 12.128

H1MD0220001CH0133 109
12. REPLACEMENT DOOR SLAB WITH OWNER’S HARDWARE
SPECIFICATIONS UNIT
CONTRACTOR’S
DIRECT JOB COST PRICE
DATABASEITEMNO.MATLS LABOR TOTAL
REPLACEDOOR SLABWITHOWNER’SHARDWARE
Remove existing door slab and replacewith new door slab using Owner’shardware # 3 hinges # Standard bore lockset # Standard bore deadbolt
1.00 Flush Birch
Particle core 2-8 x 6-8 EA --- --- --- --- 12.131
3-0 x 6-8 EA --- --- --- --- 12.132
3-0 x 7-0 EA --- --- --- --- 12.133
Lumber core 2-8 x 6-8 EA --- --- --- --- 12.134
3-0 x 6-8 EA --- --- --- --- 12.135
3-0 x 7-0 EA --- --- --- --- 12.136
Colonial 6 Panel
Fir 2-8 x 6-8 EA --- --- --- --- 12.140
3-0 x 6-8 EA --- --- --- --- 12.141
3-0 x 7-0 EA --- --- --- --- 12.142
Pine 2-8 x 6-8 EA --- --- --- --- 12.143
3-0 x 6-8 EA --- --- --- --- 12.144
3-0 x 7-0 EA --- --- --- --- 12.145
Oak 2-8 x 6-8 EA --- --- --- --- 12.146
3-0 x 6-8 EA --- --- --- --- 12.147
3-0 x 7-0 EA --- --- --- --- 12.148
3 Panel 4 lights
Fir 2-8 x 6-8 EA --- --- --- --- 12.150
3-0 x 6-8 EA --- --- --- --- 12.151
French 15 lights
Fir 2-6 x 6-8 EA --- --- --- --- 12.152
2-8 x 6-8 EA --- --- --- --- 12.153
3-0 x 6-8 EA --- --- --- --- 12.154
MORTISELOCKSET
Install Owners mortise lockset in placeof standard bore lockset
ADD EA --- --- --- --- 12.155

110 H1MD0220001CH0133
12. REPLACE ENTRANCE FRAME
SPECIFICATIONS UNIT
CONTRACTOR’S
DIRECT JOB COST PRICE
DATABASEITEMNO.MATLS LABOR TOTAL
ENTRANCEFRAME
Replace single door entrance frame withnew entrance frame @ $140 # 1-5/16" x 2" exterior brick moulding
and wood frame # Oak or aluminum sill and
weatherstripping # 2-1/4" interior casings
EA --- --- --- --- 12.200
ORNAMENTALENTRANCEFRAME
Replace single door entrance frame withnew ornamental entrance frame with 2pilasters and 11" high pediment @ $380
EA --- --- --- --- 12.205
ENTRANCEFRAME WITHSIDELIGHT(S)
Replace single door entrance frame withnew ornamental entrance frame andsidelight(s) # 2 pilasters and 11" high pediment # Each sidelight 1'-2" x 6'-8" x 1-3/4"
with insulated glass, one light or onelight and one panel
1.00 Entrance frame with 1 sidelight @ $530 EA --- --- --- --- 12.210
Entrance frame with 2 sidelights @$660 EA --- --- --- --- 12.211
DIVIDEDLIGHT GRILLE
3 or 5 light divided light grille ADD EA --- --- --- --- 12.215

H1MD0220001CH0133 111
12. SIDELIGHT AND TRANSOM
SPECIFICATIONS UNIT
CONTRACTOR’S
DIRECT JOB COST PRICE
DATABASEITEMNO.MATLS LABOR TOTAL
REPLACESIDELIGHT
Remove existing sidelight and replacewith new sidelight at one side of existingdoor # Sidelight 14" x 6'-8" x 1-3/4" # 7/16" insulated glass # Sidelight @ $250 each
EA --- --- --- --- 12.220
REPLACETRANSOM
Remove existing transom and replacewith new site-built transom aboveexisting door # Transom 15" high # 7/16" insulated glass
Transom size
1.00 5'-0" EA --- --- --- --- 12.225
6'-0" EA --- --- --- --- 12.226
8'-0" EA --- --- --- --- 12.227
Remove existing transom and replacewith new manufacturer-built transomabove existing door # Transom 15" high # 7/16" insulated glass
Transom size
5'-0" EA --- --- --- --- 12.230
6'-0" EA --- --- --- --- 12.231
8'-0" EA --- --- --- --- 12.232
REPLACEARCHITEC-TURALFEATURES
Remove existing pediment and installnew pediment # Acorn or Peaked Cap combination
Pediment size
50" x 21" EA --- --- --- --- 12.240
54" x 21" EA --- --- --- --- 12.241
58" x 19" EA --- --- --- --- 12.242
68" x 24" EA --- --- --- --- 12.243
75" x 25" EA --- --- --- --- 12.244
80" x 26" EA --- --- --- --- 12.245
85" x 28" EA --- --- --- --- 12.146
Remove existing pilaster and install newpilaster # Plain or fluted pilaster # 5-1/4" wide x 90" tall
EA --- --- --- --- 12.247

112 H1MD0220001CH0133
12. DOOR ACCESSORIES
SPECIFICATIONS UNIT
CONTRACTOR’S
DIRECT JOB COST PRICE
DATABASEITEMNO.MATLS LABOR TOTAL
KICK PLATE Install kick plate to bottom rail of door,8" x 34"
1.00 Stainless steel EA --- --- --- --- 12.250
Brass EA --- --- --- --- 12.251
MAIL SLOT Install mail slot in existing entry door
Mail slot @ $19 EA --- --- --- --- 12.252
Install Owner’s mail slot EA --- --- --- --- 12.253
PEEPHOLE Install peephole in existing door0.00
190E peephole @ $10 EA --- --- --- --- 12.254
DOORKNOCKER
Install door knocker on exiting door
Door knocker @ $15 EA --- --- --- --- 12.255
DOORBUMPERS
Install floor mounted door bumper@ $5
On wood floor EA --- --- --- --- 12.256
On tile or concrete floor EA --- --- --- --- 12.257
DOORSTOPPER
Install surface mounted flip down door stopper
Aluminum EA --- --- --- --- 12.258
Brass EA --- --- --- --- 12.259
Chrome EA --- --- --- --- 12.260
Brass plated EA --- --- --- --- 12.261
Install screw in 3-1/2" projection rubbertipped door stopper
Brass EA --- --- --- --- 12.262
Chrome EA --- --- --- --- 12.263
Brass plated EA --- --- --- --- 12.264
Molded plastic EA --- --- --- --- 12.265
NIGHTSECURITYLATCH
Install surface mounted door to jambsecurity latch
Brass EA --- --- --- --- 12.266
Chrome EA --- --- --- --- 12.267
Brass plated EA --- --- --- --- 12.268

H1MD0220001CH0133 113
12. DOOR ACCESSORIES AND PET DOOR
SPECIFICATIONS UNIT
CONTRACTOR’S
DIRECT JOB COST PRICE
DATABASEITEMNO.MATLS LABOR TOTAL
SURFACEFLUSH BOLT
Install surface bolt at top or bottom ofdoor stile
1.00 Brass EA --- --- --- --- 12.270
Chrome EA --- --- --- --- 12.271
Brass plated EA --- --- --- --- 12.272
MORTISEFLUSH BOLT
Install mortise flush bolt at top or bottomof door stile
Brass EA --- --- --- --- 12.274
Chrome EA --- --- --- --- 12.275
Brass plated EA --- --- --- --- 12.276
PET DOOR Install swinging lockable pet door inexisting entrance door
Door Size
5-1/4" x 7-1/2" EA --- --- --- --- 12.278
8-3/4" x 12-1/2" EA --- --- --- --- 12.279
11-3/4" x 16-1/2" EA --- --- --- --- 12.280
15-1/4" x 20-1/2" EA --- --- --- --- 12.281

114 H1MD0220001CH0133
12. DOOR ALTERATIONS
SPECIFICATIONS UNIT
CONTRACTOR’S
DIRECT JOB COST PRICE
DATABASEITEMNO.MATLS LABOR TOTAL
PATCH DOORPOST
Cut and patch door post (jamb leg) up to12" above threshold or stoop, insert newjamb stock without disturbing interior andexterior casings
EA = Each door post
EA --- --- --- --- 12.285
REPLACEJAMB LEG
Replace strike side jamb let (post) # Remove latch plates # Remove exterior and interior
casings # Remove defective jamb leg # Replace defective jamb leg with
new jamb stock # Re-install existing hardware and
casings
1.00 Including re-installing existing casings EA --- --- --- --- 12.286
Including installing new casings EA --- --- --- --- 12.287
CUT OFFBOTTOM OF DOOR
Cut off bottom of solid wood door toclear carpeting or new flooring
EA = Each door
EA --- --- --- --- 12.288
Cut off bottom of solid wood door toclear carpeting or new flooring, includingre-installing threshold and interlockingweather seal
EA = Each door
EA --- --- --- --- 12.289
SAND ORPLANE DOOR
Sand or plane door to fit existingopening
EA --- --- --- --- 12.290
CORRECTDOOR PANELSAG
Separate stiles from rails, inject glue andclamp square
EA = Each door
EA --- --- --- --- 12.291
CORRECTRACKINGDOOR
Add surface mounted flat angle (90E) 1" x 6" straps, 4 per side of door atstile/rail joints
EA = Each side of door
EA --- --- --- --- 12.292
STRIKE PLATEADJUSTMENT
Reposition strike plate for properalignment
EA --- --- --- --- 12.293
File strikeplate to enlarge opening EA --- --- --- --- 12.294
Lubricate latch and/or lock bolt withgraphite or dry spray silicone
EA --- --- --- --- 12.295

H1MD0220001CH0133 115
12. REPLACE DOOR CASINGS
SPECIFICATIONS UNIT
CONTRACTOR’S
DIRECT JOB COST PRICE
DATABASEITEMNO.MATLS LABOR TOTAL
CASING Remove door casing and replace withnew ranch, clamshell or colonial casing
1.00 3-0 door 2-1/4" casing EA --- --- --- --- 12.301
3-1/2" casing EA --- --- --- --- 12.302
4-1/2" casing EA --- --- --- --- 12.303
Two 3-0 doors 2-1/4" casing EA --- --- --- --- 12.304
3-1/2" casing EA --- --- --- --- 12.305
4-1/2" casing EA --- --- --- --- 12.306
EA = Each door opening
CASING WITHBACKBAND
Remove door casing and replace withnew 3/4" x 3-1/2" flat casing with 11/16"x 1-1/16" backband
3-0 door EA --- --- --- --- 12.310
Two 3-0 doors
EA = Each door opening
EA --- --- --- --- 12.311
HEADMOULDING
Install 3/4" x 1-1/4" crown moulding onbutted head
3-0 door EA --- --- --- --- 12.320
Two 3-0 doors EA --- --- --- --- 12.321
CORNERBLOCKS
Install 2 corner blocks
EA = Total for both corner blocks
EA --- --- --- --- 12.325
PLINTHBLOCKS
Install 2 plinth blocks
EA = Total for both plinth blocks
EA --- --- --- --- 12.326
EXTENSIONJAMBS
Add extension jambs where required
3-0 door EA --- --- --- --- 12.330
3-0 door with one sidelight EA --- --- --- --- 12.331
3-0 door with two sidelights EA --- --- --- --- 12.332
Two 3-0 doors EA --- --- --- --- 12.333
Two 3-0 doors with one sidelight EA --- --- --- --- 12.334
Two 3-0 doors with two sidelights
EA = Each door opening
EA --- --- --- --- 12.335

116 H1MD0220001CH0133
12. THRESHOLDS AND SWEEPS
SPECIFICATIONS UNIT
CONTRACTOR’S
DIRECT JOB COST PRICE
DATABASEITEMNO.MATLS LABOR TOTAL
REMOVEEXISTINGTHRESHOLD
Remove existing threshold from single ordouble doorway
1.00 Non-interlocking type EA --- --- --- --- 12.340
Interlocking type EA --- --- --- --- 12.341
INTERLOCKINGTHRESHOLD
Install interlocking threshold system
36" Threshold
Aluminum EA --- --- --- --- 12.342
Brass EA --- --- --- --- 12.343
72" ThresholdAluminum EA --- --- --- --- 12.344
Brass EA --- --- --- --- 12.345
ADJUSTABLEOAKTHRESHOLD
Install adjustable oak threshold withaluminum sill
36" EA --- --- --- --- 12.350
72" EA --- --- --- --- 12.351
BUMPERTHRESHOLD
Install aluminum-vinyl bumper threshold
36" EA --- --- --- --- 12.352
72" EA --- --- --- --- 12.353
SADDLETHRESHOLD
Install aluminum-vinyl saddle threshold
36" EA --- --- --- --- 12.354
72" EA --- --- --- --- 12.355
REPLACEVINYL INSERT
Remove damaged vinyl insert fromaluminum threshold and install new vinylinsert
36" EA --- --- --- --- 12.356
72" EA --- --- --- --- 12.357
DOORSWEEP
Replace or install door sweep up to 36"
Door bottom vinyl insert sweep EA --- --- --- --- 12.390
Aluminum/vinyl finned sweep EA --- --- --- --- 12.391
Door bottom/bottom edge vinyl sweep EA --- --- --- --- 12.392
Oak/vinyl finned sweep EA --- --- --- --- 12.393

H1MD0220001CH0133 117
12. THRESHOLDS AND SILLS
SPECIFICATIONS UNIT
CONTRACTOR’S
DIRECT JOB COST PRICE DATABASE
ITEM NO.MATLS LABOR TOTAL
REPLACETHRESHOLD
Replace existing 5/8" x 3-1/2" woodenthreshold on top of existing door sill
36" Threshold
1.00 Pine/Fir EA --- --- --- --- 12.370
Oak EA --- --- --- --- 12.371
Mahogany EA --- --- --- --- 12.372
72" Threshold
Pine/Fir EA --- --- --- --- 12.373
Oak EA --- --- --- --- 12.374
Mahogany EA --- --- --- --- 12.375
INSTALL NEWTHRESHOLD
Install new 5/8" x 3-1/2" woodenthreshold on top of existing door sill
36" Threshold
Pine/Fir EA --- --- --- --- 12.380
Oak EA --- --- --- --- 12.381
Mahogany EA --- --- --- --- 12.382
72" Threshold
Pine/Fir EA --- --- --- --- 12.383
Oak EA --- --- --- --- 12.384
Mahogany EA --- --- --- --- 12.385
REPLACEDOOR SILL
Replace existing 1-1/4" x 7" main doorsill, including 3" horns under exteriorcasing
48" Main sill for 36" door
Pine/Fir EA --- --- --- --- 12.358
Oak EA --- --- --- --- 12.359
Mahogany EA --- --- --- --- 12.360
96" Main sill for 72" door
Pine/Fir EA --- --- --- --- 12.361
Oak EA --- --- --- --- 12.362
Mahogany EA --- --- --- --- 12.363
INSTALL NEWDOOR SILL
Install new 1-1/4" x 7" main door sill,including 3" horns under exterior casingfor new custom field hung door
48" Main sill for 36" door
Pine/Fir EA --- --- --- --- 12.364
Oak EA --- --- --- --- 12.365
Mahogany EA --- --- --- --- 12.366
96" Main sill for 72" door
Pine/Fir EA --- --- --- --- 12.367
Oak EA --- --- --- --- 12.368
Mahogany EA --- --- --- --- 12.369

118 H1MD0220001CH0133
12. DOOR HINGES
SPECIFICATIONS UNIT
CONTRACTOR’S
DIRECT JOB COST PRICE
DATA
BASE
ITEM
NO.MATLS LABOR TOTAL
REPLACEHINGES
Replace hinges with spring hinges
EA = Each hinge
EA --- --- --- --- 12.400
1.00 Replace hinges with rising hinges
EA = Each hinge
EA --- --- --- --- 12.401
Replace hinges with new solid polishedbrass hinge
4" x 4" standard hinge EA --- --- --- --- 12.405
4" x 4" ball bearing hinge
EA = Each hinge
EA --- --- --- --- 12.406
RE-POSITIONHINGES
Re-position existing hinges to correctdoor slab alignment with strike side stop
EA = Each door
EA --- --- --- --- 12.410
ADD HINGE Add 4" x 4" standard hinge in middle ofdoor to correct warp
EA --- --- --- --- 12.411
RE-SETSCREWS
Re-set screws in hinge
EA = Each hinge
EA --- --- --- --- 12.412

H1MD0220001CH0133 119
12. REVERSE HINGES AND LOCKSET
SPECIFICATIONS UNIT
CONTRACTOR’S
DIRECT JOB COST PRICE
DATABASEITEMNO.MATLS LABOR TOTAL
REVERSEHINGES ANDLOCKSET
Reverse hinges and lockset on existingdoor # Remove door from opening and
remove hinges, lockset andstrikeplate
# Cut new mortises # Fill old hinge mortises on door and
jamb # Fill old lockset cavities on door and
jamb # Bore for new lockset location # Install door with existing hinges and
lockset
1.00 Door with standard lockset
2 hinge door EA --- --- --- --- 12.420
3 hinge door EA --- --- --- --- 12.421
Door with mortise lockset
2 hinge door EA --- --- --- --- 12.425
3 hinge door EA --- --- --- --- 12.426

120 H1MD0220001CH0133
12. LOCKSETS
SPECIFICATIONS UNIT
CONTRACTOR’S
DIRECT JOB COST PRICE
DATABASEITEMNO.MATLS LABOR TOTAL
REPLACELOCKSET
Remove existing entry lock and replacewith new entry lock in same bored holes
1.00 New entry lock EA --- --- --- --- 12.430
Replace with Owner’s new entry lock EA --- --- --- --- 12.431
Remove existing standard bore griphandle lockset and replace with newgrip handle lockset in same bored holes
New grip handle lockset EA --- --- --- --- 12.432
Replace with Owner’s new grip handlelockset
EA --- --- --- --- 12.433
NEWSTANDARDBORELOCKSET
Lay out and bore holes for newstandard bore lockset to accept newpolished brass hardware andaccessories
Interior and exterior turn knob EA --- --- --- --- 12.435
Interior turn knob and exterior grip handle EA --- --- --- --- 12.436
PATCHEXISTINGSTANDARDBORE
Patch existing standard bore # Patch and fill existing standard bore
lockset cavity # Plug latch bore on door edge # Sand or plane smooth
EA --- --- --- --- 12.437
KNOB ANDESCUTCHEON
Install knob or lever and escutcheon toexisting entry set
Knob and escutcheon set EA --- --- --- --- 12.438
Lever and escutcheon set EA --- --- --- --- 12.439
Owner’s knob and escutcheon set EA --- --- --- --- 12.440
KEYHOLECOVER
Install solid brass keyhole cover
Keyhole cover EA --- --- --- --- 12.441
Owner’s keyhole cover EA --- --- --- --- 12.442

H1MD0220001CH0133 121
12. MORTISE LOCKSETS
SPECIFICATIONS UNIT
CONTRACTOR’S
DIRECT JOB COST PRICE
DATABASEITEMNO.MATLS LABOR TOTAL
MORTISELOCKSET
Lay out and cut mortise cavity to acceptnew deep set mortise box with polishedbrass hardware accessories
1.00 Interior and exterior turn knobs EA --- --- --- --- 12.445
Interior turn knob and exterior grip handle EA --- --- --- --- 12.446
REPLACEMORTISELOCKSET
Remove existing mortise lockset andinstall new mortise lockset with polishedbrass hardware accessories
Interior and exterior turn knobs EA --- --- --- --- 12.447
Interior turn knob and exterior grip handle EA --- --- --- --- 12.448
REPLACEMORTISE BOX
Remove existing mortise box and installnew mortise box with existing hardware
EA --- --- --- --- 12.449
ALTERMORTISE BOXCAVITY
Increase size of existing mortise cavityfor larger entry set mortise box
EA --- --- --- --- 12.450
Patch and fill existing mortise box # Patch and fill existing mortise box
cavity # Plug interior and exterior through
bored holes # Sand or plane smooth
EA --- --- --- --- 12.451

122 H1MD0220001CH0133
12. DEADBOLT LOCKS
SPECIFICATIONS UNIT
CONTRACTOR’S
DIRECT JOB COST PRICE
DATABASEITEMNO.MATLS LABOR TOTAL
SURFACEMOUNTEDDEADBOLT
Remove existing surface mounteddeadbolt and install deadbolt in samelocation
1.00 Replace with new deadbolt @ $55 EA --- --- --- --- 12.455
Replace with Owner’s deadbolt EA --- --- --- --- 12.456
Remove existing surface mounteddeadbolt and install in new location,including patching existing screwholesand notched casing
Replace with new deadbolt @ $55 EA --- --- --- --- 12.458
Replace with Owner’s deadbolt EA --- --- --- --- 12.459
Install new surface mounted deadboltlock
Install new deadbolt lock @ $55 EA --- --- --- --- 12.460
Install Owner’s deadbolt lock EA --- --- --- --- 12.461
THROUGHDOORMOUNTEDDEADBOLT
Remove existing through door mounteddeadbolt and install new deadbolt insame location
Replace with new deadbolt @ $25 EA --- --- --- --- 12.462
Replace with Owner’s deadbolt EA --- --- --- --- 12.463
Remove existing through door mounteddeadbolt and install in new location,including patching existing holes andnotched casing
Replace with new deadbolt @ $25 EA --- --- --- --- 12.464
Replace with Owner’s deadbolt EA --- --- --- --- 12.465
Install new through door mounteddeadbolt
Replace with new deadbolt @ $25 EA --- --- --- --- 12.466
Replace with Owner’s deadbolt EA --- --- --- --- 12.467
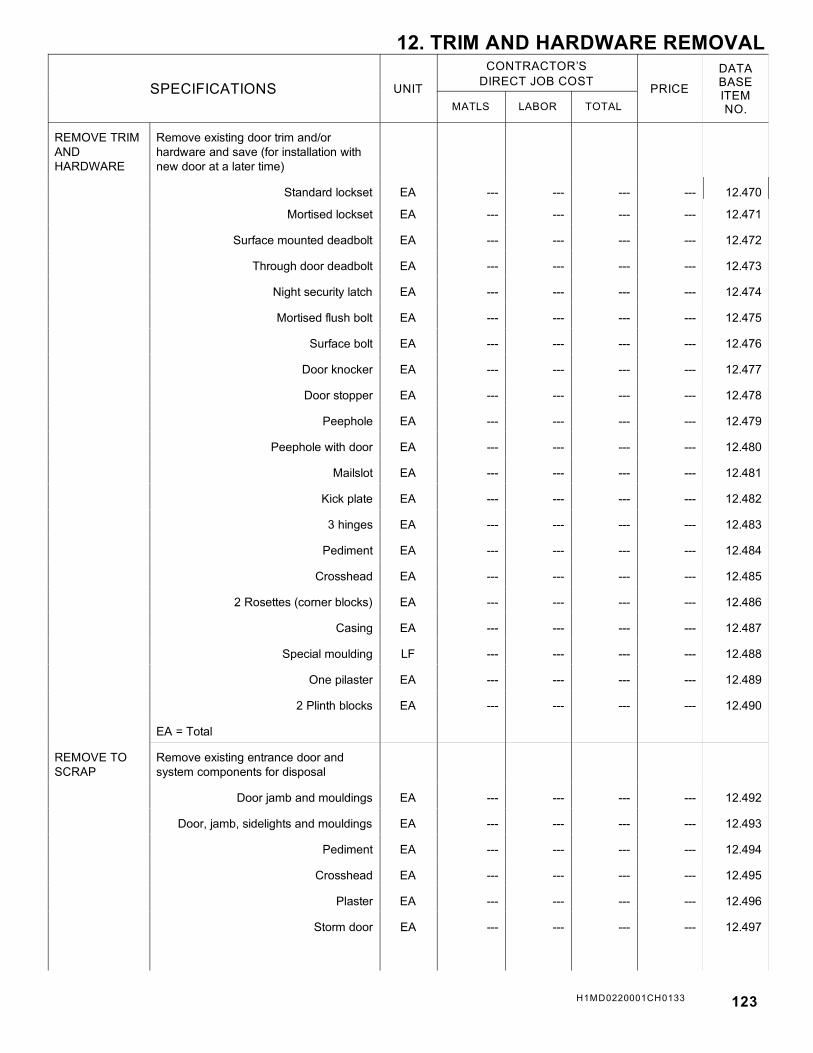
H1MD0220001CH0133 123
12. TRIM AND HARDWARE REMOVAL
SPECIFICATIONS UNIT
CONTRACTOR’S
DIRECT JOB COST PRICE
DATABASEITEMNO.MATLS LABOR TOTAL
REMOVE TRIMANDHARDWARE
Remove existing door trim and/orhardware and save (for installation withnew door at a later time)
1.00 Standard lockset EA --- --- --- --- 12.470
Mortised lockset EA --- --- --- --- 12.471
Surface mounted deadbolt EA --- --- --- --- 12.472
Through door deadbolt EA --- --- --- --- 12.473
Night security latch EA --- --- --- --- 12.474
Mortised flush bolt EA --- --- --- --- 12.475
Surface bolt EA --- --- --- --- 12.476
Door knocker EA --- --- --- --- 12.477
Door stopper EA --- --- --- --- 12.478
Peephole EA --- --- --- --- 12.479
Peephole with door EA --- --- --- --- 12.480
Mailslot EA --- --- --- --- 12.481
Kick plate EA --- --- --- --- 12.482
3 hinges EA --- --- --- --- 12.483
Pediment EA --- --- --- --- 12.484
Crosshead EA --- --- --- --- 12.485
2 Rosettes (corner blocks) EA --- --- --- --- 12.486
Casing EA --- --- --- --- 12.487
Special moulding LF --- --- --- --- 12.488
One pilaster EA --- --- --- --- 12.489
2 Plinth blocks EA --- --- --- --- 12.490
EA = Total
REMOVE TOSCRAP
Remove existing entrance door andsystem components for disposal
Door jamb and mouldings EA --- --- --- --- 12.492
Door, jamb, sidelights and mouldings EA --- --- --- --- 12.493
Pediment EA --- --- --- --- 12.494
Crosshead EA --- --- --- --- 12.495
Plaster EA --- --- --- --- 12.496
Storm door EA --- --- --- --- 12.497

124 H1MD0220001CH0133
12. GLASS REPLACEMENT
SPECIFICATIONS UNIT
CONTRACTOR’S
DIRECT JOB COST PRICE
DATABASEITEMNO.MATLS LABOR TOTAL
REPLACEGLASS INMETAL DOOR
Replace double pane tempered glasspanel in metal door
Glass size
1.00 30" x 30" EA --- --- --- --- 12.500
30" x 48" EA --- --- --- --- 12.501
30" x 60" EA --- --- --- --- 12.502
30" x 66" EA --- --- --- --- 12.503
EA = Each light
REPLACEGLASS INWOOD DOOR
Replace single pane tempered glass inwood door, including new 1/2" x 9/16"glass bead
Glass size
Up to 15" x 30" EA --- --- --- --- 12.510
30" x 30" EA --- --- --- --- 12.511
30" x 48" EA --- --- --- --- 12.512
Replace double pane tempered glass inwood door, including new 1/2" x 9/16"glass bead
Glass size
10" x 15" EA --- --- --- --- 12.513
10" x 30" EA --- --- --- --- 12.514
15" x 30" EA --- --- --- --- 12.515
30" x 30" EA --- --- --- --- 12.516
30" x 48" EA --- --- --- --- 12.517
30" x 60" EA --- --- --- --- 12.518
30" x 66" EA --- --- --- --- 12.519
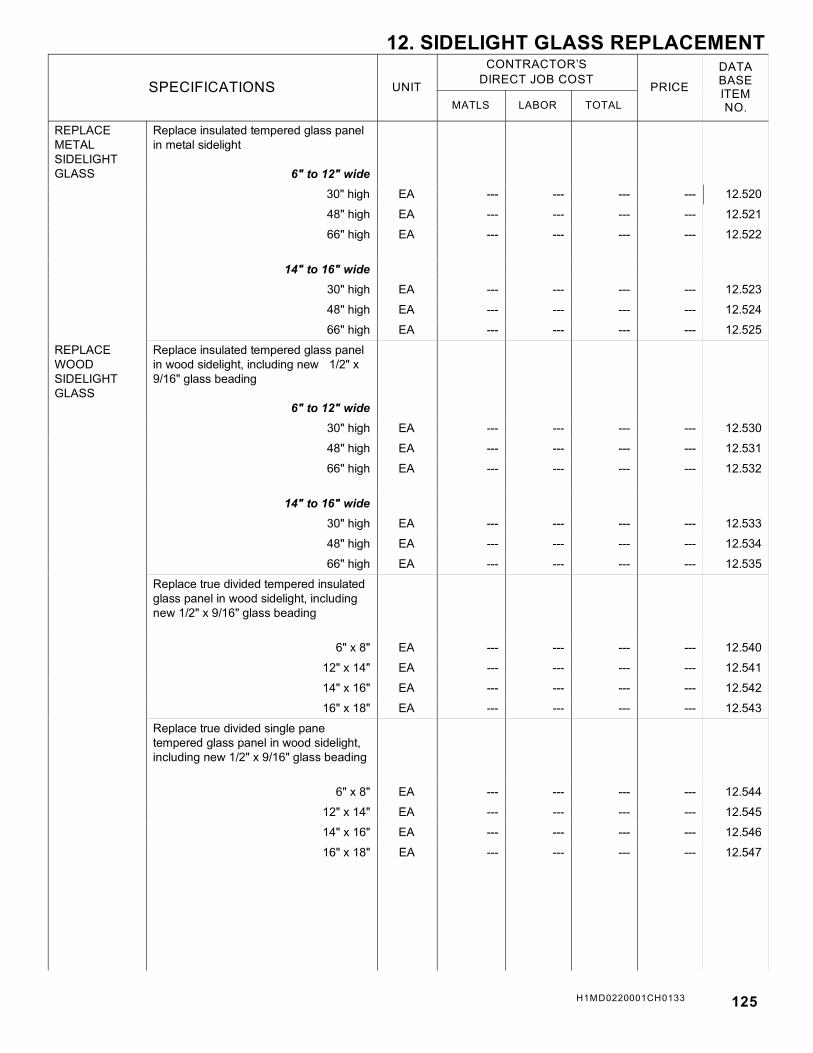
H1MD0220001CH0133 125
12. SIDELIGHT GLASS REPLACEMENT
SPECIFICATIONS UNIT
CONTRACTOR’S
DIRECT JOB COST PRICE
DATABASEITEMNO.MATLS LABOR TOTAL
REPLACEMETALSIDELIGHTGLASS
Replace insulated tempered glass panelin metal sidelight
6" to 12" wide
1.00 30" high EA --- --- --- --- 12.520
48" high EA --- --- --- --- 12.521
66" high EA --- --- --- --- 12.522
14" to 16" wide
30" high EA --- --- --- --- 12.523
48" high EA --- --- --- --- 12.524
66" high EA --- --- --- --- 12.525
REPLACEWOODSIDELIGHTGLASS
Replace insulated tempered glass panelin wood sidelight, including new 1/2" x 9/16" glass beading
6" to 12" wide
30" high EA --- --- --- --- 12.530
48" high EA --- --- --- --- 12.531
66" high EA --- --- --- --- 12.532
14" to 16" wide
30" high EA --- --- --- --- 12.533
48" high EA --- --- --- --- 12.534
66" high EA --- --- --- --- 12.535
Replace true divided tempered insulatedglass panel in wood sidelight, includingnew 1/2" x 9/16" glass beading
6" x 8" EA --- --- --- --- 12.540
12" x 14" EA --- --- --- --- 12.541
14" x 16" EA --- --- --- --- 12.542
16" x 18" EA --- --- --- --- 12.543
Replace true divided single panetempered glass panel in wood sidelight,including new 1/2" x 9/16" glass beading
6" x 8" EA --- --- --- --- 12.544
12" x 14" EA --- --- --- --- 12.545
14" x 16" EA --- --- --- --- 12.546
16" x 18" EA --- --- --- --- 12.547

126 H1MD0220001CH0133
12. WEATHERSTRIPPING
SPECIFICATIONS UNIT
CONTRACTOR’S
DIRECT JOB COST PRICE
DATABASEITEMNO.MATLS LABOR TOTAL
WEATHER-STRIPPING
Remove existing weatherstripping fromboth sides and top of door jamb
EA --- --- --- --- 12.550
1.00 Install new weatherstripping on bothsides and top of single or double doorjamb
Foam-edged wood stop EA --- --- --- --- 12.551
Adhesive backed foam EA --- --- --- --- 12.552
Adhesive backed premium rubber EA --- --- --- --- 12.553
Kerf installed vinyl clad foam EA --- --- --- --- 12.554
Synthetic felt EA --- --- --- --- 12.555
Vinyl tubing with aluminum fastener strip EA --- --- --- --- 12.556
Bronze spring seal strip
EA = Each door jamb
EA --- --- --- --- 12.557

H1MD0220001CH0133 127
12. GARAGE DOOR WEATHERSTRIPPING
SPECIFICATIONS UNIT
CONTRACTOR’S
DIRECT JOB COST PRICE
DATABASEITEMNO.MATLS LABOR TOTAL
REPLACEWEATHER-STRIPPING
Replace weatherstripping on bottom ofgarage door # 1-1/2" rubber strip affixed to bottom
of door
1.00 9'-0" wide door EA --- --- --- --- 12.561
16'-0" wide door EA --- --- --- --- 12.562
Replace weatherstripping on garagedoor opening # 9/16" x 2" vinyl stop with integral
rubber weatherstripping applied tosides and top of jambs or overexisting stops
9'-0" wide door EA --- --- --- --- 12.563
16'-0" wide door EA --- --- --- --- 12.564
Replace weatherstripping on one sideonly or top only of garage door opening # 9/16" x 2" vinyl stop with integral
rubber weatherstripping
One side only EA --- --- --- --- 12.565
Top only 9'-0" wide door EA --- --- --- --- 12.566
Top only 16'-0" wide door EA --- --- --- --- 12.567
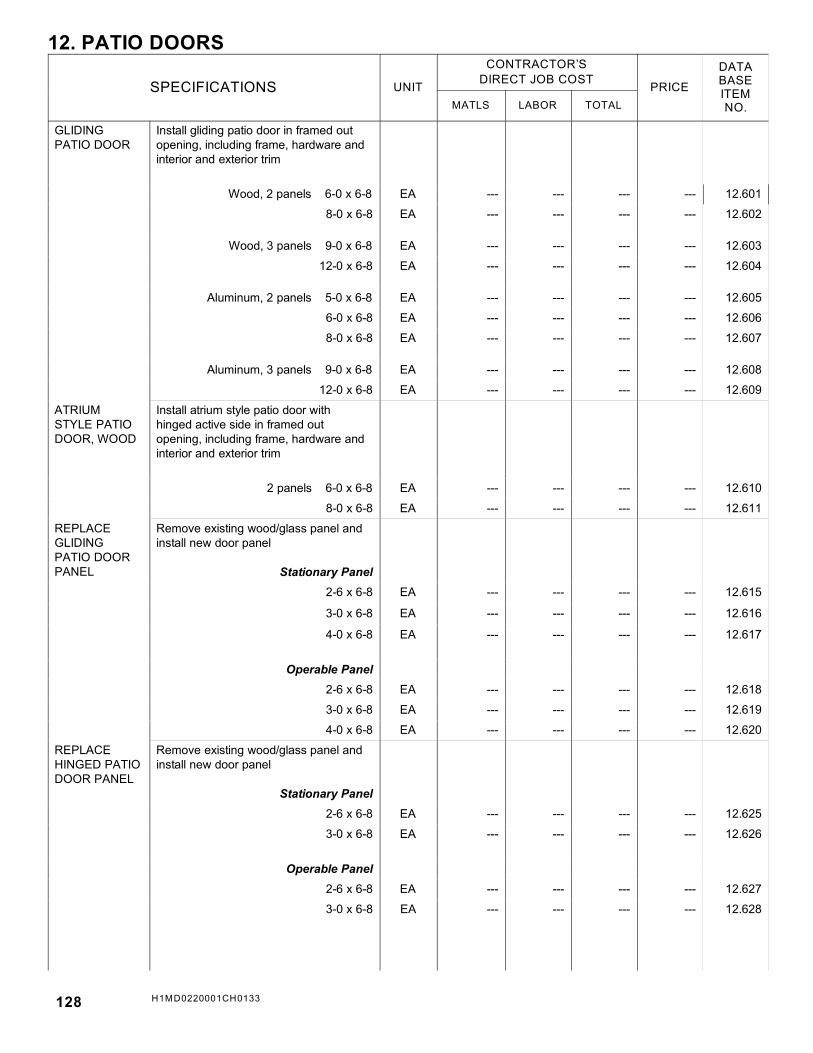
128 H1MD0220001CH0133
12. PATIO DOORS
SPECIFICATIONS UNIT
CONTRACTOR’S
DIRECT JOB COST PRICE
DATABASEITEMNO.MATLS LABOR TOTAL
GLIDINGPATIO DOOR
Install gliding patio door in framed outopening, including frame, hardware andinterior and exterior trim
1.00 Wood, 2 panels 6-0 x 6-8 EA --- --- --- --- 12.601
8-0 x 6-8 EA --- --- --- --- 12.602
Wood, 3 panels 9-0 x 6-8 EA --- --- --- --- 12.603
12-0 x 6-8 EA --- --- --- --- 12.604
Aluminum, 2 panels 5-0 x 6-8 EA --- --- --- --- 12.605
6-0 x 6-8 EA --- --- --- --- 12.606
8-0 x 6-8 EA --- --- --- --- 12.607
Aluminum, 3 panels 9-0 x 6-8 EA --- --- --- --- 12.608
12-0 x 6-8 EA --- --- --- --- 12.609
ATRIUMSTYLE PATIODOOR, WOOD
Install atrium style patio door withhinged active side in framed outopening, including frame, hardware andinterior and exterior trim
2 panels 6-0 x 6-8 EA --- --- --- --- 12.610
8-0 x 6-8 EA --- --- --- --- 12.611
REPLACEGLIDINGPATIO DOORPANEL
Remove existing wood/glass panel andinstall new door panel
Stationary Panel
2-6 x 6-8 EA --- --- --- --- 12.615
3-0 x 6-8 EA --- --- --- --- 12.616
4-0 x 6-8 EA --- --- --- --- 12.617
Operable Panel
2-6 x 6-8 EA --- --- --- --- 12.618
3-0 x 6-8 EA --- --- --- --- 12.619
4-0 x 6-8 EA --- --- --- --- 12.620
REPLACEHINGED PATIODOOR PANEL
Remove existing wood/glass panel andinstall new door panel
Stationary Panel
2-6 x 6-8 EA --- --- --- --- 12.625
3-0 x 6-8 EA --- --- --- --- 12.626
Operable Panel
2-6 x 6-8 EA --- --- --- --- 12.627
3-0 x 6-8 EA --- --- --- --- 12.628

H1MD0220001CH0133 129
12. PATIO DOORS ALTERATIONS AND ADJUSTMENTS
SPECIFICATIONS UNIT
CONTRACTOR’S
DIRECT JOB COST PRICE
DATABASEITEMNO.MATLS LABOR TOTAL
REPLACESLIDINGPATIO DOORLATCH
Replace existing patio door latchinghardware
Standard EA --- --- --- --- 12.630
1.00 Premium EA --- --- --- --- 12.631
Top Quality EA --- --- --- --- 12.632
ADJUST PATIODOORROLLERS
Adjust patio door rollers using theadjustment screw
Ea = Each door panel
EA --- --- --- --- 12.633
TUNE UPDOOR TRACK
Tune up patio door track # Straighten with wood block # Clean (scrape and vacuum) # Spray with graphite or silicone
EA = Each job
EA --- --- --- --- 12.634
BURGLAR BAR Install up to 48" aluminum drop downbar
EA --- --- --- --- 12.635
FLOOR BOLT Install floor bolt
Not keyed EA --- --- --- --- 12.636
Keyed EA --- --- --- --- 12.637
SCREENDOOR LATCH
Install patio sliding screen door latch EA --- --- --- --- 12.638
Replace patio sliding screen door latch EA --- --- --- --- 12.639
SCREENDOORROLLER
Replace patio sliding screen door nylonor steel roller assembly
EA --- --- --- --- 12.640

130 H1MD0220001CH0133
12. SCREEN DOOR FRAME AND SCREENING
SPECIFICATIONS UNIT
CONTRACTOR’S
DIRECT JOB COST PRICE
DATABASEITEMNO.MATLS LABOR TOTAL
REPLACEALUMINUMSCREENFRAME ANDSCREENCLOTH
Replace aluminum screen frame tomatch existing frame size, screen clothincluded
24" X 30" EA --- --- --- --- 12.651
24" X 72" EA --- --- --- --- 12.652
1.00 30" X 30" EA --- --- --- --- 12.653
30" X 72" EA --- --- --- --- 12.654
48" X 80" EA --- --- --- --- 12.655
REPLACEDOORSCREENING
Remove and replace screen doorscreening, stapled in with new screenbead
Aluminum or Fiberglass/vinyl screen
15" x 15" EA --- --- --- --- 12.660
15" x 30" EA --- --- --- --- 12.661
30" x 30" EA --- --- --- --- 12.662
30" x 72" EA --- --- --- --- 12.663
48" x 72" EA --- --- --- --- 12.664
Remove and replace screen doorscreening, splined in with new spline
Aluminum or Fiberglass/vinyl screen
15" x 15" EA --- --- --- --- 12.666
15" x 30" EA --- --- --- --- 12.667
30" x 30" EA --- --- --- --- 12.668
30" x 72" EA --- --- --- --- 12.669
48" x 80" EA --- --- --- --- 12.670

H1MD0220001CH0133 131
12. SCREEN DOOR
SPECIFICATIONS UNIT
CONTRACTOR’S
DIRECT JOB COST PRICE
DATABASEITEMNO.MATLS LABOR TOTAL
SOLID VINYLSCREENDOOR
Install solid vinyl screen door in existingopening # Three 3" x 3" butt hinges # One closer # Spring and chain door retainer # Standard latch # Splined screen # 32" x 6'-8" or 36" x 6'-8" white door
EA --- --- --- --- 12.680
SOLID WOODSCREENDOOR
Install solid wood screen door in existingopening # Three 3" x 3" butt hinges # One closer # Spring and chain door retainer # Standard plated steel latch # Stapled screen with screen bead # 32" x 6'-8" or 36" x 6'-8" fir door # No painting or staining included
EA --- --- --- --- 12.681
METALSCREENDOOR
Install metal screen door in existingopening # Reversible hinge system # One closer # Spring and chain door retainer # Standard latch # Splined screen # 32" x 6'-8" or 36" x 6'-8" mill finish
door
EA --- --- --- --- 12.682
1.00

132 H1MD0220001CH0133
12. STORM AND SCREEN DOOR
SPECIFICATIONS UNIT
CONTRACTOR’S
DIRECT JOB COST PRICE
DATABASEITEMNO.MATLS LABOR TOTAL
ALUMINUMSTORM ANDSCREENDOOR
Install Economy quality aluminum stormand screen door in existing opening # 1" x 2-1/2" door frame # Reversible hinge system # Tempered safety glass # Insect screen # Single closer # Spring and chain door retainer # Standard latch # 32" x 6'-8" or 36" x 6'-8" white door
EA --- --- --- --- 12.683
1.00 Install Premium quality aluminum stormand screen door in existing opening # 1-1/2" x 3-1/2" door frame # Reversible hinge system # Tempered safety glass # Insect screen # Twin closers # Solid brass mortise lockset # 32" x 6'-8" or 36" x 6'-8" white door
EA --- --- --- --- 12.684
ALUMINUMSECURITYSTORM ANDSCREENDOOR
Install Premium quality aluminum stormand screen door in existing opening # 1-1/2" x 3-1/2" door frame # Tamperproof reversible hinge
system # Tempered safety glass # Insect screen # Heat-treated heavy gauge aluminum
bars # Twin closers # Solid brass mortise lockset with lock
guard # 32" x 6'-8" or 36" x 6'-8" white door
EA --- --- --- --- 12.685
SOLID WOODCORE STORMAND SCREENDOOR
Install solid wood core storm and screendoor in existing opening # Reversible hinge system # Plated steel designer latch # Tempered safety glass # Insect screen # Single closer # Spring and chain door retainer # 32" x 6'-8" or 36" x 6'-8" door with
white baked on enamel finish
Door with no exterior cladding EA --- --- --- --- 12.686
Vinyl exterior cladding EA --- --- --- --- 12.687
Aluminum exterior cladding EA --- --- --- --- 12.688

H1MD0220001CH0133 133
12. STORM AND SCREEN DOOR ALTERATIONS
SPECIFICATIONS UNIT
CONTRACTOR’S
DIRECT JOB COST PRICE
DATABASEITEMNO.MATLS LABOR TOTAL
STORM ANDSCREENDOORPREPARATION
Install moulding(s) to existing doorframe prior to storm/screen doorinstallation
5/4" x 6" transom sill extension up to 6feet wide
EA --- --- --- --- 12.690
1.00 3/8" x 1-3/8" stop moulding LF --- --- --- --- 12.691
1-1/4" x 2" brick moulding LF --- --- --- --- 12.692
SCREENGUARD
Install guard on existing storm/screendoor to shield screen from damage
1/4" x 30" x 36" polycarbonate panel EA --- --- --- --- 12.693
36" x 18" metal mesh panel EA --- --- --- --- 12.694
5/4" x 36" x 4" wooden rail EA --- --- --- --- 12.695
REVERSEHINGES ANDLATCH
Reverse hinges and standard lockingknob and lever latch on existing woodenscreen door # Remove screen door from opening
and remove hinges, latch andstrikeplate
# Cut new mortises # Fill old hinge mortises on screen
door and jamb # Fill old latch cavities on screen door
and jamb # Bore for new latch location # Install door with existing 3 hinges,
latch and closer
EA --- --- --- --- 12.696

134 H1MD0220001CH0133
12. GARAGE DOOR OPENER AND ACCESSORIES
SPECIFICATIONS UNIT
CONTRACTOR’S
DIRECT JOB COST PRICE
DATABASEITEMNO.MATLS LABOR TOTAL
INSTALL NEWGARAGEDOOROPENER
Install new garage door opener wherenone existed # 1 wall control button # 2 remote controllers # Time delay lighting # Auto-reverse electric eye beam
Does not include 120V receptacle
1.00 Chain drive @ $175 EA --- --- --- --- 12.701
Screw drive @ $250 EA --- --- --- --- 12.702
REPLACEEXISTINGGARAGEDOOROPENER
Remove existing garage door openerand install new garage door opener # 1 wall control button # 2 remote controllers # Time delay lighting # Auto-reverse electric eye beam
Chain drive @ $175 EA --- --- --- --- 12.703
Screw drive @ $250 EA --- --- --- --- 12.704
INSTALLCEILINGMOUNT
Attach slotted steel angle assembly toceiling to suspend garage door opener
Up to 10'-0" ceiling EA --- --- --- --- 12.705
10'-0" to 12'-0" ceiling EA --- --- --- --- 12.706
EA = Each garage door opener
WALLCONTROLBUTTON
Remove existing wall control button andinstall new wall control button
Universal wall button EA --- --- --- --- 12.707
Door and light control wall button EA --- --- --- --- 12.708
LOWVOLTAGEWIRE
Install low voltage wire for interior orexterior controls, no drywall removal orpatching included
Surface mounted LF --- --- --- --- 12.709
Fished through walls and ceiling LF --- --- --- --- 12.710
LF = Length of wire used
PUSH-BUTTONKEYPAD
Install push-button wireless keypad,battery powered
EA --- --- --- --- 12.711
ELECTRIC EYESENSORSYSTEM
Install electric eye sensors at lower rightand left sides of garage door opening;low voltage wire is surface mounted
EA = Total system
EA --- --- --- --- 12.712
KEYEDDISCONNECT
External door keyed release thatdetaches garage door from automaticdoor closer mechanism
EA --- --- --- --- 12.713

H1MD0220001CH0133 135
12. GARAGE DOOR ACCESSORIES
SPECIFICATIONS UNIT
CONTRACTOR’S
DIRECT JOB COST PRICE
DATABASEITEMNO.MATLS LABOR TOTAL
CEILINGMOUNT FORTRACK
Attach slotted steel angle assembly toceiling to suspend roller track
1.00 Up to 10'-0" ceiling EA --- --- --- --- 12.720
10'-0" to 12'-0" ceiling EA --- --- --- --- 12.721
EA = Track one side only
DOORALIGNMENT
Adjust garage door section hardware sothat door meets jamb properly
EA --- --- --- --- 12.722
EA = Each door
ADJUST LOCKBAR
Align existing lock bars to their catches
EA = Each pair
EA --- --- --- --- 12.723
LOCKINGHARDWARE
Tighten, lubricate or disable existinghardware
EA = Each garage door
EA --- --- --- --- 12.724
Replace locking hardware and pair ofhandles
EA = Total
EA --- --- --- --- 12.725
REPLACEBRACKET
Replace bracket
Top roller bracket EA --- --- --- --- 12.726
Bottom bracket
EA = Each bracket
EA --- --- --- --- 12.727

136 H1MD0220001CH0133
12. GARAGE DOOR OPENER ADJUSTMENT AND REPAIR
SPECIFICATIONS UNIT
CONTRACTOR’S
DIRECT JOB COST PRICE
DATABASEITEMNO.MATLS LABOR TOTAL
REMOVEROPES
Remove garage door assist ropes usedfor manual opening and closing
EA --- --- --- --- 12.730
CONTACTREVERSE
Test and adjust force-settingappropriately to ensure safe automaticgarage door reverse travel towards theopen position
EA --- --- --- --- 12.731
ADJUST LIMITSTOPS
To correct incomplete opening or closingof the garage door, adjust the heightadjustment settings and test
EA --- --- --- --- 12.732
EMERGENCYRELEASE
Adjust or repair to ensure smoothdisconnect and re-engagement
EA --- --- --- --- 12.733
LUBRICATEOPENERCOMPONENTS
Lubricate garage door openercomponents
Bearing/Bushings EA --- --- --- --- 12.735
1.00 Screw Drive EA --- --- --- --- 12.736
Sprockets EA --- --- --- --- 12.737
EA = Each garage door opener
IDLER ANDSPROCKETS
Adjust idler and sprockets EA --- --- --- --- 12.740
Replace idler and sprockets
Replace idler EA --- --- --- --- 12.742
Replace sprockets EA --- --- --- --- 12.743
CHAINTENSION
Adjust chain tension EA --- --- --- --- 12.744
REPLACE BELT Remove existing belt and install new belt EA --- --- --- --- 12.745
REPLACECHAIN
Replace drive chain
EA = Each chain
EA --- --- --- --- 12.746
REPLACECABLE
Replace drive chain cable
EA = Each cable
EA --- --- --- --- 12.747

H1MD0220001CH0133 137
12. GARAGE DOOR ADJUSTMENTS
SPECIFICATIONS UNIT
CONTRACTOR’S
DIRECT JOB COST PRICE
DATABASEITEMNO.MATLS LABOR TOTAL
EXTENSIONCOIL SPRINGADJUSTMENT
Increase or decrease extension coilspring tension by shortening orlengthening cable attached between coilspring and base of garage door on bothsides
EA = Each garage door
EA --- --- --- --- 12.750
REPLACEEXTENSIONCOIL SPRING
Replace extension soil spring on 7'-0"high door
9'-0" wide door EA --- --- --- --- 12.751
1.00 16'-0 wide door
EA = Each spring
EA --- --- --- --- 12.752
COIL SPRINGRETENSIONCABLE
Install retention cable to extension coilspring
EA = Each spring
EA --- --- --- --- 12.753
TORSIONSPRINGADJUSTMENT
Increase or decrease torsion springtension
EA = Each garage door
EA --- --- --- --- 12.754
REPLACETORSIONSPRING
Replace torsion springs on 7'-0" highdoor
9'-0” wide door EA --- --- --- --- 12.755
16'-0" wide door EA --- --- --- --- 12.756
REPLACECABLE
Replace cable
EA = Each cable
EA --- --- --- --- 12.757
LUBRICATEROLLERS &BEARINGS
Lubricate rollers and bearings
EA = Each garage door
EA --- --- --- --- 12.760
REPLACEROLLER
Install new roller
Steel EA --- --- --- --- 12.762
Nylon EA --- --- --- --- 12.763
LUBRICATEHINGES
Lubricate hinges
9'-0" wide door EA --- --- --- --- 12.770
16'-0" wide door EA --- --- --- --- 12.771
TIGHTENHINGE
Tighten hinge EA --- --- --- --- 12.772
REPLACEHINGE
Install new hinge EA --- --- --- --- 12.773
ALIGN TRACK WITH ROLLER
Align track so rollers operate smoothly EA --- --- --- --- 12.780
TIGHTENTRACKBRACKETS
Tighten all track brackets securely
EA = Track one side only
EA --- --- --- --- 12.785
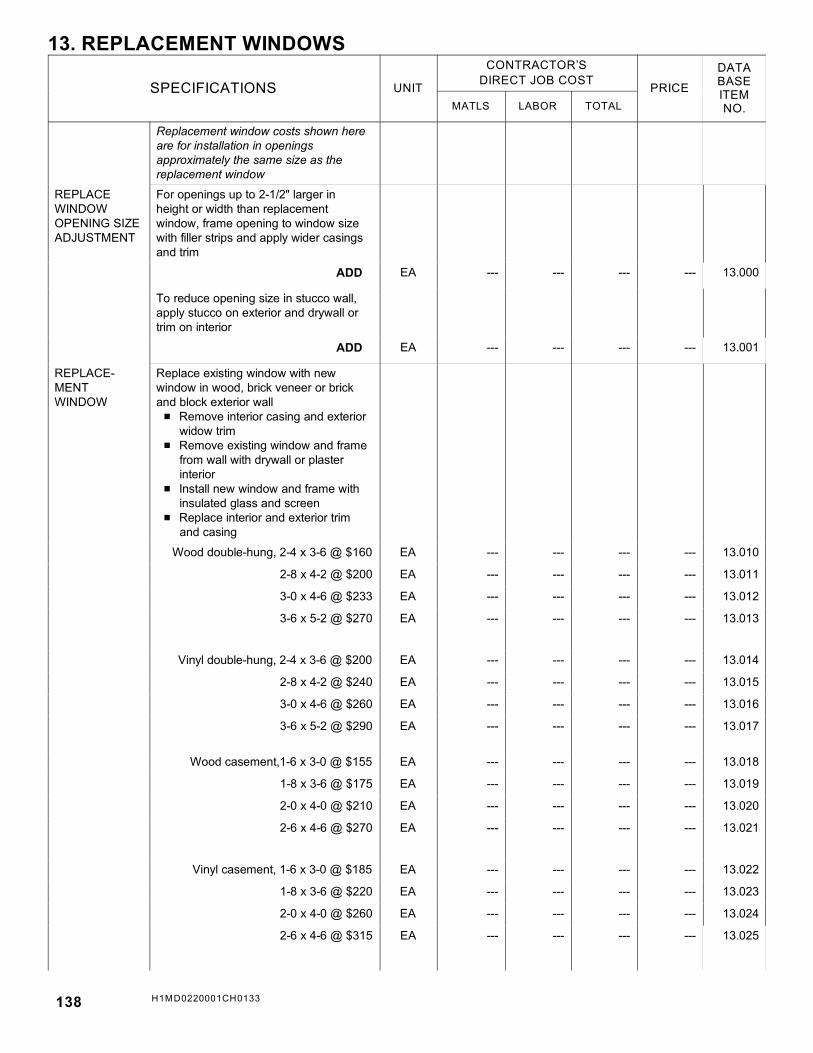
138 H1MD0220001CH0133
13. REPLACEMENT WINDOWS
SPECIFICATIONS UNIT
CONTRACTOR’S
DIRECT JOB COST PRICE
DATABASEITEMNO.MATLS LABOR TOTAL
Replacement window costs shown hereare for installation in openingsapproximately the same size as thereplacement window
1.00
REPLACEWINDOWOPENING SIZEADJUSTMENT
For openings up to 2-1/2" larger inheight or width than replacementwindow, frame opening to window sizewith filler strips and apply wider casingsand trim
ADD EA --- --- --- --- 13.000
To reduce opening size in stucco wall,apply stucco on exterior and drywall ortrim on interior
ADD EA --- --- --- --- 13.001
REPLACE-MENTWINDOW
Replace existing window with newwindow in wood, brick veneer or brickand block exterior wall # Remove interior casing and exterior
widow trim # Remove existing window and frame
from wall with drywall or plasterinterior
# Install new window and frame withinsulated glass and screen
# Replace interior and exterior trimand casing
Wood double-hung, 2-4 x 3-6 @ $160 EA --- --- --- --- 13.010
2-8 x 4-2 @ $200 EA --- --- --- --- 13.011
3-0 x 4-6 @ $233 EA --- --- --- --- 13.012
3-6 x 5-2 @ $270 EA --- --- --- --- 13.013
Vinyl double-hung, 2-4 x 3-6 @ $200 EA --- --- --- --- 13.014
2-8 x 4-2 @ $240 EA --- --- --- --- 13.015
3-0 x 4-6 @ $260 EA --- --- --- --- 13.016
3-6 x 5-2 @ $290 EA --- --- --- --- 13.017
Wood casement,1-6 x 3-0 @ $155 EA --- --- --- --- 13.018
1-8 x 3-6 @ $175 EA --- --- --- --- 13.019
2-0 x 4-0 @ $210 EA --- --- --- --- 13.020
2-6 x 4-6 @ $270 EA --- --- --- --- 13.021
Vinyl casement, 1-6 x 3-0 @ $185 EA --- --- --- --- 13.022
1-8 x 3-6 @ $220 EA --- --- --- --- 13.023
2-0 x 4-0 @ $260 EA --- --- --- --- 13.024
2-6 x 4-6 @ $315 EA --- --- --- --- 13.025

H1MD0220001CH0133 139
13. DIVIDED LIGHT GRILLES
SPECIFICATIONS UNIT
CONTRACTOR’S
DIRECT JOB COST PRICE
DATABASEITEMNO.MATLS LABOR TOTAL
DIVIDEDLIGHTGRILLES
Divided light grille for double-hung windows
1.00
2-4 x 3-6 EA --- --- --- --- 13.031
2-8 x 4-2 EA --- --- --- --- 13.032
3-0 x 4-6 EA --- --- --- --- 13.033
3-6 x 5-2 EA --- --- --- --- 13.034
Divided light grille for casement window
1-6 x 3-0 EA --- --- --- --- 13.036
1-8 x 3-6 EA --- --- --- --- 13.037
2-0 x 4-0 EA --- --- --- --- 13.038
2-6 x 4-6 EA --- --- --- --- 13.039

140 H1MD0220001CH0133
13. VINYL REPLACEMENT WINDOW
SPECIFICATIONS UNIT
CONTRACTOR’S
DIRECT JOB COST PRICE
DATABASEITEMNO.MATLS LABOR TOTAL
VINYLREPLACE-MENTWINDOW
Replace existing wood double hungwindow with new custom manufacturedall vinyl window with 1/2" insulated glassand screen # Remove upper and lower sashes # Remove center parting bead and
outside stop mould # Remove spring or pulley balance
system # Leave all interior, exterior trim and
jamb in place # Set new vinyl window from outside
against interior stop mould andsecure with screws into existingwindow jambs
# Caulk perimeter of opening # Fashion exterior capping for sill and
casing with aluminum coil stock # Install new capping to exterior trim
and caulk to window and siding
Up to 72 UI EA --- --- --- --- 13.100
73 to 82 UI EA --- --- --- --- 13.101
83 to 92 UI EA --- --- --- --- 13.102
93 to 101 UI
UI = United inches (add width of windowto the height of window)
EA = Each window
EA --- --- --- --- 13.103
WINDOWGRIDS
Window grids for divided lightappearance for above windows
SF = Overall size of window
SF --- --- --- --- 13.104

H1MD0220001CH0133 141
13. REPLACE WINDOW SASH
SPECIFICATIONS UNIT
CONTRACTOR’S
DIRECT JOB COST PRICE
DATABASEITEMNO.MATLS LABOR TOTAL
DOUBLEHUNGWINDOWWOOD SASH
Remove existing lower sash and installone new lower sash
1.00
Overall window size 2-4 x 3-6 EA --- --- --- --- 13.200
2-8 x 4-2 EA --- --- --- --- 13.201
3-0 x 4-6 EA --- --- --- --- 13.202
3-6 x 5-2 EA --- --- --- --- 13.203
Remove and replace upper sash # Remove lower sash and upper sash # Install new upper sash # Re-install existing lower sash
Overall window size 2-4 x 3-6 EA --- --- --- --- 13.210
2-8 x 4-2 EA --- --- --- --- 13.211
3-0 x 4-6 EA --- --- --- --- 13.212
3-6 x 5-2 EA --- --- --- --- 13.213
CASEMENTWINDOWWOOD SASHREPLACE-MENT
Remove and replace venting casementwindow sash
Overall window size 1-6 x 3-0 EA --- --- --- --- 13.220
1-8 x 3-6 EA --- --- --- --- 13.221
2-0 x 4-0 EA --- --- --- --- 13.222
2-6 x 4-6 EA --- --- --- --- 13.223
Remove and replace fixed casement
Overall window size 1-6 x 3-0 EA --- --- --- --- 13.230
1-8 x 3-6 EA --- --- --- --- 13.231
2-0 x 4-0 EA --- --- --- --- 13.232
2-6 x 4-6 EA --- --- --- --- 13.233

142 H1MD0220001CH0133
13. REPLACE DOOR WITH WINDOW
SPECIFICATIONS UNIT
CONTRACTOR’S
DIRECT JOB COST PRICE
DATABASEITEMNO.MATLS LABOR TOTAL
REPLACEEXISTINGDOOR WITHNEW WINDOW
# Remove existing door and framefrom framed wall
# Install new wood, aluminum or vinylwindow and frame, not more thanwidth of old door @ $300
# Close in below new window,matching existing exterior finish asclosely as possible, includingtoothing in siding or brickwork
# 1/2" drywall, plaster or prefinishedplywood paneling on inside of wall
# Install base and shoe on inside ofwall to match existing as closely aspossible
1.00
Framed wall with siding EA --- --- --- --- 13.300
Brick veneer wall EA --- --- --- --- 13.301
Brick and block wall
EA = Complete job
EA --- --- --- --- 13.302
BREAKTHROUGHWALL ANDINSTALLWINDOW
# Break opening in existing exteriorwall, install header over newopening
# Install new wood, aluminum or vinylwindow and frame, not more than 3'-6" wide @ $300
# Patch around exterior of newwindow, matching existing finish asclosely as possible, includingtoothing in siding or brickwork
# Patch drywall or plaster finish oninside of wall
Framed wall with siding EA --- --- --- --- 13.310
Brick veneer wall EA --- --- --- --- 13.311
Brick and block wall
EA = Complete job
EA --- --- --- --- 13.312
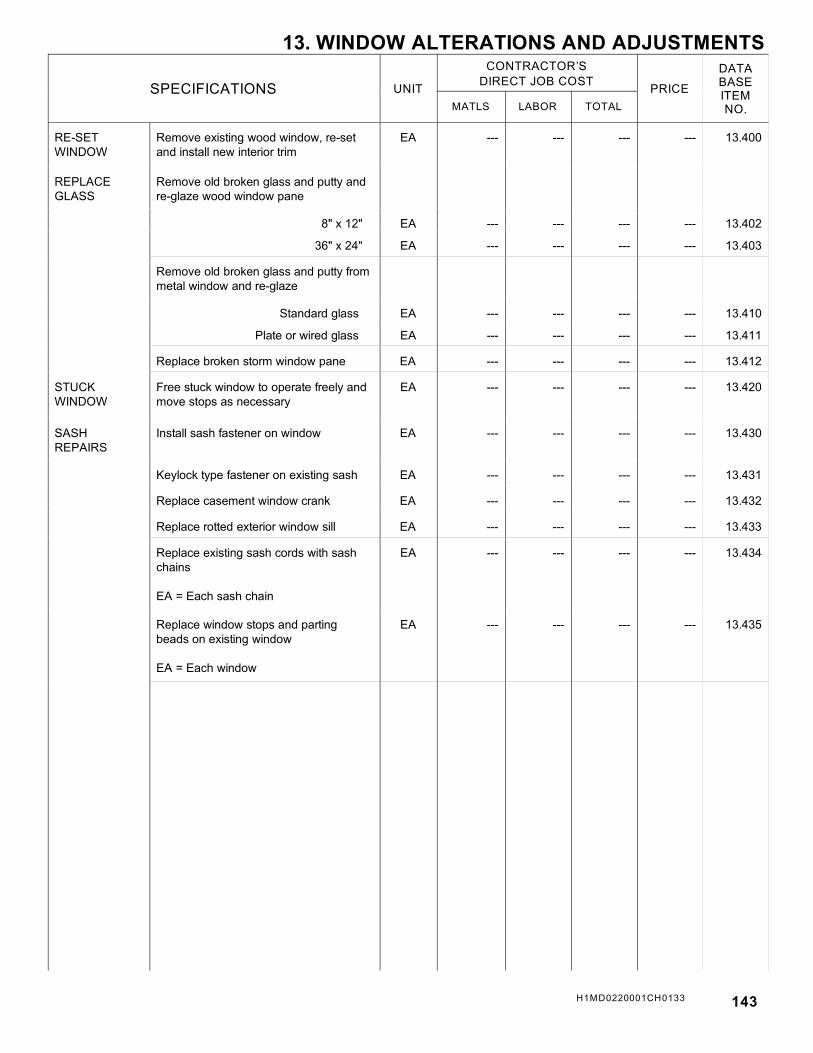
H1MD0220001CH0133 143
13. WINDOW ALTERATIONS AND ADJUSTMENTS
SPECIFICATIONS UNIT
CONTRACTOR’S
DIRECT JOB COST PRICE
DATABASEITEMNO.MATLS LABOR TOTAL
RE-SETWINDOW
Remove existing wood window, re-setand install new interior trim
EA --- --- --- --- 13.400
REPLACEGLASS
Remove old broken glass and putty andre-glaze wood window pane
1.00
8" x 12" EA --- --- --- --- 13.402
36" x 24" EA --- --- --- --- 13.403
Remove old broken glass and putty frommetal window and re-glaze
Standard glass EA --- --- --- --- 13.410
Plate or wired glass EA --- --- --- --- 13.411
Replace broken storm window pane EA --- --- --- --- 13.412
STUCKWINDOW
Free stuck window to operate freely andmove stops as necessary
EA --- --- --- --- 13.420
SASHREPAIRS
Install sash fastener on window EA --- --- --- --- 13.430
Keylock type fastener on existing sash EA --- --- --- --- 13.431
Replace casement window crank EA --- --- --- --- 13.432
Replace rotted exterior window sill EA --- --- --- --- 13.433
Replace existing sash cords with sashchains
EA = Each sash chain
EA --- --- --- --- 13.434
Replace window stops and partingbeads on existing window
EA = Each window
EA --- --- --- --- 13.435

144 H1MD0220001CH0133
14. HOSE BIBB, COPPER SUPPLY LINE, STOP VALVE
SPECIFICATIONS UNIT
CONTRACTOR’S
DIRECT JOB COST PRICE
DATABASEITEMNO.MATLS LABOR TOTAL
REPLACEHOSE BIBB
Replace existing hose bibb with newhose bibb
EA --- --- --- --- 14.000
Replace existing hose bibb with frostproof hose bibb
1.00
1/2" x 6" EA --- --- --- --- 14.001
1/2" x 12" EA --- --- --- --- 14.002
Replace existing hose bibb with self-draining frostproof hose bibb
1/2" x 8" EA --- --- --- --- 14.003
1/2" x 12" EA --- --- --- --- 14.004
REPLACECOPPERSUPPLY LINE
Replace damaged copper supply line
1/2" x 2' EA --- --- --- --- 14.005
3/4" x 2' EA --- --- --- --- 14.006
STOP VALVE Install new or replace existing in-linestop valve, 1/2" or 3/4"
Gate valve EA --- --- --- --- 14.007
Ball valve EA --- --- --- --- 14.008

H1MD0220001CH0133 145
14. SEWER EJECTION PUMP
SPECIFICATIONS UNIT
CONTRACTOR’S
DIRECT JOB COST PRICE
DATABASEITEMNO.MATLS LABOR TOTAL
REPLACESEWEREJECTIONPUMP
Replace existing pump with new splitphase submersible 4/10 HP dischargepump, 120 gallons per minute andheads to 28 feet, diaphragm pressureswitch, cast iron construction
1.00
Pump @ $330 EA --- --- --- --- 14.010
Replace existing pump with neweconomical submersible 4/10 HPdischarge pump, 72 gallons per minute,automatic float switch, thermoplasticconstruction
Pump @ $202.00 EA --- --- --- --- 14.011
Replace existing pump with Ownersupplied pump
EA --- --- --- --- 14.012
REPLACELAUNDRYTRAY PUMPSYSTEM
Replace above floor laundry tray pumpsystem in 17" x 10" x 14" space # Fully automatic # 1/4 HP submersible sump pump
# Oil-cooled 115 V motor
# 2280 Gal. per hour
# Seamless, moulded 10 gallon
polypropylene tank
# Bolt down lid
EA --- --- --- --- 14.013
Replace existing pump with Ownersupplied pump
EA --- --- --- --- 14.014
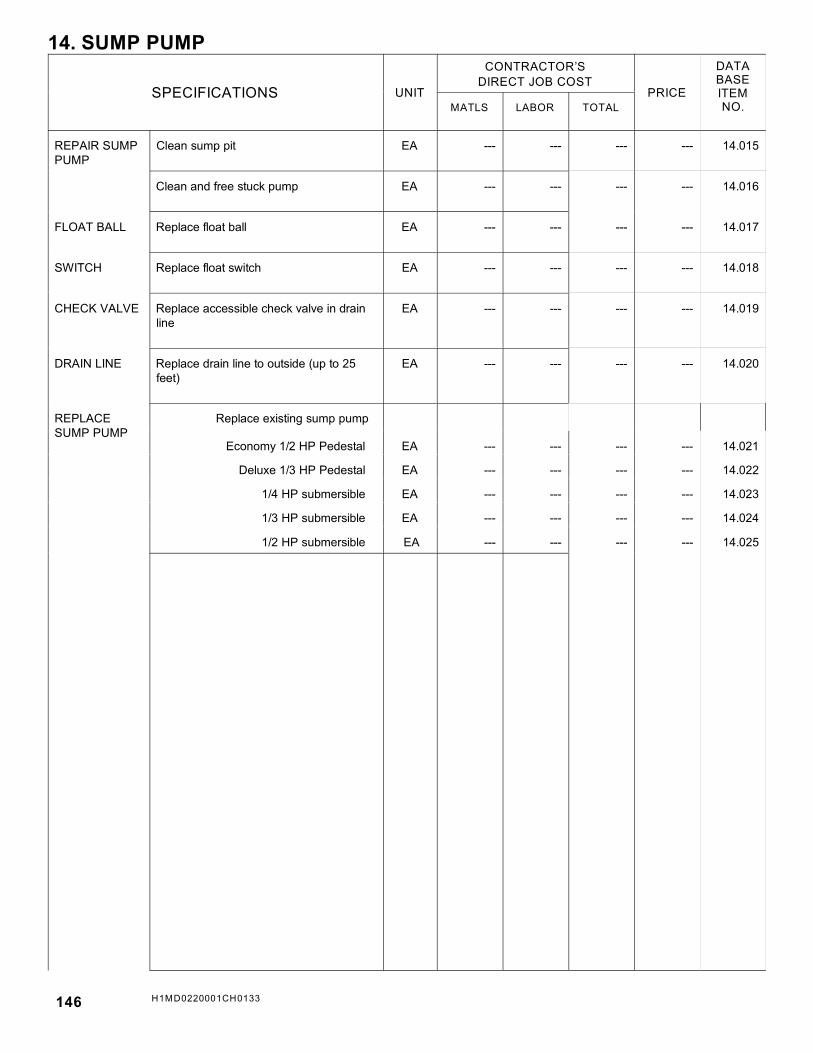
146 H1MD0220001CH0133
14. SUMP PUMP
SPECIFICATIONS UNIT
CONTRACTOR’S
DIRECT JOB COST PRICE
DATABASEITEMNO.MATLS LABOR TOTAL
REPAIR SUMPPUMP
Clean sump pit EA --- --- --- --- 14.015
1.00 Clean and free stuck pump EA --- --- --- --- 14.016
FLOAT BALL Replace float ball EA --- --- --- --- 14.017
SWITCH Replace float switch EA --- --- --- --- 14.018
CHECK VALVE Replace accessible check valve in drainline
EA --- --- --- --- 14.019
DRAIN LINE Replace drain line to outside (up to 25feet)
EA --- --- --- --- 14.020
REPLACESUMP PUMP
Replace existing sump pump
Economy 1/2 HP Pedestal EA --- --- --- --- 14.021
Deluxe 1/3 HP Pedestal EA --- --- --- --- 14.022
1/4 HP submersible EA --- --- --- --- 14.023
1/3 HP submersible EA --- --- --- --- 14.024
1/2 HP submersible EA --- --- --- --- 14.025

H1MD0220001CH0133 147
14. CLEAN-OUT
SPECIFICATIONS UNIT
CONTRACTOR’S
DIRECT JOB COST PRICE
DATABASEITEMNO.MATLS LABOR TOTAL
DRAINCLEANING
Run main sewer snake from availableclean-out
1.00
Up to 50 LF feet MIN --- --- --- --- 14.026
Additional LF over 50 LF ADD LF --- --- --- --- 14.027
REPLACECLEAN-OUT
Replace clean-out in main drain or drainstack line
PVC EA --- --- --- --- 14.028
Cast Iron EA --- --- --- --- 14.029
DRAINCLEANINGFROM UNDERKITCHEN SINK
Run main sewer snake from underkitchen sink
Up to 50 LF MIN --- --- --- --- 14.030
Additional LF over 50 LF ADD LF --- --- --- --- 14.031

148 H1MD0220001CH0133
14. WASTE LINE REPAIR
SPECIFICATIONS UNIT
CONTRACTOR’S
DIRECT JOB COST PRICE
DATABASEITEMNO.MATLS LABOR TOTAL
REPAIRHANGINGWASTE LINE
Repair waste line in basement or crawlspace hanging below joists # Cut out and remove damaged
waste line # Replace damaged waste line with
new section of PVC or cast ironpipe
1.00
Schedule 40, 4" PVC, up to 4 LF MIN --- --- --- --- 14.032
Additional LF over 4 LF ADD LF --- --- --- --- 14.033
4" Cast Iron, up to 4 LF MIN --- --- --- --- 14.034
Additional LF over 4 LF ADD LF --- --- --- --- 14.035
REPAIRWASTE LINESET INCONCRETE
Repair waste line in or below 4" or 6"concrete floor slab # Remove concrete 18" wide above
waste line leak # Cut out and remove damaged
waste line # Replace damaged waste line with
new section of PVC or cast ironpipe
# Fill around pipe with crushed stoneand cover with plastic vapor barrier
# Fill in above crushed stone withconcrete and trowel smooth
Schedule 40, 4" PVC, up to 4 LF MIN --- --- --- --- 14.036
Additional LF over 4 LF ADD LF --- --- --- --- 14.037
4" Cast Iron, up to 4 LF MIN --- --- --- --- 14.038
Additional LF over 4 LF ADD LF --- --- --- --- 14.039

H1MD0220001CH0133 149
14. WATER PIPE MAINTENANCE
SPECIFICATIONS UNIT
CONTRACTOR’S
DIRECT JOB COST PRICE
DATABASEITEMNO.MATLS LABOR TOTAL
WATER PIPEINSULATION
Tape foam pipe insulation on existing1/2" or 3/4" water supply line
1.00
Up to 10 LF of pipe insulated MIN --- --- --- --- 14.040
Additional LF over 10 LF ADD LF --- --- --- --- 14.041
WATER PIPEHEATINGCABLE
Install thermostat controlled heatingcable to existing water supply line
Up to 10 LF of cable MIN --- --- --- --- 14.045
Additional LF over 10 LF ADD LF --- --- --- --- 14.046

150 H1MD0220001CH0133
14. ELECTRIC WATER HEATER
SPECIFICATIONS UNIT
CONTRACTOR’S
DIRECT JOB COST PRICE
DATABASEITEMNO.MATLS LABOR TOTAL
TROUBLE-SHOOT
Troubleshoot water heater electricalsystem
EA --- --- --- --- 14.050
HEATINGELEMENT
Replace upper electric heating element
Standard EA --- --- --- --- 14.051
Deluxe EA --- --- --- --- 14.052
1.00 Replace lower electric heating element
Standard EA --- --- --- --- 14.053
Deluxe EA --- --- --- --- 14.054
Replace upper and lower electric heatingelements
Standard EA --- --- --- --- 14.055
Deluxe EA --- --- --- --- 14.056
THERMOSTAT Replace electric water heater thermostat
Upper EA --- --- --- --- 14.057
Lower EA --- --- --- --- 14.058
Upper and lower EA --- --- --- --- 14.059
DRAIN-OFFVALVE
Replace drain-off valve EA --- --- --- --- 14.060
PRESSURERELIEF VALVE
Replace pressure relief valve andextension tube
EA --- --- --- --- 14.061
REPLACEELECTRICWATERHEATER
Replace electric water heater with limited5 year manufacturer’s warranty
6 gallon EA --- --- --- --- 14.062
10 gallon EA --- --- --- --- 14.063
20 gallon EA --- --- --- --- 14.064
30 gallon EA --- --- --- --- 14.065
40 gallon EA --- --- --- --- 14.066
52 gallon EA --- --- --- --- 14.067
82 gallon EA --- --- --- --- 14.068
116 gallon EA --- --- --- --- 14.069
Remove old heater and install Owner’s water heater
6 to 52 gallon EA --- --- --- --- 14.070
82 to 116 gallon EA --- --- --- --- 14.071

H1MD0220001CH0133 151
14. GAS WATER HEATER
SPECIFICATIONS UNIT
CONTRACTOR’S
DIRECT JOB COST PRICE
DATABASEITEMNO.MATLS LABOR TOTAL
TROUBLE-SHOOT
Troubleshoot water heater gas system EA --- --- --- --- 14.080
PILOT Re-light gas pilot
EA = Each fixture
EA --- --- --- --- 14.081
THERMO-COUPLE
Replace standard thermocouple EA --- --- --- --- 14.082
THERMOSTATCONTROLVALVE
Replace thermostat and control valve 1.00
Lower EA --- --- --- --- 14.084
Upper EA --- --- --- --- 14.085
GAS COCK Replace gas cock EA --- --- --- --- 14.086
DIP TUBE Install new dip tube (standard) EA --- --- --- --- 14.087
DRAIN-OFFVALVE
Replace drain-off valve EA --- --- --- --- 14.088
PRESSURERELIEF VALVE
Replace pressure relief valve andextension tube
EA --- --- --- --- 14.089
REPLACENATURAL GASWATERHEATERRISERS
Replace natural gas water heater withlimited 5 year manufacturer’s warranty
30 gallon EA --- --- --- --- 14.090
40 gallon EA --- --- --- --- 14.091
50 gallon EA --- --- --- --- 14.092
Remove old heater and install Owner’s30-50 gallon water heater
EA --- --- --- --- 14.093

152 H1MD0220001CH0133
14. REPLACE TOILET
SPECIFICATIONS UNIT
CONTRACTOR’S
DIRECT JOB COST PRICE ITEMNO.
MATLS LABOR TOTAL
REPLACETOILET, TWOPIECE
Replace toilet with vitreous chinaround front two piece toilet, 12"R.I., 1.6 gpf, including seat andcover
1.00
White toilet @ $132 EA --- --- --- --- 14.100
Standard color toilet @ $162 EA --- --- --- --- 14.101
Custom color toilet @ $193 EA --- --- --- --- 14.102
Replace toilet with vitreous chinaelongated two piece toilet, 12"R.I., 1.6 gpf, including seat andcover
White toilet @ $322 EA --- --- --- --- 14.103
Standard color toilet @ $420 EA --- --- --- --- 14.104
Custom color toilet @ $482 EA --- --- --- --- 14.105
REPLACETOILET, ONEPIECE
Replace toilet with vitreous chinaround front one piece toilet, 12"R.I., 1.6 gpf, including seat andcover
White toilet @ $285 EA --- --- --- --- 14.106
Standard color toilet @ $369 EA --- --- --- --- 14.107
Custom color toilet @ $426 EA --- --- --- --- 14.108
Replace toilet with vitreous chinaelongated one piece toilet, 12"R.I., 1.6 gpf, including seat andcover
White toilet @ $574 EA --- --- --- --- 14.109
Standard color toilet @ $747 EA --- --- --- --- 14.110
Custom color toilet @ $833 EA --- --- --- --- 14.111
REPLACEOWNER’STOILET
Replace existing toilet with toiletsupplied by Owner
2 piece EA --- --- --- --- 14.112
1 piece EA --- --- --- --- 14.113
REPLACETOILET SEATAND COVER
Replace existing toilet seat andcover
Round closed front
White EA --- --- --- --- 14.114
Wood - Golden oak
Elongated closed front
EA --- --- --- --- 14.115
White EA --- --- --- --- 14.116
Wood - Golden oak EA --- --- --- --- 14.117
Replace existing toilet seat andcover with Owner supplied seatand cover
EA --- --- --- --- 14.118

H1MD0220001CH0133 153
14. TOILET REPAIRS
SPECIFICATIONS UNIT
CONTRACTOR’S
DIRECT JOB COST PRICE
DATABASEITEMNO.MATLS LABOR TOTAL
REPAIR ANDREPLACETOILET PARTSOR SHOWER
Replace flush handle 1.00
Polished chrome EA --- --- --- --- 14.120
Polished brass EA --- --- --- --- 14.121
Correct inadequate flush by tighteningset-screw on flush handle
EA --- --- --- --- 14.122
Repair ballcock, remove plunger andreplace washers
EA --- --- --- --- 14.123
Install new ballcock and float EA --- --- --- --- 14.124
Repair flush valve EA --- --- --- --- 14.125
Replace toilet supply riser EA --- --- --- --- 14.126
Replace shut-off valve and supply riser EA --- --- --- --- 14.127
Remove flush valve and repair leakbetween tank and bowl
EA --- --- --- --- 14.128
Repair flush valve, flapper or ball and liftwires
EA --- --- --- --- 14.129
Install new parts in toilet tank
Plastic EA --- --- --- --- 14.130
Brass EA --- --- --- --- 14.131
SNAKE OUTDRAIN
Unclog toilet with plunger or hand auger EA --- --- --- --- 14.132
Unclog toilet with closet auger withelectric can snake
EA --- --- --- --- 14.133
Remove toilet and reset with new seal and
solid brass closet bolts
EA --- --- --- --- 14.134
Remove toilet from bathroom floor, open
drain and reset toilet
EA --- --- --- --- 14.135
Repair existing floor flange EA --- --- --- --- 14.136
Replace floor flange swivel base
PVC EA --- --- --- --- 14.137
Cast iron EA --- --- --- --- 14.138

154 H1MD0220001CH0133
14. BIDET AND FAUCET
SPECIFICATIONS UNIT
CONTRACTOR’S
DIRECT JOB COST PRICE ITEMNO.
MATLS LABOR TOTAL
REPLACEBIDET
Replace existing bidet with new vitreouschina bidet
1.00
White @ $194 EA --- --- --- --- 14.150
Standard color @ $252 EA --- --- --- --- 14.151
Custom color @ $290 EA --- --- --- --- 14.152
Replace Owner’s bidet EA --- --- --- --- 14.153
REPLACEBIDETFAUCET
Replace existing above the rim centerset horizontal swivel spray bidet faucet
Polished chrome @ $119 EA --- --- --- --- 14.160
Polished brass @ $154 EA --- --- --- --- 14.161
Replace Owners’s faucet EA --- --- --- --- 14.162
Replace existing vertical spray fixture-mount transfer valve/vacuum breakerbidet faucet
Polished chrome @ $163 EA --- --- --- --- 14.163
Polished brass @ $257 EA --- --- --- --- 14.164
Replace Owner’s faucet EA --- --- --- --- 14.165
Replace existing below the rimhorizontal swivel, spray fixture-mountfaucet and wall-mount vacuum breaker
Polished chrome @ $283 EA --- --- --- --- 14.166
Polished brass @ $369 EA --- --- --- --- 14.167
Replace Owner’s faucet EA --- --- --- --- 14.168
REPLACEBIDETFAUCETPARTS
Replace standard seats and washers(pair)
EA = Total
EA --- --- --- --- 14.170
Replace washer and screw or top-hatwasher
EA --- --- --- --- 14.171
FAUCET STEM Replace standard faucet stem EA --- --- --- --- 14.172
Replace special faucet stem
Delta EA --- --- --- --- 14.173
Moen EA --- --- --- --- 14.174
American Standard EA --- --- --- --- 14.175
Kohler EA --- --- --- --- 14.176

H1MD0220001CH0133 155
14. BIDET DRAIN
SPECIFICATIONS UNIT
CONTRACTOR’S
DIRECT JOB COST PRICE
DATABASEITEMNO.MATLS LABOR TOTAL
BIDET DRAINREPAIR
Adjust popup drain assembly EA --- --- --- --- 14.180
1.00 Repair leak in trap without removing trap EA --- --- --- --- 14.181
Remove trap and repair leak EA --- --- --- --- 14.182
Repair leak in tail piece or popupassembly
EA --- --- --- --- 14.183
Repair leaking seal at drain withplumber’s putty
EA --- --- --- --- 14.184
BIDET DRAINREPLACE-MENT
Replace pop-up plug
Plastic EA --- --- --- --- 14.185
Metal EA --- --- --- --- 14.186
Replace 1-1/4" popup drain
Plastic EA --- --- --- --- 14.187
22 Ga. chrome plated brass EA --- --- --- --- 14.188
Polished chrome cast brass EA --- --- --- --- 14.189
Replace P-trap
PVC EA --- --- --- --- 14.190
22 Ga. chrome plated brass EA --- --- --- --- 14.191
Polished chrome cast brass EA --- --- --- --- 14.192
Polished brass cast brass EA --- --- --- --- 14.193
REPAIRLEAKS
Repair faucet leak by removing andresetting on putty
EA --- --- --- --- 14.194
Regrind existing seat, install with newwasher
EA = Total
EA --- --- --- --- 14.195
Repair leaking faucet with new sealsand springs (pair)
EA = Total
EA --- --- --- --- 14.196

156 H1MD0220001CH0133
14. REPLACE VANITY TOP
SPECIFICATIONS UNIT
CONTRACTOR’S
DIRECT JOB COST PRICE ITEMNO.
MATLS LABOR TOTAL
CULTUREDMARBLE TOP
Replace existing vanity top with samesize 22" deep cultured marble top withintegral single bowl and 3-3/4"backsplash in standard blended colors # Hook up to existing drain # Reinstall existing faucet
1.00
24" width @ $115 EA --- --- --- --- 14.200
27" width @ $123 EA --- --- --- --- 14.201
30" width @ $130 EA --- --- --- --- 14.202
33" width @ $139 EA --- --- --- --- 14.203
36" width @ $147 EA --- --- --- --- 14.204
42" width @ $167 EA --- --- --- --- 14.205
Install Owner’s top EA --- --- --- --- 14.206
PLASTICLAMINATETOP
Replace existing vanity top with samesize 22" deep plastic laminate top with4" backsplash in standard solid color # Reinstall existing lavatory # Hook up to existing drain # Reinstall existing faucet
24" width @ $44 EA --- --- --- --- 14.210
27" width @ $50 EA --- --- --- --- 14.211
30" width @ $55 EA --- --- --- --- 14.212
33" width @ $61 EA --- --- --- --- 14.213
36" width @ $66 EA --- --- --- --- 14.214
42" width @ $77 EA --- --- --- --- 14.215
Install Owner’s top EA --- --- --- --- 14.216
SOLID SURFACE TOP
Replace existing vanity top with samesize 22" deep solid surface top withintegral single bowl and 4" backsplashin standard solid color # Hook up to existing drain # Reinstall existing faucet
24" width @ $376 EA --- --- --- --- 14.220
27" width @ $404 EA --- --- --- --- 14.221
30" width @ $432 EA --- --- --- --- 14.222
33" width @ $460 EA --- --- --- --- 14.223
36" width @ $488 EA --- --- --- --- 14.224
42" width @ $544 EA --- --- --- --- 14.225
Install Owner’s top EA --- --- --- --- 14.226

H1MD0220001CH0133 157
14. REPLACE VANITY SINK BASE
SPECIFICATIONS UNIT
CONTRACTOR’S
DIRECT JOB COST PRICE
DATABASEITEMNO.MATLS LABOR TOTAL
VANITY SINKBASE
Replace vanity sink base with same size31" high and 21" deep double doorvanity sink base # Reinstall existing top and lavatory # Hook up to existing drain # Reinstall existing faucet
Vanity Base
1.00
24" width @ $237 EA --- --- --- --- 14.230
27" width @ $247 EA --- --- --- --- 14.231
30" width @ $253 EA --- --- --- --- 14.232
33" width @ $270 EA --- --- --- --- 14.233
36" width @ $281 EA --- --- --- --- 14.234
42" width @ $294 EA --- --- --- --- 14.235
Assemble Owner’s vanity EA --- --- --- --- 14.236
Install Owner’s vanity (assembled) EA --- --- --- --- 14.237

158 H1MD0220001CH0133
14. REPLACE LAVATORY WITH VANITY AND SOLID SURFACE TOP
SPECIFICATIONS UNIT
CONTRACTOR’S
DIRECT JOB COST PRICE
DATABASEITEMNO.MATLS LABOR TOTAL
REPLACELAVATORYWITH VANITY& SOLIDSURFACE TOP
Replace wall hung or pedestal lavatorywith double door vanity base and top # Vanity base 31" high and 21" deep # Solid surface top with recessed
faucet deck and flush oval bowl,including 3-1/2" integral covebacksplash in standard solid color
# Polished chrome single lever faucetwith popup drain and tail piece @$81
Vanity Base
1.00
24" width @ $237 EA --- --- --- --- 14.240
27" width @ $247 EA --- --- --- --- 14.241
30" width @ $253 EA --- --- --- --- 14.242
33" width @ $270 EA --- --- --- --- 14.243
36" width @ $281 EA --- --- --- --- 14.244
42" width @ $294 EA --- --- --- --- 14.245
Install with Owner’s materials EA --- --- --- --- 14.246

H1MD0220001CH0133 159
14. REPLACE LAVATORY WITH VANITY BASE AND TOP
SPECIFICATIONS UNIT
CONTRACTOR’S
DIRECT JOB COST PRICE
DATABASEITEMNO.MATLS LABOR TOTAL
REPLACE LAVATORY WITH VANITY& CULTUREDMARBLE TOP
Replace wall hung or pedestal lavatorywith double door vanity base and top # Vanity base 31" high and 21" deep # Cultured marble single bowl top with
standard blended colors # Polished chrome single lever faucet
with popup drain and tail piece @$81
Vanity Base
1.00
24" width @ $237 EA --- --- --- --- 14.250
27" width @ $247 EA --- --- --- --- 14.251
30" width @ $253 EA --- --- --- --- 14.252
33" width @ $270 EA --- --- --- --- 14.253
36" width @ $281 EA --- --- --- --- 14.254
42" width @ $294 EA --- --- --- --- 14.255
Install with Owner’s materials EA --- --- --- --- 14.256
REPLACELAVATORYWITH VANITY& PLASTICLAMINATETOP
Replace wall hung or pedestal lavatorywith double door vanity base and top # Vanity base 31" high and 21" deep # Plastic laminate top with 4"
backsplash in standard solid color # Cast iron or vitreous china
countertop lavatory 19" diameterround @ $66
# Polished chrome single lever faucetwith popup drain and tail piece @$81
Vanity Base
24" width @ $237 EA --- --- --- --- 14.260
27" width @ $247 EA --- --- --- --- 14.261
30" width @ $253 EA --- --- --- --- 14.262
33" width @ $270 EA --- --- --- --- 14.263
36" width @ $281 EA --- --- --- --- 14.264
42" width @ $294 EA --- --- --- --- 14.265
Install with Owner’s materials EA --- --- --- --- 14.266

160 H1MD0220001CH0133
14. REPLACE COUNTERTOP LAVATORY
SPECIFICATIONS UNIT
CONTRACTOR’S
DIRECT JOB COST PRICE
DATABASEITEMNO.MATLS LABOR TOTAL
REPLACECOUNTERTOPLAVATORY
Replace countertop lavatory with newvitreous china countertop lavatory
19" diameter round
1.00
White @ $60 EA --- --- --- --- 14.267
Standard color @ $73 EA --- --- --- --- 14.268
Custom color @ $88
19" x 15" oval
EA --- --- --- --- 14.269
White @ $125 EA --- --- --- --- 14.270
Standard color @ $162 EA --- --- --- --- 14.271
Custom color @ $190 EA --- --- --- --- 14.272
Replace with Owner’s countertop lavatory
EA --- --- --- --- 14.273
Replace countertop lavatory with newcast iron countertop lavatory
19" diameter round
White @ $66 EA --- --- --- --- 14.274
Standard color @ $84 EA --- --- --- --- 14.275
Custom color @ $97
22" x 19" oval
EA --- --- --- --- 14.276
White @ $70 EA --- --- --- --- 14.277
Standard color @ $89 EA --- --- --- --- 14.278
Custom color @ $102 EA --- --- --- --- 14.279
Replace with Owner’s countertoplavatory
EA --- --- --- --- 14.280
INCREASECOUNTER-TOP OPENINGSIZE
Increase size of countertop opening ifrequired for above replacements
Plastic laminate on wood or solid surface
EA --- --- --- --- 14.281
Ceramic tile EA --- --- --- --- 14.282
Marble tile
EA = Each opening
EA --- --- --- --- 14.283

H1MD0220001CH0133 161
14. REPLACE LAVATORY
SPECIFICATIONS UNIT
CONTRACTOR’S
DIRECT JOB COST PRICE
DATABASEITEMNO.MATLS LABOR TOTAL
WALL HUNG Replace wall hung lavatory with vitreouschina ledgeback lavatory,19-1/4" x 17-1/4"
1.00
White @ $75 EA --- --- --- --- 14.285
Standard color @ $98 EA --- --- --- --- 14.286
Replace with Owner’s lavatory EA --- --- --- --- 14.287
PEDESTAL Replace pedestal and lavatory withvitreous china pedestal and lavatory, 20" x 14" x 33"
White @ $186 EA --- --- --- --- 14.288
Standard color @ $241 EA --- --- --- --- 14.289
Custom color @ $278 EA --- --- --- --- 14.290
Replace with Owner’s pedestal andlavatory
EA --- --- --- --- 14.291
REPLACEWALL HUNGWITHPEDESTAL
Replace wall hung lavatory with vitreouschina pedestal and lavatory,20" x 14" x 33"
White @ $186 EA --- --- --- --- 14.292
Standard color @ $241 EA --- --- --- --- 14.293
Custom color @ $278 EA --- --- --- --- 14.294
Replace with Owner’s lavatory EA --- --- --- --- 14.295
SUPPLYVALVESRELOCATED
Relocate supply stops within 12" ofexisting location, no wall patchingincluded
EA = One supply valve
EA --- --- --- --- 14.296
DRAIN LINERELOCATED
Relocate 1-1/2" lavatory drain line within 12" of existing location, no wallpatching included
EA = One drain line
EA --- --- --- --- 14.297

162 H1MD0220001CH0133
14. LAVATORY FAUCET REPLACEMENT
SPECIFICATIONS UNIT
CONTRACTOR’S
DIRECT JOB COST PRICE
DATABASEITEMNO.MATLS LABOR TOTAL
FAUCETHANDLES
Replace one-handle faucet handle 1.00
Delta EA --- --- --- --- 14.300
Moen EA --- --- --- --- 14.301
Replace faucet handles (pair)
Delta EA --- --- --- --- 14.302
Moen EA --- --- --- --- 14.303
REPLACEFAUCET
Replace existing faucet with single levercenter set faucet
Polished chrome @ $65 EA --- --- --- --- 14.305
Replace with Owner’s faucet EA --- --- --- --- 14.306
Replace existing faucet with new twohandle faucet
Polished chrome @ $40 EA --- --- --- --- 14.307
Replace with Owner’s faucet EA --- --- --- --- 14.308
Replace existing faucet with new twohandle widespread lavatory base with 5"spout and wrist control lever handles
Polished chrome @ $125 EA --- --- --- --- 14.310
Polished brass @ $192 EA --- --- --- --- 14.311
Replace with Owner’s faucet EA --- --- --- --- 14.312

H1MD0220001CH0133 163
14. LAVATORY FAUCET PARTS REPLACEMENT
SPECIFICATIONS UNIT
CONTRACTOR’S
DIRECT JOB COST PRICE
DATABASEITEMNO.MATLS LABOR TOTAL
REPLACELAVATORYFAUCETPARTS
Replace standard seats and washers(pair)
EA --- --- --- --- 14.315
Replace washer and screw or top-hatwasher (each)
EA --- --- --- --- 14.316
FAUCET STEM Replace standard faucet stem (each) EA --- --- --- --- 14.317
Replace special faucet stem (each) 1.00
Delta EA --- --- --- --- 14.319
Moen EA --- --- --- --- 14.320
American Standard EA --- --- --- --- 14.321
Kohler EA --- --- --- --- 14.322
CARTRIDGE Replace Moen cartridge in
one-handle faucet
Plastic EA --- --- --- --- 14.323
Metal EA --- --- --- --- 14.324
AERATOR Replace aerator
Standard EA --- --- --- --- 14.325
Scald protector EA --- --- --- --- 14.326

164 H1MD0220001CH0133
14. LAVATORY DRAIN REPLACEMENT
SPECIFICATIONS UNIT
CONTRACTOR’S
DIRECT JOB COST PRICE
DATABASEITEMNO.MATLS LABOR TOTAL
LAVATORYDRAIN RE-PLACEMENT
Replace popup plug only 1.00
Plastic EA --- --- --- --- 14.330
Metal EA --- --- --- --- 14.331
Replace 1-1/4" popup drain assembly
Plastic EA --- --- --- --- 14.332
Chrome plated metal EA --- --- --- --- 14.333
Polished chrome cast brass EA --- --- --- --- 14.334
Replace J-bend
PVC EA --- --- --- --- 14.335
Chrome EA --- --- --- --- 14.336
Cast brass-chrome EA --- --- --- --- 14.337
Replace P-trap
PVC EA --- --- --- --- 14.338
Chrome EA --- --- --- --- 14.339
Cast brass-chrome EA --- --- --- --- 14.340
Replace S-trap
PVC EA --- --- --- --- 14.341
Chrome EA --- --- --- --- 14.342
Cast brass-chrome EA --- --- --- --- 14.343

H1MD0220001CH0133 165
14. LAVATORY DRAIN REPAIR AND REPLACEMENT
SPECIFICATIONS UNIT
CONTRACTOR’S
DIRECT JOB COST PRICE
DATABASEITEMNO.MATLS LABOR TOTAL
LAVATORYDRAIN REPAIR
Adjust popup drain assembly EA --- --- --- --- 14.350
1.00 Repair leak in trap without removing trap EA --- --- --- --- 14.351
Remove trap and repair leak EA --- --- --- --- 14.352
Repair leak in tailpiece or popup drainassembly below lavatory
EA --- --- --- --- 14.353
Repair leaking seal where drain meetslavatory with plumber’s putty
EA --- --- --- --- 14.354
REPAIRLEAKS
Repair leak from lavatory edge byremoving old sealant and recaulkingwith silicone based mildew resistantsealant
EA --- --- --- --- 14.355
Repair faucet leak by removing andresetting on putty
EA --- --- --- --- 14.356
Regrind existing seat, install with newwasher (each)
EA --- --- --- --- 14.357
Repair leaking faucet with new sealsand springs (pair)
EA --- --- --- --- 14.358
Repair leaking faucet with repair kit
Less ball EA --- --- --- --- 14.359
With ball EA --- --- --- --- 14.360

166 H1MD0220001CH0133
14. SHOWER DRAIN AND PAN
SPECIFICATIONS UNIT
CONTRACTOR’S
DIRECT JOB COST PRICE
DATABASEITEMNO.MATLS LABOR TOTAL
SHOWERDRAIN
Replace shower drain foracrylic/fiberglass moulded pan on woodframed floor
1.00
Polished chrome @ $32 EA --- --- --- --- 14.400
REPLACELEADSHOWER PAN
Replace lead shower pan
# Tear out tile floor and walls up threerows from base
# Supply and install new drainassembly and cover
# Replace existing lead pan with vinylor rubber pan
# Install new tile on floor and up threerows in mud, tile to match existingas closely as possible
EA = Complete job
EA --- --- --- --- 14.401
COPPER PAN If copper pan substituted for specifiedpan in above installation
ADD EA --- --- --- --- 14.402

H1MD0220001CH0133 167
14. SNAKE OUT TUB OR SHOWER
SPECIFICATIONS UNIT
CONTRACTOR’S
DIRECT JOB COST PRICE
DATABASEITEMNO.
MATLS LABOR TOTAL
SNAKE OUTAND OPENDRAIN
Snake out tub or shower drain withelectric drill snake to clean 1-1/2" to 3"line and clean up
EA --- --- --- --- 14.410
1.00 Open drain with plunger or hand snake EA --- --- --- --- 14.411

168 H1MD0220001CH0133
14. SHOWERHEAD
SPECIFICATIONS UNIT
CONTRACTOR’S
DIRECT JOB COST PRICE
DATABASEITEMNO.
MATLS LABOR TOTAL
REPLACESHOWER-HEAD IN TUBOR SHOWER
Replace existing showerhead withpolished chrome shower-head withadjustable spray, 2.5 GPM flow
1.00
Standard @ $15 EA --- --- --- --- 14.420
Deluxe @ $37 EA --- --- --- --- 14.421
3-way with massage @ $45 EA --- --- --- --- 14.422
Replace existing shower arm withpolished chrome shower arm
6-1/2" arm and flange @ $10 EA --- --- --- --- 14.423
10" arm and flange @ $18 EA --- --- --- --- 14.424
Replace both showerhead and arm atsame time
(For materials costs, add the showerheadand arm together)
EA --- --- --- --- 14.425
PERSONALHAND HELDSHOWER
Replace existing hand held shower withnew polished chrome hand held showerwith adjustable spray, 2.5 GPM
Standard @ $38 EA --- --- --- --- 14.426
3-way with massage @ $48 EA --- --- --- --- 14.427
HOSE Replace existing shower hose with new60" metal shower hose with swivel base
Hose @ $22 EA --- --- --- --- 14.428
Replace both hand held shower andmetal hose
(For materials costs, add the hand heldshower and metal hose together)
EA --- --- --- --- 14.429
ELBOWSUPPLY
Replace elbow supply with new polishedchrome elbow supply and flange
EA --- --- --- --- 14.430
WALL MOUNTBRACKET
Replace or install wall mount polishedchrome bracket for hand held shower
Fixed EA --- --- --- --- 14.435
Adjustable swivel EA --- --- --- --- 14.436
Slide bar height adjustable EA --- --- --- --- 14.437
2-way shower arm diverter EA --- --- --- --- 14.438

H1MD0220001CH0133 169
14. TUB AND SHOWER PARTS
SPECIFICATIONS UNIT
CONTRACTOR’S
DIRECT JOB COST PRICE
DATABASEITEMNO.
MATLS LABOR TOTAL
NON-ACCESSIBILITY
Break through standard frameconstruction walls to replace partsshown on this page. No patching or tilereplacement is included
Wall covering
1.00
Drywall or wood paneling EA --- --- --- --- 14.500
Ceramic tile and drywall EA --- --- --- --- 14.501
Ceramic tile and cementboard EA --- --- --- --- 14.502
DIVERTER Replace tub/shower diverter valve
Standard mixing valve @ $42 EA --- --- --- --- 14.503
Pressure balancing mixing valve @ $52 EA --- --- --- --- 14.504
WALL-MOUNTFAUCET
Replace tub/shower faucet with polishedchrome single handle faucet and mixingvalve
Faucet and standard mixing valve@ $59
EA --- --- --- --- 14.506
Faucet and pressure balancing mixingvalve @ $69
EA --- --- --- --- 14.507
Replace tub/shower faucet with 2handle polished chrome faucet withacrylic handles, including valve @ $56
EA --- --- --- --- 14.508
Replace tub/shower faucet with 3handle polished chrome faucet withacrylic handles, including valve @ $77
EA --- --- --- --- 14.509
WALL-MOUNTBATHTUBSPOUT
Replace bathtub spout with newpolished chrome bathtub spout
5" non-diverter spout @ $12 EA --- --- --- --- 14.511
8" non-diverter spout @ $90 EA --- --- --- --- 14.512
5" diverter spout @ $16 EA --- --- --- --- 14.513
8" diverter spout @ $99 EA --- --- --- --- 14.514

170 H1MD0220001CH0133
14. REPLACE BATHTUB PARTS
SPECIFICATIONS UNIT
CONTRACTOR’S
DIRECT JOB COST PRICE
DATABASEITEMNO.
MATLS LABOR TOTAL
REPLACE FAUCET
Replace faucet mounted on bathtub ortub deck
1.00
Polished chrome @ $235 EA --- --- --- --- 14.520
Polished brass @ $325 EA --- --- --- --- 14.521
REPLACEHAND HELDSHOWER
Replace personal hand held shower,including hose and all fittings
Polished chrome @ $158 EA --- --- --- --- 14.522
Polished brass @ $218 EA --- --- --- --- 14.523
REPLACEDIVERTER
Replace 2-way deck mount divertervalve for hand held shower
Polished chrome @ $80 EA --- --- --- --- 14.524
Polished brass @ $102 EA --- --- --- --- 14.525
REPLACEDECK MOUNTTUB SPOUT
Replace deck mount non-diverter bathspout
Polished Chrome
8-3/4" Roman spout @ $198 EA --- --- --- --- 14.526
7-1/2" Crescent spout @ $251
Polished Brass
EA --- --- --- --- 14.527
8-3/4" Roman spout @ $331 EA --- --- --- --- 14.528
7-1/2" Crescent spout @ $347 EA --- --- --- --- 14.529
TRIP LEVERANDOVERFLOWPLATE
Replace bathtub trip lever and overflowplate with new polished chrome trip leverand overflow plate
EA --- --- --- --- 14.530
WASTE ANDOVERFLOW
Replace waste and overflow, trip leverdrain
PVC @ $30 EA --- --- --- --- 14.531
20 Ga. brass @ $40 EA --- --- --- --- 14.532
TRAP Replace tub trap
PVC @ $20 EA --- --- --- --- 14.533
20 Ga. brass @ $34 EA --- --- --- --- 14.534

H1MD0220001CH0133 171
14. BATHTUB FAUCETS
SPECIFICATIONS UNIT
CONTRACTOR’S
DIRECT JOB COST PRICE
DATABASEITEMNO.
MATLS LABOR TOTAL
REPLACEFAUCET
Replace tub-on-legs faucet with newfaucet
Polished Chrome
1.00
Standard style faucet @ $110 EA --- --- --- --- 14.540
Antique style faucet @ $600
Polished Brass
EA --- --- --- --- 14.541
Standard style faucet @ $165 EA --- --- --- --- 14.542
Antique style faucet @ $900 EA --- --- --- --- 14.543
REPLACESUPPLY
Replace supply risers to faucet, 26" (pair)
Polished chrome @ $48 EA --- --- --- --- 14.544
Polished brass @ $77
EA = Pair
EA --- --- --- --- 14.545
SHUT-OFFVALVES
Replace or cut in for valve to faucet
Polished chrome @ $24 EA --- --- --- --- 14.546
Polished brass @ $34 EA --- --- --- --- 14.547
Replace sweated valve to tub valvefaucet
EA --- --- --- --- 14.548
KNUCKLES Replace knuckles on tub-on-legs faucet(pair)
EA --- --- --- --- 14.549

172 H1MD0220001CH0133
14. REPLACE KITCHEN SINK
SPECIFICATIONS UNIT
CONTRACTOR’S
DIRECT JOB COST PRICE
DATABASEITEMNO.MATLS LABOR TOTAL
STAINLESSSTEEL20 GAUGE
Remove existing kitchen sink andreplace with single bowl 25" x 22", 20gauge, stainless steel sink
1.00
Sink @ $98 EA --- --- --- --- 14.600
Remove existing kitchen sink andreplace with double bowl 33" x 22", 20gauge, stainless steel sink
Sink @ $137 EA --- --- --- --- 14.601
STAINLESSSTEEL18 GAUGE
Remove existing kitchen sink andreplace with single bowl 25" x 22", 18gauge, stainless steel sink
Sink @ $275 EA --- --- --- --- 14.602
Remove existing kitchen sink andreplace with double bowl 33" x 22", 18gauge, stainless steel sink
Sink @ $423 EA --- --- --- --- 14.603
ENAMELEDCAST IRON
Remove existing kitchen sink andreplace with single bowl 21" x 21"enameled cast iron sink
White @ $170 EA --- --- --- --- 14.604
Standard color @ $212 EA --- --- --- --- 14.605
Custom color @ $243 EA --- --- --- --- 14.606
Remove existing kitchen sink andreplace with double bowl 33" x 22"enameled cast iron sink
White @ $595 EA --- --- --- --- 14.607
Standard color @ $745 EA --- --- --- --- 14.608
Custom color @ $856 EA --- --- --- --- 14.609
Remove existing kitchen sink andreplace with Owner’s enameled castiron or stainless steel sink
Single bowl EA --- --- --- --- 14.610
Double bowl EA --- --- --- --- 14.611

H1MD0220001CH0133 173
14. REPLACE KITCHEN SINK PARTS
SPECIFICATIONS UNIT
CONTRACTOR’S
DIRECT JOB COST PRICE
DATABASEITEMNO.
MATLS LABOR TOTAL
SINK PARTSREPLACE-MENT
Replace basket strainer 1.00
Stainless steel @ $16 EA --- --- --- --- 14.620
Cast brass-chrome @ $32 EA --- --- --- --- 14.621
Replace J-bend
PVC EA --- --- --- --- 14.622
22 Ga. chrome plated brass EA --- --- --- --- 14.623
Cast brass-chrome EA --- --- --- --- 14.624
Replace P-trap
PVC EA --- --- --- --- 14.625
22 Ga. chrome plated brass EA --- --- --- --- 14.626
Cast brass-chrome EA --- --- --- --- 14.627
Replace S-trap
PVC EA --- --- --- --- 14.628
22 Ga. chrome plated brass EA --- --- --- --- 14.629
Cast brass-chrome EA --- --- --- --- 14.630
Replace tailpiece, P-trap and drain pipetrap arm outlet tube
PVC EA --- --- --- --- 14.631
22 Ga. chrome plated brass EA --- --- --- --- 14.632
Cast brass-chrome EA --- --- --- --- 14.633
Install new trap adapter arm or drainpipe outlet tube
PVC EA --- --- --- --- 14.634
22 Ga. chrome plated brass EA --- --- --- --- 14.635
Cast brass-chrome EA --- --- --- --- 14.636
Replace dishwasher side-inlet tailpiece
PVC EA --- --- --- --- 14.637
22 Ga. chrome plated brass EA --- --- --- --- 14.638
Cast brass-chrome EA --- --- --- --- 14.639
Replace tailpiece
PVC EA --- --- --- --- 14.640
22 Ga. chrome plated brass EA --- --- --- --- 14.641
Cast brass-chrome EA --- --- --- --- 14.642

174 H1MD0220001CH0133
14. KITCHEN SINK REPAIRS
SPECIFICATIONS UNIT
CONTRACTOR’S
DIRECT JOB COST PRICE
DATABASEITEMNO.MATLS LABOR TOTAL
CLEAR SINKDRAIN
Clear kitchen sink drain with plunger orhand held snake
EA --- --- --- --- 14.650
1.00 Clear kitchen sink drain with mechanicalsnake
EA --- --- --- --- 14.651
Take down trap and clean outobstruction
EA --- --- --- --- 14.652
REPAIR SINKDRAIN
Repair leak in sink trap EA --- --- --- --- 14.653
Repair leak in continuous waste line EA --- --- --- --- 14.654
Repair leak in dishwasher drainconnection if accessible from under sink
EA --- --- --- --- 14.655
Repair leaking seal at strainer withplumber’s putty
EA --- --- --- --- 14.656
REPAIRSWIVELSPOUTCOLLAR LEAK
Repair leak from around swivel spoutcollar
Remove spout and apply plumber’sgrease to o-rings
EA --- --- --- --- 14.660
Remove spout, replace o-rings andapply plumber’s grease
EA --- --- --- --- 14.661
Replace right angle supply shut-off valve EA --- --- --- --- 14.662

H1MD0220001CH0133 175
14. REPLACE KITCHEN FAUCET AND SPRAY
SPECIFICATIONS UNIT
CONTRACTOR’S
DIRECT JOB COST PRICE
DATABASEITEMNO.MATLS LABOR TOTAL
REPLACEDIVERTER
Replace diverter 1.00
Delta EA --- --- --- --- 14.670
Moen EA --- --- --- --- 14.671
SPRAY Replace spray, hose and spray head EA --- --- --- --- 14.675
Replace spray head only EA --- --- --- --- 14.676
Remove spray and plug up hole in sinkdeck and cap line below diverter
EA --- --- --- --- 14.677
Replace spout with new polishedchrome spout
14" goose neck @ $32 EA --- --- --- --- 14.679
12" swing arm @ $35 EA --- --- --- --- 14.680
FAUCET Replace existing faucet with new singlelever polished chrome faucet
Faucet @ $70 EA --- --- --- --- 14.690
Faucet with spray @ $88 EA --- --- --- --- 14.691
Replace existing faucet with new two-handle polished chrome faucet
Faucet @ $77 EA --- --- --- --- 14.692
Faucet with spray @ $91 EA --- --- --- --- 14.693
Replace existing faucet with newpolished chrome concealed deck faucet
Faucet @ $95 EA --- --- --- --- 14.694
Faucet with spray @ $113 EA --- --- --- --- 14.695
Replace existing faucet with Owner’sfaucet
Faucet only EA --- --- --- --- 14.697
Faucet with spray EA --- --- --- --- 14.698

176 H1MD0220001CH0133
14. WATER TREATMENT SYSTEM
SPECIFICATIONS UNIT
CONTRACTOR’S
DIRECT JOB COST PRICE
DATABASEITEMNO.MATLS LABOR TOTAL
REPAIRWATERTREATMENTSYSTEM
Test water on site with test kit for ironand hardness
EA --- --- --- --- 14.700
Trouble shoot existing water treatmentsystem
1.00
Basic EA --- --- --- --- 14.702
Observe full cycle EA --- --- --- --- 14.703
Clean injector and screen EA --- --- --- --- 14.704
REPLACESYSTEMPARTS
Replace injector and screen EA --- --- --- --- 14.705
Replace in-line sediment filter cartridge EA --- --- --- --- 14.706
Replace Owner supplied in-linesediment filter cartridge
EA --- --- --- --- 14.707
Replace NSA #300 HR turbulator inbrine tank
EA --- --- --- --- 14.708
Replace Owner supplied NSA #300 HRturbulator in brine tank
EA --- --- --- --- 14.709

H1MD0220001CH0133 177
14. REFRIGERATOR ICE MAKER AND WATER SUPPLY
SPECIFICATIONS UNIT
CONTRACTOR’S
DIRECT JOB COST PRICE
DATABASEITEMNO.MATLS LABOR TOTAL
NON-ACCESSIBILITY
If any of the following jobs requirebreaking through standard frameconstruction walls to replace or repairparts, add to the costs shown. Nopatching or tile replacement is included
1.00
Drywall EA --- --- --- --- 14.710
Ceramic tile and drywall EA --- --- --- --- 14.711
Ceramic tile and cement board EA --- --- --- --- 14.712
WATERSUPPLYREPAIR
Repair leak at refrigerator where watersupply line connects at rear
EA --- --- --- --- 14.720
Repair leak at valve where water supplyline connects to cold water supply
EA --- --- --- --- 14.721
REPLACESUPPLY LINE
Replace existing water supply line, maximum 10 feet
1/4" flexible PVC EA --- --- --- --- 14.723
1/4" soft copper EA --- --- --- --- 14.724
INSTALL NEWSUPPLY LINE
Install new water supply line, maximum10 feet
1/4" flexible PVC EA 8.00 40.00 48.00 100.00 14.76
1/4" soft copper EA 14.00 40.00 54.00 107.50 14.77
REPLACESUPPLYVALVE
Replace existing self-tapping saddlevalve with new 1/4" saddle valve
EA --- --- --- --- 14.730
Replace existing valve with newsweated in-line 1/4" valve
EA --- --- --- --- 14.731
INSTALL NEWSUPPLYVALVE
Install new 1/4" self-tapping saddle valve EA --- --- --- --- 14.732
Install new sweated in-line 1/4" valve EA --- --- --- --- 14.733

178 H1MD0220001CH0133
14. DISHWASHER REPAIR
SPECIFICATIONS UNIT
CONTRACTOR’S
DIRECT JOB COST PRICE
DATABASEITEMNO.MATLS LABOR TOTAL
HOT WATERSUPPLY LINE
Repair leaking hot water supplyconnections at angle-stop under kitchensink
EA --- --- --- --- 14.750
1.00 Repair leaking hot water supplyconnections at inlet valve underdishwasher
EA --- --- --- --- 14.751
AIR GAP Repair air gap leaks and clearpassageway
EA --- --- --- --- 14.752
Replace air gap EA --- --- --- --- 14.753
Replace air gap drain hose EA --- --- --- --- 14.754
Replace 6 foot long dishwasherdischarge hose
EA --- --- --- --- 14.755
Replace 6 foot long 3/8" copperdishwasher hot water supply line
EA --- --- --- --- 14.756
Replace right angle supply shut-off valve EA --- --- --- --- 14.757
DRAIN LINE Repair leaking drain line connections EA --- --- --- --- 14.760
DRAINOUTLET
Clean out debris from dishwasher drainpan drain outlet
EA --- --- --- --- 14.761
DOOR Repair leak around dishwasher door bycleaning rubber gasket around perimeterof opening
EA --- --- --- --- 14.765
CLEAN INLETSCREEN
# Shut off hot water and electricsupply to dishwasher
# Remove supply line to inlet valve # Clean inlet screen and reinstall # Reconnect supply line and turn on
hot water and electric supply
EA --- --- --- --- 14.770
REPLACEINLET VALVE
Replace dishwasher inlet valve EA --- --- --- --- 14.771
REPLACEFLOATSWITCH
Replace dishwasher float switch EA --- --- --- --- 14.772

H1MD0220001CH0133 179
14. DISPOSER
SPECIFICATIONS UNIT
CONTRACTOR’S
DIRECT JOB COST PRICE
DATABASEITEMNO.MATLS LABOR TOTAL
CLEAR ANDREPAIRDISPOSER
Re-start disposer by rotating end ofbroomstick in grinding chamber or Allenwrench rotation of main shaft
EA --- --- --- --- 14.780
1.00 Remove obstruction in disposer andstart
EA --- --- --- --- 14.781
Remove discharge elbow of disposerand remove obstruction from undersideof grinding chamber and start
EA --- --- --- --- 14.782
Disconnect and remove disposer, clearobstruction, re-install and start
EA --- --- --- --- 14.783
REPLACEDISPOSER
Remove and replace existing disposerwith new 1/3 HP disposer @ $66
Supply and install EA --- --- --- --- 14.784
Install Owner’s disposer EA --- --- --- --- 14.785
Replace existing disposer with new 1/2HP disposer @ $96
Supply and install EA --- --- --- --- 14.786
Install Owner’s disposer EA --- --- --- --- 14.787
Remove and replace existing disposerwith new 3/4 HP disposer @ $150
Supply and install EA --- --- --- --- 14.788
Install Owner’s disposer EA --- --- --- --- 14.789
NEWDISPOSER
Install new 1/2 HP disposer @ $96,including electrical connection andswitch, no wall patching included
Supply and install EA --- --- --- --- 14.790
Install Owner’s disposer EA --- --- --- --- 14.791
DISPOSERDRAIN ELBOW
Replace disposer drain elbow
PVC EA --- --- --- --- 14.795
22 Ga. chrome plated brass EA --- --- --- --- 14.796
Cast brass chrome EA --- --- --- --- 14.797

180 H1MD0220001CH0133
14. WASHING MACHINE VALVE AND DRAIN
SPECIFICATIONS UNIT
CONTRACTOR’S
DIRECT JOB COST PRICE
DATABASEITEMNO.MATLS LABOR TOTAL
REPLACEDRAIN HOSE
Replace washing machine drain hose EA --- --- --- --- 14.800
VALVE Replace supply valve 1.00
Hot or cold only EA --- --- --- --- 14.801
Both hot and cold EA --- --- --- --- 14.802
SUPPLY HOSE Replace supply hose
Hot or cold only EA --- --- --- --- 14.810
Both hot and cold EA --- --- --- --- 14.811

H1MD0220001CH0133 181
14. LAUNDRY TUB, FAUCET AND HOSE CONNECTIONS
SPECIFICATIONS UNIT
CONTRACTOR’S
DIRECT JOB COST PRICE
DATABASEITEMNO.MATLS LABOR TOTAL
REPAIR LEAK Repair leak in trap without removing trap EA --- --- --- --- 14.820
1.00 Remove trap and repair leak EA --- --- --- --- 14.821
Repair leak at washing machine hoseconnection
EA --- --- --- --- 14.822
Repair leak to hot or cold washingmachine supply valve (single)
EA --- --- --- --- 14.823
REPLACEFAUCETPARTS
Replace standard seats and washers(pair)
EA = Total
EA --- --- --- --- 14.830
Replace standard faucet stem EA --- --- --- --- 14.831
REPLACELAUNDRY TUB
Replace existing laundry tub with singlebowl laundry tub, self rimming 22" x 25"x 12" deep, white
Molded plastic installed in countertop oron legs
EA --- --- --- --- 14.832
Fiberglass installed in countertop or onlegs
EA --- --- --- --- 14.833
18 Ga. Stainless steel in countertop EA --- --- --- --- 14.834
Cast iron in countertop EA --- --- --- --- 14.835
REPLACETRAP
Replace laundry tub trap
PVC EA --- --- --- --- 14.840
Chrome EA --- --- --- --- 14.841
Cast brass-chrome EA --- --- --- --- 14.842
REPLACEFAUCET
Replace existing faucet with new two-handle polished chrome faucet withthreaded spout and vacuum breaker,faucet @ $115
EA --- --- --- --- 14.843

182 H1MD0220001CH0133
15. FURNACE FILTERS, GAS PILOT
SPECIFICATIONS UNIT
CONTRACTOR’S
DIRECT JOB COST PRICE
DATABASEITEMNO.MATLS LABOR TOTAL
REPLACEFILTER
# Replace fuel filter housing and woolfelt filter
# Refill cartridge for oil burningfurnace
1.00
Small EA --- --- --- --- 15.000
Large EA --- --- --- --- 15.001
Replace fuel filter wool felt refill cartridge
Small EA --- --- --- --- 15.002
Large EA --- --- --- --- 15.003
OIL FURNACEMAINTENANCESERVICE
Service oil furnace # Vacuum accumulated soot # Change nozzle # Clean pump strainer screen # Change filter refill cartridge
EA --- --- --- --- 15.010
REPLACE AIRFILTER
Replace furnace/AC air filter with newfilter
Pleated poly cotton synthetic media,16" x 20" x 1" to 20" x 25" x 1"
EA --- --- --- --- 15.020
Spun glass media, 16" x 20" x 1" to20" x 25" x 1"
EA --- --- --- --- 15.021
Electrostatic filter pad, 20" x 25" x 1"(Frame not included)
EA --- --- --- --- 15.022
RE-LIGHT GASPILOT
Re-light a gas furnace pilot EA --- --- --- --- 15.050

H1MD0220001CH0133 183
15. ELECTRIC HEAT AND AIR CONDITIONING
SPECIFICATIONS UNIT
CONTRACTOR’S
DIRECT JOB COST PRICE
DATABASEITEMNO.MATLS LABOR TOTAL
REPLACEBASEBOARDHEATER
Replace existing baseboard electricheater with built-in thermostat
1.00
4'-0" (1000 watt) EA --- --- --- --- 15.100
6'-0" (1500 watt) EA --- --- --- --- 15.101
8'-0" (2000 watt) EA --- --- --- --- 15.102
10'-0" (2500 watt) EA --- --- --- --- 15.103
REPLACEWALL HEATER
Replace existing electric wall heater withbuilt-in thermostat, 12" x 12"(1250 watt)
EA --- --- --- --- 15.120
REPLACEWINDOW UNIT
Replace existing window airconditioning unit, including cost of unit
EA --- --- --- --- 15.130
Replace existing window airconditioning unit, with air conditioningunit supplied by Owner
EA --- --- --- --- 15.131

184 H1MD0220001CH0133
15. REGISTERS AND GRILLES
SPECIFICATIONS UNIT
CONTRACTOR’S
DIRECT JOB COST PRICE
DATABASEITEMNO.MATLS LABOR TOTAL
REPLACEREGISTERGRILLE
Replace existing supply register grille,painted enamel finish
1.00
3-way, 10" x 6" or 12" x 6" EA --- --- --- --- 15.200
3-way sidewall, 14" x 6" EA --- --- --- --- 15.201
One-way sidewall, 10" x 6", 12" x 6",12" x 8" or 14" x 8"
EA --- --- --- --- 15.202
Sidewall ceiling square deflection, 10"x 6" or 12" x 6"
EA --- --- --- --- 15.203
Ceiling pattern diffuser, 2-way, 8" x 8" EA --- --- --- --- 15.204
4-way, 8" x 10" EA --- --- --- --- 15.205
4-way, 10" x 10" EA --- --- --- --- 15.206
Floor diffuser, 12" x 2", 12" x 4" or 14" x 4"
EA --- --- --- --- 15.207
Replace existing return air grille, paintedenamel finish, sidewall
10" x 6", 12" x 6" or 14" x 6" EA --- --- --- --- 15.210
18" x 18" or 16" x 14" EA --- --- --- --- 15.211
30" x 6" or 30" x 8" EA --- --- --- --- 15.212
Sidewall filter grille, 24" x 24",30" x 20" or 30" x 24"
EA --- --- --- --- 15.213

H1MD0220001CH0133 185
15. COMPRESSOR/CONDENSER, PUMPS
SPECIFICATIONS UNIT
CONTRACTOR’S
DIRECT JOB COST PRICE
DATABASEITEMNO.MATLS LABOR TOTAL
LEVELCOMPRESSOR/CONDENSER
Level compressor/condenser pad, 30" x 30"
1.00
No difficulty EA --- --- --- --- 15.300
Some difficulty EA --- --- --- --- 15.301
Difficult EA --- --- --- --- 15.302
CLEANAROUND UNIT
Remove all debris from under andaround compressor/condenser unit
No difficulty EA --- --- --- --- 15.310
Some difficulty EA --- --- --- --- 15.311
Difficult EA --- --- --- --- 15.312
CIRCULATINGPUMP
Replace cast iron circulating pump onexisting hot water heating system whichis valved off
EA --- --- --- --- 15.320
Replace cast iron circulating pump onexisting hot water heating system whichis not already valved off # Drain system # Replace pump # Fill system and eliminate air
One story EA --- --- --- --- 15.321
Two story EA --- --- --- --- 15.322
REPLACECONDENSATE PUMP
Replace existing condensate pump EA --- --- --- --- 15.330
Unclog existing condensate dischargeline
EA --- --- --- --- 15.331
REPLACECONDENSATEPUMP
Replace existing condensate linedraining to existing drain outlet
Up to 10 LF 3/4" SCH 40 PVC MIN --- --- --- --- 15.332
Additional LF 3/4" SCH 40 PVC ADD LF --- --- --- --- 15.333
Up to 10 LF 3/4" vinyl flex tubing MIN --- --- --- --- 15.334
Additional LF 3/4" vinyl flex tubing ADD LF --- --- --- --- 15.335

186 H1MD0220001CH0133
16. APPLIANCE CORD
SPECIFICATIONS UNIT
CONTRACTOR’S
DIRECT JOB COST PRICE
DATABASEITEMNO.MATLS LABOR TOTAL
REPLACEAPPLIANCECORD
Replace existing electric dryer cord withnew heavy duty jacketed #10 3-wire 250 V AC, 25 Amp cord andplug
1.00
36" EA --- --- --- --- 16.000
48" EA --- --- --- --- 16.001
Replace existing electric range cord withnew heavy duty jacketed #6 3-wire 250 V AC, 45 Amp cord andplug
36" EA --- --- --- --- 16.002
48" EA --- --- --- --- 16.003
60" EA --- --- --- --- 16.004
Replace existing garbage disposal cordwith vinyl jacketed #16 3 conductor 125 V AC, 10 Amp cordand plug
36" EA --- --- --- --- 16.005
48" EA --- --- --- --- 16.006
60" EA --- --- --- --- 16.007
72" EA --- --- --- --- 16.008
96" EA --- --- --- --- 16.009

H1MD0220001CH0133 187
16. TRANSFORMER, BALLAST AND STARTER
SPECIFICATIONS UNIT
CONTRACTOR’S
DIRECT JOB COST PRICE
DATABASEITEMNO.MATLS LABOR TOTAL
REPLACETRANS-FORMER
Replace existing door chimetransformer with primary rating of120 V AC and secondary rating of16 V DC, 15 watts
EA --- --- --- --- 16.050
1.00 Replace existing oil and gas heatingor air conditioning system transformerwith primary rating of 120 V AC andsecondary rating of 24 V DC, 20 watts
EA --- --- --- --- 16.051
REPLACEBALLAST
Replace existing rapid start ballast influorescent light fixture
EA --- --- --- --- 16.052
REPLACESTARTER
Replace existing conventional stylefluorescent starter in fluorescent lightfixture
EA --- --- --- --- 16.053

188 H1MD0220001CH0133
16. IRONING CENTER
SPECIFICATIONS UNIT
CONTRACTOR’S
DIRECT JOB COST PRICE
DATABASEITEMNO.MATLS LABOR TOTAL
IRONING
CENTERReplace existing ironing center
recessed between existing studs, 16"
OC
# Sturdy steel cabinet, 14-1/4" W,
60-1/4" H, 3-3/4" D
# 12" W x 42" L ironing board
# Traditional style raised panel oak
door
# Receptacle on timer
# 50 watt task light
# Storage for iron and supplies
1.00
Ironing center @ $240 EA --- --- --- --- 16.060
Install ironing center in new location
ADD EA --- --- --- --- 16.061
Install owner supplied ironing center inexisting location
EA --- --- --- --- 16.062
Install owner supplied ironing center innew location
ADD EA --- --- --- --- 16.063

H1MD0220001CH0133 189
16. ELECTRICAL ITEMS
SPECIFICATIONS UNIT
CONTRACTOR’S
DIRECT JOB COST PRICE
DATABASEITEMNO.MATLS LABOR TOTAL
SMOKEDETECTOR
Replace 120 V AC smoke detector withnew 120 V AC smoke detector with 9volt DC battery backup
EA --- --- --- --- 16.100
CARBONMONOXIDEDETECTOR
Replace 120 V AC carbon monoxidedetector
EA --- --- --- --- 16.101
DOOR CHIME Replace existing low voltage door chime EA --- --- --- --- 16.110
1.00 Replace existing door chime pushbutton
EA --- --- --- --- 16.111
REPLACEPHONE JACK
Replace existing modular phone jack
Baseboard surface EA --- --- --- --- 16.120
Hanging wall phone EA --- --- --- --- 16.121
Single wall jack EA --- --- --- --- 16.122
Duplex wall jack EA --- --- --- --- 16.123
WEATHERPROOFCOVER
Replace existing weatherproof cover
1-gang single receptacle EA --- --- --- --- 16.130
2-gang duplex receptacle EA --- --- --- --- 16.131
1-gang GFCI receptacle EA --- --- --- --- 16.132
2-gang GFCI receptacle EA --- --- --- --- 16.133
1-gang switch EA --- --- --- --- 16.134
2-gang switch EA --- --- --- --- 16.135
REPLACECOAXIALCABLE JACK
Replace existing single coaxial cablewall jack
EA --- --- --- --- 16.140

190 H1MD0220001CH0133
16. RECEPTACLES AND COVER PLATES
SPECIFICATIONS UNIT
CONTRACTOR’S
DIRECT JOB COST PRICE
DATABASEITEMNO.MATLS LABOR TOTAL
DUPLEXRECEPTACLE
Replace existing 125 V AC duplexreceptacle with ground
1.00
15 Amp EA --- --- --- --- 16.201
20 Amp EA --- --- --- --- 16.202
GFCI 15 Amp EA --- --- --- --- 16.203
GFCI 20 Amp EA --- --- --- --- 16.204
DRYER/RANGERECEPTACLE
Replace existing electric dryer 30 Amp250 V AC receptacle
Flush mount EA --- --- --- --- 16.210
Surface mount EA --- --- --- --- 16.211
Replace existing electric range/oven 50Amp, 250 V AC receptacle
Flush mount EA --- --- --- --- 16.215
Surface mount EA --- --- --- --- 16.216
COVERPLATES
Replace existing dryer/range cover platewith stainless steel cover plate
1-gang center hole EA --- --- --- --- 16.220
2-gang center hole EA --- --- --- --- 16.221
Replace existing cover plate with screwswith new plastic cover plate with screws
1-gang EA --- --- --- --- 16.230
2-gang EA --- --- --- --- 16.231
3-gang EA --- --- --- --- 16.232
4-gang EA --- --- --- --- 16.233
1-gang Blank EA --- --- --- --- 16.234
Replace existing cover plate with newscrewless designer cover plate
1-gang EA --- --- --- --- 16.235
2-gang EA --- --- --- --- 16.236
3-gang EA --- --- --- --- 16.237
4-gang EA --- --- --- --- 16.238
1-gang Blank EA --- --- --- --- 16.239

H1MD0220001CH0133 191
16. ELECTRICAL SWITCHES
SPECIFICATIONS UNIT
CONTRACTOR’S
DIRECT JOB COST PRICE
DATABASEITEMNO.MATLS LABOR TOTAL
MOVEOUTLET ORSWITCH
Move duplex outlet or switch from insidenew closet to outside closet wall, no wallpatching included
EA --- --- --- --- 16.240
LIGHTFIXTURE
Install ceiling outlet, switch and fixture(fixture cost $12) in new closet, no wallpatching included
EA --- --- --- --- 16.241
OUTDOORPHOTOSWITCH
Install automatic dusk to dawn lightingcontrol switch to existing fixture
1.00
Fixed mount type, 120 V,15 Amp., 1800 watt
EA --- --- --- --- 16.242
Stem mount with swivel,120 V., 15 Amp, 1800 watt
EA --- --- --- --- 16.243
OUTDOORMOTIONDETECTORSWITCH
Install motion detector lighting controlswitch to existing fixture
Stem mount with swivel,120 v., 15 Amp, 500 watt
EA --- --- --- --- 16.244

192 H1MD0220001CH0133
16. ELECTRICAL SWITCH REPLACEMENT
SPECIFICATIONS UNIT
CONTRACTOR’S
DIRECT JOB COST PRICE
DATABASEITEMNO.MATLS LABOR TOTAL
REPLACESWITCH
Replace existing 15 amp, 120 V ACsingle pole standard framed switch
1.00
Toggle switch EA --- --- --- --- 16.250
Rocker switch EA --- --- --- --- 16.251
Combination toggle switch andreceptacle
EA 9.10 13.00 22.10 40.63 16.25
Replace existing 15 amp, 120 V AC 3-way standard framed switch
Toggle switch EA --- --- --- --- 16.255
Rocker switch EA --- --- --- --- 16.256
Combination toggle switch andreceptacle
EA --- --- --- --- 16.257
Replace existing 15 amp, 120 V AC 4-way standard framed switch
Toggle switch EA --- --- --- --- 16.260
Rocker switch EA --- --- --- --- 16.261
Combination toggle switch andreceptacle
EA --- --- --- --- 16.262
REPLACESUMP PUMPSWITCH
Replace pedestal sump pump switch EA --- --- --- --- 16.270
Replace fully submersible sump pumpfloat switch
EA --- --- --- --- 16.271
Replace fully submersible sump pumpfloat switch, including disconnectingdischarge line and removal of pumpfrom sump pit
EA --- --- --- --- 16.272
REPLACEWATER PUMPPRESSURESWITCH
Replace water pump pressure switch,preset cut on @ 30 psi and cut off@ 50 psi
EA --- --- --- --- 16.275

H1MD0220001CH0133 193
16. REMOVE OUTLETS AND SWITCHES
SPECIFICATIONS UNIT
CONTRACTOR’S
DIRECT JOB COST PRICE
DATABASEITEMNO.MATLS LABOR TOTAL
REMOVEOUTLET ORSWITCH
Remove duplex outlet or switch and capbare wires with tape and wire nuts
EA --- --- --- --- 16.280
REMOVEELECTRICALBOX
Remove electrical box and single feedwire, no demolition or wall patchingincluded
1.00
EA = Each electrical box and feed wire
EA --- --- --- --- 16.281
Remove a switch or receptacle, wire nutand tape to conceal bare wire and installa blank plastic cover plate with screws
1 device per box EA --- --- --- --- 16.285
2 device per box EA --- --- --- --- 16.286
3 device per box EA --- --- --- --- 16.287
REMOVELIGHTFIXTURE
Remove light fixture, wire nut and tapeto conceal bare wire and
install a blank cover plate
EA --- --- --- --- 16.290

194 H1MD0220001CH0133
16. DIMMER SWITCHES
SPECIFICATIONS UNIT
CONTRACTOR’S
DIRECT JOB COST PRICE
DATABASEITEMNO.MATLS LABOR TOTAL
INSTALL ORREPLACEDIMMERSWITCH
Install new 120 V, AC, 600 wattincandescent single pole dimmer switch
1.00
Rotary dimmer EA --- --- --- --- 16.300
Toggle dimmer EA --- --- --- --- 16.301
Slide dimmer EA --- --- --- --- 16.302
Touch dimmer EA --- --- --- --- 16.303
Preset push button dimmer EA --- --- --- --- 16.304
Preset toggle dimmer EA --- --- --- --- 16.305
Preset rocker dimmer EA --- --- --- --- 16.306
Install new 120 V, AC, 600 wattincandescent 3-way dimmer switch
Rotary dimmer EA --- --- --- --- 16.310
Toggle dimmer EA --- --- --- --- 16.311
Slide dimmer EA --- --- --- --- 16.312
Touch dimmer EA --- --- --- --- 16.313
Preset push button dimmer EA --- --- --- --- 16.314
Preset toggle dimmer EA --- --- --- --- 16.315
Preset rocker dimmer EA --- --- --- --- 16.316
Install new low voltage, DC, 425 wattincandescent single pole dimmer switch
Preset pushbutton dimmer EA --- --- --- --- 16.320
Install new low voltage, DC, 425 wattincandescent 3-way dimmer switch
Preset pushbutton dimmer EA --- --- --- --- 16.321

H1MD0220001CH0133 195
16. TIMER SWITCHES
SPECIFICATIONS UNIT
CONTRACTOR’S
DIRECT JOB COST PRICE
DATABASEITEMNO.MATLS LABOR TOTAL
PLUG-INTIMER
Install plug-in heavy duty portable airconditioner timer, 240 V
EA --- --- --- --- 16.330
1.00 Plug-in electronic timer, 120 V # 4 on/4 off settings per day # Random setting to avoid
predictability
EA --- --- --- --- 16.335
Outdoor timer for lighting or pumpmotors, 120 V, 60 Hz, 15 Amp # Frosted hinged cover # 2 on/2 off settings per day # Heavy duty 18 inch cord
EA --- --- --- --- 16.336
Outdoor timer for lighting or pumpmotors, 125 V, 60 Hz, 15 Amp # Hinged cover # 6 on/6 off settings # 4 programming options # Heavy duty 18 inch cord
EA --- --- --- --- 16.337

196 H1MD0220001CH0133
16. REPLACE CEILING EXHAUST FAN
SPECIFICATIONS UNIT
CONTRACTOR’S
DIRECT JOB COST PRICE
DATABASEITEMNO.MATLS LABOR TOTAL
REPLACECEILINGEXHAUST FAN
Replace existing ceiling exhaust fanusing existing ductwork, no wallpatching included
1.00
50 CFM @ $30 EA --- --- --- --- 16.400
80 CFM @ $90 EA --- --- --- --- 16.401
110 CFM @ $95 EA --- --- --- --- 16.402
Replace existing ceiling fan and lightusing existing ductwork, no wallpatching included
100 CFM @ $140 EA --- --- --- --- 16.403
150 CFM @ $160 EA --- --- --- --- 16.404
Replace existing ceiling heater, fan andlight, including 50 watt heating element,using existing ductwork, no wall patchingincluded
70 CFM @ $220 EA --- --- --- --- 16.405
110 CFM @ $250 EA --- --- --- --- 16.406
Replace owner supplied ceiling exhaustfan using existing ductwork, no wallpatching included
Fan EA --- --- --- --- 16.407
Fan and light EA --- --- --- --- 16.408
Heater, fan and light EA --- --- --- --- 16.409

H1MD0220001CH0133 197
16. CEILING FANS
SPECIFICATIONS UNIT
CONTRACTOR’S
DIRECT JOB COST PRICE
DATABASEITEMNO.MATLS LABOR TOTAL
CEILING FANSUPPORT
In place of existing ceiling electrical lightfixture box, install fan safety bracetelescopic bar and attach metalelectrical box to support fan
EA --- --- --- --- 16.410
CEILING FAN Assemble and install new ceiling fanusing existing wiring, does not includefan support box
1.00
Ceiling fan @ $100 EA --- --- --- --- 16.420
Owner’s fan EA --- --- --- --- 16.421
Install light kit for ceiling fan, pull chaincontrol, no new wall switch
Light kit @ $52 EA --- --- --- --- 16.422
Owner’s light kit EA --- --- --- --- 16.423
REMOVECEILING FAN
Remove existing ceiling fan with light kitand install cover plate
EA --- --- --- --- 16.425
Remove existing ceiling fan light kit EA --- --- --- --- 16.426
INSTALLCEILINGEXHAUST FAN
Install ceiling exhaust fan in framedceiling # Exhaust fan unit # Wall switch(es) # Circuit as required # Does not include ductwork kit # No framing alterations included
80 CFM fan @ $90 EA --- --- --- --- 16.430
100 CFM fan and light @ $140 EA --- --- --- --- 16.431
110 CFM heater/fan/light @ $250 EA --- --- --- --- 16.432

198 H1MD0220001CH0133
16. WALL EXHAUST FANS
SPECIFICATIONS UNIT
CONTRACTOR’S
DIRECT JOB COST PRICE
DATABASEITEMNO.MATLS LABOR TOTAL
REPLACEWALLEXHAUST FAN
Remove and replace existing wallexhaust fan, no wall patching included
1.00
160 CFM 8" auto shutter @ $100 EA --- --- --- --- 16.440
270 CFM 10" auto shutter @ $130 EA --- --- --- --- 16.441
Replace owner supplied wall exhaustfan
EA --- --- --- --- 16.442
INSTALL WALLEXHAUST FAN
Break through existing wall and installwall exhaust fan # 270 CFM # 4 sones # 10" auto shutter # White or silver grill # Circuit as required # Fan @ $130 # No painting included
In framed wall EA --- --- --- --- 16.450
In brick veneer wall EA --- --- --- --- 16.451
In brick and block wall EA --- --- --- --- 16.452
In poured concrete wall EA --- --- --- --- 16.453
Install owner supplied wall exhaust fan,no painting included
In framed wall EA --- --- --- --- 16.454
In brick veneer wall EA --- --- --- --- 16.455
In brick and block wall EA --- --- --- --- 16.456
In poured concrete wall EA --- --- --- --- 16.457
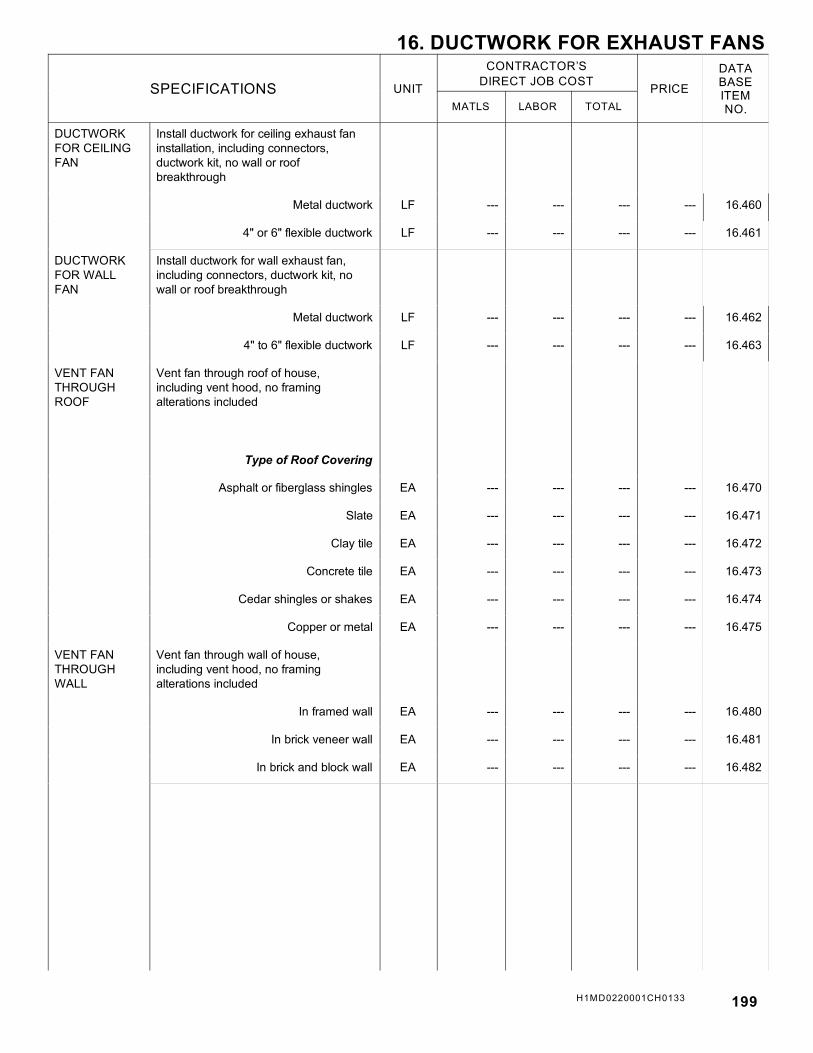
H1MD0220001CH0133 199
16. DUCTWORK FOR EXHAUST FANS
SPECIFICATIONS UNIT
CONTRACTOR’S
DIRECT JOB COST PRICE
DATABASEITEMNO.MATLS LABOR TOTAL
DUCTWORK FOR CEILINGFAN
Install ductwork for ceiling exhaust faninstallation, including connectors,ductwork kit, no wall or roofbreakthrough
1.00
Metal ductwork LF --- --- --- --- 16.460
4" or 6" flexible ductwork LF --- --- --- --- 16.461
DUCTWORKFOR WALLFAN
Install ductwork for wall exhaust fan,including connectors, ductwork kit, no wall or roof breakthrough
Metal ductwork LF --- --- --- --- 16.462
4" to 6" flexible ductwork LF --- --- --- --- 16.463
VENT FANTHROUGHROOF
Vent fan through roof of house,including vent hood, no framingalterations included
Type of Roof Covering
Asphalt or fiberglass shingles EA --- --- --- --- 16.470
Slate EA --- --- --- --- 16.471
Clay tile EA --- --- --- --- 16.472
Concrete tile EA --- --- --- --- 16.473
Cedar shingles or shakes EA --- --- --- --- 16.474
Copper or metal EA --- --- --- --- 16.475
VENT FANTHROUGHWALL
Vent fan through wall of house,including vent hood, no framingalterations included
In framed wall EA --- --- --- --- 16.480
In brick veneer wall EA --- --- --- --- 16.481
In brick and block wall EA --- --- --- --- 16.482

200 H1MD0220001CH0133
16. CLOTHES DRYER EXHAUST DUCT
SPECIFICATIONS UNIT
CONTRACTOR’S
DIRECT JOB COST PRICE
DATABASEITEMNO.MATLS LABOR TOTAL
DRYER VENTHOOD
Replace dryer vent hood in existingasphalt/fiberglass shingle roof
1.00
4" wall vent hood EA --- --- --- --- 16.500
4" eave vent hood EA --- --- --- --- 16.501
4" roof vent hood EA --- --- --- --- 16.502
Replace dryer vent hood in existingasphalt/fiberglass shingle roof
4" wall vent hood EA --- --- --- --- 16.503
4" eave vent hood EA --- --- --- --- 16.504
4" roof vent hood EA --- --- --- --- 16.505
DRYEREXHAUSTDUCT
Install dryer exhaust duct or elbow inopen walls and ceiling
4" x 8' flexible aluminum pipe EA --- --- --- --- 16.510
4" 90E elbow EA --- --- --- --- 16.511
Install adjustable periscope vent
17" to 28" EA --- --- --- --- 16.512
29" to 52" EA --- --- --- --- 16.513
29" to 77" EA --- --- --- --- 16.514
Install owner supplied duct
4" x 8' flexible aluminum pipe EA --- --- --- --- 16.515
4" 90E elbow EA --- --- --- --- 16.516
Adjustable periscope vent EA --- --- --- --- 16.517
DRYER VENTHOOD
Install dryer vent hood
In framed wall EA --- --- --- --- 16.520
In brick veneer wall EA --- --- --- --- 16.521
In brick and block wall EA --- --- --- --- 16.522
In poured concrete wall EA --- --- --- --- 16.523
Install 4" eave vent hood EA --- --- --- --- 16.525
Install 4" roof vent hood in roof
Type of Roof Covering
Asphalt or fiberglass EA --- --- --- --- 16.530
Slate EA --- --- --- --- 16.531
Clay tile EA --- --- --- --- 16.532
Cedar shingles or shakes EA --- --- --- --- 16.533
Concrete tile EA --- --- --- --- 16.534
Copper or metal EA --- --- --- --- 16.535

H1MD0220001CH0133 201
16. HOUSE VENTILATION FANS
SPECIFICATIONS UNIT
CONTRACTOR’S
DIRECT JOB COST PRICE
DATABASEITEMNO.MATLS LABOR TOTAL
ROOFVENTILATIONFAN
Replace existing roof ventilation fan withnew fan in asphalt/fiberglass shingle roof # 1500 CFM, 1/4 hp # 120 V AC, 60 hz # 13" aluminum blade (4 fins) # 24" diameter heavy gauge
aluminum housing, 11" high # Roof cutout 14-1/2" # Thermostat operation
1.00
Furnish and install EA --- --- --- --- 16.600
Install Owner’s fan EA --- --- --- --- 16.601
GABLEVENTILATIONFAN
Replace existing gable mountventilation fan with new fan # 2000 CFM, 1/5 hp # 120 V AC, 60 hz # 16" aluminum blade (4 fins) # 16-3/4" diameter zinc coated steel
housing 11" deep # Louver frame attached to fan
housing # Aluminum louvers open and close
when fan operates and shuts off # Thermostat operation
Furnish and install EA --- --- --- --- 16.610
Install Owner’s fan EA --- --- --- --- 16.611
WHOLEHOUSEVENTILATIONFAN
Replace existing whole houseventilation fan with new fan # 3000 CFM, 1/4 hp # 120 V AC, 60 hz # 20" aluminum blade (3 fins) # 24" square all-steel, self-framing
housing 12-1/2" deep # Louver attaches directly to housing # Single speed
Furnish and install EA --- --- --- --- 16.620
Install Owner’s fan EA --- --- --- --- 16.621

202 H1MD0220001CH0133
17. VAPOR BARRIER AND DUCT WRAP
SPECIFICATIONS UNIT
CONTRACTOR’S
DIRECT JOB COST PRICE
DATABASEITEMNO.MATLS LABOR TOTAL
VAPORBARRIER
Lay 4-mil vapor barrier on ground in crawlspace
1.00
Up to 120 SF of vapor barrier MIN --- --- --- --- 17.000
Additional vapor barrier over 120 SF ADD SF --- --- --- --- 17.001
WRAPHEATING ANDCOOLINGDUCT
Insulate heating and cooling duct with1-1/2" R-4.2 foil faced fiberglass duct wrap
Up to 16 LF Round 6" wrap MIN --- --- --- --- 17.100
Additional duct wrap over 16 LF ADD LF --- --- --- --- 17.101
Up to 16 LF Round 8" wrap MIN --- --- --- --- 17.102
Additional duct wrap over 16 LF ADD LF --- --- --- --- 17.103
Up to 16 LF Rectangular 8" x 8" wrap MIN --- --- --- --- 17.104
Additional duct wrap over 16 LF ADD LF --- --- --- --- 17.105
Up to 16 LF Rectangular 12" x 8" wrap MIN --- --- --- --- 17.106
Additional duct wrap over 16 LF ADD LF --- --- --- --- 17.107
Up to 16 LF Rectangular 16" x 8" wrap MIN --- --- --- --- 17.108
Additional duct wrap over 16 LF ADD LF --- --- --- --- 17.109
Up to 16 LF Rectangular 24" x 8" wrap MIN --- --- --- --- 17.110
Additional duct wrap over 16 LF ADD LF --- --- --- --- 17.111
Up to 16 LF Rectangular 12" x 12" wrap MIN --- --- --- --- 17.112
Additional duct wrap over 16 LF ADD LF --- --- --- --- 17.113
Up to 16 LF Rectangular 16" x 12" wrap MIN --- --- --- --- 17.114
Additional duct wrap over 16 LF ADD LF --- --- --- --- 17.115
Up to 16 LF Rectangular 24" x 12" wrap MIN --- --- --- --- 17.116
Additional duct wrap over 16 LF ADD LF --- --- --- --- 17.117
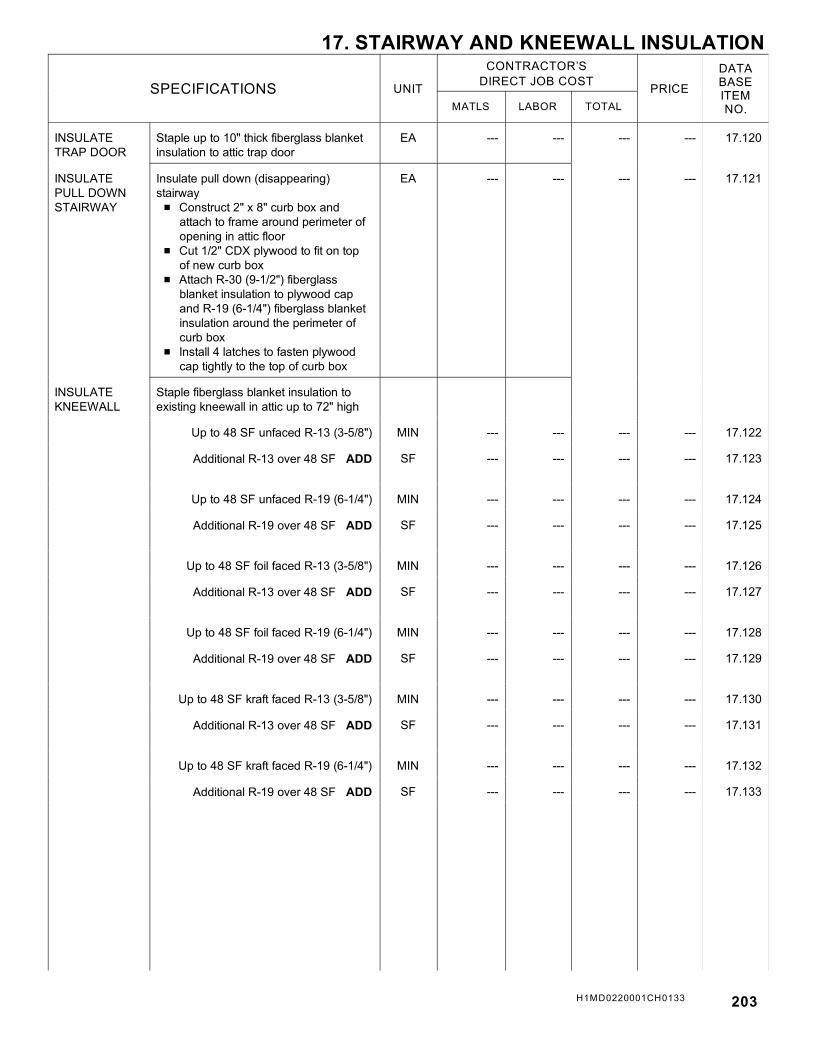
H1MD0220001CH0133 203
17. STAIRWAY AND KNEEWALL INSULATION
SPECIFICATIONS UNIT
CONTRACTOR’S
DIRECT JOB COST PRICE
DATABASEITEMNO.MATLS LABOR TOTAL
INSULATETRAP DOOR
Staple up to 10" thick fiberglass blanketinsulation to attic trap door
EA --- --- --- --- 17.120
INSULATEPULL DOWNSTAIRWAY
Insulate pull down (disappearing)stairway # Construct 2" x 8" curb box and
attach to frame around perimeter ofopening in attic floor
# Cut 1/2" CDX plywood to fit on topof new curb box
# Attach R-30 (9-1/2") fiberglassblanket insulation to plywood capand R-19 (6-1/4") fiberglass blanketinsulation around the perimeter ofcurb box
# Install 4 latches to fasten plywoodcap tightly to the top of curb box
EA --- --- --- --- 17.121
INSULATEKNEEWALL
Staple fiberglass blanket insulation toexisting kneewall in attic up to 72" high
1.00
Up to 48 SF unfaced R-13 (3-5/8") MIN --- --- --- --- 17.122
Additional R-13 over 48 SF ADD SF --- --- --- --- 17.123
Up to 48 SF unfaced R-19 (6-1/4") MIN --- --- --- --- 17.124
Additional R-19 over 48 SF ADD SF --- --- --- --- 17.125
Up to 48 SF foil faced R-13 (3-5/8") MIN --- --- --- --- 17.126
Additional R-13 over 48 SF ADD SF --- --- --- --- 17.127
Up to 48 SF foil faced R-19 (6-1/4") MIN --- --- --- --- 17.128
Additional R-19 over 48 SF ADD SF --- --- --- --- 17.129
Up to 48 SF kraft faced R-13 (3-5/8") MIN --- --- --- --- 17.130
Additional R-13 over 48 SF ADD SF --- --- --- --- 17.131
Up to 48 SF kraft faced R-19 (6-1/4") MIN --- --- --- --- 17.132
Additional R-19 over 48 SF ADD SF --- --- --- --- 17.133

204 H1MD0220001CH0133
17. CRAWL SPACE INSULATION
SPECIFICATIONS UNIT
CONTRACTOR’S
DIRECT JOB COST PRICE
DATABASEITEMNO.MATLS LABOR TOTAL
CRAWLSPACEINSULATION
Install fiberglass blanket insulationbetween joists of floor above 18" to 48"headroom crawl space with foil or kraftfaced vapor barrier facing living areaabove
1.00
Up to 120 SF Foilback R-13 (3-5/8") MIN --- --- --- --- 17.140
Additional R-13 over 120 SF ADD SF --- --- --- --- 17.141
Up to 120 SF Foilback R-19 (6-1/4") MIN --- --- --- --- 17.142
Additional R-19 over 120 SF ADD SF --- --- --- --- 17.143
Up to 120 SF foilback R-30 (9-1/2") MIN --- --- --- --- 17.144
Additional R-30 over 120 SF ADD SF --- --- --- --- 17.145
Up to 120 SF kraftback R-13 (3-5/8") MIN --- --- --- --- 17.146
Additional R-13 over 120 SF ADD SF --- --- --- --- 17.147
Up to 120 SF kraftback R-19 (6-1/4") MIN --- --- --- --- 17.148
Additional R-19 over 120 SF ADD SF --- --- --- --- 17.149
Up to 120 SF kraftback R-30 (9-1/2") MIN --- --- --- --- 17.150
Additional R-30 over 120 SF ADD SF --- --- --- --- 17.151

H1MD0220001CH0133 205
17. BASEMENT INSULATION
SPECIFICATIONS UNIT
CONTRACTOR’S
DIRECT JOB COST PRICE
DATABASEITEMNO.MATLS LABOR TOTAL
INSULATEBASEMENTWALL
Insulate basement wall with flame-resistant facing when insulation will beleft exposed
1.00
Up to 15 LF R-11 (3-1/8") 48" wide MIN --- --- --- --- 17.160
Additional R-11 over 15 LF ADD LF --- --- --- --- 17.161
Up to 15 LF R-11 (3-1/8") 60" wide MIN --- --- --- --- 17.162
Additional R-11 over 15 LF ADD LF --- --- --- --- 17.163
FULL HEIGHTBASEMENTCEILINGINSULATION
Install fiberglass blanket insulationbetween joists of floor above full height(8'-0”) basement ceiling with foil or kraftfaced vapor barrier facing living areaabove
Up to 120 SF Foilback R-13 (3-5/8") MIN --- --- --- --- 17.164
Additional R-13 over 120 SF ADD SF --- --- --- --- 17.165
Up to 120 SF Foilback R-19 (6-1/4") MIN --- --- --- --- 17.166
Additional R-19 over 120 SF ADD SF --- --- --- --- 17.167
Up to 120 SF Foilback R-30 (9-1/2") MIN --- --- --- --- 17.168
Additional R-30 over 120 SF ADD SF --- --- --- --- 17.169
Up to 120 SF Kraftback R-13 (3-5/8") MIN --- --- --- --- 17.170
Additional R-13 over 120 SF ADD SF --- --- --- --- 17.171
Up to 120 SF kraftback R-19 (6-1/4") MIN --- --- --- --- 17.172
Additional R-19 over 120 SF ADD SF --- --- --- --- 17.173
Up to 120 SF kraftback R-30 (9-1/2") MIN --- --- --- --- 17.174
Additional R-30 over 120 SF ADD SF --- --- --- --- 17.175

206 H1MD0220001CH0133
17. ATTIC INSULATION
SPECIFICATIONS UNIT
CONTRACTOR’S
DIRECT JOB COST PRICE
DATABASEITEMNO.
MATLS LABOR TOTAL
ATTICINSULATION
Install fiberglass blanket insulation betweenjoists of unfinished attic with foil or kraftfaced vapor barrier facing living area below
1.00
Up to 200 SF foil faced R-13 (3-5/8") MIN --- --- --- --- 17.180
Additional R-13 over 200 SF ADD SF --- --- --- --- 17.181
Up to 200 SF foil faced R-19 (6-1/4") MIN --- --- --- --- 17.182
Additional R-19 over 200 SF ADD SF --- --- --- --- 17.183
Up to 200 SF foil faced R-30 (9-1/2") MIN --- --- --- --- 17.184
Additional R-30 over 200 SF ADD SF --- --- --- --- 17.185
Up to 200 SF Kraft faced R-13 (3-5/8") MIN --- --- --- --- 17.186
Additional R-13 over 200 SF ADD SF --- --- --- --- 17.187
Up to 200 SF Kraft faced R-19 (6-1/4") MIN --- --- --- --- 17.188
Additional R-19 over 200 SF ADD SF --- --- --- --- 17.189
Up to 200 SF Kraft faced R-30 (9-1/4") MIN --- --- --- --- 17.190
Additional R-30 over 200 SF ADD SF --- --- --- --- 17.191
BAFFLE Install baffle around recessed light, openceiling
Up to one light baffle MIN --- --- --- --- 17.192
Additional light baffles over one ADD EA --- --- --- --- 17.193
Install baffle around chimney EA --- --- --- --- 17.194
Install baffle around fan EA --- --- --- --- 17.195
Install 48" long ventilation baffles in rafterspaces
Up to 12 baffles 14" wide MIN --- --- --- --- 17.196
Additional baffles 14" wide ADD EA --- --- --- --- 17.197
Up to 12 baffles 22" wide MIN --- --- --- --- 17.198
Additional baffles 22" wide ADD EA --- --- --- --- 17.199

H1MD0220001CH0133 207
17. BLOWN-IN INSULATION
SPECIFICATIONS UNIT
CONTRACTOR’S
DIRECT JOB COST PRICE
DATABASEITEMNO.MATLS LABOR TOTAL
BLOWN-INFIBERGLASS
Fiberglass insulation blown in betweenopen joists, including blower rental @ $50 per day (materials)
Unrestricted Area
1.00
Up to 200 SF R-19 (7") MIN --- --- --- --- 17.200
Additional R-19 over 200 SF ADD SF --- --- --- --- 17.201
Up to 200 SF R-30 (11-1/4") MIN --- --- --- --- 17.202
Additional R-30 over 200 SF ADD SF --- --- --- --- 17.203
Up to 200 SF R-49 (18-1/4") MIN --- --- --- --- 17.204
Additional R-49 over 200 SF ADD
Difficult Access Area
SF --- --- --- --- 17.205
Up to 200 SF R-19 (7") MIN --- --- --- --- 17.210
Additional R-19 over 200 SF ADD SF --- --- --- --- 17.211
Up to 200 SF R-30 (11-1/4") MIN --- --- --- --- 17.212
Additional R-30 over 200 SF ADD SF --- --- --- --- 17.213
Up to 200 SF R-49 (18-1/4") MIN --- --- --- --- 17.214
Additional R-49 over 200 SF ADD SF --- --- --- --- 17.215
BLOWN-INCELLULOSE
Fire retardant cellulose blown inbetween open joists, including blowerrental @ $50 per day (materials)
Unrestricted Area
Up to 200 SF R-22 (5-3/4") MIN --- --- --- --- 17.250
Additional R-22 over 200 SF ADD SF --- --- --- --- 17.251
Up to 200 SF R-32 (8-1/2") MIN --- --- --- --- 17.252
Additional R-32 over 200 SF ADD SF --- --- --- --- 17.253
Up to 200 SF R-42 (11-1/2") MIN --- --- --- --- 17.254
Additional R-42 over 200 SF ADD
Difficult Access Area
SF --- --- --- --- 17.255
Up to 200 SF R-22 (5-3/4") MIN --- --- --- --- 17.260
Additional R-22 over 200 SF ADD SF --- --- --- --- 17.261
Up to 200 SF R-32 (8-1/2") MIN --- --- --- --- 17.262
Additional R-32 over 200 SF ADD SF --- --- --- --- 17.263
Up to 200 SF R-42 (11-1/2") MIN --- --- --- --- 17.264
Additional R-42 over 200 SF ADD SF --- --- --- --- 17.265

208 H1MD0220001CH0133
18. GYPSUM DRYWALL
SPECIFICATIONS UNIT
CONTRACTOR’S
DIRECT JOB COST PRICE
DATABASEITEMNO.MATLS LABOR TOTAL
GYPSUMDRYWALL ONNEW WALL —COMPLETEJOB
Gypsum drywall (sheetrock) nailed orscrewed into studs or furring, taped,finished and sanded, 3 coats
1.00
3/8", up to 100 SF MIN --- --- --- --- 18.000
Additional area over 100 SF ADD SF --- --- --- --- 18.001
1/2", up to 100 SF MIN --- --- --- --- 18.002
Additional area over 100 SF ADD SF --- --- --- --- 18.003
1/2" firecode, up to 100 SF MIN --- --- --- --- 18.004
Additional area over 100 SF ADD SF --- --- --- --- 18.005
5/8" firecode, up to 100 SF MIN --- --- --- --- 18.006
Additional area over 100 SF ADD SF --- --- --- --- 18.007
1/2" moisture resistant, up to 100 SF MIN --- --- --- --- 18.008
Additional area over 100 SF ADD SF --- --- --- --- 18.009
DRYWALLOVEREXISTINGWALL —COMPLETEJOB
Gypsum drywall (sheetrock) nailed orscrewed through existing wall finish andinto studs or furring, taped, finished andsanded 3 coats
3/8", up to 100 SF MIN --- --- --- --- 18.020
Additional area over 100 SF ADD SF --- --- --- --- 18.021
1/2", up to 100 SF MIN --- --- --- --- 18.022
Additional area over 100 SF ADD SF --- --- --- --- 18.023
1/2" firecode, up to 100 SF MIN --- --- --- --- 18.024
Additional area over 100 SF ADD SF --- --- --- --- 18.025
5/8" firecode, up to 100 SF MIN --- --- --- --- 18.026
Additional area over 100 SF ADD SF --- --- --- --- 18.027
1/2" moisture resistant, up to 100 SF MIN --- --- --- --- 18.028
Additional area over 100 SF ADD SF --- --- --- --- 18.029

H1MD0220001CH0133 209
18. PATCHING WALLS
SPECIFICATIONS UNIT
CONTRACTOR’S
DIRECT JOB COST PRICE
DATABASEITEMNO.MATLS LABOR TOTAL
PATCH HOLES Patch holes in gypsum drywall orplastered walls
1.00
Patch up to 3 holes, 1" diameter MIN --- --- --- --- 18.050
Additional 1" diameter holes over 3 ADD EA --- --- --- --- 18.051
Patch 1 hole, 2" to 12" diameter MIN --- --- --- --- 18.052
Additional 2"-12" diameter holes ADD EA --- --- --- --- 18.053
Patch holes in gypsum drywall orplastered walls more than 12" diameter
Patch 1 hole, 14" to 36" diameter MIN --- --- --- --- 18.060
Additional 14"-36" diameter holes ADD EA --- --- --- --- 18.061
PATCHCRACKS
Patch cracks in existing plastered wall
Patch up to 5 LF of cracks MIN --- --- --- --- 18.062
Additional cracks over 5 LF ADD LF --- --- --- --- 18.063
Patch cracks in existing gypsum drywall
Patch up to 5 LF of cracks MIN --- --- --- --- 18.064
Additional cracks over 5 LF ADD LF --- --- --- --- 18.065
CORRECTNAIL POPS
Correct nail pops in existing gypsumdrywall, no paint touch-up included
EA = Up to one dozen nail pops
EA --- --- --- --- 18.066
REPAIR TAPEJOINTS
Remove existing tape from drywall joint,apply new joint tape, block coat, skimcoat and sand, no paint touch-upincluded
Up to 8 LF of tape removed and applied MIN --- --- --- --- 18.067
Additional tape over 8 LF ADD LF --- --- --- --- 18.068

210 H1MD0220001CH0133
18. CERAMIC AND MARBLE TILE REPAIR
SPECIFICATIONS UNIT
CONTRACTOR’S
DIRECT JOB COST PRICE
DATABASEITEMNO.MATLS LABOR TOTAL
REGROUTTILE
Regrout existing ceramic or marble tile # Dig or cut out old grout from joints # Apply new grout into joints # Wipe down and clean surfaces
thoroughly
Regrout up to 5 LF of grout joint MIN --- --- --- --- 18.100
Regrout additional LF ADD LF --- --- --- --- 18.101
SEAL GROUT Seal cured grout joints with silicone sealer
Seal up to 40 SF of tile MIN --- --- --- --- 18.110
Seal additional SF of 1" x 1" tile ADD SF --- --- --- --- 18.111
Seal additional SF of 2" x 2" tile ADD SF --- --- --- --- 18.112
Seal additional SF of 4" x 4" tile ADD SF --- --- --- --- 18.113
Seal additional SF of 8" x 8" tile ADD SF --- --- --- --- 18.114
Seal additional SF of 12" x 12" tile ADD SF --- --- --- --- 18.115
REPLACE TILE Replace tile, including removing defectiveor broken tiles and grouting
Tile @ $2.00 SF
Replace up to 1 tile MIN --- --- --- --- 18.120
Replace additional 1" x 1" tile ADD EA --- --- --- --- 18.121
Replace additional 2" x 2" tile ADD EA --- --- --- --- 18.122
Replace additional 4" x 4" tile ADD EA --- --- --- --- 18.123
Replace additional 8" x 8" tile ADD EA --- --- --- --- 18.124
Replace additional 12" x 12" tile ADD
Tile @ $8.00 SF
EA --- --- --- --- 18.125
Replace up to 1 tile MIN --- --- --- --- 18.130
Replace additional 1" x 1" tile ADD EA --- --- --- --- 18.131
Replace additional 2" x 2" tile ADD EA --- --- --- --- 18.132
Replace additional 4" x 4" tile ADD EA --- --- --- --- 18.133
Replace additional 8" x 8" tile ADD EA --- --- --- --- 18.134
Replace additional 12" x 12" tile ADD EA --- --- --- --- 18.135

H1MD0220001CH0133 211
18. CERAMIC TILE FIXTURES
SPECIFICATIONS UNIT
CONTRACTOR’S
DIRECT JOB COST PRICE
DATABASEITEMNO.MATLS LABOR TOTAL
REPLACECERAMICFIXTURE
Replace ceramic tile fixture in originallocation # Clean off existing location for fixture # Adhere fixture to its location and
tape off to secure it # After adhesive has cured, grout in
around fixture
1.00
Towel bar support EA --- --- --- --- 18.150
Soap dish EA --- --- --- --- 18.151
Soap and grab EA --- --- --- --- 18.152
Corner soap dish EA --- --- --- --- 18.153
Toothbrush and glass holder EA --- --- --- --- 18.154
Paper holder EA --- --- --- --- 18.155
RESETCERAMICFIXTURE
Reset existing ceramic tile fixture insame location # Clean off both the original fixture and
its location # Adhere fixture to its location and
tape off to secure it # After adhesive has cured, grout in
around fixture
EA --- --- --- --- 18.156

212 H1MD0220001CH0133
18. CAULKING
SPECIFICATIONS UNIT
CONTRACTOR’S
DIRECT JOB COST PRICE
DATABASEITEMNO.MATLS LABOR TOTAL
REPLACEEXISTINGCAULKING
Replace existing caulking in Bathroom,Kitchen or Laundry Room with mildew resistant silicone caulk
# Remove existing caulking bead # Clean surface thoroughly # Apply new bead of silicone caulking
Up to 5 LF of caulk MIN --- --- --- --- 18.200
Additional LF over 5 LF of caulk ADD LF --- --- --- --- 18.201
NEWCAULKING
Apply new mildew resistant siliconecaulking in Bathroom, Kitchen orLaundry Room (no cleaning out)
Up to 5 LF of caulk MIN --- --- --- --- 18.210
Additional LF over 5 LF of caulk ADD LF --- --- --- --- 18.211

H1MD0220001CH0133 213
18. WAINSCOTING AND WALL PANELING
SPECIFICATIONS UNIT
CONTRACTOR’S
DIRECT JOB COST PRICE
DATABASEITEMNO.MATLS LABOR TOTAL
SOLID WOODWAINSCOTING
Unfinished, V-joint 3/4" thick andrandom widths to 10" wide boards, solidwood wainscoting , 36" high, includingtwo piece cap and 4-1/2" base of samematerial to which the wainscoting isbutted
1.00
Clear yellow pine, up to 12 LF MIN --- --- --- --- 18.300
Additional LF over 12 LF ADD LF --- --- --- --- 18.301
Knotty white pine, up to 12 LF MIN --- --- --- --- 18.302
Additional LF over 12 LF ADD LF --- --- --- --- 18.303
Natural red oak, up to 12 LF MIN --- --- --- --- 18.304
Additional LF over 12 LF ADD LF --- --- --- --- 18.305
Clear walnut, up to 12 LF MIN --- --- --- --- 18.306
Additional LF over 12 LF ADD LF --- --- --- --- 18.307
Clear cherry, up to 12 LF MIN --- --- --- --- 18.308
Additional LF over 12 LF ADD LF --- --- --- --- 18.309
SOLID WOODWALLPANELING
Unfinished V-joint 3/4" thick andrandom widths to 10" wide boards solidwood wall paneling, 8'-0" high, including4-1/2" base of same material to whichthe paneling is butted
Clear yellow pine, up to 96 SF MIN --- --- --- --- 18.310
Additional SF over 96 SF ADD SF --- --- --- --- 18.311
Knotty white pine, up to 96 SF MIN --- --- --- --- 18.312
Additional SF over 96 SF ADD SF --- --- --- --- 18.313
Natural red oak, up to 96 SF MIN --- --- --- --- 18.314
Additional SF over 96 SF ADD SF --- --- --- --- 18.315
Clear walnut, up to 96 SF MIN --- --- --- --- 18.316
Additional SF over 96 SF ADD SF --- --- --- --- 18.317
Clear walnut, up to 96 SF MIN --- --- --- --- 18.318
Additional SF over 96 SF ADD SF --- --- --- --- 18.319

214 H1MD0220001CH0133
19. GYPSUM DRYWALL CEILING
SPECIFICATIONS UNIT
CONTRACTOR’S
DIRECT JOB COST PRICE
DATABASEITEMNO.MATLS LABOR TOTAL
GYPSUMDRYWALL ONNEW CEILING
Up to 300 SF ceiling, nailed or screwedto joists or furring, taped, finished andsanded, 3 coats
1.00
3/8", up to 100 SF MIN --- --- --- --- 19.000
Additional area over 100 SF ADD SF --- --- --- --- 19.001
1/2", up to 100 SF MIN --- --- --- --- 19.002
Additional area over 100 SF ADD SF --- --- --- --- 19.003
1/2" firecode, up to 100 SF MIN --- --- --- --- 19.004
Additional area over 100 SF ADD SF --- --- --- --- 19.005
5/8" firecode, up to 100 SF MIN --- --- --- --- 19.006
Additional area over 100 SF ADD SF --- --- --- --- 19.007
1/2" moisture resistant, up to 100 SF MIN --- --- --- --- 19.008
Additional area over 100 SF ADD SF --- --- --- --- 19.009
GYPSUMDRYWALLOVEREXISTINGCEILING
Up to 300 SF of ceiling, with nails ofrequired length through existing ceilingfinish and into joists or furring above,taped, finished and sanded, 3 coats
3/8", up to 100 SF MIN --- --- --- --- 19.010
Additional area over 100 SF ADD SF --- --- --- --- 19.011
1/2", up to 100 SF MIN --- --- --- --- 19.012
Additional area over 100 SF ADD SF --- --- --- --- 19.013
5/8" firecode, up to 100 SF MIN --- --- --- --- 19.014
Additional area over 100 SF ADD SF --- --- --- --- 19.015

H1MD0220001CH0133 215
19. PATCHING CEILING
SPECIFICATIONS UNIT
CONTRACTOR’S
DIRECT JOB COST PRICE
DATABASEITEMNO.MATLS LABOR TOTAL
PATCH HOLES Patch holes in gypsum drywall orplastered ceiling
1.00
Up to 3 holes, 1" diameter MIN --- --- --- --- 19.050
Additional 1" diameter holes ADD EA --- --- --- --- 19.051
One hole, 2"-12" diameter MIN --- --- --- --- 19.052
Additional 2"-12" diameter holes ADD EA --- --- --- --- 19.053
Patch holes in gypsum drywall orplastered ceiling more than 12"diameter
One hole 14"-36" diameter MIN --- --- --- --- 19.054
Additional 14"-36" diameter holes ADD EA --- --- --- --- 19.055
PATCHCRACKS
Patch cracks in existing plastered ceiling
Up to 5 LF crack MIN --- --- --- --- 19.060
Additional LF cracks over 5 LF ADD LF --- --- --- --- 19.061
Patch cracks in existing gypsum drywall
Up to 5 LF crack MIN --- --- --- --- 19.062
Additional LF cracks over 5 LF ADD LF --- --- --- --- 19.063
CORRECTNAIL POPS
Correct nail pops in existing gypsumdrywall, no paint touch-up included
Up to one dozen nail pops MIN --- --- --- --- 19.070
Each additional dozen nail pops ADD EA --- --- --- --- 19.071
REPAIR TAPEJOINTS
Remove existing tape from drywall joint,apply new joint tape, block coat, skimcoat and sand, no paint touch-upincluded
Up to 8 LF of tape MIN --- --- --- --- 19.080
Additional LF of tape over 8 LF ADD LF --- --- --- --- 19.081

216 H1MD0220001CH0133
19. COMPOSITION CEILING TILE
SPECIFICATIONS UNIT
CONTRACTOR’S
DIRECT JOB COST PRICE
DATABASEITEMNO.MATLS LABOR TOTAL
CEILING TILESTAPLED ORGLUED
12" x 12" or 12" x 24" ceiling tile overexisting ceiling or furring strips withstaples or adhesive
Retail cost per tile
1.22
Stapled .25 SF --- --- --- --- 19.100
0.50 SF --- --- --- --- 19.101
0.75 SF --- --- --- --- 19.102
1.00 SF --- --- --- --- 19.103
1.25 SF --- --- --- --- 19.104
Glued .25 SF --- --- --- --- 19.105
0.50 SF --- --- --- --- 19.106
0.75 SF --- --- --- --- 19.107
1.00 SF --- --- --- --- 19.108
1.25 SF --- --- --- --- 19.109
FURRING Install 1" x 3" furring strips 12" OC,ready for installation of ceiling tile
LF --- --- --- --- 19.110
Install 1"x 3" furring strips 12" OC, nailedthrough existing plastered or gypsumboard ceiling
LF --- --- --- --- 19.111
REPLACECEILING TILES
Replace damaged ceiling tiles withowner supplied 12" x 12" ceiling tiles,including removing damaged tiles
Replace up to 5 tiles MIN --- --- --- --- 19.120
Replace additional tiles ADD EA --- --- --- --- 19.121

H1MD0220001CH0133 217
19. STEEL GRID SUSPENDED CEILING
SPECIFICATIONS UNIT
CONTRACTOR’S
DIRECT JOB COST PRICE
DATABASEITEMNO.MATLS LABOR TOTAL
GRID SYSTEM Suspend ceiling with steel grid system,including entire grid system, runners,cross tees, wall moulding, hooks andwires, and ceiling panels
24" x 24" PanelSF Retail Cost
1.00
0.35 SF --- --- --- --- 19.150
0.40 SF --- --- --- --- 19.151
0.45 SF --- --- --- --- 19.152
0.50 SF --- --- --- --- 19.153
0.55 SF --- --- --- --- 19.154
0.60 SF --- --- --- --- 19.155
0.65 SF --- --- --- --- 19.156
0.70 SF --- --- --- --- 19.157
0.75 SF --- --- --- --- 19.158
0.80
24" x 48" PanelSF Retail Cost
SF --- --- --- --- 19.159
0.35 SF --- --- --- --- 19.160
0.40 SF --- --- --- --- 19.161
0.45 SF --- --- --- --- 19.162
0.50 SF --- --- --- --- 19.163
0.55 SF --- --- --- --- 19.164
0.60 SF --- --- --- --- 19.165
REPLACEGRID CEILINGTILES
Replace damaged owner supplied24" x 24" or 24" x 48" grid systemceiling tiles, including removingdamaged tiles
Replace up to 5 tiles MIN --- --- --- --- 19.170
Replace additional tiles ADD EA --- --- --- --- 19.171
GRID SYSTEMCOMPONENTS
Replace grid system components,including removing and reinstallingexisting tiles
12' Main runner LF --- --- --- --- 19.172
4' tee EA --- --- --- --- 19.173
2' tee EA --- --- --- --- 19.174
12' Wall angle moulding LF --- --- --- --- 19.175
36" hook wire (each hanging wire) EA --- --- --- --- 19.176

218 H1MD0220001CH0133
20. REPLACEMENT DOOR SLAB WITH NEW HARDWARE
SPECIFICATIONS UNIT
CONTRACTOR’S
DIRECT JOB COST PRICE
DATABASEITEMNO.MATLS LABOR TOTAL
REPLACEDOOR SLABWITH NEWHARDWARE
Remove existing door slab and replacewith new door slab on existing jambsusing new hardware # 2 hinges @ $6.00 each # Privacy lockset @ $15 # Modify hinge mortises on existing
jamb
1.00
Birch Flush Hollow Core1-6 x 6-8 EA --- --- --- --- 20.000
2-0 x 6-8 EA --- --- --- --- 20.001
2-4 x 6-8 EA --- --- --- --- 20.002
2-6 x 6-8 EA --- --- --- --- 20.003
2-8 x 6-8 EA --- --- --- --- 20.004
3-0 x 6-8 EA --- --- --- --- 20.005
Pine 6 Panel1-6 x 6-8 EA --- --- --- --- 20.006
2-0 x 6-8 EA --- --- --- --- 20.007
2-4 x 6-8 EA --- --- --- --- 20.008
2-6 x 6-8 EA --- --- --- --- 20.009
2-8 x 6-8 EA --- --- --- --- 20.010
3-0 x 6-8 EA --- --- --- --- 20.011
Hardboard Flush HC1-6 x 6-8 EA --- --- --- --- 20.012
2-0 x 6-8 EA --- --- --- --- 20.013
2-4 x 6-8 EA --- --- --- --- 20.014
2-6 x 6-8 EA --- --- --- --- 20.015
2-8 x 6-8 EA --- --- --- --- 20.016
3-0 x 6-8 EA --- --- --- --- 20.017
Hardboard Faced, 6 Raised Panels1-6 x 6-8 EA --- --- --- --- 20.018
2-0 x 6-8 EA --- --- --- --- 20.019
2-4 x 6-8 EA --- --- --- --- 20.020
2-6 x 6-8 EA --- --- --- --- 20.021
2-8 x 6-8 EA --- --- --- --- 20.022
3-0 x 6-8 EA --- --- --- --- 20.023
French Door10 lites 1-6 x 6-8 EA --- --- --- --- 20.024
2-0 x 6-8 EA --- --- --- --- 20.025
15 lites 2-4 x 6-8 EA --- --- --- --- 20.026
2-6 x 6-8 EA --- --- --- --- 20.027
2-8 x 6-8 EA --- --- --- --- 20.028
3-0 x 6-8 EA --- --- --- --- 20.029

H1MD0220001CH0133 219
20. REPLACEMENT DOOR SLAB WITH OWNER’S HARDWARE
SPECIFICATIONS UNIT
CONTRACTOR’S
DIRECT JOB COST PRICE
DATABASEITEMNO.MATLS LABOR TOTAL
REPLACEDOOR SLABWITHOWNER’SHARDWARE
Remove existing door slab and replacewith new door slab on existing jambsusing Owner’s hardware # 2 hinges # Privacy lockset
1.00
Birch Flush Hollow Core1-6 x 6-8 EA --- --- --- --- 20.050
2-0 x 6-8 EA --- --- --- --- 20.051
2-4 x 6-8 EA --- --- --- --- 20.052
2-6 x 6-8 EA --- --- --- --- 20.053
2-8 x 6-8 EA --- --- --- --- 20.054
3-0 x 6-8 EA --- --- --- --- 20.055
Pine 6 Panel1-6 x 6-8 EA --- --- --- --- 20.056
2-0 x 6-8 EA --- --- --- --- 20.057
2-4 x 6-8 EA --- --- --- --- 20.058
2-6 x 6-8 EA --- --- --- --- 20.059
2-8 x 6-8 EA --- --- --- --- 20.060
3-0 x 6-8 EA --- --- --- --- 20.061
Hardboard Flush HC1-6 x 6-8 EA --- --- --- --- 20.062
2-0 x 6-8 EA --- --- --- --- 20.063
2-4 x 6-8 EA --- --- --- --- 20.064
2-6 x 6-8 EA --- --- --- --- 20.065
2-8 x 6-8 EA --- --- --- --- 20.066
3-0 x 6-8 EA --- --- --- --- 20.067
Hardboard Faced, 6 Raised Panels1-6 x 6-8 EA --- --- --- --- 20.068
2-0 x 6-8 EA --- --- --- --- 20.069
2-4 x 6-8 EA --- --- --- --- 20.070
2-6 x 6-8 EA --- --- --- --- 20.071
2-8 x 6-8 EA --- --- --- --- 20.072
3-0 x 6-8 EA --- --- --- --- 20.073
French Door10 lites 1-6 x 6-8 EA --- --- --- --- 20.074
2-0 x 6-8 EA --- --- --- --- 20.075
15 lites 2-4 x 6-8 EA --- --- --- --- 20.076
2-6 x 6-8 EA --- --- --- --- 20.077
2-8 x 6-8 EA --- --- --- --- 20.078
3-0 x 6-8 EA --- --- --- --- 20.079

220 H1MD0220001CH0133
20. FIELD-HUNG INTERIOR DOOR UNITS
SPECIFICATIONS UNIT
CONTRACTOR’S
DIRECT JOB COST PRICE
DATABASEITEMNO.MATLS LABOR TOTAL
FIELD-HUNGDOOR
# Interior 1-3/8" door # Stain grade jamb # 2 sides casing # Privacy lock @ $15
1.00
Birch Flush Hollow Core
1-6 x 6-8 EA --- --- --- --- 20.101
2-0 x 6-8 EA --- --- --- --- 20.102
2-4 x 6-8 EA --- --- --- --- 20.103
2-6 x 6-8 EA --- --- --- --- 20.104
2-8 x 6-8 EA --- --- --- --- 20.105
3-0 x 6-8 EA --- --- --- --- 20.106
Pine 6 Panel1-6 x 6-8 EA --- --- --- --- 20.107
2-0 x 6-8 EA --- --- --- --- 20.108
2-4 x 6-8 EA --- --- --- --- 20.109
2-6 x 6-8 EA --- --- --- --- 20.110
2-8 x 6-8 EA --- --- --- --- 20.111
3-0 x 6-8 EA --- --- --- --- 20.112
Hardboard Flush HC1-6 x 6-8 EA --- --- --- --- 20.113
2-0 x 6-8 EA --- --- --- --- 20.114
2-4 x 6-8 EA --- --- --- --- 20.115
2-6 x 6-8 EA --- --- --- --- 20.116
2-8 x 6-8 EA --- --- --- --- 20.117
3-0 x 6-8 EA --- --- --- --- 20.118
Hardboard Faced, 6 Raised Panels1-6 x 6-8 EA --- --- --- --- 20.119
2-0 x 6-8 EA --- --- --- --- 20.120
2-4 x 6-8 EA --- --- --- --- 20.121
2-6 x 6-8 EA --- --- --- --- 20.122
2-8 x 6-8 EA --- --- --- --- 20.123
3-0 x 6-8 EA --- --- --- --- 20.124
Double French Doors10 lites 1-6 x 6-8 SET --- --- --- --- 20.125
2-0 x 6-8 SET --- --- --- --- 20.126
15 lites 2-4 x 6-8 SET --- --- --- --- 20.127
2-6 x 6-8 SET --- --- --- --- 20.128
2-8 x 6-8 SET --- --- --- --- 20.129
3-0 x 6-8 SET --- --- --- --- 20.130

H1MD0220001CH0133 221
20. PRE-HUNG INTERIOR DOOR UNITS
SPECIFICATIONS UNIT
CONTRACTOR’S
DIRECT JOB COST PRICE
DATABASEITEMNO.MATLS LABOR TOTAL
PRE-HUNGDOOR
# Interior 1-3/8" door # Stain grade jamb # 2 sides casing # Privacy lock @ $15
1.00
Birch Flush Hollow Core1-6 x 6-8 EA --- --- --- --- 20.140
2-0 x 6-8 EA --- --- --- --- 20.141
2-4 x 6-8 EA --- --- --- --- 20.142
2-6 x 6-8 EA --- --- --- --- 20.143
2-8 x 6-8 EA --- --- --- --- 20.144
3-0 x 6-8 EA --- --- --- --- 20.145
Pine 6 Panel1-6 x 6-8 EA --- --- --- --- 20.146
2-0 x 6-8 EA --- --- --- --- 20.147
2-4 x 6-8 EA --- --- --- --- 20.148
2-6 x 6-8 EA --- --- --- --- 20.149
2-8 x 6-8 EA --- --- --- --- 20.150
3-0 x 6-8 EA --- --- --- --- 20.151
Hardboard Flush HC1-6 x 6-8 EA --- --- --- --- 20.152
2-0 x 6-8 EA --- --- --- --- 20.153
2-4 x 6-8 EA --- --- --- --- 20.154
2-6 x 6-8 EA --- --- --- --- 20.155
2-8 x 6-8 EA --- --- --- --- 20.156
3-0 x 6-8 EA --- --- --- --- 20.157
Hardboard Faced, 6 Raised Panels1-6 x 6-8 EA --- --- --- --- 20.158
2-0 x 6-8 EA --- --- --- --- 20.159
2-4 x 6-8 EA --- --- --- --- 20.160
2-6 x 6-8 EA --- --- --- --- 20.161
2-8 x 6-8 EA --- --- --- --- 20.162
3-0 x 6-8 EA --- --- --- --- 20.163
Double French Doors 10 lites 1-6 x 6-8 SET --- --- --- --- 20.164
2-0 x 6-8 SET --- --- --- --- 20.165
15 lites 2-4 x 6-8 SET --- --- --- --- 20.166
2-6 x 6-8 SET --- --- --- --- 20.167
2-8 x 6-8 SET --- --- --- --- 20.168
3-0 x 6-8 SET --- --- --- --- 20.169

222 H1MD0220001CH0133
20. INTERIOR DOOR ALTERATIONS
SPECIFICATIONS UNIT
CONTRACTOR’S
DIRECT JOB COSTPRICE
DATABASEITEMNO.MATLS LABOR TOTAL
CUT OFFBOTTOM OFDOOR
Cut off bottom of solid wood door to clearcarpeting or new flooring
EA --- --- --- --- 20.170
1.00 Cut off bottom of hollow core door andraise bottom rail inside the veneer
EA --- --- --- --- 20.171
SAND ORPLANE DOOR
Sand or plane door to fit existing opening EA --- --- --- --- 20.172
STRIKE PLATE Reset strikeplate so latch bolt catchesproperly
EA --- --- --- --- 20.173
File strikeplate to enlarge opening EA --- --- --- --- 20.174
Lubricate latch and/or lock bolt withgraphite or dry spray silicone
EA --- --- --- --- 20.175
CORRECTDOOR PANELSAG
Separate stiles from rails, inject glue andclamp square
EA = Each door
EA --- --- --- --- 20.176
REPLACELOCKSET
Remove existing lockset and replace withnew satin brass lockset without boring newholes
EA --- --- --- --- 20.177
Remove existing lockset and replace withOwner’s new lockset without boring newholes
EA --- --- --- --- 20.178
MORTISELOCKSET
Remove existing mortise lockset and installnew mortise lockset with satin brasshardware accessories
EA --- --- --- --- 20.179
MORTISE BOX Remove existing mortise box and installnew mortise box with existing hardware
EA --- --- --- --- 20.180
Increase size of existing mortise cavity forlarger mortise box
EA --- --- --- --- 20.181
Patch and fill existing mortise box # Patch and fill existing mortise box
cavity # Plug interior and exterior through
bored holes # Sand or plane smooth
EA --- --- --- --- 20.182
NEWSTANDARDBORELOCKSET
Lay out and bore holes for new stand- ardbore interior lockset and install lockset
New satin brass lockset EA --- --- --- --- 20.184
Install Owner supplied lockset EA --- --- --- --- 20.185
NEW MORTISELOCKSET
Lay out and cut mortise cavity box toaccept new mortise box and install
New polished brass turn knobs EA --- --- --- --- 20.187
Install Owner supplied mortise lockset EA --- --- --- --- 20.188

H1MD0220001CH0133 223
20. POCKET, BIFOLD AND BY-PASS DOOR ALTERATIONS
SPECIFICATIONS UNIT
CONTRACTOR’S
DIRECT JOB COST PRICE
DATABASEITEMNO.MATLS LABOR TOTAL
ADJUSTPOCKETDOOR
# Open wall and remove base andcasing, saving them for reuse
# Undercut, reset, adjust andlubricate pocket door
# Close wall with 1/2" gypsum board,finished and sanded, ready forpainting
# Reinstall base and casing
EA --- --- --- --- 20.190
BIFOLD DOOR Adjust bifold door for smooth operation
EA = Each 2 panel unit
EA --- --- --- --- 20.191
BY-PASSSLIDINGDOOR
Adjust by-pass sliding doors for smoothoperation
EA --- --- --- --- 20.192
1.00 Remove existing roller hardware fromby-pass sliding door and install newrollers so panel operates smoothly
EA = Each door
EA --- --- --- --- 20.193

224 H1MD0220001CH0133
20. REPLACE INTERIOR DOOR HINGES
SPECIFICATIONS UNIT
CONTRACTOR’S
DIRECT JOB COST PRICE
DATABASEITEMNO.MATLS LABOR TOTAL
REPLACEHINGES
Replace hinges with new satin brasshinges in same hinge mortises
1.00
2" x 2" EA --- --- --- --- 20.200
2-1/12" x 2-1/2" EA --- --- --- --- 20.201
3" x 3" EA --- --- --- --- 20.202
3-1/2" x 3-1/2" EA --- --- --- --- 20.203
4" x 4" EA --- --- --- --- 20.204
EA = Each hinge
SPRINGHINGES
Replace hinges with new satin brassspring hinges
3-1/2" x 3-1/2" EA --- --- --- --- 20.210
4" x 4" EA --- --- --- --- 20.211
EA = Each hinge
RISINGHINGES
Replace hinges with new satin brassrising hinges
3-1/2" x 3-1/2" EA --- --- --- --- 20.220
4" x 4" EA --- --- --- --- 20.221
EA = Each hinge
SWINGINGHINGES
Replace existing “Bomber” swinginghinge with new “Bomber” swinginghinge, including new polished brassconcealment plates
Light duty, up to 35 lb. door EA --- --- --- --- 20.230
Heavy duty, up to 90 lb. door EA --- --- --- --- 20.231
Install Owner supplied swinging hinge EA --- --- --- --- 20.232

H1MD0220001CH0133 225
20. INTERIOR DOOR HINGES
SPECIFICATIONS UNIT
CONTRACTOR’S
DIRECT JOB COST PRICE
DATABASEITEMNO.MATLS LABOR TOTAL
REVERSEHINGES
Reverse hinges and lockset on existinginterior door and hang door on oppositejamb # Remove door from opening and
remove hinges, lockset andstrikeplate from door and jambs
# Modify existing hinge mortises ondoor and install hinges
# Cut new hinge mortises on oppositejamb and hang door
# Install lockset in existing bored holelocation
# Fill old hinge mortises on door jamband install strikeplate
Door with standard lockset
1.00
2 hinge door EA --- --- --- --- 20.250
3 hinge door EA --- --- --- --- 20.251
Door with mortise lockset
2 hinge door EA --- --- --- --- 20.252
3 hinge door EA --- --- --- --- 20.253
RE-SETSCREWS
RE-set screws in hinges EA --- --- --- --- 20.260
EA = Up to 3 hinges on one door
ADD HINGE Add satin brass hinge in middle of door tocorrect warp
2" x 2" EA --- --- --- --- 20.270
2-1/2" x 2-1/2" EA --- --- --- --- 20.271
3" x 3" EA --- --- --- --- 20.272
3-1/2" x 3-1/2" EA --- --- --- --- 20.273
4" x 4" EA --- --- --- --- 20.274
RE-POSITIONHINGES
Re-position existing hinges to correct doorslab alignment with strike side stop
EA = Each door
EA --- --- --- --- 20.280
SWINGINGHINGE
Install new “Bomber” swinging hinge toexisting door, including all hardware,accessories and polished brassconcealment plates
Light duty, up to 35 lb. Door EA --- --- --- --- 20.290
Heavy duty, up to 90 lb. Door EA --- --- --- --- 20.291
Install Owner supplied swinging hinge EA --- --- --- --- 20.292

226 H1MD0220001CH0133
20. CASINGS AND JAMBS
SPECIFICATIONS UNIT
CONTRACTOR’S
DIRECT JOB COST PRICE
DATABASEITEMNO.MATLS LABOR TOTAL
TRIM CASEDOPENING
Trim existing opening with jambs andtwo sides of 2-1/4" casing
1.00
FJ 3-0 x 6-8 EA --- --- --- --- 20.300
6-0 x 6-8 EA --- --- --- --- 20.301
Solid 3-0 x 6-8 EA --- --- --- --- 20.302
6-0 x 6-8 EA --- --- --- --- 20.303
TRIM ONEXISTINGJAMBS
Trim one side only on existing doorjambs with 2-1/4” door casing
FJ 3-0 x 6-8 EA --- --- --- --- 20.310
6-0 x 6-8 EA --- --- --- --- 20.311
Solid 3-0 x 6-8 EA --- --- --- --- 20.312
6-0 x 6-8 EA --- --- --- --- 20.313
TRIMEXISTINGWINDOW
Trim existing window, one side only # 2-1/4" solid casing, apron, stool cap
and window stops
2-0 x 3-2 EA --- --- --- --- 20.320
2-4 x 4-6 EA --- --- --- --- 20.321
3-0 x 4-6 EA --- --- --- --- 20.322
6-0 x 5-6 EA --- --- --- --- 20.323
EXTENSIONJAMBS
Extension jambs to extend existing dooror window jamb out to and even withwall finish, ready to be cased
Up to 2-1/2" deep LF --- --- --- --- 20.330
Over 2-1/2" and up to 4-1/2" deep LF --- --- --- --- 20.331
Over 4-1/2" and up to 6-1/2" deep
LF = Perimeter of window or door jamb
LF --- --- --- --- 20.332

H1MD0220001CH0133 227
20. REPLACE DOOR CASING
SPECIFICATIONS UNIT
CONTRACTOR’S
DIRECT JOB COST PRICE
DATABASEITEMNO.MATLS LABOR TOTAL
CASING Remove door casing and replace withnew ranch, clamshell or colonial casing
1.00
One 3-0 door, solid 2-1/4" casing EA --- --- --- --- 20.350
3-1/2" casing EA --- --- --- --- 20.351
4-1/2" casing EA --- --- --- --- 20.352
Two 3-0 doors, solid 2-1/4" casing EA --- --- --- --- 20.353
3-1/2" casing EA --- --- --- --- 20.354
4-1/2" casing
EA = Each door opening (one side)
EA --- --- --- --- 20.355
CASING WITHBACKBAND
Remove door casing and replace withnew 3/4" x 3-1/2" flat casing with11/16" x 1-1/16" backband
3-0 door EA --- --- --- --- 20.360
Two 3-0 doors
EA = Each door opening (one side)
EA --- --- --- --- 20.361
HEADMOULDING
Install 3/4" x 1-1/4" crown moulding onbutted head
3-0 door EA --- --- --- --- 20.370
Two 3-0 doors
EA = Each door opening (one side)
EA --- --- --- --- 20.371
CORNERBLOCKS
PLINTHBLOCKS
Install 2 corner blocks
EA = Total for both corner blocks
EA --- --- --- --- 20.380
Install 2 plinth blocks
EA = Total for both plinth blocks
EA --- --- --- --- 20.381

228 H1MD0220001CH0133
20. CEILING MOULDINGS
SPECIFICATIONS UNIT
CONTRACTOR’S
DIRECT JOB COST PRICE
DATABASEITEMNO.MATLS LABOR TOTAL
CEILINGMOULDINGS
Bed, cove, crown or picture mouldings 1.00
Up to 8 LF, 3/4" MIN --- --- --- --- 20.400
Additional moulding over 8 LF ADD LF --- --- --- --- 20.401
Up to 8 LF, 1-5/8" MIN --- --- --- --- 20.402
Additional moulding over 8 LF ADD LF --- --- --- --- 20.403
Up to 8 LF, 2-1/4" MIN --- --- --- --- 20.404
Additional moulding over 8 LF ADD LF --- --- --- --- 20.405
Up to 8 LF, 3-1/4" MIN --- --- --- --- 20.406
Additional moulding over 8 LF ADD LF --- --- --- --- 20.407
Up to 8 LF, 4-1/4" MIN --- --- --- --- 20.408
Additional moulding over 8 LF ADD LF --- --- --- --- 20.409
Up to 8 LF, 5-1/4" MIN --- --- --- --- 20.410
Additional moulding over 8 LF ADD LF --- --- --- --- 20.411
3-MEMBERWOODCORNICE
Install 3-member wood cornice onperimeter of room over true walls
5/8" x 1-3/4"and
3/4" x 4-3/4"and
5/8" x 1-3/4"
All 3 pieces, up to 8 LF MIN --- --- --- --- 20.420
Additional 3 pieces, over 8 LF ADD LF --- --- --- --- 20.421

H1MD0220001CH0133 229
20. CHAIR RAIL AND PANEL STRIPS
SPECIFICATIONS UNIT
CONTRACTOR’S
DIRECT JOB COST PRICE
DATABASEITEMNO.MATLS LABOR TOTAL
ONE PIECECHAIR RAIL
Install one piece chair rail 1.00
Up to 8 LF of 11/16" x 2-1/2" MIN --- --- --- --- 20.430
Additional LF over 8 LF ADD LF --- --- --- --- 20.431
Up to 8 LF of 7/8” x 2-1/2" MIN --- --- --- --- 20.432
Additional LF over 8 LF ADD LF --- --- --- --- 20.433
Up to 8 LF of 3/4" x 3" MIN --- --- --- --- 20.434
Additional LF over 8 LF ADD LF --- --- --- --- 20.435
TWO PIECECHAIR RAIL
Install two piece chair rail with cap trim, # Apron: 5/8" x 2-1/4" # Cap: 1-1/16" x 1-1/2"
Both pieces up to 8 LF MIN --- --- --- --- 20.440
Additional LF over 8 LF ADD LF --- --- --- --- 20.441
Install two piece chair rail with backerand front
5/8" x 4-1/2" backerand
1-1/16" x 2-3/4" front
Both pieces up to 8 LF MIN --- --- --- --- 20.442
Additional LF over 8 LF ADD LF --- --- --- --- 20.443
PANELSTRIPS
Panel strips attached to existing plaster,drywall or wood paneled wall for paneleffect, all joints mitered
5/8" x 7/8", up to 8 LF MIN --- --- --- --- 20.450
Additional LF over 8 LF ADD LF --- --- --- --- 20.451

230 H1MD0220001CH0133
20. BASE MOULDINGS
SPECIFICATIONS UNIT
CONTRACTOR’S
DIRECT JOB COST PRICE
DATABASEITEMNO.MATLS LABOR TOTAL
FINGERJOINTBASE
Pine clam, ranch or colonial fingerjointbase
1.00
Up to 8 LF of 2" base MIN --- --- --- --- 20.460
Additional LF over 8 LF ADD LF --- --- --- --- 20.461
Up to 8 LF of 2-1/4" base MIN --- --- --- --- 20.462
Additional LF over 8 LF ADD LF --- --- --- --- 20.463
Up to 8 LF of 3-1/4" base MIN --- --- --- --- 20.464
Additional LF over 8 LF ADD LF --- --- --- --- 20.465
Up to 8 LF of 4-1/4" base MIN --- --- --- --- 20.466
Additional LF over 8 LF ADD LF --- --- --- --- 20.467
Up to 8 LF of 5-1/4" base MIN --- --- --- --- 20.468
Additional LF over 8 LF ADD LF --- --- --- --- 20.469
SOLID BASE Pine clam, ranch or colonial solid base
Up to 8 LF of 2" base MIN --- --- --- --- 20.470
Additional LF over 8 LF ADD LF --- --- --- --- 20.471
Up to 8 LF of 2-1/4" base MIN --- --- --- --- 20.472
Additional LF over 8 LF ADD LF --- --- --- --- 20.473
Up to 8 LF of 3-1/4" base MIN --- --- --- --- 20.474
Additional LF over 8 LF ADD LF --- --- --- --- 20.475
Up to 8 LF of 4-1/4" base MIN --- --- --- --- 20.476
Additional LF over 8 LF ADD LF --- --- --- --- 20.477
Up to 8 LF of 5-1/4" base MIN --- --- --- --- 20.478
Additional LF over 8 LF ADD LF --- --- --- --- 20.479

H1MD0220001CH0133 231
20. BASE AND SHOE MOULDINGS
SPECIFICATIONS UNIT
CONTRACTOR’S
DIRECT JOB COST PRICE
DATABASEITEMNO.MATLS LABOR TOTAL
OAK BASE Oak base, 3-1/4" 1.00
Up to 8 LF of 3-1/4" oak base MIN --- --- --- --- 20.480
Additional oak base over 8 LF ADD LF --- --- --- --- 20.481
3-PIECE BASE 3-piece base
Top mould, 11/16" x 1-1/8"and
Base, 11/16" x 3-1/2"and
Oak shoe, 1/2" x 3/4"
All 3 pieces, up to 8 LF MIN --- --- --- --- 20.482
Additional 3 pieces over 8 LF ADD LF --- --- --- --- 20.483
SHOE MOULD 1/2" x 3/4" shoe mould
Up to 8 LF of Hardwood shoe mould MIN --- --- --- --- 20.485
Additional shoe mould over 8 LF ADD LF --- --- --- --- 20.486
Up to 8 LF of Pine shoe mould MIN --- --- --- --- 20.487
Additional shoe mould over 8 LF ADD LF --- --- --- --- 20.488

232 H1MD0220001CH0133
20. BOOK AND STORAGE SHELVES
SPECIFICATIONS UNIT
CONTRACTOR’S
DIRECT JOB COST PRICE
DATABASEITEMNO.MATLS LABOR TOTAL
SHELVING ONSHELFBRACKETS
Fasten slotted standards to existing wallto support shelf brackets for installationof shelves without nailing # Fasten slotted standards to existing
wall # Insert shelf brackets up to 12" long
into slotted standards # No vertical wood supports
necessary # Install shelves on slotted standards
brackets
1.00
#2 Pine
8" LF --- --- --- --- 20.500
10" LF --- --- --- --- 20.501
12" LF --- --- --- --- 20.502
Clear White Pine
8" LF --- --- --- --- 20.505
10" LF --- --- --- --- 20.506
12" LF --- --- --- --- 20.507
Oak
8" LF --- --- --- --- 20.510
10" LF --- --- --- --- 20.511
12" LF --- --- --- --- 20.512
Birch Plywood
8' LF --- --- --- --- 20.515
10" LF --- --- --- --- 20.516
12" LF --- --- --- --- 20.517
Melamine/Particle Board
8" LF --- --- --- --- 20.520
10" LF --- --- --- --- 20.521
12" LF --- --- --- --- 20.522
Medium Density Fiber (MDF)
8" LF --- --- --- --- 20.525
10" LF --- --- --- --- 20.526
12"
LF = Total length of all shelves
LF --- --- --- --- 20.527

H1MD0220001CH0133 233
20. BOOKSHELVES
SPECIFICATIONS UNIT
CONTRACTOR’S
DIRECT JOB COST PRICE
DATABASEITEMNO.MATLS LABOR TOTAL
BUILT-INBOOKCASE
Build and install bookcase # Nailed and glued ends # Vertical supports 30" OC and at
each end # Kickboard # Top rail # Shelves spaced 10" OC vertically
measured
Tight Knot Pine Shelving
1.00
8" SF --- --- --- --- 20.550
10" SF --- --- --- --- 20.551
12" SF --- --- --- --- 20.552
Clear White Pine
8" SF --- --- --- --- 20.555
10" SF --- --- --- --- 20.556
12" SF --- --- --- --- 20.557
Birch Plywood
8" SF --- --- --- --- 20.560
10" SF --- --- --- --- 20.561
12" SF --- --- --- --- 20.562
Medium Density Fiber (MDF)
8" SF --- --- --- --- 20.570
10" SF --- --- --- --- 20.571
12"
SF = Front square footage
SF --- --- --- --- 20.572
SHELFMOULDING
Install moulding at shelf edge LF --- --- --- --- 20.580
STILES 1" X 2" cwp stiles along verticalsupports of bookcase
LF --- --- --- --- 20.581
BACKING 1/4" plywood or hardboard backing SF --- --- --- --- 20.585
PIN TYPESHELFSUPPORTS
Install pin type shelf supports for shelfinstallation # Drill 1/4" holes in sides of vertical
supports # Insert metal pin type shelf supports
ADD SF --- --- --- --- 20.590
ADJUSTABLESTANDARDS
Install adjustable standards and 3/4"supports for shelf installation # Fasten two 1/2" adjustable
standards along each side ofvertical supports
# Insert 3/4" supports in slots inadjustable standards
ADD SF --- --- --- --- 20.595

234 H1MD0220001CH0133
20. CLOTHES CLOSET
SPECIFICATIONS UNIT
CONTRACTOR’S
DIRECT JOB COST PRICE
DATABASEITEMNO.MATLS LABOR TOTAL
CLOTHESCLOSET
Build 30" deep clothes closet in existingfinished living area # Studwall 2" x 4", 16" OC on two
walls, including door wall # 1/2" gypsum drywall both sides of
walls # 3-1/2" base and shoe both sides of
walls # #2 pine or fir hookstrip # 12" particleboard shelf # 1-3/8" clothes pole and clothes pole
sockets # Hooks # Install door(s) fully trimmed,
including jambs, stops, casings andall required hardware
# No painting included
1.00
Up to 5 foot wide closet, 30" deepClothes closet with one 2-6 x 6-8prehung hollow core birch flush door @ $100
EA --- --- --- --- 20.600
Clothes closet with birch flush bi-folddoors for a 2'-6" opening @ $65
EA --- --- --- --- 20.601
Up to 7 foot wide closet, 30" deepClothes closet with double 2-6 x 6-8prehung hollow core birch flush doors @$170
EA --- --- --- --- 20.602
Clothes closet with birch flush bi-folddoors for a 5 foot wide door opening @$130
EA = Complete job
EA --- --- --- --- 20.603

H1MD0220001CH0133 235
20. WALK-IN CLOTHES CLOSET
SPECIFICATIONS UNIT
CONTRACTOR’S
DIRECT JOB COST PRICE
DATABASEITEMNO.MATLS LABOR TOTAL
WALK-INCLOTHESCLOSET
Build walk-in clothes closet in existingfinished living area with two walls ofshelves and poles # Studwall 2" x 4", 16" OC on two
walls, including door wall # 3-1/2" base and shoe both sides of
walls # #2 pine or fir hookstrips on two
walls # 12" particleboard shelves on two
walls # 1-3/8" clothes poles and clothes
pole sockets on two walls # One 2-6 x 6-8 prehung birch flush
door, fully trimmed, including jambs,stops, casings and all requiredhardware
# No painting included
1.00
Up to 48 SF MIN --- --- --- --- 20.610
Additional SF over 48 SF ADD
SF = Interior of closet
SF --- --- --- --- 20.611
Build walk-in clothes closet in existingfinished living area with three walls ofshelves and poles
# Studwall 2" x 4", 16" OC on twowalls, including door wall
# 3-1/2" base and shoe both sides ofwalls
# #2 pine or fir hookstrips on threewalls
# 12" particleboard shelves on threewall
# 1-3/8" clothes poles and clothespole sockets on three walls
# One 2-6 x 6-8 prehung birch flushdoor, fully trimmed, including jambs,stops, casings and all requiredhardware
# No painting included
Up to 70 SF MIN --- --- --- --- 20.615
Additional SF over 70 SF ADD
SF = Interior of closet
SF --- --- --- --- 20.616

236 H1MD0220001CH0133
20. CLOSETS
SPECIFICATIONS UNIT
CONTRACTOR’S
DIRECT JOB COSTPRICE
DATABASEITEMNO.MATLS LABOR TOTAL
LINENCLOSET
Build linen closet 30" deep in existing finishedarea # Studwall 2" x 4", 16" OC, two walls # 1/2" gypsum drywall both sides of walls # 3-1/2" base and shoe both sides of walls # #2 pine or fir shelf support # 24" deep plywood or particleboard
shelves, 12" OC vertically measured # Install one 2-6 x 6-8 prehung hollow
core birch flush door, fully trimmed,including jambs, stops, casings and allrequired hardware
# No painting included
1.00
UP to 3 LF of closet width MIN --- --- --- --- 20.620
Additional LF of width over 3 LF ADD
LF = Width of closet
LF --- --- --- --- 20.621
CLOTHESCLOSETUNDERSTAIRWAY
Build clothes closet under existing stairway,36" x 36" # Frame walls of closet with 2" x 4", 16"
OC 3-1/2" base and shoe both sides of wall # #2 pine or fir hookstrips # 12" particleboard shelf # 1-3/8" clothes pole and clothes pole
sockets # One 2-6 x 6-8 prehung hollow core birch
flush door, fully trimmed, includingjambs, stops, casings and all requiredhardware
EA = Complete job
EA --- --- --- --- 20.630
LINEN ORPANTRYCLOSETUNDERSTAIRWAY
Build 36" x 36" linen or pantry closet understairway
# Frame closet walls with 2" x 4", 16" OC # Gypsum drywall on all walls, inside and
out, finished ready for painting # 3-1/2" base and shoe both sides of wall # #2 pine or fir shelf support # 24" deep plywood or particleboard
shelves, 12" OC vertically measured # Install one 2-6 x 6-8 prehung hollow
core birch flush door, fully trimmed,including jambs, stops, casings and allrequired hardware
EA = Complete job
EA --- --- --- --- 20.635

H1MD0220001CH0133 237
20. VENTILATED SHELVING SYSTEMS
SPECIFICATIONS UNIT
CONTRACTOR’S
DIRECT JOB COST PRICE
DATABASEITEMNO.MATLS LABOR TOTAL
COATED WIREVENTILATEDCLOSETSYSTEMS
Install coated wire ventilated closetshelving, including all necessaryhardware and supports
1.00
Wardrobe shelf with hanging bar
Up to 6 LF, 12" deep MIN --- --- --- --- 20.650
Additional LF over 6 LF ADD LF --- --- --- --- 20.651
Up to 6 LF, 16" deep MIN --- --- --- --- 20.652
Additional LF over 6 LF ADD LF --- --- --- --- 20.653
Light duty linen shelf
Up to 3 LF, 12" deep MIN --- --- --- --- 20.654
Additional LF over 3 LF ADD LF --- --- --- --- 20.655
Up to 3 LF, 16" deep MIN --- --- --- --- 20.656
Additional LF over 3 LF ADD LF --- --- --- --- 20.657
Up to 3 LF, 20" deep MIN --- --- --- --- 20.658
Additional LF over 3 LF ADD LF --- --- --- --- 20.659
Heavy duty storage shelf
Up to 5 LF, 12" deep MIN --- --- --- --- 20.660
Additional LF over 5 LF ADD LF --- --- --- --- 20.661
Up to 5 LF, 16" deep MIN --- --- --- --- 20.662
Additional LF over 5 LF ADD LF --- --- --- --- 20.663
Up to 5 LF, 20" deep MIN --- --- --- --- 20.664
Additional LF over 5 LF ADD LF --- --- --- --- 20.665
Shoe rack
Up to 4 LF, 12" deep MIN --- --- --- --- 20.670
Additional LF over 4 LF ADD LF --- --- --- --- 20.671
Wardrobe shelf corner
12" deep EA --- --- --- --- 20.675
16" deep EA --- --- --- --- 20.676
STORAGEBASKETPEDESTAL
Install pedestal with storage baskets 12" front to back, 16" wide and 9" deep
3 baskets 30" tall EA --- --- --- --- 20.680
4 baskets 40" tall EA --- --- --- --- 20.681
5 baskets 50" tall EA --- --- --- --- 20.682

238 H1MD0220001CH0133
20. INDIRECT LIGHTING SOFFIT
SPECIFICATIONS UNIT
CONTRACTOR’S
DIRECT JOB COST PRICE
DATABASEITEMNO.MATLS LABOR TOTAL
INDIRECTLIGHTINGSOFFIT
Build indirect lighting soffit on wallin U shape
# Attach a 1" x 4" ledger to the wall anappropriate distance from theceiling and fasten a 1" x 6" to thebottom, forming an “L” shapeagainst the wall
# Fasten a 1" x 6" to the front of the 1"x 6", making a “U” shape againstthe wall with the top open
1.00
Up to 15 LF of lighting soffit MIN --- --- --- --- 20.700
Additional LF over 15 LF ADD LF --- --- --- --- 20.701
Build indirect lighting soffit on wallin U shape with crown moulding forfascia
# Attach 1" x 4" ledger to the wall anappropriate distance from ceilingand fasten a 1" x 6" to the bottom,forming an “L” shape against thewall
# Fasten a 4-1/4" crown moulding tothe front of the 1" x 6", making a “U”shape against the wall with the topopen, the crown moulding as thefascia and the 1" x 6" as the soffit
Up to 15 LF of lighting soffit MIN --- --- --- --- 20.702
Additional LF over 15 LF ADD LF --- --- --- --- 20.703

H1MD0220001CH0133 239
20. INDIRECT LIGHTING SOFFIT
SPECIFICATIONS UNIT
CONTRACTOR’S
DIRECT JOB COST PRICE
DATABASEITEMNO.MATLS LABOR TOTAL
INDIRECTLIGHTINGSOFFIT,DRYWALLFINISH
Build indirect lighting soffit on wall in “U”shape finished off with drywall
# Attach a 2" x 4" to the wall anappropriate distance from theceiling and fasten a 2" x 6" to thebottom, forming an “L” shapeagainst the wall
# Fasten a 2" x 6" to the front of the 2"x 6", making a “U” shape againstthe wall with the top open
# Finish fascia and soffit with 1/2"drywall, taped, finished and readyfor painting
1.00
Up to 15 LF lighting soffit MIN --- --- --- --- 20.710
Additional LF over 15 LF ADD LF --- --- --- --- 20.711
INDIRECTLIGHTINGSOFFIT,PLYWOODFINISH
Build indirect lighting soffit on wall in “U”shape finished off with 1/4" plywood
# Attach a 2" x 4" to the wall anappropriate distance from theceiling and fasten a 2" x 6" to thebottom, forming an “L” shapeagainst the wall
# Fasten a 2" x 6" to the front of the 2"x 6", making a “U” shape againstthe wall with the top open
# Finish fascia and soffit with 1/4" pre-finished plywood @ .50 SF, coveand outside corner
Up to 15 LF lighting soffit MIN --- --- --- --- 20.720
Additional LF over 15 LF ADD LF --- --- --- --- 20.721

240 H1MD0220001CH0133
20. DISAPPEARING STAIRWAY
SPECIFICATIONS UNIT
CONTRACTOR’S
DIRECT JOB COST PRICE
DATABASEITEMNO.MATLS LABOR TOTAL
BREAKTHROUGHCEILING
Make opening in ceiling and frame outfor installation of disappearing stairway # Break through existing ceiling # Cut one joist to obtain required
width of opening for stairway # Sister joists on each side of new
opening # Install header(s) supported by joist
hangers
EA = Each framed out opening
EA --- --- --- --- 20.750
FOLDINGSTAIRWAY,WOOD
Install wood folding stairway, 26" wide,up to 10'-0" floor to floor, in existingframed opening # Mount stairway in opening # Trim opening with 2-1/4" casing
EA --- --- --- --- 20.760
ONE-PIECESLIDINGSTAIRWAY,WOOD
Install wood one-piece sliding stairway,26" wide, up to 10'-0" floor to floor, inexisting framed opening # Mount stairway in opening # Trim opening with 2-1/4" casing
EA --- --- --- --- 20.770
1.00

H1MD0220001CH0133 241
20. STAIR WORK
SPECIFICATIONS UNIT
CONTRACTOR’S
DIRECT JOB COST PRICE
DATABASEITEMNO.MATLS LABOR TOTAL
TIGHTENNEWEL POST
Tighten newel post # Drill holes through post into
subfloor, tread or riser # Fasten post using #10 3-1/2" wood
screws # Fill holes with putty and finish to
match
1.00
One newel post MIN --- --- --- --- 20.780
Additional newel posts EA --- --- --- --- 20.781
TIGHTENBALUSTER
Tighten baluster # Drill pilot hole from the top of the
baluster into the bottom of thehandrail
# Set and countersink a finish nail # Cover nail holes with color
matched touch-up stick
Up to 3 balusters MIN --- --- --- --- 20.782
Additional balusters more than 3 ADD EA --- --- --- --- 20.783
STAIR REPAIR Replace balusters in existing stairwayfrom floor to floor, open one side, twobalusters per riser
Two stock balusters EA --- --- --- --- 20.784
Two top quality stock balusters
EA = Each riser
EA --- --- --- --- 20.785
Install new handrail, one newel post andbalusters on existing stairway, twobalusters per riser
Up to 3 risers MIN --- --- --- --- 20.786
Additional risers over 3 ADD EA --- --- --- --- 20.787
Replace pine treads on basementstairway - treads only, no risers
Each 2" x SPF tread EA --- --- --- --- 20.790
Each 5/4" pine tread EA --- --- --- --- 20.791
CELLARSTAIRWAY
Build cellar stairway # 2" x 12" stringers # 2" x 10" fir treads # Open risers # 2" x 4" handrail
EA = Each tread
EA --- --- --- --- 20.792
WOODHANDRAIL
Install 2" x 2" pine or fir handrail withstandard hardware
LF --- --- --- --- 20.793

242 H1MD0220001CH0133
21. REFACE KITCHEN CABINETS
SPECIFICATIONS UNIT
CONTRACTOR’S
DIRECT JOB COST PRICE
DATABASEITEMNO.MATLS LABOR TOTAL
REFACEEXISTINGKITCHENCABINETS
Reface existing kitchen cabinets withplastic laminate, using existing cabinetdoor and drawer hardware # Remove all doors drawers and
mouldings, including cabinet hingesand pulls
# Install fillers inside existing cabinetframes to provide adequate stilewidth
# Sand off paint built-up on existingcabinet surfaces
# 1/4" plywood on bottom of upper cabinets # Cover plywood on bottom of upper
cabinets with laminate applied withcontact cement
# Cover cabinet end panels withlaminate
# Apply laminate to face of upper andlower cabinets
# Install laminate doors on upper andbase cabinets with existing cabinethardware
# Install new drawer fronts overexisting drawer fronts using existingdrawer pulls
# Install mouldings at top of uppercabinets and in corners as required
EA = Each drawer or door opening
EA --- --- --- --- 21.000
REFACEEXISTINGISLANDCABINETBACKS
Sand off paint build-up and applylaminate to backs and sides of islandcabinets with contact cement
SF = Backs and sides of island cabinets
SF --- --- --- --- 21.001
1.00

H1MD0220001CH0133 243
21. KITCHEN ALTERATIONS
SPECIFICATIONS UNIT
CONTRACTOR’S
DIRECT JOB COST PRICE
DATABASEITEMNO.MATLS LABOR TOTAL
PANTRYCABINET
Remove existing wall and base cabinetsand substitute pantry cabinet # Cut out countertop width of new
pantry cabinet to be installed # Remove one or two base cabinets
and one or two wall cabinets toprovide for width of new pantrycabinet to be installed
# Install pantry cabinet @ $1600 withfinish to match existing cabinets asclosely as possible
# Fill in spaces where base and/orwall cabinets were removed withappropriate sized filler strips
EA = Total cost
EA --- --- --- --- 21.100
COUNTERTOPEDGING
Remove existing plastic laminatedcountertop edging and install newedging
1.00
Plastic laminate edging LF --- --- --- --- 21.110
Corian manufactured edging, standardsolid color
LF --- --- --- --- 21.111
Corian manufactured edging, topquality designer color
LF --- --- --- --- 21.112
Cabinet matched wood moulding LF --- --- --- --- 21.113

244 H1MD0220001CH0133
21. BULKHEAD AND SOFFIT
SPECIFICATIONS UNIT
CONTRACTOR’S
DIRECT JOB COST PRICE
DATABASEITEMNO.MATLS LABOR TOTAL
BULKHEADAND SOFFITABOVEEXISTINGCABINETS
Build bulkhead and soffit above existingkitchen cabinets, no painting # Build “ladder” of 2" x 4", 24"
OC, the length and width ofbulkhead
# Apply drywall or 1/4" prefinishedplywood to bottom side of ladder
# Set ladder on top of cabinets andfasten it to back wall
# Nail 2" x 4" to ceiling even with frontof bulkhead ladder
# Install 1/2" CDX plywood along frontof bulkhead from 2" x 4" at ceiling tolevel of 2" x 4" ladder
# Finish fascia and soffit(s) as shownbelow:
1/2" drywall, taped and finished,ready for painting
LF --- --- --- --- 21.200
1/4" prefinished plywood @ .50 SF
LF = Length of bulkhead
LF --- --- --- --- 21.201
REMOVEEXISTINGBULKHEADAND SOFFIT
Remove existing bulkhead and soffitfrom above kitchen cabinets, no painting # Remove existing drywall or plywood
covering from bulkhead and soffit # Remove framing # Patch damaged areas
LF = Total LF of bulkhead and soffit
LF --- --- --- --- 21.202

H1MD0220001CH0133 245
21. LOWER COUNTERTOP WORK AREA
SPECIFICATIONS UNIT
CONTRACTOR’S
DIRECT JOB COST PRICE
DATABASEITEMNO.MATLS LABOR TOTAL
LOWERCOUNTERTOPWORK AREA
Remove base cabinet below existingcountertop work area and installcountertop at lower level # Remove base cabinet below
including toeboard and all shelves,leaving clear minimum width of 30"
# Cut existing countertop andbacksplash so that the two adjacentcabinets have 3/8" countertopoverhangs on their sides
# Vinyl tile on newly exposed floorarea below to match or becompatible with existing vinyl floorcovering
# Apply wood countertop edging tothe newly cut overhang on eachadjacent cabinet
# 3/16" wood veneer paneling onnewly exposed sides of adjacentbase cabinets and the verticaledges of the backsplashes to matchexisting cabinet finish as closely aspossible
# Bore two 1/4" holes in eachadjacent cabinet for shelf supportsto support countertop 28, 29, 30,31, 32 33 or 34 inches above floor
# Insert shelf supports and setcountertop at 28" level or at anylevel up to 34 inches
# Touch up any damaged areas ofexisting cabinets
# Patch area on wall as requiredwhere countertop was lowered
EA = Complete job
EA --- --- --- --- 21.250
1.00

246 H1MD0220001CH0133
21. LOWER EXISTING COOKTOP
SPECIFICATIONS UNIT
CONTRACTOR’S
DIRECT JOB COST PRICE
DATABASEITEMNO.MATLS LABOR TOTAL
LOWEREXISTINGCOOKTOP
Remove base cabinet below existingcooktop in kitchen counter and lowercooktop # Disconnect cooktop in kitchen
counter # Remove base cabinet below
cooktop, including toeboard and allshelves, leaving clear minimumwidth of 30"
# Cut existing countertop andbacksplash which contains cooktopso that the two adjacent cabinetshave 3/8" countertop overhangs ontheir sides
# Vinyl tile on newly exposed floorarea below to match or becompatible with existing vinyl floorcovering
# Apply wood countertop edging tothe newly cut overhang on eachadjacent cabinet
# 3/16" wood veneer paneling onnewly exposed sides of adjacentbase cabinets and the verticaledges of the backsplash to matchexisting cabinet finish as closely aspossible
# Attach ledger to side of eachadjacent cabinet to support thecountertop 28" from floor and installcountertop on ledger
# Re-install cooktop with requiredplumbing or electrical alterations
# Install apron to conceal existingwiring and/or gas pipes and coverwith 3/16" wood veneer paneling tomatch existing cabinet finish asclosely as possible, leaving any gasshutoff valve visible
# Touch up any damaged areas ofexisting cabinets
# Patch area on wall as requiredwhere countertop was lowered
EA = Complete job
EA --- --- --- --- 21.260
1.00

H1MD0220001CH0133 247
21. LOWER EXISTING KITCHEN SINK
SPECIFICATIONS UNIT
CONTRACTOR’S
DIRECT JOB COST PRICE
DATABASEITEMNO.MATLS LABOR TOTAL
LOWEREXISTINGSINK
Remove base cabinet below existingkitchen sink and lower countertop andsink to 28" above floor # Disconnect plumbing from kitchen
counter sink # Remove base cabinet below sink,
including toeboard and all shelves,leaving clear minimum width of 30"
# Cut existing countertop andbacksplash which contains sink sothat the two adjacent cabinets have3/8" countertop overhangs on theirsides
# Vinyl tile on newly exposed floorarea below sink to match or becompatible with existing vinyl floorcovering
# Apply wood countertop edging tothe newly cut overhang on eachadjacent cabinet
# 3/16" wood veneer paneling onnewly exposed sides of adjacentbase cabinets and the verticaledges of the backsplashes to matchexisting cabinet finish as closely aspossible
# Attach ledger to side of eachadjacent cabinet to support thecountertop 28" from floor and installcountertop on ledger
# Re-install kitchen sink with requiredplumbing alterations
# Install removable pipe protectionapron covered with 3/16" woodveneer paneling to match existingcabinet finish as closely as possible
# Touch up any damaged areas ofexisting cabinets
# Patch area on wall as requiredwhere countertop was lowered
EA = Complete job
EA --- --- --- --- 21.270
1.00

248 H1MD0220001CH0133
22. REPLACE FENCE
SPECIFICATIONS UNIT
CONTRACTOR’S
DIRECT JOB COST PRICE
DATABASEITEMNO.MATLS LABOR TOTAL
REPLACE FIROR PINEFENCE RAILS
Replace pressure treated fir or pinehorizontal rails up to 8 feet long withinsame fence section
1.00
1 x 4 Picket One rail EA --- --- --- --- 22.001
Two rails EA --- --- --- --- 22.002
Three rails EA --- --- --- --- 22.003
1 x 3 Stockade One rail EA --- --- --- --- 22.004
Two rails EA --- --- --- --- 22.005
Three rails EA --- --- --- --- 22.006
Split rail One rail EA --- --- --- --- 22.007
Two rails EA --- --- --- --- 22.008
Three rails EA --- --- --- --- 22.009
1 x 6 Solid board One rail EA --- --- --- --- 22.010
Two rails EA --- --- --- --- 22.011
Three rails EA --- --- --- --- 22.012
REPLACECEDARFENCE RAILS
Replace cedar horizontal rails up to 8feet long within same fence section
1 x 4 Picket One rail EA --- --- --- --- 22.020
Two rails EA --- --- --- --- 22.021
Three rails EA --- --- --- --- 22.022
1 x 3 Stockade One rail EA --- --- --- --- 22.023
Two rails EA --- --- --- --- 22.024
Three rails EA --- --- --- --- 22.025
Split rail One rail EA --- --- --- --- 22.026
Two rails EA --- --- --- --- 22.027
Three rails EA --- --- --- --- 22.028
1 x 6 Solid board One rail EA --- --- --- --- 22.029
Two rails EA --- --- --- --- 22.030
Three rails EA --- --- --- --- 22.031
1 x 6 Board on board One rail EA --- --- --- --- 22.032
Two rails EA --- --- --- --- 22.033
Three rails EA --- --- --- --- 22.034

H1MD0220001CH0133 249
22. REPLACE VERTICAL FENCE PARTS
SPECIFICATIONS UNIT
CONTRACTOR’S
DIRECT JOB COST PRICE
DATABASEITEMNO.MATLS LABOR TOTAL
REPLACEVERTICALFENCE PARTS
Replace pressure treated fir or pinevertical fence parts up to 72" long
1" x 4" Pickets
1.00
Up to 2 boards MIN --- --- --- --- 22.040
Additional boards over 2 ADD
1" x 3" Stockade
EA --- --- --- --- 22.042
Up to 2 boards MIN --- --- --- --- 22.043
Additional boards over 2 ADD
1" x 6" Solid or Board on Board
EA --- --- --- --- 22.044
UP to 2 boards MIN --- --- --- --- 22.045
Additional boards over 2 ADD EA --- --- --- --- 22.046
Replace cedar vertical fence parts up to72" long
1" x 4" Pickets
Up to 2 boards MIN --- --- --- --- 22.050
Additional boards over 2 ADD
1" x 3" Stockade
EA --- --- --- --- 22.051
Up to 2 boards MIN --- --- --- --- 22.052
Additional boards over 2 ADD
1" x 6" Solid or Board on Board
EA --- --- --- --- 22.053
Up to 2 boards MIN --- --- --- --- 22.054
Additional boards over 2 ADD EA --- --- --- --- 22.055

250 H1MD0220001CH0133
22. GATE POSTS
SPECIFICATIONS UNIT
CONTRACTOR’S
DIRECT JOB COST PRICE
DATABASEITEMNO.MATLS LABOR TOTAL
RE-SET GATEPOST
Re-set gate post # Remove gate from post # Remove gate post from post hole
and clean out post hole to minimumof 36" deep
# Set new post 2" into 6" gravel bed inbottom of 36" post hole
# Fill hole with tamped dirt andconcrete to top of hole
# Re-install gate
42" High
1.00
2-3/8" galvanized steel tubing EA --- --- --- --- 22.060
4" x 4" pressure treated fir or pine EA --- --- --- --- 22.061
6" x 6" pressure treated fir or pine
72" High
EA --- --- --- --- 22.062
2-3/8" galvanized steel tubing EA --- --- --- --- 22.063
4" x 4" pressure treated fir or pine EA --- --- --- --- 22.064
6" x 6" pressure treated fir or pine EA --- --- --- --- 22.065
REPAIRGATE
Re-set screws in hinge EA --- --- --- --- 22.070
Re-set lag screw hinge EA --- --- --- --- 22.071
Raise or tighten regular chain link post orframe hinge
EA --- --- --- --- 22.072
Install new hinges
Lag screw hinge EA --- --- --- --- 22.075
Strap hinge EA --- --- --- --- 22.076
Butt hinge EA --- --- --- --- 22.077
REMOVESAG IN GATE
To remove sag in gate, install a diagonalwooden brace between lower hinge sidecorner and opposite upper corner
EA --- --- --- --- 22.080
To remove sag in gate, install aturnbuckle diagonally from one hingecorner to opposite corner
EA --- --- --- --- 22.081
GATE LATCH Re-align gate latch to ensure positiveclosure
EA --- --- --- --- 22.090
Replace gate latch EA --- --- --- --- 22.091

H1MD0220001CH0133 251
22. BUILD ITEMS IN YARD
SPECIFICATIONS UNIT
CONTRACTOR’S
DIRECT JOB COST PRICE
DATABASEITEMNO.MATLS LABOR TOTAL
STORAGESHED
Build Owner’s pre-manufactured woodstorage shed # Pre-built trusses # Pre-built floor # T1-11 siding # 3 tab shingles # Double doors # All hardware
Gable Roof Style
1.00
4 foot sidewalls 8' x 8' EA --- --- --- --- 22.100
6 foot sidewalls 10' x 10' EA --- --- --- --- 22.101
10' x 12' EA --- --- --- --- 22.102
10' x 14' EA --- --- --- --- 22.103
10' x 16'
Gambrel Roof Style
EA --- --- --- --- 22.104
6 foot sidewalls 8' x 8' EA --- --- --- --- 22.110
8' x 10' EA --- --- --- --- 22.111
8' x 12' EA --- --- --- --- 22.112
10' x 10' EA --- --- --- --- 22.113
10' x 12' EA --- --- --- --- 22.114
10' x 14' EA --- --- --- --- 22.115
10' x 16' EA --- --- --- --- 22.116
7 foot sidewalls 12' x 16' EA --- --- --- --- 22.117
SWING SET Assemble Owner’s pre-manufacturedwood or metal swing set
12 feet wide EA --- --- --- --- 22.120
16 feet wide with straight slide EA --- --- --- --- 22.121
FORT SET Assemble Owner’s pre-manufacturedwood or metal fort with vinyl coveredraised platform, ladder, climbing ropeand monkey bars
EA --- --- --- --- 22.130
TEETERTOTTER
Assemble Owner’s pre-manufacturedwood or metal teeter totter
EA --- --- --- --- 22.140
SANDBOX Assemble Owner’s wood sandbox withvinyl roof
EA --- --- --- --- 22.150

252 H1MD0220001CH0133
22. MEDICINE CABINET
SPECIFICATIONS UNIT
CONTRACTOR’S
DIRECT JOB COST PRICE
DATABASEITEMNO.MATLS LABOR TOTAL
MEDICINECABINET
Remove existing recessed medicinecabinet and replace with new recessedmedicine cabinet with hinged plate glassmirror door 16" x 22", no framingchanges necessary
1.00
Supply and install medicine cabinet EA --- --- --- --- 22.200
Install Owner’s medicine cabinet EA --- --- --- --- 22.201
Remove surface mount medicinecabinet and replace with new surfacemount medicine cabinet with 2 slidingmirror doors, 24" x 16"
Supply and install medicine cabinet EA --- --- --- --- 22.202
Install Owner’s medicine cabinet EA --- --- --- --- 22.203

H1MD0220001CH0133 253
22. MIRRORS
SPECIFICATIONS UNIT
CONTRACTOR’S
DIRECT JOB COST PRICE
DATABASEITEMNO.MATLS LABOR TOTAL
REMOVEEXISTINGMIRROR
Remove existing wall or vanity mirror inpreparation for replacement, includingremoval of existing mounting clips,supports and hardware but no patchingand/or wall repairs
SF = Mirror
SF --- --- --- --- 22.210
WALL MIRROR Install square or rectangular, bevelededge, frameless wall mirror # 1/8" - 1/4" thickness # Attach to wall using mounting clips
and/or J-channel supports asrequired
Supply and install mirror @ $10 SF SF --- --- --- --- 22.220
Install Owner supplied mirror EA --- --- --- --- 22.221
VANITYMIRROR
Install square or rectangular, framelesspolished edge vanity mirror # Attach to wall using mounting clips
and/or J-channel supports asrequired
Supply and install mirror @ $8 SF SF --- --- --- --- 22.225
Install Owner supplied mirror EA --- --- --- --- 22.226

254 H1MD0220001CH0133
22. GRAB BAR
SPECIFICATIONS UNIT
CONTRACTOR’S
DIRECT JOB COST PRICE
DATABASEITEMNO.MATLS LABOR TOTAL
GRAB BAR Straight grab bar with concealed screwflange
1.00
1-1/4" O.D. 24" EA --- --- --- --- 22.230
36" EA --- --- --- --- 22.231
48" EA --- --- --- --- 22.232
1-1/2" O.D. 24" EA --- --- --- --- 22.233
36" EA --- --- --- --- 22.234
48" EA --- --- --- --- 22.235
Install Owner supplied grab bar, 24"-48"
EA --- --- --- --- 22.236
“L” shaped grab bar with concealedscrew flange, short leg 16", long leg 32"
1-1/4" O.D. EA --- --- --- --- 22.237
1-1/2" O.D. EA --- --- --- --- 22.238
Install Owner supplied “L” shaped grabbar
EA --- --- --- --- 22.239

H1MD0220001CH0133 255
22. BATHROOM ACCESSORIES
SPECIFICATIONS UNIT
CONTRACTOR’S
DIRECT JOB COST PRICE
DATABASEITEMNO.MATLS LABOR TOTAL
CHROMEBATHACCESSORIES
Install polished chrome bathaccessories # Towel bar # Toothbrush and glass holder # Paper holder # Soapdish
Supply and install EA --- --- --- --- 22.250
Install Owner’s accessories
EA = All accessories
EA --- --- --- --- 22.251
SHOWER RODAND CURTAIN
Install shower rod and standard curtain,including hardware and shower curtainhooks
Supply and install EA --- --- --- --- 22.260
Install Owner’s accessories EA --- --- --- --- 22.261
TOWEL BAR Install towel bar, including mountinghardware
Supply and install EA --- --- --- --- 22.270
Install Owner’s accessories EA --- --- --- --- 22.271
TOOTHBRUSHRACK
Install toothbrush rack
Supply and install EA --- --- --- --- 22.273
Install Owner’s accessories EA --- --- --- --- 22.274
PAPERHOLDER
Install paper holder
Supply and install EA --- --- --- --- 22.275
Install Owner’s accessories EA --- --- --- --- 22.276
HANGINGHOOK
Install standard style hanging hook
Supply and install EA --- --- --- --- 22.277
Install Owner’s accessories EA --- --- --- --- 22.278

256 H1MD0220001CH0133
22. ROOFTOP ANTENNA
SPECIFICATIONS UNIT
CONTRACTOR’S
DIRECT JOB COST PRICE
DATABASEITEMNO.MATLS LABOR TOTAL
ROOFTOPANTENNA
Secure existing rooftop televisionantenna
1.00
Strap mounted to chimney EA --- --- --- --- 22.300
Pole and cable tensioned EA --- --- --- --- 22.301
Pole and strapped to wall EA --- --- --- --- 22.302

H1MD0220001CH0133 257
22. SECURITY ITEMS
SPECIFICATIONS UNIT
CONTRACTOR’S
DIRECT JOB COST PRICE
DATABASEITEMNO.MATLS LABOR TOTAL
SECURITYBARS
Remove existing security bars fromwindow
SF = Window area
SF --- --- --- --- 22.400
Install security bars on existing window
SF = Window area
SF --- --- --- --- 22.405
SECURITYSTORM DOOR
Install 16 gauge welded steel framesecurity storm door
# Double weatherstripped # Tempered safety glass # Pre-hung with reversible hinges # Baked on finish
EA --- --- --- --- 22.410
1.00 Remove existing security or storm door EA --- --- --- --- 22.415

258 H1MD0220001CH0133
23. CERAMIC AND MARBLE TILE FLOOR
SPECIFICATIONS UNIT
CONTRACTOR’S
DIRECT JOB COSTPRICE
DATABASEITEMNO.MATLS LABOR TOTAL
REGROUTTILE FLOOR
Regrout existing ceramic or marble tilefloor # Dig or cut out old grout from joints # Apply new grout into joints # Wipe down and clean surfaces
thoroughly
Regrout up to 5 LF of grout joint MIN --- --- --- --- 23.000
Regrout additional LF of grout joint ADD LF --- --- --- --- 23.001
SEAL GROUT Seal cured grout joints with appropriatesealer
Seal up to 40 SF of tile MIN --- --- --- --- 23.010
Seal additional SF of 1" x 1" tile ADD SF --- --- --- --- 23.011
Seal additional SF of 2" x 2" tile ADD SF --- --- --- --- 23.012
Seal additional SF of 4" x 4" tile ADD SF --- --- --- --- 23.013
Seal additional SF of 8" x 8" tile ADD SF --- --- --- --- 23.014
Seal additional SF of 12" x 12" tile ADD SF --- --- --- --- 23.015
REPLACE TILE Replace floor tiles, including removingand replacing defective or broken tilesand grouting
Tile @ $2.00 SF
Replace 1 tile MIN --- --- --- --- 23.020
Replace additional 1" x 1" tile ADD EA --- --- --- --- 23.021
Replace additional 2" x 2" tile ADD EA --- --- --- --- 23.022
Replace additional 4" x 4" tile ADD EA --- --- --- --- 23.023
Replace additional 8" x 8" tile ADD EA --- --- --- --- 23.024
Replace additional 12" x 12" tile ADD EA --- --- --- --- 23.025
Tile @ $8.00 SF
Replace 1 tile MIN --- --- --- --- 23.030
Replace additional 1" x 1" tile ADD EA --- --- --- --- 23.031
Replace additional 2" x 2" tile ADD EA --- --- --- --- 23.032
Replace additional 4" x 4" tile ADD EA --- --- --- --- 23.033
Replace additional 8" x 8" tile ADD EA --- --- --- --- 23.034
Replace additional 12" x 12" tile ADD EA --- --- --- --- 23.035

H1MD0220001CH0133 259
23. VINYL TILE OVER HARDWOOD FLOOR
SPECIFICATIONS UNIT
CONTRACTOR’S
DIRECT JOB COSTPRICE
DATABASEITEMNO.MATLS LABOR TOTAL
VINYL TILE
OVER
HARDWOOD
FLOOR
Cover existing hardwood floor with vinyl
tile
# Remove existing shoe moulding
and save
# Nail 3/8" plywood underlayment
over old floor
# Install 9" x 9" or 12" x 12" vinyl tile in
adhesive over underlayment
# Re-install existing shoe moulding
9" X 9" Tile
1.00
Up to 50 SF of 1/16" tile MIN --- --- --- --- 23.100
Additional tile over 50 SF ADD SF --- --- --- --- 23.101
Up to 50 SF of 3/32" tile MIN --- --- --- --- 23.102
Additional tile over 50 SF ADD SF --- --- --- --- 23.103
Up to 50 SF of 1/8" tile MIN --- --- --- --- 23.104
Additional tile over 50 SF ADD
12" x 12" Tile
SF --- --- --- --- 23.105
Up to 50 SF of 1/16" tile MIN --- --- --- --- 23.110
Additional tile over 50 SF ADD SF --- --- --- --- 23.111
Up to 50 SF of 1/8" tile MIN --- --- --- --- 23.112
Additional tile over 50 SF ADD SF --- --- --- --- 23.113
Up to 50 SF of Premium tile MIN --- --- --- --- 23.114
Additional tile over 50 SF ADD SF --- --- --- --- 23.115

260 H1MD0220001CH0133
23. HARDWOOD FLOORING ALTERATIONS
SPECIFICATIONS UNIT
CONTRACTOR’S
DIRECT JOB COSTPRICE
DATABASEITEMNO.MATLS LABOR TOTAL
REPLACE OAK
FLOORING
Replace damaged or deteriorated oak
strip flooring
# Remove existing flooring
# Replace with new select oak strip
flooring, not toothed in
1.00
UP to 20 SF unfinished oak flooring MIN --- --- --- --- 23.200
Additional oak flooring over 20 SF ADD SF --- --- --- --- 23.201
UP to 20 SF prefinished oak flooring MIN --- --- --- --- 23.202
Additional oak flooring over 20 SF ADD SF --- --- --- --- 23.203
TOOTHED IN
OAK
FLOORING
Tooth in strip oak flooring, add to above
costs
Tooth in unfinished oak flooring EA --- --- --- --- 23.205
Tooth in prefinished oak flooring EA --- --- --- --- 23.206
EA = Each toothed in joint

H1MD0220001CH0133 261
23. FLOOR FINISHING
SPECIFICATIONS UNIT
CONTRACTOR’S
DIRECT JOB COSTPRICE
DATABASEITEMNO.MATLS LABOR TOTAL
SAND AND
FINISH OAK
FLOORING
Sand and finish new oak flooring with 2
coats polyurethane
Natural
1.00
UP to 100 SF of flooring MIN --- --- --- --- 23.220
Additional SF over 100 SF ADD
Dark Stain
SF --- --- --- --- 23.221
UP to 100 SF of flooring MIN --- --- --- --- 23.222
Additional SF over 100 SF ADD
Bleached
SF --- --- --- --- 23.223
UP to 100 SF of flooring MIN --- --- --- --- 23.224
Additional SF over 100 SF ADD SF --- --- --- --- 23.225
Sand and finish old oak flooring with 2
coats polyurethane
Natural
UP to 100 SF of flooring MIN --- --- --- --- 23.230
Additional SF over 100 SF ADD
Dark Stain
SF --- --- --- --- 23.231
UP to 100 SF of flooring MIN --- --- --- --- 23.232
Additional SF over 100 SF ADD
Bleached
SF --- --- --- --- 23.233
UP to 100 SF of flooring MIN --- --- --- --- 23.234
Additional SF over 100 SF ADD SF --- --- --- --- 23.235
ADDITIONAL
COAT OF
FINISH
Apply one additional coat of clear
polyurethane to new or old oak flooring
Natural SF --- --- --- --- 23.240
Dark Stain SF --- --- --- --- 23.241
Bleached SF --- --- --- --- 23.242

262 H1MD0220001CH0133
23. REPAIR SQUEAKY FLOOR ABOVE OPEN CEILING
SPECIFICATIONS UNIT
CONTRACTOR’S
DIRECT JOB COSTPRICE
DATABASEITEMNO.MATLS LABOR TOTAL
REPAIR
SQUEAKY
FLOOR
Repair squeaky floor caused by
loosened nails from subfloor into a joist
# Locate the loosened subfloor board,
coat both sides of a wood wedge or
shingle with glue and drive it
between the loosened subfloor
board and the joist until it is tight to
prevent the subfloor board from
moving up and down when stepped
on
Up to 1 loosened area MIN --- --- --- --- 23.250
Additional loosened areas ADD EA --- --- --- --- 23.251
Repair squeaky floor caused by several
loosened nails from subfloor into the joist
# Nail and glue a 24" long wood cleat
to the side of the joist high enough
to prevent the subfloor boards from
moving down when stepped on and
screw cleat to subfloor
Up to 1 wood cleat MIN --- --- --- --- 23.255
Additional wood cleats EA --- --- --- --- 23.256
1.00

H1MD0220001CH0133 263
23. REPAIR SQUEAKY FLOOR ABOVE CONCEALED CEILING
SPECIFICATIONS UNIT
CONTRACTOR’S
DIRECT JOB COSTPRICE
DATABASEITEMNO.MATLS LABOR TOTAL
REPAIR
SQUEAKY
FLOOR
Repair squeaky floor caused by
loosened nails from finished flooring into
subfloor
# Locate finish floor board that
squeaks, lubricate butt joints with
dry powder graphite
# Drill pilot hole 1/8" deep with 1/8"
diameter bit at a slight angle toward
the finished floor center about 1/2"
away from the board’s edge
# Drill a smaller second pilot hole
within the first pilot hole completely
through the finish floor board,
stopping and not penetrating the
subfloor
# Drive a lubricated finishing head
screw with a square drive head into
the pilot holes and into the subfloor
while bearing your weight on the
board to be secured
# Fill screw pilot hole with colored
wax stick filler
EA = Each squeaky floor board
EA --- --- --- --- 23.260
1.00

264 H1MD0220001CH0133
23. REPAIR BUCKLED FLOOR ABOVE OPEN CEILING
SPECIFICATIONS UNIT
CONTRACTOR’S
DIRECT JOB COSTPRICE
DATABASEITEMNO.MATLS LABOR TOTAL
REPAIR
BUCKLED
FLOORING
WITH OPEN
CEILING
BELOW
Repair section of buckled wood flooring
# Locate the area of buckled flooring,
drill a pilot hole into the flooring near
the center of the buckled area and
drive a small finishing nail through
the finished floor and the subfloor
with the tip showing in the underside
of the subfloor
# From above, compress and flatten
buckled flooring tight to the subfloor
using a 2" x 4" horizontal top plate
against the ceiling and a 2" x 4"
bottom plate on the buckled area
with a vertical 2" x 4" wedged
between them
# Mark the area of the buckled
flooring on the underside of the
subfloor
# Draw lines at right angles to the
finished floor across the underside
of the subfloor approximately 12"
apart and place a mark along each
line 3" apart
# Drill pilot holes at each mark
through the subfloor and into the
finished flooring to within 1/4" of the
surface
# Drill larger pilot holes at each mark
for full clearance of #8 roundhead
wood screws through the subfloor
but not penetrating the bottom of the
finished flooring
# Starting at the center of the buckled
area, drive screws from below into
the pilot holes in the subfloor,
drawing the finished flooring down
tight to the subfloor
EA = Up to 8 SF area
EA --- --- --- --- 23.270

H1MD0220001CH0133 265
23. REPAIR BUCKLED FLOOR ABOVE CONCEALED CEILING
SPECIFICATIONS UNIT
CONTRACTOR’S
DIRECT JOB COSTPRICE
DATABASEITEMNO.MATLS LABOR TOTAL
REPAIR
BUCKLED
FLOORING
WITH
CONCEALED
CEILING
BELOW
Repair section of buckled wood flooring
with concealed ceiling below
# Place 2" x 4" on floor at center of
buckled area at right angles to the
flooring and a 2" x 4" on the ceiling
above across the direction of the
joists supported by a 2" x 4" cut one
inch longer than the distance from
the bottom of the 2" x 4" above to
the top of the 2" x 4" below
# Gently hammer the 2" x 4" so that it
presses down on the buckled
flooring below drawing it tightly
against the subfloor
# Mark every other strip of flooring in
the buckled area approximately 12"
apart
# Using an 1/8" bit, bore 1/8" through
the finished flooring at each mark at
a slight angle towards the center of
the floor board and then drill a 1/16"
pilot hole within the first pilot hole
but not into the subfloor
# Drive a lubricated finishing head
screw with a square drive head
through each pilot hole into the
subfloor below to secure the finish
floor and the subfloor together
# Plug each hole with plugs with
colored wax stick filler
EA = UP to 8 SF area
EA --- --- --- --- 23.275
1.00

266 H1MD0220001CH0133
24. PAINTING PREPARATION, EXTERIOR
SPECIFICATIONS UNIT
CONTRACTOR’S
DIRECT JOB COST PRICE
DATABASEITEMNO.MATLS LABOR TOTAL
Painting costs on every page includeset-up and clean-up time andprotection of items not to be painted. All work shown is at one-story levelexcept as noted.
1.00
PAINT
REMOVAL
Remove existing paint or varnish withchemicals, 1 or 2 layers per coat ofpaint remover
Exterior wood siding SF --- --- --- --- 24.000
Exterior trim LF --- --- --- --- 24.001
Remove non-lead based paint by lightsand blasting, no cost for rentalequipment included
SF --- --- --- --- 24.002
Remove loose or blistered paint withwire brush or paint scraper
SF --- --- --- --- 24.003
BURNING
OFF
Exterior siding, non-lead based paint
Average SF --- --- --- --- 24.004
Extensive SF --- --- --- --- 24.005
Exterior trim, non-lead based paint LF --- --- --- --- 24.006
SANDING AND
FILLING
Sand and fill exterior wood siding andtrim
Average SF --- --- --- --- 24.010
Extensive SF --- --- --- --- 24.011
Sand and fill exterior trim only
Average LF --- --- --- --- 24.012
Extensive LF --- --- --- --- 24.013
REGLAZE Reglaze glass pane
Small pane 8" x 12" EA --- --- --- --- 24.020
Medium pane 12" x 15" EA --- --- --- --- 24.021
Large pane 24" x 30" EA --- --- --- --- 24.022
Very large pane 48" x 60" EA --- --- --- --- 24.023
CAULK Caulk trim or siding joints LF --- --- --- --- 24.030

H1MD0220001CH0133 267
24. PAINTING PREPARATION, WASHING
SPECIFICATIONS UNIT
CONTRACTOR’S
DIRECT JOB COST PRICE
DATABASEITEMNO.MATLS LABOR TOTAL
WASHING Power wash with TSP (or substitute) inpreparation for exterior painting,including TSP (trisodium phosphate)
SF --- --- --- --- 24.050
Power wash in preparation for exteriorpainting
SF --- --- --- --- 24.051
Each additional story if ladder or
scaffolding is required
1.00
ADD SF --- --- --- --- 24.052
ACID WASH Acid wash galvanized gutter anddownspout
LF --- --- --- --- 24.060

268 H1MD0220001CH0133
24. SHINGLES, STUCCO, MASONRY PAINTING
SPECIFICATIONS UNIT
CONTRACTOR’S
DIRECT JOB COST PRICE
DATABASEITEMNO.MATLS LABOR TOTAL
WOODSHINGLES,ROUGHSIDING
Cedar shingles, paint with brush
1 coat on painted surface SF --- --- --- --- 24.100
Prime and 1 coat SF --- --- --- --- 24.101
Prime and 2 coats SF --- --- --- --- 24.102
Cedar shingles, paint with spray gun
1 coat on painted surface SF --- --- --- --- 24.103
Prime and 1 coat SF --- --- --- --- 24.104
Prime and 2 coats SF --- --- --- --- 24.105
Cedar shingles, stained with brush
1 coat SF --- --- --- --- 24.106
2 coats SF --- --- --- --- 24.107
Cedar shingles, stained with spray gun
1 coat SF --- --- --- --- 24.108
2 coats SF --- --- --- --- 24.109
SMOOTHBRICK ORSTUCCO
With roller
1 coat on painted surface SF --- --- --- --- 24.110
Prime and 1 coat SF --- --- --- --- 24.111
Prime and 2 coats SF --- --- --- --- 24.112
With spray gun
1 coat on painted surface SF --- --- --- --- 24.113
Prime and 1 coat SF --- --- --- --- 24.114
Prime and 2 coats SF --- --- --- --- 24.115
POROUSBRICK ORSTUCCO
With roller
1 coat on painted surface SF --- --- --- --- 24.120
Prime and 1 coat SF --- --- --- --- 24.121
Prime and 2 coats SF --- --- --- --- 24.122
With spray gun
1 coat on painted surface SF --- --- --- --- 24.123
Prime and 1 coat SF --- --- --- --- 24.124
Prime and 2 coats SF --- --- --- --- 24.125

H1MD0220001CH0133 269
24. SIDING PAINTING
SPECIFICATIONS UNIT
CONTRACTOR’S
DIRECT JOB COST PRICE
DATABASEITEMNO.MATLS LABOR TOTAL
Painting costs on every page includeset-up and clean-up time andprotection of items not to be painted.All work shown is at one-story levelexcept as noted.
1.00
SIDING Wood, plywood, asbestos andcomposition siding, paint with brush
1 coat on painted surface SF --- --- --- --- 24.130
Prime and 1 coat SF --- --- --- --- 24.131
Prime and 2 coats SF --- --- --- --- 24.132
Same as above, with roller
1 coat on painted surface SF --- --- --- --- 24.133
Prime and 1 coat SF --- --- --- --- 24.134
Prime and 2 coats SF --- --- --- --- 24.135
Same as above, with spray gun
1 coat on painted surface SF --- --- --- --- 24.136
Prime and 1 coat SF --- --- --- --- 24.137
Prime and 2 coats SF --- --- --- --- 24.138
Same as above, stained, with brush
1 coat SF --- --- --- --- 24.139
2 coats SF --- --- --- --- 24.140
ALUMINUM
SIDING
Aluminum siding, paint with brush
1 coat SF --- --- --- --- 24.150
2 coats SF --- --- --- --- 24.151
Same as above, with spray gun
1 coat SF --- --- --- --- 24.152
2 coats SF --- --- --- --- 24.153
For each additional story up, per coat
ADD SF --- --- --- --- 24.154

270 H1MD0220001CH0133
24. GUTTER AND DOWNSPOUT PAINTING
SPECIFICATIONS UNIT
CONTRACTOR’S
DIRECT JOB COST PRICE
DATA
BASE
ITEM
NO.MATLS LABOR TOTAL
GUTTERAND/ORDOWNSOUT
Metal gutter and/or downspout, paintwith brush
1.00
1 coat on painted surface LF --- --- --- --- 24.200
Prime and 1 coat LF --- --- --- --- 24.201
Prime and 2 coats LF --- --- --- --- 24.202
Wood gutter, 4" x 5", paint with brush
1 coat on painted surface LF --- --- --- --- 24.205
Prime and 1 coat LF --- --- --- --- 24.206
Prime and 2 coats LF --- --- --- --- 24.207

H1MD0220001CH0133 271
24. PORCH CEILING PAINTING
SPECIFICATIONS UNIT
CONTRACTOR’S
DIRECT JOB COST PRICE
DATABASEITEMNO.MATLS LABOR TOTAL
PORCHCEILING
Paint wood porch ceiling with brush 1.00
1 coat on painted surface SF --- --- --- --- 24.210
Prime and 1 coat SF --- --- --- --- 24.211
Prime and 2 coats SF --- --- --- --- 24.212
Paint wood porch ceiling with roller
1 coat on painted surface SF --- --- --- --- 24.213
Prime and 1 coat SF --- --- --- --- 24.214
Prime and 2 coats SF --- --- --- --- 24.215
Paint wood porch ceiling with spray gun
1 coat on painted surface SF --- --- --- --- 24.216
Prime and 1 coat SF --- --- --- --- 24.217
Prime and 2 coats SF --- --- --- --- 24.218

272 H1MD0220001CH0133
24. TRIM AND SOFFIT PAINTING
SPECIFICATIONS UNIT
CONTRACTOR’S
DIRECT JOB COST PRICE
DATABASEITEMNO.MATLS LABOR TOTAL
MOULDINGAND TRIM
Door or window moulding or trim (Ifsame color and finish as wall, include inwall estimate), with brush
1.00
1 coat on painted surface LF --- --- --- --- 24.220
Prime and 1 coat LF --- --- --- --- 24.221
Prime and 2 coats LF --- --- --- --- 24.222
FASCIA ORRAKE
Up to 12" fascia or rake with brush, oneface and edge
1 coat on painted surface LF --- --- --- --- 24.223
Prime and 1 coat LF --- --- --- --- 24.224
Prime and 2 coats LF --- --- --- --- 24.225
SOFFIT,CLOSED
Up to 12" soffit, with brush
1 coat on painted surface LF --- --- --- --- 24.227
Prime and 1 coat LF --- --- --- --- 24.228
Prime and 2 coats LF --- --- --- --- 24.229
Up to 12" soffit, with roller
1 coat on painted surface LF --- --- --- --- 24.230
Prime and 1 coat LF --- --- --- --- 24.231
Prime and 2 coats LF --- --- --- --- 24.232
Up to 12" soffit with spray gun
1 coat on painted surface LF --- --- --- --- 24.233
Prime and 1 coat LF --- --- --- --- 24.234
Prime and 2 coats LF --- --- --- --- 24.235
SOFFIT, OPENWITHRAFTERS
Up to 12" soffit with brush, all sides ofrafters, interior of fascia and undersideof roof sheathing
1 coat on painted surface LF --- --- --- --- 24.240
Prime and 1 coat LF --- --- --- --- 24.241
Prime and 2 coats LF --- --- --- --- 24.242
Up to 12" soffit with spray gun
1 coat on painted surface LF --- --- --- --- 24.243
Prime and 1 coat LF --- --- --- --- 24.244
Prime and 2 coats
LF = Length of soffit
LF --- --- --- --- 24.245

H1MD0220001CH0133 273
24. EAVES PAINTING
SPECIFICATIONS UNIT
CONTRACTOR’S
DIRECT JOB COST PRICE
DATABASEITEMNO.MATLS LABOR TOTAL
EAVES,CLOSED
Up to 12" closed eaves at gable end ofbuilding, with brush
1.00
1 coat on painted surface LF --- --- --- --- 24.250
Prime and 1 coat LF --- --- --- --- 24.251
Prime and 2 coats LF --- --- --- --- 24.252
Up to 12" closed eaves with roller
1 coat on painted surface LF --- --- --- --- 24.253
Prime and 1 coat LF --- --- --- --- 24.254
Prime and 2 coats LF --- --- --- --- 24.255
Up to 12" closed eaves with spray gun
1 coat on painted surface LF --- --- --- --- 24.256
Prime and 1 coat LF --- --- --- --- 24.257
Prime and 2 coats LF --- --- --- --- 24.258
EAVES, OPENWITHRAFTERS
Up to 12" open eaves at gable end ofbuilding, all sides of rafters, interior offascia or rake and underside of roofsheathing, with brush
1 coat on painted surface LF --- --- --- --- 24.260
Prime and 1 coat LF --- --- --- --- 24.261
Prime and 2 coats LF --- --- --- --- 24.262
Up to 12" open eaves with spray gun
1 coat on painted surface LF --- --- --- --- 24.264
Prime and 1 coat LF --- --- --- --- 24.265
Prime and 2 coats
LF = Length of rake
LF --- --- --- --- 24.266

274 H1MD0220001CH0133
24. EXTERIOR PAINTING
SPECIFICATIONS UNIT
CONTRACTOR’S
DIRECT JOB COST PRICE
DATABASEITEMNO.MATLS LABOR TOTAL
LATTICEWORK
Paint all sides of lattice work with brush 1.00
1 coat SF --- --- --- --- 24.270
2 coats SF --- --- --- --- 24.271
SF = Height of lattice workmultiplied by length,measure one face only
Same as above, with spray gun
1 coat SF --- --- --- --- 24.272
2 coats SF --- --- --- --- 24.273
COLUMNSANDPILASTERS
Wood columns and pilasters, paint withbrush
1 coat SF --- --- --- --- 24.275
2 coats SF --- --- --- --- 24.276
Wood columns and pilasters, paint withspray gun
1 coat SF --- --- --- --- 24.277
2 coats SF --- --- --- --- 24.278
WINDOWSCREEN
Paint wood window screen, all sides
1 coat EA --- --- --- --- 24.280
2 coats EA --- --- --- --- 24.281
STORM SASH Paint storm sash all sides
1 coat EA --- --- --- --- 24.282
2 coats EA --- --- --- --- 24.283
BLINDS ANDSHUTTERS
Wood or metal, louvered, both sides andall edges, with brush
1 coat on painted surface EA --- --- --- --- 24.290
Prime and 1 coat EA --- --- --- --- 24.291
Prime and 2 coats EA --- --- --- --- 24.292
Paint blinds and shutters with spray gun
1 coat on painted surface EA --- --- --- --- 24.293
Prime and 1 coat EA --- --- --- --- 24.294
Prime and 2 coats EA --- --- --- --- 24.295

H1MD0220001CH0133 275
24. FENCE PAINTING
SPECIFICATIONS UNIT
CONTRACTOR’S
DIRECT JOB COST PRICE
DATABASEITEMNO.MATLS LABOR TOTAL
FENCE, PLAIN Plain board fence, paint all sides 1.00
Brush 1 coat SF --- --- --- --- 24.300
2 coats SF --- --- --- --- 24.301
Spray 1 coat SF --- --- --- --- 24.302
2 coats SF --- --- --- --- 24.303
SF = Height of fence multipliedby length of fence, measureone face only
PICKET Picket fence, all sides
Brush 1 coat SF --- --- --- --- 24.310
2 coats SF --- --- --- --- 24.311
Spray 1 coat SF --- --- --- --- 24.312
2 coats SF --- --- --- --- 24.313
CHAIN LINK Chain link fence, all sides
Brush 1 coat SF --- --- --- --- 24.320
2 coats SF --- --- --- --- 24.321
Roller 1 coat SF --- --- --- --- 24.322
2 coats SF --- --- --- --- 24.323
Spray 1 coat SF --- --- --- --- 24.324
2 coats SF --- --- --- --- 24.325

276 H1MD0220001CH0133
24. DECK AND PORCH FLOOR PAINTING
SPECIFICATIONS UNIT
CONTRACTOR’S
DIRECT JOB COST PRICE
DATABASEITEMNO.MATLS LABOR TOTAL
WOOD DECK OR PORCHFLOOR, TOPSIDE
Paint with brush 1.00
1 coat on painted surface SF --- --- --- --- 24.350
Prime and 1 coat SF --- --- --- --- 24.351
Prime and 2 coats SF --- --- --- --- 24.352
Paint with roller
1 coat on painted surface SF --- --- --- --- 24.353
Prime and 1 coat SF --- --- --- --- 24.354
Prime and 2 coats SF --- --- --- --- 24.355
Paint with spray gun
1 coat on painted surface SF --- --- --- --- 24.356
Prime and 1 coat SF --- --- --- --- 24.357
Prime and 2 coats SF --- --- --- --- 24.358
Stain and/or clear finish with brush
1 coat SF --- --- --- --- 24.359
2 coats SF --- --- --- --- 24.360
3 coats SF --- --- --- --- 24.361
Stain and/or clear finish with roller
1 coat SF --- --- --- --- 24.362
2 coats SF --- --- --- --- 24.363
3 coats SF --- --- --- --- 24.364
Stain and/or clear finish with spray gun
1 coat SF --- --- --- --- 24.365
2 coats SF --- --- --- --- 24.366
3 coats SF --- --- --- --- 24.367
CONCRETEPORCH ORDECK
Paint top surface and sides of concreteporch or deck slab with brush
1 coat SF --- --- --- --- 24.368
2 coats SF --- --- --- --- 24.369
Paint with roller
1 coat SF --- --- --- --- 24.370
2 coats SF --- --- --- --- 24.371

H1MD0220001CH0133 277
24. DECK AND PORCH PAINTING
SPECIFICATIONS UNIT
CONTRACTOR’S
DIRECT JOB COST PRICE
DATABASEITEMNO.MATLS LABOR TOTAL
DECK ORPORCHRAILING
Paint all sides of railings and balusters with brush
1.00
1 coat SF --- --- --- --- 24.375
2 coats SF --- --- --- --- 24.376
SF = Height of railing multiplied bylength of railingmeasure one side only
Paint with spray gun
1 coat SF --- --- --- --- 24.377
2 coats SF --- --- --- --- 24.378
Stain and/or clear finish with brush
1 coat SF --- --- --- --- 24.379
2 coats SF --- --- --- --- 24.380
3 coats SF --- --- --- --- 24.381
Stain and/or clear finish with spray gun
1 coat SF --- --- --- --- 24.382
2 coats SF --- --- --- --- 24.383
3 coats SF --- --- --- --- 24.384
WOOD STEPS Paint all surfaces (top, bottom, sides) ofsteps and stringers, with brush
1 coat on painted surface SF --- --- --- --- 24.386
Prime and 1 coat SF --- --- --- --- 24.387
Prime and 2 coats SF --- --- --- --- 24.388
SF = SF area, measure top sideonly of steps
Paint with spray gun
1 coat on painted surface SF --- --- --- --- 24.389
Prime and 1 coat SF --- --- --- --- 24.390
Prime and 2 coats SF --- --- --- --- 24.391
Stain and/or clear finish with brush
1 coat on painted surface SF --- --- --- --- 24.392
Prime and 1 coat SF --- --- --- --- 24.393
Prime and 2 coats SF --- --- --- --- 24.394
Stain and/or clear finish with spray gun
1 coat on painted surface SF --- --- --- --- 24.395
Prime and 1 coat SF --- --- --- --- 24.396
Prime and 2 coats SF --- --- --- --- 24.397

278 H1MD0220001CH0133
24. ENTRANCE DOOR PAINTING
SPECIFICATIONS UNIT
CONTRACTOR’S
DIRECT JOB COST PRICE
DATABASEITEMNO.MATLS LABOR TOTAL
COLONIALENTRANCE
Colonial entrance for single door, paintwith brush
1.00
1 coat on painted surface EA --- --- --- --- 24.400
Prime and 1 coat EA --- --- --- --- 24.401
Prime and 2 coats EA --- --- --- --- 24.402
Colonial entrance for single door with 2sidelights
1 coat on painted surface EA --- --- --- --- 24.404
Prime and 1 coat EA --- --- --- --- 24.405
Prime and 2 coats EA --- --- --- --- 24.406
FLUSHENTRANCEDOOR
Paint one side only, including jamb andcasing, with brush
1 coat on painted surface EA --- --- --- --- 24.410
Prime and 1 coat EA --- --- --- --- 24.411
Prime and 2 coats EA --- --- --- --- 24.412
Paint one side only, including jamb andcasing, with roller
1 coat on painted surface EA --- --- --- --- 24.413
Prime and 1 coat EA --- --- --- --- 24.414
Prime and 2 coats EA --- --- --- --- 24.415
Stain and/or clear finish one side only,with roller
1 coat EA --- --- --- --- 24.416
2 coats EA --- --- --- --- 24.417
3 coats EA --- --- --- --- 24.418
2 TO 6 PANELENTRANCEDOOR
Paint one side only, including jamb andcasings, with brush
1 coat on painted surface EA --- --- --- --- 24.419
Prime and 1 coat EA --- --- --- --- 24.420
Prime and 2 coats EA --- --- --- --- 24.421
Stain and/or clear finish one side onlywith brush
1 coat EA --- --- --- --- 24.422
2 coats EA --- --- --- --- 24.423
3 coats EA --- --- --- --- 24.424

H1MD0220001CH0133 279
24. DOORS WITH LIGHTS PAINTING
SPECIFICATIONS UNIT
CONTRACTOR’S
DIRECT JOB COST PRICE
DATABASEITEMNO.MATLS LABOR TOTAL
2 TO 6 LIGHTDOOR
Paint one side only of flush or paneldoor, including casing and jamb, withbrush
1.00
1 coat on painted surface EA --- --- --- --- 24.425
Prime and 1 coat EA --- --- --- --- 24.426
Prime and 2 coats EA --- --- --- --- 24.427
Stain and/or clear finish, with brush
1 coat EA --- --- --- --- 24.428
2 coats EA --- --- --- --- 24.429
3 coats EA --- --- --- --- 24.430
9 TO 15 LIGHTFRENCHDOOR
Paint one side only, including jamb andcasing, with brush
1 coat on painted surface EA --- --- --- --- 24.431
Prime and 1 coat EA --- --- --- --- 24.432
Prime and 2 coats EA --- --- --- --- 24.433
Stain and/or clear finish, with brush
1 coat EA --- --- --- --- 24.434
2 coats EA --- --- --- --- 24.435
3 coats EA --- --- --- --- 24.436

280 H1MD0220001CH0133
24. GLIDING PATIO DOOR PAINTING
SPECIFICATIONS UNIT
CONTRACTOR’S
DIRECT JOB COST PRICE
DATABASEITEMNO.MATLS LABOR TOTAL
GLIDINGPATIO DOOR
Paint two panels one side only,including trim, jamb and casings, withbrush
1.00
1 coat on painted surface EA --- --- --- --- 24.438
Prime and 1 coat EA --- --- --- --- 24.439
Prime and 2 coats EA --- --- --- --- 24.440
Stain and/or clear finish with brush
1 coat EA --- --- --- --- 24.441
2 coats EA --- --- --- --- 24.442
3 coats EA --- --- --- --- 24.443
Paint three panels one side only,including trim, jamb and casings, withbrush
1 coat on painted surface EA --- --- --- --- 24.444
Prime and 1 coat EA --- --- --- --- 24.445
Prime and 2 coats EA --- --- --- --- 24.446
Stain and/or clear finish with brush
1 coat EA --- --- --- --- 24.447
2 coats EA --- --- --- --- 24.448
3 coats EA --- --- --- --- 24.449

H1MD0220001CH0133 281
24. WINDOW PAINTING, EXTERIOR
SPECIFICATIONS UNIT
CONTRACTOR’S
DIRECT JOB COST PRICE
DATABASEITEMNO.MATLS LABOR TOTAL
WINDOW Paint one side only, wood or metaldouble hung, sliding, casement, awningwindow or fixed sash, including trim
1 light
1.00
1 coat on painted surface EA --- --- --- --- 24.450
Prime and 1 coat EA --- --- --- --- 24.451
Prime and 2 coats EA --- --- --- --- 24.452
2 lights
1 coat on painted surface EA --- --- --- --- 24.453
Prime and 1 coat EA --- --- --- --- 24.454
Prime and 2 coats EA --- --- --- --- 24.455
4 lights
1 coat on painted surface EA --- --- --- --- 24.456
Prime and 1 coat EA --- --- --- --- 24.457
Prime and 2 coats
8 lights
EA --- --- --- --- 24.458
1 coat on painted surface EA --- --- --- --- 24.459
Prime and 1 coat EA --- --- --- --- 24.460
Prime and 2 coats
12 lights
EA --- --- --- --- 24.461
1 coat on painted surface EA --- --- --- --- 24.462
Prime and 1 coat EA --- --- --- --- 24.463
Prime and 2 coats
16 lights
EA --- --- --- --- 24.464
1 coat on painted surface EA --- --- --- --- 24.465
Prime and 1 coat EA --- --- --- --- 24.466
Prime and 2 coats
24 lights
EA --- --- --- --- 24.467
1 coat on painted surface EA --- --- --- --- 24.468
Prime and 1 coat EA --- --- --- --- 24.469
Prime and 2 coats
EA = Each window
EA --- --- --- --- 24.470
SCAFFOLD- ING
Per additional story, if ladder orscaffolding is required
ADD EA = Each window
EA --- --- --- --- 24.471

282 H1MD0220001CH0133
24. GARAGE DOOR PAINTING
SPECIFICATIONS UNIT
CONTRACTOR’S
DIRECT JOB COST PRICE
DATABASEITEMNO.MATLS LABOR TOTAL
GARAGEDOOR
Paint one side, including jambs andcasings, with brush, 9'-0" x 7'-0" door
1.00
1 coat on painted surface EA --- --- --- --- 24.481
Prime and 1 coat EA --- --- --- --- 24.482
Prime and 2 coats EA --- --- --- --- 24.483
Paint one side with spray gun
1 coat on painted surface EA --- --- --- --- 24.484
Prime and 1 coat EA --- --- --- --- 24.485
Prime and 2 coats EA --- --- --- --- 24.486
Paint one side, including jambs andcasings, with brush, 16'-0" x 7'-0" door
1 coat on painted surface EA --- --- --- --- 24.487
Prime and 1 coat EA --- --- --- --- 24.488
Prime and 2 coats EA --- --- --- --- 24.489
Paint one side with spray gun
1 coat on painted surface EA --- --- --- --- 24.491
Prime and 1 coat EA --- --- --- --- 24.492
Prime and 2 coats EA --- --- --- --- 24.493

H1MD0220001CH0133 283
24. PAINTING PREPARATION, INTERIOR
SPECIFICATIONS UNIT
CONTRACTOR’S
DIRECT JOB COST PRICE
DATABASEITEMNO.MATLS LABOR TOTAL
PAINTREMOVAL
Remove existing paint or varnish withchemicals, 1 or 2 layers per coat of paintremover
1.00
Interior trim LF --- --- --- --- 24.500
Paneling SF --- --- --- --- 24.501
STRIP
CABINETS
Remove existing paint or varnish withchemicals
Bookshelves or cabinets(Including backing)
SF --- --- --- --- 24.510
Cabinet doors (2 sides)SF = Front square footage of
shelves, cabinets or doors
SF --- --- --- --- 24.511
BURNING OFF Burn off plain surfaces, non-lead basedpaint
SF --- --- --- --- 24.520
Burn off interior trim LF --- --- --- --- 24.521
De-gloss walls or trim SF --- --- --- --- 24.522
SANDING ANDFILLING
Fill holes and small cracks in walls orceiling
SF --- --- --- --- 24.530
Sand and fill trim LF --- --- --- --- 24.531
Caulk trim LF --- --- --- --- 24.532
HARDWARE Cabinet hardware removal andreplacement
EA --- --- --- --- 24.540
Lockset removal and replacement EA --- --- --- --- 24.541
WASHING Wash interior with TSP beforerepainting
Smooth walls SF --- --- --- --- 24.550
Textured walls SF --- --- --- --- 24.551
Door jamb, casing and trim EA --- --- --- --- 24.552
Window, including all trim EA --- --- --- --- 24.553
Mouldings LF --- --- --- --- 24.554

284 H1MD0220001CH0133
24. WINDOW PAINTING, INTERIOR
SPECIFICATIONS UNIT
CONTRACTOR’S
DIRECT JOB COST PRICE
DATABASEITEMNO.MATLS LABOR TOTAL
WINDOW Paint interior only, wood or metal doublehung, sliding, casement, awningwindow or fixed sash, including allinterior trim
1 light
1.00
1 coat on painted surface EA --- --- --- --- 24.600
Prime and 1 coat EA --- --- --- --- 24.601
Prime and 2 coats
2 lights
EA --- --- --- --- 24.602
1 coat on painted surface EA --- --- --- --- 24.603
Prime and 1 coat EA --- --- --- --- 24.604
Prime and 2 coats
4 lights
EA --- --- --- --- 24.605
1 coat on painted surface EA --- --- --- --- 24.606
Prime and 1 coat EA --- --- --- --- 24.607
Prime and 2 coats
8 lights
EA --- --- --- --- 24.608
1 coat on painted surface EA --- --- --- --- 24.609
Prime and 1 coat EA --- --- --- --- 24.610
Prime and 2 coats
12 lights
EA --- --- --- --- 24.611
1 coat on painted surface EA --- --- --- --- 24.612
Prime and 1 coat EA --- --- --- --- 24.613
Prime and 2 coats
16 lights
EA --- --- --- --- 24.614
1 coat on painted surface EA --- --- --- --- 24.615
Prime and 1 coat EA --- --- --- --- 24.616
Prime and 2 coats
24 lights
EA --- --- --- --- 24.617
1 coat on painted surface EA --- --- --- --- 24.618
Prime and 1 coat EA --- --- --- --- 24.619
Prime and 2 coats
EA = Each window
EA --- --- --- --- 24.620
GRILLE Divided light grille
Paint 1 coat EA --- --- --- --- 24.621
Paint 2 coats
EA = Each light
EA --- --- --- --- 24.622

H1MD0220001CH0133 285
24. WINDOW STAINING, INTERIOR
SPECIFICATIONS UNIT
CONTRACTOR’S
DIRECT JOB COST PRICE
DATABASEITEMNO.MATLS LABOR TOTAL
WINDOW Stain and/or clear finish interior only,wood double hung, sliding, casement,awning window or fixed sash, includingall interior trim
1.00
1 light 1 coat EA --- --- --- --- 24.630
2 coats EA --- --- --- --- 24.631
3 coats EA --- --- --- --- 24.632
2 lights 1 coat EA --- --- --- --- 24.633
2 coats EA --- --- --- --- 24.634
3 coats EA --- --- --- --- 24.635
4 lights 1 coat EA --- --- --- --- 24.636
2 coats EA --- --- --- --- 24.637
3 coats EA --- --- --- --- 24.638
8 lights 1 coat EA --- --- --- --- 24.639
2 coats EA --- --- --- --- 24.640
3 coats EA --- --- --- --- 24.641
12 lights 1 coat EA --- --- --- --- 24.642
2 coats EA --- --- --- --- 24.643
3 coats EA --- --- --- --- 24.644
16 lights 1 coat EA --- --- --- --- 24.645
2 coats EA --- --- --- --- 24.646
3 coats EA --- --- --- --- 24.647
24 lights 1 coat EA --- --- --- --- 24.648
2 coats EA --- --- --- --- 24.649
3 coats EA --- --- --- --- 24.650
GRILLE Divided light grille, stain and/or clearfinish
1 coat EA --- --- --- --- 24.651
2 coats
EA = Each light
EA --- --- --- --- 24.652

286 H1MD0220001CH0133
24. DOOR PAINTING, INTERIOR
SPECIFICATIONS UNIT
CONTRACTOR’S
DIRECT JOB COST PRICE
DATABASEITEMNO.MATLS LABOR TOTAL
INTERIORDOOR
Paint both sides of flush or panel door,including casing and jamb, with brush
1.00
1 coat on painted surface EA --- --- --- --- 24.660
Prime and 1 coat EA --- --- --- --- 24.661
Prime and 2 coats EA --- --- --- --- 24.662
Paint both sides with roller
1 coat on painted surface EA --- --- --- --- 24.663
Prime and 1 coat EA --- --- --- --- 24.664
Prime and 2 coats EA --- --- --- --- 24.665
Stain and/or clear finish both sides
1 coat EA --- --- --- --- 24.666
2 coats EA --- --- --- --- 24.667
3 coats EA --- --- --- --- 24.668
LOUVER
DOOR
Paint both sides of louver door,including casing and jamb, with brush
1 coat on painted surface EA --- --- --- --- 24.670
Prime and 1 coat EA --- --- --- --- 24.671
Prime and 2 coats EA --- --- --- --- 24.672
Stain and/or clear finish both sides
1 coat EA --- --- --- --- 24.673
2 coats EA --- --- --- --- 24.674
3 coats EA --- --- --- --- 24.675
BIFOLDDOORS
Paint both sides of bifold unit up to 5'-0"wide opening, including casing andjamb, with brush
1 coat on painted surface EA --- --- --- --- 24.680
Prime and 1 coat EA --- --- --- --- 24.681
Prime and 2 coats EA --- --- --- --- 24.682
Stain and/or clear finish both sides
1 coat EA --- --- --- --- 24.683
2 coats EA --- --- --- --- 24.684
3 coats EA --- --- --- --- 24.685

H1MD0220001CH0133 287
24. INTERIOR WALL PAINTING
SPECIFICATIONS UNIT
CONTRACTOR’S
DIRECT JOB COST PRICE
DATABASEITEMNO.MATLS LABOR TOTAL
PLASTER ORPLASTER- BOARD
Smooth finish plaster or plasterboardwith roller
1.00
1 coat on painted surface SF --- --- --- --- 24.700
Prime and 1 coat SF --- --- --- --- 24.701
Prime and 2 coats SF --- --- --- --- 24.702
Smooth finish plaster or plasterboard, with spray gun
1 coat on painted surface SF --- --- --- --- 24.703
Prime and 1 coat SF --- --- --- --- 24.704
Prime and 2 coats SF --- --- --- --- 24.705
PANELING Paint wood panelled walls, with brush
1 coat on painted surface SF --- --- --- --- 24.710
Prime and 1 coat SF --- --- --- --- 24.711
Prime and 2 coats SF --- --- --- --- 24.712
Paint wood panelled walls, with roller
1 coat on painted surface SF --- --- --- --- 24.713
Prime and 1 coat SF --- --- --- --- 24.714
Prime and 2 coats SF --- --- --- --- 24.715
Stain and/or clear finish on panelledwalls with roller
1 coat SF --- --- --- --- 24.716
2 coats SF --- --- --- --- 24.717
3 coats SF --- --- --- --- 24.718
MOULDING Base, ceiling moulding, chair rail or dooror window trim up to 6" (if same colorand finish as wall or ceiling, include inwall or ceiling estimate)
1 coat on painted surface LF --- --- --- --- 24.720
Prime and 1 coat LF --- --- --- --- 24.721
Prime and 2 coats LF --- --- --- --- 24.722
Same as above with stain and/or clearfinish
1 coat LF --- --- --- --- 24.723
2 coats LF --- --- --- --- 24.724
3 coats LF --- --- --- --- 24.725

288 H1MD0220001CH0133
24. INTERIOR CEILING PAINTING
SPECIFICATIONS UNIT
CONTRACTOR’S
DIRECT JOB COST PRICE
DATABASEITEMNO.MATLS LABOR TOTAL
SMOOTHCEILING
Smooth finish plaster or plasterboard,with roller
1.00
1 coat on painted surface SF --- --- --- --- 24.730
Prime and 1 coat SF --- --- --- --- 24.731
Prime and 2 coats SF --- --- --- --- 24.732
Smooth finish plaster or plasterboard,with spray gun
1 coat on painted surface SF --- --- --- --- 24.733
Prime and 1 coat SF --- --- --- --- 24.734
Prime and 2 coats SF --- --- --- --- 24.735
TEXTUREDCEILING
Textured ceiling, with roller
1 coat on painted surface SF --- --- --- --- 24.736
Prime and 1 coat SF --- --- --- --- 24.737
Prime and 2 coats SF --- --- --- --- 24.738
Textured ceiling with spray gun
1 coat on painted surface SF --- --- --- --- 24.740
Prime and 1 coat SF --- --- --- --- 24.741
Prime and 2 coats SF --- --- --- --- 24.742
WOODCEILING
Wood tongue and groove ceiling, withbrush
1 coat on painted surface SF --- --- --- --- 24.745
Prime and 1 coat SF --- --- --- --- 24.746
Prime and 2 coats SF --- --- --- --- 24.747
Wood tongue and groove ceiling, withroller
1 coat on painted surface SF --- --- --- --- 24.749
Prime and 1 coat SF --- --- --- --- 24.750
Prime and 2 coats SF --- --- --- --- 24.751
Wood tongue and groove ceiling, withspray gun
1 coat on painted surface SF --- --- --- --- 24.752
Prime and 1 coat SF --- --- --- --- 24.753
Prime and 2 coats SF --- --- --- --- 24.754
CATHEDRAL
CEILING
If ladder or scaffolding are required forpainting or staining not over 300 SF ofceiling area
Up to 13 feet above floor ADD EA --- --- --- --- 24.755
14 to 19 feet above floor ADD EA --- --- --- --- 24.756
20 to 25 feet above floor ADD EA --- --- --- --- 24.757

H1MD0220001CH0133 289
24. INTERIOR MILLWORK AND TRIM PAINTING
SPECIFICATIONS UNIT
CONTRACTOR’S
DIRECT JOB COST PRICE
DATABASEITEMNO.MATLS LABOR TOTAL
CASEDOPENING
Paint door jambs and 2 sides casing,with brush, 3'-0" opening
1.00
1 coat on painted surface EA --- --- --- --- 24.760
Prime and 1 coat EA --- --- --- --- 24.761
Prime and 2 coats EA --- --- --- --- 24.762
Same as above, 6'-0" opening
1 coat on painted surface EA --- --- --- --- 24.763
Prime and 1 coat EA --- --- --- --- 24.764
Prime and 2 coats EA --- --- --- --- 24.765
Stain and/or clear finish on 3'-0" opening
1 coat EA --- --- --- --- 24.766
2 coats EA --- --- --- --- 24.767
3 coats EA --- --- --- --- 24.768
Stain and/or clear finish on 6'-0" opening
1 coat EA --- --- --- --- 24.769
2 coats EA --- --- --- --- 24.770
3 coats EA --- --- --- --- 24.771
RADIATOR Paint entire radiator with brush
1 coat EA --- --- --- --- 24.780
2 coats EA --- --- --- --- 24.781
Paint entire radiator with spray gun
1 coat EA --- --- --- --- 24.782
2 coats EA --- --- --- --- 24.783
STAIR
HANDRAIL
Paint handrail, balusters and newel post,one flight
1 coat on painted surface EA --- --- --- --- 24.790
Prime and 1 coat EA --- --- --- --- 24.791
Prime and 2 coats
EA = Complete job
EA --- --- --- --- 24.792

290 H1MD0220001CH0133
24. CLOSET AND SHELF PAINTING
SPECIFICATIONS UNIT
CONTRACTOR’S
DIRECT JOB COST PRICE
DATABASEITEMNO.MATLS LABOR TOTAL
CLOTHESCLOSET
Paint shelf, hookstrip and base mouldingonly
1.00
1 coat on painted surface LF --- --- --- --- 24.800
Prime and 1 coat LF --- --- --- --- 24.801
Prime and 2 coats
LF = Width of closet
LF --- --- --- --- 24.802
LINENCLOSET
24" deep shelves, 12" OC verticallymeasured, paint shelves and trim only
1 coat on painted surface LF --- --- --- --- 24.810
Prime and 1 coat LF --- --- --- --- 24.811
Prime and 2 coats
LF = Width of closet
LF --- --- --- --- 24.812
SHELVES Paint open shelves, no backing orvertical supports, top, bottom andedges, with brush, up to 12" shelves
1 coat on painted surface LF --- --- --- --- 24.820
Prime and 1 coat LF --- --- --- --- 24.821
Prime and 2 coats LF --- --- --- --- 24.822
Stain and/or clear finish on openshelves with brush
1 coat LF --- --- --- --- 24.823
2 coats LF --- --- --- --- 24.824
3 coats LF --- --- --- --- 24.825

H1MD0220001CH0133 291
24. BOOKCASE AND CABINET PAINTING
SPECIFICATIONS UNIT
CONTRACTOR’S
DIRECT JOB COST PRICE
DATABASEITEMNO.MATLS LABOR TOTAL
Multiply height of bookcase, cabinet ordoor by the width, measuring one faceonly.
Costs shown include painting all sidesand edges of shelves and trim and oneside of backing
1.00
BOOKCASEANDCABINETS
Paint bookcase or cabinet with brush
Shelves 12" deep
1 coat on painted surface SF --- --- --- --- 24.850
Prime and 1 coat SF --- --- --- --- 24.851
Prime and 2 coats
Shelves 24" deep
SF --- --- --- --- 24.852
1 coat on painted surface SF --- --- --- --- 24.853
Prime and 1 coat SF --- --- --- --- 24.854
Prime and 2 coats SF --- --- --- --- 24.855
Stain and/or clear finish on bookcase orcabinet
Shelves 12" deep
1 coat on painted surface SF --- --- --- --- 24.857
Prime and 1 coat SF --- --- --- --- 24.858
Prime and 2 coats
Shelves 24" deep
SF --- --- --- --- 24.859
1 coat on painted surface SF --- --- --- --- 24.860
Prime and 1 coat SF --- --- --- --- 24.861
Prime and 2 coats SF --- --- --- --- 24.862
CABINET
DOOR
Paint 2 sides and all edges of cabinetdoors, with brush
1 coat on painted surface SF --- --- --- --- 24.863
Prime and 1 coat SF --- --- --- --- 24.864
Prime and 2 coats SF --- --- --- --- 24.865
Stain and/or clear finish on cabinetdoors
1 coat SF --- --- --- --- 24.866
2 coats SF --- --- --- --- 24.867
3 coats SF --- --- --- --- 24.868

292 H1MD0220001CH0133
24. WALLPAPER REPAIRS
SPECIFICATIONS UNIT
CONTRACTOR’S
DIRECT JOB COST PRICE
DATABASEITEMNO.MATLS LABOR TOTAL
REMOVEWALLPAPER
Remove wallpaper from plaster orplasterboard # Score wallpaper every 6" vertically
and horizontally # Apply wallpaper remover and
scrape
1.00
One layer SF --- --- --- --- 24.900
Several layers SF --- --- --- --- 24.901
Wash off glue with TSP solution afterremoving wallpaper from wall
SF --- --- --- --- 24.902
REPASTINGSEAMS
Repaste loose seam with dilutedadhesive, roll smooth and clean up
LF = Seams
LF --- --- --- --- 24.910
REPAIR TORNWALLCOVERING
Match a large scrap of wall covering tothe pattern, cut through both layers andreplace damaged material with pastedpatch
SF --- --- --- --- 24.911
ELIMINATEBUBBLES
Puncture bubble near edge, injectdiluted paste with syringe and press wallcovering to wall
EA = Each bubble
EA --- --- --- --- 24.920
ELIMINATEWRINKLE
Eliminate wrinkle in wall covering # Make cut in wrinkle area # Lift flaps and clean out area under
wrinkle # Apply adhesive to back of flap and
to wall # Smooth with brush, roll smooth
and clean up
EA = Each wrinkle
EA --- --- --- --- 24.921

H1MD0220001CH0133 293
24. WALLPAPERING
SPECIFICATIONS UNIT
CONTRACTOR’S
DIRECT JOB COST PRICE
DATABASEITEMNO.MATLS LABOR TOTAL
Wall covering applications shownbelow are for work in room withceiling up to 8 feet above floor
WALLPAPER Wallpaper applied to walls, 29 SF perroll
Wallpaper @ $11 per roll SF --- --- --- --- 24.930
$14 per roll SF --- --- --- --- 24.931
$17 per roll SF --- --- --- --- 24.932
$20 per roll SF --- --- --- --- 24.933
$25 per roll SF --- --- --- --- 24.934
$30 per roll SF --- --- --- --- 24.935
VINYL Vinyl wall covering applied to walls,
29 SF per roll
Vinyl coated @ $11 per roll SF --- --- --- --- 24.940
Solid vinyl @ $15 per roll SF --- --- --- --- 24.941
Fabric back vinyl @ $18 per roll SF --- --- --- --- 24.942
GRASSCLOTH
Grass cloth applied to walls,
36 SF per roll
Grass cloth @ $21 per roll SF --- --- --- --- 24.950
$32 per roll SF --- --- --- --- 24.951
$44 per roll SF --- --- --- --- 24.952
HIGH CEILING If ladder or scaffolding are required for hanging wallpaper
ADDSF = Each SF of wallpaper hung
SF --- --- --- --- 24.960
OVER OLDPAPER
For hanging paper over old layer(s) ofwallpaper
ADD SF --- --- --- --- 24.961

294 H1MD0220001CH0133
25. CLEAN-UP AND HAULING
SPECIFICATIONS UNIT
CONTRACTOR’S
DIRECT JOB COST PRICE
DATABASEITEMNO.MATLS LABOR TOTAL
DEMOLITIONDEBRIS
Removal of debris from demolition work,loading masonry, plaster, roofing andother tear-out debris # Load 3/4 ton truck by hand from
building # Haul to dumping ground within 5
miles and unload # Dumping fees not included
EA --- --- --- --- 25.000
EA = Total cost for complete job ofloading, hauling and unloading
MAIDSERVICE
Complete cleaning of interior areaaffected by repair and alteration work,including windows inside and out
SF --- --- --- --- 25.001
DUMPSTER Dumpster delivery and haul away whenfilled, 20-30 cubic yards
1.00 3 days at job EA --- --- --- --- 25.002
3 weeks at job EA --- --- --- --- 25.003

H1MD0220001CH0133 295
25. CLEAN-UP AND HAULING
SPECIFICATIONS UNIT
CONTRACTOR’S
DIRECT JOB COST PRICE
DATABASEITEMNO.MATLS LABOR TOTAL
DIRT Shovel dirt by hand into truck from pilesand haul to dumping ground up to 5miles
EA = Each 3/4 ton truckload
EA --- --- --- --- 25.010
ROOFING ANDSCRAPLUMBER
Removal of roofing materials and scraplumber from piles
EA = Each 3/4 ton truckload
EA --- --- --- --- 25.020
BATHROOMAND KITCHEN
Remove old tile, plumbing fixtures,cabinets and appliances (does notinclude disconnecting fixtures)
EA = Each 3/4 ton truckload
EA --- --- --- --- 25.030
1.00

INDEX
296
A
Accessories, exterior door 112
Access ramp handrails 97
Access ramp, wood framed 96
Air conditioning 183
Alterations
exterior door 114
interior door 222
kitchen 243
Aluminum siding
remove 12
replace 101
valley flashing 76
Antenna 256
Appliance cord 186
Areawalls and areaways 28
Asphalt driveway 37
Asphalt shingle repair 64
Attic
alterations 60,63
insulation 206
B
Baffle 206
Ballast 187
Basement
areaway 28
insulation 205
Base and shoe moulding
install 230,231
tearout 26
Bathroom accessories 255
Bathtub
faucets 171
parts 170
Beam, replace 55
Bearing wall, remove 19
Bidet and faucet
drain 155
replacement 154
Bifold door alterations 223
Block demolition 5
Blown-in insulation 244
Book and storage shelves 232
Bookcase and cabinet painting 291
Bookshelves 233
Bricks
clean 41
demolition 5
replace 43
repoint 42
Build items in yard 251
Building permit fee 2
Bulkhead and soffit 244
Bypass door alterations 223
C
Cabinets
painting 291
tearout 26
Carpeting tearout 189
Casing
exterior trim, replace 103
interior trim, replace 227
tearout 26
trim 226
Casings and jambs 226,227
Caulking 212
Cedar shingles tearout 12
Ceiling
exhaust fan, replace 196
fans 197
moulding 228
painting 288
patching 215
removal 25
steel grid suspension 217
tile, removal 25
Cellulose, blown-in 207
Ceramic tile
fixtures 211
repair 210,258
tearout 26
Chain link fence tearout 15
Chair rail
install 229
tearout 26
Chimney repair 50,51,52
Chrome bathroom accessories 255
Clapboard siding, replace 98
Cleanup 294,295
Closets 234,235,236
Closet system, ventilated 237
Clothes closet 234,235
Clothes dryer duct repair 200
Coaxial cable jack, replace 189
Column, replace 56
Composition ceiling tile 216
Compressor/condenser pumps 185
Concrete
demolition 4,6
pad 24
sawing 4
screed coat 35
slab demolition 4
step patching 39
wall patching 38
Cooktop, lower 246
Copper supply line, replace 144
Corner board, replace 99
Countertop
edging 243
lower work area 245
replace lavatory top 160
tearout 26
Cover plates, replace 190
Crawl space
insulation 204
screed coat 35
D
Deadbolt lock, remove, install 122
Deck
column, replace 86
floor, paint 276
framing, repair 87
painting 277
post or column, replace 86
tearout 14
De-icing cord 84
Demolition
block 5
brick 5
debris 294
stone 5
Dimmer switches, install 194
Dirt and demolition debris 294
Disappearing stairway 240
Dishwasher repair 178
Disposer repair 179
Divided light grilles 139
Door, exterior
accessories 113
alterations 116
casing, replace 115
chimes, replace 189
double 104
entrance doors 104,105,106
garage door painting 282
gliding patio door painting 280
hinges, replace 118
metal entrance, pre-hung 106
open concrete wall for 6
open exterior wall for 7
painting 278,279,280
removal 24
replace with window 142
slab, replace 108,109
wood, entrance, replace 104,105
Door, interior
bifold, alterations 223
hinges, replace 274
painting 286
pocket, alterations 223
pre-hung 221
slab, replace 218,219
Double up rafters (sistering) 60
Downspout
painting 270
remove, replace 74
repair 75
tearout 13

INDEX
297
Drain
bidet 155
cleaning 147
lavatory 161,164,165
lavatory, repair 165
lavatory, replace 164
shower 166
snake out 153,167
Driveway, repair 37
Drywall
ceiling 214
ceiling patching 215
wall 208
wall patching 209
Ductwork
for dryer 200
for exhaust fan 197,199
re-locate 7,10,11
Ductwrap 199
Dumpster 294
Dutch door, field-hung 107
E
Eaves, painting 273
Electric
heat, replace 183
items, replace 189
outlet, re-locate 7,10,11
switch replacement 191,192
water heater 150
Entrance door
field-hung, wood 104
frame, replace 110
painting 278
pre-hung metal 106
pre-hung wood 105
remove 24
Exhaust fan
ceiling 197
wall 198
Exterior painting 274
Exterior trim, tearout 12
F
Fascia, replace 90
Faucets
bathtub 171
kitchen 175
lavatory 162
Fence
painting 275
parts, replace 249
replace 248,249
tearout 15
Fiberglass, blown-in 202
Field-hung doors
exterior 104,107
interior 220
Fireplace and chimney repair 52,53
Flashing
aluminum valley, replace 76
copper valley, replace 77
repairs 78,79,80
replace 76,77
skylight, aluminum, repair 79
skylight, copper, repair 78
Floor
buckled 264,265
finishing 260,261
hardwood, alterations 260
hardwood, install 16,17,18,19
hardwood, vinyl tile over 259
squeaky 262, 263
tearout 22
Flower bed border, install 32
Flues in existing chimney 51
Footing, replace 56
Fort set, assemble 251
French doors, field-hung 107
French drain, install 30
Front hearth repairs 53
Furnace filters, replace 182
G
Garage door
accessories 135
adjustments 137
opener and accessories 134
opener, repair 136
painting 282
removal 24
weatherstripping 127
Gas
pilot, relight 182
water heater 151
Gate posts, repair 250
Glass replacement 124
Gliding patio door, painting 280
Grab bar, install 254
Gutter
cleaning 83
painting 270
remove and re-install 70,71
repair 72,73
tearout 13
Gypsum drywall 208,209,214,215
H
Handrail, tearout 27
Laundry tray pump system 145
Laundry tub repairs 181
Hanging hook, bathroom 255
Hardware removal 123
Hardwood flooring
alterations 260
buckled, repair 264,265
finishing 260,261
squeaky, repair 262,263
vinyl tile over 259
Hauling 294,295
Hinges
exterior door 118,119
replace 224,225
reverse on exterior door 119
reverse on interior door 225
Hose bibb, replace 144
House ventilation fan, replace 201
I
Ice dam barrier 85
Icemaker repair 177
Indirect lighting soffit 238,239
Insulation
attic 206
basement 205
blown-in 207
crawl space 204
kneewall 203
removal 25
stairway 203
Interior wall covering tearout 21
Ironing center 188
J
Jambs 226
Joists, double up (sistering) 57
K
Kitchen
alterations 243
cabinets, reface 242
cabinets, tearout 26
faucet and spray, replace 175
sink, lower existing 247
sink parts, replace 173
sink, repairs 174
sink, replace 172
kneewall insulation 203

INDEX
298
L
Laundry tray pump system 145
Laundry tub repairs 181
Laundry tub
replace 161
replace with vanity 158,159
Light grilles 139
Linen closet 236
Laundry tub
replace 161
replace with vanity 158,159
Light grilles 139
Linen closet 236
Lock, deadbolt 122
Locksets 119,120,121
Locksets, mortise 121
Locksets, mortise 121
M
Maid service 294
Marble tile repair 210,258
Masonry painting 268
Medicine cabinet 252
Metal roof repair 69
Millwork painting 289
Mirrors 253
Mudjacking 41
Mudsill, replace 54
N
Non-bearing wall removal 16,17
O
Outlets and switches, remove 193
P
Pad, concrete 34
Painting
blinds 274
bookcase 291
cabinet 291
ceiling 288
closet 290
deck 277
door, interior 266
doors with lights 279
eaves 273
Painting (continued)
entrance door 278
exterior 274
fence
garage door 282
gliding patio door 280
gutter and downspouts 270
lattice work 274
masonry 268
millwork and trim, interior 289
patio door 280
porch 277
porch ceiling 271
porch floor 276
preparation, exterior 266
preparation, interior 283
shelves 290
shingles 268
shutters 274
siding 269
storm sash 274
stucco 268
trim and soffit 272
walls, interior 287
washing 267
windows, exterior 281
windows, interior 284
window screen 274
Panel strips 229
Paneling, solid wood 213
Pantry cabinet 243
Pantry closets 236
Paperholder, bathroom 255
Patching
ceiling 215
concrete step 39
concrete wall and floor 38
built-up roof 65
stucco 45
walls 209
Patio
doors 128
doors, alterations 129
doors, painting 280
repairs 44
Permits, building 2
Pet door 113
Phone jack, replace 189
Plans, building 2
Pocket door alterations 223
Porch
ceiling, painting 271
floor, painting 276
painting 277
post, replace 88
repairs 89
tearout 14
Post, replace
Pre-hung interior doors 221
R
Radiator, re-locate 7,10,11
Rake, replace 91
Ramp, access 96,97
Receptacles, replace 190
Reface kitchen cabinets 242
Refrigerator ice maker 177
Register and grilles, replace 184
Replacement door slab
exterior 108,109
Interior 218,219
Replacement windows 138,140
Replacement windows, vinyl 140
Resilient flooring tearout 26
Retaining wall 33,46,47,48,49
Ridge beam, install 62
Ridgeboard, replace 61
Rooftop antenna 256
Roofing
aluminization 65
repair 64-69
tile, repair and replacement 68
S
Sand box, assemble 251
Sash repair 143
Sawing concrete 4
Screed coat, concrete 35
Screen door
alterations 133
door, install 132,133
frame & screening, replace 130
Security
bars 257
storm door 257
Sewer ejection pump, replace 145
Shelves 232
Shelves, painting 290
Shelving system, ventilated 237
Shingles
asphalt and fiberglass 64
cedar 66
painting 268
repair 64,66
Shoe moulding, install 23
Shower
drain and pan, replace 166
parts, replace 169
rod and curtain 255
snake out 167
Showerhead, replace 168
Sidelight
and transom 111
glass, replace 125
replace 111
INDEX
299
Sidewalk
demolition 4
replace 36
Siding
aluminum or vinyl, replace 101
clapboard, replace 98
corner board 99
T & G, replace 100
tearout 12
water table, replace 102
Sill and sweeps, threshold 117
Sistering joists and rafters 57,60,63
Skylight flashing repair 78,79
Slab, concrete, stabilize 40
Slate roof repair 67
Smoke detector, replace
Soffit
cover 93
indirect lighting 238,239
painting 272
remove 244
replace 92,94,95
Staining, interior window 285
Stairs, tearout 27
Stairway, disappearing 240
Stairway insulation 203
Stairwork 241
Starter, replace 187
Steel grid suspended ceiling 217
Stone wall demolition 5
Stop valve, replace 144
Storage shed 251
Storage shelves 232
Storm door
alterations 133
install 132
Structural ridge beam 62
Stucco
painting 268
repairs 3
tearout 12
Studwall
framing 58
tearout 20
Subfloor tearout 22
Sump pump
install 31
repair 146
Surface water control 29
Swing set, assemble 125
Switches
dimmer 194
electrical 191
replacement 192
timer 195
T
Teeter totter, assemble 251
Threshold, remove, install 116
Threshold sill and sweeps 117
Tiewall (wood retaining wall) 33
Tile, composition 216
Timer switches, install 195
Toilet
repair 153
replace 152
Tongue and groove siding 100
Towel bar 255
Transformer, ballast and starter 187
Transom, replace 111
Trim, exterior
painting 272
tearout 12
Trim, interior
painting 289
tearout 26
Tub parts, replace 169
Tub, snake out 167
TV antenna, secure 256
U
Underlayment tearout 23
V
Vanity, replace lavatory 158
Vanity base, replace lavatory 159
Vanity sink base, replace 156
Vanity top, replace 156
Vapor barrier and duct wrap 202
Ventilated shelving systems 237
Ventilation fans, replace 201
Vent pipe collar, replace 81
Vinyl
flooring, install 16,17,18,19
replacement windows 140
siding, replace 101
siding, tearout 12
tile over hardwood floor 259
W
Wainscoting 213
Wall
bearing, tearout 18,19
concrete, demolition 4
covering, interior, tearout 21
exhaust fans 198
exterior, open 7
exterior, painting 268,269
gypsum drywall 208
interior, painting 287
Wall (continued)
non-bearing, tearout 16,17
painting 287
paneling 213
papering 293
patching 209
repair 59
stone, demolition 5
wainscoting 213
Wallpaper repair 292
Wallpapering 293
Walk-in clothes closet 235
Washing machine valve & drain 180
Waste line repair 148
Water
heater, electric 150
heater, gas 151
pipe maintenance
surface control 29
table, replace 102
treatment system, repair 176
weatherstripping 126, 127
Window
alterations 143
areaway 28
installation 8,9
open concrete wall for 6
painting, exterior 281
painting, interior 284
removal 10,11,14
replacement 138,140
sash, replace 141
staining, interior 285
surface control 29
table, replace 102
treatment system, repair 176
weatherstripping 126,127
Wood
beam, replace 55
fence, tearout 15
rake, repair 91
retaining wall (tiewall) 33
siding, tearout 12