365-2013: cascading style sheets: breaking out of the box ...1 paper 365-2013 cascading style...
TRANSCRIPT

1
Paper 365-2013
Cascading Style Sheets: Breaking Out of the Box of ODS Styles Kevin D. Smith, SAS Institute Inc., Cary, NC
ABSTRACT Although cascading style sheets (CSS) have been available in various forms in ODS since SAS® 9.2, SAS 9.4 is the first version that fully uses the new style engine’s architecture. Using the new CSS engine, you can apply custom styles based on column names, BY group names, BY group variables, and anchor names. You can specify dynamic attribute values using SYMGET, RESOLVE, DYNAMIC, and EXPRESSION functions just like in PROC TEMPLATE styles. If you want to break out of the box of ODS styles and do some truly original styling, the CSS techniques in this paper takes you there.
INTRODUCTION Cascading style sheets have existed in ODS since HTML output was introduced over a decade ago. Until SAS 9.2, the use of CSS was limited to either the CSS content generated by the HTML destination or and linking to a CSS file using the STYLESHEET= option in the ODS HTML statement. In either case, interpreting CSS was done by the web browser. In SAS 9.2, with the introduction of the CSSSTYLE= option, interpreting CSS content was done by ODS itself. This meant that it could be used with destinations other than HTML, such as PDF, RTF, ExcelXP, and so on. At that point in time, the CSS content was very limited. CSS syntax was simply converted to a PROC TEMPLATE style in the parser. As a result, ODS could read only CSS files with class selectors (for example, CSS files that looked like the ones generated by ODS HTML). Each class in the CSS file was treated as a PROC TEMPLATE style element. Otherwise, style processing went on as it had in ODS since the beginning. SAS 9.3 is where the big shift in style processing happened. The simple style element lookup mechanism in ODS was swapped for a full CSS implementation. This meant that style selectors were no longer limited to CSS class names. More complex style selectors based on element names and attribute values were supported. In SAS 9.4, the CSS engine in ODS is fully featured. It includes hooks into ODS internals to access BY group, procedure, and output object information. It is possible to use PROC TEMPLATE style functions such as EXPRESSION(…), SYMGET(…), and RESOLVE(…), as well as SAS formats and dynamic variables. Essentially, the CSS engine in SAS 9.4 combines all of the power of CSS style selectors with the internal data querying capabilities of PROC TEMPLATE styles to create an extremely powerful and flexible report customization tool. Although the CSS engine in SAS 9.4 is powerful, there is a price to pay. The use of CSS outside of a web browser isn’t something that you run into every day. There is a conceptual leap to make before you can fully take advantage of all of its features. In this paper, you go through quite a bit of CSS syntax and theory before you get to the examples. It might be a little heavy at the start, but working through it makes the code in the final examples much easier to follow. By the end of the paper, you should be able to do things with styles in ODS reports you never thought were possible.
THE STYLESHEET= OPTION Before going into the new features of CSS in SAS 9.4, let’s go over the STYLESHEET= option and what its capabilities are. Because this is an alternative way of using CSS in ODS reports, it’s good to know what the differences are between what STYLESHEET= does and what CSSSTYLE= does. When you use the STYLESHEET= option in the ODS HTML statement, the CSS content that is normally generated at the top of the file is sent to an external file instead. The HTML file contains a link to the external file. When a web browser opens the HTML file, it interprets the link, and reads the external CSS file. Here is an example:
ods html file='example.html' stylesheet='example.css'; proc print data=sashelp.class; run; ods html close;
This code sample generates two files: example.html and example.css. The HTML file contains the entire markup for the report and includes a link to the style sheet that looks like the following:
<link rel="stylesheet" type="text/css" href="example.css">
Reporting and Information VisualizationSAS Global Forum 2013

2
This isn’t the only way to use the STYLESHEET= option, however. It can be used to bypass almost all ODS style processing. If you write a CSS file that addresses the ODS HTML’s element and class names, it’s possible to use a completely custom-written CSS file rather than PROC TEMPLATE styles. This is accomplished with the URL= suboption. The URL= suboption enables you to link multiple style sheets by using a space-delimited list of names.
ods html file='example.html' stylesheet=(url='example2.css example3.css example4.css'); proc print data=sashelp.class; run; ods html close;
The example generates the following links at the top of the HTML file: <link rel="stylesheet" type="text/css" href="example2.css">
<link rel="stylesheet" type="text/css" href="example3.css">
<link rel="stylesheet" type="text/css" href="example4.css">
Of course, you aren’t limited to using local CSS files. You can use any URL that a web browser supports. Let’s say that you want to link to a corporate style sheet before you use your own personal style sheet. You can do that with the following code:
ods html file='example.html' stylesheet=( url='http://my.company.com/styles/corporate.css example.css'); proc print data=sashelp.class; run; ods html close;
This generates the following links in your HTML:
<link rel="stylesheet" type="text/css" href="http://my.company.com/styles/corporate.css"> <link rel="stylesheet" type="text/css" href="example.css">
If you use Google Web Fonts or another web font service, you can link to those as well. Let’s extend the last example of using a corporate style sheet plus your own style sheet and add the Grand Hotel font from Google:
ods html file='example.html' stylesheet=( url='http://my.company.com/styles/corporate.css http://fonts.googleapis.com/css?family=Grand+Hotel
example.css'); proc print data=sashelp.class; run; ods html close;
All of these examples have one thing in common: they pass the CSS URLs through to the HTML code and let the web browser do all of the real work. ODS does not do any of the CSS file processing. This means that this technique works only for HTML. If you want to use this technique in any other output such as PDF or RTF, you are out of luck. Although this technique gives you the full power of CSS (as much as the web browser that you are using supports, that is), it works only with ODS HTML. You are limited to using selectors that map to element names and class names that ODS generates (for example, you don’t have access to any of the internal ODS information about BY groups, variables, procedures, and so on). If that’s all you need, then STYLESHEET=(URL='…') should make you very happy. If you need more than HTML or you want styles driven by more than just markup, the CSSSTYLE= option might be what you are looking for.
THE CSSSTYLE= OPTION The CSSSTYLE= option produces similar output to the STYLESHEET= option, but in a very different way. The STYLESHEET= option with the URL= suboption relies on the web browser to interpret the content of the CSS file, and then apply the resulting style properties to the appropriate areas of the report. The CSSSTYLE= option gives the CSS file to ODS to interpret. This means that it can be used on ODS destinations that use styles. Because ODS itself
Reporting and Information VisualizationSAS Global Forum 2013

3
is interpreting the CSS file information, there is a lot of information and properties internal to ODS that can be accessed from the CSS selectors. This would not be possible in an HTML-only solution.
SIMPLE EXAMPLE OF CSS USING CSSSTYLE= If you’ve ever written any ODS styles, you probably know that there are a handful of style element names that cover a lot of what you see in an ODS report. The main ones are Body, Systemtitle, Table, Header (table and column headings), Rowheader, and Data (table data cells). In fact, just defining those style elements takes you a long way to a complete-looking style. Since SAS 9.2, you can use CSSTYLE= to read a CSS file. But, it simply converts the CSS class names to PROC TEMPLATE style element names internally. Let’s write a simple CSS style using the style element names previously mentioned. Let’s map the style element names to CSS class names and add a few style attributes1 to get a feel for the CSS syntax:
.body { font-family: arial, sans-serif; color: black; background-color: white; } .systemtitle { font-family: arial, sans-serif; font-weight: bold; } .table { border-spacing: 0; border-collapse: collapse; border: 1px solid #606060; } .header { border: 1px solid #606060; padding: 5px 10px; font-family: arial, sans-serif; font-weight: bold; background-color: #e0e0e0; } .rowheader { border: 1px solid #606060; padding: 5px 10px; font-family: arial, sans-serif; font-weight: bold; background-color: #e0e0e0; } .data { border: 1px solid #606060; padding: 5px 10px; font-family: arial, sans-serif; }
When you save this to a file named mystyle.css, you can use it in the CSSSTYLE= option as follows:
ods html cssstyle='mystyle.css'; proc print data=sashelp.class(obs=3); run; ods html close;
Here’s the output:
1 In ODS, the key-value pairs that specify changes in fonts, colors, and so on are called “style attributes.” In CSS, they are called “style properties,” but they mean the same thing.
Reporting and Information VisualizationSAS Global Forum 2013
4
What’s interesting is that you can use STYLESHEET=(URL='…') with mystyle.css to get HTML that looks exactly the same. Here is the code just in case you want to try it. Keep in mind that the styles are applied by ODS when using CSSTYLE= and applied by the web browser when using STYLESHEET=(URL='…').
* stylesheet=(url='…') only works for HTML output ; ods html stylesheet=(url='mystyle.css'); proc print data=sashelp.class(obs=3); run; ods html close;
So far in this paper, CSSSTYLE= has done what STYLESHEET=(URL='…') can do in a simple case. In the next example, however, we’ll see something that STYLSHEET=(URL='…') can’t do.
* cssstyle= works for all styled output ; ods pdf cssstyle='mystyle.css'; ods rtf cssstyle='mystyle.css'; proc print data=sashelp.class(obs=3); run; ods rtf close; ods pdf close;
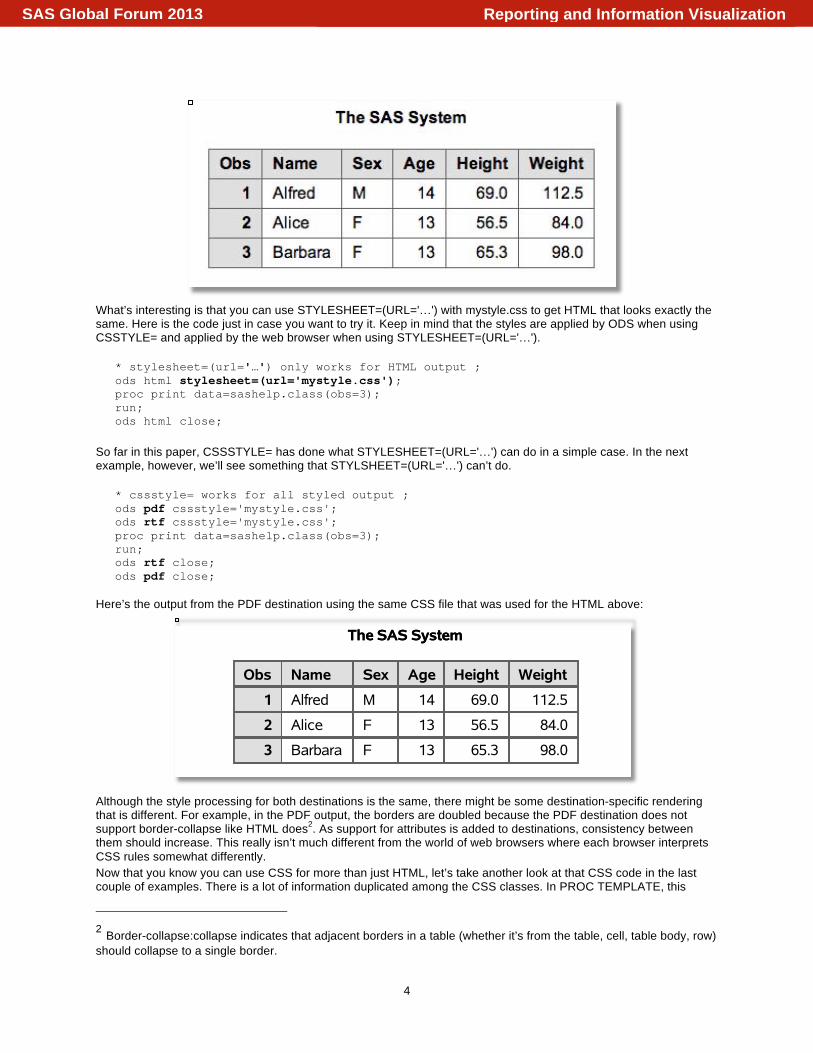
Here’s the output from the PDF destination using the same CSS file that was used for the HTML above:
Although the style processing for both destinations is the same, there might be some destination-specific rendering that is different. For example, in the PDF output, the borders are doubled because the PDF destination does not support border-collapse like HTML does2. As support for attributes is added to destinations, consistency between them should increase. This really isn’t much different from the world of web browsers where each browser interprets CSS rules somewhat differently. Now that you know you can use CSS for more than just HTML, let’s take another look at that CSS code in the last couple of examples. There is a lot of information duplicated among the CSS classes. In PROC TEMPLATE, this
2 Border-collapse:collapse indicates that adjacent borders in a table (whether it’s from the table, cell, table body, row) should collapse to a single border.
The SAS System 14:34 Thursday, January 10, 2013 1The SAS System 14:34 Thursday, January 10, 2013 1
Obs Name Sex Age Height Weight1 Alfred M 14 69.0 112.52 Alice F 13 56.5 84.03 Barbara F 13 65.3 98.0
Reporting and Information VisualizationSAS Global Forum 2013

5
would be consolidated using inheritance and style element lookup tables (for example, the font and color style elements in most SAS styles). However, this can get messy very quickly. Let’s take advantage of the cascade in cascading style sheets. Cascading in CSS means that if you specify the same selector (in this case, the class name), the style properties in each CSS rule are combined. Style properties in later rules take precedence over those in earlier rules. In addition, multiple selectors can be specified in one CSS rule by separating them with commas. All that being said, the CSS code from before can be condensed to this:
.body, .systemtitle, .header, .rowheader, .data { font-family: arial, sans-serif; } .body { color: black; background-color: white; } .table, .header, .rowheader, .data { border-spacing: 0; border-collapse: collapse; border: 1px solid #606060; } .systemtitle, .header, .rowheader { font-weight: bold; } .header, .rowheader { background-color: #e0e0e0; } .header, .rowheader, .data { padding: 5px 10px; }
This condensed version enables you to group common style properties among elements. For example, the font family is defined at the top for all style elements that use it. The borders are all specified one time for table, header, rowheader, and data. And, the padding is specified for all table cells together. You already have a usable style in only 20 lines of CSS code! So far, you haven’t used any styles specific to CSSSTYLE=,, so you can still use this CSS file in STYLSHEET=(URL='…') with HTML to get the same looking output. Up to this point, you have used only CSS class selectors to apply styles to different areas of a report. This is the most natural selector for ODS users because it maps perfectly to the style element names when writing styles using PROC TEMPLATE. However, to take advantage of many of the features of the ODS CSS engine, you need to learn about the other types of selectors that CSS offers.
CSS SELECTORS A lot of CSS terminology has been thrown around without much regard for definitions. Let’s take a step back and make sure that you understand CSS syntax and what each piece means before you head into more complex syntax. Much like PROC TEMPLATE styles, CSS contains key-value pairs that describe the visual aspects of a report such as fonts, colors, borders, and more. These are called “properties.” Here are a few example properties:
font-family: arial, helvetica, sans-serif color: red border: 1px solid black
Properties are grouped into declaration blocks. A declaration block is enclosed in curly braces and properties are separated by semicolons.
{ font-family: arial, helvetica, sans-serif; color: red; border: 1px solid black; }
A rule set is a combination of a selector and a declaration block. The selector indicates which elements in the output the style properties from the declaration block are applied. You have already seen one type of selector (the class selector), but there are many more.
.systemtitle {
Reporting and Information VisualizationSAS Global Forum 2013

6
font-family: arial, helvetica, sans-serif; color: red; border: 1px solid black; }
With all of the definitions out of the way, let’s explore the different types of selectors that are available.
SELECTOR TYPES There are many ways to select elements in a document. The different types of selectors are described below. Keep in mind that each type does not have to be used in isolation. Selectors can be combined to filter the element selection even further. Let’s go over all of the selector types and their syntax first, and then use them all together in some examples. All selector types described below are defined in the CSS specification. They work in both ODS and CSS within web browsers.
Class Selectors
In the rule set above, the selector is .systemtitle. The period (.) at the beginning indicates that this is a class selector. All that means is that in the HTML world, the element in HTML code has a CLASS= attribute that contains the given name (separated by spaces). For example, in HTML, the class selector matches the following elements:
<p class="systemtitle">The SAS System</p> <p class="focused systemtitle large">The SAS System</p>
But, it doesn’t match these:
<p>The SAS System</p> <p class="footer">The SAS System</p> <p class="system title">The SAS System</p>
The class selector is the type of selector that you have been using so far.
Element Type Selectors
Another selector type in CSS is the element type selector. This selector matches the element name. It doesn’t have any special syntax. The selector is just the name of the element. For example, all of the HTML markup examples from the previous section use the P element. So, the following CSS rule set, which uses the P element selector, matches all of them:
p { color: green }
ID Selectors
ID selectors are very similar to class selectors, except rather than matching a CLASS= attribute, they match an ID= attribute. Unlike classes, IDs must be unique within a document, and only one ID can be specified in the ID= attribute. ID selectors are indicated by a # prefix. Here is a snippet of HTML code that specifies an ID:
<section id="IDX1"><p>The SAS System</p></section>
Here’s a CSS rule set with an ID selector that matches this element: #IDX1 { font-style: italic }
Attribute Selectors
You have seen two selectors that select elements based on attribute values (ID and CLASS). However, those are special cases. There is a more general syntax for arbitrary attributes (although these can still be used to match ID= and CLASS=). Attribute selectors are indicated by a key-value pair enclosed in square brackets. Let’s start by looking at some attributes from previous selector examples:
<p class="systemtitle">The SAS System</p> <section id="IDX1"><p>The SAS System</p></section>
Reporting and Information VisualizationSAS Global Forum 2013

7
The elements are matched by the selectors in the following rules, respectively:
[class="systemtitle"] { font-weight: bold } [id="IDX1"] { color: blue }
Although it is possible to match ID= and CLASS= using the general syntax, it’s better to use each attribute’s dedicated syntax because it is much more efficient (this is true in web browsers as well as ODS). However, there is something that the general syntax can do that the dedicated syntax can’t do: partial matches. The dedicated ID and CLASS syntax matches only a complete ID or a complete CLASS name. The general syntax allows several operators to do partial matches. These operators are used in place of the standard = operator. Here are the additional operators:
Operator Description
= Matches entire attribute value.
^= Matches the beginning of an attribute value.
=$ Matches the end of an attribute value.
*= Matches any substring in an attribute value.
~= Matches any space-separated word in an attribute value. This operator can be used to emulate the class selector.
|= Matches an attribute value and an optional value followed by a hyphen. This is normally used to match language codes such as en-US, en-GB, and so on.
Pseudo-Class Selectors
Pseudo-class selectors aren’t based on things that are explicitly in the markup. They are calculated based on relationships between elements. For example, there are pseudo-classes to select the first and last child of a parent element or to arbitrarily select a specific child based on its positional index in the parent element. You can select by position of a particular element name. Pseudo-classes are represented by the pseudo-class name prefixed with a colon (:). Although CSS supports many pseudo-class selectors, ODS is limited somewhat by the fact that the entire report is not loaded into memory at once and the fact that styles are not applied to an interactive interface.
Pseudo-Class Description :root The element is the top-level element in the document. :first-child The element is the first element within the parent. :first-of-type The element is the first element of that type (for example, same element name)
in the parent. :nth-child(an+b) Selects an element based on the equation an+b. This equation can be thought of
as selecting every ath element starting with element at position b. The equation can be replaced with the keywords even or odd for the simple case of alternating selection.
:nth-of-type(an+b) Same as :nth-child except that only the same elements of the same type are used in the calculation.
:empty Selects elements that are empty. This works only for elements that have been specified as empty by the procedure.
:before :after
Selects content to be added before or after the element, respectively. This is a special case that is used to mimic pretext, preimage, posttext, and postimage.
:not(…) Selects an element if the selector within the argument is not true.
Reporting and Information VisualizationSAS Global Forum 2013

8
Universal Selector
The universal selector is essentially a wildcard. It matches any element name. The syntax for the universal selector is an asterisk (*). Although this selector might not seem useful at first, in combination with other features of CSS, it does have some interesting uses.
USING MULTIPLE TYPES OF SELECTORS TOGETHER As mentioned earlier, you can combine the previously described selectors to create even more specific selectors. There aren’t any rules that limit the order in which they must be specified, except that an element type selector should be first because it doesn’t have a syntactical prefix. Let’s start with a sample HTML snippet and use it to demonstrate some possible CSS selectors:
<section id=”IDX1” class=”oo”> <div class=”systemtitlecontainer”> <p class=”systemtitle”>The SAS System</p> </div> <table class=”table”> <thead> <tr> <th class=”header”>Num</th> <th class=”header”>Name</th> <th class=”header”>Age</th> </tr> </thead> <tbody> <tr> <th class=”rowheader”>1</td> <td class=”data”>Alfred</td> <td class=”data”>13</td> </tr> </tbody> </table> </section>
There are a lot of elements in this snippet to work with, so let’s just start at the top. The first element is a section element (used in HTML5). It has ID and CLASS attributes. The following selectors could be used to select the section element. Again, this is just standard CSS syntax that works both in ODS and CSS within web browsers:
section Element type only #IDX1 ID only .oo CLASS only #IDX1.oo ID and CLASS section#IDX1 Element type and ID section.oo Element type and CLASS section#IDX1.oo Element type, ID, and CLASS section[id=”IDX1”] Element type and ID .oo[id=”IDX1”] CLASS and ID [class=”oo”][id=”IDX1”] CLASS and ID .oo[id^=”IDX”] CLASS and partial ID match * Universal selector (matches every element)
As you can see, there are many ways to construct selectors to match just a single element. Which one you use depends on how specific a selector you need. If you simply want all section elements to have a specific style, you can use the element type selector. However, if you want a single section element with id=“IDX1”, then you can use the ID selector. Pretty much anything goes in selectors, so use them to your advantage. The only rule that you might want to follow is the use of attribute selectors. Attribute selectors aren’t as efficient as other selector types, so they are usually combined with another selector type to narrow down the element selection before doing attribute-based selection (for example, th[id=“IDX1”], .header[rowspan=“2”], and so on). In the examples so far, you haven’t touched on the pseudo-classes. Let’s look at another element in the code above for pseudo-classes. Let’s start with the Th element that has Num as its content. The following selectors match that table header cell:
th Element type only
Reporting and Information VisualizationSAS Global Forum 2013

9
.header CLASS only th:first-child Element type and first child th:nth-child(1) Element type and first child (alternate method) th:nth-child(odd) Element type and odd indexed children th:nth-child(2n+1) Element type and odd indexed children (alternate method) th:not([class=”rowheader”]) Element type and negated attribute selector
These are samples of the types of things that you can do with CSS selectors. As you can imagine, there are many, many ways to address any element in a document. It just depends on how specific you need to get. You have been looking at selectors that address a single element in the document. It’s possible to filter the selection by specifying parent elements in the selector as well.
COMBINATORS All of the selectors in the previous section merely selected the leaf node in the document that you were interested in. However, you might want to select an element based partially on its context within another element. This is done by combining selectors with others using combinators. There are several types of combinators available to select various element relationships. They are described in the table below.
Combinator Description whitespace Descendant combinator > Direct descendant combinator ~ General sibling combinator + Adjacent sibling combinator
By far, the most common combinator is the descendant combinator. This combinator indicates that the selector to the left must match an element anywhere in the parentage of the currently selected element. Although that is a mouthful, it’s easier than it sounds. Let’s look at an example. Let’s use the same HTML code from the previous section. Let’s start with one of the table header cell selectors. To keep it simple, let’s use the .header selector. Let’s say that you want all elements with CLASS=“header” and an ancestor with ID=“IDX1” to be selected. The selector would look like this:
#IDX1 .header
When combining selectors, you process them right to left. The right-most selector must match an element before any further processing occurs. So, in this case, as the document is being processed, the CSS engine looks for an element with CLASS=“header”. Once it finds one, it looks to the left of that selector to see whether anything else needs to be matched. In this case, there is a space (the descendant combinator) and another selector. That means that it must start looking through parent elements to see whether it finds a match. In the case of our HTML code, the next parent to the element with CLASS=“header” is a Tr element. It doesn’t have ID=“IDX1”, so it jumps to the next parent (the Thead element). This continues until it finds a match or it runs out of elements. If a match is found, it checks to see whether there are any more combinators in the selector. If so, it continues. If not, it stops. If all selectors in the chain match, then, and only then will the style properties associated with the selector be applied. It is possible to combine more than just two selectors with combinators. You can chain as many as you want. For the table header example, we could specify the entire ancestry as follows (where each node in the chain has various possibilities):
section#IDX table thead tr th.header
Generally, you don’t need to (and shouldn’t) specify the entire ancestry of an element, unless you really need a very specifically addressed style. There are times when you might want a more specific selection of ancestry though, and the direct descendant combinator is useful in those cases. One possibility is preventing styles from passing through to cells in nested tables. Let’s say that you have two nested tables where the outer table had a class of table and the inner table had a class of stacked, but you only wanted to have the th elements of the outer table styled. You could use the direct descendant combinator to address only the outer table th elements:
.table > thead > tr > th
The inner table th elements could be addressed with this selector:
Reporting and Information VisualizationSAS Global Forum 2013

10
.table > * > tr > * > .stacked > thead > tr > th
In this case, the universal selector is used in the outer table to allow both thead and tbody within the table. In addition, the stacked table is allowed to be within td or th elements. The last two combinators have to do with siblings rather than ancestors. The general sibling combinator (~) is used to select elements that have another sibling anywhere within the parent. The adjacent sibling combinator (+) selects only elements that have a specified element immediately preceding them. Let’s look at the last row in the table in the HTML snippet above. It has a th element followed by two td elements. They are all siblings. To select the td that immediately follows the th element and no other td elements, you could use this selector:
th + td
If you wanted to select any td element that also had a th sibling anywhere, you could use the following selector. It selects both tds in the last row of the HTML table.
th ~ td
There is one last subject to cover about selectors—selector grouping.
SELECTOR GROUPING Selector grouping uses multiple selectors for the same group of style properties. You already saw this in the section on CSSSTYLE= when the CSS content was compressed and incorporated into the cascading inheritance. To use selector grouping, you list all of the selectors for the elements that you want to style, and you separate them by commas. Here is a piece of the example used in the CSSSTYLE= section that demonstrates selector grouping:
.body, .systemtitle, .header, .rowheader, .data { … }
This can be combined with the more advanced selector syntax to get some very complex-looking selectors. Here is an example using some of the previously defined selectors. Each individual selector is on a separate line to make it easier to read.
.oo[id^=”IDX”], th:first-child, .table > thead > tr > th { … }
This section was heavy reading for anyone who hasn’t worked with CSS a lot. Luckily, you don’t need to know all of it to do interesting things with CSS. Let’s take a little break from theory and look at a couple of examples.
SELECTOR EXAMPLES IN HTML Let’s continue to use the HTML code snippet. Here it is with all of the proper HTML wrapping to make it a complete document that can be read by any web browser. Let’s add a second section to demonstrate some of the selectors more clearly:
<!doctype html> <html> <head> <title>My Report</title> <link rel="stylesheet" href="selector.css"/> </head> <body class="body"> <section id="IDX1" class="oo"> <div class="systemtitlecontainer"> <p class="systemtitle">The SAS System</p> </div>
Reporting and Information VisualizationSAS Global Forum 2013

11
<table class="table"> <thead> <tr> <th class="header">Num</th> <th class="header">Name</th> <th class="header">Age</th> </tr> </thead> <tbody> <tr> <th class="rowheader">1</td> <td class="data">Alfred</td> <td class="data">13</td> </tr> </tbody> </table> </section> <section id="IDX2" class="oo"> <table class="table"> <thead> <tr> <th class="header">Make</th> <th class="header">Model</th> </tr> </thead> <tbody> <tr> <td class="data">Ford</td> <td class="data">GT</td> </tr> </tbody> </table> </section> </body> </html>
If you save this to a file and open it in a web browser, it looks something like the following:
This might not look like much yet because you haven’t added any of your own styles to it. However, some styling is done by the web browser. It has rendered the table structure and made the table headers bold. These behaviors are built into all web browsers. Let’s use some selectors and style properties to see how the rendering is affected. Before you do that, let’s apply the CSS file that you created back in the CSSSTYLE= section. It put borders on the tables, adds a background color to the header cells, and uses the Arial font. This helps you see the table structures and gives you a nice baseline. Here is what the output looks like now. You can copy the CSS file to a file named selector.css, and then save it in the same directory as your HTML file. The HTML code above has a link to that file, so any changes made to the CSS file are reflected in the resulting HTML output.
Reporting and Information VisualizationSAS Global Forum 2013

12
By default, sections don’t have any space around them, so let’s add some padding to the sections so that the tables aren’t right against each other. This can be done with the following code, which uses an element type selector rather than the class selector:
section { margin-bottom: 20px }
When you add that code to the bottom of the CSS file, you get this output:
Let’s use the selector syntax to add some styling to this HTML output. Let’s do a few things at once to cut down on the number of screenshots needed. Let’s start with some styling on the table header cells. The styles that you add (and what they apply to) are put into the comments of the code below. Just add this CSS code to your selector.css file and reload the web browser to see the result:
/* make all th elements italic (row 1 in both tables, row headers in table 1) */ th { font-style: italic } /* use :first-child on th elements to change the font size and family */ th:first-child { font-size: 24pt; font-family: Times } /* set the background and text color of odd indexed th elements */ /* in this case, the indexes correspond to column indexes in the tables */ th:nth-child(odd) { background-color: green; color: white }
You added three rules to the CSS. Here is the current output:
Reporting and Information VisualizationSAS Global Forum 2013

13
As you can see, you haven’t added much CSS code, but the change to the HTML is quite dramatic. Probably the most interesting effect in this sample is the :nth-child(…) pseudo-class changes. It allowed you to alternate the background and text colors of the table headers. Let’s go a little further with that aspect and use another selector and combinator to clean things up. Let’s say that you only want the green background alternating color to apply to the header section of the table (for example, within the thead element, not within the tbody). You can make the small change below to the th:nth-child(odd) selector to make that happen:
/* set the background and text color of the odd indexed th elements within thead*/ thead th:nth-child(odd) { background-color: #808080; color: white }
Just by adding thead to the front of the selector, you are now requiring thead to be an ancestor of th:nth-child(odd) for the style to be applied. Here is the result:
As you can see, the first cell in the Alfred row, which is a th element, no longer gets the alternating color effect. This is because it is a child of the tbody element in the table, not the thead element. You can change the style of areas based on which ID they are within. In this example, you have two sections each with an ID (for example, IDX1 and IDX2). You can use that information to address report components within those sections independently. Let’s change the borders of the table within the IDX2 section. You can do that with the
Reporting and Information VisualizationSAS Global Forum 2013

14
following code. Note that you are using selector grouping to address the borders on the table itself and the data and header cells.
#IDX2 .table, #IDX2 .table td, #IDX2 .table th { border: 5px solid blue; }
Here is the output when the code is added to the CSS file:
Let’s look at a combinator example. You can use the general sibling combinator to address data cells (td) that have a header cell (th) in the same row. Only the first table in the example has a structure like that, so the following CSS code only applies to those data cells:
/* color tds that have a th as a sibling element yellow */ th ~ td { background-color: yellow; }
Here is the output with the data cells in the first table in yellow:
Reporting and Information VisualizationSAS Global Forum 2013

15
You have made a lot of changes to the CSS code, so let’s look at the whole file. Comments have been added throughout the file to remind you what each section is for.
/* boilerplate from first section of this paper */ .body, .systemtitle, .header, .rowheader, .data { font-family: arial, sans-serif; } .body { color: black; background-color: white; } .table, .header, .rowheader, .data { border-spacing: 0; border-collapse: collapse; border: 1px solid #606060; } .systemtitle, .header, .rowheader { font-weight: bold; } .header, .rowheader { background-color: #e0e0e0; } .header, .rowheader, .data { padding: 5px 10px; } /* add margins to the sections so the tables don’t touch */ section { margin-bottom: 12px } /* add some styling using various selectors to just table headers */ th { font-style: italic } th:first-child { font-size: 24pt; font-family: Times } thead th:nth-child(odd) { background-color: green; color: white } /* change borders on only the table within the IDX2 section */ #IDX2 .table, #IDX2 .table td, #IDX2 .table th { border: 5px solid blue; } /* use the general sibling combinator to apply a style to data cells */
Reporting and Information VisualizationSAS Global Forum 2013

16
th ~ td { background-color: yellow; }
You should have a pretty good idea of how selectors work and are combined. This part of the paper is not unique to ODS. The way that CSS selectors and rules are constructed is a W3 http://www.w3.org/ standard. That means that you can read any book or tutorial on the Internet to learn more about CSS selectors, rules, and properties. That being said, just like in the web browser world, support for certain selectors and properties varies among the ODS destinations. Speaking of ODS, so far all of the CSS selector examples in this section have been applied to a static HTML file that you constructed by hand. You don’t know how this relates to using the CSS engine within ODS. That’s the topic of the next section.
THE ODS DOCUMENT OBJECT MODEL (DOM)
Tank, load the jump program. You have to learn to let go of that anger. You must let go of everything.
You must empty yourself to free your mind. -- Morpheus, The Matrix
No one’s ever made their first jump. -- Mouse, The Matrix
Up to this point, all of the CSS selector examples have been tested against a static HTML file. Because of that, you have been using the CSS engine within the web browser to interpret the CSS code and apply it to the elements in the document. The in-memory representation of the HTML document within a browser is called the “document object model.” For CSS, you don’t really need to access the DOM itself because you have the HTML file to look at to determine which CSS selectors you need to use to access areas of the document. The problem is when you move the CSS engine into the ODS world. This is where you need to take a conceptual leap. Much like in the movie The Matrix when Neo has to leap across two impossibly far apart buildings, you need to take a similar conceptual leap between the web browser and ODS worlds. Hopefully, you can do better than Neo and actually make it on your first try. Because the CSS engine for ODS is internal to ODS, there is no document for you to look at like there is when using CSS in HTML. There is an ODS DOM in-memory, but you need to be able to see what the corresponding markup would look like to see what elements, IDs, attributes, and so on, exist so that you can construct your CSS selectors to address those areas. Once you construct your CSS file to address areas of an ODS report, and then use that file in the CSSSTYLE= option, ODS can apply the styles to the internal document and generate the reports. Just for the purpose of viewing the ODS DOM, new TRACE options have been added. These are similar to the ODS TRACE options used to view the information about output objects, but they enable you to view the ODS DOM instead. To enable tracing of all destinations at once, you simply do the following:
ods trace dom; You might want to open only one destination at a time when running this way because all of the trace information comes out in the log. If you have more than one destination open, their DOMs will be intermingled. Because each destination uses different code paths, their DOMs can be somewhat different. You might have to account for these differences in your CSS. DOM formatting is still being worked out in an attempt to make it easier to digest, so you might see some differences between versions. Let’s look at what this DOM trace looks like. A very simple test case is used because the DOM information can be very verbose.
ods trace dom; ods pdf; proc report data=sashelp.class(obs=1); column name; run; ods pdf close;
As you can see, this is a very simple case. Only one observation and one column are used in PROC REPORT. You are using the PDF destination to try to prevent confusion between the HTML DOM in the web browser and the ODS
Reporting and Information VisualizationSAS Global Forum 2013

17
DOM. This is what you will see in the SAS 9.4 log. This trace information is only for use with the CSSSTYLE= option. For STYLESHEET=(URL=“…”), you view the HTML source file.
<!DOCTYPE html> <html> <head> <title>ODS PDF DOM</title> <link rel="stylesheet" href="style.css"> </head> <body dest="pdf" class="body"> <section id="idx" class="oo" data-name="procreporttable" label="detailed and/or summarized report" proc="report" output="report" path="report.report.report"> <caption class="pageno"> <caption class="pageno" >1 </caption> </caption> <caption class="bodydate"> <caption class="bodydate" > 11:23 Monday, January 7, 2013 </caption> </caption> <h1 class="systemtitle"> </h1> <p class="systemtitle" >The SAS System </p> <table class="table"> <colgroup> <col type="char"> </colgroup> <thead> <tr> <th class="header" >Name </th> </tr> </thead> <tbody> <tr> <td class="data" type="char" unformatted-type="char" index="1" name="_c1_" data-name="_c1_" >Alfred </td> </tr> </tbody> </table> </section> <toc class="contentprocname"> </div> <toc class="contentfolder"> </div> <toc class="contentitem"> </div> </body> </html>
When you first see this, you might be confused because you asked for the PDF DOM, and this looks like HTML code. In fact, all of the DOM traces for destinations look like HTML. There is a good reason. Currently, practically all CSS tools are written for HTML, so if the DOM traces resemble HTML, it makes it more likely that standard CSS tools can be used to help analyze and style any destination. You see at the top, in the <title> section of the document, it says ODS PDF DOM, so you know you have the right one. Just below that, you see that a link to a CSS file has already been added so that you can load this file in a web browser, create a file called style.css in the same directory, and start adding styles to see the effect. When you are finished, you can use that style.css file in the CSSSTYLE= option to apply the style to the appropriate destination. Enough talking about it, let’s just try it!
Reporting and Information VisualizationSAS Global Forum 2013

18
Here is what the DOM output looks like if you open it in a web browser:
That looks about right. So far, you haven’t written any styles, so you are just getting the browser defaults. Let’s add the boilerplate styles from the first section like you did in the CSS selector section to get borders on the tables and a different font. Add that boilerplate code to the style.css file because that’s the CSS filename automatically generated by the ODS DOM trace. Adding that to the style results in the following output:
Let’s look at the information in the DOM trace to see whether there is something interesting to use in a CSS selector. The Section element has an ID and a CLASS, but there are several more attributes: DATA-NAME, LABEL, PROC, OUTPUT, and PATH. A rather interesting area is the data cell. It has TYPE, UNFORMATTED-TYPE, INDEX, NAME, and DATA-NAME attributes. Let’s try using those attributes in some CSS selectors. The following code changes the style of a PROC REPORT table data cell based on the PROC= attribute of the output object section (for example, class=“oo”). Just as a reminder, you are using attribute selectors here, so it’s always a good idea to narrow the possible elements to which the attribute match applies for performances reasons. Let’s narrow the attribute match to class=“oo” elements in this example:
/* select data cells within proc report output objects */ .oo[proc="report"] .data { background-color: blue; color: white; font-style: italic; }
This is what the HTML rendering looks like now:
The style of the data cell changed based on the CSS rule. Right now, you are still in the HTML world, using the web browser essentially as a preview tool. Let’s take the CSS file and use it in the PDF. You are going to point the ODS PDF CSSSTYLE= option to style.css as follows. Leave in all of the data columns this time.
Reporting and Information VisualizationSAS Global Forum 2013

19
ods pdf cssstyle='style.css'; proc report data=sashelp.class(obs=3); run; ods pdf close;
When you run the code, you get the following table output from ODS PDF:
The experiment worked. You ran ODS PDF with DOM tracing on, used the HTML-like trace information in a web browser to preview your style changes, and then ran the resulting CSS file back through CSSSTYLE= to let ODS process the style information and apply it to your output. You can do this with other destinations as well, including HTML. In this case, ODS is interpreting the CSS content and applying it. Here is rendered HTML output:
The style workflow is working. The CSS selector that you created styled table cells based on the PROC= attribute. The CSS selector checked to make sure that PROC=“report” is applied to the style. To make sure that application works, you need to run another procedure. Let’s add a PROC MEANS to the test case:
ods pdf cssstyle='style.css' startpage=never; proc report data=sashelp.class(obs=3); run; proc means data=sashelp.class; var age height weight; run; ods pdf close;
Here is the output:
The SAS System 12:14 Monday, January 7, 2013 1The SAS System 12:14 Monday, January 7, 2013 1
Name Sex Age Height WeightAlfred M 14 69 112.5
Alice F 13 56.5 84
Barbara F 13 65.3 98
Reporting and Information VisualizationSAS Global Forum 2013

20
The PROC REPORT data cells are still colored, but the PROC MEANS data cells aren’t. Here is the same report using ODS HTML CSSSTYLE=:
When CSSSTYLE= was introduced in the paper, you had a CSS file that you used on both CSSSTYLE= and STYLESHEET(URL=“…”). What would happen if you used the CSS file you just created on STYLESHEET(URL=“…”). If you do that, this is what the HTML looks like:
The SAS System 12:33 Monday, January 7, 2013 1The SAS System 12:33 Monday, January 7, 2013 1
Name Sex Age Height WeightAlfred M 14 69 112.5
Alice F 13 56.5 84
Barbara F 13 65.3 98
The MEANS Procedure
Variable N Mean Std Dev Minimum MaximumAgeHeightWeight
191919
13.315789562.3368421100.0263158
1.49267225.127075222.7739335
11.000000051.300000050.5000000
16.000000072.0000000150.0000000
Reporting and Information VisualizationSAS Global Forum 2013

21
Did it look like you expected? The background color and italics disappeared from the PROC REPORT table3. Why did that happen? That’s because you used a CSS selector that takes advantage of internal ODS information (for example, [proc=“report”]). That’s not a valid HTML attribute. It existed in the pseudo-HTML markup of the DOM trace information. It does not exist in the HTML generated by ODS HTML. This is a perfect example of how CSSSTYLE= differs from STYLESHEET=(URL=“…”). Using this same technique of inspecting the DOM trace to look for style-able attributes and relationships, and then using that information in CSS selectors to apply style properties, you can create effects in your reports that were never possible before. Although the ODS TRACE information has been available since SAS 9.3, SAS 9.4 adds destination-specific DOM options to make tracing and the style workflow a bit easier.
DESTINATION DOM TRACING The ODS TRACE DOM statement gives you a lot of information, but because it turns on tracing for all destinations, and all of the information goes to the log, it can get messy really fast. To alleviate this mess, a new option has been added to all of the destinations that use CSSSTYLE=. The option is called DOM=. It works just like ODS TRACE DOM, but applies only to the destination that it is used on. If the option is specified without an argument, the trace information goes to the log just like ODS TRACE DOM. However, if you specify a filename or fileref, the trace information goes to a file instead. This is handy for the previously described workflow because you had to save the trace output to a file anyway. Here is a code sample that turns DOM tracing on for PDF and HTML, but saves the trace information to two separate files:
ods pdf dom='pdfdom.html'; ods html dom='htmldom.html'; proc report data=sashelp.class; run; ods html close; ods pdf close;
If you have access to SAS 9.4, you can view the output files. They are too large to be printed here, but they look structurally similar to the trace information you just looked at. You have looked at how CSSSTYLE= can be used to read CSS files that access internal ODS information, and you have seen how to display the internal ODS DOM to see what type of information can be used in your selectors. Let’s look at a more substantial and real-world type of example, rather than just snippets.
AIR QUALITY EXAMPLE You are going to go through a report example that I created while I was at SAS Global Forum 2011 in Las Vegas. HTML is the only destination that renders this completely correct, but it’s an example that works in SAS 9.3, so hopefully more people can take advantage of the techniques before they get their hands on SAS 9.4. The final result of what you will be creating is shown below. Believe it or not, this was done with around 40 lines of CSS code (with some help from some interesting format work in SAS for trafficlighting).
3 You can ignore the border differences in the MEANS table. They are caused by some missing styles that normally get printed for stacked cells, but they don’t get printed because of the use of STYLESHEET=. Also, the horizontal line in the second one is part of the style definition and doesn’t exist in your CSS style.
Reporting and Information VisualizationSAS Global Forum 2013

22
There are a few things going on in this one table. Some of them are subtle, so I’ll point out everything before you get started. The rows alternate shades by twos. The column headings alternate colors every time. The border between the row headings and headings and the data cells is a double border. The heat map effect is done using style overrides in PROC TABULATE using a SAS format. The colors used in the heat map are RGBA colors, meaning that they have an alpha value to make them semi-transparent. There is a cloud image used across the entire table that shows through because of the RGBA colors. The alpha value of the heat map gets more opaque as the data value approaches 100%. About half of the techniques in this report are CSS techniques, and the other half are SAS programming techniques. In SAS 9.4, it is possible to do a lot more of this report directly in the CSS. Let’s get the SAS part out of the way first, and then move on to the CSS. The original test case for this is from the paper titles “SAS 9 Tips & Techniques” by Philip Mason. It contains the analysis and color map. Here is the code:
* create a format to display colors ranging from blue (cold) to red (hot); data _null_ ; call execute('proc format fmtlib ; value pct_'); max=1; maxloop=255; do i=1 to maxloop; color='cx'||put(i/maxloop*255,hex2.)||'00'||put((maxloop-i)/maxloop*255,hex2.); from=((i-1)/maxloop)*max; to=(i/maxloop)*max; call execute(put(from,best.)||'-'||put(to,best.)||'='||quote(color)) ; end; call execute('.="light gray" other="cxd0d0d0"; run ;'); run; * get the maximum value of air; proc sql ; select max(air),min(air) into :max,:min from sashelp.air; %let range=%sysevalf(&max-&min); * express values of air as a percentage of the maximum; data air; set sashelp.air; year=year(date); month=month(date); * percentage is the level above the minimum; pct=(air-&min)/⦥ run; * tabulate the results indicating maximum as red, minimum as blue; ods html file='air.html'; title;
Reporting and Information VisualizationSAS Global Forum 2013

23
proc tabulate data=air style={background=pct_.}; class year month; var pct; label pct='Air Quality Percent of Worst Month'; table sum=''*pct*f=percent.,year='Year',month='Month of Year'; run; ods html close;
This is the original output:
This is already a nice-looking table, but let’s make it even better using some CSS techniques. Let’s start with some general boilerplate CSS code that sets the overall font, background color, and borders on the table:
.body { font-family: 'lucida grande', arial, sans-serif; background-color: #e0e0e0; color: #000000; } .table { border-collapse: collapse; border-spacing: 0; border: 3px solid rgba(192,192,192,.75); background-image: url('clouds.jpg'); } .data, .header, .rowheader { font-family: 'lucida grande', arial, sans-serif; color: white; padding: 8px 13px; border: 1px solid rgba(192,192,192,.25); }
You’ve seen most of these types of things before. You are just using class selectors for everything at this point. There are a couple of details to note. One detail is that you are using RGBA colors for the borders. They are both set to a light gray, but the alpha value is set to different values for the table border and cell borders. This gives the border a two-tone effect and allows the background to show through a bit. The other detail is the padding on the table cells. CSS does padding differently on tables than HTML does (at least prior to HTML5). The padding isn’t specified using a CELLPADDING attribute on the table. It is specified as padding on the cells themselves. In this case, you are specifying two padding values. The first one is the top and bottom padding. The second one is the left and right padding. Both of these changes are subtle, but they give a more polished look. Just to let you know, I didn’t come up
Reporting and Information VisualizationSAS Global Forum 2013

24
with the styling in this example off the top of my head and write the program on the first try. It takes some trials and errors to see what looks good. So, don’t give up on your first try to make interesting-looking reports. The most dramatic difference in this code (and probably in the final report) is the background image on the table. This image spans the entire background of the table. Unfortunately, this table background image currently only works for HTML. It might be supported in the PRINTER destinations at some point. Before you go on, you need to remember to change your test case to point to your CSS file rather than using the default style. The new ODS HTML statement that you should be using is shown below:
ods html file='air.html' cssstyle='air.css';
Let’s look at the output now:
It’s starting to resemble the report that you are going for. You have the background image on the table, fonts, and some of the table borders. Not bad, considering it was only about 15 lines of CSS. The next change that you will make uses a CSS feature, but it will actually be done in the SAS code. You need to change the heat map colors to be RGBA so that the cloud image in the table background shows through. These colors were generated with DATA _NULL_ at the top of the test case. You just need to add the alpha component. You will also be removing the color entirely from the lower data values and letting the background image show through completely. Here is the new DATA _NULL_:
* create a format to display colors ranging from blue (cold) to red (hot); data _null_ ; call execute('proc format fmtlib ; value pct_'); max=1; maxloop=255; * start at 40 to eliminate lower numbers; do i=40 to maxloop; * change to rgba and add alpha component; color='rgba'||put(i/maxloop*255,hex2.)||'00'||put((maxloop-i)/maxloop*255,hex2.) ||put(i/maxloop*160,hex2.); from=((i-1)/maxloop)*max; to=(i/maxloop)*max; call execute(put(from,best.)||'-'||put(to,best.)||'='||quote(color)) ; end; * eliminate missing colors, just let them be transparent; call execute('; run ;'); */ run;
With these changes, you get output that looks very close to what you want:
Reporting and Information VisualizationSAS Global Forum 2013

25
Now that you have most of the work done, you need to put in some final details with border styles and alternating colors. Let’s look at the table, column, and row headings first. Use some more semi-transparent, light gray background colors. Set the right border of row headings and the bottom border of the last row of column headings to a double border. This gives you a double border surrounding the body of data cells. The row heading border is the easy one. You simply set a right border on .rowheader elements within Tbody as follows:
.table tbody .rowheader { border: 1px solid rgba(192,192,192,.25); border-right: 3px double rgba(192,192,192,.25); }
The column heading border is a bit more difficult. Because ODS doesn’t have the entire document in memory at one time, it doesn’t know when the last row of column headings is being generated. So, you have to do some manual work to make this one work. Use the :nth-child(…) pseudo-class to count down the number of rows within Thead.
.table thead tr:nth-child(3) td { border: 1px solid rgba(192,192,192,.25); border-bottom: 3px double rgba(192,192,192,.25); }
Unfortunately, you run into a minor snag when using :nth-child with HTML output. The tagset engine that ODS HTML is built on sends out an extra row for the table, so rather than using tr:nth-child(2), which is what you would expect to use to access the second row, you have to use tr:nth-child(3). You can see the extra DOM row being generated in the DOM trace if you turn DOM tracing on. Let’s look at another use of :nth-child before you look at the output again. The last usage of :nth-child selected a particular row in the table. That form of :nth-child used the an+b equation to determine which rows are selected. In that case, a=0 and b=2. This time, use it for something a bit more interesting: alternating colors. At the beginning, column headings were alternated each time, but the rows were alternated in batches of two. The first one is fairly easy. You just use th:nth-child(odd). The odd keyword is true for every odd positional index. Alternating in batches of two is a bit more complex. You need to split the table into batches of four rows, and then apply a color to two of them. Using the equation for :nth-child, which reads “start at b and select each ath element” or “group the elements into a groups and select the bth element”, b for your case must be 4. To select two of the elements within that group (for example, 3 and 4), you need to use 4n+3 and 4n+4 for the equations. Here is the CSS code:
/* alternate column headers, so :nth-child goes on th element */ .table thead th:nth-child(odd), /* alternate rows, so :nth-child goes on the tr element. */ /* we are doing both headers and data, so we need to include th as well as td */ .table tbody tr:nth-child(4n+3) th,
Reporting and Information VisualizationSAS Global Forum 2013

26
.table tbody tr:nth-child(4n+4) th,
.table tbody tr:nth-child(4n+3) td,
.table tbody tr:nth-child(4n+4) td { background-color: rgba(145,145,160,.4); }
This is what your output looks like with alternating colors on the column headings and rows:
There are just a few more details and the report will be finished. The box in the top left corner of the table would probably look better if it wasn’t the lighter gray. You should remove that color. The caption on the table doesn’t have any styling on it. Looking at the DOM trace or looking at the HTML source, you see that it uses the .beforecaption class name. You can change the font and color of that section. Here is the final CSS code snippet:
table thead tr th[rowspan=2] { background-color: transparent; } .beforecaption { font: bold 2em eurostile, arial, sans-serif; color: rgb(79,103,160); }
The .beforecaption section is fairly self-explanatory, but the box styling might need some explanation. You are using an attribute selector to match the box. The box cell has a rowspan=“2”, and it’s the only cell within the Thead that does, so you can use that information to style it independently from the rest of the header cells. Also, you are using a special color keyword—transparent. That just means that there shouldn’t be any color applied. It’s the same as an RGBA color with an alpha component of zero. Here is the final report:
Reporting and Information VisualizationSAS Global Forum 2013

27
So you can see all of the CSS code in one place, here it is:
.body { font-family: 'lucida grande', arial, sans-serif; background-color: #e0e0e0; color: #000000; } .table { background-image: url('clouds.jpg'); border-collapse: collapse; border-spacing: 0; border: 3px solid rgba(192,192,192,.75); } .data, .header, .rowheader { font-family: 'lucida grande', arial, sans-serif; color: white; border: 1px solid rgba(192,192,192,.25); padding: 8px 13px; } .table tbody .rowheader { border: 1px solid rgba(192,192,192,.25); border-right: 3px double rgba(192,192,192,.25); } .table thead tr:nth-child(3) td { border: 1px solid rgba(192,192,192,.25); border-bottom: 3px double rgba(192,192,192,.25); } .table thead th:nth-child(odd), .table tbody tr:nth-child(4n+3) th, .table tbody tr:nth-child(4n+4) th, .table tbody tr:nth-child(4n+3) td, .table tbody tr:nth-child(4n+4) td { background-color: rgba(145,145,160,.4); } .table thead tr th[rowspan=2] { background-color: transparent; } .beforecaption { font: bold 2em eurostile, arial, sans-serif; color: rgb(79,103,160); }
Reporting and Information VisualizationSAS Global Forum 2013

28
Ignoring the lines with just closing curly braces on it, it took only 31 lines of CSS code to accomplish this. Keep in mind that this is all of the style information provided to ODS. No other styles were inherited and no aspects overridden like you see a lot in PROC TEMPLATE styles. This is a complete style. You did have to qualify that the background image feature doesn’t work on tables in the PRINTER destinations. But, what does it look like if you generate PDF output?
Most of the styles work. You can see the heat map and alternating colors. If you set a background color similar to the cloud background image, it would be perfectly usable. However, PRINTER merges the styles from the table and cells into one color specification, so you don’t have the option of setting a background color on the table. You can set the background color of the body, though. The font I used in the HTML (Eurostile) is available on the machine that I’m viewing the HTML on, but it’s not available where SAS is running. The PDF output won’t have access to it, so you should change that to something that it does have access to. These are the changes that you should make:
.body { background-color: rgb(33,90,154) } .beforecaption { color: white; font: bold 2em arial; }
This is the PDF output that you get with the above additions to the CSS:
Reporting and Information VisualizationSAS Global Forum 2013

29
You don’t want to mess up your HTML output making these changes to the PDF. Luckily, CSS has a feature that lets you include styles only when you are generating printed output. You can use something called an at-rule. It’s called that because the rule starts with the @ character. The @media rule enables you to include only styles when a certain media is being created. In your case, the media is print. In SAS 9.4, this media is automatically set for the PRINTER destinations. In SAS 9.3, it has to be specified manually on the CSSSTYLE= option as follows: CSSSTYLE=‘style.css’(print). Regardless, the CSS code that you add to the file looks like this:
@media print { .body { background-color: rgb(33,90,154) } .beforecaption { color: white; font: bold 2em arial; } }
Anything within the @media { … } block applies only to the specified media type. You can add as many of these blocks anywhere you want in the CSS. If you add this to the end of your CSS file, you can use the same file for both HTML and PDF reports and give each one the appropriate CSS rules.
BY GROUP EXAMPLE The example shown in this section requires features of SAS 9.4. Styling based on BY group information is demonstrated. This example uses many of the same techniques as the last example, so let’s go quickly over those parts and get to the code relevant to this section. Here is the report that you are starting with. It has three BY groups and uses the UNICODE function to put stars in to signify the rating for that data point. The colors of the cells are done with formats just like the heat map in the previous example. This time, however, you are setting both the foreground and background colors using formats, and the procedure is PROC PRINT rather than PROC TABULATE.
data tempdata; length Q1 $15; input Site Q1 $ AM Aft PM; datalines; 3 Cleanliness 4 2 4 3 Friendliness 4 4 3 3 Responsiveness 3 4 3 3 Condition 4 4 3 3 Safety 4 4 2 4 Cleanliness 1 4 4 4 Friendliness 4 4 3 4 Responsiveness 4 4 3 4 Condition 4 4 3 4 Safety 4 4 3 9 Cleanliness 4 2 4 9 Friendliness 4 4 3 9 Responsiveness 4 4 3 9 Condition 4 4 3 9 Safety 1 4 4 ; run;
* format for traffic lighting;
proc format; value bgcolor 1 = 'RGBACC000040' 2 = 'RGBAFFFF0040' 3 = 'RGBA00CC0040' 4 = 'RGBAC5B35640'; value color 1 = 'RGBAC000008F' 2 = 'RGBAFFFF00DF' 3 = 'RGBA40BF40FF' 4 = 'RGBA998833FF'; run;
Reporting and Information VisualizationSAS Global Forum 2013

30
* format to convert data values to number of stars; proc format; value ratefmt 1='^{unicode 2605}' 2='^{unicode 2605}^{unicode 2605}' 3='^{unicode 2605}^{unicode 2605}^{unicode 2605}' 4='^{unicode 2605}^{unicode 2605}^{unicode 2605}^{unicode 2605}'; run;
* format to convert data value to city name;
proc format; value sitename 3='Chicago' 4='New York' 9='Seattle'; run; ods escapechar='^';
ods html file='cities.html'; proc print data=tempdata noobs label; title 'Service Ratings'; var Q1; var AM / style={background=bgcolor. color=color.}; var Aft / style={background=bgcolor. color=color.}; var PM / style={background=bgcolor. color=color.}; format AM ratefmt. Aft ratefmt. PM ratefmt. Site sitename.; by site; label AM='Morning Shift' Aft='Afternoon Shift' PM='Evening Shift' Q1='Services'; run;
ods html close;
Running the code gives you the following output:
Reporting and Information VisualizationSAS Global Forum 2013

31
Again, let’s start with some general styling for fonts, borders, and background colors. Nothing that you haven’t already seen. This report does have a SYSTEMTITLE and BYLINE. Looking either at the HTML source or the DOM trace, you can see that the SYSTEMTITLE and BYLINE classes are used, respectively. Given all of that, this is the CSS that you are going to start with:
.body { background-color: #f0f0f0; color: black; font-family: 'lucida grande', arial, sans-serif; } .table { border: 4px solid rgba(80, 80, 80, 0.2); border-collapse: collapse; border-spacing: 0; background-color: #c0c0c0; } .table td, .table th { font-family: 'lucida grande', arial, sans-serif; border: 1px solid rgba(80, 80, 80, 0.2); padding: 10px 20px; } .table tbody tr { background-color: rgba(255, 255, 255, 0.85); } .table tbody tr:nth-child(odd) { background-color: rgba(230, 230, 230, 0.85); } .systemtitle { font-family: bold 2.5em 'lucida grande', arial, sans-serif; } .byline { font: 1.5em 'lucida grande', arial, sans-serif; }
After changing the ODS HTML statement to include CSSSTYLE=‘cities.css’ and running the report, you get output that looks like the following:
Reporting and Information VisualizationSAS Global Forum 2013

32
That was really more of a sideways move in terms of aesthetics. It looks different, but not really better or worse. It does add alternating row colors, which looks quite nice. Now, let’s get to the more fun parts. If you turn on DOM tracing using either ODS TRACE DOM or the DOM option in the ODS HTML statement, you get the representation of the DOM as pseudo-HTML code, which includes lines like the following surrounding each output object:
<section id="idx" class="oo" data-name="procprinttable" label="data set work.tempdata" byline="site=chicago" byvar1="site" byval1="chicago" byvar="site" byval="chicago" byiter1="1" proc="print" output="print" contents-label="data set work.tempdata" path="print.bygroup1.print">
That’s a lot of metadata to work with to apply styles to each output object independently. What this means is that it’s possible not only to apply styles on a procedure-by-procedure basis like you saw earlier, but you can also apply styles on a BY group basis. In fact, there are several attributes that are surfaced for BY groups. They are described in the following table:
Attribute Description byline The entire BYLINE text. byvar The names of each of the BY variables separated by
spaces. byvar1, byvar2, …, byvarn The names of each BY variable. byval The values of each of the BY variables separated by
spaces. byval1, byval2, …, byvaln The values of each of the BY variables. byiter1, byiter2, …, byitern The value of the current BY group iteration. This attribute
is useful if you want to change the styles on each BY group without having to know the actual data BY variable names or values.
Reporting and Information VisualizationSAS Global Forum 2013

33
You are going to use the BY value attributes to apply different styles to each BY group. These styles include a different color and font for each BYLINE, and a corresponding color for the table borders and header background. Also, just like in the last example, you will put an image of each city’s skyline as the background of the table. Here is the CSS code for Chicago:
.oo[byval='chicago'] .byline { font-family: 'jazz let', arial, sans-serif; color: #CC8500; } .oo[byval='chicago'] .table { background-image: url(chicago.png); border: 4px solid #CC8500; } .oo[byval='chicago'] .table thead th { background-color: rgba(204, 133, 0, 0.9); }
In each of the CSS rules, the selectors start with .oo[byval='chicago']. This means that the style is applied only to elements within that context. The first rule changes the font and color of the BYLINE. The second rule sets the background image and border. The third rule sets the background color of the table header cells. With the Chicago styles in place, you get the following output:
You can add similar styling for New York and Seattle. The code for those cities is shown at the end of the example. This is what your output looks like with those styles in place:
Reporting and Information VisualizationSAS Global Forum 2013

34
This is looking really good, but it still needs some polish. You can’t see the skyline background image behind the row headings, and the column headings are difficult to read in black. You can add some CSS rules that are prefixed with .oo[byvar=’site’] to confine them to the section of the report dealing with the city service ratings. (Although, in your case, that’s the entire report, but it’s a good practice.) Here are the remaining CSS rules that you want to apply. I’ve inserted comments to describe what each one is doing:
/* set the font weight and color of the first (i.e., [index=’1’]) column */ .oo[byvar='site'] .table tbody td[index='1'] { color: rgba(64, 64, 64, 0.8); font-weight: bold; } /* set the text color and font weight of the table header cells */ .oo[byvar='site'] .table thead th { color: white; font-weight: bold; } /* set the alignment of all data cells except the first column to center */ .oo[byvar='site'] .table td:not([index='1']) { text-align: center; }
The last rule demonstrates something that you haven’t seen used yet: the :not(…) pseudo-class selector. It enables you to select an element based on the negating of a selector. In this case, you want to select everything except the first column in the table. The data cells in the first column have index=‘1’, so if you put that within a :not(…) pseudo-class selector, it selects every element where index is not equal to 1. With everything put together into one CSS file, you get the final report:
Reporting and Information VisualizationSAS Global Forum 2013

35
Here is the entire CSS file for this report:
/* basic styles for fonts, colors, and borders */ .body { background-color: #f0f0f0; color: black; font-family: 'lucida grande', arial, sans-serif; } .table { border: 4px solid rgba(80, 80, 80, 0.2); border-collapse: collapse; border-spacing: 0; background-color: #c0c0c0; } .table td, .table th { font-family: 'lucida grande', arial, sans-serif; border: 1px solid rgba(80, 80, 80, 0.2); padding: 10px 20px; } .table tbody tr { background-color: rgba(255, 255, 255, 0.85); } .table tbody tr:nth-child(odd) { background-color: rgba(230, 230, 230, 0.85); } .systemtitle { font-family: bold 2.5em 'lucida grande', arial, sans-serif; } .byline { font: 1.5em 'lucida grande', arial, sans-serif; }
Reporting and Information VisualizationSAS Global Forum 2013

36
/* styles for row and column headers */ .oo[byvar='site'] .table tbody td[index='1'] { color: rgba(64, 64, 64, 0.8); font-weight: bold; } .oo[byvar='site'] .table thead th { color: white; font-weight: bold; } /* center alignment for data cells */ .oo[byvar='site'] .table td:not([index='1']) { text-align: center; } /* Chicago by group styles */ .oo[byval='chicago'] .byline { font-family: 'jazz let', arial, sans-serif; color: #CC8500; } .oo[byval='chicago'] .table { background-image: url(chicago2.png); border: 4px solid #CC8500; } .oo[byval='chicago'] .table thead th { background-color: rgba(204, 133, 0, 0.9); } /* New York by group styles */ .oo[byval='new york'] .byline { font-family: copperplate, arial, sans-serif; font-size: 2em; color: #000080; } .oo[byval='new york'] .table { background-image: url(newyork2.png); border: 4px solid #000080; } .oo[byval='new york'] .table thead th { background-color: rgba(0, 0, 128, 0.5); } /* Seattle by group styles */ .oo[byval='seattle'] .byline { font-family: eurostile, arial, sans-serif; font-size: 2em; color: #008000; } .oo[byval='seattle'] .table { background-image: url(seattle2.png); border: 4px solid #008000; } .oo[byval='seattle'] .table thead th { background-color: rgba(0, 128, 0, 0.5); }
Eliminating comments and the lines with only a curly brace on them, there is slightly over 50 lines of CSS code for this entire report. What does it look like in PDF? You have the same issue with this example as you did in the last example—table background images don’t work in ODS PDF, yet. However, this one looks fairly reasonable as is. As with the last example, I don’t have all of the fonts installed on the machine that SAS is running on, so the BYLINES don’t show the same fonts as the HTML screenshots.
Reporting and Information VisualizationSAS Global Forum 2013

37
CONCLUSION You have covered a lot of territory in this paper on the features of the new CSS engine in ODS. Believe it or not, there is a lot more to cover, but there is enough here to chew on for a while. To recap, you started off with a comparison of STYLESHEET=(URL=“…”) and CSSSTYLE= to show how they differ so that you can decide which one fits your needs. You then heard a general discussion of CSS selectors. As mentioned earlier, you can read about CSS selectors in any number of books at the book store or on the plethora of pages about them on the Internet. The CSS selectors in HTML development and ODS reporting use the same syntax and concepts. Next, you tackled the task of showing how to relate the usage of CSS selectors in HTML to the usage of CSS selectors in ODS by using the ODS DOM tracing features. Finally, you covered two full examples of CSS selector techniques using IDs, pseudo-classes, and attributes, including applying styles based on procedure information and BY group information. If you aren’t well versed in CSS, this can be a daunting amount of information. The good news is that you can always start simple, and then build your way up. You can write complete CSS styles using class selectors, which is very much like the traditional way of writing PROC TEMPLATE styles using style elements. When you are comfortable, you can move up to the more advanced techniques. The best feature of the ODS CSS style engine isn’t so much a feature as it is access to information. You aren’t limited to documentation from the SAS domain. Because CSS is a web standard, you can use whatever CSS documentation and tools you can find to help you write your styles. My hope is that you will be able to use it to create ODS reports that surpass your expectations.
Reporting and Information VisualizationSAS Global Forum 2013

38
REFERENCES Mason, Philip. 2005. “SAS Tips & Techniques from SAS 9.” NorthEast SAS Users Group Inc. 18th Annual Conference Proceedings. Cary, NC: SAS Institute Inc. Available at http://www.nesug.org/proceedings/nesug05.pdf.
RECOMMENDED READING • Unveiling the Power of Cascading Style Sheets (CSS) in ODS, Kevin D. Smith
http://support.sas.com/resources/papers/proceedings11/297-2011.pdf • W3C Cascading Style Sheets Home Page
http://www.w3.org/Style/CSS/ • Taming Advanced CSS Selectors
http://coding.smashingmagazine.com/2009/08/17/taming-advanced-css-selectors/ • CSS Specificity: Things You Should Know
http://coding.smashingmagazine.com/2007/07/27/css-specificity-things-you-should-know/ • PROC TEMPLATE Made Easy: A Guide for SAS Users, Kevin D. Smith
CONTACT INFORMATION Your comments and questions are valued and encouraged. Contact the author at:
Kevin D. Smith SAS Institute Inc. 100 SAS Campus Drive Cary, NC 27513 E-mail: [email protected] [email protected] Web: http://www.sas.com http://support.sas.com/publishing/authors/smith_kevin.html
SAS and all other SAS Institute Inc. product or service names are registered trademarks or trademarks of SAS Institute Inc. in the USA and other countries. ® indicates USA registration. Other brand and product names are trademarks of their respective companies.
Reporting and Information VisualizationSAS Global Forum 2013